


Tumble Dryer |
EN |
|
|
|
|
|
|
|
Thank you for your trust and for buying our tumble drier. We hope it will successfully
serve its purpose for many years.
This appliance was designed for drying clothes, for home use only.
Laundry dried in the tumble drier is dried quickly, is soft and smooth and does not change the shape during drying. With a tumble drier, there is no need for an extra room and no need for ropes and waiting for a sunny day.
Instructions for Use should be of some help to you therefore it is recommendable to read
Before Use...................................................... |
12 |
Useful Hints |
|
Important Warnings..................................... |
13 |
Positioning and Installation ......................... |
13 |
Choosing the Right Place |
|
Positioning |
|
Moist Air Outlet |
|
Connecting to Power Supply |
|
Door................................................................ |
15 |
Description of the Appliance........................ |
15 |
Extractor dryer |
|
Extractor dryer |
|
Drying............................................................. |
16 |
Preparing the Laundry for Drying |
|
them carefully and to keep in an adequate place. All warnings on safe use of the dryer should be considered.
Instructions for Use have been prepared for different models of tumble dryers. Only descriptions applying to your type of dryer whether venting or condenser-type should be considered
Control Lamp |
|
ON/OFF and Drying Time Selection |
|
Temperature Selection Switch |
|
Drying Time |
|
Drying Procedure |
|
Economic use of the dryer |
|
After drying - condensation type dryer |
|
After drying - extractor dryer |
|
Cleaning and Maintenance........................... |
18 |
Housing |
|
Replacement of the lamp |
|
Cleaning of extractor dryer |
|
Cleaning procedure |
|
Cleaning of condensation dryer |
|
Trouble Shooting Guide................................ |
19 |
Before Use
Wipe the interior of the drum with soft cloth and liquid detergent. Do not use aggressive cleaning agent which could damage the surface. Load the appliance with old wet clothes and set the drying time to 45 minutes.
WHEN YOU FIND YOUR APPLIANCE IS OUT OF USE AND NO LONGER NEEDED, TRY NOT TO BURDEN THE ENVIRONMENT WITH IT. CALL YOUR NEAREST AUTHORIZED "COLLECTING SERVICE FOR USED APPLIANCES".
Useful Hints
ξDrying a large quantity of laundry is not recommended because it will remain creased and unevenly dried (max. 5 kg of dry resistant laundry is recommended).
ξDrying very delicate laundry (woolens, silk garments) is not recommended as they may shrink or lose shape.
ξSynthetic curtains, fabrics with metal threads, nylon stockings, as well as lingerie with prevailing foam rubber components or rubberlike materials, should be dried at low
12 |
Instructions for Use |
temperature setting (delicate laundry programs or time setting programs).
ξPut delicate laundry into a special sack, when drying together with other laundry.
ξWhen drying is finished, immediately take the laundry out of the drum so that it won't crease.
ξWhen drying laundry in the dryer there is no need to add a conditioner. Conditioners are added only when rinsing synthetics to neutralise static electricity.
ξWhen buying clothes, especially underwear, do not forget that they shrink during washing as well as during drying.
ξClothes marked with a "no tumble dry" label, are not suitable for drying in the tumble drier.
ξEnergy consumed whwn drying the laundry is essentially incrased if your washing machine is spinning at less than 800 r.p.m. In that case it is recommended to purchase an independent spin intended for additional water extraction.
 Important Warnings
ξOnly laundry washed with water can be dried in this dryer. Never try to dry laundry washed or cleaned with inflammable cleaning agents (e.g. benzine, trichlor ethylene), as it may cause explosion.
ξNever let children play near the appliance or even with the appliance, while it operates.
ξAfter cleaning teh filter has to be reinserted into teh air duct. Operating the appliance with damaged filter or without the filter is dangerous and can cause fire.
ξAfter the use always switch off the dryer .
ξNever let children or pets enter (the drum of) the dryer
ξ(drying time selection knob is in the position “0”) and disconnect the power supply.
ξThe appliance my not be built-in under the kitchen worktop in a row of cabinets, because the use of the appliance without the top cover is not allowed for safety reasons. Likewise, the removal of the rear panel and the bottom of the appliance are also not allowed.
ξThe appliance should be positioned in such way to provide normal ventilation.
ξAll interventions on the machine should be left to an expert. Call the authorized service station.
The address is in this manual, if not, contact your purchaser.
ξThe belt can be replaced by a service engineer only, who incorporates an original spare part with marking OPTIBELT-RB POLY-V PH 1930 5M – 606532.
ξData platc with all essential information on the dryer is placed under the door frame.
The symbol on the product or on its packaging indicates that this product 
 may not be treated as household waste. Instead it shall be handed over to the applicable collection point for the recycling of electrical and electronic equipment. By ensuring this product is disposed of correctly, you will help prevent potential negative consequences for the environment and human health, which could otherwise be caused by inappropriate waste handling of thisproduct. For more detailed information about recycling of this product, please contact your local city office, your household waste disposal service or the shop where you
purchased the product.
Positioning and Installation
Your drying machine can be placed in any room with adequate ventilation.
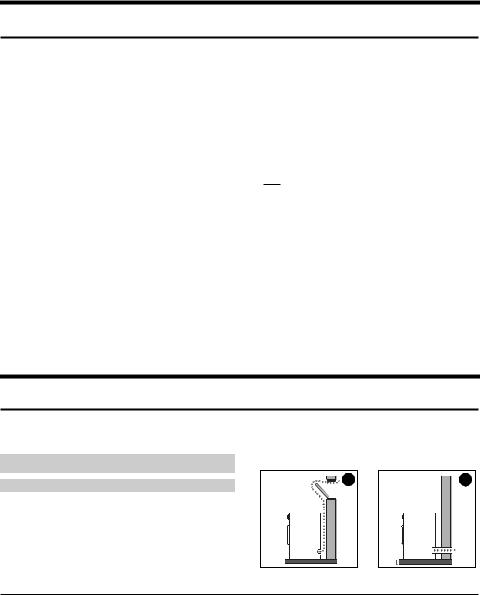
Choosing the Right Place
A - Venting - type Dryer
The most suitable place is a room with a window or with an air-conditioning fan, which is mounted into air-duct or guided out in the open (Figure 1).
In closed, smaller rooms without adequate ventilation there is too much moisture in the air, drying time is increased and so is energy consumption.
If during the drying procedure there isn't adequate ventilation in the room, we recommend you direct moist air out in the open by means of vent pipe (Fig. 2).
1 |
2 |
Instructions for Use |
13 |

Vent pipe can be bought in any technical store |
4 |
|
5 |
||
(identification code PIPE SP-377628). |
|
|
|
|
B - Condenser - type Dryer
Do not install the condenser dryer into the room where a danger of freezing can occur. Freezing of water in the condensed water drawer and the pump can damage the appliance.
Positioning
This dryer is a self standing appliance and can stand alone, or it can be placed either together with a washing machine or in the kitchen as a kitchen unit.
If the floor is uneven, use the adjustable feet to level the machine.
|
|
|
|
|
|
|
3 |
|
|
|
|
|
3a |
|
|
|
|
|
|
|
|
|
|
|
|
|
|
|
|
|
|
|
|
|
|
|
|
|
|
|
|
|
|
|
|
|
|
|
|
|
|
|
|
|
|
|
|
|
|
|
|
|
|
|
|
|
|
|
|
|
|
|
|
|
|
|
|
|
|
|
|
|
|
|
|
|
|
|
|
|
|
|
|
|
|
|
|
|
|
|
|
|
|
|
|
|
|
|
|
|
|
|
|
|
|
|
|
|
|
|
|
|
|
|
|
|
|
|
|
|
|
|
|
|
Undo the nuts. Rotate the feet to level the machine (fig. 3).
Lock the nuts (fig. 3a).
ξDo not remove the adjustable feet. The machine must be placed horizontally.
ξSome models of tumble dryers are supplied with vacuum leg braces, enabling the appliance to be placed on top of a washing machine, without hazard of falling or tripping during the operation of either appliance.
ξDo not put the dryer on the thicker rug thus preventing the possibility of air circulation.
Moist Air Outlet
A – Vent dryer
There are two openings for venting out humid air, which are situated at the bottom left-hand rear side part of the dryer. Depending on the position of the machine, please, close down one of the openings with the front cover, which has already been fastened on it, or attached to the drum (Fig 4).
Fix the cover by inserting a coin into the slash turning it clockwise. It can be removed by turning in the opposite direction.
If during the drying cycle the airing is not good enough, the air-vent tube can be inserted (screwed) into the hole. The distance between the dryer and venting opening (airduct or window) must not exceed two meters, otherwise condense can accumulate in the tube, (Fig 5,6).
1 Decorative cap
2 Vent pipe
B – Condenser - type Dryer
Humidity from the laundry in the condenser dryer is extracted into the air cooler and accumulated in the drainage container or conducted directly into the moist air outlet. After every drying the condensed water drawer should be emptied, of which you are reminded by the control lamp which is on when the container is full. The air cooler should be cleaned in time (see the chapter Maintenance and Cleaning)
Channelling the condenser tube to the drain outlet
Take off the condensed water drawer tube from the rear side of the dryer and by fitting an elbow on it channel the tube into the drain outlet. Height of the drain must not exceed 800 mm.
Connecting to Power Supply
The appliance is connected to the power supply by means of a cable cord plug. The wall socket should be earthed (safety socket). Required nominal current and frequency are stated on the rating plate. The wiring should withstand maximum load. Electric connection and earthing should be carried out in accordance with current standards and regulations.
IMPORTANT
In the supply cord is damaged, it must be replaced by the manufacturer or his service agent or a qualified person in order to avoid hazard.
ξThe appliance should be placed in the position, where the plug is within reach.
14 |
Instructions for Use |
 Loading...