


Goal Zero Lighthouse Micro User guide [ml]

Take Lighthouse Micro out of DEMO MODE by plugging it into a powered
Not near a USB? Press the On/Off/Dimmer Button five times and hold on
the sixth. The Battery Indicator will flash and Lighthouse Micro will be out
Retirez le Micro Lighthouse du MODE DÉMO en le branchant dans un port
Vous n’avez pas de port USB à portée de main ? Appuyez cinq fois sur
le bouton On (Marche)/ Off (Arrêt)/Variation (Dimmer) et maintenez-le
enfoncé la sixième fois. Le voyant d’état de la batterie clignotera et le
ライトハウスマイクロを通電したUSBに接続し、デモモードから解除して
オン/オフ/輝度調節ボタンを5回押し、6回目は長押ししてください。バッテリ
ー残量計が点滅し、ライトハウスマイクロがデモモードから解除されます。
Beenden Sie den DEMO-Modus von Lighthouse Micro, indem sie es in einen
Dimmer-Taste fünf Mal und halten Sie sie beim sechsten Mal gedrückt.
Die Batterieanzeige blinkt und Lighthouse Micro ist nicht mehr im DEMO-
Para que el Lighthouse Micro salga del MODO DE DEMOSTRACIÓN,
¿No está cerca de un USB? Presione el botón ENCENDER/APAGAR/
REGULADOR cinco veces ymanténgalo presionado la sexta vez. El
indicador debatería parpadeará y el Lighthouse Micro saldrá delMODO
Esclusi la MODALITÀ DEMO su Lighthouse Micro collegandolo ad una
Nessuna USB nelle vicinanze? Premi il pulsante On/Off/Dimmer cinque
volte e tienilo premuto la sesta volta. L’Indicatore del Livello di Batteria
lampeggerà e Lightouse Micro uscirà dalla MODALITÀ DEMO.
BEFORE FIRST USE:
USB port.
of DEMO MODE.
AVANT LA PREMIÈRE UTILISATION :
USB alimenté.
MicroLighthouse quittera le MODE DÉMO.
初回ご使用前に:
ください。
VOR DEM ERSTEN GEBRAUCH:
USB-Anschluss einstecken.
Kein USB in der Nähe? Drücken Sie die On-/Off-/
MODUS.
ANTES DEL PRIMER USO:
conéctelo a un puerto USB.
DE DEMOSTRACIÓN.
PRIMA DEL PRIMO UTILIZZO:
porta USB alimentata.

Table of Contents
Get To Know Your Gear 2
How It Works 3
Recharge Your Lighthouse Micro 3
Technical Specifications 4
Français 6-9
日本語
Deutsch 14-17
Español 18-21
Italiano 22-25
10-13
1
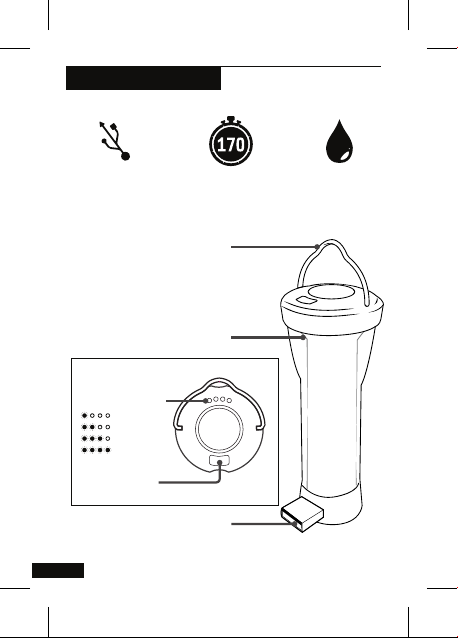
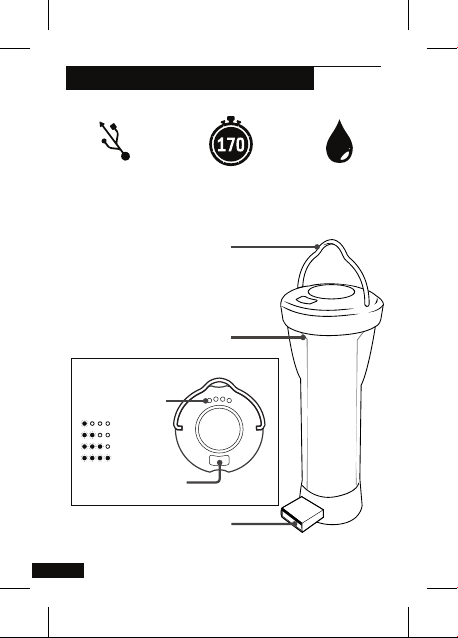
GET TO KNOW YOUR GEAR
USB
Rechargeable
Lantern Output: 150 Lumens
TOP VIEW
Battery Indicator
25%
50%
75%
100%
On/Off/Dimmer
Button
USB Charging Tip
2
Hour Runtime
on Lowest Setting
Hanger
Weatherproof
IPX6 Rated
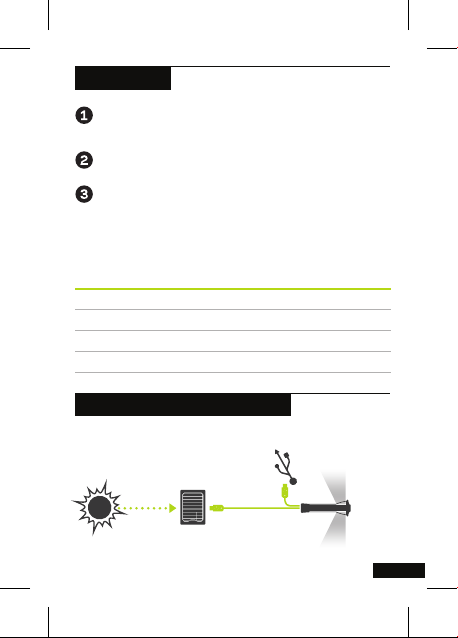
HOW IT WORKS
Push the On/Off/Dimmer Button once for both sides lit,
twice for one side lit.
Press and hold to dim each mode.
Using the flip-out USB tip, plug Lighthouse Micro into
any powered USB port to charge it up in 3.5 hours. Also
charges from 3.5 hours of full sun from the Nomad® 7.
Still in DEMO MODE? See the front cover for instructions.
RUNTIME LUMENS CHARGE TIME
One Side (Low) 170 hours 10 lumens USB source 3.5 hours
One Side (High) 15 hours 75 lumens Nomad 7 3.5 hours
Both Sides (Low) 80 hours 20 lumens
Both Sides (High) 7 hours 150 lumens
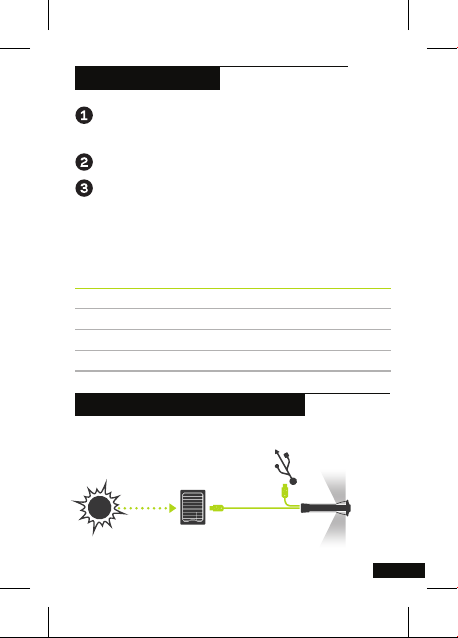
RECHARGE YOUR LIGHTHOUSE MICRO
Recharge from USB or solar panel.
Nomad® 7
Solar Panel
(sold separately)
3.5 Hours
Full Sun
3.5 Hours
USB Port
3
TECHNICAL SPECIFICATIONS
Battery
Cell chemistry Li-ion NMC
Cell type 18650
Cell capacity 9.62Wh (3.7V, 2600mAh)
Lifecycles hundreds of cycles
Shelf-life Charge every 3-6 months
Ports
USB port (input) 5V, up to 1A (5W max)
General
Durability IPX7
Weight 2.4 oz (68g)
Dimensions 3.66 x 1.5in (93 x 37.75mm)
Operating usage temp. 32-104 F (0-40 C)
Certs
Warranty 12 months
Be sure to activate your warranty at goalzero.com/warranty
4

This equipment has been tested and found to comply with the limits for a Class
B digital device, pursuant to part 15 of the FCC Rules. These limits are designed
to provide reasonable protection against harmful interference in a residential
installation. This equipment generates, uses and can radiate radio frequency
energy and, if not installed and used in accordance with the instructions, may cause
harmful interference to radio communications. However, there is no guarantee that
interference will not occur in a particular installation. If this equipment does cause
harmful interference to radio or television reception, which can be determined
by turning the equipment off and on, the user is encouraged to try to correct the
interference by one or more of the following measures:
—Reorient or relocate the receiving antenna.
—Increase the separation between the equipment and receiver.
—Connect the equipment into an outlet on a circuit different from that to which the
receiver is connected.
—Consult the dealer or an experienced radio/TV technician for help.
This device complies with part 15 of the FCC Rules. Operation is subject to the
following two conditions: (1) This device may not cause harmful interference, and (2)
this device must accept any interference received, including interference that may
cause undesired operation.
5
APPRENDRE À CONNAÎTRE VOTRE APPAREIL
Rechargeable
à l'aide d'un
port USB
Flux lumineux de la
lanterne : 150 Lumens
VUE DE DESSUS
Voyant d'état de la
batterie
25%
50%
75%
100%
Bouton On (Marche)/Off
(Arrêt)/Dimmer (Variation)
Embout de charge USB
6
Réglage de
l'autonomie en
faible luminosité
Crochet
Étanche de
classification
IPx7
COMMENT FONCTIONNE
Appuyez une fois sur le bouton On (Marche)/ Off (Arrêt)/
Variation (Dimmer) pour allumer les deux côtés, appuyez deux
fois pour allumer un seul côté.
Maintenez-le enfoncé pour activer le mode de mise en veilleuse.
À l'aide de l'embout USB qui se déplie, branchez le Micro
Lighthouse dans n'importe quel port USB alimenté pour le
recharger jusqu'à 3,5 heures. Se recharge également à partir
de 3,5 heures de plein soleil en utilisant le Nomad® 7.
Encore en MODE DÉMO ? Consultez la page de couverture
pour obtenir des instructions.
DURÉE DE FONCTIONNEMENT
Un côté (Faible) 170 heures 10 lumens Source USB 3,5 heures
Un côté (Élevé) 15 heures 75 lumens Nomad 7 3,5 heures
Les deux côtés (Faible) 80 heures 20 lumens
Les deux côtés (Élevé) 7 heures 150 lumens
LUMENS TEMPS DE CHARGE
RECHARGER VOTRE MICRO LIGHTHOUSE
Se recharge à partir d'un port USB ou d'un panneau solaire.
Panneau solaire
Nomad® 7
(vendu séparément)
3,5 heures
de plein soleil
3,5 heures
de branchement
à un port USB
7