

Page 1
1
Page 2

Table of Contents
Get To Know Your Gear 2
Charge It 3
Solar Ready™ 3
Charge Your Gear 4
Flashlight Tool 4
Flashlight 4
Fan Tool 5
Replaceable Battery 5
Troubleshooting 5
Technical Specifications 6
Français 7-11
日本語
12-16
Deutsch 17-21
Español 22-26
1
Page 3
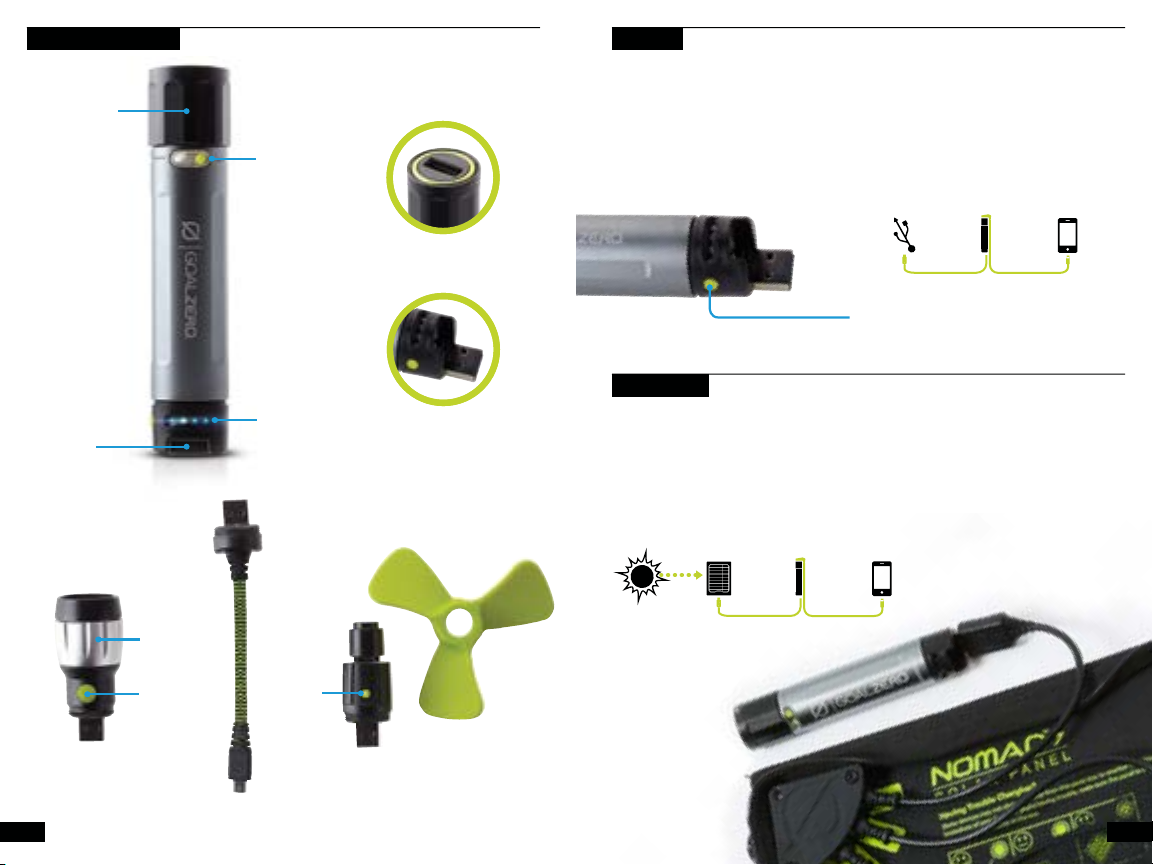
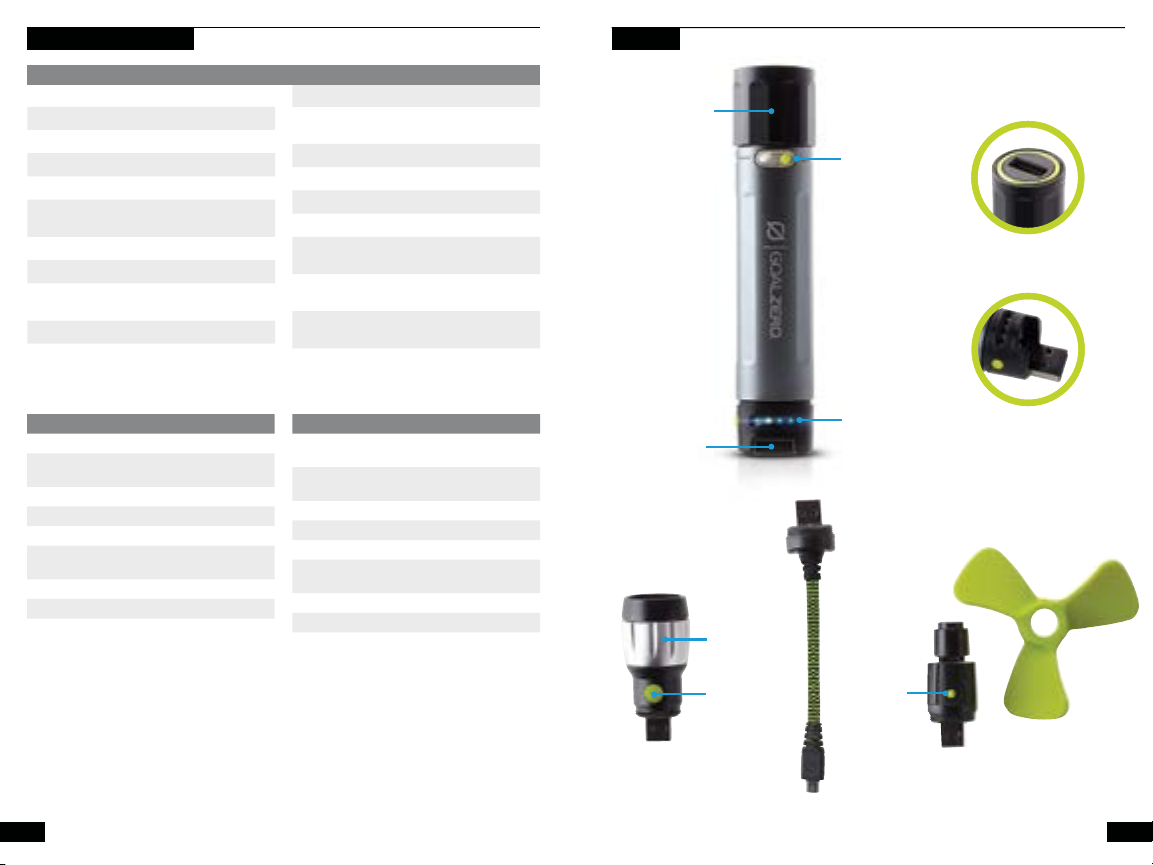
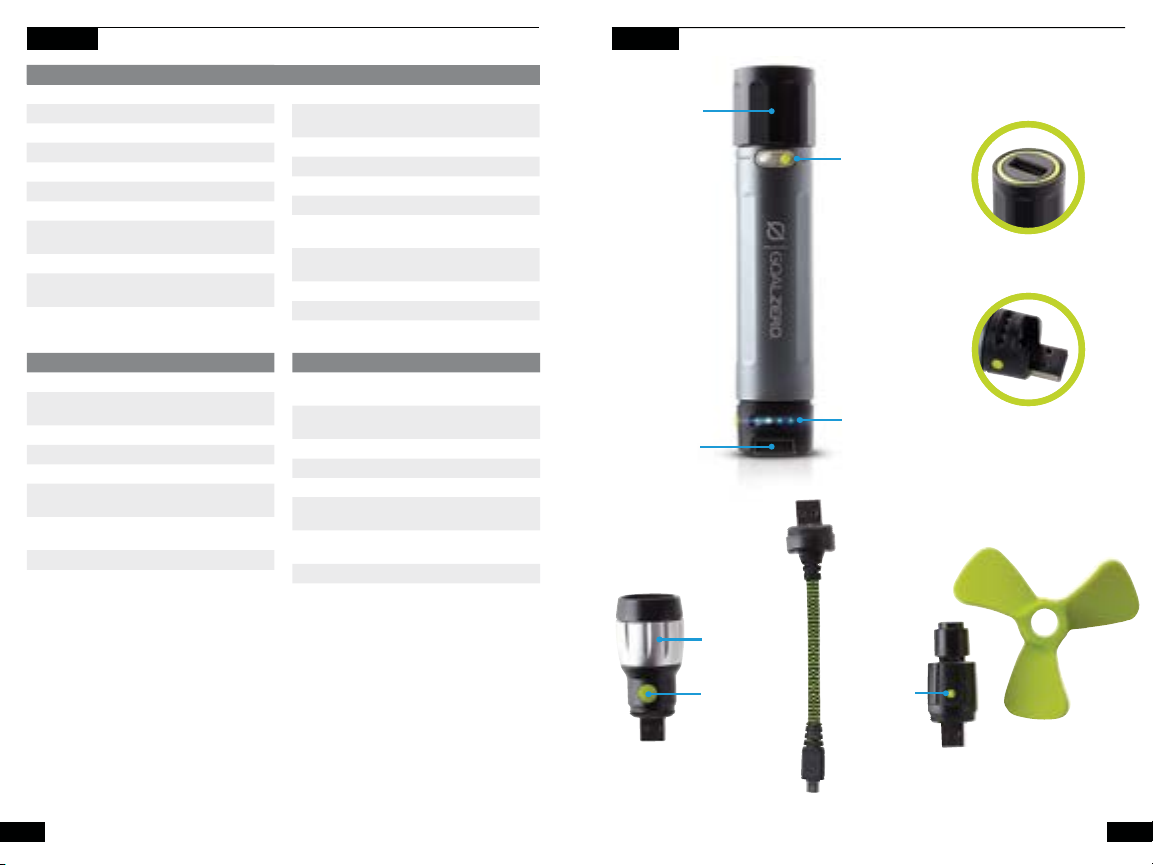
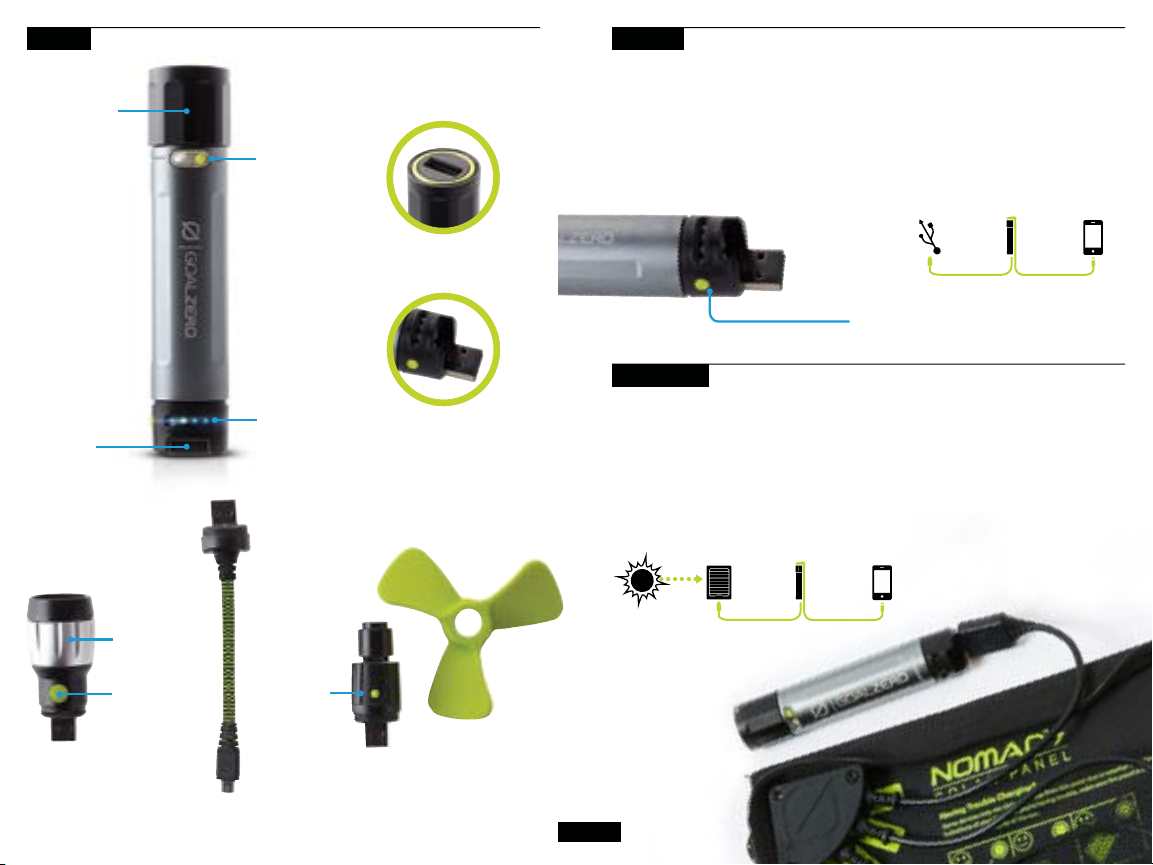
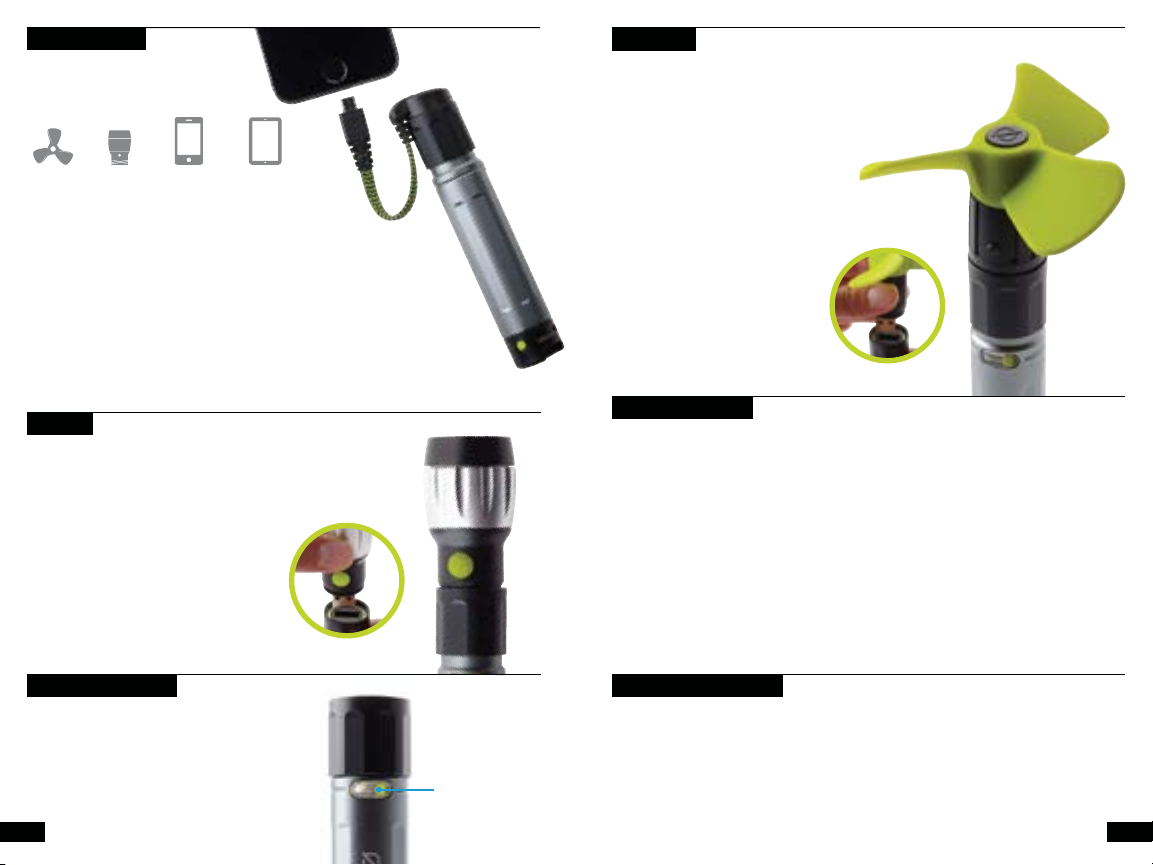
GET TO KNOW YOUR GEAR
Metal Collar
Flip-out
Charging Tip
Built-In
Flashlight
Battery
Indicator Light
USB Output
Flip-out Charging Tip
CHARGE IT
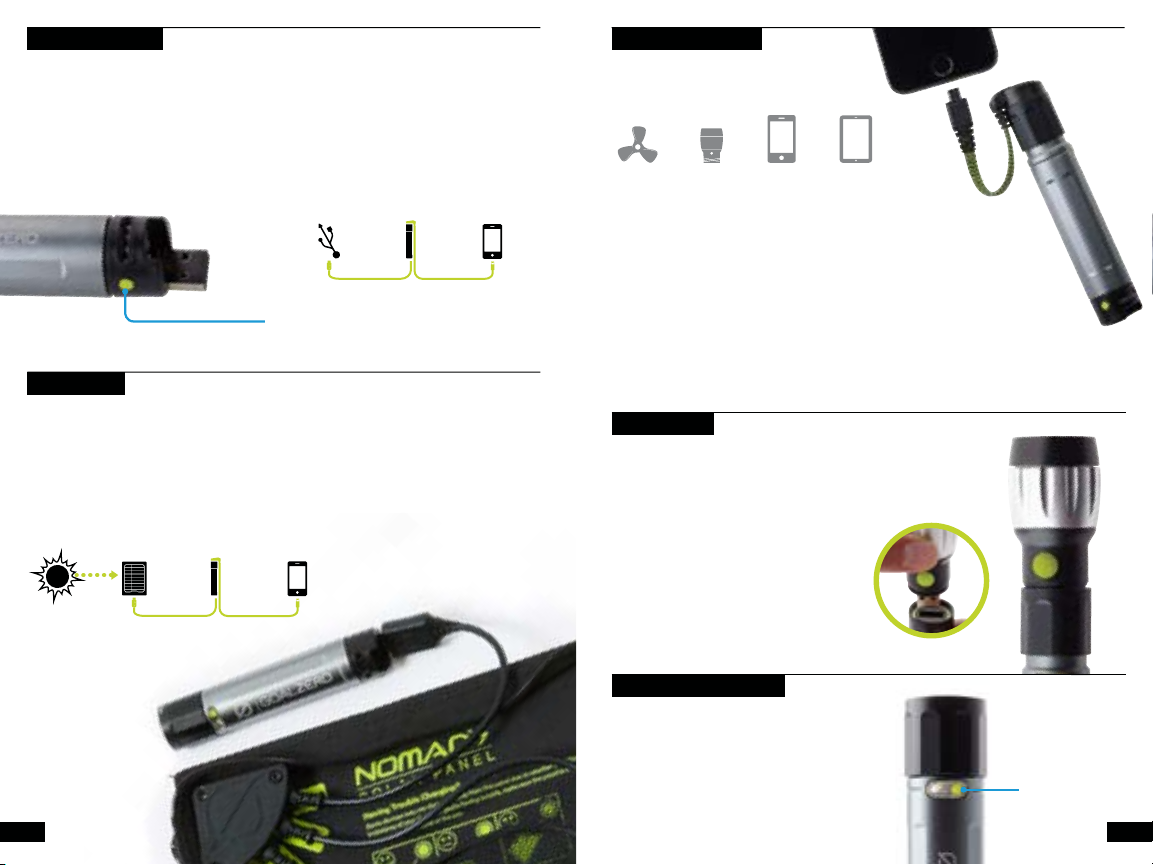
1. Using the flip-out charging USB tip, plug Goal Zero Switch 10 into any live USB port and
charge up in 4 hours.
2. Know it’s charging when the blue indicator lights illuminate and flash.
3. Goal Zero Switch 10 is ready to go when all lights are illuminated and holding steady.
Goal Zero Switch 10 allows for pass-through power so you can charge your gear and
Goal Zero Switch 10 at the same time.
USB Port Smartphone
Goal Zero
Switch 10
4 Hrs 1 Recharge
Check the battery level of Goal Zero Switch
10 by pressing the button next to the
indicator lights.
SOLAR READY™
Goal Zero Switch 10 is engineered to charge quickly from Goal Zero’s Nomad
1. Using the flip-out charging USB tip, plug Goal Zero Switch 10 into the USB port on the back
of the Nomad panel.
2. Know it’s charging when the blue lights illuminate and flash.
3. Goal Zero Switch 10 is ready to go when all lights are illuminated and holding steady.
Nomad 7
Solar Panel
Goal Zero
Switch 10
Smartphone
®
Solar Panels.
Flashlight Tool
2
Beam
Adjustment
On/Off
Button
Micro-USB Charging Cable
On/Off
Button
Fan Tool
(Two Pieces)
4 Hrs
Full Sun
1 Recharge
3
Page 4
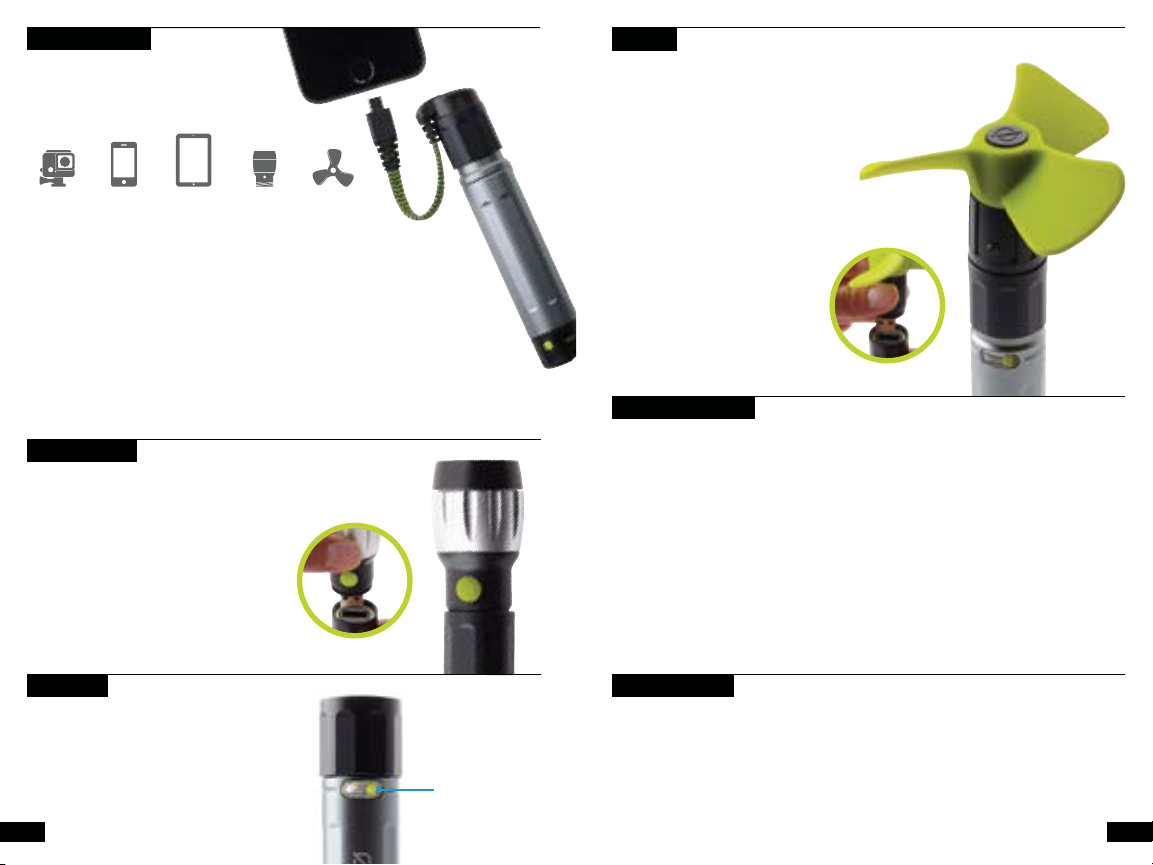
CHARGE YOUR GEAR
Goal Zero Switch 10 is designed to
charge POV cameras, phones, and other
handheld USB-powered gear.
What It Powers:
Included:
7”
POV Camera
Phone
2x
1. Using your gear’s charging cable, plug into Goal Zero Switch 10’s
USB output.
2. Goal Zero Switch 10 will automatically begin charging when you plug in
your gear.
Certified Cables
Goal Zero Switch 10 comes with certified cables to efficiently charge your gear.
1. Plug the included cable into Goal Zero Switch 10’s USB output.
2. Keeping one hand on the cable slide the metal collar up one click, and twist the
collar in the direction indicated by the “tighten” arrow until snug. Be careful not
to over tighten the collar.
1x
Tablet
25% Boost
Flashlight
4 Hours
Fan
5x
FLASHLIGHT TOOL
Goal Zero Switch 10 Flashlight is a bright,
110 lumen LED light with an adjustable beam.
1. Plug the flashlight tool into Goal Zero
Switch 10’s USB output.
2. Keeping one hand on the flashlight slide
the metal collar up one click, and twist
the collar in the direction indicated by the
“tighten” arrow until snug.
3. Twist the silver collar to focus.
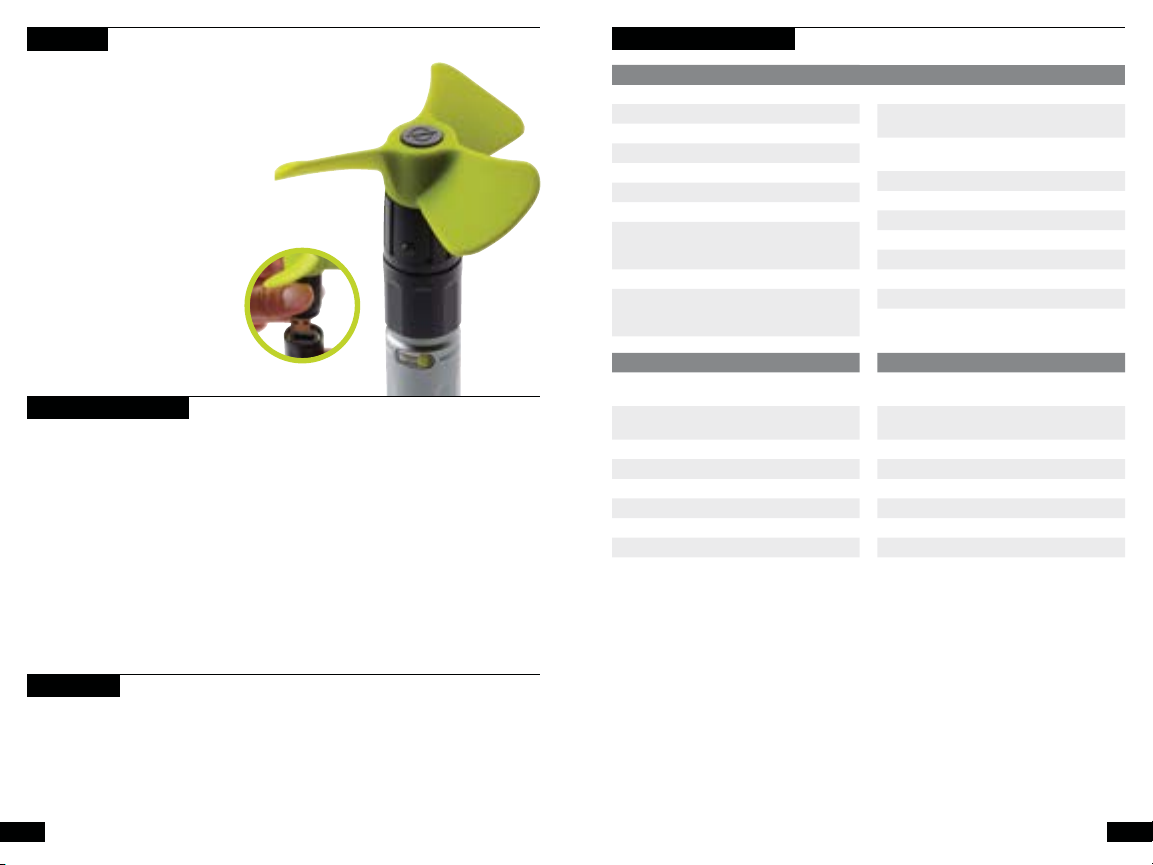
FAN TOOL
Goal Zero Switch 10 Fan is a lightweight
and quiet way to cool off.
1. Attach the soft fan blades to the motor
by sliding the two pieces together.
2. Plug the assembled fan tool into Goal
Zero Switch 10’s USB output.
3. Keeping one hand on the fan slide the
metal collar up one click, and twist the
collar in the direction indicated by the
“tighten” arrow until snug.
REPLACEABLE BATTERY
The battery inside the Goal Zero Switch
10 is replaceable. Over time, the lithium
battery inside Goal Zero Switch 10 will lose
its efficiency. If you notice your Goal Zero
Switch 10 isn’t holding a charge, or is no
longer charging your gear as much, it might
be time to replace the battery.
1. Unscrew the USB charging end (Bottom)
of Goal Zero Switch 10 by grasping the
black cap and twisting to the left.
2. Remove the old battery and insert the
new Goal Zero 18650 lithium battery in
either direction.
3. Reattach the black cap and plug Goal
Zero Switch 10 into a live USB port.
You’ll need to purchase the replacement
a Goal Zero 18650 lithium battery from
GoalZero.com – please note, Goal Zero
Switch 10 is not compatible with any other
18650 lithium battery. Our batteries are
engineered with built-in protections and are
optimized to power Goal Zero gear.
FLASHLIGHT
Built-In Flashlight
Goal Zero Switch 10 also comes with a
small, built-in flashlight. Turn it on/off by
lightly pressing the button on the light.
4 5
Built-In
Flashlight Button
TROUBLESHOOTING
Goal Zero Switch 10 Reset:
Plug Goal Zero Switch 10 into any live USB port to reset it.
Page 5
TECHNICAL SPECIFICATIONS
Goal Zero Switch 10 Recharger
Charge times:
GOAL ZERO Nomad 7 4-6 hrs
USB Source 4 hrs
Battery:
Cell chemistry Li-ion NMC
Cell type 18650 by LG chem/
Cell capacity 11Wh (3.7V, 3000mAh)
Lifecycles hundreds of cycles
Shelf-life Keep plugged in, or charge
Fuses none
Management system Charging and low-battery
Samsung
every 3-6 months
protection built-in
Ports:
USB port (output) 5V, up to 1.5A (7.5W max),
USB port (input) 5V, up to 1A (5W max)
General:
Chainable No
Weight 4 oz (113g)
Dimensions 4.5 x 1 x 1 in (11.4 x 2.5
Operating usage
temp.
Certs: (display as
icons)
Warranty 12 months
regulated
x 2.5 cm)
32-104 F (0-40 C)
CE, FCC, ROHS
FRANÇAIS
Collier métallique
Lampe intégrée
Sortie USB
Fan Tool Flashlight Tool
Fan (output) 5V, 0.35A (1.7W max)
Runtime on Goal Zero
Switch 10
GENERAL:
Chainable no
Weight 1.3 oz (36 g)
Dimensions 2.4 x 3.5 x 3.5 in (6.2 x
Operating usage temp. 32-104F (0-40C)
Certs CE, FCC, ROHS
Warranty 12 months
Be sure to ACTIVATE YOUR WARRANTY
at goalzero.com/warranty
5 hrs
9 x 9 cm)
LED (output) 3W, white CREE LED,
Runtime on Goal Zero
Switch 10
GENERAL:
Chainable no
Weight 2 oz (56 g)
Dimensions 2.6 x 1.3 x 1.3 in (6.6 x
Operating usage temp. 32-104F (0-40C)
Certs CE, FCC, ROHS
Warranty 12 months
110 Lumens
4 hrs
3.2 x 3.2 cm)
Prise de charge
articulée
Lampe de poche
Réglage du
faisceau
Bouton
Marche/Arrêt
Voyant indicateur
de batterie
Bouton
Marche/
Arrêt
Prise de charge articulée
Ventilateur
(Deux pièces)
Câble micro USB
6 7
Page 6
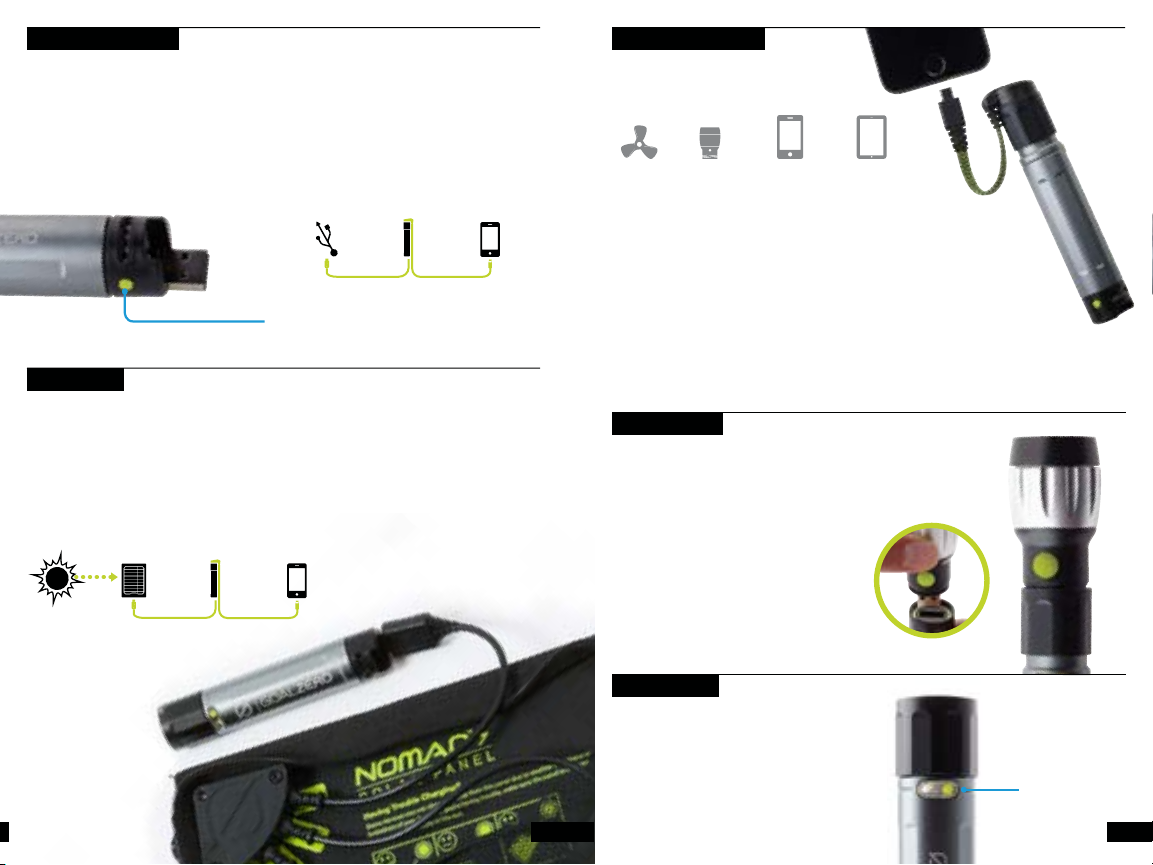
CHARGER ET RECHARGER
1. Utilisant la prise de charge articulée USB de charge articulée, branchez votre Goal Zero Switch
10 dans un port USB d’alimentation et rechargez-le en 4 heures.
2. Vous savez qu’il est en mode de recharge lorsque les voyants bleus s’allument et clignotent.
3. Goal Zero Switch 10 est prêt à fonctionner quand tous les voyants sont et restent allumés.
Goal Zero Switch 10 permet à l’énergie de le traverser, de sorte que vous puissiez charger vos
appareils et votre Goal Zero Switch 10 en même temps.
Port USB
Goal Zero
Téléphone
Switch 10
4 Heures une recharge
Pour vérifier le niveau de la batterie de votre Goal
Zero Switch 10, appuyez sur le bouton à côté des
voyants indicateurs.
SOLAR READY™
Goal Zero Switch 10 est conçu pour se charger rapidement depuis les panneaux solaires Nomad
Goal Zero.
1. Utilisant la prise USB de charge articulée, branchez votre Goal Zero Switch 10 dans le port USB à
l’arrière d’un panneau solaire Nomad.
2. Vous savez qu’il est en mode de recharge lorsque les voyants bleus s’allument et clignotent.
3. Goal Zero Switch 10 est prêt à fonctionner quand tous les voyants sont et restent allumés.
Panneau solaire
Nomad 7
Goal Zero
Switch 10
Téléphone
CHARGEZ VOS APPAREILS
Goal Zero Switch 10 est conçu pour charger
appareils photo, téléphones portables et
tout autre appareil de poche alimenté via une
prise USB.
7”
Ventilateur
Lampe de poche
5 Heures
1. Utilisant le câble de recharge de votre appareil, branchez-le
dans la prise de sortie USB de votre Goal Zero Switch 10.
2. Goal Zero Switch 10 lancera la recharge automatiquement
lorsque vous brancherez votre appareil.
Câbles certifiés
Goal Zero Switch 10 est livré avec des câbles certifiés afin de charger et recharger
efficacement votre équipement.
1. Branchez le câble fourni dans la sortie USB de votre Goal Zero Switch 10.
2. En gardant une main sur le câble, déplacez le collier métallique d’un clic vers le haut, puis
®
de
serrez le collier en le tournant dans le sens antihoraire. Veillez à ne pas trop le serrer.
LAMPE DE POCHE
La lampe de poche du Goal Zero Switch 10 est
une puissante DEL de 110 lumens avec faisceau
lumineux réglable.
1. Branchez l’outil Lampe de poche dans la
sortie USB de votre Goal Zero Switch 10.
2. En gardant une main sur la lampe, déplacez
le collier métallique d’un clic vers le haut, puis
serrez le collier en le tournant dans le sens
antihoraire.
4 Heures
Téléphone
1 recharge
Tablette
25% d’énergie
supplémentaire
4 Heures
Plein soleil
une recharge
LAMPE INTÉGRÉE
Lampe intégrée
Goal Zero Switch 10 est également équipé d’une
petite lampe intégrée. Allumez/Éteignez-la en
pressant légèrement sur son bouton Marche/Arrêt.
8 9
8
Lampe intégrée
Page 7
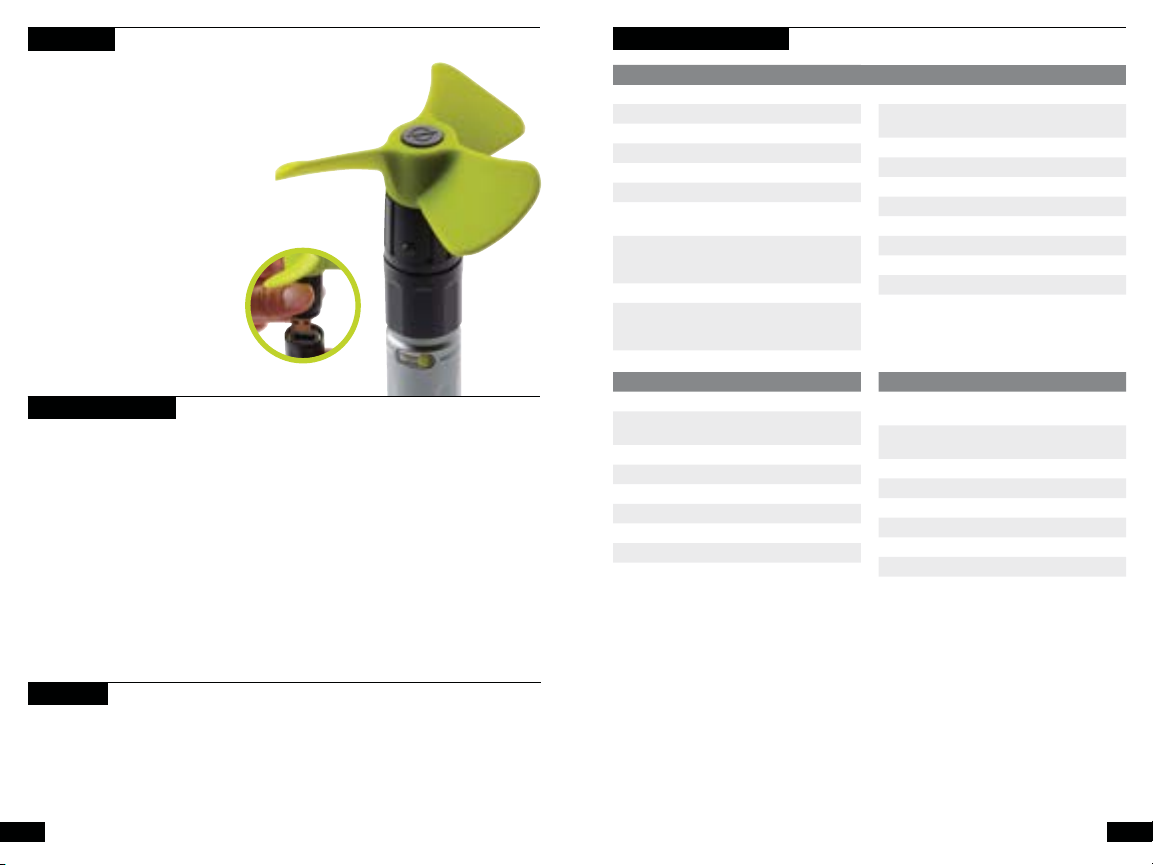
VENTILATEUR
Le Ventilateur Goal Zero Switch 10 est un moyen
léger et silencieux pour se rafraîchir.
1. Attachez les pales souples au moteur du
ventilateur en glissant et emboitant les deux
pièces.
2. Branchez alors l’outil ventilateur dans la
sortie USB de votre Goal Zero Switch 10.
3. En gardant un main sur le ventilateur,
déplacez le collier métallique d’un clic vers le
haut, puis serrez le collier en le tournant dans
le sens antihoraire.
BATTERIE REMPLAÇABLE
Au fil du temps, la batterie au lithium située à
l’intérieur de votre Goal Zero Switch 10 perdra
de son efficacité. Quand vous remarquez que
votre Goal Zero Switch 10 ne tient plus une
charge efficace, ou n’est plus capable de charger
ou recharger efficacement vos appareils, il faut
alors remplacer la batterie.
1. Dévissez le bout de la prise USB de votre
Goal Zero Switch 10 en saisissant le
capuchon noir et en le tournant vers la
gauche.
2. Retirez la batterie usagée et insérez une
nouvelle batterie au lithium Goal Zero 18650
peu importe le sens.
3. Rattachez le bouchon noir et branchez votre
Goal Zero Switch 10 dans un port USB
d’alimentation.
Vous aurez besoin d’acheter, comme
remplacement, une nouvelle batterie au lithium
Goal Zero 18650 depuis le site GoalZero.com
- Veuillez noter que votre Goal Zero Switch 10
n’est pas compatible avec toute autre batterie au
lithium 18650. Nos batteries sont conçues avec
des protections intégrées et sont optimisées
pour l’alimentation des appareils Goal Zero.
SPÉCIFICATIONS TECHNIQUES
Recharger votre Goal Zero Switch 10
TEMPS DE CHARGE :
GOAL ZERO Nomad 7 de 4 à 6 heures
Source USB 4 heures
BATTERIE :
Type de batterie Li-ion NMC
Capacité de batterie 11Wh (3.7V, 3000mAh)
Durée de vie Plusieurs centaines de
Entretien de la batterie Laissez-la branchée, ou
Fusibles Aucun
Système de gestion Protections intégrées
Ventilateur Lampe de poche
Ventilateur (sortie) 5V, 0.35A (1.7W max)
Autonomie sur Goal Zero
Switch 10
GÉNÉRAL :
Chaînable Non
Poids 36g
Dimensions 6,2 x 9 x 9 cm
Températures d’utilisation de 0C° à 40C°
Certifications CE, FCC, ROHS
Garantie 12 mois
N’oubliez pas d’activer votre garantie sur
goalzero.com/warranty
cycles
rechargez-la tous les
3-6 mois
de charge et de batterie
faible
5 heures
PORTS :
Prise USB (sortie) 5V, jusqu’à 1,5A (7.5W
Prise USB (entrée) 5V, jusqu'à 1A (5W max)
GÉNÉRAL :
Chaînable Non
Poids 113g
Dimensions 11,4 x 2,5 x 2,5 cm
Températures d’utilisation de 0C° à 40C°
Certifications CE, FCC, ROHS
Garantie 12 mois
DEL (sortie) 3W, DEL blanche CREE,
Autonomie sur Goal Zero
Switch 10
GÉNÉRAL :
Chaînable Non
Poids 56g
Dimensions 6,6 x 3,2 x 3,2 cm
Températures d’utilisation de 0C° à 40C°
Certifications CE, FCC, ROHS
Garantie 12 mois
max), régulé
110 Lumens
4 heures
DÉPANNAGE
Réinitialiser votre Goal Zero Switch 10
Branchez votre Goal Zero Switch 10 dans un port USB d’alimentation pour le réinitialiser.
10 11
Page 8
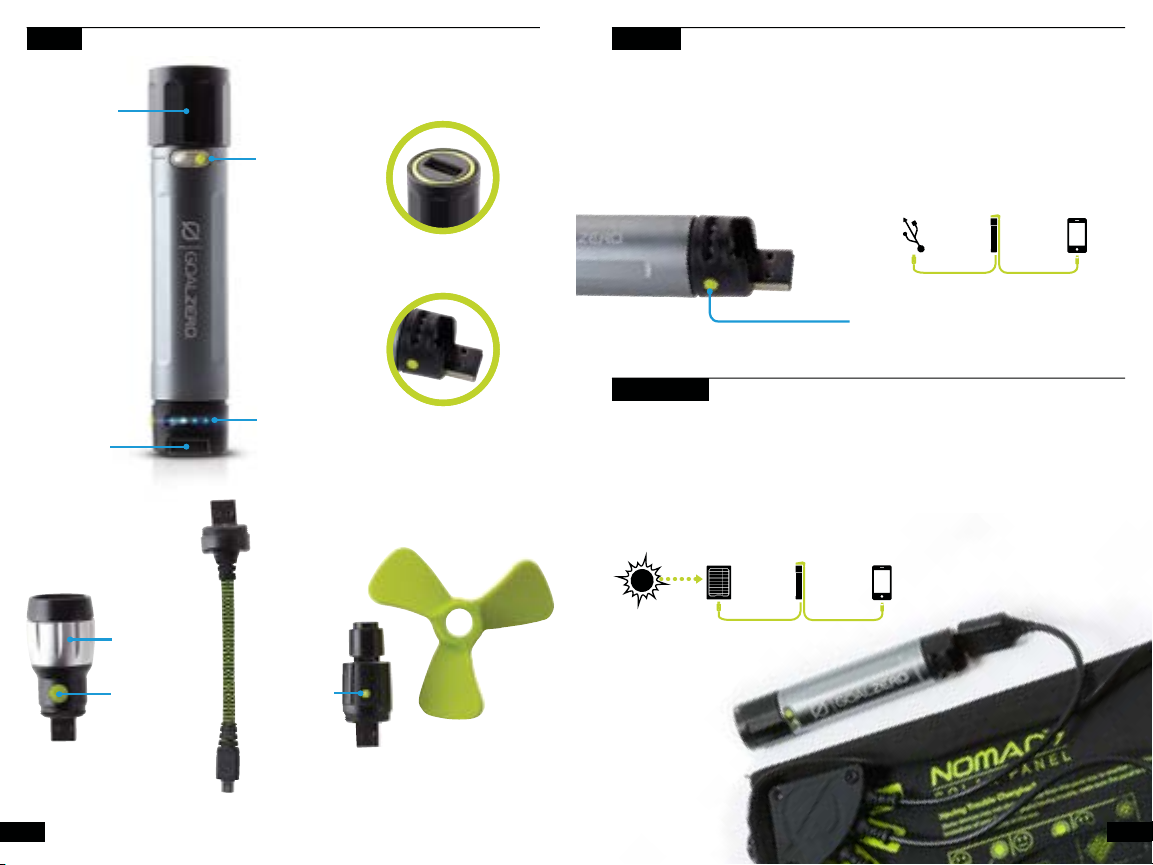
日本語
金属カラー
フリップアウ
ト充電チップ
内蔵の懐中
電灯
バッテリーインジ
ケータ・ライト
USB出力
フリップアウト充電チップ
充電する
1. フリップアウトUSBチップを使ってGoal Zero Switch 10を電気供給可能なUSBポートにつなぎ、4
時間で充電します。
2. インジケータの青色ライトが点滅して充電中であることをお知らせします。
3. すべてのライトが点灯すれば、Goal Zero Switch 10は使える状態になっています。
Goal Zero Switch 10はパススルー電力が使えるので、機器とGoal Zero Switch 10を同時に充電で
きます。
USB Port 携帯電話
4 時間 1回充電
インジケータライトの隣にあるボタンを押して
Goal Zero Switch 10のバッテリーレベルを確認
して下さい。
Goal Zero
Switch 10
SOLAR READY™
Goal Zero Switch 10はGoal ZeroのNomad
れています。
1. フリップアウトUSBチップを使ってGoal Zero Switch 10をNomadソーラーパネルの背面にある
USBポートにつなぎます。
2. 青色ライトが点滅して充電中であることをお知らせします。
3. すべてのライトが点灯すれば、Goal Zero Switch 10は使える状態になっています。
Nomad 7
ソーラーパネル
Goal Zero
Switch 10
®
ソーラーパネルから急速に充電ができるように設計さ
携帯電話
12
懐中電灯
ビーム調整
オン/オフ ボタン
マイクロUSBケーブル
オン/オフ ボタン
ファン
(2個の部品)
4 時間
1回充電
13
Page 9
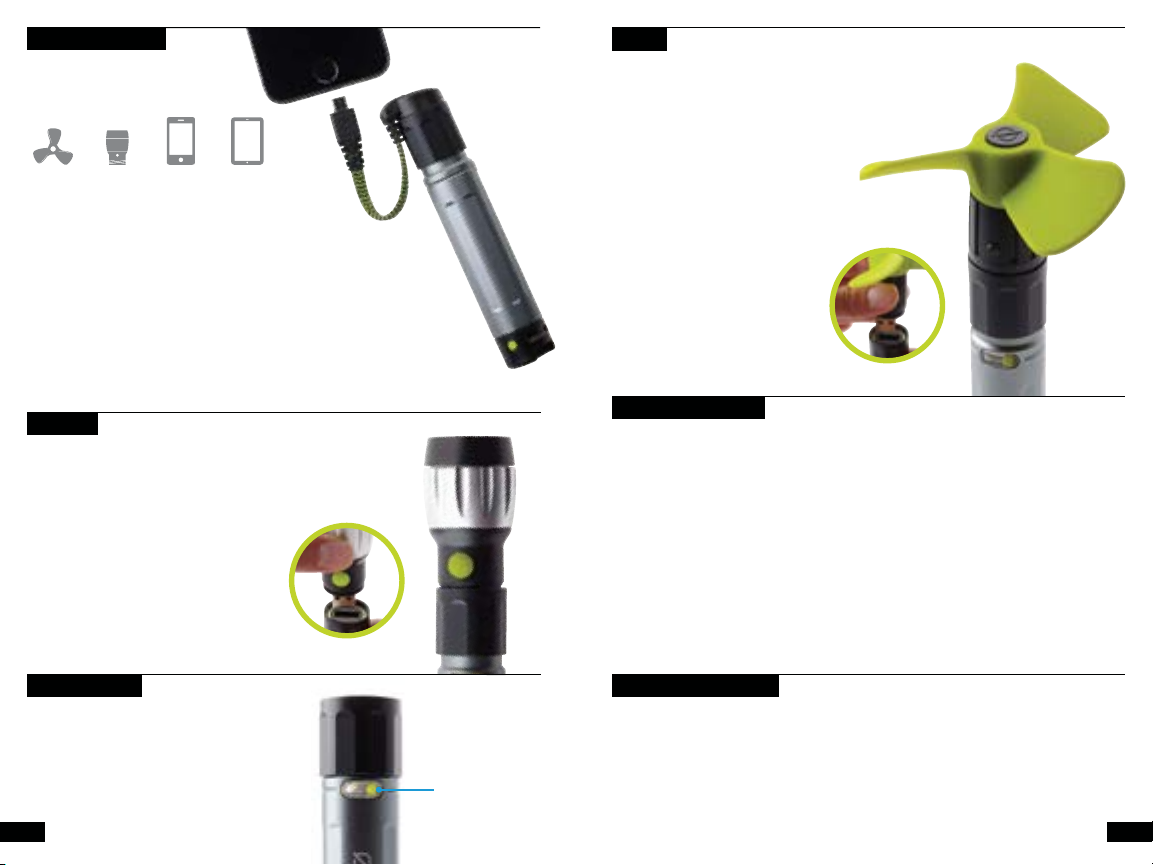
機器を充電する
Goal Zero Switch 10はPOVカメラ、携帯電
話、その他のUSB駆動の携帯機器を充電する
ように設計されています。
7”
扇風機
懐中電灯
5 時間
1. 機器付属の充電ケーブルを使い、Goal Zero Switch 10のUSB
2. 機器がつながれた時 Goal Zero Switch 10は自動的に充電を
認定充電ケーブル
Goal Zero Switch 10には機器を効率的に充電する認定ケーブルが付属します。
1. 付属の充電ケーブルを Goal Zero Switch 10のUSB出力ポートにつなぎます。
2. 片手をケーブルに置いたまま、金属カラーをすべらせカチッと止めてください。カラー
4 時間
出力ポートにつなぎます。
開始します。
を左回りにひねりしっかりと締めます。カラーを締めすぎないように注意して下さい。
携帯電話
1回
タブ レット
25%増強
ファン
Goal Zero Switch 10ファンは軽量で静かな冷
却方法です。
1. 2個の部品をいっしょにすべらせて柔らかいフ
ァンブレードをモーターに取り付けて下さい。
2. つながったファンツールをGoal Zero Switch
10のUSB出力ポートに差し込みます。
3. 片手をファンに置いたまま、金属カラーをすべ
らせカチッと止めてください。カラーを左回り
にひねりしっかりと締めます。
懐中電灯
Goal Zero Switch 10 懐中電灯は、調整可能な
ビームを備えた明るい110ルーメンのLEDライ
トです。
1. 懐中電灯ツールをGoal Zero Switch 10のUSB
出力ポートにつなぎます。
2. 片手を懐中電灯に置いたまま、金属カラーをす
べらせカチッと止めてください。カラーを左回
りにひねりしっかりと締めます。
内蔵の懐中電灯
内蔵の懐中電灯
Goal Zero Switch 10には更に小さな内蔵ライト
が備わっています。ライトの上にあるボタンを軽
く押してオン/オフします。
内蔵の懐中電灯
交換可能なバッテリー
時間が経つにつれ、Goal Zero Switch 10の内
蔵リチウムバッテリーはその効率が失われます。
もしGoal Zero Switch 10が充電状態を保持し
ないようであれば、あるいは機器を充分に充電
しなくなったとすれば、バッテリーの交換時期と
思われます。
1. Goal Zero Switch 10のUSB側の黒いキャップ
をつかみ、左にねじって外します。
2. 古いバッテリーを取り外し、新しいGoal Zero
18650リチウムバッテリーを一方方向に挿入し
て下さい。
3. 黒いキャップを再装着して、Goal Zero
Switch 10を電気供給が可能なUSBポートにつ
なぎます。
交換用にはGoal Zeroの18650リチウムバッテリ
ーを GoalZero.comにてお買い求め下さい。 –
他の18650リチウムバッテリーは互換性がありま
せんのでご注意下さい。当社のバッテリーは内蔵
保護の設計がなされ、Goal Zero機器用に最適化
されています。
トラブルシューティング
Goal Zero Switch 10 リセット Goal Zero Switch 10を電気供給が可能なUSBポートに差し込ん
でリセットします。
14 15
Page 10
技術仕様
Goal Zero Switch 10 充電器
充電時間:
GOAL ZERO Nomad 7 4-6 時間
USB電源 4 時間
バッテリー:
セル型 リチウムイオン NMC
セル容量
ライフサイクル 数百サイクル
保存期間 差し込んだまま維持、ま
ヒューズ なし
管理システム 充電および低バッテリ保
11Wh (3.7V, 3000mAh)
たは3-6ヶ月ごとに充電
護を内蔵
ポート:
USBポート (出力) 5V, 1.5A (最大7.5W)ま
USBポート (入力) 5V, 1A (最大5W)まで
一般:
連鎖の可不可 不可
重量 4オンス (113g)
寸法 4.5 x 1 x 1 インチ (11.4
操作使用の温度 華氏32-104 F (摂氏
認証
保証 12ヶ月
で。安定化
x 2.5 x 2.5 cm)
0-40 C)
CE, FCC, ROHS
DEUTSCH
Metallbefestigungsring
Eingebaute
Taschenlampe
USB-Ausgang
ファン
ファン (出力) 5V, 0.35A (最大1.7W)
Goal Zero Switch 10のラ
ンタイム
一般:
連鎖の可不可 不可
重量 1.3オンス (36 g)
寸法 2.4 x 3.5 x 3.5 インチ
操作使用の温度 華氏32-104F (摂氏
認証
保証 12ヶ月
5時間
(6.2 x 9 x 9 cm)
0-40C)
CE, FCC, ROHS
懐中電灯
LED (出力) 3W, 白色 CREE LED,
Goal Zero Switch 10のラ
ンタイム
一般:
連鎖の可不可 不可
重量 2 オンス (56 g
寸法 2.6 x 1.3 x 1.3 インチ
操作使用の温度 華氏32-104F (摂氏
認証
保証 12ヶ月
110ルーメン
4時間
(6.6 x 3.2 x 3.2 cm)
0-40C)
CE, FCC, ROHS
Ausklappbarer
Ladekontakt
Batteriestandsanzeige
Ausklappbarer
Ladekontakt
goalzero.com/warrantyにて必ず保証をアクティブにして下さい。
Lichtstrahlanpassung
Taschenlampe
An/AusKnopf
An/AusKnopf
Ventilator
(zweiteilig)
Micro-USB-Kabel
16 17
Page 11
DAS GERÄT AUFLADEN
1. Stecke den Goal Zero Switch 10 mit Hilfe des ausklappbarer ladekontakt USB-Kontakts in jeden
aktiven USB-Port und das Gerät ist innerhalb von 4 Stunden vollständig auf geladen.
2. Wenn die blaue Leuchtanzeige zu blinken beginnt, weißt du, dass sich das Gerät auflädt.
3. Wenn alle Anzeigen leuchten und nicht mehr blinken, ist der Goal Zero Switch 10 vollständig
aufgeladen.
Der Goal Zero Switch 10 ist für Durchlaufstrom ausgelegt, d.h. du kannst deine Geräte und den Goal
Zero Switch 10 zur selben Zeit aufladen.
USB-Port Handy
Goal Zero
Switch 10
4 Std. 1 Aufladung
Durch Drücken des Knopfs neben den
Anzeigeleuchten kannst du den Batteriestand des
Goal Zero Switch 10 überprüfen.
SOLAR READY™
Der Goal Zero Switch 10 ist für schnelles Aufladen durch die Goal Zero Nomad
1. Stecke den Goal Zero Switch 10 mit Hilfe des ausklappbaren USB-Kontakts in den USB-Port an der
Rückseite der Nomad Solarpaneele.
2. Wenn die blaue Leuchtanzeige zu blinken beginnt, weißt du, dass sich das Gerät auflädt.
3. Wenn alle Anzeigen leuchten und nicht mehr blinken, ist der Goal Zero Switch 10 vollständig aufgeladen.
Nomad 7
Solarpaneele
Goal Zero
Switch 10
Handy
®
Solarpaneele konzipiert.
DEINE GERÄTE AUFLADEN
Mit dem Goal Zero Switch 10 können
POV-Kameras, Handys und andere, USBgespeiste Handgeräte aufgeladen werden.
7”
Ventilator
1. Stecke einfach das Ladekabel des jeweiligen Geräts in den
2. Sobald du das Gerät einsteckst, beginnt der Goal Zero
Zertifizierte Kabel
Der Goal Zero Switch 10 wird mit zugelassenen, zertifizierten Kabeln zur effizienten
Aufladung deiner Geräte geliefert.
1. Stecke das mitgelieferte Kabel in den USB-Ausgang des Goal Zero Switch 10.
2. Halte das Kabel mit einer Hand fest, schiebe den Metallring einen Klick nach oben und
Die Goal Zero Switch 10 Taschenlampe hat
ein helles LED-Licht mit 110 Lumen und
justierbarem Lichtstrahl.
1. Stecke die Taschenlampe einfach in den
2. Halte die Taschenlampe mit einer Hand fest,
Taschenlampe
5 Std.
USB-Ausgang des Goal Zero Switch 10.
Switch 10 automatisch mit dem Ladevorgang.
dreh ihn gegen den Uhrzeigersinn, bis das Kabel festsitzt. Bitte nicht zu fest anziehen.
4 Std.
Handy
einmal
Tablet-PC
25%Steigerung
TASCHENLAMPE
USB-Ausgang des Goal Zero Switch 10.
schiebe den Metallring einen Klick nach oben
und dreh ihn gegen den Uhrzeigersinn, bis
das Kabel festsitzt.
4 Std.
volle Sonneneinstrahlung
1 Aufladung
EINGEBAUTE TASCHENLAMPE
Eingebaute Taschenlampe
Der Goal Zero Switch 10 besitzt auch eine
kleine, eingebaute Taschenlampe. Durch leichtes
Drücken des Taschenlampen-Knopfes kannst du
sie an- oder ausstellen.
18 19
Eingebaute
Taschenlampe
Page 12
VENTILATOR
Der Goal Zero Switch 10 Ventilator hat kaum
Gewicht und arbeitet annähernd geräuschlos.
1. Befestige die weichen Ventilatorflügel
am Motor, indem du beide Teile
ineinanderschiebst.
2. Stecke den fertig montierten Ventilator in
den USB-Ausgang des Goal Zero Switch 10.
3. Halte den Ventilator mit einer Hand fest,
schiebe den Metallring einen Klick nach oben
und dreh ihn gegen den Uhrzeigersinn, bis
das Kabel festsitzt.
AUSTAUSCHBARE BATTERIE
Die Lithium-Batterie in deinem Goal Zero Switch
10 verliert natürlich mit der Zeit an Leistung.
Sobald du also merkst, dass dein Goal Zero Switch
10 an Ladekraft verliert, oder du deine Geräte
nicht mehr optimal laden kannst, ist es an der Zeit
die Batterie zu wechseln.
1. Öffne das USB-Ladeende des Goal Zero Switch
10, indem du die schwarze Kappe fasst und
nach links drehst.
2. Nimm die alte Batterie heraus und lege eine
neue Goal Zero 18650 Lithium-Batterie ein –
die Richtung spielt keine Rolle.
3. Dreh die schwarze Kappe wieder auf und steck
den Goal Zero Switch 10 in einen aktiven
USB-Port.
Die Ersatz-Goal Zero 18650 Lithium-Batterien
musst du über www.GoalZero.com kaufen.
Beachte hierbei bitte, dass der Goal Zero
Switch 10 nur mit den von uns angebotenen
18650 Lithium-Batterien funktioniert. Unsere
Batterien sind so entwickelt, dass sie über einen
eingebauten Schutz verfügen und alle Goal Zero
Geräte aufladen können.
FEHLERSUCHE
Goal Zero Switch 10 Zurücksetzen
Steck den Goal Zero Switch 10 in jeden aktiven USB-Port, um ihn zurückzusetzen.
TECHNISCHE SPEZIFIKATIONEN
Goal Zero Switch 10 Ladegerät
LADEZEITEN:
GOAL ZERO Nomad 7 4-6 Std.
USB-Quelle 4 Std.
BATTERIE:
Batterieart Li-ion NMC
Batteriekapazität 11Wh (3.7V, 3000mAh)
Lebensdauer mehrere Hundert Zyklen
Haltbarkeit Eingesteckt lassen,
Sicherungen keine
Energiesystem Eingebaute
Ventilator Taschenlampe
Ventilator
(Ausgangsleistung)
Laufzeit mit Goal Zero
Switch 10
ALLGEMEIN:
Verkettungsfähig Nein
Gewicht 36 g
Abmessungen 6,2 x 9 x 9 cm
Betriebstemperatur 0° – 40°C
Zertifiziert nach: CE, FCC, ROHS
Garantie 12 Monate
Bitte vergiss nicht DEINE GARANTIE ZU AKTIVIEREN
unter goalzero.com/warranty
oder alle 3 – 6 Monate
aufladen
Aufladung und
Ladezustandsanzeige
5V, 0.35A (1.7W max)
5 Std.
PORTS:
USB-Port
(Ausgangsleistung)
USB Port
(Eingangsleistung)
ALLGEMEIN:
Verkettungsfähig Nein
Gewicht 113 g
Abmessungen 11,4 x 2,5 x 2,5 cm
Betriebstemperatur 0° – 40°C
Zertifiziert nach CE, FCC, ROHS
Garantie 12 Monate
LED (Ausgangsleitung) 3W, weißes CREE-LED,
Laufzeit mit Goal Zero
Switch 10
ALLGEMEIN:
Verkettungsfähig Nein
Gewicht 56 g
Abmessungen 6,6 x 3,2x 3,2 cm
Betriebstemperatur 0° – 40°C
Zertifiziert nach CE, FCC, ROHS
Garantie 12 Monate
5V, bis zu 1,5A (7,5W
max.), geregelt
5V, bis zu 1A (5W max.)
110 Lumen
4 Std.
20 21
Page 13
ESPAÑOL
Cuello Metálico
Punta de
Carga
Linterna
Incorporada
Luz Indicadora
de Batería
Salida USB
Punta de carga
CÁRGUELO
1. Usando la punta de carga USB conecte el Goal Zero Switch 10 a cualquier puerto USB en directo y
cárguelo en 4 horas.
2. Sabrá que está cargando cuando las luces indicadoras azules se iluminen y parpadeen.
3. El Goal Zero Switch 10 estará listo cuando todas las luces estén iluminadas y se mantengan
iluminadas.
Goal Zero Switch 10 permite el paso de la energía de forma que pueda cargar su equipo y el Goal
Zero Switch 10 a la vez.
Puerto USB Teléfonos
Goal Zero
Switch 10
4 Horas 1 Recarga
Revise el nivel de la batería del Goal
Zero Switch 10 presionando el botón
junto a las luces indicadoras.
SOLAR READY™
El Goal Zero Switch 10 está diseñado para cargar rápidamente desde cualquier Panel Solar Nomad
Goal Zero.
1. Usando la punta del USB, conecte el Goal Zero Switch 10 al puerto USB en la parte trasera del panel
Nomad.
2. Sabrá que está cargando cuando las luces azules se iluminen y parpadeen.
3. El Goal Zero Switch 10 estará listo para usarse cuando todas las luces estén iluminadas y se mantengan
iluminadas.
Panel Solar
Nomad 7
Goal Zero
Switch 10
Teléfonos
®
de
Linterna
Ajuste del
haz de luz
Botón de
Encendido/
Apagado
Cable micro-USB
Botón de
Encendido/
Apagado
Ventilador
(Dos piezas)
4 Horas
a pleno sol
23
1 Recarga
23
Page 14
CARGUE SU EQUIPO
El Goal Zero Switch 10 está diseñado para
cargar cámaras POV cameras, teléfonos,
otros equipos de mano alimentados con USB.
7”
Ventilador
5 horas
1. Usando el cable de carga de su equipo, conecte en el puerto
2. El Goal Zero Switch 10 comenzará a cargar inmediatamente
Cables Certificados
El Goal Zero Switch 10 viene con cables certificados para cargar eficazmente su equipo.
1. Conecte el cable incluido en el puerto de salida USB del Goal Zero Switch 10.
2. Mantenga una mano en el cable y deslice el cuello metálico un clic más, y gire el cuello
LINTERNA
La Linterna Goal Zero Switch 10 es una luz LED
brillante de 110 lúmenes con haz de luz ajustable.
1. Conecte la herramienta de linterna en el
2. Mantenga una mano en la linterna y deslice
Linterna
4 horas
de salida del USB del Goal Zero Switch 10.
cuando conecte su equipo.
hacia izquierda hasta que esté firme. Tenga cuidado de no apretar demasiado el cuello.
puerto de salida USB del Goal Zero Switch 10.
el cuello de metal un clic más, y gire el cuello
hacia la izquierda hasta que esté apretado.
Teléfonos
1 vez
Tableta
25% de potencia
VENTILADOR
El ventilador Goal Zero Switch 10 es una forma
liviana y silenciosa de refrescarse.
1. Fije las hojas blandas del ventilador al motor
juntando las dos piezas.
2. Conecte la herramienta de ventilador armada
en el puerto de salida USB del Goal Zero
Switch 10.
3. Mantenga una mano en el abanico y deslice
el cuello metálico un clic más, y gire el cuello
hacia la izquierda hasta que esté apretado.
BATERÍA REMPLAZABLE
Con el tiempo, la batería de litio en el Goal Zero
Switch 10 perderá su eficacia. Si advierte que
su Goal Zero Switch 10 no retiene una carga o
no está cargando mucho su equipo, puede que
sea tiempo de remplazar la batería.
1. Desenrosque el extremo de carga USB del
Goal Zero Switch 10 sosteniendo la tapa
negra y girándola hacia la izquierda.
2. Saque la batería vieja e inserte la nueva
batería de litio Goal Zero 18650 en cualquier
dirección.
3. Vuelva a colocar la tapa negra y conecte el
Goal Zero Switch 10 a un puerto USB en
directo.
Deberá adquirir el remplazo de la batería de litio
Goal Zero 18650 de GoalZero.com – Advierta
que el Goal Zero Switch 10 no es compatible
con ninguna otra batería 18650. Nuestras
baterías están fabricadas con protecciones
incorporadas y están optimizadas para
alimentar equipos Goal Zero.
LINTERNA INCORPORADA
Linterna incorporada
El Goal Zero Switch 10 también viene con una
pequeña linterna incorporada. Enciéndala/
apáguela presionando suavemente el botón en
la luz.
Botón de Linterna
incorporada
RESOLUCIÓN DE PROBLEMAS
Reiniciar el Goal Zero Switch 10:
Conecte el Goal Zero Switch 10 a cualquier puerto USB en directo para reiniciarlo.
24 25
Page 15

ESPECIFICACIONES TÉCNICAS
Cargador Goal Zero Switch 10
TIEMPO DE CARGA:
GOAL ZERO Nomad 7 4-6 horas
Fuente USB 4 horas
BATERÍA:
Tipo de célula Li-ion NMC
Capacidad de célula 11Wh (3.7V, 3000mAh)
Ciclos de vida Cientos de ciclos
Vida útil Manténgalo conectado,
Fusibles Ninguno
Sistema de manejo Carga y protección
PUNTA DE VENTILADOR PUNTA ATORNILLABLE
Ventilador (salida) 5V, 0.35A (1.7W máx)
Tiempo de ejecución en el
Goal Zero Switch 10
GENERAL:
Conexión en serie no
Peso 1.3 oz (36 g)
Dimensiones 2.4 x 3.5 x 3.5 in (6.2 x
Temperatura de uso
operativo
Certificados CE, FCC, ROHS
Garantías 12 meses
Asegúrese de ACTIVAR SU GARANTÍA en
goalzero.com/warranty
o cargue cada 3-6
meses
incorporada de batería
baja
5 horas
9 x 9 cm)
32-104F (0-40C)
PUERTOS:
Puerto USB (salida) 5V, hasta 1.5A (7.5W
Puerto USB (entrada) 5V, hasta 1A (5W máx)
GENERAL:
Conexión en serie No
Peso 4 oz (113g)
Dimensiones 4.5 x 1 x 1 in (11.4 x 2.5
Temperatura de uso
operativo
Certificaciones CE, FCC, ROHS
Garantías 12 meses
LED (salida) 3W, blanca CREE LED,
Tiempo de ejecución en el
Goal Zero Switch 10
GENERAL:
Conexión en
serie
Peso 2 oz (56 g)
Dimensiones 2.6 x 1.3 x 1.3 in (6.6 x
Temperatura de uso
operativo
Certificaciones CE, FCC, ROHS
Garantías 12 meses
máx), regulado
x 2.5 cm)
32-104 F (0-40 C)
110 Lúmenes
4 horas
no
3.2 x 3.2 cm)
32-104F (0-40C)
26
Page 16

GOAL ZERO HEADQUARTERS
675 West 14600 South
Bluffdale, UT 84065
Designed in the U.S.A.
Made in China
1-888-794-6250
Goal Zero Switch and Nomad are
trademarks of Goal Zero LLC.
CA031215
28
We make the powerless, powerful.
goalzero.com/sharethesun
Page 17
NOMAD 7
Tragbares Solarmodul
Anwendungsbereiche
Technische Spezikationen
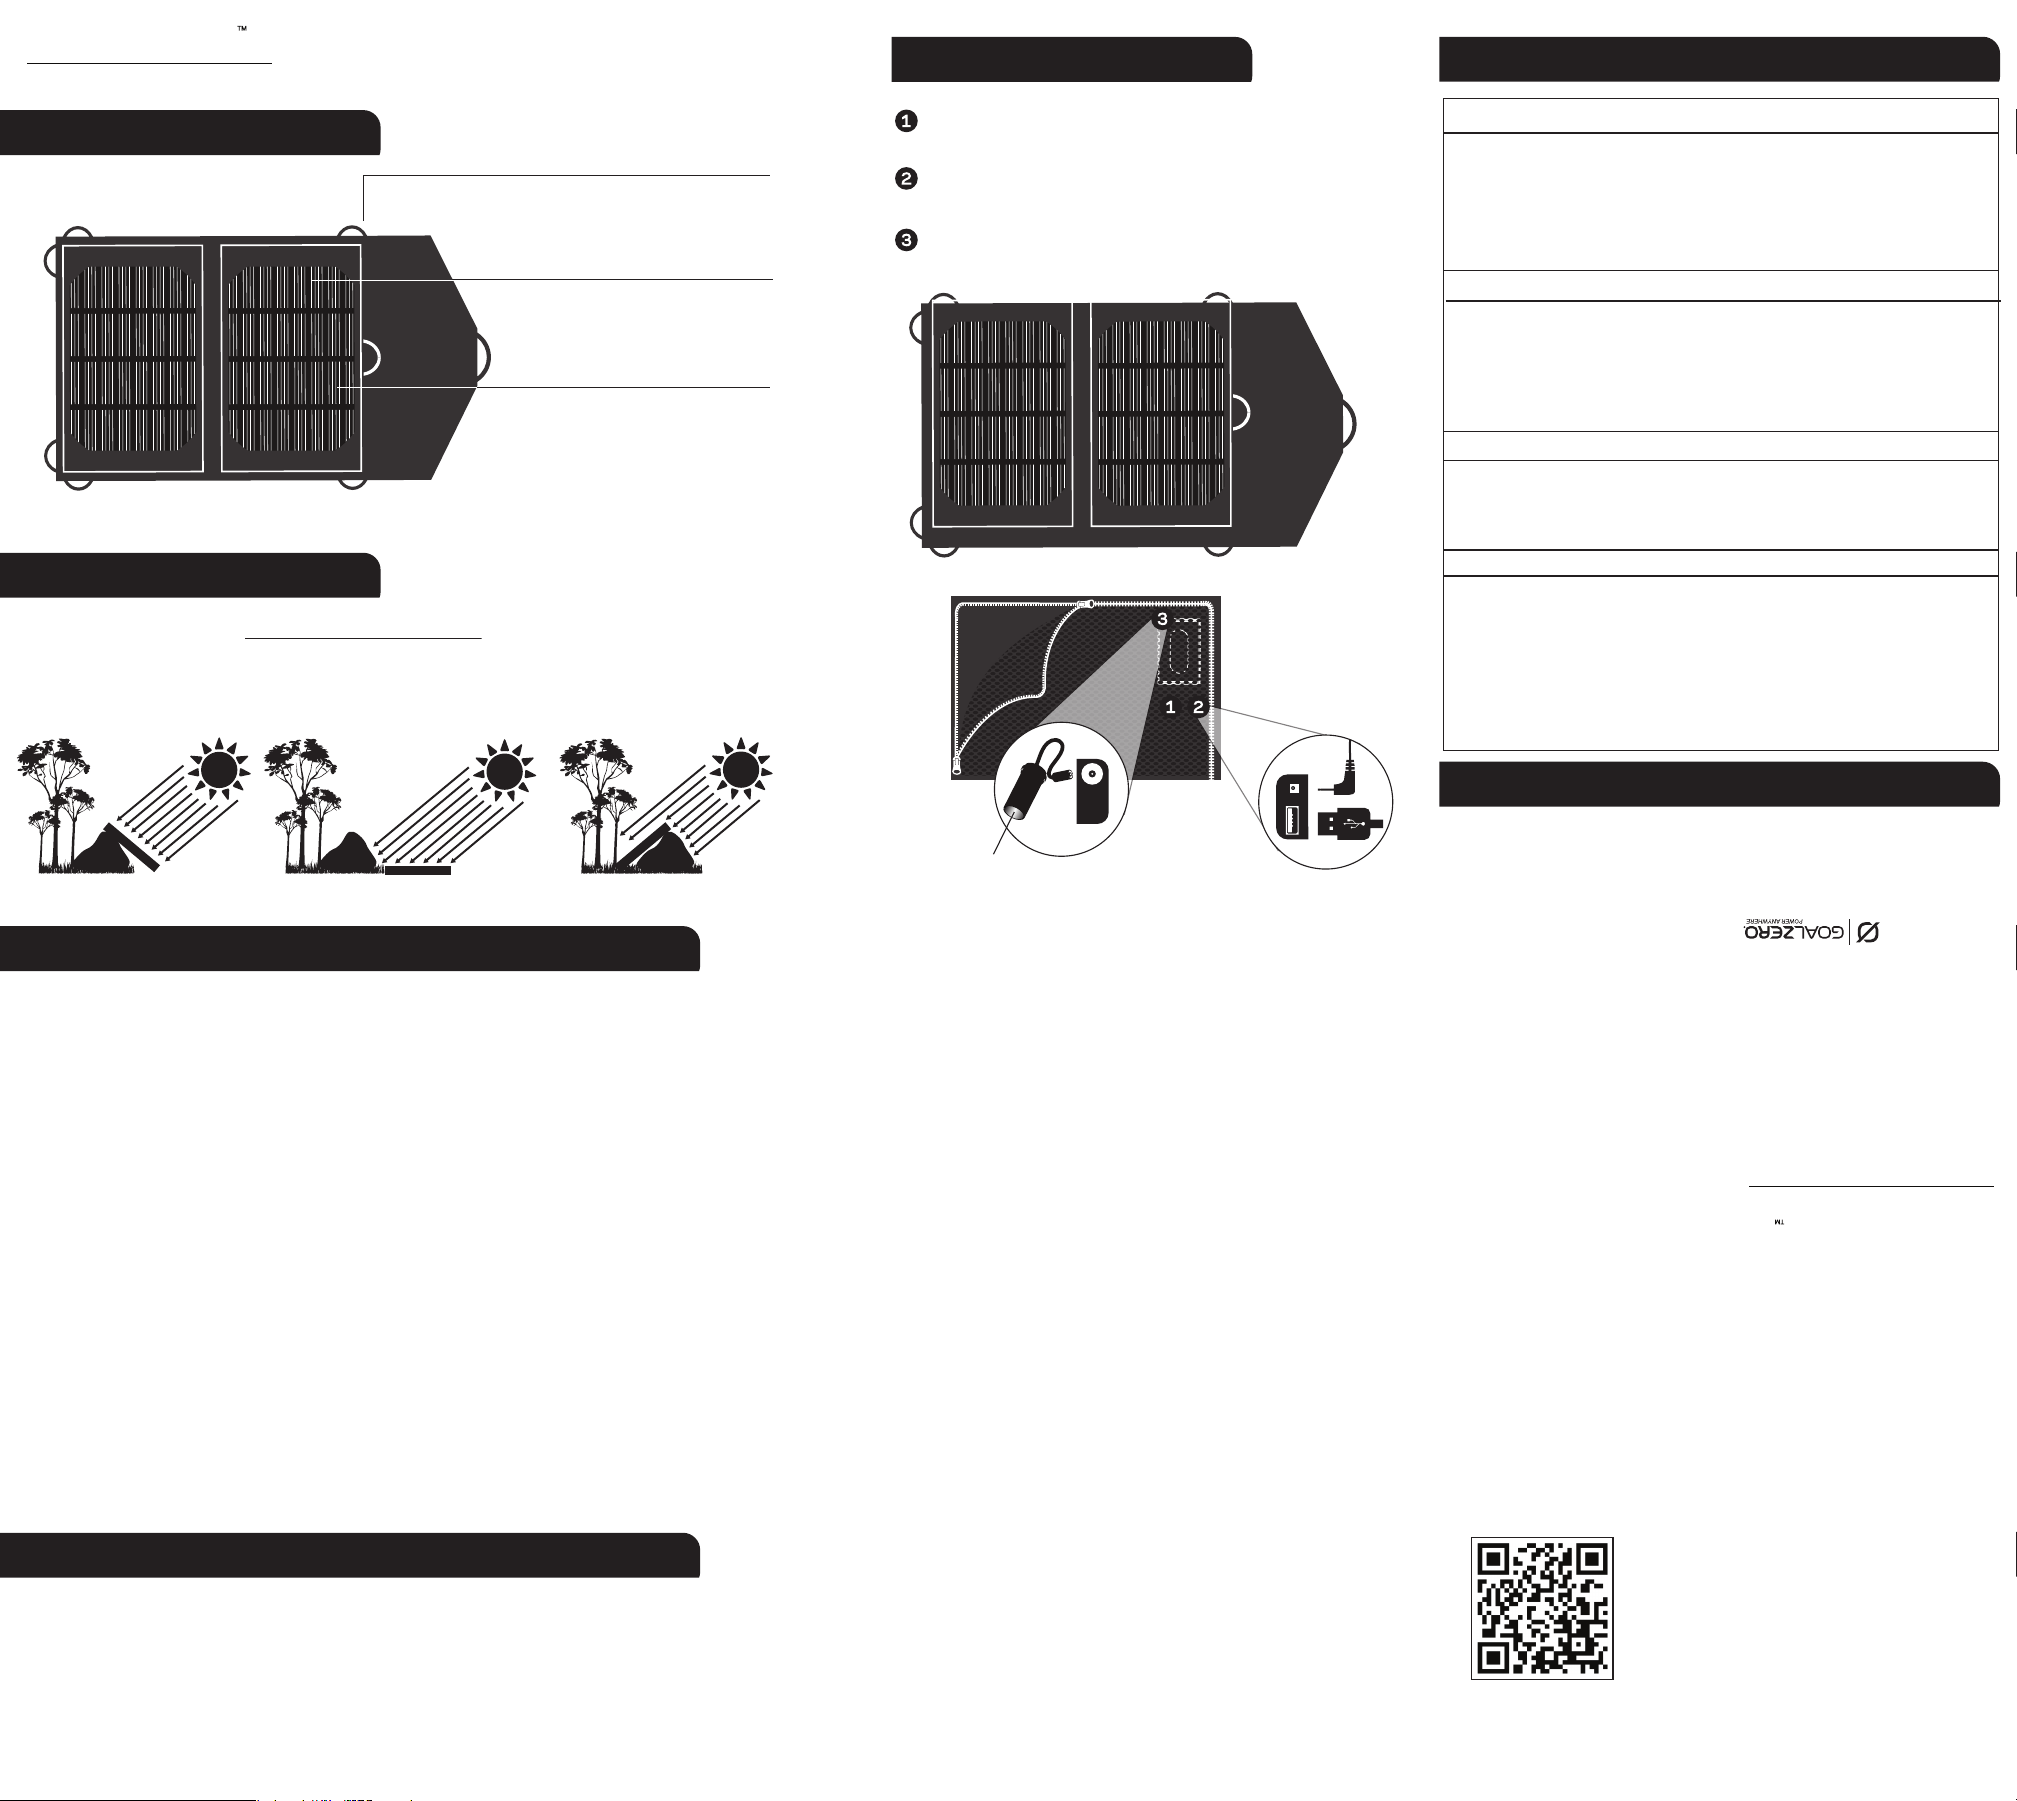
Lernen Sie Ihre Ausrüstung kennen
Monokristalline Zellen sind vergleichsweise
Fangen Sie an
1. Aktivieren Sie die Garantie www.GOALZERO.com/warranty
2. Önen und entferne Sie die Schutzfolie der Solarzellen.
3. Positioniere Sie es Richtung Sonne(siehe unten).
4. Verbinden Sie das zu ladende Gerät mit einem der Ladeanschlüsse.
Reektierende Nylon Schlaufen an denen
AUFHÄNGEN
Sie das Nomad 7 aufhängen können.
LADEN
Die hochezienten Solarzellen des
NOMAD 7 liefern bis zu 7 Watt
gebündelte Energie.
SAMMELN
preiswert und liefern die meiste Energie
USB Ausgangsanschluss
Erkennt jedes standard USB Kabel zum Laden von USB Geräten.
Solar Ausgangsanschluss
Lädt GUIDE 10 Netzteil, schneller als mit USB-Kabel.
Autoadapter und 12V -Ausgangsanschluss
Verbinde den Autoadapter (im Lieferumfang enthalten) zum Laden von 12V-Geräten
Rückseite
Anwendung
Lädt: Ungefähre Ladezeit:
GUIDE 10 Netzteil 2-4 Stunden
Handys, MP3 player 1-3 Stunden
Smartphones, GPS, USB Kamera 2-4 Stunden
Nicht kompatibel mit Laptops, wie z.B i-Pads.
Eingänge
Solar panel Bemessungsleistung: 7W
Zellentyp: Monokristalline
Leerspannung 6.5-7V
Wirkungsgrad: 17-18%
Zellengröße: 0.0394 m
Ausgänge
USB Anschluss 5V, 1.0A max (5W), linear reguliert
12V Anschluss 13-15V, 0.2A max (3W), boost reguliert
Solar Anschluss 6-6.5V, 1.0A max (6W), nicht reguliert
Allgemeines
Gewicht 0.36 kg
Abmessungen (gefaltet) 15x26x2.5 cm
Abmessungen (entfaltet) 43x23x0.25 cm
Garantie 12 Monate
Getestet und geprüft FCC und CE
Betriebstemperatur -17 - 48ºC
2
Schlecht
12V Autoadapter
SOLARMODUL
IDEAL
SOLARMODUL
OK AY
SOLARMODUL
Häug gestellte Fragen
Was kann mein NOMAD 7 laden?
Das NOMAD 7 kann nahe zu alle USB- und 12 V-Geräte laden (Keine Laptops).
Kann ich den USB-Ausgang und den 12 V-Ausgang simultan nutzen, um Geräte zu laden?
Output Ports
Ja. Das NOMAD 7 teilt die Solarenergie auf die beiden Eingänge auf, um Geräte gleichzeitig laden zu können.
Manche Geräte sind möglicherweise nicht anschlussfähig.
Warum habe ich Schwierigkeiten beim Laden meines Smartphones?
Smartphones benötigen eine sehr spezielle, einheitliche, Ladung. Wenn Ihr Nomad 7 richtig ausgerichtet ist, sollte es keine Probleme
geben. Dennoch kann man die meisten Ladeprobleme bei Smartphones beheben, indem man ein GOAL ZERO Netzteil (z.B GUIDE 10
PLUS) dazwischenschaltet.
Ist das NOMAD 7 wasserfest?
Das NOMAD 7 ist wasserfest und wird durch Regen oder Schnee nicht beschädigt.
Welche Art von Solarzellen sind im NOMAD 7 verbaut?
Wir verwenden moderne Monokristallintechnologie im NOMAD 7, weil diese mehr Energie pro cm, als irgendeine andere
Technologie auf dem Markt, liefert.
Kann das NOMAD 7 mit anderen Geräten verknüpft werden?
Ja, Sie können es mit bis zu vier anderen NOMAD 7s verknüpfen.
Kompatibel mit
Auch im Lieferumfang enthalten:
12V Autoadapter
• Registriere Sie Ihr Produkt
• Schauen Sie das Promo-Video an
• Laden Sie die Bedienungsanleitung herunter
Bedienungsanleitung
SOLAR PANEL
NOMAD 7
Kontakt:
Gebührenfrei: 00800-46259376
675 West 14600 South
Bludale, UT, 84065
den meisten tragbaren USB-Geräte:
Handys
Smartphones
GPS-Geräte
MP3 player
GOAL ZERO Produkte:
GUIDE 10 PLUS Netzteil
ROCK OUT Lautsprecher
BOLT Taschenlampe
BLAZE Kopampe
WWW.GOALZERO.COM
Wir unterstützen Tie Humanitarian
WWW.TIFIE.ORG
Page 18
1
Page 19
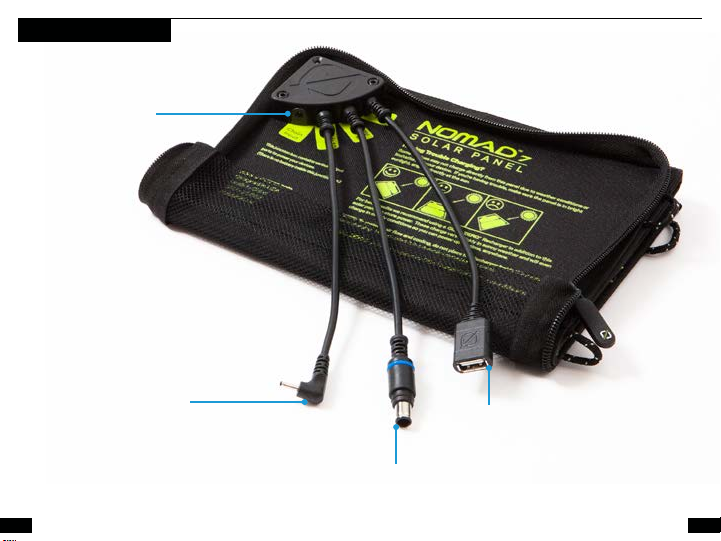
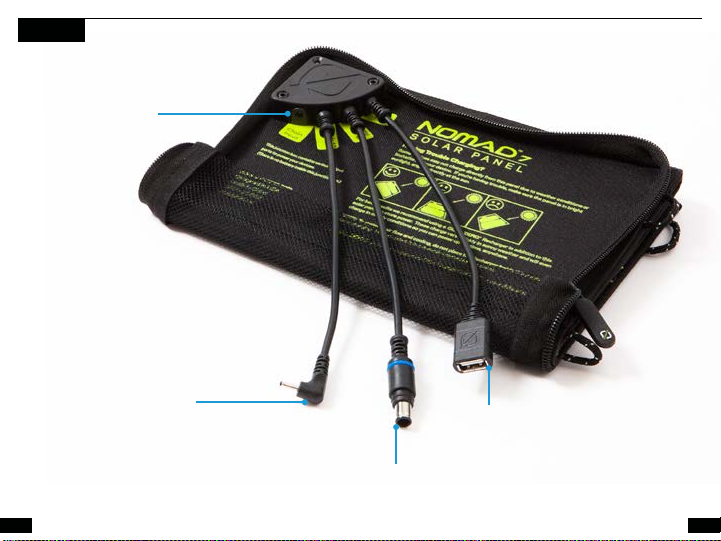
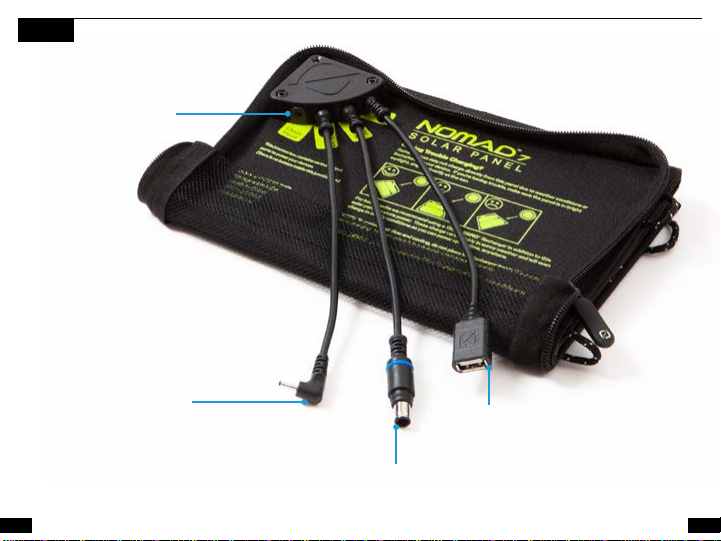
GET TO KNOW YOUR GEAR
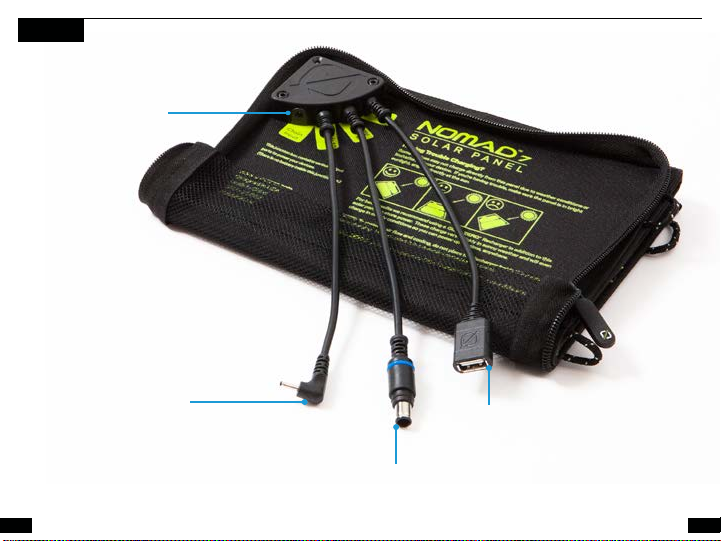
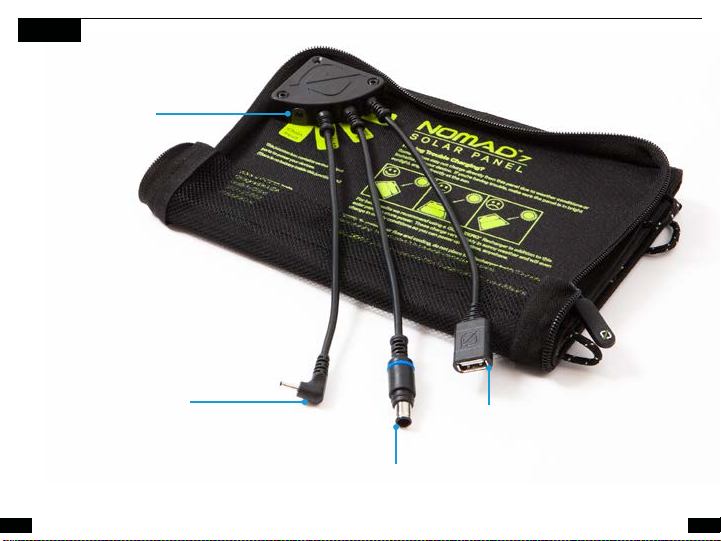
Chaining Input
For chaining Nomad 7s
Guide 10 Plus
Recharger Output
Charge Guide 10 and
chain Nomad 7s
12V (blue)
For charging 12V devices
2 3
USB
Charge USB devices and
Goal Zero rechargers
Page 20
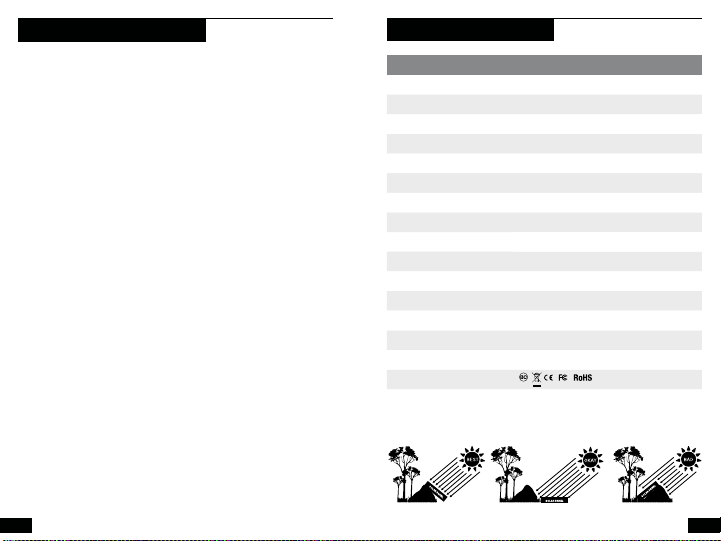
FREQUENTLY ASKED QUESTIONS
What will my Nomad 7charge?
The Nomad 7 will directly charge most USB and 12V
devices (not tablets).
Can I use the USB and 12V ports to charge devices
simultaneously?
Yes. The Nomad 7 will split the incoming solar
power between the two ports to charge devices
simultaneously. Some devices may not be compatible.
Why am I having trouble charging my smart phone?
Smart phones require very specific, consistent input. If
your Nomad 7 is angled perfectly, there shouldn’t be an
issue. However, most charging issues with a phone are
made simpler by incorporating a Goal Zero recharger as
an intermediary (such as Guide 10 Plus).
Is the Nomad 7 waterproof?
The Nomad 7 is weather-resistant and will not be
harmed if exposed to rain or snow.
What kind of solar cells do you use in the Nomad 7?
We use state-of-the-art monocrystalline technology
in the Nomad 7 because it delivers more power per
square inch than any other solar technology on the
market.
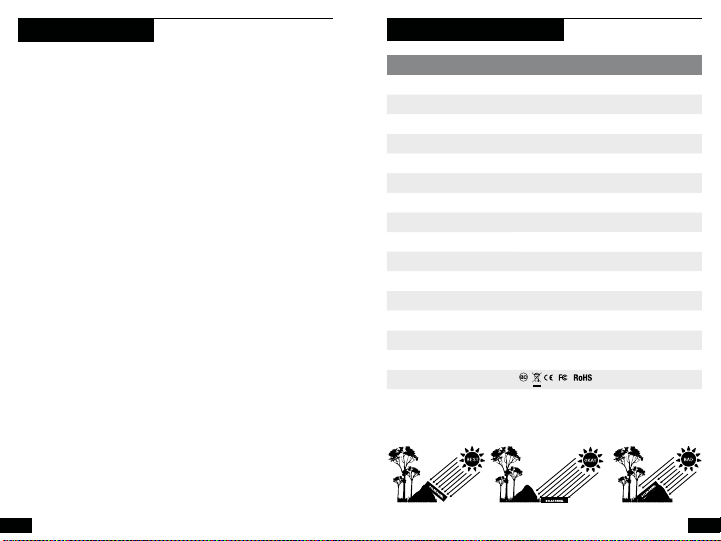
TECHNICAL SPECIFICATIONS
Nomad 7 Solar Panel
CHARGE TIMES:
Goal Zero Switch 10 4-6 hrs
Goal Zero Guide 10 Plus 3-6 hrs
SOLAR PANEL:
Rated Power 7W
Open Circuit Voltage 8-9V
Cell Type Monocrystalline
PORTS:
USB Port 5V, up to 1A (5W max), regulated
Solar Port (blue, 8mm) 15V, up to 0.3A (5W max), regulated
Mini Solar Port (2.5mm)
GENERAL:
Weight 16.2oz (460g)
Dimensions (unfolded) 9 x 1.5 x 17 in (22.9 x 3.8 x 43.2 cm)
Dimensions (folded) 9 x 1.5 x 6.5 in (22.9 x 3.8 x 16.5 cm)
Certs
Warranty 12 Months
Be sure to activate your warranty at goalzero.com/warranty
6.5V, up to 1.1A (7W max)
Can the Nomad 7 be chained with other panels?
Yes, you can chain up to four Nomad 7s.
4 5
Page 21
FRANÇAIS
Entrée de rallonge
Pour relier des Nomad7
Guide10 Plus
Sortie du chargeur
Recharger le Guide10 et
relier des Nomad7
12V (bleu)
Pour recharger des appareils
6 7
de 12V
USB
Recharger des appareilsUSB et
des chargeurs Goal Zero
Page 22
FOIRE AUX QUESTIONS
Que puis-je charger avec mon Nomad 7 ?
Le Nomad 7 charge la plupart des appareils USB et 12V (sauf
les tablettes).
Est-il possible d’utiliser les ports USB et 12V simultanément pour
charger deux appareils en même temps ?
Oui. Le Nomad 7 divisera l’énergie solaire reçue en deux pour
alimenter les deux ports et charger deux appareils en même
temps. Il est possible que certains appareils ne soient pas
compatibles.
Pourquoi est-ce que je rencontre des difficultés pour charger mon
Smartphone ?
Les Smartphones ont besoin d’une alimentation constante et
très spécifique. Si votre Nomad 7 est orienté correctement, il
ne devrait pas y avoir de problème. Cependant, la plupart des
problèmes rencontrés en rechargeant un téléphone sont résolus
en ajoutant un chargeur Goal Zero comme intermédiaire (comme
le Guide10 Plus).
Le Nomad 7 est-il étanche ?
Le Nomad 7 résiste aux intempéries et ne sera pas endommagé si
vous l’exposez à la pluie ou à la neige.
Quels types de cellules solaires utilisez-vous dans le Nomad 7 ?
Nous utilisons la technologie monocristalline, une technologie
de pointe permettant de fournir plus de puissance au centimètre
carré que n’importe quelle autre technologie solaire sur le marché.
Est-il possible de relier le Nomad7 avec d'autres panneaux
solaires?
Oui, vous pouvez relier jusqu’à quatre Nomad 7 entre eux.
8 9
SPÉCIFICATIONS TECHNIQUES
Panneau solaire Nomad7
CHARGE TIMES:
Goal Zero Switch 10 4-6h
Goal Zero Guide 10 Plus 3-6h
SOLAR PANEL:
Rated Power 7W
Open Circuit Voltage 8 à 9V
Type de cellule Monocristalline
PORTS:
Port USB 5V, jusqu’à 1A (5W max), régulé
Solar Port (blue, 8mm) 15V, jusqu’à 0,3A (5W max), régulé
Mini Solar Port (2.5mm)
GENERAL:
Poids 16.2oz (460g)
Dimensions (unfolded) 22,9x3,8x43,2cm (9x1,5x0,75po)
Dimensions (folded) 9 x 1.5 x 6.5 in (22.9 x 3.8 x 16.5 cm)
Certifications
Garantie 12mois
Be sure to activate your warranty at goalzero.com/warranty
6,5V, jusqu’à 1,1A (7W max)
Page 23
日本語
チェーン接続
Nomad 7 のチェーン接続用
Guide 10 Plus
リチャージャー出力
Guide 10 の充電と
Nomad 7 のチェーン接続
12V (青)
12V 機器の充電用
10 11
USB
USB 機器の充電と Goal
Zero リチャージャー
Page 24
よくある 質 問
Nomad 7 で充電できるものは?
Nomad 7 は大半の USB 機器および 12V 機器を充電でき
ます (タブレットを除く)。
USB と DC 12V ポートを使用して複数の機器を同時に充
電で きますか?
はいできます。Nomad 7 は太陽光から得た電力を 2 つのポ
ートに振り分け、複数の機器を同時に充電可能です。互換性の
ない 機 器もあります。
スマートフォンの充電がうまくいきません。
スマートフォンの場合、恒常性のある入力が必要です。Nomad
7 の角度をうまく調整すれば、問題なく充電できるはずで
す。電話の充電に関する問題は、Goal Zero リチャージャー
(Guide 10 Plus など) を中継させることで解消されます。
Nomad 7 は防水仕様ですか?
Nomad 7 は耐候仕様なので、雨または雪に晒されても問題
はありま せん 。
Nomad 7 に使われている太陽電池はどのようなもので
すか?
Nomad 7 には最先端の単結晶テクノロジーが用いられてお
り、市場に普及している他のソーラーテクノロジーとくらべて、
平方インチあ たりでより大きな出力を 実現します。
技術仕様
Nomad 7 ソーラーパネル
充電時間:
Goal Zero Switch 10 4 ~ 6 時間
Goal Zero Guide 10 Plus 3 ~ 6 時間
ソ ーラ ー パ ネ ル:
定格出力 7W
開放電圧 8 ~ 9 V
セル種類 単結晶シリコン型
ポ ー ト:
USB ポート 最大 5W (5V、1A) 定格
ソーラーポート (青、8mm) 最大 5 W (15V, 0.3A) 定格
ミニソー ラーポ ート
(2.5mm)
全 般:
重量 460g
寸法 (使用時) 22.9 x 3.8 x 43.2 cm
寸法 (収納時) 22.9 x 3.8 x 16.5 cm
安全規格
保証 12 か月
必ず goalzero.com/warranty から保証を有効にしてください
最大 7 W (6.5V, 1.1A)
Nomad 7 は他のパネルとチェーン接続できますか?
はい、最大 4 台の Nomad 7 を接続できます。
12 13
Page 25
DEUTSCH
Verkettungseingang
Verkettung von Nomad 7s
Guide 10 Plus
Ladeausgang
Guide 10 laden und
Nomad 7s verketten
12V (blau)
Laden von 12V-Geräten
14 15
USB
USB-Geräte und GoalZero-Ladegeräte laden
Page 26
HÄUFIG GESTELLTE FRAGEN
Was kann mein Nomad 7 laden?
Das Nomad 7 läd direkt die meisten USB- und 12V-Geräte
(keine Tablets).
Kann ich die USB- und 12V-Anschlüsse nutzen, um Geräte
gleichzeitig aufzuladen?
Ja. Nomad 7 teilt die eingehende Solarenergie zwischen
den Anschlüssen auf, damit die Geräte gleichzeitig geladen
werden. Einige Geräte sind möglicherweise nicht kompatibel.
Warum habe ich Probleme beim Laden meines
Smartphones?
Smartphone benötigen eine sehr spezifische und
gleichbleibende Ladung. Wenn Ihr Nomad 7 perfekt
eingestellt ist, sollte es keine Probleme geben. Allerdings
werden die meisten Ladeprobleme bei einem Telefon
durch die Verwendung eines Goal-Zero-Ladegeräts als
Zwischenschaltung vereinfacht (wie etwa Guide 10 Plus).
Ist das Nomad 7 wasserfest?
Das Nomad 7 ist wetterfest und wird durch Regen oder
Schnee nicht beschädigt.
Welche Art von Solarzellen werden im Nomad 7 verwendet?
Wir verwenden für den Nomad 7 hochmoderne
monokristalline Technologie, da sie pro Quadradzoll mehr
Energie liefert, als jede andere Solartechnik auf dem Markt.
TECHNISCHE SPEZIFIKATIONEN
Nomad 7 Solarmodul
LADEZEITEN:
Goal Zero Switch 10 4-6 Std.
Goal Zero Guide 10 Plus 3-6 Std.
SOLARMODUL:
Nennleistung 7 W
Leerlaufspannung 8-9 V
Zelltyp Monokristallin
Anschlüsse:
USB-Anschluss 5 V bis zu 1 A (max. 5 W), reguliert
Solaranschluss (blau, 8mm) 15 V bis zu 0,3A (max. 5W), reguliert
Mini-Solaranschlus
(2,5mm)
Allgemein:
Gewicht 16,2 oz (460g)
Maße (ausgeklappt) 9 x 1,5 x 17 Zoll (22,9 x 3,8 x 43,2 cm)
Maße (zusammengeklappt) 9 x 1,5 x 6,5 in (22,9 x 3,8 x 16,5 cm)
Zertifikate
Garantie 12 Monate
Vergessen Sie nicht, Ihre Garantie unter goalzero.com/warranty zu aktivieren
6,5V bis zu 1,1A (max. 7W)
Kann das Nomad 7 mit anderen Modulen verkettet werden?
Ja, Sie können bis zu vier Nomad 7s verketten.
16 17
Page 27
ESPAÑOL
Entrada de enlace
Para enlazar Nomad 7
Salida del cargador
Guide 10 Plus
Carga de Guide 10 y
enlace Nomad 7
12V (azul)
Para cargar dispositivos de 12 V
18 19
USB
Dispositivos USB de carga
y recargadores Goal Zero
Page 28
PREGUNTAS FRECUENTES
¿Qué carga mi Nomad 7?
El Nomad 7 cargará directamente la mayoría de aparatos USB
y de 12V (pero no tabletas).
¿Puedo usar los puertos USB y de 12V para cargar aparatos
al mismo tiempo?
Sí. El Nomad 7 dividirá la energía solar que reciba entre los
dos puertos para cargar ambos aparatos al mismo tiempo.
Puede que algunos aparatos no sean compatibles.
¿Por qué tengo problemas para cargar mi smartphone?
Los smartphones requieren una entrada de energía muy
específica y consistente. Si su Nomad 7 está enfocado
perfectamente, no debería tener problemas. Sin embargo,
la mayoría de los problemas de carga con un teléfono se
simplifican mediante la incorporación de un recargador Goal
Zero como intermediario (como Guide 10 Plus).
¿El Nomad 7 es resistente al agua?
El Nomad 7 es resistente a las condiciones meteorológicas, y
no se dañará si se expone a la lluvia o la nieve.
¿Qué tipo de células solares se usan en el Nomad 7?
En el Nomad 7 utilizamos tecnología monocristalina de última
generación porque proporciona más energía por pulgada
cuadrada que cualquier otra tecnología solar en el mercado.
¿Puede el Nomad 7 enlazarse con otros paneles?
Sí, lo puede extender con hasta cuatro unidades más de
Nomad 7.
20 21
ESPECIFICACIONES TÉCNICAS
Panel solar Nomad 7
TIEMPOS DE CARGA:
Interruptor 10 de Goal Zero De 4 a 6 horas
Goal Zero Guide 10 Plus De 3 a 6 horas
PANEL SOLAR:
Potencia nominal: 7W
Tensión del circuito abierto: De 8 a 9V
Tipo de celda monocristalina
PUERTOS:
Puerto USB 5V, hasta 1A (5W máximo), regulado
Puerto solar (azul, 8mm) 15 V, hasta 0.3 A (5W máximo), regulado
Puerto solar pequeño
(2.5mm)
GENERAL:
Peso 16.2 oz (460 g)
Dimensiones (desplegado) 9 x 1.5 x 17in (22.9 x 3.8 x 43.2 cm)
Dimensiones (plegado) 9 x 1.5 x 6.5in (22.9 x 3.8 x 16.5 cm)
Certificaciones
Garantía 12 meses
Asegúrese de registrar su producto en goalzero.com/waranty
6.5 V, hasta 1.1 A (7 W máximo)
Page 29

GOAL ZERO HEADQUARTERS
675 West 14600 South
Bluffdale, UT 84065
1-888-794-6250
Designed in the U.S.A.
Made in China
Nomad is a trademark of Goal Zero LLC.
We make the powerless, powerful.
goalzero.com/sharethesun
22
CA040815
 Loading...