

Page 1

Page 2

Table of Contents
Technical Specifications 1
Get To Know Your Gear 2
How It Works 4
Chaining 5
Area Light 6
Lantern Light 8
Français 10-19
日本語
20-29
Deutsch 30-39
Español 40-49
TECHNICAL SPECIFICATIONS
Runtimes:
Sherpa 50 10 Hrs
Yeti 150 30 Hrs
Yeti 1250 250 Hrs
Light: (output) 5W warm white Cree LED
LED High Brightness: 4.5W, 350 Lumens
LED Low Brightness: 1W, 100 Lumens
Input: (6mm barrel jack) 12V, 0.4A (4.5W max)
General:
Chainable yes
Weight 9.3oz (264g)
Dimensions (compact) 2.8 x 3.2in (71 x 80mm)
Dimensions (extended) 4.9 x 3.2in (125 x 80mm)
Operating usage temp. 0-120 F (-17-48 C)
Certs
Warranty 12 months
Be sure to register your product
at goalzero.com/support
1
Page 3

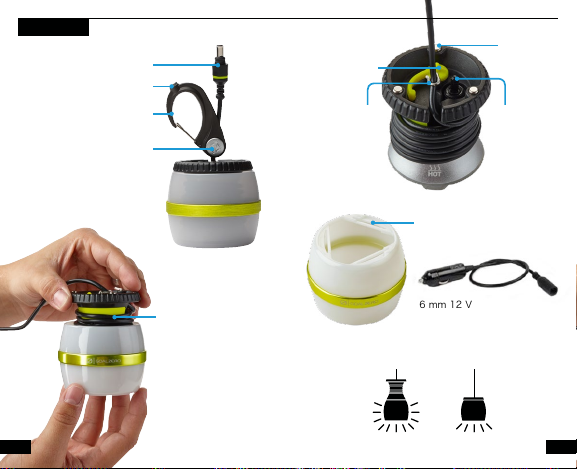
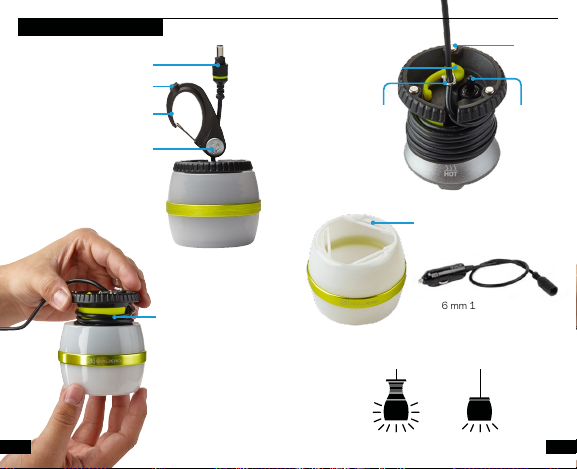
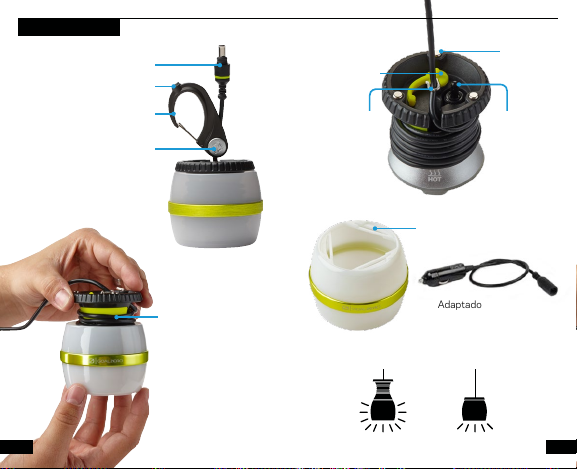
GET TO KNOW YOUR GEAR
Power Plug
Magnet
Carabiner
Cable (8ft) Length
Adjustment Button
Chaining Port
Magnet
Cable Catch Hook Power Switch
High-off-low settings
Shade
Notches
Cable Storage
2
6mm 12V Car Adapter
3
Page 4

HOW IT WORKS
Your Light-a-Life LED light can power from a
Sherpa® Power Pack or Goal Zero Yeti® Solar
Generator.
1. Insert the green plug into a 6mm 12V port on
a Sherpa Power Pack or Yeti Solar Generator.
Ensure the 12V port on your power source is
turned on.
2. Use the power switch on top of the Light-aLife to turn it on. Toggle between high and low
settings by moving the switch left or right.
3. Hang with the carabiner or attach to a metal
surface with the magnets.
You can also power the Light-a-Life from a 12V
car port using the included adapter. Simply
plug the Light-a-Life’s blue connector into the
matching end of the 12V adapter.
Unexpected rainstorms probably won’t harm it.
Ready for Outdoor Use: The Light-a-Life has been
engineered to withstand the elements, including
rain and snow. Although it’s tough enough to
withstand a storm, the Light-a-Life should not be
submerged in water and all ports/plugs should be
dry before turning on or chaining.
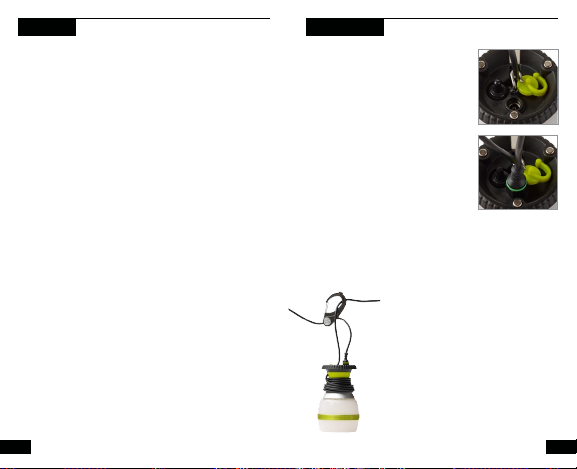
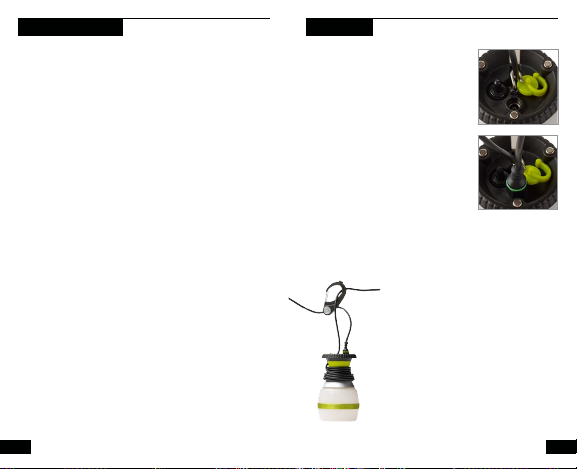
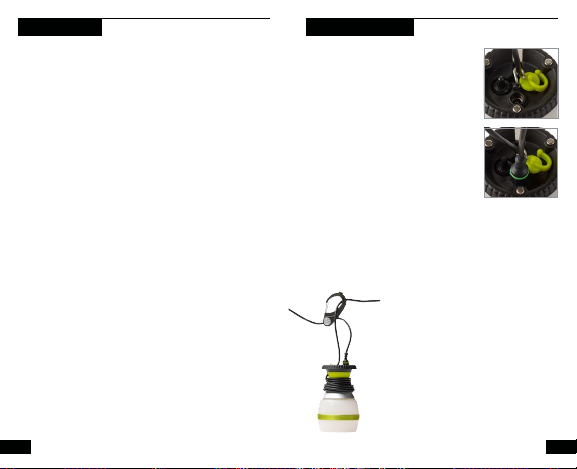
CHAINING
You can chain up to 8 Light-aLifes together.
1. Begin chaining with the first
light in your string that will plug
into your Sherpa Power Pack or
Yeti Solar Generator.
2. Tug slightly on the green
covering over the chaining port
to expose the chaining port.
3. Insert the green plug from
another Light-a-Life into the chaining port.
4. Continue on with the remainder of the lights
in your string.
Helpful Hint: Ensure each light
is turned on prior to hanging.
This allows you to turn the entire
string on/off by controlling the
first light in the series.
WARNING: While in use, the
metal neck of the Light-a-Life will
become hot to the touch. It is still
safe to wrap the cable around the
metal neck while in use.
54
Page 5

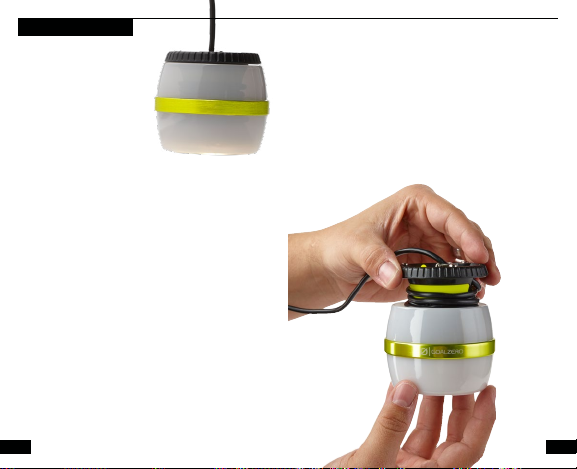
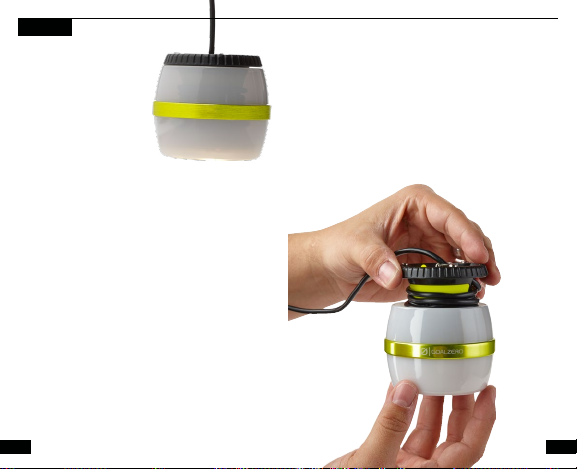
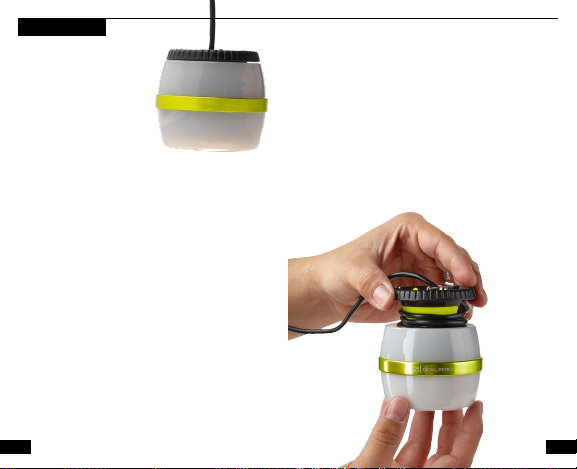
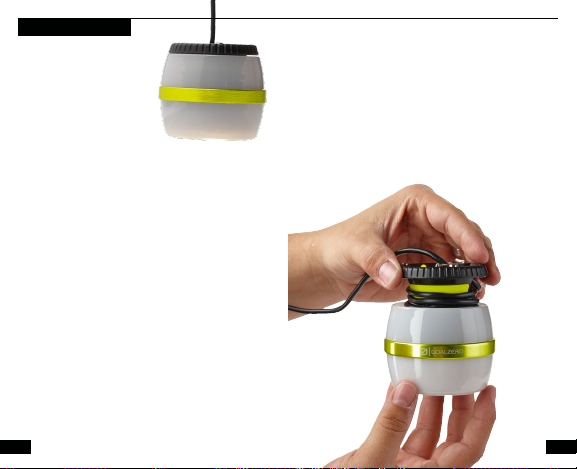
AREA LIGHT
For broad, bright light,
use the Light-a-Life
in its area light mode.
This is a great mode for
outdoor use and how the
Light-a-Life is shipped in
packaging.
1. While holding the shade in one hand, grasp
the top of the light with your second hand and
twist counter-clockwise. Slide the shade off
to remove it.
2. With the shade off, determine your desired
cable length. Adjust cable length by pushing
the button on the carabiner and sliding the
cable through.
a. Store excess cable by wrapping it around
the metal neck of the Light-a-Life.
b. Use the cable catch hook to set length.
3. With the notches of the shade touching your
palm, slide the shade over the wrapped cable.
4. Line up shade notches with the bottom of
the light.
5. Lock shade in place by turning the top of the
light clockwise.
76
Page 6

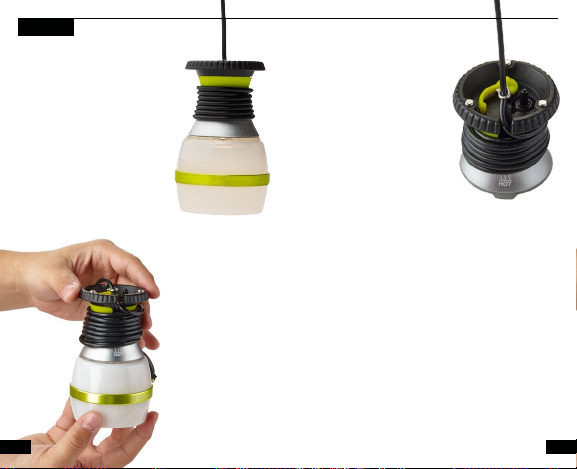
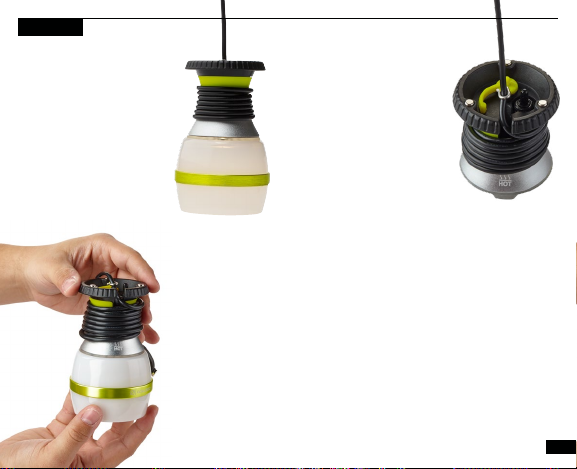
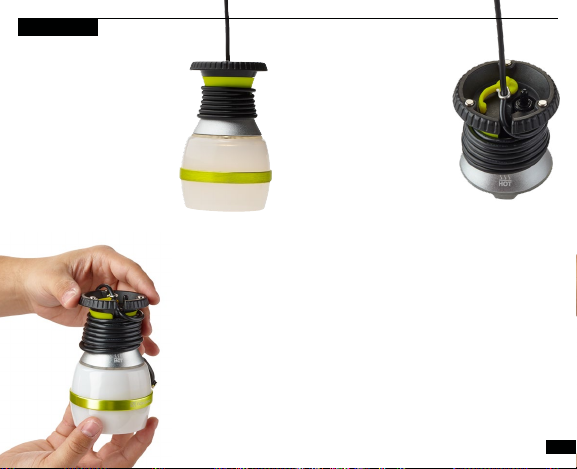
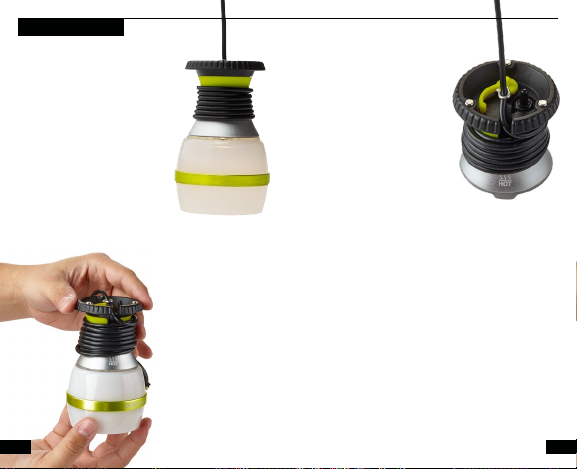
LANTERN LIGHT
For soft, ambient light,
use the Light-a-Life in its
lantern mode. This is a
great mode for indoor use.
1. While holding the shade
in one hand, grasp the top
of the light with your second
hand and twist counterclockwise. Slide the shade off
to remove it.
2. With the shade off,
determine your desired
cable length. Adjust cable
length by pushing the
button on the carabiner and
sliding the cable through.
a. Store excess cable
by wrapping it around
the metal neck of the
Light-a-Life.
b. Use the cable catch hook to set length.
3. Flip the shade around so the notches are
touching the light. Line up the shade notches
with the bottom of the Light-a-Life.
4. Lock shade in place by turning the top of the
light clockwise.
8
9
Page 7

FRANÇAIS
Table des matières
Spécifications techniques 11
Découvrez votre appareil 12
Comment ça marche 14
Chaînage 15
Lampe à rayonnement 16
Lanterne 18
SPÉCIFICATIONS TECHNIQUES
Durées d’utilisation:
Sherpa 50 10h
Yeti 150 30h
Yeti 1250 250h
Lumière: (sortie) LED Cree 5W blanc chaud
LED haute luminosité: 4,5W; 350Lumens
LED basse luminosité: 1W; 100Lumens
Entrée: (jack 6mm) 12V; 0,4A (4,5W max)
Général:
Chaînable oui
Poids 264g (9,3oz)
Dimensions (compactes) 71x80mm (2,8x3,2po)
Dimensions (étendues) 125x80mm (4,9x3,2po)
Température de
fonctionnement
Certifications
Garantie 12mois
N’oubliez pas d’enregistrer votre produit
sur goalzero.com/support
-17-48°C (0-120°F)
1110
Page 8

DÉCOUVREZ VOTRE APPAREIL
Fiche d’alimentation
Aimant
Mousqueton
Bouton de réglage de
longueur du câble (2,4m)
Port de chaînage
Crochet de fixation
du câble
Abat-jour
Encoches
Aimant
Commutateur
d’alimentation
Position fort-arrêtfaible
Rangement du câble
Adaptateur 12 V de 6 mm
pour voiture
Lanterne LED bi-mode
12
Lanterne Lampe à
rayonnement
1312
Page 9

COMMENT ÇA MARCHE
Votre lampe LED Light-a-Life nécessite un Power
Pack Sherpa
Yeti
1. Insérez la fiche verte dans un port 6mm 12V
2. Utilisez le commutateur d’alimentation
3. Suspendez à l’aide du mousqueton ou fixez à
Un orage imprévu ne lui causera probablement
aucun dommage.
Prêt à l’usage extérieur: Le Light-a-Life a été
conçu pour résister aux intempéries, notamment
la pluie et la neige. S’il résiste bien aux tempêtes,
le Light-a-Life ne doit pas être immergé dans
l’eau et tous les ports/fiches doivent être secs
avant la mise sous tension ou le chaînage.
®
ou un générateur solaire Goal Zero
®
pour fonctionner.
d’un Power Pack Sherpa ou d’un générateur
solaire Yeti. Assurez-vous que le port 12V de
votre source d’énergie est allumé.
au sommet du Light-a-Life pour l’allumer.
Choisissez entre réglage fort ou faible en
déplaçant le commutateur vers la droite ou la
gauche.
une surface métallique au moyen des aimants.
CHAÎNAGE
Vous pouvez disposer en chaîne
jusqu’à 8 Light-a-Life.
1. Commencez le chaînage par la
première lampe de la série qui sera
raccordée au Power Pack Sherpa ou
au générateur solaire Yeti.
2. Tirez doucement sur le couvercle
vert pour accéder au port de
chaînage.
3. Insérez la fiche verte d’un autre
Light-a-Life dans le port de chaînage.
4. Répétez l’opération avec les autres lampes de votre
chaîne.
Conseil utile: Assurez-vous que
chaque lampe soit allumée avant de
les suspendre. Cela vous permettra
d’allumer l’ensemble de la chaîne
à partir de la première lampe de
la série.
AVERTISSEMENT: En cours d’usage,
la bague métallique du Light-a-Life
devient chaude au toucher. Le câble
peut to utefois rester enroulé sans
danger autour de la bague métallique
pendant l’usage.
1514
Page 10
LAMPE À RAYONNEMENT
Pour un faisceau large
et puissant, utilisez le
Light-a-Life en mode
rayonnement. C’est
dans ce mode idéal pour
l’usage extérieur qu’est
livré le Light-a-Life dans
son emballage.
1. En tenant l’abat-jour d’une main, saisissez de
l’autre le sommet de la lampe et tournez dans le
sens inverse des aiguilles d’une montre. Faites
coulisser l’abat-jour pour le retirer.
2. Une fois l’abat-jour retiré, choisissez
la longueur de câble souhaitée. Réglez la
longueur du câble en poussant le bouton du
mousqueton et en y faisant défiler le câble.
a. Rangez l’excédent de câble en l’enroulant
autour de la bague métallique du Light-aLife.
b. Utilisez le crochet de fixation du câble
pour régler la longueur.
3. En plaçant les encoches de l’abat-jour dans la
paume de la main, faites coulisser l’abat-jour sur
le câble enroulé.
4. Alignez les encoches sur la base de la lampe.
5. Verrouillez l’abat-jour en place en tournant le
sommet dans le sens des aiguilles d’une montre.
1716
Page 11
LANTERNE
Pour une lumière douce
d’ambiance, utilisez le Lighta-Life en mode lanterne.
C’est le mode idéal pour un
usage intérieur.
1. En tenant l’abat-jour d’une
main, saisissez de l’autre
le sommet de la lampe et
tournez dans le sens inverse
des aiguilles d’une montre.
Faites coulisser l’abat-jour
pour le retirer.
2. Une fois l’abat-jour retiré,
choisissez la longueur de
câble souhaitée. Réglez
la longueur du câble en
poussant le bouton du
mousqueton et en y faisant
défiler le câble.
a. Rangez l’excédent de
câble en l’enroulant
autour de la bague
métallique du Light-a-Life.
b. Utilisez le crochet de fixation du câble pour
régler la longueur.
3. Renversez l’abat-jour de façon à ce que
les encoches touchent la lampe. Alignez les
encoches avec la base du Light-a-Life.
4. Verrouillez l’abat-jour en place en tournant le
sommet dans le sens des aiguilles d’une montre.
18
1918
Page 12
日本語
目次
技術仕様
各部の名称
使用方法
チェーン接続
エリア光
ランタン光
技術仕様
ランタイム:
Sherpa 50
21
Yeti 150
22
Yeti 1250
24
ライト: (出力)
25
LED 高輝度:
26
LED 低輝度:
28
入力:
(6mm バレルジャック)
その他:
チェーン接続
重量
寸法(収縮時)
寸法(拡張時)
使用温度範囲
認証
保証
製品は必ず次のサイトから登録してください:
goalzero.com/support
10 時間
30 時間
250 時間
5W Cree 製温白色 LED
4.5W、350 ルーメン
1W、100 ルーメン
12V、0.4A
(最大 4.5W)
可能
264g(9.3 オンス)
71 x 80mm
(2.8 x 3.2 インチ)
125 x 80mm
(4.9 x 3.2 インチ)
-17~48°C(0~120°F)
12か月間
2120
Page 13
各部の名称
電源プラグ
マグネット
カラビナ
ケーブル長さ(8 フィート)
調節ボタン
チェーン接続用
ポート
ケーブルキャッ
チフック
シェード
ノッチ
マグネット
パワースイッチ
高-切-低設定
ケーブル収納
6 mm 12 V 自動車用アダプター
2 モード LED ランタン
22
ランタン光 エリア光
2322
Page 14
使用方法
Light-a-Life LED ライトを使用するには、Sherpa®
パワーパックまたは Goal Zero 製 Yeti
®
ソーラー発
電機が必要です。
1. 緑のプラグを、Sherpa パワーパックまたは Yeti
ソーラー発電機の 6mm 12V ポートに接続しま
す。使用する電源の12Vポートがオンになっている
こと確認してください。
2. Light-a-Life 上部のパワースイッチを使用して、
電源オンにしてください。スイッチを左または右に
動かし、高と低の設定を切り替えます。
3. カラビナを使用して吊るすか、マグネットを使
用して鉄製の面に取り付けます。
不意の豪雨があっても心配はありません。
アウトドア用途に対応: Light-a-Life は雪や雨など
の天候条件に耐えられるように設計されています。
嵐にも耐えられるほど頑丈ですが、Light-a-Life を
水中に沈めることは避けてください。また、電源オ
ンやチェーン接続する際には、すべてのポートやプ
ラグが乾燥していることが必要です。
チェーン 接続
最大 8 台の Light-a-Life を接続し
て一緒に使用できます。
1. チェーン接続には、先ず、1 番
目のライトを Sherpa パワーパッ
クまたは Yeti ソーラー発電機に
接続します。
2. チェーン接続ポートの緑のカバ
ーを軽く引っ張り、ポートが見え
るようにします。
3. もう 1 台の Light-a-Life からの
緑のプラグを、チェーン接続ポートに差し込みます。
4. 続いて、チェーン接続する残りのライトを接続
してください。
役に立つヒント: 各ライトを吊る
す前に、電源オンになっているこ
と確認してください。このことに
より、チェーン全体のオン/オフ
を、接続した最初のライトからコ
ントロールできます。
注意: 使用中は、Light-a-Life の
金属製ネック部分には、高温のた
め触れないでください。ただし、
使用中にケーブルをネックに巻い
たままにしても安全です。
2524
Page 15
エリア光
広範囲な明るい照明に
は、Light-a-Life をエ
リア光モードで使用し
てください。これはア
ウトドア用に最適のモ
ードで、Light-a-Life は
この状態で梱包出荷さ
れます。
1. 片手でシェードを支え、もう一方の手でライト
の上部を掴んで反時計回りに回します。シェード
をずらして外します。
2. シェードを外した状態で、必要なケーブル長
さを決めてください。ケーブルの長さは、カラビ
ナにあるボタンを押し、ケーブルをスライドさせ
て調節します。
a. 余ったケーブルは、Light-a-Life の金 属ネック
部に巻き付けて収納してください。
b. ケーブルキャッチフックを使用して長さを設定し
ます。
3. 掌でシェードのノッチを押さえながら、シェード
を巻き付けたワイヤーに被せます。
4. シェードのノッチをライトの底部に合わせます。
5. ライトの上部を時計回りに回して、シェードを正
しい位置に固定します。
2726
Page 16
ランタン光
柔らかい間接照明には、Lighta-Life をランタン光モードで
使用してください。これは、室
内用に最適なモードです。
1. 片手でシェードを支え、もう
一方の手でライトの上部を掴ん
で反時計回りに回します。シェ
ードをずらして外します。
2. シェードを外した状態
で、必要なケーブル長さ
を決めてください。ケー
ブルの長さは、カラビナに
あるボタンを押し、ケー
ブルをスライドさせて調節
します。
a. 余ったケーブルは、
Light-a-Life の金属ネ
ック部 に巻 き付けて収
納してくださ い 。
b. ケーブルキャッチフックを使用して長さを設定し
ます。
3. シェードを広げて、ノッチがライトに触れるよ
うにしてください。シェードのノッチを Light-aLife の底部に合わせます。
4. ライトの上部を時計回りに回して、シェードを正
しい位置に固定します。
2928
Page 17
DEUTSCH
Inhaltsverzeichnis
Technische Spezifikationen 31
Lernen Sie Ihr Gerät kennen 32
Wie es funktioniert 34
Verkettung 35
Flächenleuchte 36
Laternenlicht 38
TECHNISCHE SPEZIFIKATIONEN
Laufzeiten:
Sherpa 50 10 Std.
Yeti 150 30 Std.
Yeti 1250 250 Std.
Licht: (Ausgang) 5W Cree LED warmweiß
LED hohe Helligkeit 4,5W, 350 Lumen
LED niedrige Helligkeit 1W, 100 Lumen
Eingang:
(6mm Hohlstecker)
Allgemein:
Verkettbar ja
Gewicht 9,3oz (264g)
Abmessungen (kompakt) 2,8 x 3,2in (71 x 80mm)
Abmessungen
(erweitert)
Betriebstemperatur 0-120 F (-17-48 C)
Zertifikate
Garantie 12 Monate
Vergessen Sie nicht Ihr Produkt zu registrieren
bei goalzero.com/support
12V, 0,4A (4,5W max)
4,9 x 3,2in (125 x 80mm)
3130
Page 18
LERNEN SIE IHR GERÄT KENNEN
Netzstecker
Magnet
Karabiner
Kabel (8ft) Taste zur
Längenregelung
Verkettungsanschluss
Kabelhaken Netzschalter
Schirm
Kerben
Magnet
Hoch-aus-niedrig
Einstellungen
Kabellagerung
6 mm 12 V Autoadapter
Dualmodus LED Laterne
32
Laternenlicht Flächenleuchte
3332
Page 19
WIE ES FUNKTIONIERT
IhrLight-a-Life LED Licht erfordert ein Sherpa® Power
Pack oder Goal Zero Yeti® Solar-Generator zum
Betrieb.
1. Den grünen Stecker in einen 6mm 12V Anschluss
an einem Sherpa Power Pack oder Yeti Solar
Generator stecken. Stellen Sie sicher, dass der 12V
Anschluss an Ihrer Energiequelle eingeschaltet ist.
2. Den Hauptschalter auf der Oberseite des Light-aLife zum Einschalten verwenden. Durch Bewegen des
Schalters nach links oder rechts zwischen Hoch- und
Niedrig-Einstellungen umschalten.
3. Mit dem Karabiner anhängen oder mit den Magneten
an einer Metalloberfläche befestigen.
Unerwarteter starker Regen beschädigt es vermutlich
nicht.
Bereit zur Verwendung im Freien. Das Light-a-Life
wurde entwickelt, um den Elementen zu trotzen,
einschließlich Regen und Schnee. Obwohl es robust
genug ist, um einem Sturm standzuhalten, sollte das
Light-aLife nicht in Wasser getaucht werden, und alle
Anschlüsse/Stecker sollten trocken sein, bevor es
eingeschaltet oder verkettet wird.
VERKETTUNG
Bis zu 8 Light-a Lifes können
miteinander verkettet werden.
1. Beginnen Sie das Verketten mit
dem ersten Licht an Ihrer Schnur,
das in Ihr Sherpa Power Pack oder
Yeti Solar Generator gesteckt wird.
2. Leicht an der grünen Abdeckung
über dem Verkettungsanschluss
ziehen, um dem
Verkettungsanschluss freizulegen.
3. Den grünen Stecker von einem
anderen Light-a-Life in den Verkettungsanschluss
einführen.
4. Fahren Sie mit dem Rest der Lichter an Ihrer Schnur fort.
Nützlicher Hinweis: Stellen Sie
vor dem Aufhängen sicher, dass
jedes Licht eingeschaltet ist. Dies
ermöglicht es Ihnen, die gesamte
Schnur durch Steuerung des
ersten Lichtes in der Serie an-/
auszuschalten.
WARNUNG: Während des Betriebs
wird der Metallhals des Light-a-Life
heiß. Es ist weiterhin sicher, das
Kabel während des Betriebs um den
Metallhals zu wickeln.
3534
Page 20
FLÄCHENLEUCHTE
Für weites, helles
Licht das Lighta-Life in seinem
Flächenleuchten-Modus
verwenden. Dies ist ein
großartiger Modus zur
Benützung im Freien,
und so wird das Light-a-Life in der Verpackung
geliefert.
1. Während Sie den Schirm in einer Hand
halten, nehmen Sie den Oberen Teil der Lampe
in die andere Hand und drehen gegen den
Uhrzeigersinn. Den Schirm abziehen, um ihn
zu entfernen.
2. Bestimmen Sie bei abgenommenem Schirm
Ihre gewünschte Kabellänge. Stellen Sie
die Kabellänge ein, indem Sie auf den Knopf
auf dem Karabiner drücken und das Kabel
durchziehen.
a. Überschüssiges Kabel durch Wickeln
um den Metallhals des Light-a-Life
aufbewahren.
b. Die Kabelabfangung zum Befestigen der
festgelegten Länge verwenden.
3. Schieben Sie den Schirm über das gewickelte
Kabel, während die Kerben des Schirms Ihre
Handfläche berühren.
4. Die Kerben des Schirms nach dem unteren
Teil der Lampe ausrichten.
5. Verriegeln Sie den Schirm, indem Sie die
Oberseite der Lampe im Uhrzeigersinn drehen.
3736
Page 21
LATERNENLICHT
Für weites Umgebungslicht
das Light-a-Life in seinem
Laternen--Modus verwenden.
Dies ist ein großartiger
Modus für die Verwendung in
Innenräumen.
1. Während Sie den Schirm in
einer Hand halten, nehmen Sie
den Oberen Teil der Lampe in
die andere Hand und drehen
gegen den Uhrzeigersinn. Den
Schirm abziehen, um ihn zu
entfernen.
2. Bestimmen Sie
bei abgenommenem
Schirm Ihre gewünschte
Kabellänge. Stellen Sie
die Kabellänge ein, indem
Sie auf den Knopf auf dem
Karabiner drücken und das
Kabel durchziehen.
a. Überschüssiges Kabel
durch Wickeln um den
Metallhals des Lighta-Life aufbewahren.
b. Die Kabelabfangung zum Befestigen der
festgelegten Länge verwenden.
3. Den Schirm umklappen, so dass die Kerben
die Lampe berühren. Die Kerben des Schirms
nach dem unteren Teil des Light-a-Life
ausrichten.
4. Verriegeln Sie den Schirm, indem Sie die
Oberseite der Lampe im Uhrzeigersinn drehen.
3938
Page 22
ESPAÑOL
Tabla de contenido
Especificaciones técnicas 41
Conozca su equipo 42
Funcionamiento 44
Enlace de lámparas 45
Luz de largo alcance 46
Luz tipo farol 48
ESPECIFICACIONES TÉCNICAS
Tiempos de ejecución:
Sherpa 50 10 horas
Yeti 150 30 horas
Yeti 1250 250 horas
Luz: (salida)
LED de alta luminosidad: 4,5W, 350 lúmenes
LED de baja luminosidad: 1W, 100 lúmenes
Entrada: (conector tipo
barril de 6mm)
General:
Enlazable sí
Peso 9,3oz (264g)
Dimensiones (compacto) 2,8 x 3,2in (71 x 80mm)
Dimensiones (extendido) 4,9 x 3,2in (125 x 80mm)
Temperatura en
operación
Certificaciones
Garantía 12 meses
Asegúrese de registrar su producto
en goalzero.com/support
LED blanca cálida Cree de 5W
12V, 0,4A (4,5W máximo)
-17 a 48ºC (0-120ºF)
4140
Page 23
CONOZCA SU EQUIPO
Enchufe
Mosquetón
Botón para el ajuste de la
longitud del cable (2,43m)
Imán
Puerto para
enlace
Gancho de cierre
del cable
Pantalla
Niveles
Imán
Interruptor de
encendido
Ajustes alto,
apagado y bajo
Almacenamiento
para el cable
Adaptador de automóvil de
12 V y 6 mm
Farol LED de doble función
42
Luz tipo farol Luz de largo alcance
4342
Page 24
CÓMO FUNCIONA
Su LED Light-a-Life requiere un adaptador
®
o un generador solar Goal Zero Yeti®
Sherpa
para funcionar.
1. Inserte el conector verde en el puerto de 6mm
(12V) en el adaptador Sherpa o en el generador
solar Yeti. Asegúrese de que el puerto de 12V
en su fuente de alimentación esté encendido.
2. Utilice el interruptor de encendido en la
parte superior del Light-a-Life para encenderlo.
Alternar entre los ajustes alto y bajo moviendo el
interruptor a la izquierda o a la derecha.
3. Cuelgue con el mosquetón o fije en una
superficie metálica con los imanes.
Es probable que tormentas inesperadas no lo dañen.
Listo para el uso al aire libre: Light-a-Life ha
sido diseñado para soportar las condiciones
climáticas, incluyendo la lluvia y la nieve. Aunque
es lo suficientemente resistente para soportar
una tormenta, el Light-a-Life no debe sumergirse
en el agua y todos los puertos/enchufes deben
secarse antes de su encendido o enlace.
ENLACE DE LÁMPARAS
Puede enlazar hasta 8 Light-a-Life.
1. Comience el enlace con la
primera luz de su cuerda que
conectará en su adaptador Sherpa
o en su generador solar Yeti.
2. Tire ligeramente de la cubierta
verde sobre el puerto de enlace
para exponer el puerto de enlace.
3. Inserte el conector verde de
otro Light-a-Life en el puerto
de enlace.
4. Continúe con el resto de las luces de su cuerda.
Consejo: Asegúrese de que cada
luz esté encendida antes de
colgarla. Esto le permitirá encender
o apagar toda la cuerda mediante el
control de la primera luz de la serie.
ADVERTENCIA: Mientras está en
uso, el cuello del metal del Lighta-Life se volverá caliente al tacto.
Sin embargo, es seguro envolver
el cable alrededor del cuello de
metal mientras esté en uso.
4544
Page 25
LUZ DE LARGO ALCANCE
Para mayor alcance y
brillo de la luz, utilice el
Light-a-Life en el modo
luz de largo alcance.
Este es un modo
excelente para el uso al
aire libre y es el modo en
que el Light-a-Life se envía en el paquete.
1. Mientras mantiene la pantalla en una mano,
sujete la parte superior de la lámpara con la otra
mano y gire en dirección opuesta a las agujas del
reloj. Deslice la pantalla para retirarla.
2. Con la pantalla fuera, determine la longitud
de cable deseada. Ajuste la longitud del cable
pulsando el botón en el mosquetón y deslizando
el cable a través de este.
a. Guarde el cable sobrante envolviéndolo
alrededor del cuello de metal del Light-a-Life.
b. Utilice el gancho de cierre del cable para
ajustar la longitud.
3. Con las muescas de la pantalla tocando su
palma, deslice la pantalla sobre el cable envuelto.
4. Alinee las muescas de la pantalla con el fondo
de la lámpara.
5. Bloquee la pantalla en su lugar girando la
parte superior de la lámpara en sentido de las
agujas del reloj.
4746
Page 26
MODO LUZ TIPO FAROL
Para una luz suave y de
ambiente, utilice el Lighta-Life en el modo tipo farol.
Este es un excelente modo
para el uso en interiores.
1. Mientras mantiene la
pantalla en una mano,
sujete la parte superior de la
lámpara con la otra mano y
gire en dirección opuesta a
las agujas del reloj. Deslice
la pantalla para retirarla.
2. Con la pantalla fuera,
determine la longitud de cable
deseada. Ajustar la longitud
del cable pulsando el botón en
el mosquetón y deslizando el
cable a través de este.
a. Guarde el
cable sobrante
envolviéndolo
alrededor del cuello de
metal del Light-a-Life.
b. Utilice el gancho de cierre del cable para
ajustar la longitud.
3. Voltee la pantalla alrededor de modo que las
muescas toquen la lámpara. Alinee las muescas
de la pantalla con la parte inferior del Light-a-Life.
4. Bloquee la pantalla en su lugar girando la
parte superior de la lámpara en sentido de las
agujas del reloj.
48
4948
Page 27
GOAL ZERO HEADQUARTERS
675 West 14600 South
Bluffdale, UT 84065
1-888-794-6250
Designed in the U.S.A.
Made in China
Goal Zero Yeti, Light-a-Life, and Sherpa
are trademarks of Goal Zero.
This equipment has been tested and found to comply with the limits for a
Class B digital device, pursuant to part 15 of the FCC Rules. These limits
are designed to provide reasonable protection against harmful interference
in a residential installation. This equipment generates, uses and can radiate
radio frequency energy and, if not installed and used in accordance with
the instructions, may cause harmful interference to radio communications.
However, there is no guarantee that interference will not occur in a particular
installation. If this equipment does cause harmful interference to radio or
television reception, which can be determined by turning the equipment off and
on, the user is encouraged to try to correct the interference by one or more of
the following measures:
—Reorient or relocate the receiving antenna.
—Increase the separation between the equipment and receiver.
—Connect the equipment into an outlet on a circuit different from that to which
the receiver is connected.
—Consult the dealer or an experienced radio/TV technician for help.
This device complies with part 15 of the FCC Rules. Operation is subject to the
following two conditions: (1) This device may not cause harmful interference, and
(2) this device must accept any interference received, including interference that
may cause undesired operation.
50
CA082316
 Loading...