

Page 1

Page 2

CHARGE ME NOW
Before reading through the rest of the manual,
plug your YETI into the wall. You should store
your YETI plugged in, so the battery is always
healthy and full.
TABLE OF CONTENTS
Goal Zero products are designed to keep you powered while you’re doing
what you love. Whether you’re climbing in the Himalaya, living in your van
while you travel the world, or camping in your backyard we will keep you
powered.
Welcome to the solar life.
Getting Started 2
i. Get to Know Your YETI
ii. Unpacking Your YETI
iii. What it Powers
Charging your YETI 4
i. Charging from Solar
ii. Charging from the Wall
iii. Charging from the Car
Using your YETI 6
i. What can I Power?
ii. How to Use
iii. Best-Use Strategy
iv. Cold Weather Usage
v. LCD Display
vi. Storage and Downtime Maintenance
vii. Chaining your YETI
Technical Specifications 8
Frequently Asked Questions 9
Troubleshooting 11
Education 12
i. Batteries 101
ii. Solar 101
Warranty and Contact Info 14
Congrats on your new Goal Zero YETI 1250 Solar Generator, a plug-andplay generator for emergencies, camping, or wherever you need power. With
1250 watt-hours of power, you can keep laptops, lights, appliances, and
refrigerators going for hours longer.
Make sure you go online and register your product to activate your warranty. You’ll
also be able to sign up to receive notifications and alerts regarding the YETI.
www.GoalZero.com/warranty
1
Page 3

Get To Know Your Gear
Chaining Output
Anderson Powerpole chaining port located on the back of YETI.
INPUT
Solar/DC Inputs
Anderson Powerpole
Display
Display Backlight
Master Power Button
Individual Port Power Button
(master power must be on)
OUTPUT
AC Outlets (pure-sine wave)
Three USB Outputs
Three DC Outputs
Anderson Powerpole
Anderson Powerpole
Chaining Fuses
Unpacking your YETI
AC Wall Charger (2 pieces)
A
B
Roll cart (For assembly, see separate
user guide in box)
C
Goal Zero Yeti 1250 Solar Generator
B
A
C
2 3
What it Powers
LAL
400+ Hours
* Full-size refrigerator runtimes from the Yeti 1250 are dependent on several factors, including
the year, make and model of your refrigerator, as well as its volume, fullness and usage. We
actively test a variety of refrigerators to determine an average runtime. For the longest runtimes
and to optimize performance, we suggest limiting the opening and closing of refrigerator doors
when powering from the Yeti 1250.
Smartphone
100+ Recharges
12 Hours
See page 6 for more details
TV
FRIDGE
12-24 Hours*
Page 4
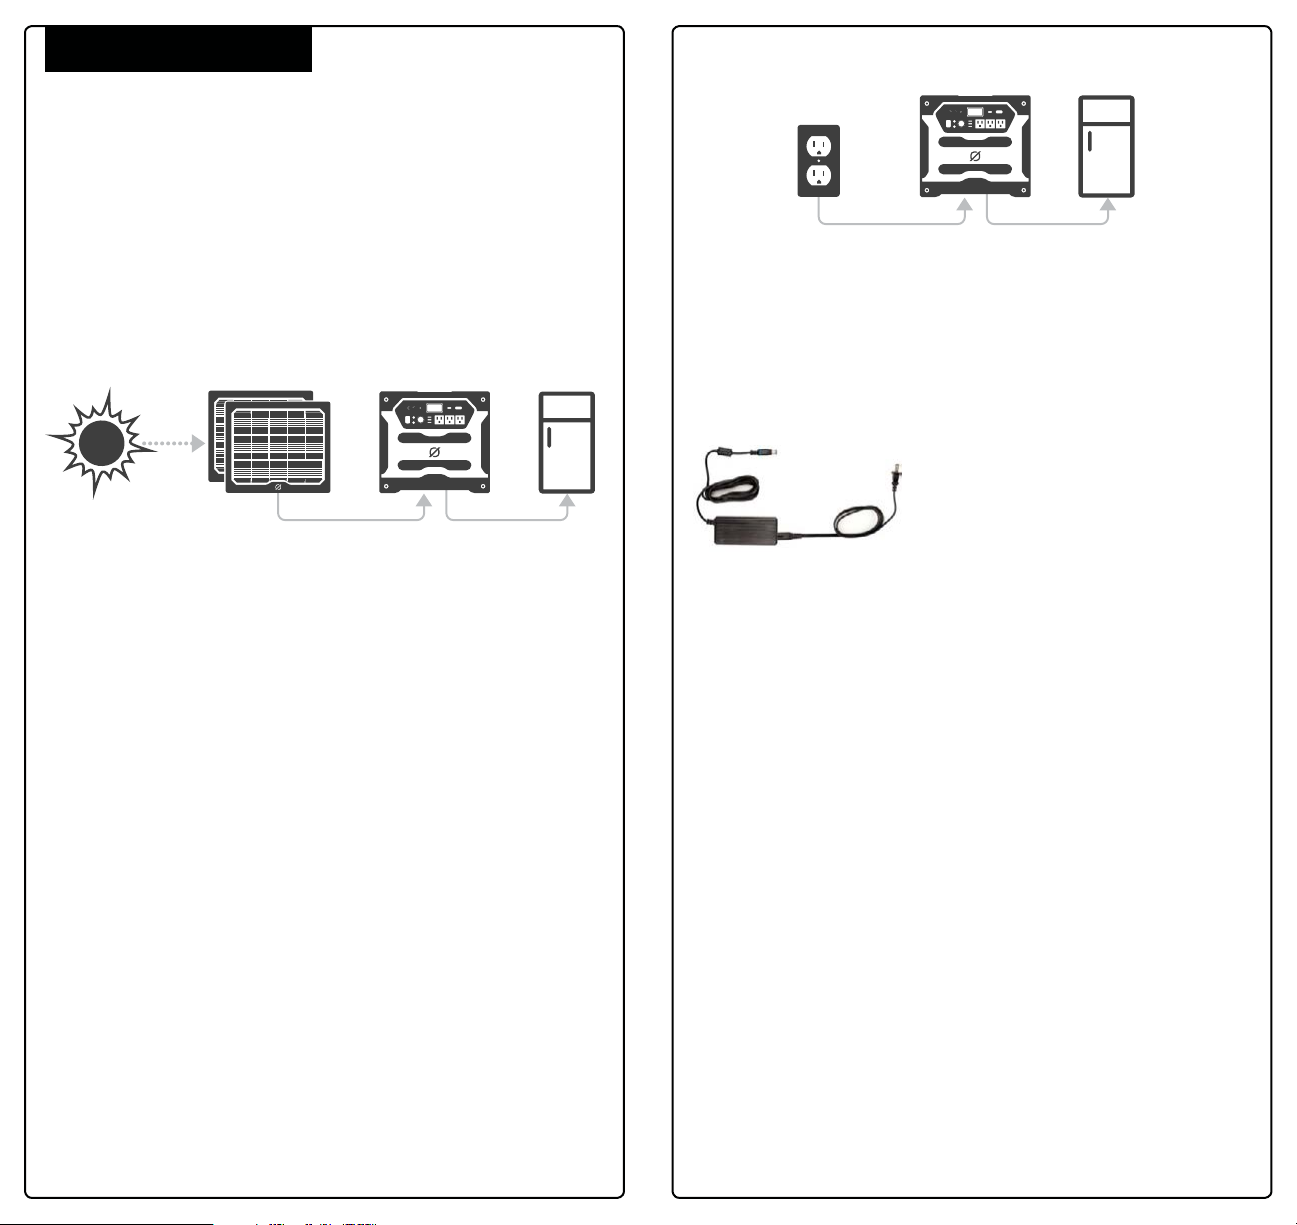
Charging Your YETI
CHARGE ME NOW: Before using or storing, plug your YETI into the wall until it is
fully charged. Keep your YETI plugged in when not in use. For more tips and tricks
on keeping your battery healthy, see the BATTERY 101 section.
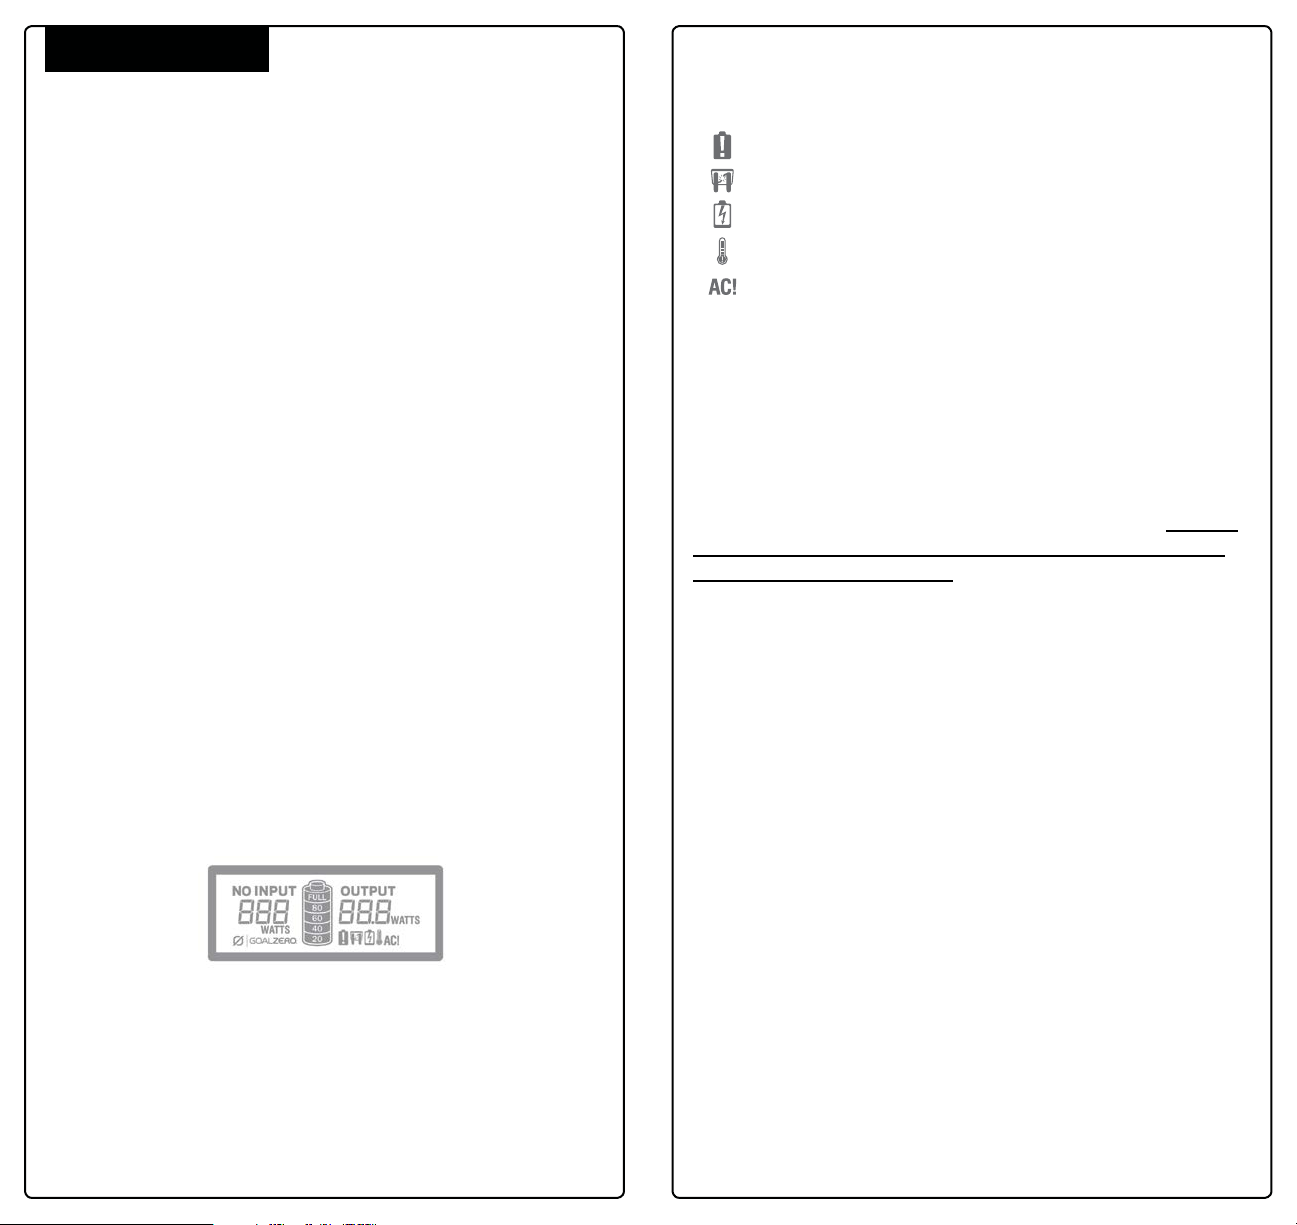
LCD Battery Display: The LCD Battery Display indicates the charge level of your
YETI. There are 5 segments to the battery, approximating 20% - 40% - 60%
- 80% -100% capacity. As you use your YETI, segments will disappear from
the display, indicating the remaining charge. When charging your YETI you will notice
a battery segment blinking at a 1 second interval. This indicates the current charge
status. Once your YETI is fully charged, all battery segments will be lit and remain solid.
2 BOULDER 30
Solar Panel
Charging from Solar
There are three different inputs you can use when charging your YETI
from solar, all located in the “INPUT” area in the top left corner of the YETI
faceplate. The two, round 8mm ports are designed to be used with Goal Zero
Solar Panels. Each port can handle up to 160W of power – the combined
total cannot exceed 240W. The Anderson Powerpole port is designed to be
used with third-party solar panels and can handle 240W of power.
1. Place your solar panel where it will get as much direct sunlight as
possible. See the graphic in SOLAR 101 for help.
2. Insert the blue-ringed solar panel plug into one of the INPUT ports on
the front of the YETI. You will know the YETI is charging when the green
LED light next to the INPUT port lights up, and the battery segments in
the LCD BATTERY DISPLAY are blinking. The YETI is fully charged when
all battery segments stop blinking and remain solid.
GOAL ZERO YETI 1250
Solar Generator
40 Hours
FRIDGE
12-24 Hours*
GOAL ZERO YETI 1250
Solar Generator
18 Hours
Charging from the Wall
Using the included AC Wall Charger, plug your YETI into any wall outlet. You
will know the Yeti is charging when the green LED light next to the INPUT
port turns on, and battery segments in the BATTERY DISPLAY are blinking.
The YETI is fully charged when all battery segments stop blinking and
remain solid. The YETI should recharge from the wall in about 18 hours.
1. The AC wall charger comes in two
pieces. Connect the two pieces by
plugging the cable into the box
Charging from your Car
Although not recommended because of slow charge times, you can charge
your YETI from any 12V source, like your car. To charge your YETI from a car
or 12V source, you will need to purchase an 8.0 mm to 12V charger from
GOALZERO.com. Call our Customer Solutions Center at 1-888-794-6250
for help identifying the charger.
* Full-size refrigerator runtimes from the Yeti 1250 are dependent on
several factors, including the year, make and model of your refrigerator,
as well as its volume, fullness and usage. We actively test a variety of
refrigerators to determine an average runtime. For the longest runtimes and
to optimize performance, we suggest limiting the opening and closing of
refrigerator doors when powering from the Yeti 1250.
12-24 Hours*
FRIDGE
3. You can also connect the YETI to other brands of solar panels using
the Anderson Power-Pole port, next to the two charging port.
4. You can chain multiple Goal Zero Solar Panels together to reduce solar
recharge times. Your YETI is capable of taking in 160W of solar per input,
no more than 240W combined.
5. You can charge your YETI with solar panels, and a wall charger at the same time.
4 5
Page 5
Using your YETI
What to power from your YETI:
USB: Smartphones, MP3 Players, Digital Cameras, E-readers, Tablets, etc.
12V: Goal Zero Lights, 12V appliances, etc.
AC: Laptops, Cameras, CPAP, Display Monitors, Appliances, Fridges, etc.
2. OUTPUT shows the amount of power (watts) your devices are using
while plugged into the YETI.
3. Yeti 1250 Warnings:
Battery Fail: Replace internal battery
Blown Fuse: Contact Goal Zero Solutions Center
How to use your YETI:
1. Press the master POWER button to turn on your YETI.
2. Press the power button located above each port you will be using. When
not using certain ports, make sure to turn them off to conserve power.
3. You’ll know the port is turned on when the green LED light on the button is
illuminated.
4. Plug in your gear for power anywhere life takes you.
5. If possible, keep your YETI plugged into a power source when not in use.
6. You can charge your YETI and charge your gear at the same time.
Best-Use Strategy:
When charging gear with your YETI, take note of the LCD Battery Display. If
you plug in devices that have a high power requirement (a large refrigerator),
the charge level of your YETI can drop very quickly and you may not get
exactly 1250Wh of power. On the flipside, if you’re recharging devices that
draw power more slowly (a small TV), you will get closer to 1250Wh from
your YETI. If you’re experiencing shorter runtimes, you may want to check
the device’s power requirements, see TROUBLESHOOTING for help.
Cold Weather Usage:
Cold temperatures (below freezing) can impact the YETI’s battery capacity.
If you’ll be living off-grid in sub-zero conditions, we recommend keeping your
YETI in an insulated cooler, and connected to a power source (solar panels).
The natural heat generated by the YETI contained in an insulated cooler will
keep battery capacity at its highest.
Low Battery: Plug into power source immediately
Temperature Warning; Too Hot: Unplug YETI and allow it to cool down
Inverter Fail: Device is pulling too much power. Unplug device and
turn AC inverter off and on. Contact Goal Zero Solutions Center
Storage and Downtime Maintenance:
Having your YETI connected to a power source, like a solar panel or wall
outlet, between adventures or while in storage keeps its battery healthy and
topped off. This prolongs battery life and will ensure your YETI is charged
and ready to go all day, every day.
If you can’t keep your YETI plugged into a power source during storage, fullycharge your YETI every 3 months and store it in a cool, dry place. Failure to
maintain your YETI by following these steps can result in battery damage
which will void the product warranty.
Chaining your Yeti:
Looking for more power from your Yeti? You can extend the run time of your
YETI by connecting it to additional 12V, 100Ah batteries. The connector on
the back of the Yeti is an Anderson Power SB175
1. Before chaining batteries to the YETI 1250, you’ll need to purchase
the correct cables and additional batteries:
a. Yeti 1250 Battery Clamp Connector Cable (SKU #98003)
temporarily connects other 12V batteries.
b. Yeti 1250 Ring Terminal Connector Cable (SKU #98001) semipermanently connects other 12V batteries.
c. Connect only 100Ah, 12V lead-acid batteries (or similar, 175Ah
LCD Display:
You can activate the display backlight by pressing the Display button. The
built-in LCD display indicates three important things:
1. INPUT shows the amount of power (watts) going into the YETI while
charging. If charging from solar, you’ll see the watts change as you
reposition the panels into/out of the sunlight.
a. LO will be displayed if power flow is below a measureable amount.
6 7
MAX) batteries to the YETI 1250.
2. Locate and remove the plastic cover on the back of the YETI (near the
top, center).
3. Connect the chaining cable to the additional batteries.
4. Connect the chaining cable into the Anderson Powerpole on the back of the YETI.
When additional batteries are chained to the YETI, you will experience
increased charge times – this is a result of having to charge up the chained
batteries in addition to the YETI.
Page 6
Technical Specifications Frequently Asked Questions
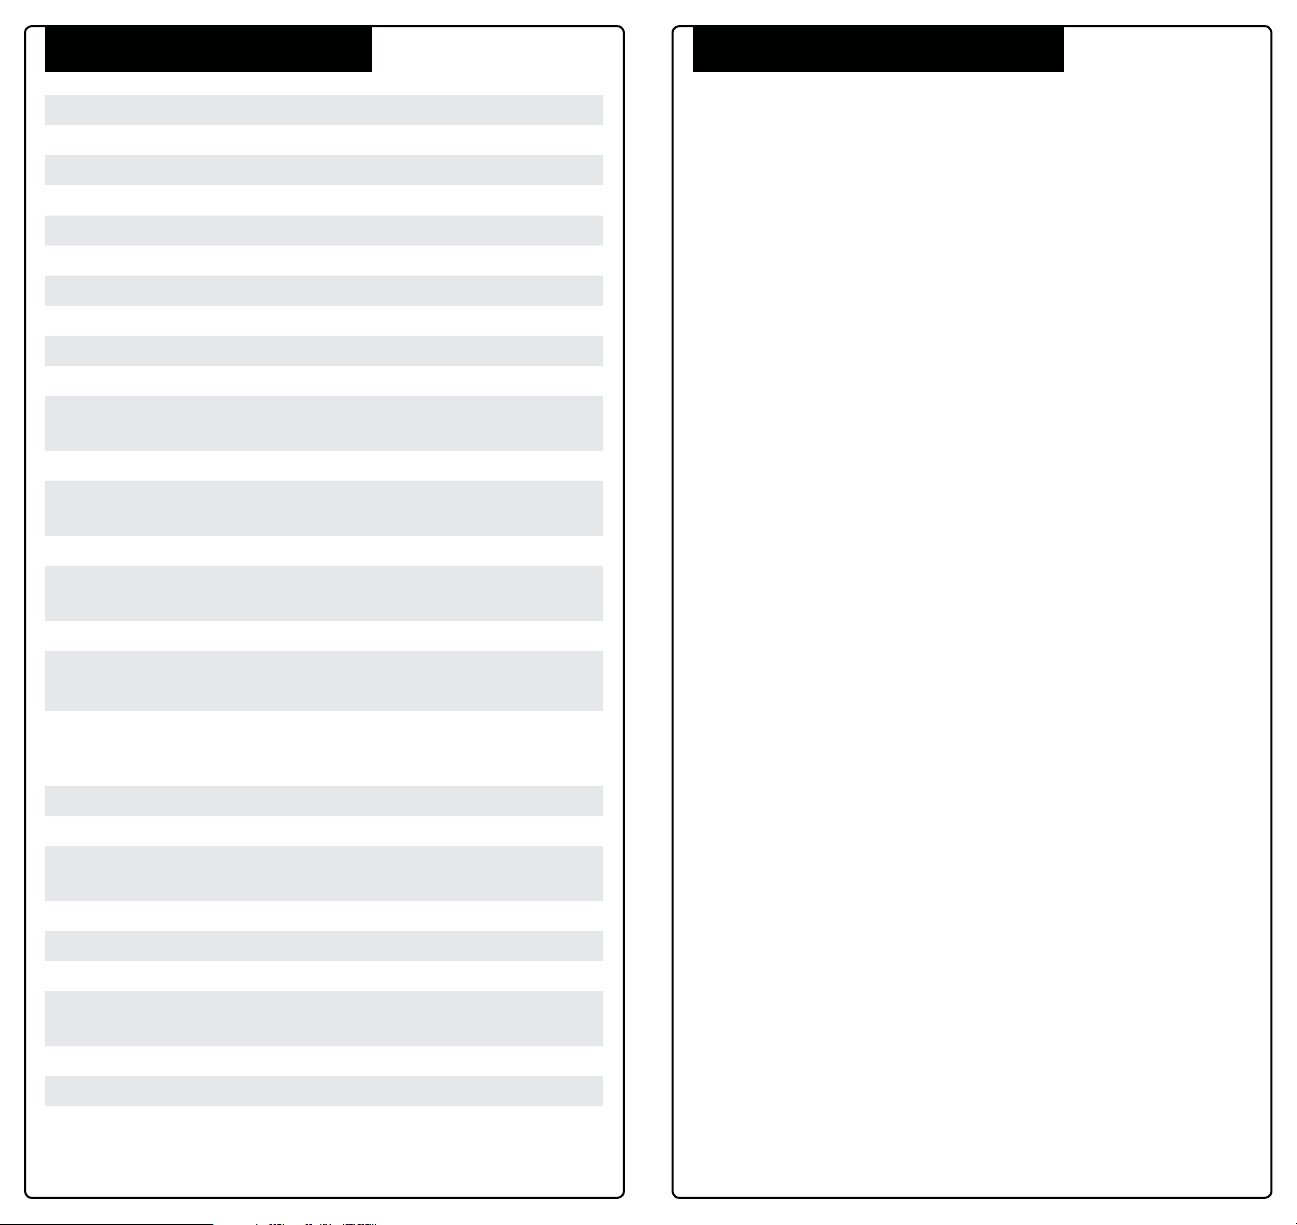
Charge times
Wall charger (72W) 18 hrs
Car charger (30W) 44 hrs
2x GOAL ZERO Boulder 30 40-80 hrs
3x GOAL ZERO Boulder 30 27-54 hrs
GOAL ZERO Nomad 100 24-48 hrs
Battery
Cell type AGM Lead Acid
Pack capacity 1200Wh (12V, 100Ah)
Lifecycles hundreds of cycles
Shelf-life Keep plugged in or charge every
3 months
Fuses 200A (4x 50A fuses in parallel)
Management system MPPT charge controller, low
battery protection
Ports
USB port (output) 5V, up to 2.1A (10W max),
regulated
6mm port (output, 6mm) 12V, up to 6A (72W max)
12V car port (output) 12V, up to 10A (120W max)
12V Power Pole port (output) 12-14V, up to 30A (360W max)
AC inverter (output, pure sine
wave)
110V, 10A (1200W
continuous, 1500W surge max)
charging port (input, 8mm) 16-48V, up to 10A (160W max)
Anderson Power PP45 (input) 16-48V, up to 20A (240W max)
Anderson Power SB175
12V, up to 175A (2100W max)
(chaining)
General
Chainable yes
Weight 103 lbs (46.7 kg)
Dimensions 11 x 16 x 14.5 in (27.9 x 40.6
x 36.8 cm)
Operating usage temp 32-104 F (0-40 C)
Certs CE, FCC, ROHS
Warranty 6 months
What type of battery is in my YETI?
Your YETI uses a Group 31, 12V, 100Ah, sealed lead-acid battery (AGM),
similar to what is found in your car. Here are some basic facts about AGM
batteries:
1. AGM batteries should be kept full at all times.
This means you should leave your YETI plugged into a power sources at
all times, especially during storage.
2. AGM batteries last longer if you do not drain them completely.
This stems from the “battery memory myth” in old rechargeable batteries.
You can read more about this in the Battery 101 section.
Can I replace the battery in my YETI?
Yes, the battery inside the YETI is extremely easy to replace.
1. Remove the four bolts holding down the top of the YETI.
2. Lift the top of the YETI off and set aside.
3. Remove the metal battery strap by unscrewing the bolt and lifting the
strap off.
4. Remove the two battery terminal bolts.
5. Disconnect the wires on the battery terminals.
6. Lift the old battery out of the body of the YETI
**This battery is HEAVY. Use caution and proper technique when lifting.
7. Insert replacement battery and reassemble in reverse order of steps
above.
How do I know if my YETI is charged?
To check the charge level of your YETI, refer to the LCD Battery Display. When
lit up, you’ll see a battery outline with five segments, indicating the current
charge level. You can turn on the Battery Display by pushing the Master
POWER button. It is OK to use your YETI even when it’s not fully charged.
How do I know if my device will work with the YETI?
First, you’ll need to determine the amount of power your device requires. This
may require some research on your end, a good Google search or examining
the user guide for your device should suffice.
8 9
Page 7
Second, you will need to check the capacity for the individual output ports.
For example, the AC port is monitored by an inverter that allows for 1200W
of continuous power. This means if your device is a pulling more than 1200W
for an extended period of time, the YETI’s inverter will shut off.
Finally, once you know your device is compatible, you’ll want to determine
how long you’ll be able to power your gear from the YETI. Here’s a quick and
dirty lesson in power.
All GOAL ZERO power packs and solar generators have a number in their
name, ex. GUIDE 10 Plus Power Pack, GOAL ZERO YETI 1250 Solar
Generator. These numbers refer to the Watt Hours (Wh), or the amount of
energy that can be stored in each recharger, and how you’ll know if your gear
is compatible with each recharger. For example, a 200Wh recharger should
run a 100W light for 2 hours (200/100=2). If your gear falls within the
1250Wh capacity of the YETI, you’ll want to check the restrictions on each
of the output ports.
Here are some common devices and their watt-hour requirements:
Device Power from Yeti 1250
Light-a-Life 12V Lantern (3Wh) 400+ Hrs
Smartphone (2-5Wh) 100+ Recharges
Tablet (25-42Wh) 45+ Recharges
Laptop (50Wh) 20+ Hrs
Desktop Computer (100W) 12 Hrs
Mini Fridge (30-60W) 20-40Hrs
32” LCD TV (98-156W) 8-12Hrs
Vacuum Cleaner (200-700W) 1.5-7Hrs
Drill (250-1000W) 1-5Hrs
Blender/Processor (200-200W) 4-6Hrs
Washing Machine (250-500W) 2-3Hrs
Refrigerator (400-800W) 2-3Hrs
So when you’re deciding on what to power from your new GOAL ZERO
recharger, do some research into your device’s wattage consumption. For more
quick tips and learning tools, check out www.GOALZERO.com/learn.html
Troubleshooting
If your devices are not recharging from your YETI, follow these steps:
1. Make sure the Master POWER button is turned on.
2. Ensure the Output Port has been turned on. The green LED light on the
power button should be lit up.
a. If any of the lights have turned red, this indicates a trip. Push the
button again to reset it. The light will turn green when it is successfully
reset.
3. Check the Battery Display. If it is at 20% or below, charge your YETI.
4. Verify your device is suitable for use with the YETI:
a. All of the YETI output ports have their own max power capacity. Check
the YETI’s Tech Specs to ensure your device is compatible.
5. Reset the battery following these steps: **Unplug all charging cables,
including device charging cables, from the YETI before attempting to reset
the battery.
a. Remove the four bolts holding the YETI top in place.
b. Lift top off and set aside.
c. Remove the two battery terminal bolts.
d. Disconnect the wires on the battery terminals. Wait 10 seconds.
e. Reconnect battery wires and reassemble YETI.
6. Check the LCD Display for warning icons: (helpful to show icons here)
a. Battery Failure: Battery needs to be replaced
b. Blown Fuse: Report to Solutions Center
c. Low Battery: Plug into a power source
d. Temperature Warning: Yeti is too hot, unplug and place in a cool, dark
place
e. Inverter Fail: Device is pulling too much power. Unplug device and turn
AC inverter off and on. If icon does not turn off, call the Solutions Center
If you are still experiencing trouble with your YETI, please call our Customer
Solutions Center at 1-888-794-6250 or by email at [email protected]
10 11
Page 8
Education
BATTERIES 101: GOAL ZERO utilizes the latest and greatest in battery
technology to accompany you on all life’s adventures. From the versatile and
lightweight Lithuim Ion, to the robust and powerful Lead Acid, we’ve compiled
some helpful tips to keep your GOAL ZERO batteries working their best.
i. Batteries need exercise
The best thing for any battery is to use it. Don’t leave a charged battery
sitting around, unloved and unused for long periods of time.
ii. The “Battery Memory” myth
Thanks to old Nickel-Cadmium (NiCd) batteries, there’s a myth running
around that you should completely drain your batteries before plugging
them in for a recharge, called “deep cycling”. Although true with NiCd
batteries, the typical batteries you’ll find in most of your gear today,
including the advanced lithium and lead-acid batteries used in your GOAL
ZERO rechargers, require no such draining. In fact, you should avoid deep
cycling your batteries – it does more harm than good in most cases.
iii. The “Stadium Effect”
The stadium effect occurs when recharging your batteries. You’ll notice
your battery quickly filling up in the beginning, then slowing down
noticeably when trying to charge up the last several percentages. Think
of how quickly a stadium fills up when the doors first open – there are
hundreds of open seats so it’s easy to find the one you want. Eventually
there are only a few open seats here and there and people have to
maneuver around to find the spot they want and filling those seats takes
longer. The same theory applies to recharging batteries. It’s easy for
energy to flow in and take up empty space in the beginning, and as time
goes on and there is less space available, it takes longer for the energy to
fill in the holes.
iv. Read the manual.
Yeah, it might be a long read, but the manual is the best place to find the
dos and don’ts for the battery in your specific device. Reading your manual
will ensure you’re taking steps to keep your batteries happy and healthy.
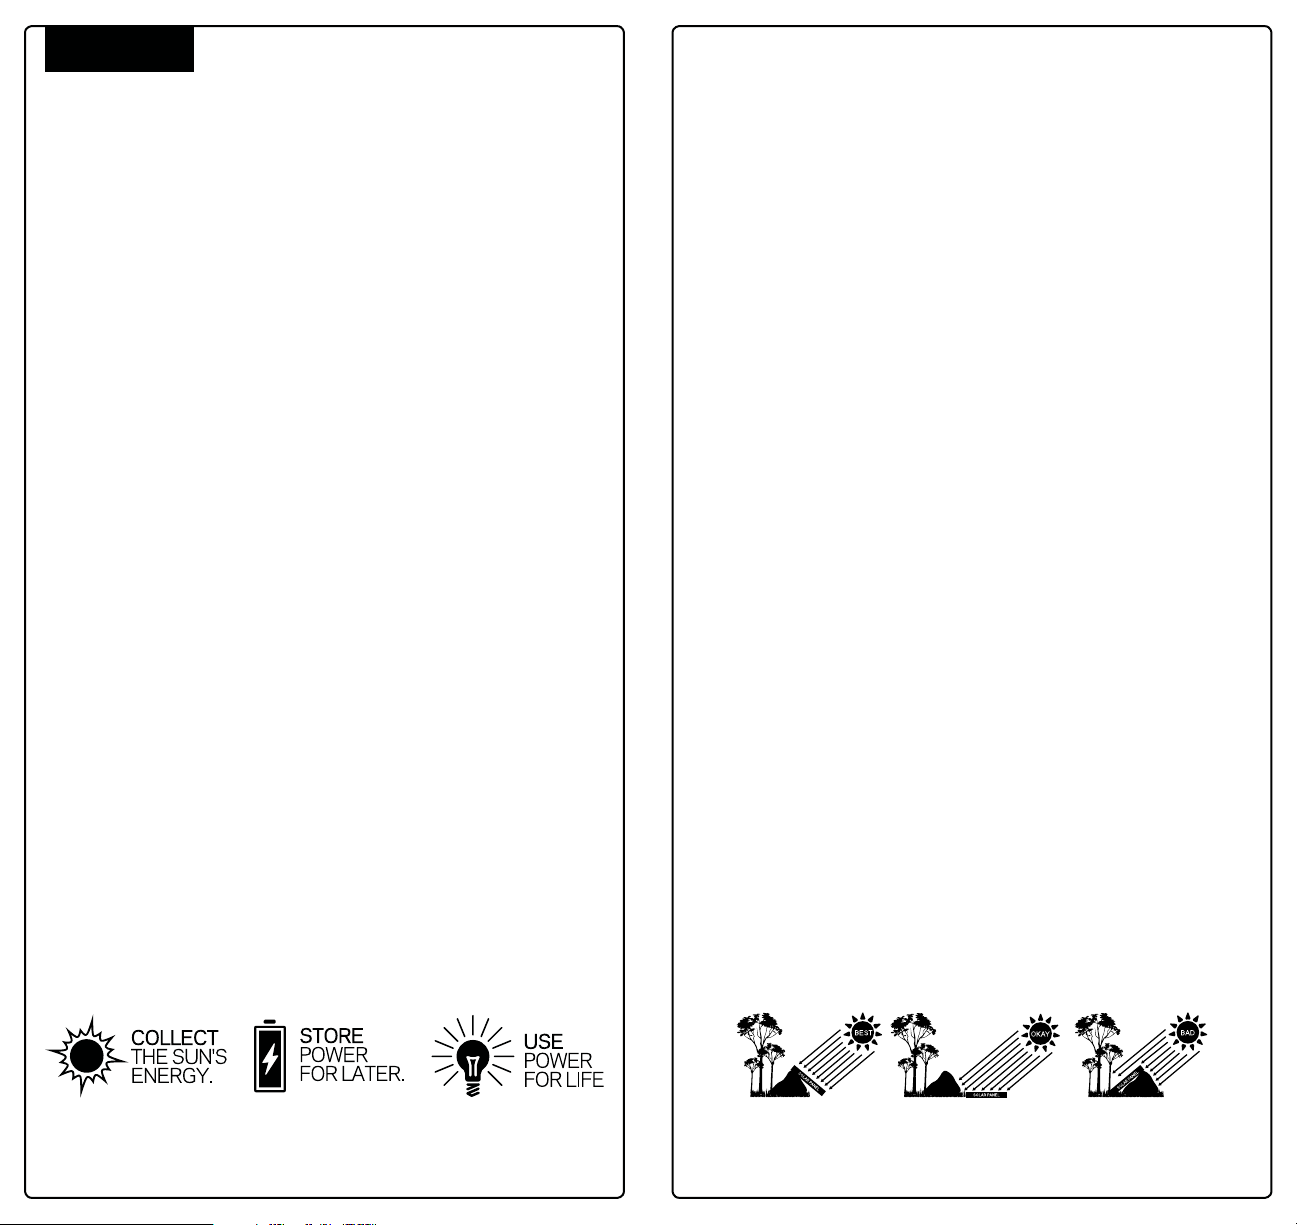
SOLAR 101: GOAL ZERO makes it easy to recharge your gear from the sun
– we didn’t invent solar power, we perfected it. Some things to keep in mind
when recharging your gear with solar power:
i. Solar panels don’t store power from the sun, they collect it.
We teach you to COLLECT – STORE – USE, which is the best way to utilize
solar power to recharge your gear. COLLECT the sun’s energy with a solar
panel. STORE the power in a recharger. USE the recharger to power your
gear, day or night. If you’re really a diehard, you can plug your gear directly
into the junction box located on the back of our NOMAD Solar Panels to
recharge from the sun.
ii. Not all solar charge times are created equal
Most solar panel manufacturers calculate their recharge times with the
following equation: Device Watt Hours/Solar Panel Watts = Solar Recharge
Times. So theoretically, a 13 watt solar panel would recharge a 50 watthour recharger in 3.84 hours (50/13 = 3.84) – and this is the number you
could find in marketing material for a solar panel. However, in order to
standardize results across all manufacturers, these tests are completed
in laboratory settings.. The truth is, on a good, sunny day, you’ll receive
about 50-75% of your solar panel’s rated wattage, and this is how the
engineers at GOAL ZERO calculate the solar recharge times you see on
our packaging.
iii. Solar works, even in overcast conditions.
Solar panels utilize IR, UV, and visible rays from the sun that can penetrate
through clouds. Although the efficiency of the solar panel will decrease in
cloudy conditions, you’ll still be collecting valuable power from the sun.
iv. Keep away from shade and windows.
Although you should seek out the shade on sunny days, your solar panels
will collect more power when fully exposed to the sunlight. Windows also
have a habit of decreasing efficiency. So keep those panels outside and in
the bright sunlight.
v. Proper alignment works wonders.
Keeping your solar panel angled toward the sun can dramatically increase
solar efficiency. Set it up and let Mother Nature do the rest.
12 13
Page 9

Warranty & Contact
LIMITED WARRANTY
GOAL ZERO LLC warrants to the original consumer purchaser that this GOAL ZERO product will
be free from defects in workmanship and material under normal consumer use during the applicable
warranty period identified in Paragraph 2, below, subject to the exclusions set forth in Paragraph
5, below. This warranty statement sets forth GOAL ZERO’s total and exclusive warranty obligation.
We will not assume, nor authorize any person to assume for us, any other liability in connection with
the sales of our products.
WARRANTY PERIOD
The warranty period for GOAL ZERO battery cells (whether purchased on a stand-alone basis or
as part of another product) is 180 days. The warranty period for all other GOAL ZERO products
and components is one (1) year. In each case, the warranty period is measured starting on the
date of purchase by the original consumer purchaser. The sales receipt from the first consumer
purchase, or other reasonable documentary proof, is required in order to establish the start date
of the warranty period. If you completed the online GOAL ZERO Product Registration Form within
30 days after purchasing your product, that registration can also establish the start date of the
warranty period (but warranty coverage is not conditioned upon such registration).
REMEDY
GOAL ZERO will repair or replace (at GOAL ZERO’s option and expense) any GOAL ZERO product
that fails to operate during the applicable warranty period due to a defect in workmanship or
material.
LIMITED TO ORIGINAL CONSUMER BUYER
The warranty on GOAL ZERO’s products is limited to the original consumer purchaser and is not
transferable to any subsequent owner.
EXCLUSIONS
GOAL ZERO’s warranty does not apply to (i) any product that is misused, abused, modified,
damaged by accident, or used for anything other than normal consumer use as authorized in GOAL
ZERO’s then-current product literature, or (ii) any product purchased through an online auction
house. GOAL ZERO’s warranty does not apply to any battery cell or product containing a battery
cell unless the battery cell is fully charged by you within seven (7) days after you purchase the
product and at least once every 6 months thereafter.
HOW TO RECEIVE SERVICE
To obtain warranty service, you must contact our customer service team via telephone at (888)
794-6250, or via email at [email protected]. If our customer service team determines that
further assistance is required, they will give you a Return Material Authorization (“RMA”) number
and will provide you with prepaid return shipping label that you can use to mail back your nonfunctioning item(s). You must properly package the product, clearly marking the RMA number on
the package and including proof of your purchase date with the product. We will process your return
and send your repaired or replacement product to you at our expense for product being shipped
to locations in North America. For product purchased or being shipped outside of North America,
please contact the local distributor from whom you purchased the product or email support@
goalzero.com to obtain further distributor information.
IMPLIED WARRANTIES
THE LIMITED WARRANTY STATED HEREIN IS IN LIEU OF ALL OTHER EXPRESS WARRANTIES.
IN NO EVENT SHALL ANY IMPLIED WARRANTIES, INCLUDING BUT NOT LIMITED TO ANY
WARRANTIES OF MERCHANTABILITY, FITNESS FOR A PARTICULAR PURPOSE OR NONINFRINGEMENT, EXTEND BEYOND THE APPLICABLE WARRANTY PERIOD IDENTIFIED IN
PARAGRAPH 2, ABOVE. Some states do not allow limitations on how long an implied warranty
lasts, so the above limitation may not apply to you. This warranty gives you specific legal rights, and
you may also have other rights which vary from state to state.
EXCLUSIVE REMEDY; LIMITATION OF LIABILITY
The foregoing provisions state GOAL ZERO’s entire liability, and your exclusive remedy, for any
breach of warranty, express or implied. IN NO EVENT WILL GOAL ZERO BE LIABLE FOR ANY
CONSEQUENTIAL OR INCIDENTAL DAMAGES ARISING FROM ANY USE OR MALFUNCTION OF
ANY GOAL ZERO PRODUCT, OR FROM ANY BREACH OF WARRANTY, INCLUDING DAMAGE TO
OTHER DEVICES. IN NO EVENT WILL GOAL ZERO’s LIABILITY FOR ANY CLAIM, WHETHER IN
CONTRACT, WARRANTY, TORT (INCLUDING NEGLIGENCE AND STRICT LIABILITY) OR UNDER
ANY OTHER THEORY OF LIABILITY, EXCEED THE AMOUNT PAID BY YOU FOR THE GOAL ZERO
PRODUCT. Some states do not allow the exclusion or limitation of incidental or consequential
damages, so the above limitation or exclusion may not apply to you.
Toll Free: 888.794.6250
675 West 14600 South Bluffdale, UT 84065
14
We proudly support
TIFIE Humanitarian
www.tifie.org
 Loading...