


GENERAL ELECTRIC PDWT580RSS, PDWT500RBB, PDWT400R, PDW8900NWW, PDW8680NSS User Manual
...Dishwashers
GEAppliances.com
. . . . . . . .SafetyInstructions |
. . . 2–5 |
Owner’s Manual |
Operating Instructions |
|
Stainless Steel |
Care and Cleaning . . . . . . . . . . . . . |
. . . . 17 |
Tub Dishwashers |
Control Panel and Settings . . . . . . |
. . 6–9 |
|
Display Lights . . . . . . . . . . . . . . . . . . |
. . . . . 9 |
|
Loading Place Settings . . . . . . . . . . |
. . . 16 |
|
Loading the Racks . . . . . . . . . . . . . |
14–16 |
|
Recommended Dishwasher |
|
|
Products . . . . . . . . . . . . . . . . . . . . . . . . |
. . . . .9 |
|
Using the Dishwasher . . . . . . . . . . |
10–13 |
|
Troubleshooting Tips . . . . . . 18–20
Consumer Support
Consumer Support . . . . . . . . . . . . . . . . .25
Warranty . . . . . . . . . . . . . . . . . . . . . . . . . . 24
Write the model and serial numbers here:
Model # __________________
Serial # __________________
You can find them on the tub wall just inside the door.
165D4700P389 49-55065 07-09 JR
Safety Instructions
Operating Instructions
Troubleshooting Tips
Consumer Support
IMPORTANT SAFETY INFORMATION
READ ALL INSTRUCTIONS BEFORE USING—
SAVE THESE INSTRUCTIONS
 WARNING!
For yoursafety,the informationin thismanual must be followedto minimize the riskof fire, explosion,electric shock,and to prevent property damage, personal injury, or death.

 WARNING! WATER HEATER SAFETY
 Under certain conditions, hydrogen gas may be produced in a water heater that has not been used for two or more weeks. HYDROGEN GAS IS EXPLOSIVE.
If the hot water has not been used for two or moreweeks, prevent the possibility of damage or injury by turning on all hot water faucetsand allowthem to run for several minutes. Do this before using any electrical appliance connected to the hot water system. This simple procedure will allow any built-up
hydrogen gas to escape.Since the gas is flammable, do not smoke, use an open flame, or use the appliance during this process.
PROPER INSTALLATION AND MAINTENANCE
This dishwasher must be properly installed and located in accordance with the Installation Instructions before it is used. If you did not receive an Installation Instructions sheet with your dishwasher, you can receive one by visiting our website at GEAppliances.com.
■Connect the dishwasher/appliance to a grounded metal, permanent wiringsystem; or run an equipment-grounding conductorwith the circuit conductors and connectto the equipmentgrounding terminal or lead of the appliance.
■Improper connectionof the equipment-grounding conductor can result in a risk of electricshock. Check witha qualified electrician or service representativeif you are in doubtwhether the appliance is properly grounded.
■Dispose of discarded appliances and shipping or packing material properly.
■Do not attempt to repair or replace any part of yourdishwasher unless it is specifically
recommended in this manual.All other servicing should be referred to a qualified technician.
■To minimize the possibility of electric shock, disconnect thisappliancefrom the power supply before attempting any maintenance.
NOTE: Turning the dishwasher off does not disconnect the appliance from the power supply. We recommend having a qualified technician service your appliance.
 CAUTION: To prevent minor injury and property damage
■Contents washed in Anti-bacterial mode, if available,may be hot to the touch. Use care before handling.
■Using a detergent that is not specifically designed for dishwashers will cause the dishwasher to fill with suds.
■If your dishwasher is connected to a wall switch, ensure that the switchis on prior to use.
■On dishwashers with electronic controls, if you choose to turn the wallswitch
off between wash cycles,allow 5-10 seconds after turning the switch on before touching START/RESET to allow the control to initialize.
■Non-Dishware Items: Do not wash items such as electronic air cleaner filters, furnace filters and paint brushes in your dishwasher. Damage to the dishwasher and discoloration or staining of the dishwasher may result.
■Close supervision is necessary if this appliance is used by or near children.
■Load light, plastic items so they do not become dislodged and drop to the bottom of the dishwasher—they might come into contact with the heating element and be damaged.
2
INFORMACIÓNIMPORTANTE DE SEGURIDAD |
|
LEA TODASLAS INSTRUCCIONESANTES DE USAR— |
|
GUARDE ESTASINSTRUCCIONES |
GEAppliances.com |
 ¡ADVERTENCIA!
Para su seguridad, debe cumplirse con la información de este manual a fin de minimizar el riesgo de incendio o explosión,descargaeléctrica o para prevenir daños a la propiedad, lesiones personales o la muerte.

 ¡ADVERTENCIA! SEGURIDAD DEL CALENTADOR DE AGUA
Bajo ciertas condiciones, puede producirsegas de hidrógeno en un calentador de agua que no se ha usado durante dos semanas o más. EL GAS DE HIDRÓGENO ES EXPLOSIVO.
Si el agua caliente no se ha utilizadopor dos semanaso más, evite la posibilidad de daños o lesiones abriendo todos los grifos de agua caliente y dejándolas correr durante varios minutos. Haga esto antes de utilizarcualquier aparato eléctrico que se encuentre conectado al sistema de agua caliente. Este simple procedimientopermitirá que se libere cualquier clase de acumulación de gas de hidrógeno. Ya que el gas es inflamable,no fume o utiliceuna llama abierta o un aparato durante este proceso.
INSTALACIÓN Y MANTENIMIENTO ADECUADOS
Este lavaplatos debe instalarsede manera adecuada y ubicarse de acuerdo con las Instrucciones de Instalación antes de comenzar el uso. Si usted no ha recibido una página de Instruccionesde instalación con su lavaplatos, puede obteneruna visitando nuestro sitio Web en GEAppliances.com.
■Conecteel lavaplatos/aparatoa un sistema de cableado permanentecon conexión a tierra
o debe utilizarse un conductorde conexión a tierra del equipamiento con los conductoresde circuito, y debe conectarse a la terminal de conexión
a tierra o conductor del aparato.
■Una conexión inadecuadadel conductorde conexión a tierra de equipopuede provocar un riesgo de descarga eléctrica.Consultea un
electricistacalificado o representantede servicio técnico si tiene dudas sobrela correctaconexión a tierra del aparato.
■Eliminelos aparatos que no va a utilizar más y el material de empaque o envío comocorresponde.
■No intente reparar o cambiar ningunapieza de su lavaplatos a menos que esté específicamente recomendado en este manual.Cualquier otro servicio debe realizarlo un técnico calificado.
■Para minimizar la posibilidad de una descarga eléctrica,desconecteeste aparato de la fuente de energía antesde realizar cualquier clase de mantenimiento.
NOTA: Apagarel lavaplatosno desconecta el aparato del suministro de energía. Recomendamos que un técnico calificado realice el servicio técnico de su aparato.
 PRECAUCIÓN: Para evitar lesiones menores y daños a la propiedad
■Los elementos lavados en el modo anti-bacterial, si se encuentra disponible,pueden quedar calientes al tacto. Tenga cuidadoantesde tocarlos.
■Utilizarun detergente no diseñado específicamente para lavaplatos provocará que el aparato se llene de espuma.
■Si su lavaplatos se encuentra conectado a un interruptor de pared, verifique que el interruptor se encuentre encendido antes del uso.
■En lavaplatos con controles electrónicos,si usted elijeapagarel interruptor de paredentre ciclos de lavado, deje pasar 5-10 segundos después de encender el interruptor antes de presionar START/RESET para permitir que el controlse inicie.
■Elementos no aptos para lavaplatos: No lave elementos como filtros de limpiadores de aire electrónicos, filtros de hornos y pinceles de pintura en su lavaplatos. Pueden producirse daños en el lavaplatos y decoloración o manchas en el aparato.
■Se requiere una supervisión estricta cuando cualquier aparato es utilizado por niños o en su cercanía.
■Cargue elementos livianos y plásticos de modo que no se desplacen y caigan al fondo del lavaplatos, ya que pueden entrar en contacto con el elemento calentador y dañarse.
3
Instructions Safety
Instructions Operating
Tips Troubleshooting
Support Consumer
Safety Instructions
Operating Instructions
Troubleshooting Tips
Consumer Support
IMPORTANT SAFETY INFORMATION
READ ALL INSTRUCTIONS BEFORE USING— SAVE THESE INSTRUCTIONS
 WARNING! RISK OF CHILD ENTRAPMENT
PROPER DISPOSAL OF THE DISHWASHER
Junked or abandoned dishwashers are dangerous…even if they will sit for “just a few days.” If you are getting rid of your old dishwasher, please follow the instructions below to help prevent accidents.
Before You Throw Away Your Old
Dishwasher:
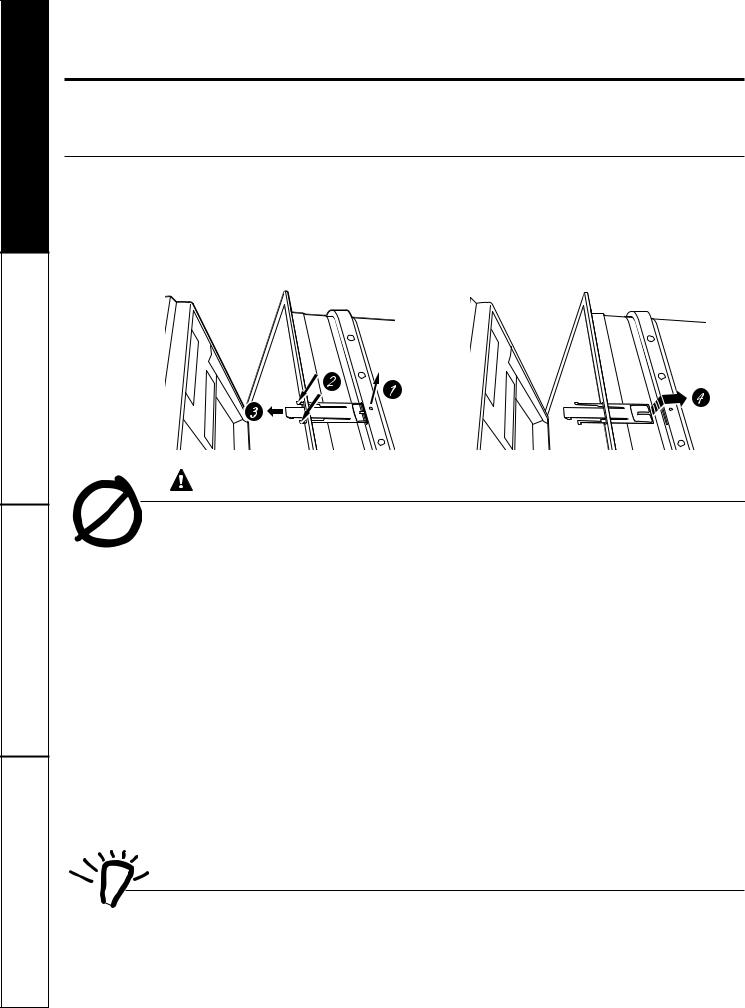
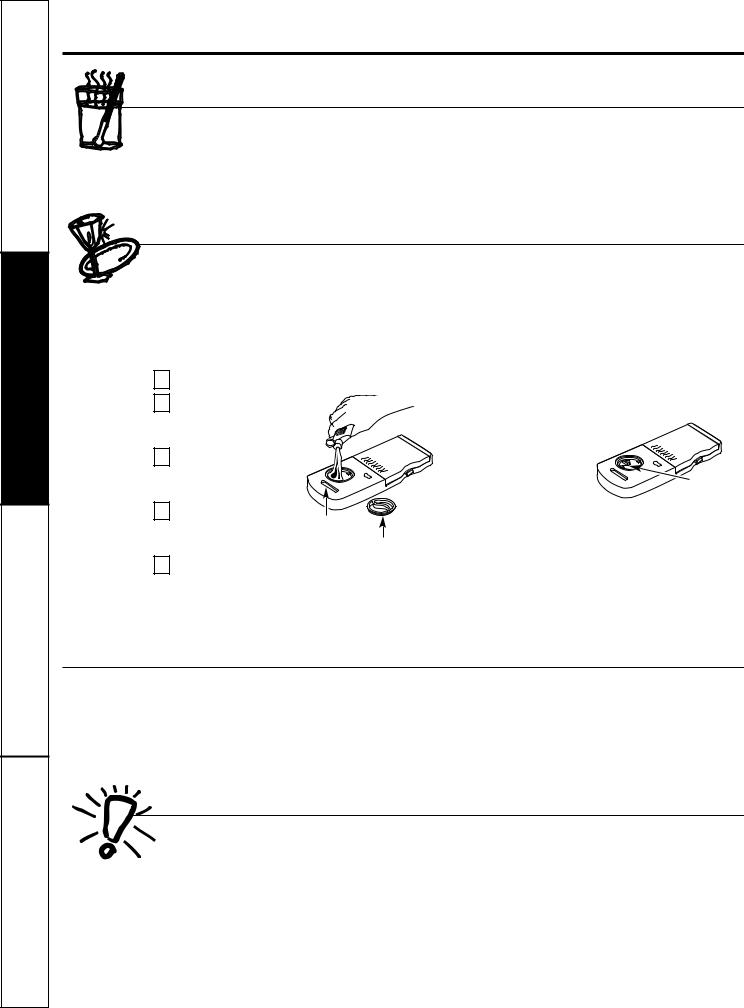
■Take off the door of the washing compartment or remove the door latch (as shown).
NOTE: All top control models also have a latch screw which must be removed (Step 1)as shown.
Screw
(on some models)
When using your dishwasher, follow basic precautions, WARNING! including the following:
■Use this appliance only for its intended purpose as described in this Owner’s Manual.
■Use only powder, tabs,liquid detergents or rinse agents recommended for use in a dishwasher and keep them out of the reachof children.
Cascade® and Cascade® Complete Automatic Dishwashing Detergents, and Cascade Crystal Clear® rinse agents have been approved for use in all GE dishwashers.
■On models with the SmartDispense™ system, do not mix any chlorine bleach-based automatic dishwashing detergent with any dishwashing detergent containing enzymes as this could causethe detergents to congeal and lead to blockage of the SmartDispenseTM system.
■Locate sharpitems so that they are not likely to damage the door seal.
■Load sharp knives with the handles up to reduce the risk of cut-type injuries.
■Do not washplastic items unlessmarked dishwashersafe or the equivalent. For plastic
items not so marked, check the manufacturer’s recommendations.
■Do not touch the heating element during or immediately after use.
■Do not operate your dishwasher unless all enclosure panels are properly in place.
■Do not tamper with controls.
■Do not abuse, sit on or stand on the door or dish rack of the dishwasher.
■Do not allow children to play around the dishwasher when opening or closing the door due to the possibility of small fingers being pinched in the door.
■Do not discarda dishwasher without first removing the door of the washing compartment or the door latch.
■Do not storeor use combustible materials, gasoline or other flammable vapors and liquids in the vicinity of this or any other appliance.
■Do not allow children to play with, on or inside this or any discarded appliance.
READ AND FOLLOW THIS SAFETY INFORMATION CAREFULLY.


 SAVE THESE INSTRUCTIONS
4
INFORMACIÓNIMPORTANTE DE SEGURIDAD |
|
LEA TODASLAS INSTRUCCIONESANTES DE USAR— |
|
GUARDE ESTASINSTRUCCIONES |
GEAppliances.com |
 ¡ADVERTENCIA! RIESGO DE ENCIERRO PARA NIÑOS
ELIMINACIÓN CORRECTA DEL LAVAPLATOS
Un lavaplatos desechado o abandonado resulta peligroso…aún si quedará en un lugar por “sólo unos días”. Si va a desechar su viejo lavaplatos, siga las siguientes instrucciones para prevenir accidentes.
Antes de desechar su viejo lavaplatos:
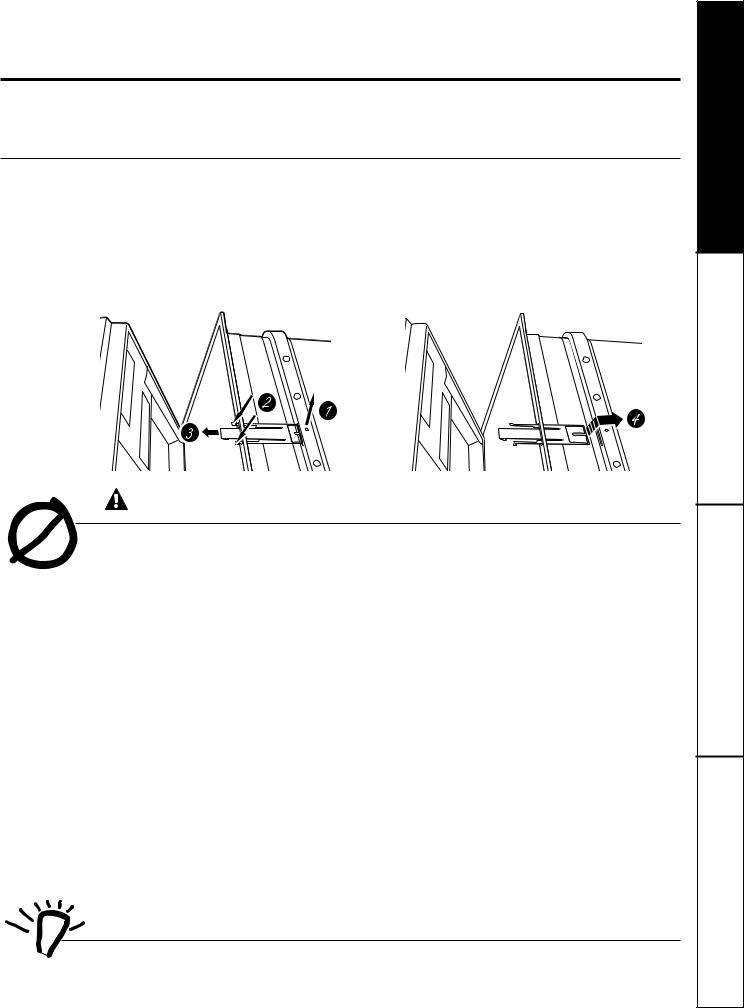
■Quite la puerta del compartimento de lavado o saque la traba de la puerta (como puede verse).
NOTA:Todos los modelos con controlsuperior también cuentan con un tornillo de la traba que debe quitarse (Paso 1) como se ilustra.
Tornillo
(en algunos modelos)
¡ADVERTENCIA! Cuando use su lavaplatos, siga precauciones básicas de seguridad, incluyendo las siguientes:
■Use este aparato sólo con el objetivo para el que fue creado, como se describeen este Manual del Propietario.
■Utilice sólo detergentes en polvo, líquido o tabletas o agentes de enjuaguerecomendados para uso en lavaplatos y manténgalos alejados del alcance de los niños. Los detergentes para lavaplatos automáticos Cascade® y Cascade® Complete,
y los agentes de enjuagueCascadeCrystal Clear® han sido aprobados para el uso en todos los lavaplatos GE.
■En modelos con el sistema SmartDispense™, no mezcle detergentes para lavaplatos automáticos con blanqueador con detergentes para lavaplatos que contengan enzimasporque los detergentes pueden solidificarsey provocar bloqueos en el sistema SmartDispense™.
■Ubique los elementos filosos de modo que no dañen el sellado de la puerta.
■Cargue cuchillos filososcon los mangoshacia arriba para reducir el riesgode una lesión personal.
■No lave elementos plásticos a menosque estén marcados como aptos para lavaplatos o
equivalente. En el caso de elementos plásticos que no estén marcados así, verifique las recomendaciones del fabricante.
■No toque el elemento calentador durante el uso o inmediatamente después de finalizar el uso.
■No haga funcionar el lavaplatos a menos que todos los paneles del recinto se encuentren en su lugar.
■No altere o modifique los controles.
■No maltrate, ni se siente o se pare sobre la puerta o bandejas de los platos del lavaplatos.
■No permita que los niños jueguen alrededor del lavaplatos cuando abra o cierre la puerta debido
a la posibilidad de pellizcar sus dedos con la puerta.
■No deseche el lavaplatos sin antes quitar la puerta del compartimento de lavado o la traba de la puerta.
■No almacene o use materiales combustibles, gasolina u otros vapores o líquidos inflamables cerca de este o cualquier otro aparato.
■No permita que los niños jueguen sobre, con o dentro de este o cualquier otro aparato desechado.
LEA Y SIGA ESTA INFORMACIÓN DE SEGURIDAD CUIDADOSAMENTE.


 GUARDE ESTAS INSTRUCCIONES
5
Instructions Safety
Instructions Operating
Tips Troubleshooting
Support Consumer

Safety Instructions
Operating Instructions
Troubleshooting Tips
Consumer Support
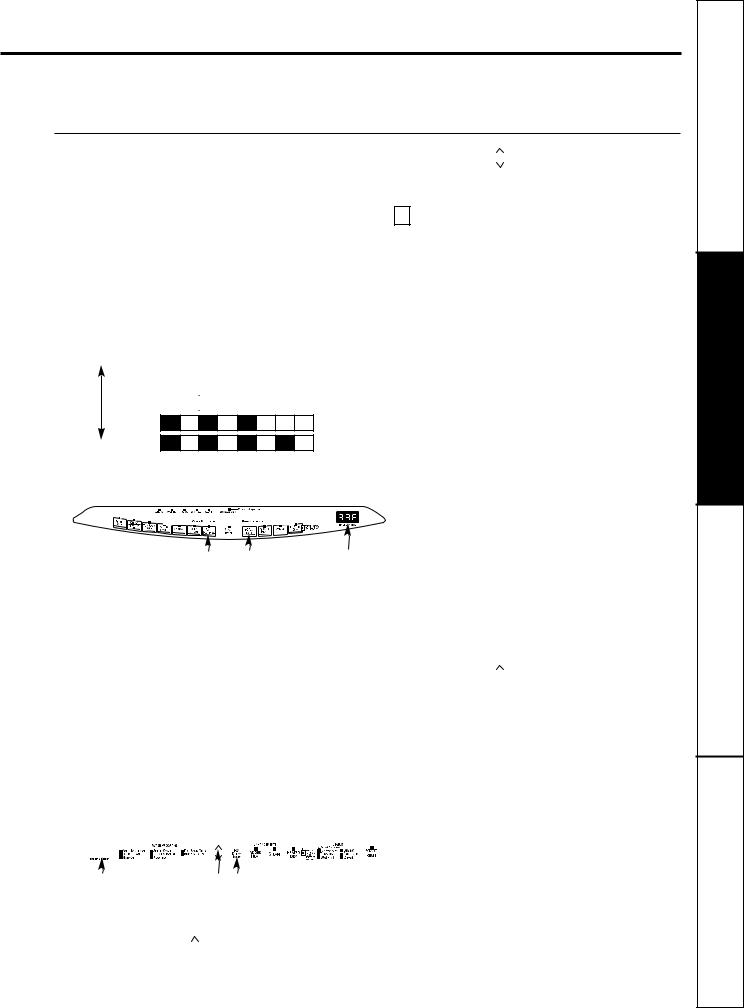
About the dishwashercontrolpanel.
You canlocate yourmodelnumber on thetubwalljustinsidethedoor. Throughoutthis manual,featuresandappearancemayvary fromyourmodel.
Front-Control Dishwashers |
1 |
6 |
|
2 |
|
3 |
|
5 |
4 |
Top-Control Dishwashers |
1 |
5 |
|
2 3 4 6
ControlSettings
1 StatusIndicator Lights (Indicators varyby models)
The Statusdisplay tellsyouwhatis happeningwhilethe dishwasher is in operation andmayflash, indicating a malfunction.Thelights will come ON indicating the sequence of the dishwasheroperation.
LOW DETERGENT DisplayedwhentheSmartDispenseTM needs to be refilledwith liquid or gel automatic dishwasherdetergent.
NOTE: If you are notusing SmartDispenseTM and you want to turn the LOW DETERGENT LED light off, pressthe ADDED HEATpad 5 timeswithin 3 seconds.You willhear3 beeps; then the light will go off. You can turnthe lightbackon by pressingthe ADDED HEATpad 5 timeswithin3 seconds.
SENSING Displayedwhile theClean SensorTM is measuring the amount of soil and temperature of water.Thedishwasher will adjust the selectedcycle to achieveoptimalperformance.
WASHING Displayedduringprewash, mainwashand rinse periods.
DRYING DisplayedduringHEATED DRY.
SANITIZED Displayedwhencycle has metsanitization conditions.
CLEAN Displayedwhena washcycle is complete.
2 TimeRemaining Display (onsome models)
During operation,the display showstheminutes remaining until the cycle is complete.Thedisplaymay adjusttheremaining timewhile the Sensing light is on. The timedisplayed at the start of each cyclemay change from the factory setting as theunitcustomizesitselfto homeuse.During a delay start, thedisplay will showhours of time remaining until thecycle starts.
NOTE: This dishwasher is equipped with CleanSensorTM with automatic temperature control; therefore, cycle length and time may vary depending on soil and water temperatureconditions.
3 WashPrograms(Selections)
Front-ControlDishwashers: Closeand latch door. Pressthepad forthedesiredwash cycle. Top-ControlDishwashers: Use thearrowpads 
 to scrollthrough thewash cycleswhiledooris open.
NOTE: All cycle timesand waterusage information contained in the following sectionare approximate values.Actual results willdependon severalfactors,includingbut not limited to inlettemperature
and amountof soil in the washwater.
The light above or next to theselectedpad willbe ON to indicatewhich WASHCYCLEhasbeenselected.
6

GEAppliances.com
3 Wash Programs (Selections) (continued)
ANTI-BACTERIAL/ 7.5–8.75 gal.,50–135 min.
SANI WASH
|
|
|
This cycle raises thewatertemperaturein the final rinse to sanitizeyour dishware. |
|
|
|
Thecycle length will vary depending on the temperature of your inletwater. |
|
|
|
NOTE: TheAnti-Bacterial cycle is monitored for sanitizationrequirements. If the cycleis |
|
|
|
interruptedduring or afterthe main wash portion or if the incomingwater temperature |
|
|
|
is so low that adequate waterheating cannot be achieved,the sanitizingconditions may |
|
|
|
notbe met. In thesecases,the sanitized light willnot illuminate at the end of the cycle. |
|
|
|
Whenusing the Anti-Bacterial cycle, do not openthe dishwasher door in the finalrinse. |
|
|
|
NOTE: NSF-certifiedresidential dishwashersarenot intended for licensedfood |
|
|
|
establishments. |
|
|
|
NOTE:Only the Anti-Bacterial cycle has been designed to meet the requirements |
|
|
|
of Section 6, NSF 184 for soil removal and sanitization efficacy. |
|
|
DEEPCLEAN |
10 gal.,115–135 min. |
(on some models) |
This cycle is meant for heavily soiled dishes or cookwarewith dried-onor baked-onsoils. |
||
|
|
|
This cycle may not remove burned-onfoods.Everyday dishes aresafe to be used in this |
|
|
|
cycle. |
|
|
|
NOTE: On somemodels, theSTEAM enhancement will be automaticallyselected when |
|
|
|
theDEEPCLEAN cycle is chosen, and cannot be de-selected. |
|
|
COOKWARE/ 8.75–10 gal.,75–140 min. |
|
|
|
POTS & PANS |
This cycle is meant for heavily soiled dishes or cookwarewith dried-onor baked-onsoils. |
(on some models) |
This cycle may not remove burned-on foods. Everyday dishes are safe to be used in |
||
|
|
|
this cycle. |
|
|
NORMAL WASH |
5.2 gal.,60–90 min. |
|
|
|
This cycle is for medium/heavily soiled dishes and glassware. |
|
|
|
Cycle time and water usage are approximate values. Results will depend on |
|
|
|
several factors, including but not limited to inlet temperature, household water |
|
|
|
pressure and amount of soil in the wash water. |
|
|
|
|
|
|
SPEEDCYCLE |
7.5 gal.,35–70 min. |
(on some models) |
This cycle is for everyday dishes and glassware. |
||
|
|
|
|
|
CHINA/CRYSTAL |
7.5 gal.,40–60 min. |
|
|
|
LIGHT WASH |
This cycle is for lightly soiled china and crystal. |
(on some models) |
NOTE:On some models, this cycle and PLASTICS selector is a toggle pad; push pad |
||
|
|
|
|
|
|
|
to switch betweenthis cycleand PLASTICS. |
|
|
|
|
|
|
GLASSES |
7.5 gal.,40–75 min. |
(on some models) |
This cycle is specifically designed for glasses. |
||
|
|
|
|
|
|
PLASTICS |
6.25–7.5 gal., 85–145 min. |
(on some models) |
The longer time for this cycleincludes a built-in drying portion that is specifically |
||
|
|
|
|
|
|
|
designed to reduce the risk of melting plastic items and improve plastic drying. |
|
|
|
|
|
TOP RACK ONLY |
5–8.75 gal., 50–110 min. |
|
(on some models) |
This cycle washeslightly soiled dishes on the upper rack only. |
||
|
|
|
|
|
|
|
|
RINSE AND HOLD |
2.5 gal.,11 min. |
||
|
|
(RINSE ONLY) |
For rinsing partial loadsthat will be washed later. Do not use detergent with this cycle. |
7
Instructions Safety
Instructions Operating
Tips Troubleshooting
Support Consumer
Safety Instructions
Operating Instructions
Troubleshooting Tips
Consumer Support
About the dishwashercontrolpanel.
4 Enhancements
The light above the selectedpad will be ON to indicate which ENHANCEMENT has been selected.
DELAYHOURS You can delaythe startof a wash cycle for up to 24 hours (depending on model). Press the DELAYSTARTpad to choosethe number of hours you want to delay the start of the cycle; then press START/RESET.
Front-Control Dishwashers: The machine will count down and start automatically at the correct time.
Top-Control Dishwashers: After closing the door, the machine will count down and automatically startat the correct time.
NOTE:To cancel the DELAYSTART selection before the cycle begins, repeatedly press the DELAYSTART pad until the display is blank.
TEMP BOOST/ When selected, the cyclewill run longer with heating element on to improveboth wash ADDED HEAT/ and dry performance.
EXTRA HOTWASH NOTE:Cannot be selected with RINSE AND HOLD cycle.
STEAM For use with heavily soiled and/or dried-on, baked-on soils. This option MUST be (on some models) selected PRIORto starting the cycle. The STEAM option adds 26 minutes to the
cycle time.
NOTE:Cannot be selected with RINSE AND HOLD cycle.
HEATED DRY When HEATED DRY is off, dishes will air dry. Top-control models havea fan that assists the drying process. The fan will run up to 4 hours after the CLEAN light illuminates. If desired, pressing any keypad will turn off the fan.
Light Off: Shuts off the drying heat option. Dishes will air dry naturally (front-control dishwashers) or fan dry (top-control dishwashers) to save energy.
Light On: Turns the heater on for faster drying. This will extend the total cycle time between 8 and 38 minutes depending on the cycle selected. On top-control models, a fan will continue to run up to 2 hours after the CLEAN light illuminates to assistthe drying process. If desired, pressing any keypad will turn off the fan.
NOTE:Cannot be selected with RINSE AND HOLD cycle.
LOCK You can lock the controls to prevent any selections from being made. Or you can lock the controls after you have started a cycle.
Children cannot accidentally start dishwasherby touching padswith this option selected.
To unlock the dishwasher controls, press and hold the HEATEDDRY pad for 3 seconds.
The lightabove the lock pad will turn off.To lock the dishwasher,press and hold the
HEATED DRY pad for 3 seconds. The light above the LOCK pad will turn on.
RESET To change a cycleafterwashing starts…
Front-Control Dishwashers: Touch the START/RESETpadto cancel the cycle.
TheSTART/RESETlight will flash while the water is pumped out if needed. This takes approximately 2 minutes.
Top-Control Dishwashers:Openthe doorslowly to prevent splash-out.
Touch the START/RESET pad to cancel the cycle. If the START/RESET light is flashing, close the door until the water pumps out (this takes approximately 2 minutes)
and the light stops flashing.
When the light stops flashing, the dishwasher can be reprogrammed and restarted.
5 Start
Front-Control Dishwashers
Close and latch the dishwasher door and select the cycle and desired enhancements. Touch the START/RESET pad one time to beginthe cycle. Water fill begins immediately, and approximately 60 seconds later the wash action begins.
When the dishwasher door is fully closed and latched, the controlpanel lights will display the last settings you selected. If you don’t want to change any of the settings, simply touch the START/RESET pad to beginthe cycle.
If the door is closed, the indicatorlights willturnoff if the START/RESETpad is not selectedwithin 5 minutes.
To activate the display,openand close the dooror pressany pad.
8

GEAppliances.com
5 Start (continued)
Top-Control Dishwashers
After selecting the cycle and desired enhancements, touch the START/RESET pad to ready the dishwasher to begin the cycle.Close the door to start the cycle or begin the DELAYSTART countdown. When the cycle starts, the water fill begins and approximately 60 seconds later the wash action begins.
The dishwasher will alwaysdisplayyour last selection and enhancements. If you don’t want to change the settings, simply touch the START/RESETpad to ready the dishwasher and close the door to begin the cycle.
ALL MODELS: If a power failure occurs NORMALand HEATEDDRY will automaticallybe programmed. Make any new selections and touch the START/RESET pad to begin the new cycle.
When the door is opened, the indicatorlightswill turn off if the START/RESET pad is not selected within 5 minutes. To activate the display,open and close the door or touch any pad.
6 Clean
Front-Control Dishwasher
The CLEAN light will illuminate and a doublebeep will sound when a wash cycle is complete.On some models, the CLEAN light will turn off when the door is opened. On other models, the CLEAN light will remain on until the door is opened and then relatched or until any keypad is pressed while the door is latched shut.
Top-Control Dishwasher
The CLEAN light will illuminate and a doublebeep will sound when a wash cycle is complete.The CLEAN light will remainon until the door is opened and then relatched or until any key is pressed.
ALL MODELS: To turn off the audibleend-of-cycle signal (or re-activate it if it was previously turned off), press the HEATED DRY pad 5 times within 3 seconds. A triple beep will sound to indicate the end-of-cycle beep option has been toggled.
Flashing display lights.
Status Indicator Lights |
WhatIt Means |
START/RESET |
Cycle has been interrupted by pressing the START/RESET pad, or there |
|
has been a power failure. Light will stop flashing after the dishwasher |
|
automatically drains out the water. The dishwasher will restart with NORMAL |
|
and HEATED DRY if the interruption was the result of a power failure. |
Recommendeddishwasherproducts.
GErecommendsthe following products for use in its dishwashers:
■For your manual detergent dispenser,Cascade® powder, liquidor gel automatic dishwasher detergents are approved.
■For your SmartDispenseTM Detergent Dispenser,use only the recommended liquidautomatic detergents listed on page 12 of this manual.
■Cascade Crystal Clear® rinse agents to remove spotsand prevent new film buildupon your dishes, glasses, flatware, cookware and plastic. Using rinse agentalso improves dry performance.
■Cerama Bryte® Stainless Steel Appliance Cleaner to clean the exterior stainless steel panel of GEand ProfileTM dishwashers (for stainless steel exterior models only).
9
Instructions Safety
Instructions Operating
Tips Troubleshooting
Support Consumer
Safety Instructions
Operating Instructions
Troubleshooting Tips
Consumer Support
Using the dishwasher.
Check the Water Temperature
The entering water should be at least 120°F and not morethan 150°F for effective cleaningand to prevent dish damage. Check the water temperaturewith a candyor meat thermometer.Turn on the hot water faucet nearest the dishwasher, placethe thermometerin a glass and let the water run continuously into the glass until the temperaturestops rising.
Use Cascade Crystal Clear® Rinse Agent
Cascade Crystal Clear® rinse agent improves drying, removes spots and prevents new film buildup on your dishes,glasses, flatware, cookware and plastic.
Filling the Dispenser
The rinse agent dispenser holds 3.5 oz. of rinse agent. Under normal conditions, this will last approximately one month. Try to keep it full, but do not overfill.
1 |
Make sure the dishwasher door is fully open. |
|
2 |
Turn the dispenser |
|
|
cap to the left and |
|
|
lift it out. |
|
3 |
Add rinse agent until |
|
|
the indicator window |
|
|
looksfull. |
|
4 |
Cleanup any spilled |
Indicator |
|
rinse agent with a |
|
|
damp cloth. |
window |
|
Dispenser cap |
|
5 |
Replace the dispenser cap. |
|
Rinse Aid Setting
The amountof rinse agent released into the final wash can be adjusted. The factory setting is at the midpoint. If there are rings of calcium (hard water) spots on dishes, try a higher setting. If there is foaming, use a lower setting.
To adjust the setting: |
|
|
Remove the dispenser cap |
|
|
then turn the adjuster |
|
|
counterclockwise to |
|
|
increase the amount |
Rinse agent |
|
of rinse agent or |
||
adjuster |
||
clockwise to reduce |
|
|
the amountof rinse agent dispensed. |
|
Dish Preparation Prior to Loading
■ No prerinsing of normal food soil is required. |
■ Remove large quantities of any remaining food. |
■ Scrape off hard soils, bones, toothpicks,skins and |
■ Remove leafy vegetables, meat trimmings and |
seeds. |
excessive amounts of grease or oil. |
Forget to Add a Dish?
A forgotten dish can be added any time before |
3 |
Add forgotten dishes. |
||
the main wash. |
|
Close the door and dishwasher will start |
||
|
||||
|
|
Squeeze the door latch to release the door. |
4 |
|
|
1 |
|
in 5 seconds. |
|
|
||||
|
|
Do not open the door until the water spray |
|
|
2 |
|
|
||
|
|
action stops. Steam may rise out of the |
|
|
|
|
|
|
|
|
|
dishwasher. |
|
|
10
GEAppliances.com
Manual Detergent Dispenser
Somemodelscome equippedwith an automaticliquid dishwasherdetergentdispenser(SmartDispenseTM) and
a manualdispenser.Youcan use eitherof thesedispensers but don’t use bothat the sametime.

 SmartDispenseTM
 Manual Detergent
Dispenser
The coverof the manualdispenserwill openduringthe wash cycle.If you are using SmartDispenseTM, leavethe cover of the manualdispenseropenbefore startingthe cycle.
For the manualdispenser,Cascade® Automatic DishwashingDetergentshavebeenapproved. Youmay use powder,liquid, gel packetsor tabletsin this dispenser.It is important to keep powdered detergents and tablets fresh and dry so theydon’t lose effectiveness.Therefore, do not put detergentinto the manualdispenseruntil you areready to wash dishes.
Filling Manual Detergent Dispenser
The amountof detergentto use depends on whetheryour water is hardor soft. With hard water,you needextra detergent. With soft water,you needless detergent.
Protect yourdishesand dishwasherby contactingyour water department and asking how hard your wateris. Twelve or moregrainsis extremely hard water.A water softeneris recommended.Withoutit, lime can buildup in the watervalve, whichcouldstick while openand cause flooding. Too much detergentwith soft water can cause a permanent cloudinessof glassware,called etching.
Use the information in the tablebelow as a guide to determinethe amount of automatic dishwasherdetergent to placein the dispenser.
When usingautomatic dishwashing detergent packets or tablets, simply placeone in the mainwash sectionand close the cover.
Number |
|
of Grains |
Detergent Cups to Fill |
|
|
Less than 4 |
Fill cup to soft line (1/3 full) |
|
|
4 to 8 |
Fill cup to medium soft line (2/3 full) |
|
|
8 to 12 |
Fill cup to medium hard line |
|
(completely full) |
|
|
Greater |
Fill both main wash cup |
than 12 |
and pre wash cup |
|
|
For heavilysoiled loads,use a bit more detergent.For water temperaturesabove140°F,use a bit lessdetergent.
|
Medium |
Medium |
Extremely |
Soft |
Soft |
Hard |
Hard |
For heavily soiled loads, use the Deep Clean or Cookware cycle.
DO NOTUSEHAND DISHDETERGENT
NOTE: Using a detergentthat is not specificallydesigned for dishwasherswillcausethe dishwasherto fill with suds. During operation,thesesuds willspill out of the dishwasher vents, coveringthe kitchenfloorand makingthe floorwet.
Becauseso many detergentcontainerslookalike,store the dishwasherdetergentin a separate spacefrom all other cleaners.Showanyonewho may use the dishwasher the correctdetergentand whereit is stored.
While therewillbe no lasting damageto the dishwasher, yourdisheswill not get clean usinga dishwashing detergentthat is not formulated to workwith dishwashers.
11
Instructions Safety
Instructions Operating
Tips Troubleshooting
Support Consumer
Safety Instructions
Operating Instructions
Troubleshooting Tips
Consumer Support
Using the dishwasher.
SmartDispenseTM Detergent Dispenser (some models)
This dishwasher may have SmartDispenseTM, a feature which automatically dispenses liquid automatic dishwasher detergent into each cycle based on soil level and water hardness. To utilize the SmartDispenseTM Detergent Dispenser, it must first be filled. Although any liquid or gel automatic dishwashing detergent can be used in the SmartDispenseTM system, all liquid or gel automatic dishwashing detergents are not the same. Most automatic dishwashing detergentsare chlorine bleach-based (such as Cascade®) while others contain enzymes (such as Cascade Complete®).
Do not mix any chlorine bleach-based automatic dishwashing detergent with any dishwashing detergent containing enzymes as this could cause the detergents to congeal and lead to blockage of the SmartDispenseTM system.
Check the detergent label to determine if the detergent is chlorine bleach-based or one that contains enzymes. It is recommended that the same type of detergent be used when refilling your SmartDispenseTM system.
 CAUTION! Absolutely do not add powder detergent, tablets or any liquid soap or detergent normally used for washing hands or dishes in a sink. Only use liquid or gel detergent specifically designed for use in
an automatic dishwasher.
 ¡PRECAUCIÓN! Bajo ninguna
circunstancia agregue detergente en polvo, tabletas o jabón o detergente líquido normalmente utilizado para lavar manos o platos en un fregadero. Sólo utilice detergente líquido o en gel específicamente diseñado para utilizar en lavaplatos automáticos.
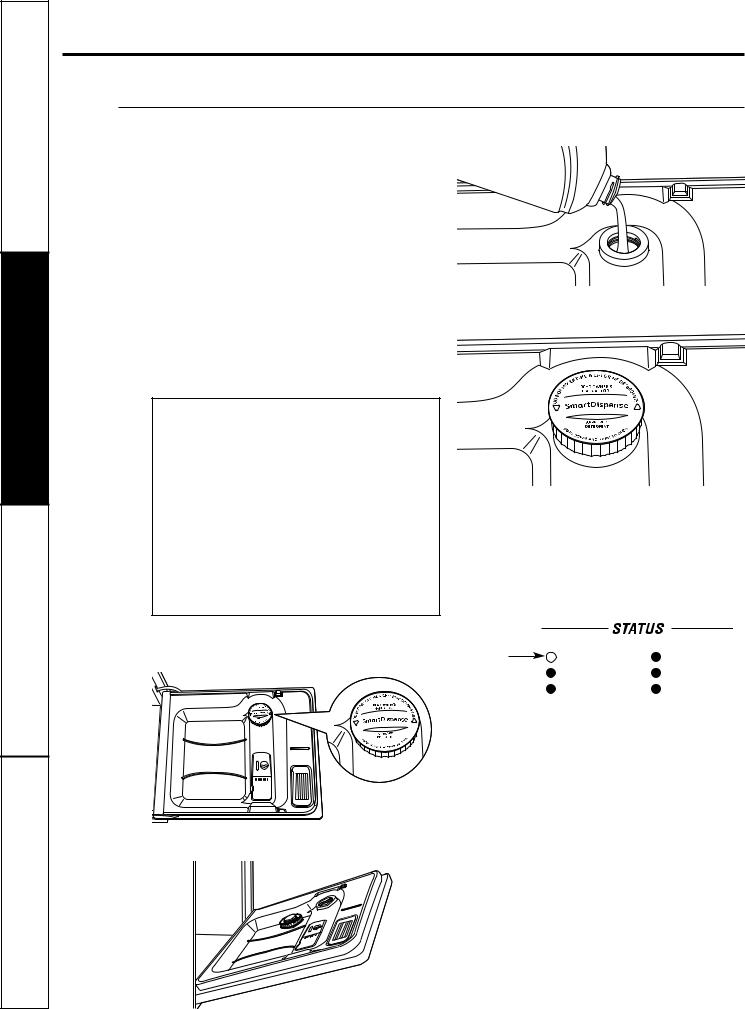
To open the dispenser for filling, push down and turn the blue cap counterclockwise until the cap is loose. Lift cap off.
Aim the detergent bottle at the opening in the door and begin to fill.
The dispenser will hold 45 oz of liquid dishwasher detergent (standard size bottle).
Turn clockwise.
When full, replace the cap and turn clockwise until tight to ensure no water enters the SmartDispenseTM dispenser. If residue is left on the door,it will be washed off in the next cycle.
An indicator light will turn on to notify you when the dispenser needs to be filled again. After filling, the light will not turn off until the door is closed. A full dispenser will last approximately 1 month for the average user.
SmartDispense
Light Will |
LOW DETERGENT |
DRYING |
|
Turn On |
SENSING |
SANITIZED |
|
When |
WASHING |
CLEAN |
|
Time to |
|||
|
|
||
Refill |
(appearance may vary) |
||
NOTE: If you are not using SmartDispenseTM and you want to turn the LOW DETERGENT LED light off, press the ADDED HEAT pad 5 times within 3 seconds. You will hear 3 beeps; then the light will go off. You can turn the light back on by pressing the ADDED HEAT pad 5 times within 3 seconds.
Set the door at a comfortable angle to fill the dispenser.
12
GEAppliances.com
SmartDispenseTM Detergent Dispenser
Water Hardness Calibration
Prior to the first use, the dishwasher needs |
3 |
Press the “Up” |
|
arrow pad to raise the value |
to be calibrated for water hardness. Please follow |
|
or the “Down” |
|
arrow pad to lower the value. |
|
||||
the directions below to calibrate the dishwasher |
|
Set the water |
|
|
|
hardness value to the number |
|||
to the hardness of your tap water. |
|
determined with the test strip and table at the left. |
||
Determinethe Hardness of Your Tap Water
In the bag that contained these instructions, you should find a water hardness test strip package. Read the instructions on the package, remove the test strip and follow the instructions to determine the hardness level of your tap water. You will use this information to calibrate your dishwasher to dispense the optimal amount of detergent.
Water hardness test strip indication. |
|
Value to Enter |
|||||||||
|
|
|
|
|
|
|
|
|
|
into Dishwasher |
|
|
SOFT |
0 RED |
|
|
|
|
|
|
|
|
1 |
|
|
|
|
|
|
|
|
|
|||
|
|
|
|
|
|
|
|
|
|
||
|
|
||||||||||
|
|
|
|
|
|
|
|
|
|
|
|
|
|
|
|
|
|
|
|
|
|
|
|
|
|
1 RED |
|
|
|
|
|
|
|
|
2 |
|
|
|
|
|
|
|
|
|
|
|
|
|
|
|
|
|
|
|
|
|
|||
|
|
2 RED |
|
|
|
|
|
|
|
|
3 |
|
|
|
|
|
|
|
|
|
|
|
|
|
3 RED |
4 |
HARD |
4 RED |
5 |
|
|
4 Once the water hardness is set, press the START/RESET pad to save the setting and return the dishwasher to normal operation.
CalibrationofModelsWithouta3-DigitDisplay
Front controls
1 |
Close and latch the door (lights on, dishwasher |
|
not running). |
|
|
|
Pressthe SANI WASH/ANTI-BACTERIAL and DELAY |
2 |
|
|
HOURS pads at the same timefor 3 seconds.All |
|
|
|
lights will light up and you will hear 1 to 5 beeps. |
|
The number of beeps indicates the current |
|
hardness value. |
|
To change the setting, press the DELAYHOURS |
3 |
|
|
pad the number of times that corresponds to the |
|
|
|
water hardness value determined at the left. The |
|
control will beep each time you press the pad. |
Calibration of 12-Button Front-Control
Models With 3-Digit Display
|
|
|
|
|
|
|
|
|
|
|
|
|
|
|
|
|
|
|
Press at the same time. |
Display |
||||||
|
Close and latch the door (lights on, dishwasher |
|||||||
1 |
||||||||
|
not running). |
|
||||||
|
Press the SANI WASH/ANTI-BACTERIALand DELAY |
|||||||
2 |
||||||||
|
HOURS padsat thesametimefor3 seconds. |
|||||||
|
||||||||
|
The displaywill showa number from 1 to 5. This |
|||||||
|
is the water hardness valuecurrentlyset. |
|
||||||
|
Press the SANI WASH/ANTI-BACTERIAL pad to |
|||||||
3 |
||||||||
|
raisethe value or the NORMAL pad to lower |
|||||||
|
||||||||
|
the value. Set the water hardness value to the |
|||||||
|
number determined with the test stripand table |
|||||||
|
above. |
|
||||||
|
Once the water hardness is set, press the |
|
||||||
4 |
|
|||||||
|
START/RESET pad to savethe setting and return |
|||||||
|
||||||||
|
the dishwasher to normal operation. |
|
||||||
Calibration of 7-Button Top-Control Models
With 3-Digit Display
|
|
|
|
|
|
|
|
|
|
|
|
|
|
|
|
|
|
|
|
|
|
|
|
|
|
|
|
|
|
|
|
|
|
|
|
|
|
|
|
|
|
|
|
|
|
|
|
|
|
|
|
|
|
|
|
|
|
|
|
|
|
|
|
|
|
|
|
|
|
Display |
|
|
Press at the same time. |
|
|
|
||||||||||||||||||||||||||||
|
|
Open the door and touch a pad (other than |
|
|
|
|||||||||||||||||||||||||||||
1 |
|
|
|
|||||||||||||||||||||||||||||||
|
|
START) to turn lights on. |
|
|
|
|||||||||||||||||||||||||||||
|
|
|
|
|
||||||||||||||||||||||||||||||
|
|
Press the “Up” |
|
arrow pad and DELAYHOURS |
|
|
|
|||||||||||||||||||||||||||
|
2 |
|
|
|
|
|||||||||||||||||||||||||||||
|
|
pad at the same |
time for 3 seconds. The display |
|
|
|
||||||||||||||||||||||||||||
|
|
|
|
|
||||||||||||||||||||||||||||||
|
|
will show a number from 1 to 5. This is the water |
|
|
|
|||||||||||||||||||||||||||||
|
|
hardness value currently set. |
|
|
|
|||||||||||||||||||||||||||||
|
4 |
Once finished pressing the pad, you will hear a |
||
|
|
confirmation with beeps for the number of times |
||
|
|
|||
|
|
you pressed the pad. |
||
|
|
If the number of beeps is not what you desire, |
||
5 |
||||
|
|
start pressing the DELAYHOURS pad again to |
||
|
|
|||
|
|
reenter a new water hardness level. |
||
|
|
Once the water hardness is set, press the |
||
6 |
||||
|
|
START/RESET pad to save the setting and return |
||
|
|
|||
|
|
the dishwasher to normal operation. |
||
Topcontrols |
||||
|
|
Open the door and touch a pad to turn lights on. |
||
1 |
||||
|
|
Press the “Up” |
|
arrow pad and DELAYHOURS |
|
2 |
|
||
|
pad at the same time for 3 seconds. All lights |
|||
|
|
|||
|
|
will light up and you will hear 1 to 5 beeps. The |
||
|
|
number of beeps indicates the current hardness |
||
|
|
value. |
||
|
|
To change the setting, press the DELAYHOURS |
||
3 |
||||
|
|
pad the number of times that corresponds to the |
||
|
|
|||
|
|
water hardness value determined at the left. The |
||
|
|
control will beep each time you press the pad. |
||
|
|
Once finished pressing the pad, you will hear a |
||
4 |
||||
|
|
confirmation with beeps for the number of times |
||
|
|
|||
|
|
you pressed the pad. |
||
|
|
If the number of beeps is not what you desire, |
||
5 |
||||
|
|
start pressing the DELAYHOURS pad again to |
||
|
|
|||
|
|
reenter a new water hardness level. |
||
|
|
Once the water hardness is set, press the |
||
6 |
||||
|
|
START/RESET pad to save the setting and return |
||
|
|
|||
|
|
the dishwasher to normal operation. |
||
NOTE: You should recalibrate the dishwasher control if water conditions change; for example, if a water
softener system is added or removed from your |
13 |
home. |
Instructions Safety
Instructions Operating
Tips Troubleshooting
Support Consumer
Safety Instructions
Operating Instructions
Troubleshooting Tips
Consumer Support
Loading the dishwasher racks.
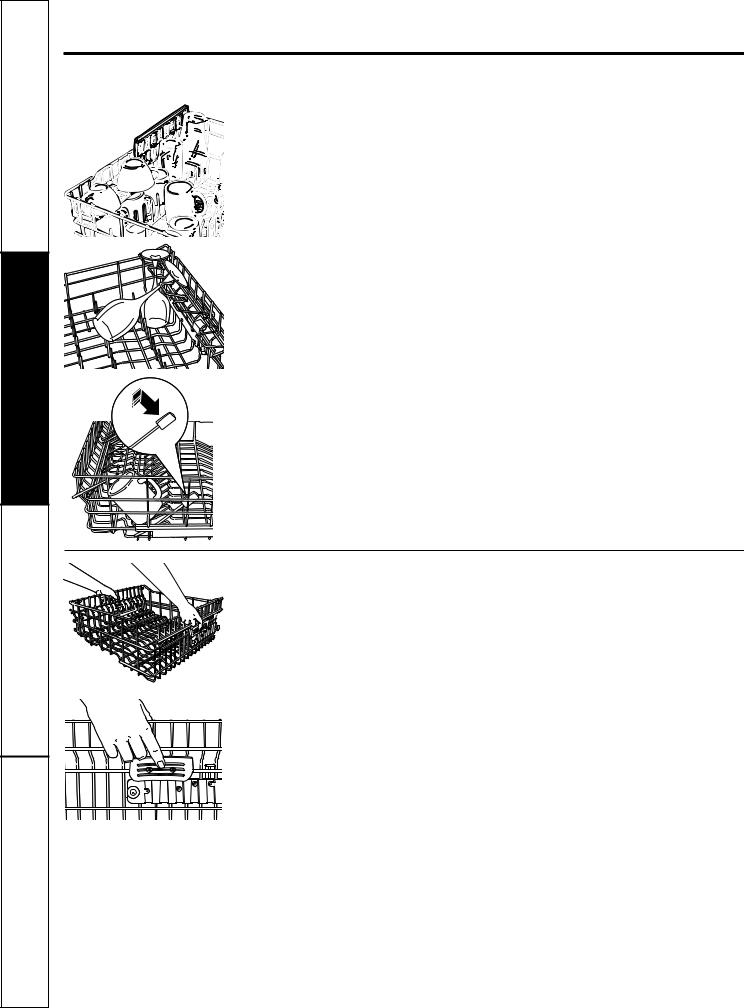
For best dishwashing results, followthese loadingguidelines. Features and appearance of racksand silverware baskets may vary from your model.
Upper Rack
Although the upper rack is primarily for glasses, cups and saucers, pots and pans can be placed in this rack for effective cleaning. Cups and glasses fit best along the sides. This is also a secure place for dishwasher plastics.
The utilityshelf (some models) may be placed in the up or down positionto add flexibility. A wine glassholder (some models) secures wine glasses for best washability.
Some models have contoured metal cup shelvesthat can secure up to 12 wine glasses (as shown).
Because wine glasses come in various sizes, after loading, slowly push in the rack to make sure they will clear the top of the dishwasher.
Some models have an Angled Rack System, which allows you to angle your dishes, such as coffee mugs, for better cleaning and quicker drying. To position the tines, pull the lever forwardthen drop the tines into position, then release the lever.
The upper rack is good for all kinds of odd-shaped utensils. Saucepans, mixing bowls and other items should be placed face down. Fold-down tines (on some models) provide flexibility for extra-large and hard- to-fit items.
Secure larger dishwasher-safe plastics over 2 tines when possible.
Make suresmall plastic items are secure so they can’t fall onto the heater.
Be surethat items do not protrude through the bottom of the rack and block rotation of the middle spray arm. This could result in poor wash performance for items in the upper rack.
Check to make sure that no items will block rotation of the wash arm.
NOTE: The Single Rack Wash selection, on models with this feature, washes the upper rack only. If you use this feature, do not load items in the lower rack.
Adjustable Upper Rack (on some models)
The standard position of your adjustable rack is “up” which allows for maximum clearance for your taller items in the lower rack. If you havetallerwine glasses, tumblers or other items to place in the upperrack,you may wantto adjust the rack to the lower position.
To lower the rack, support the weight of the rack with your hands as shown and press both finger pads about 1/4″ towardthe inside of the rack as indicated and guide the rack down to its lower position.
To raise the rack to the “up” position, pull up on the center of the rack side frame until the rack locks into place.
14
GEAppliances.com
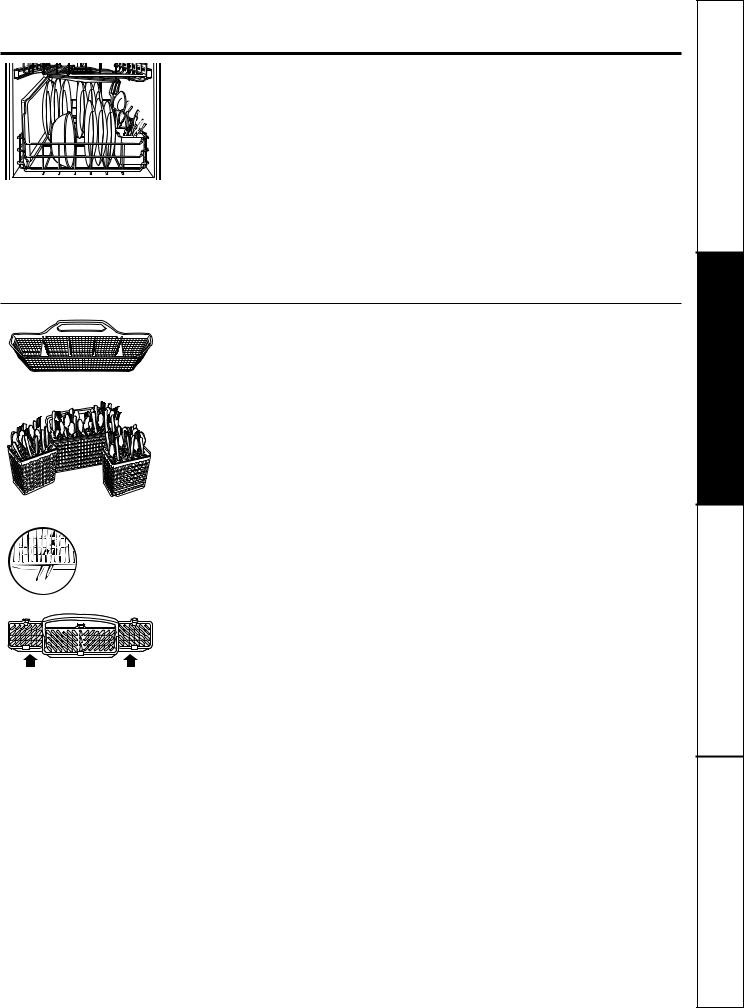
Lower Rack
The lower rack is best used for plates, saucers and cookware. Largeitemssuch as broiler pans and baking racksshould go along the left-hand side.Load platters, pots and bowls along the sides, in corners or in the back. The soiled side of items should face the center of the rack. If necessary, oversizedglasses and mugs can be placed in the lowerrack to maximizeloadingflexibility.
Also,be careful not to let a portion of an item such as a pot or dish handle extend through the bottom rack. This could blockthe wash arm and cause poor washing results.
Fold-down tines (on some models) provide flexibility for extra-large and hard-to-fit items. The tines may be left in the up position or folded down to customize the lower rack. Do not load large bowls or pots facedown in the front left-hand corner. Items loaded in this manner could prevent proper operation of the manual detergent cup.
One-piece basket (on some models)
Three-piece basket (on some models)
Don’t let any
item extend through bottom.
Silverware Basket
To load flatware, simplypush the adjustable handle to either side (on some models). Put flatwarein the removablebasket with fork and knife handles up to protect your hands. Place spoons in the basket with handles down. Mix knives, forks and spoons so they don’t nest together. Distributeevenly. Small plasticitems, such as measuring spoons and lids from small containers should go in the bottom of the silverware basket with the silverwareon top.
The one-piece silverware basket (on some models) can be placed in the front, right side or back of the lower rack.
A variety of options is available regarding the three-piece silverware basket (on some models) in your dishwasher. The complete basket is designed to fit on the right sideof the lower rack. Additionally, each end of the basket is removable to add loading flexibility to accommodate flatware and lower rack capacity needs.
The lids of both end and middle baskets (on some models)can be closed to contain small items. Long items can be placed on the utility shelf in the upper rack. Load flatware through the slots in the silverware basket covers.
To remove end baskets, grasp the basket at opposite corners and slide apart.
15
Instructions Safety
Instructions Operating
Tips Troubleshooting
Support Consumer
 Loading...