


JV394
Table of contents
 Loading...
SAFETY PRECAUTIONS
IMPORTANT SAFETY INFORMATION.
READ ALL INSTRUCTIONS BEFORE USING.
WARNING –
TO REDUCE THE RISK OF FIRE,
ELECTRIC SHOCK OR INJURY TO PERSONS,
OBSERVE THE FOLLOWING:
A. Use this unit only in the manner intended
by the manufacturer. If you have questions,
contact the manufacturer.
B. Before servicing or cleaning unit, switch
power off at service panel and lock the service
disconnecting means to prevent power from
being switched on accidentally. When the
service disconnecting means cannot be locked,
securely fasten a prominent warning device,
such as a tag, to the service panel.
C. Do not use this unit with any solid-state speed
control device.
D. Use with approved cord-connection kit only.
E. This unit must be grounded.
WARNING –
TO REDUCE THE RISK OF A
RANGE TOP GREASE FIRE:
A. Never leave surface units unattended at high
settings. Boilovers cause smoking and greasy
spillovers that may ignite. Heat oils slowly on
low or medium settings.
B. Always turn hood ON when cooking at high
heat or when cooking flaming foods.
C. Clean ventilating fans frequently. Grease should
not be allowed to accumulate on fan or filter.
D. Use proper pan size. Always use cookware
appropriate for the size of the surface
element.
(continued next page)
30″ Vented Hood
Use and Care & Installation Guide
GE Appliances
Models: JV394 JV395 JV396 JV930
Safety Instructions
...
Front Cover, 2
Operating Instructions
.........2, 3
Automatic Heat Sensor ...........................3
Controls .....................................................2
Cleaning
....................................................3
Filter............................................................3
Light Bulb Replacement..........................3
Installation
.....................................4–6
Damper/Duct Connector .........................5
Electrical Wiring .......................................6
Filter Panel.............................................3, 5
Mounting Brackets...................................5
Consumer Services
.....................7
Important Phone Numbers.....................7
Warranty ..................................Back Cover

OPERATING INSTRUCTIONS
Always turn your hood on before you begin cooking to establish an air flow
in the kitchen. Let the hood run for a few minutes to clean the air after you
turn the range off. This will keep the whole kitchen cleaner.
Controls
The hood is “OFF” when the glass visor is pushed
completely in.
LIGHT–The light will turn “ON” when the glass
visor is pulled out approximately 1/2 inch.
BLOWER–The blower will turn “ON” when the
drawer is pulled out approximately 1
1
⁄2 inches.
The blower speed is set using the slide control,
located to the right of the drawer.
2
READ AND FOLLOW THIS SAFETY INFORMATION CAREFULLY.
READ AND SAVE THESE INSTRUCTIONS
IMPORTANT SAFETY INFORMATION.
READ ALL INSTRUCTIONS BEFORE USING.
SAFETY PRECAUTIONS
CAUTION – For general ventilating use only. Do not
use to exhaust hazardous or explosive materials and vapors.
WARNING – TO REDUCE THE RISK OF INJURY TO
PERSONS IN THE EVENT OF A RANGE TOP GREASE FIRE,
OBSERVE THE FOLLOWING*:
A. SMOTHER FLAMES with a close-fitting lid,
cookie sheet, or metal tray, then turn off the burner.
BE CAREFUL TO PREVENT BURNS. If the flames
do not go out immediately, EVACUATE AND CALL
THE FIRE DEPARTMENT.
B. NEVER PICK UP A FLAMING PAN—You may
be burned.
C. DO NOT USE WATER, including wet dishcloths
or towels—a violent steam explosion will result.
D. Use an extinguisher ONLY if:
1. You know you have a Class ABC extinguisher,
and you already know how to operate it.
2. The fire is small and contained in the area
where it started.
3. The fire department is being called.
4. You can fight the fire with your back to an exit.
* Based on “Kitchen Firesafety T
ips
” published by NFPA.
WARNING –
TO REDUCE THE RISK OF FIRE,
ELECTRIC SHOCK OR INJURY TO PERSONS, OBSERVE THE
FOLLOWING:
A. Installation work and electrical wiring must be done by
qualified person(s) in accordance with all applicable
codes and standards, including fire-rated construction.
B. Sufficient air is needed for proper combustion and
exhausting of gases through the flue (chimney) of
fuel burning equipment to prevent back drafting.
Follow the heating equipment manufacturer’s
guideline and safety standards such as those
published by the National Fire Protection Association
(NFPA), and the American Society for Heating,
Refrigeration and Air Conditioning Engineers
(ASHRAE), and the local code authorities.
C. When cutting or drilling into wall or ceiling, do not
damage electrical wiring and other hidden utilities.
D. Ducted fans must always be vented to the outdoors.
WARNING – TO REDUCE THE RISK OF FIRE,
USE ONLY METAL DUCTWORK.
•
Do not attempt to repair or replace any part of your
hood unless it is specifically recommended in this
guide. All other servicing should be referred to a
qualified technician.
Automatic Heat Sensor
Your hood is equipped with an automatic thermostat.
This thermostat is a device that will turn on or speed
up the blower if it senses excessive heat above the
cooking surface.
If your blower is not on, or if it is running at low speed,
the thermostat will sense excessive cooking heat,
override the normal blower control and turn the blower
on to high speed. The blower will run until the
temperature drops to normal operating level. The blower
will then automatically return to its original setting.
Light Bulb Replacement
WARNING: ALWAYS DISCONNECT ELECTRIC POWER SUPPLY BEFORE SERVICING HOOD.
This hood uses a 24″ long F20T12 fluorescent
tube and an FS-2 starter, which are available at
most hardware stores or home centers.
To check or replace tube:
1. Pull the drawer out.
2. Rotate the filter panel clips and lower the
filter panel.
If the tube flickers or does not light, check the prongs
on the ends of the tube to make sure they are properly
seated in the tube holders.
If the tube continues to flicker or does not light,
replace the tube. Slide the tube into the holders and
rotate the tube so that the prongs in the holders grip
the tube and hold it in place.
If the ends of the tube light but the center does not,
the starter may require replacement. The starter is
located behind the filter panel on the right hand side.
Install the new starter by pushing the starter in and
turning it clockwise.
Stainless Steel (on some models)
Clean with warm sudsy water, a stainless steel cleaner
such as Kleen King
®
, or an all-purpose liquid or spray
cleaner. Always scrub in the direction of the grain.
Rinse thoroughly with a sponge or cloth and clean
water. Dry with a soft, clean cloth.
Do not use a soap-filled steel wool pad; it will scratch
the surface.
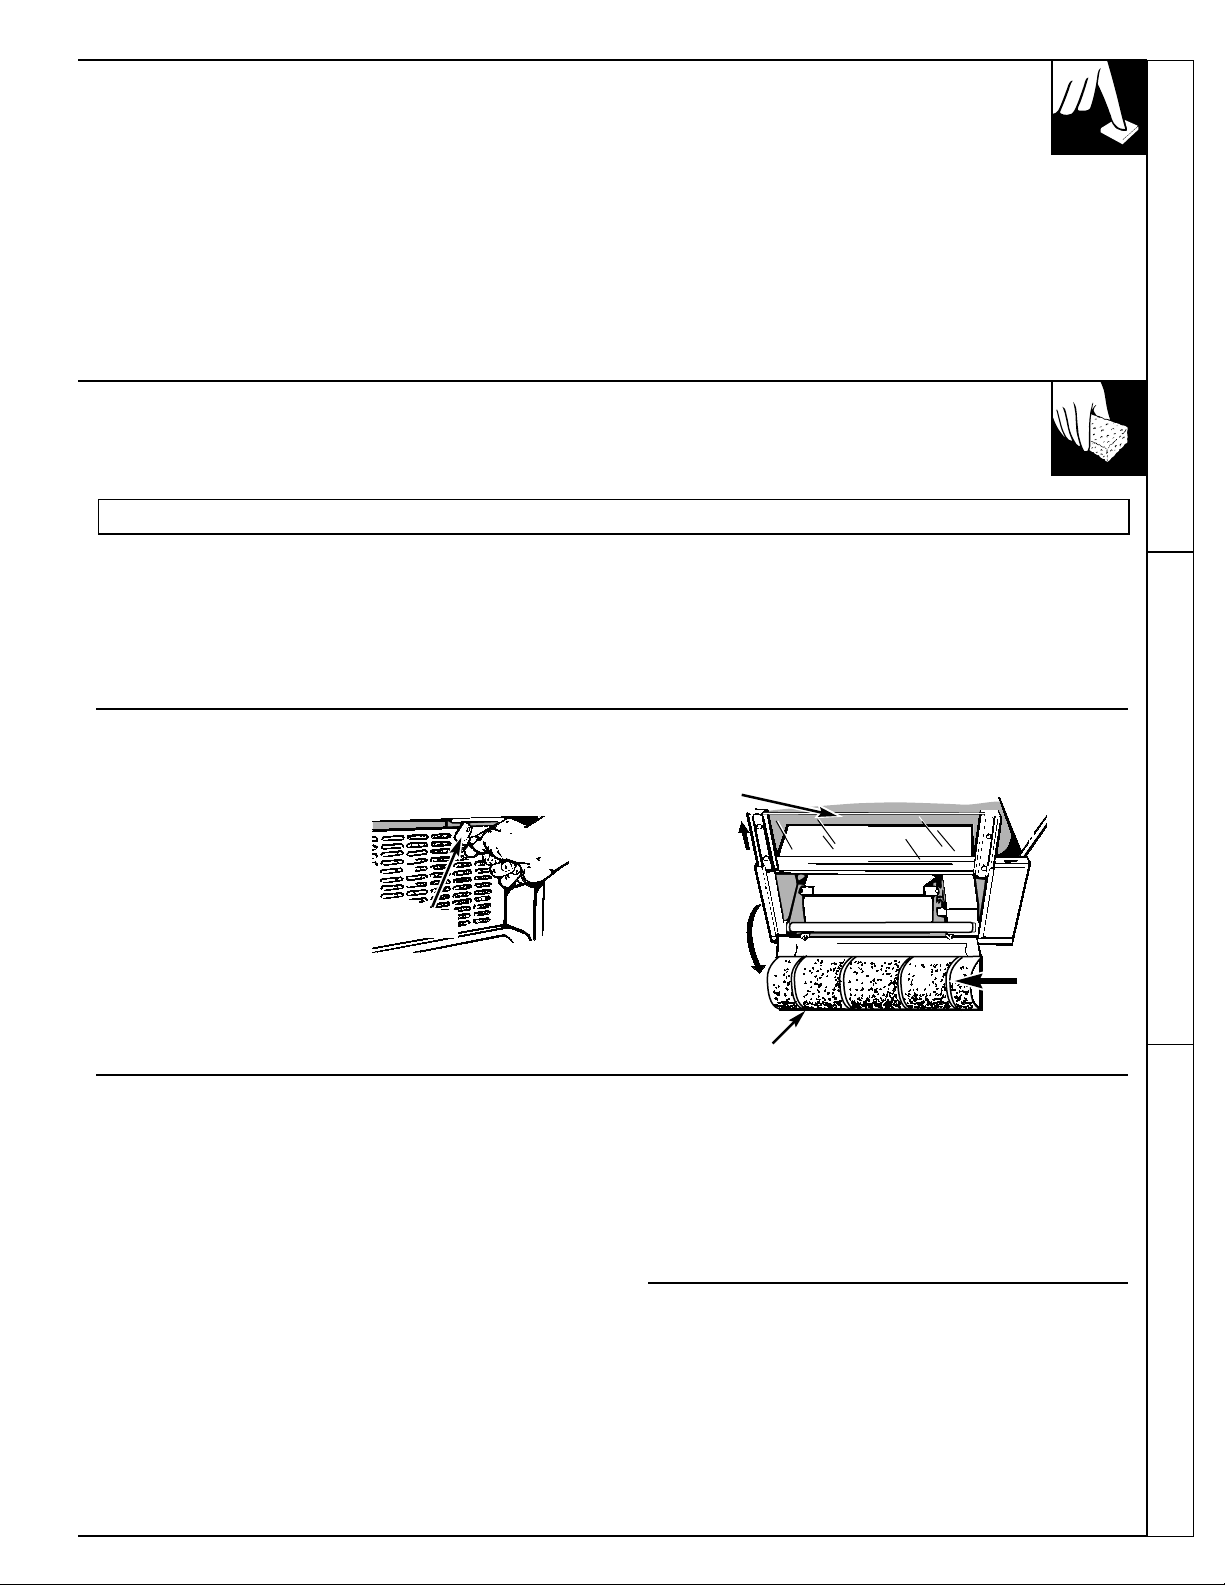
Filter
Slide the glass visor open.
Open the filter panel
by turning the two clips and
allowing it to swing free.
Flex the filter in the middle
to remove it.
Wash and rinse the filter in a
mild detergent solution.
Replace the filter before using the exhaust fan.
Panel clip
Glass visor
Filter panel
Grasp filter
and bend to
remove
CARE AND CLEANING
Use a mild detergent suitable for painted surfaces.
DO NOT USE ABRASIVE CLOTH, STEEL WOOL
PADS, OR SCOURING POWDERS. Vacuum the
blower to clean it. Do not immerse the blower in water.
The glass visor assembly and light lens are easily
removable for cleaning:
DO NOT clean in a dishwasher.
Remove the light lens by opening the filter panel and
turning the 2 metal clips holding the lens in place.
Important Safety Instructions Operating Instructions Cleaning
3
Loading...