


JTP75WM2WW
GE JTP75WM2WW, JTP75WM1WW, JTP75SM2SS, JTP75SM1SS, JTP75CM2CC Owner’s Manual
...
Safety Instructions ....... 2-4
_e° COrn
Operating Instructions
Clock and Timer ............ 9
Control Lockout ........... 19
Controls ................. 5, 6
Convection ............. l l-I 3
Oven ................... 7, 8
Sabbath Feaulre ......... 20, 21
Self-Cleaning Oven ...... 15, 16
Special Features ......... 17-19
Thermostat ............... 14
Timed Baking and Roasting . .10
Care and Cleaning
Control Panel ............. 22
Glass Surfaces ............. 25
I_oI) .................... 22
Lift-Off Oven Door . ..... 22, 23
Light Bulb ................ 24
Packaging _q)e ............ 22
Painted Surfaces ........... 25
Racks .................... 23
Stainless Steel Surfaces ...... 25
JKP30-2 7" Si_Lg'le Wull ()ve,_
JTP30-30" Sb_gTe _'_dl Ove_
JKP70-2 7" Sizable Co_vectio_ Wull ()ve_
JTP70-30" Si_gfe (,:o_mectio_ Wall Ove_
JKP_5-2 7" Double l'!2d[ (h:e_
.]TP_5-30" Doub# _4_lg (h_en
JKP55-2 7" Doub& l'!_dl (h_en
JTP55-30" Doub& l'!_/g ()ve_
JKP75-2 7" Doub& Co_vectio_ l'!_dl (h_e_
JTP75-30" Doub& Co_vectio_ 14_d[ (h_e_
Troubleshooting Tips .... 26-28
Consumer Support
Consumer Support ......... 32
Product Registration ..... 29, 30
Warranty ................. 31
Write the model and serial
numbershere:
Model #
Serial #
You can find them on a label
on the side trim or on the fl'ont
of the (lower) oven behind the
oven doo I'.
4_-8042_ 02-07 dE
IMPORTANTSAFETY/NFORMATiONo
READALLINSTRUCTIONSBEFOREUSING
It I
For your safety, the information in this manual must be followed to minim)e the risk of fire or
explosion, electric shock, or to prevent property damage, personal idury, or loss of life.
IMPORTANTSAFETYNOtiCE
The California Safe Drinking Water and Toxic Enforcement Act requires the Governor of California to
publish a list of substances known to the state to cause cancer, birth defects or other reproductive
harm, and requires businesses to warn customers of potential exposure to such substances.
The fiberglass insulation in self-clean ovens gives off a very small amount of carbon monoxide during
the cleaning cycle. Exposure can be minimized by venting with an open window or using a ventilation
fan or hood.
SAFETYPRECAUtiONS
When using electrical appflances, basic safety precautions should be followed, including the following:
Use this appliance only for its intended
purpose as described in this Owner's
Manual.
Be sure your appliance is properly
installed and grounded by a qualified
technician in accordance with the
provided installation instructions.
Do not atmmpt to repair or replace any
part of your oxen unless it is specifically
recommended in this manual. All other
servicing should be refelled to a qualified
technician.
Hme the installer show you tile location
of the circuit breaker or fllse. Mark it for
easy reference.
Before performing any service, disconnect
the ox>n power supply at the household
disuibufion panel by removing tile fuse or
switching off tile circuit breaken
Do not leme children alone--<hildren
should not be left alone or unattended in
an area where an appliance is in use. They
should nex>r be allowed to sit or stand on
any part of tile appliance.
Do not allow anyone to climb, stand oi
hang on the doon They could damag> tile
oven, oi cause sex,re personal iIljnI>
Be sure tile o\>n is secnlely installed in a
cabinet that is firmly attached m rim house
strnctnre. Never allow anyone m climb, sit,
stand or hang on tile oven door
Ne_er leave tim oven door open when you
are not watching tile oxen.
Alwws kee I) combustible wall coxerings,
curtains or drapes a sad distance flom
vonI" o\_n.
Alwws kee I) dish towels, dish cloths, pot
holders and other linens a sad distance
fFonl vonT oxPn.
Always kee I) wooden and plastic nmnsils
and canned food a safe distance aw W flom
yonr oxPn.
Teach children not to play with the
controls or any oilier part of file oven.
Large scratches or impacts m glass doors
can lead to broken or shatmied glass.
2
tt WARNING!
SAFETYPRECAUTIONS
ge.com
Do not store flammable mateiia]s in
an o_en.
CAUTION:Items of interest to
children should not be stored in cabinets
above an oven; children climbing on the
oven to reach items could be seIiouslv
ii_nred.
Never wear loose-fitting or hanging
garments while using file appliance. Be
careflll when reaching tbr items stored
in cabinets o_er file oven. Flamn_able
mateiial could be ignited if brought in
contact with hot sur_aces or heating
elements and may cause se\_re bnrns.
Use only d U pot llolders--moist or damp
pot holders on hot snifi_ces ii]ay iesult in
bums from smam. Do not let pot holders
touch hot heating elements. Do not use a
towel or other bulky cloth.
For your safety, nexer use your appliance
for wam/ing or heating tile room.
Do not let cooking giease or other
flamnlable mamrials accumulam in
or near the o_n.
Stand away flora the oven when opening
the ox>n doon Hot air or steam which
escapes can cause bums to hands, Pace
and/or eyes.
Do not heat unopened food containers.
Pressure could build up and file container
could burst, causing an iI_nry.
Kee I) the o\_n \_nt unobstructed.
Kee I) tile oven fiee fiom grease buildup.
Place tile ox>n rack in tile desired position
while the oven is cool. If racks must be
handled when hot, do not let pot holder
contact file heating elements.
_Allen using cooking or roasting bags
in the oven, follow file manufitcturer's
directions.
Do not touch file heating elements or the
interior surPace of file oven. These surPaces
may be hot enough to burn even though
they are dark in colon During and after
use, do not touch, or let clothing or oilier
flammable materials contact any interior
area of the ox>n; allow sufficient time for
cooling first.
Do not use water on gTease fires. Nexer
pick up a flaming pan. Turn the controls
oK
Flame in die oven can be smothered
completely by closing the oven door and
turning the oven off orby using a mulfi-
pm])ose dW chemical or foam-type fire
extinguisher
Never lem>jars or cans of fi_t drippings in
or Ileal vonr oxen.
Do not store or use combustible mamrials,
gasoline or other flammable vapors and
liquids ill the vicinity of this or any other
appliance.
Potentially hot surfaces inchlde oven x>nt
openings, surlCaces Ileal the openings,
crevices around the oxen dooi, the edges
of the window and metal trim parts above
tile door
REMEMBER:Tile inside surPace of die o_>n
may be hot when file door is opened.
iiiiiiiiiiii_iii
Ne_er place cooking utensils or any other
imms on file oven floon Tilere is a heating
element beneath the oven floor Placing
items on tile oven foot m W cause the
oxen to overheat, Iesulfing in damage
to the oven and risk of damag_ or fire
to cabinets.
3
IMPORTANTSAFETYINFORMATION.
READALLINSTRUCTIONSBEFOREUSING.
WARNING!
SAFETYPRECAUTIONS
Pulling out tile rack m file stoi>lock is a
convenience in lifting beax_' foods. It is
also a precaution against bnrns froll/
touching hot snrfaces of the door or
ox.en walls.
iiiiiiiiiiii_iii
Do not use tile oxen to d_T newspapers.
If oxerheated, they call catch on fire.
iiiiiiiiiiii_iii
Do not use tile oxen for a storage area.
hems stored ill all oxen call ig_fite.
iiiiiiiiiiii_iii
Do not leme paper products, cooking
utensils or food ill the oxen when not
ill use.
'After broiling, always rake any broiler pan
out of file oven and clean it. Leftover
gxease ill a broiler pan can catch fire
next time yon use the pan.
Clean only parts listed ill this Owner's
Manual.
Do not use aluminum foil to lille oxen
bottoms, except as suggested in this
manual, hnproper installation of
aluminum foil may resuh ill a risk
of electric shock or fire.
COOKMEATANDPOULTRYTHOROUGHLY...
Cookmeatandpoultry thoroughly--meat to at leastan INTERNALtemperatureof 160°Fandpoultry
toat least an INTERNALtemperatureof 180°ECookingto thesetemperaturesusuallyprotectsagainst
foodboroeilbess.
SELF-CLEANINGOVEN
Do not clean tile door gvtsket. The door
gasket is essential for a g_od seal. Care
should be taken not to rub, damag.e or
mox.e the gasket.
Do not use ox.en cleaners. No commetvial
ox.en cleaner or ox.en liner protective
coating of any kind should be used ill or
around any part of file ox.en. Residue from
ox.en cleaners will damag_ the in0de of the
ox.en when the self-clean cycle is used.
Before self-cleaning die ox.en, remox.e any
broiler pan, grid and other cookware.
Be sure to wipe up excess spillag.e before
starting the selt¥1eaning operation.
If the self-cleaning mode malfunctions,
turn tile ox.en off and disconnect rite
power supply. Hax.e it serviced by a
qualified technician.
READANDFOLLOWTHISSAFETYINFORMATIONCAREFULLY.
SAVETHESEINSTRUCTIONS
4
Usingthe ovencontrols.(on some models)
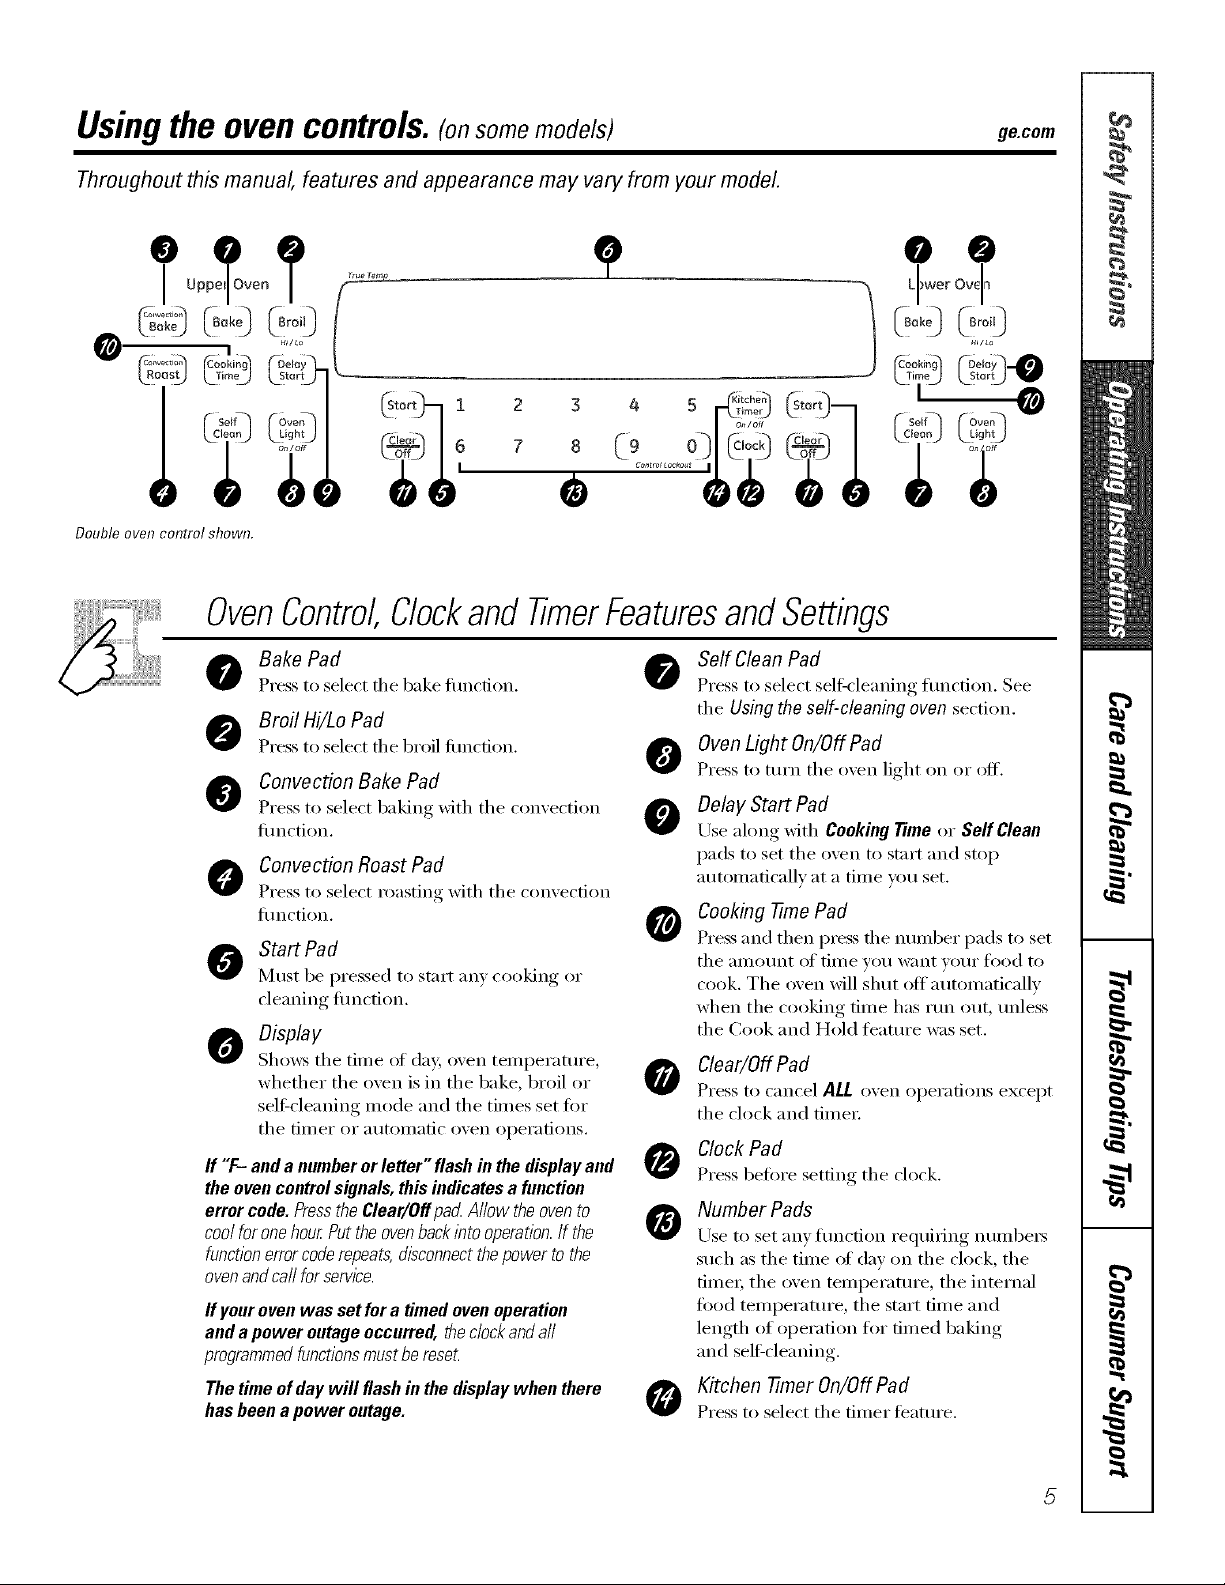
Throughout this manual, features and appearance may vary from your model.
'Ktchn
Double oven control shown.
OvenControl,ClockandtimerFeaturesandSettings
ge.com
Bake Pad
Press to select fl_e 1)ake flulcdon.
Broil Hi/Lo Pad
Press to select the broil ftin(fion.
Convection Bake Pad
Press to select baking with the comection
fiulction.
Convection Roast Pad
Press to select i'oastino with the comection
flUlCtion.
StartPad
Must be i)ressed to start any cooking or
cleaning flUlCtion.
Display
Sho_,_,:stile tinIe of day, oven tenli)erature ,
whether the ()veil is in the bake, broil or
sel6cleaning mode and the tiines set tor
tile [illler or atltOlllatic ()veil ol)ei'ations.
ff "F- anda numberorletter"flashinthedisplayand
theovencontrolsignals,thisindicatesafunction
errorcode.Pressthe Clear/Offpad Allowtheovento
coolforonehourPuttheovenbacklbtooperation.If the
functionerrorcoderepeats,disconnectthepowertothe
ovenandcarlforservice.
fly our oven was set for a timed oven operation
and a power outage occurred, theclockandall
programmedfunctionsmust be reseL
Thetime ofday will flashinthe displaywhen there
hasbeena power outage.
Self Clean Pad
Press to select self:<leaning function. See
the Using the self-cleaning oven section.
O Oven LightOn/OffPad
Press to turn the o_en light on or off'.
Delay Start Pad
Use ahmg with Cooking Time or Serf Clean
l)ads to set the oxen to start and stop
autonlaticallv at a tiine you set.
Cooking -time Pad
G
Press and then press fl_e nuinl)er l)ads to set
tile alllOtlnt of tiI//e Veil w;Int VOtli" ['ood to
cook. The oven will shut offautoniaticallv
when the cooking tiine has run ()tit, unless
the Cook and Hold timture was set.
Clear/Off Pad
0
Press to cancel ALL oxen ol)eradons except
the clock and tiinei:
Clock Pad
0
Press 1)efore setting the chick.
Number Pads
0
ILrseto set any flUlCfion requiring nuinbeis
such as the tiIne of day Oil the chick, the
tiIneI; the oven tenll)erature , the internal
flied tenll)erature, the start tiine and
length of ol)eration for dined baking
and self:cleaning.
Kitchen -timer On/Off Pad
Press to select the diner teatuI'e.
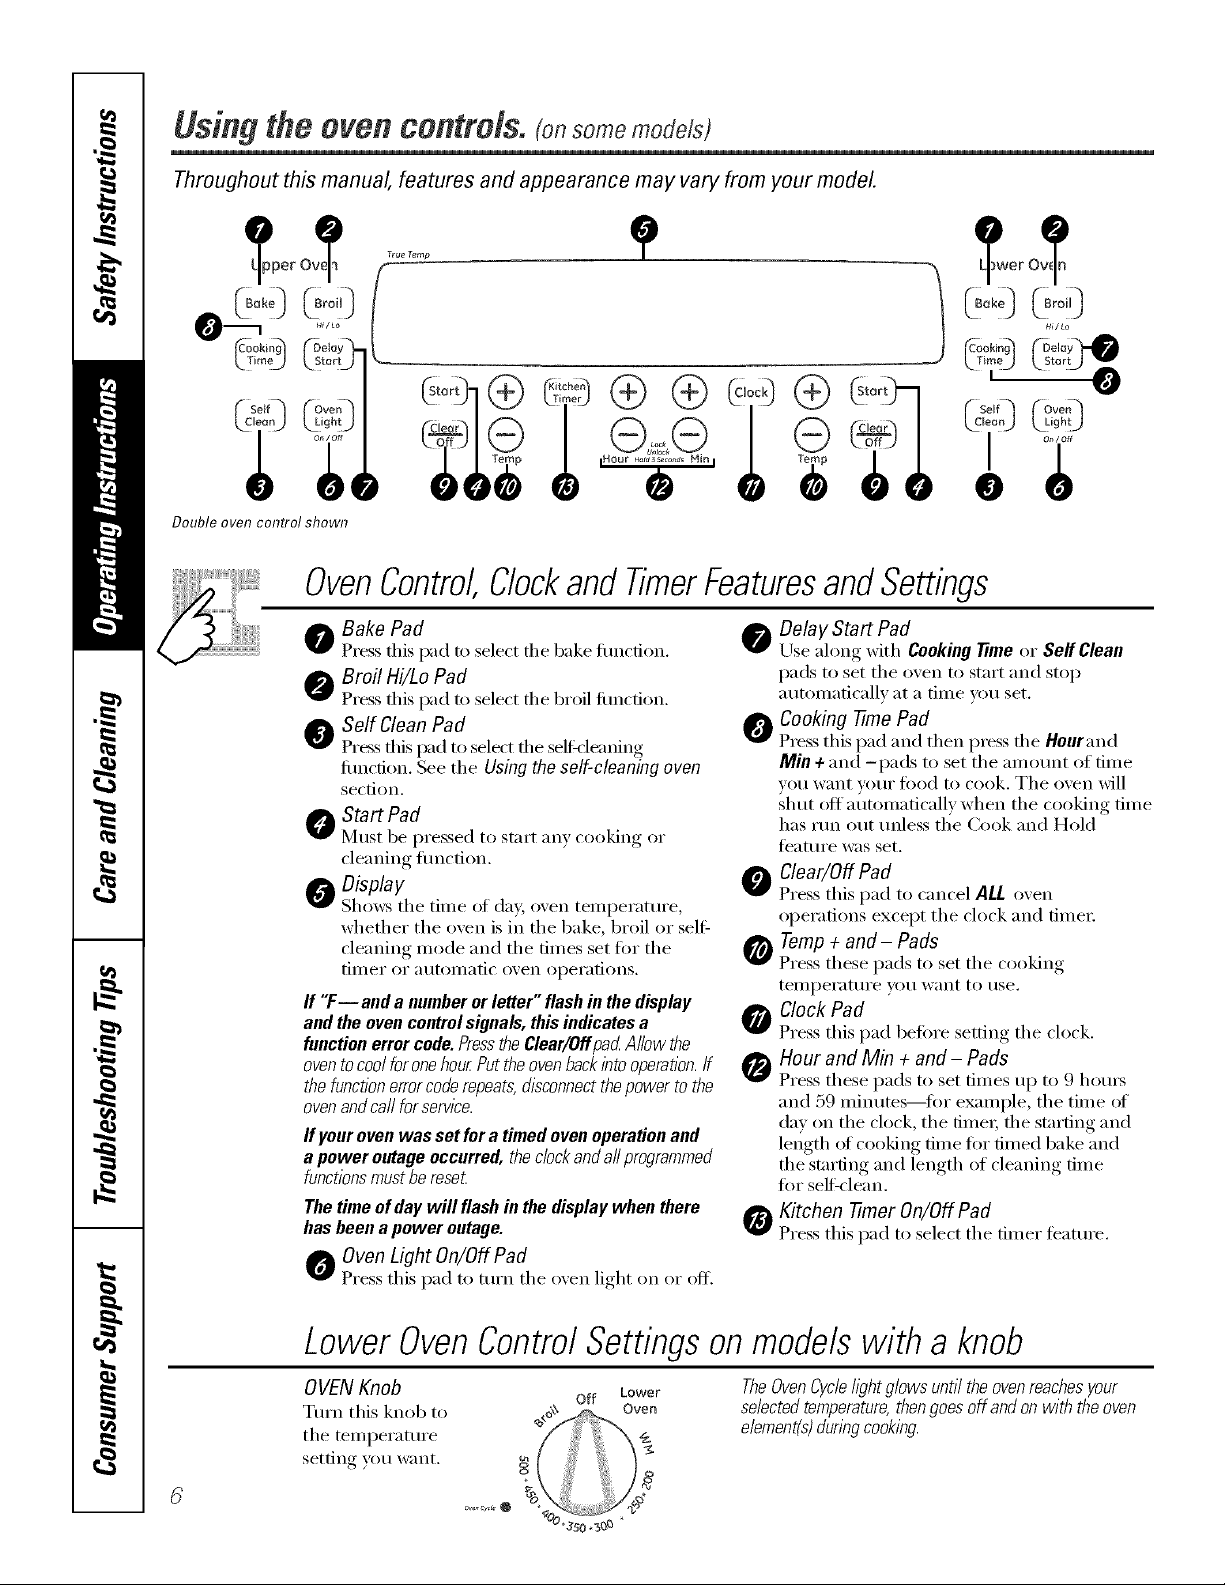
Using the oven controls, (onsomemodels)
Throughout this manual, features and appearance may vary from your model
ero rz......" "_ ero
O_ HIILo HilLO
C°°ki) LB'°'O I C°r°'i)
Cooki{_g Time_ _tor_
Double oven control shown
Delay Cookin 9 Delay
On/Off
OvenControl,ClockandTimerFeaturesandSettings
0 Bake Pad
Press tiffs pad to select the bake timcfion.
Broil Hi/Lo Pad
Press this pad to select the broil ft/n(don.
Self CleanPad
Pros this pad to select the selfk'leaning
flmction. See the Using the self-cleaning oven
section,
0 Start Pad
Must be pressed to start any cooking or
cleaning flmction.
0 Display
Shows the time of day, oven temperatm'e,
whether the o_en is in the bake, broil or self:
cleaning mode and the times set fi)r the
tilller or atltOlllatic oxen operations,
If "Fiand a number or letter" flash in the display
and the oven control signals, this indicates a
function error code.PresstheClear/Offpad Allow the
oventocoolfor onehourPuttheovenbackinto operation.If
the functionerrorcoderepeats, disconnectthepower to the
ovenandca//for service.
Ifyourovenwassetfora timedovenoperationand
a poweroutageoccurred, thedockandallprogrammed
functionsmustbereseL
The time of day will flash in the display when there
has been a power outage.
Oven Light On/Off Pad
Press this pad to mrn the men light on or off.
Delay Start Pad
Use along with Cooking time or SeffClean
pads to set the oven to start and stop
automatically at a time you set.
Cooking -time Pad
Press this pad and then press the Hourand
Min + and -pads to set the amom_t of dine
you want yore" food to cook. The oven will
shut off automatically when the cooking tim e
has mn out tmless tl_e Cook and Hold
teattlI'e WaS set.
0 Clear/Off Pad
Press this pad to cancel ALLo'_en
operations except the clock and timer.
Temp+ and- Pads
Press these pads to set the cooking
telllpei'attli'e ,VOtl W_lllt 10 rise.
Clock Pad
Press this pad before setting the clock.
Hour and Min + and- Pads
Press these pads to set times up to 9 hom_
and 59 minutes--fi)r example, the time of
day on the clock, the time_; the starting and
length of cooking time for timed bake and
fl_e starting and length of cleaning time
for selfk lean.
I_ Kitchen-timerOn/OffPad
Press this pad to select the timer teatm'e.
Lower OvenControlSettings onmodels with a knob
OVENKnob
Tm'n this knob to
the temperature
setting you want.
TheOvenCycleh)ht glows until the oven reachesyour
selectedtemperature,thengoes off and onwith the oven
element(s)dunbgcooking.
Usingthe oven. gecom
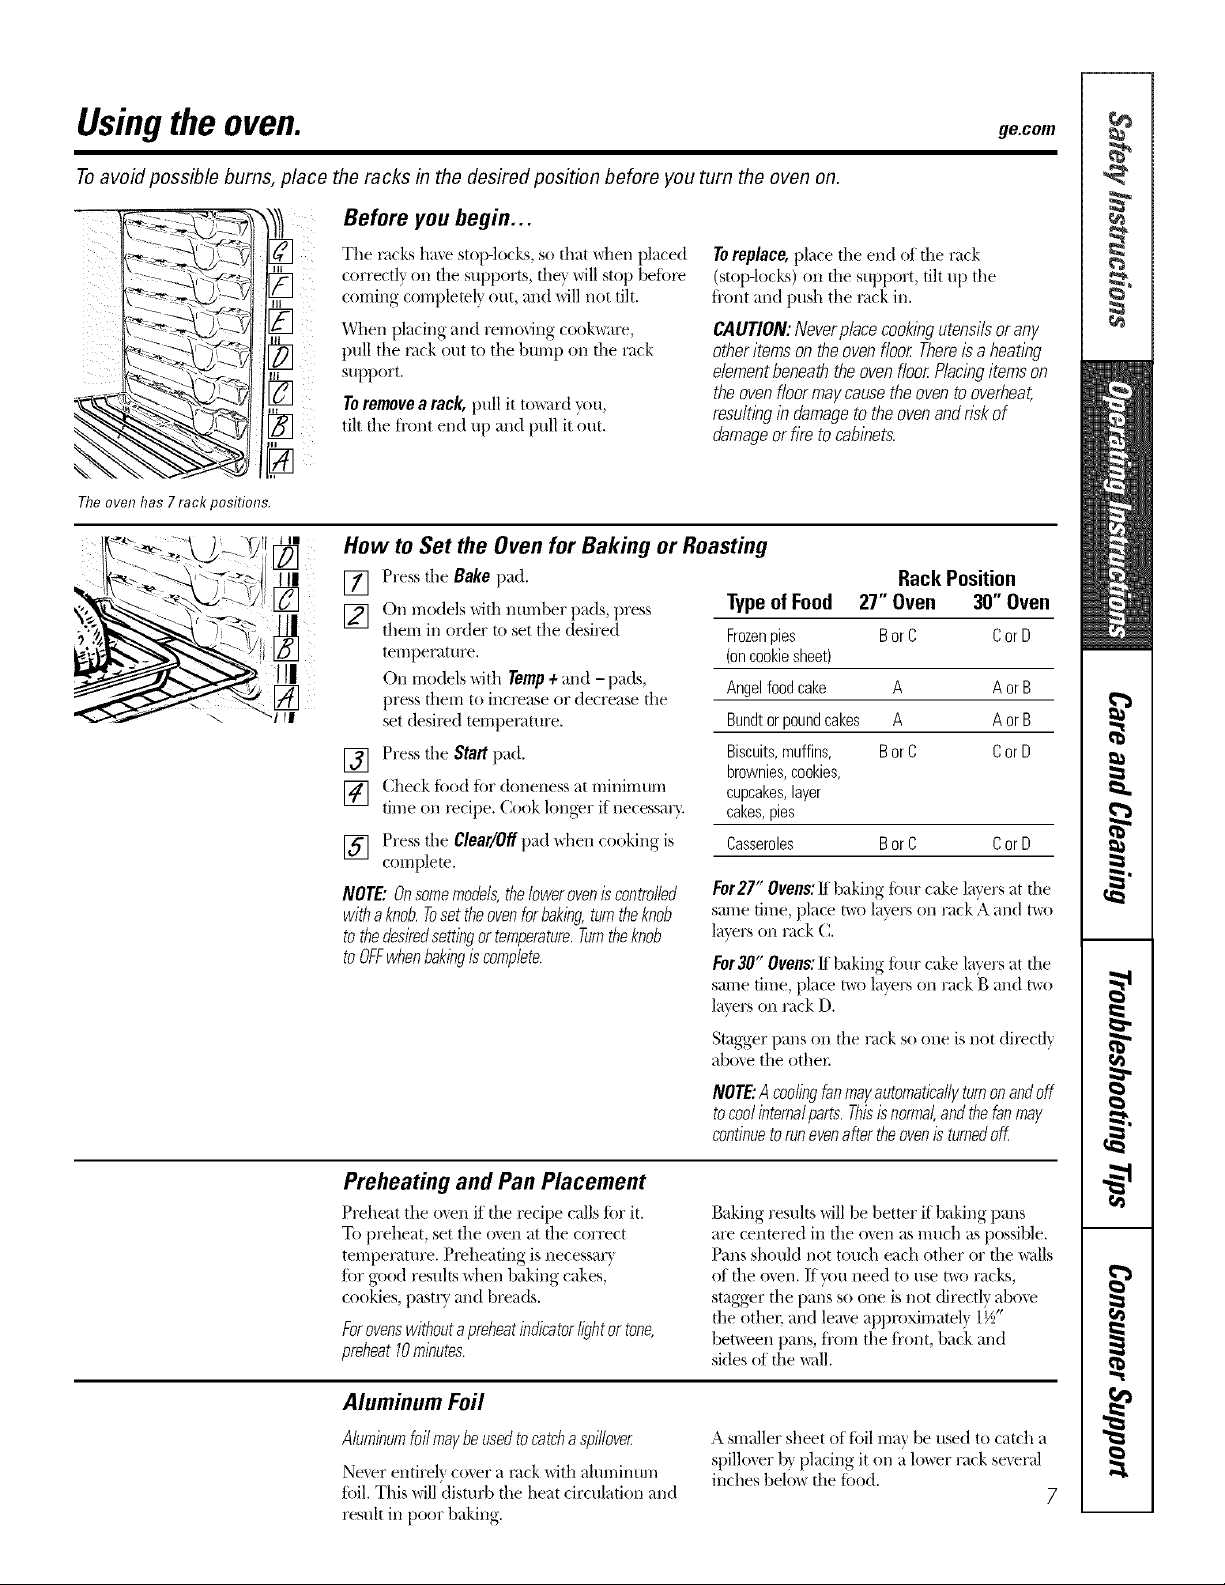
Toavoid possible bums, place the racks in the desired position before you turn the oven on.
Before you begin...
Theoven has 7 rack positions.
Tile rocks baxe stop-locks, so that when placed
correctly (m the supports, the} will stop betore
coming, comf)letelx, out, and will not tilt.
When l)lacing, and removing cookware,
pull the rock out to the bul;qp on the rack
support.
Toremove a rack, pull it tox_ard yr()(_,
tilt the ti'ont end up and pull it out.
Toreplace, place the end of d_e rack
(stop-locks)on dm support, dlt up the
fl'ont and push the rock in.
CAUTION:Neverplacecookbgutensilsorany
otheritemsontheovenfloorThereisaheat/by
dementbeneaththeovenfloorPlacingitemson
theovenf/oormaycausetheoventooverheat,
resultingin damagetotheovenandrfakof
damageor firetocabinets.
How to Set the Oven for Baking or Roasting
[] Press the Bake pad.
[] On models _qth nun-lber pads, press
them in order to set the desired
temperature.
On models with Temp+and - pads,
press them to incx_ase or decrease the
set (lesix_(1 temperature.
[] Press the Start pad.
[] Check toed tar doneness at minimum
time on recipe. Cook longer if necessaQ'.
[] Press the Clear/Offpad x_hencooking is
complem.
NOTE:Onsomemodels,the/oweroveniscontrolled
withaknob.Tosettheovenforbaking,turntheknob
tothedesiredsettingortemperature.Turntheknob
toOFFwhenbakingiscomplete.
Typeof Food 27" Oven 30" Oven
Frozenpies BorC CorD
(oncookiesheet)
Angelfoodcake A AorB
Bundtorpoundcakes A A orB
Biscuits,muffins, BorC CorD
brownies,cookies,
cupcakes,layer
cakes,pies
Casseroles BorC CorD
For27 Ovens./l baking four cake layers at the
same time, place two layers on rack A and two
layers on rack C.
For30 Ovens.1tbaking four cake layers at the
same time, place two layers on rack B and two
layers on rack D.
Rack Position
,1 . - . .
11 . . . .
Preheating and Pan Placement
Preheat the o_en if the recipe calls tar it.
To preheat, set the oven at the correct
temperature. Preheating is necessa U
tar good results \dmn baking cakes,
cookies, pastry and breads.
Forovenswithoutapreheatindicatorfightortone,
preheat10minutes.
Aluminum Foil
Aluminumfoilmaybeusedtocatcha spillover
Ne_er enfire]) co_er a rock with aluminmn
foil. This will disturb the beat circulation and
result in poor baking.
Stagger,, [)arts,on the rack so one is not (lirectl_
abo_e the othex:
NOTE:Acoolingfanmayautomaticallyturnonandoff
tocoolinternalparts.Thisisnormal,andthefanmay
continuetorunevenaftertheovenisturnedoff
Baking results will be better if baking pans
are centered in the o_en as much a.spossible.
Pans should not touch each other or the _dls
of the o_en. It_)u need to use t\_o racks,
stagger the pans so one is not directly abo\e
the otbec and leme approximately 1½"
bemeen pans, fl'om the fl'ont, back and
sides of the _dl.
A sm_dler sheet of toil may be used to catch a
spillover by placing it on _ilm_er rack sexeral
inches belm_ the toed.
7
Usingthe oven.
How to Set the Oven for Broiling
Close the doo_: Always broil with the door
closed.
[] Place the meat or fish on a broiler
grid in a broiler pan.
[] Follow suggested rack posidons in
Close the door Always broil
with the door closed,
If youroven isconnected to 208
volts, raresteaks may be broiled by
prebeating tile broiler and positioning
tile oven rack oneposition higber
the Broiling Guido.
Thesize,weight,thickness,stamngtemperature
andyourpreferenceof alonenesswillaffect
broihngt/Ynes.Thisguideisbasedonmeats
atrefngeratortemperature.
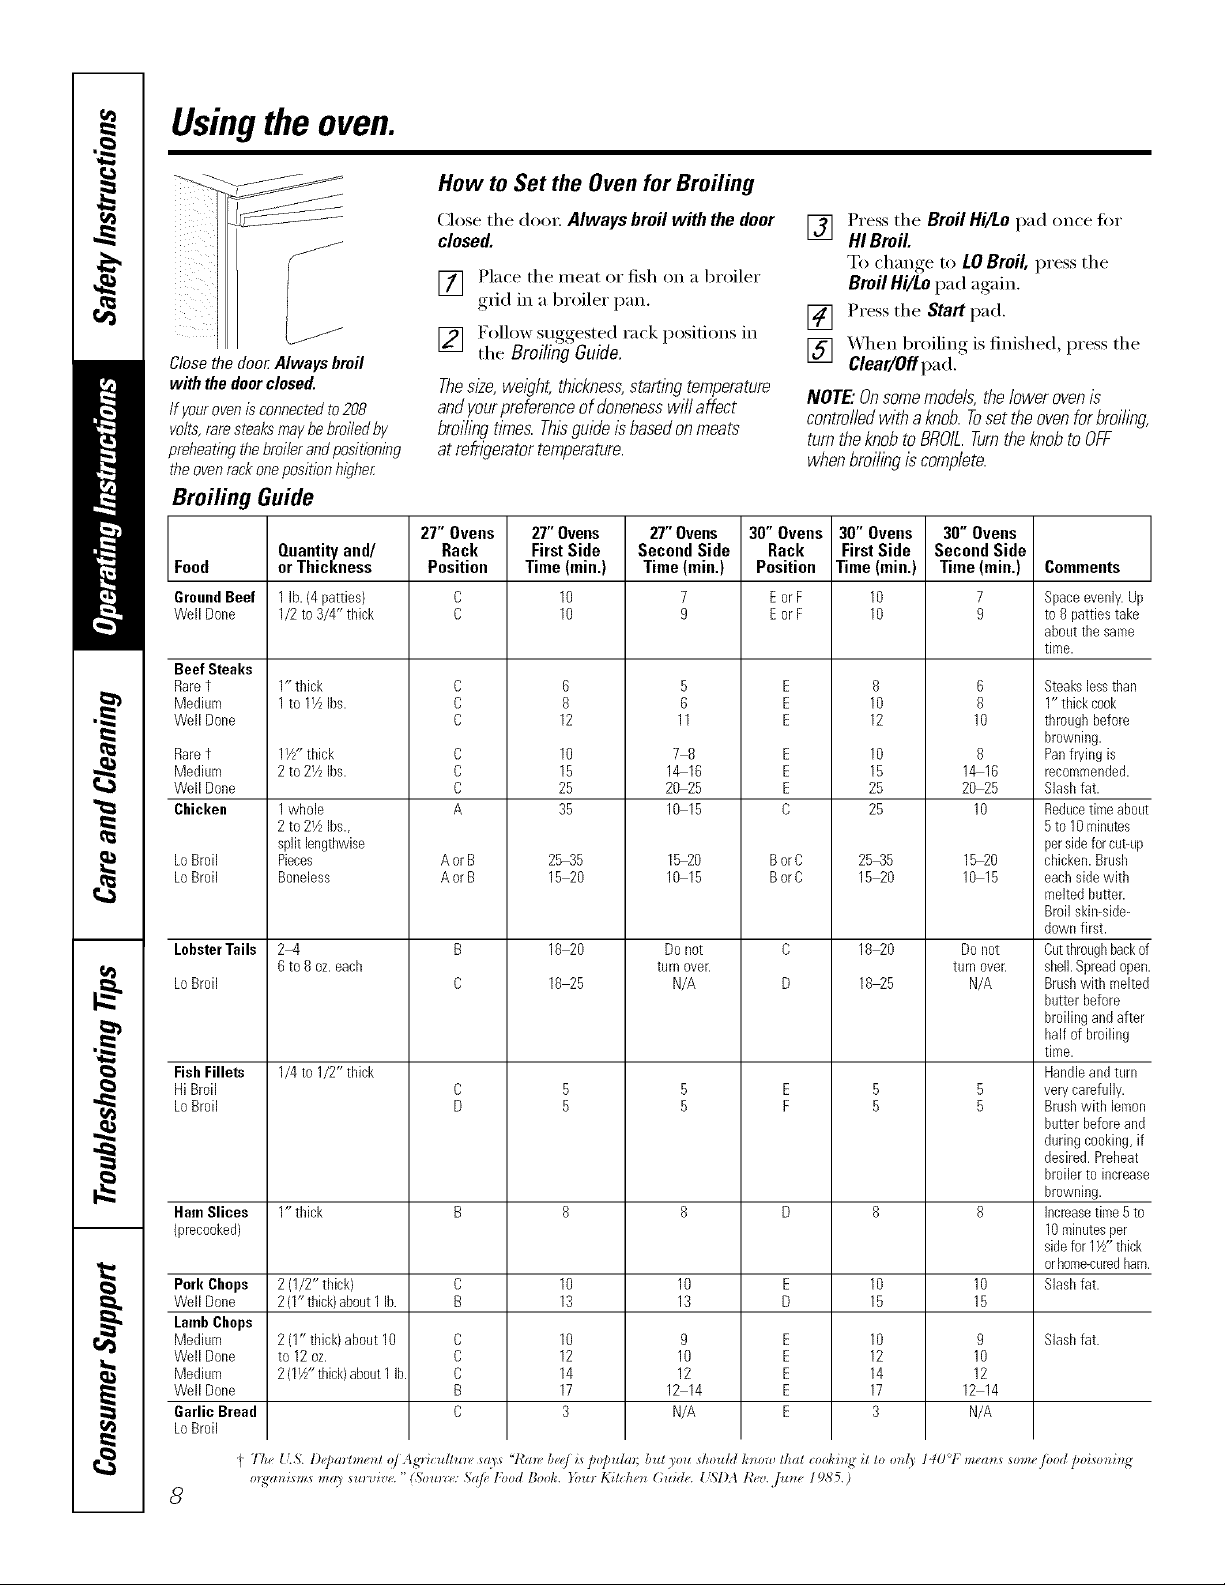
Broiling Guide
27" Ovens 27" Ovens 27" Ovens 30" Ovens 30" Ovens 30" Ovens
Food or Thickness Position Time(rain.) Time(rain.) Position Time(rain.) Time(min.) Comments
GroundBeef 1lb. {4patties) C 10 7 E or F 10 7 Spaceevenly.Up
Well Done 1/2to 3/4" thick C 10 9 Eor F 10 9 to 8 pattiestake
Beef Steaks
Raret
Medium
Well Done
Raret
Medium
Well Done
Chicken
LoBroil
LoBroil
LobsterTails
LoBroil
FishFillets
HiBroil
LoBroil
HamSlices 1" thick B 8 8 D 8 8
(precooked)
Pork Chops 2 (1/2" thick) C 10 10 E 10 10
Well Done 2(1"thick)about1lb. B 13 13 D 15 15
LambChops
Medium 2 (1" thick) ahout10 C 10 9 E 10 9 Slashfat.
Well Done to 12oz. C 12 10 E 12 10
Medium 2(1½"thick/about1lb. C 14 12 E 14 12
Well Done B 17 12 14 E 17 12 14
Garlic Bread C 3 N/A E 3 N/A
LoBroil
Quantity and/ Rack First Side Second Side Rack First Side Second Side
1" thick
1to 1½ Ibs.
1½" thick
2 to 2½ Ibs.
1whole
2 to 2_ZIbs.,
split lengthwise
Pieces
Boneless
2-4
6 to 8oz.each
1/4to 1/2" thick
C
C
C
C
C
C
A
AorB
AorB
B
C
6
8
12
10
15
25
35
2,535
15 20
18 20
18 25
5
6
11
78
14 16
20 25
10 15
1,520
10 15
Donot
turn ovelt
N/A
[] Press the BroilHi/Lopad once fl)r
HI Broil.
To change to LOBroil,pressthe
BroilHi/Lopad again.
[] Press the Start pad.
[] _,A_en broiling is finished, press the
Clear/Off pad.
NOTE'. On some models,the lower oven is
controlled with a knob. Toset the oven forbroi/ing,
turn the knob to BROIL. Turn the knob to OFF
when broiling is complete.
about the same
time.
E
E
E
E
E
E
C
BorC
BorC
C
D
8
10
12
10
15
25
25
25_5
15_0
18_0
18_5
6
8
10
8
14 16
20 25
10
1,520
10 15
Donot
turn ovelt
N/A
Steakslessthan
1" thickcook
throughbefore
browning.
Panfryingis
recommended.
Slashfat.
Reducetimeabout
5 to10 minutes
persideforcut-up
chicken.Brush
eachsidewith
meltedbutter.
Broilskin-side-
downfirst.
Cutthroughbackof
sheikSpreadopen
Brashwith melted
butterbefore
broilingand after
half ofbroiling
time.
Handleandturn
verycarefully.
Brushwith lemon
butterbeforeand
during cooking,if
desired.Preheat
broilerto increase
browning.
Increasetime 5to
10minutesper
sidefor 1Y/'thick
orhome-curedham
Slashfat.
I The U.& l)_,parh_e_zl of .lg'Hcuflm?, says "l{a_ I)_,_,fis p@uhn; but you should h_ow thai coohi,g it to onl_ 140°F m_,a_s somefi)od ]Joisoni,,_
orq(mL_ms re(t) surefire. "(,%raze: .'_a/eFood Booh. }bu_ K;t(:he_ (;uide. U?;I)A t?_,v.,furze 1985.)
8
Usingthe clock andtimer, ge.com
To Set the Clock
Make sure the clock is set to the
correct time of da,¢
On/Off
Thetimer is a mflTutetimer onl_¢
Thetimer does not control oven
operations. The maximum setting on
the timer is 9hours and 59mflTutes.
The clock must be set to the correct time []
of din' fi)r the autonmfic oxen tinting
flmcfions to work properly. The time of []
day cmmot be changed dtwing a timed
baking or self=cleaning cycle.
To Set the Timer
[] Press the Kitchen timer On/Off pad,
[] On models with nmnber pads, press
them tmtil the ran(rant of time _ou
want sho_:s in the display. For
example, to set 2 hom_ and 45
minutes, press 2, 4 and 5 in that
order.
On models with Hourand Min +
and -pads, press them m_til the
_llilOtlnt oJ[ tinle Veil W;lllt shows in
the display. The maximum time you
can enter in minutes is 59. Cooking
times more than 59 minutes should
be changed to hem5 and minutes.
For example, enter 90 minutes as
1 hem', 30 minutes.
Press the Clockpad,
On models with nmnber pads, press
them in order to set the correct time
of day:
(-)n models with Hour'and Min ÷
and -pads, press them to set the
correct time of day.
[] Press the Start pad.
[] Press the Startpad,
AfterpressingtheStartpad,SETdisappears;
thistellsyouthetimeiscountingdown,although
thedisplaydoesnotchangeuntiloneminute
haspassedSecondswill notbeshowninthe
displayuntilthelastminuteiscountingdown.
[] _&hen the timer reaches :00, the
control will beep 3 times fi)llowed
by one beep every 6 seconds tmtil
the Kitchen timer On/Off pad
is pressed,
The6-secondtone canbe cance/edby following
the stepsin the Special featuresof your oven
control sectionunder Tonesat the Endofa
TimedCycle.
If you make a mistnke, press Kitchen
timer On/Off and begin again.
ToReset the Timer
If the display is still showing the time
remaining, )_m may change it by pressing
the Kitchen timer On/Off pad, then press
the nuinber pads (on seine models) or
the Hourand Min + or-pads (on some
models) until the time you want appears
in the display.
ToCancel the Timer
Press Kitchen timer On/Off pad twice.
If the remaining time is not in the display
(clock, delay start or cooking tilne are in
the display), recall the remaining time bv
pressing the Kitchen timerOn/Offpad and
then pressing the number pads (on some
models) or the Hourand Min + or -pads
(on some models) to enter the new time
VOII W_IIIt.
Onmodelswith presspad controlsfor bothovens,you canuse timedbakingin one ovenw,hileusingserf-cleanin the other;
you can alsousetimedbakinginboth ovensatthe sametime.
NOTE;Foodsthatspoil easily--such as mill(,eggs,fish,stubggs, poultryandpork--should notbeallowedto sit formorethan
I hourbefore or after cookirlg.Roomtemperaturepromotesthe gro_§ ofharmfulbacteria•Be sure thatthe ovenlightis off
becauseheatfrom the bulbwill speedharmfulbacteriagro_h.
Hew to Set an Immediate Start and Automatic Stop
c;m et_ter i[_IlJ!]/![es
more than 59 milmtes shoukl he changed
to hours and minutes. For exm_p/e, emec
90 minums as I hou< 30 milmtes.
]]le {}x_I_tempel_Ktlre iBd the cookitlg
time that Tim emered wil!be disp! _yed.
[] Press the Start pad.
]]le display shows file o*,e!"*temperatm'e flint
}ou set and the cooking time colin/down. The
display starts chm_gil_gonce t/_emmperamre
reaches 100E
NOTE.:Whenusingbothovensatthesametimethe
timesshowingin thedisplaywillbeforthelastovenset
Tbdie,playthetimesetforthehbt ovenaet,pre._sthe
CaokingTimepadforthatoven.
The o_el; wil! (onfinue to cook fbr d_e
programmed}IHI{}II[][{}f[il]]e_lheH shlI{off
mmmmficai]}, m_iessd_e Cook aI_d H{}idi£mtre
wasset. See the Specialfeaturesof youroven
controlsection.
Pressd_eClear,/Offp:_dto dear fl_edispIa!.
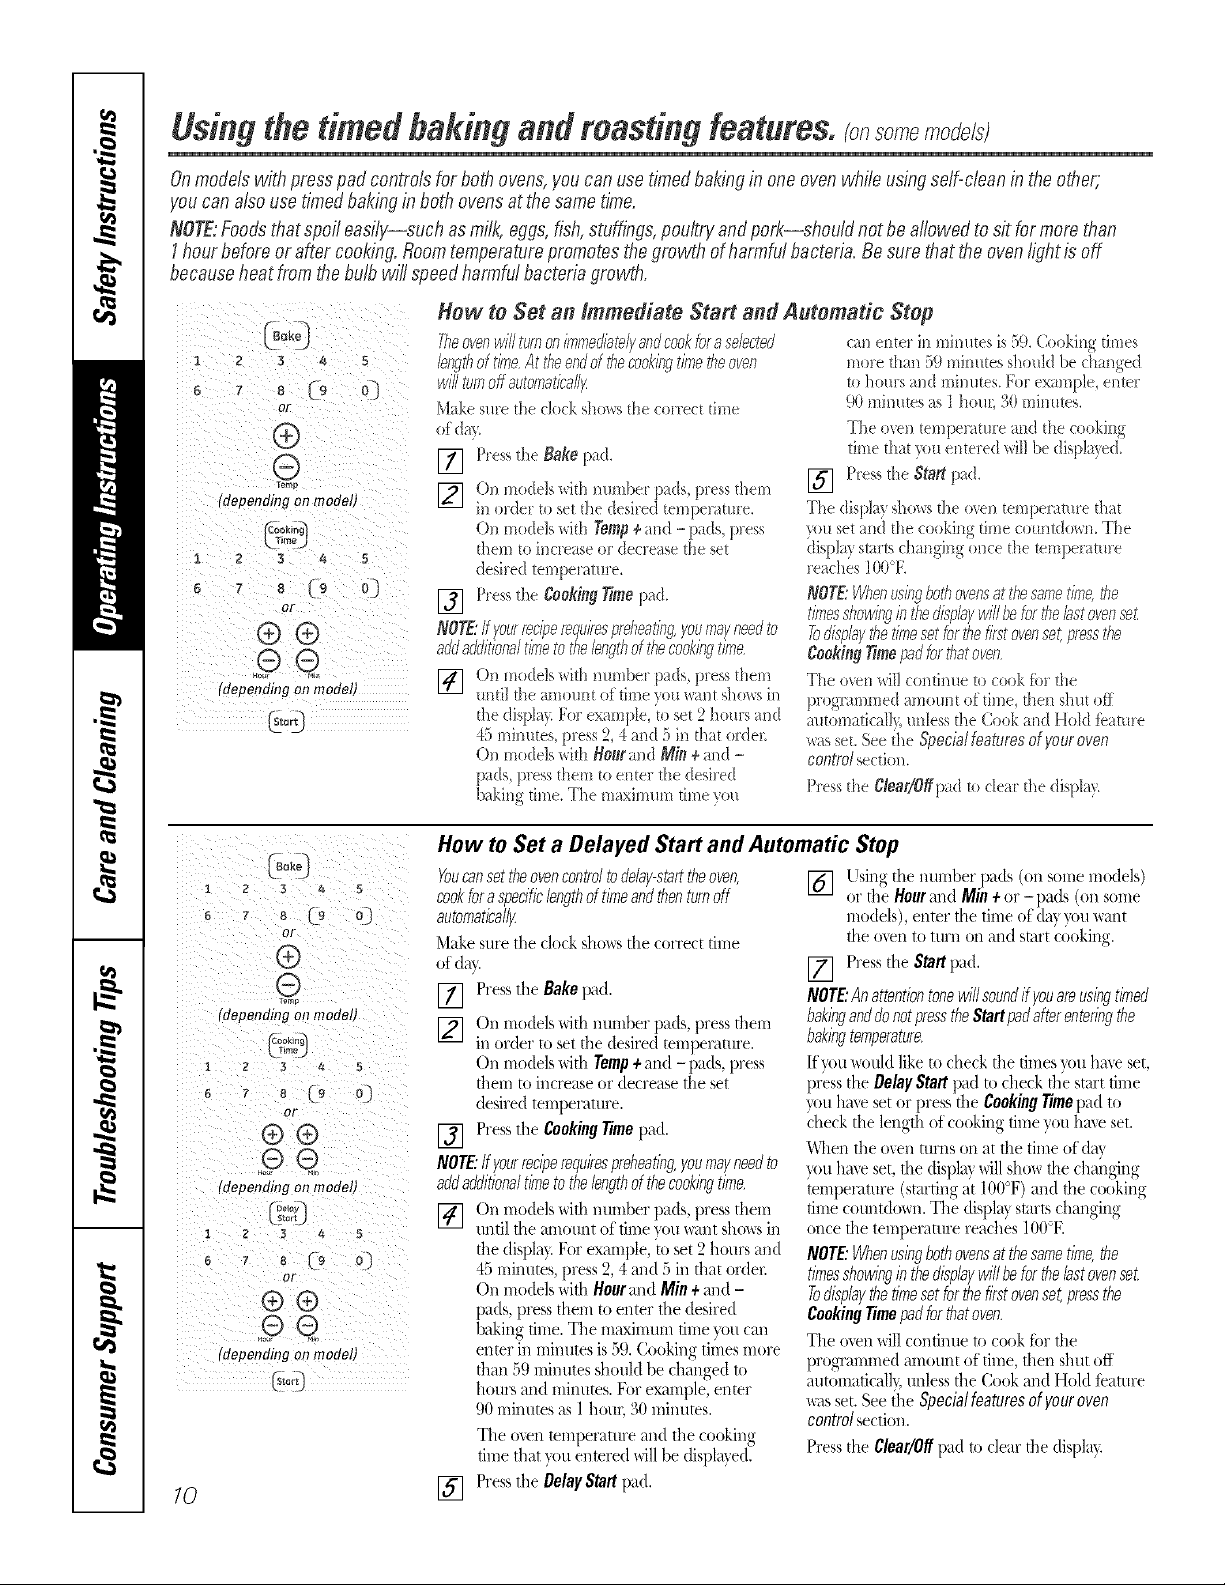
(dependingonmodel)
(Co_ _1Cooking
1 2 3 4 5
z C_ @
(depending on model)
#heovenwillturnon/bmedbte/yandcookforase/eded
lengthof time.Attheendofthecookingtimetheoven
M_ke sure the clock S_{_rS [}_e correct dine
ofdo>.
[] Press d_e Bake p_d.
[] ()£J mo(!e]s'_Jth nucqhet" pads, press [heIyJ
in order to set the desired temperature.
Ol'* models with Tamp +md -p_xds, press
them to increase oF decrease the set
desired temperature.
[] Press the Coeki#g Timepad.
NOTE:Ifyourre@erequirespreheating,youmayneedto
Mdadd/tlona/tlbetothelengthofthecookingtkrle,
[] ()n models with mm_ber p_ds_ press them
mltilthe3111{}ii[1[{}ftime}{mwant shox_sin
the displa). For example, to set 2 hems m)d
45 mi[mtes, press 2, 4 and 5 in that ordeL
On models wiflx Bour and Min +and -
}rods press them m emel lhe desired
haki_g time. The maximum time }ira
1 2 3 g_ 5
5 7 8 [9 0-.
or
®
©
(dependingon mode!l
Cooking
1 2 3 ga 5
OI
®®
(depending on medea
_Dehly
! 2 _ A 5
" o L9 0)
O[
@@
_dependingon mode!;
10
How toSet a Delayed Start and Automatic Stop
Youcansettheovencontroltodelay-starttheoven,
cookforaspecif_?lengthoftimeandthenturnoff
automatlbal/g
Make sure the clock sh(ms the correct time
of dm.
[] Press the Bakepad.
[] On models with number pads, press them
in order to set the desired temperature.
On models with Tamp+and - pads, press
them to increase or decrease rite set
desired temperature.
[] Press the CookingTimepad.
NOTE:Ifyourre@erequirespreheating,youmayneedto
addaflditk)naltinletothelengthof thecookingtlbe.
[] On models with nnnlher pads, press them
until the alnOtlnt of time _ou want sh(ms in
the displa} For example, to set 2 hours and
45 minutes, press 2, 4 and 5 in that order.
On models with HourandMin+and -
pads,pressfl_emmemer the desired
baking time. The maximum time you,can
emer in mimaes is 59.Cooking times more
tlmn 59 minutes should he changed to
hours and nfinutes. For example, enter
90 minutes as ] hou<. 30 mimaes.
The oven temperature and the cooking
time that }ou entered xdll be displayed.
[] Press the OelayStartpad.
[] Llsing the mm_ber pads (on some models)
or d)'eHourand Min+or -pads (on some
models), enter rite time of (ln} you _a.nt
rite oven to mm on and start cooking.
[] Press the Start pad.
NOTE:Anattentiontonewillsoundifyouareusingtimed
bakinganddonotpresstheStartpadafterentenngthe
bakingtemperature.
If you _)uld like to check fl_e times you hme set,
press the DelayStart ix_dm check the start time
you ha\e set or press the CookingTimepad to
&eck the length of cooking time yon hm'e set.
%_,]_enthe oven turns on at the time of do}
you hme set, the display will sho_ the changing
mn_perature (smrdng at 100°F) and rite cooking
time countdo_xn. The displa} starts dmnging
once rite ten,peroraTe reaches 100°E
NOTE:Whenusingbothovensatthesanletkrle,the
timesshowinginthe&play willbeforthebstovenset
To&play thetknesetforthefkstovenset,pressthe
CookingTimepadforthatoven.
The m_n will continue to cook Ibr d_e
programmed amonnt of time, fllen shut off
automaficall 5 unless the Cook and Hold feature
was set. See the Specialfeaturesofyouroven
controlsection.
Press the Clear/Offpad to clear the displa}.
 Loading...