

Page 1

PDP-014-1 (Module Format)
CONFIDENTIAL
Issued:June.20.2003
Version:1.0
42“ PDP
SERVICE MANUAL
MODEL:
:GTW-P42M203
::
Panel:Samsung (VVEPP42SD001F--)
Page 2

CONTENTS
1. IMPORTANT SAFETY PRECAUTIONS ……..1-2
2. SPECIFICATION …………………………….…2-9
3. FACTORY & ELECTRONIC ADJUSTMENT ..3-7
4. BLOCK DIAGRAM ……………………………..4-6
5. TROUBLE SHOOTING GUIDES …………….5-6
6. B.O.M OF BOARD ASSEMBLY…………..…….6-23
7. P.C.BOARD TOP VIEW………….…..………….7-8
8. ELECTRONIC MODULE LIST ………………….8-1
9. EXPLODED VIEW…………. ………………….9-1
10.PACKAGING OF THE LIST …………………..10-1
Page 3
IMPORTANT SAFETY PRECAUTIONS VER1.0
1. Before returning an in s trument t o the cu stome r,
always make a saf ety chec k of the entir e instr um ent,
including, but not limited to, the following items.
a.
Be sure that no built-in protective devices are defective a nd/or have been defeated during servic ing. (1)
Protective shields are pr ovided on this chassis to protect both the technicia n and the customer. Correctly
replace all missing protective shields, including any removed for servicing convenience. (2) When
reinstalling the chass is and/or other assembly in the cabinet, be sure to put back in place all protective
devices, including, but not limited to, nonmetallic control knobs, insulating fish papers, adjustment and
compartment covers /shields, and isolation resistor /capacitor networks.
Do not operate this instrument
or permit it to be operated without all protective devices correctly installed and functioning.
b.
Be sure that ther e are no cabinet op enings through which an adult or child might be able t o insert their
fingers into, Such ope ning include, but are not lim ited to, (1) spacing between the pic ture tube and the
cabinet mask , (2) exc es sively wide cabinet ventila tio n s lots, and ( 3) an improperly fitted and/ or inc or rec tly
secured cabinet back cover.
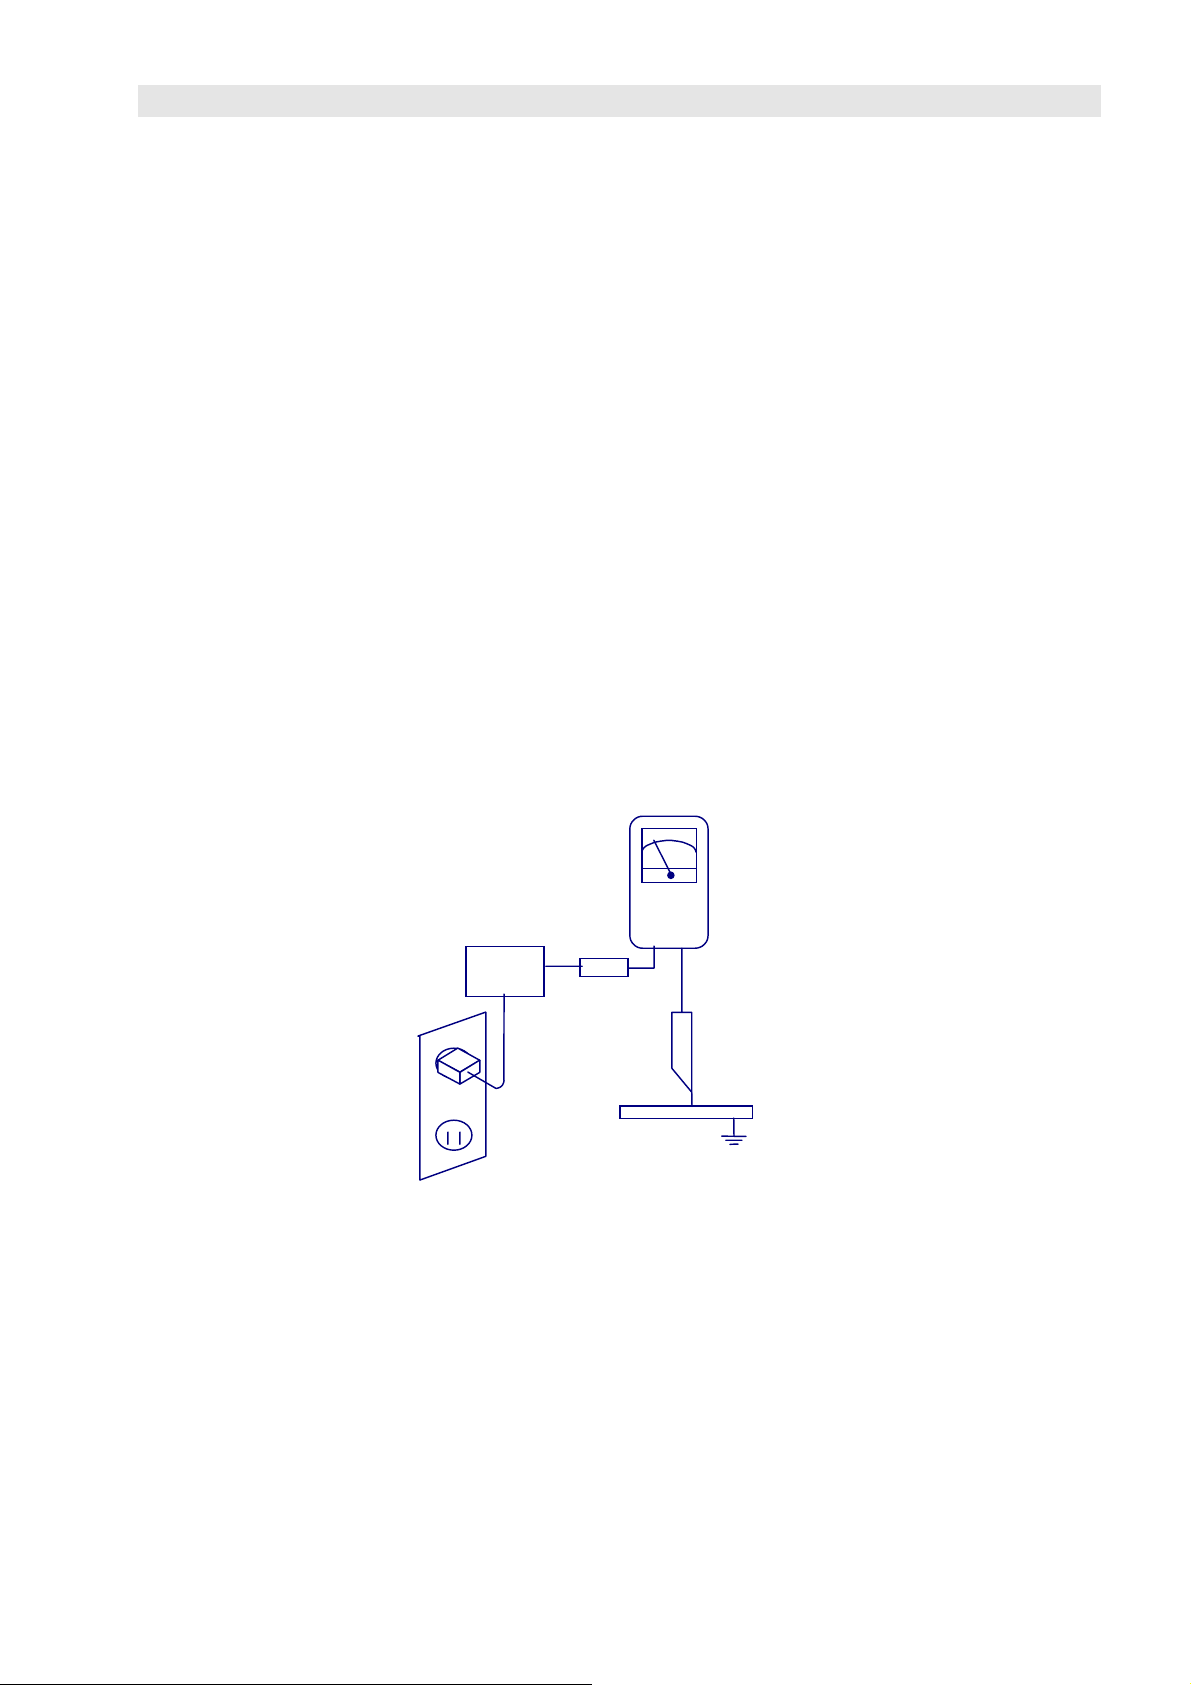
c. Leakage Current Check
—
—With the instrument completely reassembled, plug the AC line cord directly into
——
a 120V AC outlet. (Do not use a n isolatio n trans former dur ing this test.) Use a le akage cur rent tester or a
metering system that complies with American National Standards Institutes (ANSI) C101.1 Leakage
Current for Appliances and Underwriter s Laboratories (UL) 478. W ith the instrument AC s witch first in the
ON position and th en in t he O FF pos it ion, measure from a k nown ear th gr oun d ( metal water pipe, cond uit ,
etc.) to all exposed m etal parts of the inst rument (antennas, h andle bracket, m etal cabinet, scr ew heads,
metallic overla ys, control shafts, etc .), especially any exposed metal parts that offer an electrical return
path to the chass is. Any current m easured must not exceed 3.5 m illiamp. Revers e the instrument po wer
cord plug in the outlet and r epeat test.
ANY MEASUREMENTS NOT WITHIN THE LIMITS SPECIFIED
HEREIN INDICATE A POTENTIAL SHOCK HAZARD THAT MUST BE ELIMINATED BEFORE
RETURNING THE INSTRUMENT TO THE CUSTOMER.
AC Leakage Test
DEVICE
UNDER
TEST
TEST ALL
EXPOSED METAL
SURFACES
3. WIRE CORD
ALSO TEST WITH
PLUG REVERSED
(USING AC ADAPTER
PLUG AS REQUIRED)
LEAKAGE
CURRENT
TESTER
+ -
(READING
SHOULD NOT
BE ABOVE
3.5mA)
EARTH
GROUND
2.
Read and comply with all caution and safety-related notes on or inside the Monitor cabinet.
3. Design Alteration Warning
—
—Do not alter or add to the mechanical or electrical design of this unit. Design
——
alterations and add itions, including, but not limited to, circuit modif ications and the addition of th e items
such as auxiliary audio and/or video output connections might alter the safety characteristics of this
Monitor and create a hazard to the user. Any design alteratio ns or additions will void the manufactur er’s
warranty and will make you, the service, responsible for personal injury or property damage resulting there
from.
1-1
Page 4

IMPORTANT SAFETY PRECAUTIONS VER1.0
4. Primary Chassis Warning
conductor of the A C p o wer c or d. They may be safely serviced witho ut an is o lat io n tr ans f ormer only if the
AC power plug is inserte d so that the chassis is c onnected to the groun dside of the AC p ower source. To
confirm that the AC power plug is ins erted cor rectly us e an AC voltm eter to m easure the vol tage potent ial
between the chassis an d a known earth ground. If the voltage reading is gr eater than 1.0V, remove and
reinsert the AC power plug in opposite pol arity and re-m easure the voltage p otential b etween the chas sis
and a known earth gr ound. b. Certain Monitor c hasses have 85V AC ( RMS) between chassis an d earth
ground regardless of the AC plug polarity. These chasses can be safel y serviced only with an isolati on
transformer inser ted in the power line betwe en the recei ver and the AC po wer source, f or both personne l
and test equipment prot ection.
the main chassis gro und. This sec ondary ground s ystem is not iso lated from the AC power line. The two
ground systems are electrically separated by insulating material that must not be defeated or altered.
5.
Observe origina l lead dress. Take extra care to assure corr ect lead dress in the followin g areas:
sharp edges, b. near thermall y hot parts —be sur e that leads and c om ponents do not t ouch ther m ally hot
c.
parts,
or frayed wiring. Do not change the spacing between components or the spacing between the
printed-circuit board and components. Last but not least, visually check the AC power cord to ensure no
outer appearance damage is present.
6.
Components, parts, and /or wiring that appear to have overheated or are otherwis e damaged should be
replaced with com ponents, parts, or wiring tha t meet original specificat ions. Additionally, determine the
cause of overheating and/or damage and, if necessary, take corrective action to remove any potential
safety hazard(s).
the AC supply,
d.
a.
————
Certain Monitor chasses are electrically connected directly to one
c.
Some Monitor chas ses have a s econdar y ground s ystem s in addition t o
high voltage,
e.
antenna wiring. Ins pect in all areas f or pinched, out-of -place,
a.
near
7. PRODUCT SAFETY NOTICE
characteristics some of which are often not evident from visual ins pection, nor can the protec ti on th e y gi ve
necessarily be obtain ed by replacing them with c omponents rated for higher voltage, wattage, etc. Parts
that have special safety characteristics are identified in th is service data by sh ading with a mark on
schematics and by shadi ng or a * m ark in the parts list. Use of a replac ement part that does not have
the same safet y characteristic s as the rec omm ended replacem ent part in the Ser vice dat a parts lis t might
create shock, fire, and/or other hazards.
————
Many electrical and mechanical parts have special safety-related
1-2
Page 5

SPECIFICATION VER1.0
1. SCOPE:
These specifications describe all the characteristics of the 42 inch color monitor.
2. ELECTRICAL REQUIREMENTS:
2.1. Display panel: Specification
a. Screen size Diagonal 42 inch
b. Aspect ratio 16:9 wide
c. Number of pixels 852(Horizontal, RGB Trio ) X 480(Vertical)pixels
d. Pixel Pitch 1.08mm X 1.08mm
e. Luminance 570cd/m
f. Chromatically
2.2. Power Source:
a. Input voltage 100 ~ 240 Vac , 50 / 60 Hz
b. Input current 3.3A
c. Inrush current 60 A p-p/20ms Max.
d. Power consumption
e. Stand-by & DPMS 5 Watts Max. (at 110Vac)
2.3. Input Signal:
x=0.270
at center block white pattern 100% (mosaic).
380
2
,at APL13%
±±±±
0.03, y=0.300
±±±±
10% Watts ( at 110Vac/color bar pattern)
±±±±
0.03(color temperature mode 1 : )
2.3.1 Connector Type:
2.3.2 Video/S-Vi deo Signal:
a. Type Analog
b. Polarity Positive
c. Amplitude
d. Frequency
e. Input impedance 75 ohms
2.3.3 Y/CB/CR or Y/PB/PR Signal:
a. Type Analog
b. Polarity Positive
c. Amplitude AV: 1Vp-p (with sync)
d. Frequency
Y/C
Y/P
B/CR
B/PR
:HDTV
RCA Jack for audio, video Y/C
6 pin Din S-terminal
9 pin D-SUB
15 pin D-SUB
24 pin DVI
Video 1Vp-p , (priority S-Video) Y=1Vp-p C=0.286Vp-p
H: 15.734KHz V: 60Hz(NTSC)
H: 15.625KHz V: 50Hz(PAL)
S-Video: Y: 1Vp-p ,C: 0.286Vp-p
H: 15.734KHz ,V: 60Hz (NTSC)
H: 15.625KHz ,V: 50Hz (PAL)
1. 31KHz/60Hz (480P)
2. 45KHz/60Hz (720P)
33KHz/60Hz(1080I)
and Y/PB/PR
B/CR
2-1
Page 6

SPECIFICATION VER1.0
2.3.4 RGB Signal:
a. Type TTL
b. Polarity Positive or Negative
c. Amplitude RGB: 0.7Vp-p
d. Frequency
2.3.5 DVI Signal:
H: support to 31K~91KHz
V: support to 50~85Hz
a. Type
b. Polarity
c. Frequency
2.3.6 Audio Signal: Analog 500mV rms /more than 22Kohm
2.3.7 Pin Assignments For D-SUB Connector (In / Loop Out):
Pin Signal Assi gnment Pin Signal Assi gnment Pin Signal Assi gnment
1 RED 6 RED GND 11 GND
2 GREEN 7 GREEN GND 12 SDA
3 BLUE 8 BLUE GND 13 H-SYNC
4 GND 9 NC 14 V-SYNC
5 GND 10 GND 15 SCL
2.3.8 Pin Assignments For 24 Pin DVI Connector(Digital Only):
Pin Signal Assi gnment Pin Signal Assi gnment Pin Signal Assignment
1 TMDS Data 2- 9 TMDS Data 1- 17 TMDS Data 02 TMDS Data 2+ 10 TMDS Data 1+ 18 TMDS Data 0+
3 TMDS Data 2/4
Shield
4 TMDS Data 4- 12 TMDS Data 3- 20 TMDS Data 55 TMDS Data 4+ 13 TMDS Data 3+ 21 TMDS Data 5+
6 DDC Clock 14 +5V Power 22 TMDS Clock Shield
7 DDC Data 15 Ground (For +5V) 23 TMDS Clock +
8 No Connect 16 Hot Plug Detect 24 TMDS Clock -
Digital
Positive or Negative
H: support to 31K~63KHz
V: support to 50~85Hz
11 TMDS Data 1/3 Shield 19 TMDS Data 0/5 Shield
2-2
Page 7
SPECIFICATION VER1.0
2.3.9 RGB/DVI For VESA Standard:
Mode No Resolution
(Hz) (K Hz) (Hz) (TTL) (TTL) (MHz)
1
2
3
4
5
6
7
8
9
10
11
12
13
14
15
1280(SXGA)
◎◎◎◎
16
1280(SXGA)
◎◎◎◎
18
19
20
1280(HDTV)
◎◎◎◎
21
1920(HDTV)
◎◎◎◎
22
23
800(SVGA)
800(SVGA)
800(SVGA)
800(SVGA)
800(SVGA)
1024(XGA)
1024(XGA)
1024(XGA)
1024(XGA)
1280(SXGA)
640(VGA)
640(VGA)
640(VGA)
640(VGA)
640(VGA)
640(VGA)
720(DOS)
852(WGA)
480
××××
480
××××
480
××××
480
××××
600
××××
600
××××
600
××××
600
××××
600
××××
768
××××
768
××××
768
××××
768
××××
1024
××××
1024
××××
1024
××××
350
××××
480
××××
720P
××××
1080I
××××
400
××××
480
××××
Refresh
Rate
60 31.5 59.94 - - 25.175
72 37.9 72.81 - - 31.500
75 37.5 75 - - 31.500
85 43.3 85.01 - - 36.000
56 35.1 56.25 + + 36.000
60 37.9 60.317 + + 40.000
72 48.1 72.19 + + 50.000
75 46.9 75 + + 49.500
85 53.7 85.06 + + 56.250
60 48.4 60.01 - - 65.000
70 56.5 70.07 - - 75.000
75 60.0 75.03 + + 78.750
85 68.7 84.99 + + 94.500
60 63.98 60.02 + + 108.00
75 79.98 75.03 + + 135.00
85 91.15 85.02 + + 157.50
70 31.50 70 - - 25.175
50 31.5 50 - - 25.175
60 45.15 60 - - 74.250
60(I) 33.78 60 - - 74.250
70 31.46 70.08 + - 28.320
60 31.72 60.41 - - 34.00
Horizontal
Frequency
Vertical
Frequency
Vertical
Sync
Polarity
Horizontal
Sync
Polarity
Dot rate
RGB/DVI For Apple Standar d.
Mode No Resolution
(Hz) (K Hz) (Hz) (TTL) (TTL) (MHz)
640
870
1
2
3
××××
640
1920
1280
24
25 832 x 624 75 49.73 74.55 - - 57.283
26 1152 x 870 75 68.68 75.06 - - 100.000
Attention
2.3.10 Y/PB/PR For Component:
: For DVI is not supported.
◎◎◎◎
Mode No Resolution Refresh Rate
Refresh
480P
××××
1080I
××××
720P
××××
Rate
75 68.85 75.00 - - 57.283
Horizontal
Frequency
60
60
60
Vertical
Frequency
Vertical
Sync
Polarity
Horizontal
Sync
Polarity
Dot rate
2-3
Page 8

SPECIFICATION VER1.0
2.4. Display Performance Requirements:
The data of display performance are measured based on the following.
Conditions unless otherwise specified.
a. Ambient temperature
b. Warm up period 30 minutes Min.
c. Line input voltage : 100 Vac ~ 240 Vac (50 / 60 Hz)
d. Viewing distance Distance from screen is 81 cm
e. Display mode Test with window white pattern mode if not specified.
f. Brightness condition Press recall bottom to set default brightness
2.4.1 Maximum Resolution: Support to 1280 x 1024
2.4.2 Horizontal Size (Standard) 920
Vertical Size (Standard) 518
2.4.3 Horizontal Size (Max.) Mode 1~26
Vertical Size (Max.) Mode 1~26
2.4.4 Maximum Brightness Level: Timing Mode 1
a. 100% center block white
pattern(mosaic)
b. raster background
2.5. Operation:
±±±±
25
5
℃℃℃℃
±±±±
8 mm (for mode 1
±±±±
8 mm (for mode 1
ÖÖÖÖ
ÖÖÖÖ
More than 30FL
(while pressing recall button to set default brightness)
with contrast / brightness at Max. and black signal)
less than 0.4FL
full-scan
full-scan
〜〜〜〜
〜〜〜〜
26)
26)
Main unit button
IR Remote Control
2.5.1 Adjustable Items:
AV/S-video input
Y/CB/CR Color Temperature
Analog RGB input
DVI input
Main power switch (power ON /OFF)
Power ON/OFF
Input Mode (Video1 -> S-Video1 -> Video2 or S-Video2 ->
Y/P
DVI->Video1 run in circle)
Menu key -,+ Adjustment -,+
Power on/off
Input Mode (same as Main unit button)
Volume -,+ Wide , Video/S video
input:4:3/16:9/ZOOM1/ZOOM2
Analog RGB input :W4:3/W16:9
Menu -,+ Adjustment -,+ RECALL
PIP ,POP ,SWAP ,MUTE
Brightness, Contrast, Color , Tint, Sharpness
Display position :
Brightness, Contrast, Vertical position, Vertical width,
Horizontal position, Horizontal width, Color Temperature
Clock phase, DPMS.
Brightness, Contrast, Vertical position, Vertical width,
Horizontal position, Horizontal width, Color Temperature,
DPMS
1 or Y/CB/CR 1 -> Y/PB/PR 1 or Y/CB/CR 1 -> RGB ->
B/PR
2-4
Page 9

SPECIFICATION VER1.0
3. DIMENSIONS: Without/Stand With/Stand
Width
Height
Depth
3.1. Package Dimensions:
Width 1230 mm
Height 960 mm
Depth 470 mm
3.2. Weight:
Net weight 79.4lbs/36 Kgs (w/o stand) 83.8lbs/ 38Kgs (w/ stand)
Gross weight 115lbs/52 Kgs
4. ENVIRONMENT:
4.1. Operating:
Temperature
Relative humidity 20~80%
Pressure 800~1114hpa
4.2. Non-Operating:
Temperature
Relative humidity 20~90%
Pressure 700~1114hpa
Vibration X/Y/Z, 0.5G/10~55Hz(sweep), 10 minutes
1040mm
648 mm
95mm
0~40
-20~60
(32~104
℃℃℃℃
℃℃℃℃
1040mm
690mm
375 mm
)
℉℉℉℉
4.3. Acoustics:
(IHF A-weighted 1meter) 40dB Max.
5. SOUND:
a. Residual hum (at volume min)
b. Practical max. Audio output (at 10% THD max.)
1.0vp-p 1K Hz input 5W +5W Max. /12 ohm
c. Sound distortion (at 250 mw 1K Hz)
d. Sound distortion (at
i.ovp-p 1kHz input volume max )
e. Audio output (input at 1.4V
f. Max. hum (at volume max)
g. Sensitivity (at volume max. O/P 1W)
at 1KHz AV Input
h. Audio Fidelity (1KHz 0dB,corrected for emphasis characteristics)
BBE ON 60Hz
10KHz
WOOFER & BBE OFF 100Hz
P-P
)
10KHz
500
W Max.
μμμμ
1% Max.
9% max
1.0 V
≧≧≧≧
1000
150mV
P-P
W Max.
μμμμ
±±±±
6dB
8dB
-6dB
-2dB
3dB
3dB
±±±±
3dB
±±±±
3dB
±±±±
3dB
±±±±
2-5
Page 10

SPECIFICATION VER1.0
6. RF
6.1 RF Sensitivity (Peak)
VHF CH 2 ~ CH 13 30dB Max.
UHF CH 14 ~ CH 69 30dB Max.
CATV CH A-5 ~ CH W+29 30dB Max.
6.2 AFT Pull-In Range
0.6MHz Min.
VHF CH 2 ~ CH 13
UHF CH 14 ~ CH 69
CATV CH A-5 ~ CH W+29
6.3 Picture IF Rejection
VHF CH 2 ~ CH 13 50dB Min.
UHF CH 14 ~ CH 69 50dB Min.
CATV CH A-5 ~ CH W+29 50dB Min.
6.4 Picture Image Rejection
VHF CH 2 ~ CH 13 40dB Min.
UHF CH 14 ~ CH 69 35dB Min.
CATV CH A-5 ~ CH W+29 35dB Min.
±±±±
0.6MHz Min.
±±±±
0.6MHz Min.
±±±±
6.5 AGC Characteristics
AGC Figure Of Merit 50dB Min.
RF signal range in which video at PDP drops 6 dB from output level obtained
with 100mV input.
6.6 RF AGC Cut In Level
6.7 FM/AM Rejection (100mV at SIF input) 14dB min
6.8 Noise Limits Sensitivity VHF 45dB max
7. RELIABILITY REQUIREMENT:
The MTBF needs 20000hrs under operation 25
8. REGULATORY REQUIREMENTS:
8.1 Safety Requirement:
a. UL Safety of information technology equipment including
electrical business equipment
b. CSA
c. TUV
Safety of information technology equipment including
electrical business equipment
55dB
UHF 49dB max
±±±±
5
(half luminosity, motion picture)
℃℃℃℃
2dB
±±±±
8.2 Emission Requirement:
The unit shall meet the EMI limits in all screen modes. For EMI testing, the unit must be
failed with the screen pattern consisting of scrolling capital “H” characters also the
brightness contrast will be adjusted to max. Level.
a. FCC class A part 15
2-6
Page 11
SPECIFICATION VER1.0
8.3 Transit test
a. Drop Test 200mm max.
b. Vibration Test
1. Forward and backward
2. Right and left
3. Up and down
8.4 Power Management:
Mode H-sync V-sync Video Power dissipation
Normal Pulse Pulse Active Normal power
Stand-by No pulse No pulse No video Power off
Pulse No pulse Power saving
No pulse Pulse
This Plasma display is Energy star compliant when used with a computer equipped with
DPMS.
Note: The power indicator LED color is green in normal state, yellow in stand-by
and power saving state.
9. VIDEO & AUDIO
9.1 Video Signal Output (impedance 75 ohm)
(input signal at 1.0 Vp-p
0.2Vp-p)
±±±±
30 minutes 1000 c.p.m
30 minutes 1000 c.p.m
30 minutes 1000 c.p.m
Blanked Less than 5 watts
1.0 Vp-p
0.2Vp-p
±±±±
2-7
Page 12
SPECIFICATION VER1.0
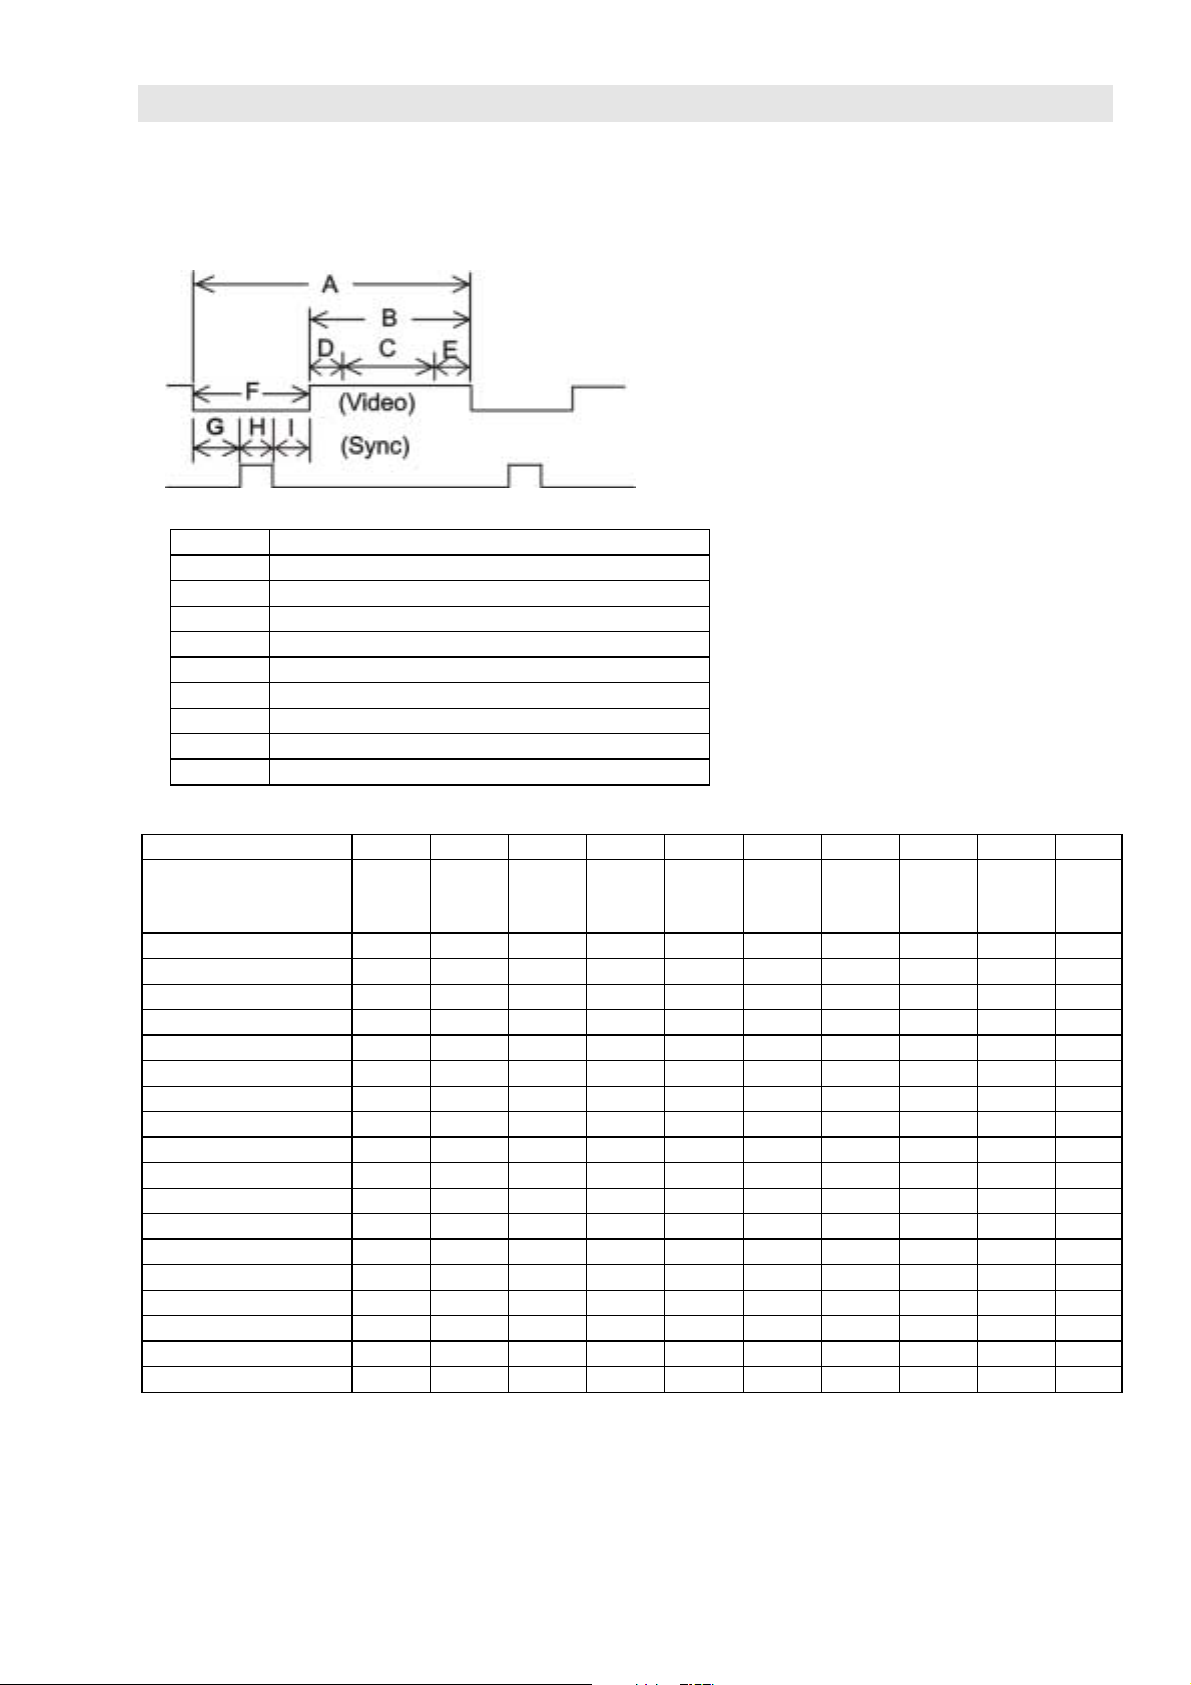
APPENDIX A :
Preset Timing Chart
Item Description:
A Total time
B Active display area including borders
C Active display area excluding borders
D Left/Top border
E Right/bottom border
F Blanking time
G Front porch
H Sync-width
I Back porch
Mode No 1 2 3 4 5 6 7 8 9
Resolution
&
Refresh Rate
Pixel 25.175 31.5 31.5 36 36 40 50 49.5 56.25 MHz
Horizontal visible 640 640 640 640 800 800 800 800 800 Dots
Horizontal total 800 832 840 832 1024 1056 1040 1056 1048 Dots
Horizontal front porch 24 32 16 56 24 40 56 16 32 Dots
Horizontal sync 96 40 64 56 72 128 120 80 64 Dots
Horizontal back porch 40 120 120 80 128 88 64 160 152 Dots
Horiz blanking time 160 192 200 192 224 256 240 256 248 Dots
Vertical visible 480 480 480 480 600 600 600 600 600 Lines
Vertical total 525 520 500 509 625 628 666 625 631 Lines
Vertical front porch 18 17 1 1 1 1 37 1 1 Lines
Vertical sync 2 3 3 3 2 4 6 3 3 Lines
Vertical back porch 25 20 16 25 22 23 23 21 27 Lines
Vertical blanking time 45 40 20 29 25 28 66 25 31 Lines
Horizontal frequency 31.469 37.9 37.5 43.3 35.1 37.9 48.1 46.9 53.7 KHz
Vertical frequency 59.94 72.81 75 85.01 56.25 60.317 72.19 75 85.06 Hz
Vertical sync polarity - - - - + + + + + TTL
Horiz sync polarity - - - - + + + + + TTL
Dot rate 25.175 31.5 31.5 36 36 40 50 49.5 56.25 MHz
640
480
60
640
480
72
640
480
75
640
480
85
800
600
56
800
600
60
800
600
72
800
600
75
800
600
85
Hz
2-8
Page 13
SPECIFICATION VER1.0
Mode No 10 11 12 13 14 15 16 18 19
Resolution
&
Refresh Rate
Pixel 65 75 78.75 94.5 108 135 157.5 25.175 25.175 MHz
Horizontal visible 1024 1024 1024 1024 1280 1280 1280 640 640 Dots
Horizontal total 1344 1328 1312 1376 1688 1688 1728 800 800 Dots
Horizontal front porch 24 24 16 48 48 16 64 16 16 Dots
Horizontal sync 136 136 96 96 112 144 160 96 96 Dots
Horizontal back porch 160 144 176 208 248 248 224 48 48 Dots
Horiz blanking time 320 304 288 352 408 408 448 160 160 Dots
Vertical visible 768 768 768 768 1024 1024 1024 350 480 Lines
Vertical total 806 806 800 808 1066 1066 1072 449 629 Lines
Vertical front porch 3 3 1 1 1 1 1 37 62 Lines
Vertical sync 6 6 3 3 3 3 3 2 2 Lines
Vertical back porch 29 29 28 36 38 38 44 60 85 Lines
Vertical blanking time 38 38 32 40 42 42 48 99 149 Lines
Horizontal frequency 48.4 56.5 60 68.7 63.98 79.98 91.15 31.50 31.5 KHz
Vertical frequency 60.01 70.07 75.03 84.99 60.02 75.03 85.02 70 50 Hz
Vertical sync polarity - - + + + + + - - TTL
Horiz sync polarity - - + + + + + - - TTL
Dot rate 65 75 78.75 94.5 108 135 157.5 25.175 25.175 MHz
1024
768
60
1024
768
70
1024
768
75
1024
768
85
1280
1024
60
1280
1024
75
1280
1024
85
640
350
70
640
480
50
Hz
Mode No 20 21 22 23 24 25 26
Resolution
&
Refresh Rate
Pixel 74.250 74.25 28.320 30 57.283 57.283 100.000 MHz
Horizontal visible 1266 1901 720 852 640 832 1152 Dots
Horizontal total 1650 2201 900 955 832 1152 1456 Dots
Horizontal front porch 42 68 18 19 32 32 32 Dots
Horizontal sync 63 63 108 48 80 64 128 Dots
Horizontal back porch 279 169 54 36 80 224 144 Dots
Horiz blanking time 384 300 180 103 192 320 304 Dots
Vertical visible 687 518 400 480 870 624 870 Lines
Vertical total 750 562.5 449 525 918 667 915 Lines
Vertical front porch 1 0.5 12 10 3 1 3 Lines
Vertical sync 6 6 2 2 3 3 3 Lines
Vertical back porch 56 38 35 33 42 39 39 Lines
Vertical blanking time 63 44.5 49 45 48 43 45 Lines
Horizontal frequency 45.15 33.78 31.46 31.72 68.85 49.73 68.68 KHz
Vertical frequency 60 60 70.08 60.41 75.00 74.55 75.06 Hz
Vertical sync polarity - - + - - - - TTL
Horiz sync polarity - - - - - - - TTL
Dot rate 74.25 74.25 28.32 30 57.283 57.283 100.000 MHz
1280
720P
60
1920
1080I
60I
720
400
70
852
480
60
640
870
75
832
624
75
1152
870
75
Hz
2-9
Page 14
FACTORY & ELECTRONIC ADJUSTMENT VER1.0
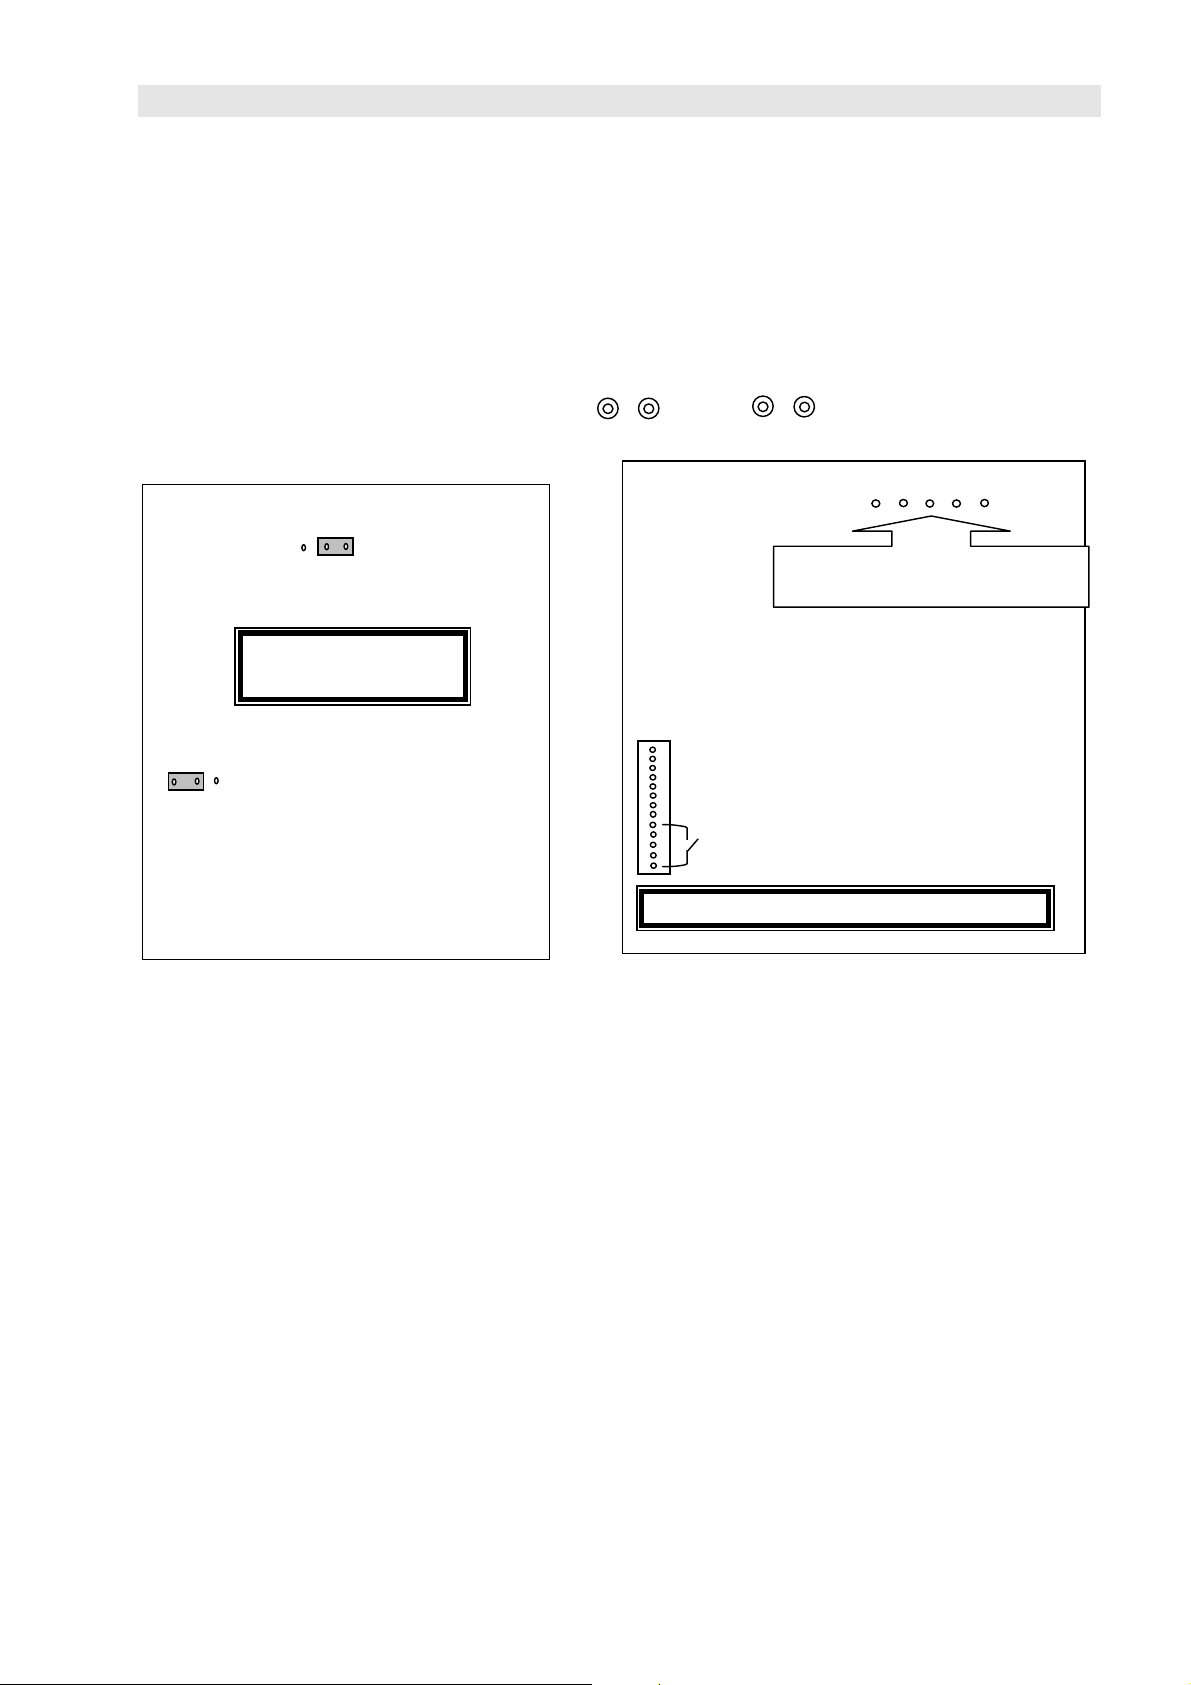
CN05 SELECT "EXT"
1. PANEL Voltage Adjustment
The power voltage needs to be re-adjusted and checked whenever the panel module
or power board module is changed.
POWER VOLTAGE ADJUSTMENT FOR SAMSUNG TTL PANEL
GND
DIGITAL BOARD
EXT INT
POWER BOARD
CN01
VA VSC VS VR VSET
Voltage Check Points
CN01 SELECT "INT"
EXT INT
CN05
SA Connector: Connect Pins 1 & 5
1. Remove the Image Board to access the Digital Board beneath it.
2. As shown in the diagram above (left), set the CN01 Jumper to “INT” and set the CN05*
Jumper to “EXT”.
3. Locate the Power Board and the SA Connector (see diagram above: right). Connect
pins 1 and 5 of the SA connector. This connection will turn on the Panel Power.
4. Locate the Voltage Label under the upper right speaker holder. The Voltage Label
specifies the 5 Voltage Adjustment Parameters and their respective values**.
5. Locate the Voltage Regulator- VR 8005 on the Pow er Boar d and connect a M ul ti meter to
the VA Voltage Check Point (see diagram above: right) and Ground. Adjust the
Voltage Regulator until the Multimeter voltage reading is equivalent to the VA value on
the Voltage Label.
6. Repeat Step 5 for VSC, VS, VR and VSET adjustments. Follow the table below for
the adjustment sequence and the Voltage Regulator to be adj usted for each Parameter.
1st → 2nd → 3rd → 4th → 5th
VA VSC VS VR VSET
VR8005 VR8006 VR8003 VR8001 VR8007
3-1
Page 15

FACTORY & ELECTRONIC ADJUSTMENT VER1.0
Color Temperature Adjustment
2. Pre-setting Adjustment and Equipment Preparation:
(1) Turn on the PDP and let it warm up for at least 30 minutes.
(2) Turn on the Color Analyzer (ie. Minolta, Model = CA-100) and reset the Color
Analyzer.
(3) Change the PDP input mode to DVI and press the “Recall” key on the remote
control to have the PDP set recalled back to default factory settings.
(4) Set up the Video Pattern Generator (ie. Chroma, Model = C2226) with the
following settings:
a. Timing: 640 x 480 @ 60Hz,
b. Make sure the Output signal is Digital (DVI)
Connect the PDP DVI input connector to the Chroma DVI output connector.
(5) Dark level and bright level center block definition:
A. Dark level center block definition:
Pattern set = Pattern name = 1-mosaic,
Color form = norm,
Background color = 0
Foreground color = 17
According to the C-2226’s user manual, appendix analog-color: Normal Pen from
Pen 17 = R: 102, G: 102, B: 102
102 (output amplifier)/1024 (total amplifier)=10%, therefore the 10% is the 10 IRE
white output pattern.
B. Bright level center block definition:
Pattern set = Pattern name = 1-mosaic,
Color form = norm,
Background color = 0
Foreground color = 25
According to the C-2226’s user manual, appendix analog-color: Normal Pen from
Pen 25 = R: 614, G: 614, B: 614
614 (output amplifier)/1024 (total amplifier)=60%, therefore the 60% is the 60 IRE
white output pattern.
(6) There are 3 different modes (DVI, RGB and AV) that have Color Temperature
settings. For each one of these 3 modes, there are 4 different Color
Temperatures (5400K, 6500D, 9300K and 13800K) that can be individually
adjusted. Each Color Temperature is adjusted through the dark level, bright
level, Gain and Bias values.
3-2
Page 16

FACTORY & ELECTRONIC ADJUSTMENT VER1.0
(7) Press the following key sequence to access the Factory Adjustment Menu:
Press and hold down the Left Arrow key for at least 5 seconds, then press and
hold down the Right Arrow key for at least 5 seconds followed by pressing the
FAV.SET key.
From the Factory Adjustment Menu, choose the Color Temp. Adj option and the
following OSD will appear.
DVI (RGB, AV) 5400K (6500D, 9300K, 13800K)
x=335 y=343
GAIN BIAS
R G B R G B
X X X X X X
*Note: When adjusting the DVI and RGB color temperatures, please set
the PDP input source so that it matches the color temperature source
being adjusted (DVI color temp. to be adjusted with DVI source under DVI
mode, RGB color temp. with RGB source under RGB mode, AV color
temp. with Composite source under AV1 mode).*
(8) Flatly place the Minolta Color Analyzer’s Photo Detector in contact with the
center of the PDP screen.
3. DVI Mode Color Temperature Adjustment procedure:
(1) With the PDP’s DVI input connected to Chroma C-2226’s DVI output connector,
set the Chroma to send a dark level center block signal (10 IRE). Now press
the Factory Adjustment key sequence as stated in point (7) above. The DVI
5400K Color Temperature setting menu will appear after choosing the Color
Temperature Adjustment option.
(2) Press the Left/Right Button to switch between the Bias (R, G, B) and Gain (R, G,
B) values. Use the Up/Down Buttons to change the Bias and Gain Values.
(3) 5400K dark level center block adjustment procedure:
A. Press the Left/Right key on the remote control to select G-BIAS and adjust
(using the up/down key) the G-Bias value until Y = 0.4±0.08 FL.
B. Press the Left/Right key on the remote control to select R-BIAS and adjust
the R-Bias value until x = 335±8
C. Press the Left/Right key on the remote control to select B-BIAS and adjust
the B-Bias value until y = 343±8
D. Repeat steps A, B and C until the following final values are obtained:
x = 335±8
y = 343±8
Y = 0.4±0.08 FL
(4) 5400K bright level center block adjustment procedure: (Please set the Chroma
C-2226 DVI bright level center block signal to 60 IRE)
A. Select G-GAIN and adjust the G-GAIN value until Y = 30±0.8 FL.
B. Select R-GAIN and adjust the R-GAIN value until x = 335±8
C. Select B-GAIN and adjust the B-GAIN value until y = 343±8
D. Repeat steps A, B and C until the following final values are obtained:
x = 335±8
y = 343±8
Y = 30±0.8 FL
3-3
Page 17

FACTORY & ELECTRONIC ADJUSTMENT VER1.0
(5) Upon completion of Steps 3 and 4 above, press the FAV.SET key for the next
Color Temperature setting (5400→6500D→9300→13800).
For each color temperature setting, please repeat Steps 3 and 4 above but
replace the x and y settings with the following values:
a. 6500D: x = 313, y = 329 for both Dark and Bright Level Settings
b. 9300K: x = 285, y = 295 for both Dark and Bright Level Settings
c. 13800K: x = 260, y = 275 for both Dark and Bright Level Settings
For these 3 Color Temperatures (6500D, 9300K and 13800K), adjust the Dark
and Bright Levels to the following Y values:
a. Dark level Y = 0.4±0.08 FL
b. Bright level Y = 30±0.8 FL
(6) Once all 4 Color Temperatures have been adjusted, skip through the RGB and
AV Color Temperatures (using the FAV.SET key) and completely exit the
Factory Adjustment Menu.
4. RGB Mode Color Temperature Adjustment procedure:
(1) Turn on the Color Analyzer (Minolta, Model = CA-100) and reset the Color
Analyzer.
(2) Switch the PDP input to RGB mode and press the “Recall” key on the remote
control to have the PDP set recalled back to default factory settings.
(3) Set up the Video Pattern Generator (Chr oma, M odel = C 2226) with the following
settings:
a. Timing: 640 x 480 @ 60Hz,
b. Make sure the Output signal is Analog (RGB)
Connect the PDP RGB input connector to the Chroma C-2226 RGB output
connector.
(4) Dark level and bright level center block definition:
C. Dark level center block definition:
Pattern set = Pattern name = 1-mosaic
Color form = norm
Background color = 0
Foreground color = 17
According to the C-2226’s user manual, appendix analog-color: Normal Pen from
Pen 17 = R: 102, G: 102, B: 102
102 (output amplifier)/1024 (total amplifier)=10%, therefore the 10% is the 10 IRE
white output pattern.
D. Bright level center block definition:
Pattern set = Pattern name = 1-mosaic
Color form = norm
Background color = 0
Foreground color = 25
According to the C-2226’s user manual, appendix analog-color: Normal Pen from
Pen 25 = R: 614, G: 614, B: 614
614 (output amplifier)/1024 (total amplifier)=60%, therefore the 60% is the 60 IRE
white output pattern.
(5) Flatly place the Minolta Color Analyzer’s Photo Detector in contact with the
center of the PDP screen.
(6) Set the Chroma C-2226 to a dark level center block signal (10 IRE). Enter the
Factory Adjustment Menu using the same Key sequence specified above and
then select the Color Temperature Adjustment option. Using the FAV.SET key
skip through all the DVI Color Temperatures until you reach the 5400K RGB
Color Temperature OSD.
3-4
Page 18

FACTORY & ELECTRONIC ADJUSTMENT VER1.0
(7) 5400K dark level center block adjustment procedure:
A. Select G-BIAS and adjust the G-Bias value until Y = 0.5±0.08 FL
B. Select R-BIAS and adjust the R-Bias value until x = 335±8
C. Select B-BIAS and adjust the B-Bias value until y = 343±8
D. Repeat steps A, B and C until the following final values are obtained:
x = 335±8
y = 343±8
Y = 0.5±0.08 FL
(8) 5400K bright level center block adjustment procedure: (Please set the Chroma
C-2226 DVI bright level center block signal to 60 IRE)
A. Select G-GAIN and adjust the G-GAIN value until Y = 30±0.8 FL
B. Select R-GAIN and adjust the R-GAIN value until x = 335±8
C. Select B-GAIN and adjust the B-GAIN value until y = 343±8
D. Repeat steps A, B and C until the following final values are obtained:
x = 335±8 y = 343±8 Y = 30±0.8 FL
(9) Upon completion of Steps 7 and 8 above, press the FAV.SET key for the next
Color Temperature setting (5400→6500D→9300→13800).
For each color temperature setting, please repeat Steps 7 and 8 above but
replace the x and y settings with the following values:
a. 6500D: x = 313, y = 329 for both Dark and Bright Level Settings
b. 9300K: x = 285, y = 295 for both Dark and Bright Level Settings
c. 13800K: x = 260, y = 275 for both Dark and Bright Level Settings
For these 3 Color Temperatures (6500D, 9300K and 13800K), adjust the Dark
and Bright Levels to the following Y values:
a. Dark level Y = 0.5±0.08 FL
b. Bright level Y = 30±0.8 FL
(10) Once all 4 Color Temperatures have been adjusted, skip through the AV
Color Temperatures and completely exit the Factory Adjustment Menu.
5. AV Mode Color Temperature Adjustment procedure:
(1) Turn on the Color Analyzer (Minolta, Model = CA-100) and reset the Color
Analyzer.
(2) Switch the PDP input to AV1 mode and press the “Recall” key on the remote
control to have the PDP set recalled back to default factory settings.
(3) Using a Pattern Generator (ie. SENCORE VP-300 Multimedia Video Generator)
set the dark level and bright level center block with the following settings:
A. Dark Level Center block definition
a. Signal Type: NTSC/PAL
b. Format: NTSC
c. Pattern = WINDOW 1 14 IRE
B. Bright Level Center block definition:
a. Signal Type: NTSC/PAL
b. Format: NTSC
c. Pattern = WINDOW 2 60 IRE
(4) Connect the PDP AV1 input to the VP-300 Composite output connector.
(5) Flatly place the Minolta Color Analyzer’s Photo Detector in contact with the
center of the PDP screen.
(6) Set the VP-300 to send a dark level center block signal (14 IRE). Enter the
Factory Adjustment Menu using the same Key sequence specified above and
then select the Color Temperature Adjustment option. Using the FAV.SET
key skip through all the DVI and RGB Color Temperatures until you reach the
5400K AV Color Temperature OSD.
:
3-5
Page 19

FACTORY & ELECTRONIC ADJUSTMENT VER1.0
(7) 5400K dark level center block adjustment procedure:
A. Select G-BIAS and adjust the G-Bias value until Y = 1.2±0.1 FL.
B. Select R-BIAS and adjust the R-Bias value until x = 335±10
C. Select B-BIAS and adjust the B-Bias value until y = 343±10
D. Repeat steps A, B and C until the following final values are obtained:
x = 335±10
y = 343±10
Y = 1.2±0.1 FL
(8) 5400K bright level center block adjustment procedure: (Please set the VP-300
bright level center block signal to 60 IRE)
A. Select G-GAIN and adjust the G-GAIN value until Y = 30±1 FL
B. Select R-GAIN and adjust the R-GAIN value until x = 335±10
C. Select B-GAIN and adjust the B-GAIN value until y = 343±10
D. Repeat steps A, B and C until the following final values are obtained:
x = 335±10
y = 343±10
Y = 30±1 FL
(9) Upon completion of Steps 7 and 8 above, press the FAV.SET key for the next
Color Temperature setting (5400→6500D→9300→13800).
For each color temperature setting, please repeat Steps 7 and 8 above but
replace the x, y and Y values with the following values:
a. 6500D: x = 313, y = 329 for both Dark and Bright Level Settings
b. 9300K: x = 285, y = 295 for both Dark and Bright Level Settings
c. 13800K: x = 260, y = 275 for both Dark and Bright Level Settings
For these 3 Color Temperatures (6500D, 9300K and 13800K), adjust the Dark
and Bright Levels to the following Y values:
a. Dark level Y = 1.2±0.1 FL
b. Bright level Y = 30±1 FL
Once all 4 Color Temperatures have been set you will automatically exit the Color Temperature
Adjustment. Once you exit the Color Temperature Adjustment proceed on by completely exiting
the Factory Adjustment Menu.
3-6
Page 20
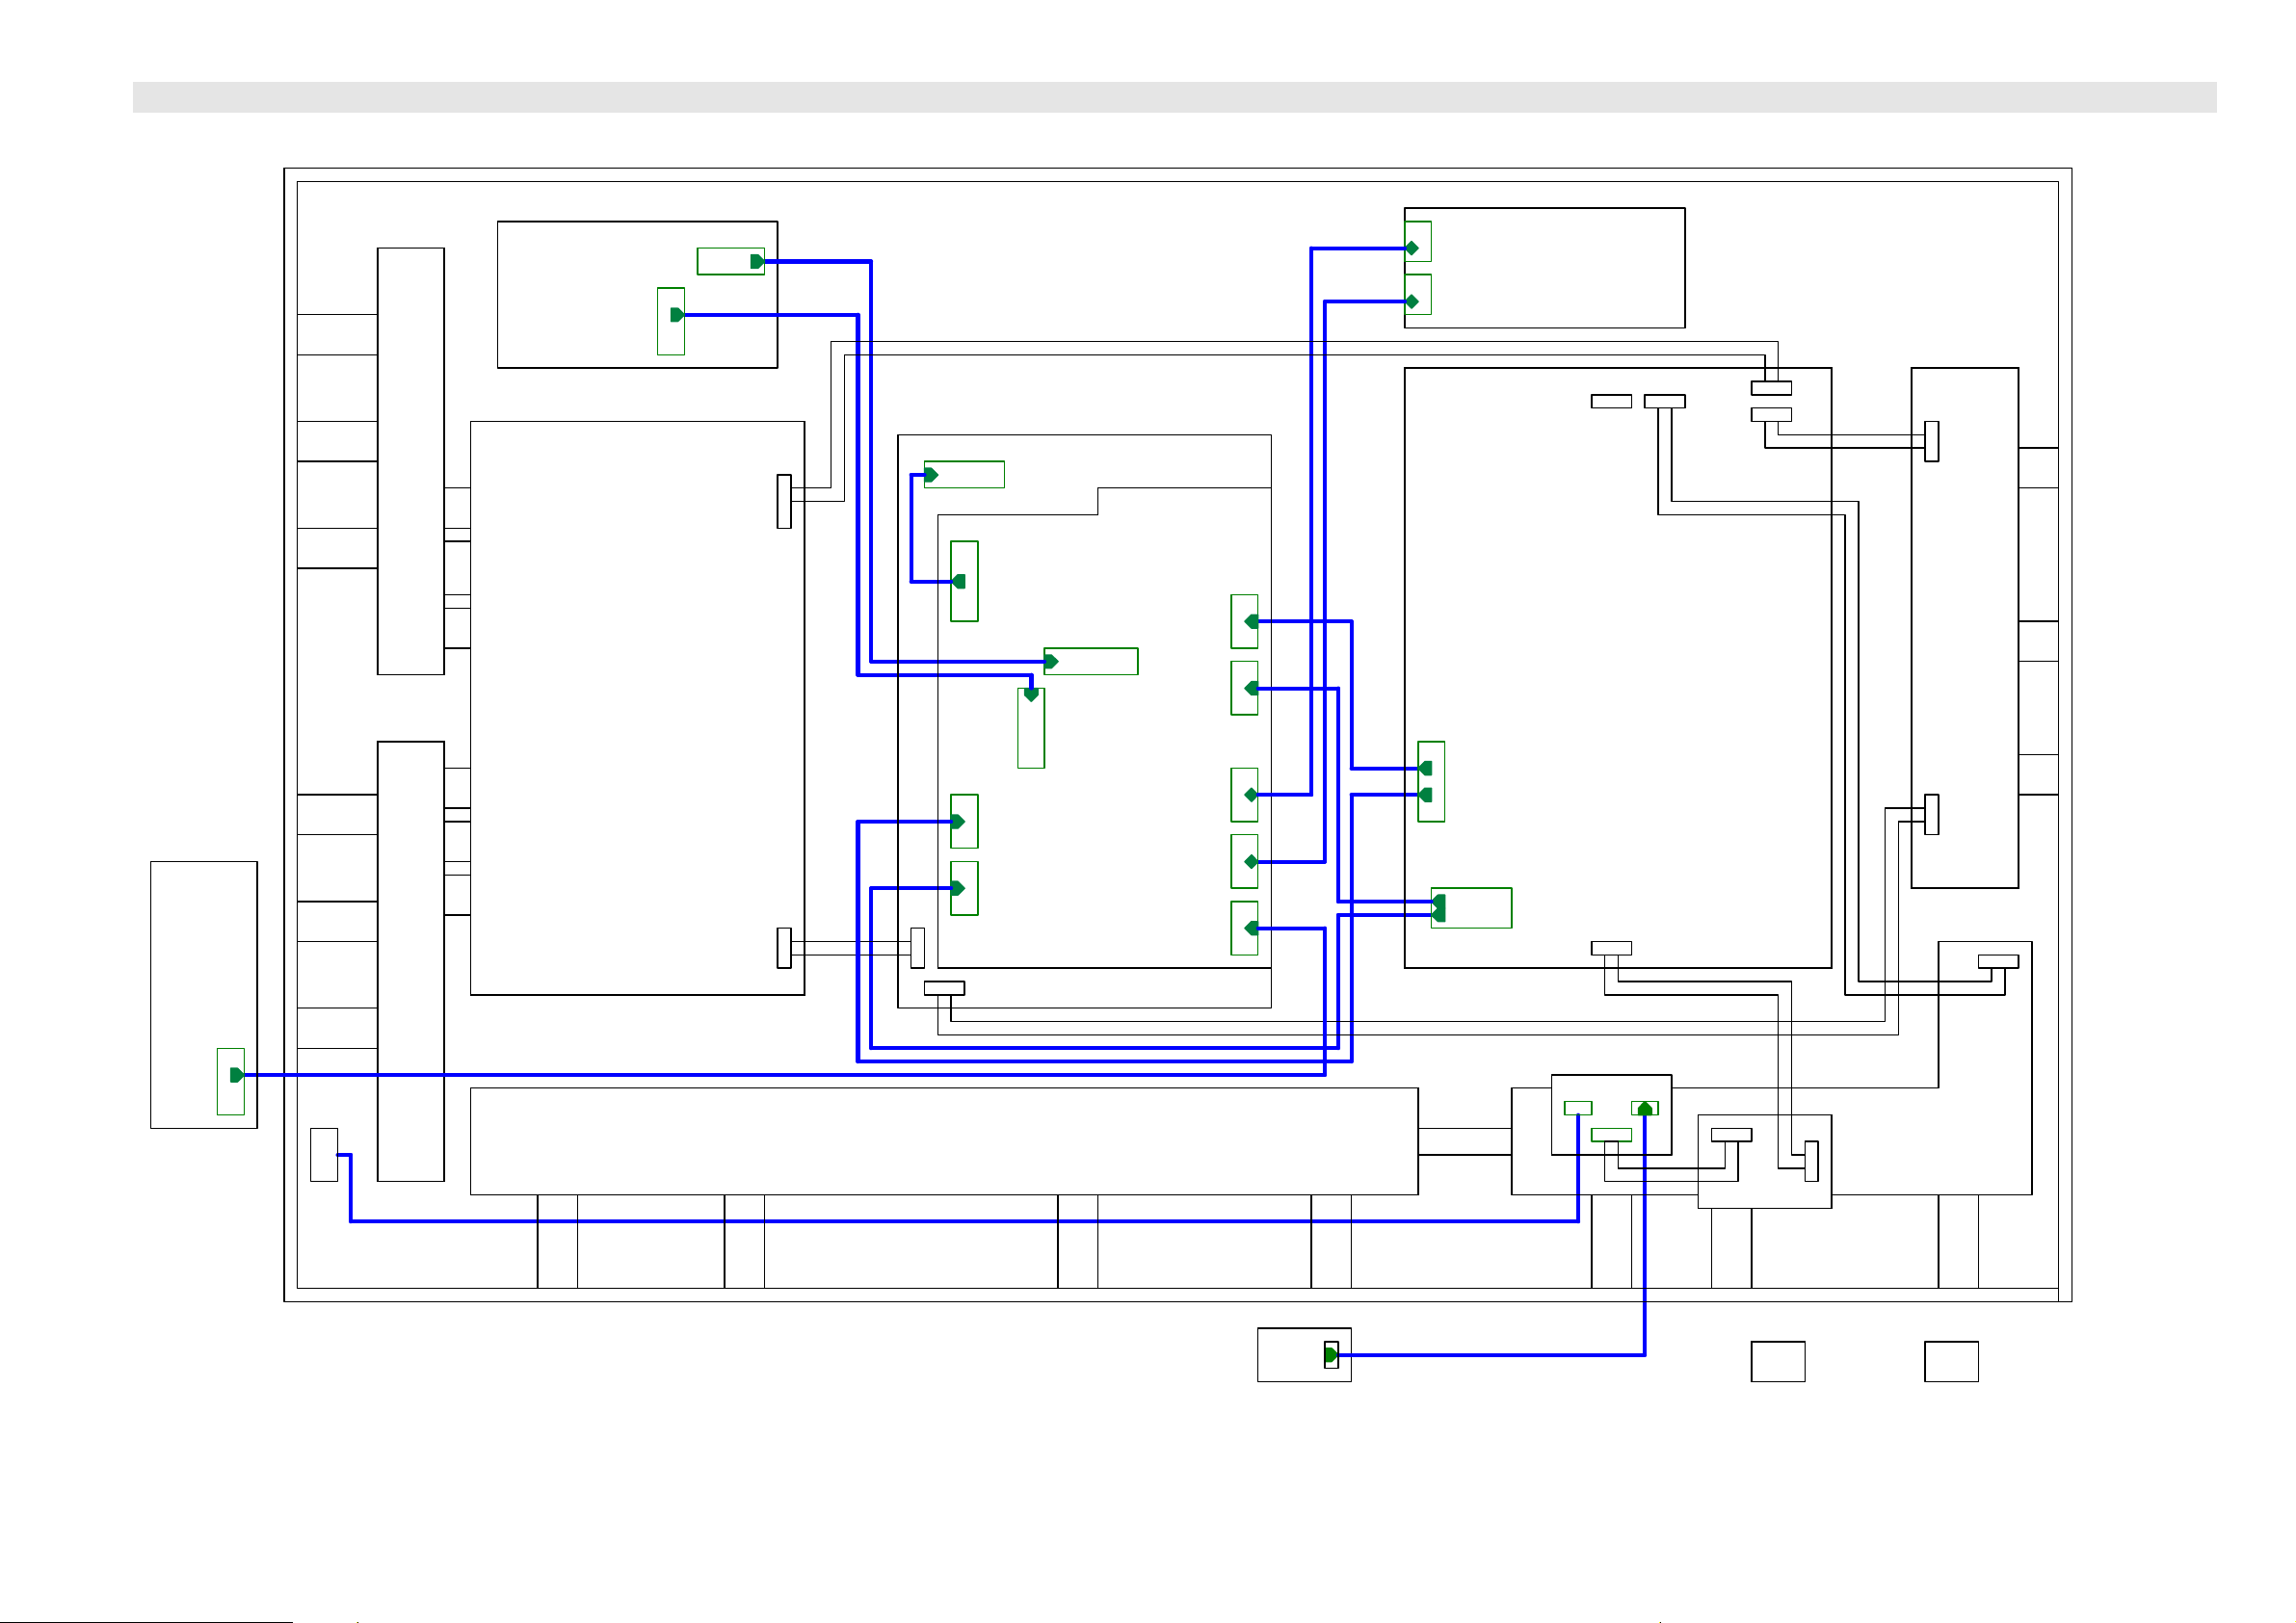
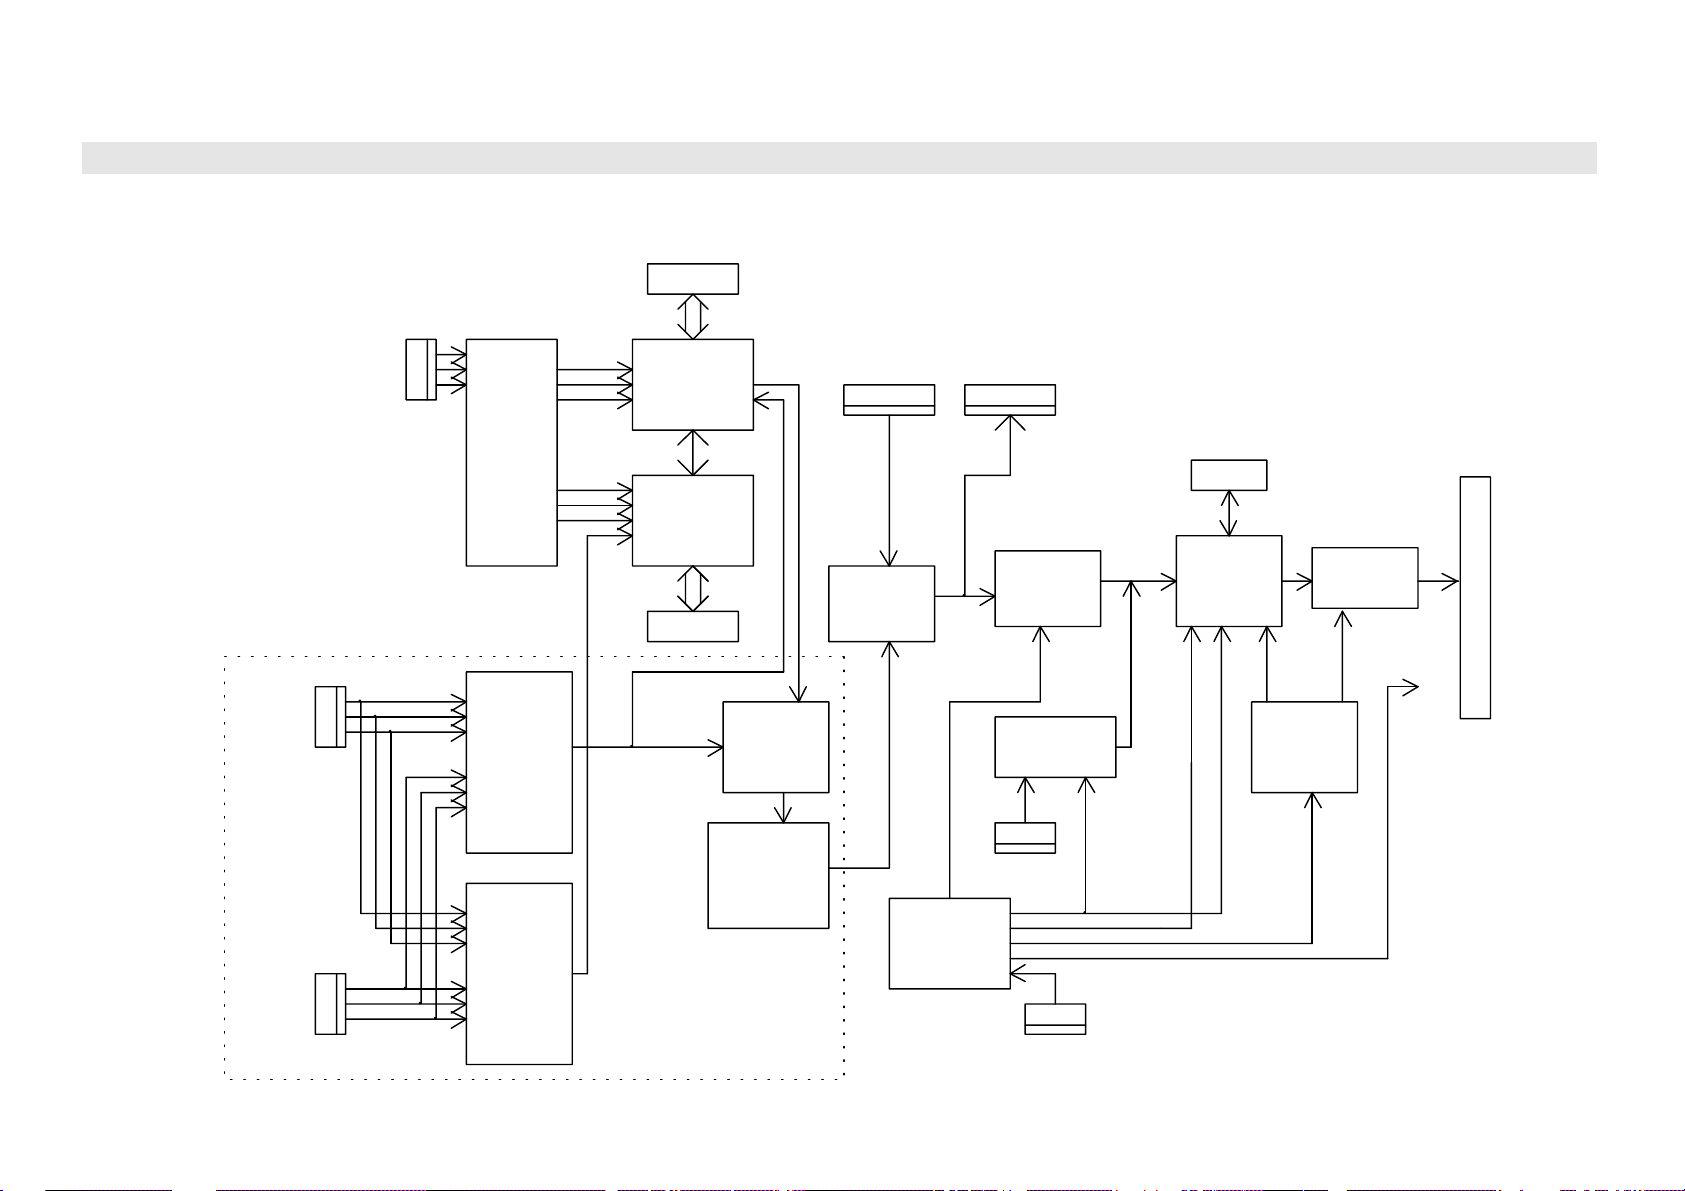
BLOCK DIAGRAM VER1.0
Front
Button
Control
Board
Assy
4
Pin[1:6]
JA3
Power
SW
Y Amp Boar d-Up per
12
13 Y Amp Board- Low er
AV Module
Board(with
Tuner)
Assy
Pin[1:32]
JP2
JP1
Pin[1:32]
5
Inter face Board- Y Ass'y
6
Logic E-Buffer
LA03
Pin[1:31]
Pin[1: 31]
Pin[1:4]
Pin[1:3]
11
PDP Socket Diagram
Logic Board Ass'y
Image Board
J1
(LVDS)
J15
(9V)
J25
(5V)
Ass'y
JP4
PinA[1:48]
Pin[1:48]
JP5
Pin[1:10]
J11
Pin[1:12]
(Audio DC,Supply)
J14
Pin[1:6]
(5V,SB DET)
J21
Pin[1:7]
(24V,9V)
J12
(Audio Si gnal )
J5
Pin[1:6]
(Key)
JA2
Pin[1:10]
JA1
Pin[1:12]
Audio Amplifier
Boar d Ass'y
3
7
1
PANEL Power
Supply Ass'y
8
SA
CON8011
Pin[1:6]
Pin[7:13]
AUDIO
CON8009
Pin[1:7]
Pin[1:2]
Inter face Board- Z Ass'y
10
AC Master po w er sw ith Bo ar d
2
SW
AC OUT
AC IN
Logic F-Buffer
14
9
Power Input
Module
Assy
AC
PLUG
Panel's Board Assembly
SAMPO Bo ard Assembly
4-1
Page 21
BLOCK DIAGRAM VER1.0
Image Board Ass'y
Pin 1
Pin 2
Pin 3
Pin 5
Pin 6
Pin 7
Pin 8
Pin 9
Pin 10
Pin 11
Pin 12
Pin 13
Pin 14
Pin 15
Pin 16
Pin 17
Pin 18
Pin 19
Pin 20
Pin 21
Pin 22
Pin 23
Pin 24
Pin 25
Pin 26
Pin 27
Pin 28
Pin 29
Pin 30
Pin 31
Pin 32
Pin 33
Pin 34
Pin 35
Pin 36
Pin 37
Pin 38
Pin 39
Pin 40
J1 (40 P i n )
NC
RARA+Pin 4
GND
GND
RBRB+
GND
GND
RCRC+
GND
GND
RCLKRCLK+
GND
GND
RDRD+
GND
GND
GND
GND
NC
GND
NC
GND
NC
GND
NC
NC
NC
NC
NC
NC
NC
NC
NC
NC
Image Board ←→ Audio Amplifier Board
Image Board
J11 (12 Pin)
Pin 1
Pin 2
Pin 3 J5 (6 Pi n )
Pin 4
Pin 5
Pin 6
Pin 7
Pin 8
Pin 9
Pin 10
Pin 11
Pin 12
Image Board ←→ Panel
J14 (6 P i n )
+5VSB
DGND
DGND
5V1 A13
SB
DGND
J15 (4 P i n )
VGND
VGND
NC
+9V
Audio Amplifier Board
JA1 (12 Pin)
Pin 1
Pin 2
Pin 3
Pin 4
Pin 5
Pin 6
Pin 7
Pin 8
Pin 9
Pin 11
Pin 12
J21 (7 P i n )
+9VT
NC
DGND
+24V
+24V
GND
GND
Content
24V
24V
DGND
SB5V
DGND
AO_SEL
SDA2
SCL2
A_MUTEn
SURR1
SURR2
DGND
J25 (3 P i n )
+5VA
VGND
VGND
Image Board Socket Data
Image Board ←→ AV Module Board
Image Board
JP5 (48 Pin)
A1
A2
A3
A4
A5
A6
A7
A8
A9
A10
A11
A12
A13
A14
A15
A16
B1
B2
B3
B4
B5
B6
B7
B8
B9
B10
B11
B12
B13
B14
B15
B16
C1
C2
C3
C4
C5
C6
C7
C8
C9
C10
C11
C12
C13
C14
C15
C16
Image Board ←→ A u dio Amplifier B oard
Image Board
J12 (10 P in)
Pin 1
Pin 2
Pin 3
Pin 4
Pin 5
Pin 6
Pin 7
Pin 8
Pin 9
Pin 10
AV Module Board
JP2 (48 Pin)
A16
A15
A14
A13
A12
A11
A10
A9
A8
A7
A6
A5
A4
A3
A2
A1
B16
B15
B14
B13
B12
B11
B10
B9
B8
B7
B6
B5
B4
B3
B2
B1
C1
C2
C3
C4
C5
C6
C7
C8
C9
C10
C11
C12
C13
C14
C15
C16
Audio Amplifier Board
JA2 (10 Pin)
Pin 1
Pin 2
Pin 3
Pin 4
Pin 5
Pin 6
Pin 7
Pin 8Pin 10
Pin 9
Pin 10
4-2
Content
+9VT
DGND
NC
DGND
SCL2
DGND
SDA2
DGND
NC A9
DGND
TV_R
DGND
TV_L
DGND
AFT_TUN
TUN_DETn
DVI_L
DVI_R
AGND
L_OUT
R_OUT
SUB_WFR
PWR_CTL
AGND
AGND
AGND
AGND
AGND
AGND
D_CTL
RESETQ
SD
AS_MP
AS_SP
RST_ DPT V
SV2_SW
V2B_DETn
YUVn_RGB
15Kn_MP
15Kn_SP
SB5V
TDO
TDI
NC
NC
TMS
DGND
TCK
Image Board
Image Board ←→ Front B u tton Contro l Board
Content
L_IN
R_IN
AGND
L_OUT
R_OUT
AGND
SUB_WFR
SPK_CTL
PWR_CTL
NC
Image Board
Image Board ←→ AV Module Board
AV Module Board
JP5 (48 Pin)
A1
A2
A3
A4
A5
A6
A7
A8
A10
A11
A12
A13
A14
A15
A16
B1
B2
B3
B4
B5
B6
B7
B8
B9
B10
B11
B12
B13
B14
B15
B16
C1
C2
C3
C4
C5
C6
C7
C8
C9
C10
C11
C12
C13
C14
C15
C16
JP2 (48 Pin)
A16GND
A15
A14
A12
A11
A10
A9
A8
A7
A6
A5
A4
A3
A2
A1
B16
B15
B14
B13
B12
B11
B10
B9
B8
B7
B6
B5
B4
B3
B2
B1
C1
C2
C3
C4
C5
C6
C7
C8
C9
C10
C11
C12
C13
C14
C15
C16
Front B u tton Contr ol
Board
Pin 1
Pin 2
Pin 3
Pin 4
Pin 5
Pin 6
JA3 (6 P i n)
Pin 1
Pin 2
Pin 3
Pin 4
Pin 5
Pin 6
Content
COMPOSITE
VGND
S2_Y
S2_C
VGND
Y1
PB1_CB1
PR1_CR1
VGND
Y2
PB2_CB2
PR2_CR2
VGND
AVB_DETn
TV
VGND
AV1_L
AV1_R
AGND
S2_L
S2_R
AGND
YUV1_L
YUV1_R
AGND
YUV2_L
YUV2_R
AGND
RGB_L
RGB_R
AGND
AGND
PCn_MPU
PCSCS
PCSI
PCSCLK
SSO
DGND
P5V
SCL2
SDA2
DGND
SCL_SP
SDA_SP
DGND
SCL2_33
SDA2_33
DGND
Content
RC_OUT
SW_OUT
ON_LED
SB_LED
DGND
SB5V
Page 22
BLOCK DIAGRAM VER1.0
TV
AV
S-VIDEO
TA8551CH
AV
SWITCH
IC1
(PAGE2)
VIDEO
Y
C
VIDEO
Y
C
Y1/CB/CR
Y1/PB/PR
MULTIPLEX
SWITCH
IC3
Image Board Signal Block Di agram
SDRAM
(PAGE4)
6630/6730
MAIN Video
Processor
U45
6630/6730
SUB Video
Porcessor
U46
YCBCR
YCBCR/YPBPR
YCBCR/YPBPR
(PAGE3)
(PAGE5)
SDRAM
(PAGE6)
YUV
MULTIPLEX
SWITCH
IC2
RGB IN
MULTIPLEX
SWITCH
U34
(PAGE7)
R,G,B
RGB OUT
AD
Converter
U29
(PAGE8)
SIL161 DVI
U32
(PAGE10)
SDRAM
(PAGE12)
SCALE IC
C711/C713
U23
(PAGE11)
LVDS
TRANSMITTER
(PAGE14)
Clock
Generator
9161A(PLL)
(PAGE13)
P
A
N
E
L
MULTIPLEX
SWITCH
Y2/CB/CR
Y2/PB/PR
IC7
(PAGE1)
TA1276
Color Space
Conveter
U43
CPU
U4
(PAGE9)
DVI IN
RS232
4-3
Page 23
BLOCK DIAGRAM VER1.0
Image board Power Block Diagram
J14
+5VSB
1
2
3
4
+5V1
5
6
SB5V
(USB5V, SB5V_M, SB5V_IO, SB5V_CPU)
SB5V_V
U63
U13
V33
U61
V33P
U62
U60
U56
U52
U31
U28
U54
U58
U53
P5V
(5V_OSD)
VDDM
5VDDA
REG_5V
5VDDD
5VDDM1
REG_5V_S
D43
R376
V33SB
USB3V
(VDD33)
V33TMP
VCC3
VCCA3
V33ADC
V33PLL
VADC3
V25_MP
VCCA3_S
SB5V_VO
L13
L17
L15
(VDRAM)
(VCC3_M)
VIP711
VCCPLL
VCCBF
J21
1
2
3
4
5
6
7
CON8009
1
2
3
4
5
6
7
8
9
CON8011
1
2
3
4
5
6
7
8
9
10
11
12
13
J25
1
2
3
+5VA
+5VA
+9VT
+24V
+9V
P9V
(+9V)
IC9
P24V
A5V
J25
1
2
3
J15
1
2
3
4
A5V
P5V_COLOR
U55
U57
U59
VADC3_S
VCC3_S
V25_SP
(VCC3_M_S)
4-4
Page 24
BLOCK DIAGRAM VER1.0
FROM AV
SELECTOR
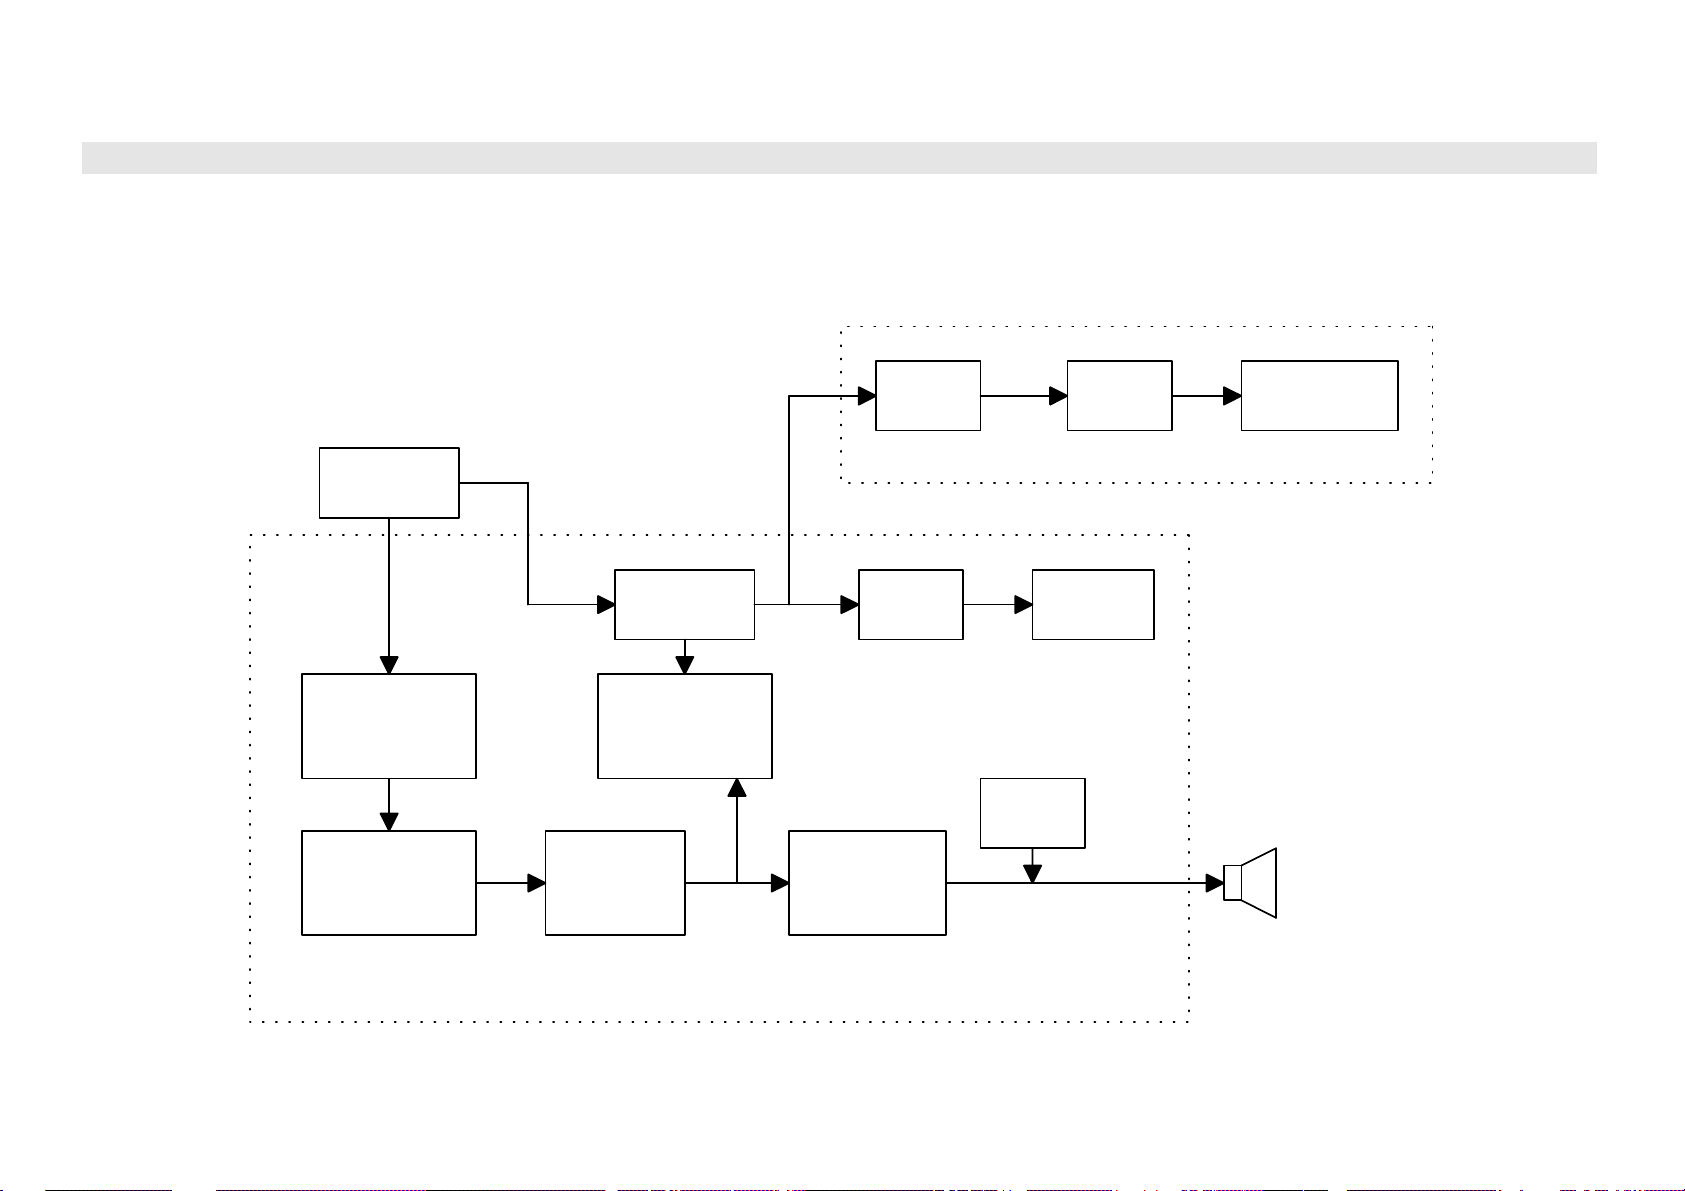
PDP Sound Block Diagram
ICS1
LPF
ICS2
MUTE
PAGE2
SUB_WOOFER
OUTPUT
Q1/Q2
INPUT BUFFER
ICA1 /ICA 2
MUTE
AV_ OUTPUT
ICR1
SRS SURROUND
PROCESSOR
IC1
BBE & SOUND
PROCESSOR
FIXED/VARIBLE
OUTPUT
SELECTOR
U1
BUFFER
AMPLIFIER
ICA3
IC2
M A IN PO WE R
AMPLIFIER
Q8/Q9/Q11
MUTE
INSIDE
SPEAKER
PAGE1
DPWB11372-1G-S-
4-5
Page 25
BLOCK DIAGRAM VER1.0
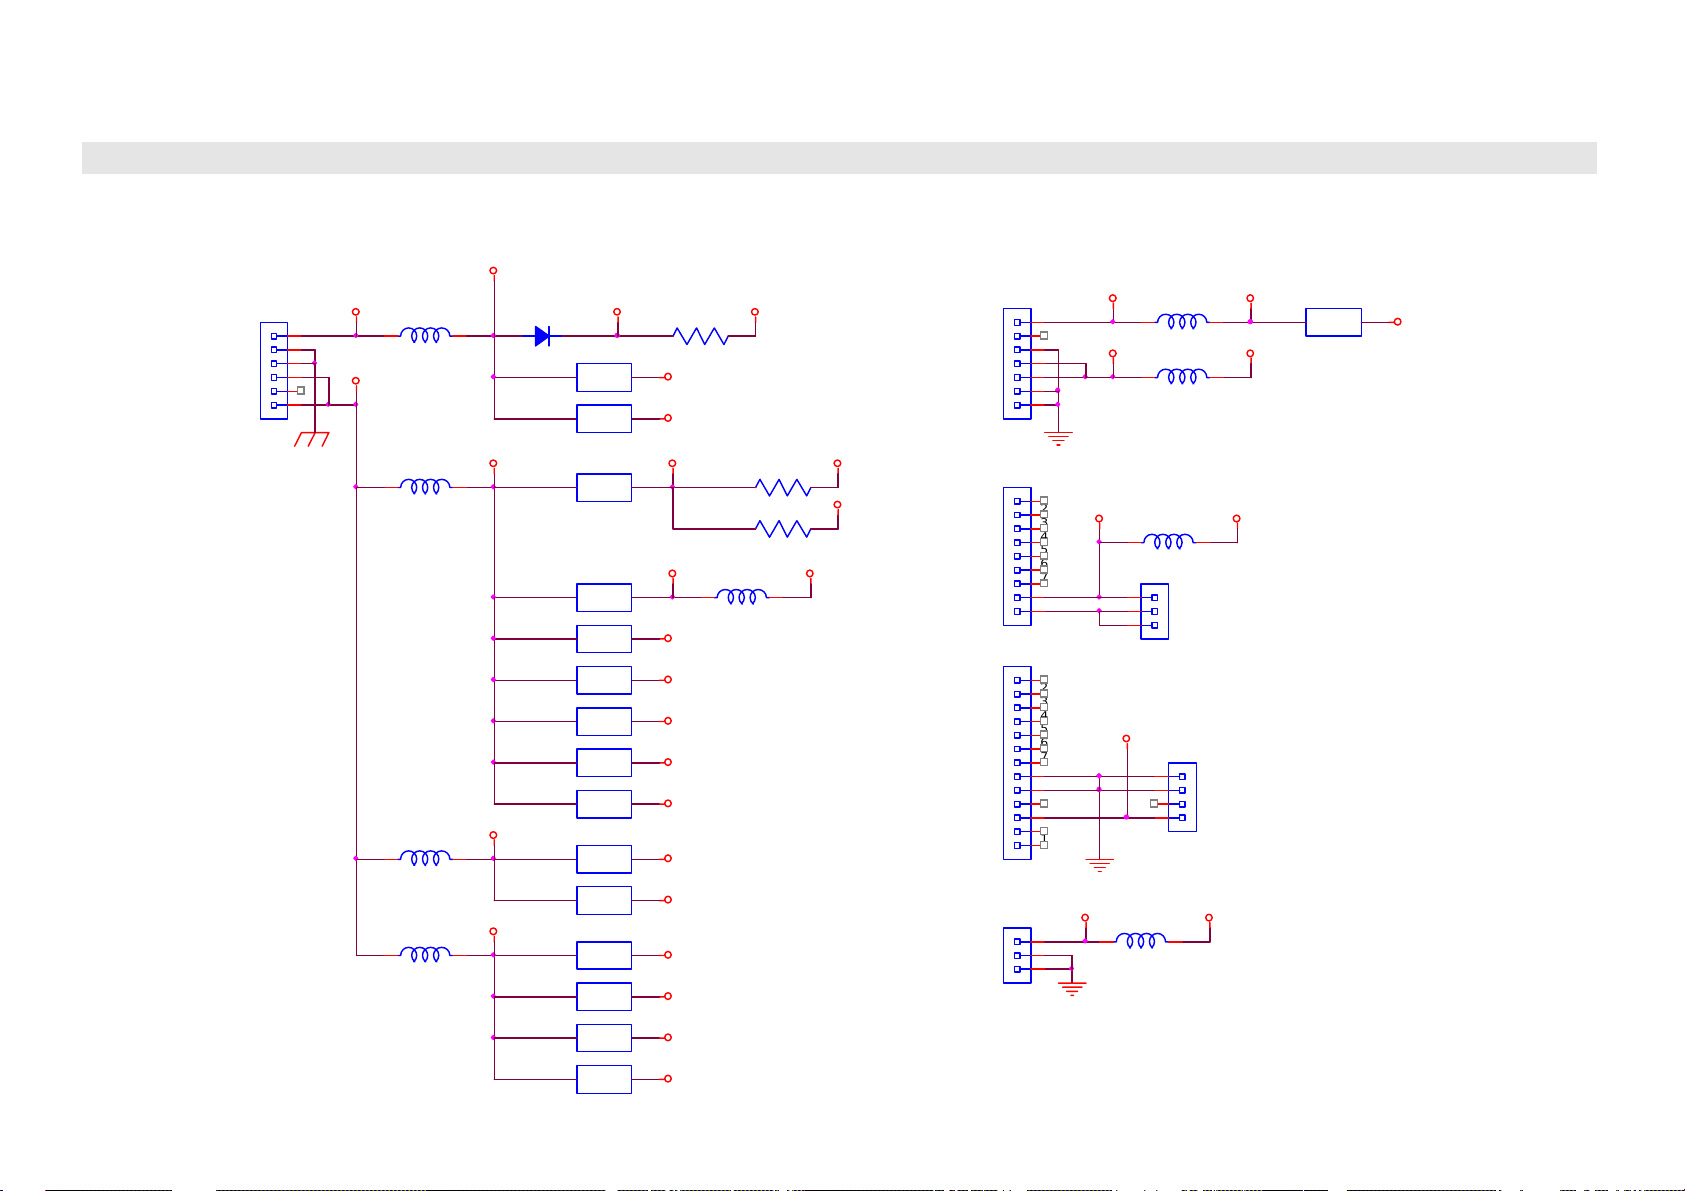
T uner Signal Block Diagram
9V
5V
POWER BLOCK
7805
IC202
7809
IC201
NE555
IC241
2SC2482
Q241
9V_T
JP2
SCL2
FROM IM AGE BOA RD CPU
SDA2
TU201 RF
MODULE
MODULE
AUDIO OUTTU201 PIF
31V
UPC 1854ACT
MTS
IC203
TV_L OUT
TV_R OUT
VIDEO OUT
DPWB11396-1G-T-
4-6
Page 26

Trouble Shooting Guides VER1.0
No Power
SET POWER ON
AC Master Power
Switch Board
(DPWB11398-1G---)
Check
G
AC Filter
(LJ92-00579A)
Check
G
NG
Replace
AC Filter
(LJ92-00579A) Check
Main Power
(LJ44-00025A)
Check
NG
Replace
Main Power
(LJ44-00025A) Check
OK
OK
5-1
Page 27

Trouble Shooting Guides VER1.0
No Picture
No Picture
AV Module Board
(with Tuner)
(DPWB11396-1G-T-)
Check
G
Image Board
(DPWB11393-1GGW
S)
Check
G
PDP Panel Module
(VVEPP42SD001F--)
Check
NG
NG
Replace
Image Board
(DPWB11393-1GGWS)
Check
OK
NG
Replace
AV Module Board
(with Tuner)
(DPWB11396-1G-T-)
Check
OK
Replace
PDP Panel Module
(VVEPP42SD001F--)
Check
5-2
OK
Page 28

Trouble Shooting Guides VER1.0
Vertical Line Fail
Vertical Line Fail
X Drive
(LJ92-00596C)
Check
G
PDP Panel Module
Assembly
(VVEPP42SD001F--)
Check
NG
Replace
X Drive
(LJ92-00596C)
Check
OK
NG
Replace
PDP Panel Module
Assembly
(VVEPP42SD001F--)
Check
5-3
OK
Page 29

Trouble Shooting Guides VER1.0
Horizontal Line Fail
Horizontal Line
Fail
Y Drive
(LJ92-00597C)
Check
NG
Y-Buffer (Upper)
(LJ92-00570A) Check
Y-Buffer (Lower)
(LJ92-00571A) Check
PDP Panel Module
Assembly
(VVEPP42SD001F--)
Check
G
G
NG
Replace
Y-Buffer (Upper)
(LJ92-00570A) Check
Y-Buffer (Lower)
(LJ92-00571A) Check
NG
Replace
PDP Panel Assembly
(VEPP42SD001F--)
Check
Replace
Y Drive
(LJ92-00597C)
Check
OK
OK
5-4
OK
Page 30

Trouble Shooting Guides VER1.0
No Remote Control
SET POWER ON
Remote Control
G
Front Button Control
Board
(DPWB11372-1G-K2)
NG
NG
Replace
Battery
OK
Replace
BRC-241
OK
Check
Image Board
(DPWB11393-1GG
WS)Check
G
Replace
Front Button Control Board
(DPWB11372-1G-K2)
Check
OK
NG
Replace Image Board
(DPWB11393-1GGWS)
Check
5-5
OK
Page 31

Trouble Shooting Guides VER1.0
Front Button Fail
SET POWER ON
Front Button Control
Board
DPWB11372-1G-K2
Y
N
Replace Front Button
Control Board
DPWB11372-1G-K2
OK
Image Board
DPWB11393-1GGWS
N
Replace
Image Board
DPWB11393-1GGWS
OK
5-6
Page 32
B.O.M of Board Assembly VER1.0
(#)
g
Module Breakdown
Model Name: GTW-P42M203
No. Module Supplier Supplier's Ass'y Part #
1 Image Board
2 AC Master Power Switch Board
3 Audio Amplifier Board
4 Front Button Control Board
5 AV w/ Tuner Module Board
6
Logic Board
7
X Drive
8
Y Drive
9
Logic E - Buffer
10
Logic F - Buffer
11
Y-Buffer (Upper)
12
Y-Buffer (Lower)
13
Main Power
14
AC Filter
15 PDP Panel Module Samsung VVEPP42SD001F-- 1 - - V1
16 Glass Filter Sampo PGLS-0013-1---- 1 Asahi Glass Corporation Japan OR
17 Speaker Sampo RSPK1L068-1CFI- 2 In Hana Industrial Co. Ltd. Taiwan OR
18 Front Bezel Sampo DMSKP0124-1F-AL 1 Cheng Fa Plastic Mfg Co., Ltd. Taiwan AL
19 Rear Cover Sampo GCABB0297-1P--I 1 Yund Cheng Industrial Co., Ltd. Taiwan I
20 Plasma Stand Assembly- Leg Type Sampo DSTN-0009-1F--A 2 Yo Tai Plastic Industrial Co., Ltd. Taiwan A
Sampo DPWB11393-1GGWS 1 TSMT Taiwan S11393-05-1A1
Sampo DPWB11398-1G--- 1 TSMT Taiwan OR
Sampo DPWB11372-1G-S- 1 TSMT Taiwan A11372-02-100
Sampo DPWB11372-1G-K2 1 TSMT Taiwan K2
Sampo DPWB11396-1G-T- 1 TSMT Taiwan T11396-00-100
Samsung LJ92-00621A 1 - - A4
Samsung LJ92-00596C 1 - - A1
Samsung LJ92-00597C 1 - - A1
Samsung LJ92-00600A 1 - - A1
Samsung LJ92-00601A 1 - - A1
Samsung LJ92-00570A 1 - - A1
Samsung LJ92-00571A 1 - - A1
Samsung LJ44-00025A 1 Danam Korea A1
Samsung LJ92-00579A 1 - - 0.2
Quantity Per
Final Assembly
Sub-Con Name
Sub-Con
Location
Current Revision
Level
Remark:
1. Please refer to each "Module BOM
2. OR: Ori
inal Revision
" Tab for each module accroding to the No. indicated in the first column.
6-1
Page 33
B.O.M of Board Assembly VER1.0
Module Part Level BOM
Module Name:
Supplier Name:
Module P/N:
Revision:
Part # Part Number Name Quantity
QCNCP1623-140-A Connector 40PIN 1 Chia-Soon Electronics Co., Ltd. J1
QCNCS1680-1---- Connector 48pin 2 Oupiin Enterprise Co., Ltd. JP4 JP5
QCNWT1285-1001QCNWT128A-1001QPWB11393-1G-5- PCB Bareboard Image Board 1 EISD Enterprise Co., Ltd. PCB
QSOCD1550-115-- Socket 2 Chia-Soon Electronics Co., Ltd. S1 S2
QSOCD1553-109-- Socket 1 Chia-Soon Electronics Co., Ltd. P1
QSOCD1555-124-- DVI Socket 24PIN 1 MOLE X J9
QSOCI1177-108-- IC Socket 8Pin 3 Suyin Corporation U33 Socket U35 Socket U7 Socket
QSOCI1514-132-S IC Socket 32Pin 1 Chia-Soon Electronics Co., Ltd. U3 SOCKET
RCHO-1022D8---- Choke 330uH 1 Top-Nation Electronic Factory L24
RCHOL1020-1100- Choke 10uH 5 Taiwan Sumida Electronics Inc. L25 L26 L27 L28 L30
RCORA1021-1---U Bead core 0.45uH 1 Murata Mfg. Co., Ltd. L29
RCORA1047-1---A Bead core
RCORA1048-1121A Bead core
RCRSL1185-1---A Crystal 16MHz 1 KDS Taiwan Electronics Corp. Y1
RCRSL1187-1---A Crystal 14.318MHz 2 KDS Taiwan Electronics Corp. Y3 YD1
RNWR-0028CM103A Network Resister 10K ohm 9 Yageo Corporation RP1 RP2 RP3 RP5 RP8 RP9 RP12 RP43 RP45
RNWR-0028CM220A Network Resister 22 ohm 13 Yageo Corporation RND1 RND2 RND3 RND4 RND5 RND6 RP35 RP36 RP37 RP38 RP39 RP40
RNWR-0028CM330A Network Resister 33 ohm 24 Yageo Corporation RP10 RP11 RP13 RP14 RP15 RP16 RP17 RP18 RP19 RP20 RP21 RP22 RP23
Image Board
Sampo
DPWB11393-1GGWS
S11393-05-1A1
Part Description
120Ω/100MHz
120Ω/100MHz
per
Assembly
JST ELECTRONIC PRODUCTS MFG.CO.,LTD
1
JST ELECTRONIC PRODUCTS MFG.CO.,LTD
1
3 Walsin Technology Corp. F21 F23 F26
4 Walsin Technology Corp. L21 L22 L23 R87
Supplier Name Ref Designator
RP41
RP24 RP25 RP26 RP27 RP28 RP29 RP30 RP31 RP32 RP33 RP34
TLABD1145-1B--- Barcode label 1 Diing Yih Enterprise C o., Ltd.
TLABD1149-1B--- Label 1 Trim International Inc.
VCEABN1CG106MNA Capacity,Aluminum Elect. 10uF 16V ±20% 62 Matsushita Electric Co., Ltd. C9 C10 C13 C14 C15 C27 C43 C58 C99 C115 C158 C185 C214 C219 C220
6-2
C221 C222 C223 C230 C231 C246 C251 C253 C258 C271 C310 C312 C322
C324 C391 C399 C400 C401 C405 C406 C407 C409 C415 CD8 CD17 CD22
CD36 CD40 CD45 CD47 CD49 CD51 CD53 CD67 CD71 CDS8 CDS17 CDS22
CDS36 CDS40 CDS45 CDS47 CDS49 CDS51 CDS53 CDS67 CDS71
Page 34
B.O.M of Board Assembly VER1.0
Module Part Level BOM
Module Name:
Supplier Name:
Module P/N:
Revision:
Part # Part Number Name Quantity
VCEABN1CG107MNA Capacity,Aluminum Elect. 100uF 16V ±20% 22 Matsushita Electric Co., Ltd. C86 C124 C211 C224 C226 C237 C241 C259 C266 C291 C295 C299 C309
VCEABN1CG226MNA Capacity,Aluminum Elect. 22uF 16V ±20% 32 Matsushita Electric Co., Ltd. C65 C71 C72 C73 C160 C194 C203 C204 C268 C277 CD16 CD23 CD69 CD82
VCEABN1CG227MNA Capacity,Aluminum Elect. 220uF 16V ±20% 10 Matsushita Electric Co., Ltd. C197 C202 C210 C337 C342 C345 C348 C411 CD18 CDS18
VCEABN1CG337MNA Capacity,Aluminum Elect. 330uF 16V ±20% 2 Matsushita Electric Co., Ltd. C269 C287
VCEABN1CG476MNA Capacity,Aluminum Elect. 47uF 16V ±20% 34 Matsushita Electric Co., Ltd. C37 C55 C59 C162 C165 C167 C171 C172 C173 C175 C179 C190 C191 C193
VCEABN1EG227MNA Capacity,Aluminum Elect. 220uF 25V ±20% 2 Matsushita Electric Co., Ltd. C333 C335
VCEABN1HG105MNA Capacity,Aluminum Elect. 1uF 50V ±20% 11 Matsushita Electric Co., Ltd. C31 C34 C192 C236 C275 C283 C297 CD12 CD14 CDS12 CDS14
VCEABN1HG224MNA Capacity,Aluminum Elect. 0.22uF 50V ±20% 1 Matsushita Electric Co., Ltd. C288
VCEABN1HG225MNA Capacity,Aluminum Elect. 2.2uF 50V ±20% 20 Matsushita Electric Co., Ltd. C4 C183 C184 C186 C187 C188 C189 C198 C199 C205 C206 C207 C208
VCEABN1VG475MNA Capacity,Aluminum Elect. 4.7uF 35V ±20% 4 Matsushita Electric Co., Ltd. C384 C385 C386 C389
VCEACU1HG476MNP Capacity,Aluminum Elect. 47uF 50V ±20% 1 Matsushita Electric Co., Ltd. C 216
VCICHN1HH100J-A Capacity,Temp. Comp. Ceramic 10PF 50V ±5% 11 Yageo Corporation C6 C7 CD38 CD39 CD42 CD43 CD44 CDS38 CDS39 CDS42 CDS44
VCICHN1HH101J-A Capacity,Temp. Comp. Ceramic 100PF 50V ±5% 3 1 Yageo Corporation C29 C30 C140 C153 C154 C155 C156 C166 C169 C176 C180 C181 C182 C232
Image Board
Sampo
DPWB11393-1GGWS
S11393-05-1A1
Supplier Name Ref DesignatorPart Description
per
Assembly
C311 C321 C323 C338 C343 C346 C349 C381 C412
CD84 CD87 CD89 CD92 CD94 CD97 CD99 CDS16 CDS23 CDS69 CDS82
CDS84 CDS87 CDS89 CDS92 CDS94 CDS97 CDSA1
C195 C215 C217 C229 C233 C234 C238 C239 C240 C249 C256 C284 C410
C417 CD9 CD13 CD15 CDS9 CDS13 CDS15
C248 C273 C274 C276 C281 C282 C286
C245 C265 C301 C308 C341 CD6 CD10 CD21 CD25 CD37 CD41 CDS6
CDS10 CDS21 CDS25 CDS37 CDS41
VCICHN1HH120J-A Capacity,Temp. Comp. Ceramic 12PF 50V ±5% 3 Yageo Corporation C22 C51 C52
VCICHN1HH121J-A Capacity,Temp. Comp. Ceramic 120PF 50V ±5% 6 Yageo Corporation C16 C17 C18 C19 C20 C375
VCICHN1HH181J-A Capacity,Temp. Comp. Ceramic 180PF 50V ±5% 5 Yageo Corporation C35 C36 C306 C307 C383
VCICHN1HH200J-A Capacity,Temp. Comp. Ceramic 20PF 50V ±5% 2 Yageo Corporation CD3 CD4
VCICHN1HH220J-A Capacity,Temp. Comp. Ceramic 22PF 50V ±5% 3 Yageo Corporation C300 C404 C414
VCICHN1HH330J-A Capacity,Temp. Comp. Ceramic 33PF 50V ±5% 3 Yageo Corporation C2 C3 C303
VCICHN1HH331J-A Capacity,Temp. Comp. Ceramic 330PF 50V ±5% 8 Yageo Corporation C144 C145 C146 C147 C148 C149 C150 C151
6-3
Page 35

B.O.M of Board Assembly VER1.0
Module Part Level BOM
Module Name:
Supplier Name:
Module P/N:
Revision:
Part # Part Number Name Quantity
VCICHN1HH470J-A Capacity,Temp. Comp. Ceramic 47PF 50V ±5% 25 Yageo Corporation C305 C351 C352 C353 C354 C355 C356 C357 C358 C359 C360 C361 C362
VCICHN1HH471J-A Capacity,Temp. Comp. Ceramic 470PF 50V ±5% 1 Yageo Corporation C177
VCICHN1HH561J-A Capacity,Temp. Comp. Ceramic 560PF 50V ±5% 1 Samsung C387
VCICHN1HH680J-A Capacity,High Diel. Ceramic 68PF 50V ±5% 1 Yageo Corporation C54
VCLFCN1HY224M-A Capacity,High Diel. Ceramic 0.22uF 50V ±20% 5 Yageo Corporation C200 C 334 C380 C402 C403
VCLFHN1EY104Z-A Capacity,High Diel. Ceramic 0.1uF 25V +80%~-20% 187 Yageo Corporation C1 C5 C8 C11 C12 C21 C23 C 24 C25 C28 C33 C38 C39 C40 C50 C56 C57
VCLRHN1CB393K-A Capacity,High Diel. Ceramic 0.039uF 16V ±10% 1 Yageo Corporation C113
VCLRHN1CB473K-A Capacity,High Diel. Ceramic 0.047uF 16V ±10% 3 Yageo Corporation C108 C109 C110
VCLRHN1CB683K-A Capacity,High Diel. Ceramic 0.068uF 16V ±10% 1 Yageo Corporation C388
VCLRHN1HB102K-A Capacity,High Diel. Ceramic 1000PF 50V ±10% 27 Yageo Corporation C376 C377 C378 C379 C430 CD30 CD31 CD73 CD74 CD75 CD76 CD77
Image Board
Sampo
DPWB11393-1GGWS
S11393-05-1A1
Supplier Name Ref DesignatorPart Description
per
Assembly
C363 C364 C365 C366 C367 C368 C369 C370 C371 C372 C373 C374
C60 C61 C62 C63 C64 C66 C67 C68 C69 C70 C74 C75 C76 C77 C78 C79 C80
C81 C82 C83 C84 C85 C87 C88 C89 C90 C91 C92 C93 C94 C95 C96 C97 C98
C100 C101 C102 C103 C104 C105 C107 C111 C114 C116 C117 C118 C119
C120 C121 C122 C123 C125 C127 C129 C130 C131 C132 C133 C134 C135
C136 C137 C138 C139 C157 C161 C178 C212 C213 C267 C278 C279 C280
C304 C313 C315 C317 C319 C325 C327 C329 C331 C336 C339 C344 C347
C350 C390 C392 C393 C394 C395 C396 C397 C398 C408 C413 C419 C421
C423 C425 C427 CD5 CD7 CD11 CD24 CD26 CD27 CD28 CD29 CD32 CD33
CD34 CD35 CD46 CD48 CD50 CD52 CD54 CD55 CD56 CD57 CD58 CD59
CD60 CD68 CD70 CD72 CD85 CD86 CD90 CD91 CD95 CD96 CD100 CD101
CDS5 CDS7 CDS11 CDS24 CDS26 CDS27 CDS28 CDS29 CDS32 CDS33
CDS34 CDS35 CDS46 CDS48 CDS50 CDS52 CDS54 CDS55 CDS56 CDS57
CDS58 CDS59 CDS60 CDS68 CDS70 CDS72 CDS85 CDS86 CDS90 CDS91
CDS95 CDS96 CDS99 CDSB2
CD78 CD79 CD80 CD81 CDS30 CDS31 CDS73 CDS74 CDS75 CDS76 CDS77
CDS78 CDS79 CDS80 CDS81
6-4
Page 36
B.O.M of Board Assembly VER1.0
Module Part Level BOM
Module Name:
Supplier Name:
Module P/N:
Revision:
Part # Part Number Name Quantity
Image Board
Sampo
DPWB11393-1GGWS
S11393-05-1A1
Supplier Name Ref DesignatorPart Description
per
Assembly
VCLRHN1HB103K-A Capacity,High Diel. Ceramic 0.01uF 50V ±10% 67 Yageo Corporation C106 C126 C128 C159 C163 C164 C168 C170 C174 C196 C201 C209 C218
C225 C228 C235 C247 C260 C270 C272 C290 C292 C293 C294 C298 C314
C316 C318 C320 C326 C328 C330 C332 C340 C382 CD61 CD62 CD63 CD64
CD65 CD66 CD102 CD103 CD104 CD105 CD106 CD107 CD108 CD109
CD110 CD111 CDS61 CDS62 CDS63 CDS64 CDS65 CDS66 CDSA2 CDSA3
CDSA4 CDSA5 CDSA6 CDSA7 CDSA8 CDSA9 CDSB0 CDSB1
VCLRHN1HB222K-A Capacity,High Diel. Ceramic 2200PF 50V ±10% 4 Yageo Corporation CD1 CD2 CDS1 CDS2
VCLRHN1HB392K-A Capacity,High Diel. Ceramic 3900PF 50V ±10% 1 Yageo Corporation C112
VCNCP0053-JJST- Connector 3 Pin 1
VCNCP0054-JJST- Connector 4 Pin 1
VCNCP0056-JJST- Connector 6 Pin 1
VCNCP0057-JJST- Connector 7 Pin 1
VCNCP0316-EJST- Connector 6 Pin 1
VCNCP031A-EJST- Connector 10 P i n 1
VCNCP031C-EJST- Connector 12 Pin 1
VCNCT1285-BJSTA Connector 5 PIN 2
VCNCT128A-BJSTA Connector 10PIN 2
JST ELECTRONIC PRODUCTS MFG.CO.,LTD
JST ELECTRONIC PRODUCTS MFG.CO.,LTD
JST ELECTRONIC PRODUCTS MFG.CO.,LTD
JST ELECTRONIC PRODUCTS MFG.CO.,LTD
JST ELECTRONIC PRODUCTS MFG.CO.,LTD
JST ELECTRONIC PRODUCTS MFG.CO.,LTD
JST ELECTRONIC PRODUCTS MFG.CO.,LTD
JST ELECTRONIC PRODUCTS MFG.CO.,LTD
JST ELECTRONIC PRODUCTS MFG.CO.,LTD
J25
J15
J14
J21
J5
J12
J11
J26 J27
J23 J24
VCPELU1HG222J-P Capacity,Polyester Film 2200PF 50V ±5% 1 Mylar Electronics Co., Ltd. C289
VCTABN1AB106M-A Capacity,tantalum 10uF 10V ±20% 4 Energie Electronic Co., Ltd. C141 C142 C143 C152
VRMBNV8--000J-A Resiser,Metal Film 0 1/8W ±5% 68 Yageo Corporation F1 F2 F5 F6 F7 F8 F9 F10 F11 F12 F13 F15 F17 F18 F20 F22 F24 L1 L2 L3 L4
L6 L7 L9 L10 L11 L12 L13 L15 L16 L17 L18 L19 L31 L33 L36 L38 L50 LD1
LD2 LD3 LD4 LD5 LD6 LD7 LD8 LD11 LD12 LD13 LD14 LD18 LD22 LD26
LDS1 LDS2 LDS3 LDS4 LDS5 LDS6 LDS7 LDS8 LDS11 LDS12 LDS13
LDS14 LDS15 LDS17 LDS19
VRMBNV8--181J-A Resiser,Metal Film 180 1/8W ±5% 2 Yageo Corporation F3 F4
VRMHNVG--000J-A Resiser,Metal Film 0 1/16W ±5% 40 Yageo Corporation R49 R91 R96 R98 R101 R123 R139 R229 R236 R246 R258 R259 R260 R261
R263 R272 R320 R340 R341 R342 R344 R345 R385 R389 R391 R393 R402
R404 R408 RD1 RD2 RD19 RD28 RD35 RDS1 RDS2 RDS19 RDS22 RDS28
RDS35
VRMHNVG--100J-A Resiser,Metal Film 10 1/16W ±5% 20 Yageo Corporation R22 R23 R38 R40 R175 R187 R189 R192 R193 R230 R235 R254 R257 R376
R377 R378 R379 R380 R381 R383
6-5
Page 37

B.O.M of Board Assembly VER1.0
Module Part Level BOM
Module Name:
Supplier Name:
Module P/N:
Revision:
Part # Part Number Name Quantity
VRMHNVG--101J-A Resiser,Metal Film 100 1/16W ±5% 16 Yageo Corporation R62 R65 R66 R67 R145 R150 R154 R159 R160 R163 R195 R198 R200 R273
VRMHNVG--102J-A Resiser,Metal Film 1K 1/16W ±5% 17 Yageo Corporation R58 R168 R170 R205 R225 R239 R256 R270 R271 R279 R303 R306 R308
VRMHNVG--103J-A Resiser,Metal Film 10K 1/16W ±5% 30 Yageo Corporation R1 R5 R36 R37 R39 R89 R92 R93 R106 R119 R120 R125 R134 R136 R138
VRMHNVG--104J-A Resiser,Metal Film 100K 1/16W ±5% 3 Yageo Corporation R6 R266 R310
VRMHNVG--105J-A Resiser,Metal Film 1M 1/16W ±5% 1 Yageo Corporation R309
VRMHNVG--121J-A Resiser,Metal Film 120 1/16W ±5% 3 Yageo Corporation R372 R373 R374
VRMHNVG--122J-A Resiser,Metal Film 1.2K 1/16W ±5% 11 Yageo Corporation R148 R151 R155 R164 R165 R166 R282 R295 R355 R356 R357
VRMHNVG--123J-A Resiser,Metal Film 12K 1/16W ±5% 3 Yageo Corporation R289 R291 R305
VRMHNVG-1240F-A Resiser,Metal Film 124 1/16W ±1% 4 Yageo Corporation R397 R398 R400 R401
VRMHNVG--124J-A Resiser,Metal Film 120K 1/16W ±5% 2 Yageo Corporation R243 R300
VRMHNVG--132J-A Resiser,Metal Film 1.3K 1/16W ±5% 1 Yageo Corporation R71
VRMHNVG--151J-A Resiser,Metal Film 150 1/16W ±5% 5 Yageo Corporation R211 R217 R220 R223 R386
VRMHNVG--152J-A Resiser,Metal Film 1.5K 1/16W ±5% 10 Yageo Corporation R208 R209 R213 R215 R218 R219 R221 R222 R276 R285
VRMHNVG--181J-A Resiser,Metal Film 180 1/16W ±5% 4 Yageo Corporation R241 R247 R269 R292
VRMHNVG--182J-A Resiser,Metal Film 1.8K 1/16W ±5% 1 Yageo Corporation R387
VRMHNVG--183J-A Resiser,Metal Film 18K 1/16W ±5% 3 Yageo Corporation R262 R264 R275
VRMHNVG--202J-A Resiser,Metal Film 2K 1/16W ±5% 4 Yageo Corporation R118 R232 R237 R248
VRMHNVG--220J-A Resiser,Metal Film 22 1/16W ±5% 8 Yageo Corporation R54 R86 R382 RDS3 RDS4 RDS5 RDS6 RDS12
VRMHNVG--221J-A Resiser,Metal Film 22 0 1/16W ±5% 10 Yageo Corporation R202 R224 R316 R369 R370 R371 RD16 RD20 RDS16 RDS20
VRMHNVG--222J-A Resiser,Metal Film 2.2K 1/16W ±5% 1 Yageo Corporation R288
VRMHNVG--223J-A Resiser,Metal Film 22K 1/16W ±5% 7 Yageo Corporation R27 R30 R34 R35 R297 R301 R311
VRMHNVG--224J-A Resiser,Metal Film 220K 1/16W ±5% 1 Yageo Corporation R250
VRMHNVG--270J-A Resiser,Metal Film 27 1/16W ±5% 3 Yageo Corporation R72 R74 R38 8
VRMHNVG--272J-A Resiser,Metal Film 2.7K 1/16W ±5% 1 Yageo Corporation R268
VRMHNVG--273J-A Resiser,Metal Film 27K 1/16W ±5% 2 Yageo Corporation RD10 RDS10
VRMHNVG--303J-A Resiser,Metal Film 30K 1/16W ±5% 2 Yageo Corporation R283 R284
Image Board
Sampo
DPWB11393-1GGWS
S11393-05-1A1
Supplier Name Ref DesignatorPart Description
per
Assembly
R281 R286
R327 R335 R337 R338
R142 R144 R156 R161 R162 R178 R184 R265 R287 R313 R339 RD13 RD23
RDS13 RDS23
6-6
Page 38
B.O.M of Board Assembly VER1.0
Module Part Level BOM
Module Name:
Supplier Name:
Module P/N:
Revision:
Part # Part Number Name Quantity
VRMHNVG--330J-A Resiser,Metal Film 33 1/16W ±5% 39 Yageo Corporation R10 R12 R18 R19 R2 0 R 2 1 R24 R31 R33 R68 R69 R 7 7 R78 R79 R80 R81 R83
VRMHNVG--332J-A Resiser,Metal Film 3.3K 1/16W ±5% 22 Yageo Corporation R7 R15 R16 R17 R109 R171 R173 R176 R179 R181 R185 R194 R199 R203
VRMHNVG--333J-A Resiser,Metal Film 33K 1/16W ±5% 2 Yageo Corporation R298 R307
VRMHNVG--390J-A Resiser,Metal Film 39 1/16W ±5% 3 Yageo Corporation RD3 RD4 RD5
VRMHNVG--391J-A Resiser,Metal Film 390 1/16W ±5% 1 Yageo Corporation R116
VRMHNVG--392J-A Resiser,Metal Film 3.9K 1/16W ±5% 1 Yageo Corporation R293
VRMHNVG--393J-A Resiser,Metal Film 39K 1/16W ±5% 2 Yageo Corporation R274 R299
VRMHNVG--470J-A Resiser,Metal Film 47 1/16W ±5% 7 Yageo Corporation R8 R9 R13 R5 9 R60 R61 R63
VRMHNVG--472J-A Resiser,Metal Film 4.7K 1/16W ±5% 6 Yageo Corporation R182 R188 R190 R197 R315 RD14
VRMHNVG--473J-A Resiser,Metal Film 47K 1/16W ±5% 17 Yageo Corporation R28 R32 R172 R174 R177 R180 R183 R186 R191 R196 R201 R204 R207 R212
VRMHNVG--474J-A Resiser,Metal Film 470K 1/16W ±5% 1 Yageo Corporation R153
VRMHNVG--4R7J-A Resiser,Metal Film 4.7 1/16W ±5% 4 Yageo Corporation R 82 R115 R117 R157
VRMHNVG--561J-A Resiser,Metal Film 560 1/16W ±5% 2 Yageo Corporation RD9 RDS9
VRMHNVG--562J-A Resiser,Metal Film 5.6K 1/16W ±5% 4 Yageo Corporation R25 R29 R278 R328
VRMHNVG--563J-A Resiser,Metal Film 56K 1/16W ±5% 5 Yageo Corporation R88 R129 R333 R334 R336
VRMHNVG--682J-A Resiser,Metal Film 6.8K 1/16W ±5% 2 Yageo Corporation R290 R332
VRMHNVG--750J-A Resiser,Metal Film 75 1/16W ±5% 20 Yageo Corporation R102 R103 R104 R146 R147 R149 R167 R169 R358 R359 R360 R361 R362
VRMHNVG--821J-A Resiser,Metal Film 820 1/16W ±5% 1 Yageo Corporation R280
VRMHNVG--823J-A Resiser,Metal Film 82K 1/16W ±5% 1 Yageo Corporation R302
VSDBAV99------A Diode BAV99 22 Philips Semiconductors D4 D8 D11 D12 D13 D14 D15 D16 D17 D18 D19 D20 D21 D22 D23 D24 D26
VSDRLS4148----A Diode RLS4148 22 ROHM CO.,LTD D1 D2 D3 D25 D34 D35 D36 D37 D38 D39 D40 D41 D42 D43 D 45 D50 D51
VSI29C020CP90BS IC- 256K CMOS Flash Memory 29C020CP90BS 1
VSI5160L16-7--D IC- SDRAM 5160L16-7 3 G-Link Technology U25 U26 U27
Image Board
Sampo
DPWB11393-1GGWS
S11393-05-1A1
per
Assembly
Supplier Name Ref DesignatorPart Description
WINBOND ELECTRONICS CORP.
R105 R108 R111 R112 R113 R114 R121 R122 R317 R318 RD29 RD30 RD31
RD32 RD33 RD34 RDS29 RDS30 RDS31 RDS32 RDS33 RDS34
R206 R210 R214 R267 R277 R312 R323 R329
R216 R296 R331
R363 R364 R365 R366 R367 R368 R375
D28 D29 D30 D31 D32
D52 D54 D55 D57 D58
U3
6-7
Page 39

B.O.M of Board Assembly VER1.0
y
Module Part Level BOM
Module Name:
Supplier Name:
Module P/N:
Revision:
Part # Part Number Name Quantity
Image Board
Sampo
DPWB11393-1GGWS
S11393-05-1A1
Supplier Name Ref DesignatorPart Description
per
Assembly
VSI74HC221D---A IC- Dual Non-Retriggerable
74HC221D 1
Philips Semiconductors / Texas Instruments
IC12
Monostable Multivibrator with Reset
VSI74HC4538D--A IC- Dual Retriggerable Precision
74HC4538D 1
Philips Semiconductors / Texas Instruments
IC11
Monostable Multivibrator
VSI74HCT04D---A IC- Inverter 74HCT04D 1
VSI74LVC157---A IC- Multiplexer 74LVC157 2
VSI74LVC244ADBA IC- Octal Buffer/Line Driver 74LVC244ADB 4
VSI74LVT04----A IC- Hex Inverter 74LVT04 2
VSI74LVT14----A IC- Hex Inverter 74LVT14 1
Philips Semiconductors / Texas Instruments
Philips Semiconductors / Texas Instruments
Philips Semiconductors / Texas Instruments
Philips Semiconductors / Texas Instruments
Philips Semiconductors / Texas Instruments
U67
U15 U22
U18 U19 U20 U21
U6 U24
U30
VSI78M05A-----A IC- 5 Voltage Regulator 78M05A 1 ST Microelectronics IC9
VSIA5-32-10VC4D IC- In System Programmable High
Densit
PLD
A5-32-10VC4 1
LATTICE SEMICONDUCTOR CORPORATION
U1
VSIAD9884AKS--D IC- Analog Interface AD9884AKS 1 ANALOG DEVICES U29
VSIAT24C21----- IC- EEPROM AT24C21 2
ST Microelectronics / Atmel Corporation
U33 U35
VSIBA033------A IC- Low Dropout 3.3 Voltage BA033 9 ROHM CO.,LTD U31 U52 U53 U54 U55 U60 U61 U62 U63
VSIBA033LBSG--A IC- 3.3 Voltage Regulator BA033LBSG 1 ROHM CO.,LTD U28
VSIBA7657F----A IC- Input Selector Switch BA7657F 1 ROHM CO.,LTD U34
VSIDS90C385---A IC- LVDS Transmitter DS90C385 1 National Semiconductor U66
VSIEM83010----- IC- I/O Expander EM83010 1 EMC CORPORATION U8
VSIHD6413079F-D IC- CPU HD6413079F 1 Hitachi SEMICONDUCTOR U4
VSIHEF4053BT--A IC- Analogue HEF4053BT 2
Philips Semiconductors / Texas Instruments
IC13 U42
VSIHIN232CB-T-A IC- RS232 IC HIN232CB 1 FAIRCHILDI SEMICONDUCTOR U12
VSIICS9161A---A IC- Programmable Freq. IC ICS9161A 1
VSIIP00C713---D IC- Color Image Enlargement
IP00C713 1 I-CHIPS TECHNOLOGY INC. U23
INTEGRATED CIRCUIT SYSTEMS
U16
Reduction LSI
VSILA7213------ IC- Monolithiclinear LA7213 3 SANYO SEMICONDUTORS IC4 IC6 IC10
VSILM1085ISX-3A IC- 3.3 Voltage Regulator LM1085ISX-3 2 NATIONAL SEMICONDUCTORS U56 U57
VSILM1085ISX-AA IC- 2.5 Voltage Regulator LM1085ISX-A 2 NATIONAL SEMICONDUCTORS U58 U59
VSIM24C16WBN6-- IC- EEPROM M24C16WBN6 1 ST Microelectronics U7
VSIM52055FP---A IC- 3-Channel Analog Switch M52055FP 3
VSIM52347FP---A IC- Sync Signal Processor M52347FP 1
MUTSUBISHI ELECTRIC CORPORATION
MUTSUBISHI ELECTRIC CORPORATION
IC2 IC3 IC7
U64
VSIMTV130-----A IC- OSD IC MTV130 1 MYSON TECHNOLOGY INC. U11
6-8
Page 40
B.O.M of Board Assembly VER1.0
Q
Module Part Level BOM
Module Name:
Supplier Name:
Module P/N:
Revision:
Part # Part Number Name Quantity
VSIPNLTVP6730-D IC- Progressive PNLTVP6730 2 Trident Technologies Inc. U45 U46
VSIS80845ANUP-A IC- Voltage Detector S80845ANUP 1 Seiko Instrunets Taiwan Inc. U5
VSISII161BCT--D IC- DVI Interface IC SII161BCT 1 SILICON IMAGE U32
VSISM84L512K--D IC- SGRAM SM84L512K 4 SILICOM MAGIC CORP. U48 U49 U50 U51
VSITA1276AF---D IC- Video/Chroma/Deflection TA1276AF 1 TOSHIBA CORPORATION U43
VSITA8851CN---- IC- Audio/Video Switch TA8851CN 1 TOSHIBA CORPORATION IC1
VST2SA1037KQ--A Transistor 2SA1037KQ 3 ROHM CO.,LTD Q31 Q34 Q39
VST2SC1213C---P Transistor 2SC1213C 1 HITACHI SEMICONDUCTOR Q48
VST2SC2412KBQ-A Transistor 2SC2412KBQ 30 ROHM CO.,LTD Q1 Q2 Q3 Q4 Q7 Q8 Q9 Q10 Q11 Q12 Q14 Q15 Q16 Q17 Q18 Q19 Q25 Q26
VSTBSN20------A Transistor BSN20 4 Philips Semiconductors Q5 Q6 Q20 Q21
VSTDTC144EKA--A Transistor DTC144EKA 6 ROHM CO.,LTD Q40 Q41 Q42 Q45 Q46 Q47
VSZRLZ7.5B----A Zener Diode RLZ7.5B 1 ROHM CO.,LTD ZD1
Image Board
Sampo
DPWB11393-1GGWS
S11393-05-1A1
Supplier Name Ref DesignatorPart Description
per
Assembly
27 Q28 Q29 Q30 Q32 Q33 Q35 Q36 Q37 Q38 Q43 Q44
6-9
Page 41
B.O.M of Board Assembly VER1.0
y
L
Module Part Level BOM
Module Name:
Supplier Name:
Module P/N:
Revision:
Part # Part Number Name Quantity per
QPWB11398-1G--- PCB Bareboard POWER SWITCH B/O 1 Chien Wey Electronic Industrial Co.,
QCNCP1552-1---- Connector 3PIN 2 Chia-Soon Electronics Co., Ltd. AC IN, AC OUT
QCNCP1622-1---- Connector 4PIN 1 Chia-Soon Electronics Co., Ltd. SW
AC Master Power Switch Board
Sampo
DPWB11398-1G--OR
Part Description
Supplier Name Ref Designator
Assembl
PCB
6-10
Page 42

B.O.M of Board Assembly VER1.0
y
g
Module Part Level BOM
Module Name:
Supplier Name:
Module P/N:
Revision:
Part # Part Number Name Quantity per
PRDAA0116-1G--I HEAT SINK IC2 USE 1 Base Strong Industrial Co., Ltd.
PRDAA0140-1P--G U2 USE Heat Sink 1 Base Strong Industrial Co., Ltd.
QPWB11372-1G-2S PCB 1 EISD Enterprise Co., Ltd. PCB (AUDIO)
RFILN1011-1---- Amp Output Filter 1000P/100V 2 Murata Mfg. Co., Ltd. F1 F2
TLABD1145-1B--- Barcode label 1 Diin
VCEACU1CG107MNP Aluminum Elect. 100uF 16V ±20% 4 Matsushita Electric Co., Ltd. C30 C31 C42 CR10
VCEACU1CG226MNP Aluminum Elect. 22uF 16V ±20% 3 Matsushita Electric Co., Ltd. C1 C8 C14
VCEACU1CG337MNP Aluminum Elect. 330uF 16V ±20% 1 Matsushita Electric Co., Ltd. C54
VCEABN1CG476MNA Aluminum Elect. 47uF 16V ±20% 1 Matsushita Electric Co., Ltd. CS1
VCEACU1CG477MNP Aluminum Elect. 470uF 16V ±20% 1 Matsushita Electric Co., Ltd. C28
VCEACU1EG477MNP Aluminum Elect. 470uF 25V ±20% 2 Matsushita Electric Co., Ltd. C52 C59
VCEACU1HG105MNP Aluminum Elect. 1uF 50V ±20% 3 Matsushita Electric Co., Ltd. C36 CR6 CR9
VCEACU1HG106MNP Aluminum Elect. 10uF 50V ±20% 15 Matsushita Electric Co., Ltd. C3 C5 C7 C12 C62 C63 C65
VCEACU1HG224MNP Aluminum Elect. 0.22uF 50V ±20% 2 Matsushita Electric Co., Ltd. C16 C40
Audio Amplifier Board
Sampo
DPWB11372-1G-SA11372-02-100
Part Description
Supplier Name Ref Designator
Assembl
Yih Enterprise Co., Ltd.
C66 C67 C68 CR4 CR5 CR15
CS2 CS3
VCEACU1HG225MNP Aluminum Elect. 2.2uF 50V ±20% 4 Matsushita Electric Co., Ltd. C2 C4 C64 CR1
VCEACU1HG475MNP Aluminum Elect. 4.7uF 50V ±20% 13 Matsushita Electric Co., Ltd. C9 C11 C17 C18 C23 C24 C25
C33 C34 C37 C41 CR13 CR16
VCEACU1VG107MNP Aluminum Elect. 100uF 35V ±20% 1 Matsushita Electric Co., Ltd. C53
VCEACU1VG108MNP Aluminum Elect. 1000uF 35V ±20% 2 Matsushita Electric Co., Ltd. C49 C71
VCEACU1VG227MNP Aluminum Elect. 220uF 35V ±20% 1 Matsushita Electric Co., Ltd. C43
VCICHN1HH221J- Temp. Comp. Ceramic 220PF 50V ±10% 2 Yageo Corporation C6 C13
VCLFCN1HY224M-A High Diel. Ceramic 0.22uF 50V ±20% 3 Yageo Corporation C51 C56 C72
6-11
Page 43

B.O.M of Board Assembly VER1.0
y
Part # Part Number Name Quantity per
Assembl
VCLFHN1AY105Z-A High Diel. Ceramic 1uF 10V +80%~-20% 1 Yageo Corporation C55
VCLFHN1EY104Z-A High Diel. Ceramic 0.1uF 25V +80%~-20% 2 Yageo Corporation C29 C45 C46 C50
VCLRCN1CB224K-A High Diel. Ceramic 0.22uF 16V ±10% 2 Yageo Corporation CR12 CR17
VCLRCN1CB474K-A High Diel. Ceramic 0.47uF 16V ±10% 6 Yageo Corporation C21 C27 C32 C35 CR2 CR11
VCLRHN1CB104K-A High Diel. Ceramic 0.1uF 50V ±10% 8 Yageo Corporation C22 C44 C69 C70 CR8 CR19
VCLRHN1CB273K-A High Diel. Ceramic 0.027uF 16V ±10% 1 Yageo Corporation CR20
VCLRHN1CB333K-A High Diel. Ceramic 0.033uF 16V ±10% 2 Lipers Enterprise Co., Ltd. C20 C39
VCLRHN1CB473K-A High Diel. Ceramic 0.047uF 16V ±10% 1 Yageo Corporation CS5
VCLRHN1HB102K-A High Diel. Ceramic 1000PF 50V ±10% 2 Yageo Corporation C15 C48
VCLRHN1HB103K-A High Diel. Ceramic 0.01uF 50V ±10% 3 Yageo Corporation CR7 CR28 CR99
VCLRHN1HB153K-A High Diel. Ceramic 0.015uF 50V ±10% 1 Yageo Corporation CR26
VCLRHN1HB222K-A High Diel. Ceramic 2200PF 50V ±10% 3 Yageo Corporation CR14 CR18 CR27
VCLRHN1HB332K-A High Diel. Ceramic 3300PF 50V ±10% 2 Yageo Corporation C19 C38
VCLRHN1HB392K-A High Diel. Ceramic 3900PF 50V ±10% 2 Yageo Corporation C58 C61
VCLRHN1HB471K-A High Diel. Ceramic 470PF 50V ±10% 1 Yageo Corporation CR25
VCLRHN1HB472K-A High Diel. Ceramic 4700PF 50V ±10% 3 Yageo Corporation CR21 CR23 CR30
VCMECU1JG474J-P Metal Ploy. Film 0.47uF 63V ±5% 1 Mylar Elctronics Co., Ltd. CR24
VCNCP0302-EJST- Connector 2 PIN 2 Chia-Soon Electronics Co., Ltd. BT1 BT2
VCNCP030A-EJST- Connector 10 PIN 1 Chia-Soon Electronics Co., Ltd. JA2
VCNCP030C-EJST- Connector 12 PIN 1 Chia-Soon Electronics Co., Ltd. JA1
VCPELU1HG104J-P Polyester Film 0.1uF 50V ±5% 1 Mylar Elctronics Co., Ltd. CR22
VCPELU1HG223J-P Polyester Film 0.022uF 50V ±5% 2 Mylar Elctronics Co., Ltd. C57 C60
VL-DH120K0000-U Peaking Coil 12uH ±10% 1 Chilisin Electronics Corp. L1
VRCPT4--2R2J-U Metel Film 2.2 1/4W ±5% 1 Yageo Corporation
VRMHNVG--000J-A Metel Film 0 1/16W ±5% 1 Yageo Corporation R55
VRMHNVG--100J-A Metel Film 10 1/16W ±5% 1 Yageo Corporation R30
VRMHNVG--101J-A Metel Film 100 1/16W ±5% 2 Yageo Corporation R33 R34
VRMHNVG--102J-A Metel Film 1K 1/16W ±5% 1 Yageo Corporation RR22
Supplier Name Ref DesignatorPart Description
CR29 CS4
6-12
Page 44

B.O.M of Board Assembly VER1.0
y
Part # Part Number Name Quantity per
Assembl
VRMHNVG--103J-A Metel Film 10K 1/16W ±5% 20 Yageo Corporation R13 R16 R17 R18 R19 R21 R41
VRMHNVG--104J-A Metel Film 100K 1/16W ±5% 4 Yageo Corporation RR11 RR17 RR29 RR31
VRMHNVG--123J-A Metel Film 12K 1/16W ±5% 2 Yageo Corporation RR25 RR27
VRMHNVG--124J-A Metel Film 120K 1/16W ±5% 2 Yageo Corporation R1 R2
VRMHNVG--152J-A Metel Film 1.5K 1/16W ±5% 4 Yageo Corporation R3 R7 R43 RR8
VRMHNVG--222J-A Metel Film 2.2K 1/16W ±5% 6 Yageo Corporation R27 R28 R56 RR13 RR20
VRMHNVG--223J-A Metel Film 22K 1/16W ±5% 2 Yageo Corporation RS1 RS2
VRMHNVG--224J-A Metel Film 220K 1/16W ±5% 2 Yageo Corporation R5 R8
VRMHNVG--272J-A Metel Film 2.7K 1/16W ±5% 6 Yageo Corporation R24 R35 R39 R40 RR24 RR26
VRMHNVG--273J-A Metel Film 27K 1/16W ±5% 1 Yageo Corporation R48
VRMHNVG--333J-A Metel Film 33K 1/16W ±5% 1 Yageo Corporation RR15
VRMHNVG--391J-A Metel Film 390 1/16W ±5% 1 Yageo Corporation RR7
VRMHNVG--392J-A Metel Film 3.9K 1/16W ±5% 4 Yageo Corporation R12 R20 RR5 RR12
VRMHNVG--472J-A Metel Film 4.7K 1/16W ±5% 3 Yageo Corporation R15 R23 RR16
VRMHNVG--473J-A Metel Film 47K 1/16W ±5% 12 Yageo Corporation R4 R6 R9 R10 R11 R25 R52
Supplier Name Ref DesignatorPart Description
R50 R51 R59 RR1 RR3 RR4
RR10 RR18 RR28 RR30 RR32
RS6 RS7
RR21
R53 RR14 RS3 RS4 RS5
VRMHNVG--563J-A Metel Film 56K 1/16W ±5% 1 Yageo Corporation RR19
VRMHNVG--682J-A Metel Film 6.8K 1/16W ±5% 4 Yageo Corporation R45 R47 RR9 RR23
VRMHNVG--822J-A Metel Film 8.2K 1/16W ±5% 2 Yageo Corporation R26 R32
VRMHNVG--823J-A Metel Film 82K 1/16W ±5% 1 Yageo Corporation R46
VRMMTV2--1R0J-U Metel Film 1 1/2W ±5% 1 Yageo Corporation R49
VRMMTV2--2R2J-U Metel Film 2.2 1/2W ±5% 2 Yageo Corporation R29 R31
VRMMTV2--8R2J-U Metel Film 8.2 1/2W ±5% 2 Yageo Corporation R42 R44
VRNMK01--R22J-- Metal Oxide Film 0.22 1W ±5% 1 Yageo Corporation R38
VRNMK03--820J-- Metal Oxide Film 82 3W ±5% 1 Yageo Corporation R57
VSDRLS4148----A Diode 6 ROHM CO.,LTD D1 DR3 DR4 DR5 DR6 DR7
6-13
Page 45

B.O.M of Board Assembly VER1.0
y
p
Part # Part Number Name Quantity per
Assembl
VSIHEF4052BT--A IC- Dual 4-Channel Analogue
Multi
lexer/ Demultiplexer
VSILM2940CT12-- IC- Voltage Regulator 1 National semiconductor U2
VSINJM2178L---- IC- SRS 3D Surround Audio
Processor
VSINJM4558M---A IC- Operational Amplifier 2 NEW JAPAN RADIO CO.,LTD ICS1 U1
VSINJW1132----- IC- Sound Processor (BBE) 1 NEW JAPAN RADIO CO.,LTD IC1
VSITC4W53FU---A IC- SMT Analogue Switch 3 TOSHIBA SEMICONDUTORS ICA1 ICA2 ICS2
VSITDA2616----- IC- Sound Amplifier 1 Philips Semiconductors IC2
VST2SA1037KQ--A Transistor 1 ROHM CO.,LTD Q6
VST2SC2412KBQ-A Transistor 3 ROHM CO.,LTD Q1 Q2 Q7
VSTDTC144EKA--A Transistor 14 ROHM CO.,LTD Q3 Q5 Q8 Q9 Q10 Q11 Q12
XBPSD30P10000-- U2 USE Screw 1 Kou Fei Screw Industrial Co., Ltd.
XJASD30P08000-- FOR PRDAA0116-1G--I*2 2 Shi Ho Screw Industrial Co., Ltd.
XJJSD30P10000-- IC2 USE Screw 2 Kou Fei Screw Industrial Co., Ltd.
1 PHILIPS SEMICONDUCTORS ICA3
1 NEW JAPAN RADIO CO.,LTD ICR1
Supplier Name Ref DesignatorPart Description
Q13 Q14 Q15 Q16 QR1 QR2
6-14
Page 46

B.O.M of Board Assembly VER1.0
y
y
,
Module Part Level BOM
Module Name:
Supplier Name:
Module P/N:
Revision:
Part # Part Number Name Quantity per
QPWB11372-1G-4K PCB 1 EISD Enterprise Co., Ltd. PCB (KEY)
QSW-A1225-11-1P Tact Switch 6 Hua Jie (Taiwan) Corp. S3 S4 S5 S6 S7 S8
VSI93M2AKF----- IC- Infrared Receiver 93M2AKF 1 Imperial Star Corp. U39
VSPHB5-30YGC--- LED 1 Huey Jann Electronics
VRMHNVG-1501F-A Metel Film 1.5K 1/16W 2 Yageo Corporation R167 R171
VRMHNVG-3301F-A Metel Film 3.3K 1/16W 2 Yageo Corporation R168 R174
VRMHNVG-7501F-A Metel Film 7.5K 1/16W 1 Yageo Corporation R169
VRMHNVG-6800F-A Metel Film 680 1/16W 1 Yageo Corporation R170
VRMHNVG-1001F-A Metel Film 1K 1/16W 2 Yageo Corporation R172 R173
VRMHNVG--471J-A Metel Film 470 1/16W 1 Yageo Corporation R175
VRMHNVG-8201F-A Metel Film 8.2K 1/16W 1 Yageo Corporation R176
VRMHNVG--821J-A Metel Film 820 1/16W 1 Yageo Corporation R177
VRMHNVG--4R7J-A Metel Film 4.7 1/16W 1 Yageo Corporation R178
VCLRHN1HB471K-A High Diel. Ceramic 470PF 50V 1 Yageo Corporation C236
VCLRHN1HB102K-A High Diel. Ceramic 1000PF 50V 1 Yageo Corporation C235
VCTAEN1AB107M-A Tantalum 100uF 10V 1 Kentec Vision Corp. C237
VCNCP0316-EJST- Connector 6 PIN 1 Chia-Soon Electronics
VSDRLS4148----A Diode RLS4148 2 ROHM CO.,LTD D100,D101
VSZUDZ5.1B----A Diode MTZJ7.5B 2 ROHM CO.,LTD ZD100,ZD101
Front Button Control Board
Sampo
DPWB11372-1G-K2
K2
Part Description
Assembl
Supplier Name Ref Designator
LD1
Industr
Co.
Co., Ltd.
JA3
Ltd.
6-15
Page 47

B.O.M of Board Assembly VER1.0
,
)
g
Module Part Level BOM
Module Name:
Supplier Name:
Module P/N:
Revision:
Part # Part Number Name Quantity
QCNCP1615-132-- Connector 2 Oupiin Enterprise Co., Ltd. JP1 JP2
QJAKM1076-1---A Pin jack 1 Jye Tai Precision Industrial Co., Ltd. J5
QJAKP1147-1---A Pin jack 1 MSK Technology Corp. J40
QJAKP1158-1-6-C Pin jack (J15A-F) 1 Gaoma Engineering Co., Ltd. J15
QJAKP1159-1-4-C Pin jack (J12A-D, J17A-
QJAKP1177-1---- Pin jack 1 Mina Information Co., Ltd. S1A/S1B
QJAKS1006-1DU-- Phone jack 1 Jye Tai Precision Industrial Co., Ltd. J3
QJUM-1039-1540U Jumper 3 J69 R201 R225
QPLGR1218-101-- 1 MSK Technology Corp. RCA Wire
QPWB11396-1G--- PCB 1 EISD Enterprise Co., Ltd. PCB (AV)
RCHOM1016-1202A Choke 1 Frontier Electronics Co., Ltd. L241
RUNTZ1036-1---- PIF TUJH9-805A 1 Forward Electronics Co. Ltd. TU202
RVRSH6014-1103- SemiVar. Resistor 10K 1 Heng Ya Electrical Industry Co., Ltd. VR201
TLABD1145-1B--- Barcode label 1 Diin
VCEACU1CG107MNP Aluminum Elect. 100uF 16V ±20% 1 Matsushita Electric Co., Ltd. C226
VCEACU1CG226MNP Aluminum Elect. 22uF 16V ±20% 1 Matsushita Electric Co., Ltd. C216
VCEACU1CG227MNP Aluminum Elect. 220uF 16V ±20% 1 Matsushita Electric Co., Ltd. C224
VCEACU1CG476MNP Aluminum Elect. 47uF 16V ±20% 1 Matsushita Electric Co., Ltd. C221
VCEACU1HG104MNP Aluminum Elect. 0.1uF 50V ±20% 1 Matsushita Electric Co., Ltd. C215
VCEACU1HG105MNP Aluminum Elect. 1uF 50V ±20% 6 Matsushita Electric Co., Ltd. C204 C205 C206 C209 C210
VCEACU1HG106MNP Aluminum Elect. 10uF 50V ±20% 3 Matsushita Electric Co., Ltd. C202 C203 C207
VCEACU1HG225MNP Aluminum Elect. 2.2uF 50V ±20% 5 Matsushita Electric Co., Ltd. C222 CE29 CE30 CE31 CE32
AV w/ Tuner Module Board
Sampo
DPWB11396-1G-TT11396-00-100
J24A-D
D
Part Description
Supplier Name Ref Designator
per
Assembly
3 Gaoma Engineering Co., Ltd. J12 J17 J24
Yih Enterprise Co., Ltd.
6-16
Page 48
B.O.M of Board Assembly VER1.0
Part # Part Number Name Quantity
per
Assembly
VCEACU1HG335MNP Aluminum Elect. 3.3uF 50V ±20% 1 Matsushita Electric Co., Ltd. C208
VCEACU1HG474MNP Aluminum Elect. 0.47uF 50V ±20% 1 Matsushita Electric Co., Ltd. C220
VCEACU2CG475MNP Aluminum Elect. 4.7uF 160V ±20% 1 Matsushita Electric Co., Ltd. C243
VCEACU1HG475MNP Aluminum Elect. 4.7uF 50V ±20% 1 Matsushita Electric Co., Ltd. C219
VCICHN1HH101J-A Temp. Comp. Ceramic 100PF 50V ±5% 7 Yageo Corporation C223 CE12 CE14 CE15 CE16
VCICHN1HH221J-A Temp. Comp. Ceramic 220PF 50V ±5% 2 Yageo Corporation C211 C212
VCICHN1HH561J-A Temp. Comp. Ceramic 5.6K 50V ±5% 1 Yageo Corporation C245
VCKBDU2HY103K-- High Diel. Ceramic 0.01uF 500V ±10% 1 MMC Electronics Taiwan Co., Ltd. C242
VCLRCN1HB104K-A High Diel. Ceramic 0.1uF 50V ±10% 1 Yageo Corporation C244
VCLFHN1EY104Z-A High Diel. Ceramic 0.1uF 25V +80%~-20% 1 Yageo Corporation C241
VCPELU1HG473J-P Polyester Film 0.047uF 50V ±5% 1 Mylar Elctronics Co., Ltd. C218
VCLRHN1HB102K-A High Diel. Ceramic 1000PF 50V ±10% 16 Yageo Corporation CE1 CE2 CE3 CE4 CE5 CE6
VCLRHN1HB103K-A High Diel. Ceramic 0.01uF 50V ±10% 1 Yageo Corporation C225
VCLRHN1HB561K-A Temp. Comp. Ceramic 560PF 50V ±5% 1 Yageo Corporation C245
VCPELU1HG104J-P Polyester Film 0.1uF 50V ±5% 2 Mylar Elctronics Co., Ltd. C213 C214
VRCPTV2--101J-U Carbon Film 100 1/2W ±5% 1 Yageo Corporation L201
VRCPTV4--2R2J-U Carbon Film 2.2 1/4W ±5% 1 Yageo Corporation R217
VRCPTV6--362G-U Carbon Film 3.6K 1/6W ±2% 1 Yageo Corporation R207
VRMBNV8--000J-A Metel Film 0 1/8W ±5% 25 Yageo Corporation FE1 FE2 FE3 FE4 FE5 F E 6 F E7
VRMHNVG--000J-A Metel Film 0 1/16W ±5% 1 Yageo Corporation R222
VRMHNVG--101J-A Metel Film 100 1/16W ±5% 4 Yageo Corporation R202 R205 R214 R215
VRMHNVG--102J-A Metel Film 1K 1/16W ±5% 5 Yageo Corporation R206 R210 R216 R220 R223
VRMHNVG--122J-A Metel Film 1.2K 1/16W ±5% 4 Yageo Corporation R203 R242 R246 R248
VRMHNVG--151J-A Metel Film 150 1/16W ±5% 1 Yageo Corporation R221
VRMHNVG--152J-A Metel Film 1.5K 1/16W ±5% 2 Yageo Corporation R208 R209
Supplier Name Ref DesignatorPart Description
CE17 CE18
CE7 CE8 CE9 CE10 CE11
CE13 CE25 CE26 CE27 CE28
FE8 FE9 FE10 FE11 FE12 FE13
FE14 FE15 FE16 FE17 FE18
FE19 FE20 FE21 FE30 FE31
6-17
Page 49
B.O.M of Board Assembly VER1.0
Part # Part Number Name Quantity
per
Assembly
VRMHNVG--273J-A Metel Film 27K 1/16W ±5% 2 Yageo Corporation R241 R244
VRMHNVG--331J-A Metel Film 330 1/16W ±5% 1 Yageo Corporation R245
VRMHNVG--392J-A Metel Film 3.9K 1/16W ±5% 1 Yageo Corporation R204
VRMHNVG--393J-A Metel Film 39K 1/16W ±5% 2 Yageo Corporation R212 R213
VRMHNVG--473J-A Metel Film 47K 1/16W ±5% 13 Yageo Corporation RE3 RE4 RE5 RE7 RE8 RE9
VRMHVG-5601F-A Metel Film 5.6K 1/16W ±10% 1 Yageo Corporation R243
VRMHNVG--681J-A Metel Film 680 1/16W ±5% 1 Yageo Corporation R219
VRMHNVG--683J-A Metel Film 68K 1/16W ±5% 1 Yageo Corporation R218
VRPTV6--133G-L Metel film 13K 1/6W ±2% 1 Yageo Corporation R211
VSDRLS4148----A Diode RLS4148 2 ROHM CO.,LTD D241 D242
VSINE555D-----A IC- Timer NE555D 1 PHILIPS SEMICONDUCTORS IC241
VSINJM7805FA--- IC- Positive Voltage Regulator NJM7805FA 1 NEW JAPAN RADIO CO.,LTD IC202
VSIUPC1854ACT-- IC- US MTS Processing LSI UPC1854ACT 1 NEC CORPORATION IC203
VSIUPC574J----- IC- Voltage Regulator UPC574J 1 NEC CORPORATION ZD241
VST2SC2412KBQ-A Transistor 2SC2412KBQ 1 ROHM CO.,LTD Q201
VST2SC2482----- Transistor 2SC2482 1 TOSHIBA CORPORATION Q241
VSZUDZ5.1B----A Zener Diode UDZ5.1B 3 ROHM CO.,LTD ZDA1 ZDA2 ZDA3
VSZUDZ6.8B----A Zener Diode UDZ6.8B 6 ROHM CO.,LTD ZDA4 ZDA5 ZDA6 ZDA7
VTU-TELH9-819A- Tuner TELH9-819A 1 Forward Electronics Co. Ltd. TU201
Supplier Name Ref DesignatorPart Description
RE10 RE11 RE12 RE14 RE25
ZDA8 ZDA9
VWVA5TMW1D-H6B- GND/GND wire 3 3
6-18
Page 50
B.O.M of Board Assembly VER1.0
,
pei,
g,
,
,
,
y
,
,
pei,
,
y,
,
,
,
Supplier Approved Vendor List_SAMPO
Remark: 1. The vendor is qualified by Sampo RD, QA and Purchasing Department.
2. The part is qualified by Sampo RD Department.
No. Vendor Name
1 ADD Microtech Corp.
TEX YEA CORPORTION
Taiwan Distributor Name
Vendor/ Taiwan Distributor Address
13Fl., No. 49, Sec. 3, Minsheng E. Rd., Sungshan
Chiu
Taipei, Taiwan 105, R.O.C.
2 ANALOG DEVICES EPCO TECHNOLOGY CO.,LTD. 6Fl., No. 37, Lane 513, Rueiguang Rd., Neihu Chiu,
Taiwan 114, R.O.C.
Tai
3 Asahi Glass Co.
4 Base Strong Industrial Co., Ltd.
5 Best Enterprise Co., Ltd.
6 Cation Industry Co., Ltd.
7 Cheng Fa Plastic Mfg Co., Ltd.
8 Chia-Soon Electronics Co., Ltd.
9 Chien Wey Electronic Industrial Co.,
Ltd.
10 Chihneng Packing Co., Ltd.
11 Chilisin Electronics Corp.
12 Digimax Innovative Products Ltd.
13 Diing Yih Enterprise Co., Ltd.
14 EISD Enterprise Co., Ltd.
15 EMC CORPORATION
16 Energie Electronic Co., Ltd.
Lim Shang Hang Temper-Safe Glass Factory
Co., Ltd.
-
-
-
-
-
-
-
-
-
-
Kuen-Chang Optic Corp.
-
46, Ta Yeh South Road, Hsiao Kang District,
Kaohsiun
812 Taiwan, R.O.C.
No. 53, Chingshiang St., Tucheng City, Taipei,
Taiwan 236
R.O.C.
1Fl., No. 143, Dadau Rd., Shinyi Chiu, Taipei,
Taiwan 110
R.O.C.
No. 59, Lane 530, Sec. 1, Kuo-Gi Road, Taoyuan,
Taiwan
R.O.C.
No. 555, Sec. 1, Wanshou Rd., Gueishan Shiang,
Tao
uan, Taiwan 333, R.O.C.
No. 145-1, Ankang Rd., Neihu Chiu, Taipei,
Taiwan 114
R.O.C.
No. 12-4, Dunglin Rd., Shiaugang Chiu, Kaohsiung,
Taiwan 812
R.O.C
No. 7, Lane 325, Jungjeng Rd., Banchiau City,
Tai
Taiwan 220, R.O.C.
No. 29, Lane 301, Deshing Rd., Hukou Shiang,
Hsinchu
Taiwan 303, R.O.C.
4Fl.-4, No. 129, Lane 235, Bauchiau Rd., Shindian
Cit
Taipei, Taiwan 231, R.O.C.
No. 32-1, Lane 23, Yian Rd., Junghe City, Taipei,
Taiwan 235
R.O.C.
1Fl., No. 52-2, Beinei St., Shulin City, Taipei,
Taiwan 238
R.O.C.
6Fl., No. 92, Baujung Rd., Shindian City, Taipei,
Taiwan 231, R.O.C.
6-1Fl., No. 142, Sec. 2, Nangang Rd., Nangang
Chiu
Taipei, Taiwan 115, R.O.C.
Zip Code Commodity Supplied
105 IC
114 IC
812 Glass Filter
236 Heat sink
110 Packing material
330 PCB insertion
333 Bezel
114 Connector, Socker
812 PCB
220 Packing AD.
303 Coil
231 Elec. accessory
235 Printing
238 PCB
231 IC
115 Capacitor
6-19
Page 51

B.O.M of Board Assembly VER1.0
pei,
,
,
,
pei,
pei,
p
,
pei,
,
,
,
g,
pei,
g
,
,
,
,
g
,
No. Vendor Name
17 FAIRCHILDI SEMICONDUCTOR
TECO ENTERPRISE CO.,LTD.
18 Forward Electronics Co. Ltd.
19 Frontier Electronics Co., Ltd.
20 G.I.S. Enterprise Co., Ltd.
21 Gaoma Engineering Co., Ltd.
22 G-Link Technology PROHUBS INTERNATIONAL CORP 9Fl., No. 77, Sec. 1, Shintai 5th Rd., Shijr City,
23 Goldfull Electronics &
Telecommunications Cor
24 Heng Ya Electrical Industry Co., Ltd.
25 Hirose
26 Hitachi SEMICONDUCTOR
.
UCOME TEK CO.,LTD
Forward-Tech Electronics, Ltd.
NISSEI SANGYO CO.,LTD. TAIPEI
BRANCH
27 Hua Jie (Taiwan) Corp.
28 Huey Jann Electronics Industry Co., Ltd.
29 I-CHIPS TECHNOLOGY INC.
Micromax Technology
30 Imperial Star Corp.
31 In Hana Industrial Co. Ltd.
32 INTEGRATED CIRCUIT SYSTEMS
MAXTEK TECHNOLGY CO.,LTD.
33 JST ELECTRONIC PRODUCTS
MFG.CO.
LTD
34 Jye Tai Precision Industrial Co., Ltd.
35 Jyh Dong Co., Ltd.
Taiwan Distributor Name
-
-
-
-
-
-
-
-
-
-
-
-
Vendor/ Taiwan Distributor Address
10Fl., No. 292, Minsheng W. Rd., Datung Chiu,
Tai
Taiwan 103, R.O.C.
No. 393, Sec. 1, Jungjeng Rd., Sanshia Jen, Taipei,
Taiwan 237
R.O.C.
4Fl., No. 48, Minchiuan Rd., Shindian City, Taipei,
Taiwan 231
R.O.C.
No. 93-15, Luju Tsuen, Luju Shiang, Taoyuan,
Taiwan 338
R.O.C.
No. 27, Lane 469, Liancheng Rd., Junghe City,
Tai
Taiwan 235, R.O.C.
Taiwan 221, R.O.C.
Tai
5Fl., No. 132, Lide St., Junghe City, Taipei, Taiwan
235
R.O.C.
3Fl., No. 542-2, Jungjeng Rd., Shindian City,
Tai
Taiwan 231, R.O.C.
4Fl., No. 118, Hougang St., Shrlin Chiu, Taipei,
Taiwan 111
R.O.C.
10Fl., No. 44, Sec. 2, Jungshan N. Rd., Jungshan
Chiu
Taipei, Taiwan 104, R.O.C.
No. 231, Lungshou St., Taoyuan City, Taoyuan,
Taiwan 330
R.O.C.
No. 27, Lane 466, Sec. 2, Gangnan Rd., Wuchi Jen,
Taichun
Taiwan 435, R.O.C.
3Fl., No. 103, Sec. 2, Jioutzung Rd., Neihu Chiu,
Tai
Taiwan 114, R.O.C.
6Fl.-4, No. 27, Lane 61, Sec. 1, Guangfu Rd.,
Sanchun
City, Taipei, Taiwan 241, R.O.C.
No. 120, Shinshing Rd., Bade City, Taoyuan,
Taiwan 334
R.O.C.
3Fl.-2, No. 197, Sec. 4, Nanjing E. Rd., Sungshan
Chiu
Taipei, Taiwan 105, R.O.C.
No. 145-1, Ankang Rd., Neihu Chiu, Taipei,
Taiwan 114
R.O.C.
5Fl.-3, No. 8, Lane 609, Sec. 5, Chungshin Rd.,
Sanchun
City, Taipei, Taiwan 241, R.O.C.
No. 20, Lane 169, Fuhua St., Jungli City, Taoyuan,
Taiwan 320
R.O.C.
Zip Code Commodity Supplied
103 IC
237 Tuner unit
231 Choke
338 Poly foam
235 Socket
221 IC
235 Power cord
231 Resistor
111 Conector
104 Transistor, IC
330 Switch
435 LED
114 IC
241 IC
334 Speaker
105 IC
114 Connector
241 Connector
320 Printing
6-20
Page 52
B.O.M of Board Assembly VER1.0
,
pei,
pei,
pei,
pei,
pei,
pei,
,
pei,
,
pei,
pei,
,
pei,
gang
y
pei,
,
,
No. Vendor Name
36 KDS Taiwan Electronics Corp.
37 Kentec Vision Corp.
CHIEFTAIN ENTERPRISES CO.,LTD.
38 Kou Fei Screw Industrial Co., Ltd.
39 LATTICE SEMICONDUCTOR
PROMASTER TECHNOLOGY CROP.
CORPORATION
40 Matsushita Electric (Taiwan) Ltd.
41 Maxi Electronic Enterprise Co., Ltd.
42 Mina Information Co., Ltd.
43 MMC Electronics Taiwan Co., Ltd.
MINA INFORMATION CO.,LTD.
MMC ELECTRONICS TAIWAN CO.,LTD.
44 MOLEX
45 MSK Technology Corp.
46 Murata Mfg. Co., Ltd.
47 MUTSUBISHI ELECTRIC
SETSUYO
CORPORATION
48 Mylar Elctronics Co., Ltd.
49 MYSON TECHNOLOGY INC.
50 National Semiconductor
ARROW\ALLY,INC.
51 National Semiconductor SILTRONTECH Electronics Corp. 11F, No. 20, Alley 1, Lane 768, Sec. 4, Pate Rd.,
52 NEC CORPORATION
53 NEW JAPAN RADIO CO.,LTD
TAIWAN SATORI CO.,LTD.
CASSNA INTERNATIONAL CO.,LTD.
54 Oupiin Enterprise Co., Ltd.
55 Philips Semiconductors
PHILIPS TAIWAN LTD.
Taiwan Distributor Name
-
-
-
-
-
-
-
-
-
-
Vendor/ Taiwan Distributor Address
6Fl., No. 69, Jilin Rd., Jungshan Chiu, Taipei,
Taiwan 104
R.O.C.
6Fl., No. 726, Sec. 6, Jungshan N. Rd., Shrlin Chiu,
Tai
Taiwan 111, R.O.C.
No. 12, Lane 195, Huacheng Rd., Shinjuang City,
Tai
Taiwan 242, R.O.C.
16Fl., No. 182, Sec. 2, Duenhua S. Rd., Daan Chiu,
Tai
Taiwan 106, R.O.C.
6Fl., No. 550, Sec. 4, Jungshiau E. Rd., Shinyi Chiu,
Tai
Taiwan 110, R.O.C.
3Fl., No. 111, Sec. 3, Chungshin Rd., Sanchung City,
Tai
Taiwan 241, R.O.C.
17Fl.-2, No. 327, Sec. 2, Fushing S. Rd., Daan Chiu,
Tai
Taiwan 106, R.O.C.
No. 20, Jianguo Rd., Tanzi Shiang, Taichung,
Taiwan 427
R.O.C.
1Fl., No. 49, Lane 264, Tzuenshian St., Beitou Chiu,
Tai
Taiwan 112, R.O.C.
No. 62, Sec. 2, Renhe Rd., Dashi Jen, Taoyuan,
Taiwan 335
R.O.C.
Zip Code Commodity Supplied
104 Crystal
111 Capacitor
242 Scraw
103 IC
110 Remote control
241 Connector
106 Connector
427 Capacitor
112 Socket
335 Connector
26-10 TENJIN 2- Core, Filter
5Fl., No. 105, Wugung 3rd Rd., Wugu Shiang,
Tai
Taiwan 248, R.O.C.
6Fl.-2, No. 135, Sec. 4, Bade Rd., Sungshan Chiu,
Tai
Taiwan 105, R.O.C.
No. 6, Alley 10, Lane 51, Sec. 3, Jungshiau E. Rd.,
Daan Chiu
Taipei, Taiwan 106, R.O.C.
19Fl., No. 75, Sec. 1, Shintai 5th Rd., Shijr City,
Tai
Taiwan 221, R.O.C.
248 IC
105 Capacitor
106 IC
221 IC
115 IC
Nan
Suite 2108, 21Fl., No. 333, Sec. 1, Jilung Rd.,
Shin
9Fl., No. 415, Sec. 4, Shinyi Rd., Shinyi Chiu,
Tai
No. 302, Changshing Rd., Bade City, Taoyuan,
Taiwan 334
28Fl., No. 66, Sec. 1, Jungshiau W. Rd., Jungjeng
Chiu
Chiu, Taipei, Taiwan 115, R.O.C.
110 IC
i Chiu, Taipei, Taiwan 110, R.O.C.
110 IC
Taiwan 110, R.O.C.
334 Connector
R.O.C
100 Diode, IC
Taipei, Taiwan 100, R.O.C.
6-21
Page 53

B.O.M of Board Assembly VER1.0
pei,
,
,
,
y,
,
pei,
,
,
,
pei,
pei,
pei,
,
,
p
,
,
,
,
,
No. Vendor Name
56 Philips Semiconductors
57 Philips Semiconductors / Texas
Instrumenis
WORLD PEACE INDUSTRIAL CO.,LTD.
ASIA FORTUNE ELECTRONIC
ENTERPRISE
58 R.U.G. Isolator (Taiwan) Ltd.
59 ROHM CO.,LTD
60 ROHM CO.,LTD
TEX YEA CORPORTION
KROM ELECTRONICS CO.,LTD.
61 Samsung Lipers Enterprise Co., Ltd. 12Fl., No. 786-1, Jungjeng Rd., Junghe City, Taipei,
62 SANYO SEMICONDUTORS
63 Seiko Instrunets Taiwan Inc.
TONG SAN
SEIKO INSTRUMENTS TAIWAN INC.
64 Shi Ho Screw Industrial Co., Ltd.
65 Shin Chi Paper Container Co., Ltd.
66 Shuning Yurn Enterprise Co., Ltd.
67 SILICOM MAGIC CORP.
68 SILICON IMAGE
69 Smart Concept Enterprise Co., Ltd.
PROHUBS INTERNATIONAL CORP
WORLD PEACE INDUSTRIAL CO.,LTD.
SMART CONCEPT ENTERPRISE LIMITED
70 ST Microelectronics
71 ST Microelectronics / Atmel
oration
Cor
TOPTREND TECHNOLOGIES CORP.
72 Suyin Corporation
73 Taiwan Sumida Electronics Inc.
74 Top-Nation Electronic Factory Yao Sheng Electronic Co., Ltd 5F, No. 15, Wu Chuang 6th Rd., Wu Ku Industrial
Taiwan Distributor Name
-
-
-
-
-
-
-
Vendor/ Taiwan Distributor Address
8Fl., No. 76, Sec. 1, Chenggung Rd., Nangang Chiu,
Tai
Taiwan 115, R.O.C.
No. 238-1, Jihe Rd., Shrlin Chiu, Taipei, Taiwan
111
R.O.C.
No. 2-2, Alley 56, Lane 250, Sec. 2, Huanhe S. Rd.,
Wanhua Chiu
Taipei, Taiwan 108, R.O.C.
13Fl., No. 49, Sec. 3, Minsheng E. Rd., Sungshan
Chiu
Taipei, Taiwan 105, R.O.C.
2Fl., No. 1, Alley 16, Lane 235, Bauchiau Rd.,
Shindian Cit
Taiwan 235
Taipei, Taiwan 231, R.O.C.
R.O.C.
Suite 406, No. 372, Linsen N. Rd., Jungjeng Chiu,
Tai
Taiwan 100, R.O.C.
4Fl., No. 40, Sec. 2, Minchiuan E. Rd., Jungshan
Chiu
Taipei, Taiwan 104, R.O.C.
12Fl., Yungchuen St., Shiaugang Chiu, Kaohsiung,
Taiwan 812
R.O.C.
No. 188-1, Hungdau Rd., Sanshia Jen, Taipei,
Taiwan 237
R.O.C.
5Fl., No. 5, Lane 163, Shinyi Rd., Banchiau City,
Tai
Taiwan 220, R.O.C.
9Fl., No. 77, Sec. 1, Shintai 5th Rd., Shijr City,
Tai
Taiwan 221, R.O.C.
8Fl., No. 76, Sec. 1, Chenggung Rd., Nangang Chiu,
Tai
Taiwan 115, R.O.C.
5Fl., No. 67, Jungfeng N. Rd., Jungli City, Taoyuan,
Taiwan 320
R.O.C.
12Fl., No. 325, Sec. 1, Duenhua S. Rd., Taipei,
Taiwan 105
R.O.C.
8Fl.-2, No. 15, Lane 360, Sec. 1, Neihu Rd., Neihu
Chiu
Taipei, Taiwan 114, R.O.C.
No. 233, Fude 1st Rd., Shijr City, Taipei, Taiwan
221
R.O.C.
No. 171, Fude St., Shinyi Chiu, Taipei, Taiwan
110
R.O.C.
Wu Ku Shiang, Taipei Hsien, Taiwan 248
Zone
Zip Code Commodity Supplied
115 Transistor
111 IC
108 Packing AD
105 Diode, IC, Transistor
231 Diode, IC, Transistor
235 Capacitor
100 IC
104 IC
812 Scraw
237 Carton
220 Choke
221 IC
115 IC
320 Packing AD
105 IC
114 IC
221 Socket
110 Choke
248 Diode
6-22
Page 54
B.O.M of Board Assembly VER1.0
,
,
,
,
gy
,
pei,
y,
,
,
g
,
,
,
p
No. Vendor Name
75 TOSHIBA CORPORATION
76 TOSHIBA SEMICONDUTORS
77 TOSHIBA SEMICONDUTORS
78 Trident Technologies Inc.
TOSHIBA ELECTRONICS TAIWAN
CORP.CO.,
TOPSHINE ELECTRONICS CORP.
TOSHIBA ELECTRONICS TAIWAN
CORP.CO.,
TRIDENT TECHNOLOGIES INC
79 Trim International 21Fl., No. 508, Sec. 5, Jungshiau E. Rd., Taipei,
80 TSMT- Taiwan Surface Mounting
Technolo
81 UNITED MICROELECTRONICS
Corp.
SAS ELECTRONIC(TAIWAN)CO., LTD.
CORP.
82 Usance Innovative Products Ltd.
83 Walsin Technology Corp.
84 Well Shin Enterprise Co., Ltd.
85 WINBOND ELECTRONICS CORP.
ULTIMA ELECTRONICS CORP.
86 Yageo Corporation
87 Yem Chio Co., Ltd.
88 Yo Tai Plastic Industrial Co., Ltd.
89 Yund Cheng Industrial Co., Ltd.
Taiwan Distributor Name
-
-
-
-
-
-
-
-
Vendor/ Taiwan Distributor Address
17Fl., No. 109, Sec. 3, Minsheng E. Rd., Sungshan
Chiu
Taipei, Taiwan 105, R.O.C.
5Fl., No. 68, Joutz St., Neihu Chiu, Taipei, Taiwan
114
R.O.C.
17Fl., No. 109, Sec. 3, Minsheng E. Rd., Sungshan
Chiu
Taipei, Taiwan 105, R.O.C.
14F, No. 3, Lishing 2nd Rd., Hsinchu, Taiwan 300,
R.O.C.
Taiwan 110
R.O.C.
No. 7, Shinghua Rd., Taoyuan City, Taoyuan,
Taiwan 330
R.O.C.
6F, No. 3, Lane 235, Bauchiau Rd., Shindian City,
Tai
Taiwan 231, R.O.C.
5F-3, No. 123, Lane 235, Pao-Chiao Rd., Hsin Tien
Cit
Taipei Hsien, Taiwan 231, R.O.C
No. 8, Dafeng Rd., Taoyuan City, Taoyuan, Taiwan
330
R.O.C.
No. 14, Lane 498, Sec. 3, Chenggung Rd., Neihu
Chiu
Taipei, Taiwan 114, R.O.C.
9Fl., No. 18, Alley 1, Lane 768, Sec. 4, Bade Rd.,
Sun
shan Chiu, Taipei, Taiwan 105, R.O.C.
3F, No. 233-1, Bauchiau Rd., Shindian City, Taipei,
Taiwan 231
R.O.C.
No. 423, Sec. 3, Mingj Rd., Taishan Shiang, Taipei,
Taiwan 243
R.O.C.
No. 26, Shujung St., Shulin City, Taipei, Taiwan
238
R.O.C.
No. 15, Lane 333, Shinshu Rd., Shinjuang City,
Tai
ei, Taiwan 242, R.O.C.
Zip Code Commodity Supplied
105 IC, Transistor
114 IC, Diode
105 IC, Diode
300 IC
110 Label
330 PCB insertion
231 IC
231 Elec. accessory
330 Core
114 Power cord
105 IC
231 Capacitor, Resistor
243 Packing AD
238 Leg base
242 Cabinet
6-23
Page 55
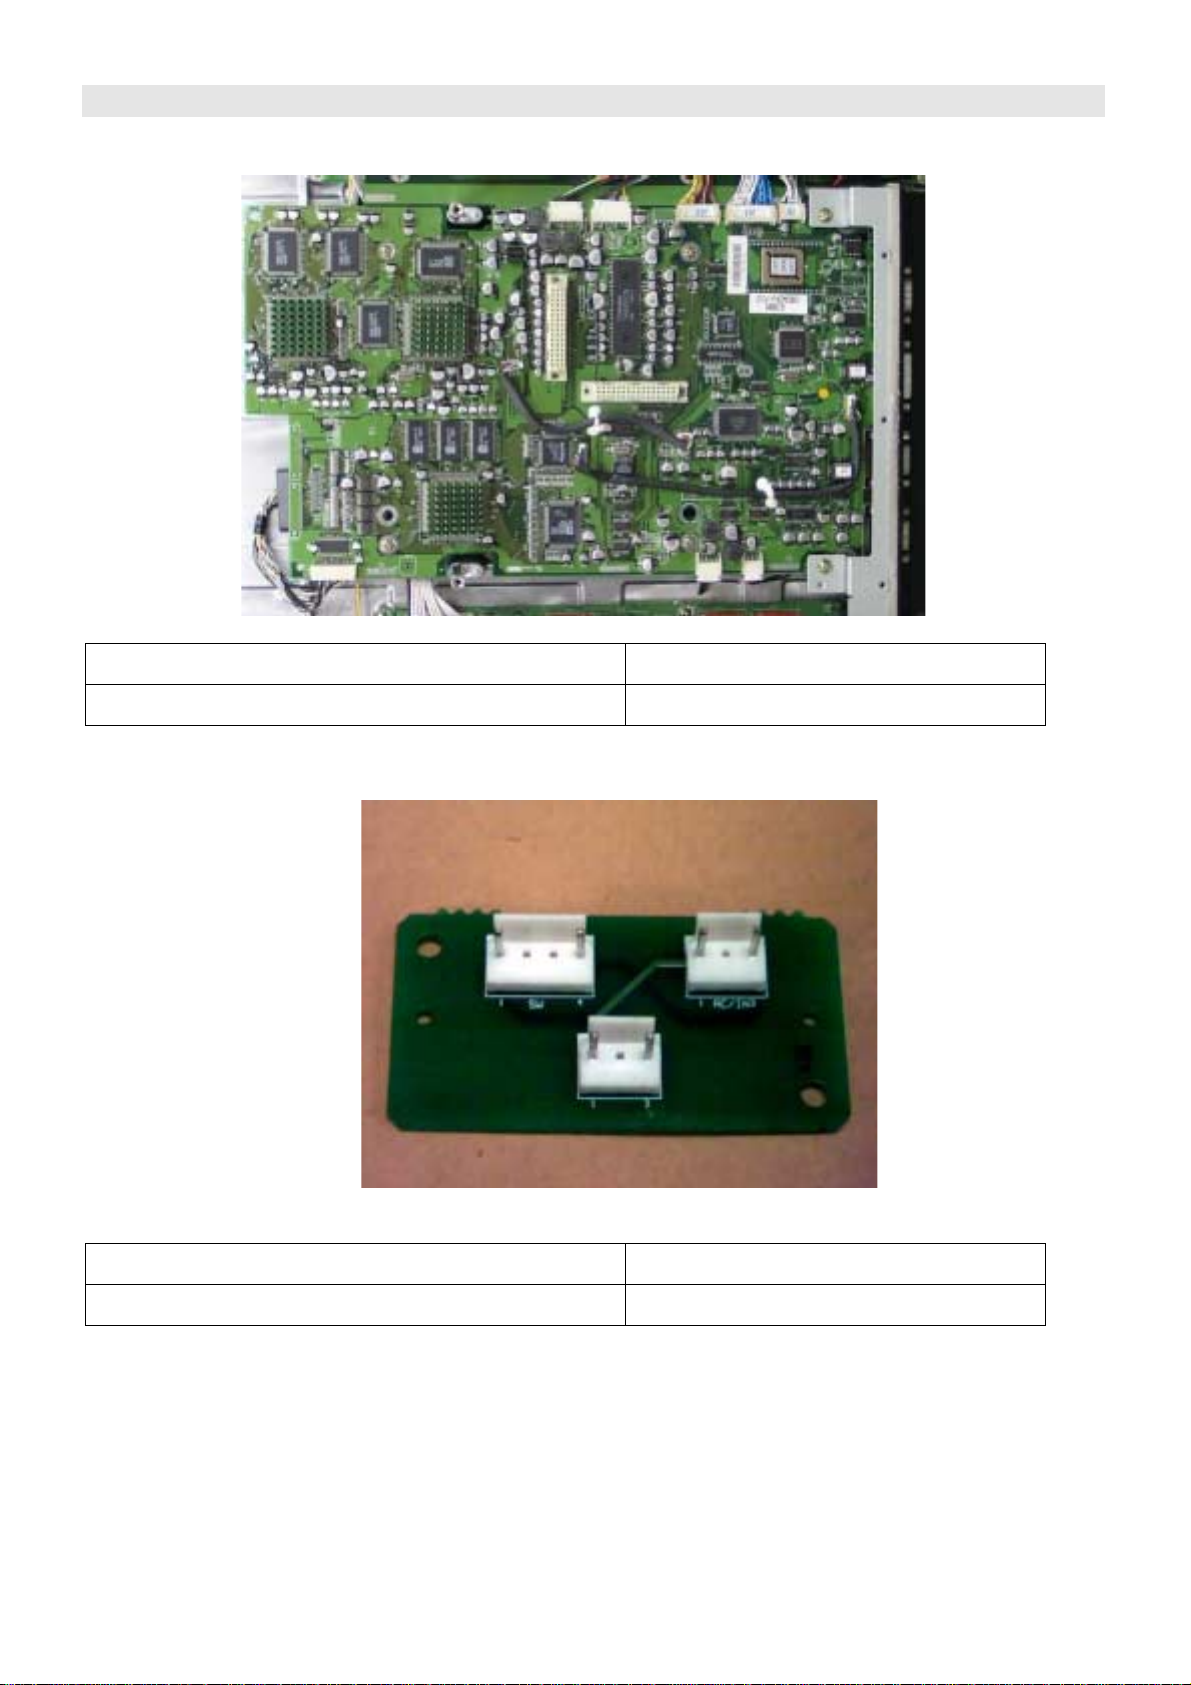
P.C. BOARD TOP VIEW VER1.0
MODULE NAME PART NO.
IMAGE BOARD ASS'Y DPWB11393-1GGWS
MODULE NAME PART NO.
AC MASTER POWER SWITCH B/D ASS'Y
DPWB11398-1G---
7-1
Page 56

P.C. BOARD TOP VIEW VER1.0
MODULE NAME PART NO.
AUDIO AMPLIFIER BOARD ASS'Y
DPWB11372-1G-S-
MODULE NAME PART NO.
FRONT BUTTON CONTROL BOARD ASS'Y
DPWB11372-1G-K2
7-2
Page 57
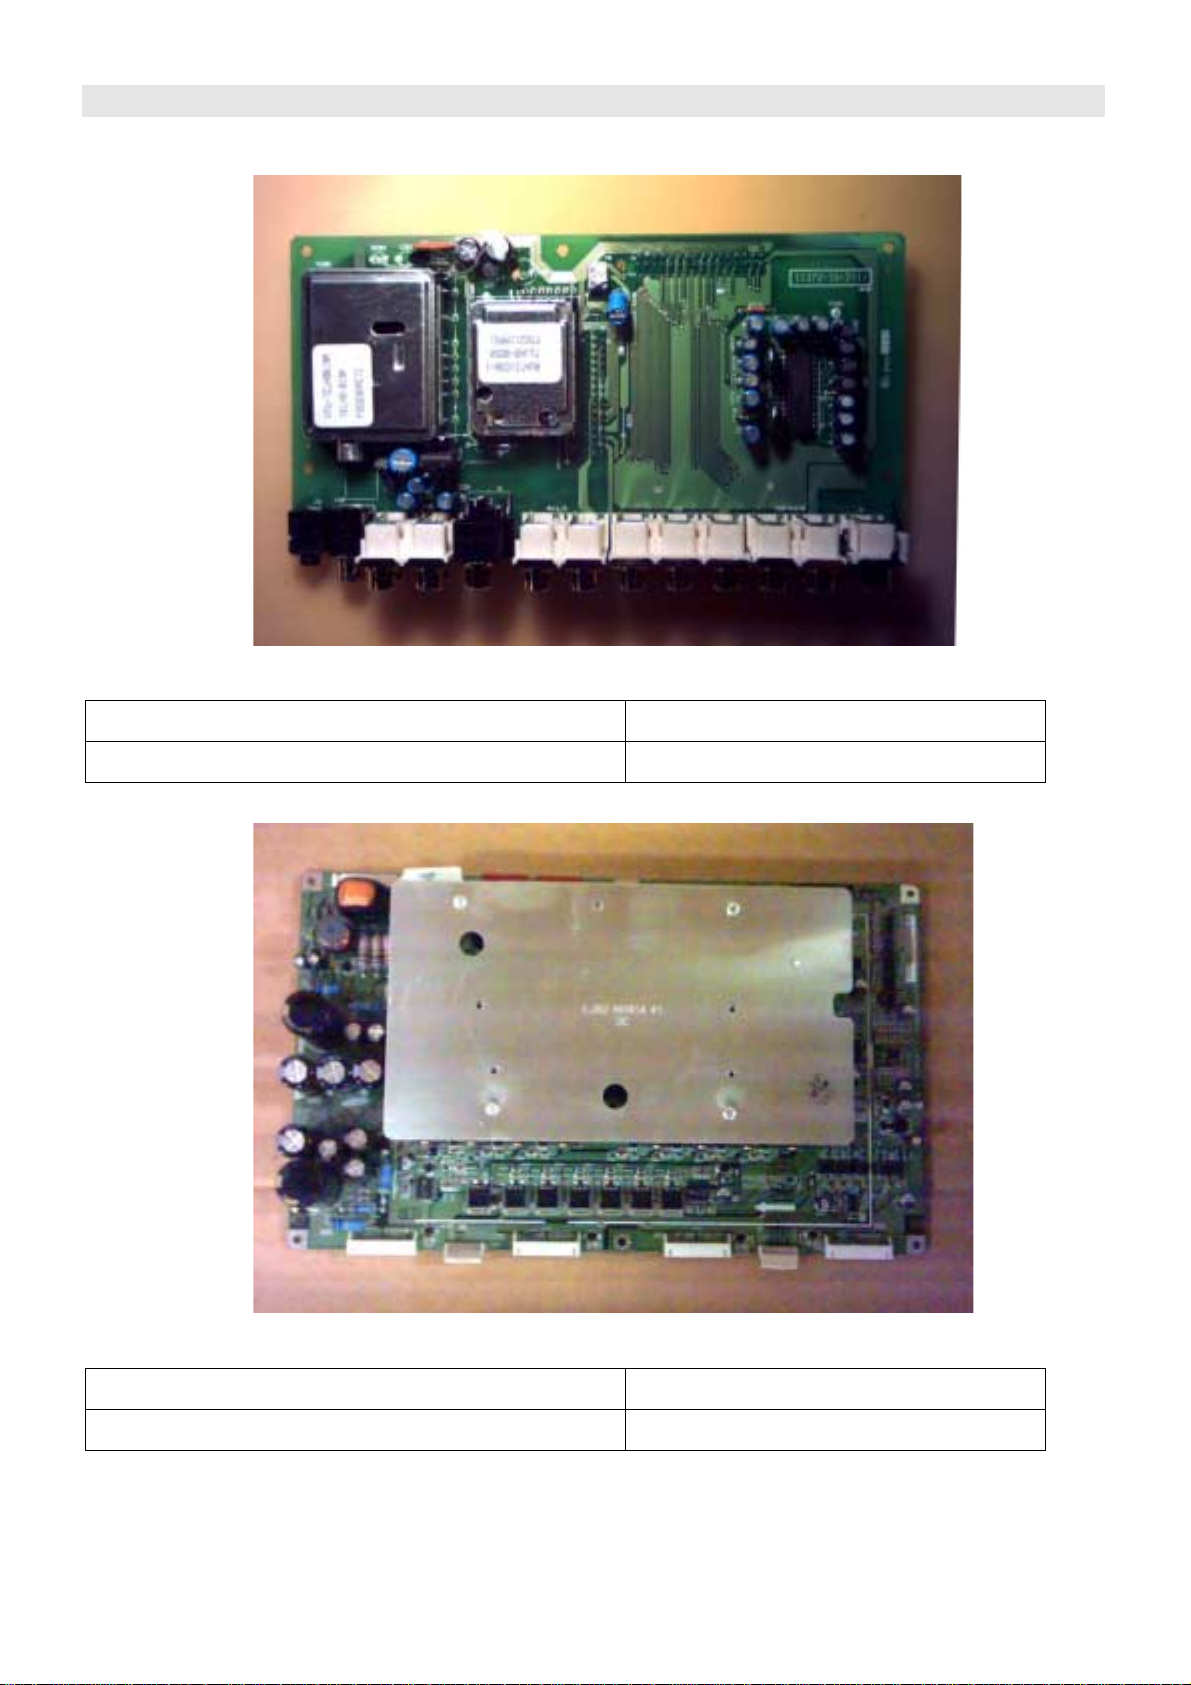
P.C. BOARD TOP VIEW VER1.0
MODULE NAME PART NO.
AV MODULE BOARD
ASS'Y
DPWB11396-1G-T-
MODULE NAME PART NO.
Y DRIVE A’SSY LJ92-00597C
7-3
Page 58

P.C. BOARD TOP VIEW VER1.0
MODULE NAME PART NO.
LOGIC BOARD ASS'Y LJ92-00621A
MODULE NAME PART NO.
MAIN POWER ASS'Y LJ44-00025A
7-4
Page 59

P.C. BOARD TOP VIEW VER1.0
MODULE NAME PART NO.
AC FILTER ASS'Y LJ92-00579A
MODULE NAME PART NO.
X DRIVE ASS'Y LJ92-00596C
7-5
Page 60

P.C. BOARD TOP VIEW VER1.0
MODULE NAME PART NO.
LOGIC E-BUFFER ASS'Y LJ92-00600A
MODULE NAME PART NO.
Y-BUFFER (UPPER) ASS'Y LJ92-00570A
7-6
Page 61

P.C. BOARD TOP VIEW VER1.0
MODULE NAME PART NO.
Y-BUFFER (LOWER) ASS'Y LJ92-00571A
MODULE NAME PART NO.
LOGIC F-BUFFER ASS'Y LJ92-00601A
7-7
Page 62

P.C. BOARD TOP VIEW VER1.0
MODULE NAME PART NO.
PDP PANEL MODULE
ASS'Y
VVEPP42SD001F--
7-8
Page 63

ELECTRONIC MODULES LIST VER1.0
Model Name: GTW-P42M203
No. Module Supplier Supplier's Designator
/ Part #
Quantity Per
Final
Current Revision
Level
Assembly
1 Image Board Sampo DPWB11393-1GGWS 1 S11393-05-1A1
2 AC Master Power Switch
Sampo DPWB11398-1G--- 1 OR
Board
3 Audio Amplifier Board Sampo DPWB11372-1G-S- 1 A11372-02-100
4 Front Button Control
Sampo DPWB11372-1G-K2 1 K2
Board
5 AV Module Board (with
Sampo DPWB11396-1G-T- 1 T11396-00-100
tuner)
6 Y Drive Samsung LJ92-00597C 1 A1
7 Logic Board Samsung LJ92-00621A 1 A4
8 Main Power Samsung LJ44-00025A 1 A1
9 AC Filter Samsung LJ92-00579A 1 0.2
10 X Drive Samsung LJ92-00596C 1 A1
11 Logic E- Buffer Samsung LJ92-00600A 1 A1
12 Y-Buffer (Upper) Samsung LJ92-00570A 1 A1
13 Y-Buffer (Lower) Samsung LJ92-00571A 1 A1
14 Logic F- Buffer Samsung LJ92-00601A 1 A1
15 PDP Panel Module Samsung VVEPP42SD001F-- 1 V1
8-1
Page 64
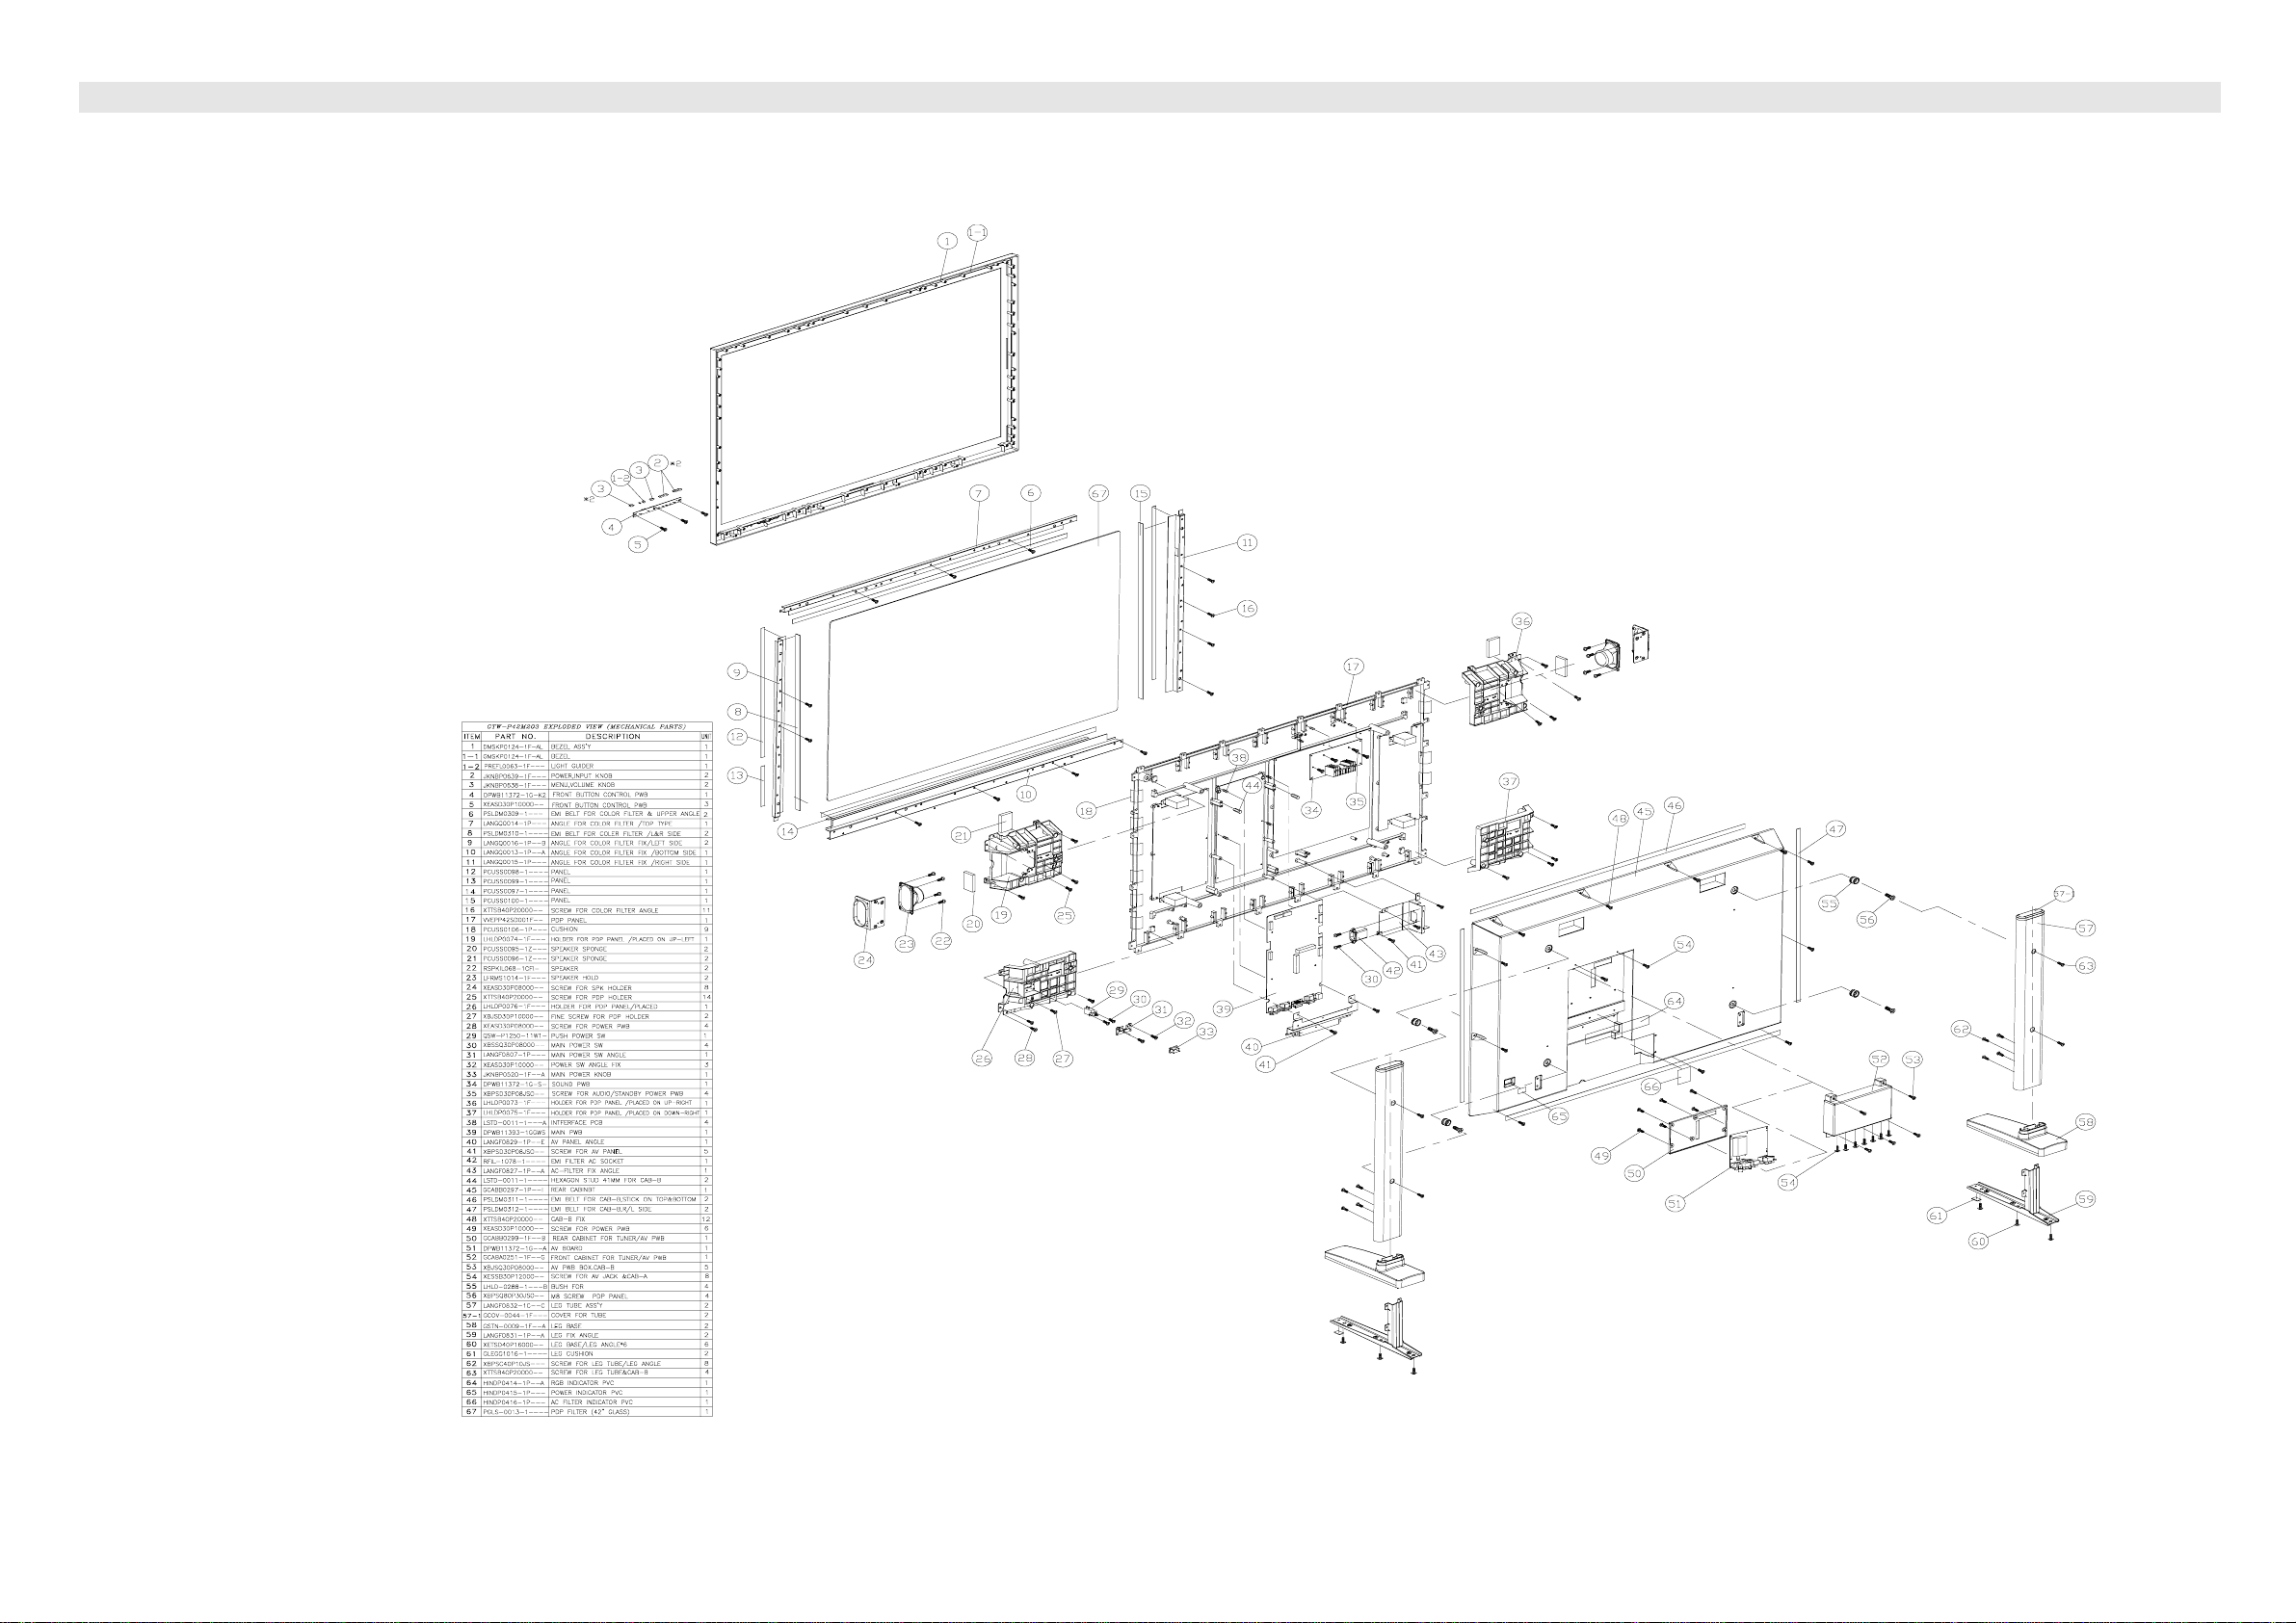
EXPLODED VIEW VER1.0
9-1
Page 65
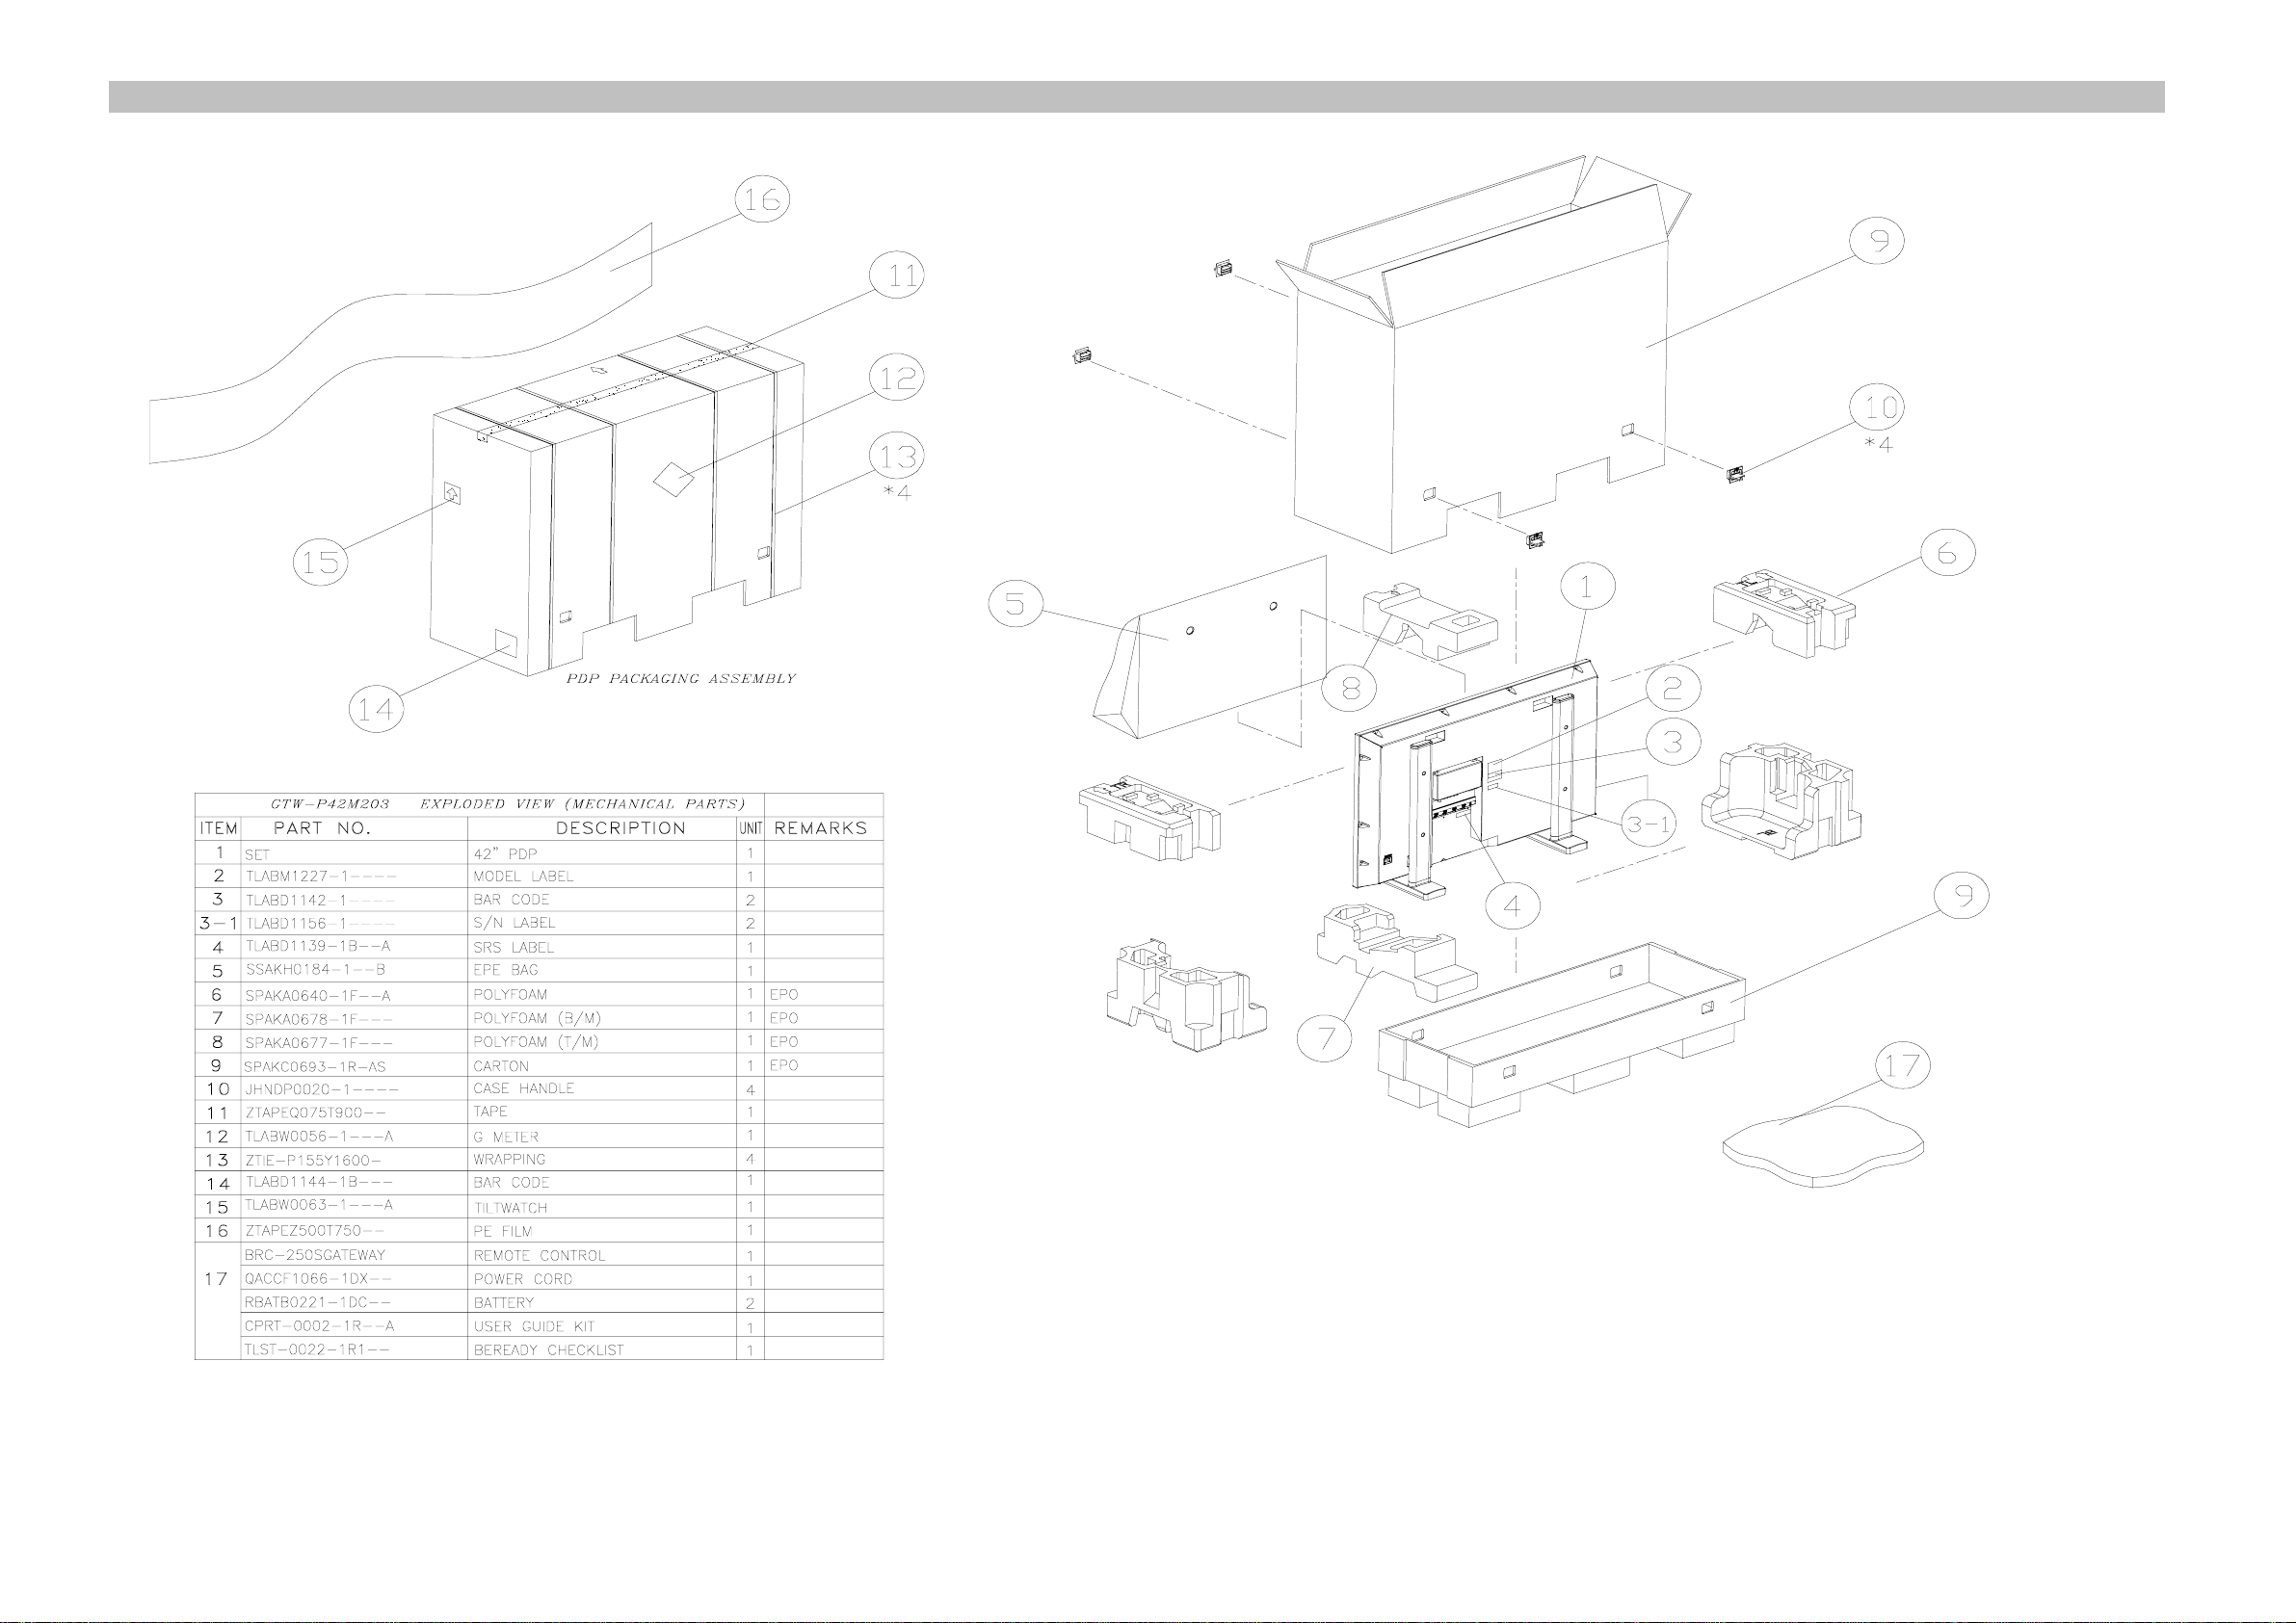
PACKAGING OF THE LIST VER1.0
10-1
 Loading...