

Garmin Road Tech Zumo 665 Owner's Manual
ZŪMO
TM
®
665
owner’s manual

© 2010 H-D and Garmin Ltd. or its subsidiaries
All rights reserved. Except as expressly provided herein, no part of this manual may be reproduced, copied, transmitted, disseminated, downloaded or stored in any storage
medium, for any purpose without the express prior written consent of Garmin. Garmin hereby grants permission to download a single copy of this manual onto a hard drive
or other electronic storage medium to be viewed and to print one copy of this manual or of any revision hereto, provided that such electronic or printed copy of this manual
must contain the complete text of this copyright notice and provided further that any unauthorized commercial distribution of this manual or any revision hereto is strictly
prohibited.
Information in this document is subject to change without notice. Garmin reserves the right to change or improve its products and to make changes in
the content without obligation to notify any person or organization of such changes or improvements. Visit the Garmin Web site (www.garmin.com) for
current updates and supplemental information concerning the use and operation of this and other Garmin products.
Harley-Davidson , the Bar & Shield logo, the Pegasus logo, and Road Tech are trademarks of H-D Michigan, Inc. and may not be used without the
express permission of H-D Michigan, Inc.
Garmin®, the Garmin logo, MapSource®, zūmo®, TracBack®, and TourGuide® are trademarks of Garmin Ltd. or its subsidiaries, registered in the USA
and other countries. Garmin Lock™, myGarmin™, and nüMaps Guarantee™ are trademarks of Garmin Ltd. or its subsidiaries. These trademarks may not
be used without the express permission of Garmin.
The Bluetooth® word mark and logos are owned by the Bluetooth SIG, Inc., and any use of such name by Garmin is under license. Windows® is a
registered trademark of Microsoft Corporation in the United States and other countries. Mac® is a registered trademark of Apple Computer, Inc. Audible.
com® is a registered trademark of Audible, Inc. © Audible, Inc. 1997–2008. SD™ is a trademark of the SD Card Association. XM® and the XM logos are
registered trademarks of XM Satellite Radio Inc. XM Radio, XM NavTrafc™, and XM NavWeather™ are trademarks of XM Satellite Radio Inc. Other
trademarks and trade names are those of their respective owners.

Introduction
WARNING
See the Important Safety and Product
Information on pages 59–60 for
product warnings and other important
information.
Manual Conventions
When you are instructed to “touch”
something, use your nger to touch an
item on the screen.
The small arrows (>) used in the text
indicate that you should touch a series
of items. For example, if you see
“touch Where To? > Favorites” you
should touch Where To?, and then
touch Favorites.
Road Tech™ zūmo Tips and Shortcuts
•
•
•
Contact Information
Contact Garmin if you have any
questions while using your zūmo. In
the USA, go to www.garmin.com
/support, or contact Garmin USA by
phone at (913) 397-8200 or
(800) 800-1020.
To quickly return to the Menu
page, touch and hold Back.
Touch and to see more
choices. Touch and hold to scroll
faster.
Pages appear differently based on
your usage mode and settings.
Introduction
Contact your local Harley-Davidson
dealer for information about products
and services.
myGarmin™
Go to http://my.garmin.com to access
the latest services for your Road
Tech™ zūmo:
Register your unit.
•
Subscribe to online services for
•
safety camera information (see
page 49).
Unlock optional maps.
•
Road Tech™ zūmo 665 Owner’s Manual

Table of Contents
Table of Contents
Introduction .................................i
Manual Conventions .............................. i
Road Tech™ zūmo Tips and Shortcuts ... i
Contact Information .............................. i
myGarmin™ ........................................... i
Getting Started ...........................4
Your Road Tech™ zūmo ........................ 4
Installing the Battery ............................. 5
Using the Menu Page ........................... 6
Selecting a Usage Mode....................... 7
Conguring Your zūmo ......................... 7
Acquiring Satellites ............................... 7
Finding Your Destination ....................... 8
Following Your Route ............................ 9
Adjusting the Volume .......................... 10
Where To? ................................ 11
Finding an Address ..............................11
Searching Near Another Location ........11
Go! Page Options ............................... 12
Setting a Home Location .................... 12
Finding a Place by Spelling the
Name .............................................. 12
Finding Recently Found Places .......... 13
Using Favorites ................................... 13
Using Photo Navigation ...................... 14
Using Extras ....................................... 14
Using Custom Routes ......................... 14
Finding a Place Using the Map ........... 15
Entering Coordinates .......................... 16
Using TracBack® ................................ 16
Using the Main Pages .............17
Map Page ........................................... 17
Turn List Page .................................... 17
Next Turn Page ................................... 18
Lane Assist Page ................................ 18
Routes Page ....................................... 18
Trip Computer Page ........................... 19
Compass............................................. 19
Enabling Fuel Tracking ....................... 20
Receiving XM® Services ..........21
Reviewing XM Subscriptions .............. 21
Using Hands-free Calling ........ 22
Pairing Your Devices........................... 22
Receiving a Call ................................. 23
During a Call ...................................... 23
Using the Phone Menu ....................... 23
Using Trafc Information ........ 25
Receiving Trafc Information .............. 25
Trafc in Your Area ............................. 26
Severity Color Code............................ 26
Trafc on Your Route .......................... 26
Viewing the Trafc Map ...................... 27
Using Weather Information ..... 28
Viewing the Weather Forecast ............ 29
Viewing the Weather Radar ................ 29
Viewing Road Conditions .................... 29
Viewing Weather Bulletins .................. 30
Viewing Weather Alerts ....................... 30
Using the Media Players ......... 31
Using a Wireless Headset .................. 31
Playing Music...................................... 31
Listening to Audible Books.................. 33
Listening to XM Radio......................... 34
Road Tech™ zūmo 665 Owner’s Manual

Managing Files .........................35
Loading Files ...................................... 35
Supported File Types .......................... 36
Deleting Files ..................................... 36
Using the Tools ........................ 37
Settings ............................................... 37
Where Am I? ....................................... 37
Help .................................................... 37
Media Player ....................................... 37
Weather .............................................. 37
Picture Viewer ..................................... 37
Custom Routes ................................... 38
My Data .............................................. 38
Managing Trip Logs ............................ 38
World Clock ....................................... 39
Language Guide ................................. 39
Calculator ........................................... 40
Unit Converter .................................... 40
Offers .................................................. 41
Customizing the Road Tech™
zūmo ......................................... 42
Changing the System Settings ........... 42
Changing the Navigation Settings ...... 43
Adjusting the Display Settings ............ 43
Updating the Time Settings................. 44
Setting the Languages ........................ 44
Changing the Map Settings ................ 44
Changing the Vehicle .......................... 45
Adding Security................................... 45
Viewing FM TMC Trafc Subscription
Information ....................................... 45
Changing Bluetooth Technology
Settings ............................................ 46
Tracking Fuel Usage ........................... 47
Reviewing XM Subscriptions .............. 47
Changing the Proximity Points Settings 47
Restoring All Settings.......................... 47
Clearing User Data ............................. 47
Appendix .................................. 48
Resetting the Road Tech™ zūmo ........ 48
Calibrating the Screen ........................ 48
Locking Your Unit ................................ 48
nüMaps Guarantee™ .......................... 48
Additional Maps .................................. 49
Updating the Software ........................ 49
Extras and Optional Accessories ........ 49
Battery Information ............................ 51
Table of Contents
Replacing the Battery in the
Road Tech™ zūmo ............................ 51
Charging Your Road Tech zūmo ......... 51
Changing the Fuse ............................. 52
About GPS Satellite Signals ............... 52
Mounting on Your Dashboard ............. 52
Removing the Road Tech™ zūmo
and Mounts ...................................... 53
Caring for Your Road Tech zūmo ....... 53
Software License Agreement .............. 54
Specications...................................... 55
Troubleshooting .................................. 56
Important Safety and Product
Information ....................................... 59
Road Tech™ zūmo® Warranty .............. 61
Index ......................................... 62
Road Tech™ zūmo 665 Owner’s Manual
Getting Started
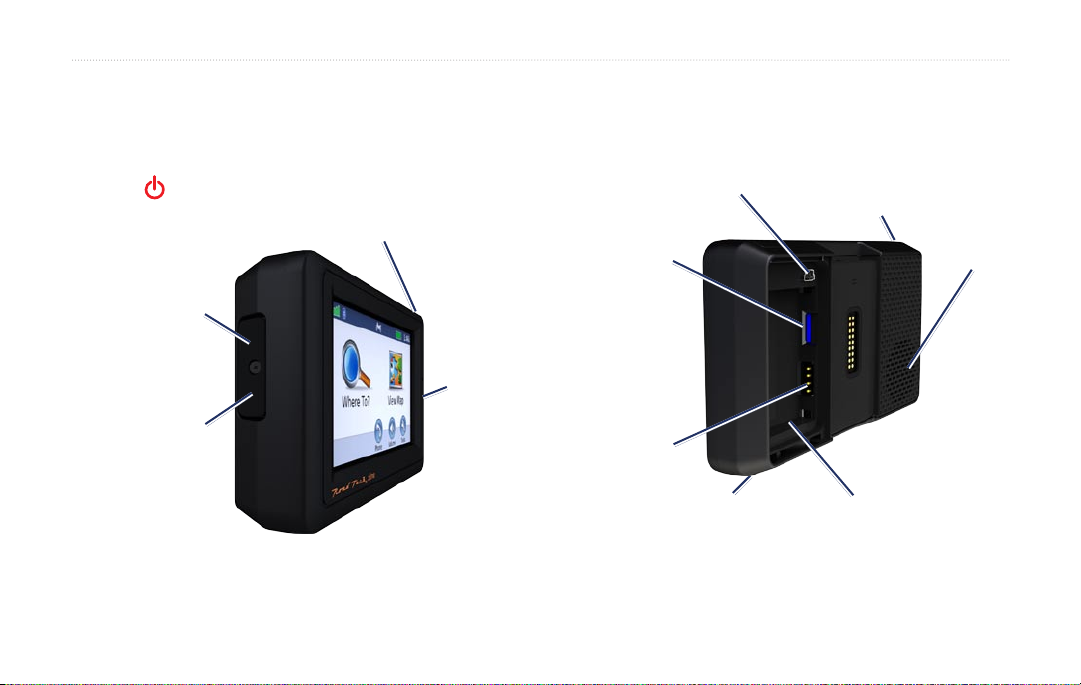
Power button:
Press and hold to turn on/off the zūmo.
Press quckly to adjust the volume and the backlght brghtness.
Headphone/
audo-out jack
(under weather cap)
Getting Started
Your Road Tech™ zūmo
connector
mcroSD™
card slot
Mcrophone
Mn-USB
GPS antenna
Speaker
External antenna
connector
(under weather cap)
Battery
contacts
Release key: Slde and
release to open the
battery cover.
Seral number
(under the battery)
NOTE: See the zūmo 665 Installation Instructions in the product box for motorcycle and automobile mounting instructions.
4 Road Tech™ zūmo 665 Owner’s Manual
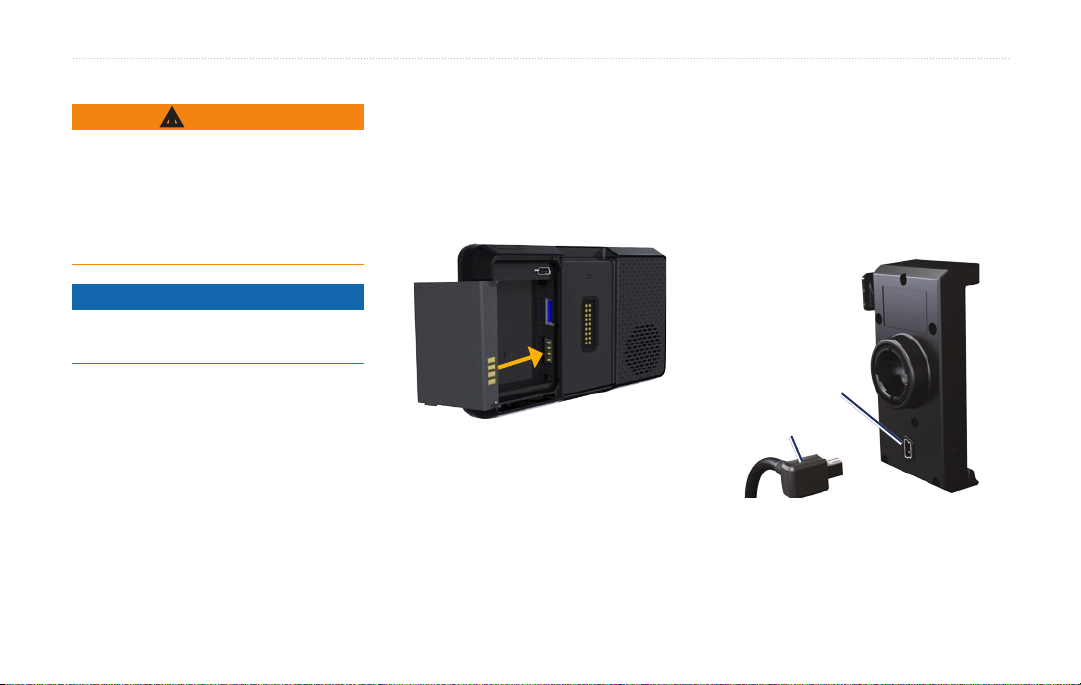
Installing the Battery
WARNING
This product contains a lithium-ion
battery. To prevent damage or personal
injury, remove the unit from the
vehicle when exiting or store it out of
direct sunlight.
Notice
Always keep the battery installed
when the zūmo is on.
1. Locate the lithium‑ion battery that
came in the product box.
2. Slide the release key until the
battery cover on the back of the
zūmo pops up.
3. Locate the metal contacts on the
end of the lithium‑ion battery.
4. Insert the battery so that the metal
contacts on the battery align with
the metal contacts inside the
battery compartment.
5. Replace the battery cover.
Getting Started
Connecting the GXM 40
Antenna to the Automotive
Mount
1. With the zūmo placed in the cradle,
plug the GXM 40 antenna into the
mini‑USB port on the back of the
automotive mount.
Mn-USB port
GXM 40
antenna
2. Place the GXM 40 antenna within
clear view of the sky.
Road Tech™ zūmo 665 Owner’s Manual 5
Getting Started
Connecting the GXM 40
Antenna to the Motorcycle
Mount
Notice
Do not place the GXM 40 antenna on
the fuel tank or in any location where
it may come into contact with fuel or
excessive heat.
1. With the zūmo placed in the
motorcycle mount, remove the
weather cap from the mini‑USB
connector on the Power cable.
2. Plug the GXM 40 antenna into the
mini‑USB connector.
3. Place the GXM 40 antenna within
clear view of the sky in an area
where there is at least 10 cm
between the antenna and your
zūmo. For best performance, place
the GXM 40 antenna at least 30 cm
away from the zūmo.
NOTE: The GXM 40 antenna can
also be placed in an area covered by
a non-conductive material; such as a
berglass top-case, tank bag, or leather
saddlebag.
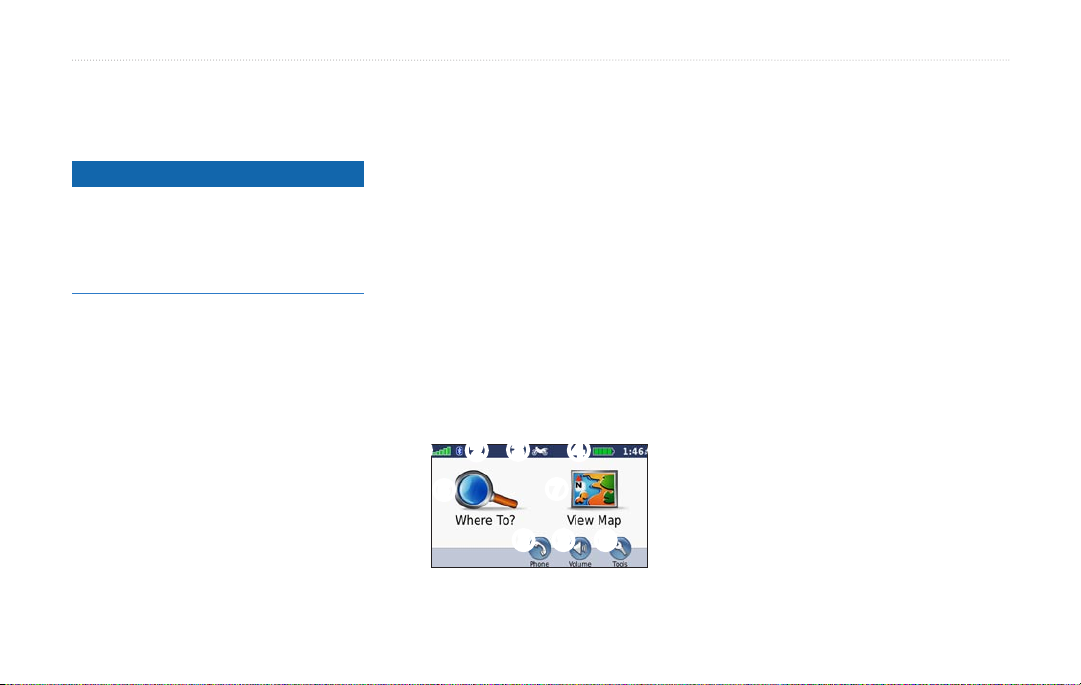
Using the Menu Page
➋
➌
➍
➎
➊
➋
Bluetooth® technology status.
➌
Touch to select motorcycle,
automobile, pedestrian, scooter,
or off road mode.
➍
Battery status.
➎
Current time. Touch to change
settings.
➏
Touch to nd a destination.
➐
Touch to view the map.
➑
Touch to make a call when
connected to a compatible mobile
phone.
➏
➊
GPS satellite strength.
6 Road Tech™ zūmo 665 Owner’s Manual
➐
➒
Touch to adjust the volume.
➓
➒➑
➓
Touch to use the tools such as
settings, Where Am I?, Help, and
routes.
Selecting a Usage Mode
Automoble
Motorcycle
Pedestran
Scooter
Off Road
To change your usage mode:
1. Touch the usage mode icon.
2. Select a mode, and touch OK.
3. Touch Yes, and follow the
Conguring Your zūmo
Your zūmo offers several usage modes
for different modes of transportation.
Routing and navigation are calculated
differently based on your usage mode.
For example, one-way streets are
treated differently in walking mode
than they are in driving mode.
When you place your zūmo in a mount
that does not correspond to its current
usage mode, the zūmo will ask you
whether you want to change usage
modes.
Your unit should turn on automatically
if it is plugged in and your vehicle is
running. To manually turn on your
zūmo, press the Power key. Follow
the on-screen instructions.
on‑screen instructions to congure
your settings.
Getting Started
Acquiring Satellites
1. Go outdoors to an open area, out
of garages, and away from tall
buildings.
2. Stop your vehicle, and turn on the
zūmo.
Acquiring satellite signals may take a
few minutes. The bars indicate
GPS satellite strength. When one
bar is green, the zūmo has acquired
satellite signals. Now you can select a
destination and navigate to it.
Road Tech™ zūmo 665 Owner’s Manual
Getting Started
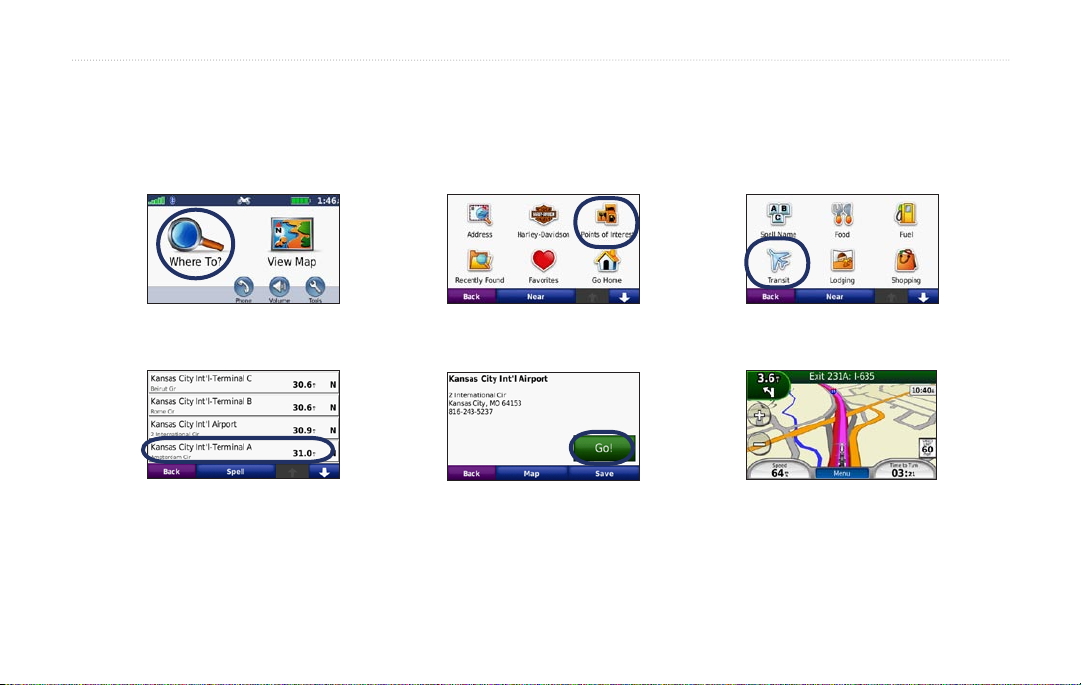
Finding Your Destination
The Where To? menu provides several different categories for you to use when searching for addresses, cities, and other
locations. The detailed map loaded in your zūmo contains millions of points of interest, such as restaurants, hotels, and auto
services.
1. Touch Where To?.
4. Select a destination.
8 Road Tech™ zūmo 665 Owner’s Manual
2.Select a category.
5.Touch Go!. 6Enjoy the route!
3.Select a subcategory.

Getting Started
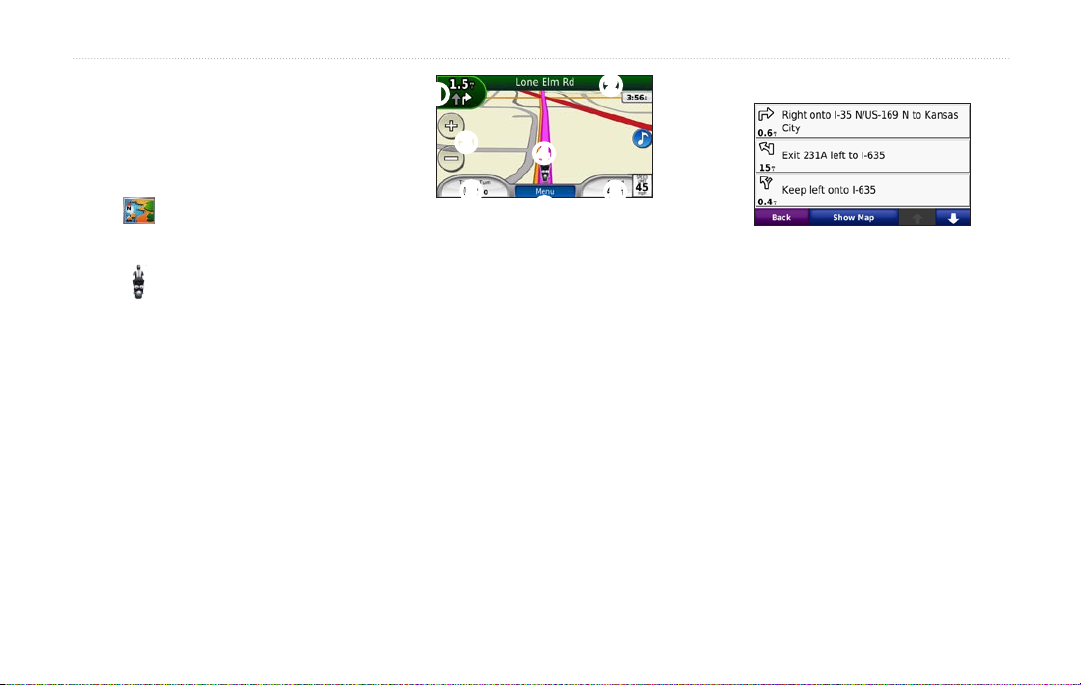
Following Your Route
Your route is marked with a magenta
line. As you travel, your zūmo guides
you to your destination with voice
prompts, arrows on the map, and
directions at the top of the map. The
upper-left corner indicates the distance
to your next maneuver and the lane
you should be in for the maneuver.
If you deviate from the original route,
your zūmo recalculates the route and
provides new directions.
A speed limit icon could appear as you
travel on major roadways.
Road Tech™ zūmo 665 Owner’s Manual
Adding a Via Point
You can add a stop (via point) to your
route. The zūmo gives you directions
to the stop and then to your nal
destination.
1. With a route active, touch Menu >
Where To?.
2. Search for the extra stop.
3. Touch Go!.
4. Touch Add As a Via Point to add
this stop before your destination.
If you want to add more than one stop
to the route, edit the current route. See
page 15.
Taking a Detour
If a road on your route is closed, you
can take a detour.
1. With a route active, touch Menu.
2. Touch Detour.
The zūmo attempts to get you back
on your original route as quickly as
possible. If the route you are currently
taking is the only reasonable option,
the zūmo might not calculate a detour.
Stopping the Route
1. With a route active, touch Menu.
2. Touch Stop.

Getting Started
Adjusting the Volume
From the Menu page, touch Volume.
Touch and to adjust the master
volume. Touch Mute to mute all
audio.
To adjust the volume levels for the
voice prompts, the media player,
and the phone, touch Mixer. Adjust
the levels as needed. Touch Restore
to return the volume settings to the
original levels.
NOTE
: Press and release the power
button to quickly access the volume
and brightness settings.
10 Road Tech™ zūmo 665 Owner’s Manual

Where To?
The Where To? menu provides
several different categories you can
3. Touch
OR
Touch Spell City or Spell Postal
use to search for locations. To learn
how to perform a standard search, see
page 8.
Finding an Address
4. Enter the number of the address,
5. Enter the street name, and touch
The steps to nd an address can vary
depending on the maps that are loaded
6. Select the correct street in the list,
on your zūmo. Not all map data
provides postal code searching.
1. Touch Where To? > Address.
2. Touch Change State or Country,
if necessary.
7. Touch the address, if necessary.
Search All.
Code, enter the city/postal code,
and touch Done. Select the city/
postal code in the list.
and touch Done.
Done.
if necessary.
Where To?
Searching Near Another Location
By default, your zūmo automatically
searches for places near your current
location. To search other locations, use
the following steps:
1. Touch Where To? > Near.
2. Select an option:
Where I Am Now—search near
•
your current location.
A Different City—search near
•
the city you enter.
My Current Route—search
•
along your route.
My Destination—search near
•
your current destination.
3. Touch OK.
Road Tech™ zūmo 665 Owner’s Manual 11

Where To?
Go! Page Options
Touch an item in the search results list
to view the Go! page.
➎
Setting a Home Location
➊
➌➋
➍
➊
Touch to call this location, if a
mobile phone with Bluetooth
wireless technology is connected.
➋
Touch to view the route on a map.
See page 43
➌
Touch to create a turn-by-turn
route to this location.
➍
Touch to view this location on the
map.
➎
You can set a Home location for the
place you return to most often.
1. Touch Where To? > Go Home.
2. Select an option.
Going Home
After you set your Home location,
you can route to it at any time. Touch
Where To? > Go Home.
Changing Your Home
Location
To set a new location as your Home
location, use the Tools menu.
Touch to save this location to
your Favorites. See page 13.
1. Touch Tools > My Data >
Set Home Location.
2. Select an option.
Finding a Place by Spelling the Name
If you know the name of the location
you are looking for, you can spell it
using the on-screen keyboard. You can
also enter letters contained in the name
to narrow the search.
1. Touch Where To? > Points of
Interest > Spell Name.
2. Using the on‑screen keyboard,
enter letters in the name.
3. Touch Done.
12 Road Tech™ zūmo 665 Owner’s Manual
Where To?
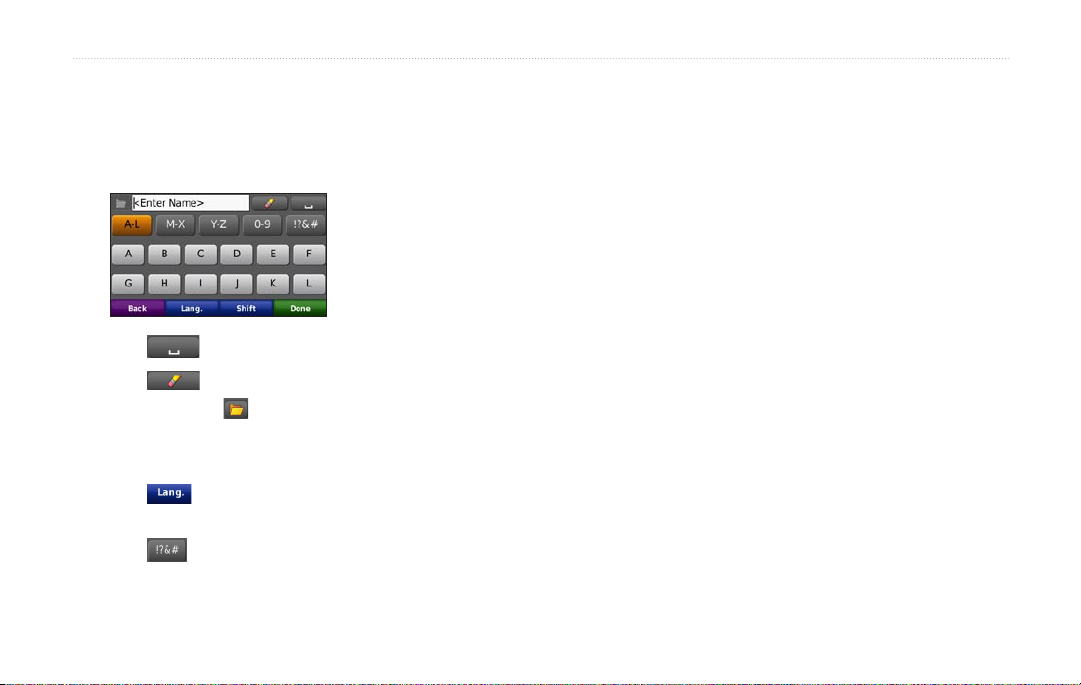
Using the On-Screen
Keyboard
When an on-screen keyboard appears,
touch a letter or number to enter it.
Touch to add a space.
•
Touch to delete the
•
character. Touch to select
words you have recently typed and
selected.
Touch to change the
•
keyboard language mode.
Touch to enter special
•
characters.
Road Tech™ zūmo 665 Owner’s Manual 13
Finding Recently Found
Places
Your zūmo stores the last 50 of your
recent nds in the Recently Found
list. The most-recently viewed places
appear at the top of the list. Touch
Where To? > Recently Found to
view your recently found items.
Clearing Recently Found
Places
To remove all places from the
Recently Found list, touch Clear
> Yes. All items from the list are
removed, but this does not delete the
actual place from your zūmo.
Using Favorites
You can save places in your Favorites,
so you can quickly nd them and
create routes to them. Your home
location is also stored in Favorites.
Saving Your Current
Location
From the Map page, touch the vehicle
icon. Touch Save Location to save
your current location.
Saving Places You Find
1. After you have found a place you
want to save, touch Save on the
Go! page.
2. Touch OK. The place is saved in
Favorites.

Where To?
Finding Saved Places
1. Touch Where To?.
2. Touch Favorites.
3. Touch a category. Your saved
locations are listed.
Editing Saved Places
1. Touch Where To? > Favorites.
2. Touch the location you want to edit.
3. Touch Edit.
Change Name—enter a new
•
name, and touch Done.
Attach Photo—select a picture
•
to assign to the location. To
load pictures on your zūmo or
memory card, see page 35.
Change Map Symbol—touch a
•
new symbol.
Change Phone Number—enter
•
a phone number, and touch
Done.
Using Photo Navigation
You can load pictures that include
location information on your zūmo
or on a memory card, and then create
routes to them.
1. Go to http://connect.garmin.com
2. Follow the instructions on the Web
3. Touch Where To? > Favorites.
Change Categories—create
•
and change the category in
which this location is saved.
Delete—touch Yes to remove
•
this item from the Favorites list.
/photos (may not be available in all
areas) to download pictures with
location information.
site to select and load pictures.
Pictures with location information
are listed.
4. Touch a picture.
Using Extras
For information about extras such as
safety camera information and Garmin
Travel Guide, see pages 49–50.
Using Custom Routes
Touch Where To? > Custom Routes.
Select the route you want to take, and
touch Go!.
Creating a Custom Route
Use your zūmo to create and save
routes before your next trip. You can
save up to 20 routes.
1. Touch Where To? (or Tools) >
Custom Routes > New.
2. Touch Add New Start Point.
14 Road Tech™ zūmo 665 Owner’s Manual
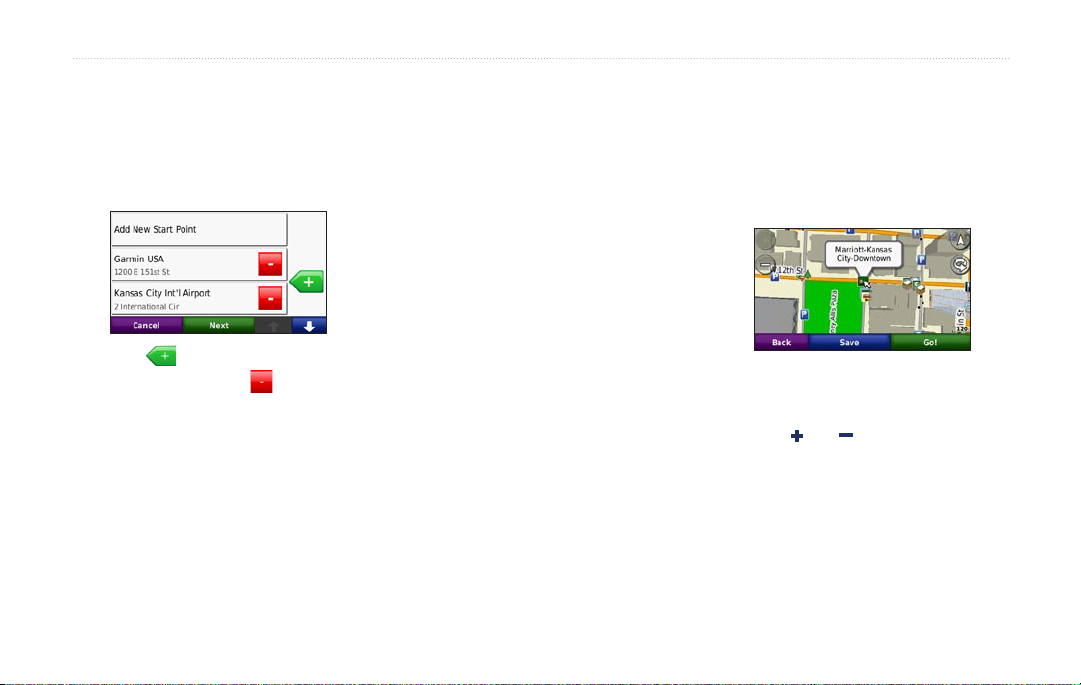
3. Find a location for your starting
point, and touch Select.
4. Touch Add New End Point.
5. Find a location for your ending
point, and touch Select.
6. Touch to add another location
to your route. Touch to remove
a location.
7. Touch Next to calculate your route
and view it on the map.
8. Touch Save to save the route and
exit.
Editing Custom Routes
1. Touch Where To? (or Tools) >
Custom Routes.
2. Select the route you want to edit.
3. Touch Edit.
4. Touch an option to edit the route:
Change Name—enter a new
•
name, and touch Done.
Add or Remove Points—add
•
or remove points from the route.
Manually Reorder Points—
•
change the order of points along
your route.
Optimally Reorder Points—
•
automatically order the points.
Recalculate—change the route
•
preference to calculate by faster
time, shorter distance, or off
road.
Delete—remove this route.
•
Your changes are automatically saved
when you exit any of the route edit
pages.
Where To?
Finding a Place Using the Map
To nd a location on the map, touch
Where To? > Browse Map or touch
anywhere on the map.
Touch and drag to view different
•
parts of the map.
Touch and to zoom in and out.
•
Touch anywhere on the map. An
•
arrow points to the location.
Touch Save to save this location.
•
Touch Go! to navigate to the
•
location.
Road Tech™ zūmo 665 Owner’s Manual 15

Where To?
If the zūmo is in simulator mode,
•
touch Set Loc. to set your location
to the selected location. (See page
42.)
Touch to switch between a 3D
•
(three-dimensional) map and a 2D
(two-dimensional) map.
Touch to rotate the viewing
•
angle in 3D view.
As you zoom out, the map changes
•
to a digital elevation map showing
the contours of the area.
Zoom far out to view a globe.
•
Touch and spin the globe to quickly
nd different areas of the world.
: You can only see detailed map
NOTE
information for areas for which you
have maps loaded on your zūmo.
Entering Coordinates
If you know the geographic
coordinates of your destination, you
can use your zūmo to navigate to
your destination using the latitude
and longitude coordinates (or other
coordinate formats). This can be
especially helpful when geocaching.
1. Touch Where To? > Coordinates.
2. Touch Format to select the correct
coordinate format for the type of
map you are using.
3. Touch a direction eld to select a
new direction.
4. Touch a numeric eld to enter the
coordinates, and touch Done.
5. After you have entered the proper
coordinates, touch Next.
Using TracBack®
Use TracBack to retrace your current
track back to where you started.
1. Touch Where To > TracBack to
view your recent track.
2. Touch Save to save the track to
your favorites.
3. Touch Go! to retrace your recent
path of travel.
16 Road Tech™ zūmo 665 Owner’s Manual
Using the Main Pages
Using the Main
➊
➋
Turn List Page
Pages
➌
Map Page
Touch View Map to view the
Map page.
The vehicle icon shows your
•
current location.
Touch the 3D view of the map to
•
select to an overhead view.
Touch and drag the map to view a
•
different area of the map (see page
15).
A speed limit icon could appear as
•
you travel on major roadways.
Road Tech™ zūmo 665 Owner’s Manual 1
➊
➋
➌
➍
➎
➏
➎
Touch to view the Next Turn page
or the Junction View page (when
available).
Touch to view the Turn List page.
Touch to zoom in and out.
Touch the vehicle icon to view
the Where Am I? page.
Touch to view the Trip Computer.
Touch to return to the Menu page.
➍
➏
➎
When you are navigating a route, the
Turn List page displays turn-by-turn
instructions for your entire route and
the distance between turns. Touch the
text bar on the top of the Map page to
view the Turn List page. Touch a turn
on the list to view the Next Turn page
for that turn. Touch Show Map to
view the entire route on the map.
Using the Main Pages
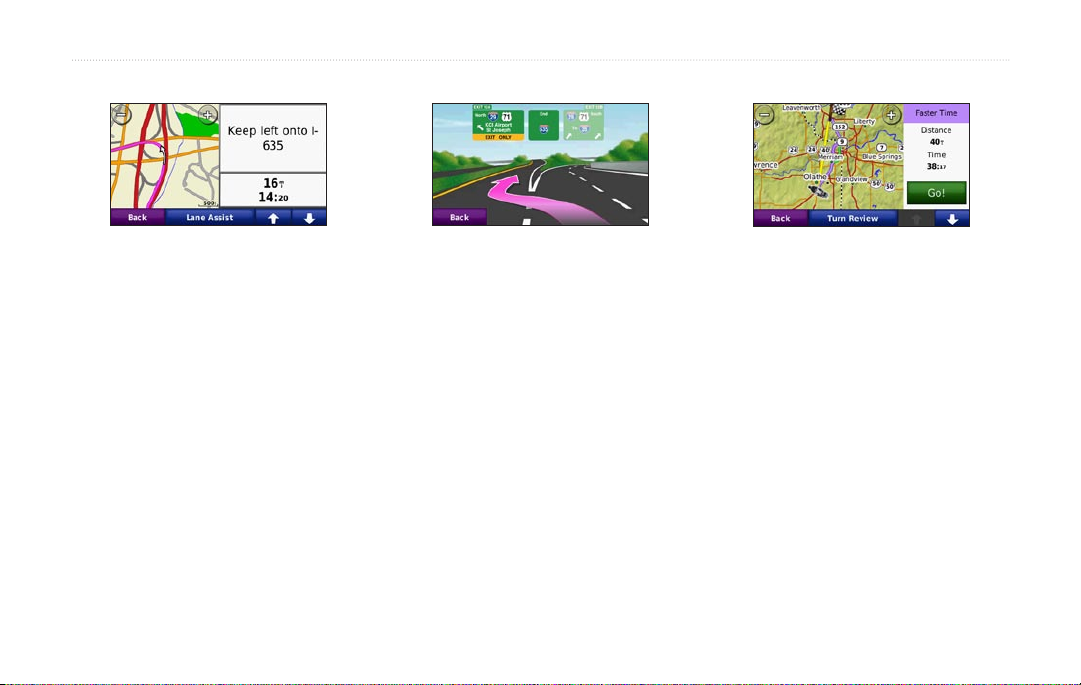
Next Turn Page
When you are navigating a route, the
Next Turn page shows the turn on the
map and the distance and time left
before you reach the turn.
To view an upcoming turn on the map,
touch the upper-left corner of the Map
page, or touch any turn on the Turn
List page. When available, touch Lane
Assist on the Next Turn page to view
the Lane Assist page for this turn.
18 Road Tech™ zūmo 665 Owner’s Manual
Lane Assist Page
When available, the Lane Assist page
may display a view of the upcoming
junction and in which lane you should
be driving. To view the Lane Assist
page touch the upper-left corner of
the Map page. You can also access the
Lane Assist page from the Next Turn
page.
Routes Page
On the Go! Page, touch the route
information tab, which lists your usage
mode and the distance and time to
your destination, to open the Routes
page.
The Routes page displays four
different types of routes to your
destination: fastest time, shortest
distance, off road, and avoid
highways. Touch an arrow button to
change the type of route, and then
touch Go!.

Using the Main Pages
Trip Computer Page
The Trip Computer provides helpful
statistics about your trip. To view the
Trip Computer, touch a data eld on
either side of Menu on the Map page.
Green check marks appear beside the
data elds that are currently displayed
on the map page.
If you make frequent stops, leave the
zūmo turned on so it can accurately
measure elapsed time during the trip.
Headng
Compass
Road Tech™ zūmo 665 Owner’s Manual 1
Customzable
data elds
Compass
You can navigate using a GPS
compass. No calibration is required;
however, you must have a clear view
of the sky. When you are traveling, the
compass rotates.
The compass is located on the Trip
Computer page, which you can access
by touching one of the data elds to
the side of the Menu button.
Changing Data Fields
You can display different information
when you are driving and routing.
1. While navigating a route, touch a
data eld in the lower left corner or
lower right corner of the Map page.
2. On the Trip Computer page, touch
a data eld you would like the map
to display.
Resetting Trip Information
To ensure accurate trip information,
reset the trip information before
beginning a route.
1. While on the map page, touch
a data eld to access the Trip
Computer page.
2. Touch Reset and then select an
option:
Touch Max. Speed to reset the
•
maximum speed.
Touch Trip Data to reset the
•
information on the Trip Computer
page.
Touch Fuel Gauge to reset the fuel
•
gauge on the trip computer.
On the Reset page, touch Fuel
Settings to enable the fuel gauge.
 Loading...