

Garmin GPSMAP 640 owner’s manual
GPSMAP® 640
owner’s manual

© 2008 Garmin Ltd. or its subsidiaries
Garmin International, Inc.
1200 East 151st Street,
Olathe, Kansas 66062, USA
Tel. (913) 397.8200 or (800) 800.1020
Fax (913) 397.8282
All rights reserved. Except as expressly provided herein, no part of this manual may be reproduced, copied, transmitted, disseminated, downloaded or stored in any storage
medium, for any purpose without the express prior written consent of Garmin. Garmin hereby grants permission to download a single copy of this manual onto a hard drive
or other electronic storage medium to be viewed and to print one copy of this manual or of any revision hereto, provided that such electronic or printed copy of this manual
must contain the complete text of this copyright notice and provided further that any unauthorized commercial distribution of this manual or any revision hereto is strictly
prohibited.
Information in this document is subject to change without notice. Garmin reserves the right to change or improve its products and to make changes in the content without
obligation to notify any person or organization of such changes or improvements. Visit the Garmin Web site (www.garmin.com) for current updates and supplemental
information concerning the use and operation of this and other Garmin products.
Garmin®, the Garmin logo, GPSMAP®, BlueChart®, g2 Vision®, and MapSource® are trademarks of Garmin Ltd. or its subsidiaries, registered in the USA and other
countries. These trademarks may not be used without the express permission of Garmin.
Windows® and Windows NT® are registered trademarks of Microsoft Corporation in the United States and/or other countries. Mac® is a registered trademark of Apple
Computer, Inc.
XM® and XM WX Satellite Weather® are registered trademarks of XM Satellite Radio Inc.
Garmin (Europe) Ltd.
Liberty House
Hounsdown Business Park,
Southampton, Hampshire, SO40 9RB UK
Tel. +44 (0) 870.8501241 (outside the UK)
0808 2380000 (within the UK)
Fax +44 (0) 870.8501251
Garmin Corporation
No. 68, Jangshu 2nd Road,
Shijr, Taipei County, Taiwan
Tel. 886/2.2642.9199
Fax 886/2.2642.9099
November, 2008 Part Number 190-01046-00 Rev. A Printed in Taiwan

Introduction
Introduction
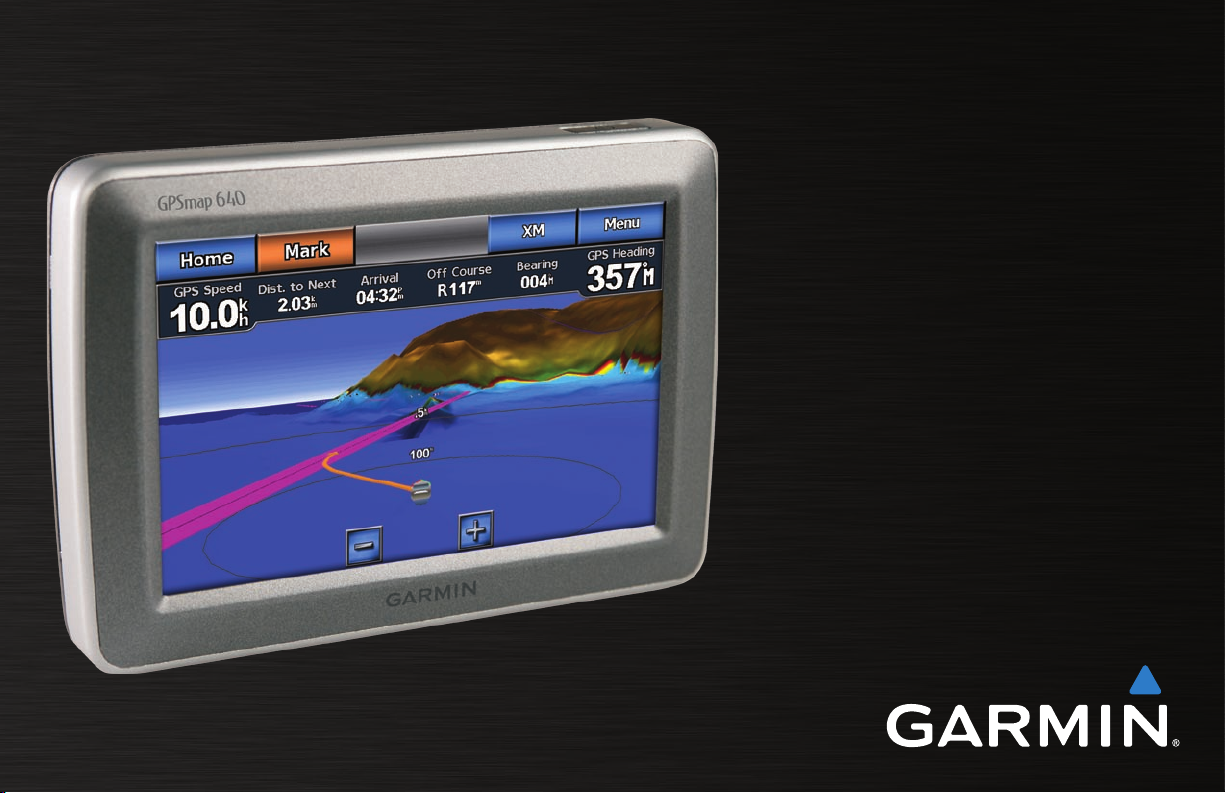
The GPSMAP® 640 is both a marine and an automotive GPSenabled navigation device. Two mounts are provided with the
GPSMAP 640 device, one for your boat and one for your car.
When you place the device in the mount installed on your boat,
it powers on in marine mode. When you place the device in the
automotive mount, it powers on in automotive mode.
This manual is divided in two sections; the rst section describes
how to use the GPSMAP 640 in marine mode, and the second
section describes how to use the device in automotive mode. The
sections are labeled with tabs along the edge of the page to help
identify the usage mode.
See the Important Safety and Product Information guide in the product
box for product warnings and other important information.
Product Registration
Help us better support you by completing our online registration
today. Go to http://my.garmin.com. Keep the original sales receipt,
or a photocopy, in a safe place.
Contact Garmin®
Contact Garmin Product Support if you have any questions while
using your GPSMAP 640. In the USA, go to www.garmin
.com/support, or contact Garmin USA by phone at (913) 397.8200
or (800) 800.1020.
In the UK, contact Garmin (Europe) Ltd. by phone at 0808
2380000.
In Europe, go to www.garmin.com/support and click Contact
Support for in-country support information, or contact Garmin
(Europe) Ltd. by phone at +44 (0) 870.8501241.
Manual Conventions
In this manual, when you are instructed to touch something, use
your nger to touch that item on the screen. Small arrows (>) used
in the text indicate that you should touch a series of items in order.
For example, if you see, “Touch Charts > Navigation Chart”,
you should touch the Charts button on the screen, and then touch
Navigation Chart.
GPSMAP 640 Owner’s Manual i

Introduction
Caring for Your GPSMAP 640
Your GPSMAP 640 contains sensitive electronic components that
can be permanently damaged if exposed to excessive shock or
vibration. To minimize the risk of damage to your GPSMAP 640,
avoid dropping your unit and operating it in high-shock and highvibration environments.
Cleaning the Unit
The GPSMAP 640 is constructed of high-quality materials and
does not require user maintenance other than cleaning. Clean
the outer casing of the unit (not the touchscreen) using a cloth
dampened with a mild detergent solution, and then wipe it dry.
Avoid chemical cleaners and solvents that can damage plastic
components.
Cleaning the Touch Screen
Clean the touchscreen with a soft, clean, lint-free cloth. Use water,
isopropyl alcohol, or eyeglass cleaner, if needed. Apply the liquid
to the cloth, and then gently wipe the touchscreen.
Protecting Your GPSMAP 640
Do not store the GPSMAP 640 where prolonged exposure to
•
extreme temperatures can occur, because it can cause permanent
damage.
Although a PDA stylus can be used to operate the touchscreen,
•
never attempt this while operating a vehicle. Never use a hard or
sharp object to operate the touchscreen because damage might
result.
Water Immersion
The unit is waterproof to IEC Standard 60529 IPX7. It can
withstand immersion in 1 meter of water for 30 minutes. Prolonged
submersion can cause damage to the unit. After submersion, be
certain to wipe and air dry the unit before reuse.
Avoiding Theft
To avoid theft, remove the unit and mount from sight when not
•
in use.
Do not keep your unit in the glove compartment.
•
Register your product at http://my.garmin.com.
•
ii GPSMAP 640 Owner’s Manual

Table of Contents
Table of Contents
Introduction ...........................................................................i
Product Registration ..................................................................... i
Contact Garmin® ...................................................................................i
Manual Conventions ..................................................................... i
Caring for Your GPSMAP 640 ......................................................ii
Getting Started .....................................................................1
Identifying the GPSMAP 640 Features ........................................ 1
Identifying the GPSMAP 640 Mounting Bracket Features ........... 1
Using the Mounting Bracket ......................................................... 2
Powering the GPSMAP 640 On and Off ...................................... 3
Removing and Inserting the Battery Pack .................................... 3
Inserting and Removing a Secure Digital (SD) Card ................... 4
Marine Mode: Getting Started ............................................5
Step 1: Mount Your GPSMAP 640 ............................................... 5
Step 2: Congure Your GPSMAP 640 ......................................... 5
Step 3: Acquire Satellites ............................................................. 5
Step 4: Use Your GPSMAP 640 ................................................... 5
Navigating Directly to a Destination ............................................. 6
Saving Your Current Location ...................................................... 6
Navigating Directly to a Saved Location ...................................... 7
Stopping Navigation ..................................................................... 7
Adjusting the Volume ................................................................... 7
Adjusting the Backlight ................................................................. 7
Marine Mode: Using Charts ................................................8
Using the Navigation Chart .......................................................... 8
Interacting With Objects on the Navigation Chart ........................ 9
Accessing Additional Object or Chart Information ........................ 9
Using Mariner’s Eye ................................................................... 10
Using BlueChart g2 Vision ..........................................................11
Using Mariner’s Eye 3D ..............................................................11
Using Fish Eye 3D ..................................................................... 12
Using Fishing Charts .................................................................. 12
Enabling High-Resolution Satellite Imagery ............................... 12
Marine Mode: Navigating ..................................................14
Step 1: Choose a Destination .................................................... 14
Step 2: Set and Follow the Course ............................................ 14
Marine Mode: Where To? ..................................................20
Searching For Marine Services .................................................. 20
Searching for Waypoints ............................................................ 20
Searching for Saved Routes ...................................................... 20
Searching for Saved Tracks ....................................................... 21
Searching by Name ................................................................... 21
Marine Mode: Using Waypoints and Tracks ...................22
Using Man Overboard (MOB) Waypoints................................... 22
Marking a Waypoint at Your Current Location............................ 22
Creating a Waypoint From the Navigation Chart ....................... 22
Editing Waypoint Details ............................................................ 23
Using Tracks .............................................................................. 23
GPSMAP 640 Owner’s Manual iii

Table of Contents
Marine Mode: Using the Dashboard ................................25
Using the Compass Screen ....................................................... 25
Using the Numbers Screen ........................................................ 26
Using the Trip Screen ................................................................ 26
Marine Mode: Viewing Almanac Data ..............................27
Viewing Tide Station Information ............................................... 27
Viewing Current Information ...................................................... 27
Viewing Celestial Information ..................................................... 28
Marine Mode: Managing User Data ..................................29
Transferring Data (Waypoints, Routes, Tracks) to
or From an SD Card ................................................................ 29
Backing up Data to a PC ............................................................ 29
Copying or Merging MapSource® Data to
the GPSMAP 640 ................................................................... 30
Marine Mode: Managing Information From
Other Vessels .....................................................................31
Viewing AIS Information .......................................................... 31
Viewing DSC Information ........................................................... 31
...........................33
Conguring System Settings ...................................................... 33
Changing Units of Measure ....................................................... 34
Conguring Communications Settings ....................................... 35
Conguring Alarm Settings ........................................................ 36
Conguring My Boat .................................................................. 37
Conguring Other Vessels ......................................................... 37
Conguring XM Radio ................................................................ 38
Conguring Navigation Chart Options ....................................... 38
Conguring Mariner’s Eye Options and
Mariner’s Eye 3D Options ....................................................... 41
Fish Eye 3D Settings ................................................................. 42
Fishing Chart Settings ............................................................... 43
Conguring the Active Track Options ......................................... 43
Conguring the Numbers Screen ............................................... 44
Marine Mode: Using XM WX Weather and Audio ............45
Using XM WX Weather .............................................................. 45
Setting the XM WX Weather Options ......................................... 45
Viewing Precipitation Information ............................................... 45
Viewing Forecast Information .................................................... 47
Viewing Sea Conditions ............................................................. 48
Viewing Fishing Information ....................................................... 49
Viewing Visibility Information...................................................... 50
Viewing Buoy Reports ................................................................ 50
Using XM Audio ......................................................................... 51
Automotive Mode: Getting Started ..................................52
Step 1: Mount Your GPSMAP 640 ............................................. 52
Step 2: Congure Your GPSMAP 640 ....................................... 52
Step 3: Acquire Satellites ........................................................... 52
Step 4: Use Your GPSMAP 640 ................................................. 52
Finding Your Destination ............................................................ 53
iv GPSMAP 640 Owner’s Manual

Table of Contents
Adding a Stop ............................................................................ 53
Taking a Detour .......................................................................... 53
Stopping the Route .................................................................... 53
Automotive Mode: Where To? ..........................................54
Finding an Address .................................................................... 54
Setting a Home Location ............................................................ 54
Go! Page Options ...................................................................... 55
Finding a Place by Spelling the Name ...................................... 55
Searching Near Another Location .............................................. 55
Finding Recently Found Places ................................................. 55
Favorites .................................................................................... 56
Finding a Place Using the Map .................................................. 56
Using Custom Routes ................................................................ 57
Entering Coordinates ................................................................. 58
Navigating Off Road ................................................................... 58
Automotive Mode: Using the Map ....................................59
Next Turn ................................................................................... 59
Turn List ..................................................................................... 59
Trip Computer ............................................................................ 60
Automotive Mode: Managing Files ..................................61
Loading Files .............................................................................. 61
Deleting Files ............................................................................ 62
Automotive Mode: Using the Tools .................................63
Settings ...................................................................................... 63
Where Am I? .............................................................................. 63
Picture Viewer ............................................................................ 63
My Data ...................................................................................... 63
..................64
Changing the System Settings ................................................... 64
Changing the Navigation Settings .............................................. 64
Adjusting the Display Settings ................................................... 64
Adjusting the Volume ................................................................. 65
Adjusting the Backlight ............................................................... 65
Updating the Time Settings ........................................................ 65
Setting the Languages ............................................................... 65
Changing the Map Settings ........................................................ 65
Changing Security Settings ........................................................ 66
Restoring All Settings ................................................................. 66
Automotive Mode: Using XM ............................................67
Listening to XM Radio ................................................................ 67
Using XM Trafc Information ...................................................... 68
Trafc in Your Area ..................................................................... 68
Severity Color Code ................................................................... 68
Trafc on Your Route ................................................................. 68
Viewing the Trafc Map .............................................................. 69
Viewing Trafc Delays ................................................................ 69
Adding an XM Subscription ........................................................ 69
GPSMAP 640 Owner’s Manual v

Table of Contents
Appendix ............................................................................70
Calibrating the Screen ............................................................... 70
Resetting Your GPSMAP 640 .................................................... 70
Updating the Software ............................................................... 70
Clearing User Data .................................................................... 70
Battery Information .................................................................... 70
Charging Your GPSMAP 640 ..................................................... 71
Changing the Fuse on the Automotive Mount ............................ 71
Additional Maps ......................................................................... 71
About GPS Satellite Signals ...................................................... 71
Extras and Optional Accessories ............................................... 72
Specications ............................................................................. 72
Declaration of Conformity .......................................................... 73
Software License Agreement ..................................................... 73
Troubleshooting ........................................................................ 73
Messages and Alarms (Marine Mode) ....................................... 74
Index ...................................................................................80
vi GPSMAP 640 Owner’s Manual
Getting Started
Getting Started
Identifying the GPSMAP 640 Features
➊
➍
➎
➏
Power button—manually turn the device on or off.
➊
Battery—removable lithium-ion rechargeable battery.
➋
Battery locking ring—lift and rotate counter-clockwise to
➌
release the battery.
DC in—power the device and recharge the battery with an
➍
external power cable.
MCX connector—connect an external GPS antenna.
➎
USB connector—connect the device to a computer or to an
➏
optional GXM 40 XM antenna (GPSMAP 640 only).
➌
➋
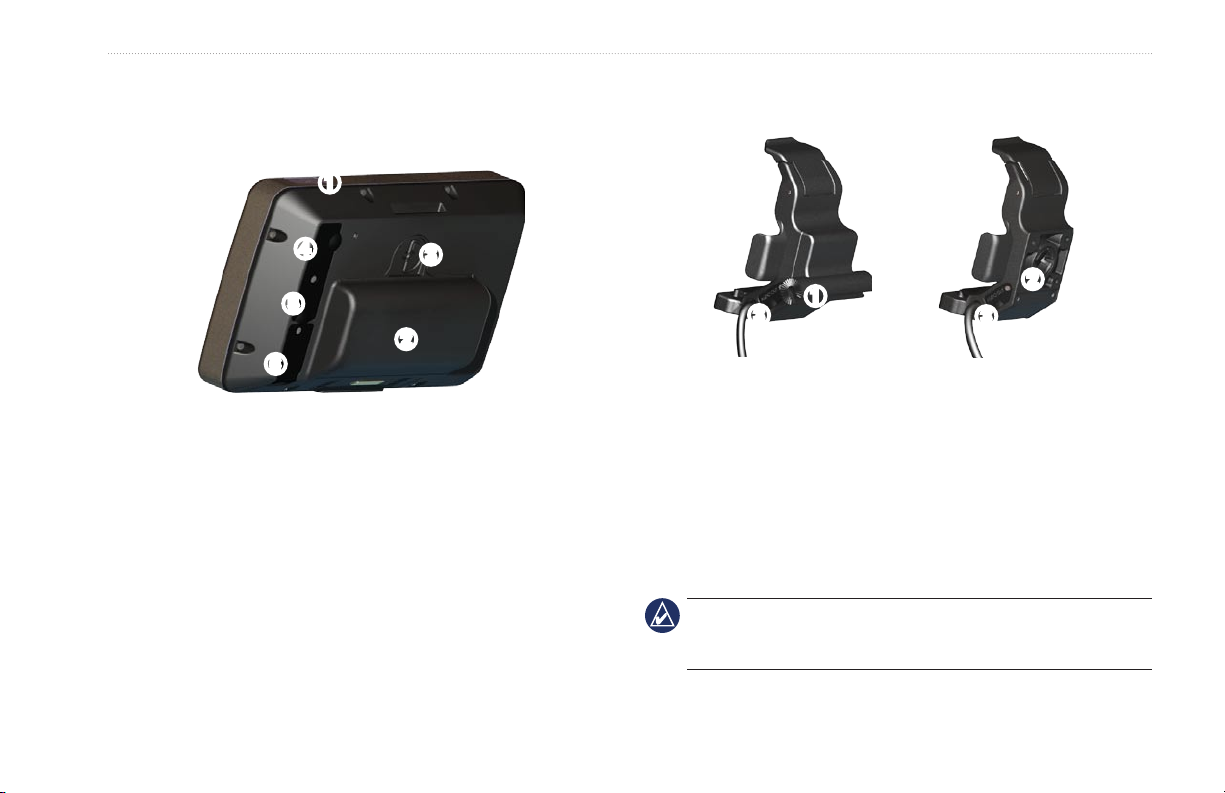
Identifying the GPSMAP 640 Mounting
Bracket Features
➋
➊
➌
Marine
Mounting Bracket
Bail-mount adapter—connect the marine mounting bracket to
➊
the marine bail mount.
➋
Ball-socket adapter—connect the mounting bracket adapter to
a compatible automotive dash mount.
Audio line out—connect the unit to an audio output source
➌
with a standard 1/8 in. (3.5 mm) stereo audio plug.
NOTE: When you remove the GPSMAP 640 from the marine
mounting bracket, dry the metal contacts and use the attached
weather cap to prevent corrosion.
➌
Automotive
Mounting Bracket
GPSMAP 640 Owner’s Manual 1
Getting Started
CAUTION: The ball-socket adapter on the GPSMAP 640 is not
compatible with Garmin automotive mounts other than the included
mount. Do not mount the device on a windshield.
Using the Mounting Bracket
CAUTION: Do not use the automotive mounting bracket in your
boat. The power connector and speaker assembly are not water
resistant, and therefore unsuitable for marine use. Additionally, do
not use the automotive-mount base in your boat. The automotivemount base does not connect to the dashboard using mounting
hardware, and therefore is not stable in marine conditions.
To install the marine mounting bracket in your boat, see the
GPSMAP 620/640 Marine Mount Installation Instructions.
To install the automotive mounting bracket in your car:
1. Place the automotive-mount base on your dash, and press
down on each of the four sides. The base bends and conforms
to your dashboard.
2. Snap the mounting bracket onto the automotive-mount arm.
3. Plug the vehicle power cable into a power outlet in your vehicle.
TIP: If the bottom surface of the automotive-mount slides on the
dash due to dust and dirt build-up, wipe it clean using a wet cloth.
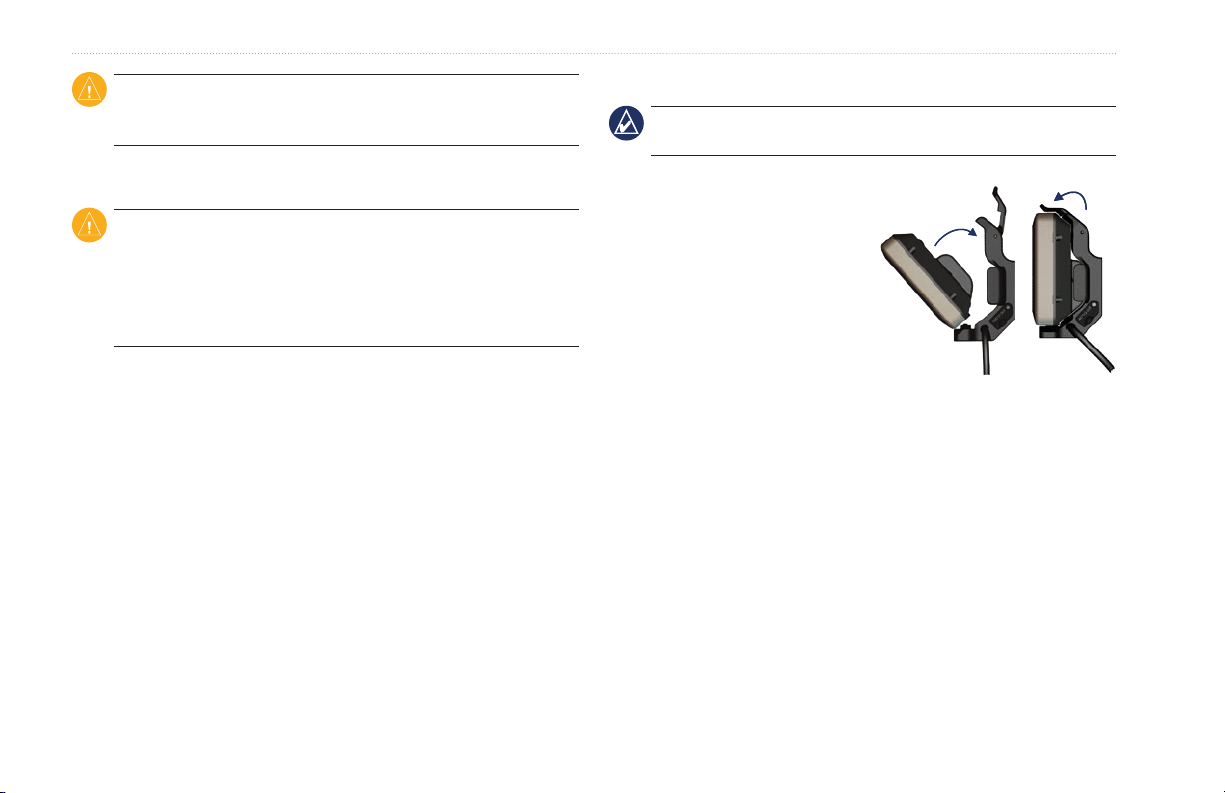
To place the GPSMAP 640 in
the mounting bracket:
1. Flip up the locking tab on top of
the mounting bracket.
2. Fit the bottom of the device into
the cradle.
3. Tilt the device back until it
stops.
Placing the GPSMAP 640 in
4. Flip down the locking tab to
hold the device in the mounting
bracket.
To remove the GPSMAP 640 from the mounting bracket:
1. Flip up the locking tab on top of the mounting bracket.
2. Tilt the device forward, and lift it out of the mounting bracket.
Placing the GPSMAP 640 in
the Mounting Bracket
the Mounting Bracket
2 GPSMAP 640 Owner’s Manual

Getting Started
Powering the GPSMAP 640 On and Off
Power on the GPSMAP 640:
• If the mounting bracket on your boat or in your car is connected
to power, the device powers on when you place it in the mount.
• To power on the device manually, press and hold the Power
key until the Garmin logo appears on the screen.
Power off the GPSMAP 640:
• When you remove the device from the mounting bracket, you
will be prompted to continue on battery power. Touch Turn Off
to power off the device.
• To power off the device manually, press and hold the Power
key until the unit powers off.
NOTE: If you manually turn off the device while it is connected to
a power source, it will continue to charge the battery
Removing and Inserting the Battery Pack
WARNING: This product contains a lithium-ion battery. To prevent damage,
remove the unit from the vehicle when exiting or store it out of direct sunlight.
To remove the battery pack:
1. Remove the GPSMAP 640 from the mounting bracket.
2. On the back of the device, lift up the battery locking ring and
turn it counter-clockwise.
3. Tilt the battery pack away from the device and lift it out.
To Insert the battery pack:
1. On the back of the GPSMAP 640, t the bottom of the battery
pack into the device.
2. Tilt the battery pack towards the device until it is tight.
3. Turn the locking ring clockwise to lock the battery pack in place.
Important battery notes:
• Before using the GPSMAP 640 for the rst time, charge the
battery for at least six hours.
• The lithium-ion battery pack used in the device is primarily a
backup battery source. Use the device in a mount with external
power whenever possible.
GPSMAP 640 Owner’s Manual 3
Getting Started
• If the device will not be used for an extended time (longer than
one week), remove the battery pack.
CAUTION: The GPSMAP 640 is waterproof to the IPX7 standard
only when the battery is connected and locked in place. Use
extreme caution around water when removing the battery from the
device.
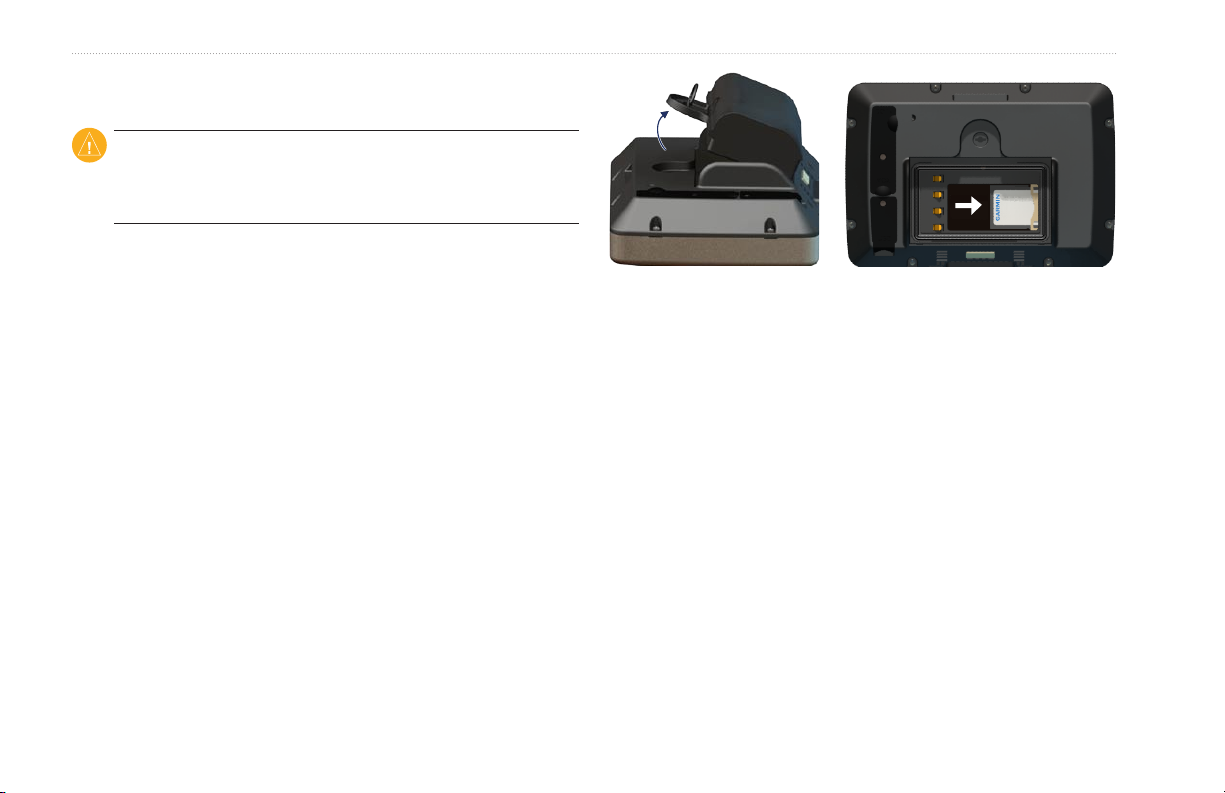
Inserting and Removing a Secure Digital
Inserting an SD Card
(SD) Card
To preserve the IPX7 water resistance of the GPSMAP 640, the SD
card slot is located under the battery.
To insert an SD card:
1. Remove the battery pack. The SD card slot is in the bottom of
the battery compartment, on the opposite side from the battery
contacts.
2. Place an SD card into the opening, label out, with the SD card
contacts facing away from the battery contacts.
3. Slide the SD card into the SD card slot, and press until it clicks
softly and locks in place.
4. Insert the battery pack.
4 GPSMAP 640 Owner’s Manual
To remove an SD card:
1. Remove the battery.
2. Press in on the SD card until it clicks softly and releases from
the SD card slot.
3. Remove the SD card.
Marine Mode: Getting Started
Marine Mode: Getting Started
Step 4: Use Your GPSMAP 640
Step 1: Mount Your GPSMAP 640
1. Install the marine mount in your boat according to the
GPSMAP 620/640 Marine Mount Installation Instructions.
2. Place the GPSMAP 640 in the marine mounting bracket (see
page 2).
Step 2:
To power on your GPSMAP 640 if it does not power on
automatically, press and hold the Power key until the Garmin
logo appears on the screen. Follow the on-screen prompts to set up
the marine mode on the device for the rst time. To power off your
GPSMAP 640, press and hold the Power key.
Step 3: Acquire Satellites
1. Go outdoors to an open area, away from tall buildings and
trees.
2. Turn on your GPSMAP 640.
Acquiring satellite signals can take a few minutes. The bars
indicate satellite strength. When at least one of the bars is green,
your GPSMAP 640 has acquired satellite signals. Now you can
select a destination and navigate to it.
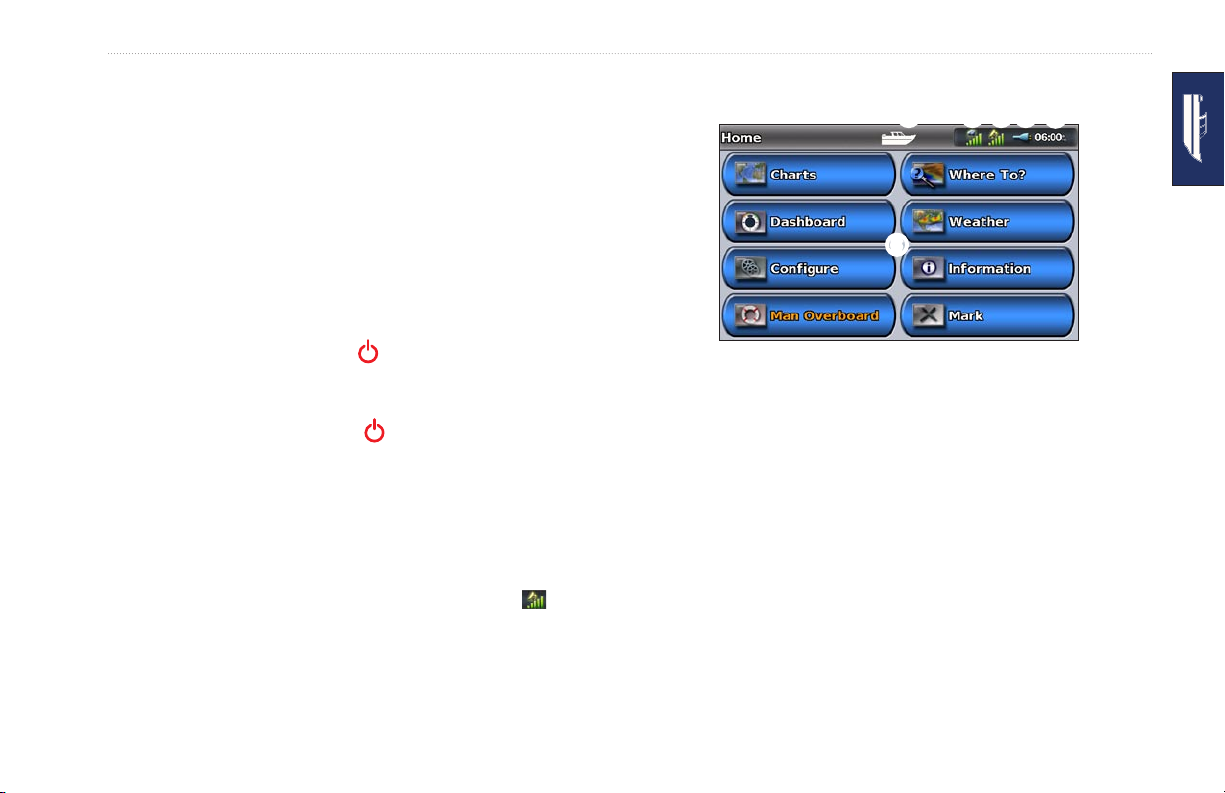
Usage mode. A boat icon represents marine mode, and a car
➊
icon represents automotive mode. Touch this icon to change
modes.
XM® satellite strength (only available on the GPSMAP 640
➋
when using an optional GXM 40 XM antenna).
GPS satellite strength.
➌
Battery status.
➍
Current time.
➎
Home screen categories and actions. Touch an icon to view the
➏
associated menu or perform the associated action.
➊ ➋ ➌➍
➏
Marine Mode: Home Screen
➎
GPSMAP 640 Owner’s Manual 5
Marine Mode: Getting Started
Navigating Directly to a Destination
1. From the Home screen, touch Charts > Navigation Chart.
2. On the Navigation chart, touch the place you would like to
navigate to.
Touch and to zoom in and out. Touch anywhere on
•
the chart and drag it to pan the map.
For more information on using charts, see page 8.
•
3. When the pointer icon is on the location you want to navigate
to, touch Navigate To > Go To.
4. Follow the magenta line drawn between your current location
and your destination. Navigate with caution; avoid land masses
and obstacles while following the line to your destination.
Tips:
• In addition to navigating directly to your destination, you
can create a route or allow the device to create a route. For
advanced navigation options, see page 14.
• You can also use the Compass screen to actively navigate to
your destination by following a pointer on a compass.
See page 25 for more information.
Saving Your Current Location
To save a location, such as your marina or a good shing spot,
mark it as a waypoint.
1. From the Home screen, touch Mark.
2. If you want to name the waypoint, touch Edit Waypoint >
Direction to
destination
Position and
heading
Navigating Directly to a Destination
Name. Use the on-screen keyboard to enter a name other than
the number assigned to the waypoint by default.
Navigation
information
6 GPSMAP 640 Owner’s Manual

Marine Mode: Getting Started
Navigating Directly to a Saved Location
1. From the Home screen, touch Where To? > Waypoints.
2. Touch the waypoint you want to navigate to.
3. Touch Navigate To > Go To.
4. Follow the magenta-highlighted line drawn between your current
location and your destination. Navigate with caution; avoid
land masses and obstacles while following the line to your
destination.
Tips:
• In addition to navigating directly to your destination, you
can create a route or allow the device to create a route. For
advanced navigation options, see page 14.
• You can also use the Compass screen to actively navigate to
your destination by following a pointer on a compass.
See page 25 for more information.
Stopping Navigation
1. While navigating, from the Navigation chart, touch Menu.
2. Touch Stop Navigation.
NOTE: you can also stop navigation from the Where To? screen.
Adjusting the Volume
1. From any screen, press and quickly release the Power key.
2. Touch Volume.
3. Touch and drag the volume slider bar left to decrease the
volume and right to increase the volume. The box to the right of
the volume slider bar shows the volume level as a percentage.
To mute the volume, touch the box to the right of the volume slider
bar. The word Mute replaces the volume percentage.
NOTE: The GPSMAP 640 must be connected to an external audio
source for you to hear audio alerts.
Adjusting the Backlight
1. From any screen, press and quickly release the Power key.
2. Touch and drag the backlight slider bar left to decrease the
brightness and right to increase the brightness. The box to the
right of the backlight slider bar shows the backlight level as a
percentage.
Touch Color Mode to change between Day Colors and Night
Colors. The Auto setting automatically changes the colors
depending on the time of day.
GPSMAP 640 Owner’s Manual 7

Marine Mode: Using Charts
Marine Mode: Using Charts
The GPSMAP 640 is loaded with both a basic worldwide imagery
map and detailed BlueChart® g2 offshore cartography for US
•
•
waters.
In addition to the preloaded maps and charts, you can use
optional BlueChart g2 Vision® preprogrammed SD cards to get
the most out of your GPSMAP 640. For more information on
BlueChart g2 Vision, see page 11.
Fishing Chart—removes navigational data from the chart and
enhances bottom contours for depth recognition (page 12).
Fish Eye 3D—
provides an underwater view that visually
represents the sea oor according information on the chart
(page 12).
NOTE: Mariner’s Eye 3D, Fishing Charts, and Fish Eye 3D
views are only available when using optional Blue Chart g2 Vision
preprogrammed SD cards. See page 11.
There are four ways to view charts on a GPSMAP 640 device:
Navigation Chart—displays an overhead view of the basic
•
worldwide imagery map, the preloaded BlueChart g2 charts
(GPSMAP 640), and the optional BlueChart g2 Vision charts
Using the Navigation Chart
From the Home screen, touch Charts > Navigation Chart.
Use the Navigation chart to plan a course (see page 14), to view
map information, and as a visual aid while navigating.
and photos.
•
Mariner’s Eye
(or Mariner’s Eye 3D)—displays a view from
above and behind your boat for a visual navigation aid
(page 10).
8 GPSMAP 640 Owner’s Manual
Panning the Navigation Chart
1. From the Home screen, touch Charts > Navigation Chart.
2. Touch and drag the chart to view other areas on the chart.
3. Touch Stop Panning to return the Navigation chart to your
current location.
Zooming In and Out on the Navigation Chart
The scale at the bottom of the chart ( ) indicates the zoom
level. The bar under the number represents the numeric scale
distance on the map.
Touch and to zoom in and out on the Navigation chart.
Interacting With Objects on the Navigation Chart
1. Touch a point on the Navigation chart.
2. Touch an option:
NOTE: The options that appear are dynamic, and depend on the
point you touched.
Review—view details of the chart objects near the pointer.
•
(Review only appears if the pointer is near multiple objects
on the chart—if the pointer is near only one object, the name
of the object appears instead of Review.)
Navigate To—view the navigation options (page 14).
•
Create Waypoint—marks a waypoint at the location of the
•
pointer (page 22).
Marine Mode: Using Charts
Information—view additional information about an object or
•
area of the chart.
Measure Distance—view the distance and bearing of the
•
object from your current location. The information appears
in a window on the upper-left corner of the screen. Touch
Set Reference to measure from a location other than your
current location.
NOTE: You can touch and drag the pointer to a new location.
Accessing Additional Object or Chart Information
1. Touch an object on the chart or an area of the chart.
2. Touch Information, and choose from the following options:
Tides—view tide information provided by the tide station
•
closest to the object or area of the chart (page 27).
Currents—view current information provided by the current
•
station closest to the object or area of the chart (page 27).
Celestial—view sunrise and sunset almanac data for the
•
object or area of the chart (page 28).
GPSMAP 640 Owner’s Manual 9
Marine Mode: Using Charts
Local Weather—view current weather conditions or
•
forecasts reported by the nearest weather station. Available
with an optional GXM 40 XM antenna (see page 47).
Local Services—view a list of the marinas and marine
•
services closest to the object or area of the chart.
Chart Notes—view National Oceanic and Atmospheric
•
Administration (NOAA) information associated with the chart
containing the object.
Using Mariner’s Eye
Mariner’s Eye provides a view from above and behind the boat
(according to your heading), and provides a visual navigation aid.
When navigating, you can use the Mariner’s Eye screen to better
follow your course, indicated by a highlighted line.
See page 14 for more information on navigating with the
GPSMAP 640.
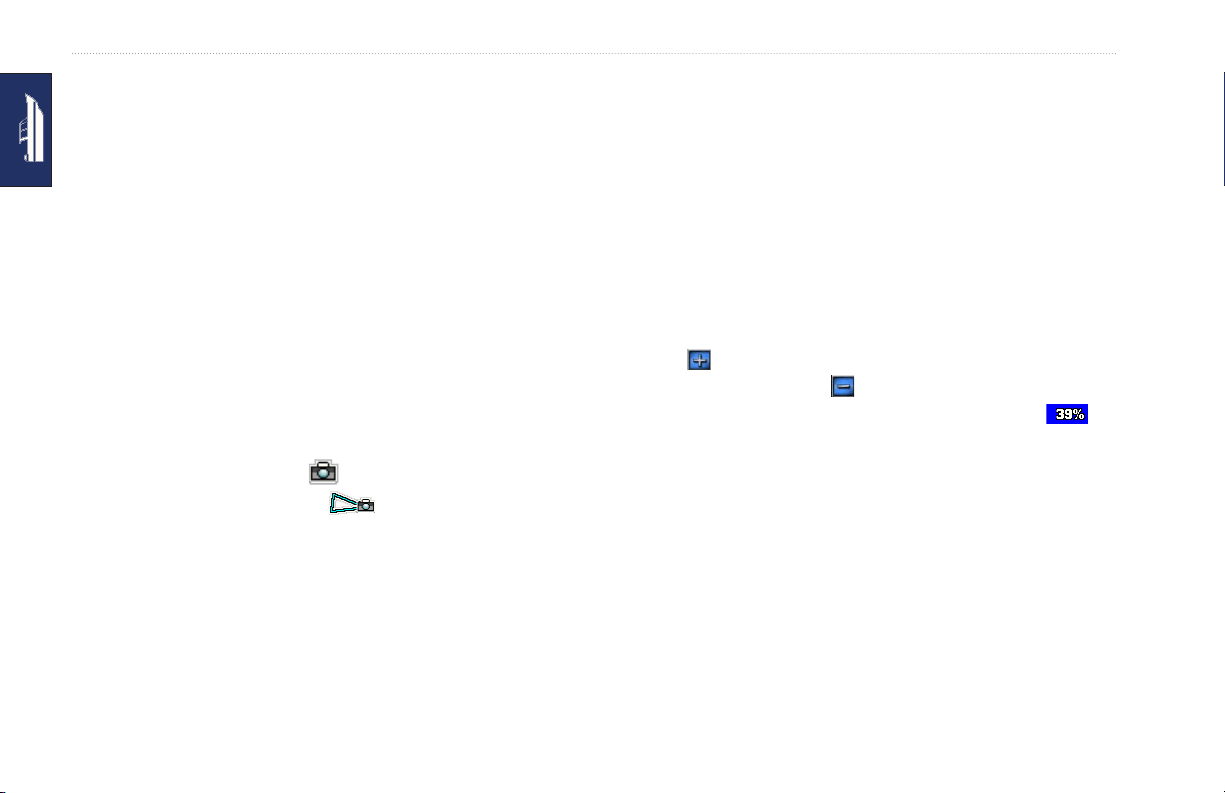
Viewing Aerial Photos
You can view aerial photos of marinas and other navigationally
signicant landmarks when using the BlueChart g2 maps preloaded
on a GPSMAP 640. You can also view aerial photos in the region
covered by an inserted BlueChart g2 Vision SD card.
1. On the navigation chart, touch a camera icon.
A standard camera icon ( ) indicates an overhead photo.
•
A camera icon with a cone ( ) indicates a perspective
•
photo. The photo was taken from the location of the camera,
pointed in the direction of the cone.
2. Touch Aerial Photo.
10 GPSMAP 640 Owner’s Manual
To access the Mariner’s Eye screen from the Home screen, touch
Charts > Mariner’s Eye.
Touch the button to move the view closer to your boat and
lower to the water. Touch the button to move the view away
from the boat. This is momentarily indicated by the scale ( ) at
the bottom of the screen.

Using BlueChart g2 Vision
Optional BlueChart g2 Vision preprogrammed SD cards allow you
to get the most out of your GPSMAP 640. In addition to detailed
marine charting, BlueChart g2 Vision has the following features:
•
•
Marine Mode: Using Charts
Detailed Roads and POI data—displays roads, restaurants,
and other points of interest (POIs) along the shore.
Auto Guidance
chart data to suggest the best passage to your destination.
—uses specied safe-depth, safe-height, and
Mariner’s Eye 3D
•
the boat for a three-dimensional navigation aid. The BlueChart
g2 Vision Mariner’s Eye 3D is more detailed than the standard
Mariner’s Eye screen.
•
Fish Eye 3D
view that visually represents the sea oor according to the
information on the chart.
Fishing Charts—displays the chart with enhanced bottom
•
contours and without navigational data. This chart works well
for offshore deep-sea shing.
•
High Resolution Satellite Imagery
satellite images for a realistic view of the land and water on the
Navigation chart.
GPSMAP 640 Owner’s Manual 11
—provides a view from above and behind
—provides an underwater, three-dimensional
—provides high resolution
Using Mariner’s Eye 3D
When using a BlueChart g2 Vision SD card, you can view the
Mariner’s Eye 3D screen. The Mariner’s Eye 3D screen is similar
to the Mariner’s Eye screen (page 10), but is much more detailed.
This view is helpful when navigating tricky shoals, reefs, bridges,
or channels, and is benecial when trying to identify entry and
exit routes in unfamiliar harbors or anchorages. Mariner’s Eye 3D
provides a three-dimensional view of both the shore and sea oor.
To access the Mariner’s Eye 3D screen from the Home screen,
touch Charts > Mariner’s Eye 3D.
As with the Mariner’s Eye screen, touch the button to move
the view closer to your boat and lower to the water. Touch the
button to move the view away from the boat. This is momentarily
indicated by the scale ( ) at the bottom of the screen.
Marine Mode: Using Charts
Using Fish Eye 3D
Using the depth contour lines of the BlueChart g2 Vision
cartography, Fish Eye 3D provides an underwater view of the sea
oor or lake bottom. The and buttons adjust the view in the
same way as the Mariner’s Eye 3D.
To access the Fish Eye 3D screen from the Home screen, touch
Charts > Fish Eye 3D.
NOTE: When navigating, the magenta line will not appear on the
Fish Eye 3D screen, though any enabled navigation data bars will
appear.
Using Fishing Charts
Use the shing chart to view detailed bottom contours and depth
soundings on the chart. There are no navigation aids such as buoys
and lights on the shing chart.
The shing chart uses highly detailed bathymetric data contained
on a preprogrammed BlueChart g2 Vision SD card, and is best for
offshore deep-sea shing.
12 GPSMAP 640 Owner’s Manual
To access the Fishing chart screen from the Home screen, touch
Charts > Fishing Chart.
Touch and to zoom in and out on the Fishing chart.
You can navigate using the Fishing chart just as you would using
the Navigation chart.
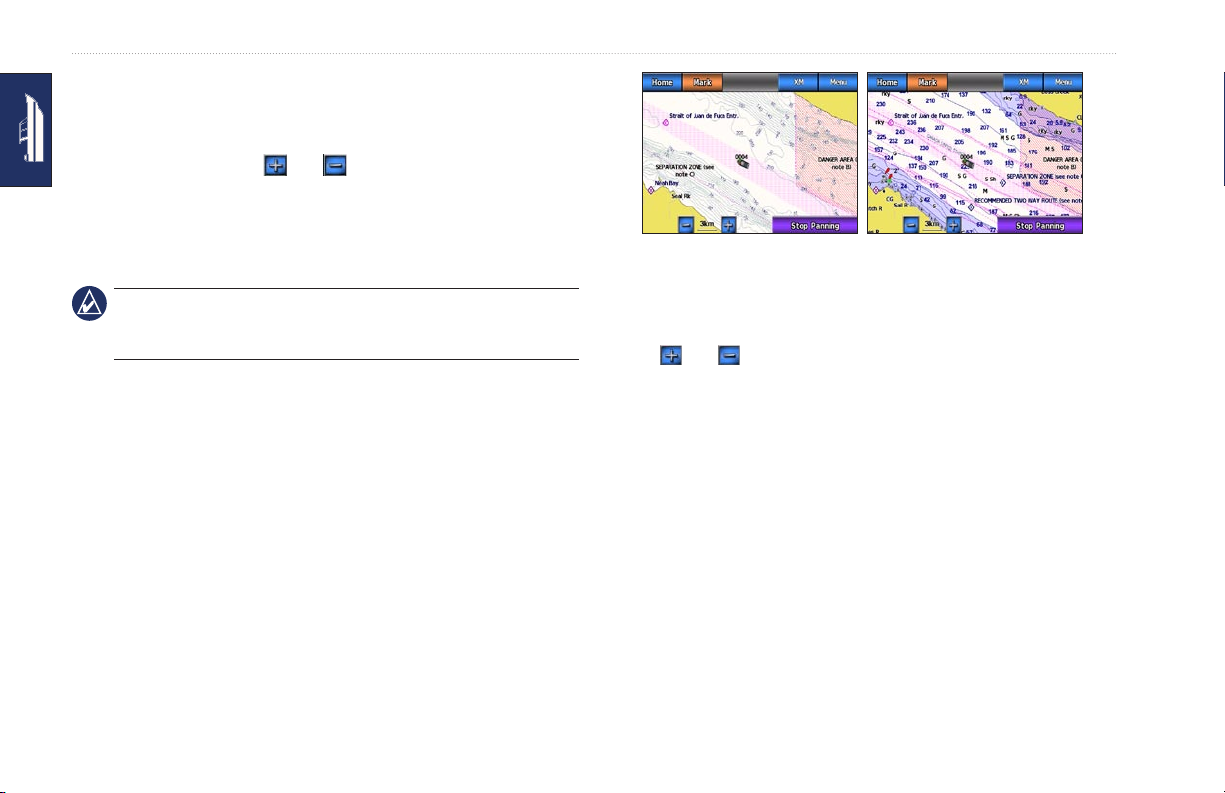
Enabling High�ResolutionHigh�Resolution Satellite
Imagery
You can overlay high-resolution satellite images on the land,
the sea, or both portions of the Navigation chart when using a
preprogrammed BlueChart g2 Vision SD card.
Navigation ChartFishing Chart

To enable satellite imagery:
1. While viewing the Navigation chart, touch Menu > Navigation
Chart Setup > Photos.
2. Touch one of the following:
Off—standard chart information is shown on the map.
•
Land Only—standard chart information is shown on water
•
with photos overlaying the land.
Photo Map Blend—photos overlay both the water and
•
the land at a specied opacity. The higher you set the
percentage, the more the satellite photos cover both water
and land.
When enabled, the high resolution satellite images are only present
at lower zoom levels. If you cannot see the high resolution images
in your BlueChart g2 Vision region, zoom in by touching , or
set the detail level higher by touching Menu > Navigation Chart
Setup > Chart Appearance > Detail.
Marine Mode: Using Charts
GPSMAP 640 Owner’s Manual 13

Marine Mode: Navigating
Marine Mode: Navigating
To navigate using the GPSMAP 640, rst choose a destination,
Choosing a Destination Using Where To?
1. From the Home screen, touch Where To?
2. Touch a category:
then set a course or create a route. Follow the course or route on
the Navigation chart or on the Mariner’s Eye or Mariner’s Eye 3D
screen.
TIP: You can also use the Compass screen to follow a course or
route. See page 25 for more information.
Step 1: Choose a Destination
You can choose a destination using either the Navigation chart or
the Where To? menu.
Choosing a Destination Using the Navigation
Chart
1. From the Home screen, touch Charts > Navigation Chart.
2. On the Navigation chart, touch the place you would like to
navigate to. The pointer icon indicates the destination on the
chart.
TIP: Touch and to zoom in and out. Touch anywhere on
the chart and drag it to pan the map. For more information on using
charts, see page 8.
3. Touch the location you want to navigate to.
Step 2: Set and Follow the Course
You can set a course three ways:
•
•
Waypoints—view a list of locations you marked previously
•
(page 20).
Routes—view a list of routes you saved previously (page
•
20).
Tracks—view a list of recorded tracks (page 21).
•
Offshore Services—view a list of nearby marinas and other
•
offshore points of interest, listed by proximity (page 20).
Search by Name—search nearby marinas and other
•
offshore points of interest by name (page 21).
Go To
—(direct course) creates a direct line from your current
location to the destination (page 15).
Route To
—create a route from the destination to your current
location, adding turns along the way (page 16).
14 GPSMAP 640 Owner’s Manual
Marine Mode: Navigating
Guide To—use the chart data on a BlueChart g2 Vision SD card
•
to automatically suggest a passage from your current location to
the destination (page 18).
After you set the course, follow the course using the Navigation
chart, the Mariner’s Eye screen, or the Mariner’s Eye 3D screen.
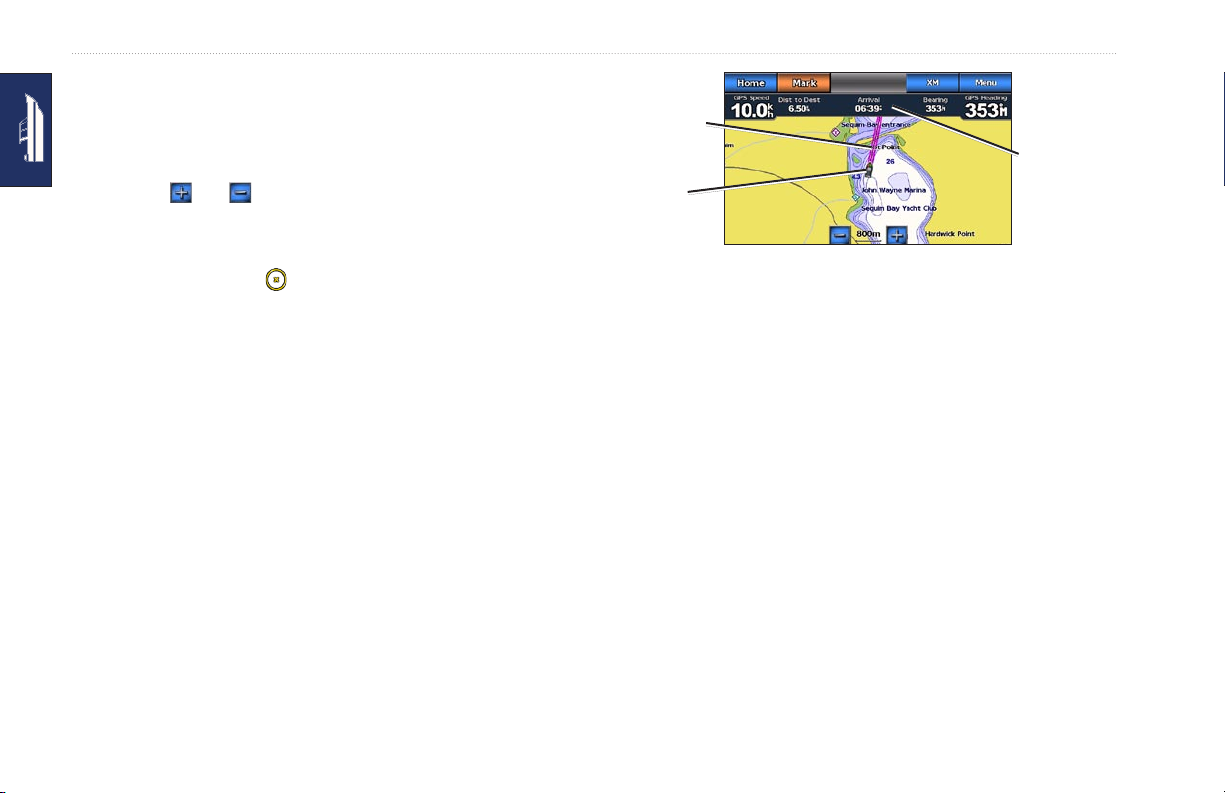
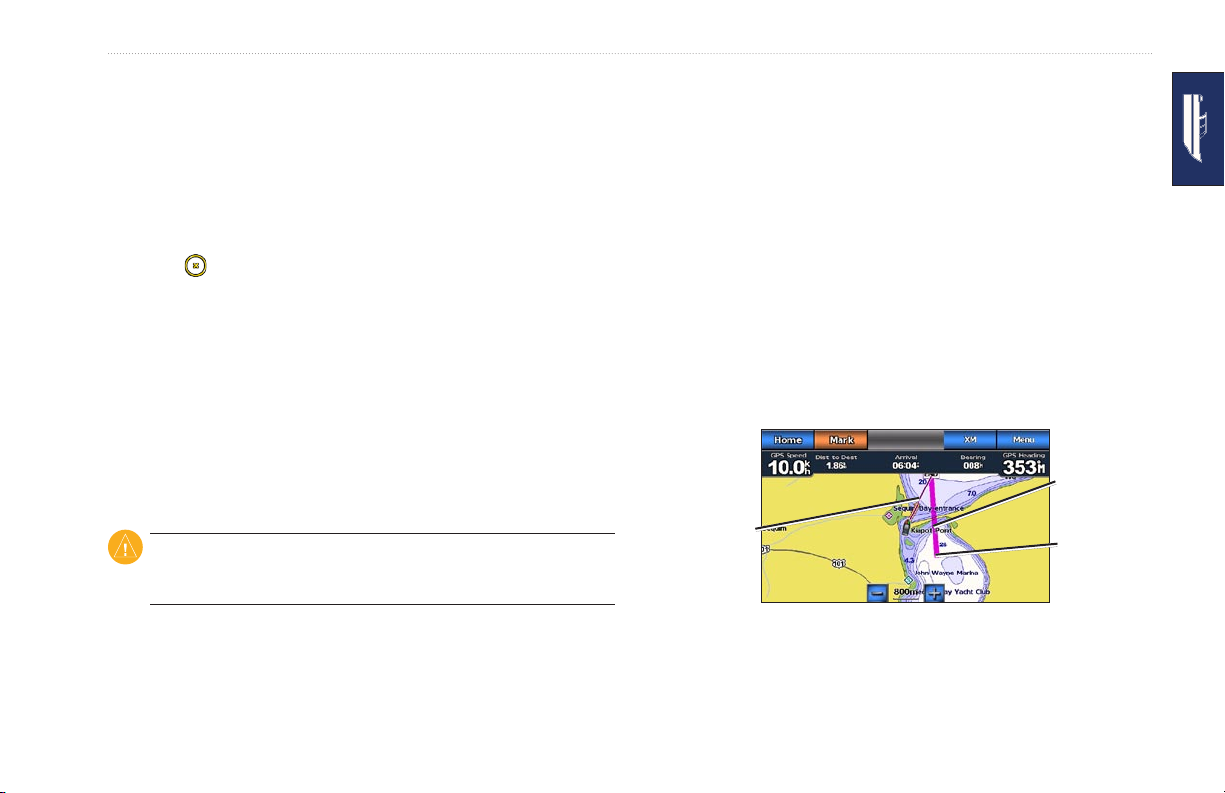
Setting a Direct Course (Go To)
When the pointer icon is on the location you want to navigate
to, or you have selected a destination using Where To, touch
Navigate To > Go To.
Following a Direct Course (Go To) on the
Navigation Chart, Mariner’s Eye Screen, or
In the center of the magenta line is a thinner purple line that
represents the corrected course from your current location to the
end point. The corrected course line is dynamic, and it moves with
your boat when you veer off course.
1. After you set a course, from the Home screen, touch Charts
and then touch Navigation Chart, Mariner’s Eye, or Mariner’s
Eye 3D.
2. Follow the magenta line (direct course).
3. Steer off course to avoid land, shallow water, and other
obstacles on the water.
4. When you are off course, follow the purple line (corrected
course) to travel to your destination, or steer back to the
magenta line (direct course).
Mariner’s Eye 3D Screen
After you set the course using Go To, a magenta line represents
the direct course from the start point to the end point, and does not
move, even when you veer off course.
CAUTION: When using Go To, a direct course and a corrected
course may pass over land or shallow water. Steer to avoid land,
shallow water, and other dangerous objects.
Corrected
course
Direct course
Start point
Following a Direct Course on the
Navigation Chart
GPSMAP 640 Owner’s Manual 15

Marine Mode: Navigating
Corrected
course
Direct course
Following a Direct Course on the
Mariner’s Eye 3D Screen
NOTE: When following a course, important navigation information
appears in a data bar along the top of the chart. To adjust the
settings of the data bar, see page 39.
3. Touch Add Turn.
4. To add an additional turn, touch another location where you
want to make a turn (working backward from the destination)
and then touch Add Turn. You can add up to 250 turns to a
Adding the Last Turn
route.
Creating a Route (Route To)
1. When the pointer icon is on the location you want to
navigate to, or you have selected a destination using Where To,
touch Navigate To > Route To.
2. Touch the location where you want to make the last turn toward
your destination.
Adding an Additional Turn
16 GPSMAP 640 Owner’s Manual
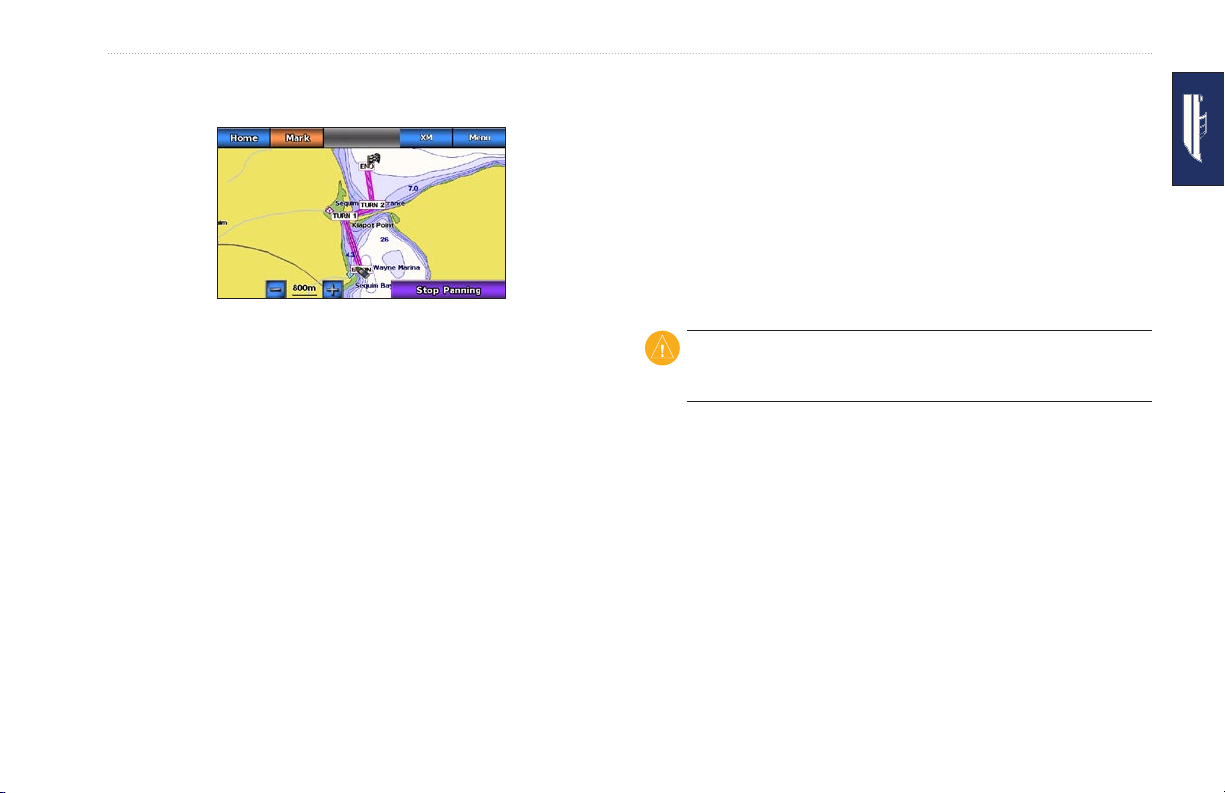
Marine Mode: Navigating
5. Touch Done to complete creating the route and to set the
course, or touch Cancel Route to delete the route.
Following a Route (Route To) on the
Navigation Chart, Mariner’s Eye Screen, or
Mariner’s Eye 3D Screen
After you create a route using Route To or choose a saved route
from the Where To? menu, a magenta and purple line appears
between the start point and the rst turning point, then continues
on to each subsequent turning point. This magenta and purple line
represents the route leg (from turning point to turning point), and
Complete Route
does not move, even when you veer off course.
Saving a Created Route (Route To)
You can save up to 50 routes, with up to 250 turns in each route.
1. After you create a route, touch Menu > Stop Navigation.
2. Touch Yes to save your current active route.
When you veer off course, an orange arrow appears to help steer
you back onto the route leg to the next turning point. This orange
arrow represents the Course to Steer.
1. After you create a route using Route To or choose a saved
CAUTION: Even when you carefully create a route, legs may pass
over land or shallow water. Steer to avoid land, shallow water, and
other dangerous objects.
route from the Where To? menu, from the Home screen, touch
Charts and then touch Navigation Chart, Mariner’s Eye, or
Mariner’s Eye 3D.
GPSMAP 640 Owner’s Manual 17
Marine Mode: Navigating
2. Follow the magenta and purple line (route leg) from the start
point to the rst turning point.
3. After you reach the rst turning point, follow the magenta and
purple line (route leg) to each subsequent turning point, until
you reach the end point.
4. Steer off course to avoid land, shallow water, and other
obstacles on the water.
5. When you are off course, follow the orange arrow (Course to
Steer) to steer back to the magenta and purple line (route leg).
Route turn
Course to
Steer
Route leg
Following a Route on the
Mariner’s Eye 3D Screen
Route turn
Route leg
Course to
Steer
Start point
NOTE: When following a route, important navigation information
appears in a data bar along the top of the chart. To adjust the
settings of the data bar, see page 39.
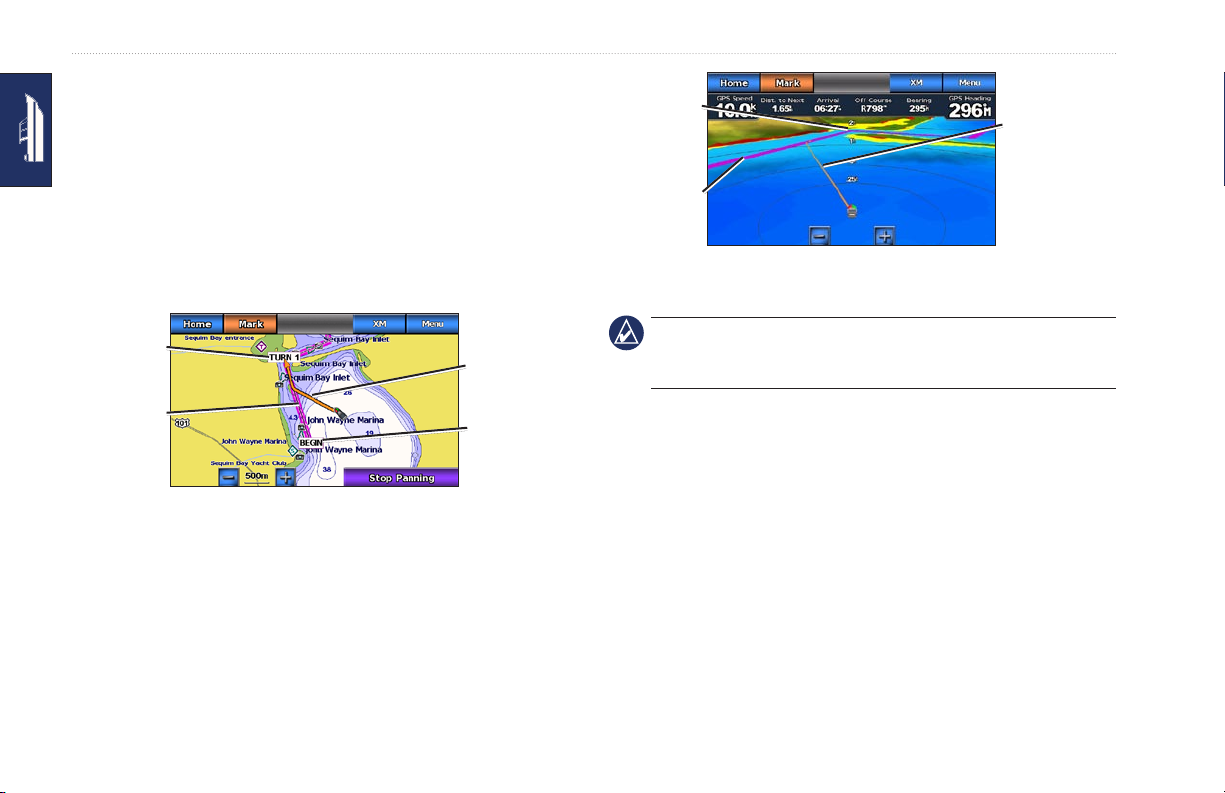
Setting an Automatic Course (Guide To)
When using a preprogrammed BlueChart g2 Vision SD card, you
can use Automatic Guidance to automatically create a suggested
Following a Route on the
Navigation Chart
passage based on available BlueChart g2 Vision chart information.
See page 37 for instructions on setting up Automatic Guidance for
your boat.
18 GPSMAP 640 Owner’s Manual

Marine Mode: Navigating
When the pointer icon is on the location you want to navigate
to, or you have selected a destination using Where To?, touch
Navigate To > Guide To.
CAUTION: The Automatic Guidance feature of the BlueChart g2
Vision SD card is based on electronic chart information. Carefully
compare the course to all visual sightings, and avoid any land,
shallow water, or other obstacles that may be in your path.
5. When you are off course, steer back to the magenta line when
the path is clear.
NOTE: When following a course, important navigation information
Following an Automatic Course (Guide To) on the
Navigation Chart, the Mariner’s Eye Screen, or
the Mariner’s Eye 3D Screen
After you create an automatic course using Guide To, a magenta
line appears. The magenta line represents the suggested passage
between the start point and the end point, and does not move, even
when you veer off course.
1. After you set an automatic course using Guide To, from the
Home screen, touch Charts and then touch Navigation Chart,
Mariner’s Eye, or Mariner’s Eye 3D.
2. Follow the magenta line from the start point to the end point.
3. Steer off course to avoid land, shallow water, and other
obstacles on the water.
appears in a data bar along the top of the chart. To adjust the
settings of the data bar, see page 39.
GPSMAP 640 Owner’s Manual 19

Marine Mode: Where To?
Marine Mode: Where To?
Use the Where To? menu on the Home screen to search for, and
navigate to, nearby fuel, repairs, and other services, as well as
waypoints and routes.
Searching For Marine Services
1. From the Home screen, touch Where To? > Offshore
Services.
2. Touch the marine service category to which you want to
navigate. A list of the 50 nearest locations appears, including
the distance and bearing to each.
3. Touch the marine service item you want to navigate to.
4. Touch Go To, Route To, or Guide To to set the selected marine
service as a navigation destination. See page 14 for details
about navigating to a destination.
Searching for Waypoints
NOTE: You must create waypoints before you can search for and
navigate to them.
1. From the Home screen, touch Where To? > Waypoints. A list
of saved waypoints appears, sorted by distance, including the
distance and bearing to each.
2. Touch the waypoint you want to navigate to.
3. Touch
Navigate To to set the selected waypoint as a navigation
destination. See page 14 for information about navigating to a
destination.
Searching for Saved Routes
1. From the Home screen, touch Where To? > Routes.
2. Touch the saved route you want to navigate.
3. Touch Navigate To to navigate the selected route, and choose
how you want to navigate it. See page 17 for information about
navigating routes.
Forward—Navigate the route from the start point to the end
•
point.
Backward—Navigate the route in reverse; from the end
•
point to the start point.
Offset—Navigate a course parallel to the route that is a
•
specied distance from the route. First choose the direction
and side of the offset, then specify the offset distance from
the route.
20 GPSMAP 640 Owner’s Manual
 Loading...