

Page 1
GPSMAP® 640
owner’s manual
Page 2

© 2009 Garmin Ltd. or its subsidiaries
Garmin International, Inc.
1200 East 151st Street,
Olathe, Kansas 66062, USA
Tel. (913) 397.8200 or (800) 800.1020
Fax (913) 397.8282
All rights reserved. Except as expressly provided herein, no part of this manual may be reproduced, copied, transmitted, disseminated, downloaded or stored in any storage
medium, for any purpose without the express prior written consent of Garmin. Garmin hereby grants permission to download a single copy of this manual onto a hard drive
or other electronic storage medium to be viewed and to print one copy of this manual or of any revision hereto, provided that such electronic or printed copy of this manual
must contain the complete text of this copyright notice and provided further that any unauthorized commercial distribution of this manual or any revision hereto is strictly
prohibited.
Information in this document is subject to change without notice. Garmin reserves the right to change or improve its products and to make changes in the content without
obligation to notify any person or organization of such changes or improvements. Visit the Garmin Web site (www.garmin.com) for current updates and supplemental
information concerning the use and operation of this and other Garmin products.
Garmin®, the Garmin logo, GPSMAP®, BlueChart®, g2 Vision®, and MapSource® are trademarks of Garmin Ltd. or its subsidiaries, registered in the USA and other
countries. These trademarks may not be used without the express permission of Garmin.
Windows® and Windows NT® are registered trademarks of Microsoft Corporation in the United States and/or other countries. Mac® is a registered trademark of Apple
Computer, Inc.
XM® and XM WX Satellite Weather® are registered trademarks of XM Satellite Radio Inc.
Garmin (Europe) Ltd.
Liberty House
Hounsdown Business Park,
Southampton, Hampshire, SO40 9LR UK
Tel. +44 (0) 870.8501241 (outside the UK)
0808 2380000 (within the UK)
Fax +44 (0) 870.8501251
Garmin Corporation
No. 68, Jangshu 2nd Road,
Shijr, Taipei County, Taiwan
Tel. 886/2.2642.9199
Fax 886/2.2642.9099
July 2009 Part Number 190-01110-00 Rev. A Printed in Taiwan
Page 3

Introduction
Introduction
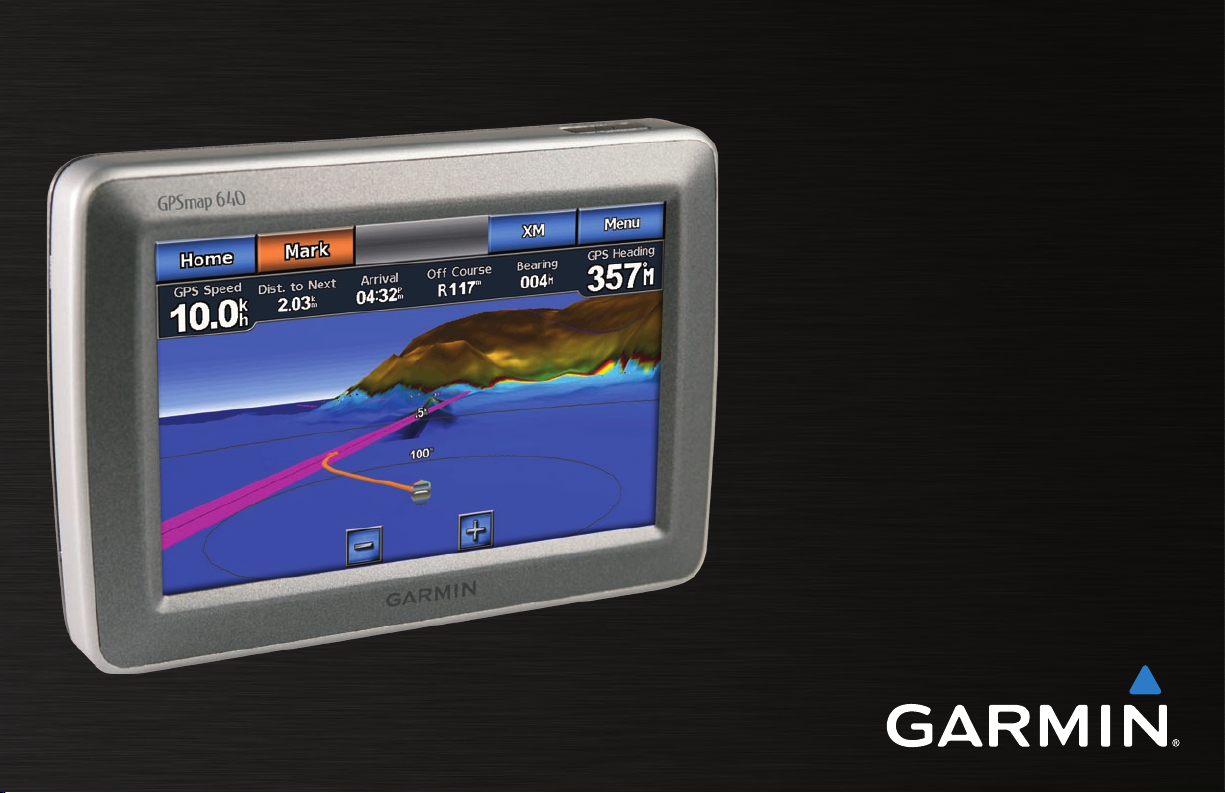
The GPSMAP® 640 is both a marine and an automotive GPSenabled navigation device. When you place the device in a mount
installed on your boat, it powers on in marine mode. When
you place the device in an automotive mount, it powers on in
automotive mode.
This manual is divided in two sections. The rst section describes
how to use the GPSMAP 640 in marine mode, and the second
section describes how to use the device in automotive mode. The
sections are labeled with tabs along the edge of the page to help
identify the usage mode.
Contact Garmin®
Contact Garmin Product Support if you have any questions while
using your GPSMAP 640. In the USA, go to
www.garmin.com/support, or contact Garmin USA by phone at
(913) 397.8200 or (800) 800.1020.
In the UK, contact Garmin (Europe) Ltd. by phone at 0808
2380000.
In Europe, go to www.garmin.com/support and click Contact
Support for in-country support information, or contact Garmin
(Europe) Ltd. by phone at +44 (0) 870.8501241.
Manual Conventions
See the Important Safety and Product Information guide in the product
box for product warnings and other important information.
Product Registration
Help us better support you by completing our online registration
today. Go to http://my.garmin.com. Keep the original sales receipt,
or a photocopy, in a safe place.
In this manual, when you are instructed to touch something, use
your nger to touch that item on the screen. Small arrows (>) used
in the text indicate that you should touch a series of items in order.
For example, if you see, “Touch Charts > Navigation Chart”,
you should touch the Charts button on the screen, and then touch
Navigation Chart.
GPSMAP 640 Owner’s Manual i
Page 4

Introduction
Caring for Your GPSMAP 640
Your GPSMAP 640 contains sensitive electronic components that
can be permanently damaged if exposed to excessive shock or
vibration. To minimize the risk of damage to your GPSMAP 640,
avoid dropping your unit and operating it in high-shock and highvibration environments.
Cleaning the Unit
The GPSMAP 640 is constructed of high-quality materials and
does not require user maintenance other than cleaning. Clean
the outer casing of the unit (not the touchscreen) using a cloth
dampened with a mild detergent solution, and then wipe it dry.
Avoid chemical cleaners and solvents that can damage plastic
components.
Cleaning the Touch Screen
Clean the touchscreen with a soft, clean, lint-free cloth. Use water,
isopropyl alcohol, or eyeglass cleaner, if needed. Apply the liquid
to the cloth, and then gently wipe the touchscreen.
Protecting Your GPSMAP 640
Do not store the GPSMAP 640 where prolonged exposure to
•
extreme temperatures can occur, because it can cause permanent
damage.
Although a PDA stylus can be used to operate the touchscreen,
•
never attempt this while operating a vehicle. Never use a hard or
sharp object to operate the touchscreen because damage might
result.
Water Immersion
The unit is waterproof to IEC Standard 60529 IPX7. It can
withstand immersion in 1 meter of water for 30 minutes. Prolonged
submersion can cause damage to the unit. After submersion, be
certain to wipe and air dry the unit before reuse.
Avoiding Theft
To avoid theft, remove the unit and mount from sight when not
•
in use.
Do not keep your unit in the glove compartment.
•
Register your product at http://my.garmin.com.
•
ii GPSMAP 640 Owner’s Manual
Page 5

Table of Contents
Table of Contents
Introduction ...........................................................................i
Product Registration ..................................................................... i
Contact Garmin® ...................................................................................i
Manual Conventions ..................................................................... i
Caring for Your GPSMAP 640 ......................................................ii
Getting Started .....................................................................1
Identifying the GPSMAP 640 Features ........................................ 1
Identifying the GPSMAP 640 Mounting Bracket Features ........... 1
Using the Mounting Bracket ......................................................... 2
Powering the GPSMAP 640 On and Off ...................................... 3
Removing and Inserting the Battery Pack .................................... 3
Inserting and Removing a Secure Digital (SD) Card ................... 4
Marine Mode: Getting Started ............................................5
Step 1: Mount Your GPSMAP 640 ............................................... 5
Step 2: Congure Your GPSMAP 640 ......................................... 5
Step 3: Acquire Satellites ............................................................. 5
Step 4: Use Your GPSMAP 640 ................................................... 5
Navigating Directly to a Destination ............................................. 6
Saving Your Current Location ...................................................... 6
Navigating Directly to a Saved Location ...................................... 7
Stopping Navigation ..................................................................... 7
Adjusting the Volume ................................................................... 7
Adjusting the Backlight ................................................................. 7
Marine Mode: Using Charts ................................................8
Using the Navigation Chart .......................................................... 8
Interacting With Objects on the Navigation Chart ........................ 9
Accessing Additional Object or Chart Information ........................ 9
Using Perspective 3D ................................................................ 10
Using BlueChart g2 Vision ..........................................................11
Using Mariner’s Eye 3D ..............................................................11
Using Fish Eye 3D ..................................................................... 12
Using Fishing Charts .................................................................. 12
Enabling High-Resolution Satellite Imagery ............................... 12
Marine Mode: Navigating ..................................................14
Step 1: Choose a Destination .................................................... 14
Step 2: Set and Follow the Course ............................................ 14
Marine Mode: Where To? ..................................................20
Searching For Marine Services .................................................. 20
Searching for Waypoints ............................................................ 20
Searching for Saved Routes ...................................................... 20
Searching for Saved Tracks ....................................................... 21
Searching by Name ................................................................... 21
Marine Mode: Using Waypoints and Tracks ...................22
Using Man Overboard (MOB) Waypoints................................... 22
Marking a Waypoint at Your Current Location............................ 22
Creating a Waypoint From the Navigation Chart ....................... 22
Editing Waypoint Details ............................................................ 23
Using Tracks .............................................................................. 23
GPSMAP 640 Owner’s Manual iii
Page 6

Table of Contents
Marine Mode: Using the Dashboard ................................25
Using the Compass Screen ....................................................... 25
Using the Numbers Screen ........................................................ 26
Using the Trip Screen ................................................................ 26
Marine Mode: Viewing Almanac Data ..............................27
Viewing Tide Station Information ............................................... 27
Viewing Current Information ...................................................... 27
Viewing Celestial Information ..................................................... 28
Marine Mode: Managing User Data ..................................29
Transferring Marine Data (Waypoints, Routes, Tracks) to or from
an SD Card .............................................................................. 29
Backing up Marine Data to a PC ................................................ 29
Copying or Merging MapSource® Marine Data to the
GPSMAP 640 .......................................................................... 30
Marine Mode: Managing Information From
Other Vessels .....................................................................31
Viewing AIS Information ............................................................. 31
Viewing DSC Information ........................................................... 31
...........................33
Conguring System Settings ...................................................... 33
Changing Units of Measure ....................................................... 34
Conguring Communications Settings ....................................... 35
Conguring Alarm Settings ........................................................ 36
Conguring My Boat .................................................................. 37
Conguring Other Vessels ......................................................... 37
Conguring Navigation Settings ................................................. 38
Conguring XM Radio ................................................................ 38
Conguring Navigation Chart Options ....................................... 39
Conguring Perspective 3D Options and Mariner’s Eye 3D
Options .................................................................................... 43
Fish Eye 3D Settings ................................................................. 44
Fishing Chart Settings ................................................................ 44
Conguring the Active Track Options ......................................... 45
Conguring the Numbers Screen ............................................... 46
Marine Mode: Using XM WX Weather and Audio ............47
Using XM WX Weather .............................................................. 47
Setting the XM WX Weather Options ......................................... 47
Viewing Precipitation Information ............................................... 47
Viewing Forecast Information .................................................... 49
Viewing Sea Conditions ............................................................. 50
Viewing Fishing Information ....................................................... 51
Viewing Visibility Information...................................................... 52
Viewing Buoy Reports ................................................................ 52
Using XM Audio ......................................................................... 53
Automotive Mode: Getting Started ..................................54
Step 1: Mount Your GPSMAP 640 ............................................. 54
Step 2: Congure Your GPSMAP 640 ....................................... 54
Step 3: Acquire Satellites ........................................................... 54
Step 4: Use Your GPSMAP 640 ................................................. 54
Finding Your Destination ............................................................ 55
Adding a Stop ............................................................................ 55
iv GPSMAP 640 Owner’s Manual
Page 7

Table of Contents
Taking a Detour .......................................................................... 55
Stopping the Route .................................................................... 55
Automotive Mode: Where To? ..........................................56
Finding an Address .................................................................... 56
Setting a Home Location ............................................................ 56
Go! Page Options ...................................................................... 57
Finding a Place by Spelling the Name ...................................... 57
Searching Near Another Location .............................................. 57
Finding Recently Found Places ................................................. 57
Favorites .................................................................................... 58
Finding a Place Using the Map .................................................. 58
Using Custom Routes ................................................................ 59
Entering Coordinates ................................................................. 60
Navigating Off Road ................................................................... 60
Automotive Mode: Using the Map ....................................61
Next Turn ................................................................................... 61
Turn List ..................................................................................... 61
Trip Computer ............................................................................ 62
Automotive Mode: Managing Files ..................................63
Copying Files to the Unit ............................................................ 63
Copying Automotive Data to the Unit Using MapSource ........... 63
Deleting Automotive Files ......................................................... 64
Automotive Mode: Using the Tools .................................65
Settings ...................................................................................... 65
Where Am I? .............................................................................. 65
GPSMAP 640 Owner’s Manual v
Picture Viewer ............................................................................ 65
My Data ...................................................................................... 65
..................66
Changing the System Settings ................................................... 66
Changing the Navigation Settings .............................................. 66
Adjusting the Display Settings ................................................... 66
Adjusting the Volume ................................................................. 67
Adjusting the Backlight ............................................................... 67
Updating the Time Settings ........................................................ 67
Setting the Languages ............................................................... 67
Changing the Map Settings ........................................................ 67
Changing Security Settings ........................................................ 68
Restoring All Settings ................................................................. 68
Automotive Mode: Using XM ............................................69
Listening to XM Radio ................................................................ 69
Using XM Trafc Information ...................................................... 70
Trafc in Your Area ..................................................................... 70
Severity Color Code ................................................................... 70
Trafc on Your Route ................................................................. 70
Viewing the Trafc Map .............................................................. 71
Viewing Trafc Delays ................................................................ 71
Adding an XM Subscription ........................................................ 71
Appendix ............................................................................72
Calibrating the Screen ............................................................... 72
Resetting Your GPSMAP 640 .................................................... 72
Updating the Software ............................................................... 72
Page 8

Table of Contents
Clearing User Data .................................................................... 72
Battery Information .................................................................... 72
Charging Your GPSMAP 640 ..................................................... 73
Changing the Fuse on the Automotive Mount ............................ 73
Additional Maps ......................................................................... 73
About GPS Satellite Signals ...................................................... 73
Extras and Optional Accessories ............................................... 74
Specications ............................................................................. 74
Declaration of Conformity .......................................................... 75
Software License Agreement ..................................................... 75
Troubleshooting ........................................................................ 75
Messages and Alarms (Marine Mode) ....................................... 76
Index ...................................................................................81
vi GPSMAP 640 Owner’s Manual
Page 9
Getting Started
Getting Started
Identifying the GPSMAP 640 Features
➊
➍
➎
➏
Power button—manually turn the device on or off.
➊
Battery—removable lithium-ion rechargeable battery.
➋
Battery locking ring—lift and rotate counter-clockwise to
➌
release the battery.
DC in—power the device and recharge the battery with an
➍
external power cable.
MCX connector—connect an external GPS antenna.
➎
USB connector—connect the device to a computer or to an
➏
optional GXM 40 XM antenna (GPSMAP 640 only).
➌
➋
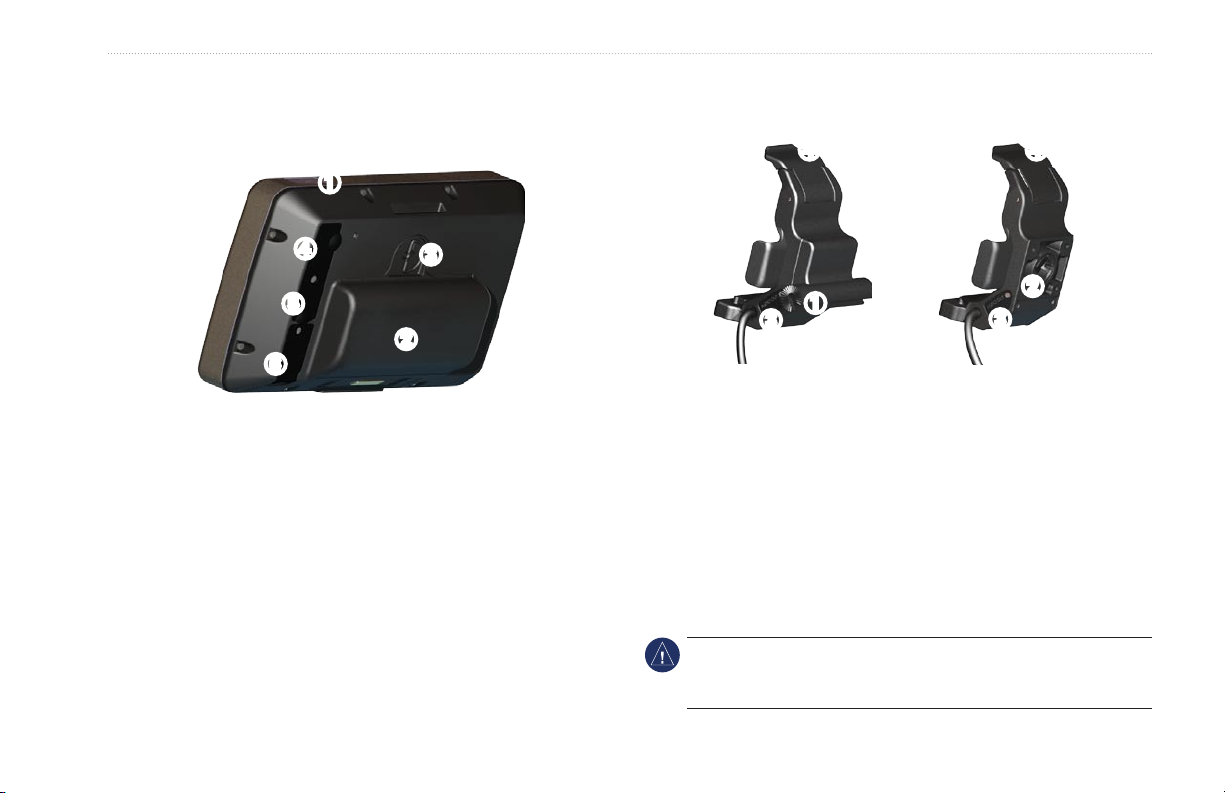
Identifying the GPSMAP 640 Mounting Bracket Features
➍
➍
➋
➊
➌
Marine
Mounting Bracket
Bail-mount adapter—connect the marine mounting bracket to
➊
the marine bail mount.
➋
Ball-socket adapter—connect the mounting bracket adapter to
a compatible automotive dash mount.
Audio line out—connect the unit to an audio output source
➌
with a standard 1/8 in. (3.5 mm) stereo audio plug.
Locking tab—use to lock the device into the mount.
➍
NOTICE: When you remove the GPSMAP 640 from the marine
mounting bracket, dry the metal contacts and use the attached
weather cap to prevent corrosion.
➌
Automotive
Mounting Bracket
GPSMAP 640 Owner’s Manual 1
Page 10

Getting Started
CAUTION: The ball-socket adapter on the GPSMAP 640 is not
compatible with Garmin automotive mounts other than the included
mount. Do not mount the device on a windshield.
Using the Mounting Bracket
NOTICE: Do not use the automotive mounting bracket in your
boat. The power connector and speaker assembly are not water
resistant, and therefore unsuitable for marine use. Additionally, do
not use the automotive-mount base in your boat. The automotivemount base does not connect to the dashboard using mounting
hardware, and therefore is not stable in marine conditions.
To install the marine mounting bracket in your boat, see the
GPSMAP 620/640 Marine Mount Installation Instructions.
NOTE:
To mount the GPSMAP 640 into your boat console,
purchase the GPSMAP 600 Series Flush Mount Kit at
www.garmin.com.
To install the automotive mounting bracket in your car:
1. Place the automotive-mount base on your dash, and press
down on each of the four sides. The base bends and conforms
to your dashboard.
2. Snap the mounting bracket onto the automotive-mount arm.
3. Plug the vehicle power cable into a power outlet in your vehicle.
TIP: If the bottom surface of the automotive mount slides on the
dash due to dust and dirt buildup, wipe it clean using a wet cloth.
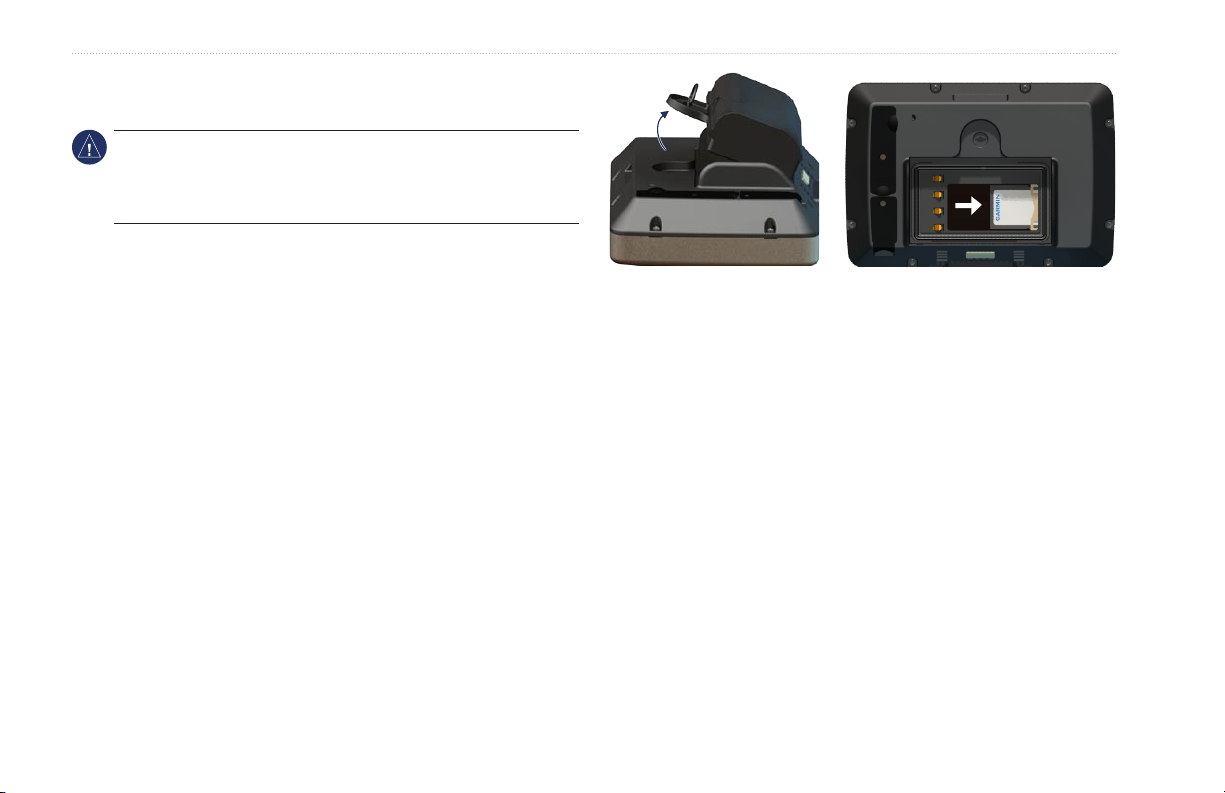
To place the GPSMAP 640 in
the mounting bracket:
1. Flip up the locking tab on top
of the mounting bracket.
2. Fit the bottom of the device
into the cradle.
3. Tilt the device back until it
stops.
4. Flip down the locking tab
to hold the device in the
mounting bracket.
To remove the GPSMAP 640 from the mounting bracket:
1. Flip up the locking tab on top of the mounting bracket.
2. Tilt the device forward, and lift it out of the mounting bracket.
Placing the GPSMAP 640 in
the Mounting Bracket
2 GPSMAP 640 Owner’s Manual
Page 11

Getting Started
Powering the GPSMAP 640 On and Off
Power on the GPSMAP 640:
• If the mounting bracket on your boat or in your car is connected
to power, the device powers on when you place it in the mount.
• The device powers on when external power is supplied through
the DC IN connector.
• To power on the device manually, press and hold the Power
key until the Garmin logo appears on the screen.
Power off the GPSMAP 640:
• When you remove the device from the mounting bracket or you
remove power from the DC IN connector, you will be prompted
to continue on battery power. Touch Turn Off to power off the
device.
• To power off the device manually, press and hold the Power
key until the unit powers off.
NOTE: If you manually turn off the device while it is connected to
a power source, it will continue to charge the battery.
Removing and Inserting the Battery Pack
NOTICE: This product contains a lithium-ion battery. To prevent
To remove the battery pack:
1. Remove the GPSMAP 640 from the mounting bracket.
2. On the back of the device, lift up the battery locking ring and
turn it counter-clockwise.
3. Tilt the battery pack away from the device and lift it out.
To Insert the battery pack:
1. On the back of the GPSMAP 640, t the bottom of the battery
pack into the device.
2. Tilt the battery pack toward the device until it is tight.
3. Turn the locking ring clockwise to lock the battery pack in place.
Important battery notes:
• Before using the GPSMAP 640 for the rst time, charge the
battery for at least six hours.
• The lithium-ion battery pack used in the device is primarily a
backup battery source. Use the device in a mount with external
power whenever possible.
damage, remove the unit from the vehicle or boat when exiting or
store it out of direct sunlight.
GPSMAP 640 Owner’s Manual 3
Page 12
Getting Started
• If the device will not be used for an extended time (longer than
one week), remove the battery pack.
NOTICE: The GPSMAP 640 is waterproof to the IPX7 standard
only when the battery is connected and locked in place. Use
extreme caution around water when removing the battery from the
device.
Inserting and Removing a Secure Digital
Inserting an SD Card
(SD) Card
To preserve the IPX7 water resistance of the GPSMAP 640, the SD
card slot is located under the battery.
To insert an SD card:
1. Remove the battery pack. The SD card slot is in the bottom of
the battery compartment, on the opposite side from the battery
contacts.
2. Place an SD card into the opening with the label showing, with
the SD card contacts facing away from the battery contacts.
3. Slide the SD card into the SD card slot, and press until it clicks
softly and locks in place.
4. Insert the battery pack.
4 GPSMAP 640 Owner’s Manual
To remove an SD card:
1. Remove the battery.
2. Press in on the SD card until it clicks softly and releases from
the SD card slot.
3. Remove the SD card.
Page 13
Marine Mode: Getting Started
Marine Mode: Getting Started
Step 4: Use Your GPSMAP 640
Step 1: Mount Your GPSMAP 640
1. Install the marine mount in your boat according to the
GPSMAP 620/640 Marine Mount Installation Instructions.
2. Place the GPSMAP 640 in the mounting bracket (see page 2).
Step 2:
To power on your GPSMAP 640 if it does not power on
automatically, press and hold the Power key until the Garmin
logo appears on the screen. Follow the on-screen prompts to set up
the marine mode on the device for the rst time. To power off your
GPSMAP 640, press and hold the Power key.
Step 3: Acquire Satellites
1. Go outdoors to an open area, away from tall buildings and
trees.
2. Turn on your GPSMAP 640.
Acquiring satellite signals can take a few minutes. The bars
indicate satellite strength. When at least one of the bars is green,
your GPSMAP 640 has acquired satellite signals. Now you can
select a destination and navigate to it.
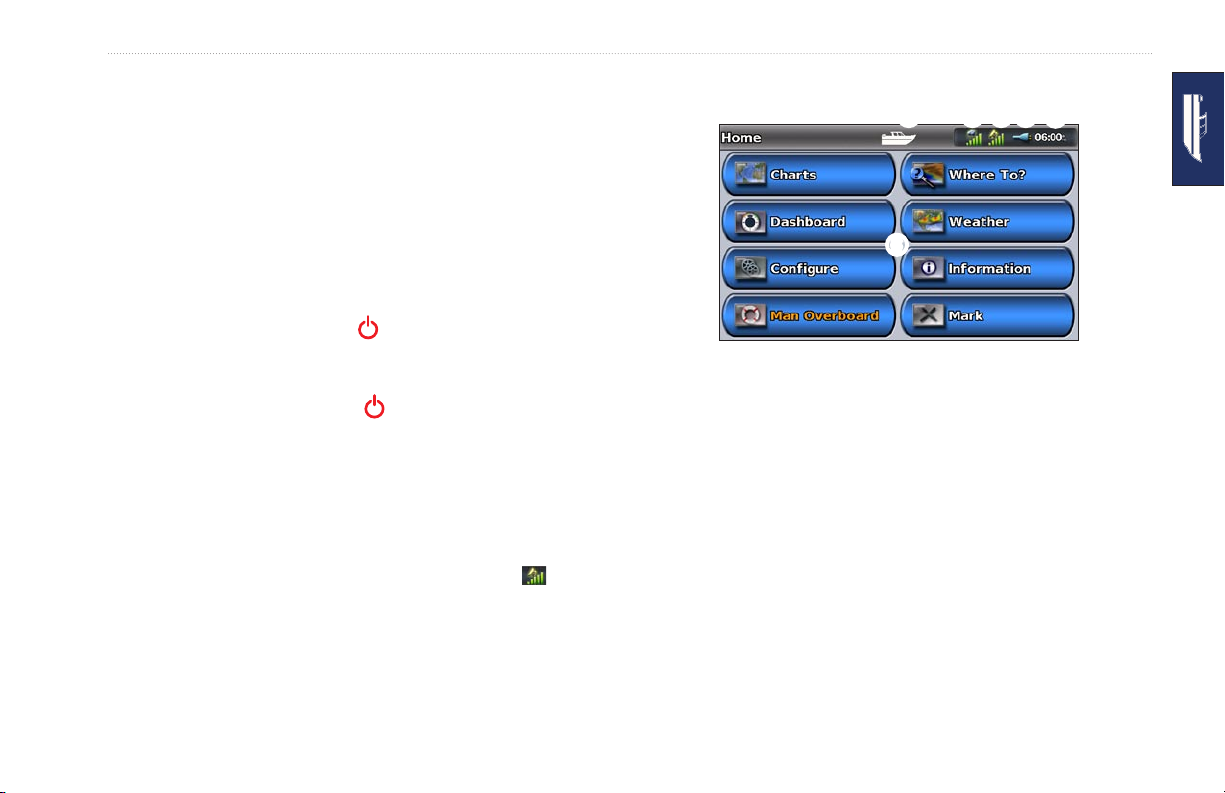
Usage mode. A boat icon represents marine mode, and a car
➊
icon represents automotive mode. Touch this icon to change
modes.
XM® satellite strength (only available on the GPSMAP 640
➋
when using an optional GXM 40 XM antenna).
GPS satellite strength.
➌
Battery status.
➍
Current time.
➎
Home screen categories and actions. Touch an icon to view the
➏
associated menu or perform the associated action.
➊ ➋ ➌➍
➏
Marine Mode: Home Screen
➎
GPSMAP 640 Owner’s Manual 5
Page 14
Marine Mode: Getting Started
Navigating Directly to a Destination
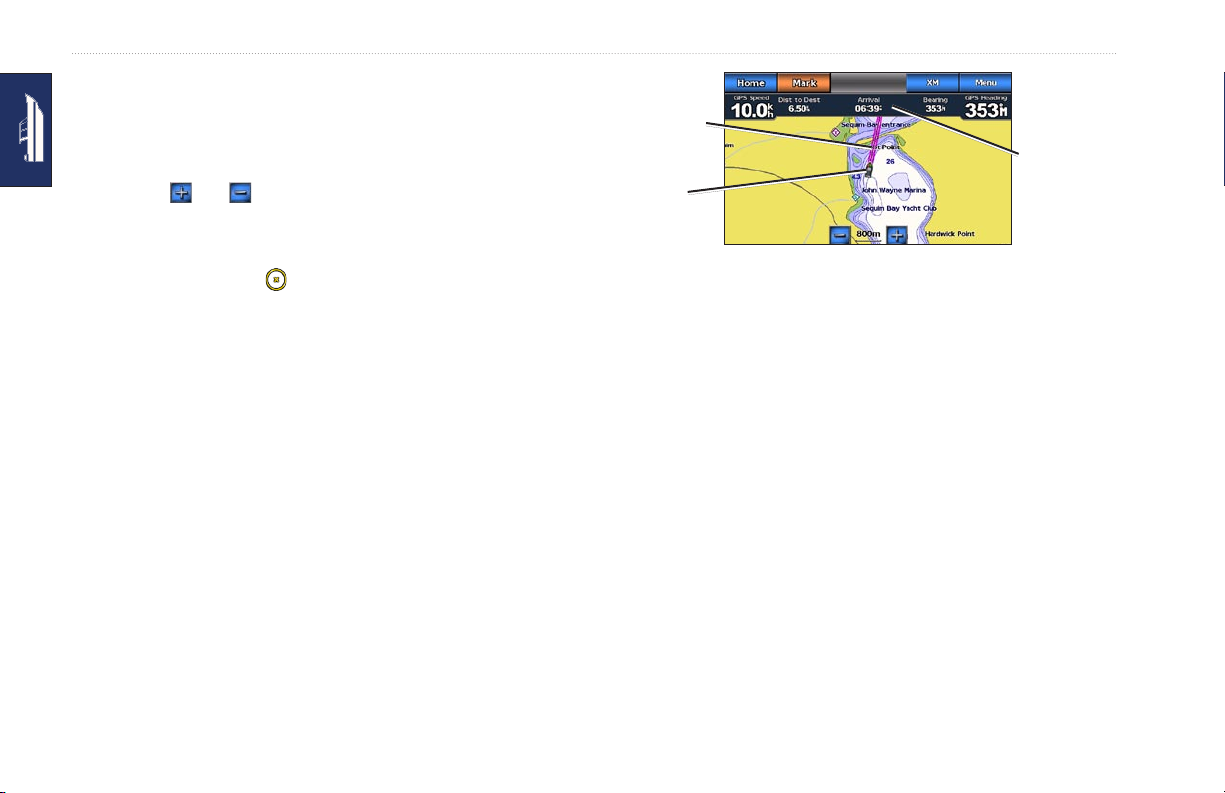
1. From the Home screen, touch Charts > Navigation Chart.
2. On the Navigation chart, touch the place you would like to
navigate to.
Touch and to zoom in and out. Touch anywhere on
•
the chart and drag to pan the map.
For more information on using charts, see page 8.
•
3. When the pointer icon is on the location you want to navigate
to, touch Navigate To > Go To.
4. Follow the magenta line drawn between your current location
and your destination. Navigate with caution. Avoid land masses
and obstacles while following the line to your destination.
Tips:
• In addition to navigating directly to your destination, you
can create a route or allow the device to create a route. For
advanced navigation options, see page 14.
• You can also use the Compass screen to actively navigate to
your destination by following a pointer on a compass.
See page 25 for more information.
Saving Your Current Location
To save a location, such as your marina or a good shing spot,
mark it as a waypoint.
1. From the Home screen, touch Mark.
2. If you want to name the waypoint, touch Edit Waypoint >
Direction to
destination
Position and
heading
Navigating Directly to a Destination
Name. Use the on-screen keyboard to enter a name other than
the number assigned to the waypoint by default.
Navigation
information
6 GPSMAP 640 Owner’s Manual
Page 15

Marine Mode: Getting Started
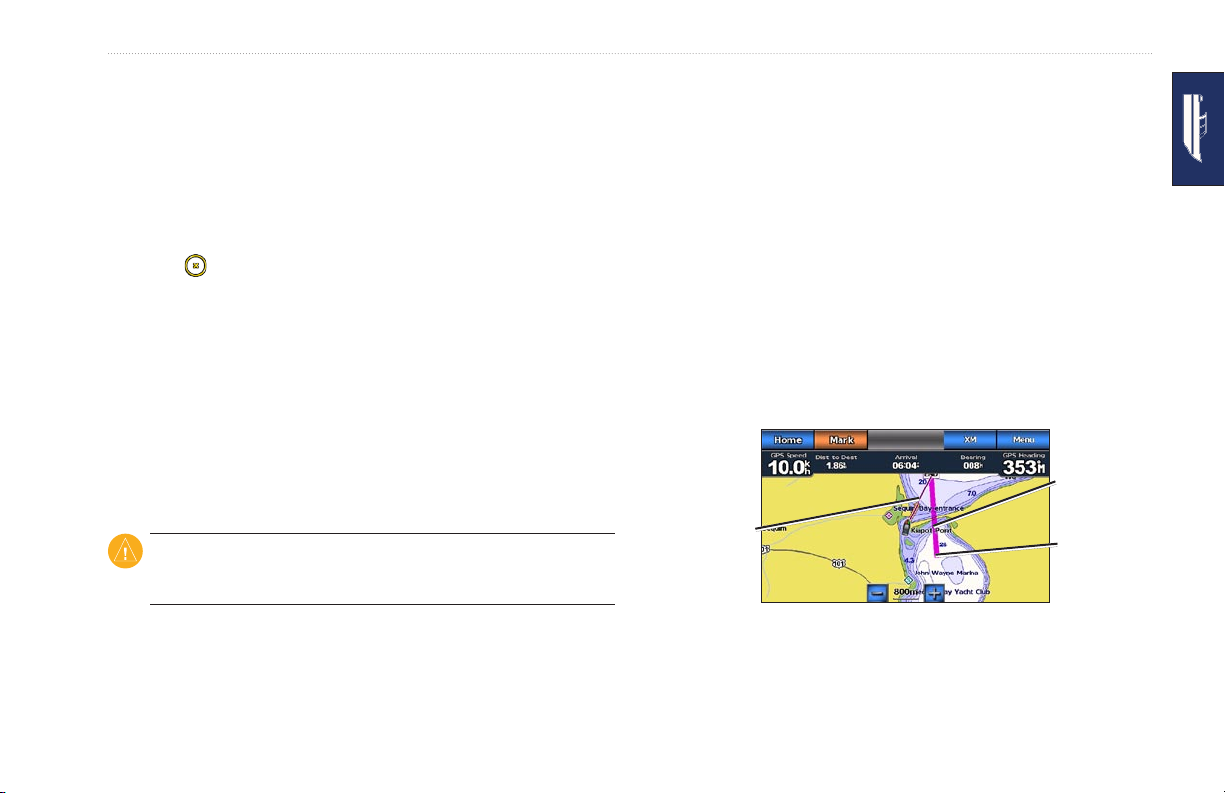
Navigating Directly to a Saved Location
1. From the Home screen, touch Where To? > Waypoints.
2. Touch the waypoint you want to navigate to.
3. Touch Navigate To > Go To.
4. Follow the magenta line drawn between your current location
and your destination. Navigate with caution. Avoid land masses
and obstacles while following the line to your destination.
Tips:
• In addition to navigating directly to your destination, you
can create a route or allow the device to create a route. For
advanced navigation options, see page 14.
• You can also use the Compass screen to actively navigate to
your destination by following a pointer on a compass.
See page 25 for more information.
Adjusting the Volume
1. From any screen, press and quickly release the Power key.
2. Touch Volume.
3. Touch and drag the volume slider bar left to decrease the
To mute the volume, touch the box to the right of the volume slider
bar. The word Mute replaces the volume percentage.
NOTE:
source for you to hear audio alerts.
Adjusting the Backlight
1. From any screen, press and quickly release the Power key.
2. Touch and drag the backlight slider bar left to decrease the
Stopping Navigation
1. While navigating, from the Navigation chart, touch Menu.
2. Touch Stop Navigation.
NOTE: You can also stop navigation from the Where To? screen.
Touch Color Mode to change between Day Colors and Night
Colors. The Auto setting automatically changes the colors
depending on the time of day.
volume and right to increase the volume. The box to the right of
the volume slider bar shows the volume level as a percentage.
The GPSMAP 640 must be connected to an external audio
brightness and right to increase the brightness. The box to the
right of the backlight slider bar shows the backlight level as a
percentage.
GPSMAP 640 Owner’s Manual 7
Page 16

Marine Mode: Using Charts
Marine Mode: Using Charts
The GPSMAP 640 is loaded with both a basic worldwide imagery
map and detailed BlueChart® g2 offshore cartography for US
waters.
In addition to the preloaded maps and charts, you can use
optional BlueChart g2 Vision® preprogrammed SD cards to get
the most out of your GPSMAP 640. For more information on
BlueChart g2 Vision, see page 11.
•
•
NOTE:
views are only available when using optional Blue Chart g2 Vision
preprogrammed SD cards. See page 11.
Fishing Chart—removes navigational data from the chart and
enhances bottom contours for depth recognition (page 12).
Fish Eye 3D—
represents the sea oor according to information on the chart
(page 12).
Mariner’s Eye 3D, Fishing Charts, and Fish Eye 3D
provides an underwater view that visually
There are four ways to view charts on a GPSMAP 640 device:
Navigation Chart—displays an overhead view of the basic
•
worldwide imagery map, the preloaded BlueChart g2 charts
(GPSMAP 640), and the optional BlueChart g2 Vision charts
and photos.
Perspective 3D (or Mariner’s Eye 3D)—displays a view from
•
above and behind your boat for a visual navigation aid
(page 10).
8 GPSMAP 640 Owner’s Manual
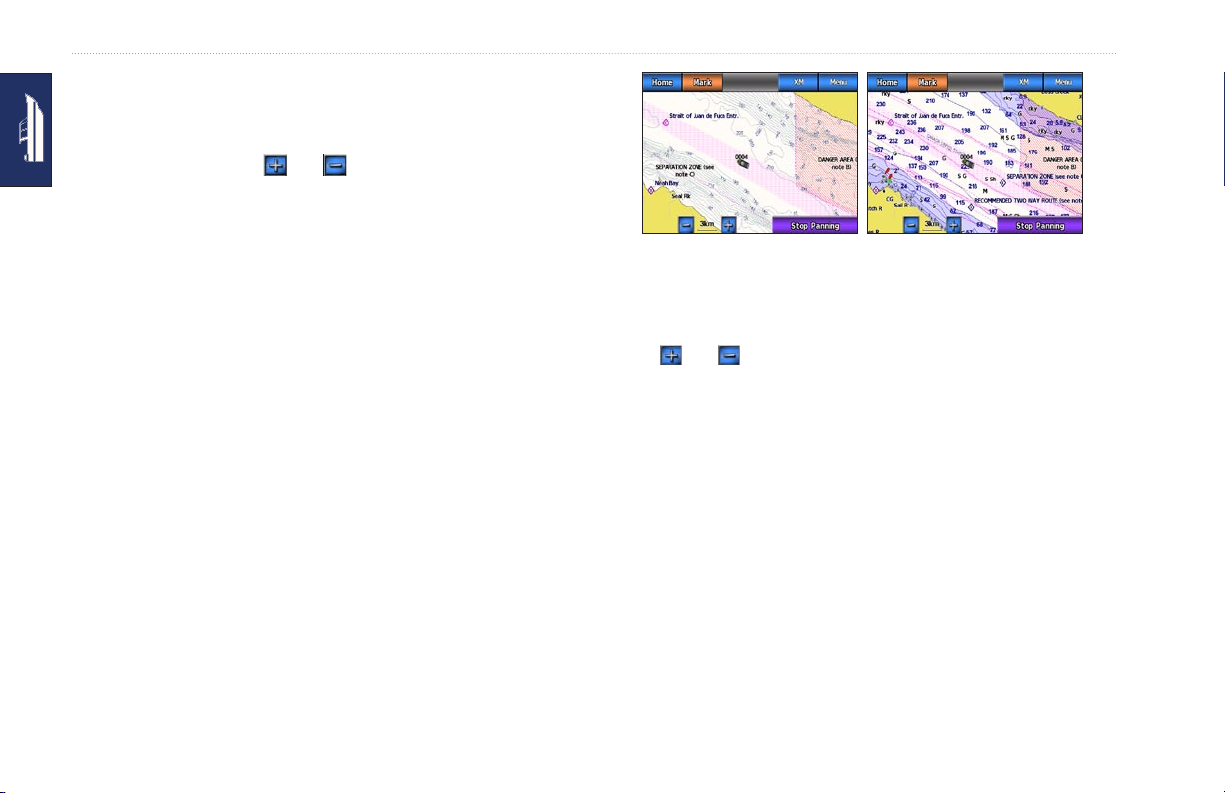
Using the Navigation Chart
From the Home screen, touch Charts > Navigation Chart.
Use the Navigation chart to plan a course (see page 14), to view
map information, and as a visual aid while navigating.
Panning the Navigation Chart
1. From the Home screen, touch Charts > Navigation Chart.
2. Touch and drag the chart to view other areas on the chart.
3. Touch Stop Panning to return the Navigation chart to your
current location.
Page 17

Zooming In and Out on the Navigation Chart
The scale at the bottom of the chart ( ) indicates the zoom
level. The bar under the number represents the numeric scale
distance on the map.
Touch and to zoom in and out on the Navigation chart.
Interacting With Objects on the Navigation
NOTE: You can touch and drag the pointer to a new location.
Chart
1. Touch a point on the Navigation chart.
2. Touch an option:
NOTE: The options that appear are dynamic, and depend on the
point you touched.
Review—view details of the chart objects near the pointer.
•
(Review only appears if the pointer is near multiple objects
on the chart—if the pointer is near only one object, the name
of the object appears instead of Review.)
Navigate To—view the navigation options (page 14).
•
Create Waypoint—marks a waypoint at the location of the
•
pointer (page 22).
Accessing Additional Object or Chart Information
1. Touch an object on the chart or an area of the chart.
2. Touch Information, and choose from the following options:
Marine Mode: Using Charts
Information—view additional information about an object or
•
an area of the chart.
Measure Distance—view the distance and bearing of the
•
object from your current location. The information appears
in a window on the upper-left corner of the screen. Touch
Set Reference to measure from a location other than your
current location.
Tides—view tide information provided by the tide station
•
closest to the object or area of the chart (page 27).
Currents—view current information provided by the current
•
station closest to the object or area of the chart (page 27).
Celestial—view sunrise and sunset almanac data for the
•
object or area of the chart (page 28).
GPSMAP 640 Owner’s Manual 9
Page 18
Marine Mode: Using Charts
Local Weather—view current weather conditions or
•
forecasts reported by the nearest weather station (available
with an optional GXM 40 XM antenna (see page 49)).
Local Services—view a list of the marinas and marine
•
services closest to the object or area of the chart.
Chart Notes—view National Oceanic and Atmospheric
•
Administration (NOAA) information associated with the chart
containing the object.
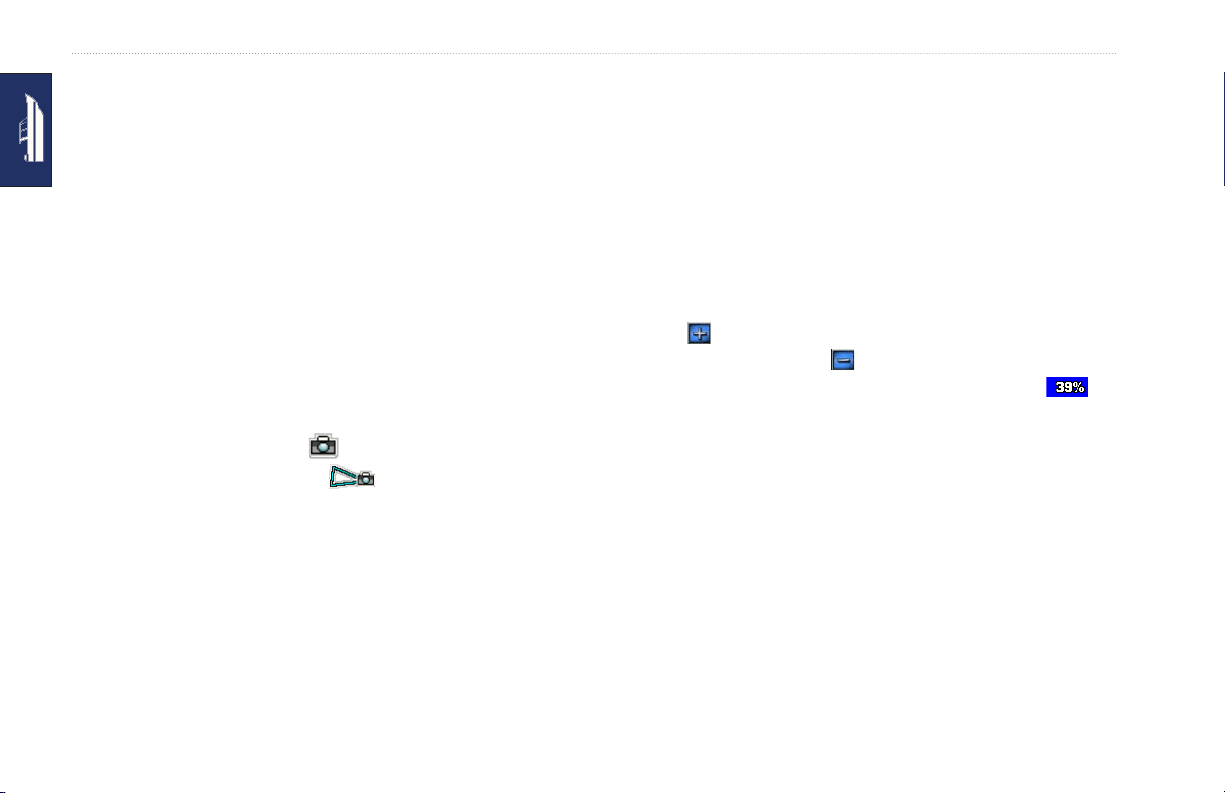
Viewing Aerial Photos
You can view aerial photos of marinas and other navigationally
signicant landmarks in the region covered by an inserted
BlueChart g2 Vision SD card.
1. On the navigation chart, touch a camera icon.
A standard camera icon ( ) indicates an overhead photo.
•
A camera icon with a cone ( ) indicates a perspective
•
photo. The photo was taken from the location of the camera,
pointed in the direction of the cone.
2. Touch Aerial Photo.
Using Perspective 3D
Perspective 3D provides a view from above and behind the boat
(according to your heading), and provides a visual navigation aid.
When navigating, you can use the Perspective 3D screen to better
follow your course, indicated by a highlighted line. See page 14 for
more information on navigating with the GPSMAP 640.
To access the Perspective 3D screen from the Home screen, touch
Charts > Perspective 3D.
Touch the button to move the view closer to your boat and
lower to the water. Touch the button to move the view away
from the boat. This is momentarily indicated by the scale ( ) at
the bottom of the screen.
10 GPSMAP 640 Owner’s Manual
Page 19

Marine Mode: Using Charts
Using BlueChart g2 Vision
Optional BlueChart g2 Vision preprogrammed SD cards allow you
to get the most out of your GPSMAP 640. In addition to detailed
marine charting, BlueChart g2 Vision has the following features:
Mariner’s Eye 3D
•
the boat for a three-dimensional navigation aid. The BlueChart
g2 Vision Mariner’s Eye 3D is more detailed than the standard
Perspective 3D screen.
•
Fish Eye 3D
view that visually represents the sea oor according to the
information on the chart.
Fishing Charts—displays the chart with enhanced bottom
•
contours and without navigational data. This chart works well
for offshore deep-sea shing.
•
High Resolution Satellite Imagery
satellite images for a realistic view of the land and water on the
Navigation chart.
•
Detailed Roads and POI data
and other points of interest (POIs) along the shore.
•
Auto Guidance
chart data to suggest the best passage to your destination.
—provides a view from above and behind
—provides an underwater, three-dimensional
—provides high-resolution
—displays roads, restaurants,
—uses specied safe depth, safe height, and
Using Mariner’s Eye 3D
When using a BlueChart g2 Vision SD card, you can view the
Mariner’s Eye 3D screen. The Mariner’s Eye 3D screen is similar
to the Perspective 3D screen (page 10), but renders a true 3D
screen. This view is helpful when navigating tricky shoals, reefs,
bridges, or channels, and is benecial when trying to identify entry
and exit routes in unfamiliar harbors or anchorages. Mariner’s Eye
3D provides a three-dimensional view of both the shore and the sea
oor.
To access the Mariner’s Eye 3D screen from the Home screen,
touch Charts > Mariner’s Eye 3D.
As with the Perspective 3D screen, touch the button to move
the view closer to your boat and lower to the water. Touch the
button to move the view away from the boat. This is momentarily
indicated by the scale ( ) at the bottom of the screen.
Touch and drag the map to the left or the right to pan the 3D
perspective.
GPSMAP 640 Owner’s Manual 11
Page 20
Marine Mode: Using Charts
Using Fish Eye 3D
Using the depth contour lines of the BlueChart g2 Vision
cartography, Fish Eye 3D provides an underwater view of the sea
oor or lake bottom. The and buttons adjust the view in the
same way as the Mariner’s Eye 3D.
To access the Fish Eye 3D screen from the Home screen, touch
Charts > Fish Eye 3D.
NOTE:
When navigating, the magenta line will not appear on the
Fish Eye 3D screen, though any enabled navigation data bars will
appear.
Using Fishing Charts
Use the shing chart to view detailed bottom contours and depth
soundings on the chart. There are no navigation aids such as buoys
and lights on the shing chart.
The shing chart uses highly detailed bathymetric data contained
on a preprogrammed BlueChart g2 Vision SD card, and is best for
offshore deep-sea shing.
12 GPSMAP 640 Owner’s Manual
To access the Fishing chart screen from the Home screen, touch
Charts > Fishing Chart.
Touch and to zoom in and out on the Fishing chart.
You can navigate using the Fishing chart just as you would when
using the Navigation chart.
Enabling High�ResolutionHigh�Resolution Satellite
Imagery
You can overlay high-resolution satellite images on the land,
the sea, or both portions of the Navigation chart when using a
preprogrammed BlueChart g2 Vision SD card.
Navigation ChartFishing Chart
Page 21

To enable satellite imagery:
1. While viewing the Navigation chart, touch Menu > Navigation
Chart Setup > Photos.
2. Touch one of the following:
Off—standard chart information is shown on the map.
•
Land Only—standard chart information is shown on water
•
with photos overlaying the land.
Photo Map Blend—photos overlay both the water and
•
the land at a specied opacity. The higher you set the
percentage, the more the satellite photos cover both water
and land.
When enabled, the high resolution satellite images are only present
at lower zoom levels. If you cannot see the high resolution images
in your BlueChart g2 Vision region, zoom in by touching , or
set the detail level higher by touching Menu > Navigation Chart
Setup > Chart Appearance > Detail.
Marine Mode: Using Charts
GPSMAP 640 Owner’s Manual 13
Page 22

Marine Mode: Navigating
Marine Mode: Navigating
To navigate using the GPSMAP 640, rst choose a destination,
then set a course or create a route. Follow the course or the route
on the Navigation chart or on the Perspective 3D or Mariner’s Eye
3D screen.
TIP:
You can also use the Compass screen to follow a course or
a route on the Navigation chart, the Perspective 3D screen, or the
Mariner’s Eye 3D screen. See page 25 for more information.
Step 1: Choose a Destination
Choosing a Destination Using Where To?
1. From the Home screen, touch Where To?
2. Touch a category:
•
•
•
•
•
You can choose a destination using either the Navigation chart or
the Where To? menu.
Choosing a Destination Using the Navigation
Chart
1. From the Home screen, touch Charts > Navigation Chart.
2. On the Navigation chart, touch the place you would like to
navigate to. The pointer icon indicates the destination on the
chart.
TIP: Touch and to zoom in and out. Touch anywhere on
3. Touch the location you want to navigate to.
Step 2: Set and Follow the Course
You can set a course three ways:
Go To
•
location to the destination (page 15).
•
Route To
location, adding turns along the way (page 16).
the chart and drag to pan the map. For more information on using
charts, see page 8.
Waypoints—view a list of locations you marked previously
(page 20).
Routes—view a list of routes you saved previously
(page 20).
Tracks—view a list of recorded tracks (page 21).
Offshore Services—view a list of nearby marinas and other
offshore points of interest, listed by proximity (page 20).
Search by Name—search nearby marinas and other
offshore points of interest by name (page 21).
—(direct course) create a direct line from your current
—create a route from the destination to your current
14 GPSMAP 640 Owner’s Manual
Page 23
Marine Mode: Navigating
Guide To—use the chart data on a BlueChart g2 Vision SD card
•
to automatically suggest a passage from your current location to
the destination (page 18).
After you set the course, follow the course using the Navigation
chart, the Perspective 3D screen, or the Mariner’s Eye 3D screen.
Setting a Direct Course (Go To)
When the pointer icon is on the location you want to navigate
to, or you have selected a destination using Where To, touch
Navigate To > Go To.
Following a Direct Course (Go To) on the
Navigation Chart, Perspective 3D Screen, or
In the center of the magenta line is a thinner purple line that
represents the corrected course from your current location to the
end point. The corrected course line is dynamic, and it moves with
your boat when you are off course.
1. After you set a course, from the Home screen, touch Charts
and then touch Navigation Chart, Perspective 3D, or
Mariner’s Eye 3D.
2. Follow the magenta line (direct course).
3. Steer off course to avoid land, shallow water, and other
obstacles on the water.
4. When you are off course, follow the purple line (corrected
course) to travel to your destination, or steer back to the
magenta line (direct course).
Mariner’s Eye 3D Screen
After you set the course using Go To, a magenta line represents
the direct course from the start point to the end point, and does not
move, even when you are off course.
CAUTION: When using Go To, a direct course and a corrected
course may pass over land or shallow water. Use visual sightings
and steer to avoid land, shallow water, and other dangerous objects.
Corrected
course
Direct course
Start point
Following a Direct Course on the
Navigation Chart
GPSMAP 640 Owner’s Manual 15
Page 24
Marine Mode: Navigating
Corrected
course
Direct course
Following a Direct Course on the
Mariner’s Eye 3D Screen
NOTE: When following a course, important navigation
information appears in a data bar along the top of the chart. To
adjust the settings of the data bar, see page 40.
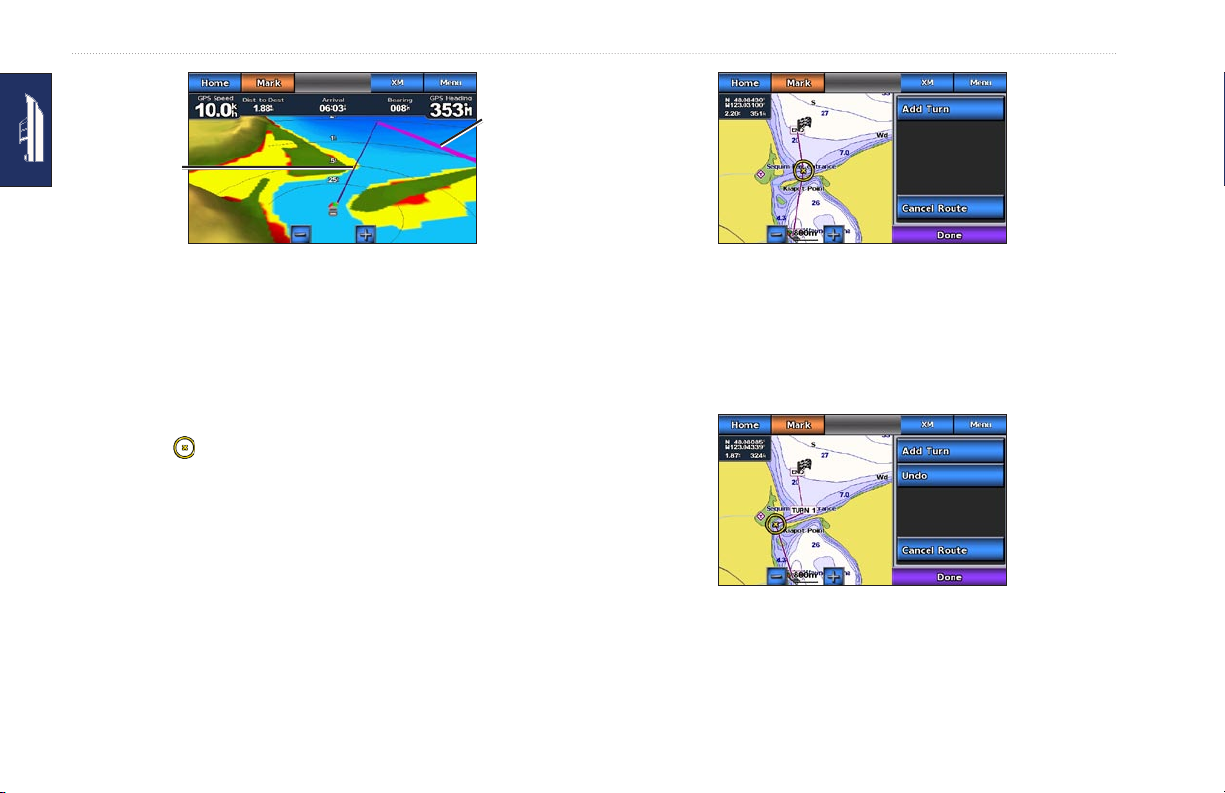
3. Touch Add Turn.
4. To add an additional turn, touch another location where you
want to make a turn (working backward from the destination)
and then touch Add Turn. You can add up to 250 turns to a
Adding the Last Turn
route.
Creating a Route (Route To)
1. When the pointer icon is on the location you want to
navigate to, or you have selected a destination using Where To,
touch Navigate To > Route To.
2. Touch the location where you want to make the last turn toward
your destination.
Adding an Additional Turn
16 GPSMAP 640 Owner’s Manual
Page 25
Marine Mode: Navigating
5. Touch Done to complete creating the route and to set the
course, or touch Cancel Route to delete the route.
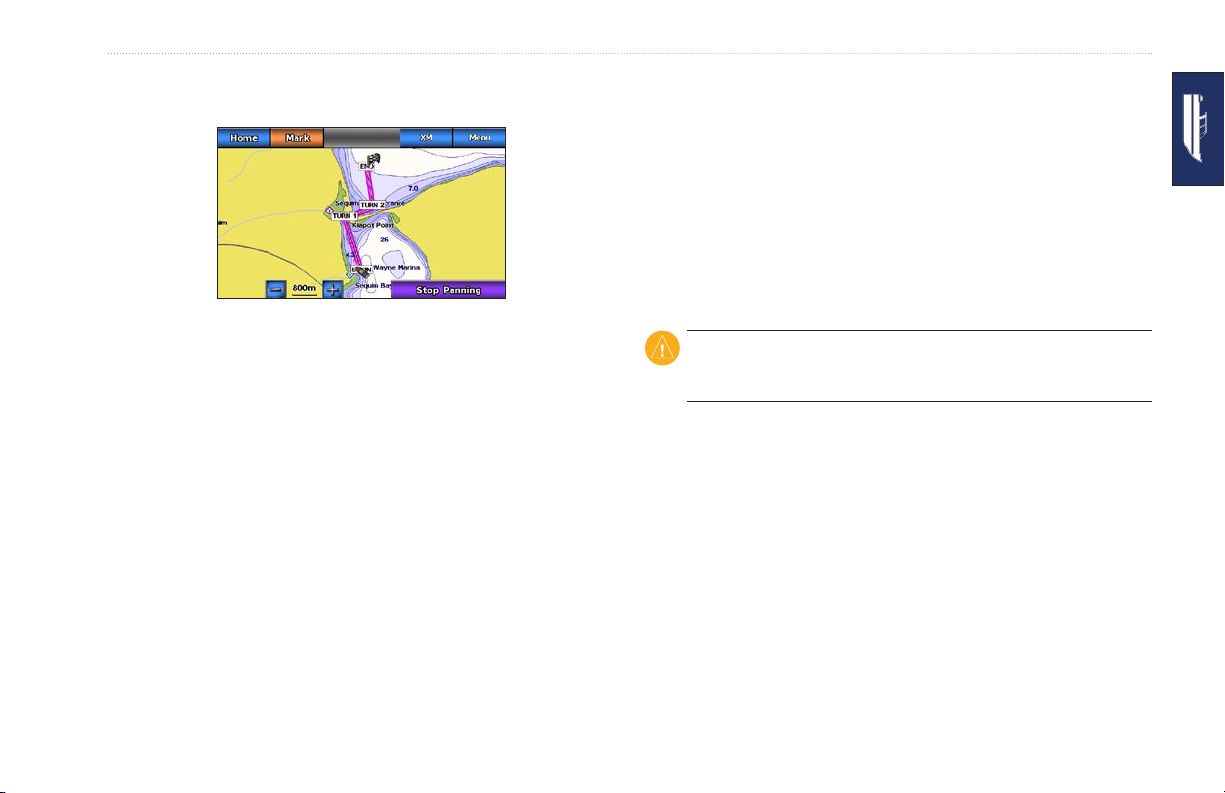
Following a Route (Route To) on the
Navigation Chart, Perspective 3D Screen, or
Mariner’s Eye 3D Screen
After you create a route using Route To or choose a saved route
from the Where To? menu, a magenta and purple line appears
between the start point and the rst turning point, then continues
on to each subsequent turning point. This magenta and purple line
represents the route leg (from turning point to turning point), and
Complete Route
does not move, even when you are off course.
Saving a Created Route (Route To)
You can save up to 50 routes, with up to 250 turns in each route.
1. After you create a route, touch Menu > Stop Navigation.
2. Touch Yes to save your current active route.
When you are off course, an orange arrow appears to help steer you
back onto the route leg to the next turning point. This orange arrow
represents the Course to Steer.
1. After you create a route using Route To or choose a saved
CAUTION: Even when you carefully create a route, legs may pass
over land or shallow water. Use visual sightings and steer to avoid
land, shallow water, and other dangerous objects.
route from the Where To? menu, from the Home screen, touch
Charts and then touch Navigation Chart, Perspective 3D, or
Mariner’s Eye 3D.
GPSMAP 640 Owner’s Manual 17
Page 26
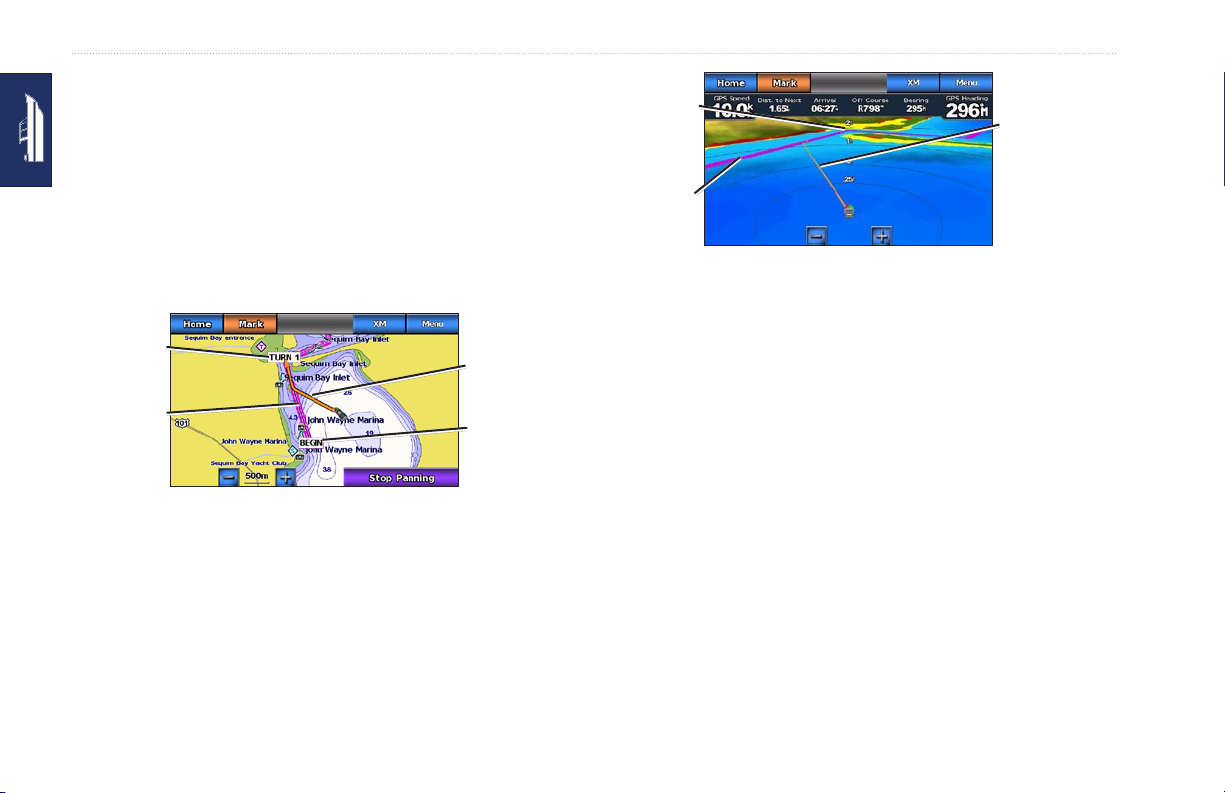
Marine Mode: Navigating
2. Follow the magenta and purple line (route leg) from the start
point to the rst turning point.
Route turn
3. After you reach the rst turning point, follow the magenta and
purple line (route leg) to each subsequent turning point, until
you reach the end point.
Route leg
4. Steer off course to avoid land, shallow water, and other
obstacles on the water.
5. When you are off course, follow the orange arrow (Course to
Steer) to steer back to the magenta and purple line (route leg).
NOTE: When following a route, important navigation information
Route turn
Route leg
Course to
Steer
Start point
appears in a data bar along the top of the chart. To adjust the
settings of the data bar, see page 40.
Setting an Automatic Course (Guide To)
When using a preprogrammed BlueChart g2 Vision SD card, you
can use Automatic Guidance to automatically create a suggested
Following a Route on the
Navigation Chart
passage based on available BlueChart g2 Vision chart information.
See page 37 for instructions on setting up Automatic Guidance for
your boat.
Course to
Steer
Following a Route on the
Mariner’s Eye 3D Screen
18 GPSMAP 640 Owner’s Manual
Page 27

Marine Mode: Navigating
When the pointer icon is on the location you want to navigate
to, or you have selected a destination using Where To?, touch
Navigate To > Guide To.
4. When you are off course, steer back to the magenta line when
the path is clear.
NOTE: When following a course, important navigation
information appears in a data bar along the top of the chart. To
CAUTION: The Automatic Guidance feature of the BlueChart g2
Vision SD card is based on electronic chart information. Carefully
compare the course to all visual sightings, and avoid any land,
shallow water, or other obstacles that may be in your path.
adjust the settings of the data bar, see page 40.
Following an Automatic Course (Guide To) on the
Navigation Chart, the Perspective 3D Screen, or
the Mariner’s Eye 3D Screen
After you create an automatic course using Guide To, a magenta
line appears. The magenta line represents the suggested passage
between the start point and the end point, and does not move, even
when you are off course.
1. After you set an automatic course using Guide To, from the
Home screen, touch Charts and then touch Navigation Chart,
Perspective 3D, or Mariner’s Eye 3D.
2. Follow the magenta line from the start point to the end point.
3. Steer off course to avoid land, shallow water, and other
obstacles on the water.
GPSMAP 640 Owner’s Manual 19
Page 28

Marine Mode: Where To?
Marine Mode: Where To?
2. Touch the waypoint you want to navigate to.
3. Touch
Use the Where To? menu on the Home screen to search for, and
navigate to, nearby fuel, repairs, and other services, as well as
waypoints and routes.
Searching for Saved Routes
Searching For Marine Services
1. From the Home screen, touch Where To? > Offshore
Services.
2. Touch the marine service category to which you want to
navigate. A list of the 50 nearest locations appears, including
the distance and bearing to each.
3. Touch the marine service item you want to navigate to.
4. Touch Go To, Route To, or Guide To to set the selected marine
service as a navigation destination. See page 14 for details
about navigating to a destination.
1. From the Home screen, touch Where To? > Routes.
2. Touch the saved route you want to navigate.
3. Touch Navigate To to navigate the selected route, and choose
Searching for Waypoints
NOTE: You must create waypoints before you can search for and
navigate to them.
1. From the Home screen, touch Where To? > Waypoints. A list
of saved waypoints appears, sorted by distance, including the
distance and bearing to each.
Navigate To to set the selected waypoint as a navigation
destination. See page 14 for information about navigating to a
destination.
how you want to navigate to it. See page 17 for information
about navigating routes.
Forward—Navigate the route from the start point to the end
•
point.
Backward—Navigate the route in reverse, from the end
•
point to the start point.
Offset—Navigate a course parallel to the route that is a
•
specied distance from the route. First choose the direction
and side of the offset, then specify the offset distance from
the route.
20 GPSMAP 640 Owner’s Manual
Page 29

Marine Mode: Where To?
Searching for Saved Tracks
1. From the Home screen, touch Where To? > Tracks.
2. Touch the saved track you want to navigate.
3. Touch Follow Track to navigate the selected saved track. See
page 23 for more information about tracks.
4. Touch Navigate To or Follow Track to begin navigation. See
Searching by Name
Use the Search by Name menu to search all marine services,
waypoints, saved routes, and saved tracks.
1. From the Home screen, touch Where To? > Search by Name.
2. Use the on-screen keyboard to type the name or part of the
name of the marine service, the waypoint, the saved route, or
the saved track you want to nd, and touch Done.
3. A list of results appears. Touch the item you want to navigate to.
Each entry is marked by an icon to help identify which category
it belongs to:
—marine service icon
•
—default waypoint icon (this icon can be changed using
•
the waypoint properties, see page 23)
—saved route icon
•
—saved track icon
•
page 14 for information about navigating to a destination. See
page 23 for more information about tracks.
GPSMAP 640 Owner’s Manual 21
Page 30

Marine Mode: Using Waypoints and Tracks
Marine Mode: Using Waypoints
2. Touch
MOB waypoint and begins navigation automatically.
and Tracks
Create waypoints in locations that you want to return to, such
as your marina or a good shing spot. You can store up to 1,500
marine waypoints with a user-dened name, symbol, depth, and
water temperature for each waypoint.
A track is a recording of your path. The track currently being
recorded is the active track. You can save your active track.
Using Man Overboard (MOB) Waypoints
Use a Man Overboard (MOB) waypoint to both create a waypoint
with an international MOB symbol ( ) and immediately begin
navigating to the MOB waypoint with a direct course (Go To).
To mark an MOB waypoint from the Home screen:
1. Touch Man Overboard. This immediately marks your current
position as an MOB waypoint.
2. Touch Yes to begin navigating to the MOB waypoint.
To mark an MOB waypoint from any other screen:
1. Touch Mark in the top-left corner of any screen except the
Home screen. This immediately marks your current position as
a waypoint.
Marking a Waypoint at Your Current Location
1. Touch Mark on any screen. This marks your current location as
a waypoint with an automatically generated name.
2. Choose from the following options:
•
•
•
•
Creating a Waypoint From the Navigation Chart
1. From the Home screen, touch Charts > Navigation Chart.
2. Touch the location you want to designate as a waypoint. A
3. Touch Create Waypoint.
Man Overboard. This designates the waypoint as an
Edit Waypoint—designates a specic name, a symbol, a
water depth, a water temperature, or a position.
Delete—deletes the waypoint.
Man Overboard—designates the current location as a Man
Overboard (MOB) waypoint.
Back—returns to the previous screen.
pointer indicates the location.
22 GPSMAP 640 Owner’s Manual
Page 31

Marine Mode: Using Waypoints and Tracks
Editing Waypoint Details
1. From the Home screen, touch Information > User Data >
Waypoints List to display the list of all waypoints, or touch a
waypoint on the Navigation chart.
2. Touch the name of the waypoint you want to edit.
3. Touch Edit Waypoint.
4. Touch the waypoint attribute you want to change.
5. Enter the new name, the symbol, the value, or the comment.
Changing the Position of a Waypoint
1. From the Home screen, touch Information > User Data >
Waypoints List to display the list of all waypoints, or touch a
waypoint on the Navigation chart.
2. Touch the name of the waypoint you want to move.
3. Touch Edit Waypoint > Position.
4. Touch Use Chart or Enter Coordinates.
5. If entering coordinates, use the on-screen keyboard to enter the
new coordinates for the waypoint. If using the chart, touch the
new location and then touch Move Waypoint.
Deleting a Waypoint or MOB
1. From the Home screen, touch Information > User Data >
Waypoints List.
2. Touch the name of the waypoint or the MOB you want to delete.
3. Touch Delete and then touch OK to conrm that you want to
delete the waypoint.
Using Tracks
A trailing line on the chart indicates your active track. The active
track holds 10,000 track points. You can specify whether the active
track stops at 10,000 track points or overwrites the earliest points
(see page 45).
To toggle the display of tracks on or off, from the Navigation chart,
touch Menu > Waypoints and Tracks > Tracks.
To disable the recording of tracks, from the Home screen, touch
Information > User Data > Tracks > Active Track Options >
Record Mode > Off.
GPSMAP 640 Owner’s Manual 23
Page 32

Marine Mode: Using Waypoints and Tracks
Saving the Active Track
You can save up to 20 tracks, with up to 700 points per saved track.
1. From the Home screen, touch Information > User Data >
Tracks > Save Active Track.
2. Either touch the time the current track began recording, or touch
Entire Log.
Clearing the Active Track
From the Home screen, touch Information > User Data > Tracks
> Clear Active Track > OK. The track memory is cleared and the
current track continues to be recorded.
Following the Active Track
1. From the Home screen, touch Information > User Data >
Tracks > Follow Active Track.
2. Either touch the time the current track began recording, or touch
Entire Log.
NOTE: You can also navigate a saved track from the saved tracks
list (Information > User Data > Tracks > Saved Tracks).
Editing or Deleting a Saved Track
1. From the Home screen, touch Information > User Data >
Tracks > Saved Tracks.
2. Touch the track you want to edit or delete.
3. Touch Edit Track:
•
•
•
•
Navigating a Saved Track
1. From the Home screen, touch Where To? > Tracks.
2. Touch the name of the saved track you want to navigate.
3. Touch Follow Track.
4. Touch Forward or Backward to follow the track in the direction
you prefer.
Name—change the name of the saved track.
Track Color—change the color of the saved track
Save Route—save the saved track as a saved route.
Delete—delete the saved track.
24 GPSMAP 640 Owner’s Manual
Page 33

Marine Mode: Using the Dashboard
Marine Mode: Using the Dashboard
Use the Dashboard to view important data such as navigation and
trip information on one screen, without using the chart screens.
Current heading
Using the Compass Screen
From the Home screen, touch Dashboard > Compass to view the
Compass screen.
Following a Direct Course or a Route Using the
Compass Screen
After you set a course using Go To, or create a route using
Route To, you can use the Compass screen to follow the course or
route.
You can view your current heading and the corrected course on the
Compass screen. When you are off course, the distance between
your current heading and the corrected course is called the Course
to Steer, and is shaded orange on the compass.
CAUTION: Just as on the Navigation chart, a direct course and
a corrected course may pass over land or shallow water. Use
visual sightings and steer to avoid land, shallow water, and other
dangerous objects.
To follow a direct course on the Compass screen:
1. After you set a course, from the Home screen, touch
Dashboard > Compass.
2. Follow the orange corrected-course pointer and steer off course
to avoid land, shallow water, and other obstacles on the water.
3. When you are off course, turn toward the orange correctedcourse pointer to reduce the shaded orange Course to Steer
and continue to the next turn in the route or to your destination.
Course to
Steer
Corrected
course
Following a Direct Course on the
Compass Screen
GPSMAP 640 Owner’s Manual 25
Page 34

Marine Mode: Using the Dashboard
Using the Numbers Screen
To view important navigation numbers, such as heading and GPS
speed, from the Home screen, touch Dashboard > Numbers. For
more information on conguring the Numbers screen, see page 45.
Using the Trip Screen
The Trip screen provides helpful statistics about your trip.
To view the Trip screen, from the Home screen, touch Dashboard
> Trip.
Resetting Trip Screen Information
1. From the Trip screen, touch Menu.
2. Touch an item to reset that category of information on the Trip
screen, or touch Reset All.
26 GPSMAP 640 Owner’s Manual
Page 35

Touch any point on the tide graph to view the tide level at a
Marine Mode: Viewing Almanac Data
•
different time. You can also drag your nger along the graph to
Use the Information screen to access almanac data about tides and
currents, as well as sun and moon (celestial) data.
You can also select tide, current, and celestial information for a
specic station directly from the Navigation chart. Touch near
the desired station. When the pointer icon is near the desired
station, touch Information and then touch Tides, Currents, or
Celestial.
scroll.
Touch Nearby Stations to view other tide stations close to your
•
position.
Touch Change Date > Manual to view tide information for a
•
different date.
Touch Show Report to view the Tide Report for the selected
•
station.
Marine Mode: Viewing Almanac Data
Viewing Tide Station Information
To view tide information from the Home screen, touch
Information > Tides. Information for the most-recently viewed
tide station is shown.
Tide station
Viewing Current Information
To view current information from the Home screen, touch
Information > Currents. Information for the most-recently
viewed current station is shown.
Touch any point on the tide graph to view the current activity at
•
a different time. You can also drag your nger along the graph
to scroll.
Local time
Tide level at
local time
The Tide Station Graph
Touch Nearby Stations to view other current stations close to
•
your present location.
Touch Change Date > Manual to view current information for
•
a different date.
Touch Show Report to view the Current Report for the selected
•
station.
GPSMAP 640 Owner’s Manual 27
Page 36

Marine Mode: Viewing Almanac Data
Viewing Celestial Information
You can view celestial almanac data for your present location. You
can view information about sunrise, sunset, moonrise, moonset, the
moon phase, and the approximate sky view location of the sun and
moon.
To view celestial information from the Home screen, touch
Information > Celestial.
Touch Change Date > Manual to view information for a
•
different date.
Touch the left and right arrows to view celestial information for
•
a different time on that date.
Touch Moon Phase to view the moon phase at the specied
•
date and time. Touch Show Skyview to return to the celestial
sky view.
Touch Next Day or Previous Day to view celestial information
•
for a different day.
28 GPSMAP 640 Owner’s Manual
Page 37

Marine Mode: Managing User Data
To view and manage marine user data from the Home screen, touch
Information > User Data.
Waypoints List—display a list of all saved waypoints.
•
Routes—display a list of saved routes.
•
•
•
•
NOTE:
between marine mode and automotive mode.
Transferring Marine Data (Waypoints, Routes, Tracks) to or from an SD Card
1. Insert an SD card into your device (see page 4).
2. From the Home screen, touch Information > User Data >
Select an option:
—display a list of saved tracks.
Tracks
Data Transfer
—transfer waypoints, routes, and tracks, to and
from an SD card.
Clear User Data
—erase all user waypoints, routes, and tracks.
User data (waypoints, routes, and tracks) is not shared
Data Transfer.
Save To Card—save waypoints, routes, and tracks to the
•
SD card.
•
•
•
Backing up Marine Data to a PC
1. Insert an SD card into your device (see page 4).
2. From the Home screen, touch Information > User Data >
Data Transfer > Save to Card. A list of user-created data les
appears.
3. Create a new data le on the card if you have not created one
previously. Touch Add New File and enter a le name.
4. Remove the SD card from the device and insert it into an SD
card reader that is attached to a PC.
5. From Windows® Explorer, open the Garmin\UserData folder on
the SD card.
6. Copy the <lename>.ADM le on the card and paste it to any
location on the PC.
Marine Mode: Managing User Data
Merge From Card—transfer data from the SD card to the
unit and combine it with existing user data.
Replace From Card—overwrite items on your device.
Copy Built�In Map—copy the pre-loaded basemap on
the GPSMAP 640 to and SD card for use with compatible
Garmin PC-software products.
GPSMAP 640 Owner’s Manual 29
Page 38

Marine Mode: Managing User Data
Restoring Backup Marine Data to your Device
1. Copy the <lename>.ADM le from your PC to an SD card in a
folder named Garmin\UserData.
2. Insert the SD card into your device.
3. From the Home screen on your device, touch Information >
User Data > Data Transfer > Replace From Card.
4. Touch the name of the data le you want to restore.
Copying or Merging MapSource® Marine Data to the GPSMAP 640
1. Insert an SD card into your GPSMAP 640 device. The unit
places a le on the card that provides information to MapSource
to format data. This only needs to be done the rst time you
copy or merge MapSource data to your device from a specic
SD card.
2. Check your MapSource version on your PC by clicking Help >
About MapSource. If the version is older than 6.12.2, update to
the most current version by clicking Help > Check for Software
Updates or check the Garmin Web site at www.garmin.com.
3. Insert the SD card into an SD card reader that is attached to the
PC.
4. From MapSource, click on Transfer > Send to Device.
5. From the Send to Device window, select the drive for the
SD card reader, and the types of data you want to copy to your
device.
6. Click Send. MapSource transfers a le named
USERDATA.adm to the SD card.
7. Insert the SD card into your device.
8. From the Home screen on your device, touch Information >
User Data > Data Transfer.
9. Touch Replace From Card or Merge From Card to copy or
merge the data into your device.
30 GPSMAP 640 Owner’s Manual
Page 39

Marine Mode: Managing Information From Other Vessels
Marine Mode: Managing Information
From Other Vessels
Use the Information screen to view and manage information about
other boats.
NOTE:
To view information about other boats, your unit must be
connected to an external Automatic Identication System (AIS) or
Digital Selective Calling (DSC) device.
Viewing AIS Information
From the Home screen, touch Information > Other Vessels >
AIS List to view the Maritime Mobile Service Identities (MMSIs)
or names (if the boat is broadcasting a name) of nearby AISequipped boats.
The AIS list is sorted by range, with the nearest boat at the top of
the list.
Viewing DSC Information
From the Home screen, touch Information > Other Vessels >
DSC List to view a list of all received DSC distress calls and
position reports.
By default, the DSC list is sorted by name. To change the sorting of
the DSC list, touch Menu, then choose a category to sort by:
Sort by Name—(default) show an alphanumerical list of DSC
•
calls and reports, sorted by name.
•
Sort by Time
received, sorted and listed chronologically by time and date.
Calls and reports with identical time and date information show
the same information in the list.
•
Sort by MMSI
reports, sorted by MMSI number.
•
Sort by Type
show the most recent calls or reports, sorted chronologically.
—show the most recent DSC calls and reports
—show an alphanumerical list of calls and
—separate distress calls from position reports, and
GPSMAP 640 Owner’s Manual 31
Page 40

Marine Mode: Managing Information From Other Vessels
Using DSC Information
To edit or interact with DSC distress calls and position reports,
select a distress call or a position report from the DSC List.
Edit
—add a name to the DSC call or report to help better
•
identify the vessel by MMSI number.
•
Navigate To
—set the selected DSC call or report as a
navigation destination. See page 14 for information about
navigating to a destination.
Create Waypoint—mark a waypoint at the position of the
•
selected DSC call or report. See page 22 for more information
about waypoints.
Clear Report—delete the selected DSC call or report.
•
Deleting All Received DSC Information
From the Home screen, touch Information > Other Vessels >
DSC List > Menu > Delete All to delete the list of all received
DSC distress calls and position reports.
32 GPSMAP 640 Owner’s Manual
Page 41

Marine Mode: Advanced
Use the Congure menu to congure general unit settings.
Use the Menu screen on various chart screens to congure chartspecic information.
From the Home screen, touch Congure > System.
Simulator—turn Simulator Mode On or Off. Touch Setup to set
Simulator options.
Language—touch to set the on-screen language.
Beeper/Display—set beeper and display options.
Beeper—touch Beeper to set when the unit makes audible
•
sounds. The settings are Off, Alarms Only, and On (Key and
Alarms) (default).
Display—touch Display to open the display menu.
•
Backlight Slider—adjust the intensity of the backlight.
◦
Color Mode—touch Color Mode to select Day Colors
◦
or Night Colors, or touch Auto to allow the device to
automatically adjust the colors.
•
•
•
GPS—view GPS information and change GPS settings.
•
•
•
System Information
settings, view the event log, and save system information.
Marine Mode: Advanced Conguration
Volume—adjust the volume levels.
◦
Screenshot Capture—toggle the screenshot capture feature on
and off. With the screenshot capture on, touch and hold Home
on any screen to take a screenshot. The screenshot is saved to an
inserted SD card.
Audio Out
has a high-impedance input. If you are experiencing audio
distortion, try toggling this setting between Low-Z and High-Z
to improve audio performance.
Calibrate Touch Screen
calibrate the touchscreen.
Skyview—view the GPS satellite constellation.
WAAS/EGNOS
EGNOS (in Europe) on or off. WAAS/EGNOS can provide
more-accurate GPS position information; however, when using
WAAS/EGNOS, the device takes longer to acquire satellites.
Speed Filter—set the speed lter to On, Off, or Auto. The
speed lter averages the speed of your boat over a short period
of time for smoother speed values.
—set to High-Z for best sound quality if your stereo
—touch the dots as they appear to
—toggle WAAS (in North America) or
—view system information, restore factory
GPSMAP 640 Owner’s Manual 33
Page 42

Marine Mode: Advanced Conguration
Factory Settings—erase all user settings and return the device
•
to factory default settings.
•
Event Log
—view a list of system events. Select an event to
view additional information.
Save to Card—save system information to an SD card. It is
•
advised to use this function only if instructed to do so by a
Garmin Product Support Specialist.
Speed Sources—specify the sensor used for Wind numbers. Touch
Wind to toggle between Water (from a water speed sensor) and
GPS (from the calculated GPS speed).
Usage Mode
—change to automotive mode.
Changing Units of Measure
From the Home screen, touch Congure > Units.
NOTE: You must be receiving NMEA sonar depth data and
temperature data to view depth and temperature information.
Distance—set the units of measure for distance readings (Miles,
•
Kilometers, or Nautical Miles).
Speed—set the units of measure for Vessel Speed and for Wind
•
Speed readings (Miles Per Hour, Kilometers Per Hour, or
Knots).
•
Elevation
—set the units of measure for elevation readings
(Feet or Meters).
•
Atmospheric Pressure
—set the units of measure for
atmospheric (Millibars or Inches of Mercury) pressure
readings.
Heading—set the reference used in calculating heading
information.
System Units
(mh, ft, ºF), Metric (kh, m, ºC), Nautical (kt, ft, ºF), or Custom.
Touch Custom to individually dene units of measure for:
Depth—set the units of measure for depth to Feet, Fathoms, or
•
Meters.
•
Temperature
—specify system-wide units of measure: Statute
—set units of measure for temperature to
Auto Mag Var (
•
Automatic Magnetic Variation)—automatically
set the magnetic declination for your location.
•
•
•
—set true north as the heading reference.
True
Grid—set grid north as the heading reference (000º).
User Mag Var
—set a custom magnetic variation value.
Fahrenheit (ºF) or Celsius (ºC).
34 GPSMAP 640 Owner’s Manual
Page 43

Marine Mode: Advanced Conguration
Position Format—select the coordinate system in which a given
location reading appears. Do not change the position format unless
you are using a map or chart that species a different position
format.
Map Datum—select the coordinate system in which the map is
structured. The default setting is WGS 84. Do not change the map
datum unless you are using a map or chart that species a different
position format.
Time
—change time settings.
Time Format—
•
set the time format (12 hour, 24 hour, or UTC)
for time readings.
•
Time Zone
—set the time zone displayed for time readings.
Communications Settings
From the Home screen, touch Congure > Communications.
Port Types
Transfer, NMEA Std. or NMEA High Speed) for each port to
use when connecting your unit to external NMEA devices, to a
computer, or to other Garmin devices.
Garmin Data Transfer
•
that is used to interface with Garmin computer programs.
•
NMEA Std.
GPSMAP 640 Owner’s Manual 35
—select the input/output format (Garmin Data
—a proprietary data transfer protocol
—supports the input or output of standard NMEA
0183 data, DSC, and sonar NMEA input support for the DPT,
MTW, and VHW sentences.
•
NMEA High Speed
—supports the input or output of high
speed NMEA 0183 data for most AIS receivers.
NMEA Setup
—enable or disable NMEA 0183 output for route
sentences and system sentences, and adjust Garmin NMEA
settings.
Posn. Precision—adjust the number of digits (Two Digits,
•
Three Digits, or Four Digits) to the right of the decimal point
for transmission of NMEA output.
•
Waypoint IDs
—select how the unit outputs waypoint identiers
(Names or Numbers).
Diagnostics—a tool used by installers to verify that
•
NMEA 0183 data is being sent across the system.
Enabling or Disabling NMEA 0183 Output
Sentences
1. From the Home screen, touch > Communications >
NMEA 0183 Setup.
2. Touch a setting (Route, System, or Garmin).
3. Touch the NMEA output sentence.
4. Touch Off to disable, or touch On to enable, the NMEA 0183
output sentence.
Page 44

Marine Mode: Advanced Conguration
You can congure the GPSMAP 640 to alert you when certain
events occur.
Setting Navigation Alarms
From the Home screen, touch Congure > Alarms > Navigation.
Arrival
—sets an alarm to sound when you arrive at a
predetermined point.
Type
•
•
•
Anchor Drag
distance from your current location.
Off Course
distance from your current course.
—set the alarm to sound either at the Destination Only
or at the Destination and Turns (when navigating a route with
turns).
Activation
sounds the alarm when you are a specied distance from the
point. The Time setting sounds the alarm when you are a
specied time from the point.
Change Distance/Change Time
from the point at which the alarm will sound.
—set the criteria for the alarm. The Distance setting
—specify the distance or time
—set an alarm to sound when you drift a specied
—set an alarm to sound when you steer a specied
Setting System Alarms
From the Home screen, touch Congure > Alarms > System.
Clock—set an alarm using the system (GPS) clock. The unit must
be on for the clock alarm to work.
GPS Accuracy
accuracy falls outside the specied value.
—set an alarm to sound when the GPS location
Setting Sonar Alarms
From the Home screen, touch Congure > Alarms > Sonar.
NOTE:
You must connect an optional sonar module and a
transducer using NMEA 0183 to receive sonar information.
Shallow Water/Deep Water—set an alarm to sound when the
depth is less than or greater than the specied value.
Water Temp
temperature sensor reports a temperature that is 2°F (1.1°C) above
or below the specied temperature.
—set an alarm to sound when the transducer or
Setting Weather Alarms
NOTE: You must have a subscription to XM WX™ Weather and a
GXM 40 antenna connected to view weather information. See
page 47 for more information.
From the Home screen, touch Congure > Alarms > Weather.
36 GPSMAP 640 Owner’s Manual
Page 45

Marine Mode: Advanced Conguration
Turn the following alarms on or off:
Marine
•
Tornado
•
Severe Storm
•
Flood
•
Flash Flood
•
My Boat
From the Home screen, touch Congure > My Boat.
Keel Offset
making it possible to measure depth from the bottom of the keel
instead of from the transducer location. Enter a positive number to
offset for a keel. Enter a negative number to compensate for a large
vessel that may draw several feet of water.
To adjust the Keel Offset:
1. From the Home screen, touch > My Boat > Keel
Offset.
2. Use the on-screen keyboard to specify the offset.
•
•
—offset the surface reading for the depth of a keel,
If you are measuring down to the keel (transducer installed
at the water line), enter a (+) positive number.
If you are measuring up to the water line (transducer
installed on the keel), enter a (-) negative number.
3. Touch Done to accept the number.
Turn Transition Distance—set how far before a turn in a route
that you transition to the next leg.
Other Vessels
From the Home screen, touch Congure > Other Vessels.
NOTE:
unit must be connected to an external AIS or DSC device.
AIS
—turn AIS on or off. AIS alerts you to area trafc by providing
the boat IDs, the position, the course, and the speed for boats that
are within range and equipped with a transponder.
DSC—turn DSC on or off.
AIS Alarm (AIS only)
equipped vessels are within a specied range. This is used for
collision avoidance and can be customized.
Range—change the measured radius of the Safe Zone ring to a
•
specied distance from 500 ft. to 2.0 nm (or 150 m to 3 km, or
500 ft. to 2.0 mi.).
•
Time to (Safe Zone)
a target will intersect the Safe Zone within the dened time
interval (ranging from 1 to 24 minutes).
To congure AIS or DSC information for other boats, your
—set an alarm to sound when other AIS-
—sounds an alarm if AIS determines that
GPSMAP 640 Owner’s Manual 37
Page 46

Marine Mode: Advanced Conguration
NOTE: Additional AIS and DSC conguration options are
available from the Navigation chart options. See page 39.
From the Home screen, touch Congure > Navigation.
Auto Guidance—
boat.
Safe Depth—set the minimum depth (using chart depth data)
•
allowed when calculating an auto-guidance path. A safe depth of
less than one meter is not allowed when using Auto Guidance.
Safe Height—set the minimum height (using chart height data)
•
of a bridge that your boat can safely travel under.
Shoreline Distance—set how close you want to travel near the
•
shore: Nearest, Near, Normal, Far, or Farthest. This is used
by the automatic guidance calculation to determine how close
to the shoreline you want the automatic-guidance line to be.
Changing this while navigating an automatic-guidance line will
recalculate the path.
Route Labels—for saved routes, this determines whether route
turns are indicated by number (Turn 1, Turn 2, and so on), by
waypoint name, or whether the description of turns is hidden.
Turn Transition Activation
38 GPSMAP 640 Owner’s Manual
select the Auto Guidance parameters for your
—set how the chartplotter transitions
to the next leg in a route. Increasing time or distance can improve
autopilot accuracy when navigating a route or an automaticguidance line with many frequent turns, or when traveling at higher
speeds. Decreasing time or distance can improve autopilot accuracy
when navigating a straighter route or automatic-guidance line, or
when traveling at slower speeds.
Turn Transition Time—set the time before a turn in a route
•
that you transition to the next leg.
Turn Transition Distance—set the distance before a turn in a
•
route that you transition to the next leg.
Off—transition when you have arrived at the next leg.
•
XM Radio
From the Home screen, touch Congure > XM Audio.
NOTE:
You must connect the optional GXM 40 XM receiver and
have a subscription to XM Radio to use XM Radio features. For
more information, refer to page 47.
Volume Slider—adjust the XM volume level.
Volume—show the volume level as a percentage. Touch Volume to
mute the XM Radio.
Channel Guide—select the specic XM channel within the
currently selected category.
Page 47

Marine Mode: Advanced Conguration
Channel Entry—enter a channel using the on-screen keyboard.
Category—select the category of channels that are displayed in the
Channel Guide.
Save Preset—save the current XM channel in the Presets list.
Touch Delete Preset to remove the current channel from the list.
“Presets” is displayed as a category in the category list.
Waypoints Display—select whether to show labels for
•
waypoints of a particular symbol with the waypoint name,
a comment, or a symbol only. You can also select to hide a
waypoint on charts by symbol. This allows the waypoints on
the map to be quickly limited to those most relevant to your
current activity.
Other Vessels
specic AIS display settings.
From the Navigation chart, touch Menu.
Waypoint and Tracks
information. For more information on waypoints and tracks,
see page 22.
Tracks
•
•
•
•
—toggle tracks on or off.
Waypoints List—view a list of all saved waypoints.
New Waypoint—mark a new waypoint.
Active Track
track, follow the active track, or save the active track.
•
Saved Tracks
•
Tracks Display
color.
—access shortcuts to waypoint and track
—change active track options, clear the active
—view the saved tracks list.
—show or hide tracks on the chart according to
DSC List—view the DSC list. See page 31.
•
•
DSC Trails
vessels on the Navigation chart. For example, if you select
4 Hours, all trail points less than four hours old for tracked
vessels are displayed. The Navigation chart displays a black line
indicating the path of the vessel, a black dot for each reported
position, and a Blue Flag symbol indicating the last reported
position. Touch Off to turn trails off for all vessels.
AIS List—view the AIS list. See page 31.
•
•
AIS Alarm
•
AIS Display Setup
settings.
◦
—access AIS and DSC shortcuts, as well as chart-
—select the number of hours to show tracked
—set the AIS alarm. See page 37.
—congure chart-specic AIS display
AIS Display Range
—specify the distance from your boat
on the navigation chart where AIS icons are visible.
GPSMAP 640 Owner’s Manual 39
Page 48

Marine Mode: Advanced Conguration
Projected Heading—specify the amount of time ahead of
◦
an AIS target to project the heading of the AIS target.
Details—toggle AIS details on the Navigation chart on or
◦
off.
◦
—show trails behind AIS icons on the Navigation
Trails
chart for a position history of other vessels. Specify the
amount of time behind each AIS icon you want to maintain
a trail.
Stop Navigation—stop active navigation.
Appearance
From the Navigation chart, touch Menu > Navigation Chart
Setup.
Photos—enable and congure BlueChart g2 Vision high-resolution
satellite imagery. See page 12.
Tides/Currents
icons on or off.
Service Points—toggle the marine services icons on or off.
Roses—enable information roses around the boat icon. Touch the
rose you want to view on the chart. Touch None if you do not want
a rose to appear on the chart.
—toggle the tide station icons and current station
NOTE: You must connect an optional NMEA 0183 wind sensor to
view the True Wind and Apparent Wind roses.
Weather—congure the appearance of weather options on the
Navigation chart. This option is only available when connected
to a Garmin GXM 40 XM antenna device. See page 47 for more
information on interpreting weather features.
Weather—general weather toggle. Turn all enabled and
•
available weather features on the navigation chart on or off.
•
NEXRAD
Cloud Cover—toggle the cloud cover overlay on or off.
•
Visibility—toggle the visibility overlay on or off.
•
WX Buoys—toggle the WX buoy icons on or off.
•
Show Legend—show the NEXRAD/cloud cover/visibility
•
—toggle the NEXRAD weather overlay on or off.
legend window on the Navigation chart. Touch the legend
window on the Navigation chart to hide it.
Data Bars—control how charting numbers appear on the screen.
Choose to show or hide the numbers by category. When set to
Auto, the overlay numbers appear only when that category is
active.
Cruising: GPS speed and GPS heading.
•
40 GPSMAP 640 Owner’s Manual
Page 49

Marine Mode: Advanced Conguration
Data Bar Setup—specify the position of the data bar on the
◦
Navigation chart, and specify the contents of the elds.
Navigation: GPS speed, distance to destination, arrival (time),
•
off course, bearing (to destination), and GPS heading. When
set to Auto, these numbers appear only when navigating to a
destination.
Data Bar Setup—toggle the Route Leg data eld (shows
◦
additional route information) and specify how each
data eld provides navigation information (by time or
by distance).
Fishing: Depth, water temperature, and water speed. Depth,
•
temperature, and water speed are only available when connected
to a sonar unit.
Sailing: Water speed, wind speed, wind angle, and Wind
•
Velocity Made Good (VMG). Wind speed, angle and VMG
are only available when connected to an optional NMEA 0183
wind sensor. See page 43 for more information on how the
chartplotter displays Wind VMG and Waypoint VMG.
Wind—choose the type of wind data used in the sailing data
◦
elds (apparent or true).
Compass Tape: Displays the current heading. An indicator
•
that shows the bearing to the desired course is displayed while
navigating.
When you are off course, the distance between your current
heading and the corrected course is called the Course to Steer,
and is shaded orange on the compass tape.
Bearing
indicator
Compass Tape – Off Course
Heading
indicator
Compass Tape – On Course
GPSMAP 640 Owner’s Manual 41
Page 50

Marine Mode: Advanced Conguration
Chart Appearance—customize the appearance of the Navigation
•
chart.
Orientation
•
◦
North Up
—change the perspective of the map display:
—set the top of the map display to a north
heading.
◦
Head Up
GPS heading. The heading line appears vertically on the
—set the top of the map display according to your
•
screen if it is shown. If the device is connected to a
NMEA 0183 heading sensor, the map remains oriented
according to GPS heading (course over ground), but the
vessel icon rotates according to magnetic heading from the
sensor.
◦
Course Up
—set the map so the direction of navigation is
always up.
Detail—adjust the amount of detail shown on the map.
•
Heading Line—draws an extension from the bow of the boat in
•
Safety Shading (with compatible BlueChart g2 Vision cards)—
areas with depths shallower than the specied value are shaded in
blue, while areas with depths greater than the specied value are
shaded in white. The contour is always drawn at, or deeper than,
the selected depth.
•
the direction of travel.
—turn off the heading line.
◦
Off
Distance—set the distance to the end of the heading line.
◦
◦
—set the amount of time until you reach the end of the
Time
heading line.
World Map—toggle the world map (basemap) between a basic
world map and a full world map.
The basic world map shows coastal outlines of the world,
◦
with land indicated in yellow.
The full world map shows the coastal outlines of the world
◦
with the land covered in a low-resolution photo image.
Spot Depths—turn on spot soundings and set a dangerous
depth.
Symbols—customize the symbols that appear on the Navigation
chart.
Navaid Size—adjust the size of the symbols shown on the
◦
map.
◦
Navaid Type
—set the navaid symbol set: National Oceanic
and Atmospheric Administration (NOAA) or International
Association of Lighthouse Authorities (IALA).
42 GPSMAP 640 Owner’s Manual
Page 51

Land POIs—toggle Points of Interest (POI) icons shown on
◦
land (this option is only available when using a BlueChart
g2 Vision SD card).
Light Sectors—adjust the drawing of light sectors on the
◦
map.
Chart Borders—(GPSMAP 640) toggle the preloaded
◦
BlueChart g2 chart borders on or off.
Understanding How Wind VMG and Waypoint
VMG Are Displayed in the Data Bars
The chartplotter automatically switches between displaying Wind
Velocity Made Good (VMG) and Waypoint VMG in the data bars.
Waypoint VMG is displayed under the following conditions:
The Route Leg data bar displays Waypoint VMG when you are
•
navigating a route or an automatic guidance line.
The Sailing data bar displays Waypoint VMG when you are
•
navigating a route or an automatic guidance line, and you turn
the Route Leg data bar off.
Wind VMG is displayed under the following conditions:
The Sailing data bar displays Wind VMG when you are not
•
navigating a route or an automatic guidance line.
Marine Mode: Advanced Conguration
The Sailing data bar displays Wind VMG when the Route Leg
•
data bar is on and you are navigating a route.
Mariner’s Eye 3D Options
From the Perspective 3D screen or the Mariner’s Eye 3D screen,
touch Menu.
Waypoint and Tracks
information shortcuts, as on the Navigation chart. See page 39.
Other Vessels
as chart-specic AIS display settings, as on the Navigation chart.
See page 39.
Weather Radar—toggle the NEXRAD weather overlay on or off.
This option is only available when connected to a Garmin GXM
40 XM antenna device. See page 47 for more information on
interpreting weather features.
Data Bars—control how charting numbers appear on the screen,
as on the Navigation chart. See page 40. You can also turn the
compass tape on or off (see page 41).
Chart Appearance
3D or Mariner’s Eye 3D screen.
—provide access to AIS and DSC shortcuts, as well
—provides access to waypoint and track
—customize the appearance of the Perspective
GPSMAP 640 Owner’s Manual 43
Page 52

Marine Mode: Advanced Conguration
Style—(Mariner’s Eye 3D only) select how chart data is
•
displayed over 3D terrain.
Hazard Colors—(Mariner’s Eye 3D only) turn hazard colors
•
on or off.
setting indicates shallow water and land with a color
◦
On
scale. Blue indicates deep water, yellow is shallow water,
and red is very shallow water.
setting shows the land as seen from the water.
◦
Off
Range Rings—toggle the range rings on or off.
•
Safe Depth—(Mariner’s Eye 3D only) adjust the depth at which
•
red indicates shallow water.
Lane Width—adjust the width of the course line drawn when
•
navigating. This setting affects direct navigation (Go To) and
routes (Route To), but does not affect automatic guidance
(Guide To).
Fish Eye 3D Settings
From the Fish Eye 3D screen, touch Menu.
View—change the viewpoint. Choose the direction you want the
camera to point. For example, if you touch Port, the view places
the camera to starboard, looking across the boat to port.
Data Bars—control how charting numbers appear on the screen, as
on the Navigation chart. See page 40.
Fishing Chart Settings
From the Fishing chart, touch Menu.
Waypoint and Tracks
information, as on the Navigation chart. See page 39.
Other Vessels
specic AIS display settings, as on the Navigation chart. See
page 39.
Navaids—toggle all navaids, such as lights and buoys, on or off.
From the Fishing chart, touch Menu > Fishing Chart Setup.
Roses—enable information roses around the boat icon, as on the
Navigation chart. See page 40.
Data Bars—control how charting numbers appear on the screen,
as on the Navigation chart. See page 40. You can also turn the
compass tape on or off (see page 41).
—access shortcuts to waypoint and track
—access AIS and DSC shortcuts, as well as chart-
Tracks
—toggle tracks on or off.
44 GPSMAP 640 Owner’s Manual
Page 53

Marine Mode: Advanced Conguration
Weather—congure the appearance of weather options on the
•
Fishing chart, as on the Navigation chart. See page 40. Instead of
Cloud Cover and Visibility, the weather appearance option on the
Fishing chart contains toggles for Sea Temp and Fish Species.
Chart Appearance
—customize the appearance of the Fishing
chart.
Orientation
•
—changes the perspective of the map display, as on
Interval
Recording more-frequent plots is more accurate, but lls the track
log faster.
•
the Navigation chart. See page 42.
Detail—adjusts the amount of detail shown on the map.
•
Heading Line—draws an extension from the bow of the boat in
•
the direction of travel, as on the Navigation chart. See page 42.
Navaid Size—adjusts the size of the symbols shown on the
•
map.
•
Navaid Type
From the Home screen, touch Information > User Data > Tracks
—sets the navaid symbol set (NOAA or IALA).
•
Track Color
> Active Track Options.
Record Mode—select Off, Fill, or Wrap
Off—does not record a track log.
•
Fill—records a track log until the track memory is full.
•
Wrap—continuously records the track log, replacing the oldest
track data with new data.
—dene the frequency at which the track is recorded.
Interval
—set whether the interval is determined by distance,
time, or resolution. (Touch Change to set the quantity.)
Distance—record the track based on a distance between
◦
points.
◦
◦
—record the track based on a time interval.
Time
Resolution—record the track based on a variance from
your course. This setting is recommended for the most
efcient use of memory. The distance value (Change) is
the maximum error allowed from the true course before
recording a track point.
Change—set the value of the interval.
—set the color of the track.
GPSMAP 640 Owner’s Manual 45
Page 54

Marine Mode: Advanced Conguration
From the Home screen, touch Dashboard > Numbers > Menu >
Congure.
1. Select the number of data elds you want to show on
the Numbers screen. The Numbers screen appears with
changeable data elds.
2. Touch the data eld you want to change.
3. Touch the data type you want to appear in the selected data
eld.
4. Repeat steps 3 and 4 until all the data elds contain the
information you want.
5. Touch Done.
46 GPSMAP 640 Owner’s Manual
Page 55

Marine Mode: Using XM WX Weather and Audio
Marine Mode: Using XM WX Weather
and Audio
To use XM WX Satellite Weather on your GPSMAP 640, you
must connect a Garmin GXM 40 XM antenna and activate an XM
WX weather subscription. To use XM Radio, you must connect
a Garmin GXM 40 XM antenna and activate an XM WX Radio
subscription.
Notes:
• XM service is available only in the lower 48 United States and
southern Canada.
• You must purchase and activate your XM service before you
can use the XM features.
Using XM WX Weather
The GXM 40 receives XM WX Weather data and shows it on the
Navigation chart and other screens throughout the device in marine
mode. The weather data for each feature comes from reputable
weather data centers such as the National Weather Service and the
Hydrometerological Prediction Center. (See the XM WX Satellite
Weather Web site at http://www.xmwxweather.com for more
information.) Any weather feature can change in appearance or
interpretation if the source that provides the information changes.
XM WX Weather data is broadcast at predetermined rates. For
example, NEXRAD (NEXt Generation Weather RADar) data is
broadcast at ve minute intervals. When the Garmin unit is turned
on or when a new feature is selected, the GXM 40 has to receive
new data before it can be shown. You might experience a delay
before weather data or a new feature appears on the map.
Setting the XM WX Weather Options
To congure the weather settings from the Home screen, touch
Weather > Weather Setup. From this menu, you can turn the
NEXRAD Loop on or off, and hide or show the weather Legend.
Viewing Precipitation Information
Precipitation shows NEXRAD radar, storm cells, lighting strikes,
and hurricane warnings. To view the Precipitation screen from the
Home screen, touch Weather > Precipitation.
GPSMAP 640 Owner’s Manual 47
Page 56

Marine Mode: Using XM WX Weather and Audio
Viewing NEXRAD Radar Information
NEXRAD shows precipitation, from very light rain and snow
to strong thunderstorms, in varying shades and colors. To turn
the NEXRAD loop on from the Home screen, touch Weather >
Weather Setup > NEXRAD Loop > On.
In the lower-left corner of the screen is a time stamp. The Time
Stamp indicates the elapsed time since the National Weather
Service last updated the information.
To view the weather legend from the Home screen, touch Weather
> Weather Setup > Legend > Show. NEXRAD is shown
independently or with a variety of other weather information.
NEXRAD Weather Overlay
To turn cloud cover on or off, touch Menu > Cloud Cover > Hide
or Show.
Understanding Storm Cell Information
The storm cells show storms as well as the projected path of a
storm in the immediate future.
The direction of the red cone indicates the projected path of the
storm cell. The red bars that appear in the cone indicate where
the storm will most likely be in the future. Each bar represents 15
minutes.
Storm Cells
Understanding Lightning Information
Lightning strikes are represented by lightning bolt icons. Lightning
appears on the map if strikes were detected within the last seven
minutes. The ground-based lightning detection network only
detects cloud-to-ground lightning.
48 GPSMAP 640 Owner’s Manual
Page 57

Marine Mode: Using XM WX Weather and Audio
Understanding Hurricane Information
The Hurricanes feature shows the current position of a hurricane,
tropical storm, or tropical depression, as well as a projected path
(indicated by a red line). The darkened dots that appear along
the red line indicate the projected locations received from the
Understanding County Warnings
When the National Weather Service issues a weather warning for
a county, the county is highlighted with the color corresponding
to the warning. To view information about the warning, touch the
county.
National Hurricane Center. The center provides four forecasts at
12-hour intervals (12, 24, 36, and 48 hours), as well as the current
conditions (now).
Hurricane
Understanding Marine Warnings
When a Marine Warning is issued, the area for the warning is
highlighted in red. To view information about the warning, touch
the warning area. The light blue lines on the chart indicate marine
weather warning zones.
Viewing Forecast Information
Forecasts show the weather conditions, including fronts and
precipitation. To view the forecast for another time period, touch
Next Forecast. The forecasted weather for the next 12 hours is
shown. Continue to touch Next Forecast to view forecasts for the
next 24, 36, and 48 hours. To view forecast information for another
location, touch and drag the screen until the desired location
appears.
Tornado warning (red)
Severe thunderstorm warning (yellow)
Flood warning (dark blue)
Flash ood warning (light blue)
GPSMAP 640 Owner’s Manual 49
Page 58

Marine Mode: Using XM WX Weather and Audio
Understanding Fronts
Fronts show lines indicating the leading edge of an air mass.
This feature also shows pressure centers. Pressure centers are
Understanding City Forecasts
City forecasts appear as standard weather symbols. The forecast is
viewed in 12-hour increments for the next 48 hours.
represented by a large Red “L” for low-pressure centers, or a large
Blue “H” for high-pressure centers. Pressure centers represent an
area where pressure is measured to be either the highest or the
lowest relative to the surrounding area.
Cold Front
Warm Front
Stationary Front
Occluded Front
Trough
Low-pressure Center—A low-pressure center is an
area where the measured pressure is lowest relative to
the surrounding area. Moving away from a low-pressure
center in any horizontal direction results in increased
Viewing Sea Conditions
Sea Conditions provide surface conditions including winds, wave
height, wave period, and wave direction.
pressure. Winds ow counterclockwise around Low
Pressure Centers in North America.
High-pressure Center—A high-pressure center is an
area where the measured pressure is highest relative to
the surrounding area. Moving away from a high-pressure
center in any horizontal direction results in decreased
pressure. Winds ow clockwise around high pressure
centers in North America.
City Forecasts
Sea Conditions
50 GPSMAP 640 Owner’s Manual
Page 59

Marine Mode: Using XM WX Weather and Audio
Understanding Surface Winds
Wind barbs indicate from which direction the wind is coming. The
wind barb is a circle with a tail. Wind speed is indicated by the
Viewing Fishing Information
The Fishing view contains current water temperatures, surface
pressure conditions, and shing forecasts.
different combinations of ags that are attached to the tail.
Wind Direction
Calm
5 knots
10 knots
15 knots
20 knots
50 knots
Understanding Surface Pressure
Understanding Wave Height
The Wave Height feature shows wave heights. The wave heights
for an area are shown by color intensities.
Understanding Wave Period
The Wave Period feature provides the time (in seconds) between
successive waves.
Understanding Wave Direction
The Wave Direction feature shows the direction in which a wave is
moving, as indicated by the direction of red arrows.
This feature shows pressure isobars and pressure centers. The
isobars connect points of equal pressure. Pressure readings can help
determine weather and wind conditions in an area. High-pressure
areas are generally associated with fair weather. Low-pressure
areas are generally associated with clouds and the chance of
precipitation. Isobars packed closely together show a strongpressure gradient. Strong-pressure gradients are associated with
areas of stronger winds.
Pressure units are shown in millibars (mbar), inches of mercury
(inHg), and hectopascals (hPa).
Fish Forecasting
GPSMAP 640 Owner’s Manual 51
Page 60

Marine Mode: Using XM WX Weather and Audio
Understanding Water Temperature Data
The Water Temperature feature indicates the surface temperature
of the water, as indicated by the legend on the left of the screen.
Temperature breaks are indicated by isotherm lines.
Viewing Fish Forecasting
To view areas that contain optimal weather conditions for specic
species of sh, from the Home screen touch Weather > Fishing
> Menu > Fish Species. Touch a species of sh. Shaded areas
indicate optimal shing areas.
Viewing Visibility Information
To view visibility information, from the Home screen touch
Weather > Visibility. Visibility is the forecasted maximum
horizontal distance that can be seen at the surface, as indicated
by the legend on the left of the screen. Contour lines show the
forecasted change in surface visibility. To view the forecasted
visibility for another time period, touch Next Forecast. The screen
shows the forecasted visibility for the next 12 hours. Continue
to touch Next Forecast to view forecasts for the next 24 and 36
hours.
Viewing Buoy Reports
Report readings are taken from buoys and coastal observation
stations. These readings are used to determine air temperature,
dew point, water temperature, tide, wave height and period, wind
direction and speed, visibility, and barometric pressure.
To view a buoy report, touch a buoy ( ) on the Navigation chart,
then touch Buoy.
Visibility
Weather Buoy
52 GPSMAP 640 Owner’s Manual
Page 61

Using XM Audio
When you connect an optional GXM 40 XM antenna to your
GPSMAP 640, and you connect the GPSMAP 640 to the audio
input of your boat, you can listen to XM Audio channels.
To display the XM Audio interface from the Home screen, touch
Congure > XM Audio.
To display the XM Audio interface from any other chart or screen,
touch XM.
To select an XM Audio Channel, touch the right or left channel.
Select arrows to change to the next or previous channel within the
current category.
Volume—touch and drag the volume slider to adjust the volume, or
touch Volume to toggle the mute on or off.
Channel Guide—select a specic XM channel by name, within
the current category.
Marine Mode: Using XM WX Weather and Audio
Channel Entry
—enter a channel using the on-screen keyboard.
Category—select the category of channels that are displayed in the
Channel Guide.
Save Preset—save the current XM channel in the Presets list.
Touch Delete Preset to remove the current channel from the list.
“Presets” is displayed as a category in the category list.
GPSMAP 640 Owner’s Manual 53
Page 62

Automotive Mode: Getting Started
Automotive Mode: Getting Started
your GPSMAP 640 has acquired satellite signals. Now you can
select a destination and navigate to it.
Step 1: Mount Your GPSMAP 640
1. Place the GPSMAP 640 automotive dash mount on the
dashboard of your vehicle.
2. Snap the GPSMAP 640 mounting bracket onto the automotive
dash mount arm, and place the GPSMAP 640 in the mounting
bracket (see page 2).
3. Plug the speaker/vehicle power cable into a power outlet in your
vehicle. Your unit should turn on automatically, in automotive
mode, if it is plugged in and the vehicle is running.
Step 4: Use Your GPSMAP 640
Step 2:
➊
If your GPSMAP 640 device does not power on automatically,
press and hold the Power key until the device turns on. Follow
the on-screen instructions. Press and hold the Power key to turn
off your device.
GPS satellite strength.
➋
Usage mode. Touch this icon to change modes.
➌
Battery status.
➍
Current time. Touch to change time settings.
Step 3: Acquire Satellites
➎
Go outdoors to an open area, away from tall buildings and trees
and turn on your GPSMAP 640.
Acquiring satellite signals can take a few minutes. The bars
indicate satellite strength. When at least one of the bars is green,
Touch to nd a destination.
➏
Touch to view the map.
➐
Touch to adjust the volume.
➑
Touch to use the tools such as Settings and Custom Routes.
➊ ➋ ➌
➎ ➏
➐ ➑
Automotive Mode: Menu Page
➍
54 GPSMAP 640 Owner’s Manual
Page 63

Automotive Mode: Getting Started
Finding YourYour Destination
The Where To? menu provides several different categories for you
to use when searching for addresses, cities, and other locations. The
detailed maps loaded in your GPSMAP 640 contain millions of
points of interest, such as restaurants, hotels, and auto services.
1. Touch Where To?.
2. Select a category.
Adding a Stop
You can add a stop (called a Via Point) to your route. The
GPSMAP 640 gives you directions to the Via Point and then to
your nal destination.
1. With a route active, touch Menu > Where To?.
2. Search for the extra stop.
3. Touch Go!.
4. Touch Add as Via Point to add this stop before your
Taking a Detour
1. With a route active, touch Menu.
2. Touch Detour.
The GPSMAP 640 attempts to get you back on your original route
as quickly as possible. If the route you are currently taking is the
3. Select a subcategory.
4. Select a destination.
only reasonable option, the GPSMAP 640 might not calculate a
detour.
Stopping the Route
1. With a route active, touch Menu.
5. Touch Go!.
2. Touch Stop.
destination. Touch Set as New Destination to make this your
nal destination.
TIP: Touch and to see more choices.
GPSMAP 640 Owner’s Manual 55
Page 64

Automotive Mode: Where To?
Automotive Mode: Where To?
The Where To? menu provides several different categories you
can use to search for locations. To learn how to perform a simple
search, see page 55.
Setting a Home Location
Set your home location for the place you return to most often.
1. Touch Where To? > Go Home.
2. Select an option:
Finding an Address
NOTE: Depending on the version of the maps loaded on your
GPSMAP 640, the button names can change and some steps could
be ordered differently.
1. Touch Where To? > Address.
2. Change the state, the country, or the province, if necessary.
3. Touch Spell City, enter the city/postal code, and touch Done.
Select the city/postal code in the list. (Not all map data provides
postal code searching.) If you are unsure of the city, touch
Search All.
4. Enter the number of the address, and touch Done.
5. Enter the street name, and touch Done.
6. Select the correct street in the list, if necessary.
7. Touch the address, if necessary.
Going Home
To navigate home after you have set your home location, touch
Where to? > Go Home.
Changing Your Home Location
To set a different home location:
1. Touch Tools > My Data > Set Home Location.
2. Select an option:
To edit your home location:
1. Touch Where To? > Favorites > All Favorites > Home.
2. Touch Edit, enter your changes, and touch Done.
Enter your address.
•
Use your current location.
•
Choose from a list of recently found locations.
•
Enter your address.
•
Use your current location.
•
Choose from a list of recently found locations.
•
56 GPSMAP 640 Owner’s Manual
Page 65

Automotive Mode: Where To?
Go! Page Options
➊ ➋
➌ ➍
Go! Page
Using the On�Screen Keyboard
When an on-screen keyboard appears, touch a letter or number to
enter it.
Touch to add a space. Touch and to move the cursor.
Touch to delete a character. Touch and hold to erase the
entire entry.
Touch &?% to enter special characters, such as punctuation marks.
Searching Near Another LocationNear Another Location
➊
Touch to view a turn-by-turn map to this location.
➋
Touch to create a turn-by-turn route to this location.
➌
Touch to view this location on the map.
➍
Touch to save this location to your Favorites.
1. Touch Where To? > Near….
2. Select an option:
•
•
•
•
Finding a Place by Spelling the Name
If you know the name of the destination you are looking for, you
can spell it using the on-screen keyboard. You can also enter letters
contained in the name to narrow the search.
1. Touch Where To? > Points of Interest > Spell Name.
2. Using the on-screen keyboard, enter letters of the name of your
destination. Touch Done.
Finding Recently Found Places
Your GPSMAP 640 stores the last 50 of your recent nds in the
Recently Found list. The most-recently viewed places appear at the
top of the list. Touch Where To? > Recently Found to view your
recently found items.
Where I Am Now—search near your current location.
A Different City—search near the city you enter.
My Current Route—search along your active route.
My Destination—search near your current destination.
GPSMAP 640 Owner’s Manual 57
Page 66

Automotive Mode: Where To?
Deleting Recently Found Places
To remove all places from the Recently Found list, touch Clear >
Yes.
NOTE:
When you touch Clear, all items in the list are removed.
This process does not delete the actual place from your
GPSMAP 640.
Favoritesvorites
You can save places in your Favorites so you can quickly nd
them and create routes to them. Your home location is also stored
in Favorites.
Saving Your Current Location
From the Map page, touch the vehicle icon ( ). Touch Save
Location to save your current location.
Saving Places You Find
1. From the Go! page, touch Save.
2. Touch OK. The place is saved in Favorites.
Finding Saved Places
1. Touch Where To?.
2. Touch Favorites. Your saved locations are listed.
Editing Saved Places
1. Touch Where To? > Favorites.
2. Select the category and the location you want to edit.
3. Touch Edit.
4. Touch an item to edit:
Change Name—enter a new name, and touch Done.
•
Attach Photo—select a picture that you have loaded
•
on your GPSMAP 640 or on an SD card to assign to the
location.
Change Map Symbol—touch a new symbol used to mark
•
this location on the map.
Change Phone Number—enter a phone number, and touch
•
Done.
Change Categories—select another category for the
•
location.
Delete—touch Yes to remove this item from the Favorites
•
list.
Finding a Place Using the Map
Use the Browse Map page to view different parts of the map. Touch
Where To? > Browse Map.
58 GPSMAP 640 Owner’s Manual
Page 67

Automotive Mode: Where To?
Tips for Browsing the Map
Touch the map, and drag to view different parts of the map.
•
Touch and to zoom in and out.
•
Touch any object on the map. An arrow appears pointing at the
•
object. Touch Save to save this location.
Touch Go! to navigate to the location.
•
If the GPS mode is off, touch Set Loc to set your simulated
•
location to the selected location.
Using Custom Routes
Touch Where To? > Custom Routes. Select the route you want to
take, and touch Go!.
Creating a Custom Route
Use your GPSMAP 640 to create and save routes before your next
trip. You can save up to 10 routes.
1. Touch Where To? (or Tools) > Custom Routes > New.
2. Touch Add New Start Point.
3. Find a location for your start point, and touch Select.
4. Touch Add New End Point.
5. Find a location for your end point, and touch Select.
6. Touch to add another location to your route. Touch to
remove a location.
7. Touch Next to calculate your route and view it on the map.
8. Touch Save to save the route and exit.
Editing Custom Routes
1. Touch Where To? (or Tools) > Custom Routes.
2. Select the route you want to edit.
3. Touch Edit.
4. Touch an option to edit the route:
Change Name—enter a new name, and touch Done.
•
Add/Remove Points—add or remove points from the route.
•
Manually Reorder Points—change the order of points
•
along your route.
Optimally Reorder Points— automatically order the points.
•
Recalculate—change the route preference to calculate by
•
faster time, shorter distance, or off road.
Delete—remove this route.
•
Your changes are automatically saved when you exit any of the
route edit pages.
GPSMAP 640 Owner’s Manual 59
Page 68

Automotive Mode: Where To?
Entering Coordinates
If you know the geographic coordinates of your destination, you
can use your GPSMAP 640 to navigate to your destination using
the latitude and longitude coordinates (or other coordinate formats).
This can be especially helpful when geocaching.
1. Touch Where To? > Coordinates.
2. Touch Format to select the correct coordinate format for the
type of map you are using.
3. Touch a direction eld to select a new direction.
4. Touch a numeric eld to enter the coordinates, and touch Done.
5. After you have entered the proper coordinates, touch Next.
Navigating Off Road
If you are not following roadways as you navigate, use Off Road
mode. Touch Tools > Settings > Navigation > Route Preference
> Off Road > OK.
60 GPSMAP 640 Owner’s Manual
Page 69

Automotive Mode: Using the Map
➊
Touch to view the next turn.
Automotive Mode: Using the Map
Your route is marked with a magenta line. As you travel, your
GPSMAP 640 guides you to your destination with voice prompts,
arrows on the map, and directions at the top of the map. A
checkered ag marks your destination. If you depart from the
original route, your GPSMAP 640 recalculates the route and
provides new directions.
➊
➋
➌
➍
➋
➌
➍
➎
Next Turn
When you are navigating a route, the next turn shows the turn on
the map and the distance and time left before you reach the turn.
To view an upcoming turn on the map, touch the turn indicator on
the map, or touch any turn from the turn list.
➎
Turn List
Automotive Mode: Map Page
TIP: A speed limit icon could appear as you travel on major
roadways. This icon displays the current speed limit of the
roadway.
When you are navigating a route, the turn list displays turn-by-turn
instructions for your entire route and the distance between turns.
Touch the text bar on the top of the map to open the turn list. Touch
a turn on the list to view the instructions for that turn. Touch Show
Map to view the entire route on the Browse Map page.
Touch to view the turn list.
Touch to zoom in and zoom out.
Touch the vehicle icon to view the Where Am I? page.
Touch to view the Trip Computer.
GPSMAP 640 Owner’s Manual 61
Page 70

Automotive Mode: Using the Map
Trip Computer
The trip computer displays your current speed and provides helpful
statistics about your trip. To view the trip computer, touch the
Speed eld on the map.
If you make frequent stops, leave the GPSMAP 640 turned on so it
can accurately measure elapsed time during the trip.
Resetting the Trip Computer
Reset the trip computer before beginning a trip. From the map,
touch the Speed eld. Touch Reset Trip to reset the information on
the trip computer. Touch Reset Max to reset the maximum speed.
62 GPSMAP 640 Owner’s Manual
Page 71

Automotive Mode: Managing Files
Automotive Mode: Managing Files
You can store les, such as JPEG image les, in the internal
memory on the GPSMAP 640 or on an SD card.
NOTE: The GPSMAP 640 is not compatible with Windows
98, Me, or Windows NT®. It is also not compatible with Mac® OS
10.3 and earlier. This is a common limitation of most USB mass
storage devices.
The GPSMAP 640 supports the following le types:
JPEG and JPG image les.
•
Maps and GPX waypoint les from MapSource: see page 73.
•
User data is not shared between automotive mode and
NOTE:
marine mode.
®
95,
NOTE: Some operating systems or computers with multiple
network drives cannot display the GPSMAP 640 drives. See
your operating system Help le to learn how to map the drives.
4. Browse your computer for the le you want to copy. You can
copy JPEG and JPG image les or maps and GPX waypoint
les from MapSource.
5. Highlight the le, and click Edit > Copy.
6. Open the “Garmin” or memory card drive/volume.
7. Click Edit > Paste. The le appears in the list of les in the
GPSMAP 640 memory or on the memory card.
8. When you are nished transferring les, click the Safely
Remove Hardware icon in your toolbar (system tray), or drag
the volume icon to the Trash on Mac computers.
9. Unplug your GPSMAP 640 from your computer.
Copying Automotive Data to the Unit
Copying Files to the Unit
1. Insert an SD card in the GPSMAP 640 unit (optional).
2. Connect a mini-USB connector to the back of the GPSMAP 640.
3. Connect the larger end of the cable to an available USB port on
your computer. Your GPSMAP 640 and memory card appear as
removable drives in My Computer on Windows computers and
as mounted volumes on Mac computers.
Using MapSource
1. Check your MapSource version on your PC by clicking Help >
About MapSource. If the version is older than 6.12.2, update to
the most current version by clicking Help > Check for Software
Updates or check the Garmin Web site at www.garmin.com.
2. Connect a mini-USB connector to the back of the GPSMAP 640.
GPSMAP 640 Owner’s Manual 63
Page 72

Automotive Mode: Managing Files
3. Connect the larger end of the cable to an available USB port on
your computer. Your GPSMAP 640 and memory card appear as
removable drives in My Computer on Windows computers and
as mounted volumes on Mac computers.
NOTE: Some operating systems or computers with multiple
network drives cannot display the GPSMAP 640 drives. See
your operating system Help le to learn how to map the drives.
4. From MapSource, click on Transfer > Send to Device.
5. From the Send to Device window, select the drive for the
GPSMAP 640, and the types of data you want to copy to your
device.
6. Click Send. MapSource transfers a le named Temp.gpx le to
the Garmin\GPX directory.
7. Click the Safely Remove Hardware icon in your toolbar (system
tray), or drag the volume icon to the Trash on Mac computers.
8. Unplug your GPSMAP 640 from your computer.
Deleting Automotive Files
Connect the GPSMAP 640 to your computer, and open the
GPSMAP 640 or memory card drive/volume. Highlight the le you
want to delete, and press the Delete key on the computer keyboard.
NOTICE: If you do not know the purpose of a le, do not delete
it. Your GPSMAP 640 memory contains important system les that
should not be deleted.
64 GPSMAP 640 Owner’s Manual
Page 73

Automotive Mode: Using the Tools
Automotive Mode: Using the Tools
The Tools menu provides many features that are helpful when you
are traveling. From the Menu page, touch Tools to access the Tools
menu.
Settings
For information about the settings, see page 66.
Where Am I?
Touch Where Am I? to view current location information,
including hospitals, police stations, and fuel. This feature is helpful
if you need to tell emergency personnel your location. Touch Save
Location to save your current location.
Viewing a Slide Show
Touch Slide Show to start a slide show, which displays each image
for a few moments and then displays the next image.
Touch anywhere on the screen to stop the slide show. Touch Stop
to return to the list of pictures. Touch Resume to resume the slide
show. Touch and to zoom in and to zoom out.
Navigating to a Picture
If a picture contains location information, touch Info, and then
touch Go! to create a route to it.
My Data
Touch Tools > My Data to manage and delete your saved data,
such as your Favorites.
Picture Viewer
Use the picture viewer to view pictures that you have stored in your
GPSMAP 640 or on an SD card.
See page 63 for more information about loading pictures to your
GPSMAP 640.
1. Touch Tools > Picture Viewer.
2. Touch a picture to view a larger image of it.
3. Touch the arrows to view all the images.
GPSMAP 640 Owner’s Manual 65
Page 74

Automotive Mode: Advanced Conguration
Automotive Mode: AdvancedAdvanced
1. Touch Tools > Settings.
2. Touch the setting you want to change.
3. Touch the button under the setting name to change it.
Changing the System Settings
Touch Tools > Settings > System.
GPS Simulator—turn on the simulator to turn off the GPS and
simulate navigation, and to save battery power.
Usage Mode
Units
Keyboard—touch QWERTY for a layout similar to a computer
keyboard, or touch ABC for an alphabetical layout.
About—display the GPSMAP 640
the unit ID number, and the audio version number. You need this
information when you update the system software or purchase
additional map data (see page 73).
Restore—restore the original system settings.
—change to marine mode.
—change units of measure to Kilometers or Miles.
software version number,
Changing the Navigation Settings
Touch Tools > Settings > Navigation.
Route Preference—select a preference for calculating your route:
Faster Time
•
be longer in distance.
Shorter Distance—to calculate routes that are shorter in
•
distance but can take more time to drive.
•
Off Road
Avoidances
routes.
Restore—restore the original navigation settings.
—to calculate routes that are faster to drive but can
—to calculate point-to-point routes (without roads).
—select the road types you want to avoid on your
Adjusting the Display Settings
Touch Tools > Settings > Display.
Color Mode—select Daytime for a light background, Nighttime
for a dark background, or Auto to automatically switch between
the two.
Screen Shot—turn on Screen Shot mode. Touch to take a
screen shot. The picture bitmap le is saved in the
Garmin\Screenshot folder on the GPSMAP 640 drive.
66 GPSMAP 640 Owner’s Manual
Page 75

Automotive Mode: Advanced Conguration
Brightness—adjust the backlight brightness level. Reducing the
backlight brightness increases your battery life.
TIP:
you can also adjust the brightness level from any screen by
pressing and quickly releasing the Power key
Restore—restore the original display settings.
Adjusting the Volume
From the Menu page, touch Volume. Touch and to adjust the
volume. Touch the box next to Mute to mute all audio.
Adjusting the Backlight
1. From any screen, press and quickly release the Power key.
2. Touch and to adjust the backlight.
Updating the Time Settings
Touch Tools > Settings > Time.
Time Format
Current Time—manually set the time on your GPSMAP 640.
Select Automatic to have the GPSMAP 640 set the time based on
your location.
Restore—restore the original time settings.
—select a 12-hour, 24-hour, or UTC time format.
Setting the Languages
Touch Tools > Settings > Language.
Voice—change the language for voice prompts.
Text
the text language does not change the language of user-entered data
or map data, such as street names.
Keyboard—select the keyboard for your language. You can
also change the keyboard language mode from any keyboard by
touching the Mode button.
Restore—restore the original language settings.
Changing the Map Settings
Touch Tools > Settings > Map.
Map Detail—adjust the amount of detail shown on the map.
Showing more detail can cause the map to redraw slower.
Map View—select a map perspective.
•
•
—change all on-screen text to the selected language. Changing
Track Up
direction of travel at the top.
North Up
—display the map in two dimensions (2D) with your
—display the map in 2D with North at the top.
GPSMAP 640 Owner’s Manual 67
Page 76

Automotive Mode: Advanced Conguration
3D—display the map in three dimensions (3D) with your
•
direction of travel at the top.
Vehicle—touch Change to change the icon used to display your
position on the map. Touch the icon you want to use, and then
touch OK. Download additional vehicle icons at
www.garmingarage.com.
Restoring All Settings
1. Touch Tools > Settings.
2. Touch Restore.
3. Touch Yes.
Trip Log
—show or hide the log of your travels. To clear your trip
log, touch Tools > My Data > Clear Trip Log.
Map Info
your GPSMAP 640. Touch a map to
—view the maps and the version of each map loaded on
enable (check mark) or disable
(no check mark) that map.
Restore—restore the original map settings.
Changing Security Settings
Touch Tools > Settings > Security.
Safe Mode—turn the safe mode on or off. When your vehicle is
moving, Safe mode disables all functions that require signicant
operator attention and could become a distraction while driving.
Restore—restore the original security settings.
68 GPSMAP 640 Owner’s Manual
Page 77

Automotive Mode: Using XM
Automotive Mode: UsingUsing XM
Your GPSMAP 640 can receive XM radio, XM weather, and XM
trafc using an optional XM smart antenna (such as the GXM 40).
Listening to XM Radio
1. Connect an optional XM antenna to the GPSMAP 640.
2. Touch Tools > XM Services > XM Radio to open the XM Radio
For more information about an XM smart antenna and XM
subscriptions, visit www.garmin.com/xm.
NOTE: To open the XM Radio player directly from the Map page,
touch the XM Radio player icon ( ).
Notes:
• XM service is available only in the lower 48 United States and
southern Canada.
• You must purchase and activate your XM service before you
can use the XM features.
Touch Tools > XM Services.
XM Radio—opens the XM tuner.
•
Local Weather—displays current weather conditions based
•
on your present location. Touch Forecast to view a ve-day
weather forecast for this area.
Weather Map—displays current weather conditions on the
•
map. See page 58 for tips on browsing the map.
•
•
•
•
player.
Now
playing
Browse
category
Automotive Mode: XM Radio player
XM signal
strength
Touch to go to the next channel in the browse category.
Touch to go to the previous channel in the browse category.
Touch Browse to search a category, such as Recent Channels,
Kids, or Urban. Adjacent to each channel is the current program
information. Touch a channel to listen to that channel.
Touch 123 to enter an XM channel. Then touch Done to listen
to that channel.
GPSMAP 640 Owner’s Manual 69
Page 78

Automotive Mode: Using XM
Touch Save to save a channel to Presets (maximum of 20).
•
Touch Delete to remove the current channel from your Presets.
•
To delete more than one channel from Presets, touch Browse >
Presets > Delete. A list of all your Presets appears. Touch the
items you want to delete. Touch Delete > Yes.
in Your Area
When you are receiving trafc information, a trafc icon appears
in the upper-left corner of the Map page. The trafc icon changes
color to indicate the severity of trafc conditions on your route or
the road you are currently travelling.
Adjusting the Volume
Touch , and then use and to adjust the volume.
Your GPSMAP 640 can receive and use trafc information using
an optional XM smart antenna (such as the GXM 40). When
a trafc message is received, your GPSMAP 640 displays the
incident on the map and can change your route to avoid the trafc
incident.
NOTE:
Garmin is not responsible for the accuracy of the trafc
information. The XM antenna receives signals from the XM trafc
provider and displays that information on your GPSMAP 640.
NOTE:
You can only access the trafc information if the
GPSMAP 640 is connected to an XM antenna and you have an XM
trafc subscription (see page 69).
Severity Color Code
Color Description Meaning
Green Low severity
Yellow
Red High severity
Medium
severity
Trafc is owing
normally.
Trafc is slightly
congested.
Trafc is heavily
congested or
stopped.
When calculating your route, the GPSMAP 640 device examines
the current trafc and automatically optimizes the route for the
shortest time. If a severe trafc delay occurs on your route while
you are navigating, the device automatically recalculates the route.
You might still be routed through trafc if no better alternative
routes exist.
70 GPSMAP 640 Owner’s Manual
Page 79

Automotive Mode: Using XM
If a non-severe trafc delay occurs on your route, the trafc icon
shows how much time the delay has added to your route. This time
is already included in your estimated arrival time.
1. On the Map page, touch the trafc icon.
2. Touch .
3. Touch the arrows to view other trafc delays on your route, if
necessary.
4. Touch Avoid to avoid the trafc delay.
The trafc map shows color-coded trafc ow and delays on
nearby roads.
1. On the Map page, touch the trafc icon.
2. Touch to view the trafc incidents on a map.
To return to the normal map from the trafc map, touch the trafc
icon, and then touch Show Normal Map.
3. Touch an item in the list to view the delay on a map and details
about the delay. If there is more than one delay, touch the
arrows to view the additional delays.
Adding an XM Subscription
1. To view XM subscription information, open the XM Radio player
(see page 69).
2. Set the channel to zero (0).
3. Touch Radio ID to open the XM Subscriptions page.
4. Touch Subscribe.
5. Follow the on-screen instructions.
NOTE: Additional documentation is provided with your Garmin
XM antenna.
For more information about an XM smart antenna, go to
www.garmin.com/xm. For subscription information and coverage
cities for XM NavTrafc, go to www.xmnavtrafc.com.
NOTE:
1. On the Map page, touch the trafc icon.
2. Touch to view a list of trafc delays.
XM subscriptions are available for North America only.
GPSMAP 640 Owner’s Manual 71
Page 80

Appendix
Appendix
Calibrating the Screen
Power the unit on in marine mode, or switch to marine mode. See
page 33 for calibration instructions.
Resetting Your GPSMAP 640
If your GPSMAP 640 stops responding, turn off the GPSMAP 640,
and then turn it back on. If this does not help, reset your
GPSMAP 640 by removing and reconnecting the battery.
Updating the Software
1. Go to www.garmin.com/products/webupdater, and download
WebUpdater to your computer.
2. Connect the GPSMAP 640 to your computer using the miniUSB cable.
3. Run WebUpdater, and follow the on-screen instructions.
After conrming that you want to perform an update, WebUpdater
automatically downloads the update and installs it on your
GPSMAP 640.
Clearing User Data
IMPORTANT: This deletes all user-entered information.
1. Hold your nger on the upper-left corner of the GPSMAP 640
screen while turning on the GPSMAP 640.
2. Keep your nger pressed on the screen until the pop-up window
appears.
3. Touch Yes to clear all user data.
All original settings are restored. Any items that you have saved are
erased.
Battery Information
To maximize the life of the battery, do not leave your
GPSMAP 640 in direct sunlight, and avoid prolonged exposure to
excessive heat.
The battery icon in the corner of the Menu page and the Home
screen indicates the status of the GPSMAP 640 battery. To increase
the accuracy of the battery gauge, fully discharge the battery and
then fully charge it. Do not unplug the GPSMAP 640 until it is
totally charged.
NOTE:
If the device will not be used for an extended period of
time (longer than one week), remove the battery pack.
72 GPSMAP 640 Owner’s Manual
Page 81

Appendix
End
piece
Silver tip
Fuse
End
piece
Silver tip
Fuse
Charging Your GPSMAP 640
Before using the GPSMAP 640 for the rst time, charge the
•
battery for at least six hours.
•
Place the GPSMAP 640 in the mounting bracket with the
bracket connected to power. The vehicle or vessel key may need
to be turned to ON/ACC for the GPSMAP 640 to charge.
Alternatively, connect the included AC adapter to the
•
GPSMAP 640 and a wall outlet.
Additional Maps
You can purchase additional MapSource map data from Garmin
and load the maps in your GPSMAP 640 internal memory or on an
optional memory card.
To determine the versions of the maps that are loaded on your
GPSMAP 640, open the Menu page. Touch Tools > Settings >
Map > Map Info. Check www.garmin.com/unlock/update.jsp
to see if an update for your map software is available. To enable
additional maps, you need your unit ID (see page 66) and serial
Changing the Fuse on the Automotive Mount
NOTICE: When replacing the fuse, do not lose any of the small
pieces, and ensure that they are put back in the proper place.
If your unit will not charge in your vehicle, you might need to
number (located near the power connector).
To load maps or waypoints in your GPSMAP 640 memory or on
your memory card, select the name for your GPSMAP 640 drive
or memory card drive. Refer to the MapSource Help le for more
information.
replace the fuse located at the tip of the vehicle adapter.
1. Unscrew the black, round end piece, and
remove it.
2. Remove the fuse (glass and silver cylinder),
and replace it with a 1.5 A fast-blow fuse.
3. Ensure that the silver tip is placed in the black
end piece. Screw on the black end piece.
GPSMAP 640 Owner’s Manual 73
About GPS Satellite Signals
Your GPSMAP 640 must acquire GPS (Global Positioning System)
satellite signals in order to navigate. If you are indoors, near tall
buildings or trees, or in a parking garage, your GPSMAP 640
may not acquire satellites. Go outside to an area free from tall
obstructions to use your GPSMAP 640.
Page 82

Appendix
When your GPSMAP 640 has acquired satellite signals, the signal
strength bars on the Home screen (or Menu page) are green. When
it loses satellite signals, the bars turn red or clear.
For more information about GPS, go to
www.garmin.com/aboutGPS.
Extras and Optional Accessories
For more information about optional accessories, go to
http://buy.garmin.com or www.garmin.com/extras, or contact your
Garmin dealer.
Data storage: Internal memory and optional removable SD card.
Computer interface: USB 2.0 high-speed and full-speed mass
Operating system
Charge time: Approximately 6 hours
Power input: 11–32 Vdc, vehicle power using vehicle power
Usage
Battery life: Up to 9 hours with minimum backlight and no XM
Physical size: W × H × D: 6 × 4 × 1 7/8 in.
(151 × 102.49 × 47.25 mm)
Weight: 17.3 oz. (490.4 g)
Display: 5 3/16 in. (132 mm) diagonal, 800 × 480 pixels; bright
WVGA landscape display; white backlight; touchscreen
Case: Waterproof to IEC 529-IPX-7
Operating temperature range
to 55°C)
Charging temperature range: From 32°F to 113°F (from 0°C to
45°C)
: From 5°F to 131°F (from -15°C
Battery type: User-replaceable rechargeable lithium-ion battery
GPS receiver: High-sensitivity
Compass-safe distance: 17 in. (43.18 cm)
Data stored indenitely.
storage
: Garmin
cable, or AC power using the included AC adapter.
: 12 W max.
antenna; up to 5 hours with maximum backlight and no XM
antenna; up to 3.5 hours with maximum backlight and a GXM
40 antenna.
74 GPSMAP 640 Owner’s Manual
Page 83

Appendix
Declaration of Conformity
Hereby, Garmin declares that this GPSMAP 640 product is in compliance with
the essential requirements and other relevant provisions of Directive 1999/5/EC.
To view the full Declaration of Conformity, go to the Web site for your Garmin
product at www.garmin.com.
Software License Agreement
BY USING THE GPSMAP 640, YOU AGREE TO BE BOUND BY THE
TERMS AND CONDITIONS OF THE FOLLOWING SOFTWARE LICENSE
AGREEMENT. PLEASE READ THIS AGREEMENT CAREFULLY.
Garmin grants you a limited license to use the software embedded in this device
(the “Software”) in binary executable form in the normal operation of the product.
Title, ownership rights, and intellectual property rights in and to the Software
remain in Garmin.
You acknowledge that the Software is the property of Garmin and is protected
under the United States of America copyright laws and international copyright
treaties. You further acknowledge that the structure, organization, and code of
the Software are valuable trade secrets of Garmin and that the Software in source
code form remains a valuable trade secret of Garmin. You agree not to decompile,
disassemble, modify, reverse assemble, reverse engineer, or reduce to human
readable form the Software or any part thereof or create any derivative works
based on the Software. You agree not to export or re-export the Software to any
country in violation of the export control laws of the United States of America.
Troubleshooting
Problem/Question Solution/Answer
My GPSMAP 640
never gets satellite
signals.
My GPSMAP 640
does not charge in
my vehicle.
How do I clear all my
user data?
My battery gauge
does not seem
accurate.
The touchscreen is
not responding to my
touches.
How do I know my
GPSMAP 640 is in
USB mass storage
mode?
Take your GPSMAP 640 out of parking garages
and away from tall buildings and trees. Remain
stationary for several minutes.
Check the fuse in the vehicle power cable
(see page 73).
Ensure the vehicle is turned on and is supplying
power to the power outlet.
Your GPSMAP 640 can only charge between
32°F and 113°F (between 0°C and 45°C). If the
GPSMAP 640 is placed in direct sunlight or in a
hot environment, it cannot charge.
Hold your nger on the lower-right corner of
the GPSMAP 640 screen while it is turning on.
Keep your nger pressed until the message
appears. Touch Yes to clear all user data.
Allow the unit to fully discharge, and fully
charge it (without interrupting the charge cycle).
Calibrate the touchscreen as described on page
33.
When your GPSMAP 640 is in USB mass
storage mode, a picture of a GPSMAP 640
connected to a computer is shown. Also, you
should see two new removable disk drives
listed in My Computer.
GPSMAP 640 Owner’s Manual 75
Page 84

Appendix
Problem/Question Solution/Answer
My computer
never detects the
GPSMAP 640 when I
connect it.
I cannot see any new
removable drives in
my list of drives.
How can I nd
restaurants near the
hotel I will be staying
at in the future?
1. Unplug the USB cable from your computer.
2. Turn off the GPSMAP 640.
3. Plug the USB cable into a USB port on your
computer and into your GPSMAP 640. The
GPSMAP 640 automatically turns on and
goes into USB mass storage mode. Ensure
your GPSMAP 640 is connected to a USB
port and not a USB hub.
If you have several network drives mapped
on your computer, Windows can have trouble
assigning drive letters to your GPSMAP 640
drives. See your operating system Help le to
learn how to map or assign drive letters.
1. Touch
2. Find the hotel, and touch Go!.
3. Touch Menu > Where To? > Near > My
4. Search for a restaurant. Restaurants
Where To? > Near > A Different
City.
Destination.
nearest your hotel are listed rst.
Messages and Alarms (Marine Mode)
AIS: Dangerous Target—an AIS target currently presents a
collision threat.
Alarm Clock
Anchor Drag Alarm
distance range.
Antenna Input is Shorted —there is a short in the wiring to the
internal or external antenna.
Approaching Waypoint <name>
distance from the destination waypoint.
Arrival Alarm <name>
Auto-guidance unable to calculate route
auto-guidance cannot calculate the route. Ensure that both your
current position and the end point are contained in the BlueChart
g2 Vision region contained on the inserted SD card.
Auto-guidance unable to calculate route. Ending position not
within safe depth—(BlueChart g2 Vision) auto-guidance cannot
calculate the route; choose an end point within the specied safe
depth.
—the alarm clock alarm has sounded.
—the boat has drifted out of the user-set
—the boat is a specied alarm
—arriving at destination waypoint.
—(BlueChart g2 Vision)
76 GPSMAP 640 Owner’s Manual
Page 85

Appendix
Auto-guidance unable to calculate route. Starting position not
within safe depth—(BlueChart g2 Vision) auto-guidance cannot
calculate the route; travel to water within the specied safe depth.
Auto-guidance unable to calculate route, please shorten route
(BlueChart g2 Vision) auto-guidance cannot calculate the route;
choose a closer end point.
Can’t Read User Card
—cannot read card when attempting a user
data transfer.
Can’t Unlock Maps
—maps are locked and cannot be used on this
unit.
Can’t Write User Card
— cannot write card when attempting a
user data transfer.
Check XM Antenna
—XM antenna is not connected. Check
connectivity.
Database Error
Deep Water Alarm
—general database error. Contact product support.
—(sonar) the boat has entered the user-dened
value for deep water.
Directory Item With This MMSI Already Exists
—MMSI unit is
Directory Memory is Full Can’t Create Entry
directory is full, no more entries can be created.
Distress Call Received from <name>—a distress call has been
—
received by the DSC module.
Drift Alarm
DSC Position Report Received From <name>—a position report
has been received by the DSC module.
Entering Target Water Temperature
transducer) the water temperature is inside the user-dened target
temperature zone.
Flash Flood Warning Alarm
ood warning in effect.
Flood Warning Alarm
warning effective.
GPS Accuracy Alarm
user-set value.
Invalid Date
already in the directory.
—DSC the
—the boat has moved a user-dened distance.
—(temperature sensor/
—(XM WX weather) there is a ash
—(XM WX weather) there is a ood
—the GPS accuracy has fallen outside the
—an invalid date was entered.
GPSMAP 640 Owner’s Manual 77
Page 86

Appendix
Invalid Entry. Default value selected—an invalid entry was
entered.
Invalid MMSI
Leaving Target Water Temperature
—an invalid DSC MMSI was entered.
—(temperature sensor/
transducer) the water temperature is outside the user-dened target
temperature zone.
Lost Heading Sensor Connection—(NMEA) the unit has lost
communications with the heading sensor. Check wiring.
Lost Satellite Reception—the unit has lost satellite reception.
Make sure you have a clear view of the sky.
Map Format Is Not Supported
—a map format on a
preprogrammed SD card is not supported.
Marine Weather Warning—(XM WX weather) there is a weather
warning in effect.
NMEA Depth Is Below Transducer
—(sonar) the NMEA depth
input is using the DBT sentence which does not include keel offset.
No DGPS Position—the unit lost differential GPS reception
(WAAS). Make sure you have a clear view of the sky.
No Proximity Waypoints Found—no proximity waypoints found
while attempting a user data transfer.
No Routes Found—no routes found while attempting a user data
transfer.
No Tracks Found
—no tracks found while attempting a user data
transfer.
No User Waypoints Found
—no user waypoints found while
attempting a user data transfer.
No XM Signal—(XM WX weather) no XM satellite signal
detected. Make sure you have a clear view of the sky.
Not All Maps Fit, Some Maps Will Not Be Drawn
—there are
more maps present on the SD card than what the unit can support.
Some of the maps on the card will not be drawn or used to nd
map features.
Off Course Alarm
Proximity Alarm
—the boat has left the user-dened course.
—the boat has come close to a user-dened
proximity point.
Proximity Alarm Memory is Full
—the proximity waypoint
memory is full. Erase existing proximity waypoints to make room.
Proximity Overlaps Another Proximity Waypoint
—a proximity
point is overlapping another proximity waypoint.
78 GPSMAP 640 Owner’s Manual
Page 87

Appendix
Route Already Exists—the named route already exists. Choose
another name.
Route is Full—the individual route is full, no more waypoints can
be added.
Route Memory is Full, Can’t Create Route—the unit Route
memory as a whole is full, no more routes can be created. Erase
existing routes to make room.
Route Truncated
—some points on the end of the route have been
discarded.
Severe Storm Warning—(XM WX weather) there is a severe
storm warning in effect.
Shallow Water Alarm
—(sonar) the boat has entered the user-
dened shallow water depth.
Simulating Operation
Tide Alarm
—the tide has reached user-specied tide alarm range.
Tornado Warning Alarm
—the unit is in simulator mode.
—(XM WX weather) a tornado warning
is in effect.
Track Already Exists
—the named track already exists. Choose
another name.
Track Log Full
log storage.
Track Memory is Full, Can’t Create Track
memory is full.
Track Truncated
discarded.
Transfer Complete
Unknown bridge height within calculated auto-guidance
route—(BlueChart g2 Vision) there is an unknown bridge height
within auto-guidance route.
User Card Not Found
card is fully inserted.
Warning: Auto-guidance route starting position moved due
to safe depth settings—(BlueChart g2 Vision) auto-guidance has
calculated the route, but the start point has been moved to deeper
water.
Warning: Auto-guidance route ending position moved due to
safe depth settings—(BlueChart g2 Vision) auto-guidance has
calculated the route, but the end point has been moved to deeper
water.
—there is no longer any space in the active track
—the saved track
—some points on the end of the track have been
—user data transfer is complete.
—user data card transfer. Make sure an SD
GPSMAP 640 Owner’s Manual 79
Page 88

Appendix
Water Temperature Alarm—(temperature sensor/transducer)
the water temperature has entered or left the user-dened water
temperature alarm zone.
Waypoint Already Exists
—the named waypoint already exists.
Choose another name.
Waypoint Memory is Full, Can’t Create Waypoint—the User
Waypoint memory is full. Erase existing waypoints to make room.
80 GPSMAP 640 Owner’s Manual
Page 89

Index
Index
Symbols
2-D, 3-D map view 67
A
accessories 74
additional maps 73
addresses 56
add turn 16
AIS 31, 37
alarms 76
deep water 36
sh 36
shallow water 36
sonar 36
system 36
water temp 36
antennas 69, 70
attaching a photo to a location 58
audio version 66
auto guidance 11, 38
automatic magnetic variation 34
avoiding
road types 66
theft ii
B
background color 66
backing up data 29
GPSMAP 640 Owner’s Manual 81
battery 72
status 5
battery information 72
beeper options 33
blend 13
BlueChart 11
brightness 67
browsing the map 59
buoy
reports 52
C
caring for your GPSMAP 640 ii
category (XM) 39, 53
celestial information 28
channel entry (XM) 39, 53
channel guide (XM) 38, 53
charging your GPSMAP 640 73, 75
charts
Fish Eye 3D 8, 11
shing 8, 11
navigation 8
Perspective 3D 8, 10, 11
coastal observation stations 52
cold front 50
colors 44
Mariner’s Eye 3D 44
communications settings 35
conguring 5, 54
coordinates 60
course up 42
current location, save 58
current stations 27
D
data transfer 29
Declaration of Conformity 75
deleting
all user data 72
character 57
Favorites 58, 59
les 64
recent nds list 58
route 59
depth 34
detail maps 68
detour 55
display settings 66
driving directions 61
DSC 31, 37
E
elevation unit settings 34
event log 34
extras 74–75
F
Favorites 58
les 63–64
deleting 64
supported types 63
nding places 6, 55
by address 56
by name 57
by postal code 56
near another location 57
recent selections 57
saved places (Favorites) 58
shing 41, 51
ash ood warning 49
ood warning 49
forecasts (weather) 49
fronts (weather) 50
fuse, changing 73
G
geocaching 60
Go! page options 57
go home 56
GPS 33
about GPS 5, 73
off/on 66
GPSMAP 640
charging 73
cleaning ii
mounting 5, 54, 73
protecting ii
resetting 72
grid north 34
Page 90

Index
H
hazard colors 44
heading 34
heading line 42
head up 42
high pressure center 50
home
setting a location 56
home screen 5
hurricanes 49
I
ID number
waypoints 35
isobars 51
J
JPEG image les 63
K
keel offset
adjusting 37
keyboard 57
language mode 67
layout 66
kilometers 66
L
land only 13
lane width 44
82 GPSMAP 640 Owner’s Manual
language
changing 33
language settings 67
lightning 48
lightning bolt icons 48
lithium-ion battery 72, 74
low pressure center 50
M
map
adding 73
browsing 58
detail level 67
enabling detail maps 68
Map Info button 68
settings 67
updating 73
version 68
viewing 67
zooming 59
map datum 35
MapSource 63, 73
MapSource data 30
Mariner’s Eye 3D 11
hazard colors 44
max speed, reset 62
measure
units 34
menu page 5, 54
messages 76
miles 66
moon phase 28
moon rise/set 28
mute
audio 67
my boat 37
My Data 65
N
National Weather Service 49
navigation 41, 61
mode 66
settings 66
navigation chart 8
nearby stations 27
NEXRAD 48
next turn 61
NMEA 35
north up 42
numbers
viewing 27
O
occluded front 50
off
heading line 42
off road, routing 59, 60, 66
on-screen keyboard 57
other boats 37
output, audio 67
overlay numbers 34, 40
P
panning 8
Perspective 3D 10
photos 13
points of interest 57
port types 35
precipitation 48
pressure gradient 51
pressure isobars 51
pressure unit settings 34
projected path 48
Q
QWERTY keyboard 66
R
range rings 44
recently found locations 57
registering ii
resetting
the max speed 62
the trip data 62
your GPSMAP 640 72
rings 44
routes
adding a stop 55
cancel 17
custom 59–60
Page 91

Index
editing 59
off road 66
preferences 66
simulating 66
stopping 7, 55, 67
viewing 29
S
safe depth 38, 44
safe height 38
safe mode 68
safe zone 37
sailing 41
satellite
imagery 12
satellite signals 73, 74
save preset (XM) 39, 53
saving
places you nd 58
your current location 58, 59, 65
screen
brightness 67
screen shots 66
SD cards
using 29
search area 57
security
settings 68
settings
restoring 68
setting your location 59
severe thunderstorm warning 49
show report 27
simulating a route 66
simulator mode 33
software
license agreement 75
updating 72
version 66
speed lter 33
speed limit icon 61
speed unit settings 34
stationary front 50
storing the GPSMAP 640 ii
storm cells 48
sunrise/sunset 28
supported le types 63
surface winds 50
system settings 66
T
temperature 34
text language 67
tide station 27
time 35
time settings 67
time stamp 48
time zone 35, 67
tools 65
tornado warning 49
touchscreen
calibrating 75
cleaning ii
settings 67
trafc
incidents 70
subscriptions 71
transferring data 29
trip computer 62
trip data, reset 62
trip log 68
tropical depression 49
tropical storm 49
troubleshooting 75
trough 50
true north 34
turn-by-turn directions 61
turn list 61
U
unit ID 66
units of measure
changing 34
updating
maps 73
software 72
usage mode 5, 66
USB 75
mass-storage mode 63
user data
clearing 29
user data, delete 72
user mag var 34
V
vehicle icon 68
via point, adding 55
viewing
currents 27
user data 29
visibility 52
Vision
BlueChart g2 11
VMG 41
voice language 67
volume 70
W
warm front 50
warnings
county 49
marine 49
water
temperature 52
wave
direction 50
height 51
period 50
GPSMAP 640 Owner’s Manual 83
Page 92

Index
waypoints
creating 9, 22
deleting 22, 23
viewing 29
weather
data 47
fronts 50
legend 48
WebUpdater 72
Where Am I? 65
Where To? 56–60
wind
barb 51
speed 41
surface 50
X
XM audio 38, 47, 53
XM NavTrafc 71
XM radio 69
XM satellite strength 5
XM weather 47
Z
zoom 9, 10, 12, 59
84 GPSMAP 640 Owner’s Manual
Page 93

Page 94

Page 95

Page 96

For the latest free software updates (excluding map data) throughout the life of your
Garmin products, visit the Garmin Web site at www.garmin.com.
© 2009 Garmin Ltd. or its subsidiaries
Garmin International, Inc.
1200 East 151st Street, Olathe, Kansas 66062, USA
Garmin (Europe) Ltd.
Liberty House, Hounsdown Business Park, Southampton, Hampshire, SO40 9LR UK
Garmin Corporation
No. 68, Jangshu 2nd Road, Shijr, Taipei County, Taiwan
www.garmin.com
July 2009 Part Number 190-01110-00 Rev. A Printed in Taiwan
 Loading...