

Garmin GPSMAP 376C User Manual
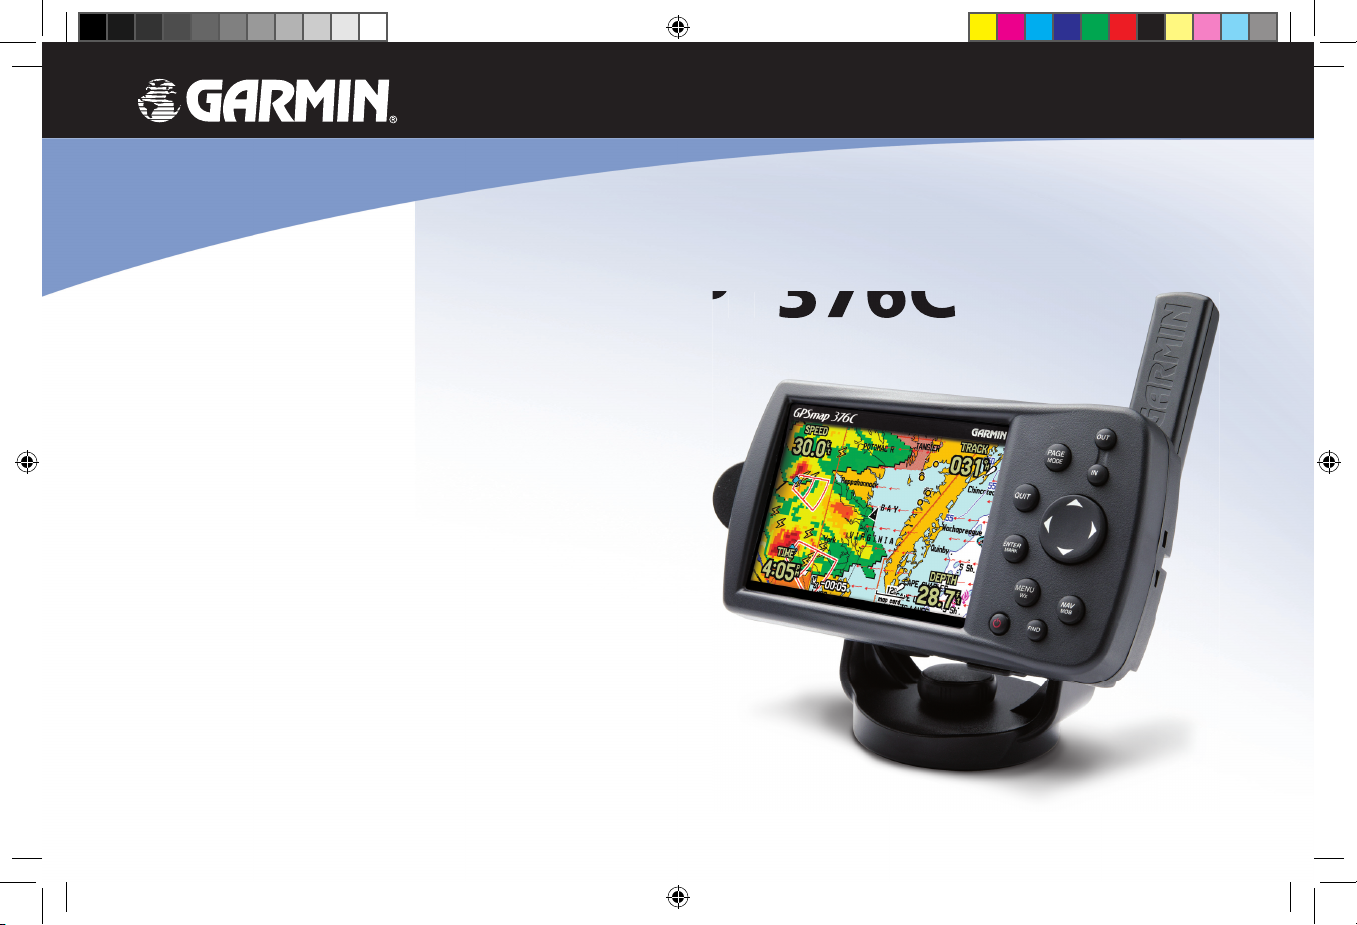
GPSMAP® 376C
chartplotting receiver
owner’s manual
376C
190-00508-00_0C.indd 1 11/6/2006 9:47:21 AM

© 2006 Garmin Ltd. or its subsidiaries
Garmin International, Inc.
1200 East 151st Street,
Olathe, Kansas 66062, USA
Tel. 913/397.8200 or 800/800.1020
Fax 913/397.8282
Garmin (Europe) Ltd.
Unit 5, The Quadrangle, Abbey Park Industrial Estate,
Romsey, SO51 9DL, UK
Tel. +44 (0) 870.8501241 (outside the UK)
0808 2380000 (UK only)
Fax 44/0870.8501251
Garmin Corporation
No. 68, Jangshu 2nd Road, Shijr, Taipei County, Taiwan
Tel. 886/2.2642.9199
Fax 886/2.2642.9099
All rights reserved. Except as expressly provided herein, no part of this manual may be reproduced, copied, transmitted, disseminated, downloaded or stored in any
storage medium, for any purpose without the express prior written consent of Garmin. Garmin hereby grants permission to download a single copy of this manual onto
a hard drive or other electronic storage medium to be viewed and to print one copy of this manual or of any revision hereto, provided that such electronic or printed
copy of this manual must contain the complete text of this copyright notice and provided further that any unauthorized commercial distribution of this manual or any
revision hereto is strictly prohibited.
Information in this document is subject to change without notice. Garmin reserves the right to change or improve its products and to make changes in the content
without obligation to notify any person or organization of such changes or improvements. Visit the Garmin Web site (www.garmin.com) for current updates and
supplemental information concerning the use and operation of this and other Garmin products.
Garmin®, GPSMAP®, AutoLocate®, TracBack®, BlueChart®, and MapSource® are registered trademarks of Garmin Ltd. or its subsidiaries and may not be used without
the express permission of Garmin.
October 2006 Part Number 190-00508-00 Rev. C Printed in Taiwan
190-00508-00_0C.indd 2 11/6/2006 9:47:21 AM

INTRODUCTION
Thank you for choosing the Garmin® GPSMAP® 376C, which uses
the proven performance of Garmin GPS and full-featured mapping
to create an unsurpassed portable marine navigation chartplotter
and automobile navigation device. Take a moment to compare
the contents of this package with the packing list on the outside
of the box; if any pieces are missing, contact your Garmin dealer
immediately.
About This Manual
To get the most out of your new navigation system, read this manual
and learn the operating procedures for your unit. This manual is
organized into the following sections:
The Introduction contains the Table of Contents, Care Information,
and Warnings.
The Getting Started section provides an overview of the unit, how
to turn the unit on, and how to simulate navigation.
The Marine Mode section provides you with information about
navigating with the GPSMAP 376C in Marine Mode.
The Marine Mode Pages section reviews the main pages in Marine
Mode.
The Automotive Mode section provides you with information about
navigating with the GPSMAP 376C.
The Automotive Mode Pages section reviews the main pages in
Automotive Mode.
The Main Menu section describes features found on the Main
Menu, and information on how to change settings.
The Using XM WX Weather section describes how to use XM WX
Satellite Weather features on your GPSMAP 376C.
The Setting Up and Using Sonar section provides instructions
on using a Garmin GSD 20 or GSD 21 Sounder Module with your
GPSMAP 376C.
The Appendix contains specifications, optional accessories,
maintenance information, and other product information.
An Index is provided at the end of the manual for reference.
GPSMAP 376C Owner’s Manual i
INTRODUCTION > ABOUT THIS MANUAL
190-00508-00_0C.indd 1 11/6/2006 9:47:22 AM

Table of Contents
Introduction ...........................................................................i
About This Manual ................................................................... i
Caring for the GPSMAP 376C ................................................ iv
Warnings .................................................................................. v
Important Information ............................................................ vi
Getting Started .....................................................................1
Unit Overview .......................................................................... 1
Charging the GPSMAP 376C .................................................. 2
Turning Your GPSMAP 376C On or Off ................................. 3
Adjusting the Backlight and Volume ..................................... 3
Getting Satellite Signals ......................................................... 4
Using the GPSMAP 376C Keypad .......................................... 7
Using the GPSMAP 376C ........................................................ 8
Using Simulator Mode .......................................................... 12
Marine Mode .......................................................................13
Marine Mode Pages ............................................................... 13
Navigating to a Destination .................................................. 14
Finding an Item ...................................................................... 17
Creating and Using Routes .................................................. 20
Creating and Using Waypoints ............................................ 24
Managing Your Tracks .......................................................... 34
Marine Mode Pages ...........................................................38
Compass Page ....................................................................... 45
Highway Page ........................................................................ 48
Active Route Page ................................................................. 50
Position Data Page ................................................................ 51
XM Audio Page ...................................................................... 52
Automotive Mode ..............................................................56
Automotive Mode Pages ....................................................... 56
Navigating to a Destination .................................................. 57
Following an Automotive Route ........................................... 63
Automotive Mode Pages ...................................................64
Map Page ................................................................................ 64
Current Route Page ............................................................... 65
Trip Computer Page .............................................................. 66
Main Menu ..........................................................................67
Main Menu Tabs ..................................................................... 67
GPS Tab .................................................................................. 68
Weather Tab ........................................................................... 68
XM Tab .................................................................................... 69
Route Tab ............................................................................... 70
ii GPSMAP 376C Owner’s Manual
INTRODUCTION > TABLE OF CONTENTS
190-00508-00_0C.indd 2 11/6/2006 9:47:22 AM

Points Tab .............................................................................. 70
Track Tab ................................................................................ 71
DSC Tab .................................................................................. 71
Sonar Tab ............................................................................... 75
Alarms Tab ............................................................................. 76
Calendar Tab .......................................................................... 78
Celestial Tab .......................................................................... 79
Message Tab .......................................................................... 83
Display Tab ............................................................................ 84
Sound Tab .............................................................................. 85
Using XM WX Weather ......................................................95
Viewing XM WX Weather ....................................................... 95
Setting XM WX Weather Options ......................................... 95
Using the Weather Tab .......................................................... 98
Finding Weather Information ............................................. 101
Setting Up and Using Sonar ...........................................103
Showing Sonar on the Map Page ....................................... 103
Using the Sonar Page ......................................................... 104
Setting Up Sonar ................................................................. 108
Understanding Sonar .......................................................... 112
Appendix ..........................................................................115
Specifications ...................................................................... 115
Optional Accessories .......................................................... 116
Installation Information ....................................................... 117
Satellite Information ............................................................ 122
What is Differential GPS (DGPS)? ..................................... 122
LORAN TD Setup ................................................................. 124
Map Datums and Location Formats .................................. 126
Digital Selective Calling (DSC) ........................................... 127
Messages ............................................................................. 129
Data Field Options ............................................................... 131
Software License Agreement ............................................. 133
Product Registration ........................................................... 134
FCC Compliance .................................................................. 134
Limited Warranty ................................................................. 135
Weather Data Warranty ....................................................... 136
Index .................................................................................138
GPSMAP 376C Owner’s Manual iii
INTRODUCTION > TABLE OF CONTENTS
190-00508-00_0C.indd 3 11/6/2006 9:47:22 AM

Caring for the GPSMAP 376C
The GPSMAP 376C case is constructed of high quality materials
and does not require user maintenance except cleaning.
Cleaning the Case
Clean the unit’s outer casing (except for the screen) using a cloth
dampened with a mild detergent solution and then wipe dry.
Avoid chemical cleaners and solvents that might damage plastic
components.
Cleaning the Screen
The GPSMAP 376C screen should be cleaned using a soft, clean,
lint-free cloth. Water, isopropyl alcohol, or eyeglass cleaner can be
used if needed. If these are used, apply the liquid to the cloth and
then gently wipe the screen with the moistened cloth.
Storage
Do not store the GPSMAP 376C where prolonged exposure to
temperature extremes might occur (such as in the trunk of a car)
as permanent damage could result. User information, such as
waypoints and routes are retained in the unit’s memory without
the need for external power. It is always a good practice to back up
important user data by manually recording it or downloading it to a
computer (transferring it to MapSource).
Water Immersion
The GPSMAP 376C is waterproof to IEC Standard 60529 IPX7.
It can withstand immersion in 1 meter of water for 30 minutes.
Prolonged submersion can cause damage to the unit. After
submersion, be certain to wipe and air dry the unit before reuse or
charging.
iv GPSMAP 376C Owner’s Manual
INTRODUCTION > CARING FOR THE GPSMAP 376C
190-00508-00_0C.indd 4 11/6/2006 9:47:22 AM
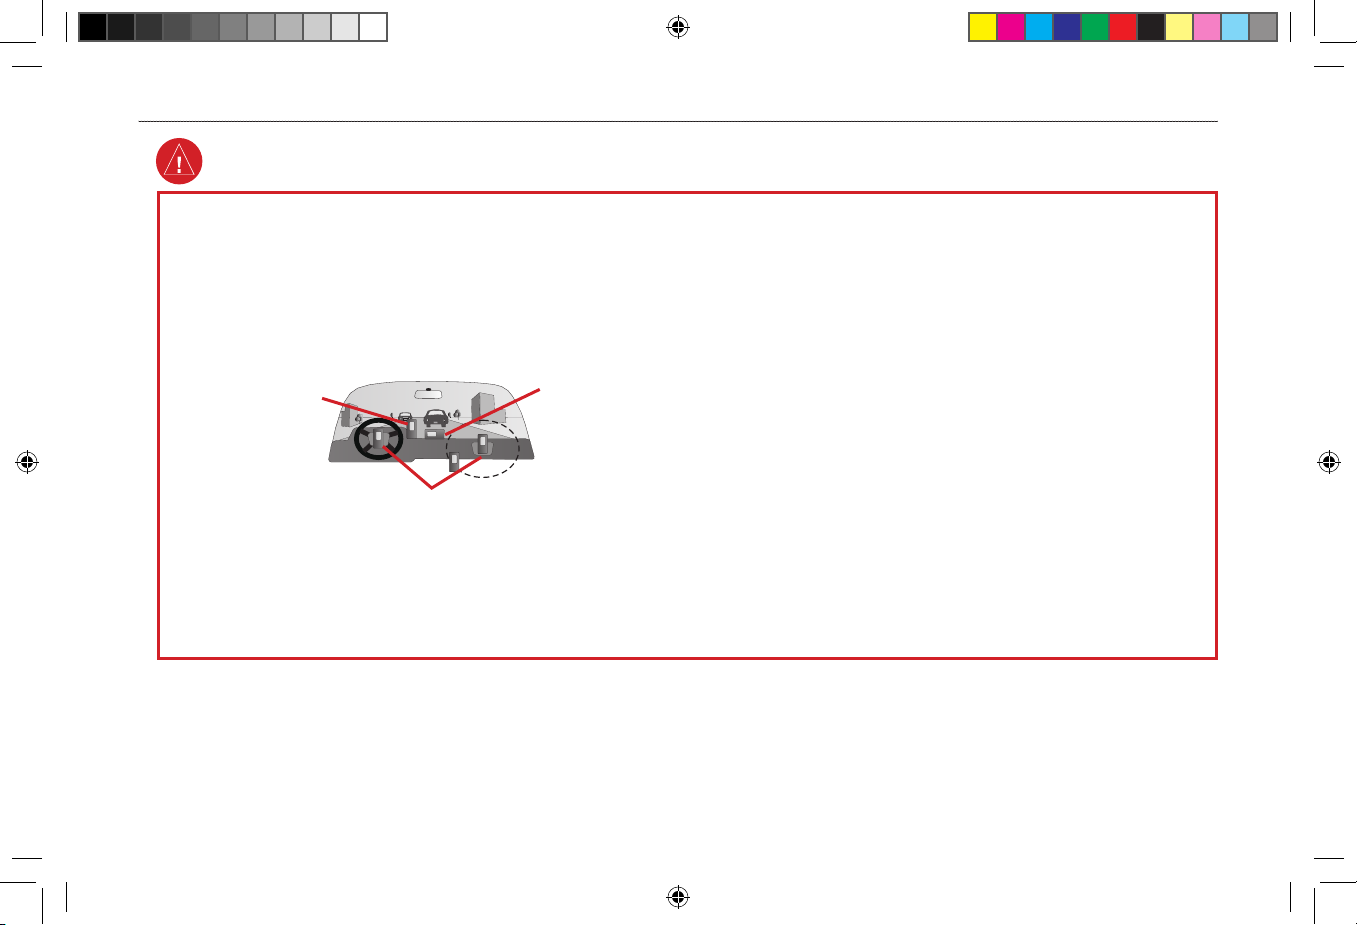
Failure to avoid the following potentially hazardous situations could
result in an accident or collision resulting in death or serious injury.
• When installing the unit in a vehicle, place the unit securely so that
it does not obstruct the driver’s view of the road or interfere with
vehicle operating controls, such as the steering wheel, foot pedals,
or transmission levers. Do not place in front of or above any airbag.
(See diagram).
Do not mount
where driver’s
field of vision is
blocked.
Do not place
unsecured on
the vehicle
dashboard.
Do not mount in front of an airbag
field of deployment.
• When navigating, carefully compare information displayed on the
unit to all available navigation sources, including information from
street signs, visual sightings, and maps. For safety, always resolve
any discrepancies or questions before continuing navigation and
defer to posted road signs.
• Always operate the vehicle in a safe manner.
Do not become
distracted by the unit while driving, and always be fully aware
of all driving conditions. Minimize the amount of time spent
viewing the unit’s screen while driving and use voice prompts
when possible. Do not input destinations, change settings, or access
any functions requiring prolonged use of the unit’s controls while
driving. Pull over in a safe and legal manner before attempting such
operations.
• This unit is designed to provide route suggestions. It is not designed
to replace the need for driver attentiveness regarding road closures
or road conditions, traffic congestion, weather conditions, or other
factors that may affect safety while driving.
• Use the electronic chart in the unit only to facilitate, not to replace,
the use of authorized government charts. Official government charts
and notices to mariners contain all information needed to navigate
safely.
• Use this unit only as a navigational aid. Do not attempt to use the
unit for any purpose requiring precise measurement of direction,
distance, location, or topography.
WARNING: This product, its packaging, and its components contain chemicals known to the State of California to cause cancer, birth defects, or reproductive
harm. This Notice is provided in accordance with California’s Proposition 65. See www.garmin.com/prop65 for more information.
Warnings
GPSMAP 376C Owner’s Manual v
INTRODUCTION > WARNINGS
190-00508-00_0C.indd 5 11/6/2006 9:47:22 AM

Important Information
MAP DATA INFORMATION: One of the goals of Garmin is to provide
customers with the most complete and accurate cartography that is available
to us at a reasonable cost. We use a combination of governmental and private
data sources, which we identify in product literature and copyright messages
displayed to the consumer. Virtually all data sources contain some inaccurate or
incomplete data. In some countries, complete and accurate map information is
either not available or is prohibitively expensive.
The California Electronic Waste Recycling Act of 2003
requires the
recycling of certain electronics. For more information on the applicability to
this product, see www.erecycle.org.
Battery Warnings
If these guidelines are not followed, the internal lithium-ion battery may
experience a shortened life span or may present a risk of damage to the GPS
unit, fire, chemical burn, electrolyte leak, and/or injury.
• Contact your local waste department to properly dispose of the unit/
battery.
• Do not leave the unit exposed to a heat source or in a high temperature
location, such as in the sun in an unattended vehicle on a hot day. To
prevent damage, remove the unit from the vehicle or store it out of
direct sunlight, such as in the glove box.
• Do not incinerate.
• When storing the unit for a limited length of time, store within the
following temperature range: -4˚ to 140˚F (-20˚ to 60˚C). When storing
the unit for an extended time, store within the following temperature
range: 32˚ to 77˚F (0˚ to 25˚C).
• Do not operate the unit outside of the following temperature range:
-4˚ to 131˚F (-20˚ to 55˚C).
NOTE: Refer to the Specifications section to determine if the lithium-ion
battery in your specific Garmin product is replaceable.
If this unit contains a replaceable, rechargeable lithium-ion battery, the
following warnings also apply:
• Do not recharge the battery out of the unit or disassemble the battery.
• Keep the used battery away from children. Do not disassemble,
puncture, or damage the battery.
• Only replace with a Garmin lithium-ion battery pack. Using another
battery presents a risk of fire or explosion. To purchase a replacement
battery, see your Garmin dealer or the Garmin Web site.
vi GPSMAP 376C Owner’s Manual
INTRODUCTION > IMPORTANT INFORMATION AND BATTERY WARNINGS
190-00508-00_0C.indd 6 11/6/2006 9:47:22 AM
GETTING STARTED
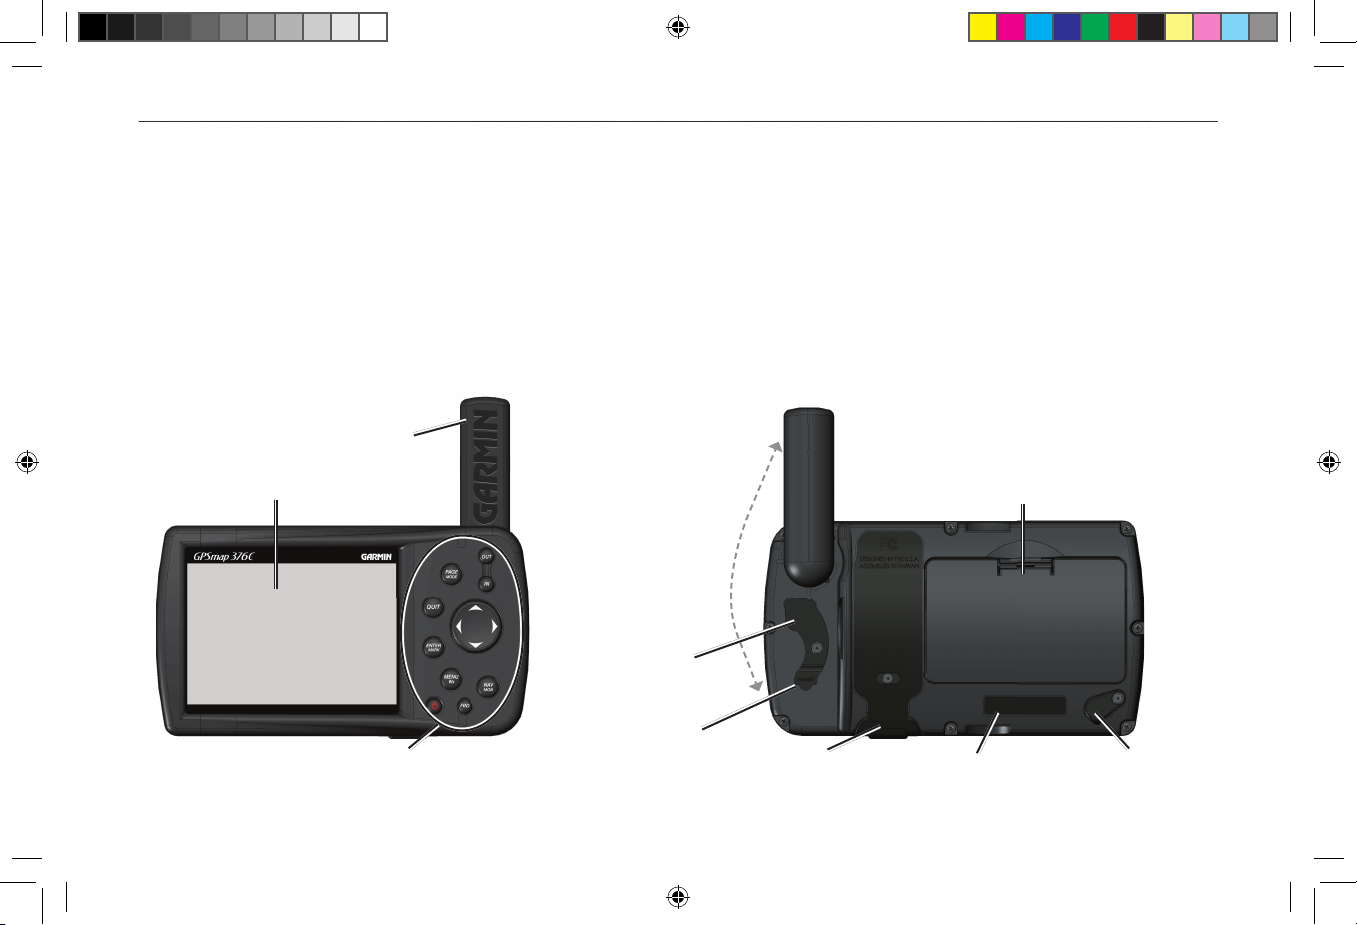
Unit Overview
The GPSMAP 376C is an all-in-one, versatile color chartplotter and automobile navigator—perfect for land or water. This portable GPS
navigator features a 256-color TFT display that is easy to read in bright sun, a built-in basemap, and auto routing to provide you with
automatically generated turn-by-turn directions. With the included GXM 30 antenna and a subscription to XM WX Satellite Weather, boaters
will have constant access to NEXRAD radar, lightning, wind speed, wave direction, and more. In addition, the GPSMAP 376C offers XM
Satellite Radio capabilities featuring more than 150 digital channels of commercial-free music; more than 30 channels of news, sports, talk,
and entertainment; and more than 20 dedicated channels of XM Instant Traffi c & Weather.
External power
connector under
weather cap
USB/GXM 30
antenna connector
under weather cap
Slot for optional data card
Battery pack. Press tab down
to remove battery pack for
replacement, if necessary.
Backlit keypad for easy nighttime operation
GPS antenna
256-Color TFT display
with backlighting
Detachable GPS antenna
collapses for storage.
Be sure the antenna
is up (as shown
here) to receive
satellite signals. See
the “Appendix”,
page 121, for
instructions on
removing the
antenna.
Serial number
Headphone/stereo jack
under weather cap
GPSMAP 376C Owner’s Manual 1
GETTING STARTED > UNIT OVERVIEW
190-00508-00_0C.indd 1 11/6/2006 9:47:24 AM
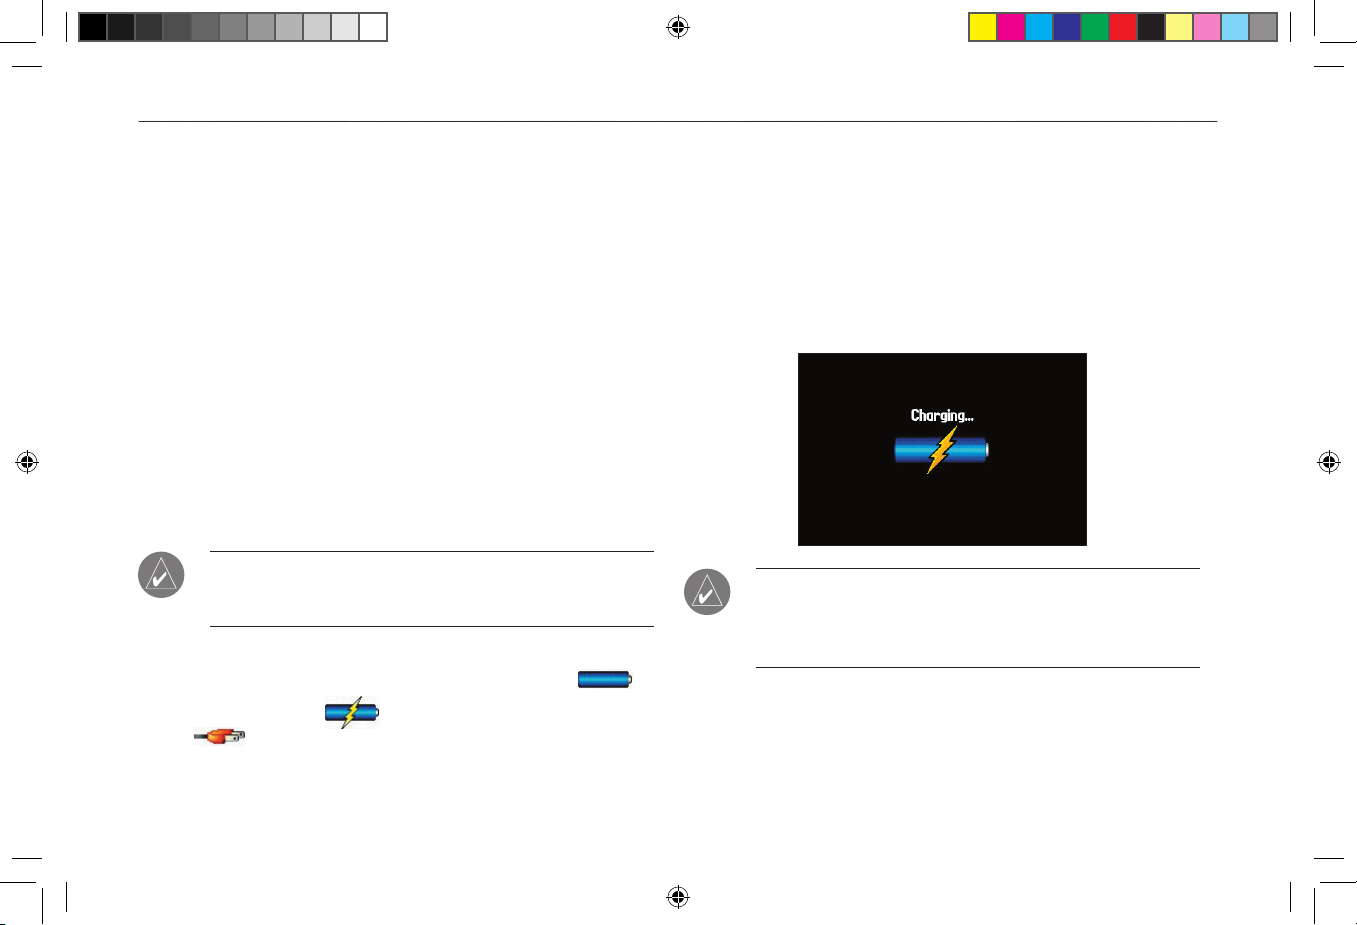
Charging the GPSMAP 376C
Before using the GPSMAP 376C, you might need to charge the
battery. Plug the power cable into an external power source to
charge. You can use the unit while it is charging.
To charge the unit’s battery:
1. Lift the rubber weather cap to expose the power connector
on the back of the unit. See the image on page 1 for
connector location.
2. Align the notches and push the plug into the connector until
fully seated.
3. Plug the 12-Volt adapter into an available AC outlet, or
cigarette lighter receptacle if you have a cigarette lighter
adapter. Use care when routing the cable; make sure it does
not interfere with vehicle operation. The unit begins charging
as soon as external power is applied.
TIP: Placing the unit in Charge Mode charges the unit more
quickly than when the unit is turned on and reduces draw on the
vehicle/vessel battery.
When you turn on the GPSMAP 376C the power source indicator on
the GPS tab shows the unit is operating off battery power ( ),
that the unit is charging ( ), or that an external power source is
in use ( ).
Using Charge Mode
If you want to charge the battery when you are not using the unit,
you can put the unit into Charge Mode.
To put the GPSMAP 376C in charge mode:
1. Connect the GPSMAP 376C to an external power supply.
2. Press and hold the POWER key. Instead of completely
turning off, the GPSMAP 376C goes into Charge Mode.
NOTE: While in Charge Mode, the GPSMAP 376C draws a
small amount of current from the vehicle/vessel battery. To avoid
discharging the vehicle’s battery, disconnect the external power
cable from the unit when not in use for several days.
Over time, you might notice that the lithium-ion battery in the unit
is not holding a charge any more. This is common for lithium-ion
batteries. Contact Garmin or your Garmin dealer to order a battery
pack replacement if you are experiencing battery charging issues.
2 GPSMAP 376C Owner’s Manual
GETTING STARTED > CHARGING THE GPSMAP 376C
190-00508-00_0C.indd 2 11/6/2006 9:47:24 AM
Turning Your GPSMAP 376C On or Off
Before you turn on the GPSMAP 376C, be sure the antenna is up as
shown on page 1, and it has a clear and unobstructed view of the sky
to receive satellite signals.
The first time you turn on your GPSMAP 376C, the GPS receiver
must collect satellite data and establish its current location. To
ensure proper initialization, the GPSMAP 376C is shipped from
the factory in AutoLocate mode, which allows the receiver to “find
itself” anywhere in the world.
To turn the GPSMAP 376C on and off:
1. Press and hold the POWER key. When the unit turns on, a
tone sounds and the Warning Page appears.
Warning Page
2. Read the warning, and then press ENTER to continue.
3. To turn off the GPSMAP 376C, press and hold the POWER
key again.
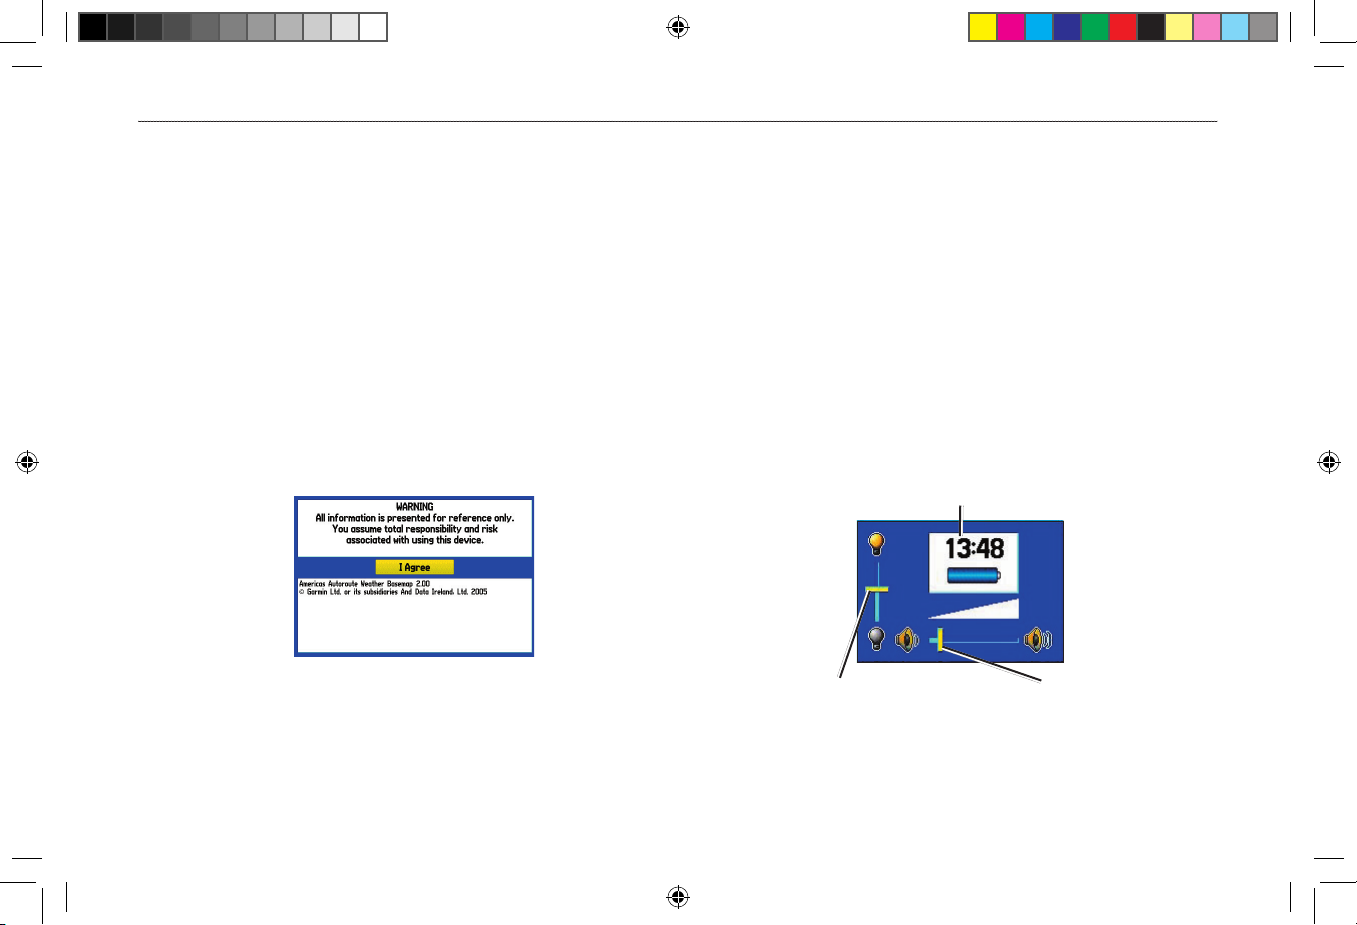
Adjusting the Backlight and Volume
You can adjust the backlight to see the screen better. If you are
using the external speaker with 12/24-Volt adapter cable with
the GPSMAP 376C, or you have headphones plugged into the
headphone jack, you can adjust the volume level of the audio output.
To adjust the backlight level or volume:
1. Press and quickly release the POWER key.
2. Press up on the ROCKER to increase the brightness or
press down to decrease. Press right to raise the volume or
left to lower.
3. Press ENTER or QUIT to close the Backlight/Volume
adjustment window.
Backlight
adjustment slider
Volume
adjustment slider
Battery time remaining and power source indicator
GPSMAP 376C Owner’s Manual 3
GETTING STARTED > TURNING YOUR GPSMAP 376C ON OR OFF AND ADJUSTING THE BACKLIGHT AND VOLUME
190-00508-00_0C.indd 3 11/6/2006 9:47:25 AM
Getting Satellite Signals
After you turn on the GPSMAP 376C, the unit automatically begins
searching for satellites. The GPS page appears while the unit is
gathering satellite signals and acquiring a fix, which should take
only a few minutes. While the GPSMAP 376C is getting satellite
signals, the GPS page shows the status as “Acquiring Satellites”.
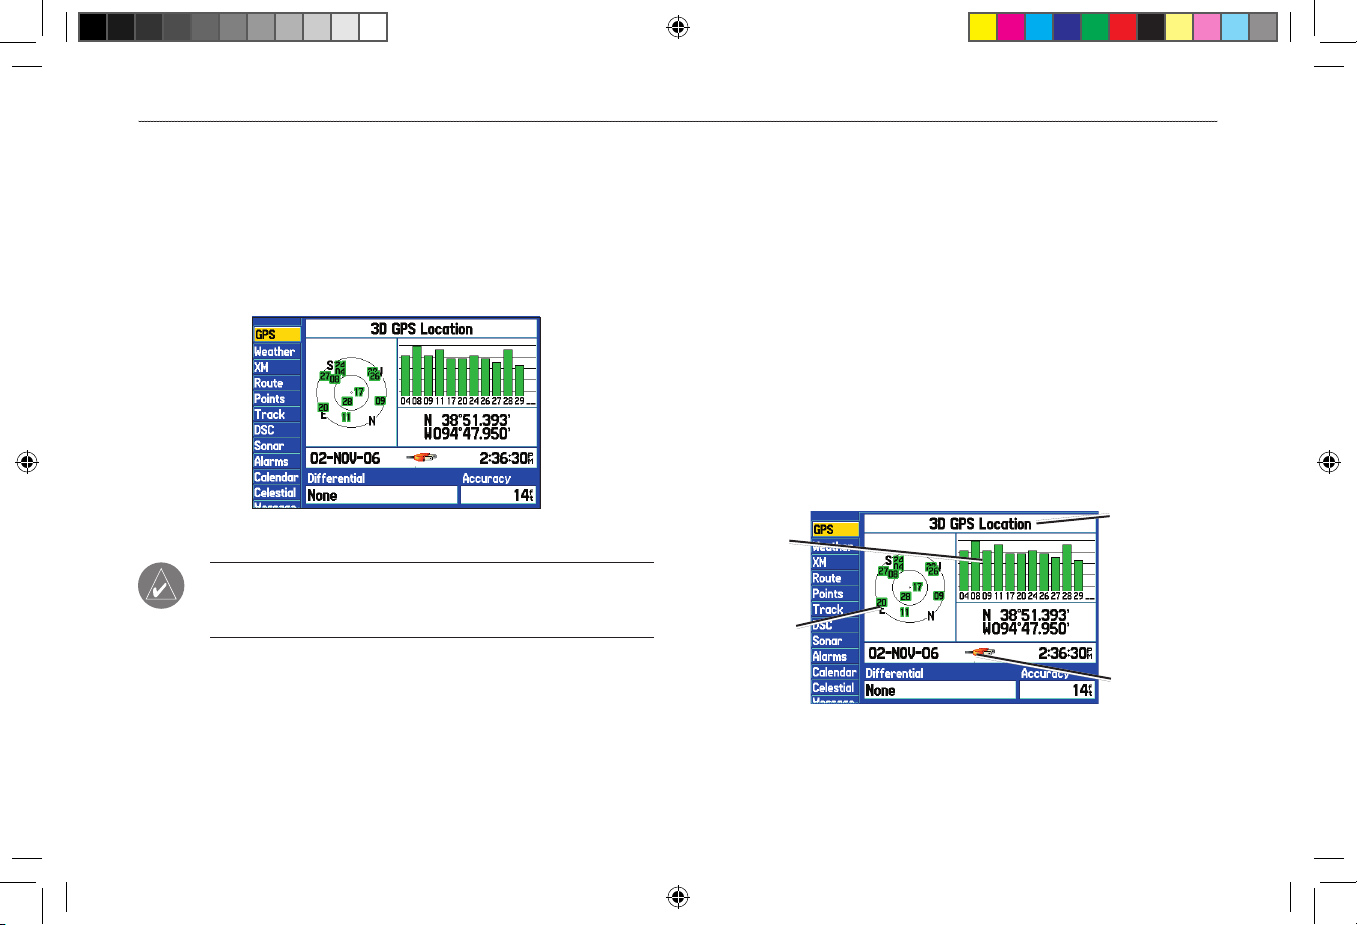
GPS Tab
NOTE: While acquiring satellites, the Map Page might show
the wrong location, such as China. You need to wait a few more
minutes to acquire satellites and find your current location.
Viewing GPS Status
The GPS tab provides a visual reference of satellite acquisition,
receiver status, and accuracy. The sky view and signal strength bars
show what satellites are visible to the receiver and whether they are
being tracked.
As the receiver locks onto satellites, a signal strength bar appears
for each satellite in view, with the appropriate satellite number
underneath each bar. The numbers below each bar represent the
particular satellite that is being received. Numbers above 33 indicate
WAAS satellites.
The sky view shows a bird’s eye view of the position of each
satellite relative to the receiver’s last known position. The outer
circle represents the horizon (north up), the inner circle represents
45º above the horizon, and the center point represents a position
directly overhead. You can also set the sky view to a Track Up
configuration, causing the top of the sky view to align along your
current track heading. Press MENU to change the configuration of
the sky view.
GPS Page
Receiver
status field
Sky view
Signal
strength bars
Power
source
indicator
4 GPSMAP 376C Owner’s Manual
GETTING STARTED > GETTING SATELLITE SIGNALS
190-00508-00_0C.indd 4 11/6/2006 9:47:25 AM

The progress of satellite acquisition is shown in three stages:
• No signal strength bars—the receiver is looking for the
satellites indicated.
• White signal strength bars—the receiver has found the
satellite and is collecting data.
• Green signal strength bars—the receiver has collected the
necessary data from this satellite.
When the GPSMAP 376C collects the necessary data from the best
satellites in view to calculate a fix, the status field indicates the
status of the receiver. The unit updates the location, date, and time.
Receiver Status
The Receiver Status field shows one of the following conditions:
• Searching the Sky—the receiver is looking for satellites.
• AutoLocate—the receiver is looking for any satellite whose
almanac was collected, which can take up to five minutes.
• Acquiring Satellites—the receiver is looking for and
collecting data from satellites visible at its last known or
initialized location but has not acquired a fix.
• 2D GPS Location—At least three satellites were acquired
and a two-dimensional position fix was calculated.
“2D Differential” appears when you are receiving DGPS
corrections in 2D mode, and a “D” appears on the strength bar
of satellites being corrected.
• 3D GPS Location—At least four satellites were acquired
and a three-dimensional fix was calculated. “3D Differential”
appears when you are receiving DGPS corrections in
3D mode, and a “D” appears on the strength bar of satellites
being corrected.
• Lost Satellite Reception—the receiver is no longer tracking
enough satellites for a 2D or 3D fix.
• Receiver Not Usable—the receiver is unusable, possibly due
to interference or abnormal satellite conditions. Turn the unit
off and back on to reset it.
• Simulating GPS—the receiver is in Simulator Mode.
• GPS Off—the GPS receiver is turned off.
GPSMAP 376C Owner’s Manual 5
GETTING STARTED > GETTING SATELLITE SIGNALS
190-00508-00_0C.indd 5 11/6/2006 9:47:25 AM
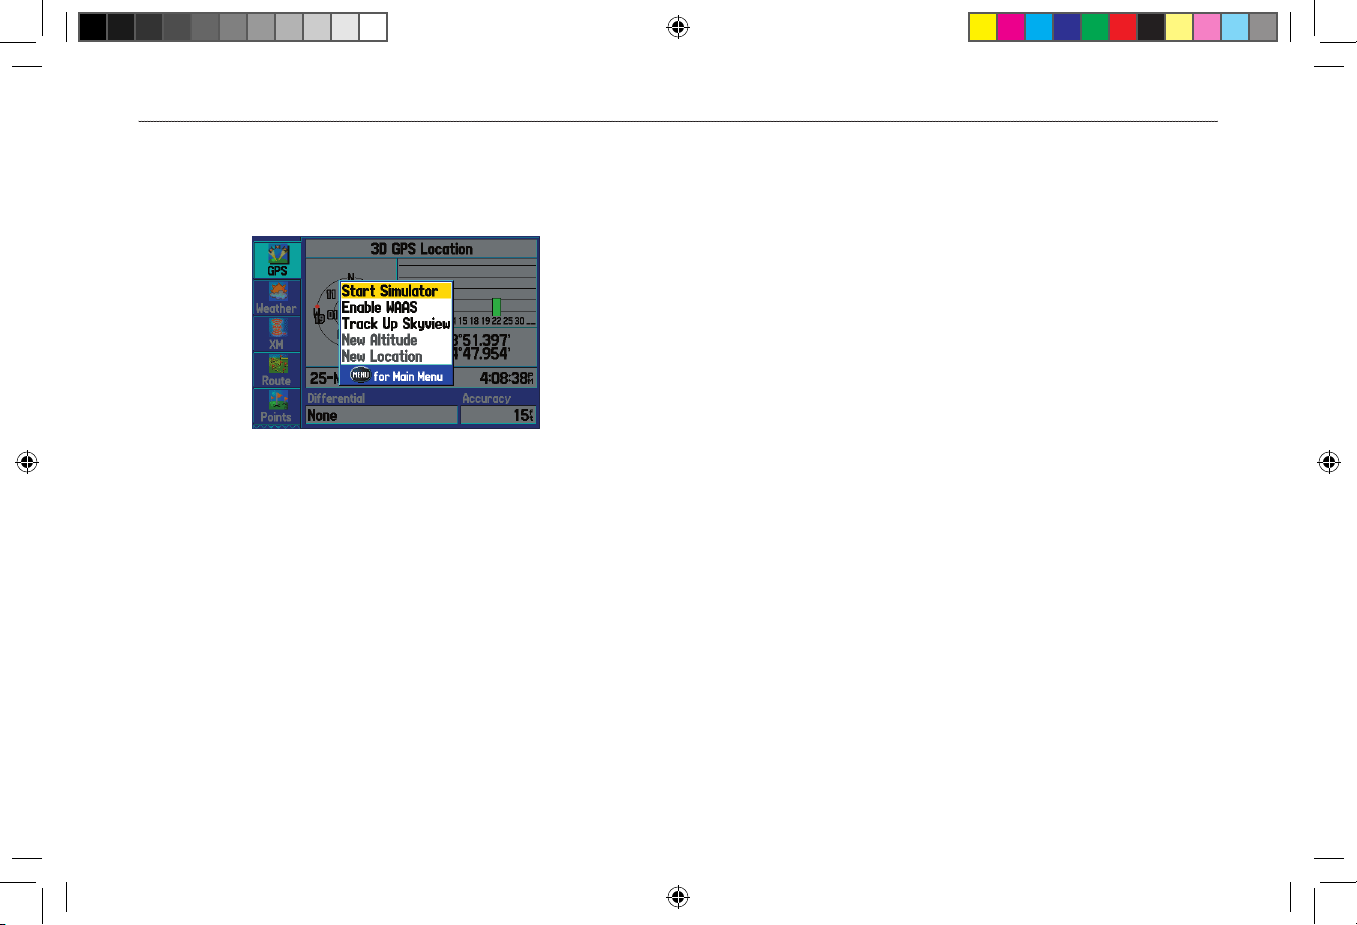
GPS Options
Press MENU twice to open the Main Menu. Use the ROCKER to
highlight the GPS tab. Press MENU to open the options menu.
Start/Stop Simulator—starts and stops Simulator Mode, which is
helpful when learning how to use your unit.
Enable/Disable WAAS—enables or disables WAAS capability. See
page 123 of the “Appendix” for more information about WAAS.
Track Up Skyview/
North Up Skyview—orients the sky view
display on the GPS page to North up or Track up.
New Altitude
—allows you to manually enter your altitude.
New Location—allows you to enter a new location automatically or
using the map.
GPS Tips
While the receiver is gathering information, your location on the
map might appear different from where you actually are located.
As soon as the receiver gathers enough satellite information, your
proper location appears on the map.
Any time you have traveled more than 600 miles with the GPS
receiver turned off, the receiver might take longer than normal to
initialize and find your location.
The GPS receiver can lose satellite signals due to interference from
such items as buildings, tunnels, and heavy tree cover. Monitoring
the GPS status is recommended.
To learn about GPS, visit
www.garmin.com/aboutGPS/.
6 GPSMAP 376C Owner’s Manual
GETTING STARTED > GETTING SATELLITE SIGNALS
190-00508-00_0C.indd 6 11/6/2006 9:47:25 AM
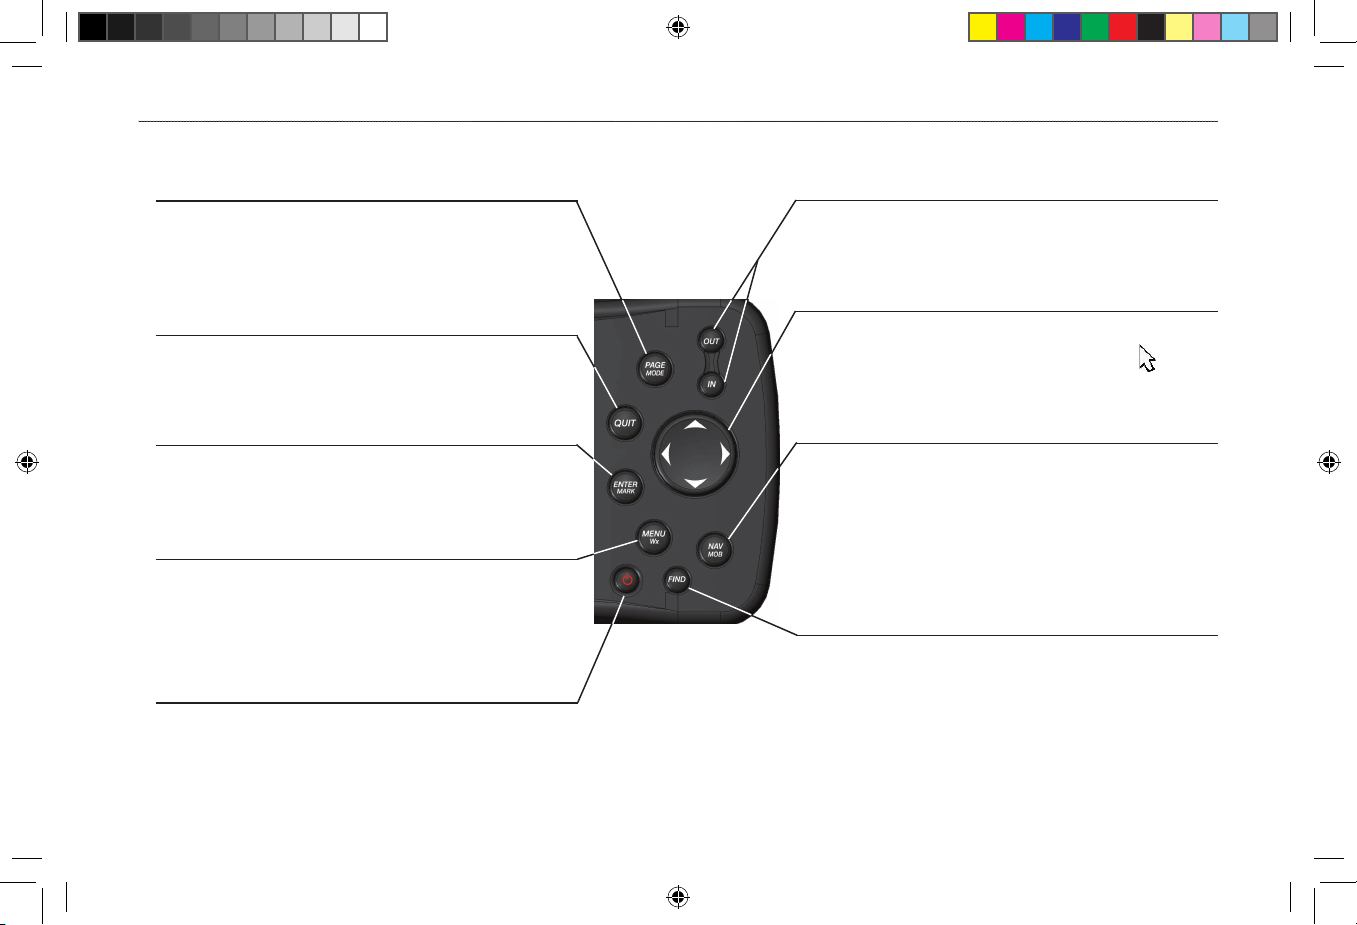
Using the GPSMAP 376C Keypad
.
IN Key/OUT Key
• Press to adjust map scale to show a larger area with
less detail (zoom out) or a smaller area with more
detail (zoom in).
PAGE/MODE Key
• Press to cycle through main pages in sequence and
exit a submenu page.
• Press and hold to switch between Marine and
Automotive Modes.
QUIT Key
• Press to cycle through main pages in reverse
sequence, revert to the previous value in a data
entry fi eld, or cancel an unintended function.
ENTER/MARK Key
• Press to select a highlighted option.
• Press and hold to mark your current location as a
waypoint.
NAV/MOB Key
• Press to show the Navigate Menu.
• In Marine Mode, press and hold to start the MOB
function.
In Automotive Mode, press and hold to show the
Next Turn page and announce the next turn when
using the external speaker.
MENU/Wx Key
• Press to open the options menu for the current page.
• Press twice to show the Main Menu.
• Press and hold to toggle XM WX weather on or off
on the Map Page.
POWER Key
• Press and hold to turn the unit on or off.
• Press and release to adjust the backlighting and
external speaker volume.
ROCKER
• Press up, down, left, or right to highlight options
and to enter data, or use to pan the arrow on the
Map Page.
FIND Key
• Press to quickly search for and access user
waypoints, cities, and other items used for
navigation.
GPSMAP 376C Owner’s Manual 7
GETTING STARTED > USING THE GPSMAP 376C KEYPAD
190-00508-00_0C.indd 7 11/6/2006 9:47:25 AM
Using the GPSMAP 376C
The advanced keypad system on the GPSMAP 376C is designed to
allow you to select options and enter data quickly and conveniently.
As you progress through this owner’s manual, you are directed to
press a specific key or highlight a field on the screen. When you
are directed to press a key, you should press and quickly release the
key. If the key needs to be held down for a period of time to start a
secondary function, the instructions tell you to do so. When a field is
selected on the screen, it is highlighted in yellow.
The following terms are used throughout this manual:
• Highlight
—move the highlighted area on the screen up,
down, left, or right with the ROCKER to select individual
fields. Moving the highlight to a given location allows you to
make a selection, begin data entry, or scroll through a list.
• Field—the location on a page where data or an option can
be shown and entered. Select (highlight) a field using the
ROCKER to begin entering data or selecting options.
• On-screen button—use the ROCKER to highlight a button
and press ENTER to select the button.
• Scroll bar—when viewing a list of items too long to appear
on the screen, a scroll bar appears along the right side of
the list. To scroll through a list, press up or down on the
ROCKER.
• Default—the factory setting saved in the unit’s memory. You
can change the settings, but you can also revert to the factory
(default) settings when you select Restore Defaults.
Highlighted field
Field
On-screen buttons
Cartography
The GPSMAP 376C has a built-in worldwide database. The unit
shows cartography as long as chart information is available for the
zoom scale you selected.
Optional preloaded Garmin data cards and MapSource CD-ROMs
enhance the versatility of your GPSMAP 376C. With optional
MapSource BlueChart information and BlueChart g2 you can view
information that is not already preloaded.
See the Garmin Web site at
www.garmin.com/cartography/ for
compatible MapSource products.
8 GPSMAP 376C Owner’s Manual
GETTING STARTED > USING THE GPSMAP 376C
190-00508-00_0C.indd 8 11/6/2006 9:47:26 AM

Selecting Options and Entering Data
To enter data and select options use the ROCKER to highlight,
select, or choose an item in a list or a field on the screen. Use the
ENTER key and the ROCKER to select options, enter names and
numbers in data fields, and activate your selections.
To select an optional feature:
1. From any page, press MENU. An options menu shows a list
of optional features specific to that page.
2. Use the ROCKER to move the highlight up, down, right, or
left on the menu to the option you want to select.
3. Press ENTER to select the feature. Another window with
more options might appear. If so, select an option and press
ENTER again.
To exit a menu or return to the previous setting:
Press QUIT. The QUIT key moves backward through your
steps. Press QUIT repeatedly to return to the starting page.
To select an on-screen button:
On a page with on-screen buttons, use the ROCKER to
highlight an on-screen button, and press ENTER.
On-screen
button
To mark your current location as a waypoint, press and hold
ENTER/MARK until the New Waypoint Page opens.
To enter data in a data field:
1. Use the ROCKER to highlight the data field you want, and
press ENTER to edit it.
2. Press up or down on the ROCKER to select characters.
Press right to move to the next character or press left to
move back to the previous character. If there are two lines of
data, keep pressing right on the ROCKER to go to the next
line.
GPSMAP 376C Owner’s Manual 9
GETTING STARTED > USING THE GPSMAP 376C
190-00508-00_0C.indd 9 11/6/2006 9:47:26 AM
Entering
data
TIP: To clear the entire data field, highlight the left-most
character field and press left on the ROCKER again.
3. Press
ENTER.
Not all fields are programmable. When you are on a page with fields
that are not selectable, the highlight skips over them.
Restoring Default Settings
You can restore factory defaults for the following Main Menu tabs:
Track, Alarms, Display, Sound, and Setup. For more information
about the Main Menu, see the “Main Menu” section beginning on
page 67.
To restore
default settings:
1. Press MENU twice to open the Main Menu.
2. Use the ROCKER to highlight a tab, and then press MENU to
open the options menu.
Setup Tab Options Menu
3. Highlight Restore Default, and press ENTER.
10 GPSMAP 376C Owner’s Manual
GETTING STARTED > USING THE GPSMAP 376C
190-00508-00_0C.indd 10 11/6/2006 9:47:26 AM
Using the Main Menu
Use the Main Menu on your GPSMAP 376C to access various
waypoint, system, navigation and interface management, and setup
menus. Press the MENU key twice from any page to open the Main
Menu. For more information, see the “Main Menu” section on
page 67.
Main Menu
To select a tab from the Main Menu:
1. From any page, press MENU twice to open the Main Menu.
2. Press up or down on the ROCKER to highlight a tab. The
information for the highlighted tab automatically appears
on the right. To highlight a sub tab, press left or right on the
ROCKER, and then press up or down to select individual
fields.
By default, the Main Menu tabs are shown as icons along the left
side of the screen. You can change the Main Menu to show tabs in a
text-only format.
To view the Main Menu icons in text-only format:
1. Highlight the Display tab, and press ENTER.
2. Select the Main Menu field. Press ENTER.
3. Highlight Text Only, and press ENTER.
GPSMAP 376C Owner’s Manual 11
GETTING STARTED > USING THE GPSMAP 376C
190-00508-00_0C.indd 11 11/6/2006 9:47:26 AM

Using Simulator Mode
Simulator Mode is great for practicing with the unit if you are
indoors or when satellite signals are not available. All waypoints and
routes created in Simulator Mode are retained in memory for future
use.
By unplugging the GXM 30 antenna and placing the unit in
Simulator Mode, you can view simulated weather information.
NOTE: Do not try to navigate using Simulator Mode. When the
unit is set to Simulator Mode, the GPS receiver is turned off.
Any satellite signal strength bars shown are only simulations and
do not represent the strength of actual satellite signals.
To turn on Simulator Mode:
1. Highlight the GPS tab on the Main Menu.
2. Press MENU to open the GPS tab options menu.
3. Highlight
Start Simulator, and press ENTER.
Entering a New Location
Use the GPS options menu to enter a new location from which to
simulate.
To enter a new location using the map:
GPS tab
Starting Simulator Mode from the GPS tab
1. Highlight the GPS tab on the Main Menu.
2. Press MENU to open the options menu.
3. Highlight New Location, and press ENTER.
4. Highlight Use Map, and press ENTER.
5. Use the ROCKER to move the panning arrow to the location
you want on the map, and press ENTER.
12 GPSMAP 376C Owner’s Manual
GETTING STARTED > USING SIMULATOR MODE
190-00508-00_0C.indd 12 11/6/2006 9:47:26 AM
MARINE MODE
This section explains some of the more common operations you will perform with your GPSMAP 376C.
To switch usage modes:
1. Press and hold the PAGE/MODE key. The Usage Mode Menu appears.
2. Select Automotive or Marine, and press ENTER.
Marine Mode Pages
Marine Mode has five main pages: Map, Compass, Highway, Active Route, and Position Data. An optional XM Audio Page can be enabled.
And an optional Sonar Page is available when GSD 21 or GSD 20 is connected. See the “Setting Up and Using Sonar” section beginning on
page 90 for more information.
Map Page
Compass Page
Highway Page
Position Data Page
Active Route Page
XM Audio Page
(Optional)
GPSMAP 376C Owner’s Manual 13
MARINE MODE > MARINE MODE PAGES
190-00508-00_0C.indd 13 11/6/2006 9:47:27 AM
Navigating to a Destination
You can navigate to your destination using the Map Page. As you
travel, you see a magenta line that always runs from your current
location to the destination or to the next turn on the Map Page. You
can use the Map Page, Compass Page, Highway Page, and Position
Data Page to help navigate.
You can navigate to a destination using one of the following
methods:
• Select a point on the map and press the NAV
key (page 15).
• Press the NAV
key to navigate a new route using the Find
Menu, or to navigate a saved route or track (page 21).
• Press the
FIND key to search for a particular item and create
a route to it (page 17).
Marine Mode and Automotive Mode are similar. Most of the
features discussed here also apply to Automotive Mode.
Navigate Options Menu
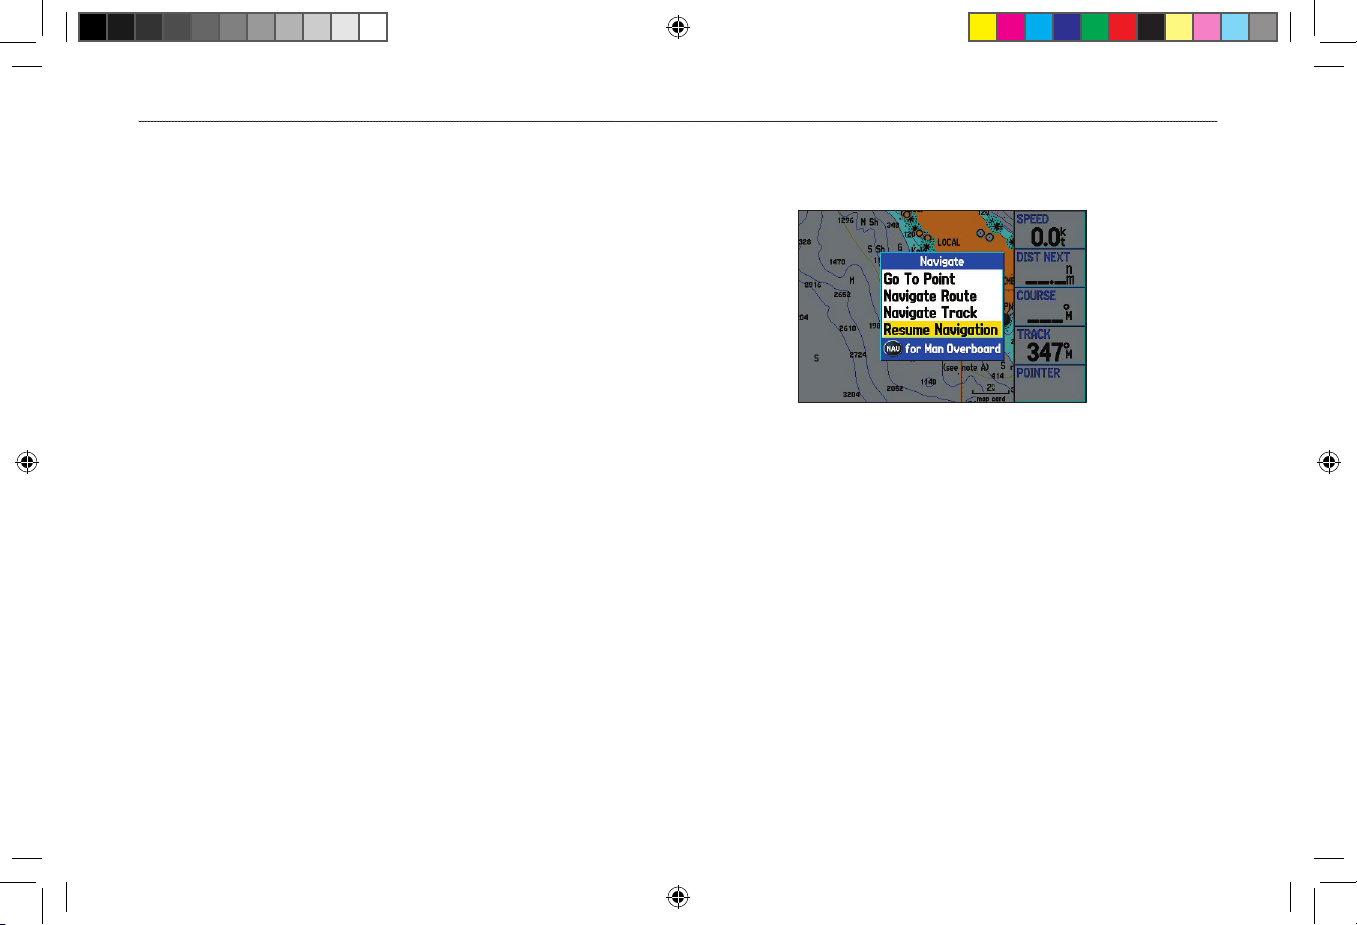
Press NAV to open the Navigate options menu.
Navigate Menu in Marine Mode
Go To Point—allows you to select a waypoint or point of interest
from the Find Menu to which to navigate.
Navigate Route—allows you to select a route to navigate. You can
also start a saved route through the Routes tab on the Main Menu.
For information about routes, see page 20.
Navigate Track (TracBack)—
allows you to select a saved track to
navigate. You can also start a saved track through the Track tab of
the Main Menu. For information about tracks, see page 34.
MOB (Man OverBoard)—creates a MOB waypoint and navigates
to that location. For more information about MOB, see page 16.
14 GPSMAP 376C Owner’s Manual
MARINE MODE > NAVIGATING TO A DESTINATION
190-00508-00_0C.indd 14 11/6/2006 9:47:27 AM
To navigate (Go To) a point on the map:
1. On the Map Page, highlight a point to navigate to, and press
NAV.
2. Highlight Go To <point name>, and press ENTER.
Navigate Menu
3. Follow the magenta route created on the Map Page.
To stop navigation:
1. While navigating to a point, press NAV.
2. Highlight Stop Navigation, and press ENTER.
3. Highlight Resume Navigation, and press ENTER to resume
navigation.
To start a new route using the Find Menu:
1. Press the NAV key to open the Navigate Menu.
2. Highlight Go To Point (or New Route when in Automotive
Mode), and press ENTER to open the Find Menu.
3. From the Find Menu, highlight Waypoints, and press
ENTER.
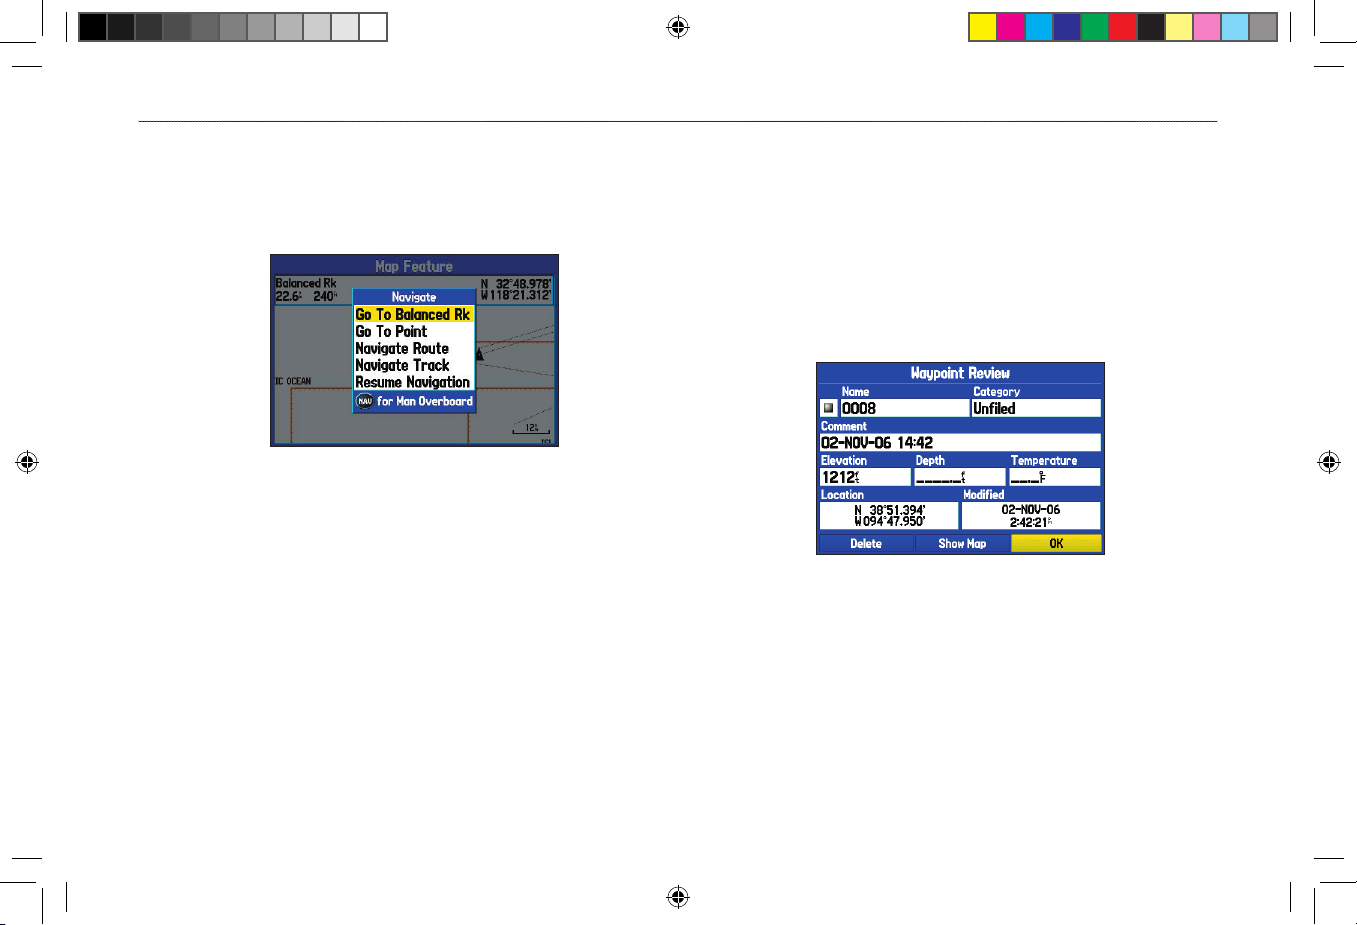
4. Select a waypoint from the list, and press ENTER to open the
Waypoint Review Page.
Waypoint Review Page
5. With the Go To button highlighted, press ENTER to begin
navigation.
GPSMAP 376C Owner’s Manual 15
MARINE MODE > NAVIGATING TO A DESTINATION
190-00508-00_0C.indd 15 11/6/2006 9:47:27 AM
To search for an item and route to it:
1. Press FIND to open the Find Menu.
2. Highlight a category, and press ENTER.
3. Press ENTER, and then press the ROCKER up or down to
enter letters contained in the item name. Press ENTER when
finished.
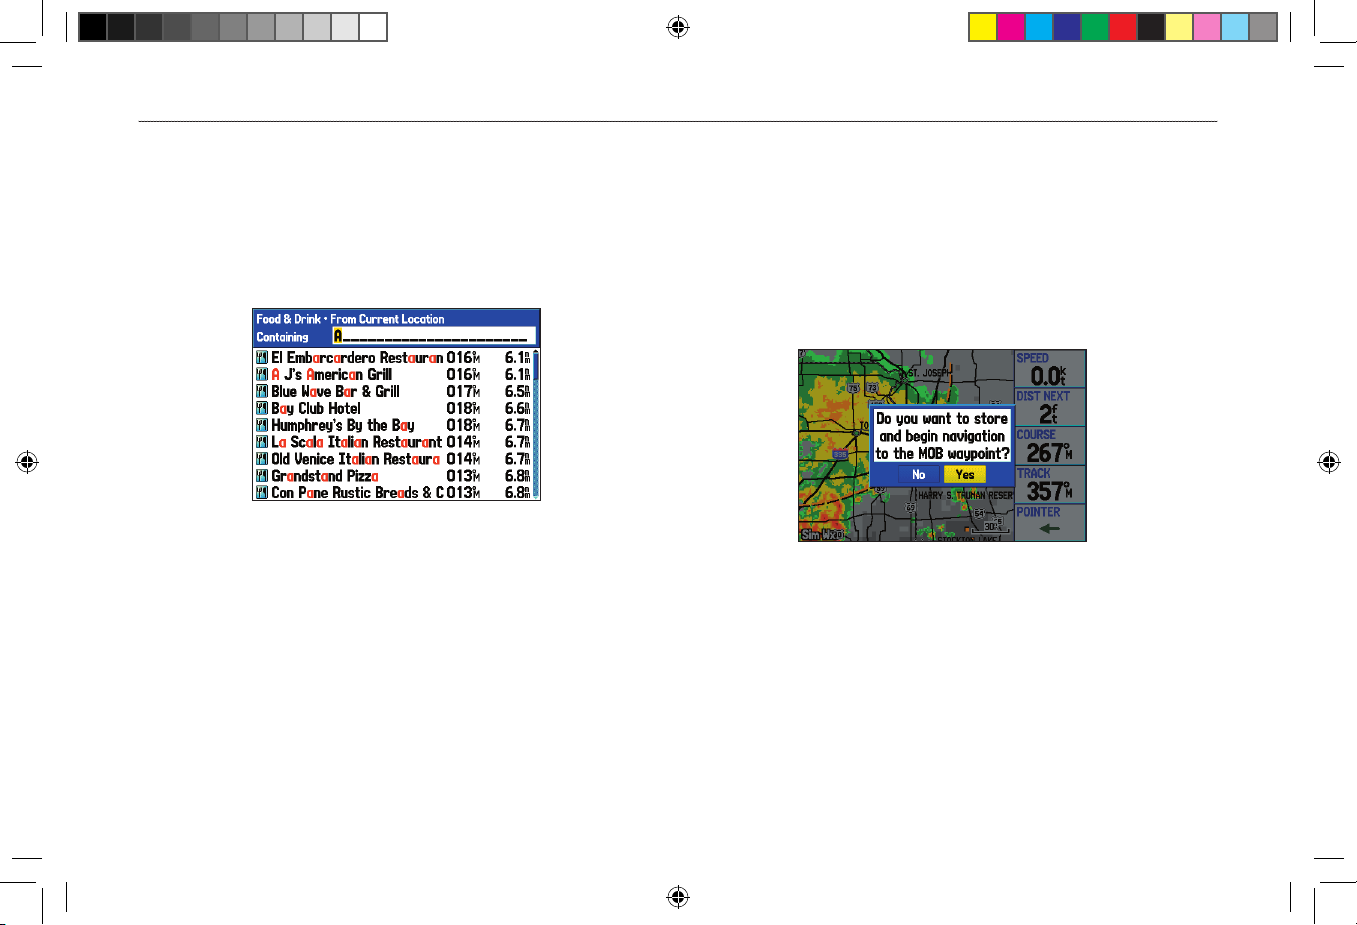
Finding an item using the Containing field: The unit searches for items
containing the letter combination you enter and shows them in the list.
4. Highlight the item from the list, and press ENTER.
5. Press ENTER when the Go To button is highlighted.
For complete information about finding an item, see the “Finding an
Item” section.
Man OverBoard (MOB)
Use the MOB function to simultaneously mark your current location
and create a direct route back to that location for quick response to
emergency situations.
To start the MOB function:
1. Press and hold the NAV/MOB key, or press the NAV/MOB
key twice.
2. Press ENTER to confirm and begin navigating to the MOB
position.
When a MOB is activated, a MOB waypoint with an international
MOB symbol is created, and the unit begins actively navigating to
that point. Use any of the Navigation Pages to guide you back to the
MOB point. The MOB waypoint is stored in the waypoint list and
can be deleted like any other waypoint.
16 GPSMAP 376C Owner’s Manual
MARINE MODE > NAVIGATING TO A DESTINATION
190-00508-00_0C.indd 16 11/6/2006 9:47:27 AM
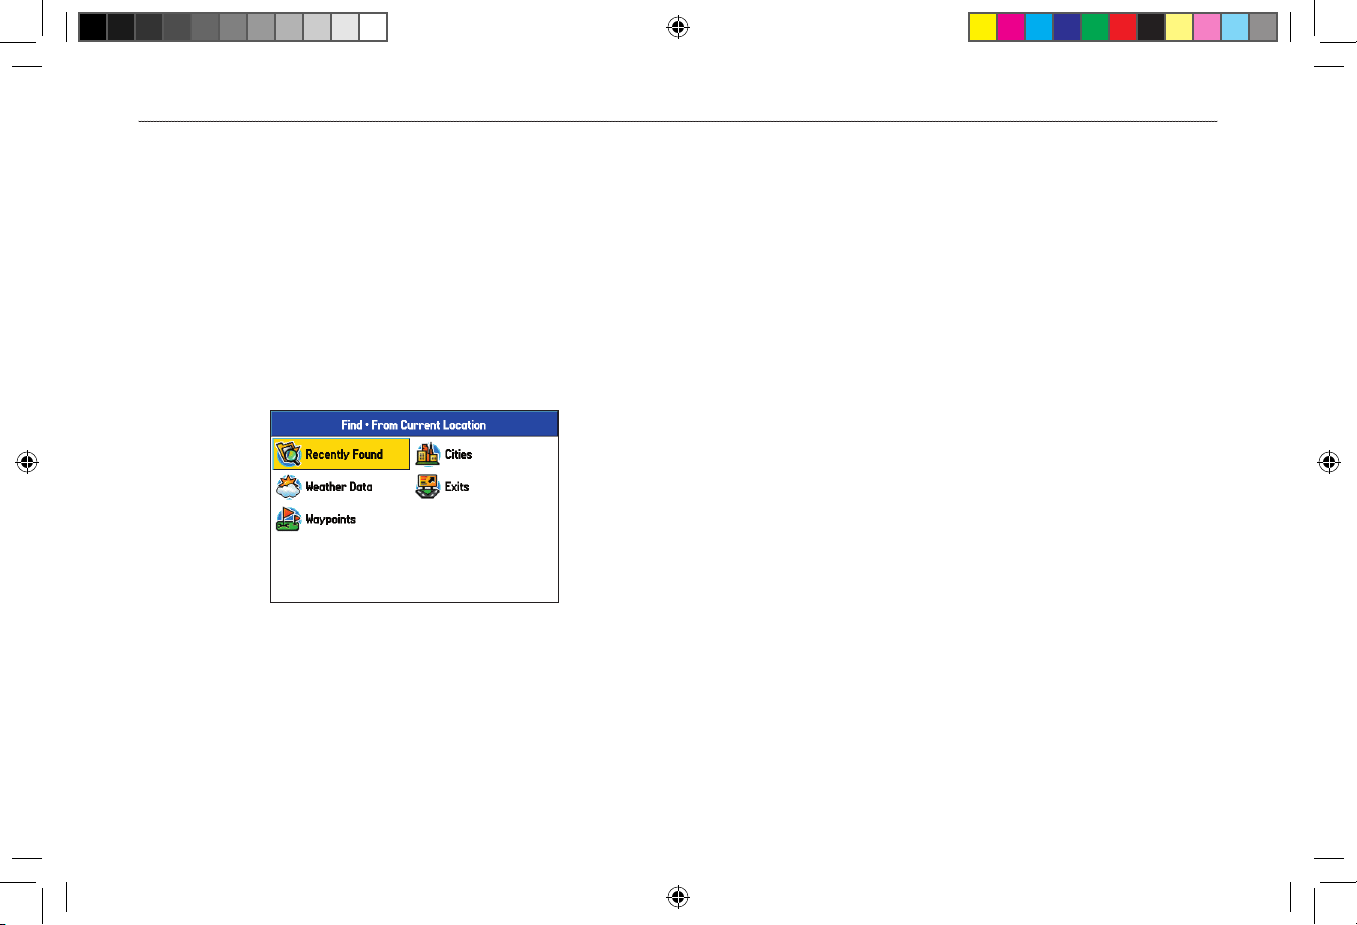
Finding an Item
Use the Find Menu to search for addresses, food & drink, fuel
services, lodging, banks/ATMs, cities, shopping, stored waypoints
and points of interest (POIs). To open the Find Menu, press the
FIND key.
The Find Menu is comprised of several default categories:
Waypoints, Cities, Exits, Transportation, Tide Stations, and Weather
Data. Additional categories appear depending on the optional
BlueChart, BlueChart g2 or MapSource data card in the unit.
Find Menu
Follow the directions on page 15 to navigate a new route using the
Find Menu.
Finding an Item From Another Location
You can use the Find Menu to center your search around an item
you just found. For example, you search for Restricted Areas and the
search shows an “Anchoring Prohibited” search result. If you press
FIND again, you will see “From Anchoring Prohibited” as the new
search from point. You can also use the Find feature to center your
search from any waypoint, route list entry, map item, or POI.
To find an item from another
location on the map:
1. Open the Map Page. Use the ROCKER to pan the arrow
(pointer) to the location you want, and press FIND. The Find
Menu opens, showing “From Map Pointer”. The list of items
is sorted to show items nearest the selected location.
2. Highlight a category from the list, and press ENTER.
3. Highlight an item from the list, and press ENTER. The item’s
Information Page automatically opens, allowing you to
save the item as a waypoint, show the item on the map, or
automatically create a route to (Go To) the item.
GPSMAP 376C Owner’s Manual 17
MARINE MODE > FINDING AN ITEM
190-00508-00_0C.indd 17 11/6/2006 9:47:27 AM
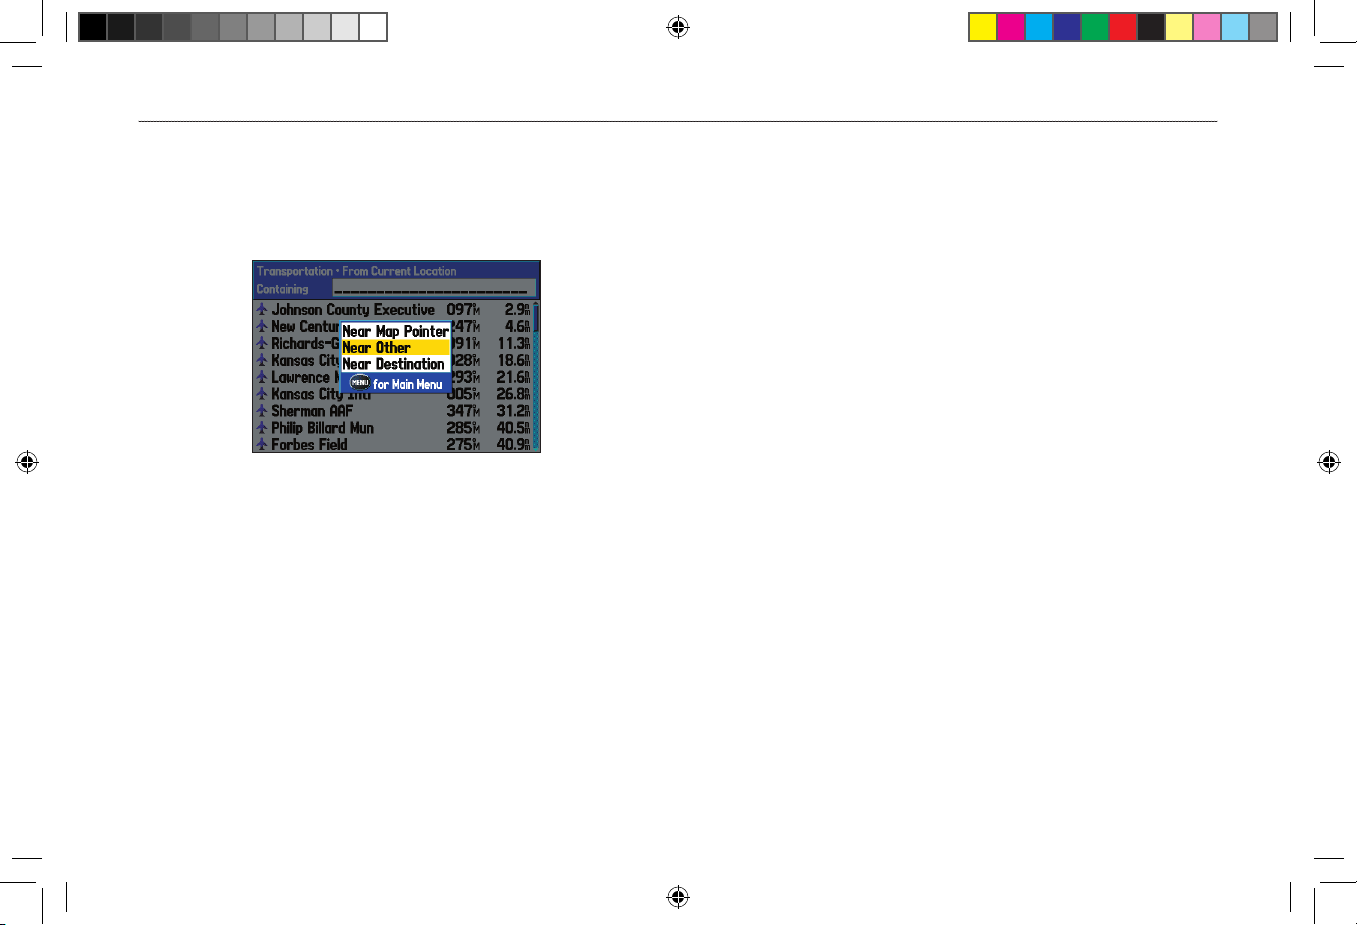
To find an item from another location:
1. From any page, press FIND.
2. Highlight a category from the list, and press ENTER.
3. Press MENU to open the options menu.
Find From Options Menu
4. Highlight Near Other, and press ENTER. If you are actively
following a route, you can also choose one of the other
options listed in the Find From list.
5. Select a reference location on the map, and press ENTER.
The list shows items nearest to the new map location.
To find an item near another item:
1. Press FIND. The Find Menu appears.
2. Highlight the item you want to find from.
3. Press FIND. The Find Menu opens again with items near the
previously selected item. Search for the item you want.
Viewing Recently Found Items
The Recently Found Page shows a list of the items you have
searched for or gone to recently.
To view a list of recently found items:
1. Press FIND to open the Find Menu.
2. Highlight Recently Found, and press ENTER to open the list
of recently found items.
3. Press MENU to open the options menu.
4. Select Show Find History to view the list of items you have
searched for recently.
OR
Select Show Go To History to view the list of items for which
you have recently created a Go To (Go To History).
5. Highlight Remove Point, and press ENTER to delete the
selected recently found point.
18 GPSMAP 376C Owner’s Manual
MARINE MODE > FINDING AN ITEM
190-00508-00_0C.indd 18 11/6/2006 9:47:27 AM
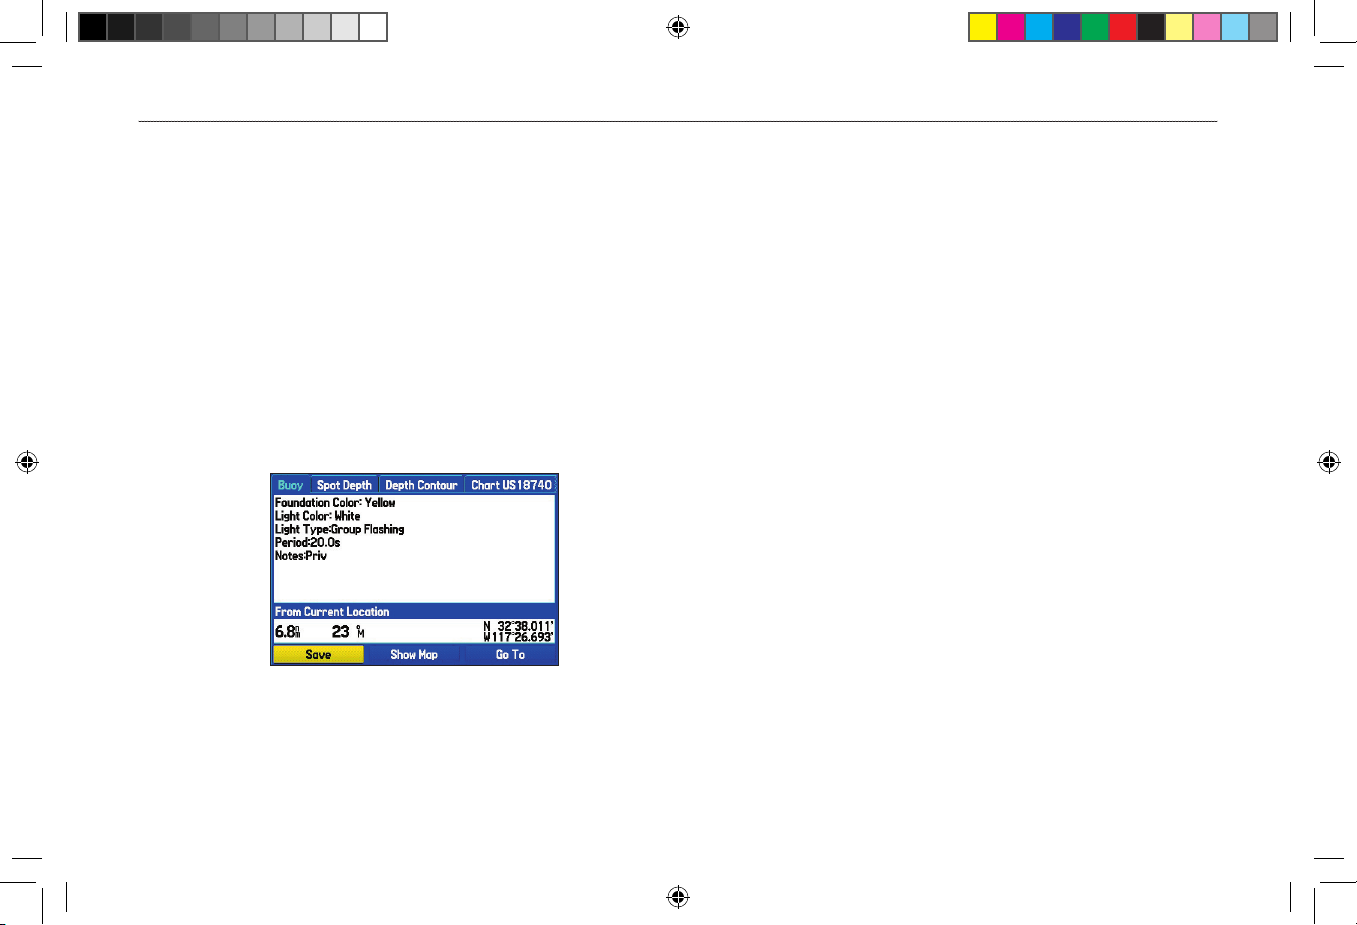
Viewing the Information Page
Each item on the map and each item listed in the results list has an
Information Page.
To view
details about an item:
1. Highlight a point on the map or in the search results list, and
press ENTER.
An Information Page appears with details about the item,
in a tabbed format. Depending on the item selected, and
if you are using optional BlueChart data cards, additional
information is available for viewing the item on the map,
viewing a tide chart, viewing the list of maps on your data
card, and viewing the next item in the search results list.
Map Feature Information Page
2. Press PAGE or QUIT to exit the Information Page. You
can also highlight one of the on-screen buttons and press
ENTER.
Find Menu Options
To view additional Find Menu options, press FIND, and then press
MENU. The following options are available:
• Enable Auto Arrange—automatically arranges the Find
Menu. When selected, Disable Auto Arrange
and Restore
Default options are available.
• Near Other—select a new location from which to compile
the Find items lists. Using the ROCKER, move the map
arrow to the location you want, and press ENTER.
• Map Information—shows information about the detailed
map data stored on the data card and allows you to select
which maps appear on the Map Page.
Additional selections are available on the options menu when you
are navigating:
• Near Next—compiles the Find items lists based on the next
turn in the route.
• Near Destination—compiles the Find items lists based on the
route destination.
• Near Current Route—compiles the Find items lists based on
the active route.
GPSMAP 376C Owner’s Manual 19
MARINE MODE > FINDING AN ITEM
190-00508-00_0C.indd 19 11/6/2006 9:47:28 AM
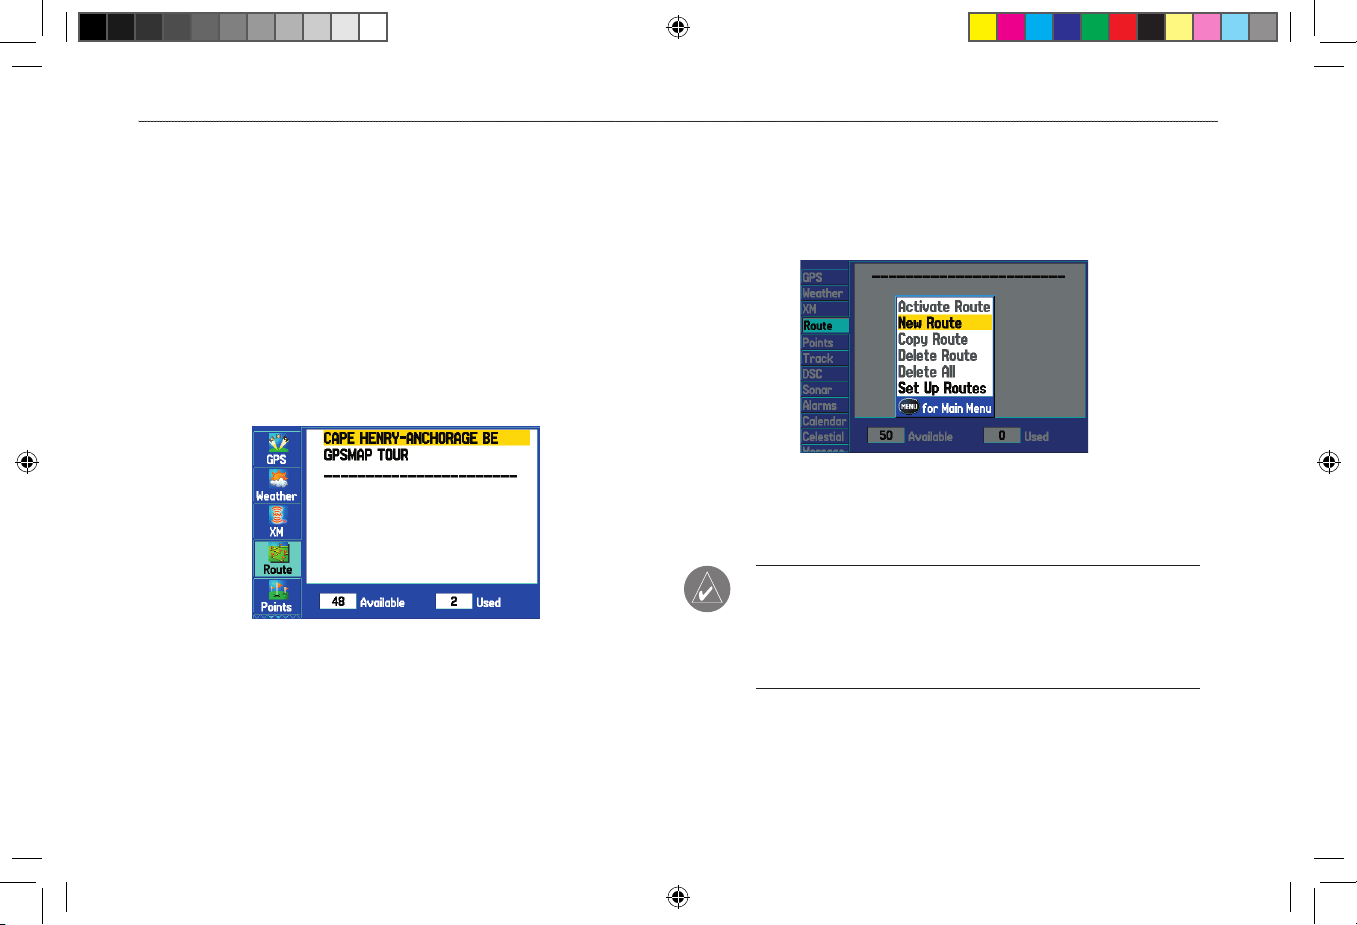
Creating and Using Routes
The GPSMAP 376C allows you to create and store up to 50
reversible routes, with up to 300 points each.
Creating a New Route
Use the Route tab to create a route by selecting waypoints from the
Find Menu, or by selecting waypoints or map items from the Map
Page.
To create a route using the Find Menu:
1. Highlight the Route tab on the Main Menu.
2. Press MENU to open the Route options menu.
3. Highlight New Route, and press ENTER.
4. Press ENTER to find items to add to the route.
5. Highlight OK, and press ENTER to add a route point.
6. Repeat step 5 to define additional route points.
To create a route using the map:
1. Highlight the Route tab on the Main Menu.
2. Press MENU to open the Route options menu.
3. Highlight New Route,and press ENTER.
4. Highlight Edit on Map,and press ENTER.
5. Highlight a location on the map, and press ENTER.
6. Repeat step 5 to define additional route points.
NOTE: If you select an area of the map that is not a feature
or waypoint, a new waypoint is created for that location. Press
ENTER on the New Waypoint Page to save the location as a
waypoint and continue adding points to your route. You can edit
the properties of this waypoint as you can with any waypoint.
20 GPSMAP 376C Owner’s Manual
MARINE MODE > CREATING AND USING ROUTES
190-00508-00_0C.indd 20 11/6/2006 9:47:28 AM
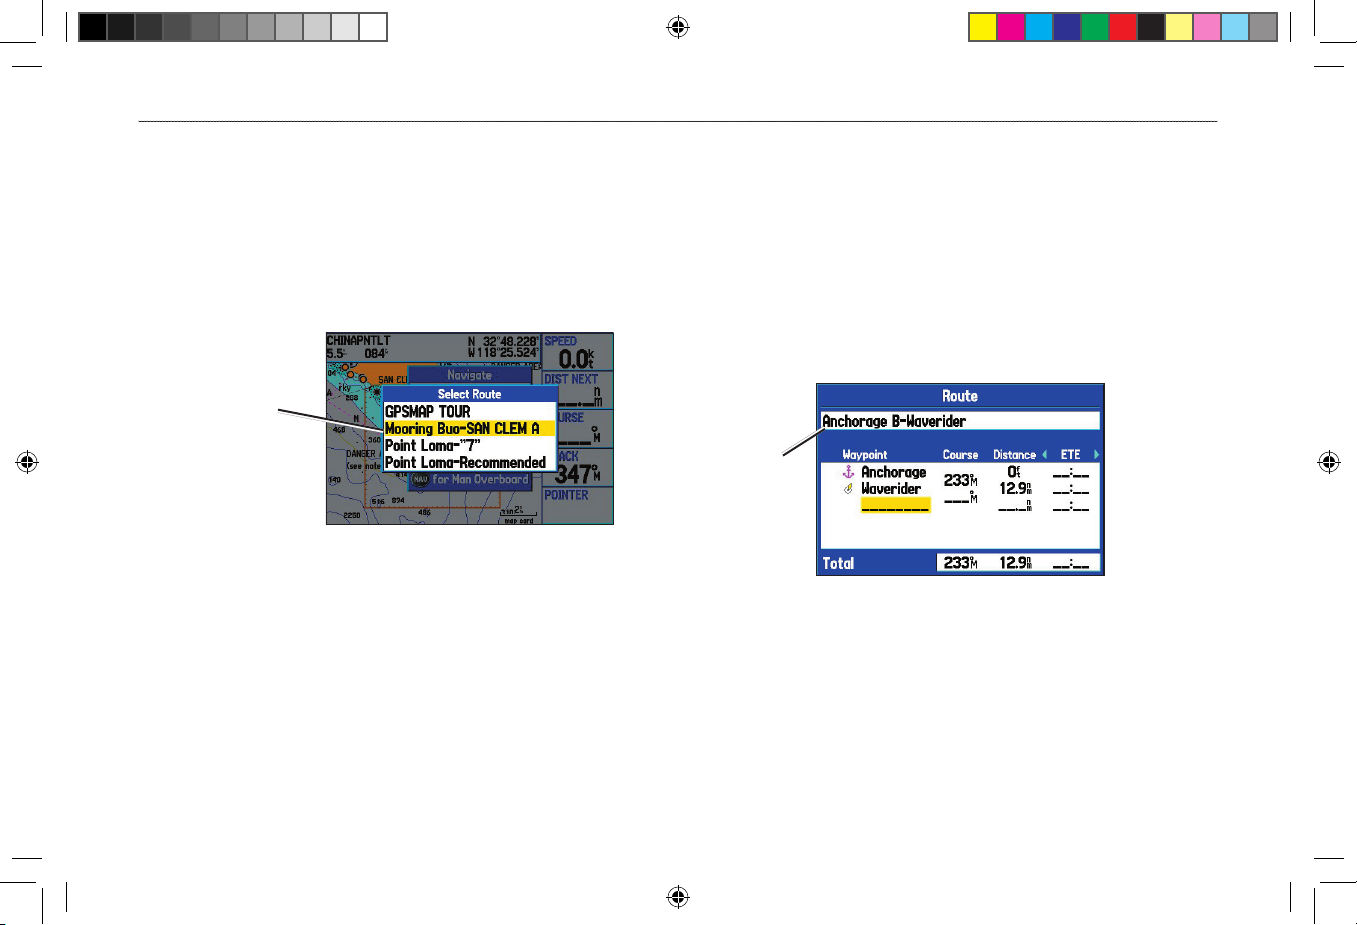
Navigating a Saved Route
Use the Navigate Route option to select and navigate a saved route.
To navigate a saved route:
1. Press the NAV key.
2. Highlight Navigate Route, and press ENTER.
3. Highlight a route, and press ENTER.
Select a route
from the list
Editing a Route
After you create a route, use the Route Review Page to edit, change
the name, and review route points of a selected route.
To change the name of the route:
1. Highlight the Route tab on the Main Menu.
2. Highlight the name of the route, and press ENTER.
3. With the Route Review Page open, highlight the route name
field at the top of the page, and press ENTER.
Route Review Page
Enter a new
Route name
here
4. Use the ROCKER to enter the route name, and press
ENTER.
GPSMAP 376C Owner’s Manual 21
MARINE MODE > CREATING AND USING ROUTES
190-00508-00_0C.indd 21 11/6/2006 9:47:28 AM
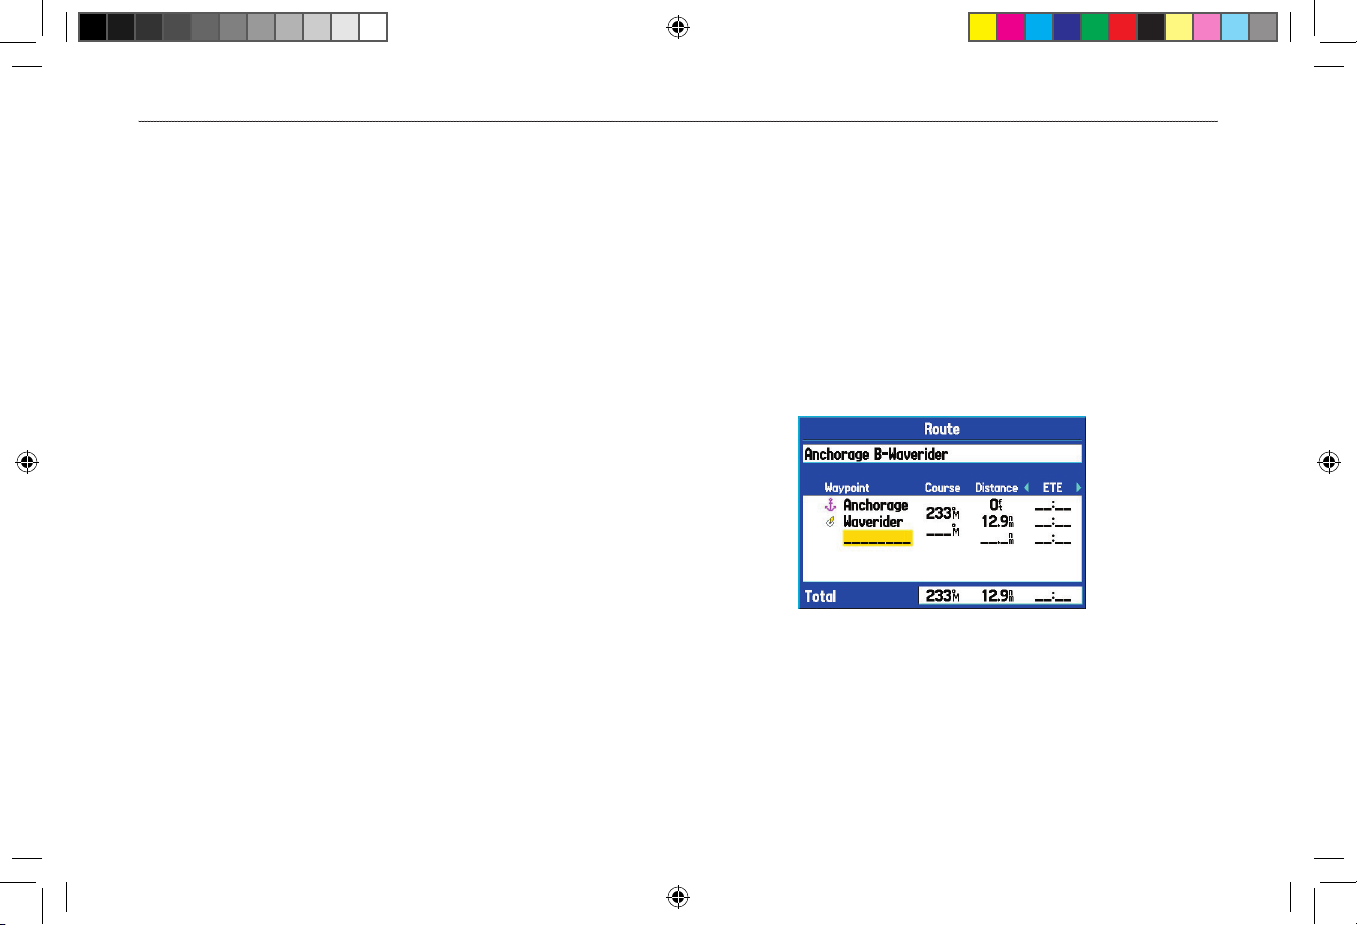
To review individual route points:
1. Highlight the Route tab on the Main Menu.
2. From the Route List Page, highlight the name of the route,
and press ENTER.
3. From the Route Review Page, highlight a point, and press
ENTER.
4. On the Point Review Page, choose Next (highlight the next
point on the route list), Show Map (show the point on a map
window), or Save (save the point as a waypoint) and press
ENTER. If the route point is a user waypoint, you can edit
any of the waypoint properties on the Waypoint Page (see
the “Creating and Using Waypoints” section beginning on
page 24 for details).
When you return to the Route Review Page, the next point in the
route is automatically highlighted. You can review each point on the
route by pressing ENTER repeatedly.
To
add points to the route:
1. Highlight the Route tab on the Main Menu.
2. Select a route, and press ENTER.
3. Highlight the spot in the route that you want to add the new
point. (The new point is added before the highlighted route
point.)
4. Press MENU.
5. Highlight Insert Waypoint, and press ENTER. The Find
Menu opens for you to search for and select the point you
want to add to the route.
Route Review Page
6. In the Point Review Page, highlight OK, and press ENTER to
add the new point to the route.
22 GPSMAP 376C Owner’s Manual
MARINE MODE > CREATING AND USING ROUTES
190-00508-00_0C.indd 22 11/6/2006 9:47:28 AM
 Loading...