


owner’s manual
530
2-way radio & personal navigator
®
P R E L I M I N A R Y
Rino520_530_prelim.indd 1 1/25/2005 5:00:18 PM

© Copyright 2005 Garmin Ltd. or its subsidiaries
All rights reserved. Except as expressly provided herein, no part of this manual may be reproduced, copied, transmitted, disseminated,
downloaded or stored in any storage medium, for any purpose without the express prior written consent of Garmin. Garmin hereby grants
permission to download a single copy of this manual onto a hard drive or other electronic storage medium to be viewed and to print one copy
of this manual or of any revision hereto, provided that such electronic or printed copy of this manual must contain the complete text of this
copyright notice and provided further that any unauthorized commercial distribution of this manual or any revision hereto is strictly prohibited.
Information in this document is subject to change without notice. Garmin reserves the right to change or improve its products and to make
changes in the content without obligation to notify any person or organization of such changes or improvements. Visit the Garmin Web site
(www.garmin.com) for current updates and supplemental information concerning the use and operation of this and other Garmin products.
Garmin®, AutoLocate®, Personal Navigator®, MapSource®, TracBack®, BlueChart®, and Rino® are registered trademarks of Garmin Ltd. or its
subsidiaries and may not be used without the express permission of Garmin.
June 2005 Part Number 190-00NNN-00 Rev. A Printed in Taiwan
Garmin International, Inc.
1200 East 151st Street
Olathe, Kansas 66062, U.S.A.
Tel. 913/397.8200 or 800/800.1020
Fax 913/397.8282
Garmin (Europe) Ltd.
Unit 5, The Quadrangle
Abbey Park Industrial Estate
Romsey, SO51 9DL, U.K.
Tel. 44/0870.8501241
Fax 44/0870.8501251
Garmin Corporation
No. 68, Jangshu 2nd Road
Shijr, Taipei County, Taiwan
Tel. 886/2.2642.9199
Fax 886/2.2642.9099
Rino520_530_prelim.indd 2 1/25/2005 5:00:18 PM

Rino® 530 Owner’s Manual i
P R E L I M I N A R Y
INTRODUCTION
Thank you for choosing the Garmin® Rino® 530 (Radio
Integrated with Navigation for the Outdoors). To get the
most from your new Rino 530, read through the Quick
Start Guide first, then this Owner’s Manual to understand
all of the operating features.
The Quick Start Guide describes the process of
navigating the Main Pages and the Option Menus, along
with some basic unit operations to familiarize you with
your new Rino 530 right out of the box. Read the Quick
Start Guide first.
This manual is organized into the following sections:
The Introduction section provides FCC, safety, warranty,
and product registration information, as well as the Table
of Contents.
The Getting Started section provides basic information
about the Rino 530.
The Unit Operation section provides information on
each of the six Main Pages, listed in the same order as
viewed on the unit. The section for each Page provides
an overview that discusses the page, how it functions,
and step-by-step instructions for using the page and its
features. It also includes an overview of some additional
features and step-by-step instructions for using the
features.
The Appendix includes additional information about the
Rino 530
The Index provides keywords and the pages on which
they appear.
INTRODUCTION
Rino520_530_prelim.indd 1 1/25/2005 5:00:19 PM

ii Rino® 530 Owner’s Manual
P R E L I M I N A R Y
INTRODUCTION > TABLE OF CONTENTS
Introduction .............................................................i
Getting to Know Your Rino 530 ............................
1
Front of the Rino 530 ...............................................2
Back of the Rino 530 ................................................3
Main Display Pages .................................................. 4
Operating the Rino 530 ............................................5
Status Bar Overview ................................................6
Unit Operation ........................................................7
Radio Page ................................................................ 7
Initializing the Rino 530 ................................................ 7
Using My ID and Symbol Fields ................................... 8
Setting the Channel and Squelch Code ........................ 10
Scanning and Monitoring ............................................ 12
Radio Page Option Menu ............................................ 14
Setup Radio ............................................................ 14
Setup Tones ............................................................ 16
Setup Scanlist ......................................................... 16
Use Weather Radio ................................................. 17
Turn Radio/GPS On/Off ........................................ 18
Informational Picture ................................................... 18
GPS Status ............................................................. 18
Radio Transmission Status .................................... 18
Mark Waypoint’s Indicators ........................................
19
Using the Rino 530 Radio Features ......................20
Peer-to-Peer Positioning .............................................. 20
New Contact Page Overview ....................................... 20
Sending a Location ...................................................... 23
Map Page ................................................................. 24
Map Page Options ....................................................... 26
Using the Pan Map Option .......................................... 27
Programming the Data Fields ...................................... 28
Setting up the Map ....................................................... 29
Measuring Distance ..................................................... 31
Navigation Page .....................................................32
Using the Navigation Page .......................................... 32
Navigation Page Options ............................................. 34
Using Sight ‘N Go ....................................................... 35
Calibrating the Compass .............................................. 35
Altimeter Page ........................................................ 37
Altimeter Page Options ............................................... 38
Viewing Pressure/Elevation Plots ................................ 39
Adjusting the Zoom Ranges ........................................ 39
Viewing Points ............................................................. 40
Resetting Data .............................................................. 40
Calibrating the Altimeter ............................................. 41
Rino520_530_prelim.indd 2 1/25/2005 5:00:19 PM

Rino® 530 Owner’s Manual iii
P R E L I M I N A R Y
INTRODUCTION > TABLE OF CONTENTS
Programming Data Fields ............................................ 41
Trip Computer Page ...............................................42
Trip Computer Page Options ....................................... 42
Main Menu Page ..................................................... 43
Using the Main Menu .................................................. 43
Main Menu Options ..................................................... 45
Shortcuts Menu ...................................................... 46
Waypoints ............................................................... 47
Mark Waypoint Page ................................................... 47
Creating Waypoints ..................................................... 48
Projecting a Waypoint .................................................. 49
Editing a Waypoint ......................................................49
Find ‘N Go ............................................................... 51
Finding a Waypoint ...................................................... 52
Finding a Contact ......................................................... 54
Finding a City .............................................................. 55
Finding an Exit ............................................................ 56
Finding a Point of Interest ........................................... 57
Finding an Address or Intersection .............................. 59
Finding a Last Found Place ......................................... 61
Weather Radio ........................................................ 62
Sending a Note ....................................................... 63
Using a Goto ...........................................................64
Routes Page ............................................................ 65
Creating and Using a Route ......................................... 65
Editing a Route ............................................................ 66
Adding or Editing from the Route Map Page .............. 69
Navigating a Route ...................................................... 70
Stopping Navigation .................................................... 71
Data Fields for the Route Page .................................... 71
Tracks Page ............................................................ 72
Using the TracBack Feature ........................................ 73
Setting up the Track Log ............................................. 74
Proximity Page .......................................................75
Satellite Page ..........................................................76
Sky View Graphic ........................................................ 76
WAAS .......................................................................... 77
Satellite Strength .......................................................... 77
Satellite Page Options .................................................. 78
Setup Pages ............................................................ 80
Time Setup Page .......................................................... 80
Units Setup Page .......................................................... 81
LORAN TD Format ............................................... 82
Display Setup Page ...................................................... 83
Heading Setup Page ..................................................... 84
Interface Setup Page .................................................... 85
Rino520_530_prelim.indd 3 1/25/2005 5:00:20 PM
iv Rino® 530 Owner’s Manual
P R E L I M I N A R Y
INTRODUCTION > TABLE OF CONTENTS
System Setup Page ....................................................... 87
Calendar ..................................................................88
Alarm Clock ............................................................90
Calculator ................................................................ 91
Stopwatch ............................................................... 92
Stopwatch Lap Options ............................................... 92
Sun & Moon ............................................................93
Hunt & Fish ............................................................. 94
Area Calculator ....................................................... 95
Games .....................................................................96
Memory Race .............................................................. 96
Waypoint Bomber ........................................................ 97
Clothesline ................................................................... 98
Assimilation ................................................................. 98
Beast Hunt ................................................................... 98
Appendix ..............................................................99
What is FRS? .......................................................... 99
FRS Features ................................................................ 99
FRS Limitations ......................................................... 100
GMRS ........................................................................ 100
Specifications .......................................................101
Physical ...................................................................... 101
Performance ............................................................... 101
Radio .......................................................................... 102
Power ......................................................................... 102
Accessories .......................................................... 103
Transferring MapSource Data .............................104
GPS Troubleshooting Guide ............................... 106
Radio Troubleshooting Guide ............................. 107
FRS Frequency Chart ................................................ 108
Weather Radio Frequency Chart ................................ 108
GMRS Frequency Chart ............................................ 109
Data Field Definitions ........................................... 110
Interface Information ............................................ 112
FCC Compliance Information .............................. 113
FCC Licensing Information ................................. 114
Limited Warranty .................................................. 115
Software License Agreement .............................. 117
Product Registration .................................................. 117
Contact Garmin .......................................................... 117
Warnings and Cautions ....................................... 118
Index ...................................................................121
Rino520_530_prelim.indd 4 1/25/2005 5:00:20 PM

Rino® 530 Owner’s Manual 1
P R E L I M I N A R Y
GETTING STARTED > GETTING TO KNOW YOUR RINO 530
GETTING TO KNOW YOUR RINO 530
The Rino 530 (Radio Integrated with Navigation for
the Outdoors) is a 7.6 ounce, 12 channel GPS-enabled
handheld device. It has integrated radio functionality to
provide two-way communications for up to two miles
using 14 FRS (Family Radio Service) channels. The Rino
530 also provides 8 high-performance GMRS (General
Mobile Radio Service) channels and 8 GMRS repeater
channels (U.S. versions only) for up to five miles.
GMRS repeater channels are not approved for use by the
Canadian government, so they are disabled on Rino 530
units sold in Canada.
The Rino 530 has three user-selectable power levels: 0.5
W, 2.0 W, and 5.0 W. Keep in mind that FRS channels
only transmit at 0.5 W, even if you select a higher power
level. The Rino 530 also has a rechargeable lithium-ion
battery pack with charger. If you wish, you can purchase
an optional alkaline battery pack (however, transmit
power is limited to 2.0 W when using this pack).
The unit contains built-in cartography of a North
American basemap that includes Interstate and State
Highways and Exit Information. Using MapSource®,
Garmin’s map data software (not included), the Rino 530
can display up to 24 MB of a variety of different map
information. We currently offer several mapping options
that are compatible with the Rino 530 including our
MetroGuide, Topo, Fishing Hot Spots, and BlueChart
®
data. Check your local dealer or the Garmin Web site
(www.garmin.com) for a complete listing of MapSource
products.
Garmin designed your Rino 530 with you, the user, in
mind. The Rino 530 is
waterproof to IPX7 standards and
is rugged enough to endure the most trying use. Garmin’s
friendly user interface allows you to start navigating with
your new GPS in no time. Your Rino 530 can provide one
more critical benefit: peace of mind. With your Rino 530
you know where you are, where you’ve been, and where
you’re going. And since you’ll always know the way back
home, you can concentrate on what you set out to do;
explore the great outdoors.
Rino520_530_prelim.indd 1 1/25/2005 5:00:20 PM
2 Rino® 530 Owner’s Manual
P R E L I M I N A R Y
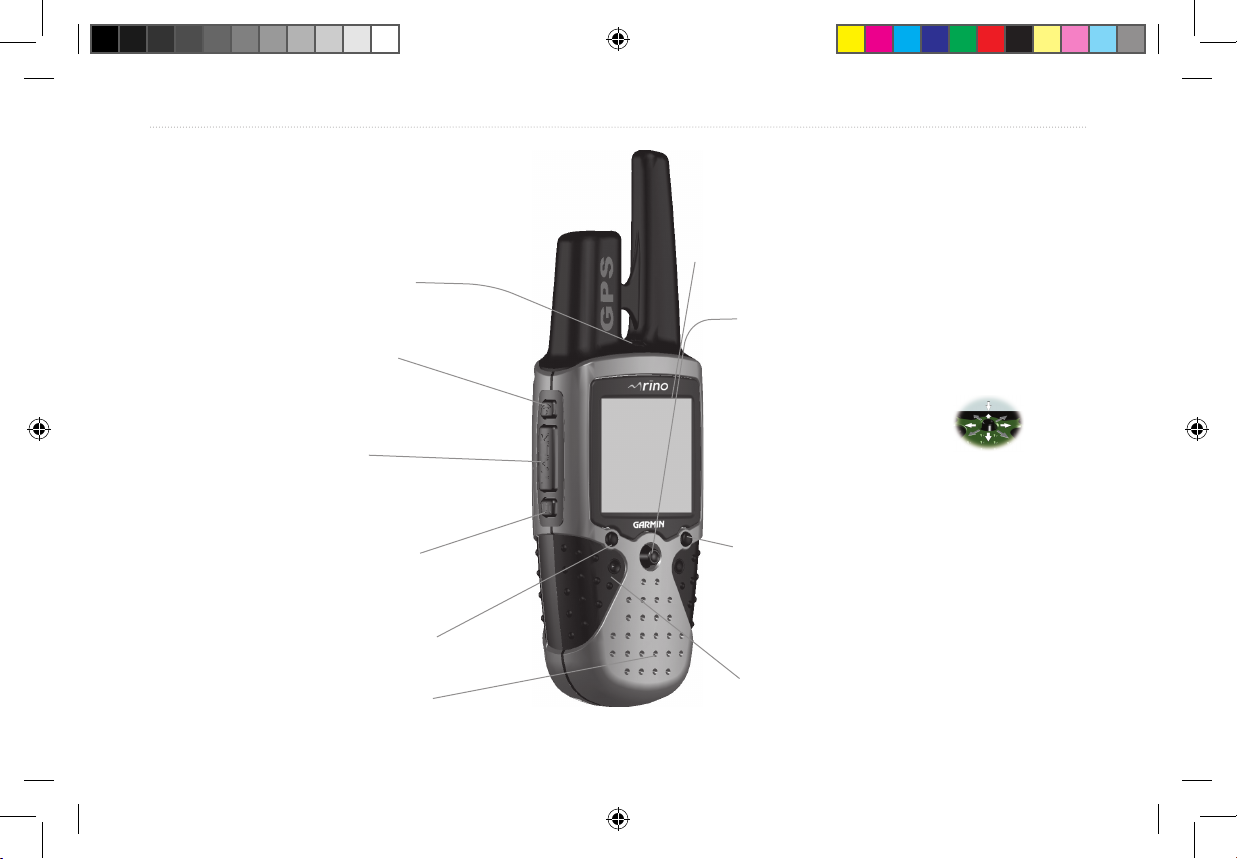
GETTING STARTED > FRONT OF THE RINO 530
Front of the Rino 530
Power button:
• Press and hold to turn the unit On/Off
• Press to adjust contrast and backlighting
Call button:
• Press to send out Call Tone
• Sends position when released
(if enabled)
Talk button:
• Press and hold to talk
• Sends position when released
(if enabled)
LCD Display
Page/Quit button:
• Press to cycle through main pages
• Used to quit or escape menu items
Volume (V) button:
• Press to open volume control window
Microphone:
• Hold unit 3-4 inches away when talking
Zoom/Map (Z) button:
• From the Map Page, press to open Zoom
control window
• From any other page, press to display Map
Page and press again to open Zoom control
Speaker
Thumb Stick
• Press In to enter highlighted options and to
confi rm messages
• Move Up, Down, Right or Left to move
through lists, highlight fi elds, onscreen buttons, icons, enter data,
or move the map panning arrow
• Press In and hold to display
Shortcuts Menu.
Rino520_530_prelim.indd 2 1/25/2005 5:00:25 PM
Rino® 530 Owner’s Manual 3
P R E L I M I N A R Y
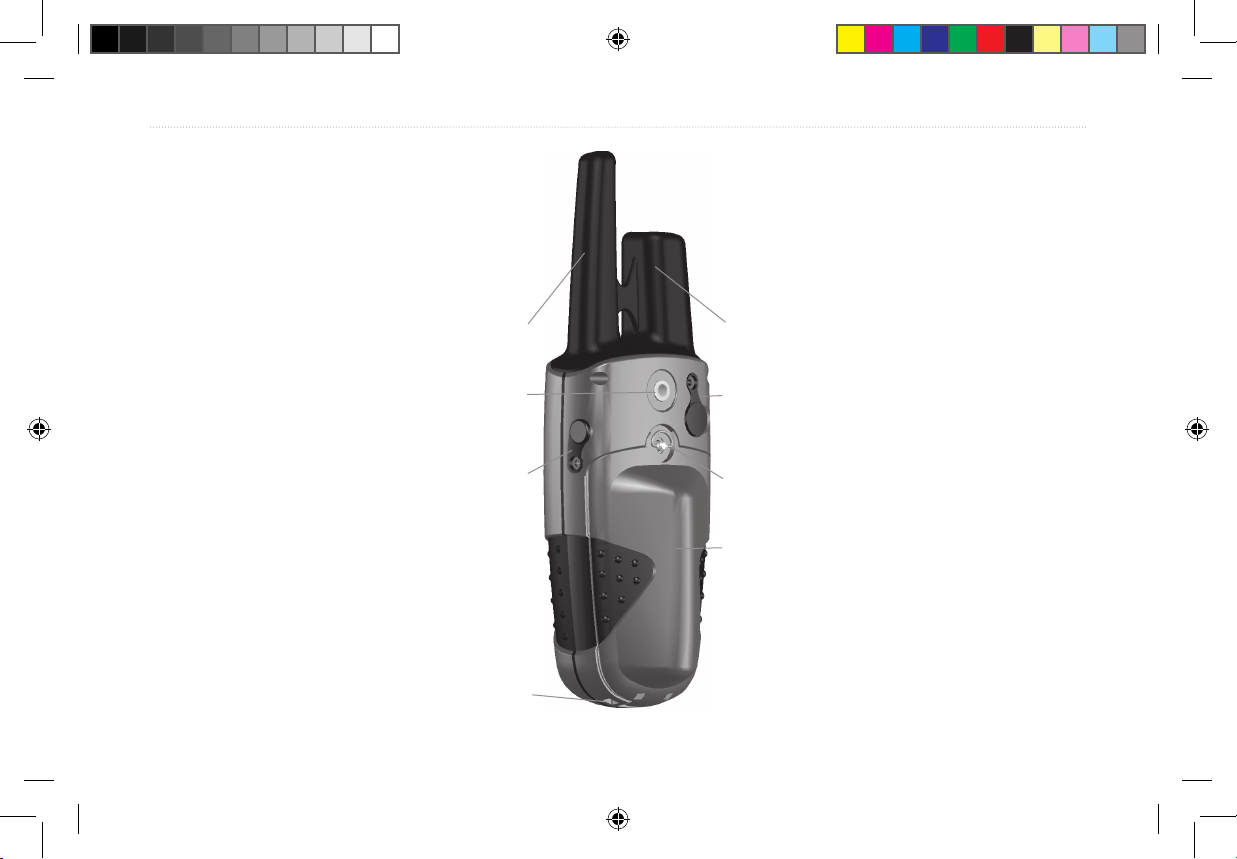
GETTING STARTED > BACK OF THE RINO 530
Back of the Rino 530
2-way FRS/GMRS Antenna
Headset Connector with
Weather cap
External Power And
Data Connector with
Weather cap
GPS Antenna
Battery Compartment Cover
Belt Clip Connector Mount
Battery Compartment D-Ring
Mount Alignment Notches
Rino520_530_prelim.indd 3 1/25/2005 5:00:26 PM
4 Rino® 530 Owner’s Manual
P R E L I M I N A R Y
GETTING STARTED > MAIN DISPLAY PAGES
Main Display Pages
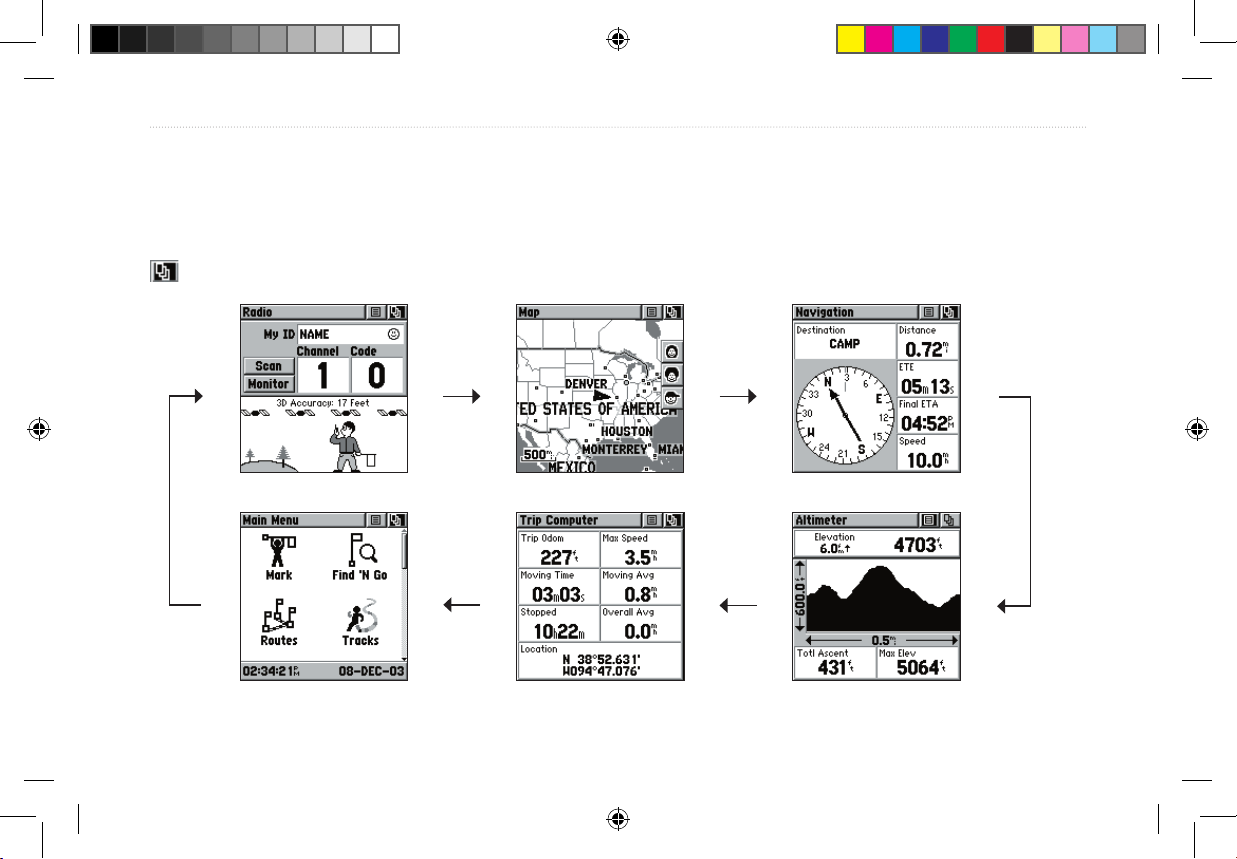
All of the information you need to operate the Rino 530 can be found on six default main pages (or display screens).
Simply press and release the Page button to cycle through the Radio Page, Map Page, Navigation Page, Altimeter Page,
Trip Computer, and Main Menu Page. You can also access the Main Pages by pressing the on-screen Main Page button
. Customize the Main Page sequence through the Main Menu (see page 45).
Main Menu
Radio Page
Map Page
Trip Computer
Navigation Page
Altimeter Page
Rino520_530_prelim.indd 4 1/25/2005 5:00:27 PM

Rino® 530 Owner’s Manual 5
P R E L I M I N A R Y
GETTING STARTED > OPERATING THE RINO 530
Operating the Rino 530
For best results, you should initialize the GPS receiver
in your Rino 530 unit before you use it the first time. See
page 7 for instructions on initializing the unit. For most
accurate results, the compass and altimeter should also
be calibrated. Refer to the “Calibrating the Compass”
and “Calibrating the Altimeter” sections for complete
information.
The Rino 530 is programmed to provide “pop-up”
messages concerning operational characteristics and
conditions. Press the Thumb Stick In to acknowledge a
message and return to the current feature.
To use the
Thumb Stick:
• Press In to enter highlighted options and to
confirm messages
• Move Up, Down, Right or Left to move through
lists, highlight fields, on-screen buttons, icons,
enter data, or move the map panning arrow
• Press In and hold to display Shortcuts Menu.
To use the page Option Menu:
1. Highlight the Option Menu on-screen button
at the top of the display screen and then press the
Thumb Stick In to open the menu.
2. Highlight the desired menu option and press the
Thumb Stick In to activate the option.
3. To close without making a selection, move the
Thumb Stick to the Right.
To lock/unlock the buttons:
1. Press and hold the Thumb Stick In to access the
Shortcuts Menu. Highlight Enable Keylock and
press the Thumb Stick In. The Talk button is now
locked.
2. To unlock, press and hold the Page button until
“Keylock Disabled” is displayed (about 5 seconds).
Rino520_530_prelim.indd 5 1/25/2005 5:00:28 PM
6 Rino® 530 Owner’s Manual
P R E L I M I N A R Y
GETTING STARTED > STATUS BAR OVERVIEW
Status Bar Overview
The Status Bar at the top of the screen displays on all
the available Main Pages. As you move around any of
the Main Pages, the current page’s title briefly displays
(3 seconds) and then is replaced by the Status Bar. The
current settings and operational icons on the Status Bar
are displayed as you operate the unit.
The available icons are:
Battery Full (Each bar represents 1/4 charge)
Battery 1/2 charge
Battery Empty
Using External Power
Receiving Radio signal
Transmitting Radio signal
Backlight On
Radio On
Peer-To-Peer On/Location Ready to Send
Keylock On
Alarm Clock On
GPS On, Position Ready
GPS On, Position Not Ready
Compass On (Press and hold the Zoom key to
turn the compass on/off)
Weather Alert On
Rino520_530_prelim.indd 6 1/25/2005 5:00:28 PM

Rino® 530 Owner’s Manual 7
P R E L I M I N A R Y
UNIT OPERATION > RADIO PAGE
UNIT OPERATION
Radio Page
The Radio Page is the first of the default Main Pages.
This page provides the user interface for FRS (Family
Radio Service) and GMRS (General Mobile Radio
Service) radio operations. Garmin Rino units work
with 3rd party FRS/GMRS radios, provided the other
radios use standard FRS/GMRS frequencies. To take full
advantage of the Rino features, communicate with other
Rino users.
The Radio Page also provides access to the Weather
Radio, which provides a constant update of current
weather conditions. The Weather Alert feature further
enhances the Weather Radio by automatically notifying
you of any weather alerts, even when the Weather Radio
is not is use and the FRS/GMRS radio is in use! These
features are helpful while outdoors or planning a road
trip.
Also use this page to control and setup the radio, view
current settings and see informational graphics of the
unit’s operation.
Radio Page
Initializing the Rino 530
To take full advantage of all of the Rino 530 features,
the GPS receiver must be initialized. The initialization
process allows the Rino 530 to receive and store satellite
information and begin using the satellites for navigation.
Initialization is automatic, should only take a few
minutes, and only needs to be done the first time the unit
is used.
Rino520_530_prelim.indd 7 1/25/2005 5:00:28 PM
8 Rino® 530 Owner’s Manual
P R E L I M I N A R Y
UNIT OPERATION > RADIO PAGE
To initialize the unit:
1. Take the Rino 530 outside where it has an
unobstructed view of the sky and turn it on.
2. The unit begins to search for satellite signals.
“Tracking Satellites” is displayed while the unit is
initializing.
3. Initialization should take no more than five
minutes. When the GPS is initialized and ready
for navigation, the message “3D Accuracy” is
displayed on the Radio Page.
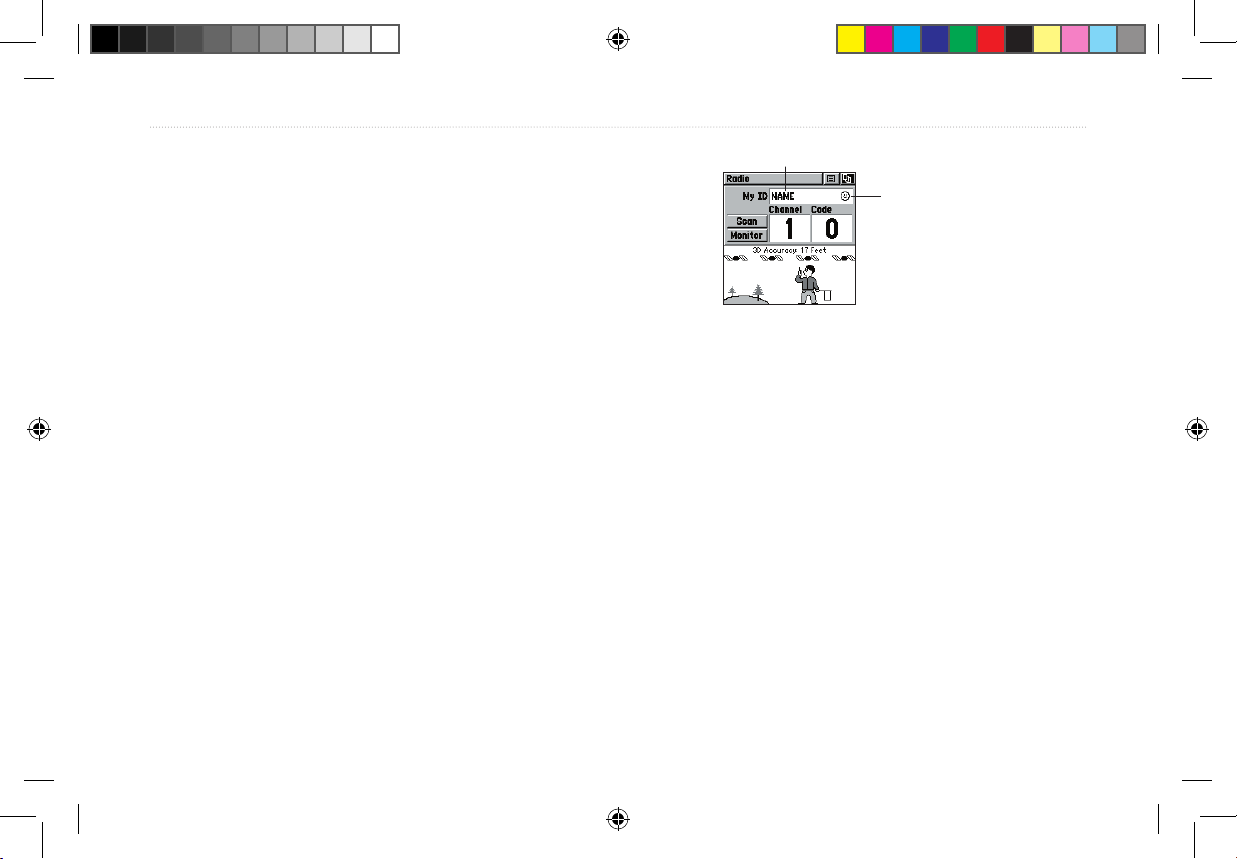
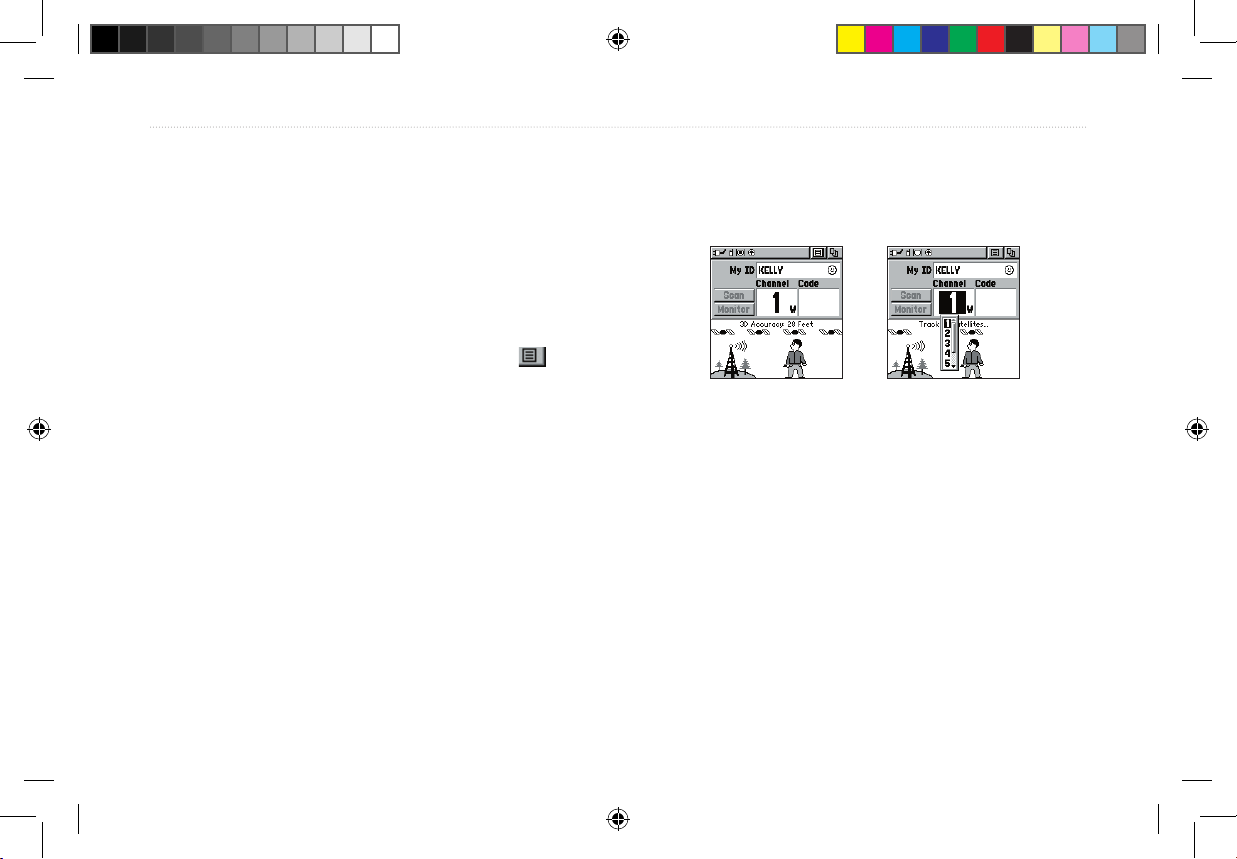
Using My ID and Symbol Fields
The My ID field allows you to enter a name and symbol
that appears on other Rino units as you communicate
with them. You may enter a name using a combination
of up to 10 letters, numbers, or spaces. The Symbol field
allows you to choose a face icon from a list to further
personalize your ID.
My ID Field
Symbol
To enter a name:
1. Using the Thumb Stick, highlight the My ID field.
Press the Thumb Stick In to activate the field and
display the keyboard.
2. Move the Thumb Stick Up, Down, Left, or Right
to highlight the Clear field, then press the Thumb
Stick In to clear the default Name ID.
3. To enter a new ID, use the Thumb Stick to move
the cursor to the desired character (letter, number,
or a space). Press the Thumb Stick In to select
that highlighted character. Choose Back to delete
the character to the left of the cursor. You may
enter up to 10 characters for your ID.
Rino520_530_prelim.indd 8 1/25/2005 5:00:29 PM

Rino® 530 Owner’s Manual 9
P R E L I M I N A R Y
UNIT OPERATION > RADIO PAGE
Entering a name
with the on-screen
keyboard
4. When you have entered your new ID, use the
Thumb Stick to highlight OK and then press the
Thumb Stick In.
To change the user symbol:
1. Using the Thumb Stick, highlight the face symbol
to the right of the My ID field. Press the Thumb
Stick In to show a list of available face icons.
2. Move the Thumb Stick Up or Down to scroll
through the selections. Because not all the
selections can fit in the window, a slider bar on the
right side indicates your current position in the list.
Changing the
user symbol
TIP: Hold the Thumb Stick Up or Down to scroll
through the list more quickly. Once you reach the end
of the list, you can wrap back to the top or bottom by
releasing the Thumb Stick then pressing in the same
direction again. This same method may also be used
on other selection windows.
3. Once you have highlighted the desired icon, press
the Thumb Stick In.
Rino520_530_prelim.indd 9 1/25/2005 5:00:29 PM

10 Rino® 530 Owner’s Manual
P R E L I M I N A R Y
UNIT OPERATION > RADIO PAGE
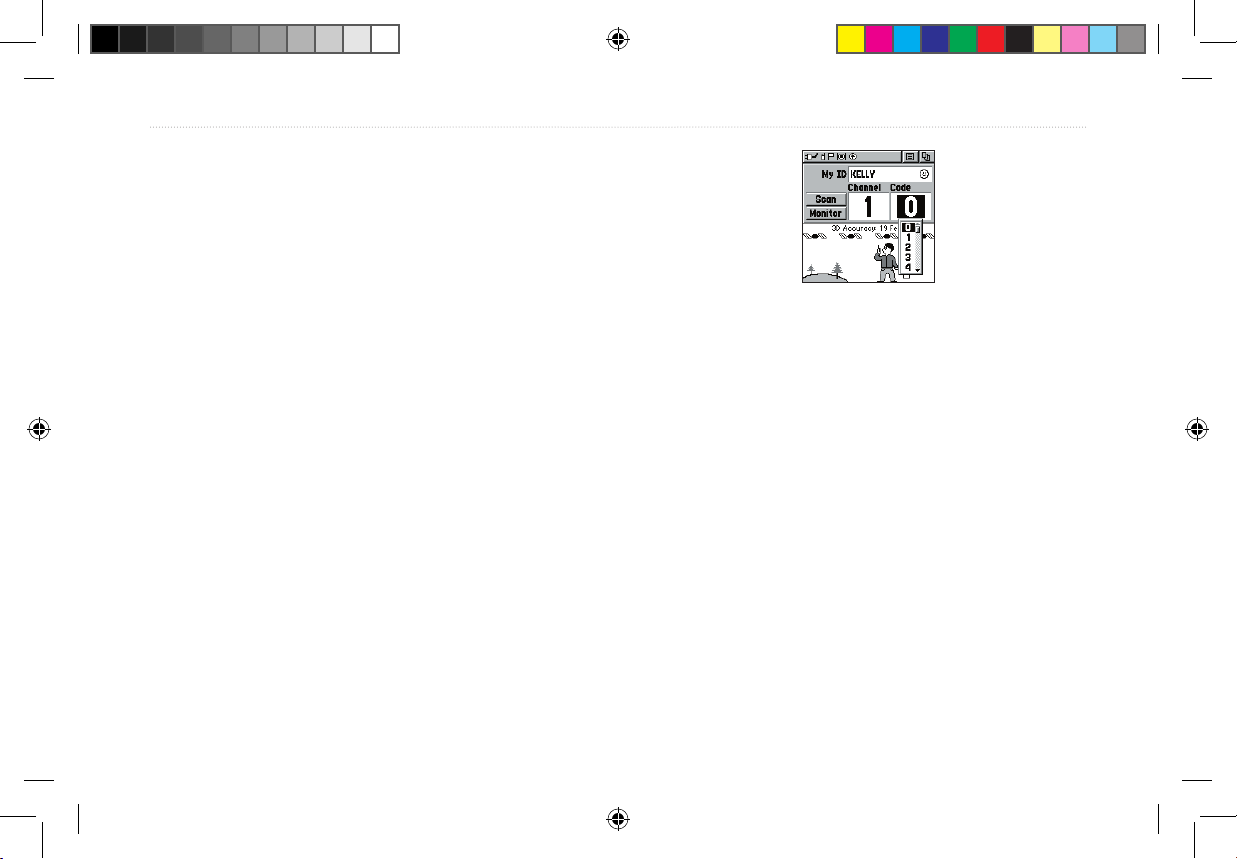
Setting the Channel and Squelch Code
The Rino 530 has a total of 22 channels (not including
GMRS repeater channels) and 38 squelch codes to select
from using the Channel and Code fields. Channels 1–7
and 15-22 GMRS channels, 8-14 are FRS channels, and
15R–22R are for GMRS repeater channels (repeater
channels are available U.S. units only and are disabled
by default). To communicate with other Rino and
FRS/GMRS users, you must be on the same channel
and squelch code. Garmin Rino units work with 3rd
party FRS/GMRS radios, provided the other radios
use standard FRS/GMRS frequencies. A chart of Rino
frequencies may be found in the “Appendix.”
Squelch codes allow you to hear calls from only specific
persons. Thirty-eight (38) Squelch Codes (called
Continuous Tone Coded Squelch System or
CTCSS)
allow your Rino 530 to ignore unwanted calls from other
persons using the same channel. Simply select the same
squelch code (number) as selected by the other person(s)
with which you will communicate.
Select from FRS 1–14, GMRS 15–22
(with GMRS enabled), and 15R–22R
GMRS repeater channels (with GMRS
and Repeater Channels enabled).
NOTE: Squelch codes do not cause your conversation to be private. They only allow you to filter out
other users on the same channel, so you only hear
the radios you want to hear. Squelch Codes are not a
scrambling system!
Rino520_530_prelim.indd 10 1/25/2005 5:00:30 PM
Rino® 530 Owner’s Manual 11
P R E L I M I N A R Y
UNIT OPERATION > RADIO PAGE
Setting the squelch code to 0 (squelch code off) allows
you to hear all activity on the selected channel, but
you must be set to the same squelch code as the other
person(s) to transmit back. See the “Appendix” for a table
listing all of the 38 Squelch Codes and their frequencies.
As you change the main channels, the Rino 530
remembers the last channel/squelch code combination
that you were using. For example, you may set the unit
channel to 5 and squelch code to 21, then change the
main channel to 8 and squelch code to 2. If you change
the channel back to 5, the squelch code changes back to
its previous setting of 21. See the “Appendix” for more
information on FRS/GMRS and its operational aspects.
Choose from 38 squelch codes. Setting
the unit to zero will allow you to hear all
transmissions on that channel, but you must
be on the same squelch code to radio back.
To change the Channel and/or Squelch Code:
1. Using the Thumb Stick, highlight the Channel or
Code field and then press the Thumb Stick In to
show a list of available channels/squelch codes.
2. Move the Thumb Stick Up or Down to scroll
through the selections. Because not all the items
fit in the window, a slider bar on the right side
indicates your current position in the list.
3. Once you have highlighted the desired selection,
press the Thumb Stick In.
Rino520_530_prelim.indd 11 1/25/2005 5:00:30 PM

12 Rino® 530 Owner’s Manual
P R E L I M I N A R Y
UNIT OPERATION > RADIO PAGE
Scanning and Monitoring
The Scan option allows you to scan through the available
channels for voice activity. As the unit scans and
receives a signal (or if you transmit), it stops on that
channel/squelch code for a few seconds, then continues
scanning. When the Rino 530 is scanning and it receives
an incoming signal, the Rino 530 automatically decodes
the Squelch Code used by the incoming signal. The Rino
530 then uses that Squelch Code when it transmits back
to that unit.
You may use the Set Scanlist option to pick which
channels/squelch codes to scan. Scanning through the
all the channels can take time: Selecting only specific
channels/squelch codes decreases the scan time and
helps prevent the chances of missing a transmission.
The Scanlist also has Option Menu choices to
Scan Current Codes or Scan All Codes. Choosing Scan
Current Codes scans only the Channel and Squelch Code
combination in memory.
The Monitor option lets you listen to a single channel
for any activity, including static and weak voice signals.
The Rino series automatically squelches a frequency
to filter out unwanted noise. Using the Monitor option
temporarily turns off the automatic squelch, allowing you
to hear the open channel. If you see a broken transmission
symbol (see page 18), there is activity on your selected
channel, but the incoming signal does not match the
Squelch Code your unit is using. You may choose to
monitor a channel if you wish to hear all the activity on a
channel.
To scan or monitor a channel(s):
1. Using the Thumb Stick, highlight the Scan or
Monitor button and then press the Thumb Stick
In. Scan starts searching through the available
channels. Monitor opens the channel to listen to
any radio transmissions on that channel.
2. To stop using either option, highlight the button
with the Thumb Stick and press In.
Rino520_530_prelim.indd 12 1/25/2005 5:00:30 PM
Rino® 530 Owner’s Manual 13
P R E L I M I N A R Y
UNIT OPERATION > RADIO PAGE
The Code field is blank
when the unit is scanning or
monitoring channels.
To setup a Scanlist:
1. Using the Thumb Stick, highlight the Option Menu
on-screen button and press In. Highlight
Setup Scanlist and press the Thumb Stick In.
2. To add/remove a channel from the list, highlight
the channel and press the Thumb Stick In to
add/remove the check mark in front of the name.
Only channels that are checked will be scanned.
3. To select all channels or clear all channels,
highlight either the Select All or Clear All buttons
and press the Thumb Stick In.
4. To Scan Current Codes, highlight the
Option
Menu and press the Thumb Stick In. Choose
the desired setting and press the Thumb Stick In.
Scanlist Page
The Radio Page Option Menu provides the following:
Setup Radio, Setup Tones, Setup Scanlist, Use Weather
Radio/Use FRS/GMRS Radio, Turn Radio Off/On,
Turn GPS Off/On, and Enable Weather Alert. Refer to
the following pages for explanations of each item in the
Radio Page Option Menu.
Rino520_530_prelim.indd 13 1/25/2005 5:00:31 PM
14 Rino® 530 Owner’s Manual
P R E L I M I N A R Y
UNIT OPERATION > RADIO PAGE
Radio Page Option Menu
The Radio Page Option Menu allows you to
customize aspects of your Rino 530, such as setting up
the radio, programming call and ring tones, and setting up
a scanlist.
Setup Radio
The Setup Radio option displays the Radio Setup Page.
This page determines how the radio functions and enables
you to adjust the radio operation to your needs. The
following options are available:
Radio Page
Option Menu
Setup Radio Page
Send Location—Enables/disables the peer-to-peer
positioning feature. See the “Peer-to-Peer” section for
more on this feature.
Allow Polling—Enables/disables your Rino 530’s ability
to respond to a poll from another Rino.
VOX Level
—Controls the sensitivity level of any
Voice Operated Transmission (VOX) accessory.
VOX accessories allow you to use the unit handsfree. A lower VOX setting is recommended for quiet
environments while a higher VOX setting should be
used in noisy environments. Setting the VOX level to 5
is recommended for most environments, but it may be
necessary to adjust the level to achieve the desired voice
trigger level. You will hear yourself talking in the headset
when transmitting successfully using VOX.
Scramble—Adds a level of security to your
conversations. When On, the voice transmission sounds
garbled to other non-scrambled Rino units, as well as
other 3rd party radios.
Rino520_530_prelim.indd 14 1/25/2005 5:00:33 PM
Rino® 530 Owner’s Manual 15
P R E L I M I N A R Y
UNIT OPERATION > RADIO PAGE
NOTE: When Scramble is set to On, in order for
peer-to-peer and Send Location features to work, the
receiving radio must have Scramble enabled also.
GMRS Radio—Use this option to turn On/Off GMRS
channels 15–22. When you turn GMRS channels off,
channels 15–22 will be disabled and channels 1–7 will
become FRS channels (GMRS interstitial). Remember,
you must obtain a license to operate GMRS channels in
the U.S. See the “FCC Licensing Information” section
and the “Appendix” for more information on using
GMRS channels.
Repeater Channel—Use this option to turn On/Off
GMRS repeater channels 15R–22R. This option is only
available when GMRS is enabled. GMRS repeater
channels are not available in Rino units sold in Canada.
Headset Type
—Allows you to choose which accessory
headset or microphone you are using with the unit, or
have the unit automatically detect the type. If you use
more than one type of headset or microphone, you need
to set the unit to Ask When Detected before changing
accessories.
NOTE: If the headset has a PTT (Push to Talk)
button, it must be pressed for the unit to detect the
headset.
Microphone Sensitivity—Allows you to set the
sensitivity of the internal microphone and the sensitivity
of a headset microphone.
Rino520_530_prelim.indd 15 1/25/2005 5:00:33 PM
16 Rino® 530 Owner’s Manual
P R E L I M I N A R Y
UNIT OPERATION > RADIO PAGE
Setup Tones
Call Tone—When the Call button is pressed, an attention
tone is transmitted. This option allows you to choose one
of ten tones.
Roger Tone
—When the Talk button is released, a tone
is sent to signify the end of the transmission. This option
allows you to choose one of four tones, or set the tone to
Off.
Ring Tone
—When an incoming transmission is received,
an attention tone will sound. This option allows you to
choose one of ten tones or set the tone to Off. The Ring
tone will not sound again until there has been 45 seconds
of radio inactivity.
Vibrate—Choose from On or Off to have the unit
vibrate when an incoming transmission is received. Once
received, the unit will not vibrate again until there has
been 45 seconds of radio inactivity.
On/Off Tone
—Enable or disable the tone the unit makes
when it is turned on and off.
Message Tone—Choose from On or Off to have the unit
emit a tone when a message or note is received.
Setup Tones Page
Setup Scanlist
Refer to “Scanning and Monitoring” for complete
information about this feature and the options in
this page.
Setup Scanlist Page
Rino520_530_prelim.indd 16 1/25/2005 5:00:33 PM
Rino® 530 Owner’s Manual 17
P R E L I M I N A R Y
UNIT OPERATION > RADIO PAGE
Use Weather Radio
The Weather Radio provides a constant update of the
weather conditions, which is helpful while outdoors or
planning a road trip. The Weather Alert further enhances
the Weather Radio by automatically broadcasting any
weather alerts if you are not actively transmitting or
receiving on the radio.
Select the Radio Page Option Menu button . Press
the Thumb Stick In when Use Weather Radio is
highlighted to turn on the weather radio. You can also
access the Weather Radio through the Shortcuts Menu.
When the Weather Radio is on, a tower emitting signals is
shown in the informational picture on the Radio Page, as
shown to the right. The FRS/GMRS radio cannot be used
when the Weather Radio is on. Also, you cannot scan or
monitor FRS/GMRS channels when the Weather Radio is
in use. The audio is unmuted when the Weather Radio is
on so that you can listen to weather broadcasts.
Change the Weather Radio channel in the same manner as
changing the FRS/GMRS radio channel. There are seven
Weather Radio channels (1 through 7) available.
Radio Page with
Weather Radio On
Changing the Weather
Radio Channel
When the Weather Radio is on, Enable Weather
Alert is added at the bottom of the Option Menu. Press
the Thumb Stick In when Enable Weather Alert is
highlighted to turn the feature on. You can then turn the
Weather Radio off and continue normal FRS/GMRS radio
operations.
Rino520_530_prelim.indd 17 1/25/2005 5:00:34 PM

18 Rino® 530 Owner’s Manual
P R E L I M I N A R Y
UNIT OPERATION > RADIO PAGE
When a Weather Alert tone is detected, the Rino 530
automatically turns on the Weather Radio and broadcasts
the Weather Alert if you are not actively transmitting or
receiving on the radio. The volume changes to 3/4 the
maximum when a Weather Alert is broadcast. Select
Disable Weather Alert to turn off this feature.
To turn the weather radio off, press the
Thumb Stick
In when Use FRS/GMRS Radio is highlighted. This
switches the Rino 530 back over to the FRS/GMRS radio
operation.
Turn Radio/GPS On/Off
Press the Thumb Stick In on either of these two options
to toggle them from on to off. For example, to turn GPS
Off, press the Thumb Stick In when Turn GPS Off is
highlighted.
Informational Picture
The Informational Picture on the bottom half of the Radio
Page features Garmin’s Mr. Mark Waypoint showing
current GPS and radio status, and radio actions. As you
operate the unit, the graphics change depending on what
actions you are taking and the unit settings.
GPS Status
Four satellites are shown on at the top of the picture along
with descriptive text to indicate GPS reception status.
As the unit collects satellite information, the satellite
symbols flash alternately until all four are steady to
indicate a 3D position fix. The more satellites that are
steady, the better your position fix.
Radio Transmission Status
As radio signals come in, signal wave symbols display to
the left of Mark Waypoint. Fragmented (or broken) signal
symbols are shown to indicate activity on that channel.
Audio remains muted because the incoming signal does
not match the squelch code your unit is set to.
Rino520_530_prelim.indd 18 1/25/2005 5:00:34 PM

Rino® 530 Owner’s Manual 19
P R E L I M I N A R Y
UNIT OPERATION > RADIO PAGE
Mark Waypoint’s Indicators
The Mark Waypoint figure displays several different icons, depending on what you are doing. See the following
illustrations for more information.
GPS On; FRS/GMRS Radio Off;
GPS operation only
GPS and FRS/GMRS Radio On;
Ready to transmit Position
GPS and Weather Radio On
(FRS/GMRS Radio Off)
GPS and FRS/GMRS Radio On;
Ready to transmit Position;
Transmitting on FRS
GPS and FRS/GMRS Radio On;
Position not ready;
Transmitting on GMRS
GPS and FRS/GMRS Radio On;
Ready to transmit Position;
Receiving transmission
GPS and FRS/GMRS Radio On;
Ready to transmit Position;
Activity on channel.
GPS and FRS/GMRS Radio On;
Position transmitted
GPS and FRS/GMRS Radio On;
Ready to transmit Position;
Position received from other
Rino user
GPS Off; FRS/GMRS Radio On;
Position sending not available
Rino520_530_prelim.indd 19 1/25/2005 5:00:36 PM
20 Rino® 530 Owner’s Manual
P R E L I M I N A R Y
UNIT OPERATION > USING THE RINO 530 RADIO FEATURES
Using the Rino 530 Radio Features
Your Rino 530 unit provides many features to enhance
your radio experience, such as transmitting your location
or any location and receiving contact information. This
section reviews some of the advanced radio features.
Refer to the “Features” section for information on all of
the features of the Rino 530.
Peer-to-Peer Positioning
The Rino 530’s most unique feature is being able to send
its location to another Rino, which is called Peer-toPeer positioning. With peer-to-peer positioning enabled
(see the “Setup Radio” section) and a GPS position,
whenever you press and release either the Call button or
the Talk button, the Rino 530 automatically sends out its
location. This information is available to all other Rino
users that are monitoring the same channel and squelch
code. This feature allows you to track the movement
of other Rino users and even navigate to their location.
Locations may only be sent once every 30 seconds due to
FCC restrictions. Your Rino 530 can respond to polling
requests from other units more frequently.
To
transmit your location to other Rino users:
1. Enable Send Location (see the “Setup Radio”
section).
2. Press and release either the Talk or Call button.
A flag on the top Status Bar or in Mark’s hand
indicates the unit is ready to transmit its position.
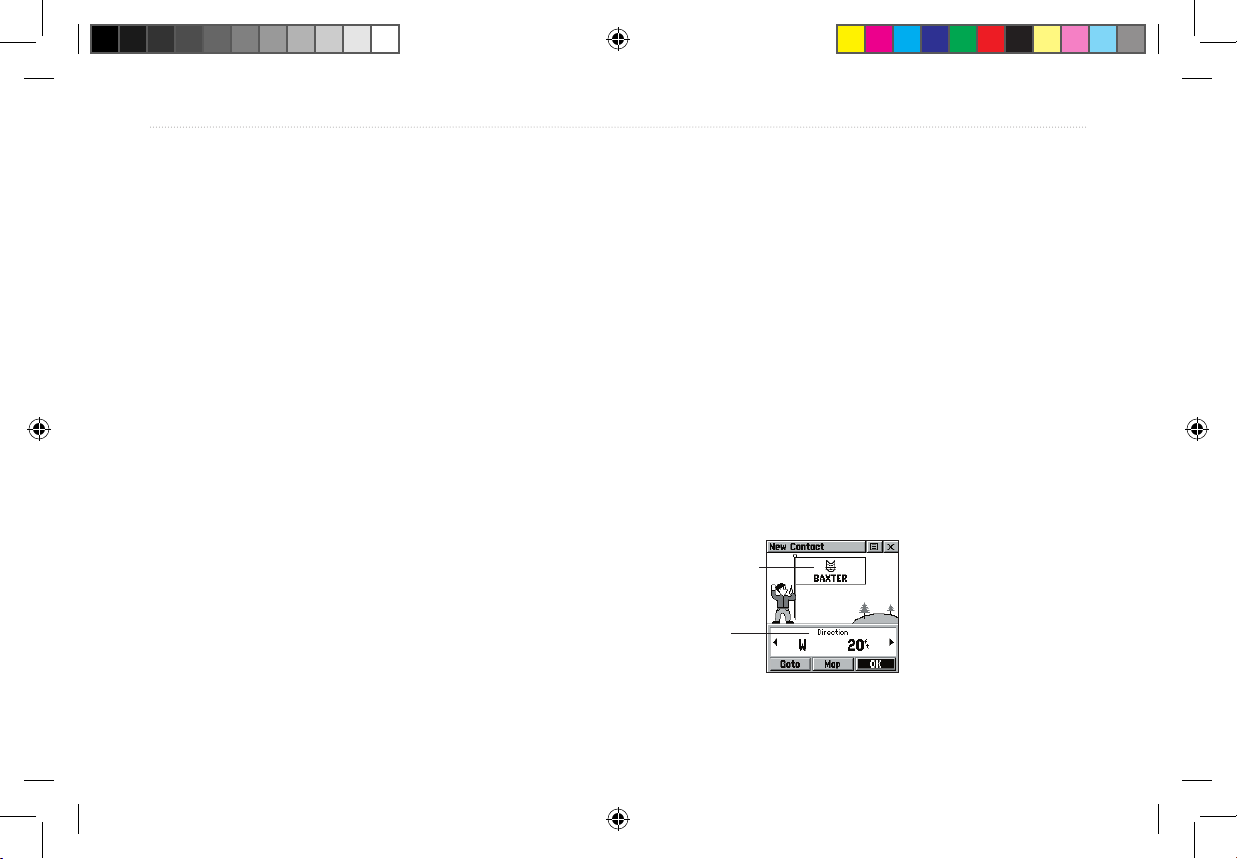
New Contact Page Overview
The first time that a signal is received from another Rino
user, a New Contact page is displayed. From the New
Contact page you can show their location on your Map,
Goto their location, or add them to your contact list
(select OK). Press Page to ignore this contact.
New
Contact Page
Name and
Symbol
Contact
Information Field
Rino520_530_prelim.indd 20 1/25/2005 5:00:37 PM

Rino® 530 Owner’s Manual 21
P R E L I M I N A R Y
UNIT OPERATION > USING THE RINO 530 RADIO FEATURES
The Rino 530 can manage up to 50 contacts at any time.
Each time you receive a signal from a contact, your map
is updated showing their new position. A Track Log
of their movement is created and shown on your map
(see the “Track Logs” section). After a contact has been
established, a “<contact name> Updated” message briefly
appears at the bottom of your display each time the
contact updates.
All contacts are listed on a Contact List Page and also
displayed in the Contact Bar on the Map Page (see the
“Map Page” section). Contacts behave like waypoints
and count towards the 500 maximum waypoint total.
If the contact did not have a GPS location on the last
transmission, a ? mark appears below the flag. To
view the contact details (such as Direction, Elevation,
Timestamp, Location, and Notes that have up to 30
characters), highlight the details field and press Left or
Right on the Thumb Stick to change to the next data
field.
Press Left or Right on the Thumb
Stick to view different contact data.
To accept a new contact:
1. When a new contact is received, the New Contact
page automatically appears.
2. Highlight OK and press the Thumb Stick In. If you
do not select OK, the contact is not saved.
Rino520_530_prelim.indd 21 1/25/2005 5:00:37 PM

22 Rino® 530 Owner’s Manual
P R E L I M I N A R Y
UNIT OPERATION > USING THE RINO 530 RADIO FEATURES
To review a contact and contact details:
1. From the Map Page, highlight the desired contact
on the Contact Bar and press the Thumb Stick In.
As you highlight the contacts on the Contact Bar,
the Map page centers the map on that contact and
display its name, direction and distance near the
top of the screen.
Or
1. Press the Thumb Stick In and hold it until the
Shortcuts Menu is displayed. Highlight Find ‘N Go
and press the Thumb Stick In.
2. Highlight Contacts and press the Thumb
Stick In.
3. From the Contacts List, select the desired contact
and press the Thumb Stick In.
To change contact details:
1. The Elevation, Position and Note fields may be
manually edited. Select the desired field and press
the Thumb Stick In.
2. For Notes, highlight
Edit and press In to start
entering data, up to 30 characters. For other
fields, highlight the field and press the Thumb
Stick In to start changing the data.
3. Highlight OK and press In when done.
To view a contact on the Map Page:
1. From the Contact Review Page, highlight Map and
press the Thumb Stick In.
2. Press the Page button when done to return to the
Contact Review Page.
Rino520_530_prelim.indd 22 1/25/2005 5:00:37 PM
Rino® 530 Owner’s Manual 23
P R E L I M I N A R Y
UNIT OPERATION > USING THE RINO 530 RADIO FEATURES
Sending a Location
Another feature is the ability to send a specific location
to other Rino users. This comes in handy when you are
trying to round-up the group or you just want to meet at
a specific location. You may send any point found from
the Find ‘N Go menu. If the unit needs to wait until 30
seconds have elapsed since the last position transmission,
a “Waiting to send location...” message appears until the
unit is able to transmit. If a location is sent more than
once, a number is automatically added to the end of the
name (for example: CAMP, CAMP 1, CAMP 2, etc.).
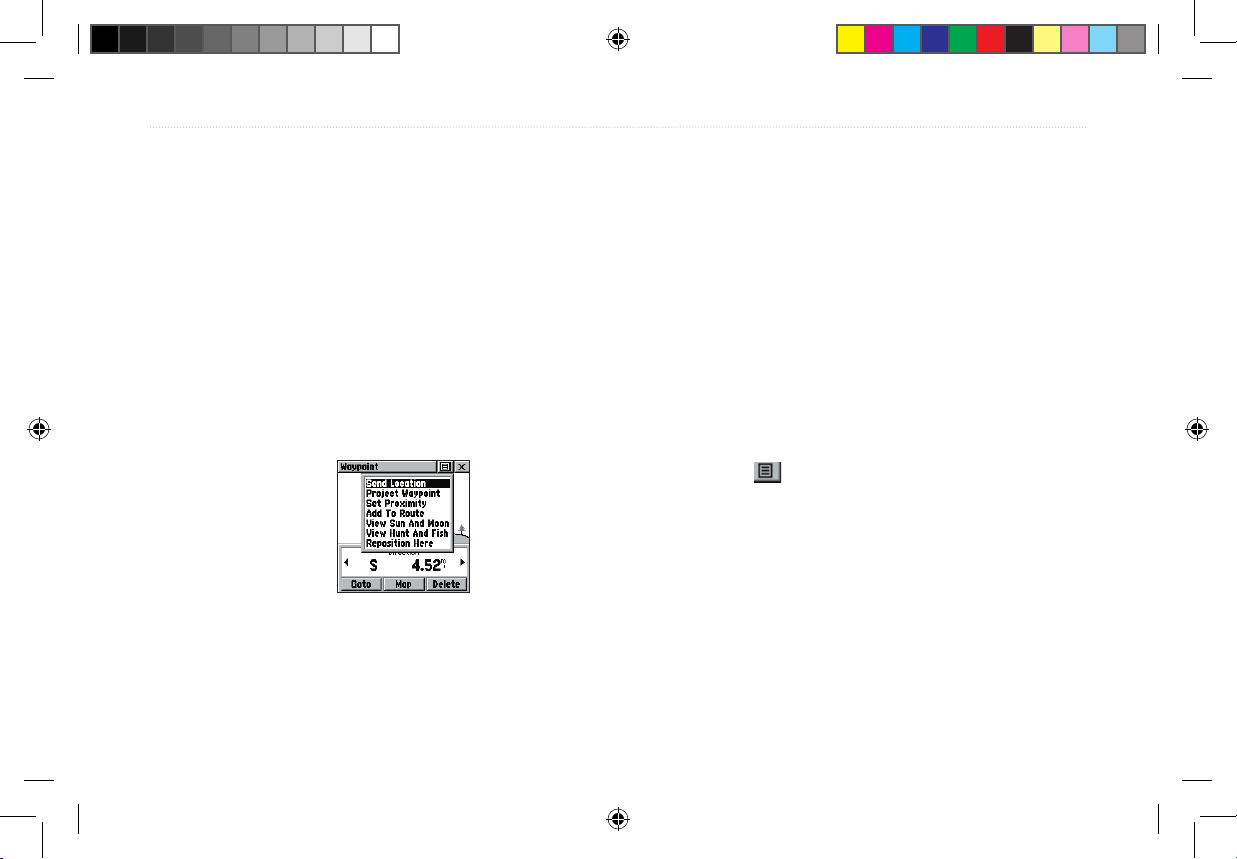
To send a location, highlight the
Option Menu from the Waypoint
Review Page and press In.
To send a location:
1. Press the Thumb Stick In and hold it until the
Shortcuts Menu is displayed.
2. Highlight Find ‘N’ Go and press the Thumb
Stick In.
3. Highlight the desired category and press the
Thumb Stick In. ( For the Contacts List, select the
desired contact and press the Thumb Stick In.)
4. Depending on which category you select, highlight
the desired item and press the Thumb Stick In to
display the Information page for that item.
5. From the Information Page, highlight the Option
Menu in the upper right and press the Thumb
Stick In.
6. Highlight Send Location and press In again.
The unit now sends the point to the other Rino
users on your channel/squelch code. If using the
Scramble feature, receiving radios must also have
Scramble enabled.
Rino520_530_prelim.indd 23 1/25/2005 5:00:38 PM
24 Rino® 530 Owner’s Manual
P R E L I M I N A R Y
UNIT OPERATION > MAP PAGE
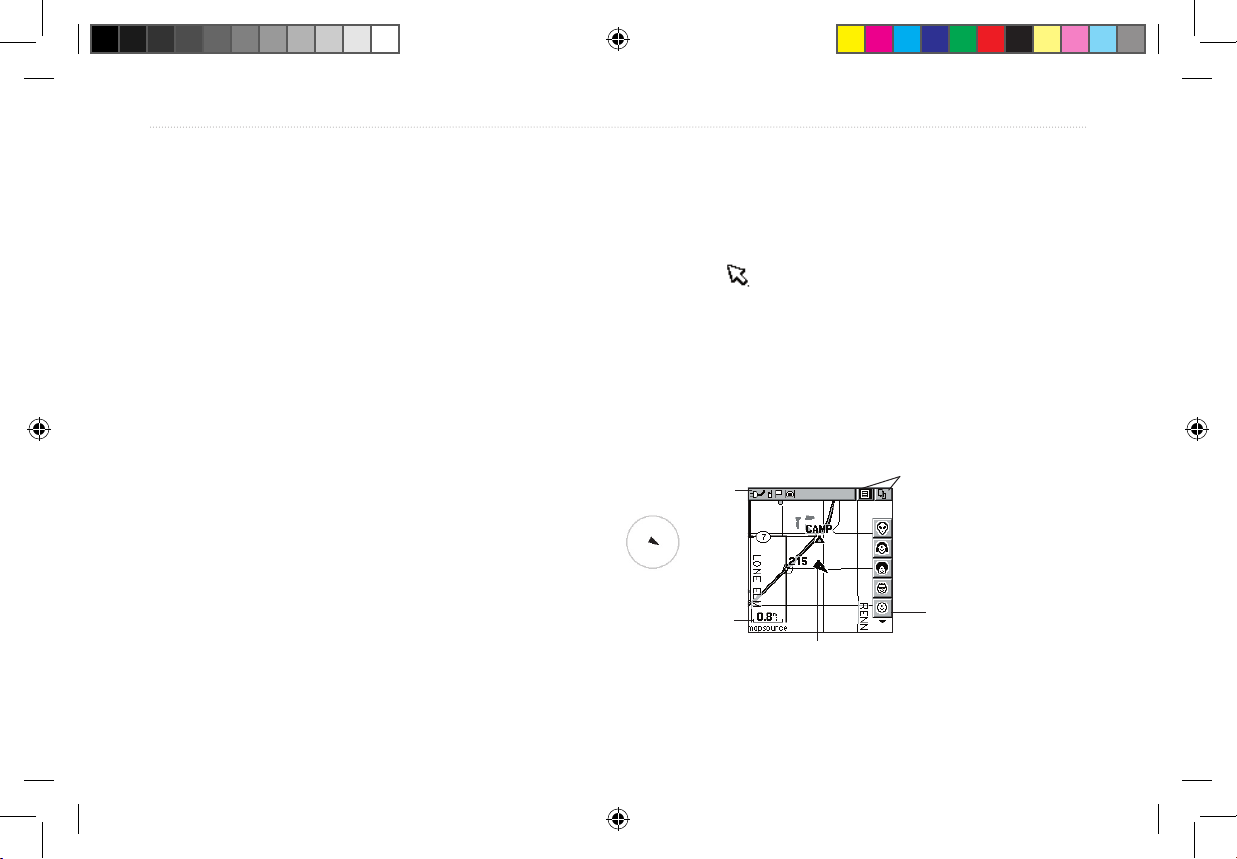
Map Page
The Map Page displays your present position and
direction of movement using a triangular Position Icon
that is centered on the map. As you travel the map display
leaves a “trail” (track log) of your movements.
The map displays geographic details such as rivers, lakes,
highways, and towns. The map can display a higher level
of detail than the basemap provided with the unit (i.e.
residential streets, parks, etc.), if Garmin MapSource
data has been downloaded to the unit using a CD-ROM
mapping program. When using MapSource data, the word
“mapsource” displays below the map scale whenever you
zoom in to view map details.
On the right side of the Map Page, you can choose to
show either the Contact Bar, Data Fields, or only the
Map. As you highlight the contacts on the Contact
Bar, the Map page centers the map on that contact and
displays its name, direction, and distance.
In many instances the map displays an Accuracy Circle
surrounding the Position Icon. The Rino 530 uses both
map resolution and GPS accuracy in defining your
location to a point within the circle. The smaller the
circle, the more accurate your location.
When using the Pan Map feature, a small outline arrow
(Map Pointer) can be moved about the page to
highlight and identify map items or to scroll the map to
view areas not shown on the display screen.
Four optional Data fields on the right side of the page
can be programmed to provide a variety of travel and
navigation information.
Accuracy Circle
Status Bar
Option Menu and Main
Page Menu Buttons
Position Icon
Map Scale
Contact Bar
Rino520_530_prelim.indd 24 1/25/2005 5:00:39 PM