

Page 1
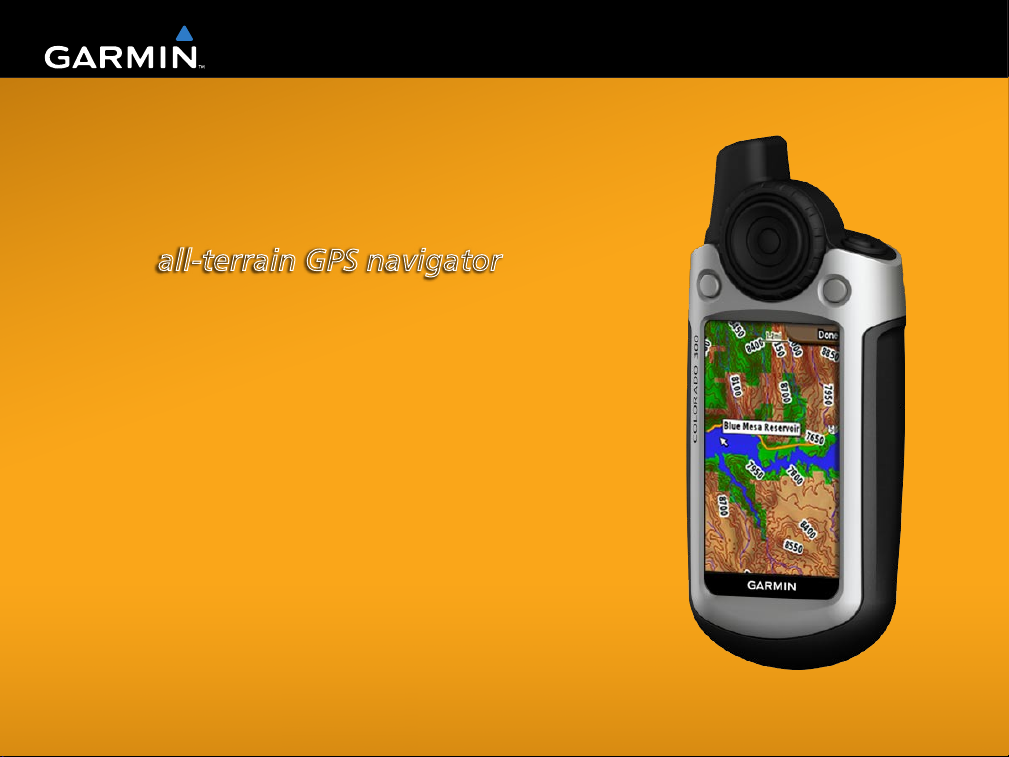
Colorado™ Series
all-terrain GPS navigator
Owner’s Manual
Page 2
© 2007 Garmin Ltd. or its subsidiaries
Garmin International, Inc.
1200 East 151st Street,
Olathe, Kansas 66062, USA
Tel. (913) 397.8200 or (800) 800.1020
Fax (913) 397.8282
Garmin (Europe) Ltd.
Liberty House
Hounsdown Business Park,
Southampton, Hampshire, SO40 9RB UK
Tel. +44 (0) 870.8501241 (outside the UK)
Garmin Corporation
No. 68, Jangshu 2nd Road,
Shijr, Taipei County, Taiwan
Tel. 886/2.2642.9199
Fax 886/2.2642.9099
0808 2380000 (within the UK)
Fax +44 (0) 870.8501251
All rights reserved. Except as expressly provided herein, no part of this manual may be reproduced, copied, transmitted, disseminated,
downloaded or stored in any storage medium, for any purpose without the express prior written consent of Garmin. Garmin hereby grants
permission to download a single copy of this manual onto a hard drive or other electronic storage medium to be viewed and to print one
copy of this manual or of any revision hereto, provided that such electronic or printed copy of this manual must contain the complete text
of this copyright notice and provided further that any unauthorized commercial distribution of this manual or any revision hereto is strictly
prohibited.
Information in this document is subject to change without notice. Garmin reserves the right to change or improve its products and to make
changes in the content without obligation to notify any person or organization of such changes or improvements. Visit the Garmin Web site
(www.garmin.com) for current updates and supplemental information concerning the use and operation of this and other Garmin products.
Garmin® is a trademark of Garmin Ltd. or its subsidiaries, registered in the USA and other countries. myGarmin™ Colorado™, Dynastream™,
ANT™, and MapSource® are trademarks of Garmin Ltd. or its subsidiaries. These trademarks may not be used without the express
permission of Garmin.
Other trademarks and trade names are those of their respective owners.
September 2007 Part Number 190-00751-00 Rev. A Printed in Taiwan
Page 3

Preface
Thank you for choosing the Garmin® Colorado™. The
Colorado uses the proven performance of Garmin GPS
and full-featured mapping to create an unsurpassed
portable GPS receiver.
•
•
myGarmin
Manual Conventions
When you are instructed to “select” something, press
the Left soft key or Right soft key and highlight the
item using the Rock ‘n’ Roller.
The small arrows (>) used in the text indicate that you
should select a series of items.
For example, if you see “select Shortcuts > Others >
Recent Finds” you press the Shortcuts key, and using
the Rock ‘n’ Roller, select Others, and Recent Finds.
Colorado Tips and Shortcuts
Use the Rock ‘n’ Roller to scroll to and select
•
items.
Help us better support you by completing our online
registration today. Go to http://my.garmin.com. and
register your Colorado. Keep the original sales receipt,
or a photocopy, in a safe place.
Contact Garmin
Contact Garmin if you have any questions while
using your Colorado. In the USA, contact Garmin
Product Support by phone: (913) 397-8200 or (800)
800-1020, Monday–Friday, 8 AM–7 PM Central
Time; or go to
www.garmin.com/support.
In Europe, contact Garmin (Europe) Ltd. at +44 (0)
870.8501241 (outside the UK) or 0808 2380000
(within the UK).
Preface
Press the Left or Right soft keys to advance to
another list or return to a previous page.
To extend battery life, turn off the GPS when
not using the Colorado for navigation. Also,
decrease the backlight.
Colorado Series Owner’s Manual i
Page 4

Preface
Table of conTenTs
Preface............................................................... i
Manual Conventions ........................................... i
Colorado Tips and Shortcuts ............................. i
myGarmin ............................................................. i
Contact Garmin ................................................... i
Getting Started ................................................. 3
What’s in the Box? ............................................. 3
Your Colorado Unit .............................................4
Installing the Batteries .............................................5
Turning On and Off the Colorado ............................5
First Time Turning On the Colorado ..................5
Operating the Colorado ...........................................6
Understanding Terms .........................................6
Using the Rock ‘N’ Roller .......................................6
Adjusting the Backlight ...........................................7
Using and Installing an SD Card .............................7
Connecting Your Colorado to a Computer ....... 8
Information about USB Drivers .........................8
Transferring tracks or waypoints .............................8
Attaching the Carabiner ...........................................9
Basic Operation ............................................. 10
Creating and Using Waypoints ....................... 10
Marking Your Current Location ............................10
Creating Waypoints Using the Map .......................10
Creating a Waypoint Using Coordinates ...............11
Editing Waypoints..................................................11
Deleting Waypoints................................................11
Appendix ........................................................ 13
Specications ................................................... 13
Physical ..................................................................13
Performance ...........................................................13
Power .....................................................................13
Accuracy ................................................................13
Optional Accessories ....................................... 14
FCC Compliance ............................................... 15
Declaration of Conformity (DoC) .................... 15
Industry Canada Compliance .......................... 15
Limited Warranty .............................................. 16
Index .................................................................. 18
ii Colorado Series Owner’s Manual
Page 5
Warning
Preface
Failure to avoid the following potentially hazardous
situations could result in an accident or collision resulting
in death or serious injury.
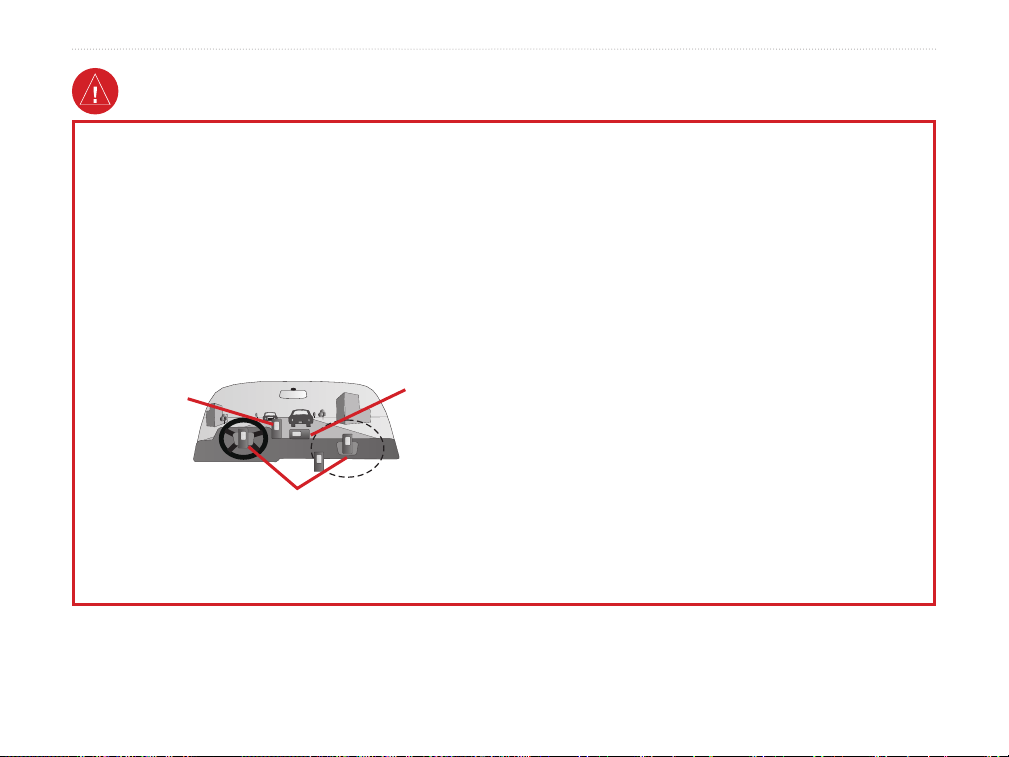
When installing the unit in a vehicle, place the unit
•
securely so that it does not obstruct the driver’s view
of the road or interfere with vehicle operating controls,
such as the steering wheel, foot pedals, or transmission
levers. Do not place in front of or above any airbag. (See
diagram).
including information from street signs, visual sightings,
and maps. For safety, always resolve any discrepancies or
questions before continuing navigation and defer to posted
road signs.
Always operate the vehicle in a safe manner. Do not
•
become distracted by the unit while driving, and
always be fully aware of all driving conditions.
Minimize the amount of time spent viewing the unit’s
screen while driving and use voice prompts when possible.
Do not input destinations, change settings, or access any
functions requiring prolonged use of the unit’s controls
Do not mount
where driver’s
eld of vision is
blocked.
Do not mount in front of an airbag
eld of deployment.
•
When navigating, carefully compare information
Do not place
unsecured on
the vehicle
dashboard.
while driving. Pull over in a safe and legal manner before
attempting such operations.
•
This unit is designed to provide route suggestions. It is
not designed to replace the need for driver attentiveness
regarding road closures or road conditions, trafc
congestion, weather conditions, or other factors that may
affect safety while driving.
displayed on the unit to all available navigation sources,
WARNING: This product, its packaging, and its components contain chemicals known to the State of California to cause cancer,
birth defects, or reproductive harm. This notice is provided in accordance with California’s Proposition 65. See www.garmin.com/
prop65 for more information.
Colorado Series Owner’s Manual iii
Page 6

Preface
Important Information
MAP DATA INFORMATION: One of the goals of Garmin
is to provide customers with the most complete and accurate
cartography that is available to us at a reasonable cost. We
use a combination of governmental and private data sources,
which we identify in product literature and copyright messages
displayed to the consumer. Virtually all data sources contain
some inaccurate or incomplete data. In some countries,
complete and accurate map information is either not available or
is prohibitively expensive.
NOTICE REGARDING WINDSHIELD MOUNTING;
SPECIAL NOTICE TO DRIVERS IN CALIFORNIA AND
MINNESOTA: State law prohibits drivers in California and
Minnesota from using suction mounts on their windshields
while operating motor vehicles. Check your state and local laws
and ordinances for similar restrictions. Other Garmin dashboard
or friction mounting options should be used. Garmin does not
take any responsibility for any nes, penalties, or damages that
may be incurred as a result of disregarding this notice or as a
result of any other state or local law or ordinance relating to
use of the unit. (See California Vehicle Code Section 26708(a);
Minnesota Statutes 2005, Section 169.71.)
The California Electronic Waste Recycling Act of 2003
requires the recycling of certain electronics. For more
information on the applicability to this product, see www.
erecycle.org.
iv Colorado Series Owner’s Manual
Page 7
Preface
GeTTinG sTarTed
What’s in the Box?
Colorado GPS device
USB cable to connect the Colorado to your computer.
Carabiner to hook the Colorado to a backpack, jacket,
or other items.
MapSource Trip & Waypoint Manager Software to
manage waypoints, Where To? items, geocaches, and
more.
Colorado Series Features
Features 300 400i 400c 400t
World Base
Map
U.S. Inland
Lakes
Mapping
U.S.
Bluechart
Mapping
U.S. TOPO
Mapping
Yes
(DEM)
No Yes No No
No No Yes No
No No No Yes
Yes
(Satellite)
Yes
(Satellite)
Yes
(DEM)
Owner’s Manual on CD for specic operating
instructions.
NOTE: Additional maps are available for each
model of the Colorado.
Quick Start Guide to start using the Colorado
immediately.
WARNING: See the Important Safety and Product Information guide in the product box for product warnings
and other important information.
Colorado Series Owner’s Manual 1
Page 8
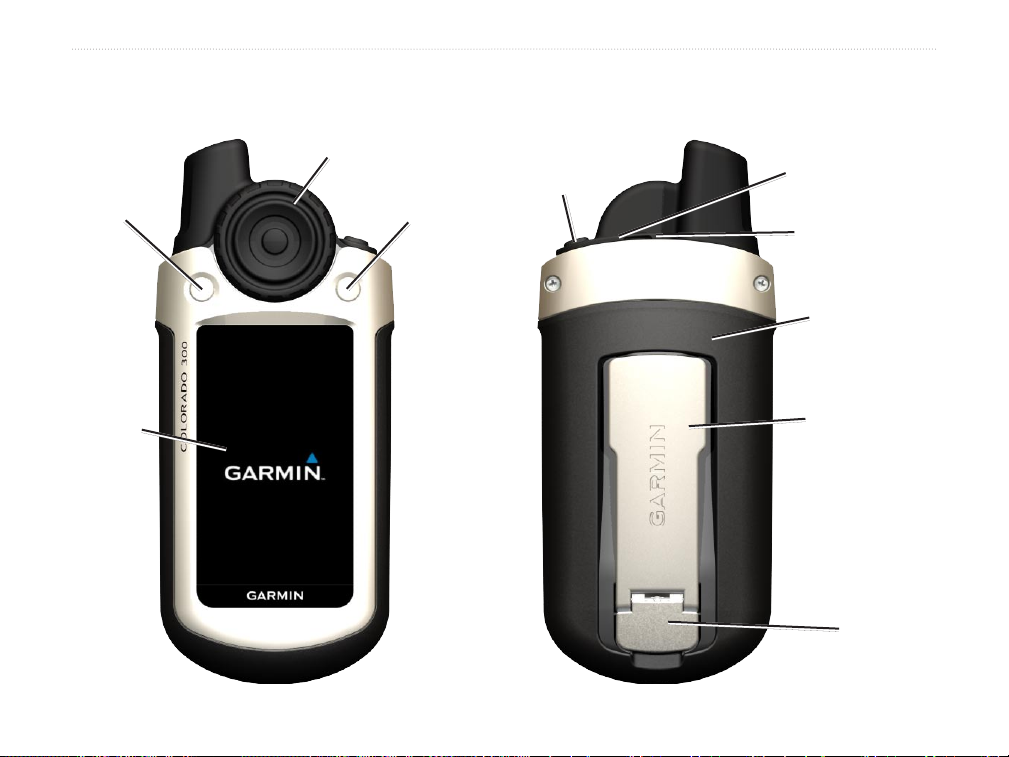
GettinG Started
The Colorado
Rock ‘n’ Roller
Left soft key
Color
display
2 Colorado Series Owner’s Manual
Right soft key
Power key
(backlight)
USB mini-B jack
(under weather cap)
External GPS
antenna connector
(under weather cap)
Battery cover
Mounting spine
Latch
Page 9
GettinG Started
Installing the Batteries
The Colorado operates on two (2) AA batteries (not
included). You can use Alkaline, NiMH, or lithium
batteries.
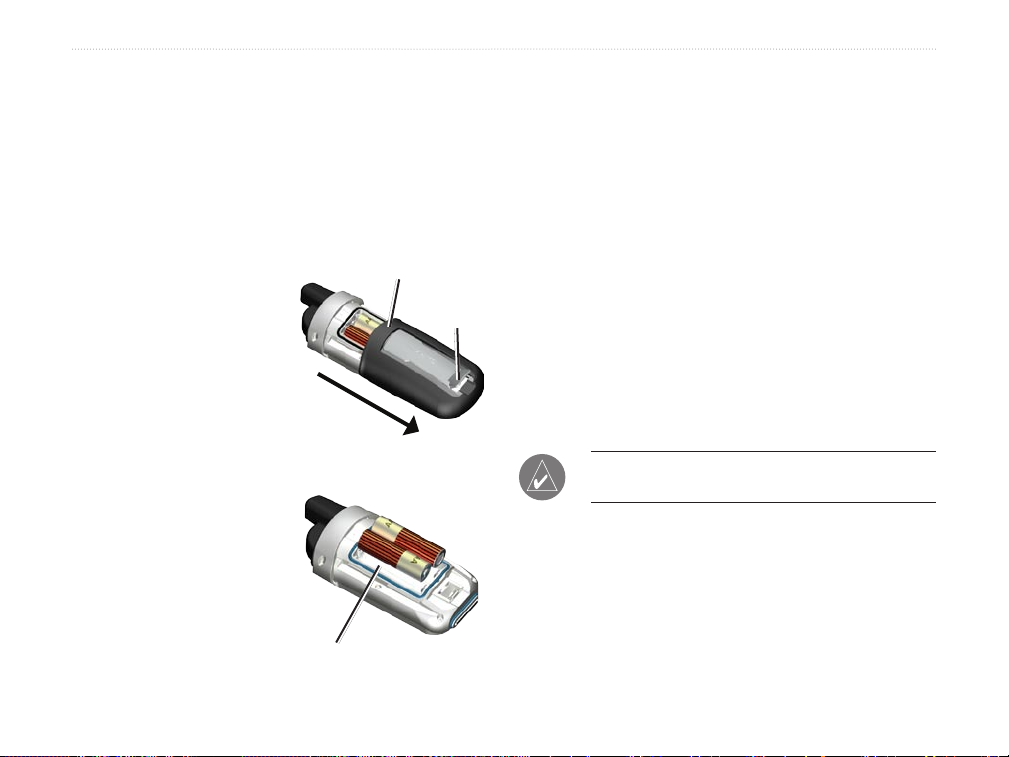
To install the batteries:
1. Remove the battery cover by lifting the latch and
sliding it off the back
of the unit.
2. Insert the batteries,
observing the proper
polarity. A diagram
is molded into the
battery compartment.
3. Reinstall the battery
cover by sliding the
casing back on the
unit and fastening the
latch.
Remove the batteries when
you do not plan to use the
unit for several months.
Stored data is not lost when
Battery compartment
Battery cover
Latch
Turning On and Off the Colorado
To power on the Colorado:
Press and hold the Power key until the
•
Welcome page displays on the Colorado.
To power off the Colorado:
Press and hold the Power key.
•
First Time Turning On the Colorado
The rst time you turn on your Colorado, the GPS
receiver must collect satellite data and establish its
current location. To ensure proper initialization, the
Colorado is shipped from the factory in AutoLocate
mode, which allows the receiver to “nd itself”
anywhere in the world.
NOTE: To receive satellite signals, you must be
outdoors and have a clear view of the sky.
After powering on the rst time, the Colorado moves
you through three setup screens: language selection,
time zone, and daylight savings time mode. For
complete information on initial Colorado setup, see the
Colorado Series Quick Start Guide.
batteries are removed.
Colorado Series Owner’s Manual 3
Page 10
GettinG Started
Operating the Colorado
Entering and selecting information on the Colorado.
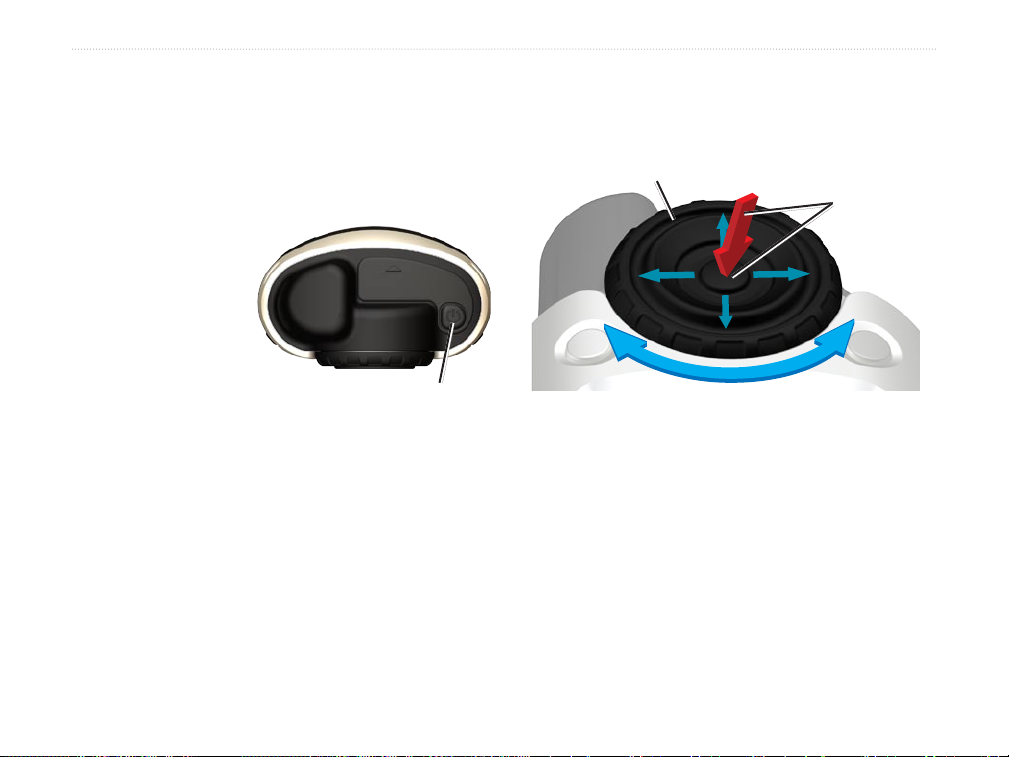
Using the Rock ‘n’ Roller
When searching for and selecting different functions on
the Colorado, use the Rock ‘n’ Roller. The scrolling
Understanding Terms
Power Button—press and hold the Power key to turn
on or off the Colorado.
Select—move the
highlighted area on
the screen up or down
with the Rock ‘n’
Roller and press the
Enter button to make a
selection.
Option Buttons—the left and right option buttons are
used to move you to specic options for each function
or back to the Shortcuts menu.
Power key
wheel turns freely to the left or right and can be used
to search through the different function options on any
of the Colorado’s screens. You can also move up and
down the options lists by pressing the top, bottom, and
Field—the location on a page where data or an option
can be shown or entered.
Default—the factory setting saved in the unit’s
sides of the wheel. To select an option or move forward
within the pages, press the Enter button in the center
of the Rock ‘n’ Roller.
memory. You can change the settings, but you can
revert to the factory settings when you select Restore
Defaults.
Scroll wheel
Enter key
4 Colorado Series Owner’s Manual
Page 11
GettinG Started
Adjusting the Backlight
You may want to adjust the backlight to better see the
screen.
Using and Installing an SD Card
The Colorado has an SD data card slot. You can
purchase an SD card for detailed map and data storage.
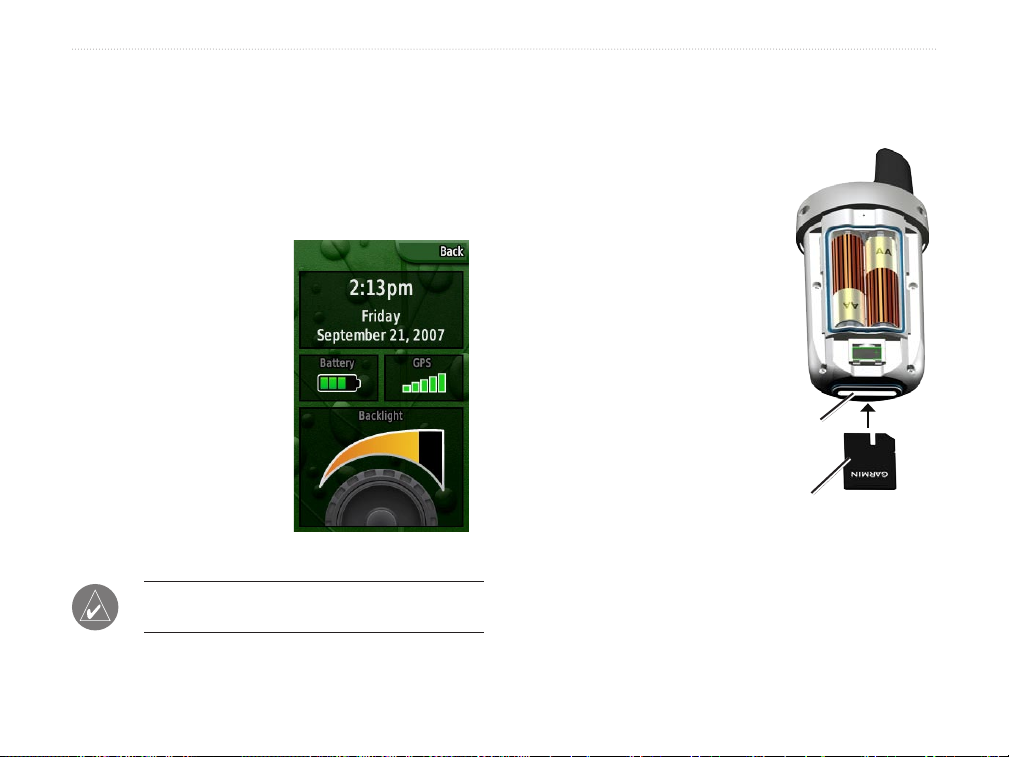
To adjust the backlight level:
1. Press and quickly release the Power button.
2. Turn the Scroll
wheel on the
Rock ‘n’ Roller
clockwise or
counter-clockwise
to increase or
decrease the
brightness.
3. Press and quickly
release the Power
key to close
the backlight
adjustment page.
Backlight Adjustment
NOTE: You can also check battery status and
GPS reception status on this page.
To install or remove an
SD card:
1. Remove the battery slip
cover from the back of
the Colorado.
2. Locate the card slot at
the bottom of the unit
and slide the card into
place until it clicks.
Check to be certain the
card is installed properly
in the slot.
3.
Press down on the card
and release quickly to
eject it from the slot and
remove from the unit.
SD card
slot
SD card
Colorado Series Owner’s Manual 5
Page 12
GettinG Started
Connecting Your Colorado to a Computer
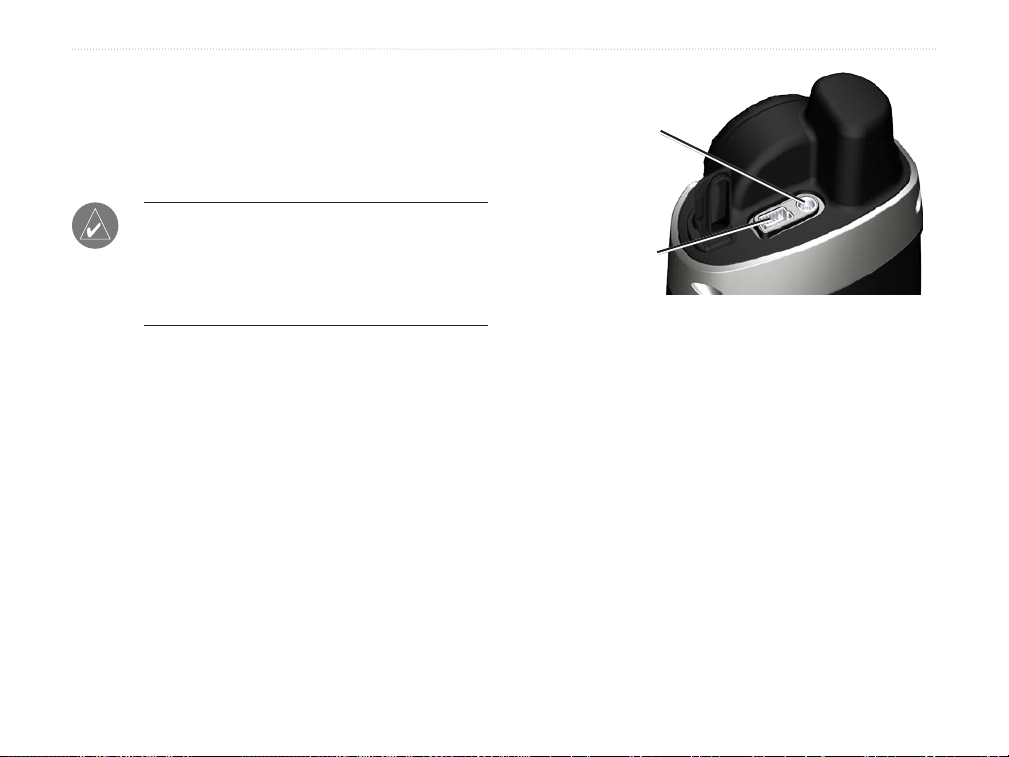
External GPS
antenna connector
You can connect your Colorado to your computer using
the PC/USB connector cable.
NOTE: Install the supplied MapSource Trip &
Waypoint Manager software on your computer
before connecting the USB cable to the computer.
Follow the instructions for installation and
operation provided with the software.
To connect your Colorado to your
computer:
1. Lift the USB port protective cover on the top of
the Colorado and insert the smaller connector on
the USB cable into the USB mini-B jack.
2. Connect the remaining cable end to your
computer's USB port.
USB mini-B jack
computer might prompt you to locate the destination
of the drivers for the device. You only need to install
the drivers once. After the drivers are installed, your
computer always detects your Colorado when it is
connected. USB drivers might be updated periodically.
You can nd updates at www.garmin.com.
Information about USB Drivers
The USB drivers are automatically installed when you
install the MapSource Trip and Waypoint Manager
software that came with your Colorado. When you
initially connect the Colorado to a USB port, your
6 Colorado Series Owner’s Manual
Page 13
GettinG Started
Transferring tracks or waypoints from
the Colorado to MapSource on your
computer
Attaching the Carabiner
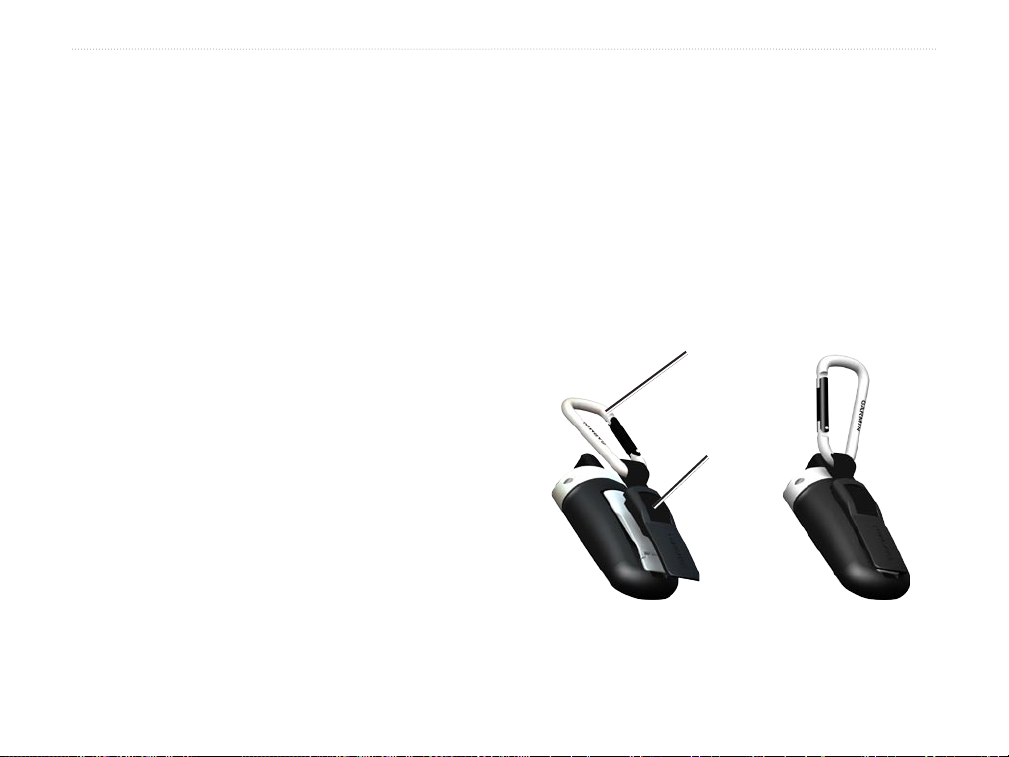
For convenience and easy accessibility, a carabiner
comes with the Colorado.
Tracks and waypoints saved on your Colorado can be
saved and viewed in Garmin MapSource.
To transfer:
1. Be certain Garmin MapSource Trip and
Waypoint Manager is installed on your computer
and open.
2. Click “Receive from Device” from the Transfer
menu or click the “Receive from Device” icon at
the top of the screen.
To attach the carabiner to your Colorado:
1. Position the carabiner mount in the slots on the
mounting spine of the Colorado.
2. Slide the mount up until it locks in place.
3. To remove the carabiner, gently push down on
the carabiner mount until it releases.
Carabiner
Carabiner clip
Carabiner attached
to Colorado
Colorado Series Owner’s Manual 7
Page 14

BaSic OPeratiOn
basic oPeraTion
To mark your current location:
1. Press and hold the Enter button on the Rock ‘N’
The most common operations you can perform with
your Colorado consist of creating and using waypoints,
working with Where To?, and setting up and using
Proles.
2. To view and edit the waypoint information,
Creating and Using Waypoints
Waypoints are locations or landmarks you record and
store in the Colorado that you might want to return to
later. You can add waypoints at any time on the unit.
There are three ways to create waypoints: press the
Enter button while at a location, create a waypoint
on the Map page, or enter coordinates for a waypoint
manually.
Marking Your Current Location
Press and hold the Enter button to quickly mark your
current location and create a new waypoint. You must
have a valid position (2D or 3D) x to mark your
current location.
3. To return to the Map page, highlight No and
Creating Waypoints Using the Map
To create a waypoint using the Map page:
1. On the Map page, use the Rock ‘N’ Roller to
2. Press in and quickly release the Rock ‘n’ Roller
3. Select Save. If there is no information for that
Roller until the screen displays that the waypoint
was successfully saved. A default three-digit
name and symbol are assigned to the new
waypoint.
highlight Yes and press Enter.
press Enter.
move the pointer to the map item you want to
mark.
to capture the pointer location and open the
information page for the map item.
point, at the “No map information at this point.
Do you want to create a user waypoint here?”
prompt, select Yes.
8 Colorado Series Owner’s Manual
Page 15
BaSic OPeratiOn
Creating a Waypoint Using Coordinates
Deleting Waypoints
This method is useful for creating a waypoint at a
specic latitude/longitude position from a chart.
To create a new waypoint by entering
location coordinates:
1. On a newly marked Waypoint page, select the
Location eld > to open the on-screen keypad.
2. Use the Rock ‘n’ Roller to enter location
coordinates. Press Done when nished.
Editing Waypoints
You can edit waypoints to change the symbol, name,
note, location, elevation, and depth.
To edit a waypoint:
1. Press and hold the Find key to open the Find
Menu.
2. Select Waypoints to open the Waypoints page.
3. Select the waypoint you want to edit, and press
Enter.
4. Make changes by highlighting each eld, and
use the waypoint symbol chart and alphanumeric
keypad to enter new data.
NOTE: When you delete a waypoint, you cannot
recover it from the unit.
To delete a waypoint:
From the Waypoints page, select the waypoint
you want to delete > Delete.
To move a waypoint on the Map Page:
1. Select Find > Waypoints.
2. Select the waypoint you want to move, and
press Enter.
3. Select the Map button to show the waypoint on
the map.
4. Press Enter to place a Move marker next to the
waypoint.
5. Use the Rock ‘N’ Roller to move the waypoint to
a new location on the map, and press Enter.
Colorado Series Owner’s Manual 9
Page 16
BaSic OPeratiOn
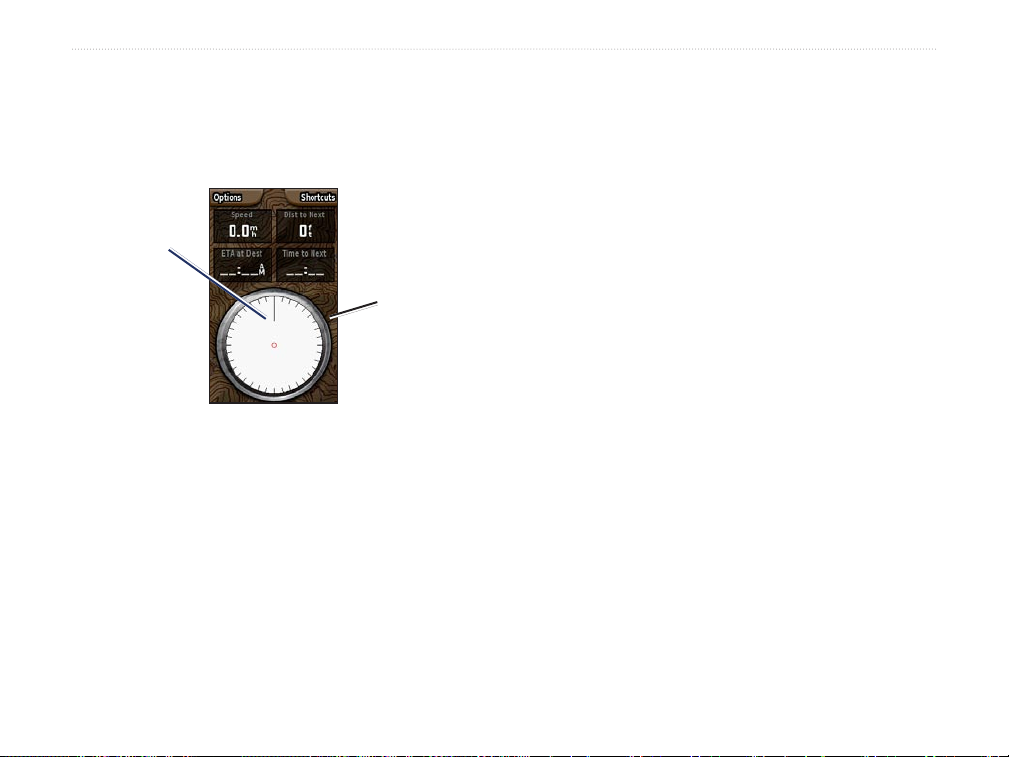
Compass Page
During active navigation, the Compass page guides
you to your destination with a graphic compass display
and a bearing or course pointer.
direction. The compass ring, bearing pointer or course
pointer work independently to show your direction of
movement and the direction to your destination. You
can choose a bearing pointer or course pointer for
guidance.
Bearing or
Course pointer
Calibrating the Electronic Compass
When you rst use the Colorado or after you install
new batteries, you have to calibrate the electronic
The compass
ring moves to
indicate North
orientation.
compass outdoors. The accuracy of the electronic
compass is adversely affected if the unit is not held
level or you are near objects that generate magnetic
elds, such as cars or buildings.
Compass Page
It uses a graphic compass ring, a bearing or course
To calibrate the electronic compass:
1. From the Compass page, select Options >
pointer, and digital data elds to show information,
such as current speed, distance to the next point on the
2. Press Enter to Start, and follow on-screen
route, and estimated arrival time.
The rotating compass ring indicates the direction
you are heading. The bearing and course pointers
indicate the direction (bearing to or course of travel)
to your destination, relative to your current heading
Calibrate Compass.
directions for holding and turning the unit.
10 Colorado Series Owner’s Manual
Page 17

aPPendix
aPPendix
Compass: Accuracy; +/- 5 degrees*, resolution; 1 degree
Altimeter: Accuracy; +/- 10 feet*, resolution; 1 ft.
Specications
Physical
Size: 5.7" H x 2.4" W x 1.3" (14.5 x 6.1 x 3.6 centimeters)
Weight: 8.5 ounces (241 grams) with batteries installed.
Display: 3.0” TFT color display (240 x 400 pixels) backlit.
Case: Rugged, metal-look waterproof standard IPX7
Temp Range: 5 to 158oF (-15 to 70oC)*
*The temperature rating of the Colorado may exceed the usable range of some
batteries. Some batteries can rupture at high temperatures.
Performance
Receiver: WAAS enabled
Acquisition Times:
Approx. 1 second (hot start)
Approx. 33 seconds (warm start)
Approx. 36 seconds (cold start)
Update Rate: 1/second, continuous
Antenna: Built-in patch
*Subject to proper user calibration.
Power
Source: Two AA batteries (alkaline, NiMH, or lithium)
Battery Life: Up to 25 hours (typical use)*
*Alkaline batteries lose a signicant amount of their capacity as the temperature
decreases. Use Lithium batteries when operating the Colorado in below-freezing
conditions.
Accuracy
GPS: <10 meters (33 feet) 95% typical*
*Subject to accuracy degradation to 100m 2DRMS under the U.S. DoD imposed
Selective Availability (SA) Program when activated.
DGPS: 3 meters (10 feet) 95% typical*
*
WAAS accuracy in North America.
Velocity: 0.1 meter/sec steady state
Interfaces: Garmin Proprietary (USB)
Data Storage Life: Indenite; no memory battery required
Map Storage: Dependant on the formatted capacity of
the microSD Card.
Colorado Series Owner’s Manual 11
Page 18

aPPendix
Optional Accessories
Several optional accessories are available to enhance
the operation of your Colorado.
To obtain replacement parts and optional accessories,
Vehicle Power Cable—provides auxiliary power from
an automobile cigarette lighter.
Hard Case—protects the Colorado when not in use.
Marine Mount Kit—allows installation on a boat.
contact your Garmin Dealer, or Garmin Product
Support in the U.S.A. at 800/800.1020, or Garmin
Europe at 44/0870.8501241.
WARNING: Garmin accessories are designed and
tested specically for use with Garmin products.
Accessories offered by other manufacturers have
not been tested or approved for use with Garmin
products. Use of such accessories could cause
damage to the Colorado and void the terms of the
warranty.
Automotive Windshield Suction Mount Kit—allows
installation on the inside of an automobile windshield.
Bike Mount Kit—allows installation on a bicycle
handlebar.
For a complete or updated list of available accessories
and maps for use with the Colorado, refer to the
Garmin Web site: www.garmin.com/
Auto Navigation Kit—provides the parts and map
data to use the Colorado in an automobile.
Carabiner (replacement)— A metal loop with a sprung
or screwed gate to attach to the Colorado.
Dashboard Disk—allows installation on an
automotive dash.
12 Colorado Series Owner’s Manual
Page 19

Consult the dealer or an experienced radio/TV technician for
FCC Compliance
This product has been tested and found to
comply with Part 15 of the FCC interference
limits for Class B digital devices FOR HOME
OR OFFICE USE. These limits are designed to provide
more reasonable protection against harmful interference in a
residential installation, and are more stringent than “outdoor”
requirements.
Operation of this device is subject to the following conditions:
(1) this device may not cause harmful interference, and (2)
this device must accept any interference received, including
interference that may cause undesired operation.
This equipment generates, uses, and can radiate radio
frequency energy and may cause harmful interference to radio
communications if not installed and used in accordance with the
instructions. However, there is no guarantee that interference
will not occur in a particular installation. If this equipment does
cause harmful interference to radio or television reception,
which can be determined by turning the equipment off and on,
the user is encouraged to try to correct the interference by one
of the following measures:
Reorient or relocate the receiving antenna.
•
Increase the separation between the equipment and the receiver.
•
Connect the equipment into an outlet that is on a different
•
circuit from the GPS unit.
•
help.
This product does not contain any user-serviceable parts.
Repairs should only be made by an authorized Garmin service
center. Unauthorized repairs or modications could result in
permanent damage to the equipment, and void your warranty
and your authority to operate this device under Part 15
regulations.
Declaration of Conformity (DoC)
Hereby, Garmin, declares that this product is in compliance
with the essential requirements and other relevant provisions of
Directive 1999/5/EC.
To view the full Declaration of Conformity, see the Garmin Web
site for your Garmin product:
www.garmin.com/products/Colorado. Click Manuals, and then
select the Declaration of Conformity link.
Industry Canada Compliance
Category I radiocommunication devices comply with Industry
Canada Standard RSS-210. Category II radiocommunication
devices comply with Industry Canada Standard RSS-310.
aPPendix
Colorado Series Owner’s Manual 13
Page 20

aPPendix
Software License Agreement
BY USING THE COLORADO, YOU AGREE TO BE BOUND
BY THE TERMS AND CONDITIONS OF THE FOLLOWING
SOFTWARE LICENSE AGREEMENT. PLEASE READ THIS
AGREEMENT CAREFULLY.
Garmin grants you a limited license to use the software
embedded in this device (the “Software”) in binary executable
form in the normal operation of the product. Title, ownership
rights, and intellectual property rights in and to the Software
remain in Garmin.
You acknowledge that the Software is the property of
Garmin and is protected under the United States of America
copyright laws and international copyright treaties. You further
acknowledge that the structure, organization, and code of the
Software are valuable trade secrets of Garmin and that the
Software in source code form remains a valuable trade secret
of Garmin. You agree not to decompile, disassemble, modify,
reverse assemble, reverse engineer, or reduce to human readable
form the Software or any part thereof or create any derivative
works based on the Software. You agree not to export or reexport the Software to any country in violation of the export
control laws of the United States of America.
14 Colorado Series Owner’s Manual
Page 21

aPPendix
Limited Warranty
This Garmin product is warranted to be free from defects
in materials or workmanship for one year from the date of
purchase. Within this period, Garmin will, at its sole option,
repair or replace any components that fail in normal use.
Such repairs or replacement will be made at no charge to the
customer for parts or labor, provided that the customer shall be
responsible for any transportation cost. This warranty does not
cover failures due to abuse, misuse, accident, or unauthorized
alteration or repairs.
This product is intended to be used only as a travel aid and must
not be used for any purpose requiring precise measurement of
direction, distance, location, or topography. Garmin makes no
warranty as to the accuracy or completeness of map data in this
product.
THE WARRANTIES AND REMEDIES CONTAINED
HEREIN ARE EXCLUSIVE AND IN LIEU OF ALL OTHER
WARRANTIES EXPRESS, IMPLIED, OR STATUTORY,
INCLUDING ANY LIABILITY ARISING UNDER ANY
WARRANTY OF MERCHANTABILITY OR FITNESS FOR
A PARTICULAR PURPOSE, STATUTORY OR OTHERWISE.
THIS WARRANTY GIVES YOU SPECIFIC LEGAL RIGHTS,
WHICH MAY VARY FROM STATE TO STATE.
IN NO EVENT SHALL GARMIN BE LIABLE FOR
ANY INCIDENTAL, SPECIAL, INDIRECT, OR
Colorado Series Owner’s Manual 15
CONSEQUENTIAL DAMAGES, WHETHER RESULTING
FROM THE USE, MISUSE, OR INABILITY TO USE THIS
PRODUCT OR FROM DEFECTS IN THE PRODUCT.
SOME STATES DO NOT ALLOW THE EXCLUSION OF
INCIDENTAL OR CONSEQUENTIAL DAMAGES, SO THE
ABOVE LIMITATIONS MAY NOT APPLY TO YOU.
Garmin retains the exclusive right to repair or replace the unit
or software or offer a full refund of the purchase price at its
sole discretion. SUCH REMEDY SHALL BE YOUR SOLE
AND EXCLUSIVE REMEDY FOR ANY BREACH OF
WARRANTY.
To obtain warranty service, contact your local Garmin
authorized dealer or call Garmin Product Support for shipping
instructions and an RMA tracking number. Securely pack the
unit and a copy of the original sales receipt, which is required
Online Auction Purchases: Products sold through online
auctions are not eligible for rebates or other special offers from
Garmin. Online auction conrmations are not accepted for
warranty verication. To obtain warranty service, an original or
copy of the sales receipt from the original retailer is required.
Garmin will not replace missing components from any package
purchased through an online auction.
I
nternational Purchases: A separate warranty is provided
by international distributors for units purchased outside the
United States. This warranty is provided by the local in-country
distributor and this distributor provides local service for your
Page 22

aPPendix
unit. Distributor warranties are only valid in the area of intended
distribution. Units purchased in the United States or Canada must
be returned to the Garmin service center in the United Kingdom,
the United States, Canada, or Taiwan for
Garmin International, Inc. Garmin (Europe) Ltd.
1200 East 151st Street, Liberty House, Hounsdown
Olathe, Kansas 66062, USA Business Park, Southampton,
Tel. (913) 397-8200 or Hampshire, SO40 9RB, UK
(800) 800-1020 Tel. +44 (0) 870.8501241
Fax (913) 397-8282 (outside the UK)
0808.2380000 (inside the UK)
Fax +44 (0) 870.8501251
Garmin Corporation
No. 68, Jangshu 2nd Road,
Shijr, Taipei County, Taiwan
Tel. 886/2.2642.9199
Fax 886/2.2642.9099
Online Auction Purchases: Products sold through online
auctions are not eligible for rebates or other special offers from
Garmin. Online auction conrmations are not accepted for
warranty verication. To obtain warranty service, an original or
copy of the sales receipt from the original retailer is required.
Garmin will not replace missing components from any package
purchased through an online auction.
International Purchases: A separate warranty is provided
by international distributors for units purchased outside the
16 Colorado Series Owner’s Manual
service.
United States. This warranty is provided by the local in-country
distributor and this distributor provides local service for your
unit. Distributor warranties are only valid in the area of intended
distribution. Units purchased in the United States or Canada
must be returned to the Garmin service center in the United
Kingdom, the United States, Canada, or Taiwan for service.
The Garmin Colorado has no user-serviceable parts. Should you
ever encounter a problem with your unit, please take it to an
authorized Garmin dealer for repairs.
The Colorado is fastened shut with screws. Any attempt to open
the case to change or modify the unit in any way will void your
warranty and may result in permanent damage to the equipment.
Page 23

index
index
A
accessories 95
addresses 23
advanced NMEA setup 92
altimeter 55–59
altimeter page 55
calibration 61
data elds 62
options menu 56
plot over time 57
pressure/elevation plots 57
reset options 60
view points 59
zoom ranges 58
altitude 55–59
appendix 91
B
backlight 4
battery installation 2
bearing pointer 53
C
calculator 83
calendar 82
Colorado Series Owner’s Manual 17
calibrate
electronic compass 50
calibration setup 75
cleaning vi
compass
calibration 50
compass page 48
data elds 54
electronic compass 49
options menu 51
D
data card storage informa-
tion 69
data elds 60
data eld denitions 93
deleting waypoints 12
display setup 67
E
editing waypoints 12
elevation, GPS 38
entering data 7
ENTER key 3
F
elds, data 56
nd 17
by name 17
information pages 18
recent nds 18
FIND/MOB key 3
FIND key 3
nd menu 16
G
geocache setup 72
GRI chain 98
guidance text 42
H
highway page 65
I
IN/OUT Zoom keys 3
initializing the GPS receiver 5
installing the lanyard 2
J
jumpmaster 77
jumpmaster setup page
constant setup 80
wind setup 79
L
lanyard installation 2
location formats 99
log track to data card 27
M
main pages 37
manual conventions i
MapSource 96
map datums 99
map page 39
additional map data 40
data elds 39
declutter 47
options menu 41
orientation 41
setup 43
zoom range 41
map setup 43
marine setup 72
marking your current location
10
MARK key 3
measure distance 42, 46
MENU key 3
N
north up/track up 38
O
on-screen messages 8
P
PAGE/COMPASS key 3
Page 24

index
page sequence setup 70
plot over time 57
Power key 3, 4
pressure plots, view 57
prole eld 56
proximity alarm tones 15
proximity waypoints 82
Q
QUIT key 3
R
ROCKER key 3
routes 32
copying 36
creating 32
deleting 35
navigating 33
route page options 35
turn previews 33
route page 65
routing setup 71
S
satellite page 38
secondary stations 98
selecting options 7
Sight ‘N Go 51
software license agreement v
18 Colorado Series Owner’s Manual
status bar 7
stop (resume) navigation 41
storage vi
sun and moon 85
system setup 66
T
terminology 6
time setup 73
tracks 26, 64
area calculation 29
clearing 26
navigating 31
proles 30
saving 27
setup 26
user waypoints on tracks
31
viewing on the map 29
track up/north up 38
transferring data to a microSD
card 9
trip & waypoint manager 96
trip computer page 36
U
units setup 74
unit overview 1
using the keypad 3
W
WAAS/EGNOS 97
warnings vii
waypoints 10
averaging a location 13
creating 11
editing 12
Man Overboard 16
moving 13
projecting 14
proximity 15
Z
zooming in and out 41
zoom range 41
Page 25

Page 26
For the latest free software updates (excluding map data) throughout the life of your
Garmin products, visit the Garmin Web site at www.garmin.com.
© 2007 Garmin Ltd. or its subsidiaries
Garmin International, Inc.
1200 East 151st Street, Olathe, Kansas 66062, USA
Garmin (Europe) Ltd.
Liberty House, Hounsdown Business Park, Southampton, Hampshire, SO40 9RB UK
Garmin Corporation
No. 68, Jangshu 2nd Road, Shijr, Taipei County, Taiwan
www.garmin.com
Part Number 190-00751-00 Rev. A
 Loading...