

Page 1
®
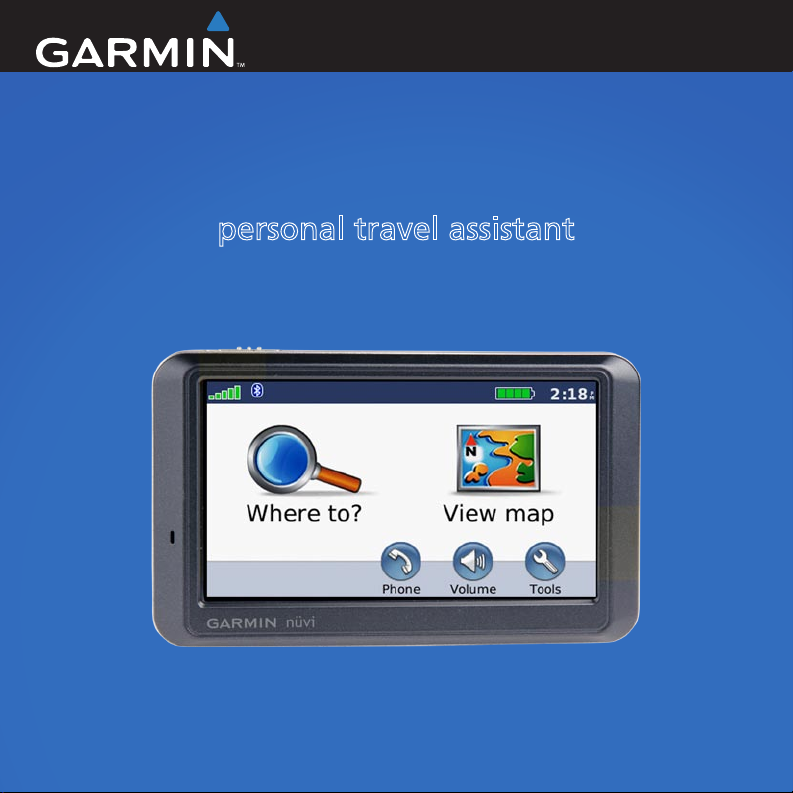
nüvi
personal travel assistant
800 Series
Owner’s Manual
Page 2
© 2007 Garmin Ltd. or its subsidiaries
Garmin International, Inc.
1200 East 151st Street,
Olathe, Kansas 66062, USA
Tel. (913) 397.8200 or
(800) 800.1020
Fax (913) 397.8282
All rights reserved. Except as expressly provided herein, no part of this manual may be reproduced,
copied, transmitted, disseminated, downloaded or stored in any storage medium, for any purpose without
the express prior written consent of Garmin. Garmin hereby grants permission to download a single copy
of this manual onto a hard drive or other electronic storage medium to be viewed and to print one copy of
this manual or of any revision hereto, provided that such electronic or printed copy of this manual must
contain the complete text of this copyright notice and provided further that any unauthorized commercial
distribution of this manual or any revision hereto is strictly prohibited.
Information in this document is subject to change without notice. Garmin reserves the right to change
or improve its products and to make changes in the content without obligation to notify any person
or organization of such changes or improvements. Visit the Garmin Web site (www.garmin.com) for
current updates and supplemental information concerning the use and operation of this and other Garmin
products.
Garmin®, nüvi®, MapSource®, and TourGuide® are trademarks of Garmin Ltd. or its subsidiaries,
registered in the USA and other countries. Garmin Lock™ and myGarmin™ are trademarks of Garmin Ltd.
or its subsidiaries. These trademarks may not be used without the express permission of Garmin.
The Bluetooth® word mark and logos are owned by the Bluetooth SIG, Inc., and any use of such name
by Garmin is under license. Windows® is a registered trademark of Microsoft Corporation in the United
States and/or other countries. Mac® and iTunes® are registered trademarks of Apple Computer, Inc.
Audible.com®, AudibleManager®, and AudibleReady® are registered trademarks of Audible, Inc. ©
Audible, Inc. 1997–2005. SaversGuide® is a registered trademark of Entertainment
Publications, Inc. RDS-TMC Trafc Information Services France © ViaMichelin 2006.
Other trademarks and trade names are those of their respective owners.
Garmin (Europe) Ltd.
Liberty House, Hounsdown Business Park,
Southampton, Hampshire, SO40 9RB, UK
Tel. +44 (0) 870.8501241 (outside the UK)
0808 2380000 (within the UK)
Fax +44 (0) 870.8501251
Garmin Corporation
No. 68, Jangshu 2nd Road,
Shijr, Taipei County, Taiwan
Tel. 886/2.2642.9199
Fax 886/2.2642.9099
December 2007 Part Number 190-00847-00 Rev. A
Printed in Taiwan
Page 3
Preface
Preface
Thank you for purchasing the Garmin
nüvi® 800 Series navigation device.
Manual Conventions
When you are instructed to “touch”
something, use your nger to touch an
item on the screen.
The small arrows (>) used in the text
indicate that you should touch a series
of items. For example, if you see “touch
Where to? > Favorites” you should
touch Where to?, and then touch
Favorites.
myGarmin™
Go to http://my.garmin.com to access the
®
latest services for your Garmin products:
•
•
•
nüvi Tips and Shortcuts
To quickly return to the Menu page,
•
touch and hold Back.
Touch and to see more
•
choices. Touch and hold to scroll
faster.
DRAFT
Register your Garmin unit.
Subscribe to online services for safety
camera information (see page 46).
Unlock optional maps.
Contact Garmin
Contact Garmin if you have any
questions while using your nüvi. In the
USA, contact Garmin Product Support
by phone: (913) 397-8200 or (800)
800-1020, Monday to Friday, 8 AM to
5 PM Central Time; or go to
www.garmin.com/support.
In Europe, contact Garmin (Europe)
Ltd. at +44 (0) 870.8501241 (outside
the UK) or 0808 2380000 (within the
UK).
nüvi 800 Series Owner’s Manual i
Page 4

Preface
Table of conTenTs
Preface.............................................i
Manual Conventions ..........................i
nüvi Tips and Shortcuts ..................... i
myGarmin™ ....................................... i
Contact Garmin ................................. i
Getting Started ...............................1
Your nüvi Unit ...................................1
Step 1: Install the Battery .................2
Step 1: Mount the nüvi .....................3
Step 2: Mount the Remote ...............4
Step 3: Congure the nüvi ................4
Step 4: Acquire Satellites .................4
Step 4: Use the nüvi .........................5
Finding Your Destination ..................6
Following Your Route .......................7
Adding a Via Point ............................7
Taking a Detour ................................8
Stopping the Route ...........................8
Speaking Commands .......................8
Adjusting the Volume ........................8
Locking the Screen ...........................8
Where to? .......................................9
Go! Page Options .............................9
DRAFT
Finding an Address ...........................9
Finding a Place by Spelling
the Name ..................................10
Setting a Home Location ................10
Finding Recently Found Places ......11
Favorites .........................................11
Creating and Taking Routes ...........12
Finding a Place Using the Map ......14
Entering Coordinates ......................14
Searching Near Another Location ..15
Navigating Off Road .......................15
Walking to a Destination .................15
Using the Main Pages .................16
Map Page .......................................16
Trip Information Page .....................17
Turn List Page ................................17
Next Turn Page ..............................17
Speaking Commands ..................18
Voice Recognition Tips ...................18
Voice Recognition Shortcuts ..........18
Activating the Remote ....................19
Mounting the Remote .....................19
Using Hands-free Calling ............20
Pairing Your Phone .........................20
Receiving a Call ............................21
ii nüvi 800 Series Owner’s Manual
Page 5

Preface
In a Call .........................................21
Phone Menu ...................................22
SMS/Text Messaging ......................23
Using the Media Players .............25
Playing Music .................................25
Listening to Audible Books .............27
Managing Files .............................28
Supported File Types......................28
Loading Files ..................................28
Deleting Files .................................29
Using the Tools ............................30
Settings ..........................................30
Where Am I? ...................................30
Games ............................................30
Language Guide .............................30
Help ................................................33
Music Player ...................................33
Trafc ..............................................33
MSN® Direct....................................33
Routes ............................................34
Audible Player ................................34
Picture Viewer ................................34
My Data ..........................................34
Using FM Trafc ...........................35
nüvi 800 Series Owner’s Manual iii
DRAFT
LED Blink Codes ............................35
Trafc In Your Area .........................36
Trafc on Your Road .......................36
Trafc on Your Route ......................36
Trafc Icons ....................................37
Severity Color Code .......................37
Trafc Subscriptions .......................37
Playing Audio Through the
Vehicle’s Speakers ......................38
Manually Tuning the FM
Transmitter ................................38
Auto Tuning the FM Transmitter .....38
Frequency Selection Tips ...............39
FM Transmitter Information ............39
Customizing the nüvi ..................40
Changing the System Settings .......40
Changing the Navigation Settings ..40
Setting the Languages ...................42
Changing the Map Settings ............42
Adding Security Settings ................43
Viewing Trafc Subscription
Information ................................43
Bluetooth Technology Settings .......44
Changing the Proximity Points
Settings .....................................45
Adjusting the Volume Levels ..........46
Page 6

Preface
Restoring All Settings .....................46
Clearing User Data .........................46
Appendix ......................................47
Ways to Charge Your nüvi ..............47
Calibrating the Screen ....................47
Resetting the nüvi ...........................47
Locking Your nüvi ...........................47
Additional Maps ..............................48
Updating the Software ....................48
Extras and Optional Accessories ....48
Battery Information ........................51
Changing the Fuse .........................51
Removing the nüvi and Mount ........52
Mounting on Your Dashboard .........52
About GPS Satellite Signals ...........53
Caring for Your nüvi .......................53
Declaration of Conformity ...............54
Important Legal Notice Regarding
Your FM Transmitter ..................55
Perchlorate Material .......................55
Software License Agreement .........56
Specications .................................57
Troubleshooting ..............................58
Index .............................................60
DRAFT
iv nüvi 800 Series Owner’s Manual
Page 7
GettinG Started
GeTTinG sTarTed
WARNING: See the Important Safety and Product Information guide in the product
box for product warnings and other important information.
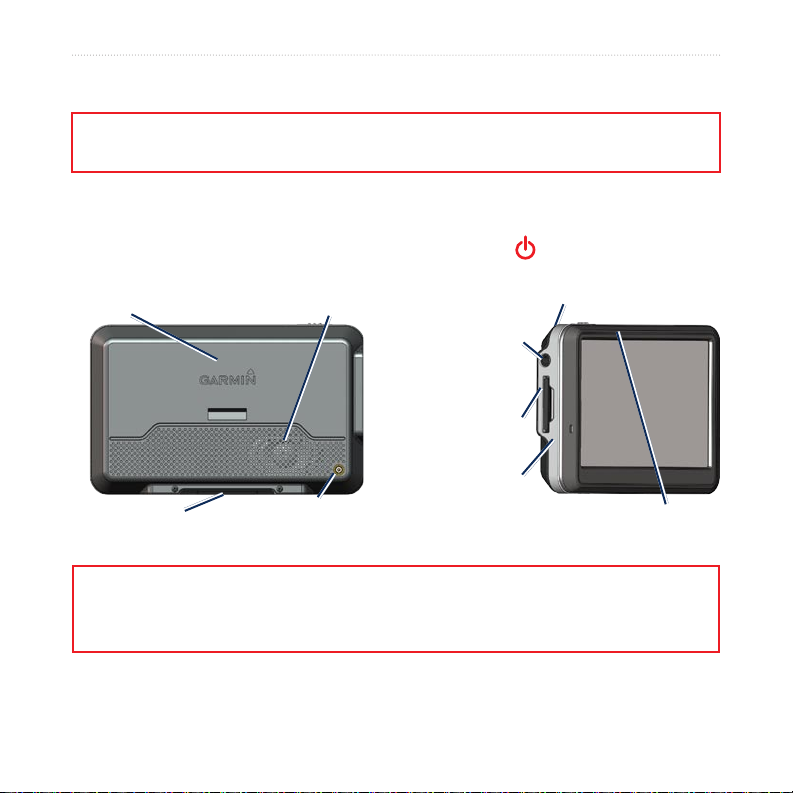
Your nüvi Unit
Power key:
slide to the left to turn the unit on/off;
slide to the right to lock the screen
Headphone/
audio out
jack
SD card
slot
Mini-USB
connector
Microphone
Serial number
SpeakerGPS antenna
External antenna
connector
WARNING: This product contains a non-replaceable, lithium-ion battery. See the
Important Safety and Product Information guide in the product box for important
battery safety information.
nüvi 800 Series Owner’s Manual 1
DRAFT
Page 8

GettinG Started
Step 1: Install the Battery
1. Locate the black or gray lithium-ion
battery that came in the product box.
2. Slide the battery cover off the back of
the nüvi.
4. Locate the metal contacts on the
end of the lithium-ion battery. Insert
the battery so the metal contacts
on the battery match up with the
metal contacts inside the battery
compartment. Press the battery down
into place.
5. Slide the battery cover back on until it
clicks into place.
Replacement Battery
If you need to replace the battery, use a
Garmin 3.7 Volt lithium-ion battery pack
(010-10840-00). Purchase a replacement
battery at http://my.garmin.com/shop.
You can also use a compatible cell phone
battery, such as a Nokia BL-5C.
DRAFT
2 nüvi 800 Series Owner’s Manual
Page 9
GettinG Started
Check your state and local trafc laws before mounting. Currently, state laws in
California and Minnesota prohibit drivers from using suction mounts on their
windshields while operating motor vehicles. Other Garmin dashboard or friction
mounting options should be used. See page 49.
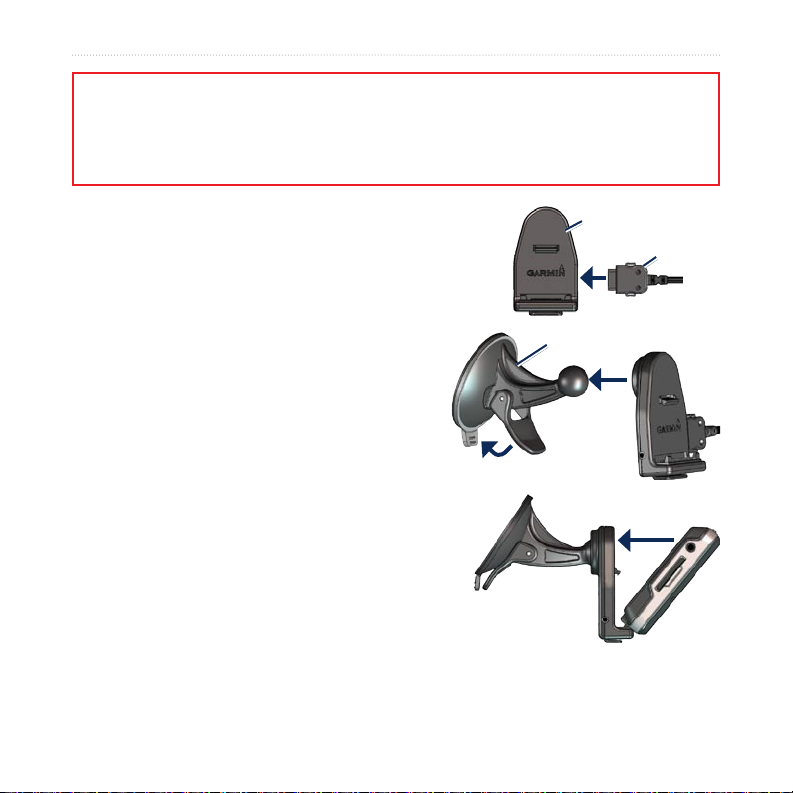
Step 1: Mount the nüvi
1. Plug the vehicle power cable into the power
connector on the right side of the cradle.
2. Snap the cradle onto the suction cup arm.
3. Clean and dry your windshield and the
suction cup with a lint-free cloth. Remove the
clear plastic from the suction cup. Place the
suction cup on the windshield.
4. Flip the lever back, toward the windshield.
5. Fit the bottom of your nüvi into the cradle.
6. Tilt the nüvi back until it snaps into place.
7. Plug the other end of the vehicle power cable
into a power outlet in your vehicle. Your unit
should turn on automatically if it is plugged in
and your vehicle is running.
8. If you are using a trafc receiver in Europe,
secure the trafc receiver’s antenna to the windshield using the suction cups.
nüvi 800 Series Owner’s Manual 3
DRAFT
Cradle
Power cable
Suction cup mount
Page 10
GettinG Started
Step 2: Mount the Remote
Mount the ASR remote in a convenient
location on your steering wheel. Use the
strap to secure the remote in place.
Step 3: Congure the
nüvi
To turn on your nüvi, slide the Power
key to the left. Follow the on-screen
instructions.
Step 4: Acquire Satellites
Go outdoors to an open area, out of
garages, and away from tall buildings.
Stop your vehicle, and turn on the nüvi.
Acquiring satellite signals may take a
few minutes.
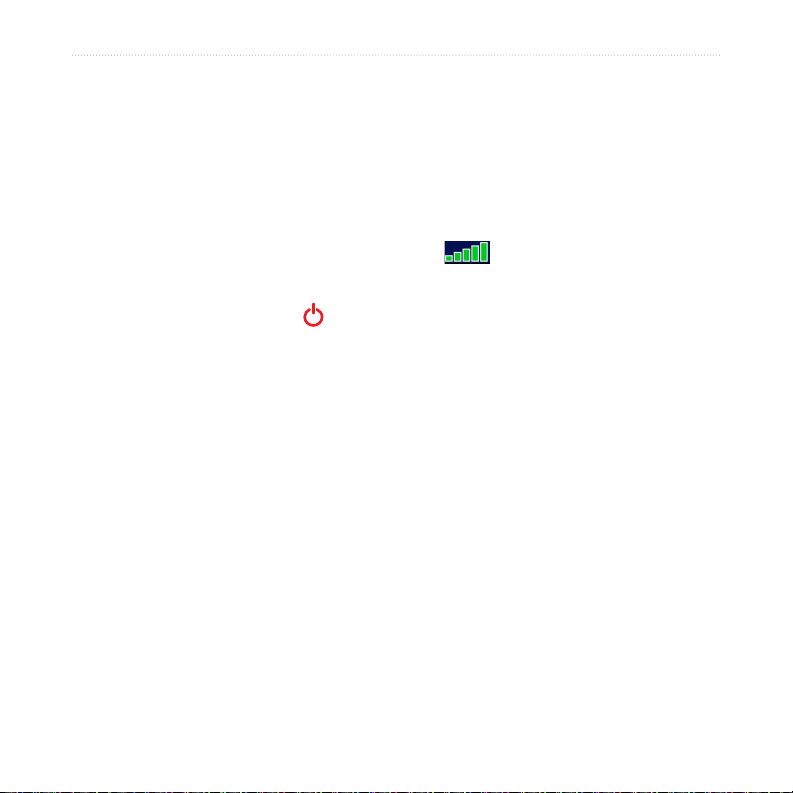
The bars indicate GPS satellite
strength. When one bar is green, the nüvi
has acquired satellite signals. Now you
can select a destination and navigate to
it. For more information about GPS, see
page 53 and visit www.garmin.com/
aboutGPS.
DRAFT
4 nüvi 800 Series Owner’s Manual
Page 11
Step 4: Use the nüvi
GettinG Started
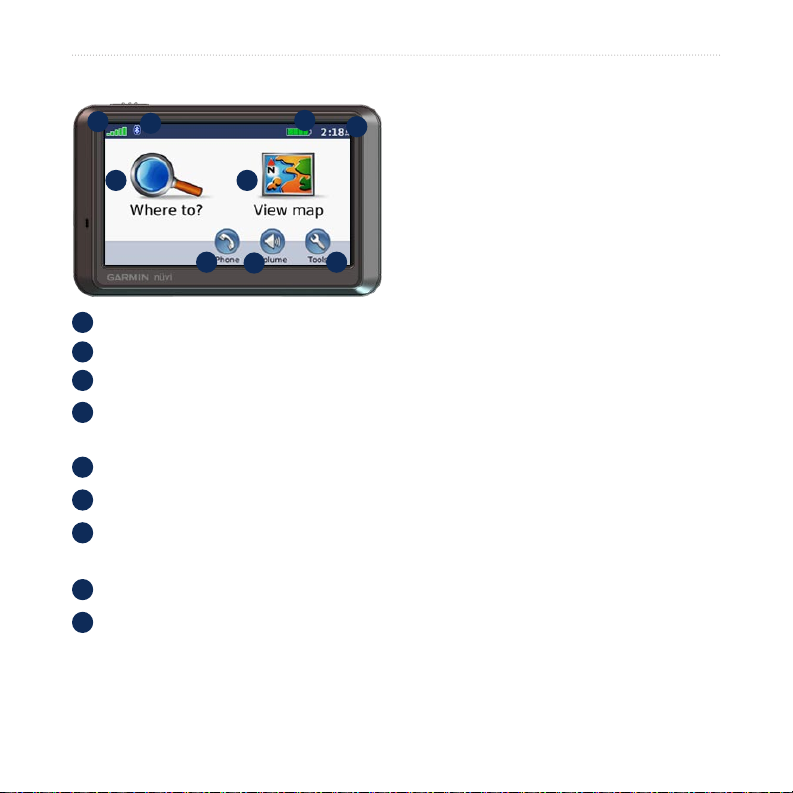
A
B
E F
G
GPS satellite strength.
A
Bluetooth® technology status.
B
C
Battery status.
D
Current time; touch to change time
settings.
E
Touch to nd a destination.
F
Touch to view the map.
G
Touch to make a call when connected
to a compatible mobile phone.
H
Touch to adjust the volume.
I
Touch to use the tools such as media
players, settings, and Help.
C
D
H
I
DRAFT
nüvi 800 Series Owner’s Manual 5
Page 12
GettinG Started
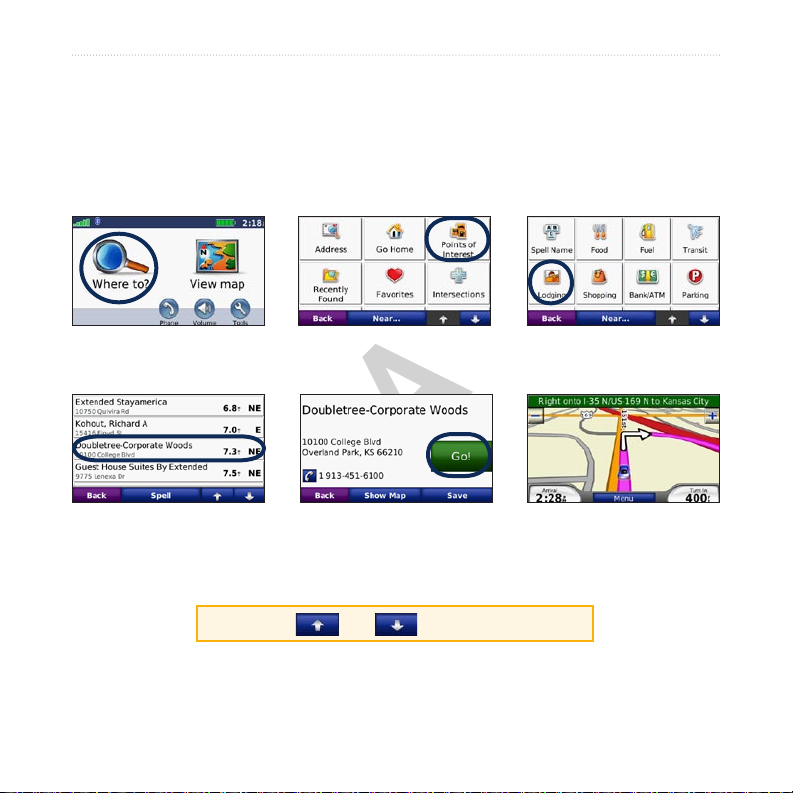
Finding Your Destination
The Where to? menu provides several different categories for you to use when
searching for addresses, cities, and other locations. The detailed map loaded in your
nüvi contains millions of points of interest, such as restaurants, hotels, and auto
services.
3. Select a sub-category.
4. Select a destination.
2. Select a category. 1. Touch Where to?.
5. Touch Go!. 6. Enjoy the route!
DRAFT
TIP: Touch and to see more choices.
6 nüvi 800 Series Owner’s Manual
Page 13
GettinG Started
Following Your Route
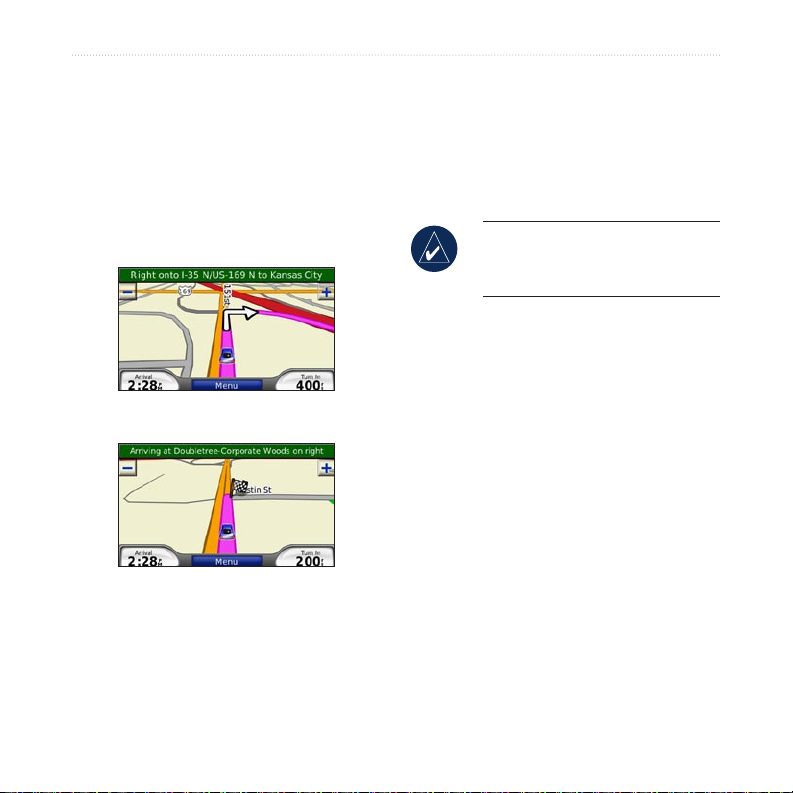
As you travel, your nüvi guides you to
your destination with voice prompts,
arrows on the map, and directions at the
top of the map. If you depart from the
original route, your nüvi recalculates the
route and provides new directions.
Your route is marked with a magenta line.
Follow the arrows as you take turns.
A checkered ag marks your destination.
DRAFT
Adding a Via Point
You can add a stop (via point) to your
route. The nüvi gives you directions
to the stop and then to your nal
destination.
1. With a route active, touch Menu >
2. Search for the extra stop.
3. Touch Go!.
4. Touch Add as Via Point to add this
TIP: If you want to add more
than one stop to the route, edit the
current route. See page 12.
Where to?.
stop before your destination. Touch
Set as new Destination to make this
your new nal destination.
nüvi 800 Series Owner’s Manual 7
Page 14

GettinG Started
Taking a Detour
If a road on your route is closed, you can
take a detour.
1. With a route active, touch Menu.
2. Touch Detour.
The nüvi attempts to get you back
on your original route as quickly as
possible. If the route you are currently
taking is the only reasonable option, the
nüvi might not calculate a detour.
Adjusting the Volume
From the Menu page, touch Volume.
Touch and to adjust the master
volume. Touch Mute to mute all audio.
To set up the FM transmitter, see pages
35 to 36.
Locking the Screen
To prevent accidental screen taps, slide
the Power key to the right ( ). To
unlock the screen, slide the Power key
to the center position.
Stopping the Route
1. With a route active, touch Menu.
2. Touch Stop.
Speaking Commands
Press the large button on the remote
control. When the icon turns green,
speak a command. You can speak
anything you see on the screen. For more
info, see pages xx to xx.
DRAFT
8 nüvi 800 Series Owner’s Manual
Page 15
Where to
Where To?
The Where to? menu provides
several different categories you can use
to search for locations. To learn how to
perform a simple search, see page 5.
TIP: Touch Near… to change the
search area. See page 13.
Go! Page Options
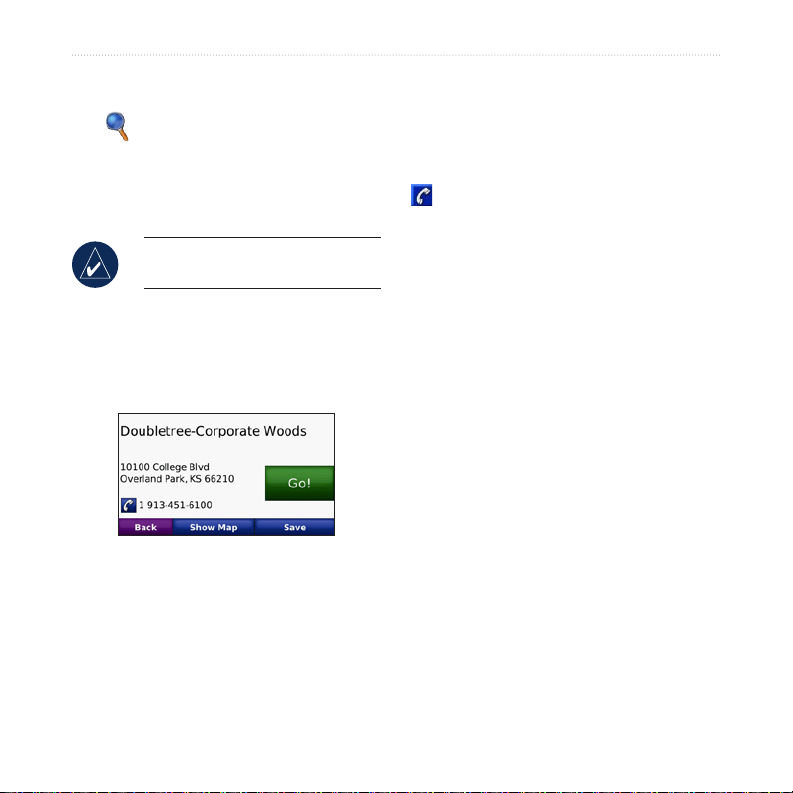
Touch an item in the search results list to
view the Go! page.
Touch Go! to create a turn-by-turn route
to this location.
Touch Show Map to view this location
on the map. If the GPS mode is off,
touch Set Location to set your current
location here.
nüvi 800 Series Owner’s Manual 9
DRAFT
Touch Save to save this location. See
page 10.
If a mobile phone with Bluetooth
wireless technology is connected, touch
to call this location.
Finding an Address
1. Touch Where to? > Address.
2. Touch Change State/Province, if
necessary.
3. Touch Search All.
OR
Touch Spell City, enter the city/postal
code, and touch Done. Select the
city/postal code in the list. (Not all
map data provides postal code
searching.)
4. Enter the number of the address, and
touch Done.
5. Enter the street name, and touch
Done. Select the correct street in the
list, if necessary.
6. Touch the address, if necessary.
Page 16
Where to
Finding a Place by Spelling the Name
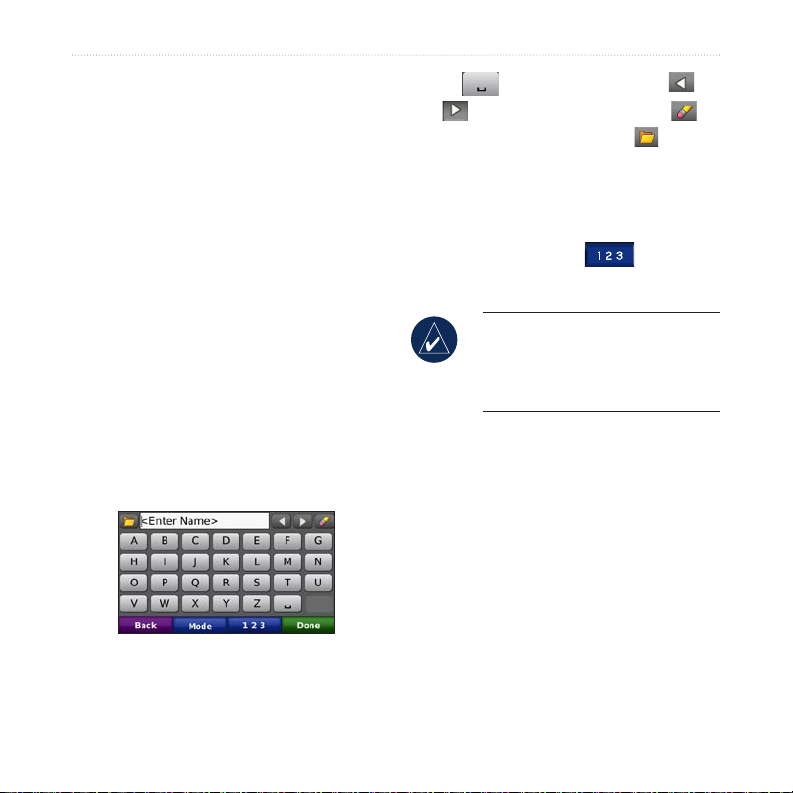
If you know the name of the location you
are looking for, you can spell it using the
on-screen keyboard. You can also enter
letters contained in the name to narrow
the search.
1. Touch Where to? > Points of
Interest > Spell Name.
2. Using the on-screen keyboard, enter
letters in the name. Touch Done.
Using the On-Screen
Keyboard
When an on-screen keyboard appears,
touch a letter or number to enter it.
DRAFT
Touch to add a space. Touch
and to move the cursor. Touch
to delete the character. Touch to
select words you have recently typed and
selected.
Touch Mode to select the keyboard
language mode. Touch to enter
numbers and special characters.
TIP: You can change the
keyboard layout to QWERTY,
which is like a standard computer
keyboard layout. See page 37.
Setting a Home Location
You can set a home location for the place
you return to most often.
1. Touch Where to? > Go Home.
2. Select an option.
Going Home
After you set your home location, you
can route to it at any time by touching
Where to? > Go Home.
10 nüvi 800 Series Owner’s Manual
Page 17
Where to
Changing Your Home
Location
To change your home location, you must
rst delete it from Favorites.
1. Touch Where to? > Favorites.
2. Touch Home > Edit > Delete > Yes.
After you delete your home location,
reset it by following the steps in the
“Setting a Home Location” section
above.
Finding Recently Found Places
Your nüvi stores the last 50 of your
recent nds in the Recently Found list.
The most recently viewed places appear
at the top of the list. Touch Where to? >
Recently Found to view your recently
found items.
DRAFT
Deleting Recently Found
Places
To remove all places from the Recently
Found list, touch Clear > Yes.
Favorites
You can save places in your Favorites,
so you can quickly nd them and create
routes to them. Your home location is
also stored in Favorites.
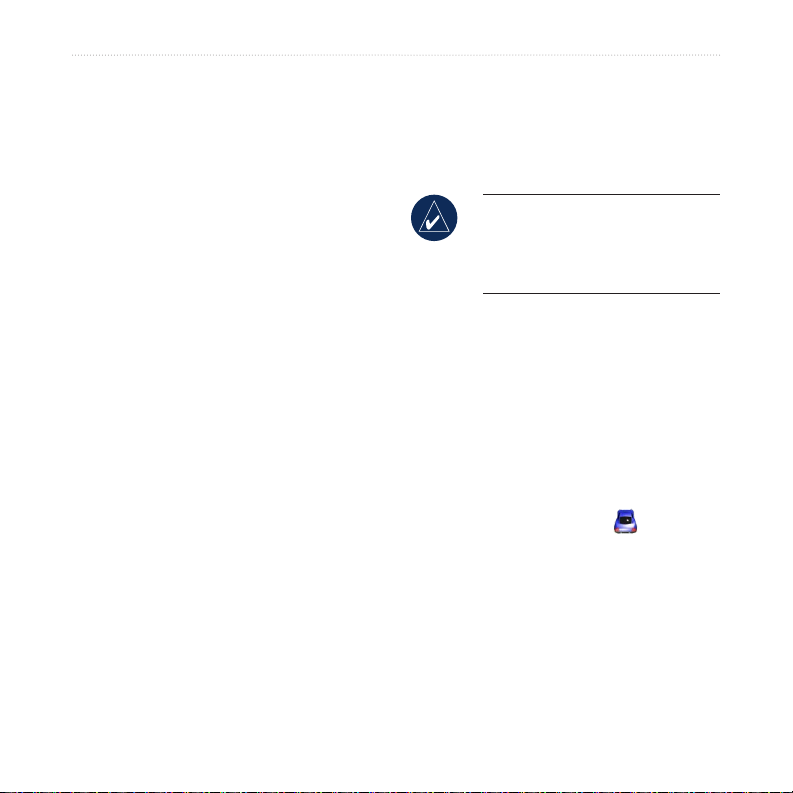
Saving Your Current Location
From the Map page, touch . Touch
Save Location to save your current
location.
NOTE: When you touch
Clear, all items from the list are
removed. It does not delete the
actual place from your unit.
nüvi 800 Series Owner’s Manual 11
Page 18
Where to
Saving Places You Find
1. After you have found a place you
want to save, touch Save.
2. Touch OK. The place is saved in
Favorites.
Finding Saved Places
1. Touch Where to?.
2. Touch Favorites. Your saved
locations are listed.
TIP: Your Last Position is
automatically saved each time you
remove the nüvi from the cradle.
Use this feature to nd your car in
a parking lot.
Editing Saved Places
1. Touch Where to? > Favorites.
2. Touch the location you want to edit.
3. Touch Edit.
DRAFT
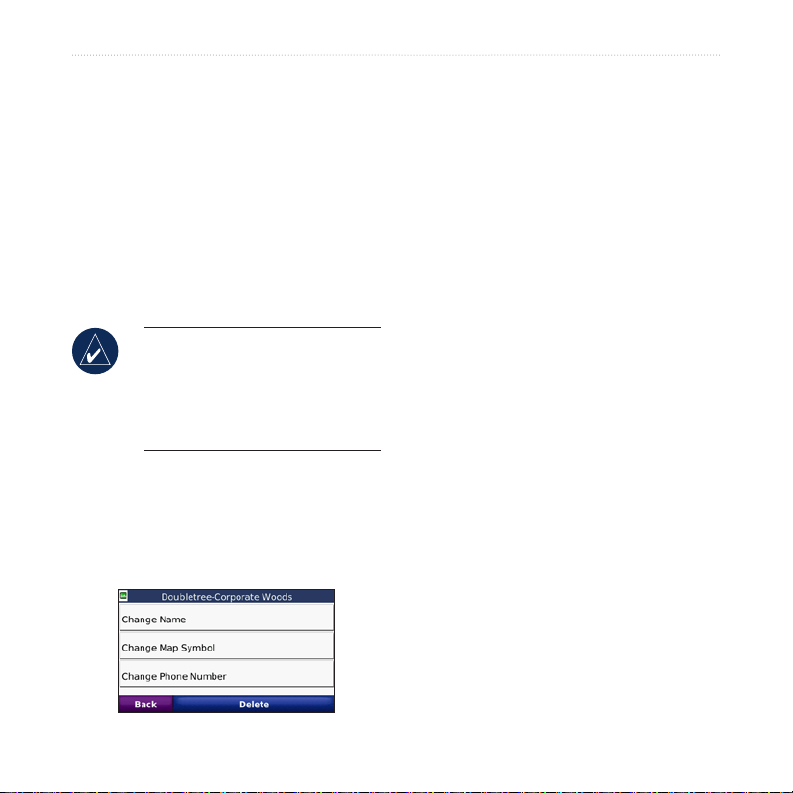
4. Touch a button to edit the location:
Change Name—enter a new
•
name, and touch Done.
Change Map Symbol—touch
•
a new symbol.
Change Phone Number—
•
enter a phone number, and
touch Done.
Delete—removes this item
•
from the Favorites list. Touch
Yes.
Creating and Taking Routes
Touch Where to? > Routes. Select the
route you want to take and touch Go!.
Creating a Saved Route
Use your nüvi to create and save routes
before your next trip. You can save up to
10 routes.
1. Touch Where to? (or Tools) >
Routes > New.
2. Touch Add New Start Point.
12 nüvi 800 Series Owner’s Manual
Page 19
Where to
3. Find a location as your starting point,
and touch Select.
4. Touch Add New End Point.
5. Find a location as your ending point,
and touch Select.
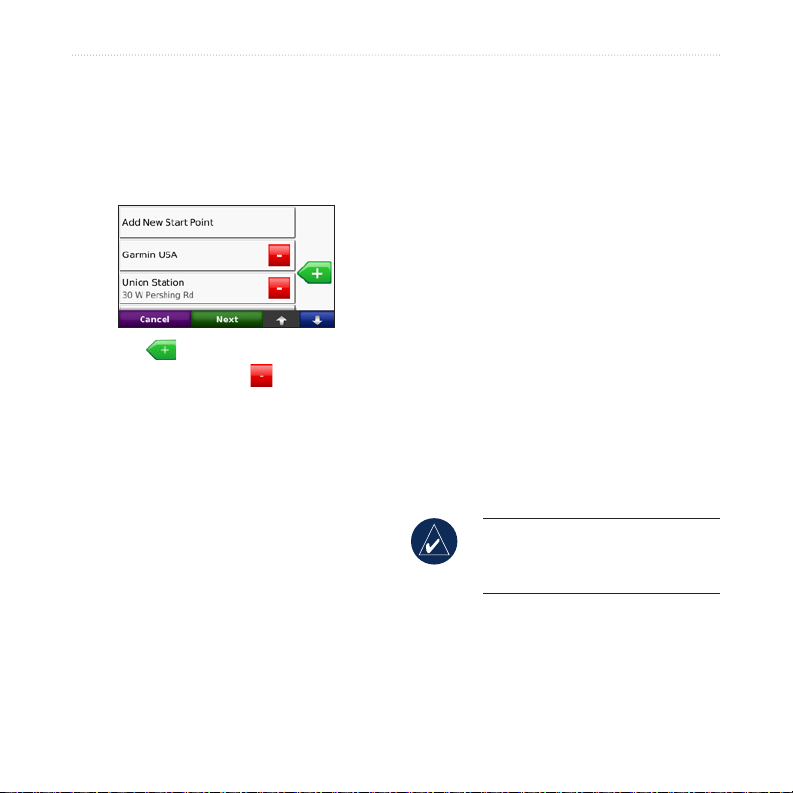
6. Touch to add another location
to your route. Touch to remove a
location.
7. Touch Next to calculate your route
and view it on the map.
8. Touch Save to save the route and
exit.
Editing Routes
1. Touch Where to? (or Tools) >
Routes.
2. Select the route you want to edit.
3. Touch Edit.
4. Touch an option to edit the route:
DRAFT
Touch Change Name. Enter a
•
new name, and touch Done.
Touch Add/Remove Points
•
to add new start, via, or end
points to the route.
Touch Manually Reorder
•
Points to change the order of
points along your route.
Touch Optimally Reorder
•
Points to automatically order
the points.
Touch Recalculate to change
•
the route preference to
calculate by faster time, shorter
distance, or off road.
Touch Delete to remove this
•
item.
NOTE: Your changes are
automatically saved when you exit
any of the route edit pages.
nüvi 800 Series Owner’s Manual 13
Page 20

Where to
Finding a Place Using the Map
Use the Browse Map page to view
different parts of the map. Touch Where
to? > Browse Map.
Tips for Browsing the Map
Touch the map, and drag to view
•
different parts of the map.
Touch and to zoom in and out.
•
Touch any object on the map. An
•
arrow appears pointing at the object.
Touch Save to save this location.
•
Touch Go! to navigate to the location.
•
If the GPS mode is off, touch Set
•
Location to set your location to the
selected location. (See page 37.)
DRAFT
Entering Coordinates
If you know the geographic coordinates
of your destination, you can use your
nüvi to navigate to any location using
its latitude and longitude coordinates.
This can be especially helpful when
geocaching.
1. Touch Where to? > Coordinates.
2. Touch Format to change the type of
coordinates. Because different maps
and charts use different position
formats, the nüvi allows you to
choose the correct coordinate format
for the type of map you are using.
3. Enter the coordinates, and touch
Done.
14 nüvi 800 Series Owner’s Manual
Page 21
Where to
Searching Near AnotherNear Another
Location
NOTE: Your nüvi automatically
searches for places near your
current location.
1. Touch Where to? > Near….
2. Select an option:
Where I Am Now—search
•
near your current location.
A Different City—search near
•
the city you enter.
My Current Route—search
•
along your route.
My Destination—search near
•
your current destination.
3. Touch OK.
DRAFT
Navigating Off Road
If you are not following roadways as
you navigate, use Off Road mode. Touch
Tools > Settings > Navigation > Route
Preference > Off Road > OK. Select a
destination and touch Go! to navigate off
road to the destination.
Walking to a Destination
If you are walking to your destination,
use Pedestrian mode to optimize your
route for walking. Touch Tools >
Settings > System > Usage Mode >
Pedestrian > OK.
nüvi 800 Series Owner’s Manual 15
Page 22
USinG the Main PaGeS
UsinG The Main PaGes
Map Page
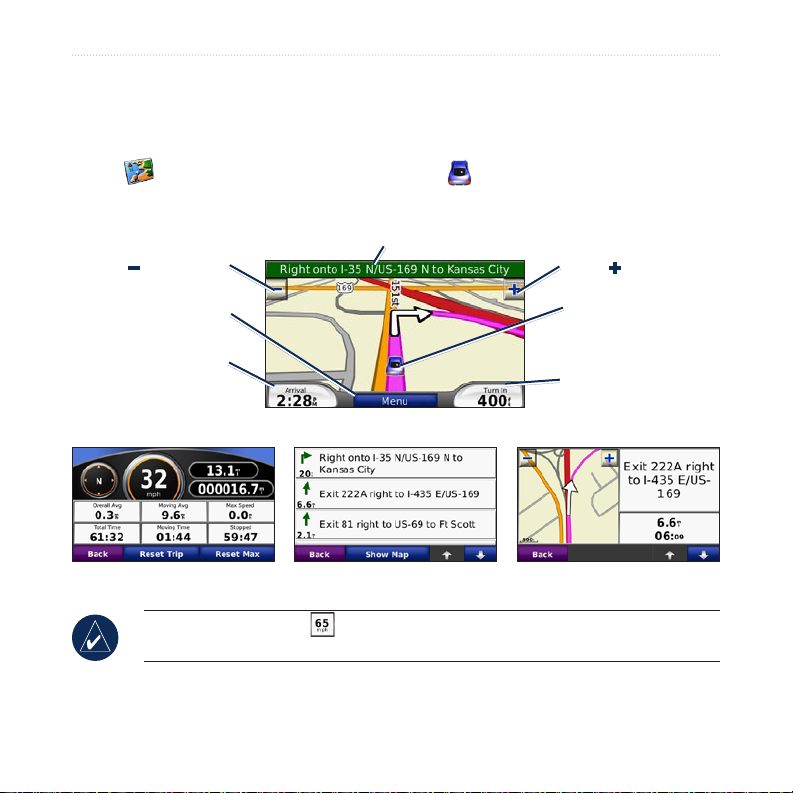
Touch View map to open the Map page. The vehicle icon shows your current
location. Touch and drag the map to view a different area of the map (see page 13).
Touch the text bar to open the Turn List page.
Touch to zoom out. Touch to zoom in.
Touch Menu to return
to the Menu page.
Touch Arrival or
Speed to open the Trip
Information page.
TIP: A speed limit icon may appear as you travel on major roadways. This icon
displays the current speed limit of the roadway.
16 nüvi 800 Series Owner’s Manual
Map Page while Navigating a Route
DRAFT
Turn List Page Next Turn PageTrip Information Page
To save your current
location, touch the
vehicle icon.
Touch Turn In to open
the Next Turn page.
Page 23

USinG the Main PaGeS
Trip Information Page
The Trip Information page displays
your current speed and provides helpful
statistics about your trip. To view the
Trip Information page, touch the Speed
or Arrival eld on the Map page.
If you make frequent stops, leave the
nüvi turned on so it can accurately
measure elapsed time during the trip.
Resetting Trip Information
If you want accurate trip information,
reset the trip information before
beginning a trip. Touch Reset Trip
to reset the information on the Trip
Information page. Touch Reset Max to
reset the maximum speed.
DRAFT
Turn List Page
When you are navigating a route, the
Turn List page displays turn-by-turn
instructions for your entire route and the
distance between turns. Touch the green
text bar on the top of the Map page to
open the Turn List page. Touch a turn on
the list to view the Next Turn page for
that turn. Touch Show Map to view the
entire route on the Browse Map.
Next Turn Page
When you are navigating a route, the
Next Turn page shows the turn on the
map and the distance and time left before
you reach the turn. To view an upcoming
turn on the map, touch the Turn In eld
on the Map page, or touch any turn from
the Turn List page.
nüvi 800 Series Owner’s Manual 17
Page 24

SPeakinG coMMandS
sPeakinG coMMands
Automatic speech recognition (ASR)
allows you to use your nüvi by speaking
the words you see on the screen.
Press the large button on the remote to
activate voice recognition. Speak when
the green X Speak icon appears and the
nüvi beeps. Speak commands exactly as
they appear on the screen.
Press the small button on the remote to
cancel the previous voice command. The
nüvi sounds two quick beeps if it does
not recognize your command.
Touch the screen to deactivate voice
recognition. The nüvi sounds a low beep
when it exits voice recognition mode.
•
•
•
•
Voice Recognition Shortcuts
•
•
DRAFT
Voice Recognition Tips
Ensure your remote is activated.
•
Reduce background noise by turning
•
down your radio and stopping
conversations.
•
Speak slowly and clearly.
Speak commands exactly as they
appear on the screen.
Respond to voice prompts from the
device (when the device asks you to
spell a name or enter an address).
On any keyboard page, say “Delete”
or “Backspace” to delete the last
character. Say “Clear” delete all
characters.
Say “Main Menu” to return to the
main menu from any screen.
From the main menu, say “Find”
followed by a category (“Find
Lodging”, “Find Fuel”).
From the main menu, say “Find”
followed by a major franchise
name (“Find McDonald’s”, “Find
Starbucks”).
18 nüvi 800 Series Owner’s Manual
Page 25

Activating the Remote
If the GPS unit does not enter voice
recognition mode, make sure the remote
is activated. From the Menu page, touch
Tools > Settings > System. Touch the
button next to Remote. Then, touch
Activate New Remote and press a
button on the remote.
Mounting the Remote
Mount the ASR remote in a convenient
location on your steering wheel. Use the
strap to secure the remote in place.
Image Here
Replacing Battery in Remote
image here
DRAFT
SPeakinG coMMandS
nüvi 800 Series Owner’s Manual 19
Page 26

USinG handS-free callinG
UsinG hands-free
callinG
Using Bluetooth wireless technology,
your nüvi can connect to your mobile
phone to become a hands-free device.
To see if your device with Bluetooth
technology is compatible with the nüvi,
visit www.garmin.com/bluetooth.
Bluetooth wireless technology
establishes a wireless link between
devices, such as a mobile phone and the
nüvi. The rst time you use two devices
together you must “pair” them by
establishing a relationship using a PIN/
passkey. After the initial pairing, the two
devices can connect automatically each
time you turn them on.
Pairing Your Phone
To pair and connect, your phone and the
nüvi must be turned on and be within 10
meters of each other.
Initiate pairing from your nüvi or from
your mobile phone. Refer to your
phone’s instructions.
To pair using the phone settings:
1. Enable the phone’s Bluetooth
2. Initiate a search for Bluetooth
3. Select the nüvi from the list of
4. Enter the nüvi’s Bluetooth PIN (1234)
DRAFT
NOTE: You might have to set
your device to connect to the nüvi
automatically when it is turned on.
To pair using the nüvi settings:
1. From the Menu page, touch Tools >
component. This might be in a
menu called Settings, Bluetooth,
Connections, or Hands-free.
devices.
devices.
into your phone.
Settings > Bluetooth > Add.
20 nüvi 800 Series Owner’s Manual
Page 27
USinG handS-free callinG
2. Enable your phone’s Bluetooth
component and enable Find Me/
Discoverable/Visible mode. These
settings might be in a Bluetooth,
Connections, or Hands-free menu.
3. Touch OK on the nüvi.
4. Select your phone, and touch OK.
5. Enter the nüvi’s Bluetooth PIN (1234)
in your phone.
When your phone is connected to your
nüvi, you are ready to make phone calls.
Touch Phone to access the Phone menu.
When you turn on the nüvi, it tries to
connect to the last phone to which it was
connected.
NOTE: Not all phones support all
features of the nüvi Phone Menu.
Ignore to ignore the call and stop the
phone from ringing.
The internal microphone is in the front
of the nüvi; speak normally.
In a Call
During a call, the In Call icon
appears. Touch > End Call to hang
up. Touch > Call Options for the
following options:
•
•
DRAFT
Receiving a Call
When you get a call, the Incoming Call
window opens.
•
Touch Tones—displays a keypad
page so you can use automated
systems, such as voice mail.
Transfer Audio To Phone
helpful if you want to turn off the
nüvi, but stay on the call or if you
need privacy. To switch back, touch
Transfer Audio To Device.
Mute Microphone.
—this is
Touch Answer to answer the call. Touch
nüvi 800 Series Owner’s Manual 21
Page 28
USinG handS-free callinG
Using Call Waiting
When you are on a call and you receive
a second call (call waiting), the nüvi
displays the Incoming Call window.
Touch Answer to answer the call. The
rst call is placed on hold.
To switch between calls:
1. Touch > Switch To.
2. Touch End Call to hang up; this does
not disconnect the call on hold.
Phone Menu
From the Menu page, touch Phone to
open the Phone menu. Press Status
to view the connected phone’s signal
strength, battery level, and name.
NOTE: Not all phones support all
features of the nüvi Phone Menu.
Using Your Phone Book
Each time your mobile phone connects
with the nüvi, the phone book is
automatically loaded into the nüvi. It
DRAFT
may take a few minutes for the phone
book to be available.
1. Touch Phone > Phone Book.
2. Touch the phone book entry (contact)
you want to call.
3. Touch Dial to call the contact, or
touch Compose to send an SMS/text
message.
Dialing a Point of Interest
1. Touch Phone > Points of Interest.
2. Search for the point of interest you
want to call.
3. Touch Dial or .
Dialing a Number
1. Touch Phone > Dial.
2. Enter the number, and touch Dial.
Viewing Your Call History
Each time your phone connects to the
nüvi, your call history is automatically
transferred to the nüvi. It may take a few
minutes to transfer this data to the nüvi.
1. Touch Phone > Call History.
22 nüvi 800 Series Owner’s Manual
Page 29

USinG handS-free callinG
2. Touch a category to view those calls.
The calls are listed in chronological
order; the most recent calls are at the
top of the list.
3. Touch an entry, and touch Dial.
Calling Home
Enter a phone number for your home
location, so you can quickly call home.
To enter your phone number:
1. Touch Phone > Call Home.
2. Touch Enter Phone Number to use
the keypad page or Select From
Phonebook (only available if your
phone supports phone book transfer).
3. Touch Done > Yes. The nüvi dials
your home phone number.
NOTE: To edit home location or
phone number, touch Where to? >
Favorites > Home > Edit.
To call home:
1. Touch Phone > Call Home.
2. The nüvi dials your home phone
number.
nüvi 800 Series Owner’s Manual 23
DRAFT
Placing Calls Using Voice Dial
You can place calls by speaking the
contact’s name.
1. Touch Phone > Voice Dial.
2. Speak the contact name.
NOTE: You may need to “train”
your mobile phone to recognize
your voice dial commands. Refer
to your phone’s instructions.
SMS/Text Messaging
If your phone supports SMS/text
messaging using Bluetooth technology,
you can send and receive text messages
on the nüvi.
Getting a Text Message
When you get a text message, the
Incoming Message window opens.
Touch Listen to play the text message,
Review to open your inbox, or Ignore to
close the window.
Page 30
USinG handS-free callinG
Sending a Text Message
1. Touch Phone > Text Message >
Compose.
2. Select an option to select the text
message recipient.
3. Enter the message, and touch Done.
NOTE: Messages sent from your
nüvi do not appear in your phone’s
outbox.
Viewing Your Messages
1. Touch Phone > Text Message.
2. Touch Inbox, Outbox, or Drafts.
3. Touch a message.
4. Select an option.
Touch to listen to the
•
message. (Must have a TTS
voice selected to listen to SMS/
text messages; see page 39.)
Touch Forward to send this
•
message to another recipient
or Reply to reply to this
contact.
DRAFT
24 nüvi 800 Series Owner’s Manual
Page 31
USinG Media PlayerS
UsinG The Media Players
Playing Music
Load music les to the internal memory
or SD card. See pages 25 to 26.
1. Touch Tools > Music Player.
2. Touch Browse.
3. Touch a category.
4. To play the entire category from the
beginning of the list, touch Play All.
To play a specic song, touch the
title.
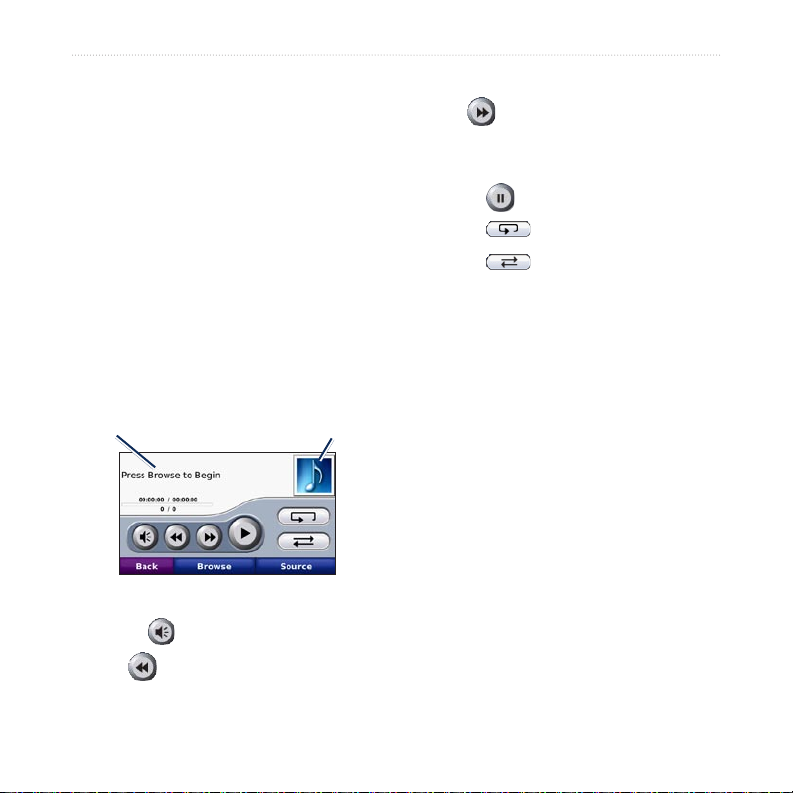
Current playlist
Album art
DRAFT
Touch the playlist to edit it.
•
Touch to adjust the volume.
•
Tap to play the previous song on
•
the playlist; touch and hold to rewind
nüvi 800 Series Owner’s Manual 25
through the current song.
Tap to skip to the next song;
•
touch and hold to skip ahead through
the current song.
Touch to pause the song.
•
Touch to repeat.
•
Touch to shufe.
•
Touch the album art to view details
•
about the music le or to remove the
song from the playlist.
Supported File Types
The nüvi supports MP3 music les, and
M3U and M3U8 playlist les.
Creating and Listening to
Playlists
Using your nüvi, you can listen to
playlists created on your computer. You
can also save playlists using your nüvi.
To save your current playlist:
1. While listening to music, touch
Browse > Playlists > Save Current
Playlist.
Page 32

USinG Media PlayerS
2. Enter a name, and touch Done.
To create a new playlist:
1. In the music player, touch Browse >
Playlists > Create New Playlist.
2. Select songs.
3. Touch Back when you have nished
adding songs to your playlist.
To create a playlist on a computer:
1. Using your computer and an audio
program, create a playlist of music
les. Save the playlist as an M3U or
M3U8 le.
NOTE: You may need to edit the
M3U le with a text editor, such
as Notepad, to remove the path
(link) to the music le. The M3U
le should only list the music
le names. Refer to the audio
program’s Help le.
2. Transfer the playlist and the music
les to the nüvi or SD drive (see
pages 25 to 26). The M3U le must
be in the same location as the music
les.
DRAFT
To play a playlist:
1. In the music player, touch Browse >
Playlists > Open Saved Playlist. All
available playlists appear.
2. Touch a playlist to start playing the
music les.
To edit a playlist:
1. While listening to music, touch the
playlist on the music player page,
or touch Browse > Playlists > Edit
Current Playlist.
2. Edit the playlist:
Touch Add to add a song to
•
the end of the playlist.
Touch a song, and then touch
•
Remove to remove it from the
playlist.
26 nüvi 800 Series Owner’s Manual
Page 33
USinG Media PlayerS
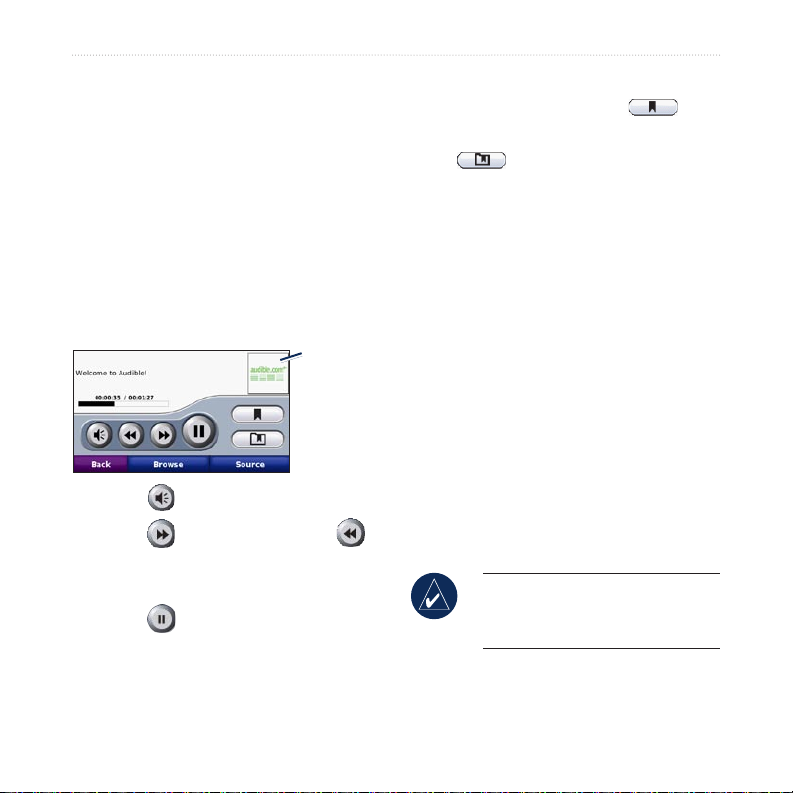
Listening to Audible Books
To purchase books from Audible.com,
go to http://garmin.audible.com.
Listening to a Book
1. Touch Tools > Audible Player.
2. Touch Browse.
3. Touch a category, and then touch a
book title.
Book cover
art
Touch to adjust the volume.
•
Touch to skip a section and
•
to jump back. Press and hold to move
forward or backward.
Touch to pause the book.
•
Touch the book cover art to view
•
more detailed information.
DRAFT
Using Bookmarks
To create a bookmark, touch and
Bookmark. To view your bookmarks,
touch , and then touch a
bookmark. Touch Play to listen to the
book from the bookmark.
Loading Audible BooksAudible Books
1. Create an Audible.com account at
http://garmin.audible.com.
2. Download AudibleManager®.
3. Open AudibleManager. Follow the on-
screen instructions to activate your
nüvi (one-time process).
4. Purchase a book at http://garmin
.audible.com, and download the book
to your computer.
5. Use AudibleManager to transfer the
book to your nüvi or SD card.
TIP: Refer to AudibleManager’s
Help le for detailed instructions.
Select Help > Help.
nüvi 800 Series Owner’s Manual 27
Page 34

ManaGinG fileS
ManaGinG files
You can store les, such as MP3s and
JPEG image les, in the nüvi’s internal
memory or on an optional SD card.
NOTE: The nüvi is not
compatible with Windows® 95,
98, Me, or NT. It is also not
compatible with Mac® OS 10.3
and earlier. This is a common
limitation of most USB mass
storage devices.
Supported File Types
MP3 music les: see pages 22 to 23
•
M3U and M3U8 music playlist les:
•
see page 22
AA audio book les: see page 24
•
JPEG and JPG image les: see page
•
27
GPI custom POI les from Garmin’s
•
POI Loader: see page 47
DRAFT
Maps, routes, and waypoints from
•
MapSource®: see page 45
Loading Files
Step 1: Insert an SD Card
(Optional)
To insert or remove the card, press it in
until it clicks.
Step 2: Connect the USB
Cable
Connect the mini-USB connector to the
bottom of the nüvi. Connect the larger
end of the cable to an available USB port
on your computer.
Your nüvi and SD card appear as
removable drives in My Computer on
Windows computers and as mounted
volumes on Mac computers.
28 nüvi 800 Series Owner’s Manual
Page 35
NOTE: On some operating
systems or computers with
multiple network drives, the nüvi
drives may not appear. See your
operating system’s Help le to
learn how to map the drives.
Step 3: Transfer Files to Your
Step 4: Eject and Unplug the
USB Cable
When you are nished transferring les,
click the Eject icon in your system
tray, or drag the volume icon to the
Trash on Mac computers. Unplug
your nüvi from your computer.
nüvi
Copy and paste les from your computer
into the nüvi drives/volumes.
1. Browse your computer for the le you
want to copy.
2. Highlight the le, and select Edit >
Copy.
3. Open the “Garmin” or SD card drive/
volume.
4. Select Edit > Paste. The le appears
in the list of les on the nüvi memory
or SD card.
DRAFT
Deleting Files
With the nüvi connected to your
computer, open nüvi or SD card drive/
volume. Highlight the le that you want
to delete, and press the Delete key on
your computer’s keyboard.
ManaGinG fileS
CAUTION: If you are not sure
about a le’s purpose, do NOT
delete it. Your nüvi memory
contains important system les
that should NOT be deleted. Be
especially cautious of les located
in folders entitled “Garmin.”
nüvi 800 Series Owner’s Manual 29
Page 36

USinG the toolS
UsinG The Tools
The Tools menu provides many features
that are helpful when you are traveling
across town or across the globe.
Settings
For information about the settings, see
pages 37 to 43.
Language Guide
The Garmin Language Guide puts data
from Oxford’s multilingual resources
and ve bilingual dictionaries in the
palm of your hand. To purchase an
accessory, go to http://buy.garmin.com
or contact your Garmin dealer.
To translate Words and Phrases:
1. Touch Tools > Language Guide >
Where Am I?
Touch Where Am I? to view
information about your current location.
This is a helpful feature if you need to
tell emergency personnel your location.
Touch a button on the right to view the
nearest locations in that category. Touch
Save Location to save your current
location.
DRAFT
Games
2. Touch Language, select the From
3. Select a category and search for a
4. Touch Search to spell the word or
5. Touch to hear the translation.
Words and Phrases Tips
•
•
Words and Phrases.
and To languages, and touch Back.
phrase.
phrase, if necessary. Touch a phrase
to open the translation.
Use Search for Keywords in
Phrases to nd all of the phrases that
contain a specic word.
Touch an underlined word to use a
30 nüvi 800 Series Owner’s Manual
Page 37

USinG the toolS
different word.
Touch More Variations to change
•
words in the phrase or get a different
translation.
To use the Bilingual Dictionaries:
The Garmin Language Guide provides
ve bilingual dictionaries.
1. Touch Tools > Language Guide.
2. Touch Bilingual Dictionaries.
3. Touch a translation option. If
necessary, touch To English.
4. Search for the word and touch it.
5. Touch to hear the translation.
DRAFT
Bilingual Tips
Touch Search to spell the word or the
•
beginning of the word.
Touch Legend information
•
on abbreviations, labels, and
pronunciation symbols for the
selected language.
All Dictionary, Word and Phrase content is
© Oxford University Press. Voice les are ©
Scansoft.
Pocket Oxford Spanish Dictionary © Oxford
University Press 2005. Pocket Oxford Italian
Dictionary © Oxford University Press 2004.
Oxford Portuguese Minidictionary © Oxford
University Press 2002. Multilingual Wordbank
© Oxford University Press 2001. Multilingual
Phrasebank © Oxford University Press 2001.
Pocket Oxford-Hachette French Dictionary
© Oxford University Press and Hachette
Livre 2005. Pocket Oxford-Duden German
Dictionary © Oxford University Press and
Bibliographisches Institut & F.A. Brockhaus
2003.
nüvi 800 Series Owner’s Manual 31
Page 38
USinG the toolS
Calculator
1. Touch Tools > Calculator.
2. Enter the rst number of your
calculation.
3. Touch an operator (÷, x, -, or +).
4. Enter the second number of your
calculation.
Touch . to add a decimal.
•
Touch ± to make the number
•
negative or positive.
Touch % to make the number a
•
percent (0.01).
Touch C to clear the entry.
•
5. Touch =.
6. Touch C to make a new calculation.
DRAFT
Currency Converter
1. Touch Tools > Currency Converter.
2. Touch a currency button to change
the currency.
3. Select a currency, and touch OK.
4. Touch the rectangle next to the
currency you want to convert.
5. Enter the number. Touch Done.
6. Touch Clear to convert a different
value.
TIP: Touch and hold to erase
the entire entry.
The nüvi allows you to update the
currency conversion rates manually
so that you are always using the most
current rates.
To update conversion rates:
1. Touch Tools > Currency Converter
> Update.
2. Touch the rate you want to update.
3. Touch to erase the current rate.
Enter a new rate, and touch Done.
32 nüvi 800 Series Owner’s Manual
Page 39
USinG the toolS
4. Touch Save to nish.
TIP: Touch Restore to use the
original rate.
Unit Converter
1. Touch Tools > Unit Converter.
2. Touch Conversion, select a type of
measurement, and touch OK.
3. Touch a unit of measure that you
want to change.
4. Select a unit of measure, and touch
OK. Repeat, if necessary.
5. Touch the blank rectangle to enter a
value.
6. Enter a value, and touch Done. The
unit is converted.
7. Touch Clear to enter another
measurement.
World Clock
1. Touch Tools > World Clock.
2. To change a city listed, touch the city.
3. Select a new time zone (or city).
Touch OK when done.
DRAFT
4. Touch World Map to view a map.
5. Nighttime hours are shown in the
shaded area. Touch World Clock
to view the clocks again, or Back to
exit.
Help
Touch Help to get information about
using your nüvi.
Music Player
For information about the media player
see pages 22 to 24.
Trafc
You can only access the trafc
information if the nüvi is connected to an
FM trafc receiver. See pages 32 to 34
for information about trafc information.
MSN® Direct
With an optional MSN Direct Receiver,
you can access MSN Direct content. For
more information, see www.garmin.com/
nüvi 800 Series Owner’s Manual 33
Page 40

USinG the toolS
trafc or http://garmin.msndirect.com.
To purchase an accessory see http://buy
.garmin.com.
Routes
For information about routes see pages
12 to 13.
Audible Player
Picture Viewer
Using the Picture Viewer, view pictures
that you have stored in your nüvi.
1. Touch Tools > Picture Viewer.
2. Touch a picture to view a larger
image of it.
3. Touch the arrows to view all the
images.
Viewing a Slide Show
Touch Slide Show to start a slide show,
which displays each image for a few
moments and then displays the next
image.
DRAFT
Touch anywhere on the screen to stop
the slide show.
My Data
Use this tool to manage and delete your
saved data, such as your Favorites.
If you have transferred a route from
MapSource, touch Import Route from
File to use that route in your nüvi.
34 nüvi 800 Series Owner’s Manual
Page 41
UsinG fM Traffic
The trafc receiver is included in some
nüvi packages.
USinG fM traffic
NOTE: You can only access the
trafc information if the nüvi
is connected to an FM trafc
receiver.
Use an FM TMC (Trafc Message
Channel) trafc receiver to receive
trafc information broadcast over the
FM Radio Data System. For information
about FM trafc receivers and coverage
areas, see www.garmin.com/trafc.
NOTE: Garmin is not responsible
for the accuracy of the trafc
information. The FM trafc
receiver simply receives signals
from the trafc service provider
and shows that information on
your nüvi.
NOTE: The FM trafc receiver
and nüvi must be in data range of
an FM station transmitting TMC
data to receive trafc information.
nüvi 800 Series Owner’s Manual 35
DRAFT
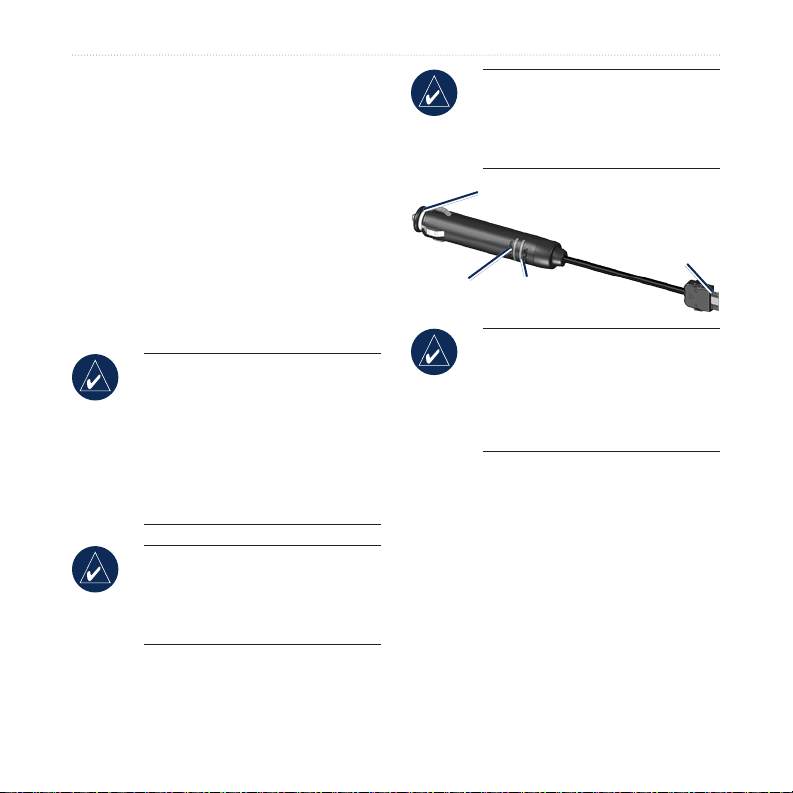
LED Blink Codes
The green Power LED lights when
connected to external power. The Status
LED indicates the signal reception:
•
•
•
To power outlet
in vehicle
Power
LED
Yellow dot-dash ashes: determining
which country you are currently in.
Yellow solid: searching for signal.
Red solid: momentary sync loss.
Status
LED
NOTE: If your FM TMC trafc
receiver has an antenna with
suction cups on it, route the
antenna on your windshield
vertically using the suction cups.
To power
connector on
nüvi cradle
Page 42
USinG fM traffic
Green solid: normal trafc data.
•
Trafc In Your Area
Touch Tools > Trafc to display trafc
incidents in your area. Touch View by
Road to see the incidents on each road in
the area. If there is trafc on your route,
touch On My Route to view details.
Trafc on Your Road
When you are not navigating a route
and there is trafc on your road, the
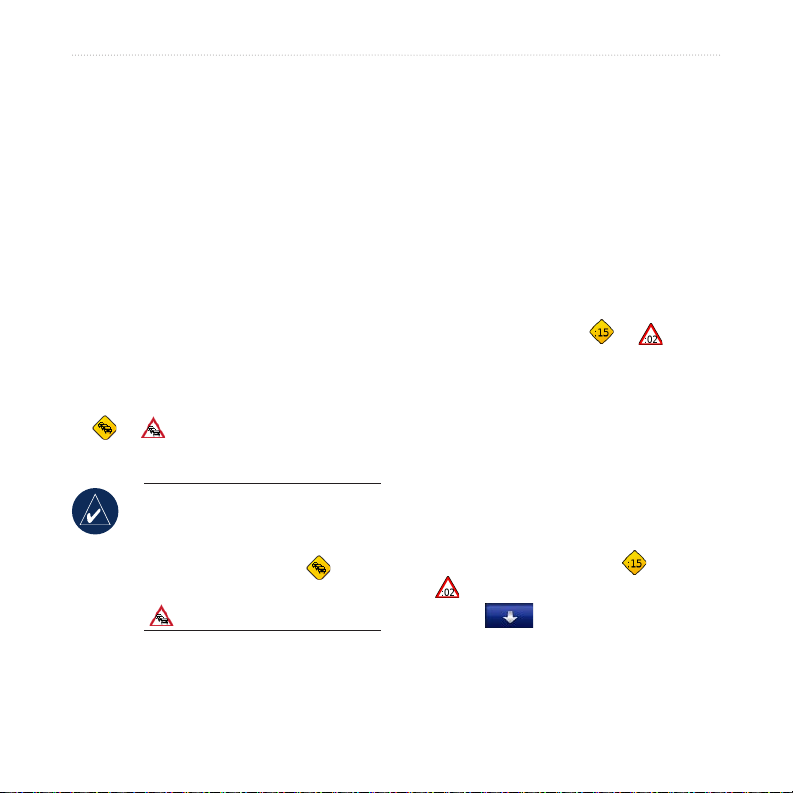
Map page displays a trafc icon, such
as or . Touch the icon to view
information about the trafc delay.
TIP: The locale you selected at
initial startup determines which
type of trafc icons are used:
diamond-shaped icons ( ) for
the United States, triangular icons
( ) for Europe.
DRAFT
Trafc on Your Route
When calculating your route, the
nüvi examines the current trafc and
automatically optimizes the route for the
shortest time. You might still be routed
through trafc if no alternative roads
exist. If a severe trafc delay occurs on
your route while you are navigating, the
nüvi automatically recalculates the route.
The Map page displays or when
there is trafc on your route. The number
in the icon represents the number of
minutes the trafc has added to your
route, which has been automatically
calculated into the arrival time shown on
the map.
To avoid trafc on your route:
1. On the Map page, touch or
2. Touch to view trafc delays.
3. Touch Avoid.
.
36 nüvi 800 Series Owner’s Manual
Page 43
USinG fM traffic
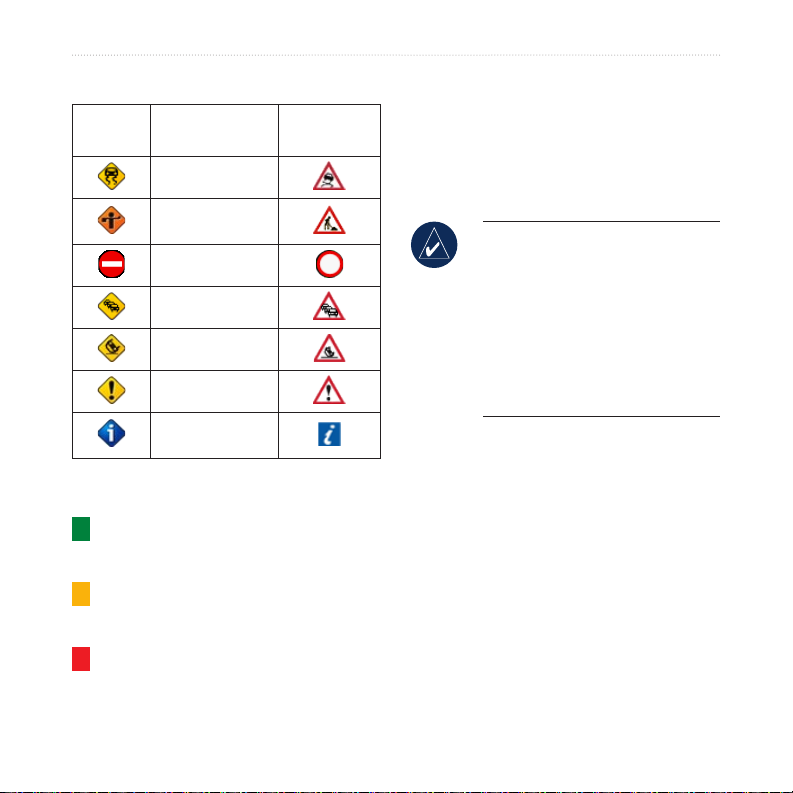
Trafc Icons
North
American
Meaning International
Road Condition
Road
Construction
Road Closed
Slow Trafc
Accident
Incident
Travel
Information
Severity Color Code
Green = Low severity; trafc is
owing normally.
Yellow = Medium severity; trafc is a
bit congested.
Red = High severity; trafc is heavily
congested or stopped.
DRAFT
Trafc Subscriptions
See pages 40 to 41 for information about
adding a trafc subscription. For more
information about trafc subscriptions,
go to www.garmin.com/fmtrafc.
NOTE: You do not need to
activate the subscription included
with your FM trafc receiver (if it
came with one). The subscription
activates automatically after your
nüvi acquires satellite signals
while receiving trafc signals
from the pay service provider.
nüvi 800 Series Owner’s Manual 37
Page 44
PlayinG aUdio throUGh the Vehicle’S SPeakerS
PlayinG aUdio ThroUGh
The Vehicle’s sPeakers
Before using the FM transmitter in your area,
see the FM transmitter legal notice on page
52.
If an FM transmitter is available on your
nüvi, you can listen to your nüvi audio
on an FM stereo.
1. From the Menu page, touch
2. Tune your stereo to an FM channel
3. Touch and to select the same
Auto Tuning the FM
NOTE: When using the FM
transmitter function on the nüvi,
any phone calls that you place or
receive through the nüvi might be
overheard by adjacent vehicles
through the FM stereo.
Manually Tuning the FM Transmitter
If you are not using an FM trafc
receiver or you are using an MSN Direct
receiver, select an FM channel for the
FM transmitter.
DRAFT
Transmitter
If you are using an FM trafc receiver,
the nüvi can select a channel for you.
1. From the Menu page, touch
2. If you are using a trafc receiver,
Volume > FM Trans > Enable FM
Transmitter.
that has a lot of static and has a low
FM frequency number.
frequency to which your stereo is
tuned.
Volume > FM Trans > Enable FM
Transmitter.
touch Auto Tune. Then tune your
stereo to the selected channel.
38 nüvi 800 Series Owner’s Manual
Page 45

PlayinG aUdio throUGh the Vehicle’S SPeakerS
Frequency Selection Tips
For best results, select a frequency below
90.1 FM.
When searching for an appropriate FM
frequency on your FM stereo, look for
an unused frequency that has steady,
consistent static. If you hear slight noises
and sounds in the background of the
static, choose a different frequency.
As you travel, you might need to change
the frequency for the FM transmitter.
A frequency not used by a radio station
in your area might be used by a station
elsewhere.
FM Transmitter Information
The FM transmitter is intended to
transmit your nüvi’s audio to your FM
stereo.
Do not adjust your FM settings while
you are driving your vehicle.
DRAFT
The distance between the vehicle power
cable, the nüvi, and the FM stereo
antenna may also affect the noise level.
Vehicles with antennas located far
away, such as a rear-mounted antenna,
may experience more interference from
outside noise sources than vehicles with
front-mounted antennas.
As you drive, you may notice changes
in the background static even though
there is no FM station using that
channel. You may notice this as you
drive through intersections where certain
kinds of trafc lights or other municipal
electronic systems are operating. You
might also notice this effect when the
terrain changes, allowing distant stations
to be received by your car stereo that
were not received when you made your
initial frequency selection. These and
other sources of electrical interference
may make it necessary to look for
another frequency.
nüvi 800 Series Owner’s Manual 39
Page 46
cUStoMizinG the nüVi
cUsToMizinG The nüVi
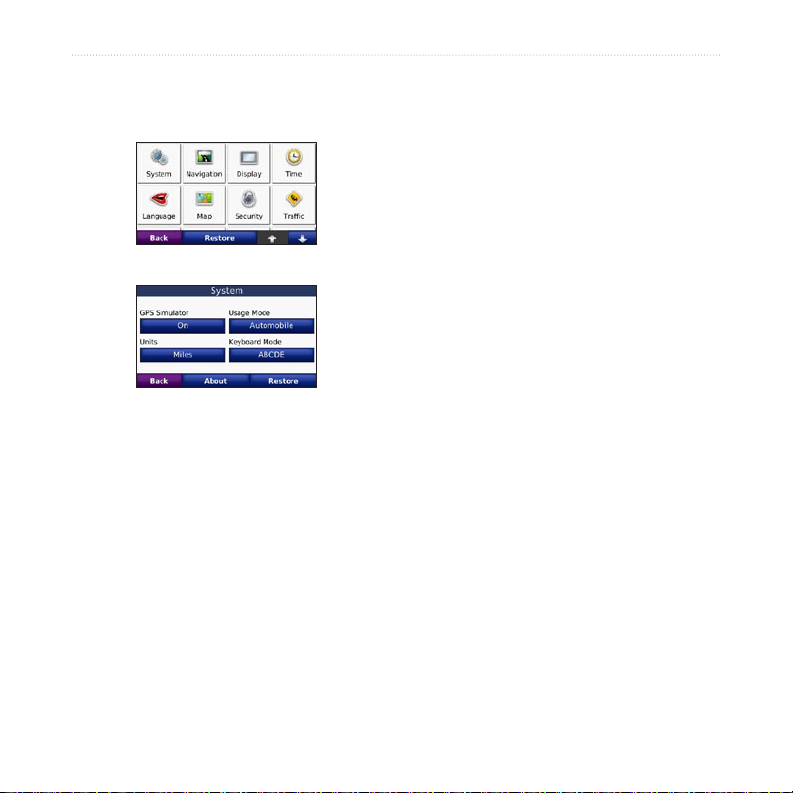
1. Touch Tools > Settings.
2. Touch the setting you want to change.
3. Touch the button below the setting
name to change it.
Changing the System Settings
Touch Tools > Settings > System.
GPS
Simulator—enable the simulator
to turn off the GPS mode to simulate
navigation and/or to save battery power.
DRAFT
Usage Mode—specify how you will
be navigating to optimize routes:
Automobile, Bicycle, or Pedestrian.
Units—change units of measure to
Kilometers or Miles.
Keyboard Layout—select QWERTY
for a layout similar to a typewriter,
or select ABCDE for an alphabetical
layout.
About
—display your nüvi’s software
version number, unit ID number, and
audio version number. You need this
information when you update the system
software or purchase additional map data
(see page 45).
Restore
—restore the system settings.
Changing the Navigation Settings
Touch Tools > Settings > Navigation.
Route Preference
for calculating your route:
40 nüvi 800 Series Owner’s Manual
—select a preference
Page 47

Faster Time—to calculate routes that
•
are faster to drive but can be longer in
distance.
Shorter Distance—to calculate
•
routes that are shorter in distance but
can take more time to drive.
•
Off Road
point routes (without roads).
Avoidances
want to avoid or you would prefer to
take on your routes.
Restore
settings.
—to calculate point-to-
—select the road types you
—restore the original navigation
cUStoMizinG the nüVi
Screen Shot—enable Screen Shot mode.
Touch the to take a screen shot.
The picture bitmap le is saved in the
Garmin\scrn folder on the nüvi drive.
Brightness—adjust the backlight
brightness level. Reducing the backlight
brightness increases your battery life.
Restore
settings.
—restore the original display
Updating the Time
Settings
Touch Tools > Settings > Time.
Adjusting the Display
Settings
Touch Tools > Settings > Display.
Color Mode—select Daytime for a
light background, Nighttime for a dark
background, or Auto to automatically
switch between the two.
nüvi 800 Series Owner’s Manual 41
DRAFT
Time Format—choose a 12-hour, 24hour, or UTC time format.
Time Zone—select a time zone or
nearby city from the list.
Daylight Saving—set to On, Off , or
Auto, if it is available.
Restore
settings.
—restore the original time
Page 48

cUStoMizinG the nüVi
Setting the Languages
Touch Tools > Settings > Language.
Voice—change the language for
voice prompts. Languages noted with
a person’s name are text-to-speech
(TTS) voices, which have an extensive
vocabulary and pronounce the street
names as you approach turns. The
pre-recorded voices (those without
a person’s name) have a limited
vocabulary and do not speak names of
locations or streets.
Text Language—change all on-screen
text to the selected language. Changing
the text language does not change the
language of user-entered data or map
data, such as street names.
Keyboard—select the keyboard for
your language. You can also change
the keyboard language mode from any
keyboard by touching the Mode button.
DRAFT
Changing the Map Settings
Touch Tools > Settings > Map.
Map Detail—adjust the amount of detail
shown on the map. Showing more detail
may cause the map to redraw slower.
Map View—select a map perspective.
Track Up—display the map in two
•
dimensions (2D) with your direction
of travel at the top.
•
North Up
with North at the top.
3D—display the map in three
•
dimensions (3D) in Track Up.
Vehicle—touch Change to change the
icon used to display your position on
the map. Touch the icon you want to
use, and then touch OK. Download
additional vehicle icons at
www.garmin.com/vehicles.
—display the map in 2D
Trip Log—show or hide the log of your
travels. To clear your trip log, touch
42 nüvi 800 Series Owner’s Manual
Page 49
cUStoMizinG the nüVi
Tools > My Data > Clear Trip Log.
Map Info
your nüvi and their version. Touch a map
to enable (check mark) or disable (no
check mark) that map.
Restore
settings.
—view the maps loaded on
—restore the original map
PIN or Security Location.
Viewing Trafc
Subscription Information
The trafc receiver is included in some
nüvi packages. Touch Tools > Settings
> Trafc.
Adding Security Settings
Touch Tools > Settings > Security.
Garmin Lock
to lock your nüvi. Enter a 4-digit PIN,
and set a security location. For more
information, see page 44.
Safe Mode—turn on or off Safe mode.
When your vehicle is moving, Safe
mode disables all functions that require
signicant operator attention and could
become a distraction while driving.
Restore
settings. Note that restoring the security
settings will not clear your Garmin Lock
—turn on Garmin Lock™
DRAFT
—restore the original security
North American Options
Your FM trafc subscriptions and
expiration dates are listed. Touch Add to
add a subscription.
NOTE: You can only access the
trafc settings if your nüvi is
connected to external power and
an FM TMC trafc receiver.
NOTE: If your trafc receiver
has a trial subscription, it does
not need to be activated and
you do not need to purchase
a subscription until the trial
subscription expires.
nüvi 800 Series Owner’s Manual 43
Page 50

cUStoMizinG the nüVi
Non-North American Options
Auto—select which provider to use.
Select Auto to use the best provider for
the area, or select a specic provider to
use.
Search—search for additional TMC
trafc providers. To increase the search
time, touch Yes to clear provider table.
Subscriptions—view your FM trafc
subscriptions and expiration dates. Touch
Add to add a subscription.
Adding a Subscription
You can purchase additional
subscriptions or a renewal if your
subscription expires. Go to Garmin’s
FM Trafc Web site at www.garmin
.com/fmtrafc.
NOTE: You do not need to
activate the subscription included
with your FM trafc receiver (if it
came with one). The subscription
activates automatically after your
nüvi acquires satellite signals
44 nüvi 800 Series Owner’s Manual
DRAFT
1. From the Menu page, touch Tools >
2. For Non-North American units, touch
3. Write down the FM trafc receiver’s
4. Go to www.garmin.com/fmtrafc to
5. Touch Next on the nüvi, enter the
The trafc subscription code cannot be
reused. You must obtain a new code each
time you renew your service. If you own
multiple FM trafc receivers, you must
obtain a new code for each receiver.
Bluetooth Technology Settings
\Touch Tools > Settings > Bluetooth.
while receiving trafc signals
from the service provider.
Settings > Trafc.
Subscriptions > Add. For North
American units, touch Add.
unit ID.
purchase a subscription and get a
25-character code.
code, and touch Done.
Page 51
cUStoMizinG the nüVi
Connections—select Add > OK to pair
with a mobile phone that has Bluetooth
wireless technology. See pages 17 to
21. Select Change to connect with a
different device.
NOTE: The nüvi’s PIN code (or
passkey) is 1234.
Drop—select the phone you want to
disconnect, and touch Yes.
Remove
to delete from the nüvi’s memory, and
touch Yes.
Bluetooth—enable and disable the
Bluetooth component. The Bluetooth
icon appears on the Menu page if the
Bluetooth component is enabled. To
prevent a phone from automatically
connecting, select Disabled.
Friendly Name
that identies your nüvi on devices with
Bluetooth technology. Touch Done.
nüvi 800 Series Owner’s Manual 45
—select the phone you want
DRAFT
—enter a friendly name
Troubleshoot—scroll through the
list containing compatible devices.
If your phone is not in this list, go to
www.garmin.com/bluetooth for more
information.
Restore
settings. This does not clear the pairing
information.
—restore the original Bluetooth
Changing the Proximity Points Settings
You must have proximity points (such as
custom POIs, a safety camera database,
or a TourGuide®) loaded to adjust the
proximity point settings. See page 47.
Touch Tools > Settings > Proximity
Points.
Proximity Alerts—touch Change
to turn on or off the alerts when you
approach custom POIs or safety cameras.
TourGuide
audio for TourGuide to be activated.
Select Auto Play to hear the complete
—set how you want the
Page 52
cUStoMizinG the nüVi
tour as programmed, Prompted to show
the speaker icon on the map when
tour information is available during your
route, or Off.
Restore
—restore the proximity points
settings.
Clearing User Data
1. Hold your nger on the lower-right
2. Keep your nger pressed until the
Adjusting the Volume Levels
From the Menu page, touch Volume to
adjust the master volume level.
To adjust the volume levels for the
media player and navigation prompts,
Tools > Settings > Volume.
Restore
—restore the original volume
levels.
Restoring All Settings
1. Touch Tools > Settings.
2. Touch Restore.
3. Touch Yes.
DRAFT
3. Touch Yes to clear all user data.
All original settings are restored. Any
items that you have saved are erased.
CAUTION: This deletes all userentered information.
corner of the nüvi’s screen while
turning on the nüvi.
message appears.
46 nüvi 800 Series Owner’s Manual
Page 53

aPPendix
aPPendix
You can also remove and then replace
the battery.
Ways to Charge Your nüvi
Use the vehicle power cable.
•
Use the USB cable.
•
Use an optional AC adapter cable.
•
Calibrating the Screen
If the touch screen is not responding
properly, calibrate the touch screen. Turn
the nüvi off and then back on. Slide the
Power key to the right (lock). Hold your
nger on the screen for about 30 seconds
until the calibration screen appears.
Follow the on-screen instructions.
Resetting the nüvi
If the nüvi screen stops functioning, turn
the nüvi off and on again. If this does not
help, slide the Power key to the left and
hold for 8 seconds. Turn the nüvi back
on. The nüvi should operate normally.
DRAFT
Locking Your nüvi
Garmin Lock™ is a theft-deterrent system
that locks your nüvi. Each time you turn
on the nüvi, enter the PIN or drive to the
security location.
1. Touch Tools > Settings > Security.
2. Touch the button below Garmin
3. Enter a 4-digit PIN and drive to a
What is a Security Location?
Select a location you return to often,
such as your home, for your security
location. If the nüvi has satellite signals
and you are at the security location, you
do not need to enter the PIN.
Lock.
security location.
NOTE: If you forget your PIN
and your security location, you
must send your nüvi to Garmin
to get it unlocked. You must also
nüvi 800 Series Owner’s Manual 47
Page 54

aPPendix
send a valid product registration
or proof of purchase.
Updating the Software
1. Go to www.garmin.com/products/
Additional Maps
You can purchase additional MapSource
map data from Garmin and load the
maps on your nüvi’s internal memory
or on an optional SD card. Also, check
www.garmin.com/unlock/update.jsp to
see if an update for your map software is
available.
To nd out the version of the maps that
are loaded on your nüvi, open the Menu
page. Touch Tools > Settings > Map >
Map Info. To enable additional maps,
you need your unit ID (see page 37) and
serial number (located near the power
connector).
To load maps, routes, or waypoints to
your nüvi memory or SD card, select
the name for your nüvi drive or SD card
drive. Refer to the MapSource Help le
for more information.
DRAFT
2. Connect the nüvi to your computer
3. Run WebUpdater, and follow the on-
After conrming that you want to
perform an update, WebUpdater
automatically downloads the update and
installs it on your nüvi.
Extras and Optional Accessories
For more information about optional
accessories, go to http://buy.garmin
.com, www.garmin.com/extras, or
contact your Garmin dealer.
webupdater and download
WebUpdater to your computer.
using the mini-USB cable.
screen instructions.
48 nüvi 800 Series Owner’s Manual
Page 55

aPPendix
Garmin Travel Guide
Much like a paper travel guide, the
Garmin Travel Guide provides detailed
information about places, such as
restaurants and hotels. To purchase an
accessory, go to http://buy.garmin.com
or contact your Garmin dealer.
To use the Travel Guide, insert the SD
card into your nüvi. Touch Where to? >
Extras. Touch the name of your Travel
Guide to open it.
SaversGuide
With the SaversGuide preprogrammed
SD data card and membership card,
your nüvi is a digital coupon book. To
purchase an accessory, go to http://buy
.garmin.com or contact your Garmin
dealer.
To use the SaversGuide, insert the SD
card into your nüvi. Touch Where to? >
Extras > SaversGuide.
®
DRAFT
Safety Cameras
Safety camera information is available in
some locations. Check http://my.garmin
.com for availability. For these locations,
the nüvi includes the locations of
hundreds of safety cameras. Your nüvi
alerts you when you are approaching
a safety camera and can warn you if
you are driving too fast. The data is
updated at least weekly, so you always
have access to the most up-to-date
information.
You can purchase a new region or extend
an existing subscription at any time.
Each region that you purchase has its
own expiration date.
CAUTION: Garmin is not
responsible for the accuracy of,
or the consequences of using,
a custom POI or safety camera
database.
nüvi 800 Series Owner’s Manual 49
Page 56

aPPendix
Custom Points of Interest
Use the POI Loader to load custom
points of interest (POIs) onto your nüvi.
POI databases are available from various
companies on the Internet. Some custom
databases contain alert information
for points, such as safety cameras and
school zones.
Go to www.garmin.com/extras, and
click POI Loader to install the POI
Loader onto your computer. For more
information, refer to the POI Loader
Help le; press F1 to open the Help le.
To view your Custom POIs, touch
Where to? > Extras > Custom POIs.
To change the proximity alert settings,
touch Tools > Settings > Proximity
Points > Proximity Alerts.
TourGuide
The TourGuide allows your nüvi to play
third-party, GPS-guided audio tours.
These audio tours can take you on a
route while playing interesting facts
about historical sites along the way. For
more information, go to www.garmin
.com/extras, and click POI Loader.
To view your TourGuide les, touch
Where to? > Extras > Custom POIs.
To change the TourGuide settings, touch
Tools > Settings > Proximity Points >
TourGuide.
DRAFT
To delete the Custom POIs from
your nüvi, connect your nüvi to your
computer. Open the Garmin\poi folder
in the nüvi drive or the SD card drive.
Delete the le entitled poi.gpi.
50 nüvi 800 Series Owner’s Manual
Page 57
aPPendix
Battery Information
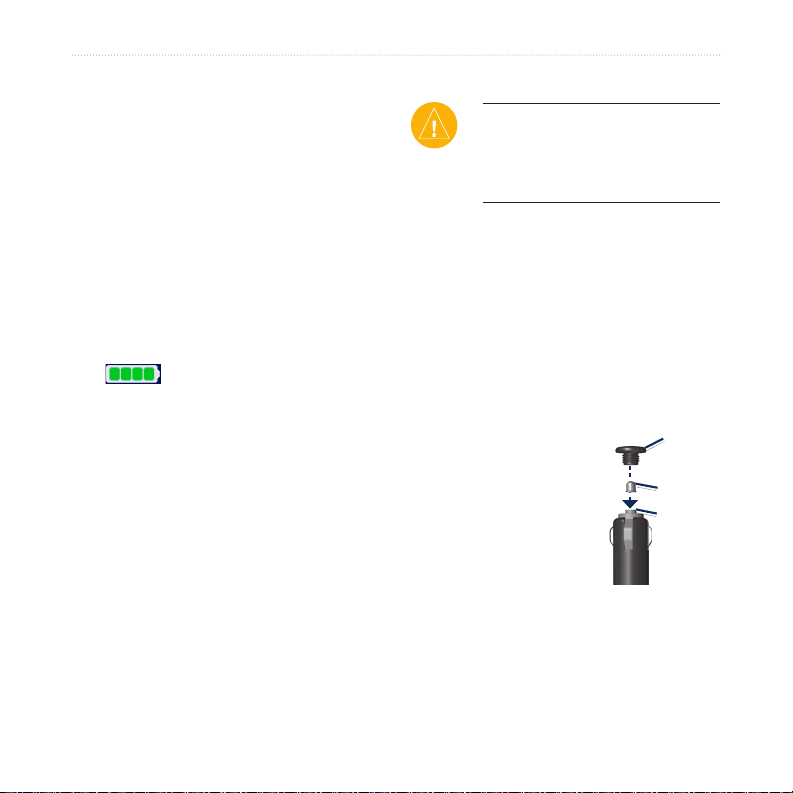
Your nüvi contains a user-replaceable,
lithium-ion battery. To maximize the
lifetime of the battery, do not leave
your nüvi in direct sunlight, and avoid
prolonged exposure to excessive heat.
Replace only with Garmin XXX.
Contact your local waste disposal
department for information on properly
disposing of the battery.
The battery icon in the corner of
the Menu page indicates the status of the
internal battery. To increase the accuracy
of the battery gauge, fully discharge the
battery and then fully charge it; do not
unplug the nüvi until it is totally charged.
To get the most life between charges,
turn down the backlight (Tools >
Settings > Display > Brightness).
DRAFT
Changing the Fuse
If your unit will not charge in your
vehicle, you may need to replace the fuse
located at the tip of the vehicle adapter.
1. Unscrew the black, round end piece,
2. Remove the fuse (glass and silver
3. Ensure that the silver
CAUTION: When replacing the
fuse, do not lose any of the small
pieces and make sure they are put
back in the proper place.
and remove it.
cylinder), and replace with a 3A fast
blow fuse.
tip is placed in the
black end piece.
Screw on the black
end piece.
End
End
piece
piece
Silver tip
Silver tip
Fuse
Fuse
nüvi 800 Series Owner’s Manual 51
Page 58
aPPendix
Removing the nüvi and Mount
To remove the nüvi from the cradle,
press the button on the bottom of the
cradle up, and tilt the nüvi forward.
To remove the cradle from the mount,
turn the cradle to the right or left. Apply
pressure in that direction until the cradle
snaps off the mount.
To remove the suction cup mount from
the windshield, ip the lever toward you.
Pull the tab on the suction cup toward
you.
Mounting on Your Dashboard
Use the enclosed mounting disk to
mount your unit to the dashboard and
comply with certain state regulations.
1. Clean and dry the dashboard where
2. Remove the backing from the
3. Place the disk on the dashboard.
4. Remove the clear plastic cover from
5. Place the suction cup mount on top of
DRAFT
CAUTION: The permanent
mounting adhesive is extremely
difcult to remove after it is
installed.
you are placing the disk.
adhesive on the bottom of the disk.
the top of the disk.
the disk. Flip the lever down (toward
the disk).
52 nüvi 800 Series Owner’s Manual
Page 59
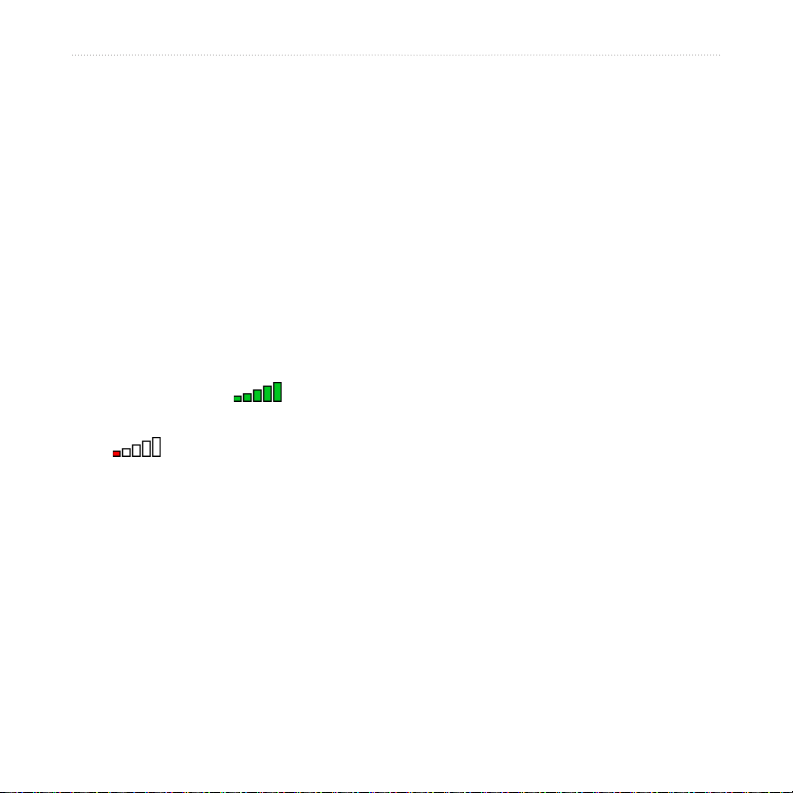
aPPendix
About GPS Satellite Signals
Your nüvi must acquire GPS (Global
Positioning System) satellite signals to
navigate. If you are indoors, near tall
buildings or trees, or in a parking garage,
your nüvi cannot acquire satellites.
Go outside to an area free from tall
obstructions to use your nüvi.
When your nüvi has acquired satellite
signals, the signal strength bars on the
Menu page are green . When it
loses satellite signals, the bars turn red or
clear .
For more information about GPS, go to
www.garmin.com/aboutGPS.
Caring for Your nüvi
Your nüvi contains sensitive electronic
components that can be permanently
damaged if exposed to excessive shock
or vibration. To minimize the risk of
damage to your nüvi, avoid dropping
your unit and operating it in high-shock
and high-vibration environments.
Cleaning the Unit
The nüvi is constructed of high-quality
materials and does not require user
maintenance other than cleaning. Clean
the unit’s outer casing (not the touch
screen) using a cloth dampened with
a mild detergent solution, and then
wipe dry. Avoid chemical cleaners
and solvents that can damage plastic
components.
DRAFT
nüvi 800 Series Owner’s Manual 53
Page 60

aPPendix
Cleaning the Touch Screen
Clean the touch screen with a soft, clean,
lint-free cloth. Use water, isopropyl
alcohol, or eyeglass cleaner, if needed.
Apply the liquid to the cloth, and then
gently wipe the touch screen.
Protecting Your nüvi
Do not store the nüvi where
•
prolonged exposure to extreme
temperatures can occur, because it
can cause permanent damage.
Do not expose the nüvi to water.
•
Contact with water can cause this unit
to malfunction.
Though a PDA stylus can be used
•
to operate the touch screen, never
attempt this while operating a vehicle.
Never use a hard or sharp object to
operate the touch screen, or damage
may result.
DRAFT
Avoiding Theft
•
•
•
•
Declaration of Conformity
Hereby, Garmin declares that this
nüvi product is in compliance with the
essential requirements and other relevant
provisions of Directive 1999/5/EC. To
view the full Declaration of Conformity,
see the Garmin Web site for your Garmin
product: www.garmin.com.
To avoid theft, remove the unit
and mount from sight when not
in use. Remove the residue on the
windshield left by the suction cup.
Do not keep your unit in the glove
compartment.
Register your product at
http://my.garmin.com.
Use the Garmin Lock feature. See
page 44.
54 nüvi 800 Series Owner’s Manual
Page 61

aPPendix
Important Legal Notice Regarding Your FM Transmitter
Your nüvi product contains an FM
transmitter. Read the following notices.
Using Your nüvi FM
Transmitter in Europe
Use of FM transmitters is currently
illegal in certain European countries due
to specic radio frequency restrictions.
You must check the local regulations
in all European countries in which
you intend to use the FM transmitter
to ensure its legality. You accept full
responsibility for complying with all
such laws and regulations applicable
in your particular country of operation.
Garmin disclaims all responsibility for
your failure to follow local laws and
regulations. See www.garmin.com/fm-
notice for more information.
DRAFT
Using Your nüvi FM
Transmitter in the United
States
While use of FM transmitters is legal in
the United States, the allowable output
power for FM transmitters is lower in the
United States than it is in those European
countries that allow FM transmitters.
The nüvi models sold in Europe contain
the higher powered European FM
transmitter and cannot be legally used
in the United States. You accept full
responsibility for complying with all
such laws and regulations applicable in
your particular country of operation. You
must disable the FM transmitter before
using your European model nüvi in the
United States.
Perchlorate Material
Replaceable coin cell batteries may contain
perchlorate material. Special handling may
apply. See www.dtsc.ca.gov/hazardouswaste/
perchlorate.
nüvi 800 Series Owner’s Manual 55
Page 62

aPPendix
Software License Agreement
BY USING THE nüvi, YOU AGREE
TO BE BOUND BY THE TERMS AND
CONDITIONS OF THE FOLLOWING
SOFTWARE LICENSE AGREEMENT.
PLEASE READ THIS AGREEMENT
CAREFULLY.
Garmin grants you a limited license to use
the software embedded in this device (the
“Software”) in binary executable form in
the normal operation of the product. Title,
ownership rights, and intellectual property
rights in and to the Software remain in Garmin.
You acknowledge that the Software is the
property of Garmin and is protected under the
United States of America copyright laws and
international copyright treaties. You further
acknowledge that the structure, organization,
and code of the Software are valuable trade
secrets of Garmin and that the Software in
source code form remains a valuable trade
secret of Garmin. You agree not to decompile,
disassemble, modify, reverse assemble, reverse
engineer, or reduce to human readable form
the Software or any part thereof or create any
derivative works based on the Software. You
DRAFT
agree not to export or re-export the Software to
any country in violation of the export control
laws of the United States of America.
56 nüvi 800 Series Owner’s Manual
Page 63

aPPendix
Specications
Physical size: 121.7 mm W x 75.2 mm H
x 19.5 mm D (4.79” x 2.96” x 0.77”)
Weight: 175 g (6.17 oz)
Display: 4.3” diagonal, 480 x 272 pixels;
WQVGA TFT landscape display with
white backlight and touch screen
Case: Not waterproof (IPXO)
Operating Temperature range
140°F (0°C to 60°C)
Charging Temperature range: 32°F to
113°F (0°C to 45°C)
Data storage: Internal memory and
optional removable SD card. Data stored
indenitely.
Computer interface: USB mass storage,
plug-and-play
Headphone jack: Standard 3.5 mm
: 32°F to
DRAFT
Power input: DC vehicle power using
included vehicle power cable or AC
power using an optional accessory
Usage: 10 W max.
Battery life: 3 to 7 hours depending on
usage
Battery type: User-replaceable lithiumion battery
Replacement Battery
GPS receiver: High-sensitivity, WAAS-
enabled?
Acquisition times*:
Warm: <1 sec
Cold: <38 sec
Factory Reset: <45 sec
*Average acquisition times for a
stationary receiver with a clear view of
the sky.
: 010-10XXX
Charge time: Approximately 4 hours
nüvi 800 Series Owner’s Manual 57
Page 64

aPPendix
Troubleshooting
Problem/Question Solution/Answer
My nüvi never gets
satellite signals.
The suction cup will not
stay on my windshield.
My nüvi does not charge
in my vehicle.
How do I clear all my
user data?
The nüvi is locked
up/frozen.
The touch screen is not
responding to my taps
properly.
My battery gauge does
not seem accurate.
My phone will not
connect to the nüvi.
Take your nüvi out of parking garages and away from tall buildings and
trees. Remain stationary for several minutes.
Clean the suction cup and windshield with rubbing alcohol. Dry with a
clean, dry cloth. Mount the suction cup as described on page 3.
Your nüvi can only charge between 32°F and 113°F (0°C and 45°C).
If the nüvi is placed in direct sunlight or in a hot environment, it cannot
charge.
Hold your nger on the lower-right corner of the nüvi’s screen while it is
turning on. Keep your nger pressed until the message appears. Touch
Yes to clear all user data.
If the nüvi screen stops functioning, turn the nüvi off and on again. If this
does not help, slide the Power key to the left and hold for 8 seconds.
Turn the nüvi back on. The nüvi should operate normally.
Turn the nüvi off and then back on. Slide the Power key to the right
(lock). Hold your nger on the screen for about 30 seconds until the
calibration screen appears. Follow the on-screen instructions.
Allow the unit to fully discharge, and then fully charge it (without
interrupting the charge cycle).
Touch Tools > Settings > Bluetooth. Verify that the Bluetooth eld is
set to Enabled.
DRAFT
Make sure your phone is turned on and is less than 10 meters (about 33
feet) away from your nüvi.
See www.garmin.com/bluetooth for more help.
58 nüvi 800 Series Owner’s Manual
Page 65

Problem/Question Solution/Answer
How do I know my nüvi
is in USB mass storage
mode?
My computer never
senses that the nüvi is
connected.
I cannot see any new
removable drives in my
list of drives.
I cannot get trafc
information.
How can I nd
restaurants near the
hotel I will be staying in
the future?
How can I nd my car in
a parking lot?
When your nüvi is in USB mass storage mode, a picture of a nüvi
connected to a computer is shown. Also, you should see two new
removable disk drives listed in My Computer.
1. Unplug the USB cable from your computer.
2. Turn the nüvi off.
3. Plug the USB cable into your computer and your nüvi. The nüvi
automatically turns on and goes into USB mass storage mode.
If you have several network drives mapped on your computer, Windows
may have trouble assigning drive letters to your nüvi drives. See your
operating system’s Help le to learn how to map/assign drive letters.
Verify that you are in a coverage area. You must be in a coverage area
to get the trafc information for that area.
Verify that the FM TMC Trafc receiver is connected to the power
connector on the cradle and also connected to a power outlet in your
vehicle. (The trafc receiver is included in some nüvi packages.)
1. Touch
2. Find the hotel and touch
3. Touch
4. Search for a restaurant. Restaurants nearest your hotel are listed
You can also use the GPS Simulator (Tools > Settings > System).
Touch Tools > Settings > Navigation > Route Preference > Off Road
> OK to put the nüvi in Off Road mode. Touch Where to? > Favorites >
Last Position > Go!. Navigate to your car!
Where to? > Near… > Different City (and enter your
vacation destination).
Menu > Where to? > Near… > My Destination.
rst.
DRAFT
aPPendix
Go!.
nüvi 800 Series Owner’s Manual 59
Page 66

index
index
Symbols
2-D, 3-D map view 42
A
accessories 48, 50
acquiring satellites 4
additional maps 48
alerts
proximity 45
safety camera 49
announce street names 42
anti-theft feature 43, 47
audible books 27
audio output 1, 38–39
audio version 40
auto tune 38
avoiding
road types 41
theft 54
trafc 36, 37
B
background color 41
battery information 51
bicycle navigation 40
bilingual dictionaries 31
Bluetooth technology 20–24
pairing with phone 20, 45
60 nüvi 800 Series Owner’s Manual
removing a phone 45
settings 44
bookmarks 27
books 27
brightness 41
browsing the map 14
C
calculator 32
call
answering
call waiting 22
hanging up 21
history 22
home 23
muting 21
caring for your nüvi 53
charging your nüvi 47, 58
clock for the world 33
computer connection 28
converting
currency 32
units 33
coordinates 14
DRAFT
cradle 3
currency, converting 32
current location, save 11
customizing the nüvi 40–46
custom POIs 50
21
D
dashboard disk 52
daylight savings 41
Declaration of Conformity 54
deleting
all user data
character 10
custom POIs 50
Favorites 12, 13
les 29
recent nds list 11
route 13
detail maps 43
detour 8
diacritical characters 10
display settings 41
driving directions 17
46
E
emergency assistance 30
Extras 48, 49
F
Favorites 11, 12
les 28–29
deleting 29
managing 28–29
supported types 28
transferring 28–29
nding places 6
Page 67

address 9
by name 10
by postal code 9
Go! page options 9
item on the map 14
near another location 15
recent selections 11
saved places (Favorites) 12
FM trafc receiver 35–37
FM transmitter 38–39
legal information 55
setup 38
fuse, changing 51
G
Garmin Lock 43, 47
geocaching 14
Go! page options 9
go home 10
GPS 4, 5
about GPS 53
off/on 40
H
hands-free phone features 20–24
headphone jack 1, 57
Help 33
home
location 10
phone number 23
index
I
incoming call 21
K
keyboard 10
language mode 10, 42
layout 10, 40
kilometers 40
L
language guide 30, 31
Last Position 12, 59
legal notice, FM transmitter 55
lithium-ion battery 51, 57
locking
screen 1, 8
the nüvi 47
M
M3U playlist format 26
map
additional 48
browse 14
customize 42
DRAFT
detail level 42
enable detail maps 43
Map Info button 43
moving 14
update 48
version 43
view 42
zoom 14
MapSource 48
max speed, reset 17
measurements, converting 33
media player 25–27
menu page 5
miles 40
mini-USB connector 1
mounting 3
on dashboard 52
removing from mount 52
MP3 music les
loading 28
playing 25
music 25
mute
audio 8
phone call 21
My Data 34
myGarmin i
N
navigation 7
mode 40
settings 40
Next Turn page 17
O
off road, routing 13, 15, 41
nüvi 800 Series Owner’s Manual 61
Page 68

index
on-screen keyboard 10
on-unit Help 33
output, audio 8
headphone jack 1, 57
vehicle speakers 38
P
pairing a mobile phone 20
pedestrian navigation mode 15,
40
phone book 22
pictures 34
PIN
Bluetooth 45
Garmin Lock 47
playlist 25
creating 26
editing 26
from computer 26
playing 26
saving current 25
position icon 16, 42
Power key 1
proximity alerts 45
Q
QWERTY keyboard 40
R
recently found locations 11
registering 54
62 nüvi 800 Series Owner’s Manual
removing the mount 52
resetting
the max speed 17
the trip data 17
your nüvi 47
routes 12–15
adding a stop 7
following 7
importing 34
mode 40
off road 41
preferences 40
simulating 40
stopping 8
S
Safe mode 43
safety camera database 49
satellite signals 4, 53
SaversGuide 49
saving
places you nd 9, 12
your current location 11,
14, 30
DRAFT
school zone database 50
screen
brightness 41
lock 1, 8
screen shots 41
SD card 28, 57
slot 1
search area 15
security location 47
security settings 43
settings 40–46
restoring 46
setting your location 9, 14
simulating a route 40
SMS 23
software license agreement 56
software update 48
software version 40
speaking commands 18
specications 57
speed limit icon 16
spelling the name 10
storing the nüvi 54
suction cup mount 3
supported le types 28
system settings 40
T
text language 42
text message 23
time settings 41
time zone 41
Tools 30–34
touch screen
calibrating 47, 58
cleaning 54
Page 69

settings 41
TourGuide 45, 50
Track Up 42
trafc 35–37
adding trafc
subscriptions 43
avoiding 36
incidents 36
transferring les 28–29
translating words 30
Travel Guide 49
trip data, reset 17
Trip Information page 17
trip log 42
troubleshooting 58
turn-by-turn directions 17
index
V
vehicle icon 16, 42
via point, adding 7
voice dial 23
voice language 42
voice mail 21
voice recognition 18
volume 8, 46
W
walking route 15, 40
WebUpdater 48
Where Am I 30
Where to 9–15; See nding
places
world clock 33
U
unit ID 40
units, convert 33
updating
maps 48
software 48
usage mode 40
USB 28
eject 29
mass storage mode 28–29
troubleshooting 58
user data, delete 46
nüvi 800 Series Owner’s Manual 63
Z
zoom 14
DRAFT
Page 70

For the latest free software updates (excluding map data) throughout the
life of your Garmin products, visit the Garmin Web site at
www.garmin.com.
© 2007 Garmin Ltd. or its subsidiaries
Garmin International, Inc.
1200 East 151st Street, Olathe, Kansas 66062, USA
Garmin (Europe) Ltd.
Liberty House, Hounsdown Business Park, Southampton, Hampshire, SO40 9RB, UK
Garmin Corporation
No. 68, Jangshu 2nd Road, Shijr, Taipei County, Taiwan
www.garmin.com
Part Number 190-00847-00 Rev. A
 Loading...