

Page 1
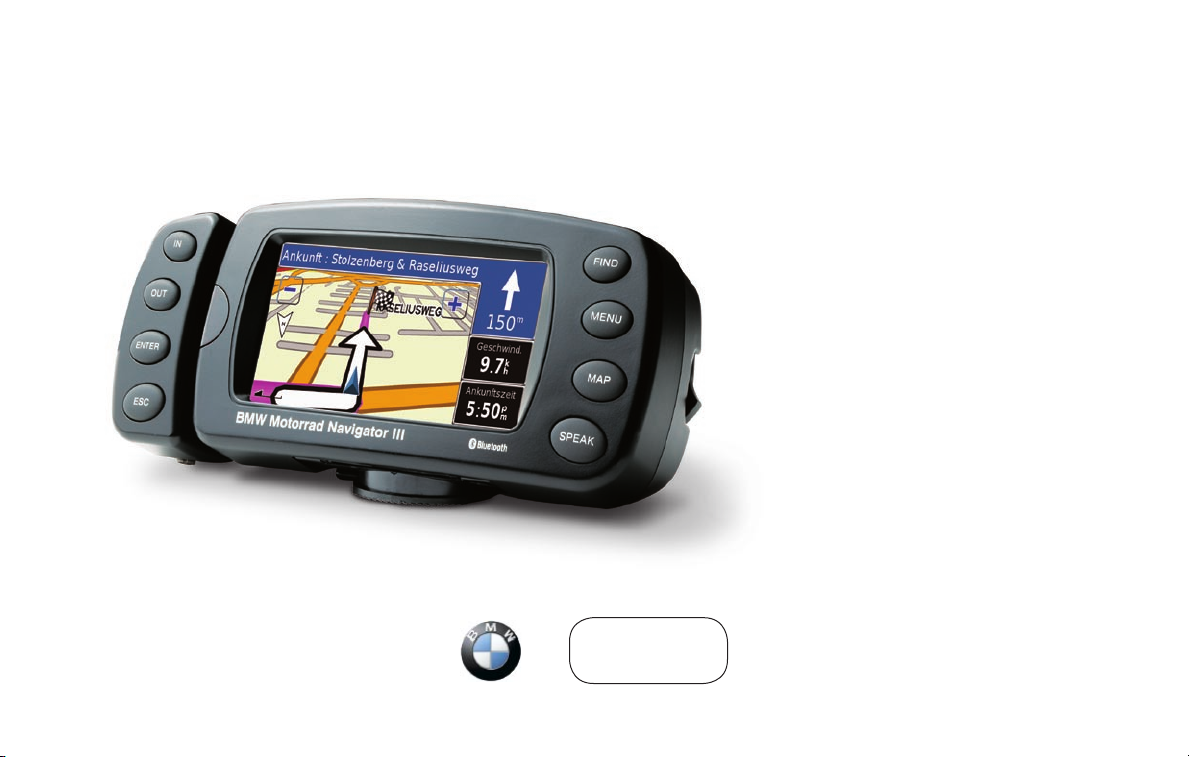
BMW Motorrad Navigator III
Owner’s Manual
portable GPS with turn-by-turn
routing, voice, and Bluetooth®
wireless technology
Teile und
Zubehör
Page 2

© 2006 Copyright by: BMW Motorrad and Garmin Ltd. or its subsidiaries
This product has been developed for you by BMW Motorrad together with Garmin Ltd. If you have any questions regarding this product, please contact your
BMW Motorrad dealer or BMW Motorrad directly. We hope you enjoy using your BMW Motorrad Navigator III.
BMW Motorrad, D-80788 München, Internet address: www.bmw-motorrad.com
Garmin International, Inc., 1200 E. 151st Street, Olathe, Kansas 66062 U.S.A. Tel. 913/397.8200 or 800/800.1020 Fax. 913/397.8282
Garmin (Europe) Ltd., Unit 5, The Quadrangle, Abbey Park Industrial Estate, Romsey, SO51 9DL U.K. Tel. 44/0870.8501241 Fax. 44/0870.8501251
Garmin Corporation, No. 68, Jangshu 2nd Road, Shijr, Taipei County, Taiwan Tel. 886/2.2642.9199 Fax. 886/2.2642.9099
All rights reserved. Except as expressly provided herein, no part of this manual may be reproduced, copied, transmitted, disseminated, downloaded or stored in
any storage medium, for any purpose without prior written consent. We hereby grant permission to download a single copy of this manual and of any revision
to this manual onto a hard drive or other electronic storage medium to be viewed, and to print one copy of this manual or any revision hereto, provided that
such electronic or printed copy of this manual must contain the complete text of this copyright notice and provided further that any unauthorized commercial
distribution of this manual or any revision hereto is strictly prohibited.
Information in this document is subject to change without notice. BMW Motorrad reserves the right to change or improve its products and to make changes in
the content without obligation to notify any person or organization of such changes or improvements. Updates and further information on the application and
use of this product can be found at the BMW Motorrad web site.
Garmin® and MapSource® are registered trademarks and City Navigator
™
is a trademark of Garmin Ltd. or its subsidiaries and may not be used
without the express permission of Garmin.
The Bluetooth® word mark and logos are owned by the Bluetooth SIG, Inc. and any use of such marks by Garmin is under license. Other
trademarks and trade names are those of their respective owners.
February 2006 Part Number 190-00634-02 Rev. A
Page 3
PREFACE
PREFACE
Contact Information
If you encounter any difficulty while using your BMW Motorrad
Navigator III, or if you have any questions, in the U.S.A.
contact Garmin Product Support by phone at 913/397.8200 or
800/800.1020, Monday–Friday, 8 AM–5 PM Central Time. You can
also e-mail product support at [email protected].
In Europe, contact Garmin (Europe) Ltd. at 44/0870.8501241.
Serial Number
Record the serial number (8-digit number located on the back of
the unit) in case your Navigator III needs service or you would like
to buy additional maps.
Serial Number: ___ ___ ___ ___ ___ ___ ___ ___
Manual Conventions
When you are instructed to “touch” something, use your finger to
touch an item on the screen. When you are instructed to “press”
something, press a key on the front of the unit or on the remote
control.
You will see small arrows (>) used in the text. They indicate that
you should touch a series of items. For example, if you see “touch
Tools > GPS Info > GPS Settings” you should touch the Tools
button, then touch GPS Info, and then touch GPS Settings.
Quick Links
• Finding an address: page 7
• Viewing the map page: page 12
• Using Bluetooth® technology: pages 21 through 24
• Turning off the GPS to use indoors: page 27
Navigator III Owner’s Manual i
• Adjusting the volume: page 27
• Adjusting the brightness: page 32
• Cleaning and storing your unit: page vi
Page 4

PREFACE
TABLE OF CONTENTS
Preface ..................................................................................i
Contact Information ................................................................. i
Serial Number ........................................................................... i
Manual Conventions ................................................................ i
Quick Links ............................................................................... i
Warning ................................................................................... iv
Attention ................................................................................... v
Caring for Your Navigator III .................................................. vi
Getting Ready ......................................................................1
Looking at the Navigator III .................................................... 1
Using the Navigator III Keys ................................................... 2
Using the Navigator III Interface ............................................ 2
Find It and Go! .....................................................................3
Finding a Restaurant ............................................................... 3
Following Your Route .............................................................. 4
Where To? ............................................................................5
Using the Where To? Menu .................................................... 5
Understanding the Search Results ........................................ 5
Finding Recently Found Locations ...................................... 6
Understanding the Information Page .................................... 6
Finding an Address ................................................................. 7
ii Navigator III Owner’s Manual
My Locations ........................................................................8
Saving Locations ..................................................................... 8
Saving Your Current Location ................................................ 8
Setting a Home Location ........................................................ 9
Finding Saved Locations ........................................................ 9
Editing Saved Locations ....................................................... 10
Deleting a Saved Location .................................................... 11
Viewing the Map and Using the Tools .............................12
Viewing the Map Page ........................................................... 12
Browsing the Map ................................................................. 12
Trip Computer ........................................................................ 13
Turn List ................................................................................. 13
Compass Page ....................................................................... 14
GPS Info Page ........................................................................ 14
Creating and Editing Routes ............................................15
Creating a New Saved Route ................................................ 15
Editing a Saved Route .......................................................... 16
Adding Multiple Destinations to a Saved Route ................. 17
Saving the Active Route ....................................................... 18
Navigating a Saved Route .................................................... 18
Recalculating the Route ....................................................... 18
Deleting All Saved Routes .................................................... 18
Stopping Your Route ............................................................. 18
Adding a Detour to a Route .................................................. 18
Adding Avoidances ............................................................... 19
Page 5

PREFACE
Using The Logs ..................................................................20
Adjusting the Track Log ....................................................... 20
Using the Mileage Logs ........................................................ 20
Using Bluetooth® Wireless Technology Hands-free
Features .............................................................................21
Pairing (Connecting) Devices .............................................. 21
Using the Hands-Free Phone Features ............................... 22
Traffic Information .............................................................25
Connecting the FM Traffic Receiver .................................... 25
Viewing Traffic Incidents ...................................................... 25
Avoiding Traffic ..................................................................... 25
Adding an FM Traffic Subscription ...................................... 26
Customizing the Navigator III ...........................................27
Adjusting the Volume ............................................................ 27
Customizing the General Settings ....................................... 27
Changing the Map Settings .................................................. 30
Changing the Navigation Settings ....................................... 31
Adjusting the Traffic Settings .............................................. 31
Changing the Screen Settings ............................................. 32
Changing the Bluetooth Technology Settings .................... 32
Viewing Unit Information (About) ........................................ 32
Restoring the Settings .......................................................... 32
Customizing the Map Data Fields ........................................ 33
Appendix ............................................................................34
Removing Your Navigator III from the Motorcycle Mount . 34
Connecting to Your Computer ............................................. 34
Register Your Navigator III .................................................... 35
Updating the Software and Map Data .................................. 35
Custom POIs (Points of Interest) ......................................... 36
Using the Optional Remote Control .................................... 36
Technical Specifications ....................................................... 37
Changing the Fuse ................................................................ 37
Using a Remote GPS Antenna ............................................. 37
Navigator III Troubleshooting ............................................... 38
FCC Compliance .................................................................... 39
Software License Agreement ............................................... 39
Declaration of Conformity .................................................... 39
Index ...................................................................................40
BMW Motorrad Navigator III Owner’s Manual iii
Page 6
PREFACE
Warning
This manual uses the term Warning to indicate a potentially hazardous situation, which, if not avoided, could result in death or serious injury.
Failure to avoid the following potentially hazardous situations could
result in an accident or collision resulting in death or serious injury.
The BMW Motorrad Navigator III must only be secured to BMW
motorcycles with holders approved by BMW Motorrad.
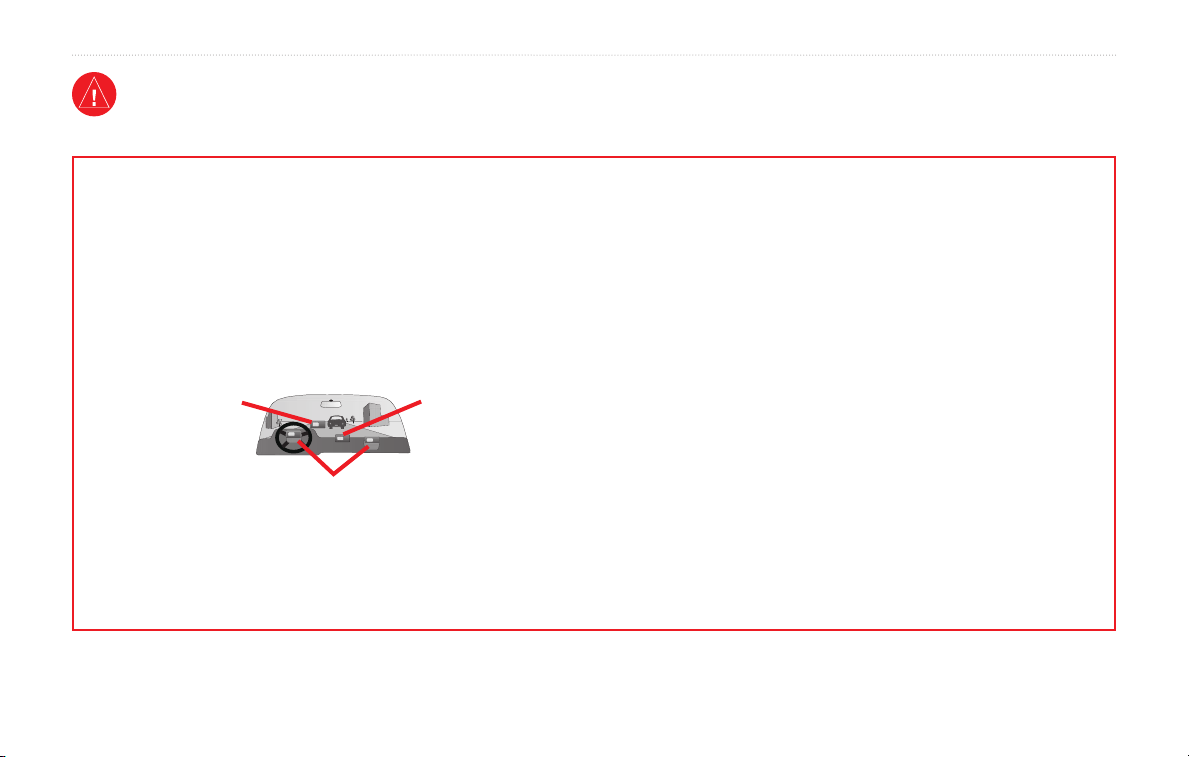
For use in or on other vehicles, it is the sole responsibility of the owner/
operator of the BMW Motorrad Navigator III to place and secure the BMW
Motorrad Navigator III so that it does not interfere with vehicle operating
controls or obstruct the driver’s view of the road (see diagram). The
mounting hardware provided by BMW Motorrad is not warranted against
collision damage or the consequences thereof.
Do not mount where
driver’s field of vision
is blocked.
Do not mount in front of an airbag field of deployment.
Tighten the security screw on the top of the motorcycle mount before driving
with the BMW Motorcycle Navigator III. Failure to tighten the screw could
result in the unit falling out of the mount, which could cause bodily injury or
property damage in addition to damage to the unit.
It is the sole responsibility of the driver of the vehicle to operate the vehicle
iv Navigator III Owner’s Manual
Do not place
unsecured on the
vehicle dash.
in a safe manner, maintain full surveillance of all driving conditions at all
times, and not become distracted by the BMW Motorrad Navigator III to the
exclusion of safe driving practices. It is unsafe to operate the controls of the
BMW Motorrad Navigator III while you are riding or driving. Failure by the
driver of a vehicle equipped with a BMW Motorrad Navigator III to pay full
attention to operation of the vehicle and road conditions while the vehicle is
in motion could result in an accident or collision with property damage and
personal injury.
Using the BMW Motorrad Navigator III in no way relieves the driver of his
own responsibilities. The currently valid traffic regulations must always be
observed. Also be aware of the current traffic situation at all times. It is more
important to observe the road traffic than look at the display. If the current
traffic situation and the information of the BMW Motorrad Navigator III
are conflicting, the currently valid traffic regulations and the current traffic
situation always have priority over the information given by the BMW
Motorrad Navigator III.
For road safety reasons, enter details in the Navigator III before starting the
journey or with the motorcycle stationary. Only look at the display if the
traffic situation allows it; it is more important to observe the traffic and keep
the hands on the handlebars. Otherwise, stop at a suitable location and look at
the display with the motorcycle stationary.
Page 7

PREFACE
Attention
This manual uses the term Attention for special notes and cautionary measures to prevent damage from occurring. Non-compliance can lead to invalidation of warranty.
Failure to avoid the following potentially hazardous situations may
result in injury or property damage.
When searching for medical emergency services (hospital or similar), do not
rely on the navigation system: it cannot be guaranteed that the information
will take you to the nearest emergency service. In this case, use local
information sources.
Unfortunately, due to constantly changing traffic routes, 100% accuracy
cannot be guaranteed under all conditions. It cannot be guaranteed that all
suggested routes are passable at all times. For example, roads closed due to
weather or work sites cannot be taken into account.
The electronic chart is an aid to navigation and is designed to facilitate
the use of authorized government charts, not replace them. Only official
government charts and notices to mariners contain all information needed for
safe navigation, and, as always, the user is responsible for their prudent use.
It is the user’s responsibility to use this product prudently. This product is
intended to be used only as a travel aid and must not be used for any purpose
requiring precise measurement of direction, distance, location or topography.
This product should not be used to determine ground proximity for aircraft
navigation.
MAP DATA INFORMATION:
reasonable cost. We use a combination of governmental and private data sources, which we identify in product literature and copyright messages displayed to the
consumer. Virtually all data sources contain inaccurate or incomplete data to some extent. In some countries, complete and accurate map information is either not
available or is prohibitively expensive.
Navigator III Owner’s Manual v
One of the goals of Garmin is to provide customers with the most complete and accurate cartography that is available to us at a
The Global Positioning System (GPS) is operated by the government of the
United States, which is solely responsible for its accuracy and maintenance.
The system is subject to changes that could affect the accuracy and
performance of all GPS equipment. Although the BMW Motorrad Navigator
III is a precision NAVigation AID (NAVAID), any navaid can be misused or
misinterpreted, and therefore become unsafe.
Use the BMW Motorrad Navigator III at your own risk. To reduce the risk
of unsafe operation, carefully review and understand all aspects of this
Owner’s Manual and thoroughly practice safe operation using the simulator
mode prior to actual use. When in actual use, carefully compare indications
from the BMW Motorrad Navigator III to all available navigation sources,
including the information from other NAVAIDs, visual sightings, charts, etc.
For safety, resolve any discrepancies before continuing navigation.
Set the volume of the BMW Motorrad Navigator III to a level that allows
you to hear traffic noise (e.g. police and ambulance sirens).
Never attempt to open the BMW Motorrad Navigator III. In the event of
problems with the unit, please contact your BMW Motorrad dealer.
Page 8

PREFACE
Caring for Your Navigator III
The Navigator III is constructed of high-quality materials and does
not require user maintenance other than cleaning.
Cleaning the Unit
Clean the unit’s outer casing using a cloth dampened with a mild
detergent solution. Wipe dry. Avoid chemical cleaners and solvents
that can damage plastic components.
Caring for the Touch Screen
The touch screen is intended to be operated with a finger. Never use
a hard or sharp object to operate the touch screen because damage
can result. Though a PDA stylus can also be used to operate the
touch screen, never attempt this while operating a vehicle.
Clean the touch screen using a soft, clean, lint-free cloth. Use
water, isopropyl alcohol, or eyeglass cleaner if needed. Apply the
liquid to the cloth and then gently wipe the touch screen.
Protecting Your Navigator III
• Do not store the unit where prolonged exposure to extreme
• Do not store alkaline batteries in the
• To avoid theft, do not leave your Navigator III in plain
temperatures can occur (such as in the trunk of a car), as
permanent damage may result.
remote control for
extended periods of time. To reduce the chance for battery
leakage in the battery compartment, remove the batteries
when storing the remote control for more than six months.
sight when you leave your vehicle. Remove the automotive
mount from visible sight. Do not keep your unit in the glove
compartment; thieves know where to look. Register your
product at http://www.garmin.com/registration; this may
help in the event your unit is stolen.
vi BMW Motorrad Navigator III Owner’s Manual
Page 9

Looking at the Navigator III
Cradle lock
IR window
(aim the optional
remote here)
(push down and then tighten the
security screw before driving)
GETTING READY
Touch screen
Light sensor
GETTING READY
Power connector
(for 12-Volt or AC adapter)
MCX connector
(for optional
remote antenna)
Weather Cap
Mini-USB
connector
Power Switch
➎
➏
➐
Audio jack
Front of Navigator III (in Motorcycle Mount) Back of Navigator III (out of Motorcycle Mount)
✔
➊
➋
➌
➍
Unit keysCradle keys
TIP: To learn more about the keys on the unit
and cradle, click a key in the image above.
Navigator III Owner’s Manual 1
Page 10
GETTING READY
Using the Navigator III Keys
Keys on the Unit
FIND opens the Find (Where To?) menu. Press twice to Go
➊
Home. Press and hold to open the Recent Finds list.
MENU opens the Main menu. Press repeatedly to scroll
➋
through the Main menu, Tools menu, and Settings menu. Press
and hold to open the Manage My Routes menu.
MAP opens the Map page. Press repeatedly to scroll through
➌
the Map page, Trip Computer, and Compass.
SPEAK announces voice directions. Press and hold to adjust
➍
the volume.
Keys on the Cradle
IN/OUT zooms in and out of the map, selects buttons and
➎
options, and scrolls through lists.
ENTER confirms (selects) a highlighted selection.
➏
ESC exits a menu or window. Press repeatedly to scroll
➐
through the Map page, Trip Computer, and Compass.
Using the Navigator III Interface
Here a some helpful tips for using your Navigator III.
• Use your finger to touch the screen and select objects. You can
also press the keys on the front of the unit or on the optional
remote control to operate your Navigator III.
• Touch the
• Touch
• When a
numbers using your finger. To enter a space, touch
to use the diacritical keyboard. To delete the last character you
entered, touch .
• You can look at other areas of the map by touching the map and
pulling your finger across the screen. See
• To adjust the volume, touch
Back button to return to the previous screen.
and to view all of the items in a list.
keyboard appears on the screen, type the name or
. Touch
to enter numbers or special characters. Touch
page 12.
Volume on the Main menu.
2 BMW Motorrad Navigator III Owner’s Manual
Page 11

FIND IT AND GO!
FIND IT AND GO!
As soon as you turn on your BMW Motorrad Navigator III, it begins acquiring GPS satellite signals. You must have a clear view of the sky
to acquire satellite signals. The bars in the upper-left corner indicate satellite strength. Touch the bars to view more information about
the GPS signals.
Finding a Restaurant
Touch Where To?
➊
Touch Food, Hotel….
➋
Touch Food & Drink.
➌
Touch a food category.
➍
Navigator III Owner’s Manual 3
Touch a location.
➎
Touch Go To.
➏
Page 12
FIND IT AND GO!
Following Your Route
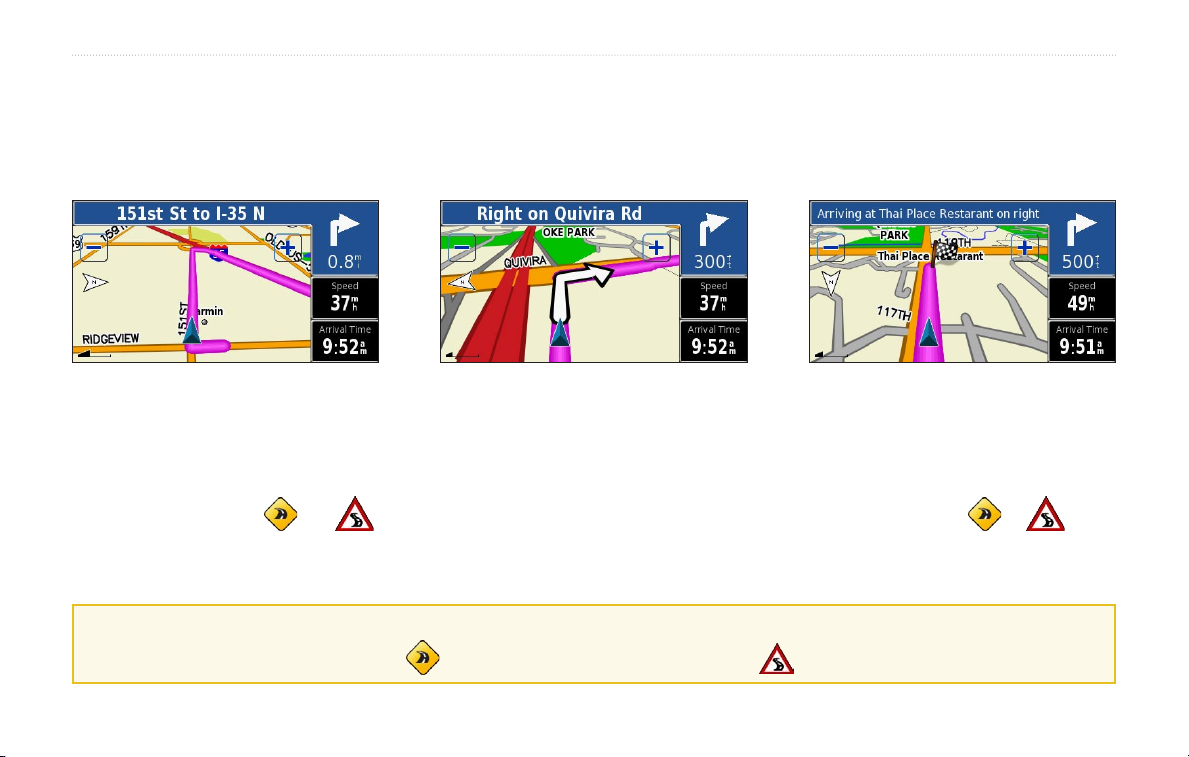
Follow the route to your destination using the map and the voice prompts. As you travel, your Navigator III guides you to your destination
with voice prompts, arrows, and directions along the top of the map. If you depart from the original route, your Navigator III recalculates
the route and provides new route instructions.
Your route is marked with a
magenta line.
For more information about using the map and other tools, see pages 12–14.
Follow the arrows. A checkered flag marks your
destination.
Taking a Better Route
The Map page displays a or a in the lower-left corner when the Navigator III has found a better route. Touch or to
take the better route. For more information about continuous auto routing, see page 31.
If you need to take a detour, press the
TIP: The icons used to indicate a better route and traffic are based upon the type of unit you have: North American
✔
units use diamond-shaped icons ( ), European units use triangular icons (
4 Navigator III Owner’s Manual
MENU key and touch Detour. For more information about taking detours, see page 18.
).
Page 13
WHERE TO?
WHERE TO?
Using the Where To? Menu
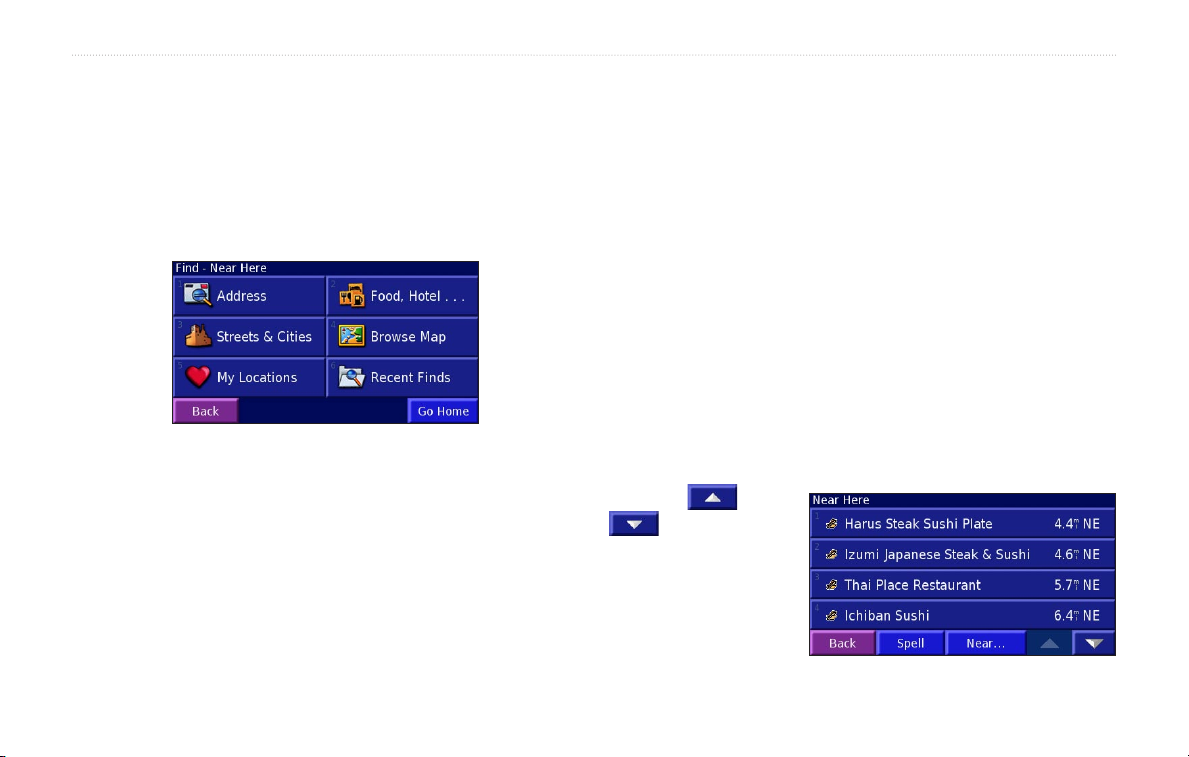
The Where To? menu (Find menu) provides several categories to
search for locations. Press the FIND key, or touch Where To? on
the Main menu.
Browse Map—use the map to find the location you are looking for,
which can be helpful when you know where the location is, but do
not know the name. See page 12.
My Locations—save your favorite locations in My Locations. For
example, you can save the hotel where you will be staying while on
vacation. See page 8.
Recent Finds—find locations you have recently selected from the
search result list.
Understanding the Search Results
Where To? menu
Address—enter the house number and street name to find a
specific address. See page 7.
Food, Hotel…—search for locations, such as schools, shopping
centers, and hospitals.
Streets & Cities—find a city, street, intersection, or exit.
Navigator III Owner’s Manual 5
Your Navigator III sorts the search results list by distance from
your current location; the closest locations are listed first.
Touch the
to view all of the
results.
See page 6 to narrow
your search or search in
different areas.
and
Search Results
Page 14
WHERE TO?
Finding Locations in a Different Area
You can search for locations in a different area, such as a different
city or near your destination.
1. From the search results list, touch Near….
2. Select one of the search options.
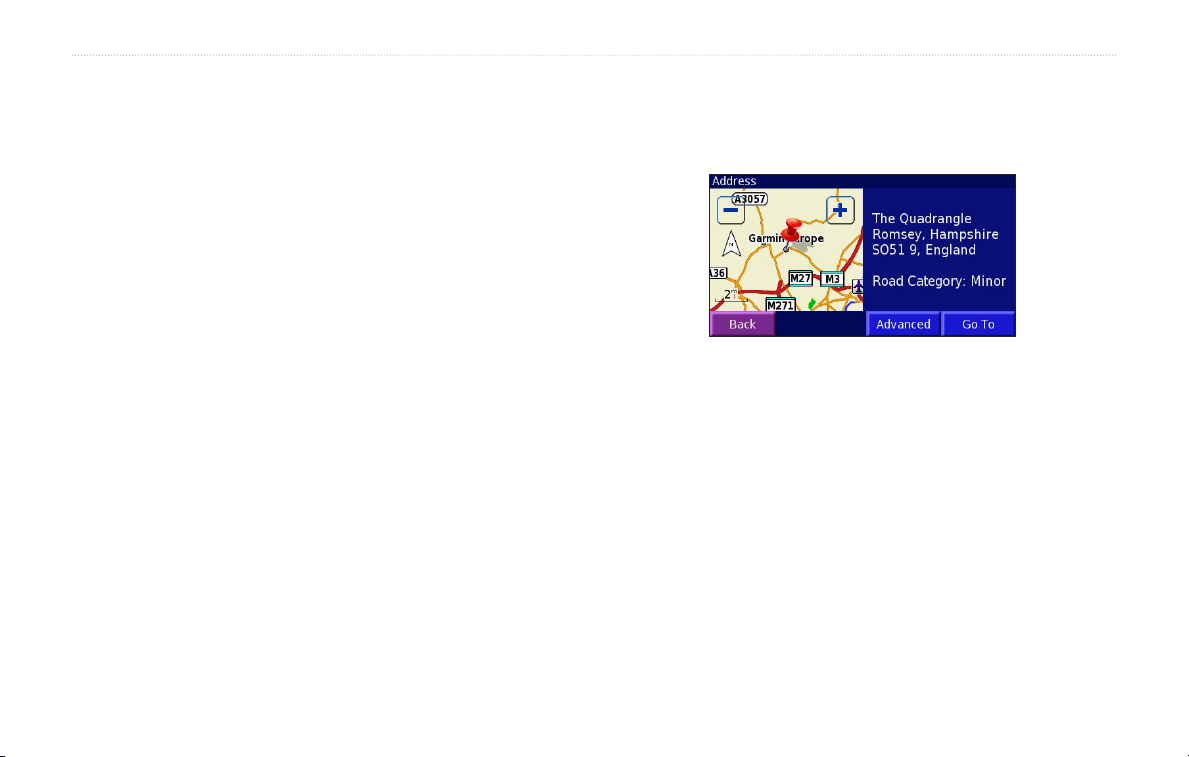
Understanding the Information Page
When you select a location from the search results list, the
location’s information page opens, as shown below.
The locations near the option you selected are displayed.
Narrowing Your Search
1. From the search results list, touch Spell.
2. Enter part of the name and touch Done.
Locations containing the letters you entered are displayed.
Touch Go To to create a route to this location. Touch Advanced to
view other options for this location:
Finding Recently Found Locations
Your Navigator III stores the last 50 locations you have found in
Recent Finds.
1. Touch Where To? > Recent Finds.
2. Select a location from the list.
Touch Category to display recent finds of a specific category, such
as Food, Hotel….
• Insert in Current Route—add this location as the next stop
(point) in your route.
• Dial Phone Number—place a call to this location, if your
phone that has Bluetooth technology is connected. See pages
21 through 24.
• Add As Favorite—add this location to your Favorites. For
more information, see page 8.
• Find Near Point—find a location near this location.
• Browse Map—view this location on the map.
6 BMW Motorrad Navigator III Owner’s Manual
Page 15
Finding an Address
WHERE TO?
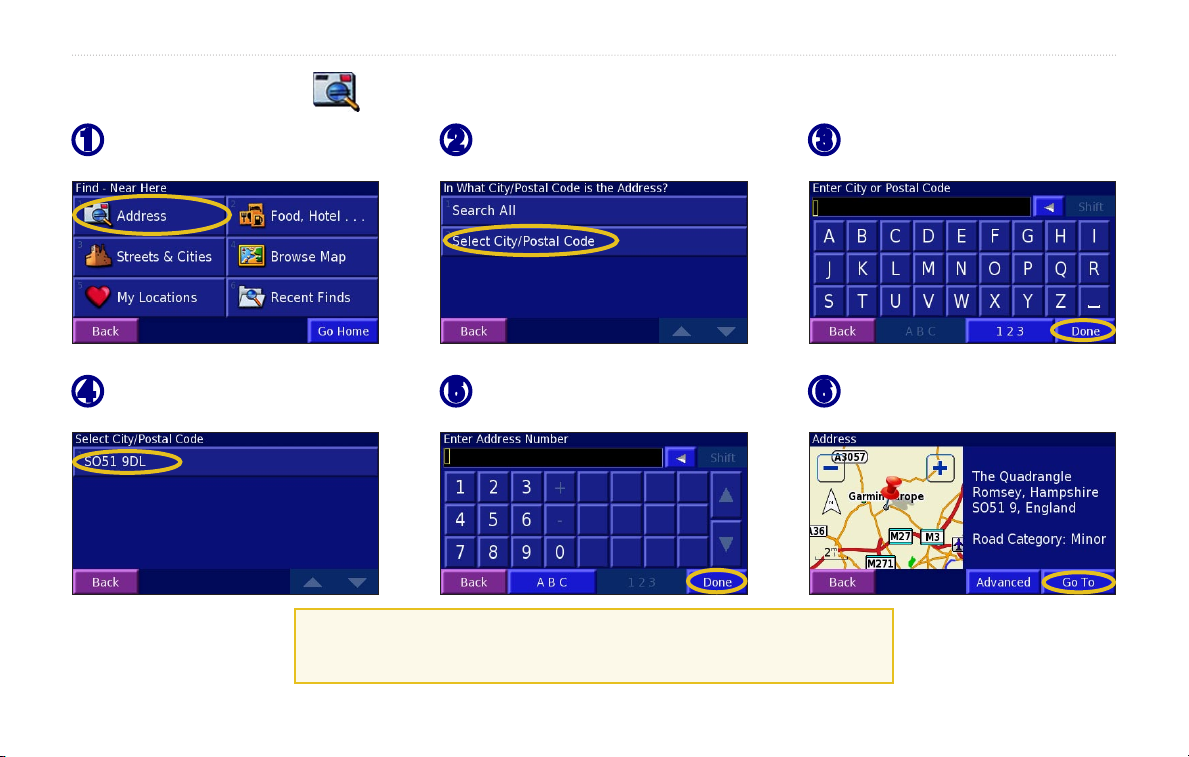
From the Main menu, touch Where
➊
To? Touch Address.
Touch the correct city/postal code.
➍
Searching for a city, street, intersection, or exit is very similar to searching
for an address. From the Main menu, touch Where To? > Streets & Cities.
Navigator III Owner’s Manual 7
Touch a country or state. Touch Search
➋
All Cities or Select City/Postal Code.
If necessary, enter the rest of the
➎
address, and touch Done.
Enter the city or postal code and
➌
touch Done.
Select the address, if necessary.
➏
Touch Go To.
Page 16
MY LOCATIONS
MY LOCATIONS
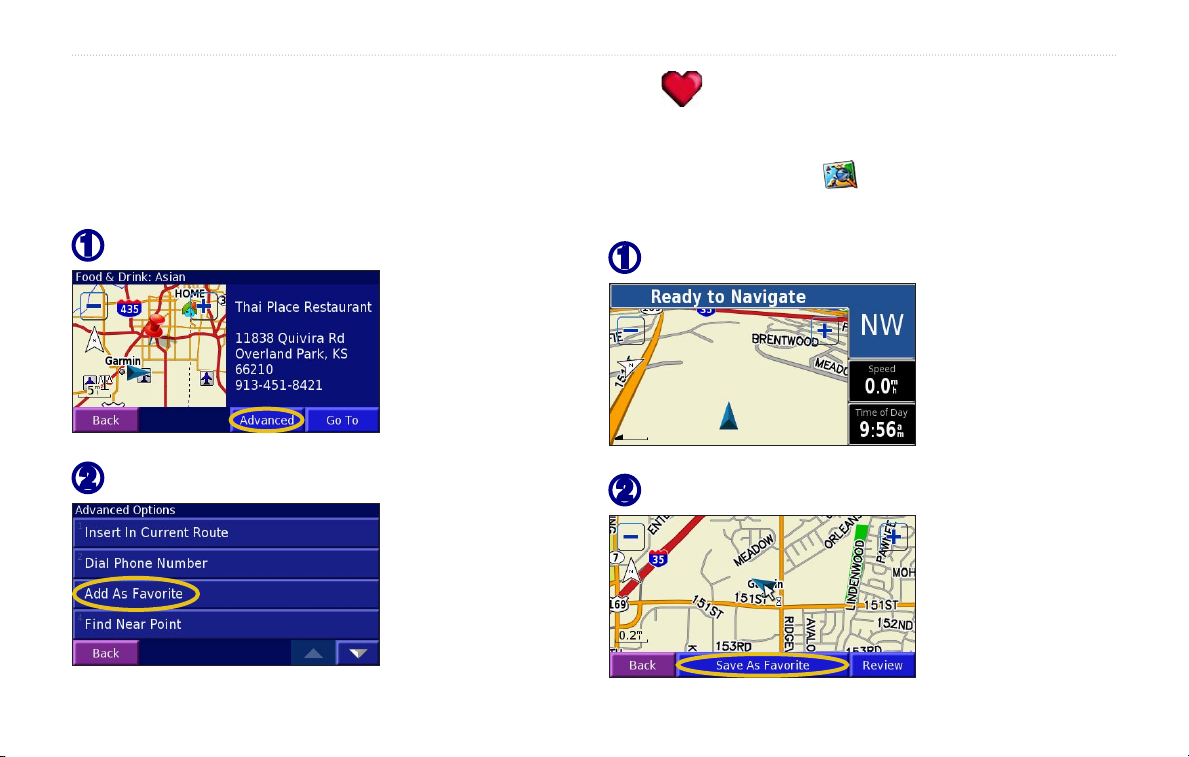
Saving Locations
Any time you are viewing a location’s information page, you can
save that location as a Favorite.
Touch Advanced.
➊
Touch Add As Favorite.
➋
8 Navigator III Owner’s Manual
Saving Your Current Location
From the Main menu, touch View Map. You can also press
the MAP key on the front of the Navigator III.
Touch anywhere on the map.
➊
Touch Save As Favorite.
➋
Page 17
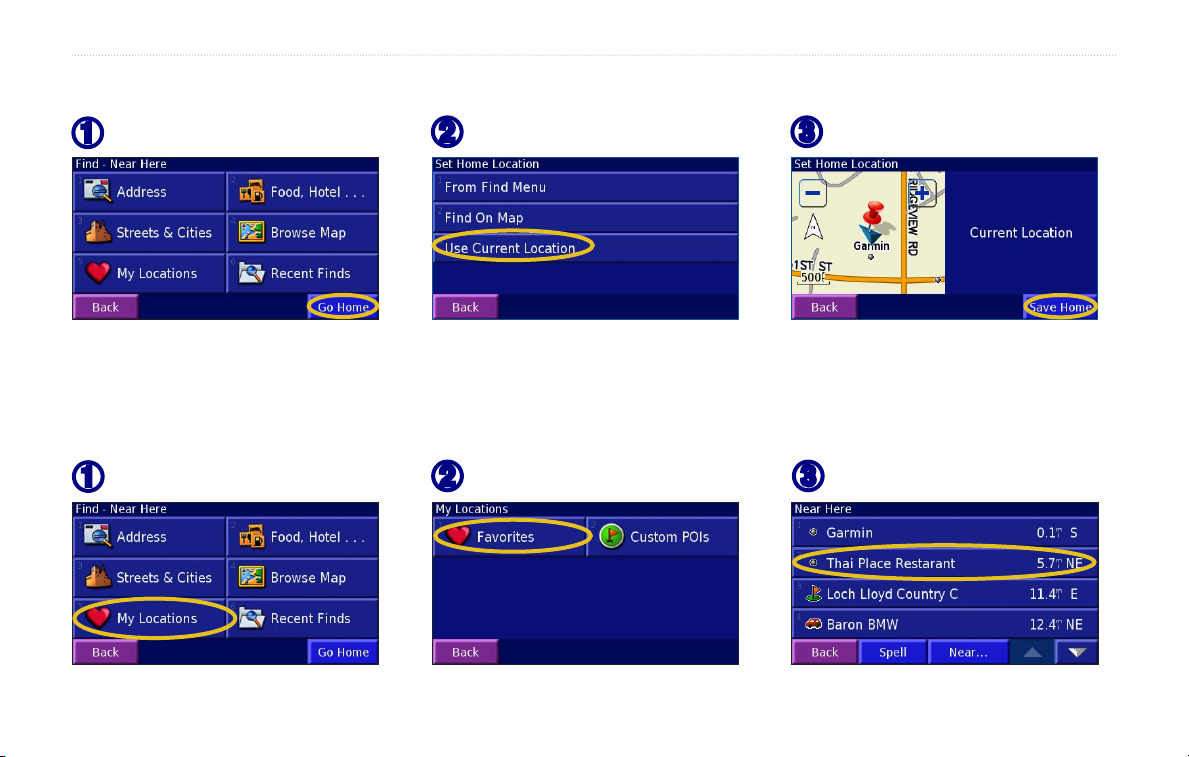
Setting a Home Location
MY LOCATIONS
Touch Where To? > Go Home.
➊
Press the FIND key twice to create a route to your Home Location. To change your Home Location, first delete it from your Favorites (see
page 11 for more information). Then set it again using the instructions above.
Select an option.
➋
Touch Save Home.
➌
Finding Saved Locations
From the Main menu, touch Where To?
Touch My Locations.
➊
Navigator III Owner’s Manual 9
Touch Favorites.
➋
Touch a saved location.
➌
Page 18
MY LOCATIONS
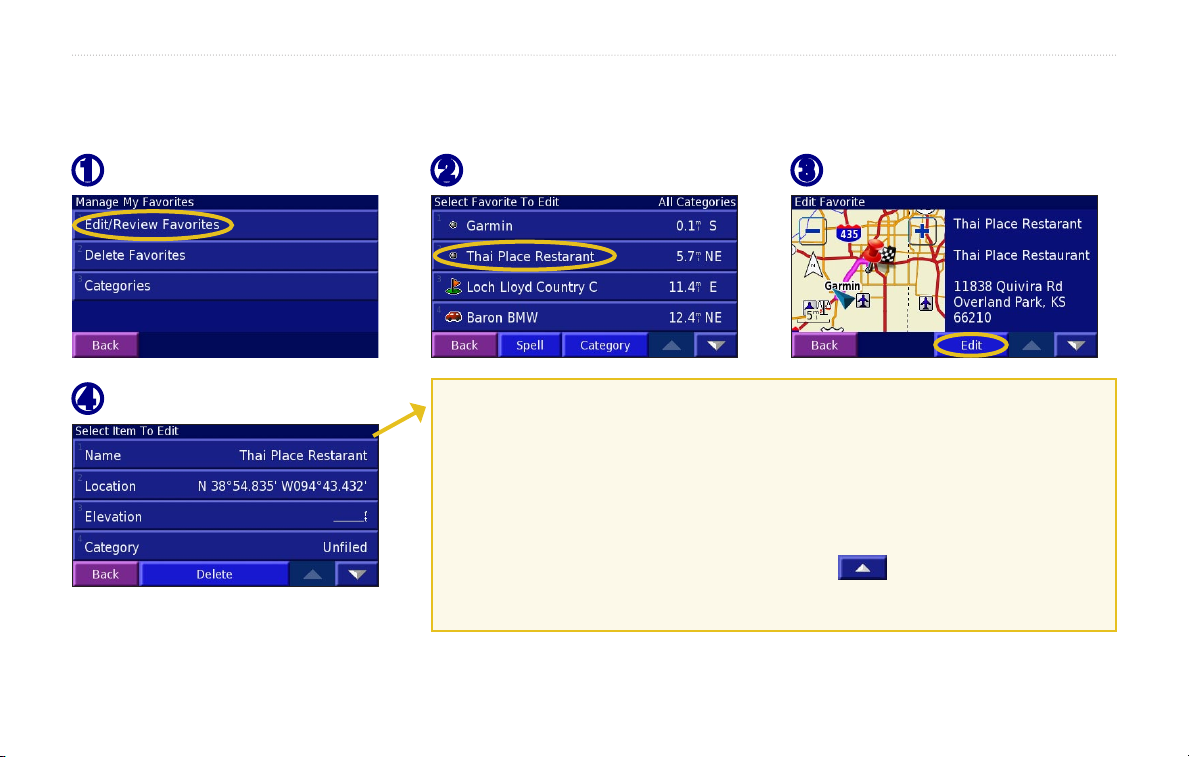
Editing Saved Locations
From the Main menu, touch Tools > My Data > Favorites.
Touch Edit/Review Favorites.
➊
Touch an item to edit it.
➍
10 Navigator III Owner’s Manual
Touch a location to edit.
➋
Saved Location Editing Options
Name—enter a new name for the location using the on-screen keyboard.
Location—edit the physical location of the saved location; you can use the map or
enter new coordinates using the keyboard.
Elevation—enter the elevation of the saved location.
Category—assign this location to a category; touch to view the categories.
Symbol—select a symbol to appear on the map for this location.
Touch Edit.
➌
Page 19
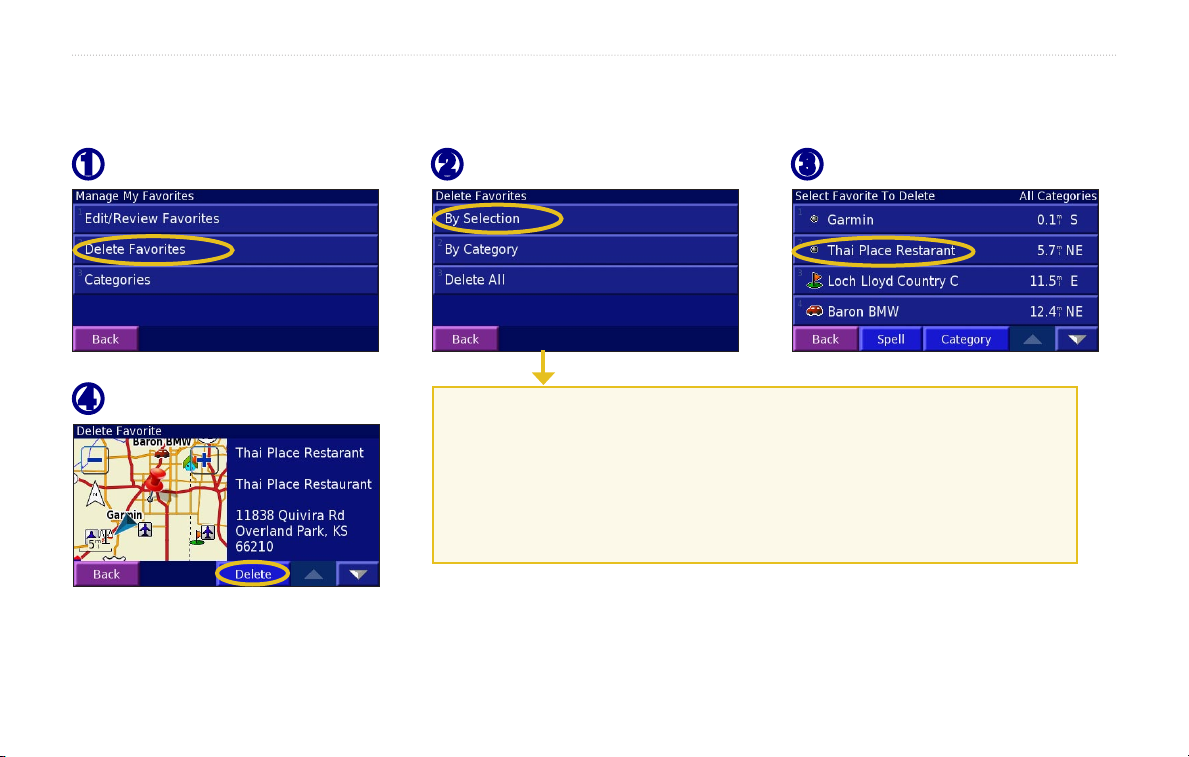
Deleting a Saved Location
To delete a saved location, touch Tools > My Data > Favorites.
MY LOCATIONS
Touch Delete Favorites.
➊
Touch Delete.
➍
Navigator III Owner’s Manual 11
Touch By Selection.
➋
Delete Options
By Selection—touch each location and delete it individually.
By Category—select one category to delete all of the locations assigned to that
category.
Delete All—removes all saved locations from your Favorites.
Touch a saved location.
➌
Page 20
VIEWING THE MAP AND USING THE TOOLS
VIEWING THE MAP AND USING THE TOOLS
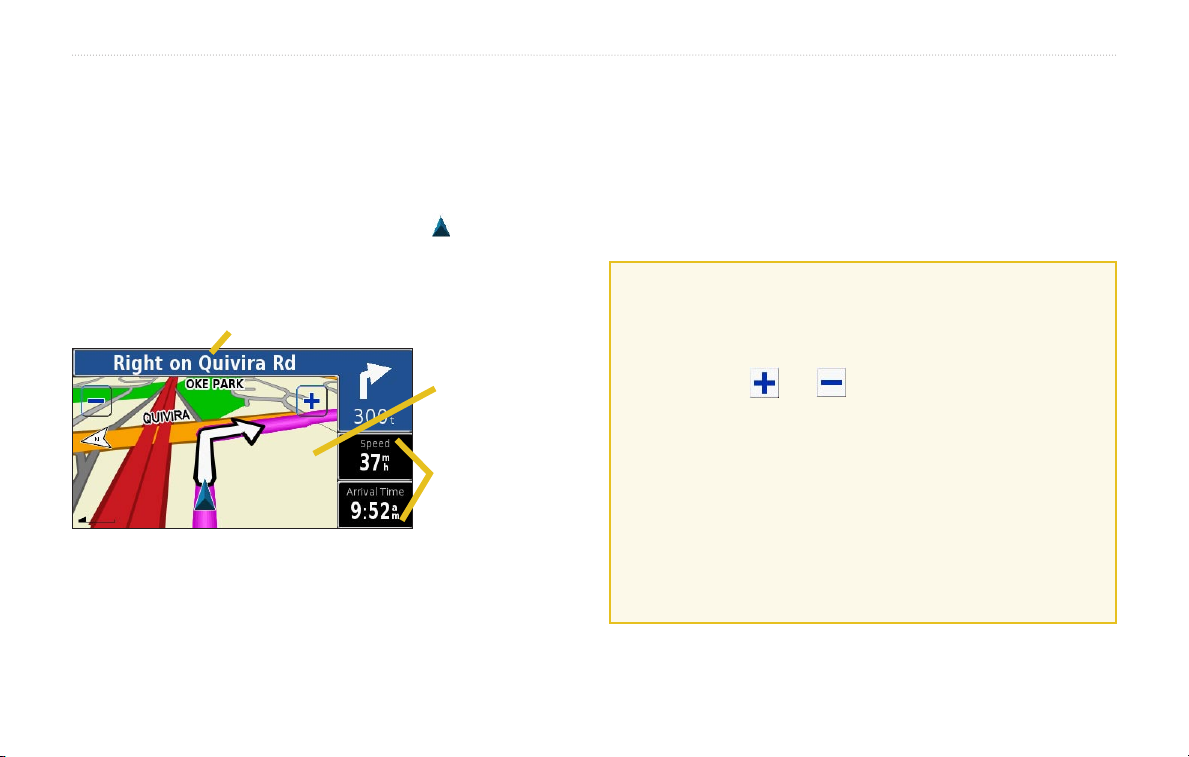
Viewing the Map Page
From the Main menu, touch View Map or press the MAP key
to open the map. Touch an area of the map to see additional
information, as shown below. The position icon shows your
Browsing the Map
From the Main menu, touch View Map. You can also touch
Where to? > Browse Map. Touch and drag anywhere on the map
to browse the map (view different parts of the map).
current location.
While navigating a route, touch the text bar to
open the Turn List. See
Map Page while Navigating a Route
page 13.
Touch the map to
view and browse
a 2-D map.
Touch to open the
Trip Computer.
See page 13.
Tips for Browsing the Map
• Touch the map and drag to view different parts of the
map.
• Touch the
• Touch any object on the map. An arrow appears pointing
at the object you selected.
• Touch
for more information, see page 6.
• Touch
and icons to zoom in and out.
Review to open the location’s information page;
Save As Favorite to save the location selected by
the arrow to your Favorites.
• Touch
12 Navigator III Owner’s Manual
Back to return to the previous screen.
Page 21
VIEWING THE MAP AND USING THE TOOLS
Trip Computer
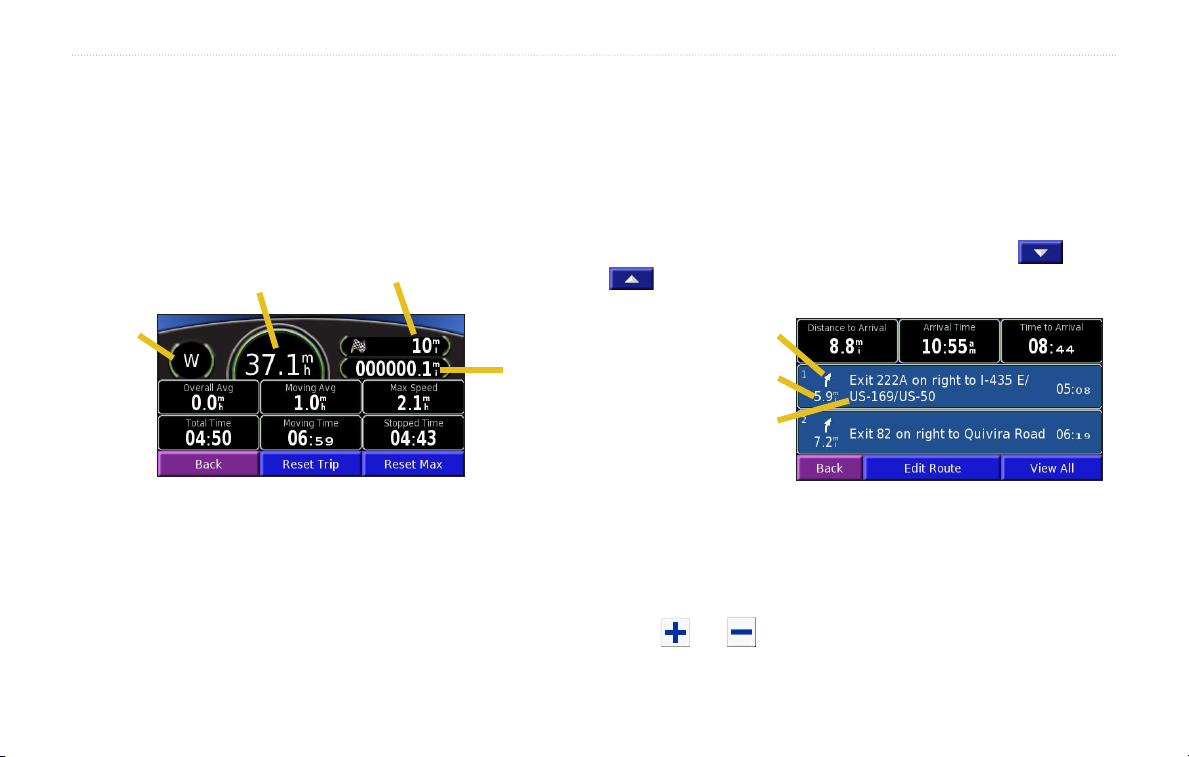
The Trip Computer indicates your current speed and provides
statistics about your trip.
To view the Trip Computer, select the
on the map or press the MAP key repeatedly. Or, from the Main
menu, touch Tools > Trip Computer.
Current speed
Current
direction
of travel
Touch Reset Trip to reset all information on the Trip Computer. To
reset the maximum speed, touch Reset Max.
Speed or Arrival Time field
Distance to your final
destination
Total
distance
traveled
(odometer)
Turn List
The Turn List provides a list of turn-by-turn instructions for your
entire route as well as arrival information.
While navigating a route, touch the text bar on the Map page to
open the Turn List. Or, from the Main menu, touch Tools > Turn
List. The next turn on your route is listed at the top of the list.
Touch
View All to see all the turns in the route. Touch and
to scroll through the list.
Direction of this turn
Distance to this turn
Turn directions
Touch Edit Route to edit this route. See page 16 for more
information.
Touch a turn to see it on a map (the Next Turn page). You can also,
press Speak on the remote control to open the Next Turn page.
Touch
and to zoom in and out of the turn on the map.
BMW Motorrad Navigator III Owner’s Manual 13
Page 22
VIEWING THE MAP AND USING THE TOOLS
Compass Page
Press the MAP key repeatedly to view the Compass page. Or, from
the Main menu, touch Tools > Compass.
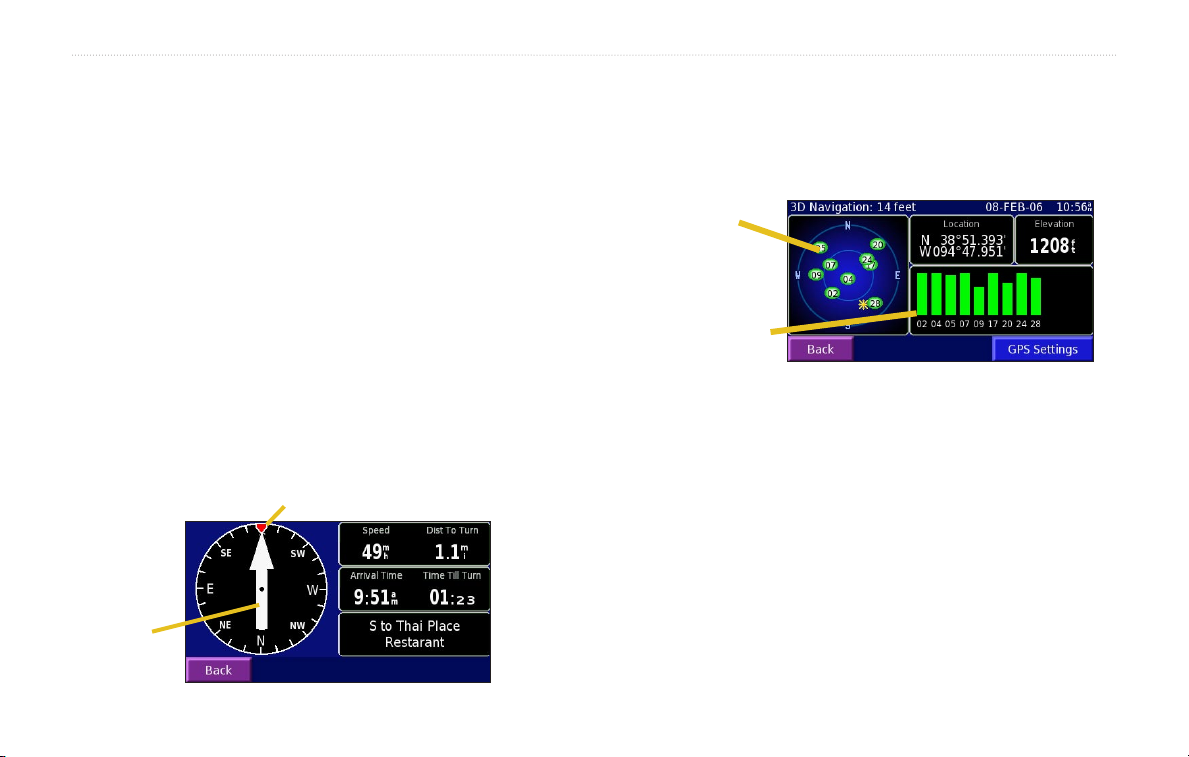
The Compass page guides you to your destination with a graphic
GPS Info Page
From the map or Main menu, touch the signal strength bars in the
upper-left corner of the screen to view the GPS Info page. Or, from
the Main menu, touch Tools > GPS Info.
compass display and bearing pointer.
When you are moving, the rotating compass shows the direction
you are heading. The bearing pointer indicates the direction
(bearing) to the next destination or turn, relative to your current
heading direction. If the arrow points up, you are going directly
to the destination. If the arrow points any other direction, turn in
the direction of the arrow until it points up and continue in that
direction.
Bug indicator
(indicates the direction you should
be travelling to stay on the route)
The sky view shows the satellites you are receiving. The satellite
signal strength bars indicate the strength of each satellite signal. A
solid bar indicates your Navigator III has a strong fix on that GPS
satellite, and the GPS satellite is ready for use.
For more information about GPS, see http://www.garmin.com/
aboutGPS/.
Bearing pointer
(indicates your
direction of
travel)
See page 27 for information about the GPS Settings.
Sky view
Satellite signal
strength bars
14 BMW Motorrad Navigator III Owner’s Manual
Page 23
CREATING AND EDITING ROUTES
Creating a New Saved Route
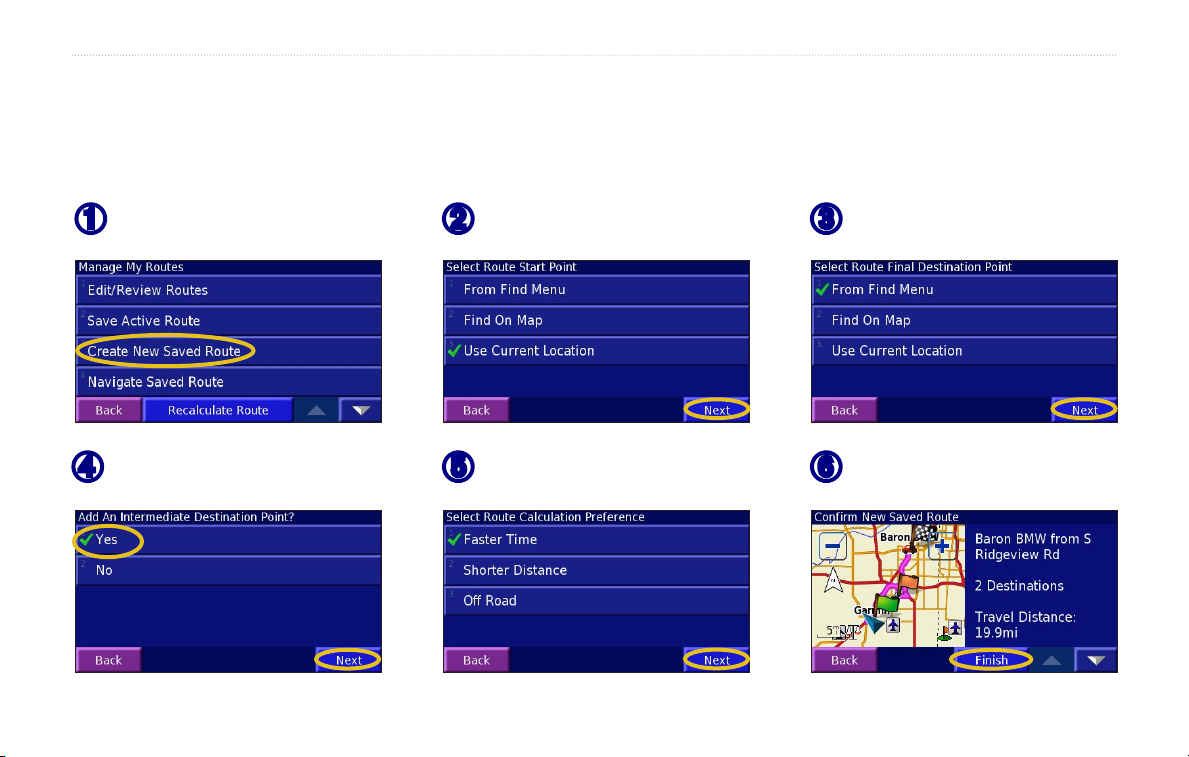
You can store up to 50 saved routes. From the Main menu, touch Tools > My Data > Routes.
CREATING AND EDITING ROUTES
Touch Create New Saved Route.
➊
To add a stop, touch Yes, then
➍
touch Next. Select the point.
Navigator III Owner’s Manual 15
Touch an option and touch Next.
➋
Select the start point.
Select your preference and touch
➎
Next. See page 31.
Touch an option and touch Next.
➌
Select the end point.
Touch Finish.
➏
Page 24
CREATING AND EDITING ROUTES
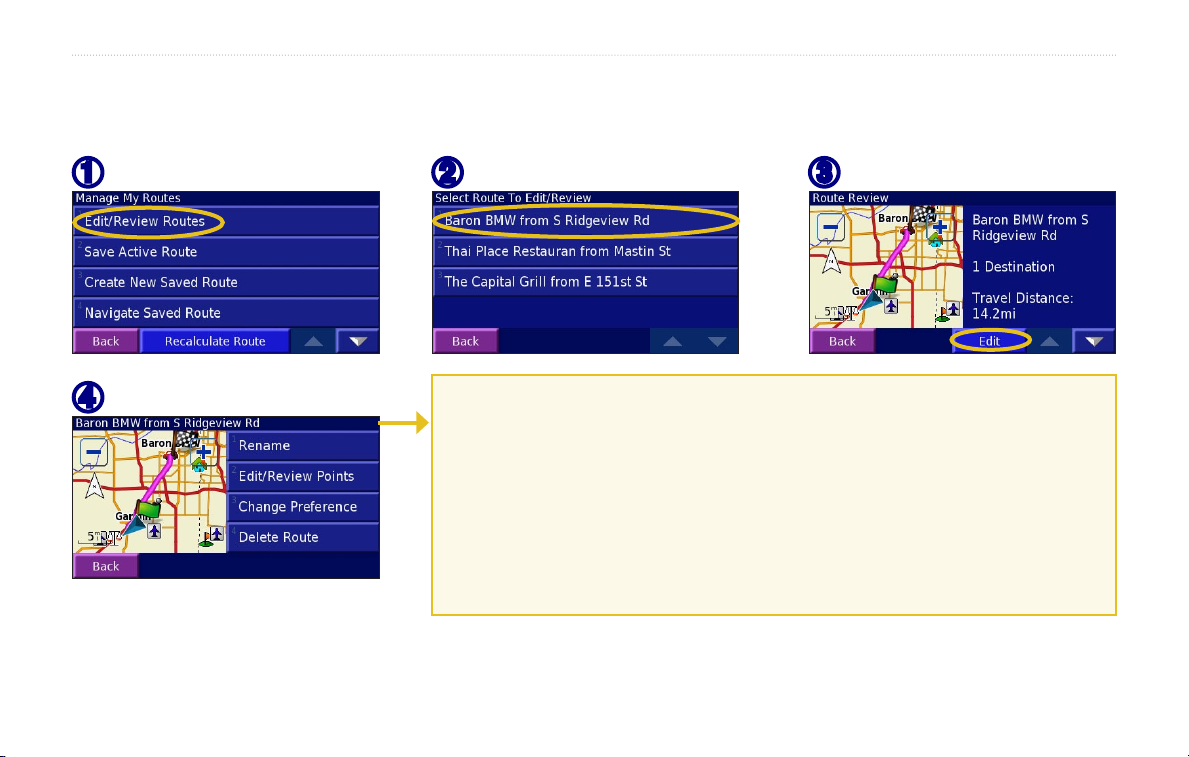
Editing a Saved Route
From the Main menu, touch Tools > My Data > Routes.
Touch Edit/Review Routes.
➊
Touch the item to edit.
➍
16 Navigator III Owner’s Manual
Touch the route to edit.
➋
Route Editing Options
Rename—enter a new name for the route using the on-screen keyboard.
Edit/Review Points—add, arrange, remove, re-order, and review points in the route.
For more info, see the next page.
Change Preference—change the route calculation preference to Faster Time, Shorter
Distance, or Off Road. See page 31 for information about the route preferences.
Delete Route—delete this route.
➌
Touch Edit.
Page 25
CREATING AND EDITING ROUTES
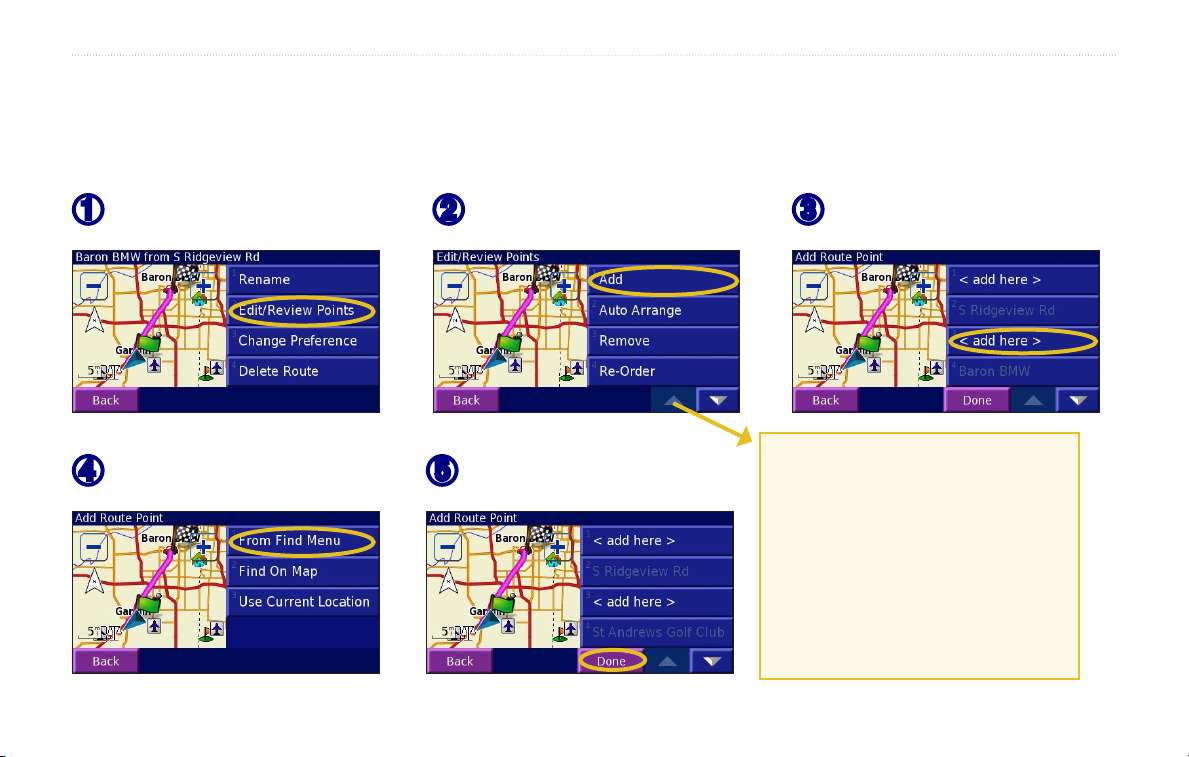
Adding Multiple Destinations to a Saved Route
You can multiple destinations (also called via points, midpoints, or stops) to your route as you create it, as described on page 15. You can
also add points to your route when you edit the route, as described below. Follow the steps on the previous page to begin editing the route.
To edit the route you are currently navigating, touch Edit Route on the Turn List page.
Touch Edit/Review Points.
➊
Touch an option and then select
➍
the point.
Navigator III Owner’s Manual 17
Touch Add.
➋
Add points as necessary. Touch
➎
Done when finished.
Touch where you to want to add
➌
the point.
Route Point Editing Options
Auto Arrange—arranges the points to
provide the shortest route.
Remove—touch the point you want to
remove and then touch Remove.
Re-Order—touch the point you want
to move. Touch Move Up or Move
Down. Touch Done when finished.
Page 26

CREATING AND EDITING ROUTES
Saving the Active Route
From the Main menu, touch Tools > My Data > Routes >
Save Active Route.
Navigating a Saved Route
From the Main menu, touch Tools > My Data > Routes >
Navigate Saved Route. Touch the route you want to navigate.
Recalculating the Route
From the Main menu, touch Tools > My Data > Routes >
Recalculate Route.
Deleting All Saved Routes
From the Main menu, touch Tools > My Data > Routes >
> Delete All Saved Routes.
Stopping Your Route
From the Main menu, touch Stop and then touch Yes.
Adding a Detour to a Route
If you need to take a detour from your current route, open the Main
menu and touch Detour.
1 kilometer, 5 kilometers, or 10 kilometers—select the distance
of the detour. For example if a road sign indicates that the street
is closed for the next three kilometers, touch 5 kilometers in the
list. Your Navigator III recalculates your route for the next five
kilometers.
Detour by Road(s) In Route—select roads in your route to avoid.
For example, if the highway ramp is closed, select the ramp in the
list of roads. Your Navigator III recalculates your route to avoid
that ramp.
Detour by Traffic Event on Route—if you are using an FM
Traffic Receiver, you can detour around traffic events (incidents).
Remove All Detours—touch to remove any detours you have
entered for the route.
18 BMW Motorrad Navigator III Owner’s Manual
Page 27
CREATING AND EDITING ROUTES
Adding Avoidances
From the Main menu, touch Settings > Navigation > > Avoidance Setup. Select the road type to avoid. Touch to view more
road types to avoid.
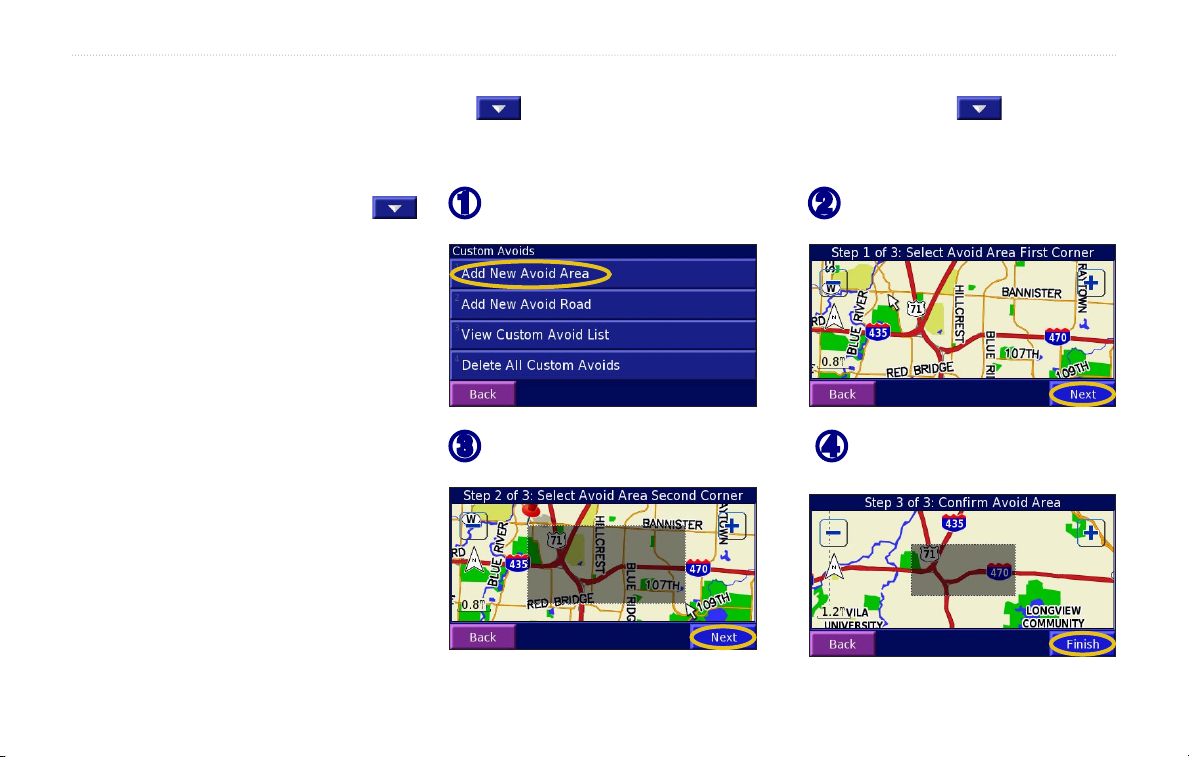
Creating Custom Avoids
From the Avoidance Setup menu, touch
two times and then touch Custom Avoids.
You can enter specific areas and roads to avoid
in your routes. When you add a new avoid road,
select the beginning point and the end point to
define the section of the road that you want to
avoid.
When you add a new avoid area, create a
rectangular area by selecting the diagonally
opposite corners.
Navigator III Owner’s Manual 19
Touch Add New Avoid Area or
➊
Add New Avoid Road.
Touch the second corner and
➌
touch Next.
Touch the first corner and
➋
touch Next.
Touch Finish.
➍
Page 28
USING THE LOGS
USING THE LOGS
Adjusting the Track Log
As you travel, the Navigator III creates a bread crumb trail (track
log) of your movement. From the Main menu, touch Tools > My
Data > Track Log.
Recording—turn off and on the track log recorder.
Percentage Full
track log. To clear the track log, touch Percentage Full > Yes >
OK.
Map Display—shows the track log on the map automatically or
at the specified zoom level. Your track log is displayed as a fine
dotted line on the map.
Resolution—records track points automatically or based on the
distance or time you specify. To enter a specific distance or time,
touch Distance or Time and touch Next. Enter a distance or time
using the on-screen keyboard and touch Done.
20 Navigator III Owner’s Manual
—displays the current percentage capacity of the
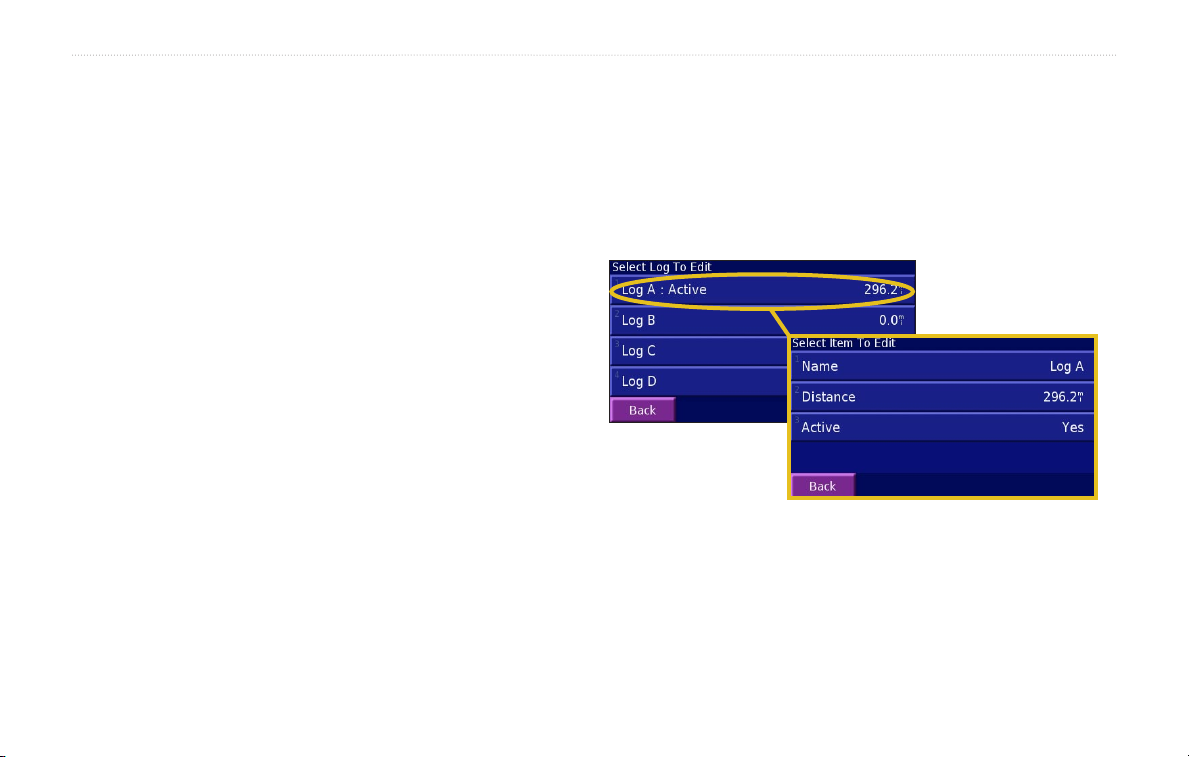
Using the Mileage Logs
You can keep four different mileage logs of your travels. From the
Main menu, touch Tools > My Data > Mileage Log. Touch a log
to edit it.
Name—enter a new name.
Distance—reset the mileage log.
Active—make this log active or inactive.
Page 29
USING BLUETOOTH® WIRELESS TECHNOLOGY HANDS-FREE FEATURES
USING BLUETOOTH® WIRELESS TECHNOLOGY HANDS-FREE FEATURES
Your Navigator III can simultaneously connect to both a helmet
that has Bluetooth wireless technology and a cellular phone that has
Bluetooth wireless technology to allow hands-free communication.
Why Should I pair my cell phone and helmet
with my Navigator III?
To get the full features of the Navigator III, you should pair
your helmet to the Navigator III and also pair your cell phone
to the Navigator III. You can then speak into your helmet when
on a call and listen to the conversation over your helmet. You
will also be able to hear all navigation prompts through your
helmet.
Pairing (Connecting) Devices
Before you can use a device that has Bluetooth wireless technology
with the Navigator III, you must pair (connect) the devices.
To pair a device:
1. Press the MENU key.
2. Touch Settings > Bluetooth > Manage Connections.
3. If you have never paired a device with your Navigator
III, touch Yes. If have already paired a device with your
Navigator III and want to add another, touch Add Device.
4. Set your helmet or phone to “Find Me,” “Discoverable,” or
“Visible” mode. Touch OK on the Navigator III.
5. Touch your device in the list.
6. If your phone’s model appears in the list, touch it. If not,
touch Other Phones….
7. When pairing your phone, enter the Navigator III’s PIN code
(1234) into your phone when prompted.
To pair another device, such as a helmet, with the Navigator
III, repeat steps 1 through 5. Enter the helmet’s PIN code in the
Navigator III, if necessary.
After you pair devices with the Navigator III, they automatically
connect to the Navigator III the next time you turn it on. If the
devices do not automatically connect to the Navigator III, you can
connect them manually (see the next page).
Navigator III Owner’s Manual 21
Page 30
USING BLUETOOTH® WIRELESS TECHNOLOGY HANDS-FREE FEATURES
To manually connect your phone/helmet to the Navigator III:
1. Press the MENU key to open the Main menu.
2. Touch Phone.
3. Touch Yes.
4. Touch the device you want to connect to, and then touch
Connect.
Using the Hands-Free Phone Features
After your cellular phone with Bluetooth technology has been
paired with the Navigator III, you can use the Navigator III to place
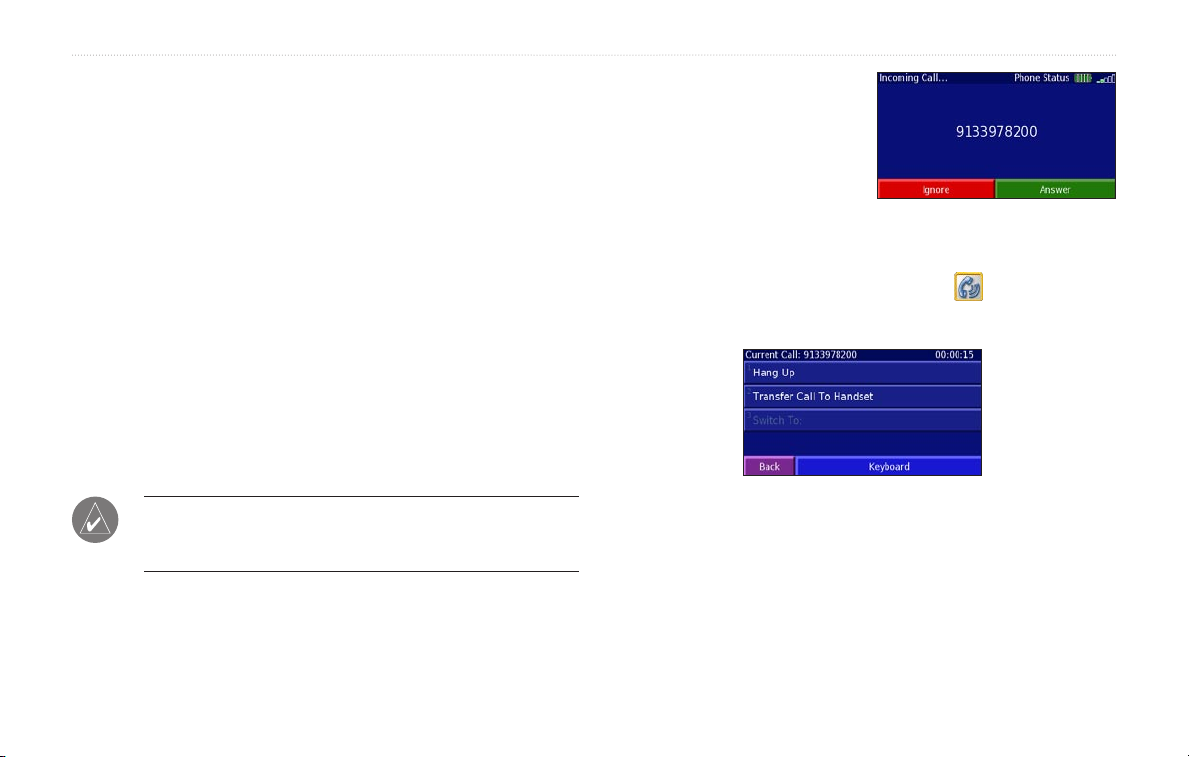
Receiving a Call
When you receive a call, a
window opens displaying the
phone number or contact name.
Touch Answer to answer the call
or Ignore to silence the ringing.
Using the In Call Menu
While you are on a call, touch the phone icon to open the In
Call menu.
and receive phone calls. From the Main menu, touch Phone. Use
the Phone menu to place calls and review your call history.
If you are using a helmet with Bluetooth technology, you can
simply talk into the helmet’s microphone and listen over the
helmet’s ear piece.
NOTE: You can only use the hands-free features that are
supported by your phone. For example, if your phone does not
support voice tags, you will not be able to use Voice Dial.
The In Call menu allows you to hang up, transfer the call to your
cell phone’s handset, and switch to an incoming call-waiting
call. Touch Keyboard to enter numbers for automated telephone
systems, such as voice mail.
Incoming Call
In Call Menu
22 BMW Motorrad Navigator III Owner’s Manual
Page 31
USING BLUETOOTH® WIRELESS TECHNOLOGY HANDS-FREE FEATURES
Using Your Phone Book
Each time your cell phone pairs with the Navigator III, the phone
book is automatically loaded into the Navigator III. This way, each
change you make to your cell phone’s phone book is reflected the
Dialing Numbers
1. From the Main menu, touch Phone.
2. Touch Dial Number.
3. Enter the number, and touch Dial.
next time you use it with your Navigator III.
Placing Calls Using Voice Dial
NOTE: After your phone is connected to the Navigator III, it
may take a few minutes for the phone book to be available.
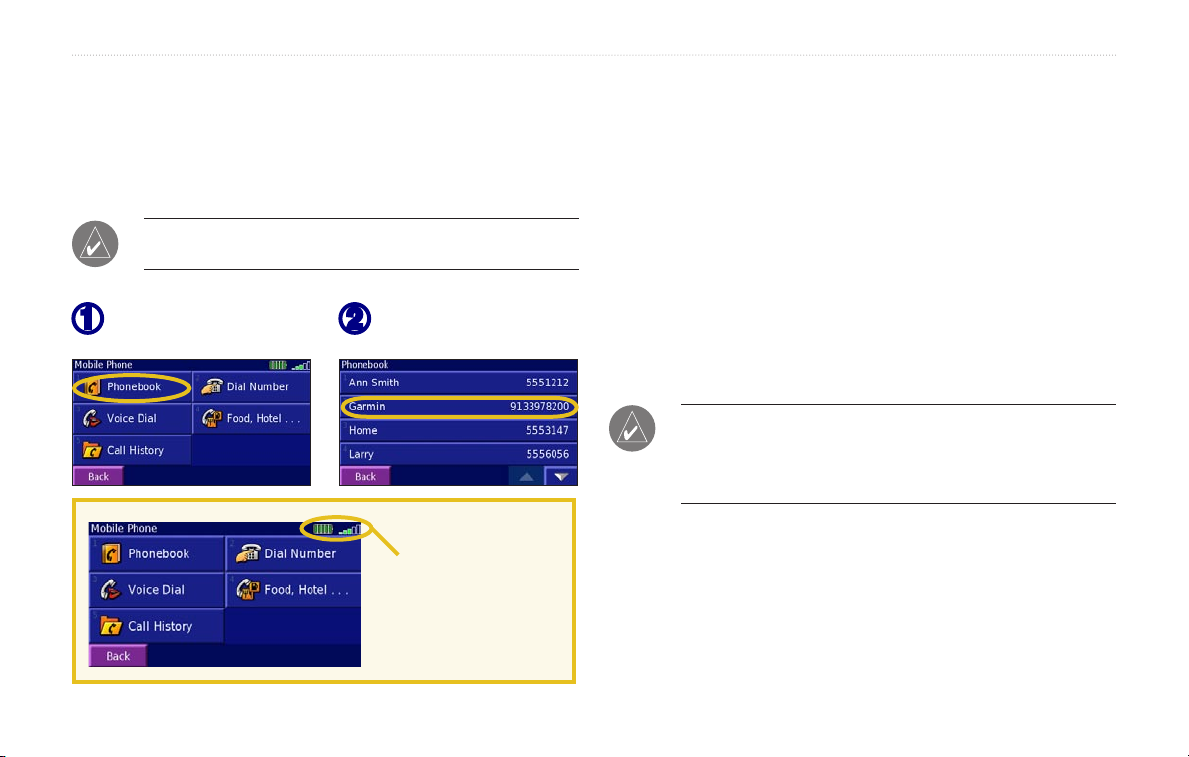
From the Main menu, touch
➊
Phone > Phonebook.
To call an entry, touch the
➋
phone book entry.
Indicates your cell phone’s
battery level and signal
strength
If your cell phone supports it, you can place calls by speaking the
contact’s name.
To make a call using Voice Dial:
1. From the Main menu, touch Phone.
2. Touch Voice Dial.
3. Speak the contact you want to call.
NOTE: You may need to “train” your cell phone to recognize
your voice commands. If so, the Navigator III will walk you
through the process. Refer to your phone’s owner’s manual, if
necessary.
BMW Motorrad Navigator III Owner’s Manual 23
Page 32
USING BLUETOOTH® WIRELESS TECHNOLOGY HANDS-FREE FEATURES
Dialing POIs
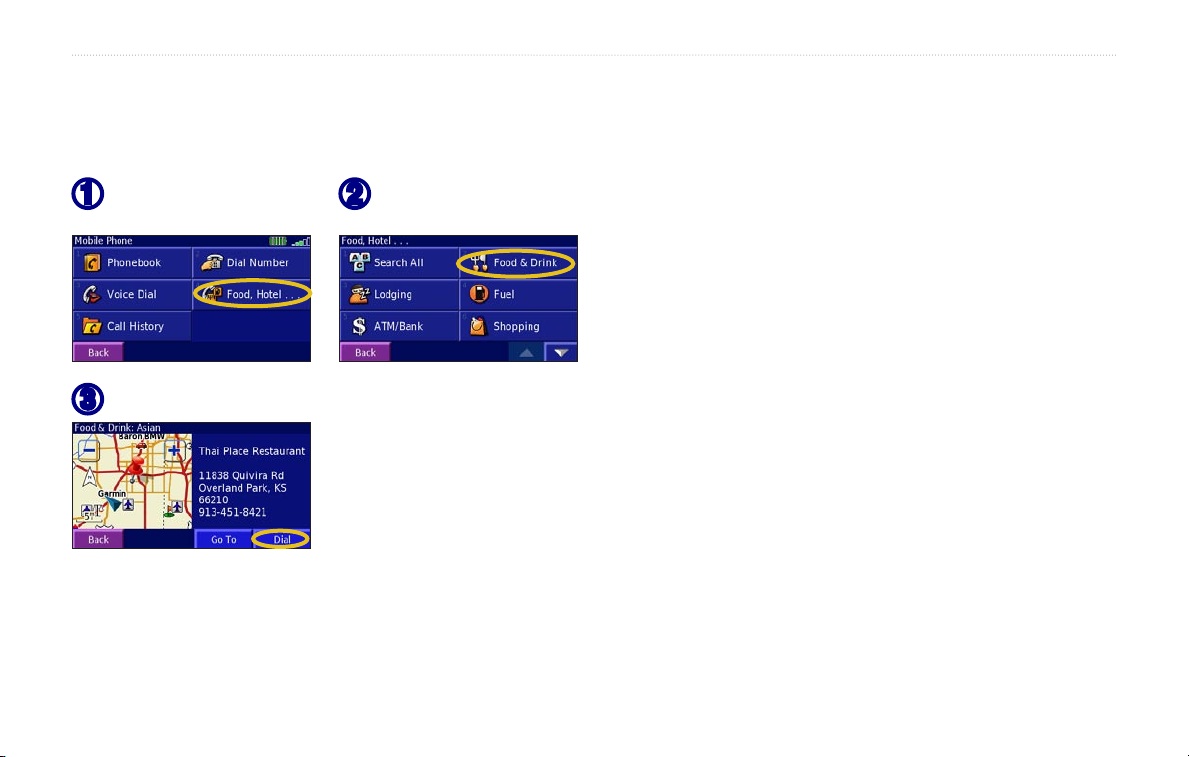
Some points of interest (POIs) have phone numbers associated with
them. You can place a call to these POIs.
From the Main menu, touch
➊
Phone > Food, Hotel….
Touch Dial.
➌
You can also call points of interest using the Find (Where To?)
menu. After you have found the location you want to call, touch
Advanced > Dial Phone Number.
Search for the location you
➋
want to call.
Viewing Your Call History
Each time you pair your phone with the Navigator III, your call
history is automatically transferred to the Navigator III.
1. From the Main menu, touch Phone > Call History.
2. Touch a category (Missed, Dialed, or Received) to view
3. To call one of the numbers listed, touch it.
those calls. The calls are listed in chronological order; the
most recent calls are at the top of the list.
24 BMW Motorrad Navigator III Owner’s Manual
Page 33
TRAFFIC INFORMATION
TRAFFIC INFORMATION
Using an optional Garmin® FM TMC Traffic Receiver, your
Navigator III can receive and use traffic information broadcast over
the FM radio data system. No more changing the radio stations to
hear the latest traffic report!
When a traffic message is received, your Navigator III displays the
incident on the map and can change your route to avoid the traffic
incident.
For more information about the FM Traffic Receiver, visit the
Garmin Web site (
www.garmin.com). For participating FM traffic
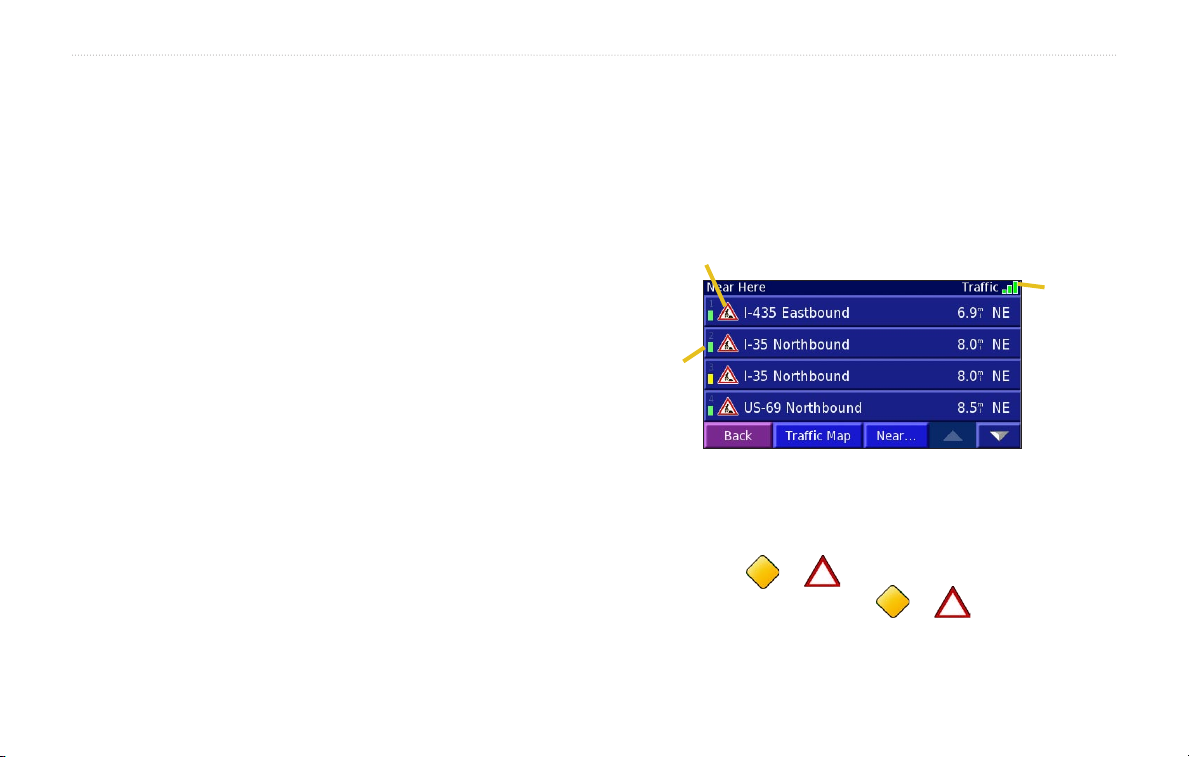
Viewing Traffic Incidents
From the Main menu, touch Tools > Traffic. Touch an item in the
list to view the details. Touch Near… to view traffic at a different
location.
Traffic Symbol
Signal
strength
Color
code
subscription providers and covered cities, refer to http://www
.garmin.com/fmtraffic.
Traffic Incident List
Connecting the FM Traffic Receiver
Plug the FM Traffic Receiver’s cable into the mini-USB connector
on the back of the Navigator III under the weather cap.
Navigator III Owner’s Manual 25
Avoiding Traffic
When a traffic incident is on your current route or on the road
you are driving, a or appears in the lower-left corner of
the map. To avoid the traffic, touch
incident, and then touch Detour Around.
or , touch the traffic
Page 34
TRAFFIC INFORMATION
Adding an FM Traffic Subscription
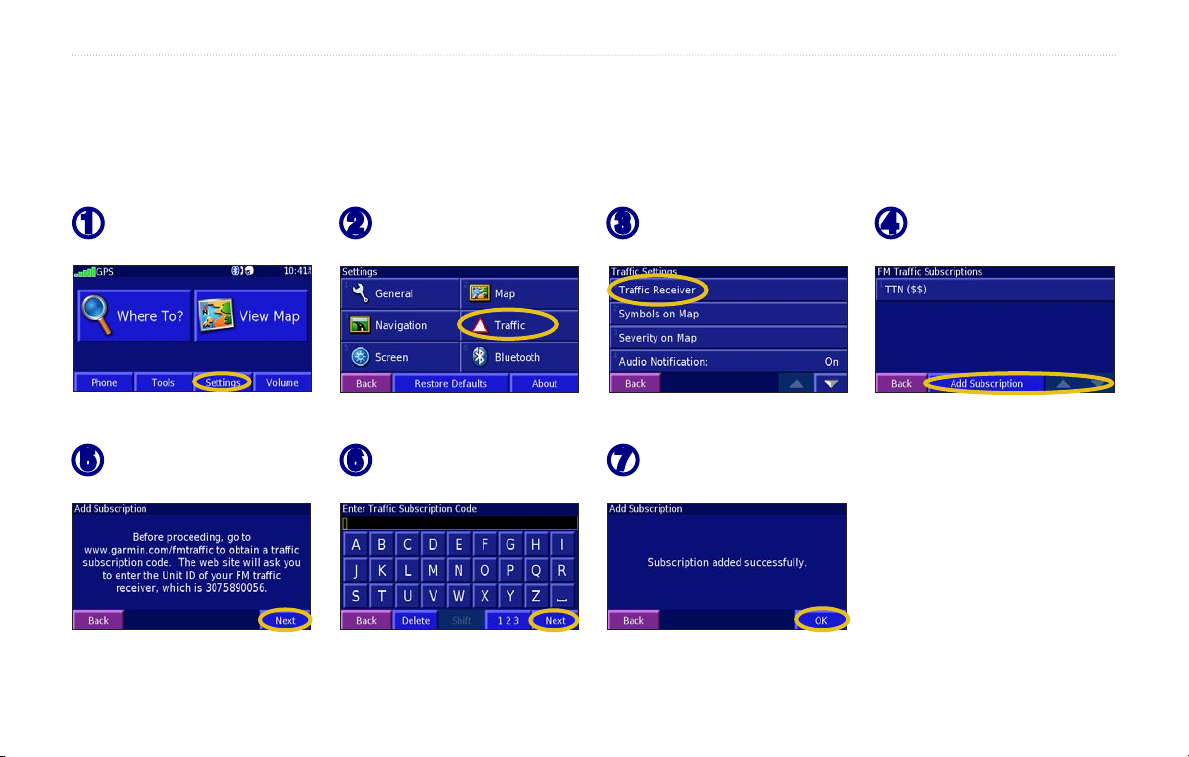
Your FM Traffic Receiver came with a trial subscription, or you may be in an area with free service. You can also add subscriptions to
expand your service area. Write down your FM Traffic Receiver’s unit ID. Go to http://www.garmin.com/fmtraffic to purchase a traffic
subscription and get a 25-character traffic subscription code.
Touch Settings.
➊
Touch Next.
➎
26 Navigator III Owner’s Manual
Touch Traffic.
➋
Enter the code and touch
➏
Next.
Touch Subscriptions.
➌
Touch OK.
➐
Touch Add Subscription.
➍
Page 35
CUSTOMIZING THE NAVIGATOR III
CUSTOMIZING THE NAVIGATOR III
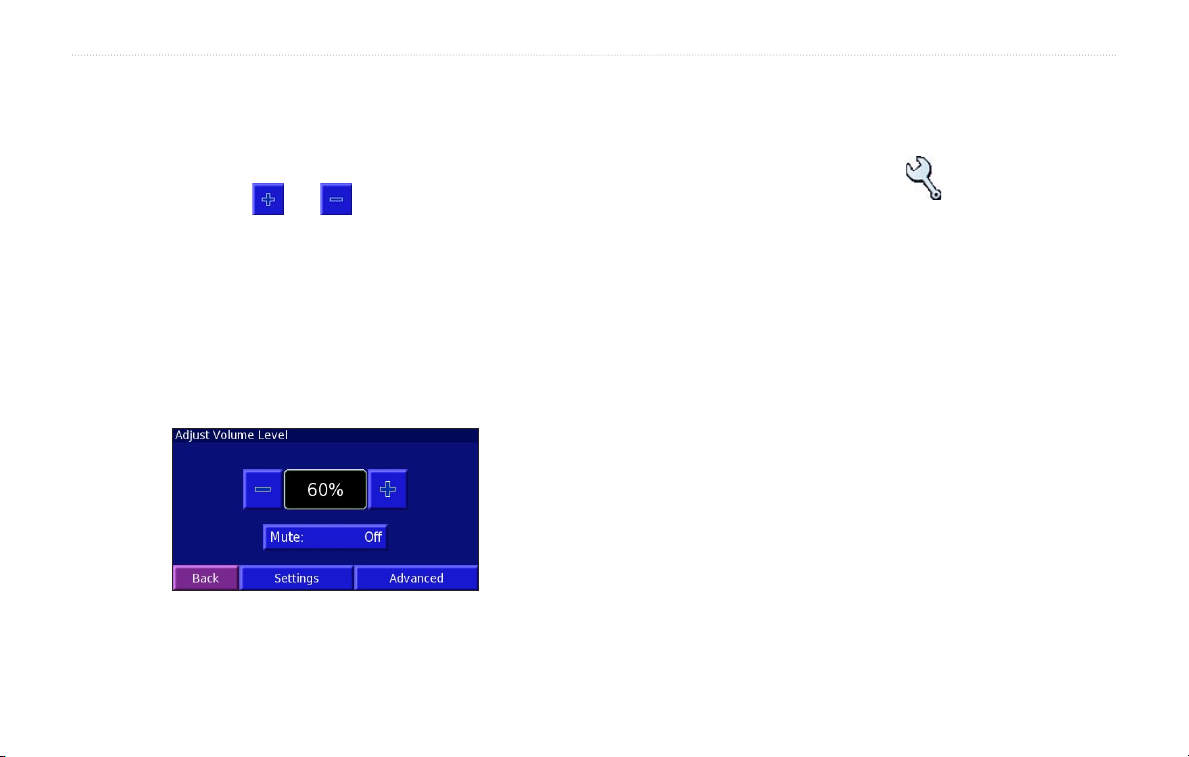
Adjusting the Volume
From the Main menu, touch Volume or simply press and hold
the SPEAK key. Touch and to adjust the volume of the
speaker.
Touch
Mute, or press and hold the SPEAK key, to mute and
unmute the Navigator III.
Touch
Settings to open the Audio Settings; see page 28.
Touch
Advanced to adjust the volume levels for the voice prompts
in relation to the other audio output.
Navigator III Owner’s Manual 27
Customizing the General Settings
From the Main menu, touch Settings > General.
Changing the GPS Settings
From the Main menu, touch Settings > General > GPS, or touch
the GPS Settings button on the GPS Info page.
Use Indoors—touch Yes to turn the GPS receiver off and use the
unit indoors.
Set Position—if Use Indoors is selected, you can select a location
on the map as your current location (position). Touch OK after you
select your location.
WAAS/
EGNOS—disable and enable WAAS/EGNOS. Wide Area
Augmentation System (WAAS) and Euro Geostationary Navigation
Overlay Service (EGNOS) are systems of satellites and ground
stations that provide GPS signal corrections, giving you even better
position accuracy. To learn about WAAS and EGNOS, visit http://
www.garmin.com/aboutGPS/waas.html.
Page 36
CUSTOMIZING THE NAVIGATOR III
Changing the Language
From the Main menu, touch Settings > General > Language.
Voice Language
messages. Touch the voice you want to use and touch OK. To
delete that voice from your Navigator III, touch Delete and OK.
Your Navigator III contains two different types of voice languages:
—change the language for all voice prompts and
Customizing the Keyboard
From the Main menu, touch Settings > General > Keyboard.
Input Type
European to use diacritical characters.
Key Size—select Large when you need to use larger keys, such as
when you are wearing gloves.
text-to-speech and pre-recorded. Languages noted with “TTS”
are text-to-speech (TTS) voices. The text-to-speech voices “read”
and “speak” the words that are displayed on the Navigator III. The
voices have an extensive vocabulary, and they pronounce the street
names as you approach turns. The languages without “TTS” are
pre-recorded voices, which have a limited vocabulary and do not
Customizing the Audio
From the Main menu, touch Settings > General > Audio.
Guidance—turn on the vocal guidance prompts or select Speak
Key Only to provide vocal guidance prompts only when you press
the SPEAK key.
speak names of locations or streets.
Attention Tone—turn on or off the attention tone that sounds
NOTE: If you change the Voice Language, your Navigator III
must restart to complete this change.
before voice prompts.
Touch Screen Tone—turn on or off the tone that sounds each time
Text Language—change the on-screen text to the selected
language. Changing the Text Language does not change the
language of map data or user-entered data.
you touch the screen.
Keypress
press a key on the remote.
Speech Rate—select the rate for the vocal prompts.
—select the English Only keyboard, or select West
Tone—turn on or off the tone that sounds each time you
28 BMW Motorrad Navigator III Owner’s Manual
Page 37

CUSTOMIZING THE NAVIGATOR III
Speed Adjusted Volume—select how much the volume increases
as your speed increases. Low increases your volume slightly; High
increases your volume the most. This is helpful when you are
driving on the highway and the ambient noise level increases (from
wind or other factors).
Adjusting the Proximity (Custom POI) Alerts
From the Main menu, touch Settings > General > Proximity
Alerts. This adjusts the visual and audio notifications for custom
POIs you have loaded on the Navigator III For more information
about loading custom POIs, see page 36.
Audio Notifications—turn off or on the alerts that sound as you
approach a custom POI.
Visual Notification—turn off or on the pop-up alerts that appear as
you approach a custom POI.
Continuous Notification
POIs) you will be continually notified about.
—select which alerts (which types of
Changing the Time Settings
From the Main menu, touch Settings > General > Time.
Time Zone—select your time zone or a nearby city. Touch
to set the time manually. Touch OK after you adjust the time.
Touch List Time Zones to return to the time zone/city list.
Time Format
Daylight Saving—select Auto, Yes, or No. The Auto setting
automatically adjusts the time for daylight saving time based on
your time zone.
Selecting Units
From the Main menu, touch Settings > General > Units. Change
all units of measure to Statute or Metric. Custom allows you to
select metric or statue for a variety of units, such as distance, speed,
and temperature.
Turning Safe Mode Off and On
From the Main menu, touch Settings > General > Safe Mode.
Turn on or off Safe Mode, which disables all unit functions
that require significant operator attention and could become a
distraction while driving. For example, when Safe Mode is On, you
cannot search for a location while the vehicle is moving.
Custom
—select 12 or 24-hour time format.
BMW Motorrad Navigator III Owner’s Manual 29
Page 38
CUSTOMIZING THE NAVIGATOR III
Changing the Map Settings
From the Main menu, touch Settings > Map.
Map Detail—adjust the amount of detail shown on the map. The
map redraws more slowly when detail is added.
Orientation—change the perspective of the map.
• 2D North Up—display the map in two dimensions (2-D) with
North at the top of the screen.
• 2D Track Up—display the map in two dimensions (2-D)
with your direction of travel at the top of the screen.
• 3D Track Up—display the map in three dimensions (3-D)
with your direction of travel at the top of the screen. This is
the default map view.
Color Mode
a black background. Select Auto to automatically switch between
the two based upon the time of day.
Auto Zoom—disable or enable automatic zooming on the map
for optimal viewing. You can also specify a maximum auto zoom
distance.
Route Color—select the color of the route line.
—select Day for a bright background. Select Night for
Dim Roads—dim roads that are not on your route. Select Never or
While Routing.
Map Data Fields—adjust the size and content of the data fields
displayed on the Map page. Select None to remove the data fields
to see more of the map. Select Wide to make the data fields larger;
they take up more room on the map. Select Thin to see make the
data flieds thinner so you can see more of the map. See the next
page for more information.
Text Size
—adjust the display size of text for various items shown
on the map, such as railroads and streets.
Zoom Level Detail—customize which map items appear at various
zoom levels. For each map item, you can select Off, Auto, or a
maximum zoom distance.
NOTE: Adding more detail increases the time it takes the map
to refresh.
Detail Maps—enable and disable the detailed maps loaded in your
Navigator III
30 BMW Motorrad Navigator III Owner’s Manual
Page 39
CUSTOMIZING THE NAVIGATOR III
Changing the Navigation Settings
From the Main menu, touch Settings > Navigation.
Vehicle—specify your vehicle type to optimize the route for your
vehicle because some roads have vehicle-based restrictions.
Preference
• Faster Time—routes calculated with this setting are faster to
• Shorter Distance—routes calculated with this setting are
• Off Road—creates a direct-line route from your current
Ask Preference
each time it calculates a route.
Next Turn Pop-up—turn on or off the Next Turn pop-up window.
Auto opens the window as you near the turn.
Off-Route Recalculation—set the way the unit responds when
you are off the route. You can silence the “off-route, recalculating”
message here.
—select a preference for route calculations.
drive but may be longer in distance.
shorter in distance but may take more time to drive.
location to your destination. This may be useful when you
are travelling outside of detailed map coverage areas, or
where no roads exist.
—select whether the unit asks for your preference
Continuous Auto Routing—turn on or off Continuous Auto
Routing, which allows the Navigator III to continually search for
a better route to your destination. This can be useful if a traffic
accident occurs or there are time-restricted turns on the current
route. When Auto is selected, a or a is displayed on the
map when the Navigator III has found a better route than the one
you are currently taking. Touch
Avoidance Setup
—see page 19.
or to take the better route.
Adjusting the Traffic Settings
From the Main menu, touch Settings > Traffic.
Provider—(European units only) if you have an FM Traffic
Receiver connected, select which provider to use. Touch
to clear the provider list and search for providers.
Subscriptions—if you have an FM Traffic Receiver connected,
touch FM Traffic Subscriptions to view your subscriptions. Touch
the subscription to display the expiration date. See page 26 for
information about adding an FM Traffic subscription.
Symbols on Map—change the symbols used to indicate the type of
traffic incident. Touch each symbol to set the zoom scale at which
each symbol appears on the map.
Advanced
BMW Motorrad Navigator III Owner’s Manual 31
Page 40
CUSTOMIZING THE NAVIGATOR III
Severity on the Map—select the scale at which traffic incidents of
a specific severity are displayed on the map.
Audio Notification—turn on or off the audio notification that alerts
you about a traffic incident.
Avoid Traffic—select Yes to avoid traffic incidents when
generating a route.
Changing the Screen Settings
From the Main menu, touch Settings > Screen.
Brightness—select Manual and then touch Next. Touch the
to decrease the brightness or to increase it. Select Auto for
automatic brightness adjustment based upon the light sensor’s
reading.
Calibrate Touch Screen
responding properly, you can calibrate the screen. Follow the onscreen instructions. Use the remote control to access this page, if
necessary.
Touch Screen—turn on or off the touch screen. When the touch
screen is off, use the unit keys or optional remote control to operate
the Navigator III.
—if you think the touch screen is not
Changing the Bluetooth Technology Settings
From the Main menu, touch Settings > Bluetooth.
Manage Connections—manage your connections to devices that
have Bluetooth wireless technology. Touch a device to connect
or disconnect from it, or to remove it from the Navigator III’s
memory. Touch Add Device to search the area for devices that
have Bluetooth technology. See pages 21 through 24 for more
information.
Bluetooth—turn on or off the Bluetooth technology.
Friendly Name—enter a name for your BMW Motorrad Navigator
III. This name is used when you are connecting to devices that have
Bluetooth technology.
Viewing Unit Information (About)
From the Main menu, touch Settings > About. Touch an item to
view information about it.
Restoring the Settings
To restore the unit to its original settings, open the Main menu and
touch Settings > Restore Defaults > Yes.
32 BMW Motorrad Navigator III Owner’s Manual
Page 41
CUSTOMIZING THE NAVIGATOR III
Customizing the Map Data Fields
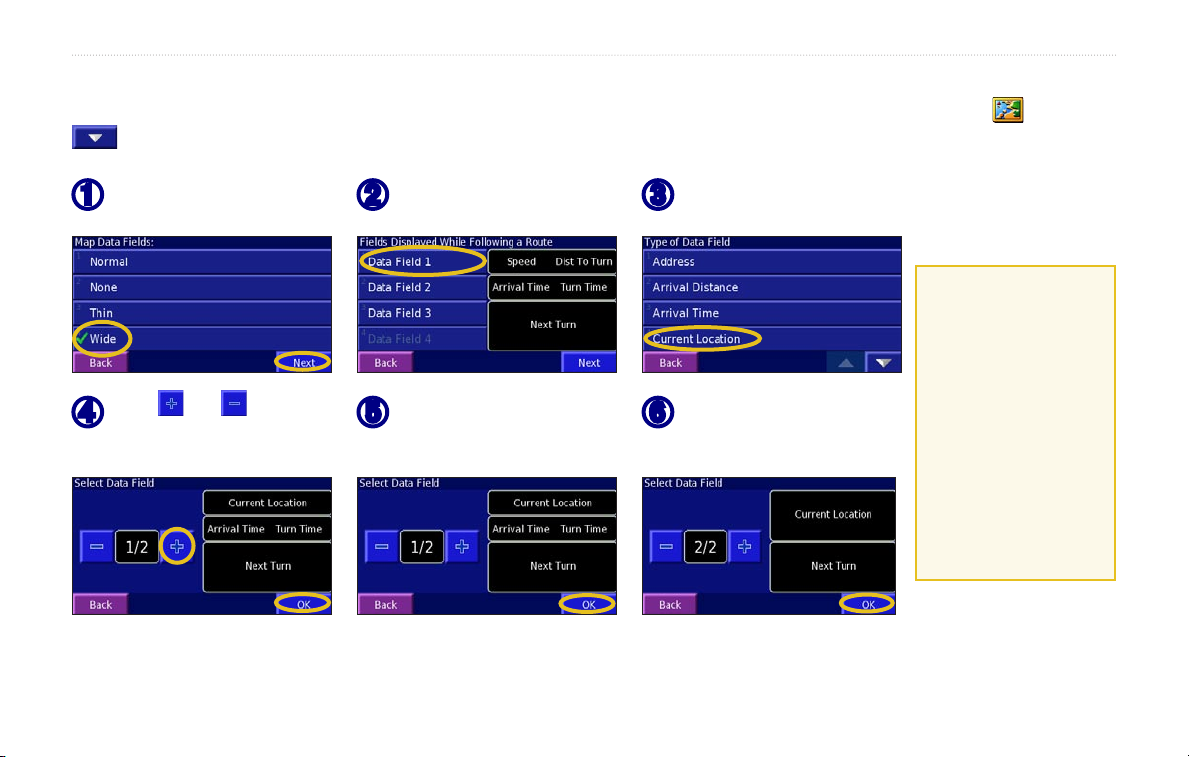
You can customize the information that appears in the data fields on the Map page. From the Main menu, touch Settings > Map >
> Map Data Fields.
Touch Wide or Thin.
➊
Touch Next.
Touch and to change
➍
the field layout. Touch OK.
Navigator III Owner’s Manual 33
Touch the data field you
➋
want to customize.
Repeat for each data field
➎
displayed while you are
following a route.
Select the type of data to
➌
appear in this field.
Touch Next. Repeat for the
➏
data fields displayed when
you are not following a route.
1/2, 2/2, 1/3?
1/2 indicates this is
your first choice out
of two choices for
the layout of the data
field. 2/2 means this
is your second choice.
Some types of data
fields allow you three
choices, but some only
provide one.
Page 42
APPENDIX
APPENDIX
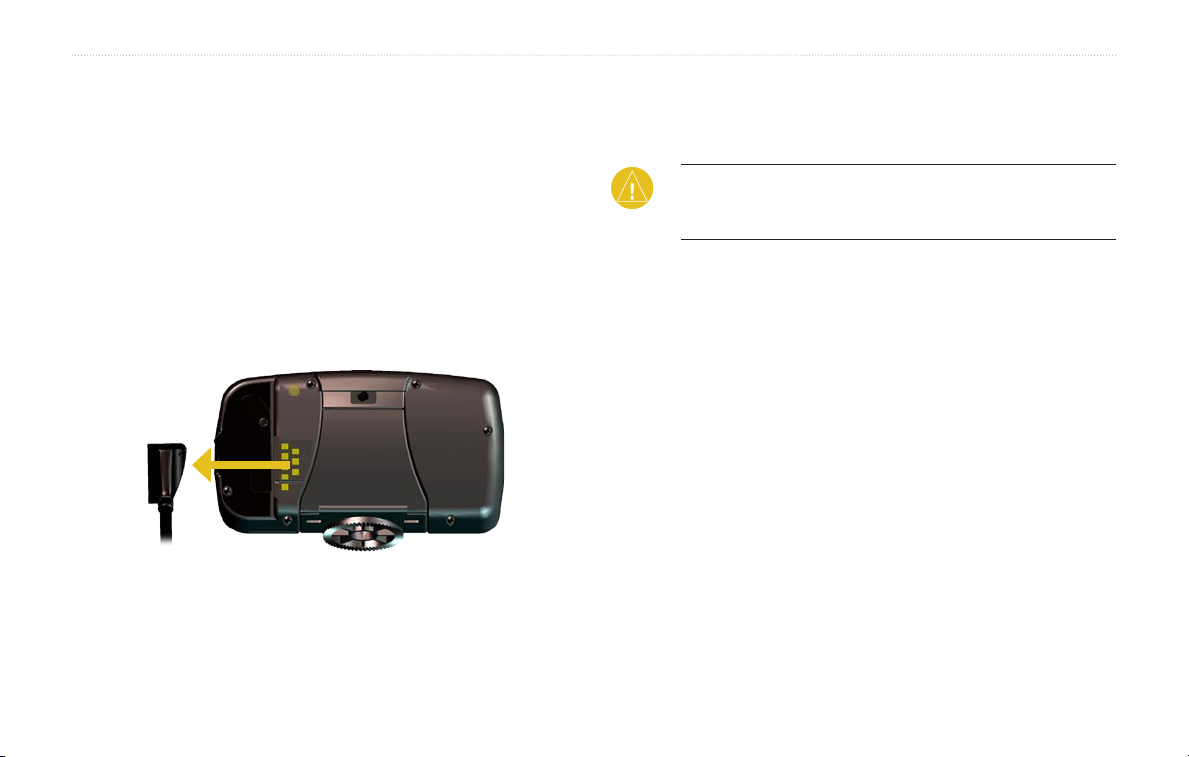
Removing Your Navigator III from the Motorcycle Mount
1. Use the security screwdriver to loosen the screw on the top
of the cradle lock.
2. Lift the cradle lock up until it clicks.
3. Pull the BMW Motorrad Navigator III unit out of the mount.
4. Slide the power connector to the left to disconnect the
power cable.
Connecting to Your Computer
NOTE: Do not connect the USB cable to your computer until
you have loaded the USB drivers using the enclosed DVDROM.
To update your software, load additional maps, or load Custom
POIs, connect your Navigator III to your computer using the USB
cable provided.
Step 1: Load the USB Drivers
Before connecting the USB cable to your computer, place the
enclosed DVD-ROM into your computer’s DVD-ROM drive.
If the DVD-ROM does not start automatically, click
then Run…. Type the letter of your DVD-ROM drive followed
by “setup” (example: “D:\setup”). Then press Enter. Follow the
on-screen instructions.
Start and
Step 2: Connect AC Power
Connect the enclosed AC power cable to the power connector
on the back of the Navigator III Connect the end to an available
electrical outlet.
34 Navigator III Owner’s Manual
Page 43
APPENDIX
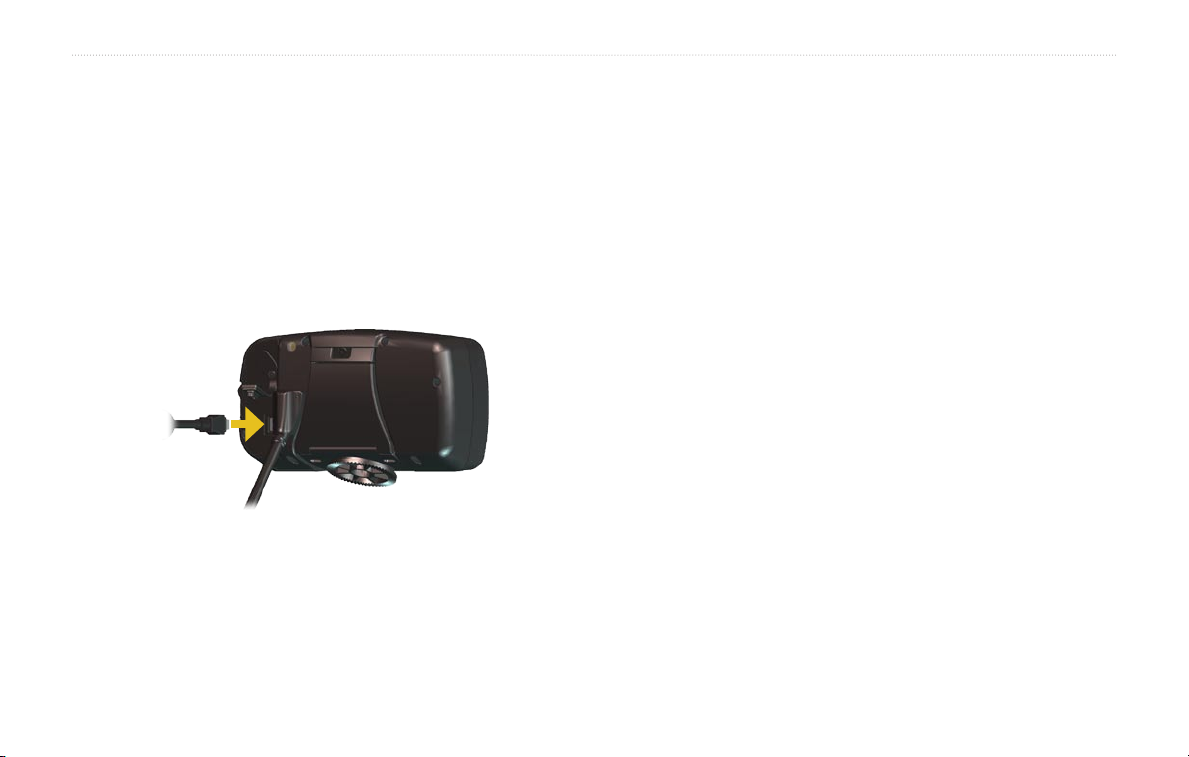
Step 3: Connect the USB Cable
Use the USB cable provided to connect the Navigator III to your
Updating the Software and Map Data
1. Load the USB drivers using the enclosed DVD-ROM. See
computer. Also use the USB cable when updating the Navigator III
software or loading additional maps.
To connect your Navigator III to your computer:
1. Plug the small end of the USB cable into the connector
located on the back of your Navigator III
2. Connect the larger end of the USB cable to an available
USB port on your computer.
2. Connect the AC cable to the power connector on the back
3. Connect the USB cable to your Navigator III and your
4. Go to http://www.garmin.com/products/navigatorIII. Select
5. Click Download next to the unit software.
6. Read and agree to the terms. Click Download.
7. Select Run (or Open). Your software is updated.
You can also use WebUpdater to update your Navigator III
software. Go to http://www.garmin.com/products/webupdater/ to
learn about WebUpdater.
Check http://www.garmin.com/unlock/update.jsp to see if an
update for your map software is available.
Register Your Navigator III
Go to http://www.garmin.com/registration/ to register your
Navigator III. By registering, you will receive notification of
software and map updates.
To find out the version of the maps that are loaded on your
Navigator III, open the Main menu. Touch
> Detail Maps. To load maps to your Navigator III, see the
MapSource Help file.
the previous page.
of the Navigator III. Turn on the Navigator III
computer.
Updates and Downloads.
Settings > About
BMW Motorrad Navigator III Owner’s Manual 35
Page 44
APPENDIX
MENU MAP
BACK SPEAK
IN OUT
PAGE
ZOOM
1
ABC
2
DEF
3
GHI
4
JKL5MNO
6
PQRS
7
TUV
8
WXYZ
9
0
VOL
Custom POIs (Points of Interest)
Your Navigator III accepts custom points of interest (POI)
databases, available from various companies on the Internet. Some
custom POI databases contain alert information for points, such as
safety cameras and school zones. Your Navigator III can notify you
when you approach one of these points.
After downloading your POI database, use the Garmin POI Loader
to install the POIs into your unit. The POI Loader is available
at http://www.garmin.com/products/poiloader/. Select Updates
and Downloads. Refer to the POI Loader Help file for more
information; press F1 to open the Help file.
CAUTION: Garmin is not responsible for the consequences
of using a custom POI database or the accuracy of the safety
camera or other custom POI database.
Finding Custom POIs
To find the Custom POIs loaded on your Navigator III, press the
FIND key and then touch My Locations > Custom POIs.
Deleting Custom POIs
To delete all of the Custom POIs, press the MENU key. Touch
Tools > My Data > Custom POIs > Delete All.
36 BMW Motorrad Navigator III Owner’s Manual
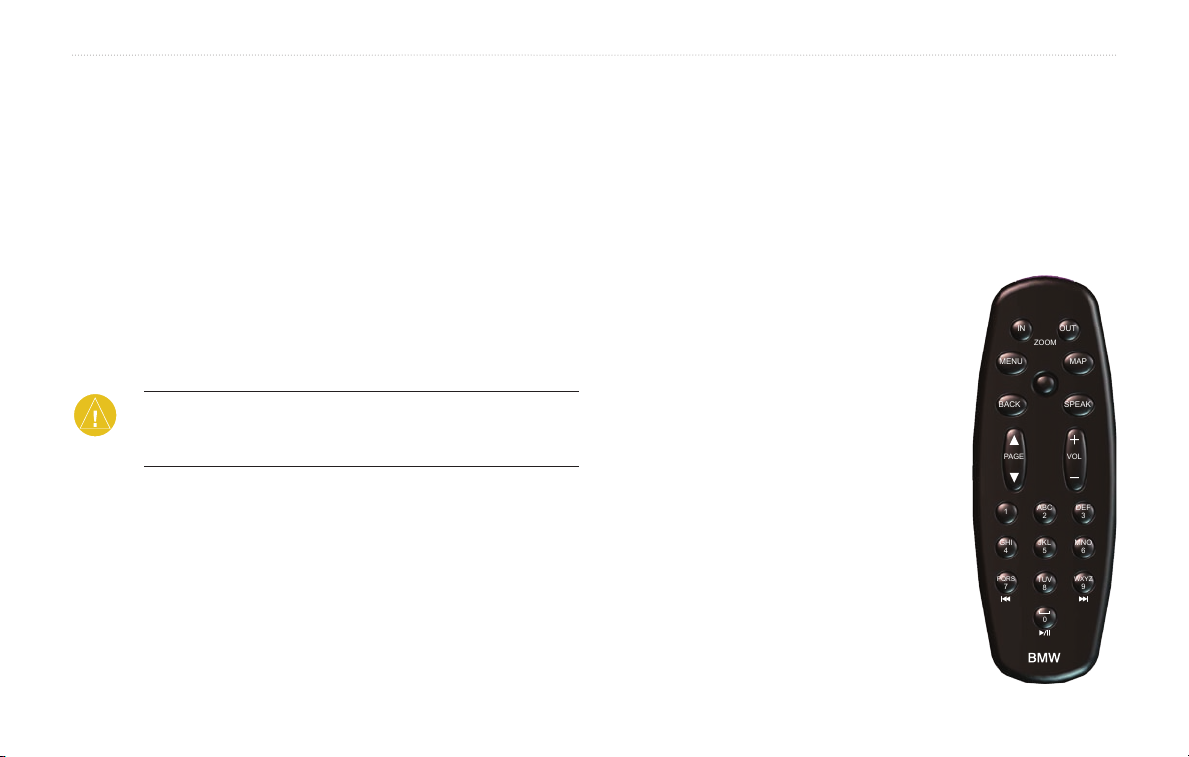
Using the Optional Remote Control
Install two AAA batteries in the remote. Aim the remote toward the
IR window on the front left of the Navigator III.
(Zoom) In—zooms in on the map.
(Zoom) Out—zooms out of the map.
Menu—opens the Main menu. Press repeatedly to view the Main
menu, the Tools menu, and Settings menu.
Map—opens the Map page. Press repeatedly
to view the Map page, Trip Computer, and
Compass.
Back—returns to the previous page or cancels
data entry.
Speak—announces the next turn or GPS
status.
Thumb Stick—highlights options and moves
the map pointer. Press in to make a selection.
Page ▲ ▼—scrolls through lists and pages.
+ - —raises and lowers the volume.
Vol
Alphanumeric Keys—enters numbers. To
enter letters, press the key repeatedly.
Page 45
APPENDIX
Technical Specifications
Size: 5.6” W x 3.2” H x 2.0” D (14.3 x 8.0 x 5.0 cm)
: 0.93 lb (420 g)
Weight
Unit Case: Rugged; fully gasketed; IPX7 waterproof*
Display: Sunlight-readable, 17:9 WQVGA automotive color TFT
display with touch screen and auto dimming; 454 pixels by 240
pixels,
Map Storage: Pre-programmed internal memory
Temperature
Power Supply
Source: 12 VDC
Usage: 12 watts maximum @ 13.8 VDC
12-volt adapter Fuse: AGC/3AG - 1.0 Amp
Optional Remote Control: Two AAA alkaline batteries (not
included).
* Note: The remote control is not waterproof.
For a complete list of specifications, visit the Garmin Web site:
http://www.garmin.com/products/navigatorIII/spec.html.
Contact your local waste disposal department for information on
properly disposing of the unit.
BMW Motorrad Navigator III Owner’s Manual 37
: 5° to 158°F (-15° to 70°C)
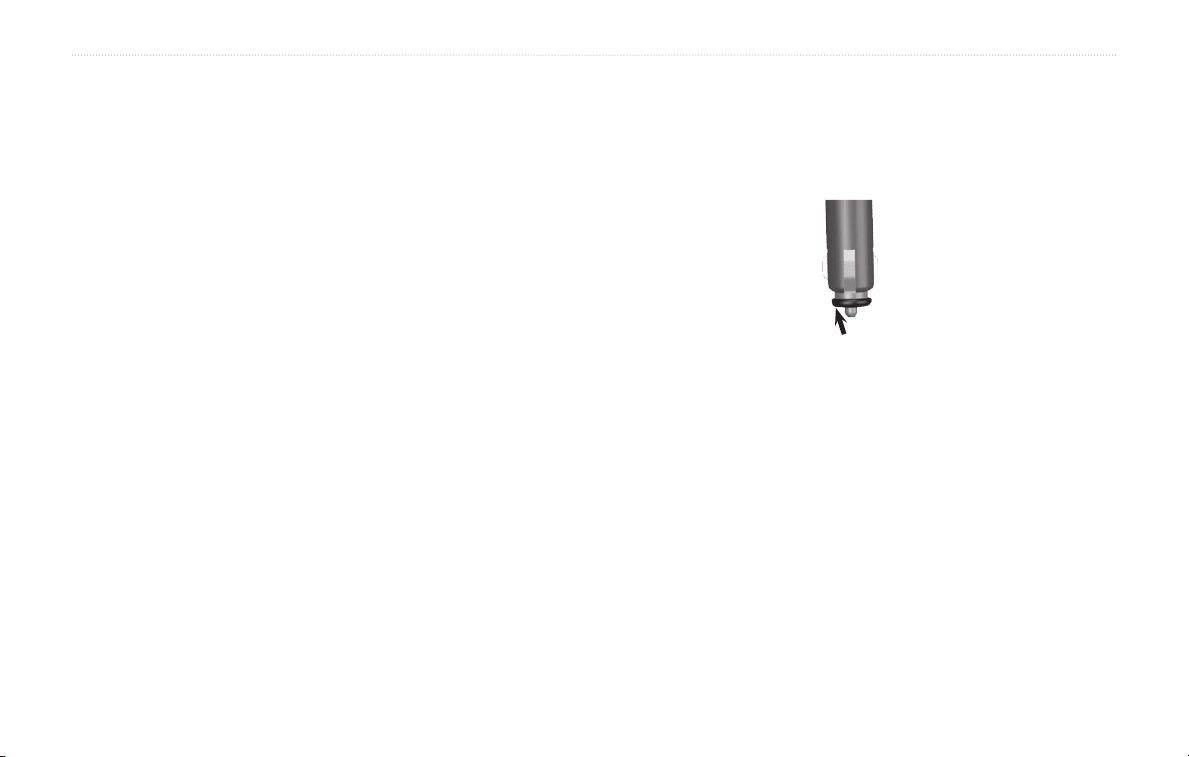
Changing the Fuse
The Vehicle Navigation Kit cable has a 3AG 1.0 Amp fast blow
fuse located at the tip of the 12-Volt adapter. If you need to change
the fuse, unscrew the black, round end piece and replace the fuse.
Unscrew
Using a Remote GPS Antenna
Use an optional external remote GPS antenna (Garmin GA 25)
when using the unit in a vehicle with a coated windshield or an
in-screen heating system, which can block GPS signals. Connect
the antenna to the MCX connector located on the back of the unit.
To purchase, go to http://www.garmin.com/products/navigatorIII.
Click Accessories.
Page 46
APPENDIX
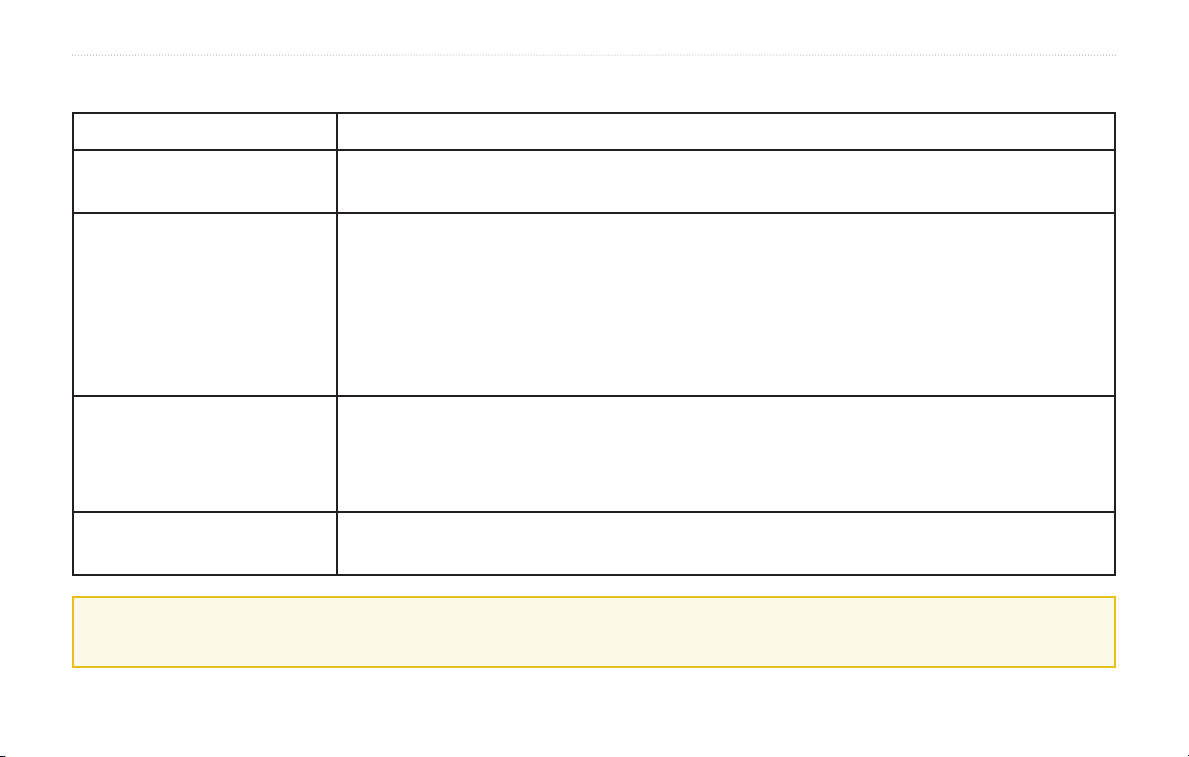
Navigator III Troubleshooting
Problem/Question Solution/Answer
The touch screen is not
responding to my taps.
The remote control does not
work.
Note: The remote is optional in
some Navigator III packages.
How do I clear all my user
data?
I need to reset my Navigator III.
My phone/helmet will not
connect to my Navigator III.
Calibrate the screen. Press Menu on the remote. Use the remote to select Settings > Display >
Recalibrate. Follow the on-screen instructions.
The remote is not enabled when in the advanced motorcycle cradle. Use the keys on the unit and
cradle and touch the touch screen to operate the Navigator III when in the cradle.
Check that two AAA batteries are installed.
Check the polarity of the batteries (+ and -).
Install fresh batteries.
Aim the front of the remote toward the IR port on the front of the Navigator III.
Turn off the Navigator III and then turn it back on. During start up, press and hold the FIND key on
the front of the Navigator III. Keep pressing Find until the message “Do you really want to erase all
user data?” appears. Touch Yes to clear all user data.
All original settings are restored. Your recent finds are also deleted.
Turn off your phone/helmet. Turn it back on. The device should connect to the Navigator III. If not,
turn the device off and turn the Navigator III off. Turn them back on.
Tip
Be sure you have loaded the USB drivers before you connect the USB cable. See page 34 for information.
38 Navigator III Owner’s Manual
Page 47

FCC Compliance
The unit complies with Part 15 of the FCC interference limits for Class B
digital devices FOR HOME OR OFFICE USE. These limits are designed
to provide more reasonable protection against harmful interference in a
residential installation, and are more stringent than “outdoor” requirements.
Operation of this device is subject to the following conditions: (1) This
device may not cause harmful interference, and (2) this device must accept
any interference received, including interference that may cause undesired
operation.
This equipment generates, uses, and can radiate radio frequency energy and, if
not installed and used in accordance with the instructions, may cause harmful
interference to radio communications. However, there is no guarantee that
interference will not occur in a particular installation. If this equipment does
cause harmful interference to radio or television reception, which can be
determined by turning the equipment off and on, you are encouraged to try to
correct the interference by one of the following measures:
• Reorient or relocate the receiving antenna.
• Increase the separation between the equipment and the receiver.
• Connect the equipment into an outlet on a circuit different from that to
which the receiver is connected.
• Consult an experienced radio/TV technician for help.
The unit does not contain any user-serviceable parts. Repairs should only
be made by an authorized Garmin service center. Unauthorized repairs
or modifications could result in permanent damage to the equipment, and
void your warranty and your authority to operated this device under Part 15
regulations.
Software License Agreement
BY USING THE NAVIGATOR III, YOU AGREE TO BE BOUND BY
THE TERMS AND CONDITIONS OF THE FOLLOWING SOFTWARE
LICENSE AGREEMENT. PLEASE READ THIS AGREEMENT
CAREFULLY.
Garmin grants you a limited license to use the software embedded in this
device (the “Software”) in binary executable form in the normal operation of
the product. Title, ownership rights, and intellectual property rights in and to
the Software remain with Garmin.
You acknowledge that the Software is the property of Garmin and is protected
under the United States of America copyright laws and international copyright
treaties. You further acknowledge that the structure, organization, and code
of the Software are valuable trade secrets of Garmin and that the Software in
source code form remains a valuable trade secret of Garmin. You agree not
to decompile, disassemble, modify, reverse assemble, reverse engineer, or
reduce to human readable form the Software or any part thereof or create any
derivative works based on the Software. You agree not to export or re-export
the Software to any country in violation of the export control laws of the
United States of America.
Declaration of Conformity
Hereby, Garmin declares that this Navigator III product is in compliance with
the essential requirements and other relevant provisions of Directive 1999/5/
EC. To view the full Declaration of Conformity, see the Garmin Web site for
your Garmin product: http://www.garmin.com/products/navigatorIII. Click
Manuals and then select Declaration of Conformity.
Page 48

INDEX
INDEX
Symbols
2 Dimensional 30
3 Dimensional 30
A
adding a traffic subscrip-
tion 26
add as favorite 6
answering a call 22
audio settings 28
audio version 32
auto arrange, route 17
avoidances 19
avoiding traffic 25
B
battery level, cell phone 23
better route 4, 31
Bluetooth technology
hands-free 22
pairing 21
settings 32
using 21–24
brightness of the screen 32
browse the map 12
40 Navigator III Owner’s Manual
C
calibrating the screen 32
calling POIs 24
call history 24
caring for your Navigator
III vi
category for saved loca-
tions 10
cell phone
pairing 21
using hands-free fea-
tures 22
cleaning vi
clear all user data 38
color mode 30
connecting a cell phone or
helmet 21
connecting the USB cable 35
connecting your Navigator III
to your computer 35
continuous auto routing 31
coordinates, entering for a
saved location 10
customizing the Navigator
III 27–33
general settings 27
map data fields 33
map settings 30
navigation settings 31
restoring the settings 32
screen settings 32
volume 27
custom avoids 19
custom POIs 36
D
data field
changing 33
default settings 32
deleting
all saved routes 18
route 16
saved location 11
detail maps
disable/enable 30
version of 32
detour, adding 18
diacritical characters 28
dialing numbers 23
dialing POIs 24
driving directions 13
E
editing saved locations 10
edit points in a route 16
EGNOS 27
elevation 10
enable maps 30
erase all user data 38
expand your search 6
F
FCC compliance 39
finding locations 5–7
address 7
item on the map 6
near this location 6
recent finds 6
restaurant 3
saved locations 9
spell the name 5
following your route 4
fuse 37
G
general settings 27
getting a call 22
Go Home 9
GPS info page 14
H
hands-free 22
hands-free cell phone 22
helmet
pairing 21
using 22
Home location 9
I
icon on the map page 25
incoming call 22
insert in current route 6
in a call 22
items to avoid 31
K
keyboard, on-screen
customizing 28
using 2
L
language 28
larger keys on keyboard 28
license agreement 39
locations
editing 10
finding 5–7
saving 8
M
map 12
browse 12
customize 30
orientation 30
update maps 35
Page 49

INDEX
zoom 12, 13
map data fields, changing 33
map version 32
metric units 29
midpoints in the route 17
mileage logs 20
My Locations 8–11
Go Home 9
My Favorites 9
Recent Finds 6
N
name of a saved location 10,
16
narrowing your search 6
navigating a saved route 18
navigation settings 31
near button 6
North Up 30
O
odometer 13
Off Road route 31
original settings 32
P
pairing a cell phone or
helmet 21
phone.
See
cell phone
Navigator III Owner’s Manual 41
phone book 23
phone icon 22
placing a phone call 22–24
position icon 12
R
re-order points in route 17
recalculating the route 18
recently found locations 6
remote control vi
remove all detours 18
remove points from route 17
rename
route 16
saved location 10
reset
max. speed 13
mileage log 20
trip computer 13
restoring the settings 32
routes 15–19
add point 6
create new route 15
detour 18
edit a saved route 16
navigate a saved route 18
save the active route 18
stop 18
route preference 31
change 16
select 15
S
Safe Mode 29
saved locations 8
deleting 11
editing 10
finding 9
saved routes
deleting 18
editing 16
navigating 18
saving locations.
locations
saving the active route 18
screen settings 32
serial number i
set position 27
signal strength
cell phone 23
FM traffic receiver 25
satellite 3, 14
software license agreement 39
software version 32
speaker volume 27
specifications 37
See
saved
speed (speedometer) 13
spell 6
stops in the route 17
stop navigation 18
storing the unit vi
symbol for locations 10
T
technical specifications 37
text language 28
time 29
touch screen
calibrating 32
cleaning vi
touch screen on and off 32
track log 20
track up 30
traffic 25–26
avoid 25
incidents 25
trip computer 13
troubleshooting 38
turn list 13
U
unit ID
FM Traffic Receiver 32
Navigator III 32
USB 34, 35
USB cable 35
use indoors 27
V
vehicle type 31
via points 17
viewing the map 12
voice dial 23
voice language 28
volume 27
speed-adjusted 29
W
WebUpdater 35
Where To? 5–7
Y
yellow diamond 25
Z
zoom 12, 13
Page 50
For the latest free software updates (excluding map data) throughout the life of your
Garmin products, visit the Garmin Web site at www.garmin.com and
the BMW Motorrad Web site at www.bmw-motorrad.com.
© Copyright 2006 Garmin Ltd. or its subsidiaries
Garmin International, Inc.
1200 East 151st Street, Olathe, Kansas 66062, U.S.A.
Garmin (Europe) Ltd.
Unit 5, The Quadrangle, Abbey Park Industrial Estate, Romsey, SO51 9DL, U.K.
Garmin Corporation
No. 68, Jangshu 2nd Road, Shijr, Taipei County, Taiwan
www.garmin.com
Part Number 190-00634-02 Rev. A
 Loading...