

DE
Mein Garten
Herzlichen Glückwunsch!
Sie haben ein Produkt allerhöchster Qualität ausgewählt.
Falls Sie Fragen zur Installation oder Verwendung Ihres Produkts
haben, wenden Sie sich an unseren GARDENA Service unter
www.gardena.de/service
2
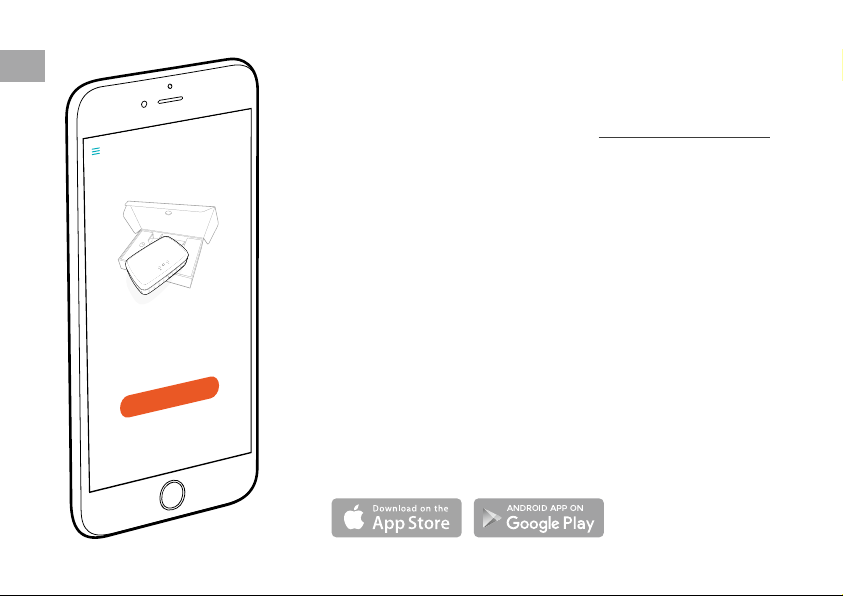
Willkommen
Sind Sie bereit?
Wir beginnen mit der Einrichtung Ihres smart Gateway.
Starten
Lieferumfang: 1 x smart Gateway
1 x Netzteil
1 x LAN-Kabel
Inbetriebnahme
Das Gateway bietet Ihnen zwei Möglichkeiten sich mit dem
Internet zu verbinden. Das Verbinden mit dem LAN-Kabel oder
über WLAN.
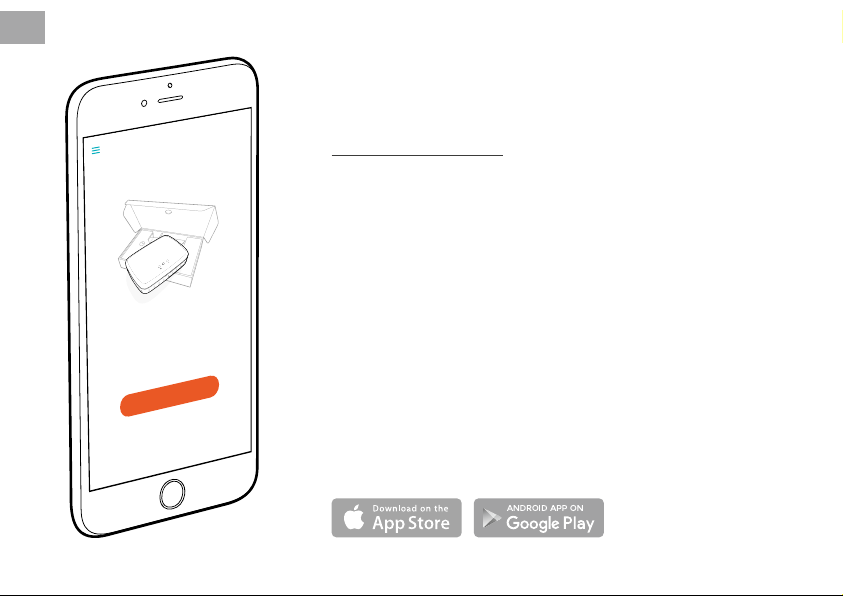
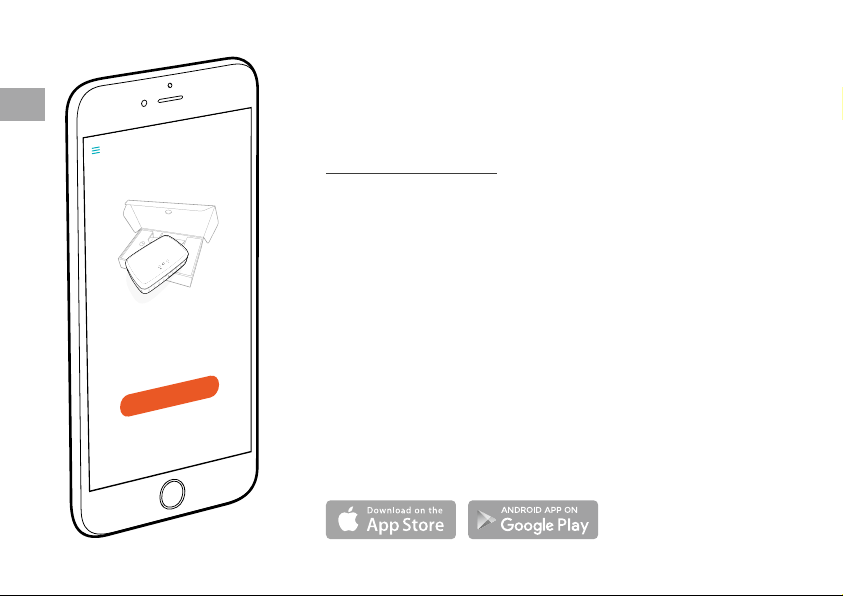
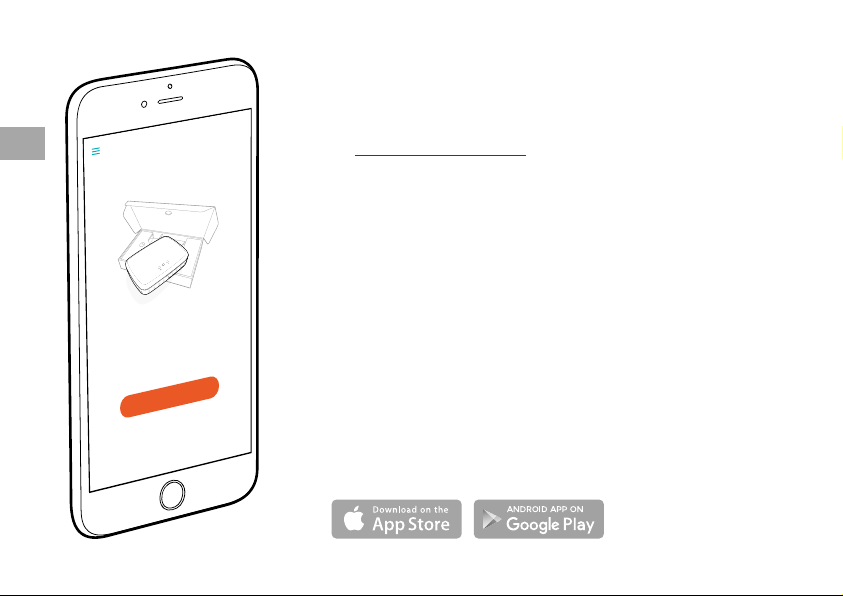
1. Laden Sie die kostenlose GARDENA smart system-App
aus dem Apple App Store oder dem Google Play Store.
2. Befolgen Sie die Anweisungen in der App.
smart Gateway in Betrieb nehmen
Für die Installation des Gateways ist eine Internetverbindung
erforderlich. Das Gateway kann über LAN oder WLAN mit dem
Internet verbunden werden.
4
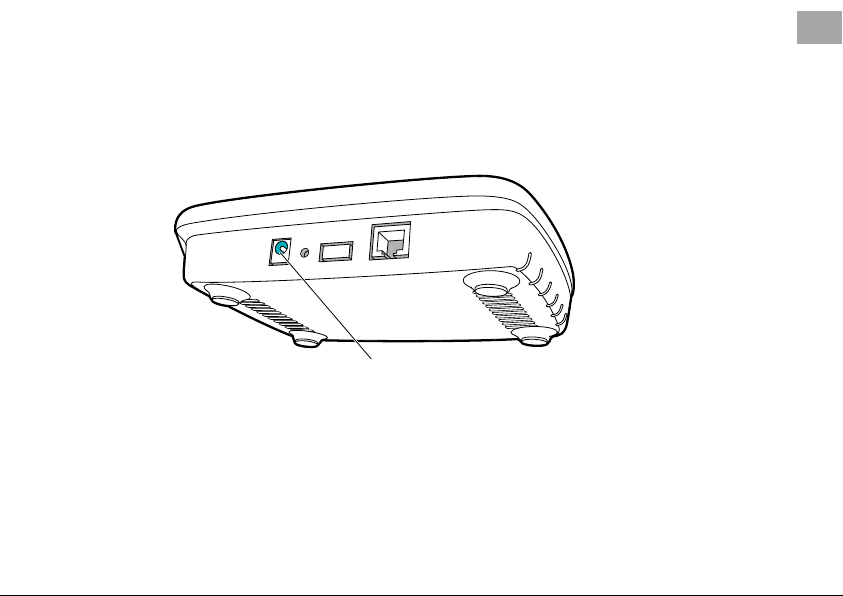
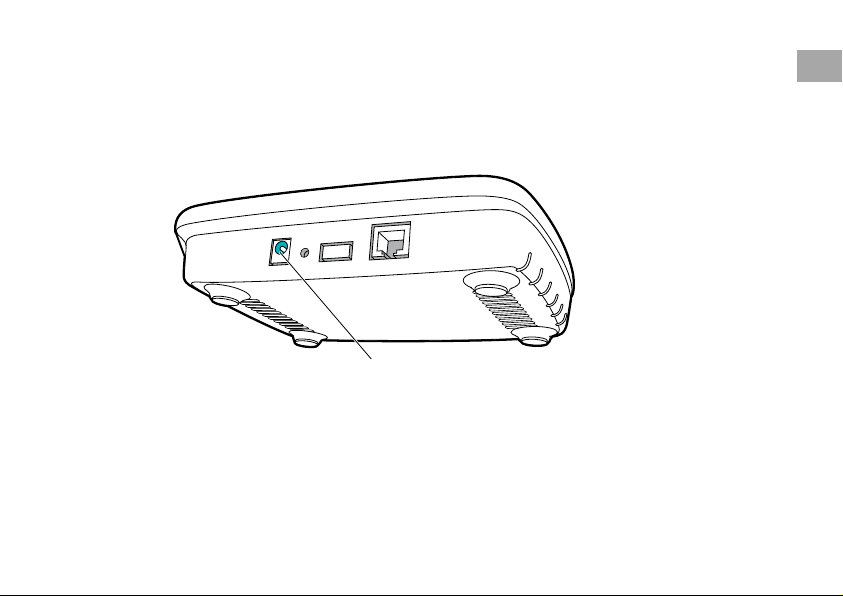
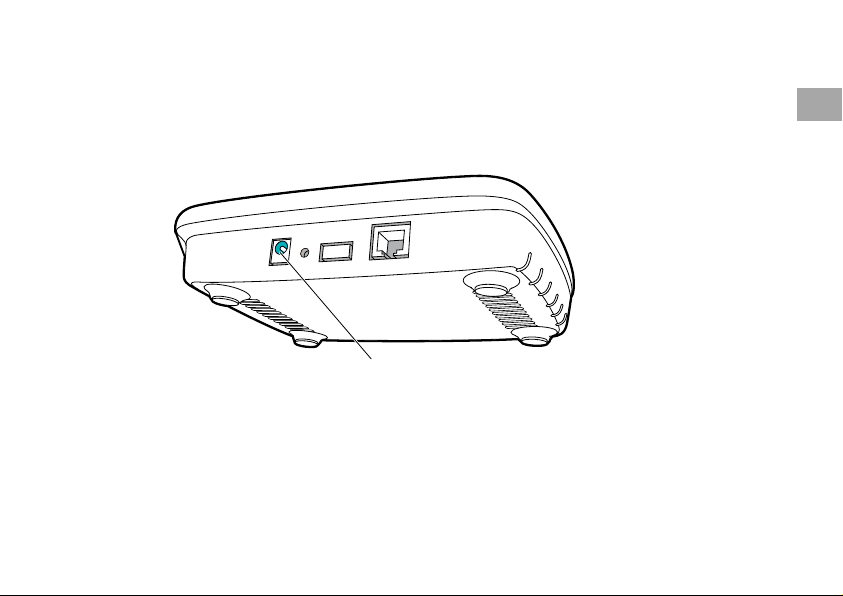
1. Stecken Sie das Steckernetzteil in eine Netzsteckdose.
2. Stecken Sie das Netzteilkabel in die Steckerbuchse
Gateways.
3. Wählen Sie eine der beiden Optionen:
Mit LAN-Kabel verbinden / Mit WLAN-Netzwerk verbinden.
4
DE
des
3
DE
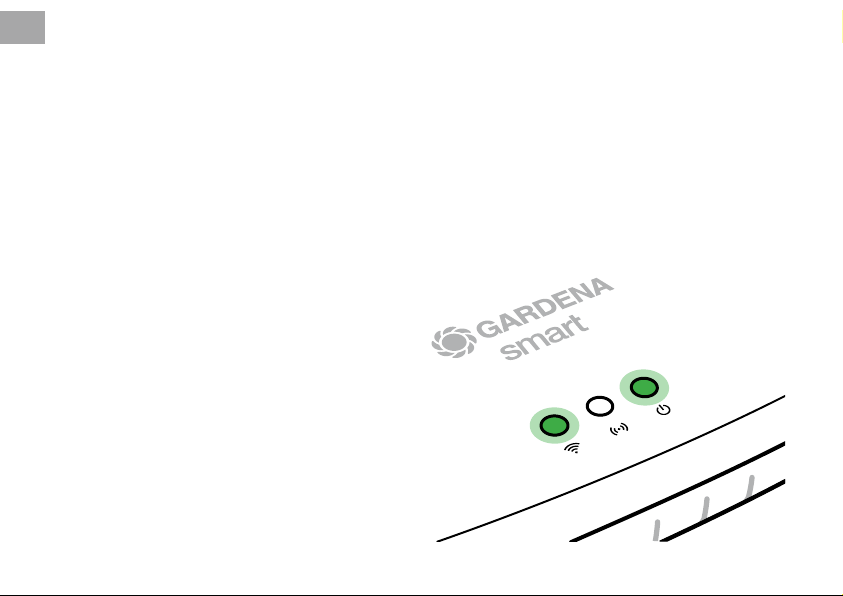
Mit LAN-Kabel verbinden (empfohlen)
1. Verbinden Sie das Gateway über das mitgelieferte LAN-Kabel mit Ihrem Router.
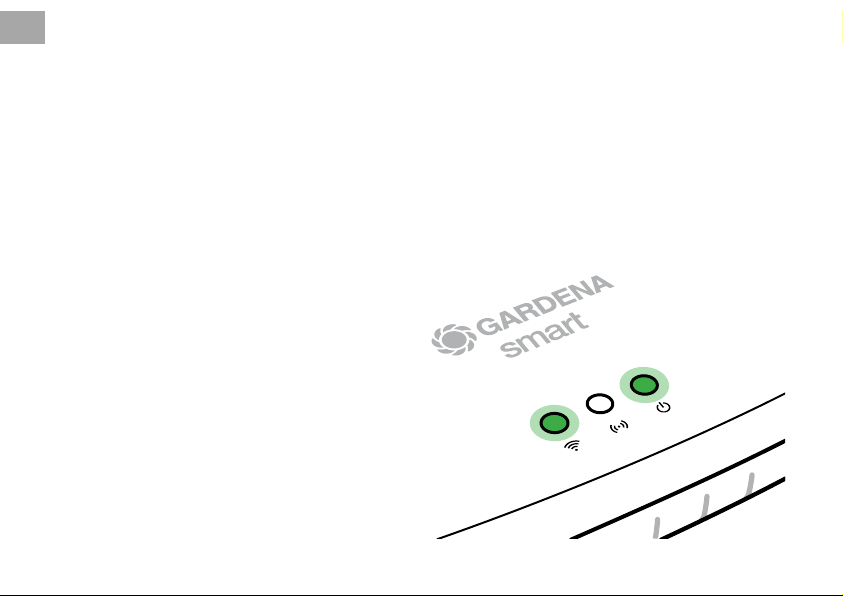
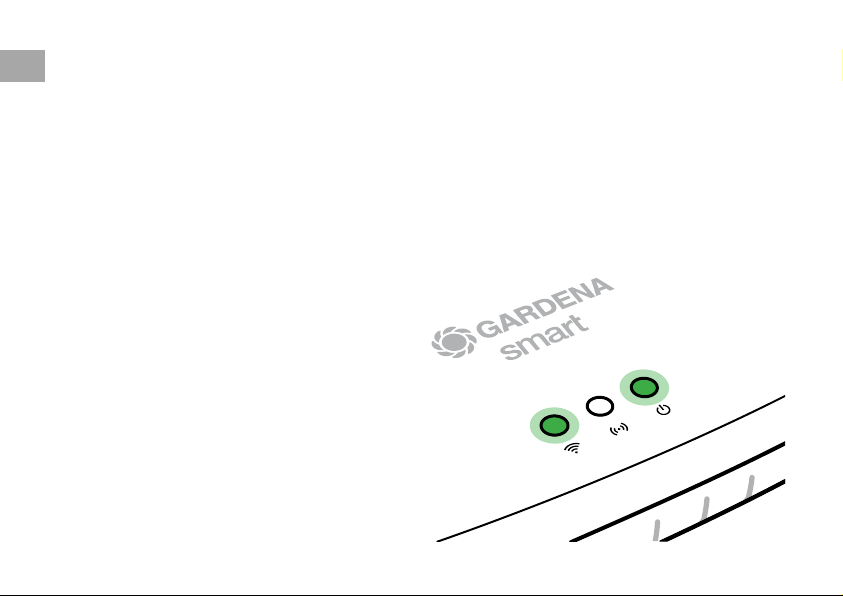
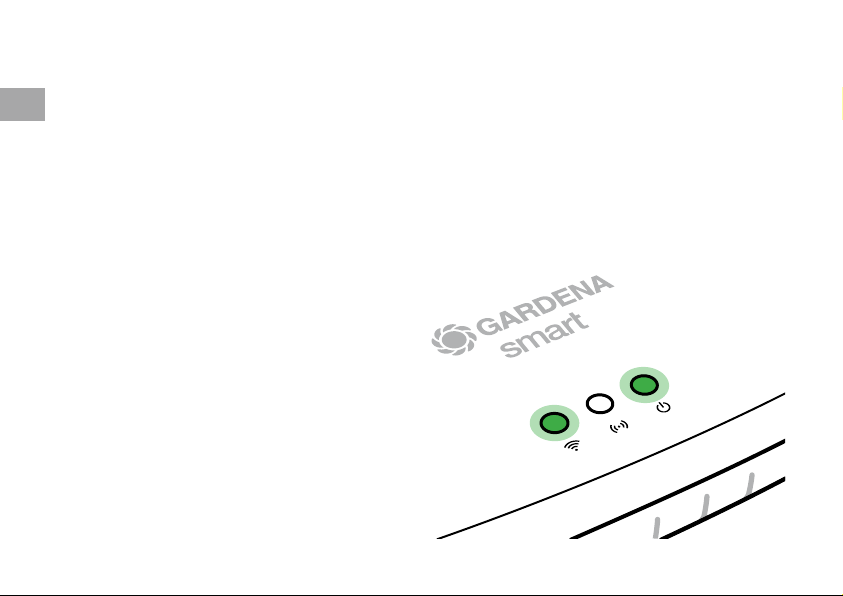
Die Software Ihres Gateways wird nun aktualisiert. Dieser Vorgang kann bis
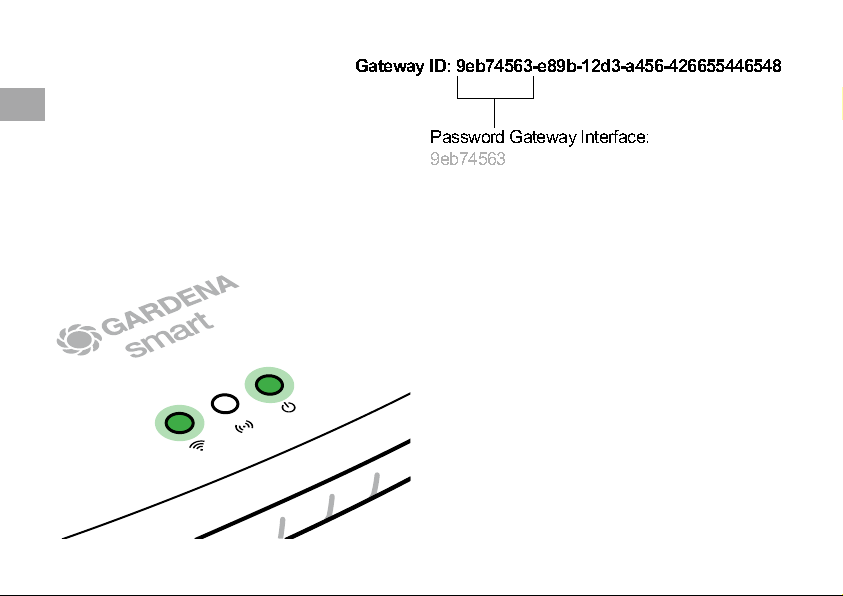
zu 15 Minuten dauern (abhängig von der Inter netverbindung). Sobald die Internet-LED und die Power-LED dauerhaft grün leuchten, wurde das Gateway
erfolgreich aktua lisiert. Nun kann das Gateway eingebundenwerden.
2. Laden Sie die GARDENA smart system App aus dem Apple App Store oder
dem Google Play Store.
3. Befolgen Sie die Anweisungen in der App.
4
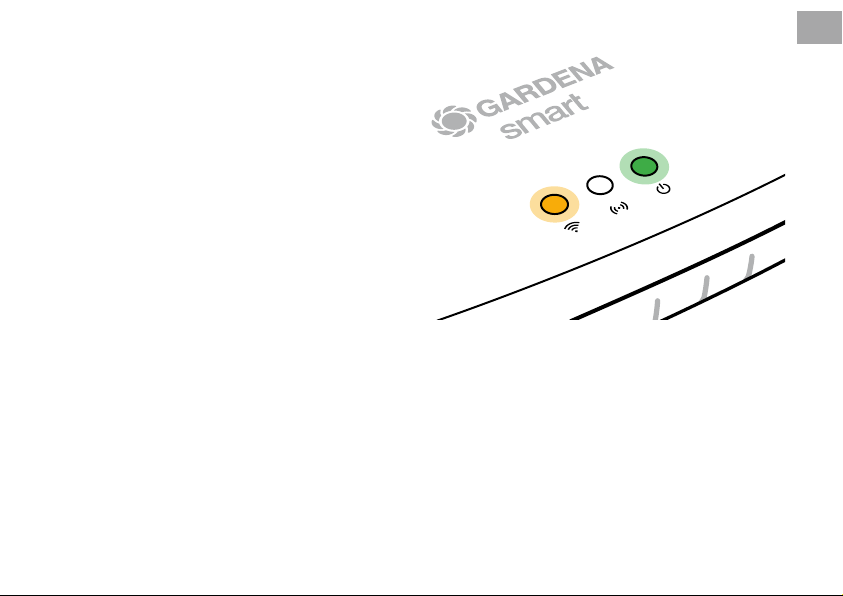
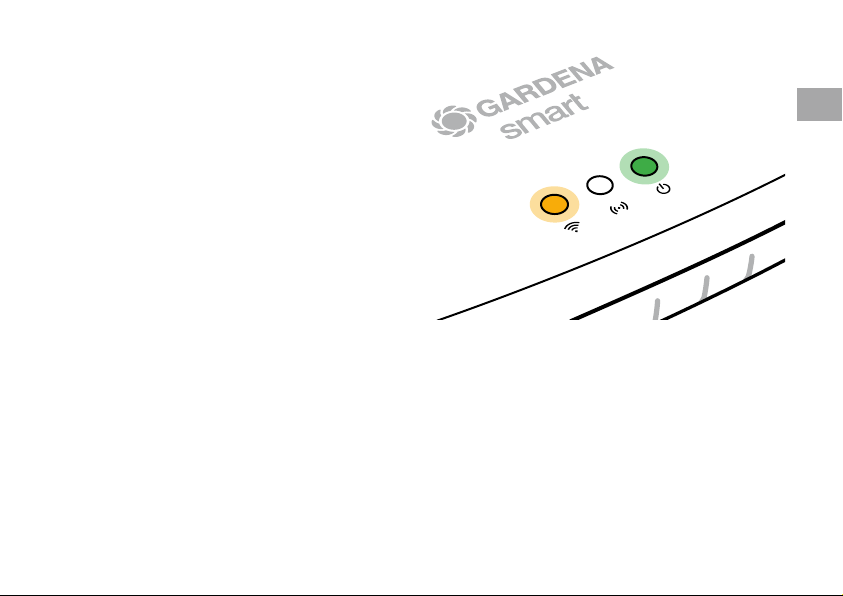
Mit WLAN-Netzwerk verbinden
Wenn das Gateway weder über ein LAN-Kabel mit dem Router verbunden, noch in
ein anderes WLAN-Netzwerk eingebunden wurde, stellt das Gateway automatisch
ca. 1 bis 2 Minuten nach dem Start ein Konfigurations-Netz bereit.
Das Konfigurations-Netz ist aktiviert, solange die Internet-LED dauerhaft
gelb leuchtet.
Das Konfigurations-Netz bleibt für 15 Minuten aktiv. Nach Ablauf der 15 Minuten
(oder falls das Gateway vorher bereits auf ein anderes, jetzt nicht mehr verfügbares
WLAN konfiguriert war), kann das Konfigurations-Netz durch kurzes Drücken der
Reset-Taste
wieder aktiviert werden.
7
DE
5
DE
WLAN-Netzwerk mit einem iOS-Gerät (iPhone, iPad) konfigurieren
Warten Sie bis die Internet-LED dauerhaft gelb leuchtet (das Konfigurations-Netz ist aktiviert).
1. Öffnen Sie die Apple Home App (diese befindet sich standardmäßig auf Ihrem mobilen iOS Gerät).
2. Wählen Sie „Gerät hinzufügen“.
3. Scannen Sie das HomeKit-Etikett auf der Unterseite des Gateways.
4. Warten Sie, bis die Internet-LED dauerhaft grün leuchtet.
Die Software Ihres Gateways wird nun aktualisiert. Dieser Vorgang kann bis zu 15 Minuten
dauern (abhängig von der Internetverbindung). Sobald die Internet-LED und
die Power-LED dauerhaft grün leuchten, wurde das Gateway
erfolgreich aktualisiert. Nun kann das Gateway eingebunden werden.
5. Laden Sie die GARDENA smart system App
aus dem Apple App Store.
6. Befolgen Sie die Anweisungen in der App.
6
WLAN-Netzwerk mit einem anderen Gerät
konfigurieren
Warten Sie bis die Internet-LED dauerhaft gelb
leuchtet (das Konfigurations-Netz ist aktiviert).
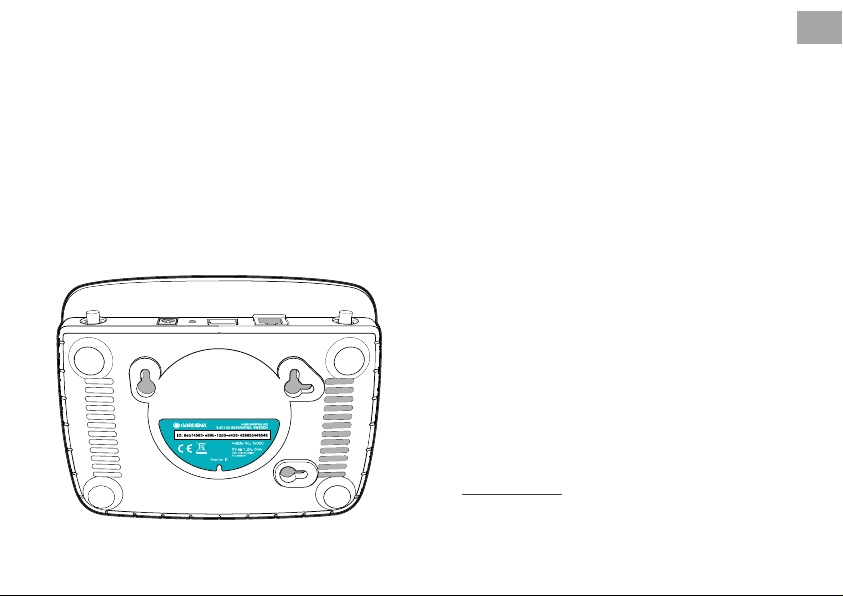
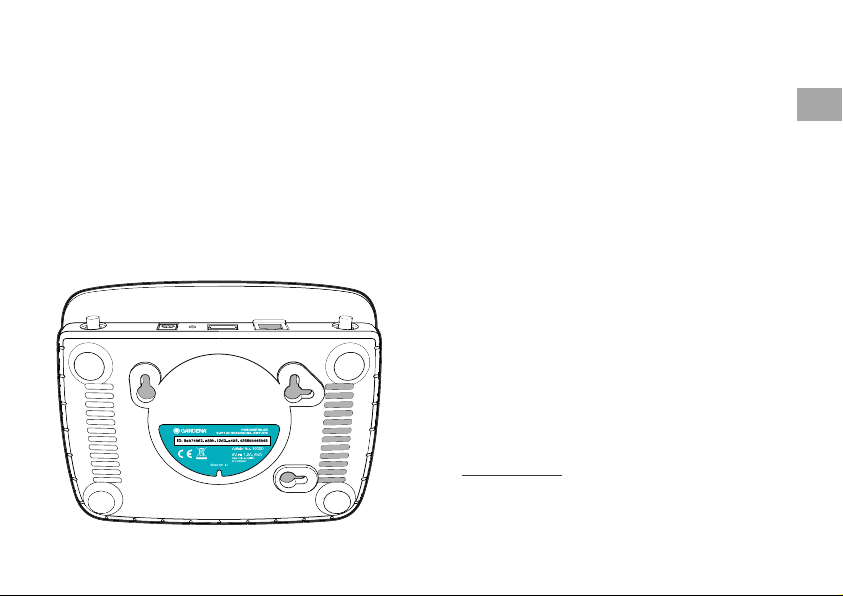
Um eine Verbindung über WLAN herzustellen,
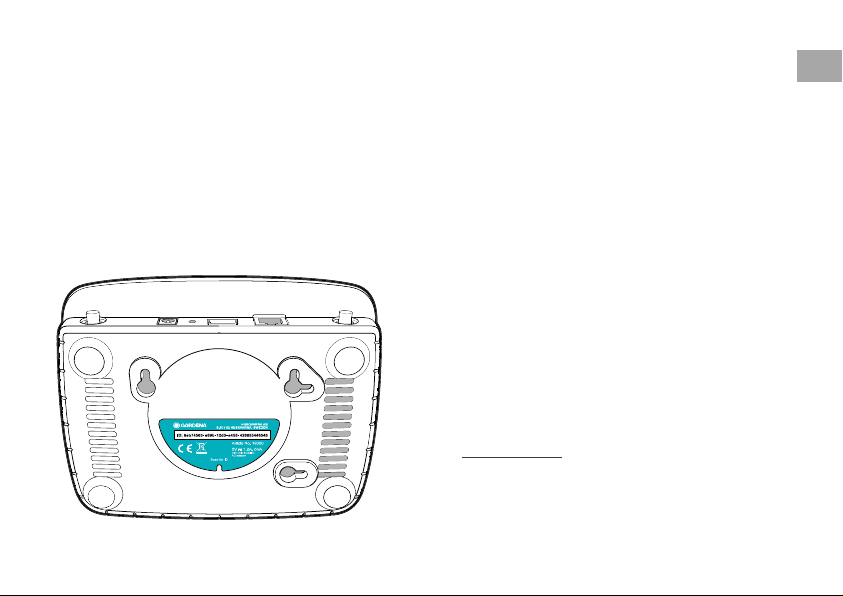
benötigen Sie ihre Gateway ID. Die Gateway ID ist
auf dem Aufkleber auf der Unterseite des Gateways ablesbar. Darüber hinaus benötigen Sie das
Passwort für Ihr WLAN-Netzwerk.
1. Stellen Sie eine Verbindung mit dem
GARDENA Konfigurations-Netz her.
Hierfür gehen Sie mit Ihrem Smartphone,
T ablet oder Computer auf die WLANEinstellungen.
Dort sollte jetzt das Gateway als verfügbares
WLAN-Netz angezeigt werden.
Der Netzwerk-Name beginnt mit
„GARDENA_config“.
2. Öffnen Sie die URL:
http://10.0.0.1
in ihrem bevorzugten Internet-Browser.
Sie befinden sich nun im Gateway Interface.
DE
7
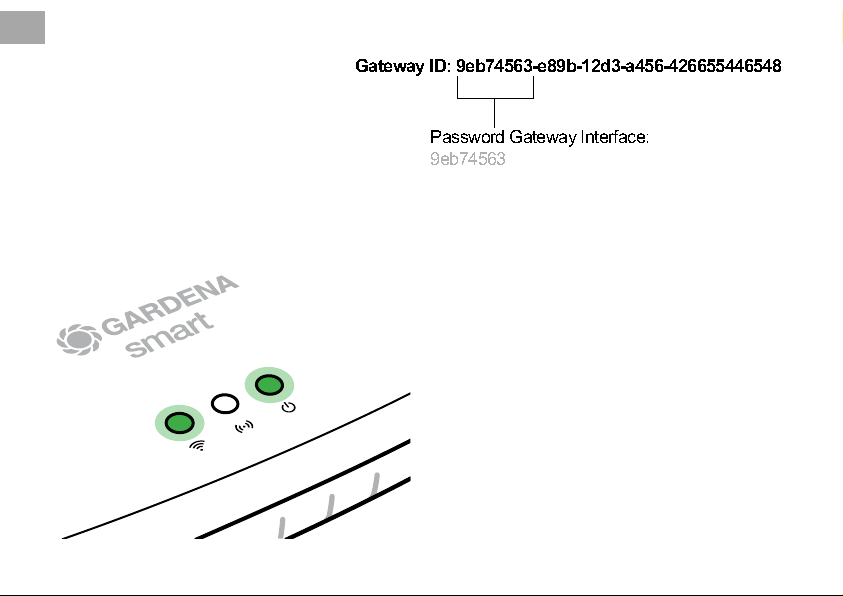
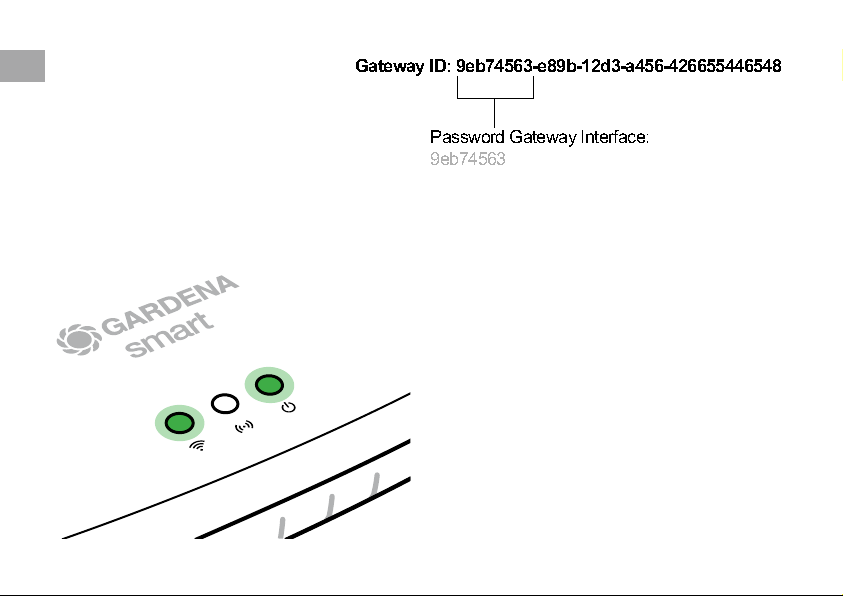
Name
GARDENA hotspot network:
GARDENA_config(9eb7)
Password
GARDENA hotspot network:
55446548
Password Gateway Interface:
9eb74563
Gateway ID: 9eb74563-e89b-12d3-a456-426655446548
DE
3. Melden Sie sich mit den ersten
acht Zeichen Ihrer Gateway ID
als Passwort an (siehe Grafik).
Die Gateway-ID befindet
sich auf der Unterseite des
Gateways.
4. Wählen Sie unter WLAN-Netzwerk
Ihr heimisches WLAN-Netz aus.
Darüber verbinden Sie das Gateway
mit dem Internet.
8
5. Geben Sie das Passwort Ihres Netzes ein und
bestätigen Sie Ihre Einstellung. Warten Sie, bis
die Internet-LED dauerhaft grün leuchtet.
Die Software Ihres Gateways wird nun aktualisiert. Dieser Vorgang kann bis zu 15 Minuten
dauern (abhängig von der Internetverbindung).
Sobald die Internet-LED und die Power-LED
dauerhaft grün leuchten, wurde das Gateway
erfolgreich aktualisiert. Nun kann das Gateway
eingebunden werden.
6. Laden Sie die GARDENA smart system App
aus dem Google Play Store.
7. Befolgen Sie die Anweisungen in der App.

Achtung: Da das GARDENA Konfigurations-Netz nicht über
einen eigenen Internetzugang verfügt, kann es vorkommen, dass
Ihr Gerät automatisch das GARDENA Konfigurations-Netz wieder
verlässt bzw. eine Fehlermeldung anzeigt. In diesem Fall müssen
Sie in den Einstellungen Ihres Gerätes zulassen, dass auch eine
Verbindung ohne Internet-Zugang aufrecht erhalten wird.
Beachten Sie, dass Ihr Browser Cookies und JavaScript aktiviert
haben muss, sonst kann die Seite nicht dargestellt werden. Die
Verbindung zum Gateway wird vom Internet Explorer nicht
unterstützt.
Open Source Software
Dieses Gerät enthält Open-Source-Software. GARDENA bietet
hiermit an, auf Anfrage eine Kopie des vollständigen entsprechenden Quellcodes für die in diesem Produkt verwendeten urheberrechtlich geschützten Open-Source-Softwarepakete zu liefern,
für die ein solches Angebot von den jeweiligen Lizenzen gefordert
wird. Dieses Angebot gilt bis zu drei Jahre nach dem Kauf des
Produkts für jeden, der diese Informationen erhält.
Um den Quellcode zu erhalten, schreiben Sie bitte auf Englisch,
Deutsch oder Französisch an:
smart.open.source@husqvarnagroup.com
DE
9
EN
My Garden
Congratulations!
You have chosen a top-quality product.
If you have any questions about installing or using your product,
please contact GARDENA Support on www.gardena.de/service
Included in delivery: 1 x smart Gateway
1 x power supply unit
1 x LAN cable
10
Welcome
Let's start by setting up your smart Gateway.
Are you ready?
Start
Getting started
The Gateway has two options for connecting to the Internet;
using the LAN cable or via Wi-Fi.
1. Download the free GARDENA smart system app from
the Apple App Store or the Google Play Store.
2. Follow the instructions in the App.
To commission the smart Gateways
An Internet connection is required for installation of the Gateway.
The Gateway can be connected to the Internet via ethernet or
Wi-Fi.
4
1. Connect the power supply unit to a mains socket.
2. Connect the power supply cable to the plug socket
the Gateway.
3. Select one of the following options:
To connect via ethernet cable / To connect to a Wi-Fi network
EN
of
4
11

To connect via ethernet cable (recommended)
EN
1. Connect the Gateway with the provided network cable to your router.
The software for your Gateway is now being updated. This process can take
up to 15 minutes (depending on your Internet connection).
Once the Internet-LED and the Power LED illuminate green permanently,
the Gateway is up to date. It can now be included in the App.
2. Download the GARDENA smart system app from the Apple App Store
or the Google Play Store.
3. Follow the instructions in the App.
12

To connect to a Wi-Fi network
If the Gateway is neither connected to the router via a LAN cable nor integrated
into another Wi-Fi network, the Gateway automatically provides a configuration
network after approx. 1 to 2 minutes after startup.
The configuration network is activated as long as the Internet LED
permanently illuminates yellow.
The configuration network remains active for 15 minutes. After the 15 minutes
have elapsed (or if the Gateway was previously configured to another Wi-Fi network
that is no longer available), the configuration network can be reactivated by briefly
pushing the reset button
.
7
EN
13
To configure the Wi-Fi network with an iOS device (iPhone, iPad)
EN
Wait until the Internet LED illuminates yellow permanently (the configuration network is activated).
1. Open the Apple Home App (this is located by default on your mobile iOS device).
2. Select “Add accessory”.
3. Scan the HomeKit label on the bottom side of the Gateway.
4. Wait until the Internet LED illuminates green permanently.
The software for your Gateway is now being updated.This process can take up to 15 minutes
(depending on your Internet connection). Once the Internet LED and the Power LED illuminate
green permanently, your Gateway is up to date. It can now be included in the App.
5. Download the GARDENA smart system app
from the Apple App Store.
6. Follow the instructions in the App.
14
To configure the Wi-Fi network with another
device
Wait until the Internet LED illuminates yellow permanently (the configuration network is activated).
To establish a connection via Wi-Fi, you need your
Gateway ID. The Gateway ID can be read on the
sticker on the underside of the Gateway. You will
also need the password for your Wi-Fi network.
1. Connect to the GARDENA configuration
network. To do this, go to the Wi-Fi settings
on your smartphone, tablet, or computer.
The Gateway should now be displayed there
as an available Wi-Fi network.
The network name starts with
“GARDENA_config”.
2. Open the URL:
http://10.0.0.1
in your preferred Internet browser.
You should now see the Gateway Interface.
EN
15
3. Login using the first eight digits of
Name
GARDENA hotspot network:
GARDENA_config(9eb7)
Password
GARDENA hotspot network:
55446548
Password Gateway Interface:
9eb74563
Gateway ID: 9eb74563-e89b-12d3-a456-426655446548
EN
your Gateway ID as the password
(see graphic).
The Gateway ID is located on the
bottom side of the Gateway.
4. Select your home Wi-Fi network
under Wi-Fi Network.
Then your Gateway is connected
with the Internet.
16
5. Enter your network password and confirm your
settings. Wait until the Internet LED illuminates
green permanently.
The software for your Gateway is now being
updated.This process can take up to
15 minutes (depending on your Internet
connection).
Once the Internet LED and the Power LED
illuminate green permanently, your Gateway is
up to date. It can now be included in the App.
6. Download the GARDENA smart system App
from the Google Play Store.
7. Follow the instructions in the App.

Note: Because the GARDENA configuration network does not
have its own Internet access, your device may automatically leave
the GARDENA configuration network or may displays an error
message. In this case, you must allow a connection without Internet access to be maintained in the settings of your device.
Also, make sure JavaScript is activated and browser cookies are
accepted, in order to display the page correctly. Connecting the
Gateway is not supported by Internet Explorer.
Open Source Software
This device contains open source software. GARDENA hereby
offers to deliver, upon request, a copy of the complete corresponding source code for the copyrighted open source software
packages used in this product for which such offer is requested
by the respective licenses. This offer is valid up to three years
after product purchase to anyone in receipt of this information.
To obtain the source code, please write in English, German or
French to:
smart.open.source@husqvarnagroup.com
EN
17
FR
18
Mon Jardin
Bienvenue
Êtes-vous prêt?
Commençons par congurer votre smart Gateway.
Démarrer
Félicitations !
Vous avez choisi un produit de qualité optimale.
Si vous avez des questions relatives à l’installation ou
l’utilisation de votre produit, veuillez contacter
l’assistance GARDENA à l’adresse
www.gardena.de/service
Inclus : 1 smart Gateway
1 bloc d’alimentation
1 câble LAN
Démarrage
Le Gateway dispose de deux options pour la connexion Internet :
câble LAN ou Wi-Fi.
1. Téléchargez gratuitement l’application GARDENA smart
system à partir de l’Apple App Store ou du Google Play Store.
2. Suivez les instructions de l’application.
Mettre le smart Gateway en marche
Pour l’installation du Gateway, une connexion Internet est
nécessaire. Le Gateway peut être connecté à Internet par LAN
ou WLAN.
4
1. Branchez le bloc d’alimentation dans une prise de courant.
2. Branchez le câble du bloc d’alimentation dans la douille
enfichable
3. Sélectionnez l’une de ces deux options :
Connecter avec un câble LAN / Connecter avec un réseau
WLAN.
du Gateway.
4
FR
19
Connecter avec un câble LAN (recommandé)
1. Connectez le Gateway à votre routeur à l’aide du câble LAN fourni.
FR
Le logiciel de votre Gateway est en cours de mise à jour. Cette procédure
peut prendre jusqu’à 15 minutes (en fonction de la connexion Internet).
Le Gateway a été mis à jour avec succès lorsque les voyants de l’Internet-LED
et du Power-LED deviennent verts de manière continue. Le Gateway peut
être maintenant intégrée.
2. Téléchargez l’application GARDENA smart system à partir de
l’Apple App Store ou du Google Play Store.
3. Suivez les instructions de l’application.
20
Connecter avec un réseau WLAN
Si le Gateway n’a été ni branché par un câble LAN avec le routeur ni intégré
dans un autre réseau WLAN, il met automatiquement à disposition un réseau
de configuration env. 1 à 2 minutes après démarrage.
Le réseau de configuration est activé tant que la LED Internet est allumée
en jaune en permanence.
Le réseau de configuration reste actif pendant 15 minutes. Une fois les 15minutes
écoulées (ou si le Gateway a été préalablement configuré sur un autre réseau WLAN
désormais plus disponible), le réseau de configuration peut être réactivé en pressant
brièvement la touche reset
.
7
FR
21

Configurer le réseau WLAN avec un appareil iOS (iPhone, iPad)
Patientez jusqu’à ce que la LED Internet s’allume en jaune en permanence
FR
(le réseau de configuration est activé).
1. Ouvrez l’application Apple Maison (celle-ci se trouve habituellement sur votre appareil mobile iOS).
2. Choisissez « Ajouter un accessoire ».
3. Scannez l’étiquette HomeKit située sous le Gateway.
4. Attendez que le voyant de l’Internet-LED devienne vert de manière continue.
Le logiciel de votre Gateway est en cours de mise à jour. Cette procédure peut prendre
jusqu’à 15 minutes (en fonction de la connexion Internet). Le Gateway a été mis à jour
avec succès lorsque les voyants de l’Internet-LED et du Power-LED
deviennent verts de manière continue. Le Gateway peut être
maintenant intégrée.
5. Téléchargez l’app smart system GARDENA
depuis l’Apple App Store.
6. Suivez les instructions de l’application.
22
Configurer le réseau WLAN avec un autre
appareil
Patientez jusqu’à ce que la LED Internet s’allume
en jaune en permanence (le réseau de configuration est activé).
Pour établir une connexion par WLAN, vous avez
besoin de votre ID Gateway. Celle-ci figure sur
l’autocollant sur le dessous du Gateway. Il vous
faut en outre le mot de passe pour votre réseau
WLAN.
1. Connectez-vous au réseau de configuration
GARDENA. Pour cela, accédez aux réglages
WLAN avec votre smartphone, tablette ou
ordinateur.
Le Gateway devrait désormais y être affiché
comme réseau WLAN disponible.
La nom du réseau commence par
« GARDENA_config ».
2. Ouvrez l’URL :
http://10.0.0.1
dans votre navigateur Internet.
Vous vous trouvez maintenant dans le
Gateway Interface.
FR
23
3. Connectez-vous en utilisant les huit
Name
GARDENA hotspot network:
GARDENA_config(9eb7)
Password
GARDENA hotspot network:
55446548
Password Gateway Interface:
9eb74563
Gateway ID: 9eb74563-e89b-12d3-a456-426655446548
premiers chiffres de votre ID de
Gateway comme mot de passe
FR
(voir l’illustration).
L’ID du Gateway se trouve sous
celui-ci.
4. Sélectionnez votre réseau WLAN
domestique sous réseau WLAN.
Il est utilisé pour connecter la
Gateway à internet.
24
5. Saisissez le mot de passe de votre réseau et
confirmez la configuration. Attendez que le
voyant de l’Internet-LED devienne vert de
manière continue.
Le logiciel de votre Gateway est en cours de
mise à jour. Cette procédure peut prendre
jusqu’à 15 minutes (en fonction de la connexion
Internet). Le Gateway a été mis à jour avec
succès lorsque les voyants de l’Internet-LED
et du Power-LED deviennent verts de manière
continue. Le Gateway peut être maintenant
intégrée.
6. Téléchargez l’app smart system GARDENA
depuis le Google Play Store.
7. Suivez les instructions de l’application.

Attention : Le réseau de configuration GARDENA ne disposant
pas de son propre accès à Internet, il peut arriver que votre
appareil quitte à nouveau automatiquement le réseau de configuration GARDENA ou affiche un message d’erreur. Dans ce
cas, vous devez autoriser dans les réglages de votre appareil
qu’une connexion sans accès à Internet soit maintenue.
Notez que les cookies et JavaScript doivent être activés sur votre
navigateur, sinon la page ne pourra pas s’afficher. La connexion
du Gateway n’est pas prise en charge par Internet Explorer.
Logiciel open source
Cet appareil est doté d’un logiciel open source. GARDENA
propose de fourni sur demande une copie du code source complet correspondant pour les prologiciels protégés par le droit
d’auteur et utilisés dans ce produit, pour lesquels une telle offre
est exigées par les licences correspondantes. Cette offre est
valable jusqu’à trois ans après l’achat de chaque produit qui
comporte ces informations.
Pour obtenir le code source, veuillez écrire en anglais,
en allemand ou en français à :
smart.open.source@husqvarnagroup.com
FR
25
NL
Mijn Tuin
Gefeliciteerd!
U hebt voor een product van topkwaliteit gekozen.
Mocht u nog vragen hebben over de installatie of het gebruik van
uw product, neem dan contact op met GARDENA-ondersteuning
via www.gardena.de/service
Welkom
Bent u er klaar voor?
Laten we beginnen met het instellen van uw smart Gateway.
Starten
Inbegrepen bij de levering: 1 x smart Gateway
1 x voedingseenheid
1 x LAN-kabel
Aan de slag
De Gateway heeft twee opties om verbinding te maken met
internet; via de LAN-kabel of via Wi-Fi.
1. Download de gratis GARDENA smart system app uit de
Apple App Store of de Google Play Store.
2. Volg de instructies in de app.

smart Gateway in gebruik nemen
Voor de installatie van de Gateway is een internetverbinding
nodig. De Gateway kan via LAN of WLAN (wifi) met internet
worden ver bonden.
4
1. Steek de stekker van het voedingsapparaat in een stopcontact.
2. Steek de kabel van het voedingsapparaat in de stekkerbus
van de Gateway.
3. Selecteer een van deze twee opties:
Met LAN-kabel verbinden / met wifi-netwerk verbinden.
NL
4
Met LAN-kabel verbinden (aanbevolen)
1. Verbind de Gateway met de bijgeleverde LAN-kabel met uw router.
De software van uw Gateway wordt nu bijgewerkt. Dit proces kan tot wel
15 minuten duren (afhankelijk van de internetverbinding). Zodra de Internet-LED
NL
en de Power-LED continu groen branden, werd het Gateway met succes
bijgewerkt. Nu kan het Gateway worden geïntegreerd.
2. Download de GARDENA smart system app uit de Apple App Store of de
Google Play Store.
3. Volg de instructies in de app.

Met wifi-netwerk verbinden
Wanneer de Gateway noch via een LAN-kabel met de router werd verbonden,
noch in een ander wifi-netwerk werd geïmplementeerd, zorgt de Gateway
ca. 1 tot 2 minuten na de start automatisch voor een configuratienetwerk.
Het configuratienetwerk is geactiveerd, zolang de internet-LED continu
geel brandt.
Het configuratienetwerk blijft gedurende 15 minuten actief. Na afloop van
de 15 minuten (of wanneer de Gateway van tevoren al voor een ander
wifi- netwerk was geconfigureerd dat nu niet meer beschikbaar is), kan het
configuratienetwerk weer worden geactiveerd door de reset-toets
in te drukken.
7
kort
NL

Wifi-netwerk met een iOS-apparaat (iPhone, iPad) configureren
Wacht tot de internet-LED continu geel brandt (het configuratienetwerk is geactiveerd).
1. Open de Apple Home app (deze bevindt zich standaard op uw mobiele iOS-apparaat).
2. Selecteer “Apparaat toevoegen”.
NL
3. Scan het HomeKit-etiket aan de onderkant van de Gateway.
4. Wacht tot de Internet-LED continu groen brandt.
De software van uw Gateway wordt nu bijgewerkt. Dit proces kan tot wel 15 minuten duren
(afhankelijk van de internetverbinding). Zodra de Internet-LED en de Power-LED continu
groen branden, werd het Gateway met succes bijgewerkt.
Nu kan het Gateway worden geïntegreerd.
5. Download de GARDENA smart system app
uit de Apple App Store.
6. Volg de instructies in de app.

Wifi-netwerk met een ander apparaat
configureren
Wacht tot de internet-LED continu geel brandt
(het configuratienetwerk is geactiveerd).
Om een verbinding via wifi tot stand te brengen,
heeft u uw Gateway-ID nodig. De Gateway-ID kunt
u aflezen van de sticker aan de onderkant van de
Gateway. Bovendien hebt u het wachtwoord voor
uw wifi-netwerk nodig.
1. Maak verbinding met het GARDENA configuratienetwerk. Hiervoor gaat u met uw
smartphone, tablet of computer naar de
wifi-instellingen.
Daar moet de Gateway nu als beschikbaar
wifi-netwerk worden weer gegeven.
De naam van het netwerk begint met
“GARDENA_config”.
2. Open de URL:
http://10.0.0.1
in uw gewenste internetbrowser.
U bevindt zich nu in de Gateway Interface.
NL

3. Meld u aan met de eerste 8 cijfers
Name
GARDENA hotspot network:
GARDENA_config(9eb7)
Password
GARDENA hotspot network:
55446548
Password Gateway Interface:
9eb74563
Gateway ID: 9eb74563-e89b-12d3-a456-426655446548
van uw Gateway-ID als wachtwoord
(zie afbeelding).
De Gateway-ID bevindt zich aan
de onderkant van de Gateway.
NL
4. Selecteer uw eigen wifi-net onder
wifi-netwerk.
Hiermee verbindt u het Gateway
met het internet.
5. Voer het wachtwoord van uw net in en bevestig
uw instelling. Wacht tot de Internet-LED continu
groen brandt.
De software van uw Gateway wordt nu bijgewerkt. Dit proces kan tot wel 15 minuten
duren (afhankelijk van de internetverbinding).
Zodra de Internet-LED en de Power-LED
continu groen branden, werd het Gateway met
succes bijgewerkt. Nu kan het Gateway
worden geïntegreerd.
6. Download de GARDENA smart system app
uit de Google Play Store.
7. Volg de instructies in de app.

Let op: Omdat het GARDENA configuratienetwerk niet over een
eigen internettoegang beschikt, kan het gebeuren dat uw apparaat het GARDENA configuratienetwerk weer automatisch verlaat
of een foutmelding geeft. In dat geval moet u in de instellingen
van uw apparaat toestaan, dat een verbinding ook zonder internettoegang behouden blijft.
Denk eraan dat uw browser cookies en JavaScript moet hebben
geactiveerd, anders kan de site niet worden weergegeven.
Het ver binden van de Gateway wordt niet ondersteund door
Internet Explorer.
Open-source-software
Dit toestel bevat open-source-software. GARDENA biedt hierbij
aan op verzoek een kopie van de volledige betreffende broncode
voor de in dit product gebruikte, met auteursrecht beschermde
open-source-softwarepakketten te leveren, waarvoor een dergelijk
aanbod door de betreffende licenties gevraagd is. Dit aanbod
geldt tot drie jaar na de aankoop van het product voor diegene,
die deze informatie krijgt.
Om de broncode te ontvangen, schrijft u in het Engels, Duits of
Frans naar:
smart.open.source@husqvarnagroup.com
NL

SV
Min trädgård
Grattis!
Du har valt en produkt av högsta kvalitet.
Har du frågor om hur du installerar eller använder produkten kan
du kontakta GARDENA Support på www.gardena.de/service
Ingår i leveransen: 1 x smart Gateway
1 x strömförsörjningsenhet
1 x LAN-kabel
34
Välkommen
Är du redo?
Vi börjar med att kongurera din smarta gateway.
Starta
Komma igång
Gatewayen har två alternativ för internetanslutning:
via LAN-kabel eller via Wi-Fi.
1. Hämta den kostnadsfria appen GARDENA smart system
från Apple App Store eller Google Play Store.
2. Följ anvisningarna i appen.

Börja använda smart Gateway
För att installera din Gateway behövs en internetanslutning.
Din Gateway kan anslutas via LAN eller WLAN till internet.
4
1. Sätt in nätaggregatet i ett nätuttag.
2. Sätt in nätaggregatskabeln i honuttaget
3. Välj ett av de båda alternativen:
Ansluta med LAN-kabel / Ansluta till WLAN-nätverk.
på din Gateway.
4
SV
35

Ansluta med LAN-kabel (rekommenderas)
1. Anslut din Gateway via den medföljande LAN-kabeln till routern.
Programvaran för din Gateway uppdateras nu. Den här proceduren
kan ta upp till 15 minuter (beroende på internetuppkopplingen).
När internet-LED:en och Power-LED:en lyser grönt konstant har din
Gateway uppdaterats korrekt. Nu går det att integrera din Gateway.
SV
2. Ladda ner GARDENA smart system-appen från Apple App Store
eller Google Play Store.
3. Följ anvisningarna i appen.
36

Ansluta till WLAN-nätverk
Om din Gateway varken har anslutits via en LAN-kabel till routern eller har
integrerats i något annat WLAN-nätverk, tillhandahåller din Gateway automatiskt
ett konfigurationsnät ca. 1 till 2 minuter efter starten.
Konfigurationsnätet är aktiverat så länge internet-LED:en lyser gult
konstant.
Konfigurationsnätet är aktivt under 15 minuter. När de 15 minuterna har gått
(eller om din Gateway redan var konfigurerad för ett annat WLAN som inte längre
än tillgängligt) går det att aktivera konfigurationsnätet igen genom att kort trycka
på reset-knappen
.
7
SV
37

Konfigurera WLAN-nätverk med en iOS-enhet (iPhone, iPad)
Vänta till internet-LED:en lyser gult konstant (konfigurationsnätet är aktiverat).
1. Öppna appen Apple Home (denna finns som standard i din mobila iOS-apparat).
2. Välj ”Lägg till enhet”.
3. Skanna HomeKit-etiketten på undersidan av din Gateway.
SV
4. Vänta tills internet-LED:en lyser grönt konstant.
Programvaran för din Gateway uppdateras nu. Den här proceduren kan ta
upp till 15 minuter (beroende på internetuppkopplingen).När internet-LED:en
och Power-LED:en lyser grönt konstant har din Gateway uppdaterats
korrekt. Nu går det att integrera din Gateway.
5. Ladda ner GARDENA smart system-appen
från Apple App Store.
6. Följ anvisningarna i appen.
38

Konfigurera WLAN-nätverk med en annan
apparat
Vänta till internet-LED:en lyser gult konstant (konfigurationsnätet är aktiverat).
För att skapa en anslutning via WLAN behöver du
ditt Gateway-ID. Gateway-ID:t finns på dekalen på
undersidan av din Gateway. Du behöver dessutom
lösenordet för ditt WLAN-nätverk.
1. Skapa en anslutning till GARDENA konfigurationsnätet. Du går du in på WLAN-inställningarna i din smartphone, surfplatta eller dator.
Där bör nu din Gateway visas som tillgängligt
WLAN-nät.
Nätverksnamnet börjar med
”GARDENA_config”.
2. Öppna webbadressen:
http://10.0.0.1
i den webbläsare som du vill använda.
Du är nu i Gateway-gränssnittet.
SV
39

3. Logga in med de först åtta tecknen
Name
GARDENA hotspot network:
GARDENA_config(9eb7)
Password
GARDENA hotspot network:
55446548
Password Gateway Interface:
9eb74563
Gateway ID: 9eb74563-e89b-12d3-a456-426655446548
i ditt Gateway-ID som lösenord
(se grafik).
Gateway-ID:t finns på undersidan
av din Gateway.
4. Välj det WLAN-nät du har hemma
under WLAN-nätverk.
SV
Via detta ansluter du din Gateway
till internet.
40
5. Ange lösenordet för ditt nätverk och bekräfta
inställningen. Vänta tills internet-LED:en lyser
grönt konstant.
Programvaran för din Gateway uppdateras nu.
Den här proceduren kan ta upp till 15 minuter
(beroende på internetuppkopplingen).
När internet-LED:en och Power-LED:en lyser
grönt konstant har din Gateway uppdaterats
korrekt. Nu går det att integrera din Gateway.
6. Ladda ner GARDENA smart system-appen
från Google Play Store.
7. Följ anvisningarna i appen.

Observera: Eftersom GARDENA konfigurationsnätet inte har
någon egen internetåtkomst kan det hända att din apparat automatiskt lämnar GARDENA konfigurationsnätet igen eller visar ett
felmeddelande. I det här fallet måste du tillåta i inställningarna för
din apparat att en anslutning är kvar också utan internetåtkomst.
Tänk på att din webbläsare måste ha cookies och JavaScript
aktiverat annars kan inte sidan visas. Anslutning till Gateway stöds
inte av Internet Explorer.
Open source-program
Den här enheten innehåller open-source-program. GARDENA
erbjuder härmed att på begäran leverera en kopia av den kompletta källkoden för de open source-programpaket skyddade
av upphovsrätt som används i den här produkten, för vilka ett
dylikt erbjudande krävs för respektive licenser. Detta erbjudande
gäller upp till tre år efter köp av produkten för alla som får den
här informationen.
För att få källkoden, vänligen skriv på engelska, tyska
eller franska till:
smart.open.source@husqvarnagroup.com
SV
41

DA
42
Min have
Velkommen
Er du klar?
Lad os starte med at kongurere din smart-gateway.
Start
Tillykke!
Du har valgt et produkt i topkvalitet.
Hvis du har spørgsmål til installationen af dit produkt, kan du
kontakte GARDENA Support på www.gardena.de/service
Indeholdt i leveringen: 1 x smart Gateway
1 x strømforsyningsenhed
1 x LAN-kabel
Kom godt i gang
Gatewayen har to muligheder for oprettelse af forbindelse til
internettet, enten med LAN-kabel eller via Wi-Fi.
1. Download den gratis GARDENA smart system-app fra
Apple App Store eller fra Google Play Butik.
2. Følg anvisningerne i app’en.

Tag smart Gateway i brug
Der skal være internetforbindelse for at kunne installere
Gateway’en. Gateway’en kan forbindes med internettet via LAN
eller wi-fi.
4
1. Stik stiknetdelen ind i en netstikdåse.
2. Stik netdelskablet ind i stikbøsningen
3. Vælg en af de to muligheder:
Forbind med LAN-kabel / forbind med WLAN-netværk.
i Gateway.
4
DA
43

Forbind med LAN-kabel (anbefales)
1. Forbind Gateway med din router ved hjælp af det medfølgende
LAN-kabel.
Gateway’ens software bliver nu aktualiseret. Dette kan tage op til
15 minutter (afhængigt af internetforbindelsen). Når internet-LED’en og
power-LED’en konstant lyser grønt, er Gateway’en blevet aktualiseret.
Nu kan Gateway’en blive forbundet.
2. Du kan hente GARDENA smart system app via Apple App Store
DA
eller Google Play Store.
3. Følg anvisningerne i app’en.
44

Forbind med WLAN-netværket
Hvis Gatewayen hverken blev forbundet ved hjælp af et LAN-kabel med routeren
eller i et andet WLAN-netværk, stiller Gateway automatisk et konfigurationsnetværk
til rådighed efter ca. 1 til 2 minutter efter starten.
Konfigurationsnettet er aktiveret, så længe internet-LED’en lyser konstant.
Konfigurationsnettet forbliver aktivt i 15 minutter. Efter der er gået 15 minutter (eller
hvis Gateway i forvejen allerede var konfigureret til et andet WLAN, der ikke står til
rådighed mere), kan konfigurationsnettet genaktiveres med et kort tryk på
Reset-knappen
.
7
DA
45

Konfiguration af WLAN-netværket med et iOS-apparat (iPhone, iPad)
Vent indtil internet-LED’en lyser gult konstant (konfigurationsnettet er aktiveret).
1. Åbn Apple Home appen (dette findes som standard på diet mobile iOS apparat).
2. Vælg „Tilføj apparat“.
3. Scan HomeKit-etiketten på undersiden af Gateway.
4. Vent, indtil internet-LED’en konstant lyser grønt.
Gateway’ens software bliver nu aktualiseret. Dette kan tage op til 15 minutter
DA
(afhængigt af internetforbindelsen). Når internet-LED’en og power-LED’en konstant
lyser grønt, er Gateway’en blevet aktualiseret. Nu kan Gateway’en blive forbundet.
5. Du kan downloade appen GARDENA smart system
i Apple App Store.
6. Følg anvisningerne i app’en.
46

Konfiguration af WLAN-netværket med et
andet apparat
Vent indtil internet-LED’en lyser gult konstant
(konfigurationsnettet er aktiveret).
For at etablere en forbindelse ved hjælp af en
WLAN, skal du bruge en Gateway ID. Gateway
ID’en står på et klistermærke, som er anbragt på
undersiden af Gatewayen. Endvidere har du
brug for en adgangskode til dit WLAN-netværk.
1. Opret forbindelse med GARDENA konfigurationsnettet. Brug her din smartphone, tablet
eller computer til at få adgang til WLAN-indstillingerne.
Her skal Gateway vises som et disponibelt
WLAN-netværk.
Netværks-navnet starter med
„GARDENA_config“.
2. Åbn URL:
http://10.0.0.1
i din internet-browser.
Du befinder dig nu i Gateway interface.
DA
47

3. Log dig på med de første otte
Name
GARDENA hotspot network:
GARDENA_config(9eb7)
Password
GARDENA hotspot network:
55446548
Password Gateway Interface:
9eb74563
Gateway ID: 9eb74563-e89b-12d3-a456-426655446548
tegn i din Gateway-ID som kodeord
(se grafikken).
Gateway-ID’en sidder på under siden af Gateway.
4. Vælg dit hjemme-WLAN-netværk
under WLAN-netværk.
Således forbinder du Gateway’en
med internettet.
DA
48
5. Indtast nettets kodeord, og bekræft din indstilling. Vent, indtil internet-LED’en konstant lyser
grønt.
Gateway’ens software bliver nu aktualiseret.
Dette kan tage op til 15 minutter (afhængigt
af internetforbindelsen). Når internet-LED’en
og power-LED’en konstant lyser grønt,
er Gateway’en blevet aktualiseret.
Nu kan Gateway’en blive forbundet.
6. Download appen GARDENA smart system
fra Google Play Store.
7. Følg anvisningerne i app’en.

Bemærk: Da GARDENA konfigurationsnettet ikke har sin egen
internetadgang, kan det forekomme, at dit apparat automatisk
forlader GARDENA konfigurationsnettet igen eller viser en fejlmeddelelse. I dette tilfælde skal du i dit apparats indstillinger give tilladelse til, at en forbindelse også kan opret holdes uden internetadgang.
Husk, at aktivere cookies og JavaScript i din browser, ellers kan
siden ikke oprettes. Internet Explorer støtter ikke forbindelsen til
Gateway’en.
Open Source software
Dette apparat indeholder open-source-software. GARDENA
tilbyder hermed på forespørgsel at levere en kopi af den fuldstændigt passende kildekolde til den ophavsretlig beskyttede
open-source-softwarepakke, som kræver en sådan pakke med
de pågældende licenser. Denne pakke gælder i op til tre år efter
købet af dette produkt for enhver, som modtager disse informationer.
For at modtage kildekoden, skal du skrive en mail på engelsk,
tysk eller fransk til:
smart.open.source@husqvarnagroup.com
DA
49

My Garden
Onneksi olkoon!
Olet valinnut erittäin korkeatasoisen tuotteen.
Jos sinulla on kysymyksiä tuotteen asentamisesta tai käytöstä,
ota yhteyttä GARDENAn asiakastukeen osoitteessa
www.gardena.de/service
Toimitukseen sisältyvät osat: 1 älykäs yhdysväylä
1 virtalähde
1 LAN-kaapeli
FI
Tervetuloa
Aloittaminen
Yhdysväylässä on kaksi vaihtoehtoa internet-yhteyden muodostamista varten: LAN-kaapeli tai Wi-Fi.
1. Lataa ilmainen GARDENA smart system -sovellus Applen
App Storesta tai Google Play -kaupasta.
2. Seuraa sovelluksen ohjeita.
50
Aloitetaan määrittämällä älykäs yhdyskäytävä.
Oletko valmis?
Aloita

smart Gatewayn käyttöönotto
Gatewayn asennukseen vaaditaan internetyhteys. Gateway voidaan yhdistää internetiin LAN- tai WLAN-yhteydellä.
4
1. Kytke pistokkeen verkkoliitäntä pistorasiaan.
2. Kytke pistokkeen verkkoliitäntä Gatewayn pistokeliitäntään
3. Valitse toinen vaihtoehdoista:
Yhdistäminen LAN-johdon kanssa / yhdistäminen WLANverkostoon.
FI
.
4
51

Yhdistäminen LAN-johdon kanssa (suositeltava)
1. Yhdistä Gateway mukana toimitetulla LAN-johdolla reitittimeen.
Gatewayn ohjelmisto päivitetään. Tämä toimenpide voi kestää jopa
15 minuuttia (internetyhteydestä riippuen). Kun internet-LED ja
power-LED palavat jatkuvasti vihreänä, Gatewayn päivitys onnistui.
Nyt Gateway voidaan ottaa käyttöön.
2. Lataa GARDENA smart system -sovellus Applen App Storesta
tai Google Play Storesta.
3. Seuraa sovelluksen ohjeita.
FI
52

Yhdistäminen WLAN-verkostoon
Jos Gatewayta ei ole yhdistetty LAN-johdon kanssa reitittimeen eikä sitä
ole yhdistetty mihinkään muuhun WLAN-verkostoon, Gateway valmistelee kokoonpanoverkon automaattisesti 1 – 2 minuuttia käynnistyksen jälkeen.
Kokoonpanoverkko on aktivoitu niin kauan kuin internet-LED palaa
jatkuvasti keltaisena.
Kokoonpanoverkko on aktiivinen 15 minuuttia. 15 minuutin jälkeen (tai jos Gateway
oli konfiguroitu jo toiseen, ei enää käytettävissä olevaan WLAN-yhteyteen) kokoonpanoverkko voidaan aktivoida jälleen lyhyellä reset-painikkeen
painalluksella.
7
FI
53

WLAN-verkoston konfigurointi iOS-laitteella (iPhone, iPad)
Odota, kunnes internet-LED palaa jatkuvasti keltaisena (kokoonpanoverkko on aktivoitu).
1. Avaa Apple Home -sovellus (tämä on vakiona mobiilissa iOS-laitteessasi).
2. Valitse ”Lisää laite”.
3. Skannaa HomeKit-etiketti Gatewayn alapuolella.
4. Odota, kunnes internet-LED palaa jatkuvasti vihreänä.
Gatewayn ohjelmisto päivitetään. Tämä toimenpide voi kestää jopa 15 minuuttia
(internetyhteydestä riippuen). Kun internet-LED ja power-LED palavat jatkuvasti
vihreänä, Gatewayn päivitys onnistui. Nyt Gateway voidaan ottaa käyttöön.
FI
5. Lataa GARDENA smart system -sovellus
Applen App Storesta.
6. Seuraa sovelluksen ohjeita.
54

WLAN-verkoston konfigurointi toisella
laitteella
Odota, kunnes internet-LED palaa jatkuvasti
keltaisena (kokoonpanoverkko on aktivoitu).
Yhteyden yhdistämiseksi WLAN-verkon kanssa,
tarvitset Gatewayn tunnuksen. Gatewayn tunnus
on luettavissa Gatewayn alapuolella olevasta
tarrasta. Lisäksi tarvitset WLAN-verkostosi salasanan.
1. Luo yhteys GARDENA-kokoonpanoverkon
kanssa. Tätä varten siirry älypuhelimessasi,
taulu- tai pöytätietokoneessasi WLAN-asetuksiin.
Gatewayn tulisi näkyä tässä käytettävissä
olevana WLAN-verkkona.
Verkoston nimi alkaa nimellä
”GARDENA_config”.
2. Avaa URL:
http://10.0.0.1
käyttämässäsi internetselaimessa.
Olet nyt Gatewayn käyttöliittymässä.
FI
55

3. Kirjaudu sisään Gatewayn
Name
GARDENA hotspot network:
GARDENA_config(9eb7)
Password
GARDENA hotspot network:
55446548
Password Gateway Interface:
9eb74563
Gateway ID: 9eb74563-e89b-12d3-a456-426655446548
tunnuksen kahdeksaa ensimmäistä
merkkiä salasanana käyttäen (katso
kuva).
Gatewayn tunnus on Gatewayn
alapuolella.
4. Valitse kohdassa WLAN-verkosto
oma WLAN-verkkosi.
Yhdistä Gateway tätä kautta internetiin.
FI
56
5. Syötä verkkosi salasana ja vahvista asetus.
Odota, kunnes internet-LED palaa jatkuvasti
vihreänä.
Gatewayn ohjelmisto päivitetään. Tämä toimenpide voi kestää jopa 15 minuuttia (internetyhteydestä riippuen). Kun internet-LED ja power-LED
palavat jatkuvasti vihreänä, Gatewayn päivitys
onnistui. Nyt Gateway voidaan ottaa käyttöön.
6. Lataa GARDENA smart system -sovellus
Google Play Storesta.
7. Seuraa sovelluksen ohjeita.

Huomio: Koska GARDENA kokoonpanoverkolla ei ole omaa
internet-yhteyttä, on mahdollista, että laitteesi poistuu automaattisesti GARDENA- kokoonpanoverkosta tai näyttää virheilmoi tuksen.
Tässä tapauksessa sinun on hyväksyttävä laitteesi asetuksissa,
että yhteys säilytetään myös ilman internet-yhteyttä.
Huomioi, että selaimesi evästeet ja JavaScript on oltava aktivoituna, koska muuten sivua ei voida näyttää. Internet Explorer ei tue
yhteyttä Gatewayhin.
Open Source Software
Tämä laite sisältää Open Source -ohjelmiston. GARDENA
tarjoutuu toimittamaan pyynnöstä täydellisen vastaavan lähdekoodin kopion tässä tuotteessa käytetylle tekijänoikeussuojatulle
Open Source -ohjelmapaketille, jos toimitukselle vaaditaan
kyseisiä lisenssejä. Tämä tarjous on voimassa kolme vuotta
tämän tuotteen ostosta, jos nämä tiedot on mainittu.
Lähdekoodin saamiseksi kirjoita englanniksi, saksaksi tai
ranskaksi osoitteeseen:
smart.open.source@husqvarnagroup.com
FI
57

My Garden
Gratulerer!
Du har valgt et høykvalitetsprodukt.
Hvis du har spørsmål om hvordan man installerer eller
bruker produktet, kan du kontakte GARDENA
Support på www.gardena.de/service
NO
58
Velkommen
Er du klar?
Vi begynner med oppsettet av smart Gateway.
Start
Inkludert i leveransen: 1 stk smart Gateway
1 stk strømforsyningsenhet
1 stk LAN-kabel
Komme i gang
Gatewayen har to alternativer for kobling til Internett, ved hjelp
av LAN-kabel eller via Wi-Fi.
1. Last ned GARDENA Smart system-appen fra Apple App
Store eller Google Play Store.
2. Følg anvisningene i appen.

Ta smart Gateway i drift
En internettforbindelse er en forutsetning for å kunne installere
Gatewayen. Gatewayen kan kobles til internett via LAN eller
WLAN.
4
1. Koble pluggadapteren til en stikkontakt.
2. Koble adapterledningen til kontakten
3. Velg en av følgende muligheter:
Koble til med LAN-kabel / Koble til med WLAN (Wi-Fi)nettverk.
på Gatewayen.
4
NO
59

Koble til med LAN-kabel (anbefales)
1. Bruk den vedlagte LAN-kabelen til å koble Gatewayen til ruteren din.
Programvaren i Gatewayen din oppdateres. Denne prosessen kan ta mer
enn 15 minutter (avhengig av internettforbindelse). Når internett-LED-en
og power-LED-en lyser konstant grønt, viser dette at oppdate ringen av Gateway
var vellykket. Nå kan Gatewayen integreres.
2. Last ned GARDENA smart system-appen fra Apple App Store eller Google
Play Store.
3. Følg anvisningene i appen.
NO
60

Koble til med WLAN-nettverk
Hvis Gatewayen hverken er koblet ruteren via en LAN-kabel eller integrert i et
annet WLAN-nettverk, vil den automatisk stille et konfigurasjonsnett til disposisjon
ca. 1 til 2 minutter etter start.
Konfigurasjonsnettet er aktivert så lenge internett-LED-en lyser konstant
gult.
Konfigurasjonsnettet er aktivert i 15 minutter. Når de 15 minuttene er omme
(eller dersom Gatewayen var konfigurert på et annet WLAN som ikke lenger er
tilgjengelig), kan konfigurasjonsnettet aktiveres på nytt ved å trykke kort på
reset-tasten
.
7
NO
61

Konfigurere et WLAN-nettverk med en iOS-enhet (iPhone, iPad)
Vent til internett-LED-en lyser konstant gult (konfigurasjonsnettet er aktivert).
1. Åpne Apple Home-appen (standard på din mobile iOS-enhet).
2. Velg «Legg til enhet».
3. Skann HomeKit-etiketten på undersiden av Gatewayen.
4. Vent til internett-LED-en lyser konstant grønt.
Programvaren i Gatewayen din oppdateres. Denne prosessen kan ta mer enn 15 minutter
(avhengig av internettforbindelse). Når internett-LED-en og power-LED-en lyser konstant
grønt, viser dette at oppdate ringen av Gateway var vellykket.
Nå kan Gatewayen integreres.
5. Last ned GARDENA smart system-appen
NO
fra Apple App Store.
6. Følg anvisningene i appen.
62

Konfigurere et WLAN-nettverk med en annen
enhet
Vent til internett-LED-en lyser konstant gult (konfigurasjonsnettet er aktivert).
For å opprette en forbindelse via WLAN trenger
du din Gateway ID. Gateway ID kan leses av på
klistremerket på undersiden av atewayen. I tillegg
trenger du passordet til WLAN-nettverket ditt.
1. Opprett en forbindelse med GARDENA
konfigurasjonsnettet. Dette gjør du ved å inn
på WLAN-innstillingene med smarttelefon,
nettbrett eller datamaskin.
Der bør nå Gatewayen vises som tilgjengelig
WLAN-nett.
Nettverksnavnet begynner med
«GARDENA_config».
2. Åpne URL:
http://10.0.0.1
i den nettleseren du foretrekker.
Nå er du i Gateway Interface.
NO
63

3. Meld deg på med de første åtte
Name
GARDENA hotspot network:
GARDENA_config(9eb7)
Password
GARDENA hotspot network:
55446548
Password Gateway Interface:
9eb74563
Gateway ID: 9eb74563-e89b-12d3-a456-426655446548
tegnene i din Gateway ID som
passord (se grafisk fremstilling).
Gateway-ID-en befinner seg på
undersiden av Gatewayen.
4. Blant WLAN-nettverkene velger
du ditt WLAN-nett.
Koble Gatewayen til internett med
dette nettet.
NO
64
5. Legg inn passordet for nettet ditt og bekreft
innstillingen. Vent til internett-LED-en lyser konstant grønt.
Programvaren i Gatewayen din oppdateres.
Denne prosessen kan ta mer enn 15 minutter
(avhengig av internettforbindelse). Når internettLED-en og power-LED-en lyser konstant grønt,
viser dette at oppdate ringen av Gateway var
vellykket. Nå kan Gatewayen integreres.
6. Last ned GARDENA smart system-appen
fra Google Play Store.
7. Følg anvisningene i appen.

OBS: Da GARDENA konfigurasjonsnettet ikke har en egen
internettilgang, kan det hende at din enhet automatisk forlater
GARDENA konfigurasjonsnettet igjen eller viser en feilmelding.
I dette tilfelle må du i innstillingene på enheten din tillate at det
opprettholdes en forbindelse også uten internettilgang.
Vær oppmerksom på at nettleseren din må ha aktivert cookies
(informasjonskapsler) og JavaScript, ellers kan siden ikke vises.
Internett Explorer støtter ikke forbindelsen til Gateway.
Open Source-programvare
Dette apparatet inneholder en Open Source-programvare.
GARDENA tilbyr herved å på forespørsel levere en kopi av den
komplette tilsvarende kilde koden for de opphavsrettslig beskyttede Open Source-programvarepakkene som brukes i dette
produktet og som det kreves et slikt tilbud for av de respektive
lisensene. Dette tilbudet gjelder i opptil tre år etter kjøp av
produktet for enhver som mottar denne informasjonen.
For å motta kildekoden bes du henvende deg på engelsk,
tysk eller fransk til:
smart.open.source@husqvarnagroup.com
NO
65

Mio Giardino
Complimenti!
Hai scelto un prodotto di eccezionale qualità.
Se hai domande sull’installazione o l’utilizzo del prodotto, contatta
l’assistenza GARDENA sul sito www.gardena.de/service
In dotazione: 1 x smart Gateway
1 x unità di alimentazione
1 x cavo LAN
IT
Benvenuti
Iniziamo impostando lo smart Gateway.
Pronti?
Start
Come iniziare
Il gateway dispone di due opzioni per il collegamento a Internet;
tramite cavo LAN o tramite Wi-Fi.
1. Scaricare l’app gratuita GARDENA smart system dall’App
Store di Apple o da Google Play Store.
2. Seguire le istruzioni riportate nell’app.
66

Mettere in funzione lo smart Gateway
Per l’installazione del Gateway è necessario il collegamento
a internet. Il Gateway può essere collegato a internet tramite
LAN o WLAN.
4
1. Infilare l’alimentatore in una presa di alimentazione.
2. Infilare il cavo dell’alimentatore nella presa
3. Selezionare una delle due opzioni seguenti:
Collegare con cavo LAN / collegare con rete WLAN.
del Gateway.
4
IT
67

Collegare con cavo LAN (consigliato)
1. Collegare il Gateway tramite il cavo LAN in dotazione con il router.
Il software del Gateway è in corso di aggiornamento. Quest’operazione
può durare fino a 15 minuti (in funzione della connessione internet).
Non appena l’Internet-LED e il Power-LED si trovano in verde fisso,
vuol dire che il Gateway è stato aggiornato con successo. Ora il
Gateway può essere incluso.
2. Scaricare l’app GARDENA smart system dall’App Store
o da Google Play Store.
3. Seguire le istruzioni riportate nell’app.
IT
68

Collegare con rete WLAN
Se il Gateway non è né collegato tramite un cavo LAN con il router né
integrato in un’altra rete WLAN, il Gateway mette automaticamente a dis posizione
una rete di configurazione dopo circa 1 o 2 minuti dall’avvio.
La rete di configurazione è attivata fintanto che il LED internet
è continuamente illuminato di giallo.
La rete di configurazione rimane attiva per 15 minuti. Una volta decorsi 15 minuti
(oppure se il Gateway era precedentemente già configurato su un’altra WLAN,
ora non più disponibile), la rete di configurazione può essere riattivata premendo
brevemente il tasto di reset
.
7
IT
69

Configurare la rete WLAN con un altro apparecchio iOS (iPhone, iPad)
Attendere finché il LED internet non si illumina continuamente di giallo
(la rete di configurazione è attivata).
1. Aprire l’app Home di Apple (questa si trova di default sul proprio apparecchio iOS mobile).
2. Selezionare “Aggiungi apparecchio”.
3. Effettuare la scansione dell’etichetta HomeKit riportata sul lato inferiore del Gateway.
4. Attendete che l’Internet-LED diventi verde fisso.
Il software del Gateway è in corso di aggiornamento. Quest’operazione può durare fino a 15 minuti
(in funzione della connessione internet).Non appena l’Internet-LED e il Power-LED si trovano in
verde fisso, vuol dire che il Gateway è stato aggiornato con
successo. Ora il Gateway può essere incluso.
5. Caricare l’app GARDENA smart system
dall’Apple App Store.
IT
6. Seguire le istruzioni riportate nell’app.
70

Configurare la rete WLAN con un altro
apparecchio
Attendere finché il LED internet non si illumina
continuamente di giallo (la rete di configurazione
è attivata).
Per stabilire un collegamento tramite WLAN,
è necessario il proprio ID Gateway, che è leggibile
sull’etichetta sul lato inferiore del Gateway.
Inoltre è necessaria la password per la propria
rete WLAN.
1. Effettuare il collegamento alla rete di configurazione GARDENA. A tal fine, andare alle
impostazioni WLAN sul proprio smartphone,
tablet o computer.
Lì ora dovrebbe essere visualizzato il Gateway
come rete WLAN disponibile.
Il nome della rete inizia con
“GARDENA_config”.
2. Aprire l’URL:
http://10.0.0.1
nel browser Internet preferito.
Ora vi trovate in Gateway Interface.
IT
71

3. Accedere utilizzando come pass -
Name
GARDENA hotspot network:
GARDENA_config(9eb7)
Password
GARDENA hotspot network:
55446548
Password Gateway Interface:
9eb74563
Gateway ID: 9eb74563-e89b-12d3-a456-426655446548
word le prime otto cifre del proprio
ID Gateway (vedere figura).
L’ID Gateway si trova sul lato
inferiore del Gateway.
4. Selezionare la propria rete WLAN
domestica alla voce Rete WLAN
per collegare il Gateway ad internet.
IT
72
5. Immettete la password di rete e confermate la
vostra posizione. Attendete che l’Internet-LED
diventi verde fisso.
Il software del Gateway è in corso di aggiornamento. Quest’opera zionepuòdurare fino
a 15 minuti (in funzione della connessione
internet).Non appena l’Internet-LED e il PowerLED si trovano in verde fisso, vuol dire che
il Gateway è stato aggiornato con successo.
Ora il Gateway può essere incluso.
6. Caricare l’app GARDENA smart system dal
Google Play Store.
7. Seguire le istruzioni riportate nell’app.

Nota: Dal momento che la rete di configurazione GARDENA
non dispone di un proprio accesso a internet, può accadere che
l’apparecchio perda di nuovo automaticamente la rete di configurazione GARDENA o visualizzi un messaggio di errore. In tal caso,
nelle impostazioni dell’apparecchio si deve consentire che venga
mantenuto un collegamento anche senza accesso a internet.
Vogliate notare che i cookie del browser e JavaScript devono
essere con sentiti. Altrimenti, la pagina non può essere visualizzata. La connessione al Gateway non è supportata da Internet
Explorer.
Software open source
Quest’apparecchio contiene un software open source. GARDENA
offre di fornire, su richiesta, una copia del codice sorgente completo corrispondente per i pacchetti software open source protetti
dal diritto d’autore utilizzati in questo prodotto, per i quali viene
richiesta una simile offerta dalle rispettive licenze. L’offerta vale fino
a tre anni dall’acquisto del prodotto per chiunque riceva queste
informazioni.
Per ricevere il codice sorgente, scrivere in inglese, tedesco
o francese a:
smart.open.source@husqvarnagroup.com
IT
73

Mi jardín
¡Felicidades!
Usted acaba de adquirir un producto de calidad óptima.
Si usted tiene preguntas relativas a la instalación o la utilización de
su producto, le rogamos que se dirija al servicio GARDENA en
www.gardena.de/service
ES
74
Le damos la bienvenida
Vamos a empezar con la conguración de su
smart Gateway. ¿Está listo(a)?
Puesta en marcha
Entregado con: 1 x smart Gateway
1 x bloque de alimentación
1 x cable LAN
Puesta en marcha
El Gateway dispone de dos opciones para la conexión a Internet.
La conexión por el cable LAN o a través de Wi-Fi.
1. Descargue gratuitamente la aplicación GARDENA
smart system-App desde el Apple App Store o del
Google Play Store.
2. Siga las instrucciones indicadas en la aplicación.

Puesta en marcha del smart Gateway
Para instalar el Gateway se requiere conexión a Internet.
El Gateway puede conectarse a Internet por LAN o Wi-Fi.
4
1. Conecte el enchufe de red a una toma de red.
2. Conecte el cable de red a la hembrilla
3. Elija una de las dos opciones siguientes:
Conectar por cable LAN / conectar por red Wi-Fi.
del Gateway.
4
ES
75

Conexión por cable LAN (recomendada)
1. Conecte el Gateway a su router mediante el cable LAN incluido en el set.
Ahora se procede a actualizar el software de su Gateway. Este proceso puede
durar hasta 15 minutos (en función de la conexión a Internet). La actualización
del Gateway se ha concluido con éxito en cuanto el LED de Internet y el LED
de alimentación se iluminan en verde de manera continua. Ahora ya puede
integrar el Gateway.
2. Descargue la aplicación GARDENA smart system desde el Apple App Store
o el Google Play Store.
3. Siga las instrucciones indicadas en la aplicación.
ES
76

Conexión por red Wi-Fi
Si no se encuentra conectado con el router mediante un cable LAN ni está integrado en otra red Wi-Fi, el Gateway pone a disposición automáticamente una red
de configuración aprox. 1 – 2 minutos después del inicio.
La red de configuración se encuentra activada mientras el LED de Internet
emita una luz amarilla fija.
La red de configuración permanece activa durante 15 minutos. Transcurridos esos
15 minutos (o si el Gateway estaba configurado anteriormente para otra Wi-Fi que
ya no se encuentra disponible), puede activarse de nuevo la red de configuración
pulsando brevemente la tecla de reset
.
7
ES
77

Configuración de la red Wi-Fi con un dispositivo iOS (iPhone, iPad)
Espere a que el LED de Internet emita una luz amarilla fija (la red de configuración está activada).
1. Abra la aplicación Apple Home (se encuentra instalada por defecto en su dispositivo móvil iOS).
2. Seleccione “Añadir dispositivo”.
3. Escanee la etiqueta HomeKit de la base del Gateway.
4. Espere a que el LED de Internet emita una luz verde fija.
Ahora se procede a actualizar el software de su Gateway. Este proceso puede durar
hasta 15 minutos (en función de la conexión a Internet). La actualización del Gateway
se ha concluido con éxito en cuanto el LED de Internet y el LED de alimentación se
iluminan en verde de manera continua. Ahora ya puede integrar
el Gateway.
5. Descargue la aplicación GARDENA
smart system desde el Apple App Store.
6. Siga las instrucciones indicadas en la
aplicación.
ES
78

Configuración de la red Wi-Fi con otro
dispositivo
Espere a que el LED de Internet emita una luz
amarilla fija (la red de configuración está activada).
Para establecer una conexión por Wi-Fi necesita
su ID de Gateway, que figura en el adhesivo que
hay en la base del Gateway. Asimismo, requiere la
contraseña de su red Wi-Fi.
1. Conéctese con la red de configuración
GARDENA. Para ello, vaya a los ajustes
Wi-Fi de su smartphone, tableta u ordenador.
En estos aparecerá el Gateway como red
Wi-Fi disponible.
El nombre de la red empieza con
“GARDENA_config”.
2. Abra la URL:
http://10.0.0.1
en su navegador preferido de Internet.
Ahora se encuentra usted en la interfaz de
Gateway.
ES
79

3. Regístrese utilizando los ocho
Name
GARDENA hotspot network:
GARDENA_config(9eb7)
Password
GARDENA hotspot network:
55446548
Password Gateway Interface:
9eb74563
Gateway ID: 9eb74563-e89b-12d3-a456-426655446548
primeros caracteres de su ID
de Gateway como contraseña
(ver ilustración).
La ID de Gateway figura en la
base del Gateway.
4. Seleccione su red Wi-Fi doméstica
en Red Wi-Fi.
De este modo conecta el Gateway a Internet.
ES
80
5. Introduzca la contraseña de su red y confirme
su ajuste. Espere a que el LED de Internet
emita una luz verde fija.
Ahora se procede a actualizar el software de
su Gateway. Este proceso puede durar hasta
15 minutos (en función de la conexión
a Internet). La actualización del Gateway se ha
concluido con éxito en cuanto el LED de Internet y el LED de alimentación se iluminan en
verde de manera continua. Ahora ya puede
integrar el Gateway.
6. Descargue la aplicación GARDENA smart
system desde el Google Play Store.
7. Siga las instrucciones indicadas en la
aplicación.

Atención: Puesto que la red de configuración GARDENA no
dispone de un acceso propio a Internet, es posible que su dispositivo se salga automáticamente de la red de configuración
GARDENA o muestre un mensaje de error. En tal caso, deberá
permitir en los ajustes de su dispositivo que también se mantengan las conexiones sin acceso a Internet.
Tenga en cuenta que en su navegador tienen que estar activadas
las cookies y JavaScript, ya que de lo contrario no podrá configurarse la página. Internet Explorer no soporta la conexión al
Gateway.
Software de código abierto
Esta herramienta contiene software de código abierto. GARDENA
ofrece la posibilidad, previa solicitud, de suministrar una copia
del código fuente completo correspondiente a los paquetes de
software de código abierto protegidos por derechos de autor que
se utilizan en este producto, y cuyas licencias estipulen tal oferta.
Esta oferta es válida hasta tres años tras la compra del producto
para todos quienes hayan recibido dichas informaciones.
Para obtener el código fuente, rogamos escribir en inglés, alemán
o francés a:
smart.open.source@husqvarnagroup.com
ES
81

Mój ogród
Gratulujemy!
Wybrany produkt to urządzenie najwyższej jakości.
Jeśli masz pytania dotyczące instalacji lub korzystania z produktu,
skontaktuj się zespołem ds. pomocy technicznej GARDENA za
pośrednictwem strony www.gardena.de/service
PL
82
Witamy
Przygotuj się!
Rozpocznijmy od skongurowania inteligentnej bramy.
Start
W zestawie: 1 x inteligentna brama
1 x zasilacz
1 x przewód LAN
Pierwsze kroki
Bramę można połączyć z Internetem na dwa sposoby:
za pomocą przewodu LAN lub za pośrednictwem sieci Wi-Fi.
1. Pobierz bezpłatną aplikację GARDENA smart system
ze sklepu Apple App Store lub Google Play.
2. Postępować zgodnie z instrukcjami w aplikacji.

Uruchamianie smart Gateway
Do instalacji Gateway konieczne jest połączenie z Internetem.
Gateway można połączyć z Internetem poprzez sieć LAN lub
WLAN.
4
1. Wtyczkę zasilacza sieciowego podłączyć do gniazdka.
2. Przewód zasilający podłączyć do gniazda
3. Wybrać jedną z opcji:
Połączenie za pomocą kabla LAN / połączenie poprzez
sieć WLAN.
Gateway.
4
PL
83

Połączenie za pomocą kabla LAN (zalecane)
1. Połączyć Gateway z routerem za pomocą dołączonego kabla LAN.
Oprogramowanie Gateway zostanie zaktualizowane. Proces ten może potrwać
do 15 minut (w zależności od połączenia internetowego). Gdy dioda LED
połączenia z Internetem i dioda LED zasilania zaczną świecić się na zielono,
oznacza to, że Gateway został pomyślnie zaktualizowany. Teraz można połączyć
Gateway.
2. Pobrać bezpłatną aplikację GARDENA smart system
z Apple App Store lub Google Play Store.
3. Postępować zgodnie z instrukcjami w aplikacji.
PL
84

Połączenie poprzez sieć WLAN
Jeśli Gateway nie został podłączony do routera za pomocą kabla LAN ani nie
został połączony z inną siecią WLAN, po ok. 1 – 2 min od włączenia Gateway automatycznie udostępni sieć do konfiguracji.
Sieć do konfiguracji jest aktywna, gdy dioda LED połączenia z Internetem
świeci się na żółto.
Sieć do konfiguracji jest aktywna przez 15 minut. Po upływie 15 minut (lub jeśli
Gateway wcześniej był już skonfigurowany do współpracy z inną siecią WLAN,
która nie jest już dostępna) można ponownie aktywować sieć do konfiguracji, krótko
naciskając przycisk Reset
.
7
PL
85

Konfigurowanie WLAN za pomocą urządzenia z systemem operacyjnym iOS (iPhone, iPad)
Odczekać, aż dioda LED połączenia z Internetem zaświeci się na żółto (sieć do konfiguracji jest aktywna).
1. Otworzyć aplikację Apple Dom (jest ona standardowo zainstalowana na mobilnym urządzeniu
z systemem iOS).
2. Wybrać opcję „Dodaj urządzenie”.
3. Zeskanować kod HomeKit na spodniej stronie Gateway.
4. Odczekać, aż dioda LED połączenia z Internetem zaświeci się na zielono.
Oprogramowanie Gateway zostanie zaktualizowane. Proces ten może potrwać do 15 minut
(w zależności od połączenia internetowego).Gdy dioda LED połączenia z Internetem
i dioda LED zasilania zaczną świecić się na zielono, oznacza to,
że Gateway został pomyślnie zaktualizowany. Teraz można
połączyć Gateway.
5. Pobrać aplikację GARDENA smart system
z Apple App Store.
6. Postępować zgodnie z instrukcjami w aplikacji.
PL
86

Konfigurowanie WLAN za pomocą innego
urządzenia
Odczekać, aż dioda LED połączenia z Internetem
zaświeci się na żółto (sieć do konfiguracji jest
aktywna).
Aby nawiązać połączenie poprzez sieć WLAN,
konieczny jest identyfikator Gateway. Identyfikator
Gateway znajduje się na naklejce na spodniej
stronie Gateway. Ponadto potrzebne jest hasło do
sieci WLAN.
1. Nawiązać połączenie z siecią do konfiguracji
GARDENA. W tym celu należy wejść w ustawienia sieci WLAN na smartfonie, tablecie
lub komputerze.
Gateway powinien pojawić się tam jako
dostępna sieć WLAN.
Nazwa sieci rozpoczyna się od
„GARDENA_config”.
2. W przeglądarce internetowej otworzyć adres:
http://10.0.0.1
Wyświetlony zostanie interfejs Gateway.
PL
87

3. Zalogować się za pomocą
Name
GARDENA hotspot network:
GARDENA_config(9eb7)
Password
GARDENA hotspot network:
55446548
Password Gateway Interface:
9eb74563
Gateway ID: 9eb74563-e89b-12d3-a456-426655446548
hasła składającego się z pierwszych
ośmiu znaków identyfikatora
Gateway (patrz grafika).
ID Gateway znajduje się na
spodniej stronie Gateway.
4. Pod pozycją Sieć WLAN wybrać
domową sieć WLAN.
Umożliwi ona połączenie Gateway
z Internetem.
PL
88
5. Wprowadzić hasło zabezpieczające sieć
i zatwierdzić. Odczekać, aż dioda LED połączenia z Internetem zaświeci się na zielono.
Oprogramowanie Gateway zostanie zaktualizowane. Proces ten może potrwać do 15 minut
(w zależności od połączenia internetowego).
Gdy dioda LED połączenia z Internetem i dioda
LED zasilania zaczną świecić się na zielono,
oznacza to, że Gateway został pomyślnie
zaktualizowany. Teraz można połączyć Gateway.
6. Pobrać aplikację GARDENA smart system
z Google Play Store.
7. Postępować zgodnie z instrukcjami w aplikacji.

Uwaga: Ponieważ sieć do konfiguracji GARDENA nie dysponuje
własnym dostępem do Internetu, urządzenie może automatycznie
zakończyć połączenie z siecią do konfiguracji GARDENA lub
wyświetlić komunikat o błędzie. W tym przypadku należy w ustawieniach urządzenia zezwolić, aby także połączenia bez dostępu
do Internetu były podtrzymywane.
Należy pamiętać, że w przeglądarce internetowej powinna być
uaktywniona obsługa „cookies” i JavaScript, w przeciwnym razie
strona nie zostanie wyświetlona. Połączenie z Gateway nie jest
obsługiwane przez przeglądarkę Internet Explorer.
Oprogramowanie Open Source
Urządzenie zawiera oprogramowanie Open Source. Na życzenie
firma GARDENA oferuje kopię kompletnego kodu źródłowego
chronionych prawem autorskim pakietów oprogramowania
Open Source wykorzystanych wniniejszym produkcie, wprzypadku których taka oferta jest wymagana wramach danej
licencji. Oferta jest ważna przez okres trzech lat od daty zakupu
produktu idotyczy każdego, kto otrzyma tę informację.
Aby otrzymać kod źródłowy, należy wysłać wiadomość wjęzyku
angielskim, niemieckim lub francuskim na adres:
smart.open.source@husqvarnagroup.com
PL
89

Az én kertem
Gratulálunk!
Ön egy csúcsminőségű terméket választott.
Amennyiben kérdései vannak a termék telepítésével vagy alkalmazásával kapcsolatban, kérjük, forduljon GARDENA szervizünkhöz
a következő oldalon: www.gardena.de/service
HU
90
Üdvözöljük
Kezdjük az Ön smart Gateway eszközének
beállításával. Ön készen áll?
Indítás
A csomagolás tartalma: 1 x smart Gateway
1 x hálózati tápegység
1 x LAN-kábel
Üzembe helyezés
A Gateway két lehetőséget kínál Önnek az internethez való
csatlakozásra. A kapcsolódás a LAN-kábellel vagy Wi-Fi segítségével lehetséges.
1. Töltse le az ingyenes GARDENA smart system-App
alkalmazást az Apple App Store-ban vagy a Google Play
Store-ban.
2. Ehhez kövesse az alkalmazásban található utasításokat.

A smart Gateway üzembe helyezése
A Gateway telepítéséhez Internet kapcsolat szükséges. A Gateway
LAN vagy WLAN hálózaton keresztül köthető össze az Internettel.
4
1. Dugja be a tápegységet a hálózati csatlakozóaljzatba.
2. Dugja be a tápegység kábelét a Gateway csatlakozóhüvelyébe
.
4
3. Az alábbi két lehetőség közül válassza az egyiket:
Kapcsolódás LAN kábellel / Kapcsolódás WLAN adathálózattal.
HU
91

Kapcsolódás LAN kábellel (ajánlott)
1. A tartozék LAN kábel segítségével kösse össze a Gateway-t az Internet
útválasztójával.
Ekkor frissülni fog a Gateway szoftverje. Ez a művelet (az Internet kapcsolat
minőségétől függően) akár 15 percig is eltarthat. Amint az internet-LED
és a Power-LED fénye tartósan zöldre vált, a Gateway frissítése sikeresen
megtörtént. A Gateway immár beköthető.
2. Az Apple App Store-ban vagy a Google Play Store-ban töltse
le a GARDENA smart system-App alkalmazást.
3. Ehhez kövesse az alkalmazásban
található utasításokat.
HU
92

Kapcsolódás WLAN adathálózattal
Ha a Gateway LAN kábel segítségével még nincs összekötve az útválasztóval,
és másik WLAN hálózatba sincs bekötve, a Gateway az indítás után körülbelül
1 – 2 perccel automatikusan rendelkezésre bocsátja a konfiguráló hálózatot.
A konfiguráló hálózat mindaddig működésben van, amíg az Internet-LED
folyamatosan sárgán világít.
A konfiguráló hálózat 15 percig marad működőképes. A 15 perc elteltével (vagy
ha a Gateway korábban egy másik, már nem elérhető WLAN hálózatra volt konfigurálva), a konfiguráló hálózat a
újból működésbe.
Reset gomb rövid megnyomá sávalhozható
7
HU
93

WLAN hálózat konfigurálása iOS készülékkel (iPhone, iPad)
Várjon, amíg az Internet-LED folyamatosan nem kezd világítani (amíg a konfiguráló hálózat működésbe
nem lépett).
1. Nyissa meg az Apple Home alkalmazást (ez alapértelmezés szerint az Ön mobil iOS készülékén van).
2. Válassza a „Készülék hozzáadása” pontot.
3. Olvassa be a Gateway alján lévő HomeKit címkét.
4. Várja meg, amíg az Internet-LED folyamatos zöld fénnyel világít. Ekkor frissülni fog a Gateway
szoftverje. Ez a művelet (az Internet kapcsolat minőségétől függően) akár 15 percig
is eltarthat. Amint az internet-LED és a Power-LED fénye tartósan zöldre
vált, a Gateway frissítése sikeresen megtörtént. A Gateway immár
beköthető.
5. Az Apple App Store-ból töltse le a
GARDENA smart system App alkalmazást.
6. Ehhez kövesse az alkalmazásban található
utasításokat.
HU
94

WLAN hálózat konfigurálása egy másik
készülékkel
Várjon, amíg az Internet-LED folyamatosan sárgán
nem kezd világítani (amíg a konfiguráló hálózat
működésbe nem lépett).
A kapcsolat WLAN segítségével történő létrehozásához szükség lesz a Gateway azonosítójára
(ID-jére). A Gateway azonosítója a Gateway alján
lévő matricáról olvasható le. Emellett még a WLAN
hálózatának jelszavára is szükség lesz.
1. Létesítsen kapcsolatot a GARDENA konfiguráló hálózattal. Ehhez álljon rá az okostelefonjával, tabletjével vagy számítógépével a WLAN
beállításokra.
A Gateway-nek a rendszer számára immár
elérhető WLAN-hálózatként kell látszódnia.
A hálózati név
„GARDENA_config”-gel kezdődik.
2. Nyissa meg a következő URL-t:
http://10.0.0.1
iaz Ön által kedvelt Internet böngészőben.
Ön immár a Gateway Interface felületen van.
HU
95

3. Jelentkezzen be, és jelszóként
Name
GARDENA hotspot network:
GARDENA_config(9eb7)
Password
GARDENA hotspot network:
55446548
Password Gateway Interface:
9eb74563
Gateway ID: 9eb74563-e89b-12d3-a456-426655446548
adja meg a Gateway AZ első nyolc
karakterét (lásd az ábrát).
A Gateway AZ a Gateway alján
található.
4. A WLAN hálózat pontja alatt
válass za ki az otthoni WLAN
hálózatát.
Ezen keresztül tud majd összekap csolódni a Gateway az Internettel.
HU
96
5. Írja be a saját hálózatának jelszavát, és hagyja
jóvá a választott beállítását. Várja meg, amíg az
Internet-LED folyamatos zöld fénnyel világít.
Ekkor frissülni fog a Gateway szoftverje. Ez a
művelet (az Internet kapcsolat minőségétől függően) akár 15 percig is eltarthat. Amint
az internet-LED és a Power-LED fénye tartósan
zöldre vált, a Gateway frissítése sikeresen megtörtént. A Gateway immár beköthető.
6. A Google Play Store-bóltöltse le a GARDENA
smart system App alkalmazást.
7. Ehhez kövesse az alkalmazásban található utasításokat.

Figyelem: Mivel a GARDENA konfiguráló hálózata nem rendelkezik saját Internet hozzáféréssel, előfordulhat, hogy az Ön készüléke automatikusan újból kilép a GARDENA konfiguráló hálózatból,
ill. hibaüzenetet ír ki. Ebben az esetben a készülék beállításaiban
engedélyeznie kell, hogy a kapcsolat internet hozzáférés nélkül
is fennmaradjon.
Ne feledje, hogy a böngészőjében működésben kell lenniük
a sütiknek és a JavaScript-nek, különben nem jeleníthető meg
az oldal. Az Internet Explorer nem támogatja a kapcsolat
kiépítését a Gateway felé.
Open Source Software
Ez a készülék egy nyílt forráskódú szoftvert (Open Source Software) tartalmaz. A GARDENA ezennel felajánlja, hogy kérésre
elküldi a jelen termékben használt, szerzői jog által védett nyílt
forráskódú szoftvercsomagok teljes megfelelő forráskódjának
másolatát, melyekhez ezt az ajánlatot az adott licencek előírják.
A jelen ajánlat a termék megvásárlását követően legfeljebb
három évig érvényes arra a személyre, aki ezt az információt
kapja.
A forráskód beszerzéséhez, kérjük, írjon angol, német vagy
francia nyelven a következő címre:
smart.open.source@husqvarnagroup.com
HU
97

Moje zahrada
Srdečně blahopřejeme!
Vybrali jste si produkt nejvyšší kvality.
Pokud máte otázky k instalaci nebo využití Vašeho produktu,
obraťte se na náš servis GARDENA na adrese
www.gardena.de/service
CS
98
Vítejte
Začínáme s instalací Vašeho smart gateway.
Jste připraveni?
Spustit
Rozsah dodávky: 1 x smart Gateway
1 x síťový díl
1 x kabel LAN
Uvedení do provozu
Gateway (brána) nabízí dvě možnosti připojení k internetu.
Připojení pomocí kabelu LAN nebo pomocí Wi-Fi.
1. Stáhněte si zdarma aplikaci GARDENA smart system-App
z Apple App Store nebo z Google Play Store.
2. Postupujte podle pokynů aplikace.

Uvedení smart Gateway do provozu
Pro instalaci Gateway je potřebné internetové připojení. Gateway
lze k internetu připojit pomocí LAN nebo Wi-Fi.
4
1. Síťovou nabíječku zastrčte do síťové zásuvky.
2. Zastrčte kabel od nabíječky do zásuvky
3. Vyberte jednu ze dvou možností:
Připojit pomocí kabelu LAN / připojit pomocí Wi-Fi sítě.
v bráně Gateway.
4
CS
99

Připojení kabelem LAN (doporučeno)
1. Propojte Gateway pomocí přiloženého kabelu LAN s Vaším routrem.
Software Vaší Gateway se nyní aktualizuje. Tento proces může trvat
až 15 minut (v závislosti na internetovém připojení). Jakmile svítí
LED diody internet a power trvale zeleně, byla Gateway úspěšně aktualizována.
Nyní lze Gateway integrovat.
2. Stáhněte si aplikaci GARDENA smart system App z Apple App Store nebo
z Google Play Store.
3. Postupujte podle pokynů aplikace.
CS
100
 Loading...