

Page 1

GAME PLAY
™
®
MANUAL
STRATEGY
Page 2

TECHNICAL SUPPLEMENT
TM
REQUIRED EQUIPMENT
For X-COM: Terror From The Deep to
work, there are a few things your
computer must have.
The processor has to be an 80386 with
a system speed of at least 33MHz
(megahertz). Basically, any computer
with “386,” “486” or “Pentium” in its
name should do just fine. For best play,
we recommend at least a 486 with a
speed of 50MHz.
You must have a version of DOS
numbered 5.0 or higher. Almost all 386,
TERROR FROM THE DEEP
486 and Pentium computers include
DOS in the standard software package.
There have to be at least 520K (532,480
bytes) of free conventional memory. The
nice thing is, you don’t even have to know
what a K is. (It’s a “kilobyte”—1024 bytes.
Never mind what a byte is.) To find out
whether you have enough, at the DOS
prompt type mem/c and press r.
Somewhere in the mess of information
that pops up will be a line something like
“Largest executable size.” That’s what
tells you how much free conventional
memory you have.
i
TERROR FROM THE DEEP
Page 3

CONTENTS
There also has to be at least 4MB of
memory installed in your system, at least
3MB of which should be free (3072K). The
“mem/c” report should also tell you the total
amount of memory installed in your system.
The graphics must be VGA quality or
better (SVGA is better).
You must have a mouse attached to
the computer. (We mean the input device;
please do not glue or staple helpless little
animals to the keyboard.) The mouse
driver must be Microsoft mouse version
8.01 or higher or something fully compatible with this.
COMPATIBILITY ISSUES
Please note that this list includes only
the known conflicts and incompatibilities.
Since no test procedure can ever be
totally comprehensive, you may run into
undiscovered problems. Please contact
Customer Support if you do.
We strongly recommend that you do
not run this game under Microsoft
Windows 3.1 or Windows 95.
We strongly recommend that you not
have any terminate-and-stay-resident
programs (TSRs) other than memory
managers loaded into memory when
playing X-COM: Terror From The Deep.
Not only will they decrease the amount of
free memory available, thus slowing the
game, but there may be unpredictable
interactions.
OPERATING DIFFICULTIES AND
LOADING PROBLEMS
Q. Why can’t I install the game to my
hard disk?
1. You must check all of the system requirements, especially the amount
of hard disk space required.
2. Try installing the program to an
uncompressed partition on the
hard drive in case Drivespace or
Doublespace or a similar utility is
conflicting in some way with the
installation program.
Note: If your hard drive is compressed with
the Drivespace or Doublespace program from
Microsoft, you must double the amount of hard
drive space needed during installation: not
every file will compress at the normal ratio of 2
to 1. For example, installation of the game
usually takes 16MB, but with Doublespace it
could take up to 32MB.
3. Finally, try installing the game on
another machine to see if the
problem recurs.
Q. What is a boot disk?
This is a startup disk for your
computer that contains alternate
startup files to those on your hard
drive. Using a boot disk will leave
more conventional memory free.
Using a Boot Disk
Insert the boot disk into your floppy
disk drive, then switch on the computer.
You should leave the disk in the floppy
drive during play.
TERROR FROM THE DEEP
ii
TERROR FROM THE DEEP
Page 4

Slow Running
If you are not running from a boot
disk, you can try using SMARTDRV.SYS
or SMARTDRV.EXE loaded into your
CONFIG.SYS or AUTOEXEC.BAT. This
might speed up the game a bit.
If you are using MS-DOS 5.0, make
sure you have the following line in your
CONFIG.SYS file:
devicehigh=c:\dos\smartdrv.sys
If you are using MS-DOS 6.0 or 6.2,
make sure the following line is in your
AUTOEXEC.BAT file:
loadhigh c:\dos\smartdrv.exe
However, you might need to remove
this line if memory problems occur.
Q. Can I run my game through
Windows?
No. This is not recommended; it is
likely that you will not have
sufficient memory to do so.
Q. Does this game run with DR DOS,
Novell DOS 7 or OS/2?
Success is not guaranteed. MicroProse games are currently designed
to run with MS-DOS 5.0 or any
100% compatible DOS.
Q. What is base memory?
This is the original 1MB (1024K) in
your machine. It is divided into
conventional memory (640K), where
MS-DOS and all PC programs load,
and upper memory (384K), where
system programs reside.
In MS-DOS 5.0, the bulk of the
operating system and associated
drivers (such as the mouse driver)
are normally loaded into upper
memory. Other drivers held in the
area of conventional memory will
reduce your 640K available for
the program.
It is important to have as much free
conventional memory as possible.
Q. What is extended memory (XMS)?
Further memory, beyond the 1MB
of base memory on your PC is
called extended memory. XMS can
be used to free more conventional
memory so that bigger games can
be run. XMS can also be used to
simulate expanded memory.
Q. What is expanded memory (EMS)?
EMS was originally designed to give
PC compatibles more memory to
run programs. It has been around
longer than XMS, so many older
programs take advantage of it. The
DOS command EMM386.EXE can
be used to turn XMS into EMS and
should be in your CONFIG.SYS.
Remember that hard drive space is
also measured in megabytes (MB).
Don’t confuse this with memory—
the two are completely different!
Memory Managers
If the program is occasionally freezing
or crashing to DOS, the game might have
a conflict with your current memory
manager. MicroProse recommends only
the drivers that come with MS-DOS (i.e.,
HIMEM.SYS and EMM386.EXE). Try
using the memory managers that come
with MS-DOS 5.0, Windows 3.1, MSDOS 6.0 or MS-DOS 6.2, in that order.
TERROR FROM THE DEEP
iii
TERROR FROM THE DEEP
Page 5

Mouse Drivers
Another common cause of the program
freezing or crashing is a conflict with
your current mouse driver. MicroProse
recommends the Microsoft driver,
MOUSE.COM or MOUSE.SYS version
8.01 or higher. See the MS-DOS manual
for full details. To check which mouse
driver you are using, run the MSD
program which comes with Windows 3.1
and MS-DOS 6.0/6.2.
TERROR FROM THE DEEP
iv
TERROR FROM THE DEEP
Page 6

TM
X-COM: TERROR FROM THE DEEP
™
©1995 MicroProse Software, Inc.
ALL RIGHTS RESERVED
This book may not be reproduced in whole or in part, by mimeograph or photocopy or other means without permission, with the
TERROR FROM THE DEEP
exception of quoting brief passages for the purpose of review.
1
TERROR FROM THE DEEP
Page 7

INTRODUCTION
BACKGROUND
On the morning of November 28, 1998, top
officials from the world’s most economically
powerful countries congregated secretly at
the UN. The reason for the meeting:
increasing terrestrial UFO activity. Over the
previous 6 months there had been numerous
confirmed sightings, landings and hostile
contacts with super-intelligent and
unpredictable aliens.
After much debate, the decision was made to
establish an independent body to combat,
investigate and defeat the alien threat. This
elite organization was equipped with the
world’s finest pilots, soldiers, scientists and
engineers, working together as one multinational force.
TERROR FROM THE DEEP
This organization was named the
Extraterrestrial Combat Unit — X-COM.
2039.
The last scarred sites of the alien war of 30
years ago are healing and, for all intents and
purposes, the threat to the Earth might never
have happened. Humans sleep easier in their
beds knowing that the evil has gone…
But in the oceans long-silent forces have been
aroused by the conflicts. Forces that have
from time to time made themselves known to
man, but for the most part have remained
hidden. Separated from their stellar cousins
for millennia, these aliens are now aware of
their brethren’s former battles culminating in
the final conflict on Mars.
2
TERROR FROM THE DEEP
Page 8

Under the ocean lies the remains of a vast
interstellar colonization ship; 400 billion tons
of metal that plummeted to the Earth some 65
million years ago. Now, the waiting is at an
end, the powerful computers begin to stir, the
ancient technology readies itself for the
coming storm. When the alien base on Mars
shuddered in its death throes, a powerful
Tachyon beam darted out to a long dormant
receptor.
Thirty years ago, awakened by the cosmic
emissions of their brothers, the vast
chambers of innumerable species began their
re-animation cycle. X-COM must now face a
new terror, an army of aliens that is already
here, but in an environment more deadly than
deep space. The aliens of the depths are well
prepared to take on man in all the oceans,
even bringing the war onto the land.
X-COM: Terror From The Deep
into combat in a strange and alien world, use
new technology to enable the war to be taken
under the seas, arm your troops for an
encounter the likes of which man has only
dreamed of in his worst nightmares…
lets you enter
GAME OVERVIEW
A vast sleeping enemy has awakened. When
the colonization vessel crash landed on Earth
some 65 million years ago, the emergency
systems placed the aliens in suspended
animation. A distress call was sent, but was
never received by the aliens’ homeworld. Over
the eons the computers awakened small
groups of aliens to attempt colonization, but
the strategies and devices were imperfect. The
aliens have also sunken ships, destroyed
planes and devastated remote ports over the
centuries — to what end we know not.
Now, deep in the vast hulk of the mother ship
the battle computers have become fully online. The systematic awakening of the aliens
and their technology has begun.
Across the globe are sites where age-old alien
advance assault squads have been attempting
to contact their distant brothers. The sites
contain powerful artifacts that they need to
conquer the planet and transform it into an
aquatic paradise for aliens.
X-COM: Terror From The Deep
command of X-COM. You control the force to
stop the alien terror. First, you’ll intercept the
alien subs and shoot them down. Then, you’ll
command a sub-aqua mission using the
‘Battlescape’ display. This view will display
only what your aquanauts can see, allowing
danger to creep up on the unsuspecting.
puts you in
TERROR FROM THE DEEP
3
TERROR FROM THE DEEP
Page 9

Successfully completing Alien Submarine
Assault missions allows X-COM scientists to
clear the sites of artifacts and begin
researching alien technology. On completion,
Engineers can reproduce superior weapons to
better attack subs. Soon you will be fighting
the aliens with their own technology.
Section 2: The Reference
Guide
For the player who is familiar with how to play
X-COM: Terror From The Deep
find out more about particular game features.
and needs to
A special UFOpaedia will contain all the
information gathered from your missions.
Special Note to
Unknown
This manual is organized in the same way as
X-COM: UFO Defense.
changes in the technology used,
Defense
interface and will only need to scan this
Gameplay manual. However, you are advised
to read the X-COM notebook provided in your
Terror From The Deep
increase your enjoyment and understand
more of the X-COM world.
Veterans
veterans will be familiar with the
UFO Enemy
Except for specific
X-COM: UFO
package in order to
THIS MANUAL
This manual is split into two main sections:
Section 1: The Gameplay
Tutorials
The Controls
The Mouse
You need a Microsoft-compatible mouse to
play
X-COM: Terror From The Deep
manual will refer to ‘clicking’ on buttons,
icons or highlighted text. To do this, simply
move the cursor over the option and press the
Left Mouse Button (LMB), unless otherwise
stated.
. This
Designed to get you playing
From The Deep
recommend that you complete each tutorial
before you begin to play the game on your own.
TERROR FROM THE DEEP
as soon as possible. We
X-COM: Terror
4
TERROR FROM THE DEEP
Page 10

SECTION 1
THE GAMEPLAY
TUTORIALS
BEFORE WE BEGIN...
Welcome to
The following tutorials are designed to help
you begin playing with the minimum of
trouble. The three main sections of the game
are covered here: the Geoscape, the
Battlescape and the Bases Screen.
For extra information on particular game
features, please see the Reference Guide
section later in this manual.
TERROR FROM THE DEEP
X-COM: Terror From The Deep
.
STARTING A NEW GAME
1. Install and load
Deep
by referring to your installation
booklet.
2. The Language Screen appears. Select a
language.
The screen changes to the Main Game
Options menu.
5
X-COM: Terror From The
TERROR FROM THE DEEP
Page 11
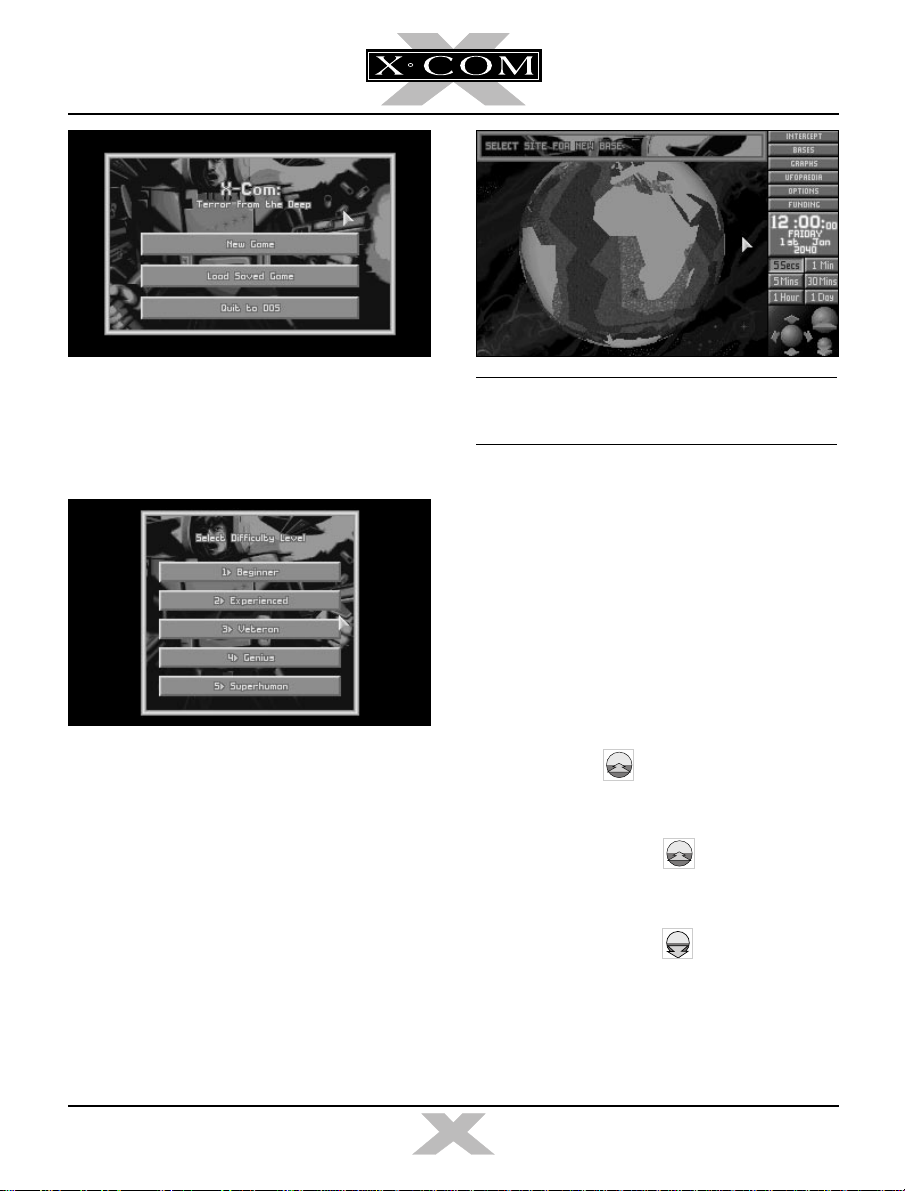
3. Move the mouse pointer over the New
Game option and click on the Left Mouse
Button (LMB), the Difficulty Level Screen
appears.
4. Click on Beginner to move to the Main
Game screen, The Geoscape. The first thing
you must do is position your first X-COM base
in one of the Earth’s oceans.
Note: You cannot place a floating base
anywhere on land.
SETTING UP A NEW X-COM
BASE.
5. The message Select Site for New Base
appears at the top of the screen.
At the bottom of the screen are three blue
spheres surrounded by arrows. These are
the Geoscape View Controls which allow
you to rotate, zoom-in and zoom-out from
the Earth display.
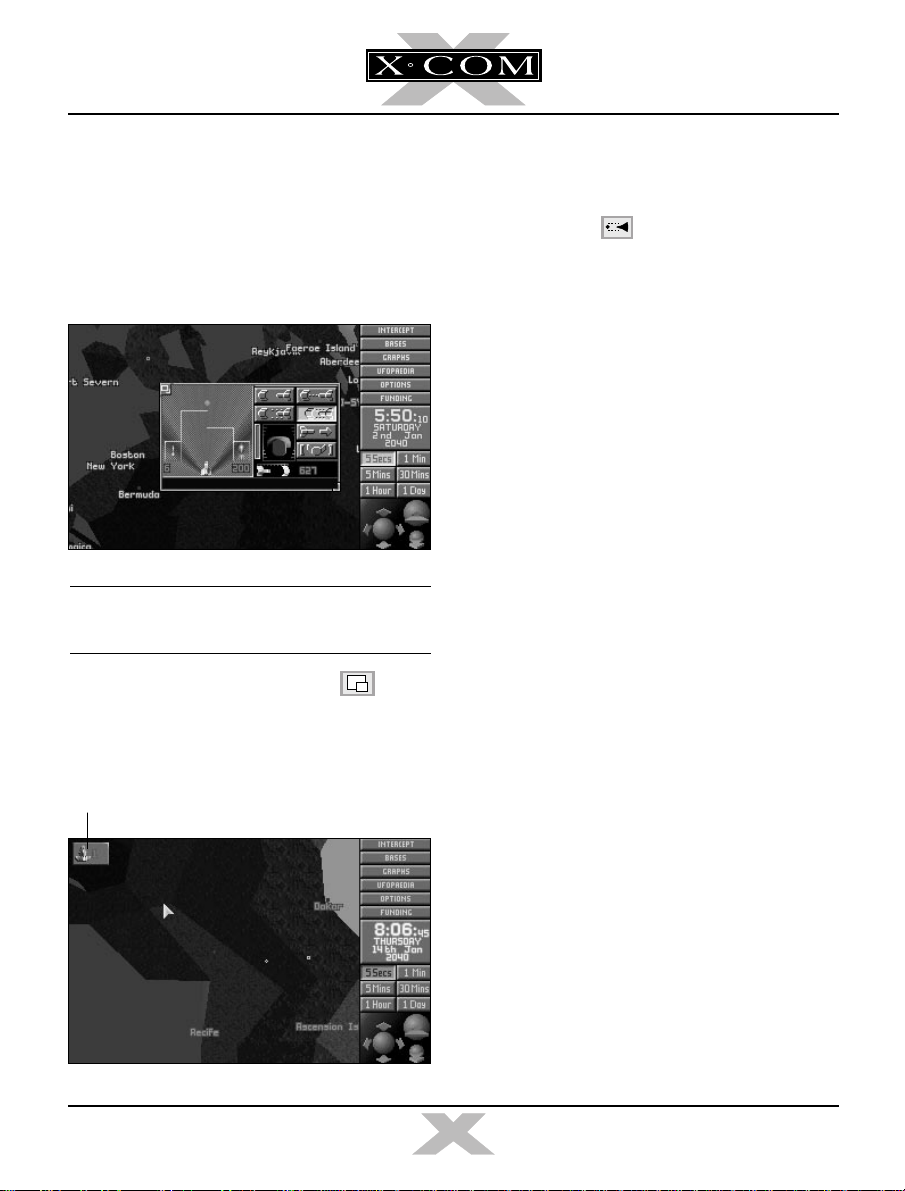
■ Click on the icon. The Earth display is
magnified to see the ocean beds in better
detail.
6. Click again on the icon. The display is again magnified — Ports, Islands
and Funding Zones will now appear.
7. Click twice on the icon. The Earth
display returns to its minimum view.
TERROR FROM THE DEEP
6
TERROR FROM THE DEEP
Page 12

8. The icon allows you to rotate the
Earth horizontally or vertically.
■ Click a few times on the Up arrow, the
Earth display tilts towards you. Hold down
the LMB and the globe will spin.
9. Click a few times on the Left arrow, the
Earth rotates from the left.
10. Position the Mouse pointer over the Earth
and click on the Right Mouse Button
(RMB) to center the Geoscape on that
location.
By using a combination of these controls,
you can manipulate the Earth’s display to
show any part of the planet in detail.
For the purposes of this Tutorial, you are
advised to select a base in an area around
the Sea of Japan.
11. Click on the Sea near Japan (but not the
land) to position your first base.
12. A window containing the prompt Base
Name? appears. Type in a name using the
keyboard and press r. You have now
set up a new X-COM Floating Base and are
ready to start playing
X-COM: Terror From
The Deep.
TERROR FROM THE DEEP
7
TERROR FROM THE DEEP
Page 13

TUTORIAL 1: THE GEOSCAPE
THE TIME CONTROLS
2. Look at the Game Time. It
is currently passing in 5
second increments. The
Time Controls, below the
Game Time, allow you to
control the rate at which
this time passes.
This tutorial will guide you through the
Geoscape’s basic controls and the process of
intercepting Alien Attack subs.
1. The Geoscape is the main screen for
playing
Your base is represented on the 3-D view of
the Earth as a Hollow Blue Square. Alien
Subs are Solid Red Crosses, Alien Bases are
Hollow Purple Squares and X-COM flying
subs are Solid Yellow Crosses.
On the right hand side of the screen is a list of
Menu Options, a display of the Game Time,
the Time Controls and the View Controls.
The Time Controls are very important in the
game, and it is these that we will go through
next.
X-COM: Terror From The Deep.
Note: If you wish to pause time at any stage
during the game, simply click on any of the
Menu Options.
■ Click on the 5 Mins button. Time now
passes at the increased rate. The Game
Time rapidly changes and you might see
night and day sweep around the Geoscape
model of the Earth.
You should use the Time Controls to advance
the game through any time-consuming
section (e.g., waiting for craft to arrive at their
destination or waiting for Alien Subs to be
detected).
TERROR FROM THE DEEP
8
TERROR FROM THE DEEP
Page 14
DETECTING ALIEN FLYING
INTERCEPTING ALIEN
SUBS
3. We will now advance time to the the point
that the first Alien Sub is detected (if this
has not already happened).
■ Click on the 1 Day button in the Time
Controls. Time passes at the maximum rate.
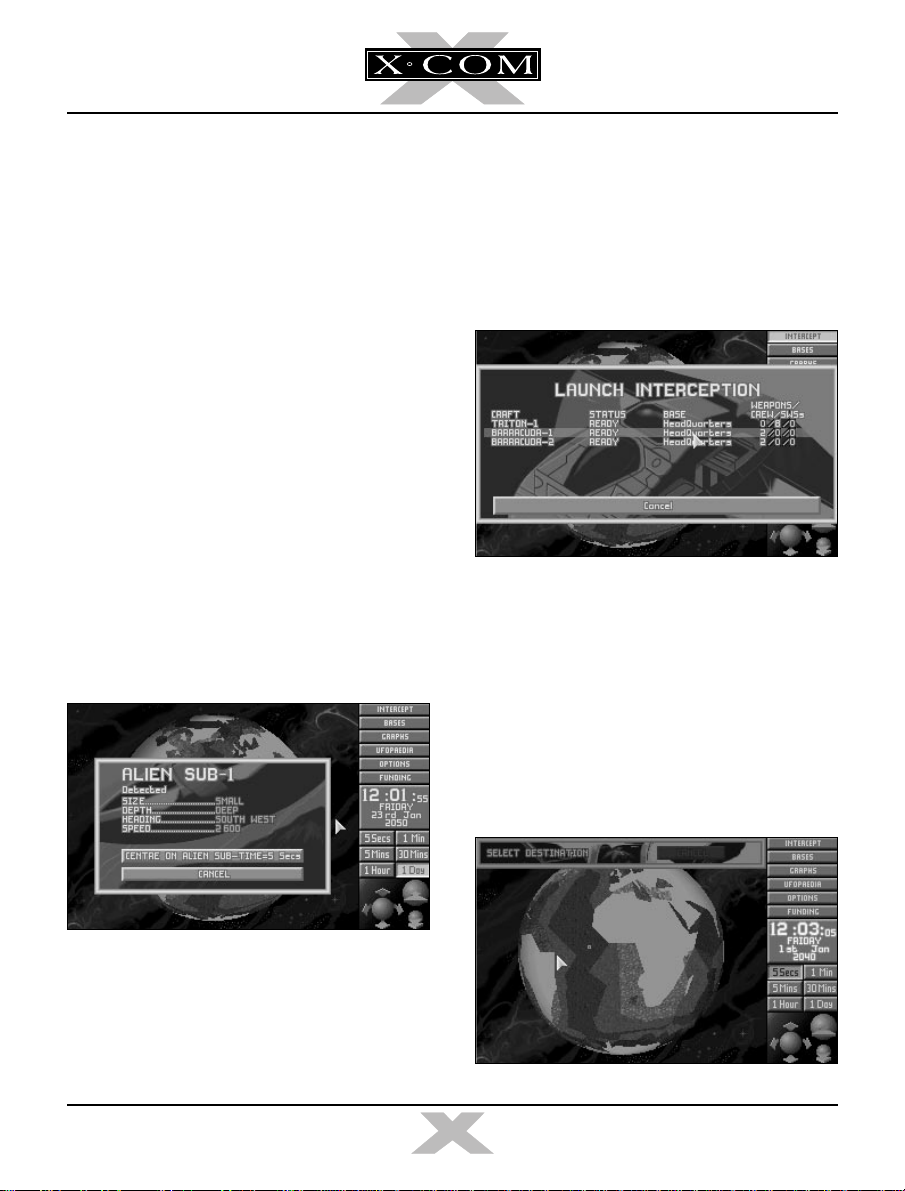
4. Eventually, a window appears over the
Geoscape with the message Alien Sub-1
Detected. Information regarding the Sub
(size, depth, heading, speed) is shown in
this window.
■ Click on the button marked Centre on Alien
Sub-Time=5 Secs. This will center the
Earth display on the Alien Sub and reduce
the passage of time to 5 seconds. The Alien
Sub appears as a red cross moving slowly
in the center of the Geoscape.
FLYING SUBS
5. Position the Mouse pointer on your base
and click the LMB. A window appears with
the title Launch Interception and a list of
the Subs available at that base.
6. Move the Mouse pointer to highlight
Barracuda-1
7. The window containing the message
Select Destination appears in the top of
the screen.
■ Click on the Alien Sub (represented as a
red cross) to select this as the
target.
and click the LMB.
Barracuda’s
TERROR FROM THE DEEP
9
TERROR FROM THE DEEP
Page 15
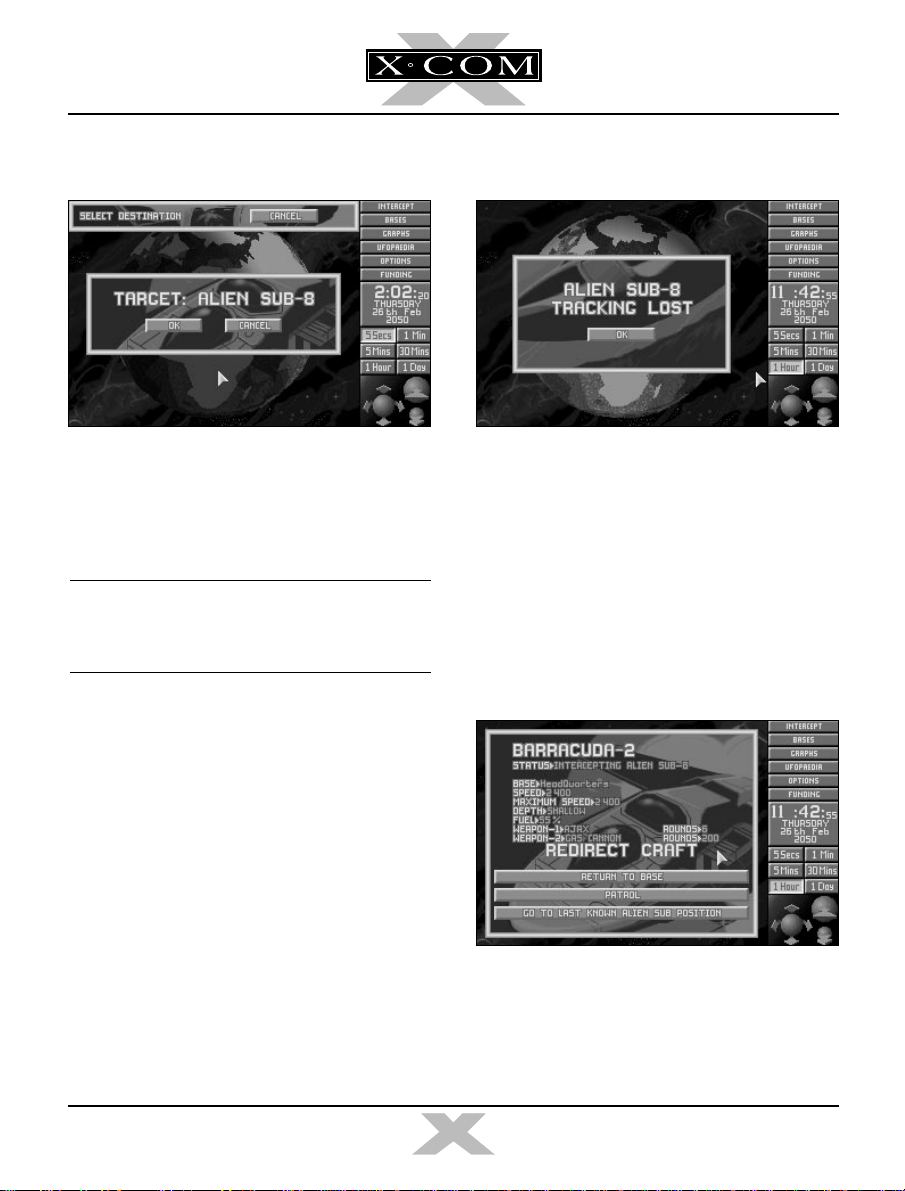
8. The window containing the confirmation
message Target: Alien Sub-1 will appear.
B. If your
Barracuda
loses contact with the
Alien Sub, the window Alien Sub-1
■ Click on the OK button.
9. The
Barracuda
(represented by a yellow
cross) will launch from its floating base
and attempt to intercept the Alien Sub.
Note: Remember, if you need to pause the
game, click on any of the Geoscape Menu
Options.
If the Alien Sub lands, it appears as a Green
Cross.
Barracuda’s
are only interception subs
and cannot carry out ground attacks; so, you
will have to wait until the Alien Sub lifts off
again — click on the 5 Mins Time Control
button to accelerate the passage of time.
10. At this point, one of two things could
happen:
A. If your
Barracuda
catches the Alien
Sub, the Sub Combat window appears.
Skip the rest of this section and go to
step 19 of this tutorial.
Tracking Lost will appear. This might
happen several times before you actually
get into combat; most Alien Subs can outperform
Barracudas.
■ Click on OK. Continue to the next step of
this tutorial.
11. The Craft Status window appears, allowing
you to redirect the
Barracuda
.
12. Click on the Go To Last Known Alien Sub
Position button.
TERROR FROM THE DEEP
10
TERROR FROM THE DEEP
Page 16
13. While the
Barracuda
is on its way to the
last known Alien Sub position, it uses its
onboard sonar to scan for the Alien Sub.
If the Alien Sub Detected window reappears,
go straight to step 14 of this tutorial.
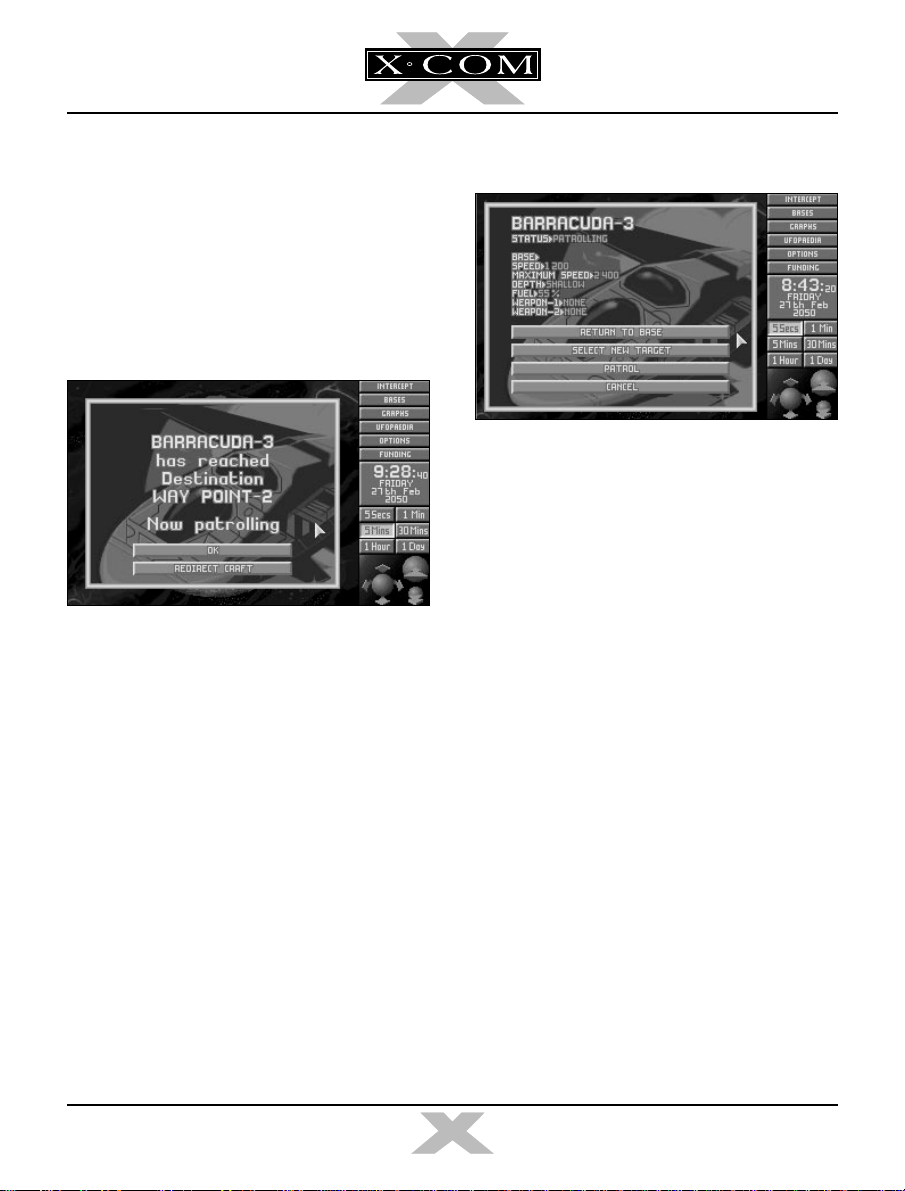
If the
Barracuda
reaches the last known Alien
Sub position without detecting the Alien Sub,
the following window will appear:
■ Click on the
Barracuda
. This brings up
the Sub Status window.
16. Click on the Select New Target button.
17. The message Select Destination appears
in the top of the screen.
■ Click on the Alien Sub to reselect it as the
target.
If this happens, the Alien Sub has disappeared
from all X-COM tracking devices. The
interception mission has failed.
■ Click on the Redirect Sub button. The Sub
Status window will reappear. Click on
Return to Base. The
Barracuda
will return
to its base.
Go back to step 3 of this tutorial.
14. Click on the Centre on Alien Sub-Time=5
Secs button in the Alien Sub-1 Detected
window.
15. At the moment, the
Barracuda
is still
heading for the last reported position of
the Alien Sub. Now reassign the Alien Sub
as the
Barracuda’s
TERROR FROM THE DEEP
target.
18. The message Target: Alien Sub-1 will
reappear.
■ Click on the OK button.
Go back to step 10 of this tutorial.
11
TERROR FROM THE DEEP
Page 17
SUB COMBAT
19. If the
Barracuda
Alien Sub, the Geoscape automatically
increases magnification and the Sub
Combat window appears over the center
of the Geoscape.
gets within range of the
21. Click on the Sub icon. This brings back the
Sub Combat window, ready for you to
attack the Alien Sub.
22. Click on the icon to carry out a Stan-
dard Attack on the Alien Sub. The progress
of the attack is displayed in the left-hand
side of the Sub Combat window. The
message box in the bottom of the window
relays the pilot’s messages to you.
Note: You cannot intercept Alien Flying Subs
over land.
■ Click on the minimize window icon in
the top left of the Sub Combat window.
The Sub icon will appear in the top left of
the screen.
Craft Icon
If the Alien Sub outruns the
to step 10 of this tutorial.
If the
Barracuda
have failed in your objectives; there is no
useful debris to investigate. Return to step 3
of this tutorial.
If you succeed in your objective the message
“Alien Sub downed!” appears in the pilot’s
message box. The crash site is marked with a
white cross. The Alien Sub is now vulnerable
to an aquanaut assault, allowing you to
investigate the wreckage.
destroys the Alien Sub, you
Barracuda,
return
TERROR FROM THE DEEP
12
TERROR FROM THE DEEP
Page 18
SAVING THE GAME
23. Now would be a good time to save your
current game.
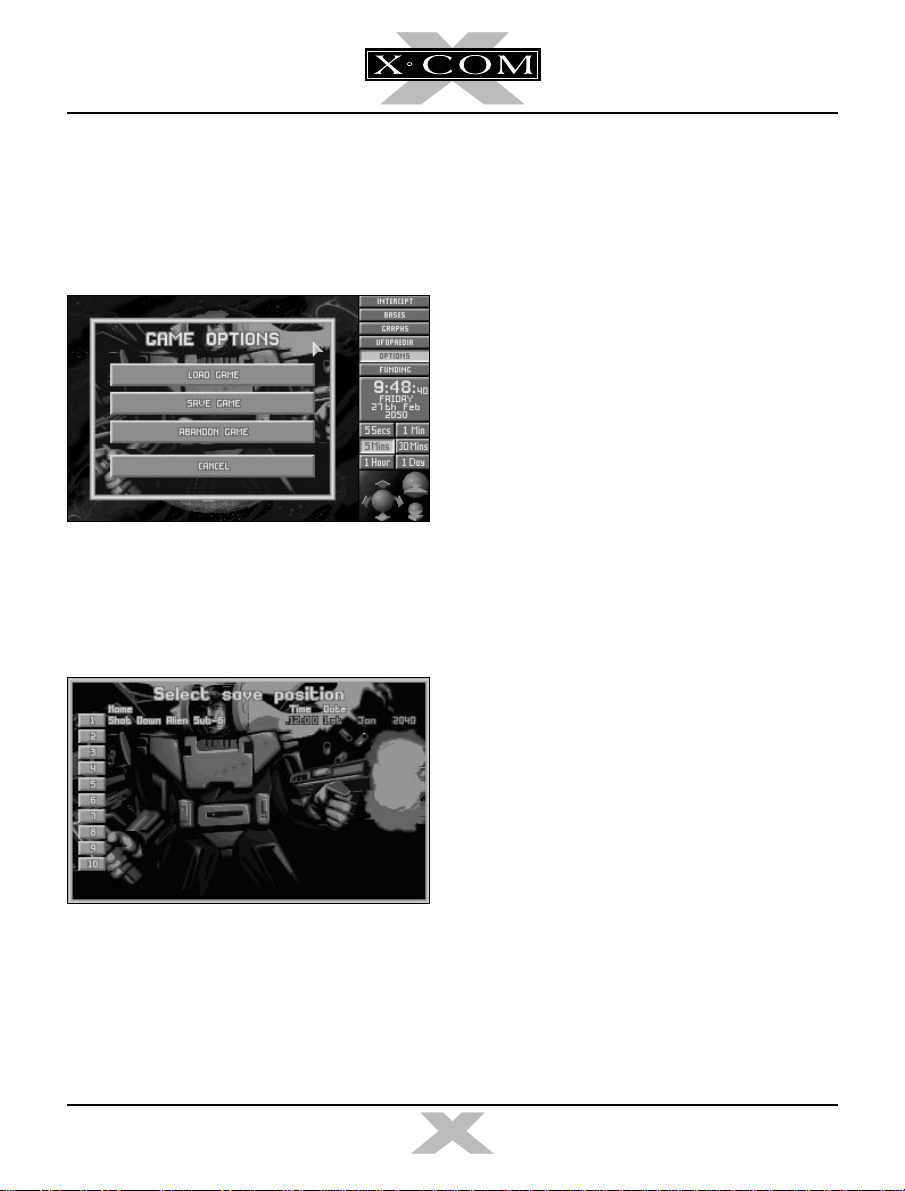
■ Click on the Options button.
26. Type in the name for your saved game
using the keyboard and press r.
When the game has saved, you return to the
Geoscape.
INVESTIGATING THE
CRASH SITE
24. Click on the Save Game button.
25.The Select Save Position screen
appears.
■ Click on any of the ten numbered buttons
to select the slot into which your current
game will be saved.
27. You will need to assign a
transport to take a squad of aquanauts
from your base to the Crash Site.
■ Find your base (you may need to rotate the
Geoscape to bring it into view). Click on
your base: the Launch Interception
window appears.
28.Move the mouse pointer to highlight
Triton-1
29. The message Select Destination appears
in the top of the screen.
30. Click on the Alien Sub Crash site (the
white cross) to select this as the
target.
31.The message Target: Crash Site-1
appears.
and click the LMB.
Triton Sub
Triton’s
TERROR FROM THE DEEP
13
TERROR FROM THE DEEP
Page 19

■ Click on OK.
32. The
Triton
(represented by a yellow cross)
will launch and make its way to the Alien
Sub Crash Site.
■ Click on the 5 Mins button if you want to
increase the passage of time.
33. When the
Triton
arrives at the Crash Site,
the Alien Sub Crash Recovery screen
appears. Read the instructions on this
screen.
■ Click on OK to enter the next section of
X-COM: Terror From The Deep —
The
Battlescape.
TERROR FROM THE DEEP
14
TERROR FROM THE DEEP
Page 20
TUTORIAL 2: THE BATTLESCAPE
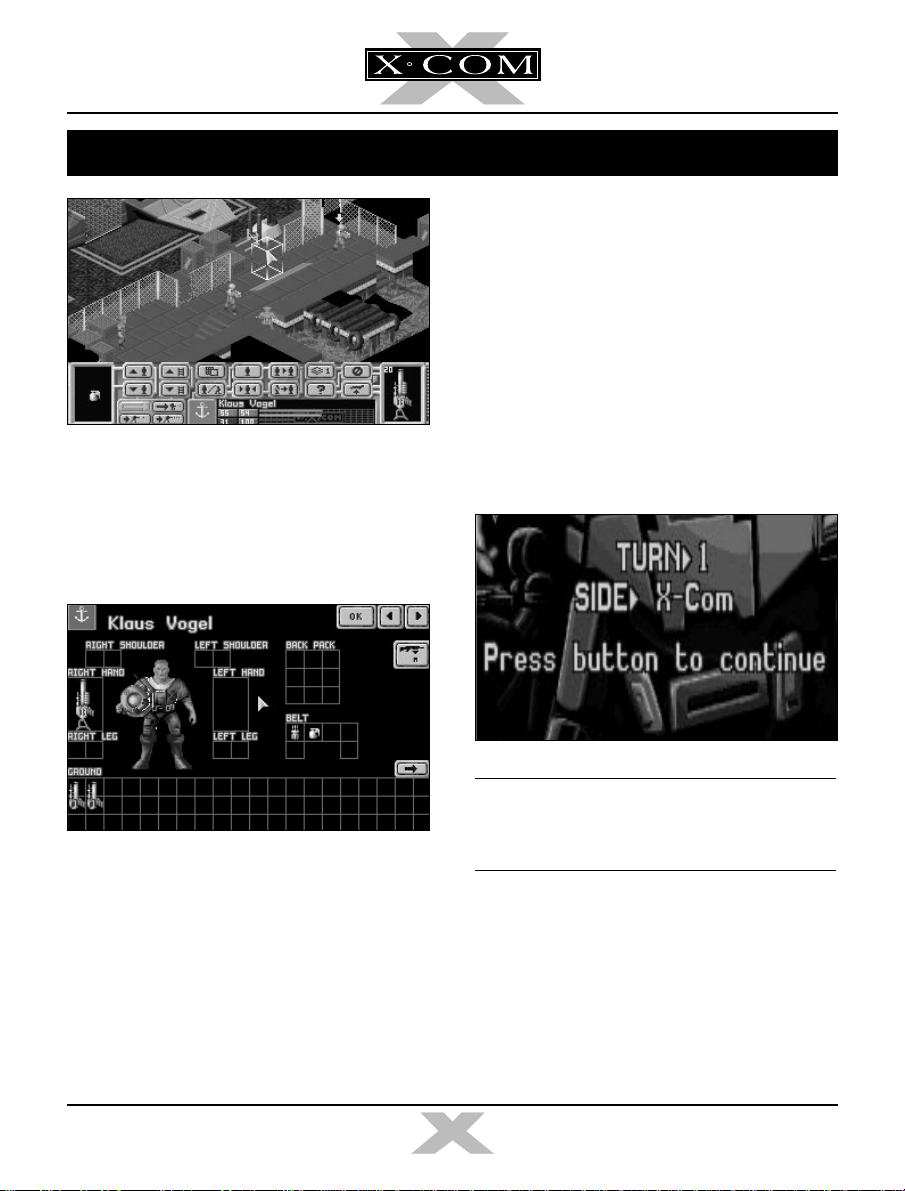
2. You will see that six of your aquanauts
have Jet-Harpoons, one has a Dart Gun
and one has a Gas Cannon. The aquanauts
carry extra ammunition and grenades on
their belts.
Full details on this section of the game are
given in the Alien Submarine Assaults
chapter of this manual.
Tutorial 2 guides you through the close
combat Battlescape — the section of the
game where you fight the aliens face-to-face.
ARMING YOUR SQUAD
1. The eight members of your squad
automatically arm themselves with the
weapons that are available. This screen
allows you to adjust the weapons your
squad will carry into action.
■ Click on the left/right arrows in the top right
of the screen to check the armament of
each of the eight members of your squad.
■ Click on the OK button to exit this screen.
3. The ‘Turn’ screen appears.
Note: All Battlescape action is turn-based.
This means it is like a 3-D game of chess —
you move your pieces, the aliens move theirs!
■ Click the LMB to continue.
TERROR FROM THE DEEP
15
TERROR FROM THE DEEP
Page 21
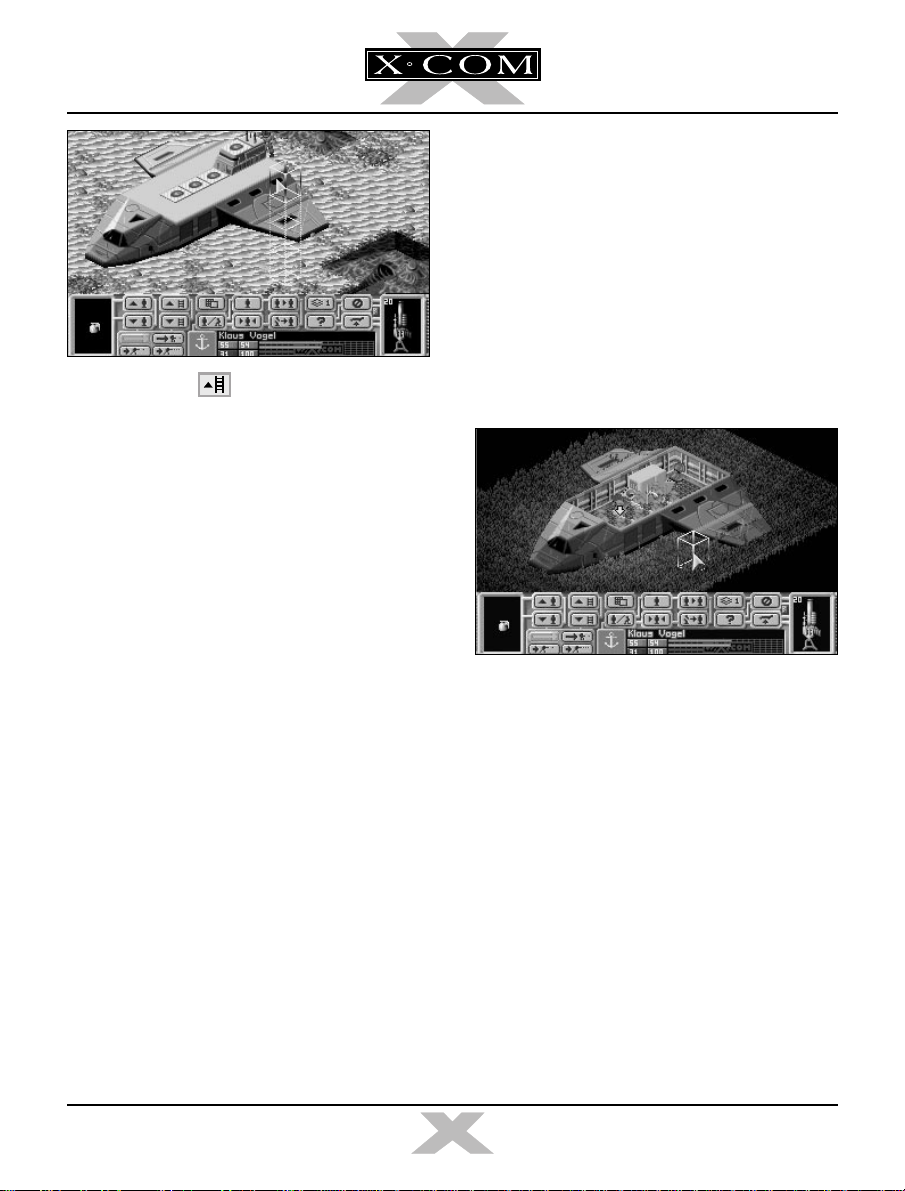
THE BATTLESCAPE
4. You will now see your
bed. Its cabin roof is ‘peeled away’ to reveal
your squad of eight aquanauts within.
The bottom section of the screen contains a
number of buttons and displays. This section
of the screen is known as the Control Bar.
Triton Sub
on the sea
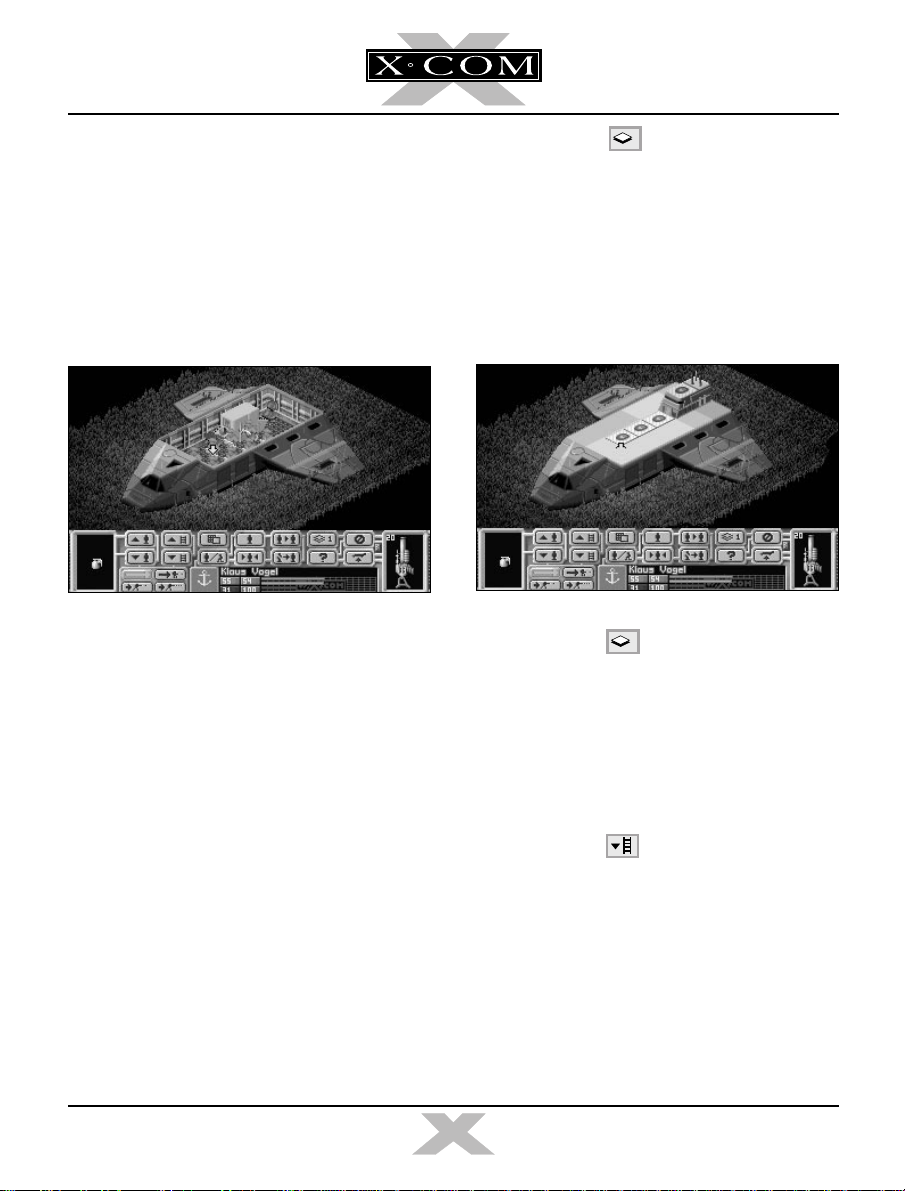
■ Click on the button in the Control
Bar. The number on the button changes
to 2.
The cabin roof and wings of the
appear. Your aquanauts are now hidden
from view. This is the Full View of the
Battlescape.
1
Triton Sub
USING THE SPLIT LEVEL
VIEW
5. The Battlescape is built up of several
levels. You can view these individually or
assembled them into a complete 3-D
picture. Splitting the Battlescape into
levels allows you to see behind walls and
inside buildings or Subs.
At the moment, the Battlescape is set to its
normal setting — the Multi-level View. The
Multi-level view hides everything above the
currently selected level, which is why the
Triton Sub
TERROR FROM THE DEEP
appears to have no roof.
6. Click on the button again. The number on the button will change back to 1.
The Battlescape returns to the Multi-level
View.
7. When you are in any of the Multi-level
Views, you might need to switch to the
next level down or up.
■ Click on the button.
8. The display again changes, now showing
the Triton from three or four levels higher.
The View window now represents the new
level.
16
1
TERROR FROM THE DEEP
Page 22
9. Click on the button.
The display returns to the original view, with
your squad visible inside the
Sub.
SELECTING AQUANAUTS
10. You control your squad individually,
selecting and moving each aquanaut in turn.
■ Move the mouse pointer over the
Battlescape display. A white 3-D box
appears under the pointer.
11. Move this box over any aquanaut. The box
now flashes yellow and red.
12. Click on the LMB. A yellow arrow appears
above the aquanaut’s head to show that
he/she is now selected.
13. Move the mouse pointer over any other
aquanaut in the
select. Watch the aquanaut’s name
change (halfway down the Control Bar)
and the arrow move to show the now
selected aquanaut.
Triton Sub
and click to
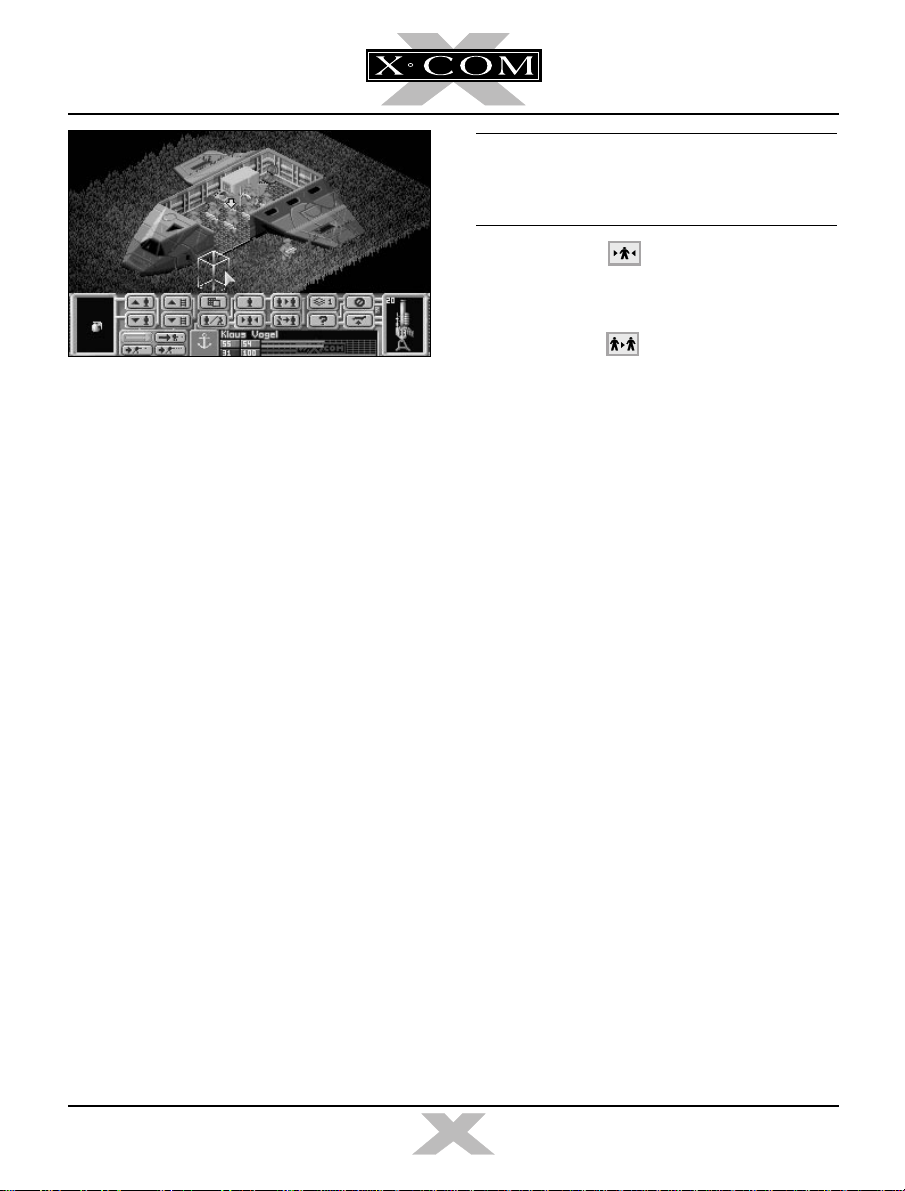
MOVING AQUANAUTS
14. Move the mouse pointer over either of the
aquanauts nearest the door of the
Sub
and click to select. The yellow arrow
appears above the aquanaut’s head to
show that he/she is now selected.
15. Now, move the mouse pointer over the
ground just outside of the
door is located on the wall facing you at
the front of the Sub.)
16. Click the LMB.
The aquanaut will walk out of the
destination you have just set.
17. Move the mouse pointer over the other
aquanaut near the door of the
and click to select.
18. Now move the mouse pointer over the
ground just outside of the
Triton Sub.
Sub
Triton
(The
Sub
to the
Triton Sub
.
TERROR FROM THE DEEP
17
TERROR FROM THE DEEP
Page 23
19. Click the LMB.
The aquanaut will walk out of the
Sub
to the
destination you have set.
20. We now have two aquanauts deployed
from the
Triton Sub
. You may notice that
the Battlescape now displays a little more
of the surrounding terrain. This is because
the Battlescape only shows what is in your
squad’s line of sight
.
■ Move the 3-D box to a point near the rear
of the Sub and click on the RMB.
The currently selected aquanaut turns around
to face the
Triton Sub
, scanning the
surrounding terrain in the process. Any
nearby black squares turn into terrain as the
aquanaut looks at them.
Note: You must take the mouse pointer to the
very bottom of the screen, under the Control
Bar, to move the View
window
downwards.
22. Click on the button to recenter the
Battlescape on the currently selected
aquanaut.
23 Click on the button. The next aqua-
naut in your squad will be selected.
This is an alternative way of selecting
aquanauts, rather than searching around the
Battlescape for every aquanaut.
24. Move this aquanaut out of the
Triton Sub
in the same way as the other two.
25. Select and move another aquanaut out of
the
Sub
.
26. You now have four aquanauts deployed
from the
Sub
. This is enough for the
moment, the rest can remain on board as
reinforcements.
The primary objective of this mission is to kill
or stun the aliens. A good place to find aliens
is the crashed Alien Sub itself, so we’ll start
the search there.
21. If you want to look around the Battlescape
at the visible terrain, move the mouse
pointer to the very edge of the screen. The
view window will move in that direction.
To stop scrolling, move the mouse pointer
back into the Battlescape.
TERROR FROM THE DEEP
18
TERROR FROM THE DEEP
Page 24
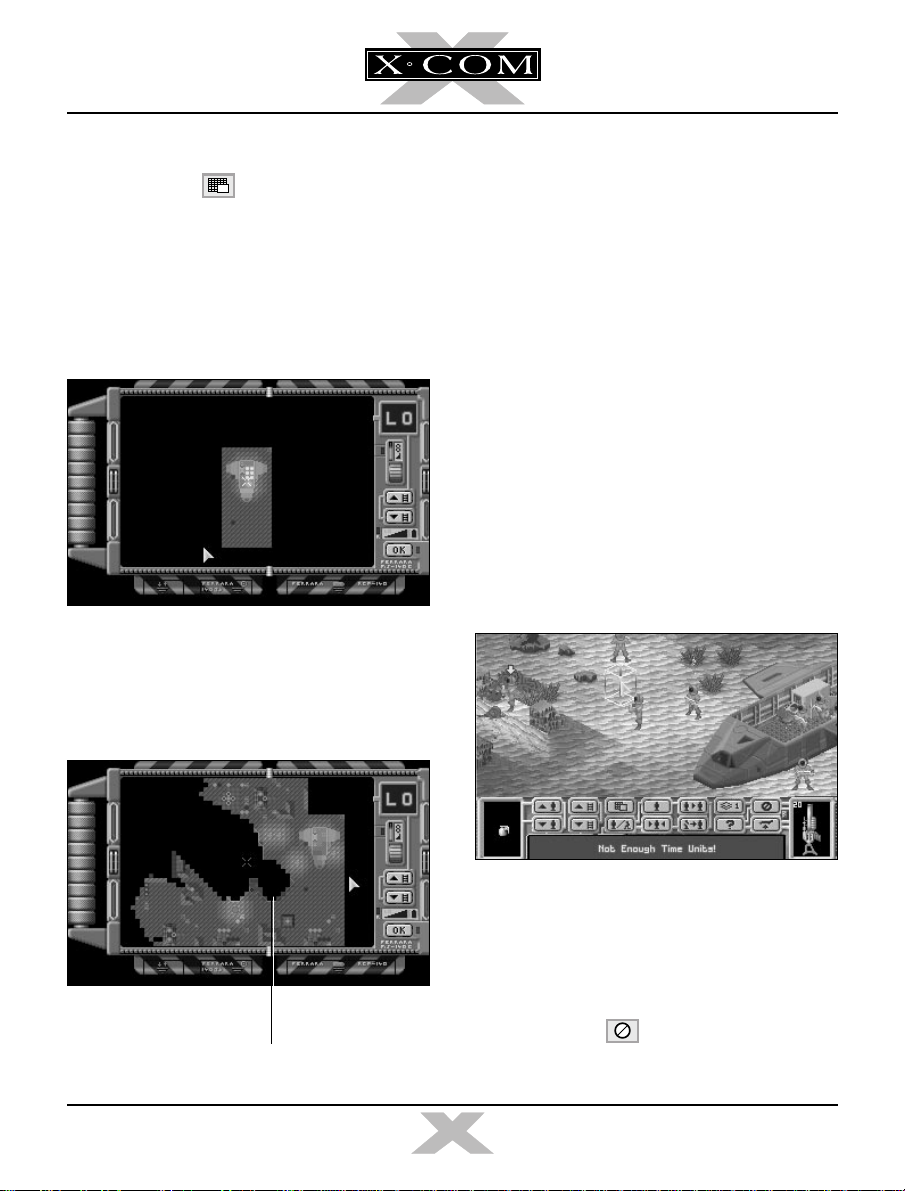
THE MAP SCREEN
27. Click on the button to access the
Map Screen. This displays a Thermal
Image of the mission area, allowing you to
see X-COM and alien forces, the X-COM
and Alien Subs. The Map Screen only
displays those objects your aquanaunts
have already sighted.
28. Your aquanauts appear as eight flashing
yellow dots on the map. If an Alien Sub
has been spotted, its hull appears as a pale
brown and grey line.
29. The map only shows one level of the
Battlescape at a time.
■ Click on the up/down arrows on the right-
hand side of the screen to display the next
level up or down.
30.Click on the RMB to return to the
Battlescape.
THE TURN-BASED SYSTEM
31. If you saw an Alien Sub in the Map screen,
start moving your aquanauts toward it. If
not, continue moving your aquanauts
around the Battlescape until you find the
Alien Sub.
Eventually the message Not Enough Time
Units! appears.
TERROR FROM THE DEEP
Alien Sub
32. This means that the selected aquanaut has
moved as far as he/she can possibly move
in this turn
have moved to this point, it is time to end
your turn.
■ Click on the button to end the turn.
19
. When all four of the aquanauts
TERROR FROM THE DEEP
Page 25
It is now the Aliens’ turn. They might open fire
on your squad — you are helpless until your
next turn.
Onscreen prompts tell you when to click the
LMB to begin your next turn.
SEARCHING FOR THE
ALIENS
33. Continue moving your squad around the
Battlescape.
• to go through doors, click inside the room.
• to go up stairs, click at the top of the
stairs (make sure your aquanaut is
directly at the bottom of the stairs).
You will notice that the Battlescape has an
edge beyond which everything is black. This is
the edge of the map — aliens will not go into
this area.
36. Aliens will appear as blue flashing dots on
this map, the white cross indicates where
the map is centered.
Look for your aquanauts on the Map — there
might be aquanauts in a better position to fire
than the aquanaut currently selected.
■ Click on the RMB to return to the
Battlescape.
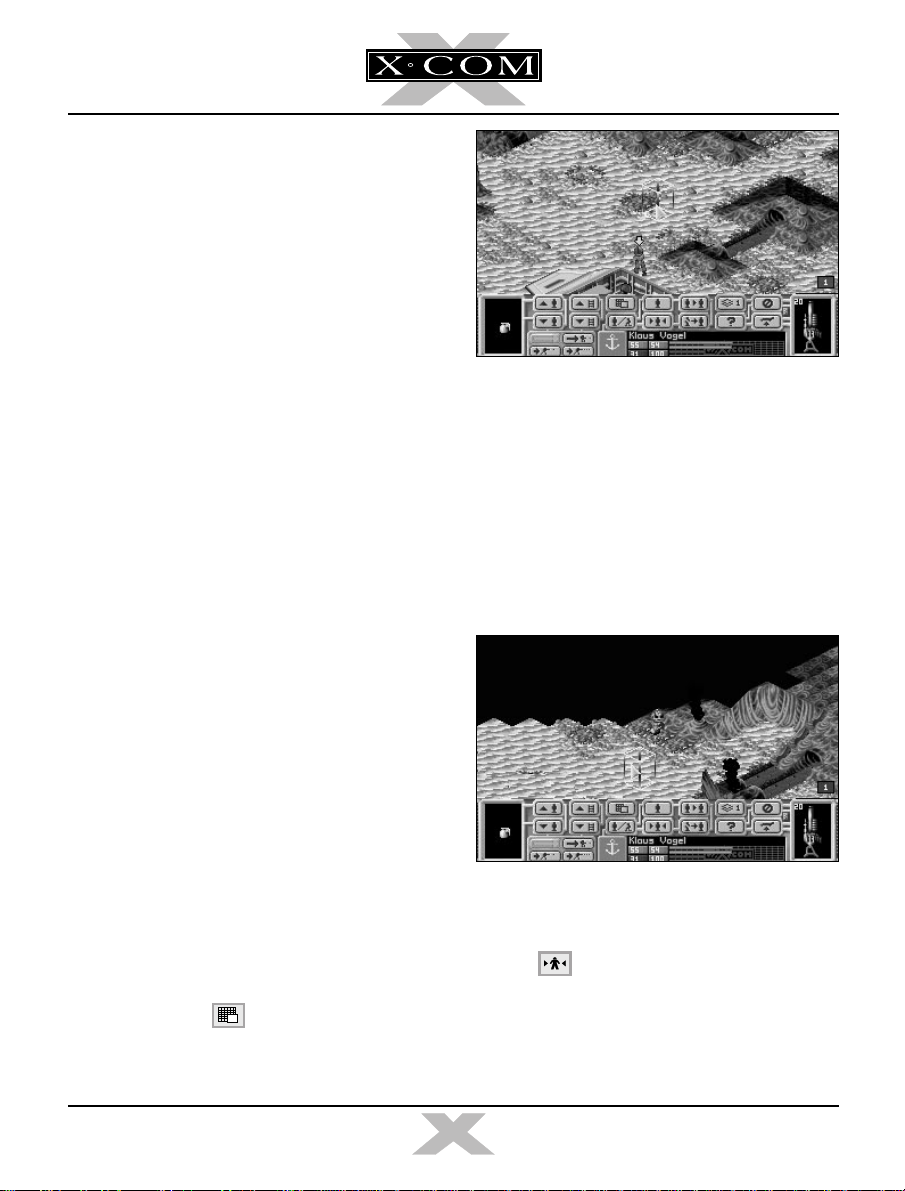
SEEING THE ALIENS
34. If one of your aquanauts sees an alien,
he/she will immediately stop moving and a
flashing numbered square will appear in
the right of the Battlescape screen, just
above the Control Bar.
■ Click on the flashing square to center the
Battlescape on the alien.
35. The screen is now centered on the alien.
■ Click on the button to access the
Map Screen.
TERROR FROM THE DEEP
37. If you want to recenter the Battlescape on
the currently selected aquanaut, click on
the button in the Control bar.
20
TERROR FROM THE DEEP
Page 26
USING WEAPONS
38. We will now use a weapon against the
alien, before it gets the chance to fire at
us. This is probably a long-range shot, so
a Jet Harpoon will be required.
■ Click on the Jet Harpoon (at the far right of
the Control Bar).
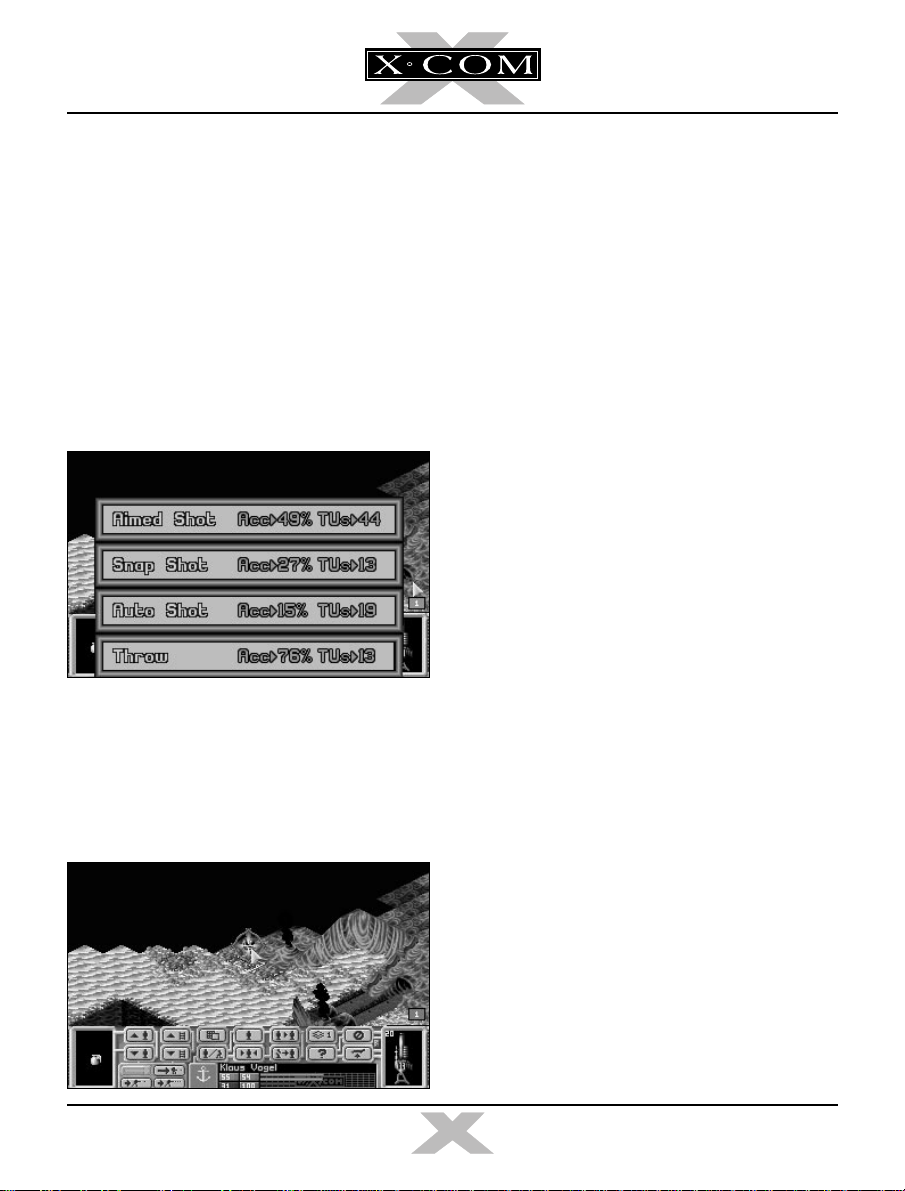
39. A window appears, allowing you to choose
from a number of shots (Aimed Shot,
Snap Shot, Auto Shot and Throw).
■ Move the Mouse pointer over the Aimed
Shot option and click.
40. The Battlescape reappears. The cursor has
changed to a targeting cross instead of the
3-D box.
■ Position the cross over the alien (it will
flash red and yellow) and click the LMB.
41. Now, one of four things could happen:
A. The message No Line of Fire! appears.
This means that there is an object between
your aquanaut and the alien. You must
move your aquanaut to a different position
or select another aquanaut before
attempting to fire again.
B. The message Not Enough Time Units!
appears. This means that your aquanaut
does not have enough Time Units to
complete the shot. You must either
choose another type of shot, select
another aquanaut or end your turn.
C. The aquanaut fires a shot… and misses.
This is unfortunate, but is expected —
initially your aquanauts are all ensigns.
You will find that your aquanauts become
more accurate as they fight more battles.
D. The aquanaut hits the alien with the shot.
The aliens wear strong armor, so it may
take more than one hit to kill them.
■ Click the RMB to change the mouse
pointer from a targeting cross to the 3-D
box. Continue your turn.
TERROR FROM THE DEEP
21
TERROR FROM THE DEEP
Page 27
Using Magna-Blast Grenades
42. If an alien is using an object for cover, you
might prefer to attack it with a grenade.
45. Click on OK to return to the Battlescape.
46. You will now see the grenade in the Item
Box on the far left of the Control Bar.
■ Click on the button to access the
Equip Aquanaut screen. This is similar to
the screen which you saw before entering
the Battlescape.
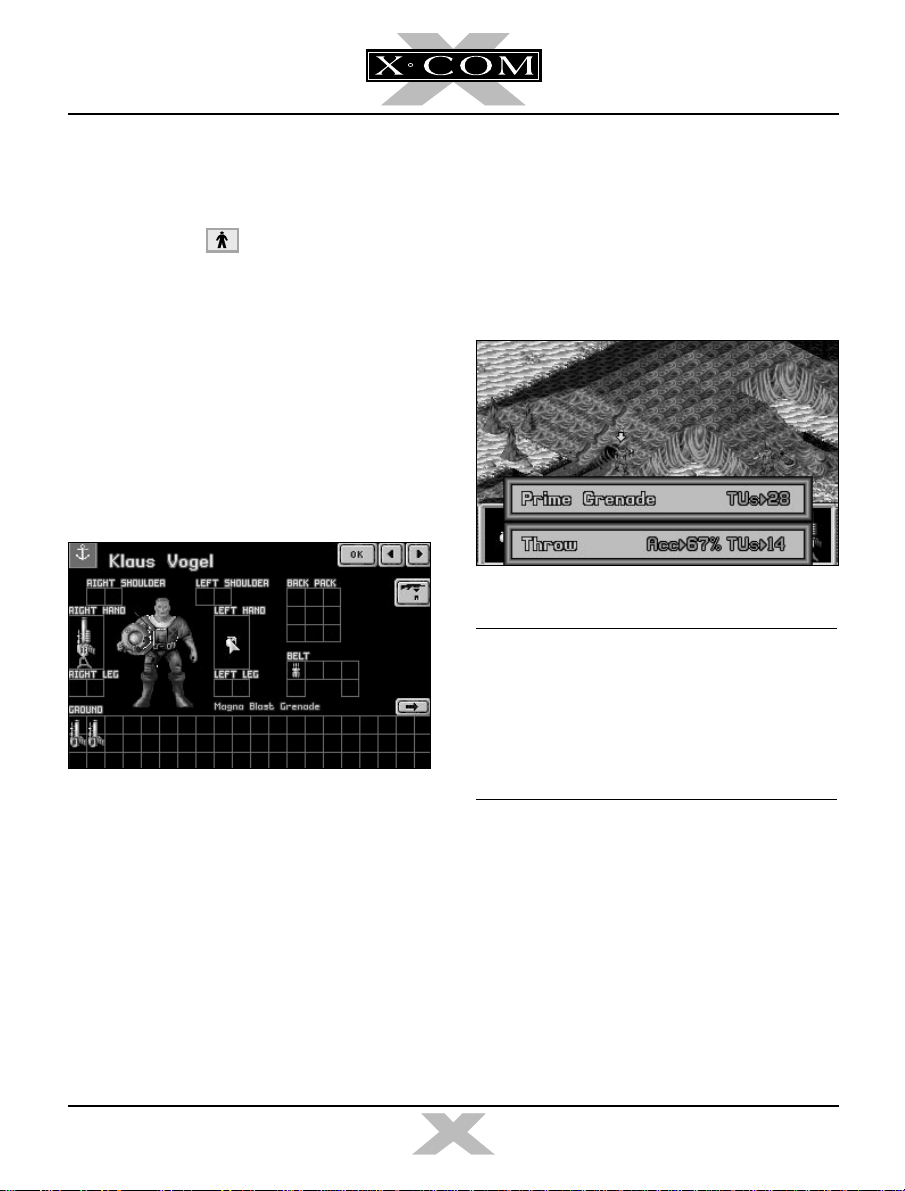
43. Every aquanaut has one grenade in his/her
belt.
■ Move the mouse pointer over the grenade
and click.
The words Magna Blast Grenade appear by
the aquanaut’s left foot.
44. Move the grenade over the box marked
Left Hand and click again.
If the aquanaut has enough Time Units, the
grenade will be placed in the aquanaut’s left
hand.
If the aquanaut does not have enough Time
Units, replace the grenade in the belt and
repeat the operation during the next turn.
■ Click on the grenade.
47. A window containing the options Prime
Grenade or Throw appears.
■ Click on Prime Grenade.
Note: If at any stage your aquanaut runs out
of Time Units, simply end the turn and
complete the priming/throwing process on
the next turn. But beware! The aquanaut may
be killed during the alien’s turn if he/she is not
in cover.
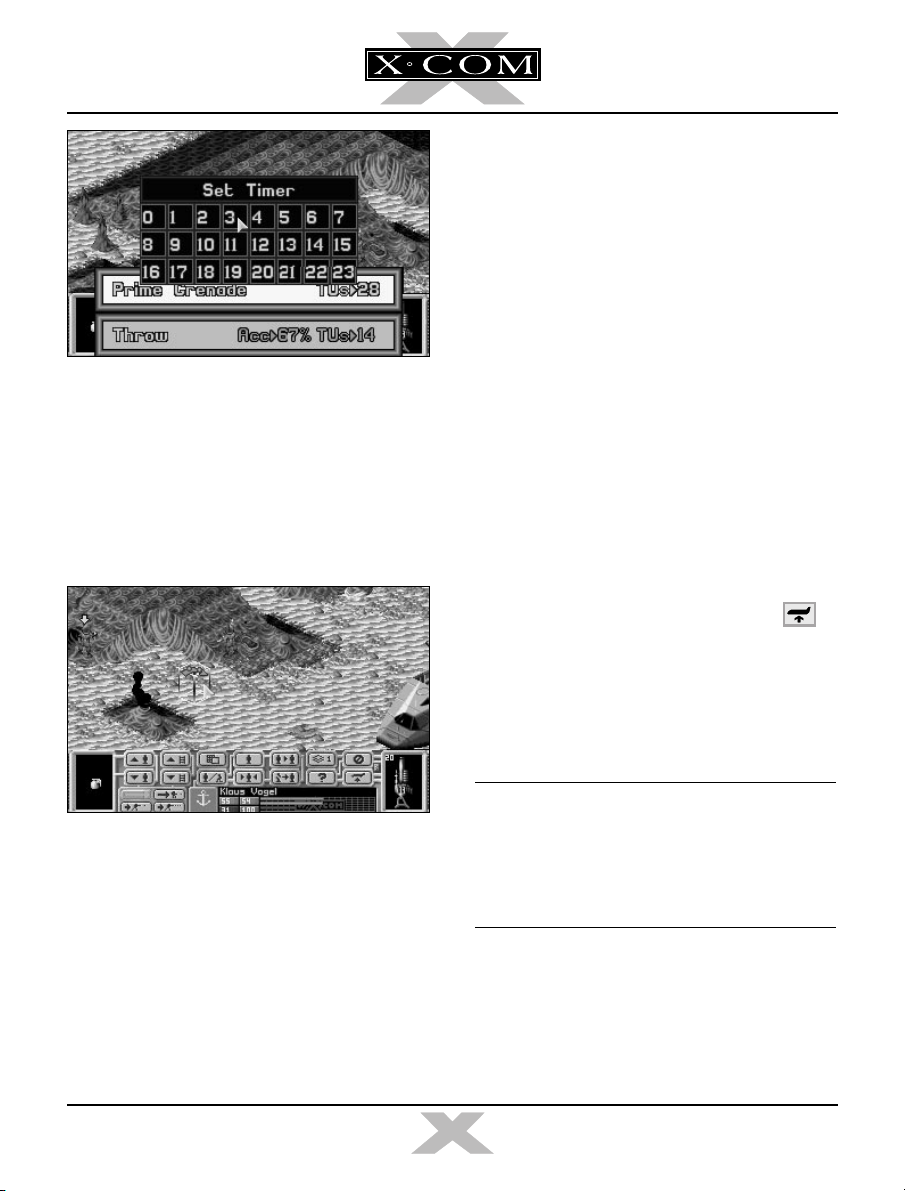
48. The Set Timer window appears, allowing
you to set the number of turns until the
grenade detonates.
■ Click on the number 3.
The Battlescape reappears, with a primed
grenade in your aquanaut’s left hand.
49. You now have three turns to throw the
grenade and get away from the blast area.
TERROR FROM THE DEEP
22
TERROR FROM THE DEEP
Page 28
C. The message Unable to throw here!
appears. This is because an object is
obstructing the throw. If this happens,
choose a different target location.
Don’t forget, once you have thrown the
grenade, you’ve got just three turns to clear
the area!
■ Click on the grenade again.
50. The only option is Throw.
■ Click on Throw.
51. The Battlescape reappears. The cursor has
a throw icon superimposed over the
3-D box.
■ Click on the location where you want to
throw the grenade.
52. One of three things will happen:
A. The aquanaut will throw the grenade.
COMPLETING THE MISSION
53. Continue searching for aliens (go back to
step 33 of this tutorial). When all aliens
have been killed, the mission is over.
X-COM will then automatically recover the
Alien Sub’s remains, alien artifacts and alien
corpses.
To abort the mission before the mission
objectives are completed, click on the
button in the Control bar.
Aborting a mission will only save aquanauts
who have returned to the
warning message appears if you attempt to
take off without your full squad.
Note: Do not allow the aliens to kill all of your
squad — there will be no one to return the
Triton Sub back to its base, and it will be lost.
If you are down to your last aquanaut, abort
the mission.
Triton Sub,
a
B. The message Out of Range! appears. If
this happens, the target location is too far
away — choose a target location closer to
your aquanaut.
TERROR FROM THE DEEP
23
TERROR FROM THE DEEP
Page 29

Two-Part Missions
To enhance the challenge, artifacts and aliens
from the first part of a two-part mission
cannot be recovered.
THE DEBRIEFING
54. At the end of an Alien Submarine Assault
mission there is a debriefing. This informs
you of your mission’s success rating and
lists the items recovered from the alien
ship.
■ Click the OK in the bottom left of this
screen to return to the Geoscape.
55. You might want to save the game at this
point (see step 23 of tutorial 1 for details
of how to save games). If you want to
replay your last Submarine Assault
mission, load in your previously saved
game.
TERROR FROM THE DEEP
24
TERROR FROM THE DEEP
Page 30

TUTORIAL 3: BASES
From research and manufacture to equipping
flying submarines and aquanauts, the Bases
screens define how well you will be able to
deal with the alien threat. Tutorial 3 guides you
through this, the most complex section of
COM: Terror From The Deep.
1. If you are continuing from tutorial 2, do
not worry if you lost your
can buy another in the Bases screen.
■ Click on the button labeled Bases in the
Geoscape Menu Options.
Triton Sub
X-
, you
■ Click on the button labeled Equip
Submarine in the Bases screen.
The Flying Sub screen appears, allowing you
to choose which Sub you will equip.
4. Move the mouse pointer over
(a pale highlight appears to show it is
selected) and click.
5. The
Barracuda-1
appears.
Equip Craft screen
Barracuda-1
2. The Bases screen appears.
Note: From now until you reenter the
Geoscape screen, time is paused. If at any
time you need to pause the game, simply click
on one of the Geoscape Menu Options.
EQUIPPING THE
SUBMARINES
3. We will now use the Equip Submarine
screen to rearm one of the
TERROR FROM THE DEEP
Barracudas
.
25
TERROR FROM THE DEEP
Page 31

The numbers 1 and 2 represent the
Barracuda’s
armament loaded is an Ajax Missile
Launcher plus missiles and a Gas Cannon
with rounds.
■ Click on the button marked with the
number 2 (right side of the screen).
6. The Select Armament window appears.
two weapon bays. The sub’s
■ Click on OK in the bottom of the screen.
9. You return to the Flying Sub screen to see
that the Status column for
shows that it is Rearming.
■ Click on OK in the bottom of this screen.
10. The Bases screen reappears.
We will now assign X-COM scientists to
undertake research.
■ Click on the button marked Research.
Barracuda-1
ASSIGNING RESEARCH
11. The Current Research screen appears.
You have one
launcher, one
range torpedo launcher and two Gas
Cannons in the base’s stores.
7. We will now rearm the
long-range torpedoes
cannon.
■ Move the mouse pointer over
Launcher
show it is selected) and click.
8. The display will return to the
Equip Submarine screen. The
now has an all-torpedo armament — this
is more effective for attacking Alien Subs.
TERROR FROM THE DEEP
Ajax
short-range torpedo
Fusion Head D.U.P.
Barracuda
in place of the
long-
with
D.U.P. Head
(a pale highlight appears to
Barracuda-2
Barracuda
We will now assign our scientists to work on
two different research projects: Gauss
Technology and the Particle Disturbance
Sensor.
■ Click on the button labeled New Project in
the bottom left of the screen.
26
TERROR FROM THE DEEP
Page 32

12.The New Research Projects window
appears.
■ Move the mouse pointer over Gauss
Technology (a pale highlight appears to
show it is selected) and click.
13. The Start Project window appears.
■ Click on the up arrow next to the word
Increase until the number to the right of
the words Scientists Allocated is 5.
15. Click on OK.
16.The New Research Projects window
reappears.
■ Move the Mouse pointer over Particle
Dist. Sensor and click.
17. The Start Project window appears.
■ Click on the Start Project button in the
bottom left of the window.
■ Click on the Start Project button in the
bottom left of the window.
14. The Scientists Allocated window appears.
This allows you to change the number of
scientists working on the project.
TERROR FROM THE DEEP
18. The Scientists Allocated window appears.
■ Click on the up arrow next to the word
Increase until the number to the right of
the words Scientists Allocated is 5.
19. Click on OK.
20.The New Research Projects window
reappears.
■ Click on OK in the bottom of this window.
27
TERROR FROM THE DEEP
Page 33

21. You return to the Current Research screen
to see that you have five scientists
assigned to research Gauss Technology
and five scientists assigned to research
the Particle Dist. Sensor. The progress in
each of these projects is unknown; the
scientists have not yet started work.
■ Click on OK in the bottom right of this
screen.
PURCHASING/RECRUITING
23.The Purchase/Hire Personnel screen
appears.
We will now purchase some items and hire
some extra aquanauts.
▼
■ Move the Mouse pointer over the
button in the Aquanaut line (at the top of
the list of items) and click once.
22. The Bases screen reappears.
Another important function carried out in the
Bases screen is the purchasing of items or the
recruiting of personnel.
■ Click on the Purchase/Recruit button.
TERROR FROM THE DEEP
24.The number in the Quantity column
changes to 1.
▼
■ Click on the button until you have
purchased enough aquanauts to replace
those lost on the Alien Submarine Assault
mission and have a few extra.
Note: The Triton Sub only holds 14
aquanauts at a time, so don’t recruit too
many aquanauts at once.
28
TERROR FROM THE DEEP
Page 34

25.If you lost your
transporter in the Alien Submarine Assault
mission, you can replace it by clicking
once on the button in the Triton line of
this screen.
26. Move the mouse pointer down the list until
you get to Coelacanth Aqua-Jet. This tank
is a large weapon—expensive but very
powerful.
▼
Triton Sub
squad
▼
27. Click once on the button. The Cost of
Purchases (in the top right of this screen)
increases by the cost of the Coelacanth
Aqua-Jet Missile Tank.
28. Now we’ll need some ammunition for it.
■ Move the Mouse pointer over the Aqua Jet
Missiles button and click eight times.
You will need to buy more ammunition
later, when you return from your next
Submarine Assault mission.
▼
▼
➡
Triton Sub
in the Alien
29. Click on the button in the bottom right
of the screen. The list will move down a
little. Continue clicking on this button until
it disappears. You have reached the
bottom of the list. The next to last item on
the list is the Thermal Tazer. This item
allows your aquanauts to knock aliens out
instead of killing them; the alien can then
be recovered alive and interrogated.
30. Move the mouse pointer over the Thermal
Tazer button and click twice.
31. If you lost your
Submarine Assault, you will need to reequip your new Triton squad. Carry out the
same process as above to choose some
weapons from the list — don’t forget
ammunition if you buy harpoons, pistols
or torpedo launchers.
32. You have now completed choosing what
you want to buy.
Note: The message Not Enough Store Space!
appears if you attempt to buy too many items.
To build more storage space, click on the
Build Facilities button in the Bases screen —
see the Bases section of the Reference Guide
of this manual for full details.
TERROR FROM THE DEEP
■ Click on OK in the bottom left of the screen
to confirm the purchase.
33. The Bases screen reappears.
■ Click on the Geoscape button in the
bottom right of the Bases screen. You will
return to the Geoscape.
29
TERROR FROM THE DEEP
Page 35

WAITING FOR DELIVERY
34. It will take several days for all the items
you purchased to be delivered.
Check the Game Time.
■ Click on the 1 Day button in the Geoscape
Time Controls and allow 3 days to pass. If
an Alien Sub is detected, intercept it (see
step 4 of tutorial 1 for full details).
35. Several windows might appear as time
passes. For the moment, just click on the
OK button to make them go away. We’ll
worry about these later.
■ When 3 days have passed, all items
should be delivered. Click on the 5 Secs
button.
36. We will now return to the Bases screen
and equip the
items we have just purchased.
■ Click on the Bases button.
37. Click on the Equip Submarine button.
Triton Flying Sub
with all the
Next to the button marked Crew are icons for
each aquanaut assigned to the
no one was lost in the Alien Submarine
Assault, there will be eight aquanaut icons.
■ Click on the Crew button.
40. The Select Squad screen appears.
Triton Sub
. If
EQUIPPING THE TRITON
SUB
38. Use the Mouse to highlight and click on
Triton-1
the ground assault and bought a new one,
it will be called Triton-2).
39. The Equip Sub screen for the
appears.
TERROR FROM THE DEEP
(if you lost your first Triton Sub in
Triton Sub
This screen displays the names of the
aquanauts who are assigned to
whichever sub you have selected).
■ Click on any name that is not assigned to
a Sub, and this will assign them to the
selected Triton Sub. The Craft column of
this screen shows which Sub the aquanaut
is assigned to.
30
TERROR FROM THE DEEP
Triton-1
(or
Page 36

41. Only 14 aquanauts may be assigned to any
one
Triton Sub
aquanauts you recruited and how many (if
any) you lost in your Alien Submarine
Assault, there might be aquanauts with no
craft assignment. It is a good idea not to
completely fill your sub, especially if you
plan to equip it with any Submersable
Weapon Systems.
■ Click on OK in the bottom of this screen.
42. You will return to the Equip Submarine
screen. Now we’ll load some equipment
onto the
■ Click on the button marked Equipment.
43. The Select Equipment screen appears.
. Depending on how many
Triton Sub.
The Coelacanth Tank is now loaded onto
Triton-1
changes to 1 from 0 indicating that it is on board.
44. Use the same process to load any other
45. Click on OK in the bottom of the screen.
46. You will return to the Equip Submarine screen.
■ Click on OK in the bottom of the Equip
47. Click on OK in the bottom of the Flying
48.Click on the Geoscape button in the
. The number in the Stores column
equipment of your choice onto the
Submarine screen to return to the Flying
Sub screen.
Sub screen to return to the Bases screen.
bottom right of the Bases screen. You
return to the Geoscape.
Triton Sub
RETURNING TO THE
GEOSCAPE
49. Click on the 1 Day button in the Geoscape Time
Controls. Soon, a message appears on the
Geoscape. This may be one of the following:
■ Move the mouse pointer over the
button in the Coelacanth Aqua-Jet
Missile Tank line (at the top of the list)
and click.
The Coelacanth Tank is a Submersable Weapon
and needs four units of space. Therefore, only
10 aquanauts may be assigned to the same
Triton
as a Coelacanth Tank.
TERROR FROM THE DEEP
▼
Alien Sub Detected — go to step 4 of tutorial
1 for details on intercepting an Alien Sub —
when you investigate the crash site this time,
your aquanauts will be better equipped.
Research Completed — your scientists have
completed their research work. You should
allocate them to another project as soon as
possible (see step 11 of this tutorial).
31
TERROR FROM THE DEEP
Page 37

X-COM Project Monthly Report — at the end
of each month, the X-COM Project Monthly
Report appears to inform you of your
progress in the fight against the aliens. See
the Geoscape section of the Reference Guide
of this manual for full details.
Other messages may appear to inform you
that a new purchase has arrived or a
manufacturing process has become available.
THE END OF THE TUTORIAL
Build more facilities (pods) at
your bases
Click on the Build Facilities button in the
Bases screen. Experiment with different sized
bases — you don’t always have to build Sub
Pens. Build dedicated ‘listening posts,’
equipped with both Standard and Wide Array
Sonar Systems, then add Sub Pens when you
can afford them. By using this tactic, you will
detect many more Alien Subs.
Much of the enjoyment of
The Deep
gathering information on the aliens, and battling
through hundreds of different landscapes.
These tutorials have been a basic guide to the
way
There may be further game enhancements
which are documented in the Technical
Supplement. Use the Reference Guide section
of this manual for details about specific menu
options or game features.
is discovering new technology,
X-COM: Terror From The Deep
X-COM: Terror From
plays.
PLAYING TIPS
To succeed in the war against the aliens, you
will need to carry out the following:
Establish more bases around
the world
Click on the Build New Base button in the
Bases screen. Establish bases in the zones
which are funding you heavily — refer to the
Graphs screen for this information.
Develop a powerful squad
Don’t allow your aquanauts to take unnecessary
risks on any missions; you will find that they
fight better when they are more experienced.
Equip your squad with the best weapons
available and avoid exposing your aquanauts to
enemy fire by keeping them in cover.
Plan your research carefully
Concentrate research on developing alienbased technologies and take care that your
scientists stay busy — research work costs
relatively little and the rewards are great.
Build new weapons and Subs
based on alien technology
If your scientists have researched alien items,
your engineers will be able to reproduce them.
X-COM will eventually be using the most
advanced weaponry on Earth, fighting the
aliens with their own technology!
TERROR FROM THE DEEP
32
TERROR FROM THE DEEP
Page 38

SECTION 2
THE REFERENCE GUIDE
THE GAME OPTIONS
NEW GAME
If you select New Game in the Game Options
screen, the Select Difficulty Level screen
appears.
The Game Options screen appears when you
load
X-COM: Terror from the Deep
Language Selection Screen) allowing you to
select between New Game or Load Saved
Game. Position the mouse pointer over the
required option and click the Left Mouse
Button (LMB) to select.
TERROR FROM THE DEEP
(after the
33
TERROR FROM THE DEEP
Page 39

This allows you to change the way the game
plays to suit your skill level, from level 1
(Beginner) to level 5 (Superhuman). It is
recommended that you complete the game at
one of the lower difficulty levels before
attempting to play the game at level 5.
The first New Game set up is to name your
first base. The prompt Base Name? will
appear — type in your first base’s name using
the keyboard and press r. You will now
be able to use the Geoscape as normal.
The difficulty level affects:
• the hostility and skill of aliens
• the aggression of Alien Subs
Pick a difficulty level by clicking on one of
these five buttons.
The Geoscape, the main game screen,
appears with the message Select Site For
New Base.
Click on any of the world’s oceans to position
your first X-COM base. Use the Geoscape
controls if you want to rotate the display of the
Earth (see the section of this manual on The
Geoscape Screen for full details of the
Geoscape controls).
LOAD SAVED GAME
If you select Load Saved Game in the Game
Options, the Select Game To Load screen
appears.
The names of all saved games are displayed in
the middle of the screen; each game’s time
and date is also displayed.
Pick a saved game by clicking the LMB on one
of the ten buttons on the left hand side of the
screen. The game returns to the Geoscape, at
the point of the save.
TERROR FROM THE DEEP
34
TERROR FROM THE DEEP
Page 40

THE GEOSCAPE SCREEN
The Geoscape screen is the main screen for
playing
displays the latest data on alien activity and
allows you to control and monitor X-COM
Interception Subs.
The Geoscape screen is made up of five parts:
the Geoscape, the View Controls, the Time
Controls, the Game Time and the Menu
Options.
X-COM: Terror From The Deep
Menu Options
; it
THE GEOSCAPE
The Geoscape is a 3-D view of the Earth which
can be rotated or magnified. At minimum
magnification, it displays the whole planet,
while at maximum magnification, it shows
detail such as underwater land contours.
Night and day are fully simulated.
The Geoscape uses symbols to represent the
following:
Blue - an X-COM Base.
Yellow - an X-COM Sub.
Orange - an X-COM Sub’s destination
Red - an Alien Sub on the move.
Green - an Alien Sub on the sea-bed.
White - an Alien Sub crash site.
Pink - an Alien Base.
Pink - an Alien Terror Site.
✙
✖
(also known as a waypoint).
✙
✖
✖
✙
Geoscape
TERROR FROM THE DEEP
Game Time
View Controls
Time Controls
35
TERROR FROM THE DEEP
Page 41

THE VIEW CONTROLS
The View Controls allow you to manipulate the
view of the Earth in the Geoscape.
Click on the up or down arrows to tilt the view
of the Earth up or down.
Click on the left or right arrows to rotate the
view of the Earth to the left or right (about the
Earth’s polar axis).
Click on the icon to increase the magnification of the Geoscape.
Click on the icon to decrease the magnification of the Geoscape.
Click on the Geoscape using the RMB to
center the display on that location.
THE GAME TIME
X-COM: Terror From The Deep
P.M. on January 2040. All game times are
given in Greenwich Mean Time (GMT).
The X-COM Project Monthly
Report
begins at 12.00
THE TIME CONTROLS
The Time Controls allow you to adjust the rate
at which time passes in the game.
Time may be accelerated from 5 second
stages to 1 minute, 5 minute, 30 minute, 1
hour and 1 day segments. This means that
you can cut out the long periods of waiting for
X-COM sonar to detect an Alien Sub. To select
a particular rate of time passage, click on any
of the six Time Control buttons.
The passage of time is suspended when any
of the Geoscape Menu Options are accessed.
TERROR FROM THE DEEP
At the end of each month, you will be given a
report of your progress so far. This report is in
the following form:
Month – the month which has just ended.
Monthly Rating – X-COM’s overall perform-
ance rating for the previous month. This takes
into account the following:
• success of interceptions;
• scores for Alien Submarine Assault
Missions;
• research work completed; and
• alien activity.
A plus (+) sign before the figure indicates a
good performance, a minus (-) sign indicates
a poor performance.
36
TERROR FROM THE DEEP
Page 42

Funding Change – the difference between this
month’s and last month’s total funding. A plus
(+) sign before the figure indicates an increase
in funding, a minus (-) sign indicates a
decrease in funding.
This is followed by a general report on how
the Council of Funding Nations views recent
X-COM anti-alien operations.
Click on the OK button to exit this screen.
Molecular Control
If you have built a Molecular Control Lab at
any of your bases, you will be taken to the
Molecular Control (MC) Training screen each
month, after the Monthly Report.
Molecular Control skills allow X-COM
aquanauts to use Molecular Control. A
Molecular Control Implant is required to use
any MC device. The implant is surgically
inserted into the aquanaut’s brain in the MC
lab. Molecular Control devices are also
required for an aquanaut to be able to use
Molecular Control.
The Molecular Control Training screen lists all
X-COM bases with Molecular Control Lab
facilities. MC Labs are essential to carry out
Molecular Control Training.
Click on any of the Base Name buttons to
Assign Aquanauts to Molecular Control
Training at that base.
Assign Aquanauts to Molecular Control
Training
This screen allows you to assign individual
aquanauts to Molecular Control training. The
top of the screen shows the Remaining M.C.
Capacity. This indicates the number of
aquanauts who may be assigned to Molecular
Control Training.
Below this is a list of the following:
Name – the aquanauts’ names.
Molecular Control Strength – this is a
measure of the aquanaut’s natural ability to
defend against Molecular attack. It never
changes, regardless of how much training the
aquanaut goes through.
TERROR FROM THE DEEP
37
TERROR FROM THE DEEP
Page 43

Molecular Control Skill/Improvement – this
is the aquanaut’s ability to use Molecular
Control. The aquanaut’s Molecular Control
combat ability is dependent on both this and
Molecular Control Strength.
Note: It is better to concentrate your
Molecular Control Training on aquanauts with
high Molecular Control Strength.
In Training? – whether or not the aquanaut is
in training.
Note: Carrying out missions also improves a
aquanaut’s Molecular Skill.
Click on OK to return to the Molecular Control
Training screen.
Click on another Base Name button to assign
more aquanauts to Molecular Control training
or click on the OK button to return to the
Geoscape.
UFOpaedia – takes you into the UFOpaedia
(see the UFOpaedia section of this manual for
full details).
Options – takes you into the Options screen
(see the Options section of this manual for full
details).
Funding – takes you into the International
Relations display (see the Funding section of
this manual for full details).
USING THE GEOSCAPE
X-COM’s main task is to shoot down and
investigate Alien Craft. This ensures continued
funding and allows X-COM to learn more
about the alien threat.
When there is no Alien activity, you will
probably want to keep the rate of time
passage fairly high. Click on the 1 Hour button
in the Geoscape Time Controls. Time will pass
rapidly until you get a message informing you
that an Alien Sub has been detected.
THE MENU OPTIONS
Click on the Menu Option buttons to access
other screens and functions:
Intercept – allows you to give X-COM Subs
orders to intercept Alien Subs.
Bases – takes you into the Bases screen (see
the Bases section of this manual for full
details).
Graphs – takes you into the Graphs screen
(see the Graphs section of this manual for full
details).
TERROR FROM THE DEEP
38
TERROR FROM THE DEEP
Page 44

The Alien Sub Detected
Window
Heading – the general direction in which the
Alien Sub is traveling.
Speed – the speed at which the Alien Sub is
traveling (in knots).
This window also gives you the option to
either:
Centre on Alien Sub-Time=5 Secs – centers
the Geoscape display on the Alien Sub’s
current position and reduces the passage of
time to 5 seconds. Click on this option if you
intend to intercept the Alien Sub.
X-COM bases automatically detect any Alien
Subs within range of their sonar. Later on in
the game, you will be able to research and
manufacture better sonar and tracking
systems, based on captured alien technology.
When an Alien Sub is detected, time is paused
and a window titled Alien Sub-
Detected appears in the center of the
Geoscape display. Every Alien Sub detected is
given a consecutive number, for example, the
41st Alien Sub detected by X-COM will be
named Alien Sub-41.
The following data is also presented when an
Alien Sub is detected:
Size – the size of the Alien Sub.
Depth – the approximate depth at which the
Alien Sub is traveling.
(number)
Cancel – hides the message window and
leaves the Geoscape as it was before the Alien
Sub was detected. Click on this option if you
wish to take no action against the Alien Sub.
Note: While your Interceptor Subs
(Barracudas) are capable of a high maximum
speed, Alien Subs often travel faster. An Alien
Sub may unwittingly change course or slow
down, however, so it is good practice to
attempt to intercept all Alien Subs detected.
The Launch Interception
Window
To assign an X-COM Barracuda to attack an
Alien Sub, you may either click on the
Barracuda’s base or click on the Intercept
Menu Option (in the top-right of the Geoscape
screen), in which case the display will change
to this:
TERROR FROM THE DEEP
39
TERROR FROM THE DEEP
Page 45

The advantage of clicking on the Intercept
Menu Option is that you can give orders to an
Interceptor that is based on the opposite side
of the Geoscape, hidden from view. Simply
clicking on a base only allows you to assign
Subs from that base.
In either case, the Launch Interception
window displays the following information:
Craft – the type and registration number of the
craft (for example,
craft to be operated by X-COM, and is a
Sub
Squad Transporter).
Status – this may be either:
Ready – the Sub is available for interception
duty.
Refueling – the Sub is refueling; this can take
several hours.
Triton Sub-6
is the sixth
Triton
Rearming – the Sub is having its weaponry
changed or replenished.
Repairs – the Sub is undergoing repair work.
Out – the Sub is already carrying out an
interception.
Base – the Sub’s home base.
Weapons/Crew/SWS’s – the number of
weapons the Sub is carrying, the number of
crew on board, and how many Submersible
Weapon Systems the sub is carrying.
If you wish to return to the Geoscape without
selecting an Interception Sub, click on the
Cancel button.
Selecting an Interception Sub
Use the mouse to highlight a
the Launch Interception list and click to select
this Sub.
The Select Destination window appears at the
top of the screen. If you wish to return to the
Geoscape without selecting a target, click on
the Cancel button.
To select an Alien Sub as the interception
target, simply click on its location on the
Geoscape.
Barracuda
from
TERROR FROM THE DEEP
The message Target: Alien Sub-
appear.
40
(number)
TERROR FROM THE DEEP
will
Page 46

Base – the craft’s home base.
Speed – the current speed of the craft (in
knots).
Maximum Speed – the craft’s maximum
speed (in knots).
Depth/Altitude – the craft’s approximate
Depth/Altitude.
Click on the OK button to accept this Alien Sub
as the target, or click on the Cancel button to
select a different target.
The Barracuda will now launch from its
submerged base and take the most direct path
to the Alien Sub.
The Craft Status Window
Any time an X-COM craft is out of its base,
click on it to display the Craft Status window.
This contains the following information:
Fuel – the percentage of fuel remaining in the
craft. When fuel reaches a critical level, the
craft will automatically return to its base.
Weapon-1 – The type of weapon loaded into
weapon bay number one followed by the
number of rounds of that weapon remaining.
Weapon-2 – The type of weapon loaded into
weapon bay number two followed by the
number of rounds of that weapon remaining.
The Craft Status window also has four
buttons, allowing you to:
Return to Base – abort the interception and
return to base.
Select New Target – abort the present
interception and select a new target.
Patrol – abort the interception and remain at
the current position.
Cancel – return to the Geoscape without
issuing any orders.
Craft Name – the type and registration
number of the craft.
Status – the orders which the craft is carrying
out.
TERROR FROM THE DEEP
41
TERROR FROM THE DEEP
Page 47

The Alien Sub Status Window
Any time an Alien Sub is displayed on the
Geoscape, you can click on it to bring up the
Alien Sub Status window, repeating the
information shown in the Alien Sub Detected
window.
The Tracking Lost Window
Click on the OK button. The Craft Status
window appears, giving you the option to
either Return to Base, Patrol or Go to Last
Known Alien Sub Position.
It is usually best to go to the last known Alien
Sub position, since the interception craft
might be able to retrack the Alien Sub with its
onboard sonar.
The Combat window
When the X-COM Sub has maneuvered within
firing range of the Alien Sub, the Combat
window appears. The interception craft is now
at stand-off range, awaiting your orders.
Remember that you are setting out to cause
the Alien Sub to crash land, not to blow it into
a million pieces!
The Combat window consists of the following:
Minimize
window Icon
Sonar Display
Order Buttons
The message Alien Sub-
(number)
Tracking
Lost will appear if X-COM tracking devices
lose contact with an Alien Sub while it is being
intercepted.
TERROR FROM THE DEEP
Weapons Display
42
Message Box
Range to the Alien Sub
Damage Display
TERROR FROM THE DEEP
Page 48

The Order Buttons
Click on the buttons in this display to carry out
the following:
Standoff – follow the Alien Sub
without firing at it.
Cautious Attack – attack the Alien
Sub from the maximum range of
each weapon.
Standard Attack – move to the
minimum range of each of the
available weapons and fire at a
standard rate.
Aggressive Attack – move to the
minimum range of each of the
available weapons and fire at a
maximum rate.
Disengage – abort the interception
and return to base.
View Alien Sub – LMB click to
return to combat window.
The Sonar Display
The Barracuda will use its onboard sonar to
carry out the attack on the Alien Sub. The
Sonar Display section of the Combat window
allows you to monitor the final stages of the
interception.
The Alien Sub appears as a bright blip on the
Sonar Display screen, the size of which
depends on the size of the Sub.
The Weapons Display
There are a pair of icons on either side of the
Sonar Display screen that represent the
weapons fitted to the weapons bays of the
Barracuda. Each of these icons has a number
under it, indicating the weapon’s number of
remaining rounds.
The maximum range of each of the weapons
is also shown, in the form of a line extending
out of the weapon icon and onto the Sonar
Display. When an Alien Sub gets within this
boundary, the Barracuda will open fire.
The Range to the Alien Sub
The range to the Alien Sub is a simple digital
readout of the distance from the Barracuda to
the Alien Sub.
The Damage Display
The damage display indicates the Interception
craft’s current damage state. The picture of
the craft is filled in red as it receives damage.
The Minimize Window Icon
If you shoot down the Alien Sub over land, the
Alien Sub will be destroyed beyond all
recognition and anything of value will be lost
in the crash. The Minimize window feature
allows you to track the Alien Craft on the
Geoscape until it is resubmerged; then you
can attempt to down the Alien Craft.
TERROR FROM THE DEEP
43
TERROR FROM THE DEEP
Page 49

To carry this out, click on the Minimize
window icon in the top left of the Combat
window. The Sub Icon (with a pictorial
representation of the Sub plus its X-COM
registration number) appears in the top left of
the Geoscape, and time can be advanced or
slowed as normal.
When the Alien Sub gets over the water, click
on the Sub Icon. The Combat window
appears, ready for you to carry out your
attack.
Note: You can also use the Minimize window
icon to give other Interception Subs orders to
attack the Alien Sub. There can be up to four
Interception Craft attacking a single Alien Sub
simultaneously, maximizing the chance of
success against a larger Craft.
Shooting Down an Alien Sub
Click on the Standard Attack button. The
message Alien Sub Crash Lands! appears if
you successfully cause the Sub to crash land.
The display automatically returns to the full
screen Geoscape with a white cross marking
the crash site.
Investigating Alien Crash Sites
The Alien Sub is now vulnerable to armed
assault, so you should send out an X-COM
squad to investigate it and to recover any
available Alien Technology.
Click on a base or use the Intercept Menu
Option to select a
Sub (just as you did previously with the
Barracuda
as the target. The
makes its way to the Alien crash site.
) and assign the Alien Sub crash site
Note: Only Subs which contain Aquanauts or
Coelacanth Tanks are allowed to intercept
Crash Sites or landed Alien Subs.
When the
the Alien Sub Crash Recovery screen appears.
Triton Sub
Triton Sub
Triton Sub
arrives at the crash site,
Troop Transport
takes off and
The Message Box
The Message Box is in the bottom of the
Combat window and displays messages from
the pilot of the Interceptor to you. These
messages either confirm your orders or
inform you of what the Alien Sub is doing.
TERROR FROM THE DEEP
44
TERROR FROM THE DEEP
Page 50

Terror Sites
The aliens will attempt to terrorize civilian
populations as part of their invasion plans.
This must be prevented at all costs:
successful alien Terror Site in a funding area
could cause its withdrawal from the X-COM
project.
a
Click on OK to enter the Equip Squad screen.
See the next chapter of this manual for full
details on Alien Submarine Assaults.
OTHER GEOSCAPE USES
As well as controlling the interception and
investigation of Alien Subs, the Geoscape can
be used for several other functions. Some of
them are outlined below; the others are for
you to discover!
Alien Submarine Assaults
As well as investigating crashed Alien Subs,
you can send a squad transport craft to an
intact Alien Sub which has touched down.
This is dangerous for your aquanauts,
however, and is not advised unless you have a
very powerful squad.
Alien Raids on X-COM Bases
As the game progresses, the aliens will carry
out missions to find X-COM floating bases. If
the aliens discover the location of any of your
bases, they will attempt to destroy them.
Alien Bases
The aliens will attempt to build bases on the
Earth. These are used for a variety of purposes from operating Alien Subs to infiltrating
funding areas of influence. Alien bases may be
detected by sending an Interception Craft to
the suspected location of the base and
selecting the Patrol option. You are advised to
raid alien bases at the earliest opportunity, but
make sure you have a very powerful squad
before you try!
TERROR FROM THE DEEP
45
TERROR FROM THE DEEP
Page 51

ASSAULTS ON ALIEN CRAFT
THE EQUIP SQUAD SCREEN
X-COM Assault Missions take place when XCOM carry out any of the following:
• Investigate crashed Alien Sub sites;
• Assault Alien Subs at their landing sites;
• Intervene at alien terror sites;
• Defend X-COM bases against alien
attack; or
• Attack alien bases.
All missions, except defending X-COM bases,
require you to use a transport Sub to get to
your destination. When you begin the game,
the only troop transport available is the
Sub
, but as the game progresses you will be
able to manufacture new craft.
Triton
Before you begin any Assault Mission, you
will be taken to the Equip Squad screen. Your
aquanauts will automatically pick up some
weapons, but you may wish to reequip them.
In the top left of the Equip Squad Screen is the
Rank icon. This displays the current rank of
your aquanaut. Click on this icon and the
Aquanaut Data screen appears. Use the
information provided here to best equip your
aquanaut. Click to exit the screen.
Next to the Rank icon is the name of the currently
selected aquanaut. At the top right of the screen
are two arrows, allowing you to select the next,
or the previous, aquanaut in your squad.
At the center of the screen is an aquanaut,
who might be dressed in the armor which you
might have selected in the Equip Craft screen.
This aquanaut is surrounded by the locations
in which weapons can be carried. The items
on the ground can be picked up and carried by
the aquanaut.
TERROR FROM THE DEEP
46
TERROR FROM THE DEEP
Page 52

To pick up an item from the ground, simply
move the mouse pointer over the item and
click. The item will now be ‘attached’ to the
mouse pointer. The name of this item is
shown in the bottom of the screen, next to the
aquanaut’s name. Move the item over the
location in which you want it to be carried and
click again. The item is now available for use
by the aquanaut.
To load a weapon with ammunition, pick up
the ammunition and click on the appropriate
weapon. To carry this out, the weapon must
be in a hand, the right type and unloaded.
To unload ammunition from a weapon, pick
up the loaded weapon and click on the Unload
button. The weapon will go to the aquanaut’s
right hand and the ammunition to the left. To
carry this out, both of the aquanaut’s hands
must be empty.
When you have finished equipping your
aquanaut, click on OK to enter the main part of
the Alien Submarine Assault — the
Battlescape.
THE BATTLESCAPE SCREEN
The Battlescape screen is a 3-D display that
allows you to control a small squad of heavily
armed X-COM aquanauts.
Using the Battlescape
Your squad starts the mission in their
transport Sub. The aquanaut nearest to the
Sub’s exit has a yellow animated arrow to
show that he/she is selected, ready to
move out.
Selecting and Moving Aquanaut’s
A 3-D box appears when you move the mouse
pointer over the Battlescape. To select a
different aquanaut, either click on the
button in the Control Bar (see the next section
for full details of the Control Bar) or move the
cursor box over the required aquanaut and
click. A yellow arrow indicates the selected
aquanaut.
TERROR FROM THE DEEP
To move the selected aquanaut to a
destination, simply move the cursor box to
the destination and click.
47
TERROR FROM THE DEEP
Page 53

To make the selected aquanaut turn around
without moving, position the cursor box in the
direction you want the aquanaut to face and
press the RMB.
Moving the View Window
Move the mouse pointer to the edge of the
screen to move the Battlescape view window
up, down, left or right.
Note: You must take the mouse pointer to the
very bottom of the screen, under the Control
Bar, to move the view window downwards.
Line of Sight
The Battlescape will only display what is
within your squad’s line of sight. This means
that you must seek out the aliens through
dark, unexplored areas.
Using the Split Level View
The Battlescape is built up of several levels.
These can be viewed individually, allowing you
to see behind walls and inside buildings or
craft. Click on the button on the Control
1
Bar to break the Battlescape into levels.
The Turn Based System
The Battlescape operates under a turn-based
system. This means that your aquanauts will
be able to move a certain distance before the
message Not Enough Time Units! appears.
When all of your squad have used their
allocated Time Units, click on the button
on the Control Bar to end your turn. When the
aliens have completed their moves, it is your
turn again.
The Hidden Movement screen appears when
the aliens are moving out of sight of X-COM
aquanauts.
However, there is an exception to the turnbased rule. If you move your aquanauts
directly into the alien’s line of fire, they will
take a shot during your turn. Similarly, your
aquanauts will automatically open fire if the
aliens move into your aquanaut’s line of fire
during their turn. See the section of this
manual on Opportunity Fire for full details.
Note: It is best to end your turn when your
aquanauts are in cover — close to rock
formations or behind large objects.
Seeing the Aliens
When one of your aquanauts sees an alien, a
pulsing square appears in the bottom right of
the Battlescape screen.
Click on the pulsing square to center the
Battlescape on the alien.
Using Weapons
When you can see an alien on the Battlescape,
you should use a weapon against it before it
gets a chance to fire. Click on one of the Item
Boxes on the left or right of the Control Bar to
use a weapon.
A window appears, allowing you to select
from a number of options. These will vary,
depending on the weapon. Click on the
required option to carry out any of the
following:
TERROR FROM THE DEEP
48
TERROR FROM THE DEEP
Page 54

Aimed Shot – a carefully aimed shot,
requiring maximum effort from the aquanaut
and, therefore, maximum Time Units.
Attack – strike your opponent with the
weapon/object. To do this, your aquanaut
must be standing next to the opponent.
Snap Shot – an unaimed shot in the target’s
general direction. This type of shot is only
effective at extremely short range or when
using a very powerful weapon (such as a
Torpedo Launcher).
Auto Shot – a three-shot burst of automatic
fire in the target’s general direction, which can
be very effective especially at short range. Not
all weapons are capable of automatic fire.
Prime Grenade – set the timer on a grenade
or explosive charge. When you click on this, a
window appears with numbers from 0 to 23,
which is the number of turns it will take before
the grenade detonates. Click on the number
and either put the grenade down or throw it.
Note: Particle Disturbance Grenades do not
have a timer, but will detonate when anything
(including your aquanauts) moves nearby.
These should always be thrown to prevent the
risk of detonation.
View Next Level
Up/Down
Ascend/Descend
Controls: Up/Down
Map Screen
Throw – throw the weapon/object. This option
is mainly intended for use with grenades or
explosives.
Maximizing Your Fire Potential
As well as the aquanaut’s ability and the type
of shot fired, there are several other factors
which determine the accuracy of a shot:
• accuracy is increased if the aquanaut is
kneeling.
• accuracy is decreased if the aquanaut is
wounded or if a two-handed weapon
(such as a harpoon or torpedo) is fired
while the other hand is not free.
Underwater Usage
Certain X-COM weapons are designed strictly
for underwater use. These are the Hydro-Jet
Cannon, the Torpedo Launcher and the
Coelacanth/Aqua Jet SWS. Please note this
when arming for terror missions.
The Battlescape Control Bar
Equip Aquanaut
Screen
Select Next
Aquanaut
Options
End Turn
Split Level
View
Dust Off
Reserve Time Units Rank Stand/Kneel Center Display
TERROR FROM THE DEEP
on Aquanaut
49
Aquanaut Data
Display
Item
Box
Select Next Aquanaut –
Deselect Current Aquanaut
TERROR FROM THE DEEP
Page 55

The Item Boxes
To the extreme left and right of the control bar
are the Item Boxes, containing a picture of the
items held in the aquanaut’s hands. Click on
these boxes to use a weapon/object.
Ascend/Descend Controls:
Up/Down
Click on either of these buttons to move
aquanauts up or down between levels when
they are standing on a Pressure Lift.
The map will only display one level of the
Battlescape at a time. Click on the up or down
arrows on the right-hand side of the map to
view the next level up or down.
The map uses symbols to represent the
following:
Yellow dots – X-COM forces
Blue dots – alien forces
Red dots – civilians
White crosses – dead aliens or humans
View Next Level Up/Down
Click on either of these buttons
to view the next level up or down from the
level which is currently displayed.
Map Screen
Click on this button to view a map of the
mission area. To recenter the map on another
part of the mission area, simply click on the
desired position. The white cross in the center
of the screen shows where both the map and
the Battlescape are centered.
Click on the RMB to return to the Battlescape
screen.
Stand/Kneel
Click on this button to make the selected
aquanaut stand or kneel. Kneeling allows your
aquanaut to be less visible to the aliens and fire
more accurately.
Equip Aquanaut Screen
Click on this button to view the equipment
carried on the selected aquanaut’s body or on
the ground at the aquanaut’s feet.
TERROR FROM THE DEEP
50
TERROR FROM THE DEEP
Page 56

This display is similar to the Equip Squad
screen at the beginning of the Assault
Mission. The only difference is that the top
right of the screen now displays the
aquanaut’s remaining Time Units.
Moving weapons and equipment from one
location to another uses Time Units. The
amount of Time Units required to move an
object is dependent on where the item is —
removing items from a backpack takes more
effort than putting an item on the ground.
Click on the RMB or the LMB or the OK icon
to return to the Battlescape screen.
Center Display on Aquanaut
Click on this button to center the
Battlescape on the currently selected
aquanaut’s level and location.
Select Next Aquanaut
Click on this button to select and
center the Battlescape on the next
aquanaut in your squad.
Select Next Aquanaut - Deselect
Current Aquanaut
Click on this button to select and center the
Battlescape on the next aquanaut in your
squad. The aquanaut currently selected will be
deselected so next time you click on
he/she will not appear. Use this button when
you are happy with the position of a particular
aquanaut.
Split Level View
1
Click on this button to change how the
levels of the Battlescape are displayed. The
number on the button will change to indicate:
1 Multi-level View – everything from the
currently selected level downwards is
displayed.
2 Full View – every level is displayed,
regardless of what level is selected.
Selecting this will hide any of your
aquanauts who are behind walls and
inside buildings or craft.
TERROR FROM THE DEEP
Note: When standing in front of and facing a
door, you can open that door — without
walking through it — by clicking the RMB
once, one square in from the door.
51
TERROR FROM THE DEEP
Page 57

Options
Click on this button to call up the
Battlescape Options screen. This allows you
to select different speeds of animation and
scrolling, depending on player preference and
the processing speed of your computer.
X-C0M Movement Speed
Click on any of the numbered buttons to
change the speed at which your aquanauts
move, from 1 (slowest) to 6 (quickest).
Alien Movement Speed
Click on any of the numbered buttons to
change the speed at which the aliens move,
from 1 (slowest) to 6 (quickest).
Save Game
The Options screen also allows you the
opportunity to save your game while in the
middle of a mission. Click Save Game to bring
up the Select Save Position Screen.
Click on OK to return to the Battlescape.
Scroll Speed
Click on any of the numbered buttons to
change the speed at which the View window
moves, from 1 (slowest) to 5 (quickest).
Scroll Type
Click on either of the numbered buttons to
change the Scroll Type between Trigger scroll
(press the LMB when the mouse pointer is at
the edge of the screen), or Auto-Scroll (the
View window moves automatically when the
mouse pointer is moved to the edge of the
screen).
Fire Speed
Click on any of the numbered buttons to
change the speed at which weapon shots
move, from 1 (slowest) to 6 (quickest).
TERROR FROM THE DEEP
End Turn
Click on this button to end your turn.
Dust Off
Click on this icon to abort the mission.
Only aquanauts aboard the Transport Sub will
be saved.
Note: If you abort an alien base raid, only
aquanauts in the rooms where you are initially
deployed are saved. Aborting the mission
during an alien raid of an X-COM base
concedes defeat to the aliens.
Reserve Time Units
When your aquanauts move, they use Time
Units that might be needed to use a weapon.
These buttons allow you to reserve Time Units
for using weapons:
52
TERROR FROM THE DEEP
Page 58

• click on the button to carry out
free movement with no limitation.
As the aquanaut’s rank improves, so too does
the skill with which he/she can fight.
• click on the button to reserve
enough Time Units for a Snap Shot.
• click on the button to reserve
enough Time Units for an Aimed Shot.
• click on the button to reserve
enough Time Units for an Auto Shot.
• click on the button to reserve
enough Time Units to Kneel.
• right-click on the button to
0
remove all Time Units.
Rank
This icon represents the currently
selected aquanaut’s rank.
X-COM aquanauts may have the following
ranks:
Seaman
Able Seaman
Ensign
Lieutenant
Commander
Captain
Aquanaut Data
The name of the selected aquanaut is shown
at the top of this section, with statistics and
information regarding the aquanaut shown
underneath.
These statistics are displayed as both figures
and bar charts and are color coded as follows:
Green – Time Units
Orange – Energy
Red – Health
Purple – Morale
Click on the Aquanaut Data box to view the
Aquanaut Data screen.
This displays the aquanaut’s name at the top
of the screen with the following information:
TERROR FROM THE DEEP
Time Units – the aquanaut’s remaining Time
Units. Time Units are required to carry out
everything from walking to firing weapons.
53
TERROR FROM THE DEEP
Page 59

Energy – the aquanaut’s current Energy level.
This will decrease as the aquanaut carries out
energy consuming actions such as walking
through seaweed. The total energy available
will be lowered if the aquanaut receives fatal
wounds to the torso.
Health – the aquanaut’s current Health. This
will decrease as the aquanaut takes hits from
enemy weapons. If the aquanaut has received
fatal wounds, each wound decreases health by
one point per turn. If the health reaches zero,
the aquanaut dies from the wounds incurred.
Fatal Wounds – the number of Fatal Wounds
received by the aquanaut. The Medi-Kit can be
used to heal fatal wounds.
Reactions – the aquanaut’s Reactions. This
determines how effective the aquanaut is at
opportunity fire — taking a shot during the
alien’s turn.
Firing Accuracy – the aquanaut’s accuracy at
firing weapons. This will increase as the
aquanaut gains more battle experience.
Throwing Accuracy – the aquanaut’s accuracy
at throwing objects. This will increase as the
aquanaut becomes more experienced.
Strength – the aquanaut’s Strength. This
affects the distance which the aquanaut can
throw objects.
Morale – the aquanaut’s Morale. An aquanaut
will lose morale if the battle starts to swing in
the alien’s favor. If the morale falls below 50
percent, there is a chance that the aquanaut
could panic.
Bravery – the aquanaut’s Bravery. This
determines the likelihood of morale
decreasing.
Armour Status – the aquanaut’s Armor Status.
This will rise as the aquanaut is equipped with
armor manufactured by your engineers.
Molecular Control Strength/Skill – the
Molecular Control Strength/Skill that the
aquanaut may call upon.
Click on the RMB to return to the Battlescape
screen.
Promotions
At the end of every mission, subject to their
mission performance, aquanauts will be
promoted.
The rank to which the aquanaut is promoted is
dependent on the following:
Seaman – each new recruit begins at this
level.
Able Seaman – in order to be promoted to an
Able Seaman, a Seaman must have had some
combat experience.
Ensign – there is one Ensign per five
aquanauts. If a position is vacant, the best
available Able Seaman is promoted.
Lieutenant – there is one Lieutenant per 11
aquanauts. If a position is vacant, the best
available Ensign is promoted.
Commander – there is one Captain per 23
aquanauts. If a position is vacant, the best
available Lieutenant is promoted.
TERROR FROM THE DEEP
54
TERROR FROM THE DEEP
Page 60

Captain – this is the supreme leader of XCOM forces — there is only one Captain. If
there are at least 30 aquanauts, the best
available Commander will be promoted.
It does not automatically follow that the higher
the rank the better the aquanaut, although this
will tend to be the case.
The Effect of Rank
When officers accompany a mission, the
morale of all the aquanauts is boosted and
they are less susceptible to panic. The higher
the rank of the officer, the better the effect on
the aquanauts’ morale.
Note: If an officer is killed during a mission, it
will have a worse effect on morale than if a
rookie had been killed.
Morale
At the start of each mission each aquanauts’
morale starts at 100 percent. This decreases
as an aquanaut is wounded or if fellow
aquanauts are killed. It will recover if an
aquanaut successfully kills aliens. The decline
in morale is reduced by an aquanaut’s Bravery
rating — the more brave an aquanaut is, the
less likely he/she is to panic.
Panic
When morale falls, the likelihood of panic
increases. When an aquanaut panics one of
three things can happen:
A. The aquanaut freezes, and can do nothing
for the current turn (i.e., he/she will have
no Time Units).
B. The aquanaut drops his/her weapon and
runs away, searching for a hiding place.
Mission Experience
When aquanauts return from a mission, their
abilities might be increased. For a skill to
benefit from experience, it must be used
during combat as much as possible. For
example, if an aquanaut uses a harpoon many
times, then accuracy is likely to improve.
Reactions, Accuracy, Time Units, Throwing
Accuracy, Molecular Control, Health,
Strength, Fitness and Bravery all benefit from
mission experience.
TERROR FROM THE DEEP
C. The aquanaut goes berserk and starts
firing at random.
Wounding
An aquanaut’s health is a general indication of
well being, but an aquanaut can also receive
Fatal Wounds. These afflict certain parts of
the body as follows:
Head, Left/Right Arm – each fatal wound
reduces the aquanaut’s weapon accuracy.
Torso – each fatal wound reduces the
aquanaut’s rate of Energy recovery.
Left/Right Leg – each fatal wound reduces the
aquanaut’s available Time Units.
55
TERROR FROM THE DEEP
Page 61

The Aquanaut Data screen displays any fatal
wounds. Each fatal wound also reduces an
aquanaut’s Health by one point per turn, so
that it is possible for an aquanaut to die from
a hit received much earlier in the mission. The
Medi-kit can heal fatal wounds.
Stunning
Aquanauts or aliens can be stunned if hit by a
stunning weapon, caught in an explosion blast
or if suffering from smoke or dust/debris
inhalation following an explosion.
You can monitor the effect of smoke/debris
inhalation on your aquanauts by checking the
white bar on the aquanaut’s health bar. If this
advances as far as the aquanaut’s health level,
the aquanaut will collapse, but should recover
a few turns later.
Aliens can also be stunned and carried back to
your craft. However, if they wake up, they will
jump out of the aquanaut’s arms and run
away!
Opportunity Fire
If you end your turn leaving your aquanauts
with enough Time Units to fire a shot, your
aquanauts will automatically fire during the
alien’s turn at any alien who strays into their
line of sight. This is called Opportunity Fire.
Your aquanauts might even be able to take a
shot before the aliens — if the aquanaut’s
Reactions and Time Units are high enough.
There might be several exchanges of fire in
each Opportunity Fire confrontation.
Note: Opportunity fire is crucial to mission
success. Remember to leave your aquanauts
with enough Time Units at the end of their
turn to carry out opportunity fire — use the
Reserve Time Units buttons to do this.
Objective
The mission will be successful when all aliens
have been either killed or stunned. The Alien
Sub’s remains, alien artifacts and alien
corpses are then recovered automatically.
TERROR FROM THE DEEP
To abort the mission before the objectives
have been achieved, click on the button
in the Control Bar.
Note: Any aquanauts not on the Triton
transport at this stage will be left behind.
56
TERROR FROM THE DEEP
Page 62

THE DEBRIEFING SCREEN
The Debriefing Screen is displayed at the end
of the Assault Mission, giving you a breakdown of your performance.
The first line of this display tells you whether
the mission objectives were achieved.
Below this is the mission performance list,
showing a breakdown of all the Items
recovered, the Quantity of each and the Score
for retrieving them. The last line of the
mission performance list shows the total
mission score.
At the bottom of the screen is the overall
mission Rating. Poor mission performance
may affect X-COM’s funding.
Click on OK in the bottom left of the screen to
return to the Geoscape screen.
TERROR FROM THE DEEP
57
TERROR FROM THE DEEP
Page 63

BASES
Click on the Bases button in the Geoscape
screen to access the Bases screen — a
display of the various X-COM installations in
operation or under construction.
X-COM bases are submerged floating stations
hiding them from alien detection systems. XCOM craft operate from concealed sub pens,
and the only access to the base is via the
access lift. X-COM bases carry out several
different functions:
• Detection of Alien Subs.
• Operation of X-COM fighter and
transport subs.
• Research into alien technology and life
forms.
• Manufacture of vehicles, equipment and
weapons for X-COM use.
The Bases screen consists of two main parts:
the Base Display and the Menu Options.
TERROR FROM THE DEEP
58
TERROR FROM THE DEEP
Page 64

THE BASE DISPLAY
The Base Display allows you to see, at a
glance, the size of your bases and their
facilities (pods).
X-COM may have up to eight bases worldwide, which are represented above the Menu
Options as a row of eight icons. Each of these
icons contain a small map of the pods which
make up the base. Green squares represent
existing pods, red squares represent pods
under construction. Click on any of these
icons to select a different base.
The name of the selected base is displayed in
the top right of the Bases screen. Below this is
the geographical area in which the base is
located followed by the total Funds available
to X-COM.
The left two-thirds of the Bases screen shows
a top down view of the base. Move the mouse
pointer over a base facility to display its name
in the top left of the screen.
THE MENU OPTIONS
The Menu Options allow you to see in detail
how each of your bases is currently
functioning. You will use the Menu Options to
carry out tasks such as building pods, arming
individual subs and organizing research and
manufacture work.
Note: At times during the game, lists of
information may extend beyond the screen. If
this happens, an arrow appears in the bottom
right of the screen. Similarly, if the list extends
off the top of the screen, an arrow appears in
the top right. Click on these arrows to scroll
the list up or down.
Build A New Base
Click on this option to establish a new X-COM
Base.
You return to the Geoscape and the message
Select Site For New Base appears at the top
of the screen — click anywhere in the sea to
position the base. You might cancel the order
to build a new base by clicking on the Cancel
button. Use the Geoscape controls if you want
to rotate the display of the Earth (see the
section of this manual on The Geoscape
Screen for full details of the Geoscape
controls).
TERROR FROM THE DEEP
When you have selected the location for your
base, a message window appears informing
you of the cost to establish a base in this part
of the world. Click on OK to accept this
location or click on Cancel to select a different
location.
59
TERROR FROM THE DEEP
Page 65

Note: As you play the game, you will find that
some areas of the world are better than others
for X-COM base sites. The Sea of Japan is a
good area for an X-COM base because the
area is both wealthy and densely populated.
When you have decided on your new Base’s
location, you are prompted to give it a name
— type in your base’s name using the
keyboard and then press r.
You will now return to the Bases screen and
are prompted to Select Position For Access
Lift. This will position the main access to the
facility from the sea. It is better to position this
fairly centrally so that new pods may be built
around it.
You have now established a new X-COM base.
Click on the Build Facilities Menu Option to
build some more pods into the base.
Base Information
Click on this option to display a breakdown of
base-related information.
The Base Icons
In the top right of the screen are eight base
icons which allow you to change the currently
selected base. These function in exactly the
same way as the Base icons in the Bases
screen.
Note: When constructing a new base, you can
only begin building new pods onto a
completed part of the base. So to begin — the
maximum new pods you could build would be
four.
TERROR FROM THE DEEP
The Base Name
Click on the base name in the top right of the
Base Information screen to change the base
name. A flashing * cursor appears. Use
B to erase the previous name, and
type in the name of your choice using the
keyboard and press r.
Short-Range Detection
This is a display of the short-range detection
ability of the base. Short-range detection
systems have a range of 300 nautical miles.
60
TERROR FROM THE DEEP
Page 66

Long-Range Detection
This is a display of the long-range detection
ability of the base. Long-range detection
systems have a range of 450 nautical miles.
Note: X-COM Sonar Systems, while very longranged, rotate very slowly — once every 10
minutes. This means that your base will
detect Alien Subs more effectively if more
than one Sonar System is in place.
The Stores Button
Click on the Stores button to view a list of the
items currently in the stores.
The Monthly Costs Button
Click on the Monthly Costs button to view a
list of your monthly expenses. These are
made up of the following:
The figures show the number of personnel
available for work followed by the total
number of personnel at the base. You should
keep the first figure zero to stop workers from
being wasted. The bar graphs to the right of
this numerical display are useful to see ‘at a
glance’ how your personnel are being utilized.
The Space Used: Space Available bar graphs
show how your space is being utilized. This is
broken down into five categories in a similar
way to the Personnel.
The figures show the space used followed by
the total amount of space available. You
should aim to keep the first figure equal or
very close to the second figure to prevent
wasted space. The bar graphs to the right of
this numerical display are useful to quickly
see how your space is being utilized.
Craft – X-COM do not own Barracudas or
Triton Flying Subs; they are leased from their
owners for a monthly fee.
Personnel – your personnel are paid monthly,
according to standard world pay scales.
Base Facilities – base facilities are
reequipped monthly. See the UFOpaedia for
details of the maintenance cost of each base
facility.
The Personnel Available: Personnel Total
data shows how your personnel are being
utilized. It is broken down into the three
groups of personnel: aquanauts, engineers
and scientists.
TERROR FROM THE DEEP
The Defences is a rating of how well the base
can defend itself against an Alien attack.
Click on the Transfers button in the bottom of
this screen to see a display of the personnel or
equipment currently in transit between other
bases and the selected base.
61
TERROR FROM THE DEEP
Page 67

The Item in transit is listed next to the
Quantity of that item and its Arrival Time at
the base in hours.
For full details on Transferring personnel and
equipment between bases, see the Transfer
section of this chapter.
Click on OK to return to the Base Information
screen.
Click on the Aquanauts button in the Bases
screen to access the Aquanaut List. This
displays all the aquanauts at the currently
selected base, regardless of which craft they
are assigned to.
Use the mouse to highlight and select an
aquanaut. The Aquanaut Data screen appears.
The Aquanaut Data screen
Click on OK in the bottom left of the Base
Information screen to return to the Bases
screen.
Aquanauts
TERROR FROM THE DEEP
The selected aquanaut’s rank badge is in the
top left of this screen.
The aquanaut’s name is next to the rank
badge. Click on this to change the aquanaut’s
name. A flashing * cursor appears. Use
B to erase the previous name, and
type in the name of your choice using the
keyboard and press r.
Click on the Armour button to change the
armor worn by the Aquanaut. The Select
Armour window appears, listing the types of
armor available and the number of each in
storage.
62
TERROR FROM THE DEEP
Page 68

Below the buttons is a display of the
following:
Rank – the aquanaut’s X-COM rank.
Missions – the number of missions that the
aquanaut has taken part in.
Kills – the number of aliens the aquanaut has
killed.
Craft – the sub that the aquanaut is currently
assigned to.
Wound Recovery – the number of days before
the aquanaut recovers to full health.
Equip Submarine
Click on this option to configure your
interception craft (Barracuda).
In the bottom two-thirds of the screen is a
display of the aquanaut’s physical statistics.
These are identical to those in the Battlescape
Aquanaut Data screen.
▼
Click on the buttons to view data for
the previous/next aquanaut at the base.
Click on OK to return to the Aquanaut List
screen.
Click on OK in the bottom of the Aquanaut List
screen to return to the Bases screen.
▼
The Equip Submarine Screen lists the
following information:
Name – the type and registration number of
the sub (for example, Barracuda-3 is the third
sub to be operated by X-COM, and is a
Barracuda).
Status – this may be:
Ready – the sub is available for interception
duty.
Refuelling – the sub is refuelling.
Rearming – the sub is having its weaponry
changed.
Repairs – the sub is undergoing repair work.
Out – the sub is carrying out an interception.
Weapon Systems – the weaponry carried by
the sub. This is presented as number
carried/maximum number which may be
carried.
TERROR FROM THE DEEP
63
TERROR FROM THE DEEP
Page 69

Crew – the number of aquanauts carried on
the sub.
SWSs – the number of Submersible Weapons
Systems (e.g., Coelacanth Tanks) carried on
the sub.
To configure a sub, use the mouse to highlight
the required craft from the list and click to
enter the Equip Craft screen.
The Equip Craft screen for the
Barracuda.
The Equip Craft screen allows you to
configure individual interception craft to suit
your requirements.
The sub’s name is at the top of the screen.
Below this is a display of the Damage and
Fuel status — useful to establish how long
the sub will be in repair or refuelling. Zero
percent damage and 100 percent fuel mean
that the sub is fully operational.
Below the Damage and Fuel status are the
weapon configuration buttons, marked with
numbers. These do not appear on the Equip
Craft screen for the
Triton Sub
transport,
since it does not have combat capability. Craft
such as the
Barracuda
have two weapon bays,
marked ‘1’ and ‘2.’
Alongside the numbered buttons are the
names of the loaded weapons and a pair of
figures:
Ammo – the number of rounds of the weapon
loaded onto the Sub.
The Equip Craft screen for the
TERROR FROM THE DEEP
Triton Sub.
Max – the maximum number of rounds that
may be carried by the Sub.
A small icon representing the weapon is
shown to each side of the craft.
64
TERROR FROM THE DEEP
Page 70

The Select Armament Window
The Select Squad Screen
Click on one of the numbered buttons to
access the Select Armament window. This
allows you to change the weapons carried in
the sub’s weapon bays.
Armament – the names of the available
weapons.
Quantity – the number of the weapon in
storage.
Ammunition Available – the number of
rounds of the weapon in storage.
If you wish to load a different weapon onto
your sub, use the mouse to highlight the
required weapon from the list and click.
Alternatively, you may click on the Cancel
button to exit this window without making any
weapon changes.
You will now return to the Equip Craft screen.
If you changed the weapons, the new
armament will be shown loaded on the craft.
The number of rounds loaded will be zero —
it takes time to rearm the sub.
Click on the Crew button to enter the Select
Squad screen. This allows you to assign
individual aquanauts to the selected sub.
The top of the screen displays the total Space
Available on board the craft and the current
amount of Space Used.
Below this is a list of the Name of the
aquanauts available with their Rank and the
Sub which they are currently assigned to.
To assign or de-assign an aquanaut to the
selected sub, use the mouse to highlight the
required aquanaut from the list and click.
Click on OK when you have finished assigning
aquanauts to the sub.
TERROR FROM THE DEEP
65
TERROR FROM THE DEEP
Page 71

The Select Equipment Screen
The Select Armour Screen
Click on the Equipment button to enter the
Select Equipment screen. This allows you to
load equipment onto the selected sub.
The top of the screen displays the total Space
Available on board the sub and the current
amount of Space Used.
Below this information is:
The Item column, listing the names of the
items which may be loaded on board.
The Stores column, listing the number of the
item which are available.
The Loaded column, consisting of a pair of
buttons for each item and the number of the
item which are loaded on the sub.
▼
Click on the buttons to decrease/
increase the number of an item which are
loaded on board the selected sub.
Click on OK when you have finished loading
equipment onto the sub.
▼
Click on the Armour button to enter the Select
Armour screen. This allows you to configure
the body armor which your aquanauts will
wear.
To set up the armor worn by a particular
aquanaut, use the mouse to highlight the
required aquanaut from the list and click.
The Select Armour Type window appears,
listing the types of armor available and the
number of each in storage.
TERROR FROM THE DEEP
66
TERROR FROM THE DEEP
Page 72

Click on an armor button. The aquanaut is
now equipped with the selected armor.
Click on OK when you have finished assigning
armor to aquanauts.
To return to the Equip Submarine screen from
the Equip Craft screen, click on OK.
To return to the Bases screen from the
Interception Craft screen, click on OK.
Build Facilities
Click on this option to build new base facilities
(pods).
The Menu Options will be replaced by the
Select Installation window. You can choose
from the following:
Living Quarters
Laboratory
Workshop
Standard Sonar System
Wide Array Sonar System
Torpedo Defences
General Stores
Alien Containment
Sub Pen
Note: As the game progresses, you will be
able to research alien-based technology to be
incorporated into your bases. See the
UFOpaedia for full details of all base
installations.
Use the mouse to highlight and click on the
required installation. The Select Installation
window is replaced by the Build Installation
window.
This displays the cost to build the installation,
the time it will take to construct it and the
maintenance cost per month. You can click on
Cancel to abort the build facility operation at
this stage.
To construct the new facility, move the mouse
pointer over the Base Display, position the
installation and click.
The new installation is now shown on the
Base Display, enclosed in a dotted line with
the number of days of construction
superimposed on it. The Build Installation
window reverts to the Select Installation
window.
TERROR FROM THE DEEP
67
TERROR FROM THE DEEP
Page 73

Click on OK to return to the Bases screen or
click on another installation from the list to
continue constructing base pods.
A message window appears in the Geoscape
screen when a base facility has been
completed.
Research
Click on this option to view your current
research status.
The Current Research screen displays the
following:
New Project
Click on the New Project button to start new
research work. The New Research Projects
window appears, listing the projects available
for research.
Use the mouse to highlight and click on the
required project.
The New Research Projects window will now
change to display the Start Project window.
Scientists Available – the number of
scientists available for work.
Scientists Allocated – the number of
scientists currently working on research
projects.
Laboratory Space Available – the amount of
floor space available in the laboratories.
Below this is a list of the research projects
currently being undertaken with the number
of scientists working on each project and a
general indication of the progress being
made.
TERROR FROM THE DEEP
You may cancel research at this stage by
clicking on Cancel. To accept the project and
continue, click on the Start Project button.
68
TERROR FROM THE DEEP
Page 74

The window changes to display the Scientists
Allocated window.
This displays the Scientists Available and the
Laboratory Space Available as before, but
allows you to set the number of scientists
allocated to this particular project.
Click on the up/down arrows to increase/
decrease the number of scientists allocated to
the project. Click on OK to exit to the New
Research Projects window.
Click on OK in the New Research Projects
window to exit to the Current Research
screen.
Research Completed
When work has finished on a project, the
Research Completed window appears on the
Geoscape. Click on OK to return to the
Geoscape or click on View Reports to view
the result of the research (this can also be
accessed at any time in the UFOpaedia).
Your scientists then inform you of any new
research or manufacture projects which are
now possible. Click on OK to exit from these
screens or click on Allocate Research or
Allocate Manufacture to start new research
or manufacture projects.
Scientists Allocated
Use the mouse to highlight and click on a
project to alter the number of scientists
allocated to that project. This is identical to
the Scientists Allocated window described
above. The more scientists involved, the
quicker the research is completed.
Click on OK to exit to the Current Research
screen.
Click on OK in the Current Research screen to
exit to the Bases screen.
TERROR FROM THE DEEP
69
TERROR FROM THE DEEP
Page 75

Manufacture
Click on this option to view your current
production status.
The Current Production screen displays the
following:
Technicians Available – the number of
technicians available for work.
Technicians Allocated – the number of
technicians currently working on production.
Cost Per Unit – the cost to manufacture each
item.
Days/Hours Left – the number of days/hours
remaining before the production will be
complete.
New Production
Click on the New Production button to start
production of a new item. The Production
Items window appears, listing the available
items for production.
Workshop Space Available – the amount of
floor space available in the workshops.
Current Funds – the amount of money
currently available to X-COM.
Below this is the production list, containing
the following:
Item – the item which is being manufactured.
Technicians Allocated – the number of
technicians working on the project.
Units Produced – the number of units of the
item produced so far.
Total to Produce – the total number of units
you have ordered to be produced.
TERROR FROM THE DEEP
Use the mouse to highlight and click on the
required item.
The Start Production window will now appear.
70
TERROR FROM THE DEEP
Page 76

The first line of this window displays the
number of engineer days it will take to
produce the item(s). One technician day is the
amount of work one technician can carry out
in one day.
The next two lines show the cost to produce
one unit and the workspace required.
You may cancel production at this stage by
clicking on the Cancel button. To accept the
production and continue, click on the Start
Production button.
The Technician Allocated window appears.
This displays the Technicians Available and
the Workshop Space Available as on the
Current Production screen, but allows you to
set both the number of technicians allocated
and the number of items to produce.
Click on the up/down arrows to increase or
decrease the number of technicians allocated
to the production and the number of units of
the item to produce. You may cancel
production at this stage by clicking on the
Stop Production button. To accept the
production and return to the Production Items
window, click on OK.
Click on OK in the Production Items window
to exit to the Current Production screen.
Technicians Allocated/Units to Produce
Use the mouse to highlight and click on any
manufacture project to alter the number of
technicians allocated to that project. This is
identical to the Technicians Allocated window
described above. The more technicians
involved, the quicker the manufacture will be
completed.
Click on OK to exit to the Current Production
screen.
Click on OK in the Current Production screen
to return to the Bases screen.
TERROR FROM THE DEEP
71
TERROR FROM THE DEEP
Page 77

Production Complete
When production of an item has been
completed, the Production Complete window
appears on the Geoscape. This displays both
the name of the item and the location at which
it has been manufactured.
Below this is a list of all the X-COM bases in
the world, with the area of the world in which
they are located.
The Transfer screen consists of:
The Item column, listing the names of the
items at the base.
Transfer
Click on this option to transfer craft,
personnel or items between bases.
Select Destination Base
This screen displays your Current Funds in
the top of the screen, to allow you to see how
the planned transfer affects your finances.
TERROR FROM THE DEEP
The Quantity column, listing the number of
each of the items at the base.
The Amount to Transfer column, consisting of
a pair of buttons for each item and the number
of items to transfer.
▼
Click on the buttons to increase or
decrease the number of the item which will be
transferred to another base.
When you are happy with the items to be
transferred, click on the Transfer button in the
bottom left of the screen. You will now be
taken to the Select Destination Base screen. A
verification screen appears showing the cost
of the transfer.
Click Cancel if the transfer is too costly. To
complete the transfer, click Transfer.
72
▼
TERROR FROM THE DEEP
Page 78

Use the mouse to highlight and click on the
required base. The Transfer screen appears.
You can view details of the items which are in
transit between bases by clicking on the
Transfers button in the Base Information
screen.
Click on the Cancel button to return to the
Bases screen.
Purchase/Recruit
Click on this option to recruit personnel, lease
craft or purchase items.
The Purchase/Hire Personnel screen displays
your Current Funds in the top of the screen
alongside the Cost of Purchases for the items
chosen.
The columns below are:
The Item column, listing the names of the
items which may be bought.
The Cost per Unit column, listing the price of
each of these items.
The Quantity column, consisting of a pair of
buttons for each item and the number of that
item to be bought.
Click on the buttons to increase or
decrease the number of the item which will be
bought.
If you do not wish to make any purchases,
click on the Cancel button to return to the
Bases screen.
When you are happy with your choice of items
to be bought, click on OK. The items will now
be purchased and you will be returned to the
Bases screen.
Items will not arrive immediately; there is a
delivery time. You can view details of the
items which are in transit to the selected base
by clicking on the Transfers button in the Base
Information screen.
▼
▼
TERROR FROM THE DEEP
73
TERROR FROM THE DEEP
Page 79

Sell/Sack
Click on this option to sell items or to sack
personnel.
The Sell Items/Sack Personnel screen
displays the Value of Sales for the items
which you have chosen to sell in the top left of
the screen with the total Funds available to XCOM in the top right.
The columns below are:
The Item column, listing the items at the
currently selected base which may be sold.
If you do not wish to make any sales, click on
the Cancel button to return to the Bases
screen.
When you are happy with your choice of items
to be sold, click on the Sell/Sack button. The
items will now be sold and you return to the
Bases screen.
Geoscape
Click on this option to return to the Geoscape
screen.
The Quantity column, listing the number of
each item which may be sold.
The Sell/Sack column, consisting of a pair of
buttons for each item and the number of that
item which will be sold.
The Value column, listing the value of each
item.
▼
Click on the buttons to increase or
decrease the number of the item to be sold.
TERROR FROM THE DEEP
▼
74
TERROR FROM THE DEEP
Page 80

GRAPHS
ALIEN ACTIVITY IN ZONES
Click on the second icon in the top of the
screen to view the Alien Activity in Zones.
This graph displays the level of Alien activity
in the funding zones. Click on the buttons on
the left-hand side of the screen to view the
graph plots for individual zones.
Click on the Graphs button in the Geoscape to
access the Graphs screen — a graphical
breakdown of Alien, X-COM and Financial
information.
These graphs are useful when planning
strategy such as where to establish new
X-COM bases and which areas to concentrate
on defending.
ALIEN ACTIVITY IN SEAS
Click on the first icon in the top of the screen
to view the Alien Activity in Seas.
This graph displays the level of Alien activity
in areas of the world. Click on the buttons on
the left-hand side of the screen to view the
graph plots for particular areas.
X-COM ACTIVITY IN SEAS
Click on the third icon in the top of the screen
to view the X-COM Activity in Seas.
This graph displays the level of X-COM activity
in seas of the world. Click on the buttons on
the left-hand side of the screen to view the
graph plots for particular seas.
X-COM ACTIVITY IN ZONES
Click on the fourth icon in the top of the
screen to view the X-COM Activity in Zones.
This graph displays the level of X-COM activity
in the funding zones. Click on the buttons on
the left-hand side of the screen to view the
graph plots for individual zones.
TERROR FROM THE DEEP
75
TERROR FROM THE DEEP
Page 81

INCOME
Click on the fifth icon in the top of the screen
to view X-COM’s Income.
This graph displays X-COM’s income from
each of the funding zones. Click on the
buttons on the left-hand side of the screen to
view the graph plots for individual zones.
• internal events such as change of
government, civil war or recession.
• alien influence: funding will stop if a
company signs a pact with the aliens.
Additional income may be generated by the
sale of alien items recovered from crashed
subs.
FINANCE
Click on the sixth icon in the top of the screen
to view X-COM’s Finance situation.
This graph displays the overall financial
situation. Click on the buttons on the left-hand
side of the screen to view graph plots for the
following:
Income
The main source of X-COM’s income is the
companies funding the project from separate
zones around the globe. Funding will vary as
the game progresses and will depend on such
things as:
• X-COM’s success in intercepting Alien
Subs in the vicinity of a funding company (i.e., the company’s zone): contribution levels will fall if Alien Subs are not
intercepted.
• X-COM’s success in recovering,
researching and producing alien items:
funding will rise if X-COM is seen to be
doing well.
Expenditure
X-COM expenditure will be of several types.
As well as purchasing/recruiting costs, there
are:
• transfer costs.
• building costs for new bases or base
pods.
• production costs for items manufactured
by X-COM technicians.
Maintenance
Maintenance costs are incurred on a regular
basis. These include:
• wages for personnel.
• maintaining base facilities.
• maintaining, refueling and repairing
Subs.
Balance
The balance is the amount of money available
to X-COM after Expenditure and Maintenance
have been subtracted from the Income.
TERROR FROM THE DEEP
76
TERROR FROM THE DEEP
Page 82

Score
X-COM’s performance rating. This score takes
into account the following:
• success of interceptions;
• scores for assault missions;
• research work completed; and
• alien activity.
Scores above zero indicate that X-COM is
winning. Scores below zero indicate that XCOM is losing.
Click on the globe icon in the top right of the
screen to return to the Geoscape screen.
TERROR FROM THE DEEP
77
TERROR FROM THE DEEP
Page 83

UFOPAEDIA
Click on the UFOpaedia button in the
Geoscape to access the UFOpaedia, an on-line
encyclopedia which contains all the information currently available to X-COM. Each
entry consists of a diagram with accompanying text and/or data.
THE SELECT SUBJECT
SCREEN
The first screen of the UFOpaedia is a list of
the subjects which may be reviewed. Click on
any one of these buttons to get to the section
which you require:
General Equipment – the weapons and
equipment that your aquanauts may use.
Aquatic Artifacts – alien weapons and
equipment that have been recovered and
researched.
X-COM Facilities (pods) – the available
structural units that may be added to your
underground bases.
Alien Creatures – data gathered from
captured aliens (either living or dead) that
have been researched by your scientists.
Alien Technology – information gained from
the interrogation of live aliens.
New Submersible Technologies –
information gained by researching objects
retrieved from crashed Alien Subs.
Alien Submarines – information regarding
known Alien Subs.
OK – click on this button to return to the
Geoscape.
X-COM Craft and Weapons – the Subs
available for X-COM use and the armament
that they may be equipped with.
Submersible Weapons Systems – the
vehicles that may be carried on X-COM
transport subs.
TERROR FROM THE DEEP
78
TERROR FROM THE DEEP
Page 84

THE SELECT ITEM SCREEN
UFOPAEDIA DATA
SCREENS
The next UFOpaedia screen allows you to
select a specific entry to review. Highlight and
click on the required item or click on the OK
button to exit.
When you are viewing a UFOpaedia Data
screen, click on the buttons to
view the previous/next UFOpaedia entries.
Click on the OK button to return to the Select
Item screen.
▼
▼
▼
▼
TERROR FROM THE DEEP
79
TERROR FROM THE DEEP
Page 85

OPTIONS
The Select Game to Load screen displays the
name, date and time of up to 10 games. Pick
a saved game by clicking on any of the
buttons numbered 1 to 10 on the left-hand
side of the screen. You return to the Geoscape
at the point when the game was saved.
Click on the Cancel button to return to the
Geoscape without loading a game.
Click on the Options button in the Geoscape to
access the Options window, allowing you to
load and save games.
LOAD GAME
Click on the Load Game button to load a
previously saved game. You exit to the Select
Game to Load screen.
Select Game to Load
SAVE GAME
Click on the Save Game button to save your
current game. The Select Save Position
screen appears.
Select Save Position
TERROR FROM THE DEEP
80
TERROR FROM THE DEEP
Page 86

Choose the game slot you wish to write over
by clicking on any of the buttons numbered 1
to 10 on the left-hand side of the screen. A
flashing * will appear. You can now use the
keyboard to type or delete as normal. Press
e to save the game and return to the
Geoscape.
Click on the Cancel button to return to the
Geoscape without saving a game.
CANCEL
Click on the Cancel button to return to the
Geoscape without loading or saving a game.
TERROR FROM THE DEEP
81
TERROR FROM THE DEEP
Page 87

FUNDING
Click on the Funding button in the Geoscape
to access the International Relations display.
This shows which organizations are funding
X-COM and how much each is contributing.
The International Relations display shows the
following:
The Organisation column, listing the name of
the Organizations funding X-COM.
The Funding column, listing the amount of
money each organization is paying to X-COM
per month.
The Change column, listing the change in the
organization’s funding at the end of last
month. This is dependent on X-COM‘s
performance in that organization’s zone.
Click on the OK button to return to the
Geoscape screen.
TERROR FROM THE DEEP
82
TERROR FROM THE DEEP
Page 88

CREDITS
Game Design Stephen Goss
Programming Annette Bell
Bill Barna
Nick Thompson
Additional Programming Scott Johnston
Original Game Engine Julian & Nick Gollop
Graphics Drew Northcott
Guy Jeffries
Martin Severn
Martin Smillie
Matthew Knott
Additional Art Terry Greer
Paul Ayliffe
Edward Garnier
Nick Cook
Justin Manning
Paul Truss
The Conversion Company
Amanda Roberts
Sound Design and Programming Andrew Parton
TERROR FROM THE DEEP
Intro Sequence Greg Shill
Drew Northcott
Nick Cook
Stephen Goss
Art Liaison Matthew Knott
Original Music John Broomhall
Sound Effects Design Allister Brimble
83
TERROR FROM THE DEEP
Page 89

Maps Marc Curtis
Amanda Roberts
Andrew Williams
Richard Bakewell
Matthew Knott
Jason Avent
Quality Assurance Pete Woods
Andrew Luckett
Phil McDonnell
Jason Sampson
Darren Kirby
Don Witcombe
Justin Manning
Jim Hendry
Andy Mazurek
Chris Bowling
Russell Clark
Daniel Luton
Don Emmel
Vaughn Thomas
Mike Richardson
Damon Harris
Manual Author/Editor (UK) Nick Stokes
Editor (US) Christine Manley
Managing Editor & Story Alkis Alkiviades
Layout (US) Joe Morel
Cesar Novoa
Additional Writing Andrew Wawrowski
TERROR FROM THE DEEP
Typesetting Sarah Kerr
Brand Manager Valentina Britten
Producer Stuart Whyte
Publishers Paul Hibbard
Pete Moreland
84
TERROR FROM THE DEEP
 Loading...