

Page 1

™
THE RIDGE CHIPPING SODBURY SOUTH GLOUCESTERSHIRE BS17 6BN
Manuals © 1997 MicroProse Ltd. All Rights Reserved. Game © 1997 Mythos Games Ltd. and MicroProse Ltd. X-COM Universe and other elements
© 1997 MicroProse Ltd. All Right Reserved.
MicroProse Ltd. All other trademarks are the property of their respective holders. MADE IN THE UK.
MICROPROSE
and
X-COM
are registered trademarks and
X-COM APOCALYPSE
is a trademark of
Page 2

CONTENTS
INTRODUCTION 1
X-COM®
Background 2
Game Overview 6
Special Note to
Finding Out Where Everything Is 8
Installation And Loading 8
This Manual 9
The Point And Click Interface 9
Game Screens 10
THE GAMEPLAY TUTORIALS 13
Starting A New Game 14
Tutorial One: Using the Cityscape 16
Exploring The City 17
The Central Information Panel 18
Game Time Controls 19
The Alert Screen 20
Tracking
Tutorial Two: Tactical Combat 25
Saving Your Game 26
The Tactical Screen 28
Exploring The Tactical Display 29
Selecting Squads 30
Moving Squads 31
Using Split Level Views 34
Selecting Individual Agents 36
Moving Individual Agents 37
The Overhead Map View 37
Searching For Aliens 39
Engaging The Aliens 40
Completing A Tactical Mission 41
Tutorial Three: Tactical Combat
(Advanced Movement) 42
X-COM
Veterans 7
X-COM
Vehicles 23
Running 43
Crawling 44
Kneeling 44
Tutorial Four: Tactical Combat
(Attacking The Enemy) 46
Attack Modes 46
Shot-Types 47
Using Cover And Targeting The Aliens 48
Firing in the Turn-Based Game 50
Using Equipment 52
Retrieving Equipment From The Tactical Area 54
Opportunity Fire (Turn-Based Only) 55
Completing Tactical Combat Missions 56
Debriefing 57
Tutorial Five: Returning To The Cityscape 58
Returning To Base 58
The Bases Screen 59
Buying Equipment 60
Hiring Agents 63
Assigning Research 65
Build New Base Facilities 68
What Happens Next? 71
The End Of The Tutorial 71
Playing Tips 72
REFERENCE GUIDE 75
Main Menu 76
Starting A New Game 77
Loading A Saved Game 78
Cityscape Screen 79
Exploring Mega-Primus 80
Buildings Screen 81
Messages 84
Cityscape Options 87
The UFOpaedia 91
Game Time Display 98
Central Information Panel 99
Bases Tab 101
The Bases Screen 102
Hire/Fire Screen 107
Buying and Selling Items 110
Transfers 112
Alien Containment Screen 115
Buy New Base 115
X-COM
Vehicles Tab 117
Equipping Vehicles 119
Vehicle Location Screen 121
Vehicle Orders 122
Intercepting Hostile Vehicles 125
Vehicle Combat and Tactics 128
Shooting Down UFOs and UFO Missions 129
Some Things to Remember 131
Agent Tab 132
Equip Agent Screen 133
Agent Location Screen 137
Deploying Agents in Mega-Primus 137
Training 142
Biochemistry, Engineering and
Quantum Physics Tabs 144
Research and Manufacture 145
Hostile Vehicles Tab 150
Organisations Tab 151
The Tactical Game 152
Equipping Agents Before a Tactical Mission 153
Briefing Screen 153
Squad Assignment Screen 155
The Tactical Screen 157
Exploring The Tactical Display 158
The Control Panel 160
Selecting Squads 166
Moving Squads 167
Selecting Individual Agents 168
Moving Individual Agents 169
Moving Agents And Setting Waypoints
In The Overhead Map View 170
Making An Agent Jump 172
Flying 172
Engaging The Enemy And Winning Tactical
Combat Missions 173
Enemy Sighted! 174
Shooting 175
Using Grenades 180
Using Psionic Weapons 182
Encumbrance 185
Exhaustion 185
Morale 185
Wounding 187
Completing Tactical Combat Missions 189
Debriefing 190
Information Screens 193
Weekly Funding Assessment 193
Diplomatic Rift Screen 193
Alien Take-Over Screen 193
APPENDIX A - Keyboard and Mouse Controls 196
CREDITS 198
p.ii
p.iii
Page 3
Introduction
p.iv
p.1
Page 4

Introduction
X-COM®
Dear Section Commander
Welcome to
tradition that spans back to the late 1990’s. Let me appraise you of
activities to date and, more importantly, the activities of the Aliens we have
encountered.
Back in the mid 1990s it became evident that “we were not alone”. By 1998,
UFOs began to land openly in rural areas; the aim of these early missions was
the abduction of local inhabitants and animals. Our first military contact with the
Aliens led to the massacre of an entire squad. In November of that year, an
emergency meeting was convened at the United Nations. As a result of that
meeting,
against the Alien menace. Most of this activity occurred in the cities and rural
areas of Earth, but eventually it took us to the Aliens’ main Base on Mars
(Cydonia).
Our victory at Cydonia saw the defeat of the immediate Alien threat, but, in its
turn reawakened a second wave of destruction that
counter.
Alien activity began once more in 2039.
this time; most of our Bases were decommissioned or converted into Theme
BACKGROUND
X-COM
(Extraterrestrial Combat unit). You are now part of a
X-COM
was established. In the following years,
X-COM
X-COM
were later enlisted to
X-COM
had only a nominal existence at
X-COM’s
waged war
Parks. The call for the re-institution of
numerous ship and aircraft losses at sea. Years of recession and political feuding
meant that funding from the world’s governments was not forthcoming; we had
to raise the money by alternative corporate means.
From 2041, after the initial recruitment in 2040, the second Alien war was waged
under the seas and oceans of the world. The war came to its climax in the battle
at the Alien city of T’leth. Buried underwater for 65 million years, the city had the
ability to destroy the Earth. Fortunately, we discovered that Alien society was
constructed like that of the bees and after killing the Alien ‘Queen’, everything
else disintegrated.
T’leth rose from the water only to self-destruct; a sight I don’t think any present
at that time will forget. Since then we have had few recorded encounters.
and Marsec however, were enlisted in the late 2060’s to fight a territorial war
against Aliens in the newly established deep space mining colonies. This conflict
left Earth uncontaminated....that was until a short while ago, when the first
Dimension-Gate appeared; right here in Mega-Primus.
The last war has indeed proven to be an expensive victory. The contamination of
Earth’s atmosphere and the devastating climatic changes that ensued, have
affected everyone. Whilst many sought to leave Earth and colonise other planets,
a self-sufficient, self-contained city was successfully constructed here on Earth
and thrived under the hazardous toxic atmosphere that surrounded our home
world. Mega-Primus has already become an important historical achievement.
X-COM
was led by the media after
X-COM
p.2
p.3
Page 5

Introduction
Unfortunately, the last four years have seen this comfortable, low-cost lifestyle
rapidly deteriorate. The social and physical fabric of our society has decayed at
an alarming rate; sociologists have been, as yet, unable to explain the cause of
decay. Statistics clearly demonstrate increases in physical and cyberspace
violence, family breakdowns, crime, ethnic unrest and strange cult group
involvement.
The frequency and pace at which incidents are occurring, is even more
disturbing. The concern of the citizens is evident. Many have already fled the city.
The ongoing mass migration increases the concern of all remaining citizens as
each day passes. Losses in tax revenue are restricting the city’s ability to deal
with incidents and the emergency services are unable to do any more than firefight existing problems.
Unless we deal with the source of the problem, social collapse appears to be a
very real possibility! Whilst the Senate remains unconvinced that Alien
interference is the source of the problems, they have secretly agreed to fund a
X-COM
covert investigation by
Due to your recent promotion, we have decided that you shall be responsible for
this investigation. We will forward existing information to you shortly.
.
X-COM
Supreme Commander
To: Section Commander
From: Tactical Office
X-COM
Subject:
Date: March 2084
Congratulations on your recent promotion and good luck in the upcoming battle.
We don’t have much to go on but this information should prove useful.
The Aliens are not acting as openly as before. UFOs have been appearing
intermittently but no attacks have been made; these appearances have been
sporadic and short-lived. In the past we were invaded from other worlds but
now, in 2084, the Aliens are travelling from another dimension. The means by
which they achieve trans-dimensional travel is unclear, but it is apparent that the
UFOs use some form of Dimensional Gateway. The gateways can appear
anywhere in Mega-Primus. We would advise beginning the research of
Dimension Gates immediately.
You have at your disposal the finest technology Mega-Primus has to offer, to
combat the Alien menace. Your Agents will be responsible for investigating any
strange events that might reveal Alien activity.
INTELLIGENCE REPORT AND OBJECTIVES SUMMARY
Yours faithfully
J.G Steinbach
p.4
The objective of these investigations is to gather as much information about the
Aliens and their technology as possible. To defend Mega-Primus effectively, you
will be responsible for research and development based on the results of these
investigations.
p.5
Page 6

Introduction
X-COM
must recover all Alien artefacts and technology from Alien encounters, in
order to research and develop new weapons and craft. The results of your
investigations will be published in the UFOpaedia, so that both you and your
Agents have the most up-to-date information. Without this information we will
not know of the Aliens’ intent or, more importantly, a means by which we can
defeat them.
X-COM
should retain a covert status as it monitors the situation in the city. Our
investigation is secretly funded by the Senate and without this funding, the
effectiveness and scope of operations will be severely diminished.
The success of our operation depends on your efforts. The safety of MegaPrimus is in your hands; your task is to command
Alien incursion!
X-COM’s
forces to defeat the
GAME OVERVIEW
X-COM ® Apocalypse™
different key elements: Tactical Combat Missions and the Cityscape. In order to
protect Mega-Primus successfully from the Alien menace, you must master both
of these elements.
Tactical Combat Missions provide the challenge of exploration and tense combat
against the Aliens. Missions can take place anywhere in Mega-Primus; your
squads of Agents could do battle with the Alien menace in factories, multi-level
is an absorbing strategy game featuring two very
corporate buildings and many other city locations. The Tactical section of
X-COM Apocalypse
strategies and tactics as you hunt down the Aliens. Whatever you do - “Don’t Get
Hurt”.
When your Agents are not engaged in close combat you will be in charge of
wider operations in the Cityscape. Here you must develop adept
COM’s
management skills in order to maximise the potential of
and the many resources at your disposal. In order to advance in the game, you
must recover as many Alien artefacts as you can from your Tactical Combat
Missions so that your scientists can carry out research about the Aliens and the
Alien threat.
is no arcade blast; you will need to apply a wide range of
X-COM
, its personnel
X-
SPECIAL NOTE TO
X-COM
Although elements of
UFO: ENEMY UNKNOWN
game’s content is new, as is the interface, which has been totally redesigned to
incorporate many new functions. It is recommended that
participate in the Tutorial Section of the manual to familiarise themselves with
the new features available.
Players are also advised to read the
X-COM Apocalypse
understanding of the
VETERANS
X-COM Apocalypse
package, in order to increase your enjoyment and
X-COM
will be familiar to players of
and
X-COM: TERROR FROM THE DEEP
X-COM Rookies’ Guide
world.
, much of the
X-COM
veterans
, provided in your
p.6
p.7
Page 7
Introduction
FINDING OUT WHERE
EVERYTHING IS
The Technical Supplement is where you’ll find detailed information about
late
hardware requirements, installation, start-up instructions and any
the game. Since it was written later, this information is more up to date than
anything in the manual.
The ReadMe file, that comes on the CD-ROM, provides details of the very latest
changes (due to printing and binding time, the manual has to be completed way
before the playtesters recommend their final tweaks). This information
supersedes even the Technical Supplement.
changes to
INSTALLATION
AND LOADING
Install and Load
X-COM Apocalypse
by referring to your Technical Supplement.
THIS MANUAL
This Manual is split into two main sections:-
SECTION 1: THE GAMEPLAY TUTORIALS
Designed to get you playing
recommend that those new to
on a new campaign.
SECTION 2: THE REFERENCE GUIDE
The
X-COM
veteran may choose to start with the Reference Guide. This section
contains details of the updated interface and additional features in
Apocalypse
.
X-COM Apocalypse
X-COM
complete each Tutorial before embarking
as quickly as possible. We
X-COM
THE POINT AND
CLICK INTERFACE
X-COM Apocalypse
MOUSE CONTROL - ‘CLICKING’
You will often be asked to ‘click’ on a particular area of the screen. Depending on
the screen you may be asked to ‘click’ on buttons, icons or text. To do this,
is played using the mouse.
p.8
p.9
Page 8

Introduction
simply move the cursor over the item and press the Left-Mouse-Button (LMB),
unless otherwise stated.
MOUSE CONTROL - ‘DOUBLE CLICKING’
Move the cursor over the item and ‘click’ the LMB twice in quick succession.
MOUSE CONTROL - ‘DRAG AND DROP’
A ‘Drag and Drop’ system is also used in many parts of the game.
• To ‘Drag’ - click and hold the LMB over an item. This item will become
attached to the cursor. You can now move that item around the screen.
• To ‘Drop’ an item - after you have ‘Dragged’ it, simply release the LMB when
the item is over your intended destination.
TOOL TIPS
We have worked very hard to make the interface as ‘user friendly’ as possible. If
you are unsure as to the function of any button or icon, just leave the cursor
over the option for a second and some help text will appear.
GAME SCREENS
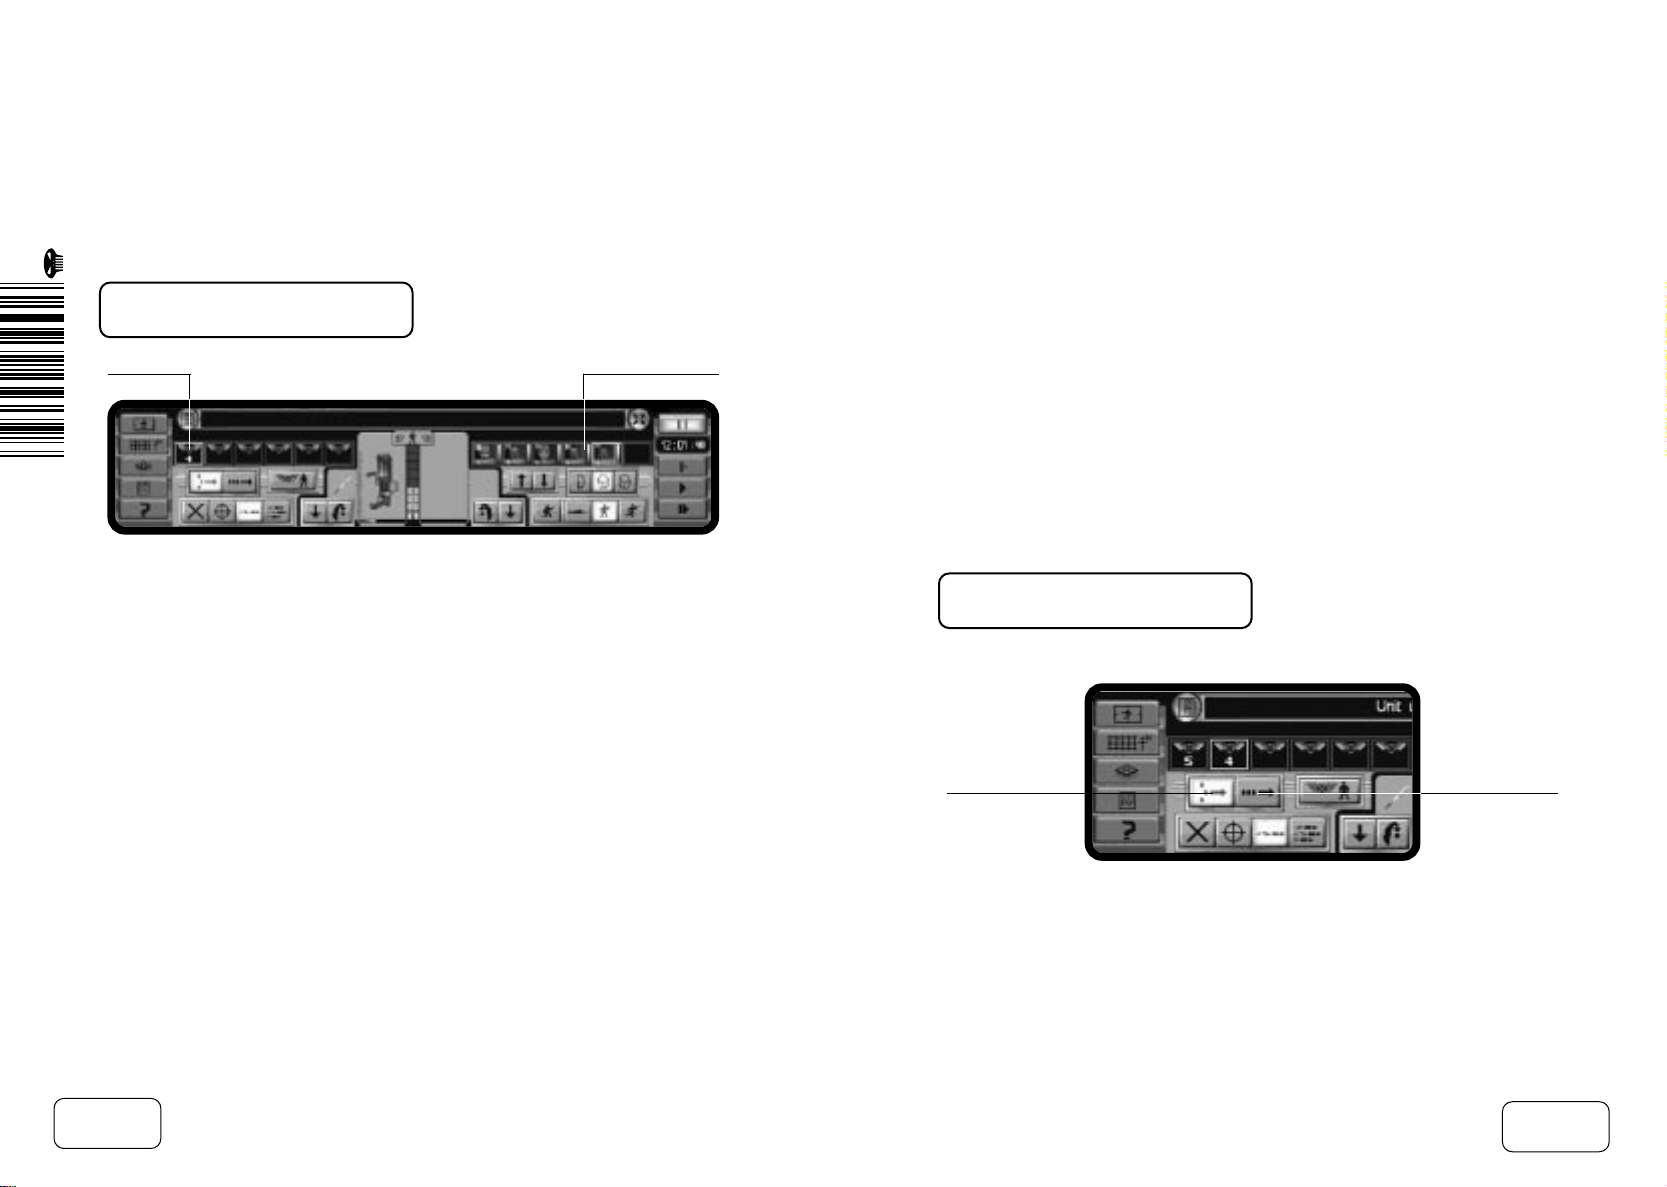
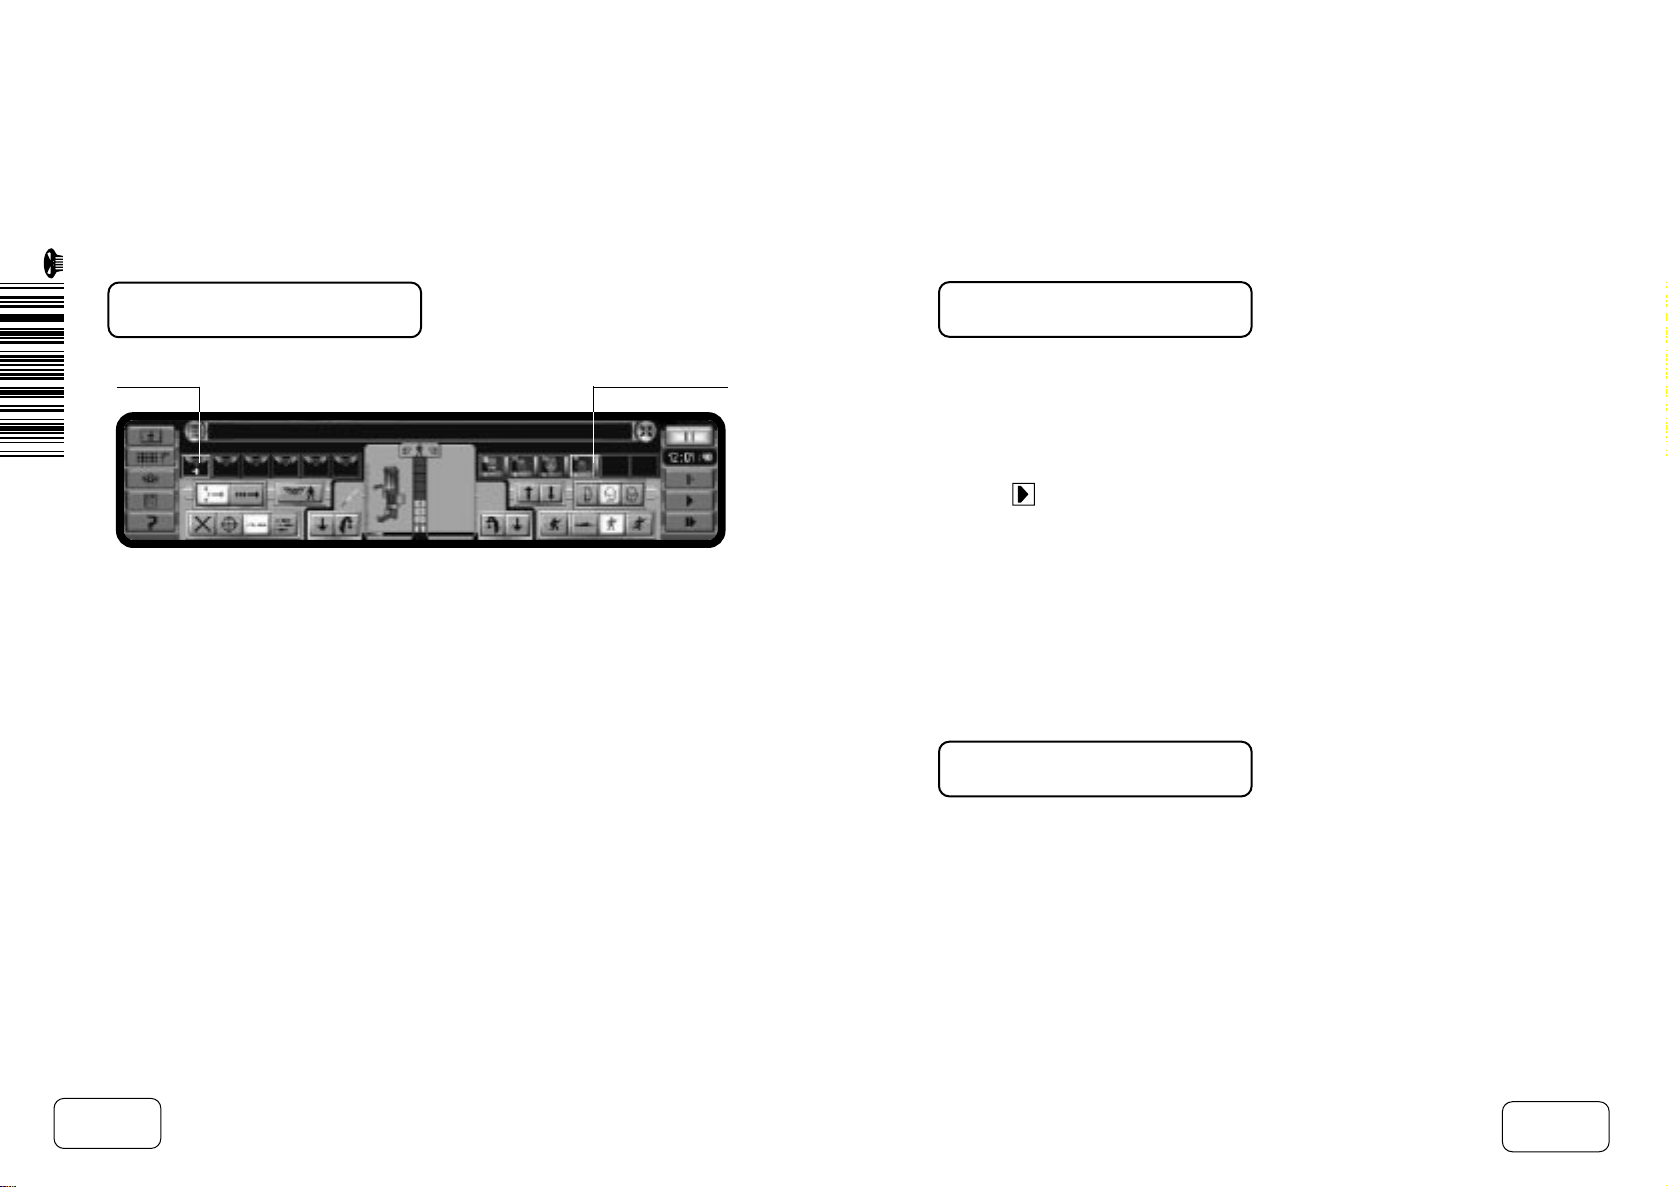
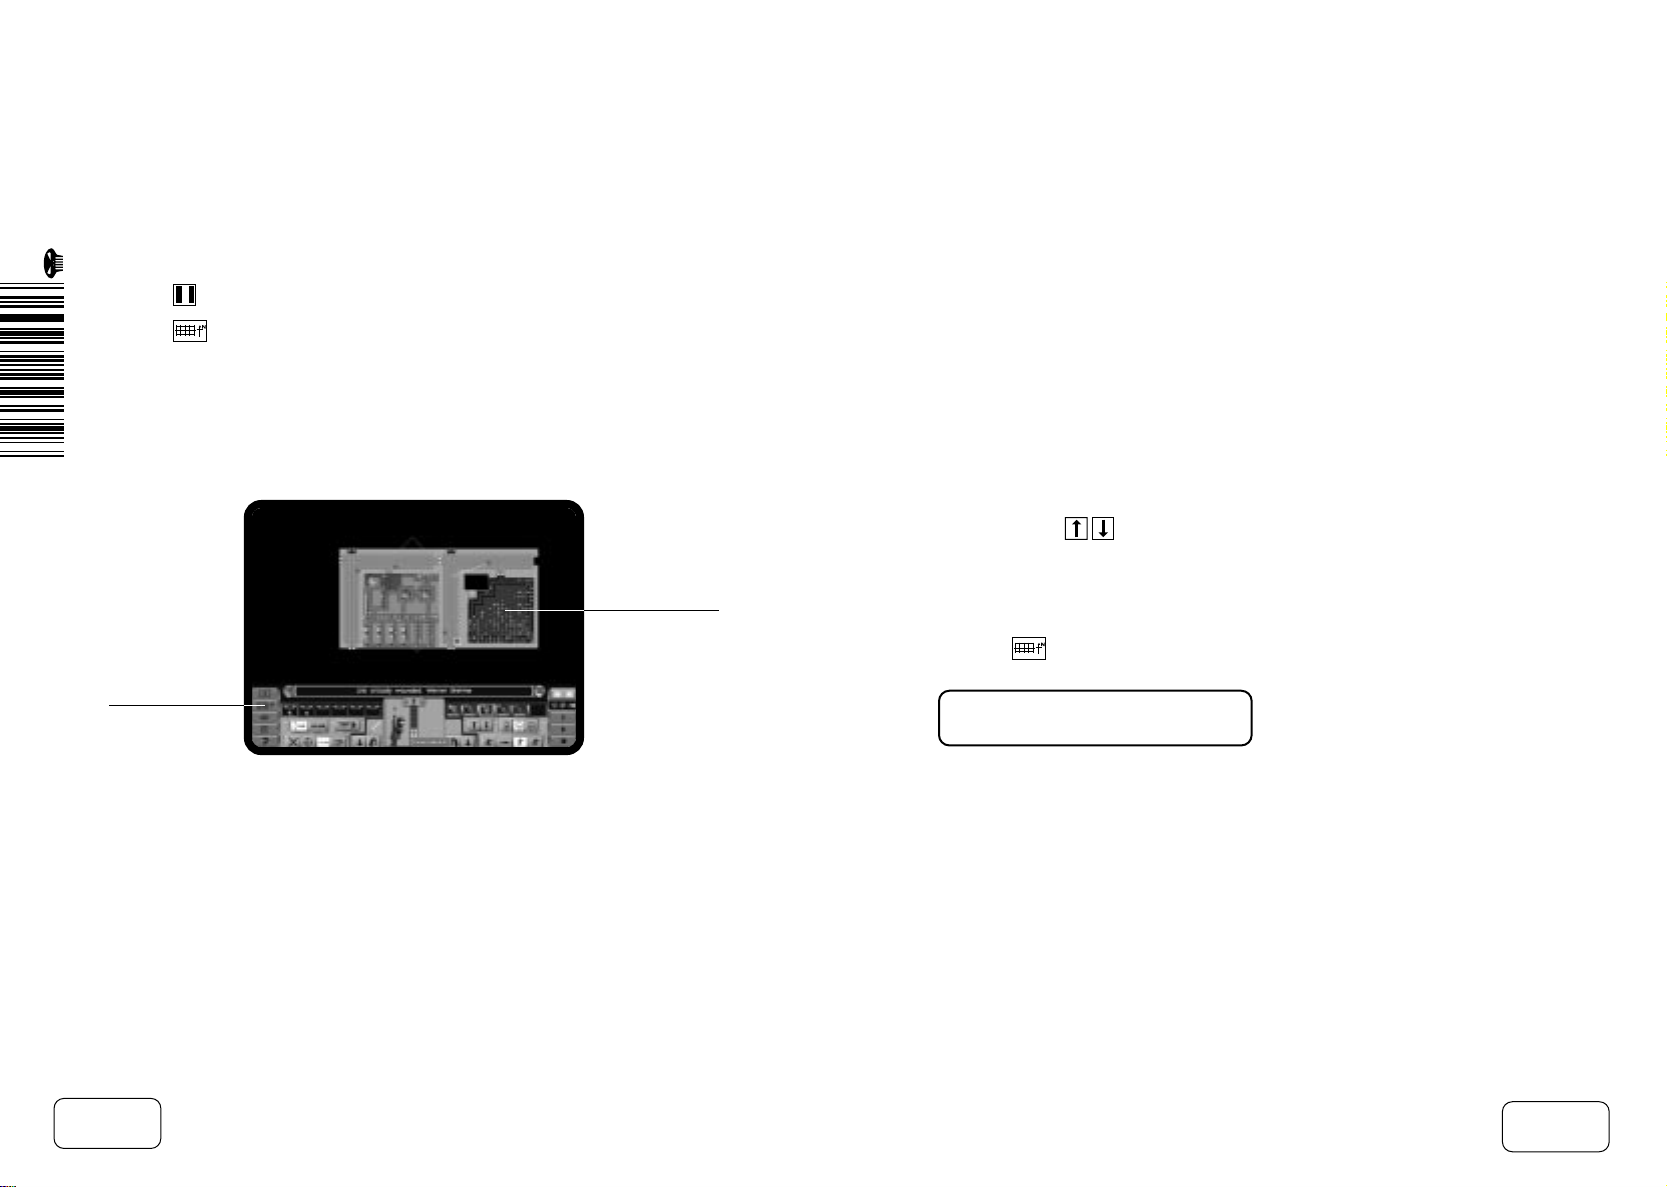
There are two Control Panels that you will use most. These are the:
• Cityscape Control Panel
• Tactical Control Panel
Note: we will cover these in more detail later.
X-COM
Funds
Menu Bar
All other screens in the game are based around a common layout.
• The Menu Bar will always appear down the right-hand edge of any screen.
• The OK button will always appear at the bottom of the Menu Bar. This button
will always accept what you have done and close the screen.
•
X-COM’s
funds will always be displayed at the top-right of the screen.
OK
p.10
p.11
Page 9

THE GAMEPLAY
TUTORIALS
p.12
p.13
Page 10
The Gameplay Tutorials
Welcome to
get into the game with the minimum of fuss. The two main sections of the game
are covered here: the Cityscape, where you deploy your Agents to investigate
Alien activity; Tactical Combat, where your Agents combat the Alien menace face
to face. In the final Tutorial, we will return to the Cityscape to buy equipment,
Recruit and Equip Agents.
For extra information on particular game features, please see the Reference
Guide later in this manual.
First of all, we will begin a new game.
X-COM Apocalypse
. The following section is designed to help you
STARTING A NEW GAME
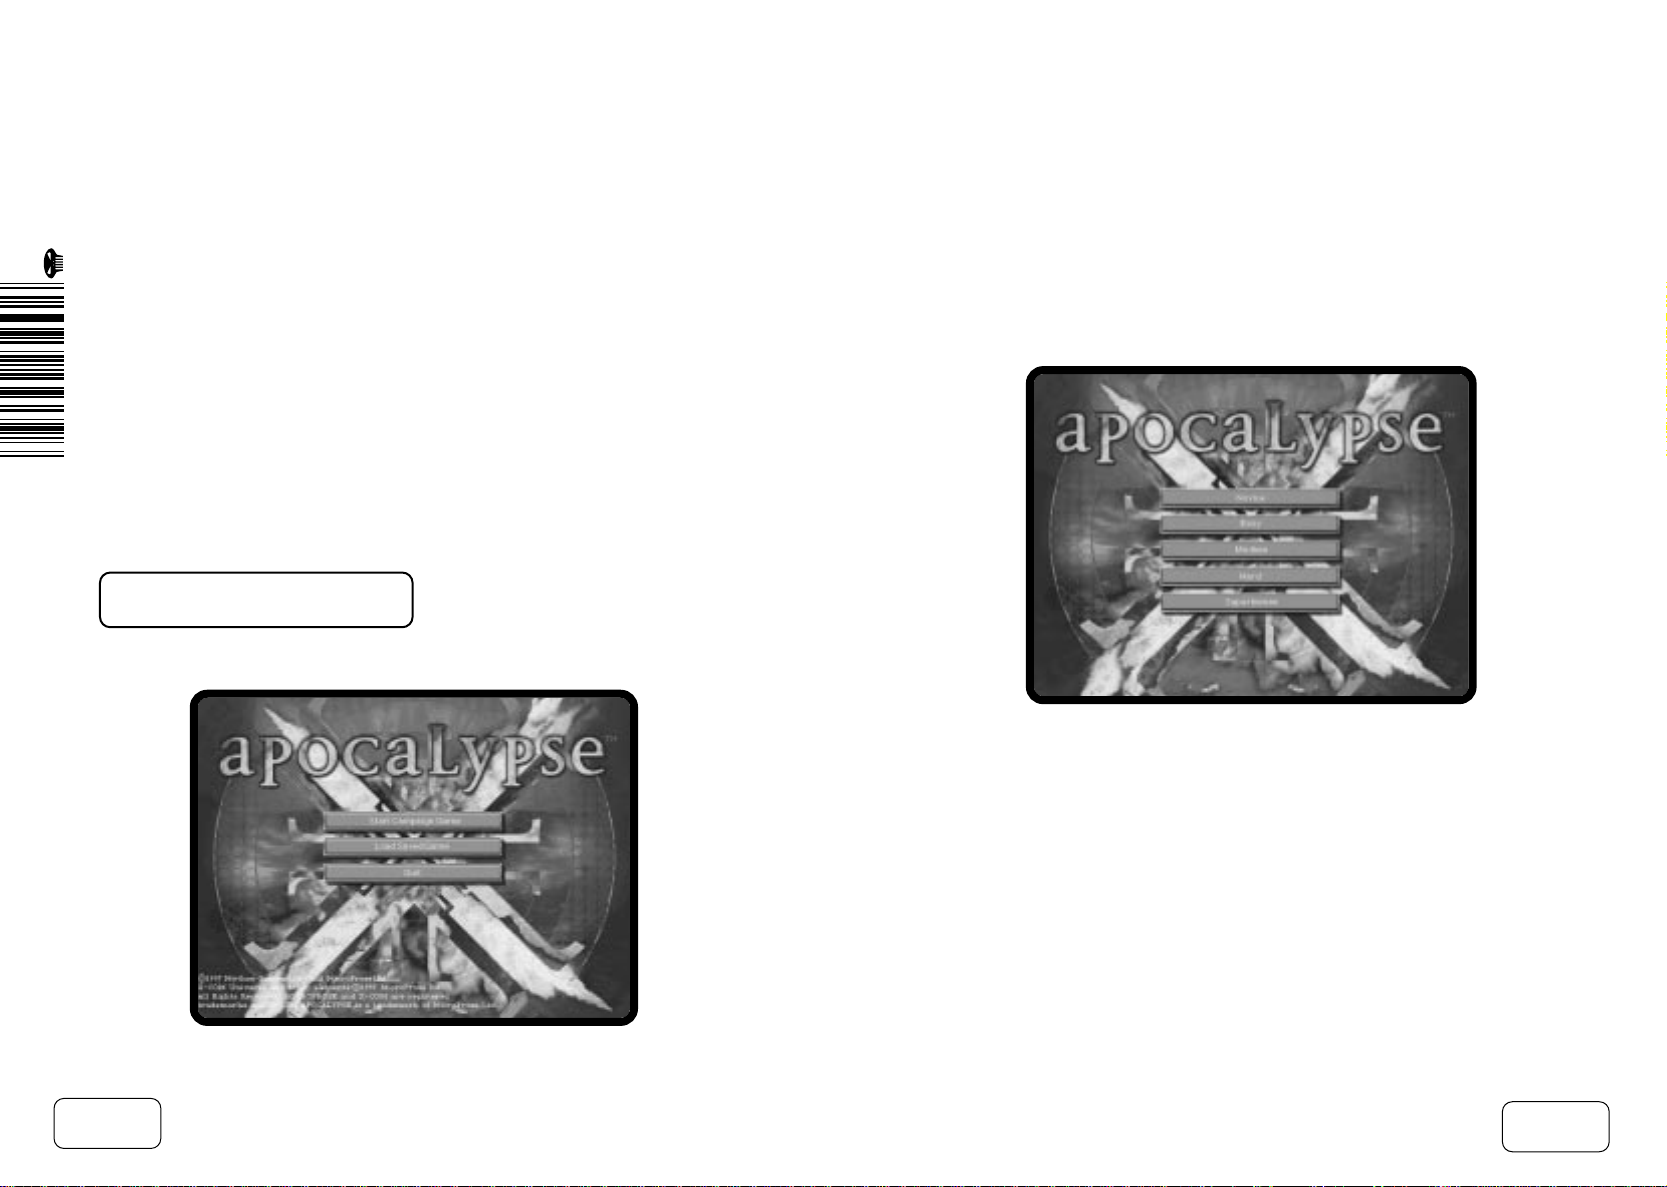
After watching the introduction, you will be taken to the Main Menu.
• Move the cursor over the Start Campaign Game button and click the LeftMouse-Button (LMB) to select. You will now be taken to the Select Difficulty
Screen.
All of the Tutorials are written assuming that you are playing at Novice level.
• Move the cursor over the Novice button and click the LMB to select. Once
you have mastered Novice level, you should choose a harder level for a
tougher challenge.
p.14
You will now be taken to the Cityscape Screen.
p.15
Page 11

TUTORIAL ONE: USING
THE CITYSCAPE
In this first Tutorial we will take a look around Mega-Primus, introduce the basic
controls of the Cityscape, focus on Alerts and deploying your Agents on Tactical
Missions.
Cityscape Display
Control Panel
The Cityscape allows you to manage
X-COM’s
resources and develop your long
term strategy. It is split into two areas: the Cityscape Display and the Control
Panel. At the beginning of the game the Cityscape Display will be centred on
your current Base. Your Base contains the vehicles, equipment and Agents with
which you will begin your new campaign.
Central Information
Panel
Message Bar
In the Control Panel you will see the Message Bar, a group of Cityscape
Options, a display of the Game Time, the Time Controls and the Central
Information Panel (more on the use of this later).
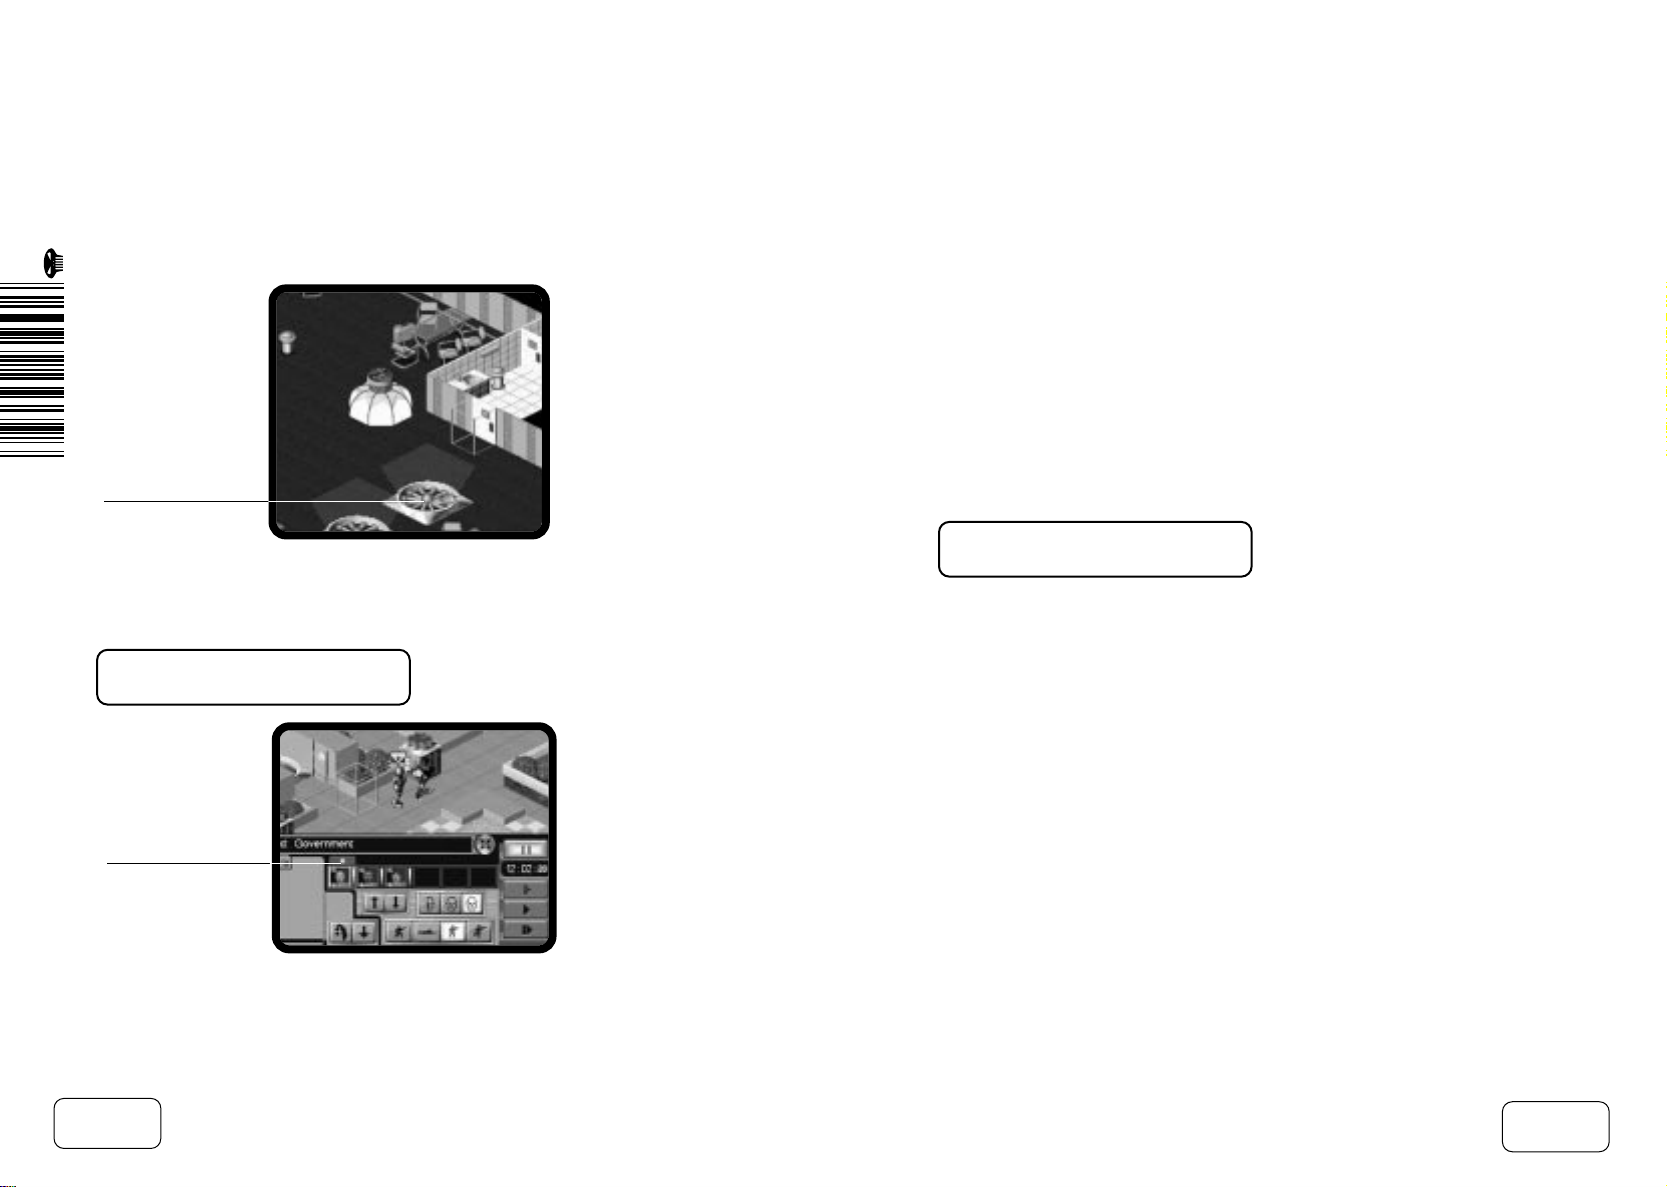
EXPLORING THE CITY
Let’s begin by taking a look around Mega-Primus using the Cityscape Display.
At the beginning of the game, the Cityscape Display will be an Isometric Map
View of the city.
• Move the mouse cursor to the left edge of the screen. The screen will scroll
revealing more of the city. Move the cursor to the other edges of the screen
and explore more of the city. You will see many of the city’s futuristic
buildings, including Corporate HQs, The Astrodome, Police Stations and even
the City Slums.
Note: to find out more about each building, simply click on one to open the
Buildings Screen. The Buildings Screen provides you with useful information
about who owns the building, its function and what Agents and vehicles are at
the building.
You can also use the cursor keys on the keyboard to scroll around the Cityscape
Display.
Cityscape Options
p.16
Game Time and
Time Controls
p.17
Page 12
Tutorial One: Using The Cityscape
THE CENTRAL
INFORMATION PANEL
The Central Information Panel is ver y important in the game and it is this that
we will look at next.
X-COM
Vehicles Tab
Biochemistry
Engineering
TabAgent TabBases Tab
Tab
Hostile
Vehicles Tab
Quantum
Physics Tab
Organisations
Tab
The Central Information Panel is split into eight ‘Tabs’. Each ‘Tab’ provides
access to further options allowing you to manage all of
X-COM’s
resources
effectively.
At the moment the Bases Tab is selected. Notice that it is coloured Green. Also
note that any icon that takes you to a Base related screen, will also be Green.
Throughout
X-COM Apocalypse
a colour-coding system is used to help you learn
the interface.
• Click on the
Blue. All functions that relate to
X-COM
Vehicles Tab (to the right of the Bases Tab), it will turn
X-COM
Vehicles are coloured Blue.
• Click on the other Tabs and you will see that they are also colour-coded as
follows:-
X-COM
Agents - Light Green
Biochemistry - Purple
Engineering - Purple
Quantum Physics - Purple
Hostile Vehicles - Red
Organisations - Orange
Now that you are familiar with the Central Information Panel, we will look at
another important feature of the game, the Time Controls.
Note: if you wish to pause time at any stage during the game, simply click
GAME TIME CONTROLS
Game Time
Slow Speed
Double Speed
Normal Speed
Quad Speed
.
Pause
p.18
Ultra Fast
p.19
Page 13
Tutorial One: Using The Cityscape
Look at the Game Time. You will see that it is passing at a very slow rate,
allowing you time to plan your strategy and look around the city. To control the
rate at which time passes, you can click any of the Time Controls.
• Click . Time will pass at an increased rate (as time passes, you will
eventually see day change to night).
You can use the Time Controls to speed up the pace of the action.
Note: clicking will advance the time much faster than any of the other Time
Controls. Because time passes so fast in this mode, it is easy to miss events in
the city; with this in mind, the game will automatically slow to Normal Speed,
whenever a key event occurs. The Ultra Fast time option cannot be activated
until this event is over (ie Ultra Fast will be disabled whilst a UFO is in the city).
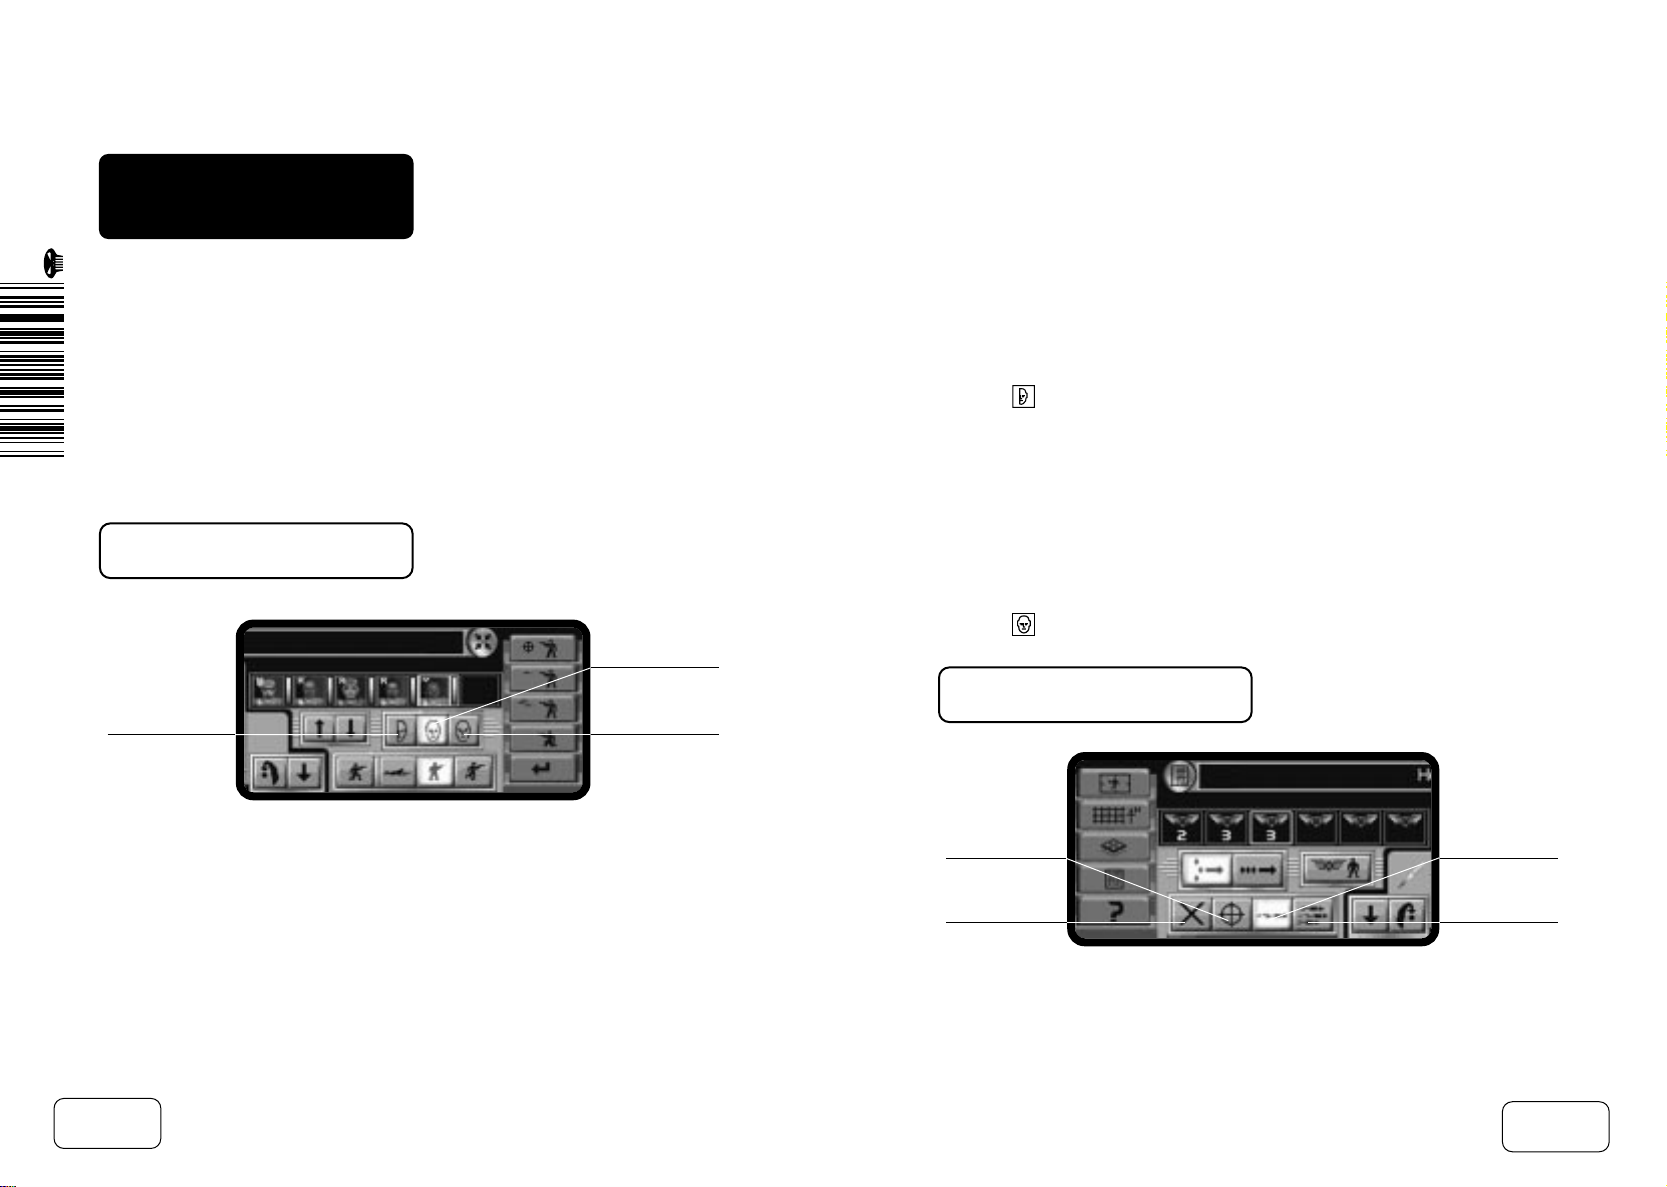
Agent
Icons
Investigate
Incident
Equip
Agent
Equip
Vehicle
Vehicle
Icons
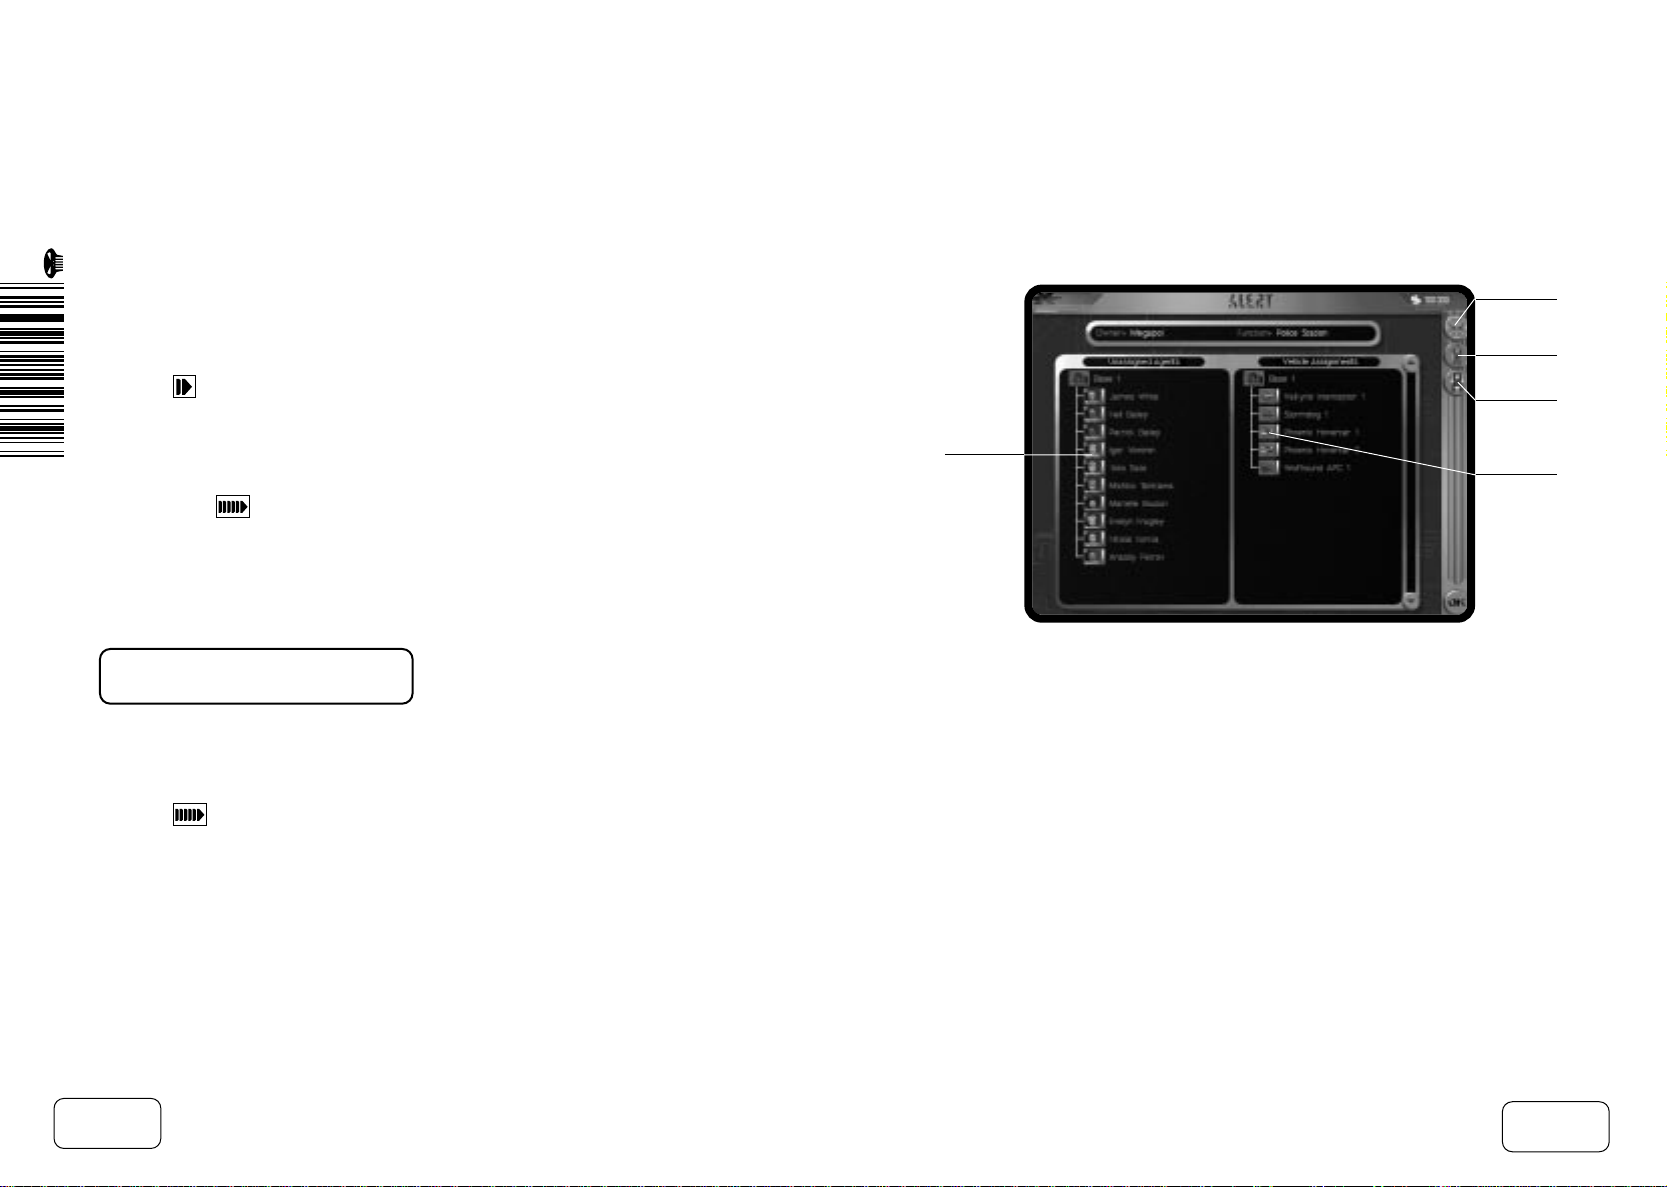
THE ALERT SCREEN
We will now advance time to the point where you will receive your first Alert (if
this has not happened already).
• Click in the Time Controls. Time will pass at the maximum rate. Shortly,
the Alert Screen will appear (whilst you are in this screen, time will be
suspended until you return to the Cityscape).
p.20
Whenever there is Alien activity in Mega-Primus,
X-COM
will be informed via the
Alert Screen.
To send a squad to the Alert Site, you must first assign them to an
X-COM
vehicle. All unassigned Agents are listed on the left-hand side of the screen; all
X-COM
assigned Agents and
vehicles are listed on the right-hand side.
We will now assign four Agents to Valkyrie Interceptor 1.
p.21
Page 14
Tutorial One: Using The Cityscape
• Highlight an Agent’s name (from the left-hand list).
• Click and hold the Left-Mouse Button with the cursor over the Agent Icon.
‘Drag’ that Agent (from the left-hand list) to the Valkyrie Interceptor icon and
release the LMB. The Agent should now appear underneath it.
The number ‘1’ should appear in the corner of the Valkyrie icon showing that one
Agent is now assigned to that vehicle. As you assign more Agents to the Valkyrie
Interceptor, this number will increase to indicate the total number of Agents
assigned.
We will now assign three more Agents. When assigning multiple Agents there is
a short-cut that you can use, instead of dragging them all individually.
• Click on the names
of three more Agents, so that they are highlighted.
• Drag and drop one of these Agents to the Valkyrie Interceptor. You will notice
that all of the selected Agents will now be transferred from the left-side of the
screen to the Valkyrie Interceptor.
Note: if you click the Agent or Vehicle Icons, you will be taken to the Equip
Agent Screen or the Equip Vehicle Screen.
Now that your Agents are assigned, we can deploy them to the Alert Site.
The text
, “Valkyrie Interceptor 1” and the name of the Agents assigned to it, will
now be highlighted.
• Click from the Menu Bar, to send the Valkyrie to the Alert Site.
Note: you can also send Agents without vehicles. Simply select Agents from the
left-hand list; these are unassigned Agents. All your Agents are automatically
armed at the beginning of each new campaign.
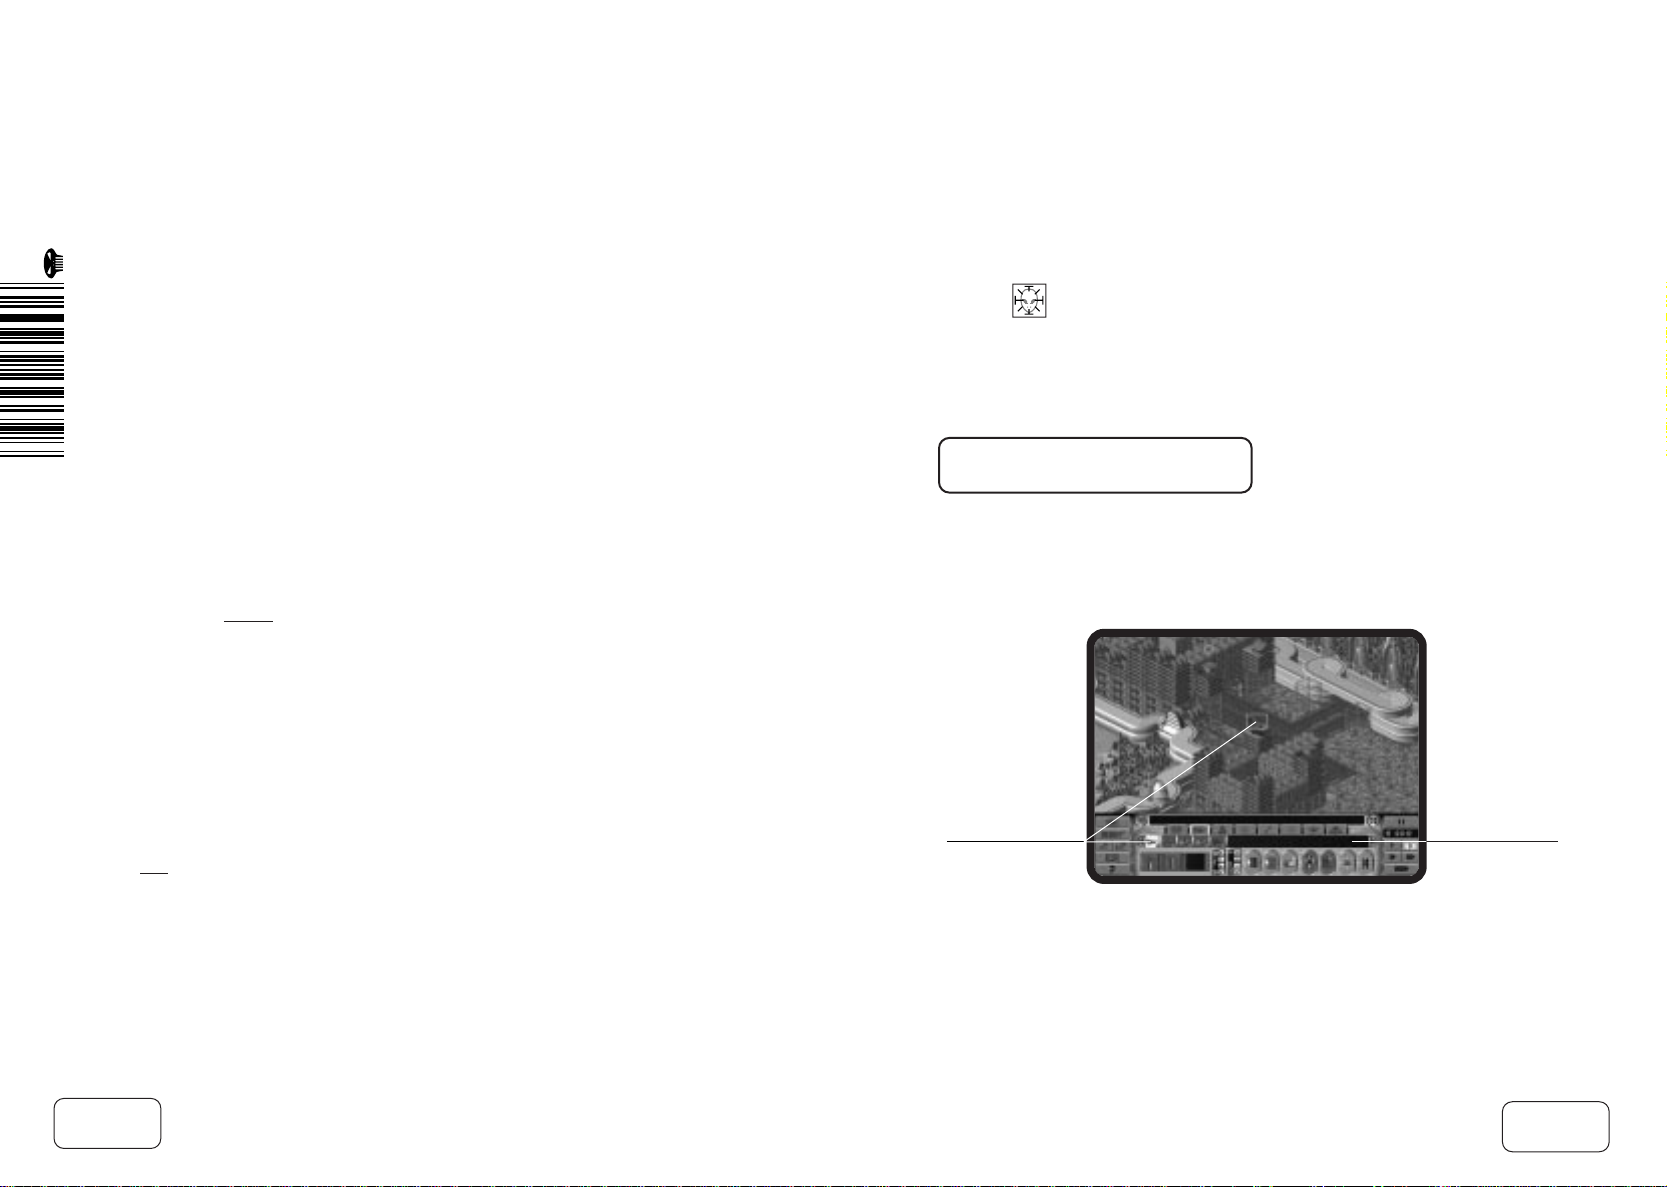
TRACKING
X-COM
VEHICLES
It is often useful (and fun) to follow Vehicles as they move to their destinations.
In this example we will follow Valkyrie Interceptor 1 as it proceeds to the Alert
Site.
Valkyrie Interceptor
Vehicle List
p.22
p.23
Page 15
Tutorial One: Using The Cityscape
TUTORIAL TWO: TACTICAL
COMBAT
• Click the
X-COM
Vehicles Tab and then select the Valkyrie Interceptor from
the Vehicle List. The icon will highlight and the display will centre on the
Interceptor. The display will automatically scroll with the Vehicle as it heads
towards the Alert Site.
When your Agents have arrived at the Alert Site, the Commence Investigation
‘window’ will open. This prompts you to confirm whether you wish to investigate
or not.
• Click Yes to begin your first Tactical Combat Mission.
You have now learned how to deploy vehicles and Agents to Alert Sites. The next
section will guide you through Tactical Combat Missions.
This, the second Tutorial, guides you through Tactical Combat; the section of the
game where you fight hostile units face-to-face. You will learn how to save your
game, move the Tactical Display, select squads/Agents and issue basic
movement orders.
You can play the Tactical Game in two different modes: Real-Time or Turn-
Based. In Real-Time you move your Agents around whilst the Aliens move playing in this way requires a greater strategic approach. Players of previous
X-COM
games will be familiar with the Turn-Based game, where
X-COM
and the
Aliens take Turns to move, just like a game of chess.
The Tutorials assume that you are playing the Real-Time game; you can follow
the Tutorial playing the Turn-Based game, as the basic functions and controls are
the same. Look for the notes explaining where the Turn-Based game differs.
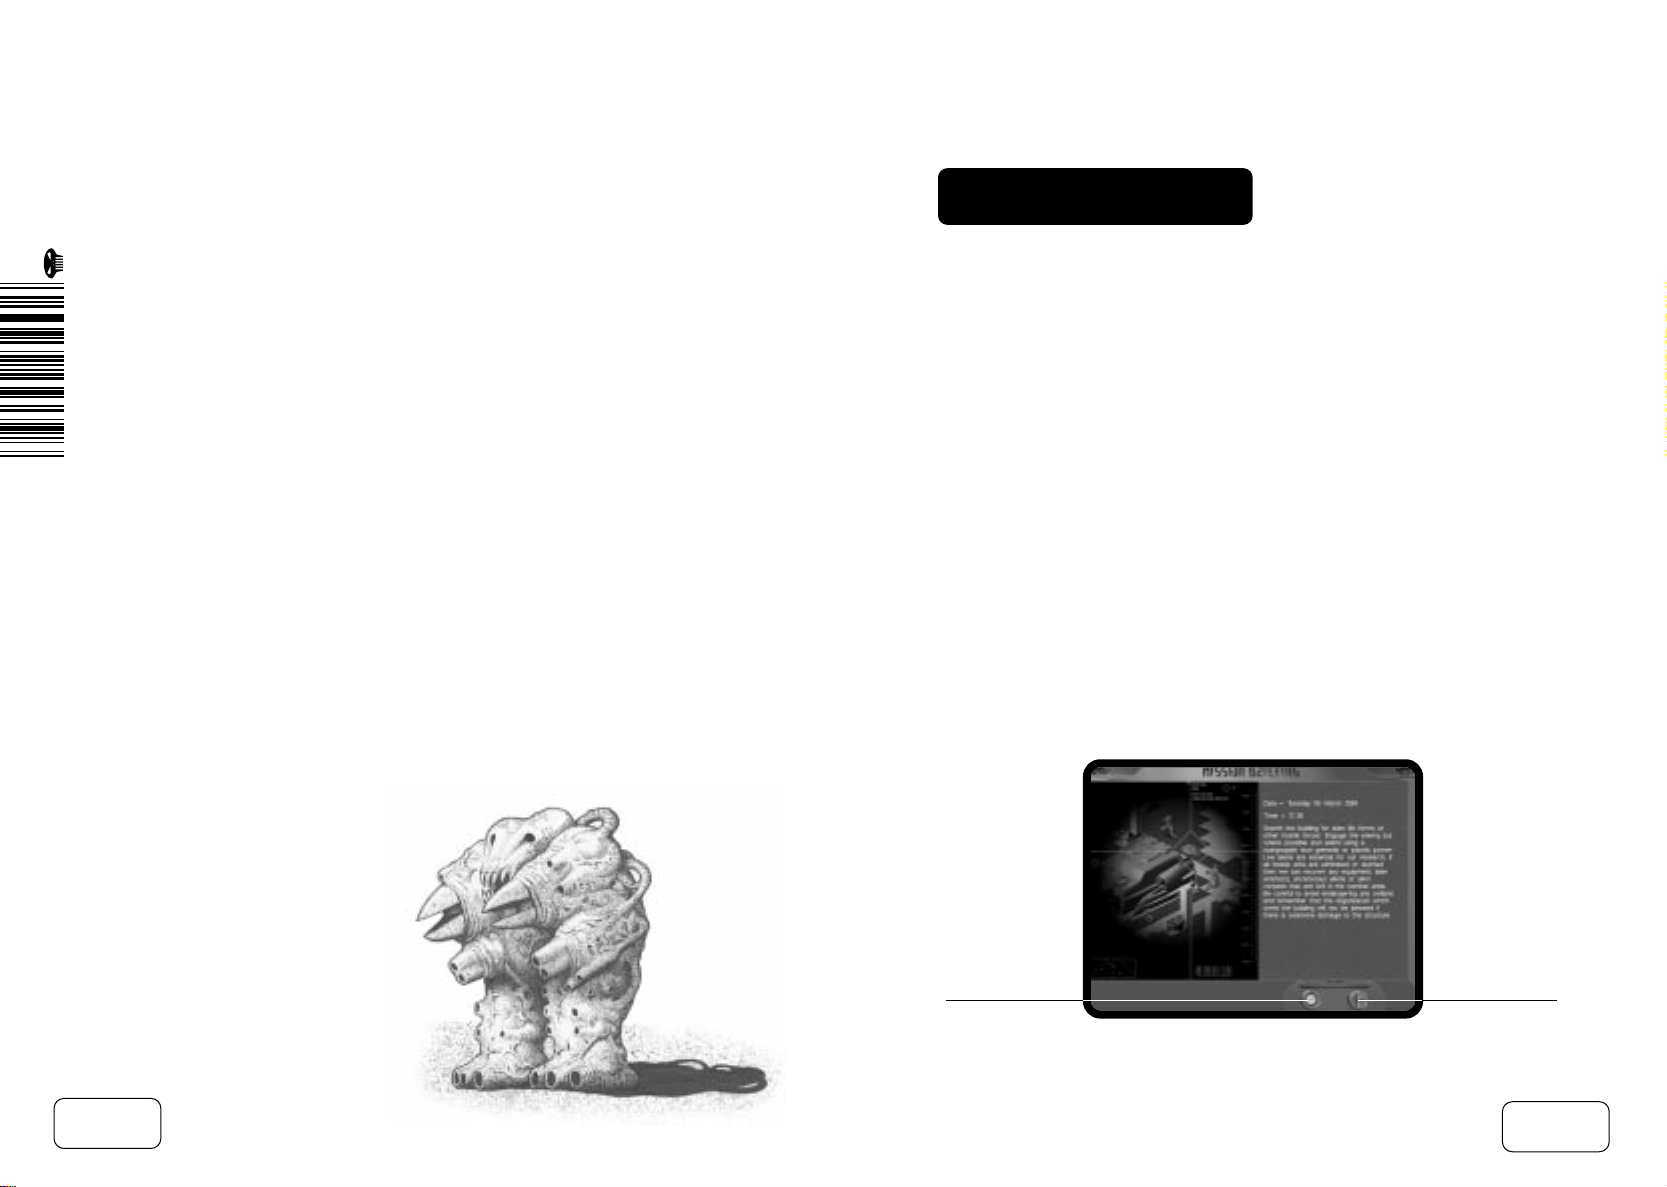
If you followed Tutorial One, you will have already successfully deployed your
Agents to an Alert Site. You should now be faced with the Mission Briefing
giving you information about your mission objectives. On this screen, you can
also select the way in which you will play the Tactical Mission: Turn-Based or
Real-Time.
p.24
Start
Real-Time Game
Turn-Based Game
Start
p.25
Page 16

Tutorial Two: Tactical Combat
• Click to go straight into the Real-Time game.
• Or, click to start a Turn-Based game.
The Squad Assignment Screen will now open. From here you can assign your
Agents into different squads. It is possible to have up to six squads each
containing up to six Agents (for full details, see Squad Assignment Screen in the
Tactical Game section of the Reference Guide).
Note: as the cursor is moved over the Agents, their statistics and the weapons
they are carrying, will be displayed in the Information Panel (on the left-side of
the screen).
At the moment we will leave your four Agents assigned to Squad One.
• Click OK to start the Tactical Game.
SAVING YOUR GAME
The Tactical Screen will now appear. Whilst the game is paused you should take
the opportunity to save your current game. You can reload this saved game to
replay the Tactical Mission at a later date; we will also use this saved game for
Tutorials Three and Four.
Save
Game
• Click the Save Game button.
• Click on any of the 10 empty slots to save your game.
When the cursor appears, type in a name for your saved game using the
keyboard and press Return.
You should receive the message “Saving Game” followed by “Save Successful”.
• Click OK to close this screen.
• Click .
p.26
p.27
Page 17
Tutorial Two: Tactical Combat
THE TACTICAL SCREEN
Note : if you are playing the Turn-Based game the Time Controls will be
replaced by four new buttons. These are used to reserve Time Units for
shooting and kneeling (more on this later). There is also an End Turn button.
The Tactical Screen is split into two sections, the Tactical Display and the
Control Panel.
The Tactical Display always defaults to the Isometric Map View, this will be
centred on your Agents that have been deployed in the Tactical Area.
Isometric
Map View
Hands Area
Control Panel
Message Bar
Time Controls
Reserve Aimed-Shot
Reserve Snap-Shot
Reserve Auto-Shot
Reserve Kneel
End Turn
EXPLORING THE
TACTICAL DISPLAY
Move the cursor to the edges of the screen. The display will scroll revealing
more of the Tactical Combat Area. At the start of each Tactical Mission, time is
automatically paused so that you are able to look around and plan your initial
moves.
You can also use the cursor keys on the keyboard to scroll the Tactical Display.
p.28
p.29
Page 18
Tutorial Two: Tactical Combat
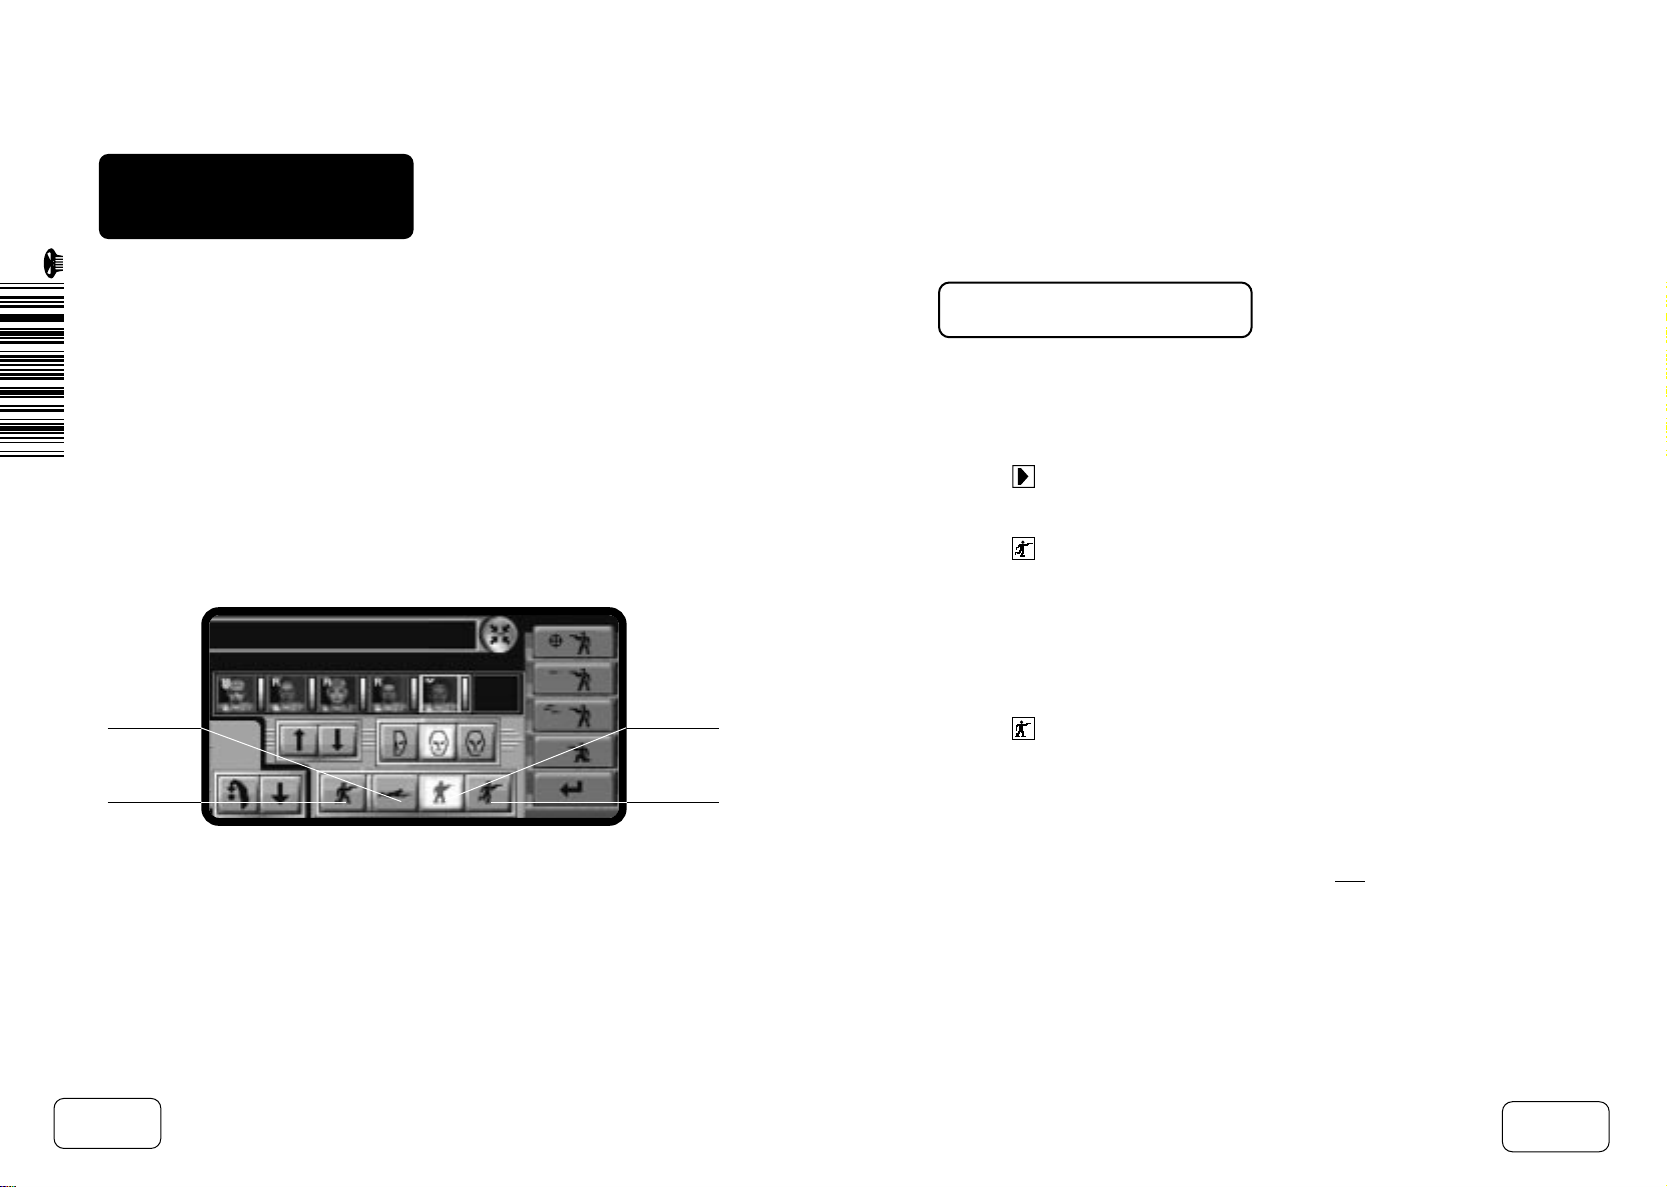
SELECTING SQUADS
Squad Icons
In
X-COM Apocalypse
, you can control Agents individually or collectively as
Agent Icons
squads. Although we have only one squad at the moment, you may have up to
six squads in the Tactical Area at any one time.
The Squad Icons indicate the number of Agents in each squad; in this case we
only have one squad and therefore only the first icon is displayed. We have four
Agents in our squad so the number four is displayed in the Squad Icon.
the centre of the markers. The Agent’s present state of health is shown by the
health bar positioned along the top of the marker. In the lower half of the marker,
the Agent’s Attack Mode is indicated by a coloured bar. Blue represents Safe
Mode, Green is Cautious Mode and Red indicates Aggressive Mode.
One of the Agent markers will be yellow; this is the Agent whose equipment will
appear centrally in the Control Panel. The current Attack Mode, Shot-Type and
movement orders, displayed in the Control Panel, also refer to this Agent only.
Note: in the Turn-Based Game, the Agent’s remaining Time Units will be
displayed above their marker.
MOVING SQUADS
• Double click on the Squad Icon to select your squad. If you have scrolled the
display so that your Agents are ‘Off Screen’, this will re-centre the display on
your Agents.
When you select a squad, the Agents will have an orange marker displayed
above their heads in the Isometric Map View. The squad number is displayed in
p.30
Group Formation
Single File
p.31
Page 19
Tutorial Two: Tactical Combat
After selecting a squad, you can move it in single file, or in a ‘Group’-Formation.
Group-Formation is selected as the default movement mode because it allows
your Agents to cover a wider area and explore more in a shorter space of time.
In the Tactical Game, the cursor is accompanied by a green box as you move it
around the Tactical Display. You may notice that the box turns yellow if you
move it over a square occupied by one of your Agents. This box is used to set
the destinations for your Agents.
• Move the cursor to a position a short way in front of the squad and click. Four
yellow arrows will appear to mark the destination of your Agents.
In order for your Agents to move, we must set time running.
• Click from the Time Controls. Your Agents will now move to their new
positions. Beware! In the Real-Time game, the Aliens can also move and your
Agents may be attacked
The objective of the current Tactical Mission is to find the Aliens and either stun
or kill them. Practice moving your squad around the building. Experiment with
both types of squad formation.
You will notice as you move around, more of the Tactical Area becomes visible.
This is because your Agents can only see what is in their Line Of Sight.
at any time!
Mouse Button (RMB). Your Agents will turn to face the direction of the cursor.
This feature is very useful when exploring the Tactical Area.
Note: in the Turn-Based game, if the Agent hasn’t enough Time-Units, or if
Time-Units are reser ved for other actions, the Agent will not be able to complete
the move until X-COM’s next Turn. If the destination is a long distance away, it
may take the Agent several Turns to complete.
Whenever your Agents have run out of Time Units, simply click . After the
Aliens have taken their Turn, your Agents will have all of their Time Units
returned to them, allowing you to play on.
While you are exploring the Tactical Area, you may well come into contact with
Aliens. The game will pause and the Message Panel will inform you of the
current situation. It is recommended that you take advantage of this to re-order
your Agents to cope with the new situation. Giving your Agents regularly updated
orders will keep them alive longer!
• Click to resume the action. Your Agents should open fire. The first Aliens
you encounter will be quite easy and your Agents should be able to pick them
off with ease. Leaving Agents without cover is not advised though as direct
Alien hits can cause serious injuries.
Note: shooting Aliens is covered in more detail in Tutorial Four.
• Move the cursor to a position away from your Agents and press the Right-
p.32
• Click , so that we can look at some other controls without being attacked.
p.33
Page 20
Tutorial Two: Tactical Combat
USING SPLIT LEVEL
VIEWS
The Tactical Area is built-up of several levels. These may be viewed individually
or assembled into a complete 3-D picture. Splitting the Tactical Area into levels
allows you to see behind walls and inside rooms (if you have already explored
them).
At the moment, the Tactical Area is set to Level Mode 2 (its default setting). This
displays the level you are on and any levels below.
• Click and the display will change to Level Mode 1; notice the button will
change. This hides everything above and below the currently selected level,
this is why some rooms in the building appear to have no roof.
• Click again and the display will change to Level Mode 3. All levels are
now displayed at once producing a complete 3-D picture.
Level
Indicator
• Click the button once more to return the display to the original Level Mode 2
setting.
When you are playing the Tactical Game you may often need to switch to the
level above or below the one that is currently displayed.
You can change to any level instantly, using the Level Indicator, positioned in
the centre of the Control Panel. To change to Level 5, for example, simply click
on the number 5.
Alternatively, you can use the buttons to move the display up or down a
single level.
• Click on the different levels using the Level Indicator and notice the display
changing. Also try moving the levels up and down, using the buttons.
Note: Page Up and Page Down, on your keyboard, can also be used to move up
or down a level.
Toggle Map
Level Display
p.34
Up/Down
Level
p.35
Page 21
Tutorial Two: Tactical Combat
SELECTING INDIVIDUAL
AGENTS
Squad Icons
Agent Icons
There are two ways to select an Agent from the current squad.
• Click on any of the four Agent Icons on the right of the Control Panel; a
yellow marker is now displayed above that Agent in the Isometric Map View.
To deselect the other Agents, simply right-click on their Agent icons.
• Move the green cursor box over an unselected Agent in the Isometric Map
View, the box should change to yellow. Click on the Agent. The marker
should disappear from the first Agent and now appear above the second
Agent. Clicking on a single Agent in the Isometric Map View automatically
causes all other Agents to be deselected
MOVING INDIVIDUAL
AGENTS
After selecting an Agent (see above) you are now ready to move that Agent.
• Click on a destination a short way in front of the Agent.
• A single yellow arrow will appear to mark the Agent’s new destination.
• Click .
• The Agent will now move to the new destination.
Note: Aliens or hostile units may be encountered at any time. Beware! Ensure
you keep an eye on your Agents!
• To make the selected Agent turn around, move the cursor to a position within
the Tactical Display and click the RMB. The Agent will now turn to face in the
direction of the cursor.
THE OVERHEAD MAP
VIEW
Now that we have started to move Agents around the Tactical Area, we will need
to be aware of their position as they continue to move around. For this, we can
use the Overhead Map View.
p.36
p.37
Page 22
Tutorial Two: Tactical Combat
• Click .
• Click to activate the Overhead Map View.
The Overhead Map View allows you to see more of the Tactical Area on screen.
The diamond shape outline, shows the area of the map that will be displayed
when you return to the Isometric Map View. As in the Isometric Map View, the
Overhead Map View will only show the areas that your Agents have explored.
Overhead
Map View
Switch
Map View
• You can scroll the Overhead Map View in the same way as the Isometric
Map View, simply move your cursor to the edge of the screen.
Note: you can also use the cursor keys (on the keyboard) to scroll around the
map.
You will see Yellow arrows on the Map; these are
X-COM
Agents. Any Red
arrows are hostile units and any Purple arrows represent neutral personnel.
Solid arrows show units on the present level; large outline arrows show units
above the current level; small outline arrows show units below the current level.
The direction of the arrow indicates the direction that a unit is facing.
Note: the map will only show the level of the Tactical Area you have currently
selected.
• Click on the buttons or the Level Indicator (in the Control Panel) to
display other levels.
• Scroll the Overhead Map View until the diamond outline surrounds at least
one of your Agents.
• Click again to return to the Isometric Map View.
SEARCHING FOR THE
ALIENS
As you continue to move your Agents around the Tactical Area, you will
encounter stairs, doors and lifts. To use these, do the following:
• To go through doors, click inside the room.
• To go up stairs, click at the top of the stairs.
• To go down stairs, click at the bottom of the stairs.
p.38
p.39
Page 23
Tutorial Two: Tactical Combat
Grav Lift
• To use a Grav Lift, move your Agents to the Lift. Select the level you wish to
move to and then click on this level. Your Agent will move up or down to the
selected level using the Grav Lift.
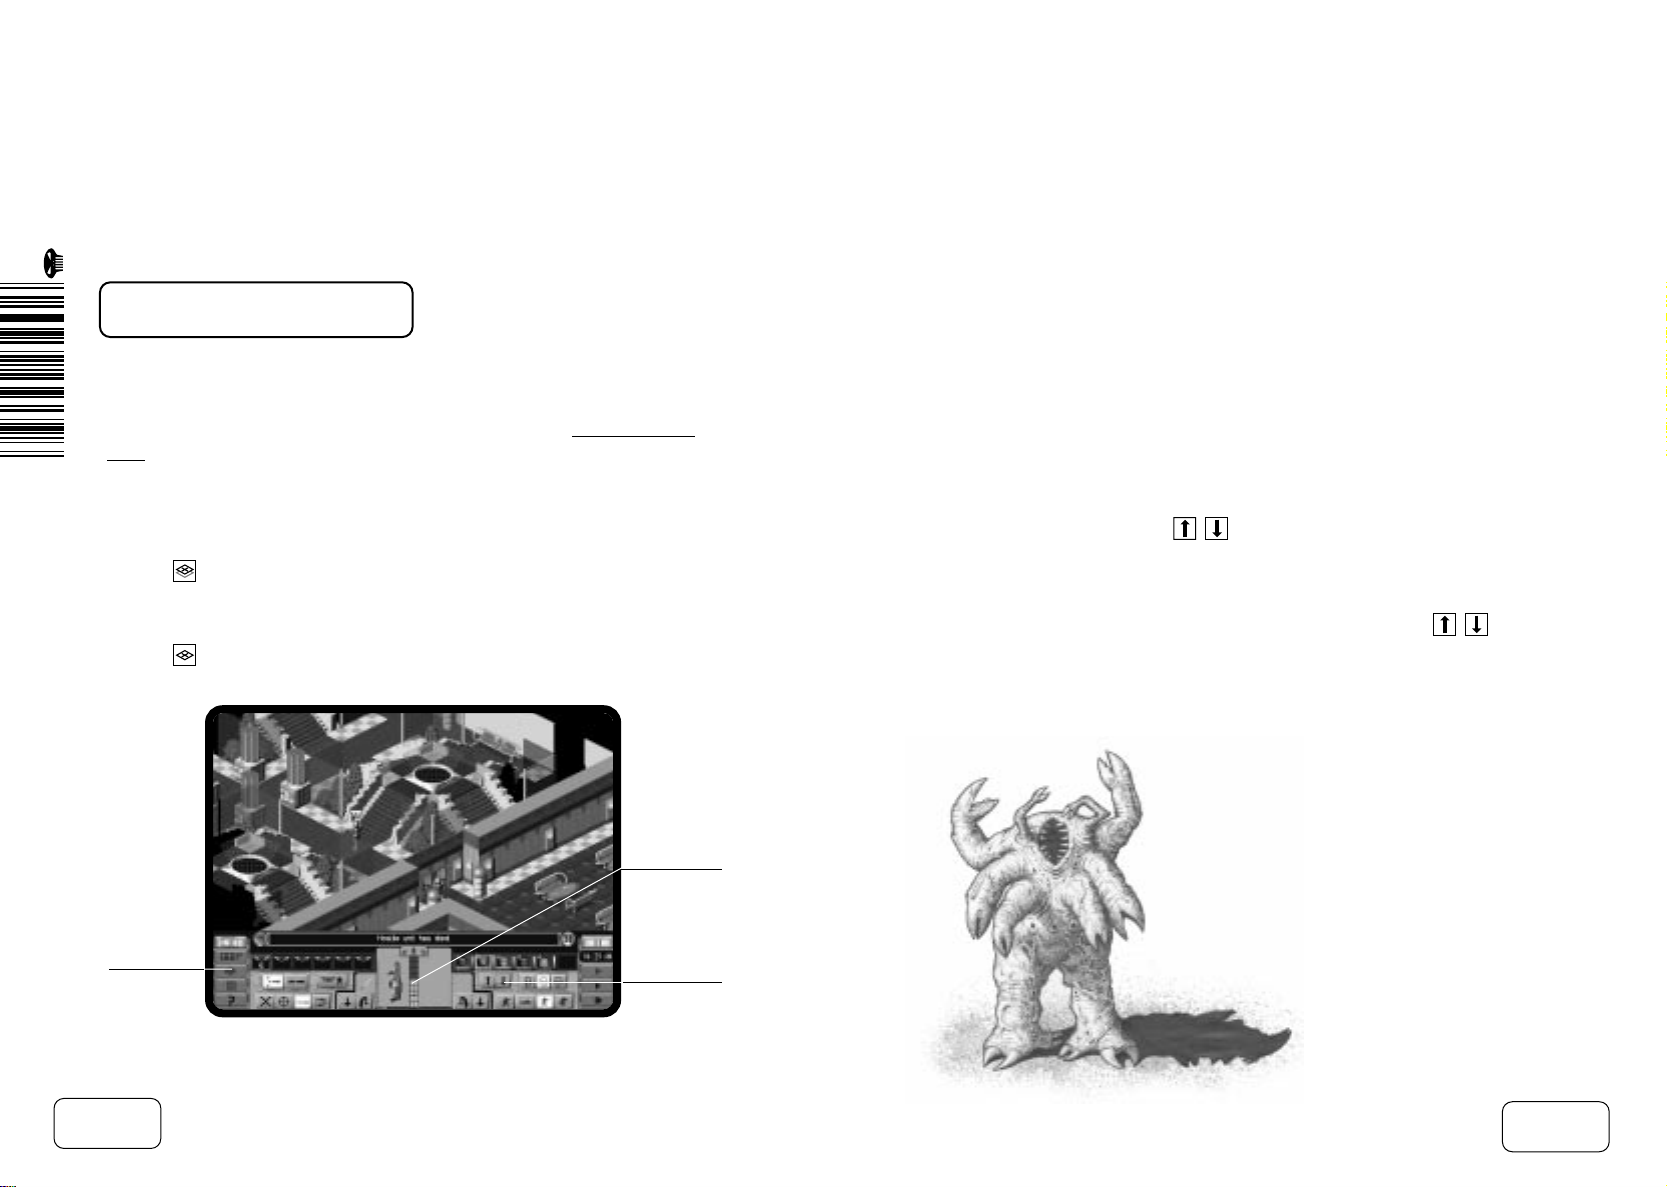
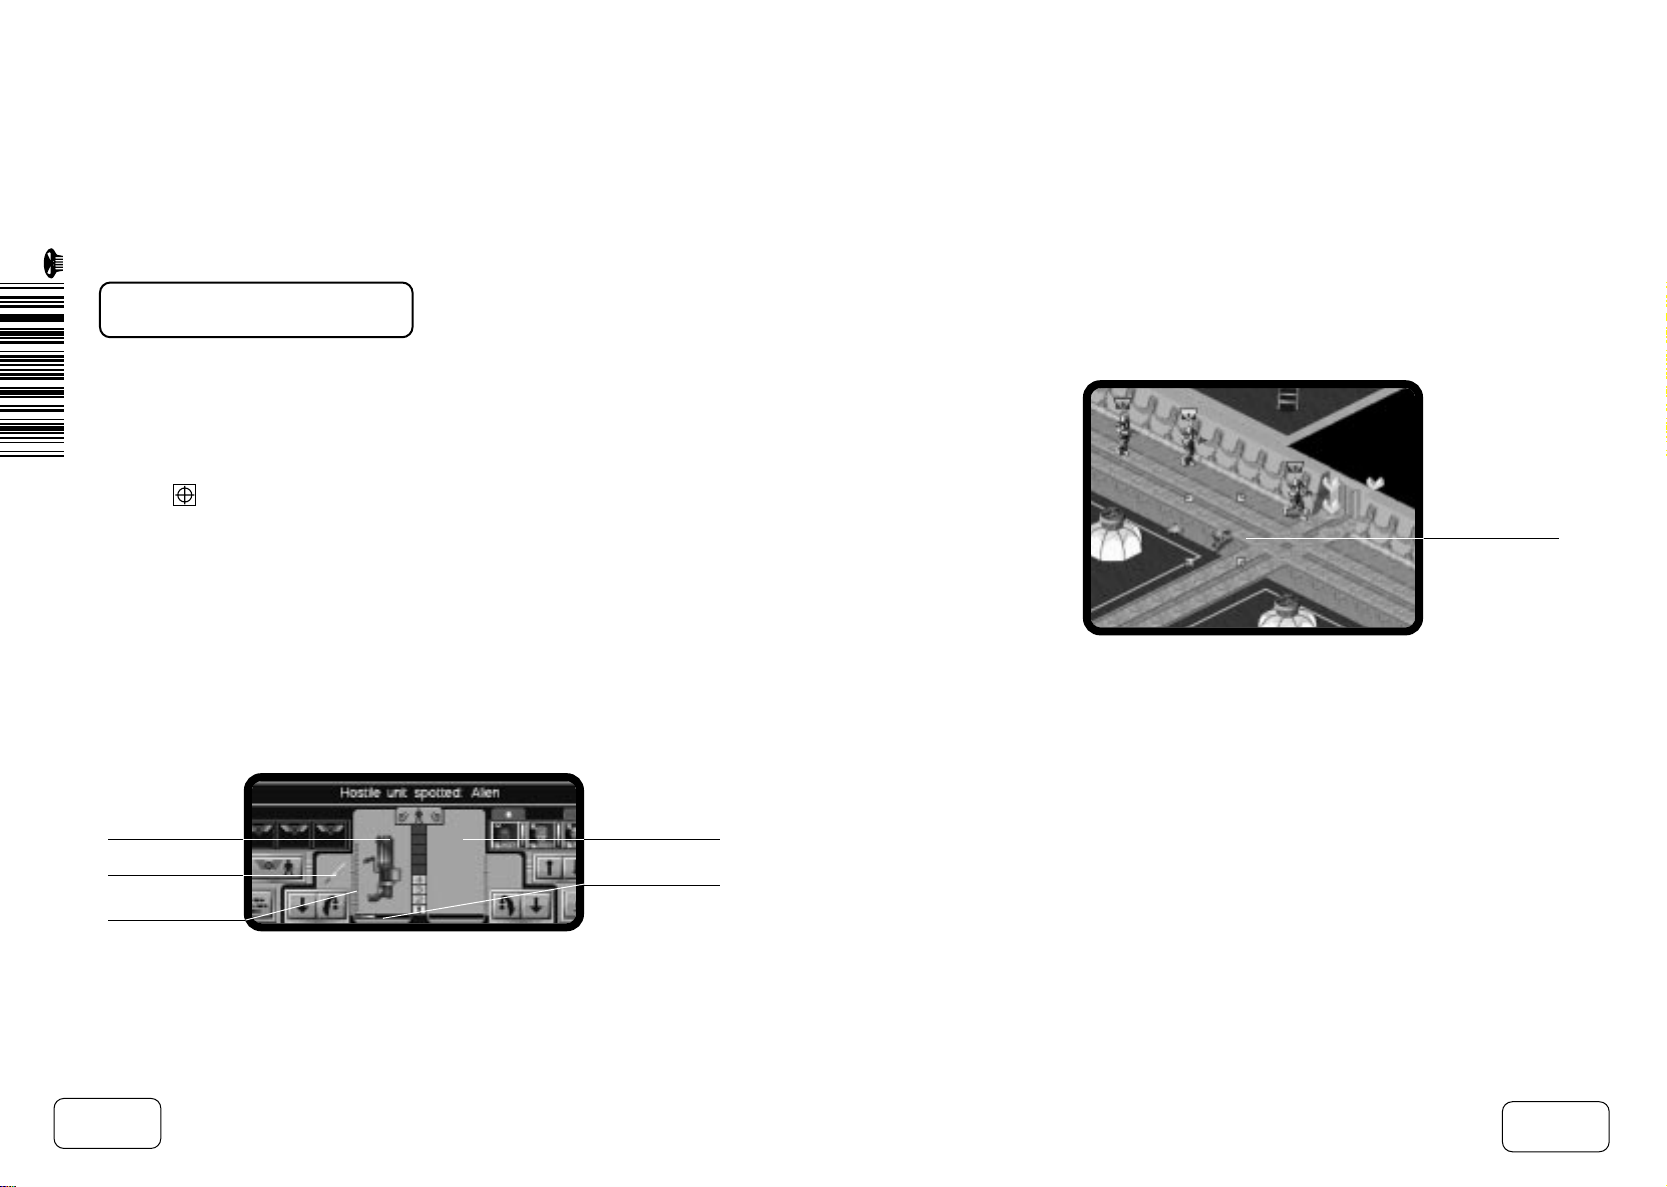
ENGAGING THE ALIENS
When one of your Agents sees an Alien, a small Alien indicator will appear above
the icon of that Agent in the Control Panel. Clicking on the ‘Alien Sighted’
Indicators will cause the display to be centred on the relevant Alien.
Agents will open fire automatically on any Aliens sighted. They will also use any
cover available (within a one square radius).
Note: if you are playing the Turn-Based Game, you will have to fire on Aliens
manually. See Tutorial Four for full details.
COMPLETING A TACTICAL
MISSION
If you successfully manage to kill or stun all Aliens in the Tactical Area, or if all of
your Agents are killed or stunned, then the Tactical Mission will end and you will
be taken to the Debriefing Screen. Here you will be given a score based on how
successfully you completed the mission objectives.
Alien Sighted
Indicator
p.40
• Click OK to return to the Cityscape.
In Tutorials Three and Four we will use our Saved Game to replay this Tactical
Mission. Tutorial Three will introduce more movement options whilst Tutorial
Four focuses on weapons and targeting modes. If you are feeling confident and
would like to explore the other controls as you play, then you can jump straight
to Tutorial Five which covers resource management within the Cityscape.
p.41
Page 24
TUTORIAL THREE:
TACTICAL COMBAT
(ADVANCED MOVEMENT)
In this, the Third Tutorial, we will replay the Tactical Mission we started in
Tutorial Two. Here we will learn to use some of the more advanced movement
options available to you during Tactical Combat Missions.
RUNNING
Firstly you must load the game you saved in Tutorial Two.
• Click Load Game from either the Main Menu or the Options screen. Select
the saved game from the list and the Tactical Mission will be restored.
We have already learnt how to move our Agents around the map, so lets look at
the different movement modes they can use.
Crawl
Kneel
Walk
Run
Agent movement is not restricted to walking. Sometimes your Agents will need
to cover ground very quickly, when they are retreating or moving into cover. In
this instance, you can order your Agents to run.
• Click to start time moving.
• Double click on the Squad Icon to select all Agents in that Squad.
• Click to order the selected Agents to run.
• Click a destination. All of the Agents should run to that destination. Be careful
not to make you Agents run too much; running expends more energy than
walking - don’t exhaust your Agents!
Note: Agents will not be able to fire at enemy units whilst they are running.
• Click to return your Agents to walking speed.
When squads or multiple Agents are selected, then any movement orders given,
will apply to them all. If you want an order to apply specifically to one Agent,
then ensure that only that Agent is selected.
Note: in the Turn-Based game, running will expend less Time Units than
walking.
p.42
p.43
Page 25
Tutorial Three: Tactical Combat (Advanced Movement)
CRAWLING
In
X-COM Apocalypse
position and move your Agents strategically within the Tactical Area. Agents can
use many features of the Tactical Area for cover, by Crawling to positions and
Kneeling behind them.
• Select an Agent.
• Click to order your Agent to assume a crawling position. Crawling
makes your Agent a harder target for any hostile units to hit.
• Click on a destination. The Agent will now Crawl to that destination.
, it is essential for Agents to use cover. You must learn to
Note: in the Turn-Based game, crawling will expend more Time Units than
walking.
Kneeling functions differently to Walking, Running and Crawling as it is a
position that your Agents will adopt once they have reached their destination
• Click to return your Agent to a standing position.
Note: in the Turn-Based game, both kneeling and standing will use an Agent’s
Time Units; if you intend to kneel at the end of each move then you must
ve enough Time Units to do so.
reser
.
KNEELING
If there is any cover close to your Agents, move your Agent to that position.
• Click to make the selected Agent kneel. The advantage of kneeling behind
cover is that your Agent is less visible to hostile units and can fire more
accurately.
p.44
p.45
Page 26
TUTORIAL FOUR:
TACTICAL COMBAT
(ATTACKING THE ENEMY)
Tutorial Four continues where Tutorial Three left-off and concentrates on the
Attack Modes and Shot-Type controls available to you in Tactical Combat
Missions. If you want to reload your Saved Game, you can do so now otherwise you will need to continue walking around the Tactical Area until you
encounter some Aliens.
X-COM
In the Real-Time game,
Agents will react automatically when hostile units
come into their line of sight; but how they react is dependant on the orders you
give them.
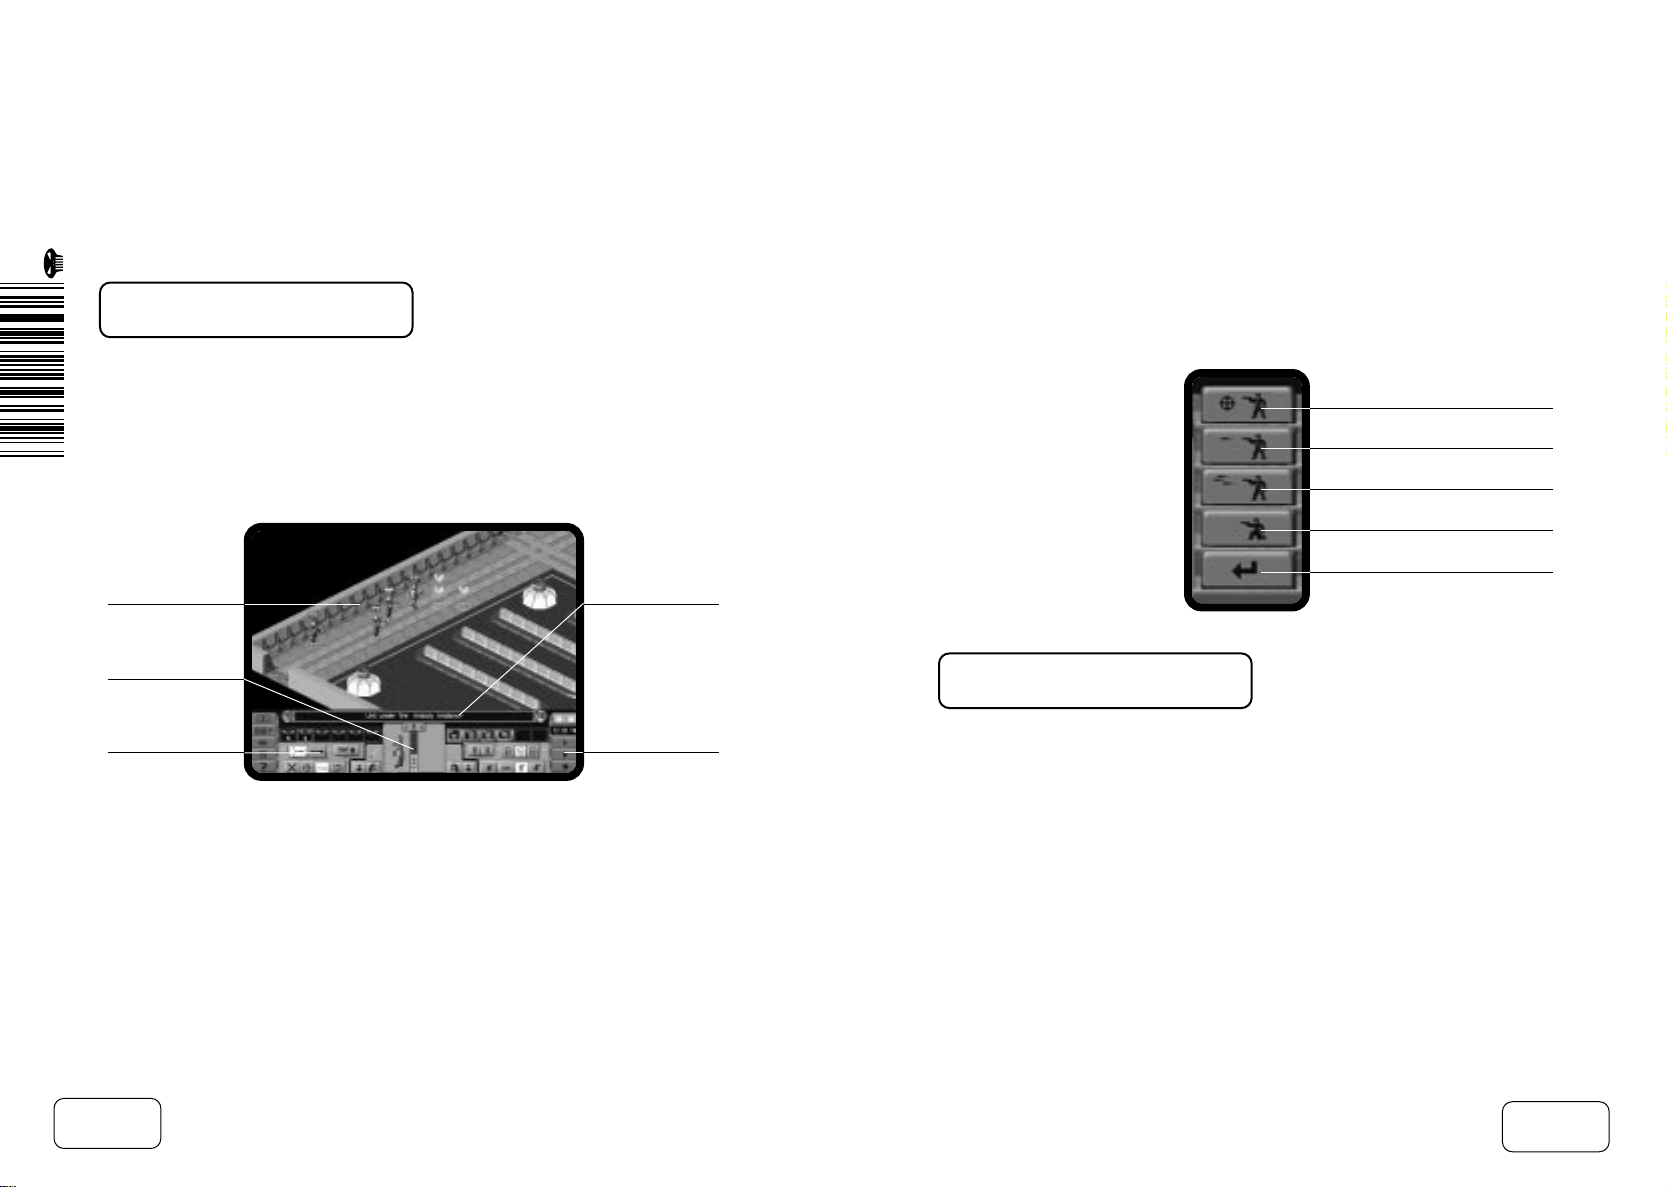
ATTACK MODES
Cautious
Safe
Aggressive
Note: in the Turn-Based game, Attack Mode “orders” only have effect in
Opportunity Fire (more on this later). If you are playing the Turn-Based game,
skip this section and turn to Firing In The Turn-Based Game.
Depending on your objectives or strategy, you may wish to change the Attack
Mode that your Agents adopt when exploring the Tactical Area.
• Select an Agent.
• Click . Your Agent will always take the safe option when moving around
the Tactical Area (ie the Agent will not be aggressive and will seek cover over
confrontation).
• Select a destination for the Agent to move to.
You can order your Agents to be Aggressive or return to Cautious behaviour as,
and when, your circumstances change. Experiment with Attack Modes as you
move around the Tactical Area.
• Click to return your Agent to a Cautious approach.
SHOT-TYPES
Aimed-Shot
No Shot
Snap-Shot
Auto-Shot
p.46
p.47
Page 27

Tutorial Four: Tactical Combat (Attacking The Enemy)
In conjunction with Attack Mode, you should also give Agents weapon orders.
• Click to make your Agent favour an Aimed-Shot.
The Aimed-Shot is more accurate than the Snap or Auto-Shots but the rate of
fire is slower.
• Now, select and give your other Agents different orders. Experiment with
different combinations and see what happens.
• Clicking will prevent your Agents from firing. This can be useful if you
haven’t much ammo.
Note: the ammo indicator is the vertical bar down the side of each hand in the
Control Panel.
As with Attack Modes, these orders affect all selected Agents. When single
Agents are being controlled, the other Agents in the squad retain their previous
orders.
USING COVER AND
TARGETING THE ALIENS
To play
X-COM Apocalypse
Agents as strategically as possible to get the greatest benefit from cover. You
should give them the best opportunity to use cover by placing them near to it;
effectively it is recommended that you place your
Agents can then duck in and out of cover or Kneel behind it. For ambushes, try
to use areas where Agents can only be attacked from one direction. Also, where
possible, use Agents to cover each other.
The game will pause and show a message whenever a hostile unit is sighted by
one of your Agents. It is recommended
order your Agents to cope with the new situation. Giving your Agents regularly
updated orders will keep them alive longer!
Should multiple hostile units appear, it is possible to direct your Agents’ fire on a
particular target.
• Move your cursor over the hostile unit - it will now change to a white target
cursor.
• Right-click on the hostile unit. A red target cross-hair will now remain on the
targeted unit.
that you take advantage of this to re-
Note: you can prevent the game from pausing by switching the Messages Panel
off. You can turn messages on or off from the Options Screen. Active Messages
are accompanied by a Tick. To switch a message off, click on the Tick, a Cross
will appear in its place indicating that the message is now disabled. All messages
will still appear in the Message Bar but will not cause the game to pause when
they appear.
p.48
p.49
Page 28
Tutorial Four: Tactical Combat (Attacking The Enemy)
FIRING IN THE
TURN-BASED GAME
If you encounter a hostile unit, you should use a weapon against it before it gets
a chance to fire.
First, select the Shot-Type you wish to use from the three options.
• Click for an Aimed-Shot in the target’s general direction.
Now that we have chosen the Shot-Type, we can fire at the enemy (as long as
the Agent is carrying a loaded gun).
• Move the cursor over the hostile unit, a target crosshair will appear.
• Click the RMB to fire.
If you are carrying two weapons and only wish to fire one, you must first select
that weapon before firing.
Left Hand
Ammo Type
Remaining
Ammo
Right Hand
Accuracy Display
• To select a weapon, click on one of the Agent’s ‘hands’. The cursor will
change to a white Target Cursor. Move the Target Cursor over the hostile unit
- it will turn red indicating that it is positioned over a potential target.
Targeted Alien
• Click on the target using the LMB. Your Agent will now fire the weapon at the
target.
Now one of three things will happen:
1) The Agent fires a shot and misses. This is unfortunate but is expected initially all of your Agents are Rookies. You will find that your Agents will
become more accurate as they fight more battles.
p.50
p.51
Page 29

Tutorial Four: Tactical Combat (Attacking The Enemy)
2) The Agent hits the hostile unit with the shot. Aliens can be very tough, so
don’t be surprised if they don’t die from the first hit.
3) The hostile unit fires back. If this happens, pray that it does not hit your Agent
and that your next shot kills it.
• You can continue to fire by clicking the Left-Mouse-Button, or cancel firing by
clicking the Right-Mouse-Button.
Note: firing in the Turn-Based Game causes Agents to use Time Units.
USING EQUIPMENT
Agents can be equipped with weapons other than guns. You may prefer to attack
with a grenade, or use a grenade to clear an area of cover.
• Click from the Control Panel to take you to the Equip Agent Screen.
• Click on a grenade to ‘pick it up’. Keep the Left-Mouse-Button depressed and
drag and drop the Megapol AP Grenade to an empty ‘hand’.
• Click OK again to return you to the Isometric Map View.
Note: Turn-Based players! Check your Time Units before you use the grenade,
you may not have enough left! If you have run-out, click . When it is your
Turn again, all of your Agent’s Time Units will be replenished.
• Click on the grenade to bring up the Prime Grenade ‘window’.
Slider Bar
Cancel Priming
The Grenade
• Click and drag the Slider Bar, in the Prime Grenade ‘window’, to the left/right
to set the grenade to detonate in “3 secs”.
Note: in the Turn-Based game, slide the Bar left/right until it reads “End of Turn”.
This means the grenade will detonate at the end of the X-COM Turn.
• Click the Tick icon to accept the grenade settings.
Note: you can click the Cross icon to cancel priming the grenade.
Each hand is accompanied by two buttons, (throw) and (drop). Because
of the three second detonation time (in the Real-Time game), it is better to throw
the grenade. You don’t want to blow-up one of your own Agents!
p.52
p.53
Page 30
Tutorial Four: Tactical Combat (Attacking The Enemy)
• Click next to the hand containing the grenade.
• Click a target in the Isometric Map View. The grenade will now be thrown
there. After three seconds (or at the end of the Turn, in the Turn-Based
Game) it will detonate, clearing whatever is in that area.
If an Agent already has a grenade in his/her hand and you need him/her to throw
it quickly, simply select the grenade with the RMB in the Hands Area. Click a
target in the Isometric Map View. The grenade will now be thrown at its
intended target and explode on contact with the floor.
RETRIEVING EQUIPMENT
FROM THE TACTICAL AREA
If you complete a Tactical Combat Mission successfully and kill, or stun, all of
the Aliens, then you will automatically retrieve all of the items left by the Aliens.
If, however, you decide to evacuate the Tactical Area before you have killed all of
the Aliens, then you will have to pick up Alien Artefacts manually.
• After you have successfully killed an Alien, position an Agent over the
equipment dropped near the corpse.
• Click to open the Equip Agent Screen. Any objects that are on the
floor will be displayed in the Item Menu at the bottom of the screen. Use the
drag and drop method to collect these items. Drop them into any spare
carrying space your Agent may have.
It is important to retrieve Alien technology so that you can research it when you
return to Base.
OPPORTUNITY FIRE
(TURN-BASED GAME ONLY)
Opportunity Fire is a slight exception to the Turn-Based rule. It allows you to
end your Turn leaving Agent’s with enough Time Units to fire a shot. Your
Agents can automatically fire during the Alien’s turn at any hostile unit who
strays into their line of sight.
The way an Agent behaves during Opportunity Fire depends on the Attack Mode
you select. You can make the Agent more likely to fire or hide depending on
these Attack Modes.
• Click to order your Agents to proceed aggressively. Agents are more
confrontational using this Attack Mode and more likely to shoot in
Opportunity Fire.
RESERVING TIME UNITS
You must reserve enough Time Units for your Agents, to take full advantage of
Opportunity Fire. In this case we will reserve enough for an Aimed-Shot.
• Click Now this is selected, the Agent will always retain enough Time
Units to per form an Aimed-Shot in the event of Opportunity Fire.
p.54
p.55
Page 31

Tutorial Four: Tactical Combat (Attacking The Enemy)
• Click to end the Turn.
COMPLETING TACTICAL
COMBAT MISSIONS
Now that you are used to ordering your Agents, try moving them around the
building to explore some of the rooms and walkways. But beware! You never
know what’s lurking around the next corner.
The Tactical Combat Mission will end under any of the following circumstances:
1. All Hostile units are unconscious or dead - You Win.
X-COM
2. All
3. All Hostile units panic and flee the combat area - You Win
4. All Agents leave the Combat Area using Exit Points.
For each building there are several Exit Points, all of which are marked by
arrows:
Agents are unconscious or dead - You Lose
Exit Point
If Agents are injured you may well want them to leave the Tactical Area in order
to seek medical attention.
• Select the Exit Point as the destination for your Agents and they will walk out
of the Tactical Area automatically.
Note: if you leave the Tactical Area without killing all hostile units, or retrieving
any Alien artefacts, you will receive a lower score in the Debriefing.
DEBRIEFING
At the end of each Tactical Combat Mission, you will be given a Debriefing. This
will inform you if your mission objectives were achieved and calculate a score
based on your performance in various areas.
• Click OK to return to the Cityscape Screen.
p.56
p.57
Page 32
TUTORIAL FIVE:
RETURNING TO THE
CITYSCAPE
In this, the Final Tutorial, you will learn how to Buy Equipment, Hire and Fire
Agents and Assign Research. How you manage your Base’s resources will define
how well you will be able to deal with the Alien threat. If you are continuing from
any of the previous Tutorials and have lost Agents, don’t worry, we will show you
how to purchase and recruit right now.
RETURNING TO BASE
After completing any Tactical Combat Mission, you will return to the Cityscape.
Your Vehicles and/or Agents will automatically make their way back to their Base.
Bases Tab
Buy New BaseBases ScreenBase
• Click the Bases Tab (if it is not already selected) from the Central Information
Panel.
You will notice that eight squares are displayed, the first of which contains an
aerial representation of your Base. As you purchase and construct more Bases
these will also be displayed. The name of the currently selected Base is displayed
in the space beneath these squares.
• Click on the aerial representation of your Base, the Cityscape Display will
now centre on your Base. If you have completed this operation quite quickly
you may well see your craft return and land at the Base.
THE BASES SCREEN
• Click from the Bases Tab, to take you to the Bases Screen.
The Bases Screen will now appear.
Base List
Information
Panel
Menu Bar
Base Display
p.58
p.59
Page 33
Tutorial Five - Returning To The Cityscape
Note: time is paused whilst you are in the Bases Screen. Time will resume only
when you return to the Cityscape.
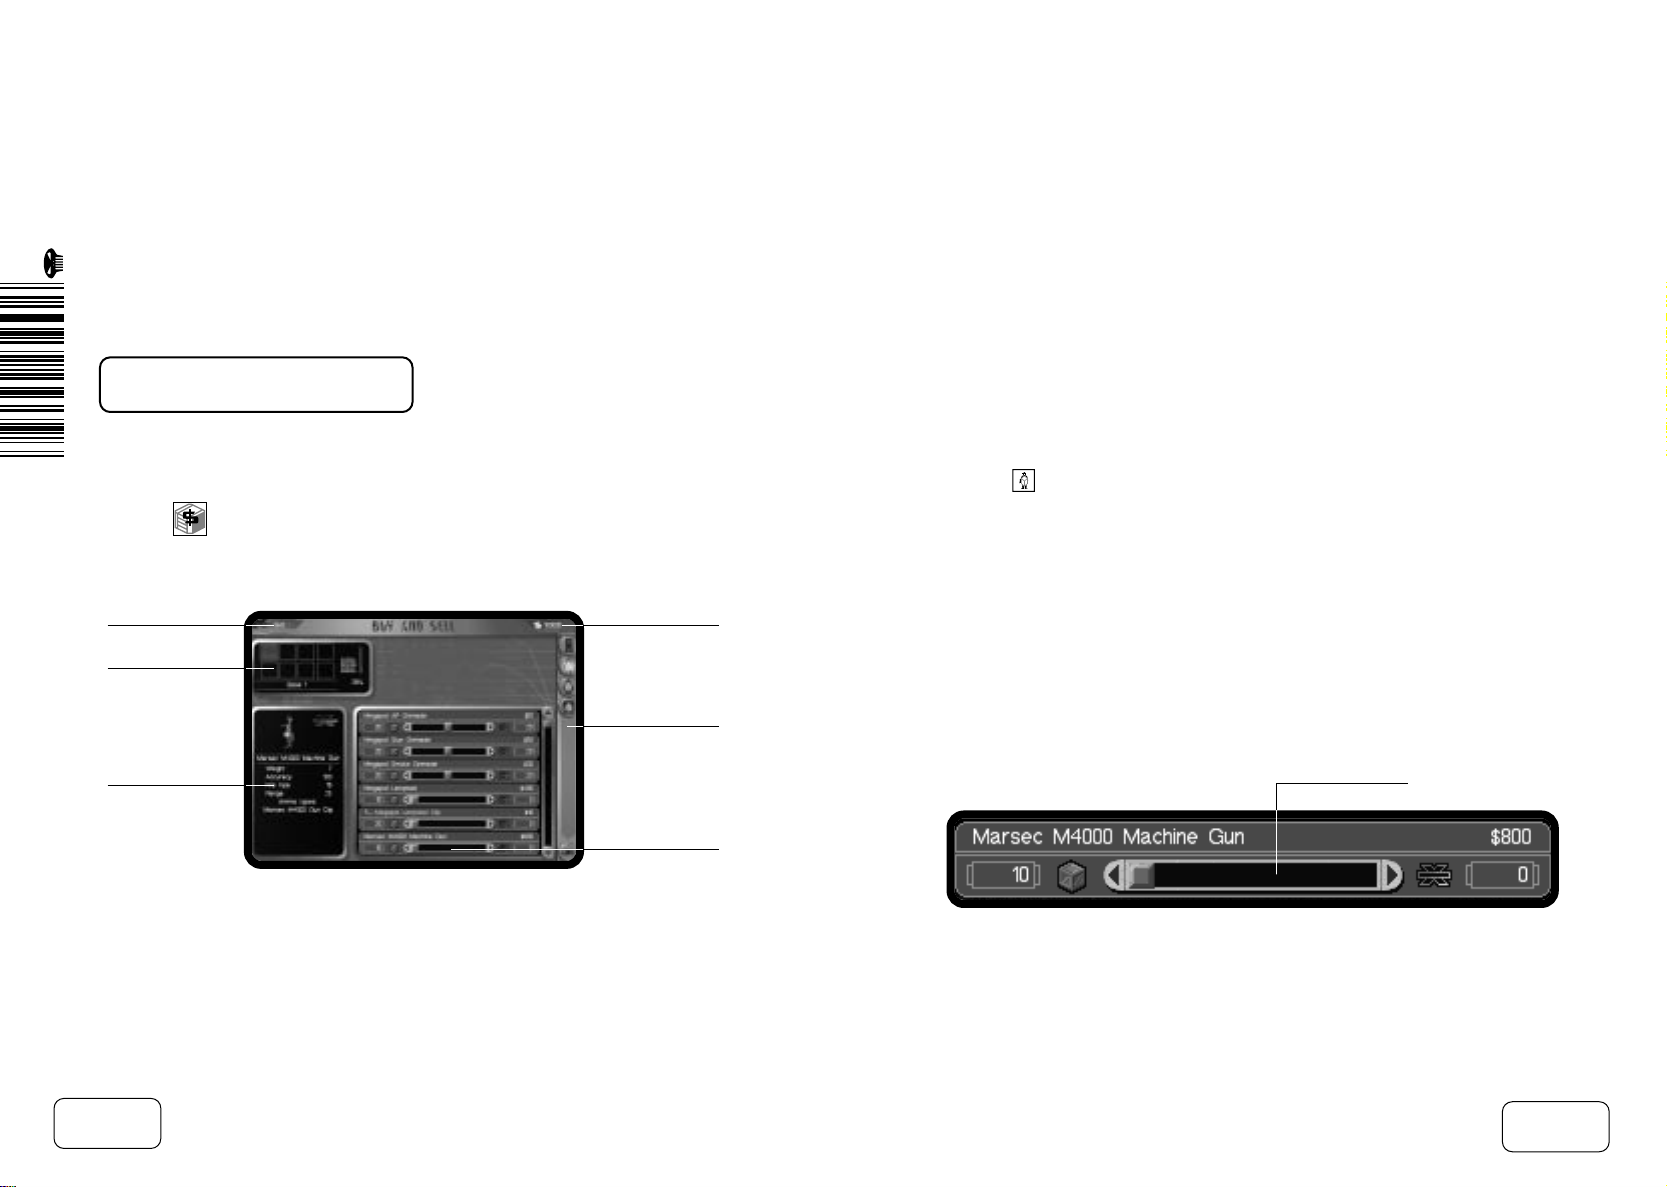
BUYING EQUIPMENT
One important function accessed from the Bases Screen is the buying and
selling of items.
• Click from the Bases Screen to take you into the Buy and Sell Screen;
it is from here that you buy everything to equip your vehicles and Agents.
Fund
Adjustment
Base List
Information
Panel
X-COM
Menu Bar
Items Menu
Funds
• The Base List displays all of
X-COM’s
current Bases. When you buy items
they are delivered to the selected Base. As you have only one Base at the
beginning, it will already be selected. Any items you buy will be delivered
here.
You will need to choose the item type from the Menu Bar. For now, we will
X-COM
assume that we want to purchase some weapons for
Agents.
• Click from the Menu Bar. A list of Agent Equipment will appear in the
Item Menu.
• Use the Scroll Arrows to find the Marsec M4000 Machine Gun in the Item
Menu. You will notice that as you move your cursor over items in the list,
their statistics will be displayed in the Information Panel.
Underneath the name there is a Slider Bar. On either side of the Slider Bar there
will be two numbers: the one on the left is the number of that item the supplier
has in stock. The figure on the right is how many
X-COM
have in their stores, eg
10 and 0. The price of the item is displayed next to the item name; in the case of
the M4000, this is $800.
Slider Bar
p.60
p.61
Page 34

Tutorial Five - Returning To The Cityscape
• Drag the Slider Bar to the right until the number ‘4’ is displayed in
X-COM’s
stores. We have now ordered four M4000 machine guns from Marsec. Repeat
the same process for the Marsec M4000 Gun Clip, but this time order ‘8’.
Next to the Base List you will see a bar showing you how much storage capacity
you have used.
Storage Capacity
Indicator
Whilst you are on the Buy and Sell Screen, you can select to buy (or sell) as
many items as you wish, providing you have the funds.
The Total Funds available to you are displayed in the top-right corner of the
screen. Fund Adjustments, as a result of buying and selling items, are displayed
in the top left corner. A positive figure indicates a profit, whilst a negative figure
shows how much you have spent.
Note: you begin your campaign with limited funds. Watch how you spend them!
Your weekly funding from the Senate can increase or decrease depending on
your performance.
• Click OK when you have finished, to accept all of your choices and return to
the Bases Screen.
HIRING AGENTS
If you’ve suffered any Agent losses during the previous Tutorial, this is where
you can recruit new Agents.
• Click from the Bases Screen.
Base List
Information Panel
Civilians List
Agent List
Menu Bar
p.62
p.63
Page 35

Tutorial Five - Returning To The Cityscape
You can select the type of personnel that you wish to hire, from the Menu Bar.
X-COM
We will recruit more
Agents - in your fight against the Aliens, it is likely
that you will sustain casualties.
X-COM
• Click on the different icons in the Menu Bar. Potential
Agents and
scientists will now appear in the Civilians List on the right-side of the screen.
• Click .
• Move your cursor over the Civilians. You can now see the statistics of
potential recruits in the Information Panel.
• Click on the Civilians with the best statistics. These will now be transferred to
the Agent List (next to the Civilians List).
The bar next to the Base List shows you how much living space you have in use.
As you take on new Agents you should keep an eye on this bar. As you run out
of living space, you should be thinking about building more Living Quarters.
• Click OK to hire your new recruits and leave this screen.
The
X-COM
Agents will now be recruited.
There is a short delay before new recruits start active service, as they have to
travel to your Base. You can use the Time Controls in the Cityscape Screen to
speed up the process.
If an Agent is making their way to your Base and you want to check their
position, you can select the Agent from the Agent List in the Agent Tab
(Cityscape Screen). The words, “Returning to Base” will be displayed until that
Agent reaches the Base. The word, ‘Free’ will then be displayed to signal that
that Agent is available for duty.
• Click OK in the Bases Screen to take you back to the Cityscape Screen.
ASSIGNING RESEARCH
Next, we will assign
X-COM
Biochemists on a Biochemistry research project. We
will begin by researching the Bio-Transport Module. Without this item you will
not be able to transport Aliens back from Tactical Combat Missions.
Biochemistry Tab
Research and
Manufacture
p.64
p.65
Page 36

Tutorial Five - Returning To The Cityscape
• Click on the Biochemistry Tab in the Central Information Panel. Clicking any
of the Biochemists will reveal their names and the details of any project they
are currently working on. As we have yet to assign any of our Biochemists to
a project, they will be flagged as ‘Free’.
• Click and you will be taken to the Research and Manufacture Screen.
Note: you can also get to this screen by clicking in the Bases Screen.
Base List
Available
Personnel List
Facilities Menu
Information
Panel
Menu Bar
Assigned
Personnel List
The Base List displays your Bases. When a Base is selected, any Labs and
Workshops at that Base, are displayed in the Facilities Menu As you have only
one Base at the beginning of the game, the labs and workshops at this Base are
automatically displayed in the Facilities Menu.
As you have entered the Research Screen via the Biochemists Tab, the
Biochemistry Lab will automatically be selected.
• Click on the other labs in the Facilities Menu. You will notice that as you click
between the different labs the list of Available Personnel will change.
• Select the Biochemistry laboratory again from the Facilities Menu.
A list of Biochemists will appear in the Available Personnel List, underneath the
Base List. “No Project” should now be written in the Information Panel.
• Before you assign scientists, you must first select a project.
• Click to open the Project Screen.
At the beginning of the game, the only project listed on the Project Screen will
be the Bio-Transport Module.
• Move the cursor over the text, Bio-Transport Module; a brief project
description will appear at the bottom of the screen. Click to highlight the
project.
• Click OK to return to the Research and Manufacturing Screen.
The name of the project will now be listed in the Information Panel along with a
progress bar.
Next you must assign a project team.
p.66
p.67
Page 37

Tutorial Five - Returning To The Cityscape
• Click all of the scientists in the Available Personnel List to Assign them to
the new project. As you select them, they will appear in the Assigned
Personnel List (bottom-right of the screen).
Note: clicking on a person in the Assigned Personnel List will release them from
their current project assignment. They will now be transferred to the Available
Personnel List.
• Click OK to leave the Research and Manufacture Screen once you have
finished.
BUILD NEW BASE
FACILITIES
As the scope of
the size of the facilities available to
X-COM’s
operations increase, so too does the need to increase
X-COM
. Facilities take time to build, so you
will want to plan your needs for the near future, at the beginning of the game.
Note: as the game progresses, you will be able to research better facilities, some
of which may be based on Alien technology.
• Click the Bases Tab.
• Click to open the Bases Screen.
facilities. For the moment we will want to build Stores, Living Quarters and
another Biochemistry Lab. This way we can accommodate more scientists and
have somewhere to store new weapons and equipment.
Base List
Information
Panel
Facilities
Menu
Base Display
Menu Bar
• Move the cursor to the Facilities Menu at the bottom of the Bases Screen.
• Move the cursor over the facilities; a white box will highlight your selection.
Details of that facility will appear in the Information Panel: the Facility
Name, Cost to Build, Days to Build and Maintenance Costs.
Located at the foot of the Bases Screen is a scrolling list of available Base
p.68
Dragging
a Facility
p.69
Page 38

Tutorial Five - Returning To The Cityscape
• Drag and drop the Stores to the desired location on your Base Display (in the
middle of the screen).
WHAT HAPPENS NEXT?
Note: you can only build a Base facility over an existing corridor.
The new facility will now be shown on the Base Display, displaying the number
of construction days remaining before it is completed.
Note: if you wish to abort the ‘build facility’ operation, you must release the
mouse button before
you have ‘dragged’ the facility to the Base Display.
‘Dropping’ the Base facility anywhere outside the Base Display will cause the
operation to be cancelled.
• Move the cursor back to the facilities list at the bottom of the screen.
• Drag and drop the Living Quarters to the desired location on your Base
Display.
• Repeat the process for the Biochemistry Lab.
Note: you can right-click on any of the facilities in the Facilities Menu to view
the UFOpaedia entry. This feature is also available in other areas of the game,
such as the Equipping Screens.
• Click OK in the Bases Screen to take you back to the Cityscape Screen.
• Click in the Time Controls. One of three events will now happen:-
1. Another ‘Alert’ may occur. Follow the steps in Tutorial One to deploy your
Agents to an Alert Site.
2. UFOs may appear within the City; for full details on intercepting UFOs, refer to
X-COM
Intercepting Hostile Vehicles in the
manual.
3. A report may appear providing feedback on your performance to date. A daily
report is supplied as well as a weekly summary.
Other messages may appear to inform you that your research is complete or
other events are occurring around the city.
Vehicles Tab section of this
THE END OF THE
TUTORIAL
Much of the enjoyment of
gathering information about Aliens and combating them through the many
different city and Alien locations.
X-COM Apocalypse
is in discovering new technology,
p.70
p.71
Page 39

Tutorial Five - Returning To The Cityscape
These Tutorials form a basic guide to
Guide section of this manual for details of specific menu options or game
features. There may be further game enhancements documented in the
Technical Supplement. For atmosphere and background, browse through the
X-COM
Rookies’ Guide included in your package.
X-COM Apocalypse
. Use the Reference
PLAYING TIPS
To succeed in the war against the Aliens, you will need to carry out the
following:-
1. Establish More Bases Around the City
For quick deployment of Agents to all areas of the city, you will need a wide
spread of Bases. The quicker your Agents can reach the site of Alien activity, the
more likely they are to catch Aliens and collect Alien artefacts, both of which are
X-COM’s
vital to
It is vital that you select Bases that are going to be big enough for your needs the Base will always be limited by space, so plan for expansion when choosing
Base Sites.
2. Build More Base Facilities at your Bases
Experiment with different-sized Bases and also consider different Base functions.
You may decide you want six Bases around the city which are solely designed to
success.
deploy Agents - in this case you will need plenty of Stores, Vehicle Repair Bays
and Living Quarters or you may want to centralise all of your research of a given
type at one Base, so at this site you will have many laboratories and living
quarters.
By using tactics, you are more likely to make efficient use of the resources
available to you.
3. Develop Powerful Squads
Agents are an expensive and limited resource; it is better to have a number of
squads that stay alive, than to have a squad whose members have to be replaced
at the end of each Tactical Combat Mission. Don’t allow your Agents to take
unnecessary risks on missions, you will find they fight better when they are
more experienced. Equip your squad with the best weapons available and avoid
exposing your Agents to enemy fire by keeping them in cover.
4. Plan Your Research Carefully
Concentrate research on developing Alien-based technologies and take care that
your scientists stay busy. Idle scientists are an expensive commodity - you
cannot afford to waste any of your resources, or time.
5. Build New Weapons and Vehicles Based on Alien Technology
If your scientists have researched Alien items, your engineers will be able to
X-COM
reproduce them.
on Earth, fighting the Aliens with their own technology!
Good Luck!
will eventually be using the most advanced weaponry
p.72
p.73
Page 40

REFERENCE GUIDE
p.74
p.75
Page 41

Reference Guide
After the Intro Sequence has finished playing, you will be taken to the Main
Menu Screen.
MAIN MENU
The Main Menu Screen allows you to select between:
Start Campaign Game
Load Game
Quit
Position your cursor over the required option and click.
STARTING A NEW GAME
Select Start Campaign Game from the Main Menu Screen. You will be taken to
the Select Difficulty Screen.
p.76
p.77
Page 42

Reference Gude
CITYSCAPE SCREEN
This allows you to change the way the game plays to suit your own ability.
Difficulty levels range from Novice to Superhuman. It is recommended that you
complete the game at one of the lower levels before attempting to play at
Superhuman level.
After choosing a difficulty level, you will be taken to the Cityscape Screen (for
full details see the Cityscape Screen section of this manual).
LOADING A SAVED
GAME
If you have previously saved a game and wish to resume playing, click this
option and then click on the game you wish to load. You will be taken to the
point at which the game was saved.
The Cityscape Screen allows you to manage
X-COM’s
resources and develop
your long term strategy. From here you can buy new Bases, deploy your squads
and vehicles to Alert Sites, Intercept UFOs and much more.
Cityscape Display
Control Panel
The Cityscape Screen is split into two areas: the Cityscape Display and the
Control Panel. At the beginning of the game the Cityscape Display will be
centred on your current Base.
Cityscape
Options
Central
Information Panel
Message
Bar
Game Time and
Time Controls
p.78
p.79
Page 43

Cityscape Screen
In the Control Panel you will see the Message Bar, a group of Cityscape
Options, a display of the Game Time, the Time Controls and the Central
Information Panel (more on the use of this later).
EXPLORING
MEGA-PRIMUS
Mega-Primus is a vast Megalopolis. The Cityscape Display shows only a small
area of the city at any one time. To see more of the city, we can scroll this
Display:
• Move the mouse cursor to the left edge of the screen. The screen will scroll
revealing more of the city. Move the cursor to the other edges of the screen
and explore more of the city. You will see many of the city’s futuristic
buildings, including Corporate HQ’s, The Astrodome, Police Stations and even
the City Slums.
You can also use the cursor keys on the keyboard to scroll the Cityscape
Display.
Clicking on any of the buildings in Mega-Primus will open the Buildings Screen.
BUILDINGS SCREEN
Building
Information
Agent List
Investigate Building
for Alien Activity
Raid Building
Vehicle List
The Buildings Screen provides you with useful information about who owns the
building, its function and what Agents and vehicles are at that building. The
Buildings Screen consists of:-
1. Building Information - The building name and function will appear at the top
of the screen.
2. Agent List - The left side of the screen gives you information about all the
unassigned Agents available in the building.
3. Vehicle List - The right of the screen gives a list of all vehicles at the building
and the Agents assigned to them.
p.80
p.81
Page 44

Cityscape Screen
4. Menu Bar - This allows you to select Investigate Building For Alien Activity,
Raid Building, Equip Agents and Equip Vehicles.
The Buildings Screen can be used for the following purposes:-
INVESTIGATE BUILDING FOR ALIEN ACTIVITY
When an organisation is at risk from Alien Infiltration, you can send Agents to
Investigate For Alien Activity at that organisation’s building. If Aliens are found,
X-COM
or the organisation is hostile to
generated.
• Click on the Agent names you wish to select, from the Agent and Vehicle
Lists.
, then a Tactical Combat Mission will be
Note: click the Agent names again to deselect them.
• Click to begin the investigation.
RAID BUILDING
X-COM
When
Mission against Aliens or security forces. The reasons for sending a squad on a
raid are:-
1. Destructive - weaken a hostile organisation by damaging their building and
killing personnel.
2. To steal any equipment in the building.
raid a building they will be placed directly into a Tactical Combat
• Click on the Agent names you wish to select, from the Agent and Vehicle
Lists.
Note: click the Agent names again to deselect them.
• Click to start your Raid.
ASSIGNING AGENTS TO VEHICLES
X-COM
The majority of
Primus. The Buildings Screen allows you to assign and reassign Agents to
vehicles.
• Drag and drop Agent Icons to the desired vehicle in the list. The Agent Icon
will now appear under the vehicle it is assigned to. You can also drag Agents
to the Agent List to leave them in a building (if you want to send your vehicle
out to intercept a UFO, without risking any of your Agents).
investigations take place in the buildings of Mega-
Note: ‘Dropping’ the person anywhere outside the Vehicle List (ie letting go of
the Left-Mouse-Button) will cause the operation to be cancelled, and the person
returned to their previous position.
EQUIPPING AGENTS AND VEHICLES
To equip Agents or Vehicles from the Buildings Screen:
• Click . You will now be taken to the Equip Agent Screen.
• Click . You will now be taken to the Equip Vehicles Screen.
p.82
p.83
Page 45

Cityscape Screen
MESSAGES
Located beneath the Cityscape Display is the Message Bar which informs you
of all events in the city.
MESSAGE BAR
Message History Message Bar Centre-On
X-COM
All messages received by
will appear in the Message Bar.
• Click to centre the Cityscape Display on the source of any message that
appears in the Message Bar.
All of the messages you receive in the Message Bar are stored in the Message
History Screen, should you wish to refer to them at a later date.
This screen contains a list of messages.
• Click to return to the Cityscape Display. The display will now be centred
on the source of the selected message.
Note: if the subject of the message no longer exists, then clicking will simply
return you to the Cityscape Display.
When you play your first campaign, any messages received by
X-COM
will
appear in a larger Message Panel. This will overlay the Message Bar and pause
the game.
• Click to take you to the Message History Screen.
p.84
p.85
Page 46

Cityscape Screen
MESSAGE PANEL
Continue
Centre-on Message
The Message Panel allows you to centre on the subject of the message, or
continue with the game.
• Click to unpause the game and continue the action.
• Click to centre the display on the subject of the message and pause the
game.
If you do not wish the game to pause every time you receive messages, you can
deactivate the Message Panel:
• Click the Tick from the Message Panel, a Cross will appear indicating that the
Message Panel is now disabled. The game will no longer pause ever y time
this particular message arrives (the message will still appear in the Message
Bar).
• You can also disable specific messages from the Options Screen (For full
details see Options Screen later in this chapter).
CITYSCAPE OPTIONS
On the left of the Control Panel you will see a group of buttons. These are the
Cityscape Options which access various other screens and functions.
VIEWING THE ACTION
When you first start your campaign the default Camera Mode causes selected
vehicles, Agents and hostile units to be automatically tracked as they move
around within the Cityscape Display.
• Click to disable tracking. This allows you to centre the display anywhere.
Notice that the icon will change to show you that tracking is disabled.
• Click again to turn tracking back on.
p.86
p.87
Page 47

Cityscape Screen
THE ISOMETRIC AND OVERHEAD MAP VIEWS
The Cityscape Display always defaults to the Isometric Map View. This view
X-COM
shows real life objects within Mega-Primus:
vehicles, Buildings, UFOs
and Dimension Gates.
• Click to change to the Overhead Map View.
The Overhead Map View is an important strategic tool; it allows you to see a
larger section of the city. Unlike the Isometric Map View, the Overhead Map
View highlights information and keeps you abreast of present activity - you are
X-COM
able to see at a glance the location of hostile units,
units and civilians. It
is also used to show the waypoints and destinations of all your vehicles and
Agents.
The Overhead Map View uses symbols to represent the following:-
X-COM
Agents - Yellow “Stick Man”
X-COM
ground craft - Yellow
X-COM
airborne craft - Yellow
Neutral ground craft - Purple
Neutral airborne craft - Purple
Hostile ground craft - Red
Hostile airborne craft - Red
Note: clicking on X-COM Agents or Vehicles in the Overhead Map View will
select the corresponding Agent or Vehicle within the appropriate Tab.
ALIEN INFILTRATION GRAPH SCREEN
Knowing when an organisation has been taken over is helpful, but more useful is
knowing which organisations are about to fall under Alien control. The Alien
Infiltration Graph allows you to select an organisation and see how far Aliens
have infiltrated that organisation.
Graph
Organisations
Key
• Click to take you to the Alien Infiltration Graph Screen
White Diamond box - this outlines the area you will see when you return to the
Isometric Map View.
p.88
On this screen, there is a scrolling list of all organisations operating in MegaPrimus.
p.89
Page 48

Cityscape Screen
• Click the organisation of your choice to see how far it has been infiltrated; the
percentage of Alien Infiltration is displayed on the graph. Use the colour Key
at the bottom of the screen to see which organisations are displayed on the
graph.
If the line rises above the critical level (indicated by a line half way up the graph)
then the organisation is at risk from Alien take-over.
X-COM
PERFORMANCE LOG
This screen allows you to review your score and check your finances.
X-COM
• Click to take you to the
• Click from the Menu Bar.
This will give you an appraisal of your current performance in dealing with Alien
activity in the city. You are rated in a number of areas and given an overall
weekly score and total score.
Performance Log Screen.
Note: at the end of each day you will automatically be given a report of your
progress.
• Click from the Menu Bar to open the Finance Screen.
This screen provides you with a breakdown of all
know how much you are spending on Scientists, Engineers and Agents. It also
lets you see how much money you are spending to maintain your Bases.
X-COM
expenditure. It lets you
• Click OK to exit this screen.
THE UFOPAEDIA
The UFOpaedia acts as an on-line encyclopaedia which contains all the
X-COM
information currently available to
all known data.
• Click to take you to the UFOpaedia Screen.
This menu screen displays all of the subjects which may be reviewed.
. Each entry consists of a diagram and
p.90
p.91
Page 49

Cityscape Screen
• Click any of these buttons to access the section you require:-
Organisations - Details on organisations in the city and their role in city affairs.
X-COM
Vehicles Vehicle Equipment - Details on vehicle weaponry, engines and general
equipment.
Equipment - Details on guns, grenades, Psionic weapons and general
equipment.
Base Facilities - Available facilities which may be added to your Bases.
Alien Craft - Information about known Alien craft.
Aliens - Information gathered about the Aliens encountered and researched.
The Alien Dimension - Information gathered about Alien buildings and their
function.
Buildings - Information on all types of building in Mega-Primus.
• Click OK to return to the Cityscape.
, police and any other civilian vehicles.
Note: not all of these categories will contain data at the beginning of the game.
As you complete research the UFOpaedia will become more comprehensive.
UFOpaedia Data Screens
When you are viewing a UFOpaedia Data Screen, you will have six other
options:-
• Click to open to the UFOpaedia Index Screen. This provides a list of all
current entries within the chosen category. Click any item in the list to view
the relevant entry.
• Click to move to the next/previous UFOpaedia entry in the current
category.
• Click to move to the start of the next/previous UFOpaedia subject
category.
p.92
• Click OK to return to the UFOpaedia Screen.
p.93
Page 50

Cityscape Screen
THE OPTIONS SCREEN
The Options Screen allows you to:
• Save Games
• Load Games
• Delete Saved Games
• Abandon Game
X-COM Apocalypse
• Quit
• Set Sound Options
• Set Game Preferences
• Click to take you into the Options Screen.
Master Volume
Music Volume
Sound Effects
Volume
Preferences
Panel
Auto-Scroll
Toggle
Saving A Game
• Click Save Game.
• Select any one of the 10 slots to save your current game.
Type in the name for your saved game using the keyboard and press Return. You
should receive the message ‘“Saving Game” followed by “Save Successful”.
Loading A Game
• Click Load Game.
• Click the saved game slot of your choice.
Deleting Saved Games
If you want to remove old saved games, you can do this by deleting them.
• Click Delete Saved Games.
• Select the saved game you wish to delete.
You will then be prompted to confirm whether you want to delete the game or
not.
p.94
p.95
Page 51

Cityscape Screen
Abandoning Games
• Click Abandon Game to abandon your current game and return to the Main
Menu.
X-COM Apocalypse
Quit
• Click Quit
system.
Sound Options
There are three Slider Bars which allow you to set the Master Volume, Music
Volume and the Sound Effects Volume.
To change any of these settings, simply drag the Slider Bar left, to decrease
volume, or right, to increase it.
There are also three other buttons which allow you to test your Stereo Settings:
• Click Test Left Speaker to ensure that sound is coming from your left
speaker, as intended.
• Click Test Right Speaker to ensure that sound is coming from your right
speaker, as intended.
• Click Reverse Speakers, if the intended sounds are coming from the wrong
speaker, ie sounds intended for the left speaker are coming out of the right
speaker.
X-COM Apocalypse
to exit the game and return to your operating
Preferences
Messages
At the top of the Preferences Panel there is a list of messages.
• To switch a message off, click on the Tick, a Cross will appear in its place
indicating that the message is now disabled. Disabled messages will only
appear in the Message Bar and will not pause the game.
• To switch a message on, click on the Cross, a Tick will appear in its place
indicating that the message is now enabled. Any message that is enabled will
cause the Message Panel to be displayed and pause the game whenever the
message occurs.
Auto-Scroll Toggle
Whenever Auto-Scroll is enabled, the screen will automatically scroll when the
cursor is at the edge of the display. If Auto-Scroll is disabled you must click the
LMB when the cursor is at the edge of the screen in order to scroll the screen.
• To disable Auto Scroll click on the Tick, a Cross will appear in its place
indicating that this feature is now disabled. Simply click on the Cross to
enable Auto Scroll again.
Note: some players prefer this method as it prevents them accidentally ‘nudging’
the display when moving around and selecting items.
• Click OK to exit this screen.
p.96
p.97
Page 52

Cityscape Screen
GAME TIME DISPLAY
The advantage of changing the speed of time, is that you can play the game at a
rate which suits you. You can also pause the game to evaluate your strategy
when Alien activity is frantic.
X-COM Apocalypse
begins at 12.00 noon on the 7th March 2084.
Note: the game clock is a 24 hour clock, meaning that 5.00pm is displayed as
17.00.
Pause
Game Time
Slow Speed
Double Speed
Normal Speed
Quad Speed
Ultra Fast
The current game time is continuously updated in the Game Time Display.
TIME CONTROLS
The Time Controls allow you to adjust the rate at which time passes in the
game. There are four time control buttons, ranging from Slow to Quad Speed.
You can also Pause the game from here, and set time to pass Ultra Fast.
• Click on any of the Time Controls on the right-hand-side of the Control
Panel, to set the rate at which time passes.
Clicking will advance the time much faster than any of the other Time
Controls. Because time passes so fast in this mode, it is easy to miss events in
the city; with this in mind, the game will slow to Normal Speed, whenever a key
event occurs. Ultra Fast cannot be selected again until the event has ended.
Time is suspended when any of the other information screens are accessed.
CENTRAL INFORMATION
PANEL
X-COM
Vehicles Tab
Biochemistry
Engineering
TabAgent TabBases Tab
Tab
Hostile
Vehicles Tab
Quantum
Physics Tab
Organisations
Tab
p.98
p.99
Page 53
Cityscape Screen
This panel provides you direct access to all of your resources, allowing you total
X-COM
control over
forces. The panel consists of eight tabs, each containing
further options. The following is a list of the Tabs:-
Bases Tab
X-COM
Vehicles Tab
Agent Tab
Biochemistry Tab
Engineering Tab
Quantum Physics Tab
Hostile Vehicles Tab
Organisations Tab
The following sections of this manual will cover each Tab in turn and detail all of
the options available to you. The manual will then cover the Tactical Game.
BASES TAB
X-COM
Bases are built inside the city and are often concealed as inconspicuous
office blocks or warehouses. The only access to these Bases is via the parking
bays or the lift shaft. Whilst most of the action in
X-COM Apocalypse
takes place
in the Cityscape and the Tactical Combat Missions, much of the preparation
happens in the Bases Screen. Your Bases serve a variety of functions crucial to
your operations in Mega-Primus:-
• Agents sleep, workout, improve Psi and firearms skills.
• Vehicles and Agents are equipped.
• Bio and Quantum Research is carried out.
• New Technology, equipment and vehicles are Manufactured.
• Aliens are contained and interrogated.
X-COM
•
activity is co-ordinated.
• Select the Bases Tab from the Central Information Panel in the Cityscape.
p.100
Bases Tab
Base List
Buy New Base
Bases Screen
p.101
Page 54

Bases Tab
The Bases Tab contains the following features:
1. Base List - This area shows all
X-COM
Bases. You can buy a maximum of
eight Bases. To select a Base, simply click the one you want (click again to
centre the display on the selected Base).
2. Base Name - The name of the presently selected Base will be displayed below
the Base List.
3. - Click this icon to take you to the Bases Screen.
4. - Click this icon to buy a new Base (for full details see Buy New Base
later in this chapter).
THE BASES SCREEN
• Click to access the Bases Screen.
Base List
Information
Panel
City Map
Base Display
Menu Bar
The Bases Screen consists of six main areas:
1. The Base Display
2. Base List
3. City Map
4. Information Panel
5. Facilities Menu
6. Menu Bar
THE BASE DISPLAY
The Base Display allows you to see, at a glance, the size of your Bases and their
facilities.
Note: to rename your base, click on the existing base name within the Base
Display. Type in your new name and press Return on the keyboard.
Initially,
X-COM
will have only one Base. As time progresses, you may have up to
eight Bases city-wide. These can be selected from the Base List. Each of these
contains a miniature map of a Base layout.
Note: red squares represent facilities under construction.
• Click a Base icon to select a Base. The name of the selected Base is displayed
underneath the Base List.
Facilities
Menu
p.102
Bases are highlighted orange on the City Map. When you have more than one
Base, the currently selected one is highlighted yellow.
p.103
Page 55

Bases Tab
INFORMATION PANEL
Moving the cursor over the Base facilities in the Base Display, or Facilities
Menu, will display the name of the facility in the Information Panel, along with
all relevant facility information.
BASE FACILITIES
At the beginning of the game you are given one Base and some facilities to help
begin investigations in the city. You will already have many facilities built,
however, you can add to this by building new facilities.
Build Facilities
As the scope of
the size of the facilities available to
its efficiency will be diminished. To begin with, you can only choose to build
from the following list:-
Living Quarters
Stores
Medical Bay
Training Area
Psi-Gym
Security Station
Vehicle Repair Bay
Bio-lab
Quantum lab
Alien Containment
Workshop
X-COM’s
operations increase, so to does the need to increase
X-COM
- if you over-subscribe a facility then
Note: as the game progresses, you will be able to research new technology that
can be incorporated into your Bases. See the on-line UFOpaedia for full details
of all Base facilities (See The UFOpaedia in the Cityscape section of the manual
for further details).
Located at the foot of the Bases Screen is a scrolling list of available Base
facilities. Simply move the cursor to the facility you wish to build; a white box
will highlight your selection and provide a list of information about construction
cost, construction time and maintenance costs in the Information Panel.
• ‘Drag and Drop’ Base facilities to the desired location on your Base Display,
to build the facility.
Note: you can only build a Base facility on top of an existing corridor.
The new facility will now be shown on the Base Display, displaying the number
of construction days remaining.
If you wish to abort the build facility operation, ‘Drop’ the Base facility anywhere
outside the Base Display.
Note: you can right-click on a facility to view the UFOpaedia entry for that
facility.
Destroy Facilities
There will be points in the game where you will wish to destroy some of the
p.104
p.105
Page 56

Bases Tab
existing facilities. There are a range of reasons why you might choose to do this:
you no longer have a need for some facilities or, you have completed research
into better facilities and you wish to upgrade the existing ones.
Whatever the reason, the demolition process is very simple:
• Click on the facility you wish to destroy, in the Base Display.
You will then be prompted to confirm whether you wish to destroy the facility or
not.
MENU BAR
The Menu Bar allows you to access various areas of your Base, so you can see
in detail how each of your Bases is currently functioning. From the Menu Bar
you can carry out tasks such as arming vehicles, organising research and
recruiting staff.
1. - Click this to open the Hire/Fire Screen (For full details see Hire/Fire
Screen later in this chapter).
2. - Click on this to open the Buy and Sell Screen (for full details see
Buying and Selling Items later in this chapter).
3. - Click on this to open the Transfer Screen (for full details see
Transferring Items later in this chapter).
4. - Click this to open the Equip Agent Screen (For full details see Equip
Agents Screen in the Agent Tab section of this manual).
5. - Clicking this icon takes you to the Equip Vehicle Screen (For full details
X-COM
see Equip Vehicle Screen in the
Vehicles Tab section of this manual).
6. - Click this to open the Research and Manufacturing Screen (for full
details see Research and Manufacturing Screen in the Biochemistr y,
Engineering and Quantum Physics Tab section of the manual).
7. - Click this to open the Alien Containment Screen.
HIRE/FIRE SCREEN
As
X-COM
increases the scope of its operations, it is essential that more Agents
and Scientists be recruited to carry out vital research and Tactical Combat
Missions.
• Click from the Bases Screen.
Base List
Menu Bar
Information
Panel
Civilian List
Agent List
p.106
p.107
Page 57

Bases Tab
The screen contains:-
1. Base List - Click any of the Bases to change your Base selection.
2. Information Panel - Agent stats and information will be displayed here.
3. Civilian List - Displayed on the far right of the screen, this lists available
X-COM
personnel for
4. Agent List - A list of currently employed
5. Menu Bar - You can select
and Engineers from here.
HIRING AGENTS
To recruit staff from this screen, select the Base from which you wish to hire
new Agents (from the Base List).
• Click the personnel type that you wish to hire (from the Menu Bar). A list of
potential recruits will appear in the Civilian List.
• As you highlight each civilian, a list of statistics will appear in the Information
Panel.
• Click on the civilian of your choice to hire that person. They will now appear
in the Agent List.
The bar next to the Base List shows you how much living space you have used.
As you take on new recruits you should keep an eye on this bar. As you begin to
run out of space, you should consider building more Living Quarters.
to hire.
X-COM
Agents.
X-COM
Agents, Biochemists, Quantum Physicists,
• Click OK to hire your chosen personnel and return to the Bases Screen.
Agents come from all over Mega-Primus, so there will be a delay before Agents
start active service, as they make their way to your Base.
Note: don’t forget to arm X-COM Agents and assign them to vehicles when they
arrive.
FIRING AGENTS
Agents cost money and can be one of your largest out-goings, depending on the
X-COM
number you have employed. You may choose to fire
you can no longer afford to keep the amount you have, or where Agents are
under-utilised.
Sacking a member of staff is a similar process to recruiting one.
• Go to the Hire/Fire Screen (see above for details).
• Select the Base from which you wish to fire personnel.
• Select the personnel type from the Menu Bar.
• Select the personnel you wish to fire from the Agent List. These Agents will
then appear in the Civilian List.
• Click OK to fire your chosen personnel and return to the Bases Screen.
personnel, when
Note: you can sack as many Agents as you wish whilst you are on this screen.
p.108
p.109
Page 58

Bases Tab
BUYING AND SELLING
ITEMS
• Click from the Base Display, to open this screen. From here you buy
everything to equip your vehicles and Agents.
The Buy and Sell Screen consists of:-
1. Base List - Located on the left of the screen, these icons show all of your
Bases.
2. Menu Bar - These buttons allow you to select specific item categories:
• Vehicles
• Agent Equipment
• Airborne Vehicle Equipment
• Road Vehicle Equipment
3. Item Menu - This displays a list of equipment, the number at your Base, the
number being bought/sold, the price of the item and a Slider Bar.
4. Information Panel - Located on the left-side of the screen, this panel will
display the currently highlighted item (from the Item Menu), and any
information about it.
BUYING ITEMS
Before buying or selling items, you must first select the Base from which they
will be bought or sold.
• Click on the Base of your choice from the Base List. To change your Base
selection, simply click on another Base.
Base List
Menu Bar
Slider Bar
Information
Panel
Item Menu
The Menu Bar on the right of the screen allows you to choose the type of item
you wish to buy or sell (eg. Agent Equipment).
• Click the appropriate button - a list of items of that type will appear in the
Item Menu.
• Use the Scroll Arrows to look through the Item Menu.
• To buy an amount of a particular item, move the Slider Bar right until the
number you wish to buy is added to the number at your Base.
p.110
• To sell any items, move the Slider Bar left.
p.111
Page 59

Bases Tab
Next to the Base List you will see a bar showing you how much storage capacity
you have used. Watch this bar. As your stores fill-up, you should consider
building another Storage Facility.
Base Lists
The Total Funds available to you are displayed in the top-right corner of the
screen. Fund Adjustments, as a result of buying and selling items, are displayed
in the top left corner. A positive figure indicates a profit, whilst a negative figure
shows how much you have spent.
When you have selected the number you wish to buy and/or sell, click OK to
accept your choices and leave the Buy and Sell Screen.
Note: whilst you are on the Buying and Selling Screen you can buy or sell as
many items as you wish, providing you have the funds.
TRANSFERS
• Click from the Base Screen, to open the Transfer Screen. It is from
here that you can transfer items from one of your Bases to another.
Note: you need more than one Base before you can transfer anything.
Slider Bar
Information
Panel
Menu Bar
Item Menu
The Transfer Screen works in the same way as the Buy and Sell Screen. It
consists of:-
1. Base List - Unlike other screens, the Transfer Screen has two Base Lists denoting where items are transferred from and to.
2. Menu Bar - These buttons allow you to select specific item categories:
• Agents
• Biochemists
• Quantum Physicists
• Engineers
• Vehicles
• Agent Equipment
• Airborne Vehicle Equipment
• Road Vehicle Equipment
• Aliens
p.112
p.113
Page 60

Bases Tab
3. Item Menu - This displays a list of equipment, the number at each Base and a
Slider Bar.
4. Information Panel - Located on the left-side of the screen, this panel will
display the currently highlighted item (from the Item Menu), and any
information about it.
TRANSFERRING ITEMS
Before transferring items, you must first select the two Bases to transfer goods
between.
• Click on the Base of your choice from the left-hand Base List.
• Click another Base from the right-hand Base List.
To change your Base selections, simply click on another Base from either set of
Base icons. Once two Bases are selected you will be able to transfer items from
either Base.
The Menu Bar on the right of the screen allows you to choose the type of item
you wish to transfer (ie Agent Equipment).
• Click the appropriate button - a list of items of that type will appear in the
Item Menu.
• Use the Scroll Arrows to look through the Item Menu.
When you have finished, click OK to accept your choices and leave the Transfer
Screen.
ALIEN CONTAINMENT
SCREEN
This is an information screen which allows you to see at a glance the following:-
• What types of Aliens you have at Base.
• How many of each Alien you have.
• The status of those Aliens (whether they are dead or alive).
• The size of the Alien.
Because you have limited space in your Bases and containment facilities, you
need to know what space Aliens take-up and how much is left. The Alien
containment screen shows you this information and allows you only to keep the
Aliens you need for research.
• Use the Slider Bars to remove Aliens from the containment facility.
BUY NEW BASE
• To transfer an item, use the Scroll Arrows to move the Slider Bar left/right
until the number you wish to transfer is added to the number at the other
Base.
p.114
As Alien activity increases, you will need more Bases around the city to deploy
Agents and vehicles quicker and more efficiently.
p.115
Page 61

Bases Tab
To buy a new Base you must first go to the Cityscape Screen.
• Click the Bases Tab from the Central Information Panel.
• Click . You will be shown the Overhead Map View of Mega-Primus.
Available sites for new Bases will be shown with a flashing white box. Existing
Bases will be highlighted with a flashing green box.
• Click on an available building to select a site for your Base; you will be taken
to the Buy Base Screen. The Buy Base Screen gives you information on your
current funds, the cost of the basement and the name of the building to which
it belongs; you will also have a picture of the Base layout.
• Click to buy the building for your Base; you will now be prompted to
name your Base - type in your new Base name using the keyboard and press
the Return key.
• Click OK to close this screen without buying the building.
Note: not all Bases are the same shape and size. You will get a different set-up
depending on the building and its cost. Look around at different options before
you make your choice.
X-COM
VEHICLES TAB
During your investigations in and around Mega-Primus you will encounter a
variety of vehicles. These range between flying and road-going, Motorbikes,
Hover bikes, Cars, Hovercars, Airtaxis, Construction Vehicles, and Interceptors.
The ownership of these vehicles varies, but largely fall into these categories:Taxis, Police,
, and Alien.
X-COM
has a full list of vehicles in the on-line
X-COM
UFOpaedia, for your reference.
At the beginning of the game, you will send vehicles out to intercept UFOs or to
carry Agents to sites around the city. As the game progresses you will use them
to attack buildings and travel into the Alien Dimension.
X-COM
• Select the
Vehicles Tab from the Central Information Panel in the
Cityscape.
Vehicle
List
X-COM
Vehicles Tab
p.116
Craft Weapon
Display
Set Attack
Mode
Set Vehicle
Altitude
p.117
Page 62

X-COM
The
1. Vehicle List - This shows all of
Vehicles Tab
X-COM
Vehicles Tab consists of:-
X-COM’s
vehicles. Use the Scroll Arrows to
look through the list of vehicles. Click on a vehicle icon to select that vehicle;
click a second time to centre the display on the selected vehicle. You can
select more than one vehicle by holding down the Control key (on the
keyboard) and clicking on the vehicle icons. Click the vehicle icons with the
RMB to deselect them.
Note: when more than one vehicle is selected, all movement and Rules of
Engagement orders will apply to all currently selected vehicles. However, the
craft weapon display, button and the button will only apply to the
highlighted vehicle (shown as a brighter icon).
2. Craft Weapon Display - The three boxes underneath the Vehicle List, display
the currently selected vehicle’s weaponry.
3. Set Attack Mode - These four buttons set the vehicle’s behaviour, from
evasive flight to aggressive attack.
4. Set Vehicle Altitude - These four buttons select a vehicle’s altitude as it flies
over Mega-Primus.
X-COM
5. - Orders an
6. - Orders an
7. - Orders an
vehicle towards a selected building.
X-COM
vehicle to a specific map location.
X-COM
vehicle to return to Base.
8. - Click this to take you to the Equip Vehicle Screen.
9. - This button opens the Vehicle Location Screen.
10. - Orders an
11. - Orders an
X-COM
vehicle to intercept another designated vehicle.
X-COM
vehicle to attack a selected building.
For a full explanation of how to select and order vehicles, see Vehicle Orders
later in this chapter.
EQUIPPING VEHICLES
Ensure that vehicles are fully equipped before you send them out on missions;
remember a vehicle can only be equipped when it is at Base.
X-COM
• Click from the
Vehicles Tab, this will take you to the Equip
Vehicle Screen.
Note: You can also click from the Bases Screen.
EQUIP VEHICLE SCREEN
Information Panel
Vehicle With
Arming Areas
Vehicle List
Menu Bar
p.118
Item Menu
p.119
Page 63

X-COM
Vehicles Tab
The Equip Vehicle Screen consists of these main areas:-
1. Vehicle List
2. Vehicle with Arming Areas
3. Information Panel - Moving the cursor over any of the vehicles in the Vehicle
List, or any of the items in the Item Menu, will display corresponding
information in this panel.
4. Item Menu - This area lists either: Weapons, Equipment or Engines.
5. Menu Bar - There are three options:
• Weapons
• Engines
• Equipment
Arming Vehicles
• Use the Scroll Arrows to cycle through the Vehicle List (if necessary).
• Highlight the vehicles by placing your cursor over them. When a vehicle is
highlighted, its statistics will appear in the Information Panel.
• Click on the vehicle you wish to equip. The vehicle will now appear in the
centre of the screen along with its present equipment.
• Click if you wish to arm the vehicle with weapons.
• Click if you wish to fit the vehicle out with engines.
• Click if you wish to load the vehicle with equipment.
• Locate the item of your choice from the Item Menu.
• Drag and drop items from the Item Menu to the equipment area of your
choice (on the vehicle).
Note: you can only ‘drop’ items into flashing Arming Areas.
To remove an item from the vehicle, simply drag and drop it to the Item Menu at
the bottom of the screen. The item will now be returned to the stores.
• Click OK to leave this screen, when you are happy with your choices.
Note: each time a vehicle returns to Base, after a mission, it will be re-armed or
re-fuelled automatically, providing there is enough ammunition or fuel of the
correct type to do so.
VEHICLE LOCATION
SCREEN
This screen is very similar to the Buildings Screen mentioned in the Cityscape
section of the Reference Guide. The screen informs you where your vehicles are
and what Agents are assigned to them.
X-COM
• Click from the
Vehicles Tab.
A list of either weapons, equipment, or engines will now appear in the Item List.
p.120
The Vehicle Location Screen consists of an Agent List and a Vehicle List.
p.121
Page 64

X-COM
Vehicles Tab
This screen allows you to drag and drop Agents to and from vehicles to assign
and de-assign them
VEHICLE ORDERS
With your vehicle equipped and ready for action, you can send it out on a
mission. To give your vehicles orders, you must be in the Cityscape Screen.
X-COM
• Click on the
Vehicles Tab if it isn’t already displayed. You will now be
in a position to give any of the following orders:-
Attack
Hostile Unit
Attack
Building
Go to
Building
Go to Map
Return
to Base
Point
Equip
Vehicle
Vehicle
Location
GO TO BUILDING
Orders a vehicle towards a selected building.
• Use the Vehicle List to choose a vehicle.
• Click on the vehicle to select it.
• Click and select the destination building by clicking on it in the
Overhead/Isometric Map View. Your vehicle will make its way towards the
building and stop there, waiting for further orders.
GO TO MAP POINT
This orders a vehicle to a location anywhere on the map.
• Use the Vehicle List to choose a vehicle.
• Click on the vehicle to select it.
• Click and select the destination by clicking on it in the
Overhead/Isometric Map View. Your vehicle will make its way towards that
destination and wait, until you give it further orders.
Note: you must use this order when you want to enter a Dimension Gate. To
enter a Dimension Gate you must have developed the appropriate technology.
RETURN TO BASE
This orders a vehicle to return to its Base.
p.122
p.123
Page 65

X-COM
Vehicles Tab
• Use the Vehicle List to choose a vehicle
• Click on the vehicle to select it
• Click . The vehicle will make its way back to Base where it will wait for
further orders.
ATTACK HOSTILE UNIT
See Intercepting Hostile Vehicles later in this chapter.
ATTACK BUILDING
When Aliens gain control of an organisation you may want to attack that
organisation’s building.
• Use the Vehicle List to choose a vehicle
• Click on the vehicle to select it
• Click and select the target building by clicking it in the
Overhead/Isometric Map View. Your vehicle will make its way towards the
target and attack.
Remember that attacking a building will provoke hostile actions from the host
organisation.
Your vehicle will continue to attack until you give it further orders.
INTERCEPTING HOSTILE
VEHICLES
When UFOs appear in the city, you may order
X-COM
Attack Hostile Unit orders an
• Use the Vehicle List to choose a vehicle.
• Click on the vehicle to select it.
• Click and select the target vehicle by clicking on it in the
Overhead/Isometric Map View. Your vehicle will now attack that vehicle, until
you give it further orders.
craft to intercept a vehicle selected by you.
X-COM
vehicles to intercept them.
Note: if you do not select a target vehicle your craft will attack any hostile vehicle
within weapon range, according to the Rules of Engagement. If you target a
particular vehicle then the craft will only
If the target vehicle is destroyed then you should order your vehicle to return to
Base.
attack the vehicle it is pursuing.
Note: when UFOs appear in the city, you will not be able to select (Ultra
Fast) from the Time Controls. To check if the UFO is still in the city, open the
Hostile Vehicles Tab (all vehicles currently in the city are listed here).
p.124
p.125
Page 66

X-COM
Vehicles Tab
RULES OF ENGAGEMENT
Whenever your vehicles are executing orders in Mega-Primus, you can control
their behaviour by setting the Rules of Engagement.
Weapons On/Off
Often your vehicles are armed with an array of weaponry, some of which might
be too powerful for the mission in hand. Rather than take these weapons off
altogether, you can just prohibit the use of that weapon by clicking on it in the
X-COM
Vehicles Tab.
Altitude
These four buttons select a vehicle’s altitude as it flies over Mega-Primus.
Attack Mode
Aggressive
Standard
Defensive
Evasive
These four buttons set the Attack Mode of your vehicle:
• Evasive - Avoid hostile craft at long range and do not fire on them. The craft
will not take a direct route to its destination if it moves close to an enemy
craft.
• Defensive - Avoid hostile craft at medium range and only fire in retaliation.
• Standard - Avoid hostile craft at short range and fire on hostile craft if they
are in weapon range.
• Aggressive - Do not avoid hostile craft at all, and fire on hostile craft if they
are in weapon range.
Waypoints
When you order your vehicles to do anything and deploy them in the city, they
will take the most direct route possible, which may not always coincide with your
strategy. In
X-COM Apocalypse
you can have more strategic control over your
vehicles, by giving them waypoints to follow.
p.126
p.127
Page 67

X-COM
Vehicles Tab
A waypoint is a fixed map position that a craft will travel through before moving
on to the next waypoint or the final destination.
Note: it is best to add waypoints and plan strategy whilst you are in the
Overhead Map View.
The procedure for adding waypoints is as follows:
• Select a vehicle, or group of vehicles from the
• Select a vehicle order (ie Attack Hostile Unit).
• To add waypoints, hold down the Control key on the keyboard whilst clicking
destination points on the map.
• Release the Control key and select your target (final destination).
Your vehicle will now complete its orders, only after following the route outlined
by the waypoints.
X-COM
Vehicles Tab.
VEHICLE COMBAT AND
TACTICS
X-COM Apocalypse
section of the game. Because of the dense population of Mega-Primus, you
should avoid combat in the city (if possible). Any damage to buildings will upset
the owning organisations and the Senate, causing you problems in the future.
allows you more scope to develop strategies in the Cityscape
However, this is not always possible, so here are a few tips for you when you
engage UFOs in the city:
• If possible, use multiple attack vehicles. Split these vehicles up and use the
waypoint system, so that they can attack from different angles.
• Plan your attacks in the Overhead Map View whilst the game is paused. Use
the pause facility to re-evaluate your strategy on a regular basis.
• Disable active weapons until there is a clear path for missiles or beam
weapons to fire.
• Using the Aggressive Attack Mode will give you greater control over your
vehicles, but you will need to pay careful attention to what is going on.
Occasionally, your craft will need to flee from UFOs. Low altitude flying will allow
you to use high buildings for cover. The quickest way to escape from a UFO, is
to go to a nearby building and hide. When the coast is clear, you can resume
your attack.
Note: experiment with different tactics, vehicles, weapons and equipment.
SHOOTING DOWN UFOS
AND UFO MISSIONS
When you are intercepting UFOs in Mega-Primus, it is worth remembering that
you are not trying to destroy them - there are larger goals than merely protecting
the city in the short term. Your objective is to capture and research as much
p.128
p.129
Page 68

X-COM
Vehicles Tab
Alien technology as possible and the only way to do that is to capture Aliens,
their weapons and their UFO technology. You should therefore aim to down UFOs
rather than destroy them.
When a UFO has crash-landed, you should send your Agents out to investigate
the crash site, before the Aliens destroy the evidence (to protect the secrets of
their technology). In order to investigate a UFO Crash Site you must send a
single flying vehicle with Agents:
• Click to order your vehicle.
Note: you can also click .
• Click the crashed UFO to set your vehicle’s destination. Your Vehicle and
Agents will now make their way to the Crash Site.
Remember, only by killing and/or stunning the entire Alien crew will you capture
the UFO technology.
Note: don’t forget that you will need a cargo module on the recovery craft in
order to return the technology to your Base.
SOME THINGS TO
REMEMBER
1. Your craft can run out of ammunition and fuel during combat. When this
happens you will be given a suitable message. When your craft returns to
Base it will automatically be re-armed and refuelled, unless there is not
enough fuel or ammunition - in this case you will also be informed.
Note: vehicles will still use fuel even if they are hovering in the city. When a
vehicle is low on fuel it will automatically return to Base.
2. When vehicles are damaged in combat, they must be returned to one of the
vehicle repair bays. Repair bays can repair several vehicles at a time, but are
less efficient when over-loaded. Ideally, you should only have one damaged
vehicle in a repair bay, at any one time.
p.130
p.131
Page 69

AGENT TAB
At the beginning of the game,
X-COM
has a small number of Agents capable of
carrying out investigations; generally these will be rookies. As the operation
expands, these Agents will gain more experience and be promoted.
• Select the Agent Tab from the Central Information Panel in the Cityscape.
Agent Tab Agent List
Agent Name
and Orders
This Tab refers to the Agents you have at your disposal. The following is an icon
summary:-
1. Agent List - The area across the top of the panel shows all of the Agents at
your disposal. Use the Scroll Arrows to look through the list. Click on an icon
to select the Agent; click again to centre the display on the Agent. You can
select multiple Agents by holding down the Control key (on the keyboard) and
clicking on the Agent icons.
2. Agent Name and Orders - This information area shows the presently
highlighted Agent’s name and current orders.
X-COM
3. - Orders an
4. - Orders an
Agent towards a selected building.
X-COM
Agent to return to Base.
5. - Click this to take you to the Equip Agent Screen.
6. - This button opens the Agent Location Screen.
7. - Click this to put a selected Agent into Combat Training (For full details
see Training later in this chapter).
8. - Click this to put a selected Agent into Psi-training (For full details see
Training later in this chapter).
EQUIP AGENT SCREEN
Agents can be equipped anywhere in the city (providing there is enough
equipment to equip them with). Your Base will be where all bought equipment is
stored, so it is probably better to equip them there.
• Click from the Agent Tab in the Cityscape Screen; to take you to the
Equip Agent Screen.
Note: you can also click from the Bases Screen. Alternatively, you can open
the Equip Agent Screen by clicking Agent icons in the Alert Screen, the
Buildings Screen and the Squad Assignment Screen.
p.132
p.133
Page 70
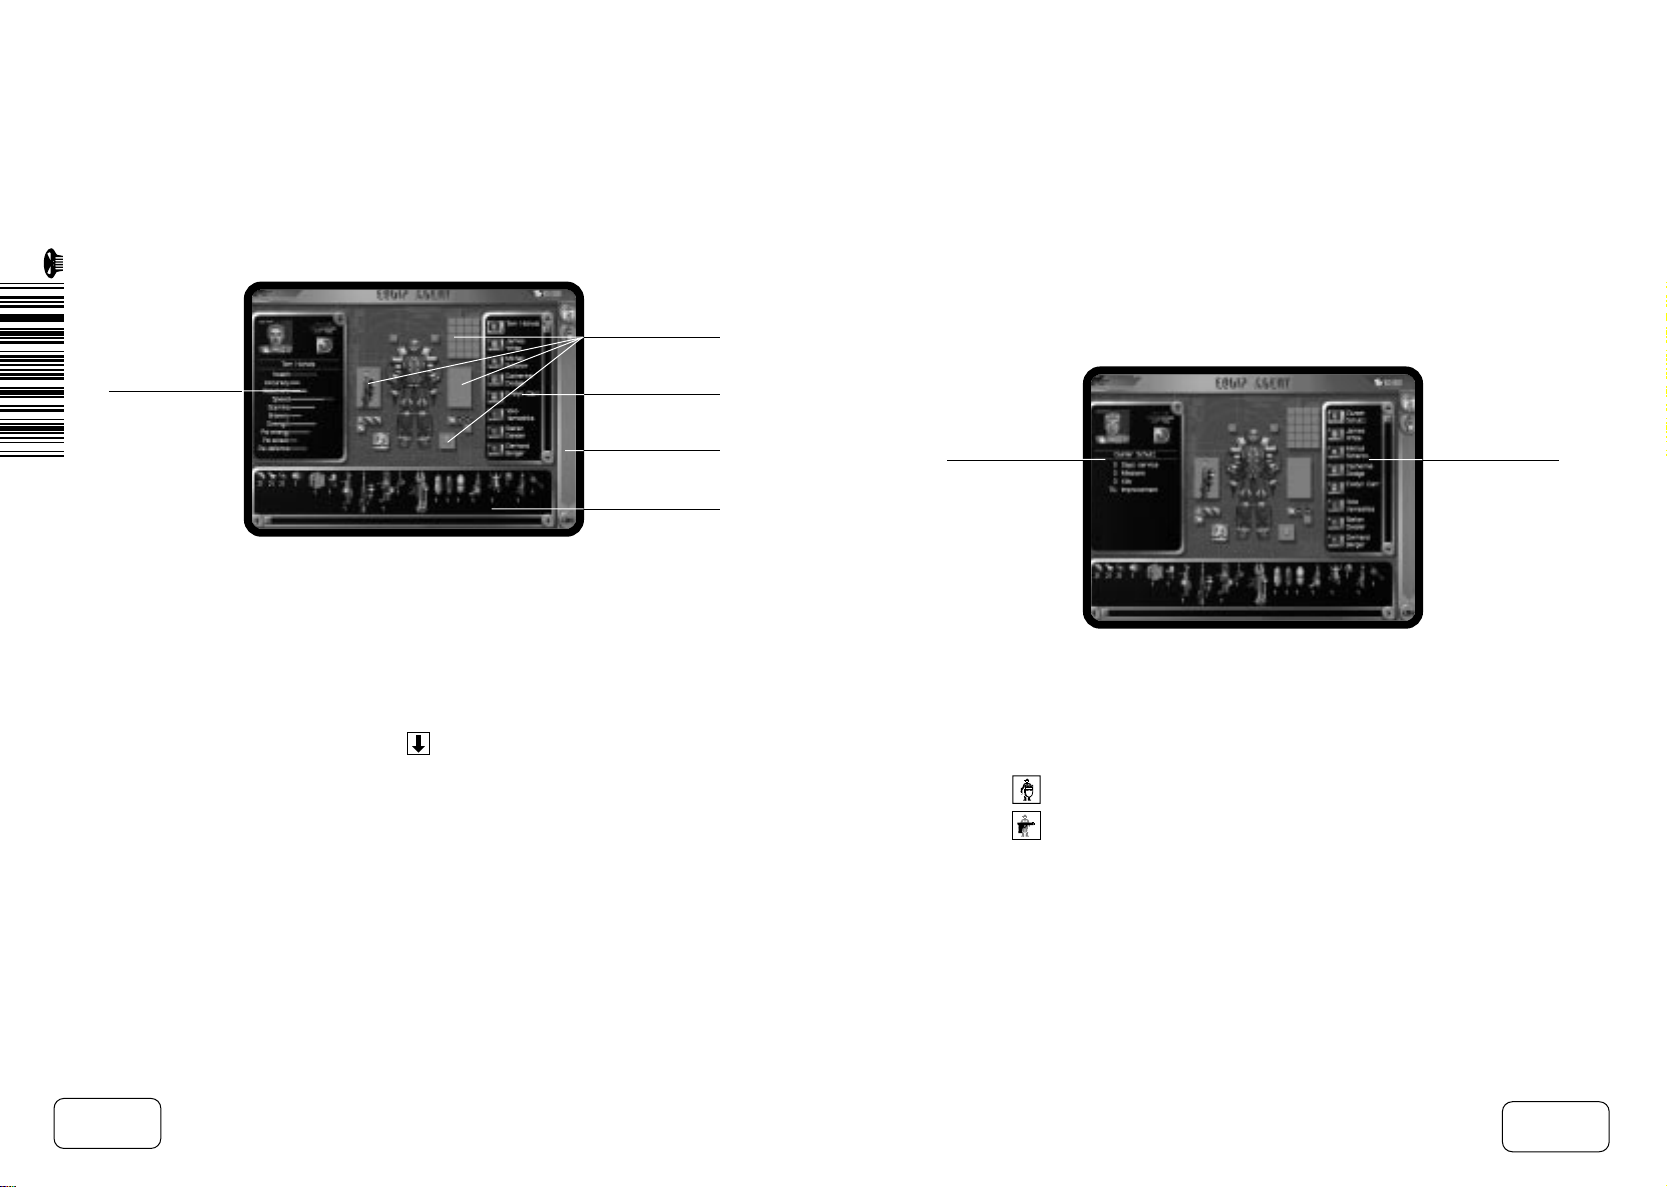
Agent Tab
EQUIPPING AGENTS
Equipment Areas
Information
Panel
Agent List
Menu Bar
Item Menu
The Equip Agent Screen consists of these main areas:-
1. Agent - Centrally located, the Agent’s body diagram is used to fit Armour.
2. Equipment Areas - These relate to areas on the Agent’s body where
equipment and weaponry can be carried.
3. Agent List - This area allows you to cycle through all available Agents.
4. Information Panel - The currently selected Agent’s portrait and statistics will
be displayed here. Also, clicking the icon in the top-right corner of the
panel, allows you to access the Agent’s Service Record.
5. Item Menu - This area lists all available equipment or armour.
6. Menu Bar - You can select to display either Agent’s equipment or armour
from here.
• Look through the Agent List using the Scroll Arrows.
Agent Service
Record
Agent List
• Click on the Agent you wish to equip. When an Agent is selected, their name
and statistics will appear in the Information Panel.
Note: you can rename your Agents by clicking on the existing name in the
Information Panel. Type the new name and press Return on the keyboard.
• Click to fit the Agent with armour.
• Click if you wish to give the Agent guns or equipment.
A list of equipment or armour will now appear (depending on which you
selected) in the Item Menu.
p.134
p.135
Page 71

Agent Tab
• To locate the desired item, cycle through the Item Menu at the bottom of the
screen.
• Drag and drop items from the Item Menu to the Equipment Area of your
choice (on the Agent). To remove an item from an Agent, simply drag and
drop the item to the Item Menu. The item will now be returned to the stores.
You can equip multiple Agents with the same item to avoid unnecessary time
spent in the Equip Agent Screen. To do this:
• Select the Agents you wish to equip by holding down the Control key on the
keyboard and click a group of Agent Icons.
The group of Agents will now be highlighted.
• Drag and drop your selected item to an Equipment Area on the current Agent
(as above). All Agents will now be equipped with that item.
Agents’ weaponry will be automatically loaded with ammunition of the correct
type (if there is some available). However, some weapons have different types of
ammunition. To load a weapon with alternative ammunition, drag and drop the
ammunition to the appropriate weapon.
When you are happy with your choices, click OK to leave this screen.
However, it is up to you to make sure you equip your Agents with any additional
ammunition or equipment.
AGENT LOCATION
SCREEN
This screen is very similar to the Buildings Screen mentioned in the Cityscape
section of the Reference Guide. The screen informs you where your Agents are
and what vehicles they are assigned to.
• Click from the Agent Tab.
The Agent Location Screen consists of an Agent List and a Vehicle List.
The screen allows you to drag and drop Agents to and from vehicles to assign
and de-assign them
DEPLOYING AGENTS IN
MEGA-PRIMUS
Once your Agents are equipped and ready for action, you can send them out in
Mega-Primus.
Note: after returning to Base from a Tactical Combat Mission, Agents will re-arm
themselves automatically, providing there is enough equipment to do so.
p.136
• Click the Agent Tab in the Cityscape Screen.
p.137
Page 72

Agent Tab
Agent Tab
• Click to highlight your Agents, then click .
• Select the building you wish to investigate by clicking on it in the
Overhead/Isometric Map View.
The Agent(s) will move immediately to that building. If the target building is
connected by a ‘People Tube’, then your Agents will use them; they may also
choose to use a Taxi or go on foot, to reach their destination.
X-COM
You can also assign Agents to
craft and dispatch the vehicle to the target
building.
Once Agents have reached their destination, an ‘Agent’ icon will appear over that
building.
• Click the building to go into it and order your Agents.
Note: for further details see Buildings Screen in the Cityscape section of this
manual.
THE ALERT SCREEN
X-COM
Whenever there is an Alert in Mega-Primus,
will be informed via the Alert
Screen. Alerts warn of Alien activity in all its guises.
Alert Information
Menu Bar
Agent List
Vehicle List
The Alert Screen consists of these items:-
1. Alert Information - This area displays the name of the building where the
Alert is taking place. It also informs you which organisation owns the
building.
2. Agent List - The left of the screen lists all the unassigned Agents you have
available to investigate the cause of the Alert and their current location.
p.138
p.139
Page 73

Agent Tab
3. Vehicle List - The right of the screen gives a list of all vehicles, the Agents
assigned to them and the vehicle’s present location.
4. Menu Bar - You can select to Investigate Incident, Equip Agent, Equip
Vehicle or click OK to ignore the Alert and return to the Cityscape.
Note: click an Agent or Vehicle icon to equip any of your Agents or vehicles.
Investigate an Alert
To deploy a squad from this screen, simply select which Agents and which
vehicles you wish to dispatch (make sure you click their names and not the
icons). Who and what you send will obviously depend on the type of Alert, and
how close they are to it.
If you deploy a vehicle to the Alert Site, then you may have to assign Agents to
that vehicle. To do this:
• Drag and drop your Agents to the desired vehicle from the Agent List. The
Agent will now appear under the vehicle icon; this is now its vehicle
assignment.
Note: Agents already assigned to vehicles will be shown in the Vehicle List.
Now that your squad has been assigned, you will have to send that vehicle to the
Alert Site.
Note: you can send more than one vehicle to an Alert Site.
• The vehicle will now be highlighted, as will all Agents assigned to that vehicle.
Note: to send a vehicle with Agents already assigned, simply select the vehicle
name. All of the Agent names will be automatically highlighted.
• Click . The vehicle will now proceed to the Alert Site and close the Alert
Screen.
Note: to send Agents only, simply select Agents, without assigning them to a
vehicle.
When your Agents have arrived at the Alert Site a ‘window’ will open. The
‘window’ will contain the Incident Type and Site information again; it will also
prompt you to confirm whether you wish to investigate or not.
• Click Yes to begin the investigation. You will be taken directly into a Tactical
Combat Mission.
• Click No to decline the investigation. You will now be returned to the
Cityscape Screen.
Note: the more heavily armed and numerous an X-COM squad is, the more
damage they will cause at the Alert Site. Causing mass destruction to a building
may make an organisation hostile, although being sent on official Alerts does
diminish this possibility.
p.140
p.141
Page 74

Agent Tab
TRAINING
X-COM
Agents, although the best in the city, are still able to improve their
abilities. They achieve this through dedicated training at the Base gyms. There
are two ways in which an Agent can improve themselves:-
• Combat Training
• Psi-Training
The process for putting an Agent into Psi-Training, is the same as putting one in
for Combat Training.
X-COM
TRAINING
From the Cityscape Screen, click the Agent Tab (Central Information Panel) and
select an Agent icon by clicking on it.
AGENTS
There are some restrictions which have to be observed before putting an Agent
into training. Firstly, any Agent that is injured will be unable to train until they are
at full health. Additionally you need the appropriate training facilities before
training can begin. In the case of Psi-Training you will need a Psi-Gym, and a
Training Facility for Combat Training (For full details on building either of these
facilities, see Build Facilities in the Bases section).
Lastly, if any of the facilities are overused then the efficiency of training will be
reduced.
The result of training is that some Agent statistics will increase. Agents who have
undergone Psi-training, will increase their Psi-statistics. Agents undergoing
Combat Training will improve reactions, stamina, max. health and current health.
The percentage improvement will also appear in the Agent’s Service Record (see
Equip Agent Screen for further details).
• Click to put an Agent into Combat Training.
• Click to put an Agent into Psi-Training.
Whenever you highlight Agents in the Agent Tab, they will be labelled as
“Training”. Once they are set to train, Agents will do so whenever they are back
at Base; training can only be done whilst at Base. The Agent will, however,
remain in active service the whole time.
p.142
p.143
Page 75

BIOCHEMISTRY,
ENGINEERING AND
QUANTUM PHYSICS TABS
When you first start the game
X-COM
will already have a small number of
quantum physicists, biochemists and engineers. You will need these to succeed
against the Aliens; only with a dedicated group of scientists and engineers
carrying out quantum research, biochemistry research and manufacturing will
this be possible.
The Biochemistry, Engineering and Quantum Physics Tabs are essentially the
same so we will cover them collectively. They consist of:-
1. Personnel List - This area shows all scientists or engineers at your disposal.
Use the Scroll Arrows to look through the list.
2. Name and Project - The name of the currently selected scientist or engineer,
and the project they are working on, will be displayed underneath the
Personnel List. The percentage of project completion, is also shown.
• Select either the Biochemistry Tab, Engineering Tab or Quantum Physics Tab
from the Central Information Panel in the Cityscape.
• The Quantum Physics and Biochemistry Tabs have a icon. Click this to
take you to the Research and Manufacture Screen.
• The Engineering Tab has a icon. Click this to take you to the Research
and Manufacture Screen.
Note: you can also click in the Bases Screen.
RESEARCH AND
MANUFACTURE
As you gather Alien artefacts from your investigations, you will need to research
them in order to find out more about the Aliens and their technology.
RESEARCH AND MANUFACTURE SCREEN
Note: you cannot research or manufacture anything without the appropriate
facilities (For full details on building facilities, see Build Facilities in the Bases
Tab section of this manual) ie if you wish to manufacture something, you must
first have an Engineering Workshop.
Menu Bar
Base List
Facilities Menu
Information Panel
Available
Personnel List
Assigned
Personnel List
p.144
p.145
Page 76

Agent Tab
The Research and Manufacture Screen consists of these main elements:-
1. Base List - This shows all of your Bases.
2. Menu Bar - There are two options: Assign Project and Stop Project.
3. Facilities Menu - At the top-right of the screen is a list of the labs and
workshops at your disposal:
• Biochemistry Lab
• Quantum Physics Lab
• Engineering Workshop
Each will have an accompanying number representing the number of personnel
currently assigned to that facility.
4. Information Panel - Project Names and percentage complete will be displayed
in this panel. Also, in this section you will be able to designate the number of
items to be manufactured, when you assign a manufacturing project.
5. Assigned Personnel List - This is a list of personnel assigned to the selected
lab or workshop.
6. Available Personnel List - This is a list of available personnel for the selected
lab or workshop.
Assigning Projects
To assign a research/manufacturing project, first select the Base at which the
project will be carried out.
• Click on the Base of your choice from the Base List. The research and
manufacturing facilities at that Base will be shown in the Facilities Menu. To
change your Base selection, simply click on another Base.
From the Facilities Menu, click the laboratory or workshop from which you wish
to work. Click the Biochemistry Lab for a Biochemistry project, the Quantum
Physics Lab for a Quantum project, or the Engineering Workshop if you wish to
pursue a manufacturing project.
A list of personnel icons will appear in the Available Personnel List, underneath
the Base List. “No Project” will now be written in the Information Panel if no
projects are assigned.
Before you assign scientists, you must first select a project.
• Click to open the Project Screen.
• As you move the cursor over the projects, a brief project description will
appear at the bottom of the screen.
• Click to select a project.
• Click OK to start the project and return to the Research and Manufacture
Screen.
The project name will now be listed in the Information Panel along with a
progress bar.
Note: when you are doing manufacturing projects, a “Number to Build” bar will
also appear in the Information Panel. Click and drag the Slider Bar until the
number you want to build is shown.
p.146
p.147
Page 77

Biochemistry, Engineering and Quantum Physics Tabs
• Click to assign personnel from the Available Personnel List. They will now be
repositioned in the Assigned Personnel List.
Research on this project will now begin.
• Click OK to close this screen.
Stopping Projects
You may wish to reassign personnel to a more important project. In this case,
you can temporarily stop one project, in favour of another.
• Go to the Research and Manufacture Screen (see above for details) and
select the lab where the project is in progress, from the Facilities Menu, ie
Biochemistry, Quantum Physics or manufacture (see above for details).
Note: each lab or engineering workshop can only have one project at a time, so
selecting a lab or workshop will automatically select the project being worked on.
• Click . All resources and personnel from that project are now free to be
used elsewhere. The progress of the project you have stopped will be retained
should staff be reassigned at a later date.
Research Completed
When work has finished on a project, the Research Completed window will
appear on the Cityscape Screen. Click No to return to the Cityscape or click Yes
to view the result of the research (all research reports are available at any time in
the UFOpaedia).
• Click OK to exit from this screen, after reading the results of your research.
The Research Screen will now open to allow you to start new research or
manufacture projects. Any new research or manufacture projects which are
now possible as a result of that research, will appear in the Project Screen.
Manufacture Completed
When manufacture of an item has been completed, the Manufacture Complete
window will appear on the Cityscape Screen. This displays both the name of the
item and the location at which it has been manufactured.
p.148
p.149
Page 78

HOSTILE VEHICLES TAB ORGANISATIONS TAB
• Select the Hostile Vehicles Tab from the Central Information Panel in the
Cityscape.
This Tab contains a scroll list of all hostile vehicles in Mega-Primus. The Hostile
Vehicles Tab allows you to select and track hostile vehicles when they appear in
Mega-Primus.
• Double-click on any of the vehicle icons to centre them in the Cityscape
Display.
• Select the Organisations Tab from the Central Information Panel in the
Cityscape.
The Organisations Tab consists of the following features:
1. A Scroll List of organisations operating in Mega-Primus.
2. Six filter buttons: All, Allied, Friendly, Neutral, Unfriendly and Hostile. These
buttons allow you to sort organisations in the Scroll List, according to their
X-COM
relationship with
organisations in the Scroll List).
3. Offer Settlement - This button allows you to offer a cash settlement to
another organisation in an attempt to patch up diplomatic relations. This is a
useful tool, particularly if you upset one of your arms suppliers such as
Marsec or Megapol.
(ie clicking Allied will only display Allied
Note: if you are in the Overhead Map View, any buildings owned by the selected
organisation will be highlighted. Hostile organisations will be Red, Unfriendly
will be Dark Red, Neutral will be Purple, Friendly will be Dark Yellow and Allied
will be Bright Yellow.
p.150
p.151
Page 79

THE TACTICAL GAME
X-COM Apocalypse
either of the previous
offers the
X-COM
X-COM
Commander more scope for action than
games. Tactical combat can be initiated in many
different scenarios.
X-COM
Raids -
Agents can raid buildings, steal equipment, attack security
guards and inflict structural damage causing economic difficulties for the owning
organisation.
Investigate Building - News that Aliens have been sighted at buildings will
X-COM
warrant
UFO Crash Site - After UFOs have been downed in the Cityscape,
searching the building for Aliens and Alien artefacts.
X-COM
may
choose to send a squad to investigate.
X-COM
Base Invasion - Hostile organisations and Aliens can, and will, invade
X-COM
your Base in an attempt to shut you down -
Agents must be prepared
and equipped to repel any such attempts.
Alien World Incursion - When you have developed your information and
technological expertise far enough, you will be able to take the battle into the
Alien Dimension. On the other side, there will be a host of as yet unknown
X-COM
objectives for the Agents of
to complete.
Any Tactical Combat Mission can also be played in either the Real-Time or TurnBased modes.
EQUIPPING AGENTS
BEFORE A TACTICAL
MISSION
You can equip your Agents anywhere where there is equipment. It is best for you
to kit them out with the appropriate weapons and equipment before sending any
X-COM
of them on a mission (for full details on equipping
Agents, see Equipping
Agents in the Agent Tab section of the manual).
Tip: ensure your Agents have enough guns and ammo to survive any surprise
encounters.
BRIEFING SCREEN
Whenever you begin a Tactical Combat Mission you will be given a briefing
detailing your objectives.
p.152
Start Real-Time
Game
Start Turn-Based
Game
p.153
Page 80

The Tactical Game
The Briefing Screen allows you to choose between Real-Time and Turn-Based
modes of play.
• Click to start a Real-Time Game. This mode provides a much more
realistic simulation of individual combat. It is more challenging than the TurnBased Game.
• Click this to start a Turn-Based Tactical Game.
The Turn-Based system allocates an amount of Time Units to each of your
Agents. Every action you perform uses Time Units; this means that your Agents
can only move a certain distance before they expend those Time Units. It also
means you can only shoot, pick things up, or use equipment if you have enough
Time Units to perform that action.
X-COM
Players of previous
Based system in
THE DEEP
X-COM Apocalypse
and now features Opportunity Movement as well as Opportunity Fire
games will be familiar with this method. The Turn-
has been improved since
TERROR FROM
(more on this later).
After you have selected your chosen game mode, you will be taken to the Squad
Assignment Screen.
SQUAD ASSIGNMENT
SCREEN
This screen allows you to assign Agents into squads.
Equip Agent
Information
Panel
Agent Icons
Squads
SQUADS AND AGENTS
Your Agents will already be assigned to squads, the game makes default
assignments depending on the number of Agents you have deployed to the
Tactical Combat Mission.
The six possible squads are displayed in the centre of the screen. Each squad
has space for up to six Agents.
p.154
p.155
Page 81

The Tactical Game
To change an Agent’s current squad assignment, drag and drop them from one
squad, to another.
THE TACTICAL SCREEN
Note: you can assign and reassign Agents as much as you wish.
INFORMATION PANEL
As you move the cursor over Agents you will see their statistics displayed in the
Information Panel; the boxes below indicate any weapons being carried in the
Agents left and right hands.
EQUIP AGENT
• Click , from the Menu Bar, to access the Equip Agent Screen and take a
more detailed look at an Agent’s weapons allocation.
Note: you can pass equipment and weapons from one Agent to another by
dragging items onto the ‘ground’ for other Agents to pick up.
It is also possible to access the Equip Agent Screen for a particular Agent by
clicking with the LMB on an Agent icon.
• Click OK to accept all squad assignments and start the Tactical Combat
Mission.
The Tactical Screen is split into two areas: the Tactical Display and the Control
Panel.
Tactical Display
Control Panel
TACTICAL DISPLAY
The Tactical Display always defaults to the Isometric Map View which allows
you to view the Tactical Area and control your squads and Agents.
p.156
p.157
Page 82

The Tactical Game
EXPLORING THE
TACTICAL DISPLAY
Moving the cursor to the edges of the screen will cause the display to scroll
revealing more of the Tactical Combat Area. At the start of each Tactical Combat
Mission, time is automatically paused so that you are able to look around and
plan your initial moves.
Note: you can also use the cursor keys (on the keyboard) to scroll the Tactical
Display.
LINE OF SIGHT
The Tactical Display will only show what is within your Agents’ line of sight. You
must move cautiously through the Tactical Area, seeking out hostile units and
exploring unrevealed terrain.
Note: Agents may be deployed anywhere within the Tactical Area.
OVERHEAD MAP VIEW
• Click to select the Overhead Map View. The Isometric Map View is
replaced with the Overhead Map View of the Tactical Area. Again, only the
areas that your Agents have explored will be displayed.
To scroll the Overhead Map View, move your cursor to the edge of the screen,
the Overhead Map will now scroll in that direction.
Note: you can also use the cursor keys on the keyboard to scroll the map.
Overhead
Map View
The Overhead Map View is an important strategic tool; it allows you to see a
larger section of the Tactical Area. Unlike the Isometric Map View, the Overhead
Map View highlights information and keeps you abreast of present activity - you
X-COM
are able to see at a glance the location of hostile units,
Agents and
civilians. It is also used to show the waypoints and destinations of all your
Agents.
The Overhead Map View uses symbols to represent the following:-
X-COM
Agents - Yellow
Hostile Units - Red
Neutral Units - Purple
p.158
p.159
Page 83

The Tactical Game
Solid arrows show units on the present level; large outline arrows show units
above the current level; small outline arrows show units below the current level.
The direction of the arrow indicates the direction that a unit is facing.
White Diamond box - this outlines the area you will see when you return to the
Isometric Map View.
• Click to return to the Isometric Map View.
THE CONTROL PANEL
Agent IconsSquad Icons Message Bar
Formations Time Controls
The Control Panel is located below the Tactical Display; it contains many icons
and buttons that allow you to manage your Agents whilst they are on Tactical
Combat Missions.
1. Message Bar - Any messages received by
X-COM
during Tactical Combat
Missions will appear in the Message Bar.
- Click this to centre the Tactical Display on the subject of any message
that appears in the Message Bar.
- Click this to take you to the Message History Screen. This screen
contains a list of messages you have received. Click to return to the
Tactical Display. This display will now be centred on the subject of the
selected message.
2. - Click this to toggle the camera mode. Clicking once stops the display
tracking units in the Tactical Display. This allows you to centre the display
anywhere. Notice that the icon will change to show you that tracking is
disabled. Clicking the button a second time enables tracking again. Any
selected unit will now be centred on in the Tactical Display.
3. - Click this to toggle between the Overhead Map View and the default
Isometric Map View.
4. - Click this to display different levels of your choice.
- Level Mode 1 hides ever ything above and below the currently selected
level, this is why some rooms in the building appear to have no roof.
- Level Mode 2 (the default setting), displays the level you are on and
any levels below.
-Level Mode 3 displays all levels at once producing a complete 3-D
picture.
5. - Click this to review your Mission Briefing.
6. - Click this to take you to the Options Screen.
p.160
p.161
Page 84

The Tactical Game
7. Double Click the Squad Icons to select and highlight squads. Each icon will
display the number of Agents in the squad. To deselect squads, simply click
on the icon with the RMB.
8. Formations - There are two squad formations you can use:
- Click this to move your squads in Group-Formation so they cover a wide
area.
- Click this to move your squads in Single-File.
9. Click the Agent Icons to select Agents. Each icon displays that Agent’s health.
When hostile units are sighted by an Agent, a small indicator is displayed at
the top of the Agent Icon.
10. - This allows you to assign Agents to different squads during Tactical
Combat Missions. Select one or more Agents and then click . Now click
on a Squad Icon and the selected Agents will be re-assigned to that squad.
11. Time Controls - Four buttons are provided to give you control over the pace
of the game.
- Click this to pause the game.
- Click this to make time pass slowly, allowing you more time to react.
- Click this to make time pass at its Normal Speed.
- Click this to make time pass at Double-Speed.
Note : if you are playing the Turn-Based game you will notice that there are an
extra four buttons which replace the Time Controls. These are used to reserve
Time Units for Shooting and Kneeling (see Turn Based Tactical Game for
details). There is also an End Turn button.
Turn-Based
Buttons
Remaining
Ammo
Ammo
Type
Hands Area
Accuracy
Display
Level
Indicator
12. Hands Area- There are two ‘hand’ areas displaying the contents of the left
and right hands. This area also contains these items:
- Click this to go to the Equip Agent Screen.
Accuracy display - The bar below each hand will show the accuracy of any
weapons held in that hand. The bars will become filled towards the centre of the
screen to indicate an Agents accuracy with the currently held weapon. The closer
the filled bar is to the centre of the screen the better an Agent’s accuracy.
Ammo Type - The box to the left/right of each hand displays the type of ammo
that is loaded in the current weapon.
p.162
p.163
Page 85

The Tactical Game
Remaining Ammo - The vertical bar next to the Agent’s hand, indicates how
much ammo is left in the weapon carried in that hand.
- Click on this to throw any item currently held in the associated ‘hand’.
- Click on this to drop any item currently held in the associated ‘hand’.
Level Indicator - Each numbered block in the bar represents a level of the
Tactical Area. Click any of these ‘blocks’ to change the level you are currently
viewing.
13. - Click these to move the view up/down a level.
Shot-Types
Movement
Orders
Attack
Modes
14. Movement Orders - There are four movement orders:
- Click this to order your selected Agent to assume a kneeling position when
they are not moving. Click the button again, Agents will now return to the
position dictated by their current Movement Orders. The advantage of kneeling
is that your Agent is less visible to hostile units and can fire more accurately.
- Click this to order your selected Agent to Crawl. The advantages of
crawling are that the Agent is a harder target to hit, and a more accurate shot
(when stationary).
- Click this to order your selected Agent to Walk.
- Click this to order your selected Agent to Run.
15. Attack Modes. There are three Attack Modes:
- Safe Mode. Click this to order your Agents to seek safety over
confrontation.
- Cautious Mode. Click this to order your Agents to use cover and engage
the enemy with caution.
- Aggressive Mode. Click this to order your Agents to ignore risks and
aggressively seek confrontation.
16. Shot-Types. The four different Shot Types control how your Agents will use
their weapons.
- Click this to prevent your Agents from taking a shot.
- Click this to make your Agent favour an Aimed-Shot. This is more accurate
than Snap or Auto-shots, but the rate of fire is slower.
- Click this to make your Agent favour a Snap-Shot. This is an un-aimed-
shot in the target’s general direction. It is most useful at short range.
- Click this to make your Agent fire a short burst of shots in the target’s
general direction. Again, this is most useful at short ranges.
p.164
p.165
Page 86

The Tactical Game
SELECTING SQUADS
In
X-COM Apocalypse
squads. You may have up to six squads in the Tactical Area at any one time.
The Squad Icons indicate the number of Agents in each squad; each squad can
contain up to six Agents.
• Double-click a Squad Icon to select a squad. To deselect the squad, simply
click the icon again with the RMB.
When you select a squad, an orange marker is displayed above each Agent in
that squad (in the Isometric Map View). The squad number is displayed in the
centre of the markers. The Agent’s present state of health is shown by the Health
Bar positioned along the top of the marker. In the lower half of the marker the
Agent’s Attack Mode is indicated by a coloured bar. Blue represents Safe Mode,
Green is used to show Cautious Mode and Red indicates Aggressive Mode.
One of the Agent markers will be yellow; this is the Agent whose equipment
appears centrally in the Hands Area. The currently displayed Attack Mode, Shot-
Type and movement orders refer to this unit only.
, you can control Agents individually or collectively as
Note: in the Turn-Based Game the number of Time Units an Agent has is
displayed above the marker. As Agents use Time Units this number will diminish.
When this number is 0 or too low to perform any actions, you will be told that
the Agent has run out of Time Units.
MOVING SQUADS
After selecting a squad, you can move it in Single-File, or in a ‘Group’ Formation.
‘Group’ Formation is selected as the default movement mode because it allows
your Agents to cover a wider area, aiding the exploration of unrevealed terrain.
In the Tactical Game, the cursor is accompanied by a green box as you move it
around the Isometric Map View. You may notice that the box turns yellow if you
move it over a square occupied by one of your Agents. This box is used to set
the destinations for your Agents.
• Select a squad (as above). Now, move the cursor to a position a short way in
front of the squad and click the LMB. Yellow arrows will appear to mark the
destination of your Agents.
Note: if you are playing in the Real-Time Game, and your Agents don’t move
when you have given them orders, check to see if time is paused. Click if
this is the case. Beware! The Aliens can now move and your Agents may be
attacked at any time.
• To stop your Agents before they reach their designated destinations, simply
click the RMB in the Tactical Display.
• Move the cursor to a position away from your Agents and press the RightMouse Button. Your Agents will turn to face the direction of the cursor. This
feature is very useful when exploring the Tactical Areas.
p.166
p.167
Page 87

The Tactical Game
Note: in the Turn-Based Game, if the Agent hasn’t enough Time Units, or if
Time Units are reser ved for other actions, the Agent will not be able to complete
the move until X-COM’s next Turn. If the destination is a long distance away, it
may take the Agent several Turns to complete.
Whenever your Agents have run out of Time Units, simply click . After the
Aliens have taken their Turn, your Agents will have all of their Time Units
returned to them, allowing you to play on. During the Aliens’ Turn The Hidden
Movement Screen will appear when Aliens are moving out of sight of X-COM
Agents. Although, any Alien units sighted by X-COM Agents will be shown.
Tip: it is best to end your Turn when your Agents are in cover; close to pipes,
tables or other large objects.
SELECTING INDIVIDUAL
AGENTS
There are two ways to select an Agent from the current squad.
• Click on any of the Agent Icons (faces) on the right of the Control Panel; a
yellow marker is displayed above the head of the Agent in the Isometric Map
View indicating who is selected. To deselect other Agents, simply right-click
on their Agent icons.
disappear from the first Agent and now appear above the second Agent.
Clicking on a single Agent in the Isometric Map View automatically causes all
other Agents to be deselected
There are also several ways to select groups of multiple Agents:
• Click and hold the LMB and move the Green cursor box over a number of
your Agents in the Tactical Display.
• Hold down the Control key on the keyboard and click the Agents of your
choice in the Isometric Map View.
• Hold down the Control key on your keyboard and click individual Agent Icons
in the Control Panel.
MOVING INDIVIDUAL
AGENTS
After selecting an Agent (see above) you are now ready to move them.
• Click on a destination a short way in front of the Agent.
A single yellow arrow will appear to show the Agent’s destination.
• Move the green cursor box over an unselected Agent in the Isometric Map
View, the box should change to yellow. Click on the Agent. The marker should
p.168
Note: Aliens or hostile units may be encountered at any time. Beware! Ensure
you keep an eye on your squad!
p.169
Page 88

The Tactical Game
• If you want your Agent to move to a square occupied by another Agent,
simply hold down the ALT key on the keyboard and click the destination. If the
Agent occupying the square is not moved, then the second Agent will move
as close as possible. Only when the first Agent moves, can the second Agent
move into that position. This is useful for moving Agents strategically along a
corridor.
• To stop Agents before they reach their designated destinations, simply click
the RMB in the Tactical Display.
• To make the selected Agent turn around, move the cursor to a position within
the Tactical Display and click the RMB. The Agent will now turn to face the
direction of the cursor.
Note: doors will open automatically, when you stand next to them.
MOVING AGENTS AND
SETTING WAYPOINTS IN
THE OVERHEAD MAP VIEW
• Click to enter the Overhead Map View.
• Click any of your
• Click a destination on the map to move the selected Agent. A blue cross will
appear at the destination, the yellow line shows the Agents distance left to
X-COM
Agents. They will be highlighted with a yellow box.
travel and the route they are taking. You can change the target destination
simply by selecting a new one.
Note: the blue cross will appear as a blue circle if the selected destination is
above or below the level currently being viewed.
Agents will take the most direct route to their new destination (depending on
their orders), which may not be in line with your strategy. The Overhead Map
View allows you to select waypoints for your Agents. A waypoint is a fixed map
position that an Agent will travel through before moving on to the next waypoint
or the final destination. This allows you to move your Agent to a Destination by
your own route.
The procedure for adding waypoints is as follows:
• Select an Agent, or group of Agents.
• To add waypoints, hold down the Control key on the keyboard whilst clicking
destination points on the map.
Your Agent will now move to the new destination only after following the route
outlined by the waypoints.
Note: you can select multiple Agents by pressing and holding the Control key on
the keyboard whilst you click the Agents you wish to select. You can also select
Agents by clicking on the Agent Icons in the Control Panel. To deselect Agents,
right-click on the Agent Icon(s).
p.170
p.171
Page 89

The Tactical Game
To move an entire squad, simply select a squad by double-clicking a Squad Icon.
A yellow highlighter box will appear around each member of that squad. As
before, just click a destination, and the Agents will move towards it.
• Click to return to the Isometric Map View.
MAKING AN AGENT
JUMP
If there is a hole in the floor or some other obstruction caused by an explosion,
providing it is not huge, the Agent will be able to jump across.
• To order an Agent to jump, hold down “J” on the keyboard and click on the
adjacent square. The Agent should now jump.
Note: Use this carefully, as jumping down multiple levels may cause Agents to
damage themselves (depending on the armour that they are wearing).
FLYING
If an Agent is equipped with the Marsec Elerium Body Armour they will be able
to fly. The Agent will fly if it helps get to a destination more quickly. To make an
Agent fly, simply select a destination in the air.
ENGAGING THE ENEMY
AND WINNING TACTICAL
COMBAT MISSIONS
USING COVER
Using the available cover in the terrain is essential for improving your tactics.
The best method is to position your Agents next to a space which provides cover
from enemy fire.
The Attack Modes are used to influence the way Agents react to their
surroundings. Agents in Cautious Mode will duck in and out of cover
automatically, if it is nearby (if they are positioned behind low cover, Agents may
kneel down to avoid enemy fire and stand to return fire).
Agents using Aggressive Mode will favour confrontation, regardless of safety.
Agents in Safe Mode will always attempt to find cover.
Tip: set up ambushes for the Aliens; try to use areas where Agents can only be
attacked from one direction and use Agents to cover each other.
USING THE MOTION SCANNER
The motion scanner can be used to help you track down enemy units. To use it,
make sure that it is in one of your Agent’s hands.
p.172
p.173
Page 90

The Tactical Game
• Click on the Motion Scanner in the Hands Area. The Motion Scanner Display
will appear in the top right corner of the screen.
The Motion Scanner Display shows moving objects as bright white blips. The
arrow in the centre of the display shows the current facing of the Agent holding
the scanner.
Note: the scanner shows moving objects. It does not discriminate between
hostile units and X-COM.
ENEMY SIGHTED!
When a hostile unit is spotted, ‘Alien Sighted’ Indicators will appear above the
Agent’s icon in the Control Panel. The number of small circles, represents the
number of Aliens spotted by that Agent.
• Click the ‘Alien Sighted’ Indicators to centre the Tactical Display on the
relevant Alien.
The game will also pause and the Message Panel will inform you of the current
situation. It is recommended
Agents to cope with the new situation. Giving your Agents regularly updated
orders will keep them alive longer!
that you take advantage of this to re-order your
• Click to pause and centre on the hostile unit.
Note: you can prevent the game from pausing by switching the Message Panel
off from the Options Screen. Active messages are accompanied by a Tick. To
switch the Message Panel off for that message, click on the Tick, a Cross will
appear in its place indicating that the message is now disabled. All messages
will still appear in the Message Bar but will not cause the game to pause when
they appear.
Hostile units will be spotted if there is no terrain obstructing your Agent’s LineOf-Sight.
Note: smoke may obstruct Line-Of-Sight depending on how thick it is.
SHOOTING
Your Agents will automatically shoot at enemy units if they see them. You must,
of course, make sure that there is a loaded weapon in one of the Agent’s hands.
The way in which an Agent reacts during engagements is heavily influenced by
their currently selected Attack Mode.
If an Agent has more than one potential target, then that Agent will try to select
the most appropriate target. To order your Agent to attack a specific target, move
the cursor over the hostile unit and click the RMB. To deselect the target, click
the RMB on any of your Agents in the Tactical Display.
p.174
p.175
Page 91

The Tactical Game
Note: to shoot in the Turn-Based Game, simply target a hostile unit and click the
RMB (ensure that your Agent is carrying a loaded weapon). To select a specific
weapon, when your Agent is carrying two, simply click the LMB on that weapon
in the Hands Area. Move the cross-hair cursor over your selected target and
click. Alternatively, press and hold the Shift key on the keyboard and click the
LMB on the target. Click each time you wish to make a shot.
To shoot at terrain in both the Real-Time and Turn-Based Games, players must
use the Shift key method (as above).
OPPORTUNITY FIRE (TURN BASED ONLY)
If you end your Turn, leaving Agent’s with enough Time Units to fire a shot, your
Agents can automatically fire during the Alien’s Turn at any hostile unit who
strays into their line of sight. This is called Opportunity Fire.
You can set your Agents to reserve Time Units for specific actions:
• Click . As long as this is selected the Agent will always retain enough
Time Units to perform an Aimed-Shot in the event of Opportunity Fire.
• Click . As long as this is selected the Agent will always retain enough
Time Units to perform a Snap-Shot in the event of Opportunity Fire.
• Click . As long as this is selected the Agent will always retain enough
Time Units to perform an Auto-Shot in the event of Opportunity Fire.
In all cases, the Agent will continue to use Time Units in the normal way,
however, the Agent will always retain enough for the reserved Shot-Type. If you
try to move, when you are in this position, you will be informed that the Time
Units are reser ved.
You can also reserve Time Units to make an Agent kneel down at the end of a
move. In combat, you may want to leave your Agent in the kneeling position to
make them less visible in Hidden Movement.
• Click to reserve enough Time-Units for your Agent to Kneel.
Opportunity Fire can be crucial to mission success. Remember, if you can leave
your Agents with enough Time Units at the end of
might even be able to take a shot before any Aliens move, if their reactions and
Time Units are high enough.
In previous
Fire. In
Movement. Agents use Opportunity Movement in accordance with their current
Attack Mode. Agents in Aggressive Mode will be trigger-happy and only attempt
to fire (they will not use Opportunity Movement). In Cautious Mode Agents will
fire and then use Opportunity Movement to seek cover. Agents in Safe Mode will
not fire and always use Opportunity Movement to seek cover.
There may be several exchanges of fire in each Opportunity Fire confrontation.
X-COM
X-COM Apocalypse
games Agents have been unable to move during Opportunity
Agents are able to take advantage of Opportunity
X-COM’s
Turn, your Agents
p.176
p.177
Page 92

The Tactical Game
SHOOTING FROM THE OVERHEAD MAP
To Shoot from the Overhead Map:
• Click on the target of your choice, whilst holding Shift on the keyboard. Each
Agent will fire a shot in that direction.
• Click repeatedly to take more than one shot.
Note: some weapons have guided munitions which will adjust their course as
they move towards the target.
REACTIONS
There are some occasions when an Agent does not fire at an enemy even though
there is a clear line of sight. There can be several reasons for this:
1. There is a delay between spotting an enemy and being able to shoot at it. This
delay depends on the reaction rating of the firing Agent, the firing rate of the
weapon and the Agent’s selected Shot-Type. An Agent with good reactions
and a quick firing machine gun using Auto-fire, will shoot quicker at a newly
spotted Alien than an Agent with poor reactions and a sniper rifle. This delay
could be long enough for the hostile unit to take cover again!
Note: once an Agent has fired, there will be no delays for any successive shots.
2. Risk to other Agents. Explosive ammunition will not be fired at a target if the
blast radius will affect another Agent (this includes the Agent making the
shot). Also, Agents will not fire, if other Agents are too close to the path of
the shot, although an Agent in Aggressive Mode will take more risks than an
Agent in Cautious Mode.
MAXIMISING ACCURACY
The bar below each hand will show the accuracy of any weapons held in that
hand. The bars will become filled towards the centre of the screen to indicate an
Agent’s accuracy with the currently held weapon. The closer the filled bar is to
the centre of the screen the better an Agent’s accuracy. The following things
affect accuracy:
• An Aimed-Shot will increase the accuracy, whereas automatic fire will
decrease the accuracy.
• Kneeling Agents will be more accurate.
• A Wounded Agent will be less accurate.
• Using a two-handed weapon (such as a sniper rifle) with an object in the
other hand, will reduce accuracy.
• Walking Agents will have reduced accuracy.
Principles that are true to real-life combat also affect accuracy:
• The larger the target the easier it is to hit.
• A stationary target is easier to hit than a moving target.
• The closer the target, the easier it is to hit.
p.178
p.179
Page 93

The Tactical Game
USING GRENADES
• Click to take you to the Equip Agent Screen.
• Click and Drag a grenade into an empty ‘hand’.
Note: proximity grenades will have an extra Slider Bar for distance setting.
Sliding the bar left/right will increase/decrease the grenade’s detection range.
Each hand is accompanied by two icons, (throw) and (drop).
• Click if you wish to drop the grenade.
• Click OK again to return you to the Tactical Screen.
• Click the grenade to open the Prime Grenade ‘window’.
Slider Bar
Cancel Priming
The Grenade
• ‘Click and drag’ the Slider Bar, in the Prime Grenade ‘window’, to the
left/right to decrease/increase the grenade’s delay time.
• Click Tick to accept the grenade settings, or click the Cross icon to cancel the
whole operation.
If you drop a grenade, ensure that you have allowed yourself enough Time Units
to move the Agent away from the blast area.
• Click if you wish to throw the grenade.
• Click a target in the Isometric Map View. The grenade will now be thrown in
that direction.
Note: if you are unable to throw the grenade for any reason, the cursor will
change, to signify that an area cannot be targeted.
Tip: you can pause the game while you prime and throw a grenade. As soon as
you restart time the grenade will be thrown.
If an Agent already has a grenade in their hand and you need them to throw it
quickly, simply select the grenade with the RMB in the Hands Area. Click a target
in the Isometric Map View. The grenade will now be thrown at its intended
target and explode on contact with the floor.
p.180
p.181
Page 94

The Tactical Game
Don’t be surprised if your Agents are not always on target, this is dependent on
their accuracy rating. Check that this rating is high in their stats when you are
recruiting!
Grenades are not the only object you can throw; other objects can be thrown in
the same way. The distance an object can be thrown depends on the weight of
the object and strength of the thrower.
Note: once an object has been thrown the throwing icons are deactivated for a
short period of time.
USING PSIONIC
WEAPONS
In addition to standard guns and grenades, your Agents also have the ability to
use Psionic Weapons. These weapons allow you to take over Aliens, panic
enemies, probe minds for information or simply stun your Agents’ target.
Before you can perform any of these Psionic attacks you will need to purchase a
device called the Mind Bender. Only those Agents with good Psionic powers
should attempt to use the Mind Bender. Agents Psionic abilities are measured as
follows:
• Psionic Energy - This represents the mental stamina of the Agent. As Psionic
powers are used the energy level will fall. If the Agent rests, energy will be
recovered gradually. If Psionic Energy falls to zero then no further Psionic
attacks are possible and any attacks currently in progress will stop.
• Psionic Attack - This represents the ability to carry out successful attacks
against a particular target.
• Psionic Defence - This represents the ability of the Agent to fend off any
Psionic attacks.
Note: if Agents are taken over by an Alien Mind Control Device, you will find
that they disappear from your list of available units. If you manage to succeed in
your mission, or you kill all of the Aliens, that Agent will return to normal.
During the time Agents are under Alien control, they will do anything the Alien
wills them to do. The Agent can only regain control when the Alien focuses its
attention elsewhere, or if the Alien is killed.
To use the Mind Bender in a Tactical Combat Mission, simply ensure that it is in
one of your Agent’s hands. Click on it in the Hands Area of the Control Panel.
Psi-Stats
Panic Unit
Control Body
Stun Unit
Probe Unit
p.182
p.183
Page 95

The Tactical Game
The Mind Bender window should open in the centre of the Control Panel. There
will be four Psi-Attack Buttons for you to use. They are:-
ENCUMBRANCE
• Control Body - After using this attack successfully, you will be able to control
the target as though it were one of your Agents (you can make Aliens shoot
Aliens!).
• Panic Unit - This makes the target panic, rendering it useless for a short
period of time.
• Stun Unit - This stuns the unit so that you can take live Aliens back to your
containment facility for Biochemistry research. You can only bring back Aliens
(alive or dead) if you have a Bio-Transport Module.
• Probe Unit - Using the ‘Mind Probe’ allows you to find out more information
about the selected target.
• Click one of the four Psi-Attack Buttons.
• Click on a target Alien in the Tactical Area. The attack will be launched against
that Alien. The effectiveness of the attack will depend on the target’s statistics
- if it has strong Psi-Defence, then the attack may not succeed.
Any attack attempted will drain the attacker’s Psionic energy depending on the
power of the attack. If the attack is successful there will also be a continuous
drain as the attack takes effect.
Equipping your Agents with a lot of heavy objects will reduce their speed
because the Agent is encumbered. An Agent with a high strength rating is able to
carry more objects than a weaker Agent without being affected by encumbrance.
EXHAUSTION
If Agents are running they will use up their stamina until they become exhausted.
An exhausted Agent will not be able to run, but can still walk and perform other
actions. The Agent can rest to regain stamina (ie remain stationary). If an Agent
is walking stamina will neither be used nor recovered.
MORALE
At the start of each mission, each Agent’s morale starts at 100%. This will
decrease as an Agent is wounded, or if fellow Agents are killed. Morale will
recover if an Agent successfully kills hostile units. The decline in morale is
lessened by an Agent’s bravery rating.
p.184
p.185
Page 96

The Tactical Game
EFFECTS OF RANK
High ranking officers help maintain the morale of your Agents. The amount an
Agent’s morale is reduced depends on:
WOUNDING
• The rank of the most senior Agent in the Agent’s squad.
• The rank of the most senior Agent in the Tactical Area.
The higher the rank, the less morale is reduced.
Note: if an officer is killed during a mission it will have a worse effect on morale
than if a Rookie had been killed.
If things are going badly Agents may Panic or be Wounded.
PANIC
When morale falls, the likelihood of panic increases. The braver an Agent is the
less likely they are to panic. When an Agent panics, one of three things can
happen:-
• The Agent freezes and can do nothing.
• The Agent runs away, searching for a hiding place.
• The Agent goes berserk and starts firing at random.
The lower an Agent’s morale the longer they will Panic.
If an Agent takes a direct hit they may well receive critical wounds. These afflict
parts of the body as follows:-
Head, Left/Right Arm - Each critical wound reduces the Agent’s weapon
accuracy.
Torso - Each critical wound reduces the Agent’s rate of energy recovery.
Each critical wound also reduces an Agent’s health gradually, so that it is
possible for an Agent to die from a hit received much earlier in the mission. If an
Agent does receive a critical wound there are three things you can do to save
that person:-
• Use a Medi-kit. The Medi-kit can heal critical wounds.
• Leave the Tactical Area. Arrows represent the areas and direction by which an
Agent can leave the Tactical Area. The Agent must return to the base medical
facility to heal the wound.
• Kill all hostile units quickly before the Agent dies. If all hostile units are killed
then the mission will be completed and the Agents will all leave the Tactical
Area automatically. In this situation, the Agents must return to Base to receive
treatment for their wounds.
p.186
p.187
Page 97

The Tactical Game
USING THE MEDI-KIT
You can use the Medi-kit to heal critical wounds. In order to use the Medi-kit
ensure that it is placed in one of your Agent’s hands.
Medi-Kit Display
Medi-Kit
• Click on the Medi-kit in the Hands Area. The Medi-kit Display will appear in
the top corner of the screen. Wounded parts of the body will appear
highlighted in red.
• Click on the affected body part in the display and it will change colour to
green to indicate that healing has been started.
You must now wait while the Agent’s wound heals, which will take some time. If
you move the Agent, the healing process is cancelled and you will have to use
the Medi-kit again.
STUNNING
Agents or Aliens can be stunned if hit by a Stunning Weapon, caught in an
explosion blast radius, or if suffering from smoke or dust/debris inhalation
following an explosion.
COMPLETING TACTICAL
COMBAT MISSIONS
The Tactical Combat Mission will end under any of the following circumstances:
• All hostile units are unconscious or dead - You Win.
In this case all equipment and Alien corpses left in the combat zone are
X-COM
recovered by
. However, equipment can only be taken back to base if
there is a vehicle with a Cargo Module at the building (you must make sure this
is the case before a Tactical Combat is initiated). Live Aliens and corpses can
only be taken back to Base if there is a vehicle with a Bio-Transport Module at
the building.
X-COM
• All
Agents are unconscious or dead - You Lose.
Any equipment left in the Tactical Area is lost. Any equipment carried by Agents
who have left the Tactical Area is retained.
• All hostile units panic and flee the combat area - You Win.
p.188
p.189
Page 98

The Tactical Game
In this case, all equipment and Alien corpses left in the Tactical Area are
X-COM
recovered by
• All Agents leave the Tactical Area using Exit Points.
In this case, unconscious Agents and Agents under mind control are considered
killed. Any equipment left in the combat zone is lost. Any equipment carried by
Agents who have left the Tactical Area is retained.
• You can press the Esc key on the keyboard to terminate a mission manually.
In this case Agents left in the combat zone may be killed depending on the
situation. Agents surrounded by Aliens are unlikely to survive. Any Agent
close to an Exit Point may sur vive. Equipment and Aliens will not be
recovered from the Tactical Area if the mission is terminated in this way.
.
DEBRIEFING
The debriefing screen is displayed at the end of the Tactical Combat Mission,
giving you a breakdown of your performance as follows:
Combat Rating - Total score for enemy units killed. If you kill civilians then your
score will be reduced for each one killed.
X-COM
Casualty Penalty - A penalty score based on the number of
in action.
Agents killed
Leadership Bonus - A bonus attributed for leadership per formance - this bonus
will be high if you have killed many Aliens and received few casualties. The
bonus will be higher still if no Agents are killed during a mission.
Live Aliens Captured - A score for Live Aliens you have captured during a
Tactical Combat Mission.
Equipment Captured - Displays a score representing the value of artefacts
captured from the enemy.
X-COM
Equipment Lost - Any equipment/objects not carried by
returned if
will be lost. This number reflects a penalty for all objects captured by the enemy
or destroyed in combat.
Total - The Total Score for the mission, representing your overall performance.
PROMOTIONS
At the end of each mission, subject to their mission performance, Agents may be
promoted.
The rank to which the Agent is promoted is dependant on the following:-
Rookie - Each new recruit begins at this level.
Squaddie - In order to be promoted to a Squaddie, a Rookie must have some
combat experience.
Squad Leader - There is one Squad Leader per five Agents. If a position is
vacant the best Squaddie is promoted.
X-COM
has a Cargo Module fitted to one of their vehicles, otherwise it
will only be
p.190
p.191
Page 99

The Tactical Game
INFORMATION SCREENS
Sergeant - There is one Sergeant per four Squad Leaders. If a position is vacant
the best Squad Leader is promoted.
Captain - There is one Captain per three Sergeants. If a position is vacant the
best Sergeant is promoted.
Colonel - There is one Colonel per two Captains. If a position is vacant the best
Captain is promoted.
X-COM
Commander - This is the leader of
best Colonel is promoted.
Generally, the higher the rank the better the Agent.
MISSION EXPERIENCE
When Agents return from a mission their abilities may be increased. For a skill to
benefit from experience, it must be used during combat as much as possible. For
example, if an Agent uses a Laser Rifle many times, then accuracy is likely to
improve. Reactions, accuracy, stamina, health, speed, and bravery all benefit
from mission experience.
• Click OK to return to the Cityscape Screen.
forces. If the position is vacant the
Note: any artefacts acquired during a Tactical Combat Mission will be available
for research when the craft and Agents arrive back at your base.
There are various Information Screens that will appear during your campaign.
These include:
• Weekly Funding Assessment
• Diplomatic Rift
• Alien Take-Over
WEEKLY FUNDING
ASSESSMENT
At the end of each week,
you of your progress. This will comprise the following:-
• A written statement of your progress.
• Your present funding.
• A funding adjustment, in light of your recent performance. Funding can be
adjusted upwards as well as downwards.
• Click OK to close this screen.
X-COM
will receive a report from the Senate informing
DIPLOMATIC RIFT SCREEN
In Mega-Primus, the
X-COM
Commander should be wary of city diplomacy. Your
p.192
p.193
Page 100

actions can both please and upset the other organisations in the city. Be aware of
the ways in which you can upset other organisations:
X-COM
• If
vehicles or with Agents during a Tactical Mission, then that organisation will
become less friendly to
• If you investigate a building with no prior Alert, there will be a small
diplomatic penalty (organisations are understandably alarmed at a squad of
heavily-armed Agents walking around their buildings).
• Raiding an organisation will make that organisation hostile to
also possible that you can upset the allies of that organisation. Watch out!
damages buildings belonging to other organisations, either with
X-COM
.
X-COM
. It is
• You will not be able to buy goods from a hostile organisation.
• You will receive no further funding from the Senate if it becomes hostile.
• You cannot recruit Alien hybrids if the Mutant Alliance is hostile.
• You cannot recruit Androids if the Sentient Engine Liberation Front is hostile.
Note: if an organisation is hostile to X-COM you will have to fight the security
forces of a building you investigate as well as any Aliens present.
ALIEN TAKE-OVER
SCREEN
The initial state of diplomatic relations in Mega-Primus, can determine which
organisations are more likely to become hostile. For a guide to the relationships
between organisations at the start of the game, you should examine the
descriptions in the UFOpaedia.
X-COM
Whenever an organisation becomes unfriendly to
hostile), it may cause a Diplomatic Rift. Organisations who feel they have been
unfairly treated will ask for money to keep relationships amicable.
The Diplomatic Rift screen allows you the opportunity to pay the organisation,
or not. If you refuse to pay the sum the organisation may become hostile
towards
There are also other penalties for hostility:
X-COM
and you may be attacked by that organisation in the future.
(but not actually
p.194
As Alien infiltration into the city escalates, you will find that organisations fall
under the control of the Aliens. This screen will warn you when this happens and
to which organisation.
Once a corporation is under Alien control, it will attempt to assist the Aliens in
whatever way it can. You may decide to destroy some of its buildings to deplete
its resources and reduce the possibility of Aliens spreading into nearby
buildings.
p.195
 Loading...