

Page 1
Page 2

MICROSOFT TRAIN SIMULATOR ENGINEER’S HANDBOOK
Contents
CHAPTER 1 GETTING STARTED...................................................................................................................... 1
Installing Train Simulator ................................................................................................................................................................................................ 2
Setup choices ............................................................................................................................................................................................................2
Getting Train Simulator Updates .................................................................................................................................................................................. 2
Starting Train Simulator .................................................................................................................................................................................................. 2
Making Train Simulator Really Perform..................................................................................................................................................................... 3
Improving both quality and performance..................................................................................................................................................... 3
Making a tradeoff between quality and performance............................................................................................................................ 4
Train Simulator Quick Start ............................................................................................................................................................................................ 5
Keyboard and Mouse commands ................................................................................................................................................................................ 6
CHAPTER 2 THE HOME SCREEN................................................................................................................... 7
Home Screen Options........................................................................................................................................................................................................ 8
Introductory Train Ride ..................................................................................................................................................................................................... 8
Tutorials................................................................................................................................................................................................................................... 8
Drive a Train ........................................................................................................................................................................................................................... 9
Load Saved Activity ........................................................................................................................................................................................................... 9
Options..................................................................................................................................................................................................................................... 10
Getting Help .......................................................................................................................................................................................................................... 10
CHAPTER 3 FINDING INFORMATION ............................................................................................................ 11
The Engineer’s Handbook ................................................................................................................................................................................................. 12
Train Simulator Help ..........................................................................................................................................................................................................12
Help While You’re Driving................................................................................................................................................................................................ 12
Further Information and Assistance .......................................................................................................................................................................... 13
GETTING STARTED | II
Page 3

MICROSOFT TRAIN SIMULATOR ENGINEER’S HANDBOOK
CHAPTER 4 TOOLS FOR DRIVING ................................................................................................................14
Using Views .......................................................................................................................................................................................................................... 15
The views ....................................................................................................................................................................................................................15
The Realism Options .........................................................................................................................................................................................................16
the Driving Aids ................................................................................................................................................................................................................... 17
The Operations Notebook ................................................................................................................................................................................................. 19
The Train Operations Window ........................................................................................................................................................................................ 20
Heads Up Display (HUD) .................................................................................................................................................................................................... 20
CHAPTER 5 TRAIN BASICS ........................................................................................................................... 21
Three Types of Locomotives......................................................................................................................................................................................... 22
Steam locomotives ................................................................................................................................................................................................. 22
Electric locomotives............................................................................................................................................................................................... 22
Diesel locomotives ................................................................................................................................................................................................. 22
General Requirements for Train Handling ................................................................................................................................................................22
Terms to Know .................................................................................................................................................................................................................... 23
Slowing and Stopping the Train ................................................................................................................................................................................... 24
Train brakes ................................................................................................................................................................................................................. 24
Locomotive brakes .................................................................................................................................................................................................. 26
Units of Measure ................................................................................................................................................................................................................. 26
CHAPTER 6 HOW TO DRIVE A STEAM LOCOMOTIVE ............................................................................... 28
What is a Steam Locomotive? ..................................................................................................................................................................................... 29
Using the Locomotive Controls .................................................................................................................................................................................... 30
Engineer’s controls .................................................................................................................................................................................................. 30
Fireman’s controls ................................................................................................................................................................................................... 31
Operating a Steam Locomotive .................................................................................................................................................................................... 33
Moving the train ........................................................................................................................................................................................................ 33
Going uphill ................................................................................................................................................................................................................. 33
Going downhill........................................................................................................................................................................................................... 33
Stopping a train ......................................................................................................................................................................................................... 34
Troubleshooting ................................................................................................................................................................................................................... 34
Flying Scotsman .................................................................................................................................................................................................................. 36
Flying Scotsman Specifications ........................................................................................................................................................................ 37
Gölsdorf Series 380 ........................................................................................................................................................................................................... 38
Gölsdorf Series 380 Specifications .................................................................................................................................................................39
GETTING STARTED | III
Page 4

MICROSOFT TRAIN SIMULATOR ENGINEER’S HANDBOOK
CHAPTER 7 HOW TO DRIVE A DIESEL LOCOMOTIVE............................................................................... 40
What is a Diesel Locomotive?...................................................................................................................................................................................... 41
Using the Diesel-Electric Locomotive Controls & Gauges ............................................................................................................................... 42
Operating a Diesel-Electric Locomotive................................................................................................................................................................... 43
Moving the train ........................................................................................................................................................................................................ 43
Slowing or stopping ................................................................................................................................................................................................ 44
Reversing ..................................................................................................................................................................................................................... 44
Blending the brakes ................................................................................................................................................................................................ 44
Wheelslip and sanding ..........................................................................................................................................................................................45
Controlling in-train forces .................................................................................................................................................................................... 45
Throttle handling ...................................................................................................................................................................................................... 45
Dash 9 ...................................................................................................................................................................................................................................... 46
Dash 9 Specifications ............................................................................................................................................................................................ 47
GP38-2...................................................................................................................................................................................................................................... 48
GP38-2 Specifications............................................................................................................................................................................................ 49
KIHA 31 ...................................................................................................................................................................................................................................... 50
KIHA 31 Specifications ............................................................................................................................................................................................ 51
CHAPTER 8 HOW TO DRIVE AN ELECTRIC LOCOMOTIVE ........................................................................ 52
What is an Electric Locomotive? ................................................................................................................................................................................ 53
Using Electric Locomotive Controls & Gauges ....................................................................................................................................................... 54
Operating an Electric Locomotive................................................................................................................................................................................ 56
Moving the train ........................................................................................................................................................................................................ 56
Stopping the train..................................................................................................................................................................................................... 56
The 2000 Series ................................................................................................................................................................................................................... 57
2000 Series Specifications.................................................................................................................................................................................. 57
The 7000 LSE Series ........................................................................................................................................................................................................... 58
7000 LSE Series Specifications .......................................................................................................................................................................... 58
Amtrak Acela Express........................................................................................................................................................................................................ 59
Amtrak® AcelaSM Express Specifications ................................................................................................................................................... 60
Acela HHP-8 ........................................................................................................................................................................................................................... 61
Amtrak® AcelaSM HHP-8 Locomotive Specifications ............................................................................................................................. 61
GETTING STARTED | IV
Page 5

MICROSOFT TRAIN SIMULATOR ENGINEER’S HANDBOOK
CHAPTER 9 OPERATIONS .............................................................................................................................. 62
Passenger Operations ....................................................................................................................................................................................................... 63
Following the timetable ....................................................................................................................................................................................... 63
Stopping at stations ................................................................................................................................................................................................ 63
Freight Operations ............................................................................................................................................................................................................... 63
Following the work order .................................................................................................................................................................................... 64
Manual switching .................................................................................................................................................................................................... 64
Identifying locomotives, cars, sidings, and station platforms........................................................................................................... 64
Coupling and uncoupling ...................................................................................................................................................................................... 65
Using Multiple Units ...........................................................................................................................................................................................................65
Refueling ................................................................................................................................................................................................................................. 66
Preventing Accidents at Road Crossings................................................................................................................................................................. 66
Bells, Whistles, and Horns ............................................................................................................................................................................................. 67
Trackside Signage .............................................................................................................................................................................................................. 67
Signaling ................................................................................................................................................................................................................................. 67
Learning the signals ............................................................................................................................................................................................... 68
Obeying signals ......................................................................................................................................................................................................... 68
Speed Limits ......................................................................................................................................................................................................................... 68
Types of speed limits............................................................................................................................................................................................ 68
CHAPTER 10 THE ACTIVITIES........................................................................................................................ 70
The Goal................................................................................................................................................................................................................................... 71
Activity Types ...................................................................................................................................................................................................................... 71
Before the Activity Begins ............................................................................................................................................................................................. 72
During the Activity............................................................................................................................................................................................................. 72
What you’re evaluated on ..................................................................................................................................................................................... 72
Using driving aids..................................................................................................................................................................................................... 73
Using the Operations Notebook .......................................................................................................................................................................... 73
Saving an Activity.................................................................................................................................................................................................... 73
After the Activity Ends ..................................................................................................................................................................................................... 74
GETTING STARTED | V
Page 6
MICROSOFT TRAIN SIMULATOR ENGINEER’S HANDBOOK
CHAPTER 11 THE ROUTES .............................................................................................................................. 75
Marias Pass ............................................................................................................................................................................................................................ 76
Northeast Corridor ............................................................................................................................................................................................................. 78
Innsbruck - St. Anton ........................................................................................................................................................................................................ 80
Settle & Carlisle Line ........................................................................................................................................................................................................ 82
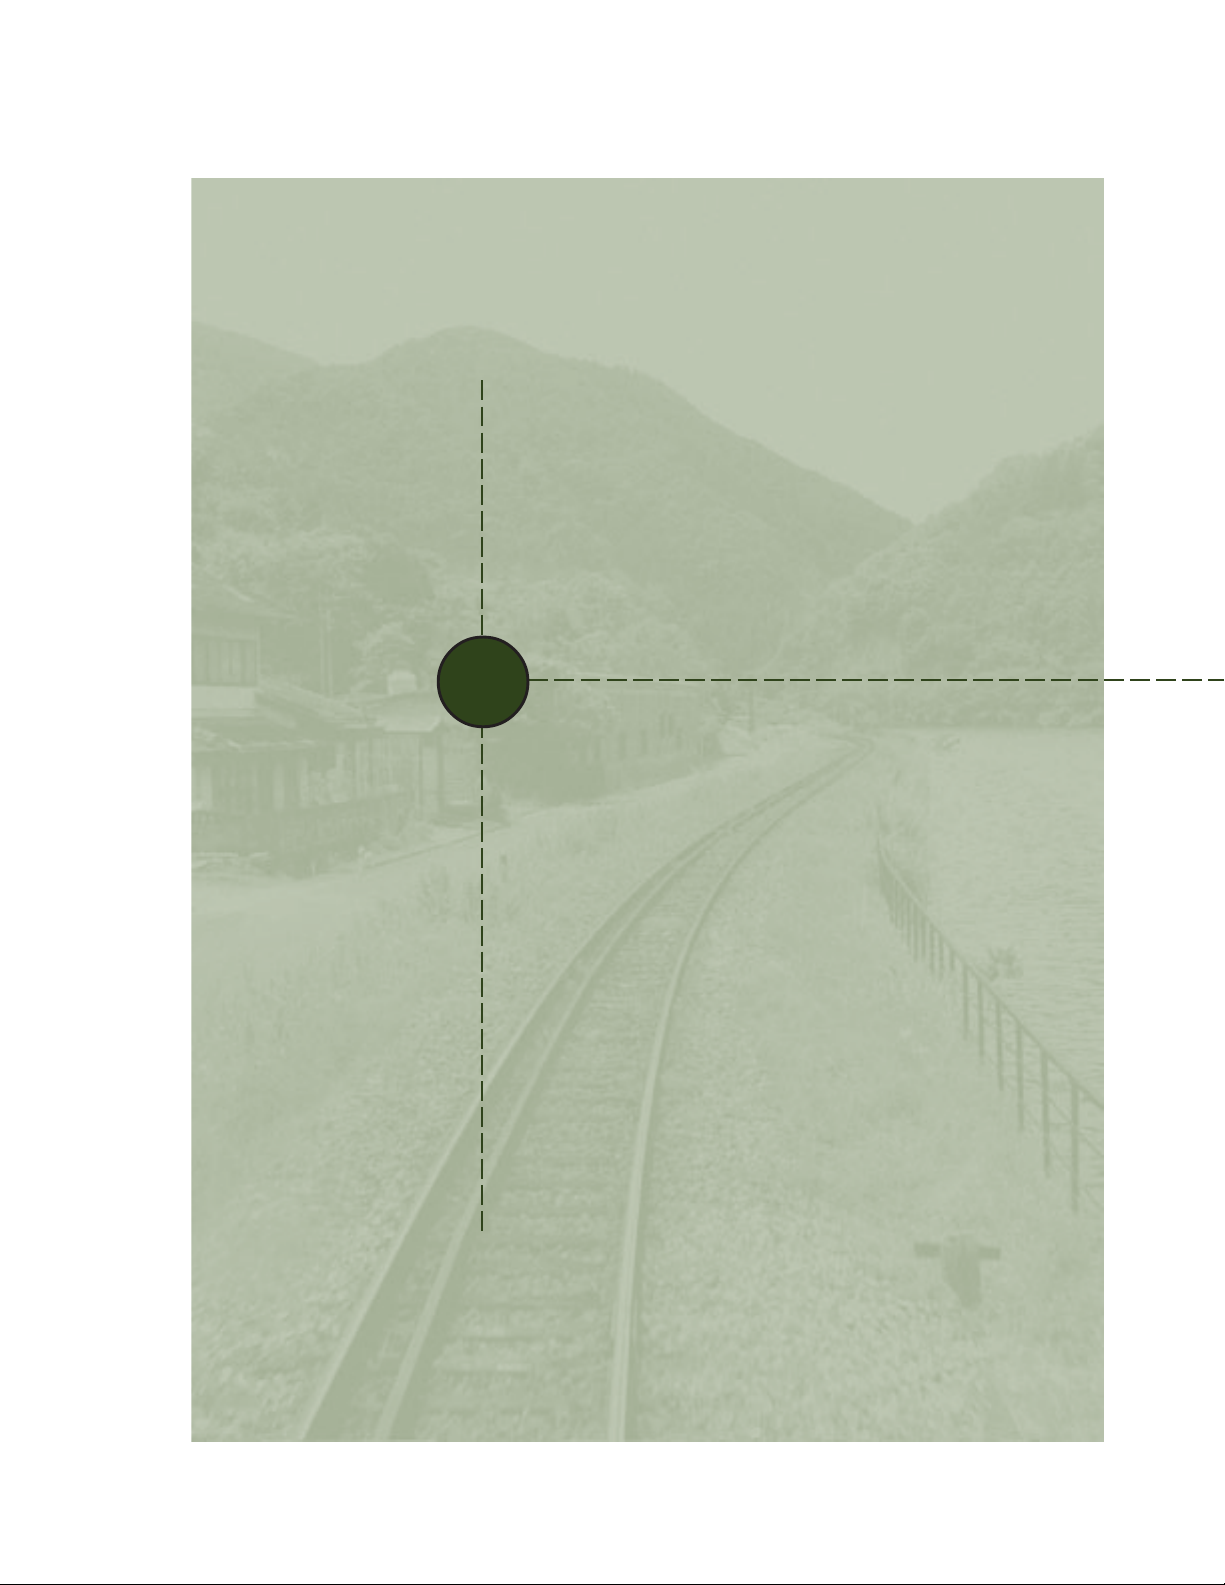
Tokyo-Hakone ....................................................................................................................................................................................................................... 84
Hisatsu Line ........................................................................................................................................................................................................................... 86
CHAPTER 12 THE EDITORS AND TOOLS ..................................................................................................... 88
Before You Begin ................................................................................................................................................................................................................. 89
The Editors and Tools ........................................................................................................................................................................................................ 89
Did You Know… ........................................................................................................................................................................................................ 91
Be Safe: .......................................................................................................................................................................................................................... 91
Operation Lifesaver, Inc. .................................................................................................................................................................................................. 91
GETTING STARTED | VI
Page 7
CHAPTER
GETTING
STARTED
1
Whether you’re a rookie, a hard-core gamer,
or a real-life train engineer, you probably
can’t wait to climb into the cab and drive
off into the sunset. Before you start using
®
Microsoft
are a few things you need to do. This chap-
ter tells you how to get started.
Train Simulator though, there
Page 8
MICROSOFT TRAIN SIMULATOR ENGINEER’S HANDBOOK
INSTALLING TRAIN SIMULATOR
1. Turn on your computer and start your Microsoft Windows® operating system (Windows 95 or later).
2. Insert Train Simulator Disc 1 into your CD-ROM drive.
3. Follow the instructions on the screen.
If your computer doesn’t support automatic installation, follow these steps:
1. Click Start on the taskbar.
2. Point to Settings, and then click Control Panel.
3. Double-click Add/Remove Programs.
4. On the Install/Uninstall tab, click Install.
-orClick Add New Programs, and then click the CD or Floppy button.
5. Follow the instructions that appear on your screen.
Setup choices
Default—Choose this option to install all the software and all six routes.
Custom—Choose this option if you need to conserve hard disk space on your computer. You can
pick just the routes you want installed on your hard disk and available in the game. You can always
install other routes later.
Note: Installation may require one or more of the two Train Simulator compact discs,
depending on the options you choose.
GETTING TRAIN SIMULATOR UPDATES
Occasionally Microsoft releases late-breaking updates about its products, so it’s always a good
idea to check the Web site for updates. Typically you install the product from the CD-ROM first
(as described above), and then install any update that you have downloaded from the Web site.
If there are any Train Simulator updates, you can find them at: http://www.microsoft.com/games/trainsim
STARTING TRAIN SIMULATOR
Click Start, point to Programs, point to Microsoft Games, point to Train Simulator, then click
Train Simulator.
-or-
Double-click the Train Simulator icon on the Windows desktop.
GETTING STARTED | 2
Page 9
MICROSOFT TRAIN SIMULATOR ENGINEER’S HANDBOOK
MAKING TRAIN SIMULATOR REALLY PERFORM
When talking about a simulation’s graphics,
performance
and
decreased performance, since displaying complex, richly detailed, three-dimensional graphics puts a
heavy load on your system. If you’re not seeing the graphics quality and performance you expect,
this section explains some choices and tradeoffs you can make to optimize your experience.
refers to how quickly and smoothly the images move. Higher quality typically means
quality
refers to how real the images look on the screen,
Improving both quality and performance
To get maximum quality and performance, consider the following options
Shut down other applications
When using Train Simulator, you probably won’t need other applications such as word
processors and e-mail programs, so close them to free up more of your computer’s
brainpower for Train Simulator.
Upgrade your graphics card —3-D graphics card technology is advancing at a tremendous rate.
Newer graphics cards, which operate faster and have more on-board RAM, can improve graphics
performance remarkably.
Make sure you:
Set the display options in Train Simulator to take full advantage of it (see “Change display
options,” in the “Making a tradeoff between quality and performance” section below).
Download the latest drivers from the manufacturer’s Web site.
If you have problems getting your 3-D card to work properly, make sure you’ve read the Train
Simulator Readme file (located in the Train Simulator directory on your hard drive) and the card
manufacturer’s documentation.
Get more RAM
Random access memory (RAM) is your computer’s short-term memory. Generally, the more
RAM there is, the faster your computer’s brain (the CPU) can process data. Your computer
must have at least 32 megabytes (MB) of RAM to run Train Simulator.
Get a faster processor
Although Train Simulator will run on a Pentium II 266 machine, a Pentium II-350 or faster
processor is recommended for optimal performance.
GETTING STARTED | 3
Page 10
MICROSOFT TRAIN SIMULATOR ENGINEER’S HANDBOOK
Making a tradeoff between quality and performance
Choosing between quality and performance depends on what you want to do. If you want to read
signs and billboards as you drive the 7000 LSE Series through downtown Tokyo, then you’re probably willing to sacrifice a little performance for a better view. But if you want to hurtle the Acela
Express along the Northeast Corridor in a snowstorm, then smooth movement of the train and the
cab controls will take precedence over scenery details. No matter what kind of hardware you have,
you can make tradeoffs between graphics quality and performance.
Try the following options to find the balance between quality and performance that’s right for your needs.
Change the resolution
Depending on your video card and monitor, you can run Train Simulator at a variety of screen
resolutions. The software is designed to run at a minimum resolution of 640 x 480. If your
system can handle it, a resolution of 1024 x 768 is optimal. Note, though, that as you increase
resolution to see more detail, you may notice a decrease in performance. Experiment with different resolutions to find the best combination of detail and performance for your system. For more
information about adjusting the screen resolution on your computer, on the Windows Start menu,
click Help, and look up “resolution” in the index.
SM
Change display options
One way to improve performance is to change the display options in Train Simulator. Do this
by clicking Options on the Home screen. If you are driving, first exit the Activity by pressing
ESC and then choosing Exit Activity from the menu that appears.
Change sound options
Depending on your machine, changing sound options may improve performance. To change
sound options, click the Sound tab on the Options screen. If you are driving, first exit the
Activity by pressing ESC and then choosing Exit Activity from the menu that appears.
Monitor the frame rate
Monitoring the frame rate (the number of times the screen is redrawn each second) is an easy
way to assess performance. Press SHIFT+Z to display the frame-rate counter. After you’ve tried
the options listed above, check the frame rate to see whether it has improved. But remember:
it’s how the simulation looks and feels to you that matters most.
Experiment!
The best way to make Train Simulator really fly down the track is to experiment. Keep testing the
performance against the graphic and sound settings to get the configuration that works for you.
Don’t forget to read the Readme file for additional tips.
GETTING STARTED | 4
Page 11
MICROSOFT TRAIN SIMULATOR ENGINEER’S HANDBOOK
TRAIN SIMULATOR QUICK START
To get the most out of Microsoft Train Simulator it’s best to prepare. Our recommendation is that you:
1. Read the rest of this
Engineer’s Handbook
.
2. Take the Introductory Train Ride (click the button from the Home screen).
3. Go through the onscreen Tutorials (click the button from the Home screen).
But if you can’t wait to get into the cab of your favorite locomotive, here are the bare essentials to get
you driving quickly.
To get started quickly
1. Install and start Microsoft Train Simulator using the instructions at the beginning of this chapter.
2. When you see the Home screen, click Drive a Train.
3. Select a route from the Routes list that appears.
A description of the selected route displays. If you’re not sure which route to pick, the following
table shows the highlights, and Chapter 11, The Routes, has even more detail.
Route Location Length Highlights
Northeast Eastern United States 133 miles High-speed inter-urban corridor linking major U.S. cities
Corridor seaboard (214 km)
Marias Pass Montana, United States 152 miles Steep grades, beautiful Rocky Mountain scenery
(245 km)
Tokyo-Hakone Tokyo region, Japan 55 miles High-speed urban corridor leading to countryside
(88 km) near Mt. Fuji
Hisatsu line Southwestern Japan, 53 miles Historic and scenic Japanese route
island of Kyushu (86 km)
Innsbruck– Tyrolean region 63 miles 1920s-era Orient-Express route through the Alps
St. Anton of Austria (101 km)
Settle & Northwest 72 miles 1920s-era rural route featuring famous
Carlisle line England (116 km)
Flying Scotsman
GETTING STARTED | 5
Page 12

MICROSOFT TRAIN SIMULATOR ENGINEER’S HANDBOOK
4. Select an Activity from the Activities list.
If you just want to get the feel of driving the train, select the Explore the Route Activity. You
won’t have to follow any rules, and you can move the switches to explore any stretch of track
that strikes your fancy. You can select the locomotive you want here, too.
If you select any other Activity, a description explains what your assignment is. The Activity
ends when you’ve completed your assignment, and you’ll get feedback on how you did.
You might want to have a look at Chapter 9, Operations, before you operate a train.
5. Click the Start button in the lower-right corner of the screen, and go!
For more information on operating locomotives see the How to Drive… Steam, Diesel and
Electric locomotive chapters.
KEYBOARD AND MOUSE COMMANDS
You’ll find a list of important key commands in the online Help, on the Key Commands tab of the
Operations Notebook (press F11), and on the Quick Reference Card included in the Microsoft Train
Simulator box. These commands help you perform such tasks as operating locomotive controls,
changing Views, displaying Driving Aids, and so on.
GETTING STARTED | 6
Page 13
CHAPTER
2
THE
HOME SCREEN
The Home Screen is the point of
departure for all of your
®
Microsoft
Train Simulator ad-
ventures. This is where you can
decide whether you’re going to
drive or ride, race down the track
for fun or with purpose, arrange
your settings, and more.
Page 14

MICROSOFT TRAIN SIMULATOR ENGINEER’S HANDBOOK
HOME SCREEN OPTIONS
From the Home Screen you can:
Sit back and just ride a train so you can get the feel of the trains and the routes.
Take a tutorial to familiarize yourself with the controls of each type of locomotive.
Operate your own train, with your choice of locomotive, route, weather, and so on.
Change your settings for best performance on your computer’s system.
Below are the details of the Home Screen options.
INTRODUCTORY TRAIN RIDE
When you choose Introductory Train Ride, Train Simulator takes the controls. Sit back and watch
while Train Simulator does the driving, shifting views as you travel. This is a great way to familiarize
you with the routes and you’ll hear a brief commentary as you ride.
To take an introductory train ride
1. On the Home screen, choose Introductory Train Ride.
2. Choose a route.
3. Select the options you want.
Change Views: By default, you see a new view every 30 seconds or so, so that you can watch
your train from several different angles. Or you can select a particular view by pressing the
desired View key (the number keys 1 through 5). If you’d rather be able to choose the view
you want and stay in that view, deselect Change Views. (For more information on views, see
the “Using Views” section in Chapter 4, Tools for Driving.)
4. Begin the introductory train ride by clicking Start.
The introductory train ride ends automatically when the train reaches the end of its route. To end the
introductory train ride and return to the Home screen, press ESC.
TUTORIALS
The Train Simulator Tutorials can teach you the skills to become an expert engineer. They also include
tips for safe, speedy, and efficient train operation, and cautions about railroading hazards and errors.
THE HOME SCREEN | 8
Page 15
MICROSOFT TRAIN SIMULATOR ENGINEER’S HANDBOOK
To select a Tutorial
1. On the Home screen, click Tutorials.
2. Select an electric, diesel, or steam lesson.
Note: It’s a good idea to do the lessons in the order they’re presented.
3. Click Start.
DRIVE A TRAIN
When you’ve completed the tutorials, you’ll be ready for the challenge of driving one of the Train
Simulator locomotives, with your choice of settings, routes, and types of service.
To drive the trains
1. On the Home screen, choose Drive a Train.
The Route and Activity screen appears.
2. Choose the route you wish to drive.
The list of Activities changes depending on what route you choose.
3. Choose an Activity.
If you choose the Activity named “Explore the Route,” you can select the locomotive, weather,
time of day, and so on. Then you can drive the route without any rules, switching the tracks
yourself to go where you please.
If you choose any other Activity, you will have an assignment to complete, and all the conditions
(such as locomotive, weather, and so on) are pre-determined. There will be other traffic on the
line, and you need to follow the rules of the railroad.
4. Click Start.
For more information about selecting and completing Activities, see Chapter 10, The Activities.
CONTINUE SAVED ACTIVITY
Any time you exit an Activity without completing it, you have the option to save the Activity. You can
resume any saved Activity.
To resume a saved Activity
1. On the Home screen, choose Continue Saved Activity.
2. From the Saved Activities list, choose the one you want.
For more information about saving and resuming Activities, see the online Help by pressing the F1 key.
THE HOME SCREEN | 9
Page 16
MICROSOFT TRAIN SIMULATOR ENGINEER’S HANDBOOK
Note: If you want to save the Activity without interrupting your run, just press the “Quick Save”
key (F2). Quick-saving is a smart thing to do every now and then. If you make a mistake (such
as lose control of the train while going down a hill), you can re-start at the point where you last
Quick-saved instead of having to start the entire Activity again from the beginning.
OPTIONS
To get the best performance with your system, you may want to adjust some of the Train
Simulator options.
To change your Train Simulator options
1. On the Home screen, choose Options.
2. On the Options screen, choose from the following tabs:
General
Keyboard
Sound
Display
Advanced Display
3. Change the options as desired.
4. To save your options and exit from the Options screen, click Save.
Since the Options button is on every screen (before you begin driving), you will be returned to the
screen from which you selected the Options button.
–or–
To undo changes and return to the default Train Simulator settings, click Restore Defaults.
For more information about Train Simulator settings and how to get the best system performance,
see the online Help by pressing the F1 key.
GETTING HELP
Pause your mouse over any item on any screen and see a helpful tip at the bottom of the screen.
For complete instructions on using any screen, click Help at the top of the screen or press F1.
See Chapter 3, Finding Information, for more tips on getting assistance.
THE HOME SCREEN | 10
Page 17
FINDING
INFORMATION
You can get great information and as-
sistance in many places in Microsoft
Train Simulator, so you can spend more
time driving trains—and less time figur-
ing out how. This chapter helps you find
the information you’re looking for.
3
CHAPTER
®
Page 18
MICROSOFT TRAIN SIMULATOR ENGINEER’S HANDBOOK
THE ENGINEER’S HANDBOOK
This
Engineer’s Handbook
railroading, the locomotives, and the routes. Think of this
for detailed procedures and specifications, use the in-game Train Simulator Help.
gives you an overview of Train Simulator with tips and instruction about
Handbook
as the view from 30,000 feet—
TRAIN SIMULATOR HELP
Want to learn about Train Simulator commands and procedures? Train Simulator locomotives?
Railroad terminology? Look in Train Simulator Help, which you can access by pressing the
F1 key or clicking the Help button in the upper-right corner of the pre-driving screens.
HELP WHILE YOU’RE DRIVING
In addition to the Train Simulator Help system, you can get helpful information as you’re
operating a train.
Rollover Help Pause your mouse over any item on any screen and a helpful tip appears
at the bottom of the screen.
Labels Place your mouse pointer over a control or instrument and its identifica-
tion label appears. If the Controls and Gauges Display is turned on, a
description of that control appears as well.
Controls & Gauges Display
Driving Aids There are a number of driving aids that give you information you need
Operations Notebook The Operations Notebook contains all the data you need to complete an
Place your mouse pointer over a control or instrument and its name,
function, and setting appears in a small box. If the display is turned off,
only the name appears.
to operate your locomotive safely and efficiently. For example, the Track
Monitor shows you signals, speed limits, and so on. For more information about the driving aids, see Chapter 4, Tools for Driving.
Activity. You’ll find your Activity Briefing, a list of key commands, procedures for operating your locomotive, and a summary of your progress
on the Activity. For more information about the Operations Notebook,
see Chapter 9, Operations.
FINDING INFORMATION | 12
Page 19

MICROSOFT TRAIN SIMULATOR ENGINEER’S HANDBOOK
FURTHER INFORMATION AND ASSISTANCE
On the Train Simulator Web site you can find news, tips, articles, reference material, and links
to other interesting simulation and railroading sites. The Train Simulator Web site is located at
http://www.microsoft.com/games/trainsim
The Train Simulator Readme file contains late-breaking information about Train Simulator. It’s a
good idea to read the Readme file to check for any known compatibility problems with hardware
you’re using. You can find the Readme file in the folder where you installed Train Simulator on
your hard disk drive.
If you’re having problems running Train Simulator, you can contact Microsoft Technical Support
using the information in the Technical Support topic in online Help.
Graphics Troubleshooting: To solve certian kinds of graphics issues you can use the Launcher,
located in the directory where you installed Train Simulator:
1. Double-click Launcher.exe
2. Choose Troubleshooting from the menu that appears.
FINDING INFORMATION | 13
Page 20
TOOLS FOR
DRIVING
CHAPTER
4
In the real world of trains you can feel the
wind on your face and the cars move from
side to side. In Microsoft
tor, since you won’t have such cues, we
give you a few tools to help you get your
bearings. The driving aids, Realism
Options, and various Views are designed
to do this. You can also use these tools
®
Train Simula-
to perform tasks from outside the cab—
you don’t have to actually be sitting in
the cab of the train to drive it.
Page 21
MICROSOFT TRAIN SIMULATOR ENGINEER’S HANDBOOK
USING VIEWS
You can use the keyboard to get all kinds of visual angles of the train—both internal and external.
Use the ARROW keys to look left, right, up or down, to pan or to zoom. Add SHIFT to pan or
zoom quickly.
Note: All key commands referred to in this chapter are used on the main part of the keyboard,
not on the numeric keypad.
view (1 key): The view from inside the cab. In steam trains, you can also “stick your head out”
Cab
of the open sides of the train. To stick your head out the window (forward), use the UP ARROW.
To stick your head out the window (backward), use the DOWN ARROW.
External view 1 (2 key): This view begins at the lead locomotive, but you can move the view along
the train.
To zoom in or out, press the UP or DOWN ARROW keys.
To rotate the view, press LEFT or RIGHT ARROW keys.
To raise or lower the view, press CTRL+UP ARROW or CTRL+DOWN ARROW.
To center the view on another car, press CTRL+LEFT ARROW or CTRL+RIGHT ARROW.
External view 2 (3 key): This view begins at the rear of the train, but you can move the view along
the train.
Trackside view (4 key): This view
trackside. As the train passes you, your point of view jumps automatically to a new point down the track
where the train is once again approaching you. Press the 4 key again for a different trackside view.
Passenger view (5 key): Look inside a passenger car from the point of view of a seated passenger.
Use the ARROW keys or hold down your right mouse button and drag the cursor to look around.
Coupler
the coupling process. You can also see the distance between the train and the unit you’re coupling
to. Use UP and DOWN arrows to zoom in and out.
Yard
freight yards.
view (6 key): This is a good view for focusing on the front or rear coupler of the train during
view (7 key): A view looking directly downward from high above your train. Use this view in
puts you in the role of an onlooker watching the train from the
For a complete list of all the view commands, see the Quick Reference Card, the Key Commands tab
of the Operations Notebook (press F11) or the online Help (press F1).
TOOLS FOR DRIVING | 15
Page 22

MICROSOFT TRAIN SIMULATOR ENGINEER’S HANDBOOK
THE REALISM OPTIONS
Realism Options make your train experience more—or less—realistic. With some of the Realism
Options, you don’t have to worry about every single one of the requirements of operating a train.
With other Realism Options you can heighten your experience by setting the options closer to
those of a real train.
To turn Realism Options on or off
While driving, use the key command (given below).
–or–
1. Before driving, from any screen, click Options.
2. Click the General tab.
3. In the Realism section, make your selections.
4. Click Save.
Below are the Realism Options and their key commands.
Simple Controls
With Simple Controls you can control the movement of the train with only three key commands:
D key=Increase power
A key=Decrease power
S key=Change direction
Some of the standard controls necessary to completing an Activity still work even if you use the
Simple Controls feature. For example, the Train Operations window still functions, and you can still
blow your whistle or horn. But some of the other tasks are handled automatically.
Derailments
If you select this option, you train will derail in the same circumstances it would in the real world, for
instance if you take a curve too fast. If you don’t select this option, your train will never derail. Select
or clear this option from the General tab of the Options screen.
Alerter
Some of the locomotives in Train Simulator have Alerters, which make sure that the engineer remains
awake and alert while driving. The Alerter sounds an alarm if the train’s controls are not operated
during a 25-second period. The engineer must respond to this alarm within 15 seconds or the brakes
are applied and the power shuts down (electric trains only), bringing the train to a halt.
You can turn the Alerter feature OFF if you wish. Select or clear this option from the General tab of the
Options screen.
TOOLS FOR DRIVING | 16
Page 23
MICROSOFT TRAIN SIMULATOR ENGINEER’S HANDBOOK
Automatic Fireman (steam trains)
The computer-controlled fireman attempts to keep the boiler at a high pressure at all times, in order to
respond to any unforeseen demands from you, the engineer. But this is not very efficient in terms of
fuel and water usage, so you may want to take over the role yourself. To take over the fireman’s role,
turn the Fireman feature OFF at the General tab of the Options screen.
THE DRIVING AIDS
Driving aids help you figure out your next move or see what your progress is so far. You can toggle
them on or off.
To turn driving aids on or off
While driving, use the key command (listed below) for the driving aid you want.
–or–
1. From any screen, click Options.
2. Click the General tab.
3. In the Driving Aids section, make your selections.
4. Click Save.
Note: You can drag the driving aids windows around the screen with your mouse. Once you
position a window, the window returns to that same location if you close it and then open it again.
Controls and Gauges driving aid
(F3)(F3)
(F3)
(F3)(F3)
As you move your mouse pointer over a control or instrument, the name and an explanation of its
function and what it is doing at the moment appears in a small box. If the box is turned off, a short
label appears to tell you the name of the control or instrument.
Track Monitor
(F4)(F4)
(F4)
(F4)(F4)
The Track Monitor shows the next 3 miles (5 kilometers) of track in front of you.
Heads Up Display (HUD
) (F5)) (F5)
) (F5)
) (F5)) (F5)
The Heads Up Display (HUD) shows important information that you can use to drive the train from
any view. It’s particularly useful when you’re not in Cab view, but you may find that its digital display
of crucial information so useful that you want to display it in Cab view too.
Cycle station/siding names
(F6)(F6)
(F6)
(F6)(F6)
You can view the names of the stations with this feature. This is useful for slowing and
stopping operations.
TOOLS FOR DRIVING | 17
Page 24
MICROSOFT TRAIN SIMULATOR ENGINEER’S HANDBOOK
Cycle car numbers
(F7)(F7)
(F7)
(F7)(F7)
You can view a train’s car number. This is useful for coupling.
Switching driving aid
(F8)(F8)
(F8)
(F8)(F8)
The Switching driving aid displays the status of both the switch immediately in front of the train and
the switch immediately behind the train. If these switches are not under the control of the dispatcher,
you can set either switch by clicking one of the arrows in the Switching driving aid or by pressing the
G key (front switch) or SHIFT+G (rear switch).
Next Station Display
(F10)(F10)
(F10)
(F10)(F10)
During a passenger run you are required to keep to a Timetable. The Next Station Display helps you
out by showing your scheduled arrival and departure time for the next station on your route. After
you arrive at a station, your actual times are tracked and displayed next to the scheduled times.
The Next Station Display shows the current time of day and the distance remaining until the next
scheduled stop.
Note: You reach 0 (zero) distance when your train reaches the end of the platform, which is
usually not the optimal location for passenger dropoff. The ideal stopping location depends on
the size of your train; the locomotive/power car may have to be stopped beyond the platform.
The Next Station Display shows only the station you are at (or have just departed from) and the next
upcoming station; the full Timetable is available in the Operations Notebook (F11).
When you begin loading and unloading passengers (press the ENTER key to do this), watch the
Loading Time display to see how quickly passengers are getting on and off the train. The loading
time is longer if any passenger cars are not next to the platform during loading and unloading.
Loading Time is based on the train’s location and the number of passengers at the station. When you
press the ENTER key, the Loading Time starts counting down. When the Loading Time reaches 0,
you must wait for the “OK to proceed” whistle, buzzer, or radio message before you depart. Moving
the train before you receive permission is considered an early departure, and is logged as an infraction in the Activity Evaluation.as an infraction in the Activity Evaluation.
Note: You don’t actually see passengers loading and unloading. The Next Station Display
driving aid displays your only indication of the passenger loading and unloading process.
Hiding all driving aids
(F12) (F12)
(F12)
(F12) (F12)
To close all your driving aids windows at once, press F12. This is useful if you want an unobstructed
view of all the controls in your cab, without having to close the windows one at a time.
TOOLS FOR DRIVING | 18
Page 25
MICROSOFT TRAIN SIMULATOR ENGINEER’S HANDBOOK
THE OPERATIONS NOTEBOOK
The Operations Notebook is a great tool to use when you want to complete an Activity. To display it at
any time, just press F11. There are six tabs:
Tab Contents
Briefing A detailed description of your assignment.
Timetable The schedule you must follow in the current Activity. Most freight Activities don’t
have timetables.
Work Order A list of tasks to perform during the current Activity. Most passenger Activities
don’t have work orders.
Evaluation A summary of your performance in the Activity so far.
Procedures Operating instructions for the current locomotive.
Key Commands The complete list of keyboard commands for the type of train (steam, diesel,
or electric) that you’re driving.
To navigate from tab to tab, simply click a tab with the mouse.
To close the Operations Notebook, press F11 again, or click the X in the upper-right corner.
To learn more about using the Operations Notebook, see the onscreen Help (press F1).
THE TRAIN OPERATIONS WINDOW
You set and release hand brakes, monitor fuel consumption, and perform coupling operations using
the Train Operations window. Press F9 to open the window.
HEADS UP DISPLAY (HUD)
This display provides all the essential information to drive the train from
any
view. (Cycle F5)
TOOLS FOR DRIVING | 19
Page 26
CHAPTER
5
TRA IN
BASICS
Before you start barreling down the track,
we recommend you learn the basics
of operating one of the three types of
®
locomotives in Microsoft
These trains are modeled so closely on real
trains that the challenges are significant,
and a little preparation can go a long way.
Train Simulator.
Page 27

MICROSOFT TRAIN SIMULATOR ENGINEER’S HANDBOOK
THREE TYPES OF LOCOMOTIVES
You can drive three types of locomotives in Train Simulator: steam, electric, and diesel.
Steam locomotives
Flying Scotsman
You can burn almost anything in a steam locomotive, but engines are typically designed to burn a
particular type of fuel, such as coal, wood, or oil. The fuel is used to heat water, creating the steam
that powers the locomotive. While steam engines were the transportation of choice in the 19th
century and early 20th century, they were largely supplanted by the more efficient diesel locomotive.
and the Gölsdorf 380 are steam locomotives, fueled by coal.
Electric locomotives
The Amtrak® AcelaSM Express power car, AcelaSM HHP-8, the 2000 Series, and the 7000 LSE Series
are electric locomotives, powered by electricity supplied from overhead power lines, also known
as catenary.
Electric locomotives use electricity to turn the wheels. The motors are very efficient, fast, reliable,
clean, and cheap to operate, but they require an electrified third rail or overhead electric lines, which
are expensive to install and maintain over long distances. Electric locomotives work particularly well
for commuter services, where high speeds and quick acceleration are important.
Diesel locomotives
The Dash 9, GP38-2, and KIHA 31 are diesel locomotives, powered by diesel fuel.
Diesel engines use diesel fuel to power the train. They replaced steam locomotives for long-haul
heavy freight operations because they are cheaper to buy, operate, and maintain. Unlike steam
locomotives, diesel locomotives can be coupled together and operated by one crew in the lead
locomotive, allowing efficient hauling of heavy loads over long distances. (When locomotives are
coupled together in this fashion, they are said to be in a “multiple-unit” consist, or “MUed together.”)
GENERAL REQUIREMENTS FOR TRAIN HANDLING
Proper train handling is all about safety and efficiency. To successfully operate a train, you must use
the right combination of the throttle and brakes to:
Protect yourself and others from injury.
Protect your cargo.
Prevent damage to the track structure and equipment.
Use fuel efficiently.
Meet your schedule.
TRAIN BASICS | 22
Page 28
MICROSOFT TRAIN SIMULATOR ENGINEER’S HANDBOOK
TERMS TO KNOW
You’ll need to understand the following terms and concepts in order to operate the locomotive
of your choice.
Tractive effort: Tractive effort is a measure of how much pulling power a locomotive has—it is the
total power the locomotive can exert before the wheels start to slip or the locomotive “stalls” from
excessive resistance. The maximum tractive effort that a locomotive can exert is equal to the weight
on the driving wheels multiplied by the ability of the wheels to grip the rails (defined as the coefficient
of adhesion, usually around 20%).
Because tractive effort is increased in proportion to total locomotive weight, locomotives are
intentionally made to be extremely heavy.
Wheelslip: Wheelslip occurs when the amount of force applied to the wheels is greater than the
ability of the wheels to grip the rails. When wheelslip happens in modern locomotives, it is detected
and corrected automatically; in Train Simulator locomotives you can apply sand to the track manually
to increase friction.
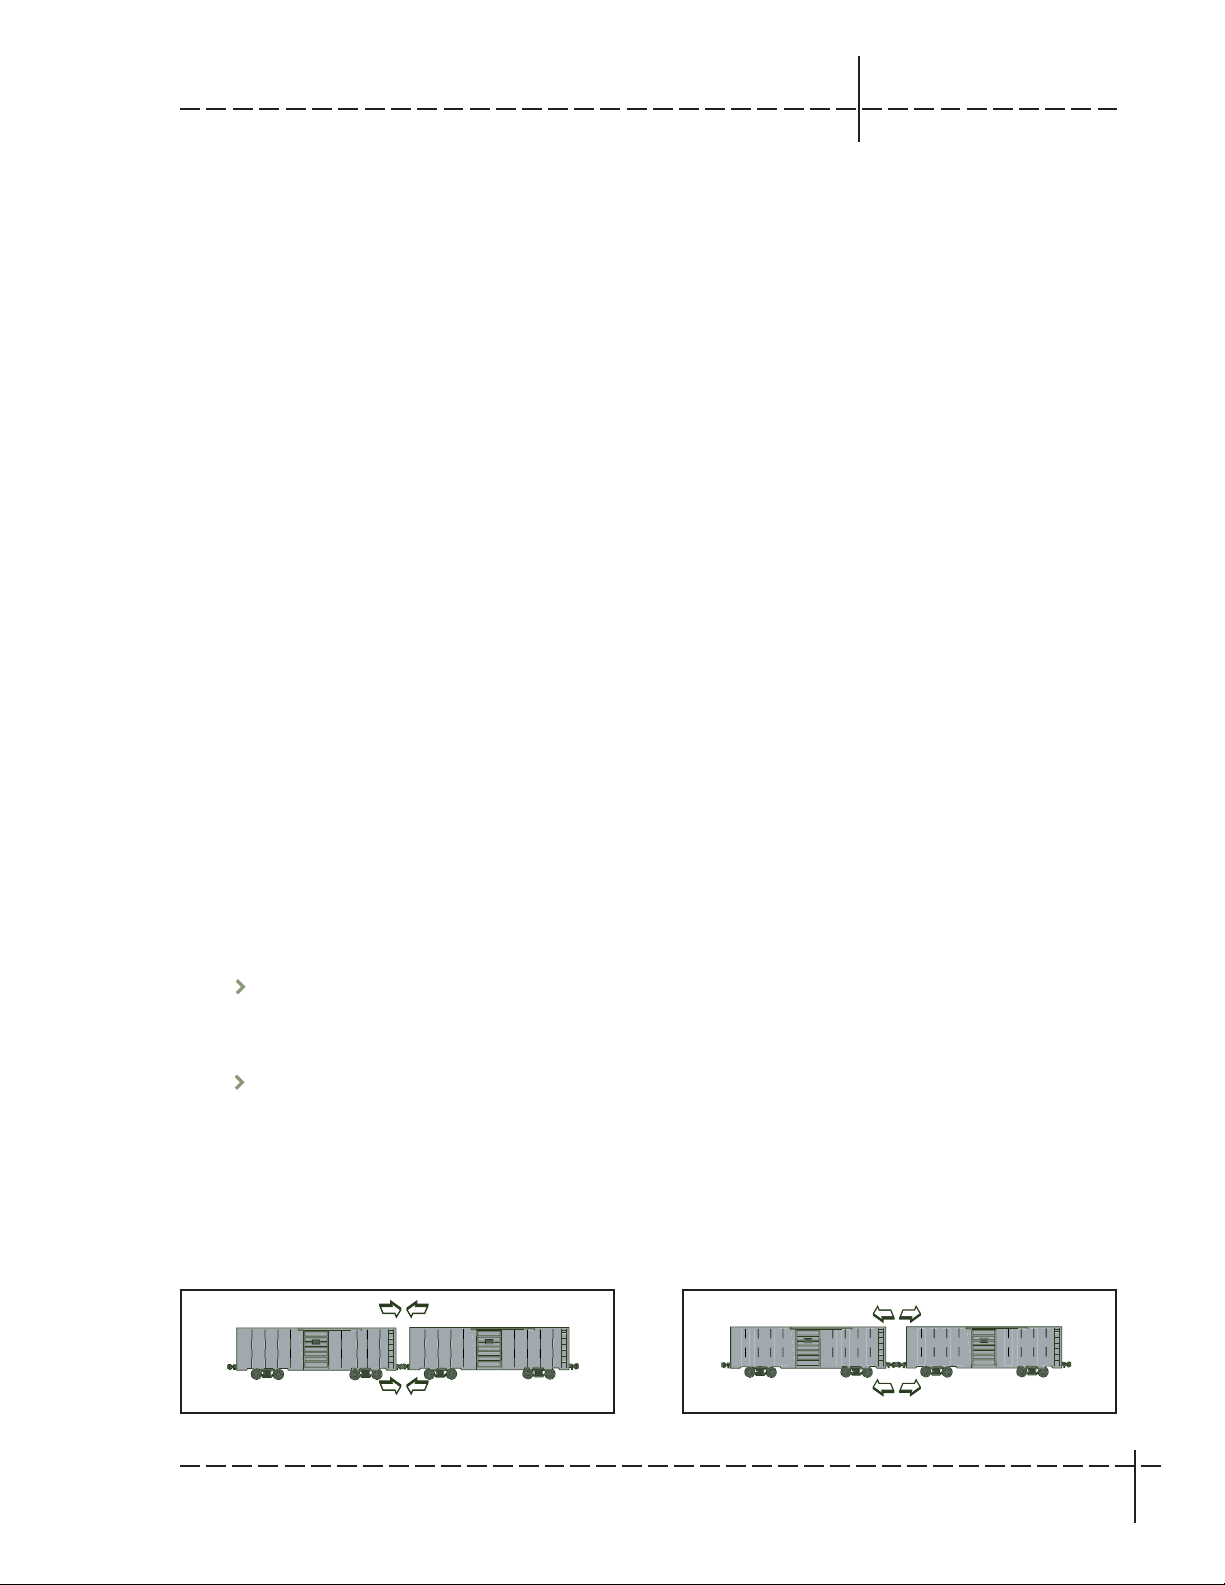
Couplers: Trains consist of individual cars strung together with couplers. In freight trains the couplers
have a certain amount of “play” in them, allowing two cars to come close together and move apart as
the train moves down the track. This helps the locomotive pull the train over varying terrain.
In-train forces: The amount of play in the couplers is called “slack”—changes in the slack between
cars are called in-train forces. The engineer keeps these forces foremost in mind when accelerating,
decelerating, braking, cornering, and making changes in grade. In fact, you could say that the freight
engineer’s main job is to manage the slack in the train.
Run-in force, run-out force: The two main in-train forces are run-in force (also known as “buff
force”) and run-out force (also known as “draft force”).
Run-in force is the impact force two cars make as they move together. Excessive run-in force
can damage the equipment as the cars impact each other, and even derail the train if the
impact is severe enough.
Run-out force is the pulling force as slack stretches out and the cars move farther apart to the
maximum tension between their couplers. Excessive run-out force can break a coupler or
drawbar (the metal arm connecting the coupler to the car).
In some cases, a long train can actually be easier to run than a short train because the forces acting
on different parts of the train can cancel each other out. The rear of the train may still be going uphill
when the front of the train is going downhill, neutralizing the forces acting on the train.
Run-in
Run-out
TRAIN BASICS | 23
Page 29
MICROSOFT TRAIN SIMULATOR ENGINEER’S HANDBOOK
SLOWING AND STOPPING THE TRAIN
It’s essential to understand braking in railroad operations, as there are many different types of brakes.
and
Both locomotives
brakes and locomotive brakes.
Modern air brake systems use electronics and brake computers to control the application and release of
brakes, but the basic system of brake pipes, air compressors, and air reservoirs is essentially the same.
Train brakes
The train brakes function on the entire train—they can be applied to all cars in the train, including the
locomotive. Since the early days of railroading, train brakes have been designed to work automatically
in case of emergency, such as when cars accidentally uncouple from the locomotive. You will often
see train brakes referred to as automatic brakes.
individual cars need them. These brakes are divided into two categories: train
Air brakes: With the exception of the steam locomotive
Flying Scotsman
, all of the locomotives in
Train Simulator use air brakes, which are also referred to as pneumatic brakes.
Traditional air brakes use changes in air pressure to control the application and release of the brakes.
The brake pipe holds air under pressure. To slow or stop the train, the engineer lowers the pressure
in the brake pipe, which signals the brakes in the cars to activate.
1 Equalizing Reservoir
2 Driver’s Brake Valve
3 Main Reservoir
4 Compressor
5 Brake Pipe
6 Auxiliary Reservoir
7 Triple Valve
8 Wheel
9 Brake Block
10 Brake Cylinder
Schematic Diagram of Air Brake System
on Vehicle in Release Position
1
2
7
6
3
5
10
9
Brake Pipe Air - Reducing to Apply Brake
4
8
Auxiliary Reservoir Air - Reducing to fill Brake Cylinder
Schematic Diagram of Air Brake System
on Vehicle in Application Position
Brake Cylinder Air - Increasing to Apply Brake
Brake Pipe Air - increasing in pressure to recharge
Auxiliary Reservoir and release brakes.
Brake Cylinder Air - reducing in pressure to
release brakes
TRAIN BASICS | 24
Page 30

MICROSOFT TRAIN SIMULATOR ENGINEER’S HANDBOOK
In an air brake system, the force of air pressure in the brake cylinder presses the brake pad against
the wheels, slowing the train.
A system of air reservoirs in each car, connected by a brake pipe that runs the length of the train, are
filled by the main compressor located on the locomotive. The important thing to remember when
operating an air brake system is that you reduce the brake pipe pressure to increase the brake
cylinder pressure, which applies the brakes.
Over the years, there have been many modifications to the traditional air brake system, particularly the
addition of electrical switches and computers to control air flow. The locomotives modeled in Train
Simulator use a variety of systems. See the online Help (press F1) for instructions on using the
brakes on the locomotive you are operating.
Vacuum brakes:
Flying Scotsman
uses vacuum brakes. A vacuum brake system is essentially the
opposite of an air brake system. Steam-powered ejectors create a vacuum in the brake pipe and
brake cylinder. When the vacuum brake handle is set to apply brakes, air moves into the brake pipe
and reduces the vacuum on one side of the brake piston. With this pressure change, the movement
of the piston causes the brake shoes to be applied to the wheels.
1 Driver’s Brake Valve
2 Ejector
3 Vacuum Brake Pipe
4 Vacuum Reservoir
5 Brake Cylinder
6 Brake Rigging
7 Brake Block
8 Wheel
8
1
2
4
3
5
6
Vacuum Reservoir
Piston
Conncection Brake Rigging
7
Diagram of Vacuum Brake Cylinder-Brake AppliedDiagram of Vacuum Brake Cylinder-Brake Released
Brake Cylinder
Air allowed into cylinder,
forcing piston up.
Connection to Brake Pipe
TRAIN BASICS | 25
Page 31

MICROSOFT TRAIN SIMULATOR ENGINEER’S HANDBOOK
Locomotive brakes
The locomotive brakes function only on the locomotive. There are several types of locomotive brakes:
Independent brakes: Independent brakes are applied only on the locomotive. The locomotive can use
these brakes when it is operating light, that is, without being coupled to cars. When the locomotive is
coupled to cars, the locomotive brakes can be applied and released independently of the train brakes.
Most locomotives use air brakes, although steam locomotives often use steam-powered brakes.
Dynamic brakes: Electric and diesel-electric locomotives are also equipped with dynamic brakes,
which use the traction motors that normally drive the train to convert the moving train’s energy into
electricity. In electric locomotives, this electricity can be returned to the catenary (called regenerative
braking), while diesel-electric locomotives dissipate the electricity into the air as heat (rheostatic
braking), using large resistor grids on the roof of the locomotive. Dynamic brakes don’t cause wear
on the brake shoes.
Engine brakes: The KIHA 31 has an engine brake instead of a dynamic brake. Engine brakes slow
the train by using the train’s momentum to turn the engine’s crankshaft. You use a similar principle
in your automobile when you put the transmission into low gear to descend a hill.
UNITS OF MEASURE
The displays and gauges in Train Simulator locomotives use the same units of measure as their
real-world counterparts. You can use the following table to convert the units into the standard
you are most familiar with, or to compare values for two locomotives.
Pressure
PSI Kg/cm
1 pound per square 1 0.07 2.04 0.068 6.89
inch (psi) is equal to
1 kilogram per 14.2 1 29.04 0.98 98
centimeter squared
is equal to
0.49 0.03 1 0.03 3.38
(Hg) at 60° F is equal to
1 bar is equal to 14.5 1.02 29.6 1 100
2
Inches Hg Bar kPa
1 kilopascal (kPa) 0.145 0.01 0.296 .01 1
TRAIN BASICS | 26
Page 32

MICROSOFT TRAIN SIMULATOR ENGINEER’S HANDBOOK
Speed
mph km/h
1 mile per hour 1 1.6
(mph) is equal to
1 kilometer per hour 0.62 1
(km/h) is equal to
TRAIN BASICS | 27
Page 33

HOW TO DRIVE A...
STEAM
LOCOMOTIVE
This chapter covers the basic operations
of steam locomotives in general, and
descriptions of the Microsoft
®
Train
6
CHAPTER
Simulator versions of
and the Gölsdorf Series 380 locomo-
tives in particular. The locomotives’
specifications appear after the general
description of the trains modeled in
the simulation.
Flying Scotsman
Page 34

MICROSOFT TRAIN SIMULATOR ENGINEER’S HANDBOOK
WHAT IS A STEAM LOCOMOTIVE?
1
4
1 Smoke Box 3 Fire Box 5 Cab Control Room
2 Boiler 4 Pilot Truck 6 Tender
Note: The terminology used throughout this
2
3
5
Engineer’s Handbook
6
is American English. See
the Sidebar for some differences in American and British terminology.
The simplest explanation of the operation of a steam engine is that the fireman creates steam and
the engineer uses the steam to move the train. The fireman and the engineer are a team; they must
cooperate closely to maintain the safe and efficient operation of the locomotive. The conductor is
charged with the safety of the train and its passengers or
freight, and its adherence to the rules of the railroad.
Terminology differences
The first steam locomotive was built by British engineer
U.S. U.K.
Richard Trevithick in 1804. By the mid-1830s, steam engines
largely replaced horses for pulling loads along the railways of
Britain. By the end of the century, steam locomotives had
Engineer Engine driver,
driver
completely transformed the landscapes and economies of the
industrializing nations.
Conductor Guard
In Train Simulator, you are the engineer. You can choose to
perform the duties of the fireman, too, or you can delegate
that task to the computer, which performs the fireman’s task,
but not as well as you can. The role of the conductor is
handled by the computer.
HOW TO DRIVE A STEAM LOCOMOTIVE | 29
Freight Car Wagon
Passenger Carriage
Coach
Freight train Goods train
Consist Rake
Switch Points
Exhaust Chimney
Stack
Page 35

MICROSOFT TRAIN SIMULATOR ENGINEER’S HANDBOOK
Note: All of the steam locomotive Activities in Train Simulator feature passenger trains. However, you can use the Activity Editor to create Activities that use steam locomotives to pull
freight trains. For more information about Activities, see Chapter 10, The Activities. For more
information about the Activity Editor, see Chapter 12, Editors and Tools.
USING THE LOCOMOTIVE CONTROLS
These are the descriptions of the various controls and gauges you will find on a Train Simulator steam
locomotive. For more information and details see the online Help (press F1).
Engineer’s controls
Steam Pressure Gauge: The Steam Pressure Gauge shows the pressure of the steam in the boiler.
2
The gauge reads in pounds per square inch (psi), kilograms per centimeter squared (kg/cm
bars. If the steam pressure is too high, you are in danger of an explosion. If the steam pressure is too
low, you won’t be able to generate sufficient force to move the train.
), or
See the conversion table in Chapter 5, Train Basics, for more information about pressure unit conversion.
Steam Chest Pressure Gauge: The Steam Chest Pressure Gauge shows the pressure of the steam in
the cylinders. The pressure is directly controlled by the Regulator.
Regulator: The Regulator (throttle) controls how much steam the boiler releases to the cylinders.
Open the Regulator to increase speed and power. Close the Regulator in time to stop the train at the
desired location with minimal application of brakes.
Reverser: The Reverser is used to move the locomotive forwards or backwards. Use the Reverser
lever to set the duration of the piston stroke during which steam enters the cylinders. The duration,
known as the cutoff, is expressed as a number (steam admitted for a percentage of the piston
stroke). As the Reverser setting is moved towards 0, the engine becomes more efficient, but the force
it develops drops.
The Reverser is similar to the transmission of an automobile engine. When starting and stopping the
train, use the Reverser in its full open position (similar to a low gear). As the train gains momentum,
move the Reverser setting back to 0 (zero), limiting the duration of the piston stroke in which steam is
entering the cylinders, and thereby using the steam more efficiently (similar to a high gear).
Brake Handle: The Brake Handle applies and releases the brakes.
brake system, while the 380 uses an air brake system.
Flying Scotsman
uses a vacuum
Brake Gauge: The brake gauge displays the pressure in the brake system.
HOW TO DRIVE A STEAM LOCOMOTIVE | 30
Page 36

MICROSOFT TRAIN SIMULATOR ENGINEER’S HANDBOOK
Cylinder Cocks: The cylinder cocks can be opened to allow steam that has condensed into water to
escape from the cylinders after the locomotive has been left standing. Water must be drained from
the cylinders because it is uncompressible and can blow out the seals of the cylinder if pressurized by
the pistons. When the train is in motion, the cocks should be closed, since steam can escape through
them. Also, the lubrication system does not work efficiently with the cocks open.
Sanders: Use the sanders to blow sand onto the track to increase traction. This helps you get a better
grip on the track when starting the train and on steep grades and wet track. There is a limited amount
of sand on the locomotive.
Speedometer: The speedometer shows your speed in miles or kilometers per hour, depending on the
locomotive. In the 1920s, many steam locomotives did not have speedometers, but Train Simulator
includes them to help you operate the locomotives.
Steam Heat Pressure Valve: With this valve you can shunt some steam into the steam heat line to
heat the passenger cars. It must be adjusted to suit the train length and pressure you want to deliver.
Steam Heat Pressure Gauge: When you are running a passenger train in cold temperatures, you will
use some of the steam to generate heat for the passenger cars. The Steam Heat Pressure Gauge
shows you how much steam you are using for this function. The longer the train, the more steam this
function uses. Steam heating can have a significant impact on the demands placed on the boiler.
You are never required to use steam heat for passenger cars in Train Simulator, but you can if you
want to make your run more realistic.
Whistle: Sound the whistle to warn passersby of your approach. For a more realistic experience, use
the proper whistle sequence. See the “Bells, Horns, Lights, and Whistles” section in Chapter 9,
Operations, for more information about specific whistle codes.
Headlights: You should keep the headlights on during regular operation. In Train Simulator, whenever
the headlights are turned on, the rear lights are illuminated, too.
For more information see the “Bells, Whistles, Horns, and Lights” section in Chapter 9, Operations.
Fireman’s controls
Note: You can delegate the role of the fireman to the computer, by choosing the Automatic
Fireman option from the General tab of the Options screen.
Exhaust Stack: Watch the smoke coming out of the exhaust stack to gauge how efficient your
fireman’s efforts are. Clear or very light gray smoke is ideal. Black smoke indicates that the coal is not
being effectively burned—this is like throwing the coal off the train rather than into the firebox! White
smoke indicates that there is too much air passing through the firebox or that the fire is too cold.
HOW TO DRIVE A STEAM LOCOMOTIVE | 31
Page 37

MICROSOFT TRAIN SIMULATOR ENGINEER’S HANDBOOK
Dampers: The dampers are the primary control of airflow to the firebox, and therefore the amount of
heat given off by the fire. Open the damper doors to add air and increase heat; close the damper
doors to reduce air and lower the heat level. You may end up leaving the damper doors open for the
entire journey.
Blower: The blower keeps exhaust gases moving through the exhaust stack, causing a vacuum that
draws air through the firebox. Use the blower when there is not sufficient natural draft flowing
through the firebox to keep the fire hot. This might occur when the locomotive is standing, coasting,
or under very low power. You can also turn on the blower to raise steam quickly, since the increased
airflow helps the fire burn hotter and makes the combustion more efficient.
Firebox Doors: Open the firebox door when you need to add coal to the firebox, or when you need a
secondary air source for the fire. Opening the firebox door is not as effective as opening the dampers
in making a hotter fire, but can be helpful for adding some extra oxygen.
Shovel and Firebox: Add the proper amount of coal to the firebox to keep the fire at the desired heat
level. There is an art to adding coal to the fire in the right amounts and at the right times. Too much
coal on the fire may suffocate the fire; too little coal will not produce enough heat to raise steam.
Remember to add coal and allow the fire to heat up before injecting additional water into the boiler,
since adding cool water also has a cooling effect. Also note that it’s bad form to add coal to the
firebox when in a station; it produces too much smoke.
To manage the fire well you need to be familiar with the locomotive and plan ahead by at least 10
minutes. On the Scotsman, planning 20 to 25 minutes ahead is a good idea.
Boiler Water Gauge: The Boiler Water Gauge shows the water level in the boiler. The level shown is
affected by circumstances that can cause the water level to shift, such as a grade or changes in
speed.
Injectors: Because the water in the boiler is constantly being converted to steam to power the train,
injectors are used to move water from the tender into the boiler. Because the injectors use steam to
move the water, and because cool water from the tender cools the water in the boiler, try to plan
ahead so that you don’t need to use the injectors when the locomotive needs a lot of steam power to
move the train.
On mainline locomotives such as
time and use the second as required. The locomotives are designed with this in mind. Under medium
power demands, one injector should be enough.
Tender Water Gauge: The Tender Water Gauge indicates the water level in the tender. If the water
level is low, refill the tender’s water supply at a water tower. In the real world, the Tender Water Gauge
is located on the tender, but in Train Simulator it is located on the front cab panel, next to the Boiler
Water Gauge.
Water Scoop: The Water Scoop is used to add water to the tender when passing over water troughs
placed between the rails.
Flying Scotsman
, it is common to leave one injector on most of the
HOW TO DRIVE A STEAM LOCOMOTIVE | 32
Page 38

MICROSOFT TRAIN SIMULATOR ENGINEER’S HANDBOOK
OPERATING A STEAM LOCOMOTIVE
In Train Simulator, the steam engine has been thoroughly checked, lubricated, and fired up for you
when you take the controls.
Moving the train
1. Double-check the boiler water level using the Boiler Water Gauge. Note that the Boiler Water Gauge
is a sight glass (water tube).
2. Make sure the Reverser is set to 0 (zero) cutoff, the Regulator is closed, and the cylinder cocks
are open.
Important: You must open the cylinder cocks if the locomotive has been standing for any
length of time. Be sure to close the cocks when the cylinders have been drained (after five or
six piston strokes).
3. Set the Reverser for forward motion—as far forward as you can.
4. Make sure that you do not have any Stop signals that apply to you.
5. Await the “OK to proceed” whistle from the conductor.
6. Slowly open the Regulator.
7. Release the brakes.
8. Continue to open the Regulator, watching the Steam Chest Pressure Gauge to judge the force being
developed by the engine. If the wheels start to slip, reduce the Regulator and consider sanding.
9. After five or six strokes of the cylinders, close the cylinder cocks.
10. As you accelerate, slowly reduce the cutoff, then adjust the Regulator to maintain the desired speed.
Going uphill
You may need to move the Reverser further towards Forward, and fully open the Regulator, to supply
greater power output to climb the hill.
Going downhill
If the grade is sufficient, you can close the Regulator and reduce the Reverser towards 0 (zero) in
order to save fuel.
Keep an eye on the water level in the boiler, but be aware that you get false readings on the water level
gauges as the boiler tilts with the hill. The water level gauge reads lower than the actual amount of
water in the boiler. It’s important that the water level be sufficient to keep the top of the firebox covered even when the boiler is tilted on a slope.
HOW TO DRIVE A STEAM LOCOMOTIVE | 33
Page 39

MICROSOFT TRAIN SIMULATOR ENGINEER’S HANDBOOK
Stopping a train
The amount of braking required to stop the train depends on the train’s speed and weight, the
locomotive’s braking power, and the grade of the track. Take these factors into consideration when
planning a stop.
As you approach the stopping point, close the Regulator. Apply light brake pressure to take up the
slack in the train if your train contains cars with couplers that have slack action (such as freight cars).
Then apply as much brake as necessary to stop the train.
The length of time required to recharge the brake system varies with the available boiler pressure and
the length of the train.
TROUBLESHOOTING
Problem: Blowing off
What it means: Each locomotive has a maximum pressure, called the working pressure, mea-
sured in pounds per square inch (psi) or kilograms per centimeter squared (kg/
2
). If the boiler develops more pressure than the working pressure upper limit,
cm
safety valves open automatically to blow off excess steam. This is an inefficient
use of coal and water, and is particularly unwelcome when standing at a station,
as “blowing off” is very noisy and the mist can dampen passengers and cargo.
How to diagnose: You see and hear steam being released from the safety valve.
How to avoid: Know your route and plan ahead so that you’re not creating steam you don’t
need. In particular, back off on firing before periods of reduced steam usage,
such as during extended stops.
What to do: The safety valves do most of the work for you by venting the excess steam and
lowering the pressure.
Problem: Boiler’s fusible plugs melt
What it means: If at any time the water level in the boiler falls so low that it does not cover the
firebox, the firebox can melt, causing a fatal boiler explosion. As a safety mechanism, the roof of the firebox contains plugs that melt at a much lower temperature
than the iron firebox. If the plugs melt, the steam from the boiler rushes into the
firebox, thereby lowering the fire temperature and alerting the crew.
How to diagnose: The Activity ends.
How to avoid: Keep the water level high enough to cover the firebox. Remember that the water
level and the water gauge are affected by the slope of the train on a grade. Be sure
to pick up additional water if the tender water level is getting low.
What to do: If the fusible plugs melt, the Activity ends.
HOW TO DRIVE A STEAM LOCOMOTIVE | 34
Page 40

MICROSOFT TRAIN SIMULATOR ENGINEER’S HANDBOOK
Problem: Black smoke
What it means: Black smoke indicates inefficient combustion of the coal.
How to diagnose: Black smoke is expelled from the exhaust stack.
How to avoid: Over time, you will gain experience in firing the locomotive. In general, black
smoke is caused by a cool fire, often due to an inadequate amount of air passing
through the firebox. This can be caused by too much coal on the fire, closed
dampers, or not enough draft for the fire (in which case you should turn on the
blower). Whenever you add coal to the fire, some black smoke is generated until
the coal is hot enough to burn completely.
What to do: Open the damper or fire doors, and/or turn on the blower. Stop or reduce the
addition of coal.
Problem: Low steam pressure
What it means: Aside from the obvious problem of lack of motive power, low steam pressure is
dangerous because steam powers the water injectors and also keeps the brakes
off. Low steam pressure could cause a boiler failure (because water cannot be
injected into the boiler) and can cause the train brakes to be applied.
How to diagnose: Low pressure is indicated on the steam pressure gauge, and the brakes may
come on.
How to avoid: Make sure you have sufficient coal and water in your tender for the journey. Plan
ahead for the amount of fire you’ll need. Smooth out the demand for steam,
making the changes in demand as small as possible. Use the gradients of the
route to help you. Beware of making the fire too “thick” or “thin.”
What to do: If there is sufficient water in the boiler, close the injectors. Look at the fire; it may
need more air from the blower. Turn off steam heat to the passenger cars until
steam pressure increases.
Make sure the dampers are fully open.
If the fire needs to be built up, do it slowly. If the fire is too deep, stop adding coal
and use the blower and fire doors effectively. You may need to the drive the train
carefully until enough fire is burned away for effective operation.
Beware of trading too much water level for steam; it’s generally easier to recover
pressure than water level.
Problem: Blowback in tunnels
What it means: The fire comes back into the cab, burning the crew as the engine enters a tunnel.
How to diagnose: The Activity ends.
How to avoid: Before entering a tunnel, close the firebox doors. Open the blower fully.
What to do: This is an Activity ending error.
HOW TO DRIVE A STEAM LOCOMOTIVE | 35
Page 41

FLYING SCOTSMAN
MICROSOFT TRAIN SIMULATOR ENGINEER’S HANDBOOK
London & North Eastern Railway’s No. 4472
“Pacifics,” was the first of the new locomotive series for the LNER. Debuting on February 7, 1923,
Flying Scotsman
61-year old King’s Cross to Edinburgh express train, No. 4472’s long recognition in the public
eye began with a two-year run as a major exhibit at the British
Empire Exhibition.
Flying Scotsman
power, but set the world record for longest non-stop regular
service run in 1928, running the 392 miles from London to
Edinburgh in just over eight hours. To accomplish this feat, a
unique corridor tender was created to allow an extra crew to
relieve the fireman and engineer without having to stop the train.
In 1934,
achieve an authenticated speed of 100 mph.
After 40 years of regular operations, the locomotive was removed
from service as one of the last steam locomotives in the British
Rail system. Alan Pegler purchased and restored No. 4472 in
1963; the 70 other locomotives in its class were all scrapped.
Flying Scotsman
Flying Scotsman
piece, pulling “specials” on April 20, 1963. It continues to capture
the hearts of steam enthusiasts around the world. No. 4472 has
made several special tours, including journeys to America and
Australia that made it the only steam locomotive to have run on
three continents. In Australia, it broke its own long-distance record
with a non-stop run of 422 miles. Under the direction of new
owner Dr. Tony Marchington,
a major restoration and is back on the rails pulling a consist of
luxury coaches on journeys throughout the United Kingdom.
represented the latest in British engineering and design. Named for the familiar,
not only was a great symbol of elegance and
was the first steam locomotive to
began its second life as a working historical
Flying Scotsman
Flying Scotsman
recently underwent
, the third of Sir Nigel Gresley’s A1
Wheel Classification
The wheel arrangement of
the Flying Scotsman is
classified using the Whyte
System, which counts the
number of leading,
driving, and trailing
wheels. Flying Scotsman is
a 4-6-2, meaning that it
has four leading wheels
(two axles), six driving
wheels (three axles), and
two trailing wheels (one
axle). Only the driving
wheels are powered; the
other wheels provide
better tracking at high
speed and carry the weight
of the firebox.
HOW TO DRIVE A STEAM LOCOMOTIVE | 36
Page 42

MICROSOFT TRAIN SIMULATOR ENGINEER’S HANDBOOK
Flying Scotsman Specifications
Note: 1 U.S. ton = 2,000 lb. (Also known as a “short ton.”)
1 metric ton = 1,000 kg = 2200 lb. (Also spelled “tonne.”)
1 Imperial ton = 2,240 lb. (Also known as a “long ton.”)
Locomotive type & no.: LNER A1 4-6-2 8P, No. 4472
Power source: 180 psi hand-fired, coal burning boiler
Wheel configuration: Six 80-in. (2.03m) diameter driving wheels
in a 4-6-2 configuration
Max. speed: 100 mph (161 km/h) under favorable conditions
Height: 13 ft, 2 in (4.03 m) (to safety valve top)
Width: 9 ft (2.74 m)(over footplate)
Length (locomotive & tender): 70.43 ft (21.47m)
Weight (locomotive & tender): 171 U.S. tons (155 metric tons)
Tractive effort: 29,835 lb (13,532.93 kg)
Coal capacity: 9 U.S. tons (8 metric tons)
Water capacity: 6,000 U.S. gallons (22,712 liters)
Brakes: Vacuum, operates at 21 in. Hg*
*See the conversion table in Chapter 5, Train Basics, for more information.
HOW TO DRIVE A STEAM LOCOMOTIVE | 37
Page 43

MICROSOFT TRAIN SIMULATOR ENGINEER’S HANDBOOK
GÖLSDORF SERIES 380
The Gölsdorf Series 380 steam locomotive is one of 47 locomotive types designed by famed Austrian
locomotive designer Karl Gölsdorf. The 380 is the freight cousin of the Series 310 passenger locomotive; both are well-known for their remarkably high boiler position, aesthetic conical shape and
functional form.
The 380 is a four-cylinder, compound locomotive. This means
the steam is used twice before being exhausted. Steam first
enters the smaller, high-pressure cylinders located between the
frame rails and drives connecting rods attached to a crankshaft
on the third axle. The exhausted steam is then routed to the
larger, low-pressure cylinders located outside the frame rails and
drives connecting rods attached to the third drive wheels.
The major differences between the Series 380 and the 310 are
the number and size of the drive wheels. The 380 has ten 55inch driving wheels while the 310 has six 82" wheels. This
greatly affects the performance of each locomotive. A passenger
locomotive like the 310 operates best with fewer, large-diameter
driving wheels that enable high-speed runs. The tradeoff is a
lower tractive effort that limits the length of passenger trains
because of a lower pulling ability. With the 380, these characteristics are reversed. The 380 uses its smaller wheels to pull the
heavy freight trains. The ten smaller wheels make the 380’s
tractive effort significantly higher than the 310’s.
The 380’s high tractive effort makes it a natural for pulling
the Orient-Express passenger train through the mountainous
regions of Austria.
Wheel Classification
The wheel arrangement of
the Gölsdorf 380 is classified using the German
system, which counts the
number of leading, driving,
and trailing axles. Numbers
are used for non-powered
axles, and letters are used
for powered (“driving”)
axles, with A equal to 1, B
equal to 2, and so on. The
380 is classified as 1E,
meaning that it has one
non-powered leading axle,
five powered axles, and no
trailing axles. Using the
Whyte system, which is
favored in the U.S. and
U.K., the 380 would be
a 2-10-0.
HOW TO DRIVE A STEAM LOCOMOTIVE | 38
Page 44

MICROSOFT TRAIN SIMULATOR ENGINEER’S HANDBOOK
Gölsdorf Series 380 Specifications
Note: 1 U.S. ton = 2,000 lb. (Also known as a “short ton.”)
1 metric ton = 1,000 kg = 2200 lb. (Also spelled “tonne.”)
1 Imperial ton = 2,240 lb. (Also known as a “long ton.”)
Locomotive type: Series 380 1E h4v (2-10-0)
Wheel configuration: Ten 55.5 in. (141 cm) diameter driving wheels,
1E configuration
Max. boiler pressure: 16kg/cm2. (228 psi)
Max. speed (permitted): 43.5 mph (70 km/h)
Height: 15 ft (4.57 m)
Width: 10 ft, 1in (3.08 m)
Length: 38 ft (11.6 m) (locomotive), 24.9 ft (7.59 m) (tender);
total: 62.9 ft (19.2 m)
Weight (locomotive &
class 156 tender): 157 U.S. tons (142 metric tons)
Max. weight on driving wheels: 15.4 U.S. tons (14 metric tons)
Tractive effort: 13.3 U.S. tons (12.1 metric tons)
Coal capacity: 11.2 U.S. tons (10.2 metric tons)
Water capacity: 7,800 gallons (29,500 liters)
Brakes: Train and locomotive air brakes
HOW TO DRIVE A STEAM LOCOMOTIVE | 39
Page 45

CHAPTER
7
HOW TO DRIVE A...
DIESEL
LOCOMOTIVE
This chapter covers the basic opera-
tions of diesel locomotives in general,
and descriptions of Microsoft
®
Train
Simulator Dash 9, GP38-2, KIHA 31
locomotives in particular. The locomo-
tives’ specifications appear after the
general description of the trains mod-
eled in the simulation.
Page 46

MICROSOFT TRAIN SIMULATOR ENGINEER’S HANDBOOK
WHAT IS A DIESEL LOCOMOTIVE?
6
5
7
14
15
3
4
2
1
1 Batteries 6 Motor Blower 11 Drive Shaft 16 Air Compressor
2 Control Stand 7 Auxiliary Alternator 12 Gearbox 17 Fuel Tank (one side)
3 Electronic Controls 8 Main Alternator 13 Radiator Fan Reservoirs (other side)
4 Rectifiers/Inverters 9 Engine 14 Radiator 18 Traction Motor
5 Air Intakes 10 Turbo Charger 15 Sandbox 19 Wheel
8
9
17
10
11
20
13
12
18
20 Truck Frame
16
19
A diesel engine is an oil-burning internal combustion engine. In a gasoline engine the fuel is ignited
by spark plugs, but in a diesel engine the fuel ignites because of heat generated by compression
inside the cylinders. When the pressure in the cylinders rises, the temperature of the fuel-air mixture
increases to the point where it ignites. The force of the ignition of the fuel moves the pistons in the
cylinders, which turn the crankshaft.
In a diesel-mechanical or diesel-hydraulic locomotive, the crankshaft is connected to a mechanical
or hydraulic transmission that both lowers the speed of rotation and allows power to connect and
disconnect from the wheels. The KIHA 31 is a diesel-hydraulic locomotive.
In a diesel-electric locomotive, the crankshaft turns an alternator or generator, which produces
electricity to power the traction motors (one located on each driving axle), which turn the wheels.
Diesel-electric locomotives are similar to electric locomotives, except that rather than having the
electricity generated outside the locomotive and delivered by electrified lines, the electricity is generated on board. The Dash 9 and GP38-2 are diesel-electric, as are almost all large diesel locomotives.
Diesel locomotives have the same operational advantages over steam that electric locomotives have,
in terms of power and fuel efficiency. But unlike pure electric locomotives, diesels can go anywhere
there is track, because they don’t need electrified lines, which are costly to build and maintain over
long distances.
HOW TO DRIVE A DIESEL LOCOMOTIVE | 41
Page 47

MICROSOFT TRAIN SIMULATOR ENGINEER’S HANDBOOK
USING THE DIESEL-ELECTRIC LOCOMOTIVE CONTROLS & GAUGES
These are the descriptions of the various controls you will find on a Train Simulator diesel-electric
locomotive. For more information and details see the online Help (press F1).
Reverser: The Reverser determines the direction of travel. There are three positions: Forward,
Neutral, and Reverse.
Throttle: The throttle controls the amount of power generated by the locomotive, and therefore,
the propulsion of the train..
Note: When starting the train, pause at each notch (throttle level) as you advance the throttle.
Dynamic Brake: The dynamic brake converts the energy of the moving train into electricity, which
is dissipated into the air as heat. Dynamic brakes cannot be used at very low speeds because they
depend on the train’s momentum. An optimum speed range of about 18 to 25 mph (30 to 40 km/h)
is typical for the operation of most dynamic brakes.
Dynamic braking may cause wheelslip. If wheelslip occurs, reduce the level of dynamic braking.
before
Always use dynamic brakes to their fullest extent
air brakes can cause wear and tear on the wheels.
Locomotive Air Brake: The Locomotive Air Brake (also called the Independent Brake) handle applies
and releases the brake pressure on the locomotive only. You can release the air brakes on the
locomotive even when the train brakes are being applied to the rest of the train, a procedure called
“actuating off the air” or “bailing off the air.”
Train Brake: The Train Brake handle typically has a series of settings from Release through various
degrees of application to Emergency.
Sanders: The sanders apply sand to the rail to increase traction and avoid wheelslip.
Horn: Each railroad has specific rules about using horns. For more information see the “Bells,
Whistles, Horns and Lights” section in Chapter 9, Operations.
Headlights: For a more realistic experience, you should keep the headlights on during regular
operation. Use the Dim setting when approaching an oncoming train or when operating through
a yard or locomotive facility.
using locomotive air brakes. In the real world,
In Train Simulator, whenever the headlights are turned on, the rear lights are illuminated, too.
Speedometer: The speedometer shows the speed of the train.
HOW TO DRIVE A DIESEL LOCOMOTIVE | 4 2
Page 48

MICROSOFT TRAIN SIMULATOR ENGINEER’S HANDBOOK
Ammeter: The ammeter shows the number of amperes of electrical current being drawn (for motive
power) or generated (for dynamic braking) in the traction motors. On the GP38-2, the ammeter is also
called the Load Indicating Meter.
Brake Pressure Gauges: The Brake Pressure gauges display how much brake pressure is applied and
how much brake pressure is available. When the brakes are applied, the equalizing reservoir and
brake pipe pressure drop. The brake cylinder pressure goes up. When the brakes are released, the
equalizing reservoir and brake pipe start to be recharged by the air compressor. The brake cylinder
pressure, which is the actual pressure pushing the brakes against the wheels of the locomotive,
decreases to 0 (zero).
For more information about brakes, see Chapter 5, Train Basics.
Brake Pipe Pressure Gauge: When you use only the locomotive brake and not the train brake,
you won’t see a change in the brake pipe pressure. This gauge displays the pressure in the
brake pipe.
Equalizing Reservoir Pressure Gauge: This gauge displays the pressure of the equalizing reser-
voir. When you apply the brakes, the pressure in the equalizing reservoir drops immediately and
the new pressure is then propagated in the brake pipe, which runs the length of the train.
Main Reservoir Pressure Gauge: This gauge displays the amount of air pressure available to
recharge the braking system. You’ll see a drop in the main reservoir pressure when the brakes are
released because air is moving from the main reservoir to recharge the equalizing reservoir, the
brake pipe, and the auxiliary reservoirs on each car.
Brake Cylinder (BC) Pressure Gauge: This gauge displays the brake cylinder pressure in the lead
locomotive. If you apply or bail off the locomotive brakes independently, remember that this
gauge does not show the pressure in the brake cylinders on the rest of the train.
OPERATING A DIESEL-ELECTRIC LOCOMOTIVE
Moving the train
You must watch your slack (the “play” between each car) and keep these points in mind:
Use the lowest throttle position possible to start the train moving. You may need to retard starting
acceleration by using the locomotive brake.
Once the train is moving, do not increase the throttle until either the amperage (as shown on the
ammeter).
To accelerate, advance the throttle slowly one notch at a time.
On curved sections of track, be moderate in applying power. This reduces the possibility of
“stringlining” (the tendency of cars to “straighten out” and derail on a curved stretch of track).
HOW TO DRIVE A DIESEL LOCOMOTIVE | 4 3
Page 49

MICROSOFT TRAIN SIMULATOR ENGINEER’S HANDBOOK
To start a train on a level grade
1. Set the Reverser for forward or backward movement.
2. Release the train brake.
3. After the brakes have released on the entire train, move the throttle to the lowest setting and
release the Locomotive Brake.
If the train moves too quickly, control acceleration using the Locomotive Brake to prevent
excessive in-train forces.
If the train does not move, slowly advance the throttle to the next setting.
4. Wait for the current reading on the Ammeter to fall before advancing the throttle to the next
higher position.
Note: Use the lowest possible throttle setting to minimize in-train forces.
Slowing or stopping
To slow or stop a train
1. Reduce throttle.
2. Gradually apply dynamic brakes to allow slack to “bunch up”
against the locomotive.
3. Add air brakes as necessary to stop or slow to your
desired speed.
Reversing
To reverse the direction of the train
1. Bring the locomotive to a full stop.
2. Move the Reverser to Reverse.
3. Release all brakes.
4. Advance the throttle.
In the Real World…
On the Burlington Northern
and Santa Fe railroad
(BNSF), the conductor
notes each signal that the
train passes: the signal
location and indication, the
time, and the train’s speed.
All members of the cab
crew speak aloud the
indication of each signal as
it appears, both to make
sure the engineer has early
notice of upcoming signals
and to keep the crew alert
and on task.
Blending the brakes
As you head down a steep or long grade, use the dynamic brake first to gently bunch up the train
slack against the locomotive(s). Then, use a minimum reduction in brake pipe pressure, such as 6 to
8 pounds per square inch (psi), to set the air brakes. You must have the train air brakes and dynamic
brakes in balance so that you won’t need to make adjustments to the air brakes and you can use the
dynamic brake to speed up or slow down.
HOW TO DRIVE A DIESEL LOCOMOTIVE | 4 4
Page 50

MICROSOFT TRAIN SIMULATOR ENGINEER’S HANDBOOK
Important: Train air brakes can be
you brake too heavily, you will have to fully release the brakes before you can try to apply them
again. If this process is repeated too often in a short period of time, you can use up all of your
air pressure and have NO AIR BRAKES, a potentially disastrous situation on a long, steep grade.
Always try to use the dynamic brakes first (because they do not have this limitation), combined
with careful, gradual application of the air brakes.
Do not supplement the dynamic brake with the
of starting or stopping and your speed is below the effective range of the dynamic brakes. Always
use dynamic brakes to their fullest extent before using locomotive air brakes.
applied
gradually but they cannot be
locomotive
air brakes unless you are in the process
released
gradually; if
Wheelslip and sanding
In the real world, computers on the locomotives monitor the axles. If there is a differential in axle
speeds, power is automatically reduced to the slipping wheel and sand is automatically applied.
In Train Simulator, you apply sand manually, by pressing the X key.
Controlling in-train forces
Except when emergency braking is required, change throttle positions and brake applications slowly
to allow your train’s slack to adjust gradually.
When you use the dynamic brakes and air brakes together and you reach the desired speed, maintain
enough dynamic brake to control slack until the air brakes are fully released.
Throttle handling
Make throttle changes one notch at a time. If the wheelslip light comes on, reduce the throttle until
the light goes out.
Never apply power to hold a train stationary on a grade. Always use the train brakes to hold a train
on a grade.
HOW TO DRIVE A DIESEL LOCOMOTIVE | 4 5
Page 51

MICROSOFT TRAIN SIMULATOR ENGINEER’S HANDBOOK
DASH 9 DIESEL-ELECTRIC LOCOMOTIVE
The GE-9-44CW (commonly called “the Dash 9”) is a modern
diesel-electric locomotive manufactured by General Electric.
Using DC (direct-current) traction technology, the Dash 9 is
part of the highly reliable and cost-effective line of locomotives descending from the Universal series of locomotives
(nicknamed “U-Boats) that first hit the rails as part of the
“Second Generation” diesel era in the early 1960s. The
locomotive’s design is very practical, with good visibility
fore and aft for the engineer and easy access to the engine
compartment for maintenance crews.
You can operate the Dash 9 on the Marias Pass route in
Montana, pulling freight between Shelby and Whitefish. If you
choose to try out this locomotive on another line, be aware
that these units are most effective pulling loads over long
stretches at freight-train speeds.
The Heritage II
The orange, green, yellow,
and silver colors are BNSF’s
new livery. The scheme is
based on the same orange
and green colors used in the
1940s and ’50s by the Great
Northern Railway Company,
one of the railroads that
merged to form Burlington
Northern (BN) in 1970, as
well as the silver and yellow
from the Santa Fe Railway,
which merged with BN in
1995. Great Northern owned
and operated the Marias Pass
route prior to the BN (and
subsequent BNSF) merger, so
the BNSF Dash 9s look right
at home hauling freight over
this Montana mountain pass.
HOW TO DRIVE A DIESEL LOCOMOTIVE | 4 6
Page 52

MICROSOFT TRAIN SIMULATOR ENGINEER’S HANDBOOK
GE-9-44CW (Dash 9) Specifications
Locomotive type: Diesel-Electric
Power: 4,400 hp
Max. speed: 74 mph (119 km/h)
Gear ratio: 83:20
Power source: Diesel engine
Alternator: GMG 197
Traction motors: Six GE752AH™ DC electric motors
Max. starting tractive effort: 142,000 lb (64,410 kg)
Max. continuous tractive effort: 105,640 lb (47,917 kg)
Wheel configuration: Twelve 42-inch (107 cm) diameter in C-C configuration
(two sets of three driven axles)
Brakes: Independent, automatic, and dynamic
Height: 15 ft, 5 in (4.70 m)
Width: 10 ft, 3 in (3.12 m)
Length: 73 ft, 2 in (22.25 m)
Weight: 210 U.S. tons (190.5 metric tons)
HOW TO DRIVE A DIESEL LOCOMOTIVE | 4 7
Page 53

MICROSOFT TRAIN SIMULATOR ENGINEER’S HANDBOOK
GP38-2
Since its introduction by the Electro-Motive Division of
General Motors in 1972, the GP38-2 diesel-electric locomotive has proven to be a popular and versatile performer for
North American railroads, capable of tasks ranging from
switching to pulling freight over the main line. While the
GP38-2 lacks the awesome power of the more modern sixaxle locomotives (like the 4,400 hp Dash 9 modeled in Train
Simulator), many are still in service today, 25 years or more
after first hitting the rails. This 2,000 hp locomotive could
even be ordered with dual controls to allow the engineer to
effectively operate from either side of the locomotive.
The Heritage I
The GP38-2 in Train Simulator
displays BNSF’s Heritage I
colors. This livery is the
current scheme for all BNSF’s
secondary and switching
locomotives, plus those older
mainline units not equipped
with comfort cabs. Like the
Dash 9’s Heritage II colors,
this paint scheme is based on
the green and orange colors of
the Great Northern Railway in
the 1940s and ’50s, and the
silver and yellow of the Santa
Fe Railway engines from the
1950s through the 1990s.
HOW TO DRIVE A DIESEL LOCOMOTIVE | 4 8
Page 54

MICROSOFT TRAIN SIMULATOR ENGINEER’S HANDBOOK
GP38-2 Specifications
Locomotive type: Diesel-Electric
Power source: Diesel engine
Power: 2,000 hp
Max. speed: 65 mph (115 km/h)
Gear ratio: 62:15
Alternator (rectified output): AR10
Traction motors: Four model D77 DC, series wound, axle-hung
Max. continuous tractive effort: 52,000 lb (23,586.8 kg)
Wheel configuration: Eight 40-in (102 cm), tapered tread in
B-B configuration (two sets of two driven axles)
Brakes: 78,000 lb (35,400 kg) retarding force dynamic;
type 26L air
Height: 15 ft, 4 in (4.7 m)
Weight: 125 U.S. tons (113.4 metric tons)
Length: 59 ft, 2 in (18 m)
Width: 10 ft, 4 in (3.1 m)
HOW TO DRIVE A DIESEL LOCOMOTIVE | 4 9
Page 55

MICROSOFT TRAIN SIMULATOR ENGINEER’S HANDBOOK
KIHA 31
The KIHA 31 is a dual cab (front and rear) self-propelled diesel-hydraulic passenger railway car. Unlike
the massive GP38-2 and Dash 9 locomotives with their multi-thousand horsepower engines and
electric transmissions, the KIHA 31 employs a modest and economical 246 hp engine coupled to a
two-speed hydraulic transmission, similar to the transmission in an automobile. The KIHA 31 modeled
in Train Simulator traverses the scenic Hisatsu tourist route on Japan’s southern island of Kyushu as
a single car or as a multiple car consist, depending on passenger traffic levels.
The KIHA 31 is a true diesel locomotive with a hydraulic transmission (rather than converting power
to electric traction motors), which makes driving the KIHA similar to driving a manual transmission
automobile. On downhill grades, you can apply the Engine Brake, which essentially ties the engine
directly to the wheels without gears so that the wheels are slowed by the engine. This saves wear on
the train’s brake shoes, and helps to prevent them from overheating.
A common KIHA 31 operating practice is unpowered operation—coasting—because it’s quiet and
economical. In fact, when traveling down from the mountain summit at Yatake, you may not need to
apply the throttle at all to start the train moving after a stop; try just releasing the brakes and coasting!
Note: You’ll find two KIHA 31 models in Train Simulator. The only difference between them is
that the KIHA 31 Isaburo/Shinpei has a placard in its window noting that it is the Isaburo/
Shinpei sightseeing train, which makes long stops at points of interest. The Isaburo/Shinpei
train runs only between Hitoyoshi and Yoshimatsu.
HOW TO DRIVE A DIESEL LOCOMOTIVE | 5 0
Page 56

MICROSOFT TRAIN SIMULATOR ENGINEER’S HANDBOOK
KIHA 31 Specifications
Note: 1 U.S. ton = 2,000 lb. (Also known as a “short ton.”)
1 metric ton = 1,000 kg = 2200 lb. (Also spelled “tonne.”)
1 Imperial ton = 2,240 lb. (Also known as a “long ton.”)
Locomotive type: Diesel-Hydraulic
Power source: Model DMF13HS diesel engine
Power:246 hp
Max. speed: 59 mph (95 km/h)
Height: 12 ft, 7 in (3.84 m)
Width: 9 ft, 7 in (2.92 m)
Length: 58 ft, 4 in (17.75 m)
Weight: 33 U.S. tons (30 metric tons)
Wheel configuration: Eight wheels in B-B configuration (one driven axle)
Brakes: Automatic air brakes, engine brake
HOW TO DRIVE A DIESEL LOCOMOTIVE | 51
Page 57

HOW TO DRIVE AN...
ELECTRIC
CHAPTER
LOCOMOTIVE
8
This chapter covers the basic operations
of electric locomotives in general, and
descriptions of the Microsoft
Simulator versions of the Odakyu
Railway 2000 and 7000 LSE Series,
®
Train
®
Amtrak
HHP-8 locomotives in particular. The
locomotives’ specifications appear after
the general description of the trains
modeled in the simulation.
AcelaSM Express, and Acela
SM
Page 58

MICROSOFT TRAIN SIMULATOR ENGINEER’S HANDBOOK
WHAT IS AN ELECTRIC LOCOMOTIVE?
8
1
2
1 Battery Pack 5 Central Block (Motor Block) 9 Coupler
2 Air Supply Unit Compressor 6 Traction Motors 10 Cab
3 Main Reservoir 7 Traction Motor Blowers
4 Auxiliary Block 8 Pantograph
3
4
5
6
7
10
9
In 1893, General Electric produced the first electric locomotive, but it was to be many years before
electrics were to become a common sight on the nation’s rails. In addition to the technological barriers
that had to be overcome to make electrified transport a reality, it was expensive to install and maintain
miles of power lines over the rails. This impediment remains today, and is one of the reasons that
diesel-electrics (which generate their own electricity) are now the most commonly used locomotives.
Despite this limitation, electric routes continue to be developed all over the world, primarily for highspeed passenger service. Electric trains continue to operate and evolve because they:
Are the lightest and fastest form of rail transport, since they don’t have to carry power-generating
equipment on board.
Are the cleanest and quietest form of motive power for rail service.
Are the beneficiaries of a wide range of technological advances in materials and electronics.
Use fuel efficiently.
Can use multiple locomotives with a single crew, or even have their traction motors distributed
throughout the train.
Retain a high level of pulling power on uphill grades.
Use dynamic braking, which can save wear on the brake shoes and return electric power to the
supply line.
Spend more of their time in service (rather than in the shop or taking on water and coal).
HOW TO DRIVE AN ELECTRIC LOCOMOTIVE | 53
Page 59

MICROSOFT TRAIN SIMULATOR ENGINEER’S HANDBOOK
Electric trains are powered by electricity supplied
either from overhead lines (catenary) or from a third
rail. All of the electric locomotives included with
Train Simulator use pantographs to access power
from the overhead lines. (A pantograph is the
mechanical linkage located on the roof of an electric
locomotive, and sometimes a passenger car, that
connect the train to its electric power line.)
Modern electric locomotives use computer technology throughout the train. Digital displays in the
cab show the train’s status and operational data
such as speed and brake conditions. Automated
systems often ensure that the train obeys signals
and speed limits.
Electric trains use both air brakes and dynamic brakes (see Chapter
5, Train Basics, for details). On some trains, a brake control computer blends the two braking systems to provide smooth, efficient
braking with minimal wear-and-tear on the components.
USING ELECTRIC LOCOMOTIVE CONTROLS
The Pantograph’s Name
The pantograph gets its
name from its similarity
in appearance to the
mechanical device that
has been used to copy
signatures since the 1700s.
& GAUGES
These are the descriptions of the various controls you will find on a Train Simulator electric
locomotive. For more information and details see the online Help (press F1).
Reverser: The Reverser controls the direction of movement of the train. On electric trains, the
Reverser has three positions: Forward, Neutral, and Reverse.
Throttle: The Throttle controls the power output of the locomotive, and therefore the speed of the train.
Brakes: The air brake handle typically has a series of settings from Release through various degrees
of application to Emergency. In some electric locomotives, one lever controls both air brakes and
dynamic brakes, which are blended together by computer for maximum efficiency and effectiveness.
See the online Help (press F1) for a detailed description of the characteristics and operation of the
brakes on the individual trains.
Note: The Acela HHP-8 (for “high horsepower 8000”) is the only electric locomotive in Train
Simulator that can be uncoupled from the passenger cars. It has an independent (locomotive)
brake handle that allows the brakes in the locomotive to be applied and released independently from the brakes on the cars.
HOW TO DRIVE AN ELECTRIC LOCOMOTIVE | 54
Page 60

MICROSOFT TRAIN SIMULATOR ENGINEER’S HANDBOOK
Brake Pressure Gauges: Brakes are a crucial part of operating any locomotive; there are several types
of brakes in the electric locomotives.
Brake Pipe Pressure Gauge: This gauge displays the pressure in the brake pipe.
Equalizing Reservoir Pressure Gauge: This gauge displays the pressure of the equalizing reser-
voir. When you apply the brakes, the pressure in the equalizing reservoir drops immediately and
is then propagated in the brake pipe, which runs the length of the train.
Main Reservoir Pressure Gauge: This gauge displays the amount of air pressure available to
recharge the braking system. You’ll see a drop in the main reservoir pressure when the brakesare
released; air is moving from the main reservoir to recharge the equalizing reservoir, the brake
pipe, and the auxiliary reservoirs on each car.
Brake Cylinder (BC) Pressure Gauge: The BC Pressure Gauge displays the brake cylinder pressure in the lead locomotive. If you apply or bail off the locomotive brakes independently, remember that this gauge does not show the pressure in the brake cylinders on the rest of the train.
Pantograph button: The Pantograph button raises and lowers the pantographs. The Japanese trains
have pantographs on the passenger cars as well as the locomotive. The pantograph picks up the
electrical current from the overhead wires and transmits it to the traction motors of the train.
Speedometer: Shows the speed of the train.
Ammeter: The Ammeter measures electric current, which flows from the catenary into the pantograph and
then to the traction motors. The Ammeter shows how much power you are using, which is controlled by
the throttle.
During dynamic braking, the Ammeter shows how much current is being generated by the traction
motors. This current is either returned to the catenary or dissipated as heat.
Horn: Each railroad has specific rules about horns. For more information see the “Bells, Whistles,
Horns and Lights” section in Chapter 9, Operations.
Headlights: You should keep the headlights on during regular operation. In Train Simulator, whenever
the headlights are turned on, the rear lights are illuminated, too.
In Train Simulator, whenever the headlights are turned on, the lights at the other end of the train are
illuminated, too.
For more information see the “Bells, Whistles, Horns, and Lights” section in Chapter 9, Operations.
Sanders: The sanders apply sand to the rails to help prevent wheelslip. Most electric locomotives
have an automatic wheelslip detection system that applies sand as needed. (The wheelslip detector
may also adjust the power going to the motors to reduce slipping.) You can use the Sander button
to apply sand yourself, but remember that there is a limited amount of sand on board.
HOW TO DRIVE AN ELECTRIC LOCOMOTIVE | 55
Page 61

MICROSOFT TRAIN SIMULATOR ENGINEER’S HANDBOOK
OPERATING AN ELECTRIC LOCOMOTIVE
Moving the train
The locomotive has been unlocked and activated for you.
To move the train
1. Raise the pantograph if it’s not already up.
2. Set the Reverser handle to Forward or Reverse.
3. Release all brakes.
4. Slowly increase the throttle.
Stopping the train
To apply brakes
Move the brake handle towards the full application position.
To reduce braking effort
Move the brake handle towards the release position.
Passenger comfort is a key sign of a good driver—proper braking is crucial. The best way to come
to a smooth stop is by coasting to a stop. You can do this by bringing the throttle back to 0 (zero) as
you approach the platform. When you are ready to come to a stop, apply only as much brake as you
need to bring the train to a gentle stop. Stop the train and then apply full brakes while the passengers
get off and on.
HOW TO DRIVE AN ELECTRIC LOCOMOTIVE | 56
Page 62

MICROSOFT TRAIN SIMULATOR ENGINEER’S HANDBOOK
THE 2000 SERIES
The Odakyu Electric Railway Company’s 2000 Series electric railcar was one of the first “Super High
Technology” trains on the Odakyu routes that run through central Tokyo. The 2000s were designed
with the commuter in mind, both for comfort and to ease the ever-growing commuter traffic on the
Odakyu lines. This series is a major improvement over the 1000 Series railcars: the cars were made
wheelchair accessible and measures were taken to reduce noise. These changes were significant
enough for Odakyu to be nominated for the “Good Design Award” by the Japan Industrial Design
Promotion Organization.
2000 Series Specifications
Locomotive/trainset type: 4M4T Electric Railcar; 16 175-kW motors, 4 on each of 4 cars
Power source: 1,350 volt, 117 amp overhead electric lines
Power: 3,750 hp
Max. speed permitted: 62 mph (100 km/h)
Height:
Width:
Length:
Brakes: MBSA-R, 4.0 km/h per second deceleration,
13 ft, 4 in (4.06 m)
9 ft, 7 in (2.9 m)
66 ft, 1 in (20.15 m)
4.7 km/h per second emergency
HOW TO DRIVE AN ELECTRIC LOCOMOTIVE | 57
Page 63

MICROSOFT TRAIN SIMULATOR ENGINEER’S HANDBOOK
THE 7000 LSE SERIES
The Odakyu 7000 Luxury Super Express (LSE) is one of the “Romance Cars,” so-called because of
the unusual luxury it offers compared to typical Japanese commuter trains. On the 7000 LSE, all
passengers have seats, unlike commuter trains, in which passengers continue to squeeze in until the
doors won’t close. The 7000 LSE also makes only a few stops, unlike the commuter trains, which stop
constantly. Consequently, the train cuts half an hour from the normal two-hour journey. The Romance
Cars first began running tourists on the route from Shinjuku to Hakone in 1948. Hakone is in the heart
of a major tourist area with outstanding views of Mt. Fuji, lakes, mountains, and hot-spring resorts.
The 7000 Series has been enhanced and improved over time, and in 1981 it won the Blue Ribbon
Award from the Japanese Railway Friendship Club (
rebuilt in 1996, when the interior design was changed to appeal to tourists and shoppers as well as
business people.
Tetsudo Tomonokai
). The 7000s were completely
7000 LSE Series Specifications
Locomotive/trainset type: 9M2T DC Electric Railcar; 16 140-kW motors, distributed across 9 cars
Power source: 1,350 volt, 420-amp overhead power line
Power: 3,000 hp
Max. speed: 68.3 mph (110 km/h)
Height: 13 ft, 4 in (4.06 m)
Width: 9 ft, 6 in (2.9 m)
Length: 53 ft, 9 in (16.39 m)
Brakes: MBS-D Electro-pneumatic air brakes, 4 km/h/s deceleration
HOW TO DRIVE AN ELECTRIC LOCOMOTIVE | 58
Page 64

MICROSOFT TRAIN SIMULATOR ENGINEER’S HANDBOOK
AMTRAK ACELA EXPRESS
The Amtrak® AcelaSM (pronounced “ah-CELL-ah”) Express is a new high-speed electric train built
for Amtrak by the companies that manufacture the Learjet (Bombardier) and the French TGV train
(ALSTOM). Each Acela Express trainset consists of five passenger cars (one First class and four
Business class), a café car, and two 6,000 hp Power Cars (locomotives), one at each end. Each
Power Car has a pantograph that draws down power from the overhead electrical lines (the catenary).
The trainset is semi-permanently coupled, and there is effectively no slack between the cars. The
Acela Express trainset uses a state-of-the-art “tilt” system that allows the train to take curves at top
speeds of up to 165 mph (265 km/h) on the test track.
The Acela Express uses computer technology in almost every system on the train. Digital displays in
the cab show the train’s status and operational data such as speed, braking, and tractive effort. The
Automatic Train Control (ATC) system ensures that the train obeys signals and speed limits. If the
engineer fails to observe speed limits or to slow the train to the appropriate speed upon receiving
an approach or stop signal, the ATC system slows the train automatically. If the engineer fails to
acknowledge this change within five seconds, full brakes are applied (this is called a “penalty brake”
application). An Alerter system also sounds an alarm if the train’s controls are not operated during
a 25-second period. The engineer must respond to this alarm within 15 seconds or the brakes will
be applied and the power will be shut down, bringing the train to a halt.
The Acela Express uses several different types of brakes. The dynamic brakes can dissipate braking
energy electrically either by regeneration by returning the energy to the catenary or rheostatically by
converting the energy to heat. Electronically controlled pneumatic brakes with an air backup provide
the primary air brake system. Disc brakes provide the majority of pneumatic braking, while tread
brakes provide supplemental braking and also keep the wheels clean for maximum adhesion between
the wheel and the rail. The Brake Control Computer blends the dynamic and air braking systems to
provide smooth, efficient braking with minimal wear-and-tear on the components.
HOW TO DRIVE AN ELECTRIC LOCOMOTIVE | 59
Page 65

MICROSOFT TRAIN SIMULATOR ENGINEER’S HANDBOOK
Amtrak® AcelaSM Express Specifications
Locomotive type: Bombardier ALSTOM Consortium high-speed electric power car
Power source: Catenary from stationary electric generator
Power, each power car: 6,169 hp; 4,600 kilowatts
Max. speed: 165 mph (265.4 km/h)
Height: 14 ft, 2 in (4.3 m)
Width: 10 ft, 5 in (3.2 m)
Length, each power car: 69 ft, 7 in (21.2 m)
Length, trainset: 663 ft, 9 in (202.3 m)
Weight, each power car: 200,000 lb (90,720 kg)
Weight, trainset: 1,171,000 lb (531,166.7 kg)
Max. short time tractive effort,
each power car: 49,000 lb (22,226 kg) (Front & rear power car
combined effort: 98,000 lb)
Wheel configuration,
each power car: Eight 40-inch diameter wheels in B-B configuration
(two sets of two driven axles)
Brakes: Air brakes, 26-L compatible. Computer controlled, with
independent air brakes in locomotive; Electro-pneumatic;
Dynamic brakes: rheostatic and regenerative
HOW TO DRIVE AN ELECTRIC LOCOMOTIVE | 60
Page 66

MICROSOFT TRAIN SIMULATOR ENGINEER’S HANDBOOK
ACELA HHP-8
The dual cab, 8,000 hp AcelaSM HHP-8 (sometimes called the HHL, the manufacturer’s abbreviation for
“High Horsepower Locomotive”) is by far the most powerful locomotive in Train Simulator. It is also
the only Train Simulator electric locomotive not permanently coupled into a trainset. The HHP-8 is
designed to operate singly, or in a consist with only one other active locomotive, pulling up to 18
passenger cars. A typical consist would be 8 to 10 passenger cars with the occasional inclusion of a
mail car at the rear of the consist. The locomotive has cabs at both ends for bi-directional operation.
It also has an independent brake—an air brake that can be applied to the locomotive only.
Amtrak® AcelaSM HHP-8 Locomotive Specifications
Locomotive type: Bombardier ALSTOM Consortium dual cab
high-speed electric power car
Power source: Catenary from stationary electric generator
Power: 8,046 hp; 6,000 kilowatts
Max. speed: 135 mph (217 km/h)
Height: 14 ft, 5 in (4.4 m)
Width: 10 ft, 5 in (3.2 m)
Length: 67 ft, 1 in (20.4 m)
Weight: 111 U.S. tons (100.7 metric tons)
Max. short time tractive effort: 71,240 lb (32,314 kg)
Wheel configuration: Eight 40-inch diameter wheels in B-B configuration
(two sets of two driven axles)
Brakes: Same as Acela Express above, plus an
independent/locomotive brake
HOW TO DRIVE AN ELECTRIC LOCOMOTIVE | 61
Page 67

OPERATIONS
To complete Train Simulator Activities, you need
to know more about railroading than just how
to operate a train—you’ve got to learn the basic
railroading rules and procedures for moving your
train smoothly and on time. In this chapter on
railroad operations you’ll learn about timetables
and work orders, coupling and uncoupling,
signals, speed limits, and more.
9
CHAPTER
Page 68

MICROSOFT TRAIN SIMULATOR ENGINEER’S HANDBOOK
PASSENGER OPERATIONS
Passenger railroading is about safely moving passengers from one place to another in comfort and
on time. In the Train Simulator Passenger Activities, you operate one of seven different locomotives
on one of five different routes. There’s a big difference between steam, diesel, and electric trains,
and between landscapes in the U.S., Great Britain, Austria, and Japan. In terms of the operational
procedures you need to follow though, all Passenger Activities are quite similar.
Following the timetable
Passenger trains generally run according to a tight timetable (most freight trains don’t). In Train
Simulator, you’ll find the timetable in the Operations Notebook. In order to complete an Activity
successfully, you must stick to your timetable.
You can refer to the timetable at any time during an Activity. Just press F11 to bring up the
Operations Notebook, and then click the Timetable tab.
Instead of having to constantly refer to the complete timetable, you can also get the scheduled arrival
and departure time for the next scheduled station stop by referring to the Next Station Display driving
aid (press F10). The Next Station Display shows the distance to the next station. To learn more, see
the “Driving Aids” section of Chapter 4, Tools for Driving
Stopping at stations
As you approach a station, ring the engine bell (if your train has one) and dim your headlights (as a
courtesy to passengers on the platform). Slow down and try to stop with as many cars as possible
alongside the platform, to make it easy for passengers to get off and onto the train quickly. The ideal
stopping location depends on the size of your train; the locomotive may have to be stopped beyond
the platform.
After stopping, press the ENTER key to initiate the unloading/loading process. Based on how many
cars are next to the platform (the more the better) and the number of passengers who want to get
on and off the train, the projected “load time” appears on the Next Station Display. (Note that in
Train Simulator there are no people on the platform; the procedure just adds realism to the station
experience.) At the scheduled departure time (or as soon as all the passengers are loaded if you’re
running late), the conductor signals you to depart by sounding a whistle or a buzzer, or giving you
permission to proceed via radio. What you hear depends on which route you’re on. Never leave a
station before the conductor signals you to do so, or if the signal ahead is indicating Stop.
FREIGHT OPERATIONS
Freight railroading is about moving cargo loaded into freight cars from one place to another. In the
Train Simulator Freight Activities, you operate either a Dash 9 or GP38-2 diesel locomotive on the
Marias Pass route. In Road Activities, you haul trains along the Marias Pass main line. In Local
OPERATIONS | 63
Page 69

MICROSOFT TRAIN SIMULATOR ENGINEER’S HANDBOOK
Activities, you pick up and drop off cars at industries along the Kalispell branch. In Yard Activities, you
sort and assemble individual cars into trains in the Whitefish Yard. In all three types of Activities, you
need to be familiar with the freight procedures explained in this section.
Following the work order
A work order is a list of tasks to perform during an Activity. Most Passenger Activities don’t have work
orders—all Freight Activities do. You’ll find the work order for your run on the Work Order page of the
Operations Notebook. There are four types of work order tasks in Train Simulator:
Pick-up: Couple your train to one or more cars or locomotives left at a specific location.
Drop-off: Leave one or more cars or locomotives (or your entire train) in a specific location.
Make a consist: Assemble a consist that contains only specific cars and/or locomotives.
Make a consist in a specific location: Assemble a consist that contains only specific cars and/or
locomotives and drop them off at a specific location.
You can refer to the work order at any time during an Activity. Just press F11 to bring up the
Operations Notebook, then click the Work Order tab. Your adherence to the work order is logged
and presented in your Activity Evaluation.
MANUAL SWITCHING
Switches on the Marias Pass Kalispell branch and in the Whitefish Yard are not under the dispatcher’s
control. You’ll have to move your cars to a siding—a section of track branching off of the main track
used for storing cars and locomotives. To get to the sidings specified in your work order, you’ll have
to manually throw switches.
Use the Switching driving aid (press F8) to see how the switch in front and behind you is set (left,
center, or right), then click the appropriate arrow to change it. For details, see the “Driving Aids”
section of Chapter 4, Tools for Driving. You can also toggle the next switch by pressing the G key.
To toggle the next switch behind the train, press SHIFT+G.
Note: In “Explore the Route” Activities, there is no dispatcher, so you must manually throw all
switches yourself.
IDENTIFYING LOCOMOTIVES, CARS, SIDINGS, AND STATION PLATFORMS
Each locomotive and car in Train Simulator has a unique number, and each siding and station platform has a unique name. You can toggle the station/siding names on and off by pressing F6, and the
car numbers on and off by pressing F7. When turned on, numbers and names appear, floating above
their respective locomotives, cars, sidings, and station platforms. This makes these items and locations easier to identify. In Yard Activities, it’s also useful to see a top-down view of the entire yard. To
switch to Overhead view, press the 7 key.
OPERATIONS | 64
Page 70

MICROSOFT TRAIN SIMULATOR ENGINEER’S HANDBOOK
COUPLING & UNCOUPLING
Coupling and uncoupling cars and locomotives is a fundamental skill you’ll need to master, especially
for Freight Activities. With a little practice, picking up and setting out cars on sidings, assembling
consists in a yard, and cutting in additional locomotives when ascending steep grades will become
second nature. In the real world, you have some help: crew members on the ground connect and
disconnect brake hoses and cables, set and release brakes on the cars, and guide you by radio and
hand signals. In Train Simulator, the process is simplified.
SM
Note: The 2000, 7000 LSE, and Acela
SM
HHP-8 is the only electric locomotive included in Train Simulator that can be coupled to
Acela
and uncoupled from its cars.
Coupling should always be done at low speeds (no faster than 2 mph, or 3 km/h) to avoid damaging
equipment. Just move slowly toward the locomotive or car you want to couple to, and the couplers
will automatically close when contact is made. Use Coupler view (press the 6 key) to watch the
coupling process from an overhead vantage point, and to visually inspect the couplers to make
sure they are locked. A distance indicator tells you how far apart the two couplers are. Once you’re
coupled, open the Train Operations window (press F9) and release the hand brakes on all the cars
you coupled to. To learn more about Coupler view and the Train Operations window, see Chapter 4,
Tools for Driving.
Express are semi-permanently coupled trainsets. The
Uncoupling requires the use of the Train Operations window (press F9). After stopping, apply the
hand brakes on the locomotives and cars that are to be uncoupled (so they don’t roll away after
being uncoupled). Then, open the desired couplers. Close the Train Operations window, and move
your consist away from the equipment you just uncoupled.
USING MULTIPLE UNITS
More than one locomotive is often required to supply enough horsepower to pull a long, heavy train,
especially up a steep mountain grade. Remotely controlled locomotives are called “distributed power
units” (DPUs), controlled from the lead locomotive. The supporting manned locomotives are called
“helpers,” and are sometimes added temporarily to the end of a train to help push it up a short,
steep grade.
In Train Simulator, while you can couple more than one locomotive to a train, you cannot individually
control the additional locomotives. They will simply mirror the performance of the lead unit
you’re controlling.
Note: In Train Simulator, you can couple only locomotives and cars that have the same type
of couplers. If you want to add more locomotives, they must be the same type (steam/diesel/
electric) as the lead locomotive.
OPERATIONS | 65
Page 71

MICROSOFT TRAIN SIMULATOR ENGINEER’S HANDBOOK
REFUELING
If your train is immobilized due to running out of diesel fuel, coal, or water, the Activity ends immediately. You can see your fuel, coal, water, and sand levels in the Train Operations window (F9).
If an Activity requires you to get more diesel fuel, coal, or water, the Activity Briefing specifies a stop at
a refueling station, coal tower, or water tower). Steam locomotives can also get water while underway,
via “water scoops” that scoop water up from troughs in the track.
To learn more about refueling and how to use water scoops, see the online Help (press F1).
PREVENTING ACCIDENTS AT ROAD CROSSINGS
Failing to provide adequate warning of your train’s approach can cause accidents, which in Train
Simulator makes the Activity end immediately. The best way to warn people is to make noise, but not
so much that you disturb nearby residents. Thus, it’s not surprising that railroad policies on whistles
and horns vary depending on the country and the era:
Route Train Simulator horn/whistle requirement
Marias Pass Begin sounding horn (press SPACEBAR) at least 1/4 mile (.4 km) away
from road crossing. Prolong or repeat signal until locomotive is in crossing.
Northeast Corridor None. No road crossings.
Innsbruck-St. Anton None. Gatekeepers ensure clear crossings.
Settle & Carlisle Line None. Gatekeepers ensure clear crossings.
Tokyo-Hakone Heavily residential; sound horn only in an emergency.
Hisatsu Line Sound horn only in an emergency.
OPERATIONS | 66
Page 72

MICROSOFT TRAIN SIMULATOR ENGINEER’S HANDBOOK
BELLS, WHISTLES, AND HORNS
In Train Simulator, you don’t
road crossings on the Marias Pass route, as explained above. But for a more realistic experience:
Ring the bell (if your train has one) before moving.
Ring the bell when arriving at a station (until stopped).
Ring the bell when moving through a yard.
Sound the whistle or horn to warn people or animals of your approach, using a quick succession
of short bursts. To clear animals from the track, first dim the headlights, then sound the horn.
Sound the whistle or horn before entering tunnels or crossing bridges.
Sound the whistle or horn frequently when weather conditions impair visibility.
When approaching a crossing, use the whistle or horn signal generally accepted by most American railroads: LONG LONG SHORT LONG, with the last long sound continuing as the locomotive
passes through the crossing.
Note: On the Dash 9, Acela
rings whenever the horn button is pressed.
have
to sound your bell, whistle, or horn anywhere except at ungated
SM
Express, and AcelaSM HHP-8 locomotives, the engine bell also
TRACKSIDE SIGNAGE
Next to the track on every route, you’ll see a variety of signs that provide you with advance warning of
things like road crossings and speed limit changes. See the Quick Reference Card or online Help for a
complete list, with pictures and their meanings.
Japanese Terms
Shinkoo
: Forward
SIGNALING
All railroads need a system to prevent two trains from
being in the same place at the same time. Over the years,
around the world, the systems for controlling trains have
®
become increasingly sophisticated. In Microsoft
Simulator, control is exercised primarily via dispatchercontrolled signals.
Most of the track on Train Simulator routes is signaled
track: lights or semaphore arms are mounted next to or
above the track. You must
obey the signals!
Train
Jokoo Yokoku
Jokoo Kaijo
Gensoku
Chuui
: Careful/Warning
Seigen
Ittan teishi
Torikeshi
: Prepare for
slow speed
: Cancel slow speed
: Slow down
: Limit (as in
55
, “Speed limit 55”)
: Stopping
: Cancelled
Seigen
OPERATIONS | 67
Page 73

MICROSOFT TRAIN SIMULATOR ENGINEER’S HANDBOOK
Note: On unsignaled track (commonly called “dark territory” in North America), safe operating
distance between trains is ensured with “track warrants” that grant trains exclusive permission
to occupy sections of track between certain mileposts or stations during certain time windows.
In Train Simulator, the only unsignaled track is the Kalispell branch of the Marias Pass route.
Learning the signals
Refer to the Quick Reference Card to find a table of all the signal
aspects (the colored lights or semaphore arm positions), and their
indications (what the aspects mean), categorized by route. You’ll
realize quickly that although different routes have unique signal
aspects, their indications are often the same. For example, a
green light on the Marias Pass route, and a raised semaphore
arm on the Settle to Carlisle route look very different, but they
both mean essentially the same thing: you can proceed.
Obeying signals
As you approach a signal you must identify which one applies to
the track that your train is operating on, and observe its indication.
Watch the signal and its changes until your train has passed it.
For more information, see the “Driving Aids” section in Chapter 4,
Tools for Driving.
Note: For more information about Train Simulator signaling, see the online Help (press F1).
In the Early Days…
In the early days of railroading, “Handsignalmen”
stood next to the track and
waved their arms or flags
by day, and lanterns by
night or in inclement
weather. Eventually
Handsignalmen were largely
replaced by mechanical
semaphore arms. In
modern times, lights
replaced the semaphore
arms, but they still exist
on some railroads, and
hand signals are still used
in some situations.
SPEED LIMITS
As you operate a train in Train Simulator, you’re expected to obey all speed limits. Speeding is not
only against the rules, it’s dangerous! A train that’s moving too fast can derail on curves and
switches, collide with other trains, become a runaway, or break apart. As an engineer, it’s imperative
that you be aware of the speed limits for the route you’re driving and obey them.
The Track Monitor driving aid helps you maintain speed limits as you drive. For more information,
see the “Driving Aids” section of Chapter 4, Tools for Driving.
Types of speed limits
There are three types of speed limits in Train Simulator: maximum speed limits, permanent reduced
speed limits, and temporary speed restrictions.
OPERATIONS | 68
Page 74

MICROSOFT TRAIN SIMULATOR ENGINEER’S HANDBOOK
Note: Speed limit signs look different on different routes, so see the Quick Reference Card
for illustrations.
Maximum speed limit
Every route in Train Simulator has a Maximum speed limit at which you are permitted to drive if
there is no Permanent Reduced speed limit or temporary speed restrictions specified for a given
track section.
Permanent Reduced speed limit
Permanent Reduced speed limits are specified for certain sections of track that require the train to
operate at a slower speed than the Maximum speed limit, such as on curves, bridges, and in tunnels.
Temporary speed restrictions
Your Activity Briefing may note areas of temporarily restricted speed due to track conditions, maintenance, or other hazards. Each railroad has its own means of indicating temporary speed restrictions.
In Train Simulator, Restricted Areas are marked with signs or colored trackside flags.
Restricted Speed
In Train Simulator, “Restricted Speed” is defined as a speed no greater than 15 mph, or 25 km/h.
You must move at Restricted Speed:
In flagged Restricted Areas, as explained above.
Within yard limits.
When reversing.
After passing a signal indicating Restricting.
After stopping, then passing, a signal indicating Stop
and Proceed.
After stopping, then passing, a signal indicating Stop
(with the dispatcher/signalman’s permission).
When you pass a flag or signal requiring movement at Restricted
Speed (for example, a signal indicating Stop and Proceed), you must
move at Restricted Speed (not faster than 15 mph, or 25 km/h) until
In the Real World…
On most North American
railroads, “Restricted
Speed” is defined as a
speed that allows stopping
within half the range of
vision short of a train, a
locomotive, a railroad car,
workers or equipment, a
Stop signal, or an improperly lined switch. In Train
Simulator, just don’t exceed
15 mph, or 25 km/h.
the leading wheels of the locomotive have passed the next governing
signal or the end of the block system.
OPERATIONS | 69
Page 75

CHAPTER
10
THE
ACTIVITIES
The Activities are where you get to put your
skills to the test in a realistic passenger or freight
scenario while operating a steam, diesel, or elec-
tric train. You’ll read the briefing, complete your
assignment on schedule, and then review your
evaluation. Keep practicing—you’ll be railroad-
ing like a pro before you know it. In this chap-
ter, we’ll explore the Activities—the essence of
®
the Microsoft
Train Simulator experience.
Page 76

MICROSOFT TRAIN SIMULATOR ENGINEER’S HANDBOOK
THE GOAL
Your overall goal in a Train Simulator Activity is simple: complete the assignment presented in the
briefing. Along the way you’ll be evaluated on your ability to follow railroad rules and procedures in
four areas:
Operations
Timetable/Work order
Speed limits
Train handling
ACTIVITY TYPES
Whether you’re attracted to the romance of steam, the sheer power of diesel, or the high-speed thrills
of electric railroading, there are Train Simulator Activities designed just for you. On the Train Simulator
Home screen, select Drive a Train. You’ll be taken to the Route & Activity Selection screen, where
you can select one of six different historical routes. Then, choose an Activity. There are six different
types of Activities in Train Simulator:
Activity Type Route Description
Explore the Route All routes Drive freely along the route without being evaluated. Go
where you want by manually setting switches as you
approach them.
Passenger All routes except Drive a passenger train, making scheduled stops at
Marias Pass stations according to a timetable.
Road Freight Marias Pass Deliver a freight train from one location to another on
a main line.
Local Freight Marias Pass Operate a freight train on a local run, making pickups and
drop-offs at industries along the way.
Yard Freight Marias Pass Solve complex switching puzzles from the cab of a yard
locomotive as you assemble individual cars into
long trains.
Player-created All routes Complete a passenger or freight Activity that you’ve
designed yourself using the Activity Editor. (For more
information, see Chapter 12, Editors & Tools.)
THE ACTIVITIES | 71
Page 77

MICROSOFT TRAIN SIMULATOR ENGINEER’S HANDBOOK
BEFORE THE ACTIVITY BEGINS
After choosing an Activity and clicking the Start button on the Route & Activity selection screen,
you’ll see the train from the locomotive’s cab, with the simulation paused. The Operations Notebook
is also displayed.
As an engineer, it’s your responsibility to become familiar with the details of the assignment you’re
about to undertake. Take some time to study the contents of the Operations Notebook’s six tabs
(Key Commands, Briefing, Timetable, Work Order, Procedures, Evaluation).
Before you start driving
1. Read your briefing.
2. Review your timetable and work order.
3. Review the locomotive operating procedures and keyboard commands.
When you’ve collected your thoughts and are ready to start the run, close the Operations Notebook
and you’re ready to go!
To learn more about the Operations Notebook, see Chapter 4, Tools for Driving.
DURING THE ACTIVITY
Once underway, you’ll have your hands full. Operating a train is more challenging than most people
realize. To learn the tricks of the trade, be sure to familiarize yourself with this
complete the interactive Tutorials, and look at the topics in the onscreen Help (press F1).
What you’re evaluated on
As you drive from station to station or complete a work order, you’ll be evaluated in four areas:
Operations
You must avoid doing things that compromise safety or your ability to complete the Activity. If
you commit a major error like passing a Stop signal without permission, breaking a coupler, or
derailing, the Activity ends immediately. Smaller mistakes are simply logged and presented as part
of your Activity Evaluation. For more information, see the onscreen Help (press F1) and individual
Activity briefings.
Timetable/Work order
Every Activity has a timetable and/or a work order that is displayed in the Operations Notebook. A
timetable is a schedule for the run and you must stop at all the stations listed. If you fail to make
a scheduled stop, arrive late, or depart early, each error is logged. A work order is a list of tasks
to complete, such as picking up or dropping off cars, delivering a consist of freight cars, or
rescuing a crippled passenger train. If you fail to complete all the tasks in a work order, each
error is logged.
Engineer’s Handbook
,
THE ACTIVITIES | 72
Page 78

MICROSOFT TRAIN SIMULATOR ENGINEER’S HANDBOOK
Speed limits
Speed limits exist to protect railroad workers, passengers, freight, and equipment. You must
obey all permanent and temporary speed limits as you drive.
Train handling
As you operate a train, you must keep passenger comfort and freight durability levels in
mind, accelerating and decelerating carefully to avoid disturbing passengers and damaging
merchandise. These levels are different depending on exactly what (or who) is on your train.
In Train Simulator, lumber and commuters are more forgiving than new automobiles and royalty.
If you jostle the passengers or freight beyond acceptable limits, each error is logged.
To learn more about proper operating procedures in Train Simulator, see Chapter 9, Operations;
the three How to Drive... chapters; and the onscreen Help (press F1).
Using driving aids
Popup driving aids can help make up for the sensory limitations of a computer simulation. For
example, the Track Monitor shows the signals and speed limits along your route. Other driving
aids help you read signals, manually throw switches not controlled by the dispatcher and follow
your timetable.
To learn more about driving aids, see Chapter 4, Tools for Driving.
Note: The keyboard commands that bring up the individual driving aids can be found on the
Quick Reference Card, on the Key Commands tab of the Operations Notebook, and in the
online Help (F1).
Using the Operations Notebook
You can review your briefing, timetable, work order, locomotive operating procedures, and keyboard
commands at any time during an Activity. Just press F11 to display the Operations Notebook. To see
how well you’re doing, click the Evaluation tab.
To learn more about the Operations Notebook and driving aids, see Chapter 4, Tools for Driving.
Saving an Activity
Some Train Simulator Activities are quite lengthy, simulating an entire real-world railroad shift. The
good news is that you don’t have to sit at your computer all day or night (unless you want to)! You
can easily save an Activity-in-progress to finish another time. Just press the ESC key and follow the
onscreen instructions. For details, see the onscreen Help (press F1).
If you want to save your Activity without interrupting your run, just press the Quick Save key (F2).
THE ACTIVITIES | 73
Page 79

MICROSOFT TRAIN SIMULATOR ENGINEER’S HANDBOOK
AFTER THE ACTIVITY ENDS
When an Activity ends (because you completed it, made an Activity-ending error, or quit), the Activity
Evaluation screen appears. Here you’ll find a summary of your performance, and the option to view a
more detailed evaluation. The evaluation is saved automatically so you can watch your skills improve
over time, and to savor as you strive for that “perfect” run.
THE ACTIVITIES | 74
Page 80

CHAPTER
11
THE ROUTES
In Train Simulator, you’ve got
six detailed routes to drive or
ride, spanning several conti-
nents and two time periods.
Whether you choose the route
from the Introductory Train Ride
screen or select the challenge of
operating a train yourself, you’ll
find these routes make the rail-
roading experience stimulating
and challenging.
Page 81

MICROSOFT TRAIN SIMULATOR ENGINEER’S HANDBOOK
MARIAS PASS
Location: Montana, USA
Route length: 152 miles (245 km)
Railroad: The Burlington Northern and Santa Fe Railway Company (BNSF)
Preferred Player-drivable locomotive: Dash 9 and GP38-2 diesel-electric locomotives
Computer-controlled locomotives and trains on route: Genesis P40 (AMD 103) Empire Builder,
SD40-2, GP38-2
Just as Europeans spent years looking for a Northwest Passage around North America to get their
ships to Asia faster, so the American railroads searched for a suitable pass over the Rocky Mountains
in the northwest United States to move freight faster from east to west. The Marias River in Montana
had been named by Meriwether Lewis in 1806, but the pass was not discovered until 1889, by John
Stevens, an engineer working for the Great Northern Railway. Marias Pass is the lowest pass through
the Rocky Mountains in the United States north of New Mexico.
Today, the rail line through Marias Pass is operated by the Burlington Northern and Santa Fe Railway
(BNSF), which uses the route to run priority intermodal trains, coal, and general freight across the
country from Chicago to Seattle and Portland. Amtrak also uses the route to host their twice-daily
Empire Builder
passenger service.
Microsoft
the branch line from Columbia Falls to Kalispell. You can haul freight over the pass, skirting the
southern border of Glacier National Park, or make local freight deliveries along the Kalispell line.
®
Train Simulator includes the mainline portion of the route from Shelby to Whitefish, and
THE ROUTES | 76
Page 82

MICROSOFT TRAIN SIMULATOR ENGINEER’S HANDBOOK
MARIAS PASS
BNSF
There are more than 390
different railroad names in the
BNSF family tree. BNSF
operates a 33,500-route-mile
freight rail network covering
28 states from Washington to
Florida, two Canadian provinces, and connections into
Mexico. Overall, BNSF employs about 40,000 people in
the U.S. and Canada and
generated revenues of about
$9 billion in the year 2000.
Web site: http://www.bnsf.com/
THE ROUTES | 77
Page 83

MICROSOFT TRAIN SIMULATOR ENGINEER’S HANDBOOK
NORTHEAST CORRIDOR
Location: Northeast United States
Route length: 133 miles (214 km)
Railroad: Amtrak
SM
Preferred player-drivable locomotive: Acela
Computer-controlled trains on route: Genesis™ P40 (AMD 103), GE E-60-CP
Express and AcelaSM HHP-8 high-speed electric locomotives
The Amtrak
®
AcelaSM Express is a new high-speed service between Boston, Providence, New York City,
Philadelphia, Baltimore, and Washington, D.C. Acela Express service has begun to compete with
airline shuttles for business travel between these Northeast United States cities. Current services, such
as the
NortheastDirect
, are being converted to Acela Regional and Acela Commuter services.
Having conducted extensive surveys and interviews with customers, Amtrak intends this service to be
first class all the way. Everything from the ticketing process, to station design, to electrical outlets at
every seat, to larger, more accessible bathrooms, has been designed to “bring business rail travel
into the 21st century.”
Train Simulator includes the portion of the route from Philadelphia, Pennsylvania, to Washington, D.C.
This route uses tracks dating back to a number of famous Northeast railroads. This route is electrified
over its entire length, which allows the efficient operation of high-speed trainsets. You’ll zoom past
major metropolitan areas as well as coastlines and forests. The track’s maximum speed limit is 125
mph and there are no level crossings (roads crossing the tracks) to slow you down.
THE ROUTES | 78
Page 84

MICROSOFT TRAIN SIMULATOR ENGINEER’S HANDBOOK
NORTHEAST CORRIDOR
Amtrak
Amtrak is the national U.S.
passenger railroad, carrying
more than 75 million passengers a year to over 500
destinations in 45 states.
Created in 1971, Amtrak
operates 265 trains a day
over a 22,000-mile route
system extending from
Boston to San Diego. Amtrak
also owns and operates the
Boston-to-Washington NE
Corridor, maintaining the
busiest passenger rail line in
the nation for over 1,700
Amtrak and local commuter
trains a day. Web site: http:/
www.amtrak.com/index1.html
THE ROUTES | 79
Page 85

MICROSOFT TRAIN SIMULATOR ENGINEER’S HANDBOOK
INNSBRUCK - ST. ANTON
Location: Austrian Alps
Route length: 63 miles (101 km)
Railroad: Orient-Express
Preferred player-drivable locomotive: Gölsdorf 380 steam locomotive
Computer-controlled trains on route: 310.23
Traveling by rail across Europe at the end of the 19
densome. So it was a somewhat revolutionary idea when George Nagelmackers created
des Wagons-Lits
Express
famous sisterships such as the
In its heyday of the 1920s and 1930s, the list of passengers read like a Who’s Who of international
royalty and celebrities. The Orient-Express still enjoys a fantastic prestige worldwide with its characteristic blue and cream livery, decorated with the two-golden lion monogram. Apart from its modern
activities in the travel business,
of the Orient-Express and all related properties, including historical archives, posters, and photos,
as well as public catalogues of products on the theme “le Voyage à la Belle Epoque.”
, would travel from Paris to Bulgaria from 1883 onward. The Orient-Express, like its other
(CIWL, http://www.wagons-lits-paris.com) whose most famous train, the
Blue Train
Compagnie des Wagons-Lits
, is still synonymous with luxury, glamor, and adventure.
th
century was difficult, uncomfortable, and bur-
la Compagnie
Orient-
is still active in preserving the legend
The original service consisted entirely of sumptuously appointed restaurant and sleeping cars, plus
baggage and mail cars. Although most famous for its Paris-Bulgaria route, there were many routes
and destinations serviced by the Orient-Express: London & Paris to Venice, Rome, Prague & Istanbul.
The opening of the Simplon Tunnel in the Swiss Alps allowed speedy service between London and
Venice, and the Arlberg tunnel in the Austrian Alps linked Paris to Vienna. Although diplomats, royalty,
nobility, and celebrities used the service, it was frequently disrupted by trade restrictions, border
disputes, and wars.
Train Simulator includes the portion of the route from St. Anton and the Arlberg Pass to Innsbruck as
it was in the late 1920s. You’ll travel past spectacular alpine peaks and visit beautiful Tyrolean villages
in pastoral valleys. We’ve recreated the line as it was before it was electrified. Driving a steam locomotive is hard work, so remember to visit the piano bar car for a taste of luxury and relaxation.
THE ROUTES | 80
Page 86

MICROSOFT TRAIN SIMULATOR ENGINEER’S HANDBOOK
INNSBRUCK - ST. ANTON
The Venice SimplonOrient-Express
On May 25, 1982, thanks to
entrepreneur and rail enthusiast
James B. Sherwood, the legend
was reborn when the
Simplon-Orient-Express
maiden run from London to
Venice. Today you can travel along
the same route as the one recreated in Train Simulator. The
Simplon-Orient-Express
same
Compagnie des Wagons-Lits
(CIWL) coaches as those of the
early 20th century, painstakingly
restored to their original luxury,
staffed with attentive stewards and
serving exquisite cuisine. Web site:
http://www.orient-expresstrains.com
Venice
made its
Venice
uses the
THE ROUTES | 81
Page 87

SETTLE & CARLISLE LINE
Location: Northwestern England
Route length: 72 miles (116 km)
Railway, circa 1930: Midland Railway
MICROSOFT TRAIN SIMULATOR ENGINEER’S HANDBOOK
Player-drivable locomotive: LNER No. 4472
Locomotive owner, circa 1930: London and North Eastern Railway (LNER)
Locomotive owner, today: Flying Scotsman Railway
Computer-controlled trains on route:
Built in the 1870s to provide a faster route for the growing Midland Railway Company’s traffic between
England and Scotland, the Settle & Carlisle Railway (“the S&C”) is considered the most dramatic train
line in England. The line travels through Yorkshire Dales National Park and into the Pennine Chain,
skirting Lake District National Park to the west.
Hundreds of railroad builders (“navvies”) lost their lives building the line, from a combination of
accidents, fights, and smallpox outbreaks. In particular, building the Ribbleshead (then Batty Moss)
viaduct, with its 24 massive stone arches 104 feet (32 meters) above the moor, caused such loss of
life that the railway paid for an expansion of the local graveyard.
The Midland Company wanted a fast line and specified gradients no greater than 1 in 100, which
meant they couldn’t always take the shortest path from point A to point B, giving rise to the nickname
“the Long Drag.” On a heavy train, a fireman could use up to five tons of coal, and the line was
occasionally used as a test track to compare the motive power of various locomotives under consideration by the railroad. The S&C is a challenging line for the driver and fireman in any weather, but its
challenges are multiplied during spring and autumn windstorms and winter snows.
The Royal Scot
Flying Scotsman
(Royal Scot Class),
steam locomotive
Pendennis Castle
(Castle Class)
Train Simulator includes the entire line from Settle to Carlisle as it was in the late 1920s. You’ll pass
through beautiful countryside, where stone walls separate fields of barley, cow pastures, and country
lanes. You’ll need to skillfully control your use of steam as you climb up to the wild Blea Moor, and
then carefully make your way down the grade while keeping your passengers safe and comfortable.
Can you keep up with
Flying Scotsman
’s illustrious history of on-time arrival?
THE ROUTES | 82
Page 88

MICROSOFT TRAIN SIMULATOR ENGINEER’S HANDBOOK
SETTLE & CARLISLE LINE
Flying Scotsman Railways
In 1996, Dr. Tony
Marchington bought
Scotsman
Scotsman Railways to fund
the restoration of the elegant
train. In order to assure
Flying Scotsman
preservation, Flying Scotsman
Railways has created a
program that keeps No. 4472
running most of the year,
both on private heritage
railways and on the main line.
Web site: http://
www.flyingscotsman.com/
and formed Flying
Flying
’s continued
THE ROUTES | 83
Page 89

MICROSOFT TRAIN SIMULATOR ENGINEER’S HANDBOOK
TOKYO-HAKONE
Location: Tokyo and Kanagawa Prefectures, Japan
Route length: 55 miles (88 km)
Railroad: Odakyu Electric Railway Company
Player-drivable locomotive: 2000 and 7000 LSE Series electric locomotives
Computer-controlled trains on route: 30000 EXE
Odakyu’s Odawara line runs from bustling Shinjuku station in downtown Tokyo to the city of Odawara.
The line is one of the longest private railroad lines in Japan. The Odawara line has become known for
connecting Tokyo and Hakone with the luxurious “Romance Car” express service, but it also serves
many metropolitan-area business commuters. The line is famous for its stunning scenery and seasonal foliage. Hakone is a world-famous spa resort with spectacular views of nearby Mt. Fuji.
Service from Shinjuku to Hakone-Yumoto began in August 1950. The Hakone Express is now one of
the most popular rail excursions in Japan.
Train Simulator includes the line from Shinjuku through Odawara to Hakone Yumoto. You’ll travel from
downtown Tokyo, through the suburbs, and into the countryside before you start your final climb to
Hakone. You can drive the commuter train (2000 Series), which makes frequent stops throughout
the city and suburbs. Or, you can choose the famous Hakone Express, reaching speeds of 68.4 mph
(110 km/h) as your passengers enjoy the luxury of the Romance Car.
THE ROUTES | 84
Page 90

MICROSOFT TRAIN SIMULATOR ENGINEER’S HANDBOOK
TOKYO-HAKONE
Odakyu Electric
Railway Company
This company, founded as
Odawara Express Railway Co.,
Ltd. in 1923, operates three
railway lines in the Tokyo
metropolitan area: Odawara line,
Enoshima line, and Tama line.
These lines extend over 120
kilometers (74.6 miles) and
carry some l.84 million passengers daily—over 670 million
people a year. They link Tokyo’s
new city center—Shinjuku—
with Hakone, home to one of
Japan’s most beautiful national
parks, and Enoshima, the site of
the country’s most famous
ocean resort. Web site:
http://www.odakyu-group.co.jp/
THE ROUTES | 85
Page 91

MICROSOFT TRAIN SIMULATOR ENGINEER’S HANDBOOK
HISATSU LINE
Location: Kyushu island, Japan
Route length: 53 miles (86 km)
Railroad: Kyushu Railway Company
Player-drivable locomotive: KIHA 31
Computer-controlled trains on route: KIHA 140
Constructed in the first decade of the 1900s, the Hisatsu line was the main railroad line in Kagoshima prefecture on the southern Japanese island of Kyushu. A number of people died during construction of the line,
especially digging Yatake Tunnel. Two stone plaques were made in order to honor all those who put tremendous effort to make the tunnel and in order to remember the hardship of building the Hisatsu Line: “Now we
are easily able to transport people and heavy goods far distances because this railway travels through difficult
geographic barriers as if it travels through flat land.” Isaburo Yamagata placed the first plaque at the entrance
of Yatake Tunnel, facing toward Hitoyoshi. Shinpei Goto placed the other plaque at the other entrance of the
tunnel, facing toward Yoshimatsu. Therefore, trains going toward the plaque placed by Isaburo Yamagata are
called “Isaburo” and trains going toward the other plaque placed by Shinpei Goto are called “Shinpei.”
In the line’s heyday in the early 1900s, steam locomotives traversed the line, hauling freight and passengers.
Today, the Hisatsu line is used mainly for scenic day trips with trains consisting of one or two cars. Occasionally, historic steam locomotives are used for special excursions.
The section between Yatsushiro and Hitoyoshi is called the River Line because it runs beside the Kuma river.
There are 24 railroad tunnels in this section of the line. The section between Hitoyoshi and Yoshimatsu is
called the Mountain Line. Trains climb the steep grade to the mountain pass (at 1772 feet (540 meters) above
sea level) using two switchbacks and a loop. “Isaburo/Shinpei,” the sightseeing train, runs on this section and
stops at viewpoints for sightseeing—it has one of the three best rail views in Japan. Long station stops allow
passengers to get off the train and explore the surrounding area before reboarding.
THE ROUTES | 86
Page 92

MICROSOFT TRAIN SIMULATOR ENGINEER’S HANDBOOK
HISATSU LINE
Kyushu Railway Company
Kyushu Railway Company
(also known as J.R. Kyushu)
was founded April 1st, 1987.
Based in Fukuoka, Japan, it
employs over 12,000 people.
The company is very involved
in the enrichment of Kyushu’s
tourism and leisure resources.
J.R. Kyushu runs a fleet of
high-speed urban and intercity
trains, while proudly maintaining the historic Hisatsu line as
an important part of Kyushu’s
past. Web site:
http://www.jrkyushu.co.jp/
THE ROUTES | 87
Page 93

THE EDITORS
AND TOOLS
CHAPTER
12
In addition to driving the different trains
and routes included in Microsoft
Simulator, you can tap your own creative
resources by using the Editors and Tools.
With these tools you can create your
own routes, import 3-D objects into Train
Simulator from other sources, and create
your own custom Activities.
®
Train
Page 94

MICROSOFT TRAIN SIMULATOR ENGINEER’S HANDBOOK
BEFORE YOU BEGIN
To successfully create and edit your own Train Simulator components, it’s important to understand
these tools are for experienced computer users only, and that they are not supported by Microsoft
Technical Support.
Note, however, that each Editor and Tool has its own online Help system.
To launch an Editor
1. From the Microsoft Windows
2. Select Microsoft Games.
3. Select Train Simulator.
4. Select Editors and Tools.
5. Select the editor you want.
®
Start menu, select Programs.
THE EDITORS AND TOOLS
The Activity Editor
The Activities have been designed to help you learn to operate the different locomotives while
providing interesting story-based scenarios to complete. With the Activity Editor, you can create
your own Activities or modify existing ones. You decide whether the Activity is Passenger or
Freight, what the objectives are, and how much time the player has to successfully complete the
Activity. You also select the time of day, the weather conditions, the season and the amount of fuel
the player starts with, as well as hazards such as animals on the tracks or signals that aren’t
functioning properly. Creating interesting Activities can be a fun and creative way to expand your
Train Simulator experience.
The Route Editor
With the Route Editor you can modify any of the six routes included with Train Simulator. You can also
create custom routes that are based in the real world or come from your own imagination. Using this
Editor you can lay track, flatten or raise the terrain, place trees, buildings, signals, sidings, and many
other objects in your route. Try starting with the basic terrain from any part of the world by using the
Route Geography Creator (see below for details).
THE EDITORS AND TOOLS | 89
Page 95

MICROSOFT TRAIN SIMULATOR ENGINEER’S HANDBOOK
The Cab Editor
The cab is the interior of the locomotive as seen by the engineer.
With the Cab Editor you can create an interactive view of the cab for
a locomotive. You can design where you want to place working
levers, warning lights, display screens, and gauges. All of the
player-drivable locomotives included in Train Simulator already have
cab views. If you want to create your own drivable locomotive you
Customization
You can repaint locomotives
and scenery objects with
your own 2-D paint tool and
then import them for use in
Train Simulator.
will need to create a cab for that locomotive.
Creating Terrain
Before you can lay track, you must first create the terrain in which you want to make a route. Terrain
consists of two-kilometer square sections called
This tool converts
Digital Elevation Map (DEM)
data into a set of terrain tiles that can be loaded into
terrain tiles
which are generated with an editing tool.
the Route Editor as the first step in creating a route. Or you can create a set of flat, blank tiles, not
based on any external data source.
THE EDITORS AND TOOLS | 90
Page 96

MICROSOFT TRAIN SIMULATOR ENGINEER’S HANDBOOK
OPERATION LIFESAVER, INC.
Operation Lifesaver, Inc. (OLI) is a national, non-profit
organization dedicated to reducing injuries and fatalities
caused by train collisions with vehicles and pedestrians.
Did You Know…
In the U.S., roughly 900 people die on the tracks every year and 1,800 are injured in 4,000
rail-related incidents.
A motorist is 40 times more likely to die in a crash involving a train than in a collision with another
motor vehicle.
Trains can’t stop quickly; for example, the average freight train stopping distance is a mile or more.
When a train hits a car, it’s like a car running over a soft drink can.
It is illegal for pedestrians to be on railroad tracks, trestles, equipment and property—trespassers
are subject to arrest and fines.
Be Safe:
Never drive around lowered gates—it’s illegal and deadly.
Never race a train to the crossing—even if you tie, you lose.
Do not get trapped on the tracks—never drive onto a rail crossing until you are sure you can
completely clear the crossing without stopping.
Cross tracks only at designated pedestrian or roadway crossings.
Do not attempt to hop aboard railroad equipment at any time. A slip of the foot can cost you a
limb, or your life.
The good news is that vehicle-train fatalities have been reduced by more than 70 % over the past 28
years; OLI has played an important role in that achievement. For more information see the Operation
Lifesaver Web site at http://www.oli.org/
THE EDITORS AND TOOLS | 91
 Loading...