

Page 1

THE LIBRARY CREATOR
Page 2

INTRODUCTION . . . . . . . . . . . . . . . . . . . . . . . . . 2
THE LIBRARY CREATOR DOWNLOADS . . . . . . . . . . . . . . . . . 2
NOT INCLUDED . . . . . . . . . . . . . . . . . . . . . . . . . . . . . . . . . . . 2
QUICK START . . . . . . . . . . . . . . . . . . . . . . . . . . 3
OVERVIEW OF THE LIBRARY CREATOR . . . . . . . . . 4
LIBRARY ASSETS. . . . . . . . . . . . . . . . . . . . . . . . . . . . . . . . . . 4
DESKTOP ELEMENTS . . . . . . . . . . . . . . . . . . . . . . . . . . . . . . 5
MAIN WINDOW . . . . . . . . . . . . . . . . . . . . . . . . . . . . . . . . . . . 5
GETTING STARTED. . . . . . . . . . . . . . . . . . . . . . . 6
COMMAND REFERENCE . . . . . . . . . . . . . . . . . . . 8
MENUS . . . . . . . . . . . . . . . . . . . . . . . . . . . . . . . . . . . . . . . . . 8
TOOLBAR . . . . . . . . . . . . . . . . . . . . . . . . . . . . . . . . . . . . . . . 10
STATUS BAR. . . . . . . . . . . . . . . . . . . . . . . . . . . . . . . . . . . . . 10
RIGHT-CLICK MENU . . . . . . . . . . . . . . . . . . . . . . . . . . . . . . . 10
LIBRARY ASSETS AND THEIR PROPERTIES. . . . . . 11
TERRAIN TEXTURES. . . . . . . . . . . . . . . . . . . . . . . . . . . . . . . 11
OBJECT TEXTURES. . . . . . . . . . . . . . . . . . . . . . . . . . . . . . . . 13
SOUNDS . . . . . . . . . . . . . . . . . . . . . . . . . . . . . . . . . . . . . . . 14
3D OBJECTS . . . . . . . . . . . . . . . . . . . . . . . . . . . . . . . . . . . . . 14
PAN ORAMA . . . . . . . . . . . . . . . . . . . . . . . . . . . . . . . . . . . . . 15
COMPILING YOUR LIBRARY. . . . . . . . . . . . . . . . 16
PREPPING YOUR LIBRARY FOR COMPILE . . . . . . . . . . . . . . 16
INSTALLING WITH COURSE UTILITIES. . . . . . . . . . . . . . . . . 17
HOW TO USE IN COURSE ARCHITECT
™
. . . . . . . . . . . . . . . . 17
GLOSSARY . . . . . . . . . . . . . . . . . . . . . . . . . . . 18
TABLE OF CONTENTS
-1
-
Page 3

Now, you have total control over your Course Architect™ libraries. The Library
Creator lets you expand the asset libraries of EA SPORTS Course Architect in
new directions. From a core set of included assets, you can build unique and
personal libraries and assemble them in The Library Creator. Technically minded designers can re-purpose existing textures to create libraries for new environments. With The Library Creator, you can take your course designs to a different level.
NEED HELP WITH COURSE ARCHITECT™?
Please see the help documen-
tation for Course Architect at http://tigerwoods2004.com.
THE LIBRARY CREATOR DOWNLOADS
For the latest information on The Library Creator:
http://tigerwoods2004.com
NOT INCLUDED
Some characteristics of a course and its libraries cannot be affected by assets
assembled in The Library Creator. The following elements are created in Course
Architect or are adjusted algorithmically from inside the game:
A
Terrain shapes
A
Water reflections
A
All object shadows
A
Galleries
A
Weather and sky selections
INTRODUCTION
-2
-
Page 4

-3
-
The Library Creator allows you to bundle data files into libraries for
use in EA SPORTS Course Architect. You can add terrain textures, 3D
objects, sounds and panoramas of various file formats to your library and then
compile for use in Course Architect. Follow these steps to get up and running in
The Library Creator.
NEED INSTALLATION HELP?
Please see the enclosed Install Guide for
installation instructions.
To get started:
1. If they are open, close Course Architect and Tiger Woods PGA TOUR
®
2004
first.
A
Prior to starting The Library Creator, you should set your display to 1024 x
768 or higher in the Display control panel. For information on how to set it,
see the Windows®Help file.
2. To start The Library Creator, select START from your Windows desktop. Then,
select LIBRARY CREATOR from the EA SPORTS Library Creator 2004 sub-menu.
3. When The Library Creator desktop opens, you are ready to begin.
➥➥
To create a new library, select NEW from the File menu.
➥➥
To open an existing library, select OPEN from the File menu. In the dialog
box, navigate your local computer to find the .TLB file. Select it and then
click OPEN.
A
For more information on the desktop in The Library Creator, ➤ Desktop
Elements on p. 5.
A
For more information on the components of a library, ➤ Library Assets
on p. 4.
QUICK START
Page 5

Welcome to The Library Creator, an easy-to-use tool for organizing and assembling libraries of assets for developing courses in EA SPORTS Course Architect.
From the desktop of The Library Creator, you can bundle together textures,
objects, sounds and panoramas to build the courses of your dreams.
After you have compiled a library in The Library Creator, it is automatically
available for use in Course Architect. If Course Architect is open when the compile finishes, close it and re-open it to make the compiled library available
through the Librarian.
LIBRARY ASSETS
A library can contain many assets in the five categories described below.
A
Terrain Textures are 2D graphical images that are placed on top of the terrain geometry that defines the surface of the course. Terrain textures define
the appearance of the terrain. For more information, ➤Terrain Textures on
p. 11.
A
Object Textures cover the surface of objects. Since each object is a unique
shape, its textures apply only to that object. For more information,
➤ Object
Textures on p. 13.
A
Sounds are played back to users based on game events, environmental
events or as ambience. In The Library Creator, sounds are assembled for
placement within the Course Architect. For more information, ➤ Sounds on
p. 14.
A
3D Objects appear on the course as obstacles, course features, or environmental color. For more information, ➤ 3D Objects on p. 14.
A
A panorama image surrounds the course to give the perception of a horizon
and a sky. For more information, ➤ Panorama on p. 15.
OVERVIEW OF THE
LIBRARY CREATOR
-4
-
Page 6
DESKTOP ELEMENTS
A
Main window – The work window where you build your libraries. For more
information, ➤ Main window below.
A
Menu System – The File, View and Help menus at the top of the screen. For
more information, ➤ Menus on p. 8.
A
Toolbar – The icons in the toolbar at the top of the screen. For more information, ➤ Toolbar on p. 10.
A
Status Bar – The messaging status bar at the bottom of the screen. For
more information,
➤ Status Bar on p. 10.
QUITTING THE PROGRAM
➥➥
To safely exit the program, select EXIT from the File menu.
A
If prompted, save your work, or unsaved changes will be lost.
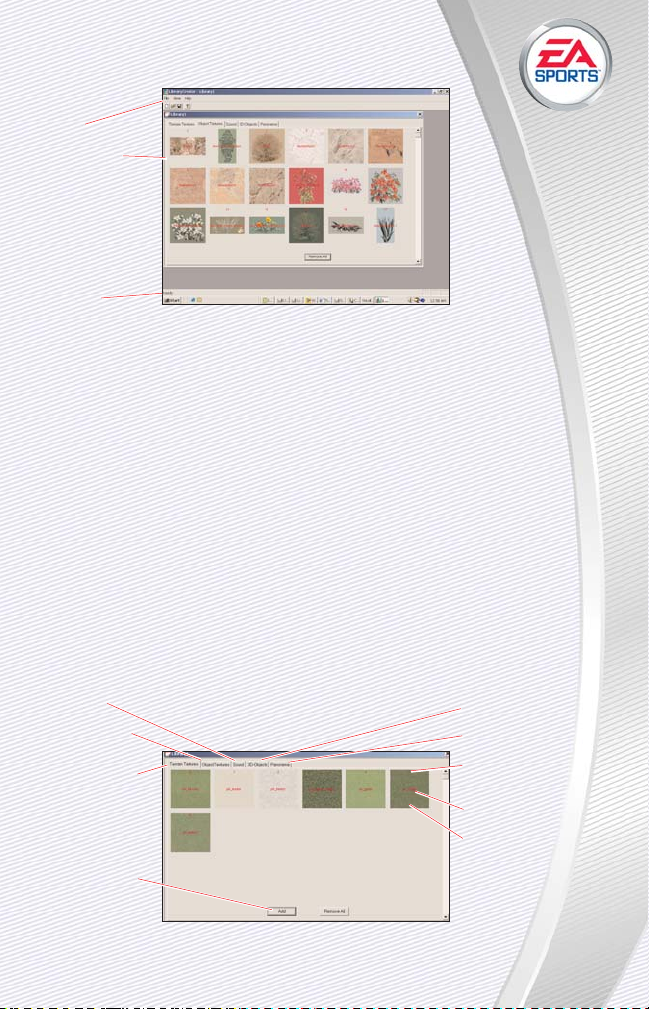
MAIN WINDOW
In the Main window, you add assets to your library, change their properties, or
remove assets that you no longer need.
-5
-
Toolbar
Main window
Status bar
Sounds tab
Object Textures
tab
Terrain Textures
tab
Click to find and
add a new asset
3D Objects tab
Panorama tab
Library index
number
Filename of asset
Right-click to edit
properties or
delete the asset
Page 7

-6
-
In a few quick steps, you can be assembling your personal library of assets for
creating golf courses in Course Architect.
A
Prior to starting The Library Creator, you should set your display to 1024 x
768 or higher in the Display control panel. For information on how to set it,
see your Windows Help file.
NOTE:
When you are using The Library Creator, it is recommended that you close
all other programs. If a library is compiled when Course Architect is open, Course
Architect must be closed and re-opened before the compiled library can appear in
The Librarian.
➥➥
To start The Library Creator, double-click the Library Creator icon or use the
Windows Start menu. The program opens.
CREATING A NEW LIBRARY
When you create a library in The Library Creator, it occupies very little space on
your hard drive, as it contains only references to objects, textures, and sounds.
As you add assets to it, the uncompiled library may grow to about 500KB in
size. Compiled libraries, however, bundle all of the referenced objects, textures,
and sounds and can be up to 20MB in size.
➥➥
To create a new library, select NEW from the File menu.
Or press
v+ N
.
A
You can have multiple libraries open at one time.
NOTE:
Be sure to save your work regularly during development of a library.
ADDING ASSETS TO YOUR LIBRARY
➥➥
To add an asset to your library, select the appropriate tab at the top of the
Main window. Then, click ADD. Navigate your local computer to select the
file to add. Then, click OPEN. The file is added.
➥➥
To edit the properties of the added asset, right-click on the asset and then
select EDIT. For more information, ➤Library Assets and Their Properties on
p. 11.
➥➥
To r emove an asset from your library, right-click on it and then select
DELETE.
GETTING STARTED
Page 8

-7
-
SAVING A LIBRARY
➥➥
To save your current library, select SAVE from the File menu. Or
press
v+ S
. If you have not saved your file yet, navigate
to the desired location on your local computer and enter a filename for the library. Then, click SAVE.
➥➥
To save your current library under a different name, select SAVE AS… from
the File menu. In the dialog, navigate to the new location and enter a new
filename. Then, click SAVE.
CLOSING A LIBRARY
➥➥
To close the current library yet remain in The Library Creator, click the X in
the top-right corner of the Main window.
➥➥
To close The Library Creator, select EXIT from the File menu.
LOADING A LIBRARY
➥➥
To load a library, select OPEN from the File menu. In the dialog, navigate to
select the .TLB file on your local computer. Then, and click OPEN.
COMPILING A LIBRARY
➥➥
To compile a library for use in Course Architect, select CREATE LIBRARY…
from the File menu. In the dialog box, navigate your computer to a destination directory for your file. Then, click SAVE.
A
For more information, ➤ Compiling Your Library on p. 16.
Page 9

-8
-
Use the Command Reference to learn the different menus and toolbars of The
Library Creator and their effects on the selected items of the displayed library.
A
Menus can be accessed from the menu bar at the top of the screen.
A
The toolbar appears on screen and can be toggled in the View menu.
A
The status bar appears along the bottom of the application window and can
be toggled in the View menu.
A
The right-click menu allows you to edit properties of a library component or
delete it from the library.
MENUS
The menus of The Library Creator give you access to all of the functions needed
to build full libraries for use in Course Architect.
FILE
From the File menu, you can select all of the features to manage your library
files and export libraries for use in Course Architect.
New
➥➥
To start a new project, select NEW from the File menu.
A
Keyboard Shortcut:
v+ N
Open
➥➥
To open an existing library, select OPEN from the File menu. In the dialog
box, navigate your local computer to find the .TLB file. Select it and click
OPEN. The library is open.
A
Keyboard Shortcut:
v+ O
NOTE:
You cannot open compiled libraries (.TCL files) in The Library Creator.
Save
➥➥
To save the current library, select SAVE from the File menu. If you have not
saved the file before, navigate your local computer to the directory where
you want to store the file. Enter a name and click SAVE. The library is saved.
A
Keyboard Shortcut:
v+ S
Save As…
➥➥
To save the current library under a different name, select SAVE AS… from the
File menu. Navigate your local computer to the directory where you want to
store the file. Enter a name and click SAVE. The library is saved.
A
Keyboard Shortcut:
v+ S
EA TIP:
Use the SAVE AS… command to experiment with different versions of
your library to get the best combination of assets.
COMMAND REFERENCE
Page 10

-9
-
Create Library…
When you are ready to create your library for use in Course
Architect, The Library Creator bundles all of the objects, textures,
and sounds into a single file with a database to manage them. When
compiled, the .TCL file is ready for immediate use in Course Architect.
➥➥
To create the library, select CREATE LIBRARY… from the File menu. In the
dialog box, navigate your local computer to the directory where you want to
save the created library. Enter a name for the library, and click CREATE. The
library is created.
When you have finished compiling your library, you can open Course Architect’s
Librarian to use the assets in the library in your courses.
➥➥
For more information, ➤ Compiling Your Library on p. 16.
Exit
To quit The Library Creator, select EXIT from the File menu. If your project is
unsaved, you are prompted prior to exit.
VIEW
From the View menu, you can toggle display of the toolbar and status bar, as
well as view other libraries that have been opened.
Toolbar
➥➥
To toggle display of the iconic toolbar, select TOOLBAR from the View menu.
A
For more information, ➤ Toolbar on p. 10.
Status Bar
➥➥
To toggle display of the status bar at the bottom of the screen, select STATUS BAR from the View menu.
A
For more information, ➤ Status Bar on p. 10.
Other Libraries
If you have multiple libraries open at the same time, you can move from one to
the other through the View menu.
➥➥
To go to another opened library, select its name from the bottom of the View
menu.
HELP
From the Help menu, you can open the Help documentation or learn more about
the people who have brought you The Library Creator.
Contents
➥➥
To open this documentation, select CONTENTS from the Help menu.
About Library Creator…
➥➥
To learn more about The Library Creator, select ABOUT LIBRARY CREATOR…
from the Help menu.
Page 11

TOOLBAR
The Toolbar provides quick access to important file management functions in
The Library Creator.
A
The toolbar can be repositioned or docked, as needed.
➥➥
To toggle display of the toolbar, select TOOLBAR from the View menu.
➥➥
To find out the function of a toolbar button, move the cursor over the button
and let it sit. A pop-up text description of the button is displayed.
STATUS BAR
At the bottom of the screen, the Status Bar displays descriptions of the currently highlighted menu function. When you move the mouse cursor over an item in
the menu system, a message appears in the Status Bar to describe it.
➥➥
To toggle display of the Status Bar, select STATUS BAR from the View menu.
RIGHT-CLICK MENU
When you right-click on a library asset, you can select to edit its properties or
remove it from the library.
EDIT
➥➥
To edit the properties of a library asset, right-click on it. Then, select EDIT.
For more information, ➤ Library Assets and Their Properties on p. 11.
DELETE
NOTE:
When you delete an asset from the library, the source file remains. You
can still access the original file that was added to the library.
➥➥
To r emove an asset from a library, right-click on it. Then, select DELETE. The
asset is removed.
-10
-
Create a new library
Open an existing
library
Save the current
library
Learn more about
the people who
brought you The
Library Creator
Page 12

The Library Creator lets you bundle assets of different types into a
single library for use in Course Architect.
➥➥
To add a new asset to your library, select the appropriate tab in the Main
window. Then, click ADD. Navigate the directory of your local computer to
select the file. Then, click OPEN.
NOTE:
You can add multiple assets simultaneously from the same directory by
pressing
v
and clicking the asset filenames. Then, click OPEN.
➥➥
To r emove all of the assets of a particular type from your library, click
REMOVE ALL. In the dialog box, click YES. All of the assets of the selected
type are removed.
➥➥
To edit the properties of a library asset, right-click on the asset in the Main
window. Select EDIT.
NOTE:
A library may contain only one panorama and a maximum total of 255 terrain and object textures. The only limitation to the number of sounds or 3D objects
in a library is disk space.
TERRAIN TEXTURES
In terms of defining the locale of your course, terrain textures may be the most
important asset. If the textures in the library do not look like they belong in the
same geographic location, players of your course may lose the sense of location. Particularly if you’re recreating an existing course, a course created in
Course Architect must look interesting and natural at the same time. The naturalness of its appearance is determined largely by the quality and selection of
terrain textures.
While it’s possible to create your own textures and add them to your libraries
through The Library Creator, doing so requires an artist’s eye. Applying them to
a course demands attention, too. One of the pleasures of playing golf is the
experience of a striking view over beautiful terrain. Keep in mind, though, that a
stunning view from a tee box may also be experienced up close when tee shots
go awry. Be sure to thoroughly test and examine any created texture from a
variety of perspectives in Course Architect.
Data Format(s) . BMP or .TGA
Minimum Dimensions 2x2
Maximum Dimensions 1024x1024
Maximum Number 255 total terrain and object textures
Color Depth 8, 15, 16, 24, or 32 bits per pixel
LIBRARY ASSETS AND
THEIR PROPERTIES
-11
-
Page 13

TERRAIN TEXTURE PROPERTIES
In the Terrain Texture Properties pop-up, you can define the type, basic properties, description and collisions of the texture.
➥➥
To create an identifying description of the texture for use in Course
Architect, enter a description in the textbox.
➥➥
To set the collision properties, click TERRAIN COLLISIONS. For more information, ➤ Terrain Collisions below.
➥➥
To accept the changes to the properties, click OK. To cancel and exit, click
CANCEL.
Terrain Collisions
In the Terrain Collisions pop-up, you can set the effects on the ball when it collides with this texture.
From the Ball Behavior Coefficients drop-down, you can select the basic physical properties of a type of surface that you may find on the golf course. For
example, if the selected texture appears to be wood chips, then you can select
WOODCHIPS from the drop-down to apply similar properties.
➥➥
To create different collision properties for the texture, enter new coefficients
in the textboxes.
➥➥
To change the icon that indicates the lie of any ball that lands on the texture, click CHANGE. In the dialog box, select the lie .TGA to apply to the texture. To apply the selection, click OPEN.
➥➥
To apply a different sound for the collision with the texture, select a sound
from the drop-down list.
➥➥
To change the text that is displayed for the ball’s lie in the game, enter a
new phrase in the Game Lie textbox.
➥➥
To apply these changes, click OK. To cancel and return to the Terrain Texture
Properties screen, click CANCEL.
-12
-
Page 14

OBJECT TEXTURES
While the geometry of an object determines its overall size and
shape, the textures associated with the object make it come to life.
In The Library Creator, you can apply different textures to individual
objects, give physical properties to those textures, and associate sounds with
impact on the textures.
NOTE:
When you add a 3D object, the textures associated with it are also added.
However, when you remove the 3D object from your library, the textures remain
until you choose to remove them.
Data Format(s) . BMP or .TGA
Minimum Dimensions 2 x 2
Maximum Dimensions 1024 x 1024
Maximum Number 255 total terrain and object textures
Color Depth 8, 16, 24, or 32 bits per pixel
OBJECT TEXTURE PROPERTIES
➥➥
To create an identifying description of the texture for use in Course
Architect, enter a description in the textbox.
➥➥
To set the collision properties, click COLLISION PROPERTIES. For more information, ➤ Object Textures Collisions below.
➥➥
To accept the changes to the properties, click OK. To cancel and exit, click
CANCEL.
Object Texture Collisions
In the Object Texture Collisions pop-up, you can set the physical properties of
the object texture that are applied to any ball colliding with it.
➥➥
To apply a different sound for the collision with the texture, select a sound
from the drop-down list.
➥➥
To change the settings for restitution and slip after an impact, enter a new
number in the space provided.
➥➥
To accept these changes, click OK. To cancel and return to the Object
Texture Properties screen, click CANCEL.
-13
-
Page 15

SOUNDS
Sound can make the difference between a mediocre computer golfing experience and an exceptional one. By carefully applying ambient and event sounds
to your courses, you can create a striking sense of place in the environment.
The wind through coastal redwoods tells players on the course that you are in
Carmel on Pebble Beach, for example. The sound of a ball landing in the rough
in Carmel, however, may be different the sound in Florida. Close attention to
these details can really improve the aesthetic experience on your courses.
Data Format(s) .WAV
Minimum Dimensions N/A
Maximum Dimensions N/A
Data Depth N/A
SOUND PROPERTIES
➥➥
To create an identifying description of the sound for use in Course Architect,
enter a description in the textbox.
➥➥
To change the thumbnail to be displayed for this sound in Course Architect,
click CHANGE.
➥➥
To accept the changes to the properties, click OK. To cancel and exit, click
CANCEL.
3D OBJECTS
The Library Creator comes with a large suite of 3D objects that you can use to
build your own libraries. Using these base geometries, you can apply different
textures to them to create different environments. For example, a rock in
Scottsdale, Arizona looks different from a rock in upstate New York, so the textures that you use for courses in these places must be different, too.
You can add multiple versions of the same object and then apply different textures to them to create multiple objects.
NOTE:
When you add a second version of a 3D object to the library, be sure to
note the index number of the object to avoid confusion with the first one.
3D OBJECT PROPERTIES
A
In the 3D-Object Properties screen, you can change the texture applied to
the selected object.
➥➥
Users cannot modify the 3D objects directly. Users can change the textures
applied to the 3D objects.
➥➥
To select a different texture of this 3D object, select the texture from the
drop-down list.
➥➥
To change the texture applied to this 3D object, click CHANGE. In the dialog
box, navigate your local computer to select the new texture. To apply the
new texture, click OPEN.
-14
-
Page 16

-15
-
➥➥
To use the default textures for the 3D object, click RESET ALL.
➥➥
To edit the properties of the selected texture, click EDIT PROPERTIES. For more information, ➤ Object Texture Properties on p. 13.
➥➥
To close the Properties window, click DONE.
PANORAMA
Covering the perimeter of a course, a panorama conveys the impression of a
horizon that seamlessly blends into the algorithmically generated sky. Because
panoramas are difficult to create and blend into a course, The Library Creator
comes with a library of panoramas from which you can choose one to include in
your library.
A panorama is a combination of a texture and a 3D geometry. The shape is
essentially an inverted bowl that covers a course. The texture is applied to the
inside of the bowl and is shaped accordingly.
PANORAMA CREATION
To create a new panorama:
1. Click on the panorama tab, and push the “Add Button”
2. A dialog will appear asking how many segments you want your pan to have.
Pans can have up to 12 sections. Each section will need to have a texture
associated with it. Select the number of segments that you want to have in
your pan and select “OK”.
3. The panorama tab will now be shown with a depiction of the default panorama.
Page 17

-16
-
4. Now you can customize the pan. By sliding the “North Direction” slider you
can change the orientation of the pan as it relates to your course. North is
indicated by where the slider points above the pan representation.
5. By adjusting the “Horizon” slider you can change the vertical position of the
pan as it related to your course.
6. Each of the segments in your panorama will have a “Edit” button below it.
By selecting this button you can specify the texture associated with each
panorama segment.
7. By selecting change default texture you can specify the texture that will
appear to fill in gaps below the panorama on your course.
The Library Creator’s compiling feature can quickly prepare, package and publish your library for immediate use in Course Architect. When your library is
compiled, the output .TCL file includes all of the assets that you added to the
library.
➥➥
To make your created library available for use in Course Architect, you must
compile it. Before compiling, you should read the rest of this section.
PREPPING YOUR LIBRARY FOR COMPILE
Before you compile your library, you should do the following:
To prep your uncompiled library:
1. Save your uncompiled library.
2. Check amount of space in the volume where your library is stored.
Depending on the number of assets, a saved library occupies between 32KB
and 20MB.
NOTE:
If you have already compiled a library from the current The Library Creator
file, you must move the compiled version, or it will be overwritten. The compiler
overwrites compiled libraries with the same name in the same directory.
3. When you have completed these steps to your satisfaction, save your
library.
4. You are ready to compile your library.
➥➥
To compile your course, select CREATE LIBRARY from the File menu. In the
dialog box, navigate your local computer to the destination directory for
your library. Enter a name for your library. Click SAVE. The library is compiled and saved.
➥➥
Be careful with your file names and locations. Compiled libraries are identified through the Windows registry, so it is possible for two libraries in different directories to have identical names in Course Architect. They would
appear as separate, identically named tabs in Course Architect. Whenever
possible, give your libraries unique file names.
COMPILING
YOUR LIBRARY
Page 18

NOTE:
Larger libraries with more assets take longer to compile. If your
library fails to compile, fix any errors before recompiling.
COMPILE COMPLETED
When the compile is completed, a dialog displays the total amount of space
consumed by the textures in the library.
A
The dialog box indicates the amount of video RAM occupied by the textures
in the library. Generally, a third of the available video RAM should be used
for textures. If you can use fewer textures, the amount of required memory
reduces, and the library assets perform better in Course Architect and Tiger
Woods PGA TOUR 2004.
➥➥
The file is saved with a .TCL extension.
NOTE:
If you forget the location of the compiled library, you can search for compiled libraries as files with the .TCL extension. For more information on how to
search your computer, see your Windows Help file.
INSTALLING WITH COURSE UTILITIES
After you compile a library, you can install it through Course Utilities.
➥➥
To install a library, open Course Utilities through the Tiger Woods PGA TOUR
2004 START menu. Click in the Libraries list. Then, click INSTALL. Navigate
to the location of the compiled library on your local computer. Select it, and
click INSTALL. The library is now listed under Libraries and is available to
Course Architect.
➥➥
To uninstall a library that you no longer want to use in Course Architect, use
Course Utilities to uninstall the library. Then, delete the file, if needed.
A
For more information on Course Utilities, see your Tiger Woods PGA TOUR
2004 documentation.
HOW TO USE IN COURSE ARCHITECT
™
After you have successfully compiled your library, you can use the components
of your library in the Librarian in Course Architect.
➥➥
To see your library in Course Architect, select LIBRARIAN… from the View
menu. Use the scroll buttons at the top of the Librarian to find and select
your library. You can drag and drop assets from your librarian into the open
course.
A
For more information on adding assets from your library to a course, see
your Course Architect documentation.
-17
-
Page 19

-18
-
TERM DEFINITION
3D OBJECT Any object that is to be placed on top of the terrain
in a Course Architect course. 3D Objects include
trees, buildings, golf ball washers, rocks, and animals.
ASSET Any data file that can be used to build a course in
Course Architect. The file parameters must fit specific
requirements. Course assets include terrain textures,
3D objects, object textures, panoramas and sounds.
COMPILED LIBRARY A single file of aggregated library assets that can be
used in building courses in Course Architect. A compiled library is the product of The Library Creator.
COURSE ARCHITECT
™
EA SPORTS Course Architect is a real-time 3D devel-
opment tool to build golf courses for use in Tiger
Woods PGA TOUR 2004.
COURSE UTILITIES An EA SPORTS utility for managing your Tiger Woods
PGA TOUR 2004 courses and their associated
libraries.
LIBRARY A collection of course assets in a single repository. In
The Library Creator, libraries are built by assembling
course assets and then compiling them for use in
Course Architect.
MAIN WINDOW In The Library Creator, library assets are added, edit-
ed and removed in the Main window.
OBJECT TEXTURE Any two-dimensional image that covers a 3D object.
An object texture has been specifically shaped and
cut to fit a single object, so in The Library Creator,
when you add a 3D object, you automatically include
the associated object texture.
PANORAMA A specially designed 2D image that wraps around the
perimeter of a Course Architect course.
PROPERTIES Associated with each course asset is a set of proper-
ties that describe the course location, physical properties, and appearance in Course Architect. The properties for an asset depend on its type; properties for
sounds differ from those of 3D objects.
GLOSSARY
Page 20

-19
-
SOUNDS On the golf course, sounds can be ambi-
ent or linked to specific events like collisions. In The Library Creator, sounds are
loaded into the library for application in
Course Architect.
STATUS BAR At the bottom of the Main window, the Status bar
indicates the function of the currently selected menu
item.
TERRAIN On a course, the terrain is the set of interlocking
geometric facets that define the surface of a golf
course. Terrain is shaped in Course Architect.
TERRAIN TEXTURE A texture applied to the surface of a piece of terrain
to give it the appearance of a golf course feature
such as a bunker, lake, or fairway.
Documentation © 2003 Electronic Arts Inc. Electronic Arts, EA, EA SPORTS, the
EA SPORTS logo and Course Architect are trademarks or registered trademarks
of Electronic Arts Inc. in the U.S. and/or other countries. All rights reserved.
The name, likeness and other attributes of Tiger Woods reproduced on this
product are the trademarks and copyrighted designs, and/or other forms of
intellectual property, that are the exclusive property of those licensers and may
not be used, in whole or in part, without their respective written consents. PGA
TOUR is a trademark of PGA TOUR, INC. and used by permission. All other
trademarks are the property of their respective owners. EA SPORTS™ is an
Electronic Arts™ brand.
 Loading...