

Page 1

PLAYER’S GUIDE
®
®
An Electronic Arts® Company
™
Page 2

Page 3

CONTENTS
History .............................................................................4
Starting the Game.............................................................8
Option Screen..............................................................8
Tutorial Walkthrough......................................................10
Main Game Screen.....................................................10
Movement..................................................................11
Combat......................................................................12
Life Bar......................................................................13
Power Bar..................................................................13
Picking Things Up .....................................................14
Putting Things Down ................................................14
Using Things..............................................................15
Eating and Drinking................................................15
Morphing...................................................................16
Abilities.....................................................................17
Option Screen............................................................18
Inventory Overview ...................................................18
Automap Screen.........................................................19
View Window Size.....................................................20
Opening and Closing.................................................20
Cursors......................................................................21
Continuing to Play.....................................................21
Death .........................................................................21
Your Character...........................................................21
Different Forms
Kirt............................................................................22
Maorin.......................................................................23
Caun..........................................................................24
Opsis..........................................................................25
Kahpa ........................................................................26
Ssair...........................................................................27
Grost..........................................................................28
Credits............................................................................30
Online Services, Bulletin Boards and Hint Line................32
Page 4

HISTORY
Kirt is a descendent of a magical race which calls itself
The People. The People enjoyed a special relationship
with both the gods and the dwellers of other planes;
they were permitted to take the shapes of these distant
beings for short durations, as they permitted the others
to take on human form.
This exchange worked for the benefit of both The
People and the fantastic creatures from the other
planes. The People used it to accomplish tasks that
were otherwise beyond their powers, while the fantastic creatures used it to do things only the human form
permitted and to use one shape’s strengths to compensate for another’s weaknesses.
The gods gave the gift of morphing to the most worthy
of The People. Enjoying as they did the gods’ favor and
the special powers this entailed, The People built a
magnificent civilization and enjoyed a great and
peaceful time under their rulers. Trusting the wisdom
of the gods to select the most worthy individuals, those
who had the greatest morphing abilities were chosen to
lead The People.
Not all of The People appreciated this arrangement.
Most notable among these were those to whom the gods
had declined to give the gift of morphing in any form.
These formed a subcaste and were generally regarded
(and treated) as less than People.
To these, Malkor, the outcast god, appeared and
promised power and riches if they would worship him
and follow his ways. Members of the subcaste eagerly
followed Malkor, who provided a different and evil
variation on the gift of morphing.
4
Page 5

Followers of Malkor would capture animals, People,
and the fantastic creatures and slay them in horrific,
painful rites. Through these rites, they acquired the
power to change into the shape of those they destroyed.
Flaunting their new powers, the most powerful of
Malkor’s minions were given positions of power over
The People. The manner of the gods’ choosing had
always been a private affair — the fact someone had
been deemed worthy was evidenced by the shapes they
received and not any divine announcement. As the Evil
One’s followers grew in number and power, slowly The
People came under the control of their least worthy
and most evil members.
At a great feast to honor the gods, Riodn, the great
holy man, revealed the practice of the evil rites — and
named the ones who were following Malkor. At this
feast, Veste, leader of the evil People, killed Riodn, and
the Kin Murders began.
In the course of the civil wars that followed, the morphing powers were used to destroy The People, their
city and the civilization they had created. In the final
battle, the followers of Good drove Veste and his servants into a temple some distance from the city. There
Veste mocked them and vowed to return to bring final
doom to The People. He then closed the temple doors
so that none could enter.
The forces of Good had won, but at what cost? The
People were virtually destroyed and their great city
turned into a haunted ruin. The gods, appalled by the
slaughter, turned their backs on The People. The gift of
morphing was intended to be used for the benefit of all,
but The People had instead used it to establish a class
of rulers and servants. In this, they had gone against
the will of the gods.
5
Page 6

One god, Tovason, did not entirely abandon The People.
If they kept watch against evil, he promised, they would
eventually return to their former greatness. The People
built a village around the temple and kept guard
against Veste’s return. Through the years they mingled
with other tribes and the gift of morphing slowly faded
away. Eventually, only two of The People carried this
gift. They were wed and bore a child they named Kirt.
At his birth, the old gods gathered. Malkor had been
growing in power, and down every path the gods could
see lay their ruin and destruction — Malkor triumphant and all the lands enslaved. But, down the path
Kirt would travel, the gods could see nothing. It was as
if he cast a shadow over the future of the worlds.
Kirt was given the name Shadowcaster. In him resided
the hope of The People and the ancient gods. But
Malkor and his followers learned of this hope. One
moonless night the doors of the temple flew open and
Veste, somehow alive centuries after he had fled, raided the village. He attacked the house where Kirt lay
sleeping and slew his mother and father.
But Tovason had been watching the child. Just before
Veste and his beasts entered the child’s room, Kirt,
under the care of the last Holy One, was sent to a faraway land where magic was little known and less
respected. There Kirt grew into maturity under the
guidance of a man he called Grandfather.
Grandfather kept close watch over Kirt, for he knew
the Evil Ones were searching everywhere for him. One
night a storm arose in which Grandfather recognized
the power of Malkor. On that night, Grandfather told
Kirt of his heritage and sent him back to The People,
just ahead of the rending claws of Malkor’s slaves.
6
Page 7

Kirt, with little knowledge of this new world, acquires
the power to change shape by touching an obelisk that
puts him in contact with the gods. He fights his way
through the ruined, cursed city of The People to
cleanse it of a great evil, and discovers a way to the
temple at the center of The People’s village.
By the time he gets there, Veste, warned of Kirt’s escape
from the world Earth, has struck again. He has carried
off the last remaining People, and has left Kirt a trail
to follow through a series of dangerous worlds where
evil creatures wait to destroy him.
The trail is clear, but can Kirt defeat the successively
more powerful servants of Malkor — and defeat Veste
in a showdown of Virtue versus Despair to restore The
People to the favor of the gods?
7
Page 8

STARTING THE GAME
1. First, install Shadowcaster on your hard disk. If you haven’t already done
this, refer to the Install Guide included in this package for instructions.
2. Select the drive on which the game is installed. (For example, if you
installed the game on your C drive, type C:
3. Select your Shadowcaster directory. (If you used our default directory,
type CD\SHADOW e.)
4. Start the game (by typing SHADOW e).
An introductory sequence begins with ORIGIN PRESENTS — RAVEN SOFTWARE
GAME. If you haven’t played the game before (or have never “saved” your pre-
vious adventures), the game proceeds to the Introduction. This provides
background information you need to complete your adventure. If you have
not already saved a game, immediately following the Introduction you begin
a new game. (If you have already seen the Introduction, you can press
z or q to bring on the following screen.)
OPTION SCREEN
The left side of the screen holds up to four small Saved Game View Windows
for saved games. The middle of the screen holds the options. The upper right
of the screen holds a larger View Window for the current game or the currently selected saved game. Below this is a Score Bar that contains your total current score, and below the Score Bar is the Text Box. The Text Box holds text
showing either the first line for each saved game (when no saved game has
been selected), or the text you entered for the currently selected saved game
when you saved it. The lower right of the screen contains the Text Bar. When
you select OPTIONS, prompts may appear here to tell you what to do next.
e.)
NEW. Starts over at the beginning of a game.
QUIT. Returns you to DOS without saving your current game.
RETURN. Sends you back to the game you were playing when you chose to
enter the Option Screen. (This option is grayed out and cannot be selected
when you do not enter the Option Screen from a game in progress.)
LOAD. Returns you to a previously saved game:
Select a saved game by clicking on its Saved Game View Window. This
causes a larger version of this View Window to appear in the top right of
the screen and the additional information you entered about the game to
appear in the Text Box at the bottom right. Once you have selected the
game you want to load, click on LOAD.
8
Page 9
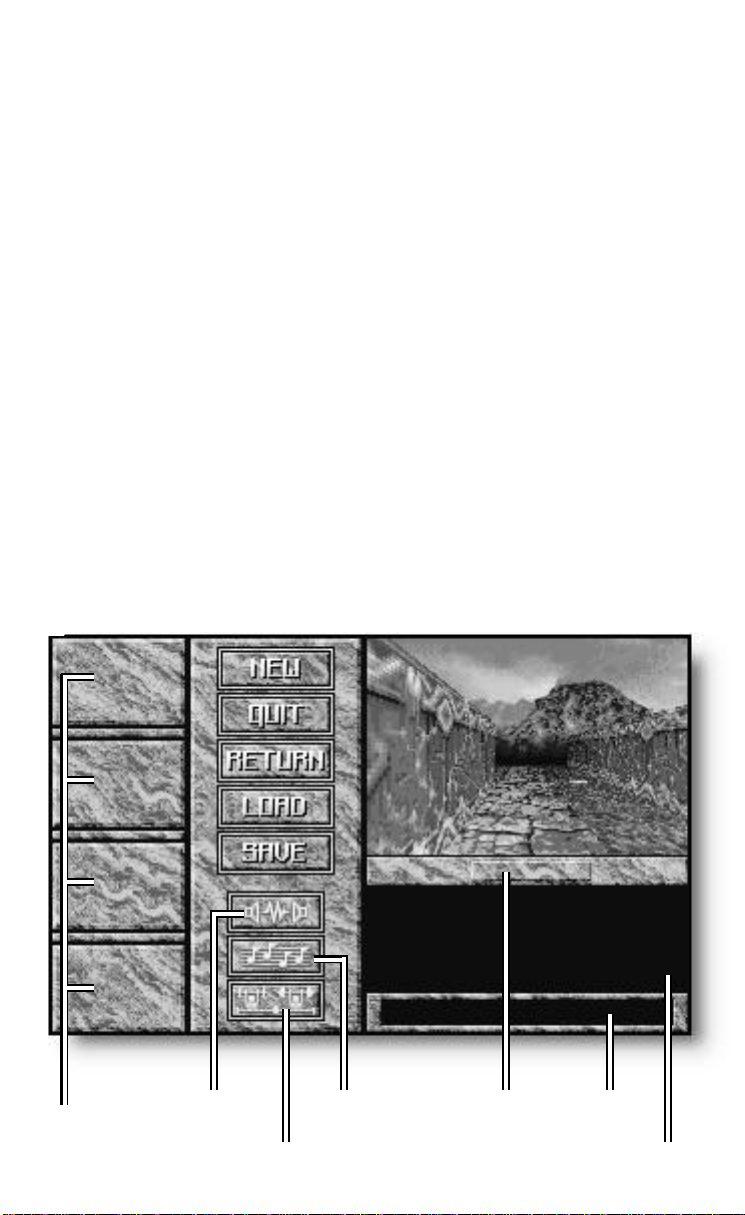
SAVE. Stores the current game. Select SAVE, choose a Saved Game View
Window by clicking on it, and enter up to eight lines of text (Save Info Text)
about the game being saved. When you have finished entering this information, press q to complete the save. The Save Info Text helps identify the
saved game. You may then click on RETURN to continue.
After saving a game, one of the four boxes on the left of the screen displays
a small View Window for that game, and the first line of each Save Info Text
is shown in the Text Box. (The save option is grayed out and cannot be
selected when you do not enter the Option Screen from a game in progress.)
SOUND. (Speakers Icon) Toggles sound effects off and on. When sound is on,
the icon has a red border.
MUSIC. (Musical Notes Icon) Toggles music off and on. When music is on,
the icon has a red border.
DIFFICULTY. (Weight Lifter Icon) Adjusts the difficulty of the game. There are
five different difficulty levels; the game is preset to the third level. When you
select this option, a screen appears that allows you to set the difficulty level
from wimp (easiest) to hero (hardest). The amount of points you are awarded is tied to the difficulty level. The game is much easier to get through at
the wimp level than at the hero level, but if you can make it through the
game at hero, your score is much higher.
You select an option by moving the cursor over it and left-clicking.
Saved Game
View Windows
Sound
Difficulty
Music
Score Bar
Text Bar
Text Box
9
Page 10
TUTORIAL WALKTHROUGH
NOTE: This tutorial walks you through the beginning of your adventure. If you
would like to use keyboard commands to supplement the mouse commands we give
here, see your Reference Card. The first time you play the game you are placed in
the situation described below (after the Introduction).
Since the game starts with you being attacked by a slobbering beast, you may
want to read the Main Game Screen, Movement and Combat sections of
this tutorial before you actually begin play.
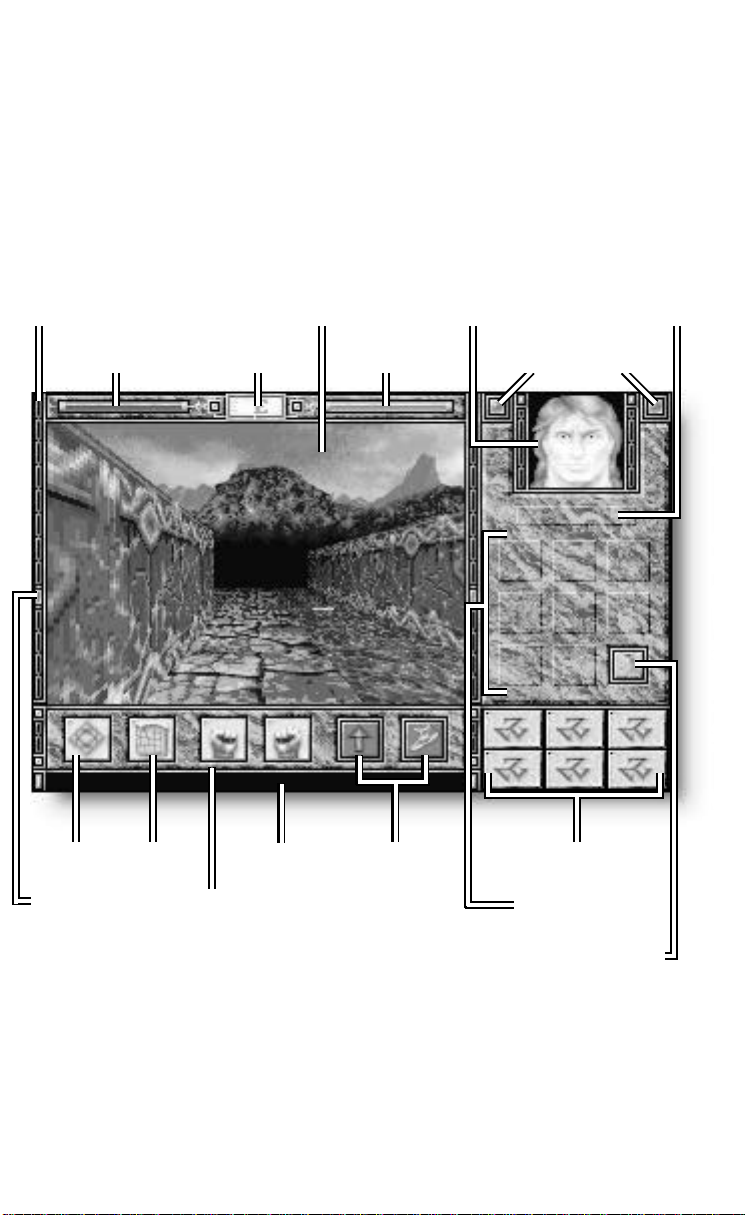
View WindowAltitude Bar Score Bar
Compass Life Bar Size GemsPower Bar
Options Automap Ability Icons
Text Bar
Ability Icons
Portrait Panel
Altitude Gem
Selection Bar
Inventory Overview Button
Inventory Boxes
MAIN GAME SCREEN
The game begins in Normal Mode — the screen you see most of the time. In
the upper left is the View Window — the world as you see it. Look below
the View Window to see the six icons of the Selection Bar. To the right of
the View Window you find the Portrait Panel. Your Portrait is at the top of
this panel, and to either side of it are purple Size Gems to control the size of
the View Window. (We’ll discuss Size Gems later, on p.20.) Look below the
Portrait — the horizontal gray bar is the Score Bar. Eight Inventory Boxes
10
Page 11

are just below the Score Bar. The ninth, gold-outlined box is the Inventory
Overview Button. Finally, at the very bottom of the right side are more
Ability Icons. Depending on your current shape, there are up to six of these.
Now look above the View Window. There is a blue bar on the left, a small
box in the center showing the letter E, and a red bar on the right. The blue
bar is the Power Bar, which shows your current power reserves. The small
box is your Compass, and it now shows that the direction you’re facing is
east. The red bar is the Life Bar, and it shows the life energy of your current
shape. To either side of the View Window are borders with small purple
Altitude Gems in them. These gems show your altitude — an important feature when you are swimming or flying. Beneath the Selection Bar is a blank
area that displays text throughout the game — the Text Bar.
MOVEMENT
Try moving your mouse around the screen — but don’t press any buttons
yet. As you move the mouse in the View Window, the mouse cursor assumes
arrow shapes corresponding to its position in the window. When you move
the cursor outside the View Window, it becomes gray cross-hairs.
Two rules govern movement:
Forward
Ahead Left
Turn Left
Side Step
Left
Backward
Ahead Right
Turn Right
Side Step
Right
Rule 1. While your cursor is inside the View Window, its position determines the direction in which you move if you left-click-and-hold the
mouse button. When the cursor is an arrow, its shape indicates direction.
When it points right, you travel to the right; when it points upward, you
travel forward, and so forth.
Rule 2. The speed at which you move depends on how far your cursor is
from the center of the View Window. When the cursor is centered, you don’t
move at all. As you move the cursor closer to any edge of the View Window,
you move more rapidly.
11
Page 12

During the course of the game, you gain the ability
to morph into the forms of other races. You get
their abilities and their weaknesses, as well as their
Click to Surface
(when swimming)
method of movement. Some of your metaforms can
fly, others can swim. To change altitude while flying, floating or swimming, click on either of the
Altitude Bars — the two thin columns to either
Click to go
Higher
side of the View Window with the purple gems. To
dive, click at the very bottom of an Altitude Bar; to
surface, click at the very top. To go higher, click
above one of the small gems. To go lower, click
below one.
Altitude Gem
Click to go
Lower
Click to Dive
(when swimming)
COMBAT
You begin the game in human form, locked in an outdoor “room.” Before you
can explore, you have to dispose of the monster that is rapidly approaching.
In the Selection Bar (below the View Window) are six icons. Two of these
look like hands and one looks like a foot. To hit the monster, left-click on
one of the HAND icons. This is now outlined in white to show that it is active.
Move the cursor back into the View Window until it is over the monster.
Now right-click. Note that the cursor changed to a red cross when you
selected the hand. This red cross appears whenever a hand (or appropriate
appendage) is selected, except when an object is cursor-grabbed.
When you hit the monster, a small star appears where you hit the creature
and you hear the sound of an impact. When a monster hits you, you are
pushed back (unless you are against a wall), you make a grunting sound and
your Life Bar decreases.
If you are unable to hit the monster, you are probably too far from it. Place
the cursor at the top of the screen above the monster and hold down the left
mouse button while attacking. This keeps moving you toward the monster
and helps to offset changes in distance caused by you and the monster pushing each other back. If you have difficulty holding down the left mouse button while clicking the right mouse button, try holding down the left mouse
button while pressing z to attack (instead of right-clicking).
12
Page 13

To use the kick attack, click on the FOOT icon. The HAND icon loses its white
border and the FOOT icon gets a white border. (Note that the cursor has
changed to an orange circle. This cursor appears whenever one of the first
two Abilities are chosen.) Attack the same way you did for the hand — place
the cursor on or above the monster, and right-click or press z.
When you defeat the monster, it collapses into a small shape on the floor.
Look at your Score Bar — you see that it is no longer 0. Winning a combat
increases your score.
LIFE BAR
Being hit by a monster decreases your Life Bar. Click on the Life Bar to find
out exactly how much life energy you have left. A message in the Text Bar
appears, giving both your current Life and potential maximum Life.
Later in the game, when you acquire additional metaforms, notice that while
the amount of current and maximum Life varies from one metaform to
another, the percentage of current Life remains constant. For example, if the
Caun (with a maximum possible Life of 20) has a current Life of 5, then the
Grost (with a maximum Life of 200) has a current Life of 50 — Life is at
25% of maximum in both instances.
Don’t worry too much about losing Life, though. There are three ways for
you to regain Life. Given time, in human form, you slowly heal on your own.
Also, a metaform that you acquire later in the game — the Caun — heals
very rapidly. The Caun also have an Ability to turn Power into Life. A third
way to regain Life is to drink a healing potion.
POWER BAR
Power is tracked across metaforms as a single number. If one form has a current Power of 30 and a maximum Power of 50, then all forms have a current
Power of 30 and a maximum Power of 50. Only as a human can you naturally
regain Power. If a metaform runs out of Power you will morph back to
human no matter where you are or what you are doing. The maximum amount
of Power that you can generate depends on your score. In addition to the
score you earn while as a human, your human form gets a percentage of the
scores earned by the non-human forms.
Power is used to morph to metaforms, and also to use certain metaform
Abilities.
13
Page 14

PICKING THINGS UP
Now take a stroll around the courtyard, explore a little, and notice the
objects on the ground. One of these is a vial containing a red-colored liquid.
To pick up the vial, approach until you are close to the vial (the vial is visible at the bottom of the screen).
Move the cursor over the red vial and right-click (or press z). If you
are close enough to the vial, you can pick it up. See how the cursor becomes
the vial. If this does not pick up the vial, you are too far away. Move closer to
the vial until right-clicking picks it up. Note that you don’t have to hold the
mouse button down to move the vial. You can also “grab” items that are in a
hand or inventory box by moving the cursor over them and right-clicking.
PUTTING THINGS DOWN
Go ahead and right-click again to put the vial down. If you still have a hand
or a foot selected, you might make an attack-like movement. In that case,
left-click on the selected icon (the one with the white border) to deselect it.
If your cursor is near the ground (at the bottom of the View Window), rightclicking drops the vial. You could also drop the vial into a hand or an inventory box by moving it over the hand or inventory box and right-clicking. If
the hand or inventory box already contains an item, you “cursor-grab” that
item when you “cursor-drop” the item you are currently holding — a simultaneous exchange.
You can only put things down by right-clicking if no other option is selected
(no icon is bordered in white).
Now is a good time to practice. Right-click on the vial to pick it up. Move it
over an empty inventory box and right-click again to put it in the box.
14
Page 15

USING THINGS
Look around until you find a wand with a green tip. Pick it up and place it
in an inventory box.
To use most things, you
need to be actively holding them. In other
words, a “cursor-grab” is
not enough — they must
be in a hand (or appropriate appendage) and
that hand (or appendage)
must be selected.
Now pick up the wand
from the inventory box
and move it over a hand.
Right-click to put it in
the hand, and then activate it by left-clicking on that hand. (A quicker
method is to left-click on the object in your inventory — it appears, selected,
in the right hand.) Now move the cursor to a far wall and right-click. You
see a blazing fireball come out of the wand and hit the wall. Don’t do this
too often — you have a limited number of fireballs.
Manipulating objects is an important skill to master. Try right-clicking on an
empty inventory box. The wand appears in that box. The hand which held
the wand is now empty, but it is still active (has a white border). Left-click
on the hand to deselect it (white border goes away). Now left-click on the
wand. The wand appears in the right hand and the hand is selected. Now
left-click on the red vial. The red vial appears in the hand which remains
selected. The wand is now in the inventory box which had held the vial.
Now left-click on an empty inventory box, and the vial appears in that box.
The hand is again empty, but remains selected. Deselect it (left-click).
There are a number of different items in the game. Things such as armor
provide benefits to your metaforms as soon as they are placed in your inventory. Some items can only be used by particular forms. To use a weapon, put
it in a selected hand/appendage, then click on what you want to attack in the
View Window.
EATING AND DRINKING
Right-clicking with an item on your Portrait is how you consume things. The
only reason for you to eat or drink is to heal or get special powers. You don’t
get hungry or thirsty during this game.
One more thing. Pick up the red vial, move it over your Portrait and rightclick. If you were hit in combat, some or all of your missing Life is restored.
15
Page 16

MORPHING
In the center of the
room is a green obelisk
with a red tip — you
can’t have missed it. In
the course of the game,
when you find an
obelisk like this one
and right-click on it,
you are granted a new
metaform as the obelisk
disappears. Click on it
now.
The metaform you have just been granted is for the Maorin — a six-legged
cat. You can now see the icon for the Maorin shape in the Ability icon area in
the lower right of the screen. Select
this icon. The Portrait Panel is
briefly taken over by an animated
sequence showing the transformation from human to Maorin. When
the transformation is complete, the
side panel goes back to its original
state, with the new Maorin portrait.
Look at your Power Bar, and notice that it has decreased somewhat. This is
because it costs Power to morph into a non-human form —as well as to
maintain that form once you have assumed it. If you run out of Power while
a non-human, you automatically morph back to human. If you happen to be
at the bottom of a lake or flying over quicksand at the time, this spells certain death. So be careful with your Power — when you need it, you don’t
want to be running low.
Click on the Life and Power Bars and watch the Text Bar. Now click on the
HUMAN icon in the lower right of the screen. You see the animation morph in
reverse. When you click on the Life and Power Bars, you should notice that
the Power remains unchanged, but the Life is different between human and
Maorin.
Once again, click on the MAORIN icon.
16
Page 17

ABILITIES
When you look at the Selection Bar, notice that some of the icons have
changed. The HAND icons are now PAW icons. (If you select one of these and
right-click in the View Window, you see the Maorin’s double-pawed claw
attack.) Also, the FOOT icon has been replaced with an EYE icon.
Each metaform has at least two abilities (the rightmost icons of the Selection
Bar). For the Maorin these abilities are Jump and Cat Sight. Selecting an icon
turns its border white. Select the CAT SIGHT icon. Right-click in the View
Window; a number of things happen. The border for the icon turns red —
telling you that an Effect has begun. The red border remains around the icon
until the effect goes away. You now have Cat Sight; Maorin can sometimes
see infra-red. When you use Cat Sight, the View Window takes on a reddish
cast and sometimes items which were hidden can be seen — Cat Sight can
be used to find hidden symbols and traps. It works for a limited amount of
time, and then your sight returns to normal. If you were watching the Power
Bar when you right-clicked, you saw it decrease. This is because Cat Sight
costs Power.
Other metaforms in the game give you other Abilities, either in the Selection
Bar or under the Inventory Area. Use them the same as you did Cat Sight —
select them and then apply them by right-clicking in the View Window.
Some of these abilities cost you Power and some do not. If the Ability is an
attack, you must right-click over the target for that attack, the same as you
would if you were using any other weapon.
Select the JUMP icon and right-click in the View Window. The screen image
dips as you jump up and forward. Now try moving ahead and simultaneously
right-clicking in the View Window to leap farther.
Because you are in a confined place, it is difficult to use the Jump Ability
now. Later in the game, however, jumping over or on top of things may be
important.
17
Page 18

OPTION SCREEN
The leftmost icon on the Selection Bar is for the Option Screen. Select this
icon (left-click on it) to bring up the Option Screen.
Going into the Option Screen pauses the game.
You saw this screen when you started the game. This is where you:
• SAVE a game,
• QUIT your current game,
• RETURN to an existing game,
• LOAD a saved game,
• toggle SOUND off or on,
• toggle MUSIC off or on, and
• set your DIFFICULTY level.
Refer to Starting the Game (p. 8) for more information on how these work.
Select the RETURN option to continue your game.
INVENTORY OVERVIEW
You can see all your available forms and what they have in their inventory
and hands (etc.) by clicking on the gold-outlined Inventory Overview Button
(at the bottom right of the inventory boxes). This causes the Inventory
Overview Screen to appear. The red line under the Maorin’s icon on this
screen shows that he is the currently active form.
Click anywhere to resume the game.
18
Page 19
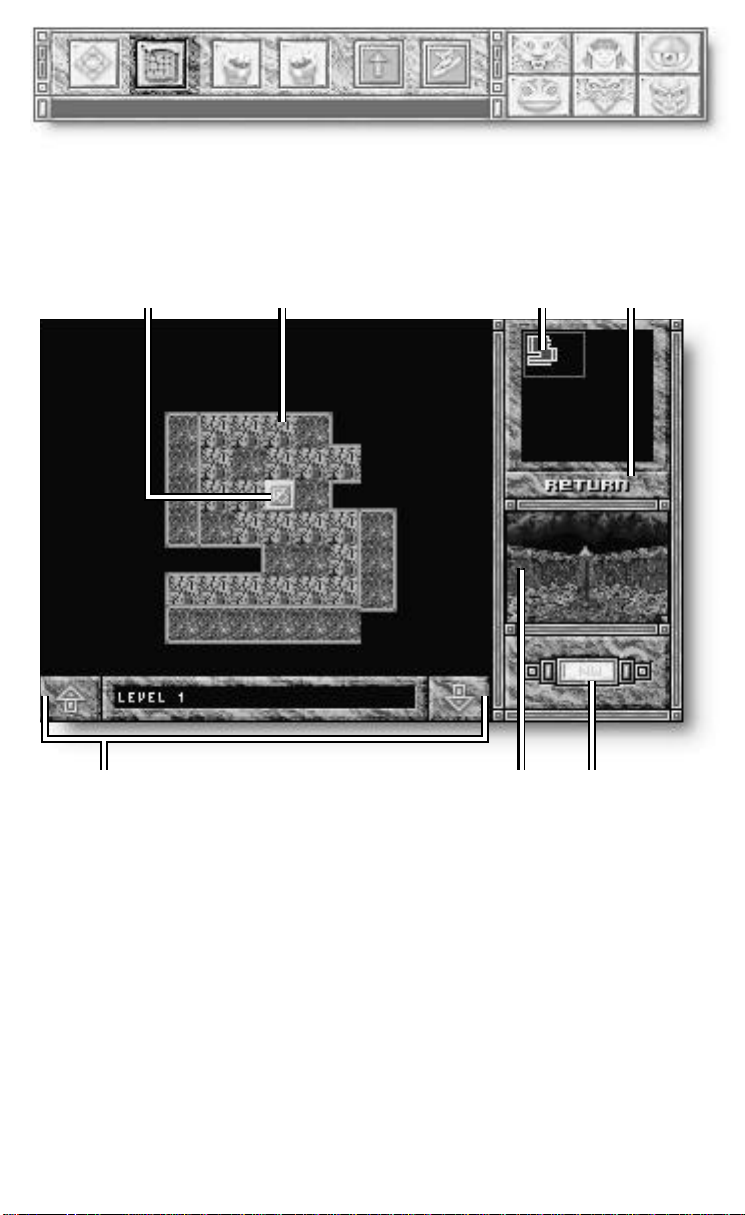
AUTOMAP SCREEN
Between the OPTION SCREEN icon and the LEFT PAW icon there is a button that
looks like a piece of parchment — the AUTOMAP icon. When this is selected,
the Automap Screen appears. Left-click on this icon.
Detailed MapLocation Arrow Overview Map
Level Indicator View Window
The Location Arrow in the Detailed Map shows where you are and what
general direction you are facing. The upper right of the map shows an
Overview Map that represents a larger, less detailed area. By left-clicking
different areas on the Overview Map, you change what the Detailed Map is
showing. The automap only shows where you have actually been and not neces-
sarily what you have only seen. At this point, that’s not much. You can get an
idea of your relative position in the larger area by looking at the map in the
upper right. The blinking red dot shows where you are located.
Return Bar
Compass
Below the smaller map is the Return Bar. Below this is a small View
Window of what you saw when you entered the map. Still lower is a
Compass that shows the direction you were facing when you selected the
automap — it is more precise than the Location Arrow. Once you’ve
mapped multiple levels, clicking the Level Indicator arrows will change
maps. Select the Return Bar to return to your game.
19
Page 20

VIEW WINDOW SIZE
You have a fair amount of control over
the View Window. Try clicking on the
Size Gem to the left of the Portrait. The
size of the View Window shrinks. Click
on this gem several times until the View
Window reaches its minimum size.
Shrinking the size of the View Window speeds up the frame rate in the
game, making things move more smoothly. This option is recommended for
people who have 386 systems.
Now click on the Size Gem to the right of the Portrait. As you might have
guessed, this causes the View Window to get bigger. When the View
Window has reached its apparent maximum size, click one more time. This
puts the game into Mega Mode. Mega Mode slows the frame rate and is only
recommended for people using 486 (or faster) systems.
In Mega Mode, the left side of the screen from top to bottom becomes the
View Window and takes up approximately 80 percent of the screen. The
Text Bar only appears when there is a text
message.
Obviously, in Mega Mode there is not room for all icons, etc. to be on the
screen at once, so there are two side panels. To toggle between the two side
panels, left-click on the Portrait. In Mega Mode, the Life and Power Bar
appear to either side of the Portrait. When you morph, the change is shown
in the Portrait window only.
Size Gems
There is only one View Window
border in Mega Mode — between
the View Window and the side
panel. At the top of the border is a
small gem. Click on this gem now
to return the game to Normal
mode.
Size Gem
OPENING AND CLOSING
When you clicked on the obelisk, you unlocked the door on the east wall.
Save the game and then open the door (right-click on it) and embark on your
adventure. Right-clicking opens and closes doors and other barriers (if they
aren’t locked).
20
Page 21

CURSORS
There are four different types of cursor in the game to help you remember
what is currently selected:
• White Arrow inside View Window. No icon is currently selected and you
can pick up/put down items or open/close things by right-clicking.
• Black and Red Crosses. A hand appendage is selected.
• Orange and Black Circles. One of your two Abilities from the Selection Bar
is selected.
• Glowing Blue Cross. One of your Abilities from under the inventory boxes is
selected.
CONTINUING TO PLAY
This walkthrough should have provided enough information to get you started. At some point you should read the rest of this document, which includes
information about the metaforms you eventually acquire and other useful
information.
Some things to keep in mind:
• When you see a black sparkling floor, step on it to teleport.
• You are strong enough to take out almost any individual evil creature you
might encounter (unless you have been damaged already).
• Evil creatures like to attack in groups. Very evil creatures like to attack just
after some other evil group.
• Conserve your Power.
DEATH
Unfortunately, sometimes the Life Bar decreases to zero. When your Life is
gone, you die and the Option Screen appears. At this point you can load a
saved game or start a new game. You cannot return to the game you were
just playing, since that game ended with your death. It is a good idea to save
whenever you have acquired something valuable or accomplished something
important (four save game slots are provided for this purpose). Otherwise,
you risk losing all you’ve achieved in an untimely, unexpected demise.
YOUR CHARACTER
Your character is either in human form or one of six non-human forms. Each
metaform has different abilities. In some metaforms, you can select one or
more Abilities from the icons under the inventory area. When an Ability
such as the Caun’s Light is selected, the blue cross cursor appears.
Forms also have different amounts of Life depending on what type of creature they are and how high their score is. Score is tracked separately for
each. Because of this, it is possible to concentrate on a metaform and make it
disproportionately powerful.
21
Page 22
DIFFERENT FORMS
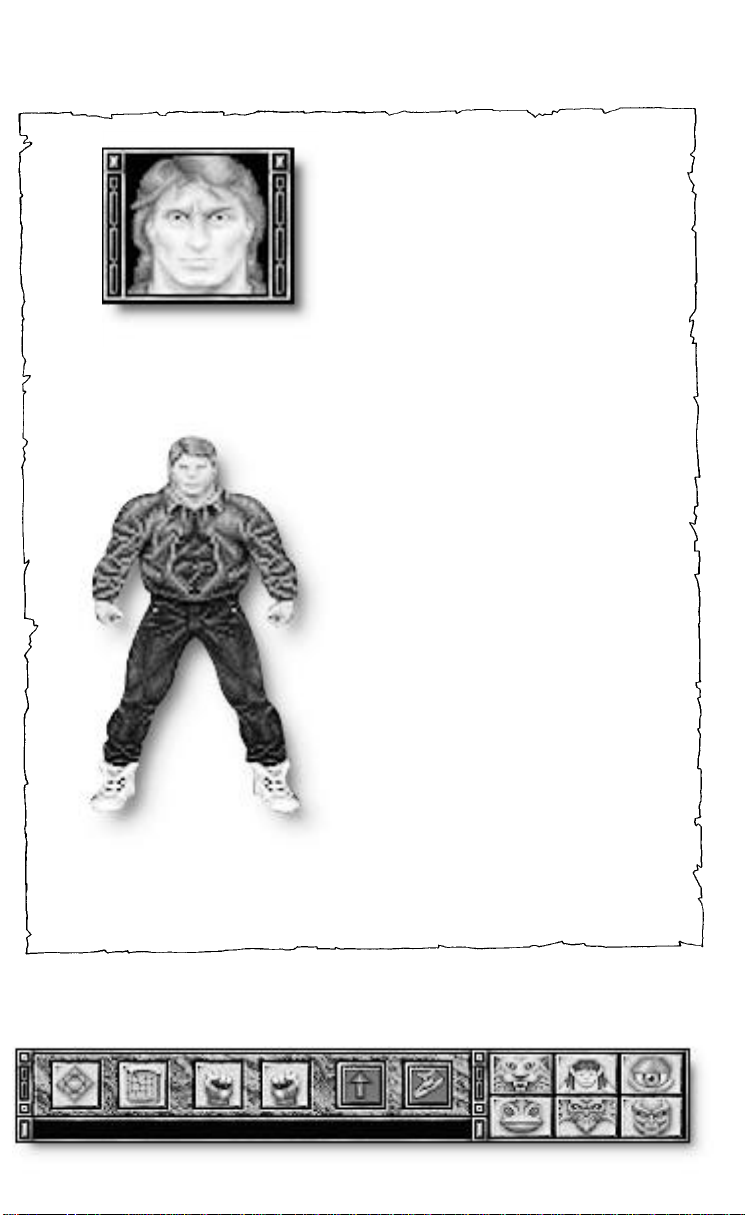
KIRT
Kirt is a seemingly normal
human who was raised in a large,
modern American city. In reality,
though, he is one of the few survivors of a race of shape morphers. Kirt has studied the martial arts and has recently been
sent back to his native world to
save his people.
Kirt has the ability to morph his
shape. He gains the power to
assume more metaforms as he
progresses through the game.
Morphing costs Power, and so
does maintaining a metaform.
Also, using most of the
Abilities of different
metaforms depletes your
Power. When he runs out of
Power, Kirt reverts back to
human form. Only in his human
shape can he regain Power.
Kirt has the Ability to jump, as
well as a superior Kick Ability.
Selecting any metaform’s icon
morphs him to that form.
22
Page 23
MAORIN
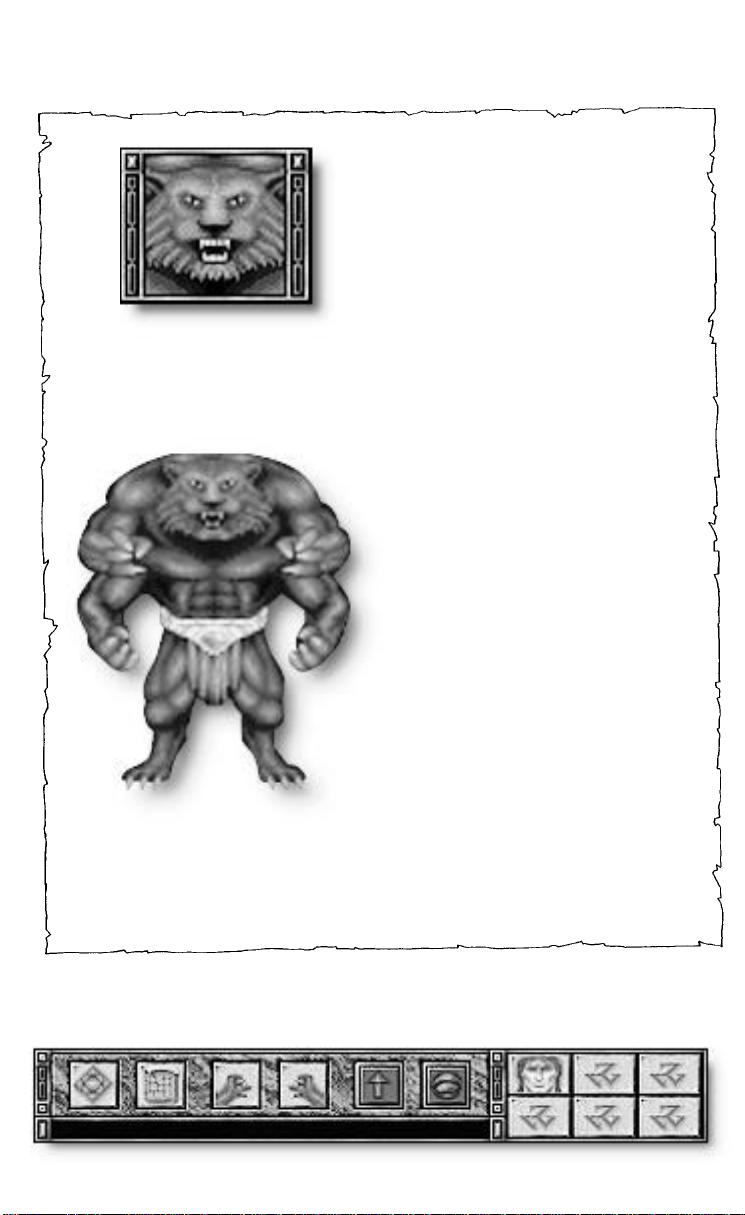
The Maorin are a six-foot tall,
six-limbed cat race. In his
Maorin form, Kirt weighs 400
pounds, runs faster, can stand
more punishment and can deal
out much more damage than a
human can.
Maorin have the Ability to see
things normally hidden to
human sight. They also have the
Ability to jump.
Maorin dislike water and drown
quickly.
23
Page 24
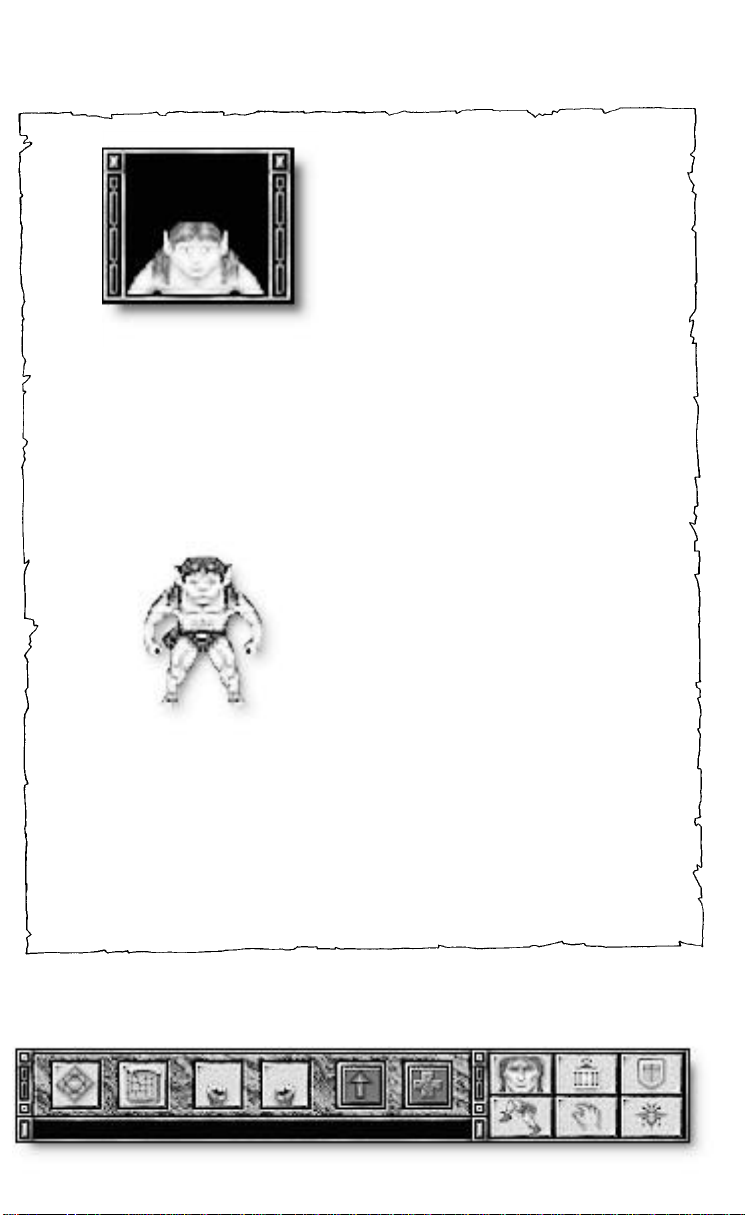
CAUN
Caun are a two-foot tall, approximately 40-pound humanoid
race with pointed ears. As fighters they are fairly ineffective, but
Caun heal much more quickly
than a human.
Caun have the Ability to jump.
They also have a Heal Ability,
but this costs Power. Caun can
create light, create a special
shield which makes it difficult
for enemies to harm them, and
can make it difficult for enemies
to locate them. Caun have the
Ability to reach out and grab
things that are some distance
away. This includes grabbing
things that are on the other side
of bars.
Lastly, Caun can cause a number
of small creatures to swarm over
their enemies in a stinging cloud.
24
Page 25
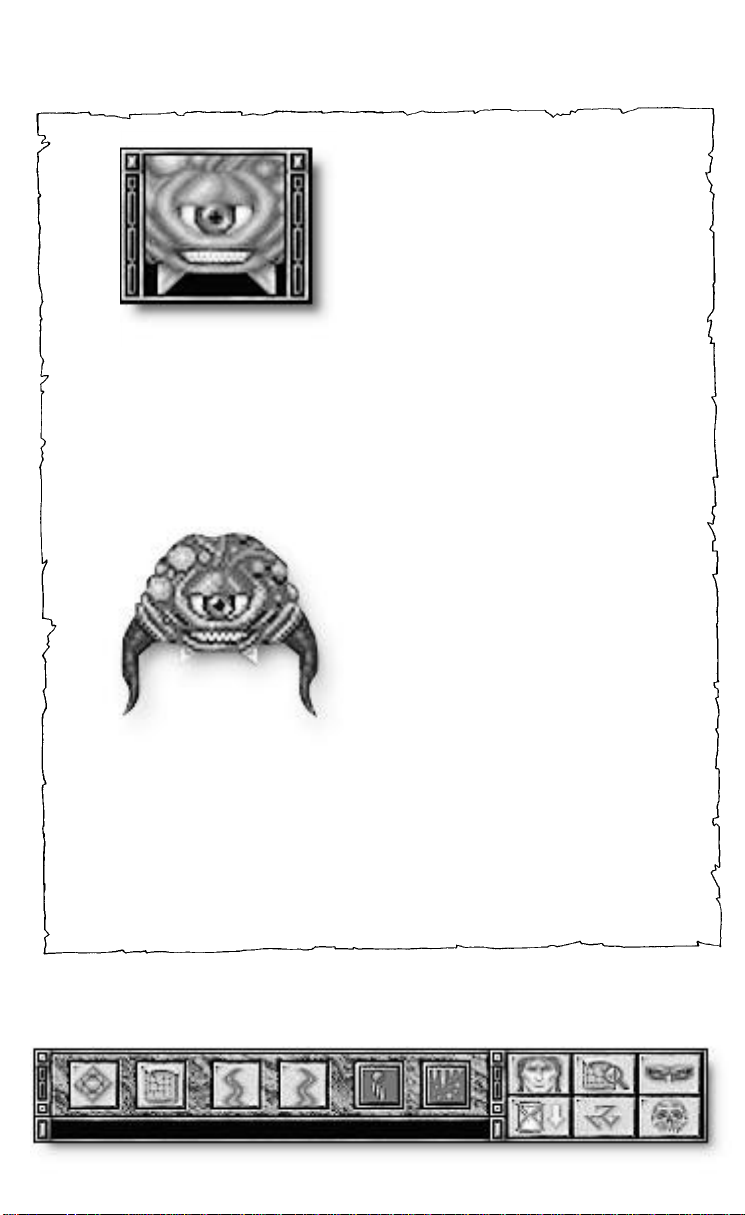
OPSIS
Opsis are large, floating orbs
with tentacles. They are not built
for physical combat, but have a
number of other abilities.
Opsis can throw cold blasts,
cause their enemies to flee in fear
or make them move in slow
motion, plus create missiles and
fire them at enemies. They can
also kill foes outright. Moreover,
Opsis can increase the range of
the automap. Normally you can
only map where you actually
have been, but when a Opsis is
using his automap power, things
that were not actually seen in the
View Window are mapped. As
you might guess, this often provides very useful information.
25
Page 26

KAHPA
Kahpa look like large, green
frog-people. They are surprisingly tough, can breathe underwater
and are good in hand-to-flipper
combat.
Kahpa can create an electrical
shock (extra damaging when
used in water) and a sonic attack
(also extra damaging in water).
26
Page 27

SSAIR
Ssair have no legs and a pointed
tail. They can both take and
inflict enormous damage, and
look like flying red dragons.
Their tail attack is very powerful.
They can also breathe fire, at the
cost of Power.
27
Page 28

GROST
Grost look like stone giants.
They can punch through some
stone walls, are almost impervious to physical attacks and can
survive in extremely hot environments.
Grost can stamp their feet to
cause earthquakes, and can paralyze with a touch.
28
Page 29

Software © 1993 Raven Software, Inc. All other materials © 1993 ORIGIN
Systems, Inc. Shadowcaster is a trademark of ORIGIN Systems, Inc. Origin
and We create worlds are registered trademarks of ORIGIN Systems, Inc.
Raven is a trademark of Raven Software, Inc. Electronic Arts is a trademark
of Electronic Arts.
29
Page 30

CREDITS
Creative Directors
Steve Raffel, Brian Raffel
Producer
Victor Penman
Associate Producer
Erin Roberts
Assistant Producer
Robert Zalot
Technical Director
Tim Brengle
Lead Programmer
Steve Coallier
Programmers
Victor Brueggemann,
Kurt Schallitz, Carl Stika
Additional Programming
Ben Gokey, Rick Johnson,
David Stildolph
3D Engine
Id Software
AIL Sound and Music System
John Miles
Music Composition, Arrangements
& Conversions
Marc Schaefgen
Digital Sound Effects
Randy Buck
30
Page 31

Audio Direction
Marc Schaefgen, Randy Buck
Artists
Brian Pelletier, Scott Rice,
Shane Gurno, Jim Sumwalt
Raven Technical Support
Wes Taylor, Tim Moore,
Michael Raymond-Judy
EA Scripting
Bill Schmitt
EA Test
Tony Iuppa, Eric Newhouse
ORIGIN Test
Scott Shelton, Marshall Andrews,
Brian Wachhaus, Rik Packham
Guest Playtesters
Steve Suhy, Keith Francart, Jeff Glazier,
Ken Rogers, Yun Shin
Documentation Writing
Victor Penman, Melissa Mead
Documentation Editing
Melissa Mead
Cover Art
Denis Loubet
Document Design
Al Carnley
Package Design
Jennifer Davis
31
Page 32

ONLINE SERVICES AND BULLETIN BOARDS
Many of the most popular online services provide access to ORIGIN company news,
product updates, release dates, technical support and game hints. In addition, ORIGIN
has established its own electronic bulletin board as a customer service.
America Online. You can e-mail Customer Support at ORIGIN CS or Marketing at
c
OSI. To reach our Customer Support board in the Industry Connection, press
for “Go to Keyword.” Then type ORIGIN in the Keyword window. In addition to reading messages, you can download files from the “Origin Software Library.” For membership information and a free starter kit, you can call America Online toll-free at 1800-827-6364.
CompuServe. To reach our Customer Support board in the Game Publishers Forum,
type GO GAMAPUB at any “!” prompt. Then select Origin Section (2). In addition to
reading the messages, you can download files from the “Library (Files)” menu. To
reach our Customer Service department by e-mail, our address is 76004,2612 (or you
can post a message in the Origin Section). For membership information and a free
starter kit, you can call CompuServe toll-free at 1-800-848-8199 and ask
Representative #361 for your free introductory membership and $15 usage credit.
ORIGIN BBS. The ORIGIN BBS is located in Austin, Texas and has a modem support
of: 300/1200/2400/9600/14,400 bauds with N,8,1. It is operational 24 hours a day, 7
days a week. Full support is provided. Call 1-512-331-4446 to contact. No membership is required and the only cost is any long distance charges that you may incur.
Internet Address. You can e-mail Origin Customer Support at support@origin.ea.com
N
EED A HINT OR A PASSWORD
?
Call 1-900-288-HINT
(1-900-288-4468)
24 hours a day, 7 days a week!
95¢ for the first minute, 75¢ for each additional minute. If you are under 18, be sure
to get a parent’s permission before calling. Hotline requires a Touchtone telephone
and is only available in the U.S. Call length is determined by user; average length is
four minutes. Messages subject to change without notice.
K
Note to Hotline Callers
To help you quickly locate the information you need, Electronic Arts will gladly send
you printed hotline menus. To receive a copy, please send your name and address to:
Hotline Menus
P.O. Box 7578
San Mateo, CA 94403-7578
Be sure to include the title and hardware format of the game you are playing.
For ORIGIN Customer Service,
call (512) 335-0440 Mon.-Fri., 9 a.m.-5 p.m., Central time,
of fax (512) 331-8559
32
Page 33

NOTE
This manual and the software described in it are copyrighted,
with all rights reserved.Under the copyright laws, this manual or
the software may not be copied, in whole or part, without written
consent of Electronic Arts, except in the normal use of the software or to make a backup copy of the software. The same proprietary and copyright notices must be affixed to any permitted
copies as were affixed to the original. This exception does not
allow copies to be made for others, whether or not sold, but all of
the material purchased (with all backup copies) may be sold,
given, or loaned to another person. Under the law, copying
includes translating into another language or format.
You may use the software on any computer owned by you, but
extra copies cannot be made for this pur pose.
 Loading...