

Page 1

Page 2

1 CONTENTS
2 INTRODUCTION . . . . . . . . . . . . . . . . . . . . . . . . . . . . . . . . . . . . . . . . . . . . . . . . . . . .5
3 INSTALLATION . . . . . . . . . . . . . . . . . . . . . . . . . . . . . . . . . . . . . . . . . . . . . . . . . . . . .6
4 MAIN MENU . . . . . . . . . . . . . . . . . . . . . . . . . . . . . . . . . . . . . . . . . . . . . . . . . . . . . . . 6
4.1 New Game . . . . . . . . . . . . . . . . . . . . . . . . . . . . . . . . . . . . . . . . . . . . . . . . . . . . . . . .6
4.2 Scenarios . . . . . . . . . . . . . . . . . . . . . . . . . . . . . . . . . . . . . . . . . . . . . . . . . . . . . . . . .6
4.3 Loading . . . . . . . . . . . . . . . . . . . . . . . . . . . . . . . . . . . . . . . . . . . . . . . . . . . . . . . . . .6
4.4 Options . . . . . . . . . . . . . . . . . . . . . . . . . . . . . . . . . . . . . . . . . . . . . . . . . . . . . . . . . . .6
5 GAME CONTROLS . . . . . . . . . . . . . . . . . . . . . . . . . . . . . . . . . . . . . . . . . . . . . . . . . 7
5.1 General Information . . . . . . . . . . . . . . . . . . . . . . . . . . . . . . . . . . . . . . . . . . . . . . . .7
5.2 Town View . . . . . . . . . . . . . . . . . . . . . . . . . . . . . . . . . . . . . . . . . . . . . . . . . . . . . . . .7
Town Center . . . . . . . . . . . . . . . . . . . . . . . . . . . . . . . . . . . . . . . . . . . . . . . . . . . . . . . . . . 8
Area Outside the Town . . . . . . . . . . . . . . . . . . . . . . . . . . . . . . . . . . . . . . . . . . . . . . . . . .8
Harbor . . . . . . . . . . . . . . . . . . . . . . . . . . . . . . . . . . . . . . . . . . . . . . . . . . . . . . . . . . . . . . 8
Mini Map . . . . . . . . . . . . . . . . . . . . . . . . . . . . . . . . . . . . . . . . . . . . . . . . . . . . . . . . . . . .9
5.3 Sea Chart . . . . . . . . . . . . . . . . . . . . . . . . . . . . . . . . . . . . . . . . . . . . . . . . . . . . . . . . . 9
Towns . . . . . . . . . . . . . . . . . . . . . . . . . . . . . . . . . . . . . . . . . . . . . . . . . . . . . . . . . . . . . . . 10
Convoys . . . . . . . . . . . . . . . . . . . . . . . . . . . . . . . . . . . . . . . . . . . . . . . . . . . . . . . . . . . . . 12
Floating Objects . . . . . . . . . . . . . . . . . . . . . . . . . . . . . . . . . . . . . . . . . . . . . . . . . . . . . . . 13
Mini Map . . . . . . . . . . . . . . . . . . . . . . . . . . . . . . . . . . . . . . . . . . . . . . . . . . . . . . . . . . . .13
5.4 Sea Battles . . . . . . . . . . . . . . . . . . . . . . . . . . . . . . . . . . . . . . . . . . . . . . . . . . . . . . . .14
Encounter . . . . . . . . . . . . . . . . . . . . . . . . . . . . . . . . . . . . . . . . . . . . . . . . . . . . . . . . . . . .14
Evading . . . . . . . . . . . . . . . . . . . . . . . . . . . . . . . . . . . . . . . . . . . . . . . . . . . . . . . . . . . . . 14
Sea Battle View . . . . . . . . . . . . . . . . . . . . . . . . . . . . . . . . . . . . . . . . . . . . . . . . . . . . . . . 15
Battle Sequence . . . . . . . . . . . . . . . . . . . . . . . . . . . . . . . . . . . . . . . . . . . . . . . . . . . . . . . 16
Maneuvering . . . . . . . . . . . . . . . . . . . . . . . . . . . . . . . . . . . . . . . . . . . . . . . . . . . . . . . . . 16
Centering . . . . . . . . . . . . . . . . . . . . . . . . . . . . . . . . . . . . . . . . . . . . . . . . . . . . . . . . . . . . 16
Switching Ships . . . . . . . . . . . . . . . . . . . . . . . . . . . . . . . . . . . . . . . . . . . . . . . . . . . . . . . 16
Open Fire! . . . . . . . . . . . . . . . . . . . . . . . . . . . . . . . . . . . . . . . . . . . . . . . . . . . . . . . . . . .16
Reloading . . . . . . . . . . . . . . . . . . . . . . . . . . . . . . . . . . . . . . . . . . . . . . . . . . . . . . . . . . . .17
Selecting Ammunition and Boarding . . . . . . . . . . . . . . . . . . . . . . . . . . . . . . . . . . . . . . . . 17
Fleeing . . . . . . . . . . . . . . . . . . . . . . . . . . . . . . . . . . . . . . . . . . . . . . . . . . . . . . . . . . . . . . 17
5.5 Attacking a Town . . . . . . . . . . . . . . . . . . . . . . . . . . . . . . . . . . . . . . . . . . . . . . . . . . 17
5.6 Land Battles . . . . . . . . . . . . . . . . . . . . . . . . . . . . . . . . . . . . . . . . . . . . . . . . . . . . . . 18
Land Attack Sequence . . . . . . . . . . . . . . . . . . . . . . . . . . . . . . . . . . . . . . . . . . . . . . . . . . 19
Tied Units . . . . . . . . . . . . . . . . . . . . . . . . . . . . . . . . . . . . . . . . . . . . . . . . . . . . . . . . . . . 20
Surprise Attacks . . . . . . . . . . . . . . . . . . . . . . . . . . . . . . . . . . . . . . . . . . . . . . . . . . . . . . . 20
Supporting Your Units . . . . . . . . . . . . . . . . . . . . . . . . . . . . . . . . . . . . . . . . . . . . . . . . . . 20
5.7 Duels . . . . . . . . . . . . . . . . . . . . . . . . . . . . . . . . . . . . . . . . . . . . . . . . . . . . . . . . . . . . 21
Controlling the Duel . . . . . . . . . . . . . . . . . . . . . . . . . . . . . . . . . . . . . . . . . . . . . . . . . . . 21
Special Attacks . . . . . . . . . . . . . . . . . . . . . . . . . . . . . . . . . . . . . . . . . . . . . . . . . . . . . . . .22
The End of the Fight . . . . . . . . . . . . . . . . . . . . . . . . . . . . . . . . . . . . . . . . . . . . . . . . . . . . 22
Taking Hostages . . . . . . . . . . . . . . . . . . . . . . . . . . . . . . . . . . . . . . . . . . . . . . . . . . . . . . .22
1
Page 3

5.8 The Chronicle . . . . . . . . . . . . . . . . . . . . . . . . . . . . . . . . . . . . . . . . . . . . . . . . . . . . . 22
5.9 The Log . . . . . . . . . . . . . . . . . . . . . . . . . . . . . . . . . . . . . . . . . . . . . . . . . . . . . . . . . .23
5.10 Game Speed . . . . . . . . . . . . . . . . . . . . . . . . . . . . . . . . . . . . . . . . . . . . . . . . . . . . . 23
6 TOWNS . . . . . . . . . . . . . . . . . . . . . . . . . . . . . . . . . . . . . . . . . . . . . . . . . . . . . . . . . . . 24
6.1 Governor Towns . . . . . . . . . . . . . . . . . . . . . . . . . . . . . . . . . . . . . . . . . . . . . . . . . . . 24
6.2 Colonial Towns . . . . . . . . . . . . . . . . . . . . . . . . . . . . . . . . . . . . . . . . . . . . . . . . . . . . 24
6.3 Seats of the Viceroys . . . . . . . . . . . . . . . . . . . . . . . . . . . . . . . . . . . . . . . . . . . . . . . .24
6.4 Town Population . . . . . . . . . . . . . . . . . . . . . . . . . . . . . . . . . . . . . . . . . . . . . . . . . . . 24
Settlers . . . . . . . . . . . . . . . . . . . . . . . . . . . . . . . . . . . . . . . . . . . . . . . . . . . . . . . . . . . . . . 24
Workers and Citizens . . . . . . . . . . . . . . . . . . . . . . . . . . . . . . . . . . . . . . . . . . . . . . . . . . . .25
Soldiers . . . . . . . . . . . . . . . . . . . . . . . . . . . . . . . . . . . . . . . . . . . . . . . . . . . . . . . . . . . . . 25
6.5 The Status of a Town . . . . . . . . . . . . . . . . . . . . . . . . . . . . . . . . . . . . . . . . . . . . . . . 25
6.6 Traders . . . . . . . . . . . . . . . . . . . . . . . . . . . . . . . . . . . . . . . . . . . . . . . . . . . . . . . . . . 26
6.7 Your Own Town . . . . . . . . . . . . . . . . . . . . . . . . . . . . . . . . . . . . . . . . . . . . . . . . . . . 26
7 ACTION BUILDINGS . . . . . . . . . . . . . . . . . . . . . . . . . . . . . . . . . . . . . . . . . . . . . . . . 27
7.1 The Warehouse . . . . . . . . . . . . . . . . . . . . . . . . . . . . . . . . . . . . . . . . . . . . . . . . . . . . 27
Overview . . . . . . . . . . . . . . . . . . . . . . . . . . . . . . . . . . . . . . . . . . . . . . . . . . . . . . . . . . . .27
Stock . . . . . . . . . . . . . . . . . . . . . . . . . . . . . . . . . . . . . . . . . . . . . . . . . . . . . . . . . . . . . . . 28
Buying Goods . . . . . . . . . . . . . . . . . . . . . . . . . . . . . . . . . . . . . . . . . . . . . . . . . . . . . . . . 28
Selling Goods . . . . . . . . . . . . . . . . . . . . . . . . . . . . . . . . . . . . . . . . . . . . . . . . . . . . . . . . .28
7.2 The Docks . . . . . . . . . . . . . . . . . . . . . . . . . . . . . . . . . . . . . . . . . . . . . . . . . . . . . . . . 29
Transfer Between Convoy and Warehouse & Cargo Trade . . . . . . . . . . . . . . . . . . . . . . . 29
7.3 Shipyards . . . . . . . . . . . . . . . . . . . . . . . . . . . . . . . . . . . . . . . . . . . . . . . . . . . . . . . . 29
7.4 The Inn . . . . . . . . . . . . . . . . . . . . . . . . . . . . . . . . . . . . . . . . . . . . . . . . . . . . . . . . . .30
Hiring Pirates . . . . . . . . . . . . . . . . . . . . . . . . . . . . . . . . . . . . . . . . . . . . . . . . . . . . . . . . . 30
7.5 The Council Building . . . . . . . . . . . . . . . . . . . . . . . . . . . . . . . . . . . . . . . . . . . . . . . 30
The General . . . . . . . . . . . . . . . . . . . . . . . . . . . . . . . . . . . . . . . . . . . . . . . . . . . . . . . . . . .30
The Treasurer . . . . . . . . . . . . . . . . . . . . . . . . . . . . . . . . . . . . . . . . . . . . . . . . . . . . . . . . .30
The Governor . . . . . . . . . . . . . . . . . . . . . . . . . . . . . . . . . . . . . . . . . . . . . . . . . . . . . . . . . 31
The Governor’s Daughter/Your Wife . . . . . . . . . . . . . . . . . . . . . . . . . . . . . . . . . . . . . . . 31
The Viceroy . . . . . . . . . . . . . . . . . . . . . . . . . . . . . . . . . . . . . . . . . . . . . . . . . . . . . . . . . .31
7.6 The Master Builder’s . . . . . . . . . . . . . . . . . . . . . . . . . . . . . . . . . . . . . . . . . . . . . . . .31
7.7 The Church . . . . . . . . . . . . . . . . . . . . . . . . . . . . . . . . . . . . . . . . . . . . . . . . . . . . . . .31
7.8 The Market . . . . . . . . . . . . . . . . . . . . . . . . . . . . . . . . . . . . . . . . . . . . . . . . . . . . . . . 31
8 SHIPS AND CONVOYS . . . . . . . . . . . . . . . . . . . . . . . . . . . . . . . . . . . . . . . . . . . . . . . 32
8.1 Ships . . . . . . . . . . . . . . . . . . . . . . . . . . . . . . . . . . . . . . . . . . . . . . . . . . . . . . . . . . . . 32
Ships in the Harbor . . . . . . . . . . . . . . . . . . . . . . . . . . . . . . . . . . . . . . . . . . . . . . . . . . . . .32
Basic Costs . . . . . . . . . . . . . . . . . . . . . . . . . . . . . . . . . . . . . . . . . . . . . . . . . . . . . . . . . . .32
Ship Types . . . . . . . . . . . . . . . . . . . . . . . . . . . . . . . . . . . . . . . . . . . . . . . . . . . . . . . . . . .32
2
Page 4

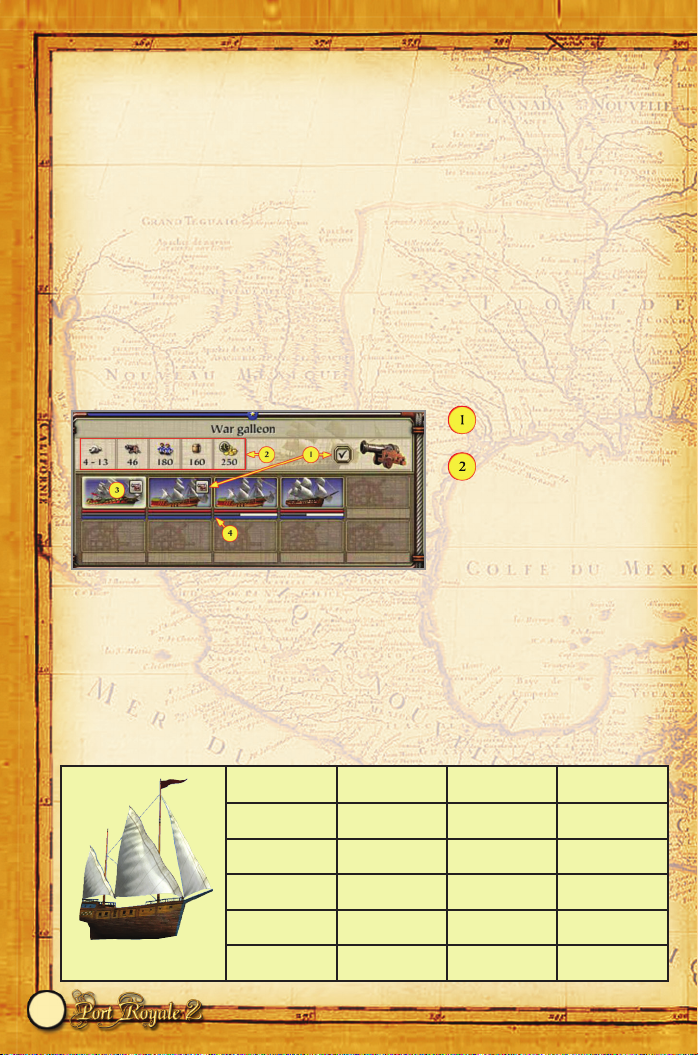
8.2 Convoys . . . . . . . . . . . . . . . . . . . . . . . . . . . . . . . . . . . . . . . . . . . . . . . . . . . . . . . . . .37
Assembling a New Convoy . . . . . . . . . . . . . . . . . . . . . . . . . . . . . . . . . . . . . . . . . . . . . . 37
Choosing a Convoy and Goods List . . . . . . . . . . . . . . . . . . . . . . . . . . . . . . . . . . . . . . . . 37
Ships List, Overview and Costs . . . . . . . . . . . . . . . . . . . . . . . . . . . . . . . . . . . . . . . . . . . 38
Attack Mode . . . . . . . . . . . . . . . . . . . . . . . . . . . . . . . . . . . . . . . . . . . . . . . . . . . . . . . . . . 38
Transfer Between Convoys and Harbors . . . . . . . . . . . . . . . . . . . . . . . . . . . . . . . . . . . . .39
Transfer Between Two Convoys . . . . . . . . . . . . . . . . . . . . . . . . . . . . . . . . . . . . . . . . . . . 39
Escort Ships . . . . . . . . . . . . . . . . . . . . . . . . . . . . . . . . . . . . . . . . . . . . . . . . . . . . . . . . . .39
Docking Unnoticed . . . . . . . . . . . . . . . . . . . . . . . . . . . . . . . . . . . . . . . . . . . . . . . . . . . . 39
Wear and Tear on Ships . . . . . . . . . . . . . . . . . . . . . . . . . . . . . . . . . . . . . . . . . . . . . . . . . .40
8.3 Captains . . . . . . . . . . . . . . . . . . . . . . . . . . . . . . . . . . . . . . . . . . . . . . . . . . . . . . . . . 40
Navigational Experience . . . . . . . . . . . . . . . . . . . . . . . . . . . . . . . . . . . . . . . . . . . . . . . . .40
Trading Experience . . . . . . . . . . . . . . . . . . . . . . . . . . . . . . . . . . . . . . . . . . . . . . . . . . . . 40
Combat Experience . . . . . . . . . . . . . . . . . . . . . . . . . . . . . . . . . . . . . . . . . . . . . . . . . . . . 40
8.4 Crew . . . . . . . . . . . . . . . . . . . . . . . . . . . . . . . . . . . . . . . . . . . . . . . . . . . . . . . . . . . . 41
Boarding Crew . . . . . . . . . . . . . . . . . . . . . . . . . . . . . . . . . . . . . . . . . . . . . . . . . . . . . . . . 41
Morale . . . . . . . . . . . . . . . . . . . . . . . . . . . . . . . . . . . . . . . . . . . . . . . . . . . . . . . . . . . . . . 41
9 TRADING GOODS . . . . . . . . . . . . . . . . . . . . . . . . . . . . . . . . . . . . . . . . . . . . . . . . . . . 41
Pricing . . . . . . . . . . . . . . . . . . . . . . . . . . . . . . . . . . . . . . . . . . . . . . . . . . . . . . . . . . . . . . 41
How to Trade . . . . . . . . . . . . . . . . . . . . . . . . . . . . . . . . . . . . . . . . . . . . . . . . . . . . . . . . . 42
Scarce Goods . . . . . . . . . . . . . . . . . . . . . . . . . . . . . . . . . . . . . . . . . . . . . . . . . . . . . . . . . 43
Types of Goods . . . . . . . . . . . . . . . . . . . . . . . . . . . . . . . . . . . . . . . . . . . . . . . . . . . . . . . 43
Imports and Exports . . . . . . . . . . . . . . . . . . . . . . . . . . . . . . . . . . . . . . . . . . . . . . . . . . . . 44
Balance of Goods . . . . . . . . . . . . . . . . . . . . . . . . . . . . . . . . . . . . . . . . . . . . . . . . . . . . . . 44
Trading Tips . . . . . . . . . . . . . . . . . . . . . . . . . . . . . . . . . . . . . . . . . . . . . . . . . . . . . . . . . .44
10 CONSTRUCTION AND PRODUCTION . . . . . . . . . . . . . . . . . . . . . . . . . . . . . . . . . 45
10.1 Buying a Building Permit . . . . . . . . . . . . . . . . . . . . . . . . . . . . . . . . . . . . . . . . . . . 45
10.2 What You Can Build . . . . . . . . . . . . . . . . . . . . . . . . . . . . . . . . . . . . . . . . . . . . . . .45
Buildings . . . . . . . . . . . . . . . . . . . . . . . . . . . . . . . . . . . . . . . . . . . . . . . . . . . . . . . . . . . . 47
Businesses . . . . . . . . . . . . . . . . . . . . . . . . . . . . . . . . . . . . . . . . . . . . . . . . . . . . . . . . . . . 48
Community Buildings . . . . . . . . . . . . . . . . . . . . . . . . . . . . . . . . . . . . . . . . . . . . . . . . . . 51
10.3 Maintaining Buildings . . . . . . . . . . . . . . . . . . . . . . . . . . . . . . . . . . . . . . . . . . . . . 51
10.4 Workers and Production . . . . . . . . . . . . . . . . . . . . . . . . . . . . . . . . . . . . . . . . . . . 51
Where do new workers come from? . . . . . . . . . . . . . . . . . . . . . . . . . . . . . . . . . . . . . . . . 51
Boom and Recession . . . . . . . . . . . . . . . . . . . . . . . . . . . . . . . . . . . . . . . . . . . . . . . . . . . 52
Goods and Raw Materials . . . . . . . . . . . . . . . . . . . . . . . . . . . . . . . . . . . . . . . . . . . . . . . .52
Production Problems . . . . . . . . . . . . . . . . . . . . . . . . . . . . . . . . . . . . . . . . . . . . . . . . . . . 52
10.5 Competition . . . . . . . . . . . . . . . . . . . . . . . . . . . . . . . . . . . . . . . . . . . . . . . . . . . . . .53
Buying up Businesses . . . . . . . . . . . . . . . . . . . . . . . . . . . . . . . . . . . . . . . . . . . . . . . . . . .53
Ruining Businesses . . . . . . . . . . . . . . . . . . . . . . . . . . . . . . . . . . . . . . . . . . . . . . . . . . . . .53
3
Page 5
11 TRADE ROUTES . . . . . . . . . . . . . . . . . . . . . . . . . . . . . . . . . . . . . . . . . . . . . . . . . . . 53
11.1 Leave it to the Captain! . . . . . . . . . . . . . . . . . . . . . . . . . . . . . . . . . . . . . . . . . . . . . 53
11.2 A Little More Control . . . . . . . . . . . . . . . . . . . . . . . . . . . . . . . . . . . . . . . . . . . . . . 55
11.3 Specific Instructions . . . . . . . . . . . . . . . . . . . . . . . . . . . . . . . . . . . . . . . . . . . . . . . 55
11.4 Using Your Warehouse for Trading . . . . . . . . . . . . . . . . . . . . . . . . . . . . . . . . . . . 56
Distributing Produced Goods . . . . . . . . . . . . . . . . . . . . . . . . . . . . . . . . . . . . . . . . . . . . . 56
Finding Raw Materials . . . . . . . . . . . . . . . . . . . . . . . . . . . . . . . . . . . . . . . . . . . . . . . . . . 57
11.5 Attacks . . . . . . . . . . . . . . . . . . . . . . . . . . . . . . . . . . . . . . . . . . . . . . . . . . . . . . . . . .57
11.6 Maintenance and Repairs . . . . . . . . . . . . . . . . . . . . . . . . . . . . . . . . . . . . . . . . . . . 58
11.7 Trade Route Overview in the Log . . . . . . . . . . . . . . . . . . . . . . . . . . . . . . . . . . . . 58
12 POLITICS AMONG THE NATIONS . . . . . . . . . . . . . . . . . . . . . . . . . . . . . . . . . . . . 59
12.1 War and Peace . . . . . . . . . . . . . . . . . . . . . . . . . . . . . . . . . . . . . . . . . . . . . . . . . . . 59
12.2 A Nation’s Strength . . . . . . . . . . . . . . . . . . . . . . . . . . . . . . . . . . . . . . . . . . . . . . . .59
12.3 Viceroys and Capturing Towns . . . . . . . . . . . . . . . . . . . . . . . . . . . . . . . . . . . . . . 59
12.4 Letters of Marque . . . . . . . . . . . . . . . . . . . . . . . . . . . . . . . . . . . . . . . . . . . . . . . . 60
12.5 Buccaneers . . . . . . . . . . . . . . . . . . . . . . . . . . . . . . . . . . . . . . . . . . . . . . . . . . . . . . 60
12.6 Pirates . . . . . . . . . . . . . . . . . . . . . . . . . . . . . . . . . . . . . . . . . . . . . . . . . . . . . . . . . . 61
Active Pirates . . . . . . . . . . . . . . . . . . . . . . . . . . . . . . . . . . . . . . . . . . . . . . . . . . . . . . . . .61
Pirate Hideouts . . . . . . . . . . . . . . . . . . . . . . . . . . . . . . . . . . . . . . . . . . . . . . . . . . . . . . . .61
Hunting for Pirates . . . . . . . . . . . . . . . . . . . . . . . . . . . . . . . . . . . . . . . . . . . . . . . . . . . . . 61
Destroying a Pirate Gang . . . . . . . . . . . . . . . . . . . . . . . . . . . . . . . . . . . . . . . . . . . . . . . . 62
13 REPUTATION AND RANK . . . . . . . . . . . . . . . . . . . . . . . . . . . . . . . . . . . . . . . . . . . 62
13.1 Your Reputation with the Nations . . . . . . . . . . . . . . . . . . . . . . . . . . . . . . . . . . . . 62
Rising Reputation . . . . . . . . . . . . . . . . . . . . . . . . . . . . . . . . . . . . . . . . . . . . . . . . . . . . . . 62
Falling Reputation . . . . . . . . . . . . . . . . . . . . . . . . . . . . . . . . . . . . . . . . . . . . . . . . . . . . . 62
Nothing Lasts Forever . . . . . . . . . . . . . . . . . . . . . . . . . . . . . . . . . . . . . . . . . . . . . . . . . . 63
13.2 Rank . . . . . . . . . . . . . . . . . . . . . . . . . . . . . . . . . . . . . . . . . . . . . . . . . . . . . . . . . . . 63
14 USING YOUR OWN LOGOS . . . . . . . . . . . . . . . . . . . . . . . . . . . . . . . . . . . . . . . . . 64
15 SERVICE AND SUPPORT . . . . . . . . . . . . . . . . . . . . . . . . . . . . . . . . . . . . . . . . . . . . 64
16 CREDITS . . . . . . . . . . . . . . . . . . . . . . . . . . . . . . . . . . . . . . . . . . . . . . . . . . . . . . . . . 66
ENGLISH - CONTROLS AND KEYBOARD CONFIGURATION . . . . . . . . . . . . . . . . .67
DANISH - QUICKSTART . . . . . . . . . . . . . . . . . . . . . . . . . . . . . . . . . . . . . . . . . . . 68
FINNISH - QUICKSTART . . . . . . . . . . . . . . . . . . . . . . . . . . . . . . . . . . . . . . . . . . . 69
NORWEGIAN - QUICKSTART . . . . . . . . . . . . . . . . . . . . . . . . . . . . . . . . . . . . . . . 70
SWEDISH - QUICKSTART . . . . . . . . . . . . . . . . . . . . . . . . . . . . . . . . . . . . . . . . . . 71
4
Page 6

2 INTRODUCTION
Welcome to Port Royale 2, the trade simulation game set in the Caribbean during the 17th
century.
The game takes you back to the beginning of the 17thcentury, when the great colonial powers
were competing for control of the Caribbean and when towns could rapidly expand (and
collapse again) over a short period of time.
You take on the role of a young adventurer who, with bravery and skill, aims to establish a large
trading enterprise of great economic and military power.
You can trade goods between towns, set up your own production facilities, accept all kinds of
tasks and missions and set off on voyages to capture enemy ships and loot towns.
In contrast to the first version of Port Royale, there are no longer any limits to the expansion of
your enterprise. You can command an unlimited number of convoys and set up production
facilities in all towns.
And that’s not all: If you have the money, you can also buy businesses from local producers and
create a monopoly in a town. Alternatively, you can take control of all the businesses producing
a particular product in various towns, which would then enable you to create a monopoly for
that product throughout the entire Caribbean region.
If you want to follow a more militant route, you can take possession of a town. By attacking
and capturing the towns belonging to enemy nations for a viceroy (that is, taking possession of
the towns on behalf of a viceroy), you can expect to be generously rewarded with plots of land.
Bit by bit, each viceroy presents you with a town that you can then set up and develop yourself.
You can also capture all the towns for a particular nation so that peace is finally brought about.
We in the Port Royale 2 team have taken great pleasure in preparing this game and we are
particularly proud to present you with an exciting trade simulation, giving you free reign to
shape and develop an historic world.
However, don’t be too ambitious at the start. First take a look at the available scenarios. There,
you are sure to find a topic of interest to introduce you to the world of Port Royale 2.
We wish you good luck and many happy hours exploring the Caribbean.
Daniel Dumont and the Port Royale 2 Team.
5
Page 7

3 INSTALLATION
Insert the Port Royale 2 CD into the CD drive of your computer.
If the AutoStart option is activated, the AutoStart menu opens automatically.
Then click on “Install” to install Port Royale 2.
If the AutoStart menu does not start automatically, you can start it yourself by doubleclicking on the “Autorun” or “AutoRun.exe” file.
To carry out the installation, follow the instructions on the screen.
It is essential that you refer to the readme.html file in the installation directory of the game,
as this file contains important technical information as well as the latest changes.
The latest news covering all aspects of Port Royale 2 is available on the Internet homepage
www.ascaron.com.
4 MAIN MENU
After starting the game, you reach the main menu.
If you are playing the game for the first time, you should take a closer look at the
“Scenarios” section. This section contains special introductory games covering various topics
in the game.
4.1 New Game
You can start a new game here. Choose a town (and therefore the nation) in which you want
to start the game. The most important thing to remember about the town where you start the
game is that you already have a warehouse and a permit to build businesses and residential
buildings there.
Choose a nation carefully, because the smaller the nation, the harder it will be for you when
you pick a fight with the enemies of that nation. However, you needn’t worry, as you can still
turn to another nation during the game.
4.2 Scenarios
Port Royale 2 offers great depth of play. For this reason, we have included scenarios that deal
with the different areas of the game, such as trade, sea battles or construction. If you are
playing Port Royale 2 for the first time, you will find it easier if you choose one of the
introductory scenarios. On the other hand, if you are looking for a challenge, you can choose
one of the more advanced scenarios.
4.3 Loading a Game
Load a previously saved game.
4.4 Options
You can set the graphics and sound here. You can also change the assignment of game
functions to the various keys or change the gameplay settings (under “Gameplay”).
6
Page 8
5 GAME CONTROLS
5.1 General Information
Note the following:
• To select a convoy or a building, left-click on the object.
• To send a convoy, select it and then right-click on a town or a position at sea.
• You can use the mouse to do everything, but there are also several keys on your
keyboard that make it easier for you to play the game.
• During the game, you can press “F1” to display a summary of the game controls.
• Use the arrow keys on the keyboard to move the area of the screen displayed.
• Press the fast forward key (the space bar) to accelerate the gameplay. You can use
this function if you do not want to wait until a convoy has reached another town,
for example.
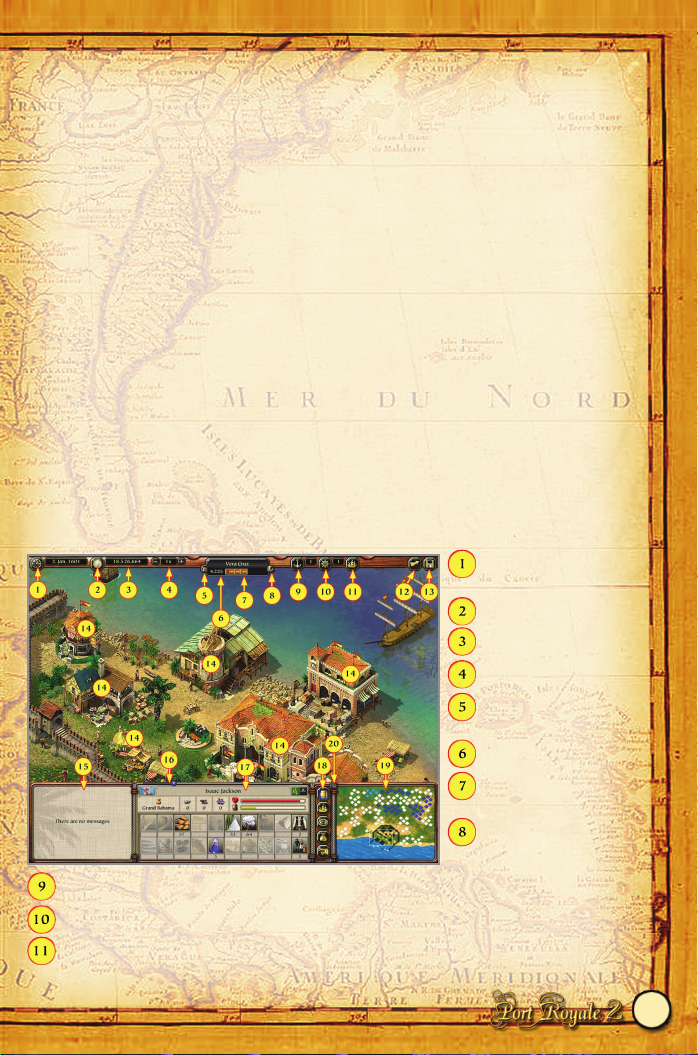
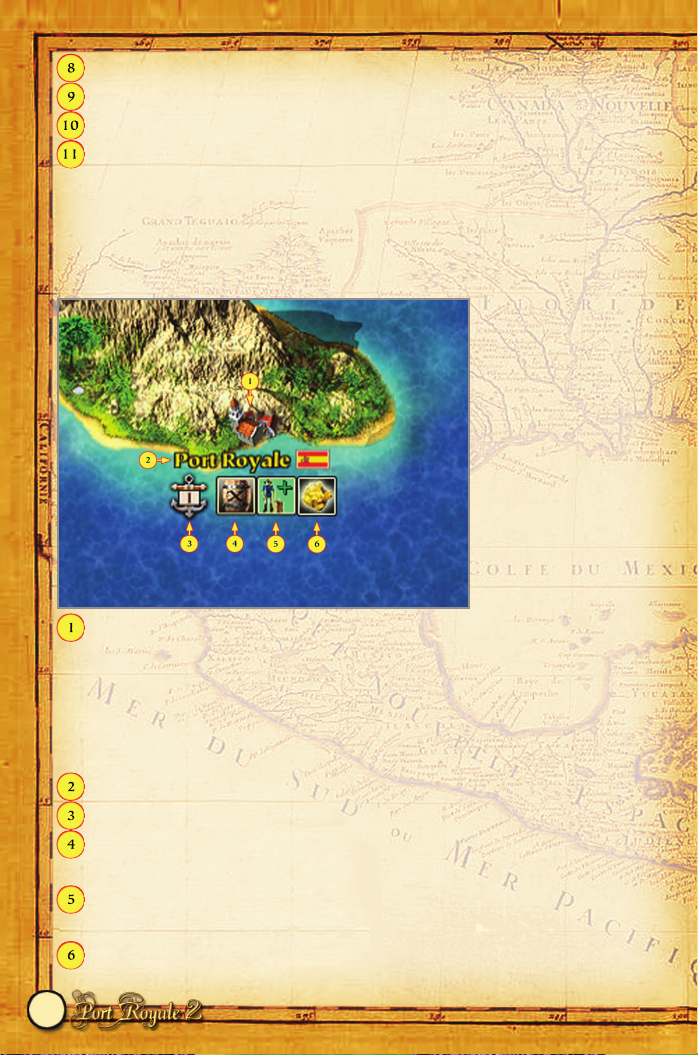
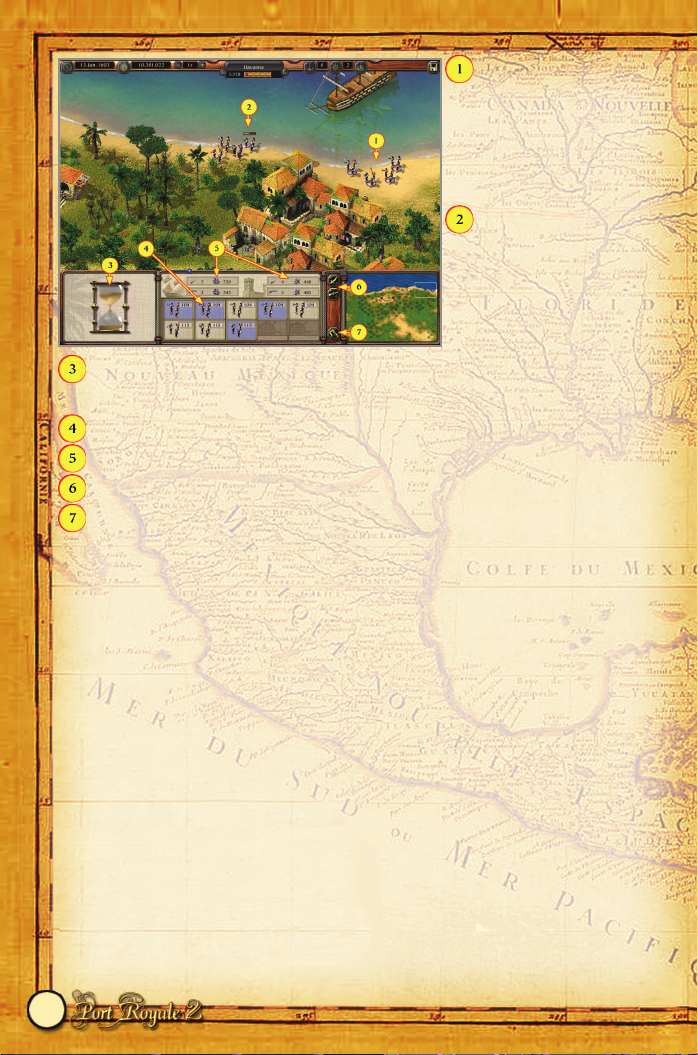
5.2 Town View
After you start a game, you reach the town view of the town where you start the game. Each
of the 60 towns in Port Royale 2 has one of these views, in which you can carry out specific
actions.
The town view displays the town’s buildings and the ships docked in the harbor. Every town
has a harbor, a town center, as well as residential areas and businesses located outside the
town.
From the sea chart, you can enter every town in which you have constructed buildings or in
which a convoy is anchored.
Chronicle, see section
5.8
Log, see section 5.9
Your cash
Game speed
Inhabitants’
consumption of goods
Population
Your reputation with the
nation of the town
Highlight your own
buildings
Switch convoys with no mission
Scroll convoys with mission
List your convoys
7
Page 9
Leave town (display sea chart)
Options menu
Action buildings (important buildings that you can enter to carry out actions)
Event window
Rank display, section 13.2
Selection window (this window displays the object (ship, convoy or building) that you
have just selected).
Selection buttons
Mini Map of the town
Toggle map
Only part of the town is displayed on the screen. You can use the arrow keys on the keyboard
to move the area of the screen displayed.
Alternatively, you can do this by moving the mouse pointer at the edge of the screen, holding
down the middle mouse button and moving the section, or by left-clicking on the Mini Map.
You can also zoom into the section of the screen by pressing the Page Up or Page Down keys
or by turning your mouse wheel.
Town Center
The town center is always surrounded by the town walls, which protect the town from attack
by land. The important action buildings (see section 7: Action Buildings) in which you can
meet various people are always situated in the town center. Simply click on one of these
building to enter it.
Area Outside the Town
You or a local producer in the town can only construct a business or a residential building
outside the town walls. Section 10: Construction and Production describes which buildings
can be constructed in a town and the construction process involved. To display information
about a residential building or a business, left-click on it. You can also implement settings in
some businesses.
Harbor
The harbor contains all the convoys and ships that are anchored in a town. A convoy is a
group of ships under the command of a single captain. If a convoy consists of several ships,
only the largest ship in the convoy is displayed in the harbor, so as to give you a clearer
overview.
To display information about a ship or a convoy, simply left-click on it. You can also
implement settings in some convoys.
8
Page 10
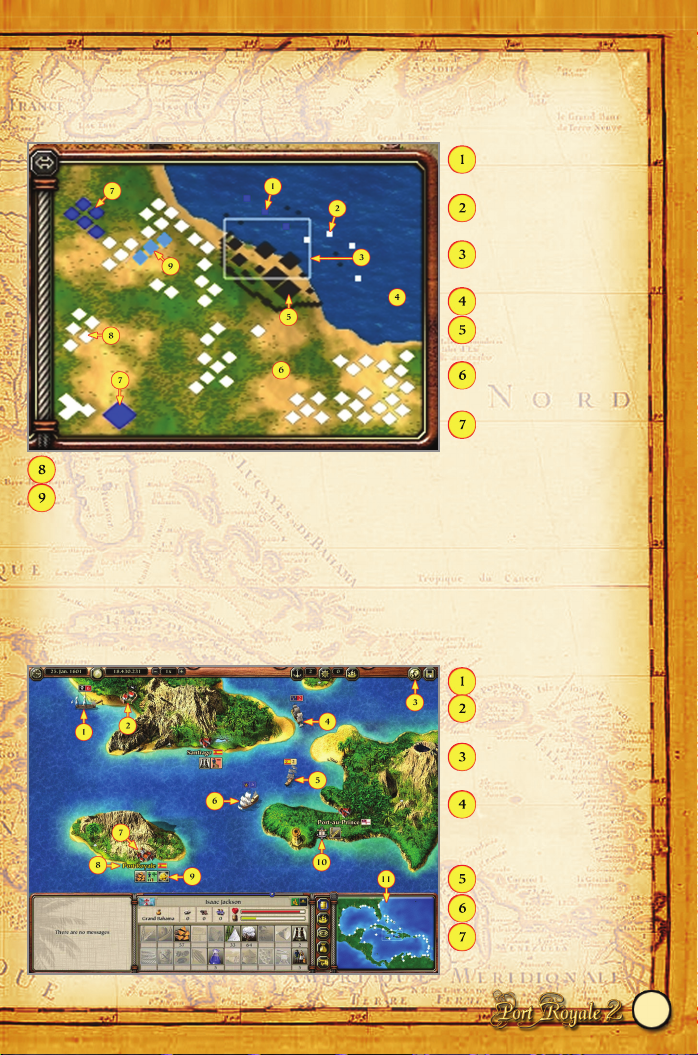
Mini Map
The Mini Map displays the entire town and surrounding area in the bottom right of the game
view. Different colors are used to indicate the buildings and convoys in the town.
Your anchored ships and
convoys
Ships belonging to other
traders
Area of the screen
displayed
Harbor
Town center with action
buildings
Areas outside of the
town
Your businesses and
residential buildings
Buildings belonging to local traders
Your warehouses
5.3 Sea Chart
The sea chart is always displayed when you leave a town. You can use the sea chart view to
follow the movements of your convoys.
It also displays all the towns that you have discovered so far. You only have to approach a
town to discover it.
To send convoys, select a convoy and then right-click on a town or a position at sea.
Pirate convoy
Pirate hideout
discovered
Display political
overview map
Military convoy or
buccaneer of a
particular nation
Trading convoy
Your convoy at sea
Town symbol
9
Page 11
Town name and nation
Town icons representing scarcity of goods, surplus of settlers and events in the town
Your convoys anchored in the town
Mini Map of the game world
As with the town view, the sea chart view only displays a part of the sea. You can use the
arrow keys to move the area of the screen displayed. Alternatively, you can also do this by
moving the mouse pointer at the edge of the screen, holding down the middle mouse button
and moving the section, or by left-clicking on the Mini Map.
Towns
Town symbol. Left-click to enter the town (you can only do this if you have a convoy or
buildings in the town).
If you have selected your docked convoy:
Right-click to trade with your convoy.
If no convoy is selected but you have a warehouse in the town:
Right-click to trade with your warehouse.
Click on the town name to display the town information.
Click on your convoys docked in the town to scroll through convoys.
A symbol depicting a product indicates that there is a shortage of this product in the
town.
The settler symbol indicates that there is either a surplus or a lack of settlers in the
town.
Various event symbols indicate the occurrence of a particular event in the town.
10
Page 12
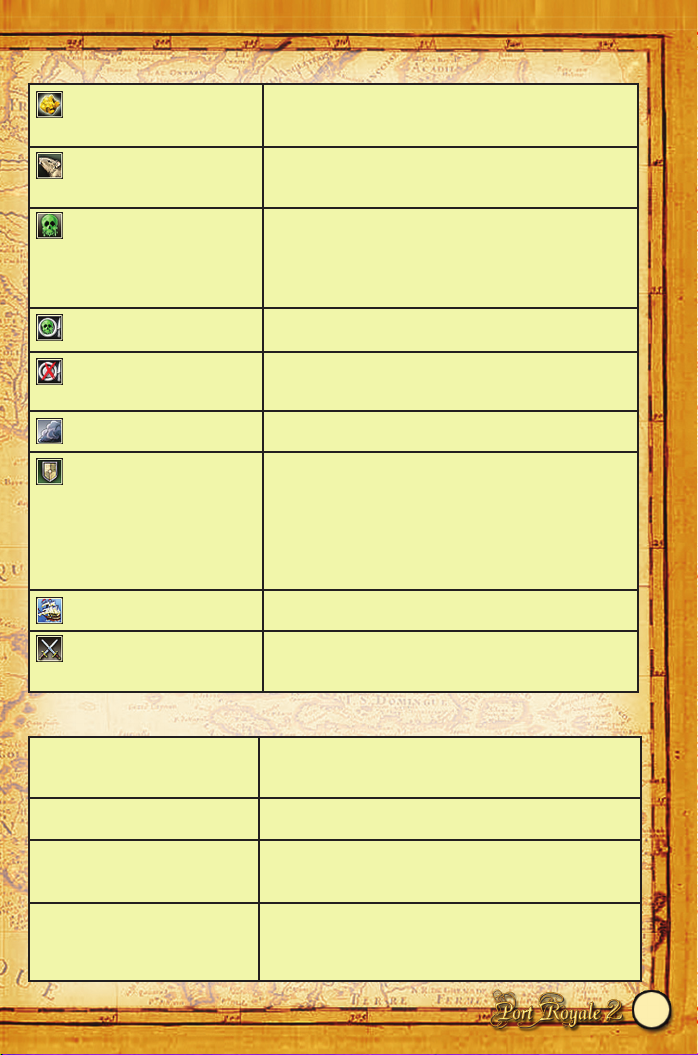
Possible events in towns
Overview of acts of sabotage carried out by buccaneers
11
Gold discovered
A gold mine has been discovered near the town. The
quality of life has risen as a result and the consumption
of luxury goods is twice as high for one month.
Plague of rats
There is a plague of rats in the town. The consumption
of wheat, fruit, corn and meat is twice as high for one
month.
Plague
A plague has broken out in the town. The quality of life
has worsened and the demand for garments is twice as
high for one month. While the plague lasts, the town’s
citizens perish daily and traders are reluctant to sail to
the town.
Food supplies contaminated
Food supplies in the town have been contaminated (this
has the same effect as a famine).
Famine
A famine has broken out. While the famine rages, the
price of wheat, fruit, corn and meat will rise.
Storm
A storm is raging over the town. Production on crop
farms is halved.
Attack by military convoy,
pirates or natives
The town was recently attacked from the land or from
the sea. The status of the town has fallen.
Effects:
• Military convoy: Many goods looted
• Pirates: Finished goods looted
• Natives: Luxury goods looted and number of
workers/citizens reduced
Treasure fleet in the town
The Spanish treasure fleet has anchored in the town.
Sabotage by buccaneers
This symbol is displayed to indicate various acts of
sabotage carried out by buccaneers. Buccaneers are only
activated in times of war.
Stocks destroyed A buccaneer sneaked into the town and destroyed large
stocks of goods belonging to various traders. The town
council refuses to accept liability.
Town’s goods stocks destroyed A buccaneer sneaked into the town and destroyed large
stocks of goods belonging to the town market.
Settlers poached A buccaneer has poached many workers and their
families. Many businesses in the town are now no longer
operating at full capacity.
Goods bought up Today, a buccaneer posing as a trader docked in the
harbor of the town under a false flag. By doing this, he
was able to buy up stocks in the town. Many goods are
now unavailable or very scarce.
Page 13

Convoys
All convoys belonging to you are displayed on the sea chart. Any other convoys that come
into their field of vision are also displayed. For each convoy displayed, the sea chart also
displays the number of ships in the convoy and the nation to which the convoy belongs.
There are various types of convoys, which can be identified by the different symbols that
they carry:
You can left-click on each convoy to select it and to display information about the convoy.
For example, this allows you to determine the type and number of escort and trading ships in
a convoy. In the case of pirate convoys, you can see which pirate gang owns the convoy.
By right-clicking on a town or a position on the sea chart, you can send your own convoys
there. To attack another convoy, right-click on the target convoy.
12
Traders intimidated A buccaneer sneaked into the town harbor and threatened
arriving traders. For at least four weeks, traders from other
towns will only very reluctantly call at the town.
Workers on strike A buccaneer entered the town under a false name and caused
a great deal of unrest among the workers. All workers cease
working for two weeks.
Food supplies contaminated A buccaneer contaminated large amounts of food in the
town. A famine has broken out as a result.
Crops destroyed A buccaneer sneaked into the town and destroyed all the crop
farms along with their harvest. You cannot harvest again for
approximately 2 weeks.
Your OWN CONVOYS fly a flag displaying a logo that you can choose in
the Options menu (also see section 14 Using Your Own Logos).
This symbol is used by TRADING CONVOYS and TRANSPORT
CONVOYS.TRANSPORT CONVOYS supply the Caribbean with goods
from Europe (see section 9 Imports and Exports). The Spanish treasure fleet
is a special type of TRANSPORT CONVOY. It travels from Europe and
collects gold from the Spanish colonies.
MILITARY CONVOYS carry a red warning symbol, patrol the waters
belonging to their nation and also become militarily active in times of war
(see section 12.2 A Nation’s Strength). Buccaneers represent a special type of
MILITARY CONVOY that attacks towns in times of war and carries out
particular actions (see section 12.5 Buccaneers).
PIRATE CONVOYS carry the pirate symbol (see section 12.6 Pirates).
Page 14
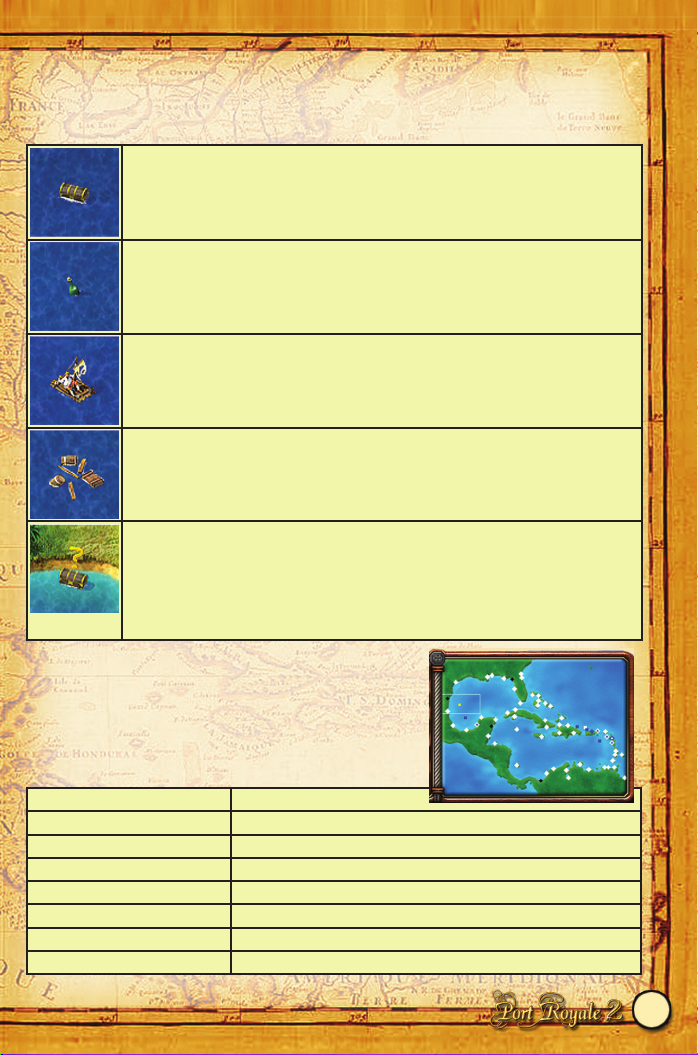
Floating Objects
Your convoys may also spot floating objects. You can take these objects on board by right
clicking on them to send your convoy over to them.
Mini Map
The Mini Map displays the entire game world in the sea
chart view.
Towns and convoys have particular colors:
13
It is always worth making a detour to pick up a floating treasure chest.
A message in a bottle turns out to be parts of a treasure map. You can use the
“Treasure Map” option in the log to view parts of a treasure map that you have
found.
You can pick up one or more castaways.
Your convoys can pick up flotsam
This object indicates a mission object:
Sometimes you receive a mission to search for a missing object. This symbol is
also used to indicate objects that are very rare and particularly difficult to find.
These objects are always located near to the shore. If you are married to the
daughter of a governor, she will give you more information as soon as you find
one of these objects.
White diamonds
Towns
Diamonds with a blue center Towns in which you have buildings
Diamonds with a blue border Towns in which one of your convoys is anchored
Blue squares Your convoy
White squares A foreign convoy
Black squares A convoy belonging to a pirate or a buccaneer
Small black squares Pirate hideouts
Small yellow squares A floating object (for example, castaways)
Page 15

The Mini Map also has other very useful functions:
5.4 Sea Battles
If you have selected one of your convoys, you can provoke a sea battle by right-clicking on
another convoy on the sea chart. As soon as the convoys are near enough to one another, the
Encounter dialog box is displayed.
Encounter
Your opponent’s flag
Your flag
Escort ships in the convoy
Trading ships in the convoy
Cannons on board the escort ships
Sailors on board the escort ships
If your convoy is attacked, you cannot
stop the battle.
In this case, you can only resort to
the “Evade” option (see below).
If you now choose “Attack”, the sea battle
view opens and the battle can commence.
Evading
You may not always be the attacker. Military convoys and pirates may attack you if your
convoys enter their field of vision. In this case, the Encounter dialog box also opens,
provided that the convoy is not on an automatic trade route (see section 11 Trade Routes).
You cannot stop this kind of battle.
However, if you do not want to wage the battle yourself, you can choose the “Evade” option.
In this case, the battle is waged automatically by the captain of your convoy. However, the
14
Left-click on the map Shift the area of the sea chart displayed
Left-click on town Enter town if you have a convoy or warehouse there
Right-click on town
Send a selected convoy to the town or trade with the town, if
selected convoy is anchored there
TIP
To wage a sea battle, you must have defined escort ships in your convoy, as only the escort
ships from both sides can take part in a battle! For an explanation of how to define escort
ships, see section 8.2 Convoys.
Page 16
captain adopts a very defensive position. His aim is to bring the battle to an end while
minimizing the amount of damage to his convoy. It is of no interest to him how much damage
he has inflicted on his opponent and nor will he loot or capture any ships.
The outcome of this type of battle is displayed immediately.
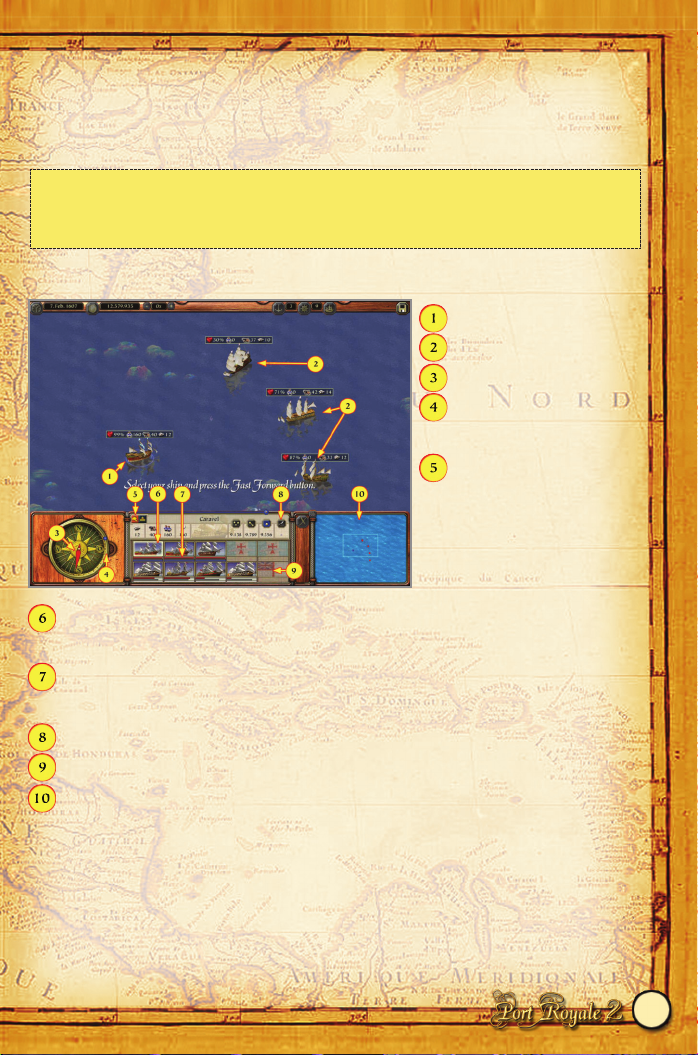
Sea Battle View
Your active ship
Opponent’s ships
Wind direction
The direction in which your
ship is heading
Morale of the crew and the
captain’s combat experience
Your escort ships and the selected ship. Before the battle commences, you can select the
ship that you want to start the battle by clicking on it.
Here, you can view the condition of the ship as well as the number of cannons and the
size of the boarding crew it is carrying.
Select your ammunition and activate the ready to board function
Your opponent’s ships
Mini Map of the sea battle with your active ship and your opponent’s ships
If you have several escort ships at the start of the battle, you can select the ship that you want
to use to begin the battle. Then press the fast forward key (this is normally the space bar).
15
TIP
Convoys sailing on a trade route always select the “Evade” option automatically. You will
then be informed of the outcome of the battle by a message, which you can call up from the
message menu in the log.
Page 17
Battle Sequence
Only the escort ships take part in the battle (see below section 8.2 Convoys). Trading ships
take no part in the fighting. However, the trading ships always fall to the victor.
The battle ends when the last escort ship belonging to one side sinks, flees or is boarded and
the winner can then decide whether to loot or capture (that is, take command of) the trading
ships.
To simplify the operation of the game, you can only control one ship at a time during the
battle, while your opponent can control up to 5 ships. Before a battle begins, you must
therefore select from among your escort ships the ship that you want to use to start the battle.
To do this, click on one of your ships in the list of ships above and then press the fast forward
key (space bar) to begin the battle.
Maneuvering
As on the sea chart, use the right mouse button to control your ship. Note that, in sea battles,
you specify a direction instead of a destination. Since each ship has a certain amount of
inertia, it always takes a little while before it turns in the direction specified.
Naturally, the ship makes much slower progress if it is sailing against the wind.
Centering
You can always center your ship during sea battles using the Shift key.
Centering will remain activated if you press the “Caps Lock” key.
Switching Ships
If you have several escort ships, you can switch to another ship during the battle simply by
selecting another ship from the list. Bear in mind that your previous ship is then set to the
fleeing mode and can no longer be used in this battle!
A ship in fleeing mode always tries to reach the edge of the sea battle area.
Open Fire!
Left-click to fire a broadside from your ship. In this case, you do not have to decide which
side of the ship should fire: Fire is automatically directed from the side of your ship that can
hit an opponent. This may also result in both sides of the ship firing if there is an opponent
on either side of your ship.
To indicate to you which opponents your ship is attacking, the relevant opposing ships are
marked with a red crosshair.
16
TIP
Since a ship in fleeing mode can still be attacked, you should only select a new ship when
the ship to be replaced has approached the edge of the map.
TIP
You can only fire if a red crosshair is displayed over an opponent’s ship. However, this does
not necessarily mean that all your cannons will hit their target. You must always decide
whether you have reached a good firing position.
Page 18
Reloading
After you have opened fire, your cannons must be reloaded. This is indicated by the blue
circle beneath your ship. If you have fewer crew members than cannons on board, the time
taken to reload will increase dramatically. The time taken to reload is also affected by the
motivation of those on board.
Selecting Ammunition and Boarding
In the ship’s selection window below, you can choose between 3 different types of
ammunition (provided that you have them on board your convoy). The ammunition is not
stored on a particular ship in your convoy, but is always available to the entire convoy. You
can also signal to your crew to prepare to board a ship.
Fleeing
Any ship that leaves the area of the sea battle while the sea battle is being waged is
considered to have fled. It can no longer take part in the battle and falls to the winner after the
battle is over.
5.5 Attacking a Town
If you sail to a town with a convoy, it normally docks in the harbor. However, you can also
specify that the convoy is to attack the town instead of visiting it.
17
TIP
It is difficult to win a sea battle in which your opponent has far superior ships. Military
convoys are especially powerful. If you find that you have underestimated the strength of an
opponent during an attack, you can also set the level of difficulty to “Easy”, even in the
middle of a sea battle.
TIP
As with reloading your cannons, it always takes a little while to switch ammunition and
prepare to board a ship. During this time, you cannot fire your cannons.
Heavy cannonballs: Inflict the heaviest damage to the ship’s hull. Select this
ammunition if you want to sink an opponent quickly. The more damage that is inflicted
on a ship, the harder it is to maneuver.
Chain balls: These are particularly useful for destroying a ship’s sails. In this way, a
ship can be rendered impossible to maneuver.
Grape shot: This puts the crew of a ship out of action.
Useful if you intend to board a ship subsequently.
Ready to board: Choose this option to prepare your crew to board a ship. Once your
crew is ready to board, all you have to do is ram another ship to start the boarding
procedure. You no longer have any control over the battle on board the ship. Of crucial
importance here is the size of your crew and the number of cutlasses that the sailors
have at their disposal.
Page 19
To do this, click on the “Attack Mode” button in the selection menu of the convoy and
activate the “Attack Towns” option (also see section 8.2 Convoys).
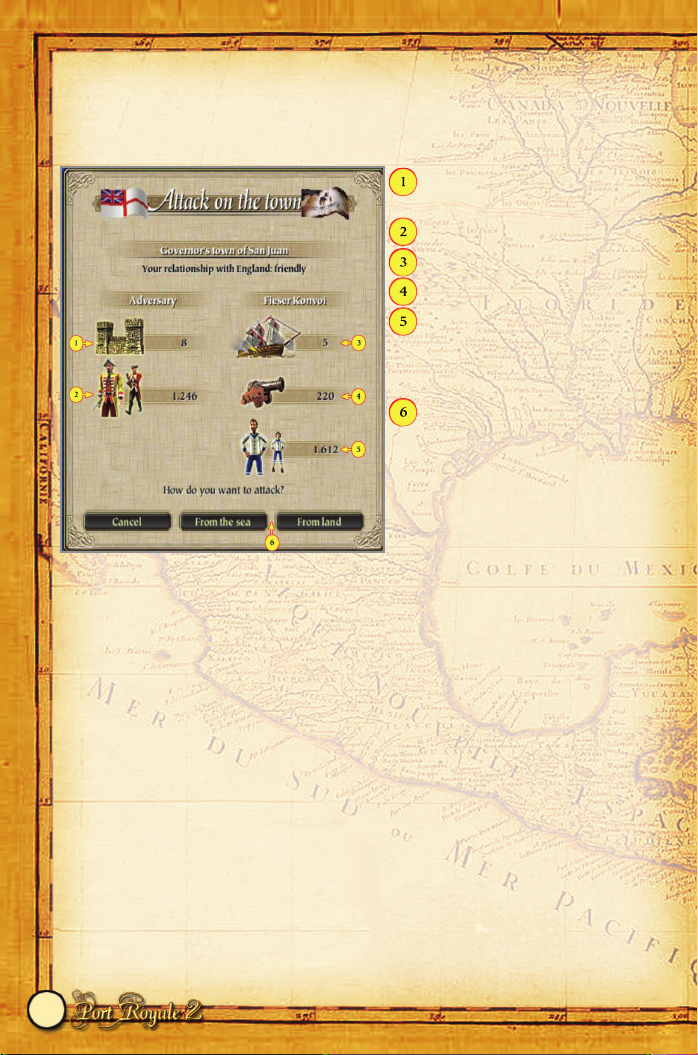
When your convoy reaches the town, a dialog box displaying both the strength of the town
and of your convoy opens (in the same way as for an encounter at sea).
The defensive towers in the town’s
harbor
The strength of the town guard
Your escort ships
Your cannons
Your boarding crew that is available
for attacks from the land. It must be
armed with cutlasses or muskets.
You can decide here whether to attack
from the land or from the sea
Choose “From the Sea” to carry out an attack from the sea. If military convoys are anchored
in the town, you must first attack and defeat them. Only then can you paralyze the harbor
defenses by firing at the defensive towers.
Once the final tower goes up in smoke, the town capitulates and can then be looted.
Alternatively, if a viceroy has issued you with a mission to capture a town (see section 12.3
Viceroys and Capturing Towns), then you can take possession of the town on behalf of
another nation.
5.6 Land Battles
If you choose the “From Land” option when you attack a town, this means that you attack the
town from the land. However, you must first defeat any military convoys that may be
anchored in the town.
Before mounting an attack from the land, you must first decide how many close combat
fighters and how many long-range fighters you want to deploy. The game always
automatically deploys the same number of sailors from your boarding crew on the convoy as
the number of muskets and cutlasses you have on board. However, if you have more weapons
than sailors, you can control how these weapons are distributed.
18
Page 20
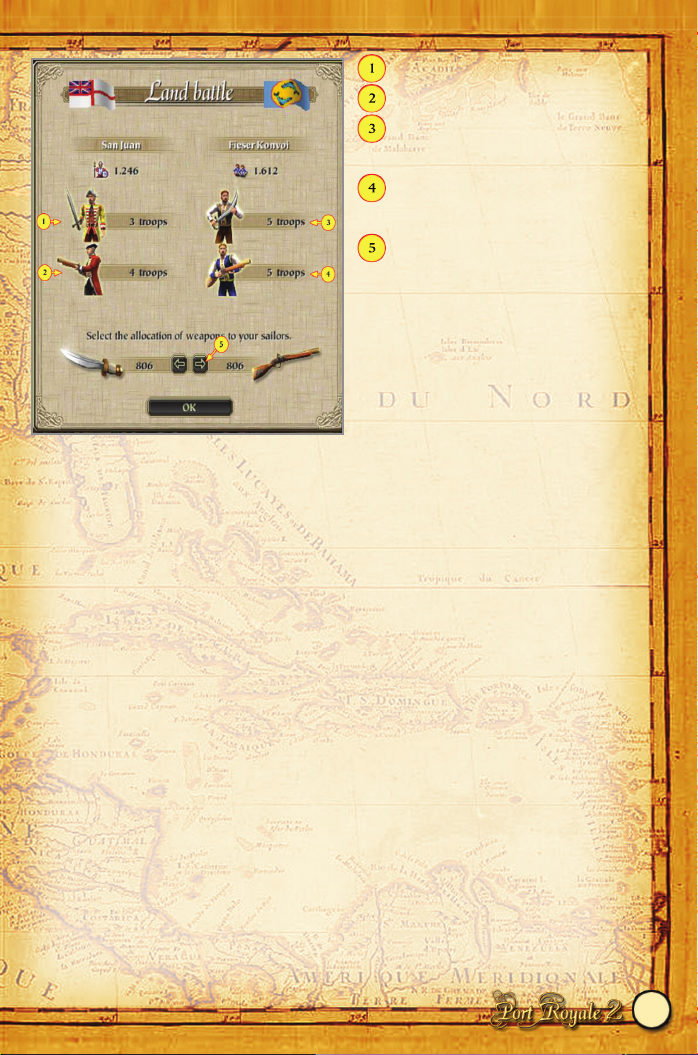
The town’s swordsmen
The town’s musketeers
Your close combat fighters (armed
with cutlasses)
Your long-range fighters (armed with
muskets)
If you have more small arms than
sailors on board, you can determine
the distribution of the weapons
yourself.
Your men are automatically organized into troops. Each troop consists of either close combat
or long-range fighters. The more men you deploy, the more troops are formed (up to a
maximum of 10 troops).
Land Attack Sequence
Your objective when attacking a town is to destroy one of the enemy’s town gates. If you
succeed, the town capitulates and you can avoid further casualties. On the other hand, you can
also win the battle by disabling all the defenders.
However: You do not have an unlimited amount of time to achieve victory.
If the fighting becomes too protracted, your troops lose courage and flee back to the ships.
The amount of time that you have depends on the morale of your crew and the status of the
town. The passage of time is measured by an hourglass. The fuller the hourglass is at the start
of the battle, the more time you have at your disposal.
Once the battle begins, you can position your troops by clicking on them and then rightclicking. Your troops will automatically attack an enemy as soon as they are close enough.
19
Page 21
Left-click on a unit to select
it. Selected troops are
indicated by a blue circle.
You can dispatch these troops
by right-clicking on them.
By moving your mouse
pointer over a unit, you can
display the hit points and
endurance of the troops.
The hourglass displays the time you have remaining to achieve victory. If the battle takes
a long time, your troops suffer a loss of morale and flee.
The units you have selected are highlighted in color.
The number of troops and the total number of sailors or soldiers.
Select all close combat or long-range fighters.
Order a retreat.
Tied Units
Troops that are attacked by an enemy are tied to that enemy. They can only be moved on if
the enemy troops have been defeated. Exception: Surprise attacks.
Surprise Attacks
By right-double-clicking, you can order your troops to attack. The unit then moves towards
the specified target more quickly than it would otherwise. However, enemy attackers are then
ignored and the defense of your troop is reduced.
Apart from this, a unit can only carry out a surprise attack for a short period because it
reduces the unit’s endurance (of which it only has a limited amount). However, the unit’s
endurance will recover once the surprise attack is over.
Supporting Your Units
By right-clicking on selected troops, you can tie them to a friendly unit, which will then
follow the tied troops and support your unit.
20
Page 22
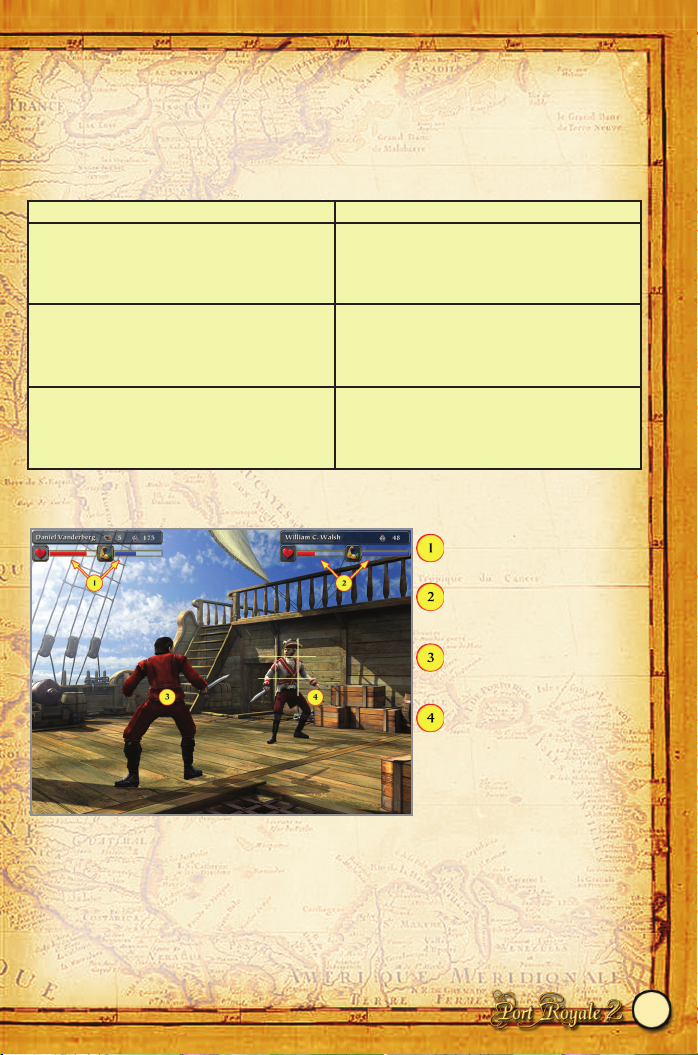
5.7 Duels
If you try to board a ship during a sea battle, the captain of your convoy may be challenged to
a duel. As a matter of courtesy, your captain always accepts this type of challenge because it
enables him to spare his crew.
The same thing may also occur during an attack on a town. The following situations may
arise:
A situation that results in a duel is actually always to your advantage. This is because the two
adversaries fight it out between themselves and your troops suffer no further losses.
The health and endurance of
your convoy’s captain
The health and endurance of
the opponent
Right-click to enable your
captain to ward off an attack
To attack your opponent, left-
click on an area of his body
Controlling the Duel
Duels are controlled using the mouse only. By left-clicking on your opponent (he is always
turned towards you), you can make an attacking movement against him. In this case, the part
of your opponent’s body that you click on makes a difference. The more you vary your
attacks, the less likely they are to be blocked.
You can block attacks by your opponent by right-clicking (provided that you react in time).
It’s best to right-click as soon as you notice your opponent starting to attack.
21
Situation
If, during a sea battle, the captain of the
opposing convoy happens to be on the ship
that you want to board, this may result in a
duel.
If you win the duel, you take control of the
enemy ship.
If you lose, you lose your ship to the enemy.
If you attack a town and manage to destroy
the last cannon tower or the last town gate,
this may result in a duel with the commander
of the town guard.
If you win the duel, the attack on the town is
deemed a success and you can then loot the
town or capture it (provided that you have
been assigned a mission).
During a land attack, the commander may
also challenge your captain to a duel to avert
another defeat if the morale of the troops in
the town is too low.
If you lose, then your attack on the town is
also unsuccessful. The crew then returns to
the convoy and the convoy continues to lie in
wait in the town (see section 8.2 Convoys).
Page 23
Special Attacks
If your captain has made a successful attack, you can cause him to make another attack
immediately before he resumes his starting position.
The time frame within which you can carry out a special attack of this kind is very short. If
you left-click too soon, your action will be ignored. If you do so too late, you may only
manage to start a normal attack.
If you can surprise your opponent with a special attack, you have a greater chance of hitting
him.
The End of the Fight
Once your captain or his opponent has run out of hit points, he surrenders and the fighting
ends. A participant in a duel cannot be killed.
Taking Hostages
If you attack a buccaneer convoy and want to board the buccaneer’s ship, this always results
in a duel. If you win the duel, you automatically take the buccaneer hostage. You can then
demand a ransom from a governor of his nation of origin.
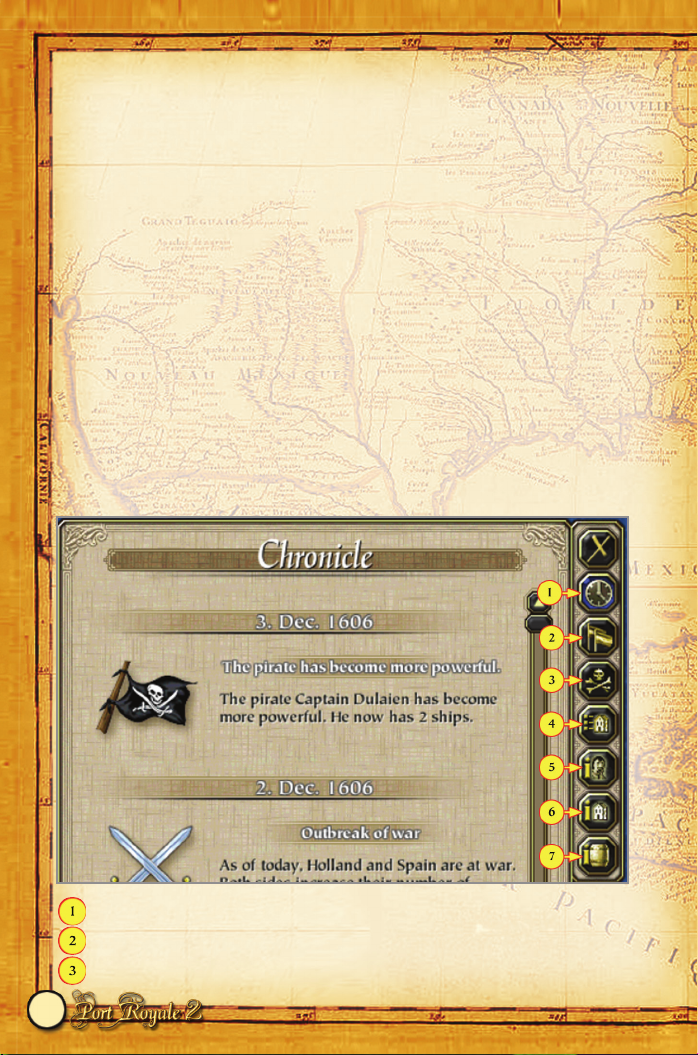
5.8 The Chronicle
The Chronicle keeps you up to date with all the current events in the world. To display it,
click on the button beside the clock on the top left of the screen.
World events
The size, strength and wars of the nations
Overview of all active pirates
22
Page 24
Towns you have discovered and their populations
Development of the inhabitants of the nations
Development of the number of towns belonging to the nations
Average prices paid for goods in the nations
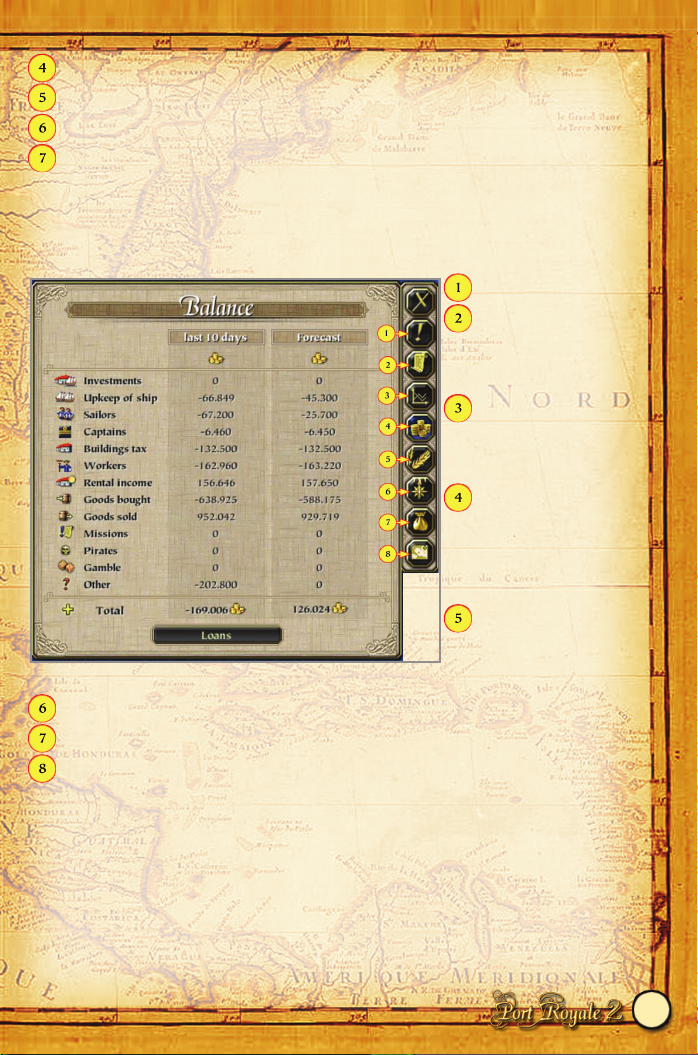
5.9 The Log
The Log contains all the relevant information about your business ventures, missions and
investments. The Log button is located beside your cash balance.
Message folder
Mission folder. Any
missions that you receive
are saved here.
Statistics regarding the
development of your
businesses
The balance sheet
displays the income and
expenses of the previous
10 days.
Problems affecting your
businesses are listed
here.
Your previous successes
Overview of all active trade routes
Treasure maps and map pieces are saved here.
5.10 Game Speed
You can change the game speed from 1x to 20x at any time, at the top of the screen. You can
also increase the game speed to 100x by holding down the fast forward key (space bar).
The speed setting does not affect the visual display in the towns. The citizens and ships in a
town always move at the same speed.
23
Page 25
6 TOWNS
The Caribbean game world consists of 60 towns that belong to different regions (see section
9 Trading Goods). There are three types of towns:
6.1 Governor Towns
8 of the 60 towns accommodate a governor, who comes from the nation to which these towns
belong and who administers and controls these towns and all the surrounding towns that
belong to his nation.
Governors of towns in which your reputation is high enough and in which you possess a
building permit assign special missions (see below Politics Among the Nations).
Governor towns only produce essential goods and finished goods (see section 9 Trading
Goods). Raw materials and colonial goods have to be supplied from colonial towns.
Another characteristic of governor towns is that they are regularly visited by transport
convoys from Europe. These convoys bring settlers and import goods from Europe and
exchange these for colonial goods, which they take back to the Old World.
6.2 Colonial Towns
These 48 towns can produce essential goods, raw materials and colonial goods. They rely to a
great extent on trade links with the governor towns.
6.3 Seats of the Viceroys
These four towns are equivalent to governor towns, with the difference that they are home to
their nation’s viceroy. Each nation has a viceroy in the New World.
The viceroys represent the interests of their respective nations and also assign special
political missions (see section 12 Politics Among the Nations).
6.4 Town Population
Settlers
Settler families arrive on the transport convoys from Europe, hoping to find work in the
colonies. They wait in the harbor for either the offer of work or a passage to another town.
24
TIP
To ensure that you enough time to carry out your various actions, you should always set the
speed to 1x. It is better to use the fast forward key if you want to temporarily accelerate the
gameplay. The time is paused while you set up a trade route to give you time to create the
required settings.
Game time is paused during battles.
Page 26
Workers and Citizens
If there is work to be found in the town, each settler family provides one worker. At the same
time, the number of citizens in the town increases by four, that is, the new worker and his
three dependents become citizens.
Soldiers
The more citizens a town has, the higher is the number of soldiers from Europe stationed in
the town.
Soldiers have no families. For every four citizens, there is normally one soldier to defend the
town in the event of an attack.
6.5 Town Status
The quality of life and therefore the status of the town depends on how well the town is
supplied with goods.
25
TIP
· A hospital and a school will somewhat improve the quality of life in a town.
· A town’s status doesn’t change overnight. It takes a couple of days for a lack of goods or a
sudden improvement in supplies to become noticeable.
· You can view the status of the town and the trend at any time in the town information
(which you can reach by clicking on the name of the town in the town view or on the sea
chart).
Status Condition Effect
Poverty – The population decreases: 1%
conversion of citizens+ workers into
settler families per day. No new
workers possible.
Recession – The population decreases: 0.5%
conversion of citizens + workers into
settler families per day. No new
workers possible.
Stagnation – No new workers possible
Recovery After attacks on the town No new workers possible
Boom – + New workers possible
Flourishing economy Only as of 2,000 inhabitants 5% reduction in wage costs
Wealth
Riches
Only as of 4,000 inhabitants
Only as of 6,000 inhabitants
10% reduction in wage costs
15% reduction in wage costs
Growth in number of settlers:
The number of settlers in the town
grows automatically
Page 27

6.6 Traders
The Caribbean is home to many traders, who build workshops in the towns and conduct trade
between them.
They see to it that goods produced in one town are distributed to other towns. This is very
important because a town can never produce all the different types of goods.
The trading convoys also make sure that the available settlers are distributed among the
towns that require workers.
6.7 Your Own Town
If you are on good terms with a viceroy and have captured many towns for him, he will
present you with a parcel of land. You can choose the location yourself from a couple of
alternatives.
This parcel of land already contains the foundation stone for a new town, which you can
immediately start to develop. Using additional gifts of land from the viceroy, you can expand
the town further and further until you eventually own the entire area.
You are the only person who can construct buildings in the town and nobody else can
interfere. As well as the usual residential buildings and businesses, you must also construct
other important buildings:
As soon as your town has a population greater than 1,000 inhabitants and provided that there
are lucrative trading opportunities there, it will be visited by traders from the various nations.
26
Docks Already built Palisade (town walls) Already built As of 6,000 inhabitants, the palisade
is upgraded to town walls.
Marketplace Already built Adjusts automatically to reflect the
wealth of the town.
Your palace Already built Replaces the warehouses. Has an
unlimited storage capacity.
Master builder Already present Only relevant for the Construction
menu. You cannot speak to the
master builder himself.
Inn Must be built Required as of 500 inhabitants
Church Must be built Required as of 2,000 inhabitants
Small dockyard Must be built Repairs your convoys free of charge
Harbor defenses Must be built Defensive towers protect the harbor
against buccaneers and pirates.
TIP
Don’t forget to take measures to defend your town.
Harbor cannons and a town guard will help you to repel attacks by buccaneers and pirates!
Page 28

7 ACTION BUILDINGS
Every town contains some special buildings. Most of these are located in the center of the
town, surrounded by the town walls. To enter a building, left-click on it in the town view.
7.1 The Warehouse
The warehouse is always the first building that you must construct in a
town if you want to set up businesses there. This is because all the
goods that your businesses produce end up in the warehouse. Some
businesses also require raw materials. These are always taken from
the warehouse.
You can find more information about this in section 10 Construction
and Production.
Each warehouse can accommodate a specific amount of goods. Therefore, if you need a lot of
storage space, you should build a sufficient number of warehouses.
The warehouse gives you an overview of your production of goods in the town. You can also
instruct the storekeeper to automatically buy or sell specific goods in the town.
Overview
To display the overview, click on a warehouse.
The number of warehouses in the town
and their capacity
The number of tenants in your
residential buildings
The number of workers in your
businesses
This overview shows which products and
how much of each you produce per day
in the town. The current production
price is also displayed.
Production here is not running smoothly
(for example: due to a lack of raw
materials).
If the amount of goods you are storing exceeds the available storage capacity, you incur
costs of 1 gold coin (GC) per barrel per day.
Each of your buildings has maintenance costs of 50 GC per day.
27
Page 29
Overview
Stock
Automatic buying
Automatic selling
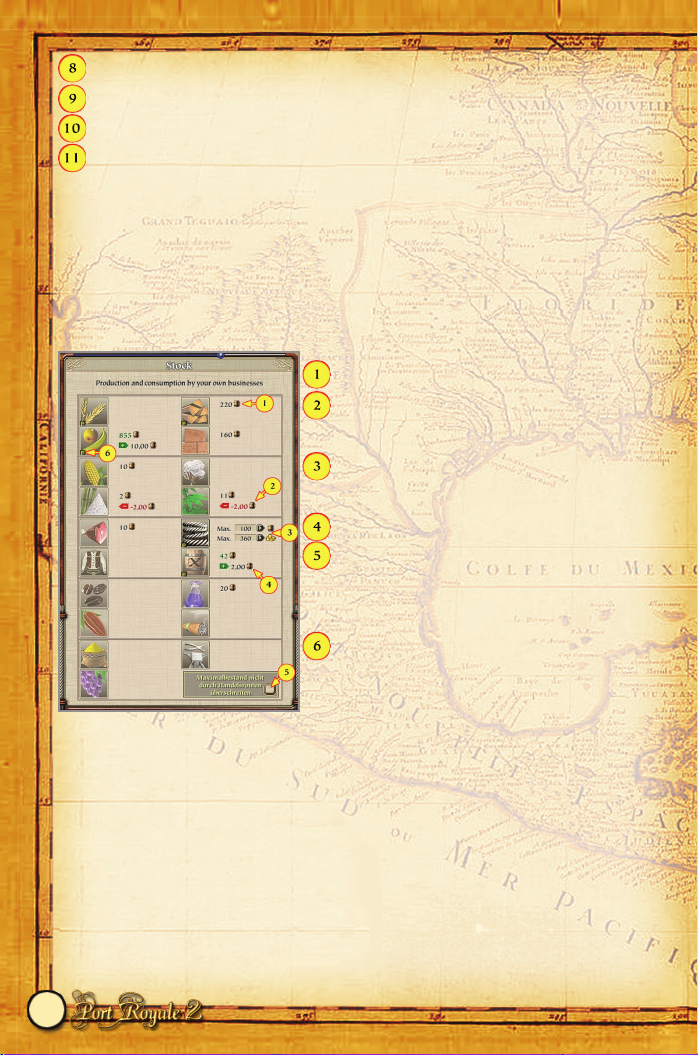
Stock
You can use the second selection button to call up the current stock of your goods. Here, you
can also view the daily production and consumption of goods.
Buying Goods
Here, you can instruct the storekeeper to regularly check the stock of goods and to maintain
them at a specific level if necessary, by buying goods in the town. You can also set the
maximum price at which the storekeeper may purchase goods from the town.
Stocks in the warehouse
Consumption of goods by your businesses in the
town
Click on a product to activate automatic buying of
goods by the storekeeper
Production of goods in your businesses in the town
Click here to prevent captains on trade routes from
oversupplying your warehouse, which will cause
the maximum levels you have set to be exceeded.
This product can be produced in this town.
Selling Goods
In the same way as for goods bought, you can also instruct the storekeeper to sell goods
automatically. In this case, you can set the minimum acceptable price at which he is to sell
goods in the town.
In addition, you can specify the quantity of goods that the storekeeper is to retain (that is, not
sell).
You can always sell goods that you produce yourself at a reasonable profit in the same town
(unless there is a huge surplus supply of those goods in the town).
28
Page 30
7.2 The Docks
The docks are always situated directly in the harbor of the town. All
trade with the town is conducted from there. You can buy and sell
goods.
Depending on whether you have a convoy or a warehouse in the
town, you can trade between town and warehouse or between town
and convoy. If you want to trade with a convoy, you must first select it
and it must also be anchored in the town’s harbor.
For more information on how to conduct trade at the docks, see section 9 Trading Goods.
Transfer Between Convoy and Warehouse
If you have a convoy and a warehouse in the town, you can transfer goods between your
warehouse and your convoy.
Cargo Trade
The trade in cargo is also conducted in the docks. To do this, choose the “Cargo Trade”
selection button in the docks. You can obtain weapons and ammunition here. You can also
hire the boarding crew for your convoys here as well as take waiting settlers on board your
convoy or set them ashore.
7.3 Shipyards
There are two types of shipyards: The small shipyard of colonial towns and the large shipyard
of governor and viceroy towns.
In small shipyards, you can only repair individual ships and convoys or change the name of a
convoy.
In large shipyards, you can also buy and sell ships.
To do this, ships must be anchored in the harbor as free ships. Ships in convoys cannot be
sold.
29
TIP
The sailors that you can hire in the docks only count as the boarding crew, which you need
for boarding ships or attacking towns. The sailors to sail your ships are always automatically
on board and do not have to be hired separately.
The number of sailors who are prepared to work for you depends on your reputation with
that nation.
TIP
· The greater the damage to a ship or a convoy, the more shipyard workers work on the
repairs and the faster the repairs are completed. Therefore, it makes more sense to send the
entire convoy for repairs rather than sending the individual ships.
· While the repairs are being carried out, the boarding crew on your convoy goes ashore on
leave (for which you do not have to pay). You only continue to meet the basic costs of the
ship and the captain’s pay.
Page 31
7.4 Inn
At the inn, you can hire captains, try your luck in a game of chance or
meet particular individuals who will offer you missions.
Hiring Pirates
You can also meet pirates at the inn, who may offer to capture ships
and treasure on your behalf and share part of the spoils with you. If
you want to do this, you must provide them with a convoy of up to five
ships. The more powerful the convoy is, the greater is the chance that these
voyages will be successful.
As soon as you have provided the convoy, the pirate searches the surrounding area for a
hideout to be used as a base from which to launch attacks. You can collect your share of the
spoils later on at the inn where you hired the pirate. The total amount that
the pirate has brought you is displayed in the log under “Pirates”.
7.5 The Council Building
Each town has a council building where you can meet different
characters, depending on the town type. You can only meet these
characters if you enjoy a certain reputation with the nation to
which the town belongs.
The General
The general provides you with information on the status of the town’s defenses. You can
support him by giving him gold for new troops or harbor cannons, which will slightly
enhance both your reputation with the nation in question and your trading record in the town
(see section 10.1 Buying a Building Permit).
The Treasurer
When you visit the treasurer, you can either take out or grant a loan, depending on the state
of your finances.
30
Town type Characters Visit possible if:
Normal town General
Treasurer
Reputation neutral or higher
Reputation neutral or higher
Governor town Governor
General
Treasurer
Governor’s daughter
Your wife
Always
Reputation neutral or higher
Reputation neutral or higher
Reputation friendly (maximum)
Always
Seat of the viceroy Viceroy
General
Treasurer
Reputation friendly (maximum)
Reputation neutral or higher
Reputation neutral or higher
Page 32
The Governor
The governor has three important functions:
1. If your reputation with his nation is unpopular or hostile, you can win him over by
paying him a sum of money. Your reputation will then return to “neutral”.
2. If your reputation with his nation is neutral or higher, he can assign missions to
you and you can own a building permit in the town.
3. If your reputation with his nation is neutral or higher and that nation is at war, he
can issue you with a Letter of Marque against the enemy nation. A Letter of
Marque allows you to attack the enemy nation, without this damaging your
reputation with the other nations that are not involved in the war.
The Governor’s Daughter/Your Wife
Once you have reached a certain rank, you may flirt with the governor’s daughter and, after
several visits, you may ask for her hand in marriage. You should visit your wife from time to
time because she may have some interesting information for you.
The Viceroy
Only the viceroy can assign you a mission to capture an enemy town on behalf of his nation
when it is at war. For more information, see section 12.3 Viceroys and Capturing Towns
7.6 The Master Builder’s
If you want to buy a building permit to construct buildings in a town, you have to visit the
master builder. If you already have a building permit, the Construction Menu will be
displayed when you visit the master builder (see section 10 Construction and Production).
As a rule, you can buy a building permit in any town. However, the more building permits
you have, the more expensive it is to buy another.
You must also prove that you are committed to ensuring the welfare of the town before the
master builder will grant you a building permit.
This means that your previous trading record must indicate that you have the interests of the
town at heart. See section 10.1 Buying a Building Permit.
7.7 The Church
At the church, you can have your convoys blessed to boost your crew’s morale, for example.
If you make donations to the church, new decorations can be bought and this will improve
your reputation with the nation to which the town belongs.
7.8 The Market
Each town has several market stalls. Click on any market stall to organize a feast or to meet
someone to transfer goods. These characters only appear if you have already accepted a
mission at the inn or from the governor.
A feast improves both your trading record and the town’s wealth. Your reputation with the
nation to which the town belongs also improves.
31
Page 33
8 SHIPS AND CONVOYS
There are 16 ship types in Port Royale 2. Certain nations prefer certain ship types.
8.1 Ships
You can buy ships in the shipyards of governor towns. You can also capture ships. The nation
to which the town belongs determines which ships are available in the shipyard. Note also
that the large warships are not available.
Ships in the Harbor
Whey you buy a ship or capture one from a convoy, it is anchored in the town’s harbor. You
then have the option of adding the ship to a convoy or using it to assemble a new convoy by
hiring a captain at the inn. You can also have it repaired or sell it in a large shipyard.
To see which ships are in the harbor, simply click on the waters in the harbor. A list of the
ships that are lying at anchor is then displayed. However, individual ships that are part of
convoys are not displayed!
Data on the selected ship
and daily maintenance costs
Click on a ship to select it
Alternatively, you can click directly
on an individual ship. This displays
both the list of anchored ships and
the selected ship.
Basic Costs
When you buy a ship, it is anchored in the harbor and you can then add it to a convoy. Each
ship automatically has a crew, which you can discharge or keep. The crew steers the ship on
voyages and protects it when it is in the harbor. This means there are basic costs involved in
maintaining each ship.
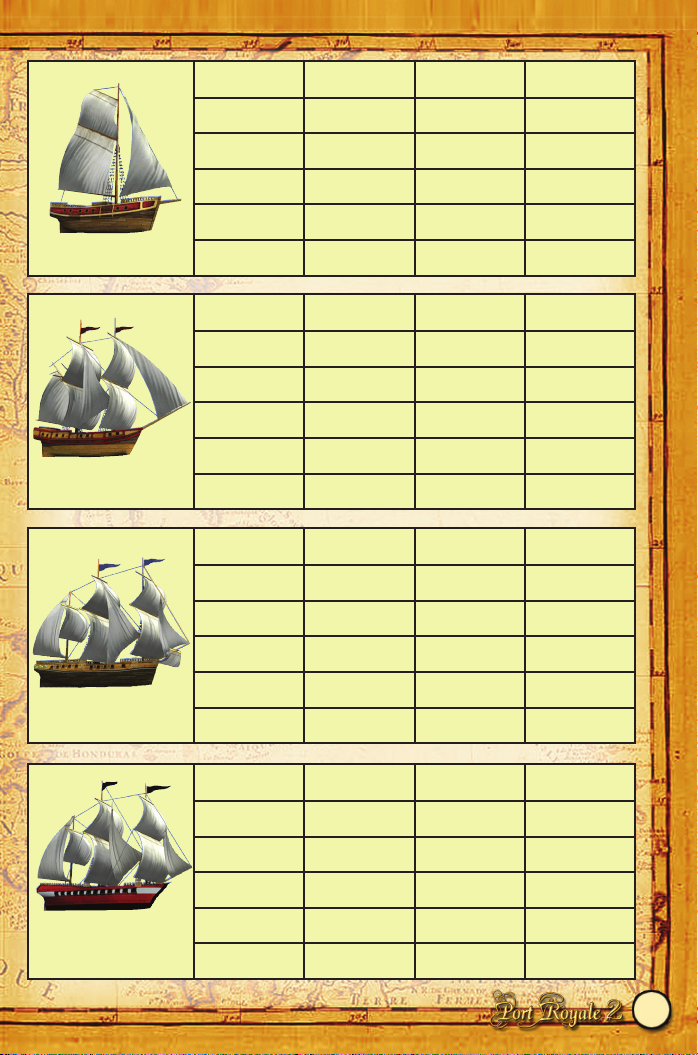
Ship Types
An overview of all available ship types is provided below.
32
NATION
LOAD CAP.
IN BARRELS
AGILITY IN % DRAFT
All 60 100 Shallow
MASTS
MIN SPEED
IN KN.
MAX SPEED
IN KN.
CANNONS
2 6 10 8
PRICE
IN GC
STABILITY
COSTS
PER DAY
BOARDING
CREW
10,000 5 20 30
Pinnace
Page 34
33
NATION
LOAD CAP.
IN BARRELS
AGILITY IN % DRAFT
All 60 100 Shallow
MASTS
MIN SPEED
IN KN.
MAX SPEED
IN KN.
CANNONS
1 6 11 14
PRICE
IN GC
STABILITY
COSTS
PER DAY
BOARDING
CREW
19,000 5 30 40
Sloop
NATION
LOAD CAP.
IN BARRELS
AGILITY IN % DRAFT
All 80 95 Shallow
MASTS
MIN SPEED
IN KN.
MAX SPEED
IN KN.
CANNONS
2 5 11 16
PRICE
IN GC
STABILITY
COSTS
PER DAY
BOARDING
CREW
27,000 8 50 50
Brig
NATION
LOAD CAP.
IN BARRELS
AGILITY IN % DRAFT
All 80 90 Shallow
MASTS
MIN SPEED
IN KN.
MAX SPEED
IN KN.
CANNONS
3 5 12 20
PRICE
IN GC
STABILITY
COSTS
PER DAY
BOARDING
CREW
36,000 8 60 60
Barque
NATION
LOAD CAP.
IN BARRELS
AGILITY IN % DRAFT
Pirates Only 80 90 Shallow
MASTS
MIN SPEED
IN KN.
MAX SPEED
IN KN.
CANNONS
3 5 13 24
PRICE
IN GC
STABILITY
COSTS
PER DAY
BOARDING
CREW
36,000 * 8 60 80
Pirate Barque
Page 35
34
NATION
LOAD CAP.
IN BARRELS
AGILITY IN % DRAFT
All 200 80 Medium
MASTS
MIN SPEED
IN KN.
MAX SPEED
IN KN.
CANNONS
3 4 10 16
PRICE
IN GC
STABILITY
COSTS
PER DAY
BOARDING
CREW
40,000 12 40 80
Flute
NATION
LOAD CAP.
IN BARRELS
AGILITY IN % DRAFT
Holland 250 70 Medium
MASTS
MIN SPEED
IN KN.
MAX SPEED
IN KN.
CANNONS
3 5 10 8
PRICE
IN GC
STABILITY
COSTS
PER DAY
BOARDING
CREW
50,000 18 40 100
Trading Flute-Ship
NATION
LOAD CAP.
IN BARRELS
AGILITY IN % DRAFT
All 140 80 Shallow
MASTS
MIN SPEED
IN KN.
MAX SPEED
IN KN.
CANNONS
3 5 12 22
PRICE
IN GC
STABILITY
COSTS
PER DAY
BOARDING
CREW
60,000 14 100 80
Corvette
NATION
LOAD CAP.
IN BARRELS
AGILITY IN % DRAFT
All 160 80 Medium
MASTS
MIN SPEED
IN KN.
MAX SPEED
IN KN.
CANNONS
3 3 11 26
PRICE
IN GC
STABILITY
COSTS
PER DAY
BOARDING
CREW
70,000 15 100 100
Frigate
Page 36
35
NATION
LOAD CAP.
IN BARRELS
AGILITY IN % DRAFT
France 120 85 Shallow
MASTS
MIN SPEED
IN KN.
MAX SPEED
IN KN.
CANNONS
3 5 14 32
PRICE
IN GC
STABILITY
COSTS
PER DAY
BOARDING
CREW
100,000 16 150 120
Military Corvette
NATION
LOAD CAP.
IN BARRELS
AGILITY IN % DRAFT
England 140 85 Medium
MASTS
MIN SPEED
IN KN.
MAX SPEED
IN KN.
CANNONS
3 5 13 40
PRICE
IN GC
STABILITY
COSTS
PER DAY
BOARDING
CREW
120,000 16 150 120
Military Frigate
NATION
LOAD CAP.
IN BARRELS
AGILITY IN % DRAFT
Spain 180 75 Deep
MASTS
MIN SPEED
IN KN.
MAX SPEED
IN KN.
CANNONS
3 4 10 36
PRICE
IN GC
STABILITY
COSTS
PER DAY
BOARDING
CREW
120,000 18 100 120
Galleon
NATION
LOAD CAP.
IN BARRELS
AGILITY IN % DRAFT
Holland 140 75 Deep
MASTS
MIN SPEED
IN KN.
MAX SPEED
IN KN.
CANNONS
4 4 12 40
PRICE
IN GC
STABILITY
COSTS
PER DAY
BOARDING
CREW
140,000 * 20 200 140
Carrack
Page 37
* These ships cannot be bought in the large shipyards!
36
NATION
LOAD CAP.
IN BARRELS
AGILITY IN % DRAFT
France 160 75 Deep
MASTS
MIN SPEED
IN KN.
MAX SPEED
IN KN.
CANNONS
3 5 12 40
PRICE
IN GC
STABILITY
COSTS
PER DAY
BOARDING
CREW
160,000 * 22 200 160
Caravel
NATION
LOAD CAP.
IN BARRELS
AGILITY IN % DRAFT
Spain 160 60 Deep
MASTS
MIN SPEED
IN KN.
MAX SPEED
IN KN.
CANNONS
3 4 13 46
PRICE
IN GC
STABILITY
COSTS
PER DAY
BOARDING
CREW
180,000 * 24 200 180
War Galleon
NATION
LOAD CAP.
IN BARRELS
AGILITY IN % DRAFT
England 170 50 Deep
MASTS
MIN SPEED
IN KN.
MAX SPEED
IN KN.
CANNONS
3 3 14 50
PRICE
IN GC
STABILITY
COSTS
PER DAY
BOARDING
CREW
200,000 * 26 300 200
Ship of the Line
TIP
· Each nation has two ships it prefers to use.
· The prices shown vary depending on your reputation with the nation from which you are
buying the ship.
·The price you get for selling a ship is much lower than the purchase price.
·Some ships cannot be bought in the large shipyards.
Page 38
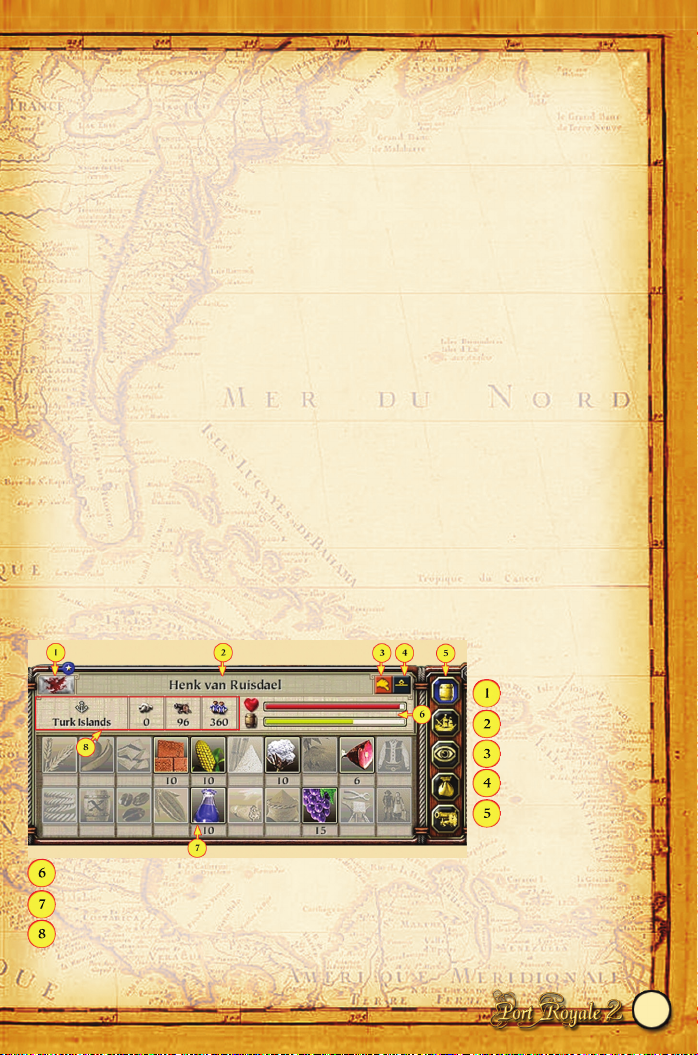
8.2 Convoys
If you want to take goods, weapons or boarding crew on board your ships or if you simply
want to set sail, you need a convoy. A convoy always consists of between 1 and 10 ships and,
most importantly, must have a captain.
You generally use a convoy the same way you use an individual ship. For example, if you
want to load goods onto your convoy, you don’t have to specify the ship on which the goods
are to be stowed. The individual ships in the convoy are only important when you are
selecting escort ships and during sea battles. Otherwise, you can always treat them as one
ship.
A convoy is always displayed as one ship on the sea chart and in the harbor. The name of the
convoy, which is displayed above the convoy in the town, tells you straight away that this is a
convoy rather than an individual ship.
Assembling a New Convoy
You assemble a convoy by hiring a new captain. To do this, go to the inn in the town where
your ship is anchored in the harbor and approach a captain. Then select the ship you want him
to captain. Now you have a new convoy.
Selecting a Convoy
Click on a convoy to select it. You can also switch between convoys using the convoy buttons
at the top of the screen. Alternatively, you can select convoys from the convoy list. When you
have selected a convoy, it appears below in the selection screen. You can then switch between
the various displays for the convoy using the selection buttons to the right.
Goods List
Your flag
Convoy name
Crew morale
Captain’s rank
Convoy selection
buttons
Condition of the convoy (average of all ships) and cargo in percent
Goods on board in barrels
Convoy’s current action, current speed, number of cannons and size of boarding crew
37
Page 39

Ships List
Click here to define
the ship as an
escort ship.
Data on the
selected ship.
Click on a ship to
display its data.
Condition, number of cannons, and boarding crew.
Overview and Costs
Name and
experience of
captain (see section
8.3 Captains)
Total costs of the convoy and individual costs for upkeep of ships,
captain and boarding crew
Total capacity of convoy and crew morale (see section 8.4 Crew)
Cutlasses, muskets and ammunition
Trade Route
See section 11 Trade Routes
Attack Mode
Click here if the
convoy is in the harbor
and you want it to
protect the harbor.
Click here if a
convoy is not in a town
but you want it to attack
a town.
38
Page 40
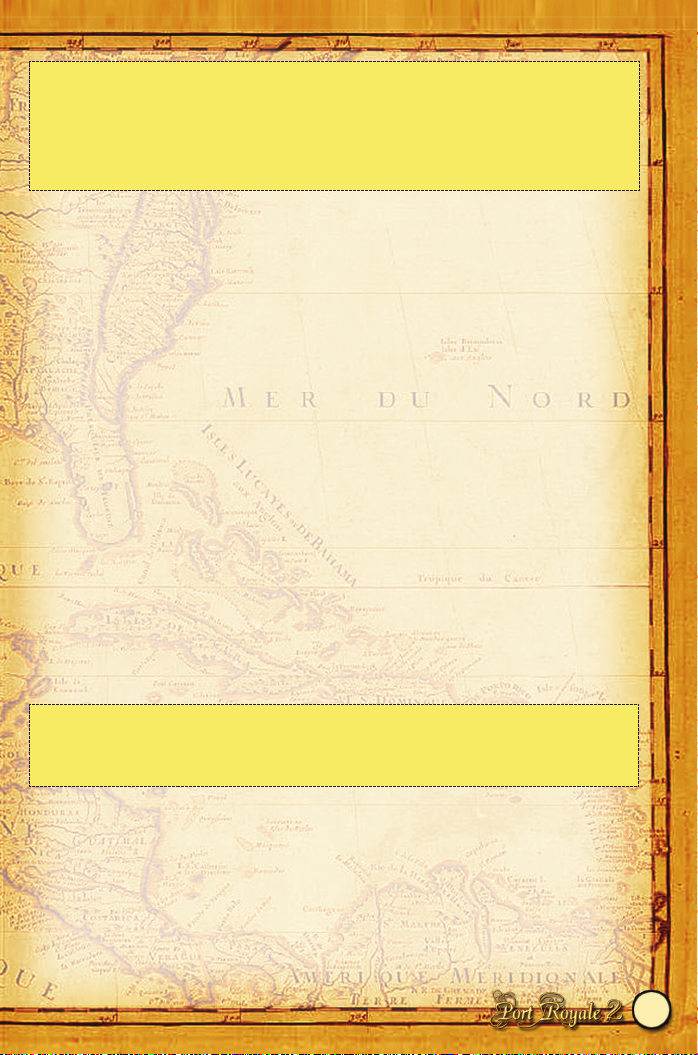
Transfer Between Convoys and Harbors
When you assemble a new convoy, it consists of only one ship at first. If you have other ships
in the harbor that you want to add to the convoy, simply select the convoy and then right-click
on the free ship or on the harbor.
This opens a dialog that displays the ships in the convoy and the free ships in the harbor. You
can then click on a ship and drag it from the harbor to the convoy or from the convoy to the
harbor.
Transfer Between Two Convoys
If you have two convoys in the harbor, you can move goods, cargo, ships, or captains between
them. To do this, click on one of the convoys and then right-click on the other convoy.
Escort Ships
When you have a convoy, you can define which ship is to be an escort ship in the ships list.
The following points apply to escort ships:
! Only escort ships take part in sea battles.
! When you take weapons and a boarding crew on board your convoy, the escort ships are
armed and manned before the other ships.
! When you define escort ships, you must make sure to take enough boarding crew, cannons,
ammunition and cutlasses on board your convoy. These are distributed evenly among all
escort ships. It would be too bad if you only discovered during a sea battle that none of your
escort ships were properly armed and manned!
Docking Unnoticed
If a nation is hostile to you, your convoy cannot anchor openly in its harbors for all to see.
However, if you dispatch a convoy to a hostile nation, it would be unwise of your captain to
wait outside the town for further instructions from you, since this could be dangerous
(military convoys!).
Therefore, the captain will automatically enter the town secretly by disguising your ship and
flag. The convoy can then anchor as normal in the harbor but cannot trade with the town.
39
TIP
· If a convoy is protecting a harbor, the Encounter dialog box opens (see section 5.4 Sea
Battles) as soon as the harbor is attacked.
· If you activate the “Attack Towns” option, the Encounter dialog box opens when you enter
a town (see section 5.5 Attacking a Town).
TIP
Cannons take up a lot of space (3 barrels per cannon) and boarding crew is very expensive (5
gold coins per man per day). You should therefore only take as many cannons and men as
you have room for on board your escort ships.
Page 41

In the convoy selection window, a special symbol indicates that the captain has managed to
dock unnoticed in the town.
Wear and Tear on Ships
All ships in a convoy experience a certain amount of wear and tear during sea voyages. For
this reason, you need to repair your convoys on a regular basis. A ship can no longer achieve
its maximum speed once the condition of its hull drops to 60%, (the sails are automatically
mended by the crew).
8.3 Captains
All convoys require a captain. You can hire a captain in any of the harbor inns. Captains
usually have varying degrees of experience in navigation, combat, and trade. The more
experience they have, the more expensive they will be.
The captains who offer their services are usually very inexperienced. Later in the game, when
you have reached a higher rank, you will also encounter more experienced captains. It may
then be worth visiting different inns to find a captain.
Navigational Experience
Your captain will gain navigational experience while your convoy is at sea. When a captain
reaches the maximum experience level, the convoy’s speed increases by 10%.
Trading Experience
Captains gain trading experience by trading in the towns on a trade route. When they reach
the maximum experience level, they receive a 5% bonus on the purchase price of goods.
Combat Experience
Captains gain combat experience by boarding ships and destroying harbor cannon towers.
The more combat experience a captain has, the more accurate the aim of the ship’s cannons
will be.
40
TIP
A convoy that has docked unnoticed cannot be attacked. It also allows you to enter a town
where you do not own a warehouse. This allows you to visit a governor and bribe him, for
example.
TIP
· A captain can have 0-5 experience points in each area. The more experience points a captain
has in an area, the longer it takes to gain another point.
· If a captain has at least 4 experience points, he can automatically operate a trade route.
Page 42
8.4 Crew
Boarding Crew
You don’t ever need to worry about having sailing crew to steer your ships. Each ship
automatically has a minimum crew, which is included in the basic costs for the upkeep of the
ship.
The crew that you can hire in the Cargo Trade window is only the additional boarding crew
that you use to board other ships during sea battles. Note also that the time required for
reloading the cannons is reduced if your boarding crew is smaller than the number of cannons
on board.
Morale
The morale of a convoy’s crew always influences their behavior in combat. If morale is too
low, the crew will even refuse to cast off.
The crew morale dwindles:
• on long voyages with insufficient shore leave
• when they suffer losses and casualties in sea battles
• if you discharge a sailor
Morale is boosted:
• as long as the convoy is anchored in a harbor
• if the convoy is blessed in a church
• if they win sea or land battles
The lower the crew morale, the longer it takes the crew members to reload cannons during sea
battles and the less damage they inflict when they board an enemy ship.
9 TRADING GOODS
In Port Royale 2, 19 different goods are transported between the towns. Since not all goods
can be produced in all towns, there is automatically a buoyant market for goods traded by
trading convoys.
Pricing
Each town has a certain supply of goods, which you can display by selecting the docks at the
town’s harbor (see section 7.2 The Docks).
41
TIP
A boarding crew is of no advantage on trade ships because only escort ships take part in sea
battles (with the exception of land attacks). Having a boarding crew on a trade route convoy
also adds nothing except costs.
Page 43

Pricing in Port Royale 2 is based on supply and demand, as well as on the reputation you
enjoy with the nation in question. Demand for goods results from the consumption of these
goods by the town’s inhabitants and businesses (if these require raw materials).
There is also additional demand for colonial wares in governor towns because these goods
are exported to Europe (see pg. 64 Imports and Exports).
The greater the demand for a good, the higher its price. Conversely, the greater the supply of
a good in the market, the lower the price.
How to Trade
If you want to trade goods with a town, click on the docks at the harbor.
You can only ever trade goods between a town and a warehouse or between a town and a
convoy. You can also transfer goods between a warehouse and a convoy if you have both a
convoy and a warehouse in a town.
Here you specify the goods you
want to trade (see tips on unit size
below).
Quantities of goods in the convoy
Click here to buy goods
Quantities of goods in the town
Click here to sell goods
Quantities shown in red indicate
that the good is scarce in the town
(see below).
You can also click on a good to
trade using a scrollbar. You can
buy or sell goods depending on the
direction in which you scroll.
Trade between town and
warehouse
Trade between town and convoy
Trade between warehouse and convoy
Goods/Cargo switch
42
Page 44

Scarce Goods
If a good is scarce in a town, its quantity is shown in red.
The following points apply to these goods:
• Scarce goods are relatively expensive.
• If you buy up scarce goods, this damages your reputation with the nation to which the town
belongs (it may drop to “unpopular”).
• If you deliver goods to a town where they are in short supply, this improves your reputation
with the nation to which the town belongs.
• If goods are in very short supply (the supply will last less than 10 days), this diminishes the
citizens’ quality of life and therefore also the town’s status.
Types of Goods
Goods can be divided into five groups and all goods in a group share an average production
price. Some groups of goods can be produced in all towns, while others can only be produced
in colonial towns or governor towns (towns with a viceroy count as governor towns).
43
TIP
· The price shown on the buy/sell arrows always depends on the unit size.
· It doesn’t matter whether you buy or sell one good 10 times or buy or sell 10 goods once.
The total price is always the same.
· The larger the unit size, the higher the price of the good because, as a rule, the price
increases with each good that you buy.
ESSENTIAL GOODS (80 )
Wheat all towns
Fruit all towns
Wood all towns
Bricks all towns
RAW MATERIALS (100 )
Corn colonial towns
Sugar colonial towns
Cotton colonial towns
Hemp colonial towns
FINISHED GOODS (300 )
Meat governor towns requires corn
Garments governor towns requires cotton
Rope governor towns requires hemp
Rum governor towns requires sugar
Page 45

Imports and Exports
Import goods cannot be produced in the Caribbean. Instead, transport convoys transport them
from Europe to the governor towns. Settlers are transported to the Caribbean in the same
way. They are dropped off in the governor towns and traders then transport them from there
to all the other towns.
Transport convoys take colonial goods from governor towns with them when they travel back
to Europe. As a result, there is always a very high demand for colonial goods in governor
towns. You can use the following rule of thumb: Half of the colonial goods produced are
consumed in the towns of the New World. The other half is destined to be transported to
Europe.
Balance of Goods
A town can only ever produce 5 goods. These are divided into the following groups:
• Each colonial town can produce 2 essential goods, 2 raw materials and 1 colonial good.
• Each governor town can produce 3 essential goods and 2 finished goods.
Since each town usually needs all of these goods to keep its citizens as happy as possible and
will therefore pay a good price for the goods it needs, there is a bustling goods trade between
the towns. It may happen that a governor town can produce finished goods but cannot
produce raw materials. If this is the case, it must source these in the colonial towns.
On the other hand, colonial towns require finished goods and import goods, which they can
obtain from governor towns.
Trading Tips
• The lower the supply (stocks of a good in the town) and the higher the demand, the higher
the price will be.
• The better your reputation with a nation, the lower the price at which you can buy goods in
the towns belonging to that nation.
44
COLONIAL GOODS (150 )
Coffee colonial towns requires tools
Cocoa colonial towns requires tools
Dyes colonial towns requires tools
Tobacco colonial towns requires tools
IMPORT GOODS (500 )
Spices governor towns
Wine governor towns
Tools governor towns
Page 46

• You should only buy goods in the towns where they are produced.
• The fastest way to get your hands on some gold is to buy colonial goods and raw materials
in colonial towns and sell them in governor towns. Buy finished goods and import goods
there and transport them to colonial towns.
• Establish trade routes as soon as possible. They may be very lucrative and could reduce your
workload significantly (see section 11 Trade Routes).
• Events like a famine push up the demand for certain goods in a town. You can then sell
more goods there at a higher price.
• Prices are calculated in real time. If a transport convoy has just docked in the town, prices
for importing goods are low. You should take advantage of this situation before the local
traders do.
10 CONSTRUCTION AND PRODUCTION
10.1 Buying a Building Permit
Before you can construct buildings in a town, you have to buy a building permit from the
master builder (see section 7.6 The Master Builder’s).
As a rule, you can buy a building permit in any town. However, the more building permits
you have, the more expensive it is to buy another. You must also prove that you are
committed to ensuring the welfare of the town, before the master builder will grant you a
building permit. This means that your previous trading record must indicate that you have the
interests of the town at heart.
Your trading record in a town always improves when you deliver goods that are urgently
required there (in this case, the quantities of the goods are shown in red in the Trade window).
You can check your current trading record in a town at any time in the town information. To
display the town information, click on the town name in the town view or on the sea chart. As
soon as your trading record reaches 100%, you can buy a building permit.
10.2 What You Can Build
To display the Construction menu, click on the master builder’s building in the center of the
town or press “B”.
The Construction menu is divided into three sections - Buildings, Businesses and Community
Buildings. Choose a section and click on the building you want to construct.
45
TIP
· You can also improve your trading record in a town by donating money to the church or to
the general, or by organizing feasts (at the marketplace)!
· The more building permits you have, the longer it takes to improve your trading record in
other towns.
Page 47
Click on the building you want to construct.
Buildings
Businesses
Community buildings
Consult the master builder.
Land and construction costs
Each building requires bricks and wood. These goods are taken from your warehouse.
Any goods you don’t have are automatically purchased from the town.
You need building materials to construct each building and gold to pay for the construction
work and the construction site. If you have a warehouse in the town, the building materials
are taken directly from the warehouse. Any building materials you don’t have are
automatically purchased from the town if they are available there.
If you don’t have a warehouse in the town, the display shows which goods are available on
your selected convoy, provided that this convoy is anchored in the harbor.
Once you have all the necessary building materials and enough cash, construction can begin.
All the areas that are available for building in the town are highlighted and you can select a
construction site by positioning your mouse pointer over a free area. Then left-click to
confirm that you want to build there. Construction of the building then begins.
Progress towards completion of the building is displayed on a progress bar.
46
TIP
· You should try to save space when you construct buildings because, at some stage, free
spaces for building will become scarce.
· You have to leave enough space between buildings for paths and streets.
· Businesses that farm the land can be joined together to form large businesses (see below).
Page 48

Buildings
The first building you always have to construct in a town is the warehouse. It provides you
with an overview of your residential buildings and businesses in the town and is also used to
store the goods you produce (see section 7.1 The Warehouse). It is also very important to
build a residential area. Unlike other buildings, no construction period is required for a
residential area. All you do is provide the construction material for later inhabitants, who will
initially live in tents, but will eventually construct magnificent homes for themselves. The
extent to which a residential area is developed depends on how old it is and on the status of
the town.
47
Trees 1,000 Trees enhance the appearance of the town
and make the inhabitants happy!
Warehouse 30
30
10,000
15 Days
The warehouse provides storage space for
your goods and an overview of your
residential buildings and businesses in the
town. You can also instruct the
storekeeper to buy or sell goods
automatically.
Residential
area
30
30
5,000
No Construction
Period
Each residential area has space for 120
tenants. You can only take new settlers
into the town if there is sufficient living
space for them. Each settler family that
finds work in the town will give you 4
tenants. The rent paid by each tenant is 1
per day.
Hospital 60
60
20,000
30 Days
Building a hospital is a noble gesture. It
improves the quality of life in the town
and your reputation with the nation to
which the town belongs and has the
practical effect of reducing the risk of
plague in the town.
School 60
60
20,000
30 Days
You will also be held in high esteem if
you build a school. A school improves the
quality of life in the town.
Page 49
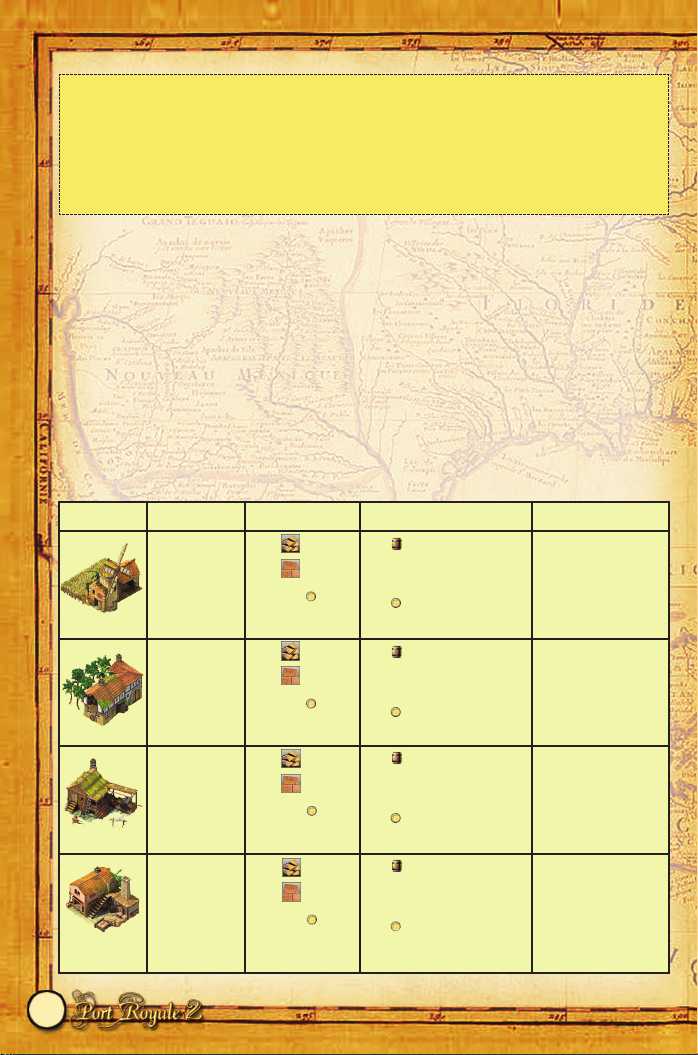
Businesses
Each town can produce 5 different goods. You construct businesses the same way you
construct other buildings, with one exception: You can construct different businesses that
have crop fields (wheat, cotton and so on) next to each other without any spaces between
them. You can combine up to four businesses of this kind (for example, four wheat farms) in
this way. This gives you large businesses. Advantage: You save valuable building space and
the town’s appearance is enhanced.
Each business can employ 30 workers and should do this to operate effectively.
A business produces a certain quantity of goods each day. Some businesses rely on raw
materials. If these raw materials are not available, production stops.
48
TIP
· If the amount of living space in the town exceeds the number of tenants, this means that not
all residential areas have a full number of tenants. To avoid this, don’t build too many
residential areas at once.
· Build exactly one residential area for each business you set up in the town. This ensures
that each residential area fills up with tenants very quickly and you can also clean up very
nicely on the rent.
BUSINESS COSTS PRODUCTION CONSUMPTION
Wheat farm 30
30
10,000
15 Days
2.5 Wheat
average production price:
80
-
Fruit farm 30
30
10,000
15 Days
2.5 Fruit
average production price:
80
-
Sawmill 30
30
10,000
15 Days
2.5 Wood
average production price:
80
-
Brickworks 30
30
10,000
15 Days
2.5 Bricks
average production price:
80
-
Page 50
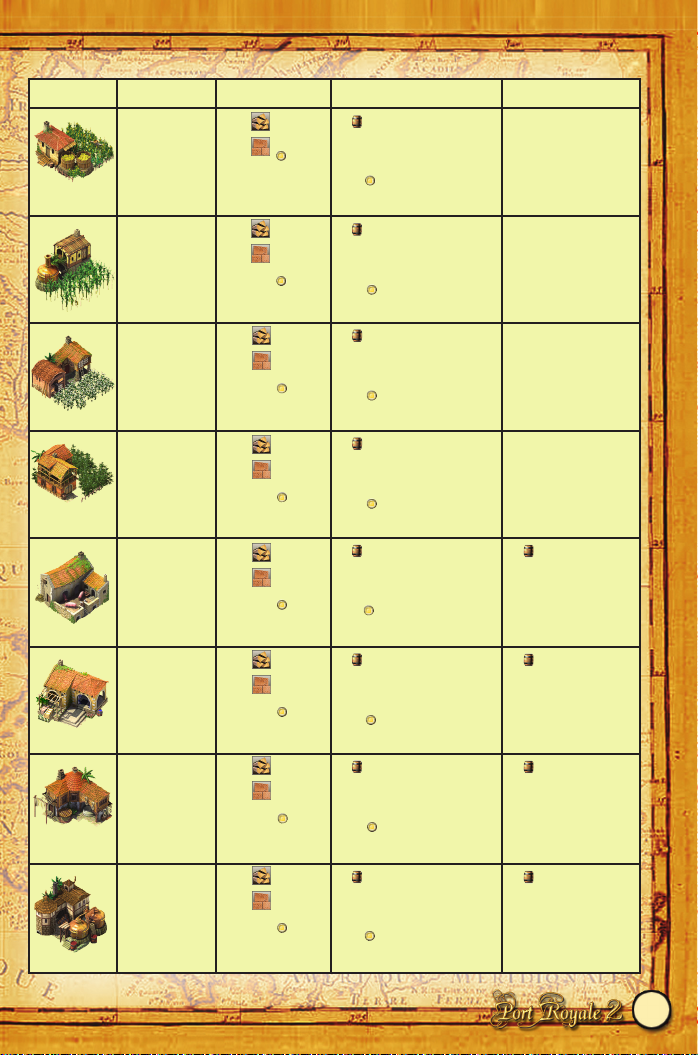
49
BUSINESS COSTS PRODUCTION CONSUMPTION
Corn farm 30
30
10,000
15 Days
2 Corn
average production price:
100
-
Sugar cane
farm
30
30
10,000
15 Days
2 Sugar
average production price:
100
-
Cotton farm 30
30
10,000
15 Days
2 Cotton
average production price:
100
-
Hemp
plantation
30
30
10,000
15 Days
2 Hemp
average production price:
100
-
Cattle farm 60
60
20,000
30 Days
1 Meat
average production price:
300
1 Corn
Weaving mill 60
60
20,000
30 Days
1 Garments
average production price:
300
1 Cotton
Ropery 60
60
20,000
30 Days
1 Rope
average production price:
300
1 Hemp
Rum
distillery
60
60
20,000
30 Days
1 Rum
average production price:
300
1 Sugar
Page 51

50
BUSINESS COSTS PRODUCTION CONSUMPTION
Coffee
plantation
30
30
10,000
15 Days
2 Coffee
average production price:
150
0.2 Tools
Cocoa
plantation
30
30
10,000
15 Days
2 Cocoa
average production price:
150
0.2 Tools
Dye
plantation
30
30
10,000
15 Days
2 Dyes
average production price:
150
0.2 Tools
Tobacco
plantation
30
30
10,000
15 Days
2 Tobacco
average production price:
150
0.2 Tools
Page 52
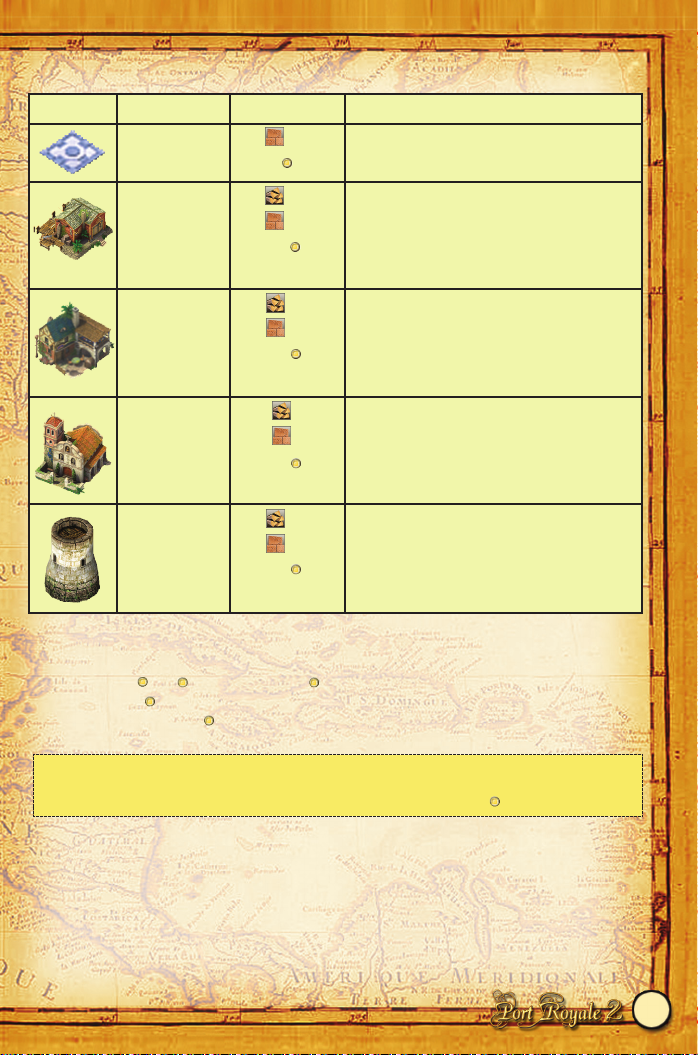
Community Buildings
10.3 Maintaining Buildings
The residential buildings and businesses you construct incur daily maintenance costs:
• Businesses: 50 + 5 per worker = 200 for a full complement of workers
• Warehouses: 50
• Residential buildings: 50
10.4 Workers and Production
Where do new workers come from?
Each business can employ 30 workers, which requires 30 settlers. As soon as new workers are
required in a town, settlers who are waiting at the harbor in the town can be converted into
workers and citizens. Each converted settler increases the number of workers by 1 and the
number of citizens by 4.
51
PROPERTY COSTS NOTE
Squares 30
1,000
Squares enhance a town’s appearance.
Small shipyard 60
60
20,000
30 Days
Can only be constructed in your own town
(see section 6.7 Your Own Town). You can
always repair ships free of charge in your
own shipyard! Can only be built in a
particular location.
Inn 60
60
20,000
30 Days
Can only be built if you own the town. Is
required if there are more than 500
inhabitants. Must be built in a particular
location.
Church 120
120
40,000
60 Days
Can only be built if you own the town. Is
required if there are more than 2,000
inhabitants. Must be built in a particular
location.
Defensive
tower
60
60
20,000
30 Days
Can only be built if you own the town.
Defends the harbor in your town. Must be
built in a particular location.
TIP
· Each warehouse has storage space for 800 barrels of goods. If you store more goods in a
town than you have storage space for in your warehouses, this costs 1 per barrel per day.
Page 53
If you ever need additional settlers, that is, if you do not have enough workers for your
businesses, you should set off straight away to look for settlers in other towns. Your first port
of call should be the governor towns because settlers from Europe are dropped off there
before they are dispersed throughout the surrounding towns.
Boom and Recession
If a town’s status drops to “Stagnation”, or if the town has been recently attacked by pirates
or buccaneers, then no settler will want to set foot in the town. This means that you won’t be
able to employ any new workers there.
If the town’s wealth continues to drop, workers and citizens will migrate elsewhere. They are
converted into settlers and wait in the harbor for a passage to a better life.
However, the town’s status can also have a positive effect on production. If the status is
“flourishing economy” or higher, your businesses receive a bonus of up to 15% on wage
costs. You should therefore take the matter of the quality of life the towns in which you
produce goods very seriously. Ensure that these towns have a particularly good supply of
goods!
Goods and Raw Materials
All of the goods produced in your businesses end up in the warehouse in your town. If a
business requires raw materials, these must be available in the warehouse at the beginning of
each day, or no goods can be produced for the rest of the day.
Production Problems
All goods have specific production costs, which comprise the cost of maintaining the
building, wage costs and the cost of buying raw materials. Production costs may rise
dramatically if your businesses do not have enough workers. On the other hand, production
costs may drop if the town achieves a high status.
You should always keep a close eye on your production costs. As long as all your businesses
are operating efficiently, that is, as long as there are enough workers in the town and all
required raw materials are available, there is no cause for concern.
However, you should still pay close attention to events in the town, such as an outbreak of
plague.
But don’t worry! The Event window and the Chronicle keep you informed of all events and
describe the consequences of each.
52
TIP
· For an overview of the various status levels a town can have and the relevant conditions
and effects of these, see section 6.5 The Status of a Town.
Page 54

You also have the following options to help you monitor production costs:
Click on one of your businesses for an overview of that particular industry in the town.
Take note of the overview in the warehouse. You will be able to tell you at a glance if one of
your businesses is not operating efficiently.
In addition, all towns in which at least one businesses is not running at full speed are
displayed under “Production Problems” in the Log. The reason is also specified. From here,
you can go directly to the town in question.
10.5 Competition
Buying up Businesses
If your competitors’ businesses prove to be a fly in the ointment, you can buy up these
businesses. To do this, select the business you want to buy in a town in which you own a
warehouse and click on the “Buy” button. This displays the price at which you can buy the
business.
This price is usually very high. It depends on the price of goods in the town, your reputation
with the nation to which the town belongs and the number of businesses you already own in
the town, in the surrounding area, or in the whole of the Caribbean (monopoly position).
Ruining Businesses
You can ruin businesses belonging to local traders by ensuring permanently low prices at the
docks. If the price of a good is at a minimum for a long period of time, the producer stops
making a profit and immediately begins sacking workers. A business is demolished once a
certain number of workers (30) have been made redundant. You can keep an eye on this by
clicking on a competitor’s business and checking the number of workers employed there.
11 TRADE ROUTES
Once you have a couple of extra convoys to play around with, you probably won’t want to
look after all the trading yourself. But you don’t have to! You may be surprised by what your
captains can actually do.
As soon a the captain of one of your convoys has more than four experience points (see
section 8.3 Captains), you can hand over a trade route to him, which he will operate on his
own to trade in the individual towns. You can specify exactly how much decision-making
power your captain is to have. You can plan a route with very simple or very complex
instructions.
11.1 Leave it to the Captain!
For the simplest trade routes, you only have to instruct the captain to visit a couple of towns.
To do this, select a suitable convoy and click on the “Trade Route” button in the selection
menu. Then press the “Sea Chart” button to display a map on which you can plan the route.
53
Page 55

Click on towns to define a route.
You cannot select towns belonging
to enemy nations. After you select the
final town on the route, the route is
automatically plotted back to the first
town.
Activate the trade route.
If you then close the map and click on
“Edit”, the individual towns are
displayed again in a list.
Then click the box underneath to activate the trade
route. The convoy immediately begins to sail to the
first town. In each town, the captain looks around to
see which goods he can buy at a low price. He also
takes into account the other towns on the route that he
still has to visit. For example, he will not buy any
wood if wood is produced in all the other towns.
When the captain arrives in a town where he will get
a good price for the goods he is transporting, he
doesn’t waste any time in selling as much as possible,
as long as he can make a profit.
Some Hints and Tips
• Even if you select the simplest trade route, you can make a tidy profit. If this does not
happen, you probably haven’t selected the best towns for the convoy to visit.
• You can make profits quickly by including colonial towns that are located very close to one
another and produce as many different goods as possible, as well as governor towns on your
trade route.
• First, define a trade route with around 4 colonial towns and 1-2 governor towns.
• To start with, use only trade ships and don’t use any escort ships. To save space and cut
costs, don’t take any weapons or boarding crew on board.
• You can compare your costs with your profits at any time in the Log.
54
Page 56

11.2 A Little More Control
If you click on the “Goods” button in the list of towns, you can prevent your captain from
trading in certain goods.
The default setting is that your captain always trades in all goods, which generally makes
sense.
However, you can also instruct
him to ignore certain goods in
certain towns. To do this, click
on a town in the list and drag
goods you want your captain to
ignore into the “No trading”
area of the screen.
Click on a town in the list to make
detailed settings for the town.
Click on goods and move them
into the “No trading” area of the
screen to prevent trading in this
town.
Move all goods.
Activate manual trading in the town.
Click here to temporarily prevent any traders visiting the town, without deleting it from
the list.
Click here to allow the convoy to be repaired in this town.
11.3 Specific Instructions
You can give your captain specific instructions by telling him exactly which goods he should
buy and the quantities in which and prices at which he should buy them. To do this, click on
the “Manual Trade” button after you select a town.
Then drag the goods for which you want to make manual settings into the lower part of the
screen. A new window then appears on the right.
55
TIP
· Usually, there is no reason to prevent the captain from trading in certain goods. However, it
may be useful to do this in some cases, for example if you have set up several trade routes
and don’t want your captains to buy up each other’s goods.
Page 57
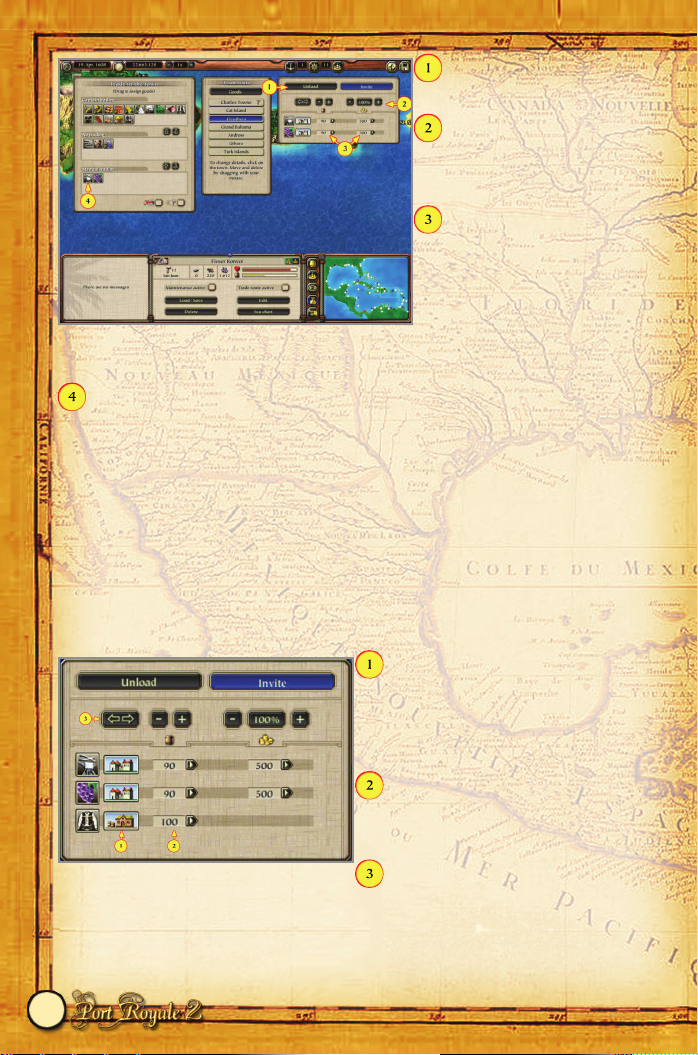
Choose between loading (buying)
and unloading (selling) here.
Set the price of all goods as the
standard production price or
change the price by 5%.
Load:
Here you specify the maximum
quantity to be bought and the
maximum price to be paid.
Unload: Here you specify the maximum quantity to be sold and the lowest price at which
the goods may be sold.
Click on goods symbols and move them to define a sequence for manual trading.
11.4 Using Your Warehouse for Trading
So far, you have only learned how to trade with a town. However, you can also transfer
goods to or from your warehouse. However, you have to set this option manually because
your captain cannot automatically use your warehouse for trading.
Distributing Produced Goods
If, for example, you produce garments in Vera Cruz, you can manually specify that the
convoy is to take garments from your warehouse on board. Your captain will then try to sell
these in other towns, without you having to make any additional settings.
Click here to switch between trade with the
town and transfer with the warehouse. You
can only do this if you have a warehouse
in the town.
The captain should take 100 barrels of
garments on board if they are available in
the warehouse.
Warehouse/Town switch for all manual
goods
56
Page 58
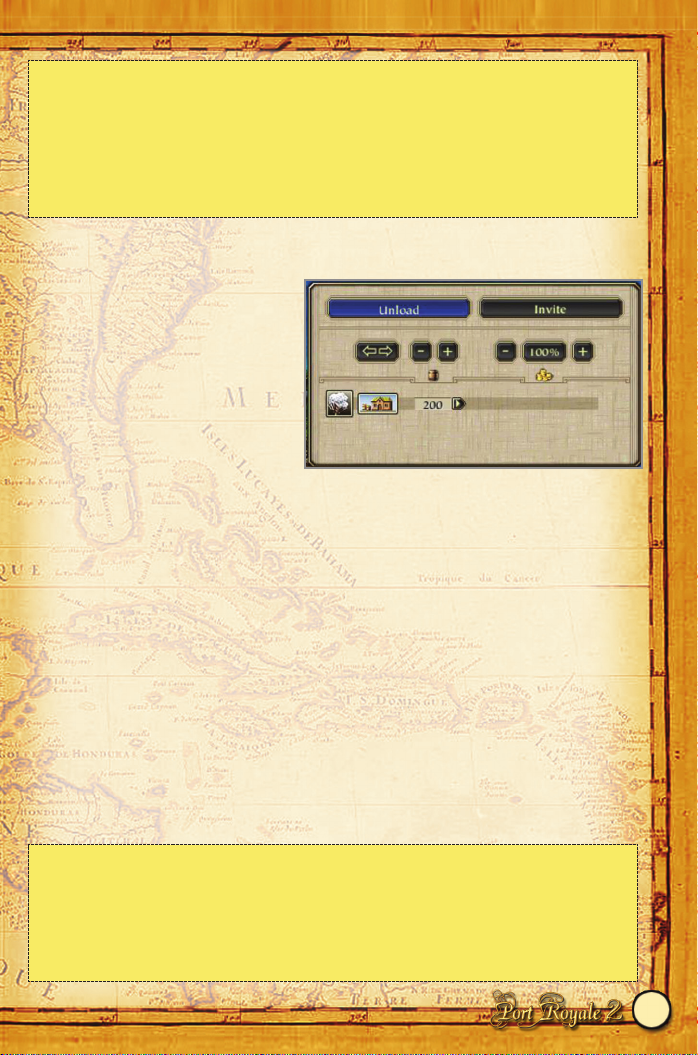
Finding Raw Materials
You can also make a manual setting for finding raw materials for your businesses. Task your
captain with buying the raw material in a
town where it is produced. Then move
the raw material to the warehouse in the
town where it is required.
Set the quantities so that you always
have some raw materials in reserve, even
if the captain doesn’t manage to find any
for you. The screen for moving a raw
material to the warehouse looks like this:
11.5 Attacks
Don’t forget that a convoy on a trade route can be attacked at any time. Military convoys
from hostile nations pose the greatest threat. But even if you don’t have a hostile relationship
with any nation, there is always a risk of an attack by pirates.
When your convoy is attacked, the captain automatically tries to avoid a battle. He won’t take
any risks. If he has any escort ships, he will try to use these to protect the trading ships.
The only aim of any attack on your trading ships is to “shave off” part of your goods. The
attacker will first and foremost try to corner the fleeing trading ships.
If your convoy has armed escort ships, this reduces the likelihood of your trading ships being
looted. However, you then run the risk of your escort ships being damaged or even sunk or
captured. Escort ships also increase costs.
You should therefore give some thought to the question of whether it is worth using escort
ships.
57
TIP
· There is another way you can include your warehouse in trading without making manual
settings for the trade route. You simply use the storekeeper to sell the goods produced in a
town to that town. You won’t make much profit by doing this but your costs will at least be
covered (unless the town is flooded with the goods). Since the goods are then available in
large quantities and at low prices in the town, the captain will buy more of these goods and
distribute them among all the towns on his trade route, without any manual settings for the
trade route being required.
TIP
· Your convoy will not be attacked if it has more cannons than the potential attacker. This
deterrent is particularly effective if you have 2 men to each cannon on board your escort
ships.
· If you activate automatic maintenance (see below), your captain will look after the cannons
and make sure you have enough sailors.
· The faster and more agile an escort ship, the lower the risk of it being looted.
Page 59

11.6 Maintenance and Repairs
While a convoy is on a trade route, the ships will be damaged due to normal wear and tear. In
each town, you can decide whether the shipyard can be used for repairing ships. This option
is activated by default in the first town on a trade route.
If you include escort ships in your convoy, these may also be damaged or lose cannons,
sailors and ammunition in battles. If you want your captain to ensure that all escort ships are
always “shipshape”, activate the “Maintenance active” option. This means that the captain
will check whether the escort ships are fully equipped with cannons, ammunition and
cutlasses in each town.
He will also make sure that they have 2 sailors to each cannon. This number of sailors is
enough to deter potential attackers, provided that you have enough space for cannons.
11.7 Trade Route Overview in the Log
The Log provides an ideal overview of the trade routes you have set up. Open the Log and
press the button with the sack of gold icon. You can then tell at a glance how profitably your
convoys are trading.
Use this scrollbar to select the
trade route you want to display.
Current storage capacity, towns
on the route, duration of last
route
Trade
: Total sales - total
purchases
Transfer: Average value of goods
unloaded into warehouse - value
of goods loaded on board from
warehouse
Costs:
Total costs (upkeep and wages, repairs, weapons and ammunition; see above)
Balance:
Trade + transfer - costs
Select convoy.
58
TIP
· The crew has shore leave while the ship is being repaired and this boosts crew morale.
Page 60

The average daily balance shows the
approximate daily profits the convoy has
recently made.
12 POLITICS AMONG THE NATIONS
12.1 War and Peace
During the period in which the game is set, the nations are constantly alternating between war
and peace. Pay close attention to the changing relationship between two nations. For example,
if one nation issues you with a Letter of Marque against another nation, it will be cease to be
valid as soon as the two nations make peace with one another. If you were to continue to
mount attacks, this would be a political gaffe to say the least.
Another effect of war is that the nations involved increase their numbers of military convoys
and occasionally sabotage towns (see section 12.4 Buccaneers).
12.2 A Nation’s Strength
Each nation uses military convoys to protect the waters around its towns. A nation normally
has approximately one military convoy per town and its strength is “normal”.
However, if war breaks out, the nation arms itself with more military convoys. As a result, its
strength rises to “strong”. The speed at which a nation arms itself at the beginning of a war
depends on how many convoys it has recently lost.
You can influence a nation’s strength in the following ways:
You can weaken a nation’s strength by tracking down and destroying its military convoys. But
beware: It’s best to obtain a Letter of Marque first!
You can hand over one or more of your convoys to a viceroy to increase his nation’s strength.
12.3 Viceroys and Capturing Towns
During a war, a viceroy may assign you a mission to capture enemy towns so that they can
then be counted among his nation’s towns. There is just one problem with this: The viceroy’s
nation must have a sufficient number of military convoys to protect the newly acquired towns.
In addition, the enemy nation must not be too strong.
59
TIP
· You can check a nation’s strength at any stage under “Nations” in the Chronicle. The
current number of military convoys is also specified there.
Page 61

The following requirements must be met before a viceroy will assign you a mission to
capture towns:
• His nation must be at war with another nation.
• The enemy nation must be “weak”, that is, it must have a small number of military
convoys.
• The viceroy’s nation must be “strong”, that is, it must have a large number of military
convoys.
12.4 Letters of Marque
During a war, governors may issue you with a Letter of Marque against enemy nations. This
means that you are then officially on his nation’s side in the war and can attack convoys and
towns belonging to the enemy nation without being regarded as a pirate.
This means:
• Your reputation improves with the nation that issued you with a Letter of Marque each
time you sink or board a ship belonging to the enemy nation.
• The same applies when you attack a town.
• Your reputation suffers with the nation you attack but remains the same with the other
nations.
12.5 Buccaneers
A standard military convoy may sometimes be converted into a buccaneer convoy during
wartime. The buccaneers that command these convoys have special names (many of which
are historically authentic) and have only one thing in mind: They want to sabotage their
enemy’s towns!
A buccaneer can choose from a broad range of possible acts of sabotage. These include
attacking a town, destroying stocks, poaching workers and much more (see the overview of
acts of sabotage carried out by buccaneers in section 5.3 Towns).
If you manage to catch these villains red-handed, you can attack their convoys. If you then
board their personal ships during sea battles, you will fight them in a duel (see section 5.7
60
TIP
· You must be careful when attacking a nation under the protection of a Letter of Marque.
Once the war is over, you may be in some serious trouble!
The nation you have offended will continue to be very displeased with you after the war has
ended and will try to hunt you down. However, if you defend yourself and capture and
or/sink their ships, this will be regarded as piracy because you no longer have a Letter of
Marque.
Remember too that piracy causes your reputation with all nations to drop significantly!
However, you can protect your reputation by forcing the attacking ships to flee or by fleeing
yourself.
Page 62
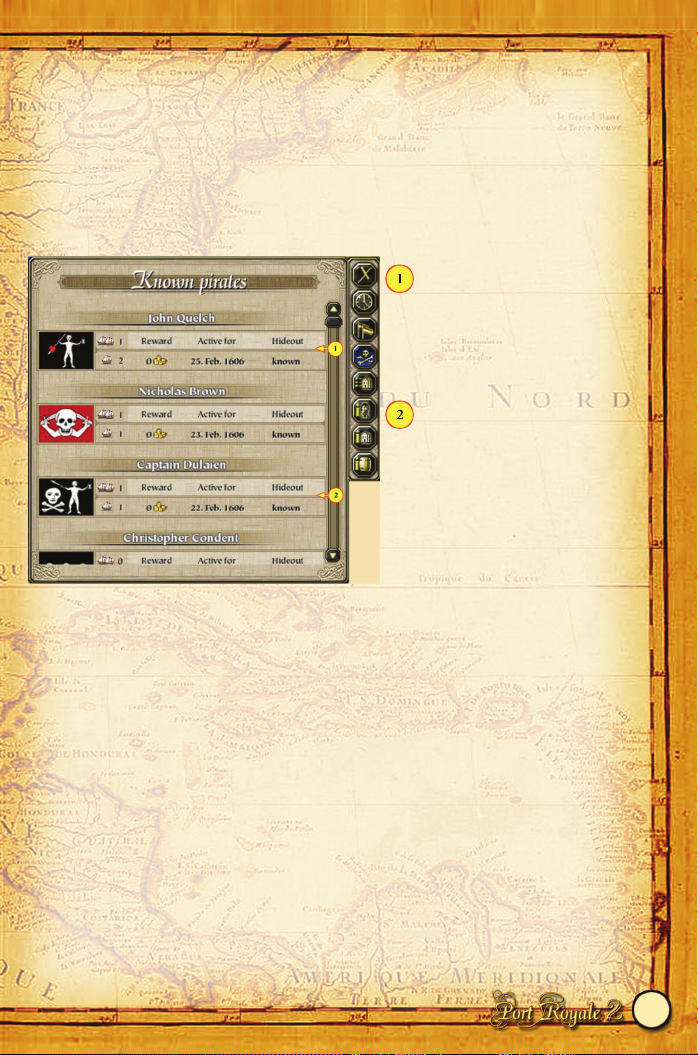
Duels) and you can take them hostage. You can then release hostages to the governors of the
buccaneer’s nation in return for a ransom.
You can also simply destroy a buccaneer convoy. The buccaneer also disappears from the
screen in this case.
12.6 Pirates
Active Pirates
This is a pirate hired by the
player. The share of the booty
shows the amount the pirate has
already earned. To collect your
share of the booty, you must meet
the pirate at the town’s inn.
This is a notorious pirate who has
7 ships, divided into 3 convoys. If
you destroy a pirate convoy, you
will receive a reward. It is
displayed here and can be
collected from any governor.
Pirate Hideouts
Pirates attack trading convoys all over the Caribbean from their pirate hideouts. All pirate
hideouts have a leader who is a notorious pirate.
Pirates have a lot of respect for military convoys and prefer to stay in waters that are not
heavily defended.
A pirate convoy returns to its hideout and drops off its booty once it has collected enough loot
or when it is too damaged to continue on its course. Each time booty is dropped off, the
hideout increases in size and more ships and convoys begin to operate from there.
Hunting for Pirates
Luckily, you can put a stop to these pirates by hunting down their convoys. This has a very
positive effect on your reputation with all nations. You will also receive a generous reward.
The Chronicle tells you which pirates are active at any given time and how much you have
earned so far as a reward. Then simply go to a governor you can trust and pocket your
reward.
61
Page 63
Destroying a Pirate Gang
At some point, when the pirates in a hideout have overstepped the mark, the location of their
hideout may be uncovered. You can then attack the hideout and put an end to the entire pirate
gang led by a specific pirate. Pirate hideouts that have been uncovered are shown on the sea
chart like towns. You can also attack them the same way you attack towns.
You can left-click on a pirate den to display information on ships and convoys that are at sea
or lying at anchor. If pirate ships escape when you attack their hideout, they will most
probably set up a new hideout at some stage.
13 REPUTATION AND RANK
13.1 Your Reputation with the Nations
You reputation with a nation will rise or fall depending on how you behave towards it. Your
reputation can rise through 4 levels:
Rising Reputation
The following actions have a positive effect on your reputation:
• trading
• donating money to the general or to the church
• organizing a feast
• sinking or boarding a pirate ship
• destroying harbor cannons in a pirate hideout
• successfully completing a mission for a governor or viceroy
• boarding or sinking enemy ships with a Letter of Marque (see section 12.4 Letters of
Marque).
• bribing a governor
Falling Reputation
The following actions cause your reputation with a nation to fall:
• buying up scarce goods in a town (see section 9 Trading Goods)
• attacking convoys and towns (exception: Letters of Marque, see section 12.4 Letters of
Marque)
62
TIP
· You can also track down the locations of pirate hideouts by following pirates to their den.
However, this does not always work.
Friendly
This is the highest level. You get the best prices for goods and ships in the
town. You can only visit the viceroy if you have reached this level.
Neutral This level is sufficient for meeting important characters in a town (the
governor, master builder and so on).
Unpopular You are tolerated but get the worst prices.
Hostile
You can no longer enter the harbors belonging to this nation (but you can
sneak into the town, see section 8.2 Convoys, Docking Unnoticed). The
nation’s military convoys will also try to hunt you down.
Page 64

Nothing Lasts Forever
Over time, nations will unfortunately forget all you have done for them. This means that,
sooner or later, your reputation will return to “neutral” unless you prove your commitment to
the nation again.
On the other hand, if you earn a “hostile” or “unpopular” reputation, it will eventually return
to “neutral”, because a nation will also pardon your bad deeds at some point.
13.2 Rank
You start the game with the rank of “Ship’s Boy”, which means that you are still quite
inexperienced. However, your rank will rise as you accumulate assets. You cannot drop below
a certain rank once you have reached it.
You can check to see when you will reach the next rank under “Successes” in the Log. You
can also check the blue bar that is always displayed at the bottom of the screen above the
selection window.
Every time you increase your assets, the bar moves to the right. Your rank increases once it
reaches the right edge of the screen.
You can always check how many assets you require by positioning your mouse pointer over
the blue bar.
As your rank rises, you can control increasing number of convoys and buy more building
permits in towns. At the start of the game, you can only own one convoy and one building
permit, but you will accumulate more as you rise through the ranks.
Your rank also plays a role in determining the missions and tasks that are entrusted to you.
63
TIP
· To make things a little easier for you at the start, your reputation with a nation slowly starts
to fall only after your reach the rank of “Sailor”.
Page 65
14 USING YOUR OWN LOGOS
In the Options menu (under Gameplay), you can select which logo you want to use in your
quest. This logo is displayed on the flags and sails on your ships during the game. You can
also change this logo at any stage during the game (but the new logo will only be activated
after you restart or reload a game).
If you want a unique logo, you can also modify existing logos or design your own. You need
a graphics program to do this.
You need to save your own logos in the following directory: “Program Files\Ascaron
Entertainment\Port Royale 2\Logos”. Here you will also find a sample logo, which you can
modify as you wish. All logos in this directory are automatically available during the game
under “Options/Gameplay”, provided that they have the correct format. Logos must be 96x64
pixels in size, in 24-bit color format (16.7 million colors), and must be saved as BMP
(bitmap) files. The color white is transparent.
15 SERVICE AND SUPPORT
The following information is provided in case you encounter any technical difficulties when
you install or run Port Royale 2:
Tips and Supplements to the Manual
You will find important technical information in the “Readme.html” file in the installation
directory of the game (the default location is C:\Program Files\Ascaron Entertainment\Port
Royale 2\).
Forum
You can use the forum to chat and exchange information with other fans of Port Royale 2.
You can also contact the game developers through the forum.
Forum: www.ascar
on-forum.com
Patch/Website
A patch is a program that optimizes the function of a program you have already installed. The
Port Royale 2 website will tell you whether you need a patch for Port Royale 2 and whether
one is already available.
Website: www.ascaron.com
Due to the multitude of hardware and software components and system configurations on the
market, it is unfortunately impossible to guarantee that problems won’t occur when you
install and run software.
Even though we do all we can to prevent this with extensive test runs and comprehensive
beta testing, some errors (that can usually be rectified quickly) may still occasionally occur.
If you experience any unexpected problems while running Port Royale 2, you can contact our
technical support department by email:
Technical Support email: service_pr2@ascaron.com
64
Page 66

If you email us, please remember to include the basic specification of your PC. It is also
essential that you attach the “DXDiag.txt” file.
To create this file:
1) Click “Start” in the bottom left corner of the screen in Windows and select “Run”.
2) Enter “dxdiag” and press “OK”.
3) The DirectX diagnostic program should then start. This may take a while to run.
4) Click on “Save all information” at the bottom of the screen and a “DXDiag.txt” file will
be created.
You can also speak to one of our technical support staff by telephone:
Telephone: +49 (0) 52 41 / 96 69 0 (Germany - lines open 14:00 – 17:00 GMT)
Make sure you’re in front of your PC when you call and have your PC’s hardware
specification to hand.
You can of course contact us by post or by fax at:
Ascaron Entertainment GmbH Ascaron Entertainment UK Ltd
Dieselstr. 66 Chantry House
D-33334 Gütersloh, Germany High Street, Coleshill
Fax: +49 (0) 52 41 / 96 66 10 Birmingham, UK. B46 3BP
Fax: +44 (0) 1675 465570
We will, of course, exchange faulty media. Please send in the original discs to the above address. Subject to
availability, we will be pleased to send you a replacement without delay.
Our warranty conditions do not apply to damage caused to the game discs by incorrect handling. In the
event that your original discs become unusable due to scratches or other misfortunes of daily life, we will
be pleased to replace it for a handling charge of €10. Please include payment of €10 in the package in
which you return your faulty discs.
We are only able to offer our exchange service for two years from date of first publication of a title. We
offer no warranty for older titles. The exchange service is a voluntary service offered by Ascaron
Entertainment. There is no statutory right of exchange.
Technical FAQs (Frequently Asked Questions)
The CD is not recognised
Possible solutions: Deactivate anti-virus software and other programs or background programs that are
running before starting Port Royale 2. Virtual CD-ROM disk drives should be deactivated or, preferably,
uninstalled.
After starting the game the screen remains black
This is probably because your graphics card or sound drivers are not up to the fastest standard. You can
download the latest drivers from the websites of the respective equipment manufacturers.
Further information and assistance
For further technical support please do the following:
• read the readme.html file which can be found in your game installation folder
• visit ascaron-forum.com and read the latest FAQ
• visit www.ascaron.com and check for updates
• contact service_pr2@ascaron.com
65
Page 67

16 CREDITS
Design and Project
Management
Daniel Dumont
Head of Programming
Bernd Ludewig
Head of QA
Lars Berenbrinker
Programming
Simulation and missions
Peter Grimsehl
Town display
Boris Fornefeld
3D graphics and special
effects
Michael Kopietz
Stephan Hodes
Sea battles
Bernd Ludewig
Land battles
Thorsten Bentrup
Interface
Ralf Rüdiger
Graphics
Technical research
Mark Külker
Animation arts
Marco Zeugner
Christian Fischer
and
Andreas Jupe
Game Design
Town design
Sebastian Neuhaus
Missions
Peter Grimsehl
Daniel Dumont
Sebastian Neuhaus
Design support
Björn Lilleike
Chronicler texts
Claus Fritzenkötter
Music and Sound Effects
Sound
Dag Winderlich
Henrik Hobein
Music
Yanco
Voice recording
M&S Music
QA
Gameplay
Sebastian Neuhaus
Roman Grow
Jörg Beilschmidt
Jan Langermann
Dirk Niestadtkötter
Ramses Schiller
Nils Grüne
Denis Rehbock
Hardware
Markus Reiser
Beta test management,
mastering
Torsten Allard
QA tools
Daniel Balster
Matthias Süß
Bastian Clarenbach
Localisation
Mirko Worsley
Alan Wild
Intro
MBA Studios
Markus Baader
Andras Kavalecz
Handbook and Cover
Design
Layout
Jürgen Venjakob
Alan Wild
Text
Daniel Dumont
Editing
Alan Wild
Technical Direction
Kay Struve
Producer
Holger Flöttmann
Marketing Director
Christian Franke
International Managing
Director
Roger Swindells
International Product
Manager
Alan Wild
Our special thanks to…
…the many participants in
the Port Royale forum,
whose ideas and
suggestions made the
second part of Port Royale
possible.
....the beta testers of Port
Royale 2, who showed a
tireless commitment to the
project during open beta
testing. Thanks in particular
to Uday Biswas, Gerald
Flemming, Jens Mensching,
Heinz Schröer, Mario
Stiele, Andy Ziese and
Ernst Beck.
... Nicole Jeannette Pescher,
Don Geraldo and BMP
from the beta test for their
logos.
66
Page 68

CONTROLS AND KEYBOARD CONFIGURATION
Left mouse button (LMB)
Left-click on convoy . . . . . . . . . . . . . . . . . . . . . . .Select
on individual ships or on harbor . . . . . . . . . . . . . Display free ships
on a building . . . . . . . . . . . . . . . . . . . . . . . . . . . . Enter the building
on town symbol(sea chart) . . . . . . . . . . . . . . . . . . Enter the town
Right mouse button (RMB)
Right-click on sea chart/Mini Map . . . . . . . . . . . . Send selected convoy
. . . and hold down CTRL . . . . . . . . . . . . . . . . . . Set route points
on anchored convoy . . . . . . . . . . . . . . . . . . . . . . .Transfer with convoy selected
on harbor . . . . . . . . . . . . . . . . . . . . . . . . . . . . . . Ship transfer with convoy selected
Mouse wheel
Town view/sea battle . . . . . . . . . . . . . . . . . . . . . . .Zoom
In lists . . . . . . . . . . . . . . . . . . . . . . . . . . . . . . . . . .Scroll
In towns
Backspace . . . . . . . . . . . . . . . . . . . . . . . . . . . . . . Leave the town
R . . . . . . . . . . . . . . . . . . . . . . . . . . . . . . . . . . . . . Send selected convoy for repairs
H . . . . . . . . . . . . . . . . . . . . . . . . . . . . . . . . . . . . . Enter the docks
B . . . . . . . . . . . . . . . . . . . . . . . . . . . . . . . . . . . . . Enter the master builder’s
W . . . . . . . . . . . . . . . . . . . . . . . . . . . . . . . . . . . . . Enter the shipyard
G . . . . . . . . . . . . . . . . . . . . . . . . . . . . . . . . . . . . . Enter the council building
L . . . . . . . . . . . . . . . . . . . . . . . . . . . . . . . . . . . . . Enter the warehouse
M . . . . . . . . . . . . . . . . . . . . . . . . . . . . . . . . . . . . .Enter the market
P . . . . . . . . . . . . . . . . . . . . . . . . . . . . . . . . . . . . . .Enter the inn
J . . . . . . . . . . . . . . . . . . . . . . . . . . . . . . . . . . . . . Enter the church
Sea battles
LMB . . . . . . . . . . . . . . . . . . . . . . . . . . . . . . . . . . Fire a broadside
RMB . . . . . . . . . . . . . . . . . . . . . . . . . . . . . . . . . . Set a course
1, 2, 3 . . . . . . . . . . . . . . . . . . . . . . . . . . . . . . . . . Select ammunition
4 . . . . . . . . . . . . . . . . . . . . . . . . . . . . . . . . . . . . .Ready to board
Land battles
LMB . . . . . . . . . . . . . . . . . . . . . . . . . . . . . . . . . . Select unit
RMB . . . . . . . . . . . . . . . . . . . . . . . . . . . . . . . . . . Send unit
1...0 . . . . . . . . . . . . . . . . . . . . . . . . . . . . . . . . . . . Select unit
General
ESC . . . . . . . . . . . . . . . . . . . . . . . . . . . . . . . . . . . Close dialog, open Options menu
Space . . . . . . . . . . . . . . . . . . . . . . . . . . . . . . . . . .Activate Fast Forward
Shift . . . . . . . . . . . . . . . . . . . . . . . . . . . . . . . . . . .Center selected convoy
Caps Lock . . . . . . . . . . . . . . . . . . . . . . . . . . . . . Always center on/off
Arrow keys . . . . . . . . . . . . . . . . . . . . . . . . . . . . . . Move display window
Ctrl + 1...0 . . . . . . . . . . . . . . . . . . . . . . . . . . . . . . Save selected convoy
1...0 . . . . . . . . . . . . . . . . . . . . . . . . . . . . . . . . . . . Retrieve saved convoy
TAB . . . . . . . . . . . . . . . . . . . . . . . . . . . . . . . . . . . Select next convoy in town/on sea chart
+ / - . . . . . . . . . . . . . . . . . . . . . . . . . . . . . . . . . . .Change game speed
F5 . . . . . . . . . . . . . . . . . . . . . . . . . . . . . . . . . . . . QuickSave (not available during battles)
Print screen button . . . . . . . . . . . . . . . . . . . . . . . Save screenshot (to “Program files\…\Port Royale 2”)
Dialogs
C . . . . . . . . . . . . . . . . . . . . . . . . . . . . . . . . . . . . . Open Chronicle
N . . . . . . . . . . . . . . . . . . . . . . . . . . . . . . . . . . . . . Open Log
K . . . . . . . . . . . . . . . . . . . . . . . . . . . . . . . . . . . . . Open convoy list
Ctrl . . . . . . . . . . . . . . . . . . . . . . . . . . . . . . . . . . .in Trade window: Switch unit size
RMB . . . . . . . . . . . . . . . . . . . . . . . . . . . . . . . . . .Closes open dialogs that have a ‘Close’ button
67
Page 69
DANISH - QUICKSTART
Venstre MuseKnap (VMK)
Venstre klik på konvoy. . . . . . . . . . . . . . . . . vælg
På et enkelt skib eller havn . . . . . . . . . . . . Viser ledige skibe
På en bygning. . . . . . . . . . . . . . . . . . . . . . . Gå ind I bygningen
På en by(søkortet) . . . . . . . . . . . . . . . . . . . Gå ind I byen
Højre MuseKnap (HMK)
Højre klik på søkortet/minikortet . . . . . . . . .Send den valgte konvoy
. . . og hold CTRL nede . . . . . . . . . . . . . . .Lav en rute
På konvoy der ligger for anker. . . . . . . . . . .Handl med valgte konvoj
På en havn . . . . . . . . . . . . . . . . . . . . . . . . . Handl med valgte by
Muse hjul
I byen/søslag . . . . . . . . . . . . . . . . . . . . . . . .Zoom
I lister . . . . . . . . . . . . . . . . . . . . . . . . . . . . .Rul
I byer
Backspace . . . . . . . . . . . . . . . . . . . . . . . . . Forlad byen
R . . . . . . . . . . . . . . . . . . . . . . . . . . . . . . . . Send valgte konvoy til reparation
H . . . . . . . . . . . . . . . . . . . . . . . . . . . . . . . . Gå I dok
B . . . . . . . . . . . . . . . . . . . . . . . . . . . . . . . . Gå til "master builder's"
W . . . . . . . . . . . . . . . . . . . . . . . . . . . . . . . . Gå til skibsværftet
G . . . . . . . . . . . . . . . . . . . . . . . . . . . . . . . . Gå til rådhuset
L . . . . . . . . . . . . . . . . . . . . . . . . . . . . . . . . Gå til lageret
M . . . . . . . . . . . . . . . . . . . . . . . . . . . . . . . .Gå til markedet
P . . . . . . . . . . . . . . . . . . . . . . . . . . . . . . . . .Gå til kroen
J . . . . . . . . . . . . . . . . . . . . . . . . . . . . . . . . . Gå til kirken
Sø slag
VMK . . . . . . . . . . . . . . . . . . . . . . . . . . . . . Affyr en bredside
HMK . . . . . . . . . . . . . . . . . . . . . . . . . . . . . Udstik en kurs
1, 2, 3 . . . . . . . . . . . . . . . . . . . . . . . . . . . . Vælg ammunition
4 . . . . . . . . . . . . . . . . . . . . . . . . . . . . . . . . Klargør til bording
Land slag
VMK . . . . . . . . . . . . . . . . . . . . . . . . . . . . . Vælg enhed
HMK . . . . . . . . . . . . . . . . . . . . . . . . . . . . . Vælg enhed
1...0 . . . . . . . . . . . . . . . . . . . . . . . . . . . . . . Vælg enhed
General
ESC . . . . . . . . . . . . . . . . . . . . . . . . . . . . . .Luk dialog, åben options
Space . . . . . . . . . . . . . . . . . . . . . . . . . . . . .Aktivér hurtig tid
Shift . . . . . . . . . . . . . . . . . . . . . . . . . . . . . . Centrer på valgte konvoy
Caps Lock . . . . . . . . . . . . . . . . . . . . . . . . . .Altid centreret aktivér/deaktivér
Arrow keys . . . . . . . . . . . . . . . . . . . . . . . . . Flyt vindue
Ctrl + 1...0 . . . . . . . . . . . . . . . . . . . . . . . . . Gem valgte konvoy
1...0 . . . . . . . . . . . . . . . . . . . . . . . . . . . . . . Hent gemt konvoy
TAB . . . . . . . . . . . . . . . . . . . . . . . . . . . . . . Vælg næste konvoy
+ / - . . . . . . . . . . . . . . . . . . . . . . . . . . . . . .Ændrer spil hastighed
F5 . . . . . . . . . . . . . . . . . . . . . . . . . . . . . . . QuickSave (deaktiveret under slag)
Print screen button . . . . . . . . . . . . . . . . . . .Gem skærmbillede(i "Program files\…\Port
Royale 2")
Dialoger
C . . . . . . . . . . . . . . . . . . . . . . . . . . . . . . . . Åben dagbog
N . . . . . . . . . . . . . . . . . . . . . . . . . . . . . . . . Åben log bog
K . . . . . . . . . . . . . . . . . . . . . . . . . . . . . . . . Åben konvoy liste
Ctrl . . . . . . . . . . . . . . . . . . . . . . . . . . . . . .I handelsvinduet: skift enhed størrelse
HMK . . . . . . . . . . . . . . . . . . . . . . . . . . . . . Lukker åbne dialog bokse
68
Page 70
FINNISH - PIKAOHJE
Hiiren vasen painike (LMB)
Painallus saattueen yllä . . . . . . . . . . . . . . . Valinta
Yksittäisen laivan tai sataman yllä . . . . . . . Näytä vapaat laivat
Rakennuksen yllä . . . . . . . . . . . . . . . . . . . . Astu rakennukseen
Kaupunki symbolin yllä (merikortilla) . . . . Astu kaupunkiin
Hiiren oikea painike (RMB)
Painallus merikortilla / mini-kartalla . . . . . Lähetä valittu saattue
. . . CTRL-painike painettuna . . . . . . . . . . Aseta reittipiste
Ankkuroidun saattueen yllä . . . . . . . . . . . . . Siirto valitun saattueen kanssa
Sataman yllä. . . . . . . . . . . . . . . . . . . . . . . . Laiva siirto valitun saattueen kanssa
Hiiren rulla
Kaupunki näkymä/meritaistelu . . . . . . . . . . Zoomaus
Listoissa . . . . . . . . . . . . . . . . . . . . . . . . . . . Vieritä
Kaupungeissa
Askelpalautin. . . . . . . . . . . . . . . . . . . . . . . . Lähde kaupungista
R . . . . . . . . . . . . . . . . . . . . . . . . . . . . . . . . Lähetä valittu saattue korjattavaksi
H . . . . . . . . . . . . . . . . . . . . . . . . . . . . . . . . Mene satamaan
B . . . . . . . . . . . . . . . . . . . . . . . . . . . . . . . . Mene rakentaja-mestarin luo
W . . . . . . . . . . . . . . . . . . . . . . . . . . . . . . . . Mene telakalle
G . . . . . . . . . . . . . . . . . . . . . . . . . . . . . . . . Mene kunnanvaltuustoon
L . . . . . . . . . . . . . . . . . . . . . . . . . . . . . . . . Mene varastoon
M . . . . . . . . . . . . . . . . . . . . . . . . . . . . . . . .Mene markkinoille
P . . . . . . . . . . . . . . . . . . . . . . . . . . . . . . . . .Mene kievariin
J . . . . . . . . . . . . . . . . . . . . . . . . . . . . . . . . . Mene kirkkoon
Meritaistelut
LMB . . . . . . . . . . . . . . . . . . . . . . . . . . . . . Ammu täyslaidallinen
RMB . . . . . . . . . . . . . . . . . . . . . . . . . . . . . Aseta kurssi
1, 2, 3 . . . . . . . . . . . . . . . . . . . . . . . . . . . . Valitse ammustyyppi
4 . . . . . . . . . . . . . . . . . . . . . . . . . . . . . . . .Valmistaudu laivaan nousuun
Maataistelut
LMB . . . . . . . . . . . . . . . . . . . . . . . . . . . . . Valitse yksikkö
RMB . . . . . . . . . . . . . . . . . . . . . . . . . . . . . Lähetä yksikkö
1...0 . . . . . . . . . . . . . . . . . . . . . . . . . . . . . . Valitse yksikkö
Yleisiä
ESC . . . . . . . . . . . . . . . . . . . . . . . . . . . . . . Sulje dialogi, Avaa Options-valikko
Välilyönti . . . . . . . . . . . . . . . . . . . . . . . . . .Pikakelaus eteenpäin
Shift . . . . . . . . . . . . . . . . . . . . . . . . . . . . . . Keskitä valittu saattue
Caps Lock . . . . . . . . . . . . . . . . . . . . . . . . Automaattinen keskitys, päällä/pois
Nuoli-näppäimet . . . . . . . . . . . . . . . . . . . . . Siirrä näkymä-ikkunaa
Ctrl + 1...0 . . . . . . . . . . . . . . . . . . . . . . . . . Tallenna valittu saattue
1...0 . . . . . . . . . . . . . . . . . . . . . . . . . . . . . . Nouda tallennettu saattue
TAB . . . . . . . . . . . . . . . . . . . . . . . . . . . . . . Valitse seuraava saattue kaupungissa/merikortilla
+ / - . . . . . . . . . . . . . . . . . . . . . . . . . . . . . .Vaihda pelinopeutta
F5 . . . . . . . . . . . . . . . . . . . . . . . . . . . . . . . Pikatallennus (ei käytettävissä taistelujen aikana)
Print screen -nappi . . . . . . . . . . . . . . . . . . . Tallenna kuvakaappaus ("Program files\…\Port
Royale 2" -hakemistoon)
Dialogit
C . . . . . . . . . . . . . . . . . . . . . . . . . . . . . . . . Avaa kronikka (Chronicle)
N . . . . . . . . . . . . . . . . . . . . . . . . . . . . . . . . .Avaa loki (Log)
K . . . . . . . . . . . . . . . . . . . . . . . . . . . . . . . . .Avaa saattue-lista
Ctrl . . . . . . . . . . . . . . . . . . . . . . . . . . . . . . . Kaupankäynti ikkunassa: Vaihda yksikön kokoa
RMB . . . . . . . . . . . . . . . . . . . . . . . . . . . . . . Sulkee avoimet dialogit, joissa on Sulje-nappi
('Close')
69
Page 71
NORWEGIAN - QUICKSTART
Venstre museknapp (VMK)
Venstre-klikk på flåte . . . . . . . . . . . . . . . . . Velg
På enkelte skip og havner . . . . . . . . . . . . . . Vis frie skip
På en bygning . . . . . . . . . . . . . . . . . . . . . . .Gå inn i bygning
På et bysymbol(sjøkart) . . . . . . . . . . . . . . . Innta byen
Høyre museknapp (HMK)
Høyre klikk på sjøkart/Minikart . . . . . . . . . .Send utvalgt flåte
. . . og hold nede CTRL . . . . . . . . . . . . . . . Sett reisevei
På en flåte som har kastet anker . . . . . . . . Flytte med valgt flåte
På havn . . . . . . . . . . . . . . . . . . . . . . . . . . . Bytte skip med valgt flåte
Muse hjul
Byoversikt/sjøkamp . . . . . . . . . . . . . . . . . . . Zoom
I lista . . . . . . . . . . . . . . . . . . . . . . . . . . . . . Scroll
I byer
Backspace . . . . . . . . . . . . . . . . . . . . . . . . . Forlat byen
R . . . . . . . . . . . . . . . . . . . . . . . . . . . . . . . . Send valgt flåte til reparasjon
H . . . . . . . . . . . . . . . . . . . . . . . . . . . . . . . . Innta havna
B . . . . . . . . . . . . . . . . . . . . . . . . . . . . . . . . Gå inn i master builder's
W . . . . . . . . . . . . . . . . . . . . . . . . . . . . . . . . Gå inn I shipyard
G . . . . . . . . . . . . . . . . . . . . . . . . . . . . . . . . Gå inn I rådhuset
L . . . . . . . . . . . . . . . . . . . . . . . . . . . . . . . . Gå inn I varehuset
M . . . . . . . . . . . . . . . . . . . . . . . . . . . . . . . .Gå inn I markedet
P . . . . . . . . . . . . . . . . . . . . . . . . . . . . . . . . .Gå inn I vertshuset
J . . . . . . . . . . . . . . . . . . . . . . . . . . . . . . . . Gå inn I kirken
Sjøkamp
LMB . . . . . . . . . . . . . . . . . . . . . . . . . . . . . Fyr av en salve
RMB . . . . . . . . . . . . . . . . . . . . . . . . . . . . . Sett en kurs
1, 2, 3 . . . . . . . . . . . . . . . . . . . . . . . . . . . . Velg ammunisjon
4 . . . . . . . . . . . . . . . . . . . . . . . . . . . . . . . . Gjør deg klar til å borde
Landkamp
LMB . . . . . . . . . . . . . . . . . . . . . . . . . . . . . Velg enhet
RMB . . . . . . . . . . . . . . . . . . . . . . . . . . . . . Send enhet
1...0 . . . . . . . . . . . . . . . . . . . . . . . . . . . . . . Velg enhet
Generelt
ESC . . . . . . . . . . . . . . . . . . . . . . . . . . . . . . Lukk dialog, åpne Options meny
Mellomrom . . . . . . . . . . . . . . . . . . . . . . . . Aktivere Fast Forward
Shift . . . . . . . . . . . . . . . . . . . . . . . . . . . . . . Midstill valgt flåte
Caps Lock . . . . . . . . . . . . . . . . . . . . . . . . .Alltid center på/av
Piltastene . . . . . . . . . . . . . . . . . . . . . . . . . . Flytt display vindu
Ctrl + 1...0 . . . . . . . . . . . . . . . . . . . . . . . . . Lagre valgt flåte
1...0 . . . . . . . . . . . . . . . . . . . . . . . . . . . . . . Laste ned lagret flåte
TAB . . . . . . . . . . . . . . . . . . . . . . . . . . . . . . Velg neste flåte i by/sjøkart
+ / - . . . . . . . . . . . . . . . . . . . . . . . . . . . . . . Forandre spillhastighet
F5 . . . . . . . . . . . . . . . . . . . . . . . . . . . . . . . QuickSave (ikke tilgjengelig I kamp modus)
Print screen button . . . . . . . . . . . . . . . . . . Lagre screenshot (til "Program files\…\Port
Royale 2")
Dialog
C . . . . . . . . . . . . . . . . . . . . . . . . . . . . . . . . Åpne dagbok
N . . . . . . . . . . . . . . . . . . . . . . . . . . . . . . . . Åpne logg
K . . . . . . . . . . . . . . . . . . . . . . . . . . . . . . . . Åpne flåte liste
Ctrl . . . . . . . . . . . . . . . . . . . . . . . . . . . . . .i Trade vindu: Skift enhetstørrelse
RMB . . . . . . . . . . . . . . . . . . . . . . . . . . . . . Lukk åpne dialoger som har "close" knapp
70
Page 72
SWEDISH - SNABBSTART
Vänster musknapp
Vänster klicka på en konvoj. . . .. . . . . . . . . Välj denna enhet
på individuellt skepp eller hamn.... . . . . . . . Visa tillgängliga skepp
på en byggnad . . . . . . . . . . . . . . . . . . . . . . Tillträde till byggnad
på en stadssymbol (se sjökarta) . . . . . . . . . Tillträde till staden
Höger musknapp
Höger klick på sjökarta/minikarta. . . . . . . . Skicka vald konvoj
. . . och håll ner CTRL . . . . . . . . . . . . . . . Sätta kurspunkter
på ankrad konvoj . . . . . . . . . . . . . . . . . . . .Förhandla med vald konvoj
på hamn . . . . . . . . . . . . . . . . . . . . . . . . . . .Fartygsförhandling med vald konvoj
Mushjul
I staden / sjökartan . . . . . . . . . . . . . . . . . . . Zoom
I menyer / listor . . . . . . . . . . . . . . . . . . . . . Nedrullning
I staden
Backsteg . . . . . . . . . . . . . . . . . . . . . . . . . . Lämna staden
R . . . . . . . . . . . . . . . . . . . . . . . . . . . . . . . . Skicka vald konvoj för reparation
H . . . . . . . . . . . . . . . . . . . . . . . . . . . . . . . . Tillträde till skeppsdocka
B . . . . . . . . . . . . . . . . . . . . . . . . . . . . . . . . Tillträde till byggmästaren
W . . . . . . . . . . . . . . . . . . . . . . . . . . . . . . . . Tillträde till varvet
G . . . . . . . . . . . . . . . . . . . . . . . . . . . . . . . . Tillträde till rådhuset
L . . . . . . . . . . . . . . . . . . . . . . . . . . . . . . . . Tillträde till magasinet
M . . . . . . . . . . . . . . . . . . . . . . . . . . . . . . . .Tillträde till marknaden
P . . . . . . . . . . . . . . . . . . . . . . . . . . . . . . . . .Tillträde till värdshuset
J . . . . . . . . . . . . . . . . . . . . . . . . . . . . . . . . Tillträde till kyrkan
Sjöslag
Vänster musknapp. . . . . . . . . . . . . . . . . . . . Attack från bredsida
Höger musknapp . . . . . . . . . . . . . . . . . . . . .Sätt en kurs
1, 2, 3 . . . . . . . . . . . . . . . . . . . . . . . . . . . . Välj ammunition
4 . . . . . . . . . . . . . . . . . . . . . . . . . . . . . . . .Ombordstigning
Fältslag
Vänster musknapp . . . . . . . . . . . . . . . . . . . Välj en enhet
Höger musknapp. . . . . . . . . . . . . . . . . . . . . Skicka en enhet
1...0 . . . . . . . . . . . . . . . . . . . . . . . . . . . . . . Välj en enhet
Diverse
ESC . . . . . . . . . . . . . . . . . . . . . . . . . . . . . .Stäng dialog, öppna inställningsmenyn
Blanksteg . . . . . . . . . . . . . . . . . . . . . . . . . ,Aktivera påskyndning av tid
Shift . . . . . . . . . . . . . . . . . . . . . . . . . . . . . . Centrera vald konvoj
Caps Lock . . . . . . . . . . . . . . . . . . . . .. . . . Centrering: av / på
Piltangenterna . . . . . . . . . . . . . . . . . . . . . . Flytta visningsfönstret
Ctrl + 1...0 . . . . . . . . . . . . . . . . . . . . . . . . . Spara vald konvoj
1...0 . . . . . . . . . . . . . . . . . . . . . . . . . . . . . . Återfå sparad konvoj
TAB . . . . . . . . . . . . . . . . . . . . . . . . . . . . . . Välj nästa konvoj i stad / på sjökarta
+ / - . . . . . . . . . . . . . . . . . . . . . . . . . . . . . .Ändra spelhastighet
F5 . . . . . . . . . . . . . . . . . . . . . . . . . . . . . . . Snabbspara (inte tillgänglig under sjöslag)
Print screen . . . . . . . . . . . . . . . . . . . . . . . . Spara skärmdump (till "Program files\…\Port
Royale 2")
Dialoger
C . . . . . . . . . . . . . . . . . . . . . . . . . . . . . . . . Öppna översikten
N . . . . . . . . . . . . . . . . . . . . . . . . . . . . . . . . Öppna loggen
K . . . . . . . . . . . . . . . . . . . . . . . . . . . . . . . . Öppna konvojlistan
Ctrl . . . . . . . . . . . . . . . . . . . . . . . . . . . . . .I förhandlingsfönstret: Ändra enhets-storlek
Höger musknapp . . . . . . . . . . . . . . . . . . . .Stänger öppna dialoger som har en avslut
ningsknapp
71
Page 73

Notes
72
 Loading...