

Page 1
Page 2

2
Page 3

INTRODUCTION
One of the most common questions people ask me is, “How many
are there in your development team?” Most expect an answer of at
least five, maybe 10, even 15 people or more — like most, if not all,
other games development teams. They are usually stunned to learn
that I create my games with only the help of a freelance graphic
artist and a musician. I do all the design, programming, project
management and research myself. Does this mean my games can’t
be as good as those developed by large teams? Not at all. In fact, I
think many game designs suffer from having too many people
working on them, losing their individual character and becoming
games that look and play like so many others. Of course, the amount
of work involved in creating a modern game is immense, and when
you don’t have a large team it can take a long time.
Chris Sawyer’s Locomotion™ started life in 1999 after I completed
RollerCoaster Tycoon®, but has much earlier roots. In the early 1990s, I
created the game
In 1996, I wanted to start from scratch on a sequel to
, and put a lot of work into it, but then something came along
Tycoon
and distracted me — roller coasters! So, the whole project was
gradually re-shaped into what we now know as
one of the best-selling PC games of all time. In 1999, I resumed work
on the
Transport Tycoon sequel, but once again I postponed the
project while creating
Tycoon 2
was created using large parts of the programming intended
for this game. Once
got my full attention again, and after two more years of work, the
game is at last completed.
In some ways,
concept is very basic: just transport cargo and passengers from a
location that produces them to a location that wants them. But the
game is vast in scale and depth, where you can play the game in your
own particular style and get drawn into the world you are building in,
getting personally attached to your handiwork. It isn’t the perfect
game, but then I don’t see that as being the aim of my job — a
perfect game would have no flaws, no character, no individuality. I try
to create games that are unique and different in style, games from
which the player can achieve satisfaction through construction rather
than destruction, games with ongoing gameplay rather than a limited
script or only a single definition of success. People are still playing
Transport Tycoon 10 years after it was published — I hope that 10 years
from now people are still playing
Transport Tycoon, which was a tremendous success.
Transport
RollerCoaster Tycoon,
RollerCoaster Tycoon 2. In fact, RollerCoaster
RollerCoaster Tycoon 2 was complete, the sequel
Chris Sawyer’s Locomotion is a very simple game. The
Chris Sawyer’s Locomotion!
Chris Sawyer
3
Page 4
Page 5
Page 6

TABLE OF CONTENTS
INTRODUCTION 3
TROUBLESHOOTING 4
WELCOME TO CHRIS
SAWYER’S LOCOMOTION 8
GETTING STARTED 8
THE README FILE 8
INSTRUCTION MANUAL 9
SETUP AND INSTALLATION 9
Installation of DirectX 9
MAIN MENU 10
TAKE CONTROL 11
CONTROLLING THE VIEW 14
GAME OPTIONS 14
Game Options Window 15
Display Options 15
Sound Options 16
Music Options 16
Regional Options 17
Control Options 18
Miscellaneous Options 18
SOUND MENU 18
VIEW MENU 19
STATUS DISPLAY 19
TIME DISPLAY 20
SINGLE-PLAYER GAME 20
TWO-PLAYER GAME 21
Starting A Multiplayer Game
Host A Game 22
Join A Game 22
Start New Game/
Load Game 22
Connecting Through
A Firewall 23
Playing the
Two-Player Game 23
21
CHRIS SAWYER’S
LOCOMOTION BASICS 25
THE OBJECT OF THE GAME 25
FIRST STEPS 25
Status Window 26
Company Owner
and Status 26
SURVEY THE LANDSCAPE 29
Mini-Map 29
Supply and Demand 31
INDUSTRY 32
The Industry List 32
The Industry Status Window
MANIPULATING THE
LANDSCAPE 34
Clear Area 34
Adjust Land 35
Adjust Water 36
Plant Trees 37
BUILDING ROADS 37
The Stations Tab 39
BUILDING RAILROADS 40
Build Tracks Window 41
Signal Construction 43
BUILDING VEHICLES 44
Vehicle Information
Window 45
Vehicle Status Window 50
MESSAGES 51
Show Recent Messages 51
Message Options 51
RUNNING YOUR
TRANSPORTATION EMPIRE 53
STATIONS 53
Station List Window 53
Building a Station 54
Station Catchment Area 55
Road Stations 55
33
6
Page 7
Rail Stations 56
Airports 57
Docks 58
The Station Window 58
TOWNS AND CITIES 60
Towns List 60
Town Information Window 60
Local Authority Rating 61
AVAILABILITY AND
OBSOLESCENCE 62
FINANCIAL MATTERS 62
Loans 62
Optimizing Your Finances 63
The Companies List 64
Rival Owner Characteristics 65
MONITORING YOUR
PROGRESS 66
Company Value 66
Performance Index 66
ADVANCED STRATEGIES 68
ADVANCED VEHICLE
CONCEPTS 68
Adding To Existing Vehicles 68
Refitting a Vehicle 69
Vehicle Reliability 69
Planning Vehicle Routes
and Stops 70
BUILDING ON
DIFFICULT TERRAIN 72
Slopes 72
Bridges 73
Tunnels 74
STATION MANAGEMENT 75
WORKING ON
THE RAILROAD 76
Locomotive Power 76
Building Junctions 77
Signals 78
EFFECTIVE TRACK DESIGN 78
Basic Loop 78
Basic Double Track Line 80
Enhanced Double Track Line
Complex Double
Track Layout 82
Junctions in Double
Track Layouts 83
INDUSTRIES 85
Interfering With
Industry Output 85
Funding New Industries 85
SCENARIO EDITOR 87
SCENARIO MAIN SCREEN 87
Editor Options Menu 87
Sound Menu 88
Objects Window 88
CREATING A SCENARIO
— STEP-BY-STEP 88
Step 1: Object Selection 88
Step 2: Landscape
Generation 91
Step 3: Scenario Options 94
Step 4: Save Scenario 95
Step 5: You’re Done! 95
SUOMI 96
SVENSKA 98
PORTUGUESE 100
CREDITS 102
TECHNICAL SUPPORT 106
KEYBOARD SHORTCUTS 107
81
7
Page 8

WELCOME TO CHRIS SAWYER’S LOCOMOTION
Everything needs to get somewhere: iron ore to the steel mill, steel
to the factory, goods to the city, and passengers and mail across
town or across the country. The world needs transport. Your
challenge is to build and run the transport networks to keep the
world moving — to provide the locomotion!
Of course. you’re not in the transport business just to keep the world
moving... you’re in it for the money. Design and build efficient
networks, and you’ll be raking it in and extending your routes before
you know it. While you’re doing this, the world is changing: wellserved towns grow, industries close down as new ones start up, and
transport technology advances with faster and more efficient vehicles.
But not everything will be smooth sailing -- resources will run dry,
vehicles will break down and, worst of all, you probably won't be the
only company competing for items to carry.
Your opponents might be ruthless and aggressive, building stations
right next door to yours to compete for passengers and cargo,
running better services to attract more cargo, and generally getting
in your way. But with careful planning and good management you
can beat them at their own game and build a dominant transport
company worth millions.
GETTING STARTED
THE README FILE
The Chris Sawyer’s Locomotion CD-ROM game has a ReadMe file that
includes the License Agreement and up-to-date information about the
game. We strongly encourage you to take the time to read this file in
order to benefit from changes made after this manual went to print.
To view the ReadMe file, double-click on the
Chris Sawyer’s Locomotion directory found on your hard disk (usually
C:\Program Files\Atari\Locomotion). You can also view the ReadMe
file by clicking on the
then select
8
Programs>Atari>Locomotion, and click on ReadMe.
Start button on your Windows® taskbar, and
ReadMe.txt icon on the
Page 9

INSTRUCTION MANUAL
Included on this product’s game disc is an electronic version of the
game’s Instruction Manual in .pdf format, Adobe Acrobat Reader 6
(which enables you to view the manual in .pdf format).
SETUP AND INSTALLATION
1.Start Windows® 98/Me/2000/XP.
2.Insert the
3.If AutoPlay is enabled, a title screen should appear. If AutoPlay is
not enabled, or the installation does not start automatically, click
on the Start button on your Windows® taskbar, then on Run. Type
D:\Setup and click on OK.
to a letter other than D, substitute that letter.
4.Follow the remainder of the on-screen instructions to finish
installing
5.Once installation is complete, click on the Start button on the
Windows® taskbar and choose
Locomotion/Locomotion
the Locomotion icon on your Windows® desktop to start the game.
Note: You must have the Chris Sawyer’s Locomotion game disc in your
CD-ROM drive to play.
Installation of DirectX®
The Chris Sawyer’s Locomotion game requires DirectX® 9.0b or higher
in order to run. If you do not have DirectX® 9.0b or higher installed
on your computer, click “Yes” to accept the DirectX® 9.0b License
Agreement. This will then launch the DirectX® 9.0b Install.
Chris Sawyer’s Locomotion game disc into your CD-ROM drive.
Note: If your CD-ROM drive is assigned
Chris Sawyer’s Locomotion.
Programs/Atari/
to start the game. You can also click on
9
Page 10
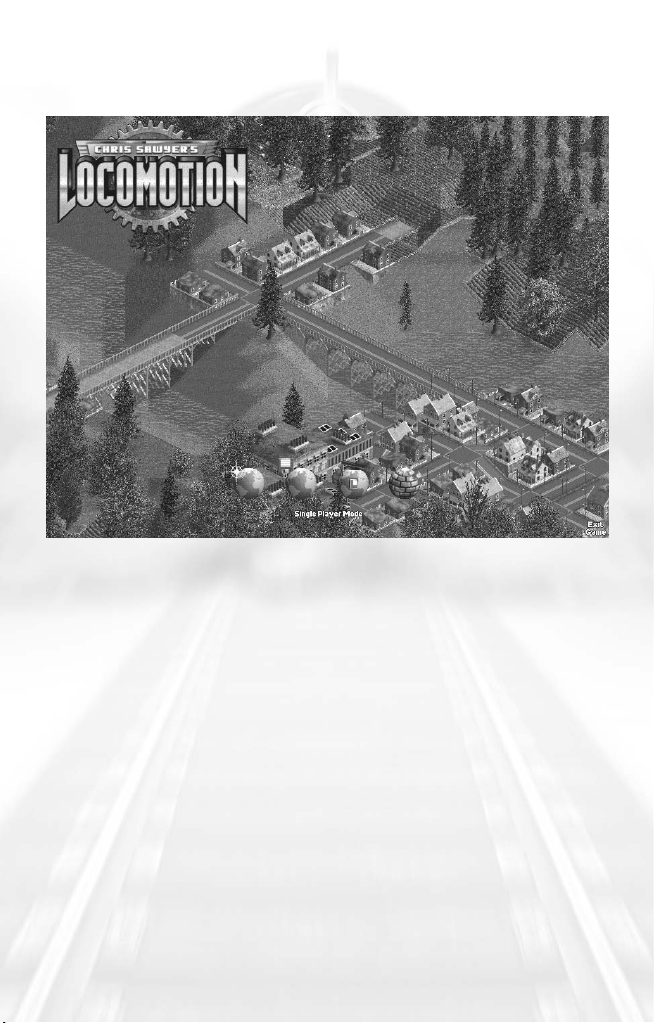
MAIN MENU
The Main Menu opens automatically when you start the game:
• Start New Game: Start a new single-player game of Chris Sawyer’s
Locomotion
• Load Saved Game: Load a previously saved game. To load a game,
click the Load Saved Game icon and click on the name of the
saved game.
• Show Tutorial: Click the Show Tutorial icon to display a list of
available tutorials. Click the name of a tutorial to view it.
• Scenario Editor: Open the game editor, which allows you to create
your own
• Single-Player/Two Player Mode Toggle: Switch between single-
player mode (see page 20) and two-player mode (see page 21).
• Exit Game: Close Chris Sawyer’s Locomotion and return to the
Windows desktop.
.
Chris Sawyer’s Locomotion scenarios.
10
Page 11
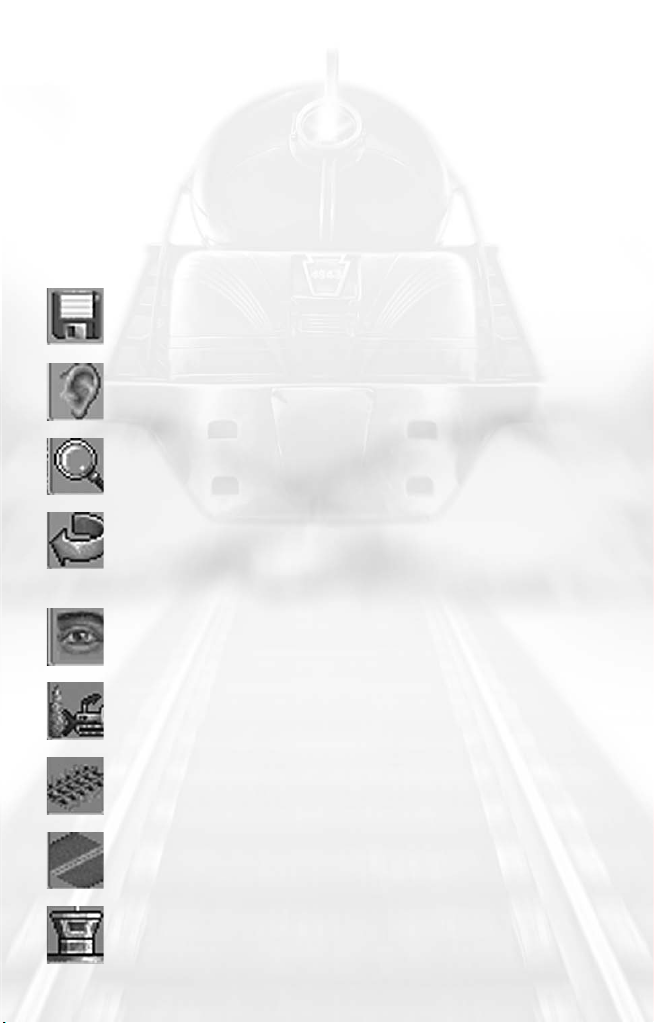
TAKE CONTROL
In order to get the best experience while learning to play Chris
Sawyer’s Locomotion
tutorials and read the following overview of the game interface first
before you dive into the scenarios.
The game screen contains a number of basic control and display
elements, which are described in detail later in this manual. The
icons along the top of the screen (1-13) provide access to drop
down menus.
Game Options Menu: Access general game functions,
including saving and loading, and game options (see “Game
Options” on page 14).
Sound Menu: Adjust sound and music options (see “Sound
Menu” on page 18).
Zoom Menu: Zoom in and out on the game screen, and
access the Mini-Map. You can also spin the mouse wheel to
zoom in and out.
Rotate Menu: Rotate the game screen clockwise or
counterclockwise. Holding down the right mouse button and
spinning the mouse wheel also rotates the game view. You can
also rotate the landscape clockwise by pressing the Enter key.
View Menu: Change game screen view options (see “View
Menu” on page 19).
, we recommend that you start with the in-game
Landscape Menu: Change the height of the land, plant trees,
and so on (see “Manipulating the Landscape” on page 34).
Tracks Menu: Build train and tram tracks (see “Building
Railroads” on page 40).
Roads Menu: Build roads and bridges (see “Building Roads”
on page 37).
Port Menu: Build airports and docks (see "Airports" on page
57 and "Docks" on page 58).
11
Page 12
Vehicle Construction Menu: Buy and upgrade vehicles (see
“Building Vehicles” on page 44).
Vehicle Status Menu: Access information about your vehicles
(see “Vehicle Status” on page 50).
Stations Menu: Access information about your stations (see
“Stations” on page 53).
Town/Industry Menu: Display information about towns and
industries (see “Industries” on page 85 and “Towns and
Cities” on page 60).
Status Display: View financial information
and approval ratings for all companies
(see “Financial Matters” on page 62).
Time Display: View the current date,
control the game speed, access the
Messages window and open the MiniMap (see “Mini-Map” on page 29).
Information and Control
Windows
All windows in the game share
common interface and display
elements:
1. Title Bar: Shows the name of the
window, station, vehicle, and so on.
Click on the title bar of a vehicle or
station you own to change its
name. You can reposition a window
by clicking on its title bar and
dragging it.
2. Close Button: Click to close the
window. You can also press
Backspace to close the topmost
window. Pressing
Shift + Backspace closes all open windows.
12
1 2
3
4
5
Page 13

3. Tabs: Many windows include multiple panes of information, which
you can access by clicking the tabs at the top of the window.
4. Drop-Down Menus: Some windows include drop-down menus.
5. Checkboxes: Some windows include options with checkboxes.
Information Displays: Many windows include information displays.
See the descriptions of specific control windows later in this manual
for details.
Resize Handle: Most windows are resizable. To resize a window, click
and drag the resize handle in the lower-right corner.
Sorting Window Information
Some windows include scrolling lists with multiple columns of
information. You can sort the information in these lists by clicking at
the top of a column.
For example, the Industries window contains the Industry, Status, and
Production Transported columns. By default, industries are ordered
alphabetically by name (Industry). If you click on the Status column
header, the industry list is resorted by the type of cargo produced.
Pop-up Help
Most tabs and buttons have “floating help text” that identifies their
function. To see this text, hold the mouse cursor over the tab or
button for a few seconds. For example, if you select a bridge type
while building a track and hold your mouse button over it, a box
pops up showing the type of bridge, maximum height, and
maximum speed.
Opening Multiple Windows
You can open up to seven windows at a time. If you attempt to open
more, the game automatically closes one of the open windows.
13
Page 14
CONTROLLING THE VIEW
Chris Sawyer’s Locomotion uses an overhead isometric view. To rotate the
view in 90-degree increments, use the
press the
either pressing the
Enter key. You can zoom in and out of the main view by
Page Up / Page Down keys or by using the
Rotate Menu (see page 11) or
mouse wheel.
The main view will automatically move when you scroll the mouse to
any edge of the screen, if you have this option checked (see “Control
Options” on page 18). You can also scroll the main view by using
the arrow keys, or by right-clicking and dragging on the landscape.
Most objects in the game will display context-sensitive information
that can be activated by the mouse. For example, when you move
the mouse pointer over a a station, you can see what goods or
people are waiting there. Left-clicking on an object generally opens
the window associated with that particular object. Right-clicking on a
road or track allows you to edit it in that location. Right-clicking an
object such as a station or train displays the general status window
associated with that type of object.
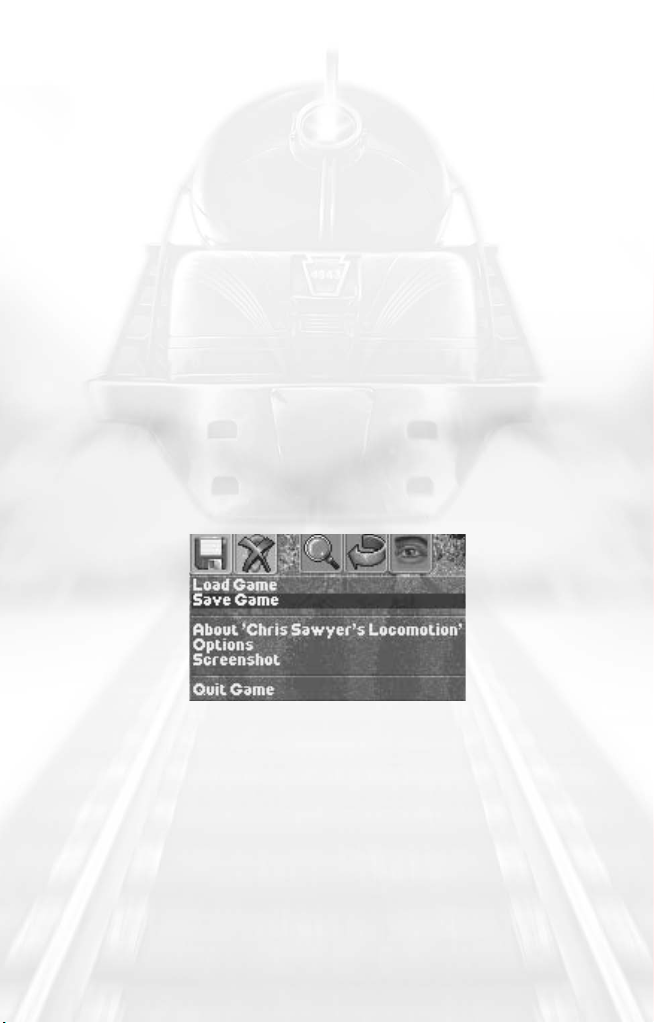
GAME OPTIONS
The Game Options menu provides access to a number of basic ingame functions:
• Load Game: Load a previously saved game.
• Save Game: Save your current game. Enter a name in the Save
Game dialog and click Save. By default, single-player saved games
are saved in the Single Player Saved Games folder in the
Sawyer’s Locomotion
directory, and two-player games are saved in
the Two Player Saved Games folder, but you can save in any folder
you choose. You can also open the Save Game dialog by clicking
the
Game Options Menu icon.
14
Chris
Page 15
• About Chris Sawyer’s Locomotion: View the game credits.
• Options: Open the Game Options window (see below).
• Screenshot: Save a BMP-format screenshot of the game in
progress. You can also save a screenshot at any time by pressing
Ctrl-S. Screenshots are automatically saved in the Chris Sawyer’s
Locomotion
• Quit Game: Quit the game in progress and return to the
Main Menu.
game folder.
Game Options Window
Game Options window provides access to various basic game
The
play options, including video, sound, music, and game controls
and preferences.
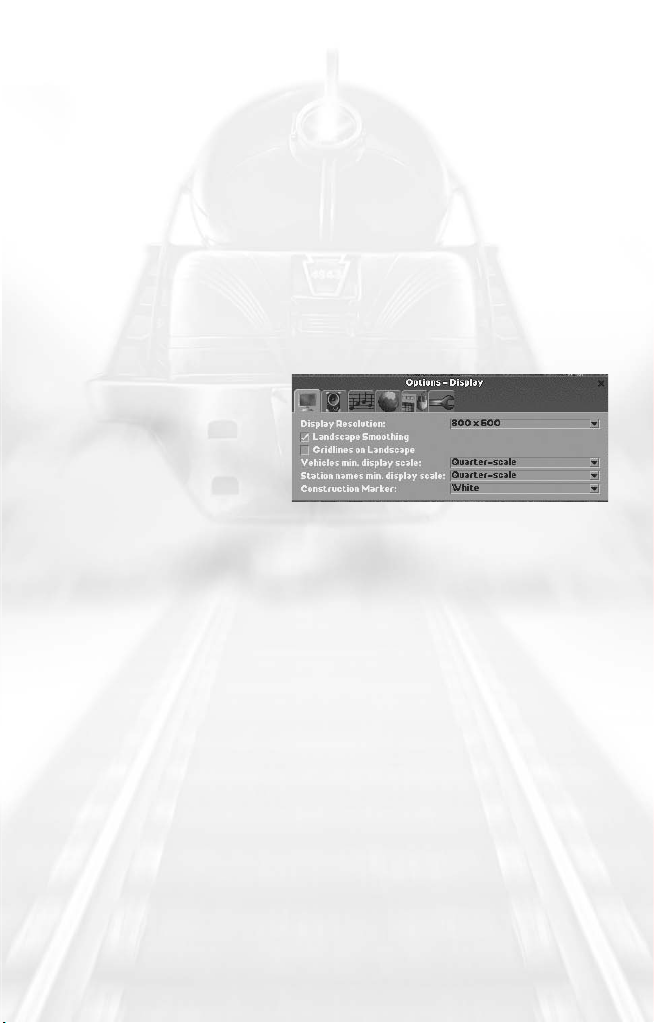
Display Options
• Display Resolution: Set the
graphic resolution for
Sawyer’s Locomotion
Chris
. The
default resolution is
generally one step below
your current desktop resolution. (So, if your desktop is set to
1024x768, the game’s default display resolution is 800x600.) Higher
resolutions may cause performance issues on slower machines.
• Landscape Smoothing: When this option is checked, the edges of
the landscape tiles on the main view are smoothed. By default, this
option is ON.
• Gridlines on Landscape: When this option is checked, the landscape
grid is visible. By default, this option is OFF, however landscape
gridlines appear when you are building tracks and roads.
• Vehicles min. display scale: Determines the smallest size at which
vehicles appear in the game when you zoom in and out. The
default selection is Quarter-scale.
• Station names min. display scale: Determines the smallest size at
which the text for station names appears. The default selection is
Quarter-scale.
• Construction Marker: Toggles the colour of the cursor used for
constructing roads, tracks, and so on between white (default)
and translucent.
15
Page 16
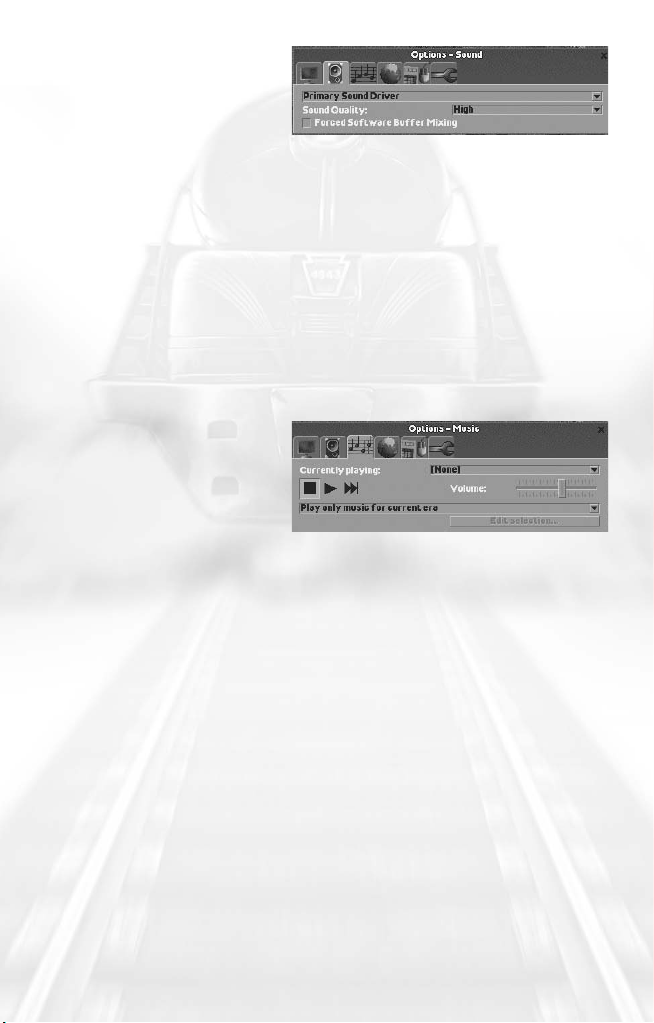
Sound Options
• Sound Driver: Chris
Sawyer’s Locomotion
automatically selects an
appropriate sound driver when the game is installed. To change to
a different sound driver, select it from the drop-down menu.
• Sound Quality: The game automatically selects the most
appropriate sound-quality setting (low, medium, or high) upon
installation. You can change this setting here.
• Forced Software Buffer Mixing: Some computer/sound card
combinations can cause compatibility issues with
Locomotion
. If you experience a crackling in the sound or the game
Chris Sawyer’s
hesitates when sound effects play, toggle this option to its
opposite setting to alleviate the problem. If you do not experience
sound problems, you do not need to change this option.
Music Options
• Currently Playing: Shows
the name of the music
track currently playing.
To select a different
music track, select it
from the list.
• Music Player Controls: Controls the music playback. From left to
right the controls are: Stop (stop music playback); Play (start
playback of Currently Playing music track); and Next Track (skip to
the next music track on the Currently Playing list).
• Volume: Controls the playback volume of the music.
The drop-down menu below the volume slider allows you to
select the music tracks you want played in the game. You have
three choices:
• Play only music for current era: Select this option to play only
music associated with the current game year (or time period).
• Play all music: Select this option to allow all music tracks to play
throughout the game.
• Play customized selection of music: Select this option to play only the
music tracks selected (checked) on the
Edit Music Selection menu.
16
Page 17
When “Play customized selection of music” is selected, click on “Edit
selection…” at the bottom of the window to create your own list of
music tracks. The
Edit Music Selection window will open, listing the
names of all music available in the game. Check music tracks to
select them. When you finish making your choices, close the window
to save your changes.
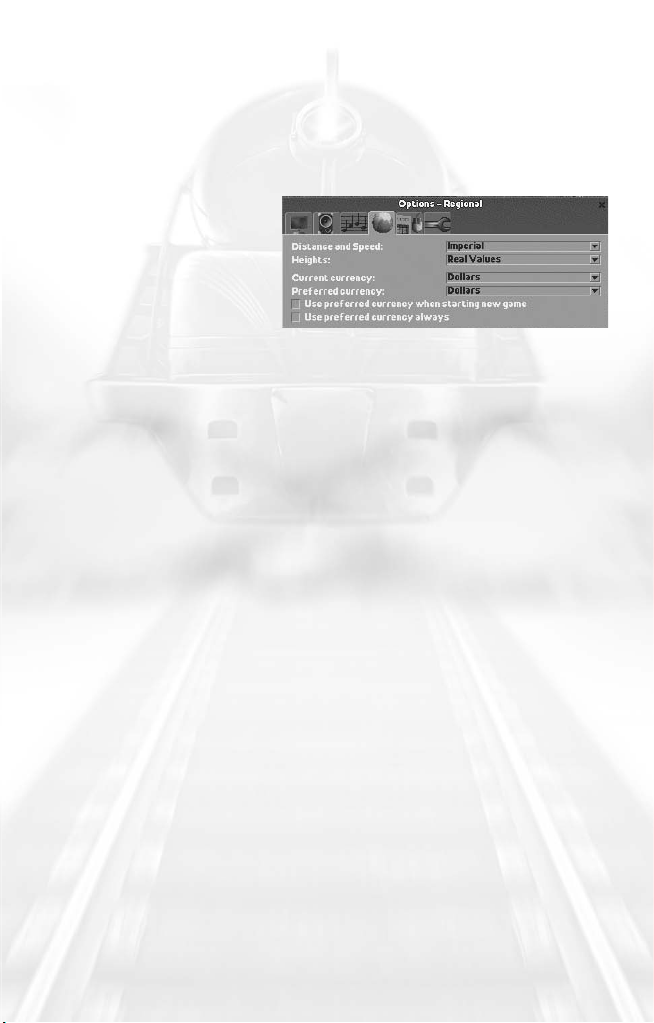
Regional Options
• Distance and Speed:
Toggle the distance and
speed measurements
between Imperial (miles,
miles-per-hour) and
Metric (kilometers,
kilometers-per-hour).
• Heights: Toggle the height marker displayed when the Show
Height Marks on Land option is selected on the
View menu.
Options are: Real Values (feet, meters) and Units (a positive or
negative number that shows the land height in units relation to
sea level: +1, -5, and so on).
• Current Currency: Selects the type of currency (dollars, Euros, yen,
and so on) used in the current scenario. Current Currency defaults
to the currency defined by the scenario.
• Preferred Currency: Set the default currency. This setting has
no effect unless you click one or both of the checkboxes
described below.
• Use preferred currency when starting a new game: Select this
option to use the currency type displayed in the
Currency menu
each time you start a new game. When you load a
Preferred
saved game that specifies a type of currency other than the
preferred currency, that specified currency is used.
• Use preferred currency always: Select this option to use the
currency type displayed in the
Preferred Currency menu
at all times.
17
Page 18
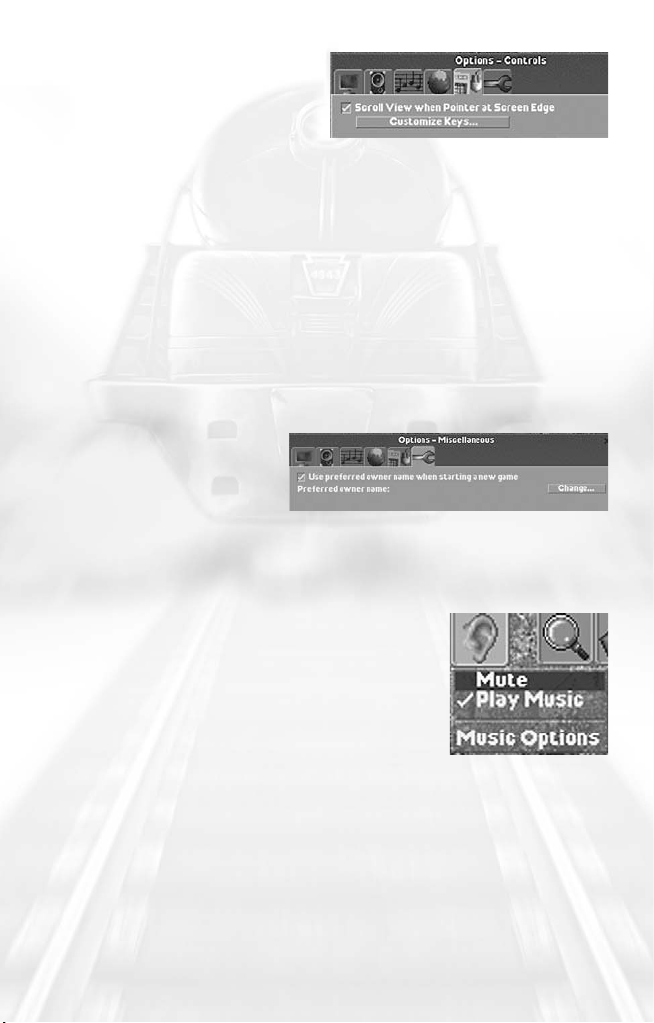
Control Options
• Scroll View when Pointer at
Screen Edge:
When this option
is checked, the view
automatically scrolls when you move your mouse pointer to the
edge of the screen. (You can also scroll the view by holding down
the right mouse button and dragging the mouse in the direction
you want to scroll, or by pressing the arrow keys.)
• Customize Keys: Set keyboard commands to suit your style of play.
To change a keyboard shortcut, click the command on the list and
then press the key to which you want to map the control. If you
select a key that is already used for an existing shortcut, the newly
selected shortcut replaces the old one. Click on Reset Keys to reset
the keyboard shortcuts to their default values. Close the
Shortcuts window
to save the settings. (See “Keyboard
Keyboard
Commands” on page 107 for a list of default keyboard shortcuts.)
Miscellaneous Options
The miscellaneous options
group allows you to set a
default owner name. To
change the preferred owner name, click on Change. Check the “Use
preferred owner name when starting a new game” option to use this
name every time you start a new scenario.
SOUND MENU
• Mute: Toggle all game sounds and music ON
and OFF. When Mute is selected, the Sound
Menu icon has a red X through it. You can
also toggle mute mode by clicking the Sound
Menu icon.
• Play Music: Toggles the music ON and OFF.
• Music Options: Opens the Music Options section of the Game
Options window
. (See “Music Options” on page 16 for details.)
18
Page 19
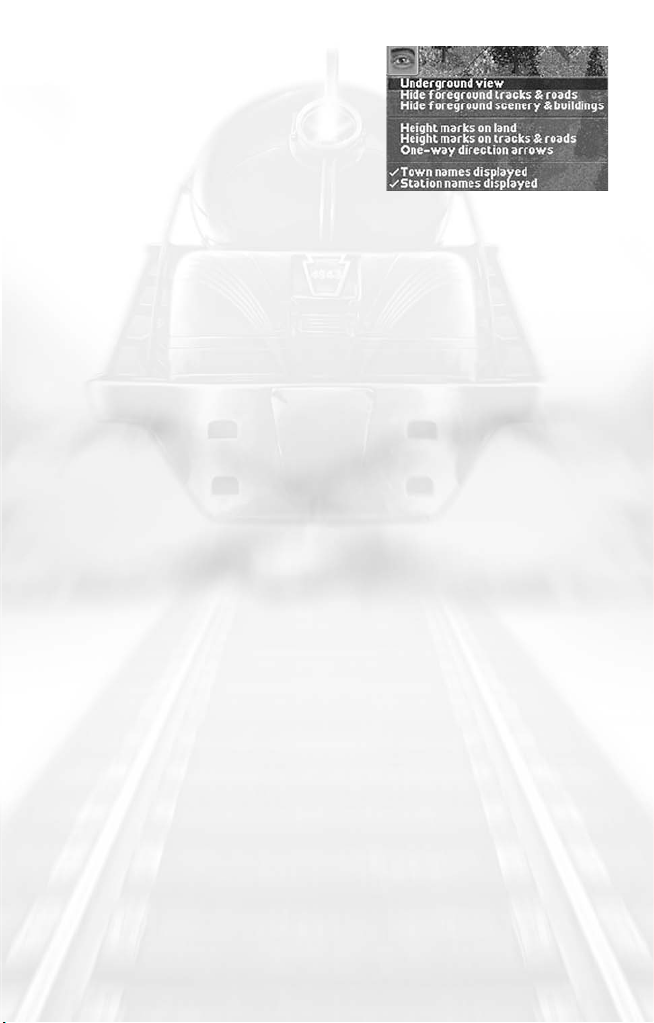
VIEW MENU
• Underground view: Renders the ground
transparent so you can see tunnels and
other underground features.
• Hide foreground tracks & roads: Hide
roads, railroads, airports and docks in
the lower half of the screen.
• Hide foreground scenery & buildings: Hide terrain objects (such as
trees) and buildings in the lower half of the screen.
• Height marks on land: Display the height of every land square not
occupied by a road or railroad. These marks are only visible in the
closest zoom mode.
• Height marks on tracks and roads: Display terrain height marks on
all roads and tracks.
• One-way direction arrows: Display one-way arrows on roads
and tracks.
• Town names displayed: Display town names.
• Station names displayed: Display station and passenger stop names.
STATUS DISPLAY
The Status Display in the lower-left corner provides access to
information about all of the transport companies in the game. This
display shows company treasuries (the amount of cash on hand) and
Performance Indexes. (See “Performance Index” on Page 66 for more
information.)
The face icon on the left side of the display is your owner image.
Click this image to open your company’s Status window. (See
“Status Window” on page 26 for details.)
Move the cursor over the face icon to display the
which lists all of the companies competing in the current scenario
and their current standing in the game from highest-ranked (top) to
lowest-ranked (bottom). To open a competitor’s
that company name.
Click the Companies List option to open the
which contains a number of graphs and displays that compare your
company’s progress to those of your competitors. (See “Companies
List” on page 64.)
Owners menu,
Status window, click
Companies List window,
19
Page 20
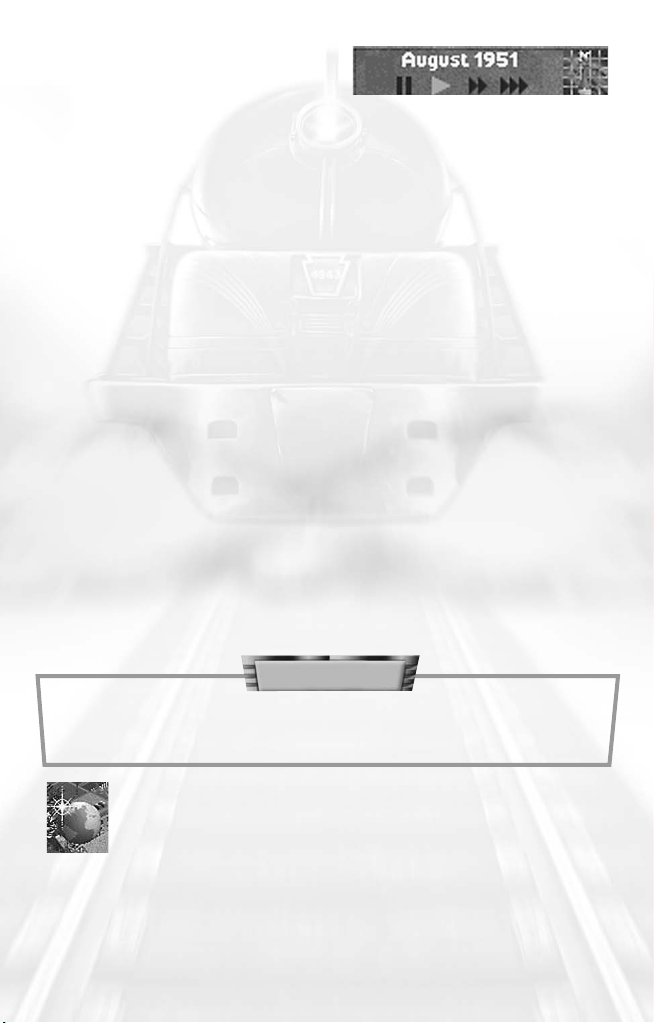
TIME DISPLAY
• Pause: While paused, you can
look at status menus and
displays, but you cannot manipulate any objects on the landscape.
Doing so starts play again at normal speed. To manually resume
play, click on Pause again, or click one of the three Play controls.
You can also pause the game by pressing the
• Play Normal Speed: Play at normal speed. This is the default
time rate.
• Fast Forward: Play at three times the normal rate.
• Extra Fast Forward: Play at nine times the normal rate.
Click the icon on the right side of the
Mini-Map (see “Mini-Map” on page 29 for details).
Note: The fast-forward play options are not available in two-player
games.
The Time Display also shows scrolling ticker-tape messages. Click this
display to open the Message window. (See “Message” on page 51.)
Time Display to open the
Pause key.
SINGLE-PLAYER GAME
There are over 40 single player scenarios available in Chris Sawyer’s
Locomotion
in unique ways.
, each one challenging your transport management skills
20
TIP
Start with the Beginner scenarios, and move on to greater
challenges as you gain familiarity with the game.
New Game
Click the Start New Game icon on the
the
Select Scenario window.
Main Menu to open
Page 21
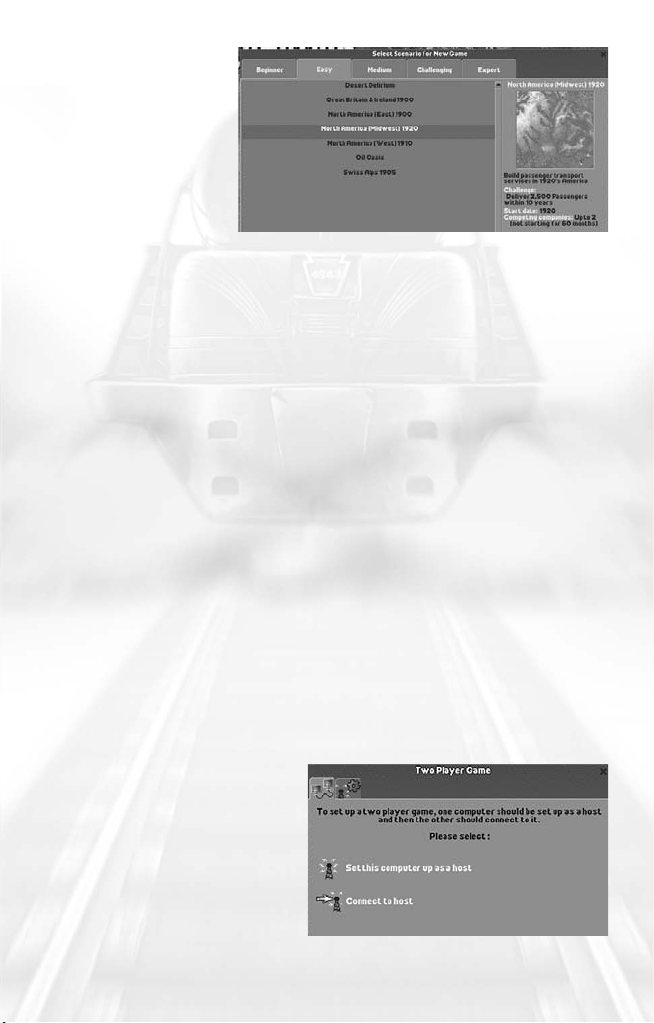
The scenarios are
divided into five
levels of difficulty:
• Beginner
• Easy
• Medium
• Challenging
• Expert
Select a tab on the
Select Scenario window to display a list of
scenarios. Move the cursor over a scenario to display a thumbnail
image of the game map, a description of the highlighted scenario
and the following statistics:
• Challenge: The goal or goals you must achieve.
• Start Date: The starting year of the scenario.
• Competing Companies: The maximum number of competing
companies and the time at which each one enters the game.
Click the scenario name to play that scenario.
TWO-PLAYER GAME
Chris Sawyer’s Locomotion allows you to engage in fiscal combat with
the most unpredictable and potentially cunning rival on the planet:
another human player.
In terms of speed and reliability, two-player mode is ideally suited to
local area network (LAN) play. The game will play on dial-up
connections, but might be prohibitively sluggish.
Chris Sawyer’s Locomotion supports only the TCP/IP network protocol
for LAN and Internet play.
Starting a Multiplayer
Game
To start a two-player game,
click the Single Player
Mode/Two-Player Mode
toggle on the
This opens the
Game window
Main Menu.
Two Player
, which has
two tabs:
21
Page 22

• Two Player Game: The left tab has two options: Host and Join.
• Two Player Game — Options: The time-out value sets the amount
of time the game will wait for expected data from the other
computer while playing. The games will disconnect if this timeout value is exceeded. The second option, “Share additional
companies/owner faces”, allows you to share owner images that
you import from an external faces editor (not yet available) with
your opponent. Select this option to automatically copy your
custom companies and faces to your opponent’s machine when
you connect over the LAN or Internet.
Host A Game
To host a game, click “Set this computer up as host” on the
Player Game window
. The game will wait for another player to join.
Two
Click Cancel to exit Host mode before another machine connects.
Join a Game
To join a game hosted by another player, click “Connect to host”
on the
Two Player Game window. This opens the Enter Host
Address dialogue
.
The next step varies for Internet and LAN play:
• Internet Games: To join an Internet game, type the IP address of
the host machine in the text field and click OK. You must know
the host IP address in order to play over the Internet.
• LAN Games: To join a game on a local area network, type the IP
address or the name of the host computer in the prompt and click
OK. To search for any valid host machine, leave the dialog box
blank and click OK.
If the host computer isn’t located, an error message appears. Click
OK on the error prompt to return to the
Two Player Game window.
Start New Game/Load Game
Once two machines are connected, both players see a message in
the
Two Player Game window that indicates a successful connection
and identifies the computer to which they are connected. At this
point, the
Main Menu updates and displays new controls:
22
Page 23

• Start New Game: Start a new two-player game. This opens the
Select Scenario window, from which you can choose any available
scenario.
• Load Saved Game: Load a previously saved game. You can only
load two-player saved games when in two-player mode. Either
player can start or load a game.
A Chat (red telephone) icon appears on the updated
Main Menu.
Click this icon to send text messages to your opponent during the
setup mode. Just type your message and press
Click Disconnect on the
Main Menu before the game begins.
Two Player Game window to return to the
ENTER to send.
Connecting Through a Firewall
When attempting to play a two-player game on a computer that
uses a software or hardware firewall, you might have to change
some settings in order to connect.
Some firewalls automatically prompt you when an attempt is made
to send data from a program that the firewall doesn’t recognize. If
the connection fails, you might need to manually configure your
firewall to open the following ports:
• 6073
• 2032 through 2400
If you are attempting to use an Internet connection through a
network router with NAT, you must configure the router’s Port
Forwarding to forward the above-listed ports to your local
computer’s IP address.
If you are unfamiliar with changing your firewall settings, consult
your firewall’s documentation.
Playing the Two-Player Game
Once you and your opponent are connected, the two-player version
of
Chris Sawyer’s Locomotion plays nearly identically to the single-
player game, with a few exceptions:
• Human opponents are not bound by the time restrictions for entry
of new companies — both human-controlled companies are
present from the moment the game starts.
23
Page 24

• The game’s only speed-related controls are Play and Pause. When
either player pauses in a two-player game, the game pauses for
both players.
• Above the Time Display, there is a Send Message control. Click this
to send text messages to your opponent. Type a message in the
prompt and press
ENTER to send it. Messages from your opponent
appear in a pop-up window tagged with the opponent’s image.
All single-player scenarios are available in the two-player version.
Two-player saved games are stored in a folder separate from singleplayer saves. You cannot load a two-player saved game in singleplayer mode (or vice-versa).
The game automatically disconnects when either player quits the game.
24
Page 25

CHRIS SAWYER’S LOCOMOTION BASICS
THE OBJECT OF THE GAME
Your company starts with a modest bank loan and a simple survey
map. Where you go from there is, well, your business.
Your underlying mission in
same: deliver cargo and passengers from one place that produces
them to another place that requires them. You must provide
necessary services to the towns and industries in the areas you serve.
If you do a good job, you are rewarded with a burgeoning bank
account and a high Performance Index. If you are unable to meet
the transportation needs of the people, your Performance Index
drops… along with your profits.
In order to complete each scenario, you must successfully reach
defined goals. Your first few
seem a bit overwhelming — there can be a lot to think about at
once, especially once rival companies enter the scene. However, if
you understand the basic game systems and take a measured
approach to planning and building transport lines, you’ll soon be at
the top of your own transport empire.
FIRST STEPS
Each scenario begins with a view of the game world. Pause the game
and take some time to scroll around the landscape and check out
the terrain features, towns, and industries. Once you’ve done an
initial survey, it’s time to set up your company.
Unless you set a preferred owner name in the Miscellaneous Options
section of the
page 14 for details), entering your name is the first task. There are a
number of additional company-related tasks that you need to attend
to before you get started. All of these initial options are set on the
Status window.
Game Options menu (see “Game Options Menu” on
Chris Sawyer’s Locomotion is always the
Chris Sawyer’s Locomotion games might
25
Page 26
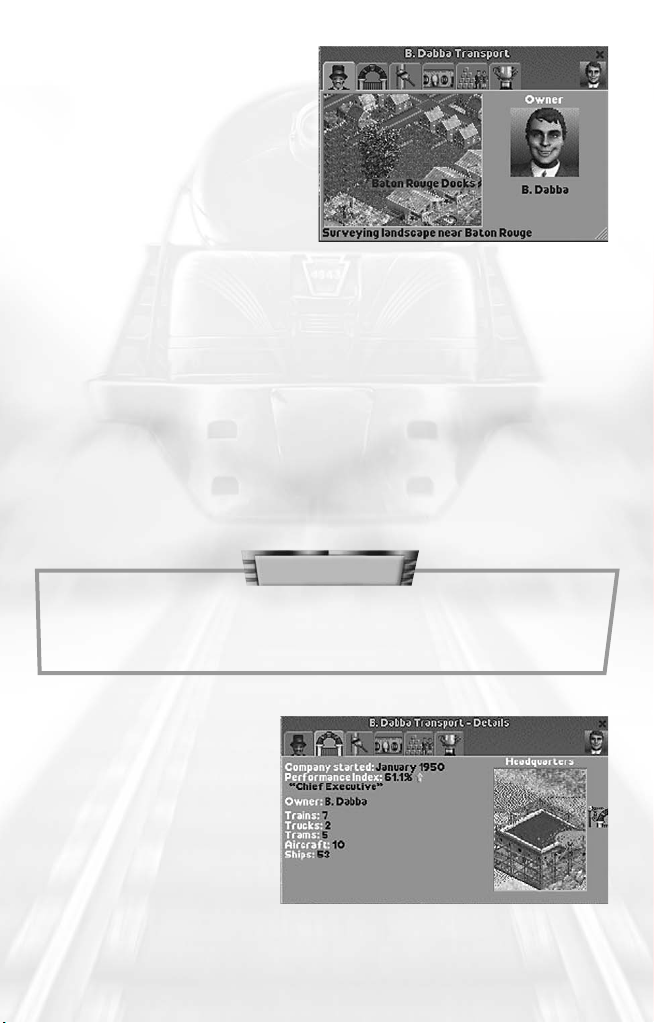
Status Window
The
Status window
automatically opens when you
start a new game. To open the
Status window while playing,
click the owner icon on the
Status Display. There are six
tabs on this window:
Company Owner and Status
• Status View: Shows the viewpoint of the company owner. The
Status View is most useful for “spying” on other company owners,
to see where they are building, or what they have their sights on
next. Click the cluster of arrows in the lower-right corner of the
Status View to centre the game screen on the area shown.
• Owner Image: The owner image is randomly selected at the start
of each scenario. Click your owner image to select a new one.
• Owner Name: The owner name appears below the owner image.
Click on the name to change it. You can also click on the title bar
of the window to change the name.
TIP
Use the Status View to keep an eye on your opponents.
If they’re surveying the landscape, chances are they’re
about to build in that location.
Details
The
Details section tab
shows basic company
performance statistics and
allows you to construct
and view the company
headquarters.
26
Page 27
• Company started: The year the company was founded.
• Performance index: The company’s current Performance Index.
• Owner: The owner’s name.
When viewing a computer-controlled opponent’s
Status window, the
owner’s Intelligence, Aggressiveness, and Competitiveness ratings
appear below his or her name. (See “Rival Owner Characteristics” on
page 65 for details about competing owners and companies.)
The image on the right side of this display shows the company’s
headquarters (if one exists). Click the icon on the right edge of the
window to construct your headquarters. Select a spot on the
landscape and click to construct the building. Construction is
completed after a short time.
To move your headquarters to a different location, click the
construction icon and then click the new headquarters location.
When construction begins on your new headquarters building, the
old one is automatically destroyed.
You can operate your company successfully without a headquarters,
but building this structure is quite inexpensive, and its growth and
changes in style (or lack thereof) over the course of the game serves
as a visual symbol of your success.
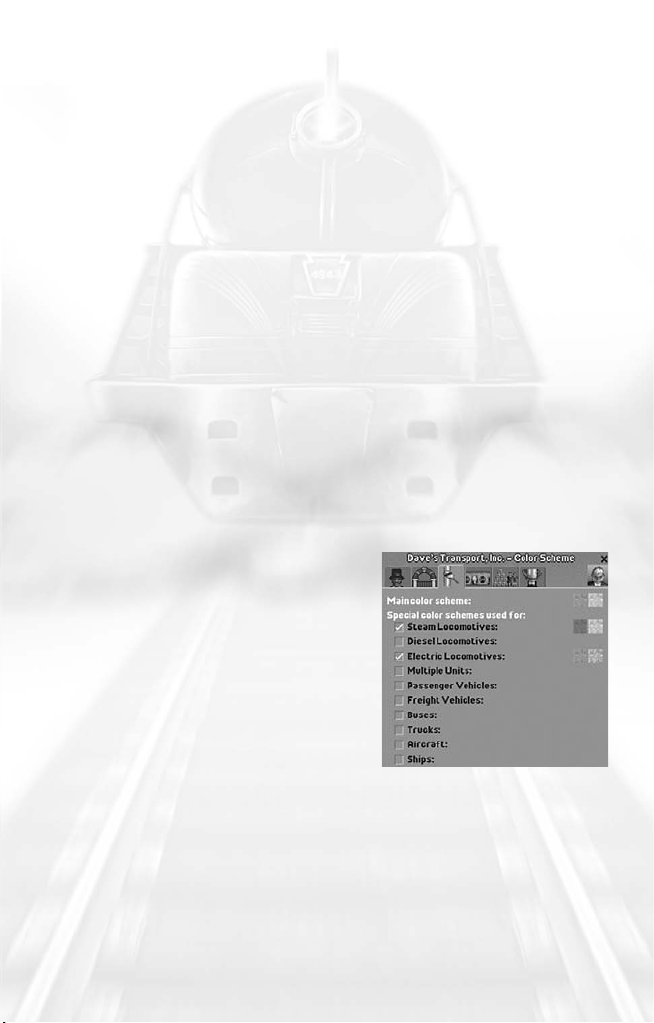
Colour Scheme
The
Colour Scheme tab allows you to
specify colours for your company
displays, structures, and vehicles. You
can set both an overall colour scheme
for your company and a specific colour
scheme for every vehicle type.
• Main colour scheme: Defines the
background hue of your window title
bars and the colours used on your
buildings. The two coloured squares show the currently selected
colours. To pick a new colour, click on a square to open the palette
of available colours and then click on a new colour.
• Special colour schemes used for: Defines the colours for individual
vehicle types. Click checkbox beside the vehicle type to display
the vehicle type’s current colour scheme. Change the colours as
described above.
27
Page 28
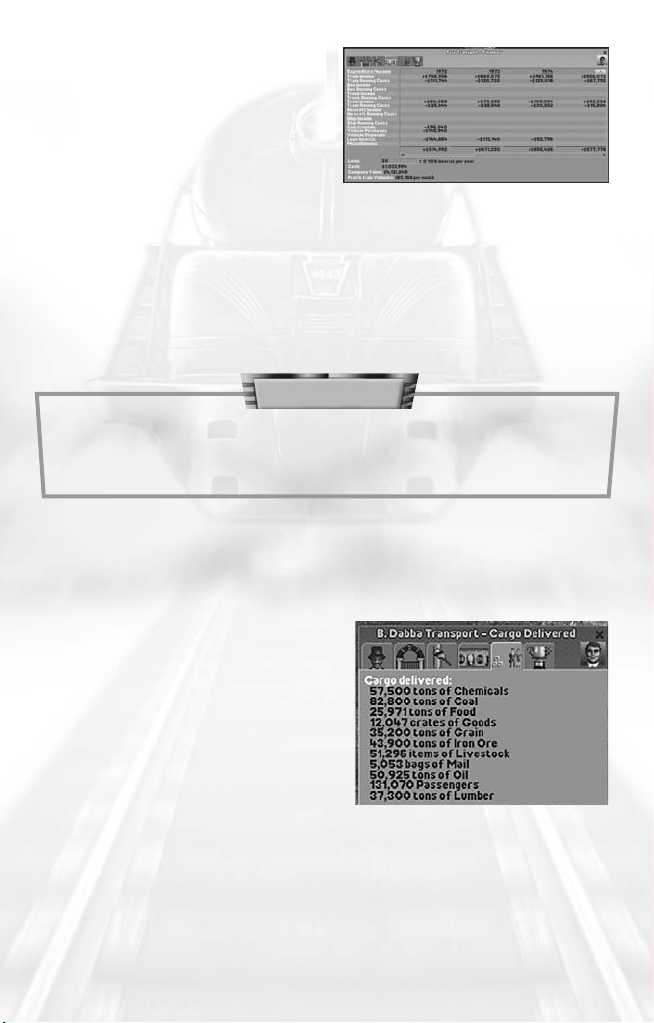
Finances
The
Finances tab shows a
breakdown of the company’s
income and expenditures,
company value and current profits,
and provides an interface for
applying for and paying off loans.
• Expenditure/Income: Shows the company’s profit and loss for each
year.
• Loan: Shows the total amount of money owed to the bank. Click
the up arrow to the right of the loan amount to borrow more
money, and click the down arrow to pay down your loan.
TIP
If you run out of cash and need some more, be sure to check with
the bank to see if they’ll loan you more money. Banks continue to
raise your credit rating as you progress in the game.
• Cash: The current amount of cash available.
• Profit from Vehicles: The monthly profit or loss you are incurring
from vehicle operations.
Cargo Delivered
This tab provides information on
cargo successfully transported
and delivered.
28
Page 29

Challenge
The
Challenge tab provides an
overview of your goals in the
current scenario, including a
summary of your progress,
and, if the scenario has a time
limit, the time remaining to
achieve these goals.
SURVEY THE LANDSCAPE
After naming your new company and double-checking your
objectives, you need to determine your first transportation task.
Should you haul grain with trucks, build a railroad and carry coal to
a steel mill, set up a bus line in the biggest town? The choices are
usually many, but not all of them make sense as your first venture.
You generally start a new game with enough cash to build a modest
transportation network. Once that starts to turn a profit, you are able
to afford more expensive vehicles and more ambitious routes.
One of the best resources for surveying the landscape is the
Map
. You can examine the landscape, towns and industries with the
game paused, which is usually a good idea at the beginning of the
game. Click Pause on the
then open the
Mini-Map.
Time Display (or press the Pause key) and
Mini-Map
Mini-Map provides a strategic overview of the
The
territory covered in the scenario. To open the
click Map on the
Zoom menu or click the Mini-Map
icon on the Time Display.
Click a spot on the
Mini-Map to centre the main game view on that
area. The black dashed-line rectangle defines the area that is
currently displayed on the main view.
On the right side of the window is a list of items, each of which is
represented by a different colour on the
Mini-Map. Moving the
mouse cursor over an item causes every object of that type to flash
on the
Mini-Map for easy identification. This Mini-Map has five tabs:
Mini-
Mini-Map,
29
Page 30
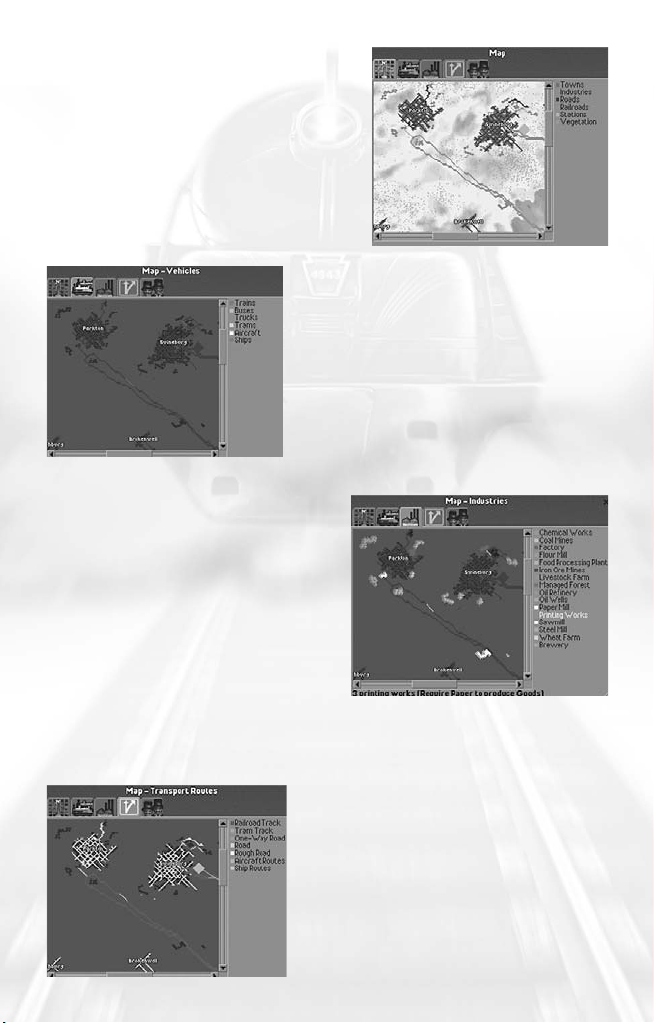
Default View
The default
Mini-Map view provides a
basic overview of the scenario
landscape. It shows the locations of
towns, industries, roads, railroads,
stations and vegetation.
Vehicles View
The
Vehicles view shows the locations
of all vehicles in the game. Holding
your cursor over a vehicle type on the
right causes the corresponding objects
to flash on the map and show the
number of vehicles of that type
currently deployed.
Industries View
The
Industries view shows all of the
industries currently in the scenario,
and is probably the most important
Mini-Map tab early in the game.
The total number of industries is
shown in the space just below the
map. When you place the mouse
cursor over an industry on the list,
this number changes to show how many facilities of that type exist.
The supplies or demands of that industry type are shown in
parentheses next to the industry type.
30
Transport Routes View
The
Transport Routes view displays all
of the land, air, and sea routes that are
currently operational. The routes are
broken down by type for easy
identification.
Page 31

Companies View
The
Companies view lists all of the
companies in the game. In this
view, the map breaks down the
routes, vehicles and stations by the
company that owns them.
TIP
Getting too ambitious too quickly is a good way to go bankrupt.
In many scenarios, setting up simple bus or tram services within
towns is a safe way to start. It not only provides a steady income,
it encourages population growth.
Supply and
Demand
One factor that
leads to success is
keeping track of
available cargo and
determining where
this cargo is
required.
You can assess the
transportation needs of the community at a glance by moving your
mouse cursor over the buildings, stations, and industries in each
town. When the cursor passes over a building, a pop-up shows what
the building is, the cargo it produces and what deliveries it accepts.
You can deliver and unload cargo that is not accepted at a station,
but you are not paid for it. In this situation, the unwanted cargo
simply sits at the station and waits for you to pick it up again.
In order to pick up and unload cargo, you must build stations —
cargo loading bays, passenger stops, airports, docks, and so on.
Open a station’s Station
needs. (See “Stations” on page 53 for details.)
Overview window to assess the station’s
31
Page 32

INDUSTRY
The industries in each scenario generally provide a large percentage
of your potential transport business. Some industries provide goods
and raw materials from the surrounding land. Farms, mines, oil wells,
and managed forests, for example, all produce cargo that is just
waiting to be transported.
Other industries, such as sawmills, flourmills and oil refineries, require
the raw materials produced by the aforementioned industries in
order to produce products. Once they have the raw materials they
need, these industries start stockpiling goods that you can transport
as cargo.
The Industry List
Select Industries
from the
Town/Industry
menu
to open
the
Industries
window
can also open
the
The left tab of the
industries and three columns of information:
• Industry: The name and type of industry.
• Status: What the industry is currently producing or what the
• Production Transported: The percentage of the industry’s total
. You
Industries window by right-clicking on any industry building.
Industries window shows a scrolling list of all
industry requires in order to begin production.
cargo output that is currently being transported.
32
TIP
Right-click an industry on the landscape to quickly
display the Industries window
Page 33

To obtain more detailed information on any listed industry, click on it
to access its
Industry Status window. (See “Industry Status Window”
below.)
The second tab opens the
Fund New Industries view. This section of
the window displays a scrolling list of industry buildings. From here
you can fund the construction of new industries. This is expensive,
and is not a viable option early in the game (see “Funding New
Industries” on page 85 for details.)
The Industry Status Window
Like other buildings, the products and requirements of an industry
are displayed when you move the mouse cursor over the industry
building. To obtain detailed information on an industry’s production
and statistics, click the industry on the landscape to open its
Status window
Industry Status window has three tabs.
The
or click its name on the Industries window.
Industry
Industry
Industry tab shows a status
The
view of the industry. To centre
the main view on this industry,
click the gray arrows in the
lower-right corner of the image.
Listed below the image are the
items it requires (if any) and the
goods it produces.
Monthly Production
The
Monthly Production tab shows a
graphic representation of the facility’s
production. The line graph charts the
number of cargo units produced on the
left and the game year along the top.
Industries that require the delivery of raw
materials in order to produce goods —
factories and steel mills, for example —
show production growth only when they receive a steady supply of
the materials they need. It is up to you (or your competitors) to
ensure a steady flow of materials to these facilities.
33
Page 34

Statistics
The
Statistics tab is the most
important tab to examine
before deciding whether to
build a transport route to a
particular industry. It shows the amount of required goods or raw
materials the industry has produced or received in the past month,
and the amount of produced goods that have been transported
away from the facility. Use this display to determine whether it’s
worth investing in transporting cargo from this industry.
MANIPULATING THE LANDSCAPE
Not all locales are ideally suited to construction. Before you build
roads, lay tracks and perform other tasks to expand your
transportation empire, it is often necessary to reshape the landscape.
The
Landscape menu provides the following tools to help you
accomplish your earthmoving chores:
• Clear Area
• Adjust Land
• Adjust Water
• Plant Trees
Clear Area
The Clear Area option allows you to clear
areas of trees and other obstacles — including
houses and other man-made objects —
from the landscape. (To clear roads and
tracks, use the tools on the Build Roads and
Build Tracks menus.)
Select the Clear Area tool to open the
Clear Area tab. The graphic in the centre of the window shows the
Landscape window to the
size of the “brush” you are using. The number of brush squares
indicates the number of terrain squares you clear each time you click
the landscape. Click the + and – buttons in the corners of the
graphic to adjust the brush size. Click on the landscape to clear it.
34
Page 35

TIP
If your Local Authority Rating is too low, you might not be
allowed to clear an area around a town
(see “Local Authority Rating” on page 61).
As you move the cursor over the land, the cost of clearing the land
encompassed by the brush appears at the bottom of the Landscape
window. The number of objects cleared determines the price. You can
also remove an obstacle from the landscape by right-clicking on it.
TIP
Some landscape elements — trees, for example — are cleared
automatically when you build track, roads, and so on in the squares
they occupy. The cost of clearing these items are automatically
added to the construction cost.
Adjust Land
This tool allows you to change the height and slope of a land square
(or group of land squares).
Raising and Lowering Land
When in Adjust Land mode, the
cursor is a shovel attached to a grid
(brush) that defines the area of land
you affect as you make your changes.
The number of brush squares
indicates the number of terrain
squares you will raise or lower at a
time. Click the + and – buttons in the
corners of the graphic to adjust the brush size.
Click and hold the left mouse button. Move the mouse away from
you to lower the land section or toward you to raise it.
If the land in the defined area isn’t level — that is, some parts are
higher than others — the land evens itself out first and then moves
up or down as a unit.
35
Page 36

Every land square you raise or lower costs money for each unit of
height change. As you move the cursor over the landscape, the cost
of raising and lowering the area defined by your brush is displayed at
the bottom of the
houses are automatically cleared from the land square when you
raise or lower it, and you are charged accordingly.
Landscape window. Objects such as trees, and
TIP
You are charged for every change you make. Every time you
adjust land height, you pay for it. Be decisive. If you drag the
land tile up and down repeatedly trying to get it “just right,”
you quickly drain your bank account!
Changing Slope
You can change the slope of a land
square by raising or lowering only
one corner at a time. To do this, set
the brush size to one square. Next,
move the brush onto the land square
you want to change, and adjust the
pointer so that only one corner of the
square is highlighted. Once the cursor is positioned, click and drag
the mouse to raise or lower the selected corner.
TIP
When using a brush size of one square, you can raise the whole
square or a single corner. The cost is the same, so be sure to select
the entire square if that’s what you want to raise or lower.
Adjust Water
You can create lakes, canals
and other waterways using the
Adjust Water tool. It works
nearly identically to the Adjust
Land tool (see “Adjust Land”
on page 35).
36
Page 37

Plant Trees
The towns that you serve enjoy ontime cargo delivery and a good
passenger transportation
infrastructure — but they also love
nature. If you cut down too many
trees around a town, your Local
Authority Rating drops (see “Local
Authority Rating” on page 61).
Planting trees near a town helps to
stabilize and improve your Local Authority Rating. A few well-placed
trees can even soothe town officials who are unhappy because you’ve
destroyed too many of their town’s buildings in the name of progress.
Select Plant Trees from the
foliage. The types of trees available vary by scenario.
Click on a tree and then click on the landscape where you want to
plant it. The cost of planting the selected tree is shown at the
bottom right of the
change their appearances. If the selected tree can be rotated, a
rotational arrow appears on the right side of the window. Click the
arrow to rotate the tree to a different view or press the Z key.
Landscape menu to display available
Landscape window. You can rotate some trees to
TIP
Not all species of trees grow in all climates.
BUILDING ROADS
Part of building a transportation
empire is ensuring that your
vehicles can get from their source
to their destination. Early on, this
often involves building roads. To
build a road, right-click on an
existing section of road or select a road type from the
There are three types of roads available:
Roads menu.
37
Page 38

• Rough Roads: These two-way unpaved thoroughfares are the
cheapest to build, but restrict the speed of the vehicles.
• Roads: Paved roads are more expensive, but allow two-way traffic,
higher speeds.
• One-Way Roads: These paved roads allow traffic flow in only one
direction. One-way roads are generally used to build divided
highways — two side-by-side roads running in opposite directions.
If you have a particularly busy route or a road that covers a long
distance, divided highways allow faster vehicles to pass their slower
counterparts.
When the
Build Roads window opens, the cursor automatically
changes to a road-building cursor. The arrow on the cursor indicates
the direction that the road will take when you start building it (and,
in the case of One-Way Roads, the direction of the traffic flow when
the road is built). Click the Rotational Arrow at the bottom of the
Build Roads window to change the road section’s facing, or press the
Z key. When the road is facing in the direction you want to build,
click the terrain square where you want to place it.
The main view of the
• Curve: Determines whether the section
Build Roads window is divided into several sections:
you are about to build is straight or
curved. Click a button to select the
desired curve. A preview of the road
section appears on the
Build This button
and the cursor indicates the shape and
direction of the proposed road section.
• Slope: Determines whether the section of
road you are about to build is level or at
an uphill or downhill grade. A preview of
the road section appears on the
This button
and the cursor indicates the
Build
shape and direction of the proposed
road section. For more detail on dealing
with slopes see “Slopes” on page 72.
38
Page 39

• Bridge: When an uphill or downhill slope is selected and the slope
cannot be built without building a bridge, a drop-down menu of
bridge types appears (see “Bridges” on page 73).
• Build This: The Build This button shows a preview of the road
section you are about to build and its construction cost. Click this
button to build a new road section at the flashing point on the
main view. Each time you click the button, a new road section of
the displayed type is constructed.
The bottom section of the
required in the road construction process:
• Rotational Arrow: Click this button to change the facing of
your initial road section before you place it. Once you place
the initial section, the Bulldozer and Crosshair icons replace the
Rotational Arrow.
• Bulldozer: Click to destroy the previous section of road (the section
behind the current position of the build road cursor). When you
destroy a section of road, you receive a partial refund for cost of
the road section destroyed. To destroy sections of a previously built
road, right-click on the road section and then click the Bulldozer.
• Crosshair: Click to halt construction in the current location and
select a new starting point for a road.
Build Roads window displays tool icons
TIP
You can use a shortcut when adding sections to an existing road.
Move the cursor onto the end of the existing road and right-click
to begin construction. The tool automatically defaults to the type
of road to which you are adding the new section.
The Stations Tab
The second tab at the top of the
Building window
stations and passenger stops along
your roadways. See “Stations” on page
53 for details on building cargo and
passenger stations and stops on roads.
allows you to build
Road
39
Page 40

BUILDING RAILROADS
Railroads provide a faster means of transporting cargo and
passengers from place to place, especially when long distances or
large cargos are involved. Creating an efficient rail network requires
forethought, planning and practice. Your first rail lines are likely to be
simple, but you’ll have to build more advanced lines in order to
compete in more advanced scenarios. The basic track-building tools
are presented here, for information on advanced rail-building, see
“Working on the Railroad” on page 76.
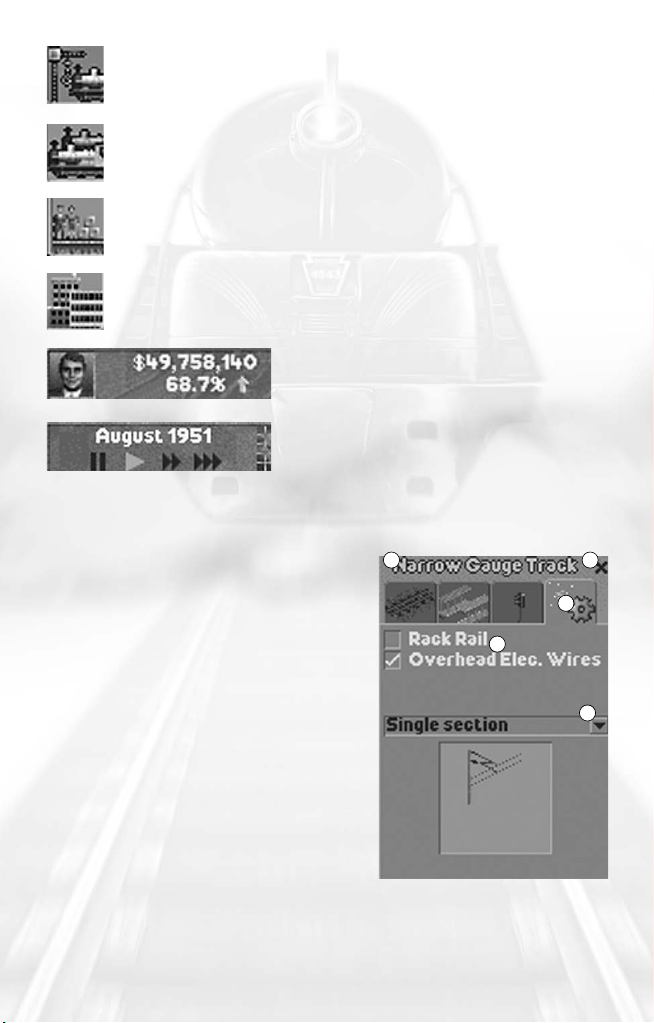
Select a track type from the Tracks
menu. There are up to three different
track types in each scenario:
• Railroad Track: Standard railroad track.
• Narrow Gauge Track: Typically used in
mountainous terrain, narrow gauge
track can make sharper turns and
climb steeper slopes than standard
railroad track. Narrow gauge trains are
smaller than standard trains, and their
carrying capacity is less than their
standard-sized counterparts.
• Tram Track: Trams are strictly used for
passenger transportation in urban
areas. Tram tracks are laid in parallel
pairs that can be connected at the
ends, creating a closed loop. Unlike
other types of tracks, tram tracks can
be built along existing roads.
TIP
Tram tracks are more expensive per section than railroad tracks, but
the trams themselves are more economical to run if passenger
service is your goal.
40
Page 41

To select a track type from the menu, click it to open the Build
Tracks window
.
When adding to an existing track, move the cursor onto the end of
an existing track section and right-click to begin construction. The
tool automatically defaults to the type of track to which you are
connecting the new section.
Build Tracks Window
The main view of the Build Tracks window is nearly identical to that
of the
Build Roads window. Follow the same procedures used for
building roads when building tracks (see “Building Roads” on page
37 for details).
Stations
The second tab on the
Build Tracks window allows you to build
stations for your railways and tramways. (See “Stations” on page 53
for details on rail and tram stations.)
Track Electrification/Enhancement and Signals
The
Build Tracks window has up to two additional tabs that allow you
to build special track enhancements and signals along your rail lines.
This tab accesses track enhancements required for certain train types.
Each selected enhancement is automatically added to every track
section you build while the option is checked. Track enhancements
increase the construction cost of each track section.
41
Page 42

Depending on the scenario and track type, one or more of these
enhancement options might be available:
• Electric 3rd Rail: An electrified rail that provides power to some
electric trains.
• Overhead Elec. Wires: A series of poles and overhead wires that
provide power to some electric trains and trams.
• Rack Rail: When a narrow gauge railroad is built on an uphill
or downhill slope that is too steep for the engine to climb by
normal means, a central cogwheel must be mounted on the
engine. This wheel grips a third “rack” rail and provides additional
traction when climbing and descending hills. Not all narrow gauge
engines are equipped to use rack rails. (See “Slopes” on page 72
for more details.)
TIP
Add rack rails only on steeply sloped sections of track. Adding them
to the entire track is expensive and severely limits the train’s speed.
Check the statistics of the train type you intend to build to determine
what enhancements you need to incorporate into the track.
To add enhancements to an existing track section, select the
enhancement or enhancements you want to add. When you do so, a
drop-down menu appears below the enhancement options. Choose
one of the following options from the menu:
• Single Section: Add the enhancement(s) to a single section of track.
• Block Section: Add the enhancement(s) to all connected track up
to the next signal in all directions from the clicked square. If there
are no signals placed along the track, this option functions
identically to the All Connected Track option.
• All Connected Track: Add the enhancement(s) to all track sections
connected to the clicked square.
To add the selected enhancement(s), move the cursor over the
section of track to which you want to add it and click.
42
Page 43

Signal Construction
The
Signal Construction tab allows you to
place track signals along your rail lines.
Track signals warn train engineers of
dangerous situations on the track ahead.
Properly placed signals can prevent
disasters. If you want to run more than one
train on a track, you need to install signals.
There are two signal types. The difference
between the two signal types (and the
different styles within each signal type) is
purely cosmetic. All signals perform the
same function, and all are equally effective.
• Colourlight: Signals trains using coloured lights. There are several
models of colourlight signals.
• Semaphore: Signals trains using one or more arms that are
arranged in a pattern to identify the impending situation.
To place a signal, select the signal type from the drop-down menu.
Two images of the selected signal appear in the window — a twoway signal that serves trains approaching from either direction and a
one-way model that serves trains approaching from a single
direction. (Trains are not allowed to pass a one-way signal going in
the wrong direction.)
Click the model you want to build,
and move the cursor over the track
section where you want to build it. If
you select a one-way signal, an
arrow appears on the track to show
the direction of travel the signal
serves. Click to place the signal.
The proper placement of signals along your rail lines takes practice.
See “Signals” on page 78 for more information.
43
Page 44

BUILDING VEHICLES
Start vehicle construction by selecting a vehicle type from the
Vehicle Construction menu. There are up to six choices,
depending on the scenario:
• Build Trains: Build trains for both standard and
narrow gauge tracks.
• Build Buses: Build buses to transport
passengers.
• Build Trucks: Build trucks to haul cargo.
• Build Trams: Build rail-bound passenger
vehicles.
• Build Aircraft: Build passenger and cargo aircraft.
• Build Ships: Build ships to carry passengers
and cargo.
When you select a vehicle type from the
the Build Vehicles window opens. Tabs display each vehicle type
listed on the
Build Vehicles window includes the following elements:
The
• Vehicle List: Lists pictures and names of all available vehicles of the
Vehicle Construction menu.
selected type. Move the mouse cursor over a vehicle to highlight it
and display its statistics. Click on a vehicle to buy it.
• Vehicle View: A rotating image of the vehicle currently highlighted
on the Vehicle Menu.
• Vehicle Statistics: Lists of statistics for the highlighted vehicle,
including cost, monthly operating cost, the year it was designed,
its requirements, power, weight, and maximum speed.
In scenarios where both standard and narrow gauge trains are
available, two tabs appear on the
above the
Vehicle Menu when Build Trains is selected. These tabs
toggle between standard and narrow gauge railroad vehicles.
Vehicle Construction menu,
Build Vehicles window directly
44
Page 45

Building Vehicles
To build a vehicle, click its
name on the Vehicle List.
This deducts the cost of
the vehicle from your
available cash and opens
the
Vehicle Information
window
The cursor changes to
allow you to place the
vehicle on the landscape.
When you are building a train, you can add cars before or after you
set it on the tracks. Continue clicking cars on the Vehicle list to add
them to the newly constructed train. As each car is built, it is added
to the train’s Vehicle Information window.
Vehicle Information Window
The
Vehicle Information window displays options and controls to
place the vehicle on the landscape and to operate it. This window
opens automatically when you build a new vehicle. To open the
Vehicle Information window for a selected vehicle at any point
during the game, click the vehicle on the landscape or click the
vehicle’s name on the
Vehicle Status window.
for that vehicle.
TIP
If you close the Vehicle Information window before you place a
vehicle on the landscape, it still incurs operating expenses but
produces no income. To locate an orphaned vehicle, open the
Vehicle List window, find the missing vehicle on the list and
click its name (its status shows “No Position”).
The vehicle’s name appears on the title bar. To change a vehicle’s
name, click the title bar. You can open the
window
purposes, but you cannot issue orders or make changes to vehicles
that don’t belong to you.
The Vehicle Information window has five tabs.
for vehicles belonging to rival companies for observation
Vehicle Information
45
Page 46

Show View
The vehicle’s position on
the landscape is displayed
in the
Show View tab. To
centre the main view on
the vehicle, click the gray
arrows in the lower-right
corner of the image. The
text below the image
describes the current
activities and speed of the vehicle.
If the vehicle is not currently on the game landscape — immediately
after the vehicle is constructed, for example — the vehicle view is
not displayed. Instead, a prompt appears instructing you to place the
vehicle on the landscape. To place the vehicle on the landscape, click
in an appropriate square.
TIP
If you are unable to place a train on a track, it usually means that
another train is in the way. To avoid this problem, use signals to
designate blocks of track into which only one train can enter. See
“Signals” on page 78.
While in Show View mode, up to four control buttons appear along
the right side of the window:
• Stop/Start Vehicle: Set the vehicle in motion or stop it in its
current location (or in the case of aircraft, at the next airport).
When the vehicle is stopped, the flag is red; when the vehicle is in
motion, the flag is green.
• Place/Remove Vehicle: If the vehicle is not currently on the game
landscape, you can click this button to switch the cursor to Place
Vehicle mode. When the vehicle is on the landscape and stopped,
this button changes to a Remove Vehicle button. In this mode,
click the button to remove the vehicle from the landscape.
• Pass signal at danger: This button, which appears only when the
Vehicle Information window for a train is selected, orders the train
to pass a track signal at which it would normally stop.
• Change direction: Click this button to change the vehicle’s
heading by 180-degrees. This button is only available when the
vehicle is stopped.
46
Page 47

TIP
Use the “Pass signal at danger” command with caution — ignoring
signals can lead to costly collisions.
Vehicle Details
This tab lists the image and
name of the vehicle and any
attached cars. Vehicle statistics
appear below the vehicle list,
including total power, weight,
maximum speed, and vehicle
reliability. In the case of
attached vehicles, these
numbers apply to all attached cars.
For attachable vehicles, the vehicle list provides an interface for
changing the order of the attached cars. To change the position of a
car, click and drag it to a new position. Release the mouse button
when the car is positioned where you want it.
In Vehicle Details mode, there are up to three control buttons on the
right side of the window:
• Modify vehicle: Click this button to add onto attachable vehicles —
to add cars to a train, for example. When you click the button, the
Build Vehicles window opens, displaying compatible vehicles. (For
details, see “Refitting a Vehicle” on page 69.)
• Place/Remove Vehicle: This button is identical to its counterpart in
the Show View mode.
• Sell Vehicle: Click to sell the current vehicle When you do so, the
vehicle’s sale price is automatically added to your bank account. To
sell an individual car, drag it onto the trashcan.
TIP
In the case of attachable vehicles (trains, etc.), clicking the Sell
(Vehicle) button sells the entire train including the locomotive
and all attached cars. To sell an individual car,
drag it to the trashcan.
47
Page 48

Cargo
Select this tab to display
an image of the selected
vehicle and a summary of
the amount and type of
cargo it is carrying. The
text at the bottom of the
window shows the total
number of cargo units the
vehicle is carrying.
Some vehicles are “refittable” — you can update them to carry one
of several types of cargo. When the selected vehicle is refittable, a
Refit button appears on the right side of the window. For details on
refitting, see “Adding to and Refitting Existing Vehicles” on page 69.
Finances
The
Finances tab shows a
summary of all of the
vehicle’s monetary statistics.
The following stats are
displayed:
• Last Income: The day,
month, and year of the last
cargo delivered by the
vehicle, the cargo type and amount, the transport distance and
transit time, and the amount of money earned on the run.
• Last journey average speed: The average speed of the vehicle over
the course of its most recent run.
• Monthly Running Cost: The amount of money the vehicle costs to
run and maintain monthly. In the case of attached vehicles, this is
the cumulative cost of maintaining all cars.
• Monthly Profit: The monthly profit of the vehicle based on activity
during the past few months.
• Sale value of vehicle: The amount of money that would be added
to your treasury if you sold the vehicle. In the case of attached
vehicles, this is the sale price of all cars combined.
48
Page 49

Route
The
Route tab allows you to
set station stops and
waypoints for the selected
vehicle, and provides a
number of routing-related
controls.
The Route List shows all of
the current waypoints,
orders and stops set for the vehicle. Click the Local/Express toggle at
the top of the list to switch the vehicle between local and express
service. A Local vehicle stops at all stations between route waypoints.
An Express vehicle only stops at the waypoints on its route.
To highlight an item on the route list, click it. To centre the main
game view on a stop or waypoint, double-click it on the Route List.
When a vehicle is in motion, a white arrow on the Route List
indicates its next destination.
As you click waypoints, and stops on the landscape, they are
automatically added to the Route List in the order clicked. Waypoints
and stops are numbered to indicate their order. Orders, waypoints,
and routes are explained in “Planning Vehicle Routes and Stops” on
page 70.
There are up to six buttons available along the right side of the
window in this mode:
• Unload all cargo: Click this button to insert an order to unload all
of the cargo the vehicle is carrying. If the vehicle can carry more
than one cargo type, click and hold this button to display a menu
of available cargo types and then select one.
• Wait for full load: Click this button to insert an order for the vehicle
to wait for a full load of cargo at a station stop. If the selected
vehicle can carry more than one cargo type, click and hold this
button to display a menu of cargo types and then select one.
• Skip to next order on list: Orders the vehicle to skip to the next
order on the Route List. Click the button once for each order you
want the vehicle to skip.
49
Page 50

• Delete last/selected order: Click this button to delete the currently
highlighted order/stop from the Route List. If no order is
highlighted, clicking this button eliminates the order added most
recently.
• Move selected order up/down the list: Click these buttons to move
the currently highlighted order up or down the Route List.
Vehicle Status
Window
Although your
vehicles take care of
themselves for the
most part, it is
important to
monitor their
activities to ensure
that your transport routes remain profitable. The
window
helps you track down and monitor your planes, trains, ships,
Vehicle Status
and road vehicles.
Click the
window
Vehicle Status menu icon to open the Vehicle Status
. This window has one tab for each vehicle type. The
following information is displayed for each vehicle on the list:
• Name: The name and picture of the vehicle, as well as a
description of the vehicle’s general activities and speed.
• Monthly Profit: What the vehicle is currently earning.
• Age: The number of years the vehicle has been in service.
• Reliability: The vehicle’s reliability rating. (See “Vehicle Reliability”
on page 69 for details.)
If you need additional information on a particular vehicle or you
want to pinpoint its location on the landscape, click the vehicle’s
name to open its
Vehicle Information window.
50
Page 51

MESSAGES
Occasionally, messages
appear to inform you
of important and
interesting game
events. These messages
take one of two forms:
a pop-up window, or a
ticker message that scrolls across the top of the
windows
close on their own after a few seconds, but you can close a
news window manually by clicking the X button in the upper-right
corner of the window, or by pressing the
News window includes graphics that illustrate the event, you can
If a
click the graphic to open an associated window.
You can access a list of recent messages and control the type and
form of the messages displayed throughout the game by clicking the
date/ticker display at the top of the
Message window, which contains two tabs.
Time Display. This opens the
Show Recent Messages
The left tab accesses a
scrolling menu that lists
the headlines of recentlyreceived messages. Click a
message headline to view
a complete message in a
pop-up news window.
Time Display. News
Spacebar.
Message Options
The message options
tab lists the six message
types that appear in the
game and allows you to
control how they are
displayed.
51
Page 52

• Own company major news: Messages concerning important events
pertaining to your company.
• Other company major news: Messages concerning important
events that occur at rival companies.
• Own company minor news: Trivial messages concerning your
company’s achievements — new speed records and similar items.
• Other company minor news: Trivial messages concerning the
achievements of rival companies.
• General News: Scenario events that can possibly affect any
company — the startup and shutdown of industries, reduced
industry production, and so on.
• Advice: Game-related hints and tips.
Click an option on the drop-down menu to change how each
message type is displayed.
• Off: Messages of this type are not displayed in any form.
• Ticker Message: Messages of this type are displayed as scrolling
ticker messages on the
• News Window: Messages of this type are displayed in a pop-up
Time Display.
news window.
52
Page 53

RUNNING YOUR TRANSPORTATION EMPIRE
The following sections explore the object and goals of Chris Sawyer’s
Locomotion
and monitor an effective transportation company.
STATIONS
Stations are the loading and unloading points
for cargo of all types. Without stations, your
vehicles wander the landscape aimlessly and
serve no purpose. Stations are classified by the
type of vehicles they serve:
• Road Stations: Serve trucks and buses. Road
station types include cargo loading bays,
passenger stops, and passenger terminuses.
• Rail Stations: Serve all tracked vehicles. They
include stations and tram passenger stops.
• Airports: Serve airplanes and helicopters.
• Docks: Serves ships.
Station List Window
, and provide the additional information you need to run
You can view information about all of your stations in the
window
the station type you want to view. The
five tabs:
• All Stations: Lists every station type.
• Rail Stations: Lists railroad and tram stations.
• Road Stations: Lists road stations.
• Airports: Lists airports.
• Docks: Lists docks.
. To access this window, open the Stations menu and select
Station List window has
Station List
53
Page 54

The following information is listed for each station:
• Name: The name and type of the station.
• Status: The number cargo units currently waiting at the station, by
cargo type.
• Total Waiting: The total number of cargo units of all types
currently waiting at the station.
• Accepts: A list of the cargo types the station accepts.
Click the station name to open the Station window for that facility.
(See “The Station Window” on page 58 for more details.)
Building a Station
For road and rail stations, access the
station-building controls by clicking the
Stations tab on the appropriate build
menu. To build a dock or airport, select
that station type from the
opens the
The
Station Construction window.
Station Construction window has
Port menu. This
three tabs:
• Station Type List: Lists all available
station types. Open the list and click
the desired station type to select it.
• Station View/Cost: Displays an image of the station selected on
the Station Type list. When you move the cursor over a suitable
location on the main game view, the cost of building the station
appears directly below the station image.
• Catchment Area Report: When the cursor is placed over an
appropriate station location on the main game view, the bottom
section of the
Station Construction window displays a report of the
cargo that will be accepted and produced within the station’s
defined catchment area were the station to be built on that spot.
(For more information, see “Station Catchment Area” on page 55.)
To construct the station, move the cursor over a suitable terrain
square and click. All station types have restrictions on their
placement, as described later.
All stations are company-owned — you cannot load or unload cargo
at another company’s station.
54
Page 55

Station Catchment
Area
Every station has a
catchment area that
defines the area that it
serves. The catchment
area for the station you
are building is highlighted
in blue when you place
the cursor over a suitable
build site.
When you hold the cursor over a potential site, the Catchment Area
Report at the bottom of the Station Construction window shows the
cargo types accepted and produced in the projected catchment area.
TIP
Select station sites that provide a good balance of accepted and
produced cargo. Also, avoid building stations whose catchment areas
overlap those of other stations — unless you are attempting to steal
business from a rival company or you find that a single station
cannot handle the cargo volume for a given region.
Road Stations
Road stations are cargo and passenger
pickup and drop-off points that serve
trucks and buses. There are three road
station types.
Cargo Loading Bay
Cargo loading bays are used to load and unload non-passenger
cargo from trucks. They are two lanes wide, so two trucks can load
and unload cargo simultaneously. Cargo loading bays can only be
built at the end of a rough or standard road. You cannot construct
them on one-way roads.
55
Page 56

Passenger Stop
Passenger stops are designated roadside
pick-up and drop-off points for
passengers that you can construct on
any road type. Buses and trams can stop
briefly at passenger stops to deliver and
discharge people, but cannot remain at
these stations to wait for a full load of passengers. On the main
game view, passenger stops appear as small signposts along the side
of the road.
Passenger Terminus
Like a passenger stop, a passenger
terminus serves as a pick-up and dropoff point for passengers. You can only
build this station type at the end of a
road, but a passenger terminus has two
advantages over a passenger stop:
• It allows buses to wait for a full load of passengers, thus
maximizing the profit potential of the vehicle.
• It allows two buses to load and unload simultaneously.
Rail Stations
Stations can be
placed on any
straight and level
section of railroad or
narrow gauge rail
tracks (including on
bridges), but not on
tram tracks. Rail
stations are universal
— they accept both
passengers and
cargo.
You can build a rail station up to 16 squares in length. Multiple
stations built in adjoining terrain squares automatically merge to
form one large station.
56
Page 57

Any size rail station can load and unload any size train. However, the
speed at which a train is loaded or unloaded is based on the size of
the station in relation to the size of the train. A 10-car train can be
unloaded at a single-square station, but it takes much longer than it
would at a 12-square station (10 squares for the cars and two
squares for the locomotive).
The best rule of thumb is to build rail stations as long as the longest
train running on the rail line. This maximizes loading and unloading
efficiency and minimizes delays.
Airports
Airports allow you to
transport cargo and
passengers from one
point to another across
areas that aren’t
connected by roads or
tracks — even locations
that aren’t on the same
landmass. Although
they can carry all cargo
types, aircraft are better for passenger transport than for cargo
transport in most situations.
TIP
You need at least two airports in order to set up aircraft routes —
planes must travel between two compatible airports. Until you can
afford to build two airports, don’t bother with this type of station.
The sizes and type of airfield affects the number and type of aircraft
it can accommodate and serve.
• Small Airport: A limited-capacity airfield available from game years
1919 through 1940.
• Medium Airport: A larger field that serves a wider variety of aircraft
than its smaller counterpart. Available from 1935 through 1975.
• Large Airport: The biggest and most modern airfield in the game.
Available starting in 1970.
57
Page 58

• City Heliport: A helicopter pad on top of a building. Can serve as
base for a single helicopter. Available starting in 1952.
TIP
Airports (other than city heliports) are extremely expensive to build.
You can greatly minimize the cost by only building these facilities in
locations that require a minimum of landscaping.
Docks
Docks can also link two
locations not connected
by land routes. Ship
transportation offers
exceptional cargo
capacity, but is slow. Like
airports, docks serve as
terminals for both
passengers and cargo.
Docks must be constructed along a coastline bordering a river, lake,
or ocean. Each dock can service one ship at a time. Docks are like rail
stations in that docks built adjacent to one another automatically
merge into a single station, increasing the vehicle loading and
unloading efficiency of the facility.
Ships can only travel between docks — they cannot stop at any
other type of facility. Like airports, docks must be constructed in pairs
in order to set up transport routes.
The Station Window
You can monitor the efficiency of stations, passenger stops, airports
and docks using the
name of the station on the landscape, or click the station’s name on
the
Station List window.
Station window. To open this window, click the
TIP
Right click a station on the landscape to open the Station List window.
58
Page 59

The station name appears in the window’s title bar. Click it to change
a station’s name. The
Station window has three tabs:
Station
Station tab shows
The
an image of the
station. To centre the
main view on the
station, click the gray
arrows in the lowerright corner of the
image. An overview of
the cargo types and
number of cargo units
available is displayed just below the station image.
Cargo Waiting and
Accepted
This tab shows a list of the
cargo waiting for
transport at the station
and the types of cargo the
station accepts.
Click the button to the
right of the menu to
highlight the station’s catchment area on the landscape.
Cargo Rating
The Cargo Rating panel
tracks the station’s
effectiveness. For more
information on cargo
ratings, see “Station
Management” on
page 75.
59
Page 60

TOWNS AND CITIES
Towns and cities provide you with excellent sources of transportation
revenue. The relationship between your company and the towns and
cities that dot the landscape is symbiotic — if you do your job well,
the cities thrive, and so do your profits.
Towns List
Select Towns from
the
Town/Industry
menu
to open the
Towns List window,
which contains the
following
information:
• Name: The name of the town.
• Type: Town types range from Hamlet (smallest) to Metropolis
(largest).
• Population: The current population.
• Stations: The number of stations in the town built by all of the
companies in the game.
To obtain more detailed information on a town, click its name on the
Towns List window or on the landscape. This opens the Town
Information window
Town Information Window
Town Information window provides detailed information on the
The
status of a town and how that that town’s government views the
activities of your transport company and those of your rivals. There
are three tabs on this window:
.
60
Town
This displays status view of the
town centre. Click the gray
arrows in the lower-right corner
of this image to centre the game
view on the selected town.
The size and population of the
selected town appear below the
town image.
Page 61

Population Graph
This shows a line graph that
charts population increases and
declines throughout the scenario.
A constantly rising population is
a sign of town expansion —
which, in turn, is a good
indicator that you (or your competitors) are adequately providing for
the town’s transportation needs.
TIP
As a town’s population increases, keep an eye on passenger
availability in the town and provide additional passenger
transportation as needed — that’s where the real money is.
Town Ratings
The
Town Ratings tab displays
the Local Authority Rating for
each of the companies that
serve the town. These ratings
show the attitude the town
government has toward you
and your competitors. (See “Local Authority Rating” for details.)
Local Authority Rating
A company’s Local Authority Rating tracks a town’s attitude toward
the activities of the company. This rating is based on the
effectiveness of the company’s transportation ventures in the town
and the amount of demolition and deforestation that the company
has performed in the area. If you destroy a lot of trees and buildings
or your transportation services in the area are sub-par, your Local
Authority Rating drops. If your rating drops too low, the town
government will forbid you from demolishing in their area.
Local Authority Rating is separate from Cargo Ratings (which affect
individual stations) and your Performance Index (which is an
indication of your overall success).
61
Page 62

AVAILABILITY AND OBSOLESCENCE
Vehicles, buildings and other items in Chris Sawyer’s Locomotion
become available only after a certain game year. The statistics for
vehicles include a “Designed” characteristic that indicates the game
year when the vehicle first becomes available. When a new item
becomes available for purchase/construction, it is generally
announced in a
Most items in the game have a built-in obsolescence date. This date
is not displayed in the game, though it is shown in the item’s
statistics in the scenario editor. (See “Scenario Editor” on page 87 for
more information.) The obsolescence of an item usually corresponds
with the arrival of a newer replacement.
If you notice that a vehicle has disappeared from the build lists, it has
probably become obsolete. Other than vehicles (which take a
reliability hit when they reach their obsolescence date), there is no
consequence to obsolescence. You can continue to operate obsolete
vehicles and facilities for as long as you want.
News window.
FINANCIAL MATTERS
Without money, you can’t build
and expand your transportation
infrastructure, and without a solid
transportation infrastructure, you
can’t make money. You can
monitor your financial status by
selecting the finances tab on your Status window. (See “Status
Window” on page 26
for details.)
Loans
The money you start out with at the beginning of each scenario
comes from a loan — you start every game in debt. The amount of
money you owe at the start varies depending on the scenario, but
no matter what the total, one of your first expenses in the game is
yearly interest on this loan — usually to the tune of about 10% per
year!
62
Page 63

Your current loan amount is shown on the Finances tab of your
Status window. If you run low on funds, you can borrow additional
money. Click the up arrow to the right of the loan field to borrow
more money. Click on the down arrow to pay back your loan.
TIP
Low debt is particularly important if the scenario goal calls for
increasing your company value.
Optimizing Your Finances
Learning how to optimize your finances to reap the greatest returns
with the least possible debt is a delicate process. Here are a few basic
tips for financial success:
• Faster delivery = bigger profits. The faster you get your cargo from
its origin to its destination, the more you get paid. The payment
rate for certain cargo types — food and passengers, for instance —
drops off sharply over time. The payment drop-off isn’t quite as
sharp on other cargo types but every type of cargo loses value due
to slow delivery. Check the cargo payment rates tab on the
Companies List window for a graphic representation.
• Longer delivery distance = bigger profits. Another factor that
figures into cargo payment rates is the distance the cargo is
delivered. Cargo delivered over great distances (measured in
“blocks” — land squares) leads to higher payment. Fast, long
cargo routes are big money-makers.
• Keep your vehicles up to date. The older a vehicle gets, the less
reliable it becomes. Replace unreliable and obsolete vehicles as
soon as they begin to break down too often.
• Manage your vehicle routes. From time to time, revisit the routes
your vehicles are following and make sure they remain effective.
Update roads and tracks as necessary to prevent bottlenecks and
delays. Add new stations in thriving areas and eliminate stations
and stops that produce and/or accept minimal cargo.
63
Page 64

• Leech business from the competition. Because you and your
opponents are trying to accomplish the same goals, sometimes it
is not enough for you to do well — you must ensure that your
rivals do poorly. Keep an eye on your opponents’ transportation
ventures, and build your own routes into lucrative areas. If you
serve your stations better than your opponents, you can grab the
majority of the business. Even if you can’t get a majority share,
every little bit of cargo you divert from an opponent’s station robs
your rival of potential revenue.
The Companies List
You can keep tabs on your opponents using the
window
Display
. Place your cursor over the owner image on the Status
to open the Owners menu, and click Companies List to open
Companies List
the window.
The
Companies List window has seven tabs:
• Companies: Lists company name, owner status (the activities the
owner is currently engaged in), Performance Index, and current
value. To obtain additional information on a company, click its
name to open that company’s
Status window. (See “Status
Window” on page 26 for details.)
• Company Performance Indexes: This graph charts the rise and fall
of each company’s Performance Index. The company names are
listed on the right side of the window, and each is represented by
a different colour line on the graph. Move the cursor over a
company name to make its line flash on the graph. (See
“Performance Index” on page 66 for details.)
64
Page 65

• Units of Cargo Delivered per Month: This graph charts the total
number of cargo units delivered by each company each month,
starting with the first month of the scenario.
• Distance x Units of Cargo Delivered per Month: The statistic
charted on this graph multiplies the units of cargo delivered by the
distance the cargo traveled to reach its destination each month.
This statistic accounts for half of each company’s Performance
Index.
• Company Values: Tracks the rises and drops in each company’s
value starting in the first month of the scenario. Company value
figures prominently in the goals of certain scenarios.
• Cargo Payment Rates: Illustrates the amount of money you make
for transporting cargo based on the amount of transit time
between pickup and drop-off. Payment rate is charted on the
vertical axis, and time is charted on the horizontal axis.
• Speed Records: Accesses a list of speed records set by various
companies. Displayed here is the owner image and company
name, and the type, speed, and date that the record was set.
Records are updated and added throughout the scenario.
Rival Owner Characteristics
The characteristics of a computer-controlled company owner
determine the way in which the company conducts business.
Each computer-controlled owner has the following three traits:
• Intelligence: The higher the owner’s intelligence, the better they
plan and compete.
• Aggressiveness: Aggressive owners expand their transportation
networks faster. Owners with low aggression tend to build and
expand slower.
• Competitiveness: Highly competitive companies go head-to-head
with their opponents. They seek out existing routes and build their
own competing routes in the same region to steal business.
Owners with a low competitiveness trait tend to find their own
routes well away from those of other companies.
You can view the traits of a computer-controlled owner by checking
the
Company Details tab on his or her company’s Status window.
65
Page 66

MONITORING YOUR PROGRESS
The windows and displays described throughout this manual provide
you with many ways to monitor your progress and the progress of
your opponents. However, there are a few more statistics and
displays that help you to assess the effectiveness of your play and
monitor certain aspects of the game.
Company Value
Company value is one of the many outward indicators of your
success. A high company value means that your company is
financially healthy, with lots of cash on hand, a steady source of
profits, and low debt. Some scenarios require that you achieve a
certain company value level in order to win. The following equation
is used to calculate company value:
• Company Value = Cash – Loan + potential sale price of all currently active
vehicles + (32 x current monthly profit of all vehicles)
Performance Index
Your Performance Index constantly monitors your proficiency. A high
Performance Index shows that you are doing a good job. A low
rating indicates that your efforts are not providing for the needs of
the towns and people who are depending on you. This rating figures
prominently in the goals for many of the scenarios.
Your Performance Index is expressed as both a percentage and a
verbal rating. The Corporate ratings that correspond to each
percentage score are listed in the following table.
VERBAL RATING PERCENTAGE
Platelayer 0 – 9.9%
Engineer 10 – 19.9%
Traffic Manager 20 – 29.9%
Transport Coordinator 30 – 39.9%
Route Supervisor 40 – 49.9%
Director 50 – 59.9%
Chief Executive 60 – 69.9%
Chairman 70 – 79.9%
President 80 – 89.9%
Tycoon 90 – 100%
66
Page 67

Your Performance Index is continuously updated and shown on the
Status Display. When a green up-arrow appears next to the rating,
your score is on the rise. When a red down-arrow appears next to
the rating, the Performance Index is dropping. This statistic is
calculated based on two factors:
• Monthly Units of Cargo Delivered x Delivery Distance: The amount
of cargo you successfully deliver every month multiplied by the
distance the cargo was delivered.
• Monthly Vehicle Profit/Loss: Positive cash flow with regard to your
vehicles leads to a higher rating. Vehicles whose operating costs
exceed their income detract from your rating.
Each of these factors accounts for 50% of your Performance Index.
You can monitor these statistics and compare your statistics to those
of other companies on the
Companies List (see “Companies List” on
page 64 for details).
The Performance Index is calculated exponentially, so doubling the
number of units of cargo you deliver every month doesn’t necessarily
double your rating. The higher your rating, the more difficult it is to
increase the rating further. In other words, expect large increases
early in the game, and proportionally slower increases as the game
progresses.
If you see your Performance Index dropping, check the profitability
of your vehicles and cargo routes and eliminate those that are losing
money. Also, check the supply and demand at the various stations
and passenger stops, and establish new cargo and passenger routes
in areas that aren’t adequately served.
67
Page 68

ADVANCED STRATEGIES
A firm grasp of the basic game concepts is the first step toward
success in
progressively harder scenarios, the challenges you face demand that
you expand your knowledge.
The following sections expand discuss concepts and strategies that
should help you when the going gets rough.
ADVANCED VEHICLE CONCEPTS
Adding To Existing
Vehicles
Some vehicles — trains
and certain trucks —
are capable of linking
with other compatible
vehicles to form a
single unit. Once you
build an attachable
vehicle, you can link
additional compatible
vehicles to it at any
time. To do so, open
the
details tab, and click the
Build Vehicles window with a list of compatible vehicles that can be
added to the selected vehicle type.
To add to the vehicle, click an item on the Build Vehicles list. Once a
new piece/car is added to an existing vehicle, it immediately
becomes an integrated part of the vehicle. From that point on, the
game treats all attached pieces as a single vehicle rather than
multiple separate vehicles.
Chris Sawyer’s Locomotion. However, as you move on to
Vehicle Information window for the vehicle, select the vehicle
Modify Vehicle button. This displays the
TIP
As long as the Vehicle Information window of a compatible
attachable vehicle is open to the Vehicle Details tab, building new
vehicles attaches them to the selected vehicle. To build a separate
vehicle, you must first close the Vehicle Information windows of all
other compatible vehicles.
68
Page 69

Refitting a Vehicle
Certain vehicles are
designated as
“refittable” and can
be modified to carry
one of several
different types of
cargo. To find out whether a vehicle is refittable, check its statistics
on the
Build Vehicles window. “Refittable” appears in the Capacity
statistic for vehicles with this attribute.
The controls for refitting a vehicle are located on the
Vehicle Information window. Open the window to this tab and click
and hold the Refit button on the right side of the window to display
a list of cargo types and amounts that the vehicle can carry. An
arrow designates the type of cargo the vehicle currently carries. To
refit the vehicle, click the new cargo type on the menu. A vehicle
must be stopped in order to refit it.
Cargo tab of its
TIP
Refitting vehicles takes no time at all, and doesn’t cost you a dime. It
is a cost-effective way to transport multiple cargo types in a region
using a limited number of vehicles.
Vehicle Reliability
The reliability of your vehicles is a vital consideration. Even the bestplanned transport route in the most lucrative town sees a significant
drop in monthly income if the vehicles on the route keep breaking
down.
When a vehicle breaks down, it ceases to function until it is repaired.
Repairs take only a short time to complete and are performed
automatically. While a vehicle is broken down, it earns no money,
however, and can block other vehicles.
One exception is a train that has more than one locomotive. If one
locomotive breaks down, the train’s speed is only reduced as long as
the other locomotive(s) attached to the train are functional.
69
Page 70

You can check a vehicle’s current reliability rating by selecting the
vehicle details tab on the
the vehicle’s status on the
vehicle remains in service, the lower its reliability becomes. When the
vehicle becomes obsolete, it takes an additional reliability hit.
Vehicle Information window, or by checking
Vehicle Status window. The longer a
TIP
When a vehicle’s becomes too unreliable, it is likely to be costing
you more than its worth. From time to time you should sell aging
vehicles and replace them with newer, more reliable models.
Planning Vehicle
Routes and
Stops
Simply placing a
vehicle on the
landscape and
sending it on its
way is no way to
earn a profit. In
order to get the most out of a vehicle, you must define its route. To
plan a vehicle’s route and assign cargo stops, open its
Information window
the
Route tab. This displays the vehicle’s Route List and places the
cursor in route mode.
There are several different items that can define a vehicle’s route:
• Station Stops: A station stop on the vehicle’s Route List orders the
vehicle to stop at a designated station to pickup and discharge
cargo. Under normal conditions, the vehicle only discharges the
type of cargo the station accepts. A vehicle can only pick up the
type of cargo with which it is compatible. To set a station stop,
click on the station in the main view.
• Passenger Stops: A passenger stop is a point along a road or tram
track where a vehicle can pickup and discharge passengers. To set
a passenger stop, click on the station in the main view.
(described in the previous sections) and select
Vehicle
70
Page 71

• Waypoints: Waypoints are numbered markers that allow you to
fine-tune a vehicle’s route. When no waypoints are set between
stops, the vehicle chooses its own path from one destination to the
next. If you place waypoints between stops on the Route List, the
vehicle moves through all of the designated waypoints, following
the route you choose. You can set vehicle waypoints in any
location along the appropriate travel route. When the cursor
passes over an appropriate waypoint position on the landscape, it
changes to four inward-pointing arrows. To set the waypoint, click.
TIP
Setting waypoints for trains traveling on complex tracks and ships
sailing in open water is usually a good idea.
As mentioned earlier in the manual, you can also set two special
cargo orders for a vehicle:
• Unload all cargo: When this command is in place all cargo is
unloaded at the preceding station stop whether or not the station
accepts that cargo type. You are not paid for a delivery of this
type, and the unaccepted cargo simply sits at the station and waits
for you to pick it up at a later time — you are only paid for the
cargo when it is finally delivered to a station that accepts it. This
order must be placed immediately after a station stop on the
Route List in order to be effective.
• Wait for full load: When this command is in place, the vehicle
waits at the station stop that precedes it on the Route List until it is
filled to capacity and then moves on to the next destination on the
Route List. This order has no effect at passenger stops — vehicles
can only wait for full loads of cargo at stations and terminals. This
order must be placed immediately after a station stop on the
Route List in order to be effective.
Stops, waypoints, and orders are added to the Route List in the order
they are selected. You can change the order of and delete items from
the Route List using the controls next to the Route List.
71
Page 72

TIP
You can copy route orders from one vehicle to another by clicking
another vehicle’s orders while both windows are open. You can also
click the other vehicle’s ‘end of list’ marker to copy the entire route.
Click the Local/Express toggle at the top of the Route List to select a
type of service for the vehicle.
• Local: Local vehicles stop at all stations and stops along the
defined vehicle route regardless of whether the Route List orders
the vehicle to stop there. Local routes are ideal for densely
populated areas where busy stations are plentiful.
• Express: Express vehicles stop only at the stations designated as
stops on their Route List, ignoring all other stops that they pass
along the way. Long haul vehicles and vehicles carrying cargo that
must be delivered to a distant destination in a timely fashion
should be set to Express service.
You can toggle a vehicle between local and express service at any time.
Setting up effective and efficient vehicle routes is a task that takes
some practice. As you experiment with different routes and orders,
keep an eye on the vehicle’s progress and profitability, and change
the route as necessary to increase the vehicle’s efficiency.
BUILDING ON DIFFICULT TERRAIN
Not all roads and tracks run along flat level ground. Obstacles —
both natural and manmade — often get in the way of your
expansion efforts. Several advanced road and track concepts help
you get around (or through) these difficult situations.
Slopes
You can build standard
railroad tracks on a shallow
slope — one unit of increase
or decrease in height over
two terrain squares. In order
to achieve this, you must
build a bridge, since terrain
always rises or falls at a
minimum of one unit of
72
Page 73

height per square. Note that certain bridge types are not suitable for
slopes. (See “Bridges” below for details.)
Roads, narrow gauge railroad tracks and tram tracks can be built at
steep angles — one unit of increase or decrease in height over a
single terrain square. If the positioning of the road and the slope of
the landscape are an exact match, you can build steeper-grade roads
and tracks directly on the terrain. When the terrain and the projected
course of the road/track don’t match up, you must construct a
bridge to fill the gap and support the road/track.
Road vehicles and trams are equipped to handle any grade without
assistance, but narrow gauge trains require the addition of a rack rail
— a central rail that is gripped by a cogwheel in the train engine —
in order to negotiate steep slopes. Not all narrow gauge engines are
equipped to use a rack rail, so make sure you choose the proper type
when travel on steep slopes is necessary. (See “Building Tracks” and
“Building Vehicles” for details on rack rails and vehicle statistics.)
Bridges
When the terrain requires
it, the Bridge menu
appears below the grade
options on the
Building window
Road
. There
are six bridge types, each
with its own unique
characteristics:
• Wooden Bridge:
Wooden bridges are the
most economical, but they are limited in height and can only
accommodate slow vehicle speeds. Wooden bridges must be built
level — you cannot slope them up or down. Wooden bridges
accommodate curves, junctions, and straight tracks and roads.
• Brick Bridge: Brick bridges are the most versatile in the game. They
accommodate curves, junctions, straight roads and slopes.
However, brick bridges are limited to medium height and
moderate vehicle speeds.
73
Page 74

• Suspension Bridge: Suspension bridges accommodate high vehicle
speeds and can be built higher than any other bridge type, thus
making them ideal for spanning deep canyons. Suspension bridges
are limited to straight roads, and cannot accommodate junctions
or slopes.
• Steel Girder Bridge: Steel girder bridges cannot be built on slopes,
and are limited in height. They can, however accommodate
curves, junctions, and vehicles of any speed.
• Steel Arch Bridge: Steel arch bridges are more economical than
steel girder bridges, and share the same “no speed limit”
advantage and height limitations. The trade off for a lower price is
that steel arch bridges do not accommodate curves, slopes, or
junctions.
When you are building a road or track and you come to a change in
terrain that requires a bridge, the game automatically constructs a
bridge to span the gap. The default type of bridge built in this
instance is determined by the currently selected bridge type and the
terrain. To ensure that the game constructs the type of bridge you
want, select a preferred bridge type from the bridge menu before
you start building your road/track across the gap.
TIP
If you want to build a junction into a bridge type that doesn’t
accommodate junctions, you need to delete the bridge section
where you want to build the junction and replace it with a
compatible type, such as steel girder or brick.
Tunnels
Changing the landscape to
make way for roads or tracks is
not always feasible, especially
in mountainous terrain. For a
price, you can tunnel through
rugged terrain so that your
vehicles can continue on their
way without having to
navigate around the hills.
74
Page 75

Building tunnels is as easy as building roads and tracks in open
terrain. In order to start a tunnel, you need a vertical cliff face. You
might have to do a bit of terrain altering to get the proper surface
(see on page 34 for details). Once the hillside is properly prepared,
simply continue building the road or track through the mountain.
To select an underground starting point for a road or track section,
hold down the Shift key while in road/track construction mode and
move the cursor into the area where you want to start the
road/track. When the cursor passes over an appropriate starting
point, the Underground view option automatically engages, allowing
you to place your first road/track section.
TIP
Press the Shift key while building tracks or roads to start
construction underground.
STATION MANAGEMENT
Station management plays a big role in your transport empire. You
can build a large station next to a thriving livestock farm, for
example, but your share of livestock cargo is limited if the
transportation to and from that station is inefficient.
Every station has a cargo rating based on how well it is serving the
needs of its catchment area. Steady and efficient movement of cargo
in and out of the station leads to a high rating. Allowing cargo and
passengers to pile up at a station causes the cargo rating of the
station to drop. A different rating is calculated for each cargo type
associated with the station.
You can see a station’s cargo rating in the third tab on its
Overview window
The cargo rating determines the percentage of available goods and
passengers in the catchment area that that is available at the station.
For example, if the station’s coverage area produces 100 units of iron
ore and the station’s cargo rating for iron ore is currently 75%, 75
units of iron ore appear at the station for delivery. The other 25 units
simply disappear if there is no other station in the area.
.
Station
75
Page 76

TIP
You can often improve your cargo rating at a train station by
running a number of short trains through the station rather than
one long train. This keeps the interval between departures shorter,
which in turn leaves less time for cargo to accumulate.
When two or more stations have overlapping catchment areas, the
cargo ratings of the stations determine the percentage of cargo and
passengers available at each station. For example, if your station has
a cargo rating of 50% and a competitor’s station in the same
coverage area has a rating of 75%, the competitor’s station receives
proportionally more cargo.
It is vital that you keep the cargo rating of all of your stations as high
as possible. Make sure that your vehicles make frequent stops at the
station to avoid allowing cargo and passengers to pile up.
TIP
Servicing a station with faster vehicles is one way to improve its
cargo rating.
WORKING ON THE RAILROAD
As you take on the challenges of the more advanced scenarios, you’ll
find that trains play an increasingly important role in the game. An
understanding of the elements that go into creating an effective rail
network is vital to your success as a transport tycoon.
Locomotive Power
Every type of vehicle in the game has a power statistic, but this stat
is particularly important when it comes to locomotives.
The amount of weight that a locomotive can effectively pull is based
on its power rating. If you attach too many heavy cars to a
locomotive, the train’s rate of acceleration slows considerably. In
addition, an underpowered, overloaded train has difficulty going up
hills. You can avoid this problem by attaching more than one
locomotive to heavier trains to increase the total pulling power, or by
replacing the existing locomotive with a more powerful model.
76
Page 77

TIP
Make sure your train has a locomotive! The game allows you to
build individual train cars and place them on railroad tracks —
but without a locomotive attached, they won’t get very far.
Building Junctions
As your railroad network
grows, you are bound to
encounter situations when
you need to merge one
track into another. This
could be part of a simple
dual-track design to create
an efficient straight-line
rail network between two
stations, or part of a
complex track layout that
connects multiple destinations.
Creating a junction — a place where a new track merges into or
crosses an existing track — is a relatively straightforward process.
Open the
section of track where you want the junction. If the purpose of the
junction is to branch off onto another track — to allow the routing
of multiple trains to different destinations, for example — the first
section you build at the junction point should be a curved track that
leads in the direction you want the junction to lead, as shown in the
illustration. This type of junction allows trains to transition from one
track to the other.
Another type of junction is a simple 90-degree junction where two
perpendicular tracks cross. This type of junction doesn’t allow trains
to switch from one track to another — it is simply a crossing of two
different rail networks. A 90-degree junction requires four signals —
one on each section of track entering the junction (see “Signals” on
page 78). To avoid building signals and the possible slowdown in
service this type of junction will cause, you can build a slope and a
bridge that causes one track to cross above the other.
Other examples of track junctions are illustrated in “Effective Track
Design” starting on page 78.
Build Tracks window and place the build cursor on the
77
Page 78

Signals
A single train on a simple track layout runs smoothly on its own.
However, when you want to operate more than one train on a single
railroad, you need to install signals.
Signals divide your track network into block sections and prevent
more than one train from entering a block section. A proper
understanding of how signals work and where to place them can
prevent costly delays and collisions.
As mentioned in “Building Tracks Window” on page 41, there are
two types of signals — colour light and semaphore. Other than the
cosmetic differences between the two, they are basically identical
and operate with equal effectiveness. (The signal types and sub-types
are included in the game for purposes of historical accuracy.) Both
colour light and semaphore signals are available in single- and dualdirection models.
Dual-direction signals provide information for trains approaching
from either direction. These are used on any track section where
two-way traffic is possible, such as the 90-degree junction mentioned
recently.
Single-direction signals are used to move traffic in one direction —
only trains approaching the signal in the proper direction are allowed
in the block section defined by single-direction signals. This is
effective when creating dual tracks that are used by multiple trains
that all visit the same stations. A series of single-direction signals is
also a good idea on a simple loop layout if you intend to run more
than one train on the loop.
EFFECTIVE TRACK DESIGN
The following sections show several track configuration ideas that
illustrate a number of effective track layouts. In addition to these
examples, you might want to run through “Tutorial 3: Building a rail
service between two towns” (accessible via the Show Tutorial button
on the
Main Menu).
Basic Loop
A simple loop track layout is ideal for circling a city or for connecting
several towns or industries in succession for the transportation of
people or cargo. This layout is designed for one-way traffic — one or
more trains running in the same direction at all times.
78
Page 79

Signals are placed at intervals around the loop, all facing the same
direction of travel. The distance between the signals should be
enough to accommodate the longest train you plan to run on the
line. If a train stretches between two signals, it could cause a
slowdown.
This layout shows only two stations, but you can add as many as you
need to accommodate cargo and passengers along the way. The
stations should ideally be as long as the longest train.
The number of trains you place on a track configuration of this type
should be based on the size of the layout and the number of signals
in place. The bigger the track and the more signals you place, the
more trains you can effectively run.
TIP
When running multiple trains, all trains will move only as fast as
the slowest train on the track, so there is no advantage in adding
fast trains to the route when more than one train is present
unless all of the trains are fast.
79
Page 80

Basic Double Track Line
This layout is a simple double-track line connecting two stations, one
at either end of the line. The two tracks in the double-track section
run in opposite directions, and each has single-direction signals
facing in the direction of travel placed at regular intervals along the
way. As is true in the previous example, signals should be spaced no
shorter than your longest train.
The single track sections at either end of this layout must be longer
than the longest train, otherwise the train will be unable to turn
around.
TIP
In Chris Sawyer’s Locomotion, you don’t have to construct a loop at
the end of a straight line track to allow a train to turn around.
Trains automatically turn in place at the end of the line provided
they have a straight track section that is at least as long as the
train itself in which to do so.
80
Page 81

Enhanced Double Track Line
This example, which builds on the basic double-track line described
earlier, replaces the single track and single platform station at either
end with two platforms that are constructed in parallel along dual
tracks. Note the signal placement at the stations. In order to allow
both platforms to be used simultaneously, you must build signals on
both tracks just outside the station before the junction tracks join.
These signals must be dual direction signals so that trains can pass in
both directions.
Although this example shows only two parallel stations, you can
conceivably place more stations in parallel at each end of the track to
accommodate more trains.
81
Page 82

Another variation on the enhanced double track layout involves
joining two tracks into a single track and then splitting them back off
into a double track at an “X” junction. The results of this design
variation are similar to those of the other advanced double-track
design except that this arrangement is more compact and efficiency
is increased because the junction is blocked for a shorter length of
time as trains move through it.
Complex Double Track Layout
82
Page 83

In this example, a double-track passenger line (designed using one of
the methods previously described) connects three towns, and a midway station serves the central town. Theoretically, this station doesn’t
need to be any different than the ones discussed earlier — just add
stations to each of the two tracks and that could be effective.
However, as passenger traffic increases at this station, trains take
longer to load and unload, holding up the other trains on the line —
and costing you money in the process.
In this example, we’ve created two additional platforms at this
central station, one in each direction, which significantly eases traffic
through the station. Place single-direction signals just before and
after the junctions in each direction, and make sure that all of the
station platforms are as long as the longest train on the line.
This design is also effective in that it allows you to run a combination
of local trains (trains that stop at every station along the line) and
express trains. When the local trains stop at this station, the express
trains can continue through unhindered.
Junctions in Double Track Layouts
Often, as you expand your train network to serve more towns, loop
tracks and dual tracks that run in straight lines are impractical. For
example, if you’ve already built a double-track line between Town 1 and
Town 2 and you want to connect this existing track network to Town 3
(which lies due south of the track in the pictured example). The pictured
junction allows you to run trains between Towns 1 and 2, 3 and 2, and 1
and 3. Note the direction and positioning of the signals at the junction.
83
Page 84

There are some drawbacks to this type of junction. First, you cannot
run trains directly between Town 2 and Town 3 (the junction is in
the wrong direction). This can be remedied by building additional
junctions.
Another drawback is that a train crossing the junction blocks all other
routes as it passes through. If you are running a lot of trains on this
track network, this can lead to frequent slowdowns and delays.
A solution to the delay problem is to construct the junction as a “flyover” junction. Instead of curving the northern-most track in this
example across the oncoming eastbound track, you instead curve
the junction off to the north, slope the track upward, and then curve
back south over a bridge that spans the track.
84
Page 85

INDUSTRIES
The basics of industries and their role in the game are discussed
earlier in the manual. There are, however, a number of things you
can do — both positive and negative — that impact industrial
output.
Interfering With Industry Output
The cargo output levels of many industries are affected by their
surroundings. For example, a grain farm’s output depends on the
number of fields around it. If the fields the farm is using, get cleared
or covered up — by trees, roads, tracks, buildings, and so on —
output drops.
Take extra care not to destroy the resources that allow local
industries to produce in your haste to expand your transportation
network. If space is available, these industries might attempt to
increase output — in this example, by creating new fields in the
surrounding landscape squares — but the best way to ensure a
steady production rate is to avoid the random destruction of valuable
industry resources.
Funding New Industries
To further increase your revenues, you can establish new industries.
To fund the start of a new industry, open the
to the Fund tab. (See “Industry List” on page 32 for details.)
Click an industry to select it. When the industry is selected, the
cursor changes to a build cursor. As you move the cursor over the
terrain, the cost of constructing the industry is shown in the lowerright corner of the Industries window. To build the industry, left-click
the terrain.
Industries List window
85
Page 86

The industry types you can fund in this manner are limited to
industries that produce products as opposed to raw materials —
factories as opposed to mines, for example. Funding such an
industry can be useful if you have a raw material-producing industry
in the area that is producing cargo that isn’t required by any other
industry currently in the scenario. By building an industry that
requires this cargo, you are creating a new potential cargo route.
There are a couple of disadvantages to funding industries. First, it is
expensive. Second, once the industry you spend millions to fund is up
and running, all of your rivals have access to it. Unlike the stations and
track that are yours exclusively when you build them, funded industries
are in the public domain. So, that new source of revenue you create for
yourself might enhance your opponents’ bankrolls as well.
86
Page 87

SCENARIO EDITOR
Chris Sawyer’s Locomotion includes a full-featured
scenario editor that allows you to modify existing
scenarios and to create your own entirely original
scenarios to play and share with other players.
This editor makes it easy for anyone to become a
scenario designer.
This manual doesn’t cover the theory of balanced game design — it
simply gives you the information you need to start working with the
editor. As you play the game, take note of all of the elements that make
each of the included scenarios balanced and fun to play, and keep
these elements in mind when you start creating worlds of your own.
To start the scenario editor, click on the Scenario Editor button on
the
Main Menu.
SCENARIO MAIN SCREEN
The main screen of the scenario editor contains a number of
controls. In the top-left corner are two menu buttons that are similar
to the menu selections in the game but with a few different options.
Editor Options Menu
• Load Landscape: Load a saved
landscape. Select the name of
the landscape you want to load
and click OK. In addition to
landscapes you create, you can
load any scenario files that are
included with the game.
TIP
Make a backup copy of any scenario file that you edit so that you
can restore the scenario to its original state if necessary.
• Save Landscape: Save the landscape that you are currently editing.
• Quit Scenario Editor: Close the scenario editor and return to the
Main Menu.
87
Page 88

The remaining options on the Editor Options menu are identical to
the corresponding options in the game. (See “Game Options Menu”
on page 14 for details.)
Sound Menu
The scenario editor
Sound menu has a single option: Mute. This
option functions identically to the corresponding option in the
game. (See “Sound Menu” on page 18 for details.)
Objects Window
The scenario editor main screen is dominated by the
window
. This window allows you to fine-tune the game elements
that go into your scenario. The controls and displays on the
window
are described in the scenario creation walkthrough that
Objects
Objects
follows.
CREATING A SCENARIO — STEP-BY-STEP
This section describes the creation of a new scenario. To edit an
existing scenario, first load it from the Editor Options menu and then
follow the same steps outlined below for creating a new scenario.
Scenario creation is a relatively simple, step-by-step process that is
presented in a series of screens. During each section of the process,
there is a Forward to Next Step button in the lower-right corner of
the screen. When you are finished with each step, click this button to
move the next. If, after moving forward you decide you want to
return to a previous step of the process, click the Back to Previous
Step button in the lower-left corner of the screen.
Step 1: Object Selection
The first step is to either
select a world region or go
the more advanced route
and design and tweak every
detail of your world before
moving on.
88
Page 89

If you choose the simple route, you need to simply select the region
of the world in which you want to set your scenario. In addition to
terrain differences, the world region affects the types and models of
vehicles you have to choose from and the style of the buildings.
The illustration in the right portion of the window shows a sample of
the architecture and vehicle style of the region you select.
If you select one of these options and move on to the next step, the
editor generates a world with the default characteristics of the
selected region. To fine-tune the elements of your game world
before it is generated, click the Advanced button in the upper-right
corner of the
This changes the
Elements window
simple, one-tab window to
one that contains 20 tabs,
each of which includes a
different set of scenario
elements. Selecting certain
elements (such as trains)
will make other elements
(such as tracks) required,
and you will be unable to deselect them. Place the cursor over an
object name to display more information about it on the right side of
the window.
The tabs and their basic functions are as follows:
• World Region: Select the setting of your scenario.
• Industries: Select the industries that are present in the game. You
can add and remove industries, up to a maximum of 16.
• Buildings: Select the buildings that are present in the world. You
can add any number of buildings, mixing and matching styles at
will, up to a maximum of 128 building types.
Objects window.
Scenario
from a
TIP
Make sure you include a variety of building types (houses, office
buildings, and so on) to ensure a good mix of generated and
accepted cargo in the scenario. Also, make sure the building
availability dates match the intended era of your scenario.
89
Page 90

• Climate: Select a weather pattern from a list of six options.
• Trees: Select up to 64 different varieties of trees.
• Vehicles: Choose up to 224 vehicles that will appear in the
scenario. Selecting a vehicle automatically selects its requirements
(railroad track, overhead wires, etc.).
• Airports: Select the airport types available in the scenario.
• Roads: Select the types of road available in the scenario. There are
only three basic road types (road, one-way road, and rough road)
but there are a few graphic variations. Tram Track is also listed
under the
• Road Extras: Select extra options for enhancing roads and Tram
Roads tab.
Tracks.
• Road Stations: Select road station types and styles.
• Tracks: Select railroad track types.
• Track Extras: Select available enhancements for railroad and narrow
gauge tracks.
• Track Stations: Choose from among several rail station styles. Apart
from cosmetic and year availability differences, all of these stations
perform the same function. You must have at least one track
station selected in order to effectively operate a train line.
• Bridges: Set the availability of bridge styles. See “Bridges” on page
73 for details on the functional differences between bridge types.
• Level Crossings: Select the crossing gate styles that appear in the
game. There is no functional difference between crossing types,
and they automatically appear at any junction where a road
crosses a track
• Signals: Select the signal styles available in the scenario. There is
no functional difference between signal types and sub-types — the
variations are strictly cosmetic.
TIP
You must have at least one signal type selected if you intend to
operate complex train layouts.
90
Page 91

• Walls: Select the walls and fences that automatically appear around
industries and fields in the game.
• Town Names: Select a style for the town names that are generated
when the scenario is created.
• Land: Choose up to 32 land textures for the scenario. When the
map is generated, the editor uses only the selected texture styles.
• Currency: Set a single currency standard for the scenario.
In the case of items like industries and buildings, selecting items on
these menus doesn’t guarantee that all of the selected items will
appear on the generated terrain. The selected items are merely those
items that are available to the scenario editor when it generates the
landscape.
When all of the options are set to your liking, click Forward to Next
Step to proceed.
Step 2: Landscape Generation
When you advance to step two, the editor generates a basic game
map based on the options you defined in step one. You can scroll
around the game view and zoom in and out just as you would in the
game itself. At this point, a number of additional menus appear at
the top of the screen:
• Zoom Menu
• Rotate Menu
• View Menu
• Landscape Menu
• Roads Menu
• Town/Industry Menu
These menus and their options function identically to their in-game
counterparts, all of which are described earlier in the manual, with
several additional options on certain menus (as described below). You
can use these options to view the game world from any angle, to
reshape the world, and so on before you move on to the next step.
91
Page 92

Landscape Menu
The
Landscape Menu in the Scenario Editor contains one option not
present in the game version of the menu:
• Build Walls: Opens the Landscape window to the Walls and Fences
tab
. This tab shows all available walls and fences, and allows you
to place them on the landscape. To build a wall or fence, select the
style you want to build and click a landscape square to place it.
Town/Industry Menu
The
Town/Industry
Menu
in the Scenario
Editor allows you to
place industries,
buildings, and even entire towns on the map in addition to its
normal in-game functions.
The
Towns List window in the Scenario Editor has three additional
build tabs:
• Build New Towns: Select this tab to build a new town on the map.
Select the town size from the drop-down list, and click the
landscape to place the town.
• Build Town Buildings: Select this tab to construct individual
buildings. Select the building type from the list of available
buildings. Click the rotational arrow on the right to change the
building’s facing. Click the landscape to place the building.
• Build Miscellaneous Buildings: Select this tab to construct power
lines, transmitters, and other miscellaneous structures. Select the
structure you want to build from the list, and click the landscape
to place it.
On the
tab
Industries List window, the Fund tab is replaced by a Build
in the scenario editor. Select this tab to place new industries on
the map. To build a new industry, select it from the list and click the
landscape to place it.
92
Page 93

Landscape Generation
Options Menu
The one new menu, to the
right of the
menu
Generation Options menu
Click this menu to open the
Landscape Generation
window
open by default when step two begins, and it has five tabs:
Landscape
, is the Landscape
.
. This window is
TIP
If you check the “Only generate random landscape when game
starts” option, the game will automatically create a new
landscape when a player begins that scenario.
• Options: Set the start year of the scenario and whether a random
landscape is generated each time the scenario begins. There is also
a button that generates a new landscape. Click this button to
replace the current landscape with a fresh one. Note: Although
you can create scenarios beyond the year 2000, the vehicles in the
game are limited to the years 1900-2000.
• Land: Access controls for fine tuning topographical features. Set
the height of sea level; set the minimum land height; select the
basic topographical style; and control the density (frequency) of
hills. All land types available in the scenario are listed in scrolling
window. Each has a drop-down menu that allows you to select the
distribution pattern of the land type.
• Forests: Controls forest features. Set the number of forests on the
map; set the minimum and maximum number of terrain squares in
each forest; set minimum and maximum forest density; select the
number of random individual trees; and the minimum and
maximum terrain altitude at which trees appear.
• Towns: Set the maximum number of towns, and the minimum size
of each.
93
Page 94

• Industries: Choose the approximate number of industries that can
operate simultaneously in the scenario. Also on this tab are options
that allow industries to shut down and/or start up during the
course of the scenario.
All of the options you select here are guidelines that are used when
the landscape for your scenario is generated when you load the
scenario in the game. These options also apply when you click the
Generate new landscape button on the
Options tab.
When all of your landscape generation options are set and the
generated map is to your liking, click Forward to Next Step to proceed.
Step 3: Scenario
Options
The third step in the
process allows you to
set the goals,
competition level,
starting conditions, and
other options for your
scenario. The
Options window
Scenario
has
four tabs:
• Scenario Challenge: Set the goals a player must achieve to win
your scenario. Here, you select a basic goal, the
numerical/monetary value associated with the goal, and (if
desired) a time limit and other ancillary options. The challenge
text, as it will appear in your scenario’s overview on the
Scenario window
in the game, appears at the bottom, and is
Select
updated as you select options.
• Company Options: Set the following for your scenario: the
maximum number of competing companies (not including the
player); a delay time before computer-controlled companies are
established; and the preferred levels of computer company owner
Intelligence, Aggressiveness, and Competitiveness. You can also
select vehicle types that are forbidden to competing companies
and/or the player’s company. (For additional information on
computer-controlled players and their statistics, see “Rival Owner
Characteristics” on page 65.)
94
Page 95

• Financial Options: Set the monetary options in the scenario,
including the amount of the starting loan, the maximum amount
that companies can borrow, and the yearly interest rate.
• Scenario Options: Access a few miscellaneous options that help to
give your scenario polish and an identity. Enter a name for your
scenario by clicking Change… next to the Scenario Name field and
entering a name on the resulting prompt. Select the group
(difficulty) in which you want your scenario to appear on the
Select Scenario window. Finally, click the “Change…” button next
to Scenario Details to enter a description of your scenario. This
description appears below the scenario name on the
Scenario window
.
Select
When all of your scenario options are set, click Forward to Next Step
to proceed.
Step 4: Save Scenario
The only thing remaining at
this point is to save your
newly created scenario.
When you proceed to Step 4,
a standard Save dialog
appears. If you entered a
name on the
Options tab
Scenario
in Step 3, this
name appears in the File
name field on the Save
dialog. Otherwise, enter a name for the scenario.
After choosing a save directory and entering a file name, click OK to
save the scenario. Player-generated scenarios are saved in the \
Sawyer’s Locomotion
\Scenarios folder. Remember that you can also
Chris
save the landscape during any step of the creation process.
Step 5: You’re Done!
After you save your new scenario, the scenario editor closes and you
are returned to the
Main Menu. If you want to create another
scenario, click the Scenario Editor button to start the process again.
Otherwise, dive into the game and start playing in your customcreated game world. Have fun!
95
Page 96

ALOITTAMINEN
README-TIEDOSTO
Chris Sawyer’s Locomotion -CD-ROM-peliin kuuluu ReadMe-tiedosto,
joka sisältää käyttöoikeussopimuksen ja uusimpia tietoja pelistä.
Lukemalla tiedoston voit hyötyä kaikista muutoksista, joita on
mahdollisesti tehty tämän ohjekirjan painamisen jälkeen.
Saat
ReadMe-tiedoston näkyviin kaksoisnapsauttamalla ReadMe.txt-
kuvaketta kiintolevyn
C:\Ohjelmatiedostot\Atari\Locomotion). Voit avata ReadMetiedoston myös napsauttamalla Windows®-tehtäväpalkin Käynnistäpainiketta ja valitsemalla
napsauttamalla sitten View ReadMe (Avaa ReadMe-tiedosto).
OHJEKIRJA
Tuotteen pelilevylle sisältyy myös Instruction Manual (Ohjekirja) ohjeiden sähköinen versio .pdf-muodossa, Adobe Acrobat Reader 6
(jonka avulla voit lukea .pdf-muotoista ohjekirjaa).
ASETUKSET JA ASENTAMINEN
1. Käynnistä Windows® 98/Me/2000/XP.
2. Aseta
3. Jos automaattinen käynnistys on käytössä, pelin alkunäyttö tulee
4. Viimeistele
5. Kun asennus on valmis, voit aloittaa pelin napsauttamalla
Huomautus: Chris Sawyer’s Locomotion -pelilevyn on oltava pelin aikana
CD-ROM-asemassa.
Chris Sawyer’s Locomotion -pelilevy CD-ROM-asemaan.
näkyviin. Jos automaattinen käynnistys ei ole käytössä tai asennus
ei ala automaattisesti, napsauta Windows®-tehtäväpalkin
Käynnistä-painiketta ja valitse sitten Suorita. Kirjoita D:\Setup ja
valitse OK. Huomautus: Jos CD-asemalle on määritetty jokin muu
kirjain kuin D, käytä oikeaa kirjainta.
Chris Sawyer’s Locomotion -pelin asennus noudattamalla
näyttöön tulevia ohjeita.
Windows®-tehtäväpalkin Käynnistä-painiketta ja valitsemalla
Ohjelmat / Atari / Chris Sawyer’s Locomotion / Locomotion . Voit
aloittaa pelin myös napsauttamalla Windowsin® työpöydällä
olevaa
Chris Sawyer’s Locomotion -kuvaketta.
Chris Sawyer’s Locomotion -hakemistossa (yleensä
Ohjelmat > Atari > Locomotion ja
96
Page 97

DirectX®:n asennus
Chris Sawyer’s Locomotion -pelin käyttämiseen tarvitaan DirectX® 9.0b
tai uudempi versio. Jos tietokoneeseen ei ole asennettu DirectX®
9.0b -ohjelmaa tai uudempaa versiota, hyväksy DirectX® 9.0b:n
käyttösopimus (License Agreement) valitsemalla Yes (Kyllä). DirectX®
9.0b -ohjelman asennusohjelma käynnistyy.
PIKANÄPPÄIMET
Seuraavassa taulukossa on ilmoitettu kaikki Chris Sawyer’s Locomotion pelin toimintojen ja komentojen oletuspikanäppäimet. Voit
mukauttaa komentoja (liittämällä ne haluamiisi näppäimiin) Game
Options (Peliasetukset) -ikkunan Control Options (Komentoasetukset)
-osassa. (Lisätietoja on englanninkielisen ohjekirjan kohdassa ”Game
Options Window”.)
TOIMINTO PIKANÄPPÄIN
Päällimmäisen ikkunan sulkeminen askelpalautin
Kaikkien irrallisten ikkunoiden sulkeminen vaihtonäppäin + askelpalautin
Rakennustilan peruuttaminen ESC
Pelin keskeyttäminen/jatkaminen Pause
Näkymän loitontaminen PageUp
Näkymän lähentäminen PageDown
Näkymän kääntäminen Enter
Rakennusobjektin kääntäminen Z
Maanalaisen näkymän käyttöönotto tai käytöstä poisto 1
Edustajälkien ja teiden piilottaminen tai näyttäminen 2
Edustanäkymän piilottaminen tai näyttäminen 3
Maan korkeusmerkkien näyttäminen tai piilottaminen 4
Raiteiden ja teiden korkeusmerkkien näyttäminen tai piilottaminen 5
Suuntanuolien näyttäminen tai piilottaminen raiteilla ja teillä 6
Maan säätö L
Veden säätö W
Puiden istutus P
Alueen raivaaminen X
Raiteiden rakentaminen T
Teiden rakentaminen R
Lentokenttien rakentaminen A
Satamien rakentaminen D
Uusien laitteiden rakentaminen N
Ajoneuvoluettelon näyttäminen V
Asemaluettelon näyttäminen S
Kaupunkiluettelon näyttäminen U
Teollisuusluettelon näyttäminen I
Kartan näyttäminen M
Yritysluettelon näyttäminen C
Yrityksen tietojen näyttäminen Q
Talouden näyttäminen F
Ilmoitusluettelon näyttäminen SARKAIN
Kuvakaappaus Ctrl + S
Viimeisimmän ilmoituksen peruutus tai näyttäminen VÄLILYÖNTI
Sanoman lähettäminen (kaksinpelitilassa) F1
97
Page 98

KOMMA IGÅNG
FILEN README
Till CD-ROM-spelet Chris Sawyer’s Locomotion hör en ReadMe-fil som
inbegriper licensavtalet och aktuell information om spelet. Vi
rekommenderar att du tar dig tid att läsa filen för att informera dig
om de ändringar som införts sedan handboken trycktes.
Du öppnar
i katalogen
C:\Program Files\Atari\Locomotion). Du kan också öppna filen genom
att klicka på knappen Start i Aktivitetsfältet i Windows®, välja
> Atari > Locomotion
BRUKSANVISNING
På spelskivan finns en elektronisk version av spelets bruksanvisning i
.pdf-format, Adobe Acrobat Reader 6 (med vilket du öppnar
bruksanvisningen).
INSTALLATION
1. Starta Windows® 98/Me/2000/XP.
2.
Sätt in skivan med spelet Chris Sawyer’s Locomotion i CD-ROM-enheten.
3. Om du har aktiverat Spela upp automatiskt visas en titelskärm
efter en kort stund. Om Spela upp automatiskt inte har aktiverats
eller om installationen inte startar automatiskt, kan du klicka på
Start i Aktivitetsfältet i Windows® och därefter välja Kör. Skriv
D:\Setup och klicka på OK. Obs! Om CD-ROM-enheten har en
annan beteckning än D skriver du denna beteckning i stället.
4. Slutför installationen av
övriga anvisningar på skärmen.
5. När installationen är klar klickar du på Start i Aktivitetsfältet i
Windows® och väljer Program > Atari > Chris Sawyer’s
Locomotion > Locomotion för att starta spelet. Du kan också starta
spelet genom att klicka på ikonen Chris Sawyer’s Locomotion på
skrivbordet i Windows®.
Obs! Skivan med spelet Chris Sawyer’s Locomotion måste sitta i CD-
ROM-enheten för att du ska kunna spela.
ReadMe-filen genom att dubbelklicka på ikonen ReadMe.txt
Chris Sawyer’s Locomotion på hårddisken (vanligtvis
Program
och klicka på View ReadMe (Visa Readme).
Chris Sawyer’s Locomotion genom att följa
98
Page 99

Installera DirectX®
Chris Sawyer’s Locomotion kräver DirectX® 9.0b eller högre för att
fungera. Om DirectX® 9.0b eller högre inte har installerats på datorn
kan du klicka på Ja för att godta licensavtalet till DirectX® 9.0b. Då
startas installationsprogrammet till DirectX® 9.0b.
GENVÄGAR PÅ TANGENTBORDET
Följande tabell är en lista över alla standardinställda kortkommandon till
funktionerna och kommandona i
anpassa kommandona (koppla dem till de tangenter du själv önskar)
med hjälp av alternativen i fönstret med spelalternativ. (Mer information
finns i avsnittet om detta fönster i den kompletta handboken.)
ÅTGÄRD SNABBTANGENT
Stäng det övre fönstret Backsteg
Stäng alla flytande fönster Skift + Backsteg
Avbryt byggnadsläget ESC
Gör paus/återuppta spel Pause
Zooma ut PageUp
Zooma in PageDown
Rotera vy Return
Rotera byggnadsobjekt Z
Underjordisk vy, växlingsknapp 1
Dölj stigar och vägar i förgrunden 2
Dölj landskap i förgrunden, växlingsknapp 3
Höjdmarkeringar på land, växlingsknapp 4
Höjdmarkeringar på stigar och vägar, växlingsknapp 5
Riktningspilar på stigar och vägar, växlingsknapp 6
Ändra land L
Ändra vatten W
Plantera träd P
Schakta område X
Skapa stigar T
Skapa vägar R
Bygg flygplatser A
Bygg fartygsdockor D
Bygg nya fordon N
Visa fordonslista V
Visa stationslista S
Visa stadslista U
Visa fabrikslista I
Visa karta M
Visa företagslista C
Visa företagsinformation Q
Visa kapital F
Visa meddelandelista TAB
Skärmbild Ctrl + S
Avbryt eller visa senaste meddelande Blanksteg
Skicka meddelande (tvåspelarläge) F1
Chris Sawyer’s Locomotion. Du kan
99
Page 100

PARA COMEÇAR
O FICHEIRO README
O CD-ROM do jogo Chris Sawyer’s Locomotion tem um ficheiro ReadMe que
inclui o Acordo de Licenciamento e a informação actualizada sobre o jogo.
Recomendamos vivamente que leias este ficheiro de forma a beneficiares das
alterações que foram feitas depois de o manual ter sido impresso.
Para veres este ficheiro faz um duplo-clique sobre o ícone ReadMe.txt no
directório Chris Sawyer’s Locomotion que encontrarás no teu disco rígido (em geral
C:\Program Files\Atari\Locomotion). Também podes ver o ficheiro ReadMe
clicando primeiro no botão Start na barra de tarefas do Windows®, depois
seleccionando Programas>Atari>Locomotion, e clicando em View ReadMe.
MANUEL DE INSTRUÇÕES
Incluído no disco de jogo deste programa está uma versão electrónica do
Manual de Instruções em formato .pdf, o Adobe Acrobat Reader 6 (que te
permite ver o manual em formato .pdf).
CONFIGURAÇÃO E INSTALAÇÃO
1. Inicia o Windows® 98/Me/2000/XP.
2. Introduz o CD-ROM do jogo Chris Sawyer’s Locomotion na unidade de CD-
ROM.
3. Se o AutoPlay estiver activo, deverá aparecer o ecrã do título. Se o
AutoPlay não estiver activo, ou se a instalação não começar
automaticamente, clica no botão Start na barra de tarefas do Windows®,
depois em Executar, escreve D:\Setup e clica em OK. Nota: Se a tua
unidade de CD-ROM tiver outra letra que não seja o D, substitui essa letra.
4. Segue as restantes instruções do ecrã para acabares de instalar o Chris
Sawyer’s Locomotion.
5. Logo que a instalação esteja completa, clica no botão Start na barra de
tarefas do Windows® e escolhe Programas/Atari/Chris Sawyer’s
Locomotion/Locomotion para começares o jogo. Podes também clicar no
ícone Chris Sawyer’s Locomotion no teu ambiente de trabalho do
Windows® para começares o jogo.
Nota: Para jogares, tens que ter o disco do jogo Chris Sawyer’s Locomotion
na unidade de CD-ROM.
100
 Loading...