

Page 1

Table of Contents
Introduction . . . . . . . . . . . . . . . . . . . . . . . .8
Section One: Technical . . . . . . . . . . . . . . . .9
Setup and Installation . . . . . . . . . . . . . . . . . . . . .10
The ReadMe file . . . . . . . . . . . . . . . . . . . . . . . . .10
Section Two: The Getting Started Guide . . . .11
The Game Tutorial . . . . . . . . . . . . . . . . . . . . . . . . . . . . . .12
Overview . . . . . . . . . . . . . . . . . . . . . . . . . . . . . . . . . . . . . .12
Starting Off . . . . . . . . . . . . . . . . . . . . . . . . . . . . . . . . . . . .12
Game Controls . . . . . . . . . . . . . . . . . . . . . . . . . . . . . . . .20
Getting Around . . . . . . . . . . . . . . . . . . . . . . . . . . . . . . . .22
Warning Red Text . . . . . . . . . . . . . . . . . . . . . . . . . . . . . .23
Skip Time . . . . . . . . . . . . . . . . . . . . . . . . . . . . . . . . . . . .25
Accelerate Time . . . . . . . . . . . . . . . . . . . . . . . . . . . . . . . .25
Crew Management . . . . . . . . . . . . . . . . . . . . . . . . . . . . . . .26
Returning Home . . . . . . . . . . . . . . . . . . . . . . . . . . . . . . . . .28
Mission Debriefing . . . . . . . . . . . . . . . . . . . . . . . . . . . . . . .28
Saving the Game . . . . . . . . . . . . . . . . . . . . . . . . . . . . . . . .29
The Training Missions . . . . . . . . . . . . . . . . . . . . . .29
Taxi and Take Off . . . . . . . . . . . . . . . . . . . . . . . . . . . . . . . .30
Approach and Landing . . . . . . . . . . . . . . . . . . . . . . . . . . . .30
Feathering/Restarting an Engine . . . . . . . . . . . . . . . . . . . . . .31
Bombing – Good Conditions . . . . . . . . . . . . . . . . . . . . . . . . .31
Bombing – Poor Conditions . . . . . . . . . . . . . . . . . . . . . . . . .32
Gunnery . . . . . . . . . . . . . . . . . . . . . . . . . . . . . . . . . . . . . .34
The Quickstart Missions . . . . . . . . . . . . . . . . . . . .34
Limping Home . . . . . . . . . . . . . . . . . . . . . . . . . . . . . . . . . .35
Attack of the Axis . . . . . . . . . . . . . . . . . . . . . . . . . . . . . . . .35
Where are the ‘Little Friends’? . . . . . . . . . . . . . . . . . . . . . . .35
Opportunity for the Axis . . . . . . . . . . . . . . . . . . . . . . . . . . . .35
Fighter sweep over France . . . . . . . . . . . . . . . . . . . . . . . . . .35
Defence of the Reich . . . . . . . . . . . . . . . . . . . . . . . . . . . . .36
Section Three: Reference . . . . . . . . . . . . . .37
The Main Menu Screen . . . . . . . . . . . . . . . . . . . .38
Page 2

Player Options Menu . . . . . . . . . . . . . . . . . . . . . .39
Controls Menu . . . . . . . . . . . . . . . . . . . . . . . . . . . . . . . . . .39
Realism/Difficulty Menu . . . . . . . . . . . . . . . . . . . . . . . . . . .40
Graphics Menu . . . . . . . . . . . . . . . . . . . . . . . . . . . . . . . . . .42
Sound Menu . . . . . . . . . . . . . . . . . . . . . . . . . . . . . . . . . . .43
Load/Save Menu . . . . . . . . . . . . . . . . . . . . . . . . . . . . . . . . .43
The Game Options Screen . . . . . . . . . . . . . . . . . .44
The Campaign Game . . . . . . . . . . . . . . . . . . . . . . . . . . . . . .44
The Bomber Commander Campaign . . . . . . . . . . . . . . . . . .44
The Squadron Commander Campaign . . . . . . . . . . . . . . . . .44
The Single Mission Game . . . . . . . . . . . . . . . . . . . . . . . . . .45
The Quickstart Mission . . . . . . . . . . . . . . . . . . . . . . . . . . .45
The Training Mission . . . . . . . . . . . . . . . . . . . . . . . . . . . .45
Play a Historical Mission . . . . . . . . . . . . . . . . . . . . . . . . .45
Bombardment Division/Group Screen . . . . . . . . . . . . . . . . . . .45
Campaign Start . . . . . . . . . . . . . . . . . . . . . . . . . . . . . . . .47
Customise Bomber Screen . . . . . . . . . . . . . . . . . . . . . . . . . .47
New Bomber Name . . . . . . . . . . . . . . . . . . . . . . . . . . . . .47
Choose Nose Art . . . . . . . . . . . . . . . . . . . . . . . . . . . . . . .47
Bomber Crew Screen . . . . . . . . . . . . . . . . . . . . . . . . . . . . . .47
Squadron Bomber Names/Nose Art . . . . . . . . . . . . . . . . . . . .48
Squadron Crew Screen . . . . . . . . . . . . . . . . . . . . . . . . . . . .49
The HQ Corridor . . . . . . . . . . . . . . . . . . . . . . . . .49
The Operations Room . . . . . . . . . . . . . . . . . . . . . . . . . . . . .49
The Map – Planning the Mission . . . . . . . . . . . . . . . . . . . .50
Map Controls . . . . . . . . . . . . . . . . . . . . . . . . . . . . . . . .50
The Map Icons . . . . . . . . . . . . . . . . . . . . . . . . . . . . . . .50
The Map Symbols . . . . . . . . . . . . . . . . . . . . . . . . . . . . .51
Setting up a Reconnaissance Mission . . . . . . . . . . . . . . .51
Setting up a Bombing Mission . . . . . . . . . . . . . . . . . . . .52
Target Intelligence . . . . . . . . . . . . . . . . . . . . . . . . . . .52
The Primary Target . . . . . . . . . . . . . . . . . . . . . . . . . .52
The Secondary Target . . . . . . . . . . . . . . . . . . . . . . . . .52
Setting Waypoints . . . . . . . . . . . . . . . . . . . . . . . . . . .53
Intelligence File – Target Details . . . . . . . . . . . . . . . . . . . .53
The Blackboard . . . . . . . . . . . . . . . . . . . . . . . . . . . . . . . .54
Outside – Inspect the Bombers . . . . . . . . . . . . . . . . . . . . .54
Bomber Clipboard . . . . . . . . . . . . . . . . . . . . . . . . . . . .54
Mechanical File . . . . . . . . . . . . . . . . . . . . . . . . . . . . . .55
Crew Management File . . . . . . . . . . . . . . . . . . . . . . . . .55
Crew Replacement File . . . . . . . . . . . . . . . . . . . . . . . . .55
Next Bomber . . . . . . . . . . . . . . . . . . . . . . . . . . . . . . . .55
Page 3

Clipboard – Choose Bombers for the Mission . . . . . . . . . . . .56
Ordnance – Select Munitions for the Mission . . . . . . . . . . . .56
Blackboard – View Mission Summary . . . . . . . . . . . . . . . . .57
The Squadron Commander’s Office . . . . . . . . . . . . . . . . . . . .57
In-tray ‘Read New Mail’ . . . . . . . . . . . . . . . . . . . . . . . . . .57
Out-tray ‘Read Old Mail’ . . . . . . . . . . . . . . . . . . . . . . . . . .57
Crew Information File . . . . . . . . . . . . . . . . . . . . . . . . . . . .57
Bomber Information File . . . . . . . . . . . . . . . . . . . . . . . . . .57
Medical File . . . . . . . . . . . . . . . . . . . . . . . . . . . . . . . . . .58
Squadron History Files (The Bookcase) . . . . . . . . . . . . . . . .58
Inspect the Bombers (Window) . . . . . . . . . . . . . . . . . . . . .58
The Bomber Commander’s Office . . . . . . . . . . . . . . . . . . . . .58
In-tray ‘Read New Mail’ . . . . . . . . . . . . . . . . . . . . . . . . . .58
Out-tray ‘Read Old Mail’ . . . . . . . . . . . . . . . . . . . . . . . . . .58
Crew Information File . . . . . . . . . . . . . . . . . . . . . . . . . . . .58
Inspect the B-17 . . . . . . . . . . . . . . . . . . . . . . . . . . . . . . .58
The Mission Briefing Room . . . . . . . . . . . . . . . . . . . . . . . . .59
View Route Map . . . . . . . . . . . . . . . . . . . . . . . . . . . . . . .59
View Reconnaissance Film . . . . . . . . . . . . . . . . . . . . . . . .59
Read Mission Briefing . . . . . . . . . . . . . . . . . . . . . . . . . . .60
Beginning the Mission . . . . . . . . . . . . . . . . . . . . . . . . . . .60
Inside the Aircraft . . . . . . . . . . . . . . . . . . . . . . . .60
Your Mission Responsibilities . . . . . . . . . . . . . . . . . . . . . . . .60
The Squadron Commander . . . . . . . . . . . . . . . . . . . . . . . .60
The Bomber Commander . . . . . . . . . . . . . . . . . . . . . . . . .60
Starting Off . . . . . . . . . . . . . . . . . . . . . . . . . . . . . . . . . .61
The Crew . . . . . . . . . . . . . . . . . . . . . . . . . . . . . . . . . . . . . .61
Crew Portrait Panel (pop up menu) . . . . . . . . . . . . . . . . . . .61
Crew Position Panel (pop-up menu) . . . . . . . . . . . . . . . . . .62
Crew Views Panel (pop-up menu) . . . . . . . . . . . . . . . . . . . .62
External View . . . . . . . . . . . . . . . . . . . . . . . . . . . . . . . .63
Compartment View . . . . . . . . . . . . . . . . . . . . . . . . . . . .63
Action View . . . . . . . . . . . . . . . . . . . . . . . . . . . . . . . . .63
Instrument View . . . . . . . . . . . . . . . . . . . . . . . . . . . . . .63
Window View . . . . . . . . . . . . . . . . . . . . . . . . . . . . . . . .63
The Pilot and Co-Pilot . . . . . . . . . . . . . . . . . . . . . . . . . . . . .63
The Navigator . . . . . . . . . . . . . . . . . . . . . . . . . . . . . . . . . .65
The Bombardier . . . . . . . . . . . . . . . . . . . . . . . . . . . . . . . . .67
The Engineer/Top Turret Gunner . . . . . . . . . . . . . . . . . . . . . .68
The Radio Operator . . . . . . . . . . . . . . . . . . . . . . . . . . . . . . .69
The Gunners (Ball Turret, Waist 1 and 2, Tail) . . . . . . . . . . . . .70
Compartment Selection (pop up menu) . . . . . . . . . . . . . . . . .71
Page 4

Section Four: The Training Schools . . . . . . .73
An Introduction to the Basics of Flight . . . . . . . . . .74
Flying School (Pilot and Co-Pilot) . . . . . . . . . . . . . .78
Control Keys . . . . . . . . . . . . . . . . . . . . . . . . . . . . . . . . . . .78
Pilot’s and Co-Pilot’s Instrument Panel . . . . . . . . . . . . . . . . .82
The Take Off . . . . . . . . . . . . . . . . . . . . . . . . . . . . . . . . . . .83
Starting your Engines . . . . . . . . . . . . . . . . . . . . . . . . . . . .85
Taxiing . . . . . . . . . . . . . . . . . . . . . . . . . . . . . . . . . . . . . .86
The Pilot Helper . . . . . . . . . . . . . . . . . . . . . . . . . . . . . . .87
Getting into the Air . . . . . . . . . . . . . . . . . . . . . . . . . . . . .87
Climbing . . . . . . . . . . . . . . . . . . . . . . . . . . . . . . . . . . . .88
Levelling the B-17 . . . . . . . . . . . . . . . . . . . . . . . . . . . . . .89
Trimming and Cruising . . . . . . . . . . . . . . . . . . . . . . . . . . .89
Turns . . . . . . . . . . . . . . . . . . . . . . . . . . . . . . . . . . . . . . .90
Stalls and Spins . . . . . . . . . . . . . . . . . . . . . . . . . . . . . . .91
Forming Up . . . . . . . . . . . . . . . . . . . . . . . . . . . . . . . . . . . .91
Flying a Mission . . . . . . . . . . . . . . . . . . . . . . . . . . . . . . . . .91
The Waypoints . . . . . . . . . . . . . . . . . . . . . . . . . . . . . . . .91
The Initial Point . . . . . . . . . . . . . . . . . . . . . . . . . . . . . . .91
Flying Over the Target . . . . . . . . . . . . . . . . . . . . . . . . . . .91
The Rally Point . . . . . . . . . . . . . . . . . . . . . . . . . . . . . . . .92
The Return Home . . . . . . . . . . . . . . . . . . . . . . . . . . . . . .92
Getting Lost . . . . . . . . . . . . . . . . . . . . . . . . . . . . . . . . . .92
Feathering the Engine(s) . . . . . . . . . . . . . . . . . . . . . . . . . .92
Engine Fire Extinguishers . . . . . . . . . . . . . . . . . . . . . . . . .93
War Emergency Power . . . . . . . . . . . . . . . . . . . . . . . . . . .93
Lock Out AI Engine Control . . . . . . . . . . . . . . . . . . . . . . . .93
Landing the B-17 . . . . . . . . . . . . . . . . . . . . . . . . . . . . . . . .93
Pre-landing Checks . . . . . . . . . . . . . . . . . . . . . . . . . . . . .93
Pilot Checks . . . . . . . . . . . . . . . . . . . . . . . . . . . . . . . . . .93
The Traffic Pattern . . . . . . . . . . . . . . . . . . . . . . . . . . . . . .94
Pilot Helper . . . . . . . . . . . . . . . . . . . . . . . . . . . . . . . . . .94
The Final Approach . . . . . . . . . . . . . . . . . . . . . . . . . . . . .94
The Landing Roll . . . . . . . . . . . . . . . . . . . . . . . . . . . . . . .94
Taxi to Hardstand . . . . . . . . . . . . . . . . . . . . . . . . . . . . . .94
Bombardier School . . . . . . . . . . . . . . . . . . . . . . .95
Bombardier – General Principles . . . . . . . . . . . . . . . . . . . . . .95
Bombing Factors . . . . . . . . . . . . . . . . . . . . . . . . . . . . . . . .96
The Bomb Run . . . . . . . . . . . . . . . . . . . . . . . . . . . . . . . . . .97
Salvo Switch . . . . . . . . . . . . . . . . . . . . . . . . . . . . . . . . . .98
Intervalometer . . . . . . . . . . . . . . . . . . . . . . . . . . . . . . . . .98
Page 5

Searching for the Target . . . . . . . . . . . . . . . . . . . . . . . . . .98
Bombing Results . . . . . . . . . . . . . . . . . . . . . . . . . . . . . . .99
The Chin Turret . . . . . . . . . . . . . . . . . . . . . . . . . . . . . . . .99
Navigator School . . . . . . . . . . . . . . . . . . . . . . . . .99
Pilotage . . . . . . . . . . . . . . . . . . . . . . . . . . . . . . . . . . . . . .99
Dead Reckoning . . . . . . . . . . . . . . . . . . . . . . . . . . . . . . . .100
The Navigator’s Map . . . . . . . . . . . . . . . . . . . . . . . . . . . . .100
Map Controls . . . . . . . . . . . . . . . . . . . . . . . . . . . . . . . . . .100
The Map Icons . . . . . . . . . . . . . . . . . . . . . . . . . . . . . . .101
The Map Symbols . . . . . . . . . . . . . . . . . . . . . . . . . . . . .101
Re-setting Waypoints . . . . . . . . . . . . . . . . . . . . . . . . . . .102
Navigation Realism . . . . . . . . . . . . . . . . . . . . . . . . . . . .102
The Drift Meter . . . . . . . . . . . . . . . . . . . . . . . . . . . . . . . .102
Engineer School . . . . . . . . . . . . . . . . . . . . . . . .103
Fuel Transfer . . . . . . . . . . . . . . . . . . . . . . . . . . . . . . . . . .103
Radio Operator School . . . . . . . . . . . . . . . . . . . .104
The Radio . . . . . . . . . . . . . . . . . . . . . . . . . . . . . . . . . . . .104
Messages Inward Log . . . . . . . . . . . . . . . . . . . . . . . . . . . .104
Messages Outward Log . . . . . . . . . . . . . . . . . . . . . . . . . . .104
Gunnery School . . . . . . . . . . . . . . . . . . . . . . . . .105
Gunner Skills . . . . . . . . . . . . . . . . . . . . . . . . . . . . . . . . . .106
Machine Guns . . . . . . . . . . . . . . . . . . . . . . . . . . . . . . . . .106
Gunsights . . . . . . . . . . . . . . . . . . . . . . . . . . . . . . . . . . . .106
The Clock System of Defence . . . . . . . . . . . . . . . . . . . . . . .106
The Zone Firing System . . . . . . . . . . . . . . . . . . . . . . . . . . .107
Sighting and Firing . . . . . . . . . . . . . . . . . . . . . . . . . . . . . .107
Red Text Warning . . . . . . . . . . . . . . . . . . . . . . . . . . . . . . .107
Unjamming Machine Guns . . . . . . . . . . . . . . . . . . . . . . . . .108
Ammo . . . . . . . . . . . . . . . . . . . . . . . . . . . . . . . . . . . . . . .108
Section Five: Crew/Bomber Management . . .109
Moving Crew to New Positions . . . . . . . . . . . . . . .110
Red Text Warning . . . . . . . . . . . . . . . . . . . . . . . . . . . . . . .111
Injured Crew . . . . . . . . . . . . . . . . . . . . . . . . . . .111
First Aid . . . . . . . . . . . . . . . . . . . . . . . . . . . . . . . . . . . . .111
Panic . . . . . . . . . . . . . . . . . . . . . . . . . . . . . . . . . . . . . . .111
Repairing items . . . . . . . . . . . . . . . . . . . . . . . . .111
Fighting Fires . . . . . . . . . . . . . . . . . . . . . . . . . .112
Baling Out . . . . . . . . . . . . . . . . . . . . . . . . . . . .112
Page 6

Bomber Management . . . . . . . . . . . . . . . . . . . . .112
External Views . . . . . . . . . . . . . . . . . . . . . . . . . . . . . . . . .112
Flight . . . . . . . . . . . . . . . . . . . . . . . . . . . . . . . . . . . . . . .113
Formation . . . . . . . . . . . . . . . . . . . . . . . . . . . . . . . . . . . .113
Accelerate Time (Home) . . . . . . . . . . . . . . . . . . . . . . . . . . .113
Decelerate Time (End) . . . . . . . . . . . . . . . . . . . . . . . . . . . .113
Skip Time (Return/Enter) . . . . . . . . . . . . . . . . . . . . . . . . . .113
Mini-Time Skip . . . . . . . . . . . . . . . . . . . . . . . . . . . . . . .113
Pause Simulation (Pause/Break) . . . . . . . . . . . . . . . . . . . . .114
Jump to Other Bombers . . . . . . . . . . . . . . . . . . . . . . . . . . .114
Aircraft Select Pop-up Menu . . . . . . . . . . . . . . . . . . . . . . .114
Emergencies . . . . . . . . . . . . . . . . . . . . . . . . . . . . . . . . . .115
Red Text Warnings . . . . . . . . . . . . . . . . . . . . . . . . . . . . .115
Engine Fire Extinguisher . . . . . . . . . . . . . . . . . . . . . . . . .115
Mission Debriefing . . . . . . . . . . . . . . . . . . . . . . .115
Medals, Promotions and WIA . . . . . . . . . . . . . . . .116
Section Six: Fighter School . . . . . . . . . . . .117
Fighter Cockpit Instruments . . . . . . . . . . . . . . . .118
Single–engine Aircraft Controls . . . . . . . . . . . . . . . . . . . . . .118
Twin-engine/jet Aircraft Controls . . . . . . . . . . . . . . . . . . . . .119
Compass . . . . . . . . . . . . . . . . . . . . . . . . . . . . . . . . . . .120
Artificial Horizon . . . . . . . . . . . . . . . . . . . . . . . . . . . . . .120
Airspeed Indicator . . . . . . . . . . . . . . . . . . . . . . . . . . . . .120
Tachometer . . . . . . . . . . . . . . . . . . . . . . . . . . . . . . . . . .120
Altimeter . . . . . . . . . . . . . . . . . . . . . . . . . . . . . . . . . . .120
Oil Pressure Gauge . . . . . . . . . . . . . . . . . . . . . . . . . . . .121
Engine Temperature Gauge . . . . . . . . . . . . . . . . . . . . . . .121
Fuel Gauge . . . . . . . . . . . . . . . . . . . . . . . . . . . . . . . . . .121
Manifold Pressure Gauge . . . . . . . . . . . . . . . . . . . . . . . .121
Rate of Climb Indicator . . . . . . . . . . . . . . . . . . . . . . . . .121
Fighter Controls . . . . . . . . . . . . . . . . . . . . . . . . . . . . . . .121
Take Offs . . . . . . . . . . . . . . . . . . . . . . . . . . . . . . . . . . . . .122
Changing Fighters . . . . . . . . . . . . . . . . . . . . . . . . . . . . . . .123
Navigation to Target . . . . . . . . . . . . . . . . . . . . . . . . . . . . .123
Escort Fighters . . . . . . . . . . . . . . . . . . . . . . . . . . . . . . .123
Luftwaffe . . . . . . . . . . . . . . . . . . . . . . . . . . . . . . . . . . .123
Combat . . . . . . . . . . . . . . . . . . . . . . . . . . . . . . . . . . . . . .123
Landings . . . . . . . . . . . . . . . . . . . . . . . . . . . . . . . . . . . . .124
The Fighter Escort . . . . . . . . . . . . . . . . . . . . . . .124
P-38 Lightning . . . . . . . . . . . . . . . . . . . . . . . . . . . . . . . . .125
P-47 Thunderbolt . . . . . . . . . . . . . . . . . . . . . . . . . . . . . . .126
P-51 Mustang . . . . . . . . . . . . . . . . . . . . . . . . . . . . . . . . .127
Page 7

The Luftwaffe . . . . . . . . . . . . . . . . . . . . . . . . . .128
Attacking the Bombers . . . . . . . . . . . . . . . . . . . . . . . . . . .128
FW 190 . . . . . . . . . . . . . . . . . . . . . . . . . . . . . . . . . . . . .129
Bf-109 (Me-109) . . . . . . . . . . . . . . . . . . . . . . . . . . . . . . .130
Me-262 . . . . . . . . . . . . . . . . . . . . . . . . . . . . . . . . . . . . . .131
Section Seven: Customer Information . . . . .141
Infogrames Customer Service Numbers . . . . . . . . . . . . . . . .142
Credits . . . . . . . . . . . . . . . . . . . . . . . . . . . . . . . . . . . . . .143
Page 8

Introduction
They called it ‘The Mighty Eighth’, the US Army Air Force 8th Bomber
Command. The force that flew daylight missions over occupied Europe,
striking at specific military targets with pinpoint accuracy. The main
drawback was that enemy fighters and flak concentrations could clearly
see them in daylight. The solution was massive defensive bomber
formations that had to fight their way there and fight their way back.
B-17 Flying Fortress ‘The Mighty Eighth’ recreates that era, in a Second
World War simulation that gives you total control of every aspect of the
strategic air war (including the opposing fighters).
You’ll learn to fly the legendary B-17G ‘Flying Fortress’ and feel the
power and grace of the massive four-engine bomber. You can also be
one of the escort fighter pilots and fly the P-38 ‘Lightning’, the P-51
‘Mustang’, or the P-47 ‘Thunderbolt’. In addition, you can take on the
role of the Luftwaffe and jump into the cockpit of the German
interceptors: the Bf-109, FW-190, and the jet powered Me-262!
This is the ultimate flight crew simulation, as you become an expert at
all ten B-17 crew positions allowing you to take off and land the
massive bomber, shoot from all turret positions, navigate across a
realistically mapped Europe, send radio messages, carry out bomb runs,
release the bombs and watch them hit the target!
B-17 Flying Fortress ‘The Mighty Eighth’. The complete WW2 strategic air
war flight simulation
8
Page 9

Section One: Technical
Page 10

Specification
Make sure the specification shown on the B-17 Flying Fortress
‘The Mighty Eighth’ box matches that of your machine.
Installation
• Insert the B-17 Flying Fortress ‘The Mighty Eighth’ CD into your
CD-ROM drive.
• If autorun is enabled, B-17 Flying Fortress ‘The Mighty Eighth’ will
take you to the installation screen.
• Click on the ‘Install’ button and follow all on-screen directions.
• If autorun has not been enabled, you’ll have to double-click on the
‘My Computer’ icon on the Windows
®
Desktop, then on the CD-ROM
icon, and then click on ‘Setup.exe’.
The simulation will now install.
• Follow all on-screen instructions.
Once B-17 Flying Fortress ‘The Mighty Eighth’ is installed it will appear
in the Program Group on the START Menu.
Loading
• Select Start > Programs > MicroProse > B-17.
The game will now load.
The Read Me file
The B-17 Flying Fortress ‘The Mighty Eighth’ CD-ROM has a Read Me
file where you can view trouble shooting and updated information about
the product. To view this file, double-click on “Read Me” in the B-17
directory found on your hard drive. You may also view the Read Me file
by first clicking on the START button on your Win95/98/Millennium
taskbar, then on Programs > MicroProse > B-17 > Read Me file.
10
Page 11
Section Two: The Getting
Started Guide
Page 12
The Game Tutorial
Overview
Well, you’ve successfully installed and loaded the game and you’re
itching to get into the air in that big bomber and see some WW2 action.
This tutorial will get you up and running in a Bomber Commander
campaign game, but it will not teach you the complete simulation
(manual flying, bombing etc). For that you will need to try the specific
Training and Quickstart Missions using the Training School sections
later in this manual.
Starting Off
After the opening animation screens you will see the Main Menu screen.
Before you do anything else you must check the status of the
Navigation realism. Navigation is an important factor in the simulation
and the aircraft can fly at three levels of Navigation Complexity:
Historical, Easy
or
Flawless
. For this guide we don’t want you to get lost
so you will be flying with Flawless navigation.
• Click on the Game Option icon (bottom left) - a red light will switch
on when selected.
• Click on the Continue button (bottom right).
You will be taken to the Game Difficulty/Realism menu screen.
• Select the second icon down on the left (marked 1, 2, 3) and click
on the Continue switch (lower right).
• Scroll down the list to Navigation Complexity and make sure this is
set at ‘Flawless’.
If it isn’t click on the line and click on Flawless in the lower panel.
• Click on the Continue switch (lower right).
• Click on the return to previous screen switch (lower left) to return to
the Main Menu screen.
12
Game Options
New Game
Page 13

Now we want to play a
New Game
(the icon of the B-17 – lower left).
• Click on the icon (a red light will switch on when selected) and then
click on the Continue button (bottom right).
You will be taken to the Game Type screen.
• Select to Play a Single Bomber Commander Campaign (the single
aircraft icon – top left) and flip the Continue switch.
You will now be taken to the 8th Air Force Division screen. Here you
can choose which Bombardment group and which Squadron in that
Group you want to join. Different Bombing Groups are based at
different airfields across England.
• Select the 401st Bombing Group from the left hand panel.
• Select the 612th Squadron from the right hand panel.
The lower graphic panels will show the insignia of the Bombing Group
and the specific Squadron you have chosen.
At the bottom of the screen is a Campaign Start panel (covering the
period December 1st 1943 to February 10th 1945). This is where you
choose the campaign length.
• Click in the panel until it shows the date March 1st 1944.
• Flip the Continue switch (lower right).
You will now be taken to your bomber Name and Nose Art selection screen.
• Click on a ‘nose art’ name for your bomber (click and drag the scroll
bar to view all options in the left panel).
The picture will be shown on the right hand panel.
• Now click on the Bomber Name panel (top), delete the default
name with the Backspace key and type in your own choice of name
for your bomber and press Return/Enter.
Try to match the name to the nose art you have chosen.
• Flip the Continue switch (lower right).
Your next stop is your Crew screen. This shows the current crew for your
B-17. Remember that in a Bomber Commander campaign you are in
overall charge of the ten-man crew and the one bomber.
13
Page 14
• Click on the top left portrait (the Bombardier) and the bombardier’s
name will appear in the central panel.
• Click inside the name panel and delete the name using the
Backspace key.
• Type in a new name (it could be your own) in the two panels and
press Return/Enter.
• Flip the Continue switch (lower right) and you will be taken to the
HQ Corridor screen.
The HQ Corridor gives access to various mission planning and briefing
screens. If you were playing the Squadron Commander game you would
be able to plan all strategic operations in the Operations Room but as
Bomber Commander you will NOT have access to mission planning.
But you do have your own office.
• Click on the door on the far left of the HQ Corridor and you will
enter your office (you must try to be a bit more tidy!).
Here you will find information about your crew and your bomber.
• Click on the book on the left of your desk and you will open the Crew
Information File. The first page will open on the Bombardier details
and will show the name you inserted in the Crew screen. Clicking on
the tabs along the side of the book will show details for all ten crew
(coded by position: TG – Tail Gunner, N – Navigator etc).
14
Bomber
Commander’s
Office
Briefing Room
Bomber
Inspection
Squadron
Commander’s
Office
Operations Room
Page 15

• Click away from the pages and the book will close.
• Click on the book on the right of the desk and the Bomber
Information File will open
This shows the details of the bomber you renamed. This is a new
campaign so there will not be details of any previous missions.
• Click anywhere away from the book to close the file.
• Click on the windows to go outside to Inspect Bomber and you will
be taken to your Jeep.
A clipboard will show the name of your bomber.
• Click on the B-17’s name on the clipboard.
This will take you to the aircraft waiting at its dispersal point (in the 3D
world). Inspection is particularly useful when you have returned from a
mission and want to see the damage your bomber has sustained.
Full camera views are available:
Numeric Keypad
Plus + and Minus - = Zoom in/Zoom out.
Arrow keys = move the view left/right/up/down.
PageUp/PageDown = tip view up/down.
Ins/Delete = rotate view left and right.
Mouse
Alternately, you can use the mouse (with the right mouse button pressed
in to zoom in/out and the left mouse button pressed in to rotate view).
• Press ESC to return to the jeep bonnet – this contains the Crew
Management File.
• Click on the Crew Management File.
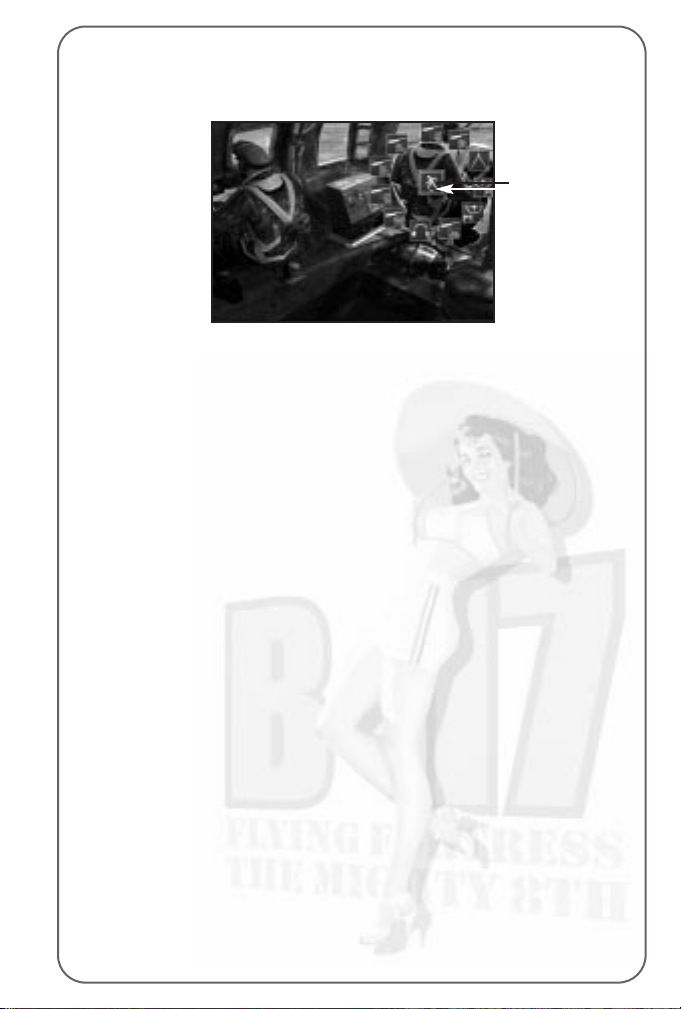
This shows a summary of the crew’s abilities. A cross ‘X’ shows the
correct job of each crew member, a slash ‘/’ shows a competence in
another job. It’s here that you can reassign your crew and manage their
abilities as the campaign begins to take its toll and injuries or KIAs
accumulate. To change a crewman’s job, click on the slash and it will
become a cross. Note: Other crew positions will be automatically
adjusted to fit in with your choices.
• Click on the right hand page to turn it over and you will see details
of each crewman’s skills.
These will improve as each man gets more and more mission experience.
• Click away to close the book and click on the bunch of keys to
return to the airbase. You will be returned to the HQ Corridor.
Now you have examined all aspects of your crew and bomber, you’d best
get a briefing about your first mission.
15
Page 16
• Click on the doorway on the near left to enter the Briefing Room.
The Briefing Room gives you all the current information available about
your target (or targets) and the routes there and back.
In the centre of the stage there are facilities to see a fly-over film of
your target, as it will appear to the Bombardier.
• Click on the film screen and watch the film carefully.
In this tutorial guide you’ll be sitting in the Bombardier’s seat during
the bomb run so it’ll help if you recognise the target.
When the film has finished or when you have pressed ESC, you will
return to the Mission Briefing room.
• Click on the Map on the right of the stage to see bomber route,
the target and the route back.
The Map can be controlled by using the numeric keypad keys:
Plus and Minus (+/-) = Zoom in/Zoom out.
Arrow keys = move the map left/right/up/down.
PageUp/PageDown = tip map up/down.
Ins/Delete = rotate map left and right.
Alternately, you can use the mouse (with the right mouse button
pressed in) to move the map in all directions.
The map shows Waypoints, Initial Points, Primary, Secondary, Tertiary
targets (if available) and Rally Points. The red arrows show the direction
of travel along the route.
• Place your mouse cursor on a gold pyramid waypoint marker (you
might have to tip the map view) and you will see the height the
bomber formation should be flying at when it hits that particular
waypoint (you might also have to zoom in with numeric keypad + key).
• Press ESC to leave the map and return to the Briefing Room.
You’ve now seen a reconnaissance film and the route to the target but
you’ve still to read all the target details.
16
Film Screen
Map
Read Mission
Briefing
Page 17

• Click on the green Mission Briefing file on the desk in front of you.
This opens on the Mission Summary page that includes details on the
Primary and Secondary targets, type of bomb selected, distance to
travel and fighter escort details.
• Click on the right hand page of the Mission Briefing file and it will
turn the page to show the Primary Target details including Flak
Strength, Fighter Strength and Target Intelligence.
• Click again on the right-hand page to view details of the
Secondary Target.
• When you have read about the mission targets click on the right
hand page again.
You will now have to sign that you have read and understood the target/
mission details.
• Click on the line (marked by an X) and a signature will appear.
• Click away from the book to close the Mission Briefing file and
return to the Mission Briefing room.
Now let’s start the mission.
• Click on the door on the right of the Mission Briefing hut
(Start Mission) to enter the 3D simulation.
Now you’ve made it to the aircraft dispersal point. The B-17 has bombs
loaded, fuel tanks are full and all the crew are ready for the off.
You will see an outside view of the aircraft and the game will be in
computer-controlled mode (a small computer icon will be shown on the
lower right of the screen). Note: The default is always computer control
whenever a view or crew position is changed.
Use the numeric keypad controls +/- to zoom in and out on the B-17,
the arrow keys to move left/right/up/down. PageUp to tip up and PageDown
to tip down the view. Ins and Del will rotate the view left/right. Or you can
move the mouse, with the right mouse button pressed in for zooming
in/out or the left mouse button pressed in to tip or rotate the view.
17
Computer
control icon
Page 18
Before you can do anything you must give the orders to begin the mission.
• Press F1 to go inside the aircraft.
You will now be on the flight deck just behind the Pilot/Co-Pilot seats
on the flight deck. To give the Begin Mission order you must go to the
Radio Operator station.
• Press keyboard key 6 and you will jump to the Radio Operator’s
Compartment view. You will now see the Radio Operator sitting at his
station with a highlight around him. You now need to go to the Radio
Operator’s Instrument View and can do this in one of two ways:
Either move your mouse cursor to the extreme right side of the
screen (in the middle) to reveal a bank of five view icons.
The current view is lit with a red light (the figure icon).
Click on the fourth icon down (the dial icon).
Or with the Radio Operator selected (highlighted) press key I.
This will bring up the Radio Operator’s Instrument View (a radio set and
two message books).
• Click on the ‘Outgoing Messages’ book (on the left) and it will open.
• Look for the Begin Mission order.
Before you can do anything you must take control away from the
computer AI. This is a feature of B-17: everything will work on
computer control but if you want to influence a position or character,
you must take manual control.
• Press key M and the ‘computer controlled’ icon will disappear and
be replaced by the manual control symbol (a ‘hand’ icon).
You are now in control of the Radio Operator.
• Find the Begin Mission order and click on it.
The order to start engines will be issued and Begin Mission will
disappear from the messages list (you will not need to use it again on
this mission).
18
Manual control
Page 19

• Click away from the book and you will return to the Radio Operator’s
Instrument View.
You should hear the engines starting.
• Hover the mouse pointer to the extreme right of the screen (near
the centre) to open the View Menu panel. This is available in all
internal B-17 screens.
• Select the second icon down on the View Menu panel and you will
return to the Compartment View (or press key C).
• Press keyboard key 3 to go to the Pilot’s Compartment view.
• Press F2 to go to an outside view to see the aircraft taxiing to its
take off position.
Note: If you return to the Radio Operator’s position he will now be back
in computer control – this applies to all crew management positions in
the simulation.
The B-17 will now taxi to the main runway, followed by the rest of
the squadron.
• Watch this from the outside view (using the mouse or numeric
keypad controls).
Use the camera keys especially the zoom out feature to see the
whole airfield.
The bomber will taxi to the main runway followed by the rest of the
squadron and take up a position at the head of the take off runway.
The simulation also has a Pilot Helper key (H) that can guide you in
various aspects of the simulation. In take off, if you press key H you will
see a large green cone take up position in front of the aircraft. This leads
you to the main take off runway. Press key H to switch off Pilot Helper.
Eventually when you get to the take off runway, the B-17 will stop briefly
for the final checks to be carried out. It will then speed up and take off.
The landing gear will retract and the other aircraft in the squadron will
follow the leader.
Your B-17 will circle until the other bombers in the squadron form up
with it.
When taking off in manual mode the Pilot Helper key (H) also comes
into play here. When you hear the command ‘Join Formation’ press H
and you will see a white formation box appear (you might have to look
for it with view keys). This box is where you should be for all the
squadron to form up with you).
19
Page 20

Game Controls
You can ‘pause’ the simulation at any time by pressing the Pause/
Break key (toggle).
The Home key will speed up the simulation 2, 4 or 8 times.
The End key will slow down the simulation (if things are happening too
quickly) 2, 4, 8 times.
Once in the air and in formation, the B-17 will head for the target,
perform the mission to the best of the crew’s current ability/initiative,
defend itself against any attack, and try to return home and land.
If you want to skip large chunks of time when nothing important is
happening, press the Return/Enter key to Time Skip. You cannot skip
when there is an important game event happening (flak attack, fighter
activity etc).
You need not do anything if you don’t want to. But the fun of this
simulation is that you can jump into any position and take over manual
control of that job! Similarly, you can jump into the escort and enemy
fighter cockpits and dogfight with your enemy. Or, you can simply admire
the views of the aircraft crossing a fully mapped Northern Europe!
In this tutorial guide we’ll jump into a variety of positions.
You should still be in external view, in the B-17 squadron formation.
• Skip time (press Return/Enter) as much as you can to speed up the
‘getting there’ procedure. If you are unable to skip time that means
that a ‘game event’ is happening, such as escort fighters
scrambling, flak firing or enemy fighters engaging you in combat.
Now let’s look at the Pilot and Co-Pilot controls.
• Return to the Pilots’ Compartment view by pressing F1.
You should be on the flight deck just behind the Pilot and Co-Pilot.
(If you are not press key 3 and select Compartment View from the right
hand pop-up menu.)
• Select the Pilot (if he’s not already selected) by clicking on the
figure on the left.
All members of the crew have their own set of specific views. The Pilot
has an Action view (accessed by pressing key A) which drops you into
his seat looking out of the front window (and left/right in the cockpit),
and an Instrument view (press key I) showing the fully functioning
cockpit dials and switches/levers. All these views can also be accessed
via the View Menu panel by hovering the mouse cursor on the central
right edge of the screen.
20
Page 21

In addition, some crew positions have additional instrument views that
relate to their jobs. The Pilot and Co-Pilot have specific zoomed-in
instrument views (F5, F6, F7, F8 and F9).
• Press key A to access the Pilot’s Action view.
• Look left/right in the cockpit using the joystick ‘hat’ or Camera
view keys.
• Press key I to access the Instrument view.
This is a fully functioning B-17 cockpit with dials, switches, levers etc
all working. If you hover the mouse pointer on a switch or lever a tooltip
will show what it does.
• Press F5 or F9 to see the Co-Pilot’s instruments.
• Press F6 to see the close-up engine dials.
• Press F7 or F8 to see the close-up Pilot’s dials/switches.
DO NOT OPERATE ANY OF THESE INSTRUMENTS UNTIL YOU
UNDERSTAND MORE ABOUT THE B-17 SIMULATION CONTROLS
(see the Training Schools later in this manual).
Now let’s have a tour of the different crew positions.
• Return to the Pilot’s Compartment view (key C or use the View
Menu panel).
All crew positions in the simulation have a pre-set keyboard key:
` Bombardier
1 Navigation
2 Cheek Gun
3 Pilot
4 Co-Pilot
5 Engineer/Top Turret Gun
6 Radio
7 Ball Turret Gun
8 Left Waist Gun
9 Right Waist Gun
0 Tail Gun
• Press keyboard key 1 and you will jump to the Nose Compartment.
This is where the Bombardier and the Navigator work. Note: Key 1 has
also selected and highlighted the Navigator. If you press key ` (to the
left of keyboard key 1) the Bombardier will be highlighted.
We’ve already seen the Pilots’ Compartment (see earlier) so let’s
continue with the tour.
• Press key 5.
This will take you to the Engineer/Top Turret Gun compartment next to
the bomb bay.
21
Page 22

Note: Because of his position the Engineer/Top Turret gunner is
obscured by the bombs and is not shown fully, but you can just see his
legs highlighted.
• Press the Action view (key A) and you will see the Top Turret view.
• Press key M to take control of the top turret and rotate/fire the guns
using your keyboard or joystick.
Notice the realistic tracer path but do not shoot at your own aircraft!
• You’ve already seen the Radio Operator’s Compartment (key 6) so
try pressing key 7 and note that because you were in the Top Turret
Gunner’s Action view, you have jumped immediately into the Ball
Turret Gunner’s Action view.
• Press key C or click on the second icon down on the View Menu
panel to see the Compartment view.
You will now see the two waist gunners with an almost obscured
highlight of the Ball. Turret gunner’s position close to the feet of the
Right Waist Gunner.
• Now select one of the Waist Gunners (click on one of them or press
key 8 or 9), and go to his Action view (key A or View Menu panel
third icon down).
You will be in position in front of the machine gun.
• Select manual control (key M) and fire the machine gun.
• Now return to the Compartment view by pressing key C.
The last compartment is where the Tail Gunner lives.
• Select keyboard key zero 0 and key A to view the Tail Gunner’s
action view.
Press key M to take over control and try firing the machine guns.
Getting Around
There are various ways to navigate around the aircraft positions.
1. At the top of the screen is a
Crew Portrait pop-up panel
that allows you to jump to
any member of the crew by
clicking on his portrait.
22
Page 23

2. To the left of the screen is a
Crew Position pop-up panel
that allows you to jump to
any crew task (Navigation,
Bomb Aiming/Dropping,
Flying (as Pilot) etc.).
3. At the bottom of the screen
is a panel that pops-up only
in Compartment View that
allows you to jump into the
six B-17 compartments.
• Return to the Tail Gunner’s compartment view (key 0 and key C).
Warning Red Text
Throughout the mission you will hear speech from the crew calling out
messages to each other, giving headings (Navigator to Pilot) etc.
This will be shown at the bottom of the screen in ordinary text.
You have merely to note what is being said. However there will be times
when you will be prompted to perform a task (such as during an enemy
fighter attack) to man the machine guns etc – in this case Red Text will
appear when the message is heard.
If you click on the red text (or press SHIFT + H) you will jump
immediately to the action station most associated with that message.
For example, if you see red text message ‘Bandits at 6 o’clock, level’
and you click on the text, you will jump to the Tail Gunner’s station in
Action view. Either watch the Tail Gunner fire his gun at the enemy
fighters or press M to take control and fire the gun yourself.
Now let’s look at where the aircraft is headed and jump to the
Navigator’s station.
• Open the top panel and click on the second portrait from the left –
this is the Navigator. You are currently in Compartment view, so you
will jump to the aircraft nose section (where the Bombardier also
lives). The Navigator will be highlighted to show that he is the
selected crewman.
23
Page 24
• Press key I to access the Navigator’s Instrument view. This will show
his desk and instruments: the Radio Compass, the Drift Meter
(see later) and the Map.
• Click on the Map (on the left of the screen), or press the Spacebar,
and you will jump to the Map screen.
This map is very similar to the
Mission Briefing map but it also
has a track of the plane’s
position (a green aircraft icon at
the correct height and an
aircraft shadow to show its
position across the ground),
its projected course (a broken
blue line) and its actual course
across the map (a solid
coloured line). The solid line is
coloured green when there is ample fuel left, amber if the fuel status is
becoming critical and red if the fuel is calculated to run out.
All map controls are the same as for the map in the Briefing Room
(see above). You are flying on Flawless Navigation level so the actual
course flown by the aircraft will not differ from the mission briefing, but
if you were to fly Easy or Historical navigation complexity you would have
to adjust position by constantly referring to the map and what you can
see outside (see the Navigator School later in this manual for details).
• Exit the Map screen by pressing key C to go to the Compartment view.
• Select the Bombardier by clicking on him (the crewman sitting right
in the nose of the Compartment) and he will be highlighted.
The Bombardier is also the Chin Turret operator when he is not busy with
the bombsight. You may have to get him to change from Chin Turret to
Bombsight. In this case right-click on him to open the Icon Rose.
Look at the topmost icon (at 12 o’clock), if this is a bombsight left click
on it and he will change jobs. If it’s a Chin Turret, simply click away.
• Now press the Instrument key I to view the Norden bombsight.
This is a complex piece of equipment that Bombardiers use to locate
and lock on to targets as long as the correct data is input properly.
For actual details of manual bombing see the
Bombardier School
later
in this manual, but for now let’s look through the sight.
• Press the Action View key A.
You will be looking at the ground (or the sea) through the bombsight.
24
Page 25
In this tutorial you will not drop bombs manually; you will leave the
crew Bombardier to do this for you.
• Return to Compartment view by pressing key C.
Skip Time
The simulation allows you to skip large chunks of time by pressing the
Return/Enter key but you might not be allowed to ‘skip’ if a game event
is happening.
Accelerate Time
You can also accelerate time by pressing the Home key (3 levels of speed
up) or slow down time by pressing the End key (3 levels of slow down).
Throughout the mission the Navigator will give the Pilot instructions
about new turn headings and waypoints and the pilot will respond.
You need do nothing in this guide but let them get on with it!
Eventually you will reach the last turn before the target (the Initial
Point). Check this on the Navigator’s map. This is the straight line run
to the target.
Now control of the aircraft is passed to the Bombardier. You may hear
him call out “We’re on the bomb run” or “I have the plane”. Now make
sure the Bombardier is selected and jump into the Bombardier’s Action
view (key A).
You might have to be patient here depending on the length of the bomb
run but watch carefully as the target is sought out by the AI controlled
Bombardier, then acquired and locked into position.
You’ll notice two marker blocks
on the right of the bombsight
that are slowly approaching
each other. When they meet,
the red release light will come
on and the bombs will be
dropped. The view will then
switch automatically to the
bomb bay where you will see
the bombs dropping.
• When this happens press F6 (to see the bombs in the air) and F6
again to view the bombs hitting the target.
• Use the mouse with left/right buttons pressed in to view the target
from various angles or zoom.
• Press F1 to return to the Bomb Bay.
You’ve now looked at all the B-17 positions. Why don’t you take a flight
in one of the many fighters available in the simulation?
25
Page 26
• Press key F2 to get an exterior view of the B-17.
In Bomber Commander mode, only one bomber can be selected out of
the six in the squadron. In the Squadron Commander game you can
select all six bombers.
• Your B-17 will be centred in the middle of the screen.
• To access the fighters, hover your mouse pointer on the extreme
right side of the mid-screen.
This area will show a pop-up
menu with a white icon
representing your B-17, your
fighters (if there are any on your
mission) and the enemy fighters
types (if there are any around).
• If there are any friendly fighters around, click on the icon to jump
to an outside view of the fighter.
• Press F1 to enter the cockpit of the fighter.
• Press key M to take control of the fighter and fly around (be careful
and check the keyboard/joystick controls on the Reference Card).
Take a moment to examine the detailed cockpit and fully functioning
dials, levers and joystick.
• Press the camera keys to view the virtual cockpit.
• Press key F2 to go to the outside view (you’ll still be in control!)
• Press key M to return to AI control.
• Return to your B-17 by accessing the B-17 icon in the pop-up panel.
• Press F1 to go back into your B-17.
Crew Management
You’ve now looked over the basic areas of the bomber simulation. Now let’s
look at aspects of crew management that you’ll need to know when things
get rough and you experience casualties or emergencies such as fires.
Depending on their level of initiative set up, crew can be told to
takeover other crew positions, and made to perform certain actions in
emergencies (apply first aid, unjam guns, take over in case someone
panics etc.). If all else fails, they can be ordered to bail out!
Make sure you’re in the nose section in the Compartment view (you can
see the figures of the Bombardier and the Navigator).
26
Page 27
• Select the Bombardier by clicking on him and check that he
is highlighted.
• Place your mouse cursor on the Bombardier and right click.
This will open an ‘Icon Rose’. All the icons in the circle are instructions
you can issue to individuals; all 10 crew in the B-17 can be given these
types of orders (but they do vary depending on the job).
• Place your mouse cursor on a few of the icons and read the pop-up
tooltips associated with these icons.
The central icon is the instruction you are issuing (such as ‘Move To’ a
different position). If you click on the central icon the instruction will
change (Give First Aid, Repair, Use, Bail Out etc).
If you select Give First Aid and you see a portrait (or portraits) with a
red cross on – that means there is a crewman who requires first aid.
Click on the injured crew portrait and the selected crewman will go to
him and help.
If there is a fire additional icons with pop-up tooltips will show which
fire extinguishers can be used in what compartments. Remember to put
out fires as soon as you get a warning (or see smoke). Fire is your worst
enemy aboard the B-17!
The Bombardier also has control of the Chin Turret that’s located just
under his bombsight station. This is useful when he has completed the
bomb run and can function as a defensive gunner on the dangerous
journey back home.
Now, let’s change his ‘job’ to that of a chin turret gunner.
• Right click on the Bombardier and open the icon rose.
The central icon will be the Move To (walking man) order (if it isn’t then
right click on it until it is).
• Move your mouse cursor to the top of the ‘rose’ and click on the
Chin Turret icon (the pop-up tooltips will confirm this) and left click.
27
Icon Rose
Page 28

The Bombardier will now move the chin turret controls over the bombsight.
• Press key A to access the Chin Turret Action view and you will see
the chin turret sight.
• Press key M to get manual control of the Chin Turret and fire off a
few rounds.
• Now, with what you’ve already learnt, try to make the Bombardier
return to his Bombsight. Note: The Norden Bombsight icon will have
replaced the chin turret icon in the topmost position of the icon ‘rose’.
Returning Home
After releasing their bombs the aircraft will go to the Rally Point and
then take the route marked on the mission map home (check this on
the Navigator’s map view). Again, except in ‘flawless’ Navigation
complexity, your Navigator will need to check the map to the actual
geography. This is a dangerous time when all gunners have to be alert;
you may be attacked by fighters or flak. This is a good opportunity to try
out the Gunners’ stations and to get an understanding for the zones
around the B-17 that each Gunner can defend.
Be careful not to shoot at your own aircraft in the formation and note that,
if the guns jam, you can attempt to unjam them in the following way:
• Return to compartment view (key C).
• Right click on the gunner figure to open his ‘Icon Rose’.
• Right click on the icon in the middle until you see the ‘Repair’
spanner and click on the ‘Unjam’ guns icon that appears above it.
Gunners will call out bandits on the Clock System with 12 o’clock in
front of the aircraft, six o’clock behind, and nine o’clock on the left etc.
Level means level with the aircraft high and low are relative to the
B-17’s level flight.
Unless something happens to the Pilot, the B-17 will be flown back to
base and landed.
Mission Debriefing
At the end of the mission the aircraft will be landed. Here in manual mode
you could also use the Pilot Helper key (key H). This will show a cone that
you should fly towards to get to your base and to the landing runway. When
the B-17 has landed the green cone will help you taxi back to the hardstanding dispersal point you will be taken to the Mission Debriefing hut.
• Double-click on the Mission Debriefing file to view details of your
recent mission performance (click on the page to turn it).
Here you’ll find all details of the mission analysed and you may be
informed of any medals and promotions.
28
Page 29
Saving the Game
• To save the game at this point, press ESC. This will open the
Options screen.
• Click on the Load/Save Menu (the floppy disc icon) and flip the
continue switch (lower right).
• Select <New File> and type in a name for the file in the panel.
• Click on the right hand button (Save the Current Game).
• Return to the Options menu (flip switch lower left).
• Flip the switch (lower left) to resume the game.
The Training Missions
If you have completed the tutorial, you will have already been on a
complete mission and had a quick taster of action. The more complex
levels of the simulation however depends on your own skills and so,
to improve these skills, the game provides a set of Training Missions
(use of bombsight etc.). Remember to have the Reference Card to hand
when attempting these missions.
• Select New Game.
• Select Choose a Training Mission (the middle panel on the right)
and you will go to the mission selection screen.
• Look at the panel at the top of the screen to access a training
mission topic (you can scroll down the list by clicking on,
holding down and dragging the right hand slider).
• Select the training topic you want to practice and the mission brief
or set of tasks will be shown in the lower panel.
• Scroll this panel to read full details of what you have to do.
• Flip the Continue switch (lower right) to jump into a Training Mission.
You will be taken into the 3D world so that you can perform the training
exercise without risk to life and limb.
29
Page 30

Mission 1: Taxi and Take Off
Your aircraft is on a hardstand at an airfield with engines running,
wheel brakes set and flaps fully lowered.
This is simply an exercise in taxiing the B-17 to the main runway and
then carrying out a take off. It’s here that you will learn basic ground
handling skills and take off procedures. The mission will end once you
get to 1,000 feet pull in your gear and raise your flaps.
• Press key M to take control. The four engines will start automatically.
1. You will not be able to see much of the runway from the pilot’s
position (just like the real thing) so you’re advised to stay in outside
view when manoeuvring the B-17 to the runway.
2. Throttle slowly up (+).
3. Unlock your Tailwheel (Shift + T).
4. Use all camera views (especially the zoom in/out functions) to see
where the main runway is.
5. Move very slowly and steer left- right using the Rudder controls
(keyboard or joystick).
6. Stop at the top of the main runway (Wheel Brakes On - Insert key),
lock your tail wheel (T).
7. Throttle up full using keyboard or joystick controls.
8. Wheel Brakes Off (Delete key) and as the aircraft speeds up over
the runway, ease it gently into the air and perform a shallow climb.
9. Raise all landing gear (Up Arrow).
10. Raise flaps (key F).
Mission 2: Approach and Landing
You are on approach to the main runway of the airfield. All engines are
running, gear and flaps are fully raised. You are in the Pilot’s seat
behind the controls of the B-17 as it turns onto final approach.
You will need to follow the correct approach and ease the bomber onto
the runway. The mission ends once you’ve landed and brought the
aircraft to a complete halt.
• Press key M to take control.
1. Use the external camera views for maximum visibility.
2. Locate the main runway where you will land (it should be lined up
in front of you).
3. Drop your landing gear (Shift + Up Arrow).
4. Ease up on the all engine throttles.
5. Lower flaps (Shift + F).
30
Page 31

6. Glide in to the runway and land all three wheels.
7. Cut throttle as plane rolls (- minus key).
8. Put Wheel Brakes on (Insert key) to stop aircraft moving.
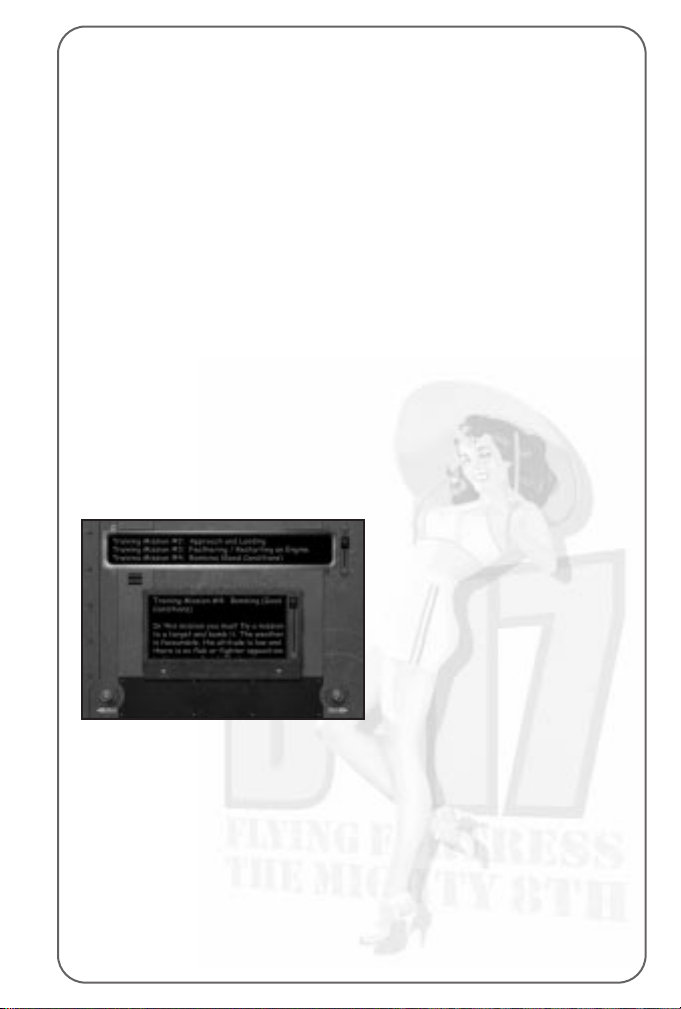
Mission 3: Feathering/Restarting an Engine
An engine that is not feathered when it has stopped will add severe drag.
This could cause a fire or even break the propshaft, so it’s very important
to learn how to feather an engine. You are flying above the airfield at an
altitude of 5,000 feet and airspeed of 155mph (IAS).
The engines are running, gear and flaps are fully raised. You must
feather engine number 1 and then restart it, all while maintaining speed
and altitude. If you drop below 1,000 feet you will fail this mission.
• Press key M to take control.
1. Go to the Pilot’s Instruments
view in the cockpit (key I).
2. Click on the large, round red
button marked “1”.
3. Find the fuel system switches
above the pedestal and turn
off the left-most column.
4. Click and move the TurboSupercharger and Throttle to
zero for Engine 1.
Number One Engine should now be feathered.
5. Locate the fuel system switches above the pedestal and turn on the
leftmost column.
6. Click on the large, round red button marked “1”.
7. Set the throttle and Turbo speeds to match the other three engines.
At this point the engine should start.
Mission 4: Bombing – Good Conditions
In this mission you must locate the target and release the bombs as
accurately as possible. You will be the Bombardier just at the beginning
of the bomb run. The Norden bombsight is already configured with
altitude and speed correctly. Altitude is 8,000 feet, and airspeed
155mph (IAS). All engines are running well, gear and flaps are fully
raised. The weather is good, altitude is low and there is no flak or
fighter opposition to worry about.
31
Page 32

• Press key M to take control.
1. Wait for the Bombardier to indicate he is on the bombrun.
Then press key A to go to Bombardier’s Action View (you will be
looking through the bombsight).
2. Enter “Search Mode” by using SHIFT + K (a light will come on).
3. Use your joystick to locate the target, place the crosshair over the
target and then hit SHIFT + K to ‘lock’ the target.
4. The Sight starts in DRIFT tracking mode. Moving the joystick left
adjusts the angle of Drift to the left – the target will begin to drift
more to the right of the sight picture. Moving the joystick right will
alter the angle of Drift to the right – the target will begin to drift
more to the left of the sight picture.
5. Press key N to enter the RATE tracking mode. Moving the joystick
up makes the rate track more slowly, so the target will move towards
the bottom of the sight picture. Moving the joystick down will make
the rate track more quickly, hence the target will appear to move
back up towards the top of the sight picture. The objective is to
freeze any vertical movement of the target.
6. You should adjust DRIFT and RATE until the sight picture shows no
movement at all. This is called SYNCHRONISATION, and means the
bombsight is correctly allowing for speed, altitude and wind drift.
7. During your alterations, the target may have slipped out from the
crosshairs. If you have time, you can enter SEARCH mode, using the
SHIFT + K key combination, and place the target directly under the
crosshair again. Provided that you have correctly SYNCHRONISED the
sight, as described above, the crosshair will remain where you left it.
8. Watch the two markers close towards each other, when they meet
the bombs will be dropped automatically by the bombsight – thus
ensuring a drop accurate to the millisecond.
9. Watch bombs release from bay and then press F6 to view down
from inside the bomb bay and F6 again to view target from ground
level (use mouse left button to zoom in and right hand button to
move around target.
Mission 5: Bombing – Poor Conditions
In this mission you must fly a mission to a target and bomb it.
The weather is more overcast and more like normal European cloud
cover. The altitude is 18,000 feet, which is average for a run on a
defended target, but there is no flak or fighter opposition. The bomber
mission starts just before the Initial Point of the bomb run so you must
carry out the full calibration of the bombsight.
32
Page 33

• Press key M to take control.
1. Press the spacebar to go to the Bomb Panel.
2. Click Bomb Indicator button ON.
3. Click ON – Bomb Bay Doors, Bomb Arming and Autopilot switches.
4. Press spacebar to return to Norden bombsight view.
5. Wait for the Bombardier to indicate he is on the bomb run.
Then press key A to go to Bombardier’s Action View (you will be
looking through the bombsight).
6. Enter “Search Mode” by using SHIFT + K (A light will come on).
7. Use your joystick to locate the target, place the crosshair over the
target and then hit SHIFT + K to ‘lock’ the target.
8. The Sight starts in DRIFT tracking mode. Moving the joystick left
adjusts the angle of Drift to the left – the target will begin to drift
more to the right of the sight picture. Moving the joystick right will
alter the angle of Drift to the right – the target will begin to drift
more to the left of the sight picture.
9. Press key N to enter the RATE tracking mode. Moving the joystick
up makes the rate track more slowly, so the target will move towards
the bottom of the sight picture. Moving the joystick down will make
the rate track more quickly, hence the target will appear to move
back up towards the top of the sight picture. The objective is to
freeze any vertical movement of the target.
10. You should adjust DRIFT and RATE until the sight picture shows no
movement at all. This is called SYNCHRONISATION, and means the
bombsight is correctly allowing for speed, altitude and wind drift.
11. During your alterations, the target may have slipped out from the
crosshairs. If you have time, you can enter SEARCH mode, using
the SHIFT + K key combination, and place the target directly under
the crosshair again. Provided that you have correctly
SYNCHRONISED the sight, as described above, the crosshair will
remain where you left it.
12. Watch the two markers close towards each other. When they meet,
the bombs will be dropped automatically by the bombsight,
thus ensuring a drop accurate to the millisecond.
13. Watch bombs release from bay and then press F6 to view down
from inside the bomb bay and F6 again to view target from ground
level (use mouse left button to zoom in and right hand button to
move around target.
33
Page 34

Mission 6: Gunnery
You are in the air above the airbase at an altitude of 12,000 feet and
an airspeed of 150mph IAS. The Navigator is in his alternative position
on the Cheek gun.
You must shoot at a target B-17. It will come up alongside you in
various positions to cover all gun positions. You should experiment with
‘leading a target’ and the effects of range on bullet arcs. You must hit
the bomber with 50 rounds from each position but don’t worry about
doing any damage – all guns are loaded with special ‘paint’ rounds.
You will begin in the Top Turret position.
• Press key M to take control (of Bombardier).
1. Wait for the target B-17 to appear.
2. Aim and fire. When 50 hits are recorded you will not be able to fire
anymore and have to move on.
3. Press F2 to get an outside view of the B-17.
4. Press [ to select the target B-17 and use the Camera keys to look at
the colourful ‘damage’.
5. Press [ to select your B-17 and press F1 to return to Chin
Turret station.
6. Repeat the above for all gun positions in this order:
Chin Turret, Cheek Gun, Top Turret, Ball Turret, Left Waist Gun,
Right Waist Gun and Tail Gun.
7. When you have succeeded in hitting the B-17 with all guns the
mission will end.
All Training Missions will be debriefed. You will be told in the
Debriefing File if you have achieved the required competence.
The Quickstart Missions
These Quickstart missions all have limited objectives and are specially
designed for a ‘quick blast’ of realistic flight combat action when time
is short.
• Select New Game.
• Select Choose a Quickstart Mission (the top panel on the right) and
flip the Continue switch.
You will be shown a list of missions in the panel at the top of the
screen. Scroll down the list (by clicking and dragging the slider on the
right) to review all the missions available.
34
Page 35

Mission 1: Limping home
You are flying a B-17 as part of the low element of your squadron on a
mission to Berlin. Over the target you were hit by flak, damaging you
quite badly. Limping home you were savaged by a group of Bf-109’s
who were driven away by your faithful fighter escort. You made it home
to your airbase and are just performing the flight checks for landing
when you realise that your undercarriage has been badly shot up!
You now have to plan and execute an emergency landing.
Mission 2: Attack of the Axis
In this mission you must endure a savage attack by German fighters
against your formation. Luckily you have ‘little friends’ along for the
ride, but they will be outnumbered and in many cases the only thing
between you and the long drop will be the guns of your formation.
A full formation of B-17’s, minus one that has been shot down,
accompanies your bomber.
A formation of P-51’s is riding ‘shotgun’, in their usual position about
1,000 feet higher than the bombers. They have just arrived and none
have been engaged so they have their drop tanks and full ammo loads.
Mission 3: Where are the ‘Little Friends’?
As the war progressed the ‘little friends’ cut a safe path through
German airspace for the bomber formations. US losses dropped sharply
as the German fighters turned from the hunters to the hunted.
From time to time, however, bad weather or navigational errors led to
the fighters and bombers missing each other. In this mission, exactly
this has happened and the bomber formation must rely on its own guns
to drive off the German fighters. A full formation of B-17’s, less one
bomber that has been shot down, accompanies your aircraft.
Mission 4: Opportunity for the Axis (Luftwaffe)
The American fighters have been making your job very difficult of late.
Finally your fighters have found a formation of B-17 bombers that are
unaccompanied by their escorts, making them easy meat for you!
This is your chance to inflict heavy losses on the bombers and win a battle
for the Luftwaffe. Two bombers are already missing from the formation.
Mission 5: Fighter sweep over France
In this mission you have finished an uneventful escort mission in a
flight of P-47s and are now performing a sweep of northern France.
A passing flight of P-51s reports a formation of Bf-109s to the
northeast that they did not engage because of lack of fuel. This being
the only action in the area you turn to engage. Your orders are to sweep
the area clean of German fighters.
35
Page 36

Mission 6: Defence of the Reich (Luftwaffe)
The B-17 bombers are coming again and, as usual the 8th Air Force is
trying to clear the Luftwaffe defenders with an advance sweep of P-51s
just before the bombers arrive. Formations of Luftwaffe fighters are
waiting to savage the bomber stream if you can knock down this
advance wave. You should be able to do the job with your Fw-190s,
but a small formation of flight instructors in jet powered Me-262s is
standing by in case you need the help.
You are part of a full formation of Fw-190s, already in the air and closing.
There is a formation of three Me-262s on the ground, ready to scramble.
• To select a mission click on the name and study the mission
briefing (scroll down by clicking and dragging on the slider to the
right of the panel).
• Flip the Continue switch (lower right) to jump into the mission.
You will be thrown into the 3D world.
Get ready for action!
36
Page 37

Section Three: Reference
Page 38

The Main Menu Screen
After the opening sequences you
will enter the Main Menu screen.
This allows you to select Game
Options, the type of game you
want to play, load in previously
saved games and watch the
opening sequences again.
Player Options
Click on the icon to get access to Controls, Realism, Difficulty, Sound,
Graphics and Save Menus. You can also access this Options screen by
pressing ESC at any time.
New Game
Click on the icon to play a new game. A red warning light will be lit to
show your selection.
Load Game
Click on the icon to load a previously saved game. A red warning light
will be lit to show your selection.
Replay Intro
Click on the icon to view the initial screen sequences. After the
animations are over you will return to this menu.
You can also select the icons by clicking and dragging on the on-screen
central dial.
Continue Switch
Once you have made your selection flip the Continue Switch (lower right)
to carry on with the game set up.
Quit Switch
Click on the Quit switch (lower left) to exit the game.
38
Page 39

PLAYER OPTIONS MENU
The Player Options menu gives you access to Controls, Realism, Difficulty,
Sound, Graphics and Save menus.
The Controls Menu
The simulation will automatically detect if you have a joystick attached
to your PC and will make this the intelligent default. Some joysticks
have extra controls (R-axis or throttle) if these exist on your joystick
they will be in force. You can of course re-assign most controls to suit
your style of play.
Control Keys Assigned
The panel on the left shows a
complete list of simulation
controls. If you select one of the
items (for example, Parking
Brake On) the panel on the
right shows the key or key
combination required to activate
that item. If other types of
controls are possible (such as
Joystick Buttons or Joystick
Axis) then these are shown.
Assigning Joystick Buttons
To assign a joystick button, highlight ‘Activate: (Not Assigned)’ and
click. The software will scan for a control input. Press the joystick
button you want to use and this will be detected and shown.
Assigning Joystick Axis
If you want to assign a control that’s based on the joystick axis
movement, highlight the control (for example Pitch (Nose Up/Down)
and, in the right hand panel click on the line below ‘Axis’.
39
Controls
Load/Save
Realism/Difficulty
Graphics
Sound
Page 40

Notice that the software is ‘scanning’ for a control input and that the
two small panels in the lower left/right of the screen are showing Down
and Up. Move the Joystick forward and back and the central dial should
react moving to the extreme left for Down and the extreme right for Up.
Let go of the joystick and this control will be assigned.
Customising Control Keys
You can also customise the B-17 keys in UNSHIFTED/SHIFT/CTRL/
SHIFT+CTRL combinations in the same way as above.
Note: The right hand main panel also allows you to assign other types of
controls for appropriate items. For example Yaw (Rudder Left/Right) has
Slow/Medium/Fast Non-Centring or Centring options. Click on the line
to toggle through the options.
The use of other Controllers
B-17 should accept any controller supported by Direct Input under
DirectX. Check the operation of any Axes or Buttons carefully to ensure
the game is accepting input in the correct way. Remember you can opt
to reverse axes or change how controls handle such issues as speed of
movement and centring.
• Click on the lower right hand switch to accept the changes and
return to the Options Screen.
• Click on the lower left hand switch to cancel all control changes.
Realism/Difficulty Menu
Click to select levels of Realism/Difficulty throughout the game. The top
panel shows the current state (scroll to view full details).
• Click on an item and various options will appear in the lower panel.
• Click on an option to select.
Flak Accuracy
The general level of German flak concentration against the bomber
formation. Choose from Rookie, Veteran or Elite.
‘Enemy’ Fighter Skill
The general opposition fighter pilot skill from Rookie, Veteran or Elite.
Friendly Fighter Skill
The general friendly fighter pilot skill from Rookie, Veteran or Elite.
Ammunition Quantity
Choose a quantity of ammo held by your side (B-17 machine guns, Allied
fighters etc) from Historical, Double the historical amount or Unlimited.
Fuel Quantity
Choose the quantity of fuel on board your aircraft from Historical,
Double the historical amount or Unlimited.
40
Page 41

Bomb Damage
Select the amount of damage your B-17 bombs can inflict on a target
from Historical, Historical without Duds/Double the damage without
Duds. Duds are damaged or defective bombs that hit the target but do
not explode.
B-17 Durability
How tough do you want your bomber(s) to be? Choose from Historical,
Enhanced or Invulnerable.
Norden (Bombsight) Complexity
Set how realistic you want your bombsight to react and function from
Full Complexity or Simplified.
Navigation Complexity
Set how realistic you want Navigation to be from Historical,
Easy or Flawless.
Friendly Bullet Strength
How effective do you want your machine gun bullets to be?
Choose from Historical, Increased or Double strength.
G-Force Effects on Pilot
Set what level of G-force effects you want acting on the pilots (this
applies more to fighter pilots when they are in tight turns) from
Accurate, Reduced or None.
Collision Damage
Set parameters for any collision damage your aircraft may suffer.
Choose from Ground/Other Aircraft, Ground Only or No Collision Damage.
General Difficulty
Choose an overall difficulty level for the simulation from Low, Medium
or High.
Weather Severity
Set a level for bad weather encountered from Light, Moderate or Severe.
Crew Autonomy
Set how much initiative you want your crew to have when not directly in
your control from:
None – they will show no initiative without your prompting.
Limited – they will show initiative in only essential tasks.
Normal – they will behave like an average crew.
Superior – they will show above average initiative.
Note: The crews of aircraft not currently possessed by the player in
Squadron Commander mode will always count as being on Superior
Autonomy. This setting covers the autonomy of a player-occupied
bomber only.
41
Page 42

Fighter Gun Convergence Range
Select a convergence range for your fighter plane guns between 150
(rookie shot) to 600 yards (good shot).
• Click on the lower right hand switch to accept the changes and
return to the Options Screen.
• Click on the lower left hand switch to cancel all control changes.
Note: Beyond the convergence range, the bullet pattern will spread
again. This may be useful if you are intending to “spray” the aircraft.
The Graphics Menu
The Graphics options allow you to select a suitable set-up for your
machine: a ‘Speed’ setting will give you the lowest and less ‘high spec’
machine settings; a ‘Detail’ setting will give you the highest graphic
quality and a Balanced setting will give you a cross between the two.
The top panel shows the current settings.
• Click on an option and details will appear in the lower panel.
• Click to select the option in the lower panel.
Object Complexity
How detailed do you want your 3D game objects? Choose from Speed
(the fastest but less detailed level), Balanced or Detail.
Environmental Effect
This gives a level for items such as Particles, Clouds and Smoke
effects. Choose from Speed, Balanced or Detail.
Interior Shadows
Interior shadows make the flying experience more realistic. Choose from
Speed (the fastest but less detailed level), Balanced or Detail.
Special Effects
Select a level for in-game special effects such as explosions from
Speed, Balanced or Detail.
Landscape Textures
Choose the landscape texture detail that suit your machine spec from
Speed, Balanced or Detail.
Non-Player B-17s
How detailed and numerous do you want the non-player B-17s to
appear in-game? Choose from Speed, Balanced or Detail.
Damage Modelling
What grade of damage and ancillary damage do you want?
Choose from Speed, Balanced or Detail.
Note: This controls only the visibility of the damage; any damage
inflicted will still affect the flight model.
42
Page 43

General Quality
Set a general overriding level for game 3D graphics from Speed,
Balanced or Detail.
• Click on the lower right hand switch to accept the changes and
return to the Options Screen.
• Click on the lower left hand switch to cancel all control changes.
The Sound Menu
Click to select a number of in-game sound options. The higher panel
shows the current state.
• Click on an option and details will appear in the lower panel.
• Click to select in the lower panel.
Ambient Detail
What level of ambient sound (Wind, Bird Song, Foghorns, etc.) do you
want Choose from Low, Medium or High.
Engine Volume
Select an engine volume setting from Off, Level 1 to Level 5.
Gun Volume
Select a Gun volume setting from Off, Level 1 to Level 5.
Speech Volume
Select a Speech volume setting from Off, Level 1 to Level 5.
Mechanical Volume
Select a Mechanical objects volume setting from Off, Level 1 to Level 5.
Bomb and Flak Volume
Select Bomb and Flak volume setting from Off, Level 1 to Level 5.
Overall Volume
A general setting for all volume levels in the game from Off, Level 1 to
Level 5.
• Click on the lower right hand switch to accept the changes and
return to the Options Screen.
• Click on the lower left hand switch to cancel all control changes.
The Load/Save Menu
This allows you to Save the current game state or Load in any previously
saved games.
Saving the Current Game
• Type in a name for your current game.
• Click on the right-hand button at the bottom of the screen.
The saved game name will appear in the lower panel.
43
Page 44

Loading Games
The lower panel shows a list of saved games.
• Click to select and it will appear on the top panel.
• Click on the Load a Saved Game button (on the left).
The Game Options Screen
• Click on New Game in the Main Menu screen.
The Game Options screen allows you to select what sort of mission or
campaign you want to take part in. As in the previous menu screens you
can either click on the icon or on the dial. A red warning light indicates
your selection and you must click on the Continue switch to implement
your choice.
The Campaign Game
Playing a Campaign Game will give you a complete tour of duty,
meaning that you will have to complete the 25 missions for the
scenario time period you are flying:
The Bomber Commander Campaign
Click on the top left icon (one aircraft) to participate in a full tour
campaign in command of just one bomber and its ten-man crew.
Command the bomber and crew throughout the entire period of the
tour. Define your crew’s success with medals/promotions, and nurture
your ten ‘flyboys’ to get the best out of everyone from rookies to
veterans. Your ultimate goal is to get everyone to complete their tour of
duty and back to the US as quickly and safely as possible!
The Squadron Commander Campaign
Click on the lower left icon (multi-aircraft) to participate in a full tour
campaign as the Commander in charge of a squadron of B-17s; each
one with a complete ten-man crew. Plan your own missions to fulfil a
long-term strategy and use reconnaissance opportunities to strike at key
enemy installations as they are developed.
44
Single bomber
commander
campaign
Quickstart
Missions
Squadron
commander
campaign
Training
Missions
Historical
Missions
Page 45

Manage your bombers and their crew using all your available resources
to best effect. You are a career officer in this campaign – your ultimate
goal is progression up the chain of command. This is achieved by
managing your Squadron as effectively as possible.
The Single Mission Games
There are three single mission options available on this menu.
These allow you to jump into the simulation for specific and limited
single missions. You can choose between Quickstart Missions, Training
Missions or specific Historical Missions.
The Quickstart Mission
Click on the top right icon to launch a Quickstart mission. The red
light will indicate your choice. (See earlier in this manual for full
mission details).
Now, flip the Continue switch and you will go to the Quickstart
mission screen.
To select a mission, click on its name and read the briefing (scroll down
by clicking and dragging on the slider to the right of the panel).
Flip the Continue switch on the right to go into the mission. Quickstart
missions represent definite areas of experience within the broader scope
of a mission. You will have to be ready for the situation described in your
text, as no further briefing will be given! When the situation has passed,
you will be debriefed on your performance.
The left hand switch will return you to the Game Options screen.
The Training Mission
Click on the middle icon on the right of the Game Options screen if you
want to carry out a Training mission. The red light will confirm your choice.
See earlier in the manual for full details. Now flip the Continue switch
(on the lower right of the screen) to access the Training mission screen.
Flip the right hand Continue switch to jump into the selected training
mission. You will be taken into the 3D world so that you can perform
the training exercise without risk to life and limb.
The left hand switch will return you to the Game Options screen.
Play a Historical Mission
Historical Missions are actual missions flown during the real bomber
campaign. Click on the lowest icon on the right to play a choice of
historical missions.
Flip the Continue switch (bottom right) to go to the Historical
Mission screen.
The top panel on this screen shows a scrollable list of six ‘real’
historical missions.
45
Page 46

Mission One: Bremen on 20/12/43
On the 20th of December 1943, the 381st Bombardment Group
(Heavy) had a tough assignment. The target was Bremen, a feared
target due to its numerous flak batteries. The group had been there on
the previous day and made it back with no losses, but this time it was
to be a rather different story. The Group took off at 08:15 and by the
time they made it back to Ridgewell they had lost four bombers,
victims of the punishing flak.
Mission Two: Osnabruck on 22/12/43
On the 22nd of December 1943 the 381st Bombardment Group
(Heavy) set off for Osnabruck to attack its vital industrial centre.
On this mission flak wasn’t so troublesome, but the 381st had more
than its fair share of fighter attention. Due to excellent escort fighters,
the 381st made it back home with no losses.
Mission Three: Ludwigshafen on 07/01/44
On the 7th of January 1944 the 381st Bombardment Group (Heavy)
set off to the vital industrial centre of Ludwigshafen on the bank of the
Rhine River. Through bad weather the fortresses dropped their bombs on
target and turned for home. The escorting fighters drove off heavy fighter
attacks, but one bomber fell to flak before the group got back home.
Mission Four: Frankfurt on 29/01/44
On the 29th of January 1944 the 381st Bombardment Group (Heavy)
targeted the industrial centre of Frankfurt. The target was bombed
through heavy cloud for the loss of two Fortresses and all agreed that
losses would have been higher had the fighter escort not performed so
valiantly. As it was, the flak was very intense, and the result of the
bombing was believed to be good.
Mission Five: Brunswick on 30/01/44
On the 30th of January 1944 the 381st Bombardment Group (Heavy)
was sent on a mission to bomb Brunswick. The target was largely
obscured by cloud, but the Group found a hole and achieved success.
The German defence was described as ‘frequent but not persistent’ with
fighter attacks and intense but inaccurate flak. Despite this, three of
the Group’s Fortresses failed to return.
Mission Six: Hamburg on 18/06/44
On the 18th of June 1944 the 381st Bombardment Group (Heavy) broke
from its pattern of hitting ‘invasion priority’ targets and was sent to bomb
Germany’s oil industry centre in Hamburg. The enemy fighters didn’t
prove to be too much of a problem, thanks to the escort provided and,
even with the heavy flak, the 381st managed not to lose a single bomber.
46
Page 47

Click on a mission name and study the mission details in the lower
panel. If it’s a mission you want to undertake, flip the Continue switch to
go to the Mission Briefing room (see Mission Briefing below). The game
will play as if you had been assigned this mission as part of a regular
campaign. You will be debriefed on your return from the mission.
Bombardment Group/Squadron Screen
If you have chosen to play a
Single Bomber Campaign you
will be taken to this screen to
choose your Bombardment
Group (left panel) based at
different airfields and Squadron
(right panel). Select the
Group/Squadron you want from
the list. Note: The specific
insignia will be shown.
Campaign Start
The lowest panel on this screen shows when the campaign will begin.
Click on the date to alter the start date of the campaign. Start between
December 1st 1943 and February 10th 1945.
When you have made your selection, click on the Continue Switch
(lower right) to go to the Customise Bomber screen.
Customise Bomber Screen
It’s here where you can personalise your B-17 by giving it your choice
of name and nose art.
New Bomber Name
The top panel shows a default B-17 name. To change a name, click on
it to access a text cursor. Delete the existing name with the Backspace
key, type in your own choice of name and press Return/Enter.
Choose Nose Art
On the left-hand side of the two central panels, you will see a list of ‘nose
art’ names. Click on one of the names and you will see the nose art in the
right hand panel. Use the scroll button to view the rest (if necessary) and
click on your choice.
Your B-17 will now be painted with your choice of nose art. If you are
playing the Squadron Commander game, you can customise each one of
your squadron’s aircraft.
Click on the Continue switch (lower right) to go to the Bomber Crew Screen.
47
Page 48

Bomber Crew Screen
If you have chosen to play a Single Bomber Commander Campaign you
will be taken to the Bomber Crew screen. This shows portraits of all 10
crew that are now your responsibility.
The crew from top left to top
right are:
Bombardier
Navigator
Pilot
Co-Pilot
Engineer/Top Turret Gunner
The crew from bottom left to
bottom right are:
Radio Operator
Ball Turret Gunner
Left Waist Gunner
Right Waist Gunner
Tail Gunner
By clicking on each portrait you see his name in the display panel.
Renaming the Crew
You can rename any or all members of your crew. Click on the name in
the two display panels, delete it using the Backspace key and re-type
your choice of name (first name and surname) then press Return/Enter.
Your choice of crew names will be used throughout the campaign.
Replace Entire Crew
In the middle of the screen you will see a red button that allows you to
replace the entire crew line up. All portraits will change but any crew
already named by you will retain their identities – gaining new faces.
Selector Dial
As in most B-17 Flying Fortress menu screens, clicking and dragging
the Selector Dial Indicator will also perform crew selection.
Continue Switch
When you have made your choice flip the Continue Switch (lower right)
to enter the HQ Corridor.
Return to Previous Screen Switch
Flip the Return to Previous Screen switch (left) if you want to change
any previous selection.
48
Page 49

Squadron Bomber Names/Nose Art
If you are playing the Squadron Commander Campaign you will be able
to name and customise each bomber in your squadron.
When you have made your choice flip the Continue Switch to enter the
Squadron Crew screen.
Squadron Crew Screen
The Squadron Crew screen is similar to the Bomber Crew screen
(see above) but it also has an extra panel that shows all of the aircraft
in your squadron formation. By clicking on the individual bombers
(or the dial), you can access the entire 10-man crew for each bomber,
rename them, or generate entirely new crews.
When you have made your choice flip the Continue Switch to enter the
HQ Corridor.
The HQ Corridor
Once you have made all your game selections, you will enter the HQ
Corridor. This is the planning hub of the airbase, which will allow you
access to the following areas:
Bomber Inspection - the windows.
The Bomber Commander’s Office – the furthest door on the left (for the
Bomber Commander only).
The Briefing Room – the nearest door on the left.
The Squadron Commander’s Office – the furthest door on the right (for the
Squadron Commander only).
The Operations Room – the nearest door on the right (for the Squadron
Commander only).
49
Bomber
Commander’s
Office
Briefing Room
Bomber
Inspection
Squadron
Commander’s
Office
Operations Room
Page 50

The Operations Room
The Operations Room will only
be available when you have
chosen to play the Squadron
Commander campaign game.
This is the where all mission
planning takes place; where you
can send out reconnaissance
missions, select strategic
targets, check what S2
(Intelligence) has to say about
them and plan your bombing
route using waypoints to avoid as much flak and enemy fighters as
possible. Here you can also set mission altitude and the type of bombs
to be dropped (for best target effectiveness).
The Map – Planning the Mission
First, let’s have a look at the operations map. This will give you an idea
of the area in which the Squadron will be operating and the number of
strategic targets you currently have information about.
• Left click the map on the Ops room table to open the Operations
Map screen.
Map Controls
You can scroll around the map
by using either the mouse
and/or
the keyboard.
Mouse Control:
• Move around the map by holding down the right mouse button and
moving the mouse.
• Tilt and rotate the map by holding down the Shift key plus the right
mouse button and moving the mouse.
50
Page 51

Numeric Keypad Controls:
Use numeric keypad ‘Ins’ and ‘Del’ to rotate the map horizontally left
and right.
Use numeric keypad 9 and 3 to rotate the map vertically (from 0° to
90° degrees).
Use numeric keypad 4 and 6 to move the map left and right.
Use numeric keypad 8 and 2 to move the map forward and backwards.
Use numeric keypad + and – to Zoom In/Out.
Fine-tune all the above map control movement by holding down CTRL
as you press the keys.
The Map Icons
At the top of the map screen
are a number of icons that will
allow you to assign targets, set
waypoints and reconnaissance
missions. All 3D buildings
shown on the map represent the
targets currently available.
Red Bomb – this will designate the Primary Target for the mission.
Orange Bomb – this will designate a Secondary Target for the mission
(if appropriate).
Yellow Bomb – this will designate a Tertiary Target for the mission
(if appropriate).
Gold Pyramid – this will set the vertical heights of any Waypoint.
Red Arrow – (once a target is assigned) will set a waypoint
horizontal position.
Purple Aircraft – these three icons allow you to set up
Reconnaissance Missions.
The Map Symbols
The map shows standard
features such as:
Urban Areas
Lakes
Rivers
Forests
Minor and Major Roads
Railways
51
Page 52

It is also marked with Allied fighter (White Star) and bomber (Grey-out
Star) Airbases, Luftwaffe airbases (Blue filled circle)
The following is important mission information:
Light Red Circles (or arcs) – areas of light flak concentrations.
Red Circles (or arcs) – areas of medium flak concentrations.
Dark Red Circles (or arcs) – areas of heavy flak concentrations.
Factory Icon – Target location.
Blue Circles (or arcs) – areas that have strong enemy fighter
concentrations.
The map also shows the shifting front line (thick red line) throughout
the years of the campaign.
Setting up a Reconnaissance Mission
Reconnaissance missions will provide you with more accurate
information about a potential target so it’s important (if you are the
Squadron Commander) to request recon missions of the next set of
potential targets before sending the whole squadron on a full mission.
Recon missions will also give you black and white film of the target for
the Mission Briefing (see below).
Note: If you are playing the Bomber Commander recon footage will be
shown to you automatically for the current mission primary target.
• Click on the purple aircraft icon, hold down the left mouse button
and drag it above a potential target. A recon mission will provide
target details for the next mission and if one of those targets is
chosen as the Primary, you will have access to film footage of it in
the Briefing Room.
• Press ESC to exit the Map screen.
Setting up a Bombing Mission
Target Intelligence:
• Study the map and the targets carefully. Check all available details
in the Target Intelligence File (see below), and then decide where
you think your Squadron would be most effective.
• Decide on the Primary Target and choose a Secondary Target close
by (in case the Primary is unavailable or obscured). You could also
set a Tertiary Target (if a third target is also close).
The Primary Target:
• To assign a Primary Target, make sure it is shown on the map, click on
the red bomb at the top of the map screen, hold down the left mouse
button and drag the bomb on to the target icon and release.
52
Page 53

The target will now have a small
red bomb above it and the
suggested mission route will be
clearly shown. The route will be a
blue broken line route from your
airbase, via several waypoints
(red arrows) at appropriate
heights (gold pyramids) to the
Initial Point (the last turn before
the bomb run), the target, the
Rally Point (the first waypoint
and forming up point after the bomb run) and then back home.
The Secondary Target:
To assign a Secondary repeat the above procedure using the orange
bomb icon on your choice of Secondary Target.
Setting Waypoints:
Apart from your home airbase and the assigned targets, you can adjust all
other aspects of waypoints, the initial point and rally point, including
ground location and waypoint/bombing height. Tooltips on the waypoint
gold pyramid markers will indicate the altitude for any particular waypoint.
• To move a waypoint, click on the red arrow, hold down the left
mouse button and drag it to its new position.
• To de-select a target, click on the bomb icon and drag it up away
from the ground until it disappears.
This map is very similar to the Mission Briefing Map and the Navigator’s
map on the B-17 (see Navigation below). Remember that, depending on
what Navigation complexity you are playing (Historical, Easy or Flawless)
you might choose to place waypoints on recognisable geographical
features so that visual sightings can be made by the Navigator to
confirm aircraft position.
When you have finished setting waypoints, press ESC to exit the Map
screen and return to the Operations Room.
Intelligence File – Target Details
Now you’ve decided on the target(s) for the bombing mission, you should
check all intelligence about the target(s).
Note: Intelligence is only provided for targets that have current
reconnaissance information. To add a target to this file, make sure it is
assigned to a reconnaissance flight (see above) and fly your next
mission. When you return, the target will be included for as long as the
information you have remains current. Periodic reconnaissance flights
are needed to keep target information current.
53
Page 54

• Click on the Intelligence File on the right of the desk.
• When the file opens flip through the targets (if appropriate) by clicking
on the right hand page. The page will turn and show the next target.
• Locate your chosen target(s) in the book and check details on:
Flak Strength, Fighter Strength, Strategic Priority and Damage
Already Inflicted.
The Blackboard
If you’ve forgotten which targets you selected in the Map screen,
click away from the File and click on the blackboard at the back of the
Ops Room. This will give you full details. Click away from the blackboard
to get back to the room and continue to study the Target Intelligence File.
Outside – Inspect the Bombers
Before you send your entire squadron on a bombing mission you must
first check the status of each bomber and their crew. It would be
foolish to send out a badly damaged aircraft or one that did not have a
complete crew.
• So in order to check each of your bombers, click on the office
window to get into the jeep to take you on your tour of inspection.
Bomber Clipboard
The clipboard shows your squadron bomber strength.
• Point to one of the bomber names and left click. You will be taken
into the 3D world with the selected bomber on its hardstand.
Use the camera keys to look around the bomber. If this is your first
mission it will have no visible damage.
Now press ESC to go to the jeep bonnet.
• Click on the files to go to read the specific reports.
Each B-17 has the following files associated with it:
54
Page 55

Mechanical File
• Click on the file to open it.
Here you will see bomber details including summaries of essential/
recommended repairs and maintenance. If you click on the right hand
page you will see a form that allows you to order the aircraft to be
scrapped for parts and to replace it with a new aircraft. If the B-17 is in a
bad state of repair you will have to sign it off and ask for a replacement.
You must click on the signature line at the bottom of the page.
• Click on the bonnet to close the file.
Crew Management File
• Click on the file to open the file.
This will give you all details about that bomber’s crew. On the front page
is a summary of crew names and their specific positions (marked as Xs)
with an indication of other specialist crew positions they could be
assigned to successfully.
• Click on the right hand page to turn the page and you will see more
details of the first member of the crew, including ‘morale’ and skill
levels for the key emergency tasks Gunnery, Piloting, Bomb Aiming,
Navigation, First Aid and Technical.
Get to know your crew and understand their strengths and weaknesses;
particularly who would be useful to double up on a crew position and
who is good at Technical or First Aid.
You can also assign a crewmember to Ground Duties (for example,
you might think his morale is too low).
• Click on the Ground Duties box to make the slash into a cross.
A rookie will take his place and he will be shown in the Crew
Replacement File.
• Click on the bonnet to close the file.
Crew Replacement File
• Click on the file cover to open.
This file only contains ex-flight crew that you have put there – rookie
replacements will always be provided to fill in any gaps but will leave
when crew member is recovered.
• Click on the bonnet to close the file.
Next Bomber
When you have finished inspecting the first bomber, click on the
Keys/Hat/Gloves to return to the Clipboard and inspect the other
bombers in the Squadron in the same way.
55
Page 56

• When you have finished inspecting all the B-17s, click away from
the Clipboard to return to the HQ Corridor. From the HQ corridor,
return to the Operations room to continue planning the mission.
Clipboard - Choose Bombers for the Mission
• Click on the left-hand clipboard to assign the 6 aircraft for the
bombing mission. You will see be shown a list of the bombers
available. The other bombers not chosen will have crews who are
being rested or are too badly damaged to take part (after a number
of missions).
• Click on the ‘selected’ column for the B-17s you want to go on that
mission (the slash/symbol will become a cross).
• Click away from the clipboard to return to the Ops Room.
Ordnance - Select Munitions for the Mission
Now you’ll need to select the type of bombs to drop on the
selected target(s).
• Click on the Ordnance File (the book in the middle of the desk) to
open the Mission Ordnance Selection.
This will determine what type of bomb load the B-17s will be carrying
on this mission. Most of the targets can be hit with General Purpose
Bombs but some will need Incendiary, Armour Piercing or
Anti-Personnel ordnance.
General Purpose bombs are the most commonly carried ordnance on 8th
Airforce missions. Also known as “Demolition” bombs, they are used to
break open multi-storey buildings and destroy other structures. GP bombs
come in a variety of sizes – in general harder targets require larger bombs.
As a target becomes more armoured, General Purpose bombs achieve less
and less, soon the size of bomb required to damage a target becomes
prohibitive. This is when Armour Piercing and Semi-Armour Piercing
bombs come into play. Both these types of bombs devote more of their
weight to heavy casing, sacrificing explosive charge for the ability to
penetrate far more steel and concrete.
Armour Piercing bombs should be saved for heavily armoured targets,
such as Submarine Pens or the largest factories. Much of their
explosive weight has been converted to steel penetrator, so although
they inflict massive damage to armoured targets, they have little
explosive radius in relation to their overall weight.
Semi-Armour Piercing bombs represent a halfway house. Roughly between
General Purpose and Armour Piercing, they represent a good compromise
solution if, for example, your Primary target is armoured, but your
secondary target is not, and you wish to hedge your bets.
56
Page 57

As well as the explosive bombs, there are other types that the 8th
Airforce uses to good effect in its campaigns. Incendiary bombs are
especially useful in areas such as Oil Refineries or Factories, where
flammable objects can burn for many hours after a raid. Anti Personnel
cluster bombs are especially useful against airbases and troop
concentrations, where they cause casualties amongst vital personnel
and can hinder the clean up process.
• Click away from the file to return to the Ops Room
Blackboard – View Mission Summary
Finally, before you leave the Ops Room check the Blackboard on the back
wall of the Ops Room to remind yourself of the basic mission details.
• Click away from the blackboard to return to the Ops Room.
• Click on the left hand door to return to the HQ Corridor.
The Squadron Commander’s Office
(The furthest door on the right.)
If you have chosen to play the Squadron Commander campaign game,
this is where you come to for complete information about your bomber
squadron. All information is contained in files arranged on the desk or
on the bookshelves.
In-tray ‘Read New Mail’
The ‘in-tray’ is where you will read all new mail that relates to the latest
mission flown by your bombers and crew.
• Click on the sheets of paper to view details of missions flown,
enemy aircraft ‘kills’, mechanical status, targets, bomb damage
inflicted, aircraft shot down, injuries incurred and medals awarded.
Out-tray ‘Read Old Mail’
• Click on the ‘out-tray’ to examine old mail about previously
completed missions.
Crew Information File
• Click the book on the left to see a complete dossier of all crews in the
Squadron. Different bombers are ‘tabbed’ along the edge of the file.
• Click on a tab to open at the marked point.
• Click away to shut the book.
Bomber Information File
• Click the book in the middle to open the bomber dossier for all B-17s
in the Squadron. Bombers are ‘tabbed’ along the edge of the file.
• Click on a tab to open at the marked point.
• Click away to shut the book.
57
Page 58

Medical File
The Medical File (on the right of the desk) shows the list of personnel
wounded in action and details of when they can return to the aircraft or
be given a possible discharge. When a crew member is fully recovered
from being wounded in action, he will be moved from this file and be
made available for air duties.
• Click away to shut the book.
Inspect the Bombers (Window)
Click on the window to carry out a full inspection of all your bombers.
Details are similar to the Inspect Bombers section from the Operations
Room (above).
• Click on the left hand door to return to the HQ Corridor.
The Bomber Commander’s Office
If you have selected the Bomber Commander Campaign game, you will
have access to the Bomber Commander’s Office (the furthest door on the
left). Remember, you will not be able to go to the Operations Room or
the Squadron Commander’s Office - you do not have a high enough rank.
This office is where you keep all information about your specific
bomber, your crew, read any mail (old and new) and where you can go
to inspect your B-17. It deals specifically with your bomber but in most
other respects is similar to the Squadron Commander’s Office.
In-tray ‘Read New Mail’
The in-tray is the place where you read your new mail that’s relevant to
the latest mission flown by your bomber and crew.
• Click on the top sheet to flick through details of missions flown,
enemy aircraft ‘kills’, mechanical status, targets, bomb damage
inflicted, aircraft shot down, injuries incurred and medals awarded
(if applicable).
Out-tray ‘Read Old Mail’
• Click on the out-tray to read details of previously completed missions.
Crew Information File
• Click to open complete personnel dossiers for all members of your
crew. Crew positions are ‘tabbed’ along the edge of the file.
Inspect the B-17
• Click on your office window to take the jeep to inspect your bomber
and access the Bomber Crew Management Files where you can
assign personnel in correct or different positions.
• Click the Keys/Hat/Gloves on the jeep bonnet to exit the screen and
return to the HQ Corridor.
58
Page 59

The Mission Briefing Room
When all preparations have been made (and whether you are playing
Squadron or Bomber Commander) you will have to go to the Mission
Briefing Room. This is where all the details of the mission are revealed
to the crews and all the formalities are completed before a mission
is undertaken.
• Click on the nearest door on the left of the HQ Corridor to enter the
Mission Briefing Room.
View Route Map
Click on the Map on the right of the stage to look at the route to and from
the targets. If you are not playing the Squadron Commander this will be
the first time that you will see details of the mission. The controls are the
same as those in the Operations Room. Press ESC to return to the
Mission Briefing Room.
View Reconnaissance Film
Click on the Movie Screen at the centre of the stage to view any
reconnaissance film of the target gathered by your Intelligence Section
and pay particular attention if you are planning to ‘act’ as bombardier.
This will show you what the target looks like from the air.
Reconnaissance film will be shown only for the highest priority target
that has current reconnaissance information. If the Primary target has
no reconnaissance then the Secondary target will be shown. If the
Secondary target has none, then the Tertiary target will be shown. If no
targets have reconnaissance information, then no film will be shown.
In a Bomber Commander campaign, Group HQ will ensure you ALWAYS
have reconnaissance information for your Primary target.
59
Film
Reconnaissance
View Map
Begin the
Mission
Page 60

Read Mission Briefing
At the desk in front of you is the Mission Briefing File. Click on the cover
to open it. This gives you a full written Mission Summary including:
Date of Mission
Primary Target Details
Secondary Target Details
Ordnance Selected
Distance to Farthest Target
Fighter Escort
• Click the page to turn over.
On the final page of the summary you must sign that you have read and
understood the briefing.
• Click on the line to sign, then click away from the file and you will
return to the Briefing Room.
Beginning the Mission
Now all preparations are completed you’re ready to get set off on your
mission. Click on the door on the far right of the room to leave the
Briefing and be taken to the aircraft to start the mission.
Inside the Aircraft
Your Mission Responsibilities
The Squadron Commander
Taking the role of the Squadron Commander in the simulation is the
ultimate test of your abilities, not only to command but also to set in place
operations and missions that will have a positive effect on the war effort.
It’s not just one crew and one bomber you are nurturing but the whole
squadron. But all this doesn’t mean you can’t fly the complete mission as
the tail gunner (if you so wish) and let the computer control the rest.
In short, you must fly the same mission as the Bomber Commander,
but also bear the responsibility for 5 other aircraft and 50 other aircrew –
in addition to having planned the whole show in the first place!
The Bomber Commander
In the Bomber Commander game, you are in charge of a B-17 with all the
duties and responsibilities that come with a ten-man bomber crew.
You are responsible for the aircraft and the crew, their safety and
efficiency, not just when you are flying a mission but at all times.
Your crew is made up of specialists: Pilot, Co-Pilot, Navigator,
Bombardier, Engineer, Radio Operator and four Gunners. Each must play
a part in an effective combat team who reflect your ability as commander.
60
Page 61

You must get to know members of your crew, their character, capabilities
and shortcomings. Take an interest in their problems, ambitions, and need
for extra training. Be aware of their morale. Your crew should be trained to
work as a team. Get to know each one’s duties and any difficulties
experienced. To succeed, you must have a thorough knowledge of each job
and the likely problems that will be encountered.
Starting Off
Once you have left the Mission Briefing room, you will begin all campaign
missions with all your crew inside the bomber in their assigned positions
ready for take off. You will see your B-17 (or lead B-17) in external view
positioned at its dispersal point awaiting orders. If you are playing
Squadron Commander the game will centre on an outside view of the lead
bomber in the squadron or, if you are playing the Bomber Commander
game, it will centre on ‘your’ B-17 – the lead bomber.
The Crew
Let’s take a tour of the B-17 crew positions and compartments.
• Press F1 to move from exterior view to the B-17 interior view.
You will begin in the Pilot’s compartment view looking at the Pilot and
Co-Pilot.
There are several different ways to select your crew and their specific
views. On most internal screens you will be able to access the following:
Crew Portrait Panel (pop up menu)
Hover the mouse pointer at the
top of the screen and the Crew
Portrait Panel will pop up. This
shows the portraits of the ten
crew positioned in the B-17. If
you hover the mouse pointer over
a picture you will see a name.
• Click on a portrait to select and jump to that crewman.
61
Page 62

Crew Position Panel (pop-up menu)
This is another pop-up menu but
this time it accesses the B-17
station not the man but if the
position is not filled (for example,
there’s no one manning the
Cheek Gun) you will not be able
to access it. Note: Positions filled
by wounded crewmen will also
vanish from this panel – making
it an excellent way to judge the gaps in your gun coverage.
• Hover the mouse pointer to the left of the screen and the Crew
Position Panel will appear showing icons of all ten jobs on board.
• Click on one of these jobs to jump to the action view for this crew
position. This is very useful if you want to jump to different action
stations quickly (for example in air combat).
Note: These positions (plus an eleventh Cheek Gun action position) are
also accessible from the keyboard keys:
`. Bombardier; 1. Navigation; 2. Cheek Gun; 3. Pilot; 4. Co-Pilot;
5. Top Turret Gun/Engineer; 6. Radio Operator; 7. Left Waist Gun;
8. Right Waist Gun; 9. Ball Turret Gun; 10. Tail Gun.
Crew Views Panel (pop-up menu)
All crew positions in B-17 have a number of different ‘views’ available.
These are accessible through the Crew Views pop-up menu and keyboard
shortcuts. If there are two or more crew shown in the compartment,
the views will refer to the selected crew member (highlighted by a
white border).
• Hover the mouse pointer on the extreme right side of the screen
(about mid-screen) and a panel of icons will pop-up that allow you
to access those views for a specific crewmember.
Note: Some crew will not have all of these views available to them.
62
Sight
Dial
Window
Crew
Aircraft
Page 63

The Aircraft Icon – External View (key F2)
By clicking on the top icon (or pressing key F2) you will jump to the
external view of the aircraft and be able to access all the 3D camera
controls (see Reference Card). Press F1 to return to the internal
crew position.
The Crew Icon – Compartment View (key C)
Clicking on the crew icon (or pressing key C) will show the Compartment
View. This is a general view of the section of the B-17 that your selected
crewman is located in. There may be another crewman shown but the
one selected will be highlighted with a white border.
The Sight Icon – Action View (key A)
By clicking on the sight icon you will enter the Action View for that
crewman. For example, for the pilot this will be looking through the front
windshield; for the Gunners it will be the sight/machine gun view etc.
The Dial Icon – Instrument View (key I)
This will show any ‘instrument’ view and will vary depending on the
crewman selected. For example, the Bombardier will have a general
view of his Norden bombsight with adjustable dials. Note:
Additional
Instrument Views also exist for some crew that can be accessed by
pressing the spacebar.
Window Icon – Window View (key W)
This shows a view of the external world seen by the crewman through
the nearest window.
The Pilot and Co-Pilot
The Pilot and Co-Pilot must be able to take off and land equally well.
They are the senior officers on board and are also responsible for flying
the aircraft. The B-17 is a big plane, more than any one Pilot can
handle, you must make sure the Pilot and Co-Pilot do an equal share of
flying, take-offs, landings, and instrument work. Do not allow one pilot
to increase in skill to the detriment of the other. That pilot may get
injured or be re-assigned to another position and you may have to rely
on the skills of an inferior pilot to get the plane safely back to base.
This is how the Pilot/Co-Pilot can make effective use of their specific
Crew views:
Aircraft Icon – External View (key F2)
The external aircraft view allows you to look around your bomber.
When you jump to external view you need not fly the aircraft - it will be
controlled by the AI in Computer Mode, but by pressing key M you will
toggle Manual Mode, effectively allowing you to fly the aircraft from the
outside view. This view is also important when taxiing from the
dispersal point to the runway because the pilot’s normal view (Action
View) on the ground is extremely limited (as in the real thing!).
63
Page 64

Crew Icon – Compartment View (key C)
This is the general compartment view and allows you to select whether
you want to control the Pilot (left seat) or the Co-Pilot (right seat).
Click once on the figure you want to select with the left mouse button
(or press the relevant crew key 3 or 4) and he will be highlighted.
All further actions will then concern only the selected crew member.
This view also allows you to carry out full crew management, for instance,
if the Pilot is injured and you want him to change places with the Co-Pilot
(or any other crew member who can fly the aircraft), right click on the
figure and you will open the main crew management device, the Icon
Rose. The compartment view will also show any damage inflicted on that
part of the aircraft.
The Icon Rose
By clicking on any of the
position icons shown (in the
circle) you can make the Pilot/
Co-Pilot exchange positions with
any other crewman.
In the centre of the menu you
can left click on a number of
other icons that allow the Pilot/
Co-Pilot to perform other
functions: Use Item, First Aid,
Repair, Fire Extinguish, or Bale
Out.
Sight Icon – Action View (key A)
The Pilot’s and Co-Pilot’s Action
View is the view they have out
the front of the aircraft. They
can see out of their own side of
the windshield but can also look
left and right using Camera
keys. The flight instrument/dials
panel is not seen from this view.
Dial Icon – Instrument View (key I)
The Pilot’s and Co-Pilot’s Instrument View shows the complete Pilot’s
instrument panel with fully working dials and switches (enabling you to fly
the aircraft manually if you want to). Note: The plane is flown jointly by the
Pilot and Co-Pilot and the instruments in front of each are different.
64
Page 65

So, for example, you may be the Pilot but you will need to ‘become’ the
Co-Pilot to fire up the engines because they are on the Co-Pilot’s side.
Once in Instrument View the following additional instrument views
come into play:
F4 – Pilot’s Instrument View (general).
F5 – Co-Pilot’s Instrument View (general).
F6 – Close Up Engine Instruments.
F7 – Close Up Pilot’s Directional Instruments.
F8 – Close Up Pilot’s Fuel and Electrics Instruments.
F9 – Close Up Co-Pilot’s Engine Start Up and Cooling Instruments.
Window Icon – Window View (key W)
The Pilot/Co-Pilot do not have a separate Window View (see Action
View above).
From within the aircraft the Pilot can be accessed with key 3 and the
Co-Pilot by pressing key 4.
The Navigator
The Navigator must direct your airplane from take off to the target and
back again. He must know the precise position of the airplane at every
moment that it is in the air. Even though his work requires accuracy and
concentration he must be able to use the .50 calibre cheek-mounted
machine gun sited close to his station, and must be familiar with
bomber systems and learn how to operate turrets and radio equipment.
Aircraft Icon – External View (key F2)
Jump to the external aircraft view. Press key F1 to return.
Crew Icon – Compartment View (key C)
Shows the nose compartment view of the Navigator (left) and Bombardier
(right). Click once on either figure to select. Like all compartment views
this allows you to perform various tasks by right clicking on the figure and
accessing the crew management icons.
65
Page 66

Note: This compartment has two additional positions available: Chin Turret
Gunner (usually controlled by the Bombardier) and a Cheek Gun (usually
controlled by the Navigator).
Sight Icon – Action View (key A)
The Navigator’s Action View accesses the Drift Meter that must be used
to calculate wind drift. In the Action View you will be looking through
the meter. You must try to align the dotted scale lines (using joystick left
and right) so that a fixed ground point will travel along one of them for a
period of time. Then you can read off the wind drift value (in degrees)
from the scale to the right. You can use the drift scale value as the
initial wind drift value in the bombsight.
Note: When in computer control, the Navigator will set the wind drift as
best he can. If you correct the drift scale for the Navigator you will be
helping to improve the navigator’s skills for future missions.
Dial Icon – Instrument View (key I)
The Navigator’s Instrument View shows the Radio Compass dial,
the Navigator’s Map and the Drift Meter.
The Radio Compass has a needle that shows the compass heading of
the aircraft:
0/360 = North; 90 = East; 180 = South; 270 = West.
On his table is the Navigator’s map. This is accessible by clicking on it
and is controlled in much the same way as the as Mission Planning and
Mission Briefing maps. You can also select this map by pressing the
Spacebar from the Navigator’s Instruments view, as with every other
alternate instrument view.
The Navigator’s Map
All controls and icons are the same as the Operation Room map but
with the addition of a third type of target bomb icon (a green one).
This allows the setting up of ‘opportunity targets’ in the event of
Primary, Secondary and Tertiary targets being unavailable.
• Click on the bomb icon and drag it over a suitable target on the map.
A course will be plotted to the target, and waypoints set up for the
bomb run.
The map is obviously a very important tool for you to use – it’s where
you get your information of where you are and how you are progressing
on the mission. It also details areas of flak concentration and areas of
fighter concentration.
Unless you select Flawless navigation, you will have to concentrate to
keep the aircraft on track to and from the target. This means looking at
the terrain and checking where you think you are on the map (for more
information check out the Navigation School section).
66
Page 67

Window Icon – Window View (key W)
The Navigator’s Window view is a simple view of the 3D world looking
out over the port engines (1, 2).
The Bombardier
The ultimate aim of any mission is effective and accurate bombing of a
strategic target. Mission success depends on the Bombardier and what
he achieves in a short space of time over the target. When he takes over
control of the aircraft on the bombing run he is the ‘commander’ and
remains so until he signals ‘bombs away’. The Bombardier must
understand his bombsight, all his bombing equipment and instruments,
and must be thoroughly trained in target identification.
During a bomb run the Bombardier looks through a sighting telescope to
locate the target. The bombardier inputs bomb load and altitude data,
then sets the telescope sight over the target. The base of the sight is gyrostabilised and, by keeping the telescope on the target, aircraft movement
information is fed into the sighting computer. The computer produces
course correction signals that are channelled into the pilot’s panel.
When the bomber is close to the target, the sight telescope is almost
vertical and the computer calculates that the release angle has been
reached, a series of electronic contacts are closed and the drop bombs
signal lights automatically. When the angle is exactly right, the bombs will
be dropped automatically. The Norden bombsight channels data directly
into the autopilot and the bomb aimer effectively flies the plane by fine
adjustment of the sighting telescope. The main disadvantage of this sight
is that it needs at least 20 seconds of non-deviational flight and loses
accuracy if fire and smoke obscure the target.
Aircraft Icon – External View (F2 key)
Jump to the external aircraft view. Press key F1 to return.
Crew Icon – Compartment View (key C)
The Bombardier’s Compartment View is the same as the Navigator’s
(see above).
Sight Icon – Action View (key A)
The Bombardier’s Action View is that of the Norden sighting telescope,
search/release indicators and scales (for details see the section on
Bombardier School). It’s from this view that the search for target, finetuning flying and bomb release is controlled.
Dial Icon – Instrument View (key I)
This is a view of the complete Norden bombsight allowing you to input
the wind drift details (from the Navigator) and the mission altitude.
67
Page 68

Bombing Panel (Spacebar)
The Instrument View has an additional screen that shows the Bombing
Panel accessed by pressing the Spacebar. The Bombing Panel gives you
full control over the bomb bay doors, bomb arming, auto pilot and the
way the bombs are released (trail or salvo). Press the Spacebar again to
return to Instrument View.
Window Icon – Window View (key W)
The Bombardier has a clear view from the front of the aircraft through
the plexi-glass dome.
Note: Cheek Gun and the Chin Turret – In the nose section there are also
two extra (and key) gun positions. The Cheek gun is to the right side of
the nose and is usually operated by the Navigator (where appropriate)
and the Chin Turret sits under the plexiglass nose and is usually
operated by the Bombardier (where appropriate).
The Engineer/Top Turret Gunner
Located just behind the flight deck in front of the Bomb Bay is the
Engineer/Top Turret station. A good combat Engineer knows his aircraft,
engines and armaments like the back of his hand. He is responsible for
all equipment and therefore the lives of all the crew flying in the
airplane. The Engineer also can regulate the flow of fuel between the
four engines (for example, if one engine seizes up he can direct fuel to
the other engines). He must also be an outstanding gunner.
Aircraft Icon – External View (key F2)
Jump to the external aircraft view. Press key F1 to return.
Crew Icon – Compartment View (key C)
The Engineer is only partially visible in the top left of the screen
(it’s easier to see when he’s highlighted in this view). The Engineer’s
compartment view also allows a view of the bombs and if you’re watching
from here when they’re dropped you’ll see them drop off their mountings.
Sight Icon – Action View (key A)
Selecting the Engineer’s/Top Turret Action View will access full control of
the Top Turret twin machine guns. Click key M to take manual control,
traverse left right up down using your controller option (joystick
recommended) and fire using your primary button.
Dial Icon – Instrument View (key I)
Selecting the Instrument View will access a screen showing the ammo
boxes. Hover your mouse pointer over the boxes to see how much
ammo remains.
68
Page 69

Fuel Control Panel (Spacebar)
The Instrument View has an
additional screen accessed by
pressing the Spacebar.
This allows the Engineer to
move fuel from engine tank to
engine tank by clicking on the
red levers (starboard engine 1,
2) and (port engines 1, 2) to
select and the control switch to
carry out the transfer.
Note: You can only see the effects of the transfer in the Co-Pilot’s close
up Instrument View (key F8).
• Press Spacebar again to return to Instrument View.
Window Icon – Window View (key W)
The Engineer has no Window View.
The Radio Operator
The Radio Operator must know everything about his radio equipment.
He must provide position reports, upkeep the tuning of the radio sets
and maintain a comprehensive log of Messages Outward and Inward.
He is the source of all orders transmitted to the crew. It’s also advisable
for him to gain experience of guns and turrets.
Aircraft Icon – External View (key F3)
Jump to the external aircraft view.
Crew Icon – Compartment View (key C)
A view of the Radio Compartment showing the Radio Operator at work
Sight Icon – Action View (key A)
A view through the Radio Operator’s window located on the left side of
the aircraft
Dial Icon – Instrument View (key I)
A view of the radio set plus the Outgoing Messages log and the Mission
Messages log.
• Click on the book covers to open the logs. When in manual mode
(key M) click on the message to implement it and it will disappear.
Window Icon – Window View (key W)
The Radio Operator has no Window view.
69
Page 70

The Gunners (Ball Turret, Left & Right Waist and Tail)
The B-17 is designed to be a defensive gun platform. The way your
Gunners perform establishes the effectiveness of the Flying Fortress.
All Gunners must understand the ‘zones’ covered by their guns and be
able to bring the armaments to bear quickly and accurately. Gunners
should be experts in aircraft identification and familiar with the operation
of their machine guns. They must be able to use sights correctly and to
fire accurately from all the other gun positions on the aircraft.
Aircraft Icon – External View (key F2)
Jump to the external aircraft view.
Crew Icon – Compartment View (key C)
The Waist and Ball Turret
gunners share a Compartment
view looking towards the front
of the aircraft. The Left Waist
gunner is on the left, the Right
Waist gunner on the right; the
Ball Turret gunner is tucked in
on the floor between the two
(inside his Sperry turret).
As well as the standard Icon Rose orders system (Move To, First Aid,
Fire Extinguish etc.) Gunners also have an Unjam Guns icon option
when a gun is jammed.
The Tail Gunner has his own Compartment View.
Sight Icon – Action View (key A)
Action View will access full control of the machine gun or guns.
Press key M to take manual control of the guns; aim, move and fire
using your controller option.
Dial Icon – Instrument View (key I)
Selecting the Instrument View will access the Ammo screen. Leave the
mouse pointer over the ammo box and a pop-up message will show how
many rounds of ammo remain in the boxes.
Window Icon – Window View (key W)
Gunners do not have a separate window view.
70
Page 71

Compartment Selection (pop-up menu)
When you are in any
Compartment view (see above)
you can easily jump to any of
the other six B-17
compartment views.
• Hover the mouse pointer at the bottom of the screen.
This will open the Compartment Selection pop-up menu showing an
outline of the aircraft divided up into the six different compartments.
• Click on the section you want, a red indicator light will confirm your
selection and you will jump to that Compartment view. Click on a
figure to select.
71
Page 72

72
Page 73

Section Four: The Training
Schools
Page 74

The Training Schools are here to give you detailed instruction on
performing the basic functions for each of the ten man crew positions
manually. Remember that, if you wish to let the AI control these
functions the mission will still be carried out but it may not be as
successful without your input. Or, if the realism settings are too high
you may never get to the target!
An Introduction to the Basics of Flight
The Forces
The only way to really be in control of your aircraft is to understand the
forces acting on it and the way that the control surfaces manipulate those
forces. There are five basic physical forces that are important to you when
flying an aircraft that you must understand in order to be in full command
of your aircraft.
Gravity
Your airplane and everything in it are attracted to the surface of the
Earth. The more weight (or mass) on your craft, the greater the attraction.
If there were no other forces acting on your aircraft it would simply stay
on the ground.
Lift
This is what keeps your aircraft in the air. The design of the wings uses a
side effect of the law of conservation of energy. The shape of the wing
makes the air move faster going over the top of the wing than it does going
under the wing. Faster moving air has a lower pressure than the slower air
and the difference in pressure between the bottom surface and the top
surface of the wing lifts it up. When the lift force on both wings is high
enough, the aircraft is held up in the air. In combination with Thrust this
makes the aircraft fly. The amount of lift produced is governed by the
angle at which the wings meet the airflow (known as the ‘angle of attack’).
Thrust
Thrust provided by the engine (jet or propeller) pushes the air backwards
which, through an equal and opposite reaction, provides forward motion
on the entire aircraft. The jet engine provides much more thrust than the
propeller because the air is taken in through the front intake and the
oxygen is burned with fuel creating an exhaust which leaves the engine
at great speed.
Drag
Drag is the resistance that the air puts up to anything that is travelling
through it. Without thrust a moving aircraft will slow down and stop
because of the drag of the air around it.
74
Page 75

Torque
In prop driven aircraft the engine rotates in only one direction.
This coincides with the roll axis of the plane, so as the engine turns it
transfers some of the torque to the body of the aircraft making the
plane try to rotate in the opposite direction as the engine (usually
counter-clockwise) making the left wing drop. At low speeds and during
landings the pilot must counter this force or it could prove very
dangerous. Note: The P-38 has two props which counter rotate
(they rotate in different directions) cancelling out each others torque.
The Three Axes
Although an aircraft can move in an unlimited number of directions,
there are three axes of motion that you can control.
Roll
Roll is the rotation of the aircraft around its length (tipping the aircraft
left or right).
Pitch
Pitch is the rotation of the aircraft around the line of its wings (tilting
the nose up or down).
Yaw
Yaw is the rotation of the aircraft around its middle (so if you were
looking from above the nose would move left/right and the tail right/left).
The Control Surfaces
You control the movement of your plane by manipulating the basic forces
(see above).
Thrust
is provided by the engine and you can control its
level by slowing it down or speeding it up.
Gravity
always pulls at the aircraft and you cannot affect this.
Drag
and
Lift
however, do not affect all parts of the aircraft equally and
this permits the introduction of ‘control surfaces’ that enable you to
control those two forces’ effect on the plane.
Elevators
These are vertically tilting sections of the horizontal part of the tail.
Through Drag they affect the pitch of the plane and the pilot controls
them with the forward/back movement of the stick (or column). If you
push the stick forward the elevators drop down creating an imbalance in
the Drag the nose tilts down and this makes the plane dive (lessening
the angle of attack). If you pull the stick back, the elevators go up and
have the affect of tilting the nose up making the plane climb (increasing
the angle of attack).
75
Page 76

Ailerons
These are located on the wings and act in the same way as the elevators.
Moving the stick/column to either side makes one aileron go up and the
other go down which means one wing gains extra lift (rises) and the other
gets more Drag (drops). The aircraft will roll as it banks in the direction
you moved the stick.
Flaps
Flaps are located in the backs of the wings. They can be extended or
retracted and are particularly useful when landing.
‘
Flaps down’ means extending the flaps resulting in extra lift (the plane
rises), increased drag (the plane slows down). Generally this lowers the
speed at which the aircraft will stall, so on landing you can approach
more slowly or dive to a landing more steeply (because you are moving
at a slower speed).
‘
Flaps up’ means retracting the flaps making the plane faster but losing
some lift (the plane will drop a little.
‘
Partial flaps’ are sometimes used on take off to provide extra lift.
Rudder
The rudder is located in the back of the vertical part of the tail and
through its action on drag affects the yaw of the aircraft. When the rudder
is moved left/right, the nose ‘yaws’ left/right. The rudder is used to smooth
out turns, lining up an accurate position for firing (in a fighter) and landing
or recovering from a spin.
Wings
Your aircraft wings can also be used indirectly as control surfaces to
manipulate lift. Use the elevators to increase the plane’sangle of attack
and the airflow over the wings changes giving more lift (up to a point)
as long as airspeed is high enough. Beware that too big an AoA without
a corresponding increase in airspeed will create turbulence, stall and
spin. Similarly, reducing the AoA creates less lift.
Inertia
If your aircraft is sitting still it wants to stay that way, resisting a
change to its state of motion. If it is moving in a particular direction at
a particular speed, it ‘wants’ to retain that speed and heading.
In flight, inertia tends to make manoeuvres more difficult at higher
speeds. The faster your plane is moving, the more inertia it has in the
direction of movement and so the engine and control surfaces have to
do more work to get the plane to change direction.
76
Page 77

G forces are the most obvious problem caused by inertia. G is the
acceleration due to gravity (any acceleration experienced by the plane
and pilot). When you change direction you are subject to G’s, inertia
tries to keep you moving in your original direction. Side turns cause
transverse G’s pushing you sideways in the opposite direction;
downward turns cause negative G’s making you feel lighter; upward
turns cause positive G’s pushing you into your seat. Note: Positive G’s
can cause blackouts and negative G’s can cause redouts.
Level Flight
Level flight is achieved when all the forces are in balance and the aircraft
moves at a constant speed without changing altitude. Pilots make level
flight easier by setting the trim of the aircraft (this is akin to calibrating a
joystick). By trimming you calibrate the elevators to compensate for lift
and the ailerons and rudder to compensate for roll.
Level Climb and Level Descent
To gain or lose altitude without changing the pitch of the aircraft is done
by changing the amount of lift generated by the wings. So to begin a level
climb, increase the throttle. Speed will increase and add more lift making
the aircraft climb gradually. To lose altitude (without diving and gaining
speed), simply cut back on the throttle, reducing speed and creating less
lift making the plane descend gradually. Do not fly at full throttle all the
time, you will use up fuel and overheat your engines. Keep to cruising
speed until you need to go into combat.
Climbs and Dives
To climb, pull back on the stick, the farther you pull, the steeper the
climb you get although this depends on the capabilities of your aircraft
and your airspeed. The most efficient full throttle angle of climb is about
20 degrees above the horizon.
To dive, push forward on the stick, the farther you push, the steeper the
dive will be (and the faster your airspeed gain).
Banking
To carry out a simple turn, push the stick to either side and the aircraft
will roll in that direction redirecting the wings’ lift, making the plane bank
to that side and turn in that direction. By pulling back on the stick you
can tighten the turn you are making but you will also lose speed as you
turn (nose dips and altitude drops). You must add throttle and pull back
on the stick.
77
Page 78

FLYING SCHOOL (PILOT AND CO-PILOT)
Note: You can fly/control the aircraft with a combination of keyboard,
mouse and joystick. Most of the flight deck controls are fully functioning
and can be clicked, dragged, switched on and operated like the real
thing. You can also reconfigure most controls for both controllers in the
Controls section of the Player Options Menu (see earlier).
Control Keys
Flight Controls Key(s)
Pitch (Nose Up) .
Pitch (Nose Down) ;
Roll (Bank Left) Z
Roll (Bank Right) X
Yaw (Rudder Left) B
Yaw (Rudder Right) N
Flaps Up F
Flaps Down SHIFT + F
Steering/Brake Controls
Left Steering Brake B
Right Steering Brake N
Parking Brake On P
Parking Brake Off SHIFT + P
Wheel Brakes On INSERT
Wheel Brakes Off DELETE
Tailwheel Lock On T
Tailwheel Lock Off SHIFT + T
Landing Gear Controls
Landing Gear (All) Raise Up Arrow
Landing Gear (All) Lower SHIFT + Up Arrow
Landing Gear (Left Main) Raise Left Arrow
Landing Gear (Left Main) Lower SHIFT + Left Arrow
Landing Gear (Right Main) Raise Right Arrow
Landing Gear (Right Main) Lower SHIFT + Right Arrow
Landing Gear (Tail/Nose) Raise Down Arrow
Landing Gear (Tail/Nose) Lower SHIFT + Down Arrow
In-Flight Trim Controls
Trim Positive Elevator – Fine CTRL + END
Trim Negative Elevator – Fine CTRL + HOME
Trim Left Aileron – Fine CTRL + DELETE
Trim Right Aileron – Fine CTRL + PAGE DOWN
Trim Left Rudder – Fine CTRL + INSERT
78
Page 79

Trim Right Rudder – Fine CTRL + PAGE UP
Trim Positive Elevator – Coarse SHIFT + END
Trim Negative Elevator – Coarse SHIFT + HOME
Trim Left Aileron – Coarse SHIFT + DELETE
Trim Right Aileron – Coarse SHIFT + PAGE DOWN
Trim Left Rudder – Coarse SHIFT + INSERT
Trim Right Rudder – Coarse SHIFT + PAGE UP
Trim – Neutral CTRL + Backspace
Engine Controls
Select Engine 1 Q
Select Engine 2 W
Select Engine 3 E
Select Engine 4 R
Start Engine A (or Engine key + A)
Stop Engine S (or Engine key + S)
Feather Engine D (or Engine key + D)
Engine 1 Throttle (Up/Down) No Default
Engine 2 Throttle (Up/Down) No Default
Engine 3 Throttle (Up/Down) No Default
Engine 4 Throttle (Up/Down) No Default
Port Engines Throttles (Up/Down) No Default
Starboard Engines Throttles (Up/Down) No Default
Throttle Step Up = (or Engine key + =)
Throttle Step Down - (or Engine key + -)
Throttle Step Up – Fine CTRL + =
Throttle Step Down – Fine CTRL + Throttle Maximum SHIFT + =
Throttle Minimum SHIFT + Lock Out AI Engine Control L (or Engine key + L)
War Emergency Power (WEP) Enable K (or Engine key + K)
Engine Fire Extinguisher J (or Engine key + J)
Game Controls
Computer/Manual Control (Toggle) M
Accelerate Time 2x, 4x, 8x (Cycle Through) Home
Decelerate Time 2x, 4x, 8x (Cycle Through) End
Pause (Toggle) Pause
Time Skip Return
Mini-Time Skip CTRL + Return
Jump to Next Plane (in sequence) ]
Jump to Previous Plane (in sequence) [
Jump to Own B-17 Backspace
79
Page 80

B-17 Controls
Pilot Helper (Toggle) H
Switch to Action SHIFT + H
Start Mission CTRL + B
Instruments View I
Action View A
Window (Miscellaneous) View W
Compartment View C
Bombardier’s station (if occupied) `
Navigator’s station (if occupied) 1
Cheek Gunner’s station (if occupied) 2
Pilot’s station (if occupied) 3
Co-Pilot’s station (if occupied) 4
Top Turret Gunner’s station. (if occupied) 5
Radio Operator’s station (if occupied) 6
Ball Turret Gunner (if occupied) 7
Left Waist Gunner (if occupied) 8
Right Waist Gunner (if occupied) 9
Tail Gunners Station (if occupied) 0
Any Alternative View Spacebar
Flight Instruments
Pilot Instruments
(Pilot/Co-Pilot Instrument View) F4
Co-Pilot Instruments
(Pilot/Co-Pilot Instrument View) F5
Engine Instruments Zoom
(Pilot/Co-Pilot Instrument View) F6
Directional Instruments Zoom
(Pilot/Co-Pilot Instrument View) F7
Fuel & Electrics Instruments Zoom
(Pilot/Co-Pilot Instrument View) F8
Startup & Cooling Instruments Zoom
(Pilot/Co-Pilot Instrument View) F9
Bombsight Controls
Bombsight Fine Correction Adjuster B
Bombsight Search/Track Mode SHIFT + K
Bombsight Rate Correction Adjuster N
Weapon Controls
Machine Guns ’
Cannons ’
Eject Drop Tanks CTRL + D
80
Page 81

Padlock Targeting Controls
Padlock Nearest Enemy Y
Padlock Nearest B-17 CTRL + Y
Padlock Nearest Airfield SHIFT + Y
Padlock Target Nearest Centre of View U
Clear/Restore Padlock View SHIFT + U
Cockpit Views
Instrument Snap CTRL + I
Snap View (Toggle) CTRL + P
Other Views
Internal View F1
External View F2
Chase View Spacebar
(from External view)
Bomb Release and Target View F6
Camera Controls
Zoom In (Coarse) Numpad +
Zoom Out (Coarse) Numpad Zoom In (Fine) CTRL + Numpad +
Zoom Out (Fine) CTRL + Numpad Reset Camera Numpad 5
Camera Up (Coarse) Numpad 7
Camera Down (Coarse) Numpad 1
Camera Left (Coarse) Numpad 4
Camera Right (Coarse) Numpad 6
Camera Forward (Coarse) Numpad 8
Camera Backward (Coarse) Numpad 2
Camera Pan Left (Coarse) Numpad 0
Camera Pan Right (Coarse) Numpad .
Camera Pan Up (Coarse) Numpad 9
Camera Pan Down (Coarse) Numpad 3
Camera Up (Fine) CTRL + Numpad 7
Camera Down (Fine) CTRL + Numpad 1
Camera Left (Fine) CTRL + Numpad 4
Camera Right (Fine) CTRL + Numpad 6
Camera Forward (Fine) CTRL + Numpad 8
Camera Backward (Fine) CTRL + Numpad 2
Camera Pan Up (Fine) CTRL + Numpad 3
Camera Pan Down (Fine) CTRL + Numpad 9
Camera Pan Left (Fine) CTRL + Numpad 0
Camera Pan Right (Fine) CTRL + Numpad .
81
Page 82

Miscellaneous Controls
Console Mode ESC
Bail Out CTRL + SHIFT + B
Quit Mission CTRL + SHIFT + Q
Quit to Desktop ALT + F4
The Pilot’s and Co-Pilot’s Instrument Panel
(see separate Reference Card)
• Select the Pilot and begin your mission in the Pilot’s seat (on the
left of the flight deck).
Before you begin flying, study the instrument panel and make sure you
are familiar with the location of all dials and switches. If you are new to
the simulation keep your Reference Card in front of you. The most
important dials are:
The Altimeter
This shows the height of the aircraft above sea level. The long needle
shows hundreds of feet and the shorter needle shows thousands of feet.
Always be aware of your flying height by keeping an eye on this dial.
The Directional Gyro
This dial shows your heading. A heading of 0° (or 360°) is North, 90° is
East, 180° is South and 270° is West.
The Airspeed Indicator
This shows the speed of the aircraft through the air in mph (from 0 to
500mph).
The Rate of Climb Indicator
This is a visual indication of your climb/dive angle shown as hundreds
of feet per minute. When the indicator points to 0 this means you have
achieved level flight.
Landing Gear Indicator
A visual indicator that the Landing Gear has been raised (Up Arrow) or
lowered (SHIFT + Up Arrow).
Flaps Indicator
Shows the position of the Flaps (Up = key F, Down = SHIFT + F).
When lowered, flaps give the aircraft extra lift at take off and slow it
down for landings.
The Yoke Wheel/Control Column
The Yoke Wheel/Control column is the Pilot’s and Co-Pilot’s method of
controlling the aircraft direction in flight. In this simulation this is
controlled by a joystick or the keyboard.
82
Page 83

Turning Left/Right
Ailerons are lateral control flaps at the rear of the airplane’s main wing
tips. Turning the wheel/control column left/right will raise/lower these
flaps making the aircraft bank left/right.
Diving and Climbing
Elevators are horizontal portions of the tail and these are moved up/down
by pushing/pulling the control column. This makes the plane climb or dive.
The Rudder
Pressing the rudder controls left (key B) or right (key N) will swing the
nose of the plane left/right (Yaw) by moving the trailing edge of the
vertical segment of the tail left/right. The rudder will centre automatically
or manually depending on the keyboard/Joystick options in Player set up.
The Four Engines
The B-17 is a large four-engine bomber and this simulation gives you
full control of all four engines including setting individual throttle levels,
fire extinguishers and feathering the props. Engine number 1 is the left
outer from the Pilot’s position followed by 2, 3 and 4 in sequence.
Engines can also be boosted with War Emergency Power (key K) for a
short space of time to get you out of tricky situations.
The Take Off
You will begin the mission in the Pilot’s seat under AI control (the icon in
the lower right will show the computer symbol). You are the lead bomber in
a squadron formation and will be taking off first. Once you have taken off
you will climb and circle waiting for the other aircraft in your squadron to
join you. The squadron will then form up before heading out to the target.
Make sure you are in the Pilot’s Compartment.
• Select the Pilot (on the left).
• Perform all pre-flight checks. If you are in AI mode you will hear the
pre-flight checks taking place. If you are the Pilot you will have to
perform the checks yourself from the list shown:
• For take off you will also need to access all the other Instrument
views in this mode:
Pilot’s Instrument View F4.
Co-Pilot’s Instrument View F5.
Instrument Close Up Views [F6, F7, F8, F9].
83
Page 84

Checklist before starting the engines
1. Fuel transfer valves and switch – These switches (the alternate
instrument view for the Top Turret gunner) must be off or else they
will waste fuel and pump one engine tank dry.
2. Intercoolers – These are visible from the B-17 Instrument Panel
(press F9). Check that Intercoolers are in the Cold position.
3. Fuel shut off switches – These are the upper bank of four switches,
above the throttle quadrant. Make sure these are open (Up) at all
times except in emergencies.
4. Landing Gear Switch – Make sure this is in the neutral position
(unless you left or right click on the switch – it will always be neutral).
5. Cowl Flaps (Open) – These are four wingnut type switches above the
throttles. They must be must be open before starting the engines in
the Locked position (check visually by pressing “A”, then looking
left and right from the cockpit).
6. Turbos – Turbos are always off (Up) during engine starting.
7. Fuel Mixture – AUTO RICH – Fuel mixture controls (M1-M4) must
be in the AUTO-RICH position (as far down as possible).
8. Throttles – Move them up to 1000rpm setting (approx 1/3 the way
up from the bottom).
9. Propeller Controls in High RPM – Puts Prop Pitch controls to
‘High RPM’.
10. The Master switch (the big red bar next to the Magneto’s) must be
in the “On” (forward) position.
11. Set the Parking Brakes using the P key (or press F9 and pull out
the brake lock stalk).
12. Ensure the four Fuel Booster pumps (the lower bank of Four switches,
under the Fuel Shut off switches) are in the “ON” (Up) position.
84
Page 85

Starting Your Engines
You must start your engines in the correct sequence: Engine 1 (left outer),
Engine 2 (left inner), Engine 3 (right inner), and Engine 4 (right outer).
Engine One
1. Turn the Ignition Switch
(Magneto) for Engine 1 ON.
2. Press F9 to go to the Co-pilot’s
Auxiliary Panel.
1. Locate the Starter Panel above
the Intercoolers (and the Fire
Extinguisher control panel).
The Starter Panel has four
switches: two Starter and two
Mesh switches. These switches
each have three positions,
a neutral (central) position,
an up and a down position.
• Place the leftmost START switch in its downward position, by left
clicking on it.
• Count for 10 seconds.
• Move to the next switch (the leftmost Mesh switch), and left click
on it, holding it down for about 6 seconds. Judge by ear when the
engine has successfully started.
• Return both the Starter and the Mesh switches to their Neutral
positions by left clicking.
• Press F4 to return to the Pilot’s Instrument View.
Engine Two
• Turn the Magneto for Engine 2 ON.
• Press F9 to go to the Co-pilot’s Auxiliary Panel.
• Place the leftmost START switch in its up position, by RIGHT
clicking on it.
• Count for 10 seconds.
• Move to the next switch (the leftmost Mesh switch), and RIGHT click
on it, holding it down for about 6 seconds. Judge by ear when the
engine has successfully started.
85
Page 86

• Return both the Starter and the Mesh switches to their Neutral
positions by left clicking.
• Press F4 to return to the Pilots Instrument view.
Engine Three
• Turn the Magneto for Engine 3 ON.
• Press F9 to go to the Co-pilot’s Auxiliary Panel.
• Place the centre right START switch of the Panel in its upward
position, by right clicking.
• Count 10 seconds.
• Move to the next switch to the right (the rightmost Mesh switch),
and right click on it, holding it down for about 6 seconds. Judge by
ear when the engine has successfully started.
• Return both the Starter and the Mesh switches to their
neutral positions.
• Press F4 to return to the Pilots Instrument view.
Engine Four
• Turn the Magneto for Engine 4 ON.
• Press F9 to go to the Co-pilot’s Auxiliary Panel.
• Place the centre right switch of the Starter Panel in its downward
position, by left clicking.
• Count 10 seconds.
• Move to the next switch to the right, the rightmost Mesh switch,
and left click on it, holding it down for about 6 seconds. Judge by
ear when the engine has successfully started.
• Return both the Starter and the Mesh switch to their neutral positions.
• Press F4 to return to the Pilot’s Instrument view.
All four engines should now have started!
Note: You MUST right click on the throttle lever for each of the four
engines to allow the AI access to the engines again. If you fail to do
this, the pilot AI will not be able to fly the plane, and the engines will
not respond to your joystick’s throttle.
Taxiing
Taxiing must be carried out very slowly (about the speed of a running
man). You must be able to stop easily without heavy use of the brakes.
You can use Left/Right Brakes for steering (keys B + N).
As in the real thing the cockpit view of the airfield is very limited on
the B-17 and as Pilot you cannot crane your head out of one side of the
window so you will have to taxi so you can either use an External (F2)/
Chase View (Spacebar) to see the B-17 from outside, or you can use
the Pilot Helper (key H) to guide you in Action view.
86
Page 87

The Pilot Helper (H)
When you are in Pilot’s Action view, press H to activate the Pilot Helper.
This will set up a cone (red when you are parked and green when you
start to move) that you can see through the small windshield, This cone
will direct you to the main runway.
You can turn the aircraft using the Rudder control (key B – left, key N –
right). If you have a joystick with an R-Axis (such as a
Sidewinder™
)
you can use the twist control to turn the rudder.
Make sure you are still in Pilot’s Instrument View (F4).
• Increase the throttle slightly for all four engines (using the Plus + key)
or by clicking on and dragging up the throttles for all four engines.
• Release the Parking Brake (SHIFT + P) and the B-17 will begin
to move.
When taxiing the tail wheel must be unlocked (SHIFT + T).
• Stay on the correct path and DO NOT stray onto the grass.
Check which runway you are heading for by using appropriate
outside camera views and zoom up (Numeric keypad - minus key).
• From the outside Chase View (Spacebar) steer the B-17 carefully to
the edge of the take off runway and try to line up its nose with the
white dotted line and stop (Insert key).
Note: As you become more proficient in taxiing and can gauge the turns
to get to the runway you may prefer to steer the B-17 from the Pilot’s
Action view (to increase the realism).
Getting into the Air
• Make sure flaps are down (SHIFT + F).
• Lock the tail wheel (key T).
• Advance the throttles (key +).
• Apply power gradually to the throttles and you will begin to
move forward.
• Use the Steering Brakes (keys B + N or Joystick R-axis) and
throttles to give you directional control. Do not use the Ailerons but
keep them in a ‘neutral’ position.
The takeoff must be from a 2-point ‘tail low’ attitude (the tail wheel
should be off the ground). Do not try to pull the plane into the air.
• When you reach an airspeed of 110 to 115mph, a gentle pulling back
on the control column (joystick or keyboard controller) will enable the
B-17 to lift itself off the ground.
If you are in the Co-Pilot’s seat you will be watching crucial engine
instruments such as Manifold Pressure, RPM, Temperature and
Pressure gauges.
87
Page 88

• After the aircraft has left the ground and you are sure you have
sufficient flying speed to continue your climb, raise the landing gear
(Up Arrow) and check that this has happened.
• When an airspeed of 140mph is reached, reduce power (minus key -)
so that you stay at that airspeed as you climb and obtain a normal
climb attitude by reducing the throttles to a Manifold Pressure of 35
and an RPM of 2300.
• Cowl flaps should now be closed. Click on Cowl Flaps switches
1, 2, 3, 4.
Climbing
• Make sure the Rate of Climb indicator is at 200 to 300 feet per
minute and check that the Altimeter is rising gently.
The rate at which an aircraft will climb is obtained directly from the
difference between the power required for level flight and the power
available from the engines. This is the ‘reserve power’ available
for climbing.
• Make you climb at between 130 and 150mph, but remember that
decreasing atmospheric pressure as you climb causes the Airspeed
Indicator to show an airspeed
lower
than your true airspeed.
As you climb you will notice the engines will get hotter (increasing cylinder
head and oil temperatures).
• Open the Cowl Flaps to keep the engine cylinder head temperatures
at about 205 degrees.
Note: Cowl Flaps will affect your climb rate by adding ‘drag’ and upsetting
the airflow – so use the
minimum
settings you can get away with.
• Oil temperature can be reduced quickly by decreasing the engine
RPM and Manifold Pressure.
• The Airspeed Indicator will show an airspeed lower than the true
airspeed (e.g. at 20,000 feet, 150mph is indicated, while the
actual airspeed is 207mph).
• Manifold pressure will now decrease and full throttles cannot keep
the required level so you must use the turbo-superchargers to boost
this level.
Note: As you climb your fuel pump may be subject to ‘vapour lock’ so
you must use the booster pumps above 10,000 feet. These remain on
until you drop below this altitude.
88
Page 89

Sequence of power panel changes if you want to increase power:
1. Set Mixture Controls to
‘Auto Rich’ (down).
2. Set Propellers to desired
RPM (up).
3. Increase Throttles (up).
4. Advance Superchargers one
at a time (up).
If you want to decrease power, you must reverse this sequence:
1. Return Superchargers one at a time (down).
2. Decrease Throttles (down).
3. Set Propellers to desired RPM (down).
4. Set Mixture Controls to ‘Auto Lean’ (up).
Levelling the B-17
Once you have climbed to the correct height, you must level off to
achieve your cruising altitude. Levelling off properly builds up full
momentum for cruising. If you change immediately from climb to level
flight and reduce power the aircraft will have a high angle of attack
(AoA) and hence high ‘drag’ and will be flying inefficiently.
• After achieving the correct cruising altitude, continue to climb for
another 300 feet.
• Level the B-17 and drop the nose a little to pick up speed.
• Reduce power to desired levels (2400 rpm and 42" max) and slowly
descend to the correct altitude.
• Your Co-Pilot will carry out propeller synchronisation and now you
will be able to trim the aircraft.
Trimming and Cruising
Correct trim will give you a better airspeed, more efficient fuel use, and
will increase the efficiency of the aircraft, making it easier to keep in
formation. It can be hard work trying to control a ‘poorly trimmed’
heavy bomber.
• Make sure you have equal Manifold Pressure on all 4 engines to
balance the power.
• Check the Altimeter, the Flight Indicator and Rate of Climb
Indicator are correctly showing level flight.
• Watch the Directional Gyro to see if the aircraft is turning.
Correct any turn with the rudder until it shows a steady course.
89
Page 90

Trim Controls
The aim of trim controls is to achieve level flight without having to fight
the controls. You should be able to take your hands off the controls for
a moment and the aircraft should continue on a level flight.
Explanation of Terms:
Elevator Positive – you want the nose of the aircraft to stay up.
Elevator Negative – you want the nose of the aircraft to drop down.
Left Aileron – you want the left wing to level out.
Right Aileron – you want the right wing to level out.
Left Rudder – you want the aircraft to stop left ‘yaw’.
Right Rudder – you want the aircraft to stop right ‘yaw’.
• Carry out ‘Coarse’ trim first and then ‘Fine’ trim.
In-Flight Trim Controls
Trim Positive Elevator – Coarse SHIFT + END
Trim Negative Elevator – Coarse SHIFT + HOME
Trim Left Aileron – Coarse SHIFT + DELETE
Trim Right Aileron – Coarse SHIFT + PAGE DOWN
Trim Left Rudder – Coarse SHIFT + INSERT
Trim Right Rudder – Coarse SHIFT + PAGE UP
Trim Positive Elevator – Fine CTRL + END
Trim Negative Elevator – Fine CTRL + HOME
Trim Left Aileron – Fine CTRL + DELETE
Trim Right Aileron – Fine CTRL + PAGE DOWN
Trim Left Rudder – Fine CTRL + INSERT
Trim Right Rudder – Fine CTRL + PAGE UP
• When you have finished trimming, try going to an outside view (F2)
and taking your hands (and feet, if appropriate) off all controls for a
moment, the aircraft should not need any heavy handed control and
be ‘flying itself’.
• Once you are in cruise mode you can set the Mixture Controls to
Auto–Lean (move all four levers up).
Turns
The B-17 has good directional stability, so just by dropping one wing
(joystick/yoke left or right) you will get an effective turn.
Turns and Load Factors
When making shallow turns, ‘load factors’ will be small but will
increase as the turn gets steeper. Banking at 10 degrees produces a
‘load factor’ of 1.5, but banking at 70 degrees will make this 3.0 and,
in a heavily laden aircraft, this could cause structural failure.
90
Page 91

Stalls and Spins
The B-17 has good stall characteristics with the large vertical tail reducing
the tendency to roll. To recover from a stall, dive smoothly at about 30
degrees and regain airspeed for normal flight. It’s extremely difficult to
make the B-17 go into a spin because of its superior directional stability.
Forming Up
When you have got sufficient height you should begin to form up with
the other aircraft in the squadron. This is never an easy task but for the
purposes of this simulation we have provided a Pilot Helper function for
forming up (key H).
• After you have heard the command ‘Join Formation’ press the Pilot
Helper key H and a large white box will appear in the sky at the place
where you should be in formation (you may have to look around you
with outside views to find it).
You may have to climb or drop in height to achieve the correct position.
• Manoeuvre the aircraft as gently as possible close to the white box.
The other B-17s of the squadron will form up on you.
Flying a Mission
The Waypoints
Check the Map in the Navigator’s station to remind you of the route
selected to the target, the individual waypoints and the return leg.
The Navigator will tell you when you have reached specific waypoints
and a turn is coming up. He will also give you compass headings and
may also warn you that he’s hopelessly lost! The Radio Operator will log
the key messages. If you miss any radio messages, go to the Radio
Operator’s compartment and consult his Messages log.
Each mission will have a different number of waypoints depending on
operational factors and the target (i.e. if you want to avoid heavy flak or
enemy fighter concentrations).
The Initial Point
This is the last waypoint before the bomb run. When you reach the Initial
Point you must line up the aircraft on the bomb run and fly without
deviation or change of height (no matter what’s been thrown at you!)
to give the Bombardier a good chance of finding or lining up the target.
Flying Over the Target
The Bombardier will be in control of the aircraft during the bomb run.
He will open the bomb bay doors, then look for the target and effectively
be ‘flying’ the aircraft. When he locks the bombsight on the target the
aircraft will be flying on autopilot towards the correctly computed release
point. After the ‘Bombs Away’ signal the aircraft will return to your control.
91
Page 92

Now you can take any evasive action you see fit. Note: Failing to drop the
bombs on the Primary may need you to ‘go around again’ to repeat the
bomb run or going to a Secondary, Tertiary or Opportunity target.
The Rally Point
The Rally Point is the waypoint after the target. When the squadron
have all released their bombs they will head for the designated Rally
Point where they will reform for the journey back to base.
The Return Home
Take note of any damage to the aircraft and perform all necessary crew
management tasks (First Aid, Repairs etc.). The flight home will require
you to fly to a series of defined waypoints. Your Navigator will be
keeping track of your geographical/map position.
Feathering the Engine(s)
The propellers on the B-17 can be feathered in case of emergency when
it’s necessary to continue with 2 or 3 engines. Feathering will turn the
blades at 90° and stop the propeller from turning, reducing drag and
eliminating vibration that might weaken the aircraft structure.
The easiest way to feather an engine is to select the engine (Q – 1,
W – 2, E – 3 or R – 4) press key D. Press D again to unfeather.
However, if you want to use the cockpit controls:
Engine Feathering (Example Engine 1)
• Go to the Pilot’s Instruments view in the cockpit.
• Click on the large, round red button marked “1”.
• Find the fuel system switches above the pedestal and turn off the
leftmost column.
• Click and move the Turbo-Supercharger and Throttle to zero for
Engine 1.
The engine is Feathered.
Engine Un-Feathering (Example Engine 1)
• Locate the fuel system switches above the pedestal and turn on the
leftmost column.
• Click on the large, round red button marked “1”.
You might need to set the Throttle and Turbo speeds to match the other
three engines manually.
At this point the engine should start, but if you’re not developing power
from that engine, or if the power is erratic, you should run through the
startup sequence on the starter panel (see earlier).
92
Page 93

Engine Fire Extinguishers (J)
Each of the four engines on the B-17 has a built in fire extinguishing
system. If you notice an engine on fire:
• Select the Engine (Q, W, E, or R).
• Press key J.
Alternatively, if you want to use the cockpit controls:
1. Head to the Co-Pilot’s Instrument View (key 4 and then key I).
2. Select the Co-Pilot’s Engine Startup and Cooling panel by pressing F9.
3. The Fire Extinguisher panel is located above the Intercoolers, turn the
dial to point to the engine that needs extinguishing (inboard engines at
the top, outboard at the bottom).
4. Pull one of the red handles to fire one of the two extinguisher
charges fitted.
War Emergency Power (K)
You have at your disposal a limited amount of WEP. Press key K and
this will give the engines a short power boost to get out dangerous
situations. Note: The B-17 does not include WEP – most fighters,
however, have some form of it.
Lock Out AI Engine Control (L)
There may be occasions when you need to adjust Engine settings
without the AI cutting in. Select the engine first (Q, W, E, or R) and
press key L.
Landing the B-17
Pre-Landing Checks
Note: All pre-landing checks are performed automatically.
• The Radio Operator will call the airbase control tower to get the
altimeter setting for the landing field.
• The Pilot checks all the crew and makes sure they are in their
correct positions for landing.
Pilot Checks
• Put the Landing Gear in the down position (SHIFT + Up Arrow) and
make sure that this has happened with a visual check either from the
Ball Turret gunner or an external view (F2). Remember, that your gear
may have been damaged on the mission. If all is well the landing gear
warning light on the Instrument Panel should be On.
• If gear is not responding and you need to use manual gear controls,
you can issue an order using the Icon Rose (ask the Engineer to help).
Note: If the gear is totally unusable you will have to attempt a belly
landing (You can try this out in Quickstart Mission 1).
93
Page 94

The Traffic Pattern
On most B-17 airfields the traffic pattern (the flight path to line up for
final approach) is rectangular in shape.
• Fly a large rectangular path over the airfield at an altitude of about
800 to 1000 feet.
• Fly the pattern at 130 to 150mph IAS.
• Increase RPM to 2100.
• Decrease Manifold Pressure to 23".
• Lower your flaps (SHIFT + F) when you turn on the base leg
(the last turn before final approach).
• Keep airspeed between 110 to 120mph.
You may have to go around again if there are aircraft that are in trouble
ahead of you. If this is necessary, the tower will inform you.
Pilot Helper (H)
The Pilot Helper is also available to help you on the correct approach to
the airfield. Press key H and you will see a marker to help you line up your
final approach. The marker will respond to all turns and waypoints called
out by the Navigator. Keep this marker lined up in pilot’s Action view
(through the windshield) or in external view (F2) or Chase view (Spacebar).
The Final Approach
Important points to bear in mind when making your final approach.
• Maintain a constant altitude on the base leg turn.
• Maintain constant airspeed and angle of glide.
• Put the flaps fully down (SHIFT + F).
• Reduce power to all engines gradually (Minus - key).
• Glide in to the runway at a speed of 120mph.
• Make a 3-point landing.
If the B-17 is not on the ground within the first third of the runway you
might decide to go around again.
The Landing Roll
• When you have landed, make sure you use the entire runway for the
landing roll.
• Do not apply brakes too early but try to time them when you feel the
aircraft is slowing down from its roll then apply the brakes (Insert key).
Taxi to Hardstand
(Using Pilot Helper H) – If you still have the Pilot Helper key on you
will see a large green inverted cone close to the static aircraft. This is
your guide to take you to your B-17 hardstanding. You can use it from
the Pilot’s Action View or from an outside view.
94
Page 95

• Taxi in the same way as for take off using throttle/steering brake
and try to keep the cone in the centre of your windshield view and
edge slowly towards it.
The cone will move to another position, repeat this process until the
cone guides you to your bomber position. It will then turn red.
• Slow down and stop (throttle down).
• Apply the Parking Brake (key P).
Once you have parked the aircraft in its correct position the mission is
effectively over. You will then be taken to the Mission Debriefing.
Bombardier School
Bombardier - General Principles
If you want to be the Bombardier give yourself plenty of time to get into
position from whatever view or location you are in and re-familiarise
yourself with the bombing controls.
Remember the mission has only one aim: to drop the bombs on the
correct target accurately and promptly. You must be sure of your target
identification and you must set the sight correctly to hit that target.
Whilst the Norden bombsight is an incredibly flexible and accurate
instrument, it can be brutally punishing to inexperienced users – make
sure you have flown both Training Missions, and are well acquainted
with the skills of displacing and synchronising.
The Targets
The Primary target is your main objective. If the Primary is impossible
or unavailable due to weather or other unhelpful conditions, you must
switch to Secondary – this is usually a lower order target that is within
close range of the Primary. If you have to switch to secondary you must
issue the ‘Select Secondary Target’ message in the radio compartment.
The Pilot will fly a new heading set by the Navigator.
You may also have another option of a Tertiary target.
If all three mission targets are unavailable to you (for whatever reason)
then you may set an Opportunity target from the Navigator’s Map
station. Click on a green bomb icon and drag it to a likely target on the
map. The waypoints will appear automatically.
Remember that random, ill-directed bombing will be penalised.
However, if bombs are jettisoned to preserve the safety of the crew and
the bomber, there will be no penalty imposed by Bomber Group.
A mission is deemed to be successful by the amount of damage done to
the target. If you fail to drop the bombs on the correct target the
mission will be classed as a failure.
95
Page 96

Bombardier Skills
The Bombardier must know his bombsight, what it does and how it works.
The Bombardier must understand the automatic pilot and how it works
in the bomb run.
The Bombardier must know how to operate all gun positions on the aircraft.
The Bombardier must understand the destructive power of the bombs
his aircraft is carrying and the vulnerability of the targets he is seeking.
The Bombardier must be fully conversant with target and
aircraft identification.
The Bombardier is in effective command of the aircraft on the bomb run.
He should be mindful of this responsibility.
Bombing Factors
The following bombing factors will come into play when dropping
bombs from a heavy bomber:
Altitude
Altitude determines the length of time the bomb is in flight and therefore
the time the bombs can be affected by the atmospheric conditions. This in
turn affects the range (the forward travel of the bomb from launch) and
deflection (the distance the bomb drifts in a crosswind).
True Airspeed
True Airspeed is a measure of the speed of the airplane through the air.
It’s this speed that gives the bomb its initial forward velocity and thus
affects the trail (see below) of the bomb (the distance the bomb lags
behind the airplane at the moment of impact).
Bomb Ballistics
This is the size, shape and density of the bomb - factors that give it an
air resistance value.
Trail
This is the horizontal distance the bomb is behind the airplane at the
moment of impact and is therefore affected by altitude, airspeed, bomb
ballistics and air density. A value is obtained from bombing tables and
is pre-set into the bombsight.
Actual Time of Fall
This is the length of time the bomb stays in the air from the point of
release to impact.
Groundspeed
This is the speed of the aircraft in relation to the earth’s surface and
has an effect on the range of the bomb. Groundspeed is entered into
the bombsight through synchronisation on the target while the pilot
maintains constant airspeed and the correct altitude.
96
Page 97

Drift
This is the speed and direction of the wind that determines the
distance the bomb will travel downwind from the airplane from release
point to impact. This value is set on the bombsight by the Bombardier
and is given to him by the Navigator.
The Bomb Run
• As the bomber approaches the Initial Point (IP) select the
Bombardier position (key ` or click the bombsight icon in the Crew
Position pop-up menu).
• The Bombardier will announce ‘We’re on the Bomb Run!’.
• Press key I to view the Bombardier’s Instrument Panel
(the Norden Bombsight).
• Check that the Mission Altitude is correct on the Bombsight.
• Set Mission Altitude on the large dial on the right of the bombsight
(a tooltip will give you details of the setting).
• Set the Course Drift by clicking on and moving the indicator at the
bottom of the sight. The Course (or Wind) Drift is calculated at the
Navigator’s station (see later).
• Access the Bomb Sight action panel by pressing the spacebar.
• Press key M to assume manual control of the Bomb Sight Panel (BSP).
• Click on the switch at the top of the panel to activate the BSP.
Below the topmost switch is a bank of three switches.
1. The first on the left opens the bomb bay doors.
2. The second arms the bomb delivery system.
3. The third enables the autopilot giving the bombardier control of
the aircraft.
• Click all of these switches to ‘On’.
By clicking on the autopilot switch you will be sending a message to
the pilot that you have control of the aircraft.
97
Bombsight Panel
On/Off
Bomb Bay Doors
Autopilot
Arming
Rack Selector
Arming
Salvo/Train
Mode
Page 98

Below the mid bank switches are another set of four switches that
select the bomb racks in the bomb bay. If you have ordnance on all four
racks, arm all four by flicking the switches. Red lights will confirm all
‘On’ switches.
On the left of the BSP are two controls that affect the bomb
release mechanism.
Salvo Switch
The first is the ‘Salvo Switch’. This control switches between Salvo Mode
(all the bombs drop at once) or Train Mode (bombs drop one at a time
with an interval set by an Intervalometer.
Intervalometer
The second control is the Intervalometer.
• Click to set the interval between bombs dropped in train
(by milliseconds) up to 1 second maximum.
You have now set the bombsight and are ready to release your bombs.
• Switch to the Bombardier ‘Action View’ by pressing key A.
• Make sure you have manual control set (key M).
• Enter “Search Mode” by using SHIFT + K (A light will come on).
• Use your joystick to locate the target, place the crosshair over the
target and then hit SHIFT + K to ‘lock’ the target.
• The Sight starts in DRIFT Correction mode. Moving the joystick left
adjusts the angle of Drift to the left – the target will begin to drift
more to the right of the sight picture. Moving the joystick right will
alter the angle of Drift to the right – the target will begin to drift
more to the left of the sight picture.
• Press key N to enter RATE Correction mode. Moving the joystick up
makes the rate track more slowly, so the target will move towards
the bottom of the sight picture. Moving the joystick down will make
the rate track more quickly, hence the target will appear to move
back up towards the top of the sight picture. The objective is to
freeze any vertical movement of the target.
98
Crosshairs
Search Mode
Bomb Release
Indices
Page 99

• You should adjust DRIFT and RATE until the sight picture shows no
movement at all. This is called SYNCHRONISATION, and means the
bombsight is correctly allowing for speed, altitude and wind drift.
• During your alterations, the target may have slipped out from the
crosshairs. If you have time, you can enter SEARCH mode, using
the SHIFT + K key combination, and place the target directly under
the crosshair again. Provided that you have correctly
SYNCHRONISED the sight, as described above, the crosshair will
remain where you left it.
• Watch the two markers close towards each other. When they meet,
the bombs will be dropped automatically by the bombsight,
thus ensuring a drop accurate to the millisecond.
• Watch bombs release from bay and then press F6 to view down
from inside the bomb bay and F6 again to view target from ground
level (use mouse left button to zoom in and right hand button to
move around target.
Bombing Results
Full details of your bomb drop pattern and reconnaissance film of the
damage to the target will be shown when you are in the
Mission Debriefing.
Chin Turret
It’s highly likely that enemy fighters will attack you on your journey back
to your home base. Before and after the Bombardier has completed his
bombing tasks he should man the powered Chin Turret (unless otherwise
assigned by the Commander), to fend off any attacks from the front of
the B-17.
Navigator School
It’s the job of the Navigator to direct your flight from the moment of take
off to landing back at base (or any other airfield). Navigation is the skill
of knowing where your bomber is geographically by means of either
pilotage or ‘dead reckoning’. The skilled Navigator will use a
combination of these methods.
Pilotage
This is the method of working out the aircraft’s position by visual
reference to the ground. This requires accuracy to within 400 metres.
The Navigator performs this by referring constantly to groundspeeds and
ETAs for points ahead, on the ground, and on maps and charts. As long
as a Navigator can keep visual contact with the ground he can work out
pinpoint positions and plot the exact track of the airplane.
99
Page 100

Dead Reckoning
This is the basis of all other types of navigation and, essentially, is the
way the Navigator works out the position of the aircraft at any given
time by keeping track of the distance flown from the take off point or
the last known position. DR can be sub-divided into:
DR using a series of known positions – the Navigator uses pilotage (see
above) until the airplane goes into cloud and loses contact with the
ground. Then he uses Dead Reckoning from the last pilotage point to
determine the position of the airplane; using wind speed prevalent at
that altitude and the track and groundspeed being made. By working
out track and distance from the last known point he can always tell his
position and if the airplane comes out of cloud he’ll be able to search
for and pick up pilotage points quickly.
The Navigator’s Map
• Select the Navigator position.
• Press key I to access Navigation instruments.
• Click on the map on the desk, or press the Spacebar, to open the
Map screen.
The map is similar to the
Operations Room and Briefing
Room maps and is controlled in
a similar fashion.
Map Controls
You can scroll around the map by using either the mouse and/or
the keyboard.
Mouse Control:
• Move around the map by holding down the right mouse button and
moving the mouse.
• Tilt and rotate the map by holding down the Shift key plus the right
mouse button and moving the mouse.
Numeric Keypad Controls:
Use numeric keypad ‘Ins’ and ‘Del’ to rotate the map horizontally left
and right.
Use numeric keypad 9 and 3 to rotate the map vertically (from 0° to
90° degrees).
100
 Loading...