

Page 1
®
Page 2
For IBM PC & compatible computers
◆◆
RAILROAD TYCOON DELUXE
TECHNICAL SUPPLEMENT
Sid Meier’s
Minimum System
Requirements
INSTALLATION
Computer: IBM, or fully compatible, 80386 16MHz
Hard Drive: with at least 5 million bytes (5 meg) available
Conventional Memory: a system with a base minimum of 640K of RAM
Graphics: VGA graphics card and VGA monitor
DOS: MS-DOS 5.0 or higher
Controls: The simulation can be run entirely from the keyboard, or with a mouse
and a keyboard. A mouse is recommended as the interface has been designed to take
advantage of the mouse. Railroad Tycoon Deluxe does not support a joystick.
The installation program checks your system for a number of conditions, and
advises you if your system does not meet the conditions.
The installation program decompresses and copies numerous files from the distribution disks onto your hard drive. The install program also auto-detects your computer’s
configuration and provides recommendations for sound, speech, and control device
(keyboard, mouse).
The entire installation procedure can take a variable amount of time depending on
the speed of your computer and hard drive.
Technical Notes: This install program creates a sub directory on your hard disk
titled “C:\MPS\RAILSDX” and copies all files into that sub directory. It then copies a
runtime batch file into your root directory titled “RDX.BAT”, for your convenience. If
you’re an experienced DOS user, feel free to modify or move “RDX.BAT”.
i
Page 3
LOADING
This assumes your machine runs under DOS 5.0 when it boots, which is true of most
IBM and compatible machines with hard disks.
(1) Turn on your machine. If it is already on, exit all programs and return to the
root directory with the “CD” (change directory) DOS command. For example, if your hard
disk is C: then “CD C:\” does this.
(2) Set Speed: If you have a “turbo” or multi-speed computer, use your normal speed
setting.
(3) Enter MPS directory: You can enter the MPS directory with the “CD” (change
directory) DOS command. For example, if you are in your root directory C:, then “CD MPS”
will take you to the MPS directory.
(4) Load Program: Type “RDX” and press return. The simulation will begin loading.
Sound Driver
Options
When Railroad Tycoon Deluxe loads it asks you to select a sound option. The current
options include the following:
No Sound: This turns off all sound throughout the game.
IBM Internal Speaker: This default sound setting is appropriate to all IBM machines
with no special sound hardware.
Adlib or compatible: Use this option only if you have added an Adlib sound card or
an Adlib compatible sound card to your computer.
Covox Sound Master: Use this option only if you have added a Covox Sound Master
II sound card to your computer.
Sound Blaster (original): Use this option only if you have added an original Sound
Blaster sound card to your computer.
Sound Blaster Pro (early): Use this option only if you have added a Sound Blaster
Pro (early) sound card to your computer.
Sound Blaster Pro (new): Use this option only if you have added a Sound Blaster Pro
(new) sound card to your computer.
Pro Audio Spectrum: Use this option only if you have added a Pro Audio Spectrum
sound card to your computer.
Pro Audio Spectrum Plus or Sound Blaster 16: Use this option only if you have
added a Pro Audio Spectrum Plus or Sound Blaster 16 to your computer. These cards have
the new OPL-3 synthesizer chip.
Gold Sound Standard: Use this option only if you have added a Gold Sound Standard
card to your computer.
Roland MT-32/LAPC-1/CM-32L MIDI Board: Use this option if you have one of
these Roland instruments using an MPS-401 or compatible MIDI interface.
General MIDI: Use this option if you have a General MIDI compatible synthesizer and
an MPU-401 or compatible MIDI interface.
ii
Page 4
Configuration
Music/Sound
Effects and
Digitized Spech
card selection
SAVED GAMES
As part of the installation process, you are required to designate selections for music,
sound, and digitized speech. Fortunately, the install program auto-detects the majority
of the possible options.
This configuration process is also utilized to change your selections if you add, delete
or modify system equipment or just decide to change the selections.
From this panel, selections for music/sound effects and digitized speech are made.
The installation program highlights all of the possible music options it detects; the nondetected options are grayed-out. You may, however, select grayed-out options as well as
the highlighted options. If your card is not installed at the factory defaults, it will not be
detected, though you can still use it by manually entering the correct parameters. IRQ
and DRQ parameters are NOT auto detected.
Separate and distinct options are possible for music/sound effects and digitized
speech. The same choice is not required for both. In some cases, the same options are
not offered for both. For example, you may select Adlib for music/sound effects, but Adlib
is not an option for digitized speech; in this case, you would need to select No Speech.
DMA type sound cards have configurable settings. These three settings, address,
IRQ and DRQ, are user specified, and must be configured to match the settings on the
cards. If the settings do not match, or there is an interrupt and/or DMA conflict in your
computer, you will probably not get digitized sounds and your computer may lock up.
You may save games currently under way and continue them at a later date. Games
may be saved onto your hard drive or onto a previously formatted saved game disk. You
may not save games onto your original game disks or back-up game disks. To save a
current game, open the Game menu and choose “Save Game”. This opens a window that
asks you to name the drive to which you wish to save. You may only have four games saved
on any disk.
Saving Games to a
Floppy Disk
1) Place your previously formatted save game disk in the floppy drive to which you
wish to save, normally either your A: or B: drive.
2) Enter the letter of the drive where you have previously placed your saved game
disk and press RETURN.
3) This opens the saved game files on your disk. Each disk can contain four saved
games. Highlight the file into which you wish to save your game and press RETURN. This
saves your game into this file.
4) If the game files are full on any disk, move the highlight to the existing saved game
you wish to overwrite and press return. This writes the new saved game over the old one,
erasing the old one. If you don’t want to erase any game on a full disk, press the ESCAPE
key to return to the game, and start over. However, you cannot format a disk while the
game is underway, so have additional formatted disks handy.
iii
Page 5
Saving Games to a
Hard Drive
1) The letter of your hard drive is already shown in the window, just press RETURN.
2) This opens the saved game files on your hard drive. Move the highlight to the file
into which you wish to save your game and press RETURN. This saves your game into
this file.
Loading a
Saved Game
ADDITIONAL
IBM RAILROAD
TYCOON DELUXE
FEATURES
Saved games can only be loaded during the pre-game options. To load a saved game,
follow these instructions:
1) Choose the option “Load Saved RR” when you start the game.
2) Type the letter of the drive where the saved game disk is located, either your hard
drive or a floppy drive. Insert disk if necessary.
3) After selecting the drive, press RETURN.
4) Move the highlight down the list of saved games until the game you wish to load
is .highlighted, and press RETURN. This loads the saved game.
All saved games consist of two files, a RRD#.SVE and a RRD.MAP. The number
corresponds to the saved game on the disk, numbered 0 to 3. If you have several saved
game disks, then you have several games named RRD1.SVE, etc. Saved game files are
normal DOS files that can be moved and copied using standard DOS commands
Dissolving Railroads: If the share price of a competing railroad falls below $5 and
stays there for too long, there is a chance that the railroad can be dissolved and disappear
entirely from the game.
Bankruptcy Penalty: For each bankruptcy that you declare, the interest you must
pay for selling new bonds increases by 1%. After enough bankruptcies, you will be unable
to sell any bonds.
Rail Car Costs: Each car you place on your trains costs $5,000. When you make
consist changes, you are only charged if the total number of cars on your railroad
increases.
Menu Options: You may highlight any menu option by pressing the letter key of the
first letter in the option. If more than one choice share the same first letter, additional
letter key taps cycle through the options that start with the same letter.
Sound Effects: If you selected one of the sound driver options when you started your
game, you may toggle the sound effects on or off later in the game. This is done from the
Features option, found in the Game menu (in the same manner as animations are toggled
on or off). If you selected No Sounds when beginning play, the sound effects option does
not operate.
iv
Page 6

PROBLEMS?
The latest notes regarding this program and problems with “compatibles” can be
found on disk, in an ASCII file named “READ.ME”. You can read this file by using a text
editor or standard DOS commands such as “TYPE READ.ME”. (DOS 5.0 or better will allow
you to enter “TYPE READ.ME|MORE”; this pages through the file, making it easier to
read.)
If the program does not load or run correctly, turn off your entire machine and restart
it. Make sure DOS and Railroad Tycoon Deluxe are the only programs loading into memory.
If you continue to have trouble, try reinstalling the game from scratch or installing the
Railroad Tycoon Deluxe disks in another computer. If the disks work in another computer,
then your computer has compatibility problems (ie: some aspect is not entirely IBM
compatible). You may also try a different machine speed, keyboard, or sound option.
Sometimes an alternate configuration works.
v
Page 7
DISPLAY COLORS
Regional Display
Map Colors
COLOR INFORMATION DISPLAYED
Dark blue Oceans and lakes
Light blue Rivers
Dark cyan Woods
Dark green Cleared land
Light green Farmland
Light gray Foothills
Light cyan Hills
White Mountains/Alps
Brown Swamp/Desert
Red Villages
Yellow Cities
Red/yellow Industries
Dark red Harbors
Black Coal, wood, chemicals, nitrates
Train Roster
COLOR INFORMATION DISPLAYED
Black line Stopped train
Red line Paused train
Green line Train speed indicator
Black engine Normal loads
Green engine Priority Shipment on board
White car Mail car at least half full
Light gray car Mail car less than half full
Light cyan car Passenger car at least half full
Dark cyan car Passenger car less than half full
Yellow car Fast freight car at least half full
Light green car Fast freight car less than half full
Red car Slow freight car at least half full
Dark red car Slow freight car less than half full
Black car Bulk freight car at least half full
Dark gray car Bulk freight car less than half full
vi
Page 8
Freight Classes
COLOR INFORMATION DISPLAYED
White Mail
Light cyan Passengers
Yellow Fast freight
Red Slow freight
Black Bulk freight
Financial Reports
Shipping Report
Borders
Train Report
Scheduled Stops
Station Reports
Construction Box
Colors
COLOR INFORMATION DISPLAYED
Red Losses or decreases
Black Profits or increases
COLOR INFORMATION DISPLAYED
Gray Normal revenues
Red Halved revenues
White Doubled revenues
COLOR INFORMATION DISPLAYED
Light gray Scheduled stop
Black Current destination
COLOR INFORMATION DISPLAYED
Dark green Cargo picked up this period or
Revenue earned for delivery
Red Cargos removed by other transport
Light green Cargos available now
16-COLOR INFORMATION DISPLAYED
White Build track
Red Remove track and bridges
vii
Page 9
CONTROLS
General
FUNCTION KEYBOARD MOUSE
Selector RETURN key Left button
Selector 1 RETURN key Left button
Selector 2 Right button
Open menu First letter key Left button
Move cursor, Numeric keypad keys
Construction Box (Box)
or menu highlight
Track
Construction/
Demolition Keys
Shortcut Keys
FUNCTION KEYBOARD COMMAND
North Shift and numeric keypad ‘8’ key
Northeast Shift and numeric keypad ‘9’ key
East Shift and numeric keypad ‘6’ key
Southeast Shift and numeric keypad ‘3’ key
South Shift and numeric keypad ‘2’ key
Southwest Shift and numeric keypad ‘1’ key
West Shift and numeric keypad ‘4’ key
Northwest Shift and numeric keypad ‘7’ key
FUNCTION KEYBOARD COMMAND
Go to Regional Display ‘F1’ key
Go to Area Display ‘F2’ key (centers on cursor or pointer)
Go to Local Display ‘F3’ key (centers on cursor or pointer)
Go to Detail Display ‘F4’ key (centers on cursor or pointer)
Open Income Statement ‘F5’ key
Open Train Income Report ‘F6’ key
Build a new train ‘F7’ key (must own engine shop)
Build station ‘F8’ key (Box on spot)
Call broker ‘F9’ key (game not frozen)
Survey elevations ‘F10’ key (from Detail Display only)
viii
Page 10
Additional Keys
KEYBOARD
INTERFACE ONLY
General
FUNCTION KEYBOARD COMMAND
Double track a single track section Shift and ‘D’ key
(Box must be on track section)
Single track a double track section Shift and ‘S’ key
(Box must be on track section)
Get information ‘I’ key or Shift and ‘?’ key
(for icon inside Box)
Override signal ‘S’ key
(for signal within Box or cursor)
Center map on cursor or pointer ‘C’ key
Quit game Alt and ‘Q’ key
Exit menu without making choice ESC key
FUNCTION KEYBOARD COMMAND
Switch cursor TAB key
(between map and Train Roster)
Open Train Report RETURN key
(train marked in roster by cursor)
Pause Train ‘H’ key
(train marked in roster by cursor)
FUNCTION KEYBOARD COMMAND
Go to priority row of Train Report ‘P’ key
Highligh schedule stops 1, 2, 3, or 4 ‘1,’ ‘2,’ ‘3,’ or ‘4’ key
Go to Route Map Shift and ‘S’ key
Move highlight on Route Map Numeric keypad ‘1-9’ keys (not '5')
Select highlighted stop on Route Map RETURN key
Exit Route Map without any changes ESC key
ix
Page 11
SOUND CUES
SIGNAL
OVERRIDE
CHART
Normal Operation
Sound Caused By
Whistle/Horn Train passing through
station without stopping
Clink of coins Revenue earned (one
clink for each $25,000)
Existing Signal 4-color 16-color Effect
GO Cyan Green Indicates currently safe
to enter block
STOP Magenta Red Indicates currently not
safe to enter block
Overridden
Operation
PROCEED White Yellow Passes next train
and returns to
NORMAL operation
HOLD Black Dark red Stops all trains
until overridden with
NORMAL or PROCEED
Note: On the Area and Local Displays, normal signals appear in black boxes and
overridden signals appear in white boxes.
x
Page 12
1
Page 13

Sid Meier's
RAILROAD TYCOON DELUXE
Computer Simulation
MICROPROSE
All rights reserved.
This book may not be reproduced in whole or in part by mimeograph or any other means without permission,
with the exception of quoting brief passages for the purposes of reviews.
IBM is a registered trademark of International Business Machines Inc.
Hercules is a registered trademark of Hercules Computer Technology, Inc.
Commodore 64 and Amiga are registered trademarks of Commodore Business Machines, Inc.
Apple and Macintosh are registered trademarks of Apple Computer, Inc.
Copyright © 1994 MicroProse.
Printing: 9 8 7 6 5 4 3 2 1
Tandy is a registered trademark of Tandy Corporation.
Atari is a registered trademark of Atari Corp.
2
Page 14
1
INTRODUCTION
Railroad Tycoon is a game about the fascinating world of railroads: steel tracks stretching to the horizon, promising adventure
and romance; steam, diesel, and electric locomotives, some of the
largest machines man has ever built; nations transformed by the
speed and strength that locomotives could achieve, eclipsing the
puny power of man himself and the animals he could domesticate; the
sounds of steam whistles, diesel horns, and clanging bells; a world of
risk - natural disasters, poor economic times, and rival railroads; and
a world of opportunity - money, prestige, and fame.
Railroad Tycoon puts you into this world as the president of a tiny
railroad enterprise. Your railroad empire is only a dream, but you
have a little money from investors and your own ability to start with.
Your task is to carve your railroad empire out of this great world of
opportunity.
In Railroad Tycoon, you, the player, construct and operate a
complete railroad, from tracks and signals to locomotives and livestock cars. If you successfully manage your resources and make
them grow, you can expect a long professional life of railroading
achievement. However, you are not alone in the world and other men
possess the same dream as you.
Your skills as a tycoon are tested by competing railroads run by
men such as Commodore Vanderbilt, James Hill, and J. P. Morgan,
determined to crush you or brush you from their path. Running your
own railroad well is not going to be enough if your competitors do
better, or raise the money to take you over.
You begin Railroad Tycoon by choosing one of six different world
maps to play on: Northeastern America, Western North America,
INTRODUCTION
3
Page 15

North America, South America, Africa or Central Europe. Some of
these regions also offer a selection for the historical year in which the
game starts. Each region has its own geography, economic opportunities, and locomotive technology.
These six worlds were chosen for their specific interest or railroad
history. The Northeast United States witnessed the beginning of
railroading in America, and fostered many of the world’s most famous
railroads. The Western USA was the site of some of railroading’s
greatest construction efforts, the building of transcontinental railroads. Europe remains very railroad oriented, and France is running
some of the fastest trains in the world.
North America has been blessed with huge amounts of natural
resources which, combined with a rapidly growing population, present
opportunities which can not be found on any other continent. South
America hosts some of the most rugged and challenging terrain in the
world, including the Andes and the Amazon Rain Forest. In Africa
there are vast amounts of natural resources, which are land locked
by a weak industrial base and a turbulent political setting.
Each new world map is empty of railroads but full of the
opportunity to earn money hauling freight and passengers. You must
parlay one million dollars of loans and stockholder investments into
a functioning, revenue earning business. If you dawdle or make too
many mistakes, expect to be forcibly retired by irate stockholders or
see your company gobbled up by a competitor.
You simultaneously wear the hats of construction superintendent, master of the road, dispatcher, chief financial officer, and chief
executive officer. You decide where to lay tracks, what types of trains
to put in service, when to schedule trains, where to change the types
of cars in a train, when to upgrade equipment, where to add facilities,
where to encourage industry, and how best to finance expansion and
improvements.
At any moment in the game your attention can be directed to
several places: to find the best route for expansion toward a new city,
to examine the maintenance costs of your locomotives to see if any are
getting too high, to scan Station Boxes to see if one cargo or another
4
Page 16

is piling up enough to justify another train, to look for new industries
springing up in areas where you can provide service.
To succeed you must balance the investment of your limited
funds between more construction projects, adding more trains,
adding more facilities, and stock purchases. Profitable investment
decisions increase your revenue and make possible further expansion and service improvements. But keep your eye on the stock
market to see what your competitors are up to and don’t let them
ambush you.
Competing railroads are operated by their presidents in the style
of their historical personality. Expect a road run by Jay Gould to look
for stock market profits and take every opportunity to raid your stock.
Jim Hill can be expected to build an extensive and profitable system.
Beware of his propensity to quickly grab access to profitable areas,
blocking you out if possible.
Competing railroads can be attacked operationally by building
tracks into their stations and starting rate wars. The railroad that
does the best job of providing service to the city is given a monopoly
on local service by the city council. The loser must withdraw from the
city, forfeiting his investment in track and stations. By this tactic you
can reduce the earnings of competitors and continue your expansion.
Alternatively, you may invest in the stock of competing railroads
and possibly take them over. If you get control of another railroad, you
can direct its finances and expansion, using it to help your road or
block competitors.
Your ultimate goal as a Railroad Tycoon is to run the most
profitable railroad that you can and retire to a prestigious position,
perhaps even becoming President of the United States. If your
railroad is sufficiently profitable at your retirement you may be
enshrined in the railroader’s Hall of Fame.
If you aren’t able to make the grade as a railroad president, you
may be able to find work as a snake oil salesman or circus impresario.
5
Page 17
Consider a railroad operating between Baltimore and Philadel-
phia. The railroad has laid a single track between these cities, setting
up stations at each city where cargo can be put on trains and taken
off. The railroad also purchases a locomotive and some freight cars.
It advertises service between these cities leaving Baltimore at certain
hours and arriving in Philadelphia roughly an hour after leaving
Baltimore. Return trips are also scheduled from Philadelphia and
take about an hour to reach Baltimore.
Businesses in either city have the ability to use the railroad to
ship goods back and forth. Whether the railroad is used for shipment
or not depends on the relative cost, safety, and timeliness of railroad
shipment versus alternative shippers (trucks, ships, airplanes, etc.).
This Baltimore & Philadelphia Railroad (the B&P) can only draw
business by providing the required service at attractive prices, and
thereby staying competitive with other transport modes.
Once the B&P has started carrying cargos, it must balance its
expenses and revenues to remain in business. The start-up costs of
the railroad are the land it had to purchase to place its tracks, the cost
of track construction plus any bridges or tunnels required along the
way, station facilities, maintenance facilities, its locomotive and
freight cars. All of these items plus operating personnel must be in
place before the first train can run.
After operations begin, the railroad has to provide fuel for the
locomotive, maintenance expenses for equipment, and salaries for
the work force. The revenue earned by the railroad must be sufficient
to cover the expense of construction, operation, and provision for the
future.
For the B&P, the future may mean upgrading stations, buying
additional locomotives and cars to carry more freight, double tracking the line so trains can simultaneously run in both directions,
building signal systems so that multiple trains can run on the same
track without colliding, freight yards, new car types for special
cargos, etc. Railroads must constantly evolve because technology
and service demands are changing and they must adapt to remain
competitive.
WHAT IS A
RAILROAD
6
Page 18

All railroads, regardless of their size, are composed of three
elements linked together for one function. Track, locomotives, and
cars are combined to move people and things from one place to
another.
The strengths and efficiencies of a railroad come from the
elements that make it up and how they work together. Tracks make
it possible for enormous loads to be supported, guided, and moved at
one time. The cars are designed to carry specific cargos, for ease of
loading and unloading, and for safe movement in combination. The
locomotives make the railroads go. Supported and guided by the
tracks, they can pull long trains of loaded cars at relatively low cost.
A railroad train is made up of a locomotive, or source of motive
power, and the cargo cars lined up behind it to be pulled. The types
of engines and cars that make up the train are called the consist. For
example, a train consist might be a single 1500 horsepower (hp)
locomotive and 20 coal hopper cars.
In a typical railroad operation, a crew of three or more men
(engineer, conductor, brakeman, etc.) are assigned a locomotive and
a train to pull. The crew takes the locomotive from the engine house
out to the departure yard and connects up to the waiting train
previously assembled by the yard crew. The conductor checks the
train against its manifest to be sure everything is in order and okays
movement. Following train orders from the dispatcher, the crew
begins its trip, pulling the train from the yard out onto the track of the
mainline.
On the mainline the engineer takes over, controlling the speed of
the train according to speed limits posted along the right-of-way,
watching the signals that additionally govern movement and speed in
each block, watching the track ahead for obstacles, making proper
horn signals at crossings, and monitoring the performance of the
locomotive. The brakeman’s duties on the road are mainly to watch
the train itself, looking out for smoking wheel bearings or other
conditions that might result in an accident.
7
Page 19

At the end of its run, the train pulls into the receiving yard of
another terminal and the crew uncouples the locomotive from the
cars. They head to the engine house for maintenance and refueling
of the locomotive, while the train is turned over to yard crews who
break up the train and place the cars into other trains that take them
on to their destinations.
Railroads earn their money by being paid to move things. In the
case of freight goods, the railroad and shipper make arrangements for
the cargo to be loaded into a freight car. The railroad then arranges
for the car to be picked up and added to a passing train. This train
pulls the car towards its destination, perhaps directly there, perhaps
only to a rendezvous with another train which carries it on farther.
Ultimately the railroad brings the car to its destination where the
receiver of the cargo arranges to get the goods out of the carrying car.
The railroad is paid a fee for the delivery. This fee is normally
prearranged and paid upon delivery within a reasonable period.
Because a late or damaged delivery may reduce the fee or drive
business to alternative transportation modes, railroads must be
operated safely and according to schedules which assure timely
service.
Railroads today generate most of their revenue and profits from
hauling large, heavy trains over long distances. In this role they
continue to be the most efficient carrier. The purpose of most railroad
operations is to get freight into and out of these long trains quickly
and safely.
Railroads came into existence because their technology offered
transportation at speeds and costs previously unimagined. They
continue to prosper today, despite competition from other transportation modes, because in certain situations they are clearly more
efficient than any alternative.
8
Page 20
BEFORE YOU
START
Sorting the Materials
This Manual provides detailed instructions on how to play and
information on the background of railroad construction, operation,
and finances. The manual text is printed in two main type faces,
normal and italic. Text in normal type usually discusses specific
instructions. Text in italic type is usually a commentary on the
information discussed in normal type. When you are looking for
specific information in a manual section, look first in the normal type
parts. The manual applies to all computer systems.
The Technical Supplement gives specific instructions for loading
and/or installing the game on your computer. It also provides a
complete reference of all the graphics and keys used in the game.
The Player Aid Cards offer a handy reference for the economic
relationships of the various industries and geographic features on the
individual region maps.
Learning the Game
Study Method: You can study the actual controls and instructions in this manual. Begin by reading through the Interface Introduction, Pre-Game Options, Reading And Using The Displays. Now
begin play and refer back to the instructions as needed.
Jump Right In Method: This is the most popular with experienced computer game players. We recommend you at least read
through the Interface Introduction, Pre-Game Options, and Reading
And Using The Displays, but even this is not necessary. Refer to the
manual’s instructions for help with problems that arise.
9
Page 21
The interface of Railroad Tycoon was primarily designed to take
advantage of the mouse. A keyboard/mouse combination is recommended for play, as the keyboard functions do not operate as
specified without a mouse.
Throughout this manual there are references to certain keys, the
Selector, Selector 1, and Selector 2. Because the manual is written for
all machine formats you need to refer to the Technical Supplement to
learn what these keys or buttons are.
The interface relies heavily on menus. At every point where you
can perform game functions there is a menu bar available from which
menus can be accessed.
INTERFACE
INTRODUCTION
Throughout the manual you are instructed to pull down menus
to open them up and reveal the options they contain. To open a menu
using the mouse, place the mouse pointer on the name of the menu
in the menu bar and press Selector 1.
You can also pull down a menu by pressing the keyboard letter
key for the first letter in the name of the menu. For example, the Game
menu is opened by pressing the G key.
When a menu is opened, the choices it contains appear listed in
a menu window.
In Railroad Tycoon there are generally two types of menus. The
most common is simply a list of choices from which you choose the
one desired. Making your selection usually closes the menu and
implements your choice at the same time.
In the second type of menu, the options are either toggled on or
off. Options that are on are noted by a check mark. Options that are
off have no check mark. To exit these menus press Selector 1 outside
and below the menu or press Selector 2.
Opening Menus
Menu Types
10
Page 22
Menu Choices
To make your choice of the options available using the mouse,
place the mouse pointer on your selection and press Selector 1.
Alternatively, you can open a menu by placing the mouse pointer
on the menu name, pressing and holding down Selector 1, and
dragging the mouse pointer down from the menu name. As you drag
the pointer down the length of the opened menu, its options are
highlighted one by one. To select an option, drag the pointer down
until the option of your choice is highlighted, and then release
Selector 1.
The menus can also be accessed using the Hot Key, the first letter
of the menu option, and then by using the Direction keys to move a
highlight bar up and down the menu until the choice you want is
highlighted. Then press the Selector 1 key to make your choice. Note
that in most menus the highlight bar does not appear until you press
a Direction key, usually the one that moves downward.
When you are using the mouse, if you have opened a menu and
wish to make no choice, you can accomplish this by either moving the
mouse pointer below the menu and pressing Selector 1, or just by
pressing Selector 2.
Shortcut Keys
Even when using the mouse, there are places when one key can
save several steps. Included in the interface are several of these
shortcuts, described in the Technical Supplement. These keys are
normally accessed with the left hand, leaving the right hand free to
use the mouse.
11
Page 23

When playing Railroad Tycoon, you spend most of your time
viewing one map display or another. In order to be able to move around
the various maps you need to understand how to scroll.
In order to scroll, move the mouse pointer to any part of the map
visible, and press one of the following: Selector 2 or the shortcut key
for the map display that you are on. The Center key (C) can also be
used to redraw the map with the current cursor location centered.
The map immediately centers on the position of the pointer.
Map Scrolling
12
Page 24
PRE-GAME
OPTIONS
The beginning of a game of Railroad Tycoon requires you to make
a number of choices regarding the parameters and location of the game
you wish to play.
To begin a game of Railroad Tycoon, follow the instructions in the
Technical Supplement for booting the game. After the title and credit
screens, you may be required to answer a few technical questions
regarding your hardware, depending on the machine format you are
using. You then proceed to the selection of pre-game options.
Game/World
Options
Difficulty Levels
The first menu that appears asks you to choose which game to load:
“Start New RR”
“Load Saved RR”
“Load Tutorial”
Choose “Start New RR” to begin a new game. Choose “Load Saved
RR” to load a previously saved game. A menu of your saved games
appears and you choose the one you wish to load. Choose “Load
Tutorial” to load the tutorial railroad. After you have completed one
year of play, you will also be given the option to resume a game from
the end of the last completed year.
The next menu asks you to choose the world you wish to play in:
“Eastern USA”
“Western USA”
“North America”
“South America”
“Africa”
“Europe”
If there are multiple time periods for the world you have chosen,
a box will pop up displaying the optional dates.
You are next asked to choose the level of difficulty at which you
wish to play:
“Investor”
“Financier”
“Mogul”
“Tycoon”
The Investor level is the easiest level to play and the difficulty
increases as you move down the list. The level of difficulty affects how
13
Page 25

much revenue is earned by each delivery. You may run your Railroad
for 100 years unless forced into early retirement.
The level of difficulty chosen also affects your tycoon rating when
you retire, as explained below in the section on Difficulty Factors.
After you have chosen the difficulty level, you are then asked to
set the level of reality at which you wish to play. A menu appears with
three reality levels listed:
“No Collision Operation/Dispatcher Operation”
“Friendly Competition/Cut-Throat Competition”
“Basic Economy/Complex Economy”
This menu differs from most others in that each option is actually
a toggle between two choices. The option that is shown in the menu
is the active option of each pair. If you choose an option, that option
is turned off and is replaced by the other one of the pair.
If the menu currently lists “No Collision Operation”, then the
game is set to run in the No Collision Mode. If you choose the “No
Collisions” option from the menu, that turns on the “Dispatcher
Operation” option and the game is set to play with more complex train
operations. In this case, the movement of trains is controlled by block
signals, and collisions are possible (see Operating Trains, page 86).
New players should choose No Collisions.
If the competition is friendly, they do not buy your stock, attempt
to take you over (see Stock Market Takeovers), or start rate wars at
your stations (see Rate Wars). If the competition is cut-throat, they
aggressively buy your stock, try to take you over, and start rate wars
to capture your stations. New players should keep the competition
friendly.
In a basic economy every station serving a moderate size city
demands all cargos. This makes it easier to make money, because any
cargos that you can pick up can be delivered to any city station. In a
complex economy the demand at a station is determined by demand
of the industry and community it serves (see Railroad Stations). New
players should play with a simple economy until comfortable with the
concepts of supply and demand.
Reality Levels
14
Page 26
For each of the reality levels, choosing the easier option makes the
game easier to play by dropping out some concepts a new player then
doesn’t have to think about. As you get more familiar with the mechanics of the game and the decisions that must be made, you can selectively
increase the reality level of your games.
In addition to making the game more or less easier to play, setting
the reality level has an effect on the difficulty factor explained below.
The Difficulty Factor
The difficulty factor is a measure of the degree of difficulty that
you have set for your game. When you retire or are forcibly retired, the
difficulty factor helps to determine your retirement bonus and tycoon
ranking. The difficulty factor is a percentage, from 25% to 100%, and
the higher the percentage, the higher your ranking is, other things
being equal.
The difficulty factor has two general components, the levels of
difficulty and reality that you have set for your game. Each level of
difficulty has a difficulty factor value.
To these factors are added the factors from each of the reality
levels. The easier levels of reality have a 0% difficulty factor. The
difficult levels of reality are each assigned a number of difficulty
factors that are added to your total when selected.
When you are setting the level of reality for your game, the
Difficulty Factor window is also visible. Within this window is
displayed the current difficulty factor of your game, ranging up to a
maximum of 100%, and set at first by the level of difficulty that you
have already chosen. As you adjust the reality levels, you can see the
difficulty factor changing with each adjustment.
New players should start with a very modest reality level. A
difficulty factor of 100% is achieved by playing at the tycoon level with
all three of the difficult reality levels turned on. This is the ultimate
Railroad Tycoon challenge.
15
Page 27

The effect of your difficulty factor on your retirement bonus reflects
the number of jobs you took on as president of your railroad. If you
additionally acted as your railroad’s dispatcher, had to battle much
fiercer competition, and acted as your railroad’s shipping agent, then
your bonus is going to be larger.
When you are satisfied with the reality levels that you have
chosen and the difficulty factor that results from your choices, press
the Selector 1 key, or Selector 2 if using the mouse, to proceed.
This ends the pre-game choices you need to make to begin play. At
this point the map is drawn and mountains, resources, and cities are
added to complete the world for your game.
As prompted, press any key to begin play.
16
Page 28
READING AND
USING THE
DISPLAYS
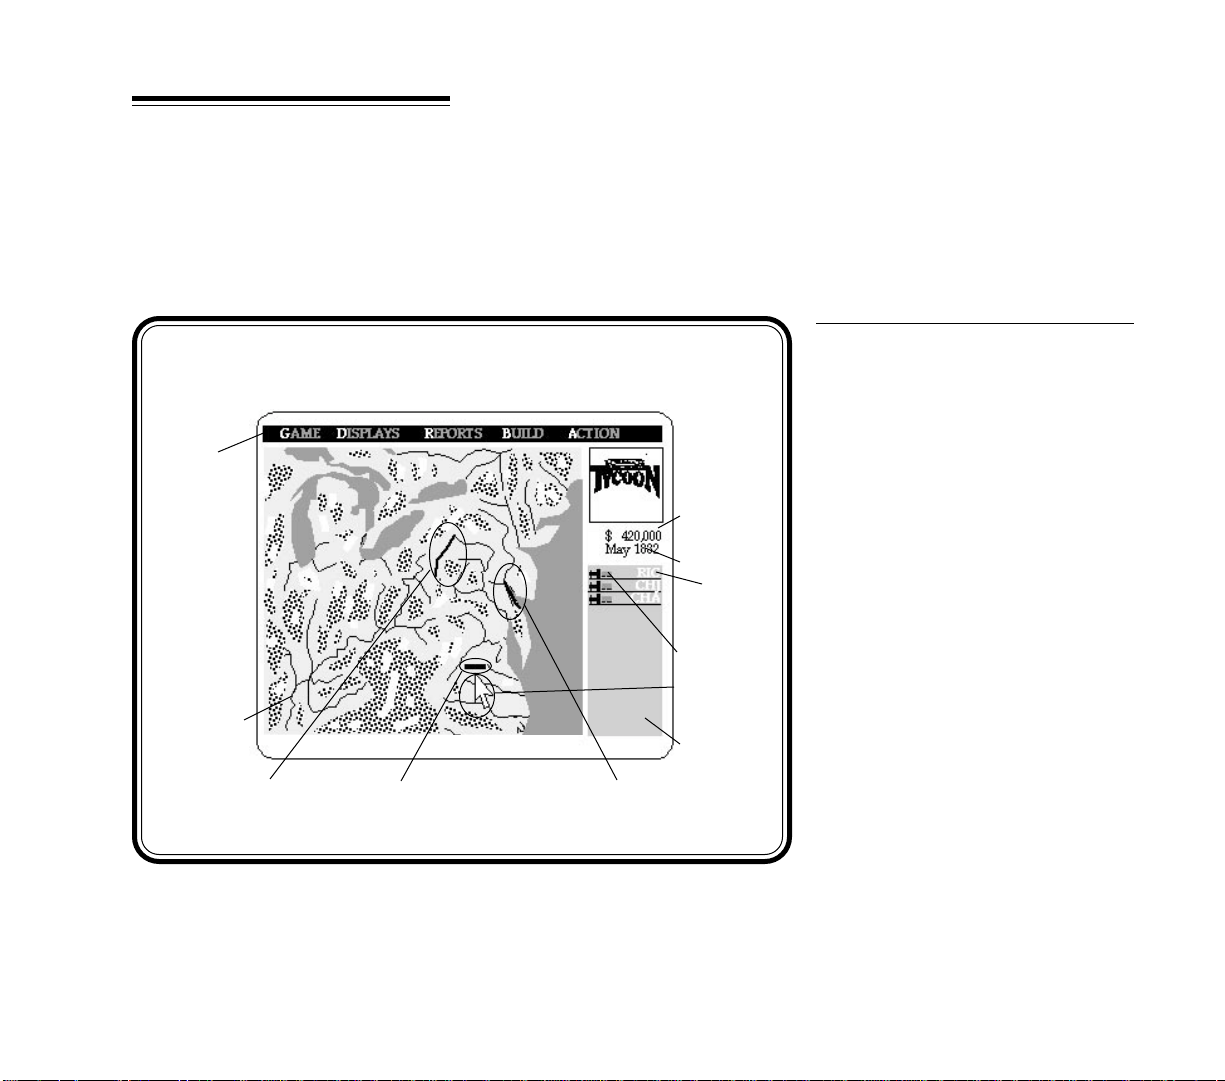
After you finish choosing the pre-game options, the game opens at
the Regional Display. The main feature of this display is the world map
chosen for this game shown in the display window. The other important
features of this display are the Menu Bar, the Train Roster, the date,
your railroad’s current cash, and the World View window. These
features are found on the other displays as well.
You spend the majority of the game playing from the displays, and
you need to understand what you are seeing and how you can perform
game functions from these displays to play well.
Regional Display
Menu
Bar
Regional
Display
Track of the
Johnstown &
Williamsport RR
Track of the
Charlottesville &
Richmond RR
sider building your railroad. Normally this is an area where at least
two good sized cities are close enough together to make building a
railroad between them a reasonable proposition.
Current
Cash
Date
Destination
of Train #1
Train #1
Pointer
Train
Roster
Window
Track of the Dover
& Wilmington RR
The Regional Display
This display shows the entire
world chosen for your game. In
the case of the Tutorial Railroad,
from which the above illustration
comes, the game world is the
Eastern USA. You should be able
to recognize the rivers and coastlines. Refer to the Technical Supplement to learn what the different colors that are visible on land
represent.
This display gives you the
complete picture of the world. It
shows the basic geography, including the location of mountains
and rivers, and also indicates centers of population. If railroads
have started operating, they are
visible as well.
From the Regional Display you
can pick out likely areas to con-
17
Page 29

Across the top of the entire window is the menu bar. From here
you gain access to a number of menus from which you can change
game parameters, save games, jump to other displays, read railroad
reports, build railroad equipment and structures, and perform other
game functions. In the following sections, the individual menus that
are found on the menu bar are described in detail.
The Menu Bar
When opened, the Game menu consists of 6 options:
“Game Speed”
“Train Messages”
“News Reports”
“Features”
“Repeat Message”
“Save Game”
You can open this menu and make choices from it at any time
during the game. The 5 possible options have these functions:
Game Speed: Choose this option to vary the speed of the game.
A new menu opens listing the 5 game speed options:
“Frozen”
“Slow”
“Moderate”
“Fast”
“Turbo”
Choose “Frozen” to completely stop the passage of time. This
allows you to examine geography, build track, place stations, etc.,
while all trains and activities of competing railroads are halted. In
addition, although you may call your broker, he won’t answer until
time starts moving again.
“Slow”, “Moderate”, and “Fast” are simply relative scales of time,
each faster than the other with no additional effect.
“Turbo” speed is another special case, that not only triggers the
fastest passage of time, but the game does not pause as is normal for
any messages or end of year fiscal reports. The game just continues
playing at top speed with no stops.
Train Messages: This option refers to the train arrival announcements that appear in the World View window at the top right of the
The Game Menu
18
Page 30

display. Normally a report appears in this window each time a train
arrives at a station. This report lists the number of the train, where
it has arrived, the time of arrival, what cargos are delivered, and the
revenues earned by the delivery. By choosing the “Train Messages”
option, you open another menu that gives you the choice of turning
off these messages, or having them go away fast or slowly.
News Reports: Choosing this option opens another menu from
which you can set the type of news reports you wish to receive. From
this menu you control the presence of the reduced sized newspaper
reports that appear from time to time. If you are getting the information, the option has a check mark next to it. If you have the option
turned off, the check mark is missing. Your options are:
“Financial News”
“Railroad News”
“Local News”
•Financial News: These are mainly reports on the financial
activities of competing railroads, specifically the stock that they are
buying and selling. You do not receive news of their bond sales and
purchases unless the competing railroad transacting bonds owns
stock in your railroad.
•Railroad News: These are reports on the non-financial activities
of the competing railroads, such as the start up of a new railroad, and
the building of new stations and track.
•Local News: These reports refer to events on your railroad such
as the presence of a Priority Shipment or a change in the local supply
or demand due to the loss or addition of industry (only when playing
with a Complex Economy).
Repeat Message: If you were not able to read the last message
that appeared, you can choose this option to have the message
repeated.
19
Page 31

Save Game: The game you are currently playing is saved at the
moment you make this choice. You are asked which of the 4 saved
game files you wish to place the saved game in. Thereafter, this game
can be called up again and play resumes from the exact moment when
you saved it. If you choose to write the saved game into a file that holds
a previously saved game, the older game is eliminated.
The Display menu consists of 6 choices:
“Regional Display”
“Area Display”
“Local Display”
“Detail Display”
“Options”
“Find City”
This menu is used to zoom in or out among the displays, or to
change the information shown on the displays. The Regional Display
is the farthest zoom, and the Detail Display is the closest zoom. How
best to zoom from this menu depends on whether you have a mouse
or not.
If you have a mouse, pull down the Display menu and choose the
display option you wish to see. You are prompted to “Click on map
center”. Place the mouse pointer in the area of the current display to
which you wish to zoom and press Selector 1. The new display centers
on the mouse pointer.
Alternatively, the shortcut keys shown on the menu can be used
with either the mouse or keyboard interface. To use the shortcut keys,
center either the cursor or the mouse pointer in the area you wish to
examine, and press the shortcut key specific for the display you wish
to see. The new display centers on the area you marked.
Options: By choosing this option, you open another menu from
which you may toggle on or off information reported on the displays.
The information that can be toggled on or off are the Station Boxes
and the Resource Map. If the information is on, the option has a check
mark next to it. Information toggled off has no check mark.
The Display Menu
20
Page 32

•Station Boxes: If checked, Station Boxes are visible from the
Area and Local Displays. If not checked these reports are removed.
•Resource Map: If checked, this option converts the Area and
Local Display maps to Resource Maps to help you find nearby sources
of cargo supply and demand. If not checked, the normal Area and
Local displays appear.
The Reports Menu
The Reports menu consists of 7 choices:
“Balance Sheet”
“Income Statement”
“Train Income”
“Stocks”
“Accomplishments”
“Efficiency”
“History”
Choose the option you wish to examine, and the report opens.
Each of these reports is explained in more detail elsewhere in this
manual, but a short description is included below.
Balance Sheet: A financial statement from your railroad that
shows its current condition in terms of assets, liabilities, and the
retained earnings, or profits over its lifetime.
Income Statement: Another financial report showing your
railroad’s revenues and expenses, both for the fiscal period to date,
and lifetime of the railroad.
Train Income: A list of every train running on your railroad and
information about that train, especially the revenue it has earned so
far this period and in its lifetime.
Stocks: A graph that plots the prices of your stock and the stock
of the competing railroads.
Accomplishments: A list of the major accomplishments by your
railroad including when it was founded, new stations, record revenues,
etc.
21
Page 33

Efficiency: A report on how efficient your railroad is in picking
up cargos waiting at stations, how full your trains are kept, the
revenue you are earning per car, etc.
History: A graphic recreation of the growth of your railroad and
your competitors on a year by year basis.
The Build menu can consist of up to 7 choices, depending on
what already exists on your railroad and what display you are
currently at:
“New Train”
“Build Station”
“Build Industry”
“Remove Track
“Build Track”
“Improve Station”
“Upgrade Bridge”
Each of these build options is explained in more detail elsewhere
in this manual, but a short description is included below.
New Train: Available from any display, choose this option to
build a new train.
Build Station: Available only from the Detail Display and only
after at least one track section has been laid, choose this option to
build a new station on your railroad.
Build Industry: Available only from the Detail Display, choose
this option to attempt to build a new industrial site, such as a steel
mill, factory, etc.
The Build Menu
22
Page 34

Remove Track/Build Track: Available only from the Detail
Display, this option toggles between building track and demolishing
track. When the “Build Track” option is active, it is marked by a ( )
check mark. Similarly, there is a check mark next to the "Remove
Track", when this is the active option. In addition, the color of the
Construction Box box changes to reflect the active option, as explained in the Technical Supplement.
Improve Station: Available only from the Detail Display and only
if the Construction Box is centered over an existing station, choose
this option to build improvements at the selected station, such as an
engine shop, maintenance shop, post office, restaurant, etc.
Upgrade Bridge: Available only from the Detail Display and only
if the Construction Box is centered over an existant bridge, choose
this option to replace an existing bridge with a better one.
The Action Menu
The Action menu consists of 5 choices, or actions that you as
president of your railroad can undertake:
“Call Broker”
“Survey”
“Name RR”
“Reality Levels”
“Retire”
You can open this menu and make choices from it at any time
during the game. The 5 possible options have these functions:
Call Broker: Gets you in contact with your stock broker so that
you can buy and sell stocks and bonds. You can buy the stock of your
own railroad or the stock of a competing railroad. Also through your
broker you can direct the operations of any railroads that you control.
(See Calling Your Broker and Controlling Other Railroads.) Your broker
may not always be able to return your call because he is currently
taking calls from competing railroads or because you have frozen
time. If you have a call placed, a letter B appears to the left of your
current cash indicating that your broker will get back to you as soon
as he can, and that you don’t have to keep calling.
23
Page 35

Survey: Available only from the Detail Display, choosing this
option calls in your engineers to survey the area visible on the display
map. The engineers mark the elevation of the area in order to help you
plan where best to lay your tracks to minimize grades. (See Surveys
And Grades.)
Name RR: Choosing this option allows you to give your railroad
a new name. A window opens and prompts you to type in the name
you desire. In addition to the full name, you are asked for a 3 letter
handle for your railroad that is used in places where the full name
would take too much space. For example, the handle of the Baltimore
& Ohio Railroad might be the B&O.
Reality Levels: Choosing this option opens a new menu of the
game options that you selected when beginning play (see Pre-Game
Options, page 16). You may turn these options on or off from this
menu. The reality levels that can be changed are:
•No Collision Operations/Dispatcher Operation: New players
should choose No Collisions.
•Friendly Competition/Cut-Throat Competition: New players
should keep the competition friendly.
•Basic Economy/Complex Economy: New players should play
with the Basic Economy.
Retire: Choose this option to end the game or to see how you are
doing at this time. By choosing this option, you receive a report on
what your retirement bonus would be if you retired now, and what
occupation your performance indicates that you are best suited for.
Press Selector 1 to open a menu that gives you a chance to return to
the game or really retire.
24
Page 36

The World
View Window
This small window is most often used to show you at a glance the
part of the world map that is currently shown in the display window.
It is also used to display Train Arrival Announcements when one of
your trains arrives at a station. (Note that how long Train Arrival
Announcements linger in this window, or whether they appear at all
can be determined by you from the Game menu.)
When the world map is shown within the World View window, a
box is drawn around the part of the world that is currently shown in
the display window. Since it would not make any sense to show this
map when you are at the Regional Display, the Railroad Tycoon logo
is shown in the window instead.
Current Cash
Date
The amount of money shown here is the cash your railroad
currently has on hand to spend. The color of this number (as
described in the Technical Supplement) indicates whether the balance is positive or negative. A negative cash balance is the current
amount of short term loans that you have outstanding (see Short
Term Loans).
This is the current month and year of your Railroad Tycoon
game. Each game begins in the month of January of the starting year.
For example, games in the Eastern USA begin as early as January of
1830. The end of December in each odd-numbered year ends a fiscal
period in the game and you review the financial reports of your
railroad at that time. At the end of December of each year, you are
charged interest on your bonds and short term loans.
25
Page 37

This roster is a list of your trains, in order, from Train #1 at the
top, down to the last train on your railroad (see Train Roster, page 65).
From this roster you can tell at a glance the cars currently in a train,
whether they are loaded or empty, the train’s destination, whether it
is currently paused or not, its relative speed, and whether or not it is
carrying a Priority Shipment. If a Priority Shipment is available on
your railroad, the current reward for its delivery is shown at the
bottom of the Train Roster.
From the roster you can obtain more detailed information about
each train and make changes to its route and consist by opening its
Train Report (see Train Reports).
The Train Roster
26
Page 38

The Area Display
Station
Name
Station
Boxes
Train #1
Track Station Signal
The Area Display
This is the next zoom down
from the Regional Display and is
a schematic display of your railroad. It shows no geography, but
only the track, signals, trains,
stations, and Station Boxes (if
not toggled off) of your Railroad.
For this display you may toggle off
the Station Boxes (see Display
Menu) and toggle on or off the
Resource Map (see Resource
Map).
This display is useful when
you want to see more of your
railroad at one time than you can
at the Local Display. From here it
is also easier to pick out the railroad features since the local geography is hidden.
27
Page 39

The Local Display
This is the second zoom down
from the Regional Display and
shows not only your railroad’s
features, but also the local geography and industry. From this
display you can plan the expansion of your railroad into nearby
areas with good population centers or industrial sites, while keeping the location of mountain and
river obstacles in view.
On this display you may also
toggle on or off the Station Boxes
of your stations or the Resource
Map.
Local Display
Coal Mine
Steel Mill
Local Display
Train #2
Cities Factory
Tracks of the Charlottesville
& Richmond RR
Train #1
Regional Map
Section
28
Page 40

Detail Display
City of
Charlottesville
Steel Mill
Detail Display
Charlottesville
Station
Train #1
Tracks of the
Charlottesville &
Richmond RR
Construction
Box
Regional
Map
Section
Factory
Richmond
Station
River
City of Richmond
The Detail Display
This is the closest zoom possible, and is the display at which
all railroad construction is done.
This display shows in greatest
detail the geography, population
centers, and industrial sites on
the map. From this display only,
you may survey the local geography and plan in detail the laying
of track (see Surveys and Grades).
This display is also the most
useful when planning train movements that require the overriding
of block signals (see Overriding A
Block Signal), because you get the
clearest view of the relative locations of your trains on your tracks.
29
Page 41

A game of Railroad Tycoon can end in one of four ways. First, if
you are thrown out of office and replaced as president of your railroad
by irate stockholders (see Stockholder Happiness), the game ends
immediately. Second, if another railroad manages to buy enough
stock to gain control of your railroad, your services are no longer
required and the game ends immediately (see Stock Market Takeovers). Third, the game will end after one hundred years. Fourth, you
have the option of retiring at any time.
ENDING THE GAME
AND
Ending The Game
WINNING
Regardless of how the game ends, your performance is rated
according to several factors, including the value of the railroad when
you retired, the number of years that you were president, the
difficulty factor of your game, the number of competing railroads, if
any, that you control, and whether you were thrown out of office.
The resulting retirement rating is your retirement bonus and
final rank as a tycoon, and indicates the job that you are most
qualified for after retirement. Post retirement jobs range from Snake
Oil Peddler, the worst, to Secretary of the Treasury, the best. In the
final scene of each game you are shown a picture of yourself in your
new position.
Throughout play, as you reach new levels of achievement you
may receive offers of other jobs. These offers give you a general idea
of how you are doing in the tycoon rankings.
If you do an exceptional job as railroad president, upon your
retirement you may be elected into the Railroader’s Hall Of Fame.
This is a select group of the 5 greatest Railroad Tycoons. If your tycoon
ranking is high enough, you are given the opportunity to add your
name to the list.
Tycoon Rankings
Railroader’s Hall Of
Fame
30
Page 42

2
TUTORIAL RAILROAD
To help new players understand the major concepts of Railroad
Tycoon, a working railroad has been started and is described in this
section. Follow the instructions for loading this railroad and read
through this section with the railroad on your screen. Before attempting to follow the tutorial you need to at least be familiar with the manual
section Interface Introduction.
To load the tutorial railroad, follow the instructions for setting
the Pre-Game Options up to the point where you have the option of
starting a new railroad, loading a saved railroad, or loading the
tutorial. Choose “Load Tutorial”. This action skips the remainder of
the pre-game options and takes you into the tutorial railroad game.
The first step is the drawing of the world map. When the map is
complete, press any key to begin the game.
TUTORIAL
RAILROAD
After you press any key from the previous step, the Regional
Display opens. Before you do anything else, pull down the Game
menu at the top left of the display on the menu bar and choose the
option “Game Speed”. From the new menu that opens, choose
“Frozen”. This action freezes time until you change game speed again,
and allows you to look around your new railroad before resuming
operation.
31
Looking Around
Page 43

Regional Display
Menu
Bar
Regional
Display
Track of the
Hagerstown &
Harper’s Ferry
RR
Track of the
Charlottesville &
Richmond RR
this world map. For a more detailed description of what you are seeing
on these displays and how to use them, refer to the manual section
Reading And Using The Displays, page 20.
For now, just pull down the menus listed across the menu bar,
one at a time, to familiarize yourself with the options they contain.
Note that some of the options have shortcut keys listed after them.
You can use these keys to choose the corresponding option without
having to use the menus.
After you have looked at the menus, open the next display down,
the “Area Display”. There are several ways to do this, but for now open
the Display menu by pressing “d” and use the Direction key to
highlight “Area Display”. Press the Enter key to select “Area Display”
Current
Cash
Date
Destination
of Train #1
Train #1
Pointer
Train
Roster
Window
Track of the
Salisbury & Dover
You are looking at the
Regional Display. In the biggest
window of the display is the map
of the Eastern USA world, and
you should be able to recognize
the Great Lakes, rivers, and
Atlantic coastline. In the bottom
right area of the map, just north
of one of the rivers, is an angled
line that is a different color from
the rivers. This is the track of
your railroad, the Charlottesville
and Richmond. Throughout this
tutorial the Charlottesville and
Richmond is referred to by its
handle, the C&R.
When you play Railroad Tycoon, you spend the majority of
your time at this display or one of
the three other similar displays.
The other three displays are similar in design, except that the maps
they show are closer zooms of
32
Page 44

and click on the screen just below
the visible track of the C&R when
The Area Display
prompted.
This display is a schematic
representation of your railroad,
and shows no geography. The
parts of your railroad that are
visible are the tracks, stations,
signals, trains, and Station Boxes.
The Station Boxes graphically report which cargos are supplied
Station
Name
Station
Boxes
and/or demanded at each of your
stations, and are described in
more detail in the manual section
Train #1
Station Boxes.
Notice that the display features surrounding the map window have remained unchanged,
with one important exception. To
the top right of the display where
Track Station Signal
the game’s logo previously appeared, there now appears a section of the world map. Within this
map section a box appears. The area within the box is the area of the
world map now visible within the display window.
This Area Display can be modified to change the information it
reports. To see this, open the Display menu and choose “Options”.
Notice on the menu that appears that Station Boxes are checked,
indicating they are on, and that Resource Map is not checked,
indicating that it is off. Take the time now to switch these features on
and off, pressing Selector 2 after each change to see the effect.
As you play, you may find it helpful to have the Station Boxes
turned off to see more of the surrounding area. The Resource Map
shows you at a glance the location of industry and population that
33
Page 45

Local Display
Coal Mine
Steel Mill
Local Display
Train #2
Train #1 Cities Factory
Tracks of the
Charlottesville
& Richmond RR
found on the Player Aid Cards. The parts of your railroad are
represented in the same manner as they were on the Area Display.
Note that the display features surrounding the map window have
remained unchanged from the Area Display. Also, on this display you
may turn off the Shipping Reports or turn on the Resource Map, as
was possible on the Area Display.
From this display, for the first time, you can obtain information
about some of the map features. Using the mouse, place the pointer
on the icon two squares below the Charlottesville station, and press
Selector 1. The icon is revealed as a steel mill.
Regional Map
Section
supply and demand goods. For
more information, see Resource
Map.
Before going on to the next
display, reset the options to
Station Boxes on and Resource
Map off. To zoom in closer to the
C&R, open the Display menu with
the keyboard and choose "Local
Display". Click just below the
Charlottesville Station Box (the
box marked "Cha") when
prompted. Open the Display menu
with the keyboard and choose
“Local Display”.
This display is a closer look
at your railroad and the nearby
geography. Now you can see map
icons that represent the different types of terrain, industry,
and population centers. These
icons are described in detail in
the World Economies Chart
34
Page 46

To zoom in as close as possible to the C&R, Open the Display menu with the keyboard and
choose "Detail Display". Then
Detail Display
City of
Charlottesville
Charlottesville
Station
click on the track...half-way between the Charlottesville and
Richmond stations... when
prompted.
This display is the closest
zoom you can achieve, and the
most detailed view of the map
and your railroad available. From
this view you can see the trains
Steel Mill
moving in detail, including the
smoke puffing from their stacks.
Also visible in the greatest detail
are the map icons for the geography and industries. The icons
now visible are the ones shown in
the World Economies Chart on
the Player Aid Cards. Also visible
for the first time are the names of
Detail Display
Tracks of the
Charlottesville
& Richmond
Train #1
the cities on the map.
From the Detail Display you can obtain information about the
map features present, as you can from the Local Display. However,
the Station Boxes are no longer visible and the Resource Map cannot
be turned on.
The Detail Display is the display where all railroad construction
is conducted. From this display you lay track and build stations. How
to perform these functions is described later in the tutorial. Before
beginning construction, you should examine a few reports to get a
better idea of how your railroad is operating.
Regional
Map
Section
Factory
Richmond
Station
River
City of Richmond
Construction
Box
35
Page 47

Station Report
Station Supply
Station
Name
Station
Construction
Date
Engine
Shop Icon
Station Reports
Station Demand
Station
Size
Station Icon
for Richmond you see that it also supplies mail and passengers.
This presents you with an opportunity to run mail and/or
passenger trains back and forth between the two cities, hauling mail
and passengers between them. At each end you can pick up a cargo,
take it to the other city for delivery, and then pick up a similar cargo
for the return trip.
The information regarding the local cargo supply and demand is
also available in the Station Boxes visible from the Area and Local
Displays mentioned earlier. You use the Station Boxes and the more
detailed Station Reports to help plan where you wish trains to run.
For a more detailed discussion of how stations work, see Railroad
Stations.
Move the Construction Box
onto the Charlottesville Station
icon and press the Information
key or press Selector 1 on your
mouse. Either way you open the
Station Report for the station at
Charlottesville. This report shows
you how big the station is, what
improvements have been made
there (only an engine shop at this
time), what cargos are waiting to
be picked up (cargos that are
supplied there), and what cargos the city will pay for (what
cargos are in demand there).
This information helps you
plan what trains to run where.
You learn, for example, that you
can sell anything here that you
can carry, and that the city is
supplying mail and passengers.
If you look at the Station Report
36
Page 48

The tutorial railroad is set up to run at the lowest difficulty and
reality levels. One of the reality options is the basic economy, where
a city icon generates demand for all cargos. To quickly see how a
complex economy works, return to the Detail Display from the Station
Report, and pull down the Action menu. Choose the option “Reality
Levels”, and from the menu that opens choose “Complex Economy”.
This places a check mark next to the option indicating that the
complex economy is turned on.
Now return to the Station Report for the Charlottesville station to
see the effect of changing to a complex economy. The station will no
longer pay for (demand) everything. It will pay only for those cargos
that the surrounding industry and population want. The city wants
mail, passengers, and goods, the steel mill wants coal, and the paper
mill wants wood. These are the only cargos now in demand.
Before continuing with the tutorial, you can turn off the complex
economy or leave it on as you wish. Next, it is time to examine one of
your trains.
From the Detail Display, turn your attention to the Train Roster
at the bottom right of the display. In this area are shown in order the
three trains that already exist on your railroad. For each train the
roster shows the number and types of cars in the train, the train’s
destination, and other information as explained in the section Train
Roster. For now you want to use the roster to open the detailed Train
Report of Train #2.
To open the report, place the mouse pointer on the locomotive
icon of Train #2 and press Selector 1.
37
Train Reports
Page 49

Train Report
Train Number
Train
Icons
Current
Cargo
Priority
Orders
Wait Until
Full Orders
Train Route
Train Type
The Train Report that is now
visible provides you with detailed
information about this particular
train, including what it is carry-
Train
Location
Maintenance
Costs per
Fiscal Period
ing and where it is headed. For a
Destination
more complete discussion of what
you can see here and what you can
do to make changes, see Trains.
Of particular interest right
now is the part of the report
titled Scheduled Stops at the
Priority
Consist
bottom left. Listed here are the
four stops planned for this train.
To the right of the planned stops,
Planned
Consist
Changes
under New Consist, some freight
cars are visible. The stops and
consist changes for this train have
been planned to take advantage
of opportunities for profit along
the C&R.
If you return to the Local
Display of the C&R, you can see
the reasons for the schedule and
consist of Train #2. At Char-
lottesville Junction there is supply of coal and at Charlottesville is a
steel mill that wants coal. The steel mill takes the coal and converts
it into steel, creating a supply of steel. In Richmond there is a factory
that wants steel. If it gets steel, it converts the steel into manufactured goods. The city of Charlottesville wants manufactured goods.
So Train #2 has been scheduled to load coal at Charlottesville
Junction into a coal car. It then travels to Charlottesville, delivering
the coal. The coal becomes steel. Train #2 takes off its coal car and
puts on a steel car to carry away the steel. The steel is carried to
Richmond and delivered to the factory. The factory converts the steel
to manufactured goods, creating a supply of goods. Train #2 takes off
its steel car and puts on a goods car to carry the goods back to
38
Page 50

Charlottesville. After reaching Charlottesville a second time and
delivering the goods, the train switches to a coal car again and starts
the route over again.
Note that next to Charlottesville Junction on the list of Scheduled
Stops there is a letter “W”. This indicates that this train is ordered to
wait at this stop until it is fully loaded before leaving. How this order
is placed and the advantage it offers is explained in Wait Until Full
Orders.
Note that at this time, Train #2 is listed as a Fast Freight Local.
Open the Train Type menu and select the choice “Limited”. This
changes Train #2 to a Fast Freight Limited, and the train now only
stops at the stations listed in its schedule, and only in the order listed.
In the manual section on Routing Trains, the reasons for making this
change are explained in detail.
The manual sections on Routing Trains and Train Consist
explain how schedules such as this one for Train #2 are arranged. If
you wish, read these sections now. For practice, take Train #3, now
hauling coal to Charlottesville, and give it the same schedule and
consist of Train #2. Before leaving this report, however, pull down the
other menus across the top to see what options are available.
The first real step in getting a new railroad operating is laying
track. Although the C&R is already operating, it is going to have to
expand to grow and increase revenues. You are going to lay some
track to the north of Charlottesville to connect up to the lumber mill
on the map in that direction. Wood from the lumber mill can be
carried to the paper mill and converted into paper, as noted on the
World Economies Chart (see the Player Aid Cards).
To build some new track, return to the Detail Display and place
the Construction Box on the track section directly below the paper
mill that is to the east of the Charlottesville station. Now press the
Track Construction key for laying track in a northeast direction. You
see a new track section appear, branching off from the mainline to
Richmond. Lay one more section in a northeast direction.
Because the terrain directly ahead is hills, it might pay to survey
the local area to see what the best route is. Press the Center key to
39
Laying Track
Page 51

center the map on the Construction Box, and then open the Action
menu and choose “Survey”. The elevations of all the visible map
squares are revealed and this makes it clear that laying straight
ahead would mean a steep rise in the relative elevation. However, if
you build north for a while and then curve around the hills, the
elevation changes remain reasonable. You can leave the survey on if
you like, or remove it by pressing the Center key again.
Lay four more track sections straight north, and then one more
northeast. That brings your track adjacent to the lumber mill. Note
that with the laying of each track section, your cash is reduced. Cash
is being spent for the track and the land, or right-of-way, that the
track takes up. You now have the track completed for the connection
to the lumber mill, and it’s time to put a station there to load the wood.
Building A Station
To build a station for the lumber mill, place the Construction Box
on the track section that ends next to the mill. Pull down the Build
menu and choose “Build Station”. A new menu appears from which
you choose the type of facility to build. Also, the economic radius of
the types of stations available appears centered around the Construction Box.
The economic radius is explained in further detail in the manual
section How to Build a Station, page 58. Basically it represents how
far people and industry are willing to travel to each station type to pick
up deliveries or drop off cargos to be shipped. The better the station,
the farther they will come. Since your station is going right next to
the lumber mill and there are no other likely customers nearby,
you need only build the smallest station, a Depot with a radius of
one square in every direction.
Choose “Depot” from the list of options, and a station report for
the new station at Charlottesville Crossing appears. This report
shows that the station can be expected to supply 6 cars per year with
a normal economy, and that no cargos are in demand here. Now that
the track and a station have been built to a supply of wood, you need
to put on a train to carry the wood to the paper mill.
40
Page 52

To build a new train to carry the wood, pull down the Build menu
and choose “New Train”. A new window appears offering you the
choice of locomotives to put on the train. However, at this time, only
one locomotive is available,the John Bull.
You make your selection by placing the mouse pointer on the icon
of the locomotive on the left side of the window and then pressing
Selector 1.
Next, you are taken to the Charlottesville Station where the new
locomotive is built. The engine appears here because the only engine
shop on your railroad is at Charlottesville. (For more information
about the engine shop and other facilities that can be built at your
station, see Station Improvements.
The new locomotive drives out of the engine shop and stops to the
left of the station platform. At this point you add the cars that you
want on the train. You can put as many as 8 cars on any train, but
this tiny locomotive is not capable of pulling that many. As time
passes and better engines are developed, you can build much bigger
trains, but for now just put on one wood hopper car. When the hopper
is on, choose “Continue” to complete the train. You now go to the
Train Report for your new train, Train #4.
Your train is ready to go except that its schedule sends it back
and forth from Charlottesville to Richmond. You want this train to go
to Charlottesville Crossing instead, to pick up wood. You need to
make this schedule change before allowing the train to start out.
To change the schedule, place the mouse pointer on the city
name “Richmond” and press Selector 1. This opens the Route Map.
Move the mouse pointer to the small box beside Charlottesville
Crossing and press Selector 1. Press Selector 2 to return to the Train
Report. Charlottesville Crossing is now stop #2 on the list of scheduled stops for Train #4. This train is now scheduled to run back and
forth carrying wood to the paper mill at Charlottesville. You can now
leave the Train Report.
Building A Train
41
Page 53
Restarting
The Railroad
You have now examined the major game functions that you must
understand to play Railroad Tycoon. Pull down the Game menu again
and choose “Game Speed”. Set the speed to “Slow” and let your
railroad begin operating. Take the time now to examine some of the
reports found in the Reports menu. They are explained in detail in the
manual chapter, Railroad Business. Zoom in and out among the
displays, and turn on the Resource Map for a while to look for likely
areas to expand the C&R.
It may be useful to save the C&R at this point, and then
experiment with new routes, trains, and the reality options. To save
the game at this point, pull down the Game menu and choose “Save
Game.” Your first experiments with Dispatcher Operations may
result in some collisions, unless you have studied the manual section
on Operating Trains and have broken up your railroad into signal
blocks. If things go wrong, simply reload the C&R from where you last
saved it and try again.
Reality Experiments
If you decide to experiment with Dispatcher Operation, consider
placing a signal tower halfway between Charlottesville and Richmond, and two more just after the switch on the way to Charlottesville
Crossing. Place one on the mainline east of the switch and one on the
branch line on the north side of the switch. Experimentation and
reading the section on Operating Trains should make it clear how
these signals can speed the movement of your trains.
The track between the new signals at the Charlottesville Crossing
switch and Charlottesville can be double tracked to allow two trains
at a time to move through this block.
You may also consider changing over to a complex economy. The
C&R as set up for you can operate perfectly well with a complex
economy. Further profitable expansion, however, will require that
you understand how stations work, and the relationship between
industry and cargos.
When you have finished experimenting, it is time to restart the
game, select your new railroad world, and build your own railroad
from the beginning.
42
Page 54

3
RAILROAD ENGINEERING
Where a railroad places its track can make a significant difference
in its operations and profits. If track is laid up a hill, every train using
the route must slow down or increase power to make the climb. If the
track is sharply curved, trains must again slow down to prevent
derailment. Poor track planning increases costs and reduces earnings.
The most desirable track is straight and level, allowing trains to
maximize speed in both directions. The more curves and grades, the
slower trains can move and thus, the slower deliveries are made. Since
most revenue is tied to speedy delivery, slow trains may be the
difference between profits and losses.
Once a railroad decides to lay track between two points, the
construction process takes several steps. The first is to send engineers
into the country to survey the geography. The surveyors select a route
that minimizes grades, curves, and right-of-way expense. Railroads
must buy the land, or right-of-way, over which their tracks are to be laid.
The route selected should pass over undeveloped and less expensive
real estate where possible, rather than expensive residential or industrial areas.
Once the route is selected and the right-of-way acquired, track
laying begins with the leveling of the roadbed to as nearly level a grade
as possible. This may require earth fills in depressions, cuts through
ridges, and bridges and tunnels for more serious obstacles. Once the
road bed is prepared, on goes the gravel ballast, the wooden crossties,
and finally, the steel rails.
In Railroad Tycoon you may also survey the areas through which
you wish to lay track. By conducting your survey you can plan how best
to run your tracks so as to minimize grades, curves, tunnels and
LAYING TRACK
43
Page 55

bridges. Building tunnels and bridges greatly increases the cost of your
track, but may be a better alternative to long detours or steep grades.
Your trains will move more slowly up steep grades and through
tight curves, so good planning before the trains start running will
increase your average train speed and profits over the life of your road.
As construction engineer of your railroad, you must carefully balance
the cost of alternative routes vs. their effects on your train operations.
How To Lay Track
Track is constructed on the Detail Display only. It is built in
sections, one section at a time. A track section connects the center of
one map square to the center of an adjacent square.
To lay a section of track, center the Construction Box on the map
in the square from which you wish the track piece to be constructed.
Press the correct Track Construction key to build a section of
track in the direction you desire. Watch the new track piece appear
and note that the cost of the right-of-way and track construction are
subtracted from your cash.
Once your first section of track is laid, you can continue putting
down more track in any of six directions: straight ahead or back, a 45
degree angle to the left or right, or a 90 degree angle to the left or right.
However, once track building begins, you may only build new
sections off of existing track. You cannot thereafter start a new
section independent of existing track.
All track built into a new square is single track. (See Double
Track.)
You may build switches by having track split off an existing track
piece at a 45 degree angle (not a 90 degree angle), but either the switch
or original track must be a straight section. You cannot build a “Y” track
junction.
You may not lay track across another section of your track or a
section of another railroad’s track.
44
Page 56

Surveys And Grades
As you lay track you may receive a message reporting that the
section you wish to lay has a grade
of a certain size, 1.5% or higher.
The higher the percentage, the
steeper the grade and the slower
trains can move here. You are given
the choice of proceeding or not
with construction. Before laying
the track consider conducting a
survey of the area to look for an
easier route.
You can survey an area by
centering it in the Detail Display
and choosing “Survey” from the
Action menu. In each square of
the map a number appears. These
numbers represent the relative
elevations of the squares. Grade
percentages result from a complicated calculation of the differences between the elevations of
two adjacent squares.
Trains are slowed down by
even the tiniest grade, and are
only unaffected when moving
downhill or on a level. Grades of
some sort are all but impossible
to avoid, and in many cases you
have no good alternative but to
accept grades of 3% or even
higher.
Track Examples
45
Page 57

River Bridges
Bridging the gaps over rivers and other geographic features was
a major engineering challenge for railroads. In the early days the
material of choice was stone, but its expense often forced the compromise of wood. As technology and engineering science progressed,
engineers turned to steel as the best structural material for their
bridges. It was relatively cheap but still capable of supporting the
growing weight of trains.
You may lay track across rivers by building bridges. To build a
bridge, proceed as if you were laying a normal straight track section.
Bridges cannot be built on curves. A menu appears showing you the
cost of each bridge type now available. You have the option building
any one of the bridge types, or of not building the bridge at all.
River bridges may only be built in a straight line over one river
square. The bridge is built from the starting square to the first land
square on the river’s other side. You may not build a bridge that
crosses more than one river square.
Floods may wash out your bridges. Trains on bridges that wash
out or that cannot be stopped or rerouted before going off of a washed
out bridge are destroyed (see Train Wrecks). A washed out bridge is
rebuilt after the passage of sufficient time. You cannot speed the
rebuilding process, or build a bridge of a new type at this location
while the washout remains.
You have a choice of up to three types of bridge to build. A wooden
trestle costs $50,000 and is very susceptible to washouts. A steel
girder bridge costs $200,000 and is much harder to wash out, but is
not available until the technology for it is achieved. A stone masonry
bridge costs $400,000 and is almost impervious to floods. Only steel
and stone bridges may be double tracked, wooden trestles may not.
Ferryboats
It is possible for your trains to cross tidal estuaries, the ocean or
large lakes with the help of ferryboats. To build a ferry, proceed as if
you were laying track over the ocean or lake. In effect you build a ferry
route, which may include curves but may not be double tracked.
Ocean ferries are built one square at a time. If the water to be
crossed is several squares wide, you must continue building ferry
sections to the other side of the water.
46
Page 58

Trains move over ferries as if they were normal track sections,
except that train speed is very slow.
Ferries can not be sunk or otherwise damaged.
When a hill or mountain along a planned route was impossible to
build around or slice through with a cut, the last resort was a tunnel.
Despite their cost, tunnels were normally bargains that eliminated the
need for long, tortuous switchbacks with steep grades or long detours.
In Railroad Tycoon you may have situations where your tracks
cannot cross a mountainous area without building very steep grades.
In these situations the increase in train speeds may justify the cost of
a tunnel.
If you attempt to build a straight track section of sufficiently
steep grade, your engineers inform you that building a tunnel may be
an option here. To build it, choose the “Build Tunnel” option from the
choices presented. The engineers then calculate how long the tunnel
needs to be to come out at the same elevation it starts at. A second
menu appears reporting the required length of the tunnel and its cost.
To build the tunnel, again choose “Build Tunnel”. To not build the
tunnel, choose “Never Mind”.
If you build the tunnel, it appears on the map and you can
continue building track from its end. The track inside the tunnel is
straight and level.
Tunnels are constructed at the elevation of the square from
which they are built and therefore have no grade.
Tunnels may not be double tracked.
The value of having two tracks between stops, one for traffic in each
direction, was recognized by railroads early on. With a flexible system
of switching between the tracks and monitoring the relative position of
trains, double tracking made train movement more efficient. Doubling
track, even at a later date, was much less expensive than the cost of a
second single track because the right-of-way was already owned and
much of the preparation was already accomplished.
In Railroad Tycoon all of the track you lay is single track, but you
may go back over existing sections and double track them. This
immediately doubles the number of trains that can safely move over
Tunnels
Double Track
47
Page 59

any section (see Operating Trains). However, doubling track is expensive and normally necessary on only your busiest sections. Monitor
your train operations and double track those parts of your railroad
where too often trains are kept idle waiting for tracks to clear.
To double a track section center the Detail Display over the area
to be improved. Place the Construction Box on the section to be
doubled and press the Double Track key. Note the change of the
section to the map symbol for double track. Track is doubled one
section at a time.
The following features may not be double tracked: 90 degree
curves, tunnels, and wooden trestles.
All stations, including signal towers, are automatically double
tracked.
Track And Bridge
Demolition
Railroads occasionally found it necessary to rebuild or remove
track and other structures. The B&O for example, rebuilt its main line
from Baltimore to Harpers Ferry several times to eliminate difficult
curves and grades. As railroads have concentrated their business into
long, mainline hauling, many branch lines have been abandoned and
torn up. Many industries have gone over to truck transport, or entirely
disappeared, eliminating the need for rail transport to communities.
In Railroad Tycoon you may find circumstances where a station no
longer needs to be served because the local industry has gone out of
business, or where a bridge that can be double tracked is a good
investment, etc. In these cases it may be financially beneficial for your
railroad to remove or realign your tracks. Note that track not being used
stills costs you money for maintenance.
To demolish a track section or bridge from your railroad, go to the
Detail Display and place the Construction Box at the end of the
section or bridge to be removed. Pull down the Build menu and choose
the “Remove Track” option. Note that the Construction Box changes
color, signifying that your work crews are now prepared for demolition.
48
Page 60

Press the Track Construction key for the direction in which you
wish to tear up track and the section is removed. When track is
removed, you receive cash for the value of the right-of-way that is
sold.
When you have completed all desired demolitions, pull down the
Build menu again and choose the “Build Track” option. This returns
the Construction Box to its normal color signifying that track building
is again possible.
49
Page 61

RAILROAD
STATIONS
The first regularly operating railroad station in the United States is
thought to have been built by the Baltimore & Ohio Railroad in the Mount
Clare area of its home city. This station was used for many years until
the passenger and freight traffic passing through it grew too large. Most
of its functions were moved to a larger station in the Camden area that
was better equipped to handle the traffic flow into and out of the
expanding city.
The purpose of a railroad station, like those on the B&O, is to
provide a place for people and goods to transfer to and from trains. A
small platform by the trackside where farmers drop off their milk cans,
the special sidings adjacent to a coal mine, or the New York Central’s
Grand Central Station in Manhattan are all examples of stations or
facilities functioning as stations.
In order to work efficiently, a railroad sets up a network of
appropriately sized and equipped stations to provide reasonable service to its customers. Grand Central Station would be wasted in a small
rural town, while a small commuter station would not begin to handle
the needs of New Yorkers.
In Railroad Tycoon, you have a choice of three different sized
stations to build. The larger the station you choose for a location, the
larger the surrounding area it serves. However, larger stations cost
more. Your challenge is to accurately assess the needs of the local
community and provide a station that provides the most service for a
reasonable investment. A station that is too large is a waste of money,
and a station that is too small reduces the local supply and demand for
cargos, lowering potential revenue.
Description
In Railroad Tycoon stations are the only places that trains can stop
to pick up and deliver cargos. Building track into industrial sites or cities
has no effect on creating supply and demand for cargos. The transfer
facilities that automatically come with a station must be present for
pickups and deliveries to take place.
There are three types of station: Depots ($50,000), Stations
($100,000), and Terminals ($200,000). They are differentiated by
their cost, economic radius, and map icon.
50
Page 62

The economic radius is a
range in squares out from the
station in all directions. The bet-
Station Economic Radius
ter the station, the farther people
and industry can be expected to
travel to do business with your
Terminal
Radius
railroad. All industrial and population sites within the radius of a
station send (supply) and receive
(demand) business through the
station. By adding together the
Station
Radius
supply and demand for cargos
from the industry and population
within range, the supply and demand for the station is deter-
Depot
Radius
mined. For example, assume each
coal mine creates an average supply of two carloads of coal per
year. A station with three coal
mines within its economic radius
then generates a supply of about
Construction
Box
six carloads of coal per year.
A Depot has a radius of one
square in all directions, a Station
has a radius of two, and a Terminal has a radius of three. The square
the station occupies also contributes. During the station construction process you are graphically shown the radius of each station type
before you actually spend money to build. Examine this graphic to
determine which station incorporates the area that you desire.
The section of track that any station occupies is automatically
double tracked.
Each station comes automatically with a Signal Tower attached
(see How Signals Work). Additional facilities can be built at any
station location (see Station Improvements). An engine shop is
automatically built at the first station that you build.
Build
Station
Menu
51
Page 63

How To Build
A Station
Railroad stations are built on the Detail Display. Place the
Construction Box on the track section square where you want the
station. Pull down the Build menu and choose “Build Station”. A
second menu appears offering four choices: “Signal Tower ($25,000)”,
“Depot ($50,000)”, “Station ($100,000)”, or “Terminal ($200,000)”.
For now, ignore the Signal Tower (see Signal Towers). Choose the
station type you wish to build and press Selector 1. The icon for the
station type you chose appears under the Construction Box.
Immediately thereafter a graphic appears describing the station
you just built. The station is named, and its type is shown with the
date of construction. In a window is displayed the average yearly
supply of specific cargos this station can be expected to generate, if
any, plus a list of cargos that are demanded here.
Stations may only be built on straight track sections, not curves.
The straight section may end in the square chosen, thereby placing
a station at the end of the line.
Stations may not be built if their economic radius overlaps the
radius of a nearby station in any square.
To replace a station with a larger or smaller one, repeat the
procedure for building a station and place the new station on top of
the old one. For example, if you have a Depot that you wish to replace
with a Terminal, center the Construction Box on the Depot and then
follow the procedure for building a Terminal. The Depot is replaced
by the Terminal.
Station Boxes
An operating railroad must be flexible in its ability to reroute trains,
add or delete trains, and otherwise adjust its service in response to
changes in the supply and demand of cargos along its system. The
opening of new coal fields, the burning down of a factory, or the growth
of a city’s population are the kinds of factors that are constantly
affecting railroads. A nimble management quickly adjusts to increased
supply of steel here and decreased demand for livestock there by
switching livestock trains to steel. Otherwise, trains that could earn
revenue in one area run mostly empty in another, while the maintenance costs pile up.
52
Page 64

In Railroad Tycoon you monitor the supply and demand of cargos
at your stations by checking their supply and demand reports. When
you see supplies of cargos to be shipped piling up on one station’s
report, you need to look at your other Station Reports to find places to
deliver those cargos.
Supply and demand information for your stations is found in two
places, Station Boxes, and their cousins, Station Reports. These two
reports are available at all times for each station on your railroad.
To see a station’s Station Box, go to either an Area or Local
Display of the part of your railroad containing the station. The Station
Box is the window attached to the station icon by a line, and is also
identified by a three letter abbreviation of the station’s name.
In addition to the name of the station, you can read the following
information on the Station Box: what cargos are demanded here; what
cargos are now available here to be shipped, and roughly how many
cars of each; whether freight rates for deliveries here are halved,
normal, or doubled; whether a priority shipment is available or demanded here (see Priority Shipments; and a relative measure of
revenue earned for deliveries to this station.
A short line in a column of the box indicates that that cargo is
demanded at this station. For example, a line in the first column of
the second row indicates you can earn revenue for bringing passengers here.
One or more train car icons in a column indicates the number of
carloads of the corresponding cargo now available here to be picked
up by a train. No more than four car icons appear in a column,
although more carloads than that may be available.
The border around the window indicates freight rates. There is a
border color for normal rates, for half rates (only during rate wars),
and double rates (see the Technical Supplement for the correct
colors). Double rates exist for a new station from its opening until the
end of the current fiscal period, and for one fiscal period after a
successful rate war.
Station Box
Supply of Mail
City
(Baltimore)
Revenue Earned
to Date
Demand
for Coal
Demand for
Passengers
Supply
of Steel
53
Page 65

To indicate where you are making money, the bottom of the
Station Box window fills in as revenue is earned for delivering cargos
to this station. The fill is emptied at the end of the fiscal period.
The freight class cargos for Africa and Europe are slightly
different from those in the Americas, as shown in the Station Boxes
on the Player Aid Cards.
Station Reports
Station Report
Station Supply
Station
Name
Station
Construction
Date
Engine
Shop Icon
A Station Report provides supply and demand data in a different
format from the Station Boxes, plus other information as well. Where
the Station Boxes can show a maximum of four carloads of a cargo
waiting, the Station Report can
Station Demand
show a more accurate account
using both car icons and actual
numbers.
You can call up a Station
Report from the Area or Local
Displays in two ways. Place the
Station
Size
mouse cursor on the Station
Boxes and press Selector 1.
From the Detail Display, the
Construction Box must be centered on the station for the Infor-
mation key or Selector 1 to call up
the Station Report. However,
when using the mouse, if you
position the pointer on the station and press Selector 1, the
Station Icon
Construction Box moves to the
station square and then either
Selector 1 or the Information key
open the Station Report.
54
Page 66

In addition to stations and track, railroads developed a need for
additional facilities and structures to improve the efficiency of the road
or bring in additional revenue. Railroads built shops at strategic spots
along their lines for building and maintaining locomotives and rolling
stock. Switching yards were required at major junctions and stops
where trains could be quickly broken up and reassembled. Railroads
that skimped on these facilities paid high maintenance costs or provided unsatisfactory service.
Railroads also found that they could earn money on additional
services beyond transportation. They built railway hotels near their
stations, and included restaurants in the stations themselves, such as
those on the Atchison, Topeka, and Santa Fe run by the Harvey Girls
(the best food in the west!).
On your railroad you may build similar facilities to keep maintenance costs under control, store certain cargos to reduce wastage, and
earn revenue. However, facilities are not cheap and you must carefully
measure their benefit versus cost. Decide what facilities to add where
based on the operating needs of your railroad and the traffic passing
through individual stations.
At each station (but not signal towers) you may build any of the
following improvements:
Engine Shop ............ $100,000
Switching Yard......... $50,000
Maintenance Shop ... $25,000
Cold Storage ............ $25,000
Livestock Pens ......... $25,000
Goods Storage .......... $25,000
Post Office................ $50,000
Restaurant ............... $25,000
Hotel ........................ $100,000
New trains may only be started at stations containing an engine
shop. When you build a new train you are given the choice of which
of your engine shops to place the locomotive. If you have only shop,
the new train must start there. Having more than one engine shop
makes placing trains on the far reaches of your railroad easier.
Engine shops also act as maintenance shops. A switching yard
Station
Improvements
55
Page 67

reduces the time required to change the cars in a train by 75% (see Train
Consist). Place switching yards at stations where trains regularly
change their consists. The more trains you have changing at switching yards, the greater the distance your trains can travel in a year.
A maintenance shop reduces the maintenance cost of trains that
pass through its station in a fiscal period by 75%. Trains that do not
receive regular maintenance may pay very large maintenance bills and
erode your railroad’s profits. In your role as master of the road,
your staff informs you which trains are not receiving regular
maintenance each year.
All supplies of cargos that are not picked up eventually waste
away. In effect they are picked up by some alternative transport.
Storage facilities prevent this wastage of cargos at the station where
they are built. Post offices store mail. Cold storage warehouses store
food. Livestock pens store livestock. Goods warehouses store manufactured goods. Other theaters have storage for cargos unique to their
worlds.
Restaurants and hotels earn additional revenue from passengers
delivered to their stations, with hotels earning two times the revenue
of a restaurant. Rail travelers need to be fed and often require
overnight lodging when arriving or departing. Railroads that provide
these services fill the needs of their customers and earn extra
revenue.
You build station improvements from the Detail Display. Center
the Construction Box over the station to be improved, pull down the
Build menu, and choose “Improve Station” from the options. From
the list of improvements that appears, choose the one you wish to
place.
At the station you see the improvement being built. Press
Selector 1 to return to the game.
You may build each facility only once at a station. A facility that
already exists at the station is shown in parentheses with no cost
when you pull down the menu and cannot be purchased again.
You receive an engine shop with the first station you build. Its
cost is automatically subtracted from your cash.
56
Page 68

The function of a railroad is to transport people and freight from one
place to another, and this is physically accomplished by trains. A train
consists of two parts, an engine providing the power for motion and the
carrying vehicles pulled by the engine. In the United States the engines
and carrying vehicles are generally known as locomotives and cars.
Since the earliest days of railroading there has been a continual
evolution in the technology of both locomotives and cars. Safety,
efficiency, and reliability have increased.
For locomotives the evolutionary trend has generally been toward
higher speed and greater pulling power. In addition, locomotive designs
were adapted to the role they were to perform and to the geography the
road ran through. For example, trains operating in mountain or plains
areas required different gear ratios. Locomotives designed for express
passenger trains had relatively less pulling power but generated higher
speed. Where speed was of less importance, such as for bulk cargos like
coal, gearing and wheel size emphasized pulling power.
In addition, locomotives have evolved from wood burning steam
engines to coal and oil burning steam engines, diesel-electrics, dieselhydraulics, and electrics.
Cars have gotten larger, but mainly more specialized. The earliest
cars were horse-pulled wagons fitted for use on rails. These evolved into
specific cars for passengers, livestock, coal, liquids, etc.
The job of the master of the road is to provide suitable locomotives
and cars for the service the railroad is providing. This mix of equipment
and rolling stock must be maintained, upgraded when outmoded, and
adjusted for changing service needs.
In Railroad Tycoon you must continuously monitor the equipment
and rolling stock needs of your railroad so that the correct cars and
trains are in operation. As time passes new locomotive designs become
available for your railroad and correctly matching locomotives to tasks
improves your road’s efficiency. For example, a fast Ten Wheeler
locomotive pulls a two or three car passenger train much faster than a
powerful Consolidation locomotive, but the Consolidation pulls a 6 car
coal train much faster than the Ten Wheeler would.
In addition, you must be sure that the proper cars are available
when trains arrive in a station to load cargos. A train of passenger cars
TRAINS
57
Page 69

is not going to take on a load of oil. You arrange for the correct cars to
be in the right place by setting the routes of your trains and/or changing
the cars in an arriving train to provide the desired service. Incorrect
routing or cars means cargos are not picked up and revenue is lost while
the maintenance cost meter is running.
Building Trains
You place a new train on your railroad by first building a new
locomotive and then buying cars to couple to it. In order to build a new
locomotive, however, you must have previously built at least one
railroad station. This is necessary because all new trains appear with
their locomotive at an engine shop, and your first engine shop appears
automatically with the building of your first station.
When at least one engine shop exists on your road, you may build
new trains from any Display. To build a new train, pull down the Build
menu and choose “New Train”. This opens the New Train window that
shows a picture of the locomotive types available, their characteristics, and their cost. Place the pointer on the icon of the locomotive you
wish to build and press Selector 1.
If you build a locomotive, another menu appears listing your
choices of engine shops where the locomotive may be constructed. If
you have only one engine shop this menu doesn’t appear. When
necessary, choose the location for your new train by selecting the
desired option.
Having chosen the location for the new train, you go to the station
where it was built and watch the new locomotive driving out of the
engine shop. The engine stops on the left side of the platform ready
for you to add cars. Choose new cars one by one from the Car menu
now present. When the train is finished to your satisfaction, choose
the “Continue” option. This opens the Train Report discussed below.
A train may include up to 8 cars, of any combination of types. You
may build a train containing no cars. (They can be added later on the
Train Report.)
58
Page 70

The Train Roster is a graphic display of the trains currently
running on your railroad and is placed at the lower right of the display
windows. When a new train is purchased, it is added to the roster. The
oldest train on your railroad is at the top of the roster and the newer
trains are added in order below it. The bottom train on the roster is
the most recent train added.
Each train occupies one line on the roster, with a locomotive
symbol at the left of the line and up to eight car symbols to its right.
The car symbols are the same ones that appear in Station Boxes.
From their shape and color you can tell at a glance what type of car
each represents. In addition, the color of the cars changes slightly
depending on whether the car is at least 50% full or not.
At the far right of the line is a three letter abbreviation for the
name of the city that is the train’s next destination. In the above
example, the first train is headed for RIC, the abbreviation for
Richmond.
A colored line that appears below a train’s destination indicates
the train’s relative speed. Right clicking on a train in the roster will
cause it to stop at the next station.
Train Roster
Train Roster
Train #1
Cars
Destination
Speed
Indicator
59
Page 71

Train Report
Train Number
Train
Icons
Current
Cargo
Priority
Orders
Wait Until
Full Orders
Train Route
Train Type
Train Reports
As each new train is built on
Train
Location
Maintenance
Costs
per Year
your railroad, a Train Report is
created for it. This report is al-
Destination
ways available for consulting.
A Train Report provides in one
place the important information
concerning a train, and also is
where changes in the train’s
makeup, type, and schedule are
Priority
Consist
made. Understanding how this
report can be used, how you make
changes in what your trains are
Planned
Consist
Changes
made up of, and how you change
what they are doing is a key factor
in playing Railroad Tycoon.
A Train Report appears immediately after a train is purchased, and thereafter the report
for any train on your railroad can
be accessed from any display.
The Train Report quickly pro-
vides the following detailed information about your train.
•Train #: Train 1 is at the top of the Train Roster, number 2 is the
second from the top, etc.
•Name/Class/Type: If this train has been awarded a name, it is
shown (see Naming Trains). For trains that are not named, their
freight class and type are shown instead. To change the train’s type,
see Train Types.
•Location: The approximate location of the train on your railroad.
•Locomotive type: The locomotive type pulling the train. If you
wish to see detailed information about the performance of the
locomotive on your train pull down the Engine menu and choose the
option “Engine Info”. To change the locomotive on the train see
Changing Locomotives. To retire a train entirely, see Retiring Trains.
60
Page 72

•Maintenance: The expected maintenance cost of this train per
fiscal period.
•Speed: The current speed of your train.
•Destination/Loading/Unloading: The destination is the name
of the station to which this train is currently heading. To change the
train’s destination see Changing Destinations below. If the train is
stopped and either loading or unloading, this is noted and a destination is not listed.
•Consist: Graphic icons of the locomotive and car types that
currently consist this train. To change the train’s consist, see Train
Consist below.
•Cargo: Type or types of cargo on board.
•Priority Orders: If the train has priority movement orders, they
are shown here. To give the train priority movement orders, see
Priority Orders below.
•Priority Consist: If the train has priority consist change orders,
they are shown here. To give the train priority consist orders, see
Priority Consist below.
•Scheduled stops: Each train may have from 2 to 4 scheduled
stops and they are listed here. To change the train’s scheduled stops,
see Routing Trains below.
•Consist Changes: Any consist changes planned at scheduled
stops are planned here. To change the train’s consist at stops, see
Train Consist below.
•Wait Until Full Orders: If the train is to wait at a stop until fully
loaded, that order is noted in this column. To place or remove this
order, see Wait Until Full Orders below.
•Revenue Earned: This fiscal period to the left, and last fiscal
period to the right.
To open a Train Report, place the mouse pointer on the locomotive of the train that you wish to examine, and press Selector 1.
Alternatively, you can place the mouse pointer on a locomotive on any
of the displays and press Selector 1.
61
Page 73

Naming Trains
Railroads got into the habit of giving their fastest and best known
scheduled trains distinctive names. Crack named trains gave the public
a symbol by which to judge the railroad and improved the morale of
railroad employees. Most names were practical or had some historical
or geographic significance, but others promised or advertised something more than just transportation. Examples of the latter types are the
Orient Express (adventure), Flying Scotsman (speed), and the 20th
Century Limited (modernity).
Trains that received names were generally passenger trains, but in
many cases the faster scheduled freight trains were named as well.
Trains maintained their names over many years, regardless of changes
in locomotives and cars. The name was applied to a scheduled service,
such as the New York to Chicago express, not to the specific locomotive
and cars that made up the train.
In Railroad Tycoon you may have the opportunity to name certain
of your trains as well, and within the limits of length, you may choose
any title you think suitable.
The only way you can name a train is if that train succeeds in
setting a new speed record for service between any two stops on your
road. If one of your trains sets such a record you may type in the name
you choose. However, train names cannot exceed a length of 24
letters, including spaces. Thereafter, the train’s name appears on its
Train Reports.
The passenger revenue earned by a train is increased by 25% if
the train is named.
Once a train has been named, the name cannot be changed,
unless the train sets a new speed record. If the train is retired, the
name is also retired.
62
Page 74

Railroads have to move a number of trains each day over a limited
area. In order to help arrange these movements, they developed a
system whereby trains are ranked, or classified, depending on the
value of their cargos. When two or more trains want to move over the
same track, the dispatchers controlling movements had a clear set of
rules by which to determine the order of train movements. Generally,
the higher classed trains moved first.
In Railroad Tycoon trains are classified as either mail, passenger,
fast freight, slow freight, or bulk trains, with mail being the highest
class, bulk being the lowest class, and the others ranked in between.
Class is determined by the car types in the train. If only one type of
car is in the train, then the class of that car type sets the class of the
train. For example, a train made up entirely of coal cars is classified
as a bulk train.
If more than one type of car is in the train, it is called a mixed
freight, but its class is determined by the most common car type in
the train. For example, a train containing a livestock car (fast freight),
two grain cars (slow freight), and a petroleum car, is a mixed freight
classified as a slow freight, because the most common car types were
slow freights.
The class of the train is important when two or more trains are
attempting to move over the same section of track. In this case the
highest class train is given clearance by your dispatcher and moves
first, and then the others move in descending class order.
Understanding and acting upon these relationships can improve
the operation of your railroad. By keeping car types in trains of similar
or adjacent classes, you can keep cargos moving at efficient speeds.
As explained later (see How Revenues Vary), for some cargos the
time elapsed from pickup to delivery is more important than for others.
It therefore pays to have similar cargos combined into trains and not
mix all of the cargo types together.
For speed sensitive cargos such as mail and passengers, it pays
to place them in smaller faster trains because the increased revenues
more than pay for the increased cost per ton for the train operations.
For bulk and slow freight cargos that are much less speed
sensitive, it pays to combine them into longer, slower trains. The bulk
Train Classes
63
Page 75

or slow freight revenues are nearly the same whether delivered in
several small fast trains or one long slow train. However, the long slow
train has only one locomotive earning the revenue, while moving in
several faster trains requires investing in several locomotives and
crews.
Train Types
An additional method of defining trains was to assign them a type,
such as local, through, express, or limited. The purpose of these types
was to separate trains, not by what they were made up of, but by
where they were intended to stop. By dividing its trains into types, a
railroad made planning of movements easier, and also advertised to
the public the various services these trains provided.
In Railroad Tycoon you also may define your trains by type. This
is useful because the train type determines what stops the train
makes, if any, in addition to those specifically scheduled.
You may make each of your trains a local, through, express, or
limited train. The effects of these types are that they stop at more or
less stations where they could possibly pick up or deliver cargo.
•Local: Stops at every possible station between scheduled
stops.
•Through: Stops at every possible station between scheduled
stops, except that it does not stop at Depots.
•Express: Stops at every possible station between scheduled
stops, except that it stops only at Terminals between scheduled
stops, not at Depots or Stations.
•Limited: Stops only where scheduled.
Regardless of type, a train always stops at those stations sched-
uled for it on its Train Report.
To change the type of a train, open its Train Report, pull down the
Train Type menu, and choose the type you wish the train to be. The
train’s type is changed on the Train Report, and thereafter, the train
makes stops according to its new type. Note that when a train is first
built, it is automatically made a local type train and remains a local
unless you change it.
The advantage to be gained from changing a train’s type is that
you can customize where it does or does not stop. In most cases you
64
Page 76

are raising a train’s type to keep it from making unnecessary or
unprofitable stops.
For example, a passenger train running from New York to Philadelphia could stop at several stations in between, all accepting delivery of
passengers. But knowing that passenger revenues are higher for fast
delivery over long distances, you change the type of the train to a limited
type so that it skips all of the intervening stations.
Your passenger train now receives the revenue for a longer delivery, keeps its speed maximized by eliminating stops along the route,
and remains full. If it made many stops at smaller stations along the
way, the train would probably not be able to keep fully loaded.
Without this change, passengers may be picked up and delivered
in several places along the route, slowing down the train’s passage
between the two cities, and probably collecting less revenue because
the passengers only travel a short distance before being delivered.
As the game continues, locomotives age and their maintenance
costs begin to climb. In addition, new locomotive types are invented that
offer better service. Every locomotive needs to be replaced at some
point, either because it is too old or because a newer type can do a much
better job. When you decide it is time to replace a locomotive, you make
the change from the Train Report.
To change the locomotive on a train, open the Train Report, pull
down the Engine menu, and select “Replace Engine”. From the list of
locomotives available that appears, choose the engine you wish put
on the train.
The change takes place immediately. The Train Report is updated
to show the change, and the cost of the new locomotive is subtracted
from your cash.
You may occasionally find that a train is no longer profitable,
causing congestion on the line and slowing more important trains, or
otherwise no longer worth maintaining. If you choose to do so, the entire
train can be removed from your roster.
To remove a train from your railroad, open its Train Report, pull
down the Engine menu, and choose the “Retire Train” option. The
65
Changing
Locomotives
Retiring Trains
Page 77

Routing Trains
train disappears from the roster, its report goes away, and the
numbers of all trains adjust to reflect the new order in the Train
Roster.
The routing, or scheduling, of trains is one of the most important
parts of railroad management. An efficient schedule insures that cargos
are picked up and delivered in a timely manner, and that the train
operation costs for providing service are kept down. A great many extra
trains insures timely service, but run up costs so much that railroad
profits shrink.
In practice, the master of the road provides the locomotives and
cars that the dispatcher requires to meet the demands for service. The
dispatcher receives requests for service from industry and uses this
information to plan what trains are required.
Railroads found that by regularly scheduling certain trains, or by
arranging with important customers to provide service at specific times,
passengers and shippers could make their plans to ship or receive
according to the schedule. A regular schedule also made it easier to plan
the movement of trains, as dispatchers along the line could expect
certain trains to arrive in their divisions at scheduled times.
In Railroad Tycoon, the scheduling of your trains is also very
important. By examining the Station Boxes, you learn what cargos are
available for shipment, and where those cargos can be delivered. Your
task is to build trains of the proper cars to carry the available cargo, and
then rout the train so it moves from stations where cargos are supplied
to stations where the cargo can be delivered.
For example, in our tutorial game both Richmond and Charlottesville
supply and demand passengers. So, a train of passenger cars can run
back and forth between these cities picking up passengers at either
city and delivering them at the other. To do this, you must build a train
of a locomotive and at least one passenger car, and then route the train
to run from Charlottesville to Richmond. Having been scheduled, this
train runs between the two cities forever, or until you step in to make
changes.
When a new train is built, it is automatically given a route
between the station at which it was built and another station on your
railroad. This is shown on the Train Report. You are rarely going to
66
Page 78

want your train to run this exact route, so the route needs to be
changed, and this is done from the Train Report.
For example, assume you are running the Charlottesville &
Richmond Railroad. You notice that the supply of coal is building up
at Charlottesville Junction and that a train could take this coal to a
Steel Mill in Charlottesville, pick up steel there and take it to a factory
in Richmond, and pick up manufactured goods there for delivery to
Charlottesville. You decide to change the route of Train #3, now
scheduled to run back and forth
from Charlottesville to Charlottesville Junction.
To change the route of Train
#3, open its Train Report and
Train Route Orders
Station Name
place the pointer on the open line
below Charlottesville in the section marked Scheduled Stops.
Press Selector 1, and the route
diagram for this train opens.
Notice that the current route
of this train is marked. The num-
Stop
Sequence
ber 1 next to Charlottesville Junction notes this station as the first
station on the route, and the number 2 next to Charlottesville notes
it as the second stop. Move the
mouse pointer directly below the
box marking the station at Richmond, and the information regarding supply and demand there
appears to the right.
Train Route
Diagram
With the pointer below the
Richmond station box, press Se-
lector 1 to make Richmond stop number 3. Notice that the station box
turns to the color of scheduled stops, the track into the station turns
the color of an active route, and that the number 3 appears next to
Station Supply
& Demand
Remove
Station Box
67
Page 79

the station box. Richmond has now been added to this train’s route
as scheduled stop #3. To check this, press Selector 2 which returns
you to the Train Report. Notice that scheduled stop #3 is indeed listed
as Richmond.
Since you want this train to return to Charlottesville from
Richmond, you have to add Charlottesville to the route again as stop
#4. Place the mouse pointer on the open line below Richmond in the
Scheduled Stops section and press Selector 1 to open the route
diagram. Move the mouse pointer under the box for the Charlottesville
station and press Selector 1 again. The number 4 appears with the
number 2 next to the Charlottesville station box, noting that this
station is stop #4 as well as stop #2.
Return to the Train Report by pressing Selector 2 to be sure the four
scheduled stops are arranged in order from 1 to 4 as Charlottesville
Junction, Charlottesville, Richmond, and Charlottesville again.
Repeat this procedure to select Charlottesville as stop #4.
As the final step in arranging this route, pull down the Train Type
menu and choose the “Limited” option. This makes Train #3 a Limited
train and it stops only at stations on its route. This makes no
difference now, but if more stations are added at a later time, it
prevents needless or wasteful stops.
Train #2 is now scheduled to run its route between these four
stations. After it completes its route, reaching Charlottesville for the
second time coming back from Richmond, it returns to the first
station on its route and begins the route all over again.
68
Page 80

The number and types of cars that make up a train are called its
consist. The dispatcher plans the consist of a train to insure that the
correct types of cars are available to carry waiting cargos. At stops
along its route a train may change its consist several times as it makes
pickups and deliveries.
In Railroad Tycoon, you may arrange for regularly scheduled
consist changes to take place at stops along a train’s route so that the
train contains correct cars for cargo pickups. You can coordinate the
changes in the train’s consist with its scheduled stops, so that the train
may carry several different types of cargos in one circuit of its route. If
all the cars needed were put on at the same time, only some of the cars
would be needed at one time, and the others would be just extra weight
for the locomotive to pull.
For an example of planning a train’s consist changes, return to the
Train Report for Train #3 of the Charlottesville & Richmond whose
schedule was just rearranged in the section above.
Train #3 is now scheduled to run to four stops to take advantage
of several related industries. Coal from Charlottesville Junction can be
taken to the steel mill at Charlottesville and converted into steel. The
steel from Charlottesville can be taken to the factory at Richmond and
converted into manufactured goods which can be delivered to Charlottesville. But the train cannot take advantage of these industries if the
consist remains one coal car because the coal car cannot carry steel or
goods.
To change the consist of Train #3, open its Train Report. Place the
mouse pointer on the line showing “no changes” to the right of the
scheduled stop Charlottesville Junction under the heading “New
Consist”. Press Selector 1 and choose “Coal Car” from the Add Car
menu that appears. Note that a coal car icon appears on the line
where “no changes” was previously showing.
You may also use the mouse to repeat the train's current consist
from the top of the report in any row of the New Consist area. Place
the mouse pointer on the row where you want the consist repeated
and press Selector 2. This is useful if you want to add cars to the
current consist without rebuilding the entire train.
Train Consist
69
Page 81

The presence of the coal car indicates that the consist orders for
this train are to remove all other cars on the train when it reaches this
stop and put on one coal car. Repeat this process and place a steel car
at the second stop, Charlottesville, and a goods car at the third stop,
Richmond. Leave the consist at the fourth stop, Charlottesville again,
unchanged.
You have now arranged the consist changes necessary for Train
#3 to take advantage of the industry along its route. It is scheduled
to carry coal from Charlottesville Junction to the steel mill at
Charlottesville. The steel mill uses the coal to make steel and your
train puts on steel cars there to carry the steel on the factory at
Richmond. The factory takes the steel and converts it into manufactured goods. Your train again changes its consist to a goods car so it
can carry the goods back to Charlottesville for delivery.
When your train reaches Charlottesville for the second time, it
has completed its route and returns empty to Charlottesville Junction to start the route over. At the start of its route it replaces its goods
car with a coal car and starts the cycle over again.
Changing
Destinations
As you monitor the operations of your trains, you may wish from
time to time to change slightly the route of a train. This may be useful
when a bridge is washed out on the route, or because a supply of a
cargo further down the route has diminished, or for other reasons. By
changing the destination of the train, you can have it skip a wasteful stop
or avoid a wreck.
In the Train Orders section of the Train Report, under Scheduled
Stops, the next city to which the train is moving, its destination, is
highlighted. You may change this destination to another city on your
railroad, regardless of whether the new destination is on the train’s
list of scheduled stops or not. To temporarily change the destination
to a city not on the current route list, see Priority Orders.
To change your destination to another scheduled stop, place the
mouse pointer on the name of the stop you wish to make the new
destination for the train and press Selector 2. The new station is
highlighted, signifying that it is the next destination for this train.
70
Page 82

You may find it occasionally useful to have one of your trains
temporarily change its route to avoid a washed out bridge, to pick up
a Priority Shipment, or to take advantage of a temporary change in the
supply or demand of a cargo nearby.
For example, a train that was unable to fill up with coal to take on
to a steel mill may be rerouted by a Priority Order to another nearby city
where coal has been sitting unused. By rerouting your train to pick up
this coal, you fill it with coal more quickly than having it wait at its first
coal stop until full.
To temporarily change the destination for a train to a city not on
its list of scheduled stops, you must give it Priority Orders. This
change is made from the Train Report.
To give a train Priority Orders, place the mouse pointer on the
space below Priority Orders to the right of the “P” symbol, and press
Selector 1. On the route diagram that appears, move the mouse
pointer to the station box for the city which you wish to be the new
destination and press Selector 1. A “P” symbol appears next to the city
you have selected, noting this station as a priority destination. Press
Selector 2 to return to the Train Report.
Back on the Train Report, you see that under Priority Orders the
new destination is listed, and the bottom part of the Train Orders
section is screened out. This signifies that the normal train orders
have been overridden. Once the train reaches its priority destination,
it returns to its normal route, picking it up where it left off.
Priority Orders
Occasionally you may wish to temporarily change the consist of a
train. This is especially useful when attempting to pick up a Priority
Shipment. This type of change is made from the train’s Train Report.
To give a train a Priority Consist order, move the mouse pointer
onto the line below Priority Consist marked “no changes”, and press
Selector 1. This opens the Add Car menu from which you may choose
a car to be added to the Priority Consist. When a car is selected, the
menu goes away, but you can call it back by placing the pointer on
the same line again and pressing Selector 1. To delete a car in the
Priority Consist, place the pointer on it and press Selector 1, and it is
removed.
71
Priority Consist
Page 83

The cars of the Priority Consist are placed on the train at its next
stop, overriding any previously scheduled consists. The train proceeds along its normal route (unless given Priority Orders) and at the
second station it stops at, its normal consist orders again go into
effect.
Wait Until
Full Orders
For sufficiently large customers, railroads put on unit trains, or
trains dedicated to this one shipper. A common example are coal trains,
sent to one mine to load coal and carry this cargo directly to a port, steel
mill, etc. These trains were not scheduled to arrive and depart by
timetable as other trains, but were sent to be loaded, and then moved
when loading was complete. In this way the railroad could arrange for
proper locomotives and crews knowing that they would be moving a
full train.
In Railroad Tycoon you may also arrange that a train wait to move
until fully loaded by giving it Wait Until Full Orders. Trains given this
order do not move until every car in the train is fully loaded or until the
order is lifted. Using these orders you can improve the efficiency of your
railroad, especially when the train is to pick up a cargo to be converted
and carried on to another stop on its route.
For example, consider Train #2 on the Charlottesville & Richmond
Railroad of the tutorial. This train is scheduled to make four stops and
change its consist three times. The coal it loads at the start of its route
is converted to steel which is carried to a factory. At the factory the steel
is converted to manufactured goods which are delivered back to
Charlottesville.
As noted later in the section about cargo conversions, the conversion process is 100% efficient. If the train starts with 40 tons of coal,
this converts to 40 tons of steel, and this converts to 40 tons of goods.
For this reason, it is beneficial to begin with 40 tons of coal, thereby
guaranteeing full loads at every stop.
For cargos where no conversion is to follow, or where the cargo
is very speed sensitive, such as mail, waiting until full is less
valuable or actually wasteful.
To order a train to wait at a stop until fully loaded, open its Train
Report. Place the pointer in the space between the stop number and
72
Page 84

the name of the stop under Scheduled Stops and press Selector 1. Use
the same procedure to remove wait orders from a train that is already
waiting.
A “W” appears to the right of the stop number signifying that this
train is ordered to wait until full at this stop.
The accidental wrecking of trains has been a part of railroading
from its start. The severity of accidents ranged from commonplace
derailments to spectacular head-on collisions. Wrecks resulted from
mechanical failure and bad weather, but more often from human error.
The negative effects of a major wreck included not only the
possible loss of passengers, crew, cargo, and equipment destroyed,
but also a drop in demand for the railroad’s services. Passengers and
shippers looked to alternative railroads or transport rather than risk
the trains of a demonstrably incompetent railroad.
In Railroad Tycoon you can suffer train wrecks due to washed out
bridges or to collisions. Trains that cannot be halted or rerouted in time
plunge off of washed out bridges. When you override block signals, you
run the risk of letting too many trains into a block and causing a
collision.
If one of your trains goes over a washed out bridge or two or more
of your trains collide, the result is a train wreck. When a train wrecks,
the locomotive, cars, and cargos that make it up are destroyed and
removed from your railroad. You receive no compensation.
In addition, all cargos of the same type as those lost on your train
immediately disappear from every other train on your railroad.
Shippers have their cargos taken off your trains immediately.
Also, all supply of these same cargos disappears from the
stations on your railroad, as shippers find other ways of moving their
goods.
Eventually calm is restored and the cargos once more become
available, assuming you suffer no more wrecks.
Train Wrecks
73
Page 85

REVENUE AND
CARGOS
Railroad revenue comes from two main sources, passenger fares
and freight charges. A passenger boarding a train in Chicago pays a
fare for being conveyed to Detroit. A steel mill in Pittsburgh pays a
freight charge for delivery of a load of coal from Scranton.
In these examples the railroad is responding to the supply and
demand for passengers and coal. The passenger in Chicago represents
a supply of passengers there. The coal piled up in Scranton also
represents a supply, this time of coal. The desire of the passenger to go
to Detroit represents the demand for passengers in Detroit, just as the
mill’s desire for coal represents demand for coal in Pittsburgh.
Since steel mills in Railroad Tycoon also demand coal, a steel mill
within the radius of a Pittsburgh station on your railroad would be
represented by the demand at that station for coal. If your railroad has
track connections to a station near Scranton that has a coal mine within
its radius, you can make money by having a train take coal cars to the
Scranton station, load coal, and then deliver it to the Pittsburgh station.
The key to a good start and profitable existence in Railroad Tycoon
is understanding the relationships between the industries that create
the supply and demand for cargo, the stations that act as shipping and
receiving points for industry, and the revenue you earn by having trains
carry cargos from stations that are shipping to those that are receiving.
Earning Revenue
Revenue is earned by loading your trains at a station that is a supply
source for a cargo and then routing the loaded train to a station that has
demand for that cargo. When a train stops at a station to make a delivery,
several things take place to mark the event.
First, in the World View window at the top right of your screen, an
announcement appears describing the train’s arrival. The announcement lists the time of the arrival, the train’s type and number, the name
of the station, the cargos delivered, and the revenue received.
Second, when the cargo is delivered, the car icons on the Train
Roster switch from loaded to unloaded.
Third, your cash balance shown in the bottom of the Information
window increases by the revenue received.
And fourth, the bottom of the Station Box fills in green proportionally to the revenue earned.
74
Page 86

Some cargos are more valuable to railroads than others because
some customers are willing to pay higher fees for faster service. For this
reason railroads develop a hierarchy of trains offering different services
and customers can select the type of service that suits them best.
In general, mail, passengers, and express packages attract the
highest fares because they are given the best service. The fastest freight
trains earn slightly lower fees for speedy delivery of important cargos
such as perishable foods. Bulk cargos such as coal have the lowest
rates but are still profitable because railroads can efficiently carry them
in huge quantities.
On your railroad you can arrange some differentiation of service to
improve profitability by making up trains of the same or neighboring
freight classes, by carefully setting train types and routes, and by
understanding how freight rates are determined.
The revenue earned for delivering cargos can vary between stations (see Station Boxes), cargo classes, worlds, and over time. For the
Western United States, revenues are higher than normal for east-west
deliveries and lower than normal for north-south deliveries. The other
worlds use the normal rate structure. Over time, freight rates tend to
fall. To compensate, you must run bigger, faster, and/or greater
distance trains.
The revenue for mail is most sensitive to time and distance. The
faster it is delivered once picked up and the farther it is carried, the
higher the revenue per ton. Passengers are less sensitive to time and
distance, fast freight is even less sensitive, and so on down to bulk cargos
that are insensitive to time and distance. It doesn’t matter how far you
carry bulk cargos or how fast. You are paid a strict fee by the ton.
How Revenues Vary
The economies of the various theatres are each represented by
11 cargos that can be carried by railroads. Some cargos are unique
to one world, and some are available in all six. The 11 cargo types are
separated into 5 freight classes, each with a distinctive color as
described in the Technical Supplement: mail, passengers, fast freight,
slow freight, and bulk.
75
Cargo Types
Page 87

The cargo class determines the revenue earned for delivery (as
explained in the section above), how long it takes to load or unload a car,
the weight of a full car, and the weight of an empty car. Mail class cars
take the least time to load or unload, then passenger cars, etc., down to
bulk cars that take the longest time. Mail cars are the heaviest when
empty, then passenger cars, down to bulk cars that are the lightest car
type when empty. Conversely, bulk cars are the heaviest when full, then
slow freight, up to mail cars that are the lightest when full.
By being aware of these differences in cargo types when loading,
riding empty, etc., you can improve the efficiency of your railroad by
carefully arranging the makeup of your trains. For example, a train
made up entirely of mail cars or mail and passenger cars, loads and
unloads much faster than the same train if a slow freight car is also
in the consist. Thus a mail train moves faster.
The supply and demand for cargos is derived from cities, villages,
and industries as shown on the World Economies Chart found on the
Player Aid Card. Be aware, however, that it takes more than one village
by itself to have any significant effect. The aggregate of supply and
demand from several villages is needed to make rail service worthwhile.
Resource Map
To help you see where cargos are supplied and in demand, you can
convert the Local Display into a Resource Map. When you do this, the
geography of the map is removed, and new one-letter symbols appear
to mark sources of cargo supply and demand. You can call up this
Resource Map while planning and see at a glance the economic
situation in your vicinity.
To access the Resource Map, center the Area or Local Display
over the part of the map that you wish to examine and pull down the
Display menu. Choose “Options” from this menu. From the Options
menu, choose “Resource Map”, and a check mark appears next to
that option. The check mark indicates that the Resource Map is now
taking the place of the normal Area and Local Displays. Press any
Selector to make the display change to the Resource Map.
76
Page 88

The letter symbols that appear on the map indicate a source
of supply for a cargo at the symbol’s location. For example, “C”
Resource Map
Supply of
Passengers (City)
indicates a source of coal which
must be a coal mine.
A letter symbol on a square
background indicates a source of
demand for a cargo. For example,
a “W” on a square background
indicates a source of demand for
Supply of
Coal
(coal
mines)
wood, most likely a paper mill.
If your Station Boxes of are
blocking your review of the map,
you can turn them off from Option
menu as well. When the Station
Boxes are visible, their menu option is checked. Choose “Station
Boxes” from the menu to turn off
the check mark, and this makes
them disappear from the display.
Charlottesville
Station
Demand for
Coal (Steel Mill)
To put the Resource Map
away and return to the normal
map displays, reverse the procedure for accessing the Resource Map and remove the check mark
from the Option menu.
Demand for
Wood (paper mill)
Train #1
Richmond
Station
Certain industries developed a special relationship with railroads
because raw materials brought to them by rail were converted into
products that were in turn shipped out by rail. For example, cattle brought
by train to packing plants was converted to frozen or canned meats and
then shipped by rail to markets. In this case an important rail cargo,
processed meat, does not exist as a naturally found resource.
In each world of Railroad Tycoon there are a number of cargos that
come into being only after the conversion of another cargo at an
industry. These types of cargos can offer special opportunities for
revenues because the same cargo can be carried several times.
77
Cargo Conversions
Page 89

As shown on the World Economies Chart found on the Player Aid
Cards, some industries demand one cargo and then convert it to
another that they now supply. For example, a carload of coal brought
to a station that serves a steel mill is converted into a carload of steel.
A carload supply of steel is then available at the station. This steel
could then be taken to a factory’s station, converted to manufactured
goods, and then carried finally to a station demanding goods. In this
case, one carload of coal is converted into two successive carloads,
each earning revenue.
The majority of railroad trains are run according to timetables. In
this way the railroad can schedule its stops and equipment needs for
efficiency, and its customers can confidently make travel and shipping
plans. However, railroads are often requested to provide special trains
for excursions, emergency shipments, etc. These special trains are
usually quite profitable because the railroad would not disrupt its
normal service to accommodate the specials if they weren’t.
Occasionally during play your railroad can receive requests for
delivery of Priority Shipments. When delivered quickly they can be very
lucrative, but at other times the pickup and delivery points are placed
such that the disruption to your regular service may be too great. When
a priority shipment appears, take a few moments to decide whether the
delivery is worth your trouble.
You are notified by a message window when a Priority Shipment
becomes available. The message tells you the cargo type to be
delivered, where it must be picked up, and where it is to be delivered.
In addition, a letter P appears in the Station Box of the station
where the shipment is waiting, and a letter D appears in the Station
Box of the destination station.
When a Priority Shipment appears, the fee for delivering it also
appears in the bottom of the Train Roster window. The amount shown
is what your railroad would earn for delivery at that instant. Unfortunately, that fee continually shrinks in size as time passes, but
many are so large as to be quite substantial even after much time has
passed. If the delivery fee reaches $20,000 the shipment is cancelled
and all further references to it are removed.
Priority Shipments
78
Page 90

In order to pick up a Priority Shipment, a train containing a car
capable of carrying the priority cargo must be routed to the station where
it is waiting. When the train stops, the Priority Shipment is loaded on
board. The color of this train’s locomotive icon on the Train Roster
changes, to indicate the shipment is on board. Note that every train
containing the correct type car that stops at this station picks up the
shipment, not just the first.
Priority Shipments may be handed to other trains. Whenever a train
carrying the shipment stops at another station, it “stocks” that station
with the shipment. Thereafter, any train containing the correct type car
and stopping at this “stocked” station, also picks up the shipment.
Building Industry
Recognizing the benefit to themselves and the economic regions they
served, railroads often encouraged industry along their system.
You may find at times that your railroad could substantially benefit
from new industry in the right area, such as placement of a steel mill near
a large coal area, or a food processing plant near a grain area. A judicious
investment such as these, or the provision of a missing link for a chain of
cargo converting industries could provide a handsome return.
As an alternative to waiting for industries to grow, you may speed the
natural process by attempting to invest in specific industries. You may try
this at any time. The industries that may be built in each world are shown
on the World Economies Chart, found on the Player Aid Cards.
To build a new industry, go the Detail Display. Center the Construction Box in the area where you want the industry to appear and pull
down the Build menu. This menu lists the industries available to be
built. Choose the industry you desire. If a suitable site was found in the
area, the industry is built and the Construction Box moves to the site to
point it out. If no suitable site is available, you are informed that the
industry can not be built.
The search for a suitable site is carried out by your engineers. You
cannot choose the square you desire. If a suitable site cannot be found
within 3 squares of where you placed the Construction Box, the
investment does not take place. In this case you may elect to move the
Construction Box to another location and try again.
As with other industries in the game, ones you build may also go
out of business or change type.
79
Page 91

OPERATING
TRAINS
The operation of a train is in the hands of two people, the
locomotive engineer who sets the train’s speed, and a dispatcher who
determines when and where the train moves.
Railroad locomotives only move straight ahead or in reverse, as
they have no steering wheel. The engineer, sitting in the cab and
watching the track ahead, uses the throttle to adjust the train’s speed
to reach points along the line as scheduled. He assumes that the tracks
ahead are correctly arranged to guide the train to its end destination.
In Railroad Tycoon, all of your engineers drive like Casey Jones on
a good day. When the tracks are clear, they open the throttles wide on
your locomotives and make the best possible time.
The dispatcher’s job is to be sure that the orders given the engineer
before the train pulls out put his train at the right place at the right time,
that the tracks are properly arranged as needed, and that the movement of all trains is accomplished safely.
You perform the first two functions of the dispatcher on your
railroad (scheduling and switching) on the Train Report. When you set
a train’s route on the Train Report, the division dispatchers on your
road schedule departures and arrivals, and arrange for the necessary
track switching.
The third function of the dispatcher, providing safe operation, is
more complicated. The safe movement of trains is controlled by the
dispatcher on a large schematic diagram of the railroad. The location
of each running train is continually updated on the board. The entire
road is divided into blocks, and the movement of trains into blocks is
controlled by signals, like traffic lights. A train is not allowed into a
block until trains ahead of it are out of the block, thus preventing the
chance of collision.
On your railroad, safety is assured by signals that are automati-
cally set up when stations are built. However, relying on these signals
alone may result in very conservative, inefficient operation. In your
roles as construction engineer and dispatcher, you may improve the
efficiency of your road for minimum cost by selective placement of
additional signals and double tracks. You may also step into the
management of individual trains by pausing them or opening blocks
that would normally be closed.
80
Page 92

The rules for signals apply only when the reality option “Dispatcher
Operations” is in effect.
Each station or signal tower on your railroad comes equipped
with a set of track signals, one signal on each side of the track that
passes through the station. These signals control the movement of
trains past them in either direction. A Go signal allows an approaching train to pass, while a Stop signal stops it. Refer to the Signals
Chart on the Player Aid Card for a description of Go and Stop signals.
All of the track stretching from one signal to the next along the line
is considered a block of track. Only
one train at a time is allowed in a
block of single track. When a train
enters a block of single track, the
signals at both ends of the block
turn to Stop preventing any more
trains from entering. When the
train reaches the end of the block,
the signals at both ends turn to Go
and once again allow entry.
Note that the boundaries of a
block are set by the placement of
signals. In cases where tracks split
at a switch, the tracks that continue on from the switch remain
part of the original block unless a
signal is placed after the switch.
For example, assume your
railroad lays track between Richmond and Charlottesville. You
then place a switch between these
two and run another track section
north to Washington, D.C. If you
don’t add any more signals, all of the track between the three cities
exists as one block, and only one train can normally run on all of this
track at a time.
Block Signals
Block
Signal
Train #1
Block
How Signals Work
Block
Signal
81
Page 93

By placing another signal just past the switch on the way to
Washington, you separate the old block into two blocks, one that runs
between Richmond and Charlottesville, and one that runs between the
switch and Washington.
If all of the track in a block is double track, the signal system allows
two trains at a time to be in the block, regardless of their relative
position.
Every set of signals on your railroad comes with a signalman in
a tower. If a train approaches a tower and the block ahead is empty,
the signal is set to Go. When the train enters the block, the signalman
telegraphs the dispatcher and the dispatcher marks the train in the
new block on his board. The dispatcher telegraphs the signalman and
his counterpart at the other end of the block to close the block. Both
signalmen set their block signals to Stop and no further trains are
allowed in. When the train inside reaches the other end of the block,
the signalman at that end telegraphs the dispatcher, and he gives the
okay to reopen the block.
Recognizing what track constitutes a block can become complicated when tracks begin branching out. Signals do not come with
switches. All track that extends off of your mainline from a switch
remains part of your mainline block unless you add a signal tower to
the branch to separate it.
Signal Towers
A block that separates two stations a great distance apart may be
so long that trains are running very inefficiently between them. While
one train is traveling across the block, the second is sitting at a Stop
signal at one end.
One thing you can do to speed the relative movement of trains in
this situation is divide the big block into smaller blocks by adding
signal towers along the line. The mathematics of calculus say that the
more blocks you divide the big block into, the faster two or more trains
can move between the ends of the original block. But signal towers are
expensive. You must find an economical compromise between the
number of towers to add and the increase in train speed that would
follow, versus the cost of the those towers.
82
Page 94

To build a signal tower, go to the Detail Display and place the
Construction Box on the track section where you want the tower to
appear. Pull down the Build menu, choose the option “Build Station”,
and then choose the option “Signal Tower” from the menu of station
choices. The new tower appears within the Construction Box on the
display and the signals immediately begin affecting the movement of
trains.
A signal tower consists of a set of signals and a section of double
track. An unlimited number of trains may wait adjacent to a signal
with no risk of collision.
Signal towers cost $25,000 and may only be built on existing
straight track sections. They may not be built on curved, switch,
bridge, or tunnel sections.
The dispatchers on your railroad never make mistakes, but they
are also very conservative. There may be times on your railroad when
more liberal train operations can result in faster, yet safe, service. In
your role as chief dispatcher, you may open blocks that are normally
closed to get stopped trains moving. This action is useful when a fast
train is already in a block and a slower train is waiting stopped behind
it, or when one train is inside a complicated block of switching tracks
and a train that is waiting has a route that doesn’t interfere with the
moving train.
You may override a signal from any display except the Regional
Display. On the Detail Display, the Construction Box must be
centered on the signal you plan to change.
Using the mouse, place the pointer on the signal you wish to
override and press Selector 1. A Signal window opens showing the
track, tower/station, and the two signals, one in each direction. The
two signals are at either end of the building and control the blocks
that they are adjacent to. Inside the Signal window, place the mouse
pointer on the signal you wish to override and again press Selector 1.
83
Overriding A Block
Signal
Page 95

Another menu opens offering you the choices “Normal”, “Hold”,
or “Proceed”.
Choosing “Normal” restores normal signal operation: stop if the
block is full, go if the block is empty.
You may override existing signals with either menu choices
“Hold” or “Proceed”. How these overrides are graphically displayed is
shown on the Signal Override Chart in the Technical Supplement.
A signal overridden with “Hold” stops all trains until the signal is
overridden again back to “Normal” operation.
A signal overridden with “Proceed” allows the next train through,
but then automatically returns to normal operation.
The menu choice “Normal” returns a currently overridden signal
back to normal operation.
Pausing Trains
Railroads find it desirable on occasion to hold up the movement of
a train. A train could be held to prevent an accident or to allow a
following train to pass.
On your railroad you may also find it desirable to temporarily halt a
train. In addition to the above reasons, you may wish for a train to wait
outside a station until a supply of cargo has built up for the train to carry
away.
You may pause a train by either changing the signal that it is
approaching (as explained in the section immediately above, Overriding Signals), or by ordering the train itself to pause. Changing a signal
to “Hold”, however, stops all trains that reach this signal. Pausing an
individual train stops it alone.
You pause an individual train from the Train Roster.
Move the mouse pointer to the line below the train you wish to
pause, and press Selector 2. The line below the train changes color or
pattern to indicate that the train is ordered to pause.
The change in the line below the train indicates that this train is
going to stop moving at the next signal it reaches and move no farther
until you remove the pause order.
To remove the pause order, repeat the procedure for pausing.
The line reverts to its normal appearance and the train resumes
normal operation.
84
Page 96

When you are first learning to play Railroad Tycoon, it may be
useful to play without having to worry about signals and collisions.
This may allow you to concentrate on learning other aspects of the
game.
To play without the possibility of collisions and be able to ignore
the system of blocks and signals, choose the "No Collision" option
when you are setting the parameters of your railroad.
The effects of the No Collision Mode are that trains can never
wreck. Even though the signal system does not work, trains do not
collide. When two trains meet or pass each other, the lower class train
pulls over to a siding and halts. This is handled automatically by your
dispatchers and you don't have to make any preparations. When the
higher class train has passed, the halted train gradually begins
moving again. A disadvantage to this mode is that a low class train
may be halted many times when trying to complete its route.
No Collisions Mode
85
Page 97

4
THE RAILROAD BUSINESS
Railroads were one of the great capital enterprises of the industrial
age, requiring huge investments in the global construction projects that
they became. Before the first train could run, costly and extensive
preparation was required: miles of roadbed prepared, bridges built
where necessary, rails purchased and laid down, minimum station
facilities built, locomotives and rolling stock made ready.
The money that made railroads possible came from several
sources, including investors subscribing to stock shares and thereby
becoming partial owners of the enterprise, investors buying long term
bonds, short term bank loans, and profits generated by the railroad
once operations started.
When a new game of Railroad Tycoon begins, you have already sold
part of the public on your dream and attracted investors who have bought
enough of your stock and bonds to give you a start. As play continues you
may have the opportunity to sell additional stock, borrow more money,
buy back stock into the treasury, and buy back bonds.
RAILROAD
CAPITALIZATION
The initial capitalization of your railroad is $1,000,000, $500,000
obtained from selling bonds and $500,000 obtained from investors
who have bought 100,000 shares of your stock at $5 per share. This
is the money you begin your railroad with.
As time passes and your railroad grows, new stock, in addition
to the 100,000 outstanding at the start, may come into existence in
two ways: new stock issues or stock splits.
New stock may be issued only when you build a station into a new
city. As a bonus for the new railroad connection, the local city leaders
may offer to buy 10,000 new shares from you at the current market
92
Initial Capital
Additional Stock
Page 98

price. If this occurs, you have the option of making the sale or not.
Choose the option you wish from the menu that appears. The stock
sold consists of newly authorized and registered shares that previously did not exist. The sale increases the outstanding shares in the
public’s hands by 10,000.
A 2 : 1 stock split occurs at the end of any fiscal period in which
your stock price reaches $100 per share or higher. At the beginning
of the next year, the number of shares is doubled and the price of the
new shares is halved from the price of the old. For example, if the
price at the end of the year of 140,000 shares is calculated to be $110,
the stock splits resulting in 280,000 shares priced at $55 per share.
Stockholder
Happiness
Bonds
Regardless of the fact that the railroad you are running is your
dream and that your decisions have made it the great enterprise that
it is, you nevertheless work for the stockholders and they are a cynical
bunch. Your stockholders are only happy if the stock price is higher
than last year and headed higher. If the stock price doesn’t increase
they become unhappy, and they can become quite angry if by some
shocking circumstance the stock price should actually fall.
You retain office as president of your railroad so long as the
stockholders are at least content with the job you are doing. Their
happiness is measured at the end of each fiscal period when the
stockholders calculate their return on investment (ROI) averaged
over the last 5 years. The higher this number, the happier they are.
If for several periods in a row this number doesn’t increase, or
actually decreases, the stockholders become progressively angrier.
If stockholder patience runs out, they may throw you out of office
and replace you as railroad president. You are forcibly retired and
your management of the railroad ends. Owning 50% of your stock
can reduce the likelihood of being kicked out of office.
Your railroad starts with an outstanding 4% bond of $500,000.
Further bonds are sold and bought back in $500,000 increments.
Each bond sold has an annual interest rate which is subtracted
from your railroad’s cash at the end of every December. The interest
rate on any new bond you wish to sell depends on the economy and
the number of bonds you have outstanding as in the table below.
93
Page 99

Once the current interest rate reaches 9%, you
may not sell any further bonds, regardless of how
many you already have outstanding or the current
state of the economy. If the economy improves and
interest rates fall, you may sell further bonds until
the rate reaches 9% again.
Bond rates are lower in the Western USA due to
government subsidies.
To sell bonds or buy them back, call your
broker.
Interest Rate Table
Calling Your Broker
To conduct most financial transactions involving stocks and bonds, you call your broker and gain
access to the financial activity menus. Pull down the Action menu and
choose the option “Call Broker”. This opens the Financial Summaries
window. From here you can obtain certain financial information
about your railroad and your competitors, sell or buy back bonds,
buy and sell treasury stock, buy and sell competing railroad stock
(see Stock Market Takeovers), and operate competing railroads (see
Controlling Other Railroads).
To sell or buy back a bond, pull down the Cash menu. If you choose
the option “Sell $500,000 Bond”, that amount of money is added to your
cash and to the size of your bonds. Choosing the option “Buy Back
$500,000 Bond” subtracts that amount from your cash and bonds.
To buy stock in your railroad and put it in your treasury, pull
down the Buy Stock menu and choose the option “Buy Treasury
Stock”. The cost of the stock is subtracted from your cash and 10,000
shares are added to your treasury. Treasury stock is sold in the same
manner as it is bought, except from the Sell Stock menu. Note that
you cannot buy treasury stock if the public doesn’t own any, and that
you cannot sell treasury stock if there isn’t any in the treasury.
The price of stock is determined by normal buying and selling on
the stock market. When a very large order to buy or sell is placed, the
price is forced up or down in order to find enough sellers or buyers on
the other side to complete the transaction.
94
Page 100
All stock transactions in Railroad Tycoon are extraordinary orders
involving relatively large amounts of the outstanding shares. For this
reason, expect to actually pay 10% more than the quoted price when
buying, and receive 10% less than the quoted price when selling.
Short Term Loans
Declaring
Bankruptcy
During play you may spend more money than you have. When
you engage in deficit spending, the color of your current cash in the
display window changes color. If at the end of a year you have a
negative cash position, you are charged 12% on the negative balance.
Like any business, railroads can get so deeply in debt that
protection from debtors and court supervised reorganization is the only
alternative to utter ruin. The normal result of a bankruptcy is that the
previous owners (stockholders) are wiped out, the bonds outstanding
are reduced to a manageable level, and the remaining lenders receive
new stock in exchange for their money that was lost. If the business
returns to health, the rising stock price may someday equal or exceed
the money lost when part of the bankrupt company’s bonds were
converted to stock.
If economic conditions, accidents, and other circumstances work
against your railroad to the extent that it appears headed for ruin, you
have the option of declaring bankruptcy at any time. This step can
partially relieve your debt burden and perhaps get your railroad back
on its feet. There may be times when it’s good defensive strategy as
well.
To declare bankruptcy, call your broker, pull down the Cash
menu, and choose the option “Declare Bankruptcy”. All bonds that
can be repaid from your cash are paid off, half of your outstanding
bonds are eliminated (rounded down), all of your treasury stock is
eliminated, all of your stock held by competing railroads is eliminated, and the public is left with 100,000 shares.
After declaring bankruptcy, you may not lay any more track until
your cash balance is positive and all remaining bonds have been
repaid.
95
 Loading...