


ENGLISH
ESPAÑOL
PORTUGUÊS
GAGGIA ANIMA PRESTIGE /CLASS
Sup 037RG
Operating instructions Instrucciones de uso Instruções de utilização

2
1
2
3
4
ESPRESSO |
CAPPUCCINO |
ESPRESSO LUNGO |
LATTE MACCHIATO |
AROMA STRENGTH |
MENU |
5
8 |
|
7 |
11 |
6 |
12 |
|
13 |
41 |
9 |
|
|
40 |
10 |
|
|
39 |
16 |
15 |
14 |
|
|
|
|
38 |
17 |
|
|
18 |
|
|
|
37 |
|
|
|
19 |
|
|
|
36 |
|
|
|
|
|
|
|
35 |
|
|
|
|
20 |
|
|
21
|
34 |
22 |
|
33 |
|
|
32 |
23 |
|
31 |
|
29 |
30 |
24 |
|
||
|
|
25 |
28 |
26 |
|
27 |

English |
3 |
Table of Contents |
|
Overview of the machine....................................................................................................... |
4 |
Introduction ........................................................................................................................... |
4 |
Control panel and display...................................................................................................... |
5 |
Buttons for quickly preparation of beverages........................................................................................................ |
5 |
Navigation buttons.......................................................................................................................................................... |
5 |
AROMA STRENGTH button ........................................................................................................................................... |
5 |
MENU button .................................................................................................................................................................... |
6 |
First installation...................................................................................................................... |
6 |
Measuring the water hardness.............................................................................................. |
8 |
"INTENZA+" Water Filter ........................................................................................................ |
9 |
“INTENZA+”Water Filter Installation.......................................................................................................................... |
9 |
Replacing the “INTENZA+”Water Filter ................................................................................................................... |
10 |
Types of beverage ................................................................................................................ |
10 |
Types of beverages ........................................................................................................................................................ |
10 |
Coffee Preparation ............................................................................................................... |
11 |
Coffee Preparation Using Coffee Beans.................................................................................................................. |
11 |
Coffee Preparation Using Pre-Ground Coffee ...................................................................................................... |
11 |
Preparation of Coffee and Milk-based and Frothed Milk-based Beverages.................... |
12 |
Filling the Milk Carafe.................................................................................................................................................... |
12 |
Inserting the Milk Carafe.............................................................................................................................................. |
13 |
Removing the Milk Carafe ........................................................................................................................................... |
13 |
Dispensing Milk-based Beverages............................................................................................................................ |
13 |
Special Beverages and Hot Water........................................................................................ |
14 |
How to Select Special Beverages.............................................................................................................................. |
14 |
Dispensing Hot Water ................................................................................................................................................... |
14 |
Beverage Customization...................................................................................................... |
15 |
Adjusting Coffee and Milk Amount.......................................................................................................................... |
15 |
Adjusting the Aroma Strength of Coffee ............................................................................................................... |
15 |
Adjusting Grinding Settings ....................................................................................................................................... |
16 |
Cleaning and Maintenance.................................................................................................. |
16 |
Cleaning table ................................................................................................................................................................. |
16 |
Brew Group Cleaning ........................................................................................................... |
18 |
Brew Group Cleaning under Running Water ........................................................................................................ |
18 |
Cleaning of the Brew Group Using Tablets for Removal of Fat Coffee Residues...................................... |
18 |
Reinserting the Brew Group ....................................................................................................................................... |
19 |
Lubrication........................................................................................................................................................................ |
20 |
Cleaning the Milk Carafe .................................................................................................... |
21 |
Quick Clean of the Carafe ............................................................................................................................................ |
21 |
Thorough Cleaning of the Milk Carafe.................................................................................................................... |
21 |
Weekly Cleaning of the Milk Carafe ......................................................................................................................... |
22 |
Monthly Cleaning of the Milk Carafe....................................................................................................................... |
23 |
Limescale Removal Operation............................................................................................. |
24 |
What to do in case of Interruption of the Limescale Removal ....................................................................... |
25 |
Warning Icons and Error Codes ........................................................................................... |
26 |
Meaning of the Warning Icons................................................................................................................................... |
26 |
Meaning of the Error Codes........................................................................................................................................ |
27 |
Troubleshooting ................................................................................................................... |
28 |
Technical specifications ....................................................................................................... |
31 |

4 |
English |
|
|
Overview of the machine |
|
|
|
1 |
User interface |
22 |
Aroma-preserving cap |
|
|
|
|
2 |
ESPRESSO button |
23 |
Coffee bean hopper |
|
|
|
|
3 |
ESPRESSO LUNGO button |
24 |
Brew group |
|
|
|
|
4 |
AROMA STRENGTH button (aroma intensity) |
25 |
Maintenance door interior |
|
|
|
|
5 |
Standby button |
26 |
Coffee outlet duct |
|
|
|
|
6 |
MENU button |
27 |
Coffee residues tray |
|
|
|
|
7 |
LATTE MACCHIATO button |
28 |
Coffee grounds drawer |
|
|
|
|
8 |
CAPPUCCINO button |
29 |
Drip tray grill |
|
|
|
|
9 |
Protection cover |
30 |
Hot water dispensing spout |
|
|
|
|
10 |
Adjustable coffee dispensing spout |
31 |
Opening for the hot water dispensing spout |
|
|
|
|
11 |
Water tank lid |
32 |
Water tank |
|
|
|
|
12 |
Coffee bean hopper lid |
33 |
Milk container |
|
|
|
|
13 |
Pre-ground coffee container lid |
34 |
Milk dispensing unit |
|
|
|
|
14 |
Main power button |
35 |
Milk dispensing unit lid |
|
|
|
|
15 |
Power cord socket |
36 |
Milk dispensing spout |
|
|
|
|
16 |
Maintenance door |
37 |
“INTENZA+” filter |
|
|
|
|
17 |
Full drip tray indicator |
38 |
Water hardness tester |
|
|
|
|
18 |
Drip tray |
39 |
Tube of lubricant |
|
|
|
|
19 |
Drip tray release buttons |
40 |
Cleaning brush |
|
|
|
|
20 |
Power cord |
41 |
Measuring scoop |
|
|
|
|
21 |
Knob for choosing the grinding |
|
|
|
|
|
|
Introduction
Congratulations on your purchase of a Gaggia fully automatic coffee machine!
In this user manual you will find all the information needed for installing, using, cleaning and descaling your machine. Before using your machine for the first time, please read carefully the safety manual provided separately and store it for future use.
English 5
Control panel and display
This espresso coffee machine features an intuitive display for easy use. For a quick overview of the buttons, please read the following sections.
Buttons for quickly preparation of beverages
Press the beverage buttons only once (ESPRESSO, ESPRESSO LUNGO, CAPPUCCINO and LATTE MACCHIATO) to quickly make one of the predefined beverages.
-Ensure that the carafe is in position and ready to use when you select the
CAPPUCCINO or LATTE MACCHIATO options.
-To stop the dispensing before the machine has finished dispensing the amount of preset coffee or milk, simply press the OK button.
-After the preparation of a milk-based beverage, the display will request you whether you wish to perform a quick clean of the carafe.
Navigation buttons
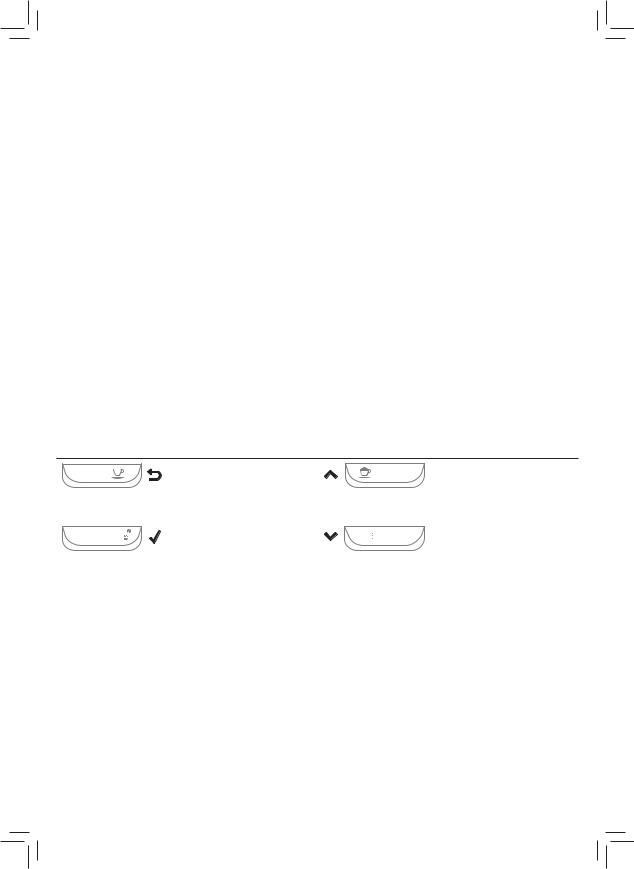
Some of the buttons for quick preparation of beverages feature a du- al-function. Namely, they can also be used to navigate the menu:
ESPRESSO |
ESPRESSO button = ESC |
CAPPUCCINO |
CAPPUCCINO button = UP |
||
|
button: press this button |
|
|
|
button: press this button |
|
to return to the main |
|
|
|
to scroll upwards in the |
|
menu. |
|
|
|
display menu. |
|
|
|
|
|
|
AROMA STRENGTH |
AROMA STRENGTH button |
|
|
MENU |
MENU button = DOWN |
|
|
||||
= OK button: press this |
|
|
button: press this button |
||
|
|
|
|
||
|
button to select, confirm or |
|
|
|
to scroll downwards in the |
|
stop a function. |
|
|
|
display menu. |
|
|
|
|
|
|
AROMA STRENGTH button
Use the AROMA STRENGTH button to regulate the intensity of the coffee aroma (see “Regulating the Coffee Aroma Intensity”) or to prepare a coffee using ground coffee (see “Preparing Pre-ground Coffee”).
6 English
MENU button
Use the MENU button to prepare other beverages, such as hot water or frothed milk. You can also use the MENU button to modify the following settings:
-Coffee temperature;
-Stand-by time: this is the period of time after which the machine enters stand-by mode;
-Display contrast;
-Water hardness: this adjusts the machine settings depending on the water strength in your area;
-To enable the "INTENZA+" filter;
-To start removal of limescale.
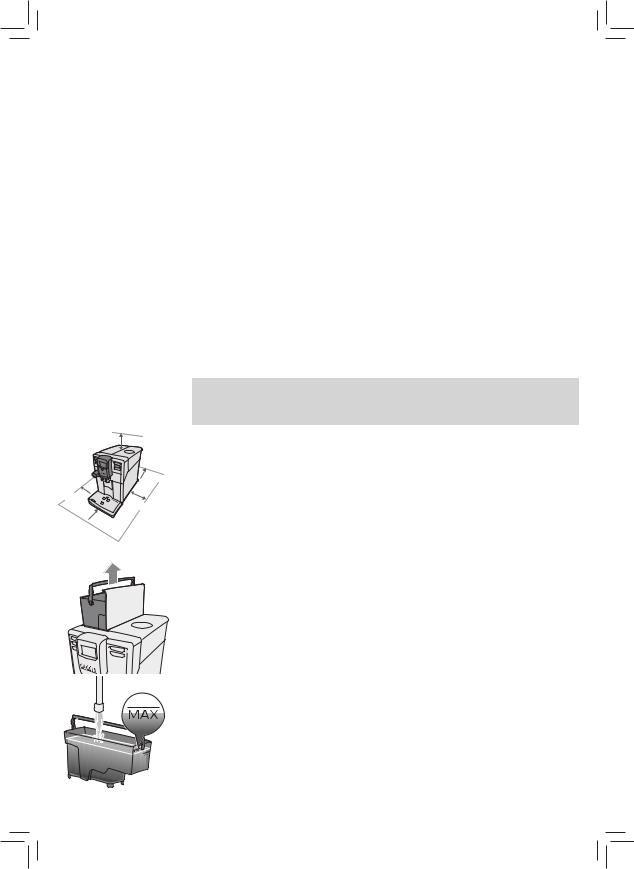
First installation
15 cm
 15 cm
15 cm
15 cm 

 15 cm
15 cm  15 cm
15 cm
Note: This machine has been tested with coffee. Although properly cleaned, it may show residues of said substance. In any case, we can guarantee that the machine is brand new.
Remove the machine from the packaging.
For best use, we recommend to:
-choose a safe and level surface, where there will be no danger of overturning the machine or being injured;
-choose a location that is sufficiently well-lit, clean and near an easily reachable socket;
-allow for a minimum distance from the machine sides as shown in the figure.
Remove the water tank, rinse it and fill it with running water up to the MAX level. Make sure that the water tank is fully inserted into the compartment.
ESPRESSO |
|
ESPRESSO LUNG |
O |
AROMA STRENGT |
H |
ESPRESSO |
|
English 7
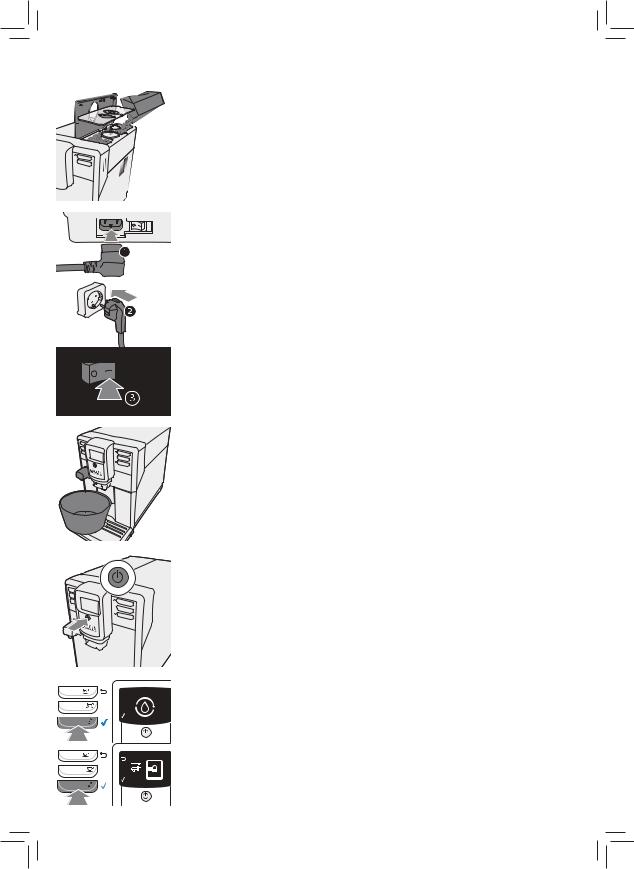
Lift the coffee bean hopper lid and the aroma-preserving cap.
Pour the coffee beans and reposition both the lid and the cap.
Insert the plug into the socket the back of the machine and the other end of the power cord into a wall socket with suitable power voltage.
Switch the main power button to "I".
Place a container under the coffee dispensing spout and under the water dispensing spout.
The standby button will blink. Press the button to switch on the machine.
Press the OK button to start the circuit priming.
The machine indicates to install the water dispensing spout. Press the OK button to confirm.
ESPRESSO LUNG |
O |
AROMA STRENGT |
H |
8 English
The machine will start dispensing hot water.
The bar under the icon shows the operation progress. When the operation is complete, the machine stops dispensing automatically and starts warming up.
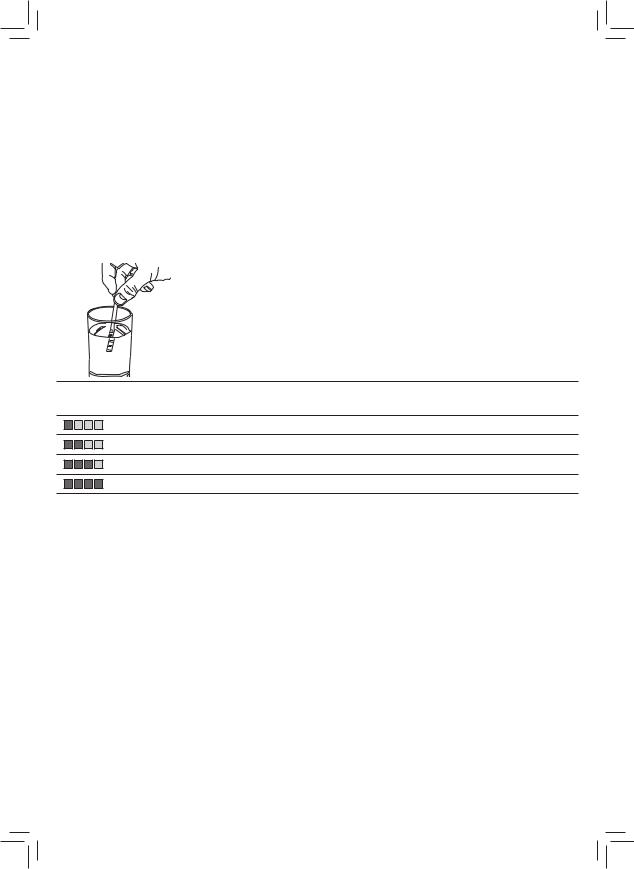
Measuring the water hardness
Use the supplied stripe for measuring the water hardness. |
|
||
1 |
Immerse the stripe provided into running water for 1 second. |
||
2 |
Remove the stripe from water and wait for 1 minute. |
|
|
3 |
Count the number of small squares which have turned red and compare |
||
|
the result to the following table. |
|
|
Number of red small |
Value to set |
Water hardness |
INTENZA+ |
squares |
|
|
|
|
1 |
very soft water |
A |
|
2 |
soft water |
A |
|
3 |
hard water |
B |
|
4 |
very hard water |
C |
4Press the MENU and the OK buttons, select the menu and scroll until selecting the water hardness. Select the preferred water hardness setting and press the OK button in order to confirm.

English 9
"INTENZA+" Water Filter
We recommend that you install the “INTENZA+” water filter as this prevents limescale build-up in your machine and preserves a more intense aroma of your coffee.
The “INTENZA+” water filter can be purchased separately.
Water is a crucial part of every coffee, so it is very important to always have it professionally filtered. Using the “INTENZA+” water filter will prevent mineral deposits from building up and improve your water quality.
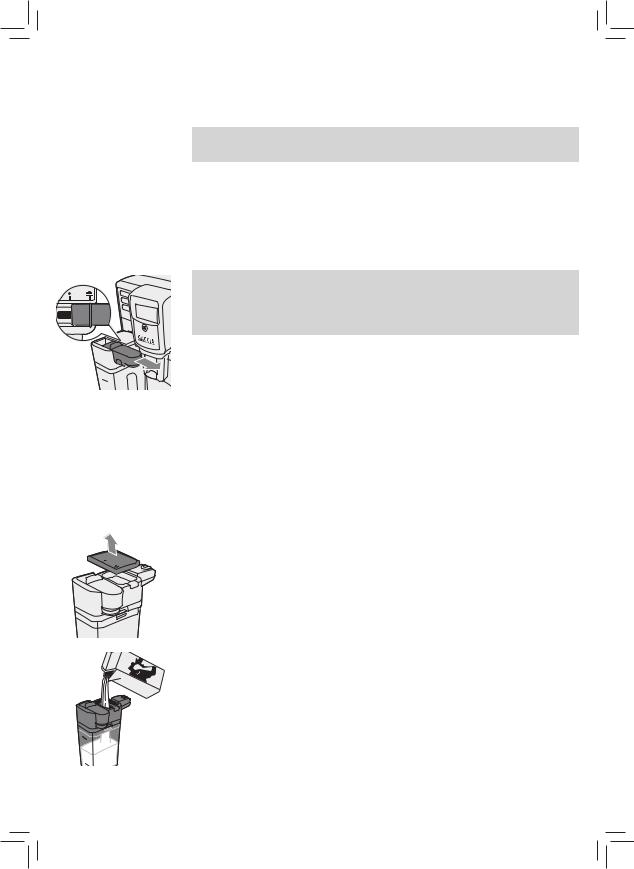
“INTENZA+”Water Filter Installation
Remove the small white filter from the water tank and store it in a dry place.
Immerse the "INTENZA+" water filter vertically in cold water (with the opening positioned upwards) and gently press its sides to let the air bubbles out.
Set the “INTENZA+” water filter according to the measurements performed (see “Measuring the water hardness”) and indicated on the base of the filter: A = soft water – equals 1 or 2 small squares
B = hard water (standard) – equals 3 small squares C = very hard water – equals 4 small squares
Insert the “INTENZA +” water filter in the empty water tank and push it down to the lowest point.
Fill the water tank with running water and put it back into the machine.
Dispense all the water in the water tank by using the hot water function (see the “Dispensing Hot Water” chapter).
Then, fill the tank again.
1 Press the MENU and the OK buttons to confirm. Scroll until selecting the water filter. Press the OK button.
2 Select ON, then press OK and finally exit from the menu.
10 English
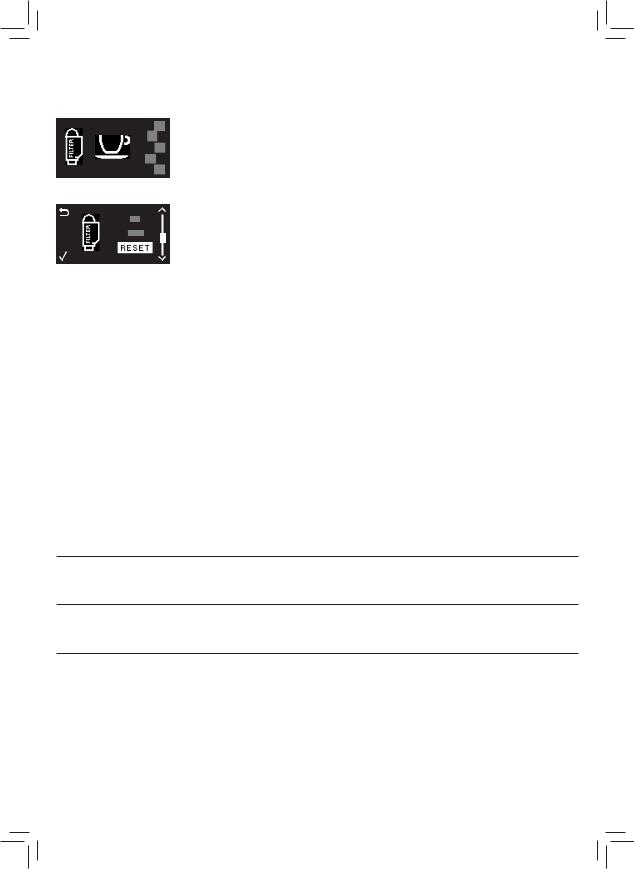
Replacing the “INTENZA+”Water Filter
When the “INTENZA+” water filter needs to be replaced, the filter icon is
displayed.
Replace the water filter by scrolling the menu until selecting the water filter as described in the “INTENZA+ Filter Installation” chapter.
Select RESET and confirm with the OK button.
The machine is now programmed to manage a new “INTENZA+” water filter.
Types of beverage
Types of beverages
Name of the beverage |
Description |
Selection mode |
|
|
|
Espresso |
Coffee with dense crema served |
Button for quick preparation of |
|
in a small cup. |
beverages on the control panel. |
|
|
|
Espresso lungo |
Longer espresso with dense |
Button for quick preparation of |
|
crema served in a middle cup. |
beverages on the control panel. |
Cappuccino |
1/3 espresso, 1/3 hot milk and |
|
1/3 milk froth served in a big |
|
cup. |
Button for quick preparation of beverages on the control panel.
Latte Macchiato |
Long dose of hot milk froth with |
|
a dose of espresso served in a |
|
tumbler. |
Button for quick preparation of beverages on the control panel.
Frothed milk |
Hot milk froth. |
MENU/DRINKS |
|
|
|
Hot water |
|
MENU/DRINKS |
|
|
|
English 11
Coffee Preparation
Coffee Preparation Using Coffee Beans
Warning: use coffee beans only for espresso preparation. Do not use ground coffee, unroasted coffee, freeze-dried coffee or instant coffee in the coffee bean hopper, as they may damage the machine.
Note: using the aroma-preserving cap keeps the beans fresh.
1 Place 1 or 2 cups under the coffee dispensing spout by manually lifting or lowering the coffee dispensing spout to adjust its height depending on the size of the cups.
2 To prepare a coffee, press the espresso or the long espresso button.
Coffee dispensing stops automatically when the set level is reached; however, it is possible to stop it earlier by pressing the OK button.
Note: to prepare two cups of espresso or long espresso, press the button of the preferred beverage twice. The machine performs two consecutive grinding cycles automatically.
Coffee Preparation Using Pre-Ground Coffee
To prepare coffee using pre-ground coffee, use the measuring scoop provided to insert the correct dose in the pre-ground coffee compartment.
1 Lift the pre-ground coffee compartment lid.
2 Add a measuring scoop of pre-ground coffee in its compartment and close the lid.
Warning: do not insert substances other than pre-ground coffee in the preground coffee compartment, as they may damage the machine.
3Place a cup under the dispensing coffee spout.
4Press the AROMA STRENGTH button and select the pre-ground coffee
function.
12 English
5Press the button of the preferred beverage and the machine will start dispensing automatically.
Note: with pre-ground coffee, it is possible to prepare just one cup of coffee at a time.
Preparation of Coffee and Milk-based and Frothed Milk-based
Beverages
Warning: before selecting a coffee and milk-based or a frothed milk-based beverage, ensure the milk carafe is installed and the milk dispensing spout is open. If the milk carafe is not correctly installed, the milk dispensing spout may spray steam or hot milk.
Filling the Milk Carafe
Before using the milk carafe, clean it thoroughly as described in the “Cleaning and Maintenance” chapter.
The milk carafe can be filled before or during use.
1 Lift the lid of the milk dispensing unit.
2 Pour the milk into the milk carafe: the milk level must be between the minimum (MIN) and the maximum (MAX) level indicators shown on the carafe. Put the lid back on.

English 13
Inserting the Milk Carafe
If installed, remove the water dispensing spout:
1 Press the two side buttons to unlock the dispensing spout and lift it slightly.
2 Pull the water dispensing spout to remove it.
3 Slightly tilt the milk carafe. Insert it all the way into the guides of the machine.
4 Push the carafe downwards while rotating it at the same time until it is locked onto the drip tray.
Do not force the carafe while inserting it.
Removing the Milk Carafe
Rotate the carafe upwards until it is naturally released from the insert in the drip tray. Then, remove the carafe.
Dispensing Milk-based Beverages
1 Pull out the milk dispensing spout to the right up to the  icon.
icon.
Note: if the carafe dispensing spout has not been pulled all the way out, milk may not be properly frothed.
2 Place a cup under the open milk dispensing spout. 3 Choose your milk-based beverage.
-Press the CAPPUCCINO or the LATTE MACCHIATO buttons just once to prepare immediately one of these two milk-based beverages.
-Press the MENU button, select DRINKS, confirm with OK, scroll until selecting MILK FROTH and press the OK button again in order to dispense frothed milk.
The machine will remind you to install the milk carafe and open the milk dispensing spout.

14 English
3The machine pours in the cup or in the tumbler a preset amount of milk froth first and then a preset amount of coffee.
Note: press the OK button to interrupt milk or coffee dispensing.
4 After the preparation of coffee and milk-based beverages, the display requests you whether you wish to perform a quick clean of the milk carafe. This operation can be enabled within 10 seconds (see “Quick Clean of the Carafe”). This operation can be performed with the carafe containing milk. It is recommended to perform the quick clean at least once a day. Press the OK button to confirm or the ESC button to perform the quick clean later.
Special Beverages and Hot Water
How to Select Special Beverages
1Press the MENU button and select DRINKS.
2Press the OK button to confirm.
3Scroll through the menu and select the preferred beverage.
Dispensing Hot Water
Warning: when the preparation of hot water starts, the hot water dispensing spout may spray steam and hot water. Before removing the hot water dispensing spout, wait until the end of the preparation.
1Insert the hot water dispensing spout.
2Press the MENU button, select DRINKS, confirm and scroll through the
menu to select “HOT WATER”.
Warning: select HOT WATER in the menu just when the hot water dispensing spout is installed.
3Press the OK button to confirm. The display reminds you to insert the hot water dispensing spout: press the OK button to confirm. The machine will start dispensing hot water.
4To stop hot water dispensing, press the OK button.
English 15
Beverage Customization
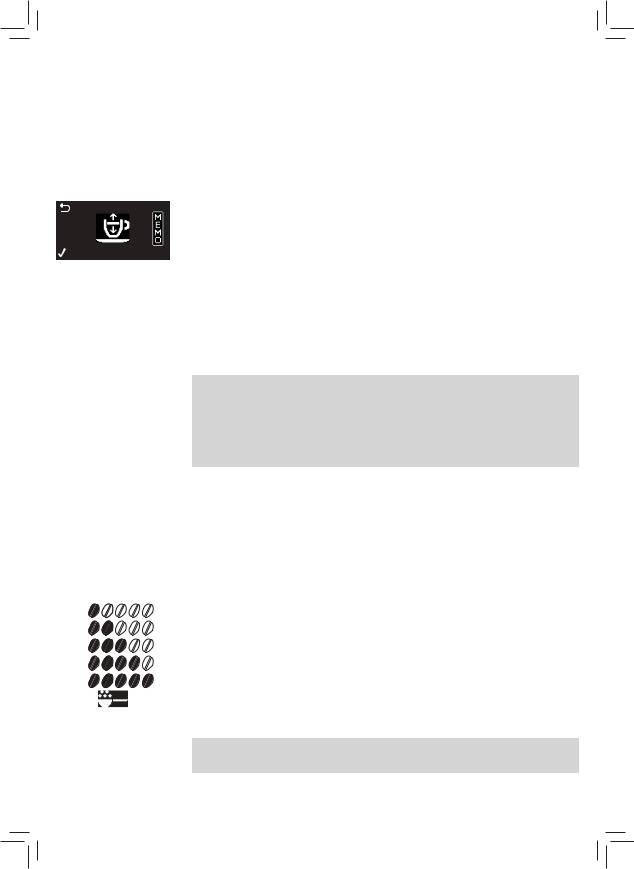
Adjusting Coffee and Milk Amount
It is possible to adjust the amount of the beverage to your taste and the size of the cups.
1 To adjust the amount of espresso, hold the ESPRESSO button until the display shows the MEMO icon.
The machine enters the programming stage and starts preparing the selected beverage.
2When the cup contains the desired amount of espresso, press the OK button.
The tick on the display indicates that at every pressing the machine will prepare the set amount of espresso.
Note: to set the amount of ESPRESSO LUNGO, CAPPUCCINO and LATTE MACCHIATO, follow the same operation: hold the button which corresponds to the selected beverage and press the OK button when the cup contains the desired amount. To adjust the amount of the coffee and milk-based beverages, insert the milk carafe and save the amount of milk first and then the amount of coffee.
Adjusting the Aroma Strength of Coffee
1
2
3
4
5
To modify the aroma strength of coffee, press the AROMA STRENGTH button. Every time you press the AROMA STRENGTH button, the aroma strength changes of one degree. The display shows the selected strength which will be saved by preparing a cup of coffee.
1Very mild
2Mild
3Normal
4Strong
5Very strong
Note: you can also use the AROMA STRENGTH button to prepare coffee with pre-ground coffee.
16 English
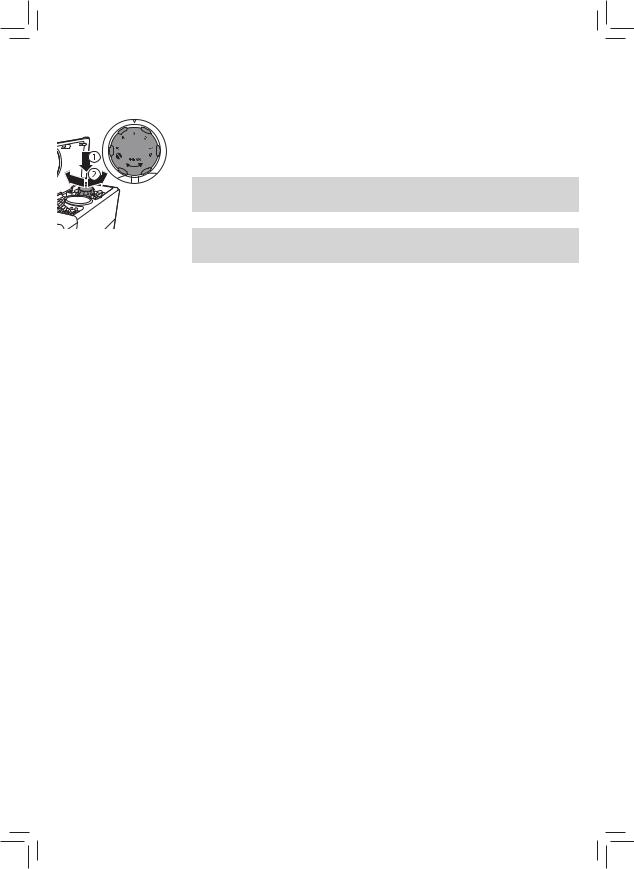
Adjusting Grinding Settings
You can adjust the grinding settings using the knob for choosing the grinding in the coffee bean hopper. For every selected setting, the ceramic coffee grinder guarantees a perfect and even grinding for the preparation of every cup of coffee. The aroma is preserved and every cup ensures a perfect flavour.
Note: you can adjust the grinding settings only when the machine grinds the coffee beans.
Warning: do not rotate the knob for choosing the grinding more than one level at a time, so as to avoid to damage the coffee grinder.
1Place a cup under the coffee dispensing spout.
2Open the coffee bean hopper lid and lift the aroma-preserving cap.
3Press the ESPRESSO button.
4When the coffee grinder starts working, press the knob for choosing the grinding and rotate it leftwards or rightwards. You can choose 5 different grinding settings. The lower the setting, the stronger the aroma of the coffee.
Cleaning and Maintenance
Regular cleaning and maintenance keep the machine in perfect conditions and ensure a perfect coffee flavour, a constant coffee flux and an excellent milk froth. Refer to the following table to know when and how to clean the removable parts of the machine. For more detailed information, please read the relevant chapters.
Cleaning table
Part description |
When to clean |
How to clean |
|
|
|
Brew group. |
Weekly. |
Remove the brew group and wash it under |
|
|
running water. |
|
|
|
|
Depending to the type of use. |
Lubricate the brew group. |
|
|
|
|
Monthly. |
Clean the brew group using the tablet for |
|
|
removal of fat coffee residues. |
|
|
|
|
|
English |
17 |
Part description |
When to clean |
How to clean |
|
|
|
|
|
Milk carafe. |
After every use. |
After preparing a milk-based beverage, start |
|
|
|
the QUICK CLEAN operation according to indi- |
|
|
|
cations of the machine. |
|
|
|
|
|
|
Daily. |
Clean the milk carafe thoroughly. |
|
|
|
|
|
|
Weekly. |
Disassemble the milk carafe and clean all its |
|
|
|
parts under running water. |
|
|
|
|
|
|
Monthly. |
For this cleaning cycle, use a product for the |
|
|
|
cleaning of milk circuits. |
|
Full Drip tray. |
When the red indicator emerg- |
|
es from the drip tray grate. |
Empty the drip tray and clean it under running water.
Coffee grounds |
At machine’s request. |
Empty the coffee grounds drawer and wash |
drawer. |
|
it under running water. Ensure the machine is |
|
|
switched on while you empty and clean the |
|
|
coffee grounds drawer. |
|
|
|
Water tank. |
Weekly. |
Wash it under running water. |
|
|
|
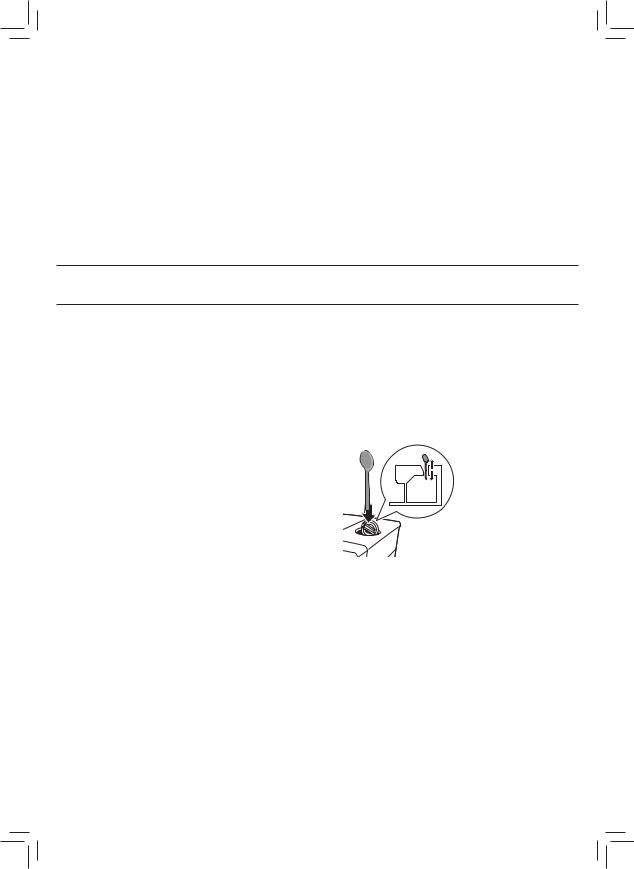
Pre-ground coffee |
Weekly. |
Clean the upper part using the handle of a |
compartment/coffee |
|
spoon, as shown below. |
outlet duct. |
|
|
|
|
|
18 English
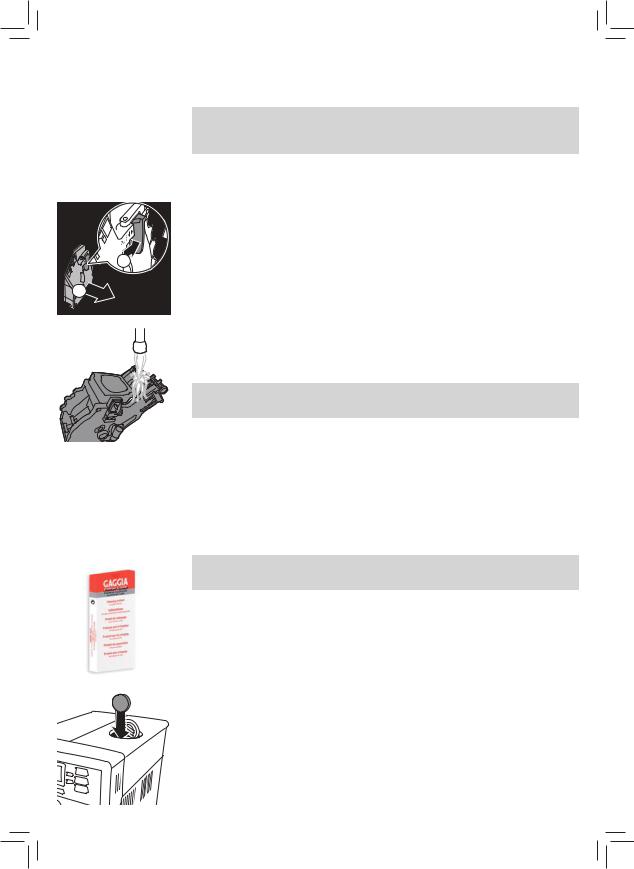
Brew Group Cleaning
Warning: do not wash the brew group in the dishwasher and do not use washing-up liquids, since they may cause the malfunctioning of the brew group and alter the coffee flavour.
Brew Group Cleaning under Running Water |
|
1 |
Switch off the machine and unplug it. |
2 |
Remove the drip tray and the coffee grounds drawer. |
3 |
Open the maintenance door. |
4 |
Press the PUSH lever (1) and pull the handle of the brew group to remove |
1 |
it from the machine (2). |
2 |
|
5 |
Rinse the coffee grounds drawer thoroughly using lukewarm water. Wash |
|
the upper filter thoroughly. |
6 |
Let the brew group dry in the air. |
Note: do not dry the brew group with clothes in order to avoid the build-up of fibres in the interior.
Cleaning of the Brew Group Using Tablets for Removal of Fat Coffee Residues
Warning: use Gaggia tablets for the removal of fat coffee residues, since they do not perform a descaling action.
1Place a container under the coffee dispensing spout.
2Press the AROMA STRENGTH button and select pre-ground coffee.
3Insert a tablet for the removal of fat coffee residues in the compartment of pre-ground coffee.
4Press the ESPRESSO LUNGO button. The machine dispenses water from the coffee dispensing spout.
5When the progress bar is halfway, switch the main power button on the back of the machine to “0”.
6 Let the solution for the removal of fat coffee residues act for about 15 minutes.
English 19
7Switch the main power button to “1”. Press the Stand-by button.
8Wait for the machine to perform an automatic rinse cycle.
9Perform the “Brew Group Cleaning under Running Water” operation.
10Remove the drip tray and the coffee grounds drawer. Empty them and insert them in the machine again.
11Press the AROMA STRENGTH button and select pre-ground coffee.
12Press the ESPRESSO LUNGO button. The machine dispenses water from the coffee dispensing spout.
13Repeat steps 11 and 12 twice. Throw away dispensed water.
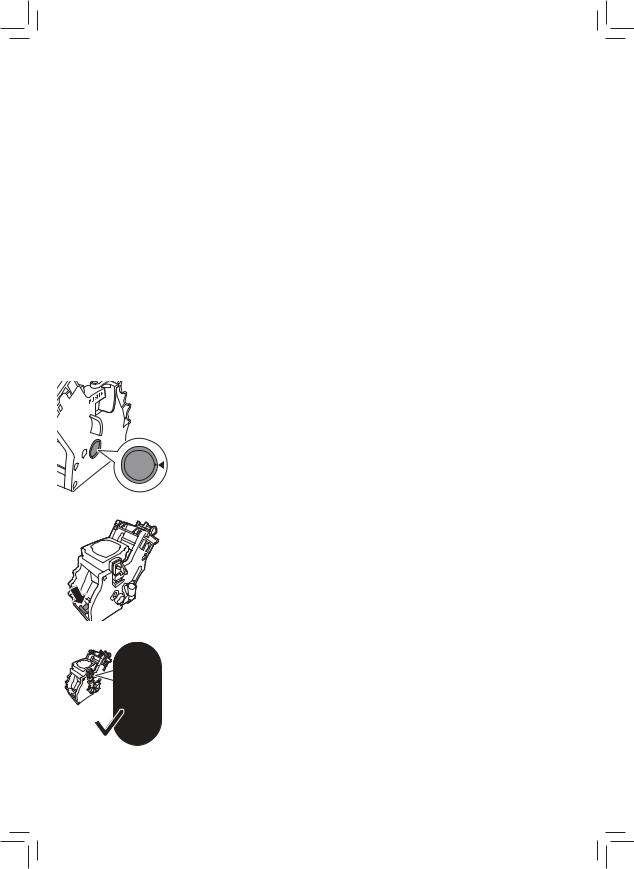
Reinserting the Brew Group
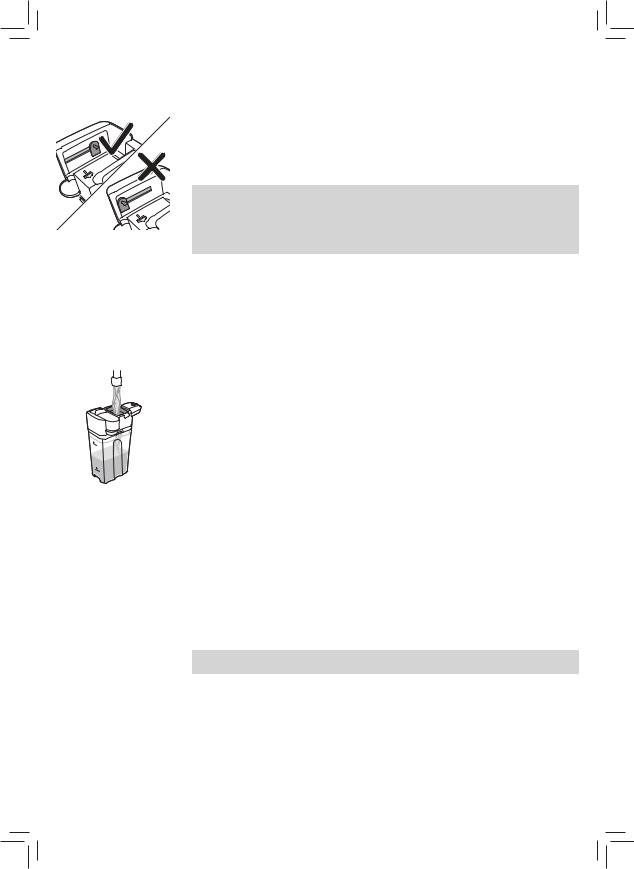
1 Before reinserting the brew group into the machine, ensure the two yellow reference indicators on the side coincide. If this is not the case, perform the following step:
Ensure that the lever is in contact with the brew group base.
2 Ensure that the yellow locking hook of the brew group is in the right position.
To correctly position the hook, push it upwards to the highest position.

20 English
If the hook is still in a lower position, this means that it has not been correctly positioned.
3 Slide the brew group along the side guides into the machine until it locks in the right position with a click.
Warning: do not press the PUSH lever.
4 Close the maintenance door.
Lubrication
In order to ensure perfect performances of the machine, it is necessary to Lubricate the brew group. Refer to the following table for the frequency of lubrication.
Frequency of use |
Number of daily prepared beverages |
Frequency of lubrication |
|
|
|
Low |
1-5 |
Every 4 months |
|
|
|
Regular |
6-10 |
Every 2 months |
|
|
|
High |
>10 |
Every month |
|
|
|
1 Switch off the appliance and unplug it.
2 Remove the brew group and rinse it using lukewarm water (see “Brew Group Cleaning under Running Water”).
3 Spread a thin layer of lubricant around the inserting pin in the lower part of the brew group.
4 Spread a thin layer of lubricant onto the guides on both sides (see the figure).
5 Reinsert the brew group (see “Reinserting the Brew Group”).
You can use the tube of lubricant many times.
English 21
Cleaning the Milk Carafe
Quick Clean of the Carafe
After preparing a milk-based beverage, the display shows the icon for the cleaning of the carafe.
1When the display shows the icon for the cleaning of the carafe, press the OK button if you wish to perform a cleaning cycle. The cycle can be enabled within 10 seconds.
2Remove the cup with the beverage and place a container under the milk dispensing spout.
Note: ensure that the milk dispensing spout has been removed.
3 Press the OK button to start dispensing hot water.
Thorough Cleaning of the Milk Carafe
To clean the milk carafe thoroughly, you have to perform these operations regularly:
1 Remove the lid from the milk dispensing unit.
2 Remove the milk dispensing spout from its dispensing unit. 3 Remove the milk tube from the dispensing spout.
4 Rinse the milk tube and its dispensing spout thoroughly using lukewarm water.
22 English
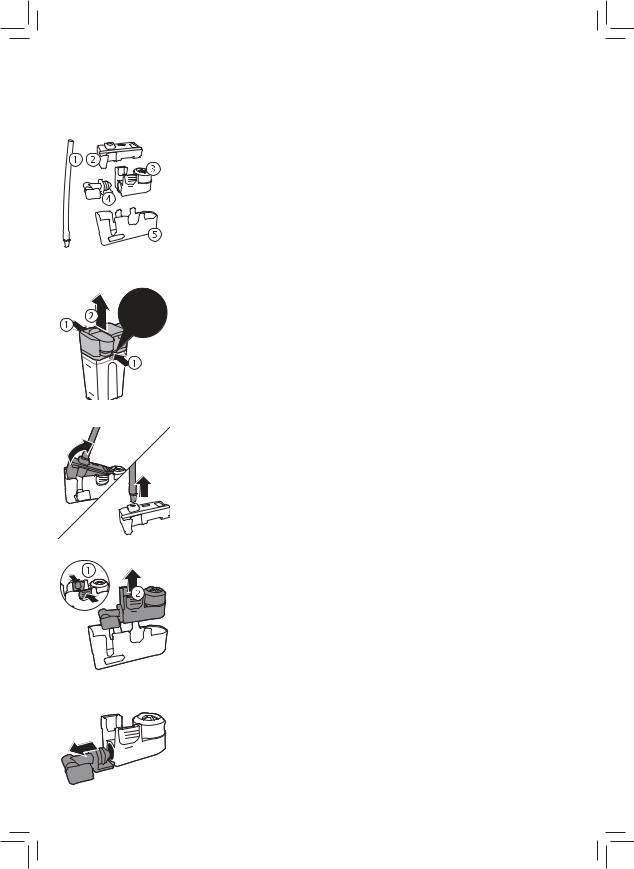
Weekly Cleaning of the Milk Carafe
The milk dispensing spout is composed by 5 components. Remove all components once a week and wash them under the tap. You can also wash all components in the dish washer, apart from the milk container.
1 |
Milk tube |
2 |
Rubber holder |
3 |
Pannarello |
4 |
Pannarello Mount |
5 |
Milk Dispensing Spout Housing |
Disassembling the Milk Dispensing Spout
1 Press the releasing buttons on both sides of the upper part of the milk dispensing unit (1) and pull out the upper part of the milk container (2).
2 Overturn the milk dispensing unit and hold it firmly in the hand. Pull out the milk tube from the holder.
3 Press the release buttons on the Pannarello and remove the Pannarello form the rubber holder.
4 Pull out the mount from the Pannarello.
5 Wash all the components with lukewarm water.
English 23
Reassembling the Milk Carafe
1To reassemble the milk dispensing spout, follow the steps from 2 to 4 in “Disassembling the Milk Dispensing Spout” the opposite way.
2 Put the milk dispensing spout back in the upper part of the milk carafe. 3 Put the upper part of the milk carafe back in the same carafe.
Note: before putting the milk dispensing spout back in the upper part of the milk carafe, place the pin inside the upper part in its right position. If the pin is not in its right position, you cannot put the milk dispensing spout back in the upper part of the milk carafe.
Monthly Cleaning of the Milk Carafe
For this cleaning cycle, use a product for the cleaning of milk circuits.
1 Pour a bag of milk circuit cleaning product in the milk carafe. Fill the milk carafe using water up to the MAX level indication.
2 Insert the milk carafe in the machine and place a container under the milk dispensing spout.
3 Press the MENU button, select DRINKS, confirm with the OK button and scroll down to MILK FROTH. Press the OK button to start dispensing the cleaning solution.
4Repeat step 3 until emptying the milk carafe.
5When the carafe is empty, remove the container and the milk carafe from the machine.
6Wash the milk carafe thoroughly and fill it using running water up to the MAX level indication.
7Insert the milk carafe into the machine.
8Place the container under the milk dispensing spout.
9Press the MENU button and select MILK FROTH in the DRINKS menu to start the rinse cycle of the carafe.
10Repeat step 9 until emptying the milk carafe.
Note: never ingest the solution dispensed at this stage.
11Repeat steps from 6 to 10.
12When the machine does not dispense water anymore, the cleaning cycle is over.
13Disassemble all components and wash them using running water. The machine is ready for use.

24 English
Limescale Removal Operation
When the display shows START CALC CLEAN, you have to perform the cleaning of the machine. If you do not perform the cleaning of the machine when the display shows this message, the machine will stop functioning correctly.
In this case, any repair is not covered by the guarantee.
Use Gaggia descaling solution to remove scale from the machine. Gaggia descaling solution has been designed to ensure excellent performances of the machine. The use of other products may damage the machine and leave residues in the water.
The operation of limescale removal lasts for about 30 minutes and consists of a descaling cleaning cycle and a rinse cycle. You can pause the descaling cleaning cycle or the rinse cycle by pressing the ESC button. To continue the descaling cleaning cycle or the rinse cycle press the OK button.
Note: during limescale removal, do not remove the brew group.
Warning: do not ingest the descaling solution or the water dispensed during limescale removal.
1Remove “INTENZA+” filter.
2Remove the drip tray and the coffee grounds drawer, empty, clean and insert them into the machine again.
3Place a large container (1.5 l) under the coffee dispensing spout.
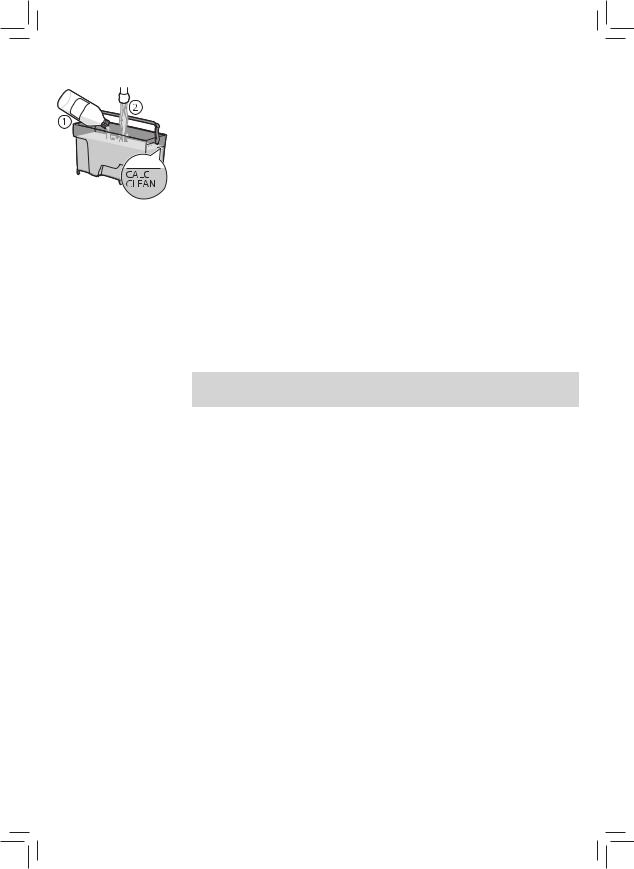
4 When the display shows START CALC CLEAN, press the OK button to start the limescale removal operation. Remove the hot water dispensing spout, if any.
-The display indicates to insert the carafe.
-The display indicates to open the milk dispensing spout.
Note: you can press ESC to postpone the descaling clean. If you wish to start the limescale removal later, press the MENU button, select MENU, press OK and scroll until selecting START CALC CLEAN . Press OK to confirm.
English 25
4 Pour the Gaggia descaling solution in the water tank. Fill the tank using clean water up to the CALC CLEAN level indication. Put the tank back in the machine. Press the OK button to confirm. The first stage of the descaling clean starts. The machine will start dispensing the descaling solution at regular intervals. The display shows the descaling clean icon, stage and duration. The first stage lasts for 20 minutes.
5 Let the machine dispense the descaling solution until the water tank is empty.
6Remove the water tank and rinse it.
7Fill the tank using clean water up to the CALC CLEAN level indication. Put the tank back in the machine and press OK.
8Remove the milk carafe and wash it. Fill the milk carafe with water up to the MIN level indication. Insert the milk carafe into the machine and open the milk dispensing spout.
9Remove the container, empty it and put it back under the coffee dispensing spout. Press OK to confirm.
10The second stage of the cleaning cycle starts, that is the rinse cycle. This stage lasts for 3 minutes. The display shows the rinse icon and the duration of this stage.
Note: if the water tank is not filled up to CALC CLEAN level, it may be necessary to repeat the rinse cycle.
11Wait until the machine does not dispense water anymore. The limescale removal is over when the display shows a tick.
12To exit the descaling cleaning cycle, press the OK button. The machine starts warming up and performs an automatic rinse cycle.
13Remove the container and empty it.
14Perform the “Weekly Cleaning of the Milk Carafe” operation to clean the carafe after the descaling clean.
15Clean the brew group as described in the “Brew Group Cleaning under Running Water” chapter.
16Install a new "INTENZA+" filter into the water tank.
Tip: the “INTENZA+” filter reduces the frequency of the descaling clean.
What to do in case of Interruption of the Limescale Removal
You can exit the limescale removal pressing the STAND-BY button on the control panel. In case the limescale removal stops before its completion, perform the following operations:
1Empty the water tank and wash it thoroughly.
2Fill the water tank using running water up to the CALC CLEAN level indication and switch on the machine again. The machine will warm up and perform an automatic rinse cycle.

26 English
3Before preparing any beverage, perform a manual rinse cycle. To perform a manual rinse cycle, dispense half a tank of hot water, then prepare 2 cups of pre-ground coffee without adding ground coffee.
Note: if this operation is not complete, it is necessary to perform another limescale removal as soon as possible.
Warning Icons and Error Codes
Meaning of the Warning Icons
Warning icons are red. The list below reports the warning icons that the display can show along with their meanings.
Fill the tank using running water up to the MAX level indication.
The milk carafe is not installed. Insert the milk carafe into the machine.
The coffee bean hopper is empty. Insert the coffee beans in the coffee bean hopper.
The coffee grounds drawer is full. Check that the machine is on. Remove the coffee grounds drawer and empty it.
The brew group is not in the machine or it has not been inserted correctly. Insert the brew group.
The brew group is clogged by coffee powder. Clean the brew group.
The hot water dispensing spout is not installed. Insert the hot water dispensing spout.
Insert the drip tray and close the maintenance door.
If an error is shown on the display, refer to the “Meaning of the Warning Icons” section to check the meaning of the code shown and how to proceed. You cannot use the machine when the display shows this icon.
Empty the coffee grounds drawer. Wait about 5 seconds before reinserting it.
English 27
Meaning of the Error Codes
The list below reports the warning icons that the display can show, their meanings and how to solve the problem. If the indicated solutions are ineffective because the display keeps on showing the error code icon and the machine does not function correctly, please contact the Gaggia customer service.
In case other error codes are shown, please take the machine to an authorized after-sale service centre.
The contacts are listed in the guarantee brochure or on the www.gaggia. com and www.gaggia.it websites.
Error |
Problem |
Cause |
Possible solution |
codes |
|
|
|
|
|
|
|
01 |
The coffee grinder is |
The coffee outlet duct |
Switch off the machine using the main |
|
clogged. |
is clogged. |
power button and remove the brew |
|
|
|
group. Clean the coffee outlet duct |
|
|
|
thoroughly using the handle of the |
|
|
|
measuring scoop or the handle of a |
|
|
|
spoon. Switch on the appliance again. |
03 - 04 |
A problem occurred in |
The brew group is |
|
the brew group. |
dirty or it is not well |
|
|
lubricated. |
Switch off the machine using the main power button. Remove the brew group and clean it thoroughly. (refer to the “Cleaning the Brew Group” chapter).
The brew group is not correctly positioned.
Switch off the machine using the main power button. Remove the brew group and reinsert it again. Ensure the brew group is in its right position before inserting it. Refer to the “Reinserting the Brew Group” chapter.
05 |
A problem occurred in |
There is air in the |
Remove and reinsert the tank in the |
|
the water circuit. |
water circuit. |
machine twice. Ensure to insert the tank |
|
|
|
correctly in the machine. Check that |
|
|
|
space of the water tank is clean. |
|
|
|
|
|
|
|
If you use a “INTENZA+” filter: pull |
|
|
|
out the filter from the water tank and |
|
|
|
shake it to remove all air from the filter. |
|
|
|
Reinsert the "INTENZA+" filter into the |
|
|
|
water tank. |
|
|
|
|
14 |
The machine is over- |
There may be multiple |
Switch off the machine and switch it |
|
heated. |
causes. |
on again after 30 minutes. Perform this |
|
|
|
operation 2 or 3 times. |
|
|
|
|

28 English
Troubleshooting
This chapter summarises the most common problems you may encounter while using the machine. If you are not able to solve the problem following the information below, visit the www.gaggia.com o www.gaggia.it websites for FAQs or contact the Customer Service Centre in your country.
Problem |
Cause |
Solution |
The machine does not |
The machine is not plugged in or the |
Check that the power cord has been correctly |
switch on. |
main power button is in the “off” (0) |
inserted. |
|
position. |
|
|
|
Ensure the main power button is in the “on” (I) |
|
|
position. |
The machine is in DEMO mode.
You have pressed the Standby button for more than 8 seconds.
Switch off the machine and switch it on again using the main power button on the back part of the machine.
The drip tray fills quickly. It is a normal phenomenon. The ma- |
Empty the drip tray when the indicator is shown |
chine uses water to rinse the internal |
through the drip tray grate. |
circuit and the brew group. Part of |
|
the water flows through the internal |
|
system directly into the drip tray. |
|
|
Place a cup under the dispensing spout to gather |
|
rinse water. |
The display continuously shows the “full coffee grounds drawer” icon.
The coffee grounds drawer has been emptied when the machine was off.
Always empty the coffee grounds drawer when the machine is on. If you empty the coffee grounds drawer when the machine is off, the coffee cycle counter does not reset. In this case, the display shows the icon even if the container is not full.
The coffee grounds drawer has been put back too quickly.
Always wait about 5 seconds when you put back the coffee grounds drawer. So doing, the coffee ground counter will reset to zero.
The coffee grounds |
The drip tray has been removed with- |
When removing the drip tray, empty the coffee |
drawer is too full and |
out emptying the coffee grounds |
grounds drawer completely, even if it is almost |
the “Empty the coffee |
drawer. |
empty. So doing, the coffee ground counter |
grounds drawer” mes- |
|
will reset to zero and start to count the coffee |
sage is not shown. |
|
grounds correctly again. |
The machine requests to |
The machine has not reset the |
Always wait about 5 seconds when you put back |
empty coffee grounds |
counter last time the coffee grounds |
the coffee grounds drawer. So doing, the coffee |
drawer even if the drawer |
drawer has been emptied. |
ground counter will reset to zero. |
is not empty. |
|
|
|
|
Always empty the coffee grounds drawer when |
|
|
the machine is on. If you empty the coffee |
|
|
grounds drawer when the machine is off, the |
|
|
coffee cycle counter does not reset. |
Impossible to remove the |
The brew group is not in its correct |
brew group. |
position. |
Close the maintenance door. Switch off the machine and switch it on again. Wait for the display to show the ready message, then remove the brew group.
The coffee grounds drawer has not |
Remove the coffee grounds drawer before |
been removed. |
removing the brew group. |
 Loading...