


 Loading...
FUSION®
MS-UD/AV650
M A R I N E E N T E R T A I N M E N T S Y S T E M
O W N E R ’ S M A N U A L
®
ENGLISH
FUSIONENTERTAINMENT.COM
© 2014–2015 Garmin Ltd. or its subsidiaries
All rights reserved. Under the copyright laws, this manual may not be copied, in whole or in part, without the written consent of Garmin. Garmin reserves the right to change or improve its products and to make changes in the content of this manual without obligation to notify any person or organization of such changes or improvements. Go to www.fusionentertainment.com for current updates and supplemental information concerning the use of this product.
Garmin®, the Garmin logo, FUSION®, and the Fusion logo are trademarks of Garmin Ltd. or its subsidiaries, registered in the USA and other countries. FUSION-Link™ and True-Marine™ are trademarks of Garmin Ltd. or its subsidiaries. These trademarks may not be used without the express permission of Garmin.
Android™ is a trademark of Google Inc. Apple®, the Apple logo, iPod®, iPod touch®, iPod classic®, iPod nano®, iPhone®, and Lightning™ are trademarks of Apple Inc., registered in the U.S. and other countries. Bluetooth® word mark and logos are owned by the Bluetooth SIG, Inc. and any use of such marks by Garmin is under license. NMEA®, NMEA 2000®, and the NMEA 2000 logo are registered trademarks of the National Marine Electronics Association. Pandora® and the Pandora trade dress are trademarks or registered trademarks of Pandora Media, Inc. Used with permission. Sirius, XM and all related marks and logos are trademarks of Sirius XM Radio Inc. Wi Fi® is a registered mark of Wi-Fi Alliance Corporation. Other trademarks and trade names are those of their respective owners.
Made for iPhone 6 Plus, iPhone 6, iPhone 5s, iPhone 5c, iPhone 4s, iPhone 4, iPod touch (3rd through 5th generation), iPod classic, and iPod nano (4th through 7th generation).
"Made for iPod and iPhone" means that an electronic accessory has been designed to connect specifically to an iPod or an iPhone respectively, and has been certified by the developer to meet Apple performance standards. Apple is not responsible for the operation of this device or its compliance with safety and regulatory standards. Please note that the use of this accessory with an iPhone may affect wireless performance.
Table of Contents
Getting Started
What's In the Box
Stereo Controls
Using the Dial to Select Items Entering Text
Stereo Screen
Media Player Connection Media Player Compatibility
Connecting a Media Player Using the Dock Connecting a USB Device Using the USB Cable Connecting an Auxiliary Device
Selecting a Source Adjusting the Volume
Adjusting the Tones Speaker Zones
Infrared Remote Control
Bluetooth Device Playback
Connecting a Compatible Bluetooth Device Bluetooth Range Information
Selecting a Different Bluetooth Source Bluetooth Source Settings
DVD and CD Playback
Inserting a DVD or CD Setting the DVD Region Playing a DVD or CD Ejecting a DVD
USB, MTP, and Apple Device Playback
Setting a Song to Repeat Shuffling Songs
MTP File Information
Pandora Service
Downloading the Pandora Application Controlling Pandora Radio with the Stereo
Radio
Setting the Tuner Region Changing the Radio Station Presets
Saving a Channel as a Preset Selecting a Preset from a List Removing Presets
DAB Playback
Setting the Tuner Region Scanning for DAB Stations
Changing DAB Stations
Selecting a DAB Station from a List Selecting a DAB Station from a Category
DAB Presets
Saving a DAB Station as a Preset Removing DAB Presets
SiriusXM Satellite Radio
Enabling the SiriusXM Source
Locating the SiriusXM Radio ID Activating a SiriusXM Subscription Selecting a Category
Parental Controls
Enabling the Parental Controls Locking a Channel
Clearing All Locked Channels
Changing the Parental Control Passcode SiriusXM Troubleshooting
General Settings
|
Appendix |
8 |
|
|
Registering Your MS-UD/AV650 |
8 |
|
1 |
Software Updates |
8 |
|
1 |
True-Marine™ Products |
8 |
|
1 |
FUSION-Link |
8 |
|
1 |
Audio Control with NMEA 2000 |
8 |
|
1 |
Optional Wired Remote Controls |
8 |
|
1 |
Configuring an Optional Wired Remote |
8 |
|
1 |
Troubleshooting |
8 |
|
2 |
The stereo does not respond to key presses |
8 |
|
2 |
The stereo keeps locking up when connected to an Apple |
|
|
2 |
device |
8 |
|
2 |
The stereo is not finding my connected Apple device |
8 |
|
2 |
My Apple device has gone into thermal protection mode |
8 |
|
2 |
My MTP device is unresponsive |
8 |
|
2 |
The stereo does not find all of my music files on my MTP |
|
|
3 |
device |
9 |
|
3 |
My Bluetooth audio is interrupted by short breaks |
9 |
|
3 |
The stereo does not display all song information from my |
|
|
Bluetooth source |
9 |
||
3 |
|||
Specifications |
9 |
||
4 |
|||
Index |
10 |
||
4 |
|||
4 |
|
|
Table of Contents |
i |
Getting Started
What's In the Box
•Two Mounting plates
•Mounting hardware
◦Four 8-gauge, self-tapping screws
◦Four M4 machine screws
•Power and speaker wiring harnesses
•RCA splitter
•Micro-USB to USB cable (UD models only)
•Lightning™ connector to USB cable (UD models only)
•Apple® 30-pin to USB cable (UD models only)
•Remote control (AV models only)
•Two AAA batteries (AV models only)
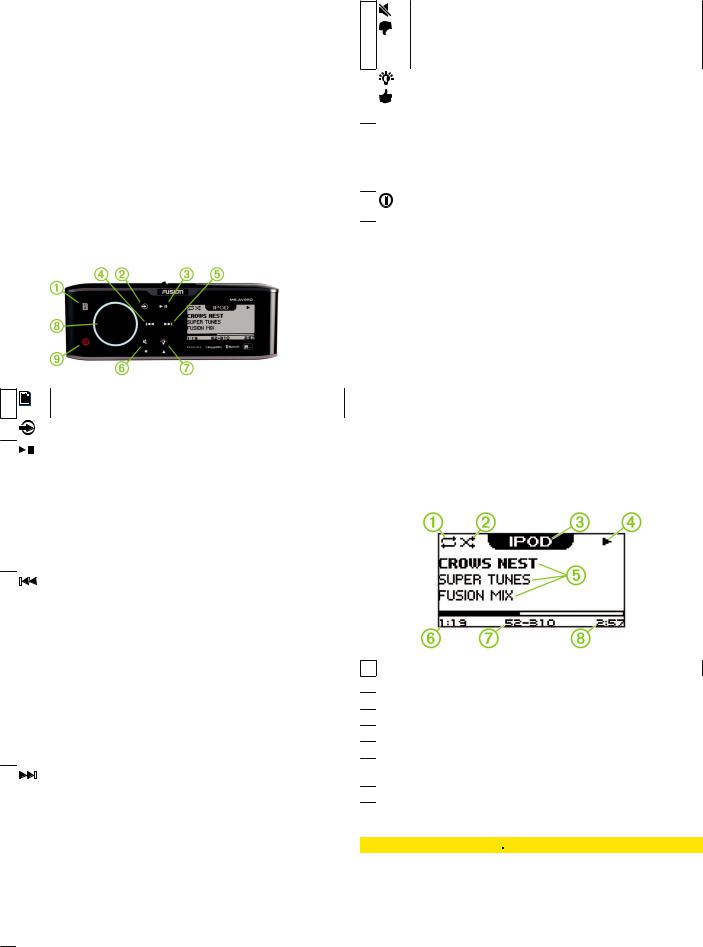
Stereo Controls
• Select to open a menu.
À
• Select to return to the previous screen or menu.
Select to move through the available sources.
Á
• Select to pause or resume.
Â
•AM, FM source:
◦Select to move through the tuning modes: auto, manual, and presets (when two or more presets are saved).
◦Hold to save this station as a preset.
•SIRIUSXM source: Select to move through the tuning modes (auto and presets), when you have at least one preset channel.
•DAB source: Select to scan for DAB stations.
à |
|
• Select to skip to the previous track, when using an |
|
||
|
|
applicable source. |
•Hold to rewind the current track, when using an applicable source.
•AM, FM source:
◦Select to tune to the previous station.
◦Hold for faster tuning (manual mode only).
•AUX1, AUX2 source: Select to decrease the gain for the connected source.
•SIRIUSXM source: Select to return to the previous channel.
•DAB source: Select to return to the previous DAB station in the ensemble. When you reach the beginning of the current ensemble, the stereo automatically changes to the last available station in the previous ensemble.
Ä |
|
• Select to skip to the next track, when using an applicable |
|
||
|
|
source. |
•Hold to fast forward the current track, when using an applicable source.
•AM, FM source:
◦Select to tune to the next station.
◦Hold for faster tuning (manual mode only).
•AUX1, AUX2 source: Select to increase the gain for the connected source.
•SIRIUSXM source: Select to advance to the next channel.
•DAB source: Select to advance to the next DAB station in the ensemble. When you reach the end of the current ensemble, the stereo automatically changes to the first available station in the next ensemble.
• Select to mute the audio output.
Å
•Select to unmute the muted audio.
The volume continues at the previously set level.
•Pandora®: Press and hold to tell Pandora not to play this track.
Æ |
• Select to adjust the screen and dial brightness, or to |
|
adjust the screen contrast. |
•Pandora: Press and hold to tell Pandora you like this track and would like this station to play more tracks similar to it.
Dial • Turn to adjust the volume.
Ç
•Press and hold for at least one second to adjust the subwoofer levels.
•Turn to move through the menus or adjust a setting.
•Press to select the highlighted option.
• Select to turn on the stereo.
È
• Hold to turn off the stereo.
Using the Dial to Select Items
You can use the dial to highlight and select items on the screen.
•Turn the dial to select an item on the screen.
•Press the dial to select the highlighted option.
Entering Text
You can enter text to change some settings field values on this device.
1In a settings field that allows you to enter text, select 

 to erase the existing characters.
2 Use the dial to choose a letter, and press the dial to select it. 3 Add additional letters to finish entering the text.
4 Select 

 to save the new text.
Stereo Screen
The information displayed on the stereo screen varies depending on the source selected. This example shows the stereo playing a track on an iPhone® mobile digital device.
Repeat status icon
À
Shuffle status icon
Á
Source
Â
Play status icon
Ã
Track details (if available)
Ä
Elapsed time
Å
Current track number out of total number of tracks in the playlist (if
Æ
available)
Track duration
Ç
Media Player Connection
 CAUTION
You may need to remove the media player from a sleeve or case to fit inside the dock.
Insert the media player with the display facing up. Never force the media player into the dock.
Be careful when removing the media player from the dock, because the surfaces may be warm.
Getting Started |
1 |
Loading...