


700 Series Manual
MARINE ENTERTAINMENT SYSTEM
MS-IP700i
True Marine Entertainment System for iPod
MS-AV700i
True Marine DVD Entertainment System

WARNINGS AND CAUTIONS
Do not attempt to open the unit’s chassis.
There are no user-serviceable parts or adjustments inside.
USING iPod
This unit has been tested with compatible authentic iPod models under normal expected operating conditions, free from any pre-existing defects in either the unit or the iPod.
No responsibility can be taken for use of the unit other than under normally expected operating conditions in conjunction with fully functional and undamaged iPod units which have been manufactured and authorized by Apple Inc.
USB Flash Drives
•Drive format: All USB flash drives used with this unit must be formatted to either FAT32 or NTFS format. These are the most commonly used format for USB flash drives.
•Audio track format: Audio tracks stored on USB flash drive must be in MP3/ M4A/FLAC format to play on this unit.
Handling CD or DVD disc’s (MS-AV700i model only)
•Avoid touching the surface of the disc.
•Avoid exposing the disc to direct sunlight.
•Ensure the disc is clean. If necessary, clean the disc with a clean, dry, soft, lint-free cloth.
•Ensure the disc is not scratched or damaged.
•Ensure the disc is dry when inserted into the unit.
Care and Maintenance
As with all products exposed to the harsh marine environment, a little care will help preserve the finish. FUSION recommends that you clean any salt water and/ or salt residue from the stereo with a damp cloth soaked in fresh water.
Most marine Stereo’s have small vents in their cases to allow a way out for moisture that finds its way in. In some limited instances it is possible for moist air to be drawn into the vents when the air inside the Stereo cools down after it is turned off. Direct sunlight on the front can draw this moisture up against the Window, causing fogging. Turning on the Stereo will speed up moisture removal. Fogging is not abnormal, nor will it harm your Stereo, which is built to withstand the harsh marine environment.
1

REGISTER YOUR PRODUCT ONLINE:
For your own peace of mind, register your product purchase online at www.fusionelectronics.com
We’ll keep you up to date with any news related to your product, any software upgrades or new accessories to help you get the most from your product.
All FUSION True Marine Products are backed by a 3 Year Limited Consumer Warranty and by registering your product you can be assured that if the unexpected occurs we’ll have your details and be ready to help.
RECORD YOUR PRODUCT DETAILS HERE:
SERIAL NUMBER |
|
DATE OF PURCHASE |
AFFIX RECEIPT HERE
2

CONTENTS
USER INTERFACE AND CONTROLS . . . . . . . . . . . . . . . . . . . . . 5
Control Panel Layout . . . . . . . . . . . . . . . . . . . . . . . . . . . . . . . . . . . . . . . . . . . . . . . . . . . . . . |
. 5 |
Button Description . . . . . . . . . . . . . . . . . . . . . . . . . . . . . . . . . . . . . . . . . . . . . . . . . . . . . . . . |
. 5 |
ROTARY ENCODER AND MENU KEY . . . . . . . . . . . . . . . . . . . . |
6 |
Encoder Operation . . . . . . . . . . . . . . . . . . . . . . . . . . . . . . . . . . . . . . . . . . . . . . . . . . . . . . . . |
. 6 |
Menu Key Operation . . . . . . . . . . . . . . . . . . . . . . . . . . . |
. 6 |
Using the Encoder and Menu Key . . . . . . . . . . . . . . . . . . . . . . . . . . . . . . . . . . . . . . . . . . . |
. 7 |
GETTING STARTED . . . . . . . . . . . . . . . . . . . . . . . . . . . . |
8 |
Powering the Unit On or Off . . . . . . . . . . . . . . . . . . . . . . . . . . . . . . . . . . . . . . . . . . . . . . . . |
. 8 |
Input Source Screens . . . . . . . . . . . . . . . . . . . . . . . . . . . |
8 |
Adjusting Volume Level . . . . . . . . . . . . . . . . . . . . . . . . . . . 9
Muting Output . . . . . . . |
. . . . . . . . . . . . . . . . . . . . . . |
. 10 |
Adjusting Sub Level and Tone . |
. . . . . . . . . . . . . . . . . . . . . . |
11 |
Displaying the Clock . . . . . . . . . . |
. . . . . . . . . . . . . . . . . . . . . . . . . . . . . . . . . . . . . . . . . . . . |
. 12 |
Setting and Clearing the Alarm |
. . . . . . . . . . . . . . . . . . . . . . |
. 13 |
Adjusting Screen Brightness . |
. . . . . . . . . . . . . . . . . . . . . . |
. 14 |
TUNER . . . . . . . . . . . |
. . . . . . . . . . . . . . . . . . . . . . |
15 |
Listening to the Tuner . . . . |
. . . . . . . . . . . . . . . . . . . . . . |
. 15 |
Tuner Source Screens . . . . |
. . . . . . . . . . . . . . . . . . . . . . |
. 15 |
SiriusXM . . . . . . . . . . |
. . . . . . . . . . . . . . . . . . . . . . |
16 |
Tuning Methods . . . . . . . |
. . . . . . . . . . . . . . . . . . . . . . |
16 |
Adding and Removing Presets . |
. . . . . . . . . . . . . . . . . . . . . . . . . . . . . . . . . . . . . . . . . . . . |
. 18 |
Setting up VHF . . . . . . . |
. . . . . . . . . . . . . . . . . . . . . . |
. 18 |
PLAYING MUSIC CONTENT. . . . |
. . . . . . . . . . . . . . . . . . . . . . |
. 19 |
iPod, MTP, Bluetooth and USB Source Screens . . . . . . . . . . . . . . . |
20 |
|
Controlling iPod Playback . . . . . . . . . . . . . . . . . . . . . . . . . 20 |
||
Controlling Bluetooth and MTP Playback . . . . . . . . . . . . . . . . . . . . . . . . . . . . . . . . . . . . |
. 21 |
|
Changing iPod Settings . . . . . . . |
. . . . . . . . . . . . . . . . . . . . . . . . . . . . . . . . . . . . . . . . . . . . |
. 23 |
Changing MTP Settings . . . |
. . . . . . . . . . . . . . . . . . . . . . |
. 24 |
Changing Bluetooth Settings . |
. . . . . . . . . . . . . . . . . . . . . . . 24 |
|
AUXILIARY INPUT . . . . . . . . . . . . . . . . . . . . . . . . . . . . 24 |
||
Listening to Auxiliary Input . . |
. . . . . . . . . . . . . . . . . . . . . . |
. 24 |
Auxiliary Source Screen . . . |
. . . . . . . . . . . . . . . . . . . . . . |
25 |
ADDITIONAL FEATURES . . . . . . . . . . . . . . . . . . . . . . . . . 25 |
||
FUSION-Link . . . . . . . . |
. . . . . . . . . . . . . . . . . . . . . . |
. 25 |
Total Audio Control via NMEA2000 . . . . . . . . . . . . . . . . . . . . |
. 26 |
|
FUSION MS-NRX200I Remote Control . . . . . . . . . . . . . . . . . . |
. 26 |
|
3

Ethernet Support . . . . . . . . . . . . . . . . . . . . . . . . . . 26 Infrared (IR) Remote . . . . . . . . . . . . . . . . . . . . . . . . . 27
INSTALLING THE 700 Series . . . . . . . . . . . . . . . . . . . . .29
CONNECTIONS . . . . . . . . . . . . . . . . . . . . . . . . . . . 31 INSTALLATION . . . . . . . . . . . . . . . . . . . . . . . . . . . 34 700 Series Connection Example . . . . . . . . . . . . . . . . . . . . . . . . . . . . . . . . . . . . . . .35
SETTING UP THE 700 Series . . . . . . . . . . . . . . . . . . . . .36 Zones . . . . . . . . . . . . . . . . . . . . . . . . . . . . . . . . . . . . . . . . . . . . . . . . . . . . . . . . . . . . .36 Preparing For iPod, MTP Device or USB Connection . . . . . . . . . . .39 MS-IP700i Model . . . . . . . . . . . . . . . . . . . . . . . . . . 40 Bluetooth Media Device . . . . . . . . . . . . . . . . . . . . . . . 43 Preparing for Auxiliary Input . . . . . . . . . . . . . . . . . . . . . 43 Clock Setting . . . . . . . . . . . . . . . . . . . . . . . . . . . . 44 SiriusXM Satellite Radio . . . . . . . . . . . . . . . . . . . . . . . . . . . . . . . . . . . . . . . . . . . . . .45 Advanced Settings . . . . . . . . . . . . . . . . . . . . . . . . . . . . . . . . . . . . . . . . . . . . . . . . . . .50
APPENDICES . . . . . . . . . . . . . . . . . . . . . . . . . . . .55 Troubleshooting . . . . . . . . . . . . . . . . . . . . . . . . . . .55 Specifications . . . . . . . . . . . . . . . . . . . . . . . . . . . .59
Licensing . . . . . . . . |
. . . . . . . . . . . . |
. |
. |
. |
. |
. |
. |
. |
. |
. |
.60 |
|
Support, Sales and Service |
. . . . . . . . . . . . |
. |
. |
. |
. |
. |
. |
. |
. |
. |
.60 |
|
Index |
. . . . . . . . . |
. . . . . . . . . . . . |
. |
. |
. |
. |
. |
. |
. |
. |
. |
. 61 |
4
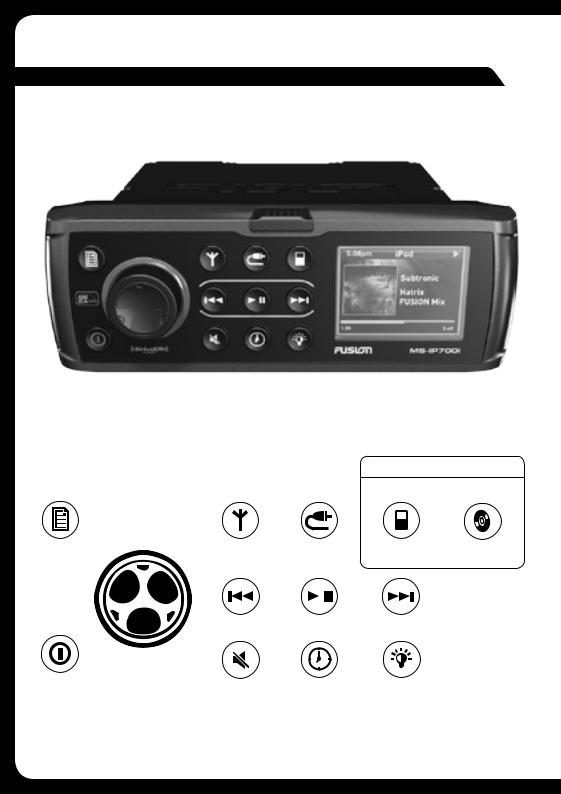
USER INTERFACE AND CONTROLS
CONTROL PANEL LAYOUT
BUTTON DESCRIPTION
PRIMARY SOURCE
MS-IP700i
MS-AV700i
Menu |
Tuner |
Auxiliary |
iPod |
DVD |
|
source |
|
|
|
|
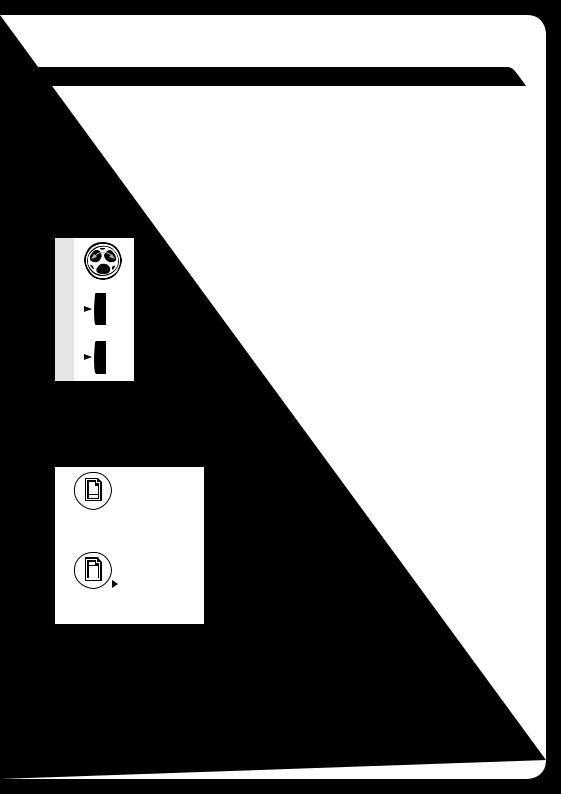
Rewind |
Play/Pause |
Forward |
|
Power |
Mute |
Clock |
Brightness |
|
|
|
5
ROTARY ENCODER AND MENU KEY
Although the controls of the 700 Series are designed to be intuitive to use, we recommend that you familiarize yourself with the operation of the Encoder and
Menu key before using the unit.
ROTARY ENCODER OPERATION
The Encoder can be used in three ways to control the operation of the 700
Series:
1 |
|
|
|
Rotary Encoder turn |
|
|
|
|
|
2 |
|
|
|
Encoder press |
|
|
|
||
|
|
|
|
|
|
|
|
|
|
3 |
|
|
+1 |
Encoder press and hold down for at least one second |
|
||||
|
|
|
||
|
|
|
|
|
|
|
|
|
|
MENU KEY OPERATION
You can use the Menu key to open or to exit from menus:
|
Menu key |
Press the Menu key to open a menu. |
|
|
|
|
|
In an open menu you can use the Menu key at any time to save |
|
|
changes and exit: |
|
|
• Press the Menu to exit from the current menu level or control |
|
Menu exit |
screen. |
|
• Press and hold down the Menu key to exit from the menu |
|
|
|
|
|
|
completely. Or press any other key. |
|
|
Time out feature: After 10 seconds of inactivity, the menu exits |
|
|
and any changes are saved automatically. |
|
|
|
6
USING THE ROTARY ENCODER AND MENU KEY
You can use the Rotary Encoder and Menu key to adjust levels, access menus and open control screens.
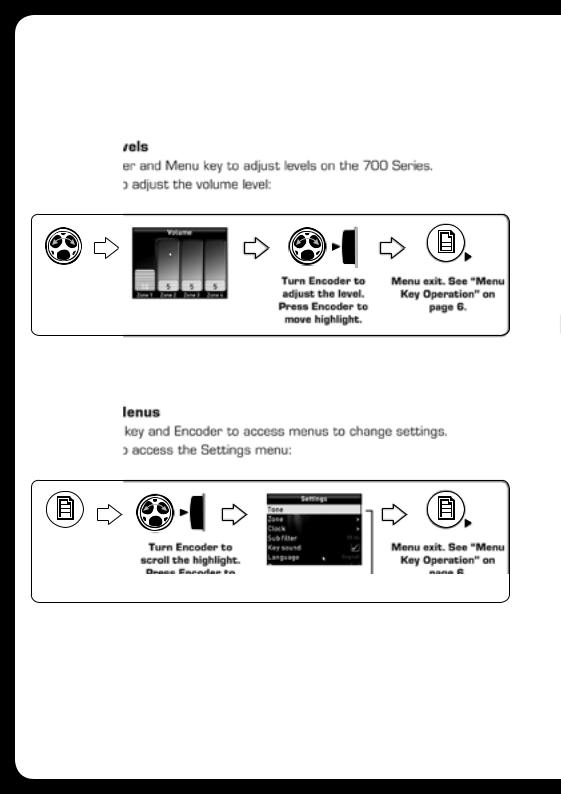
Adjusting levels
Use the Encoder and Menu key to adjust levels on the 700 Series.
For example, to adjust the volume level:
Turn Encoder to |
Turn Encoder to |
Menu exit. See “Menu |
open the Volume |
adjust the level. Press |
Key Operation” on page |
screen |
Encoder to move |
6. |
|
highlight. |
|
Accessing Menus
Use the Menu key and Encoder to access menus to change settings.
For example, to access the Settings menu:
Press Menu key |
|
|
|
|
|
|
|
|
|
|
|
Turn Encoder to scroll |
|
|
Menu exit. See “Menu |
||
|
|
|
|||
|
the highlight. |
|
|
Key Operation” on page |
|
|
Press Encoder to select |
|
|
6. |
|
|
Settings menu. |
Highlight |
|||
7
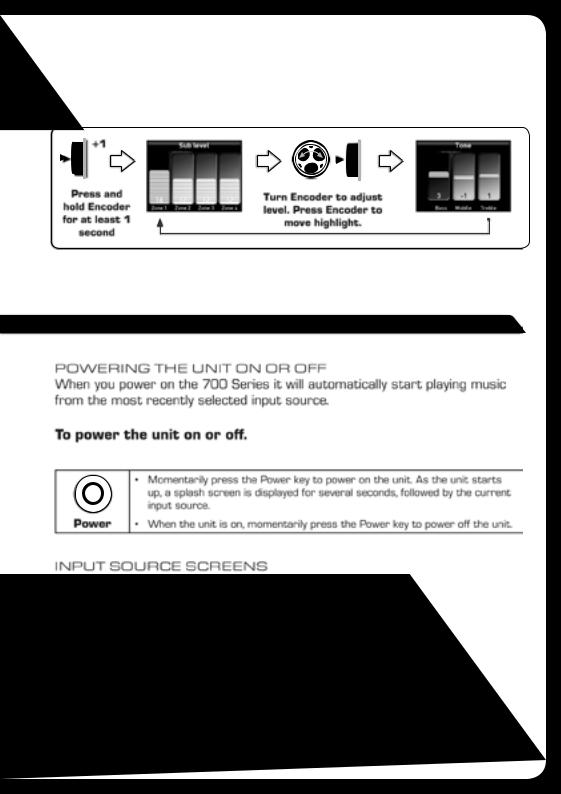
Opening Control Screens
Use the Encoder to open the Sub Level and Tone control screens to adjust levels:
+1
Press and hold Encoder for at least 1 second
Turn Encoder to adjust level. Press Encoder to move highlight.
GETTING STARTED
POWERING THE UNIT ON OR OFF
When you power on the 700 Series it will automatically start playing music from the most recently selected input source.
To power the unit on or off.
|
|
• |
Momentarily press the Power key to power on the unit. As the unit starts |
|
|
|
up, a splash screen is displayed for several seconds, followed by the current |
|
|
|
|
Power |
|
input source. |
|
• |
When the unit is on, momentarily press the Power key to power off the unit. |
||
|
|
|
|
INPUT SOURCE SCREENS
The 700 Series supports a wide range of input source types, depending on model:
•MS-IP700i AM/FM/VHF/SiriusXM; iPod/iPhone via internal dock; USB and iPod/iPhone/MTP devices (Android) via external dock or cable; auxiliary; Bluetooth.
•MS-AV700i AM/FM/VHF/SiriusXM; CD/DVD; USB and iPod/iPhone/MTP devices (Android) via external dock or cable; auxiliary; Bluetooth.
8
Both models are also SiriusXM-Ready (USA only). Requires optional SiriusXM
Connect Vehicle Tuner. For further details of setting up SiriusXM options see
“SiriusXM Satellite Radio” on page 45.
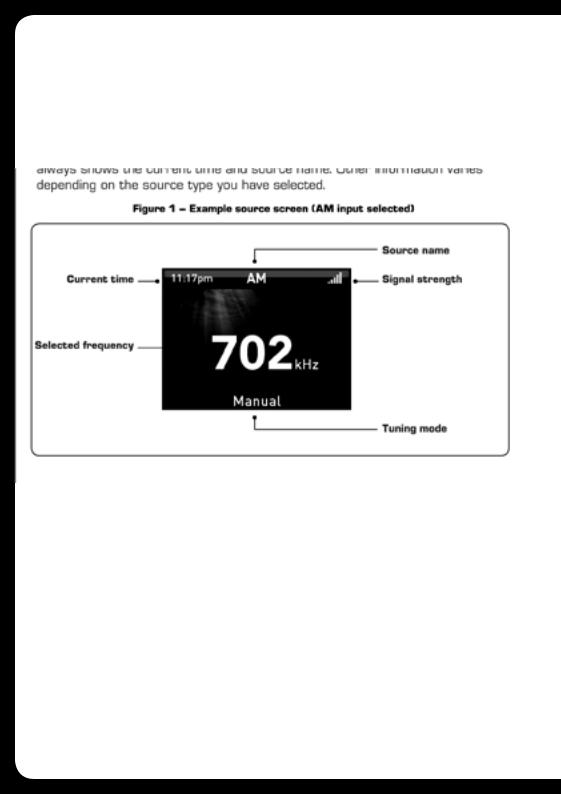
When you select one of these sources, the 700 Series displays a source screen, similar to the AM source screen shown in Figure 1 below. The title bar always shows the current time and source name. Other information varies depending on the source type you have selected.
ADJUSTING VOLUME LEVEL
The 700 Series allows you to control speaker output volume level in up to four named areas called Zones. Note: Zone 3 and 4 require additional amplification.
If you wish, you can customize the settings for each Zone by defining a volume limit, a balance setting, a sub-woofer level and a personalized name (such as
“Saloon” or “Galley”). For further details see “Zones” on page 36.
9
To adjust the volume level:
1.Turn the Encoder.
•The Volume screen is displayed with the Current Zone Selection Highlighted (remembered from previous use).
•The volume is adjusted in the highlighted Zone (or Zones) only.
2.If required, press the Encoder to highlight the next Zone to adjust its volume level.
While the Volume screen is displayed, each press of the Encoder will highlight available Zones in the following order:
|
Zone 1 |
|
Zone 2 |
|
Zone 3 |
|
Zone 4 |
|
All Zones |
|
|
|
|
|
|
|
|||||
|
|
|
|
|
|
|
|
|
|
|
3.When finished, press the Menu key (or leave to time out) to save the current volume level and exit.
MUTING OUTPUT
To mute and unmute the volume:
|
• |
Press the Mute key to mute the audio output. The Mute icon is displayed |
|
|
over the top of the current input source screen. |
Mute |
• |
Press the Mute key again to unmute the audio output. The volume continues |
|
at the previously set level. |
|
|
|
|
|
|
|
10
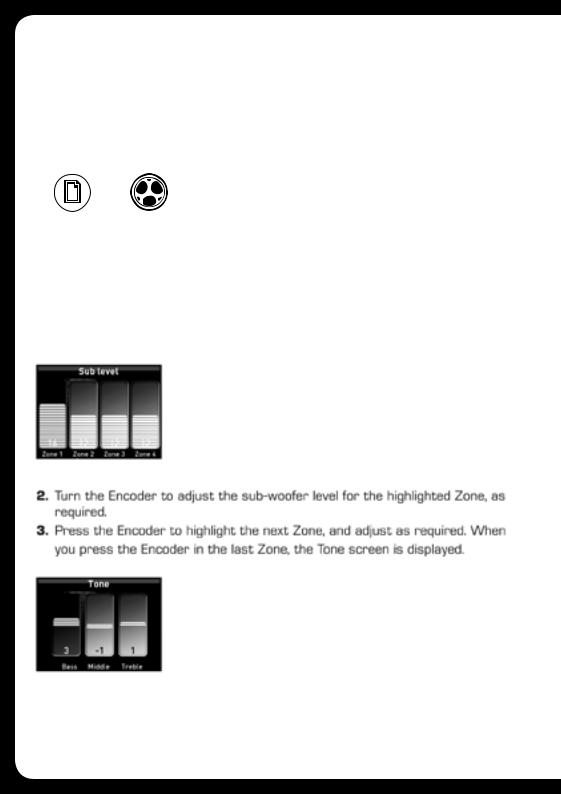
ADJUSTING SUBWOOFER LEVEL AND TONE
Use the Sub level and Tone screens to set the sub-woofer levels and tone.
Sub-woofer level can be adjusted for each Zone individually, but tone adjustments affect all Zones.
Menu key |
Encoder |
|
|
To set sub-woofer levels or tone:
1.Press and hold down the Encoder for at least one second. The Sub level screen is displayed.
2.Turn the Encoder to adjust the sub-woofer level for the highlighted Zone, as required.
3.Press the Encoder to highlight the next Zone, and adjust as required. When you press the Encoder in the last Zone, the Tone screen is displayed.
11

4.Turn the Encoder to left or right to adjust the Bass level, if required.
5.Press the Encoder to highlight each tone control, and adjust as required.
When you press the Encoder on the Treble tone control, the Sub level screen is displayed again.
6. Press any key to exit
DISPLAYING THE CLOCK
Use the Clock key to display the current time. If the time is incorrect, see “Clock Setting” on page 44.
Note: The current time is also displayed in the title bar of each input source screen.
• Press the Clock key to display the current time
Clock
12

SETTING AND CLEARING THE ALARM
Use alarm mode to turn on the 700 Series at a pre-defined time.
When the alarm is activated, your 700 Series will play the last selected input source at the volume level in use when the unit was turned off.
Menu key |
Encoder |
|
|
To set the alarm:
1.Press the Menu key.
2.Turn and then press the Rotary Encoder to select Settings > Clock > Set alarm.
3.Do one or both of the following:
•Turn the Rotary Encoder to change the hour setting.
•Press the Rotary Encoder to move to the minutes field. Adjust the minutes setting as required.
•Press the Rotary Encoder to move to the AM/PM field (if enabled). Turn encoder to select AM or PM.
4.Press the Menu key to save the time settings and exit (the time out feature does not operate here).
5.Highlight the Alarm enabled checkbox and press the Encoder to enable it (  ).
).
6.Press any key to exit
To clear the alarm:
1.Press the Menu key.
2.Turn and then press the Rotary Encoder to select Settings > Clock.
3.Highlight the Alarm enabled checkbox and press the Rotary Encoder to disable it (  ).
).
4.Press any key to exit
13

ADJUSTING SCREEN BRIGHTNESS
Note: LCD and button backlight brightness can be linked to the ambient lighting level. For further details, see “Installing the 700 Series” on page 34.
Brightness
To adjust the brightness of the display screen:
1. Press the Brightness key. The Brightness screen is displayed.
2.Turn the Rotary Encoder to adjust the brightness setting.
3.Press any key to exit
14
TUNER
LISTENING TO THE TUNER
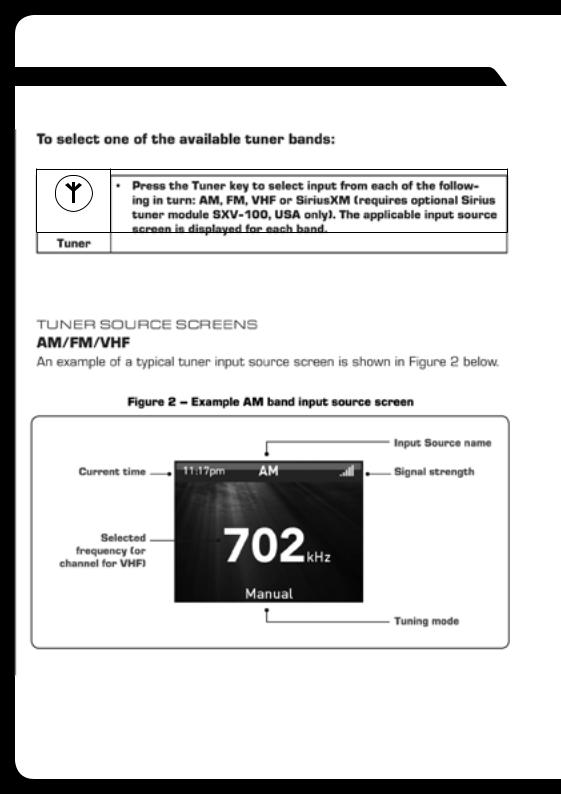
To select one of the available tuner bands:
•Press the Tuner key to select input from each of the following in turn:
|
AM, FM, VHF or SiriusXM (USA only) requires optional SiriusXM Con- |
|
nect Vehicle Tuner. The applicable input source screen is displayed for |
Tuner |
each band. |
TUNER SOURCE SCREENS
AM/FM/VHF
An example of a typical tuner input source screen is shown in Figure 2 below.
Figure 2 – Example AM band input source screen
15

SiriusXM
An example of the SiriusXM input source screen is shown in Figure 3 below.
Figure 3 – Example SiriusXM input source screen
TUNING METHODS
You can use three methods to tune the 700 Series: manual, automatic and preset.
|
|
|
|
|
|
|
|
|
|
|
|
|
|
|
|
|
|
Encoder |
Menu key |
Play / |
Rewind |
Fast |
||||
|
|
Pause |
|
|
Forward |
|||
|
|
|
|
|
|
|
|
|
To tune to a required frequency, channel or preset:
Press the Play / Pause key to step through the available tuning methods for each band:
Note: Preset function only available if 2 or more presets are saved
16

Tuning Method |
Applies to… |
When tuning with this method… |
|
|
|
Manual |
All bands |
• Press the Forward or Backward key to step through |
|
|
the range of frequencies or channels one at a time. |
|
|
• Press and hold down the key for rapid scanning of |
|
|
frequencies or channels. |
Manual |
SiriusXM |
• Press the Forward or Backward key to step through |
|
|
all channels one at a time. |
|
|
|
Category |
SiriusXM |
• Press the Play / Pause, Forward or Backward key to |
|
|
step through the channels in the selected category. |
|
|
• Only available when a category is selected in |
|
|
the Category menu item. For further details see |
|
|
“Category” on page 47. |
|
|
|
Auto |
AM/FM |
• Press the Forward or Backward key to start |
|
|
searching for available stations. |
|
|
• Press the Play / Pause, Forward or Backward key to |
|
|
stop the search. |
|
|
|
Scan |
VHF |
• Scans through preset channels, pausing on a |
|
|
channel while it is transmitting. |
|
|
• Only available if there are two or more presets |
|
|
saved. |
|
|
• If there is any background noise, the scan will stop. |
|
|
For further details see “Minimizing background |
|
|
noise” on page 18. |
|
|
• Press the Play / Pause, Forward or Backward key to |
|
|
turn scan mode off. For further details see “Turning |
|
|
scan mode on” on page 19. |
|
|
NOTE: The Scan function is activated from the settings |
|
|
menu, see ‘Setting up VHF’ |
|
|
|
Preset |
All bands |
• Press the Forward or Backward key to step through |
|
|
available presets. |
|
|
• Only available if there are two or more presets |
|
|
saved. |
|
|
• To tune to a specific preset: |
|
|
a. Press the Menu key, and then press the |
|
|
Encoder to select Presets. |
|
|
b. Turn the Encoder to highlight the required |
|
|
preset. |
|
|
c. Press the Encoder to tune to the highlighted |
|
|
preset. |
|
|
For further details, see “Adding and Removing Presets” |
|
|
on page 18. |
|
|
|
17

ADDING AND REMOVING PRESETS
The 700 Series allows you to set up your favorite AM/FM stations, VHF or
SiriusXM channels as presets for easy recall.
Note: Up to 15 presets can be stored for each radio band.
|
|
|
|
|
|
|
|
|
|
|
|
|
|
|
|
|
|
|
|
Encoder |
Menu key |
Play / |
Rewind |
Fast |
Tuner |
||||
|
|
Pause |
|
|
Forward |
|
|||
|
|
|
|
|
|
|
|
|
|
To add a new preset:
Do one of the following.
1.Tune the 700 Series to the required frequency or channel.
2.Press and hold down the Play / Pause key. The message: “Preset saved” is displayed
briefly.
or
1. Press the Menu key.
2.Turn and then press the Encoder to select Presets > Save current. The message: “Preset saved” is displayed briefly.
To remove one or more presets:
1.Press the Menu key.
2.Turn and then press the Encoder to select Presets > Remove presets.
3.Do one of the following (there is no warning or confirmation prompt before deletion):
• Select Remove all presets and press the Encoder to remove all
current presets.
• Select a preset and press the Encoder to remove the selected preset.
4.Press any key to exit
SETTING UP VHF
Note: A marine FM antenna is required for VHF reception, DO NOT connect to a VHF splitter.
Minimizing background noise
Use the Squelch feature to reduce background noise on VHF input. Select a VHF channel, and then adjust the squelch control while there is nothing being transmitted on the channel.
To set the squelch level:
1.Press the Menu key.
2.Turn and then press the Encoder to select Squelch.
3.Turn the Encoder to adjust the squelch level:
•Increase the squelch level until the background noise is muted.
•Reduce the squelch level if the audio transmission is not heard.
18
4. Press any key to exit
Turning scan mode on
Scan mode allows the 700 Series to scan through preset VHF channels, looking for active channels.
Note: If the Squelch level is adjusted so that you can hear a constant hissing sound, the unit will not scan correctly. To correct this, see “Minimizing background noise”, above.
To turn scan mode on:
1.Press the Menu key.
2.Turn the Encoder to highlight the Scan menu item.
3.Press the Encoder to select the checkbox ( ). Scan mode is turned on and the
menu exits automatically.
Note: Pressing the Play / Pause, Forward or Rewind key turns scan mode off.
PLAYING MUSIC CONTENT
Before you can use your media device as an input source you must first connect the device to the FUSION stereo as described in the installation section.
To listen to audio from your iPod, MTP device, Bluetooth device or USB FLASH drive:
ANDROID (MTP) SUPPORT: MTP is a standard developed for connecting media (music) devices over USB. It has been adopted on a number of platforms including Android. FUSION currently supports a range of smartphones utilising MTP.
Refer to www.fusionelectronics.com for the latest list of support devices.
MS-IP700i |
|
|
|
• Press the iPod key. The iPod input source screen is |
|
|
|
|
displayed. The most recently selected track starts |
|
|
|
|
|
|
|
|
|
playing at the current play point. |
|
iPod |
• To appear on the iPod source screen the iPod |
||
|
may be inserted either into the internal dock or |
|||
|
|
|
|
|
|
|
|
|
an external UNI-Dock or connected to the external |
|
|
|
|
USB connector. |
|
|
|
|
|
MS-AV700i, |
|
|
|
• Press the Auxiliary key. Keep pressing the key until |
MS-IP700i |
|
|
|
the iPod (MS-AV700i only), USB, Bluetooth or MTP |
|
|
|
|
source screen is displayed. |
Auxiliary
19
IPOD, MTP, BLUETOOTH AND USB SOURCE SCREENS
An example of a typical input source screen;
Note: The availability of song information such as song title, artist name, track duration and album cover artwork is dependent on the capability of your phone and music application. Album cover artwork and Shuffle/Repeat Status icons are not supported over Bluetooth.
Note: For Bluetooth a FUSION Bluetooth module MS-BT200 is required.
CONTROLLING iPod PLAYBACK
Selecting tracks from a playlist
There can be thousands of tracks on an iPod, so you need to select the tracks you wish to play from one of the groupings available (such as Playlists, Artists,
Albums). For example, to select tracks by artist:
Press |
Turn Rotary Encoder |
Menu key |
to scroll the highlight. |
|
Press Rotary Encoder |
|
to select Artist. |
Turn Rotary Encoder to scroll the highlight. |
Menu exit. See |
|
“Menu Key |
||
Press Rotary Encoder to select the artist |
||
Operation” on |
||
or track. |
||
page 6. |
||
Note: Additional “A, B, C…” menu |
||
|
||
may appear if FAST is enabled. See |
|
|
“Searching” on page 23). |
|
Controlling Playback
You can control iPod playback with the Play / Pause, Forward and Rewind keys.
The selected track starts playing automatically.
20
 Loading...