

Page 1

P3PC-6232-01ENZ0
fi-718PR Imprinter
Operator's Guide
Page 2

Contents
Introduction ................................................................................................................................................. 1
1. Preparations ............................................................................................................................................ 3
1.1. Checking the Package Contents ................................................................................................................. 3
1.2. Names of Component Parts ......................................................................................................................... 3
2. Installation ............................................................................................................................................... 4
2.1. Installing the Imprinter ................................................................................................................................. 4
2.2. Loading the Print Cartridge ......................................................................................................................... 5
2.3. Test Print ....................................................................................................................................................... 6
3. Basic Operation ...................................................................................................................................... 8
3.1. Setting the Print Position ............................................................................................................................. 8
3.2. How to Use the Paper Guides ...................................................................................................................... 8
3.3. Print Setup .................................................................................................................................................... 9
3.4. Replacing the Print Cartridge .................................................................................................................... 10
3.5. Removing Jammed Documents ................................................................................................................ 12
4. Daily Care .............................................................................................................................................. 13
4.1. Cleaning the Print Cartridge ...................................................................................................................... 13
4.2. Cleaning the Imprinter................................................................................................................................ 13
4.3. Cleaning the Rollers ................................................................................................................................... 14
4.4. Cleaning Materials ...................................................................................................................................... 14
5. Error Messages ..................................................................................................................................... 15
6. Specifications ....................................................................................................................................... 16
The contents of this manual are subject to change without notice.
PFU Limited is not liable whatsoever for any damages resulting from the use of this scanner and procedures
described in this manual, profit loss due to defects, and any claims by a third party.
Copying of the contents of this manual in whole or in part and copying of the scanner applications is prohibited under
the copyright.
© PFU Limited 2013-2017
Page 3

Introduction
Product
Indication
Windows® XP Professional x64 Edition
Windows Vista® Ultimate (32-bit/64-bit)
®
(64-bit)
®
Windows
7 Ultimate (32-bit/64-bit)
2012 (*1)
(64-bit)
2012 R2 (*1)
Windows® 8 Enterprise (32-bit/64-bit)
Windows® 10 Home (32-bit/64-bit)
Windows® 10 Education (32-bit/64-bit)
Windows 10 (*1)
Windows Server® 2016 Standard (64-bit)
Windows Server
2016 (*1)
Scanner Operator's Guide
Thank you for purchasing the fi-718PR Imprinter option
(hereinafter referred to as the “Imprinter”) for the
fi-7160/fi-7180 Image Scanner.
This guide explains how to install, connect, operate, and
take daily care of the imprinter.
For further details about the functions and operations of the
fi-7160/fi-7180 Image Scanner (hereinafter referred to as
the "Scanner"), refer to the "fi-7160/fi-7260/fi-7180/
fi-7280 Image Scanner Operator's Guide" included in the
Setup DVD-ROM provided with the scanner.
We hope this manual will be helpful in your future use of the
Imprinter.
March 2017
Safety Information
The attached "Safety Precautions" manual contains
important information about the safe and correct use of this
product. Make sure that you read and understand it before
using the scanner.
Manufacturer
PFU Limited
YOKOHAMA i-MARK PLACE, 4-4-5 Minatomirai,
Nishi-ku, Yokohama, Kanagawa, 220-8567, Japan
Abbreviations Used in This Manual
The operating systems and products in this manual are
indicated as follows.
Windows® XP Home Edition
Windows® XP Professional
Windows Vista® Home Basic
(32-bit/64-bit)
Windows Vista
(32-bit/64-bit)
Windows Vista
Windows Vista
Windows Server
(32-bit/64-bit)
Windows Server
Windows
(32-bit/64-bit)
Windows
Windows
Windows Server® 2012 Standard (64-bit) Windows Server
Windows Server® 2012 R2 Standard
®
Home Premium
®
Business (32-bit/64-bit)
®
Enterprise (32-bit/64-bit)
2008 Standard
®
2008 R2 Standard
7 Home Premium
®
7 Professional (32-bit/64-bit)
®
7 Enterprise (32-bit/64-bit)
®
Windows XP
(*1)
Windows Vista
(*1)
Windows Server
2008 (*1)
Windows 7 (*1)
Windows Server
Trademarks
Microsoft, Windows, Windows Server, and Windows Vista
are either registered trademarks or trademarks of Microsoft
Corporation in the United States and/or other countries.
PaperStream is a registered trademark of PFU Limited in
Japan.
Other company names and product names are the registered
trademarks or trademarks of the respective companies.
Windows® 8 (32-bit/64-bit)
Windows® 8 Pro (32-bit/64-bit)
Windows® 8.1 (32-bit/64-bit)
Windows® 8.1 Pro (32-bit/64-bit)
Windows
Windows® 10 Pro (32-bit/64-bit)
Windows® 10 Enterprise (32-bit/64-bit)
fi-718PR Imprinter Imprinter
fi-7160/fi-7180 Image Scanner Scanner
fi-7160/fi-7260/fi-7180/fi-7280 Image
®
8.1 Enterprise (32-bit/64-bit)
Windows 8 (*1)
Windows 8.1 (*1)
Operator's Guide
*1: Where there is no distinction between the different
versions of the above operating system, the general term
"Windows" is used.
fi-718PR Imprinter Operator’s Guide | 1
Page 4

Arrow Symbols in This Manual
Right-arrow symbols (→) are used to separate icons or
menu options you should select in succession.
Example: Click the [Start] menu
→ [Control Panel].
Screen Examples in This Manual
Microsoft product screenshots are reprinted with
permission from Microsoft Corporation. The screen
examples in this manual are subject to change without
notice in the interest of product improvement.
If the actual screen differs from the screen examples in this
manual, operate by following the actual displayed screen
while referring to the user’s manual of the scanner
application you are using.
The screen examples used in this manual are of the
PaperStream IP (TWAIN) driver.
The screenshots used in this manual are of Windows 7. The
windows that appear and the operations differ by the
operating system. Also note that with some scanner models,
the screens and operations may differ from this manual
when you update the PaperStream IP (TWAIN) driver. In
that case, refer to the manual provided upon updating the
driver.
2 |
Page 5
1. Preparations
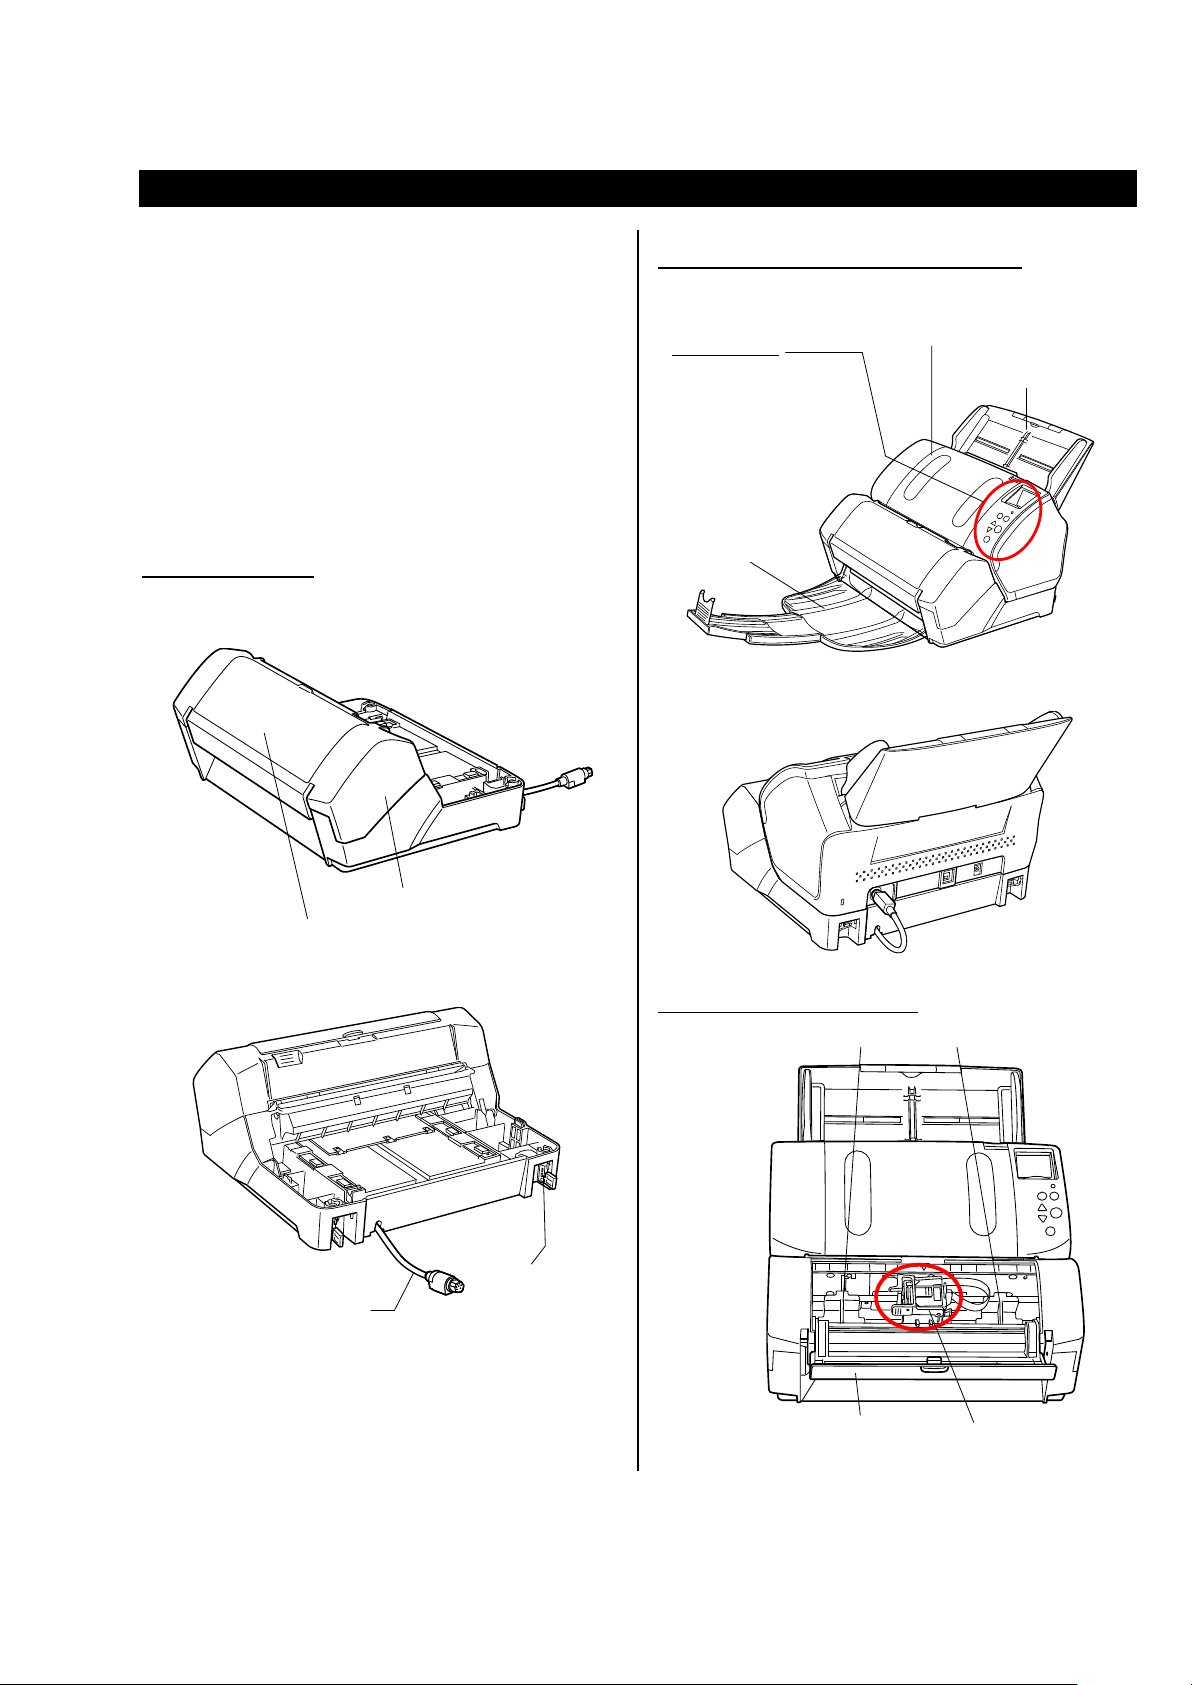
Print cartridge cover
Print cartridge holder
Paper guides
EXT cable
(Imprinter cable)
Lock
ADF paper chute
Operator panel
ADF (Automatic Document Feeder)
Stacker
Print section
Print cartridge cover
1.1. Checking the Package Contents
When you open the imprinter package, handle the main unit
and its attachments carefully.
Make sure it contains all the parts listed in the package
contents list that is included in the imprinter package box.
If any of the components are missing, contact your
FUJITSU scanner dealer or an authorized FUJITSU scanner
service provider.
1.2. Names of Component Parts
<Imprinter Unit>
Front
<Imprinter with Scanner Installed>
Front
● LCD
● [Menu] button
● [] button/[] button
● [Scan/Enter] button
● [Stop/Clear] button
● [Power] button
(feeder)
Back
Back
<Inside of the Imprinter>
fi-718PR Imprinter Operator’s Guide | 3
Page 6

2. Installation
After installation
Lock
Carefully pull the stacker out.
Push against the scanner with your thumb.
About 80 degrees
Stacker
2.1. Installing the Imprinter
Install the imprinter in the following procedure.
1. Turn off the scanner, and disconnect the power
cable.
2. Remove the stacker from the scanner as shown
below.
1) Hold the left side of the stacker with your left hand.
2) Gently pull the stacker as you push against the scanner
with your thumb.
3. Install the scanner onto the imprinter.
Holding the scanner above the rear side of the imprinter,
gently mount the scanner onto the imprinter while lowering it
forward until it makes contact with the imprinter.
ATTENTION
Be careful not to have your fingers caught.
3) Once the left arm of the stacker has been released from the
scanner, remove the right arm.
ATTENTION
You must remove the stacker before installing the imprinter.
4. Raise the locks (x2) on the back of the scanner.
4 |
Page 7
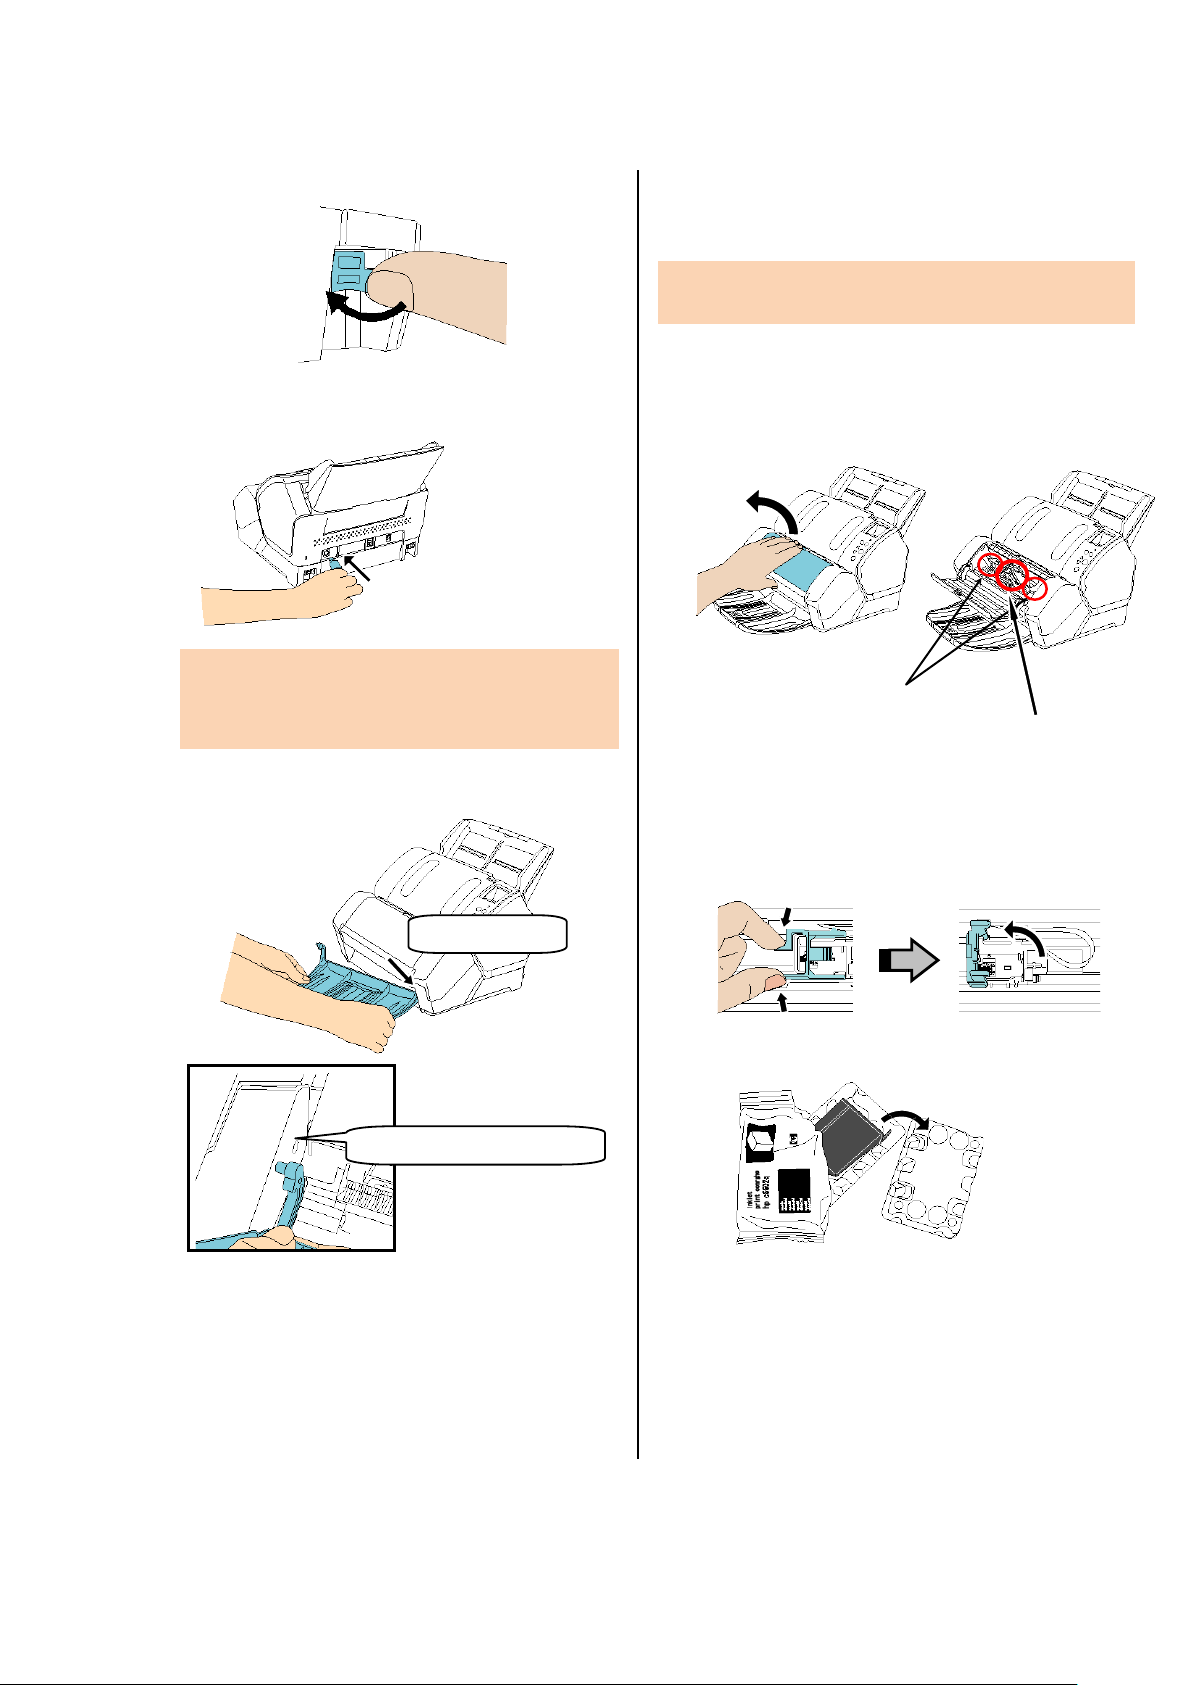
5. Turn the locks inwards.
Print cartridge holder
Paper guides
Insert one arm.
Gently slide in the other arm.
6. Connect the EXT cable to the connector on the
back of the scanner.
2.2. Loading the Print Cartridge
Load the print cartridge in the following procedure.
ATTENTION
When installing the print cartridge, install it properly.
1. Turn off the scanner.
2. Place your hand in the middle part of the print
cartridge and open it as shown below.
ATTENTION
The imprinter does not work if the EXT cable is not
connected. Scanning without the EXT cable connected will
cause paper jams inside the imprinter.
7. Attach the stacker (removed in step 2) on the front
of the imprinter.
①
②
3. Remove the packing tape from the print cartridge
holder and the paper guides.
4. Lift the print cartridge holder by pinching the lever
with your fingers as shown below.
5. Take out a new print cartridge.
8. Connect the power cable to the scanner.
fi-718PR Imprinter Operator’s Guide | 5
Page 8
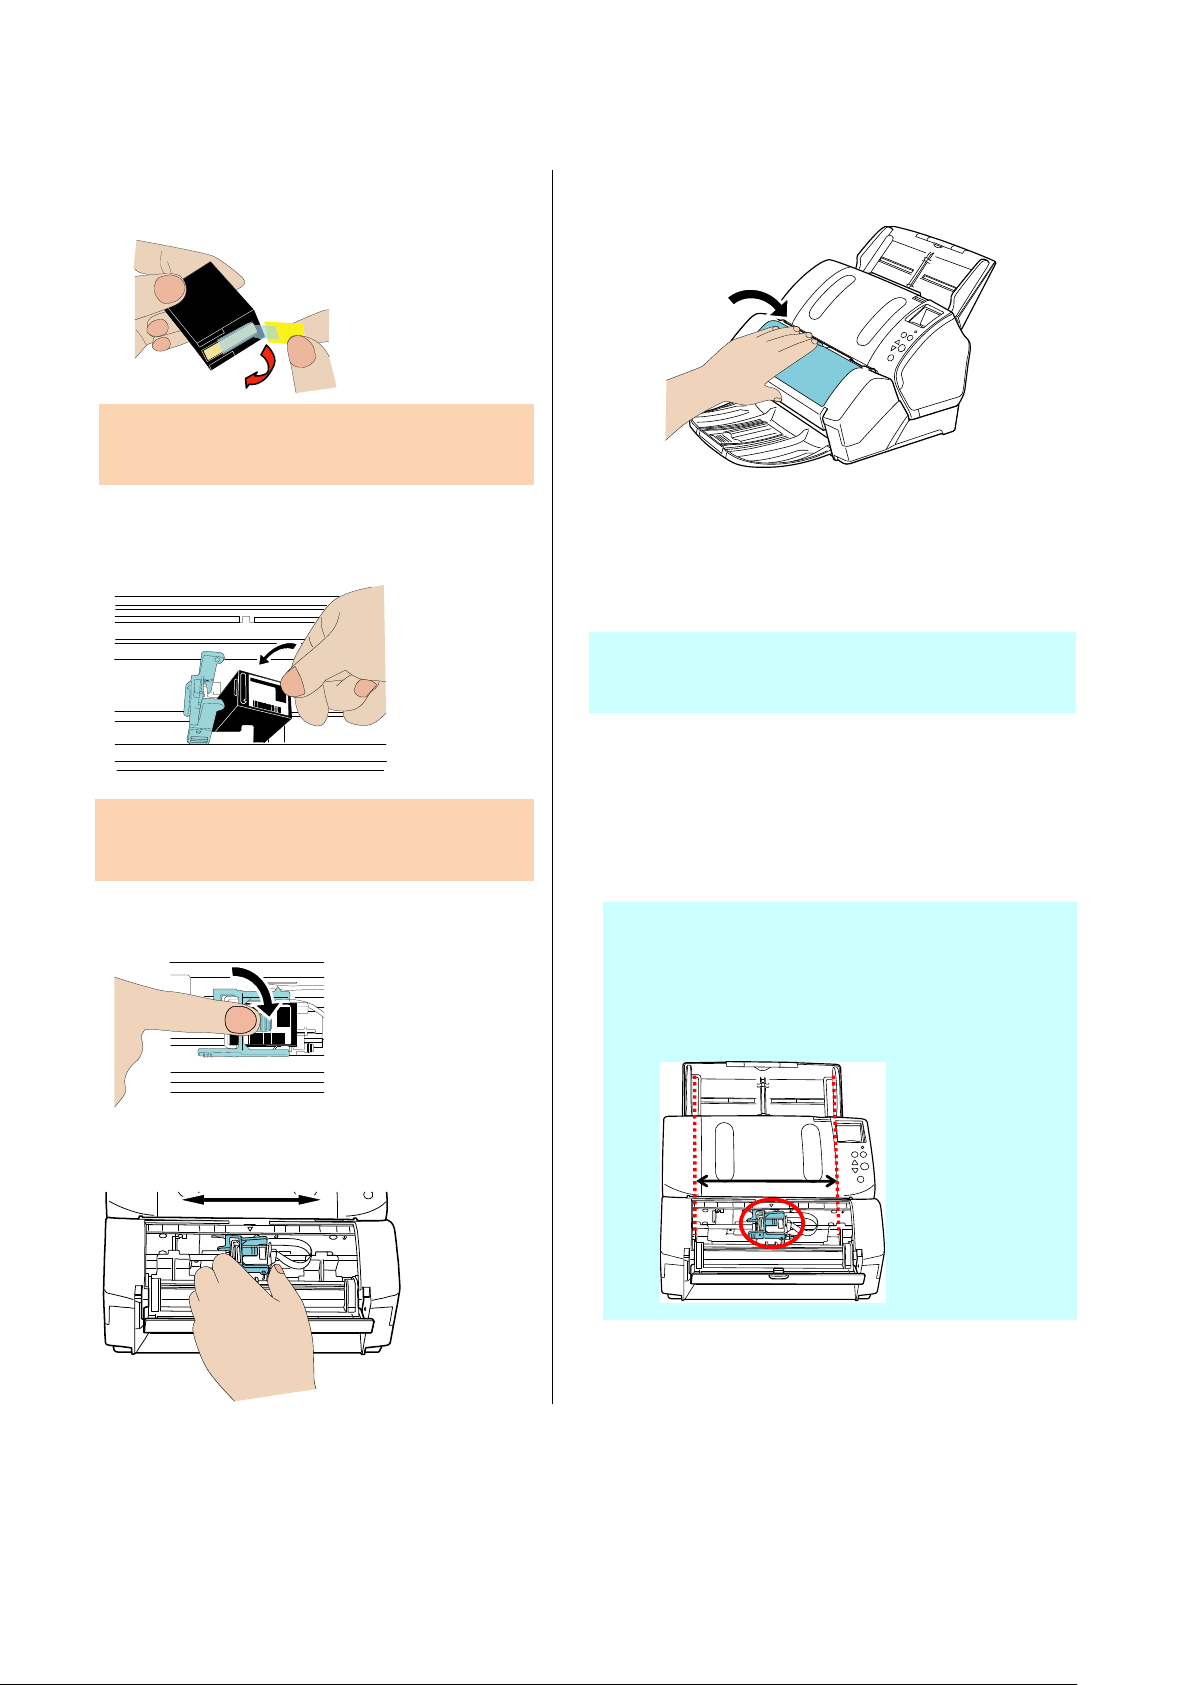
6. Remove the protective tape from the print
cartridge.
ATTENTION
Do not touch the metal part of the cartridge nor put the
protective tape back on.
10. Close the print cartridge cover.
7. Place the print cartridge into the holder as
shown below with its tab pointing to the right.
ATTENTION
Be careful not to let the print cartridge touch or catch onto
the print circuit film.
8. Lower the print cartridge holder until it locks in
place.
9. Position the print cartridge holder along where
the document will pass through.
2.3. Test Print
After installing the print cartridge, check if the printing
operation can be done.
HINT
For details about the operator panel, refer to the Operator's Guide
provided with the scanner.
1. Press the [Power] button on the operator panel
on the scanner.
The [Ready] screen is shown on the LCD.
2. Load a blank document in the ADF paper chute
(feeder).
HINT
● Use an A4 or Letter size blank sheet. If the paper
size is smaller than A4 or Letter, printing may not
complete successfully.
● Confirm that the print cartridge is positioned
within the document width.
6 |
Page 9

3. Press the [Menu] button.
of one, starting from 0 (zero).
5 mm
Feed direction
Sample Print Out of a Test Pattern
M
e
nu
Scan/Enter
Check
Power
Stop/Clear
⑥
⑤
④
③
②
①
The [Settings Menu] screen is shown on the LCD.
4. Select [3: Test Print] by pressing the [] or []
button, and press the [Scan/Enter] button.
The [No. of Sheets Scanned] screen is shown on the
LCD.
ATTENTION
If the Imprinter is disconnected or not connected properly,
[Cannot use this function because the Imprinter is not
connected.] is shown on the LCD.
5. Select [1: Single Sheet Only] or [2: Multiple
Sheets] by pressing the [] or [] button, and
press the [Scan/Enter] button.
When [2: Multiple Sheets] is selected, printing is
performed for all sheets set in the scanner.
The [Print Pattern] screen is shown on the LCD.
6. Select a print pattern by pressing the [] or []
button, and press the [Scan/Enter] button.
HINT
Print Test Patterns
Test Pattern 1 (Horizontal):
ABCDEFGHIJKLMNOPQRSTUVWXYZ[¥]^_`00000000
Test Pattern 2 (Horizontal):
abcdefghijklmnopqrstuvwxyz{|}‾ 00000000
Test Pattern 3 (Horizontal):
!”#$%&'()*+,-./0123456789:;<=>?@00000000
Test Pattern 4 (Vertical):
ABCDEFGHIJKLMNOPQRSTUVWXYZ[¥]^_`00000000
Test Pattern 5 (Vertical):
abcdefghijklmnopqrstuvwxyz{|}‾ 00000000
Test Pattern 6 (Vertical):
!”#$%&'()*+,-./0123456789:;<=>?@00000000
The numbering section "00000000" increases in increments
The [Test Print] screen is shown on the LCD.
7. Select [1: Yes] by pressing the [] button or []
button, and press the [Scan/Enter] button.
The blank sheet is fed into the scanner, and the
imprinter will print out a print test pattern leaving
a 5 mm gap (with an allowance of 4 mm inwards
or outwards) from the edge of the document.
8. To stop a test print, press the [Power] button on
the operator panel to turn off the scanner.
fi-718PR Imprinter Operator’s Guide | 7
Page 10

3. Basic Operation
Paper guides
Feed direction
3.1. Setting the Print Position
To position the print cartridge for printing:
1. Open the print cartridge cover.
2. Hold the print cartridge holder, as below, and
slide it to the left or right within the document
width to set it at a suitable print starting position.
HINT
● The triangle-shaped protrusion on the locking lever of the
print cartridge holder indicates the current print position on
the page.
● In the upper back of the print cartridge holder are the
document size markings; use them to adjust for paper
sizes and printing positions.
● Put the actual document in the ADF and confirm that the
print cartridge is positioned within the document’s width.
3.2. How to Use the Paper Guides
Use the paper guides to prevent paper jams due to curling of
the edges, as shown below.
Place the paper guides at the ends where the paper edges
will pass through.
1. Load the document in the scanner.
2. Open the print cartridge cover.
3. Slide the paper guides to the left and right edges
of the paper.
8 |
ATTENTION
Be careful not to let the paper guide touch or catch onto the
print circuit film.
Page 11
Paper guide
Paper guide
Paper guide
HINT
When you wish to print on a section near the edge of wide
paper, remove the paper guide in order to open space for
the print cartridge, and attach the removed guide in the
center.
For Right-Edge Printing
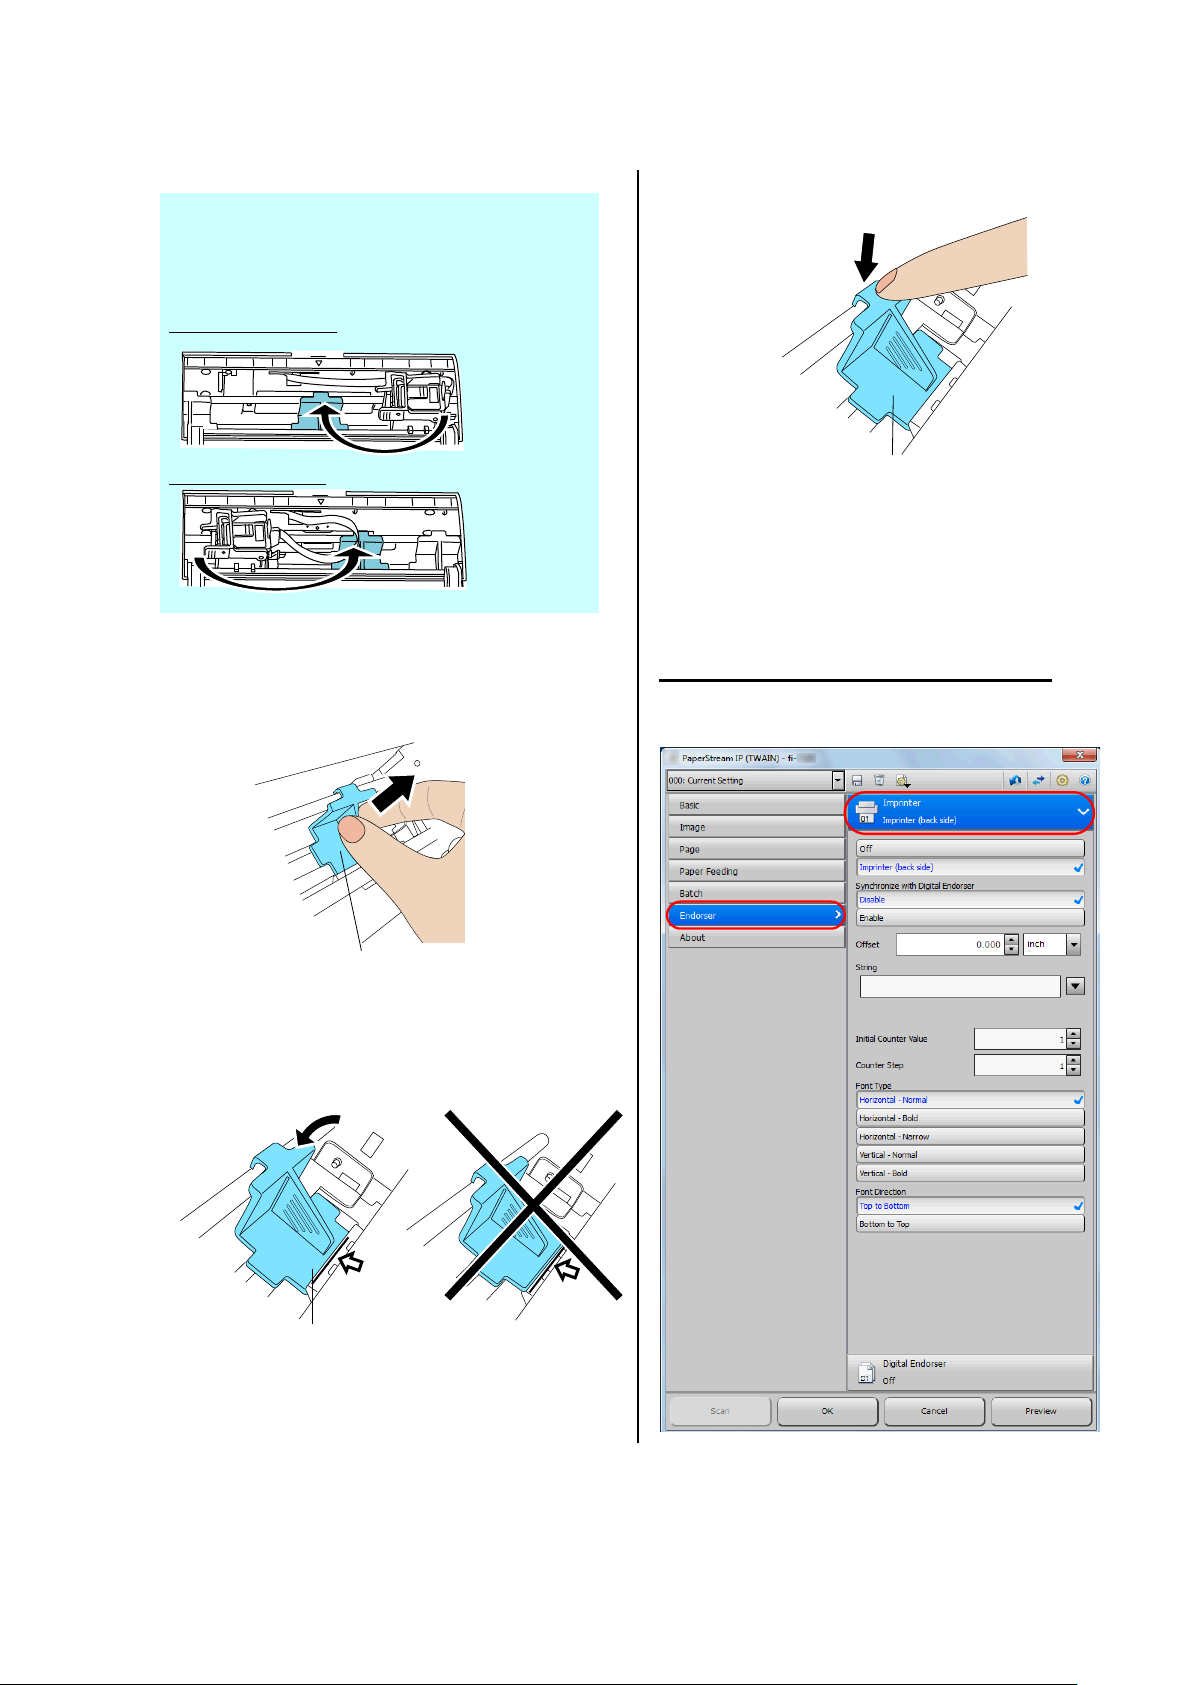
2. Push in the top portion of the guide to fit tightly.
For Left-Edge Printing
To Remove the Paper Guides>
<
Pressing and holding together with your fingers, as below,
lift up and pull away the guide.
<To Attach the Paper Guides>
3.3. Print Setup
You can configure settings for the imprinter by using the
scanner driver’s setup dialog box.
PaperStream IP (TWAIN) driver (Example)
Configure the settings in [Imprinter] of the [Endorser] menu in
standard mode.
1. Put the paper guides in place as in the picture on
the left.
fi-718PR Imprinter Operator’s Guide | 9
Page 12

Print cartridge holder
HINT
The following items can be specified. For details, refer to
PaperStream IP Driver Help.
● Imprinter status (On or Off)
● Whether the PaperStream IP driver is synchronized with the
Digital Endorser
● Printing settings (such as font type, direction, imprinting start
position, imprinting string, and initial, increased and decreased
values for the counter)
3.4. Replacing the Print Cartridge
The print cartridge is a consumable.
Replace the print cartridge in the following procedure.
ATTENTION
● When the following message appears, replace the print
cartridge as soon as possible. If you continue to print without
replacing the cartridge, your print output will be faded.
3. Lift the print cartridge holder by pinching the lever
with your fingers as shown below.
4. Remove the print cartridge.
5. Remove the protective tape from a new print
cartridge.
● When replacing the print cartridge with another cartridge,
make sure it is installed properly.
1. Turn off the scanner.
2. Place your hand in the middle part of the print
cartridge and open it as shown below.
ATTENTION
Do not touch the metal part of the cartridge nor put the
protective tape back on.
6. Insert the print cartridge with its tab to the right.
ATTENTION
Be careful not to let the print cartridge touch or catch onto
the print circuit film.
10 |
Page 13

7. Lower the print cartridge holder until it locks in
place.
8. Position the print cartridge holder along where
the document will pass through.
ATTENTION
Note that when the scanner prints right up to the edge of the
document, a part of the content may be printed outside the
document depending on the position of the print.
11. Reset the ink counter.
ATTENTION
Make sure to reset the ink counter after replacing the print
cartridge.
Display the [Software Operation Panel] window.
Windows XP/Windows Vista/
Windows Server 2008/Windows 7
Select the [Start] menu → [All Programs] → [fi Series] →
[Software Operation Panel].
Windows Server 2012/Windows 8
Right-click the Start screen, and click [All apps] on the
app bar → [Software Operation Panel] under [fi Series].
Windows Server 2012R/Windows 8.1
Click [↓] on the lower left side of the Start screen →
[Software Operation Panel] under [fi Series].
To display [↓], move the mouse cursor.
Windows 10/Windows Server 2016
Select the [Start] menu → [fi Series] → [Software
Operation Panel].
From the listing on the left, select [Device Setting].
9. Close the print cartridge cover.
10. Turn on the scanner.
Click the [Clear] button for the remaining ink.
The counter is set to “100”.
Click the [OK] button on the [Software Operation Panel]
dialog box.
A message appears.
Click the [OK] button.
The settings are saved.
fi-718PR Imprinter Operator’s Guide | 11
Page 14

3.5. Removing Jammed Documents
scanner is installed.
ADF
Print section
ADF
Print section
When a paper jam occurs, remove the document in the
following procedure.
ATTENTION
Do not use force to pull out the jammed document.
1. Remove all documents from the ADF paper chute
(feeder).
2. Place your hand on the right side of the print
section to open it, as shown below.
6. Close the print section.
ATTENTION
● Confirm that the ADF is closed before closing the print
section.
● Be careful not to have your fingers caught.
● Do not move the imprinter or scanner while printing.
● When you are not using the imprinter for a long time, it is
recommended to remove the print cartridge.
Ink will be consumed even when printing is not performed,
such as when the scanner is turned on.
● To prevent damage, do not transport the imprinter when the
ATTENTION
Make sure to open the print section before opening the ADF.
3. Open the ADF.
4. Remove the jammed document.
5. Close the ADF.
12 |
Page 15
4. Daily Care
as the ink is water-based.
Nozzle plate
4.1. Cleaning the Print Cartridge
If ink gets on the nozzle plate of the print cartridge or if the
imprinter has not been used for a long time, it may cause
low quality prints. When this happens, clean the nozzle
plate of the print cartridge.
ATTENTION
For cleaning, use a dry cloth (DO NOT use tissues), and gently
wipe any dirt and stains off on the nozzle plate.
HINT
If the ink emission holes are still blocked after cleaning the print
cartridge, replace it with a new cartridge.
1. Turn off the scanner.
2. Remove the print cartridge.
(Refer to “3.4. Replacing the Print Cartridge”)
4.2. Cleaning the Imprinter
After frequent use, the waste ink will begin to accumulate
on the base surface of the print cartridge holder, which can
soil printouts. Always maintain the base surface clean.
To assure high quality print outs and long use of the
imprinter, adopt a daily maintenance procedure as given
below.
ATTENTION
When cleaning, use an absorbent cloth or a waste cloth to wipe
the ink off the surface of the base.
If the ink has dried, wipe it lightly with a water-moistened cloth
1. Turn off the scanner.
2. Remove the print cartridge.
(Refer to “3.4. Replacing the Print Cartridge”)
3. Open the print section.
4. Dab the surface of the base of the print cartridge
with a cloth or waste cloth to remove the ink.
ATTENTION
Be careful not to touch the nozzle plate or the contact part
with your hand.
3. Gently wipe off the ink on the nozzle plate.
4. Confirm that the print cartridge is clean, and then
install the print cartridge.
(Refer to “3.4. Replacing the Print Cartridge”)
ATTENTION
When installing the print cartridge, install it properly.
ATTENTION
Be careful not to touch the metal wheels located behind the
upper rollers in the print section.
5. Confirm that the print section is clean, and then
close the print section.
6. Reinstall the print cartridge and close the print
cartridge cover.
(Refer to “3.4. Replacing the Print Cartridge
fi-718PR Imprinter Operator’s Guide | 13
”)
Page 16

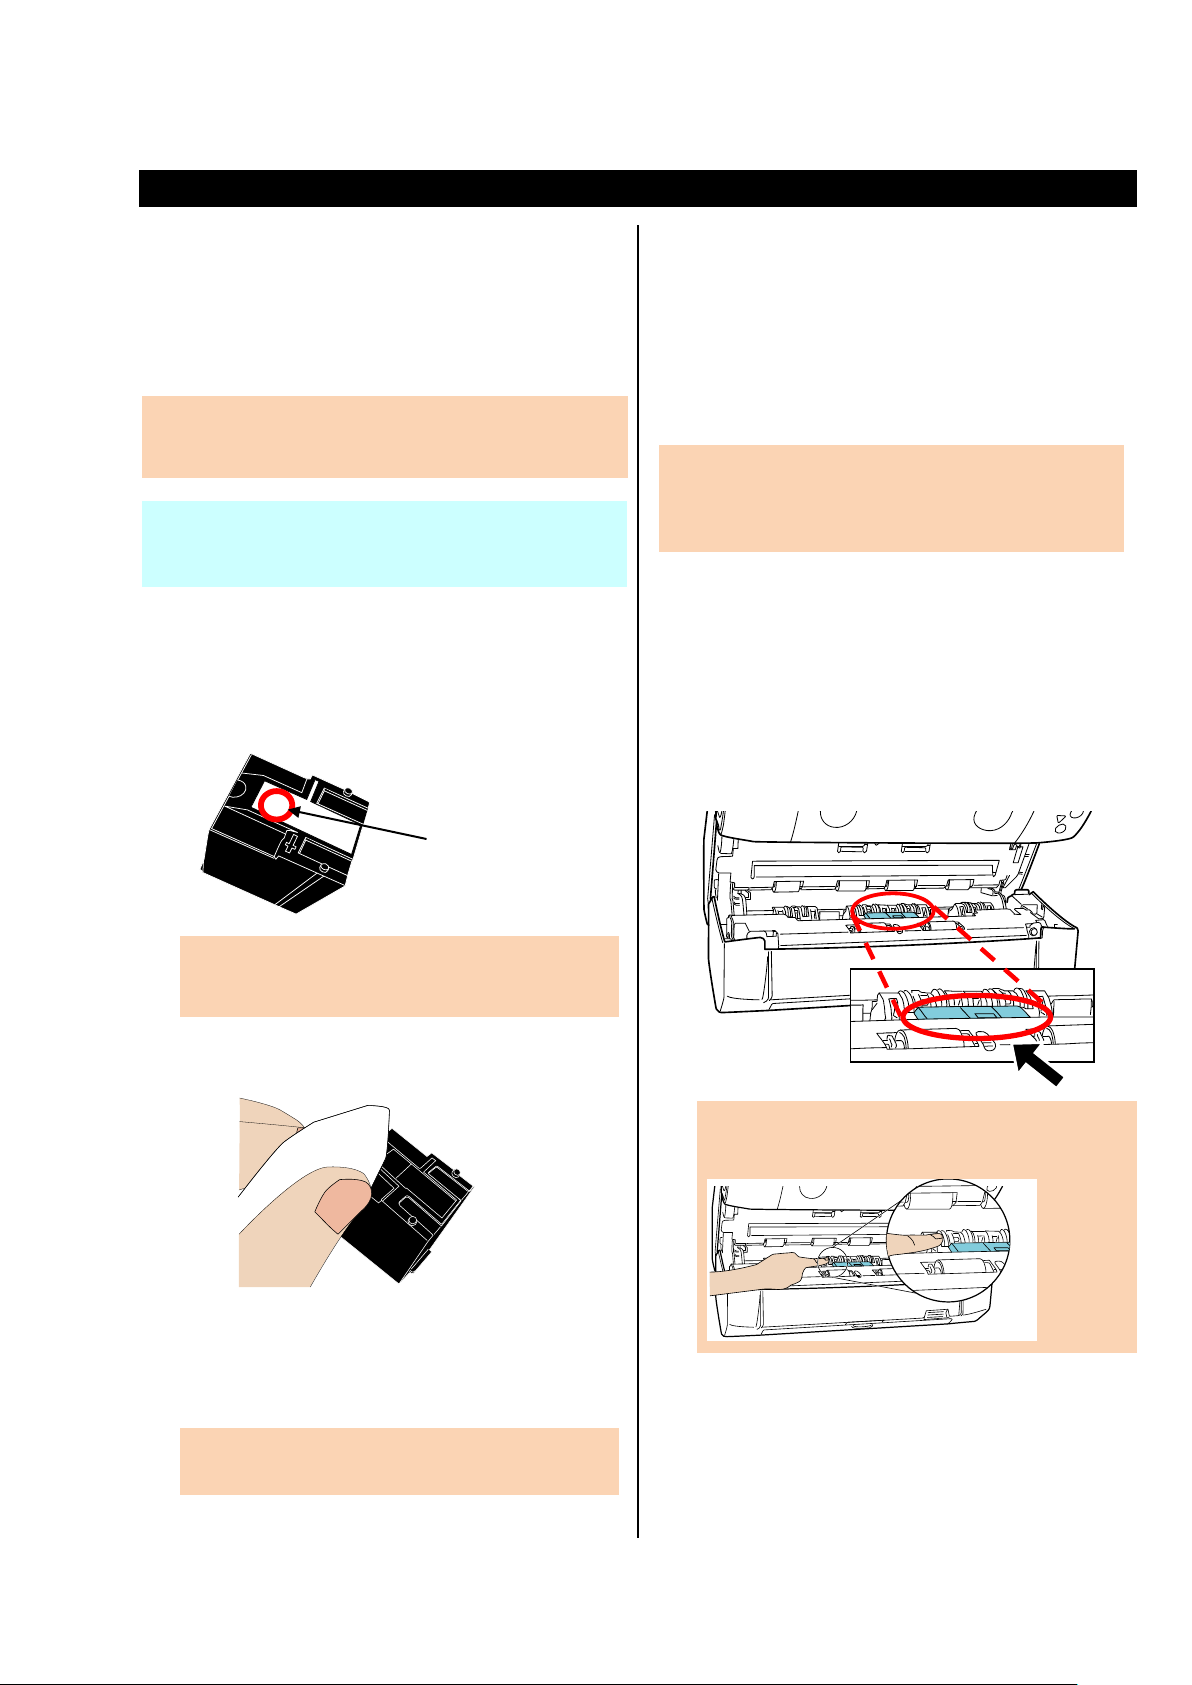
4.3. Cleaning the Rollers
Name
Part No.
Notes
Print section
Print section
When ink or dust from paper is stuck on the feed roller
surfaces, documents may not feed smoothly. To prevent
feed problems, clean the roller surfaces regularly.
HINT
Cleaning should be performed approximately every 1,000 sheets
scanned. Note that this guideline varies depending on the types of
documents you scan.
1. Open the print section.
2. Clean the six rubber rollers.
The rollers are located as indicated below.
Gently wipe the dirt and dust off the surface of the
rollers with a cloth moistened with Cleaner F1.
ATTENTION
It may take a long time to dry if an excessive amount of
Cleaner F1 is used. Use it in small quantity. Wipe off the
cleaner completely to leave no residue on the cleaned parts.
Clean the entire surface of the rubber rollers as you
rotate them manually.
ATTENTION
When cleaning, be careful not to touch the metal wheels
located behind the upper rollers in the Print section.
3. Clean the two idler rollers (black).
The rollers are located inside the print section as
indicated below.
Put a piece of cloth moistened with Cleaner F1 against
the roller surface, and gently wipe the rollers as you
rotate them manually.
4. Confirm that the rollers are clean, and then close
the print section.
4.4. Cleaning Materials
Cleaner F1
PA03950-0352 100 ml
Cleaning Wipe
PA03950-0419
*1: For information about the cleaning materials, contact your
FUJITSU scanner dealer or an authorized FUJITSU scanner
service provider.
*2: Pre-moistened with Cleaner F1. It can be used instead of
moistening a cloth with Cleaner F1.
ATTENTION
● In order to use the cleaning materials safely and correctly,
read the precautions on each product thoroughly.
● It may take a long time to dry if an excessive amount of
Cleaner F1 is used. Use it in a small quantity. Wipe off the
cleaner completely to leave no residue on the cleaned parts.
24 packets
(*1)(*2)
14 |
Page 17

5. Error Messages
Error Code
Error Message
Action
Close the print section of the imprinter, and load the
document again.
No print cartridge is installed.
provider.
A0:B2
Imprinter error (RAM)
An error occurred in the imprinter.
provider.
A1:B3
Imprinter error (communication timeout)
A2:B5
Imprinter error (print head)
A3:B6
Imprinter error (EEPROM)
An error occurred in the imprinter.
provider.
This chapter explains the Imprinter error messages.
Error messages are displayed on the operator panel of the scanner. Refer to the error indication that is displayed for
troubleshooting.
HINT
For details on the error indications that are displayed on the operator panel and other errors, refer to the Operator's Guide provided with the
scanner.
Error codes and messages are displayed on the LCD.
U5:4A (*1) Imprinter Cover Open
Check if the print cartridge is installed correctly.
U6:B4 Print cartridge not installed
A4:B8 Imprinter error (ROM)
If the problem persists, write down the displayed
error code and contact your FUJITSU scanner
dealer or an authorized FUJITSU scanner service
Try the following:
1. Confirm that the EXT cable of the imprinter is
connected properly to the EXT connector on the
back of the scanner.
2. Confirm that the print cartridge is installed
correctly.
3. Turn the scanner off then back on.
If the problem persists, write down the displayed
error code and contact your FUJITSU scanner
dealer or an authorized FUJITSU scanner service
H6:B1 Imprinter system error
*1: When you open the imprinter print section while the scanner is in standby, only an error message will appear without an
error code. Also, note that buttons on the operator panel are disabled while the imprinter print section is open.
Turn the scanner off then back on.
If the problem persists, write down the displayed
error code and contact your FUJITSU scanner
dealer or an authorized FUJITSU scanner service
fi-718PR Imprinter Operator’s Guide | 15
Page 18
6. Specifications
Item
Specification
Printing Method
Thermal inkjet printing
Print Timing
Post printing
Printing Characters
Alphabet : A to Z, a to z
Symbols : ! ” $ # % & ’ ( ) * + , - . / : ; < = > ? @ [ ¥ ] ^ _‘ { | }¯
Maximum number of
characters per line
Maximum 43 characters
Print orientation
Normal, Bold: 0º, 180º (horizontal), 90º, 270º (vertical)
Narrow : 0º, 180º (horizontal)
Character size
Normal, Bold: Height 2.91 × width 2.82 mm (horizontal orientation),
Narrow : Height 2.91 × width 2.12 mm (horizontal orientation)
Character pitch
3.53 mm (Normal, Bold), 2.54 mm (Narrow)
Font Style
Regular, Bold
Character width
Normal, Bold, Narrow
Document that can be
Documents that can be scanned with the scanner
Thick plastic documents such as credit cards and a Carrier Sheet cannot be scanned when
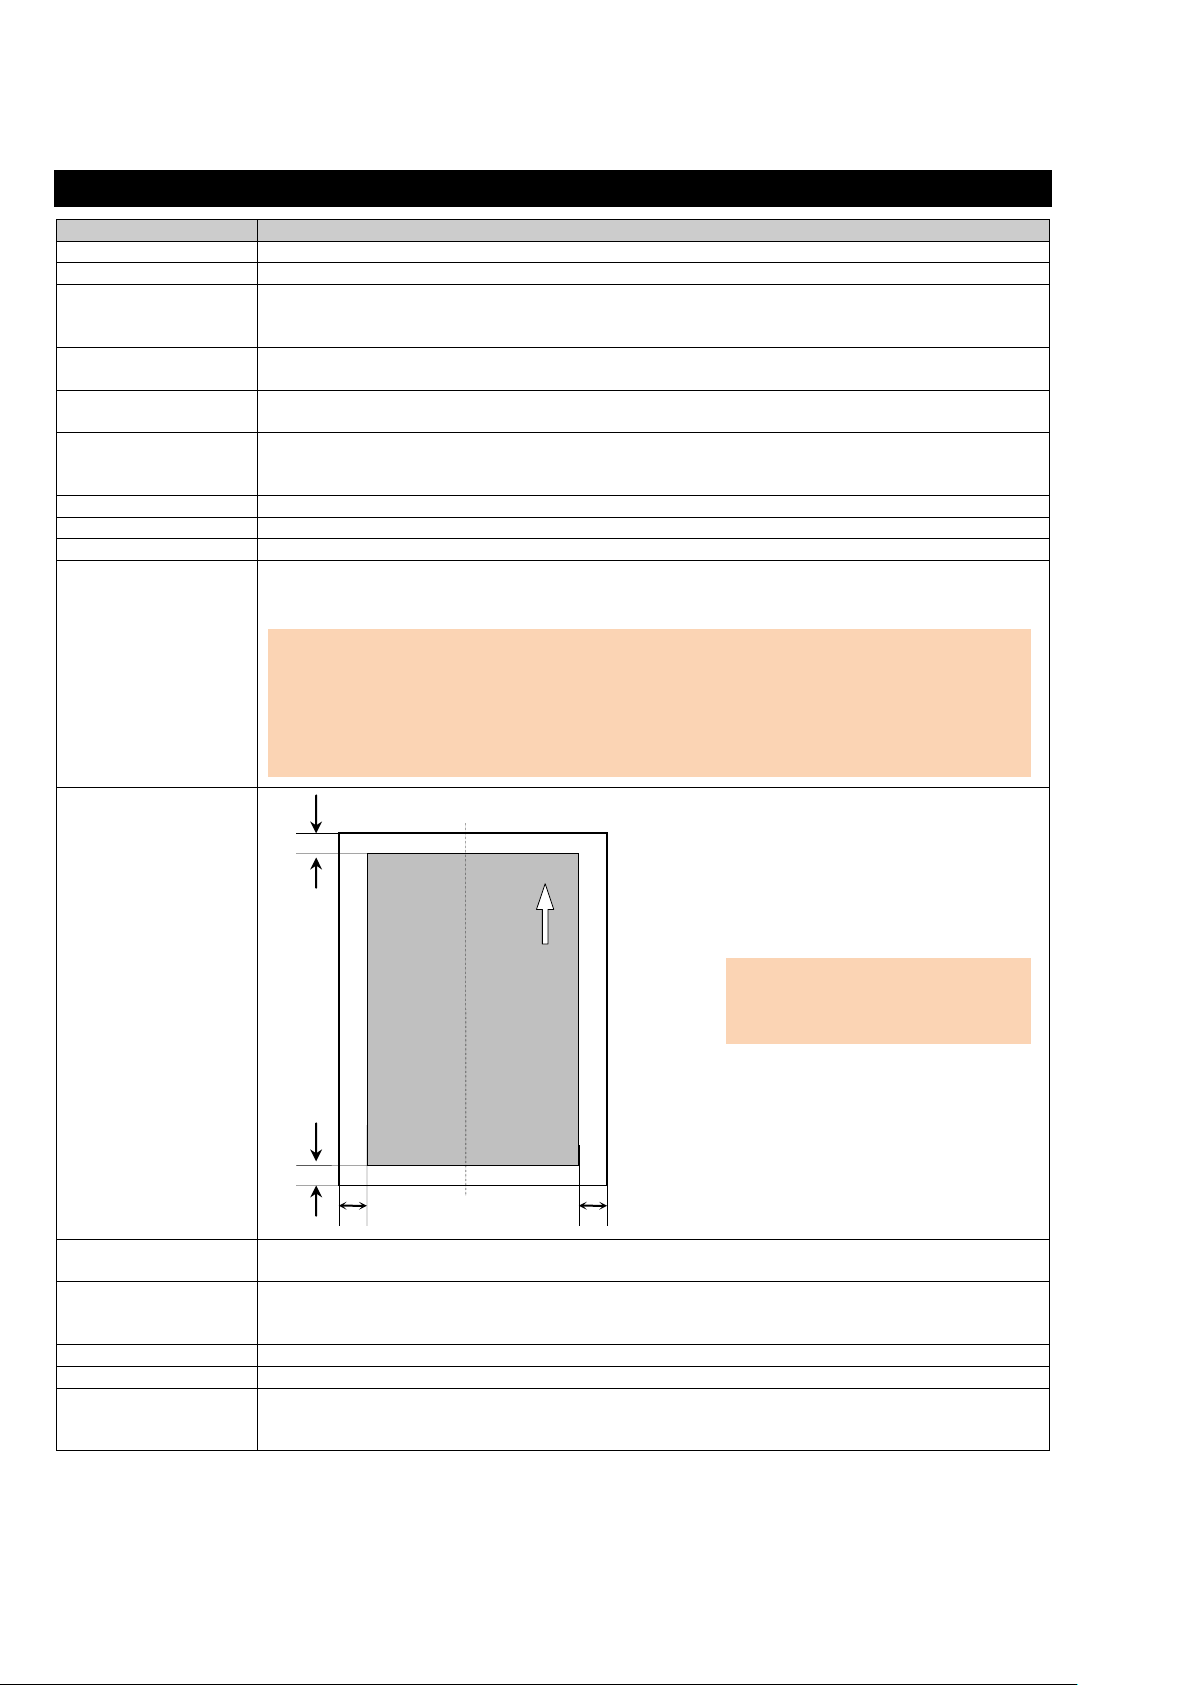
Printing area
Accuracy of Printing
position
±4 mm from the starting point for feed direction
Dimension
Without scanner : 300(W) × 255(D) × 136(H) mm / 11.81(W) × 10.04(D) × 5.35(H) in.
(Excluding the interface cable, ADF paper chute (feeder) and stacker)
Weigh t
2.7 kg (5.95 lb)
Ambient condition
Temperature: 10 to 35ºC (50 to 95 ºF), Humidity: 20 to 80%
Consumable
Print Cartridge (P/N: CA00050-0262)
Replacement cycle : 4,000,000 characters or six months after opening
A=5 mm
A B C
D
Printing Area
Feed direction
Numeric characters : 0, 1 to 9
Height 2.82 × width 2.91 mm (vertical orientation)
scanned
For details, refer to the Operator's Guide provided with the scanner.
Note that paper weight should be 52 to 127 g/m
2
(14 to 34 lb).
ATTE NTION
● Documents with glossy surface such as thermal paper, thermal transfer paper, coated
paper, and art paper take longer time for the ink to dry and may cause poor print quality.
The imprinter must be cleaned more frequently if you use these types of papers.
●
the imprinter is installed.
B=5 mm
C=5 mm
D=5 mm
(0.20 in.)
ATTE N TION
(Back)
Do not print within 5 mm from the
edge of the document.
With scanner : 300(W) × 266(D) × 208(H) mm / 11.81(W) × 10.47(D) × 8.91(H) in.
The printable number of characters: 4,000,000 characters (May decrease depending on the font selection)
16 |
 Loading...