

Page 1
fi-6800
Image Scanner
P3PC-2492-03ENZ0
TOP
Contents
Index
Introduction
Operator’s Guide
Thank you for purchasing the fi-6800 Color Image Scanner.
This manual explains about the basic operations and handling of this product.
For information on scanner installation, connection, and uninstalling the software, refer to the
“Getting Started” guide.
Explains the names and functions of parts
and basic scanner operation.
Explains how to load documents on the
scanner.
Explains about the setting items in the
scanner drivers.
Explains how to use the Operator Panel.
Explains about various ways of scanning.
Explains how to clean the scanner.
Explains how to replace consumables.
Scanner
Overview
How to Load
Documents
Configuring
the Scan
Settings
How to Use
the Operator
Panel
Various Ways
to Scan
Daily Care
Replacing
Consumables
Explains about troubleshooting.
Explains how to configure settings by using
the Software Operation Panel.
How to Use This Manual
Troubleshooting
Operational
Settings
Appendix
Glossary
Page 2
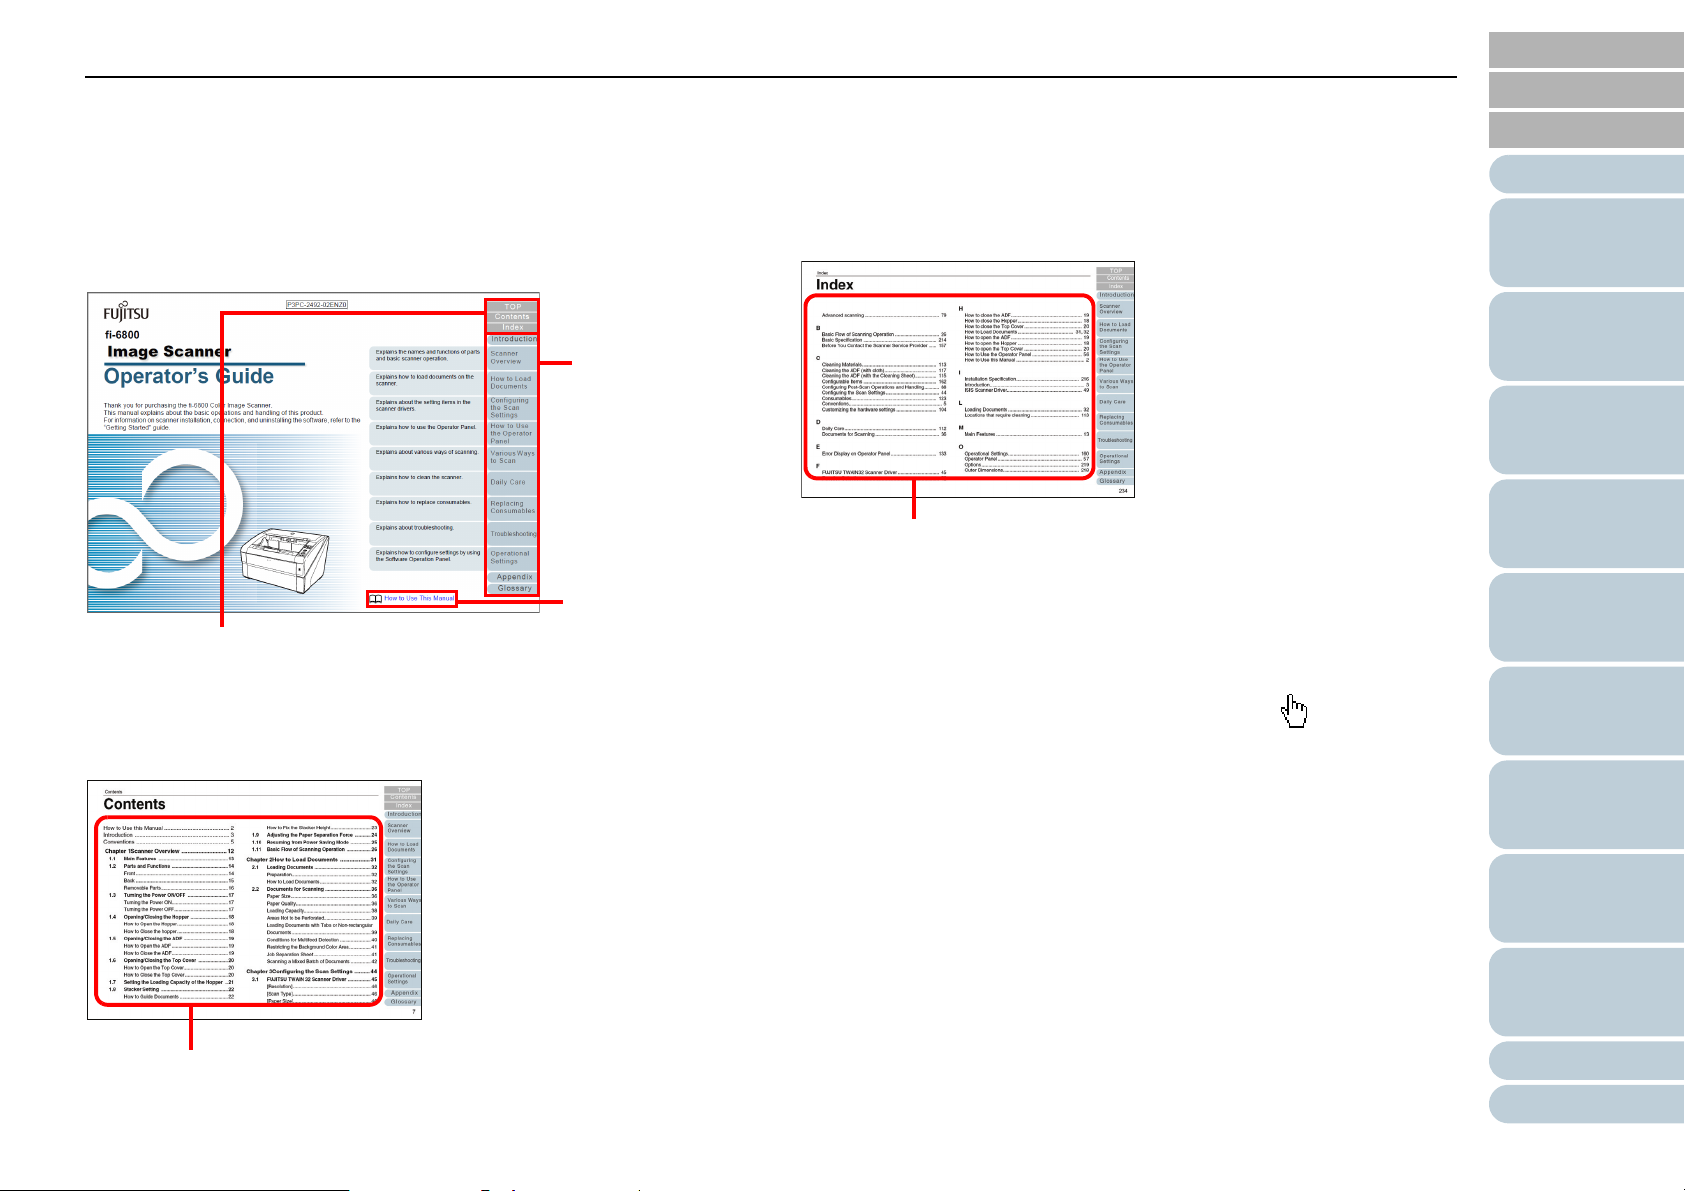
How to Use This Manual
Jumps to the
first page of
each chapter.
TOP: Jumps to the cover page.
Contents: Jumps to the contents page.
Index: Jumps to the index page.
Jumps to this
page.
Click a title to jump to the page.
Click an index title to jump to the page.
TOP
Contents
How to Use This Manual
The following shows the tips for using this manual.
Cover page
Contents page
Index page
Common Notes:
z To display or print this manual, either Adobe
or Adobe
z Clicking a blue character string (where your mouse pointer changes
to the shape of a hand pointing upward (such as ) when you
hover over the string) moves to the linked section.
z In this manual, you can use the navigation option of Adobe
or Adobe
For details, refer to the Adobe
z Use the [PageUp] key to return to the previous page, and the
[PageDown] key to go to the next page.
®
Reader® (7.0 or later) is required.
®
Reader®.
®
Acrobat® or Adobe® Reader® Help.
®
Acrobat® (7.0 or later)
®
Acrobat®
Index
Introduction
Scanner
Overview
How to Load
Documents
Configuring
the Scan
Settings
How to Use
the Operator
Panel
Various Ways
to Scan
Daily Care
Replacing
Consumables
Troubleshooting
Operational
Settings
Appendix
Glossary
2
Page 3

Introduction
TOP
Contents
Introduction
Thank you for purchasing the fi-6800 Color Image Scanner.
This document describes the basic operation methods to
perform scanning by using ScandAll PRO. The version of
ScandAll PRO bundled with this product is subject to change
without notice, in which case the screenshots captured in this
document may differ from the actual displayed image.
For more information about ScandAll PRO, refer to the
separate [ScandAll PRO V2.0 User's Guide].
About This Product
The fi-6800 is equipped with an Automatic Document Feeder
(ADF) for automatic document feeding and duplex (doublesided) scanning.
The scanner also comes with a Color Graphics Accelerator
(CGA) board as a standard feature which enables advanced
image processing at a high speed when used with Kofax VRS
Professional (hereinafter referred to as “Kofax VRS”).
Manuals
The following manuals are included for this product. Read
them as needed.
Manual Description
Safety Precautions
(paper)
This manual contains important
information about the safe use of this
product.
Make sure to read this manual before
using fi-6800.
Manual Description
Getting Started
(paper, PDF)
Operator’s Guide
(this manual)(PDF)
ScandAll PRO V2.0
User's Guide (PDF)
fi-680PRF/PRB Imprinter
Operator’s Guide (paper)
TWAIN User's Guide
(PDF)
Image Processing
Software Option User’s
Guide (PDF)
Read Before Using VRS
(PDF)
Outlines the procedures from installation to
operation of the scanner.
The PDF version is included in the Setup
DVD-ROM.
Provides detailed information on how to
operate and maintain the scanner daily,
how to replace the consumables, and how
to troubleshoot problems. Included in the
Setup DVD-ROM.
Provides information on how to scan
documents by using ScandAll PRO.
Included in the Setup DVD-ROM.
Provides detailed information on how to
operate and maintain the fi-680PRF/PRB
daily, how to replace the consumables, and
how to troubleshoot problems. fi-680PRF/
PRB imprinters are options for the fi-6800
scanner.
Explains how to install and operate the
TWAIN scanner driver. Included in the
Setup DVD-ROM.
Explains how to install and operate the
Image Processing Software Option.
Included in the Setup DVD-ROM.
Explains how to connect and install Kofax
VRS.
Included in the Setup DVD-ROM.
Index
Introduction
Scanner
Overview
How to Load
Documents
Configuring
the Scan
Settings
How to Use
the Operator
Panel
Various Ways
to Scan
Daily Care
Replacing
Consumables
Troubleshooting
Operational
Settings
Appendix
Glossary
3
Page 4

Introduction
Manual Description
Scanner Central Admin
4.0 User's Guide (PDF)
Error Recovery Guide
(HTML Help)
Help - Embedded in the
scanner drivers
Help - Embedded in
related applications
Explains about the overview, installation,
operation and maintenance of Scanner
Central Admin. Included in the Setup DVDROM.
Details the status of the scanner and
explains how to resolve problems
encountered.
Contains movies that explain how to clean
and replace the consumables. Included in
the Setup DVD-ROM.
Explains how to use the scanner drivers,
and how to configure the scanner settings.
Can be referenced from each scanner
driver.
Explains how to use and configure the
settings for the application software. Use
help files as necessary. Can be referenced
from the applications.
Other company names and product names are the registered
trademarks or trademarks of the respective companies.
Manufacturer
PFU LIMITED
International Sales Dept., Imaging Business Division,
Products Group
Solid Square East Tower, 580 Horikawa-cho, Saiwai-ku,
Kawasaki-shi Kanagawa 212-8563, Japan
Phone: (81-44) 540-4538
© PFU LIMITED 2009-2011
TOP
Contents
Index
Introduction
Scanner
Overview
How to Load
Documents
Configuring
the Scan
Settings
How to Use
the Operator
Panel
Various Ways
to Scan
Trademark Credits
Microsoft, Windows, Windows Server, Windows Vista, and
SharePoint are either registered trademarks or trademarks of
Microsoft Corporation in the United States and/or other
countries.
ISIS and Quick Scan are either registered trademarks or
trademarks of EMC Corporation in the United States.
Adobe, the Adobe logo, Acrobat, and Adobe Reader are either
registered trademarks or trade names of Adobe Systems
Incorporated in the United States and/or other countries.
Kofax and VRS are either registered trademarks or
trademarks of Kofax, Inc.
Daily Care
Replacing
Consumables
Troubleshooting
Operational
Settings
Appendix
Glossary
4
Page 5
Conventions
TOP
Contents
Conventions
Safety Information
This manual describes important details for users to use this
product safely and correctly. Read this manual thoroughly
before you start using this product.
Symbols Used in This Manual
For notational convention, the following symbols are used in
this manual:
This symbol alerts particularly important information. Be sure
to read this information.
This symbol alerts operators to helpful advice regarding
operations.
Naming Conventions in This Manual
The operating systems and products in this manual are
indicated as follows:
Product Indication
Microsoft
Microsoft
Microsoft
Edition,
Microsoft
Microsoft
Edition,
Microsoft
×64 Edition,
Microsoft
Edition,
Microsoft
×64 Edition
Microsoft
(32/64-bit),
Microsoft
(32/64-bit),
Microsoft
(32/64-bit),
Microsoft
(32/64-bit),
Microsoft
(32/64-bit)
®
®
®
®
®
®
®
®
®
®
®
®
®
Windows® 2000 Professional
Windows® XP Professional,
Windows® XP Professional x64
Windows® XP Home Edition
Windows Server® 2003 Standard
Windows Server® 2003 Standard
Windows Server® 2003 R2 Standard
Windows Server® 2003 R2 Standard
Windows Vista® Home Basic
Windows Vista® Home Premium
Windows Vista® Business
Windows Vista® Enterprise
Windows Vista® Ultimate
Windows
2000
Windows
XP
Windows
Server
2003
Windows
Vista
Windows
(*1)
Index
Introduction
Scanner
Overview
How to Load
Documents
Configuring
the Scan
Settings
How to Use
the Operator
Panel
Various Ways
to Scan
Daily Care
Replacing
Consumables
Troubleshooting
Operational
Settings
Appendix
Glossary
5
Page 6

Conventions
Product Indication
Microsoft® Windows Server® 2008 Standard
(32/64-bit),
®
Microsoft
(64-bit)
Windows
Windows
Windows
Windows
Microsoft
2003
Microsoft
Microsoft
Adobe
*1: Where there is no distinction between the different versions of the
above operating system, the general term "Windows" is used.
*2: All the descriptions in this manual assume the usage of Adobe Acrobat
bundled with this product. However, Adobe Acrobat may be upgraded
without notice. If the descriptions differ from the actual displayed
screens, refer to the Adobe Acrobat Help.
Windows Server® 2008 R2 Standard
®
7 Home Premium (32/64-bit),
®
7 Professional (32/64-bit),
®
7 Enterprise (32/64-bit),
®
7 Ultimate (32/64-bit)
®
Office SharePoint® Portal Server
®
Office SharePoint® Server 2007
®
SharePoint® Server 2010
®
Acrobat
®
Windows
Server
2008
Windows 7
SharePoint Server
Adobe Acrobat (*2)
Windows
(*1)
Screen Examples in This Manual
The screen examples in this manual are subject to change
without notice in the interest of product improvement.
If the actual displayed screen differs from the screen examples
in this manual, operate by following the actual displayed
screen while referring to the user's manual of the scanner
application that you are using.
The screen examples used in this manual are of TWAIN
scanner driver, ISIS scanner driver, ScandAll PRO (an image
acquisition software), and Adobe Acrobat.
This manual uses screenshots from Windows Vista.
The windows that appear and the operations differ by the
operating system that you are using. Also note that with some
scanner models, the screens and operations may differ from
this manual when you update the TWAIN scanner driver or
ISIS scanner driver. In that case, refer to the manual provided
upon updating the driver.
TOP
Contents
Index
Introduction
Scanner
Overview
How to Load
Documents
Configuring
the Scan
Settings
How to Use
the Operator
Panel
Various Ways
to Scan
Daily Care
Arrow Symbols in This Manual
Right-arrow symbols () are used to separate icons or menu
options you should select in succession.
Example: Click [Scan] menu [Scan Setting].
Replacing
Consumables
Troubleshooting
Operational
Settings
Appendix
Glossary
6
Page 7

Contents
TOP
Contents
Contents
How to Use This Manual ........................................ 2
Introduction ............................................................. 3
Conventions ............................................................ 5
Chapter 1 Scanner Overview ............................ 12
1.1 Main Features ....................................................13
1.2 Parts and Functions .......................................... 14
Front ..................................................................... 14
Back .....................................................................15
Removable Parts.................................................. 16
1.3 Turning the Power ON/OFF ..............................17
Turning the Power ON.......................................... 17
Turning the Power OFF........................................ 18
1.4 Opening/Closing the Hopper ............................ 19
How to Open the Hopper...................................... 19
How to Close the Hopper .....................................19
1.5 Opening/Closing the ADF ................................. 20
How to Open the ADF ..........................................20
How to Close the ADF.......................................... 21
1.6 Opening/Closing the Top Cover ......................22
How to Open the Top Cover................................. 22
How to Close the Top Cover ................................ 22
1.7 Setting the Loading Capacity of the Hopper .. 23
1.8 Stacker Setting .................................................. 24
How to Guide Documents ....................................24
How to Fix the Stacker Height.............................. 25
1.9 Adjusting the Paper Separation Force ............ 26
1.10 Resuming from Power Saving Mode ............... 27
1.11 Basic Flow of Scanning Operation .................. 28
1.12 Image Scanning Application ............................ 31
1.13 Centralized Management of Scanners ............32
Chapter 2 How to Load Documents .................. 33
2.1 Loading Documents .......................................... 34
Preparation........................................................... 34
How to Load Documents...................................... 35
2.2 Documents for Scanning .................................. 40
Paper Size............................................................ 40
Paper Quality........................................................ 40
Loading Capacity.................................................. 42
Areas Not to be Perforated................................... 43
Loading Documents with Tabs or
Non-rectangular Documents ............................. 43
Conditions for Multifeed Detection ....................... 44
Restricting the Background Color Area................ 45
Job Separation Sheet........................................... 45
Scanning a Mixed Batch of Documents ............... 46
Chapter 3 Configuring the Scan Settings ......... 48
3.1 TWAIN Scanner Driver ...................................... 49
[Resolution] .......................................................... 50
Index
Introduction
Scanner
Overview
How to Load
Documents
Configuring
the Scan
Settings
How to Use
the Operator
Panel
Various Ways
to Scan
Daily Care
Replacing
Consumables
Troubleshooting
Operational
Settings
Appendix
Glossary
7
Page 8

Contents
[Scan Type] ..........................................................50
[Paper Size].......................................................... 50
[Image Mode] .......................................................50
About the Indicators ............................................. 64
4.2 Main Menu ..........................................................65
How to Use Main Menu........................................ 65
TOP
Contents
Index
Introduction
[Scan] Button........................................................ 50
[Preview] Button ...................................................51
[Close] / [OK] Button............................................. 51
[Reset] Button....................................................... 51
[Help] Button......................................................... 51
[About] Button....................................................... 51
[Option] Button .....................................................51
[Advance] button ..................................................52
[Config] button ...................................................... 52
3.2 ISIS Scanner Driver ...........................................53
[Main] Tab ............................................................54
[Layout] Tab .........................................................54
[Image Processing] Tab .......................................55
[Paper Handling] Tab ........................................... 56
[Multifeed Detection] Tab .....................................56
[Gamma] Tab .......................................................57
[Color Dropout] Tab.............................................. 57
[Blank Page Deletion] Tab.................................... 58
[Compression] Tab ............................................... 58
[Imprinter] Tab ...................................................... 59
[About] Tab........................................................... 59
Chapter 4 How to Use the Operator Panel ....... 60
4.1 Operator Panel ................................................... 61
Items Configurable in the Main Menu................... 74
4.3 Function Selection ............................................ 81
How to Use Function Selection ............................ 81
Item Configurable in Function Selection............... 82
Chapter 5 Various Ways to Scan ....................... 83
5.1 Summary ............................................................ 84
5.2 Scanning Documents of Different Types and
Sizes ................................................................... 85
Scanning Both Sides of a Document.................... 85
Scanning Documents of Different Widths............. 86
Scanning a Document Longer Than A3 Size ....... 87
5.3 Advanced Scanning .......................................... 88
Excluding Colors from Images (Dropout Color).... 88
Skipping Blank Pages .......................................... 90
Scanning the Image Brighter................................ 92
Removing Punch Holes........................................ 94
Feeding Documents Manually.............................. 96
5.4 Configuring Post-Scan Operations and
Handling ........................................................... 100
Automatically Correcting Skewed Document
Images ............................................................ 100
Automatically Correcting the Page Orientation .. 102
Saving Scanned Images in PDF Format............ 104
Scanner
Overview
How to Load
Documents
Configuring
the Scan
Settings
How to Use
the Operator
Panel
Various Ways
to Scan
Daily Care
Replacing
Consumables
Troubleshooting
Operational
Settings
Names and Functions of the Operator Panel ....... 61
Indications on LCD ............................................... 62
Outputting in Multi-Image Mode ......................... 108
Appendix
Glossary
8
Page 9

Contents
Automatically Detecting the Document Color
(Color/Monochrome) ....................................... 110
Adjusting the Scanned Image in
8.3 Troubleshooting .............................................. 154
Scanner cannot be powered ON........................ 155
Display on LCD switches OFF. .......................... 156
TOP
Contents
Index
Introduction
[Image Adjustment] Dialog Box....................... 112
5.5 Customizing the Hardware Settings .............. 113
Using a Button on the Scanner to Start
Scanning ......................................................... 113
Detecting Multifeed Errors.................................. 115
Bypassing Multifeed Detection for a Fixed
Format............................................................. 117
Chapter 6 Daily Care ........................................ 121
6.1 Cleaning Materials and Locations that
Require Cleaning .............................................122
Cleaning Materials.............................................. 122
Locations to Clean and Cleaning Frequency ..... 122
6.2 Cleaning the ADF (with Cleaning Sheet) ....... 124
6.3 Cleaning the ADF (with cloth) ........................126
Chapter 7 Replacing Consumables ................ 133
7.1 Consumables and Replacement Cycles .......134
7.2 Replacing the Pick Roller ...............................135
7.3 Replacing the Separator Roller ......................137
7.4 Replacing the Brake Roller ............................. 140
Scanning does not start...................................... 157
Quality of the scanned photo/picture is poor
when scanning in black & white...................... 158
Quality of scanned text or lines is
unsatisfactory.................................................. 159
Images are distorted or not clear........................ 160
Vertical streaks appear on the scanned image. . 161
Multifeed error occurs frequently........................ 162
Situation in which the document is not fed into
the ADF occur frequently. ............................... 164
Paper jams/pick errors occur frequently............. 165
Scanned images turn out elongated................... 166
A shadow appears on the leading edge of the
scanned image................................................ 167
Scanner is not recognized by the computer
when using Kofax VRS. .................................. 168
8.4 Before You Contact the Scanner Service
Provider ............................................................ 169
General............................................................... 169
Error Status ........................................................ 169
Scanner
Overview
How to Load
Documents
Configuring
the Scan
Settings
How to Use
the Operator
Panel
Various Ways
to Scan
Daily Care
Replacing
Consumables
Troubleshooting
Chapter 8 Troubleshooting .............................. 142
8.1 Paper Jam ........................................................ 143
8.2 Error Indications on Operator Panel .............145
Temporary Errors ...............................................146
Device Errors...................................................... 149
8.5 Checking the Product Labels ......................... 171
Location.............................................................. 171
Chapter 9 Operational Settings ....................... 172
9.1 Starting Up the Software Operation Panel .... 173
9.2 Configurable Items .......................................... 174
Operational
Settings
Appendix
Glossary
9
Page 10

Contents
Device Setting ....................................................174
Device Setting 2 .................................................176
9.3 Settings Related to Page Counters ...............185
Paper Feeding Operation Setting
[Soft Pick Setting]............................................ 199
Cropping the Image Boundary
TOP
Contents
Index
Introduction
Checking and Resetting the Counters................ 185
Specifying the Cycle to Clean the Scanner
[Cleaning Cycle].............................................. 187
Specifying the Cycle to Replace Consumables
[Life Counter Alarm Setting]............................ 188
9.4 Settings Related to Scanning .........................189
Adjusting the Starting Position for Scanning
[Offset/Vertical Magnification Adjustment] ...... 189
Eliminating Shadows or Streaks on the Scanned
Image Edge [Page Edge Filler (ADF)] ............ 191
Eliminating Shadows or Streaks on the Scanned
Image Edge [Page Edge Filler
(Automatic Page Size Detection)] ................... 192
Specifying a Color to Drop Out
[Dropout color] ................................................ 193
Specifying Custom Color(s) to Drop Out
[Multi dropout colors]....................................... 194
Shortening the Scanning Intervals [Pre-Pick]..... 196
[AutoCrop Boundary] ...................................... 200
Setting Automatic Detection for
Color/Monochrome [Auto color Detection] ...... 201
Sounding an Alarm When an Error Occurs
[Alarm setting]................................................. 202
Detecting Paper Jam outside of Scannable Area
[Jam Detection outside of scannable area
when transporting paper] ................................ 203
Setting for a Function to Save the Documents
from Being Damaged [Paper Protection] ........ 204
Specifying the Sensitivity Level for Paper
Protection [Paper Protection Sensitivity]......... 205
Scan Settings for Documents with
Tabs/Non-rectangular Documents
[Scan Setting for Document with Tab
(Automatic Page Size Detection)]................... 206
Scanning Documents with Dark Background
Color [Scan Setting for Document in Dark
Scanner
Overview
How to Load
Documents
Configuring
the Scan
Settings
How to Use
the Operator
Panel
Various Ways
to Scan
Daily Care
Replacing
Consumables
Specifying the Number of Feeding Retries
[Number of paper feeding retries] ................... 197
Specifying the Interval to Feed the Documents
[Set the interval for feeding sheets] ................ 197
Setting the Speed to Feed the Documents
[Pick Speed].................................................... 198
Ground Color] ................................................. 207
Adjusting the Result of the Output Image
[Overcrop/Undercrop] .....................................208
Adjusting the Output Result for Overscan
[Overscan Control].......................................... 209
9.5 Settings Related to Multifeed Detection ........ 210
Troubleshooting
Operational
Settings
Appendix
Glossary
10
Page 11

Contents
Specifying a multifeed detection method
[Multifeed] .......................................................210
Settings for Multifeed Detection in Manual
Feeding [Multifeed detection when scanning
in manual feeding mode]................................. 212
Specifying the Area to Detect Multifeed
A.4 Scanner Options .............................................. 228
A.5 Uninstalling the Software ............................... 229
Glossary ............................................................ 230
Index ...................................................................244
TOP
Contents
Index
Introduction
Scanner
Overview
[Document check area specification for
Multifeed Detection] ........................................213
Specifying an Area Not to Detect Multifeed
[Intelligent Multifeed Function] ........................ 216
9.6 Settings Related to the Waiting Time ............ 217
Setting the Waiting Time for Manual Feeding
[Timeout for manual feeding] ..........................217
Setting the Waiting Time to Enter Power Saving
Mode [Power saving] ......................................218
9.7 Settings Related to Power ON/OFF Control .. 219
Setting the Paper Separation Force upon
Turning the Power Off
[Retain current paper thickness] ..................... 219
9.8 Settings Related to Maintenance/Options .... 220
Setting the Maintenance/Inspection Cycles for
the Scanner
[Maintenance and Inspection Cycle] ............... 220
How to Load
Documents
Configuring
the Scan
Settings
How to Use
the Operator
Panel
Various Ways
to Scan
Daily Care
Replacing
Consumables
Troubleshooting
Imprinter Settings [Imprinter selection]............... 221
Appendix ........................................................... 222
A.1 Basic Specification .........................................223
A.2 Installation Specification ................................225
A.3 Outer Dimensions ...........................................227
Operational
Settings
Appendix
Glossary
11
Page 12

TOP
Contents
Index
Chapter 1 Scanner Overview
This chapter explains about the names and functions of the scanner components, as well as the methods for basic
operations.
1.1 Main Features.............................................................................................................................................13
1.2 Parts and Functions....................................................................................................................................14
1.3 Turning the Power ON/OFF ........................................................................................................................17
1.4 Opening/Closing the Hopper ......................................................................................................................19
1.5 Opening/Closing the ADF...........................................................................................................................20
1.6 Opening/Closing the Top Cover..................................................................................................................22
1.7 Setting the Loading Capacity of the Hopper...............................................................................................23
1.8 Stacker Setting ...........................................................................................................................................24
1.9 Adjusting the Paper Separation Force........................................................................................................26
Introduction
Scanner
Overview
How to Load
Documents
Configuring
the Scan
Settings
How to Use
the Operator
Panel
Various Ways
to Scan
Daily Care
1.10 Resuming from Power Saving Mode ........................................................................................................27
1.11 Basic Flow of Scanning Operation ...........................................................................................................28
1.12 Image Scanning Application .....................................................................................................................31
1.13 Centralized Management of Scanners .....................................................................................................32
Replacing
Consumables
Troubleshooting
Operational
Settings
Appendix
Glossary
Page 13

Chapter 1 Scanner Overview
TOP
Contents
1.1 Main Features
This section explains about the main features of this product.
The scanner is equipped with the following features:
Realizes a scanning speed of 130 sheets/260 pages per
minute (under JPEG compression)
With a newly-developed high-speed CCD and a high-speed image
processing circuit, the scanner can achieve a scanning speed of up to
130 sheets/260 pages per minute with A4/Letter color documents. This
allows you to scan up to approximately 60,000 sheets per day.
Mounts a Liquid Crystal Display (LCD)
The scanner mounts an LCD that displays various operational settings
for scanning, number of pages scanned, and error status. This allows
you to easily check the status of the scanner.
Improved efficiency for pre- and post-scan work
The scanner supports "batch scanning" which allows you to scan
documents with different paper thickness/size/color/brightness at once,
simplifying the process of sorting the documents before scanning. Also,
the new "Elevator Stacker" has been adopted which automatically keeps
the stacker at a certain height. This prevents the scanned documents
from being scattered in the output, which makes the scan operation
more efficient.
Reduced work loss caused by multifeeds
The scanner mounts an ultrasonic multifeed sensor that accurately
detects errors when two or more sheets are fed through the scanner at
once (called "multifeed"). This multifeed detection is reliable even when
scanning a mixed batch of documents with different thickness/size/color/
brightness, avoiding potential work loss.
Intelligent Multifeed function
When there is paper of the same size attached to a designated location
on the page, the Intelligent Multifeed function recognizes the location of
the attachment. This allows you to continue scanning instead of
detecting every paper attached to that location as multifeed.
Furthermore, functions such as Paper Protection will save valuable
documents from being damaged.
Various functions to help the operators
“Anti-Dust Coating Glass built-in Paper Path” keeps the surface of the
scan glass clean, reducing the operators’ work load by extending the
cleaning cycles.
“Automatic Stacker” is adopted which stacks the scanned documents
neatly, reducing the operators’ work load by shortening the time to
prepare and sort the documents.
“Automatic Image Quality Checker” checks through the scanned images
and displays images that are in poor condition.
Advanced image processing functions
The scanner’s automatic detection function outputs images in color or
monochrome by document content. You do not have to change the
settings every time you scan. Also, it comes with a Kofax CGA board
which is known for quality image processing. High quality images can be
acquired by using functions such as Automatic Image Rotation which
rotates documents into their correct orientations, as well as other
various image processing functions such as Background Removal.
Front-Side/Back-Side Imprinter Option
Front-Side/Back-Side Imprinters are available as scanner options, which
are often demanded for managing/verifying vouchers and business
forms. You can select Front-Side Imprinter (to print on the front side of
the document) or Back-Side Imprinter (to print on the back side of the
document) for improved usability.
Centralized management of multiple scanners
The bundled "Scanner Central Admin Agent" application allows you to
manage multiple scanners together, for example, to update the scanner
settings and drivers, as well as to monitor the operating status of each
scanner.
Index
Introduction
Scanner
Overview
How to Load
Documents
Configuring
the Scan
Settings
How to Use
the Operator
Panel
Various Ways
to Scan
Daily Care
Replacing
Consumables
Troubleshooting
Operational
Settings
Appendix
Glossary
13
Page 14
Chapter 1 Scanner Overview
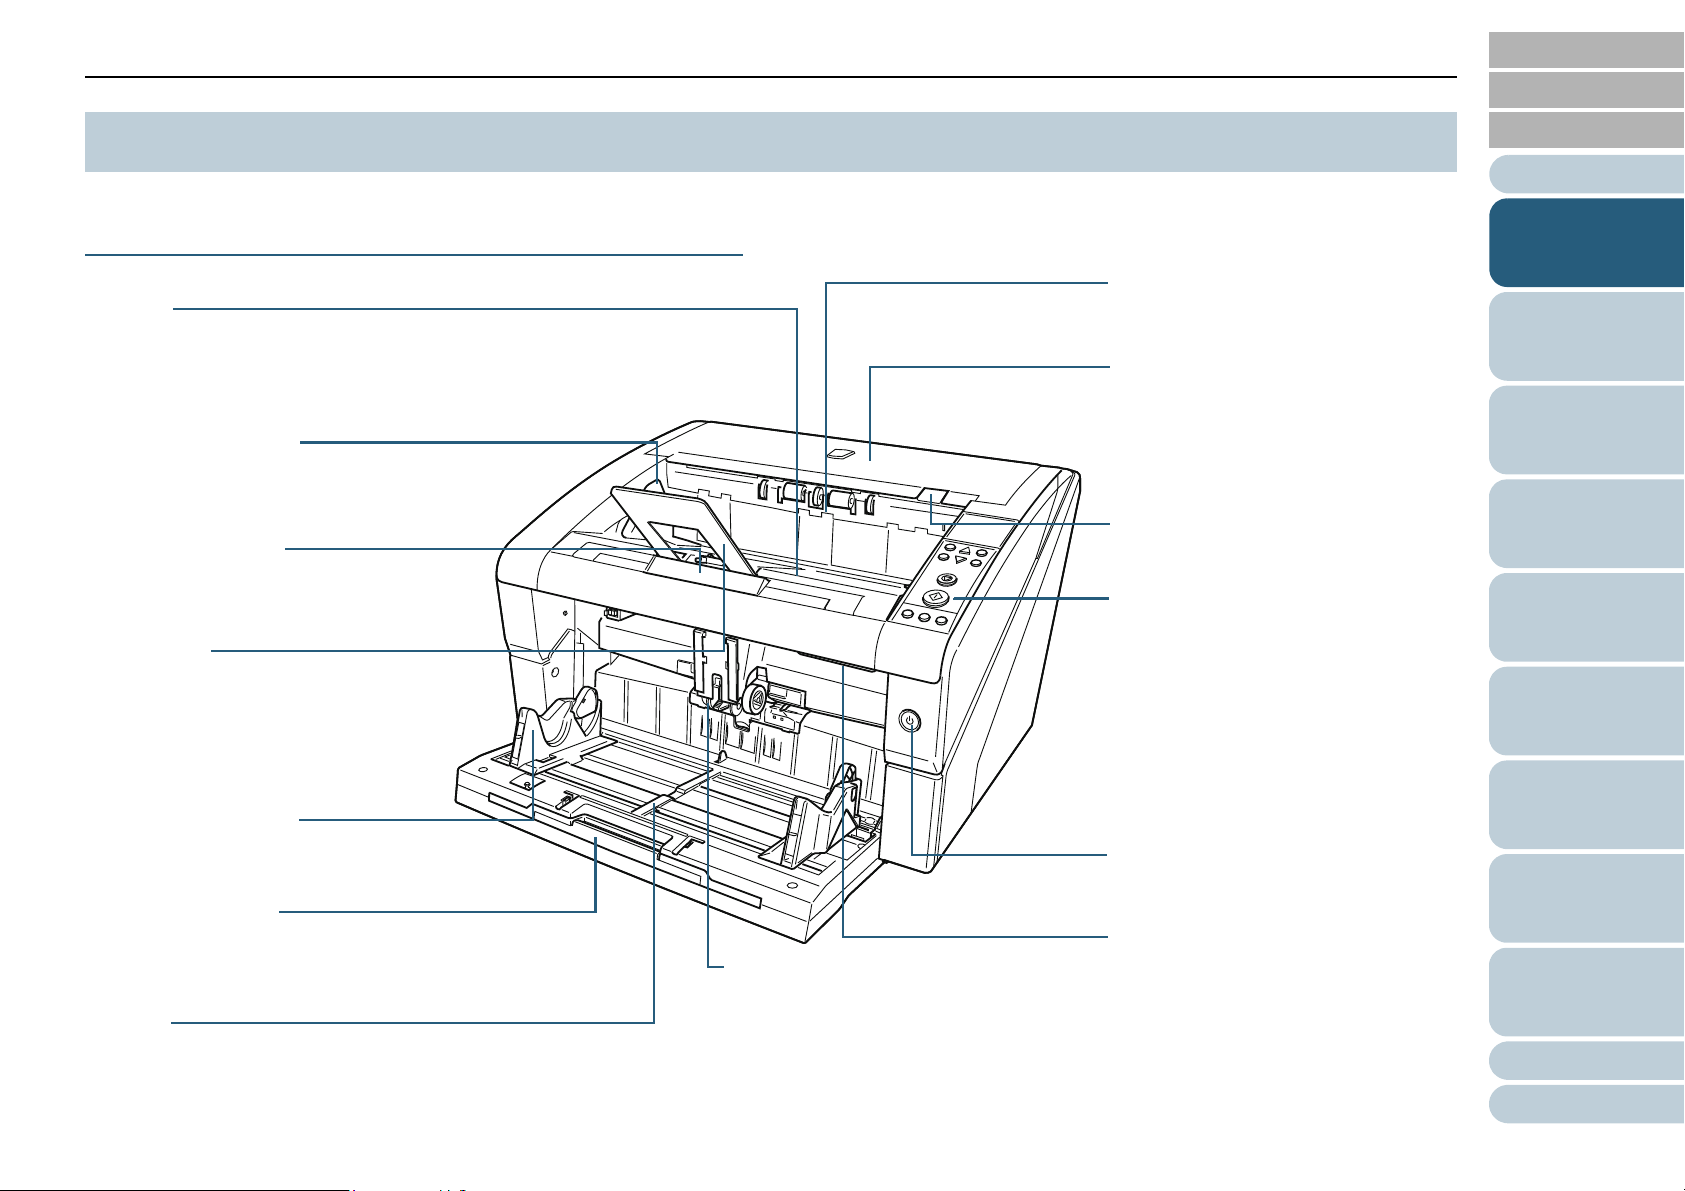
Stacker Side Guide
Aligns the documents in width direction
as they are ejected onto the stacker.
To p C o ve r
A cover for the upper paper path.
Open it to remove jammed
documents or clean the inside of the
scanner.
Stacker
Stacks up the ejected documents. It
can be kept at an optimum height to
straighten the documents.
Operator Panel
Consists of LCD, buttons and LED.
It can be used to operate the
scanner or check its status.
For details about the operator panel,
refer to "Chapter 4 How to Use the
Operator Panel" (page 60).
ADF (Automatic Document Feeder)
Pulls and feeds the documents loaded on
the hopper one at a time.
Open it to replace the consumables or
clean the inside of the scanner.
Paper Stop
Guides the ejected documents in length
direction to prevent them from being
scattered. Though documents can be
aligned without the paper stop, use it to
stack them more neatly.
Stacker Extension
Pull out and adjust to the length of the
documents.
Hopper Side Guide
Guides the documents in width direction
as they are fed into the scanner.
Hopper Extension
Pull out to place long documents on
the hopper.
Paper Output
Ejects the scanned documents.
Power Button
Press to turn the power ON/OFF.
Hopper
A table for loading documents to scan.
ADF Release Tab
Lift up to open the ADF.
Top Cover Release Tab
Lift up to open the top cover.
TOP
Contents
1.2 Parts and Functions
This section shows the names of the scanner parts.
Front
Index
Introduction
Scanner
Overview
How to Load
Documents
Configuring
the Scan
Settings
How to Use
the Operator
Panel
Various Ways
to Scan
Daily Care
Replacing
Consumables
Troubleshooting
Operational
Settings
Appendix
Glossary
14
Page 15
Chapter 1 Scanner Overview
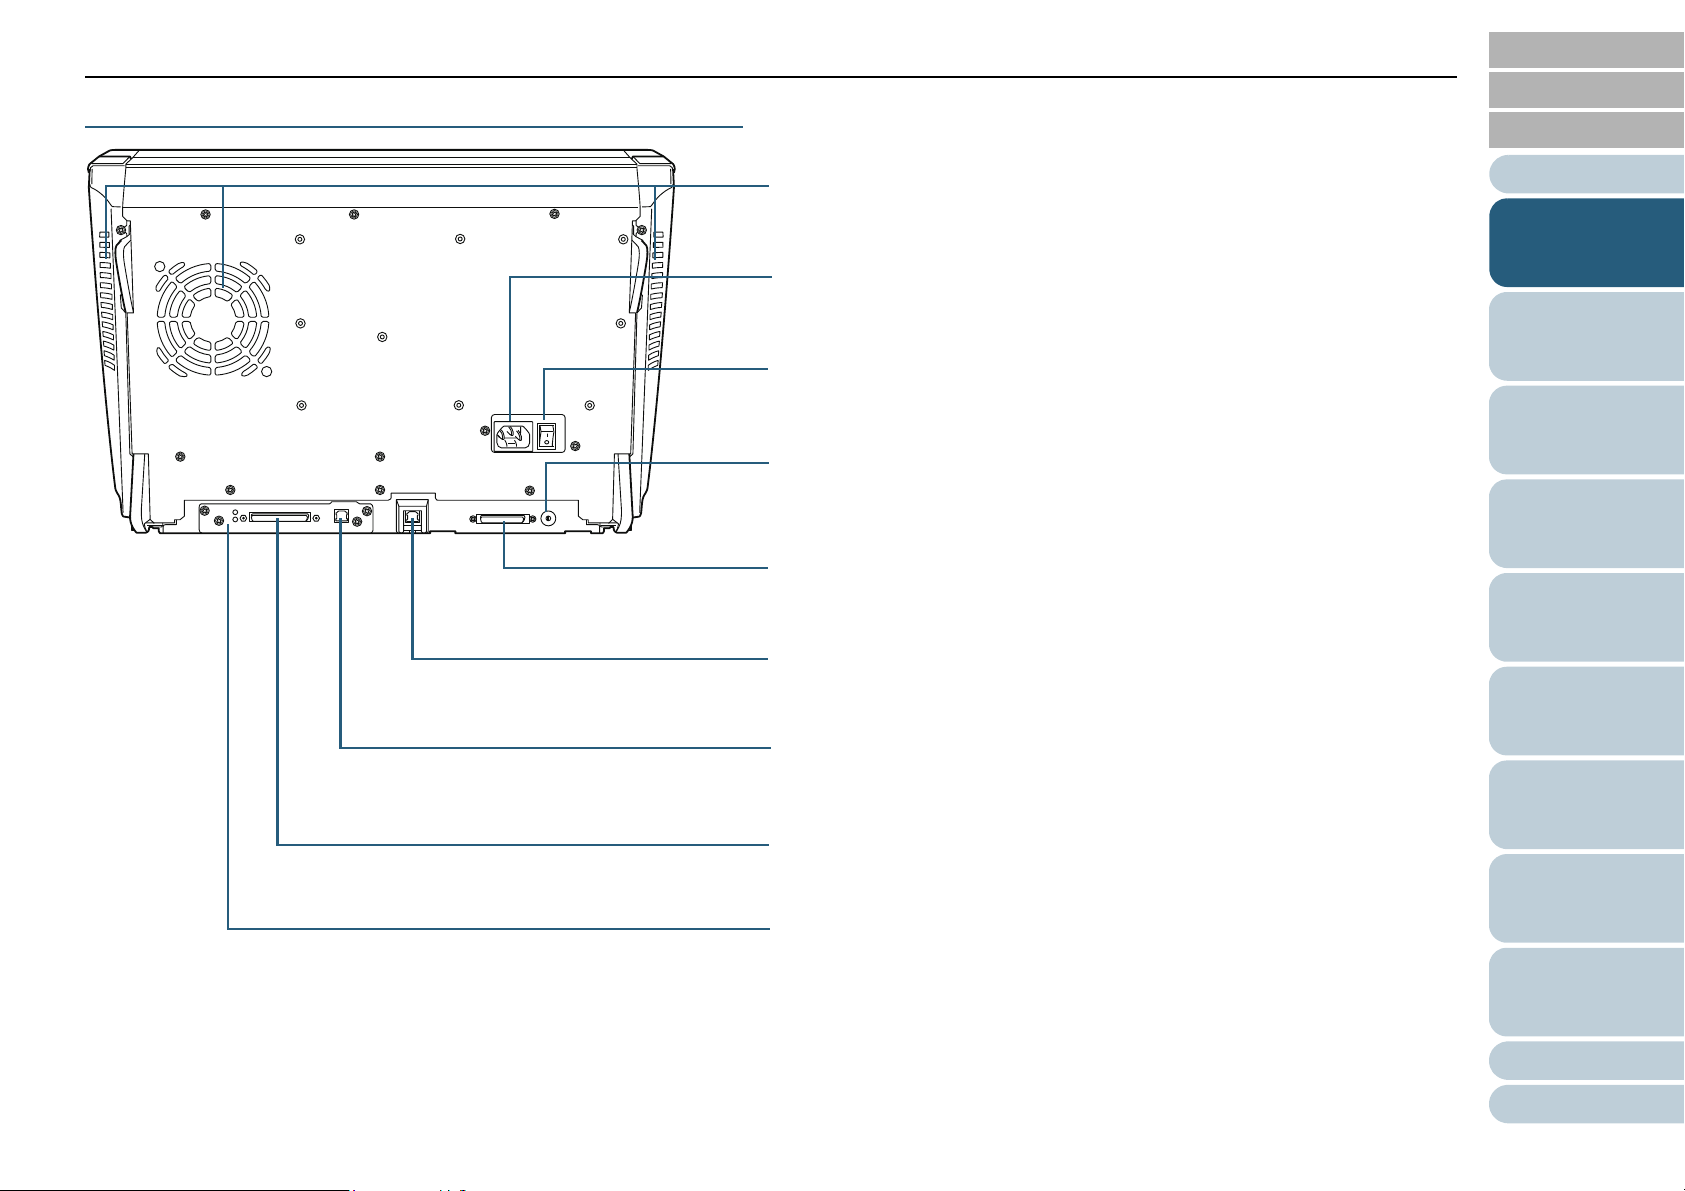
USB Connector 1
For connecting a USB cable.
SCSI Connector 1
For connecting a SCSI cable.
SCSI ID Switch
Used to configure the SCSI ID (Factory default setting: 5).
Ventilation Port
An outlet for ventilating hot air from inside the scanner.
Power Connector
A connector for the power cable.
Main Power Switch
Powers ON/OFF the scanner.
SCSI Connector 2
For connecting a SCSI cable.
A SCSI connector for using Kofax VRS.
USB Connector 2
For connecting a USB cable.
A USB connector for using Kofax VRS.
CGA Board
A CGA board for Kofax VRS.
Back
TOP
Contents
Index
Introduction
Scanner
Overview
How to Load
Documents
Configuring
the Scan
Settings
How to Use
the Operator
Panel
Various Ways
to Scan
Daily Care
Replacing
Consumables
Troubleshooting
Operational
Settings
Appendix
Glossary
15
Page 16
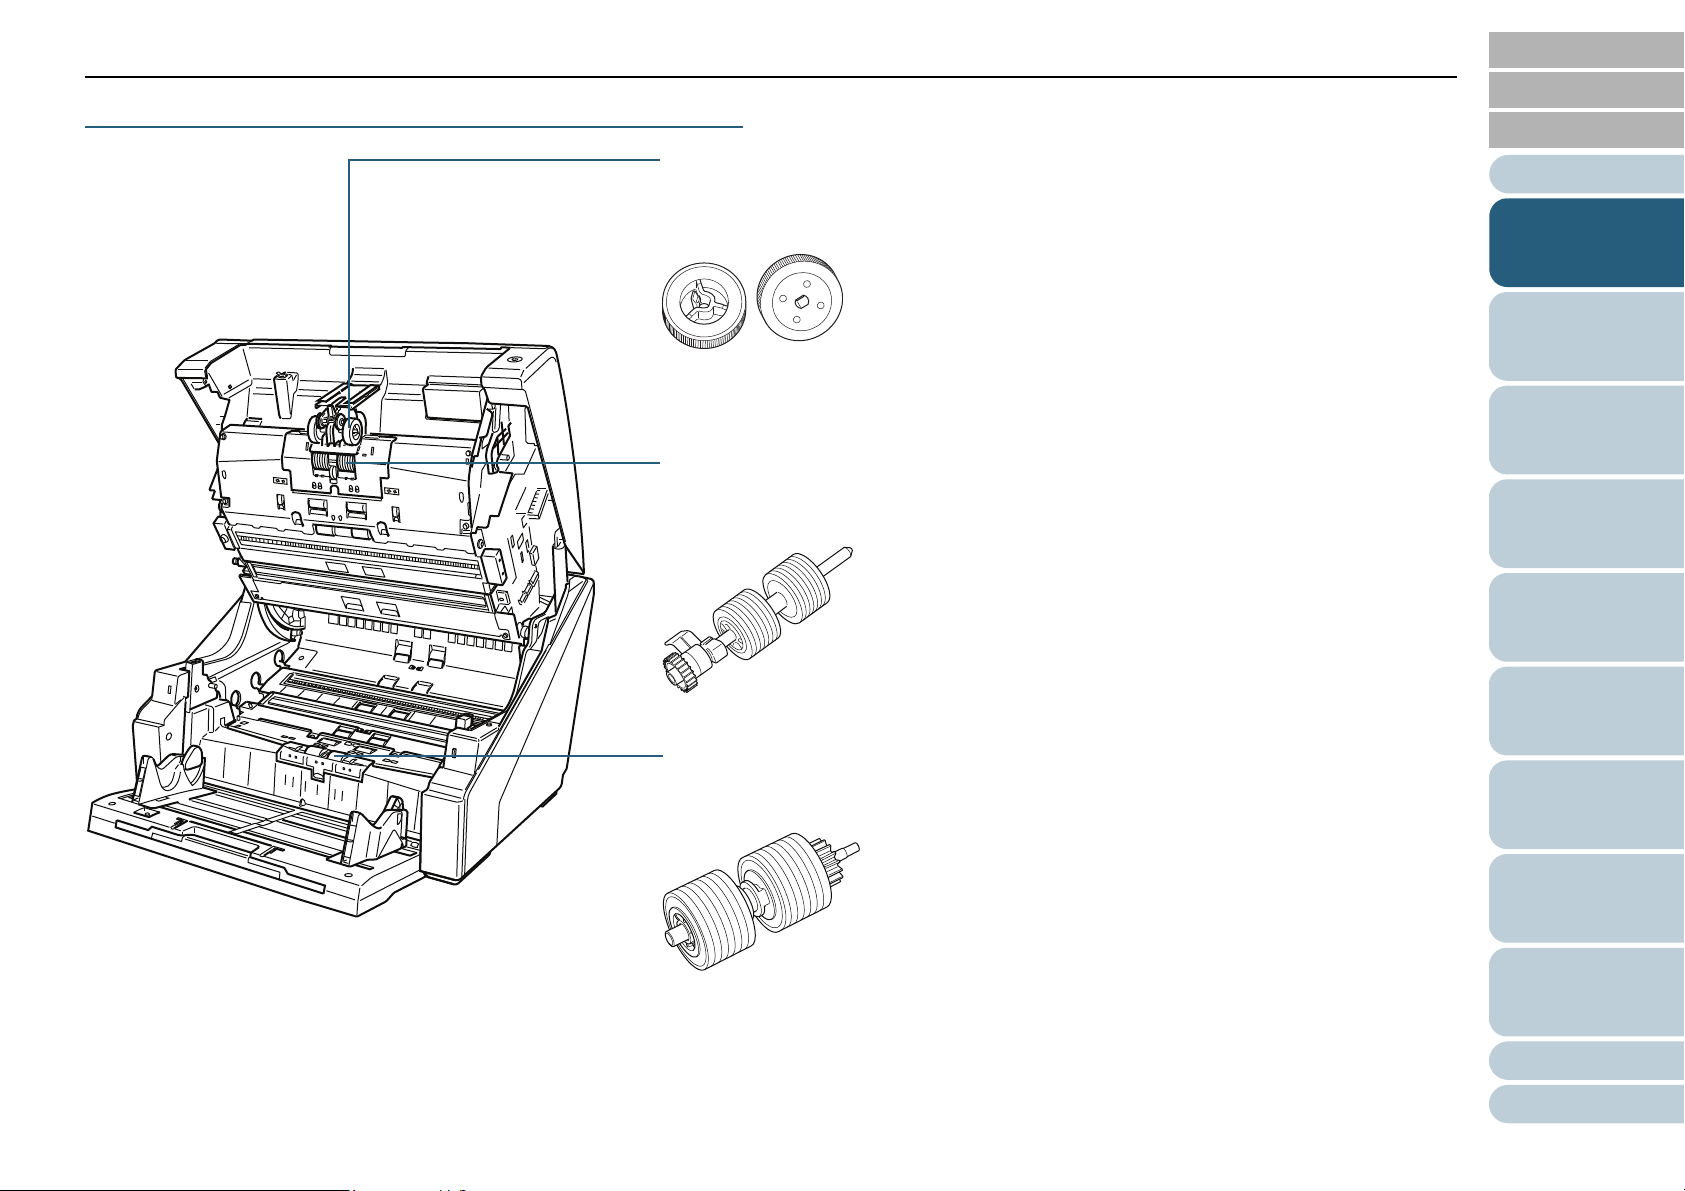
Chapter 1 Scanner Overview
Brake Roller
For information on how to remove the brake roller, refer to
"7.4 Replacing the Brake Roller" (page 140).
Pick Roller
For information on how to remove the pick roller, refer to
"7.2 Replacing the Pick Roller" (page 135).
Separator Roller
For information on how to remove the separator roller, refer to
"7.3 Replacing the Separator Roller" (page 137).
Removable Parts
TOP
Contents
Index
Introduction
Scanner
Overview
How to Load
Documents
Configuring
the Scan
Settings
How to Use
the Operator
Panel
Various Ways
to Scan
Daily Care
Replacing
Consumables
Troubleshooting
Operational
Settings
Appendix
Glossary
16
Page 17
Chapter 1 Scanner Overview
ONOFF
Power Button
TOP
Contents
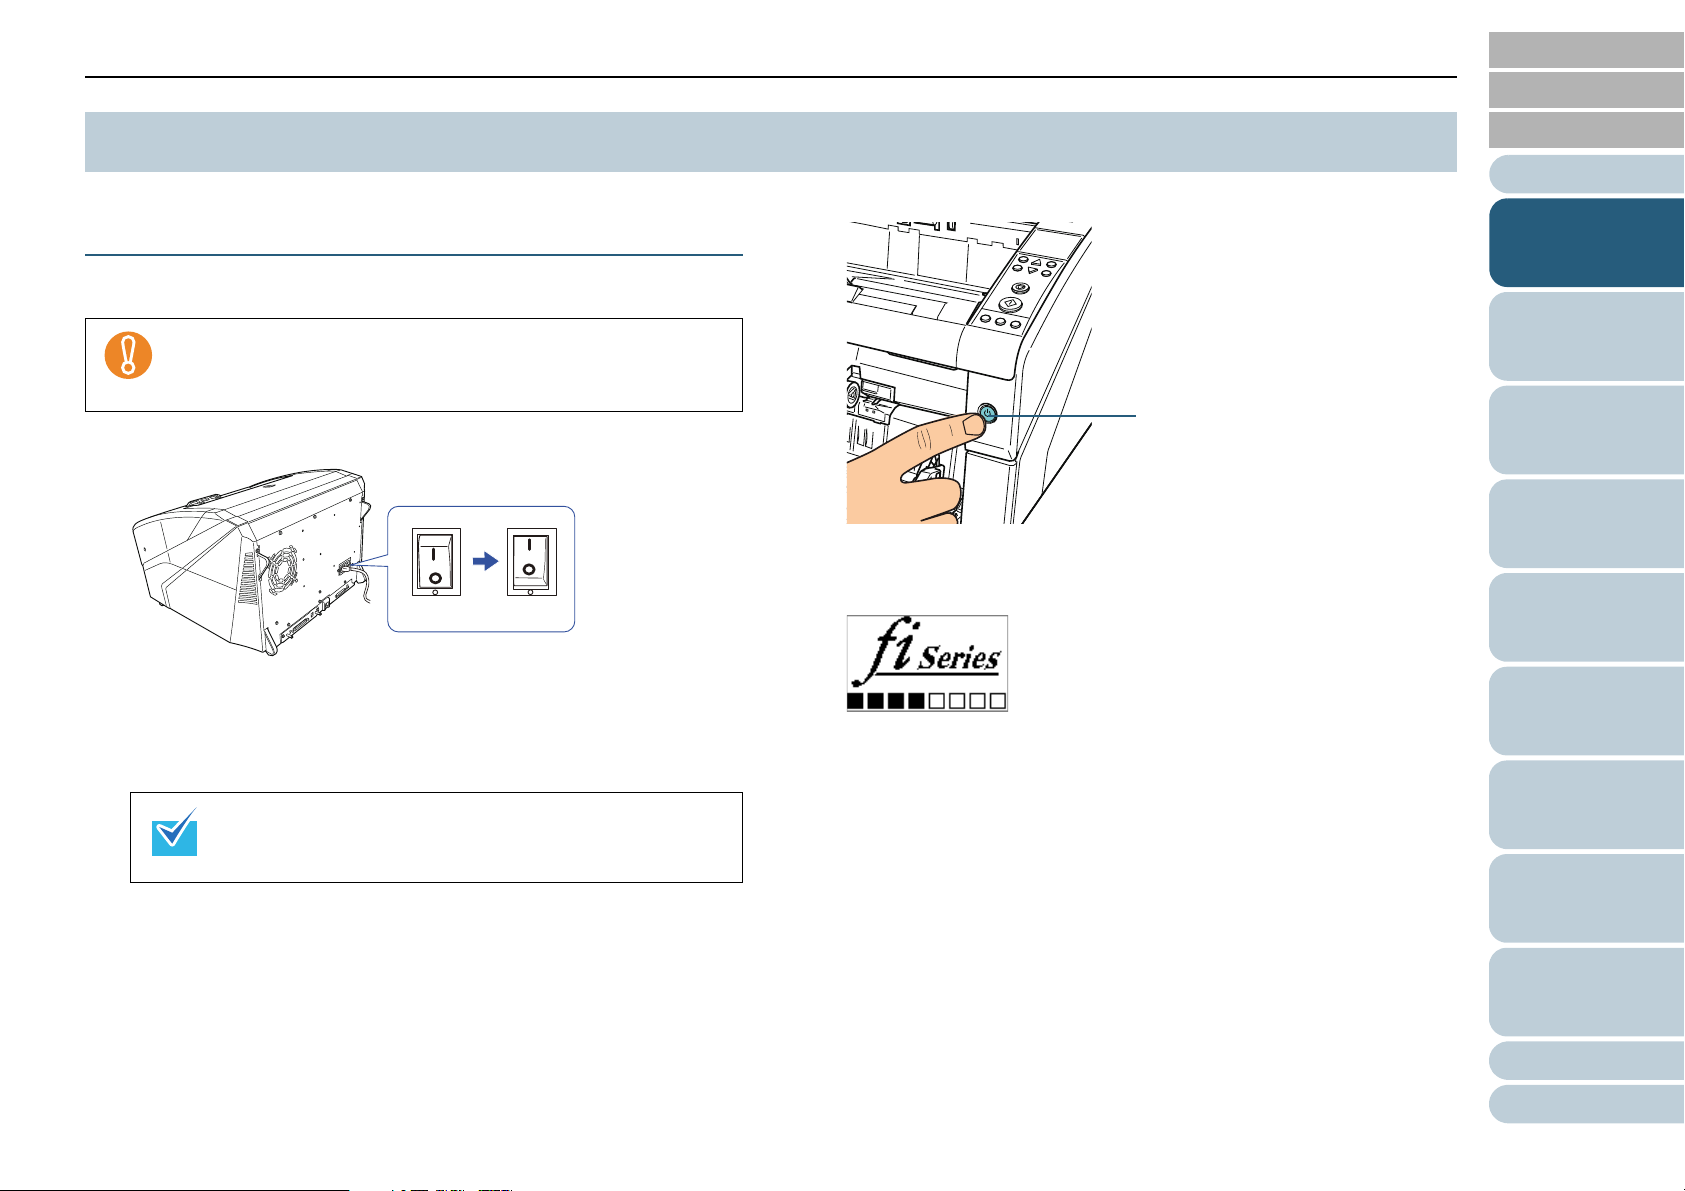
1.3 Turning the Power ON/OFF
This section explains how to power on/off the scanner.
Turning the Power ON
Turn on the power in the following procedure:
When connected via SCSI, turn on the scanner and confirm
that [Ready] is displayed on the LCD before you turn on the
computer.
1 Press the "|" side of the main power switch on the back.
2 Open the hopper.
For information on how to open the hopper, refer to "1.4 Opening/
Closing the Hopper" (page 19).
Make sure to open the hopper before you press the power
button to turn on the scanner.
3 Press the power button on the front of the scanner.
The power is turned on, and the power button lights in blue.
Note that the following screen is displayed on the operator panel
LCD during initialization.
When [Ready] is displayed on the LCD, the scanner is ready to start
scanning.
Index
Introduction
Scanner
Overview
How to Load
Documents
Configuring
the Scan
Settings
How to Use
the Operator
Panel
Various Ways
to Scan
Daily Care
Replacing
Consumables
Troubleshooting
Operational
Settings
Appendix
Glossary
17
Page 18

Chapter 1 Scanner Overview
ONOFF
ON OFF
Turning the Power OFF
Turn off the power in the following procedure:
TOP
Contents
Index
Introduction
1 Press the power button on the front for more than two
seconds.
The power is turned off, and the power button switches off.
If the scanner will not be used for a long time, press the
"{" side of the main power switch to turn off the power,
then unplug the power cable.
Scanner
Overview
How to Load
Documents
Configuring
the Scan
Settings
How to Use
the Operator
Panel
Various Ways
to Scan
Daily Care
Replacing
Consumables
Troubleshooting
Operational
Settings
Appendix
Glossary
18
Page 19
Chapter 1 Scanner Overview
Hopper Extension
TOP
Contents
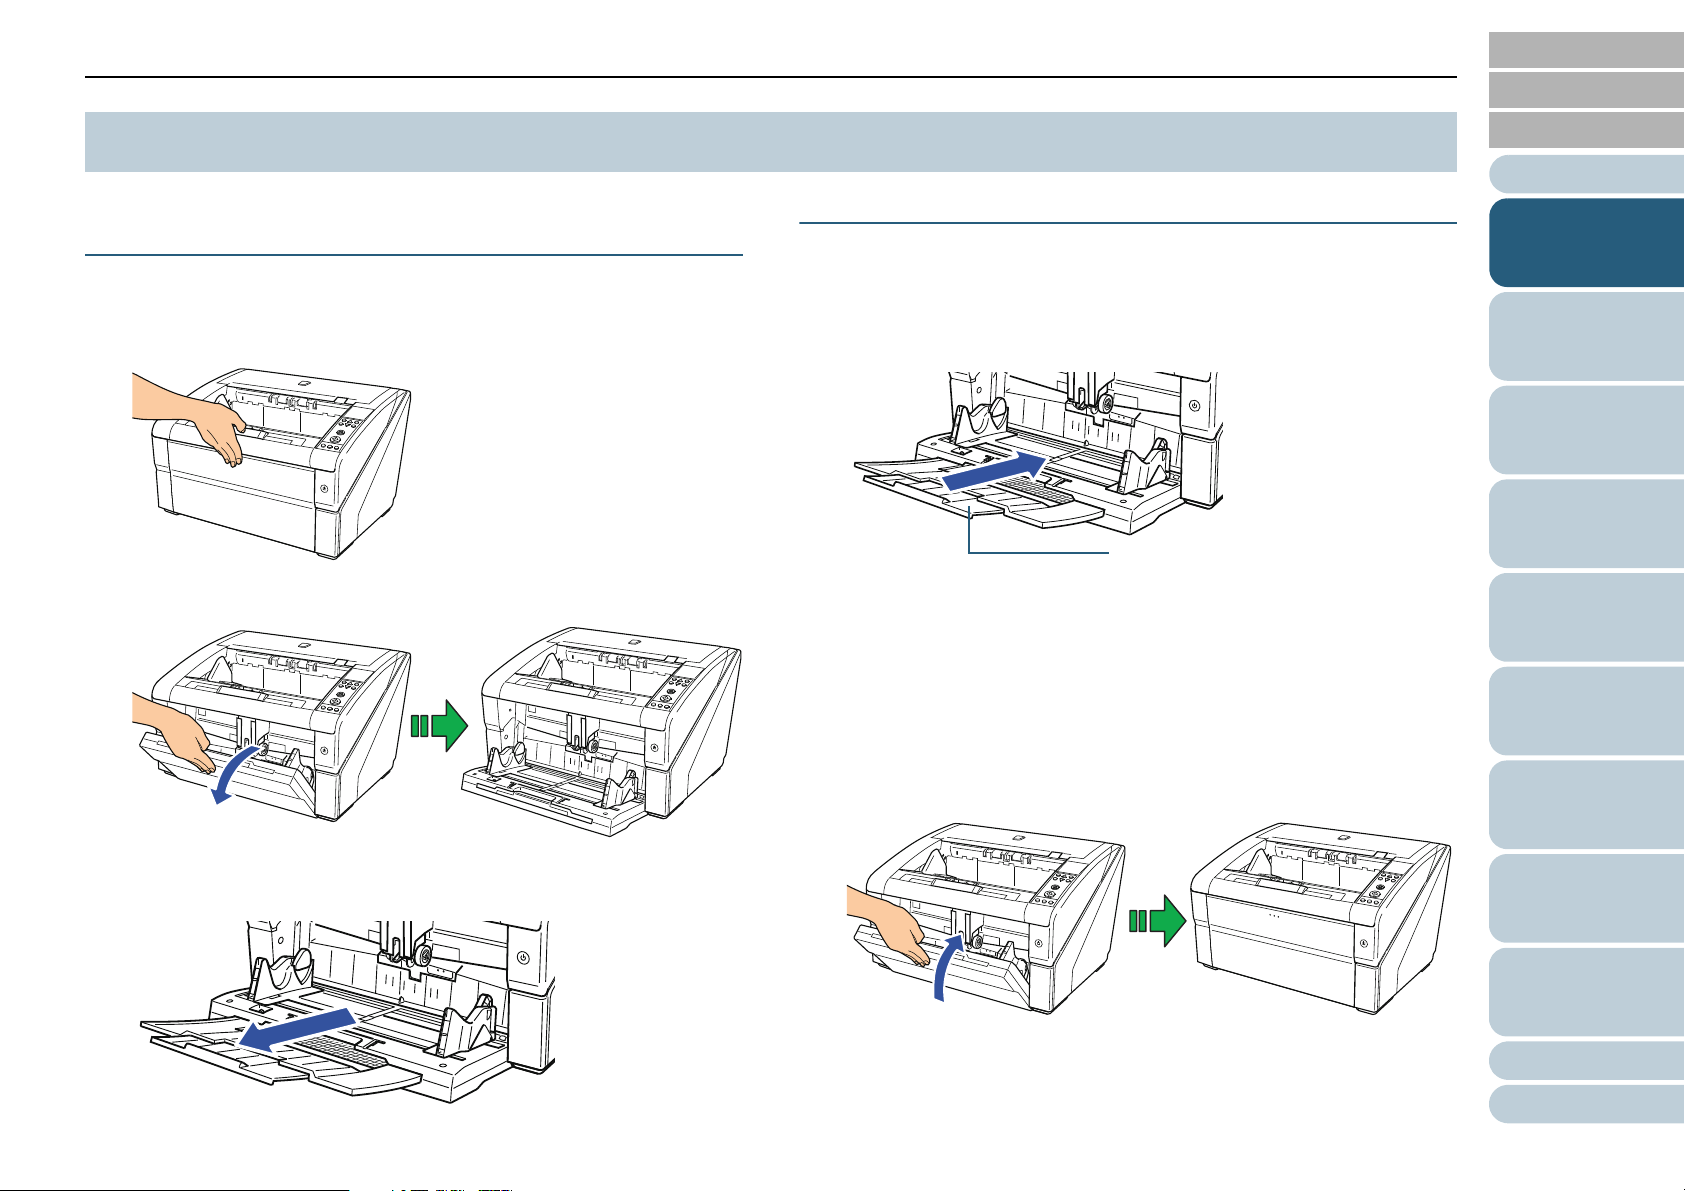
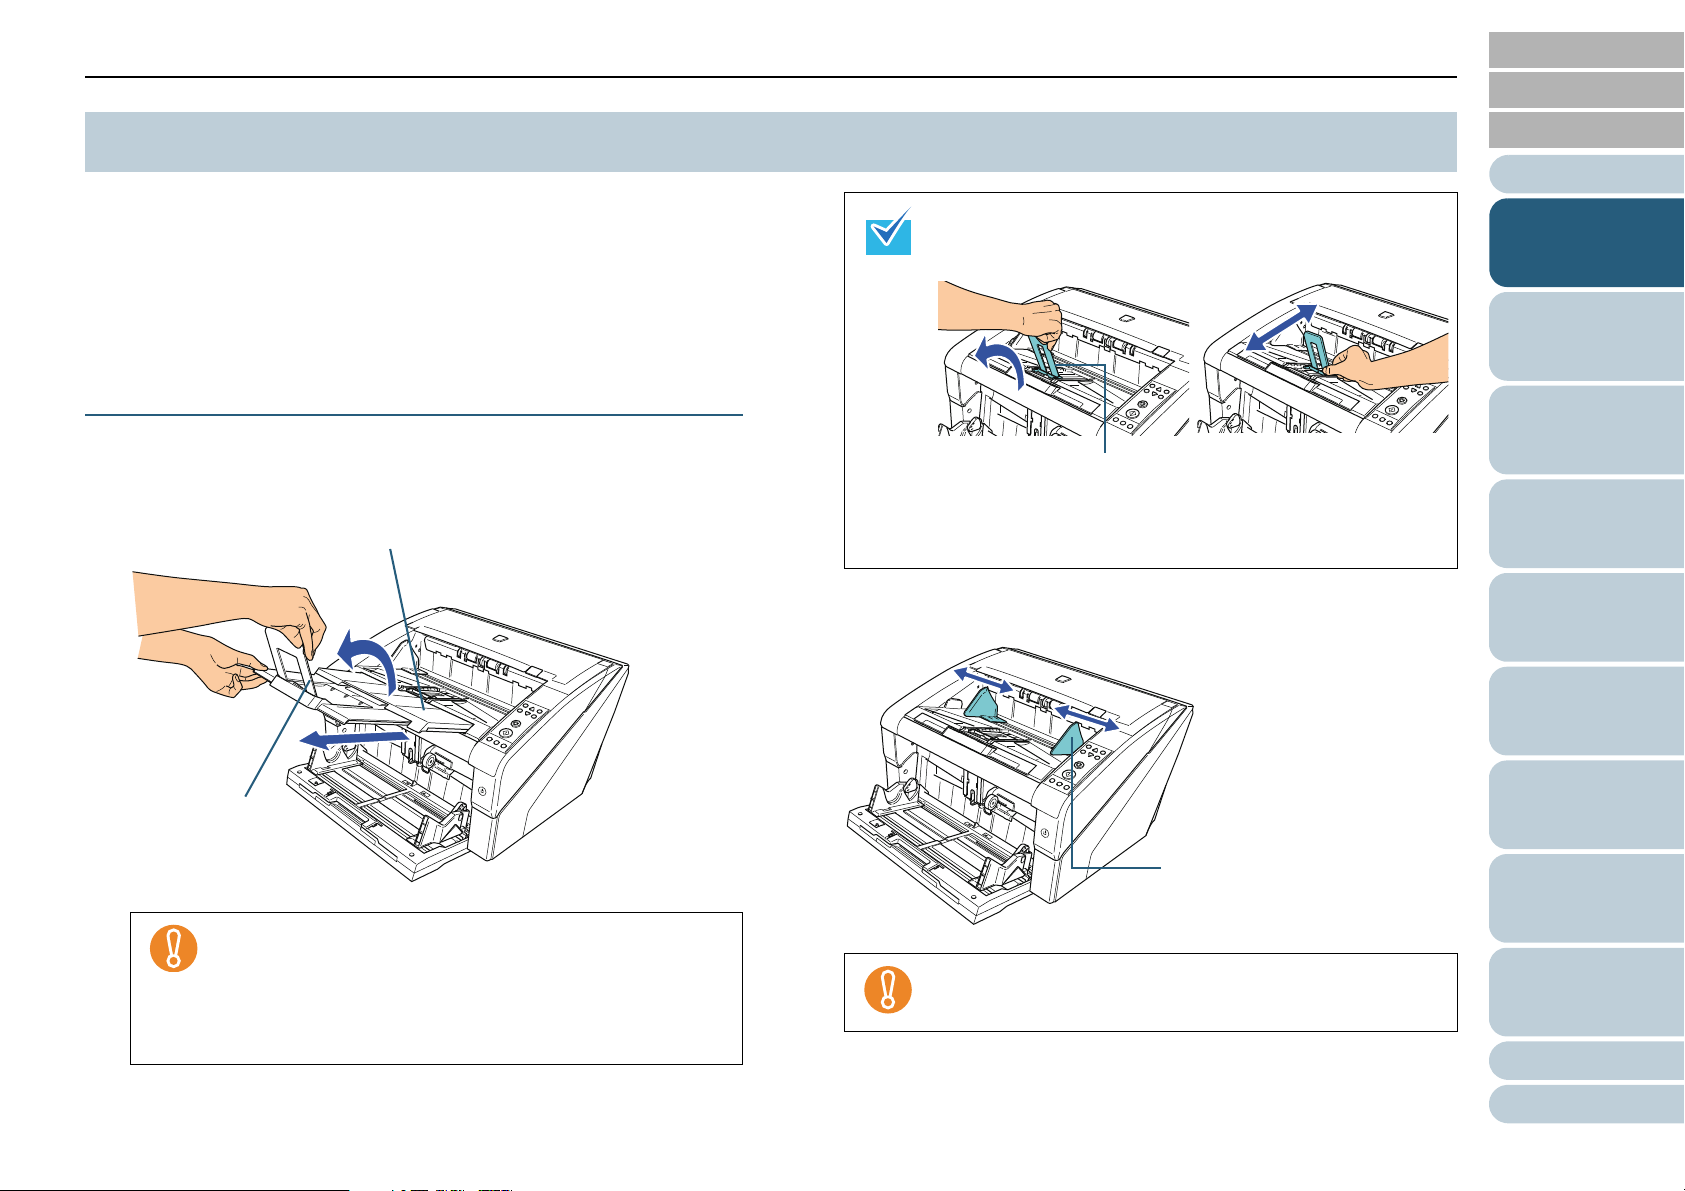
1.4 Opening/Closing the Hopper
This section describes how to open and close the hopper.
How to Open the Hopper
Open the hopper in the following procedure:
1 Push the upper middle section of the hopper.
2 Bring down the hopper as you support it with your hand.
How to Close the Hopper
Close the hopper in the following procedure:
1 Remove all documents from the hopper.
2 Slide in the hopper extension.
3 If the hopper level has been adjusted, set the hopper back
to the lower position.
Lower the hopper level from the operator panel on the scanner.
For details on how to adjust the hopper level, refer to "1.7 Setting the
Loading Capacity of the Hopper" (page 23).
Index
Introduction
Scanner
Overview
How to Load
Documents
Configuring
the Scan
Settings
How to Use
the Operator
Panel
Various Ways
to Scan
Daily Care
3 Adjust the hopper extension to the length of the
document.
4 Close the hopper.
Make sure to push the hopper until it locks.
Replacing
Consumables
Troubleshooting
Operational
Settings
Appendix
Glossary
19
Page 20
Chapter 1 Scanner Overview
TOP
Contents
1.5 Opening/Closing the ADF
This section describes how to open and close the ADF.
How to Open the ADF
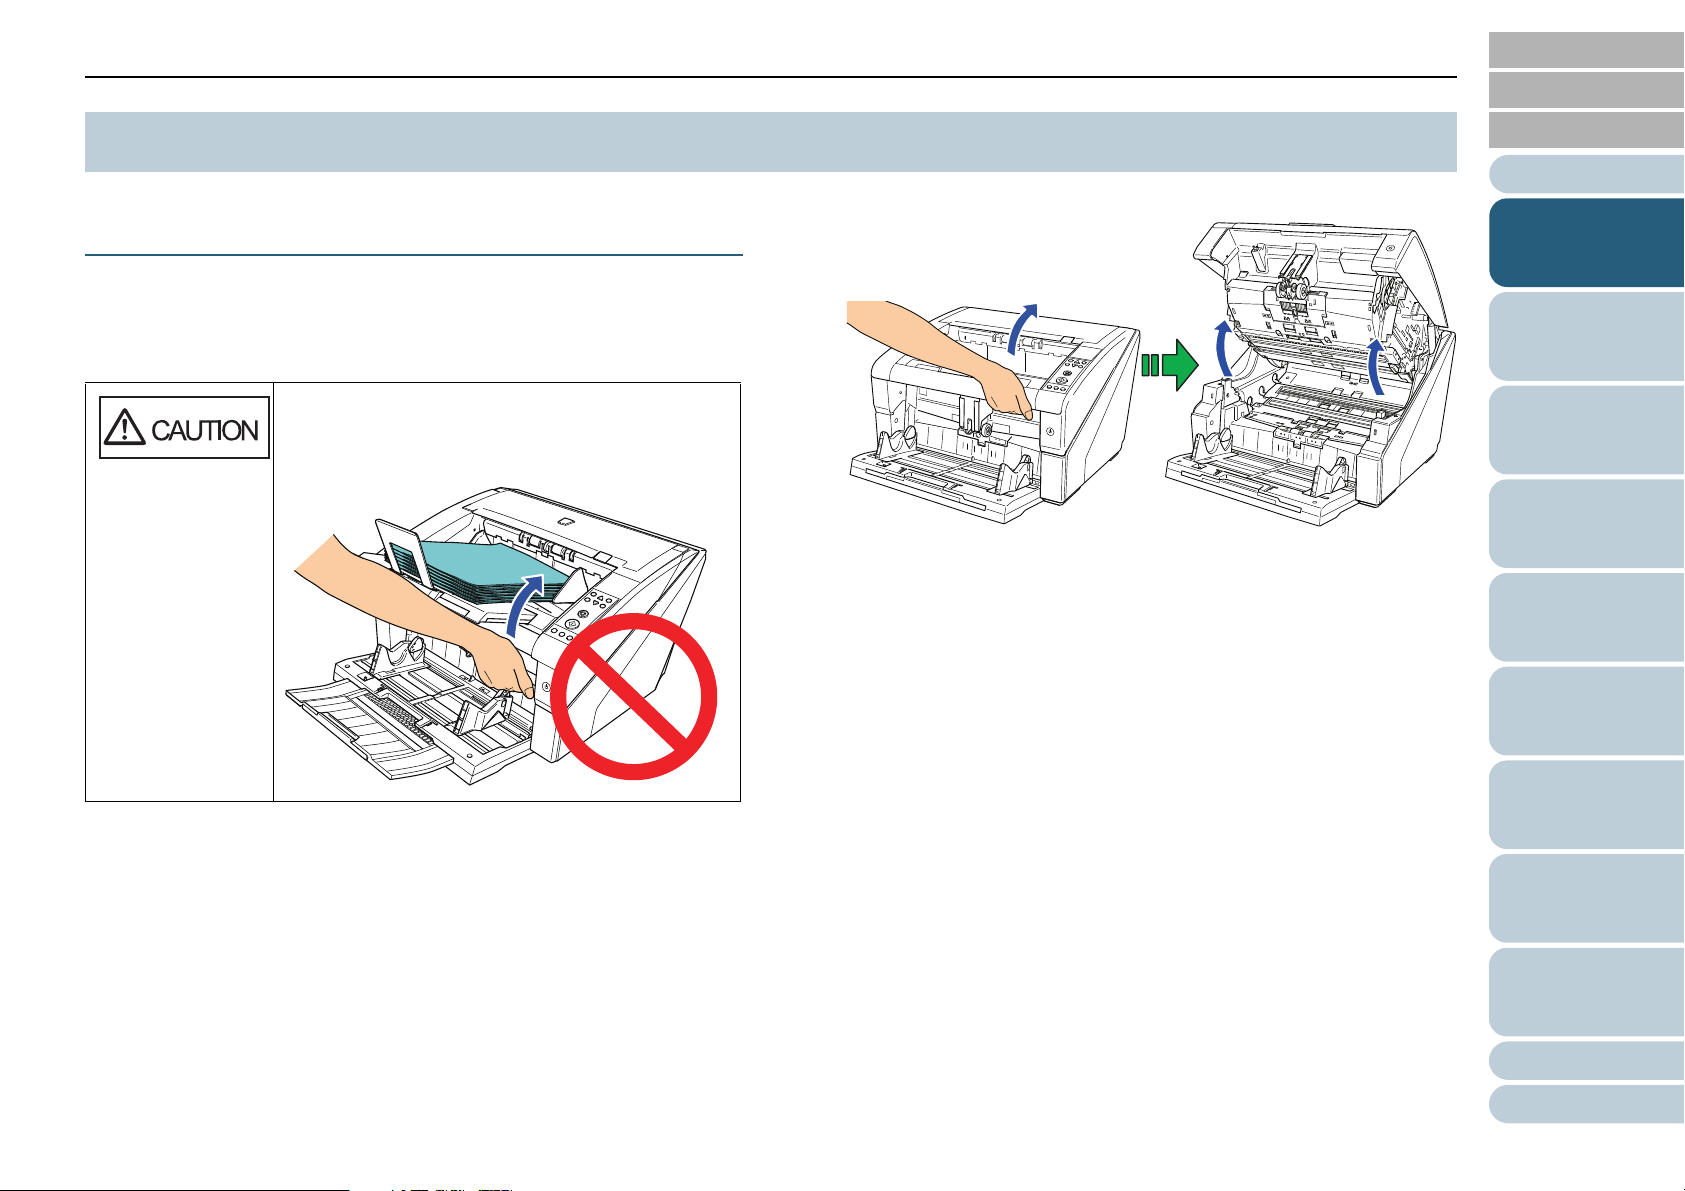
Open the ADF in the following procedure:
1 Remove all documents from the stacker.
Do not open the ADF when there is a large volume
of documents left on the stacker.
You may have your fingers caught if the ADF
closes from the weight of the documents.
Index
Introduction
2 Grab the ADF release tab and lift it up to open the ADF.
Scanner
Overview
How to Load
Documents
Configuring
the Scan
Settings
How to Use
the Operator
Panel
Various Ways
to Scan
Daily Care
Replacing
Consumables
Troubleshooting
Operational
Settings
Appendix
Glossary
20
Page 21
Chapter 1 Scanner Overview
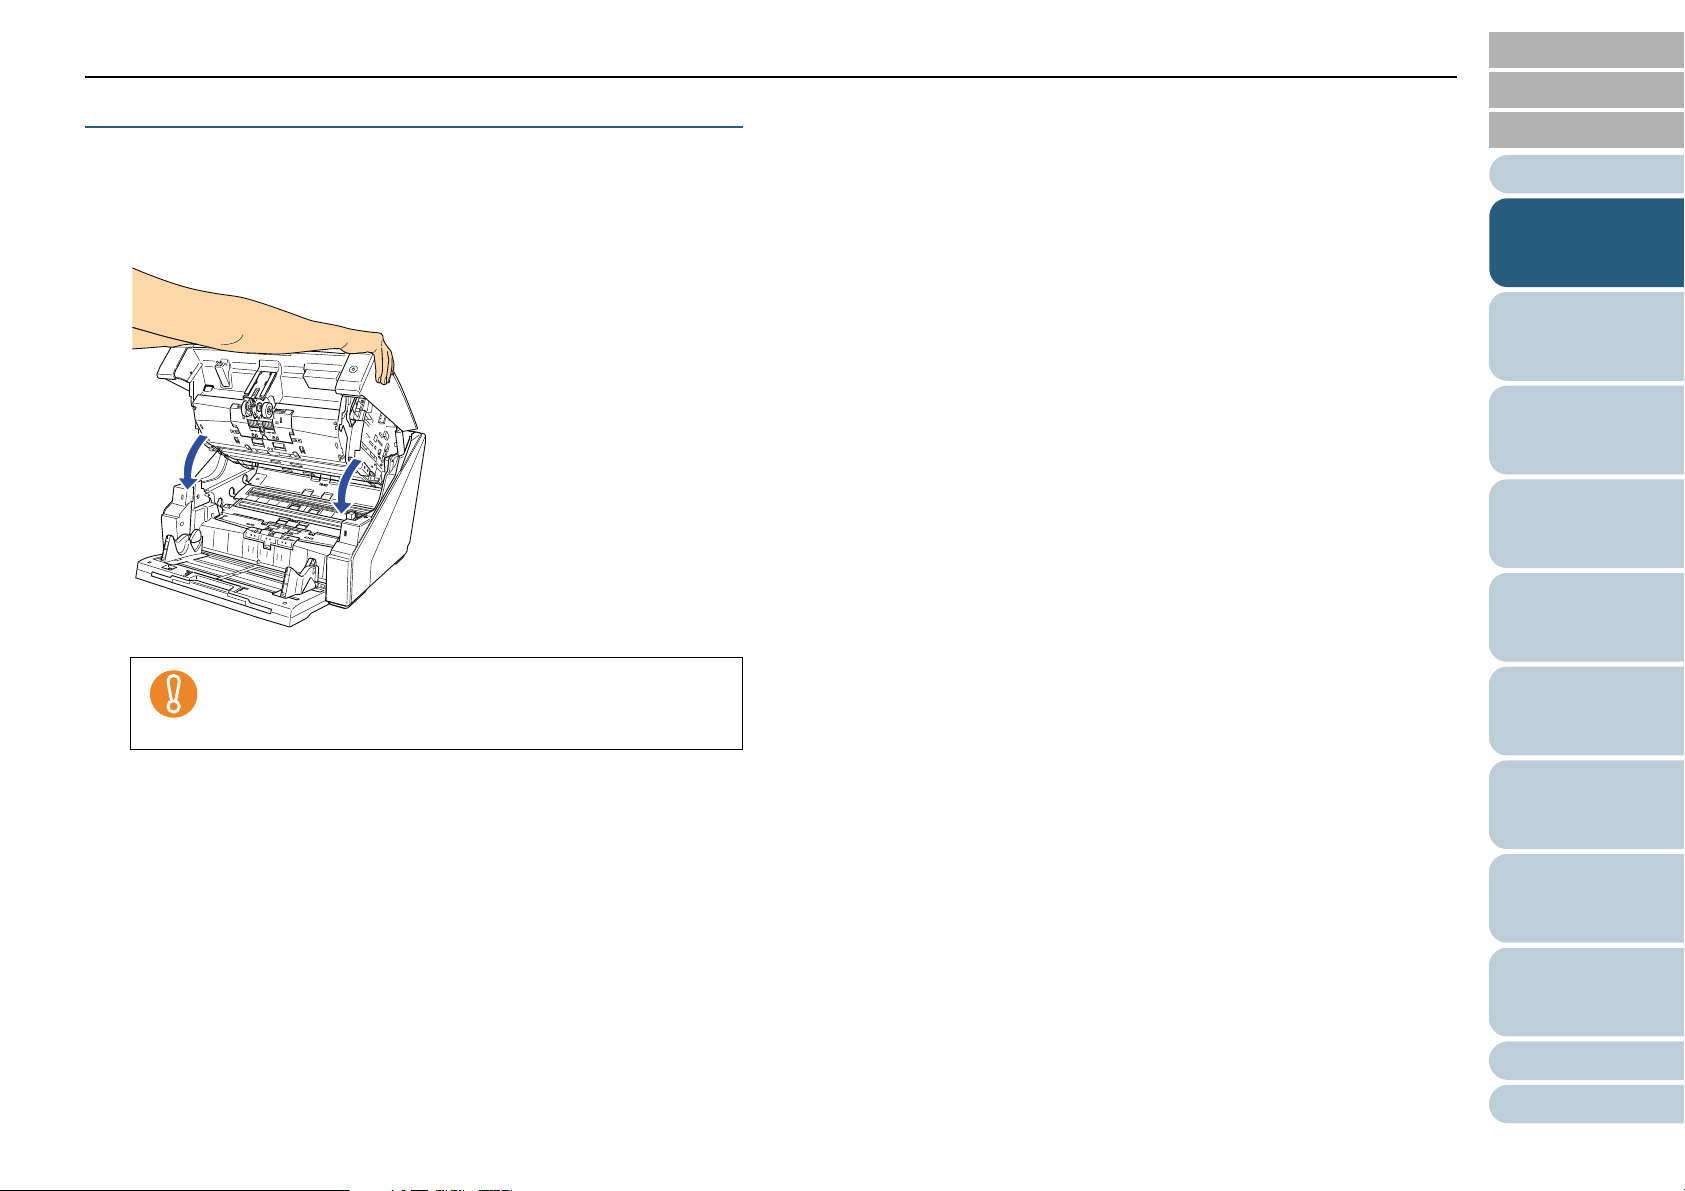
How to Close the ADF
Close the ADF in the following manner:
TOP
Contents
Index
Introduction
1 Hold the ADF with both hands and push it down slowly.
Push the ADF until it locks.
z Make sure that there is no foreign matter caught inside
the ADF.
z Be careful not to have your fingers caught.
Scanner
Overview
How to Load
Documents
Configuring
the Scan
Settings
How to Use
the Operator
Panel
Various Ways
to Scan
Daily Care
Replacing
Consumables
Troubleshooting
Operational
Settings
Appendix
Glossary
21
Page 22
Chapter 1 Scanner Overview
Top Cover Release Tab
Top Cover
TOP
Contents
1.6 Opening/Closing the Top Cover
This section describes how to open and close the top cover.
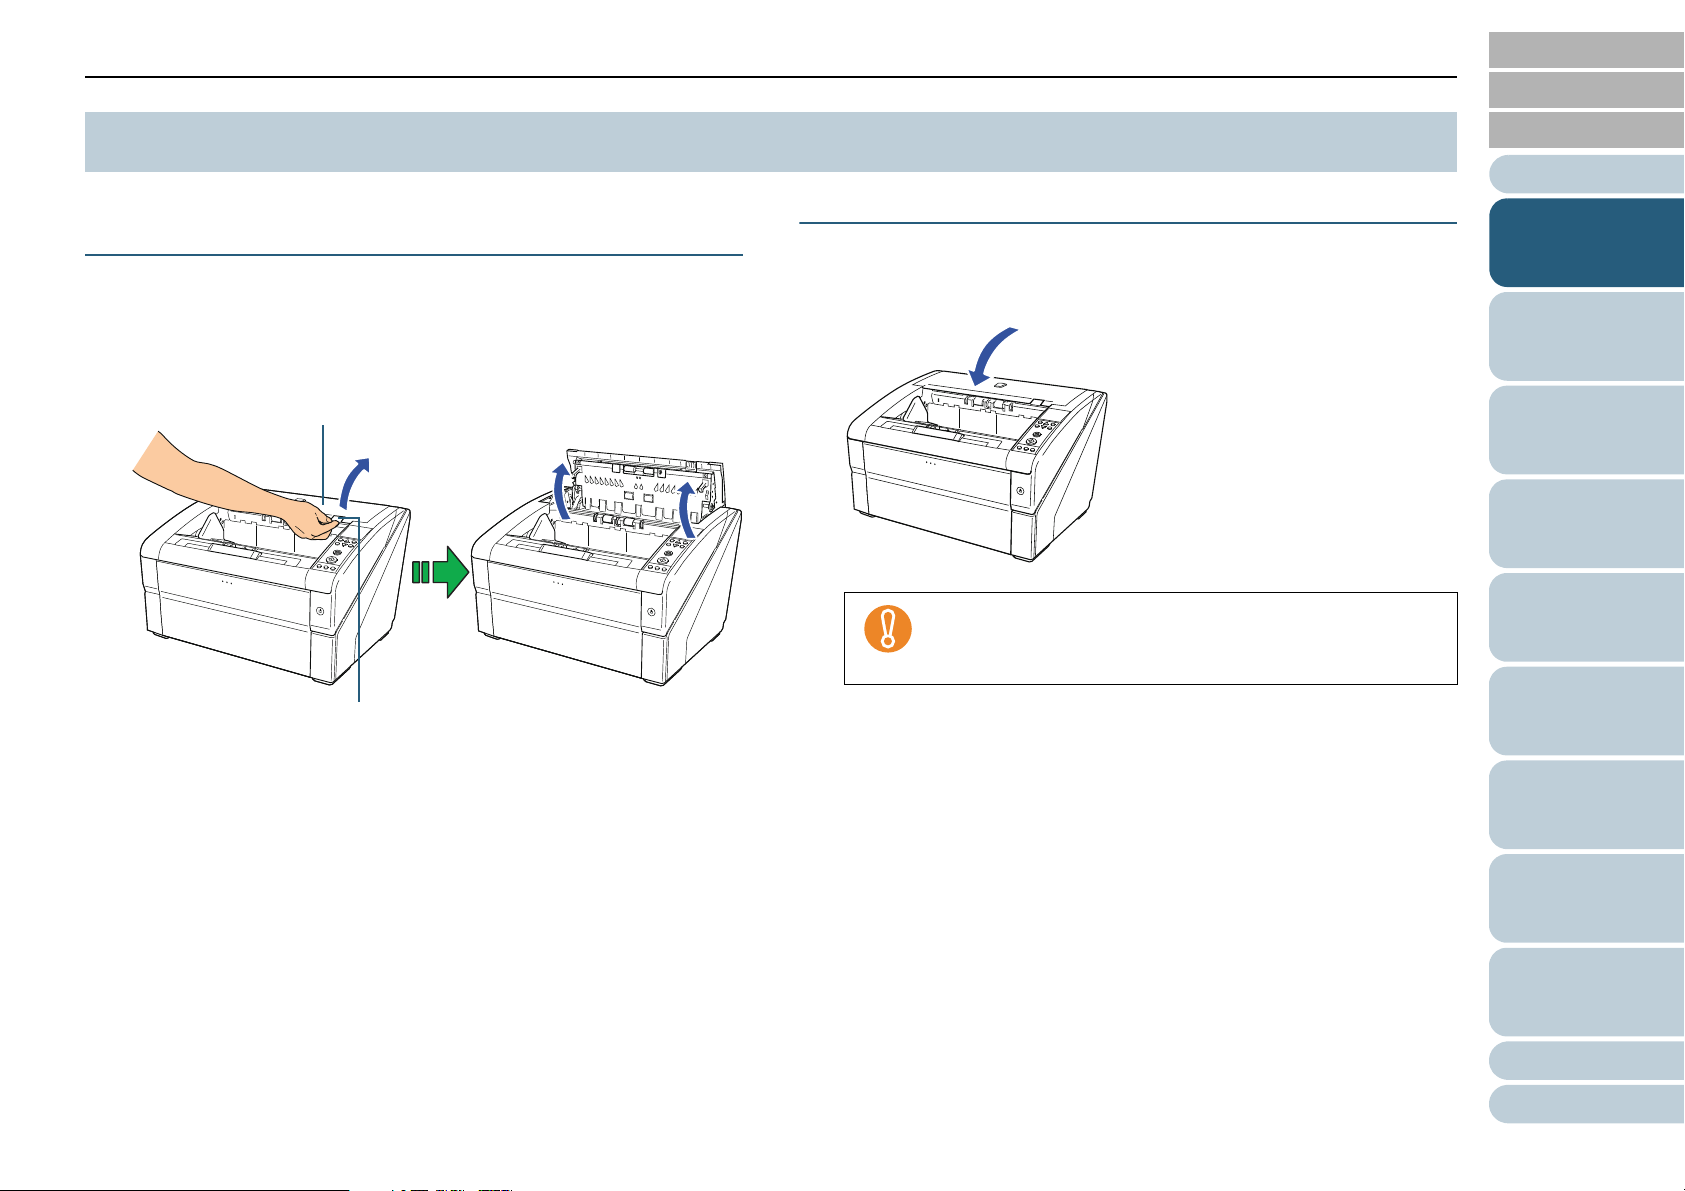
How to Open the Top Cover
Open the top cover in the following manner:
1 Hold onto the top cover release tab and push it up to open
the top cover.
How to Close the Top Cover
Close the top cover in the following manner:
1 Close the top cover and push it down gently until it locks.
z Make sure that there is no foreign matter caught inside
the top cover.
z Be careful not to have your fingers caught.
Index
Introduction
Scanner
Overview
How to Load
Documents
Configuring
the Scan
Settings
How to Use
the Operator
Panel
Various Ways
to Scan
Daily Care
Replacing
Consumables
Troubleshooting
Operational
Settings
Appendix
Glossary
22
Page 23
Chapter 1 Scanner Overview
Lower
Middle
Upper
Function
/Enter
Check
Menu
Scan
Stop
Eject
Counter
Reset
iMFF
Send to
/Pause
Clear
/Back
TOP
Contents
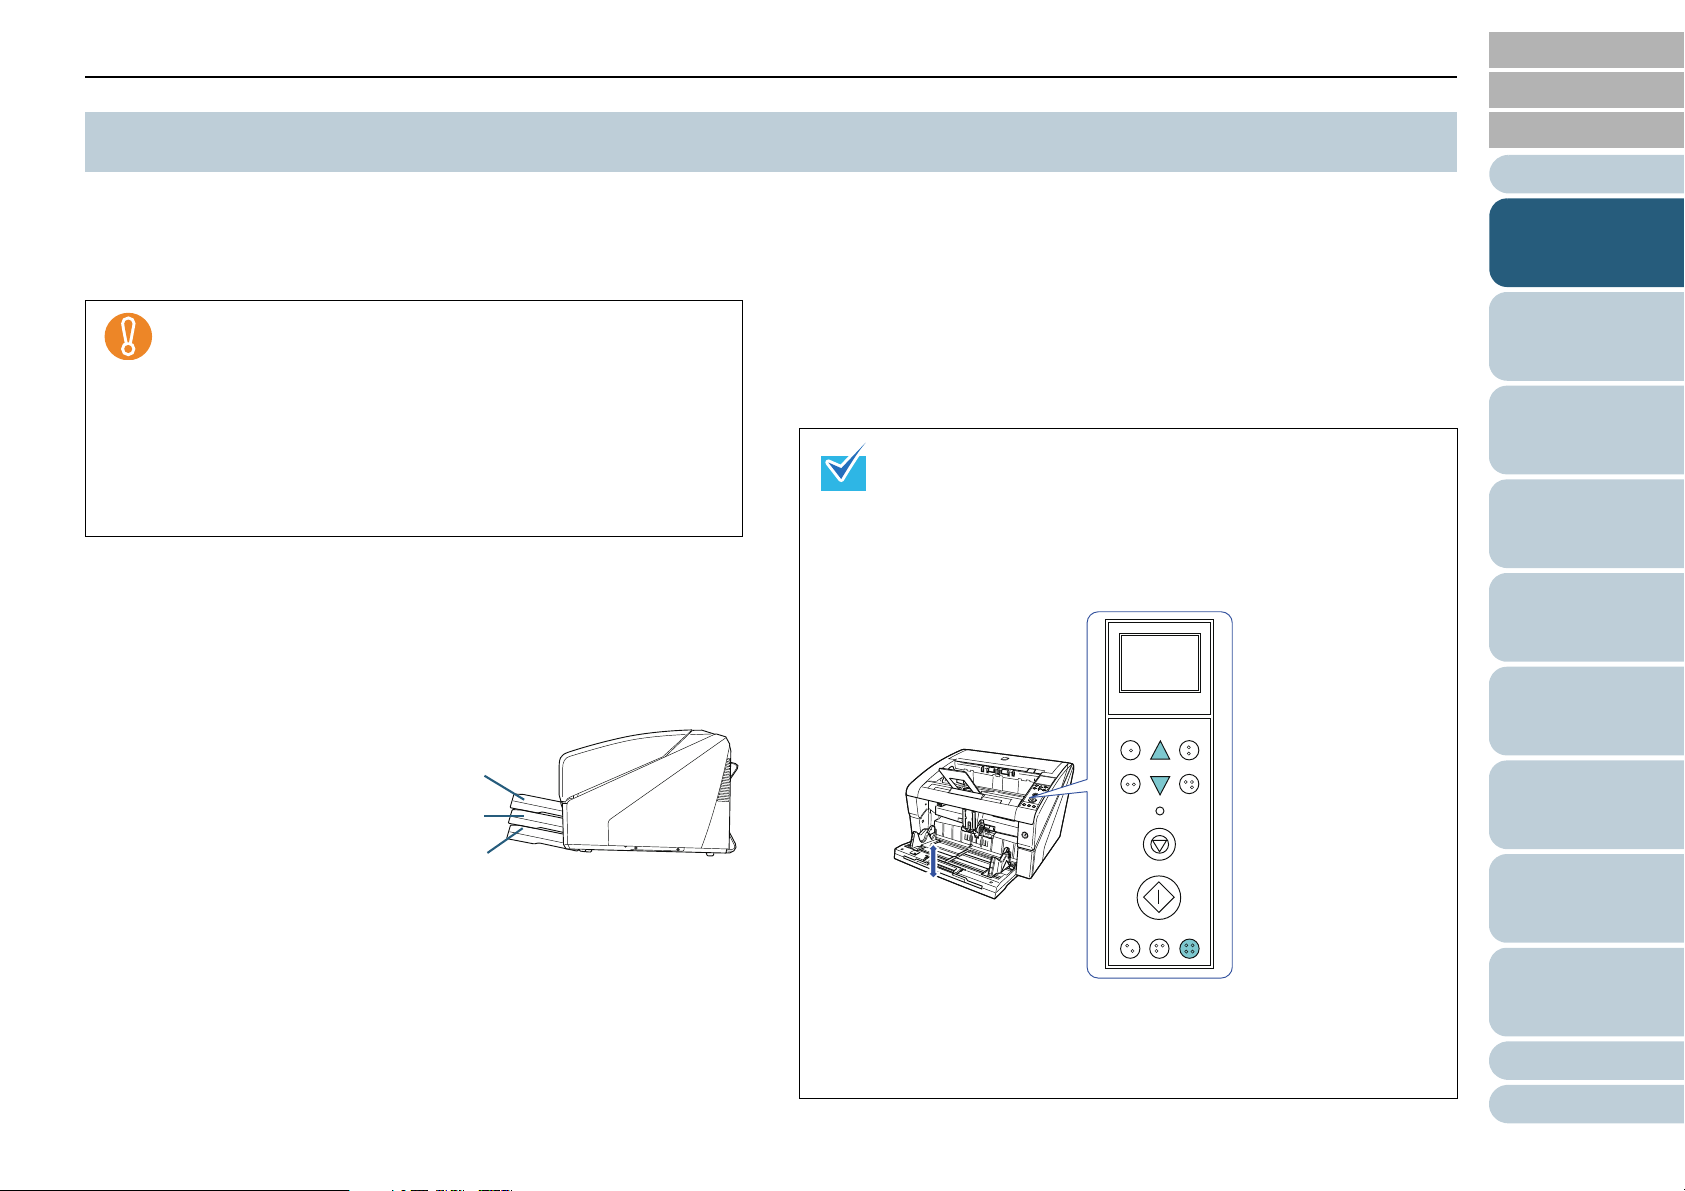
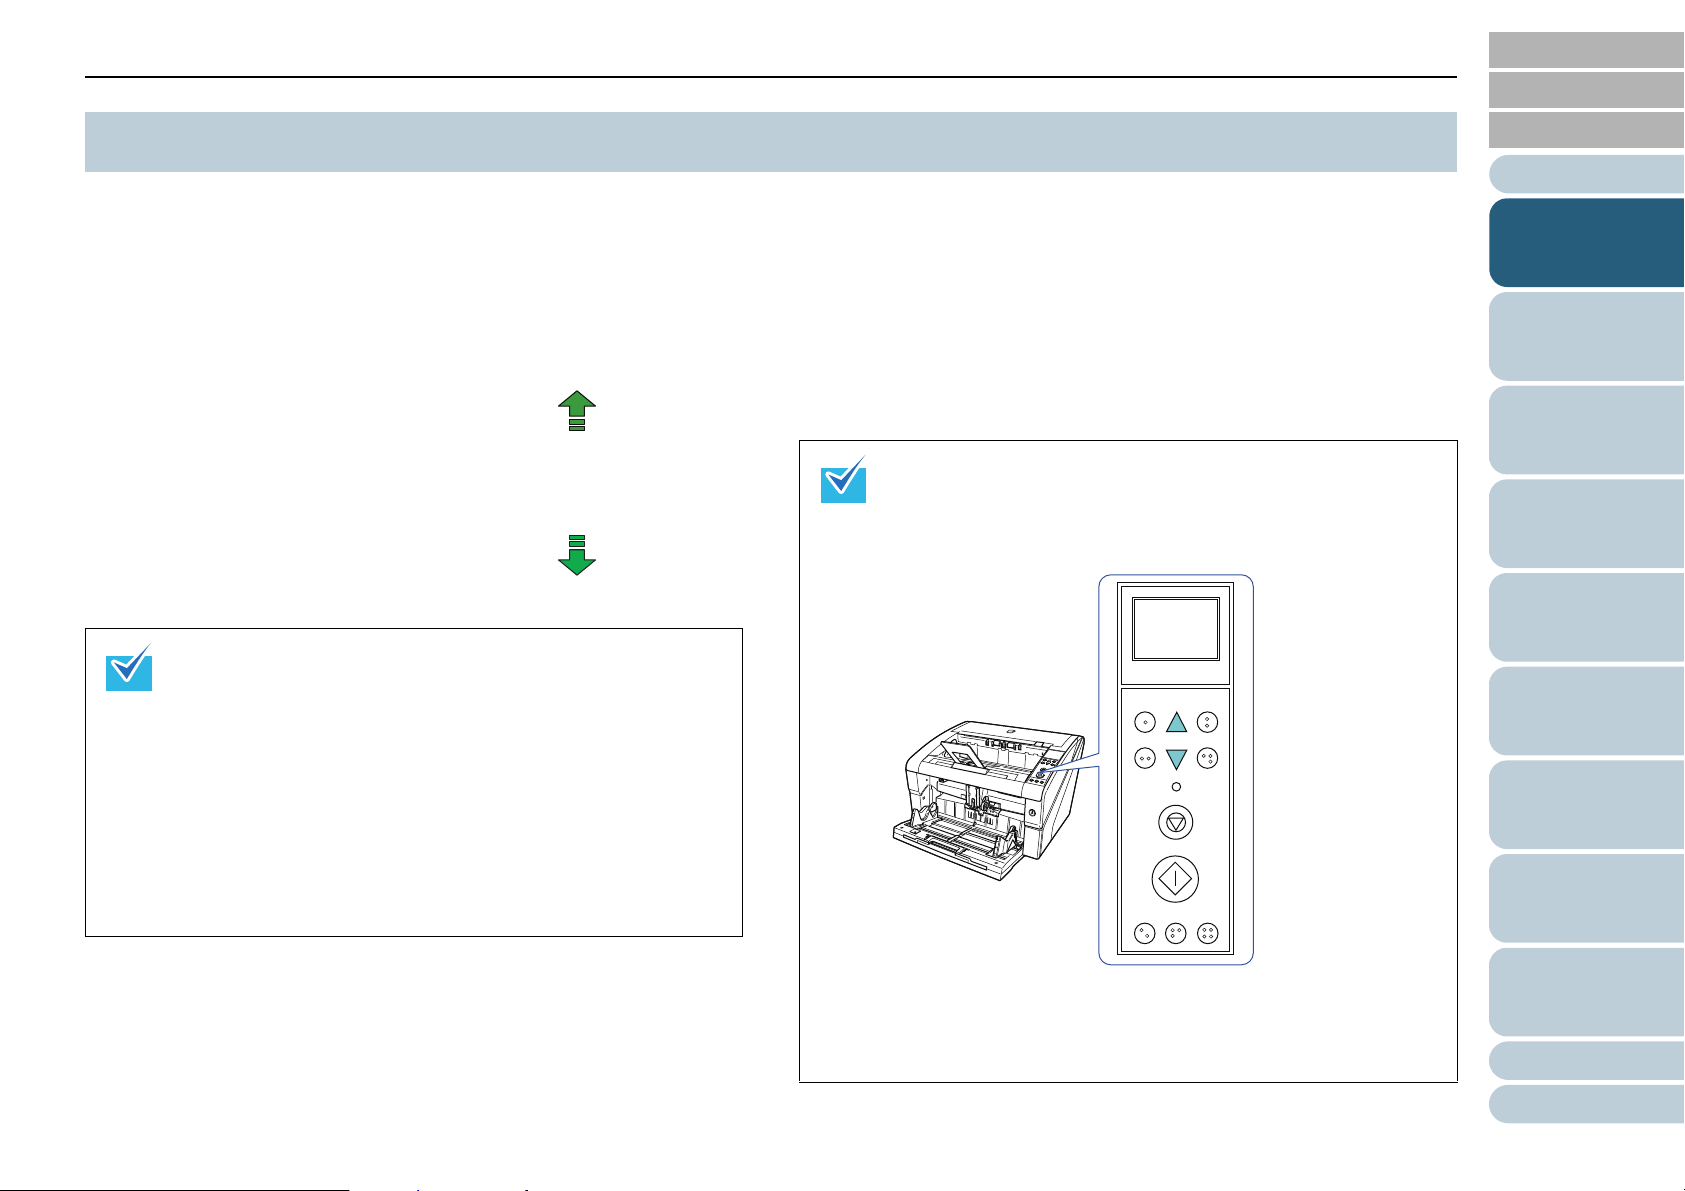
1.7 Setting the Loading Capacity of the Hopper
If there are only a few documents, you can set the hopper to a
higher position and shorten the time to get to the feeding
position.
z To avoid the risk of jamming your fingers, do not touch the
hopper while it is moving up/down.
z Do not place anything on top of the hopper while it is
moving. The scanner may be damaged if any object is
caught inside.
z To avoid any contact that may damage the scanner, do not
place anything beneath the hopper.
z Do not adjust the hopper height from the operator panel
when the hopper is closed, as it may damage the hopper.
This function is only available when [Ready] is displayed on
the operator panel LCD.
The hopper level can be set for three different capacities.
Upper: A maximum of 100
sheets (*1) can be
loaded.
Use the operator panel to adjust the height of the hopper.
Configure by selecting [10: Hopper Level] in the [Main Menu]
of the operator panel.
For more details about the settings, refer to "4.2 Main Menu"
(page 65).
When the scanner has just been powered on, it is set to the [4:
Lower] position.
[Hopper Level] can also be displayed by shortcut key. To
display the [Hopper Level] screen by shortcut key, press the
[Eject] button and either [] or [] button at the same time
when [Ready] is displayed. Change the hopper level by using
the [] or [] button in [Hopper Level]. Note that the [Hopper
Level] screen is not displayed unless the two buttons are
pressed simultaneously.
Index
Introduction
Scanner
Overview
How to Load
Documents
Configuring
the Scan
Settings
How to Use
the Operator
Panel
Various Ways
to Scan
Daily Care
Middle: A maximum of 300
sheets (*1) can be
loaded.
Lower: A maximum of 500
sheets (*1) can be
loaded.
*1: For documents with a paper weight of 80 g/m2 (20 lb).
The capacity varies depending on the paper weight of the document.
For more details, refer to "2.2 Documents for Scanning" (page 40).
When [Hopper Level] is displayed by shortcut key, the screen
returns to [Ready] after a certain period of time. This period of
time can be configured in [18: Operation Panel Timeout] of the
operator panel.
Replacing
Consumables
Troubleshooting
Operational
Settings
Appendix
Glossary
23
Page 24
Chapter 1 Scanner Overview
Stacker Extension
Paper Stop
Paper Stop (Small)
Stacker Side Guide
TOP
Contents
1.8 Stacker Setting
When you perform a scan, the document loaded on the
hopper is ejected onto the stacker.
You can stack the documents neatly by using the stacker
extension and the stacker side guides as shown in the
procedure below.
You can also fix the stacker at certain heights.
How to Guide Documents
1 Adjust the stacker extension to the length of the
document, and pull up the paper stop.
Use the paper stop (small) when the document length is
short. Lift up the paper stop (small) to about 130 degrees
from the stacker level.
To scan documents longer than A3 size, pull out the
hopper extension and the stacker extension all the way.
Also, make sure not to pull up the paper stop.
2 Adjust the stacker side guides to the width of the
document.
Index
Introduction
Scanner
Overview
How to Load
Documents
Configuring
the Scan
Settings
How to Use
the Operator
Panel
Various Ways
to Scan
Daily Care
z Do not hold the paper stop when you pull out the
stacker extension because it may break.
z Make sure that the position of the paper stop is set
longer than the document length.
You can align the documents neatly by leaving a small
gap between the paper stop and the documents.
Make sure to set the distance between the stacker side
guides longer than the document width.
Replacing
Consumables
Troubleshooting
Operational
Settings
Appendix
Glossary
24
Page 25
Chapter 1 Scanner Overview
Sensor
Sensor
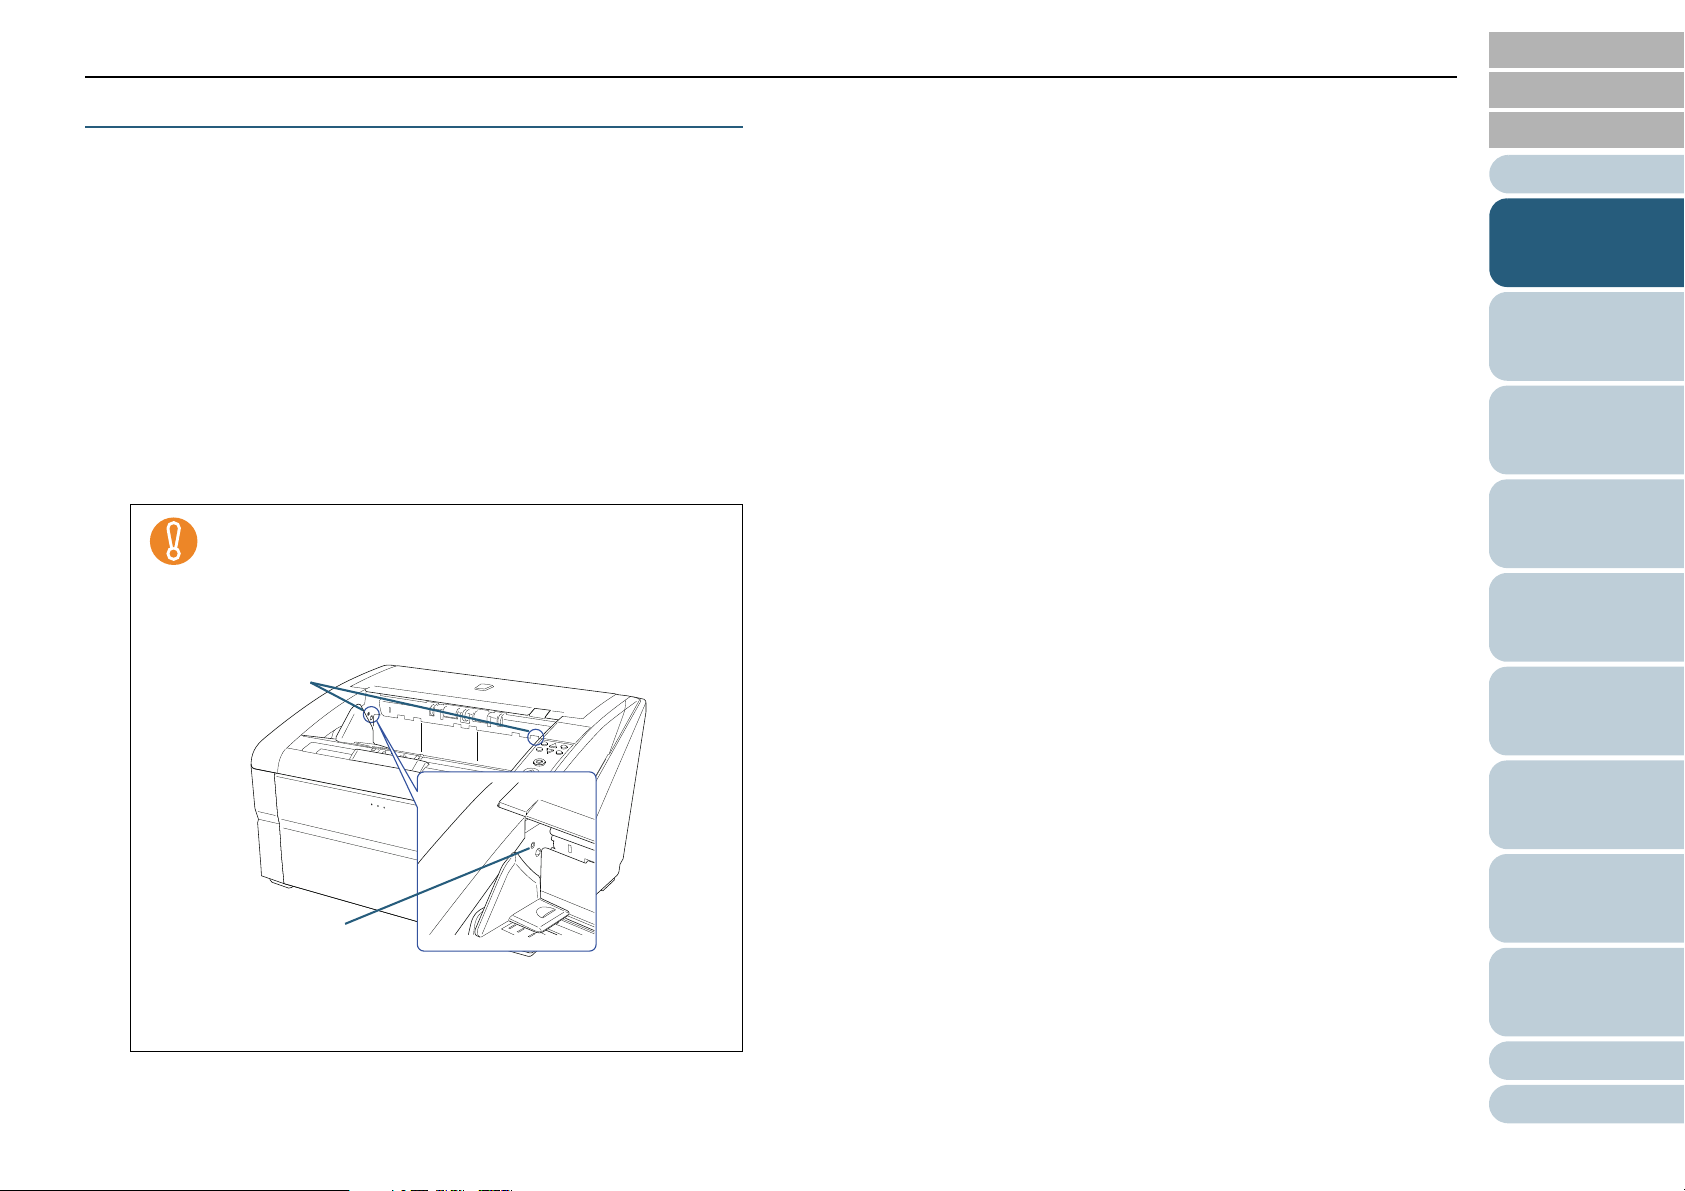
How to Fix the Stacker Height
Highly deformed (curled, folded or creased) documents may
be scattered in the output when they are ejected onto the
stacker. In that case, having the stacker height fixed during
scanning may help the documents be stacked neatly.
TOP
Contents
Index
Introduction
Scanner
Overview
1 If the scanner driver’s setup dialog box is displayed, close
the dialog box.
2 In the [Main Menu] of the operator panel, select [2: Fixed]
for [9: Stacker Positioning].
For details about the settings, refer to "4.2 Main Menu" (page 65).
The stacker height is fixed.
z When the scanner has just been powered on, it is set
to [1: Movable].
z In the rear ends of the stacker, a sensor is mounted on
each side which detects documents. Make sure that
nothing is placed in a location (between the two
sensors) that may block the sensor.
How to Load
Documents
Configuring
the Scan
Settings
How to Use
the Operator
Panel
Various Ways
to Scan
Daily Care
Replacing
Consumables
Troubleshooting
z The stacker may move just after turning the power on
or when the scanning starts. Do not touch or place
anything on top.
Operational
Settings
Appendix
Glossary
25
Page 26
Chapter 1 Scanner Overview
Function
/Enter
Check
Menu
Scan
Stop
Eject
Counter
Reset
iMFF
Send to
/Pause
Clear
/Back
TOP
Contents
1.9 Adjusting the Paper Separation Force
When you experience frequent multifeeds, pick errors or paper
jams, you can fix the problem by adjusting the force that
separates the papers. Keep the default setting for normal use.
Paper separation force can be set in five different levels.
Low High Force Paper type
: Low Low friction, easy
to separate
: Slightly low
: Mid (default)
: Slightly high High friction,
difficult to separate
: High
z Set the paper separation force lower when pick errors or
paper jams occur frequently.
z Set the paper separation force higher if multifeeds occur
frequently when the paper separation force is low.
z Errors such as multifeed, pick error and paper jam may also
be caused by worn-out consumables or contamination in
the feeding mechanism. If these symptoms do not improve
after changing the paper separation force, either replace the
consumables or clean the inside of the scanner.
z Documents may be damaged if the paper separation force
is set too high. In that case, set the paper separation force
lower.
Prevents pick
error and
paper jam
Prevents
multifeed
The paper separation force is set to [] when the
power has just been turned on.
However, note that you can also have the paper separation
force setting memorized by using the Software Operation
Panel. For more details, refer to " Setting the Paper Separation
Force upon Turning the Power Off [Retain current paper
thickness]" (page 219).
[Paper Separation Force] can also be displayed by shortcut
key. To display the [Paper Separation Force] screen by shortcut
key, press the [] or [] button when [Ready] is displayed.
Change the paper separation force by using the [] or []
button.
Index
Introduction
Scanner
Overview
How to Load
Documents
Configuring
the Scan
Settings
How to Use
the Operator
Panel
Various Ways
to Scan
Daily Care
Replacing
Consumables
Troubleshooting
Use the operator panel to adjust the paper separation force.
[11: Paper Separation Force] can be adjusted in the [Main
Menu] of the operator panel.
For more details about the settings, refer to "4.2 Main Menu"
(page 65).
When [Paper Separation Force] is displayed by shortcut key,
the screen returns to [Ready] after a certain period of time.
This period of time can be configured in [18: Operation Panel
Timeout] of the operator panel.
Operational
Settings
Appendix
Glossary
26
Page 27
Chapter 1 Scanner Overview
TOP
Contents
1.10 Resuming from Power Saving Mode
Power saving mode saves the power consumption of the
scanner while the power is turned on.
If the scanner is left powered on for 15 minutes or more
without being used, it automatically enters power saving
mode.
When it enters power saving mode, the LCD on the operator
panel turns off. The power button remains lit in blue.
To resume from power saving mode, perform one of the
following:
z Load a document on the hopper.
z Press any button (except for power button) on the operator panel.
Note that the scanner will be turned off when you press the power
button for more than two seconds.
z Execute a command from the scanner driver.
The waiting time for entering power saving mode can be
changed in the Software Operation Panel.
For more details, refer to "Setting the Waiting Time to Enter
Power Saving Mode [Power saving]" (page 218).
Index
Introduction
Scanner
Overview
How to Load
Documents
Configuring
the Scan
Settings
How to Use
the Operator
Panel
Various Ways
to Scan
Daily Care
Replacing
Consumables
Troubleshooting
Operational
Settings
Appendix
Glossary
27
Page 28
Chapter 1 Scanner Overview
TOP
Contents
1.11 Basic Flow of Scanning Operation
This section explains about the basic flow of scanning
operations.
In order to perform a scan, you need a scanner driver and an
application that supports the scanner driver.
This product bundles the TWAIN driver and the ISIS driver
(compliant to the respective standards), Kofax VRS, and an
application called "ScandAll PRO" which supports both drivers
and Kofax VRS.
z For details about the scanner drivers, refer to the following:
- "Chapter 3 Configuring the Scan Settings" (page 48)
- TWAIN Scanner Driver Help
- ISIS Scanner Driver Help
z For details about Kofax VRS, refer to:
- Kofax VRS Help
z For details about ScandAll PRO, refer to the following:
- ScandAll PRO V2.0 User's Guide
- ScandAll PRO Help
2 Load documents on the hopper.
Set the documents with the front side (scanning side) facing up.
For information on how to load documents, refer to "Chapter 2 How to
Load Documents" (page 33).
Index
Introduction
Scanner
Overview
How to Load
Documents
Configuring
the Scan
Settings
How to Use
the Operator
Panel
Various Ways
to Scan
Daily Care
1 Turn on the scanner.
For information on how to turn on the power, refer to "1.3 Turning the
Power ON/OFF" (page 17).
z When connected via SCSI, turn on the scanner and
confirm that [Ready] is displayed on the LCD before
you turn on the computer.
z When switching the connectors, make sure to power
off the scanner and the computer first.
Replacing
Consumables
Troubleshooting
Operational
Settings
Appendix
Glossary
28
Page 29
Chapter 1 Scanner Overview
When ScandAll PRO is launched
For TWAIN
For ISIS
Kofax VRS:
3 Start up the application to use for scanning.
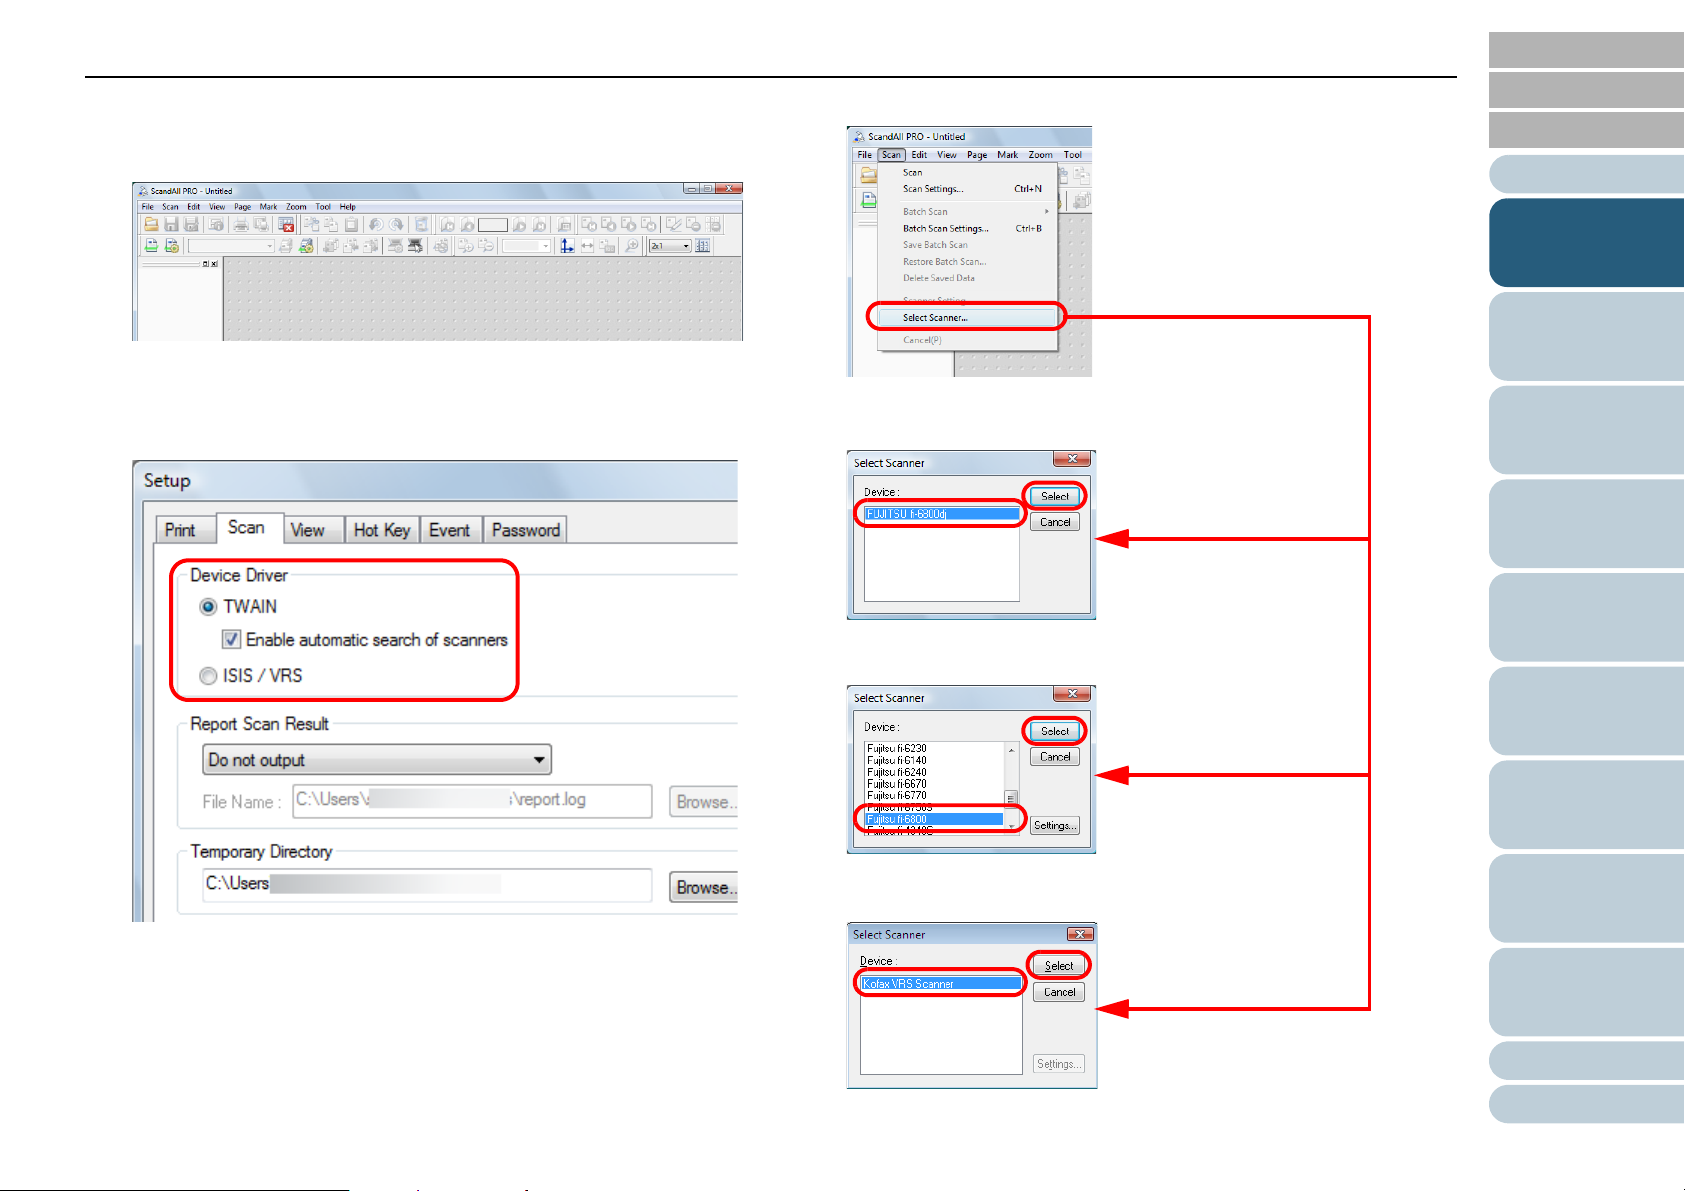
4 Select a scanner driver to use for scanning.
ScandAll PRO will be used here as an example to explain the
procedure.
For information on how to launch ScandAll PRO, refer to "ScandAll
PRO V2.0 User's Guide".
TOP
Contents
5 Select a scanner.
Index
Introduction
Scanner
Overview
How to Load
Documents
Configuring
the Scan
Settings
How to Use
the Operator
Panel
Various Ways
to Scan
Daily Care
Replacing
Consumables
Troubleshooting
Operational
Settings
Appendix
Glossary
29
Page 30
Chapter 1 Scanner Overview
For TWAIN
For ISIS
Kofax VRS:
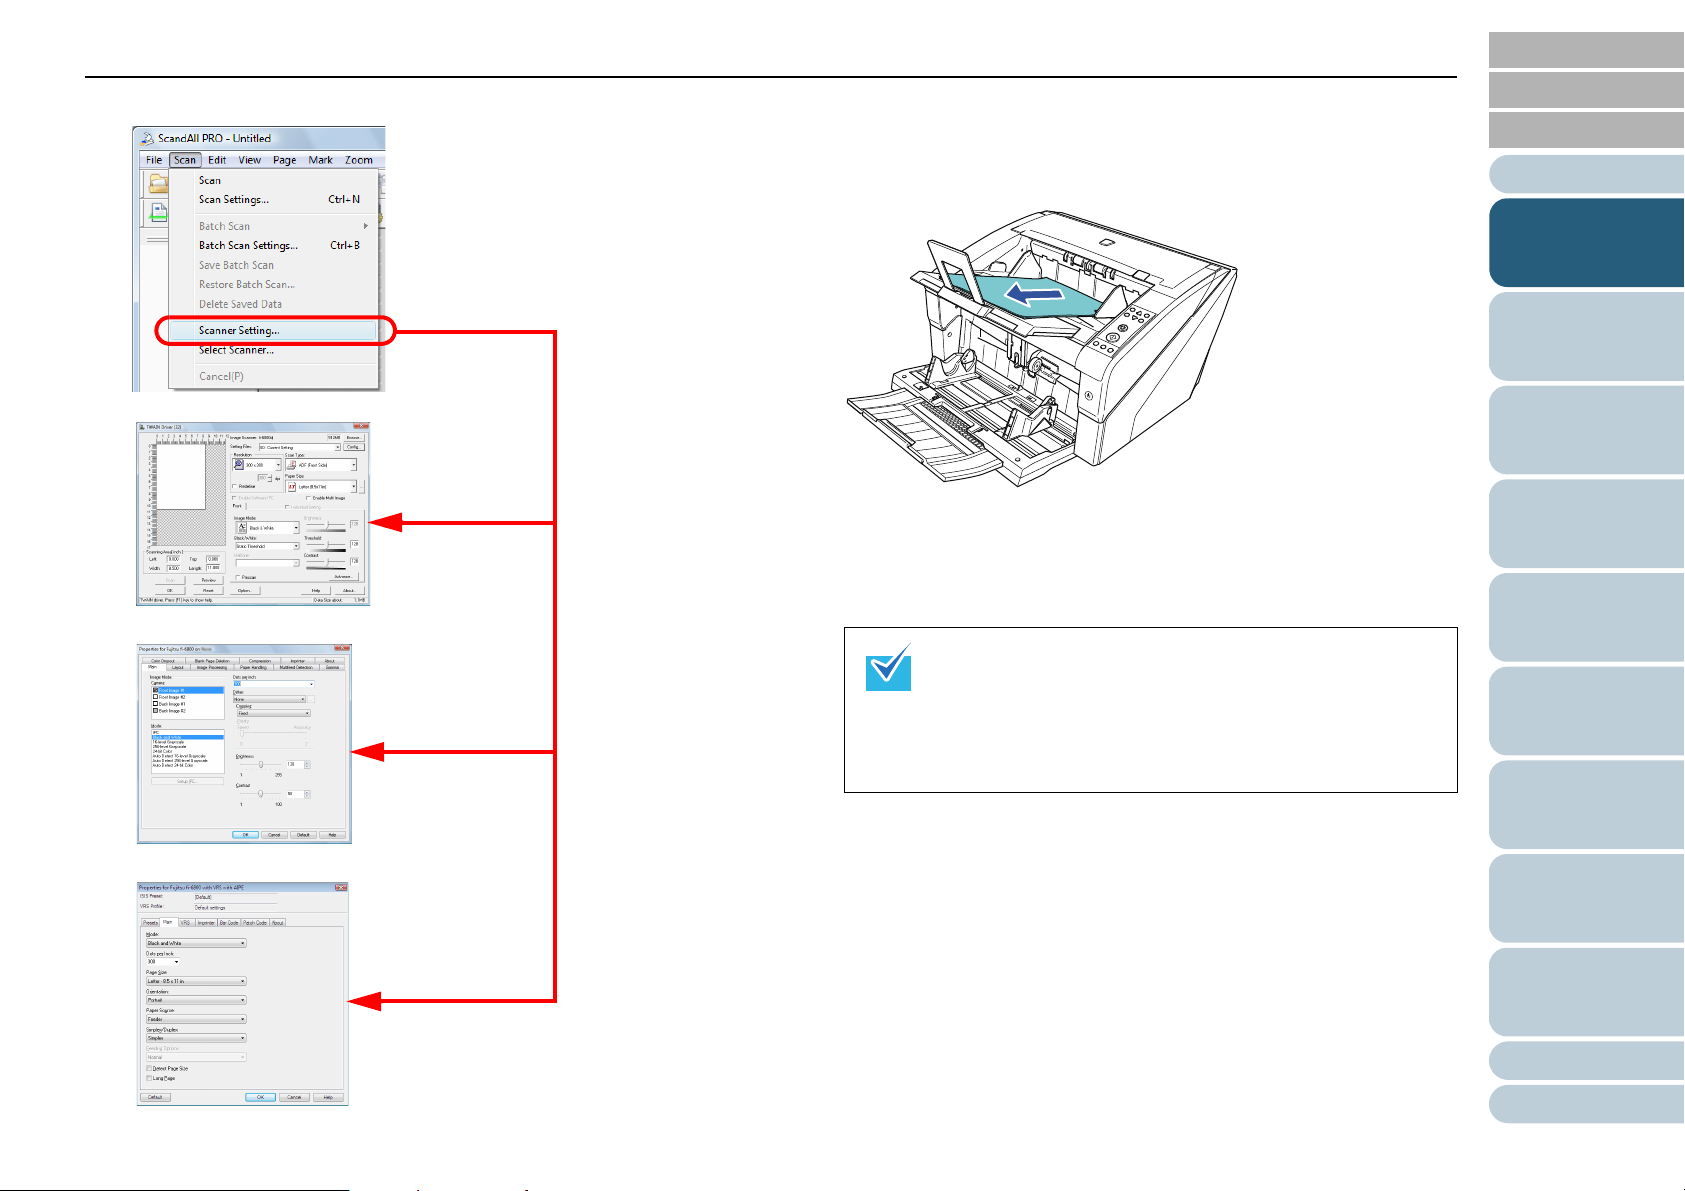
6 Launch a scanner driver from the application. 7 In the scanner driver’s setup dialog box, configure the
scan settings.
TOP
Contents
Index
8 Perform a scan.
For information on how to scan using ScandAll PRO, refer to
"ScandAll PRO V2.0 User's Guide".
9 Save the scanned images in a file.
Procedures and operations slightly vary depending on the
application used.
For details about how to scan using ScandAll PRO, refer
to "ScandAll PRO V2.0 User's Guide".
To perform scanning with other applications, refer to the
manual bundled with the application.
Introduction
Scanner
Overview
How to Load
Documents
Configuring
the Scan
Settings
How to Use
the Operator
Panel
Various Ways
to Scan
Daily Care
Replacing
Consumables
Troubleshooting
Operational
Settings
Appendix
Glossary
30
Page 31

Chapter 1 Scanner Overview
TOP
Contents
1.12 Image Scanning Application
This section explains about the bundled “ScandAll PRO”
image scanning application, which is used as an example to
explain the procedures in this manual.
ScandAll PRO supports both TWAIN and ISIS drivers. By
defining scan settings as profiles, you can customize the
settings according to your preference.
Index
Introduction
Scanner
Overview
How to Load
Documents
Configuring
the Scan
Settings
How to Use
the Operator
Panel
Various Ways
to Scan
Daily Care
Replacing
Consumables
Troubleshooting
Operational
Settings
Appendix
Glossary
31
Page 32

Chapter 1 Scanner Overview
Scanner Central
Admin Server
Scanner Central
Admin Agent
Scanner Central
Admin Agent
Scanner Central
Admin Agent
Scanner Central
Admin Agent
Scanner Scanner Scanner Scanner
Administrator
Upload update modules/
check update status
Alerts for consumable part
replacement and errors
Alerts for consumable part
replacement and errors
Scanner Central
Admin Console
SCAModule
Creator
Update
module
Update
:
:
TOP
Contents
1.13 Centralized Management of Scanners
This section explains about managing a large number of
scanners in a unified manner by providing the following
capabilities.
z Simultaneously update settings for multiple scanners and their
drivers.
Because there is no need to update each scanner one by one, a
significant reduction is achieved in the time required to update a large
number of scanners.
z Monitor scanners to check for any consumable parts that require
replacement, or the occurrence of errors.
The alerts for consumable part replacement and errors are provided
by scanners, which provides an easy way of checking the operating
status of scanners.
To enable the above functions, "Scanner Central Admin" is
required which consists of four applications bundled with this
product:
z Scanner Central Admin Server
Install this application in the main computer that is used for the
centralized management of scanners.
By registering scanners on the Scanner Central Admin Server, you
can build a system to run a unified management for all scanners.
z Scanner Central Admin Console
Install this application in a computer to upload update modules and to
monitor the operating status of the scanners.
The administrators can perform these tasks from the Scanner Central
Admin Console window, where they can also check the alerts for
consumable replacement and errors sent from the scanners.
z Scanner Central Admin Agent
Install this application in a computer connected to a scanner. It allows
scanners to link with the Scanner Central Admin Server.
Linking with the Scanner Central Admin Server will enable you to
apply updates on scanner settings, and the scanner can also send
alerts on consumable replacement and errors.
z SCAModule Creator
Use this application to create update modules to upload onto the
Scanner Central Admin Server.
It is only required for creating update modules.
For more details, refer to the Scanner Central Admin 4.0
User’s Guide.
Index
Introduction
Scanner
Overview
How to Load
Documents
Configuring
the Scan
Settings
How to Use
the Operator
Panel
Various Ways
to Scan
Daily Care
Replacing
Consumables
Troubleshooting
Operational
Settings
Appendix
Glossary
32
Page 33

TOP
Contents
Index
Chapter 2 How to Load Documents
This chapter explains how to load documents on the scanner.
2.1 Loading Documents....................................................................................................................................34
2.2 Documents for Scanning ............................................................................................................................40
Introduction
Scanner
Overview
How to Load
Documents
Configuring
the Scan
Settings
How to Use
the Operator
Panel
Various Ways
to Scan
Daily Care
Replacing
Consumables
Troubleshooting
Operational
Settings
Appendix
Glossary
Page 34

Chapter 2 How to Load Documents
TOP
Contents
2.1 Loading Documents
This section explains how to load documents on the scanner.
Preparation
Prepare the documents as described below.
For details about the paper size and paper quality required for
normal operations, refer to "2.2 Documents for Scanning"
(page 40).
1 Check the documents.
1 Check if the documents to be loaded are of the same size or
different sizes. Ways to load documents differ depending on
whether the documents are the same size or not.
2 Check the number of sheets. Up to 500 sheets can be loaded (with
2
paper weight of 80 g/m
under 50 mm, and the total weight under 5 kg).
For more details, refer to "Loading Capacity" (page 42).
z For documents with tabs or non-rectangular
documents, refer to "Loading Documents with Tabs or
Non-rectangular Documents" (page 43).
z For documents with different widths, refer to "Scanning
a Mixed Batch of Documents" (page 46) and
"Scanning Documents of Different Widths" (page 86).
[20 lb], thickness of the document stack
2 Fan the documents.
1 Hold both ends of the documents and bend them.
2 Firmly holding the documents with both hands, bend them back in
the opposite direction as follows.
3 Repeat steps 1) and 2) a few times.
4 Rotate the documents by 90 degrees and fan them in the same
manner.
5 Align the edges of the documents.
For information on how to fan documents, refer to the
“Error Recovery Guide”.
The Error Recovery Guide is included in the Setup DVDROM. For information on how to install the Error Recovery
Guide, refer to "Installing the Scanner Software" in
“Getting Started”.
Index
Introduction
Scanner
Overview
How to Load
Documents
Configuring
the Scan
Settings
How to Use
the Operator
Panel
Various Ways
to Scan
Daily Care
Replacing
Consumables
Troubleshooting
Operational
Settings
Appendix
Glossary
34
Page 35

Chapter 2 How to Load Documents
Maximum Load Line
Hopper Extension
How to Load Documents
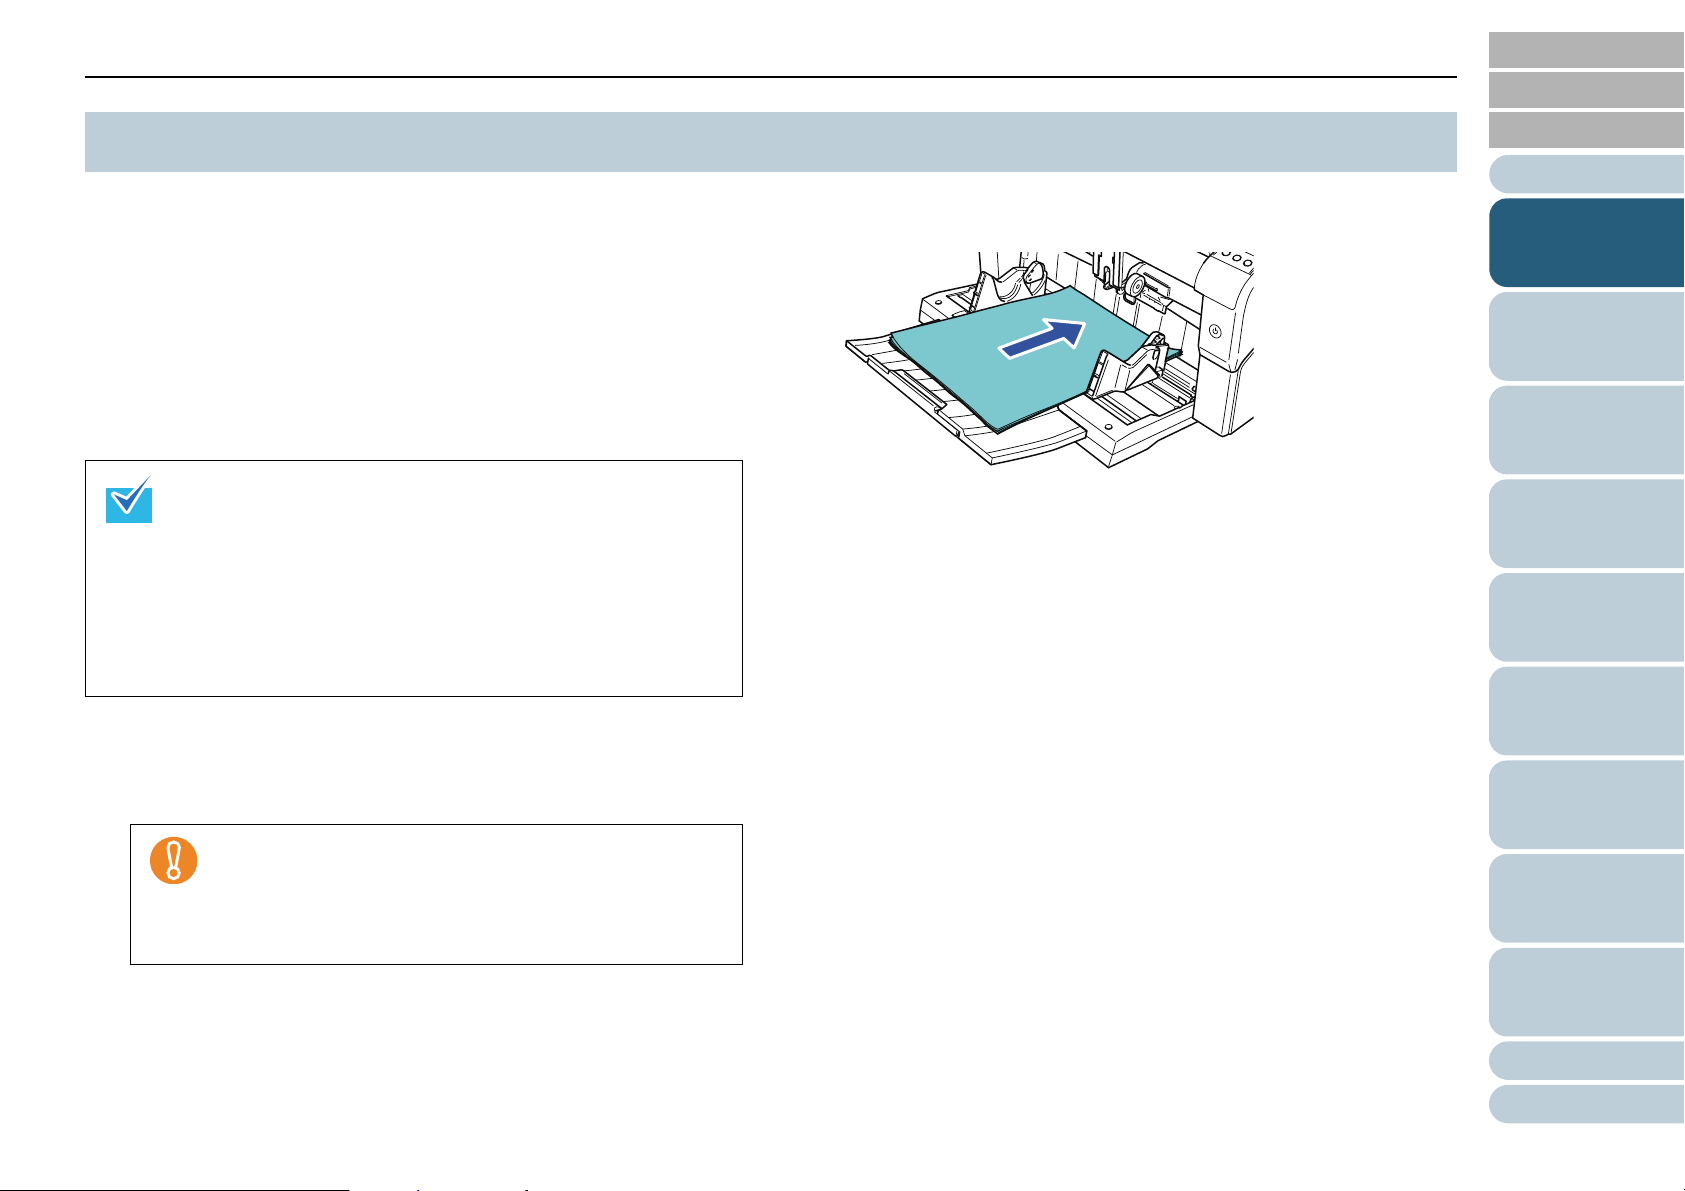
There are two ways to load the documents.
Setting the documents at the center of the hopper
This style is used mainly when the documents are of the same size.
Setting the documents by the left or right side of the
hopper
This style is used mainly when the documents are in different sizes or
when you want to shift the center of the documents.
Note that different conditions apply for multifeed detection when
you set the documents by either left or right side of the hopper.
■Setting the documents at the center of the
hopper
1 Load documents on the hopper.
Set the documents with the front side (scanning side) facing up.
z Make sure to keep the documents within the maximum
load line on the inside of the hopper side guides.
z Pull out the hopper extension according to the length
of the document before placing the documents.
TOP
Contents
Index
Introduction
Scanner
Overview
How to Load
Documents
Configuring
the Scan
Settings
How to Use
the Operator
Panel
Various Ways
to Scan
Daily Care
Replacing
Consumables
Troubleshooting
Operational
Settings
Appendix
Glossary
35
Page 36

Chapter 2 How to Load Documents
Hopper Side
Guide
Side Guide
Clutch
Hopper Hopper Side Guide
Line mark
Line mark
Line mark
Hopper Side Guide
Line mark
Hopper Side Guide
2 Adjust the hopper side guides to the document width.
Move the hopper side guides while pressing the side guide clutch so
that there is no space left between the documents and the hopper
side guides.
Otherwise, the documents may be scanned skewed.
Remove all paper clips and staples. Reduce the amount
of documents if a multifeed or pick error occurs.
Make sure that the hopper side guides do not pass the
line marks embedded on each side of the hopper.
Make sure that the hopper side guides do not pass the
line marks embedded on each side of the hopper.
z Good example
z Bad example
TOP
Contents
Index
Introduction
Scanner
Overview
How to Load
Documents
Configuring
the Scan
Settings
How to Use
the Operator
Panel
Various Ways
to Scan
Daily Care
Replacing
Consumables
Troubleshooting
Operational
Settings
Appendix
Glossary
36
Page 37

Chapter 2 How to Load Documents
Hopper Side Guide
Pick Roller
3 Adjust the stacker extension to the document length, and
pull up the paper stop.
For information on how to set the stacker, refer to "1.8 Stacker
Setting" (page 24).
4 Start up an application for scanning and perform a scan.
For information on how to scan using ScandAll PRO, refer to
"ScandAll PRO V2.0 User's Guide".
■Setting the documents by the left or right side
of the hopper
1 Slide the hopper side guides to their outermost positions.
2 Set the documents so that the smallest document can be
picked by the pick rollers.
Set the documents with the front side (scanning side) facing up.
TOP
Contents
Index
Introduction
Scanner
Overview
How to Load
Documents
Configuring
the Scan
Settings
How to Use
the Operator
Panel
Various Ways
to Scan
Daily Care
Replacing
Consumables
Troubleshooting
Operational
Settings
Appendix
Glossary
37
Page 38

Chapter 2 How to Load Documents
Pick Roller
Pick Roller
Hopper Side Guide
Side Guide Lock
locked
Make sure that all documents are placed underneath the
pick roller, otherwise the document will not be picked.
z Good example
z Bad example
3 Adjust the hopper side guides to the document width.
Move the hopper side guides towards the center as you press the
side guide clutches, and leave no space between the hopper side
guide and the widest document.
4 Lock one of the hopper side guides.
In this case, lock the hopper side guide on the right side by sliding up
the side guide lock.
TOP
Contents
Index
Introduction
Scanner
Overview
How to Load
Documents
Configuring
the Scan
Settings
How to Use
the Operator
Panel
Various Ways
to Scan
Daily Care
Replacing
Consumables
Troubleshooting
Operational
Settings
Appendix
Glossary
38
Page 39

Chapter 2 How to Load Documents
Hopper Side Guide
unlocked
Side Guide
Lock
Side Guide
Clutch
5 Move the other hopper side guide to the target position
while pressing the side guide clutch.
In this case, slide the left hopper side guide as you press the side
guide clutch and leave no space between the hopper side guide and
the document.
7 Start up an application for scanning and scan the
documents.
For information on how to scan using ScandAll PRO, refer to
"ScandAll PRO V2.0 User's Guide".
To unlock the hopper side guide, follow the steps below.
1 Slide down the side guide lock of the hopper side
guide that is locked.
2 Move both hopper side guides towards the center
while pressing the side guide clutches.
TOP
Contents
Index
Introduction
Scanner
Overview
How to Load
Documents
Configuring
the Scan
Settings
How to Use
the Operator
Panel
Various Ways
to Scan
6 Adjust the stacker extension to the document length, and
pull up the paper stop.
For information on how to set the stacker, refer to "1.8 Stacker
Setting" (page 24).
3 Release the side guide clutches.
Both hopper side guides will now move in
conjunction with each other.
Daily Care
Replacing
Consumables
Troubleshooting
Operational
Settings
Appendix
Glossary
39
Page 40

Chapter 2 How to Load Documents
A
B
Feeding
direction
TOP
Contents
2.2 Documents for Scanning
Paper Size
The paper size that can be scanned is specified as follows.
A: 52 to 304.8 mm (2.0 to 12.0 in.)
B: 74 to 431.8 mm (2.9 to 17.0 in.)(*1)
*1: Long Page Scanning supports scanning of documents with a length up
to 3048 mm (120 in.) in feeding direction.
Paper Quality
Paper type
Recommended paper types for scanning are as follows:
z Wood-free paper
z Wood containing paper
When using paper types other than the above, make sure to test with the
same type of paper and see if it can be scanned before you start
scanning the actual document.
Paper weight
Paper weights supported for scanning are as follows:
z A5 or larger, A4 or smaller: 20 to 209.3 g/m
z Smaller than A5, larger than A4: 40.7 to 209.3 g/m
2
(5.5 to 56.1 lb)
2
(11.0 to 56.1 lb)
Index
Introduction
Scanner
Overview
How to Load
Documents
Configuring
the Scan
Settings
How to Use
the Operator
Panel
Various Ways
to Scan
Daily Care
Replacing
Consumables
Troubleshooting
Operational
Settings
Appendix
Glossary
40
Page 41

Chapter 2 How to Load Documents
More than 30 mm
Feeding direction
Less than
3 mm
Less than
5 mm
More than 30 mm
Feeding direction
(0.20 in.)
(0.12 in.)
(1.18 in.)
(1.18 in.)
Leading edgeLeading edge
Scanned side Scanned side
Precautions
The following types of documents may not be scanned successfully:
z Documents of non-uniform thickness (e.g. envelopes, documents with
photographs attached)
z Wrinkled or curled documents
z Folded or torn documents
z Tracing paper
z Coated paper
z Carbon paper
z Photosensitive paper
z Perforated documents
z Documents that are neither square nor rectangular
z Very thin documents
z Photographs (photographic paper)
z To scan a document that is semi-transparent, increase the
brightness level to avoid bleed-through.
z To prevent the rollers from becoming dirty, avoid scanning
documents that contain large areas filled with pencil lead.
If you have to scan such documents, make sure to perform
cleaning frequently.
A message may appear when you scan a lot of documents
written with pencil. For more details, refer to "8.2 Error
Indications on Operator Panel" (page 145).
z If multifeeds, pick errors, or paper jams occur frequently,
refer to "1.9 Adjusting the Paper Separation Force" (page
26) for troubleshooting.
z All documents must be flat on the leading edge. Make sure
that curls on the leading edge of the documents are kept
within the following range:
TOP
Contents
Index
Introduction
Scanner
Overview
How to Load
Documents
Configuring
the Scan
Settings
Also, do not scan the following types of documents:
z Paper-clipped or stapled documents
z Documents on which the ink is still wet
z Documents smaller than A8 size
z Documents wider than 304.8 mm (12.0 in.)
z Documents other than paper such as fabric, metal foil and OHP film.
z Important documents such as certificates and cash vouchers which
must not be damaged
z Since carbonless papers contain chemical substances
which may harm the rollers (e.g. pick roller), be aware of the
following risks:
Cleaning: If paper jams occur frequently, clean
each roller. For information on how to
clean the rollers, refer to "Chapter 6
Daily Care" (page 121).
Parts replacement: The life of each roller may end sooner
compared to scanning wood containing
papers.
z When scanning wood containing papers, the life of each
roller may end sooner compared to scanning wood-free
papers.
z Rollers may be damaged when a photo/sticky note on the
document contacts the rollers during scanning.
z The surface of the document may be damaged when
scanning gloss papers such as photographs.
How to Use
the Operator
Panel
Various Ways
to Scan
Daily Care
Replacing
Consumables
Troubleshooting
Operational
Settings
Appendix
Glossary
41
Page 42

Chapter 2 How to Load Documents
500
80
250
31 209.3
150
100
300
157
50
Hopper's Loading Capacity (Sheets)
Paper weight(g/m )
2
Hopper level low
Hopper level normal
Hopper level high
Loading Capacity
The number of sheets that can be loaded on the hopper is
determined by the paper size and paper weight of the
document. See the following graph:
TOP
Contents
Index
Introduction
Scanner
Overview
How to Load
Documents
Configuring
the Scan
Settings
How to Use
the Operator
Panel
Various Ways
to Scan
Paper weight (unit) Conversion
2
(paper weight)
g/m
lb 8.31114172021242834425456.1
kg 26.7 35 45 55 64.5 69 77.5 90 110 135 174 180
31 40 52 64 75 80 90 104 127 157 203 209
Daily Care
Replacing
Consumables
Troubleshooting
Operational
Settings
Appendix
Glossary
42
Page 43

Chapter 2 How to Load Documents
15
35
Feeding direction
Center of document
(Unit : mm)
Bottom of paper
Leading edge
Reference point
Front side
Feeding direction
Example: Tab Example:
Non-rectangular document
Feeding direction
Example: Tab
Example:
*these parts may get caught
Non-rectangular document
Areas Not to be Perforated
An error may occur when there are punched holes in the area
shaded in light blue in the following picture.
Loading Documents with Tabs or Nonrectangular Documents
To scan a document with tabs or a document that is nonrectangular, place it in a way that does not get caught when it
is being fed through.
Good example:
TOP
Contents
Index
Introduction
Scanner
Overview
How to Load
Documents
Configuring
the Scan
Settings
How to Use
the Operator
Panel
The above condition applies when the document is set to the
center of the pick roller width.
If there are any holes in the 35 mm-wide central column, you
can move the document to the left or right to avoid an error.
Bad example:
z When you perform scanning as shown in the bad example
above, the indicated sections may be caught during feeding.
This may cause a paper jam or tear the document.
z When a tab or the non-rectangular part of the document
does not pass above the feed roller/assist roller, these parts
of the document may remain in the generated image and
turn out elongated.
Various Ways
to Scan
Daily Care
Replacing
Consumables
Troubleshooting
Operational
Settings
Appendix
Glossary
43
Page 44

35
6060
35 35
Feeding direction
Center of document
(Unit : mm)
Bottom of paper
Leading edge
Reference point
Front side
35
Feeding direction
Center of document
(Unit : mm)
Bottom of paper
Leading edge
Front side
Reference point
Chapter 2 How to Load Documents
Conditions for Multifeed Detection
Multifeed is an error when two or more sheets are fed through
the ADF at once. It is also called a “multifeed” when a different
document length is detected.
Multifeed detection is performed by either checking the
overlapping of documents, length of the documents, or the
combination of both. The following conditions are required for
an accurate detection.
Detection by overlapping
z Load documents of the same thickness onto the hopper.
z Paper weight: 20 to 209.3 g/m
/ 0.025 to 0.25 mm (0.001 to 0.010 in.)
z Do not punch holes within 35 mm (1.38 in.) of the vertical lines in the
left, center and right of the document. See Fig.1.
z Do not attach other documents within 35 mm (1.38 in.) of the vertical
lines in the left, center and right of the document. See Fig.1.
Detection by length
z Load documents of the same length onto the hopper.
z Variance in document lengths: 1% or less
z Do not punch holes within 35 mm (1.38 in.) over the vertical center
line of the document. See Fig. 2.
Detection by overlapping and length
z Load documents of the same thickness and the same length onto the
hopper.
z Paper weight: 20 to 209.3 g/m
/ 0.025 to 0.25 mm (0.001 to 0.010 in.)
z Variance in document lengths: 1% or less
z Do not punch holes within 35 mm (1.38 in.) of the vertical lines in the
left, center and right of the document. See Fig.1.
z Do not attach other documents within 35 mm (1.38 in.) of the vertical
lines in the left, center and right of the document. See Fig.1.
The above condition applies when the document is set to the
center of the pick roller width.
2
(5.5 to 56.1 lb)
2
(5.5 to 56.1 lb)
Fig.1
Fig.2
z The rate of multifeed detection may drop with some
documents. Multifeed cannot be detected in the area of
15 mm from the leading edge of the document.
z The areas in Fig.1 can be changed in the Software
Operation Panel. For more details, refer to "9.5 Settings
Related to Multifeed Detection" (page 210).
TOP
Contents
Index
Introduction
Scanner
Overview
How to Load
Documents
Configuring
the Scan
Settings
How to Use
the Operator
Panel
Various Ways
to Scan
Daily Care
Replacing
Consumables
Troubleshooting
Operational
Settings
Appendix
Glossary
44
Page 45

Chapter 2 How to Load Documents
Restricting the Background Color Area
The scanning area from the leading edge to the first 3 mm
should be in white (ground color of the document).
If [White Level Follower] is enabled, the following area (shaded
in light blue) must be the same as the ground color or the color
to be dropped out.
If the document contains text, frames or signatures in this
area, disable [White Level Follower].
Job Separation Sheet
The following is a typical form of a Job Separation Sheet.
Reference point
15
Leading edge
20
TOP
Contents
Index
Introduction
Scanner
Overview
How to Load
Documents
Reference point
Scanned side
Feeding direction
Background (white) or
Dropout color area
3
(Unit: mm)
For details about [White Level Follower], refer to the TWAIN
Scanner Driver Help.
Feeding direction
Bottom edge
Center of document
(Unit : mm)
The document must be wider than A4/Letter size (210 mm/
8.27 in.).
The above condition applies when the document is set to the
center of the pick roller width.
Configuring
the Scan
Settings
How to Use
the Operator
Panel
Various Ways
to Scan
Daily Care
Replacing
Consumables
Troubleshooting
Operational
Settings
Appendix
Glossary
45
Page 46

Chapter 2 How to Load Documents
64mm
Pick Roller
Pick Roller
10 mm or less
Document
Bottom of hopper
Scanning a Mixed Batch of Documents
The following restrictions apply when scanning a mixed batch
of documents with different paper thicknesses/friction
coefficients/sizes. Always test scan a few sheets and see if the
documents can be fed through before scanning a mixed batch
of documents.
For information on how to scan mixed batches, refer to
"Scanning Documents of Different Widths" (page 86).
Paper type
Align the direction of the paper fiber with the feeding direction.
Paper weight
When scanning documents with different paper weight in the same
batch, keep the paper weight within the following range:
z A5 or larger, A4 or smaller: 20 to 209.3 g/m
z Smaller than A5, larger than A4: 40.7 to 209.3 g/m
Friction coefficient
We recommend that you use the same type of paper from the same
manufacturer.
When papers of different manufacturers/brands are mixed, it affects the
feeding performance as the difference in the friction coefficient
increases.
The recommended friction coefficients are as follows:
0.35 to 0.60 (reference value for paper friction coefficient)
Document position
Use paper sizes that fit the 64 mm width of the pick rollers in the center.
2
(5.5 to 56.1 lb)
2
(11.0 to 56.1 lb)
Paper size
When a set of wider documents is placed on top of smaller documents
within the same batch, the wider documents on top may hang down and
affect the feeding performance.
Try to meet the following condition:
z When scanning a mixed batch of documents with different
sizes, it is more likely to skew because the hopper side
guides do not function on every sheet. We recommend
scanning with [Automatic Page Size Detection] enabled.
z Multifeed detection by checking the length cannot be used
together with [Automatic Page Size Detection].
TOP
Contents
Index
Introduction
Scanner
Overview
How to Load
Documents
Configuring
the Scan
Settings
How to Use
the Operator
Panel
Various Ways
to Scan
Daily Care
Replacing
Consumables
Troubleshooting
Operational
Settings
Appendix
Glossary
46
Page 47

Chapter 2 How to Load Documents
Refer to the table below when mixing documents of different sizes.
Maximum size A3DLB4LTRA4B5A5B6A6B7A7B8A8
Width (mm) 297 279 257 216 210 182 149 129 105 91 74.3 64.3 52.5
TOP
Contents
Index
Introduction
A3 297
DL 279
B4 257
LTR 216
A4 210
B5 182
A5 149
Minimum size
B6 129 Available range
A6 105
B7 91
A7 74.3
B8 64.3
A8 52.5
DL: 11 × 17 inches
LTR: Letter size
Scanner
Overview
How to Load
Documents
Configuring
the Scan
Settings
How to Use
the Operator
Panel
Various Ways
to Scan
Daily Care
Replacing
Consumables
A8 size cannot be scanned in a mixed batch.
Troubleshooting
Operational
Settings
Appendix
Glossary
47
Page 48

TOP
Contents
Index
Chapter 3 Configuring the Scan Settings
This chapter explains about the scan parameters of the scanner drivers.
3.1 TWAIN Scanner Driver ...............................................................................................................................49
3.2 ISIS Scanner Driver....................................................................................................................................53
Introduction
Scanner
Overview
How to Load
Documents
Configuring
the Scan
Settings
How to Use
the Operator
Panel
Various Ways
to Scan
Daily Care
Replacing
Consumables
Troubleshooting
Operational
Settings
Appendix
Glossary
Page 49

Chapter 3 Configuring the Scan Settings
TOP
Contents
3.1 TWAIN Scanner Driver
The TWAIN scanner driver is a software driver that conforms
to the TWAIN standard. This driver can be used with an
application that supports TWAIN to perform scanning.
Normally, the scanner driver is launched via an application,
and then the scan settings are configured in the setup dialog
box of the driver (some applications may not display the setup
dialog box).
Ways to launch the scanner driver differ depending on the
application.
For more details, refer to the manual or the Help files of the
application.
Settings for the TWAIN scanner driver are configured in the
above dialog box.
The following are descriptions of the main configuration items.
For more details, refer to the TWAIN Scanner Driver Help.
Index
Introduction
Scanner
Overview
How to Load
Documents
Configuring
the Scan
Settings
How to Use
the Operator
Panel
Various Ways
to Scan
Daily Care
Replacing
Consumables
Troubleshooting
Operational
Settings
Appendix
Glossary
49
Page 50

Chapter 3 Configuring the Scan Settings
[Resolution]
Specify the resolution for scanning.
You can either select a predefined value from the list, or
specify a custom resolution (from 50 to 600 dpi, in increments
of 1 dpi).
By selecting the [Predefine] check box, you can also easily
perform scanning by selecting a predefined resolution from
[Best], [Better], and [Normal].
Values in [Predefine] can be changed by clicking the [...]
button.
[Scan Type]
[Paper Size]
Select a paper size from the displayed list.
Up to three custom sizes can be added to the list by using the
[...] button.
You can also change the order in which the items (sizes) are
listed.
[Image Mode]
Specify the output image type for the scanned images.
Mode Description
Black&White Scanned in binary (black & white) mode.
TOP
Contents
Index
Introduction
Scanner
Overview
How to Load
Documents
Configuring
the Scan
Settings
Specify the side(s) to scan.
Scanning side(s) can be specified as follows:
z ADF Front Side
z ADF Duplex
z Long Page (Front side)
z Long Page (Duplex)
z ADF Back Side
Halftone Scanned through halftone processing in binary
(black & white) mode.
Grayscale Scanned in gradations from black to white.
Select either [Grayscale] (256) or [4bit
Grayscale] (4-bit or 16 grayscale).
SEE (Selectable
Edge
Enhancement)
Color Scanned in color mode. Select a color mode
Line drawings and photographs are scanned
using halftone processing, emphasizing the lines
and text on the document.
This mode is most suitable when you want to
emphasize only the text in a document that
contains both text and photographs.
from [24 Color] (24-bit color), [256 Color] (256
colors), and [8 Color] (8 colors).
[Scan] Button
Click this button to start scanning by the current settings.
How to Use
the Operator
Panel
Various Ways
to Scan
Daily Care
Replacing
Consumables
Troubleshooting
Operational
Settings
Appendix
Glossary
50
Page 51

Chapter 3 Configuring the Scan Settings
[Preview] Button
This button allows you to preview the scanned image.
Perform a test scan by the current settings and display the
result in the Preview window.
[Close] / [OK] Button
TOP
Contents
[Option] Button
Index
Configure the options in the following window.
Introduction
Scanner
Overview
Click this button to save the current settings and close the
window.
[Reset] Button
Click this button to undo the changes made.
[Help] Button
Click this button to display the TWAIN Scanner Driver Help. It
can also be displayed by the [F1] key.
[About] Button
Click this button to display the version information of the
TWAIN Scanner Driver.
z [Rotation] Tab
Configures settings such as the binding direction of double-sided
documents, image rotation, deskew, page size detection, end of page
detection, overscan, hole punch removal and cropping width.
z [Job/Cache] Tab
Configures settings such as caching, batch detection, multifeed
detection, displaying the multifeed image, pre-pick, paper protection,
and blank page skip.
z [Imprinter (Endorser)] Tab
Specifies the print settings for the imprinter which is available
separately.
This tab does not appear if the imprinter is not installed.
How to Load
Documents
Configuring
the Scan
Settings
How to Use
the Operator
Panel
Various Ways
to Scan
Daily Care
Replacing
Consumables
Troubleshooting
Operational
Settings
Appendix
Glossary
51
Page 52

Chapter 3 Configuring the Scan Settings
z [General] Tab
Specifies the units to display in the [TWAIN Driver (32)] dialog box.
Select from inch, mm, and pixel.
z [Startup] Tab
Configures the settings of the operator panel on the scanner.
z [Filter] Tab
Selects the filter for image processing.
TOP
Contents
Index
Introduction
Scanner
Overview
Item Description
Digital Endorser Adds alphanumeric character strings on the
scanned image data.
Page Edge Filler Fills in the margins of the scanned image in
a specified color.
z [Compression] Tab
Specifies the compression rate for JPEG transfer.
[Advance] button
Click this button to configure detailed settings related to image
processing.
Items such as Gamma Pattern, White Level Follower, Dropout
Color, Reverse, and Edge Extract can be configured.
[Config] button
Click this button to manage the setting files.
By saving the settings configured in the [TWAIN Driver (32)]
dialog box onto a file under [Setting File], you can change the
scan settings easily.
How to Load
Documents
Configuring
the Scan
Settings
How to Use
the Operator
Panel
Various Ways
to Scan
Daily Care
Replacing
Consumables
Troubleshooting
Operational
Settings
Appendix
Glossary
52
Page 53

Chapter 3 Configuring the Scan Settings
TOP
Contents
3.2 ISIS Scanner Driver
The ISIS scanner driver is a software driver which conforms to
the ISIS standard. This driver can be used with an application
that supports ISIS to perform scanning.
Normally, the scanner driver is launched via an application,
and then the scan settings are configured in the setup dialog
box of the driver (some applications may not display the setup
dialog box).
Ways to launch the scanner driver differ depending on the
application.
For more details, refer to the manual or the Help files of the
application.
Index
Introduction
Scanner
Overview
How to Load
Documents
Configuring
the Scan
Settings
How to Use
the Operator
Panel
Various Ways
to Scan
Daily Care
Settings for the ISIS scanner driver are configured in the
above dialog box.
For more details, refer to the ISIS Scanner Driver Help.
Replacing
Consumables
Troubleshooting
Operational
Settings
Appendix
Glossary
53
Page 54

Chapter 3 Configuring the Scan Settings
[Main] Tab
TOP
Contents
[Layout] Tab
Index
Introduction
Scanner
Overview
How to Load
Documents
Configuring
the Scan
Settings
How to Use
the Operator
Panel
Various Ways
to Scan
Settings such as the scanning side(s), color (color/grayscale/
black & white), resolution, brightness and contrast can be
configured.
Settings such as the page orientation of the document to
scan, the binding direction for duplex scanning, feeding
direction and paper size can be configured.
Clicking the [Scan Area] button displays the [Scan Area] dialog
box.
For [Image Orientation], [Automatic] is available only when
ScandAll PRO is installed.
Daily Care
Replacing
Consumables
Troubleshooting
Operational
Settings
Appendix
Glossary
54
Page 55

Chapter 3 Configuring the Scan Settings
[Scan Area] Dialog Box
You can select the scan area for the specified paper size.
TOP
Contents
[Image Processing] Tab
Index
Introduction
Scanner
Overview
How to Load
Documents
Configuring
the Scan
Settings
How to Use
the Operator
Panel
Various Ways
to Scan
You can select a configuration pattern that is used frequently
for scanning.
Also, you can configure settings for scanning documents with
non-white background, or with punched holes.
Daily Care
Replacing
Consumables
Troubleshooting
Operational
Settings
Appendix
Glossary
55
Page 56

Chapter 3 Configuring the Scan Settings
[Paper Handling] Tab
TOP
Contents
[Multifeed Detection] Tab
Index
Introduction
Scanner
Overview
How to Load
Documents
Configuring
the Scan
Settings
How to Use
the Operator
Panel
Various Ways
to Scan
You can configure settings such as prescan, pre-pick
(i.e. feeding the document to the starting position before
scanning), and paper protection.
You can configure the setting for multifeed detection.
Daily Care
Replacing
Consumables
Troubleshooting
Operational
Settings
Appendix
Glossary
56
Page 57

Chapter 3 Configuring the Scan Settings
[Gamma] Tab
TOP
Contents
[Color Dropout] Tab
Index
Introduction
Scanner
Overview
How to Load
Documents
Configuring
the Scan
Settings
How to Use
the Operator
Panel
Various Ways
to Scan
You can specify the gamma correction pattern. You can
customize detail settings such as the gamma value and
brightness.
You can select a color to drop out from the image.
Daily Care
Replacing
Consumables
Troubleshooting
Operational
Settings
Appendix
Glossary
57
Page 58

Chapter 3 Configuring the Scan Settings
[Blank Page Deletion] Tab
TOP
Contents
[Compression] Tab
Index
Introduction
Scanner
Overview
How to Load
Documents
Configuring
the Scan
Settings
How to Use
the Operator
Panel
Various Ways
to Scan
You can configure the setting for deleting blank pages.
When scanning in black & white, you can use the dot rate to
process the blank page(s) for the white and black
backgrounds separately.
When scanning in grayscale/color, you can use the sensitivity
to process the blank page(s) for the white and black
backgrounds together.
You can specify a compression rate and the image quality for
scanning in color/grayscale.
You can also configure a sample ratio used for compression.
Daily Care
Replacing
Consumables
Troubleshooting
Operational
Settings
Appendix
Glossary
58
Page 59

Chapter 3 Configuring the Scan Settings
[Imprinter] Tab
TOP
Contents
[About] Tab
Index
Introduction
Scanner
Overview
How to Load
Documents
Configuring
the Scan
Settings
How to Use
the Operator
Panel
Various Ways
to Scan
You can specify the print settings for the imprinter option which
is available separately. This tab does not appear if the
imprinter is not installed.
Select this tab to view the version information on the ISIS
scanner driver and the information on the scanner that is
connected to the computer.
Daily Care
Replacing
Consumables
Troubleshooting
Operational
Settings
Appendix
Glossary
59
Page 60

TOP
Contents
Index
Chapter 4 How to Use the Operator Panel
This chapter explains how to use the operator panel.
4.1 Operator Panel ...........................................................................................................................................61
4.2 Main Menu..................................................................................................................................................65
4.3 Function Selection ......................................................................................................................................81
Introduction
Scanner
Overview
How to Load
Documents
Configuring
the Scan
Settings
How to Use
the Operator
Panel
Various Ways
to Scan
Daily Care
Replacing
Consumables
Troubleshooting
Operational
Settings
Appendix
Glossary
Page 61

Chapter 4 How to Use the Operator Panel
Function
/Enter
Check
Menu
Scan
Stop
Eject
Counter
Reset
iMFF
Send to
/Pause
Clear
/Back
Check LED
Lights in orange when an error occurs.
Flashes when consumables reach the end of
the life cycle.
LCD
Indicates the status of the scanner.
[Function/Enter] Button
Confirms the selected item.
Switches the number (No.01 to No.50 / No.C)
for the application launched by pressing the
[Send to/Pause] button.
[Send to/Pause] Button (*1)
Launches the linked application software.
Pauses the scan.
[Scan] Button (*1)
Launches the linked application software.
Resumes the scan.
Power Button
Turns the power ON/OFF.
Lights in blue when the scanner is
turned on.
[Stop] Button
Stops the scan immediately.
[Menu] Button
Configures various types of scanning
operations.
[] / [] Button
Switches the selected item.
Changes the paper separation force.
[Clear/Back] Button
Cancels the selected item and returns to the
previous screen.
Clears the displayed error indication.
[iMFF] Button
Changes the settings for Intelligent Multifeed function when
pressed down (for more than two seconds). Determines
whether or not to memorize the pattern if pressed when a
multifeed occurs.
[Counter Reset] Button
Resets the page counter.
Stops the scan when pressed while scanning
in Manual Feed mode.
[Eject] Button
Ejects the document when a multifeed occurs.
*1: For information on how to scan by using the [Scan] button or [Send to/Pause] button, refer to the TWAIN Scanner Driver Help provided in the Setup
DVD-RO M or "Using a Button on the Scanner to Start Scanning" (page 113).
TOP
Contents
4.1 Operator Panel
The operator panel consists of an LCD, buttons and LED.
Names and Functions of the Operator Panel
Index
Introduction
Scanner
Overview
How to Load
Documents
Configuring
the Scan
Settings
How to Use
the Operator
Panel
Various Ways
to Scan
Daily Care
Replacing
Consumables
Troubleshooting
Operational
Settings
Appendix
Glossary
61
Page 62

Chapter 4 How to Use the Operator Panel
Function
/Enter
Check
Menu
Scan
Stop
Eject
Counter
Reset
iMFF
Send to
/Pause
Clear
/Back
[Menu] button
“1” in braille
[Function/Enter] button
“2” in braille
[Send to/Pause] button
“3” in braille
[Clear/Back] button
“4” in braille
[iMFF] button
“5” in braille
[Eject] button
“7” in braille
[Counter Reset]
button
“6” in braille
Title
Counter
Indicator
Title
Items
Title
Items
Do not use the operator panel while the Software Operation
Panel is running.
Indications on LCD
Display Description
TOP
Contents
Index
Introduction
z Buttons on the operator panel are also braille buttons,
allowing users to understand the button’s function by
touching the button.
z Apart from English, the operator panel can also display
French, German, Italian, Spanish, Russian and Chinese
(Simplified). You can open the clear cover and replace the
overlay (a sheet on which another language is written).
Processing initialization.
Ready to start scanning.
Indicates that the initialization
was successfully completed.
For more details about the
indicators, refer to "About the
Indicators" (page 64).
An item from the menu can be
selected.
When you press the [Menu]
button in the [Ready] screen, the
[Main Menu] screen is displayed.
Main Menu is used to configure
various operational settings upon
scanning.
For details about the Main Menu
screen, refer to "4.2 Main Menu"
(page 65).
When you press the [Function/
Enter] button in the [Ready]
screen, the [Function Selection]
screen is displayed.
By using this, you can configure
an application to launch when
the [Send to/Pause] button is
pressed.
For details about the Function
Selection screen, refer to "4.3
Function Selection" (page 81).
Scanner
Overview
How to Load
Documents
Configuring
the Scan
Settings
How to Use
the Operator
Panel
Various Ways
to Scan
Daily Care
Replacing
Consumables
Troubleshooting
Operational
Settings
Appendix
Glossary
62
Page 63

Chapter 4 How to Use the Operator Panel
Error code
Error
Message
Error code
Error
Message
Display Description
Indicates that a recoverable error
occurred during scanning.
Error codes beginning with the
letter "J" or "U" are displayed.
For more details about the
errors, refer to "Temporary
Errors" (page 146).
You can clear the error display by
pressing the [Clear/Back] or the
[Stop] button.
Note that if the error is “Paper
jam”, the message disappears
after a certain amount of time
elapses with no documents
([Ready] status) in the scanner.
Indicates that a device error
occurred during initialization or
scanning.
Error codes beginning with the
letter "E", "F", "C", "H", "A" or "L"
are displayed.
For more details about the
errors, refer to "Device Errors"
(page 149).
When this indication of a device
error is displayed, turn the power
off then back on from the main
power switch.
If the indication continues to
appear after turning the power
back on, contact your FUJITSU
scanner dealer or an authorized
FUJITSU scanner service
provider.
Display Description
When the scanner has not been
in operation for the set sleep
interval, it enters power saving
mode.
Press any button on the operator
panel to return to the previous
screen.
TOP
Contents
Index
Introduction
Scanner
Overview
How to Load
Documents
Configuring
the Scan
Settings
How to Use
the Operator
Panel
Various Ways
to Scan
Daily Care
Replacing
Consumables
Troubleshooting
Operational
Settings
Appendix
Glossary
63
Page 64

Chapter 4 How to Use the Operator Panel
Paper Separation Force
Displays the paper separation
force as follows:
For information on how to
adjust the paper separation
force, refer to "1.9 Adjusting
the Paper Separation Force"
(page 26).
Icon Low High
iMFF Setting
Displays the iMFF setting as follows:
The icon switches when the [iMFF]
button is pressed down for more than
two seconds. In Manual mode,
is displayed at all times.
In Auto mode 1 and Auto mode 2, it
displays the number of multifeed
patterns memorized (max. of 8
patterns). For information on how to
configure the iMFF setting, refer to "4.2
Main Menu" (page 65).
Icon Mode
Manual mode
Auto mode 1
Auto mode 2
Multifeed Pattern Memory
appears when memorizing a multifeed pattern.
For information on how to memorize multifeed patterns, refer to
"Bypassing Multifeed Detection for a Fixed Format" (page 117).
[Send to/Pause] Button Configuration Number
Displays the number assigned to the application that is launched when
the [Send to/Pause] button is pressed. For information on how to
configure the [Send to/Pause] button, refer to "4.3 Function Selection"
(page 81).
MF Quick Change Setting
Displays whether or not to detect multifeed as follows:
The icon switches when the [Eject] button is pressed. Normally, one of
the above icons for “Normal” appears when [Enable(Detect)] or
[Enable(Ignore)] is specified. For information on how to configure the
MF Quick Change setting, refer to "4.2 Main Menu" (page 65). In Doc
Counting mode, one of the above icons for “Doc Counting Mode”
appears regardless of the MF Quick Change setting.
Icon Detection
method
Normal
Doc Counting Mode
Enable (Detect)
Enable (Ignore)
Information
appears when a message for replacing consumables/cleaning/
replacing maintenance parts/regular maintenance is displayed.
For instructions on when is displayed, refer to "4.2 Main Menu"
(page 65).
Prioritize Panel Settings
appears when the operator panel settings are prioritized.
For information on how to prioritize the operator panel settings, refer to
"4.2 Main Menu" (page 65).
About the Indicators
TOP
Contents
Index
Introduction
Scanner
Overview
How to Load
Documents
Configuring
the Scan
Settings
How to Use
the Operator
Panel
Various Ways
to Scan
Daily Care
Replacing
Consumables
Troubleshooting
Operational
Settings
Appendix
Glossary
64
Page 65

Chapter 4 How to Use the Operator Panel
TOP
Contents
4.2 Main Menu
This section explains about the Main Menu.
When you press the [Menu] button in the [Ready] screen, the
[Main Menu] screen is displayed.
The Main Menu can be used to configure various operational
settings upon scanning.
How to Use Main Menu
This section explains how to use the Main Menu of the
operator panel by the following categories.
Operation Description Setting Item
Operational
Settings
You can configure
various settings for
operating the scanner
and using the
operator panel.
For more details
about settings, refer to
"Operational settings"
(page 67).
1: iMFF settings
2: No. of Paper Feed Retries
3: Pick Speed
4: Soft Pick Setting
5: Manual Feed Timeout
6: Paper Protection
7: MF Quick Change
8: Alarm Volume
9: Stacker Positioning
10: Hopper Level
11: Paper Separation Force
12: Alarm Sound Time
13: Button Sound Vol
14: Contrast
15: Backlight ON
16: LED Blink Cycle
17: Horizontal Scroll Speed
18: Operation Panel Timeout
19: Language
20: Prioritize Panel Settings
24: Ope. Panel Initialization
Index
Introduction
Scanner
Overview
How to Load
Documents
Configuring
the Scan
Settings
How to Use
the Operator
Panel
Various Ways
to Scan
Daily Care
Replacing
Consumables
Troubleshooting
Cleaning the
scanner
You can clean the
scanner by using
materials such as the
Cleaning Sheet.
For more details, refer
to "Chapter 6 Daily
Care" (page 121).
21: Cleaning
Operational
Settings
Appendix
Glossary
65
Page 66

Chapter 4 How to Use the Operator Panel
Operation Description Setting Item
Tes t p r in t f o r
Imprinter
Checking and
resetting the
consumables/
cleaning
counter
You can run a test
print when the
imprinter is installed.
For more details, refer
to the “fi-680PRF/
PRB Imprinter
Operator's Guide”.
You can check the
replacement cycle of
the consumables and
the total page count
on the maintenance
parts.
Also use it to reset the
counter when you
have replaced the
consumables or
performed cleaning.
For more details, refer
to "Checking and
resetting counters"
(page 68).
22: Print Test
23: Show/Clear Counters
Operation Description Setting Item
Checking the
information
appears when a
message for replacing
consumables/
cleaning/replacing
maintenance parts/
regular maintenance
is displayed.
Read the message
and take measures
accordingly.
For more details
about settings, refer to
"Checking the
information" (page
72).
Information
TOP
Contents
Index
Introduction
Scanner
Overview
How to Load
Documents
Configuring
the Scan
Settings
How to Use
the Operator
Panel
Various Ways
to Scan
Daily Care
Checking the
number of
sheets
scanned
Compare the number
of sheets scanned in
Doc Counting Mode
and Doc Count Check
Mode.
For more details, refer
to "Checking the
number of sheets
scanned" (page 70).
25: Doc Counting Mode
Replacing
Consumables
Troubleshooting
Operational
Settings
Appendix
Glossary
66
Page 67

Chapter 4 How to Use the Operator Panel
cPower Button
e[] / [] Button
[Function/Enter] Button
d [Menu] Button
f[] / [] Button
[Function/Enter] Button
■Operational settings
1 Press the power button on the front of the scanner.
[Ready] is displayed on the LCD.
TOP
Contents
Index
Menu
Send to
/Pause
iMFF
Check
Stop
Scan
Counter
Reset
Function
/Enter
Clear
/Back
Eject
2 Press the [Menu] button.
[Main Menu] is displayed on the LCD.
3 Press the [] or [] button and select a setting item, then
press the [Function/Enter] button to confirm.
For more details about the setting items, refer to "Items Configurable
in the Main Menu" (page 74).
The selected item is displayed on the LCD.
4 Press the [] or [] button and select a parameter, then
press the [Function/Enter] button to confirm.
For more details about the setting parameters, refer to "Items
Configurable in the Main Menu" (page 74).
If [Main Menu] is displayed on the LCD, it indicates that the setup
has been completed.
If the LCD displays a setting item, repeat step 4 until it shows the
[Main Menu] screen.
Introduction
Scanner
Overview
How to Load
Documents
Configuring
the Scan
Settings
How to Use
the Operator
Panel
Various Ways
to Scan
Daily Care
Replacing
Consumables
Troubleshooting
Operational
Settings
Appendix
Glossary
67
Page 68

Chapter 4 How to Use the Operator Panel
cPower Button
d [Menu] Button
e[] / [] Button
[Function/Enter] Button
f[] / [] Button
g[] / [] Button
[Counter Reset] Button
h[] / [] Button
[Function/Enter] Button
■Checking and resetting counters
1 Press the power button on the front of the scanner.
[Ready] is displayed on the LCD.
TOP
Contents
Index
Menu
Send to
/Pause
iMFF
Check
Stop
Scan
Counter
Reset
Function
/Enter
Clear
/Back
Eject
2 Press the [Menu] button.
[Main Menu] is displayed on the LCD.
3 Press the [] or [] button and select [23: Show/Clear
Counters], then press the [Function/Enter] button to
confirm.
[Show/Clear Counters] is displayed on the LCD.
4 Press the [] or [] button and check the counter.
Counters are highlighted when consumable replacement,
maintenance part replacement, or cleaning is required.
The counter will appear highlighted when:
z The page count after replacing the consumable reaches 95% of the
value configured in "Specifying the Cycle to Replace Consumables
[Life Counter Alarm Setting]" (page 188) in the Software Operation
Panel. (For brake roller/pick roller/separator roller counters)
z The scanner determines that the condition of the roller has
exceeded the threshold that can be corrected, by monitoring the
wear on the roller. (For assist roller counter)
z The page count after cleaning reaches 100% of the value
configured in "Specifying the Cycle to Clean the Scanner [Cleaning
Cycle]" (page 187) in the Software Operation Panel. (Cleaning
counter)
z The amount of remaining ink reaches below 33%. This is only
displayed when the imprinter is installed. (For [Ink Level: Front] /
[Ink Level: Back])
Introduction
Scanner
Overview
How to Load
Documents
Configuring
the Scan
Settings
How to Use
the Operator
Panel
Various Ways
to Scan
Daily Care
Replacing
Consumables
Troubleshooting
Operational
Settings
Appendix
Glossary
68
Page 69

Chapter 4 How to Use the Operator Panel
5 After replacing the consumables or cleaning, select the
highlighted counter with the [] or [] button, and press
the [Counter Reset] button.
A message appears to confirm that you want to clear the counter.
TOP
Contents
Index
Introduction
The assist roller counter cannot be cleared. It requires a
service engineer to clear the counter.
For more information, contact your FUJITSU scanner
dealer or an authorized FUJITSU scanner service
provider.
6 Select [1: Yes] by the [] or [] button, and press the
[Function/Enter] button to confirm.
The counter value will be reset to 0.
For ink level, the value will be set to 100.
Scanner
Overview
How to Load
Documents
Configuring
the Scan
Settings
How to Use
the Operator
Panel
Various Ways
to Scan
Daily Care
Replacing
Consumables
Troubleshooting
Operational
Settings
Appendix
Glossary
69
Page 70

Chapter 4 How to Use the Operator Panel
cPower Button
d [Menu] Button
e[] / [] Button
[Function/Enter] Button
f[Scan] Button
hScan
g[Function/Enter] Button
See Step 6
■Checking the number of sheets scanned
1 Press the power button on the front of the scanner.
[Ready] is displayed on the LCD.
TOP
Contents
Index
Menu
Send to
/Pause
iMFF
Check
Stop
Scan
Counter
Reset
Function
/Enter
Clear
/Back
Eject
2 Press the [Menu] button.
[Main Menu] is displayed on the LCD.
3 Press the [] or [] button and select [25: Doc Counting
Mode], then press the [Function/Enter] button to confirm.
[Doc Counting Mode (More documents)] is displayed on the LCD.
4 Load the documents on the hopper and press the [Scan]
button.
100 sheets will be loaded as an example here.
Scanning starts and [Count] will display "100".
Documents may not be counted correctly if a multifeed
occurs during scanning.
You can switch whether to enable multifeed detection by
pressing the [Eject] button. For more details, refer to
" About the Indicators" (page 64).
5 Press the [Function/Enter] button to confirm.
[Doc Count Check Mode] is displayed on the LCD.
Introduction
Scanner
Overview
How to Load
Documents
Configuring
the Scan
Settings
How to Use
the Operator
Panel
Various Ways
to Scan
Daily Care
Replacing
Consumables
Troubleshooting
Operational
Settings
Appendix
Glossary
70
Page 71

Chapter 4 How to Use the Operator Panel
6 Load the documents on the hopper, start up a scanning
application, and perform a scan.
For information about the scanning procedure in ScandAll PRO, refer
to "ScandAll PRO V2.0 User's Guide".
Depending on the number of sheets scanned, it will be displayed
as follows:
Sheets Display Description
z When you press the [Counter Reset] button, the
screen returns to [Doc Count Check Mode] in step 5.
z When you press the [Stop] button, it exits [Doc Count
Check Mode] and returns to the [Ready] screen.
TOP
Contents
Index
Introduction
Scanner
Overview
75
sheets
100
sheets
110
sheets
Since the count has been set to
100 in step 4, it is -25 sheets.
[-] appears in the top right and
[Count] indicates “25”.
If you load additional documents
at this point, you can scan up to
25 sheets.
Since the count has been set to
100 in step 4, it is +/- 0.
[=] appears in the top right and
[Count] indicates “0”.
Since the count has been set to
100 in step 4, it is +10 sheets.
[+] appears in the top right and
[Count] indicates “0”. Scanning
stops once 100 sheets have been
scanned.
z Documents may not be counted correctly if a multifeed
occurs during scanning.
z In the following cases, the scanning returns to normal
from Doc Count Check mode:
- When you only scan the specified pages (selecting
[Scan the specified number of pages] in [Scan
Settings] of ScandAll PRO)
- When you scan using a Job Separator
How to Load
Documents
Configuring
the Scan
Settings
How to Use
the Operator
Panel
Various Ways
to Scan
Daily Care
Replacing
Consumables
Troubleshooting
Operational
Settings
Appendix
Glossary
71
Page 72

Chapter 4 How to Use the Operator Panel
cPower Button
d [Menu] Button
e[] / [] Button
[Function/Enter] Button
f[] / [] Button
■Checking the information
1 Press the power button on the front of the scanner.
[Ready] is displayed on the LCD.
TOP
Contents
Index
Menu
Send to
/Pause
iMFF
Check
Stop
Scan
Counter
Reset
Function
/Enter
Clear
/Back
Eject
2 Press the [Menu] button.
[Main Menu] is displayed on the LCD.
3 Press the [] or [] button and select [Information], then
press the [Function/Enter] button to confirm.
[Information] is displayed on the LCD.
[Information] can be selected only when there is a
message for replacing consumables/cleaning/replacing
maintenance parts/regular maintenance.
4 Press the [] or [] button to check the contents of the
information.
You can check the messages for replacing consumables/cleaning/
replacing maintenance parts/regular maintenance.
When the message prompts replacing consumables/maintenance
parts or cleaning, the corresponding counter that requires
consumable replacement/maintenance part replacement/cleaning is
highlighted.
Counters will appear highlighted when:
z The page count after replacing the consumable reaches 95% of the
value configured in "Specifying the Cycle to Replace Consumables
[Life Counter Alarm Setting]" (page 188) in the Software Operation
Panel. (For brake roller/pick roller/separator roller counters)
z The scanner determines that the condition of the roller has
exceeded the threshold that can be corrected, by monitoring the
wear on the roller. (For assist roller counter)
z The page count after cleaning reaches 100% of the value
configured in "Specifying the Cycle to Clean the Scanner [Cleaning
Cycle]" (page 187) in the Software Operation Panel. (Cleaning
counter)
z The amount of remaining ink reaches below 33%. This is only
displayed when the imprinter is installed. (For [Ink Level: Front] /
[Ink Level: Back]
Introduction
Scanner
Overview
How to Load
Documents
Configuring
the Scan
Settings
How to Use
the Operator
Panel
Various Ways
to Scan
Daily Care
Replacing
Consumables
Troubleshooting
Operational
Settings
Appendix
Glossary
72
Page 73

Chapter 4 How to Use the Operator Panel
5 Take measures according to the contents of [Information].
Follow the instructions in the message if it prompts consumable
replacement/cleaning/maintenance part replacement.
For information on how to replace consumables, refer to the following:
z Pick Roller "7.2 Replacing the Pick Roller" (page 135)
z Separator Roller "7.3 Replacing the Separator Roller" (page 137)
z Brake Roller "7.4 Replacing the Brake Roller" (page 140)
For details about cleaning, refer to "Chapter 6 Daily Care" (page 121).
Maintenance parts (assist roller) require a service engineer to
perform replacement. For more information, contact your FUJITSU
scanner dealer or an authorized FUJITSU scanner service provider.
If the message prompts regular maintenance, please have the
scanner checked by a service engineer for regular maintenance/
inspection. For more information, contact your FUJITSU scanner
dealer or an authorized FUJITSU scanner service provider.
TOP
Contents
Index
Introduction
Scanner
Overview
How to Load
Documents
Configuring
the Scan
Settings
How to Use
the Operator
Panel
Various Ways
to Scan
Daily Care
Replacing
Consumables
Troubleshooting
Operational
Settings
Appendix
Glossary
73
Page 74

Chapter 4 How to Use the Operator Panel
Items Configurable in the Main Menu
TOP
Contents
Index
Item Description Setting/Value Factory Default
1: iMFF Setting When there is paper of the same size attached to a designated
location on the page, you can have the scanner memorize the
location of the attachment and not detect the same pattern as
multifeed.
Note that you need to specify [Detect by overlap (Ultrasonic)] in
either the scanner driver’s setup dialog box or the multifeed
detection setting in "Specifying a multifeed detection method
[Multifeed]" (page 210) beforehand.
By selecting [4: Clear pattern], you can clear the overlapping
patterns (length, location) that were previously memorized in Auto
mode. It can also be configured from the Software Operation
Panel.
2: No. of Paper
Feed Retries
3: Pick Speed When you experience frequent multifeeds and paper jams, the
Used to change the number of paper feeding retries (when the
document is not picked properly).
It can also be configured from the Software Operation Panel.
symptom may be improved by slowing down the speed in which
documents are picked (fed).
It can also be configured from the Software Operation Panel.
- : No settings/values
1: Manual mode
2: Auto mode 1
3: Auto mode 2
4: Clear pattern
1 to 12 (times) 3
1: Normal
2: Slow
1: Manual mode
1: Normal
Introduction
Scanner
Overview
How to Load
Documents
Configuring
the Scan
Settings
How to Use
the Operator
Panel
Various Ways
to Scan
Daily Care
4: Soft Pick
Setting
When you experience pick errors from the separator roller slipping
on the paper, or paper jams from scanning thin papers of small
widths, the symptom may be improved by bringing down the pick
roller unit and keeping the unit at the lower position (disabling the
Soft Pick Setting).
It can also be configured from the Software Operation Panel.
1: Disable
2: Enable
2: Enable
Replacing
Consumables
Troubleshooting
Operational
Settings
Appendix
Glossary
74
Page 75

Chapter 4 How to Use the Operator Panel
Item Description Setting/Value Factory Default
5: Manual Feed
Timeout
6: Paper
Protection
Specify the waiting time to clear Manual Feed mode.
It can also be configured from the Software Operation Panel.
Select whether to enable or disable Paper Protection.
Enabling this setting reduces the risk of having the documents
damaged upon feeding errors, by stopping the scan when the
scanner detects a document that is unusually warped.
You can specify the level of sensitivity to detect an abnormal
feeding of documents when Paper Protection is enabled.
Documents are deformed (e.g. warped, bent, creased) when they
are not being fed by the rollers properly. To detect such a symptom
and stop the scan, select [1: Low] to only detect documents that
are highly deformed, and [3: High] to also detect documents that
are slightly deformed.
Paper Protection is disabled in Manual Feed mode.
Enable/Disable can also be configured from the scanner driver’s
setup dialog box or the Software Operation Panel. In this case,
priority is given to the scanner driver setting unless you have
prioritized the operator panel setting.
Sensitivity can also be configured from the Software Operation
Panel. Priority is given to the scanner driver setting unless you
have prioritized the operator panel setting.
- : No settings/values
SCSI or USB Connector 1:
5, 10, 20, 30, 40, 50, 60, 70, 80, 90, 100,
110, 120, 180, 240, 300, 360, 420, 480,
540, 600, 900, 1200, 1500, 1800, 1999
(seconds)
SCSI or USB Connector 2:
5, 10, 20, 30 (seconds)
1: Enable
2: Disable
Sensitivity:
1: Low
2: Normal
3: High
10
2: Disable
Sensitivity:
2: Normal
TOP
Contents
Index
Introduction
Scanner
Overview
How to Load
Documents
Configuring
the Scan
Settings
How to Use
the Operator
Panel
Various Ways
to Scan
Daily Care
Replacing
Consumables
Troubleshooting
Operational
Settings
Appendix
Glossary
75
Page 76

Chapter 4 How to Use the Operator Panel
Item Description Setting/Value Factory Default
7: MF Quick
Change
8: Alarm Volume Specify whether or not to ring an alarm when an error such as
9: Stacker
Positioning
10: Hopper Level Change the hopper level during standby. Selecting [1: Manual
11: Paper
Separation
Force
12: Alarm Sound
Time
Enables you to switch whether or not to detect multifeed by a push
of a button. Priority is given to the driver setting when [1: Disable]
is selected.
When [2: Enable(Detect)] or [3: Enable(Ignore)] is selected, it
switches between detecting/not detecting multifeed every time the
[Eject] button is pressed. It can be switched during scanning.
For [2: Enable(Detect], it detects multifeed by default and
multifeed detection is performed according to the driver setting.
For [3: Enable(Ignore)], it does not detect multifeed by default and
this setting is given priority over the driver setting.
multifeed or paper jam occur.
It can also be configured from the Software Operation Panel.
Adjust the stacker position.
You can set the stacker at certain heights.
(Continuous)] switches the scanner to Manual Feed mode
(Continuous Feed mode). The hopper level cannot be changed in
Manual Feed mode (Single Feed mode).
Remove all documents from the hopper when you configure this
item.
The hopper is set to [4: Lower] when you clear manual feeding
(continuous).
When you experience frequent multifeeds, pick errors or paper
jams, take measures by adjusting the force to separate the
papers.
Keep the default setting for normal use.
For more details, refer to "1.9 Adjusting the Paper Separation
Force" (page 26).
Specify the duration to ring the alarm in when errors such as
multifeed and paper jam occur.
- : No settings/values
1: Disable
2: Enable(Detect)
3: Enable(Ignore)
1: OFF
2: Low
3: High
1: Movable
2: Fixed
1: Manual (Continuous)
2: Upper
3: Middle
4: Lower
Low High
0.5, 1, 1.5, 2.0, 2.5 (seconds) 2.0
1: Disable
1: OFF
(*1)
(*2)
TOP
Contents
Index
Introduction
Scanner
Overview
How to Load
Documents
Configuring
the Scan
Settings
How to Use
the Operator
Panel
Various Ways
to Scan
Daily Care
Replacing
Consumables
Troubleshooting
Operational
Settings
Appendix
Glossary
76
Page 77

Chapter 4 How to Use the Operator Panel
Item Description Setting/Value Factory Default
13: Button Sound
Vol
Specify whether or not to make a sound when a button on the
operator panel is pressed.
- : No settings/values
1: OFF
2: Low
3: High
(ring time fixed at 0.01 second)
TOP
Contents
Index
Introduction
1: OFF
Scanner
Overview
14: Contrast Specify the contrast for the LCD on the operator panel. Weak Strong
15: Backlight ON Specify the duration for which the backlight is lit ON.
Until initialization is complete after turning the power on, this item
operates in [ON] regardless of the setting configured.
16: LED Blink
Cycle
17: Horizontal
Scroll Speed
18: Operation
Panel Timeout
Specify the interval in which the Check LED flashes when
(for Information) is displayed on the LCD.
Specify the speed in which the display is horizontally scrolled.
The displayed item is scrolled horizontally when the text does not
fit in the LCD.
Specify the time to return to the [Ready] screen from [Hopper
Level] or [Paper Separation Force].
Note that this option is only available when you display [Hopper
Level] or [Paper Separation Force] from the [Ready] screen by
using a shortcut key.
To display [Hopper Level] by shortcut key, press the [Eject] button
and either the [
displayed.
Note that the [Hopper Level] screen is not displayed unless the
two buttons are pressed simultaneously.
To display the [Paper Separation Force] screen by shortcut key,
press the [
] or [] button at the same time when [Ready] is
] or [] button in the [Ready] screen.
OFF, ON, 5, 10, 20, 30, 40, 50, 60, 90, 120,
150, 180, 210, 240, 270, 300 (seconds)
0.5, 1.0, 1.5, 2.0, 2.5 (seconds) 2.0
1: Fast
2: Normal
3: Slow
4: OFF
OFF, 5 to 9 (seconds) 7
ON
2: Normal
How to Load
Documents
Configuring
the Scan
Settings
How to Use
the Operator
Panel
Various Ways
to Scan
Daily Care
Replacing
Consumables
Troubleshooting
Operational
Settings
Appendix
Glossary
77
Page 78

Chapter 4 How to Use the Operator Panel
Item Description Setting/Value Factory Default
19: Language Specify the language in which data is displayed. 1: Japanese
2: English
3: French
4: German
5: Italian
6: Spanish
7: Russian
8: Chinese
20: Prioritize
Panel Settings
21: Cleaning Use this setting when you clean the scanner.
Prioritize the operator panel setting for Paper Protection.
When [1: Paper Protection] is selected, the Paper Protection
setting of the operator panel is prioritized.
When [2: Clear] is selected, the Paper Protection setting is no
longer prioritized.
For more details, refer to "Chapter 6 Daily Care" (page 121).
1: Paper Protection
2: Clear
--
- : No settings/values
2: English
2: Clear
TOP
Contents
Index
Introduction
Scanner
Overview
How to Load
Documents
Configuring
the Scan
Settings
How to Use
the Operator
Panel
Various Ways
to Scan
Daily Care
Replacing
Consumables
Troubleshooting
Operational
Settings
Appendix
Glossary
78
Page 79

Chapter 4 How to Use the Operator Panel
Item Description Setting/Value Factory Default
22: Test Print Use this option to run a test print when the Imprinter is installed.
For more details, refer to the “fi-680PRF/PRB Imprinter Operator's
Guide”.
- : No settings/values
No. of sheets scanned:
1: Single sheet only
2: Multiple sheets
Print: (*4)
1: Front Side
2: Back Side
TOP
Contents
Index
Introduction
(*3)
Scanner
Overview
How to Load
Documents
23: Show/Clear
Counters
24: Ope. Panel
Initialization
Check the replacement cycle of the consumables and the total
page count of the maintenance parts.
Also use it to reset the counter when you have replaced the
consumables or performed cleaning.
Initialize the settings of the operator panel, except for the
language setting and any items without a factory default setting.
Print Pattern:
1: (L)ABCDEFGHIJKLMNOPQRSTUVWX
YZ[¥]^_`00000000
2: (L)abcdefghijklmnopqrstuvwxyz{|}~0000
0000
3: (L)!”#$%&’()*+,-./0123456789:;<=>?@
00000000
4: (P)ABCDEFGHIJKLMNOPQRSTUVWX
YZ[¥]^_`00000000
5: (P)abcdefghijklmnopqrstuvwxyz{|}~0000
0000
6: (P)!”#$%&’()*+,-./0123456789:;<=>?@
00000000
Test Print:
1: Yes
2: No
Brake Roller / Pick Roller / Separator
Roller / Assist Roller / Cleaning
Ink Level:Front / Ink Level:Back
(only when imprinter is installed)
1: Yes
2: No
0
Only displayed
when imprinter is
installed
(*5)
Configuring
the Scan
Settings
How to Use
the Operator
Panel
Various Ways
to Scan
Daily Care
Replacing
Consumables
Troubleshooting
Operational
Settings
25: Doc Counting
Mode
Compare the number of sheets scanned in Doc Counting Mode
and Doc Count Check Mode.
--
Appendix
Glossary
79
Page 80

Chapter 4 How to Use the Operator Panel
Item Description Setting/Value Factory Default
Information
[Information] appears as an item in [Main Menu] only when is
displayed on the LCD.
- : No settings/values
Message for replacing consumables /
cleaning / replacing maintenance parts /
regular maintenance
Only displayed
when there is
information
TOP
Contents
Index
Introduction
Scanner
Overview
*1: Although there is no factory default setting, it is set to [1: Movable] when you turn on the power. Therefore, the setting does not change even when you
initialize the operator panel.
*2: Although there is no factory default setting, it is set to [4: Lower] when you turn on the power. Therefore, the setting does not change even when you
initialize the operator panel.
*3: Although there is no factory default setting, the settings are configured as follows when you turn on the power: [2: Multiple sheets] for [No. of sheets
scanned], [1: Front Side] for [Print], [1: (L)ABCDEFGHIJKLMNOPQRSTUVWXYZ[|]^_’00000000] for [Print Pattern], and [1: Yes] for [Test Print].
Therefore, the settings do not change even when you initialize the operator panel.
*4: [Print: 1: Front Side / 2: Back Side] does not appear unless both Front-Side and Back-Side Imprinters are installed.
*5: Although there is no factory default setting, it is set to [2: No] when you turn on the power. Therefore, the setting does not change when you initialize the
operator panel.
How to Load
Documents
Configuring
the Scan
Settings
How to Use
the Operator
Panel
Various Ways
to Scan
Daily Care
Replacing
Consumables
Troubleshooting
Operational
Settings
Appendix
Glossary
80
Page 81

Chapter 4 How to Use the Operator Panel
Function
/Enter
Check
Menu
Scan
Stop
Eject
Counter
Reset
iMFF
Send to
/Pause
Clear
/Back
cPower Button
d [Function/Enter] Button
e[] / [] Button
[Function/Enter] Button
TOP
Contents
4.3 Function Selection
This section explains about the Function Selection.
When you press the [Function/Enter] button in the [Ready]
screen, [Function Selection] is displayed.
By using Function Selection, you can configure an application
to be launched when the [Send to/Pause] button is pressed.
How to Use Function Selection
1 Press the power button on the front of the scanner.
[Ready] is displayed on the LCD. The indicator displays [F01]
when the power has just been turned on.
2 Press the [Function/Enter] button.
[Function Selection] is displayed on the LCD.
3 Press the [] or [] button and select a parameter, then
press the [Function/Enter] button to confirm.
For more details about the setting parameters, refer to "Item
Configurable in Function Selection" (page 82).
The setup is completed when the LCD displays the [Ready]
screen.
The configured parameter is shown by the indicator.
In this example, the indicator displays "F02".
Note that No.C indicates that the setting is fixed at the Software
Operation Panel. If No.C is selected, the indicator displays "SOP".
Index
Introduction
Scanner
Overview
How to Load
Documents
Configuring
the Scan
Settings
How to Use
the Operator
Panel
Various Ways
to Scan
Daily Care
Replacing
Consumables
Troubleshooting
Operational
Settings
Appendix
Glossary
81
Page 82

Chapter 4 How to Use the Operator Panel
Item Configurable in Function Selection
TOP
Contents
Index
Item Description Setting Factory Default
Function
Selection
*1: Although there is no factory default setting, it is set to [No.01] when you turn on the power. Therefore, the setting does not change even when you initialize
the operator panel.
Configure the application(s) to be launched by the [Send to/
Pause] button.
It displays the scanner button events configured in the computer
([Send to 1] to [Send to 50]).
For information on how to configure scanner button events, refer to
"Using a Button on the Scanner to Start Scanning" (page 113).
Note that this item is not available when using Kofax VRS.
No.01 to No.50 / No.C
(No.C indicates the Software Operation
Panel)
(*1)
Introduction
Scanner
Overview
How to Load
Documents
Configuring
the Scan
Settings
How to Use
the Operator
Panel
Various Ways
to Scan
Daily Care
Replacing
Consumables
Troubleshooting
Operational
Settings
Appendix
Glossary
82
Page 83

TOP
Contents
Index
Chapter 5 Various Ways to Scan
This chapter explains how to scan documents in various ways, by using examples of TWAIN started via ScandAll PRO.
5.1 Summary ....................................................................................................................................................84
5.2 Scanning Documents of Different Types and Sizes....................................................................................85
5.3 Advanced Scanning....................................................................................................................................88
5.4 Configuring Post-Scan Operations and Handling.....................................................................................100
5.5 Customizing the Hardware Settings .........................................................................................................113
Introduction
Scanner
Overview
How to Load
Documents
Configuring
the Scan
Settings
How to Use
the Operator
Panel
Various Ways
to Scan
Daily Care
Replacing
Consumables
Troubleshooting
Operational
Settings
Appendix
Glossary
Page 84

Chapter 5 Various Ways to Scan
TOP
Contents
5.1 Summary
The following lists various ways of scanning documents.
Scanning documents of different types and sizes
z "Scanning Both Sides of a Document" (page 85)
z "Scanning Documents of Different Widths" (page 86)
z "Scanning a Document Longer Than A3 Size" (page 87)
Advanced scanning
z "Excluding Colors from Images (Dropout Color)" (page 88)
z "Skipping Blank Pages" (page 90)
z "Scanning the Image Brighter" (page 92)
z "Removing Punch Holes" (page 94)
z "Feeding Documents Manually" (page 96)
Configuring post-scan operations and handling
z "Automatically Correcting Skewed Document Images" (page 100)
z "Automatically Correcting the Page Orientation" (page 102)
z "Saving Scanned Images in PDF Format" (page 104)
z "Outputting in Multi-Image Mode" (page 108)
z "Automatically Detecting the Document Color (Color/Monochrome)"
(page 110)
z "Adjusting the Scanned Image in [Image Adjustment] Dialog Box"
(page 112)
For information on how to scan documents in the following
methods, refer to "ScandAll PRO V2.0 User’s Guide".
z Dividing a Multipage Document Using Patch Codes
z Dividing a Multipage Document Using Barcodes
z Specifying the Result of Zone OCR as a File Name
z Specifying the Result of Barcode Recognition as a File Name
z Creating Saving Folders for Each Batch Scan
z Saving Scanned Images from a Batch Scan to Microsoft SharePoint
Server
z Restarting a Suspended Batch Scan
z Outputting Indexing Information File and Linking with an Application
z Detecting Errors in the Scanned Document
Index
Introduction
Scanner
Overview
How to Load
Documents
Configuring
the Scan
Settings
How to Use
the Operator
Panel
Various Ways
to Scan
Daily Care
Replacing
Consumables
Customizing the hardware settings
z "Using a Button on the Scanner to Start Scanning" (page 113)
z "Detecting Multifeed Errors" (page 115)
z "Bypassing Multifeed Detection for a Fixed Format" (page 117)
Troubleshooting
Operational
Settings
Appendix
Glossary
84
Page 85

Chapter 5 Various Ways to Scan
TOP
Contents
5.2 Scanning Documents of Different Types and Sizes
Scanning Both Sides of a Document
1 Load a document on the hopper.
For information on how to load documents, refer to "Chapter 2 How to
Load Documents" (page 33).
2 Start up ScandAll PRO and open the [TWAIN Driver (32)]
dialog box.
For information on how to display the [TWAIN Driver (32)] dialog box,
refer to "ScandAll PRO V2.0 User's Guide".
3 Select [ADF (Duplex)] for [Scan Type].
6 Perform a scan from ScandAll PRO.
For information on how to perform scanning, refer to "ScandAll PRO
V2.0 User's Guide".
Index
Introduction
Scanner
Overview
How to Load
Documents
Configuring
the Scan
Settings
How to Use
the Operator
Panel
Various Ways
to Scan
Daily Care
4 Configure other settings such as [Paper Size].
5 Click the [OK] button.
The changes are applied.
Replacing
Consumables
Troubleshooting
Operational
Settings
Appendix
Glossary
85
Page 86

Chapter 5 Various Ways to Scan
Pick Roller
Pick Roller
Scanning Documents of Different Widths
When you scan a batch of documents with different widths,
load the documents using the following procedure:
z When you scan documents of different widths at the same
time, some of the smaller documents may be skewed or
may not be fed into the scanner. Try to scan documents of
the same width.
z For more details about the conditions of scanning
documents in mixed batches, refer to "Scanning a Mixed
Batch of Documents" (page 46).
1 To avoid skewed images, select [Automatic Page Size
Detection] in [Automatic Size and Skew Detection].
For more details about settings, refer to "Automatically Correcting
Skewed Document Images" (page 100).
For information on how to load documents on the hopper, refer to "2.1
Loading Documents" (page 34).
Make sure that all documents are placed underneath the
pick roller, otherwise the document will not be picked.
z Good example
TOP
Contents
Index
Introduction
Scanner
Overview
How to Load
Documents
Configuring
the Scan
Settings
How to Use
the Operator
Panel
2 Align the edges of the documents.
z Align by the center
z Align by the side
3 Place the documents on the hopper and adjust the hopper
side guides to the widest document in the batch.
z Bad example
4 Perform a scan from ScandAll PRO.
For information on how to perform scanning, refer to "ScandAll PRO
V2.0 User's Guide".
Various Ways
to Scan
Daily Care
Replacing
Consumables
Troubleshooting
Operational
Settings
Appendix
Glossary
86
Page 87

Chapter 5 Various Ways to Scan
Scanning a Document Longer Than A3 Size
TOP
Contents
4 Specify the paper size and click the [OK] button.
Index
1 Load the document on the hopper.
For information on how to load documents, refer to "Chapter 2 How to
Load Documents" (page 33).
To scan documents longer than A3 size, pull out the
hopper extension and stacker extension all the way.
Also, make sure not to pull up the paper stop.
2 Start up ScandAll PRO and open the [TWAIN Driver (32)]
dialog box.
For information on how to display the [TWAIN Driver (32)] dialog box,
refer to "ScandAll PRO V2.0 User's Guide".
3 In [Scan Type], select [Long page (Front Side)] or [Long
page (Duplex)].
Select [Long page (Front Side)] for simplex scanning and [Long page
(Duplex)] for duplex scanning.
5 Click the [OK] button.
The changes are applied.
6 Perform a scan from ScandAll PRO.
For information on how to perform scanning, refer to "ScandAll PRO
V2.0 User's Guide".
z Long page scanning cannot be used with the following
functions:
- Multi Image Output
- Auto Color/Monochrome Detection
z To scan documents longer than 864 mm (34 in.), set
the resolution to 300 dpi or lower.
Introduction
Scanner
Overview
How to Load
Documents
Configuring
the Scan
Settings
How to Use
the Operator
Panel
Various Ways
to Scan
Daily Care
[Long Page Paper Size Setting] dialog box appears.
Replacing
Consumables
Troubleshooting
Operational
Settings
Appendix
Glossary
87
Page 88

Chapter 5 Various Ways to Scan
ABC ABC
Example: When [Green] is specified for Dropout Color
TOP
Contents
5.3 Advanced Scanning
Excluding Colors from Images (Dropout Color)
You can select a primary color (green, red, blue) to be
removed (dropped out) from the scanned image.
For instance, when you scan a document containing black text
with a green background, you can output the image with only
the black text.
z Dropout colors can only be specified in black & white or
grayscale mode.
z Dropout works best with light (low intensity) colors, and dark
colors may not drop out.
1 Load a document on the hopper.
For information on how to load documents, refer to "Chapter 2 How to
Load Documents" (page 33).
2 Start up ScandAll PRO and open the [TWAIN Driver (32)]
dialog box.
For information on how to display the [TWAIN Driver (32)] dialog box,
refer to "ScandAll PRO V2.0 User's Guide".
3 Click the [Advance] button.
The [Advance] dialog box appears.
4 Select a color to drop out in the [Dropout Color] drop-
down list under [More].
If you select [Hardware Setting], the setting of the Software
Operational Panel is enabled.
No color is dropped out when you select [None].
Index
Introduction
Scanner
Overview
How to Load
Documents
Configuring
the Scan
Settings
How to Use
the Operator
Panel
Various Ways
to Scan
Daily Care
Replacing
Consumables
Troubleshooting
Operational
Settings
Appendix
Glossary
88
Page 89

Chapter 5 Various Ways to Scan
To drop out a specific color, select [Custom], [Custom 2], [Custom 3]
or [Custom 4].
When you select [Custom], [Custom 2], [Custom 3] or [Custom 4], the
[Select Dropout Color] dialog box is displayed where you can select
up to three colors to be dropped out.
- [Dropout] check box
Select this check box in the [Color 2] or [Color 3] tab to specify
more than one color to be dropped out.
- [Red] / [Green] / [Blue]
Displays the information of the specified dropout color in
numerical values. These values can be typed in directly or
changed by clicking the [] / [] button.
- [Sample color]
Displays the specified color.
z [Priority Black] check box
Select this check box when you do not want to drop out the text.
This option saves low-intensity colors such as black (generally
used for characters) from being dropped out.
z [Sensitivity]
Specify the allowable range for the selected dropout color.
Range: 15 to 180 degrees
The larger the value, the wider the dropped out color range
becomes.
z [File] button
Allows you to view an image file (*.bmp) in the [Original Image]
frame and select a dropout color.
z [Apply] button
Applies the configured settings and closes the dialog box.
z [Cancel] button
Cancels the configured settings and closes the dialog box.
TOP
Contents
Index
Introduction
Scanner
Overview
How to Load
Documents
Configuring
the Scan
Settings
How to Use
the Operator
Panel
Various Ways
to Scan
Daily Care
z [Original image]
A sample color palette is displayed. Click to select the color.
z [Dropout image]
The image after dropping out the color(s) is displayed.
z [Color 1], [Color 2], and [Color 3] tabs
Specify the color(s) to be dropped out. Up to three colors can be
selected at once.
5 Click the [OK] button.
It returns to the [TWAIN Driver (32)] dialog box.
6 Click the [OK] button in the [TWAIN Driver (32)] dialog
box.
The settings are saved.
7 Perform a scan from ScandAll PRO.
For information on how to perform scanning, refer to "ScandAll PRO
V2.0 User's Guide".
Replacing
Consumables
Troubleshooting
Operational
Settings
Appendix
Glossary
89
Page 90

Chapter 5 Various Ways to Scan
Skipping Blank Pages
Blank pages (black or white) in the documents can be
detected and automatically removed during scanning.
For instance, when you scan a mixed batch of double-sided
and single-sided documents in duplex scanning mode, it
generates the images without the back sides of the singlesided documents (blank pages).
1 Load documents on the hopper.
For information on how to load documents, refer to "Chapter 2 How to
Load Documents" (page 33).
2 Start up ScandAll PRO and open the [TWAIN Driver (32)]
dialog box.
For information on how to display the [TWAIN Driver (32)] dialog box,
refer to "ScandAll PRO V2.0 User's Guide".
4 Click the [Job/Cache] tab and clear the [Blank Page Skip]
check box.
TOP
Contents
Index
Introduction
Scanner
Overview
How to Load
Documents
Configuring
the Scan
Settings
How to Use
the Operator
Panel
3 Click the [Option] button.
The [Option] dialog box appears.
When this check box is selected, the cache mode automatically
switches to [Use Both Memory].
5 Use the slide bars of [Blank Page Skip] to adjust the ratios
to skip blank pages by.
z Binary/Halftone mode
Adjust [Black Dots Ratio] for white pages and [White Dots Ratio]
for black pages.
Various Ways
to Scan
Daily Care
Replacing
Consumables
Troubleshooting
Operational
Settings
Appendix
Glossary
90
Page 91

Chapter 5 Various Ways to Scan
The value on the right side of the slide bar indicates the ratio of
image noise (*1), and is recognized as blank when the scanned
image contains a smaller value.
The value ranges from 0.2 to 3.0% (in increments of 0.2) or
OFF (--).
*1: The ratio of black dots to the scan area (for white papers).
z Color/Grayscale mode
TOP
Contents
Index
Introduction
Scanner
Overview
How to Load
Documents
Specify a sensitivity level from 1 to 5 for skipping blank (white)
pages. The larger the value is set, the more likely for the pages
to be detected as blank.
6 Click the [OK] button.
It returns to the [TWAIN Driver (32)] dialog box.
7 Click the [OK] button in the [TWAIN Driver (32)] dialog
box.
The settings are saved.
8 Perform a scan from ScandAll PRO.
For information on how to perform scanning, refer to "ScandAll PRO
V2.0 User's Guide".
Configuring
the Scan
Settings
How to Use
the Operator
Panel
Various Ways
to Scan
Daily Care
Replacing
Consumables
Troubleshooting
Operational
Settings
Appendix
Glossary
91
Page 92

Chapter 5 Various Ways to Scan
Scanning the Image Brighter
TOP
Contents
3 Select grayscale or color in [Image Mode].
Index
The brightness of the scanned image can be increased for
scanning in grayscale or color.
1 Load documents on the hopper.
For information on how to load documents, refer to "Chapter 2 How to
Load Documents" (page 33).
2 Start up ScandAll PRO and open the [TWAIN Driver (32)]
dialog box.
For information on how to display the [TWAIN Driver (32)] dialog box,
refer to "ScandAll PRO V2.0 User's Guide".
Introduction
Scanner
Overview
How to Load
Documents
Configuring
the Scan
Settings
How to Use
the Operator
Panel
Various Ways
to Scan
Daily Care
4 Click the [Advance] button.
The [Advance] dialog box appears.
Replacing
Consumables
Troubleshooting
Operational
Settings
Appendix
Glossary
92
Page 93

Chapter 5 Various Ways to Scan
5 Click the [Color] tab, and then select [Bright] in [Preset
Gamma].
8 Perform a scan from ScandAll PRO.
For information on how to perform scanning, refer to "ScandAll PRO
V2.0 User's Guide".
TOP
Contents
Index
Introduction
6 Click the [OK] button.
It returns to the [TWAIN Driver (32)] dialog box.
7 In the [TWAIN Driver (32)] dialog box, click the [OK]
button.
The settings are saved.
When using applications other than ScandAll PRO, you can
also increase the default brightness of the TWAIN driver.
Select [Tools] [FtSwtGmm] [Twain] in the Setup DVDROM and double-click "FtSwtGmm.exe", and then select
[Bright) in the [Default scan setting (TWAIN)] dialog box.
Scanner
Overview
How to Load
Documents
Configuring
the Scan
Settings
How to Use
the Operator
Panel
Various Ways
to Scan
Daily Care
Replacing
Consumables
Troubleshooting
Operational
Settings
Appendix
Glossary
93
Page 94

Chapter 5 Various Ways to Scan
Original Output image
Removing Punch Holes
You can remove punch holes from the output scanned image.
TOP
Contents
3 Click the [Option] button.
Index
Introduction
Scanner
Overview
Punch holes cannot be removed when:
z The holes are not aligned along the edge of the document
z The size and gaps between the holes vary
z The document is not rectangular
z The document has a dark background color
z There are characters/pictures over the edge or the holes
z [Automatic Page Size Detection] is specified and the
scanned document is larger than the specified paper size
z The size of the scanned document is not as specified in
[Paper Size] while [Black Background] is selected.
1 Load a document on the hopper.
For information on how to load documents, refer to "Chapter 2 How to
Load Documents" (page 33).
2 Start up ScandAll PRO and open the [TWAIN Driver (32)]
dialog box.
For information on how to display the [TWAIN Driver (32)] dialog box,
refer to "ScandAll PRO V2.0 User's Guide".
The [Option] dialog box appears.
4 Click the [Rotation] tab and select [Automatic Page Size
Detection] or [Black Background] in the [Automatic Size
and Skew detection] drop-down list.
The Hole Punch Removal function is disabled when a setting other
than [Automatic Page Size Detection] or [Black Background] is
specified.
How to Load
Documents
Configuring
the Scan
Settings
How to Use
the Operator
Panel
Various Ways
to Scan
Daily Care
Replacing
Consumables
Troubleshooting
Operational
Settings
Appendix
Glossary
94
Page 95

Chapter 5 Various Ways to Scan
5 Select [Fill with white] or [Background color] under [Hole
punch removal].
Select [Background color] when scanning a color document. If [Fill
with white] is selected, the punch holes will appear as if they are filled
with white squares.
6 Click the [OK] button.
It returns to the [TWAIN Driver (32)] dialog box.
7 Click the [OK] button in the [TWAIN Driver (32)] dialog
box.
The settings are saved.
8 Perform a scan from ScandAll PRO.
For information on how to perform scanning, refer to "ScandAll PRO
V2.0 User's Guide".
With some types of documents, the characters or
graphics may be falsely detected as punch holes and
filled with a color, or the punch holes may not be filled at
all. In such cases, select [Automatic Page Size Detection]
and specify "2" for [Priority] to improve the accuracy of
hole punch removal.
TOP
Contents
Index
Introduction
Scanner
Overview
How to Load
Documents
Configuring
the Scan
Settings
How to Use
the Operator
Panel
Various Ways
to Scan
Daily Care
Replacing
Consumables
Troubleshooting
Operational
Settings
Appendix
Glossary
95
Page 96

Chapter 5 Various Ways to Scan
Feeding Documents Manually
Besides the normal automatic document feeding in which you
load a batch of documents on the hopper and scan them one
by one, you can also use the “Manual Feed mode” where you
manually feed each sheet and perform scanning.
Normally, in automatic feeding, the scanner stops scanning
once all the loaded documents are scanned.
In manual feeding, the scanner waits for the next sheet to be
set within a specified time. It continues scanning if an
additional document is loaded within the specified time, or
stops scanning if no document is loaded.
With this option, you can perform scanning as you check the
documents one by one.
Manual feeding is effective for:
z Scanning as you check the contents of each sheet
z Scanning documents that cause multifeed or paper jam when they
are loaded together
z Continuously scanning documents such as clippings of magazines
and newspapers which cannot be loaded together at once
z Paper Protection is disabled in Manual Feed mode.
z Pause function ([Send to/Pause] button) is disabled
during manual feeding.
There are two modes in manual feeding.
Single Feed mode
Only one sheet is manually fed and scanned.
z Suitable for scanning thick papers, envelopes and folded papers that
are difficult to scan by automatic feeding (In case of folded paper,
make the folding line as the leading edge).
z Reduces the pressure applied on the document when it enters the
ADF (because the pick roller does not touch the document).
z Used to accurately feed and scan one sheet of document.
z No paper separation force is applied regardless of the paper
separation force setting (five levels). Therefore, this mode enables
you to scan documents such as envelopes which cause paper jams in
automatic document feeding.
Continuous Feed mode
Multiple sheets of document are manually fed one at a time and
continuously scanned.
z Documents are scanned one by one even if multiple sheets are
mistakenly fed.
z When you scan more than one sheet, you can check every sheet as
you scan.
z Used to accurately feed and scan multiple sheets of documents.
z The paper separation force setting (five levels) is enabled as with
scanning in automatic document feeding. Adjust the paper separation
force when multifeeds, pick errors or paper jams occur frequently.
TOP
Contents
Index
Introduction
Scanner
Overview
How to Load
Documents
Configuring
the Scan
Settings
How to Use
the Operator
Panel
Various Ways
to Scan
Daily Care
Replacing
Consumables
Troubleshooting
Operational
Settings
Appendix
Glossary
96
Page 97

Chapter 5 Various Ways to Scan
Pick Roller Unit
Roller
■ Scanning in Single Feed mode
1 Lift up the pick roller unit.
Push up the tab in the middle with your finger.
2 Load a document on the hopper with the front side
(scanning side) facing up.
Make sure not to place the document all the way in.
3 Perform a scan from ScandAll PRO.
For information on how to perform scanning, refer to "ScandAll PRO
V2.0 User's Guide".
TOP
Contents
Index
Introduction
Scanner
Overview
4 Insert the document until the top edge touches the rollers
on the inside.
The document is picked, scanned, then ejected onto the stacker.
After the scan, the scanner waits for the next sheet to be fed for
the time specified in the Software Operation Panel.
Let go of the document as soon as you confirm that the
document is being fed by the rollers.
How to Load
Documents
Configuring
the Scan
Settings
How to Use
the Operator
Panel
Various Ways
to Scan
Daily Care
Replacing
Consumables
The pick roller unit will click into place.
The hopper moves up to the feeding position.
z Make sure that there is no document left on the
hopper.
z Be careful not to have your fingers or anything caught
when the hopper moves up.
Troubleshooting
Operational
Settings
Appendix
Glossary
97
Page 98

Chapter 5 Various Ways to Scan
Pick Roller Unit
5 Repeat step 4 until all the documents are scanned.
z Scanning can be stopped immediately by pressing the
[Counter Reset] button on the operator panel.
z Scanning stops when no document is loaded on the
hopper after the time specified in the Software
Operation Panel.
z The scanner waits for the period of manual feed
timeout even when there is no document left on the
hopper.
z The timeout period for manual feeding can be
configured on the operator panel or in the Software
Operation Panel.
z To release Manual Feed mode, bring the pick roller
unit back down to its original position. Put your finger
on the tab in the center and push it down.
■ Scanning in Continuous Feed mode
1 Open the hopper if it is closed.
For information on how to open the hopper, refer to "1.4 Opening/
Closing the Hopper" (page 19).
2 Configure by selecting [Main Menu] [10: Hopper Level]
[1: Manual (Continuous)] on the operator panel.
For more details about the setting, refer to "4.2 Main Menu" (page
65).
The hopper moves up to the feeding position.
z Make sure that there is no document left on the
hopper.
z Be careful not to have your fingers or anything else
caught when the hopper moves up.
You can also set it to [Manual (Continuous)] from the
[Hopper Level] screen via shortcut key. For details about
the setting, refer to "1.7 Setting the Loading Capacity of
the Hopper" (page 23).
TOP
Contents
Index
Introduction
Scanner
Overview
How to Load
Documents
Configuring
the Scan
Settings
How to Use
the Operator
Panel
Various Ways
to Scan
3 Load the documents on the hopper with the front side
(scanning side) facing up.
Make sure not to place the documents all the way in.
4 Perform a scan from ScandAll PRO.
For information on how to perform scanning, refer to "ScandAll PRO
V2.0 User's Guide".
Daily Care
Replacing
Consumables
Troubleshooting
Operational
Settings
Appendix
Glossary
98
Page 99

Chapter 5 Various Ways to Scan
Roller
5 Insert the document until the top edge touches the rollers
on the inside.
When more than one sheet is loaded, only insert the document on the
top of the stack.
The document is picked, scanned, then ejected onto the stacker.
After the scan, the scanner waits for the next sheet to be fed for
the time specified in the Software Operation Panel.
In [Continuous Feed] mode, the scanner separates the
documents and only scans one sheet at a time even when
multiple sheets are accidentally fed.
6 Repeat step 5 until all the documents are scanned.
z Scanning can be stopped immediately by pressing the
[Counter Reset] button on the operator panel.
z Scanning stops when no document is loaded on the
hopper after the time specified in the Software
Operation Panel.
z The scanner waits for the period of manual feed
timeout even when there is no document left on the
hopper.
z The timeout period for manual feeding can be
configured on the operator panel or in the Software
Operation Panel.
z Continuous Feed mode can be cleared in [10: Hopper
Level] of the [Main Menu] on the operator panel. The
hopper is set to [4: Lower] when you clear manual
feeding (continuous). For more details about the
settings, refer to "4.2 Main Menu" (page 65).
TOP
Contents
Index
Introduction
Scanner
Overview
How to Load
Documents
Configuring
the Scan
Settings
How to Use
the Operator
Panel
Various Ways
to Scan
Daily Care
Replacing
Consumables
Troubleshooting
Operational
Settings
Appendix
Glossary
99
Page 100

Chapter 5 Various Ways to Scan
Original
Output images
TOP
Contents
5.4 Configuring Post-Scan Operations and Handling
Automatically Correcting Skewed Document Images
You can automatically correct the scanned images when the
documents are fed into the ADF skewed.
1 Load documents on the hopper.
For information on how to load documents, refer to "Chapter 2 How to
Load Documents" (page 33).
2 Start up ScandAll PRO and open the [TWAIN Driver (32)]
dialog box.
For information on how to display the [TWAIN Driver (32)] dialog box,
refer to "ScandAll PRO V2.0 User's Guide".
3 Click the [Option] button.
4 Click the [Rotation] tab and select [Automatic Deskew] or
[Automatic Page Size Detection] in the [Automatic Size
and Skew detection] drop-down list.
See the table below for levels of priority.
Priority Documents suitable for scanning
0 Rectangular documents with straight edges
Index
Introduction
Scanner
Overview
How to Load
Documents
Configuring
the Scan
Settings
How to Use
the Operator
Panel
Various Ways
to Scan
Daily Care
Replacing
Consumables
Troubleshooting
The [Option] dialog box appears.
1 Documents without tabs (those that have no index
sheets, sticky notes, or index stickers)
2 Documents with tabs (those that have index sheets,
sticky notes, or index stickers)
Operational
Settings
Appendix
Glossary
100
 Loading...