

Page 1
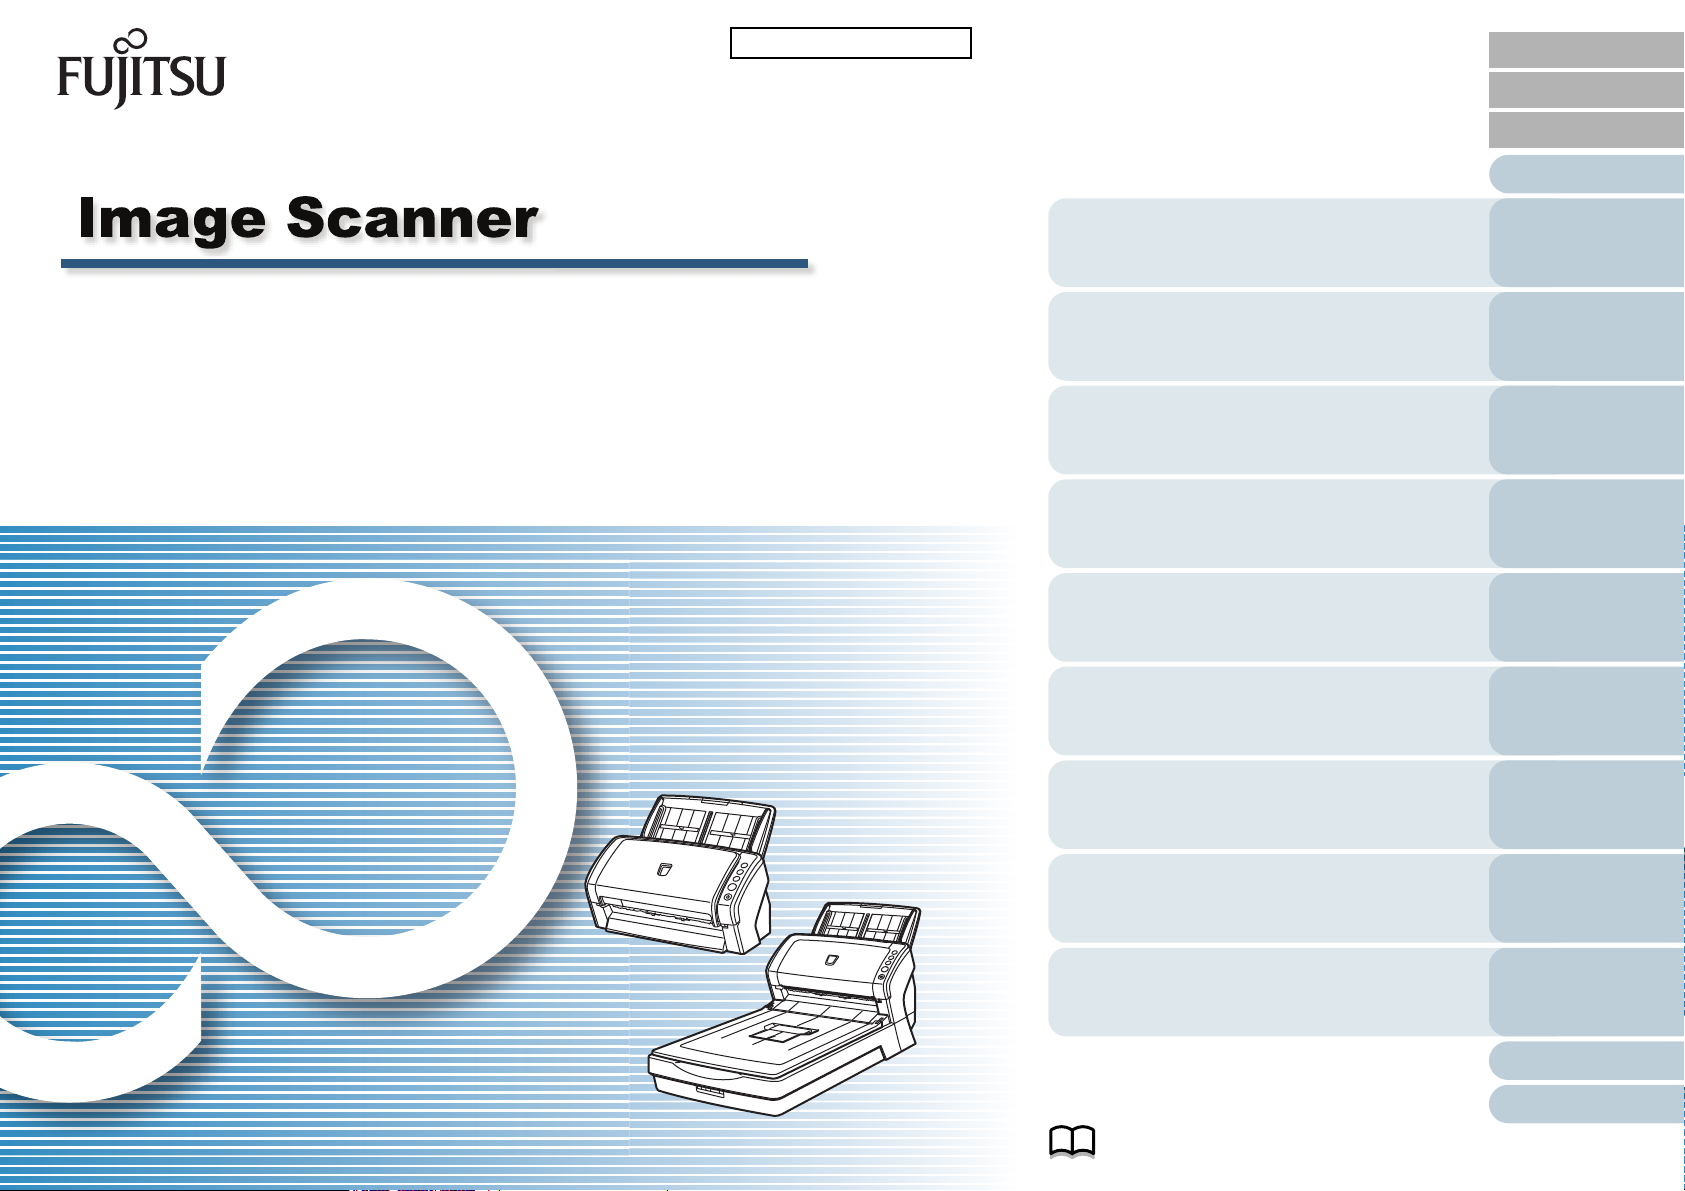
fi-6130Z/fi-6230Z/fi-6140Z/fi-6240Z
P3PC-3342-01ENZ0
TOP
Contents
Index
Introduction
Operator's Guide
Thank you for purchasing the fi-Series color image scanner.
This manual explains about the basic operations and handling of the scanner.
For information on scanner installation, connection and software installation,
refer to "Getting Started".
Explains the names and functions of parts
and basic scanner operation.
Explains how to load documents on the
scanner.
Explains about the setting items in the
scanner drivers.
Explains how to use the Operator Panel.
Explains about various ways of scanning.
Explains how to clean the scanner.
Explains how to replace the consumables.
Scanner
Overview
How to Load
Documents
Configuring the
Scan Settings
How to Use the
Operator Panel
Various Ways to
Scan
Daily Care
Replacing the
Consumables
Explains about troubleshooting.
Explains how to configure settings in the
Software Operation Panel.
How to Use This Manual
Troubleshooting
Operational
Settings
Appendix
Glossary
Page 2
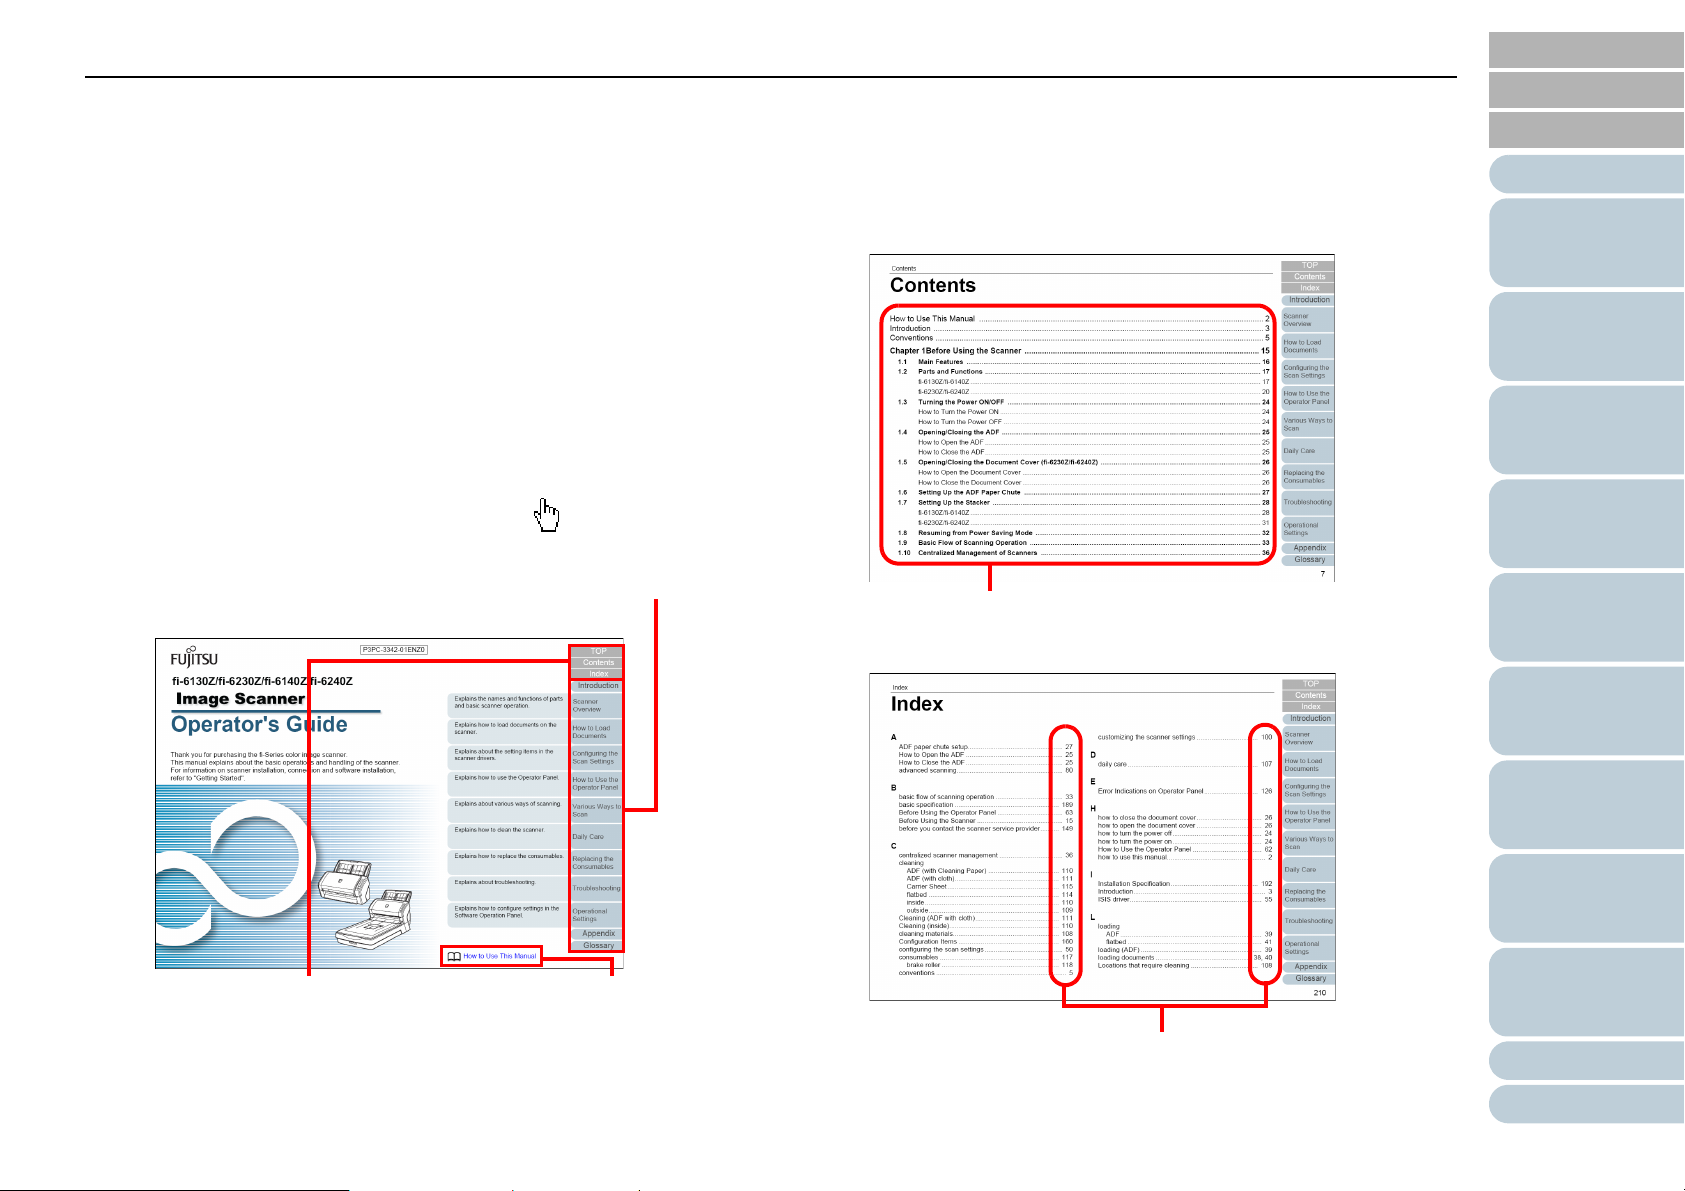
How to Use This Manual
Jumps to the first page of each chapter.
This tab is on every page.
TOP : Jumps to the cover page.
Contents: Jumps to the contents page.
Index : Jumps to the index page.
This tab is on every page.
Jumps to this page.
Click on a title to jump to the link.
Click on a page number to jump to the link.
TOP
Contents
How to Use This Manual
The following shows the tips for using this manual.
z To display or print this manual, either Adobe® Acrobat® (7.0 or later)
®
or Adobe
z In this manual, you can use the Search tool of Adobe
Adobe
For details, refer to the Adobe
z Use the [Page Up] key to return to the previous page, and the [Page
Down] key to go to the next page.
z Click a blue character string, tab or contents/index title (where the
mouse cursor changes into a shape such as ) to jump to the link.
- Common for all pages
Reader® (7.0 or later) is required.
®
Reader®.
®
Acrobat® or Adobe® Reader® Help.
®
Acrobat® or
- Contents page
- Index page
Index
Introduction
Scanner
Overview
How to Load
Documents
Configuring the
Scan Settings
How to Use the
Operator Panel
Various Ways to
Scan
Daily Care
Replacing the
Consumables
Troubleshooting
Operational
Settings
Appendix
Glossary
2
Page 3
Introduction
TOP
Contents
Introduction
Thank you for purchasing our fi-Series color image scanner.
About This Product
"This product" refers to four scanner models, which are
fi-6130Z, fi-6230Z, fi-6140Z, and fi-6240Z.
Each scanner is equipped with an Automatic Document
Feeder (ADF) that allows duplex (double-sided) scanning, and
supports USB interface.
The following table shows the differences between each
model.
Model Scanner type Interface Scanning
speed (*2)
ADF Flatbed
(*1)
fi-6130Z - - 30 ppm/60 ipm
fi-6230Z - 30 ppm/60 ipm
USB SCSI
Manuals
The following manuals are included for this product. Read
them as needed.
Manual Description
Safety Precautions
(paper)
Getting Started
(paper, PDF)
Operator's Guide
(this manual) (PDF)
Contains important information about the
safe use of this product.
Make sure to read this manual before
using the scanner.
Outlines the procedures from installation to
operation of the scanner.
The PDF version is included in the Setup
DVD-ROM.
Provides detailed information on how to
operate and maintain the scanner daily,
how to replace the consumables, and how
to troubleshoot problems. Included in the
Setup DVD-ROM.
Index
Introduction
Scanner
Overview
How to Load
Documents
Configuring the
Scan Settings
How to Use the
Operator Panel
Various Ways to
Scan
Daily Care
fi-6140Z - 40 ppm/80 ipm
fi-6240Z 40 ppm/80 ipm
: Available
- : Not available
*1 : Flatbed allows you to scan thin paper and thick documents such as a
book.
*2 : When scanning A4 size documents at 300 dpi with JPEG
compression.
ScandAll PRO V2.0
User’s Guide (PDF)
fi-614PR Imprinter
Operator's Guide
(PDF)
FUJITSU TWAIN User's
Guide (PDF)
Provides information on how to scan
documents by using ScandAll PRO.
Included in the Setup DVD-ROM.
Provides detailed information on how to
operate and maintain the option fi-614PR
imprinter daily, how to replace the
consumables, and how to troubleshoot
problems. Included in the Setup DVDROM.
Explains how to install and operate the
FUJITSU TWAIN driver. Included in the
Setup DVD-ROM.
Replacing the
Consumables
Troubleshooting
Operational
Settings
Appendix
Glossary
3
Page 4

Introduction
Manual Description
Kofax VRS Installation
Guide (PDF) (*1)
Image Processing
Software Option User's
Guide (PDF)
Scanner Central Admin
4.0 User's Guide (PDF)
Error Recovery Guide
(HTML Help)
Help (scanner driver) Explains how to use and configure the
Help (application) Explains how to use and configure the
*1 : Kofax VRS Professional (hereinafter referred to as “Kofax VRS”) is
bundled with this product.
Explains about the precautions for
installing Kofax VRS and other features
such as the VRS Professional features.
Included in the Setup DVD-ROM.
Explains how to install and operate the
Image Processing Software Option.
Included in the Setup DVD-ROM.
Explains about the overview, installation,
operation and maintenance of Scanner
Central Admin. Included in the Setup DVDROM.
Details the status of the scanner and
explains how to resolve problems
encountered.
Contains movies that explain how to clean
and replace the consumables. Included in
the Setup DVD-ROM.
settings for the scanner drivers.
Can be referenced from each scanner
driver.
settings for the application software.
Can be referenced from each application.
Trademarks
Microsoft, Windows, Windows Server, Windows Vista, and
SharePoint are either registered trademarks or trademarks of
Microsoft Corporation in the United States and/or other
countries.
ISIS and Quick Scan are either registered trademarks or
trademarks of EMC Corporation in the United States.
Adobe, the Adobe logo, Acrobat, and Adobe Reader are either
registered trademarks or trade names of Adobe Systems
Incorporated in the United States and/or other countries.
ABBYY™ FineReader™ Engine © 2011 ABBYY. OCR by
ABBYY
ABBYY and FineReader are trademarks of ABBYY.
Kofax and VRS are registered trademarks or trademarks of
Kofax, Inc.
Other company names and product names are the registered
trademarks or trademarks of the respective companies.
Manufacturer
PFU LIMITED
International Sales Dept., Imaging Business Division,
Products Group
Solid Square East Tower,
580 Horikawa-cho, Saiwai-ku, Kawasaki, Kanagawa
212-8563, JAPAN.
Phone: (81-44) 540-4538
© PFU LIMITED 2011
TOP
Contents
Index
Introduction
Scanner
Overview
How to Load
Documents
Configuring the
Scan Settings
How to Use the
Operator Panel
Various Ways to
Scan
Daily Care
Replacing the
Consumables
Troubleshooting
Operational
Settings
Appendix
Glossary
4
Page 5
Conventions
!!!
TOP
Contents
Conventions
Safety Information
The attached "Safety Precautions" manual contains important
information about the safe and correct use of this product.
Make sure that you read and understand it before using the
scanner.
Symbols Used in This Manual
The following indications are used in this manual to obviate
any chance of accident or damage to you, people near you,
and your property. Warning labels consist of a symbol
indicating the severity and a warning statement. The symbols
and their meanings are as follows.
This indication alerts operators to an operation
that, if not strictly observed, may result in severe
injury or death.
This indication alerts operators to an operation
that, if not strictly observed, may result in safety
hazards to personnel or damage to the product.
Abbreviations Used in This Manual
The operating systems and products in this manual are
indicated as follows.
Name Indication
z Windows
z Windows
z Windows
z Windows Server
z Windows Server
z Windows Server
z Windows Server
z Windows Vista
z Windows Vista
z Windows Vista
z Windows Vista
z Windows Vista
®
XP Home Edition
®
XP Professional
®
XP Professional x64 Edition
®
2003, Standard Edition
®
2003, Standard x64 Edition
®
2003 R2, Standard Edition
®
2003 R2, Standard x64 Edition
®
Home Basic (32/64-bit)
®
Home Premium (32/64-bit)
®
Business (32/64-bit)
®
Enterprise (32/64-bit)
®
Ultimate (32/64-bit)
Windows XP
(*1)
Windows
Server 2003
(*1)
Windows
Vista (*1)
Index
Introduction
Scanner
Overview
How to Load
Documents
Configuring the
Scan Settings
How to Use the
Operator Panel
Various Ways to
Scan
Daily Care
Replacing the
Consumables
Besides warning indicators, the following symbols are used in
this manual.
This symbol alerts operators to particularly important
information.
Be sure to read this information.
This symbol alerts operators to helpful advice regarding
operation.
z Windows Server
z Windows Server
z Windows
z Windows
z Windows
z Windows
®
7 Home Premium (32/64-bit)
®
7 Professional (32/64-bit)
®
7 Enterprise (32/64-bit)
®
7 Ultimate (32/64-bit)
®
2008 Standard (32/64-bit)
®
2008 R2 Standard (64-bit)
Windows
Server 2008
(*1)
Windows 7
(*1)
Troubleshooting
Operational
Settings
Appendix
Glossary
5
Page 6

Conventions
Name Indication
z Microsoft® Office SharePoint® Portal Server 2003
®
z Microsoft
z Microsoft
ScandAll PRO ScanSnap mode Add-in ScanSnap
ScanSnap Carrier Sheet Carrier Sheet
*1: Where there is no distinction between the different versions of the
above operating system, the general term "Windows" is used.
Office SharePoint® Server 2007
®
SharePoint® Server 2010
SharePoint
Server
mode
Arrow Symbols in This Manual
Right-arrow symbols (J) are used to separate icons or menu
options you should select in succession.
Example: Click the [Scan] menu J [Scanner Setting].
Screen Examples in This Manual
The screen examples in this manual are subject to change
without notice in the interest of product improvement.
If the actual displayed screen differs from the screen
examples in this manual, operate by following the actual
displayed screen while referring to the user's manual of the
scanner application that you are using.
The screen examples used in this manual are of the TWAIN
driver, ISIS driver, and ScandAll PRO (image scanning
application).
This manual uses screenshots from Windows 7. The windows
that appear and the operations differ by the operating system
that you are using. Also note that with some scanner models,
the screens and operations may differ from this manual when
you update the TWAIN driver or the ISIS driver. In that case,
refer to the manual provided upon updating the driver.
TOP
Contents
Index
Introduction
Scanner
Overview
How to Load
Documents
Configuring the
Scan Settings
How to Use the
Operator Panel
Various Ways to
Scan
Daily Care
Replacing the
Consumables
Troubleshooting
Operational
Settings
Appendix
Glossary
6
Page 7

Contents
TOP
Contents
Contents
How to Use This Manual ................................................................................................................................... 2
Introduction ........................................................................................................................................................ 3
Conventions ....................................................................................................................................................... 5
Chapter 1 Scanner Overview ........................................................................................................................ 14
1.1 Main Features .............................................................................................................................................................. 15
1.2 Parts and Functions .................................................................................................................................................... 16
fi-6130Z/fi-6140Z ............................................................................................................................................................ 16
fi-6230Z/fi-6240Z ............................................................................................................................................................ 19
1.3 Turning the Power ON/OFF ........................................................................................................................................ 23
How to Turn the Power ON ............................................................................................................................................ 23
How to Turn the Power OFF .......................................................................................................................................... 23
1.4 Opening/Closing the ADF ........................................................................................................................................... 24
How to Open the ADF .................................................................................................................................................... 24
How to Close the ADF.................................................................................................................................................... 24
Index
Introduction
Scanner
Overview
How to Load
Documents
Configuring the
Scan Settings
How to Use the
Operator Panel
Various Ways to
Scan
Daily Care
1.5 Opening/Closing the Document Cover (fi-6230Z/fi-6240Z) ...................................................................................... 25
How to Open the Document Cover ................................................................................................................................ 25
How to Close the Document Cover ................................................................................................................................ 25
1.6 Setting Up the ADF Paper Chute ............................................................................................................................... 26
1.7 Setting Up the Stacker ................................................................................................................................................ 27
fi-6130Z/fi-6140Z ............................................................................................................................................................ 27
fi-6230Z/fi-6240Z ............................................................................................................................................................ 30
1.8 Power Saving Mode .................................................................................................................................................... 31
1.9 Basic Flow of Scanning Operation ............................................................................................................................ 32
1.10 Image Scanning Application ...................................................................................................................................... 35
Replacing the
Consumables
Troubleshooting
Operational
Settings
Appendix
Glossary
7
Page 8

Contents
1.11 Centralized Management of Scanners ...................................................................................................................... 36
Chapter 2 How to Load Documents ............................................................................................................. 37
2.1 Loading Documents in the ADF ................................................................................................................................. 38
TOP
Contents
Index
Introduction
Preparation..................................................................................................................................................................... 38
How to Load Documents ................................................................................................................................................ 39
2.2 Loading Documents on the Flatbed (fi-6230Z/fi-6240Z) ........................................................................................... 40
2.3 Documents for Scanning (ADF) ................................................................................................................................. 41
Paper Size...................................................................................................................................................................... 41
Conditions ...................................................................................................................................................................... 41
Loading Capacity............................................................................................................................................................ 44
Area Not to be Perforated .............................................................................................................................................. 45
Conditions for Multifeed Detection ................................................................................................................................. 45
Conditions for Mixed Batch Scanning ............................................................................................................................ 47
Conditions for Automatic Page Size Detection............................................................................................................... 49
Conditions for Using the Carrier Sheet........................................................................................................................... 50
Chapter 3 Configuring the Scan Settings ................................................................................................... 51
3.1 TWAIN Driver ............................................................................................................................................................... 52
[Resolution] .................................................................................................................................................................... 53
[Scan Type] .................................................................................................................................................................... 53
[Paper Size].................................................................................................................................................................... 53
Scanner
Overview
How to Load
Documents
Configuring the
Scan Settings
How to Use the
Operator Panel
Various Ways to
Scan
Daily Care
Replacing the
Consumables
[Image Mode] ................................................................................................................................................................. 53
[Scan] Button.................................................................................................................................................................. 53
[Preview] Button ............................................................................................................................................................. 54
[Close] / [OK] Button....................................................................................................................................................... 54
[Reset] Button................................................................................................................................................................. 54
[Help] Button..................................................................................................................
[About] Button................................................................................................................................................................. 54
................................................. 54
Troubleshooting
Operational
Settings
Appendix
Glossary
8
Page 9

Contents
[Option] Button ............................................................................................................................................................... 54
[Advance] Button ............................................................................................................................................................ 55
[Config] Button................................................................................................................................................................ 55
TOP
Contents
Index
Introduction
[Browse] Button .............................................................................................................................................................. 55
3.2 ISIS Driver .................................................................................................................................................................... 56
[Main] Tab ...................................................................................................................................................................... 57
[Layout] Tab ................................................................................................................................................................... 57
[Image Processing] Tab ................................................................................................................................................. 58
[Paper Handling] Tab ..................................................................................................................................................... 59
[Gamma] Tab ................................................................................................................................................................. 59
[Color Dropout] Tab........................................................................................................................................................ 60
[Compression] Tab ......................................................................................................................................................... 60
[Imprinter] Tab ................................................................................................................................................................ 61
[Blank Page Deletion] Tab.............................................................................................................................................. 61
[About] Tab..................................................................................................................................................................... 62
Chapter 4 How to Use the Operator Panel .................................................................................................. 63
4.1 Operator Panel ............................................................................................................................................................. 64
Names and Functions .................................................................................................................................................... 64
Indications on Function Number Display........................................................................................................................ 65
Chapter 5 Various Ways to Scan ................................................................................................................. 66
Scanner
Overview
How to Load
Documents
Configuring the
Scan Settings
How to Use the
Operator Panel
Various Ways to
Scan
Daily Care
Replacing the
Consumables
5.1 Summary ...................................................................................................................................................................... 67
5.2 Scanning Documents of Different Types and Sizes ................................................................................................ 68
Scanning Both Sides at Once ........................................................................................................................................ 68
Documents with Different Widths ................................................................................................................................... 69
Documents Larger than A4/Letter Size .......................................................................................................................... 70
Scanning Photographs and Clippings ............................................................................................................................ 73
Long Page Scanning ...................................................................................................................................................... 76
Troubleshooting
Operational
Settings
Appendix
Glossary
9
Page 10

Contents
Scanning a Book (fi-6230Z/fi-6240Z) ............................................................................................................................. 78
Scanning a Large Document on the Flatbed (fi-6230Z/fi-6240Z) ................................................................................... 80
5.3 Advanced Scanning .................................................................................................................................................... 82
TOP
Contents
Index
Introduction
Removing a Color from the Scanned Image (Dropout Color) ........................................................................................ 82
Skipping Blank Pages .................................................................................................................................................... 85
Removing Punch Holes.................................................................................................................................................. 86
Scanning the Image Brighter.......................................................................................................................................... 88
Feeding Documents Manually in the ADF...................................................................................................................... 90
5.4 Configuring Post-Scan Operations and Handling .................................................................................................... 91
Automatically Correcting Skewed Images...................................................................................................................... 91
Automatically Correcting the Page Orientation .............................................................................................................. 93
Splitting the Scanned Image in Two............................................................................................................................... 95
Using the Multi Image Output......................................................................................................................................... 97
Automatically Detecting Color/Monochrome Documents ............................................................................................... 99
5.5 Customizing the Scanner Settings .......................................................................................................................... 101
Using a Button on the Scanner to Start Scanning........................................................................................................ 101
Detecting Multifeed Errors............................................................................................................................................ 103
Ignoring Multifeed for a Set Pattern.............................................................................................................................. 105
Chapter 6 Daily Care ................................................................................................................................... 108
6.1 Cleaning Materials and Locations that Require Cleaning ..................................................................................... 109
Cleaning Materials........................................................................................................................................................ 109
Scanner
Overview
How to Load
Documents
Configuring the
Scan Settings
How to Use the
Operator Panel
Various Ways to
Scan
Daily Care
Replacing the
Consumables
Location and Frequency............................................................................................................................................... 109
6.2 Cleaning the Outside ................................................................................................................................................ 110
fi-6130Z/fi-6140Z .......................................................................................................................................................... 110
fi-6230Z/fi-6240Z .......................................................................................................................................................... 110
6.3 Cleaning the Inside ................................................................................................................................................... 111
Cleaning the ADF (with Cleaning Paper) ..................................................................................................................... 111
Cleaning the ADF (with cloth)....................................................................................................................................... 112
Troubleshooting
Operational
Settings
Appendix
Glossary
10
Page 11

Contents
Cleaning the Flatbed (fi-6230Z/fi-6240Z) ..................................................................................................................... 115
6.4 Cleaning the Carrier Sheet ....................................................................................................................................... 116
Chapter 7 Replacing the Consumables ..................................................................................................... 117
TOP
Contents
Index
Introduction
7.1 Consumables and Replacement Cycles ................................................................................................................. 118
7.2 Replacing the Brake Roller ....................................................................................................................................... 119
7.3 Replacing the Pick Roller ......................................................................................................................................... 121
Chapter 8 Troubleshooting ......................................................................................................................... 124
8.1 Paper Jam .................................................................................................................................................................. 125
8.2 Error Indications on Operator Panel ....................................................................................................................... 126
Temporary Errors ......................................................................................................................................................... 127
Device Errors................................................................................................................................................................ 128
8.3 Troubleshooting ........................................................................................................................................................ 130
Scanner cannot be powered ON. ................................................................................................................................. 131
The Function Number Display switches OFF............................................................................................................... 132
Scanning does not start................................................................................................................................................ 133
Image quality is poor when scanning pictures/photos in black & white........................................................................ 134
Quality of scanned text or lines is unsatisfactory. ........................................................................................................ 135
Images are distorted or not clear.................................................................................................................................. 136
Vertical streaks appear on the scanned image. ........................................................................................................... 137
"E" (or other number/letter) is already displayed on the Function Number Display after power-on. ............................ 138
Scanner
Overview
How to Load
Documents
Configuring the
Scan Settings
How to Use the
Operator Panel
Various Ways to
Scan
Daily Care
Replacing the
Consumables
Multifeed error occurs frequently.................................................................................................................................. 139
Situation in which the document is not fed into the ADF occurs frequently.................................................................. 141
Paper jams/pick errors occur frequently....................................................................................................................... 142
Scanned images turn out elongated............................................................................................................................. 143
A shadow appears at the top or the bottom of the scanned image. ............................................................................. 144
There are black traces on the document...................................................................................................................... 145
The Carrier Sheet is not fed smoothly. / Paper jams occur. ......................................................................................... 146
Troubleshooting
Operational
Settings
Appendix
Glossary
11
Page 12

Contents
Part of the image appears missing when using the Carrier Sheet. .............................................................................. 148
8.4 Before You Contact the Scanner Service Provider ................................................................................................ 149
General......................................................................................................................................................................... 149
TOP
Contents
Index
Introduction
Error Status .................................................................................................................................................................. 150
8.5 Checking the Product Labels ................................................................................................................................... 151
Location........................................................................................................................................................................ 151
Chapter 9 Operational Settings .................................................................................................................. 152
9.1 Starting Up the Software Operation Panel .............................................................................................................. 153
9.2 Password Setting ...................................................................................................................................................... 154
Setting a Password ...................................................................................................................................................... 154
Setting the [View Only mode] ....................................................................................................................................... 155
Clearing the [View Only mode]..................................................................................................................................... 156
Changing the Password ............................................................................................................................................... 157
Clearing the Password ................................................................................................................................................. 158
Resetting the Password ............................................................................................................................................... 159
9.3 Configuration Items .................................................................................................................................................. 160
Device Setting .............................................................................................................................................................. 160
Device Setting 2 ........................................................................................................................................................... 162
9.4 Settings Related to Page Counters ......................................................................................................................... 166
Checking and Resetting the Counters.......................................................................................................................... 166
Replacement Cycle of Consumables [Life Counter Alarm Setting] .............................................................................. 168
Scanner
Overview
How to Load
Documents
Configuring the
Scan Settings
How to Use the
Operator Panel
Various Ways to
Scan
Daily Care
Replacing the
Consumables
9.5 Settings Related to Scanning ................................................................................................................................... 169
Adjusting the Position to Start the Scan [Offset/Vertical magnification Adjustment] .................................................... 169
Removing Shadows/Streaks that Appear around the Scanned Image [Page Edge Filler (ADF)] /
[Page Edge Filler (FB)] (fi-6230Z/fi-6240Z)............................................................................................................... 171
Removing a Color from the Scanned Image [Dropout color]........................................................................................ 173
Shortening the Scanning Intervals [Pre-Pick]............................................................................................................... 174
Number of Paper Feeding Retries................................................................................................................................ 175
Troubleshooting
Operational
Settings
Appendix
Glossary
12
Page 13

Contents
Cropping the Image Boundary [AutoCrop Boundary]................................................................................................... 176
Protecting the Documents from Being Damaged [Paper Protection] ........................................................................... 177
Specifying the Sensitivity Level for Paper Protection [Paper Protection Sensitivity] .................................................... 178
TOP
Contents
Index
Introduction
Scanning Thick Plastic Cards [Feed Mode] (fi-6140Z/fi-6240Z)................................................................................... 179
9.6 Settings Related to Multifeed Detection .................................................................................................................. 180
Specifying a Multifeed Detection Method [Multifeed] ................................................................................................... 180
Specifying the Area to Detect Multifeed [Document check area specification for Multifeed Detection]........................ 182
Specifying an Area Not to Detect Multifeed [Intelligent Multifeed Function]................................................................. 185
9.7 Settings Related to Waiting Time ............................................................................................................................ 186
Waiting Time in Manual Feed Mode [Manual-feed timeout]......................................................................................... 186
Waiting Time to Enter Power Saving Mode [Power saving] ......................................................................................... 187
9.8 Settings Related to Power ON/OFF ......................................................................................................................... 188
Method of Turning the Scanner ON/OFF [Power SW Control]..................................................................................... 188
Appendix ..................................................................................................................................................... 189
A.1 Basic Specification ................................................................................................................................................... 190
A.2 Installation Specification .......................................................................................................................................... 193
A.3 Outer Dimensions ..................................................................................................................................................... 195
fi-6130Z/fi-6140Z .......................................................................................................................................................... 195
fi-6230Z/fi-6240Z .......................................................................................................................................................... 195
A.4 Scanner Options ........................................................................................................................................................ 196
A.5 Uninstalling the Software ......................................................................................................................................... 197
Scanner
Overview
How to Load
Documents
Configuring the
Scan Settings
How to Use the
Operator Panel
Various Ways to
Scan
Daily Care
Replacing the
Consumables
Glossary ....................................................................................................................................................... 198
Index ............................................................................................................................................................. 209
Troubleshooting
Operational
Settings
Appendix
Glossary
13
Page 14

TOP
Contents
Index
Chapter 1 Scanner Overview
This chapter explains about the names and functions of the scanner components, as well as the methods for basic
operations.
1.1 Main Features.............................................................................................................................................15
1.2 Parts and Functions....................................................................................................................................16
1.3 Turning the Power ON/OFF........................................................................................................................23
1.4 Opening/Closing the ADF...........................................................................................................................24
1.5 Opening/Closing the Document Cover (fi-6230Z/fi-6240Z) ........................................................................25
1.6 Setting Up the ADF Paper Chute ...............................................................................................................26
1.7 Setting Up the Stacker................................................................................................................................27
1.8 Power Saving Mode ...................................................................................................................................31
1.9 Basic Flow of Scanning Operation .............................................................................................................32
Introduction
Scanner
Overview
How to Load
Documents
Configuring the
Scan Settings
How to Use the
Operator Panel
Various Ways to
Scan
Daily Care
1.10 Image Scanning Application .....................................................................................................................35
1.11 Centralized Management of Scanners .....................................................................................................36
Replacing the
Consumables
Troubleshooting
Operational
Settings
Appendix
Glossary
Page 15

Chapter 1 Scanner Overview
TOP
Contents
1.1 Main Features
This section explains about the main features of this product.
The scanner is equipped with the following features:
High speed scanning
Realizes a scanning speed of 30 ppm/60 ipm (fi-6130Z/fi-6230Z),
or 40 ppm/80 ipm (fi-6140Z/fi-6240Z) (*1). Furthermore, you can load up
to 50 sheets of documents for continuous scanning which allows you to
quickly digitize a large volume of documents.
Capable of scanning photographs, clippings, and
documents larger than A4/Letter size
The bundled "Carrier Sheet" allows you to scan documents that are
larger than A4/Letter size, as well as non-standard size documents such
as photographs and clippings. You can load multiple Carrier Sheets or
mix it with regular documents in the same batch.
Function Number Display
The scanner mounts a "Function Number Display" which displays error
indications. It is used to easily check the status of the scanner.
Improved efficiency for pre-scan work
The scanner can perform "batch scanning" which allows you to scan
documents with different paper weights and sizes at once, simplifying
the process of sorting the documents before scanning.
Intelligent Multifeed function
When there is paper of the same size attached to a designated location
on the page, the Intelligent Multifeed function enables the scanner to
recognize the location of the attachment. This allows you to continue
scanning instead of pausing the scan by detecting every paper
attachment as multifeed. Furthermore, the "paper protection" function
will reduce the risk of damaging your valuable documents.
Advanced image processing function
The scanner’s automatic detection function outputs images in color or
monochrome by the document content.
Imprinter option
Imprinter is available as an option, which is often demanded for
managing/verifying documents. Having the capability to print on the
scanned documents could drastically improve usability.
The imprinter can be installed on fi-6130Z or fi-6140Z.
Scanning on black background
Black document pad is available as an option, which allows you to
perform scanning on black background when using the flatbed. It can be
used to automatically correct skewed images or accurately detect the
size of the scanned document.
The black document pad can be used on fi-6230Z or fi-6240Z.
Index
Introduction
Scanner
Overview
How to Load
Documents
Configuring the
Scan Settings
How to Use the
Operator Panel
Various Ways to
Scan
Daily Care
Reduced work loss caused by multifeeds
The scanner mounts an ultrasonic multifeed sensor that accurately
detects "multifeed" errors where two or more sheets are fed through the
scanner at once.This multifeed detection is reliable even when scanning
a mixed batch of documents with different paper weights and sizes,
avoiding potential work loss.
Centralized management of multiple scanners
The bundled "Scanner Central Admin Agent" application allows you to
manage multiple scanners together, for example, to update the scanner
settings and drivers, as well as to monitor the operating status of each
scanner.
*1: When scanning A4 size documents at 300 dpi with JPEG compression.
Replacing the
Consumables
Troubleshooting
Operational
Settings
Appendix
Glossary
15
Page 16

Chapter 1 Scanner Overview
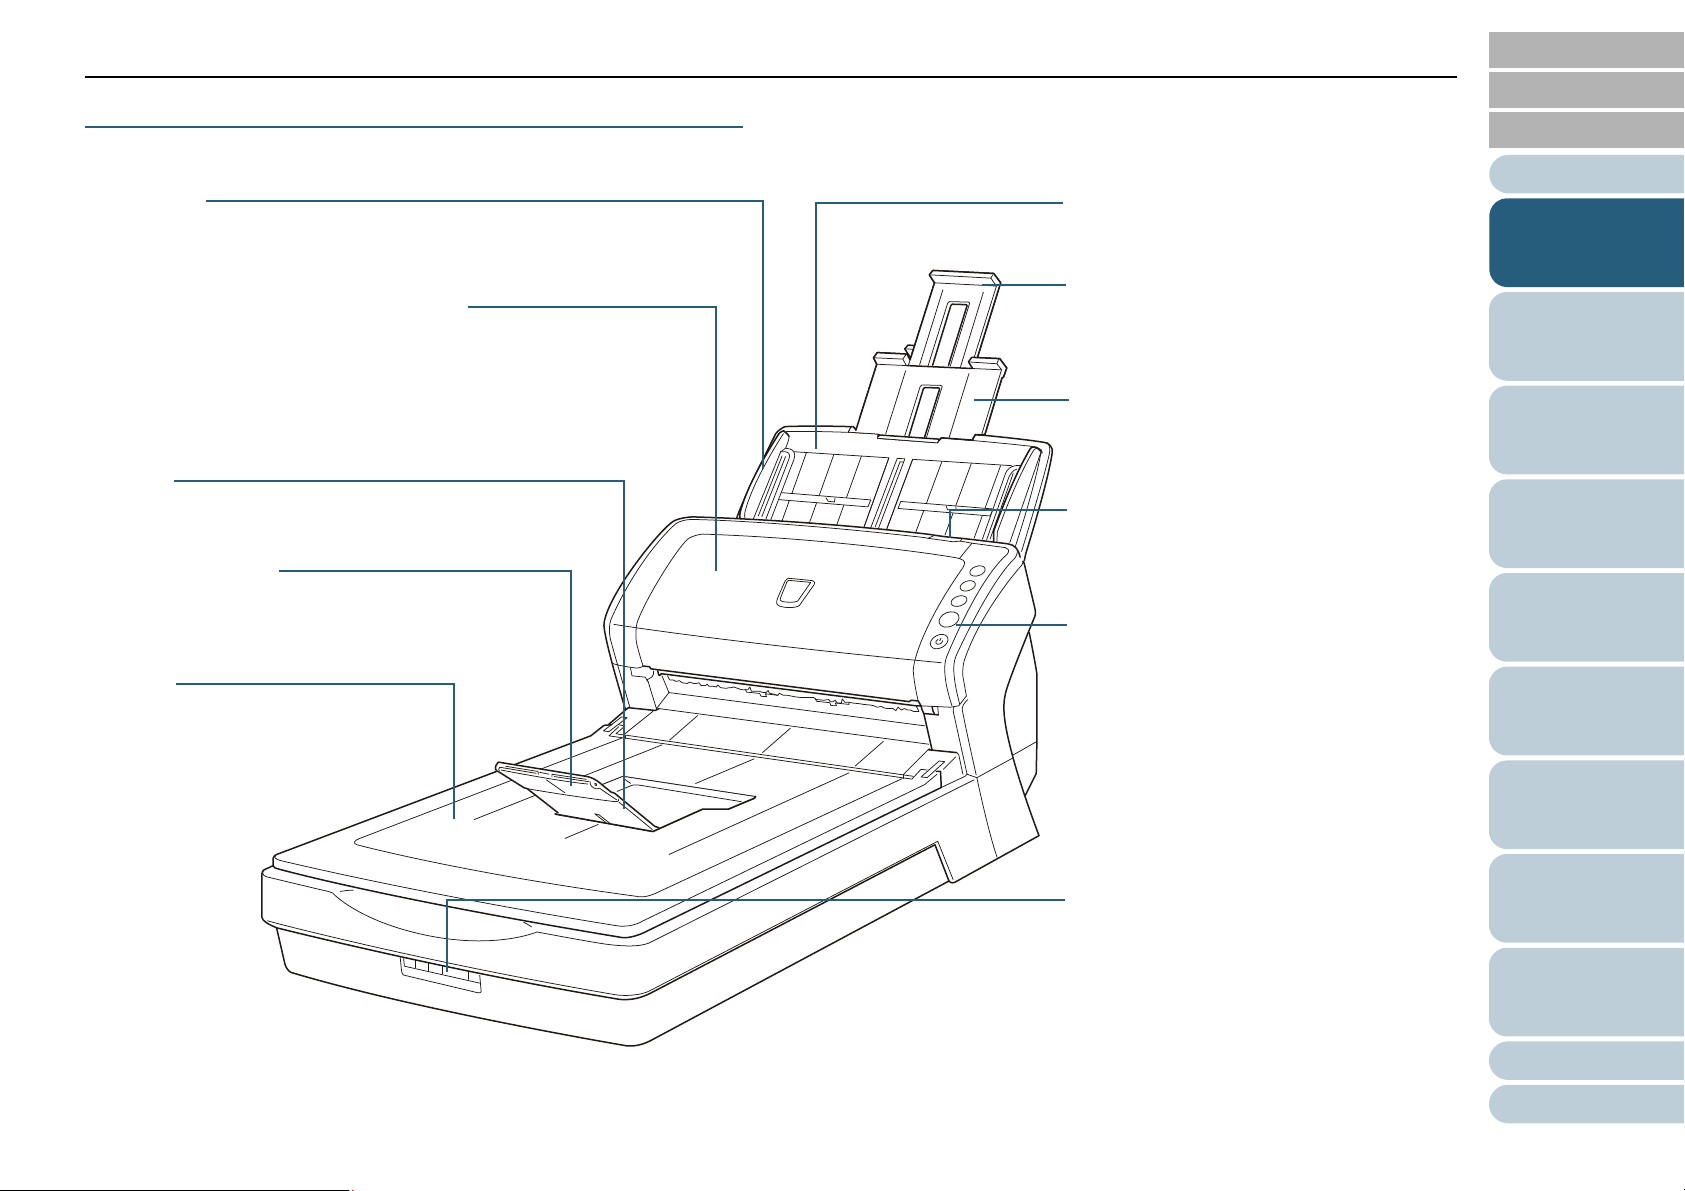
Stacker
Stacks up the ejected documents.
Operator panel
Consists of the Function Number Display,
buttons, and LED indicator.
Can be used to operate the scanner or
check the status.
For details, refer to "Chapter 4 How to Use
the Operator Panel" (page 63).
ADF (Automatic Document Feeder)
Pulls and feeds the documents one sheet
at a time from the ADF paper chute.
Open to replace consumables or clean the
inside of the scanner.
Side guide
Guides the documents in width direction
as they are fed into the scanner.
Chute extension 2
Pull out to adjust to the document length.
ADF paper chute
Holds the documents to be scanned.
ADF release tab
Pull this tab to open the ADF.
Stacker extension 2
Lift up to adjust to the document length.
Chute extension 1
Pull out to adjust to the document length.
Stacker extension 1
Slide out to adjust to the document length.
Stacker extension 3
Lift up to adjust to the document length.
TOP
Contents
1.2 Parts and Functions
This section shows the names of the scanner parts.
fi-6130Z/fi-6140Z
■Front
Index
Introduction
Scanner
Overview
How to Load
Documents
Configuring the
Scan Settings
How to Use the
Operator Panel
Various Ways to
Scan
Daily Care
Replacing the
Consumables
Troubleshooting
Operational
Settings
Appendix
Glossary
16
Page 17
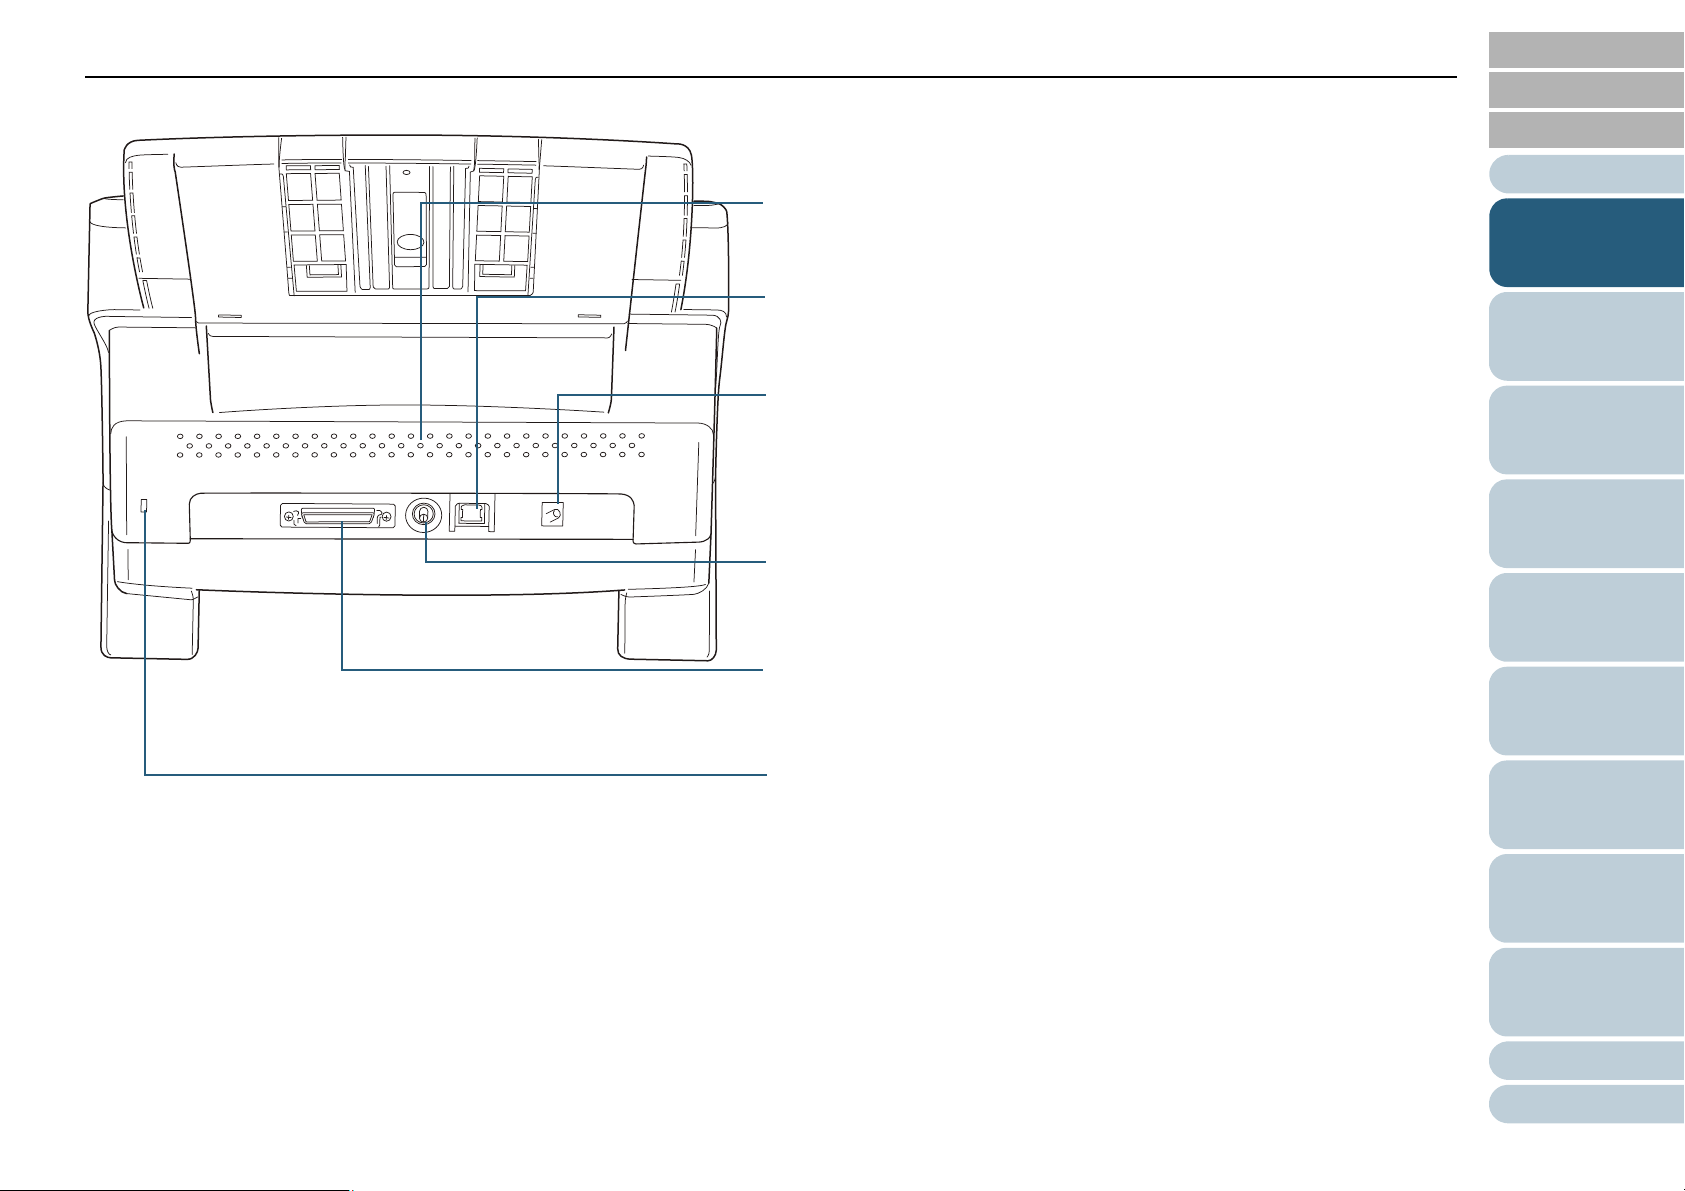
Chapter 1 Scanner Overview
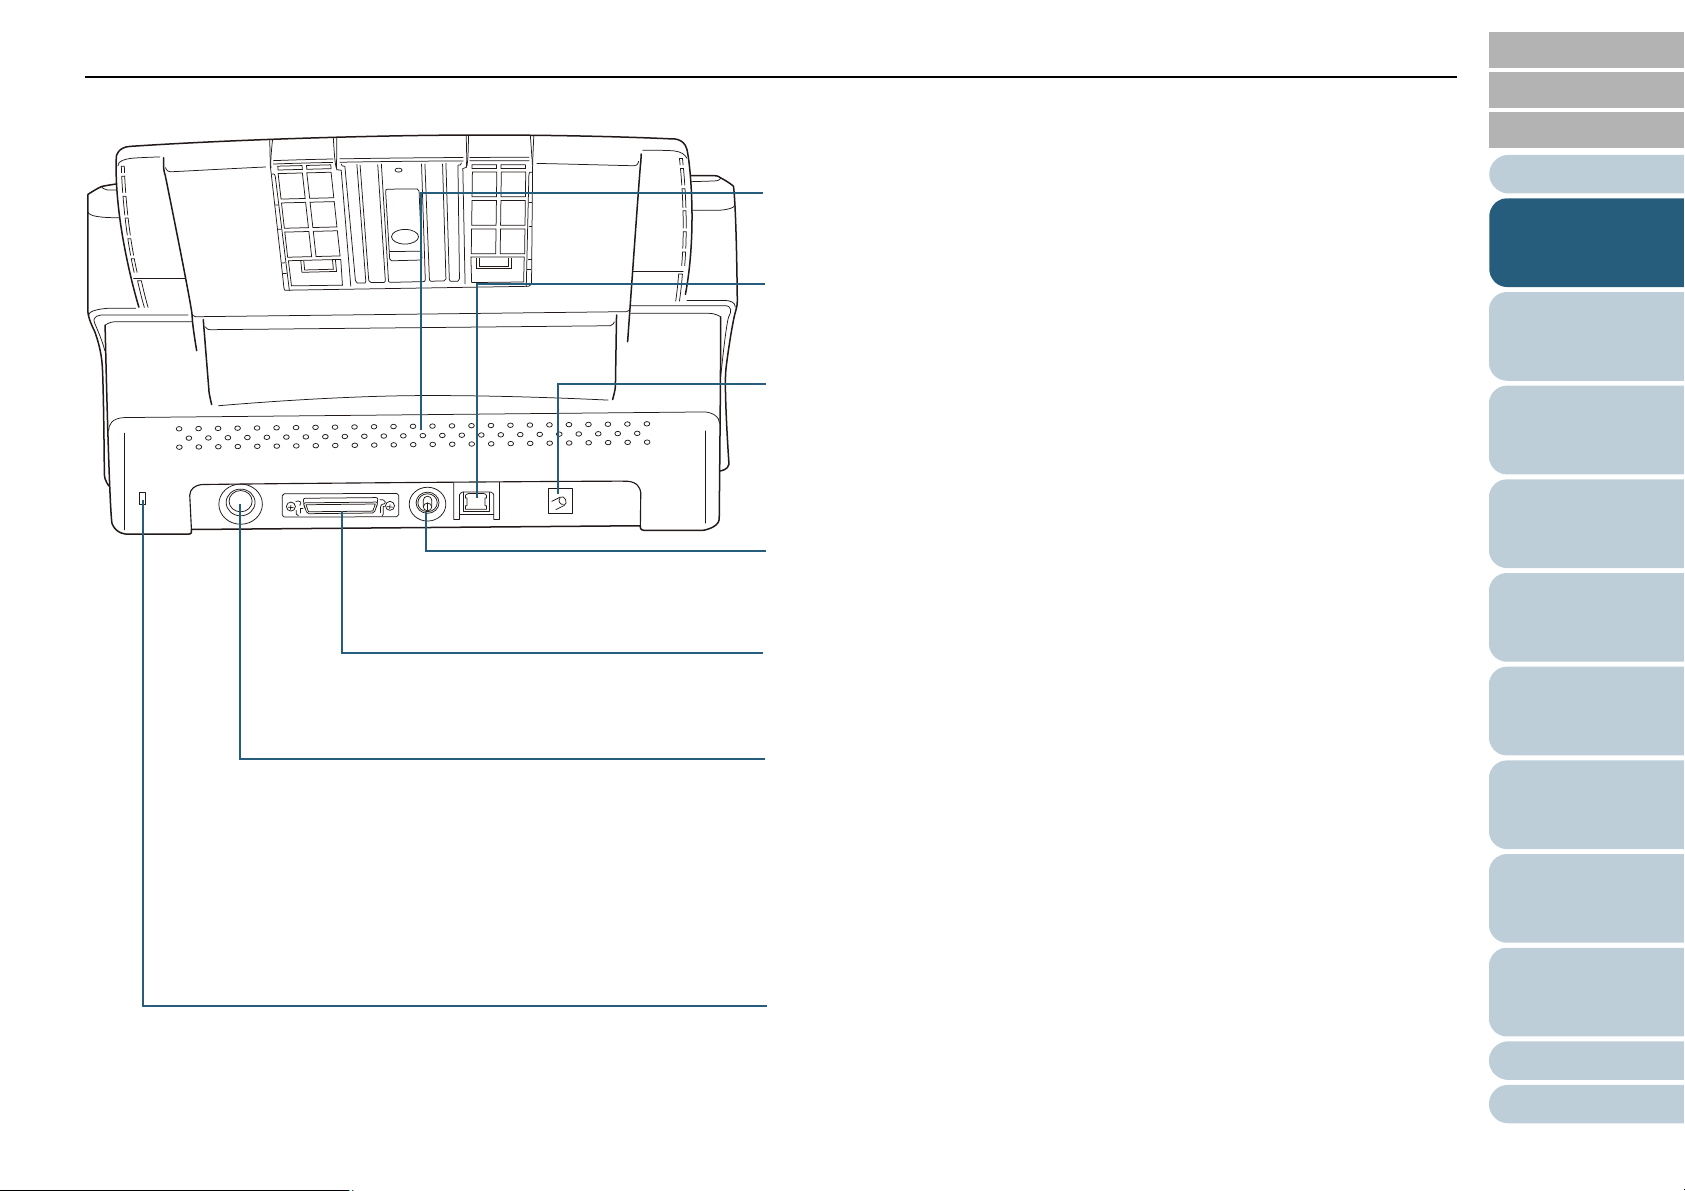
USB connector
Used to connect a USB cable.
Security cable slot
Used to connect an anti-theft security cable (commercially available).
Ventilation port
Holes for ventilating hot air from inside the scanner.
Power connector
Used to connect the power cable.
"Power cable" refers to the AC cable and AC adaptor connected together.
SCSI connector (fi-6140Z)
Used to connect a SCSI cable.
EXT connector
Used to connect the imprinter.
The imprinter is used to print text (e.g. alphabets, numbers) on the scanned
documents, and is available as an option.
It can be useful for managing documents when you add a name, date or
serial number on the scanned document.
For details, refer to "A.4 Scanner Options" (page 196).
SCSI ID switch (fi-6140Z)
Used to configure the SCSI ID (factory default: 5).
■Back
TOP
Contents
Index
Introduction
Scanner
Overview
How to Load
Documents
Configuring the
Scan Settings
How to Use the
Operator Panel
Various Ways to
Scan
Daily Care
Replacing the
Consumables
Troubleshooting
Operational
Settings
Appendix
Glossary
17
Page 18
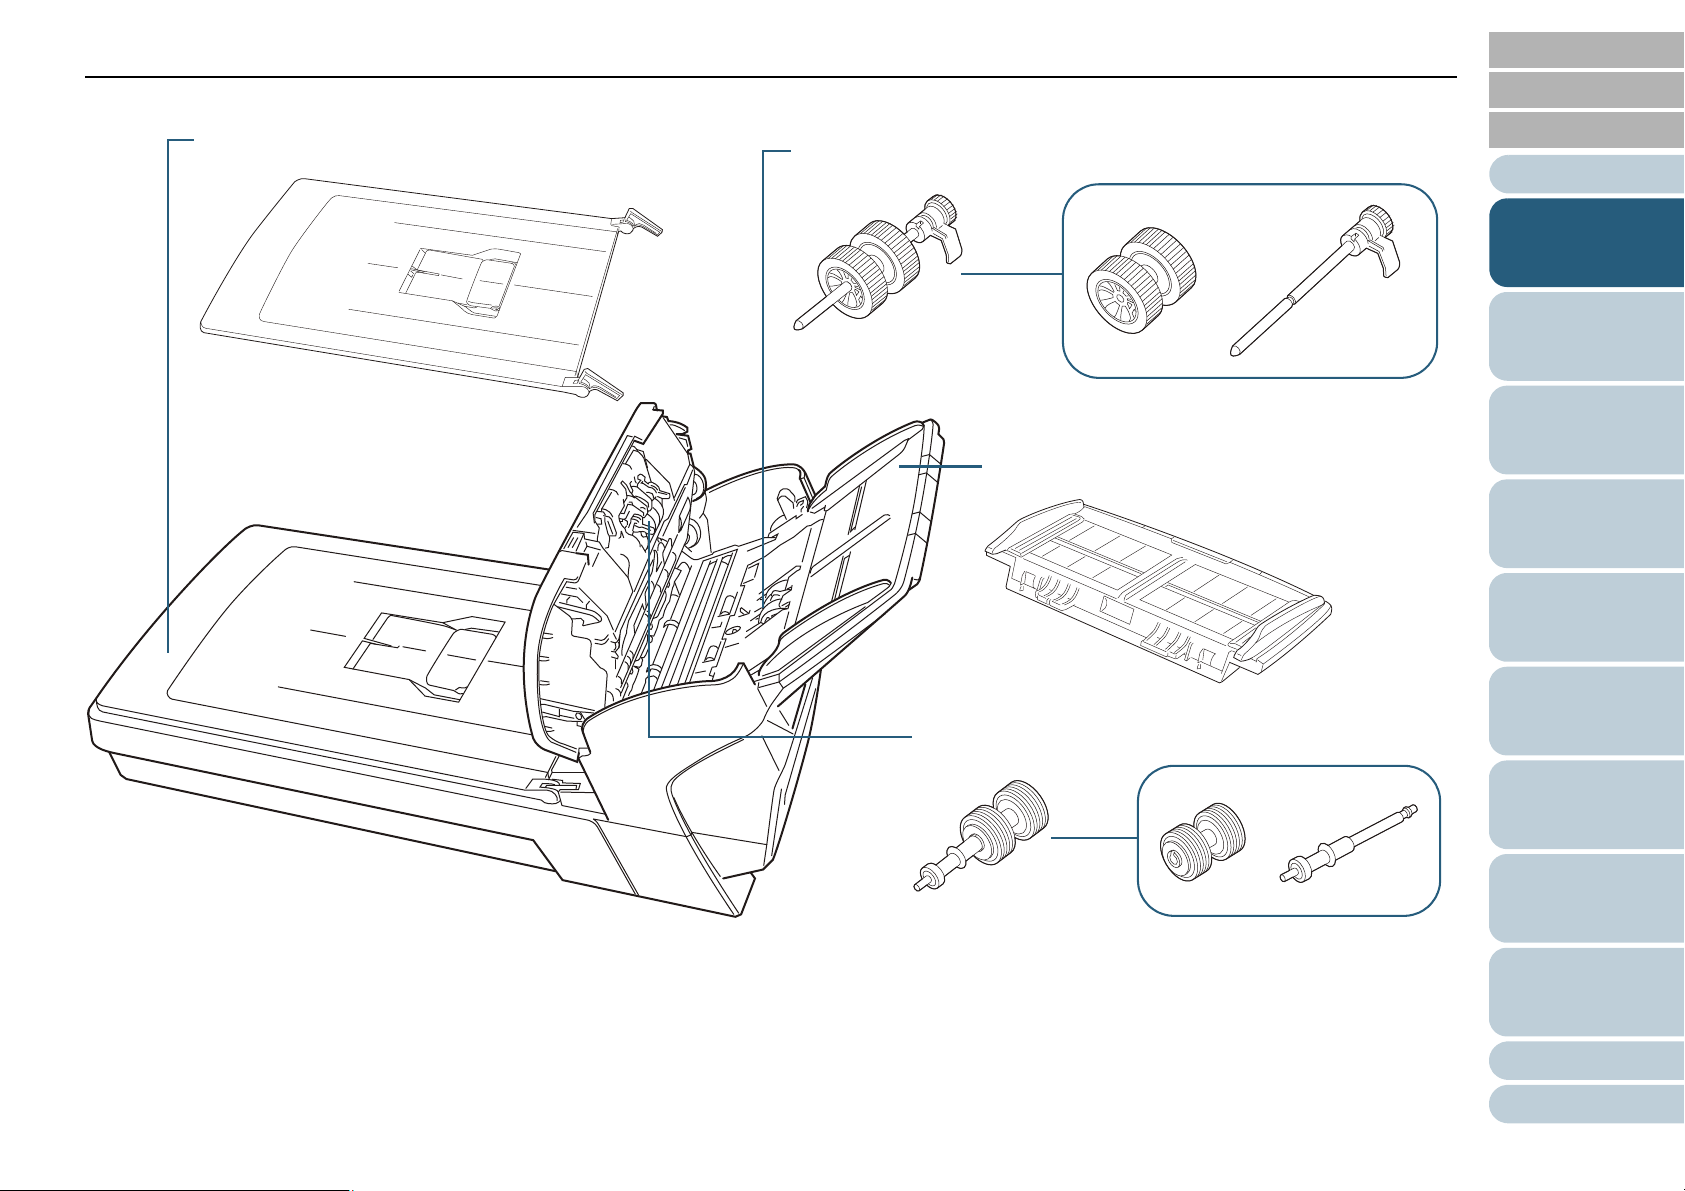
Chapter 1 Scanner Overview
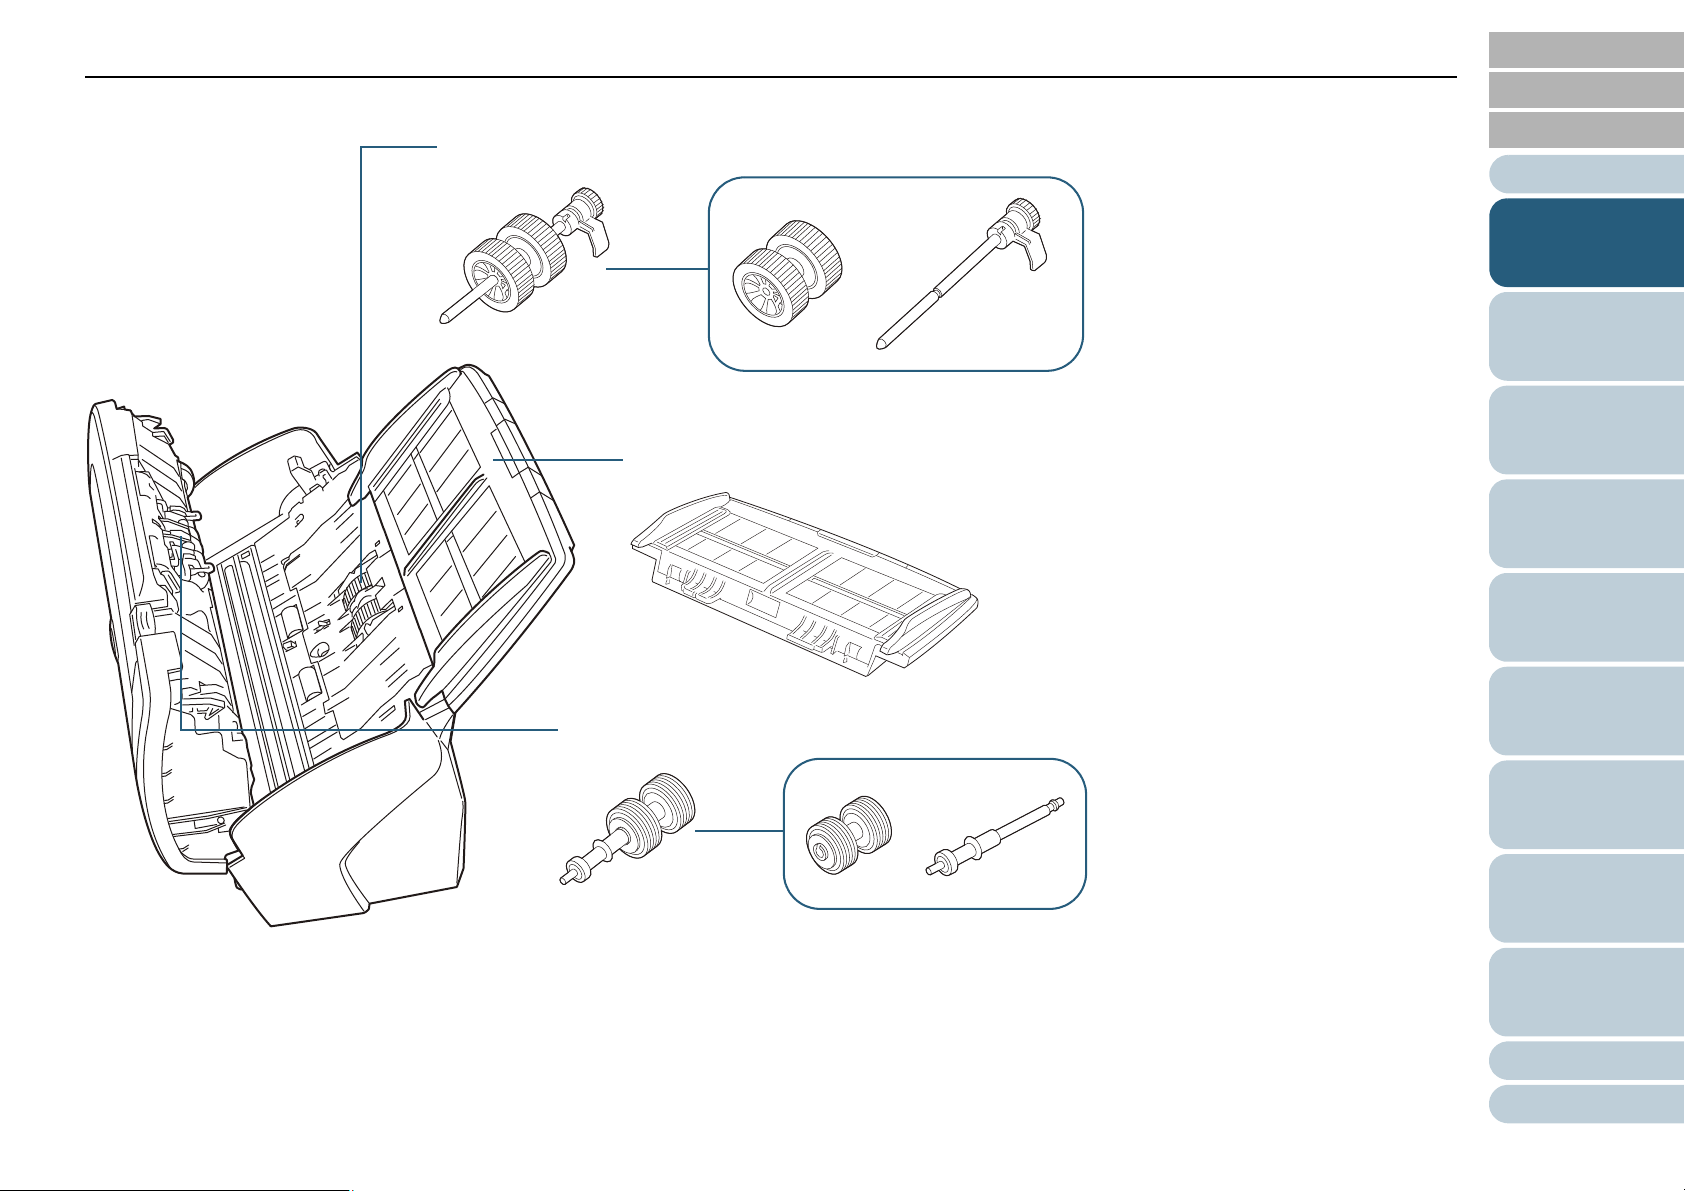
Pick roller
ADF paper chute
Brake roller
■Removable Parts
TOP
Contents
Index
Introduction
Scanner
Overview
How to Load
Documents
Configuring the
Scan Settings
How to Use the
Operator Panel
Various Ways to
Scan
Daily Care
Replacing the
Consumables
Troubleshooting
Operational
Settings
Appendix
Glossary
18
Page 19
Chapter 1 Scanner Overview
Stacker
Stacks up the ejected documents.
Operator panel
Consists of the Function Number Display,
buttons, and LED indicator.
Can be used to operate the scanner or
check the status.
For details, refer to "Chapter 4 How to Use
the Operator Panel" (page 63).
ADF (Automatic Document Feeder)
Pulls and feeds the documents one sheet
at a time from the ADF paper chute.
Open to replace consumables or clean the
inside of the scanner.
Side guide
Guides the documents in width direction
as they are fed into the scanner.
Chute extension 2
Pull out to adjust to the document length.
ADF paper chute
Holds the documents to be scanned.
ADF release tab
Pull this tab to open the ADF.
Flatbed
For scanning documents (e.g. thin
paper, books) that cannot be scanned
with the ADF.
Chute extension 1
Pull out to adjust to the document length.
Stacker extension
Lift up to adjust to the document
length.
Transport lock switch
Locks the carrier unit (which is inside the
flatbed) to prevent damage during
transportation.
fi-6230Z/fi-6240Z
■Front
TOP
Contents
Index
Introduction
Scanner
Overview
How to Load
Documents
Configuring the
Scan Settings
How to Use the
Operator Panel
Various Ways to
Scan
Daily Care
Replacing the
Consumables
Troubleshooting
Operational
Settings
Appendix
Glossary
19
Page 20
Chapter 1 Scanner Overview
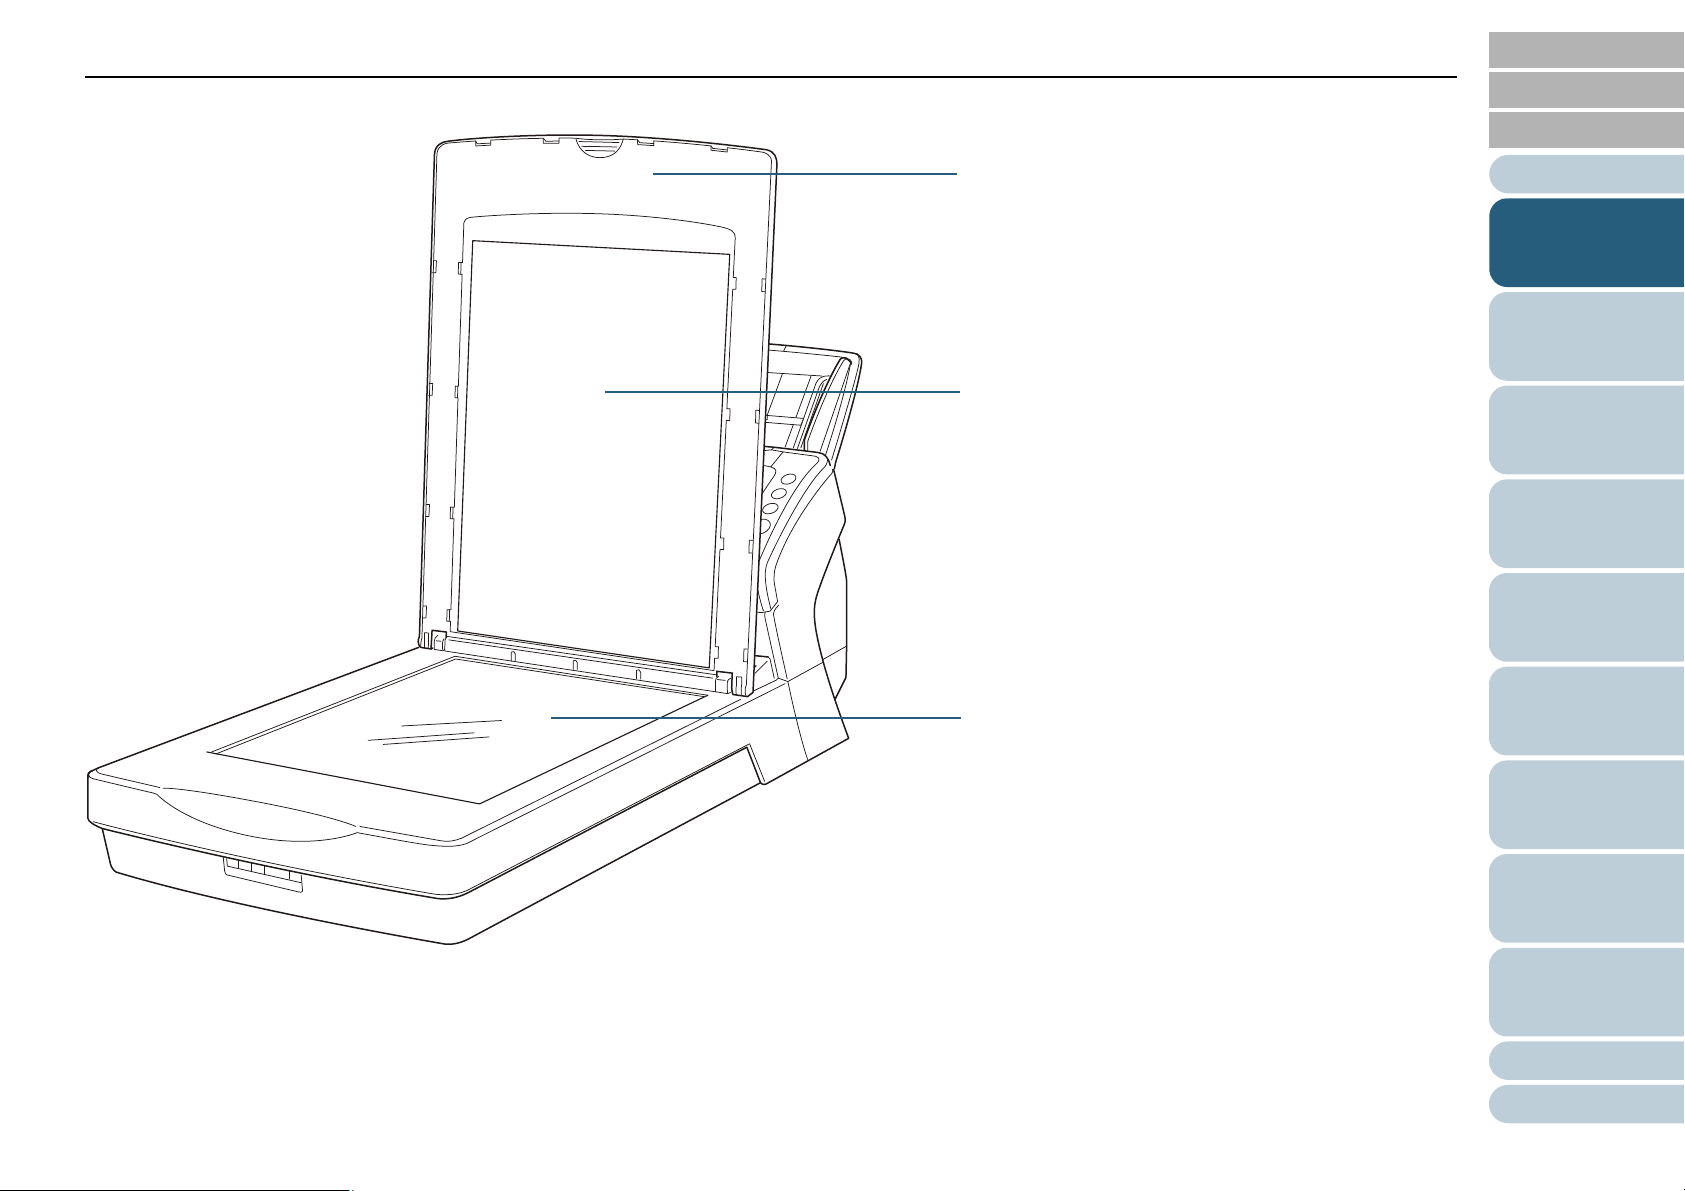
Document bed
Place a document on the glass section.
Document pad
Holds the document down against the document bed.
Document cover with a black document pad is also
available as an option.
Use it to perform scanning in black background on the
flatbed.
For details, refer to "A.4 Scanner Options" (page 196).
Document cover
Close it to hold the document in place.
■Inside
TOP
Contents
Index
Introduction
Scanner
Overview
How to Load
Documents
Configuring the
Scan Settings
How to Use the
Operator Panel
Various Ways to
Scan
Daily Care
Replacing the
Consumables
Troubleshooting
Operational
Settings
Appendix
Glossary
20
Page 21
Chapter 1 Scanner Overview
USB connector
Used to connect a USB cable.
Security cable slot
Used to connect an anti-theft security cable (commercially available).
Ventilation port
Holes for ventilating hot air from inside the scanner.
Power connector
Used to connect the power cable.
"Power cable" refers to the AC cable and AC adaptor connected together.
SCSI connector (fi-6240Z)
Used to connect a SCSI cable.
SCSI ID switch (fi-6240Z)
Used to configure the SCSI ID (factory default: 5).
■Back
TOP
Contents
Index
Introduction
Scanner
Overview
How to Load
Documents
Configuring the
Scan Settings
How to Use the
Operator Panel
Various Ways to
Scan
Daily Care
Replacing the
Consumables
Troubleshooting
Operational
Settings
Appendix
Glossary
21
Page 22
Chapter 1 Scanner Overview
Pick roller
ADF paper chute
Brake roller
Document cover
■Removable Parts
TOP
Contents
Index
Introduction
Scanner
Overview
How to Load
Documents
Configuring the
Scan Settings
How to Use the
Operator Panel
Various Ways to
Scan
Daily Care
Replacing the
Consumables
Troubleshooting
Operational
Settings
Appendix
Glossary
22
Page 23
Chapter 1 Scanner Overview
!!!
Check
Function
Send to
Scan
/Stop
Power
[Power] Button
TOP
Contents
1.3 Turning the Power ON/OFF
This section explains how to power on/off the scanner.
The method by which the scanner is powered on/off can be
specified from one of the following:
z Press the [Power] button on the operator panel
z Unplug the power cable then plug it back in
z Have the scanner turn on/off in sync with the computer's
power
For details, refer to "Method of Turning the Scanner ON/OFF
[Power SW Control]" (page 188).
How to Turn the Power ON
When connected via SCSI, turn on the scanner and confirm
that "1" is displayed on the Function Number Display before
you turn on the computer.
1 Press the [Power] button on the operator panel.
D The scanner is turned on, and the [Power] button lights in green.
During initialization, the Function Number Display changes in the
following order: "8" J "P" J "0" J "1". "1" indicates that the
scanner is ready.
When you press the [Power] button, the LED indicator will
flash once. Note that this is an initial diagnosis and not a
malfunction.
How to Turn the Power OFF
1 Press the [Power] button on the operator panel for more
than 2 seconds.
D The scanner is turned off, and the [Power] button switches off.
Index
Introduction
Scanner
Overview
How to Load
Documents
Configuring the
Scan Settings
How to Use the
Operator Panel
Various Ways to
Scan
Daily Care
Replacing the
Consumables
Troubleshooting
Operational
Settings
Appendix
Glossary
23
Page 24

Chapter 1 Scanner Overview
ADF release tab
!
TOP
Contents
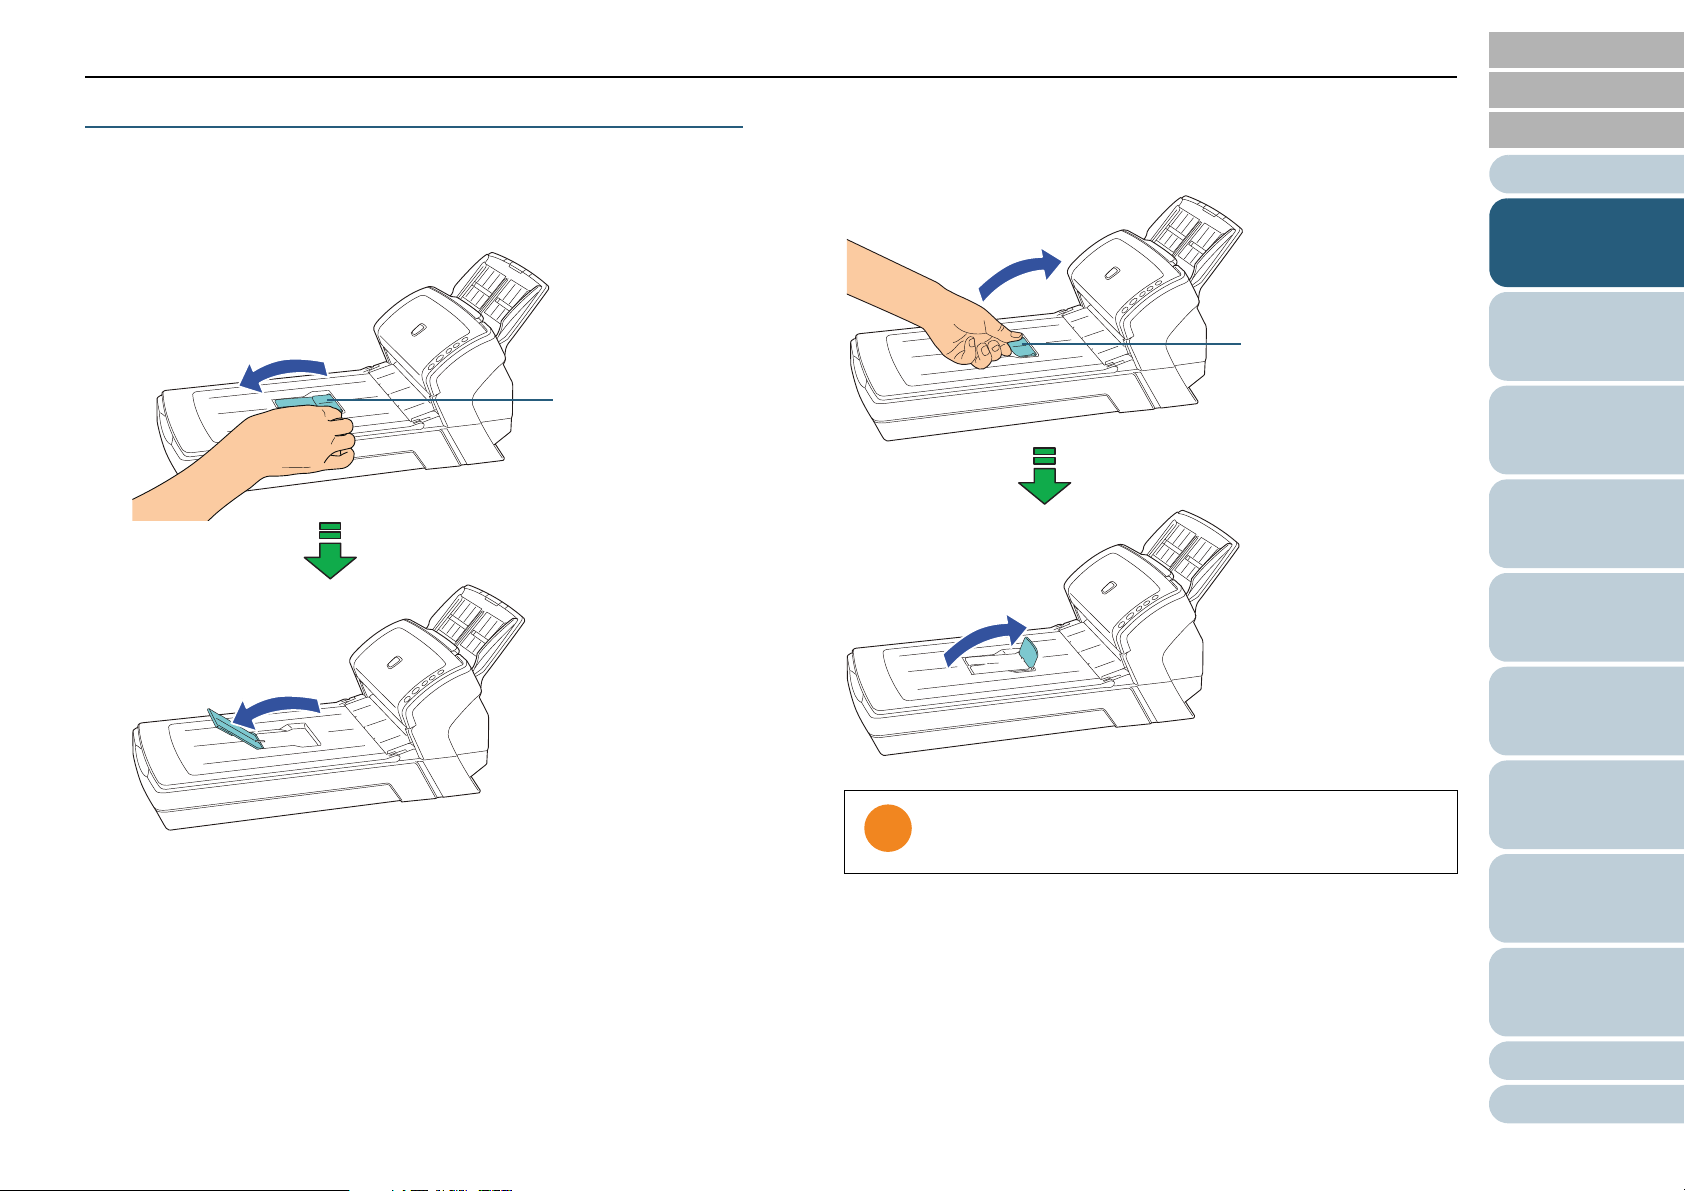
1.4 Opening/Closing the ADF
This section describes how to open and close the ADF.
How to Open the ADF
1 Remove all documents from the ADF paper chute.
2 Pull the ADF release tab towards you to open the ADF.
How to Close the ADF
1 Close the ADF.
Push the center of the ADF until it locks in place.
Be careful not to have your fingers caught
when the ADF closes.
Index
Introduction
Scanner
Overview
How to Load
Documents
Configuring the
Scan Settings
How to Use the
Operator Panel
Various Ways to
Scan
Be careful not to have your fingers caught
when the ADF closes.
!
!
Daily Care
Make sure that there is no foreign matter caught inside
the ADF.
Replacing the
Consumables
Troubleshooting
Operational
Settings
Appendix
Glossary
24
Page 25
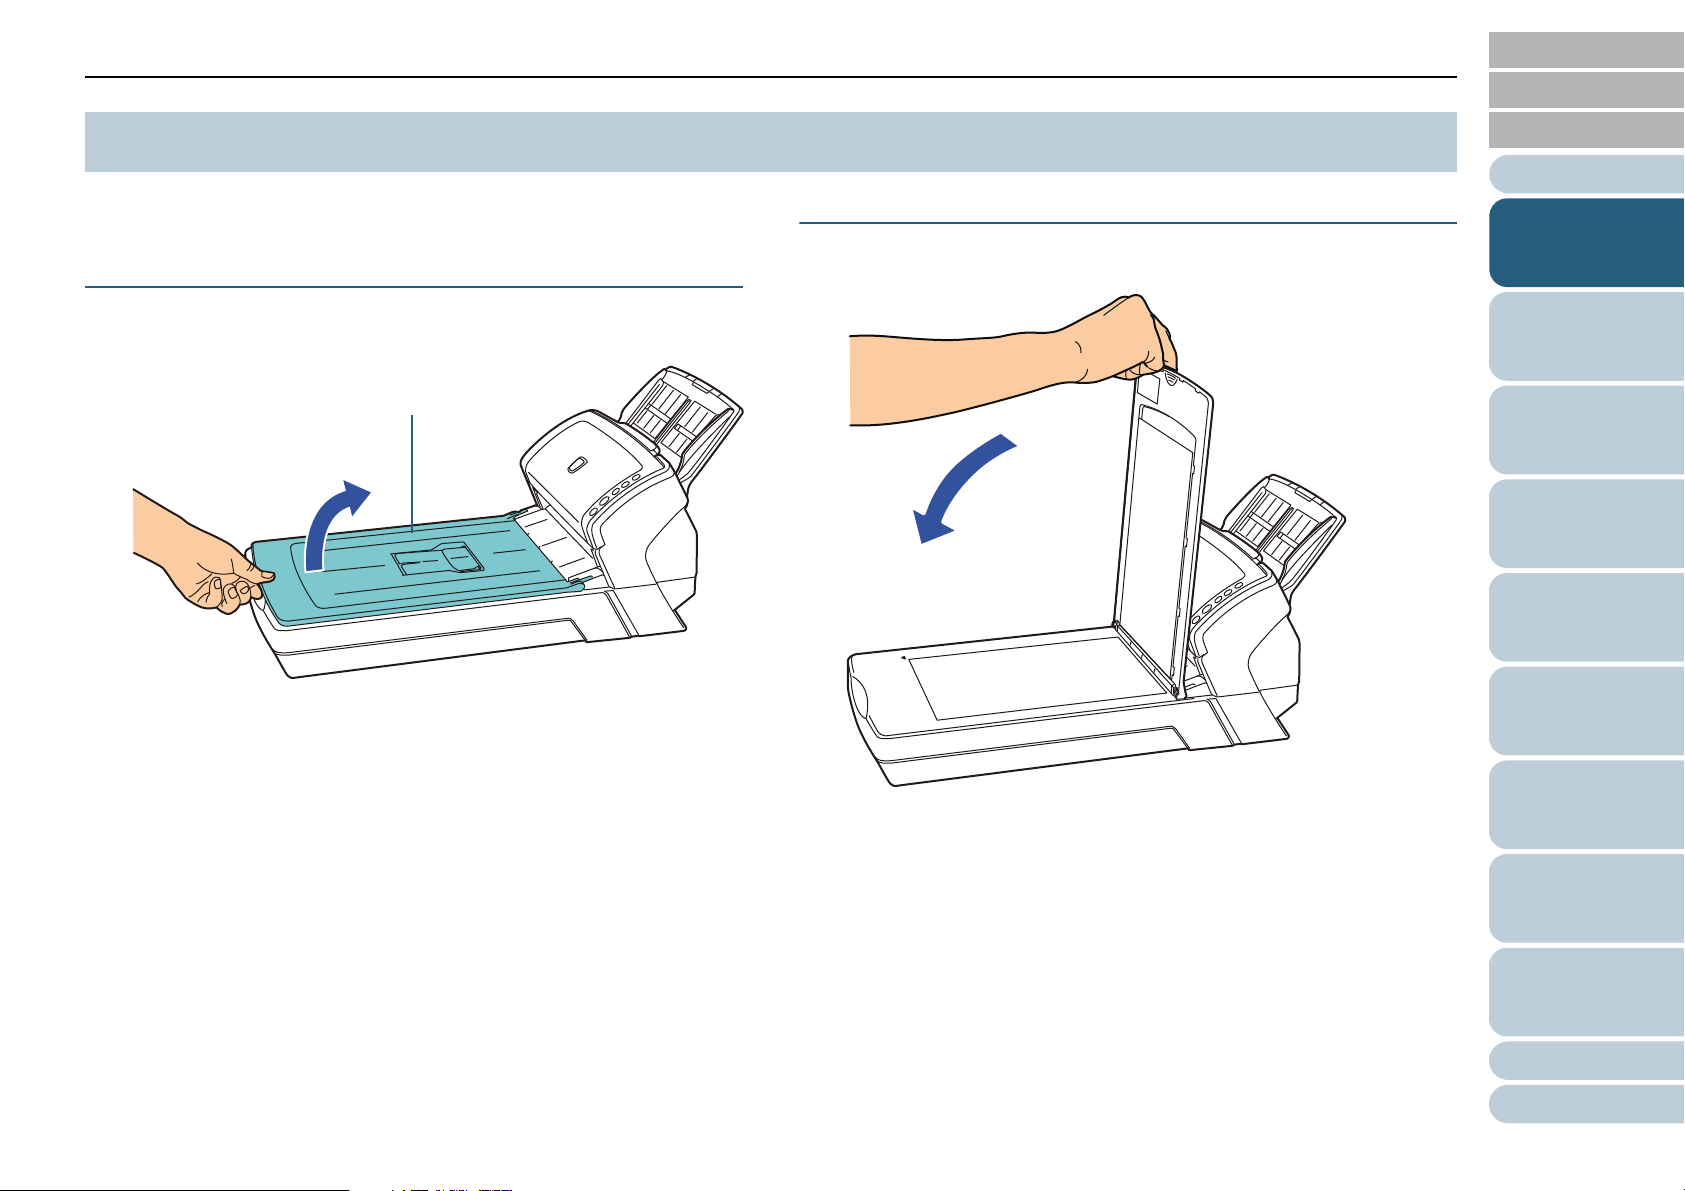
Chapter 1 Scanner Overview
Document cover
TOP
Contents
1.5 Opening/Closing the Document Cover (fi-6230Z/fi-6240Z)
This section describes how to open and close the document
cover.
How to Open the Document Cover
1 Open the document cover.
How to Close the Document Cover
1 Gently close the document cover.
Index
Introduction
Scanner
Overview
How to Load
Documents
Configuring the
Scan Settings
How to Use the
Operator Panel
Various Ways to
Scan
Daily Care
Replacing the
Consumables
Troubleshooting
Operational
Settings
Appendix
Glossary
25
Page 26
Chapter 1 Scanner Overview
Chute extension 1
Chute extension 2
TOP
Contents
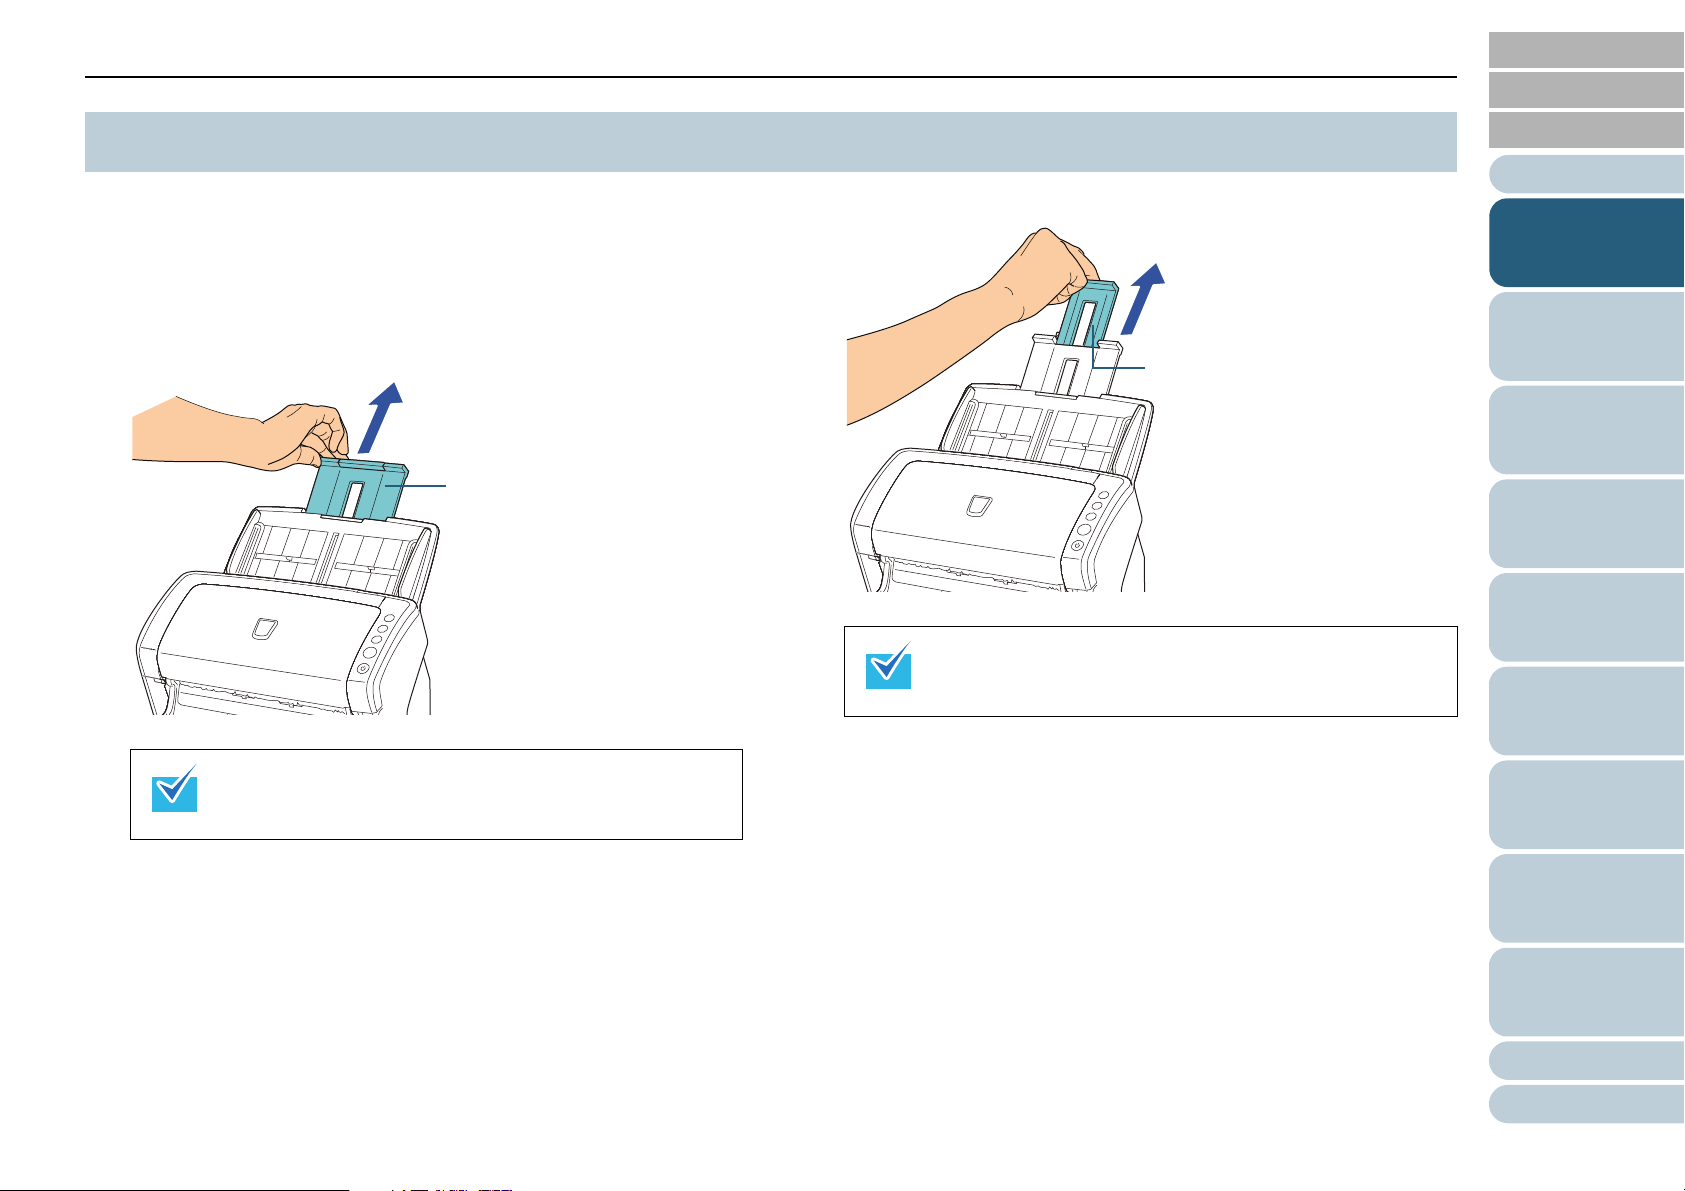
1.6 Setting Up the ADF Paper Chute
Documents loaded in the ADF paper chute are fed into the
ADF one by one.
Using the chute extensions will keep the documents straight
and feed them smoothly.
1 Pull out chute extension 1.
2 Pull out chute extension 2.
Make sure to hold the scanner while you pull out the
chute extension.
Index
Introduction
Scanner
Overview
How to Load
Documents
Configuring the
Scan Settings
How to Use the
Operator Panel
Various Ways to
Scan
Make sure to hold the scanner while you pull out the
chute extension.
Daily Care
Replacing the
Consumables
Troubleshooting
Operational
Settings
Appendix
Glossary
26
Page 27
Chapter 1 Scanner Overview
Stacker
Stacker extension 1
TOP
Contents
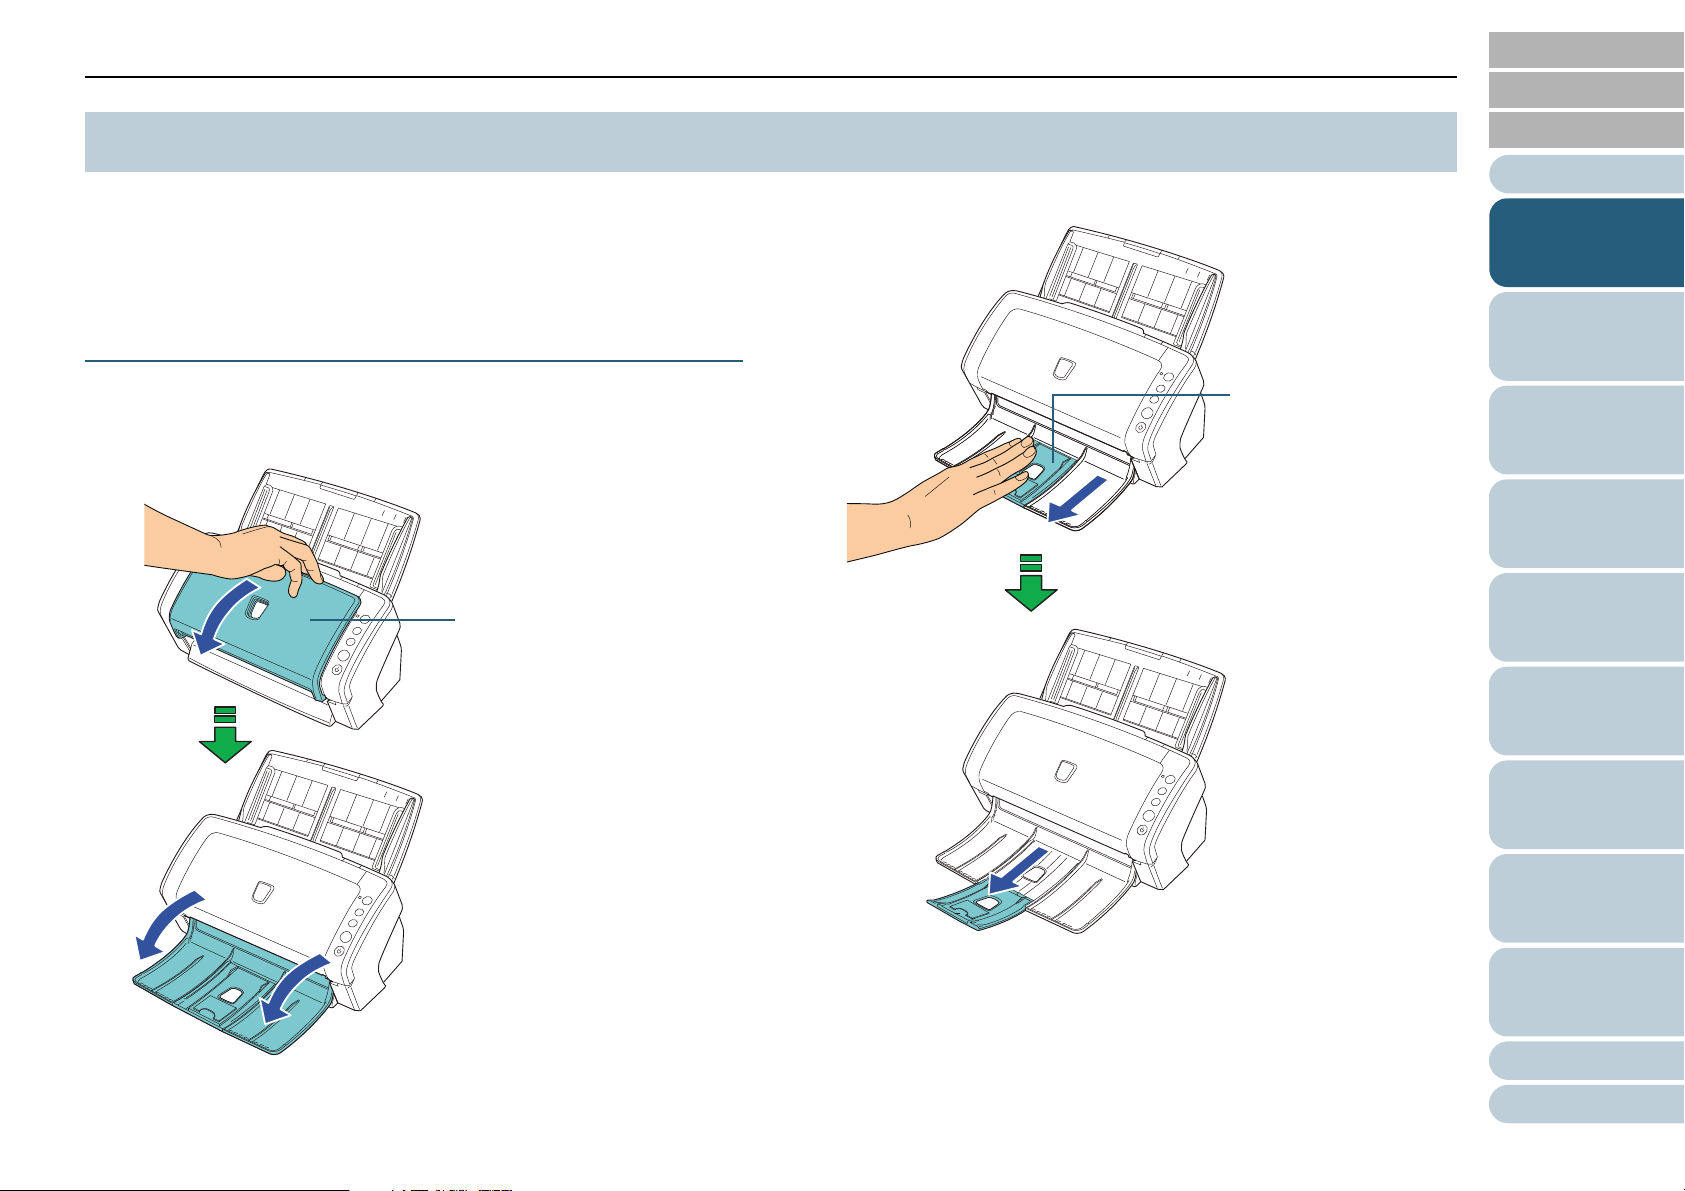
1.7 Setting Up the Stacker
Documents loaded in the ADF paper chute are ejected onto
the stacker one by one.
Using the stacker and stacker extensions will keep the
documents straight and stack them neatly.
fi-6130Z/fi-6140Z
■A6 (landscape) or larger
1 Bring down the stacker from the top towards you.
Index
Introduction
2 Slide out the stacker extension 1 towards you.
Scanner
Overview
How to Load
Documents
Configuring the
Scan Settings
How to Use the
Operator Panel
Various Ways to
Scan
Daily Care
Replacing the
Consumables
Troubleshooting
Operational
Settings
Appendix
Glossary
27
Page 28
Chapter 1 Scanner Overview
Stacker extension 2
3 Lift up the stacker extension 2 towards you.
TOP
Contents
Index
Introduction
Scanner
Overview
How to Load
Documents
Configuring the
Scan Settings
How to Use the
Operator Panel
Various Ways to
Scan
Daily Care
Replacing the
Consumables
Troubleshooting
Operational
Settings
Appendix
Glossary
28
Page 29
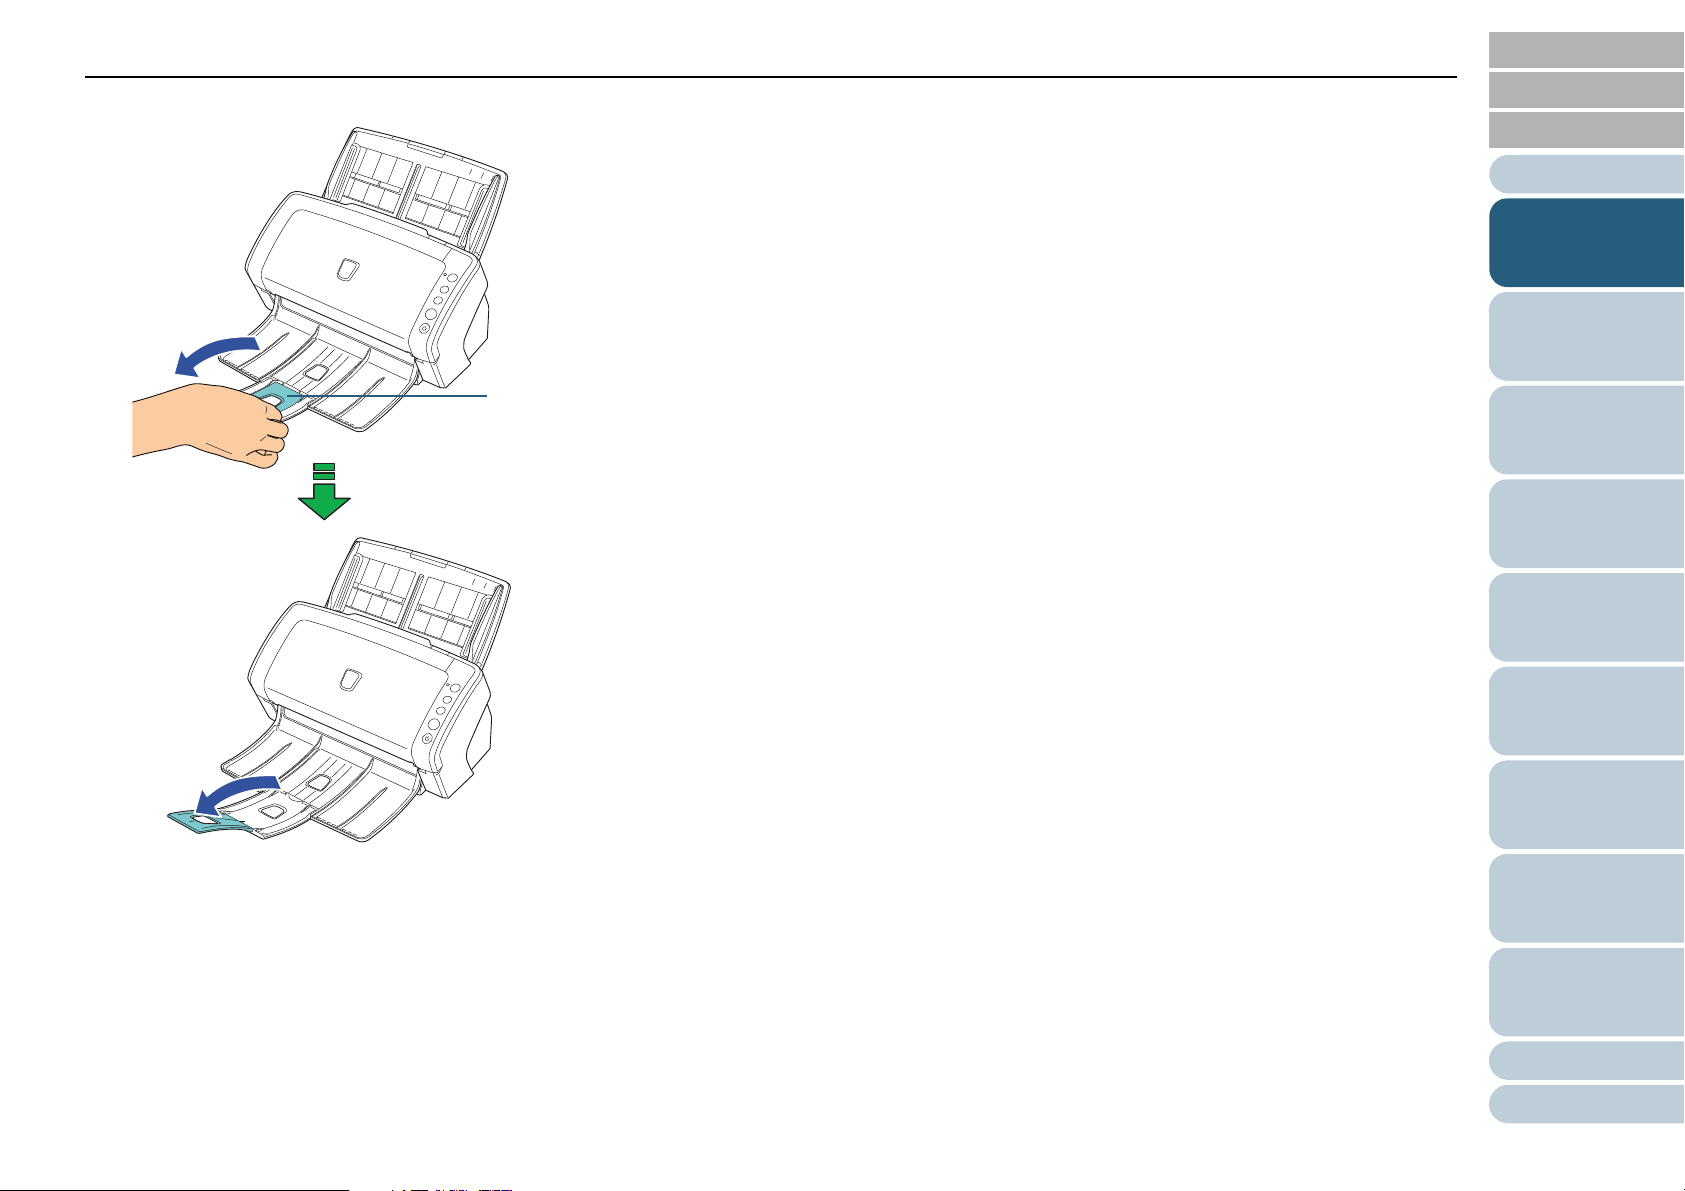
Chapter 1 Scanner Overview
Stacker
!!!
Stacker extension 3
■A7 (landscape) or smaller
1 Bring down the stacker from the top towards you.
2 Lift up the stacker extension 3.
TOP
Contents
Index
Introduction
Scanner
Overview
How to Load
Documents
Configuring the
Scan Settings
How to Use the
Operator Panel
Various Ways to
Scan
Do not bend the stacker extension more than 90 degrees,
because it may break.
Daily Care
Replacing the
Consumables
Troubleshooting
Operational
Settings
Appendix
Glossary
29
Page 30
Chapter 1 Scanner Overview
Stacker
!!!
Stacker extension
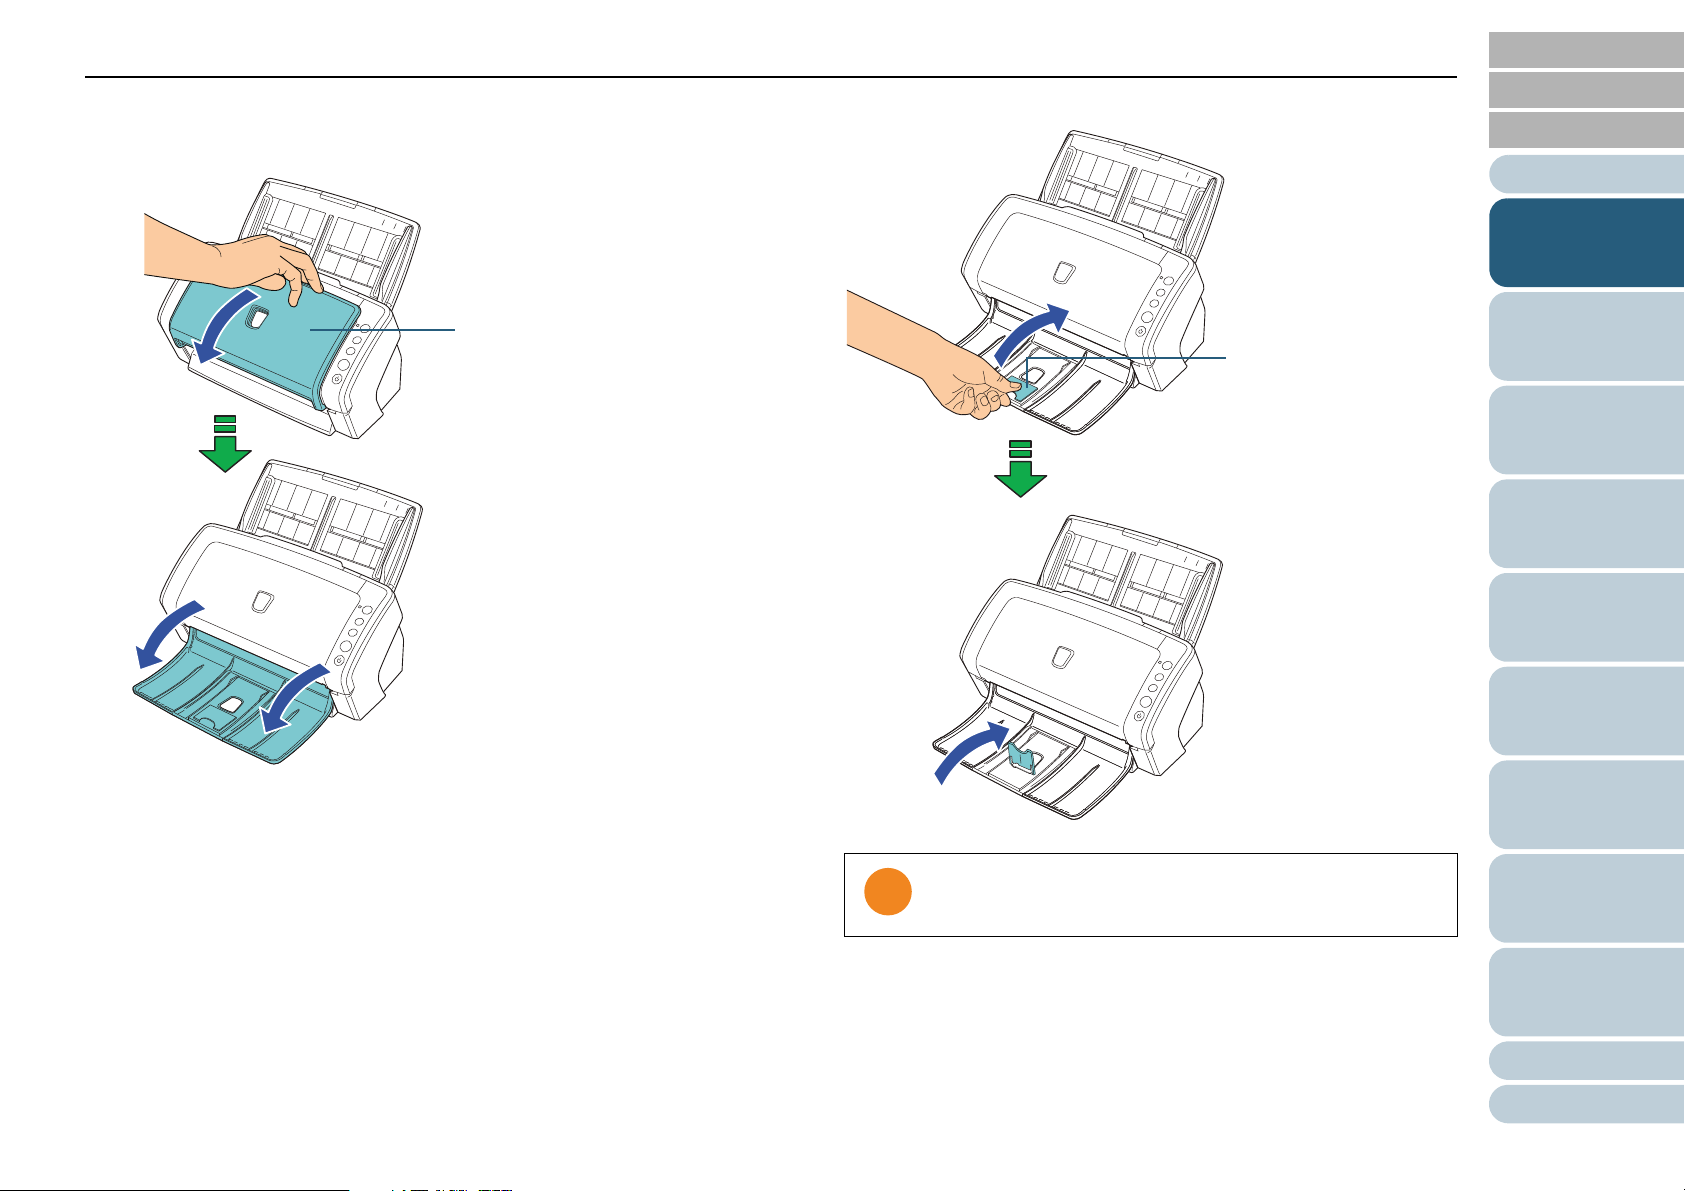
fi-6230Z/fi-6240Z
■A5 (portrait) or larger
■A6 (portrait)/A5 (landscape) or smaller
1 Lift the stacker extension.
TOP
Contents
Index
Introduction
1 Lift up the stacker towards you.
Do not bend the stacker extension more than 90 degrees,
because it may break.
Scanner
Overview
How to Load
Documents
Configuring the
Scan Settings
How to Use the
Operator Panel
Various Ways to
Scan
Daily Care
Replacing the
Consumables
Troubleshooting
Operational
Settings
Appendix
Glossary
30
Page 31

Chapter 1 Scanner Overview
!
TOP
Contents
1.8 Power Saving Mode
Power saving mode keeps the power consumption low when
the scanner has not been used for a certain period of time.
If the scanner is left powered on for 15 minutes without being
used, it automatically enters power saving mode.
When it enters power saving mode, the Function Number
Display switches off but the [Power] button remains lit in
green.
To resume from power saving mode, perform one of the
following:
z Load a document in the ADF paper chute
z Press any button on the operator panel
Note that pressing the [Power] button for more than 2 seconds will
turn the power off.
z Perform scanning from an application
The scanner may not enter power saving mode if there was a
!
!
document remaining on the paper path.
For details about how to remove documents, refer to "8.1
Paper Jam" (page 125).
Index
Introduction
Scanner
Overview
How to Load
Documents
Configuring the
Scan Settings
How to Use the
Operator Panel
Various Ways to
Scan
Daily Care
The waiting time for entering power saving mode can be
changed in the Software Operation Panel.
For details, refer to "Waiting Time to Enter Power Saving Mode
[Power saving]" (page 187).
Replacing the
Consumables
Troubleshooting
Operational
Settings
Appendix
Glossary
31
Page 32

Chapter 1 Scanner Overview
TOP
Contents
1.9 Basic Flow of Scanning Operation
This section explains about the basic flow of performing a
scan.
In order to perform a scan, you need a scanner driver and an
application that supports the scanner driver.
This product bundles the TWAIN driver and the ISIS driver
(compliant to the respective standards), Kofax VRS, and an
application called "ScandAll PRO" which supports both drivers
and Kofax VRS.
z For details about the scanner drivers, refer to:
- "Chapter 3 Configuring the Scan Settings" (page 51)
- TWAIN driver Help
- ISIS driver Help
z For details about Kofax VRS, refer to:
- Kofax VRS Help
z For details about ScandAll PRO, refer to:
- ScandAll PRO V2.0 User’s Guide
- ScandAll PRO Help
The following describes the normal procedure for scanning.
1 Turn on the scanner.
For details, refer to "1.3 Turning the Power ON/OFF" (page 23).
2 Load a document face-down in the ADF paper chute.
For details, refer to "Chapter 2 How to Load Documents" (page 37).
Index
Introduction
Scanner
Overview
How to Load
Documents
Configuring the
Scan Settings
How to Use the
Operator Panel
Various Ways to
Scan
Daily Care
Replacing the
Consumables
Troubleshooting
Operational
Settings
Appendix
Glossary
32
Page 33

Chapter 1 Scanner Overview
Example: ScandAll PRO
TWAIN driver:
ISIS driver:
Kofax VRS:
3 Start an application for scanning.
ScandAll PRO will be used here as an example to explain the
procedure.
5 Select a scanner.
TOP
Contents
Index
Introduction
Scanner
Overview
How to Load
Documents
For details about how to start up ScandAll PRO, refer to "ScandAll
PRO V2.0 User’s Guide".
4 Select a scanner driver.
Configuring the
Scan Settings
How to Use the
Operator Panel
Various Ways to
Scan
Daily Care
Replacing the
Consumables
Troubleshooting
Operational
Settings
Appendix
Glossary
33
Page 34

Chapter 1 Scanner Overview
TWAIN driver:
ISIS driver:
Kofax VRS:
!
6 Launch the scanner driver from the application. 7 In the scanner driver's setup dialog box, configure the
scan settings.
TOP
Contents
Index
8 In ScandAll PRO, select the [Scan] menu J [Scan].
For details about scanning with ScandAll PRO, refer to "ScandAll
PRO V2.0 User’s Guide".
9 Save the scanned image to a file.
Do not unplug the USB cable or log off the user account
!
!
when the scanner and the computer are communicating,
for instance, during scanning.
Introduction
Scanner
Overview
How to Load
Documents
Configuring the
Scan Settings
How to Use the
Operator Panel
Various Ways to
Scan
Daily Care
Replacing the
Consumables
Procedures and operations slightly vary depending on the
application used.
For more details about scanning with ScandAll PRO, refer
to "ScandAll PRO V2.0 User’s Guide".
To perform scanning with other applications, refer to the
manual bundled with the application.
Troubleshooting
Operational
Settings
Appendix
Glossary
34
Page 35

Chapter 1 Scanner Overview
!
TOP
Contents
1.10 Image Scanning Application
This section explains about the bundled “ScandAll PRO”
image scanning application, which is used as an example to
explain the procedures in this manual.
ScandAll PRO supports both TWAIN and ISIS drivers. By
defining scan settings as profiles, you can customize the
settings according to your preference.
When ScandAll PRO is installed, you can also install
“ScanSnap mode”. This is an add-in application which
provides a different set of driver settings as an alternative to
using ScandAll PRO. TWAIN driver is required to use this
application. Using the ScanSnap mode enables easy
scanning with a single button.
You cannot use ScanSnap mode in the following cases:
!
!
z When the scanner is connected to fi-5000N
z When the scanner is connected with a SCSI cable
Index
Introduction
Scanner
Overview
How to Load
Documents
Configuring the
Scan Settings
How to Use the
Operator Panel
Various Ways to
Scan
Daily Care
"Chapter 5 Various Ways to Scan" (page 66) explains how to
scan different types of documents by using examples of the
TWAIN driver started via ScandAll PRO.
For more details about ScandAll PRO, refer to “ScandAll PRO
V2.0 User’s Guide”.
Replacing the
Consumables
Troubleshooting
Operational
Settings
Appendix
Glossary
35
Page 36

Chapter 1 Scanner Overview
Scanner Central
Admin Server
Scanner Central
Admin Agent
Scanner Central
Admin Agent
Scanner Central
Admin Agent
Scanner Central
Admin Agent
Scanner Scanner Scanner Scanner
Administrator
Upload update modules/
check update status
Alerts for consumable part
replacement and errors
Alerts for consumable part
replacement and errors
Scanner Central
Admin Console
SCAModule
Creator
Update
module
Update
:
:
TOP
Contents
1.11 Centralized Management of Scanners
This section explains about managing a large number of
scanners in a unified manner by providing the following
capabilities.
z Simultaneously update settings for multiple scanners and their
drivers.
Because there is no need to update each scanner one by one, a
significant reduction is achieved in the time required to update a large
number of scanners.
z Monitor scanners to check for any consumable parts that require
replacement, or the occurrence of errors.
The alerts for consumable part replacement and errors are provided
by scanners, which provides an easy way of checking the operating
status of scanners.
To enable the above functions, "Scanner Central Admin" is
required which consists of four applications bundled with this
product:
z Scanner Central Admin Server
Install this application in the main computer that is used for the
centralized management of scanners.
By registering scanners on the Scanner Central Admin Server, you
can build a system to run a unified management for all scanners.
z Scanner Central Admin Console
Install this application in a computer to upload update modules and to
monitor the operating status of the scanners.
The administrators can perform these tasks from the Scanner Central
Admin Console window, where they can also check the alerts for
consumable replacement and errors sent from the scanners.
z Scanner Central Admin Agent
Install this application in a computer connected to a scanner. It allows
scanners to link with the Scanner Central Admin Server.
Linking with the Scanner Central Admin Server will enable you to
apply updates on scanner settings, and the scanner can also send
alerts on consumable replacement and errors.
z SCAModule Creator
Use this application to create update modules to upload onto the
Scanner Central Admin Server.
It is only required for creating update modules.
For more details, refer to the Scanner Central Admin 4.0
User’s Guide.
Index
Introduction
Scanner
Overview
How to Load
Documents
Configuring the
Scan Settings
How to Use the
Operator Panel
Various Ways to
Scan
Daily Care
Replacing the
Consumables
Troubleshooting
Operational
Settings
Appendix
Glossary
36
Page 37

TOP
Contents
Index
Chapter 2 How to Load Documents
This chapter explains how to load documents on the scanner.
2.1 Loading Documents in the ADF..................................................................................................................38
2.2 Loading Documents on the Flatbed (fi-6230Z/fi-6240Z).............................................................................40
2.3 Documents for Scanning (ADF)..................................................................................................................41
Introduction
Scanner
Overview
How to Load
Documents
Configuring the
Scan Settings
How to Use the
Operator Panel
Various Ways to
Scan
Daily Care
Replacing the
Consumables
Troubleshooting
Operational
Settings
Appendix
Glossary
Page 38

Chapter 2 How to Load Documents
TOP
Contents
2.1 Loading Documents in the ADF
This section explains how to load documents in the ADF.
Preparation
For details about the paper size and quality required for normal
operations, refer to "2.3 Documents for Scanning (ADF)" (page
41).
1 If you are loading multiple sheets, check the documents.
1 Check if the documents to be loaded are of the same width or
different widths.
Ways to load documents differ depending on whether they are the
same width or not.
If the document width varies, refer to "Conditions for Mixed Batch
Scanning" (page 47) or "Documents with Different Widths" (page
69).
2 Check the number of sheets.
Up to 50 sheets can be loaded (with paper weight of 80 g/m² [20 lb]
and thickness of the document stack under 5 mm).
For details, refer to "Loading Capacity" (page 44).
2 Fan the documents.
1 Grab a stack of documents, which should be 5 mm or less.
2 Hold both ends of the documents and fan them a few times.
3 Rotate the documents by 90 degrees and fan them in the same
manner.
4 Perform steps 1 to 3 for all documents.
5 Align the edges of the documents.
For more details about how to fan documents, refer to the
Error Recovery Guide.
The Error Recovery Guide is included in the Setup DVDROM. For details about installation, refer to "Installing the
Software" in Getting Started.
Index
Introduction
Scanner
Overview
How to Load
Documents
Configuring the
Scan Settings
How to Use the
Operator Panel
Various Ways to
Scan
Daily Care
Replacing the
Consumables
Troubleshooting
Operational
Settings
Appendix
Glossary
38
Page 39

Chapter 2 How to Load Documents
!!!
Side guide
How to Load Documents
1 Pull out the chute extensions according to the length of
the document.
For details, refer to "1.6 Setting Up the ADF Paper Chute" (page 26).
2 Lift the stacker and stacker extension according to the
length of the document.
For details, refer to "1.7 Setting Up the Stacker" (page 27).
4 Adjust the side guides to the width of the document.
Do not leave space between the side guides and the document.
Otherwise, the document may be fed skewed.
TOP
Contents
Index
Introduction
Scanner
Overview
How to Load
Documents
3 Load the document face-down in the ADF paper chute.
Remove all paper clips and staples. Reduce the number
of sheets if a multifeed or pick error occurs.
5 Start up an application for scanning and perform a scan.
For details about the scanning procedure in ScandAll PRO, refer to
"ScandAll PRO V2.0 User’s Guide".
Configuring the
Scan Settings
How to Use the
Operator Panel
Various Ways to
Scan
Daily Care
Replacing the
Consumables
Troubleshooting
Operational
Settings
Appendix
Glossary
39
Page 40

Chapter 2 How to Load Documents
ABC
ABC
ABC
Reference point
TOP
Contents
2.2 Loading Documents on the Flatbed (fi-6230Z/fi-6240Z)
1 Open the document cover.
For details, refer to "1.5 Opening/Closing the Document Cover (fi-
6230Z/fi-6240Z)" (page 25).
2 Load a document on the document bed.
Place the document face-down to align its top left-hand corner with
the reference point.
3 Close the document cover.
For details, refer to "1.5 Opening/Closing the Document Cover (fi-
6230Z/fi-6240Z)" (page 25).
4 Start up an application for scanning and perform a scan.
For details about the scanning procedure in ScandAll PRO, refer to
"ScandAll PRO V2.0 User’s Guide".
Index
Introduction
Scanner
Overview
How to Load
Documents
Configuring the
Scan Settings
How to Use the
Operator Panel
Various Ways to
Scan
Daily Care
Replacing the
Consumables
Troubleshooting
Operational
Settings
Appendix
Glossary
40
Page 41

Chapter 2 How to Load Documents
Feed direction
Feed direction
A
B
C
D
Portrait Landscape
TOP
Contents
2.3 Documents for Scanning (ADF)
Paper Size
The following paper sizes can be scanned.
A: 52 to 216 mm (2.1 to 8.5 in.)
B: 74 to 355.6 mm (2.9 to 14.0 in.) (*1)
C: 74 to 216 mm (2.9 to 8.5 in.)
D: 52 to 355.6 mm (2.1 to 14.0 in.) (*1)
*1: Long page scanning supports documents with a length up to 3,048 mm
(120 in.).
Conditions
Paper type
The following paper types are recommended:
z Wood-free paper
z Wood-containing paper
z PPC paper (recycled)
z Plastic card
When using paper types other than the above, make sure to test with
the same type of paper first to check if the document can be scanned.
Paper weight (thickness)
The following paper weights can be used:
z 41 to 209 g/m² (11 to 56 lb)
z 127 to 209 g/m² (34 to 56 lb) for A8 size
z 1.4 mm or less for plastic cards (*1)
*1: Up to 1.25 mm is supported for scanning at 200 dpi (60 ppm) in
landscape when using fi-6140Z/fi-6240Z. This setting can be
changed in the Software Operation Panel to scan plastic cards with
a thickness up to 1.4 mm. For details, refer to " Scanning Thick
Plastic Cards [Feed Mode] (fi-6140Z/fi-6240Z)" (page 179).
Index
Introduction
Scanner
Overview
How to Load
Documents
Configuring the
Scan Settings
How to Use the
Operator Panel
Various Ways to
Scan
Daily Care
Replacing the
Consumables
Troubleshooting
Operational
Settings
Appendix
Glossary
41
Page 42

Chapter 2 How to Load Documents
!!!
Cleaning : If paper jams occur frequently, clean the
brake roller and pick roller.
For details about cleaning, refer to
"Chapter 6 Daily Care" (page 108).
Consumable
replacement
: The life of the brake roller and pick roller
may end sooner compared to scanning
wood-containing papers.
Precautions
The following types of documents may not be scanned successfully:
z Documents of non-uniform thickness (e.g. envelopes, documents with
attachments)
z Wrinkled or curled documents
z Folded or torn documents
z Tracing paper
z Coated paper
z Carbon paper
z Photosensitive paper
z Perforated documents
z Documents that are not square or rectangular
z Thin paper (less than 41 g/m²)
z Photographs (photographic paper)
The following types of documents must not be scanned:
z Paper-clipped or stapled documents
z Documents on which the ink is still wet
z Documents smaller than A8 size (portrait)
z Documents wider than 216 mm (8.5 in.)
z Documents other than paper/plastic card such as fabric, metal foil
and OHP film
z Important documents such as certificates and cash vouchers which
must not be damaged
z Since carbonless papers contain chemical substances that
may harm the rollers (e.g. pick roller), take note of the
following.
z When scanning wood-containing papers, the life of the
brake roller and pick roller may end sooner compared to
scanning wood-free papers.
z Brake roller and pick roller may be damaged when a photo/
sticky note on the document contacts these parts during
scanning.
z The surface of the document may be damaged when
scanning gloss papers such as photographs.
TOP
Contents
Index
Introduction
Scanner
Overview
How to Load
Documents
Configuring the
Scan Settings
How to Use the
Operator Panel
Various Ways to
Scan
Daily Care
Replacing the
Consumables
Troubleshooting
Operational
Settings
Appendix
Glossary
42
Page 43

Chapter 2 How to Load Documents
!!!
BACKBACK
Size : 85.6 × 53.98 mm
Thickness : 1.4 mm or less (*1)
Material : PVC (polyvinyl chloride) or PVCA (polyvinyl
chloride acetate)
z When you scan plastic cards, take note of the following.
- Up to three plastic cards can be loaded in the ADF paper
chute.
Note that you can only load one card at a time if the
plastic card is embossed.
- It is recommended to place the card face-down in the
ADF paper chute.
- Cards should be within the following specifications:
ISO7810 ID-1 type compliant
- Plastic cards cannot be scanned when the imprinter is
connected.
- Scanning thick documents such as plastic cards will be
falsely detected as multifeed. In that case, disable
multifeed detection.
z When scanning semi-transparent documents, increase the
brightness for scanning to avoid bleed-through.
z When you scan documents written in lead pencil, make
sure to clean the rollers frequently. Otherwise, the rollers
will be contaminated which may leave black traces on the
document or cause feeding errors.
For details about cleaning, refer to "Chapter 6 Daily Care"
(page 108).
z If multifeeds, pick errors or paper jams occur frequently,
refer to "8.3 Troubleshooting" (page 130).
z When you scan documents with the ADF, all documents
must be flat on the leading edge. Make sure that curls on
the leading edge of the documents are kept within the
following range.
Leading edgeLeading edge
30 mm or more
(1.18 in.)
Feeding direction
3 mm
or less
(0.12 in.)
30 mm or more
(1.18 in.)
Feeding direction
5 mm
or less
(0.20 in.)
Scanned side Scanned side
TOP
Contents
Index
Introduction
Scanner
Overview
How to Load
Documents
Configuring the
Scan Settings
How to Use the
Operator Panel
Various Ways to
Scan
Daily Care
Make sure to check if the card can be scanned first.
*1: Up to 1.25 mm is supported for scanning at 200 dpi (60
ppm) in landscape when using fi-6140Z/fi-6240Z. This
setting can be changed in the Software Operation Panel
to scan plastic cards with a thickness up to 1.4 mm. For
details, refer to " Scanning Thick Plastic Cards [Feed
Mode] (fi-6140Z/fi-6240Z)" (page 179).
- Rigid cards may not be fed properly.
- If the surface of the card is dirty with grease marks (e.g.
fingerprints) and such, perform scanning after wiping the
dirt off.
Replacing the
Consumables
Troubleshooting
Operational
Settings
Appendix
Glossary
43
Page 44

Chapter 2 How to Load Documents
Loading Capacity
TOP
Contents
Index
The number of sheets that can be loaded in the ADF paper
chute is determined by the paper size and paper weight.
See the graph below.
A4/Letter or smaller
Legal
52
60
50
Paper weight
50
41
35
29
80 104 127
2
(g/m
)
29
24
60
50
40
30
Capacity (sheets)
20
10
0
41 64
25
20
157
19
15
209
Introduction
Scanner
Overview
How to Load
Documents
Configuring the
Scan Settings
How to Use the
Operator Panel
Various Ways to
Scan
Daily Care
Unit Conversion
g/m² 41 52 64 75 80 90 104 127 157 209
lb 11 14 17 20 21 24 28 34 42 56
kg 35 45 55 64.5 69 77.5 90 110 135 180
Replacing the
Consumables
Troubleshooting
Operational
Settings
Appendix
Glossary
44
Page 45

Chapter 2 How to Load Documents
!!!
( Unit : mm)
To p
Reference point
Front side
Feed
direction
Bottom
35
Center
Area Not to be Perforated
TOP
Contents
Conditions for Multifeed Detection
Index
An error may occur when there are punched holes in the
shaded area in the following figure. Such documents can be
scanned by using the flatbed (fi-6230Z/fi-6240Z).
The above condition applies when the document is set to the
center of the pick roller width.
Multifeed is an error where two or more sheets are fed through
the ADF at once. It is also called a multifeed when a different
document length is detected.
Multifeed detection is performed by either checking the
overlapping of documents, length of the documents, or the
combination of both. The following conditions are required for
an accurate detection.
Detection by overlapping
z Load documents of the same paper weight in the ADF paper chute.
z Paper weight: 41 to 209 g/m² (11 to 56 lb)
z Do not punch holes within 35 mm (1.38 in.) over the center of the
document. See Fig.1.
z Do not attach other documents within 35 mm (1.38 in.) over the
center of the document. See Fig.1.
Detection by length
z Load documents of the same length in the ADF paper chute.
z Variance in document lengths: 1% or less
z Do not punch holes within 35 mm (1.38 in.) over the center of the
document. See Fig.1.
Detection by overlapping and length
z Load documents of the same paper weight and length in the ADF
paper chute.
z Paper weight: 41 to 209 g/m² (11 to 56 lb)
z Variance in document lengths: 1% or less
z Do not punch holes within 35 mm (1.38 in.) over the center of the
document. See Fig.1.
z Do not attach other documents within 35 mm (1.38 in.) over the
center of the document. See Fig.1.
Introduction
Scanner
Overview
How to Load
Documents
Configuring the
Scan Settings
How to Use the
Operator Panel
Various Ways to
Scan
Daily Care
Replacing the
Consumables
Troubleshooting
Operational
Settings
If there are any holes in the 35 mm-wide central column, you
can move the document to the left or right to avoid an error.
Appendix
Glossary
45
Page 46

Chapter 2 How to Load Documents
!
( Unit : mm)
To p
Reference point
Front side
Feed
direction
Bottom
35
Center
Fig. 1
z Accuracy of multifeed detection may drop with some
documents.
Multifeed cannot be detected for the top 30 mm of a
document.
z For the shaded area in Fig. 1, you can also specify a length
not to detect multifeeds in the Software Operation Panel.
For details, refer to "9.6 Settings Related to Multifeed
Detection" (page 180).
TOP
Contents
Index
Introduction
Scanner
Overview
How to Load
Documents
Configuring the
Scan Settings
How to Use the
Operator Panel
!
!
z The above condition applies when the document is set to
the center of the pick roller width.
z When you use detection by overlapping, scanning thick
documents such as plastic cards will be falsely detected as
multifeed. In that case, disable multifeed detection.
Various Ways to
Scan
Daily Care
Replacing the
Consumables
Troubleshooting
Operational
Settings
Appendix
Glossary
46
Page 47

Chapter 2 How to Load Documents
!
Conditions for Mixed Batch Scanning
The following conditions apply when scanning a mixed batch
of documents with different paper weights/friction coefficients/
sizes. Make sure to test a few sheets first to check if the
documents can be scanned.
For details about scanning, refer to "Documents with Different
Widths" (page 69).
Paper direction
Align the direction of the paper fiber with the feed direction.
Paper weight
The following paper weights can be used:
41 to 209 g/m² (11 to 56 lb)
Friction coefficient
It is recommended to use the same type of paper from the same
manufacturer.
When papers of different manufacturers/brands are mixed, it affects the
feeding performance as the difference in the friction coefficient
increases.
The following friction coefficients are recommended:
0.35 to 0.60 (reference value for paper friction coefficient)
Document position
Use paper sizes that fit the 39 mm width of the pick roller in the center.
Pick roller
Paper size
When you scan a mixed batch with different sizes, not feeding the
documents straight may cause paper jams or part of the image to
appear missing.
It is recommended to check the documents thoroughly before scanning
and also check the image if the document was skewed.
z When scanning a mixed batch with different sizes,
!
!
documents are more likely to skew because the side guides
do not contact every sheet.
z Do not use [Check Length] or [Check Overlapping and
Length] for multifeed detection.
Documents that cannot be scanned in a mixed batch
The following types of documents cannot be mixed in the same batch:
z Carbonless paper
z Bond paper
z Perforated documents
z Thermal paper
z Carbon-backed paper
z OHP film
z Tracing paper
TOP
Contents
Index
Introduction
Scanner
Overview
How to Load
Documents
Configuring the
Scan Settings
How to Use the
Operator Panel
Various Ways to
Scan
Daily Care
Replacing the
Consumables
Troubleshooting
39 mm
Operational
Settings
Appendix
Glossary
47
Page 48

Chapter 2 How to Load Documents
Combinations of standard paper sizes in a mixed batch
Refer to the table below for a guideline of the range available for mixed
batch scanning.
However, note that not feeding the documents straight may cause paper
jams or part of the image to appear missing.
It is recommended to check the documents thoroughly before scanning
and also check the image if the document was skewed.
Maximum size
Width (mm) (*1)
LTR ( P )
Carrier Sheet
A4 (P)
A5 (L)
B5 (P)
B6 (L)
A5 (P)
A6 (L)
B6 (P)
B7 (L)
A6 (P)
A7 (L)
B7 (P)
B8 (L)
A7 (P)
A8 (L)
B8 (P)
LTR (P )
Carrier Sheet
216
210
Available range
182
149
129
105
91
74.3
64.3
216 210 182 149 129 105 91 74.3 64.3 52.5
A4 (P)
A5 (L)
B5 (P)
B6 (L)
A5 (P)
A6 (L)
B6 (P)
B7 (L)
A6 (P)
A7 (L)
B7 (P)
B8 (L)
A7 (P)
A8 (L)
TOP
Contents
Index
Introduction
Scanner
Overview
B8 (P) A8 (P)
How to Load
Documents
Configuring the
Scan Settings
How to Use the
Operator Panel
Various Ways to
Scan
Daily Care
Replacing the
Consumables
A8 (P)
Minimum size
LTR: Letter size
(P) : Portrait
(L) : Landscape
52.5
Troubleshooting
Operational
Settings
Appendix
Glossary
48
Page 49

Chapter 2 How to Load Documents
!
*1: The following picture shows how to set the widest and the
narrowest documents of the batch between the side
guides.
Maximum width
Minimum width
B8 (portrait) and A8 (portrait) cannot be scanned with other
!
!
paper sizes.
Widest document
Narrowest document
Side guide
Conditions for Automatic Page Size Detection
[Automatic Page Size Detection] does not work with the
following types of documents:
z Non-rectangular documents
z Documents with black background/edges
[Automatic Page Size Detection] may not work with the
following types of documents:
z Thin paper (52 g/m² [14 lb] or less)
z Documents with dark background/edges
TOP
Contents
Index
Introduction
Scanner
Overview
How to Load
Documents
Configuring the
Scan Settings
How to Use the
Operator Panel
Various Ways to
Scan
Daily Care
Replacing the
Consumables
Troubleshooting
Operational
Settings
Appendix
Glossary
49
Page 50

Chapter 2 How to Load Documents
Conditions for Using the Carrier Sheet
■Paper size
The following paper sizes can be scanned:
z Carrier Sheet (216 × 297 mm)
z A3 (297 × 420 mm)(*1)
z A4 (210 × 297 mm)
z A5 (148 × 210 mm)
z A6 (105 × 148 mm)
z B4 (257 × 364 mm)(*1)
z B5 (182 × 257mm)
z B6 (128 × 182 mm)
z Post card (100 × 148 mm)
z Business card (91 × 55 mm, 55 × 91 mm)
z Letter (8.5 × 11 in./216 × 279.4 mm)
z Double Letter (11 × 17 in./279.4 × 431.8 mm)(*1)
z Custom size
Width : 25.4 to 216 mm (1 to 8.5 in.)
Length : 25.4 to 297 mm (1 to 11.69 in.)
*1: Fold in half for scanning.
■Conditions
Paper type
The following paper type is recommended:
z Standard office paper
Paper weight
The following paper weights can be used:
z Up to 127 g/m² (34 lb)
z Up to 63.5 g/m² (17 lb) when folded in half
Precautions
Take note of the following:
z Up to three Carrier Sheets can be loaded at once.
z Depending on the amount of memory used by running applications,
there may be insufficient memory to scan a double-page spread
document with the Carrier Sheet in high resolution. In that case,
specify a lower resolution and try scanning again.
z Do not write on, color, stain, or cut the end with a black and white
pattern on the Carrier Sheet.
z Do not place the Carrier Sheet upside down. Otherwise, a paper jam
may occur and damage the Carrier Sheet and the document inside.
z Do not leave your document inside the Carrier Sheet for a long time.
Otherwise, the ink on the document may be transferred onto the
Carrier Sheet.
z To avoid deformation, do not use or leave the Carrier Sheet in high
temperature places such as under direct sunlight or near a heating
apparatus for a long time.
z Do not fold or pull the Carrier Sheet.
z Do not use a damaged Carrier Sheet because it may damage or
cause the scanner to malfunction.
z To avoid deformation, keep the Carrier Sheet on a flat surface without
any weight on it.
z Be careful not to cut your finger on the edge of the Carrier Sheet.
z If paper jams occur frequently, feed about 50 sheets of PPC paper
(recycled paper) before scanning with the Carrier Sheet.
The PPC paper can either be blank or printed.
z Paper jams may occur when you place several small documents (e.g.
photos, postcards) in the Carrier Sheet for scanning. It is
recommended to place only one document at a time in the Carrier
Sheet.
TOP
Contents
Index
Introduction
Scanner
Overview
How to Load
Documents
Configuring the
Scan Settings
How to Use the
Operator Panel
Various Ways to
Scan
Daily Care
Replacing the
Consumables
Troubleshooting
Operational
Settings
Appendix
Glossary
50
Page 51

TOP
Contents
Index
Chapter 3 Configuring the Scan Settings
This chapter explains about the scan parameters of the scanner drivers.
3.1 TWAIN Driver..............................................................................................................................................52
3.2 ISIS Driver ..................................................................................................................................................56
Introduction
Scanner
Overview
How to Load
Documents
Configuring the
Scan Settings
How to Use the
Operator Panel
Various Ways to
Scan
Daily Care
Replacing the
Consumables
Troubleshooting
Operational
Settings
Appendix
Glossary
Page 52

Chapter 3 Configuring the Scan Settings
TOP
Contents
3.1 TWAIN Driver
The TWAIN driver is a driver that conforms to the TWAIN
standard. It can be used with an application that supports
TWAIN to perform scanning.
Normally, the scanner driver is launched via an application,
and then the scan settings are configured in the setup dialog
box of the driver (some applications may not display the setup
dialog box).
Ways to launch the scanner driver differ depending on the
application.
For more details, refer to the manual or the Help files of the
application.
Index
Introduction
Scanner
Overview
How to Load
Documents
Configuring the
Scan Settings
How to Use the
Operator Panel
Various Ways to
Scan
Settings for TWAIN driver are configured in the above dialog
box.
The following are descriptions of the main configuration items.
For details, refer to the TWAIN driver Help.
Daily Care
Replacing the
Consumables
Troubleshooting
Operational
Settings
Appendix
Glossary
52
Page 53

Chapter 3 Configuring the Scan Settings
[Resolution]
TOP
Contents
[Paper Size]
Index
Specify the resolution for scanning.
You can either select a predefined value from the list, or
specify a custom resolution which can range between 50 dpi
and 600 dpi (in increments of 1 dpi).
Also, selecting the [Predefine] check box allows you to
perform scanning easily by selecting a predefined resolution
from [Best], [Better] and [Normal].
Values in [Predefine] can be changed by clicking the [...]
button.
[Scan Type]
Specify the scanning side(s) from the following:
z ADF Front Side
z ADF Duplex
z Long Page (Front side)
z Long Page (Duplex)
z Flatbed (fi-6230Z/fi-6240Z)
z ADF Back Side
z Double-page spread
z Clipping (Front)
z Clipping (Duplex)
Select a paper size from the drop-down list.
Up to three custom sizes can be added to the list by using the
[...] button.
You can also change the order in which the items (sizes) are
listed.
[Image Mode]
Specify the type of scanned image.
Item Description
Black & White Scans in binary (black & white) mode.
Halftone Scans via halftone processing in binary (black &
white) mode.
Grayscale Scans in gradations from black to white.
Select [Grayscale] (256) or [4bit Grayscale] (16
grayscale).
Color Scans in color mode. Select [24bit Color], [256
Color] or [8 Color].
[Scan] Button
Click this button to start scanning by the current settings.
Introduction
Scanner
Overview
How to Load
Documents
Configuring the
Scan Settings
How to Use the
Operator Panel
Various Ways to
Scan
Daily Care
Replacing the
Consumables
Troubleshooting
Operational
Settings
Appendix
Glossary
53
Page 54

Chapter 3 Configuring the Scan Settings
[Preview] Button
TOP
Contents
[Option] Button
Index
Allows you to preview the scanned image.
Perform a test scan by the current settings and display the
result in the preview window.
[Close] / [OK] Button
Click this button to save the current settings and close the
window.
[Reset] Button
Click this button to undo the changes made.
[Help] Button
Displays the TWAIN driver Help which can also be displayed
by the [F1] key.
[About] Button
Displays the version information of TWAIN driver.
Configure the optional settings in the following window.
z [Rotation] Tab
Includes the binding direction of double-sided documents, image
rotation, deskew, page size detection, end of page detection,
overscan, hole punch removal, and image split.
z [Job/Cache] Tab
Includes caching, multifeed detection, and blank page skip.
z [Imprinter (Endorser)] Tab
Includes print settings for the imprinter which is available separately.
Displayed only when the imprinter is installed.
z [Generic] Tab
Specify the measurement unit to display in the [TWAIN Driver (32)]
dialog box.
Select from inch, mm, and pixel.
z [Startup] Tab
Includes settings related to the operator panel on the scanner.
Introduction
Scanner
Overview
How to Load
Documents
Configuring the
Scan Settings
How to Use the
Operator Panel
Various Ways to
Scan
Daily Care
Replacing the
Consumables
Troubleshooting
Operational
Settings
Appendix
Glossary
54
Page 55

Chapter 3 Configuring the Scan Settings
z [Filter] Tab
Select the filter for image processing.
TOP
Contents
Index
Item Description
Digital Endorser Adds alphanumeric character strings on the
scanned image data.
Page Edge Filler Fills in the margins of the scanned image in
a specified color.
z [Compression] Tab
Specify the compression rate for JPEG transfer.
[Advance] Button
Click this button to configure detailed settings related to image
processing.
Items such as gamma pattern, dropout color, reverse and
edge extract can be configured.
[Config] Button
Click this button to manage the setup files.
Scan settings can be changed easily if you save the settings
configured in the [TWAIN Driver (32)] dialog box onto a file
under [Setting Files].
[Browse] Button
Introduction
Scanner
Overview
How to Load
Documents
Configuring the
Scan Settings
How to Use the
Operator Panel
Various Ways to
Scan
Daily Care
Replacing the
Consumables
Click this button to view a list of connected scanners.
Troubleshooting
Operational
Settings
Appendix
Glossary
55
Page 56

Chapter 3 Configuring the Scan Settings
TOP
Contents
3.2 ISIS Driver
The ISIS driver is a driver that conforms to the ISIS standard.
It can be used with an application that supports ISIS to
perform scanning.
Normally, the scanner driver is launched via an application,
and then the scan settings are configured in the setup dialog
box of the driver (some applications may not display the setup
dialog box).
Ways to launch the scanner driver differ depending on the
application.
For more details, refer to the manual or the Help files of the
application.
Index
Introduction
Scanner
Overview
How to Load
Documents
Configuring the
Scan Settings
How to Use the
Operator Panel
Various Ways to
Scan
Settings for ISIS driver are configured in the above dialog box.
For details, refer to the ISIS driver Help.
Daily Care
Replacing the
Consumables
Troubleshooting
Operational
Settings
Appendix
Glossary
56
Page 57

Chapter 3 Configuring the Scan Settings
!
[Main] Tab
TOP
Contents
[Layout] Tab
Index
Introduction
Scanner
Overview
How to Load
Documents
Configuring the
Scan Settings
How to Use the
Operator Panel
Various Ways to
Scan
Includes settings such as the scanning side(s), color mode
(color/grayscale/black & white), resolution, brightness and
contrast.
Includes settings such as the page orientation, feeding
direction, Carrier Sheet mode, paper size and image split.
Clicking the [Scan Area] button displays the [Scan Area]
dialog box.
Note that [Automatic] in [Image Orientation] is available only
!
!
when ScandAll PRO is installed.
Daily Care
Replacing the
Consumables
Troubleshooting
Operational
Settings
Appendix
Glossary
57
Page 58

Chapter 3 Configuring the Scan Settings
[Scan Area] Dialog Box
The scanning area for the specified paper size can be
selected.
TOP
Contents
[Image Processing] Tab
Index
Introduction
Scanner
Overview
How to Load
Documents
Configuring the
Scan Settings
How to Use the
Operator Panel
Various Ways to
Scan
You can select a configuration pattern that is used frequently
for scanning. This tab also includes a setting for hole punch
removal.
Daily Care
Replacing the
Consumables
Troubleshooting
Operational
Settings
Appendix
Glossary
58
Page 59

Chapter 3 Configuring the Scan Settings
[Paper Handling] Tab
TOP
Contents
[Gamma] Tab
Index
Introduction
Scanner
Overview
How to Load
Documents
Configuring the
Scan Settings
How to Use the
Operator Panel
Various Ways to
Scan
Includes settings related to document feeding.
Select a method from the following:
z Automatic (fi-6230Z/fi-6240Z)
z ADF
z Flatbed (fi-6230Z/fi-6240Z)
This tab also includes settings such as pre-pick (i.e. feeding
the document to the starting position before scanning), paper
protection and multifeed detection.
Includes settings related to gamma pattern. You can also
customize detail settings such as the gamma value and
brightness.
Daily Care
Replacing the
Consumables
Troubleshooting
Operational
Settings
Appendix
Glossary
59
Page 60

Chapter 3 Configuring the Scan Settings
[Color Dropout] Tab
TOP
Contents
[Compression] Tab
Index
Introduction
Scanner
Overview
How to Load
Documents
Configuring the
Scan Settings
How to Use the
Operator Panel
Various Ways to
Scan
Select a color to remove from the scanned image.
Select a compression rate and the image quality for scanning
in color/grayscale.
You can also configure a sample ratio used for compression.
Daily Care
Replacing the
Consumables
Troubleshooting
Operational
Settings
Appendix
Glossary
60
Page 61

Chapter 3 Configuring the Scan Settings
[Imprinter] Tab
TOP
Contents
[Blank Page Deletion] Tab
Index
Introduction
Scanner
Overview
How to Load
Documents
Configuring the
Scan Settings
How to Use the
Operator Panel
Various Ways to
Scan
Includes print settings for the imprinter which is available
separately.
Displayed only when the imprinter is installed.
Includes settings for deleting blank pages.
When scanning in black & white, you can use the dot ratio to
process the blank page(s) for white and black backgrounds
separately.
When scanning in grayscale/color, you can use the sensitivity
to process the blank page(s) for white and black backgrounds
together.
Daily Care
Replacing the
Consumables
Troubleshooting
Operational
Settings
Appendix
Glossary
61
Page 62

Chapter 3 Configuring the Scan Settings
[About] Tab
TOP
Contents
Index
Introduction
Scanner
Overview
How to Load
Documents
Configuring the
Scan Settings
How to Use the
Operator Panel
Various Ways to
Scan
Select this tab to view information related to the version of the
ISIS driver as well as the scanner connected to the computer.
Daily Care
Replacing the
Consumables
Troubleshooting
Operational
Settings
Appendix
Glossary
62
Page 63

TOP
Contents
Index
Chapter 4 How to Use the Operator Panel
This chapter explains how to use the operator panel.
4.1 Operator Panel ...........................................................................................................................................64
Introduction
Scanner
Overview
How to Load
Documents
Configuring the
Scan Settings
How to Use the
Operator Panel
Various Ways to
Scan
Daily Care
Replacing the
Consumables
Troubleshooting
Operational
Settings
Appendix
Glossary
Page 64

Chapter 4 How to Use the Operator Panel
Check
Function
Send to
Scan
/Stop
Power
LED indicator
Lights in orange when an error occurs.
Flashes when the ADF is open.
Function Number Display
Indicates the status of the scanner.
Switches off when the scanner enters power saving mode.
[Send to] button (*1)
Launches the linked application software.
Clears the displayed error indication.
Pauses the scan. (*2)
[Scan/Stop] button (*1)
Launches the linked application software.
Clears the displayed error indication.
Cancels or resumes the scan.
[Power] Button
Turns the power on/off.
Lights in green when the scanner is turned on.
[Function] button
Switches the number (1 to 9/C) assigned to the application
launched by the [Send to] button.
*1: For details about how to scan by pressing the [Scan/Stop] or
[Send to] button, refer to the TWAIN driver Help (included in the
Setup DVD-ROM) or "Using a Button on the Scanner to Start
Scanning" (page 101).
*2: When using TWAIN driver, pressing the [Send to] button during
scanning will pause the scan after that document is scanned.
When using ISIS driver/Kofax VRS/ScanSnap mode, pressing the
[Send to] button during scanning will cancel the scan after that
document is scanned.
!!!
TOP
Contents
4.1 Operator Panel
The operator panel consists of the Function Number Display,
buttons, and LED indicator.
Names and Functions
Index
Introduction
Scanner
Overview
How to Load
Documents
Configuring the
Scan Settings
How to Use the
Operator Panel
Various Ways to
Scan
Do not use the operator panel while the Software Operation
Panel is running.
Daily Care
Replacing the
Consumables
Troubleshooting
Operational
Settings
Appendix
Glossary
64
Page 65

Chapter 4 How to Use the Operator Panel
Indications on Function Number Display
Display Description
8 Displayed when the scanner has just been powered on.
P Processing initialization.
0 Initialization is almost complete.
1 Ready to start scanning.
Indicates that the initialization was successfully completed.
This is referred to as "ready" status.
Function
number
(flash)
A function number will flash after detecting a multifeed.
This indication prompts whether or not to memorize the
overlap pattern.
For details, refer to "Ignoring Multifeed for a Set Pattern"
(page 105).
Display Description
E
F
C
H
A
L
None The display switches off when the scanner enters power
Indicates that a device error (alarm) occurred during
initialization or scanning.
The display will switch between either "E'", "F", "C", "H", "A"
or "L", and an "alarm number".
For information about the error details, refer to "Device
Errors" (page 128).
The display will return to ready ("1") if the [Scan/Stop] or
[Send to] button is pressed.
When this alarm occurs, turn the power off then back on.If
the problem persists after turning the power back on,
contact your FUJITSU scanner dealer or an authorized
FUJITSU scanner service provider.
saving mode.
TOP
Contents
Index
Introduction
Scanner
Overview
How to Load
Documents
Configuring the
Scan Settings
How to Use the
Operator Panel
c
(flash)
P
(flash)
J
U
Indicates that the ADF was opened when the status was
ready ("1").
Note that the LED indicator will also flash.
To return to ready ("1") status, close the ADF by
For details, refer to "1.4 Opening/Closing the ADF" (page
24).
If the display does not return to ready ("1") after closing the
ADF, turn the power off then back on.If the problem still
persists, contact your FUJITSU scanner dealer or an
authorized FUJITSU scanner service provider.
Indicates that the scan was paused by pressing the [Send
to] button.
Press the [Scan/Stop] button to resume the scan.
Indicates that a temporary error occurred during scanning.
The display will switch between either "J" or "U", and an
"error number".
For information about the error details, refer to "Temporary
Errors" (page 127).
The display will return to ready ("1") if the [Scan/Stop] or
[Send to] button is pressed.
Various Ways to
Scan
Daily Care
Replacing the
Consumables
Troubleshooting
Operational
Settings
Appendix
Glossary
65
Page 66

TOP
Contents
Index
Chapter 5 Various Ways to Scan
This chapter explains how to scan documents in various ways, by using examples of the TWAIN driver started via
ScandAll PRO.
5.1 Summary ....................................................................................................................................................67
5.2 Scanning Documents of Different Types and Sizes....................................................................................68
5.3 Advanced Scanning....................................................................................................................................82
5.4 Configuring Post-Scan Operations and Handling.......................................................................................91
5.5 Customizing the Scanner Settings ...........................................................................................................101
Introduction
Scanner
Overview
How to Load
Documents
Configuring the
Scan Settings
How to Use the
Operator Panel
Various Ways to
Scan
Daily Care
Replacing the
Consumables
Troubleshooting
Operational
Settings
Appendix
Glossary
Page 67

Chapter 5 Various Ways to Scan
TOP
Contents
5.1 Summary
The following lists various ways of scanning documents.
Scanning documents of different types and sizes
z "Scanning Both Sides at Once" (page 68)
z "Documents with Different Widths" (page 69)
z "Documents Larger than A4/Letter Size" (page 70)
z "Scanning Photographs and Clippings" (page 73)
z "Long Page Scanning" (page 76)
z "Scanning a Book (fi-6230Z/fi-6240Z)" (page 78)
z "Scanning a Large Document on the Flatbed (fi-6230Z/fi-6240Z)"
(page 80)
Advanced scanning
z "Removing a Color from the Scanned Image (Dropout Color)" (page
82)
z "Skipping Blank Pages" (page 85)
z "Removing Punch Holes" (page 86)
z "Scanning the Image Brighter" (page 88)
z "Feeding Documents Manually in the ADF" (page 90)
Customizing the scanner settings
z "Using a Button on the Scanner to Start Scanning" (page 101)
z "Detecting Multifeed Errors" (page 103)
z "Ignoring Multifeed for a Set Pattern" (page 105)
For information on how to scan documents in the following
methods, refer to "ScandAll PRO V2.0 User’s Guide".
z Saving Scanned Image in PDF File Format
z Dividing a Multipage Document Using Patch Codes
z Dividing a Multipage Document Using Barcodes
z Specifying the Result of Zone OCR as a File Name
z Specifying the Result of Barcode Recognition as a File Name
z Creating Saving Folders for Each Batch Scan
z Saving Scanned Images from a Batch Scan to Microsoft SharePoint
Server
z Restarting a Suspended Batch Scan
z Outputting Indexing Information File and Linking with an Application
Index
Introduction
Scanner
Overview
How to Load
Documents
Configuring the
Scan Settings
How to Use the
Operator Panel
Various Ways to
Scan
Daily Care
Configuring post-scan operations and handling
z "Automatically Correcting Skewed Images" (page 91)
z "Automatically Correcting the Page Orientation" (page 93)
z "Splitting the Scanned Image in Two" (page 95)
z "Using the Multi Image Output" (page 97)
z "Automatically Detecting Color/Monochrome Documents" (page 99)
Replacing the
Consumables
Troubleshooting
Operational
Settings
Appendix
Glossary
67
Page 68

Chapter 5 Various Ways to Scan
TOP
Contents
5.2 Scanning Documents of Different Types and Sizes
Scanning Both Sides at Once
1 Load the document in the ADF paper chute.
For details, refer to "Chapter 2 How to Load Documents" (page 37).
2 Start up ScandAll PRO and select the [Scan] menu J
[Scanner Setting].
D The [TWAIN Driver (32)] dialog box appears.
If the [TWAIN Driver (32)] dialog box does not appear,
check the setting in ScandAll PRO by selecting the [Tool]
menu J [Preferences] to open the [Setup] dialog box,
then confirm that [TWAIN] is selected for [Device Driver]
in the [Scan] tab.
3 Select [ADF (Duplex)] for [Scan Type].
4 Configure other settings such as [Paper Size].
5 Click the [OK] button.
D The changes are applied.
6 Scan the document by selecting the [Scan] menu J
[Scan] in ScandAll PRO.
Index
Introduction
Scanner
Overview
How to Load
Documents
Configuring the
Scan Settings
How to Use the
Operator Panel
Various Ways to
Scan
Daily Care
Replacing the
Consumables
Troubleshooting
Operational
Settings
Appendix
Glossary
68
Page 69

Chapter 5 Various Ways to Scan
!!!
!!!
Pick roller's width
Good
Pick roller's width
Bad
Documents with Different Widths
When you scan a mixed batch with different widths, some of
the smaller documents may be skewed or not fed into the ADF.
In that case, separate the documents by their widths, and scan
them in different batches.
Make sure that all documents are placed underneath the
pick roller. Otherwise, some documents may be skewed
or not fed into the ADF.
TOP
Contents
Index
Introduction
Scanner
Overview
For more details about scanning a mixed batch of documents,
refer to "Conditions for Mixed Batch Scanning" (page 47).
1 To avoid skewed images and detect the paper size
automatically, select [Automatic Page Size Detection] in
[Automatic Size and Skew Detection].
For details, refer to "Automatically Correcting Skewed Images" (page
91).
2 Align the top of the documents.
3 Place the documents at the center of the ADF paper
chute, and adjust the side guides to the widest document
in the batch.
For details, refer to "Chapter 2 How to Load Documents" (page 37).
How to Load
Documents
Configuring the
Scan Settings
How to Use the
Operator Panel
Various Ways to
Scan
Daily Care
Replacing the
Consumables
Troubleshooting
4 Scan the document by selecting the [Scan] menu J
[Scan] in ScandAll PRO.
Operational
Settings
Appendix
Glossary
69
Page 70

Chapter 5 Various Ways to Scan
!!!
Documents Larger than A4/Letter Size
The Carrier Sheet can be used to scan documents larger than
A4/Letter size, such as A3 and B4. By folding the document in
half and scanning in duplex mode, the two sides are merged
into a single image.
2 Place the document inside the Carrier Sheet.
Align the fold line with the right edge of the Carrier Sheet so that
the document fits in the upper right-hand corner.
TOP
Contents
Index
Introduction
Scanner
Overview
Part of the image around where the document is folded may
appear missing. Using the Carrier Sheet is not recommended
for obtaining high quality image.
You can also scan a double-sided document that is smaller
than A4 size, and output the image as a double-page spread
image.
1 Place the document inside the Carrier Sheet.
1 Fold the document in half so that the sides to be scanned are
facing out.
Fold it tightly and smooth out any creases.
Otherwise, it may cause the document to skew during feeding.
The front side of the Carrier Sheet has a thick vertical
line on the right side of the black & white pattern.
2 Load the Carrier Sheet face-down in the ADF paper
chute.
Secure the Carrier Sheet with the side guides to avoid skewing.
How to Load
Documents
Configuring the
Scan Settings
How to Use the
Operator Panel
Various Ways to
Scan
Daily Care
Replacing the
Consumables
Troubleshooting
Operational
Settings
Appendix
Glossary
70
Page 71

Chapter 5 Various Ways to Scan
3 Start up ScandAll PRO and select the [Scan] menu J
[Scanner Setting].
D The [TWAIN Driver (32)] dialog box appears.
5 Click the [Carrier Sheet] tab and configure settings such
as [Image Mode].
TOP
Contents
Index
Introduction
If the [TWAIN Driver (32)] dialog box does not appear,
check the setting in ScandAll PRO by selecting the [Tool]
menu J [Preferences] to open the [Setup] dialog box,
then confirm that [TWAIN] is selected for [Device Driver]
in the [Scan] tab.
4 Select [Double-page spread] for [Scan Type].
6 Click the [OK] button.
D The settings are saved.
7 Scan the document by selecting the [Scan] menu J
[Scan] in ScandAll PRO.
D The images on the front and back are merged into a single image.
Scanner
Overview
How to Load
Documents
Configuring the
Scan Settings
How to Use the
Operator Panel
Various Ways to
Scan
Daily Care
Replacing the
Consumables
Troubleshooting
Operational
Settings
Appendix
Glossary
71
Page 72

Chapter 5 Various Ways to Scan
!!!
z There may be a line or a gap appearing between the
front and back side images.
Also when you scan thick papers, images on both left
and right may skew towards each other from the top.
These symptoms may be improved when you perform
the following:
- Fold the document tightly
- Align the edges of the document neatly with the
edges of the Carrier Sheet
- Turn over the Carrier Sheet to the other (reverse)
side
z When [Automatic detection] is specified for [Paper
Size], the closest standard size (A3, A4 or Double
Letter) is selected from the same drop-down list. Note
that the size of the image may become smaller than the
original document depending on the document
scanned.
Example: When you scan an A3 size document whose
content is printed to fit A4 size in the center
DThe image is output in B4 size.
To output the scanned image in the actual size of the
document, specify the document size for [Paper size].
z Part of the image around where the document is folded
may appear missing. In that case, set the document so
its edge is about 1 mm inside from the edge of the
Carrier Sheet.
z When [Black & White] is specified for [Image Mode],
the edges around the image may appear in black from
the shadow of the document.
TOP
Contents
Index
Introduction
Scanner
Overview
How to Load
Documents
Configuring the
Scan Settings
How to Use the
Operator Panel
Various Ways to
Scan
Daily Care
Replacing the
Consumables
Troubleshooting
Operational
Settings
Appendix
Glossary
72
Page 73

Chapter 5 Various Ways to Scan
Scanning Photographs and Clippings
Using the Carrier Sheet allows you to scan documents that
can be damaged quite easily such as photographs, or
documents that are difficult to load directly such as newspaper
clippings.
2 Load the Carrier Sheet face-down in the ADF paper
chute, as shown below.
Secure the Carrier Sheet with the side guides to avoid skewing.
TOP
Contents
Index
Introduction
Scanner
Overview
1 Place the document inside the Carrier Sheet.
Place it against the top center of the Carrier Sheet.
3 Start up ScandAll PRO and select the [Scan] menu J
[Scanner Setting].
D The [TWAIN Driver (32)] dialog box appears.
If the [TWAIN Driver (32)] dialog box does not appear,
check the setting in ScandAll PRO by selecting the [Tool]
menu J [Preferences] to open the [Setup] dialog box,
then confirm that [TWAIN] is selected for [Device Driver]
in the [Scan] tab.
How to Load
Documents
Configuring the
Scan Settings
How to Use the
Operator Panel
Various Ways to
Scan
Daily Care
Replacing the
Consumables
Troubleshooting
Operational
Settings
Appendix
Glossary
73
Page 74

Chapter 5 Various Ways to Scan
!
4 Select [Clipping (Front)] or [Clipping (Duplex)] for [Scan
Type].
Select [Clipping (Front)] for simplex scanning and [Clipping (Duplex)]
for duplex scanning.
5 Click the [Carrier Sheet] tab and configure settings such
as [Image Mode].
TOP
Contents
Index
Introduction
Scanner
Overview
How to Load
Documents
Configuring the
Scan Settings
How to Use the
Operator Panel
6 Click the [OK] button.
D The settings are saved.
7 Scan the document by selecting the [Scan] menu J
[Scan] in ScandAll PRO.
z The image is output at the center of the page in the
!
!
size specified in [Paper Size].
z When [Automatic detection] is specified for [Paper
Size], the closest standard size is selected from the
same drop-down list. Note that the size of the image
may become smaller than the original document
depending on the document scanned, or part of the
image may appear missing.
Example: When an A5 size image is printed in the
center of an A4 size document
DThe image is output in A5 size.
To output the scanned image in the actual size of the
document, specify the document size for [Paper size].
Various Ways to
Scan
Daily Care
Replacing the
Consumables
Troubleshooting
Operational
Settings
Appendix
Glossary
74
Page 75

Chapter 5 Various Ways to Scan
Blank
sheet
In the following cases, place a blank (white) sheet of
paper underneath the document when scanning.
z The scanned image is not output in the correct size
when [Automatic detection] is selected in the [Paper
size] drop-down list
z Shadows appear around the edges of the scanned
image
z Black lines appear around the edges of a uniquely
shaped cutting
z Colors outside the document appear on the scanned
image
TOP
Contents
Index
Introduction
Scanner
Overview
How to Load
Documents
Configuring the
Scan Settings
How to Use the
Operator Panel
Various Ways to
Scan
Daily Care
Replacing the
Consumables
Troubleshooting
Operational
Settings
Appendix
Glossary
75
Page 76

Chapter 5 Various Ways to Scan
!!!
Long Page Scanning
Documents with a length up to 3,048 mm (120 in.) can be
scanned by long page scanning.
1 Load the document in the ADF paper chute.
For details, refer to "Chapter 2 How to Load Documents" (page 37).
To scan documents longer than A4/Letter size, perform
the following:
z Pull out the chute extensions all the way.
For details, refer to "1.6 Setting Up the ADF Paper
Chute" (page 26).
z Lift the stacker and stacker extension towards you.
For details, refer to "1.7 Setting Up the Stacker" (page
27).
TOP
Contents
Index
Introduction
Scanner
Overview
z Long page documents should be loaded one sheet at a
time in the ADF paper chute.
z When you scan long pages, take note of the following.
- Loading
Hold the document with your hand so it does not fall
out of the ADF paper chute.
- Removing
Secure enough space around the stacker to prevent
the ejected sheet from falling off the stacker.
2 Start up ScandAll PRO and select the [Scan] menu J
[Scanner Setting].
D The [TWAIN Driver (32)] dialog box appears.
If the [TWAIN Driver (32)] dialog box does not appear,
check the setting in ScandAll PRO by selecting the [Tool]
menu J [Preferences] to open the [Setup] dialog box,
then confirm that [TWAIN] is selected for [Device Driver]
in the [Scan] tab.
How to Load
Documents
Configuring the
Scan Settings
How to Use the
Operator Panel
Various Ways to
Scan
Daily Care
Replacing the
Consumables
Troubleshooting
Operational
Settings
Appendix
Glossary
76
Page 77

Chapter 5 Various Ways to Scan
!!!
3 In [Scan Type], select [Long page (Front Side)] or [Long
page (Duplex)].
Select [Long page (Front Side)] for simplex scanning and [Long page
(Duplex)] for duplex scanning.
D The [Long Page Paper Size Setting] dialog box appears.
6 Scan the document by selecting the [Scan] menu J
[Scan] in ScandAll PRO.
z To scan documents longer than 864 mm (34 in.), set
the resolution to 200 dpi or lower.
z Depending on the application or scan settings (e.g.
paper size), there may be insufficient memory to
perform scanning.
TOP
Contents
Index
Introduction
Scanner
Overview
How to Load
Documents
Configuring the
Scan Settings
How to Use the
Operator Panel
Various Ways to
Scan
4 Specify the paper size and click the [OK] button.
5 Click the [OK] button.
D The changes are applied.
Daily Care
Replacing the
Consumables
Troubleshooting
Operational
Settings
Appendix
Glossary
77
Page 78

Chapter 5 Various Ways to Scan
Reference point
Scanning a Book (fi-6230Z/fi-6240Z)
1 Open the document cover.
For details, refer to "1.5 Opening/Closing the Document Cover (fi-
6230Z/fi-6240Z)" (page 25).
2 Remove the document cover by pulling it out in the
direction of the arrow.
3 Load the document on the document bed.
Place the document face-down to align its top left-hand corner with
the reference point.
4 Start up ScandAll PRO and select the [Scan] menu J
[Scanner Setting].
D The [TWAIN Driver (32)] dialog box appears.
If the [TWAIN Driver (32)] dialog box does not appear,
check the setting in ScandAll PRO by selecting the [Tool]
menu J [Preferences] to open the [Setup] dialog box,
then confirm that [TWAIN] is selected for [Device Driver]
in the [Scan] tab.
TOP
Contents
Index
Introduction
Scanner
Overview
How to Load
Documents
Configuring the
Scan Settings
How to Use the
Operator Panel
Various Ways to
Scan
Daily Care
Replacing the
Consumables
Troubleshooting
Operational
Settings
Appendix
Glossary
78
Page 79

Chapter 5 Various Ways to Scan
!!!
5 Select [Flat Bed] for [Scan Type].
8 Attach the document cover.
9 Close the document cover.
For details, refer to "1.5 Opening/Closing the Document Cover (fi-
6230Z/fi-6240Z)" (page 25).
TOP
Contents
Index
Introduction
Scanner
Overview
How to Load
Documents
Configuring the
Scan Settings
How to Use the
Operator Panel
Various Ways to
Scan
6 Click the [OK] button.
D The changes are applied.
7 Scan the document by selecting the [Scan] menu J
[Scan] in ScandAll PRO.
Do not look directly into the light source.
Do not move the document during scanning.
Daily Care
Replacing the
Consumables
Troubleshooting
Operational
Settings
Appendix
Glossary
79
Page 80

Chapter 5 Various Ways to Scan
Reference point
Scanning a Large Document on the Flatbed (fi-6230Z/fi-6240Z)
3 Load the document on the document bed.
Place the document face-down to align its top left-hand corner with
the reference point.
TOP
Contents
Index
Introduction
1 Open the document cover.
For details, refer to "1.5 Opening/Closing the Document Cover (fi-
6230Z/fi-6240Z)" (page 25).
2 Remove the document cover by pulling it out in the
direction of the arrow.
4 Start up ScandAll PRO and select the [Scan] menu J
[Scanner Setting].
D The [TWAIN Driver (32)] dialog box appears.
If the [TWAIN Driver (32)] dialog box does not appear,
check the setting in ScandAll PRO by selecting the [Tool]
menu J [Preferences] to open the [Setup] dialog box,
then confirm that [TWAIN] is selected for [Device Driver]
in the [Scan] tab.
Scanner
Overview
How to Load
Documents
Configuring the
Scan Settings
How to Use the
Operator Panel
Various Ways to
Scan
Daily Care
Replacing the
Consumables
Troubleshooting
Operational
Settings
Appendix
Glossary
80
Page 81

Chapter 5 Various Ways to Scan
!!!
5 Select [Flat Bed] for [Scan Type].
8 Attach the document cover.
9 Close the document cover.
For details, refer to "1.5 Opening/Closing the Document Cover (fi-
6230Z/fi-6240Z)" (page 25).
TOP
Contents
Index
Introduction
Scanner
Overview
How to Load
Documents
Configuring the
Scan Settings
How to Use the
Operator Panel
Various Ways to
Scan
6 Click the [OK] button.
D The changes are applied.
7 Scan the document by selecting the [Scan] menu J
[Scan] in ScandAll PRO.
Do not look directly into the light source.
Do not move the document during scanning.
Daily Care
Replacing the
Consumables
Troubleshooting
Operational
Settings
Appendix
Glossary
81
Page 82

Chapter 5 Various Ways to Scan
!
ABC ABC
Example: When [Green] is selected for dropout color
TOP
Contents
5.3 Advanced Scanning
Removing a Color from the Scanned Image (Dropout Color)
You can select either green, red, blue (primary colors), or a
color of your choice to remove the details of the selected color
from a scanned image.
For example, if a document with black characters and a green
background is scanned, only the black characters will appear
on the scanned image if [Green] is selected.
2 Start up ScandAll PRO and select the [Scan] menu J
[Scanner Setting].
D The [TWAIN Driver (32)] dialog box appears.
If the [TWAIN Driver (32)] dialog box does not appear,
check the setting in ScandAll PRO by selecting the [Tool]
menu J [Preferences] to open the [Setup] dialog box,
then confirm that [TWAIN] is selected for [Device Driver]
in the [Scan] tab.
3 Click the [Advance] button.
D The [Advance] dialog box appears.
Index
Introduction
Scanner
Overview
How to Load
Documents
Configuring the
Scan Settings
How to Use the
Operator Panel
Various Ways to
Scan
Dropout works the best with light (low intensity) colors, and
!
!
dark colors may not drop out.
Dropout color is only available in black & white or grayscale
mode.
1 Load the document.
For details, refer to "Chapter 2 How to Load Documents" (page 37).
Daily Care
Replacing the
Consumables
Troubleshooting
Operational
Settings
Appendix
Glossary
82
Page 83

Chapter 5 Various Ways to Scan
4 Click the [Gray] tab, and then select a color from [Dropout
Color] under [More].
When you select [Custom], [Custom 2], or [Custom 3], the [Select
Dropout Color] dialog box is displayed where you can select up to
three colors of your choice.
TOP
Contents
Index
Introduction
Scanner
Overview
How to Load
Documents
Configuring the
Scan Settings
How to Use the
Operator Panel
Various Ways to
Scan
If you select [Panel setting], the setting of the Software Operational
Panel is enabled.
No color is dropped out when you select [None].
To drop out a color of your choice, select either [Custom], [Custom 2]
or [Custom 3].
z [Original image]
A sample of the color is displayed.Click to select the color.
z [Dropout image]
The image after removing the details of the color is displayed.
Daily Care
Replacing the
Consumables
Troubleshooting
Operational
Settings
Appendix
Glossary
83
Page 84

Chapter 5 Various Ways to Scan
z [Color 1], [Color 2] and [Color 3] tabs
Specify the color(s) to be dropped out.
Up to three colors can be selected at once.
- [Dropout] check box
Select this check box in the [Color 2] or [Color 3] tab when two or
more dropout colors are specified.
- [Red] / [Green] / [Blue]
The specified colors are displayed in numerical values. Either
type in the value directly or use the [▲] / [▼] button to change
the value.
- [Sample color]
The specified color is displayed.
z [Priority Black] check box
Select this check box when you do not want any text/characters to
be dropped out.
This option saves low intensity colors such as black (generally
used for characters) from being removed.
z [Sensitivity]
Specify the allowable range for the selected dropout color.
Range: 15 to 180 degrees
The larger the value is set, the wider the color range becomes.
z [File] Button
You can select an image file (*.bmp) to be displayed for [Original
image], and then specify the color to be dropped out.
z [Apply] Button
Applies the configured settings and closes the dialog box.
z [Cancel] Button
Cancels the configured settings and closes the dialog box.
TOP
Contents
Index
Introduction
Scanner
Overview
How to Load
Documents
Configuring the
Scan Settings
How to Use the
Operator Panel
Various Ways to
Scan
Daily Care
Replacing the
Consumables
5 Click the [OK] button.
D It returns to the [TWAIN Driver (32)] dialog box.
6 Click the [OK] button in the [TWAIN Driver (32)] dialog
box.
D The settings are saved.
7 Scan the document by selecting the [Scan] menu J
[Scan] in ScandAll PRO.
Troubleshooting
Operational
Settings
Appendix
Glossary
84
Page 85

Chapter 5 Various Ways to Scan
Skipping Blank Pages
Blank pages (black or white) in the documents can be
detected and automatically deleted during scanning. For
example, when you scan a mixed batch of double-sided and
single-sided documents in duplex mode, the images are
generated without the back sides of the single-sided
documents (blank pages).
1 Load the documents in the ADF paper chute.
For details, refer to "Chapter 2 How to Load Documents" (page 37).
2 Start up ScandAll PRO and select the [Scan] menu J
[Scanner Setting].
D The [TWAIN Driver (32)] dialog box appears.
4 Click the [Job/Cache] tab and select the [Blank Page
Skip] check box.
TOP
Contents
Index
Introduction
Scanner
Overview
How to Load
Documents
Configuring the
Scan Settings
How to Use the
Operator Panel
If the [TWAIN Driver (32)] dialog box does not appear,
check the setting in ScandAll PRO by selecting the [Tool]
menu J [Preferences] to open the [Setup] dialog box,
then confirm that [TWAIN] is selected for [Device Driver]
in the [Scan] tab.
3 Click the [Option] button.
D The [Option] dialog box appears.
D The cache mode automatically switches to [Ram cache] or
[Use Both Memory].
5 Use the slider to adjust the sensitivity.
Select from five levels. The larger the value is set, the more likely for
the pages to be detected as blank.
Blank pages will not be deleted if you select [--].
6 Click the [OK] button.
D It returns to the [TWAIN Driver (32)] dialog box.
7 Click the [OK] button in the [TWAIN Driver (32)] dialog
box.
D The settings are saved.
8 Scan the document by selecting the [Scan] menu J
[Scan] in ScandAll PRO.
Various Ways to
Scan
Daily Care
Replacing the
Consumables
Troubleshooting
Operational
Settings
Appendix
Glossary
85
Page 86

Chapter 5 Various Ways to Scan
!
Original Output image
Removing Punch Holes
3 Click the [Option] button.
TOP
Contents
Index
You can remove punch holes from the output scanned image.
Punch holes cannot be removed when:
!
!
z The holes are not aligned along the edge of the document
z The size and gap between the holes vary
z The hole is near the edge of the document
z The document is not rectangular
z The document has a dark background color
z There are characters/pictures over the edge or the holes
z [Automatic Page Size Detection] is specified and the
scanned document is larger than the selected paper size
z [Black Background] is specified and the scanned document
does not match with the selected paper size.
D The [Option] dialog box appears.
4 Click the [Rotation] tab and select [Automatic Page Size
Detection] or [Black Background] in the [Automatic Size
and Skew detection] drop-down list.
The [Hole punch removal] function is disabled when a setting other
than [Automatic Page Size Detection] or [Black Background] is
specified.
Introduction
Scanner
Overview
How to Load
Documents
Configuring the
Scan Settings
How to Use the
Operator Panel
Various Ways to
Scan
Daily Care
1 Load the documents.
For details, refer to "Chapter 2 How to Load Documents" (page 37).
2 Start up ScandAll PRO and select the [Scan] menu J
[Scanner Setting].
D The [TWAIN Driver (32)] dialog box appears.
If the [TWAIN Driver (32)] dialog box does not appear,
check the setting in ScandAll PRO by selecting the [Tool]
menu J [Preferences] to open the [Setup] dialog box,
then confirm that [TWAIN] is selected for [Device Driver]
in the [Scan] tab.
5 Select [Fill with white] or [Background color] under [Hole
punch removal].
Select [Background color] when scanning a color document. If [Fill
with white] is selected, the punch holes will appear as if they are filled
with white squares.
Replacing the
Consumables
Troubleshooting
Operational
Settings
Appendix
Glossary
86
Page 87

Chapter 5 Various Ways to Scan
6 Click the [OK] button.
D It returns to the [TWAIN Driver (32)] dialog box.
TOP
Contents
Index
7 Click the [OK] button in the [TWAIN Driver (32)] dialog
box.
D The settings are saved.
8 Scan the document by selecting the [Scan] menu J
[Scan] in ScandAll PRO.
With some types of documents, the characters or
graphics may be falsely detected as punch holes and
filled with a color, or the punch holes may not be filled at
all. In such cases, select [Automatic Page Size Detection]
and specify "3" for [Priority] to improve the accuracy of
hole punch removal.
Introduction
Scanner
Overview
How to Load
Documents
Configuring the
Scan Settings
How to Use the
Operator Panel
Various Ways to
Scan
Daily Care
Replacing the
Consumables
Troubleshooting
Operational
Settings
Appendix
Glossary
87
Page 88

Chapter 5 Various Ways to Scan
Scanning the Image Brighter
3 Select grayscale or color in [Image Mode].
TOP
Contents
Index
The brightness of the scanned image can be increased for
scanning in grayscale or color.
1 Load the document.
For details, refer to "Chapter 2 How to Load Documents" (page 37).
2 Start up ScandAll PRO and select the [Scan] menu J
[Scanner Setting].
D The [TWAIN Driver (32)] dialog box appears.
If the [TWAIN Driver (32)] dialog box does not appear,
check the setting in ScandAll PRO by selecting the [Tool]
menu J [Preferences] to open the [Setup] dialog box,
then confirm that [TWAIN] is selected for [Device Driver]
in the [Scan] tab.
Introduction
Scanner
Overview
How to Load
Documents
Configuring the
Scan Settings
How to Use the
Operator Panel
Various Ways to
Scan
Daily Care
4 Click the [Advance] button.
D The [Advance] dialog box appears.
Replacing the
Consumables
Troubleshooting
Operational
Settings
Appendix
Glossary
88
Page 89

Chapter 5 Various Ways to Scan
5 Click the [Color] tab, and then select [Bright] in [Preset
Gamma].
8 Scan the document by selecting the [Scan] menu J
[Scan] in ScandAll PRO.
TOP
Contents
Index
6 Click the [OK] button.
D It returns to the [TWAIN Driver (32)] dialog box.
7 In the [TWAIN Driver (32)] dialog box, click the [OK]
button.
D The settings are saved.
When using applications other than ScandAll PRO, you can
also increase the default brightness of the TWAIN driver.
Select [Tools] J [FtSwtGmm] J [Twain] in the Setup DVDROM and double-click "FtSwtGmm.exe", and then select
[Bright) in the [Default scan setting (TWAIN)] dialog box.
Introduction
Scanner
Overview
How to Load
Documents
Configuring the
Scan Settings
How to Use the
Operator Panel
Various Ways to
Scan
Daily Care
Replacing the
Consumables
Troubleshooting
Operational
Settings
Appendix
Glossary
89
Page 90

Chapter 5 Various Ways to Scan
Feeding Documents Manually in the ADF
5 Repeat step 4 until all documents are scanned.
D Scanning will stop if no document is loaded within the set time.
TOP
Contents
Index
Documents can also be loaded manually one sheet at a time
in the ADF.
Normally, in automatic feeding, the scanner stops scanning
once all the documents loaded in the ADF paper chute have
been scanned.
In manual feeding, the scanner waits for the next document to
be loaded within a specified time. Scanning will continue as
long as another document is loaded within the set time, and
stops if no document is loaded.
By using this method, you can perform scanning as you check
the documents one by one.
Manual feeding is effective in the following cases.
z To scan as you check the contents of each sheet.
z To scan documents that cause multifeed or paper jam when loaded
together in the same batch.
z To continue scanning documents such as magazine/newspaper
clippings that cannot be loaded together.
1 Enable manual feeding in the Software Operation Panel.
For details, refer to "Waiting Time in Manual Feed Mode [Manual-feed
timeout]" (page 186).
z Pressing the [Send to] button on the operator panel will
stop the scan immediately.
z When [Manual-feed timeout] is enabled, the scanner
will wait for the set time even if you start scanning with
no document in the ADF paper chute.
z When you use manual feeding frequently, replacement
cycle of the consumables may be shortened.
Introduction
Scanner
Overview
How to Load
Documents
Configuring the
Scan Settings
How to Use the
Operator Panel
Various Ways to
Scan
Daily Care
2 Load a document in the ADF paper chute.
For details, refer to "Chapter 2 How to Load Documents" (page 37).
3 Scan the document by selecting the [Scan] menu J
[Scan] in ScandAll PRO.
D After the document is scanned, the rollers inside the ADF keep
rotating, waiting for the next document to be loaded for the time
specified in the Software Operation Panel.
4 Load the next document in the ADF paper chute.
D The document is scanned.
Replacing the
Consumables
Troubleshooting
Operational
Settings
Appendix
Glossary
90
Page 91

Chapter 5 Various Ways to Scan
!!!
Original Output image
TOP
Contents
5.4 Configuring Post-Scan Operations and Handling
Automatically Correcting Skewed Images
When the documents are fed into the ADF skewed, the
skewed images can be detected and straightened
automatically.
Note that upon deskewing the images, the paper size of the
documents are also detected automatically.
Note that the image may be output a few mm larger than the
document to avoid any part of the image to appear missing.
2 Start up ScandAll PRO and select the [Scan] menu J
[Scanner Setting].
D The [TWAIN Driver (32)] dialog box appears.
If the [TWAIN Driver (32)] dialog box does not appear,
check the setting in ScandAll PRO by selecting the [Tool]
menu J [Preferences] to open the [Setup] dialog box,
then confirm that [TWAIN] is selected for [Device Driver]
in the [Scan] tab.
3 Click the [Option] button.
D The [Option] dialog box appears.
Index
Introduction
Scanner
Overview
How to Load
Documents
Configuring the
Scan Settings
How to Use the
Operator Panel
Various Ways to
Scan
Daily Care
For details about automatic page size detection, refer to "
Conditions for Automatic Page Size Detection" (page 49).
1 Load the documents in the ADF paper chute.
For details, refer to "Chapter 2 How to Load Documents" (page 37).
Replacing the
Consumables
Troubleshooting
Operational
Settings
Appendix
Glossary
91
Page 92

Chapter 5 Various Ways to Scan
!
4 Click the [Rotation] tab and select [Automatic Page Size
Detection] in the [Automatic Size and Skew detection]
drop-down list.
5 Click the [OK] button.
D It returns to the [TWAIN Driver (32)] dialog box.
6 Click the [OK] button in the [TWAIN Driver (32)] dialog
box.
D The settings are saved.
7 Scan the document by selecting the [Scan] menu J
[Scan] in ScandAll PRO.
TOP
Contents
Index
Introduction
Scanner
Overview
How to Load
Documents
Configuring the
Scan Settings
How to Use the
Operator Panel
Various Ways to
Scan
!
!
[Automatic Page Size Detection] may not work properly if
the documents are severely skewed.
Selecting [Automatic Page Size Detection] may slow
down the scanning speed.
Daily Care
Replacing the
Consumables
Troubleshooting
Operational
Settings
Appendix
Glossary
92
Page 93

Chapter 5 Various Ways to Scan
Opqrstu
Vwxyz.
DEF
Opqrstu
Vwxyz.
DEF
Abcdefg
Hijklmn
Abcdefg
Hijklmn
Original Output image
Automatically Correcting the Page Orientation
When you scan a batch of documents with mixed page
orientations, the images can be adjusted to their correct page
orientations automatically.
1 Load the documents in the ADF paper chute.
For details, refer to "Chapter 2 How to Load Documents" (page 37).
2 Start up ScandAll PRO and select the [Scan] menu J
[Scanner Setting].
D The [TWAIN Driver (32)] dialog box appears.
If the [TWAIN Driver (32)] dialog box does not appear,
check the setting in ScandAll PRO by selecting the [Tool]
menu J [Preferences] to open the [Setup] dialog box,
then confirm that [TWAIN] is selected for [Device Driver]
in the [Scan] tab.
4 Click the [Rotation] tab and select [Automatic] in the
[Rotation Degree] drop-down list.
TOP
Contents
Index
Introduction
Scanner
Overview
How to Load
Documents
Configuring the
Scan Settings
How to Use the
Operator Panel
Various Ways to
Scan
Daily Care
Replacing the
Consumables
3 Click the [Option] button.
D The [Option] dialog box appears.
Troubleshooting
Operational
Settings
Appendix
Glossary
93
Page 94

Chapter 5 Various Ways to Scan
!!!
z The following types of documents may not be adjusted
correctly because the page orientation is detected
based on the characters printed on the document:
- Documents scanned at a resolution of less than 200
dpi
- Documents with many extremely large or small
characters
- Documents on which the pitches between lines or
characters are extremely narrow, or characters are
overlapped with each other
- Documents with many photographs or figures and
few characters
- Documents with characters printed in various
directions (e.g. drawings)
- Documents written using only capital characters
- Documents with handwritten characters
- Skewed documents
- Documents written in a language other than the
supported languages: Japanese, English, French,
German, Italian, Spanish, Chinese (Simplified and
Traditional), Korean, Russian and Portuguese.
- Documents with characters on patterned
background
- Documents with a complex layout
- Documents with a large amount of image noise
z The language selected in the Windows [Regional and
Language Options] is used for judging the text on the
document.
z The image orientation may not be corrected properly
depending on the scanner driver setting at scanning
(e.g. dithering).
z If you cannot correct the image orientation properly,
use the Edge Emphasis function of the driver to correct
it.
z Shadows may remain on the edge of the scanned
image.
z [Automatic] in [Rotation Degree] is available only when
ScandAll PRO is installed.
5 Click the [OK] button.
D It returns to the [TWAIN Driver (32)] dialog box.
6 Click the [OK] button in the [TWAIN Driver (32)] dialog
box.
D The settings are saved.
7 Scan the document by selecting the [Scan] menu J
[Scan] in ScandAll PRO.
TOP
Contents
Index
Introduction
Scanner
Overview
How to Load
Documents
Configuring the
Scan Settings
How to Use the
Operator Panel
Various Ways to
Scan
Daily Care
Replacing the
Consumables
Troubleshooting
Operational
Settings
Appendix
Glossary
94
Page 95

Chapter 5 Various Ways to Scan
!!!
ABC
123
ABC
123
Original Output image
Splitting the Scanned Image in Two
3 Click the [Option] button.
TOP
Contents
Index
Each page of the scanned image can be split horizontally into
two separate pages.
This function may not work properly in some applications.
1 Load the document.
For details, refer to "Chapter 2 How to Load Documents" (page 37).
2 Start up ScandAll PRO and select the [Scan] menu J
[Scanner Setting].
D The [TWAIN Driver (32)] dialog box appears.
If the [TWAIN Driver (32)] dialog box does not appear,
check the setting in ScandAll PRO by selecting the [Tool]
menu J [Preferences] to open the [Setup] dialog box,
then confirm that [TWAIN] is selected for [Device Driver]
in the [Scan] tab.
Introduction
Scanner
Overview
D The [Option] dialog box appears.
How to Load
Documents
Configuring the
Scan Settings
How to Use the
Operator Panel
Various Ways to
Scan
Daily Care
Replacing the
Consumables
Troubleshooting
Operational
Settings
Appendix
Glossary
95
Page 96

Chapter 5 Various Ways to Scan
!
4 Click the [Rotation] tab and select the [Split Image] check
box.
6 Click the [OK] button in the [TWAIN Driver (32)] dialog
box.
D The settings are saved.
TOP
Contents
Index
Introduction
!
!
This option is not available with the following settings:
z Multi image output
z Auto color/monochrome detection
z Resolution set to 1200 dpi
z [Double-page spread], [Clipping (Front)] or [Clipping
(Duplex)]
When scanning in duplex mode, the back of the image is
output in the following order according to the [Flip Side
Rotation] setting:
z Book: top J bottom
z Fanfold: bottom J top
7 Scan the document by selecting the [Scan] menu J
[Scan] in ScandAll PRO.
Scanner
Overview
How to Load
Documents
Configuring the
Scan Settings
How to Use the
Operator Panel
Various Ways to
Scan
Daily Care
Replacing the
Consumables
Troubleshooting
5 Click the [OK] button.
D It returns to the [TWAIN Driver (32)] dialog box.
Operational
Settings
Appendix
Glossary
96
Page 97

Chapter 5 Various Ways to Scan
!
Original Output image
Example: When a color document is scanned
Using the Multi Image Output
3 Select the [Enable Multi Image] check box.
TOP
Contents
Index
"Multi image output" allows you to obtain both a color/
grayscale image and a black & white image from a single
scan.
This function may not work properly in some applications.
!
!
ABC
ABC
1 Load the document.
For details, refer to "Chapter 2 How to Load Documents" (page 37).
2 Start up ScandAll PRO and select the [Scan] menu J
[Scanner Setting].
D The [TWAIN Driver (32)] dialog box appears.
D The [Multi Image] dialog box appears.
Introduction
Scanner
Overview
How to Load
Documents
Configuring the
Scan Settings
How to Use the
Operator Panel
Various Ways to
Scan
Daily Care
Replacing the
Consumables
Troubleshooting
If the [TWAIN Driver (32)] dialog box does not appear,
check the setting in ScandAll PRO by selecting the [Tool]
menu J [Preferences] to open the [Setup] dialog box,
then confirm that [TWAIN] is selected for [Device Driver]
in the [Scan] tab.
Operational
Settings
Appendix
Glossary
97
Page 98

Chapter 5 Various Ways to Scan
4 Select [Multi Image Output] for [Output mode].
5 In [Order (for Multi Image Output)], select the order in
which the images are output.
TOP
Contents
Index
Introduction
Order Description
Primary : Color/Grayscale
Secondary : Binary
Primary : Binary
Secondary : Color/Grayscale
A color/grayscale image is output
first, then a black & white image.
A black & white image is output
first, then a color/grayscale image.
6 Select a side in [Select Current Image Setting].
Configure the scan settings for [Primary] and then [Secondary] in the
[TWAIN Driver (32)] dialog box.
7 Click the [OK] button in the [TWAIN Driver (32)] dialog
box.
D The settings are saved.
8 Scan the document by selecting the [Scan] menu J
[Scan] in ScandAll PRO.
Scanner
Overview
How to Load
Documents
Configuring the
Scan Settings
How to Use the
Operator Panel
Various Ways to
Scan
Daily Care
Replacing the
Consumables
Troubleshooting
Operational
Settings
Appendix
Glossary
98
Page 99

Chapter 5 Various Ways to Scan
!!!
Automatically Detecting Color/Monochrome Documents
The color of the document can be automatically detected then
output in color or grayscale for color documents, and in black
& white for black & white documents.
3 Select the [Enable Multi Image] check box.
TOP
Contents
Index
Introduction
Scanner
Overview
This function may not work properly in some applications.
1 Load the documents.
For details, refer to "Chapter 2 How to Load Documents" (page 37).
2 Start up ScandAll PRO and select the [Scan] menu J
[Scanner Setting].
D The [TWAIN Driver (32)] dialog box appears.
If the [TWAIN Driver (32)] dialog box does not appear,
check the setting in ScandAll PRO by selecting the [Tool]
menu J [Preferences] to open the [Setup] dialog box,
then confirm that [TWAIN] is selected for [Device Driver]
in the [Scan] tab.
D The [Multi Image] dialog box appears.
How to Load
Documents
Configuring the
Scan Settings
How to Use the
Operator Panel
Various Ways to
Scan
Daily Care
Replacing the
Consumables
Troubleshooting
Operational
Settings
Appendix
Glossary
99
Page 100

Chapter 5 Various Ways to Scan
4 Select [Auto Color Detection] for [Output mode].
5 Select a side in [Select Current Image Setting].
You need to pre-configure the scan settings for each case when the
document is recognized as [Color/Grayscale] or [Binary].
Configure the scan settings in the [TWAIN Driver (32)] dialog box.
If it is recognized as a color/grayscale document, the
image is output in the mode selected for [Image Mode] in
the [TWAIN Driver (32)] dialog box.
TOP
Contents
Index
Introduction
Scanner
Overview
How to Load
Documents
Configuring the
Scan Settings
How to Use the
Operator Panel
Various Ways to
Scan
6 Click the [OK] button in the [TWAIN Driver (32)] dialog
box.
D The settings are saved.
7 Scan the document by selecting the [Scan] menu J
[Scan] in ScandAll PRO.
Daily Care
Replacing the
Consumables
Troubleshooting
Operational
Settings
Appendix
Glossary
100
 Loading...