


CFEF372EC7
Frigidaire CFEF372EC7, CFEF372ES5, CFES365ES6, CFES365EC7, CFES365EB6 Owner’s Manual
...
ELECTRONIC OVEN CONTROL GUIDE
NOTE: The basic timer is externally arranged in different configuration in various appliance models. This does not change
the way it operates.
NOTE: Some models have a touch pad control. To activate it, you just have to touch the pad with a finger. Take care to
have a good contact between the finger and the touch pad. Long nails can make the activation difficult. It is a good idea to
clean the control panel after each use or as soon as possible after a spill, boil over or spatter because some ionic or salty
ingredients as ketchup, tomatoes sauce, etc.., can operate the control. Before cleaning the control panel it is
recommended to turn on the control lockout feature.
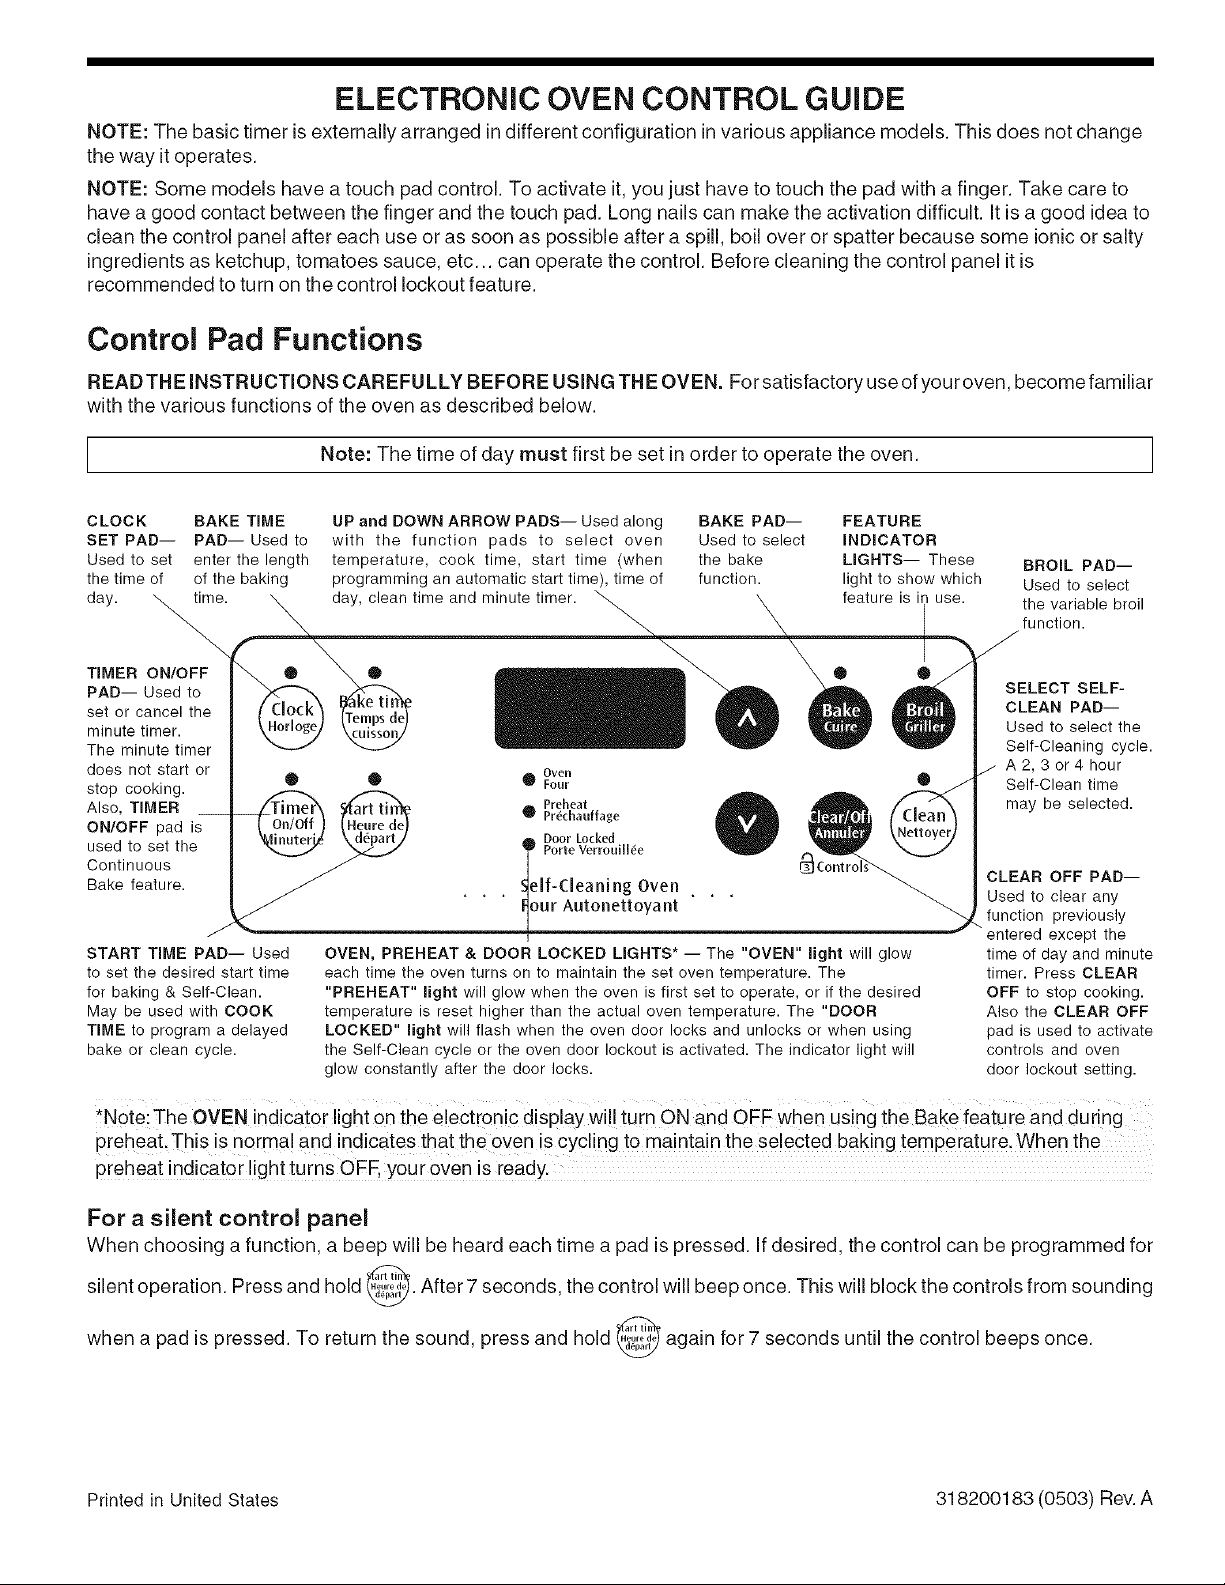
Control Pad Functions
READTHE INSTRUCTIONS CAREFULLY BEFORE USING THE OVEN. For satisfactory use of youroven, become familiar
with the various functions of the oven as described below.
I Note: The time of day must first be set in order to the oven. I
operate
I
CLOCK SAKE TIME UP and DOWN ARROW PADS-- Used along BAKE PAD-- FEATURE
SET PAD-- PAD--Used to with the function pads to select oven Used to select INDICATOR
Used to set enter the length temperature, cook time, start time (when the bake LIGHTS-- These BROIL PAD--
the time of of the baking programming an automatic start time), time of function, light to show which Used to select
day. time. day, clean time and minute timer, feature is in use. the variable broil
function.
TIMER ON/OFF
PAD-- Used to
set or cancel the
minute timer.
The minute timer
does not start or
stop cooking.
Also, TIMER
ON/OFF pad is
used to set the
Continuous
Bake feature.
START TIME PAD-- Used
to set the desired start time
for baking & Self-Clean.
May be used with COOK
TIME to program a delayed
bake or clean cycle.
® ® ® ®
Oven
0 Four
Preheat
Pr_chauffage
Door Locked
PorteVerrouill_e
eif-(:leaning Oven
our Autonettoyant
OVEN, PREHEAT & DOOR LOCKED LIGHTS* -- The "OVEN" light will glow
each time the oven turns on to maintain the set oven temperature. The
"PREHEAT" light will glow when the oven is first set to operate, or if the desired
temperature is reset higher than the actual oven temperature. The "DOOR
LOCKED" light will flash when the oven door locks and unlocks or when using
the Self-Clean cycle or the oven door lockout is activated. The indicator light will
glow constantly after the door locks.
SELECT SELF-
CLEAN PAD--
Used to select the
Self-Cleaning cycle.
A2,3or4hour
Self-Clean time
may be selected.
CLEAR OFF PAD--
Used to clear any
function previously
entered except the
time of day and minute
timer. Press CLEAR
OFF to stop cooking.
Also the CLEAR OFF
pad is used to activate
controls and oven
door lockout setting.
*Note:The OVEN indicator light on the electrenic display wi!! turn ON and OFF when using the Bake feature and during
preheat This is norma! and indicates that the oven is cycling t0 maintain the selected baking temperature, When the
preheat indicator light turns OFF, your oven is ready.
For a silent control panel
When choosing a function, a beep will be heard each time a pad is pressed, ifdesired, the control can be programmed for
silent operation. Press and hold _i_. After 7 seconds, the control will beep once. This will block the controls from
sounding
v
when a pad is pressed. To return the sound, press and hold I_ again for 7 seconds until the control
beeps
once.
Printed in United States 318200183 (0503) Rev. A
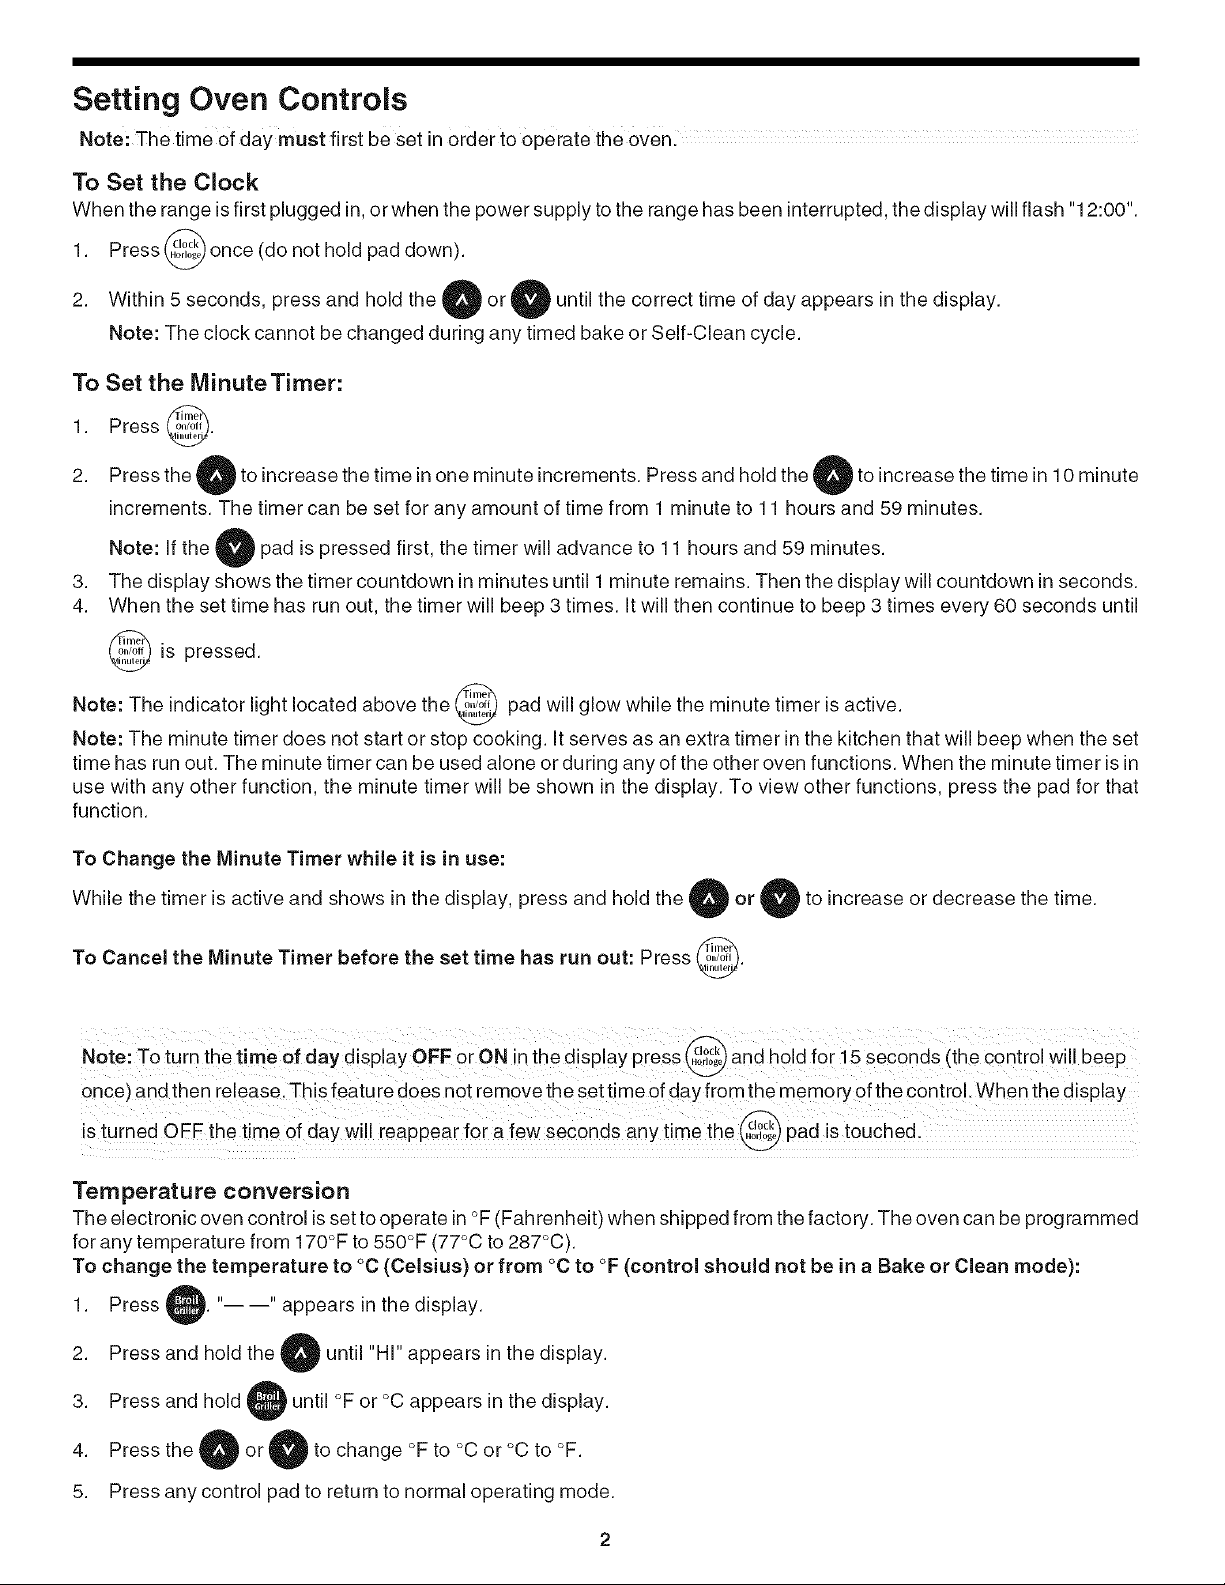
Setting Oven Controls
Note: The time of day must first be set in order to operate the 0venl
To Set the Clock
When the range is first plugged in,or when the power supply to the range has been interrupted, the display will flash "t 2:00".
t. Press _ once (do not hold pad down).
2. Within 5 seconds, press and hold the 4 tuntil the correct time of day appears inthe display.
Note: The clock cannot be changed during any timed bake or Self-Clean cycle.
To Set the MinuteTimer:
1. Press _.
2. Press the O to increase the time inone minute increments. Press and hold the to increase the time in 10 minute
increments. The timer can be set for any amount of time from 1 minute to 11 hours and 59 minutes.
Note: If the O pad is pressed first, the timer will advance to 11 hours and 59 minutes.
3. The display shows the timer countdown in minutes until 1minute remains. Then the display will countdown in seconds.
4. When the set time has run out, the timer will beep 3 times. It will then continue to beep 3 times every 60 seconds until
is pressed.
Note: The indicator light located above the _ pad will glow while the minute timer is active.
Note: The minute timer does not start or stop cooking. It serves as an extra timer in the kitchen that will beep when the set
time has run out. The minute timer can be used alone or during any of the other oven functions. When the minute timer is in
use with any other function, the minute timer will be shown in the display. To view other functions, press the pad for that
function.
To Change the Minute Timer while it is in use:
While the timer is active and shows in the display, press and hold the or O to increase or decrease the time.
To Cancel the Minute Timer before the set time has run out: Press _.
NOte: To turn the time Of day display OFFer ONin the display piess _ and hold f0r i 5 seconds (the C0nti0! will beep
once) and then release, This feature does not remove the set time of day from the memory of the contro!. When the display
is turned OFF the time 0f day will reappear for a few secondS a_Y time the@ pad is touched.
Temperature conversion
The electronic oven control is setto operate in°F (Fahrenheit) when shipped from the factory. The oven can be programmed
for any temperature from 170°F to 550°F (77°C to 287°C).
To change the temperature to °C (Celsius) or from °C to °F (control should not be in a Bake or Clean mode):
t. Press, _." " appears inthe display.
Press and hold the A until "Hi" appears inthe2.
display.
3. Press and hold , until °F or °C appears in the display.
A
4. Press the orU to change °F to °C or °C to
°F.
5. Press any control pad to return to normal operating mode.
Setting Oven Controls (cont'd)
To Set or Change the Temperature for Baking
The oven can be programmed to bake at any temperature from 170°F to 550°F (77°C to 287°C).
To Set the Controls for Baking:
1. Press ..... appears in the display.
2.
3.
Within 5seconds, press the ).The display will show "350°F (177°C)." By pressing and holding the
the temperature can then be adjusted in 5°F increments (1°C).
soon as the1 } pad is released, the oven will begin heating to the selected temperature. When the displayed
As
temperature reaches the desired baking temperature, the preheat indicator light will turn OFF and the control will beep 3
times.
4. To cancel baking, press,
To Change the Oven Temperature after Baking has Started:
1. Press _ and make sure the bake temperature is
displayed.
2. Press the
) pad to increase or decrease the set temperature.
To Set Control for Continuous Bake or 12 Hour Energy Saving
The oven control has a built-in 12 Hour Energy Saving feature that will shut off the oven if the control is left on for more than
11 hours and 59 minutes. The oven can be programmed to override this feature for continuous baking.
To set control for continuous baking:
1. Press and hold _ii!i_ down for 5 seconds until tone is heard, "---- hr" will appear in display for continuous
cooking.
The current time of day will return to the display.
2. TocanceltheContinuous Bakefunction, press_!!_!_and hold for5secondsuntiltoneisheard. "12hr" will appear in display
indicating that the control has returned to the 12 Hour Energy Saving feature.
To Set Control for Controls lockout
The control can be programmed to lock the oven control pads and the oven door.
To set the Lockout feature:
1. Press _ and hold for 3 seconds. "Loc" will appear indisplay, the "Door Locked" indicator light will flash and the motor
driven door lock will begin to close automatically. DO NOT open oven door while the indicatorlight isflashing. Allow about
15 seconds for the oven door to lock. Once the oven door is locked, the current time of day will appear in the display.
2. Tocancelthe L_ck_utfeature_press0andh_ldf_r3sec_nds.Thec_ntr__willunl_ckthe_vend__randresumen_rma_
operation.
Note: If anYeontroi pad is pressed while in the over= LoCkout mode, "Loc!, will appear inthe displayu ntilthe control
pad is released.
Setting Oven Controls (cont'd)
To Set the Timed Bake and Delay Start Features
The _,,,_,',_BAKE TiME and _i;_ START TiME pads operate the features that will turn the oven ON and OFF at the times
you select inadvance. The oven can be programmed to start immediately and shut off automatically (Timed Bake) orto begin
baking at a later time with a delayed start time (Delay Start).
Note: During Timed Bake the preheat indicator light will nOtfunctionl
To Program the Oven to Begin Baking Immediately and To Shut Off Automatically (Timed Bake):
1. Be sure that the clock shows the correct time of day.
2. Place the food in the oven.
3.
4.
5.
6.
7.
Press ..... appears in the display.
seconds, press the, or O' The display will show "350°F (177°C). '' By holding
Within 5 the_
temperature can then be adjusted in 5°F increments (1°C ).
_,i,% "o:oo"
[Temps de
Press _!_. will flash in the display (HR:MIN).
Press the until the desired baking time appears in the display.
The oven will turn ON and begin heating.
or the
To Program Oven for a Delayed Start Time and to Shut-Off Automatically (Delayed Start Bake):
1. Be sure that the clock shows the correct time of day.
2. Place the food in the oven.
3. Press ..... appears in the display.
4. Within 5 seconds, press the, or 0' The display will show "350°F (177°C). '' By holding the_ or
the
temperature can then be adjusted in 5°F increments (1°C).
keti, "0:00"
5. Press ,o,,,,,,,_. will flash in the display (HR:MIN).
6. Press the or until the desired baking time appears.
Press _. The earliest possible start time will appear in the
7.
display.
8. Press the until the desired start time appears in the display.
9. Once the controls are set, the control calculates the time when baking will stop in order to start at the time you have set.
10. The oven will turn ON at the delayed start time and begin heating.
When the Set Bake Time Runs Out:
1. "END" will appear in the display window and the oven will shut-off automatically.
2. The control will beep 3 times every 60 seconds until is pressed.
To Change the Oven Temperature or Bake Time after Baking has Started:
1. Press the function pad you want to change.
2. Press the
,to adjust the setting.
Use caution with the Timed Bake and Delayed Start features. Foods that can easily spoil such as milk, eggs,
fish, meat or poultry, should be chilled in the refrigerator first. Even when chilled, they should not stand in the oven for more
than 1 hour before cooking begins, and should be removed promptly when cooking is completed.
Setting Oven Controls (cont'd)
To Set for Broiling:
1. Arrange the oven rack while oven isstill cool. Position the rack as suggested in the
Broil Rack Position Table below.
2. Press "---- "will appear in display.
3. Press and holdthe_
4.
5.
6.
7.
puntil the desired broil setting level appears in the
A
display.
Press the for HI broil or the U for LO broil. Most foods may be
broiled at the Hi broil setting. Select the LO broil setting to avoid excess browning
or drying of foods that should be cooked to the well-done stage.
For optimum browning, preheat broil element or burner for 3 - 4 minutes
before adding food.
Place the insert on the broil pan, then place the food on the insert (See Fig. 1). DO
NOT use the broil pan without the insert or cover the insert with aluminum foil.
The exposed fat could ignite.
Be sure to center the broiler pan directly under the broiler element. GAS MODELS:
Close the oven door. ELECTRIC MODELS: Make sure the oven door is in the
broil stop position (See Fig. 2).
Broil on one side until food is browned. Turn and broil food on 2nd side.
Note: Always pull the oven rack out to the stop position before turning or removing
the food.
8. When broiling is finished, press i
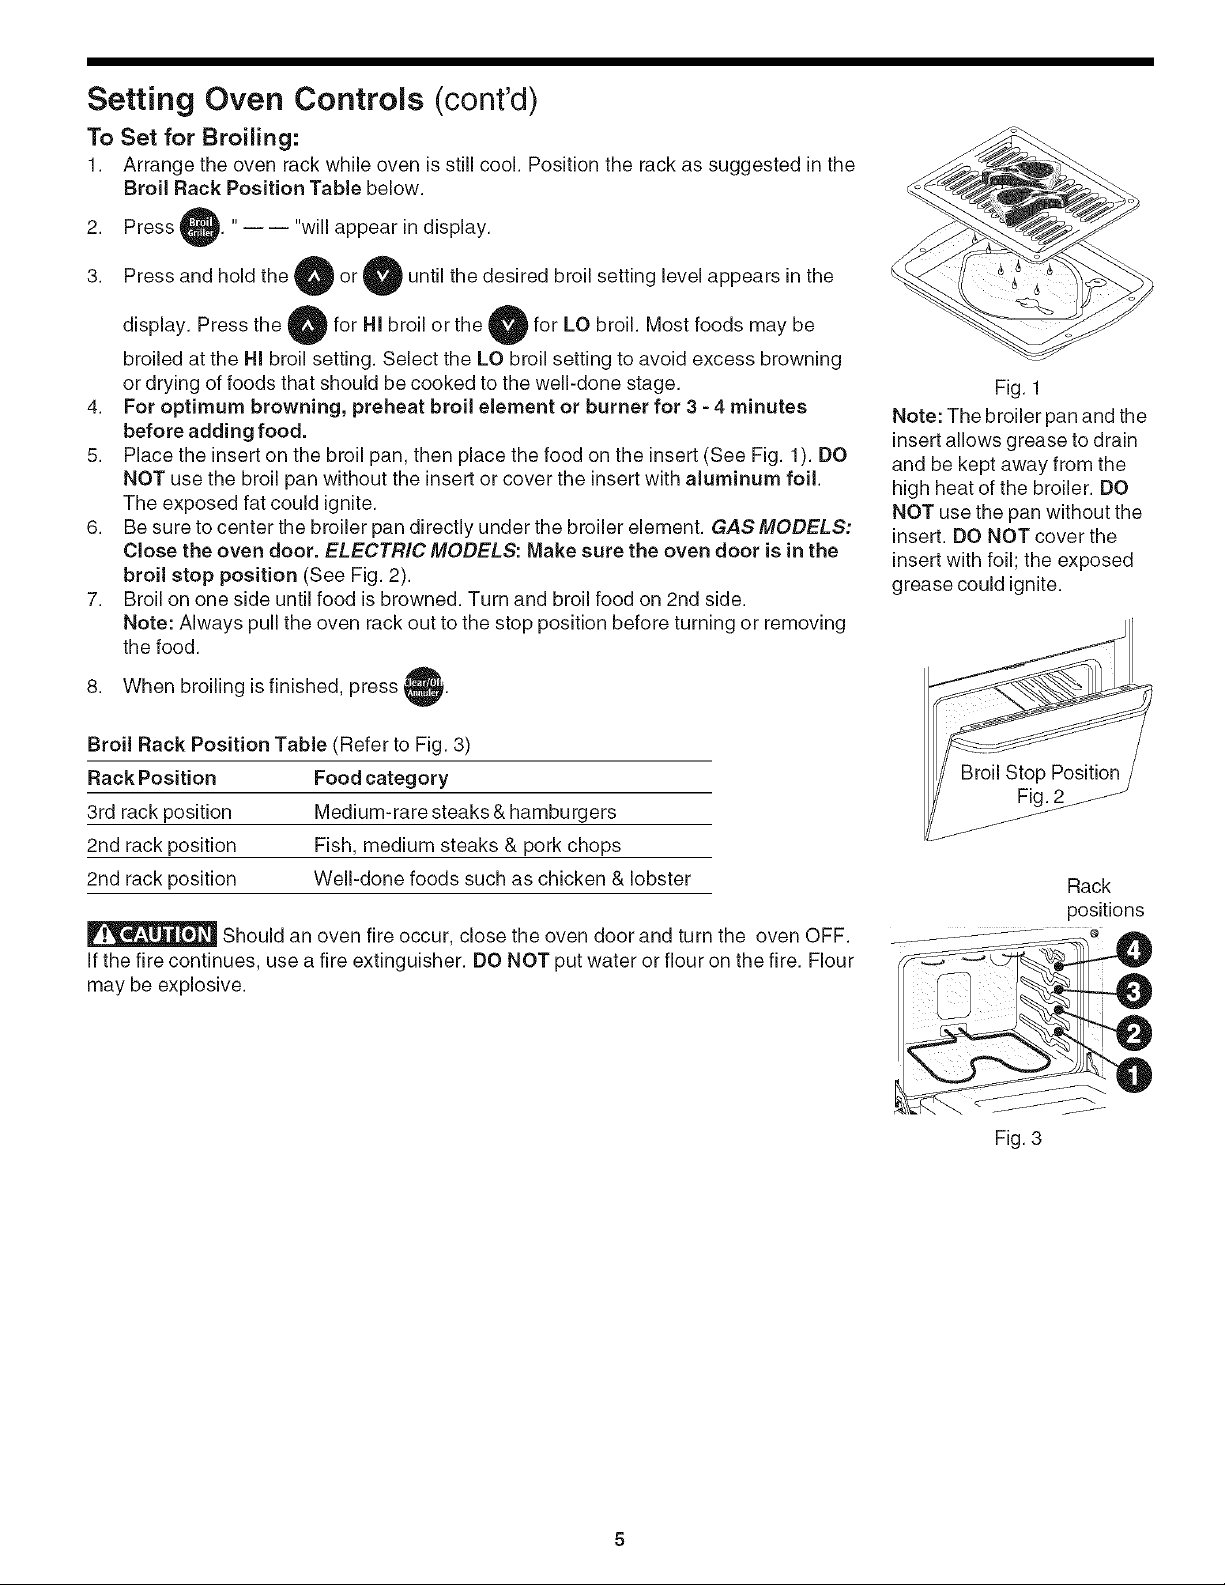
Fig. 1
Note: The broiler pan and the
insert allows grease to drain
and be kept away from the
high heat of the broiler. DO
NOT use the pan without the
insert. DO NOT cover the
insert with foil; the exposed
grease could ignite.
Broil Rack Position Table (Refer to Fig. 3)
Rack Position Food category
3rd rack position Medium-rare steaks & hamburgers
2nd rack position Fish, medium steaks & pork chops
2nd rack position Well-done foods such as chicken & lobster
Should an oven fire occur, close the oven door and turn the oven OFF.
If the fire continues, use a fire extinguisher. DO NOT put water or flour on the fire. Flour
may be explosive.
Rack
positions
Fig. 3
 Loading...