


FortiExtender 20D, 40D
QuickStart Guide

July 17, 2019
Copyright © 2018 Fortinet, Inc. All rights reserved. Fortinet®, FortiGate®, FortiCare® and FortiGuard®, and certain other marks are registered trademarks of Fortinet, Inc., in the U.S. and other jurisdictions, and other Fortinet names herein may also be registered and/or common law trademarks of Fortinet. All other product or company names may be trademarks of their respective owners. Performance and other metrics contained herein were attained in internal lab tests under ideal conditions, and actual performance and other results may vary. Network
variables, different network environments and other conditions may affect performance results. Nothing herein represents any binding commitment by Fortinet, and Fortinet disclaims all warranties, whether express or implied, except to the extent Fortinet enters a binding written contract, signed by Fortinet’s General Counsel, with a purchaser that expressly warrants that the identified product will perform according to certain expressly-identified performance metrics and, in such event, only the specific performance metrics expressly identified in such binding written contract shall be binding on Fortinet. For absolute clarity, any such warranty will be limited to performance in the same ideal conditions as in Fortinet’s internal lab tests. In no event does Fortinet make any commitment related to future deliverables, features or development, and circumstances may change such that any forward-looking statements herein are not accurate. Fortinet disclaims in full any covenants, representations, and guarantees pursuant hereto, whether express or implied. Fortinet reserves the right to change, modify, transfer, or otherwise revise this publication without notice, and the most current version of the publication shall be applicable.
Register for Support
Register your Fortinet product to receive:
•Technical Support
•New product features
•Protection from new threats
Vous devez enregistrer le produit pour recevoir:
•Support technique
•Nouvelles fonctionnalitées du produit
•Protection contre de nouvelles menaces
La reistrazione ti permette di usufruire di:
•Supporto Tecnico
•Nuove funzionalita
•Proteezione dalle ultime minaccce
Debe registrar el producto para recibir:
•Apoyo técnico
•Nuevas funcionalidades del producto
•Protección contra ataques
テクニカルサポート• •
https://support.fortinet.com Toll free: 1 866 648 4638 Phone: 1 408 486 7899 Fax: 1 408 235 7737 Email: register@fortinet.com
QuickStart Guide

Box Includes
|
USB Extension Cable |
Antennas |
|
|
(FEX-20D only) |
||
FEX-20D or FEX-40D |
(FEX-40D only) |
||
|
Device Guide
Initial Setup and Installation
Mount Kit 1 Drill template
2 Self-tap anchors and long screws
2 Small assembly screws (FEX-20D)
* Images are a representation of items in the box.
2 Micro/Nano to Mini SIM card adapter sets (FEX-40D only)
Power Adapter
(Optional Accessory)
1.Connect the device to the network.
2.Assemble the hardware.
3.Configure the device.
4.Mount the device.
QuickStart Guide
4 |
5 |

1 Basic Connections
Internet
LAN/POE
Optional Power
Connection
1.Connect the modem or SIM card:
FEX-20D: Insert your 3G/4G modem into the USB port on the device either directly or using the provided USB extension adapter.
FEX-40D: Insert your 3G/4G LTE SIM card(s) into the ports labeled SIM1 and SIM2.
2.Insert the provided Ethernet cable into the LAN/POE port on the device.
3.Insert the other end of the Ethernet cable into the PoE LAN port on your FortiGate appliance. FortiGate and FortiExtender must be on the same subnet.
4.Optionally, if you are not using PoE, connect the device to a power outlet using the optional power adapter.
Warning: Adequate grounding must be provided to the PoE injector of the FortiExtender unit if required, in compliance with your local electrical code or regulations.
This device complies with IEEE 802.3af PoE specification. Do not use a PoE injector that is not IEEE 802.3af compliant as it might damage your device.
2 Assembly
FEX-20D
1. Insert a supported 3G/4G modem into the USB port on the device either directly or using the provided USB extension adapter.
2.Attach the cover:
a.Insert the front tabs.
b.Align the front lip.
c.Tilt back and secure the cover with
two machine screws.
Note: For the latest FortiExtender USB modem compatibility matrix please visit: http://docs.fortinet.com/d/modem-compatibility-matrix
6 |
7 |
FEX-40D
1.Remove the dust cover that protects the SIM ports and fits over the antenna posts.
2.Insert your 3G/4G LTE SIM card(s) into the SIM ports. A Micro/Nano to Mini SIM card adapter is provided. Observe these guidelines:
•If you install one SIM card, it can be inserted in either SIM port.
•If you install two SIM cards, SIM1 is the primary port and SIM2 is the secondary.
3.Press the SIM card in slot 1 as primary and slot 2 for backup link. Press again to remove.
4.Reattach the cover and then attach the antennas.
Step 1
Step 4
8
3 Configuration
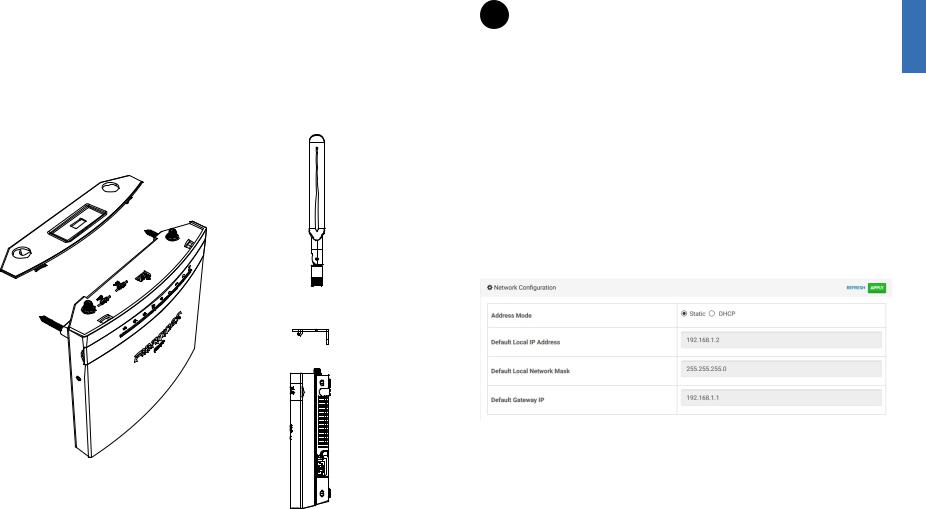
Configuring an IP address
After you have connected the FortiExtender network interfaces, the device automatically attempts to obtain an IP address from a DHCP server. If you do not use DHCP, you can configure a static IP address.
To configure a static IP address:
1.Use a network cable to connect the FortiExtender WAN/POE port to the Ethernet port of your laptop.
2.Configure the laptop to be on the same subnet as FortiExtender by changing the laptop IP address to 192.168.1.1 and the netmask to 255.255.255.0.
3.Open the laptop web browser to the default FortiExtender web UI address http://192.168.1.2.
4.In both the username and password fields, type admin and press Enter.
5.Go to Network Configuration.
6.For address mode, select Static.
7.Specify the IP address, netmask, and gateway; and then click APPLY.
9

Updating FortiExtender firmware
You can find the version of the installed firmware on the FortiExtender web UI home page.
Fortinet periodically updates FortiExtender firmware. Check the Fortinet Customer Service & Support website at https://support.fortinet.com to see if updates are available. If the support site firmware download page shows a newer version than the one displayed on the FortiExtender web UI home page, read the release notes and download the firmware.
To install and boot the new firmware:
1.Go to Firmware Upgrade.
2.Select Extender.
3.Use the controls to browse, select, and upload the firmware file.
When you click the upload icon (up arrow), the file is uploaded and the upgrade is initiated. A green success message is displayed when the process is complete.
4.Click RESTART NOW to boot the newly installed firmware.
Note: You can also use the CLI to upgrade FortiExtender firmware, or you can upgrade a FortiGate-managed FortiExtender unit from the FortiGate management web UI. For details, see the FortiExtender release notes.
10
Updating SIM firmware (FEX-40D)
The firmware installed in the factory supports AT&T and Verizon 3G/4G LTE SIM cards. If you have a SIM card for a different ISP, you can use the FortiExtender CLI or web UI to update the firmware. Check the Fortinet Customer Service & Support website to see if a firmware package is available for your ISP’s SIM card.
Before you begin:
You must download the appropriate firmware to your laptop. Depending on the package you download and the instructions from your ISP, you might need to install a firmware file, a carrier provisioning file (PRI), or both.
To install and boot the new firmware:
1.Go to Firmware Upgrade.
2.Select SIM1 Firmware or SIM2 Firmware to update the firmware for respective slot.
3.Use the controls to browse, select, and upload the firmware file. When you click the upload icon (up arrow), the file is uploaded and the
upgrade is initiated. A green success message is displayed when the process is complete.
4.Select SIM1 PRI or SIM2 PRI to upload the carrier provisioning file for the respective slot.
5.Click RESTART NOW to boot the newly installed firmware.
11
 Loading...