


V3240

www.foodsaver.com
EN
Reference Guide
IT
Guida di riferimento
FR
Guide de référence
ES
Guía de referencia
DE
Guide de référence Anleitung
NL
Handleiding
SW
Referensguide
VACUUM SEALING SYSTEM
SISTEMA DI CONFEZIONAMENTO SOTTOVUOTO
SYSTÈME D’EMBALLAGE SOUS VIDE
SISTEMA DE ENVASADO AL VACÍO
VAKUUMVERPACKUNGSSYSTEM
VACUÜMVERPAKKINGSSYSTEEM
VAKUUMFÖRSEGLINGSSYSTEM
V3240
MODEL • MODELL
MODELLO • MODELL
MODÈLE • MODELL
MODELO • MODELL
www.foodsavereurope.com

www.foodsavereurope.com
1
Important Safeguards
For your own safety, always follow these basic
precautions when using a FoodSaver
®
appliance:
1. Read the User Manual carefully for operating
instructions. Read all instructions in this manual
before use.
2. Do not use appliance on wet or hot surfaces,
or near a heat source.
3. To protect against electric shock, do not immerse
any part of the appliance, power cord or plug in
water or other liquid. Unplug from outlet when
not in use and before cleaning.
4. To disconnect, unplug power cord from electrical
outlet. Do not disconnect by pulling on cord.
5. Do not operate the appliance with a damaged
power cord or plug. Do not operate the
appliance if it malfunctions or is in any way
damaged. Take it to the nearest Authorised
Service Centre for examination, repair or
electrical or mechanical adjustment.
6. Use appliance only for its intended use.
7. Caution: A short power cord is provided to
reduce risks from entanglement or tripping
over a longer cord. An extension cord may be
used when marked electrical rating is no less
than electrical rating of this appliance. All cords
should not drape over counter or tabletop
where cords can be tripped over or pulled on
unintentionally, especially by children.
8. Do not place on or near a hot gas or electric
burner, or heated oven. Extreme caution must
be used when moving products containing hot
liquids.
9. Wait 20 seconds between seals to allow
appliance to cool.
10. No user servicing
11. This appliance is not intended for use by
persons (including children) with reduced
physical, sensory or mental capabilities, or lack
of experience and knowledge, unless they have
been given supervision or instruction concerning
use of the appliance by a person responsible for
their safety.
12. Close supervision is necessary when any
appliance is used by or near children to ensure
they do not play with the appliance.
For Household Use Only
SAVE THESE INSTRUCTIONS
If the plug is not suitable for the socket outlets
in your home, it can be removed and replaced
by a plug of the correct type. Please refer to
“Installation of a plug” below.
Installation of a plug applicable to U.K. and
Ireland.
NOTE: If the terminals in the plug are not marked
or if you are unsure or in doubt about the
installation of the plug, please contact a qualified
electrician. If a 3A 3-pin plug is fitted, it must be
an ASTA approved plug, conforming to BS1363
standard.
Replacement 3A fuses must be BSI or ASTA
BS1362 approved.
The wires in the mains lead are coloured as such:
BROWN - LIVE
BLUE - NEUTRAL
Please note that the colour of these mains wires
may not correspond with the colour markings that
identify the terminals in your plug.
Please proceed as follows:
The BROWN coloured wire must be connected to
the terminal, which is marked with the letter “L” or
is coloured RED.
The BLUE coloured wire must be connected to the
terminal, which is marked with the letter “N” or is
coloured BLACK.
Important Safeguards
For U.K. and Ireland Only

www.foodsavereurope.com
2
Congratulations…
You are about to enjoy the freshness
benefits of FoodSaver
®
, The #1 Selling
Brand of Vacuum Packaging Systems. For
years, the FoodSaver
®
Vacuum Packaging
System has helped millions of households
keep food fresh longer in the refrigerator,
freezer and pantry. The FoodSaver
®
system
is designed to remove air and extend
freshness up to five times longer than
conventional storage methods. Keep your
FoodSaver
®
appliance on your worktop,
and you will soon discover its convenience
and versatility.
Why Vacuum Package?
Exposure to air causes food to lose nutrition and
flavour, and also causes freezer burn and enables
bacteria, mould and yeast to grow. The FoodSaver
®
vacuum packaging system removes air and seals
in flavour and quality. With a full line of FoodSaver
®
Bags, Canisters and Accessories to expand your
options, you can now enjoy the benefits of a
scientifically proven food storage method that
keeps food fresh up to five times longer.
The FoodSaver
®
Vacuum Packaging System Saves
Time and Money.
• Spend less money. With the FoodSaver
®
system,
you can buy in bulk or buy when needed and
vacuum package your food in desired portions
without wasting food.
• Save more time. Cook ahead for the week,
preparing meals and saving them in FoodSaver
®
Bags.
• Marinate in minutes. Vacuum packaging opens
up the pores of food so you can get that great-
marinated flavour in minutes instead of hours.
• Make entertaining a breeze. Make your
signature dish and holiday treats in advance
so you can spend quality time with your guests.
• Enjoy seasonal or specialty foods. Keep highly
perishable or infrequently used items fresh
longer.
• Control portions for dieting. Vacuum package
sensible portions and write calories and/or
fat content on the bag.
• Protect non-food items. Keep camping and
boating supplies dry and organised for outings.
Protect polished silver from tarnishing by
minimising exposure to air.
Do not return this product
to place of purchase.
Welcome to FoodSaver
®
Vacuum Sealing System

www.foodsavereurope.com
3
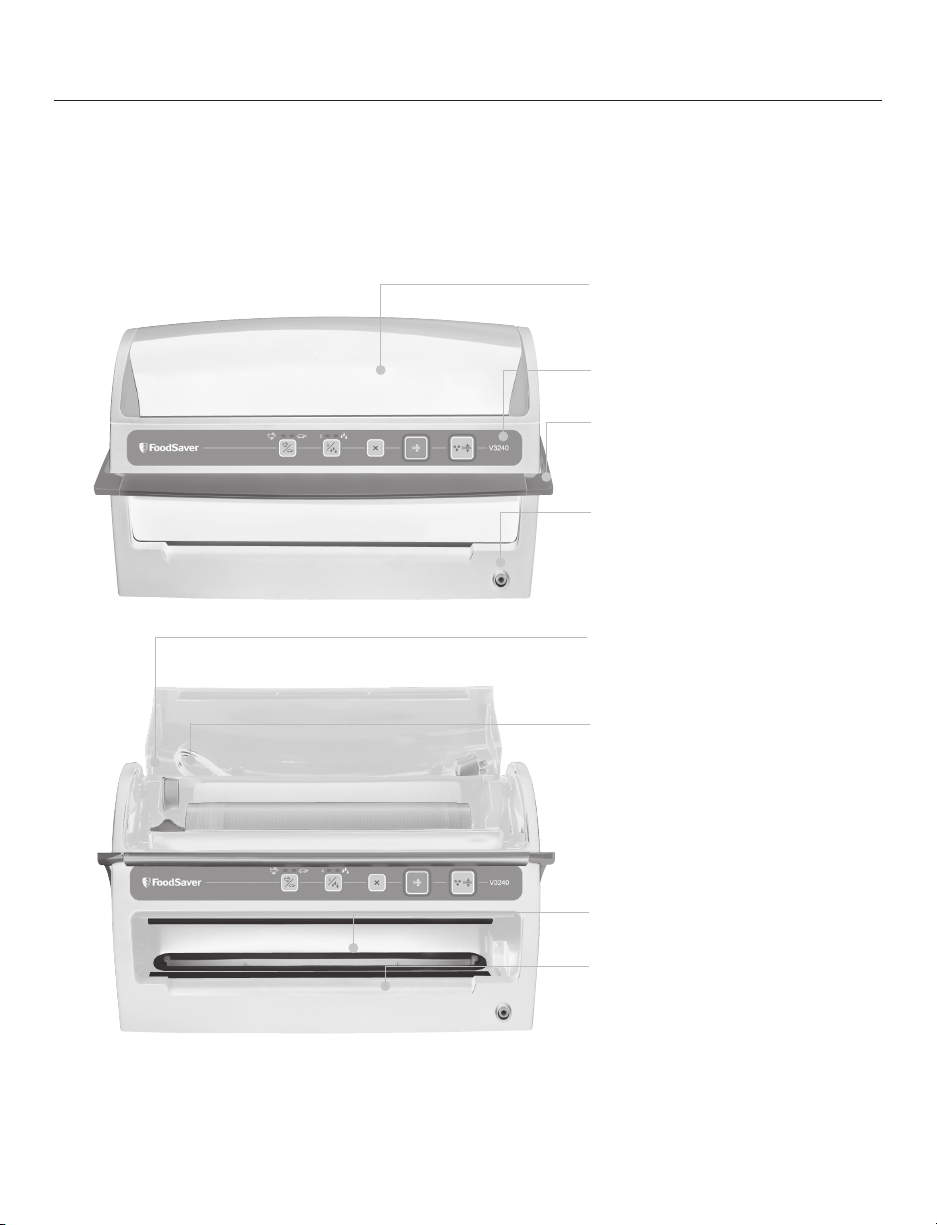
Features of Your FoodSaver
®
Appliance
B. Appliance Control Panel
C. Easy-lock Latch
D. Accessory Port
A. Roll Storage
(Under lid.)
E. Container Adaptor Storage
(Adaptor not included; it is provided
with FoodSaver containers.)
F. Accessory Hose & Storage
G. Easy-clean Drip Tray
H. Extra-wide Sealing Strip

www.foodsavereurope.com
4
Features of Your FoodSaver
®
Appliance
Vacuum & Seal
Button
Adjustable
Food Settings
Dry Moist
4
2
2 2
Advanced Design Features
The user-friendly control panel makes it easy for you to get the most out of your FoodSaver
®
System,
and the touchpad design allows you to easily wipe it clean.
To Use: Lower bar to close door, when lights illuminate on control panel, you can select seal
or vacuum and seal.
1
Speed Settings
Select speed to optimize vacuum – Gentle for delicate foods; Normal for bags, canisters and
all accessories.
2
Adjustable Food Settings
Select food type to optimize the seal – Dry (normal seal time) for foods without liquid;
Moist (longer seal time) for juicy foods.
3
SEAL BUTTON
Crush Free Instant Seal feature - This button has four uses:
1. Press to immediately stop the vacuum process
and begin sealing the bag. This prevents crushing delicate items such as bread, biscuits and pastries.
2. Press to create a seal when making bags from
a FoodSaver® Roll.
3. Press to create a seal on most Mylar bags (such as a potato crisp bag) to keep food sealed airtight.
4
Vacuum & Seal Button
This button has two uses:
1. Press to vacuum package and seal food airtight. Appliance shuts off automatically.
2. Press to cancel any process at any point.
5
Seal Indicator Light
This light has two uses:
1. Constant light indicates sealing process is engaged.
2. Flashes to indicate error.
6
Vacuum Indicator Light
Shows progress of vacuum and seal process. Shuts off when the full process is finished.
Speed Settings
1
Seal
Button
3
Vacuum
Indicator
Light
6
Seal
Indicator
Light
5
www.foodsavereurope.com
5
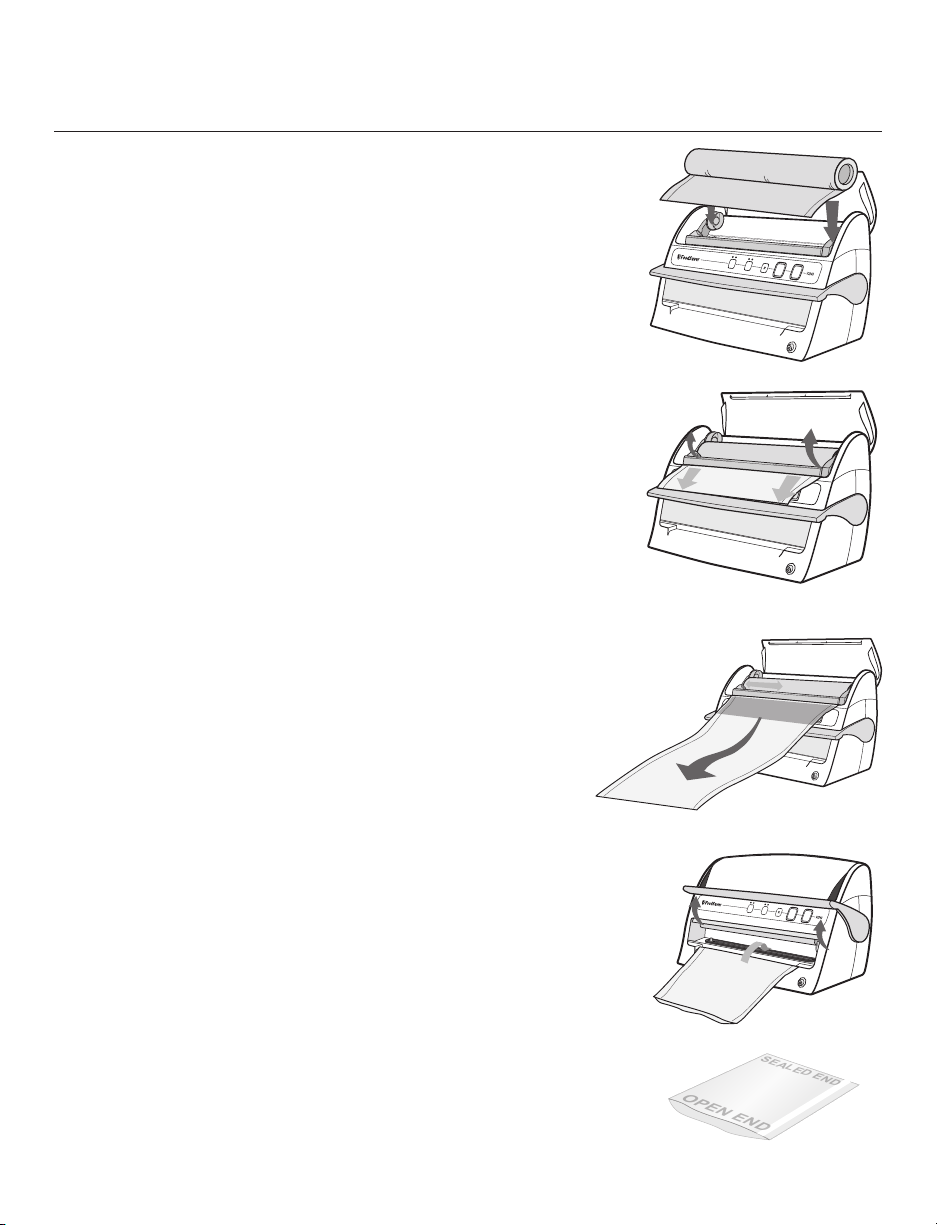
1. Open the appliance door and place the roll into the Roll
Storage Compartment (Fig.1). For Best results, insert
the roll with material flap down. Note: Bags can be
sealed with the appliance door either open or closed.
2. Lift up the Roll Cutter Bar and place bag material
beneath the cutter bar (Fig.2).
3. Pull out enough bag material to hold the item being
vacuum packed, plus 4 inches (10 cm). Lower the
Cutter Bar and slide the Roll Cutter across the Cutter
Bar (Fig.3).
4. Lift Bar, place bag over sealing strip, gently
lower bar, press Seal button. Once red light
goes off, lift bar and remove bag (Fig. 4).
5. You now have one sealed end.
6. Now you are ready to vacuum seal with your new bag
(Fig. 5).
How to Make a Bag from a
FoodSaver
®
Vacuum Sealing Roll
OPEN END
SEALED END
Fig. 1
Fig. 3
Fig. 5
Fig. 2
4”
Fig. 4
www.foodsavereurope.com
6
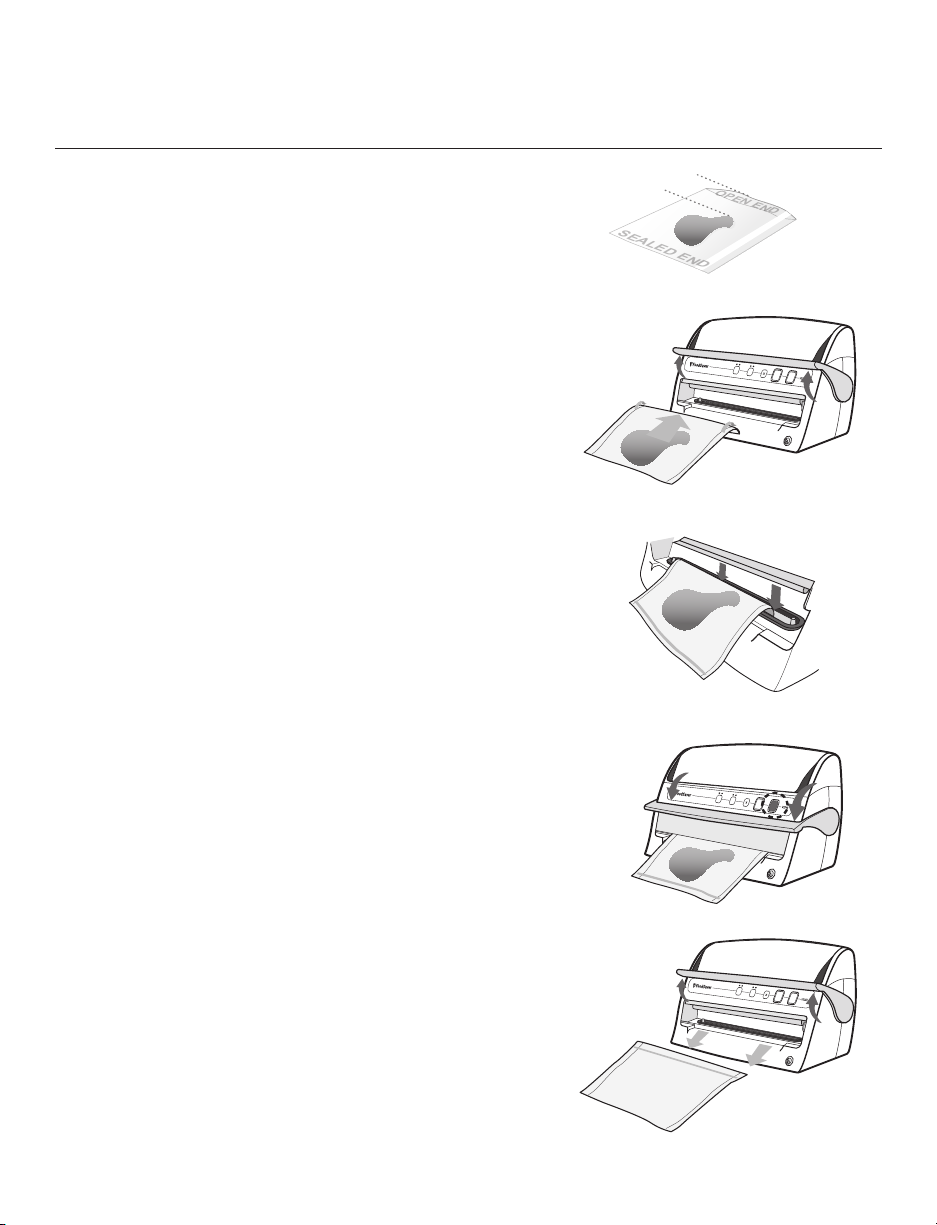
1. Begin with a FoodSaver
®
Vacuum Sealing System Bag (or
create a bag as described in the “How to Make a Bag from
a Roll” section).
2. Place item(s) in bag, allowing at least 8 cm (3 inches) of
space between bag contents and top of bag (Fig. 1).
3. Using two hands, insert open end of bag curl side down
into Vacuum Channel (Fig. 2).
4. Place bag end into Drip Tray (Fig. 3).
5. Lower Bar, press Vacuum & Seal button (Fig. 4).
6. Once Seal light goes off, lift bar and remove
sealed bag (Fig. 5).
How to Vacuum Seal
with FoodSaver
®
Vacuum Sealing Bags
SEALED END
OPEN END
3 inches
Fig. 1
Fig. 2
Fig. 3
Fig. 4
Insert Bag
Curl Downward
2
Fig. 5

www.foodsavereurope.com
7
Vacuum Packaging and Food Safety
The vacuum packaging process extends the life of
foods by removing most of the air from the sealed
container, thereby reducing oxidation, which
affects nutritional value, flavour and overall quality.
Removing air can also inhibit the growth of micro-
organisms, which can cause problems under certain
conditions:
Mould – Easily identified by its fuzzy characteristic.
Mould cannot grow in a low oxygen environment,
therefore vacuum packaging can slow the growth
of mould.
Yeast – Results in fermentation, which can be
identified by smell and taste. Yeast needs water,
sugar and a moderate temperature to grow. It can
also survive with or without air. Slowing the growth of
yeast requires refrigeration, while freezing stops
it completely.
Bacteria – Results in an unpleasant odour,
discolouration and/or soft or slimy texture. Under
the right conditions, anaerobic bacteria such as
Clostridium Botulinum (the organism that causes
Botulism) can grow without air and sometimes cannot
be detected by smell or taste. Although
it is extremely rare, it can be very dangerous.
To preserve foods safely, it is critical that you maintain
low temperatures. You can significantly reduce the
growth of microorganisms at temperatures of 4°C
(40°F) or below. Freezing at -17°C (0°F) does not
kill microorganisms, but stops them from growing.
For long-term storage, always freeze perishable
foods that have been vacuum packaged, and keep
refrigerated after thawing.
It is important to note that vacuum packaging is
NOT a substitute for canning and it cannot reverse
the dete rio ration of foods. It can only slow down the
changes in quality. It is difficult to predict how long
foods will retain their top-quality flavour, appearance
or texture because it depends on the age and
condition of the food on the day it was vacuumed
packaged.
IMPORTANT: Vacuum packaging is NOT a substitute
for refrigeration or freezing. Any perishable foods
that require refrigeration must still be refrigerated
or frozen after vacuum packaging.
Food Preparation and Reheating Tips
Thawing and Reheating Vacuum Packaged Foods
Always thaw foods in either a refrigerator or
microwave — do not thaw perishable foods at room
temperature.
To reheat foods in a microwave in a FoodSaver
®
Bag,
always cut the corner of the bag before placing it on a
microwave-safe dish. However, to avoid hot spots, do
not reheat bone-in meat or greasy foods in microwave
within a FoodSaver
®
Bag. You can also reheat foods
in FoodSaver
®
Bags by placing them in water at a low
simmer below 75°C (170°F).
Preparation Guidelines for Meat and Fish:
For best results, pre-freeze meat and fish for 1-2 hours
before vacuum packaging in a FoodSaver
®
Bag. This
helps retain the juice and shape, and guarantees a
better seal.
If it is not possible to pre-freeze, place a folded paper
towel between meat or fish and the top of the bag,
but below the seal area. Leave a paper towel in the
bag to absorb excess moisture and juices during the
vacuum packaging process.
Note: Beef may appear darker after vacuum
packaging due to the removal of oxygen. This is not
an indication of spoilage.
Preparation Guidelines for Hard Cheeses:
To keep cheese fresh, vacuum package it after each
use. Make your FoodSaver
®
Bag extra long, allowing
2.5 cm (1-inch) of bag material for each time you plan
to open and reseal in addition to the 8 cm (3-inch)
room you normally leave between the contents and
the seal. Simply cut the sealed edge and remove
cheese. When you are ready to repackage the cheese,
just drop it in the bag and reseal.
IMPORTANT: Due to the risk of anaerobic bacteria,
Soft cheeses should never be vacuum packaged.
Preparation Guidelines for Vegetables:
Vegetables need to be blanched before vacuum
pack ag ing. This process stops the enzyme action that
could lead to loss of flavour, colour and texture.
To blanch vegetables, place them in boiling water
or in the microwave until they are cooked, but still
crisp. Blanching times range from 1 to 2 minutes
for leafy greens and peas; 3 to 4 minutes for sugar
snap peas, sliced courgettes or broccoli; 5 minutes
for carrots; and 7 to 11 minutes for corn on the cob.
After blanching, immerse vegetables in cold water to
stop the cooking process. Finally, dry vegetables on a
towel before vacuum packaging.
Note: All vegetables (including broccoli, brussels
sprouts, cabbage, cauliflower, kale, turnips) naturally
emit gases during storage. Therefore, after blanching,
they must be only stored in the freezer.
When freezing vegetables, it is best to pre-freeze
them for 1-2 hours or until solidly frozen. To freeze
Guidelines
for Vacuum Packaging

www.foodsavereurope.com
8
Guidelines
for Vacuum Packaging
vegetables in individual servings, first place on
a baking sheet and spread them out so they are
not touching. This prevents them from freezing
together in a block. Once they are frozen, remove
from baking sheet and vacuum package vegetables
in a FoodSaver
®
Bag. After they have been vacuum
packaged, return them to the freezer.
IMPORTANT: Due to the risk of anaerobic bacteria,
fresh mushrooms, onions, & garlic should never
be vacuum packaged.
Preparation Guidelines for Leafy Vegetables:
For best results, use a canister to store leafy
vegetables. First wash the vegetables, and then dry
with a towel or salad spinner. After they are dried,
put them in a FoodSaver
®
Canister or Container and
vacuum package. Store in the refrigerator.
Preparation Guidelines for Fruit:
When freezing soft fruit or berries, it is best to pre-
freeze them for 1-2 hours or until solidly frozen. To
freeze fruit in individual servings, first place on a
baking sheet and spread them out so they are not
touching. This prevents them from freezing together
in a block. Once they are frozen, remove from baking
sheet and vacuum package fruit in a FoodSaver
®
Bag.
After they have been vacuum packaged, return them
to the freezer.
You can vacuum package portions for baking, or
in your favourite combinations for easy fruit salad
all year round. If storing in the refrigerator, we
recommend using a FoodSaver
®
Canister or Container.
Preparation Guidelines for Baked Goods:
To vacuum package soft or airy baked goods, we
recommend using a FoodSaver
®
Canister or Container
so they will hold their shape. If using a bag, pre-freeze
for 1-2 hours or until solidly frozen. To save time,
make cookie dough, pie shells, whole pies, or mix dry
ingredients in advance and vacuum package for later
use.
Preparation Guidelines for Coffee and Powdery
Foods:
To prevent food particles from being drawn into the
vacuum pump, place a coffee filter or paper towel
at the top of the bag or canister before vacuum
packaging. You can also place the food in its original
bag inside a FoodSaver
®
Bag.
Preparation Guidelines for Liquids:
Before you vacuum package liquids such as soup
stock, pre-freeze in a casserole dish, loaf tin or ice
cube tray until solid. Remove frozen liquid from the
pan and vacuum package in a FoodSaver
®
Bag. You
can stack these “frozen bricks” in your freezer. When
you’re ready to use, just cut the corner of the bag and
place in a dish in microwave or drop into water at a
low simmer, below 75°C (170°F).
To vacuum package non-carbonated bottled liquids,
you can use a FoodSaver
®
Bottle Stopper with the
original container. Remember to leave at least 2.5 cm
(1 inch) of room between the contents and the bottom
of the Bottle Stopper. You can re-seal bottles after
each use.
Preparation Guidelines for Make-ahead Meals,
Leftovers and Sandwiches:
Efficiently store your make-ahead meals, leftovers and
sandwiches in the stackable, lightweight FoodSaver
®
containers. They are microwaveable, top rack
dishwasher safe and come with a custom adaptor. The
lightweight containers will be ready to go to the office
or school when you are!
Preparation Guidelines for Snack Foods:
Your snack foods will maintain their freshness
longer when you vacuum package them. For best
results, use a FoodSaver
®
Canister or Container for
crushable items like biscuits.
Vacuum Packaging Non-Food Items
The FoodSaver
®
vacuum packaging system also
protects non-food items from oxidation, corrosion
and moisture. Simply follow the directions to vacuum
package items using FoodSaver
®
Bags, Canisters,
Containers and Accessories.
To vacuum package silver, wrap fork tines in soft
cushioning material, such as a paper towel, to avoid
puncturing the bag. Your FoodSaver
®
Bags are ideal
for outdoor excursions. For camping and hiking, keep
your matches, maps and food dry and compact. To
have fresh water for drinking, simply fill a FoodSaver
®
Bag with ice, seal it and when needed, let the ice
pack melt. If you are going sailing or boating, vacuum
package your food, film and a dry change of clothes.
Just remember to bring scissors or a knife to open the
bag. To keep emergency kits safe and dry, vacuum
package flares, batteries, torches, matches, candles
and other necessities. Your emergency items will stay
dry and organised in your home, car or boat.

www.foodsavereurope.com
9
Tips on Removing Air from a Bag
Avoid wrinkles when inserting the bag into the
Vacuum Channel
Wrinkles in the seal may cause a leakage and allow air
to return into the bag. To eliminate any wrinkles while
inserting the bag into the vacuum channel, hold the bag
with two hands gently stretching the bag flat until the
vacuum pump begins. If you find wrinkles after seal-
ing the bag, simply cut the bag open and vacuum seal
again.
If motor runs for more than 30 seconds without
stopping, consider the following:
If you are vacuum sealing with a bag, make sure the
bag is properly sealed (See “How to Make a Bag From
a Roll”). Check the foam gasket around the Drip Tray to
make sure it is free from food material and is properly
inserted into the gasket channel.
If vacuum sealing with an accessory, check the
Accessory Hose connections to ensure a tight fit.
General Tips
Tips for Successful Vacuum Sealing
1. Vacuum sealing is NOT a substitute for the heat process
of canning. Perishables still need to be refrigerated or
frozen.
2. For best results, use FoodSaver
®
brand Bags, Canisters,
Containers and Accessories.
3. During the vacuum sealing process, small amounts of
liquids, crumbs or food particles can be pulled
inadvertently into the Drip Tray, clogging the pump and
damaging your appliance.
To prevent this, follow these tips:
a. For moist and juicy foods: Freeze first and avoid
overfilling bags. You can also place a folded paper
towel inside top of bag, and below the seal area,
before vacuum sealing.
b. For soups, sauces and liquids: Freeze first and avoid
overfilling bags. Or, use a canister or container in
refrigerator.
c. For powdery or fine-grained foods: Avoid overfilling
bags or use a canister or container. You can also place
a coffee filter or paper towel inside before vacuum
packaging.
d. Empty the Drip Tray after each use.
4. To avoid overfilling, always leave at least 8 cm (3 inches)
of bag material between the bag contents and the top
the of bag. Then leave at least one additional inch of bag
material for each time you plan to reuse the bag.
5. Do not create your own side seams for a FoodSaver
®
brand Bag. Our bags are manufactured with a special
side seam, which is sealed all the way to the outer edge.
6. To prevent wrinkles in a seal when vacuum sealing bulky
items, gently stretch bag flat while inserting into the
vacuum channel and hold until the pump begins.
7. If you are unsure whether your bag was sealed properly,
simply reseal the bag.
8. When you are vacuum sealing items with sharp edges
(dry spaghetti, silverware, etc.), protect the bag from
punctures by wrapping item in soft cushioning material,
such as a paper towel. You may want to use a canister or
container instead of a bag.
9. When using accessories, remember to leave 2.5 cm
(1-inch) of space at top of canister or container.
10. Pre-freeze fruits and blanch vegetables before vacuum
sealing for best results. Refer to the Guidelines in the
Vacuum Packaging section for more information.
11. If the appliance does not function, or the Seal button
flashes to signal an error:
a. Check the power cord to see if it is firmly plugged
into an electrical outlet.
b. Examine the power cord for any damages.
c. See if the electrical outlet is working by plugging in
another appliance.
d. Check to be certain that the Upper Bag Detection
Tray is properly inserted.
e. Make sure the bag is placed correctly inside the
Vacuum Channel. (See How to Vacuum Seal with
FoodSaver
®
Vacuum Sealing Bags)
f. Check to ensure the Easy-lock latch is in the closed
position.
g. Check the Foam Gasket around the Drip Tray to
make sure it is free from food material and is
properly inserted into the gasket channel.
h. Check the Upper Gasket around the Upper Bag
Detection Tray to be sure it is free from food
material.
i. If overheated, allow the appliance to cool for 20
minutes.
j. For more usage tips visit our website at
www.foodsavereurope.com.
Tips for Successful Vacuum Sealing

www.foodsavereurope.com
10
Tips on Sealing a Bag
When making a bag from a roll:
Press the Seal Button before placing the bag material into
the Vacuum Channel. Once the bag is inserted the Seal
process will begin immediately.
Note: If you forget to press the Seal Button before
inserting the bag into the Vacuum Channel, the vacuum
pump will turn on. This is not a problem, simply press the
Seal Button to prevent the pump from running
continuously,and the sealing process will begin.
How to Prevent moisture or liquid from being pulled into
the Drip Tray or getting trapped in the seal:
Either pre-freeze moist food such as raw meat for 1-2
hours before vacuum sealing, or place a folded paper towel
between food and the end of the bag to absorb excess
liquid. Be sure to leave at least 8 cm (3 inches) between the
paper towel and the end of the bag so that the bag seals
properly with the paper towel inside and not positioned in
the seal area.
Make sure appliance has time to cool down.
Wait at least 20 seconds between seals. Under very
heavy usage, the appliance will stop operating to prevent
overheating. If it does, wait 20 minutes to allow the
appliance to cool down.
Tips for Successful Vacuum Sealing (continued)
Tips on Vacuum Sealing with Accessories
How to prepare FoodSaver
®
Accessories for
Vacuum packaging
Accessories include FoodSaver
®
Vacuum Packaging
Canisters, Containers and Bottle Stoppers.
1. Always leave at least 2.5 cm (1 inch) of space between
the contents and the rim.
2. Wipe rim of canister, container or bottle to ensure it is
clean and dry.
3. Place lid on canister or container, or place stopper in
bottle.
4. For accessories with a large knob on lid, turn knob
to Vacuum. Vacuum package using the instructions
below. When the vacuum process is complete, turn the
knob to Closed before removing the Accessory Hose.
5. For Accessories without a large knob on the lid,
vacuum package using instructions below.
The FoodSaver
®
Quick Marinator Canister is the perfect
FoodSaver
®
Accessory for marinating foods. Foods will
marinate in minutes when vacuum sealed because the
vacuum process opens the pores of the food and absorbs
the marinade more quickly.
Important Note: Use the FoodSaver
®
Quick Marinating
Canister with clear lid and large white knob. To marinate,
make sure the knob on the accessory lid is set to
Vacuum/Canister position.
1. Prepare enough of your favourite marinade to fully
cover food inside a marinating canister. Always leave
at least 2.5 cm (1-inch) of space between the contents
and the top of the rim.
2. Make sure the rubber gasket underneath the lids as
well as the rim of the marinating canister is free from
food materials.
3. Make sure the Accessory Hose is securely inserted into
the port on the FoodSaver
®
Quick Marinator lid.
4. Make sure the knob on the accessory lid is set to
Vacuum/Canister.
5. Make sure lid is firmly attached to marinator base.
6. Press the Vacuum & Seal button on the control panel.
7. Your FoodSaver
®
Vacuum Sealing System will now
begin the Quick Marinate Cycle. The Vacuum Indicator
Light will flash to indicate the marinating process has
begun.
8. While Marinating, the Vacuum Progress Display will
blink during the Vacuum Hold or Rest Cycle.
9. To preserve food safely, after completing the marinat-
ing cycle, the appliance will signal with short beeps to
indicate your Quick Marinate Cycle is completed. Press
any button to silence the signal. You may now cook or
refrigerate your marinated food.
Marinating with your FoodSaver
®
Appliance

www.foodsavereurope.com
11
Storage Guide
Meat, Cheese, Vegetables, Fruits
Foods
Where
to Store
Recommended
FoodSaver
®
Bag/Accessory
Storage Life
with FoodSaver
®
Normal
Storage Life
Meat
Beef, Pork, Lamb
Freezer
FoodSaver
®
Bag 2-3 years
6 months
Ground Meat Freezer FoodSaver
®
Bag 1 year 4 months
Poultry Freezer FoodSaver
®
Bag 2-3 years 6 months
Fish Freezer FoodSaver
®
Bag 2 years 6 months
Hard Cheeses ( Do not vacuum package soft cheese )
Cheddar, Swiss Refrigerator FoodSaver
®
Bag,
Canister
4-8 months 1-2 weeks
Parmesan Refrigerator FoodSaver
®
Bag,
Canister
4-8 months 1-2 weeks
Vegetables ( Do not vacuum package fresh mushrooms, onions & garlic )
Asparagus Freezer FoodSaver
®
Bag 2-3 years 8 months
Broccoli, Cauliflower Freezer FoodSaver
®
Bag 2-3 years 8 months
Cabbage, Brussels
Sprouts
Freezer FoodSaver
®
Bag 2-3 years 8 months
Corn (cob or kernel) Freezer FoodSaver
®
Bag 2-3 years 8 months
Green Beans Freezer FoodSaver
®
Bag 2-3 years 8 months
Lettuce, Spinach Refrigerator FoodSaver
®
Canister 2 weeks 3-6 days
Mangetout, Sugar
snap Peas
Freezer FoodSaver
®
Bag 2-3 years 8 months
Fruits
Apricots, Plums Freezer FoodSaver
®
Bag 1-3 years 6-12 months
Peaches, Nectarines Freezer FoodSaver
®
Bag 1-3 years 6-12 months
Softer Berries
Raspberries,
Blackberries
Refrigerator FoodSaver
®
Canister 1 week 1-3 days
Strawberries Refrigerator FoodSaver
®
Canister 1 week 1-3 days
Harder Berries
Blueberries Refrigerator FoodSaver
®
Canister 2 weeks 3-6 days
Cranberries Refrigerator FoodSaver
®
Canister 2 weeks 3-6 days

www.foodsavereurope.com
12
Baked Goods, Coffee, Snacks and Liquids
Foods
Where
to Store
Recommended
FoodSaver
®
Bag/Accessory
Storage
life with
FoodSaver
®
Normal
Storage Life
Baked Goods
Bagels, Bread,
Pastries
Freezer FoodSaver
®
Bag
1-3 years
6-12 months
Nuts
Almonds,
Peanuts
Pantry FoodSaver
®
Bag, Canister 2 years 6 months
Sunflower
Seeds
Pantry FoodSaver
®
Bag, Canister 2 years 6 months
Coffee
Coffee Beans Freezer FoodSaver
®
Bag 2-3 years 6 months
Coffee Beans
Pantry FoodSaver
®
Bag, Canister 1 year 3 months
Ground Coffee Freezer FoodSaver
®
Bag 2 years 6 months
Ground Coffee Pantry FoodSaver
®
Bag, Canister 5-6 months 1 month
Prepared Liquids
Sauces, Soups,
Stews
Freezer FoodSaver
®
Bag 1-2 years 3-6 months
Bottled Liquids
Oils Pantry FoodSaver
®
Bottle Stopper 1-11⁄2 years 5-6 months
Dry Foods
Beans, Grains Pantry FoodSaver
®
Bag, Canister 1-2 years 6 months
Pasta, Rice Pantry FoodSaver
®
Bag, Canister 1-2 years 6 months
Powdery Foods
Dry Milk Pantry FoodSaver
®
Bag, Canister 1-2 years 6 months
Dried Coconut Pantry FoodSaver
®
Bag, Canister 1-2 years 6 months
Flour Pantry FoodSaver
®
Bag, Canister 1-2 years 6 months
Sugar, Brown
Sugar
Pantry FoodSaver
®
Bag, Canister 1-2 years 6 months
Snack Foods
Crisps Pantry FoodSaver
®
Canister 3-6 weeks 1-2 weeks
Biscuits, Crackers Pantry FoodSaver
®
Canister 3-6 weeks 1-2 weeks

www.foodsavereurope.com
13
Care and Cleaning
To Clean Appliance:
Remove Power Cord from electrical outlet. Do not immerse in liquid.
Check Gaskets and around Drip Tray to make sure they are free from
food materials. Wipe off gasket with warm soapy cloth if needed.
Bottom gasket may be removed for cleaning. Clean with warm, soapy
water. The top gasket is not removable.
The Removable Drip Tray makes cleanup easy when small amounts
of liquids are inadvertently pulled into the Vacuum Channel during
vacuum process.
Empty Drip Tray after each use. Wash in warm soapy water or place in top
rack of dishwasher. Dry thoroughly before re-inserting into the appliance.
Always leave lid latch in open or store position, never leave in closed
position. When appliance is left in closed position, the gaskets become
compressed and the unit may not function properly.
Do not leave appliance outside in the environment while not in use.
Remove All Food
Around Gaskets
Lift Drip Tray Out

www.foodsavereurope.com
14
another
Problem
Solution
Red Seal LED Flashing • Unit is overheated. Always allow 20 seconds between seals. Under heavy
usage, appliance will shut off automatically and Red Light will flash. Wait
for 20 min for unit to cool off.
• Wait 20 seconds between seals.
• Vacuum pump running more than 120 seconds. Under heavy usage,
appliance will shut off automatically and Red Light will flash. See next
section “Vacuum Pump is running, but bag is not evacuating”.
Vacuum Pump is
running, but bag
is not evacuating
• If making a bag from a roll, make sure one end of bag is sealed. See
“How to Make a Bag from a FoodSaver
®
Vacuum Sealing Roll”.
• Adjust the bag and try again. Make sure the open end of the bag in down
inside the vacuum channel.
• Check for wrinkles in bag along Sealing Strip. To prevent wrinkles in the
seal, gently stretch bag flat while inserting bag into vacuum channel.
• Open unit and make sure gaskets are inserted properly and there are no
foreign objects, dirt or debris on the top or bottom gasket (see “Care and
Cleaning”).
• Appliance has been left in the latched position: Gaskets may be
compressed. Unlatch and allow 10 to 20 minutes for gaskets to expand.
• Make sure the accessory hose is not attached to accessory port.
Gasket is loose or has
a tear
• If it is the lower gasket, take out the lower gasket, clean it and reinsert
the gasket into the vacuum channel.
• If it is the upper gasket, please contact Customer Service.
Bag is not sealing
properly
• Liquid in bag, make sure unit is on moist food setting.
• Too much liquid in bag, freeze before vacuuming.
• Check for food debris around seal area. If present, take out the Gasket, clean it
and reinsert the Gasket into the Vacuum Channel (see “Care and Cleaning”).
• Bag has wrinkles: To prevent wrinkles in the seal, gently stretch bag flat while
inserting bag into vacuum channel.
No lights on the
control panel
• Make sure unit is plugged in
• Make sure wall outlet is functional
• Make sure lid is all the way down, and the bar is in the closed position.
Trouble-Shooting

www.foodsavereurope.com
15
another
Problem
Solution
Nothing happens
when bar is closed
and button is pressed
• Make sure unit is plugged in.
• Make sure wall outlet is functional.
• Lower bar, make sure door is all the way down.
Cannot insert bag into
machine
• Make sure there is enough bag material to reach center of drip tray. Always
allow three inches (7.62mm) extra space to allow the bag to seal tightly
around food contents.
• Gently stretch bag flat while inserting. Insert bag CURL DOWN into Vacuum
Channel.
Air was removed from
the bag, but now air
has re-entered
• Examine the seal. A winkle along the seal may cause air to re-enter the bag.
To prevent wrinkles in the seal, gently stretch bag flat while inserting bag into
vacuum channel.
• Sometimes moisture or food material (such as juices, grease, crumbs,
powders, etc.) along seal prevents bag from sealing properly. Cut bag open,
wipe top inside of bag and reseal.
• Sharp food items may have punctured bag. Use a new bag if there is a hole.
Cover sharp food items with a soft cushioning material, such as a paper towel,
and reseal.
• Fermentation or the release of natural gases from inside the foods may have
occurred. When this happens, food may have begun to spoil and should be
discarded.
Bag Melts • Sealing Strip may have become too hot. Always wait at least 20 seconds for
appliance to cool down before you vacuum package another item.
• Use FoodSaver brand bags. Our FoodSaver® Bags and Rolls are specially
designed for FoodSaver® units.
If you need further
assistance:
• Call Consumer Services at your country.
• For additional tips and answers to frequently asked questions, go to
www.foodsavereurope.com
Trouble-Shooting (cont.)

www.foodsavereurope.com
16
Get the most out of your FoodSaver
®
appliance
with easy-to-use FoodSaver
®
Bags, Canisters and
Accessories.
FoodSaver
®
Bags and Rolls
The design of FoodSaver
®
Bags and Rolls features
special channels that enable the efficient and complete
removal of air. The multi-ply construction makes
them an especially effective barrier to oxygen and
moisture, preventing freezer burn. FoodSaver
®
Bags and
Rolls come in a variety of sizes.
IMPORTANT: To avoid possible illness, do not reuse
bags after storing raw meats, raw fish or greasy foods.
Do not reuse bags that have been microwaved or
simmered.
FoodSaver
®
Vacuum Packaging Canisters
FoodSaver
®
Canisters are simple to use and ideal for
vacuum packaging delicate items such as muffins and
other baked goods, liquids and dry goods.
The canisters come in a variety of styles and sizes and
can be used on the countertop, in the refrigerator or in
the pantry.
The Quick Marinator is an excellent way to marinate
foods in minutes instead of hours. Any FoodSaver
®
Canister can be used for marinating, but we recommend
the square or rectangular shapes because less marinade
is needed. Canisters should not be used in the freezer.
The stackable, lightweight containers are a convenient
option to store make-ahead meals, leftovers and snacks.
Note: Allow hot foods to cool to room temperature
before vacuum packaging. Otherwise contents may
bubble up out of canister.
FoodSaver
®
Bottle Stopper
Use FoodSaver
®
Bottle Stoppers to vacuum package
wine, non-carbonated liquids and oils. This will extend
the life of the liquid and preserve the flavour. Avoid
using the Bottle Stopper on plastic bottles.
Note: Do not vacuum package carbonated or sparkling
beverages as gas removal will cause them to go flat.
How to Purchase FoodSaver
®
Bags, Rolls
and Accessories
FoodSaver
®
products are available at most major
retailers.
The Complete FoodSaver
®
System

www.foodsavereurope.com
17
Please keep your receipt as this will be required for any claims under this guarantee.
This appliance is guaranteed for 2 years after your purchase as described in this document.
During this guaranteed period, if in the unlikely event the appliance no longer functions due to a design or
manufacturing fault, please take it back to the place of purchase, with your till receipt and a copy of this
guarantee.
The rights and benefits under this guarantee are additional to your statutory rights, which are not affected
by this guarantee. Only Holmes Products (Europe) Ltd. (“Holmes”) has the right to change these terms.
Holmes undertakes within the guarantee period to repair or replace the appliance, or any part of appliance
found to be not working properly free of charge provided that:
• youpromptlynotifytheplaceofpurchaseorHolmesoftheproblem;and
• theappliancehasnotbeenalteredinanywayorsubjectedtodamage,misuse,abuse,repairor
alteration by a person other than a person authorised by Holmes.
Faults that occur through, improper use, damage, abuse, use with incorrect voltage, acts of nature, events
beyond the control of Holmes, repair or alteration by a person other than a person authorised by Holmes or
failure to follow instructions for use are not covered by this guarantee. Additionally, normal wear and tear,
including, but not limited to, minor discoloration and scratches are not covered by this guarantee.
The rights under this guarantee shall only apply to the original purchaser and shall not extend to
commercial or communal use.
If your appliance includes a country-specific guarantee or warranty insert please refer to the terms and
conditions of such guarantee or warranty in place of this guarantee or contact your local authorized dealer
for more information.
This marking indicates that this product should not be disposed with other household wastes throughout
the EU. To prevent possible harm to the environment or human health from uncontrolled waste disposal,
recycle it responsibly to promote the sustainable reuse of material resources. To return your used device,
please use the return and collection systems or contact the retailer where the product was purchased.
They can take this product for environmental safe recycling.
Holmes Products (Europe) Limited
1 Francis Grove
London
SW19 4DT
UK
Guarantee

www.foodsavereurope.com
1
Importanti misure di sicurezza
Per assicurare la propria sicurezza, osservare
sempre queste precauzioni di base quando si usa un
apparecchio FoodSaver
®
:
1. Leggere attentamente il manuale dell’utente per
le istruzioni di funzionamento. Leggere tutte le
istruzioni prima di usare questo manuale.
2. Non usare l’apparecchio su superfici bagnate o
bollenti o vicino a una fonte di calore.
3. Per proteggersi da un’elettrocuzione, non
immergere alcuna parte dell’apparecchio o del
cavo di alimentazione nell’acqua o in altri liquidi.
4. Per disconnettere, staccare il cavo elettrico dalla
presa elettrica. Non disconnettere tirando il cavo.
5. Non usare l’apparecchio con un cavo o una
presa danneggiati. Non usare l’apparecchio se il
funzionamento è difettoso o risulta danneggiato
in qualche modo. Portarlo a un Centro di
servizio autorizzato per farlo esaminare, riparare
o regolare l’alimentazione o la meccanica.
6. Usare l’apparecchio solo per l’uso al quale è
destinato.
7. Attenzione: è fornito un cavo di alimentazione
corto per ridurre i rischi di attorcigliamento o di
disinnesto causati da un cavo più lungo. Si può
usare una prolunga quando la taratura indicata
non è inferiore alla taratura del cavo di questo
apparecchio. Tutti i cavi non devono pendere
dal piano di lavoro o dal tavolo per evitare che
possano essere inavvertitamente disinnescati o
tirati, specialmente dai bambini.
8. Non porre l’apparecchio sopra o nei pressi
di un fornello a gas o elettrico acceso o in un
forno caldo. Fare estrema attenzione durante la
movimentazione di prodotti contenenti liquidi
bollenti.
9. Attendere 20 secondi tra le sigillature per
consentire all’apparecchio di raffreddarsi.
10. Nessuna manutenzione è necessaria da parte
dell’utente
11. Questo apparecchio non è concepito per l’uso
da parte di persone (inclusi i bambini) con
capacità fisiche, sensorie o mentali ridotte o
che mancano di esperienza o conoscenza, salvo
se è stato loro fornita supervisione o istruzione
sull’uso dell’apparecchio da parte di una
persona responsabile della loro sicurezza.
12. Un’attenta supervisione è necessaria quando
un apparecchio è usato da bambini o nelle loro
vicinanze per assicurarsi che essi non giochino
con l’apparecchio.
Solo per uso domestico
CONSERVARE QUESTE
ISTRUZIONI
Importanti misure di sicurezza

www.foodsavereurope.com
2
Congratulazioni…
State per beneficiare dei vantaggi di
freschezza del FoodSaver
®
. Per anni, il
sistema di conservazione sottovuoto
FoodSaver
®
ha aiutato milioni di famiglie
a mantenere gli alimenti freschi il più a
lungo nel frigorifero, nel freezer e nella
dispensa. Il sistema FoodSaver
®
è studiato
per rimuovere l’aria e prolungare il tempo
di freschezza degli alimenti fino a cinque
volte più a lungo dei metodi convenzionali
di conservazione. Mantenere l’apparecchio
FoodSaver
®
sul piano di lavoro per
scoprirne presto la convenienza e la
versatilità.
Perché la conservazione sottovuoto?
L’esposizione all’aria causa la perdita dei valori
nutrizionali e del sapore e la bruciatura da
freddo e favorisce la crescita di batteri, muffa
e fermentazione. Il sistema di conservazione
sottovuoto FoodSaver
®
rimuove l’aria e sigilla il
sapore e la qualità. Con una gamma completa
di sacchetti, scatole e accessori per ampliare le
opzioni, si può ora beneficiare dei vantaggi di un
metodo di conservazione degli alimenti provato
scientificamente, che mantiene questi ultimi freschi
fino a cinque volte più a lungo del normale.
Il sistema di conservazione sottovuoto FoodSaver
®
fa risparmiare tempo e denaro.
• Fa spendere meno denaro. Con il sistema
FoodSaver
®
, si può acquistare all’ingrosso o in
saldo e conservare gli alimenti nelle porzioni
desiderate senza sprechi.
• Farisparmiarepiùtempo. Si può cucinare in
anticipo per la settimana, preparando le pietanze
e conservandole nei sacchetti FoodSaver
®
.
• Marinaturapossibileinpochiminuti.La
conservazione sottovuoto apre i pori degli
alimenti, in modo che si può ottenere la fragranza
di una magnifica marinata in pochi minuti invece
che di ore.
• Facilital’intrattenimento. Si può cucinare il
proprio piatto preferito e preparare le festività
in anticipo in modo da poter trascorrere
tranquillamente il proprio tempo con gli ospiti.
• Consentediapprezzarepiùalungoglialimenti
stagionali o speciali. Si mantengono freschi più
a lungo gli alimenti deperibili o consumati con
minor frequenza.
• Aiutaacontrollareleporzioniperlediete.
Si possono conservare sottovuoto porzioni
controllate e scrivere sui sacchetti le calorie e/o i
grammi di grasso.
• Proteggegliarticolinonalimentari.Mantiene
gli oggetti per il campeggio o le vacanze in
barca asciutti e organizzati per le escursioni .
Protegge l’argenteria lucidata dall’annerimento,
minimizzando l’esposizione all’aria.
Non riportare questo prodotto
dove è stato acquistato
Benvenuti al sistema di sigillatura sottovuoto Foodsaver
®
www.foodsavereurope.com
3
Caratteristiche dell’apparecchio FoodSaver
®
B. Pannello di controllo dell’apparecchio
C. Dispositivo di facile bloccaggio
D. Porta dell’accessorio
A. Conservazione del rotolo e (sotto
coperchio.)
E. Conservazione dell’adattatore del
contenitore (l’adattatore non è
incluso; esso è fornito con i contenitori
FoodSaver®.)
F. Tubo flessibile e conservazione
dell’accessorio
G. Vassoio di gocciolamento facile da
pulire
H. Stricia di sigillatura extra larga

www.foodsavereurope.com
4
Caratteristiche dell’apparecchio FoodSaver
®
Pulsante di aspirazione
e di sigillatura
Impostazioni regolabili in
funzione degli alimenti
4
2
Impostazioni
della velocità
1
Pulsante di
sigillatura
3
Spia di
aspirazione
6
Spia di
sigillatura
5
Caratteristiche di progettazione avanzate
Il pannello di controllo facile da usare pone l’utente in condizione di ottenere il massimo dal suo sistema
FoodSaver® e il design del tastierino permette di pulirlo facilmente.
Per usarlo: abbassare la barra per chiudere la porta, quando la spia si accende sul pannello di controllo, si
può selezionare sigilla o aspira e sigilla.
1
Impostazioni della velocità
Selezionare la velocità per ottimizzare l’aspirazione – Lenta per gli alimenti delicati; Normale per i
sacchetti, le scatole e tutti gli accessori.
2
Impostazioni regolabili in funzione degli alimenti
Selezionare il tipo di alimento per ottimizzare la sigillatura – Secco (tempo di sigillatura normale) per
alimenti senza liquidi; Umido (tempo di sigillatura più lungo) per alimenti succosi.
3
Pulsante di sigillatura
Sigillatura automatica senza schiacciamento - Questo pulsante ha tre funzioni:
1. Premere per arrestare immediatamente il processo di aspirazione e iniziare la sigillatura del sacchetto. In tal
modo si evita di schiacciare articoli delicati, come il pane, i biscotti e la pasticceria.
2. Premere per creare una sigillatura quando si fanno i sacchetti da un rotolo FoodSaver®.
3. Premere per creare una sigillatura su sacchetti umidi Mylar (come un sacchetto di patatine) per mantenere il
cibo sigillato ermeticamente.
4
Pulsante di aspirazione e sigillatura
Questo pulsante è previsto per due usi:
1. Premere il pulsante per aspirare la confezione e sigillare gli alimenti a tenuta d’aria. L’apparecchio
si arresta automaticamente.
2. Premere per annullare qualsiasi processo in qualsiasi momento.
5
Spia di sigillatura
Questa spia è prevista per due usi:
1. Una luce costante indica che il processo di sigillatura è iniziato.
2. Lampeggiamento indica errore.
6
Spia dell’aspirazione
Mostra la progressione di aspirazione e sigillatura. Si spegne quando il processo è terminato completamente.
Secco Umido
2 2

www.foodsavereurope.com
5
Come fare un sacchetto da un rotolo di sigillatura sottovuoto
Foodsaver
®
1. Aprire lo sportello dell’apparecchio nel compartimento
di conservazione del rotolo (Vedere la figura.1). Per
ottenere migliori risultati , inserire il rotolo con il mate-
riale rivolto in basso. Nota: i sacchetti possono essere
sigillati con lo sportello dell’apparecchio chiuso o
aperto.
2. Sollevare verso l’alto la barra del taglierino del rotolo e
porre il materiale sotto la barra del taglierino (Vedere
la figura.2).
3. Fare uscire il foglio per una lunghezza sufficiente per
mantenere l’articolo conservato sottovuoto, più 4
pollici (11 cm). Abbassare la barra del taglierino e far
scivolare il taglierino del rotolo lungo la barra (Vedere
la figura.3).
4. Sollevare la barra, posizionare il sacchetto sulla striscia
di sigillatura, abbassare la barra dolcemente, premere
il pulsante Sigilla. Quando la luce rossa si spegne,
sollevare la barra e rimuovere il sacchetto (Vedere la
figura.4).
5. Si dispone di un lato sigillato (Vedere la figura.5).
6. Ora si è pronti per una sigillatura sottovuoto con il
nuovo sacchetto (Vedere qui di seguito).
OPEN END
SEALED END
Fig. 1
Fig. 3
Fig. 5
Fig. 2
4”
Fig. 4

www.foodsavereurope.com
6
1. Iniziare con un sacchetto del sistema si sigillatura
sottovuoto FoodSaver® (o creare un sacchetto come
descritto nella sezione precedente “Come fare un sacchetto
da un rotolo”).
2. Porre l’alimento nel sacchetto, lasciando almeno 8 cm (3
pollici) di spazio tra il contenuto e la parte superiore del
sacchetto (Vedere la figura.1).
3. Usando le due mani, inserire il lato aperto del sacchetto nel
canale di aspirazione (Vedere la figura.2).
4. Porre l’estremità del sacchetto nel vassoio di gocciolamento
(Vedere la figura.3).
5. Abbassare la barra, premere il pulsante di aspirazione e
sigillatura (Vedere la figura.4).
6. Quando la spia si spegne, sollevare la barra e rimuovere il
sacchetto sigillato (Vedere la figura.5).
SEALED END
OPEN END
3 inches
Fig. 1
Fig. 2
Fig. 3
Fig. 4
Inserire il
sacchetto
Avvolgere
in basso
2
Fig. 5
Come sigillare sottovuoto i
sacchetti FoodSaver
®

www.foodsavereurope.com
7
Confezionamento sottovuoto e sicurezza
degli alimenti
Il confezionamento sottovuoto prolunga la vita degli
alimenti, poiché elimina la maggior parte dell’aria dal
contenitore ermetico e riduce l’ossidazione che incide
sul valore nutritivo, sul sapore e sulla qualità generale
dei cibi. L’eliminazione dell’aria inibisce inoltre il
proliferare di microrganismi che possono causare
problemi in specifiche circostanze:
Muffa – Facilmente identificabile per il suo aspetto
vellutato. La muffa non cresce in ambienti dal basso
contenuto di ossigeno e quindi il confezionamento
sottovuoto ne rallenta la formazione.
Lievito – Produce fermentazione, ravvisabile da un
odore acre e un sapore cattivo. Il lievito si forma
in presenza di acqua, zucchero e a temperatura
moderata e può anche sopravvivere in assenza d’aria.
La refrigerazione rallenta la crescita di lievito; il
congelamento la inibisce del tutto.
Batteri – Producono un odore sgradevole, causano
scolorimento e/o rivestono il prodotto con una
patina viscida. In condizioni propizie, il clostridium
botulinum (l’organismo che causa il botulismo)
si può formare in assenza d’aria e non è sempre
avvertibile dall’olfatto o dal gusto. Benché molto raro,
il botulismo è assai pericoloso.
Per la conservazione sicura degli alimenti, è
importante mantenerli a bassa temperatura. La
crescita batterica si riduce considerevolmente a
temperature di 4ºC e inferiori. Il congelamento a -
17ºC non neutralizza i microrganismi ma ne arresta
la crescita. Per la conservazione nel lungo periodo,
surgelare sempre i cibi deteriorabili che sono stati
confezionati sottovuoto, e tenerli in frigorifero dopo
averli scongelati. È importante osservare che il
confezionamento sottovuoto NON è un’alternativa
all’inscatolamento e non inverte il deterioramento dei
prodotti alimentari, ma può solo rallentare la perdita
di qualità. È difficile prevedere la durata dei cibi al
livello di qualità massima, ciò dipende dall’età e dalle
condizioni di ogni prodotto quando viene sigillato
sottovuoto.
IMPORTANTE: Il confezionamento sottovuoto NON è
un’alternativaallarefrigerazioneoalcongelamento.
Qualsiasi prodotto alimentare deteriorabile da tenere
in frigorifero deve essere refrigerato o surgelato dopo
il confezionamento sottovuoto.
Suggerimenti per la preparazione dei cibi e
per il riscaldamento
Scongelamento e riscaldamento di prodotti
alimentari confezionati sottovuoto
Scongelare sempre i prodotti in frigorifero o nel forno
a microonde; non scongelare i cibi deteriorabili a
temperatura ambiente.
Per riscaldare i cibi in una busta FoodSaver
®
con un
forno a microonde, aprire sempre un angolo della
busta prima di posarla sul piatto del microonde. Per
evitare la concentrazione di calore in alcuni punti, non
riscaldare al microonde carni con l’osso o cibi grassi
utilizzando le buste FoodSaver
®
. È anche possibile
riscaldare i cibi nelle buste FoodSaver
®
a bagnomaria
(al di sotto di 75°C).
Istruzioni per la preparazione di carne e pesce:
Per i migliori risultati, precongelare carni e pesce
per 1-2 ore prima di confezionare questi prodotti
sottovuoto in una busta FoodSaver
®
. In tal modo si
conservano i succhi e la forma dei prodotti alimentari,
e si assicura una sigillazione ottimale.
Se non è possibile precongelarli, inserire un pezzo di
carta da cucina sopra il prodotto, appena sotto l’area
di sigillazione. Lasciare la carta nella busta in modo
che assorba l’umidità eccessiva e i succhi durante il
confezionamento sottovuoto.
NB: La carne di manzo può avere un colore più
scuro dopo il confezionamento sottovuoto, a causa
della rimozione dell’ossigeno. Ciò non indica che il
prodotto è avariato..
Instruzioni per la preparazione di formaggi a pasta dura:
Per la freschezza dei formaggi, riconfezionarli
sottovuoto dopo ogni uso. La busta FoodSaver
®
deve
essere particolarmente lunga, con 2,5 cm di materiale
supplementare per ogni volta che si prevede di aprire e
risigillare la busta, oltre allo spazio di 7,5 cm da lasciare
normalmente tra il prodotto e la chiusura. Tagliare il
bordo sigillato e togliere il formaggio. Per riporlo in
conservazione, richiudere la busta e risigillarla.
IMPORTANTE: I formaggi a pasta molle non devono
mai essere confezionati sottovuoto.
Istruzioni per la preparazione di verdure:
Le verdure devono essere scottate prima del
confezionamento sottovuoto. Ciò arresta il processo
enzimatico che deteriora il sapore, il colore e la
consistenza delle verdure.
Per la scottatura, versare le verdure in acqua bollente
o utilizzare un forno a microonde, assicurando
che rimangano comunque croccanti. I tempi per la
scottatura variano da 1 a 2 minuti per le verdure a
foglia verde e i piselli, da 3 a 4 minuti per taccole
(piselli dolci), zucchine a fette e broccoli; 5 minuti per
le carote; da 7 a 11 per le pannocchie di granoturco.
Dopo la scottatura, immergere le verdure in acqua
fredda per arrestarne la cottura. Infine, asciugarle
amponandole con un canovaccio prima del
confezionamento sottovuoto.
NB: tutte le verdure (compresi broccoli, cavolini di
Bruxelles, cavolo, cavolfiore, cavolo riccio, rapa)
emanano gas naturali durante la conservazione.
Dopo la scottatura, devono dunque essere conservati
unicamente in freezer.
Quando si congelano le verdure, si consiglia di
presurgelarle per 1-2 ore o finché non appaiono
dure al tatto. Per congelare le verdure in porzioni
singole, spargerle su una teglia da forno in modo
che non si sovrappongano. In questo modo se ne
Linee direttive per la conservazione sottovuoto

www.foodsavereurope.com
8
impedisce il congelamento in blocco. Dopo averle
congelate, toglierle dalla teglia e chiuderle sottovuoto
in una busta FoodSaver
®
. Dopo il confezionamento
sottovuoto, riporle nuovamente nel freezer.
IMPORTANTE: a causa del rischio di batteri
anaerobici,ifunghifreschi,lecipolleel’aglionon
devono mai essere confezionati sottovuoto.
Istruzioni per la preparazione di verdure in foglia:
Per i migliori risultati, utilizzare un contenitore per le
verdure in foglia. Lavare le verdure, quindi asciugarle
con un canovaccio o in una centrifuga per insalata.
Dopo averle asciugate, riporle in un contenitore e
confezionarle sottovuoto. Conservarle in frigorifero.
Istruzioni per la preparazione della frutta:
Quando si congelano frutti molli o frutti di bosco,
si consiglia di presurgelarli per 1-2 ore o finché non
appaiono duri al tatto. Per congelare la frutta in
porzioni singole, spargerla su una teglia da forno in
modo che i singoli frutti non si sovrappongano. In
questo modo se ne impedisce il congelamento in
blocco. Dopo averla congelata, toglierla dalla teglia e
chiuderla sottovuoto in una busta FoodSaver
®
. Dopo
il confezionamento sottovuoto, riporla nuovamente
nel freezer.
È possibile creare porzioni sottovuoto per l’uso nella
preparazione di torte oppure per l’aggiunta alla
macedonia. In questo modo la frutta è disponibile
tutto l’anno. Per la conservazione in frigorifero, si
consiglia l’uso di contenitori FoodSaver
®
.
Istruzioni per la preparazione di prodotti da forno:
Per confezionare sottovuoto prodotti da forno morbidi
e gonfi, si consiglia di utilizzare un contenitore
FoodSaver
®
che non ne schiaccia la forma. Se si usa
una busta, presurgelare i prodotti per 1-2 ore o finché
non appaiono duri al tatto. Per velocizzare i tempi,
creare la pasta per torte e biscotti, i fondi delle torte o
torte complete o premescolare gli ingredienti asciutti
e confezionarli sottovuoto per l’uso futuro.
Istruzioni per la preparazione di caffè e prodotti
farinosi:
Per impedire l’infiltrazione di piccole particelle di
cibo nella pompa del sottovuoto, porre un pezzo di
carta da cucina sopra il prodotto nella confezione o
nella busta prima di applicare il sottovuoto. È anche
possibile riporre l’alimento nella confezione originale
all’interno di una busta FoodSaver
®
o utilizzare un
coperchio universale FoodSaverT
®
con il contenitore
originale per il confezionamento sottovuoto.
Istruzioni per la preparazione di liquidi:
brodo per minestra, presurgelarlo in una casseruola,
una marmitta o nel vassoio dei cubetti di ghiaccio.
Togliere il liquidi congelato e confezionarlo sottovuoto
in una busta FoodSaver
®
. I cubetti di brodo congelati
sono facilmente impilabili nel freezer. Per utilizzarli,
sarà sufficiente tagliare un angolo della busta e
collocare la busta nel forno a microonde oppure in
acqua a bassa ebollizione (al di sotto di 75°C).
Per conservare sottovuoto liquidi in bottiglia non
efervescenti, si può usare un tappo FoodSaver
®
con
il contenitore originale. Ricordarsi di lasciare almeno
2,5 cm (1 pollice) di spazio tra il contenuto e il fondo
del tappo. Le bottiglie possono essere risigillate dopo
ogni uso.
Linee guida per la preparazione per cibi preparati in
anticipo, resti e sandwich:
Si conservano efficacemente i cibi preparati in
anticipo, i resti e i sandwich nei contenitori leggeri,
impilabili FoodSaver
®
. Essi possono essere passati
nel forno a microonde o lavati nel cestello superiore
della lavatrice e forniti con un adattatore regolabile. I
contenitori leggeri saranno pronti per essere portati in
ufficio o a scuola o dovunque!
Linee guida per la preparazione di spuntini:
I vostri spuntini rimarranno freschi più a lungo se
li conserverete sottovuoto. Per migliori risultati
utilizzate un barattolo o un container della gamma
FoodSaver per gli alimenti fragili come i crackers.
Conservazione sottovuoto di articoli non
alimentari
Il sistema di conservazione sottovuoto
FoodSaver
®
protegge anche articoli non alimentari
dall’ossidazione, la corrosione e l’umidità. Basta
seguire le istruzioni per la conservazione sottovuoto
degli alimenti usando scatole, contenitori e accessori
FoodSaver
®
.
Per conservare sottovuoto posate in argento, inserirle
in un materiale di imbottitura, come tovaglioli di
carta, per evitare di forare il sacchetto. I sacchetti
FoodSaver
®
sono ideali per le escursioni all’aperto.
Per il campeggio e le escursioni, si possono portare
i fiammiferi, le mappe e il cibo asciutto e compatto.
Per avere acqua fresca da bere, riempire un sacchetto
FoodSaver
®
con ghiaccio, sigillarlo e, quando
necessario, lasciare che il ghiacciolo fonda. Se si
fanno gite in barca a vela o in motoscafo, si può
conservare sottovuoto il proprio cibo, le pellicole e
un ricambio asciutto di vestiti. Ricordare di portare
delle forbici o un coltello per aprire il sacchetto. Per
mantenere i kit di emergenza al sicuro e asciutti,
conservare sottovuoto segnali luminosi, batterie,
torce elettriche, fiammiferi e candele e altri oggetti
necessari. Gli articoli di emergenza resteranno asciutti
e in ordine in casa, in macchina o in barca.
Linee direttive per la conservazione sottovuoto

www.foodsavereurope.com
9
Consigli per riuscita di una sigillatura sottovuoto
1. La sigillatura sottovuoto NON è un sostituto del
processo di riscaldamento dei cibi in scatola. Gli
alimenti deperibili devono essere refrigerati o
congelati.
2. Per i migliori risultati, usare sacchetti, scatole,
contenitori o accessori FoodSaver®.
3. Durante il processo di sigillatura sottovuoto, piccolo
quantitativi di liquido, molliche o particelle di alimenti
possono essere inavvertitamente spinti nel vassoio di
gocciolamento, intasando la pompa e danneggiando
l’apparecchio.
Per impedire questo problema, seguire questi consigli:
a. Per gli alimenti umidi e succosi: congelarli prima ed
evitare di riempire troppo i sacchetti. Si può anche
porre un tovagliolo di carta ripiegato nella parte
superiore del sacchetto e sotto l’area di sigillatura.
b. Per le minestre, le salse e i liquidi: congelarli prima
ed evitare di riempire troppo i sacchetti. Oppure
usare una scatola o un contenitore nel frigorifero.
c. Per gli alimenti in polvere o finemente granulati:
evitare di riempire troppo i sacchetti o usare una
scatola o un contenitore. Si può anche introdurre
un filtro per il caffé o un tovagliolo di carta prima di
confezionare sottovuoto.
d. Dopo ogni uso vuotare il vassoio di gocciolamento.
4. Per evitare un riempimento eccessivo, lasciare almeno
8 cm (3 pollici) tra il contenuto e la parte superiore del
sacchetto. Quindi lasciare almeno un altro pollice di
sacchetto per il momento in cui si vuole riusarlo.
5. Non creare le proprie costure per un sacchetto di marca
FoodSaver®. I nostri sacchetti sono prodotti con una
speciale giuntura laterale, che è sigillata lungo l’intero
bordo esterno.
6. Per evitare rugosità quando si sigillano sottovuoto
alimenti voluminosi, tirare delicatamente per appiattire
il sacchetto quando esso viene inserito nel canale di
aspirazione e tenerlo fino a che la pompa comincia a
funzionare.
7. Se non si è sicuri che il sacchetto sia sigillato
correttamente, sigillarlo di nuovo.
8. Quando si deve sigillare sottovuoto articoli con
bordi taglienti (spaghetti non cotti, argenteria, ecc.),
proteggere il sacchetto da forature avvolgete gli
articoli in un materiale di imbottitura soffice come un
tovagliolo di carta. Si può anche usare una scatola o un
contenitore invece del sacchetto.
9. Quando si usano accessori, ricordarsi di lasciare 2,5
cm (1 pollice) di spazio sulla parte superiore della
scatola o del contenitore.
10. Per ottenere i migliori risultati, surgelare la frutta
e scaldare la verdura prima della sigillatura
sottovuoto. Fare riferimento alle linee guida della
Sezione Confezionamento sottovuoto, per maggiori
informazioni.
11. Se l’apparecchio non funziona o se il pulsante di
sigillatura lampeggia per segnalare un problema:
a. Controllare il cavo di alimentazione per vedere se è
correttamente inserito in una presa elettrica.
b. Esaminare il cavo di alimentazione per controllare
che non sia danneggiato.
c. Vedere se la presa elettrica funziona, inserendo un
altro apparecchio.
d. Controllare per assicurarsi che il vassoio superiore
di rilevazione del sacchetto sia correttamente
inserito.
e. Assicurarsi che il sacchetto sia inserito
correttamente nel canale di aspirazione. (Vedere
Come sigillare sottovuoto con i sacchetti
FoodSaver®)
f. Controllare per assicurarsi che il dispositivo di facile
bloccaggio sia in posizione chiusa.
g. Controllare la guarnizione in spugna intorno al
vassoio di gocciolamento, per assicurarsi che non
vi sia presenza di cibo o materiali e che essa sia
correttamente inserita nel relativo canale.
h. Controllare la guarnizione superiore intorno al
vassoio di rilevazione del sacchetto superiore per
assicurarsi che non vi sia presenza di cibo o
materiali.
i. Se l’apparecchio è surriscaldato, lasciarlo riposare
20 minuti.
j. Per ulteriori consigli sul funzionamento, visitare il
nostro sito web al www.foodsavereurope.com.
Consigli per la riuscita di una sigillatura sottovuoto
Suggerimenti di carattere generale
Consigliperrimuoverel’ariadalsacchetto
Consigliperrimuoverel’ariadalsacchetto
Rugosità nella sigillatura possono causare perdite e
lasciare che l’aria ritorni nel sacchetto. Per eliminare
qualsiasi rugosità, inserire il sacchetto nel canale di
aspirazione, tenere il sacchetto delicatamente con le
due mani, stirandolo delicatamente per farlo divenire
piatto fino a che sia attivata la pompa di aspirazione. Se
si notano delle rugosità dopo aver sigillato il sacchetto,
aprire quest’ultimo e ripetere la sigillatura sottovuoto.
Seilmotorefunzionaperpiùdi30secondisenza
arrestarsi, considerare quanto segue:
Se si sta sigillando sottovuoto con un sacchetto,
assicurarsi che quest’ultimo sia correttamente sigil-
lato (Vedere “Come fare un sacchetto da un rotolo”).
Controllare la guarnizione di schiuma intorno al vassoio
di gocciolamento, per assicurarsi che esso sia vuoto
di alimenti e che sia correttamente inserito nel canale
della guarnizione.
Se si sta sigillando sottovuoto con un accessorio, contr-
ollare le connessioni del tubo flessibile dell’accessorio,
per assicurare una stretta corrispondenza.

www.foodsavereurope.com
10
Consigli per sigillare un sacchetto
Quando si fa un sacchetto da un rotolo:
Premere il pulsante di sigillatura prima di inserire il
sacchetto nel canale di aspirazione. Una volta inserito il
sacchetto, il processo di sigillatura inizia immediatamente.
Nota: se si dimentica di premere il pulsante di sigillatura
prima di inserire il sacchetto nel canale di aspirazione, la
pompa di aspirazione si attiva, creando un problema, basta
allora premere il pulsante di sigillatura, per impedire alla
pompa di funzionare continuamente e iniziare il processo
di sigillatura.
Comeimpedireall’umiditàeailiquididiesserespintinel
vassoio di gocciolamento o di restare intrappolati nella
sigillatura:
Precongelare l’alimento umido come la carne cruda per
1-2 ore prima della sigillatura sottovuoto o porre un
tovagliolo di carta tra il cibo e l’estremità del sacchetto, per
assorbire i liquidi in eccesso. Assicurarsi di lasciare almeno
8 cm (3 pollici) tra il tovagliolo di carta e l’estremità del
sacchetto, in modo che quest’ultimo possa essere sigillato
correttamente col tovagliolo di carta all’interno e non sia
posto in mezzo dell’area di sigillatura.
Assicurarsichel’apparecchioabbiailtempodi
raffreddarsi.
Attendere almeno 20 secondi tra le sigillature. In
condizioni di uso molto gravose, l’apparecchio arresta
il funzionamento per impedire il surriscaldamento. Se
questo avviene, attendere 20 minuti per permettere
all’apparecchio di raffreddarsi.
Consigli per la riuscita di una sigillatura sottovuoto (continua)
Consigli sulla sigillatura sottovuoto con un accessorio
Come preparare gli accessori FoodSaver® per il
confezionamento sottovuoto
Gli accessori includono le scatole di confezionamento
sottovuoto FoodSaver®, i contenitori e i tappi delle
bottiglie.
1. Lasciare almeno 2,5 cm (1 pollice) di spazio tra il
contenuto e il bordo.
2. Strofinare il bordo della scatola, del contenitore o
della bottiglia per assicurarsi che sia pulito e asciutto.
3. Porre il coperchio sulla scatola o sul contenitore o
porre il tappo sulla bottiglia.
4. Per gli accessori con un grande pomello sul coperchio,
girare il pomello per aspirare. Confezionare sottovuoto
seguendo le istruzioni qui di seguito. Quando il
processo di aspirazione è completato, girare il pomello
in posizione di chiuso prima di rimuovere il tubo
flessibile dell’accessorio.
5. Per gli accessori con un grande pomello sul coperchio,
confezionare sottovuoto, seguendo le istruzioni seguenti.
La scatola di marinatura rapida FoodSaver è il perfetto
accessorio FoodSaver® per marinare gli alimenti. Questi
si possono marinare in pochi minuti con la sigillatura
sottovuoto, perché il processo di aspirazione apre i pori
degli alimenti e assorbe la marinatura più rapidamente.
Nota Importante: usare la scatola di marinatura rapida
FoodSaver® con un coperchio chiaro e un grande
pomello bianco. Per eseguire la marinatura, assicurarsi
che il pomello sul coperchio dell’accessorio sia regolato
sulla posizione di marinatura.
1. Preparare una quantità di marinata, sufficiente
a coprire interamente il cibo in una scatola di
marinatura. Lasciare sempre almeno 2,5 cm (1 pollice)
tra il contenuto e la parte superiore del bordo.
2. Assicurarsi che la guarnizione a forma di nastro si trovi
sotto il coperchio e il bordo della scatola di marinatura
sia libero di materiale alimentare.
3. Assicurarsi che il tubo flessibile dell’accessorio sia
inserito saldamente nello sportello del coperchio di
marinatura FoodSaver®.
4. Assicurarsi che il pomello sul coperchio
dell’accessorio sia impostato sulla posizione di
marinatura.
5. Assicurarsi che il coperchio sia saldamente attaccato
alla base del recipiente di marinatura.
6. Premere il pulsante di sigillatura sul pannello di
controllo.
7. Ora, il sistema di sigillatura sottovuoto FoodSaver®
inizia il ciclo di marinatura rapida. La spia di
aspirazione e sigillatura lampeggia per indicare che il
processo di marinatura è iniziato.
8. Durante la marinatura, il display del progresso di
aspirazione lampeggia durante l’aspirazione o il ciclo
di riposo.
9. Per conservare gli alimenti in condizioni di sicurezza,
dopo aver completato il ciclo di marinatura,
l’apparecchio segnalerà con brevi segnali acustici che
il ciclo rapido di marinatura è completato. Premere
qualsiasi pulsante per silenziare il segnale acustico.
Ora si può cuocere o mettere in frigorifero il cibo
marinato.
Marinatura con l’apparecchio FoodSaver
®

www.foodsavereurope.com
11
Guida per la conservazione degli alimenti | Carni, formaggi,
verdure, frutta
Alimenti
Luogo di
conservazione
Busta/accessorio
FoodSaver
®
consigliato
Durata di
conservazione
FoodSaver
®
Durata di
conservazione
normale
Carne
Rinforzi, maiale, agnello
Freezer
FoodSaver
®
Busta 2-3 anni
6 mesi
Carne macinata Freezer FoodSaver
®
Busta 1 anni 4 mesi
Pollame Freezer FoodSaver
®
Busta 2-3 anni 6 mesi
Pesce Freezer FoodSaver
®
Busta 2 anni 6 mesi
Formaggi a pasta dura ( Non confezionare sottovuoto formaggi a pasta molle )
Formaggio cheddar Frigorifero FoodSaver
®
Busta,
Contenitore
4-8 mesi 1-2 settimane
Parmigiano Frigorifero FoodSaver
®
Busta,
Contenitore
4-8 mesi 1-2 settimane
Verdure ( Non confezionare sottovuoto funghi freschi, cipolle e aglio )
Asparagi Freezer FoodSaver
®
Busta 2-3 anni 8 mesi
Broccoli, cavolfiore Freezer FoodSaver
®
Busta 2-3 anni 8 mesi
Cavolo, cavolini di
Bruxelles
Freezer FoodSaver
®
Busta 2-3 anni 8 mesi
Mais (pannocchie o in
grani)
Freezer FoodSaver
®
Busta 2-3 anni 8 mesi
Fagiolini Freezer FoodSaver
®
Busta 2-3 anni 8 mesi
Lattuga, spinaci Frigorifero FoodSaver
®
Contenitore 2 settimane 3-6 giorni
Pisellini, taccole Freezer FoodSaver
®
Busta 2-3 anni 8 mesi
Frutta
Albicocche, prugne Freezer FoodSaver
®
Busta 1-3 anni 6-12 messi
Pesche, pesche noce Freezer FoodSaver
®
Busta 1-3 anni 6-12 messi
Frutti di bosco teneri
Lamponi, more Frigorifero FoodSaver
®
Contenitore 1 settimane 1-3 giorni
Fragole Frigorifero FoodSaver
®
Contenitore 1 settimane 1-3 giorni
Frutti di bosco sodi
Mirtilli Frigorifero FoodSaver
®
Contenitore 2 settimane 3-6 giorni
Mirtilli rossi Frigorifero FoodSaver
®
Contenitore 2 settimane 3-6 giorni

www.foodsavereurope.com
12
Pane, caffè, snacks e liquidi
Alimenti
Luogo di
conservazione
Busta/accessorio
FoodSaver
®
consigliato
Durata di
conservazione
FoodSaver
®
Durata di
conservazione
normale
Prodotti da forno
Panini, Bread,
pasticcini
Freezer FoodSaver
®
Busta
1-3 anni
6-12 mesi
Frutta secca
Mandorle,
arachidi
Dispensa FoodSaver
®
Busta, Contenitore 2 anni 6 mesi
Semi di
girasole
Dispensa FoodSaver
®
Busta, Contenitore 2 anni 6 mesi
Caffè
Chicchi Freezer FoodSaver
®
Busta 2-3 anni 6 mesi
Chicchi
Dispensa FoodSaver
®
Busta, Contenitore 1 anni 3 mesi
Macinato Freezer FoodSaver
®
Busta 2 anni 6 mesi
Macinato Dispensa FoodSaver
®
Busta, Contenitore 5-6 mesi 1 mesi
Prodotti liquidi
Sughi,
minestre, bolliti
Freezer FoodSaver
®
Busta 1-2 anni 3-6 mesi
Liquidi in bottiglia
Oli Dispensa FoodSaver
®
Tappo di bottigla 1-11⁄2 anni 5-6 mesi
Prodotti secchi
Fagioli, cereali Dispensa FoodSaver
®
Busta, Contenitore 1-2 anni 6 mesi
Pasta, riso Dispensa FoodSaver
®
Busta, Contenitore 1-2 anni 6 mesi
Prodotti farinosi
Latte in polvere Dispensa FoodSaver
®
Busta, Contenitore 1-2 anni 6 mesi
Cocco essiccato Dispensa FoodSaver
®
Busta, Contenitore 1-2 anni 6 mesi
Farina Dispensa FoodSaver
®
Busta, Contenitore 1-2 anni 6 mesi
Zucchero,
zucchero
greggio
Dispensa FoodSaver
®
Busta, Contenitore 1-2 anni 6 mesi
Spuntini
Patatine Dispensa FoodSaver
®
Contenitore 3-6 settimane 1-2 settimane
Biscotti, cracker Dispensa FoodSaver
®
Contenitore 3-6 settimane 1-2 settimane
 Loading...