

Page 1
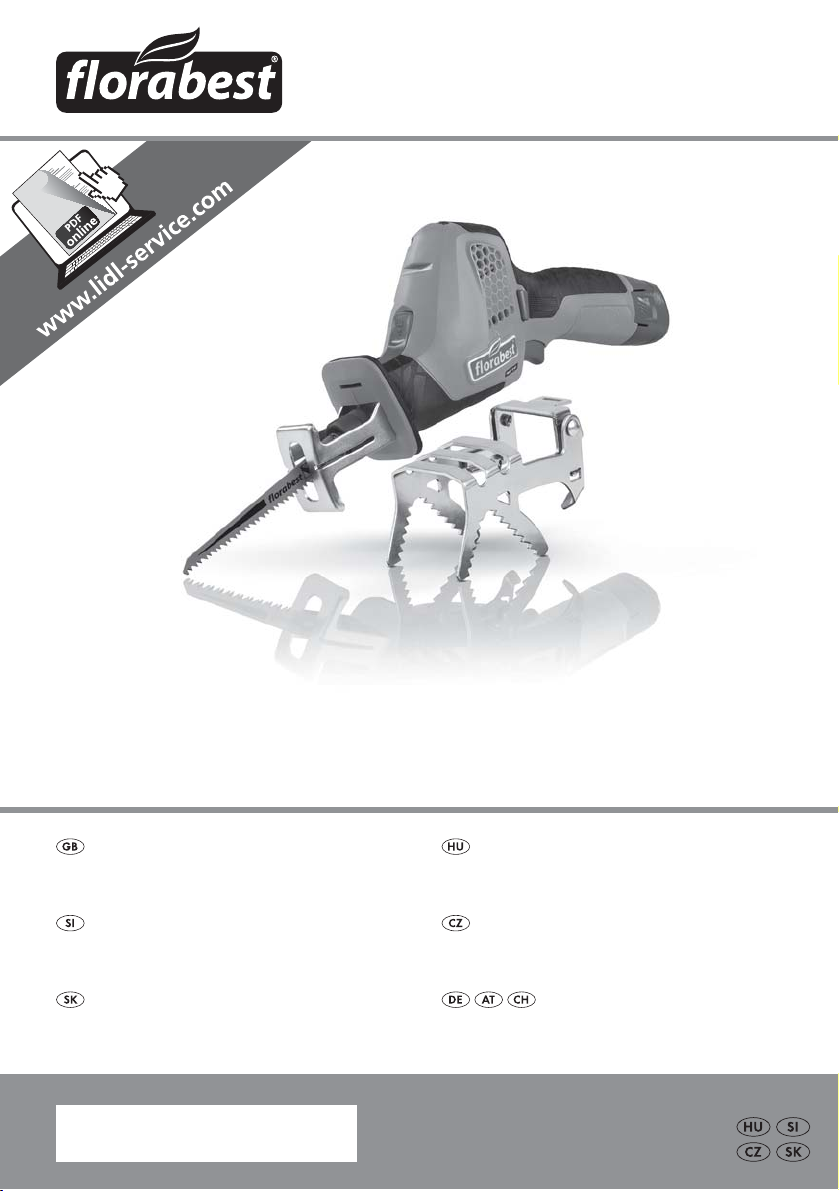
CORDLESS BRANCH SAW FAAS 12 A1
CORDLESS BRANCH SAW
Translation of the original instructions
AKUMULATORSKA ŽAGA ZA VEJE
Prevod originalnega navodila za uporabo
AKUMULÁTOROVÁ PÍLA NA VETVY
Preklad originálneho návodu na obsluhu
IAN 275666
AKKUS ÁGFŰRÉSZ
Az originál használati utasítás fordítása
AKU PILKA NA VĚTVĚ
Překlad originálního provozního návodu
AKKU-ASTSÄGE
Originalbetriebsanleitung
Page 2
Before reading, unfold both pages containing illustrations and familiarise yourself with all functions of the
device.
Olvasás előtt kattintson az ábrákat tartalmazó mindkét oldalra és végezetül ismerje meg a készülék
mindegyik funkcióját.
Pred branjem obe strani s slikami odprite navzven in se nato seznanite z vsemi funkcijami naprave.
Před čtením si odklopte obě dvě strany s obrázky a potom se seznamte se všemi funkcemi přístroje.
Pred čítaním si odklopte obidve strany s obrázkami a potom sa oboznámte so všetkými funkciami prístroja.
Klappen Sie vor dem Lesen die beiden Seiten mit den Abbildungen aus und machen Sie sich anschließend
mit allen Funktionen des Gerätes vertraut.
GB Translation of the original instructions Page 1
HU Az originál használati utasítás fordítása Oldal 11
SI Prevod originalnega navodila za uporabo Stran 21
CZ Překlad originálního provozního návodu Strana 31
SK Preklad originálneho návodu na obsluhu Strana 41
DE / AT / CH Originalbetriebsanleitung Seite 51
Page 3
A B
C D
Page 4
E
F
G
Page 5

Contents
Introduction ......................................................2
Intended use ................................................................ 2
Features ................................................................... 2
Package contents ............................................................ 2
Technical data .............................................................. 2
General Power Tool Safety Warnings ................................3
1. Work area safety .......................................................... 3
2. Electrical safety ........................................................... 3
3. Personal safety ............................................................ 4
4. Power tool use and care .................................................... 4
5. Use and handling of the cordless electrical power tool ............................. 5
6. Service .................................................................. 5
Appliance-specific safety instructions ............................................. 5
Safety guidelines for battery chargers ............................................ 5
Practical advice on sawing .........................................5
Original accessories/auxiliary equipment ......................................... 6
Information on saw blades ..................................................... 6
Before use .......................................................6
Charging the battery pack .....................................................6
Attaching/disconnecting the battery pack to/from the appliance ....................... 6
Checking the battery charge level ............................................... 6
Attaching/removing the grip bracket ............................................. 7
Fitting/changing the saw blade .................................................7
Operation .......................................................7
Switching on and off .........................................................7
Sawing methods ............................................................. 7
Maintenance and cleaning ..........................................8
Warranty ........................................................8
Service ..........................................................9
Importer ........................................................9
Disposal .........................................................9
Translation of the original Conformity Declaration .....................10
FAAS 12 A1
GB
│
1 ■
Page 6
CORDLESS BRANCH SAW
FAAS 12 A1
Introduction
Congratulations on the purchase of your new appliance. You have selected a high-quality product.
The operating instructions are part of this product.
They contain important information on safety, usage
and disposal. Before using the product, please
familiarise yourself with all operating and safety
instructions. Use the product only as described and
for the specified areas of application. Please also
pass on these operating instructions to any future
owner.
Intended use
This appliance – standard designation: reciprocating saw – is intended for the sawing of wood,
plastics and building materials up to a fixed stop
(base plate). The appliance is suitable for rough
sawing work, straight and curved cuts; it cuts surfaces off flush. With the grip bracket mounted, the
appliance is suitable for sawing branches. Follow
the information concerning saw blades and practical advice on sawing. Any other uses of or modification to the appliance is deemed to be improper
and carries the risk of serious personal injury. The
manufacturer accepts no responsibility for damage(s) attributable to misuse. The appliance is not
intended for commercial use.
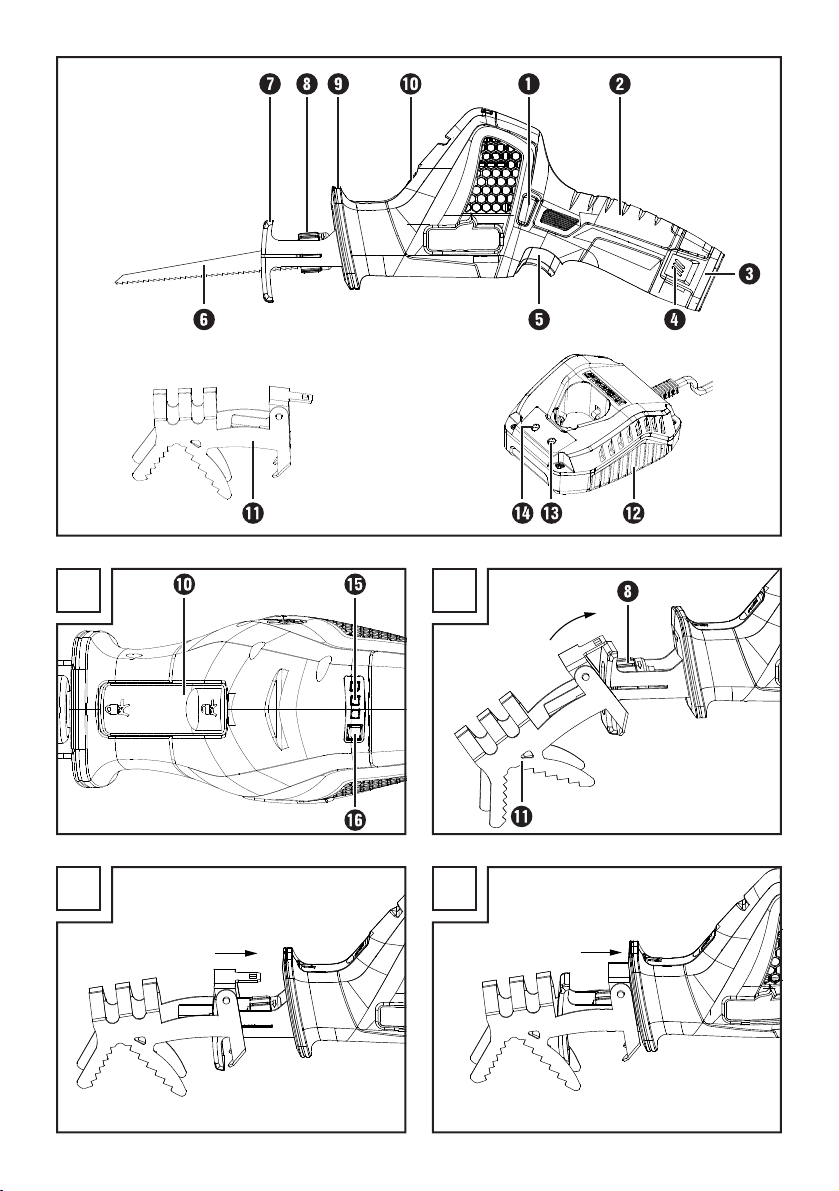
Features
Safety lock-out
Handle
Battery pack
Release (battery pack)
ON/OFF switch
Saw blade
Base plate
Quick-release chuck
Hand guard
Release (grip bracket)
Grip bracket
High-speed battery charger
Control LED (green)
Control LED (red)
Battery charge level display
Test button
Package contents
1 cordless branch saw FAAS 12 A1
1 high-speed battery charger FAAS 12 A1-2
1 battery pack FAAS 12 A1-1
1 grip bracket
1 saw blade for wood 152 mm
1 carrying case
1 set of operating instructions
Technical data
Cordless branch saw: FAAS 12 A1
Rated voltage: 12 V
Rated idle speed: n
Stroke length: 20 mm
Max. cutting performance: Wood 80 mm
Battery pack: FAAS 12 A1-1
Type: LITHIUM ION
Rated voltage: 12 V
Capacity: 1500 mAh
High-speed
battery charger: FAAS 12 A1-2
INPUT:
Rated current: 230–240 V ~, 50Hz
(alternating current)
Rated power consumption: 30 W
OUTPUT:
Rated voltage: 12.6 V
Rated current: 1800 mA
Charging time: approx. 60 min.
Protection class: II /
Noise emission values:
Measured values for noise determined in accordance
with EN ISO 4871. The A-rated noise level of the
power tool at the working location is typically as
follows:
Sound pressure level: L
Uncertainty: K
Sound power level: L
Uncertainty: K
pA
pA
WA
WA
Wear hearing protection!
(DC)
0–2700 rpm
0
(DC)
(DC)
(double insulation)
= 79 dB(A)
= 3 dB
= 90 dB(A)
= 3 dB
■ 2 │ GB
FAAS 12 A1
Page 7
Total vibration values (vector total of three directions) determined in accordance with EN 60745:
Cutting boards: a
Cutting wooden beams: a
= 6.6 m/s
h,B
Uncertainty K = 1.5 m/s
= 12.6 m/s
h,WB
Uncertainty K = 1.5 m/s
2
2
NOTE
► The vibration level specified in these instruc-
tions has been measured in accordance with
a standardised measuring procedure and can
be used to make equipment comparisons. The
specified vibration emission value can also
be used to make an initial exposure estimate.
WARNING!
► The vibration level varies in accordance with
the use of the power tool and may be higher
than the value specified in these instructions
in some cases. Regular use of the electric
tool in such a way may cause the user to
underestimate the vibration. Try to keep the
vibration loads as low as possible. Measures
to reduce the vibration load are, e.g. wearing
gloves and limiting the working time. Wherein
all states of operation must be included (e.g.
times when the power tool is switched off and
times where the power tool is switched on but
running without load).
General Power
Tool Safety
2
2
Save all warnings and instructions for future
reference.
The term "power tool" in the warnings refers to your
mains-operated (corded) power tool or batteryoperated (cordless) power tool.
1. Work area safety
a) Keep work area clean and well lit.
b) Do not operate power tools in explosive atmo-
c) Keep children and bystanders away while
Warnings
WARNING!
► Read all safety warnings and all instructions.
Failure to follow the warnings and instructions may result in electric shock, fire and/or
serious injury.
Cluttered or dark areas invite accidents.
spheres, such as in the presence of flammable
liquids, gases or dust. Power tools create sparks
which may ignite the dust or fumes.
operating a power tool. Distractions can cause
you to lose control.
FAAS 12 A1
2. Electrical safety
a) Power tool plugs must match the outlet.
Never modify the plug in any way.
Do not use any adapter plugs with earthed
(grounded) power tools. Unmodified plugs
and matching outlets will reduce risk of electric
shock.
b) Avoid body contact with earthed or grounded
surfaces, such as pipes, radiators, ranges and
refrigerators. There is an increased risk of elec-
tric shock if your body is earthed or grounded.
c) Do not expose power tools to rain or wet
conditions. Water entering a power tool will
increase the risk of electric shock.
│
GB
3 ■
Page 8

d) Do not abuse the cord. Never use the cord
for carrying, pulling or unplugging the power
tool. Keep cord away from heat, oil, sharp
edges or moving parts. Damaged or entangled
cords increase the risk of electric shock.
e) When operating a power tool outdoors, use
an extension cord suitable for outdoor use.
Use of a cord suitable for outdoor use reduces
the risk of electric shock.
f) If operating a power tool in a damp location
is unavoidable, use a residual current device
(RCD) protected supply. Use of an RCD reduces
the risk of electric shock.
3. Personal safety
a) Stay alert, watch what you are doing and
use common sense when operating a power
tool. Do not use a power tool while you are
tired or under the influence of drugs, alcohol
or medication. A moment of inattention while
operating power tools may result in serious
personal injury.
b) Use personal protective equipment. Always
wear eye protection. Protective equipment
such as dust mask, non-skid safety shoes, hard
hat, or hearing protection used for appropriate
conditions will reduce personal injuries.
c) Prevent unintentional starting. Ensure the
switch is in the off-position before connecting
to power source and/or battery pack, picking
up or carrying the tool. Carrying power tools
with your finger on the switch or energising
power tools that have the switch on invites accidents.
d) Remove any adjusting key or wrench before
turning the power tool on. A wrench or a key
left attached to a rotating part of the power tool
may result in personal injury.
e) Do not overreach. Keep proper footing and
balance at all times. This enables better control
of the power tool in unexpected situations.
f) Dress properly. Do not wear loose clothing or
jewellery. Keep your hair, clothing and gloves
away from moving parts. Loose clothes, jew-
ellery or long hair can be caught in moving
parts.
g) If devices are provided for the connection of
dust extraction and collection facilities, ensure
these are connected and properly used. Use of
dust collection can reduce dust-related hazards.
4. Power tool use and care
a) Do not force the power tool. Use the correct
power tool for your application. The correct
power tool will do the job better and safer at
the rate for which it was designed.
b) Do not use the power tool if the switch does
not turn it on and off. Any power tool that cannot be controlled with the switch is dangerous
and must be repaired.
c) Disconnect the plug from the power source
and/or the battery pack from the power tool
before making any adjustments, changing
accessories, or storing power tools. Such
preventive safety measures reduce the risk of
starting the power tool accidentally.
d) Store idle power tools out of the reach of
children and do not allow persons unfamiliar
with the power tool or these instructions to
operate the power tool. Power tools are dan-
gerous in the hands of untrained users.
e) Maintain power tools. Check for misalignment
or binding of moving parts, breakage of parts
and any other condition that may affect the
power tool’s operation. If damaged, have the
power tool repaired before use. Many acci-
dents are caused by poorly maintained power
tools.
f) Keep cutting tools sharp and clean. Properly
maintained cutting tools with sharp cutting
edges are less likely to bind and are easier to
control.
g) Use the power tool, accessories and tool bits
etc. in accordance with these instructions, taking into account the working conditions and
the work to be performed. Use of the power
tool for operations different from those intended
could result in a hazardous situation.
■ 4 │ GB
FAAS 12 A1
Page 9

5. Use and handling of the cordless
electrical power tool
a) Charge a rechargeable battery unit using
only the charger recommended by the manufacturer. Chargers are often designed for a
particular type of rechargeable battery unit.
There is the danger of fire if other types of rechargeable battery units are used.
b) Only the rechargeable battery units supplied
are to be used with an electrical power tool.
The use of other rechargeable battery units may
lead to the danger of injury or fire.
c) When they are not being used, store re-
chargeable battery units away from paper
clips, coins, keys, nails, screws or other small
metal objects that could cause the contacts
to be bridged. Short-circuiting the contacts of
a rechargeable battery unit may result in heat
damage or fire.
d) Fluids may leak out of rechargeable batteries
if they are misused. If this happens, avoid
contact with the fluid. If contact occurs, flush
the affected area with water. Seek additional
medical help if any of the fluid gets into your
eyes. Escaping battery fluid may cause skin
irritation or burns.
CAUTION! RISK OF EXPLOSION!
Never charge non-rechargeable
batteries!
Protect the rechargeable battery
from heat, for example from continuous exposure to sunlight, fire, water
and moisture. There is a risk of explo-
sion.
6. Service
a) Have your power tool serviced by a qualified
repair person using only identical replacement
parts. This will ensure that the safety of the
power tool is maintained.
Appliance-specific safety instructions
■ Hold power tool by insulated gripping sur-
faces, when performing an operation where
the fastener may contact hidden wiring or its
own cord. Fasteners contacting a "live" wire
may make exposed metal parts of the power
tool "live" and could give the operator an electric shock.
■ Wear a dust mask!
Safety guidelines for battery chargers
■ This appliance may be used by children aged
8 years and above and by persons with limited
physical, sensory or mental capabilities or lack
of experience and knowledge, provided that
they are under supervision or have been told
how to use the appliance safely and are aware
of the potential risks. Do not allow children to
play with the appliance. Cleaning and user
maintenance tasks may not be carried out by
children unless they are supervised.
This charger is suitable for indoor use
only.
■ To avoid potential risks, damaged mains cables
should be replaced by the manufacturer or the
manufacturer’s customer service department or
a similarly qualified person.
Practical advice on sawing
■ Check the material to be worked to make sure
that all foreign objects have been removed,
e.g. nails, screws, etc.
■ Switch the appliance off immediately if the saw
blade jams. Open up the sawn gap using a
suitable tool and pull out the reciprocating saw.
■ Saw the material at a constant speed.
FAAS 12 A1
GB
│
5 ■
Page 10
Original accessories/auxiliary
equipment
■ Use only the additional equipment and ac-
cessories specified in the operating instructions.
Using attachments or accessory tools other than
those recommended in the operating instructions
can lead to a risk of injury.
Information on saw blades
You can use any saw blade that has a suitable
mount – ½" (12.7 mm) universal shaft. Saw blades
are available from retail stores in various lengths
and optimised for a variety of purposes.
NOTE
► TPI = teeth per inch = the number of teeth per
2.54 cm
Before use
Charging the battery pack
CAUTION!
► Always unplug the appliance before you
remove the battery pack
the battery pack to the high-speed battery
charger .
■ Never charge the battery pack
ambient temperature is below 10°C or above
40°C.
♦ Connect the battery pack
battery charger .
♦ Insert the power plug into the socket. The control
LED lights up red.
♦ The green control LED indicates that the
charging process is complete and the battery
pack is ready for use.
♦ Push the battery pack
ance.
■ Never recharge a battery pack
mediately after rapid charging. This could overcharge the battery pack
lifespan of the battery and charger.
from or connect
when the
to the high-speed
back into the appli-
again im-
, thus reducing the
♦ You should always switch the high-speed char-
off for at least 15 minutes between suc-
ger
cessive charging processes. Also disconnect the
power plug from the mains power socket.
Attaching/disconnecting the battery
pack to/from the appliance
Attaching the battery pack:
♦ Click the battery pack
Removing the battery pack:
♦ Press the release button
battery pack
.
into the handle .
and remove the
Checking the battery charge level
♦ Press the test button to check the charge
level of the battery (see Fig. A).
The status/remaining charge will be shown on
the battery charge level display
♦ RED / ORANGE / GREEN = maximum
charge/performance
RED/ORANGE = medium charge/performance
RED = low charge – charge the battery
as follows:
■ 6 │ GB
FAAS 12 A1
Page 11
Attaching/removing the grip bracket
NOTE
► The grip bracket
removed while the saw blade is attached.
Attaching the grip bracket (see fig. B–D):
♦ Press the release button
♦ Push the grip bracket over the guides on the
base plate and onto the appliance.
♦ Lock the release button .
Removing the grip bracket:
♦ Press the release
forwards out of the guides.
cannot be attached/
.
and pull the grip bracket
Fitting/changing the saw blade
Wear protective gloves when fitting/changing a
saw blade.
♦ Turn the quick-release chuck
go in the direction of the arrow and hold it in
this position.
♦ Push the required saw blade into the quick-
release chuck
CAUTION!
► The teeth of the saw blade
downwards!
as far as the stop.
as far as it will
must point
Operation
Switching on and off
Switching on:
♦ Press the safety lock-out
♦ Press the ON/OFF switch .
Switching off:
♦ Release the ON/OFF switch
Sawing methods
A) Working without the grip bracket (see fig. E):
■ For branches of a larger diameter or wood,
plastic or building material, work without the
grip bracket. The workpiece must be right up
against the base plate. Use a rocking cutting
motion for round workpieces.
A1) Sawing flush:
■ Flexible saw blades allow you to saw off pro-
truding workpieces such as pipes located close
to the wall, provided the saw blade is long
enough.
1. Place the saw blade directly against the wall.
2. Bend it by applying lateral pressure to the reciprocating saw so that the base plate
into contact with the wall.
3. Switch the appliance on as described and saw
off the workpiece by applying constant pressure.
A2) Plunge cutting (see fig. F):
.
.
comes
♦ Let go of the quick-release chuck ; it must
return to its initial position.
The saw blade is now locked.
FAAS 12 A1
CAUTION! RISK OF KICKBACK!
► Plunge cuts may only be made in soft materials
(wood or similar).
1. Place the reciprocating saw with the lower edge
of the base plate
the appliance on.
2. Tilt the reciprocating saw forwards and plunge
the saw blade into the workpiece.
3. Position the reciprocating saw vertically and
continue sawing along the cutting line.
B) Working with the grip bracket (see fig. G):
♦ Push down lightly and move the saw downwards.
on the workpiece. Switch
│
GB
7 ■
Page 12

Maintenance and cleaning
WARNING! RISK OF INJURY! Always
switch the appliance off and remove
the battery before carrying out any
work on the appliance.
■ Always remove the saw blade before carrying
out any work on the power tool.
■ Keep the appliance and ventilation slits clean at
all times. If the ventilation slits are blocked, there
is a risk of overheating and/or the appliance
being damaged.
■ Always clean the appliance after completion
of work.
■ Do not allow any liquids to get into the appli-
ance. Use a cloth to clean the housing. Never
use petrol, solvents or cleansers which can
damage plastic.
■ Clean the saw blade mount, if necessary with a
brush or by blowing it out with compressed air.
■ If a lithium-ion battery is to be stored for an
extended period, the charge level should be
checked regularly. The optimum charge level is
between 50% and 80%. The optimum storage
climate is cool and dry.
Warranty
This appliance is provided with a 3-year warranty
valid from the date of purchase. The appliance
has been manufactured with care and inspected
meticulously prior to delivery. Please retain your
receipt as proof of purchase. In the event of a
warranty claim, please contact your Customer
Service unit by telephone. This is the only way
to guarantee free return of your goods.
The warranty only covers claims for material and
manufacturing defects, not for damage sustained
during carriage, components subject to wear and
tear or damage to fragile components such as
switches or batteries. This appliance is intended
solely for private use and not for commercial purposes. The warranty shall be deemed void in cases
of misuse or improper handling, use of force and
modifications/repairs which have not been carried
out by one of our authorised Service centres. Your
statutory rights are not restricted by this warranty.
The warranty period is not prolonged by repairs
effected under the warranty. This also applies to
replaced and repaired components. Any damage
and defects present at the time of purchase must be
reported immediately after unpacking, but no later
than two days after the date of purchase. Repairs
carried out after expiry of the warranty period shall
be subject to charge.
■ 8 │ GB
FAAS 12 A1
Page 13
Service
WARNING!
► Have the power tool repaired by the Service
centre or a qualified electrician and only
using genuine replacement parts. This will
ensure that the safety of the appliance is
maintained.
► Always ensure that the power plug or the
mains cable is replaced only by the manufacturer of the appliance or by an approved
customer service provider. This will ensure
that the safety of the appliance is maintained.
NOTE
► Replacement parts not listed (such as
batteries, switches and grip bracket) can be
ordered via our service hotline.
Service Great Britain
Tel.: 0871 5000 720 (£ 0.10/Min.)
E-Mail: kompernass@lidl.co.uk
IAN 275666
Importer
KOMPERNASS HANDELS GMBH
BURGSTRASSE 21
44867 BOCHUM
GERMANY
www.kompernass.com
Disposal
The packaging is made from environment-
ally friendly material and can be disposed of at your local recycling plant.
Do not dispose of power tools in
your normal household waste!
European Directive 2012/19/EU requires that
worn-out power tools be collected separately and
recycled in an environmentally compatible manner.
Do not dispose of batteries in your
normal domestic waste!
Defective or worn-out rechargeable batteries must
be recycled according to Directive 2006/66/EC.
Take the battery pack and/or appliance to a
nearby collection facility.
Please consult your local authorities regarding
suitable disposal of worn out power tools/battery
packs.
FAAS 12 A1
GB
│
9 ■
Page 14

Translation of the original
Conformity Declaration
We, KOMPERNASS HANDELS GMBH, documents officer: Mr. Semi Uguzlu, BURGSTR. 21,
44867 BOCHUM, GERMANY, hereby declare that
this product complies with the following standards,
normative documents and EC directives:
Machinery Directive
(2006/42/EC)
EMC (Electromagnetic Compatibility)
(2014/30/EU)
RoHS Directive
(2011/65/EU)
Applied harmonised standards:
EN 60745-1:2009/A11:2010
EN 60745-2-11:2010
EN 62233:2008
EN 60335-1:2012/A11:2014
EN 60335-2-29:2004/A2:2010
EN 55014-1:2006/A2:2011
EN 55014-2:1997/A2:2008
EN 61000-3-2:2014
EN 61000-3-3:2013
Type/appliance designation:
Cordless branch saw FAAS 12 A1
Year of manufacture: 02 - 2016
Serial number: IAN 275666
Bochum, 26/01/2016
Semi Uguzlu
- Quality Manager The right to effect technical changes in the context
of further development is reserved.
■ 10 │ GB
FAAS 12 A1
Page 15

Tartalomjegyzék
Bevezető .......................................................12
Rendeltetésszerű használat ................................................... 12
Kivitelezés. . . . . . . . . . . . . . . . . . . . . . . . . . . . . . . . . . . . . . . . . . . . . . . . . . . . . . . . . . . . . . . . . 12
A csomag tartalma ..........................................................12
Műszaki adatok ............................................................12
Általános biztonsági előírások elektromos kéziszerszámokhoz ..........13
1. Munkahelyi biztonság .....................................................13
2. Elektromos biztonság ......................................................13
3. Személyi biztonság .......................................................14
4. Az elektromos kéziszerszám használata és kezelése .............................14
5. Az akkumulátoros kéziszerszám használata és kezelése ........................... 15
6. Szerviz .................................................................15
Szablyafűrészre vonatkozó készülék-specifikus biztonsági előírások .................... 15
Töltővel kapcsolatos biztonsági előírások ........................................ 15
Fűrészeléssel kapcsolatos munkavégzési tudnivalók ...................16
Eredeti tartozékok / kiegészítő eszközök .........................................16
Fűrészlapokra vonatkozó információk ...........................................16
Üzembe helyezés előtt ............................................16
Akkumulátor-telep töltése .....................................................16
Akkumulátor-telep behelyezése a készülékbe / kivétele a készülékből ..................16
Akkumulátor állapotának ellenőrzése ........................................... 16
Tartókengyel felhelyezése / levétele ............................................17
Fűrészlap felszerelése / cseréje ................................................17
Üzembe helyezés ................................................17
Be- / kikapcsolás ........................................................... 17
Fűrészelési módszerek .......................................................17
Karbantartás és tisztítás ..........................................18
Garancia .......................................................18
Szerviz .........................................................19
Importőr .......................................................19
Ártalmatlanítás ..................................................19
Az eredeti megfelelőségi nyilatkozat fordítása .......................20
FAAS 12 A1
HU
│
11 ■
Page 16
AKKUS ÁGFŰRÉSZ FAAS 12 A1
Bevezető
Gratulálunk új készüléke megvásárlásához. Vásárlásával kiváló minőségű termék mellett döntött. A
használati útmutató a termék része. Fontos tudnivalókat tartalmaz a biztonságra, használatra és
ártalmatlanításra vonatkozóan. A termék használata előtt ismerkedjen meg valamennyi használati
útmutatóval és biztonsági figyelmeztetéssel. Csak
a leírtak szerint és a megadott célokra használja a
készüléket. Ha a készüléket harmadik személynek
továbbadja, akkor adja át a készülékhez tartozó
valamennyi dokumentumot is.
Rendeltetésszerű használat
A rögzített ütközővel (talplemez) ellátott készülék tulajdonképpen szablyafűrész - fa, műanyag és építőanyag fűrészelésére használható. A készülék durva
fűrészelési munkákra, egyenes és görbe vágásra
és felületek egy síkban történő szétválasztására
alkalmas. A készülék felszerelt tartókengyellel ágak
fűrészelésére alkalmas. Vegye figyelembe a fűrészlapokra vonatkozó információkat és a fűrészeléssel
kapcsolatos biztonsági tudnivalókat. Minden egyéb
felhasználási mód vagy a gép módosítása rendeltetésellenesnek minősül és jelentős balesetveszélyt
rejt magában. A nem rendeltetésszerű használatból
eredő károkért a gyártó nem vállal felelősséget. A
készülék ipari használatra nem alkalmas.
Kivitelezés
Kapcsolózár
Markolat
Akkumulátor-telep
Kireteszelő gomb (akkumulátor-telep)
BE/KI kapcsoló
Fűrészlap
Talplemez
Gyorsbefogó tokmány
Kézvédelem
Kireteszelő gomb (tartókengyel)
Tartókengyel
Akkumulátor gyorstöltő
Ellenőrző LED (zöld)
Ellenőrző LED (piros)
Akkumulátor-állapot kijelző
Ellenőrző gomb
A csomag tartalma
1 akkus ágfűrész FAAS 12 A1
1 akkumulátor gyorstöltő FAAS 12 A1-2
1 akkumulátor-telep FAAS 12 A1-1
1 tartókengyel
1 fűrészlap fához 152 mm
1 hordtáska
1 használati útmutató
Műszaki adatok
Akkumulátoros ágfűrész: FAAS 12 A1
Névleges feszültség: 12 V
Névleges üresjárati
fordulatszám: n
Lökethossz: 20 mm
Max. vágásteljesítmény: Fa 80 mm
Akkumulátor-telep: FAAS 12 A1-1
Típus: LÍTIUM-ION
Névleges feszültség: 12 V
Kapacitás: 1500 mAh
Akkumulátor
gyorstöltő: FAAS 12 A1-2
BEMENET/input:
Névleges áram: 230 - 240 V ~, 50 Hz
(váltóáram)
Névleges teljesítményfelvétel: 30 W
KIMENET/output:
Névleges feszültség: 12,6 V
Névleges áram: 1800 mA
Töltési idő: kb. 60 perc
Védelmi osztály: II /
(egyenáram)
0–2700 min
0
(egyenáram)
(egyenáram)
(dupla szigetelés)
-1
■ 12 │ HU
FAAS 12 A1
Page 17
Zajkibocsátási értékek:
A zaj mért értéke az EN ISO 4871 szabvány alapján került meghatározásra. Az elektromos kéziszerszám A-súlyozott zajszintjének jellemző értéke:
Hangnyomásszint: L
Bizonytalansági érték: K
= 79 dB (A)
pA
= 3 dB
pA
Hangerőszint: LWA = 90 dB (A)
Bizonytalansági érték: KWA = 3 dB
Viseljen hallásvédőt!
Rezgés összértéke (három irány vektorösszege), az
EN 60745 szabvány szerint mérve:
Forgácslemez
fűrészelése: a
= 6,6 m/s2
h,B
Bizonytalansági érték K = 1,5 m/s
Fagerenda
fűrészelése: a
= 12,6 m/s2
h,WB
Bizonytalansági érték K = 1,5 m/s
TUDNIVALÓ
► A jelen használati útmutatóban megadott
rezgésszint szabványos mérési eljárással lett
meghatározva és felhasználható a készülékek összehasonlítására. A megadott rezgés
kibocsátási érték a kitettség előzetes megbecsüléséhez is felhasználható.
FIGYELMEZTETÉS!
► A rezgésszint az elektromos kéziszerszám
alkalmazásától függően változik és egyes esetekben a jelen útmutatókban megadott érték
felett lehet. A rezgésterhelés alulbecsült lehet,
ha az elektromos kéziszerszámot rendszeresen
így használják. Próbálja a rezgésterhelést
a lehető legalacsonyabb szinten tartani. A
rezgésterhelés csökkentésére tett intézkedések
például a kesztyű viselése az eszköz használata során és a munkaidő korlátozása. Ebben
az esetben a működési ciklus minden részét vegye figyelembe (például amikor az elektromos
kéziszerszám ki van kapcsolva, és amikor bár
be van kapcsolva, de terhelés nélkül fut).
Általános biztonsági
előírások elektromos
kéziszerszámokhoz
FIGYELMEZTETÉS!
► Olvassa el az összes biztonsági előírást és
utasítást. A biztonsági előírások és utasítások
figyelmen kívül hagyása áramütést, tüzet és/
vagy súlyos sérüléseket okozhat.
2
Őrizze meg az összes biztonsági előírást és
utasítást későbbi használatra.
A biztonsági előírásokban használt „elektromos
2
kéziszerszám“ kifejezés hálózatról (hálózati kábelen át) üzemeltetett elektromos kéziszerszámokra
és akkumulátoros elektromos kéziszerszámokra
(hálózati kábel nélkül) vonatkozik.
1. Munkahelyi biztonság
a) Tartsa tisztán és jól megvilágítva a munkate-
rületét. A rendetlenség és a rosszul megvilágí-
tott munkaterület balesetet okozhat.
b) Ne dolgozzon a készülékkel olyan robba-
násveszélyes környezetben, ahol gyúlékony
folyadékok, gázok vagy porok vannak. Az
elektromos kéziszerszámok szikráznak, amik
meggyújthatják a port vagy gőzöket.
c) Az elektromos kéziszerszám használata köz-
ben ne engedjen közel gyermekeket és más
személyeket. Ha elterelik a figyelmét, elveszít-
heti uralmát a készülék felett.
2. Elektromos biztonság
a) Az elektromos kéziszerszám csatlakozódugójá-
nak illeszkedjen a csatlakozóaljzatba.
A csatlakozót semmilyen módon nem szabad
módosítani. A földelt elektromos kéziszerszámokat ne használja adapterrel. A nem módo-
sított csatlakozó és a megfelelő csatlakozóaljzat
használata csökkenti az elektromos áramütés
veszélyét.
FAAS 12 A1
HU
│
13 ■
Page 18

b) Ügyeljen arra, hogy teste ne érintkezzen föl-
delt felülettel, mint például csővezeték, fűtőtest,
tűzhely vagy hűtőszekrény felületével. Az áram-
ütés kockázata nagyobb, ha a teste földelve van.
c) Óvja az elektromos kéziszerszámot esőtől vagy
nedves környezettől. Növeli az áramütés kockázatát, ha víz kerül az elektromos készülékbe.
d) A vezetéket csak a céljának megfelelően
használja, ne vigye és ne akassza fel az
elektromos kéziszerszámot a kábelnél fogva
és ne a vezetéknél fogva húzza ki a csatlakozót az aljzatból. Tartsa távol a vezetéket
hőtől, olajtól, éles szegélyektől vagy mozgó
alkatrészektől. A sérült vagy összecsavarodott
vezeték növeli az áramütés kockázatát.
e) Ha a szabadban dolgozik az elektromos ké-
ziszerszámmal, akkor csak olyan hosszabbító
kábelt használjon, ami kültéren is engedélyezett. A kültéri használatra alkalmas hosszabbító
kábellel csökkentheti az áramütés veszélyét.
f) Ha az elektromos kéziszerszám nedves he-
lyen használata elkerülhetetlen, akkor használjon hibaáram védőkapcsolót. A hibaáram
védőkapcsoló használata csökkenti az áramütés veszélyének kockázatát.
3. Személyi biztonság
a) Legyen mindig figyelmes, figyeljen arra, amit
tesz és hozzáértéssel végezze a munkát az
elektromos kéziszerszámmal. Ne használjon
elektromos kéziszerszámot, ha beteg, fáradt,
vagy ha kábítószer, alkohol vagy gyógyszer
hatása alatt áll. Az elektromos kéziszerszám
használatakor már egy pillanatnyi figyelmetlenség is komoly sérüléseket okozhat.
b) Viseljen személyes védőfelszerelést és mindig
vegyen fel védőszemüveget. Az elektromos kéziszerszám jellegének és használatának megfelelő személyes védőfelszerelés, például pormaszk,
csúszásmentes biztonsági cipő, védősisak vagy
fülvédő csökkenti a személyi sérülések veszélyét.
c) Előzze meg a készülék véletlenszerű bekapcso-
lását. Győződjön meg arról, hogy az elektromos kéziszerszám ki van kapcsolva, mielőtt a
villamos hálózatra és/vagy az akkumulátorra
csatlakoztatja, illetve kézbe veszi vagy hordozza. Balesetet okozhat, ha a készülék hordozása
közben az ujja a BE/KI kapcsolón van vagy a
készülék már bekapcsolt állapotban van, amikor
csatlakoztatja az áramellátásra.
d) Távolítsa el a beállító szerszámokat vagy
csavarkulcsokat az elektromos kéziszerszám
bekapcsolása előtt. A készülék forgó részében
maradt szerszám vagy kulcs balesetet okozhat.
e) Kerülje a normálistól eltérő testtartást. Ve-
gyen fel biztonságos álló helyzetet és tartsa
meg folyamatosan az egyensúlyát. Ily módon
váratlan helyzetekben is jobban úrrá lehet a
készüléken.
f) Viseljen alkalmas ruházatot. Ne viseljen bő
ruházatot vagy ékszert. Tartsa távol a haját,
ruháját és kesztyűjét a mozgó részektől. A
laza ruházat, az ékszer vagy a hosszú haj
beleakadhat a mozgó részekbe.
g) Amennyiben a készülékhez porelszívó és por-
gyűjtő berendezés is szerelhető, akkor győződjön meg arról, hogy azokat csatlakoztatta és
megfelelően használja. A porelszívó alkalmazá-
sa csökkentheti a por általi veszélyeztetést.
4. Az elektromos kéziszerszám
használata és kezelése
a) Ne terhelje túl a készüléket. Használja a mun-
kájának megfelelő elektromos kéziszerszámot.
A megfelelő elektromos kéziszerszámmal jobban
és biztonságosabban tud dolgozni a megadott
teljesítmény-tartományban.
b) Ne használjon olyan elektromos kéziszerszá-
mot, amelyiknek hibás a kapcsolója. A nem
be- és kikapcsolható elektromos kéziszerszám
használata veszélyes, javítsa meg.
c) Húzza ki a csatlakozót az aljzatból és/vagy
vegye le az akkumulátort, mielőtt a készüléken beállításokat végez, tartozékokat cserél
vagy a készüléket elteszi. Ezzel a megelőző
biztonsági intézkedéssel megakadályozható az
elektromos kéziszerszám véletlen bekapcsolása.
d) A nem használt elektromos kéziszerszámot
gyermekektől elzárva tárolja. Ne engedje,
hogy olyan személyek használják a készüléket, akik nem ismerik a használatát, vagy
nem olvasták az erre vonatkozó utasításokat.
Ha tapasztalatlan személyek használják, akkor
az elektromos kéziszerszámok veszélyesek.
■ 14 │ HU
FAAS 12 A1
Page 19

e) Gondosan ápolja az elektromos kéziszerszá-
mokat. Ellenőrizze, hogy a mozgó részek tökéletesen működnek és nincsenek beszorulva,
részei nincsenek eltörve vagy olyannyira megsérülve, hogy az befolyásolná az elektromos
kéziszerszám működését. A készülék használata előtt javíttassa meg a sérült részeket. A
rosszul karbantartott elektromos kéziszerszámok
sok balesetet okoznak.
f) A vágószerszámokat tartsa mindig élesen és
tisztán. A gondosan karbantartott éles vágóeszközök kisebb valószínűséggel szorulnak be és
könnyebben irányíthatók.
g) Az elektromos kéziszerszámot, a tartozékokat,
a betétszerszámokat stb. a használati utasításnak megfelelően használja. Vegye figyelembe
a munkakörülményeket és az elvégzendő
feladatot. Az elektromos kéziszerszám rendel-
tetésétől eltérő használata veszélyes helyzeteket
teremthet.
5. Az akkumulátoros kéziszerszám
használata és kezelése
a) Az akkumulátort csak a gyártó által ajánlott
töltővel töltse. Olyan töltő esetén, amely egy
bizonyos típusú akkumulátor töltésére alkalmas,
tűzveszély áll fenn, ha másfajta akkumulátorral
használja.
b) Csak az elektromos kéziszerszámba való
akkumulátort használja. Más akkumulátorok
használata sérülést okozhat és tűzveszélyes.
c) A nem használt akkumulátort tartsa megfe-
lelő távolságban gémkapcsoktól, érméktől,
kulcsoktól, szögektől, csavaroktól vagy más
apró fémtárgyaktól, amelyek rövidzárlatot
okozhatnak. Az akkumulátor érintkezői közötti
rövidzárlat égési sérülést vagy tüzet okozhat.
d) Helytelen alkalmazás esetén folyadék szivá-
roghat ki az akkumulátorból. Ne nyúljon hozzá. Ha véletlenül mégis hozzáérne, öblítse le
vízzel. Ha a folyadék szembe kerül, forduljon
orvoshoz. A kiszivárgó folyadék bőrirritációt
vagy égési sérülést okozhat.
VIGYÁZAT! ROBBANÁSVESZÉLY!
Soha ne töltsön fel egyszer használatos elemeket.
Védje az akkumulátort hőségtől,
például tartós napsütéstől, tűztől,
víztől és nedvességtől. Robbanásve-
szély áll fenn.
6. Szerviz
a) Az elektromos kéziszerszámot csak szakkép-
zett szakemberrel és csak eredeti cserealkatrészekkel javíttassa. Ezzel biztosíthatja az
elektromos kéziszerszám hosszan tartó biztonságos működését.
Szablyafűrészre vonatkozó készülékspecifikus biztonsági előírások
■ Az elektromos kéziszerszámot csak a szigetelt
markolóval fogja meg, ha olyan munkát végez, ahol az elektromos kéziszerszám rejtett
áramvezetékekbe vagy a saját hálózati kábelébe ütközhet. A feszültség alatt álló vezetékkel
érintkezés feszültség alá helyezheti a készülék
fém alkatrészeit is, ez pedig elektromos áramütést okozhat.
■ Viseljen porvédő maszkot!
Töltővel kapcsolatos biztonsági
előírások
■ A készüléket 8 éves kor feletti gyermekek és
csökkent fizikai, érzékszervi vagy szellemi képességű vagy tapasztalattal, illetve ismeretekkel
nem rendelkező személyek felügyelet mellett
használhatják, ha felvilágosították őket a készülék biztonságos használatáról és megértették
az ebből eredő veszélyeket. Gyermekek nem
játszhatnak a készülékkel. Tisztítást és a felhasználó által végzendő karbantartást felügyelet
nélküli gyermekek nem végezhetnek.
A töltő kizárólag beltéri használatra alkal-
mas.
FAAS 12 A1
HU
│
15 ■
Page 20
■ A veszélyek elkerülése érdekében a sérült
csatlakozóvezetéket a gyártó, a gyártó vevőszolgálata vagy hasonló szakképzett személy
cserélje ki.
Fűrészeléssel kapcsolatos
munkavégzési tudnivalók
■ Ellenőrizze, hogy a megmunkálandó anyagon
vannak-e idegen testek, például szögek, csavarok és adott esetben távolítsa el azokat.
■ Azonnal kapcsolja ki a készüléket, ha a fűrészlap
megakad. Megfelelő szerszámmal feszítse szét a
már kifűrészelt rést és húzza ki a szablyafűrészt.
■ Az anyagot egyenletes előtolással fűrészelje.
Eredeti tartozékok / kiegészítő
eszközök
■ Csak a használati útmutatóban megadott
tartozékokat és kiegészítőket használjon.A
használati útmutatóban ajánlottól eltérő betétszerszám vagy tartozék használata sérülésveszélyt jelenthet az Ön számára.
Fűrészlapokra vonatkozó
információk
Bármilyen fűrészlapot használhat, feltéve, ha az
a hozzáillő tokmánnyal - ½“ (12,7 mm) univerzális szárral - van ellátva. A szablyafűrész minden
alkalmazásához megfelelően kialakított, különféle
hosszúságú fűrészlapok kaphatók a kereskedelmi
forgalomban.
TUDNIVALÓ
► TPI = teeth per inch = fogak száma / 2,54 cm
Üzembe helyezés előtt
Akkumulátor-telep töltése
VIGYÁZAT!
► Mindig húzza ki a hálózati csatlakozódugót,
mielőtt az akkumulátor-telepet
gyorstöltőből vagy belehelyezi.
■ Soha ne töltse az akkumulátor-telepet
ha a környezet hőmérséklete 10°C alatt vagy
40°C felett van.
kiveszi a
akkor,
♦ Helyezze be az akkumulátor-telepet
gyorstöltőbe
♦ Csatlakoztassa a hálózati csatlakozódugót
a csatlakozóaljzatba. Az ellenőrző LED
pirosan világít.
♦ A zöld ellenőrző LED jelzi, hogy a töltési
folyamat lezárult és az akkumulátor-telep
üzemkész.
♦ Helyezze be az akkumulátor-telepet
készülékbe.
■ Soha ne töltsön fel akkumulátor-telepet
egyszer közvetlenül a gyorstöltés után. Fennáll a
veszélye, hogy az akkumulátor-telep túltöltődik
és ezáltal az akkumulátor és a töltő élettartama
csökken.
♦ Az egymást követő töltési műveletek között leg-
alább 15 percre kapcsolja ki a gyorstöltőt .
Ehhez húzza ki a hálózati csatlakozódugót.
.
a
a
még
Akkumulátor-telep behelyezése a
készülékbe / kivétele a készülékből
Akkumulátor-telep behelyezése:
♦ Kattintsa be az akkumulátor-telepet
kolatba
Az akkumulátor-telep kivétele:
♦ Nyomja meg a kireteszelő gombot és vegye
ki az akkumulátor-telepet
.
.
a mar-
Akkumulátor állapotának
ellenőrzése
♦ Az akkumulátor állapotának ellenőrzéséhez
nyomja meg az ellenőrző gombot (lásd
az A ábrát). Az állapot, illetve a fennmaradó
teljesítmény az alábbiak szerint jelenik meg az
akkumulátor-állapot kijelzőn
♦ PIROS / NARANCSSÁRGA / ZÖLD =
maximális töltés / teljesítmény
PIROS / NARANCSSÁRGA = közepes töltés /
teljesítmény
PIROS = gyenge töltés – akkumulátor töltése
szükséges
:
■ 16 │ HU
FAAS 12 A1
Page 21

Tartókengyel felhelyezése / levétele
TUDNIVALÓ
► A tartókengyelt
esetén nem lehet felhelyezni / levenni.
Tartókengyel felhelyezése (lásd a B-D ábrákat):
♦ Nyomja meg a kireteszelő gombot
♦ Csúsztassa a tartókengyelt a talplemez
vezető elemein keresztül a készülékbe.
♦ Reteszelje a kireteszelő gombot .
Tartókengyel levétele:
♦ Nyomja meg a kireteszelő gombot
ki előre a tartókengyelt a vezető elemekből.
felszerelt fűrészlap
.
és húzza
Fűrészlap felszerelése / cseréje
A fűrészlap behelyezésekor / cseréjekor viseljen
védőkesztyűt.
♦ Forgassa el teljesen a gyorsbefogó tokmányt
a nyíl irányába és tartsa elforgatva.
♦ Nyomja a szükséges fűrészlapot ütközésig a
gyorsbefogó tokmányba
FIGYELEM!
► A fűrészlap
fogai mutassanak lefelé!
.
Üzembe helyezés
Be- / kikapcsolás
Bekapcsolás:
♦ Nyomja meg a kapcsolózárt
♦ Nyomja meg a BE/KI kapcsolót .
Kikapcsolás:
♦ Engedje el a BE/KI kapcsolót
Fűrészelési módszerek
A) Munkavégzés tartókengyel nélkül
(lásd az E ábrát):
■ Vastagabb ágak vagy fa, műanyag és építő-
anyag fűrészelése esetén tartókengyel NÉLKÜL
dolgozzon. A fűrészelni kívánt munkadarab feküdjön fel a talplemezre. Kerek munkadarabok
esetén billegtető vágással mozgassa a fűrészt.
A1) Egy síkban fűrészelés:
■ Rugalmas fűrészlapokkal – megfelelő hosz-
szúságot feltételezve – közvetlenül a falnál
fűrészelheti le a kiálló munkadarabokat, például
csöveket.
1. Helyezze a fűrészlapot közvetlenül a falhoz.
2. A fűrészlapot a szablyafűrészre gyakorolt
oldalnyomással hajlítsa el, hogy a talplemez
oldalt felfeküdjön a falra.
3. Kapcsolja be a készüléket és állandó nyomást
kifejtve fűrészelje le a munkadarabot.
.
.
♦ Ha elengedi a gyorsbefogó tokmányt , akkor
elvileg visszatér eredeti helyzetébe. A fűrészlap
így el van reteszelve.
FAAS 12 A1
A2) Merülő fűrészelés (lásd az F ábrát):
VIGYÁZAT! VISSZAÜTÉS VESZÉLYE!
► Merülő vágás csak puha alapanyagban (fa,
stb.) végezhető.
HU
│
alsó
17 ■
1. Helyezze a szablyafűrészt a talplemez
peremével a munkadarabra. Kapcsolja be a
készüléket.
2. Billentse előre a szablyafűrészt és merítse be a
fűrészlapot a munkadarabba.
3. Állítsa függőleges helyzetbe a szablyafűrészt és
fűrészeljen tovább a vágásvonal mentén.
Page 22

B) Munkavégzés tartókengyellel
(lásd a G ábrát):
♦ Mozgassa a fűrészt enyhén lefelé nyomva.
Karbantartás és tisztítás
FIGYELMEZTETÉS! SÉRÜLÉSVESZÉLY!
A készüléken végzendő bármely
művelet előtt kapcsolja ki a készüléket és vegye ki az akkumulátort.
■ Az elektromos kéziszerszámon végzendő mun-
kálatok előtt mindig távolítsa el a fűrészlapot.
■ Tartsa mindig tisztán a készüléket és a szellőző-
nyílásokat. Eltömődött szellőnyílások esetén a
készülék túlmelegedhet és / vagy megsérülhet.
■ Tisztítsa meg a készüléket a munka befejezése
után.
■ Ne hagyja, hogy folyadék kerüljön a készülék
belsejébe. A készülékház tisztításához használjon törlőkendőt. Soha ne használjon benzint
vagy olyan oldószert, tisztítószert, amely kárt
tesz a műanyagban.
■ A fűrészlap-befogót szükség esetén ecsettel
vagy sűrített levegővel tisztítsa meg.
■ A lítium-ion akkumulátor hosszabb tárolása
esetén rendszeresen ellenőrizze az akkumulátor
töltöttségét. Az optimális töltöttségi állapot 50
és 80% között van. Az optimális tárolási környezet hűvös és száraz.
Garancia
A készülékre a vásárlás napjától számított 3 év
garanciát vállalunk. A készüléket gondosan gyártottuk, és szállítás előtt lelkiismeretesen ellenőriztük. Kérjük, hogy a vásárlás igazolására őrizze
meg a pénztári blokkot. Kérjük, hogy garanciaigény esetén telefonon keresse fel az ügyfélszolgálatát. Csak ebben az esetben garantálhatjuk, hogy
díjmentesen tudja beküldeni az árut.
A garancia csak anyag- és gyártási hibára vonatkozik, nem pedig szállítási kárra, kopásra vagy olyan
törékeny részek sérülésére, mint pl. a kapcsoló vagy
az akkumulátor. A termék kizárólag magánhasználatra, nem ipari felhasználásra készült. A garancia
érvényét veszti visszaélésszerű vagy szakszerűtlen
kezelés, erőszak alkalmazása vagy olyan beavatkozások esetén, amelyeket általunk nem engedélyezett
szervizben végeztek. Az Ön törvényben előírt jogait
ez a garancia nem korlátozza. A garancia ideje nem
hosszabbodik meg a jótállással. Ez a cserélt és javított alkatrészekre is vonatkozik. Az esetlegesen már a
vételkor meglévő károkat és hiányosságokat a kicsomagolás után azonnal, de legkésőbb két nappal a
vásárlás napja után jelezze. A garanciaidő lejárta
után esedékes javítások díjkötelesek.
■ 18 │ HU
FAAS 12 A1
Page 23

Szerviz
FIGYELMEZTETÉS!
► A készüléket szervizben vagy elektromos
szakemberrel és kizárólag eredeti alkatrészek felhasználásával javíttassa. Ezzel bizto-
sítható a készülék hosszan tartó biztonsága.
► A csatlakozót és a hálózati vezetéket min-
dig az eszköz gyártójával vagy ügyfélszolgálatával cseréltesse. Ezzel biztosítható a
készülék hosszan tartó biztonsága.
TUDNIVALÓ
► A felsorolásban nem szereplő alkatrészeket
(mint pl. akkumulátor, kapcsoló vagy
tartókengyel) ügyfélszolgálati forródrótunkon
keresztül rendelheti meg.
Szerviz Magyarország
Tel.: 0640 102785
E-Mail: kompernass@lidl.hu
IAN 275666
Importőr
KOMPERNASS HANDELS GMBH
BURGSTRASSE 21
44867 BOCHUM
GERMANY
www.kompernass.com
Ártalmatlanítás
A csomagolás környezetbarát anyagok-
ból készült, amit a helyi hulladékhasznosítónál adhat le ártalmatlanításra.
Ne dobjon elektromos kéziszerszá-
mot háztartási hulladékba!
A 2012/19/EU európai irányelv értelmében az
elektromos kéziszerszámokat elkülönítve kell gyűjteni és környezetbarát módon hasznosítsa újra.
Ne dobjon akkumulátort a háztartá-
si hulladékba!
A hibás vagy elhasználódott akkumulátorokat a
2006/66/EC irányelv szerint hasznosítsa újra.
Az akkumulátor-telepet és / vagy a készüléket a
rendelkezésre álló gyűjtőhelyeken adhatja vissza.
Az elhasznált elektromos kéziszerszámok / akkumulátor-telepek ártalmatlanítási lehetőségeiről tájékozódjon települése önkormányzatánál.
FAAS 12 A1
HU
│
19 ■
Page 24

Az eredeti megfelelőségi
nyilatkozat fordítása
Mi, a KOMPERNASS HANDELS GMBH, a
dokumentáció felelőse: Semi Uguzlu, BURGSTR. 21,
44867 BOCHUM, NÉMETORSZÁG, ezennel
igazoljuk, hogy ez a termék megfelel az alábbi
szabványoknak, normatív dokumentumoknak és
EK-irányelveknek:
Gépek irányelv
(2006 / 42 / EC)
Elektromágneses összeférhetőség
(2014 / 30 / EU)
RoHS irányelv
(2011 / 65 / EU)
Alkalmazott harmonizált szabványok:
EN 60745-1:2009/A11:2010
EN 60745-2-11:2010
EN 62233:2008
EN 60335-1:2012/A11:2014
EN 60335-2-29:2004/A2:2010
EN 55014-1:2006/A2:2011
EN 55014-2:1997/A2:2008
EN 61000-3-2:2014
EN 61000-3-3:2013
Típus / Készülék megnevezése:
Akkus ágfűrész FAAS 12 A1
Gyártási év: 2016-02
Sorozatszám: IAN 275666
Bochum, 2016.01.26.
Semi Uguzlu
- minőségbiztosítási vezető A továbbfejlesztés érdekében a műszaki változtatá-
sok jogát fenntartjuk.
■ 20 │ HU
FAAS 12 A1
Page 25

Kazalo
Uvod ..........................................................22
Predvidena uporaba. . . . . . . . . . . . . . . . . . . . . . . . . . . . . . . . . . . . . . . . . . . . . . . . . . . . . . . . . 22
Oprema .................................................................. 22
Vsebina kompleta ........................................................... 22
Tehnični podatki ............................................................ 22
Splošni varnostni napotki za električna orodja ........................23
1. Varstvo pri delu .......................................................... 23
2. Električna varnost .........................................................23
3. Varnost oseb ............................................................ 24
4. Uporaba in ravnanje z električnim orodjem .....................................24
5. Uporaba in ravnanje z akumulatorskim orodjem ................................. 25
6. Servis ..................................................................25
Posebni varnostni napotki za sabljaste žage ......................................25
Varnostni napotki za polnilnike ................................................ 25
Delovni napotki za žaganje ........................................25
Originalni pribor/dodatne naprave ............................................. 26
Informacije o žaginih listih .................................................... 26
Pred prvo uporabo ...............................................26
Polnjenje akumulatorskega paketa .............................................. 26
Vstavitev akumulatorskega paketa v napravo/njegova odstranitev .....................26
Preverjanje stanja akumulatorja ................................................26
Vstavitev držalnega loka v napravo/njegova odstranitev ............................27
Vgradnja/zamenjava žaginega lista ............................................ 27
Začetek uporabe ................................................27
Vklop/izklop. . . . . . . . . . . . . . . . . . . . . . . . . . . . . . . . . . . . . . . . . . . . . . . . . . . . . . . . . . . . . . . 27
Načini žaganja ............................................................ 27
Vzdrževanje in čiščenje ...........................................28
Garancijski list ..................................................28
Servis ..........................................................29
Uvoznik ........................................................29
Odstranjevanje med odpadke .....................................29
Prevod izvirne izjave o skladnosti ..................................30
FAAS 12 A1
SI
│
21 ■
Page 26

AKUMULATORSKA ŽAGA
ZA VEJE FAAS 12 A1
Uvod
Čestitamo vam ob nakupu nove naprave. Odločili
ste se za kakovosten izdelek. Navodila za uporabo
so sestavni del tega izdelka. Vsebujejo pomembna
obvestila za varnost, uporabo in odlaganje naprave
med odpadke. Preden začnete izdelek uporabljati,
se seznanite z vsemi obvestili o njegovi uporabi in
varnosti. Izdelek uporabljajte le tako, kot je opisano
v navodilih, in samo za navedena področja uporabe.
Ob predaji izdelka tretji osebi zraven priložite vso
dokumentacijo.
Predvidena uporaba
Naprava – ki je pravzaprav sabljasta žaga – ima
trden omejevalnik (podnožno ploščo) in je predvidena za žaganje lesa, umetnih snovi ter gradbenih
materialov. Naprava je primerna za grobo žaganje,
ravne in vijugaste reze ter za odrezovanje površin
na isti ravni. Z montiranim držalnim lokom je naprava primerna za žaganje vej. Upoštevajte informacije
o žaginih listih in delovne napotke za žaganje. Vsaka druga uporaba ali sprememba naprave velja za
nepredvideno in pomeni bistveno nevarnost nezgod.
Proizvajalec ne prevzema nobene odgovornosti za
škodo, nastalo zaradi nepredvidene uporabe. Naprava ni predvidena za poslovno uporabo.
Oprema
zapora vklopa
ročaj
akumulatorski paket
tipka za sprostitev (akum. paketa)
stikalo za vklop/izklop
žagin list
podnožna plošča
hitra vpenjalna glava
zaščita rok
tipka za sprostitev (držalnega loka)
držalni lok
hitri polnilnik akumulatorjev
kontrolna lučka LED (zelena)
kontrolna lučka LED (rdeča)
prikaz stanja akumulatorja
preizkusna tipka
Vsebina kompleta
1 akumulatorska žaga za veje FAAS 12 A1
1 hitri polnilnik akumulatorjev FAAS 12 A1-2
1 akumulatorski paket FAAS 12 A1-1
1 držalni lok
1 žagin list 152mm
1 prenosni kovček
1 navodila za uporabo
Tehnični podatki
Akumulatorska žaga za veje: FAAS 12 A1
Nazivna napetost: 12 V
Nazivno število vrtljajev
v prostem teku: n
Dolžina hodov: 20 mm
Maks. zmogljivost
rezanja: les 80 mm
Akum. paket: FAAS 12 A1-1
Tip: LITIJ-IONSKI
Nazivna napetost: 12 V
Kapaciteta: 1500 mAh
Hitri polnilnik akumulatorjev: FAAS 12 A1-2
VHOD/Input:
Nazivni tok: 230–240 V~, 50 Hz
Nazivna vhodna moč: 30 W
IZHOD/Output:
Nazivna napetost: 12,6 V
Nazivni tok: 1800 mA
Trajanje polnitve: pribl. 60 min
Razred zaščite: II/
Vrednosti emisij hrupa:
Izmerjena vrednost za hrupnost je določena po
standardu EN ISO 4871. A-vrednotena raven
hrupa električnega orodja na mestu uporabnika
tipično znaša:
Raven zvočnega tlaka: L
Negotovost: K
Raven zvočne moči: LWA = 90 dB (A)
Negotovost: K
Nosite zaščito sluha!
(enosmerni tok)
0–2700 min
0
(enosmerni tok)
(izmenični tok)
(enosmerni tok)
(dvojna izolacija)
= 79 dB (A)
pA
= 3 dB
pA
= 3 dB
WA
-1
■ 22 │ SI
FAAS 12 A1
Page 27

Skupne vrednosti tresljajev (vektorska vsota treh
smeri), izračunane v skladu z EN60745:
Žaganje iverne plošče: a
Negotovost K = 1,5 m/s
2
Žaganje lesnih tramov: a
Negotovost K = 1,5 m/s
2
= 6,6 m/s
h,B
= 12,6 m/s
h,WB
NAPOTEK
► Raven tresljajev, navedena v teh navodilih,
je bila izmerjena v skladu s standardiziranim
merilnim postopkom in se lahko uporablja za
primerjavo naprav. Navedena vrednost emisij
tresljajev se lahko uporablja tudi za uvodno
oceno izpostavljenosti.
OPOZORILO!
► Raven tresljajev se spreminja v skladu z upora-
bo električnega orodja in je lahko v določenih
primerih tudi nad vrednostjo v teh navodilih.
Obremenitev zaradi tresljajev je mogoče
podcenjevati, če se električno orodje dlje
časa uporablja na določen način. Obremenitev z vibracijami poskušajte ohraniti na čim
nižji stopnji. Primeri ukrepov za zmanjšanje
obremenitve z vibracijami so nošenje rokavic
pri uporabi orodja in omejitev delovnega
časa. Ob tem je treba upoštevati vse dele
obratovalnega cikla (na primer čase, ko
je električno orodje izklopljeno, ter čase, v
katerih je vklopljeno, vendar obratuje brez
obremenitve).
Splošni varnostni
2
napotki za električna
orodja
2
OPOZORILO!
► Preberite vse varnostne napotke in navodila.
Nedoslednost pri upoštevanju varnostnih
napotkov in navodil lahko povzroči električni
udar, požar in/ali težke telesne poškodbe.
Vse varnostne napotke in navodila shranite
za prihodnjo uporabo.
Izraz »električno orodje«, ki se uporablja v varnostnih napotkih, se nanaša na električna orodja z
napajanjem iz električnega omrežja (z električnim
kablom) in na električna orodja z akumulatorskim
napajanjem (brez električnega kabla).
1. Varstvo pri delu
a) Svoje delovno območje ohranjajte čisto in
dobro osvetljeno. Nered in neosvetljena delov-
na območja lahko privedejo do nezgod.
b) Električnega orodja ne uporabljajte na ob-
močju nevarnosti eksplozije, na katerem so
goreče tekočine, plini ali prah. Električna
orodja povzročajo iskre, ki lahko povzročijo
vnetje prahu ali hlapov.
c) Otrokom in drugim osebam med uporabo
električnega orodja ne pustite blizu. Zaradi
odvračanja pozornosti lahko izgubite nadzor
nad napravo.
FAAS 12 A1
2. Električna varnost
a) Priključni vtič električnega orodja mora biti
primeren za vtičnico. Vtiča ni dovoljeno spreminjati na noben način. Skupaj z zaščitno
ozemljenimi električnimi orodji ne uporabljajte
adapterskih vtičev. Nespremenjeni vtiči in pri-
merne vtičnice zmanjšajo tveganje električnega
udara.
│
SI
23 ■
Page 28

b) Izogibajte se telesnemu stiku z ozemljenimi
površinami, kot so cevi, radiatorji, štedilniki in
hladilniki. Če je vaše telo ozemljeno, obstaja
povečano tveganje zaradi električnega udara.
c) Električnega orodja ne izpostavljajte dežju ali
vlagi. Vdor vode v električno napravo poveča
tveganje električnega udara.
d) Kabla ne uporabljajte za druge namene, na
primer za prenašanje ali obešanje električnega orodja za kabel ali za vlečenje vtiča iz
vtičnice. Kabla ne približujte virom vročine,
olju, ostrim robovom ali premikajočim se
delom naprave. Poškodovani ali zasukani kabli
povečajo tveganje električnega udara.
e) Če z električnim orodjem delate na prostem,
uporabljajte samo podaljške kablov, ki jih je
dovoljeno uporabljati na prostem. Uporaba
podaljška kabla, primernega za uporabo na
prostem, zmanjša tveganje električnega udara.
f) Če uporabe električnega orodja v vlažni oko-
lici ni mogoče preprečiti, uporabite zaščitno
stikalo za okvarni tok. Uporaba zaščitnega
stikala za okvarni tok zmanjša tveganje električnega udara.
3. Varnost oseb
a) Bodite vedno pozorni, pazite, kaj počnete,
dela z električnim orodjem se lotite premišljeno. Električnega orodja ne uporabljajte, ko
ste bolni ali utrujeni ali pod vplivom drog,
alkohola ali zdravil. Že en sam trenutek nepaz-
ljivosti pri uporabi električnega orodja lahko
privede do resnih telesnih poškodb.
b) Nosite osebno zaščitno opremo in zmeraj
uporabljajte tudi zaščitna očala. Uporaba
osebne zaščitne opreme, kot je maska za zaščito pred prahom, nedrseči zaščitni čevlji, zaščitna čelada ali zaščita sluha, odvisno od vrste in
uporabe električnega orodja zmanjša tveganje
poškodb.
c) Izogibajte se nehotenemu zagonu naprave.
Prepričajte se, da je električno orodje izključeno, preden ga priključite na vir električnega
toka in/ali akumulator, ga dvignete ali prenašate. Če pri prenašanju električnega orodja
s prstom pritiskate na stikalo ali že vklopljeno
napravo priključite na oskrbo s tokom, lahko to
privede do nezgod.
d) Pred vklopom električnega orodja odstranite
nastavitvena orodja ali izvijače. Orodje ali
izvijač v vrtečem se delu naprave lahko privede
do poškodb.
e) Izogibajte se neobičajni drži telesa. Poskrbite
za varen položaj in vedno ohranjajte ravnotežje. Tako lahko električno orodje še posebej
v nepričakovanih situacijah bolje nadzorujete.
f) Nosite primerna oblačila. Ne nosite ohlapnih
oblačil ali nakita. Lase, oblačila in rokavice
imejte zunaj dosega premikajočih se delov.
Premikajoči se deli lahko zagrabijo ohlapna
oblačila, nakit ali lase.
g) Če lahko vgradite priprave za sesanje ali
prestrezanje prahu, se prepričajte, da so te
priključene in se pravilno uporabljajo.
Uporaba naprave za sesanje prahu lahko
zmanjša nevarnost zaradi prahu.
4. Uporaba in ravnanje z električnim
orodjem
a) Naprave ne preobremenjujte. Za svoje delo
uporabljajte zanj predvideno električno orodje.
Delo s primernim električnim orodjem v navedenem območju moči je boljše in varnejše.
b) Nikoli ne uporabljajte električnih orodij s
pokvarjenim stikalom. Električno orodje, ki ga
ni mogoče vklopiti in izklopiti, je nevarno in ga
je treba popraviti.
c) Potegnite vtič iz vtičnice in/ali odstranite aku-
mulator, preden začnete izvajati nastavitve
naprave, menjavati njene dele in preden
napravo odložite.Ta previdnostni ukrep prepre-
či nehoteni zagon električnega orodja.
d) Ko električnih orodij ne uporabljate, jih hranite
zunaj dosega otrok. Naprave naj ne uporabljajo osebe, ki z uporabo niso seznanjene ali
niso prebrale teh navodil. Električna orodja so
nevarna, če jih uporabljajo neizkušene osebe.
e) Električna orodja skrbno vzdržujte. Preverjajte,
ali premični deli naprave delujejo brezhibno
in niso zataknjeni, ali deli niso odlomljeni ali
tako poškodovani, da je ovirano delovanje
električnega orodja. Pred uporabo naprave
poskrbite za popravilo poškodovanih delov.
Veliko nezgod nastane zaradi slabo vzdrževanih električnih orodij.
■ 24 │ SI
FAAS 12 A1
Page 29

f) Vaša rezalna orodja naj bodo ostra in čista.
Skrbno vzdrževana rezalna orodja z ostrimi
rezili se manj zatikajo in so lažje vodljiva.
g) Električno orodje, pribor, delovno orodje itd.
uporabljajte v skladu s temi navodili. Pri tem
upoštevajte delovne pogoje in vrsto opravila,
ki ga izvajate. Uporaba električnih orodij za
nepredvideno uporabo lahko privede do nevarnih situacij.
5. Uporaba in ravnanje z akumulatorskim orodjem
a) Akumulatorje vstavite samo v polnilnike, ki
jih priporoča proizvajalec. Za polnilnik, ki je
namenjen za določeno vrsto akumulatorjev,
obstaja nevarnost požara, če ga uporabljate
z drugimi vrstami akumulatorja.
b) V električnih orodjih zato uporabljajte samo
zanje predvidene akumulatorje. Uporaba
drugih akumulatorjev lahko povzroči telesne
poškodbe in požar.
c) Akumulator, ki ga ne uporabljate, hranite
stran od pisarniških sponk, kovancev, ključev,
žebljev, vijakov ali drugih manjših kovinskih
predmetov, ki bi lahko povzročili premostitev
kontaktov. Kratki stik med kontakti akumulatorja
lahko povzroči opekline ali ogenj.
d) Ob napačni uporabi lahko iz akumulatorja
izteče tekočina. Preprečite stik s to tekočino.
Ob nenamernem stiku mesto sperite z vodo.
Če pride tekočina v stik z očmi, poiščite zdravniško pomoč. Tekočina, ki se izteka iz akumula-
torja, lahko draži kožo in povzroči opekline.
POZOR! NEVARNOST EKSPLOZIJE!
Nikoli ne uporabljajte baterij, ki niso
primerne za dodatno polnjenje.
Akumulator zaščitite pred vročino,
npr. pred trajnimi vplivi sončne
svetlobe, ognja, pa tudi vode in
vlage. Obstaja nevarnost eksplozije.
6. Servis
a) Električno orodje dajte v popravilo samo
usposobljenemu strokovnemu osebju, ki naj
uporablja izključno originalne nadomestne
dele. S tem zagotovite, da se ohrani varnost
električnega orodja.
Posebni varnostni napotki za sabljaste
žage
■ Električno orodje držite samo na izoliranih
površinah ročaja, kadar izvajate dela, pri
katerih lahko uporabljeno električno orodje
zadene skrite električne napeljave ali lasten
električni kabel. Stik z napeljavo pod nape-
tostjo lahko povzroči prenos napetosti tudi na
kovinske dele naprave in privede do električnega
udara.
■ Nosite masko za zaščito pred prahom!
Varnostni napotki za polnilnike
■ Otroci od 8. leta starosti naprej in osebe z
zmanjšanimi telesnimi, zaznavnimi ali duševnimi
sposobnostmi ali s pomanjkljivimi izkušnjami
in znanjem napravo lahko uporabljajo le pod
nadzorom ali če so bili poučeni o varni uporabi
naprave in so razumeli nevarnosti, ki izhajajo iz
njene uporabe. Otroci se z napravo ne smejo
igrati. Otroci brez nadzora ne smejo čistiti ali
opravljati uporabniškega vzdrževanja naprave.
Polnilnik je primeren samo za uporabo v
notranjih prostorih.
■ Če je električni priključni kabel pri tej napravi
poškodovan, ga mora zamenjati proizvajalec,
njegova servisna služba ali podobno usposobljena oseba, da ne pride do nevarnosti.
Delovni napotki za žaganje
■ Preverite, da na materialu za obdelavo ni tujkov,
kot so žeblji, vijaki itd. in te odstranite.
■ Napravo takoj izklopite, če se žagin list zatak-
ne. S primernim orodjem razširite zažagano
režo in sabljasto žago odstranite iz nje.
■ Material žagajte z enakomernim potiskanjem
žage.
FAAS 12 A1
SI
│
25 ■
Page 30

Originalni pribor/dodatne naprave
■ Uporabljajte samo pribor in dodatne priprave,
ki so navedeni v navodilu za uporabo.
Uporaba drugih delovnih orodij ali pribora, kot
so navedeni v navodilih za uporabo, lahko za
vas pomeni nevarnost poškodbe.
Informacije o žaginih listih
Uporabite lahko kateri koli žagin list, pod pogojem,
da je opremljen s primernim sprejemnim nastavkom
– univerzalnim steblom s ½" (12,7 mm). V trgovini
so na voljo žagini listi različnih dolžin, optimizirani
za posamezne namene uporabe vaše sabljaste
žage.
NAPOTEK
► TPI = teeth per inch = število zobcev na
2,54 cm
Pred prvo uporabo
Polnjenje akumulatorskega paketa
PREVIDNO!
► Preden akumulatorski paket
hitrega polnilnika akumulatorjev oz. ga
vstavite vanj, vedno najprej izvlecite električni
vtič iz vtičnice.
■ Akumulatorskega paketa
če je temperatura okolice pod 10°C ali nad
40°C.
♦ Vtaknite akumulatorski paket v hitri polnilnik
.
♦ Vtaknite električni vtič v vtičnico. Kontrolna lučka
sveti rdeče.
LED
♦ Zelena kontrolna LED vam sporoča, da je
postopek polnjenja zaključen in je akumulatorski
paket pripravljen za uporabo.
♦ Akumulatorski paket
■ Akumulatorskega paketa
polnite neposredno po hitrem postopku polnjenja. Obstaja nevarnost, da se akumulatorski
paket prenapolni in se tako skrajša življenjska doba akumulatorja in polnilnika.
vzamete iz
nikoli ne polnite,
vstavite v napravo.
nikoli ponovno ne
♦ Hitri polnilnik
postopkoma polnjenja izklopite za najmanj
15 minut. V ta namen električni vtič potegnite
iz vtičnice.
med dvema zaporednima
Vstavitev akumulatorskega paketa
v napravo/njegova odstranitev
Vstavite akumulatorski paket:
♦ Akumulatorski paket
Odstranitev akumulatorskega paketa:
♦ Pritisnite tipko za sprostitev in odstranite
akumulatorski paket
naj se zaskoči v ročaju .
.
Preverjanje stanja akumulatorja
♦ Za preverjanje stanja akumulatorja pritisnite
preizkusno tipko
preostala kapaciteta se prikaže na prikazu
stanja akumulatorja
♦ RDEČA/ORANŽNA/ZELENA = napolnjeno
do konca/največja moč
RDEČA/ORANŽNA = napolnjeno do polovice/
srednja moč
RDEČA = skoraj prazno – napolnite akumulator
(glejte sliko A). Stanje oz.
, kot sledi:
■ 26 │ SI
FAAS 12 A1
Page 31

Vstavitev držalnega loka v napravo/
njegova odstranitev
NAPOTEK
► Vstavljanje/odstranjevanje držalnega loka
pri montiranem žaginem listu
Vstavite držalni lok (glejte sliko B–D):
♦ Pritisnite tipko za sprostitev
♦ Potisnite držalni lok na vodilih podnožne
plošče v napravo.
♦ Blokirajte tipko za sprostitev .
Odstranitev držalnega loka:
♦ Pritisnite tipko za sprostitev
lok iz vodila.
ni mogoče.
.
in izvlecite držalni
Vgradnja/zamenjava žaginega lista
Pri nameščanju/menjavanju žaginega lista nosite
zaščitne rokavice.
♦ Obrnite hitro vpenjalno glavo
smeri puščice in jo držite obrnjeno.
♦ Potisnite potrebni žagin list v hitro vpenjalno
glavo
► Zobje žaginega lista
do omejevalnika.
POZOR!
navzdol!
do konca v
morajo pri tem kazati
Začetek uporabe
Vklop/izklop
Vklop:
♦ Pritisnite na zaporo vklopa
♦ Pritisnite stikalo za vklop/izklop .
Izklop:
♦ Spustite stikalo za vklop/izklop
Načini žaganja
A) delo brez držalnega loka (glejte sliko E):
■ Pri večjem premeru vej ali žaganju lesa, umetne
snovi in gradbenih materialov delo izvajajte
BREZ držalnega loka. Kos za žaganje se mora
prilegati podnožni plošči. Pri okroglih obdelovancih žagajte z nihajnim premikanjem žage.
A1) Žaganje na isti ravni:
■ S prilagodljivimi žaginimi listi ustrezne dolžine
lahko štrleče kose obdelovancev, npr. cevi,
odžagate neposredno ob zidu.
1. Položite žagin list neposredno ob steno.
2. Ob strani pritisnite na sabljasto žago in list upognite tako, da se podnožna plošča
prilega steni.
3. Napravo vklopite in obdelovanec ob nespremenjenem pritiskanju odžagajte.
.
.
ob strani
♦ Hitro vpenjalno glavo spustite; vrniti se mora
v svoj izhodiščni položaj. Žagin list je sedaj
zapahnjen.
FAAS 12 A1
A2) Potopno žaganje (glejte sliko F):
PREVIDNO! NEVARNOST
VZVRATNEGA UDARCA!
► Potopne reze je dovoljeno izvajati le v mehkih
materialih (lesu ipd.).
1. Položite sabljasto žago s spodnjim robom podnožne plošče
vklopite.
2. Nagnite sabljasto žago naprej in žagin list
pogreznite v obdelovanec.
3. Postavite sabljasto žago v navpičen položaj in
žagajte naprej po črti poteka reza.
na obdelovanec. Napravo
│
SI
27 ■
Page 32

B) Delo z držalnim lokom (glejte sliko G):
♦ Žago premikajte z rahlim pritiskanjem navzdol.
Vzdrževanje in čiščenje
OPOZORILO! NEVARNOST TELESNE
POŠKODBE! Pred vsemi deli na
napravi to izklopite in odstranite
akumulator.
■ Pred vsemi deli z električnim orodjem vedno
prej odstranite žagin list.
■ Napravo in prezračevalne reže vedno ohranjaj-
te čiste. V primeru zamašenih prezračevalnih
rež grozi pregretje in/ali poškodba naprave.
■ Napravo po zaključku dela očistite.
■ V notranjost naprave ne smejo zaiti nobene
tekočine. Za čiščenje ohišja uporabljajte krpo.
Nikoli ne uporabljajte bencina, topil ali čistil, ki
razžirajo umetne snovi.
■ Po potrebi očistite sprejemni nastavek za žagin
list s čopičem ali ga spihajte s stisnjenim zrakom.
■ Če litij-ionski akumulator hranite dlje časa, mo-
rate redno preverjati stanje njegove napolnjenosti. Najprimernejša napolnjenost akumulatorja
je med 50 in 80%. Akumulatorje je najbolje
shraniti na hladnem in suhem.
Garancijski list
1. S tem garancijskim listom jamčimo Kompernass
Handels GmbH, da bo izdelek v garancijskem
roku ob normalni in pravilni uporabi brezhibno
deloval in se zavezujemo, da bomo ob izpolnjenih spodaj navedenih pogojih odpravili morebitne pomanjkljivosti in okvare zaradi napak v
materialu ali izdelavi oz. po svoji presoji izdelek
zamenjali ali vrnili kupnino.
2. Garancija je veljavna na ozemlju Republike
Slovenije.
3. Garancijski rok za proizvod je 3 leta od dneva
nabave.
4. Kupec je dolžan okvaro javiti pooblaščenemu
servisu oz. se informirati o nadaljnjih postopkih
na zgoraj navedeni telefonski številki. Svetujemo
vam, da pred tem natančno preberete navodila
o sestavi in uporabi izdelka.
5. Kupec je dolžan pooblaščenemu servisu
predložiti garancijski list in račun, kot potrdilo in
dokazilo o nakupu.
6. V primeru, da proizvod popravlja nepooblaščeni servis ali oseba, kupec ne more uveljavljati
zahtevkov iz te garancije.
7. Vzroki za okvaro oz. nedelovanje izdelka morajo
biti lastnosti stvari same, in ne vzroki, ki so zunaj
proizvajalčeve oz. prodajalčeve sfere. Kupec ne
more uveljavljati zahtevkov iz te garancije, če se
ni držal priloženih navodil za sestavo in uporabo
izdelka ali, če je izdelek kakorkoli spremenjen ali
nepravilno vzdrževan.
8. Jamčimo servisiranje in rezervne dele za minimalno dobo, ki je zahtevana s strani zakonodaje.
9. Obrabni deli oz. potrošni material so izvzeti iz
garancije.
10. Vsi potrebni podatki za uveljavljanje garan-
cije se nahajajo na dveh ločenih dokumentih
(garancijski list, račun).
11. Ta garancija proizvajalca ne izključuje pravic
potrošnika, ki izhajajo iz odgovornosti prodajalca za napake na blagu.
Prodajalec:
Lidl d.o.o.k.d., Pod lipami 1, SI-1218 Komenda
■ 28 │ SI
FAAS 12 A1
Page 33

Servis
OPOZORILO!
► Naprave dajte v popravilo samo servisni
službi ali strokovnjaku za elektrotehniko,
ki naj uporablja le originalne nadomestne
dele. S tem zagotovite, da se ohrani varnost
naprave.
► Zamenjavo vtiča ali priključnega voda
zmeraj prepustite proizvajalcu naprave ali
njegovi servisni službi. S tem zagotovite, da
se ohrani varnost naprave.
NAPOTEK
► Nadomestne dele, ki niso navedeni (npr.
akumulatorje, stikala ali držalni lok), lahko
naročite v naših klicnih centrih.
Servis Slovenija
Tel.: 080080917
E-Mail: kompernass@lidl.si
IAN 275666
Uvoznik
KOMPERNASS HANDELS GMBH
BURGSTRASSE 21
44867 BOCHUM
GERMANY
www.kompernass.com
Odstranjevanje med odpadke
Embalaža je iz okolju prijaznih materialov
in jo lahko oddate na lokalnih zbirališčih
reciklažnih odpadkov.
Električnih orodij ne zavrzite med
gospodinjske odpadke!
V skladu z evropsko direktivo 2012/19/EU
je treba rabljena električna orodja zbirati ločeno in jih
oddati za ekološko primerno predelavo.
Akumulatorjev ne odvrzite med
gospodinjske odpadke!
Okvarjene ali izpraznjene akumulatorje je
treba v skladu z Direktivo 2006/66/EC reciklirati.
Akumulator in/ali napravo oddajte na javnih
zbirališčih.
O možnostih odstranitve neuporabnih električnih
orodij/akumulatorskih paketov povprašajte pri
svoji občinski ali mestni upravi.
FAAS 12 A1
SI
│
29 ■
Page 34

Prevod izvirne izjave o
skladnosti
Mi, KOMPERNASS HANDELS GMBH, in odgovorna oseba za dokumentacijo: gospod Semi Uguzlu,
BURGSTR. 21, 44867 BOCHUM, NEMČIJA,
izjavljamo, da je ta izdelek skladen z naslednjimi
standardi, normativnimi dokumenti in direktivami
ES:
Direktiva o varnosti strojev
(2006/42/EC)
Direktiva o elektromagnetni združljivosti
(2014/30/EU)
Direktiva RoHS
(2011/65/EU)
Uporabljeni harmonizirani standardi:
EN 60745-1:2009/A11:2010
EN 60745-2-11:2010
EN 62233:2008
EN 60335-1:2012/A11:2014
EN 60335-2-29:2004/A2:2010
EN 55014-1:2006/A2:2011
EN 55014-2:1997/A2:2008
EN 61000-3-2:2014
EN 61000-3-3:2013
Tip/oznaka naprave:
Akumulatorska žaga za veje FAAS 12 A1
Leto izdelave: 02 - 2016
Serijska številka: IAN 275666
Bochum, 26.1.2016
Semi Uguzlu
– vodja kakovosti –
Pridržujemo si tehnične spremembe v smislu razvoja.
■ 30 │ SI
FAAS 12 A1
Page 35

Obsah
Úvod ..........................................................32
Použití vsouladu surčením ....................................................32
Vybavení .................................................................32
Rozsah dodávky ............................................................ 32
Technické údaje ............................................................32
Obecné bezpečnostní pokyny pro elektrická nářadí ...................33
1. Bezpečnost na pracovišti ................................................... 33
2. Elektrická bezpečnost. . . . . . . . . . . . . . . . . . . . . . . . . . . . . . . . . . . . . . . . . . . . . . . . . . . . . . 33
3. Bezpečnost osob .........................................................34
4. Použití a údržba elektrického nářadí ..........................................34
5. Použití akumulátorového nářadí a nakládání s ním ............................... 35
6. Servis ..................................................................35
Bezpečnostní pokyny specifické pro šavlové pily ................................... 35
Bezpečnostní pokyny pro nabíječky ............................................. 35
Pracovní pokyny pro řezání .......................................36
Originální příslušenství / originální přídavná zařízení ...............................36
Informace kpilovým listům .................................................... 36
Před uvedením do provozu ........................................36
Nabíjení akumulátoru ........................................................ 36
Vložení akumulátoru do přístroje/ jeho vyjmutí zpřístroje ........................... 36
Kontrola stavu akumulátoru ................................................... 36
Nasazení / odpojení přídržného ramena ........................................ 37
Montáž / výměna pilového listu ...............................................37
Uvedení do provozu ..............................................37
Zapnutí/vypnutí ............................................................ 37
Metody řezání ............................................................. 37
Údržba a čištění .................................................38
Záruka .........................................................38
Servis ..........................................................39
Dovozce ........................................................39
Likvidace .......................................................39
Překlad originálu prohlášení o shodě ...............................40
FAAS 12 A1
CZ
│
31 ■
Page 36

AKU PILKA NA VĚTVĚ
FAAS 12 A1
Úvod
Blahopřejeme vám kzakoupení vašeho nového
přístroje. Rozhodli jste se pro vysoce kvalitní výrobek.
Návod kobsluze je součástí tohoto výrobku. Obsahuje důležité informace obezpečnosti, použití a likvidaci. Před použitím výrobku se prosím dobře seznamte se všemi provozními a bezpečnostními pokyny.
Výrobek používejte pouze předepsaným způsobem
a pro uvedené oblasti použití. Při předávání výrobku
třetím osobám předejte spolu sním ityto podklady.
Použití vsouladu surčením
Přístroj - normativní šavlová pila - je s pevným dorazem (základová deska) určena pro řezání dřeva,
plastu a stavebních materiálů. Přístroj je vhodný
pro hrubé řezání, rovné a zakřivené řezy a oddělí
plochy v jedné rovině. S namontovaným přídržným
ramenem je přístroj vhodný k řezání větví. Respektujte informace o pilových listech a pracovních
pokynech k řezání. Jakékoliv jiné použití nebo
úprava stroje jsou pokládány za použití vrozporu
surčením a mohou způsobovat značná nebezpečí
úrazu. Za škody, které vzniknou při použití vrozporu surčením, nenese výrobce odpovědnost. Přístroj
není určen pro podnikatelské účely.
Vybavení
blokovací tlačítko
rukojeť
akumulátor
odjištění (akumulátor)
vypínač
pilový list
základová deska
rychloupínací sklíčidlo
ochrana rukou
odjištění (přídržné rameno)
přídržné rameno
rychlonabíječka akumulátorů
kontrolní LED (zelená)
kontrolní LED (červená)
indikace stavu nabití akumulátoru
zkušební tlačítko
Rozsah dodávky
1 aku pilka na větvě FAAS 12 A1
1rychlonabíječka akumulátorů FAAS 12 A1-2
1akumulátor FAAS 12 A1-1
1 přídržné rameno
1 pilový list na dřevo 152 mm
1přenosný kufřík
1návod kobsluze
Technické údaje
Akumulátorová
prořezávací pila: FAAS 12 A1
Jmenovité napětí: 12 V
Jmenovité volnoběžné
otáčky: n
Délka zdvihu: 20 mm
Max. řezný výkon: Dřevo 80 mm
Akumulátor: FAAS 12 A1-1
Typ: LITHIO-IONTOVÝ
Jmenovité napětí: 12 V
Kapacita: 1500 mAh
Rychlonabíječka
akumulátorů: FAAS 12 A1-2
VSTUP/input:
Jmenovitý proud: 230 - 240 V ~, 50 Hz
(střídavý proud)
Jmenovitý příkon: 30 W
VÝSTUP/output:
Jmenovité napětí: 12,6 V
Jmenovitý proud: 1800 mA
Doba nabíjení: cca 60 min.
Třída ochrany: II /
(stejnosměrný proud)
0–2700 min
0
(stejnosměrný proud)
(stejnoměrný proud)
(dvojitá izolace)
-1
■ 32 │ CZ
FAAS 12 A1
Page 37

Hodnoty emise hluku:
Naměřená hodnota hluku zjištěná podle EN ISO
4871. Typicky vyhodnocená hladina hluku A elektrického nářadí na pracovišti uživatele je:
Hladina akustického
tlaku: L
Nejistota: K
= 79 dB (A)
pA
= 3 dB
pA
Hladina akustického
výkonu: LWA = 90 dB (A)
Nejistota: KWA = 3 dB
Používejte ochranu sluchu!
Celkové hodnoty vibrací (součet vektorů tří směrů)
stanoveny vsouladu sEN 60745:
Řezání dřevotřísky: a
= 6,6 m/s2
h,B
Nejistota K=1,5m/s
2
Řezání dřevěných
trámů: a
= 12,6 m/s2
h,WB
Nejistota K=1,5m/s
2
UPOZORNĚNÍ
► Hladina vibrací uvedená vtomto návodu byla
měřena vsouladu se standardizovanou metodou měření a lze ji použít ke srovnání přístrojů.
Uvedenou hodnotu emise vibrací lze rovněž
použít kpředběžnému posouzení expozice.
VÝSTRAHA!
► Hladina vibrací se mění vzávislosti na použití
elektrického nářadí a může být vněkterých
případech vyšší než hodnota uvedená vtomto
návodu. Pokud se elektrické nářadí užívá takovým způsobem pravidelně, mohlo by být zatížení vibracemi podceněno. Snažte se udržovat
zatížení vibracemi co nejnižší. Příklady opatření
na snížení zatížení vibracemi je použití rukavic
při práci snářadím a omezení doby práce
snářadím. Přitom se musí zohlednit všechny
části provozního cyklu (například doby, kdy je
elektrické nářadí vypnuté a doby, kdy je sice
zapnuté, ale běží bez zatížení).
Obecné bezpečnostní
pokyny pro elektrická
nářadí
VÝSTRAHA!
► Přečtěte si všechna bezpečnostní upozor-
nění a pokyny. Nedbalost při dodržování
bezpečnostních upozornění a pokynů může
vést kúrazu elektrickým proudem, k požáru
a/nebo těžkým zraněním.
Veškerá bezpečnostní upozornění a pokyny
uschovejte pro budoucí použití.
Pojem „elektrické nářadí“ užívaný vbezpečnostních pokynech se vztahuje na elektrické nářadí
napájené ze sítě (síťovým kabelem) a elektrické
nářadí napájené akumulátorem (bez síťového
kabelu).
1. Bezpečnost na pracovišti
a) Svůj pracovní prostor udržujte včistotě a dobře
osvětlený. Nepořádek a neosvětlený pracovní
prostor mohou vést kúrazům.
b) S elektrickým nářadím nepracujte vprostředí
ohroženém výbuchem, ve kterém se nachází
hořlavé kapaliny, plyny nebo prachy. Elektric-
ké nářadí vytváří jiskry, od nichž se může vznítit
prach nebo výpary.
c) Nedovolte dětem ani jiným osobám, aby se
přibližovaly kelektrickému nářadí vdobě,
kdy jej používáte. Vpřípadě odvedení pozor-
nosti můžete ztratit kontrolu nad přístrojem.
2. Elektrická bezpečnost
a) Síťová zástrčka elektrického nářadí musí od-
povídat zásuvce. Zástrčka se nesmí žádným
způsobem pozměňovat. Nepoužívejte adaptérové zástrčky vkombinaci suzemněným
elektrickým nářadím. Nepozměněné zástrčky
a jim odpovídající zásuvky snižují riziko úrazu
elektrickým proudem.
FAAS 12 A1
CZ
│
33 ■
Page 38

b) Zabraňte kontaktu těla suzemněnými předmě-
ty jako jsou trubky, topení, sporáky a chladničky. Je-li vaše tělo uzemněné, hrozí zvýšené riziko
úrazu elektrickým proudem.
c) Elektrické nářadí chraňte před deštěm a vlh-
kostí. Vniknutím vody do elektrického přístroje
se zvyšuje riziko úrazu elektrickým proudem.
d) Nepoužívejte kabel vrozporu sjeho určením
pro přenášení či zavěšování elektrického nářadí nebo kvytahování zástrčky ze zásuvky.
Udržujte kabel vdostatečné vzdálenosti od
zdrojů vysoké teploty, oleje, ostrých hran nebo
pohyblivých částí přístroje. Poškozené nebo
zapletené kabely zvyšují riziko úrazu elektrickým
proudem.
e) Pokud pracujete selektrickým nářadím venku,
používejte pouze takové prodlužovací kabely,
jež jsou schváleny i pro venkovní použití. Po-
užíváním prodlužovacího kabelu vhodného pro
venkovní použití se snižuje riziko úrazu elektrickým proudem.
f) Pokud nelze zabránit provozu elektrického
nářadí ve vlhkém prostředí, používejte proudový chránič. Použitím ochranného spínače
chybného proudu se snižuje riziko úrazu elektrickým proudem.
3. Bezpečnost osob
a) Buďte stále pozorní, sledujte, co děláte a k prá-
ci selektrickým nářadím přistupujte s rozumem.
Elektrické nářadí nepoužívejte, pokud jste nemocni, unaveni nebo pod vlivem drog, alkoholu
či léků. Jediný okamžik nepozornosti při používání
elektrického nářadí může způsobit vážná zranění.
b) Noste osobní ochranné prostředky a vždy
i ochranné brýle. Nošením osobních ochranných prostředků jako je ochranná maska proti
prachu, protiskluzová bezpečnostní obuv, ochranná přilba nebo ochrana sluchu, a to vzávislosti
na druhu a použití elektrického nářadí, se snižuje riziko zranění.
c) Zabraňte neúmyslnému uvedení přístroje do
provozu. Než elektrické nářadí zapojíte do
elektrické sítě a/nebo připojíte akumulátor
nebo než nářadí zvednete či přenesete, ujistěte
se, že je vypnuté. Pokud máte při přenášení
elektrického nářadí prst na vypínači, nebo pokud
do sítě zapojíte již zapnutý přístroj, může dojít
kúrazu.
d) Předtím, než elektrické nářadí zapnete, od-
straňte nastavovací nástroje nebo šroubováky.
Pokud se nástroj nebo šroubovák nacházejí votáčející se části přístroje, může to vést kezraněním.
e) Vyhýbejte se nepřirozenému držení těla. Za-
jistěte si bezpečnou stabilitu a neustále udržujte rovnováhu. Tak dokážete elektrické nářadí
vneočekávaných situacích lépe kontrolovat.
f) Noste vhodný oděv. Nenoste volné oblečení
ani šperky. Vlasy, oděv a rukavice udržujte
vbezpečné vzdálenosti od pohyblivých částí.
Volný a nepřiléhavý oděv, šperky nebo dlouhé
vlasy mohou být pohyblivými částmi zachyceny.
g) Pokud lze namontovat zařízení pro odsávání
a zachytávání prachu, ujistěte se, zda jsou
připojena a správně použita. Použitím odsává-
ní prachu se může snížit ohrožení prachem.
4. Použití a údržba elektrického nářadí
a) Přístroj nepřetěžujte. Pro svou práci používej-
te elektrické nářadí, vhodné k danému účelu.
Svhodným elektrickým nářadím se vám bude
vuvedeném výkonovém rozsahu pracovat lépe
a bezpečněji.
b) Nepoužívejteelektrické nářadí, jehož přepínač
je vadný. Elektrické nářadí, které se již nedá
zapnout nebo vypnout, představuje nebezpečí
a musí se opravit.
c) Před nastavováním nářadí, výměnou dílů pří-
slušenství nebo odložením nářadí vytáhněte
zástrčku ze zásuvky a / nebo vyjměte akumulátor. Toto bezpečnostní opatření zabraňuje
neúmyslnému spuštění elektrického nářadí.
d) Nepoužívané elektrické nářadí udržujte
mimo dosah dětí. Nedovolte používat přístroj
osobám, které sním nejsou obeznámeny
nebo které nečetly tento návod. Elektrické
nářadí je nebezpečné, manipulují-li sním nezkušené osoby.
■ 34 │ CZ
FAAS 12 A1
Page 39

e) Údržbu elektrického nářadí vykonávejte pečli-
vě. Zkontrolujte, zda jsou vpořádku pohyblivé
části přístroje a zda jim není bráněno vpohybu, zda nejsou některé součásti rozbité nebo
natolik poškozené, že je funkčnost elektrického
nářadí omezená. Poškozené části přístroje
nechte před jeho použitím opravit. Řada úrazů
má svou příčinu ve špatné údržbě elektrického
nářadí.
f) Řezné nástroje udržujte vostrém a čistém sta-
vu. Pečlivě udržované řezné nástroje sostrými
řeznými hranami se méně zasekávají a snáze
se vedou.
g) Elektrické nářadí, příslušenství, nástavce atd.
používejte dle těchto pokynů. Zohledňujte
přitom pracovní podmínky a vykonávanou
činnost. Použití elektrického nářadí kjiným než
určeným účelům může vést ke vzniku nebezpečných situací.
5. Použití akumulátorového nářadí
a nakládání s ním
a) Akumulátory nabíjejte jen vnabíječkách do-
poručených výrobcem. Unabíječky, která je
určena pro určitý typ akumulátorů, hrozí nebezpečí vzniku požáru, je-li používána sjinými
akumulátory.
b) Selektrickým nářadím používejte jen akumu-
látory pro ně určené. Použití jiných akumulátorů
může vést ke zranění a nebezpečí vzniku požáru.
c) Nepoužívaný akumulátor udržujte vdostateč-
né vzdálenosti od kancelářských sponek, mincí,
klíčů, hřebíků, šroubů a jiných drobných kovových předmětů, které mohou způsobit přemostění kontaktů. Zkrat mezi kontakty akumulátoru
může způsobit popáleniny nebo požár.
d) Při nesprávném použití může zakumulátoru
vytéct kapalina. Zabraňte kontaktu skapalinou akumulátoru. Při náhodném kontaktu
opláchněte zasažené místo vodou. Pokud se
kapalina dostane do očí, vyhledejte lékařskou
pomoc. Kapalina unikající zakumulátoru může
způsobit podráždění kůže nebo popáleniny.
POZOR! NEBEZPEČÍ VÝBUCHU!
Nikdy nenabíjejte baterie, které
nejsou určeny knabíjení.
Chraňte akumulátor před horkem,
např. také před dlouhodobým slunečním zářením, ohněm, vodou a vlhkostí.
Hrozí nebezpečí výbuchu.
6. Servis
a) Nechte své elektrické nářadí opravovat pouze
kvalifikovanými odborníky a používejte jen
originální náhradní díly. Tím zajistíte, že zůstane
zachována bezpečnost elektrického nářadí.
Bezpečnostní pokyny specifické pro
šavlové pily
■ Při práci, ukteré by mohlo dojít ke kontaktu
elektrického nářadí se skrytými vodiči nebo
svlastním síťovým kabelem, držte elektrické
nářadí pouze za izolované plochy rukojeti.
Kontakt svedením pod napětím může přenést
napětí i na kovové díly přístroje, což může vést
kzásahu elektrickým proudem.
■ Noste ochrannou masku proti prachu!
Bezpečnostní pokyny pro nabíječky
■ Děti starší 8let a osoby somezenými fyzickými,
smyslovými nebo mentálními schopnostmi či nedostatkem zkušeností a znalostí mohou používat
tento přístroj, avšak pouze tehdy, pokud jsou pod
dohledem nebo pokud byly poučeny obezpečném používání přístroje a pokud porozuměly
ztoho vyplývajícímu nebezpečí. Děti si nesmí
spřístrojem hrát. Čištění a uživatelskou údržbu
nesmí provádět děti bez dozoru.
Nabíječka je vhodná pouze pro provoz
ve vnitřních prostorách.
■ Pokud se napájecí kabel tohoto přístroje poškodí,
musí jej vyměnit výrobce, jeho zákaznický servis
nebo obdobně kvalifikovaná osoba, aby se tak
zabránilo nebezpečím.
FAAS 12 A1
CZ
│
35 ■
Page 40

Pracovní pokyny pro řezání
■ Zkontrolujte materiál, který se má opracovat, na
výskyt cizích těles jako jsou hřebíky, šrouby atd.
a odstraňte je.
■ Když se pilový list vzpříčí, přístroj okamžitě vy-
pněte. Rozevřete již nařezanou mezeru vhodným
nástrojem a vytáhněte šavlovou pilu.
■ Řežte materiál stejnoměrným posuvem.
Originální příslušenství / originální
přídavná zařízení
■ Používejte výhradně příslušenství a přídavná
zařízení, která jsou uvedena vnávodu kpoužití. Používání jiných přídavných zařízení nebo
jiného příslušenství, než je uvedeno vnávodu
kobsluze, pro vás může znamenat nebezpečí
úrazu.
Informace kpilovým listům
Můžete však použít také jakýkoliv jiný pilový list,
pokud je opatřen vhodným upínáním - univerzální
stopka 1/2“ (12,7 mm). V obchodě jsou k dostání
optimalizované pilové listy v různých délkách a pro
každý účel použití vaší šavlové pily.
UPOZORNĚNÍ
► TPI = teeth per inch = počet zubů na 2,54 cm
jení nenabíjejte podruhé. Hrozí nebezpečí, že
se akumulátor
životnost akumulátoru a nabíječky.
♦ Rychlonabíječku
nabíjeními vypněte na dobu minimálně 15minut. Vytáhněte síťovou zástrčku ze zásuvky.
až příliš nabije, čímž se zkrátí
mezi po sobě následujícími
Vložení akumulátoru do přístroje/
jeho vyjmutí zpřístroje
Vložení akumulátoru:
♦ Nechte akumulátor
Vyjmutí akumulátoru:
♦ Stiskněte tlačítko odblokování a vyjměte
akumulátor
zaskočit do rukojeti .
.
Kontrola stavu akumulátoru
♦ Pro kontrolu stavu akumulátoru stiskněte zkušeb-
ní tlačítko (viz obr. A). Stav resp. zbývající
stav nabití se na LED indikaci akumulátorů
zobrazí takto:
♦ ČERVENÁ / ORANŽOVÁ / ZELENÁ = maxi-
mální nabití/výkon
ČERVENÁ/ORANŽOVÁ=průměrné nabití/
výkon
ČERVENÁ=slabé nabití– akumulátor nabijte
Před uvedením do provozu
Nabíjení akumulátoru
POZOR!
► Předtím, než akumulátor
vyjmete resp. nebo jej do ní vložíte, vytáh-
něte vždy zástrčku ze sítě.
■ Akumulátor
nižší než 10°C nebo vyšší než 40°C.
♦ Zastrčte akumulátor do rychlonabíječky .
♦ Zastrčte síťovou zástrčku do zásuvky. LED kont-
rolka svítí červeně.
♦ Zelená kontrolní LED
nabíjení ukončeno a akumulátor je připraven
kpoužití.
♦ Zasuňte akumulátor
■ Akumulátor
nenabíjejte, je-li okolní teplota
bezprostředně po rychlém nabí-
■ 36 │ CZ
z rychlonabíječky
vám signalizuje, že je
do přístroje.
FAAS 12 A1
Page 41

Nasazení / odpojení přídržného
ramena
UPOZORNĚNÍ
► Nasazení / odpojení přídržného ramena
není možné v případě namontovaného pilového listu
.
Uvedení do provozu
Zapnutí/vypnutí
Zapnutí:
♦ Stiskněte blokovací tlačítko
♦ Stiskněte vypínač .
.
Nasazení přídržného ramena (viz obr. B–D):
♦ Stiskněte odblokovací tlačítko
♦ Zasuňte přídržné rameno přes vedení zákla-
dové desky do přístroje.
♦ Zaaretujte odjišťovací tlačítko .
Odpojení přídržného ramena:
♦ Stiskněte odblokovací tlačítko
přídržné rameno směrem dopředu z vedení.
.
a vytáhněte
Montáž / výměna pilového listu
Při vkládání / výměně pilového kotouče noste
ochranné rukavice.
♦ Otočte rychloupínacím sklíčidlem
směru šipky a podržte ho vtéto poloze.
♦ Zatlačte požadovaný pilový list do rychloupína-
cího sklíčidla
POZOR!
► Zuby pilového listu
dopředu!
♦ Pusťte rychloupínací sklíčidlo , toto se musí
vrátit do své výchozí polohy. Pilový list je nyní
zajištěný.
až na doraz.
přitom musí směřovat
úplně ve
Vypnutí:
♦ Vypínač
pusťte.
Metody řezání
A) Práce bez přídržného ramena (viz obr. E):
■ V případě většího průměru větve nebo řezání
dřeva, plastů a stavebních materiálů, pracujte
BEZ přídržného ramena. Objekt určený k řezání
musí doléhat na základovou desku. U oblých
obrobků pohybujte pilou při řezu kývavým
pohybem.
A1) Zarovnávání:
■ Flexibilními pilovými listy s odpovídající délkou
můžete odřezat vyčnívající obrobky, jako jsou
např. trubky přímo na stěně.
1. Přiložte pilový list přímo na stěnu.
2. Ohněte ho bočním tlakem na šavlovou pilu tak,
aby základová deska
stěnu.
3. Zapněte přístroj a odřežte obrobek konstantním
tlakem.
A2) Ponorné řezání (viz obr. F):
POZOR! NEBEZPEČÍ ZPĚTNÉHO
RÁZU!
► Ponorné řezy se smí provádět pouze do
měkkých materiálů (dřevo apod. ).
1. Nasaďte šavlovou pilu spodní hranou základové
desky
2. Vyklopte šavlovou pilu dopředu a ponořte ji
pilovým listem do obrobku.
3. Nastavte šavlovou pilu vertikálně a řežte dál
podél čáry řezu.
na obrobek. Zapněte přístroj.
doléhala bočně na
FAAS 12 A1
CZ
│
37 ■
Page 42

B) Práce s přídržným ramenem (viz obr. G):
♦ Pohybujte pilou mírným tlakem směrem dolů.
Údržba a čištění
VÝSTRAHA! NEBEZPEČÍ ZRANĚNÍ!
Před jakoukoli prací na přístroji přístroj vypněte a vyjměte akumulátory.
■ Před všemi pracemi na elektrickém nářadí vytáh-
něte vždy pilový list.
■ Udržujte přístroj a větrací otvory vždy v čistotě.
V případě ucpaných větracích otvorů hrozí
přehřátí a / nebo poškození přístroje.
■ Přístroj po ukončení práce očistěte.
■ Dovnitř přístroje nesmí vniknout žádné tekutiny.
Kčištění krytu přístroje používejte hadřík. Nikdy
nepoužívejte benzin, rozpouštědla nebo čisticí
prostředky, které narušují umělou hmotu.
■ Vyčistěte upínání pilového listu příp. štětcem
nebo jej vyfoukejte stlačeným vzduchem.
■ Pokud je nutné lithio-iontový akumulátor sklado-
vat po delší dobu, musí se pravidelně kontrolovat stav jeho nabití. Optimální stav nabití je mezi
50% a 80%. Optimální skladovací klima je
chladné a suché.
Záruka
Na tento přístroj získáváte záruku vtrvání 3let
od data zakoupení. Přístroj byl vyroben pečlivě
a před dodáním byl svědomitě odzkoušen.
Uschovejte si prosím pokladní lístek jako doklad
onákupu. Vpřípadě uplatnění záruky se spojte
telefonicky se servisní dílnou. Pouze tak lze zajistit
bezplatné zaslání vašeho zboží.
Záruční plnění se vztahuje pouze na vady materiálu
či výrobní vady, nikoli na škody vzniklé při dopravě,
na díly podléhající opotřebení či na poškození křehkých dílů, např. spínače nebo akumulátory. Výrobek
je určen jen pro soukromé účely a nikoli pro komerční použití. Při nesprávném a neodborném používání,
při použití násilí a při zásazích, které nebyly provedeny našimi autorizovanými servisními provozovnami, záruční nároky zanikají. Vaše práva vyplývající
ze zákona nejsou touto zárukou omezena. Záručním plněním se záruční doba neprodlužuje. To platí
ipro vyměněné a opravené součásti. Poškození
nebo vady vyskytující se již při nákupu výrobku je
nutno oznámit ihned po vybalení, avšak nejpozději
do dvou dnů od data nákupu. Po uplynutí záruční
doby podléhají veškeré opravy zpoplatnění.
■ 38 │ CZ
FAAS 12 A1
Page 43

Servis
VÝSTRAHA!
► Nechte přístroje opravit vservisní dílně
nebo odborným elektrikářem a pouze za
použití originálních náhradních dílů. Tím
se zajistí, že zůstane zachována bezpečnost
přístroje.
► Výměnu zástrčky nebo síťového kabelu
svěřte vždy výrobci přístroje nebo jeho
zákaznickému servisu. Tím se zajistí, že
zůstane zachována bezpečnost přístroje.
UPOZORNĚNÍ
► Neuvedené náhradní díly (jako např.
akumulátor, spínače nebo přídržné rameno)
můžete objednat přes naši zákaznickou linku.
Servis Česko
Tel.: 800143873
E-Mail: kompernass@lidl.cz
IAN 275666
Dovozce
KOMPERNASS HANDELS GMBH
BURGSTRASSE21
44867 BOCHUM
GERMANY
www.kompernass.com
Likvidace
Obal se skládá zekologických materiálů,
které lze zlikvidovat vkomunálních
sběrných dvorech.
Nevyhazujte elektrické nářadí do
domovního odpadu!
Vsouladu sevropskou směrnicí č. 2012/19/EU
musí být opotřebovaná elektrická nářadí shromažďována odděleně a odevzdána kekologické
recyklaci.
Akumulátory nevyhazujte do
domovního odpadu!
Vadné nebo staré akumulátory se musí podle směrnice 2006/66/EC recyklovat. Akumulátor a/nebo
přístroj odevzdejte do příslušných sběren.
Omožnostech likvidace vysloužilého elektrického
nářadí/ akumulátorů se informujte usvého obecního či městského úřadu.
FAAS 12 A1
CZ
│
39 ■
Page 44

Překlad originálu prohlášení o
shodě
My, KOMPERNASS HANDELS GMBH, osoba
odpovědná za dokumentaci: pan Semi Uguzlu,
BURGSTR. 21, 44867 BOCHUM, DEUTSCHLAND/
NĚMECKO, prohlašujeme, že tento výrobek je
ve shodě snásledujícími normami, normativními
dokumenty a směrnicemi ES:
Směrnice ostrojních zařízeních
(2006 / 42 / EC)
Směrnice oelektromagnetické kompatibilitě
(2014 / 30 / EU)
Směrnice oomezení používání nebezpečných
látek (RoHS)
(2011/65/EU)
Použité harmonizované normy:
EN 60745-1:2009/A11:2010
EN 60745-2-11:2010
EN 62233:2008
EN 60335-1:2012/A11:2014
EN 60335-2-29:2004/A2:2010
EN 55014-1:2006/A2:2011
EN 55014-2:1997/A2:2008
EN 61000-3-2:2014
EN 61000-3-3:2013
Typ/ označení zařízení:
Aku pilka na větvě FAAS 12 A1
Rok výroby: 02 - 2016
Sériové číslo: IAN 275666
Bochum, 26.01.2016
Semi Uguzlu
- manažer kvality Technické změny ve smyslu dalšího vývoje jsou
vyhrazeny.
■ 40 │ CZ
FAAS 12 A1
Page 45

Obsah
Úvod ..........................................................42
Používanie vsúlade surčením ................................................. 42
Vybavenie ................................................................42
Rozsah dodávky ............................................................ 42
Technické údaje ............................................................42
Všeobecné bezpečnostné pokyny pre elektrické náradia ...............43
1. Bezpečnosť na pracovisku ..................................................43
2. Elektrická bezpečnosť ..................................................... 43
3. Bezpečnosť osôb ......................................................... 44
4. Používanie a manipulácia s elektrickým náradím .................................44
5. Používanie a zaobchádzanie s akumulátorovým prístrojom ........................45
6. Servis ..................................................................45
Bezpečnostné upozorneniašpecifické pre šabľové píly .............................. 45
Bezpečnostné upozornenia pre nabíjačky ........................................45
Pracovné pokyny na pílenie .......................................46
Originálne príslušenstvo/prídavné zariadenia ..................................... 46
Informácie o pílových listoch .................................................. 46
Pred uvedením do prevádzky ......................................46
Nabitie boxu s akumulátorom ................................................. 46
Vloženie/vybratie boxu s akumulátorom do/z prístroja .............................. 46
Kontrola stavu akumulátora ................................................... 46
Vloženie/vybratie držiaka .................................................... 47
Montáž/výmena pílového listu .................................................47
Uvedenie do prevádzky ..........................................47
Zapnutie/vypnutie .......................................................... 47
Metódy pílenia .............................................................47
Údržba ačistenie ................................................48
Záruka .........................................................48
Servis ..........................................................49
Dovozca ........................................................49
Likvidácia ......................................................49
Preklad originálneho vyhlásenia o zhode ............................50
FAAS 12 A1
SK
│
41 ■
Page 46

AKUMULÁTOROVÁ PÍLA
NA VETVY FAAS 12 A1
Úvod
Srdečne vám gratulujeme kukúpe vášho nového
prístroja. Touto kúpou ste sa rozhodli pre výrobok
vysokej kvality. Návod na obsluhu je súčasťou tohto
výrobku. Obsahuje dôležité upozornenia týkajúce
sa bezpečnosti, používania alikvidácie.
Pred používaním výrobku sa oboznámte sovšetkými
pokynmi na obsluhu abezpečnostnými pokynmi.
Výrobok používajte iba podľa popisu a vuvedených
oblastiach použitia. Pri postúpení výrobku tretej
osobe odovzdajte spolu sním aj všetky dokumenty.
Používanie vsúlade surčením
Prístroj – normatívne šabľová píla – je s pevnou zarážkou (základová doska) určená na pílenie dreva,
plastu a stavebných materiálov. Prístroj je vhodný na
hrubé pílenie, rovné, zakrivené rezy a na zarovnané
oddeľovanie plôch. S namontovaným držiakom je
prístroj vhodný na pílenie konárov. Dodržiavajte informácie o pílových listoch a pracovné pokyny týkajúce
sa pílenia. Akýkoľvek iný spôsob používaniaalebo
úprava strojasapovažuje zapoužívanie vrozpore
surčením aje skrytým zdrojom nebezpečenstva úrazu. Za škody vzniknuté v dôsledku použitia v rozpore
s určením výrobca nepreberá žiadnu zodpovednosť.
Prístroj nie je určený na priemyselné použitie.
Vybavenie
blokovanie zapnutia
rukoväť
box s akumulátorom
odblokovanie (box s akumulátorom)
spínač ZAP / VYP
pílový list
základová doska
rýchloupínacie skľučovadlo
ochrana rúk
odblokovanie (držiak)
držiak
rýchlonabíjačka akumulátora
LED kontrolka (zelená)
LED kontrolka (červená)
indikácia stavu akumulátora
kontrolné tlačidlo
Rozsah dodávky
1 akumulátorová píla na vetvy FAAS 12 A1
1 akumulátorová rýchlonabíjačka FAAS 12 A1-2
1 box s akumulátormi FAAS 12 A1-1
1 držiak
1 pílový list na drevo 152 mm
1 prenosný kufrík
1 návod na obsluhu
Technické údaje
Akumulátorová píla na konáre: FAAS 12 A1
Dimenzačné napätie: 12 V
Dimenzačné otáčky
chodu naprázdno: n0 0 – 2700 min
Dĺžka zdvihu: 20 mm
Max. rezný výkon: drevo 80 mm
Box s akumulátormi: FAAS 12 A1-1
Typ: LÍTIUM-IÓNOVÝ
Dimenzačné napätie: 12 V
Kapacita: 1500 mAh
Akumulátorová rýchlonabíjačka: FAAS 12 A1-2
VSTUP/Input:
Dimenzačný prúd: 230 – 240 V ~, 50 Hz
Dimenzačný príkon: 30 W
VÝSTUP/Output:
Dimenzačné napätie: 12,6 V
Dimenzačný prúd: 1800 mA
Doba nabíjania: ca. 60 min.
Trieda ochrany: II /
(jednosmerný prúd)
-1
(jednosmerný prúd)
(striedavý prúd)
(jednosmerný prúd)
(dvojitá izolácia)
■ 42 │ SK
FAAS 12 A1
Page 47

Hodnoty emisií hluku:
Nameraná hodnota hluku stanovená vsúlade s
EN ISO 4871. Vyhodnotená hladina hluku A elektrického náradia na mieste používateľa je typicky:
Hladina akustického hluku: L
Neurčitosť: K
= 3 dB
pA
= 79 dB (A)
pA
Hladina akustického výkonu: LWA = 90 dB (A)
Neurčitosť: KWA = 3 dB
Noste ochranu sluchu!
Hodnoty celkových vibrácií (súčet vektorov troch
smerov) zisťované podľa EN60745:
Pílenie drevotriesky: a
Neurčitosť K = 1,5 m/s
= 6,6 m/s
h,B
2
Pílenie dreveného trámu: a
Neurčitosť K = 1,5 m/s
2
2
= 12,6 m/s
h,WB
UPOZORNENIE
► Vibračná hladina uvedená v týchtopokynoch
bola meraná vsúlade suvedeným postupom
merania a môže sa použiť na porovnanie
prístrojov. Uvedená hodnota emisií vibrácií sa
môže tiež použiť na počiatočné posúdenie
prerušenia.
VÝSTRAHA!
► Vibračná hladina sa mení podľa používania
elektrického náradia a vniektorých prípadoch môže byť väčšia ako hodnota uvedená
vtýchto pokynoch. Zaťaženie vibráciami by
sa mohlo podceniť, keď sa elektrické náradie
používa pravidelne takýmto spôsobom.
Pokúste sa zaťaženie vibráciami udržať na
čo najnižšej hodnote. Príkladom opatrení
na zníženie zaťaženia vibráciami je nosenie
rukavíc pri používaní náradia a obmedzenie
pracovného času. Pritom sa musia zohľadniť
všetky časti prevádzkového cyklu (napríklad
časy, v priebehu ktorých je elektrické náradie
vypnuté a tie, počas ktorých je síce zapnuté,
ale beží bez zaťaženia).
Všeobecné bezpečnostné
pokyny pre elektrické
náradia
VÝSTRAHA!
► Prečítajte si všetky bezpečnostné pokyny a
upozornenia. Zanedbania pri dodržiavaní
bezpečnostných pokynov a upozornení môžu
mať za následok zásah elektrickým prúdom,
požiar a/alebo ťažké poranenia.
2
Pre prípad budúceho použitia uschovajte
všetky bezpečnostné pokyny a upozornenia.
V bezpečnostných upozorneniach používaný pojem
„elektrické náradie“ sa týka elektrického náradia
napájaného zo siete (so sieťovým káblom) aelektrického náradia prevádzkovaného s akumulátorom
(bez sieťového kábla).
1. Bezpečnosť na pracovisku
a) Udržiavajte vaše pracovisko v čistote adobre
osvetlené. Neporiadok aneosvetlené pracovné
oblasti môžu viesť k úrazom.
b) Nepracujte s elektrickým náradím na miestach
s nebezpečenstvom výbuchu, na ktorých sa
nachádzajú horľavé kvapaliny, plyny alebo
horľavý prach. Z elektrického náradia vy-
chádzajú iskry, ktoré môžu tento prach alebo
výpary zapáliť.
c) Počas používaniaelektrického náradia za-
bráňte prístupu detí a iných osôb. Pri odvedení
pozornosti môžete stratiť kontrolu nad prístrojom.
2. Elektrická bezpečnosť
a) Prípojná zástrčka elektrického náradia musí
byť vhodná pre danú zásuvku. Zástrčka sa
nesmie žiadnym spôsobom modifikovať. Spolu
s elektrickým náradím, ktoré má ochranné
uzemnenie, nepoužívajte žiadne sieťové
adaptéry. Nezmenené zástrčky avhodné zá-
suvky znižujú riziko úrazu elektrickým prúdom.
FAAS 12 A1
SK
│
43 ■
Page 48

b) Vyvarujte sa telesnému kontaktu suzemne-
nými povrchmi, ako sú potrubia, vykurovacie
telesá, sporáky achladničky. Ak je vaše telo
uzemnené, hrozí zvýšené riziko úrazu elektrickým prúdom.
c) Chráňte elektrické náradie pred dažďom
alebo vlhkosťou. Vniknutie vody do elektrického náradia zvyšuje riziko úrazu elektrickým
prúdom.
d) Nepoužívajte kábel na iné účely, ako napr.
na nosenie, zavesenie elektrického náradia
alebo na vyťahovanie zástrčky z elektrickej
zásuvky. Udržiavajte kábel mimo zdrojov
tepla, oleja, ostrých hrán alebo pohybujúcich
sa častí prístroja. Poškodené alebo zamotané
káble zvyšujú riziko úrazu elektrickým prúdom.
e) Ak pracujete s elektrickým náradím vonku,
používajte len taký predlžovací kábel, ktorý
je schválený na vonkajšie použitie. Použitie
predlžovacieho kábla vhodného do vonkajšieho
prostredia zníži riziko úrazu elektrickým prúdom.
f) Ak nie je možné zabrániť prevádzke elektric-
kého náradia vo vlhkom prostredí, použite
prúdový chránič. Použitie prúdového chrániča
znižuje riziko úrazu elektrickým prúdom.
3. Bezpečnosť osôb
a) Buďte vždy pozorní a dbajte na to, čo robíte
a pri práci s elektrickým náradím postupujte
s rozvahou. Elektrické náradie nepoužívajte,
keď ste chorí alebo unavení alebo ste pod
vplyvom drog, alkoholu alebo liekov. Aj okamih
nepozornosti pri používaní elektrického náradia
môže spôsobiť vážne zranenia.
b) Vždy noste osobné ochranné prostriedky a
ochranné okuliare. Nosenie osobných ochranných prostriedkov, ako je maska proti prachu,
protišmyková bezpečnostná obuv, ochranná
prilba alebo ochrana sluchu, podľa druhu
apoužitia elektrického náradia, znižuje riziko
poranení.
c) Zabráňte neúmyselnému uvedeniu do pre-
vádzky. Pred zapojením napájania elektrického náradia do siete a/alebo akumulátora
a pred jeho zdvíhaním a prenášaním sa
presvedčte, či je vypnuté.
Ak máte pri prenášaní elektrického náradia prst
na spínači, alebo ak prístroj zapojíte do zdroja
elektrického prúdu zapnuté, môže to viesť
kúrazom.
d) Skôr než zapnete elektrické náradie, odstráňte
nastavovacie náradie alebo kľúč na skrutky.
Náradie alebo kľúč, ktorý sa nachádza na
otáčajúcej sa časti prístroja, môže spôsobiť
zranenia.
e) Vyhýbajte sa neprirodzenému držaniu tela.
Majte pevný postoj a nepretržite udržiavajte
rovnováhu. Takto môžete elektrické náradie
lepšie kontrolovať v neočakávaných situáciách.
f) Noste vhodný odev. Nenoste voľný odev ani
šperky. Vlasy, odev arukavice udržiavajte
v bezpečnej vzdialenosti od pohyblivých
dielov. Voľný odev, šperky alebo dlhé vlasy
môžu byť zachytené pohybujúcimi sa časťami
prístroja.
g) Ak je možná montáž zariadení na odsávanie
a zachytávanie prachu, presvedčte sa, či sú
tieto zapojené a či sú používané správne.
Používanie odsávania prachu môže zredukovať
ohrozenie prachom.
4. Používanie a manipulácia
s elektrickým náradím
a) Prístroj nepreťažujte. Pri vašej práci používajte
len na to určené elektrické náradie. Sospráv-
nym elektrickým náradím pracujete lepšie abezpečnejšie v uvedenom rozsahu jeho výkonu.
b) Nepoužívajte žiadny elektrický nástroj, kto-
rého spínač je poškodený.Elektrické náradie,
ktoré sa nedá zapnúť alebo vypnúť, je nebezpečné amusí sa opraviť.
c) Pred akýmkoľvek nastavovaním, výmenou
príslušenstva a pred odložením prístroja
vytiahnite zástrčku z elektrickej zásuvky a/
alebo odstráňte akumulátor.Toto preventívne
opatrenie zabraňuje neúmyselnému spusteniu
elektrického náradia.
d) Nepoužívané elektrické náradie uschovávajte
mimo dosahu deti. Nedovoľte používať prístroj
osobám, ktoré sním nie sú oboznámené alebo
si neprečítali tieto pokyny. Elektrické náradie
je nebezpečné, ak ho používajú neskúsené
osoby.
■ 44 │ SK
FAAS 12 A1
Page 49

e) Elektrické náradie starostlivo udržiavajte.
Skontrolujte, či pohyblivé diely fungujú správne, a nie sú zaseknuté, či niektoré diely nie
sú zlomené alebo poškodené tak, že je obmedzená funkcia elektrického náradia. Pred
použitím prístroja nechajte poškodené časti
opraviť. Veľa úrazov je spôsobených nedosta-
točnou údržbou elektrických náradí.
f) Rezné nástroje udržiavajte ostré ačisté.
Starostlivo udržiavané rezné nástroje sostrými
reznými hranami sa menej zasekávajú aľahšie
sa dajú viesť.
g) Elektrické náradie, príslušenstvo, nasadzo-
vané nástroje a pod. používajte v súlade s
týmito pokynmi. Zohľadnite pritom pracovné
podmienky ačinnosť, ktorú budete vykonávať.
Použitie elektrických náradí za iným, ako určeným účelom použitia, môže mať za následok
nebezpečné situácie.
5. Používanie a zaobchádzanie
s akumulátorovým prístrojom
a) Akumulátory nabíjajte len v nabíjačkách, ktoré
odporúča výrobca. Pri nabíjačkách, ktoré sú
určené pre určitý typ akumulátorov, hrozí nebezpečenstvo požiaru, ak sa použijú s inými akumulátormi.
b) V elektrických nástrojoch používajte len
akumulátory, určené na tento účel. Používanie
iných akumulátorov môže viesť kúrazom a
nebezpečenstvu požiaru.
c) Nepoužívaný akumulátor uchovávajte ďalej
od kancelárskych sponiek, mincí, kľúčov,
klincov, skrutiek a iných malých kovových
predmetov, ktoré by mohli spôsobiť premostenie kontaktov. Skrat medzi kontaktmi akumulá-
tora môže spôsobiť popáleniny alebo požiar.
d) Pri nesprávnom používaní môže z akumuláto-
ra vytekať kvapalina. Vyhýbajte sa kontaktu
s touto kvapalinou. Po náhodnom kontakte
miesto opláchnite vodou. Ak sa kvapalina
z akumulátora dostane do očí, vyhľadajte
lekársku pomoc. Unikajúca kvapalina z aku-
mulátora môže spôsobiť podráždenie kože a
popáleniny.
POZOR! NEBEZPEČENSTVO VÝ-
BUCHU! Nikdy nenabíjajte akumulátory, ktoré nie sú nabíjateľné.
Chráňte akumulátor pred sálavým
teplom, napr. aj pred trvalým slnečným žiarením, ohňom, vodou a vlhkosťou. Hrozí nebezpečenstvo výbuchu.
6. Servis
a) Elektrické náradie smie opravovať len kvali-
fikovaný odborný personál alen s použitím
originálnych náhradných dielov. Takto sa
zabezpečí, že zostane zachovaná bezpečnosť
elektrického náradia.
Bezpečnostné upozorneniašpecifické
pre šabľové píly
■ Ak vykonávate práce, pri ktorých by elektric-
ké náradie mohlo zasiahnuť skryté elektrické
vedeniaalebo vlastný sieťový kábel, uchopte
elektrické náradie zaizolované plochy
držadla. Kontakt selektrickým vedením, ktoré
je pod napätím, môže uviesť pod napätie aj
kovové časti prístroja aspôsobiť zásah elektrickým prúdom.
■ Noste ochrannú protiprachovú masku!
Bezpečnostné upozornenia pre
nabíjačky
■ Tento prístroj môžu používať deti od 8 rokov,
ako aj osoby sozníženými fyzickými, zmyslovými alebo mentálnymi schopnosťami alebo
nedostatkom skúseností avedomostí, ak sú pod
dohľadom alebo boli o bezpečnom používaní
prístroja poučené apochopili z toho vyplývajúce nebezpečenstvá. Deti sa nesmú hrať
sprístrojom. Deti nesmú vykonávať čistenie
anipoužívateľskú údržbu bez dohľadu.
Nabíjačka je určená len na prevádzku
v interiéri.
FAAS 12 A1
SK
│
45 ■
Page 50

■ Ak sa prípojný sieťový kábel tohto prístroja
poškodí, musí sa nechať vymeniť výrobcom
alebo jeho zákazníckym servisom alebo obdobne kvalifikovanou osobou, aby sa zabránilo
nebezpečenstvu.
Pracovné pokyny na pílenie
■ Skontrolujte, či sa v materiáli, určenom na
obrábanie, nenachádzajú cudzie telesá, ako
sú napr. klince, skrutky atď. a odstráňte ich.
■ Ak sa pílový list zasekne, prístroj ihneď vypnite.
Prepílenú štrbinu roztiahnite pomocou vhodného náradia a šabľovú pílu vytiahnite von.
■ Materiál píľte rovnomerným posuvom.
Originálne príslušenstvo/prídavné
zariadenia
■ Používajte len príslušenstvo a prídavné za-
riadenia, ktoré sú uvedené v návode na obsluhu. Použitie iných ako v návode na obsluhu
uvedených, vsádzkových nástrojov alebo iného
príslušenstva, môže znamenať nebezpečenstvo
poranenia.
Informácie o pílových listoch
Používať môžete každý pílový list, za predpokladu,
že je vybavený vhodnou upínacou univerzálnou
stopkou 1/2“ (12,7 mm). Na každý účel použitia
vašej šabľovej píly sú v obchode dostupné optimalizované pílové listy rôznych dĺžok.
UPOZORNENIE
► TPI = teeth per inch = počet zubov na 2,54
cm
Pred uvedením do prevádzky
Nabitie boxu s akumulátorom
POZOR!
► Vždy vytiahnite sieťovú zástrčku, keď vkladáte
alebo vyberáte box s akumulátorom
rýchlonabíjačky .
■ Nikdy nenabíjajte box s akumulátorom
je teplota okolia pod 10 °C alebo nad 40 °C.
z
, keď
♦ Zastrčte box s akumulátorom do rýchlonabí-
jačky
.
♦ Zastrčte elektrickú zástrčku do zásuvky. LED
kontrolka
♦ Zelená LED kontrolka
je ukončené a box s akumulátorom je pripravený
na použitie.
♦ Zastrčte box s akumulátor
■ Nikdy nenabíjajte box s akumulátorom
krát bezprostredne po rýchlonabíjaní. Hrozí
nebezpečenstvo, že box s akumulátorom
prebijete a skrátite tak životnosť akumulátora
a nabíjačky.
♦ Vypnite rýchlonabíjačku
sebe nasledujúcimi nabíjaniami minimálne na
15minút. Pritom vytiahnite sieťovú zástrčku.
svieti červeno.
signalizuje, že nabíjanie
do prístroja.
druhý
medzi dvomi po
Vloženie/vybratie boxu s akumulátorom do/z prístroja
Vloženie boxu s akumulátorom:
♦ Nechajte box s akumulátorom
zadného ručného držadla
Vybratie boxu s akumulátorom:
♦ Stlačte tlačidlo na odblokovanie a vyberte
box s akumulátorom
.
zapadnúť do
.
Kontrola stavu akumulátora
♦ Na kontrolu stavu nabitia akumulátora stlačte
kontrolné tlačidlo (pozri obr. A). Stav, príp.
zvyšný výkon signalizuje indikácia stavu akumulátora nasledovne:
♦ ČERVENÁ/ORANŽOVÁ/ZELENÁ = maximálne
nabitie/ maximálny výkon
ČERVENÁ/ORANŽOVÁ = stredné nabitie/
stredný výkon
ČERVENÁ = nízka kapacita – nabite akumulátor
■ 46 │ SK
FAAS 12 A1
Page 51

Vloženie/vybratie držiaka
UPOZORNENIE
► Vloženie/vybratie držiaka
nom pílovom liste nie je možné.
Vloženie držiaka (pozri obr. B – D):
♦ Stlačte odisťovacie tlačidlo
♦ Zastrčte držiak cez vedenia základovej
dosky do prístroja.
♦ Zaaretujte odisťovacie tlačidlo .
Vybratie držiaka:
♦ Stlačte odistenie
smerom dopredu z vedenia.
a vytiahnite držiak
pri namontova-
.
Montáž/výmena pílového listu
Pri montáži/výmene pílového listu noste ochranné
rukavice.
♦ Otočte rýchloupínacie skľučovadlo
v smere šípky apodržte ho otočené.
♦ Vtlačte požadovaný pílový list do rýchloupína-
cieho skľučovadla
POZOR!
► Zuby pílového listu
dopredu!
až na doraz.
musia pritom smerovať
úplne
Uvedenie do prevádzky
Zapnutie/vypnutie
Zapnutie:
♦ Stlačte blokovanie zapnutia
♦ Stlačte spínač ZAP / VYP .
Vypnutie:
♦ Pustite spínač ZAP / VYP
Metódy pílenia
A) Práca bez držiaka (pozri obr. E):
■ Pri väčších priemeroch konárov alebo pílení
dreva, plastu a stavebných materiálov pracujte
BEZ držiaka. Pílený kus musí dosadať na základovú dosku. Pri okrúhlych obrobkoch pohybujte
pílou kývavým rezným pohybom.
A1) Zarovnané pílenie:
■ Pomocou flexibilných pílových listov, za
predpokladu zodpovedajúcej dĺžky, môžete
odpíliť vyčnievajúce obrobky, ako napr. rúry
bezprostredne pri stene.
1. Pílový list priložte priamo na stenu.
2. Bočným tlakom na šabľovú pílu ho ohnite tak,
aby základová doska
3. Zapnite prístroj a obrobok odpíľte pomocou
konštantného tlaku.
.
.
priliehala na stenu.
♦ Pustite rýchloupínacie skľučovadlo , toto sa
musívrátiť späť do svojej východiskovej polohy.
Pílový list je teraz zablokovaný.
FAAS 12 A1
A2) Ponorné pílenie (pozri obr. F):
POZOR! NEBEZPEČENSTVO
SPÄTNÉHO NÁRAZU!
► Ponorné rezy sa smú vykonávať iba do
mäkkých materiálov (drevo a pod.).
1. Šabľovú pílu nasaďte spodnou hranou základovej
dosky
2. Šabľovú pílu preklopte smerom dopredu a
ponorte ju pílovým listom do obrobku.
3. Šabľovú pílu nastavte do zvislej polohy a píľte
ďalej pozdĺž línie rezu.
na obrobok. Zapnite prístroj.
SK
│
47 ■
Page 52

B) Práca s držiakom (pozri obr. G):
♦ Pohybujte pílou s ľahkým tlakom nadol.
Údržba ačistenie
VÝSTRAHA! NEBEZPEČENSTVO
PORANENIA! Pred akýmikoľvek
prácami na prístroji ho vypnite a
vyberte z neho akumulátor.
■ Pred všetkými prácami na elektrickom náradí
odstráňte vždy pílový list.
■ Prístroj a vetracie štrbiny udržiavajte vždy v
čistom stave. Pri upchatých vetracích štrbinách
hrozí prehriatie a / alebo poškodenie prístroja.
■ Po ukončení práce prístroj očistite.
■ Do vnútra prístroja sa nesmú dostať žiadne teku-
tiny. Na čistenie krytu používajte utierku. Nikdy
nepoužívajte benzín, rozpúšťadlá alebo čistiace
prostriedky, ktoré poškodzujú umelú hmotu.
■ Príp. vyčistite upnutie pílového listu štetcom
alebo vyfúkaním stlačeným vzduchom.
■ Pri dlhšom skladovaní lítium-iónového akumu-
látora musíte pravidelne kontrolovať jeho stav
nabitia. Optimálny je stav nabitia v rozsahu
50% až 80%. Na uskladnenie je najvhodnejšie chladné a suché prostredie.
Záruka
Natento prístroj máte záruku 3roky od dátumu
zakúpenia. Prístroj bol starostlivo vyrobený apred
dodaním dôkladne preskúšaný. Pokladničný blok
si uschovajte ako doklad ozakúpení. V prípade
poškodenia vzáruke sa, prosím, telefonicky spojte
s vaším servisným strediskom. Len tak sadá
zaistiť bezplatné zaslanie vášho tovaru.
Záruka sa vzťahuje len na chyby materiálu alebo
výroby, ale nie na poškodenia spôsobené prepravou, na spotrebné súčiastky, ani na poškodenia
krehkých dielov, napr. spínače alebo akumulátory.
Prístroj je určený len nasúkromné anie nakomerčné použitie. Zárukastrácaplatnosť pri nesprávnom
aneodbornom zaobchádzaní, po použití násilia
apri zásahoch, ktoré neboli vykonané naším autorizovaným servisom. Vaše práva vyplývajúce zo
zákona nie sú touto zárukou obmedzené. Záručné
plnenie nepredlžuje záručnú dobu. To platí aj pre
vymenené aopravené diely. Prípadné chyby anedostatky zistené už pri zakúpení musíte nahlásiť
ihneď po vybalení, najneskôr však do dvoch dní od
dátumu zakúpenia. Po uplynutí záručnej lehoty sú
prípadné opravy vykonané za poplatok.
■ 48 │ SK
FAAS 12 A1
Page 53

Servis
VÝSTRAHA!
► Opravy vašich prístrojov zverte špecializo-
vanej opravovni alebo odbornému elektrikárovi a pri opravách použite iba originálne
náhradné diely. Tým sa zaistí, že sa zachová
bezpečnosť prístroja.
► Výmenu zástrčky alebo sieťového kábla ne-
chajte vykonať len výrobcom prístroja alebo
jeho zákazníckym servisom. Tým sa zaistí, že
sa zachová bezpečnosť prístroja.
UPOZORNENIE
► Neuvedené náhradné diely (ako napr.
akumulátor, spínač alebo držiak) si môžete
objednať prostredníctvom nášho callcentra.
Servis Slovensko
Tel. 0850 232001
E-Mail: kompernass@lidl.sk
IAN 275666
Dovozca
KOMPERNASS HANDELS GMBH
BURGSTRASSE 21
44867 BOCHUM
GERMANY
www.kompernass.com
Likvidácia
Obal sa skladá zekologických materiá-
lov, ktoré môžete zlikvidovať vmiestnych
zberných surovinách.
Elektrické náradie nehádžte do
komunálneho odpadu!
V súlade s európskou smernicou č. 2012/19/EU
sa opotrebované elektrické náradia musia zberať
oddelene a odovzdať za účelom ekologickej
recyklácie.
Akumulátory nehádžte do komunál-
neho odpadu!
Chybné alebo použité akumulátory sa musia
recyklovať podľa smernice č. 2006/66/EC.
Akumulátor a prístroj odovzdajte v miestnych
zberných zariadeniach.
O možnostiach likvidácie opotrebovaných elektrických nástrojov sa, prosím, informujte na obecnej
alebo mestskej správe.
FAAS 12 A1
SK
│
49 ■
Page 54

Preklad originálneho vyhlásenia o zhode
My, spoločnosť KOMPERNASS HANDELS GMBH,
zodpovedná osoba za dokumentáciu:
pán Semi Uguzlu, BURGSTR. 21, 44867 BOCHUM,
DEUTSCHLAND vyhlasujeme, že tento výrobok je
vsúlade snasledovnými normami, normatívnymi
dokumentmi a smernicami ES:
Smernicao strojových zariadeniach
(2006/42/EC)
Elektromagnetická kompatibilita
(2014/30/EU)
Smernica RoHS
(2011/65/EU)
Použité harmonizované normy:
EN 60745-1:2009/A11:2010
EN 60745-2-11:2010
EN 62233:2008
EN 60335-1:2012/A11:2014
EN 60335-2-29:2004/A2:2010
EN 55014-1:2006/A2:2011
EN 55014-2:1997/A2:2008
EN 61000-3-2:2014
EN 61000-3-3:2013
Typ/označenie prístroja:
Akumulátorová píla na vetvy FAAS 12 A1
Rok výroby: 02 ‒ 2016
Sériové číslo: IAN 275666
Bochum, 26.01.2016
Semi Uguzlu
– Manažér kvality –
Technické zmeny vzmysle ďalšieho vývoja sú
vyhradené.
■ 50 │ SK
FAAS 12 A1
Page 55

Inhaltsverzeichnis
Einleitung .......................................................52
Bestimmungsgemäßer Gebrauch ............................................... 52
Ausstattung ................................................................52
Lieferumfang ............................................................... 52
Technische Daten ...........................................................52
Allgemeine Sicherheitshinweise für Elektrowerkzeuge ..................53
1. Arbeitsplatz-Sicherheit .....................................................53
2. Elektrische Sicherheit ...................................................... 53
3. Sicherheit von Personen ....................................................54
4. Verwendung und Behandlung des Elektrowerkzeugs .............................54
5. Verwendung und Behandlung des Akkuwerkzeugs ............................... 55
6. Service .................................................................55
Gerätespezifische Sicherheitshinweise für Säbelsägen .............................. 55
Sicherheitshinweise für Ladegeräte .............................................55
Arbeitshinweise zum Sägen .......................................56
Originalzubehör / -zusatzgeräte ............................................... 56
Informationen zu Sägeblättern .................................................56
Vor der Inbetriebnahme ..........................................56
Akku-Pack laden ............................................................56
Akku-Pack ins Gerät einsetzen / entnehmen ...................................... 56
Akkuzustand prüfen ......................................................... 56
Haltebügel einsetzen /entnehmen ..............................................57
Sägeblatt montieren / wechseln ............................................... 57
Inbetriebnahme .................................................57
Ein- / ausschalten ...........................................................57
Sägemethoden .............................................................57
Wartung und Reinigung ...........................................58
Garantie .......................................................58
Service .........................................................59
Importeur ......................................................59
Entsorgung .....................................................59
Original-Konformitätserklärung ....................................60
FAAS 12 A1
DE│AT│CH
│
51 ■
Page 56

AKKU-ASTSÄGE FAAS 12 A1
Einleitung
Wir beglückwünschen Sie zum Kauf Ihres neuen
Gerätes. Sie haben sich damit für ein hochwertiges
Produkt entschieden. Die Bedienungsanleitung ist
Teil dieses Produkts. Sie enthält wichtige Hinweise für
Sicherheit, Gebrauch und Entsorgung. Machen Sie
sich vor der Benutzung des Produkts mit allen Bedienund Sicherheitshinweisen vertraut. Benutzen Sie das
Produkt nur wie beschrieben und für die angegebenen Einsatzbereiche. Händigen Sie alle Unterlagen
bei Weitergabe des Produkts an Dritte mit aus.
Bestimmungsgemäßer Gebrauch
Das Gerät - normativ eine Säbelsäge - ist mit
festem Anschlag (Fußplatte) zum Sägen von Holz,
Kunststoff und Baustoffen bestimmt. Das Gerät eignet sich für grobe Sägearbeiten, gerade, kurvige
Schnitte und trennt Flächen bündig ab. Mit montiertem Haltebügel ist das Gerät zum Sägen von
Ästen geeignet. Beachten Sie die Informationen
zu Sägeblättern und Arbeitshinweise zum Sägen.
Jede andere Verwendung oder Veränderung der
Maschine gilt als nicht bestimmungsgemäß und
birgt erhebliche Unfallgefahren. Für aus bestimmungswidriger Verwendung entstandene Schäden
übernimmt der Hersteller keine Haftung. Das Gerät
ist nicht für den gewerblichen Einsatz bestimmt.
Ausstattung
Einschaltsperre
Handgriff
Akkupack
Entriegelung (Akkupack)
EIN- / AUS-Schalter
Sägeblatt
Fußplatte
Schnellspannfutter
Handschutz
Entriegelung (Haltebügel)
Haltebügel
Akku-Schnellladegerät
Kontroll-LED (grün)
Kontroll-LED (rot)
Akkuzustandsanzeige
Prüftaste
Lieferumfang
1 Akku-Astsäge FAAS 12 A1
1 Akku-Schnellladegerät FAAS 12 A1-2
1 Akku-Pack FAAS 12 A1-1
1 Haltebügel
1 Sägeblatt Holz 152 mm
1 Tragekoffer
1 Bedienungsanleitung
Technische Daten
Akku-Astsäge: FAAS 12 A1
Bemessungsspannung: 12 V
Bemessungs-
Leerlaufdrehzahl: n
Hublänge: 20 mm
Max. Schnittleistung: Holz 80 mm
Akku-Pack: FAAS 12 A1-1
Typ: LITHIUM-IONEN
Bemessungsspannung: 12 V
Kapazität: 1500 mAh
AkkuSchnellladegerät: FAAS 12 A1-2
EINGANG / Input:
Bemessungsstrom: 230 - 240 V ~, 50 Hz
Bemessungsaufnahme: 30 W
AUSGANG / Output:
Bemessungsspannung: 12,6 V
Bemessungsstrom: 1800 mA
Ladedauer: ca. 60 min
Schutzklasse: II /
Geräuschemissionswerte:
Messwert für Geräusch ermittelt entsprechend EN
ISO 4871. Der A-bewertete Geräuschpegel des
Elektrowerkzeugs am Ort des Benutzers beträgt
typischerweise:
Schalldruckpegel: L
Unsicherheit: K
Schallleistungspegel: LWA = 90 dB (A)
Unsicherheit: K
Gehörschutz tragen!
(Gleichstrom)
0–2700 min
0
(Gleichstrom)
(Wechselstrom)
(Gleichstrom)
(Doppelisolierung)
= 79 dB (A)
pA
= 3 dB
pA
= 3 dB
WA
-1
■ 52 │ DE
│AT│
CH
FAAS 12 A1
Page 57

Schwingungsgesamtwerte (Vektorsumme dreier
Richtungen) ermittelt entsprechend EN 60745:
Sägen von
Spanplatte: a
= 6,6 m/s2
h,B
Unsicherheit K = 1,5 m/s
2
Sägen von
Holzbalken: a
= 12,6 m/s2
h,WB
Unsicherheit K = 1,5 m/s
2
HINWEIS
► Der in diesen Anweisungen angegebene
Schwingungspegel ist entsprechend einem
genormten Messverfahren gemessen worden
und kann für den Gerätevergleich verwendet
werden. Der angegebene Schwingungsemissionswert kann auch zu einer einleitenden
Einschätzung der Aussetzung verwendet
werden.
WARNUNG!
► Der Schwingungspegel wird sich entspre-
chend dem Einsatz des Elektrowerkzeugs
verändern und kann in manchen Fällen über
dem in diesen Anweisungen angegebenen
Wert liegen. Die Schwingungsbelastung
könnte unterschätzt werden, wenn das
Elektrowerkzeug regelmäßig in solcher Weise
verwendet wird. Versuchen Sie, die Belastung
durch Vibrationen so gering wie möglich zu
halten. Beispielhafte Maßnahmen zur Verringerung der Vibrationsbelastung sind das Tragen von Handschuhen beim Gebrauch des
Werkzeugs und die Begrenzung der Arbeitszeit. Dabei sind alle Anteile des Betriebszyklus zu berücksichtigen (beispielweise Zeiten,
in denen das Elektrowerkzeug abgeschaltet
ist, und solche, in denen es zwar eingeschaltet ist, aber ohne Belastung läuft).
Allgemeine
Sicherheitshinweise
für Elektrowerkzeuge
WARNUNG!
► Lesen Sie alle Sicherheitshinweise und Anwei-
sungen. Versäumnisse bei der Einhaltung der
Sicherheitshinweise und Anweisungen können
elektrischen Schlag, Brand und/oder schwere
Verletzungen verursachen.
Bewahren Sie alle Sicherheitshinweise und
Anweisungen für die Zukunft auf.
Der in den Sicherheitshinweisen verwendete Begriff
„Elektrowerkzeug“ bezieht sich auf netzbetriebene
Elektrowerkzeuge (mit Netzkabel) und auf akkubetriebene Elektrowerkzeuge (ohne Netzkabel).
1. Arbeitsplatz-Sicherheit
a) Halten Sie Ihren Arbeitsbereich sauber und
gut beleuchtet. Unordnung und unbeleuchtete
Arbeitsbereiche können zu Unfällen führen.
b) Arbeiten Sie mit dem Elektrowerkzeug nicht in
explosionsgefährdeter Umgebung, in der sich
brennbare Flüssigkeiten, Gase oder Stäube
befinden. Elektrowerkzeuge erzeugen Funken, die
den Staub oder die Dämpfe entzünden können.
c) Halten Sie Kinder und andere Personen wäh-
rend der Benutzung des Elektrowerkzeugs
fern. Bei Ablenkung können Sie die Kontrolle
über das Gerät verlieren.
2. Elektrische Sicherheit
a) Der Anschlussstecker des Elektrowerkzeuges
muss in die Steckdose passen. Der Stecker
darf in keiner Weise verändert werden.
Verwenden Sie keine Adapterstecker gemeinsam mit schutzgeerdeten Elektrowerkzeugen.
Unveränderte Stecker und passende Steckdosen
verringern das Risiko eines elektrischen Schlages.
FAAS 12 A1
DE│AT│CH
│
53 ■
Page 58

b) Vermeiden Sie Körperkontakt mit geerdeten
Oberflächen, wie von Rohren, Heizungen,
Herden und Kühlschränken. Es besteht ein
erhöhtes Risiko durch elektrischen Schlag, wenn
Ihr Körper geerdet ist.
c) Halten Sie Elektrowerkzeuge von Regen oder
Nässe fern. Das Eindringen von Wasser in ein
Elektrogerät erhöht das Risiko eines elektrischen
Schlages.
d) Zweckentfremden Sie das Kabel nicht, um
das Elektrowerkzeug zu tragen, aufzuhängen
oder um den Stecker aus der Steckdose zu
ziehen. Halten Sie das Kabel fern von Hitze,
Öl, scharfen Kanten oder sich bewegenden
Geräteteilen. Beschädigte oder verwickelte Kabel
erhöhen das Risiko eines elektrischen Schlages.
e) Wenn Sie mit einem Elektrowerkzeug im
Freien arbeiten, verwenden Sie nur Verlängerungskabel, die auch für den Außenbereich
zugelassen sind. Die Anwendung eines für den
Außenbereich geeigneten Verlängerungskabels
verringert das Risiko eines elektrischen Schlages.
f) Wenn der Betrieb des Elektrowerkzeuges in
feuchter Umgebung nicht vermeidbar ist, verwenden Sie einen Fehlerstromschutzschalter.
Der Einsatz eines Fehlerstromschutzschalters vermindert das Risiko eines elektrischen Schlages.
3. Sicherheit von Personen
a) Seien Sie stets aufmerksam, achten Sie darauf,
was Sie tun und gehen Sie mit Vernunft
an die Arbeit mit einem Elektrowerkzeug.
Benutzen Sie kein Elektrowerkzeug, wenn Sie
krank oder müde oder unter dem Einfluss von
Drogen, Alkohol oder Medikamenten stehen.
Ein Moment der Unachtsamkeit beim Gebrauch
des Elektrowerk zeuges kann zu ernsthaften
Verletzungen führen.
b) Tragen Sie persönliche Schutzausrüstung und
immer eine Schutzbrille. Das Tragen persönlicher
Schutzausrüstung wie Staubmaske, rutschfeste
Sicherheitsschuhe, Schutzhelm oder Gehörschutz,
je nach Art und Einsatz des Elektrowerkzeuges,
verringert das Risiko von Verletzungen.
c) Vermeiden Sie eine unbeabsichtigte Inbetrieb-
nahme. Vergewissern Sie sich, dass das
Elektrowerkzeug ausgeschaltet ist, bevor Sie
es an die Stromversorgung und / oder den
Akku anschließen, es aufnehmen oder tragen.
Wenn Sie beim Tragen des Elektrowerkzeuges den
Finger am Schalter haben oder das Gerät bereits
eingeschaltet an die Stromversorgung anschließen,
kann dies zu Unfällen führen.
d) Entfernen Sie Einstellwerkzeuge oder Schrau-
benschlüssel, bevor Sie das Elektrowerkzeug
einschalten. Ein Werkzeug oder Schlüssel, der
sich in einem drehenden Geräteteil befindet,
kann zu Verletzungen führen.
e) Vermeiden Sie eine abnormale Körperhaltung.
Sorgen Sie für einen sicheren Stand und halten
Sie jederzeit das Gleichgewicht. Dadurch kön-
nen Sie das Elektrowerkzeug in unerwarteten
Situationen besser kontrollieren.
f) Tragen Sie geeignete Kleidung. Tragen Sie
keine weite Kleidung oder Schmuck. Halten
Sie Haare, Kleidung und Handschuhe fern
von sich bewegenden Teilen. Lockere Kleidung,
Schmuck oder lange Haare können von sich
bewegenden Teilen erfasst werden.
g) Wenn Staubabsaug- und -auffangeinrichtun-
gen montiert werden können, vergewissern
Sie sich, dass diese angeschlossen sind und
richtig verwendet werden. Die Verwendung
einer Staubabsaugung kann Gefährdungen
durch Staub verringern.
4. Verwendung und Behandlung des
Elektrowerkzeugs
a) Überlasten Sie das Gerät nicht. Verwenden
Sie für Ihre Arbeit das dafür bestimmte
Elektrowerkzeug. Mit dem passenden Elektro-
werkzeug arbeiten Sie besser und sicherer im
angegebenen Leistungsbereich.
b) Benutzen Sie kein Elektrowerkzeug, dessen
Schalter defekt ist. Ein Elektrowerkzeug, das
sich nicht mehr ein- oder ausschalten lässt, ist
gefährlich und muss repariert werden.
c) Ziehen Sie den Stecker aus der Steckdose
und / oder entfernen Sie den Akku, bevor Sie
Geräteeinstellungen vornehmen, Zubehörteile wechseln oder das Gerät weglegen. Diese
Vorsichtsmaßnahme verhindert den unbeabsichtigten Start des Elektrowerkzeuges.
d) Bewahren Sie unbenutzte Elektrowerkzeuge
außerhalb der Reichweite von Kindern auf.
■ 54 │ DE
│AT│
CH
FAAS 12 A1
Page 59

Lassen Sie Personen das Gerät nicht benutzen,
die mit diesem nicht vertraut sind oder diese
Anweisungen nicht gelesen haben. Elektro-
werkzeuge sind gefährlich, wenn sie von
unerfahrenen Personen benutzt werden.
e) Pflegen Sie Elektrowerkzeuge mit Sorgfalt.
Kontrollieren Sie, ob bewegliche Teile einwandfrei funktionieren und nicht klemmen, ob Teile
gebrochen oder so beschädigt sind, dass die
Funktion des Elektrowerkzeuges beeinträchtigt
ist. Lassen Sie beschädigte Teile vor dem Einsatz
des Gerätes reparieren. Viele Unfälle haben ihre
Ursache in schlecht gewarteten Elektrowerkzeugen.
f) Halten Sie Schneidwerkzeuge scharf und
sauber. Sorgfältig gepflegte Schneidwerkzeuge
mit scharfen Schneidkanten verklemmen sich
weniger und sind leichter zu führen.
g) Verwenden Sie Elektrowerkzeug, Zubehör,
Einsatzwerkzeuge usw. entsprechend diesen
Anweisungen. Berücksichtigen Sie dabei die
Arbeitsbedingungen und die auszuführende
Tätigkeit. Der Gebrauch von Elektrowerkzeugen
für andere als die vorgesehenen Anwendungen
kann zu gefährlichen Situationen führen.
5. Verwendung und Behandlung des
Akkuwerkzeugs
a) Laden Sie die Akkus nur in Ladegeräten auf,
die vom Hersteller empfohlen werden. Für
ein Ladegerät, das für eine bestimmte Art von
Akkus geeignet ist, besteht Brandgefahr, wenn
es mit anderen Akkus verwendet wird.
b) Verwenden Sie nur die dafür vorgesehenen
Akkus in den Elektrowerkzeugen. Der Gebrauch
von anderen Akkus kann zu Verletzungen und
Brandgefahr führen.
c) Halten Sie den nicht benutzten Akku fern von
Büroklammern, Münzen, Schlüsseln, Nägeln,
Schrauben oder anderen kleinen Metallgegenständen, die eine Überbrückung der Kontakte
verursachen könnten. Ein Kurzschluss zwischen
den Akkukontakten kann Verbrennungen oder
Feuer zur Folge haben.
d) Bei falscher Anwendung kann Flüssigkeit aus
dem Akku austreten. Vermeiden Sie den Kontakt damit. Bei zufälligem Kontakt mit Wasser
abspülen. Wenn die Flüssigkeit in die Augen
kommt, nehmen Sie zusätzlich ärztliche Hilfe
in Anspruch. Austretende Akkuflüssigkeit kann
zu Hautreizungen oder Verbrennungen führen.
VORSICHT! EXPLOSIONSGEFAHR!
Laden Sie nicht aufladbare Batterien
niemals auf.
Schützen Sie den Akku vor Hitze, z. B.
auch vor dauernder Sonneneinstrahlung, Feuer, Wasser und Feuchtigkeit.
Es besteht Explosionsgefahr.
6. Service
a) Lassen Sie Ihr Elektrowerkzeug nur von qualifizier-
tem Fachpersonal und nur mit Original-Ersatzteilen
reparieren. Damit wird sichergestellt, dass die
Sicherheit des Elektrowerkzeugs erhalten bleibt.
Gerätespezifische
Sicherheitshinweise für Säbelsägen
■ Halten Sie das Elektrowerkzeug an den
isolierten Griffflächen, wenn Sie Arbeiten
ausführen, bei denen das Elektrowerkzeug
verborgene Stromleitungen oder das eigene
Netzkabel treffen kann. Der Kontakt mit einer
spannungsführenden Leitung kann auch metallene Geräteteile unter Spannung setzen und zu
einem elektrischen Schlag führen.
■ Tragen Sie eine Staubschutzmaske!
Sicherheitshinweise für Ladegeräte
■ Dieses Gerät kann von Kindern ab 8 Jahren
und darüber sowie von Personen mit verringerten physischen, sensorischen oder mentalen
Fähigkeiten oder Mangel an Erfahrung und
Wissen benutzt werden, wenn sie beaufsichtigt
oder bezüglich des sicheren Gebrauchs des
Gerätes unterwiesen wurden und die daraus
resultierenden Gefahren verstehen. Kinder
dürfen nicht mit dem Gerät spielen. Reinigung
und Benutzer-Wartung dürfen nicht von Kindern
ohne Beaufsichtigung durchgeführt werden.
Das Ladegerät ist nur für den Betrieb im
Innenbereich geeignet.
FAAS 12 A1
DE│AT│CH
│
55 ■
Page 60

■ Wenn die Netzanschlussleitung dieses Gerätes
beschädigt wird, muss sie durch den Hersteller
oder seinen Kundendienst oder eine ähnlich
qualifizierte Person ersetzt werden, um Gefährdungen zu vermeiden.
Arbeitshinweise zum Sägen
■ Prüfen Sie das zu bearbeitende Material auf
Fremdkörper wie Nägel, Schrauben etc. und
entfernen Sie diese.
■ Schalten Sie das Gerät sofort aus, wenn das
Sägeblatt verklemmt. Spreizen Sie den bereits
gesägten Spalt mit einem geeigneten Werkzeug
und ziehen Sie die Säbelsäge heraus.
■ Sägen Sie das Material mit gleichmäßigem
Vorschub.
Originalzubehör / -zusatzgeräte
■ Benutzen Sie nur Zubehör und Zusatzgeräte,
die in der Gebrauchsanweisung angegeben
sind. Der Gebrauch anderer als in der Bedie-
nungsanleitung empfohlener Einsatzwerkzeuge
oder anderen Zubehörs kann eine Verletzungsgefahr für Sie bedeuten.
Informationen zu Sägeblättern
Sie können jedes Sägeblatt verwenden, vorausgesetzt, es ist mit der passenden Aufnahme - ½“
(12,7 mm) Universalschaft versehen. Es sind für
jeden Einsatzzweck Ihrer Säbelsäge optimierte
Sägeblätter in verschiedenen Längen im Handel
erhältlich.
HINWEIS
► TPI = teeth per inch = die Anzahl der Zähne je
2,54 cm
Vor der Inbetriebnahme
Akku-Pack laden
VORSICHT!
► Ziehen Sie immer den Netzstecker, bevor Sie den
Akku-Pack
nehmen bzw. einsetzen.
■ Laden Sie den Akku-Pack
Umgebungstemperatur unterhalb 10 °C oder
oberhalb 40 °C liegt.
aus dem Akku-Schnell-Ladegerät
nie, wenn die
♦ Stecken Sie den Akku-Pack
Ladegerät
♦ Stecken Sie den Netzstecker in die Steckdose.
Die Kontroll-LED
♦ Die grüne Kontroll-LED
dass der Ladevorgang abgeschlossen und der
Akku-Pack einsatzbereit ist.
♦ Schieben Sie den Akku-Pack
■ Laden Sie einen Akku-Pack
bar nach dem Schnell-Ladevorgang ein zweites
Mal auf. Es besteht die Gefahr, dass der AkkuPack überladen und dadurch die Lebensdauer von Akku und Ladegerät verringert wird.
♦ Schalten Sie das Schnell-Ladegerät zwischen
aufeinanderfolgenden Ladevorgängen für
mindestens 15 Minuten ab. Ziehen Sie dazu den
Netzstecker.
.
leuchtet rot.
in das Schnell-
signalisiert Ihnen,
in das Gerät ein.
niemals unmittel-
Akku-Pack ins Gerät
einsetzen / entnehmen
Akku-Pack einsetzen:
♦ Lassen Sie den Akku-Pack
einrasten.
Akku-Pack entnehmen:
♦ Drücken Sie die Taste zur Entriegelung und
entnehmen Sie den Akku-Pack
in den Handgriff
.
Akkuzustand prüfen
♦ Drücken Sie zum Prüfen des Akkuzustands die
Prüftaste (siehe Abb. A).
Der Zustand bzw. die Restleistung wird in der
Akkuzustandsanzeige
♦ ROT / ORANGE / GRÜN = maximale Ladung /
Leistung
ROT / ORANGE = mittlere Ladung / Leistung
ROT = schwache Ladung – Akku aufladen
wie folgt angezeigt:
■ 56 │ DE
│AT│
CH
FAAS 12 A1
Page 61

Haltebügel einsetzen /entnehmen
HINWEIS
► Das Einsetzen / Entnehmen des Haltebügels
ist bei montiertem Sägeblatt nicht möglich.
Haltebügel einsetzen (siehe Abb. B–D):
♦ Drücken Sie die Entriegelungstaste
♦ Schieben Sie den Haltebügel über die Füh-
rungen der Fußplatte in das Gerät.
♦ Arretieren Sie die Entriegelungstaste .
Haltebügel entnehmen:
♦ Drücken Sie die Entriegelung
den Haltebügel nach vorne aus der Führung.
.
und ziehen Sie
Sägeblatt montieren / wechseln
Tragen Sie beim Einsetzen / Wechsel des Sägeblattes Schutzhandschuhe.
♦ Drehen Sie das Schnellspannfutter
dig in Pfeilrichtung und halten Sie es gedreht.
♦ Drücken Sie das benötigte Sägeblatt bis zum
Anschlag in das Schnellspannfutter
ACHTUNG!
► Die Zähne des Sägeblatts
nach unten zeigen!
vollstän-
.
müssen dabei
Inbetriebnahme
Ein- / ausschalten
Einschalten:
♦ Drücken Sie die Einschaltsperre
♦ Drücken Sie den EIN- / AUS-Schalter .
Ausschalten:
♦ Lassen Sie den EIN- / AUS-Schalter
Sägemethoden
A) Arbeiten ohne Haltebügel (siehe Abb. E):
■ Bei größeren Astdurchmessern oder Sägen von
Holz, Kunststoff und Baustoffen arbeiten Sie
OHNE Haltebügel. Das Sägestück muss an der
Fußplatte anliegen. Bewegen Sie die Säge bei
runden Werkstücken im Wiegeschnitt.
A1) Bündig sägen:
■ Mit flexiblen Sägeblättern, entsprechende Län-
ge vorausgesetzt, können Sie hervorstehende
Werkstücke wie z. B. Rohre unmittelbar an der
Wand absägen.
1. Legen Sie das Sägeblatt direkt an der Wand an.
2. Biegen Sie es durch seitlichen Druck auf die
Säbelsäge so, dass die Fußplatte
der Wand anliegt.
3. Schalten Sie das Gerät ein und sägen Sie das
Werkstück mit konstantem Druck ab.
.
los.
seitlich an
♦ Lassen Sie das Schnellspannfutter los, es
muss in seine Ausgangsposition zurückkehren.
Das Sägeblatt ist nun verriegelt.
FAAS 12 A1
A2) Tauchsägen (siehe Abb. F):
VORSICHT! RÜCKSCHLAGGEFAHR!
► Tauchschnitte dürfen nur in weichen Werkstoffen
(Holz o. ä.) durchgeführt werden.
1. Setzen Sie die Säbelsäge mit der Unterkante der
Fußplatte
Sie das Gerät ein.
2. Kippen Sie die Säbelsäge nach vorn und
tauchen mit dem Sägeblatt in das Werkstück ein.
3. Stellen Sie die Säbelsäge senkrecht und sägen
Sie weiter entlang der Schnittlinie.
auf das Werkstück auf. Schalten
DE│AT│CH
│
57 ■
Page 62

B) Arbeiten mit Haltebügel (siehe Abb. G):
♦ Bewegen Sie die Säge mit leichtem Druck nach
unten.
Wartung und Reinigung
WARNUNG! VERLETZUNGSGEFAHR!
Schalten Sie vor allen Arbeiten am
Gerät das Gerät aus und entnehmen
Sie den Akku.
■ Entfernen Sie vor allen Arbeiten am Elektrowerk-
zeug stets das Sägeblatt.
■ Halten Sie das Gerät und die Lüftungsschlitze
stets sauber. Bei verstopften Lüftungsschlitzen
droht eine Überhitzung und / oder eine Beschädigung des Gerätes.
■ Reinigen Sie das Gerät nach Abschluss der
Arbeit.
■ Es dürfen keine Flüssigkeiten in das Innere
des Gerätes gelangen. Verwenden Sie zum
Reinigen des Gehäuses ein Tuch. Verwenden
Sie niemals Benzin, Lösungsmittel oder Reiniger,
die Kunststoff angreifen.
■ Reinigen Sie die Sägeblattaufnahme ggf. mit ei-
nem Pinsel oder durch Ausblasen mit Druckluft.
■ Soll ein Lithium-Ionen-Akku längere Zeit gela-
gert werden, muss regelmäßig der Ladezustand
kontrolliert werden. Der optimale Ladezustand
liegt zwischen 50 % und 80 %. Das optimale
Lagerungsklima ist kühl und trocken.
Garantie
Sie erhalten auf dieses Gerät 3 Jahre Garantie
ab Kaufdatum. Das Gerät wurde sorgfältig
produziert und vor Anlieferung gewissenhaft
geprüft. Bitte bewahren Sie den Kassenbon als
Nachweis für den Kauf auf. Bitte setzen Sie sich
im Garantiefall mit Ihrer Servicestelle telefonisch
in Verbindung. Nur so kann eine kostenlose
Einsendung Ihrer Ware gewährleistet werden.
Die Garantieleistung gilt nur für Material- oder
Fabrikationsfehler, nicht aber für Transportschäden, Verschleißteile oder für Beschädigungen an
zerbrechlichen Teilen, z. B. Schalter oder Akkus.
Das Produkt ist lediglich für den privaten und nicht
für den gewerblichen Gebrauch bestimmt. Bei
missbräuchlicher und unsachgemäßer Behandlung,
Gewaltanwendung und bei Eingriffen, die nicht
von unserer autorisierten Service-Niederlassung
vorgenommen wurden, erlischt die Garantie. Ihre
gesetzlichen Rechte werden durch diese Garantie
nicht eingeschränkt. Die Garantiezeit wird durch
die Gewährleistung nicht verlängert. Dies gilt auch
für ersetzte und reparierte Teile. Eventuell schon
beim Kauf vorhandene Schäden und Mängel müssen sofort nach dem Auspacken gemeldet werden,
spätestens aber zwei Tage nach Kaufdatum. Nach
Ablauf der Garantiezeit anfallende Reparaturen
sind kostenpflichtig.
■ 58 │ DE
│AT│
CH
FAAS 12 A1
Page 63

Service
WARNUNG!
► Lassen Sie Ihre Geräte von der Servicestelle
oder einer Elektrofachkraft und nur mit
Original-Ersatzteilen reparieren. Damit wird
sichergestellt, dass die Sicherheit des Gerätes
erhalten bleibt.
► Lassen Sie den Austausch des Steckers
oder der Netzleitung immer vom Hersteller
des Gerätes oder seinem Kundendienst
ausführen. Damit wird sichergestellt, dass die
Sicherheit des Gerätes erhalten bleibt.
Entsorgung
Die Verpackung besteht aus umweltfreund-
lichen Materialien, die Sie über die örtlichen
Recyclingstellen entsorgen können.
Werfen Sie Elektrowerkzeuge nicht
in den Hausmüll!
Gemäß Europäischer Richtlinie 2012/19/EU
müssen verbrauchte Elektrowerkzeuge getrennt
gesammelt und einer umweltgerechten Wiederverwertung zugeführt werden.
HINWEIS
► Nicht aufgeführte Ersatzteile (wie z.B. Akku,
Schalter oder Haltebügel) können Sie über
unsere Callcenter bestellen.
Service Deutschland
Tel.: 0800 5435 111 (Kostenfrei aus dem
dt. Festnetz/Mobilfunknetz)
E-Mail: kompernass@lidl.de
IAN 275666
Service Österreich
Tel.: 0820 201 222 (0,15 EUR/Min.)
E-Mail: kompernass@lidl.at
IAN 275666
Service Schweiz
Tel.: 0842 665566 (0,08 CHF/Min.,
Mobilfunk max. 0,40 CHF/Min.)
E-Mail: kompernass@lidl.ch
IAN 275666
Importeur
KOMPERNASS HANDELS GMBH
BURGSTRASSE 21
44867 BOCHUM
GERMANY
www.kompernass.com
Werfen Sie Akkus nicht in den
Hausmüll!
Defekte oder verbrauchte Akkus müssen gemäß
Richtlinie 2006/66/EC recycelt werden. Geben
Sie Akku-Pack und / oder das Gerät über die angebotenen Sammeleinrichtungen zurück.
Über Entsorgungsmöglichkeiten für ausgediente
Elektrowerkzeuge / Akku-Packs informieren Sie sich
bitte bei Ihrer Gemeinde- oder Stadtverwaltung.
FAAS 12 A1
DE│AT│CH
│
59 ■
Page 64

OriginalKonformitätserklärung
Wir, KOMPERNASS HANDELS GMBH, Dokumentenverantwortlicher: Herr Semi Uguzlu, BURGSTR. 21,
44867 BOCHUM, DEUTSCHLAND, erklären hiermit,
dass dieses Produkt mit den folgenden Normen,
normativen Dokumenten und EG-Richtlinien übereinstimmt:
Maschinenrichtlinie
(2006 / 42 / EC)
Elektromagnetische Verträglichkeit
(2014 / 30 / EU)
RoHS-Richtlinie
(2011 / 65 / EU)
Angewandte harmonisierte Normen:
EN 60745-1:2009/A11:2010
EN 60745-2-11:2010
EN 62233:2008
EN 60335-1:2012/A11:2014
EN 60335-2-29:2004/A2:2010
EN 55014-1:2006/A2:2011
EN 55014-2:1997/A2:2008
EN 61000-3-2:2014
EN 61000-3-3:2013
Typ / Gerätebezeichnung:
Akku-Astsäge FAAS 12 A1
Herstellungsjahr: 02 - 2016
Seriennummer: IAN 275666
Bochum, 26.01.2016
Semi Uguzlu
- Qualitätsmanager Technische Änderungen im Sinne der Weiterent-
wicklung sind vorbehalten.
■ 60 │ DE
│AT│
CH
FAAS 12 A1
Page 65

KOMPERNASS HANDELS GMBH
BURGSTRASSE 21
44867 BOCHUM
DEUTSCHLAND / GERMANY
www.kompernass.com
Last Information Update · Információk állása · Stanje informacij
Stav informací · Stav informácií · Stand der Informationen:
01 / 2016 · Ident.-No.: FAAS12A1-012016-3
IAN 275666
4
 Loading...