

Fisher & Paykel OR30SDPWSX Installation Instructions And User Manual

US CA
Installation instructions
and User guide
Freestanding cooker
OR30SDPWSX model


1
Contents
Safety and warnings
2
Installation instructions
8
First time
17
Setting the clock
18
Using your oven
19
Cooking functions
22
Cooking guide
24
Using the electronic timer
26
Automatic cooking
27
Using your Ceramic glass cooktop
28
Using the warming drawer
32
Care and cleaning
34
Troubleshooting
44
Warranty and service
47
Important!
SAVE THESE INSTRUCTIONS
The models shown in this User Guide may not be available in all markets and are
subject to change at any time. For current details about model and specification
availability in your country, please go to our website www.fisherpaykel.com or
contact your local Fisher & Paykel dealer.
US
CA
2
Safety and warnings
Your safety is important to us.
Please read this information before using your cooktop.
Installation
IMPORTANT SAFETY INSTRUCTIONS
Read these instructions carefully before installing or using this product.
Save these instructions for the local electrical inspector’s use.
Please make this information available to the person responsible for installing your cooktop,
as it could reduce the installation costs.
Please leave these instructions with the appliance. Inform the customer to retain for future
reference.
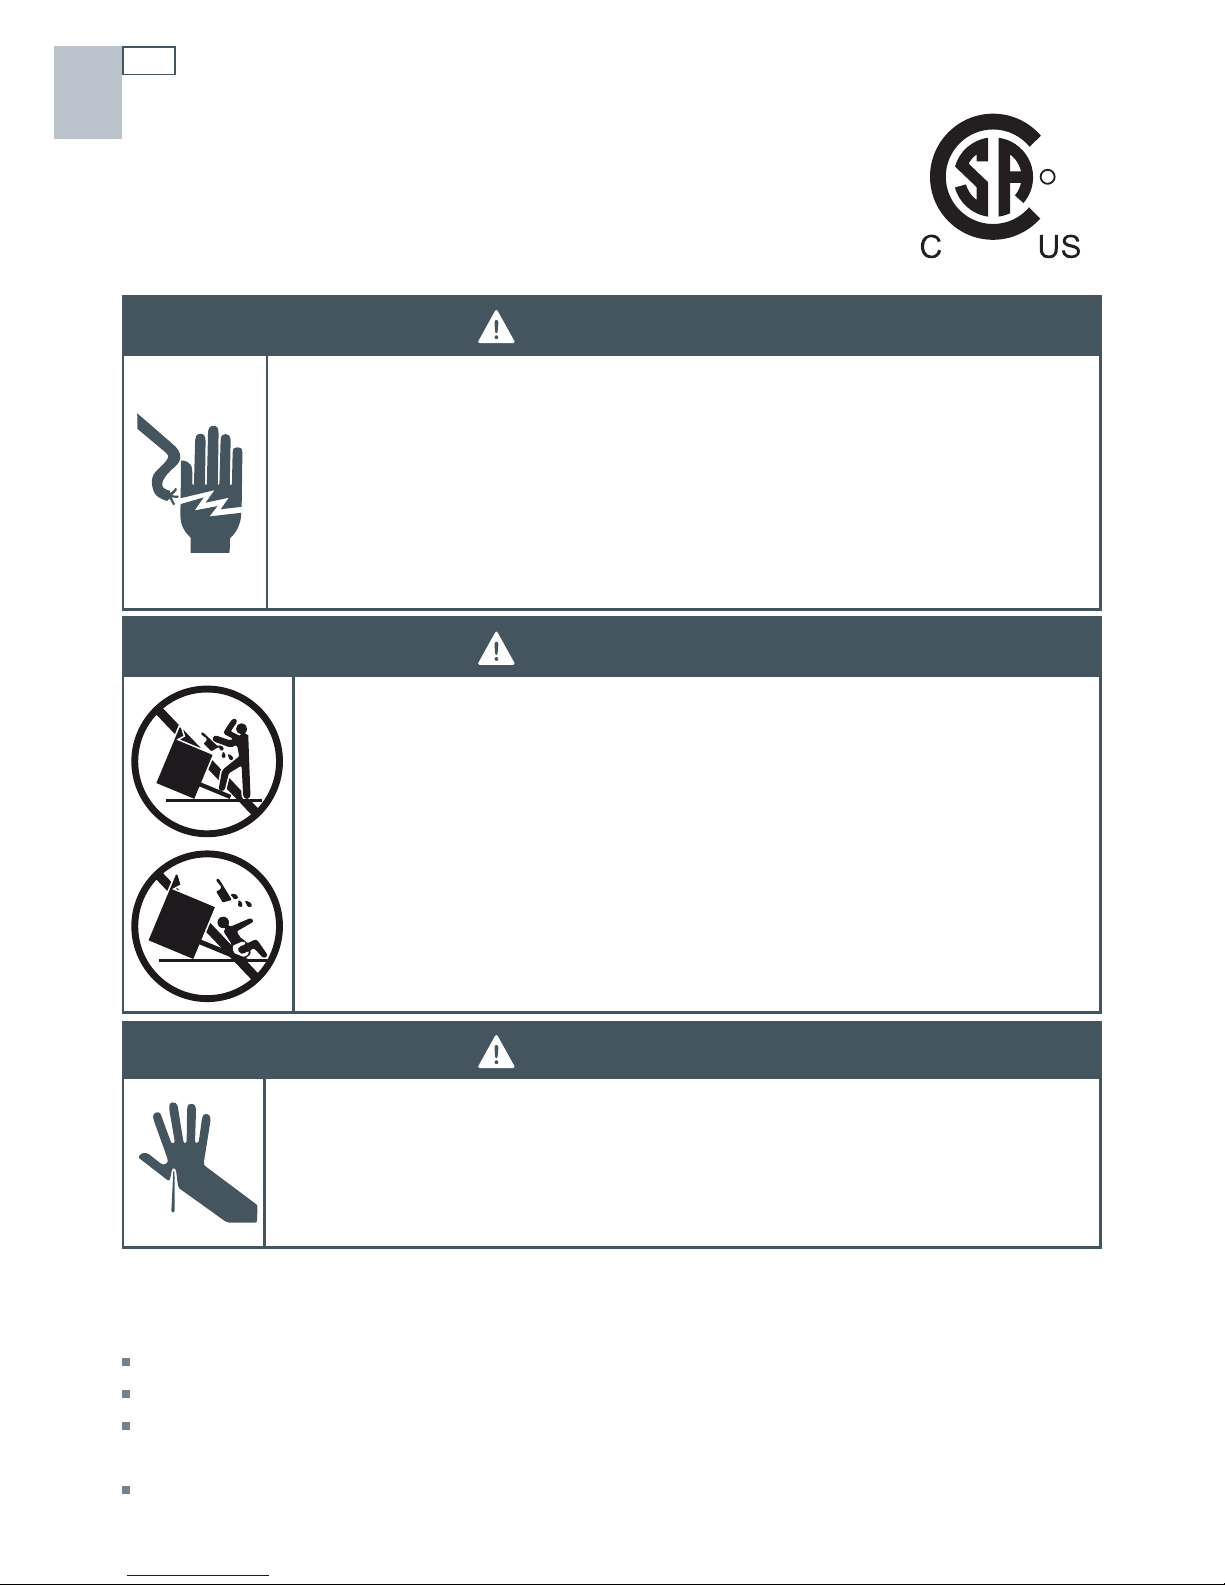
WARNING!
Electrical Shock Hazard
Disconnect the appliance from the mains electricity supply before carrying
out any work or maintenance on it.
Connection to a good earth wiring system is essential and mandatory.
Alterations to the domestic wiring system must only be made by a qualified
electrician.
Failure to follow this advice may result in electrical shock or death.
WARNING!
Cut Hazard
Take care - panel edges are sharp.
Failure to use caution could result in injury or cuts.
US
CA
R
WARNING!
Tipping Hazard
To reduce the risk of tipping the appliance, the appliance must be secured
by properly installed anti-tip device packed with the appliance.
- ALL COOKERS CAN TIP
- INJURY TO PERSONS COULD RESULT
- INSTALL ANTI-TIP DEVICE PACKED WITH COOKER
- SEE INSTALLATION INSTRUCTIONS

3
Safety and warnings
IMPORTANT SAFETY INSTRUCTIONS
This appliance is to be installed and connected to the electricity supply only by a qualified
technician in compliance with national codes, local regulations and according to these
instructions.
Electrical installation (including electrical grounding) must be done in accordance with the
National Electrical Code, ANSI/NFPA70 – latest edition and/or local codes. In Canada: Electrical
installation must be in accordance with the current CSA C22.1 Canadian Electrical Codes Part 1
and/or local codes.
Failure to install the appliance correctly could invalidate any warranty or liability claims.
For personal safety, this appliance must be properly grounded.
Do not leave packaging elements (e.g. plastic bags, polystyrene foam, staples, packing straps)
within easy reach of children during or after installation, as these may cause serious injury.
Make sure you recycle the packaging material.
Before disposing of any appliance, make sure that it can no longer be used and that all hazardous
parts are removed or made harmless, so that children playing with the old appliance cannot
harm themselves.
Only genuine replacement parts may be used for servicing the appliance. These are available
from your nearest Fisher & Paykel Authorized Service Center.
To eliminate the risk of burns or fire by reaching over heated surface units, cabinet storage space
located above the surface units should be avoided. If cabinet storage is to be provided, the risk
can be reduced by installing a rangehood that projects horizontally a minimum of 5 inches
beyond the bottom of the overhead cabinets.
This appliance is equipped with a four-prong grounding plug (NEMA 14-50P) for your protection
against shock hazard and should be plugged directly into a properly grounded socket. Do not
under any circumstances cut or remove the fourth (ground) prong from the power plug.
If an external electrical source is utilized, the appliance, when installed, must be electrically
grounded in accordance with local codes or, in the absence of local codes, with the national
Electrical Code, ANSI/NFPA 70.
The mains electricity switch should always be accessible.
When installing or removing the cooker for service, a rolling lift jack should be used. Do not push
against any of the edges of the cooker in an attempt to slide it into or out of the installation.
Pushing or pulling a cooker (rather than using a lift jack) also increases the possibility of bending
the leg spindles or the internal coupling connectors.
US
CA
4
Safety and warnings
Operation and maintenance
WARNING!
Electrical Shock Hazard
Do not cook on a broken or cracked cooktop. If the cooktop should break or
crack, cleaning solutions and spillovers may penetrate it and create a risk of
electrical shock. Contact a qualified technician immediately.
Failure to follow this advice may result in death or electrical shock.
US
CA
WARNING!
Cut Hazard
The razor-sharp blade of a cooktop scraper is exposed when the safety cover
is retracted. Use with extreme care and always store safely and out of reach
of children.
Failure to use caution could result in injury or cuts.
5
Safety and warnings
Operation and maintenance
WARNING!
Hot Surface Hazard
DO NOT TOUCH SURFACE UNITS OR AREAS NEAR UNITS OR THE INTERIOR
SURFACES OF THE OVEN. – Surface units may be hot even though they are
dark in color. Areas near surface units may become hot enough to cause
burns. During and after use, do not touch, or let clothing or other flammable
materials contact surface units or areas near units until they have had
sufficient time to cool. Among these areas are the glass surfaces within and
around the circles and the interior of the oven.
Never leave metal objects (such as kitchen utensils) or empty pans on the
cooktop as they can become hot very quickly.
Keep children away.
Handles of saucepans may be hot to touch. Check saucepan handles do not
overhang other cooking zones that are on. Keep handles out of reach of
children.
Do not store flammable items in the oven or warmer drawer.
Failure to follow this advice could result in burns and scalds.
WARNING!
Fire Hazard
Never leave the appliance unattended when in use. Boilover causes smoking
and greasy spillovers that may ignite.
NEVER try to extinguish a fire with water. Switch the appliance off at the wall
and then cover the flame with a lid or fire blanket.
Failure to follow this advice may result in overheating, burning, and injury.
US
CA

6
Safety and warnings
Operation and maintenance
IMPORTANT SAFETY INSTRUCTIONS
This appliance is designed and manufactured solely for the cooking of domestic (household)
food and is not suitable for any non-domestic application and therefore should not be used in a
commercial environment. The appliance warranty will be void if the appliance is used within a
non-domestic environment (i.e. a semi commercial, commercial or communal environment).
Proper installation — Be sure your appliance is properly installed and grounded by a qualified
technician.
Never use your appliance for warming or heating the room.
Do not leave children alone — Children should not be left alone or unattended in the area where
the appliance is in use. They should never be allowed to sit or stand on any part of the appliance.
Wear proper apparel — Loose-fitting or hanging garments should never be worn while using the
appliance.
User servicing — Do not repair or replace any part of the appliance unless specifically
recommended in the manual. All other servicing should be referred to a qualified technician.
Storage in or on appliance — Flammable materials should not be stored in an oven or near
surface units.
Do not use water on grease fires — Smother fire or flame or use dry chemical or foam-type
extinguisher.
Use only dry potholders — Moist or damp potholders on hot surfaces may result in burns from
steam. Do not let potholder touch hot heating elements. Do not use a towel or other bulky cloth.
Use proper pan size — This appliance is equipped with one or more surface units of different size.
Select utensils having flat bottoms large enough to cover the surface unit heating element. The
use of undersized utensils will expose a portion of the heating element to direct contact and may
result in ignition of clothing. Proper relationship of utensil to cooking element will also improve
efficiency.
Never leave surface units unattended at high heat settings – Boilover causes smoking and greasy
spillovers that may ignite.
Utensil handles should be turned inward and not extend over adjacent surface units — To reduce
the risk of burns, ignition of flammable materials, and spillage due to unintentional contact with
the utensil, the handle of a utensil should be positioned so that it is turned inward, and does not
extend over adjacent surface units.
Do not cook on broken cooktop — If cooktop should break, cleaning solutions and spillovers may
penetrate the broken cooktop and create a risk of electric shock. Contact a qualified technician
immediately.
Clean cooktop with caution — If a wet sponge or cloth is used to wipe spills on a hot cooking
area, be careful to avoid steam burn. Some cleaners can produce noxious fumes if applied to a
hot surface.
US
CA

7
IMPORTANT SAFETY INSTRUCTIONS
CAUTION - Do not store items of interest to children in cabinets above an appliance - children
climbing on the appliance to reach items could be seriously injured.
If the appliance is malfunctioning, it will display an alert code: first note down the alert code (see
section ‘Alert codes’ in this manual), then contact your Authorized Service Center or Customer
Care to arrange for service. Do not use your appliance until it has been repaired by a Fisher &
Paykel authorized technician.
Never use your appliance as a work or storage surface.
Never leave any objects or utensils on the appliance.
Do not place or leave aluminum foil on the cooktop.
After use, always turn off the cooking zones as described in this manual.
Children or persons with a disability which limits their ability to use the appliance should have a
responsible and competent person to instruct them in its use. The instructor should be satisfied
that they can use the appliance without danger to themselves or their surroundings.
Do not use a steam cleaner to clean your cooktop.
Do not place or drop heavy objects on your cooktop.
Do not stand on your cooktop. Do not stand, sit or step or place heavy weights on the oven door.
Do not use pans with jagged edges or drag pans across the ceramic glass surface as this can
scratch the glass.
Do not use scourers or any other harsh/abrasive cleaning agents to clean your cooktop, as these
can scratch the ceramic glass.
Make sure the electrical cables connecting other appliances in the proximity of the cooker cannot
come into contact with the hob or become entrapped in the oven door.
Fire risk! Do not store flammable material in the oven or warming drawer.
Do not line the oven walls with aluminium foil. Do not place shelves, broiler pan, pans or other
cooking utensils on the oven floor.
Stand away from the cooker when opening the door. Hot air or steam which escapes can cause
burns.
Always use oven gloves or mitts when placing or removing items in the oven.
Never touch the appliance with wet hands.
After use, ensure the dials are all in the `OFF’ position.
The manufacturer declines all liability for injury to person or damage to property caused by
incorrect or improper use of the appliance.
Always turn off the mains power to the cooker prior to cleaning or maintenance.
Safety and warnings
Operation and maintenance
US
CA
8
US
CA
Installation instructions
Important!
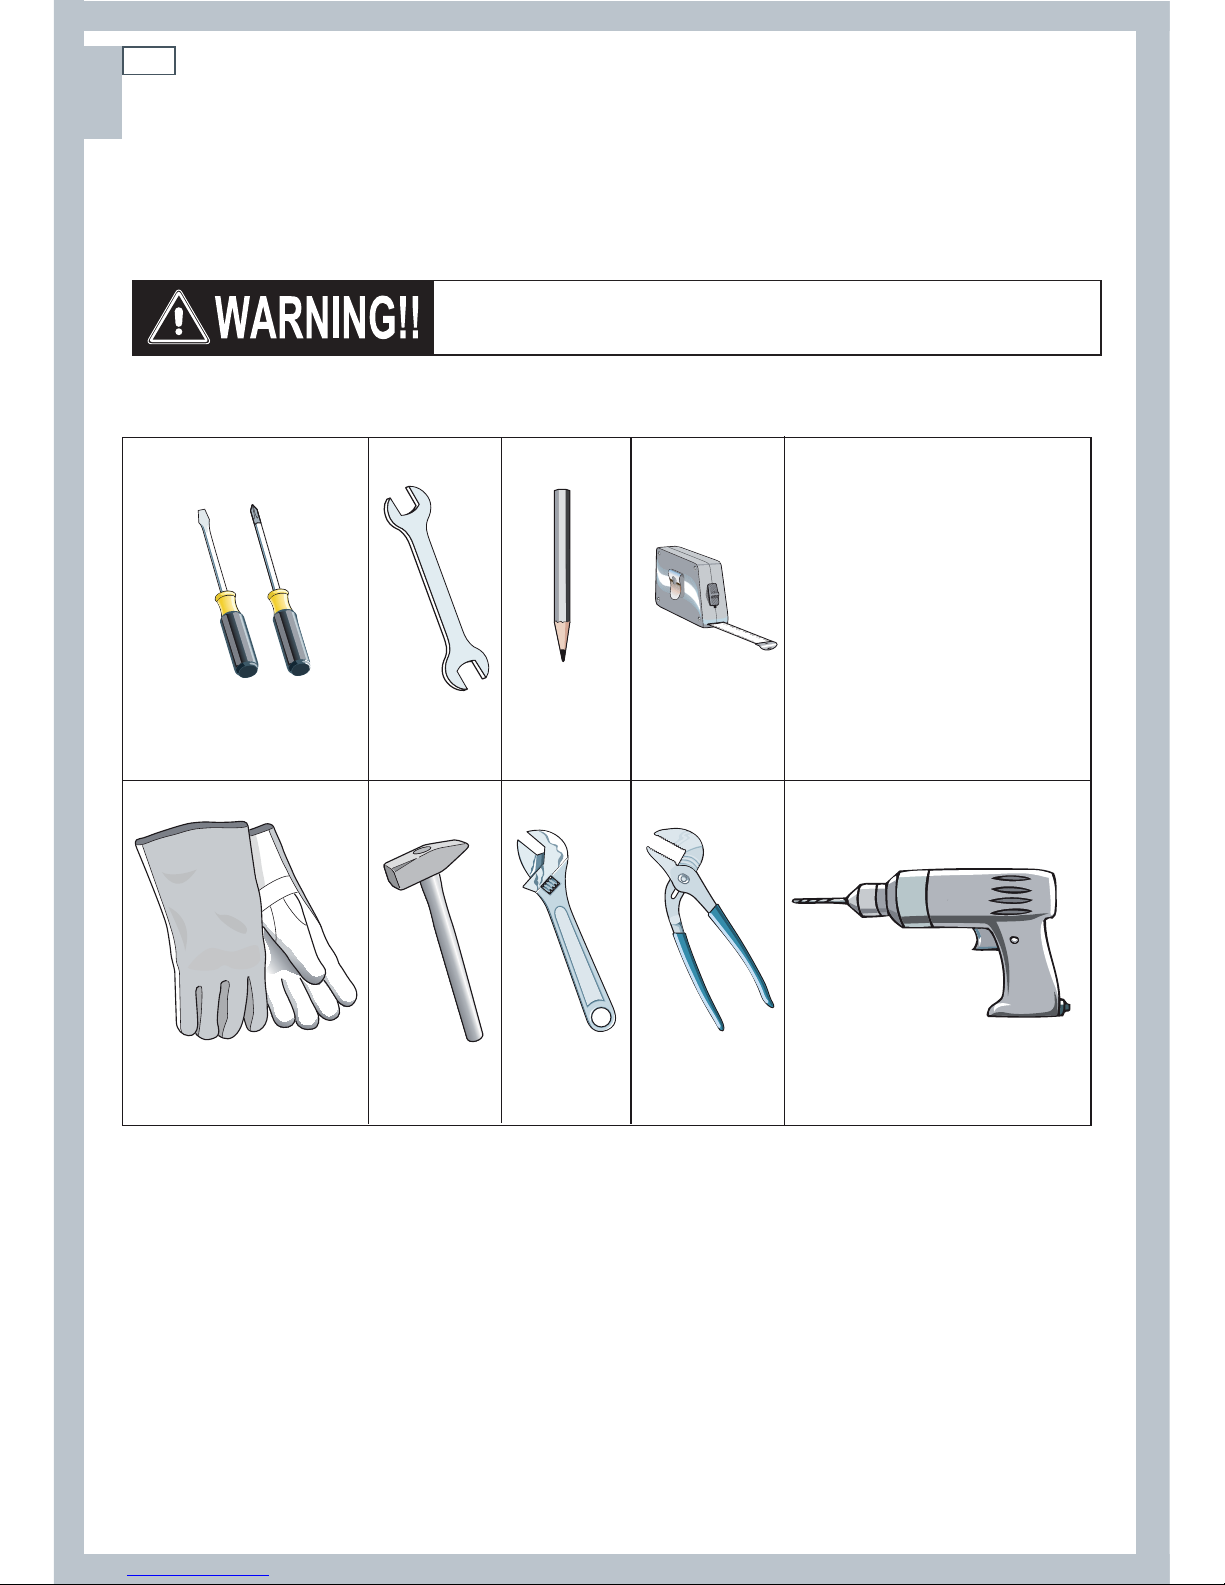
THIS APPLIANCE MUST BE INSTALLED BY A QUALIFIED INSTALLER.
Improper installation, adjustment, alteration, services, or maintenance can cause injury or property
damage. Consult a qualified installer, service agent, or the gas supplier.
Screwdriver 2 - Wrench
Tape
measurePencil
Adjustable
pliers
Adjustable
wrench
Suitable protective
gloves
Drill
Hammer
Tools needed for installation (not supplied with the appliance)
IMPORTANT: The use of suitable protective clothing/gloves is
recommended when handling or installing this appliance.
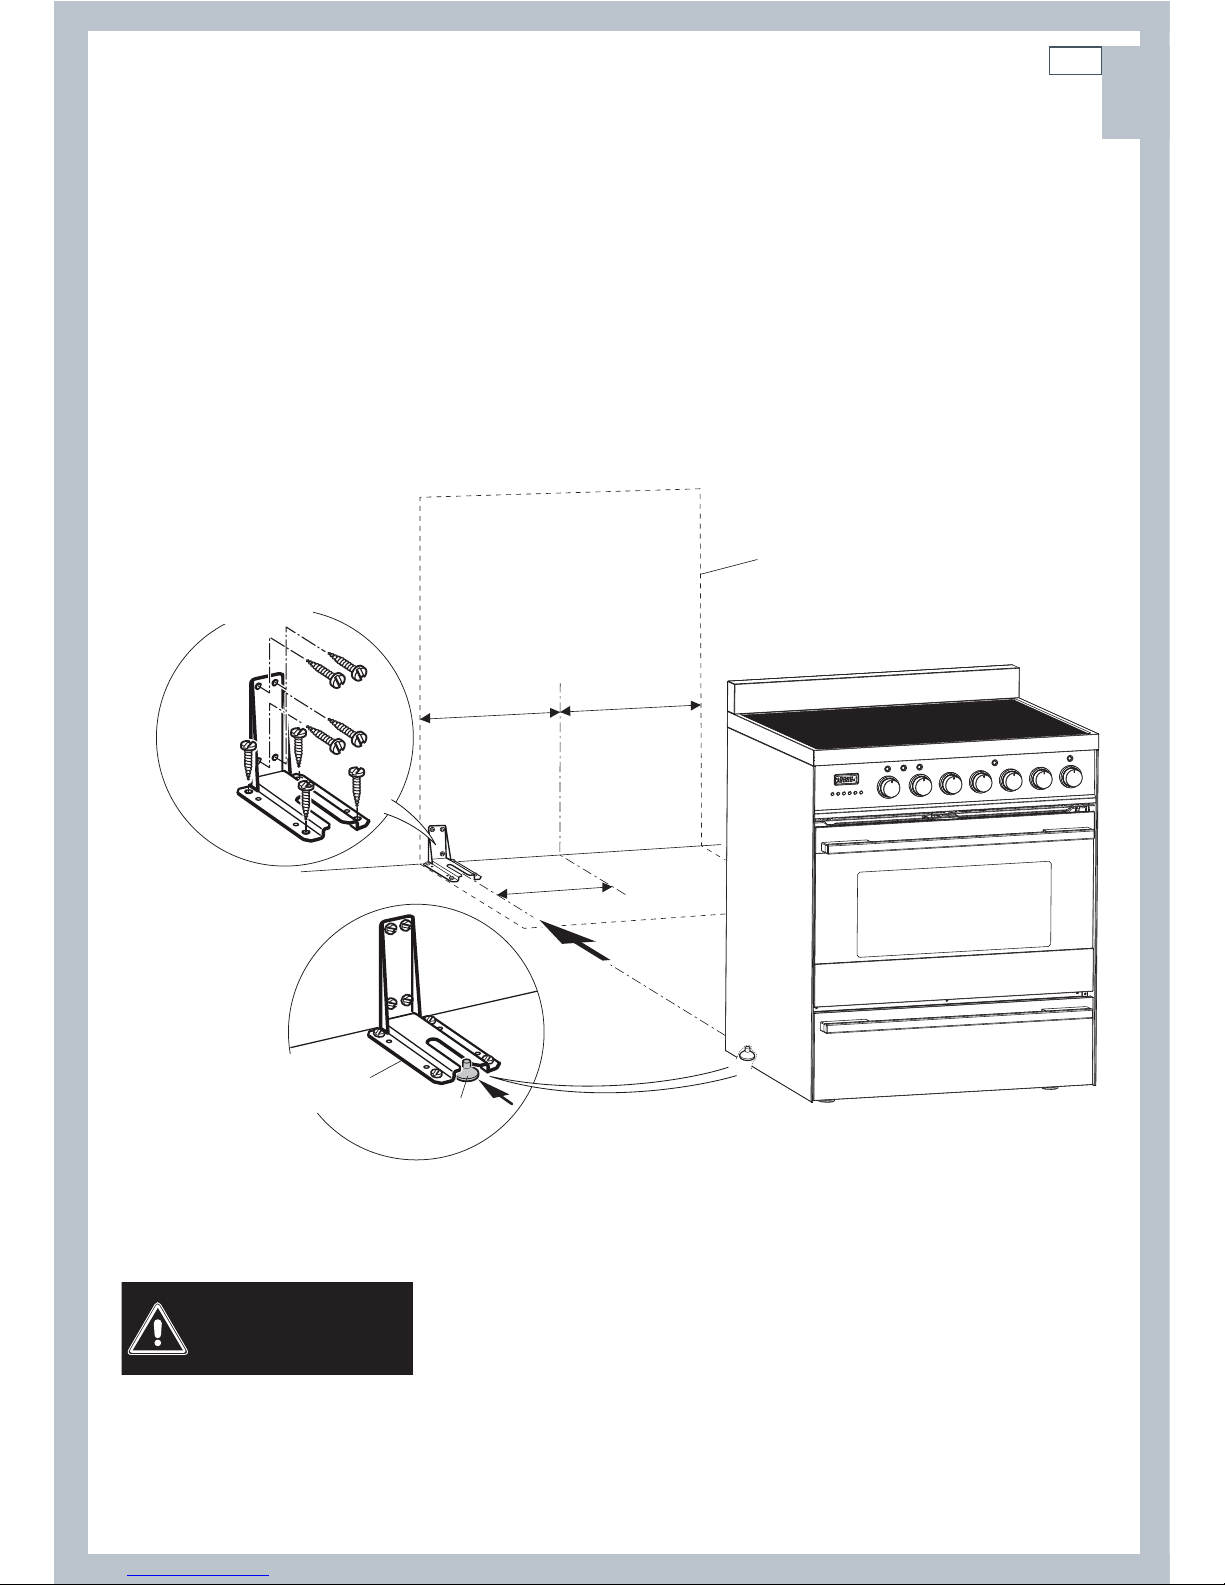
9
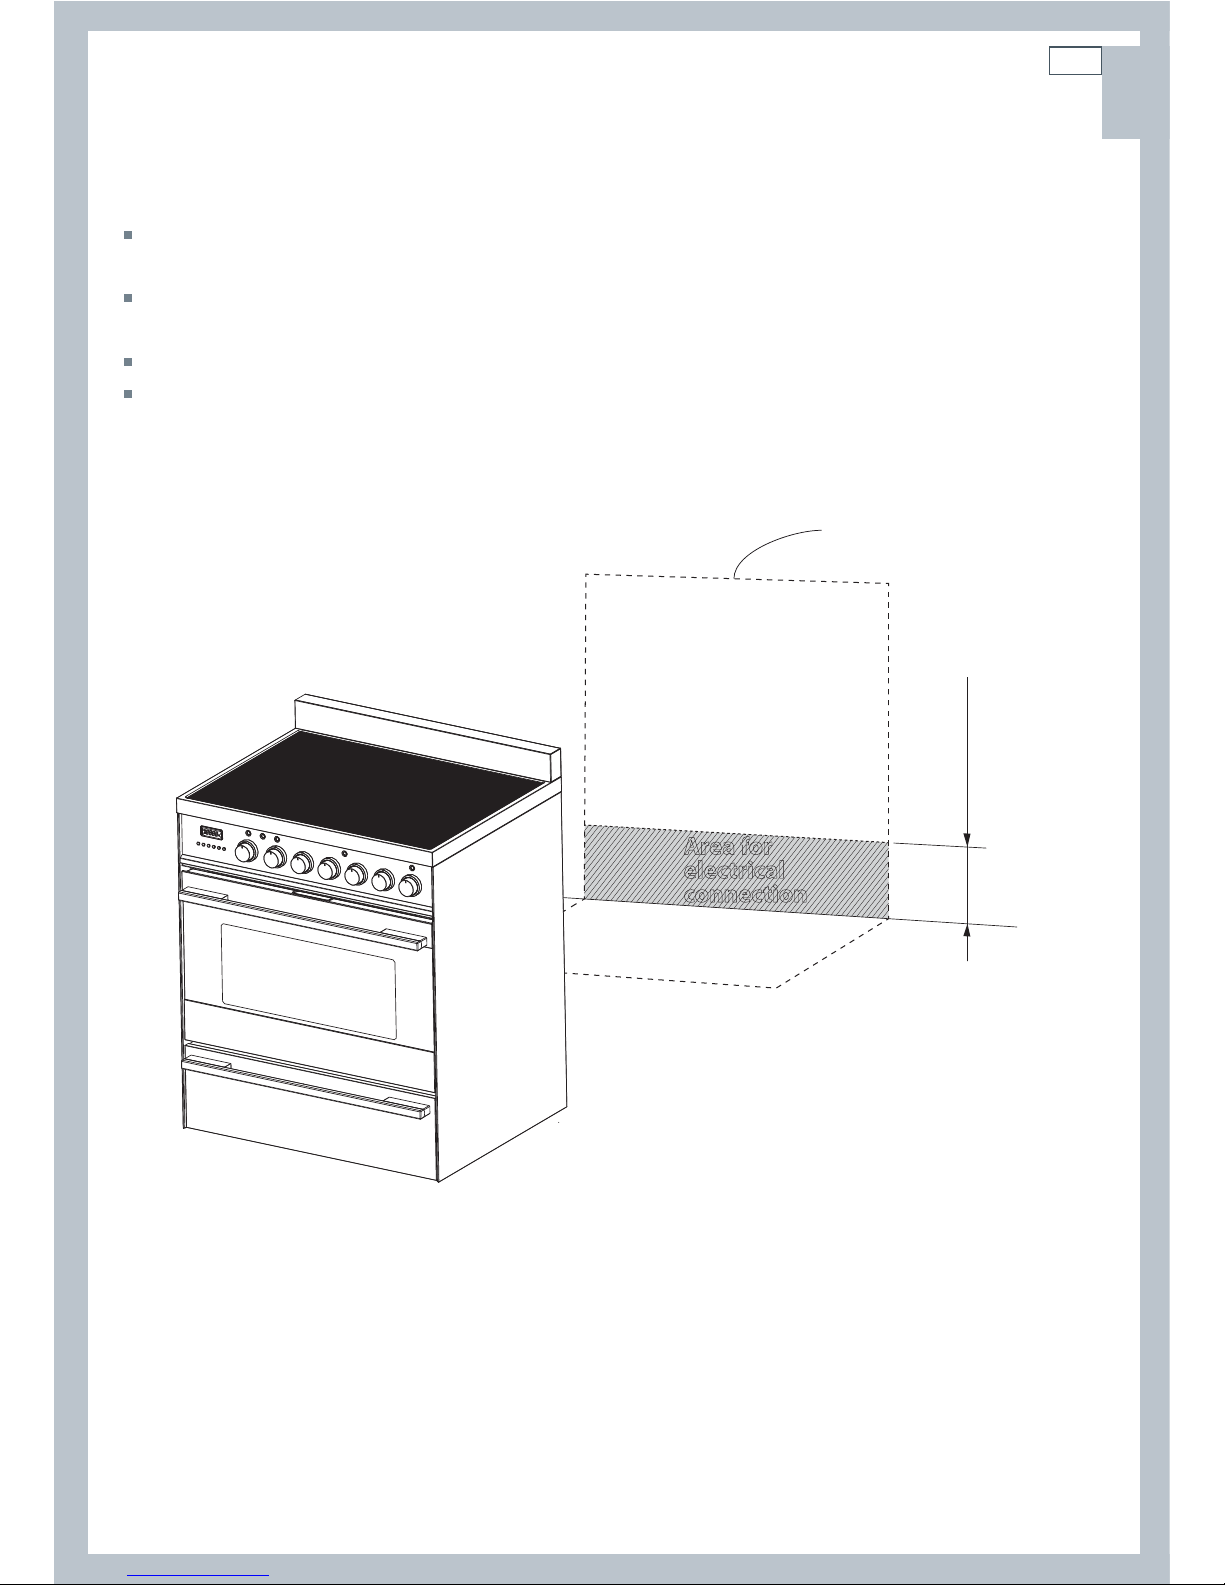
Dotted line showing
the position of the
cooker when installed
Area for
electrical
connection
Area for
electrical
connection
5
7
/
16” (138 mm) to
6
1
/
8” (155.5 mm) (
*
)
(*) Depending on
feet adjustment
US
CA
Installation instructions
Dimensions and clearances
The cooker must be installed no less than 2” (50 mm) away from any side walls which exceed the
height of the cooktop.
The cabinetry surrounding the cooker must be made of heat-resistant material and must be able
to withstand temperatures of 150 °F (65 °C) above room temperature.
Do not install the cooker near flammable materials (eg curtains).
If you stand the cooker on a pedestal, make sure you provide safety measures to keep it in place.
Grounded outlet: should be located from the left to the right side of the range; from 5” 7/16 (138
mm) to 6” 1/8 (155.5 mm) [depending on feet regulation] from the floor.
The electric cord with 4-prong ground plug (NEMA 14-50P) shall have a minimum length of 48”
(1220 mm) beyond the back of the appliance.
Locating the area for electrical connection
10
US
CA
Installation instructions
2” min.
(50
mm)
13” max.
(330 mm)
0”(0 mm)
0” (0 mm)
30” min.
(672 mm)
36”
(914 mm)
19
5
/
8
” min.
(500
mm)
18” min.
(457 mm)
Cooker overall dimensions [mm]
•
height (without backguard):
MIN 35 21/32” (906 mm) MAX 36 11/32” (923 mm)
•
product width:
29 7/8” (759 mm)
•
depth:
24 13/64” (615 mm)
•
backguard (height):
3” (76 mm)
The range CANNOT be installed directly adjacent to
sidewalls, tall cabinets, tall appliances, or other side vertical
surfaces above 36” (914 mm) high.
There must be a minimum of 2” (50 mm) side clearance
from the range to such combustible surfaces TO THE RIGHT
above the 36” (914 mm) high countertop; or there must be
a minimum of 2” (50 mm) side clearance from the range to
such combustible surfaces TO THE LEFT above the 36” (914
mm) high countertop.
Important!
One side (left or right) above the 36” (914 mm) high countertop
must always be kept clear.
The maximum upper cabinet depth recommended is 13”
(330 mm).
Any wall cabinet above the range must be a minimum of
30” (762 mm) above the countertop with a minimum width
of 30” (762 mm) and must be centered with the range.
Side wall cabinets above the range must be a minimum of
18” (457 mm) above the countertop.
11
US
CA
Installation instructions
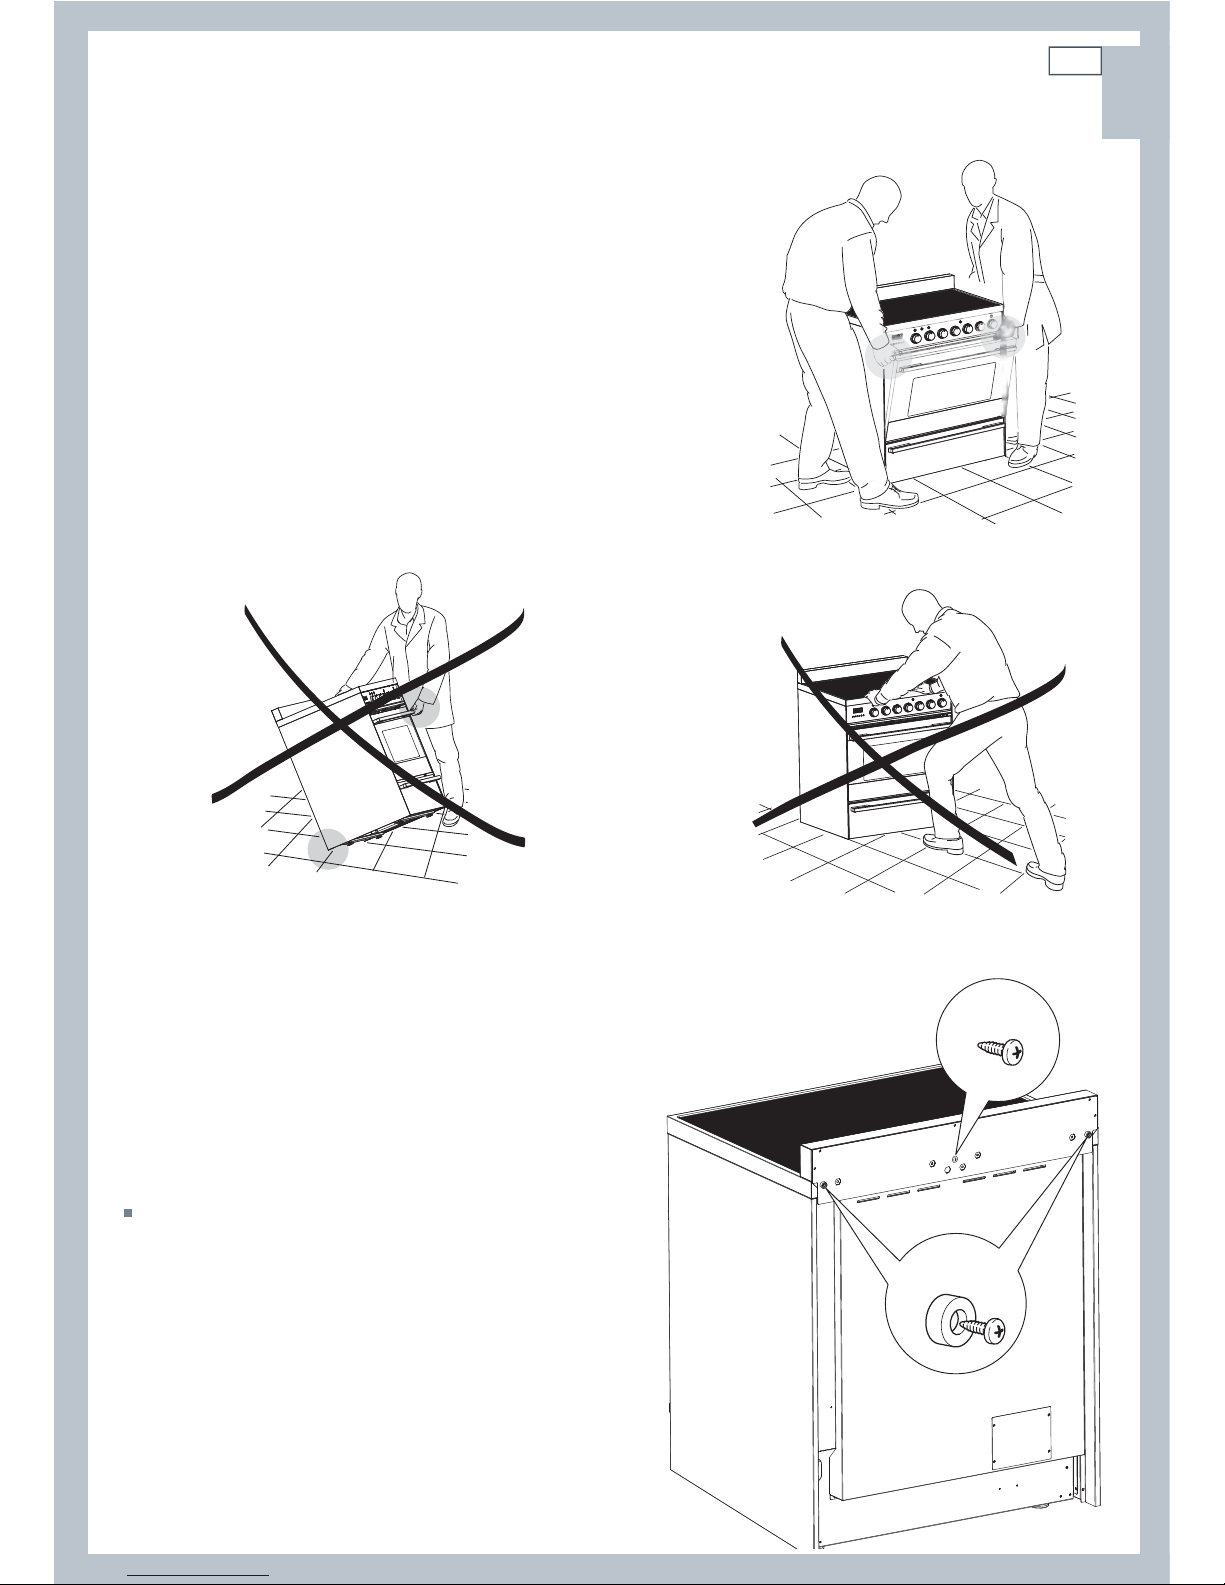
Important!
To prevent damaging the adjustable feet or lower
trim, ensure the cooker is always lifted by two
people.
Do not lift the cooker by the door handles.
DO NOT DRAG the cooker. Lift the feet clear of the
floor.
Take extra care not to damage the door sensor (top
right of oven).
Moving the cooker
Correctly lifting the cooker
Incorrectly moving the cookerIncorrectly lifting the cooker
Fixing the backguard
It is mandatory to install the backguard.
Before installing the cooker, assemble the
backguard “C” .
The backguard “C” can be found packed
with the cooker.
1
Before assembling, remove any protective
film/adhesive tape.
2
Assemble the backguard
“C”
as shown
3
Screw in the two screws “A”, interposing
the spacers.
4
Screw in the central screw “B”.
Assembling
the backguard
C
A
B
12
US
CA
Installation instructions
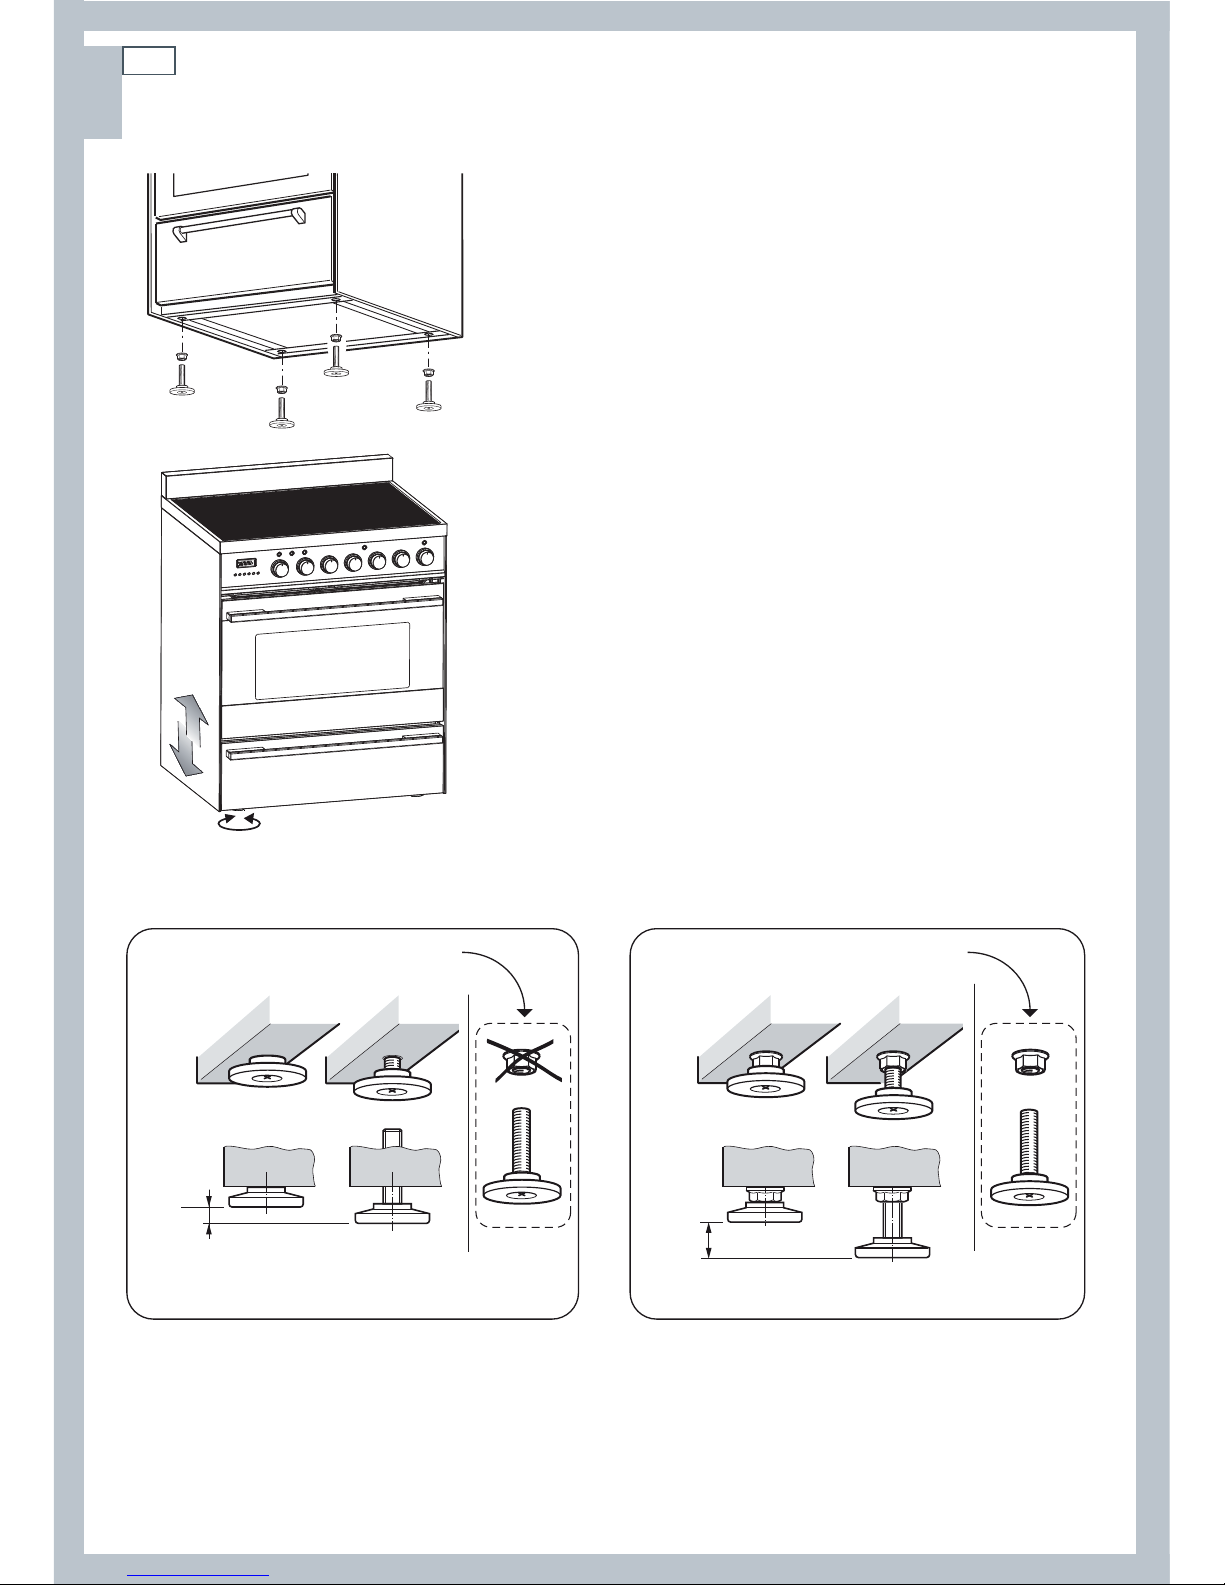
Levelling the range
The range is equipped with 4 LEVELLING FEET and may be
levelled by screwing or unscrewing the feet.
Follow the directions below.
Supplied with the range
in a separate kit
Supplied with the range
in a separate kit
0”
0 mm
+ 5/16”
+ 8 mm
+ 5/16”
+ 8 mm
+ 11/16”
+ 17.5 mm
13
US
CA
Installation instructions
=
=
Dotted line showing the position
of the range when installed
ANTI-TIP STABILITY
DEVICE FIXING
Anti-tip stability
device
Rear left
feet of range
11” 11/16
(297 mm)
YOU MUST USE STABILITY
ANTI TIP BRACKET TO
PREVENT UNIT FROM
TIPPING.
Anti-tip stability device installation instructions
1
the anti-tip bracket has to be attached as shown on figure below (only rear left side), it has to be
fixed on the floor OR on the rear wall by no. 4 (four) suitable screws (not supplied). Alternatively
the anti-tip bracket can also be fixed on the floor AND on the rear wall by no. 8 (eight) suitable
screws (not supplied).
2
After fixing the anti-tip bracket, slide range into place. Be sure the rear left foot slides under the
anti-tip bracket attached.
14
Installation instructions
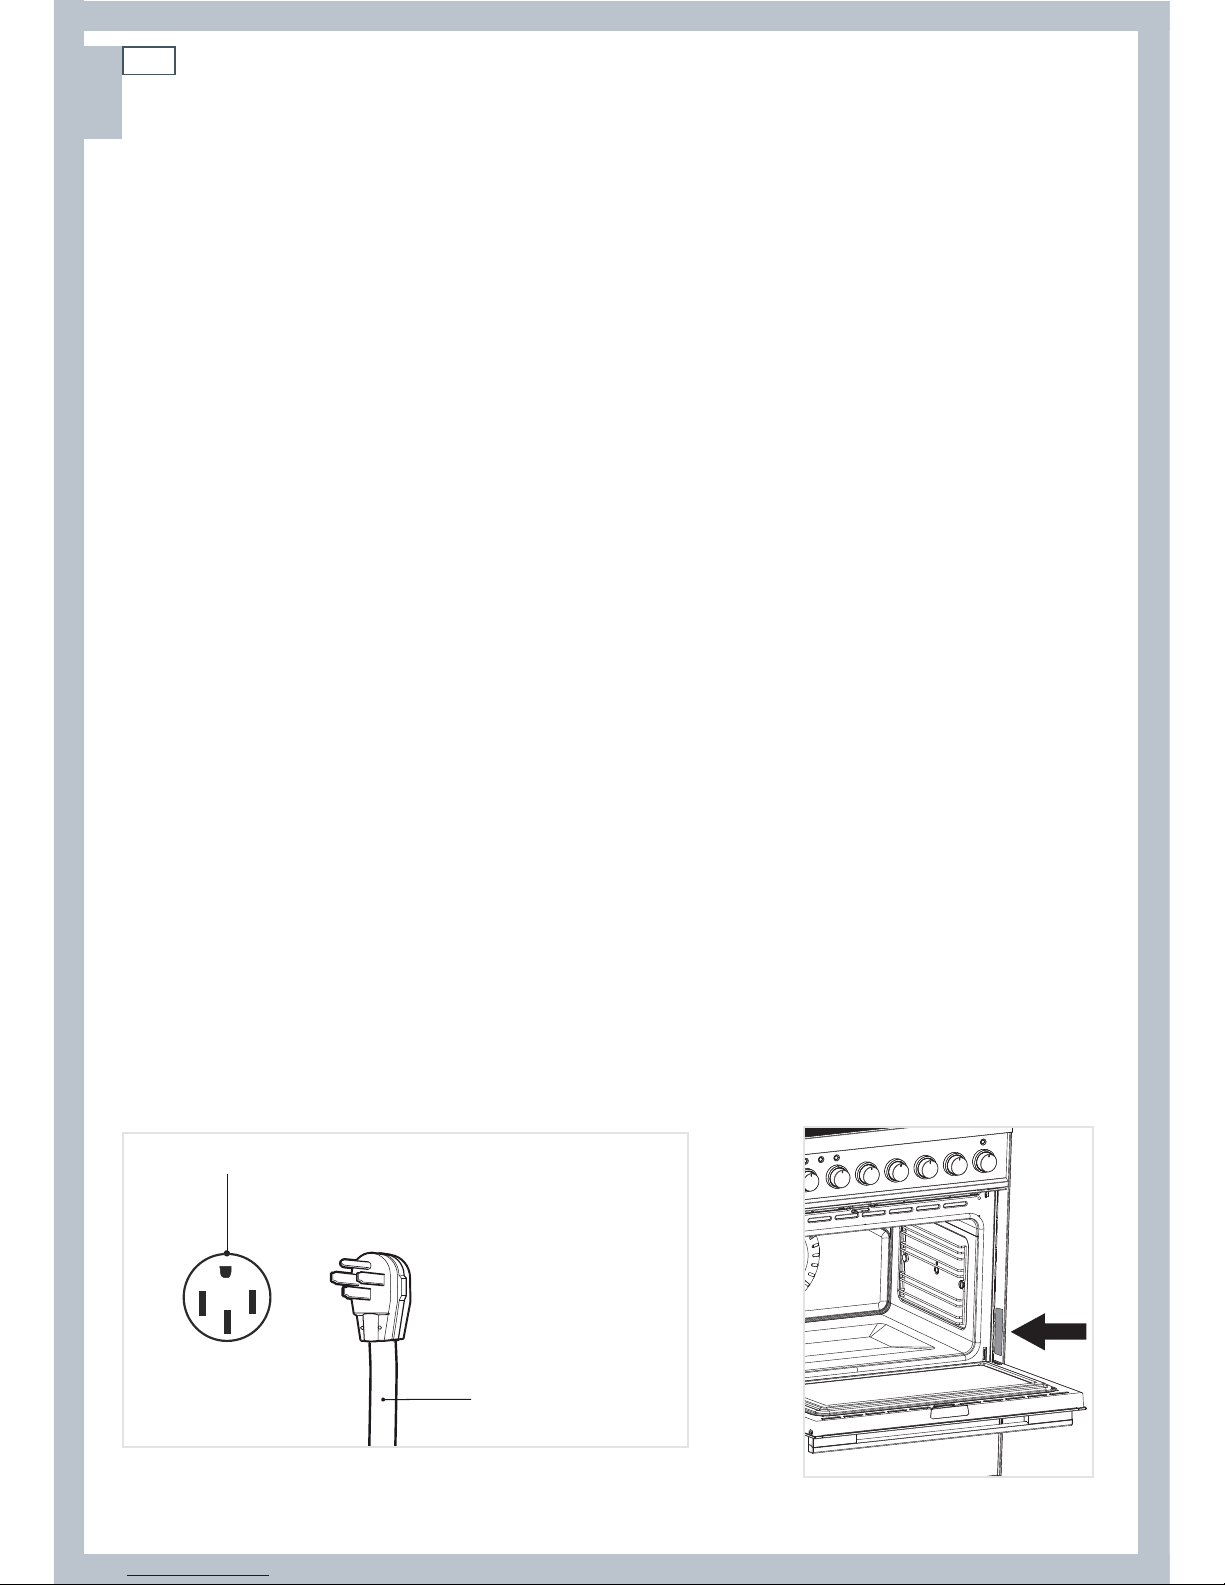
Connecting the power supply cable
Important!
This cooker must be connected to the electricity supply only by an authorised person.
Your cooker is supplied with a certified 4 prong NEMA 14-50P power cord and should be
plugged directly into a properly grounded socket. Do not under any circumstances cut or
remove the forth (ground) prong from the power plug. Do not ground to a gas pipe.
Do not have a fuse in the neutral or ground circuit.
Do not use an extension cord.
Check with a qualified electrical installer if you are not sure if the range is properly grounded.
If codes permit, and a separate ground wire is used, it is recommended that a qualified electrical
technician determines the ground path and wire gauge are in accordance with local codes.
Be sure that the electrical connection and wire size are adequate and in conformance with:
ANSI/NFPA 70 latest addition and local codes and ordinances;
CSA standard C22.1, Canadian Electrical Code, Part 1 - latest edition and local codes and
ordinances.
When a 4-wire, two phase 240-208/120V 60Hz AC only electrical supply is available a 50 amp
maximum circuit protection is required, fused on both sides of the line.
Replacing the power cord
Replacements should only be made by qualified electrical technicians.
If replacing the power cord, use only a suitable UL or CSA approved one. Tighten the power cord
using the power cord strain relief bracket supplied with the appliance. Allow enough slack to
easily attach the cord terminals to the terminal block.
Voltage and Power Consumption
240-208 / 120V 60Hz 10350W (240V) 7800W (208V)
43.51A (240V) 37.82A (208V)
Power supply cord with
NEMA 14-50P plug
Standard NEMA 14-50R wall receptacle
Location of Nameplate
US
CA
 Loading...