


WEBSERVER OPERATION MANUAL

CONTENTS
3 1 • BASICS
Introduction to Webserver
4-8 2 • INSTALLATION/UNISTALLATION OF COMPONENTS
Uninstalling the Internet Information Service (IIS)
Installing the Webserver
Installation of GPRS Tool Into the Terminal
9-14 3 • WEBSERVER OPERATIONS
Webserver Settings
Monitoring the Terminal Activities
User Management
How to Check Transaction Logs from Fingertec Webserver
How to Assign an Administrator to Webserver
15-19 4 • MYSQL ODBC COMPONENTS
Installation of MySQL ODBC
Allowing Port in Windows Firewall
20-21 5 • SQLYOG COMMUNITY COMPONENTS
Installation of SQLYOG Community
22-25 6 • DATA DOWNLOAD TO SOFTWARE FROM WEBSERVER
How to Download Data from Webserver into TCMSV2
Fingertec Terminals
Employee Enrollments
Transaction Logs

1
BASICS
•
Introduction to webserver
Fingertec Webserver is a basic web version of our TCMS V2 software. We highly recommend that you install the webserver into a PC that can double as a server. The designated
PC will need to have a fixed IP address in order to transform into a workstation that links
together the Fingertec terminals via GPRS or Internet. No IP address is required on any of
the terminals as the terminals will search for any GPRS or Internet signal available to establish the connection.
Webserver installation is hassle-free as it contains only one single installation file, which are
packed with all the necessary components for the software to work.
The information downloaded from the terminal will be stored in MySQL database. In order
to retrieve information for time attendance calculation or reporting, you will need to link
the TCMS V2 software to MySQL database. You can also fully utilize the information in the
MySQL database by using your own software or application.
3
2
INSTALLATION/UNINSTALLATION
•
OF COMPONENTS
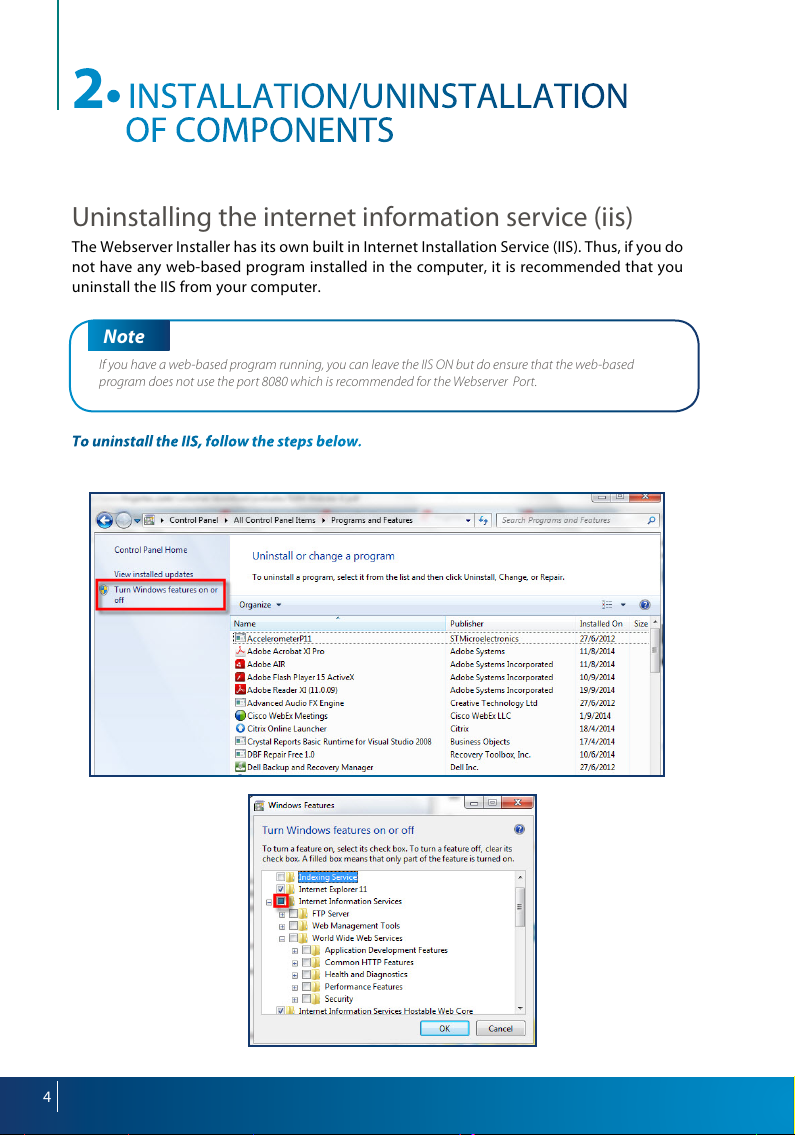
Uninstalling the internet information service (iis)
The Webserver Installer has its own built in Internet Installation Service (IIS). Thus, if you do
not have any web-based program installed in the computer, it is recommended that you
uninstall the IIS from your computer.
Note
If you have a web-based program running, you can leave the IIS ON but do ensure that the web-based
program does not use the port 8080 which is recommended for the Webserver Port.
To uninstall the IIS, follow the steps below.
Go to Control Panel > Programs and Features > Select Turn Windows features on or off
Ensure that all the IIS
component is turned
off (checked box is
empty).
4

Installing the webserver
Open the FingerTec Web Serv-
er folder. Right click on the
Webserver setup file and select
‘Run as Administrator’ .
This will prompt the installer
to start the Webserver instal-
lation.
Click ‘Next’ to begin.
Read to understand the terms
and conditions and select “I
accept the agreement” . Click
‘Next’ to proceed.
Setup will then create the
shortcut in the Start Menu fold-
er for easy access. Click ‘Next’
to proceed.
5

Click Install to initiate the installa-
tion process. Follow the on-screen
instructions to complete the instal-
lation.
The installation will take a few min-
utes to complete.
Select ‘Yes, restart the computer
now’ and click ‘Finish’ to end the
process.
A new icon for FingerTec Web Serv-
er will be created on the desktop.
Double click on the icon to start
the FingerTec Web Server.
6
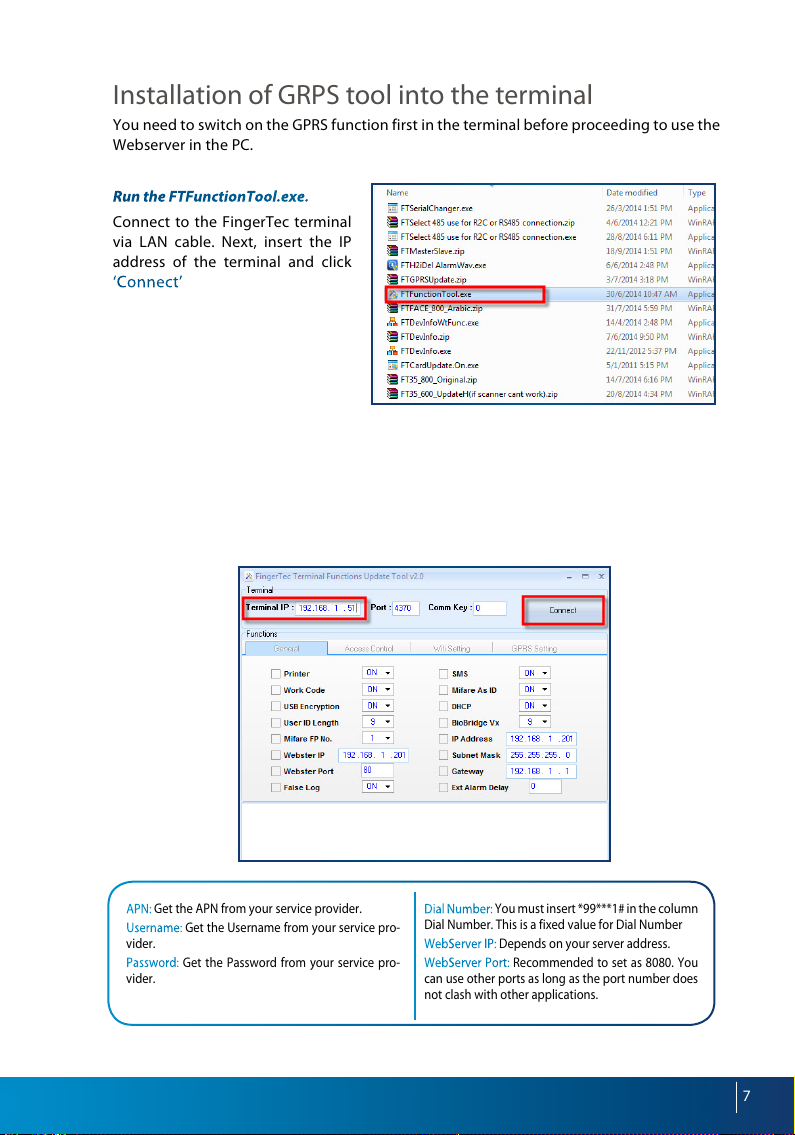
Installation of GRPS tool into the terminal
You need to switch on the GPRS function first in the terminal before proceeding to use the
Webserver in the PC.
Run the FTFunctionTool.exe.
Connect to the FingerTec terminal
via LAN cable. Next, insert the IP
address of the terminal and click
‘Connect’ to start.
If connection to the terminal is successful, the information will be displayed at the window
below the tool. Check the information to make sure that you are connecting to the correct
terminal. Click on the GPRS Setting Tab on the tool.
Tick the checkbox to ‘Update GPRS Setting so you can key in the details.
Below are a number of settings that you need to fill in first before proceeding to the next
step.
APN: Get the APN from your service provider.
Username: Get the Username from your service pro-
vider.
Password: Get the Password from your service pro-
vider.
Dial Number: You must insert *99***1# in the column
Dial Number. This is a fixed value for Dial Number
WebServer IP: Depends on your server address.
WebServer Port: Recommended to set as 8080. You
can use other ports as long as the port number does
not clash with other applications.
7
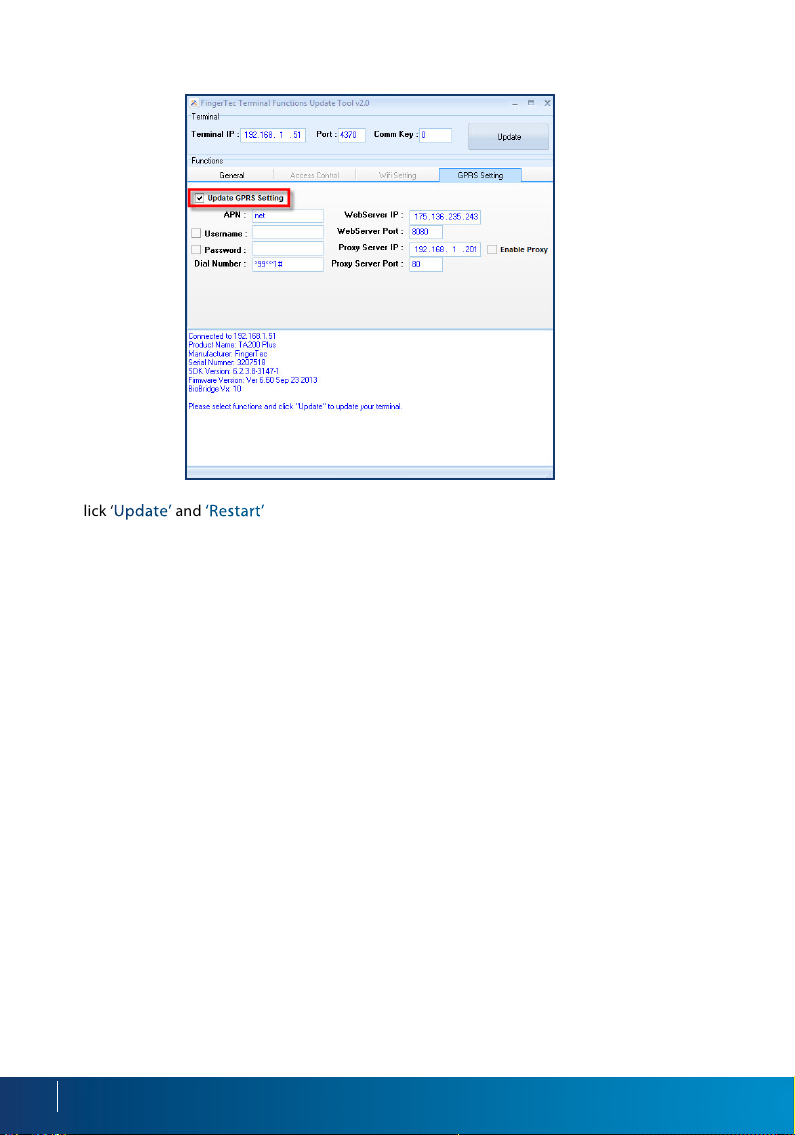
Click ‘Update’ and ‘Restart’ for the new settings to take effect.
8

3
WEBSERVER OPERATIONS
•
Webserver settings
The Webserver application allows ad-
ministrators to communicate and to
control all Fingertec Terminals in all op-
erations.
Go to Start Menu > All Programs >
Fingertec Webserver > Server Man -
ager
At the Server Manager window, enter
‘8080’ in the ‘Port’ field and click ‘Start’ .
Once the status has indicated that it is
‘running’ , you can proceed to save the
setting.
Double click the icon on your
desktop.
The Webserver Application allows administrator to communicate and control
some of the terminals’ operation.
The default username and password are both set to “admin”. You can change the password
after the first time login for tighter security.
9

The Webserver will always look for the nearest detectable terminal and connect to any Fingertec terminals available during start-up. The information retrieved from the terminals will
be displayed on the Webserver homepage i.e. serial number, IP address, device name, total
users and etc.
Monitoring the terminal activities
At the Device Tab, select ‘Transaction Monitor’. Administrator can monitor all the user’s activities or the terminals immediately from this screen.
The activities includes new user enrolment, verification of users, clocking status and etc. will
be displayed here.
10

User management
Newly enrolled users will be downloaded into the Webserver immediately. If enrolment
is done before the Webserver is switched on, the download process will resume once it is
switched on. Therefore, the administrator does not need to download any users manually
from the terminals.
Go to Data tab and Select Employee.
Webserver will then connect to all terminals to download the user information. This process
is fully automatic.
Click the User ID to edit his/her additional information.
The user information is optional. However, do take note of the user’s “Privilege”. There are a
few levels of privilege in our Fingertec Terminals, which are normal, registrar, administrator
and supervisor (do check the different privileges in the hardware user manual).
11

Click Submit so that the changes will take effect on the terminals.
Administrator can also transfer users to another terminal without re-enrolment. Select the
users that you wish to transfer to another terminal. Under the ‘Operation for selected’ tab,
select ‘Transfer employee to the device’ to start the process.
You will be prompted a window requesting you to select the device where you wan to transfer the employee to. Select the serial number and click Submit to proceed.
12

How to check transaction logs from ngertec
webserver
The Fingertec Web Server will automatically download transaction logs from all the termi-
nals that have been connected during start up.
In order to check the transaction logs, click on ‘Data’ and select ‘Transaction’ .
All the transaction logs will be then be displayed on this window. These logs will be stored
directly into the MySQL Database.
How to assign an administrator to webserver
An administrator can assign administrator privilege to other users of the Webserver. In or-
der to do so, go to ‘System Tab’ and select ‘User’ .
13

Select ‘Append’ to add a new administrator to the list.
Fill in the relevant information and click ‘Submit’ .
14

4
MYSQL ODBC COMPONENTS
•
Installation of MYSQL ODBC
Prior to using the TCMSv2 software to import data from the webserver, you must first
install the MySQL ODBC in order to connect with the software required.
Open the MySQL ODBC folder. Double click on the setup file to run it.
This will prompt the installer to start the Webserver installation.
Click ‘Next’ to begin.
Read and understand the terms
and conditions for the software.
Once you have completed this
task, you may then select “I accept
the license agreement”. Click Next
to proceed.
15

Select the ‘Typical’ setup type and
click ‘Next’ .
Click ‘Install’ to initiate the installa-
tion process. Follow the on-screen
instructions to complete the instal-
lation.
The installation will take a few min-
utes to complete.
16
Click ‘Finish’ to end the process.

Allowing port in windows rewall
In order for TCMS V2 to import data from Webserver, you will need to provide access to
port 43306 in the system.
Go to Control Panel on your computer and look for the ‘Windows Firewall’ program.
Select ‘Advanced Settings’ on the left side of the menu.
17

In order to add the port, click on ‘Inbound Rules’ . This will then display a list of options,
select the ‘New Rule’ tab to move on to the next step.
Select ‘Port’ and Click ‘Next’ .
18

Key in ‘433 06’ at the ‘Specific Local Ports:’ field.
You may then click ‘Next’ for the consequent (Action and Profile tabs) on-screen instruc-
tions.
When you have reached the final step (‘Name’ tab), key in your desired Port name as
prompted. Complete the setup by clicking on the ‘Finish’ button.
19

5
SQLYOG COMMUNITY
•
COMPONENTS
Installation of Sqlyog Community
To install SQYOG, follow the on screen instructions.
Step 1: Select your preferred
language.
Step 2: Click ‘Next’ .
20
Step 3: The application will
then initialize and begin installing.

Step 4: Click ‘Finish’ to com-
plete the installation of SQLyog
Community.
Once the installation is complete,
double click on the SQLYog icon
on the desktop. Key in the cre-
dentials as per below.
Click on icdat on the left window and key in the following command (GRANT ALL ON *.* TO
‘webserver’ @’%’ IDENTIFIED BY ‘webserver’ ; FLUSH PRIVILEGES;) on the right window to
allow the webserver login.
After that, click on the double arrow to start the command.
Once you have performed all the installations as instructed, you may then proceed to TCMS
V2 to download the data.
21

6
DATA DOWNLOAD TO SOFTWARE
•
FROM WEBSERVER
How To Download Data From Webserver Into
TCMS V2
Launch the TCMSV2 software and click on the ‘Devices’ tab. From there, select the ‘Fin-
gertec Webserver database management’ option.
You will be prompted with the win-
dow as per below screenshot. Key in
the credentials as per below.
Fingertec Webserver: Key in the IP ad-
dress of the server and the location of
the Webserver’s installation.
Username: webserver
Password: webserver
After filling up the required fields,
click ‘Login’ .
22

Fingertec Terminals
At the first tab, click on the ‘Lightning’ icon. This will then display the terminal model type
and other related details. Click on ‘Synchronize terminal’ to complete the process.
23

Employee Enrollments
Go to the 2nd tab, and repeat the same step. Click on the ‘lightning’ icon and you will be
able to see a list of employees that have already enrolled. In order to complete the process,
click on ‘Synchronize Terminal’.
24

Transaction Logs
Before shifting to the 3rd tab, close the window and proceed to the Devices tab. Activate
the terminal before going into the 3rd tab.
Proceed to the Fingertec Webserver database management and go to the ‘Transaction
Logs’ tab.
Next, click on the ‘Lightning’ icon and click ‘Download’ to download all logs from the termi
nal.
-
With the settings above done, you are now ready to use TCMSv2 to manage the employee’s
attendance.
25

© 2 014 Timet ec C ompu ting Sdn Bhd. All rig hts r eser ved. • 10 2014
 Loading...