

Farfisa EX362 User Manual

Citofono con decodifica integrata per sistema DUO
Intercom with integrated coding for DUO system
Combiné doté de décodage intégré pour système DUO
Teléfono con decodificación integrada para sistema DUO
Telefone com descodificação integrada para sistema DUO
Haustelefon mit integriertem Decodiermodul für DUO Systeme
Art. EX362
IT ALIANOENGLISHFRANÇAISESPAÑOLPORTUGUÊSDEUTSCH
Mi 2401
Dati tecnici
Alimentazione direttamente dalla linea
Assorbimento:- a riposo 8 mA
- durante il funzionamento 0,1A
T emperatura di funzionamento: 0°÷+50°C
Massima umidità ammissibile: 90%RH
Datos técnicos
Alimentación directa desde la línea
Consumo: en reposo 8m A
durante el funcionamiento 0,1A
T emperatura de funcionamiento: 0°÷+50°C
Humedad máxima tolerada: 90% RH
Morsettiera e dati elettrici
Terminal board and electrical data
Bornier et données électriques
LM / LM
A1
GN
Ingressi di linea
Line inputs
Entrées de ligne
Ingresso positivo chiamata di piano
Floor call positive input
Entrée appel positif d'étage
Ingresso negativo chiamata di piano
Floor call negative input
Entrée appel négatif d'étage
Technical characteristics
Power supply directly from the line
Stand-by current: 8m A
Operating current: 0.1A
Operating temperature: 0° ÷ +50°C
Maximum admissible humidity: 90% RH
Dados técnicos
Alimentação directamente da linha
Absorção: em repouso 8 m A
durante o funcionamento 0,1A
T emperatura de funcionamento: 0° ÷ +50°C
Máxima umidade permitida: 90% RH
Terminales y datos eléctricos
Terminais e dados elétricos
Klemmenbrett und elektrische Daten
Entradas de línea
Entrada de linha
Leitungseingänge
Entrada positiva llamada de piso
Entrada positiva chamada de patamar
positiver Eingang Etagenruf
Entrada negativa llamada de piso
Entrada negativa chamada de patamar
negativer Eingang Etagenruf
Données techniques
Alimentation directe depuis la ligne
Absorption: à repos 8 m A
pendant le fonctionnement 0,1A
T empérature de fonctionnement: 0° ÷ +50°C
Max. humidité admissible: 90% RH
Technische Daten
Versorgung direkt über die Leitung
Aufnahme: bei aufgelegtem Hörer 8m A
während des Betriebs 0,1A
Betriebstemperatur: 0° ÷ +50°C
Zulässige Feuchtigkeit: max. 90% RH
GC
GE
Rilancio positivo di un attuatore supplementare
Additional actuator positive output
Relance positive d'un actuateur supplémentaire
Rilancio negativo di un attuatore supplementare
Additional actuator negative output
Relance negative d'un actuateur supplémentaire
Relance positivo de un actuator auxiliar
Reactivação positiva de um actuador suplementar
positiver Wiederanlauf eines zusätzlichen Kontaktgliedes
Relance negativo de un actuator auxiliar
Reactivação negativa de um actuador suplementar
negativer Wiederanlauf eines zusätzlichen Kontaktgliedes
Mi 2401
- 1 -

IT ALIANOENGLISHFRANÇAISESPAÑOLPORTUGUÊSDEUTSCH
Selezione impedenza di chiusura
Nel citofono vi è un ponticello J1 che, posizionato
correttamente, permette di adattare il segnale
proveniente dalla montante e quindi consentire
un corretto funzionamento degli apparati ad esso
collegati.
Jumper the closing impedance
The intercom are provided with the jumper J1
that, when placed in the correct position, allows
to adapt the signal from the riser for the correct
operation of the connected devices.
Sélection de l’impédance de
Selección impedancia de cierre
El teléfono es provisto de un puente J1 que,
colocado correctamente, permite de adaptar la
señal procedente de la columna montante para
permitir el correcto funcionamiento de los aparatos conectados.
Selecção impedimento de fechamento
No telefone encontra-se um ponte J1 que
posicionado corretamente possibilita a
adaptação do sinal proveniente da montante e,
assim, possibilita um correto funcionamento dos
aparatos ligados a ele.
fermeture
Dans le combiné, il y a un pontet J1 qui,
correctement positionné, permet de adapter le
signal provenant de la colonne montante et donc
consentir le fonctionnement correct des appareils
qui y sont branchés.
Auswahl der Schlussimpedanz
Bei richtiger Einstellung in die Sprechanlage
befindlichen Jumpers J1 kann das Signal von
der Steigleitung angepasst werden, um die
Funktionstüchtigkeit der daran angeschlossenen Apparate zu gewährleisten.
J1 Ponticello per adattare l'impedenza di chiusura linea
Jumper to select impedance termination line
Pontet pour sélection impédance de fermeture ligne
Puentecillo por selección impedancia de cierre línea
Ponte para selecção impedância de fechar linha
Steg für Auswahl Impedanz von Schließung Linie
1-2 chiusura 100
termination 100
fermeture 100
100
cierre 7
fecho 100
Schließung
Ω Ω
Ω
Ω Ω
Ω Ω
Ω
(di fabbrica)
Ω Ω
Ω Ω
Ω
(default)
Ω Ω
Ω Ω
Ω
(de série)
Ω Ω
Ω Ω
Ω (de serie)
Ω Ω
(de série)
Ω Ω
100
Ω (von ernst)
Ω Ω
2-3 chiusura 15
termination 15
fermeture 15
15
ΩΩ
Ω
ΩΩ
ΩΩ
Ω
ΩΩ
cierre
fecho 15
Schließung
ΩΩ
Ω
ΩΩ
ΩΩ
Ω
ΩΩ
ΩΩ
Ω
ΩΩ
ΩΩ
15
Ω
ΩΩ
3-4 linea aperta
open line
ligne ouverte
línea abierta
linha aberta
offene Linie
Mi 2401
- 2 -

PROGRAMMAZIONI
Il citofono deve essere programmato
opportunamente per definirne il funzionamento.
I modi possibili di programmazione sono 2:
- automatico (consente di programmare
velocemente solo il codice utente agendo dal
posto esterno);
- manuale (consente di programmare tutte le
funzioni dal citofono)
Le programmazioni che possono essere
eseguite sono:
- indirizzo utente;
- indirizzo interno;
- codici da assegnare ai pulsanti “1”, “2”, “3”,
“4", "5” e "6" per effettuare eventuali chiamate
intercomunicanti o per applicazioni speciali;
- scelta della durata e tipo di soneria per 4 tipi
di chiamate
(vedi tabella 1)
.
Programmazione di fabbrica
- indirizzo utente = 100
- indirizzo interno = 000
- pulsanti “1”, “2”, “3”, “4”, "5", "6" = ai pulsanti
non è associato alcun codice
- numero di squilli e tipo di soneria
(vedi
tabella 1)
T abella 1.
Programmazione di fabbrica delle chiamate
Numero Tipo di
Chiamate di squilli soneria
da posto esterno 1 Din-Don
intercomunicante 4 Dring 1
da altro utente 4 Dring 2
da piano 1 Dring 3
Attenzione: solo la programmazione dell'in-
dirizzo utente è obbligatoria; tutte le altre sono
facoltative.
Entrare in programmazione
Tenere premuto per più di 4 secondi il pulsante
e, dopo aver udito un momentaneo tono di
conferma, sollevare il microtelefono; si accenderà il led giallo per tutta la fase di scelta
programmazione.
Rilasciare il pulsante .
Se per 2 minuti non si esegue alcuna operazione, il sistema ritorna automaticamente alla modalità "funzionamento".
Uscire dalla programmazione
In qualsiasi momento è possibile uscire dalla
modalità programmazione riponendo nella sua
sede il microtelefono; il led giallo si spegne.
Programmazione automatica
Con la programmazione automatica è possibile
memorizzare l’indirizzo del citofono agendo dal
posto esterno. Per effettuare la programmazione
automatica occorre:
entrare nella modalità di programmazione
seguendo le indicazioni descritte nel capitolo
“
Entrare in programmazione
effettuare una chiamata da un posto
esterno entro 2 minuti. In impianti dove è
presente la tastiera digitale TD2100 comporre
il numero che si vuol assegnare al citofono e
premere “ ”; in impianti dove è presente il
codificatore digitale CD2131, CD2132,
CD2134 o CD2138 premere sulla pulsantiera
”;
il pulsante che si desidera assegnare all’utente.
Alla chiamata il citofono si programma
automaticamente e sul microtelefono si ode
un tono di chiamata. Riporre e risollevare il
microtelefono per entrare in conversazione
con il posto esterno e verificare il corretto
funzionamento dell’apparecchio; la programmazione è segnalata sul posto esterno da un
tono di conferma se accettata o di dissuasione
se errata;
ripetere le fasi di programmazione per tutti i
citofoni presenti nell’impianto.
Programmazione manuale
La programmazione manuale permette, oltre a
codificare l'indirizzo utente, di assegnare
l'indirizzo interno e i codici ai pulsanti da "1" a "6"
(esempio di programmazione a pagina 12)
.
Utilizzo pulsanti
Per immettere gli indirizzi o i codici utilizzare i
pulsanti "
:La pressione di questo pulsante serve per
: La pressione di questo pulsante serve per
: La pressione di questo pulsante serve per
", "1" e "2".
confermare la programmazione di un
indirizzo o di un codice oppure passare
ad una fase di programmazione
successiva.
confermare la cifra composta e per
passare alla composizione della cifra
successiva in quest'ordine: centinaia,
decine, unità.
incrementare il valore della cifra da
inserire. Premere il pulsante un numero di
volte pari alla cifra da inserire (cifra 1 = 1
pressione; cifra 9 = 9 pressioni; cifra 0 = 10
pressioni)
Immissione codici o indirizzi
- I codici e /o gli indirizzi da memorizzare devono
essere sempre formati da tre cifre (centinaia,
decine ed unità); i codici e/o gli indirizzi
composti da sole decine ed unità o da sole
unità devono essere completati con l’aggiunta
di zeri. Per esempio l’indirizzo 96 diventa 096
e l’indirizzo 5 diventa 005.
- Le cifre devono essere immesse una alla volta
(iniziando dalle centinaia) premendo “n” volte il
pulsante “2” dove “n” corrisponde al valore
della cifra da immettere. Confermare la cifra
premendo il pulsante “1”; un segnale acustico
segnala l'avvenuto inserimento della 1
- Seguire la stessa procedura per l'inserimento
Esempio:
-premere 10 volte il pulsante “2” per inserire la
-premere 9 volte il pulsante “2” per inserire la
-premere 6 volte il pulsante “2” per inserire la
a
della 2
e 3a cifra.
per inserire il codice 096 occorre:
cifra 0 e premere il pulsante “1”; si udirà un tono
sull'altoparlante;
cifra 9 e premere il pulsante “1”; si udirà un tono
sull'altoparlante;
cifra 6 e premere il pulsante “1”; si udirà un tono
sull'altoparlante.
a
cifra.
Programmazione indirizzo utente ed
indirizzo interno
- Indirizzo utente - codice che permette di
ricevere la chiamata da esterno, conversare
ed aprire la serratura del posto esterno
chiamante.
- Indirizzo interno - codici che identificano i
citofoni presenti nell’appartamento (massimo
7). Se vi è un solo citofono, il codice d’interno
deve essere 000 (programmazione di fabbrica)
mentre se sono presenti altri apparecchi
(massimo altri 6) occorre assegnare ad essi i
codici 001, 002, 003, ecc. Inserendo questi
codici tutti i citofoni suoneranno contemporaneamente quando si effettua una chiamata
da esterno, da altro utente e di piano
programmato)
Per effettuare la programmazione utente ed
interno, occorre:
entrare nella modalità di programmazione
seguendo le indicazioni descritte nel capitolo
“
Entrare in programmazione
premere per 4 secondi il pulsante “ ”; il led
giallo inizia a lampeggiare;
inserire le 3 cifre che compongono l'indirizzo
utente seguendo la procedura del paragrafo
“Immissione codici o indirizzi”;
premere il pulsante “ " per confermare e
passare alla codifica dell'indirizzo interno;
si udirà un tono di conferma;
inserire le 3 cifre che compongono l'indirizzo
interno seguendo la procedura del paragrafo
“Immissione codici o indirizzi”;
premere il pulsante “ " per confermare; si
udirà un tono di conferma ed il led giallo si
accende in modo continuo;
proseguire con un'altra programmazione od
uscire riponendo il microtelefono.
Nota. Se uno dei due indirizzi è corretto e non si
vuole modificare è sufficiente confermarlo premendo il pulsante “
.
”;
".
(se
Programmazione indirizzo dei pulsanti
I pulsanti da 1 a 6 possono essere usati per
effettuare:
chiamate intercomunicanti;
- per chiamare utenti di altri appartamenti
inserire il rispettivo indirizzo utente (codici da
001 a 200).
- per chiamate intercomunicanti tra citofoni
presenti nello stesso appartamento assegnare
ai pulsanti sempre il codice 000 iniziando dal
pulsante 1 e proseguendo con i pulsanti
successivi fino a coprire le esigenze dell'utente;
automaticamente alla pressione dei pulsanti
saranno chiamati i citofoni secondo l'ordine
dell'indirizzo interno
Esempio:
con indirizzo interno 002 si effettuerà la chia-
mata al citofono con indirizzo interno 003.
inserzione diretta verso i posti esterni; per
abilitare questo servizio inserire l'indirizzo del
posto esterno (codici da 231 a 250).
servizi vari tramite attuatori art.2281; per
attivare questo servizio inserire l'indirizzo
dell'attuatore da abilitare (codici da 211 a
220).
Per effettuare la programmazione, occorre:
entrare nella modalità di programmazione
seguendo le indicazioni descritte nel capitolo
“
Entrare in programmazione
a - premere per 4 secondi il pulsante che si
desidera programmare; il led giallo inizia a
lampeggiare;
b - inserire le 3 cifre che compongono il
codice o l'indirizzo da programmare seguendo
la procedura del paragrafo “Immissione
codici o indirizzi”;
c - premere il pulsante " "; si udirà un tono
di conferma ed il led giallo si accende in modo
premendo il pulsante 3 dal citofono
(vedi tabella 3)
”;
Mi 2401
.
- 3 -
IT ALIANOENGLISHFRANÇAISESPAÑOLPORTUGUÊSDEUTSCH
continuo;
ripetere le fasi a-b-c per programmare altri
pulsanti od uscire dalla programmazione riponendo il microtelefono; il led giallo si spegne.
Note
.
- Ad ogni pulsante può essere abbinato un solo
codice od indirizzo.
- Non è possibile intercomunicare o collegarsi
IT ALIANOENGLISHFRANÇAISESPAÑOLPORTUGUÊSDEUTSCH
con utenti e posti esterni di altre palazzine se tra
loro vi è lo scambiatore digitale art.2273.
Programmazione del tipo e numero di squilli
delle sonerie
Il citofono può ricevere 4 differenti chiamate che
possono essere variate come indicato nella seguente procedura. La programmazione di fabbrica e la sequenza delle chiamate sono indicate
nella tabella 1. Tutta la programmazione deve
essere eseguita con il microtelefono a riposo.
Premere per 4 secondi il pulsante "1"; il led
giallo si accende e si udirà la soneria precedentemente programmata per chiamata da
posto esterno.
a - Premere ripetutamente il pulsante "1" per
selezionare la soneria preferita.
b - Premere il pulsante “ " per confermare e
passare alla scelta del numero di squilli.
c - Premere il pulsante "1" un numero di volte
pari al numero di squilli desiderato (1 volta = 1
squillo; 4 volte = 4 squilli).
d - Premere il pulsante “ " per confermare e
passare alla programmazione della soneria
successiva (chiamata intercomunicante).
Se occorre variare la chiamata intercomunicante e le due successive (chiamata da altro
utente e da piano), ripetere i punti a-b-c-d.
Per uscire dalla programmazione, sollevare e
riporre il microtelefono; il led giallo si spegne.
Regolazione del volume
Con il microtelefono nella sua sede, è possibile
regolare 4 livelli di volume uguali per tutte le
sonerie come indicato nella seguente procedura:
premere per 4 secondi il pulsante "1"; il led
giallo si accende e si udirà la soneria della
chiamata dal posto esterno;
tenere premuto il pulsante " " e rilasciarlo
quando si ascolta il volume desiderato;
per uscire dalla programmazione, sollevare e
riporre il microtelefono; il led giallo si spegne.
I livelli del volume della soneria sono memorizzati
e verranno usati per le successive chiamate.
Altre programmazioni per funzioni
specifiche
Programmazione indirizzi utente seconda-
(
programmazione aggiuntiva ed indipenden-
ri
te dalle precedenti programmazioni degli indirizzi utente ed interni)
La programmazione seguente consente di memorizzare 4 ulteriori indirizzi utente sullo stesso
citofono (es.: funzione centralino, citofono collo-
cato in un locale di uso comune a più utenti, ecc.)
N.B.: sul citofono è obbligatorio programmare
anche l'indirizzo interno (chiamato indirizzo
interno comune) come specificato nei paragrafi
successivi.
Per effettuare la programmazione, occorre:
entrare nella modalità di programmazione
seguendo le indicazioni descritte nel capitolo
“
Entrare in programmazione
premere per 4 secondi il pulsante “ ”; il led
giallo inizia a lampeggiare;
premere nuovamente per 4 secondi il pulsante
“
”; il led giallo inizia a lampeggiare
velocemente;
inserire le 3 cifre che compongono il 1°
indirizzo utente secondario (codici da 1 a
200) seguendo la procedura del paragrafo
“Immissione codici o indirizzi”;
premere il pulsante “ ” per confermare e
passare all'inserimento del 2° indirizzo utente
secondario; si udirà un tono di conferma;
inserire le 3 cifre del 2° indirizzo utente
secondario e confermarlo premendo “
proseguire inserendo il 3° e 4° indirizzo utente
secondario (se necessari) oppure proseguire
premendo due volte il pulsante “
sare all'inserimento dell'indirizzo interno comune;
inserire le 3 cifre che compongono l'indirizzo
interno comune ai 4 nuovi indirizzi utente
(codici da 000 a 007) seguendo la procedura
del paragrafo “Immissione codici o
indirizzi”.
Nota
: l'indirizzo interno comune deve essere
unico e differente dagli indirizzi interni
eventualmente programmati su altri citofoni
che hanno lo stesso indirizzo utente;
premere “ ” per confermare e tornare alla
fase di scelta di programmazione; si udirà un
tono di conferma ed il led giallo si accende in
modo continuo;
riporre il microtelefono per uscire dalla programmazione.
Nota
: Qualora si desideri effettuare chiamate
intercomunicanti occorre programmare i pulsanti adibiti alla chiamata con i codici degli utenti da
chiamare.
Esempio
Programmazione di tre citofoni con numeri di
utente 101, 102 e 103 dei quali l'utente 103 deve
ricevere anche le chiamate dirette agli utenti 101
e 102; gli utenti 101 e 102 invece ricevono solo
le chiamate a loro dirette.
- L'utente 101 deve essere programmato con
indirizzo utente 101 ed indirizzo interno 000.
- L'utente 102 deve essere programmato con
indirizzo utente 102 ed indirizzo interno 000.
- L'utente 103 deve essere programmato con
indirizzo utente 103, indirizzo interno 000, 1°
indirizzo utente secondario 101, 2° indirizzo
utente secondario 102 ed indirizzo interno comune 101 essendo l'indirizzo interno 000 già
programmato nei citofoni 101 e 102.
”;
” per pas-
Programmazione di sistema
La programmazione seguente consente la
personalizzazione del modo di funzionamento
del pulsante "1", dei morsetti GC-GE e l'abilitazione dell'invio della chiamata di piano ad altri
eventuali apparati con lo stesso indirizzo utente
(posti interni in parallelo). Vedi tabella 2.
Per effettuare la programmazione, occorre:
entrare nella modalità di programmazione
seguendo le indicazioni descritte nel capitolo
“
Entrare in programmazione
premere per 4 secondi il pulsante “ ”; il led
giallo inizia a lampeggiare;
a - premere per 4 secondi il pulsante “1”; il led
giallo inizia a lampeggiare velocemente;
b - premere una volta il pulsante “2” per abilitare
il modo 0 (si udirà un tono acuto); premere,
entro 2 secondi, un'altra volta il pulsante “2” per
disabilitare il modo 0 (si udirà un tono grave);
c - premere “1” per confermare e passare alla
programmazione del modo successivo;
ripetere i punti a, b e c per programmare tutti
i modi presenti nella tabella 2;
”;
dopo aver programmato e confermato con il
pulsante “1” il modo 7, premere il pulsante
“
” e riporre il microtelefono nella sua sede
per uscire dalla programmazione.
Nota
.
La programmazione non sarà modificata se non saranno abilitati/disabilitati correttamente tutti i modi di funzionamento.
”;
- Esempio di programmazione a pagina 5.
Ritorno alla programmazione di fabbrica
(default)
Per riportare il citofono alla programmazione di
fabbrica e quindi cancellare tutte le variazioni
effettuate in fase di programmazione occorre:
entrare in programmazione come descritto nel
capitolo "
premere consecutivamente i pulsanti 6, 5, 4, 3,
2 e 1; un tono avverte del ritorno alla programmazione di fabbrica.
entrare in programmazione
Funzioni aggiuntive
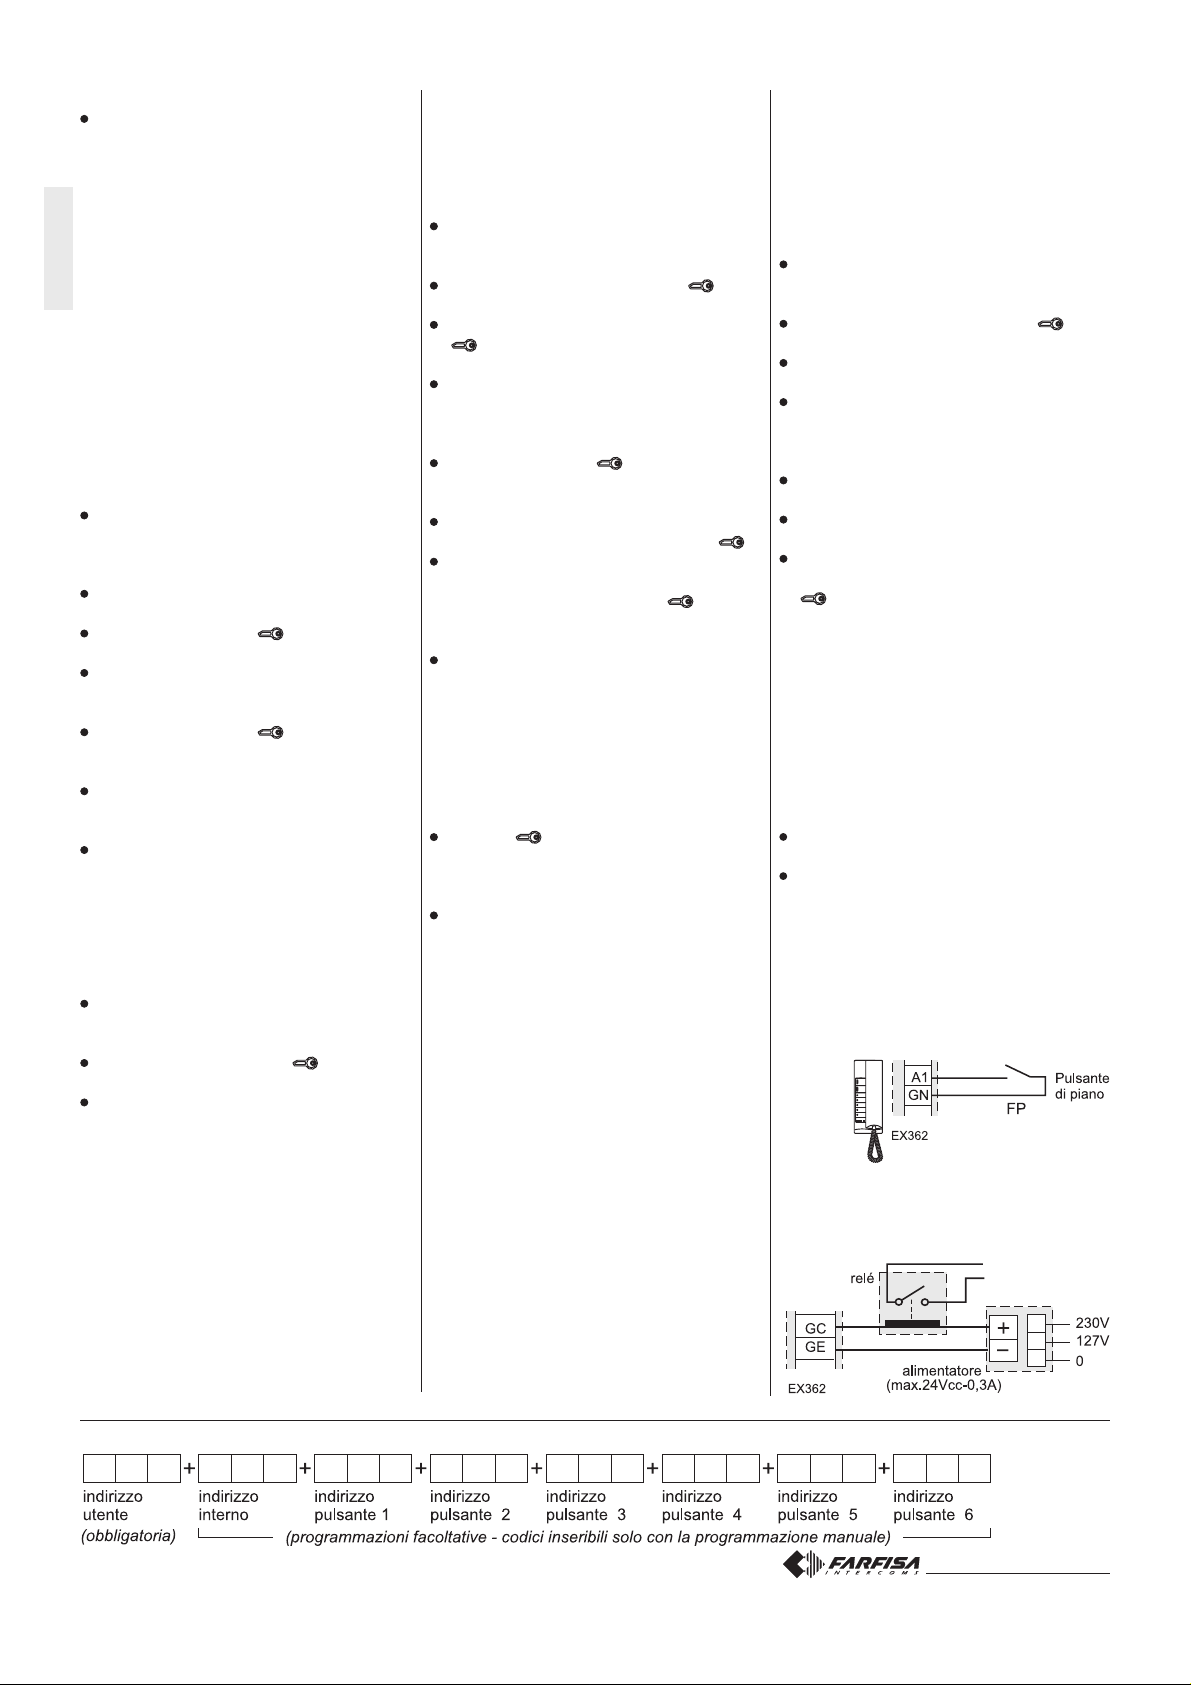
Chiamata di piano
Per avere la chiamata di piano collegare gli
apparati come da schema.
Ripetizione di chiamata
Collegando gli apparati secondo lo schema
riportato di seguito è possibile rilanciare la
soneria del citofono in altri punti della casa.
";
Per facilitare la programmazione e per ricordarla in seguito, si consiglia di scrivere i codici nella tabella seguente
Mi 2401
- 4 -
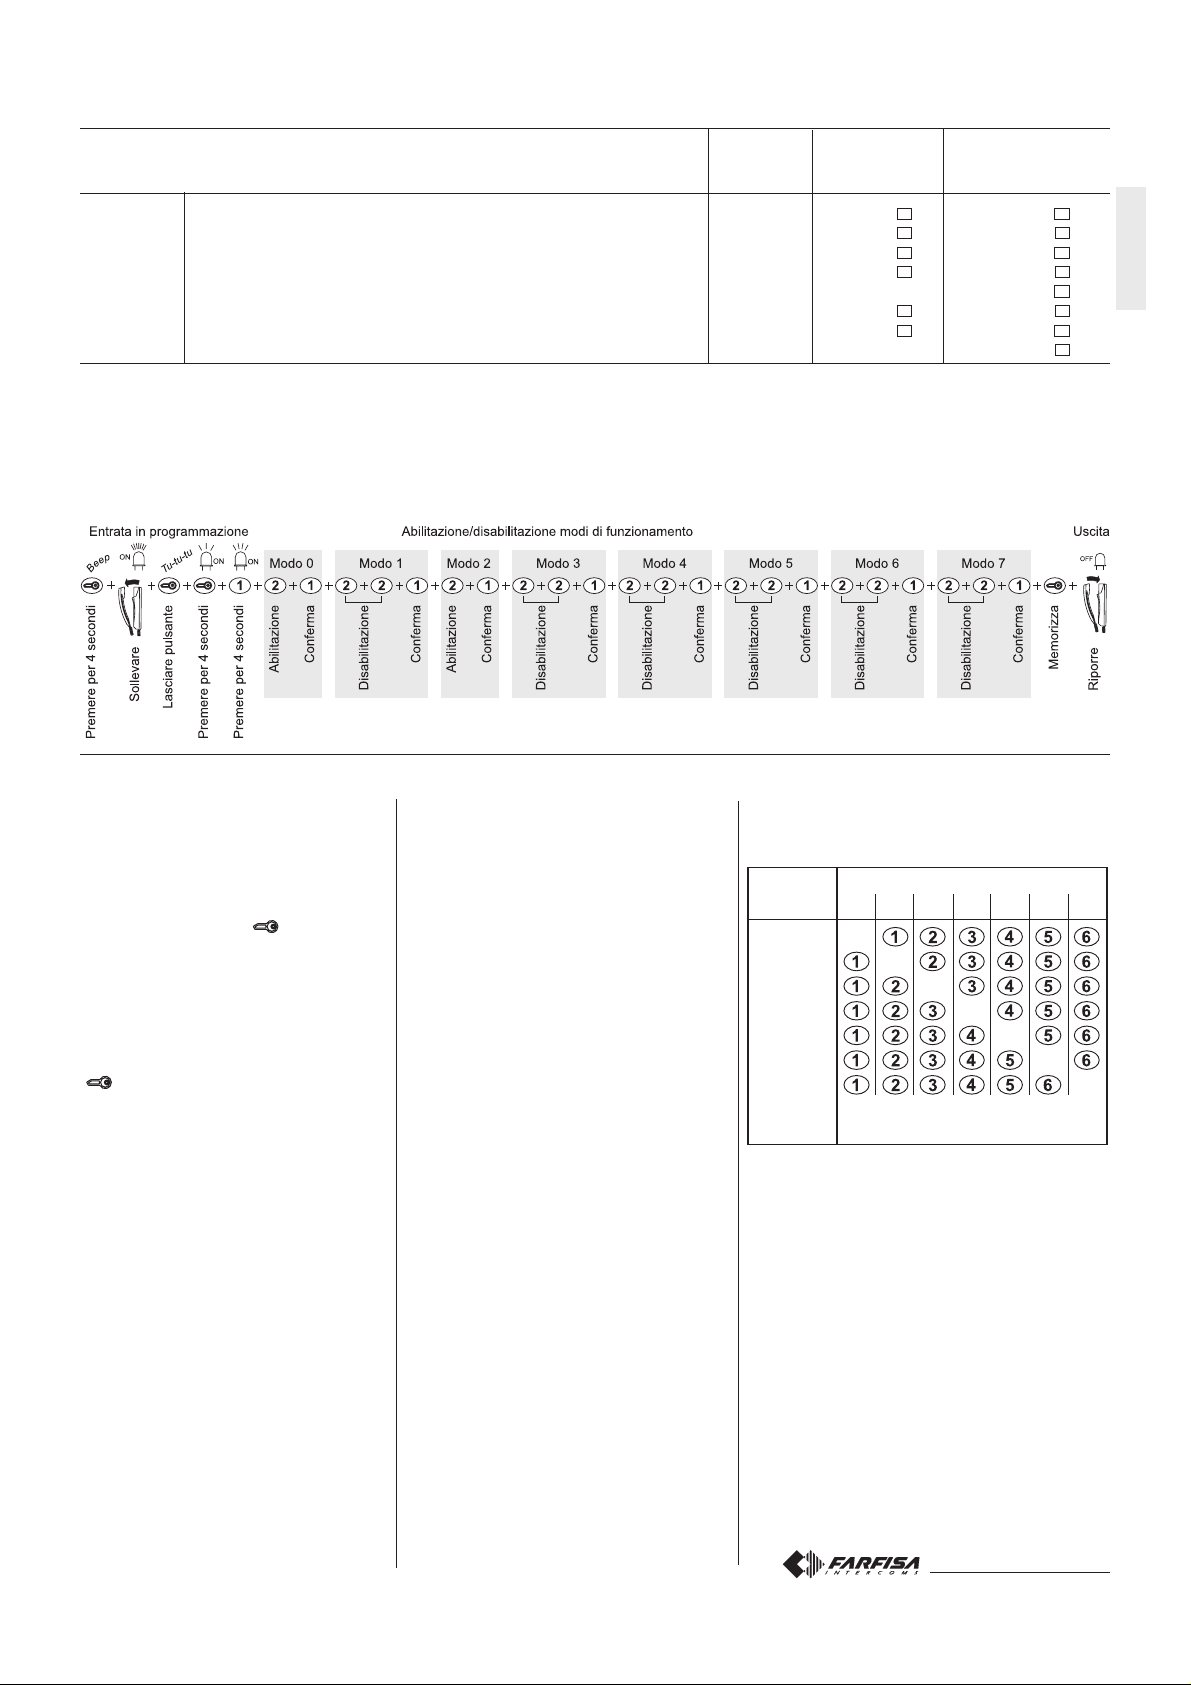
Tabella 2 - Programmazione di sistema
Modi di funzionamento di fabbrica premere 1 volta premere 2 volte
modo 0 invio chiamata di piano su altri posti interni in parallelo
modo 1 il pulsante "1" disabilita tutte le sonerie
modo 2 il pulsante "1" disabilita tutte le sonerie ed i toni dei pulsanti
modo 3 il pulsante "1" non disabilita le sonerie ed i toni
modo 4 riservato; lasciare disabilitato disabilitato - disabilitato
modo 5 i morsetti GC-GE si attivano su chiamata da posto esterno
modo 6 i morsetti GC-GE si attivano su chiamata intercomunicante
modo 7 riservato; lasciare disabilitato disabilitato - disabilitato
(1)
Dal posto interno collegato al pulsante di chiamata di piano (morsetto A1) e con il modo di funzionamento 0 abilitato, la chiamata di piano viene
inviata anche agli altri apparati in parallelo.
(2)
Se i modi 1, 2 e 3 sono disabilitati, premendo il pulsante "1" per 4 secondi quando non si è in conversazione, si disattivano le sonerie esterne ed
intercomunicanti. Per riattivare le sonerie, premere nuovamente per 4 secondi il pulsante "1"; si udirà un tono di conferma.
(3)
Se i modi 5 e 6 sono disabilitati, i morsetti GC e GE sono attivati per il rilancio delle chiamate.
(2)
(1)
(2)
(2)
(3)
(3)
Impostazioni Abilitazione Disabilitazione
il tasto "2" il tasto "2"
disabilitato abilitato disabilitato
disabilitato abilitato disabilitato
disabilitato abilitato disabilitato
disabilitato abilitato disabilitato
disabilitato abilitato disabilitato
disabilitato abilitato disabilitato
Esempio programmazione di sistema per abilitare i modi di funzionamento 0 e 2 e disabilitare tutti gli altri
IT ALIANOENGLISHFRANÇAISESPAÑOLPORTUGUÊSDEUTSCH
Funzionamento
Chiamata da posto esterno.
Effettuando una chiamata dal posto esterno,
il citofono emette una segnalazione acustica
e si abilita per circa 30 secondi. Sollevando
il microtelefono si comunica con il posto
esterno per un tempo di circa 90 secondi e,
premendo il pulsante "
serratura.
Collegamento con uno o più posti esterni
senza ricezione della chiamata.
Sollevando il microtelefono con impianto a
riposo (nessuna conversazione in corso) si
udirà il tono di libero. Premendo il pulsante
"
" si entrerà in collegamento fonico con il
posto esterno o, se presenti più ingressi, con
l’ultimo posto esterno dal quale si è stati
chiamati; in questo caso se i pulsanti da 1 a
6 sono stati programmati con gli indirizzi dei
posti esterni ci si potrà collegare selettivamente con essi premendo il relativo tasto.
Se sollevando il microtelefono non si ode
alcun tono, l’impianto è occupato (è in corso
una conversazione con altro utente) e nessuna
operazione può essere eseguita fino a che
l’impianto non tornerà libero.
Effettuare o ricevere una chiamata da
altro utente.
Con impianto a riposo è possibile effettuare
una chiamata ad un altro utente. Per eseguire
questa operazione bisogna avere preventivamente memorizzato nei pulsanti numerici
l’indirizzo dell’utente che si desidera
chiamare.
Per effettuare la chiamata occorre sollevare
il microtelefono, verificare la presenza del
tono di impianto libero, e premere il pulsante;
sul microtelefono si udirà il tono di chiamata,
", si aziona la
mentre il citofono dell’altro utente suonerà con
un timbro diverso da quello di chiamata da
posto esterno o da intercomunicante dal proprio
appartamento. Se l’utente chiamato risponde
entro 30 secondi ha inizio una conversazione
che può durare fino a 90 secondi, altrimenti
l’impianto ritorna libero. Una chiamata da posto
esterno ad un qualunque utente dell’impianto
concluderà forzatamente la conversazione
interna in corso.
Se sollevando il microtelefono non si ode alcun
tono l’impianto è occupato e occorre attendere
che ritorni libero.
Effettuare o ricevere una chiamata intercomunicante nel proprio appartamento.
Con impianto a riposo è possibile effettuare
una chiamata intercomunicante a tutti i citofoni
presenti nello stesso appartamento (massimo
7 e codici d'interno da 000 a 006) premendo
i pulsanti numerici precedentemente programmati con codice 000
(vedi tabella 3)
.
Per effettuare la chiamata intercomunicante
occorre sollevare il microtelefono, verificare
la presenza del tono di impianto libero, e
premere il relativo pulsante. Sull'altoparlante
si udirà il tono di chiamata, mentre il citofono
chiamato suonerà con il timbro scelto nella
fase di programmazione.
Se l’utente chiamato risponde entro 30 secondi
ha inizio una conversazione che può durare
fino a 90 secondi, altrimenti l’impianto ritorna
libero.
Una chiamata da posto esterno ad un
qualunque utente dell’impianto concluderà
forzatamente la conversazione interna in
corso.
Tabella 3. Utilizzo pulsanti per chiamate intercomunicanti di massimo 7 citofoni installati nel
proprio appartamento.
Citofoni Citofono da chiamare
chiamanti CT0 CT1 CT2 CT3 CT4 CT5 CT6
(000)
CT0
CT1
CT2
CT3
CT4
CT5
CT6
N.B.:
I codici in parentesi nella tabella sono gli indirizzi di identificazione degli interni precedentemente
programmati (vedere capitolo
dirizzo utente ed indirizzo interno"
Esempi:
-Dal citofono CT1
pulsante n° 1 per chiamare il citofono CT0.
-Dal citofono CT2
pulsante n° 4 per chiamare il citofono CT4.
-Dal citofono CT4
pulsante n° 4 per chiamare il citofono CT3.
-
(001)
(002)
(003)
(004)
(005)
(006)
-
-
Pulsanti da premere
(tutti programmati con codice 000)
(indirizzo interno 001)
(indirizzo interno 002)
(indirizzo interno 004)
-
-
-
-
"programmazione in-
).
premere il
premere il
premere il
Mi 2401
- 5 -
PROGRAMMING
The intercom must be suitably programmed for
operation.
Two programming modes are available:
-automatic (quick programming of user code
acting from external station);
-manual (programming of all intercom functions)
IT ALIANOENGLISHFRANÇAISESPAÑOLPORTUGUÊSDEUTSCH
The following programming is possible:
- user address;
- internal address;
- code to assign to buttons “1”, “2”, “3”, “4”, "5"
and "6" to make intercom calls or for special
services;
- selection of the call timing and call melody
for 4 different call melodies (
see table 1
Factory setting
- user address = 100
- internal address = 000
- buttons “1”, “2”, “3”, “4”, "5", "6" = no codes
are stored to the buttons
- number of call rings and call melody (
table 1
)
Table 1.
Factory setting for calls
Number Type of
Calls of rings melody
from door station 1 Din-Don
intercommunicating 4 Dring 1
from other users 4 Dring 2
floor (local) 1 Dring 3
Attention: it is mandatory to program the
equipment only with the user code (address) all
other programming are optional.
Enter the programming phase
Hold the button pressed for more than 4
seconds and pick up the handset after the
confirmation tone; the yellow LED turns on and
stays on for the entire programming selection
phase.
Release the button .
If for 2 minutes no keys are pressed, system
switches back to the operating mode.
Exit the programming phase
You can exit the programming phase at any time
by replacing the handset; yellow LED turns-OFF.
Automatic programming
You can use the automatic programming mode
to save the intercom address from the external
station. To enter the automatic programming
mode you must:
enter the programming mode following the
instructions described in “
programming phase
make a call from an external station within
2 minutes. In case of installations with digital
push-button keyboard TD2100, key in the
number you want to assign to the intercom and
press “ ”. In case of installations with digital
encoder CD2131÷CD2138 press the button
you want to assign to the user on the push-
button keyboard. When the call is received, the
intercom is programmed automatically, you
hear the call tone in the handset. Close and
”;
Enter the
pick up the handset to start a conversation with
the external door station and check the correct
operation of the system; programming mode
is signalled on the external door station by an
acknowledge tone if accepted or a dissuasion
tone if rejected;
repeat programming phases for all the
intercoms connected to the system.
Manual programming
The manual programming mode allows you to
enter the user address, assign the internal address
and codes to numerical buttons (from 1 to 6).
Example of programming to page 12.
).
Using the push-buttons for programming
Press button " ", "1" and "2" to enter
addresses or codes.
:Press this button to confirm address or
code programming or go to the next
programming step.
1 : Press this button to confirm the digit just
see
dialled and to proceed to enter next digit in
the following order: hundreds, tens, units.
2 : Press this button to increase the value
you want to enter. Press the button for a
number of times equal to the digit you want
to enter (digit 1 = 1 time; digit 9 = 9 times;
digit 0 = 10 times).
address it is necessary to:
enter the programming mode following the
instructions described in “
programming phase
keep pressed the button for more than 4
seconds; yellow LED starts flashing;
enter the 3 digit of the user address following
the procedure reported on the paragraph
“Entering codes or addresses”;
press the button to confirm the present
phase and move to the next phase which is:
programming of the internal address; an
acknowledge tone will be heard;
enter the 3 digit of the internal address
following the procedure reported on the
paragraph “Entering codes or addresses”;
press the button to confirm; an acknowledge tone will be heard and the yellow LED
lights-ON continuously;
proceed with another programming phase or
exit the programming phase by hanging up the
handset.
Note. If one of the two above mentioned
addresses is already correctly programmed and
you don’t want to program it again it would be
possible to skip its programming by simply
pressing button
”;
.
Enter the
Programming address to be stored to each
button
Entering codes or addresses
- Codes and/or addresses must have three digits
(hundreds, tens, units); codes and/or addresses
with tens and units or units only must be
completed by adding zeros. For example,
address 96 will become 096 and address 5 will
become 005.
- Digits must be entered individually (beginning
from the hundred), by pressing the button “2” for
a number of times “n”, where “n” is the value of
the digit you want to enter. Store the digit pressing
the button "1"; a tone will confirm the acquisition
st
of the 1
- Follow the same procedure to store the 2nd
and 3rd digit.
For example
- press button “2” 10 times to enter digit 0 and
press the button “1”; you will get a tone on the
loudspeaker;
- press button “2” 9 times to enter digit 9 and
press the button “1”; you will get a tone on the
loudspeaker;
- press button “2” 6 times to enter digit 6 and
press the button “1”; you will get a tone on the
loudspeaker.
digit.
, to enter code 096 you must:
Programming of the user address and
internal address
- User address – this code allows you to receive
an external call, have a conversation and open
the door at the calling external station.
- Internal address – these codes are used to
identify the intercoms installed in the apartment
(max.7). In case of one intercom only, the internal
code must be 000 (default value); if other
intercoms are present (max. other 6) you must
assign to them the codes 001, 002, 003 etc.
Programming these addresses all the
intercoms will ring-UP when receiving an
external, intercommunicating or floor (local) call
(
if programmed
To program the user address and internal
).
Buttons 1, 2, 3, 4, 5 and 6
These buttons can be used to:
make intercommunicating calls;
-to call users of different apartments it is
necessary to store in each button of your
intercom the address of the user you wish to
call pressing that button (codes from 001 to
200).
-to call other intercoms installed in the same
apartment (local intercommunicating service),
it is necessary to store in the buttons 1, 2, 3, 4,
5, 6 of each intercom always the code 000;
starting from button 1 and going on until you
have programmed, with the code 000, as
many buttons as are the intercoms installed in
the apartment you wish to call; automatically
by pressing buttons of one unit you will call the
unit whose internal address is related to the
pressed button according to table 3.
For example if you press the button 3 from the
intercom whose intercommunicating address
is 002 you will call the user with intercom-
municating address 003.
monitoring external door stations; to
enable this feature store the address of the
external door station (codes from 231 to 250).
optional functions operated by means of
the actuators art.2281; to enable this functions
store the address of the actuator to be operated
(codes from 211 to 220).
To make the programming it is necessary:
enter the programming mode following the
instructions described in “
programming phase
a - keep pressed for more than 4 seconds the
button you wish to program; yellow LED starts
flashing;
b -enter the 3 digit of the code or address you
wish to store following the procedure reported
on the paragraph “Entering codes or
addresses”;
.
Enter the
”;
Mi 2401
- 6 -
c -press the button ; an acknowledge tone
will be heard and the yellow LED lights-ON
continuously;
repeat phases a-b-c to program other buttons
or exit the programming mode by hanging up
the handset; yellow LED turns-OFF.
Notes.
- In each button can be stored only one code or
address.
- Intercom conversations or connections with
users and external stations of other buildings
will not be possible if digital exchanger art.2273
is installed.
Programming the number of ringing call
The intercom can receive 4 different calls that
can be changed as indicated in the procedure
below. The default programming values and the
call sequence are shown in table 1.
All programming operations must be carried out
with the handset in idle position.
Keep pressed the button "1" for more than 4
seconds; the yellow LED turns ON and you
hear the ring tone that was programmed for
calls from external door station.
a - Press the button “1” repeatedly to select the
ring tone.
b - Press the button “ ” to confirm and go on
to select the number of rings.
c - Press the button “1” as many times as the
desired number of rings (once = 1 ring; 4 times
= 4 rings).
d - Press the button “ ” to confirm and go on
to program the ring tone for intercom calls.
If you want to change the other two tone rings
(call from other user or floor call), you must
repeat steps a-b-c-d.
Pick up and close the handset for exit the
programming mode; yellow LED turns-OFF.
Adjusting the volume
With the handset in idle position, you can adjust
4 volume levels for all ring tones, as indicated
below:
press the button “1” for 4 seconds; the yellow
LED turns ON and you hear the external door
station ring tone;
hold the button “ ” pressed and release it
when you hear the desired volume;
pick up and close the handset for exit the
programming mode; yellow LED turns-OFF.
The volume levels are stored and will be used for
the next calls.
More programming operations for
specific functions
How to program secondary user addresses
(
additional programming operation that does
not depend on the programming operations of
user and internal station addresses)
The following programming operation allows you
to save 4 additional user addresses on the same
intercom (i.e.: exchanger function, intercom
installed in common area with multiple users,
etc.).
N.B.: intercom must be programmed also with
the internal common address as specified in the
following.
To make the programming it is necessary:
enter the programming mode following the
instructions described in “
programming phase
keep pressed the button “ ” for more than 4
seconds; yellow LED starts flashing;
again keep pressed the button “ ” for more
than 4 sec.; yellow LED starts quickly flashing;
enter the 3 digit of the 1st user secondary
address (codes from 1 to 200) following the
procedure reported on the paragraph
“Entering codes or addresses”;
press the button " " to confirm the present
address and move to the 2nd user address; an
acknowledge tone will be heard;
enter the 3 digit of the 2nd user secondary
address and confirm by pressing button "
proceed entering the 3rd and 4th secondary
user addresses consumer (if necessary) or to
press twice the “
the internal common address;
enter the 3 digit that compose the internal
common address to the 4 new user
addresses (codes from 000 to 007) following
the procedure of the paragraph “Entering
codes or addresses”.
Note:
the internal common address has to be
unique and different from you address him
inside eventually programmed on other intercoms that has the same user address;
to press “ ” to confirm and to return of choice
of programming; an acknowledge tone will be
heard and the yellow LED lights-ON continuously;
pick up the handset for exit the programming
mode.
Note
: If you want to make intercom calls, you must
program the call buttons with the codes of the
users you want to call.
Example
How to program three intercoms with user addresses 101, 102 and 103; from which user 103
should receive also calls addressed to user 101
and 102; user 101 and 102 should receive only
calls addressed to them.
-User 101 must be programmed only with user
address 101 and internal address 000.
-User 102 must be programmed only with user
address 102 and internal address 000.
-User 103 must be programmed with user ad-
dress 103, internal address 000, 1st secondary
address 101, 2
nal common address 001 being the internal
address of intercoms 101 and 102 already
programmed to 000.
”;
” to pass to the insertion of
nd
secondary address 102, inter-
Enter the
System programming
The following programming allows you to
personalise the operation mode of button “1”
used to deactivate the ring tones and the GC-GE
terminals and send the floor call to the systems
with the same user address (internal stations in
parallel). See table 2.
To make the programming it is necessary:
enter the programming mode following the
instructions described in “
programming phase
keep pressed the button “ ” for more than 4
seconds; yellow LED starts flashing;
a - keep pressed the button “1” for more than 4
seconds; yellow LED starts quickly flashing;
b - press the button “2” once to enable operating
mode 0 (you hear a sharp tone); within 2
seconds press the button “2” again to disable
operating mode 0 (you hear a low tone);
c - press the button “1” to confirm and proceed
to program the next mode;
you must repeat steps a, b and c to program all
";
operating modes in table 2;
after you have completed the operation and
confirmed operating mode 7 with the button
“1”, press the button “
handset to exit the programming phase.
Programming will not be changed if the
Note.
values of all modes are not entered correctly.
”;
Enter the
” and replace the
- Programming example of page 8.
Resetting the default programming values
To reset the intercom default programming values and delete all the variations made in the
programming mode you must:
enter the programming mode following the
instructions described in “
ming phase
press the buttons 6, 5, 4, 3, 2 and 1 successively; the tone indicates that the default values
have been restored.
”;
Enter the program-
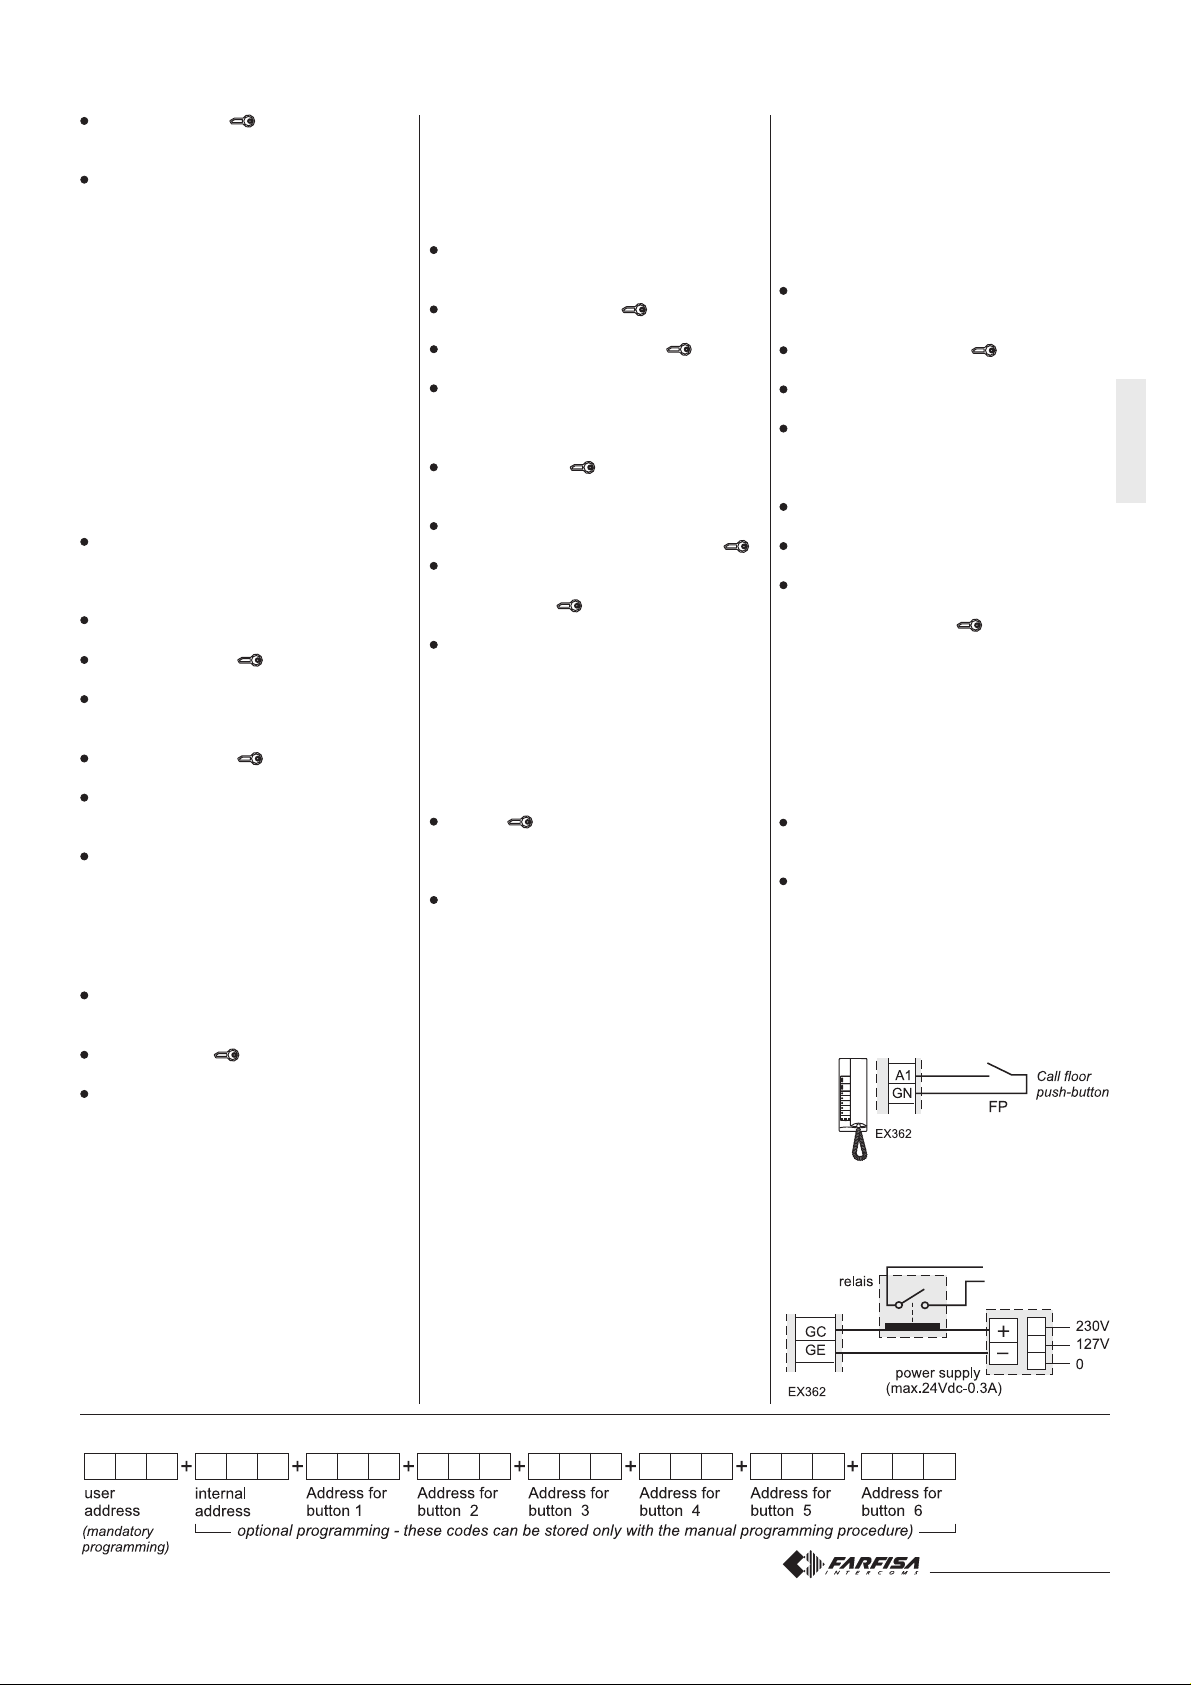
Additional functions
Call floor
To have the floor call connect the apparatus as
illustrated in the diagram.
Call Repeat
You can connect the apparatuses as illustrated in
the diagram below to sent the intercom ring to
other locations in the house.
IT ALIANOENGLISHFRANÇAISESPAÑOLPORTUGUÊSDEUTSCH
To make the programming easier and to remind your self the stored codes, please fill in the following table
Mi 2401
- 7 -
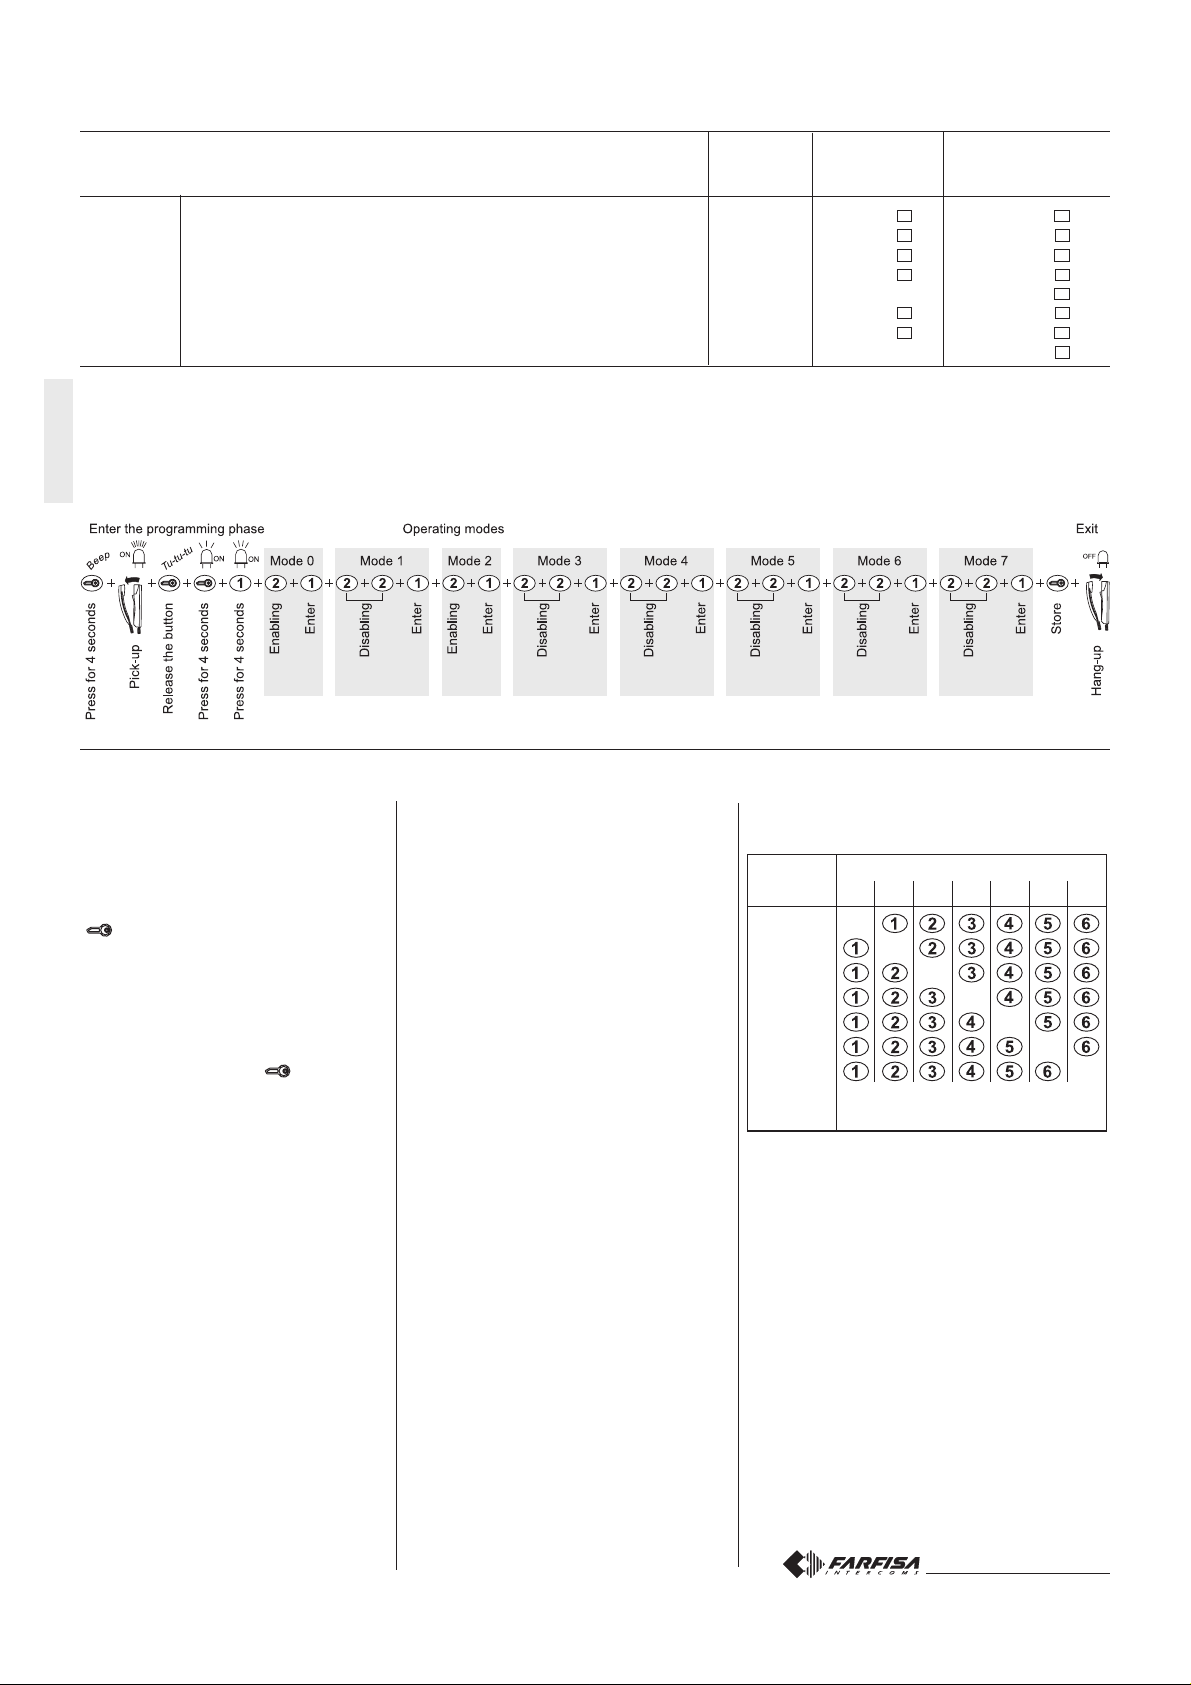
Table 2 - System programming codes
Operating modes value press 1 time press 2 times
Default To enable To disable
button "2" button "2"
mode 0 send floor call to other internal stations in parallel
mode 1 button “1” deactivates all ring tones
mode 2 button “1” deactivates all ring tones and button tones
mode 3 button “1” does not deactivate ring tones and button tones
IT ALIANOENGLISHFRANÇAISESPAÑOLPORTUGUÊSDEUTSCH
mode 4 reserved; disabled disabled - disabled
mode 5 the GC-GE terminals are activated upon call from external door station
mode 6 the GC-GE terminals are activated upon intercom call
mode 7 reserved; disabled disabled - disabled
(1)
From the internal station connected to the floor call button (terminal A1) and with operating mode 0 enabled, the floor call is also sent to the other
apparatuses in parallel.
(2)
If modes 1, 2 and 3 are disabled, press the button “1” for 4 seconds , without a conversation in progress, to deactivate the external and intercom
ring tones. To reactivate the ring tones, press the button “1” again for 4 seconds; you hear the confirmation tone.
(3)
If modes 5 and 6 are disabled, the GC and GE terminals are activated to send the calls.
(2)
(1)
(2)
(3)
(2)
disabled enabled disabled
disabled enabled disabled
disabled enabled disabled
disabled enabled disabled
(3)
disabled enabled disabled
disabled enabled disabled
Example of system programming to enable operating mode 0 and 2 and to disable all the others operating modes
Operation
Call from external station.
When a call is made from the external station,
the intercom generates an acoustic tone and
stays ON for about 30 seconds. Pick up the
handset to start conversation with the external
station for about 90 seconds and press button
"
" to open the door.
Connection with one or more external
stations without receiving the call.
Picking-up the handset when the system in
stand-by and no conversation in progress you
will hear the tone of system ready.
By pressing the button "
connected with the door station or, if more
than one door station is present in the system,
with the door station from which you received
the last call; in this case if the buttons from 1
to 6 have been programmed with the
addresses of the door stations present in the
system it would be possible to communicate
with them by pressing the associated buttons.
If picking up the handset you did not get any
tone, the system is busy (a communication
with another user is in progress), and no other
operations are allowed until the system
becomes free.
Making or receiving a call from another
user.
When the installation is in stand-by, you can
make a call to another user. You must have
stored the address of the desired user’s in the
buttons 1÷6.
To make the call, pick up the handset, wait for
the free tone and press button. You will hear
the call tone and the intercom of the called
user will ring with a ring different from calls
from external stations or intercom calls from
" you will be
the same apartment. If the called user answers
within 30 seconds, a 90-second conversation
starts, otherwise the system goes back to free.
The internal conversation in progress will be
automatically interrupted in case of call from
external station to any other user.
If you pick up the handset and receive no tone,
the installation is busy and you must wait until it
is free.
Making or receiving an intercom call in
your apartment.
When the installation is in stand-by, you can
make an intercom call to all intercom in the
same apartment (max 7 with internal address
from 000 to 006) by pressing buttons previously
programmed with code 000
To make the intercom call, pick up the handset,
wait for the free tone and press proper button.
After pressing the button you will get a calling
tone on the loudspeaker, while the intercom of
the called user rings with the programmed
melody. If the called user answers within 30
seconds, a 90-second conversation starts,
otherwise the system goes back to free.
The internal conversation in progress will be
automatically interrupted in case of call from
external station to any other user.
(see table 3)
.
Table 3. Button use for intercom calls of max. 7
intercoms in the same apartment.
Calling Intercom to call
intercoms CT0 CT1 CT2 CT3 CT4 CT5 CT6
(000)
CT0
CT1
CT2
CT3
CT4
CT5
CT6
N.B.:
The codes in parenthesis in the table are the
identification addresses of the internal stations that
were programmed previously (see chapter
-
(001)
(002)
-
-
(003)
(004)
(005)
(006)
Button to press
(all programmed with code 000)
-
-
-
-
“programming of the user address and internal
address”
Examples:
- From intercom CT1
- From intercom CT2
- From intercom CT4
).
(internal address 001)
the button 1 for calls to intercom CT0.
(internal address 002)
the button 4 for calls to intercom CT4.
(internal address 004)
the button 4 for calls to intercom CT3.
Mi 2401
press
press
press
- 8 -
 Loading...