


INSTALLATION MANUAL SIENA SERIES
4 NOV 2016 - V 1.0

CONGRATULATIONS
Congratulations and thank you for choosing a Falmec rangehood.
To avoid the risks that are always present when you use an electrical appliance it is important that the rangehood is installed correctly and that you read the safety instructions carefully to avoid misuse and hazards.
We recommend that you keep this instruction booklet for future reference and pass it on to any future owners.
Important Information
AFTER UNPACKING THE RANGEHOOD PLEASE REVIEW YOUR NEW ITEM TO ENSURE THAT IT HASN’T BEEN DAMAGED IN TRANSIT OR IS MISSING ANY COMPONENTS. FAILURE TO REPORT ANY ISSUE WITHIN 72 HOURS OF RECEIPT OF YOUR ITEM MAY RESULT IN ADDITIONAL CHARGES.
Environmental Tip
Information on disposal for users
Most of the packing materials are recyclable. Please dispose of those materials through your local recycling depot or by placing them in a appropriate collection bin.
TO AVOID THE RISK OF INJURY OR DAMAGE TO THE PRODUCT IT IS ESSENTIAL TO READ THESE INSTRUCTIONS PRIOR TO
If you wish to discard this product, please contact |
INSTALLATION AND USE |
your local authorities and ask for the correct method |
|
of disposal. |
|

PRODUCT DESCRIPTION & CARTON CONTENTS
CARTON 1 - HOOD UNIT
INTEGRATED HOOD - ON BOARD HOOD
Models include:
SIENA F3SN60S1, F3SN90S1 and F3SND90S1
Included in the carton:
1.Main hood housing including control module and lighting
2.Baffle filters
3.Grease trap
4.Fixing screws
5.Operating & installation guide
SAFETY INSTRUCTIONS
AND WARNINGS
Installation operations are to be carried out by skilled and qualified installers in accordance with the instructions in this booklet and in compliance with the regulations in force.
DO NOT use the hood if the power supply cable or other components are damaged: disconnect the hood from the electrical power supply and contact the Dealer or an authorised Servicing Dealer for repairs.
Do not modify the electrical, mechanical or functional structure of the equipment.
Do not personally try to carry out repairs or replacements. Interventions carried out by incompetent and unauthorised persons can cause serious damage to the unit or physical and personal harm, not covered by the Manufacturer’s warranty.
WARNINGS FOR THE INSTALLER
TECHNICAL SAFETY
Before installing the hood, check the integrity and function of each part. Should anomalies be noted, do not proceed with installation and contact the Dealer.
Do NOT install the hood if an aesthetic (or cosmetic) defect has been detected. Put it back into its original package and contact the dealer.
No claim can be made for aesthetic (or cosmetic) defects once it has been installed.
During installation, always use personal protective equipment (e.g.: Safety shoes) and adopt prudent and proper conduct.
The installation kit (screws and plugs) supplied with the hood is only to be used on masonry walls: in case of installation on walls of a different material, assess other installation options keeping in mind the type of wall surface and the weight of the hood (indicated on page 2).
Keep in mind that installations with different types of fastening systems from those supplied, or which are not compliant, can cause electrical and mechanical seal danger.
Do not install the hood outdoors and do not expose it to atmospheric elements (rain, wind, etc.).
ELECTRICAL SAFETY
The electrical system to which the hood is to be connected must be in accordance with local standards and supplied with earthed connection in compliance with safety regulations in the country of use. It must also comply with European standards regarding radio antistatic properties.
Before installing the hood, check that the electrical mains power supply corresponds with what is reported on the identification plate located inside the hood.
The socket used to connect the installed equipment to the electrical power supply must be within reach: otherwise, install a mains switch to disconnect the hood when required.
Any changes to the electrical system must be carried out by a qualified electrician.
The maximum length of the flue fastening screws (supplied by the manufacturer) must be 13 mm. Use of non-compliant screws with these instructions can lead to danger of an electrical nature.
Do not try to solve the problem yourself in the event of equipment malfunction, but contact the Dealer or an authorised Servicing Department for repairs.
When installing the hood, disconnect the equipment by removing the plug or switching off the main switch.
FUMES DISCHARGE SAFETY
Do no connect the equipment to discharge pipes of fumes produced from combustion (for example boilers, fireplaces, etc.).
Before installing the hood, ensure that all standards in force regarding discharge of air out of the room have been complied with.
USER WARNINGS
These warnings have been drawn up for your personal safety and those of others. You are therefore kindly asked to read the booklet carefully in its entirety before using the or cleaning the equipment.
The Manufacturer declines all responsibility for any damage caused directly, or indirectly, to persons, things and pets as a consequence of failing to comply with the safety warnings indicated in this booklet.
It is imperative that this instructions booklet is kept together with the equipment for any future consultation.
If the equipment is sold or transferred to another person, make sure that the booklet is also supplied so that the new user can be made aware of the hood’s operation and relative warnings.
After the stainless steel hood has been installed, it will need to be cleaned to remove any residues remaining from the protection adhesive as well as any grease and oil stains which, if not removed, can cause irreversible damage to the hood surface. To properly clean the unit, the manufacturer recommends using the supplied moist wipes, which are also available sold separately.
Insist on original spare parts.
INTENDED USE
The equipment is solely intended to be used to extract fumes generated from cooking food in non-professional domestic kitchens: any other use is improper. Improper use can cause damage to persons, things, pets and exempts the Manufacturer from any liability.
The equipment can be used by children over the age of 8 and by persons with reduced physical, sensory and mental abilities, or with no experience or knowledge, as long as they do so under supervision or after having received relative instructions regarding safe use of the equipment and understanding of the dangers connected to it.
Children are not to play with the equipment. Cleaning and maintenance by the user must not be carried out by children without supervision.
USE AND CLEANING WARNINGS
Before cleaning or carrying out maintenance operations, disconnect the equipment by removing the plug or switching off the main switch.
Do not use the hood with wet hands or bare feet.
Always check that all electrical parts (lights, extractor fan) are off when the equipment is not being used.
The maximum overall weight of any objects placed or hung (if applicable) on the hood must not exceed 1.5 Kg.
Always supervise the cooking process during the use of deep-fryers: Overheated oil can catch fire.
Do not leave open, unattended flames under the hood. Do not prepare food over an open flame under the hood.
Never use the hood without the metal anti-grease filters: in this case, grease and dirt will deposit in the equipment and compromise its operation.
Accessible parts of the hood can be hot when used at the same time as the cooking appliances.
Do not carry out any cleaning operations when parts of the hood are still hot.
There can be a risk of fire if cleaning is not carried out according to the instructions and products indicated in this booklet.
Disconnect the main switch when the equipment is not used for long periods of time.
If other appliances that use gas or other fuels are being used at the same time (boiler, stove, fireplaces, etc.), make sure the room where the fumes are discharged is well-ventilated, in compliance with the local regulations.
INSTALLATION
only intended for qualified personnel
Before installing the hood, carefully read the chapter “SAFETY INSTRUCTIONS AND WARNINGS”.
TECHNICAL FEATURES
The technical specifications are exhibited on the labels located inside the hood.
POSITIONING
The minimum distance between the highest part of the cooking equipment and the lowest part of the hood is indicated in the installation instructions.
Generally, when the hood is placed over gas cookers, the distance must be at least 65 cm (25.6’’). However, according to an interpretation of standard EN60335-2-31 dated 11-07-2002 of TC61 (sub-clause 7.12.1 meeting 15 agenda item 10.11), the minimum distance between the cooker and lower part of the hood can be reduced to the quota reported in the installation instructions.
Should the instructions for the gas cooker specify a greater distance, this must be taken into consideration.
Do not install the hood outdoors and do not expose it to outdoor environment (rain, wind, etc.).
OPERATION
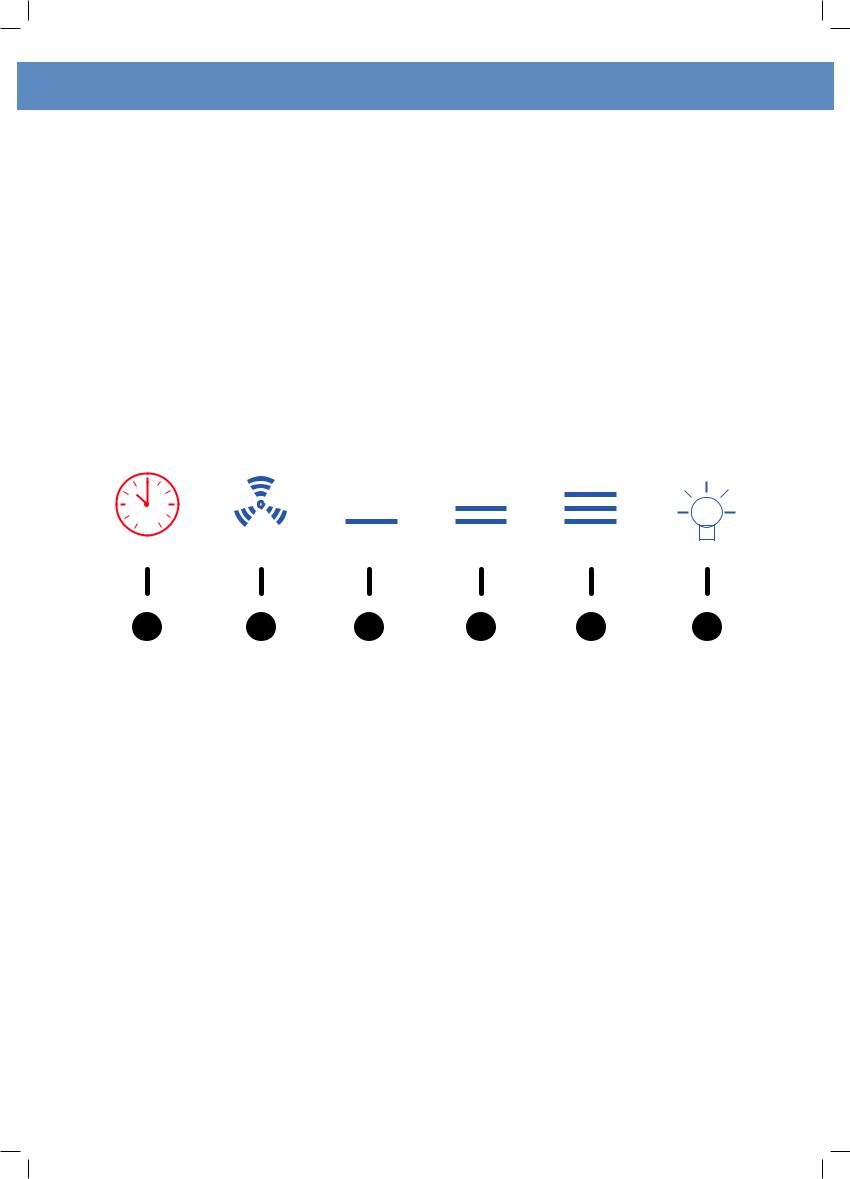
OPERATING YOUR CONTROL PANEL WITH THE 6 BUTTON TOUCH CONTROL
Turning the extraction function ON or OFF:
•In standby mode, press button 2 to turn on operating mode, then press buttons 3 through to 5 to change the speed.
•The hood has three speed options and a boost speed plus the 24 recirculating mode.
•To turn hood off, press button 2 repeatedly until hood returns to standby mode.
Turning the light function ON or OFF:
Press button 6 to turn on or turn off the light in either standby mode or when the hood is in use. Light will remain on indefinitely until switched off using button 6 again, otherwise will switch off when time elapses in timer mode (when in use).
Turning the timer function ON or OFF:
In operating mode, press button 1 to engage the timer function.
The default time set is 15 minutes and cannot be increased or decreased.
24h
|
|
|
|
|
|
|
|
|
|
|
|
|
|
|
|
|
|
|
|
|
|
1 |
2 |
3 |
4 |
5 |
|
6 |
||||
BUTTON 1:
TIMER (Red LED flashing)
Auto switch-off after 15 min.
The function deactivates (red LED off ) if:
-The motor turns off (key ).
-The speed is changed (keys +/-).
FILTER ALARM (red LED steady on)
Anti-grease filter maintenance after approximately 30 hours of operation. Press and hold the button for 3 seconds to reset.
BUTTON 2: Motor ON/OFF
Motor on/off and Speed1
If pressed for more than 3 seconds, it activates the 24h cycle (1h ON -> 3h OFF -> 1h ON)
Rangehood activates for 1 hour on speed 1 and then turns off for 3 hours. This cycle repeats for the next 24 hours.
BUTTON 3: Speed 2 activation
BUTTON 4: Speed 3 activation
BUTTON 5: Speed 4 activation for 10 minutes only
BUTTON 6: Light on/off
 Loading...