


 Loading...
1
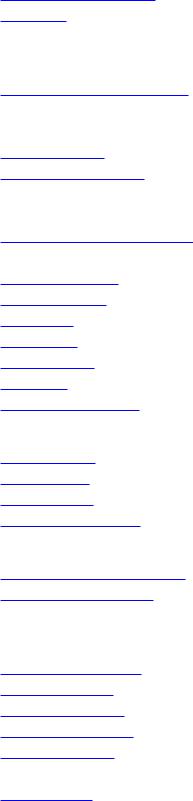
Table of Contents
Introduction
. .About. . . . .FabFilter. . . . . .Volcano. . . . . .2. . . . . . . . . . . . . . . . . . . . . . . . . . . . . . . . . . . . . . . . . . . . . . . . . . . . . . . . . . . .3
. .Quick. . . . start. . . . . . . . . . . . . . . . . . . . . . . . . . . . . . . . . . . . . . . . . . . . . . . . . . . . . . . . . . . . . . . . . . . . . . . . .5
Using FabFilter Volcano 2
. .Overview. . . . . . . . . . . . . . . . . . . . . . . . . . . . . . . . . . . . . . . . . . . . . . . . . . . . . . . . . . . . . . . . . . . . . . . . . . . . .6
. .What. . . .-you. . .-use. . .-is. .-what. . . .-you. . .-see. . . . . . . . . . . . . . . . . . . . . . . . . . . . . . . . . . . . . . . . . . . . . . . . . . . . . . . . . .8
. .Knobs. . . . . . . . . . . . . . . . . . . . . . . . . . . . . . . . . . . . . . . . . . . . . . . . . . . . . . . . . . . . . . . . . . . . . . . . . . . .10.
. .Filters. . . . . . . . . . . . . . . . . . . . . . . . . . . . . . . . . . . . . . . . . . . . . . . . . . . . . . . . . . . . . . . . . . . . . . . . . . . .11.
. .Filter. . . .parameters. . . . . . . . . . . . . . . . . . . . . . . . . . . . . . . . . . . . . . . . . . . . . . . . . . . . . . . . . . . . . . . . . . . . . . . .12.
. .Interactive. . . . . . . .filter. . . .display. . . . . . . . . . . . . . . . . . . . . . . . . . . . . . . . . . . . . . . . . . . . . . . . . . . . . . . . . . . . . . . .14.
. .Routing. . . . . . . . . . . . . . . . . . . . . . . . . . . . . . . . . . . . . . . . . . . . . . . . . . . . . . . . . . . . . . . . . . . . . . . . . . . .15.
. .Modulation. . . . . . . . . . . . . . . . . . . . . . . . . . . . . . . . . . . . . . . . . . . . . . . . . . . . . . . . . . . . . . . . . . . . . . . . . . . .16.
. .Drag. . . -.and. . .-drop. . . .modulation. . . . . . . .slots. . . . . . . . . . . . . . . . . . . . . . . . . . . . . . . . . . . . . . . . . . . . . . . . . . . . . . . . .17.
. .XLFO. . . . . . . . . . . . . . . . . . . . . . . . . . . . . . . . . . . . . . . . . . . . . . . . . . . . . . . . . . . . . . . . . . . . . . . . . . . .19.
. .Envelope. . . . . . .generator. . . . . . . . . . . . . . . . . . . . . . . . . . . . . . . . . . . . . . . . . . . . . . . . . . . . . . . . . . . . . . . . . . . . .21.
. .Envelope. . . . . . .follower. . . . . . . . . . . . . . . . . . . . . . . . . . . . . . . . . . . . . . . . . . . . . . . . . . . . . . . . . . . . . . . . . . . . .22.
. .MIDI. . . .source. . . . . . . . . . . . . . . . . . . . . . . . . . . . . . . . . . . . . . . . . . . . . . . . . . . . . . . . . . . . . . . . . . . . . . . .23.
. .XY. .controller. . . . . . . . . . . . . . . . . . . . . . . . . . . . . . . . . . . . . . . . . . . . . . . . . . . . . . . . . . . . . . . . . . . . . . . . . .24.
. .Output. . . . . controls. . . . . . . . . . . . . . . . . . . . . . . . . . . . . . . . . . . . . . . . . . . . . . . . . . . . . . . . . . . . . . . . . . . . . . .25.
. .MIDI. . . .Learn. . . . . . . . . . . . . . . . . . . . . . . . . . . . . . . . . . . . . . . . . . . . . . . . . . . . . . . . . . . . . . . . . . . . . . . .26.
. .Undo,. . . . .redo,. . . .A/B. . .switch. . . . . . . . . . . . . . . . . . . . . . . . . . . . . . . . . . . . . . . . . . . . . . . . . . . . . . . . . . . . . . . .28.
Presets
. .Loading. . . . . .presets. . . . . . . . . . . . . . . . . . . . . . . . . . . . . . . . . . . . . . . . . . . . . . . . . . . . . . . . . . . . . . . . . . . . . .29.
. .Saving. . . . .presets. . . . . . . . . . . . . . . . . . . . . . . . . . . . . . . . . . . . . . . . . . . . . . . . . . . . . . . . . . . . . . . . . . . . . . .30.
. .Section. . . . . .presets. . . . . . . . . . . . . . . . . . . . . . . . . . . . . . . . . . . . . . . . . . . . . . . . . . . . . . . . . . . . . . . . . . . . . .31.
. .How. . . presets. . . . . .are. . .stored. . . . . . . . . . . . . . . . . . . . . . . . . . . . . . . . . . . . . . . . . . . . . . . . . . . . . . . . . . . . . . . .32.
Purchasing FabFilter Volcano 2
. .Purchasing. . . . . . . .FabFilter. . . . . . .Volcano. . . . . .2. . . . . . . . . . . . . . . . . . . . . . . . . . . . . . . . . . . . . . . . . . . . . . . . . . . . . . .33.
. .Entering. . . . . . your. . . .license. . . . .key. . . . . . . . . . . . . . . . . . . . . . . . . . . . . . . . . . . . . . . . . . . . . . . . . . . . . . . . . . . . .34.
Support
. .Support. . . . . . . . . . . . . . . . . . . . . . . . . . . . . . . . . . . . . . . . . . . . . . . . . . . . . . . . . . . . . . . . . . . . . . . . . . . .35.
. .Upgrading. . . . . . . .to. Volcano. . . . . . 2. . . . . . . . . . . . . . . . . . . . . . . . . . . . . . . . . . . . . . . . . . . . . . . . . . . . . . . . . . . . .36.
. .Manual. . . . . installation. . . . . . . . . . . . . . . . . . . . . . . . . . . . . . . . . . . . . . . . . . . . . . . . . . . . . . . . . . . . . . . . . . . . . . .37.
. .VST. . .plug. . .-.in. .versions. . . . . . . . . . . . . . . . . . . . . . . . . . . . . . . . . . . . . . . . . . . . . . . . . . . . . . . . . . . . . . . . . . .38.
. .External. . . . . .side. . . chaining. . . . . . . . . . . . . . . . . . . . . . . . . . . . . . . . . . . . . . . . . . . . . . . . . . . . . . . . . . . . . . . . . . .39.
. .License. . . . . .agreement. . . . . . . . . . . . . . . . . . . . . . . . . . . . . . . . . . . . . . . . . . . . . . . . . . . . . . . . . . . . . . . . . . . . . .41.
. .Acknowledgements. . . . . . . . . . . . . . . . . . . . . . . . . . . . . . . . . . . . . . . . . . . . . . . . . . . . . . . . . . . . . . . . . . . . . . . . . . . .43.
. .About. . . . .FabFilter. . . . . . . . . . . . . . . . . . . . . . . . . . . . . . . . . . . . . . . . . . . . . . . . . . . . . . . . . . . . . . . . . . . . . . .44.
2

About FabFilter Volcano 2
Volcano 2 is more than just an update of Volcano 1. The original idea of high quality filters\being modulated with several sources is still present but Volcano 2 has been redesigned from the\ground up. Now it is not only capable of high quality filtering effects, but it can even be used\for phasing, flanging, chorus and many other cool effects!
Bigger than ever... and easier-to-use than ever!
Of course, the new version of Volcano brings a lot of new features. To start with, you now get\four full-featured filters which can be routed in almost any\possible way (including Per-Channel and Mid-Side). Then, the real fun starts with our totally re-designed\drag-and-drop modulation system with a 24 slot\modulation matrix. And instead of the two simple LFOs and the single Envelope Generator in\Volcano 1, you now get all the XY Controller, XLFOs, Envelope Generators, Envelope Followers and MIDI Sources\you need! Of course, the new version also has a side-chain input,\which can be used to trigger the Envelope Generators or feed the Envelope Followers. Volcano 2\also features our improved MIDI Learn system, which makes\it easy to associate your controllers to Volcano's parameters.
What-you-use-is-what-you-see
Volcano 2 introduces a revolutionary new interface concept: what-you-use-is-what-you-see. The idea is simple yet powerful: do you\want another filter? Just add one! Do you want an Envelope Follower? Just add one and start\modulating things! At all times, the interface only contains the filters, modulation sources and\slots that you are actually using. This results in an intuitive user interface that experienced\producers and novices alike will embrace.
Modulation madness
Volcano 2 brings new and improved modulation sources and because of our improved interface,\you don't have to worry about how many sources you have: there are enough sources to keep you\busy for a long time!
Our new XLFO offers you anything from a simple sine wave to a fully programmable 16-step\sequencer. The Envelope Generators and Envelope Followers can make use of the plug-in's\side-chain signal, and the new MIDI modulation sources let you modulate parameters using any form\of MIDI data.
Finally
If you have spent some time with Volcano 2, you will find use for it in any kind of project.\The best way to discover what you can do with it is to explore the presets. Find out what a\variety of effects you can create, and use them as a starting point for your own\explorations.
FabFilter Volcano 2 is available in VST, VST3, AU (Audio Units), AAX Native and AudioSuite formats (all both 64-bit and 32-bit), as well as RTAS (32-bit only), for Mac OS X and Windows.
3

Windows requirements |
Mac OS X requirements |
32-bit: Windows 10, 8, 7, Vista or XP |
OS X 10.6 or higher |
64-bit: Windows 10, 8, 7 or Vista (x64) |
AU or VST 2/3 host or Pro Tools |
VST 2/3 host or Pro Tools |
Intel processor |
|
|
Next: Quick start |
|
See Also |
|
Using FabFilter Volcano 2 |
|
Upgrading to Volcano 2 |
|
VST plug-in versions |
|
4

Quick start
The installer will copy the FabFilter Volcano 2 plug-in into the common VST, VST 3, AU (macOS only)\and Pro Tools plug-in folders on your computer. On macOS, the global plug-in folders in\/Library/Audio/Plug-Ins are used.
In most cases, your host will then recognize the plugin automatically. However, if the\instructions below do not work, see Manual\installation instead.
 Cubase
Choose an empty insert slot, for example in the Mixer, and select FabFilter Volcano 2 from the menu that appears. To use the MIDI features in Volcano 2, create a new MIDI track and set its output to the Volcano 2 instance you have just created. (The VST 3 version of Volcano 2 can be found in the Filter section.)
 Logic Pro
Choose an empty insert slot on one of your audio tracks, instrument tracks or buses and select\FabFilter Volcano 2 from the pop-up menu. You will find FabFilter Volcano 2 in the Audio Units > FabFilter section (named FF Volcano 2).
 Ableton Live
In Session view, select the track you would like to place FabFilter Volcano 2 on, for example by\clicking the track name. At the left top of Ableton Live's interface, click on the Plug-in\Device Browser icon (third icon from the top). From the plug-ins list, double-click\FabFilter/FabFilter Volcano 2, or drag it onto the track.
 Pro Tools
Choose an empty insert slot on one of your audio tracks, instrument tracks or buses and select\FabFilter Volcano 2 from the pop-up menu in the Effect section.
Use the Presets button to try different settings from the many factory presets that are\bundled with FabFilter Volcano 2. Have fun!
Next: FabFilter Volcano 2 overview
See Also
VST plug-in versions
Upgrading to Volcano 2
Overview
Loading presets
5
Overview
Volcano's interface is divided into horizontal sections:
 Presets, undo and A/B
The Undo, Redo, A/B and Copy buttons at\the top of the plug-in interface enable you to undo your changes and switch between different\states of the plug-in. With the preset buttons,\you can easily browse through the factory presets or save your own settings so you can re-use\them in other songs.
 Interactive filter display
This is the graphic representation of the filter settings which allows you to drag all filters\individually or simultaneously and control the filter settings with key combinations. See\Interactive filter display.
 Filter controls
At the bottom of the display, the filter controls provide full\control over all filter parameters. The filters offer a choice of low-pass, high-pass and\band-pass modes and come with 11 algorithms that offer different filter characteristics. Each\filter has a special delay option with short delay times up to 30 ms, creating all kinds of\stereo effects. At the left of the filter controls, the routing\button selects the routing of the four filters.
 Modulation button
The modulation button shows or hides the entire modulation section at the bottom of the\interface. FabFilter Volcano 2 offers virtually unlimited modulation possibilities, but all\this power might be a bit intimidating. That's why the modulation section is hidden by default,\and you can look 'under the hood' when you want to tweak a preset or design your own.
 Source selection bar
The source selection bar shows all modulation sources at a glance and lets you easily scroll\around and create new sources. FabFilter Volcano 2 offers XLFO,\Envelope Generator (EG), Envelope Follower (EF), MIDI and XY Controller sources.\See also Modulation.
 Modulation slots and sources
The bottom section contains the modulation sources. The modulation section in Volcano 2 is\fully modular Ñ but without the cables! We found a simple way to show you everything that is\modulating, and what is modulated by what. Above each modulation source, the modulation slots\show exactly what targets are modulated by this source and let you adjust the amount of\modulation. You can very easily set up modulation connections with drag-and-drop. All in all, we think we made sound design easier and\more fun!
 MIDI Learn, monitoring and input/output/mix
6

The bottom bar contains the MIDI Learn feature which sets up any\MIDI controller to control any plug-in parameter. Next, we find various output options and mix\buttons. See Output controls.
 Resize
The resize button in the lower-right corner lets you choose between normal and wide interface\layouts. The wide layout provides more space for the modulation sources at the bottom of the\interface. Most hosts support dynamic resizing of the interface; otherwise just close and\re-open the interface window.
Next: What-you-use-is-what-you-see
See Also
About FabFilter Volcano 2
Support
7
What-you-use-is-what-you-see
Most of the times an impressive feature list results in an impressively difficult-to-use\interface, full of controls for parameters you might never even use.
For almost every plug-in developer one of the greatest challenges when making such a complex\full-featured plug-in is to design an interface that is easy-to-use. And we think we did it!\FabFilter introduces a revolutionary new interface concept: What-you-use-is-what-you-see.
The idea is simple yet powerful. Do you want another filter? Just\add one! Do you want an envelope follower? Just add one and start\modulating things! At all times, the interface only contains the filters, modulation sources and\slots that you are actually using. Of course there is a limit to the number of sources you can create, but in practice it feels like you can create as many sources as you will ever need.
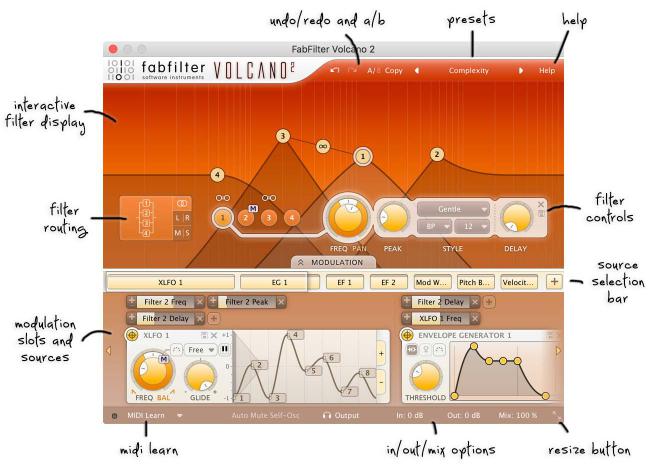
This results in an intuitive user interface that experienced producers and novices alike will\embrace. To give you an idea, a simple preset with just one low pass filter and the modulation\section hidden looks like this:
... a more complex preset with two filters and modulation using our new XLFO and an Envelope\Generator looks like this:
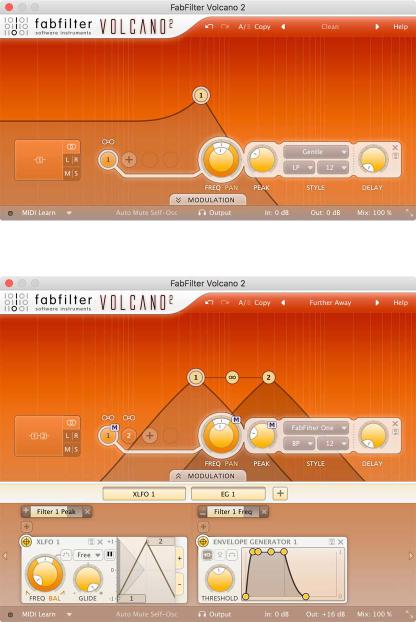
... and a very complex preset, with four filters and a lot of modulation sources and\modulation, looks like this:
8
To help you understand even the most complex presets, modulation slots are grouped with each\source. Each component, knob or controller that is being modulated is marked with a little M\button. Simply click the M to highlight the modulation source and slots responsible for the\modulation. See also Modulation.
Next: Knobs
See Also
Modulation
Overview
9
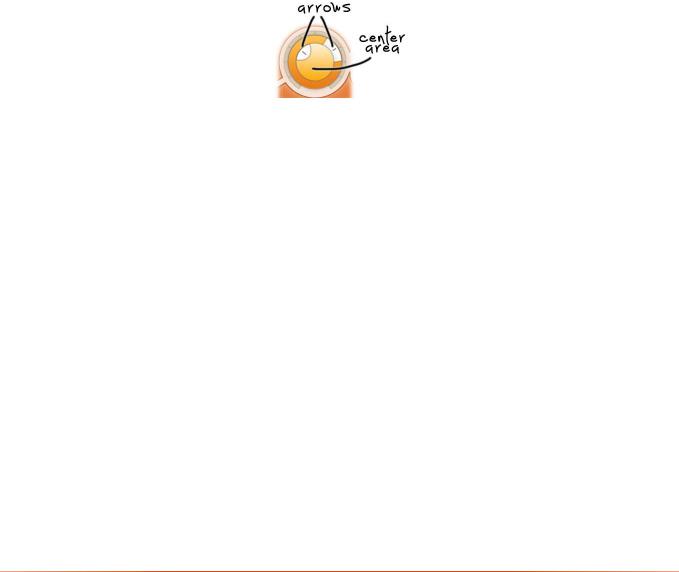
Knobs
It is easy to control FabFilter Volcano 2's parameters with the large round knobs. They will light up when you move the mouse cursor around to indicate that you can adjust them. The moment you move the mouse cursor over a knob, a parameter value display will pop up, which shows the name and the current value of the parameter.
All knobs support four ways of control:
1.Vertical mode
Click on the center area of a knob and drag up or down to rotate it. The knob reacts to the\speed with which you are dragging, so if you move the mouse slowly, you make precise\adjustments.
2.Rotate mode
Grab the arrow of the knob and drag it around. By moving the mouse cursor further away from the knob while dragging it, you can make precise adjustments.
3.Mouse wheel mode
Perhaps the easiest way to make adjustments is by using the mouse wheel when you hover over a knob. This mode works for all the knobs and possible panning rings. (On Windows, you might need\to click in the plug-in interface first to make sure it is the active window.)
4.Text entry mode
Double-click a knob to enter an exact value using the keyboard.
Tips
 To reset a knob to its default position, hold down the Ctrl key (Windows) or\Command key (macOS) and click the knob once. Note: In Pro Tools, Volcano 2 uses the\default Pro Tools keyboard shortcut for reset: Alt+click.
 To fine-tune a value when using vertical drag mode or the mouse wheel, hold down the\Shift key while dragging or moving the mouse wheel. Note: In Pro Tools, Volcano 2 uses the default Pro Tools keyboard shortcut for fine tune: Ctrl+drag on Windows or\Command+drag on macOS.
 There are several handy shortcuts in text entry mode. With frequency values, you can\type e.g. '1k' to set the value to 1000 Hz, and also 'A4' for 440 Hz, or even strings like\'C#3+13'. With dB values, you can type e.g. '2x' to get +6 dB (the value that corresponds to\two times louder). With all values, you can also type a percentage (e.g. '50%' will put a knob\exactly in the middle position).
 Sometimes, knobs in our plug-in interfaces are linked: these be adjusted\simultaneously by holding down the Alt key (Shift key in Pro Tools) while\dragging on one of them. For example, an output level and input level setting of a plug-in\could be adjusted simultaneously (in the opposite direction) this way.
Next: Filters
See Also
Support
10
Filters
Volcano 2 comes with four multi-mode stereo filters, which can be routed in almost every\possible way, even per-channel and mid-side.
Every filter can be switched between low-pass, high-pass, and band-pass responses with 12, 24\and 48 dB/octave slopes and a staggering amount of eleven different high-quality filter\characteristics that define the unique sound and overdrive of the filter. They range from smooth\with moderate overdrive to raw, selfoscillating and over-the-top! All characteristics have been tuned very carefully, using our\state-of-the-art FabFilter filter technology.
One set of filter controls is shared among all filters,\which shows the parameters of the active filter.
 To activate a filter, click one of the numbered filter buttons. The button\for the currently active filter lights up and is connected visually with the filter controls\section.
 To bypass the active filter, click its filter button again. The first\click activates the filter; once it is active, the filter button enables and disables the\filter. When a filter is bypassed, the filter controls will\look disabled, but can still be used to adjust the filter.
 To add a filter, click the + button next to the last\filter button. The newly added filter will copy most of its settings from the currently active\filter.
 To remove a filter, activate it and then click the Remove button
  at the top right of the filter controls section. If there is only one filter left, you cannot remove it.
 Click the Presets button
  to save the current filter and routing settings, or to access previously saved section presets. Note that this affects all filters and the routing, not just the active\filter. See also Section presets.
In the filters section, we applied our new what-you-use-is-what-you-see concept: you only get filter buttons for filters\that you are actually using at the moment. Even the Routing button only contains the routing\options available for the current number of filters!
When using L/R or M/S configuration, the amount of filters will\always be 2 or 4. So when adding or deleting filters just one click will add or delete 2 filters\automatically.
You can use the filters individually or combine filter characteristics to create your own\sounds in any way imaginable. To experience the full potential of Volcano 2's filters, try it on\some signals with rich harmonics (synth sounds, distorted guitar or complete mixes are good\sources for filtering).
Next: Filter parameters
See Also
Interactive filter display
Modulation
11
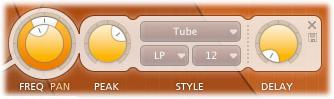
Filter parameters
Volcano 2 contains up to four independent multi-mode filters. You control the parameters of\the active filter with the following settings:
 Frequency
The filter frequency is adjustable over the entire audio range. The Frequency controls the\center or cutoff frequency of the active filter and can be controlled in real time, either\manually or via external devices.
 Pan
Pan
The Pan ring around the Frequency knob lets you filter the left and right channels\differently. It works as a stereo balance setting for the center frequency of the filter. For\example, when you turn the Pan knob to the left, the left channel will be filtered with a\lower center frequency, and the right channel will be filtered with a higher center\frequency. You can use this to create various stereo filtering effects, especially in\combination with modulation.
 Peak
Peak
The Peak knob adjusts the resonance of the active filter. A little resonance will cause the\filter to create warmer and more characteristic tones. At maximum resonance, the filter will\self-oscillator with most filter characteristics. (The Auto Mute Self-Osc option in the\bottom bar will help to keep this manageable. See Output\controls.)
 Characteristic
FabFilter Volcano 2 lets you choose between 11 different filter characteristics:
1.FabFilter One, the original filter characteristic taken from our award-winning\FabFilter One synthesizer
2.Smooth, like the cream in your coffee
3.Raw, a filter with lots of overdrive and exhibits a character of its own. Great\for distortion guitar sounds
4.Hard, moderately distorting filter, with a nice clean whistle
5.Hollow, juicy moderate distortion with fairly much low-end self-oscillation
6.Extreme, for more wild sonic ideas
7.Gentle, a more smooth and clean general purpose characteristic
8.Tube, with a warmer sound and nice overdrive, great for synth sounds
9.Metal, with a rough, sharper sound and distortion
10.Easy Going, a softer version of the Tube filter
11.Clean, linear behavior with no clipping distortion at all
 Response
The response of each filter can be set to either Low Pass, High Pass, or Band Pass. In Low Pass\mode, the filter will pass through frequencies lower than the center frequency. In High Pass\mode, frequencies higher than the center frequency will be passed through. In Band Pass mode,\only the frequencies around the cut-off frequency will be passed through.
 Slope
Slope
The slope switch sets the steepness of the filter, which controls how aggressively the\frequencies around the center frequency are filtered. You can choose between 12 dB/octave, 24\dB/octave or 48 dB/octave settings. For example, if the response is set to Low Pass, more high\frequencies will be passed above the cutoff frequency using at 12 dB/octave than at 48\dB/octave. But let your ears decide! Just listen to the sound as you move the filter around and\see if you like it...
 Delay
Delay
Each filter has an delay function that will, well yes, delay the sound passing through.\This feature will add some more wobblyness to your sounds! For example the creation of\comb-filter effects (chorus/flanging). These effects occur when 2 or more signals are added\together while the delay time is changing of at least 1 of the signals. You can set it up by\using an XLFO sending a simple sine wave to modulate the delay time\of a filter. Use slow XLFO rates to create the classic flanging effect. In this case the\Stereo configuration works best.
Or how about some crazy stereo effects using the "Haas" effect. Mr. Haas found out that\time differences
12

are very important for your stereo perception. So when the left channel is\delayed we will hear it coming from the right speaker. More about this in this Wikipedia article  .
.
To set this up start with 2 filters and select the L/R configuration with the\routing button. The schematic diagram will show us the filter 1 is\used for the left channel and filter 2 is used for the right channel. If you raise the delay\of filter 1 it will sound like the sound is panned to the right purely based on delay times,\not volume. Now reset the delay time (both filters) to 0 and take a new XLFO to modulate the delay time of both filters and inverse 1 of the Modulation\Slot. Now you will hear the stereo image move from left to right. Sweet innit! From here\you can add more filters with different settings and pan them differently and it will create\some truly blissful stereo effects.
The delay offers so many extra sound design opportunities that we strongly suggest that\you take some time to experiment with it.
Tip: When you make changes to filter parameters that are modulation targets (cut-off frequency, peak, pan and delay), the modulation slots that use that target are automatically shown. You can\return to view all connections by using the Show All Slots button that appears on the left\in the modulation slots bar.
Next: Interactive filter display
See Also
Filters
Modulation
13
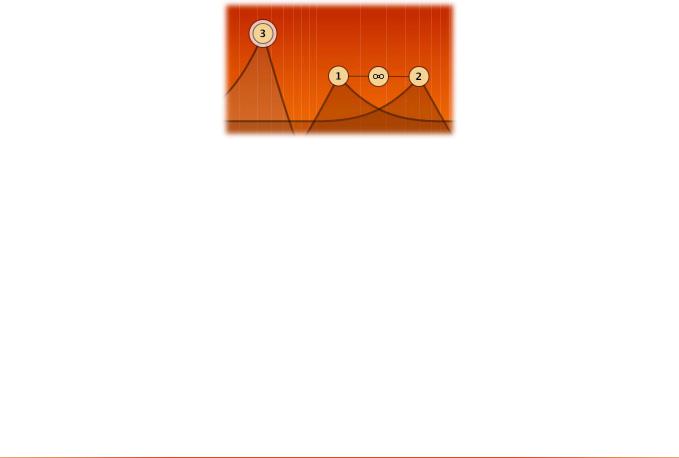
Interactive filter display
The interactive filter display gives an overview of the filter parameters and makes it very\easy to adjust multiple filter parameters simultaneously. The vertical lines in the background\represent a logarithmic scale that correspond to the actual filter frequencies.
 Drag a filter dot to adjust the Frequency and Peak\parameters for that filter. The active filter will have a light\colored ring around its filter dot in the display (filter 2 in the screen shot above).
 Drag the link dot (between filter 1 and 3 in the screen shot above) to\adjust all linked filters simultaneously. To link filters, click on the link\buttons that appear when the mouse is just above the filter buttons. For example, you\can set them up as 4 resonant band-pass filters and sweep the cutoffs simultaneously. This\configuration will give you access to all manner of 'vocal' sounds, as well as even more\dramatic formant-based timbres.
 Shift+click a filter dot to toggle between the different filter slopes.
 Ctrl+click (Command+click on Mac) a filter dot to toggle between the\different filter responses.
 When holding down the Alt key while dragging a filter dot, the other linked filters\will change accordingly, as if you where dragging the link dot.
 Holding down both the Alt+Ctrl keys (Alt+Command keys on Mac) while dragging\a filter dot will adjust all linked filters while fixing the link dot in the center, so the\other linked filters will 'mirror' the changes.
Tips
 Of course, all changes made in the filter display can be automated!
 You can connect a MIDI controller to either the frequency or the peak adjustment of the\link dot with the MIDI Learn feature.
Next: Routing
See Also
Filters
Filter parameters
14
Loading...