


 Loading...
1

Table of Contents
Introduction
. .About. . . . .FabFilter. . . . . .Pro. . -.MB. . . . . . . . . . . . . . . . . . . . . . . . . . . . . . . . . . . . . . . . . . . . . . . . . . . . . . . . . . . . . . .3
. .Quick. . . . start. . . . . . . . . . . . . . . . . . . . . . . . . . . . . . . . . . . . . . . . . . . . . . . . . . . . . . . . . . . . . . . . . . . . . . . . .5
Using FabFilter Pro-MB
. .Overview. . . . . . . . . . . . . . . . . . . . . . . . . . . . . . . . . . . . . . . . . . . . . . . . . . . . . . . . . . . . . . . . . . . . . . . . . . . . .6
. .Knobs. . . . . . . . . . . . . . . . . . . . . . . . . . . . . . . . . . . . . . . . . . . . . . . . . . . . . . . . . . . . . . . . . . . . . . . . . . . . .8
. .Display. . . . . .and. . .workflow. . . . . . . . . . . . . . . . . . . . . . . . . . . . . . . . . . . . . . . . . . . . . . . . . . . . . . . . . . . . . . . . . . . .9
. .Basic. . . .band. . . .controls. . . . . . . . . . . . . . . . . . . . . . . . . . . . . . . . . . . . . . . . . . . . . . . . . . . . . . . . . . . . . . . . . . . .11.
. .Expert. . . . .band. . . .controls. . . . . . . . . . . . . . . . . . . . . . . . . . . . . . . . . . . . . . . . . . . . . . . . . . . . . . . . . . . . . . . . . . .13.
. .Processing. . . . . . . .mode. . . . . . . . . . . . . . . . . . . . . . . . . . . . . . . . . . . . . . . . . . . . . . . . . . . . . . . . . . . . . . . . . . . .15.
. .Oversampling. . . . . . . . . . . . . . . . . . . . . . . . . . . . . . . . . . . . . . . . . . . . . . . . . . . . . . . . . . . . . . . . . . . . . . . . . . . .16.
. .Full. . .Screen. . . . .mode. . . . .and. . .resizing. . . . . . . . . . . . . . . . . . . . . . . . . . . . . . . . . . . . . . . . . . . . . . . . . . . . . . . . . . . .17.
. .Spectrum. . . . . . .analyzer. . . . . . . . . . . . . . . . . . . . . . . . . . . . . . . . . . . . . . . . . . . . . . . . . . . . . . . . . . . . . . . . . . . . .18.
. .Input. . . .and. . . output. . . . . options. . . . . . . . . . . . . . . . . . . . . . . . . . . . . . . . . . . . . . . . . . . . . . . . . . . . . . . . . . . . . . . .20.
. .MIDI. . . .Learn. . . . . . . . . . . . . . . . . . . . . . . . . . . . . . . . . . . . . . . . . . . . . . . . . . . . . . . . . . . . . . . . . . . . . . . .21.
. .Undo,. . . . .redo,. . . .A/B. . .switch. . . . . . . . . . . . . . . . . . . . . . . . . . . . . . . . . . . . . . . . . . . . . . . . . . . . . . . . . . . . . . . .23.
Presets
. .Loading. . . . . .presets. . . . . . . . . . . . . . . . . . . . . . . . . . . . . . . . . . . . . . . . . . . . . . . . . . . . . . . . . . . . . . . . . . . . . .24.
. .Saving. . . . .presets. . . . . . . . . . . . . . . . . . . . . . . . . . . . . . . . . . . . . . . . . . . . . . . . . . . . . . . . . . . . . . . . . . . . . . .25.
. .How. . . presets. . . . . .are. . .stored. . . . . . . . . . . . . . . . . . . . . . . . . . . . . . . . . . . . . . . . . . . . . . . . . . . . . . . . . . . . . . . .26.
Purchasing FabFilter Pro-MB
. .Purchasing. . . . . . . .FabFilter. . . . . . .Pro. .-.MB. . . . . . . . . . . . . . . . . . . . . . . . . . . . . . . . . . . . . . . . . . . . . . . . . . . . . . . . . .27.
. .Entering. . . . . . your. . . .license. . . . .key. . . . . . . . . . . . . . . . . . . . . . . . . . . . . . . . . . . . . . . . . . . . . . . . . . . . . . . . . . . . .28.
Support
. .Support. . . . . . . . . . . . . . . . . . . . . . . . . . . . . . . . . . . . . . . . . . . . . . . . . . . . . . . . . . . . . . . . . . . . . . . . . . . .29.
. .Manual. . . . . installation. . . . . . . . . . . . . . . . . . . . . . . . . . . . . . . . . . . . . . . . . . . . . . . . . . . . . . . . . . . . . . . . . . . . . . .30.
. .VST. . .plug. . .-.in. .versions. . . . . . . . . . . . . . . . . . . . . . . . . . . . . . . . . . . . . . . . . . . . . . . . . . . . . . . . . . . . . . . . . . .31.
. .External. . . . . .side. . . chaining. . . . . . . . . . . . . . . . . . . . . . . . . . . . . . . . . . . . . . . . . . . . . . . . . . . . . . . . . . . . . . . . . . .32.
. .License. . . . . .agreement. . . . . . . . . . . . . . . . . . . . . . . . . . . . . . . . . . . . . . . . . . . . . . . . . . . . . . . . . . . . . . . . . . . . . .34.
. .Acknowledgements. . . . . . . . . . . . . . . . . . . . . . . . . . . . . . . . . . . . . . . . . . . . . . . . . . . . . . . . . . . . . . . . . . . . . . . . . . . .36.
. .About. . . . .FabFilter. . . . . . . . . . . . . . . . . . . . . . . . . . . . . . . . . . . . . . . . . . . . . . . . . . . . . . . . . . . . . . . . . . . . . . .37.
2

About FabFilter Pro-MB
Multiband compression and expansion are very powerful and useful tools, but many people find\the concept quite difficult to grasp, or don't know how and when to use it. With FabFilter\Pro-MB, multiband dynamics processing becomes intuitive yet powerful at the same time.
The traditional approach to multiband processing is to simply split the whole incoming signal\into bands using a set of crossovers. In most cases however, this is overly complicated as you're\often only interested in working with a particular frequency range. Instead, we have chosen to\approach this from the user's perspective: think bands, not crossovers. You're working on some\audio and want to adjust a certain frequency range... so just create a band at that frequency\range and start working! The interface clearly reflects that the rest of the spectrum stays\untouched.
Next, we have also pushed the limits to achieve the best possible sound. We've gone through a\lot of research and developed our own unique Dynamic Phase processing mode. It has virtually the\same frequency response as traditional multiband processing, but features zero latency operation,\no pre-ringing effects, and only introduces phase changes when actually changing the gain. This\mode really makes Pro-MB stand apart! Of course, we have also included an excellent Linear Phase\mode and a traditional Minimum Phase mode.
As you've come to expect from FabFilter, Pro-MB has a highly intelligent and intuitive\interface, making it easy to create, organize and adjust bands that are freely placed in the\frequency spectrum. With its well-thought-out display, designed to achieve an optimal workflow,\FabFilter Pro-MB is an absolute time-saver and a joy to use.
Key features
 Up to six processing bands, freely placed anywhere in the spectrum
 Unique Dynamic Phase processing mode plus\excellent Linear Phase and traditional Minimum Phase modes
 Any form of dynamics processing, from highly transparent compression, limiting and\expansion to pumping upward compression and punchy gating
 Fully customizable per band: lookahead (up to\20 ms), variable knee, variable stereo linking with midonly or side-only processing, band/free\side-chain triggering (external or internal), variable slopes between 6 dB/oct and 48 dB/oct\(in Dynamic and Linear Phase mode)
 Intelligent, highly programand frequency-dependent attack and release curves
 Full Screen mode: with just the click of a\button, Pro-MB instantly fills the whole screen, making superprecise adjustments easy and\fast
 Choose between normal or large interface\sizes
 Unique interactive multiband display, designed for an\optimal workflow
  Global dry/wet mix from 0% to 200%
3

 High-quality audio processing algorithms with 64-bit internal processing where needed
 Up to four times oversampling
 Accurate and smooth, customizable real-time frequency\analyzer with pre-processing, post-processing and SC options, freeze, tilt, speed and\resolution settings, and horizontal spectrum zoom
 Precise output metering
 Retina support on OS X and High DPI support on Windows
FabFilter Pro-MB is available in VST, VST3, AU (Audio Units), AAX Native and AudioSuite formats (all both 64bit and 32-bit), as well as RTAS (32-bit only), for Mac OS X and Windows.
Windows requirements |
Mac OS X requirements |
|
32-bit: Windows 10, 8, 7, Vista or XP |
OS X 10.6 or higher |
|
64-bit: Windows 10, 8, 7 or Vista (x64) |
AU or VST 2/3 host or Pro Tools |
|
VST 2/3 host or Pro Tools |
Intel processor |
|
|
|
|
|
|
|
Next: Quick start |
|
|
See Also |
|
|
Using FabFilter Pro-MB |
|
|
4

Quick start
The installer will copy the FabFilter Pro-MB plug-in into the common VST, VST 3, AU (macOS only)\and Pro Tools plug-in folders on your computer. On macOS, the global plug-in folders in\/Library/Audio/Plug-Ins are used.
In most cases, your host will then recognize the plugin automatically. However, if the\instructions below do not work, see Manual\installation instead.
 Cubase
Choose an empty insert slot, for example in the Mixer, and select FabFilter Pro-MB from the menu that appears. To use the MIDI features in Pro-MB, create a new MIDI track and set its output to the Pro-MB instance you have just created. (The VST 3 version of Pro-MB can be found in the Dynamics section.)
 Logic Pro
Choose an empty insert slot on one of your audio tracks, instrument tracks or buses and select\FabFilter Pro-MB from the pop-up menu. You will find FabFilter Pro-MB in the Audio Units > FabFilter section (named FF Pro-MB).
 Ableton Live
In Session view, select the track you would like to place FabFilter Pro-MB on, for example by\clicking the track name. At the left top of Ableton Live's interface, click on the Plug-in\Device Browser icon (third icon from the top). From the plug-ins list, double-click\FabFilter/FabFilter Pro-MB, or drag it onto the track.
 Pro Tools
Choose an empty insert slot on one of your audio tracks, instrument tracks or buses and select\FabFilter Pro-MB from the pop-up menu in the Dynamics section.
To begin, just open the plug-in, move your mouse above the display and click anywhere to\create a first band. Enjoy!
Next: FabFilter Pro-MB overview
See Also
About FabFilter Pro-MB
5
Overview
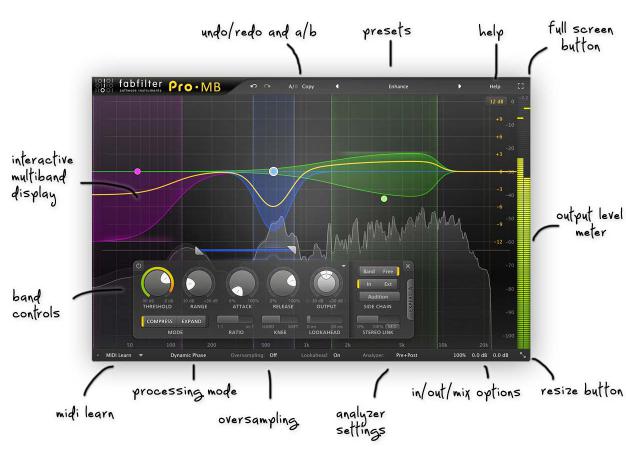
The interface of FabFilter Pro-MB is designed to be easy to use while providing all necessary\information and controls. It consists of the following elements:
 Interactive multiband display
Using the interactive display, you can easily create, organize and adjust processing bands. See\Display and workflow.
 Band controls
The band controls let you adjust the dynamics, level and triggering settings of one more\selected bands. See Basic band controls.
 Level metering
At the right of the interface, the output level meter\and level read-outs provide an immediate overview of the current output level. See Input and output options.
 MIDI Learn
MIDI Learn lets you easily associate any MIDI controller with any plug-in parameter.\See MIDI Learn.
 Processing mode
The Processing mode setting specifies how the\incoming signal is split into bands before processing them. See Processing mode.
 Oversampling
The Oversampling setting sets the amount of internal oversampling, which reduces possible\aliasing for fast/aggressive dynamics processing and improves high-end frequency response for\the Minimum Phase and Dynamic Phase processing modes, at the cost of additional CPU usage.\See Oversampling.
 Analyzer settings
Using the Analyzer settings, you can enable and customize the built-in spectrum analyzer that\lets you visually judge the effect of processing on the incoming signal. See Spectrum analyzer.
 Input and output options
At the right of the bottom bar, you can bypass the entire plug-in and adjust the initial\input and final output levels. See Input and output\options.
 Resize and Full Screen mode
Using the Resize button at the far right of\the bottom bar, you can choose a desired interface size. In addition, using the Full Screen\button at the right top corner, you can enter Full Screen mode, in which Pro-MB fills the\whole screen. See Full Screen mode and resizing.
 Presets, undo, A/B, help
With the preset buttons, you can easily browse through the factory presets or save your own\settings so
6

you can re-use them in other songs. The Undo, Redo, A/B and Copy buttons at the top\of the plug-in interface enable you to undo your changes and switch between different states of\the plug-in. Finally, the Help menu provides access to help and version information.\See Loading presets and Undo, redo, A/B switch.
Next: Knobs
See Also
Quick start
7

Knobs
It is easy to control FabFilter Pro-MB's parameters with the large round knobs. They will light up when you move the mouse cursor around to indicate that you can adjust them. The moment you move the mouse cursor over a knob, a parameter value display will pop up, which shows the name and the current value of the parameter.
All knobs support four ways of control:
1.Vertical mode
Click on the center area of a knob and drag up or down to rotate it. The knob reacts to the\speed with which you are dragging, so if you move the mouse slowly, you make precise\adjustments.
2.Rotate mode
Grab the arrow of the knob and drag it around. By moving the mouse cursor further away from the knob while dragging it, you can make precise adjustments.
3.Mouse wheel mode
Perhaps the easiest way to make adjustments is by using the mouse wheel when you hover over a knob. This mode works for all the knobs and possible panning rings. (On Windows, you might need\to click in the plug-in interface first to make sure it is the active window.)
4.Text entry mode
Double-click a knob to enter an exact value using the keyboard.
Tips
 To reset a knob to its default position, hold down the Ctrl key (Windows) or\Command key (macOS) and click the knob once. Note: In Pro Tools, Pro-MB uses the\default Pro Tools keyboard shortcut for reset: Alt+click.
 To fine-tune a value when using vertical drag mode or the mouse wheel, hold down the\Shift key while dragging or moving the mouse wheel. Note: In Pro Tools, Pro-MB uses the default Pro Tools keyboard shortcut for fine tune: Ctrl+drag on Windows or\Command+drag on macOS.
 There are several handy shortcuts in text entry mode. With frequency values, you can\type e.g. '1k' to set the value to 1000 Hz, and also 'A4' for 440 Hz, or even strings like\'C#3+13'. With dB values, you can type e.g. '2x' to get +6 dB (the value that corresponds to\two times louder). With all values, you can also type a percentage (e.g. '50%' will put a knob\exactly in the middle position).
 Sometimes, knobs in our plug-in interfaces are linked: these be adjusted\simultaneously by holding down the Alt key (Shift key in Pro Tools) while\dragging on one of them. For example, an output level and input level setting of a plug-in\could be adjusted simultaneously (in the opposite direction) this way.
Next: Display and workflow
See Also
Overview
8

Display and workflow
The large display provides an overview all bands and lets you easily create new bands and edit\them. Each band visualizes its potential dynamic range, while the thick yellow curve shows the\overall dynamic frequency response at the present moment.
Unlike traditional multiband tools, the unique workflow in FabFilter Pro-MB does not require\you to divide the entire spectrum in bands. You just create one or more bands at the frequency\range that you actually want to work on, and leave the rest of the spectrum unprocessed. We take\care of the rest!
Creating bands
 To create the first band, just click anywhere in the display. The band is created with a\default width, but you can adjust this with the mouse wheel as you hover over the display.
 To create more bands, hover over an empty area or over an existing band in the display and\click the + button at the top.
 Alternatively, you can drag the yellow overall curve or double-click in an empty area. After creating a band, you can immediately start dragging to adjust it.
Selecting bands
 Click anywhere inside a band to select it.
 Click and drag on the display background to select adjacent bands by dragging a\rectangle around them.
 Alternatively, hold down Ctrl (Cmd on Mac OS X) and click\another band to select multiple bands. Hold down Shift and click a band\to select a consecutive range of bands.
 Click once in an empty area to deselect all bands.
Adjusting and editing bands
 Click the peak dot in the center of a band and drag vertically to adjust the\gain, or horizontally to adjust the center frequency. All\selected bands are adjusted in parallel. As you move a band across the spectrum, the other\bands are squashed and then moved as well to make space.
 Use the mouse wheel or hold down Ctrl (Cmd on Mac OS X) and drag\vertically to adjust the width of a band.
 Hold down Shift while dragging\to fine-tune the settings of the selected bands.
 Normally, dragging is constrained to either a horizontal or a vertical adjustment. To\bypass this and drag freely in both directions, hold down Alt while dragging.
If you move a band close to another band, it will snap to it, and they will\start sharing a single crossover. Likewise, you can also snap a band to the display edge. If you\want, you can use this to divide the entire spectrum in bands for a more traditional approach to\multiband processing.
When hovering over a snapped crossover line, two buttons appear. The Split\button creates a new band between the two snapped bands. The Unsnap button\unsnaps the two bands, creating a small empty area in between. This lets you move them\independently again.
When you hover the mouse over a band, additional controls appear in the display:
9

 The solo/mute buttons enable you to mute a band or listen to it\exclusively. Hold down the solo or mute button to solo or mute a band only temporarily, as long\as the mouse button is pressed, To solo or mute a band exclusively, Ctrl-click\(Windows) or Cmd-click (Mac) the solo or mute button.
 The crossover lines let you drag each crossover independently. In\contrast, dragging the peak dot horizontally changes the center frequency, adjusting both\crossovers in parallel.
 The slope buttons set the low and high crossover slope for the band. Each\crossover can have an independently variable slope value from 6 dB/oct to 48 dB/oct. To change\multiple slope values at the same time, click and drag a rectangle around the slope buttons to\select more than one.
 The range line lets you easily adjust the Range parameter for a band by dragging the line up and down.
In the top-right corner of the display, there is a drop-down button to choose\the display range: +/- 3 dB, 6 dB, 12 dB or 30 dB. When you are dragging a\curve outside the current range of the display, the range will expand automatically as\needed.
Horizontal zooming
Sometimes it might be useful to zoom in to a specific frequency for extra precise editing. You\can easily do this by clicking and dragging the frequency scale at the bottom of the display,\just above the bottom bar. You can do the following:
 Click and drag up and down to zoom in and out at the frequency you have\clicked on.
 While zoomed in, you can also drag left and right to move the frequency\scale.
  Just double-click the scale to return to its default full range.
Tips
 In Full Screen mode, available via the button at the right top of the\interface, the display will fill the whole screen so you can make very precise adjustements.\See Full Screen mode and resizing.
 You can turn off the automatic adjustment of the display range by clicking\Auto-Adjust Display Range in the Help menu.
 Note that two display scales are drawn: the yellow scale is adjusted by the Display Range\drop-down button and corresponds to the band curves, range and the yellow overall curve. The\gray scale is used by the spectrum analyzer and output level meter.
 You can double-click the crossovers, slope buttons and range line to enter a value with the\keyboard. When you double-click the peak dot, you start editing the gain of the band; press Tab\or double-click on the center frequency in the parameter value display to edit the center\frequency instead.
Next: Basic band controls
See Also
Overview
10
Basic band controls
Once one or more bands are selected in the multiband display,\controls for the selected bands will appear at the bottom of the display. The band controls will\be positioned below the currently selected bands. Note that the arrow at the top of the container\has a glow that matches the color of the band it is controlling right now. A subtle yellow glow\indicates that you are controlling multiple bands simultaneously.
 The Threshold knob sets the threshold level for compression or expansion.\Whether the band triggers on signals above or below the threshold depends on both the Range\parameter and the current dynamics mode (Compress or Expand): see Dynamics Mode below. The circular side-chain level meter around the Threshold knob shows the level of the filtered and possibly stereo-linked signal that is used\for detection. This feedback makes it a lot easier to choose a proper setting.
 The Range knob limits the maximum amount of applied gain change. In\addition, the Range knob chooses between downward and upward compression or expansion: see\Dynamics Mode below.
 The Dynamics Mode buttons select between compression and expansion. In\combination with the Range knob, four different types of dynamic processing are possible: see\Dynamics Mode below.
 The Attack knob sets the speed with which gain reduction sets in. Fast\attack times are needed when you want to react on transients as fast as possible, for example\to achieve limiting (Compress mode) or gating (Expand mode). The Attack knob shows a\percentage value from 0% to 100%, because actual attack times are very program dependent, and\even depend on the placement of the band in the frequency spectrum.
 The Release knob sets the speed at which the compressor/expander recovers\from gain reduction. Higher release values will result in more subtle leveling. Like Attack,\the Release knob shows a percentage value from 0% to 100%, because actual release times are\very program dependent, and even depend on the placement of the band in the frequency\spectrum.
 The Ratio slider adjusts the amount of compression or expansion that is\applied, scaling the dynamic effect of the band on the input signal. For example, when\applying compression with a ratio setting of 4:1, three of every four dB above the threshold\will be attenuated. In comparison, the Range knob limits the final amount of compression or\expansion rather than scaling it.
 The Knee slider sets the type of knee to use for the compressor/expander.\A soft knee setting causes it to react more gradually around the threshold, somewhat smoothing\the dynamic effect.
 The Lookahead slider sets the compressor/expander to start reacting up to\20 ms before gain change is actually detected. This is an excellent way to preserve transients,\while still avoiding ultra-fast attack times that might cause distortion or aliasing. You can\globally enable or disable lookahead with the Lookahead Enabled button in the bottom bar.
 The Output Level knob adjusts the final level of the band: this is equal\to the gain value controlled by the peak dot for a band in the display. The Output Pan ring around the level knob adjusts\the panning between mid and side levels of the band, which is very useful in many multiband\processing situations. For example, you can easily make the low-end of your signal more mono,\or increase high-end stereo width.
 The bypass button at the left top lets you easily bypass the currently\selected bands. While a band is bypassed, it is dimmed in the display and the bypass button\itself glows red. You can temporarily bypass a band by holding down the mouse on the bypass\button.
 The delete button at the right top removes the currently selected bands.\If you have accidentally deleted some bands, you can easily restore them using the Undo button at the top of the plug-in interface.
 The band preset button, just left of the delete button, opens a drop-down\menu that lets you save and load specific settings for a band. You can simply overwrite the\Default preset to change the default settings for new bands.
11
 The Expert button at the right enables or disables the expert controls for all bands.
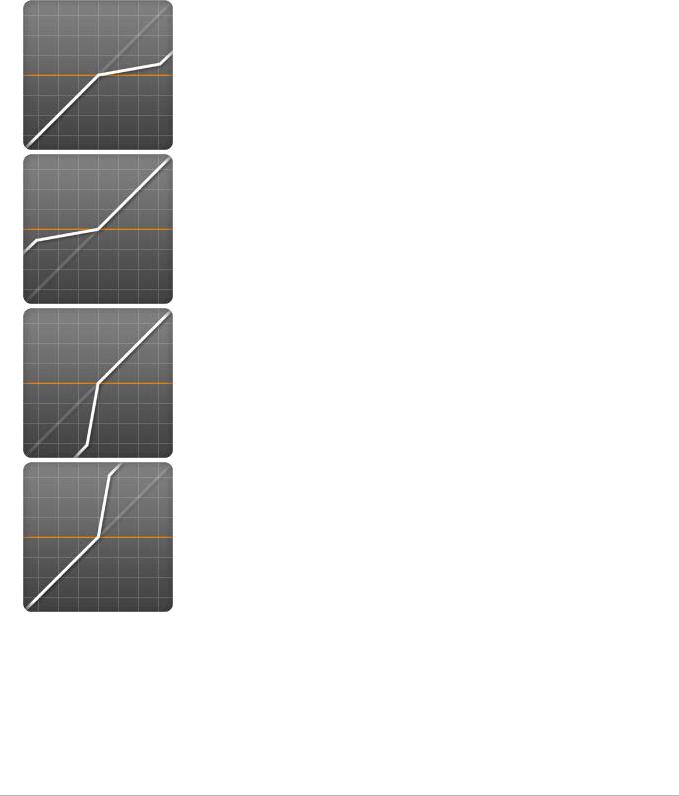
Dynamics Mode
FabFilter Pro-MB can apply any kind of dynamics processing per band, using the Dynamics Mode\buttons in combination with the Range knob. When the Dynamics Mode is set to Compress, use either\a negative or positive range to apply downward (normal) or upward compression. The same applies\to Expand mode. Here are diagrams to visualize the four different combinations:
Downward compression
Using Compress mode in combination with a negative Range will result in normal, downward\compression. The dynamic range of the signal is reduced by attenuating peaks that exceed\the specified threshold level.
Upward compression
Using Compress mode in combination with a positive gain does the opposite of normal\compression: instead of reducing peaks above the threshold, it adds gain as soon as the\level drops below the threshold. So this reduces the dynamic range from the noise floor up\instead of from the peaks down. Upward compression can be very useful to add loudness and\body, while leaving the transients untouched. Also, when used with extreme range, ratio and\release values, you can achieve creative pumping effects.
Downward Expansion
When using Expand mode in combination with a negative range, the signal will be\attenuated as soon as it drops below the threshold, increasing the perceived dynamics of\the signal around the threshold. This is the most common type of expansion and with higher\ratio and range values, it's often called gating.
Upward Expansion
Expand mode in combination with a positive range will again do the opposite of normal\expansion: instead of attenuating the signal when it drops below the threshold, it will add\gain as soon as the signal exceeds the threshold, emphasizing the peaks in the audio. So\this increases the dynamic range from the threshold up instead of from the threshold down.\Upward expansion is a great way to enhance transients. For example, you can easily increase\the impact of a snare in a drum loop using upward expansion.
Tips
 If multiple bands are selected, the band controls will adjust all selected bands\simultaneously.
 If you hold down the Alt key while dragging a band's Output Level knob, the\Output Pan ring will simultaneously be adjusted in such a way, that make-up\gain is applied according to the current Stereo Link Mid-only or Side-Only processing amount. For example, when using 100% mid-only\processing, holding the Alt key while dragging the band's Output Level to +6 dB,\will also set the panning to "-6 dB Side". This ensures the side signal stays unchanged, only\adding make-up gain to the mid signal.
 If lookahead is disabled, oversampling is turned off, and\the processing mode is set to Dynamic Phase or Minimum Phase,\FabFilter Pro-MB works without any latency. When lookahead is enabled, the latency will be 20\ms, plus possible additional latency for Linear Phase processing and oversampling.
Next: Expert band controls
See Also
Overview
Display and workflow
12
Loading...