


 Loading...
1

Table of Contents
Introduction
. .About. . . . .FabFilter. . . . . .One. . . . . . . . . . . . . . . . . . . . . . . . . . . . . . . . . . . . . . . . . . . . . . . . . . . . . . . . . . . . . . . . . .3
. .Key. . .features. . . . . . . . . . . . . . . . . . . . . . . . . . . . . . . . . . . . . . . . . . . . . . . . . . . . . . . . . . . . . . . . . . . . . . . . . .4
. .Quick. . . . start. . . . . . . . . . . . . . . . . . . . . . . . . . . . . . . . . . . . . . . . . . . . . . . . . . . . . . . . . . . . . . . . . . . . . . . . .5
Using FabFilter One
. .Overview. . . . . . . . . . . . . . . . . . . . . . . . . . . . . . . . . . . . . . . . . . . . . . . . . . . . . . . . . . . . . . . . . . . . . . . . . . . . .6
. .Knobs. . . . . . . . . . . . . . . . . . . . . . . . . . . . . . . . . . . . . . . . . . . . . . . . . . . . . . . . . . . . . . . . . . . . . . . . . . . . .7
. .Oscillator. . . . . . . . . . . . . . . . . . . . . . . . . . . . . . . . . . . . . . . . . . . . . . . . . . . . . . . . . . . . . . . . . . . . . . . . . . . . .8
. .Filter. . . . . . . . . . . . . . . . . . . . . . . . . . . . . . . . . . . . . . . . . . . . . . . . . . . . . . . . . . . . . . . . . . . . . . . . . . . . .9
. .Envelope. . . . . . .generator. . . . . . . . . . . . . . . . . . . . . . . . . . . . . . . . . . . . . . . . . . . . . . . . . . . . . . . . . . . . . . . . . . . . .10.
. .Modulation. . . . . . . .basics. . . . . . . . . . . . . . . . . . . . . . . . . . . . . . . . . . . . . . . . . . . . . . . . . . . . . . . . . . . . . . . . . . . .12.
. .Modulation:. . . . . . . . .I.can't. . . .stop. . . . . . . . . . . . . . . . . . . . . . . . . . . . . . . . . . . . . . . . . . . . . . . . . . . . . . . . . . . . . .14.
. .MIDI. . . .Learn. . . . . . . . . . . . . . . . . . . . . . . . . . . . . . . . . . . . . . . . . . . . . . . . . . . . . . . . . . . . . . . . . . . . . . . .15.
. .Undo. . . .and. . .redo. . . . . . . . . . . . . . . . . . . . . . . . . . . . . . . . . . . . . . . . . . . . . . . . . . . . . . . . . . . . . . . . . . . . .16.
. .Stand. . . .-.alone. . . .(Windows). . . . . . . . . . . . . . . . . . . . . . . . . . . . . . . . . . . . . . . . . . . . . . . . . . . . . . . . . . . . . . . . . . .17.
How To Create
. .Creating. . . . . . sounds. . . . . . . . . . . . . . . . . . . . . . . . . . . . . . . . . . . . . . . . . . . . . . . . . . . . . . . . . . . . . . . . . . . . . .18.
. .Bass. . . .sounds. . . . . . . . . . . . . . . . . . . . . . . . . . . . . . . . . . . . . . . . . . . . . . . . . . . . . . . . . . . . . . . . . . . . . . . .19.
. .Lead. . . .sounds. . . . . . . . . . . . . . . . . . . . . . . . . . . . . . . . . . . . . . . . . . . . . . . . . . . . . . . . . . . . . . . . . . . . . . . .20.
. .Drums. . . . .sounds. . . . . . . . . . . . . . . . . . . . . . . . . . . . . . . . . . . . . . . . . . . . . . . . . . . . . . . . . . . . . . . . . . . . . . .21.
. .Sounds. . . . . .effects. . . . . . . . . . . . . . . . . . . . . . . . . . . . . . . . . . . . . . . . . . . . . . . . . . . . . . . . . . . . . . . . . . . . . .22.
Presets
. .Loading. . . . . .presets. . . . . . . . . . . . . . . . . . . . . . . . . . . . . . . . . . . . . . . . . . . . . . . . . . . . . . . . . . . . . . . . . . . . . .23.
. .Saving. . . . .presets. . . . . . . . . . . . . . . . . . . . . . . . . . . . . . . . . . . . . . . . . . . . . . . . . . . . . . . . . . . . . . . . . . . . . . .24.
. .How. . . presets. . . . . .are. . .stored. . . . . . . . . . . . . . . . . . . . . . . . . . . . . . . . . . . . . . . . . . . . . . . . . . . . . . . . . . . . . . . .25.
Purchasing FabFilter One
. .Purchasing. . . . . . . .FabFilter. . . . . . .One. . . . . . . . . . . . . . . . . . . . . . . . . . . . . . . . . . . . . . . . . . . . . . . . . . . . . . . . . . . . .26.
. .Entering. . . . . . your. . . .license. . . . .key. . . . . . . . . . . . . . . . . . . . . . . . . . . . . . . . . . . . . . . . . . . . . . . . . . . . . . . . . . . . .27.
Support
. .Support. . . . . . . . . . . . . . . . . . . . . . . . . . . . . . . . . . . . . . . . . . . . . . . . . . . . . . . . . . . . . . . . . . . . . . . . . . . .28.
. .Manual. . . . . installation. . . . . . . . . . . . . . . . . . . . . . . . . . . . . . . . . . . . . . . . . . . . . . . . . . . . . . . . . . . . . . . . . . . . . . .29.
. .MIDI. . . .controller. . . . . . .messages. . . . . . . . . . . . . . . . . . . . . . . . . . . . . . . . . . . . . . . . . . . . . . . . . . . . . . . . . . . . . . . . .30.
. .License. . . . . .agreement. . . . . . . . . . . . . . . . . . . . . . . . . . . . . . . . . . . . . . . . . . . . . . . . . . . . . . . . . . . . . . . . . . . . . .31.
. .About. . . . .FabFilter. . . . . . . . . . . . . . . . . . . . . . . . . . . . . . . . . . . . . . . . . . . . . . . . . . . . . . . . . . . . . . . . . . . . . . .33.
2

About FabFilter One
In the last few years, more and more people have started to use software synthesizers,\software samplers and effect plug-ins instead of good old hardware. However, it seems almost\impossible to recreate those fat, warmsounding analog synths and effects in digital form. Many\companies have tried and failed, giving their plugins vintage-look interfaces, tons of features,\and crappy effects, diverting you from the real issue: the sound.
FabFilter does things differently. We don't compromise on sound quality and ease of use. We\give you the tools you need to create your music. After years of intensive research and\development, we present our first product: FabFilter One.
FabFilter One is a simple yet awesome sounding synthesizer, based on analog classics like the\Korg MS-10. It has the fattest filter you've ever heard in a\digital synth. And we've invested lots of time in the little things that make all the difference:\smooth and sexy portamento, perfectly fine-tuned knobs and interpolation algorithms that are responsive and\smooth at the same time.
Of course, the FabFilter One also supports everything you've come to expect from modern\plugins, like an extensive preset system, sample\accurate parameter changes, and a complete MIDI interface with\MIDI Learn.
FabFilter One is available in VST, VST3, AU (Audio Units) and AAX Native formats (all both 64-bit and 32-bit), as well as RTAS (32-bit only), for Mac OS X and Windows.
Windows requirements |
Mac OS X requirements |
32-bit: Windows 10, 8, 7, Vista or XP |
OS X 10.6 or higher |
64-bit: Windows 10, 8, 7 or Vista (x64) |
AU or VST 2/3 host or Pro Tools |
VST 2/3 host or Pro Tools |
Intel processor |
|
|
Next: Key features |
|
See Also |
|
Quick Start |
|
Using FabFilter One |
|
3
Key features
FabFilter One stands out on many points:
 Best cut-off filter
We have put tremendous effort in creating the best cut-off\filter ever. No useless features and options here: it's just the fattest and smoothest\self-oscillating digital filter you've ever heard. It sound is inspired by the analog Korg\MS-series from the late seventies: raw but never cheap, going crazy with high peak values, but\never over the top. Even at full resonance, there are none of the zippery digital artefacts\that are so common among other plugin filters.
 Great oscillator
The oscillator sounds strong, pure, and clean. Again,\we've invested a lot of time to get just the right analog feel, custom-shaping the waveforms\and fine-tuning the sound. You get pure fatness in the low regions and total clarity in the\high regions! There are extensive pulse width modulation options and it's also possible to mix\white or pink noise into the signal, which is great for percussive sounds.
 Smoothest portamento
Most synthesizers just slide from one note to another without giving it another thought. We\understand that good portamento is one of those things\that give your play just that little bit extra. Good portamento is magic. So we've fine-tuned\it until it was just right, and added polyphony support as well. Feel it yourself!
 Smart parameter interpolation
Parameter changes are interpolated by smart algorithms, ensuring both responsiveness and smooth transitions without clicks or 'zipper' effects. This is especially important with MIDI controller changes.
 Polyphony and velocity sensitivity
FabFilter One now supports 10-voice polyphony, volume and filter velocity sensitivity, and\filter keyboard tracking. As an extra bonus, the modulation generator can now also be synchronized to the\plug-in host.
 Straightforward user interface
The user interface is simple, modern, and easy to use. The knobs are large and can be dragged up and down as well as\turned around for precise adjustments. You can tweak and tune your sounds to your hearts'\content without having to hunt for impossible little knobs and sliders.
 Presets
FabFilter One comes with a standard set of dozens of great sounds and enables you to create and\save your own presets. You can share your sounds\with other FabFilter One users and the preset files are the same in the Mac OS X and Windows\versions.
 Sample accuracy and high sample rates
Naturally, the FabFilter One plug-in handles all parameter changes at sample accuracy and it\can be used with arbitrary sample rates.
Next: Quick start
See Also
Quick Start
Using FabFilter One
4
Quick start
The installer will copy the FabFilter One plug-in into the common VST, VST 3, AU (macOS only)\and Pro Tools plug-in folders on your computer. On macOS, the global plug-in folders in\/Library/Audio/Plug-Ins are used.
In most cases, your host will then recognize the plugin automatically. However, if the\instructions below do not work, see Manual\installation instead.
 Cubase
Choose an empty insert slot, for example in the Mixer, and select FabFilter One from the menu that appears. To use the MIDI features in One, create a new MIDI track and set its output to the One instance you have just created. (The VST 3 version of One can be found in the Instruments section.)
 Logic Pro
Choose an empty insert slot on one of your audio tracks, instrument tracks or buses and select\FabFilter One from the pop-up menu. You will find FabFilter One in the Audio Units > FabFilter section (named FF One).
 Ableton Live
In Session view, select the track you would like to place FabFilter One on, for example by\clicking the track name. At the left top of Ableton Live's interface, click on the Plug-in\Device Browser icon (third icon from the top). From the plug-ins list, double-click\FabFilter/FabFilter One, or drag it onto the track.
 Pro Tools
Choose an empty insert slot on one of your audio tracks, instrument tracks or buses and select\FabFilter One from the pop-up menu in the Instruments section.
Use the Presets button at the top of the plug-in interface to try different settings from the\many factory presets that are bundled with FabFilter One. Have fun!
Next: FabFilter One overview
See Also
Overview Loading presets
5

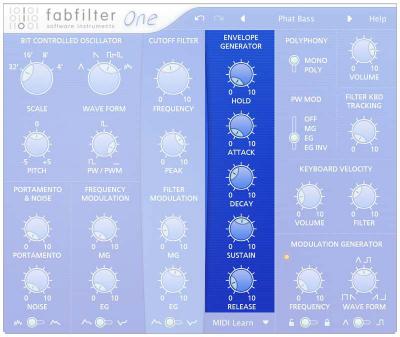
Overview
The FabFilter One interface is divided into several sections, somewhat like the front panel of\a traditional analogue synthesizer.
 Oscillator
The oscillator is the heart of the synthesizer, producing the raw\tones that are modified by the other components. It also contains portamento, additional noise\settings and settings that control the amount of frequency modulation by the modulation generator and envelope\generator.
 Filter
The filter alters the tones from the oscillator to make them warmer\and less harsh. Like a true analogue filter, it can easily be driven to self-oscillation to\create completely distorted sounds, or a warm lead with a little raw edge. The filter section\also contains settings that control the amount of frequency modulation by the modulation\generator and envelope generator
 Envelope generator
The final touch and feel of the sound is defined by the envelope generator. Tweak the various settings here to create\anything between short percussive hits to long reverberating effects.
 Modulation generator
The modulation generator generates a low-frequency square\or triangle wave that can be used to modulate both the frequency of the oscillator and the\cut-off frequency of the filter. This is where the fun starts!
 Additional features
This section contains a few useful extras. You can choose between monophonic and polyphonic\(10-voice) mode, set the type of pulse width modulation, set the amount of filter keyboard\tracking and set the amount of keyboard velocity modulation for the volume and the filter\cut-off frequency.
 Presets
With the preset button, you can easily browse through the factory presets or save your own\sounds so you can re-use them in other songs. See Presets.
Next: Knobs and switches
See Also
Quick start Creating sounds
6

Knobs
It is easy to control FabFilter One's parameters with the large round knobs. They will light up when you move the mouse cursor around to indicate that you can adjust them. The moment you move the mouse cursor over a knob, a parameter value display will pop up, which shows the name and the current value of the parameter.
All knobs support four ways of control:
1.Vertical mode
Click on the center area of a knob and drag up or down to rotate it. The knob reacts to the\speed with which you are dragging, so if you move the mouse slowly, you make precise\adjustments.
2.Rotate mode
Grab the arrow of the knob and drag it around. By moving the mouse cursor further away from the knob while dragging it, you can make precise adjustments.
3.Mouse wheel mode
Perhaps the easiest way to make adjustments is by using the mouse wheel when you hover over a knob. This mode works for all the knobs and possible panning rings. (On Windows, you might need\to click in the plug-in interface first to make sure it is the active window.)
4.Text entry mode
Double-click a knob to enter an exact value using the keyboard.
Tips
 To reset a knob to its default position, hold down the Ctrl key (Windows) or\Command key (macOS) and click the knob once. Note: In Pro Tools, One uses the\default Pro Tools keyboard shortcut for reset: Alt+click.
 To fine-tune a value when using vertical drag mode or the mouse wheel, hold down the\Shift key while dragging or moving the mouse wheel. Note: In Pro Tools, One uses the default Pro Tools keyboard shortcut for fine tune: Ctrl+drag on Windows or\Command+drag on macOS.
 There are several handy shortcuts in text entry mode. With frequency values, you can\type e.g. '1k' to set the value to 1000 Hz, and also 'A4' for 440 Hz, or even strings like\'C#3+13'. With dB values, you can type e.g. '2x' to get +6 dB (the value that corresponds to\two times louder). With all values, you can also type a percentage (e.g. '50%' will put a knob\exactly in the middle position).
 Sometimes, knobs in our plug-in interfaces are linked: these be adjusted\simultaneously by holding down the Alt key (Shift key in Pro Tools) while\dragging on one of them. For example, an output level and input level setting of a plug-in\could be adjusted simultaneously (in the opposite direction) this way.
Next: Oscillator
See Also
Overview
7

Oscillator
At the heart of the synthesizer, the oscillator produces the raw tones that are later modified\by other components, such as the filter and the envelope generator.
You control the oscillator with the following settings:
 Wave Form
Selects the wave form that the oscillator produces: triangle (a soft, warm tone),\sawtooth (a sharp bright tone that is ideal for filtering), square (a more\metallic sound, adjustable with the pulse width setting), and white noise (which is\great for percussive sounds and effects).
 PW/PWM
Adjusts the pulse width of the square wave form, from an even square to an infinitely thin\pulse (which is inaudible). In combination with the Pulse Width Modulation switch in the\Patching Features section, this knob also adjusts the amount of pulse width modulation. See\Modulation: I can't stop.
 Scale
Scale
Transposes the tones that are produced by the oscillator by full octaves. The oscillator\produces rich bass tones at the 32' position and high whistles at 4'. The 16' and 8' settings\are good for lead sounds.
 Pitch
Pitch
Slightly detunes the oscillator, which can be necessary if you want to play along with a\record, or with live instruments. To reset this setting, hold down Ctrl and click the Pitch\knob once.
 Portamento
Adjusts the amount of portamento or glide, which makes the oscillator slide from one note to\another. A little portamento is great for smooth keyboard solos, or when playing large bass\intervals. The portamento feature in FabFilter One is unique because it also works in\polyphonic mode, so you can play sliding chords!
 Noise
Noise
Adds extra noise to the oscillator signal. Use the Noise Type switch at the bottom to\choose between white and pink noise. A small amount of noise makes instruments sound more\natural, and you can create thundering sound effects with lots of pink noise. (Try the Pink\Noise preset in the Basic submenu for a good starting point.)
Next: Filter
See Also
Overview
8

Filter
The 12 dB/octave low-pass filter is one of the most important components in the synthesizer.\Especially when using the modulation features, it is the key to creating great sounds.
The Frequency knob adjusts the cut-off frequency. Basically, all sounds below the\cut-off frequency will go through the filter, but sounds with higher frequencies are damped. At\position 10, the cut-off frequency is far above 20 kHz and therefore the filter will allow all\frequencies to go through unchanged. At position 0, the cutoff frequency is just a few Hz and\the filter will block almost all sound from the oscillator.
The wave forms produced by the oscillator contain many harmonics: high frequencies that are\multiples of the fundamental tone. Therefore, they sound bright and a little harsh. By turning\the Frequency knob to the left, you reduce the number of harmonics to change the character of the\wave forms and create warmer sounds.
The Peak knob adjusts the filter resonance. A little resonance will cause the filter to\create warmer and more characteristic tones. Around position 8, the filter starts to\self-oscillate at the cut-off frequency which creates terrific effects in combination with the\sound from the oscillator. At these high peak values, the filter produces deep, ringing bass\tones if you set the Frequency knob around position 3 or 4.
We've carefully tuned the filter to avoid the whistles and other digital artefacts that are\common with other digital filters when you change the cut-off frequency at maximum resonance. Our\filter sounds crazy but never over the top!
You can modulate filter cut-off frequency with the modulation generator (the MG knob),\the envelope generator (the EG knob), and with\keyboard velocity. Read the modulation basics section to\learn more about the modulation features of the FabFilter One.
Next: Envelope generator
See Also
Modulation basics Overview
9
Envelope generator
The envelope generator changes the volume of the sound dynamically when you press and release\keys. It shapes your sounds, adjusting the timbre and release. It's also frequently used to\modulate the filter for dynamically changing sounds.
 Hold
Hold
Sets the extra time that a key appears to be held down after you have released it. After\releasing a key, the envelope generator pretends it is still down for the duration of the hold\time. This enables you to press new keys while the previous note is still playing.
 Attack
Sets the attack time, which controls how long it takes for the volume to increase when you\press a key. The volume always increases from zero to the maximum value. Set this to 0 for\staccato instruments and drums. Use larger values for more natural sounds, such as flutes and\pads.
 Decay
Decay
Sets the decay time, which controls how long it takes for the volume to decrease after the\maximum value has been reached at the end of the attack stage. The volume always decreases from\the maximum value to the sustain level. The effect of the decay setting depends on the sustain\level. With a low sustain level and short attack and decay times, the envelope generator\produces a sharp tick whenever you press a key. With the sustain level at its maximum, the\volume does not decrease at all, so the decay setting has no effect.
 Sustain
Sets the sustain level: the volume that is produced when both the attack and decay stages are\over, but the key is still held down. If you want a sharp attack (especially when you also use\the envelope generator to modulate the filter), you have to\use a low sustain level. If you set the sustain level to 0, the sound will be inaudible after\the attack and decay stages, which is often useful for drums and percussion.
 Release
Sets the release time, which controls how long it takes for the volume to decrease from the\current level to zero when you release a key and the hold time has elapsed. When playing the\synthesizer live, it's often nice to have a little longer release time because this gives you\time to play a new note while the current note still fades away.
This diagram illustrates the stages that the envelope generator goes through when you press\and release a key:
10
Loading...