


TWIN-2
Table of contents
 Loading...
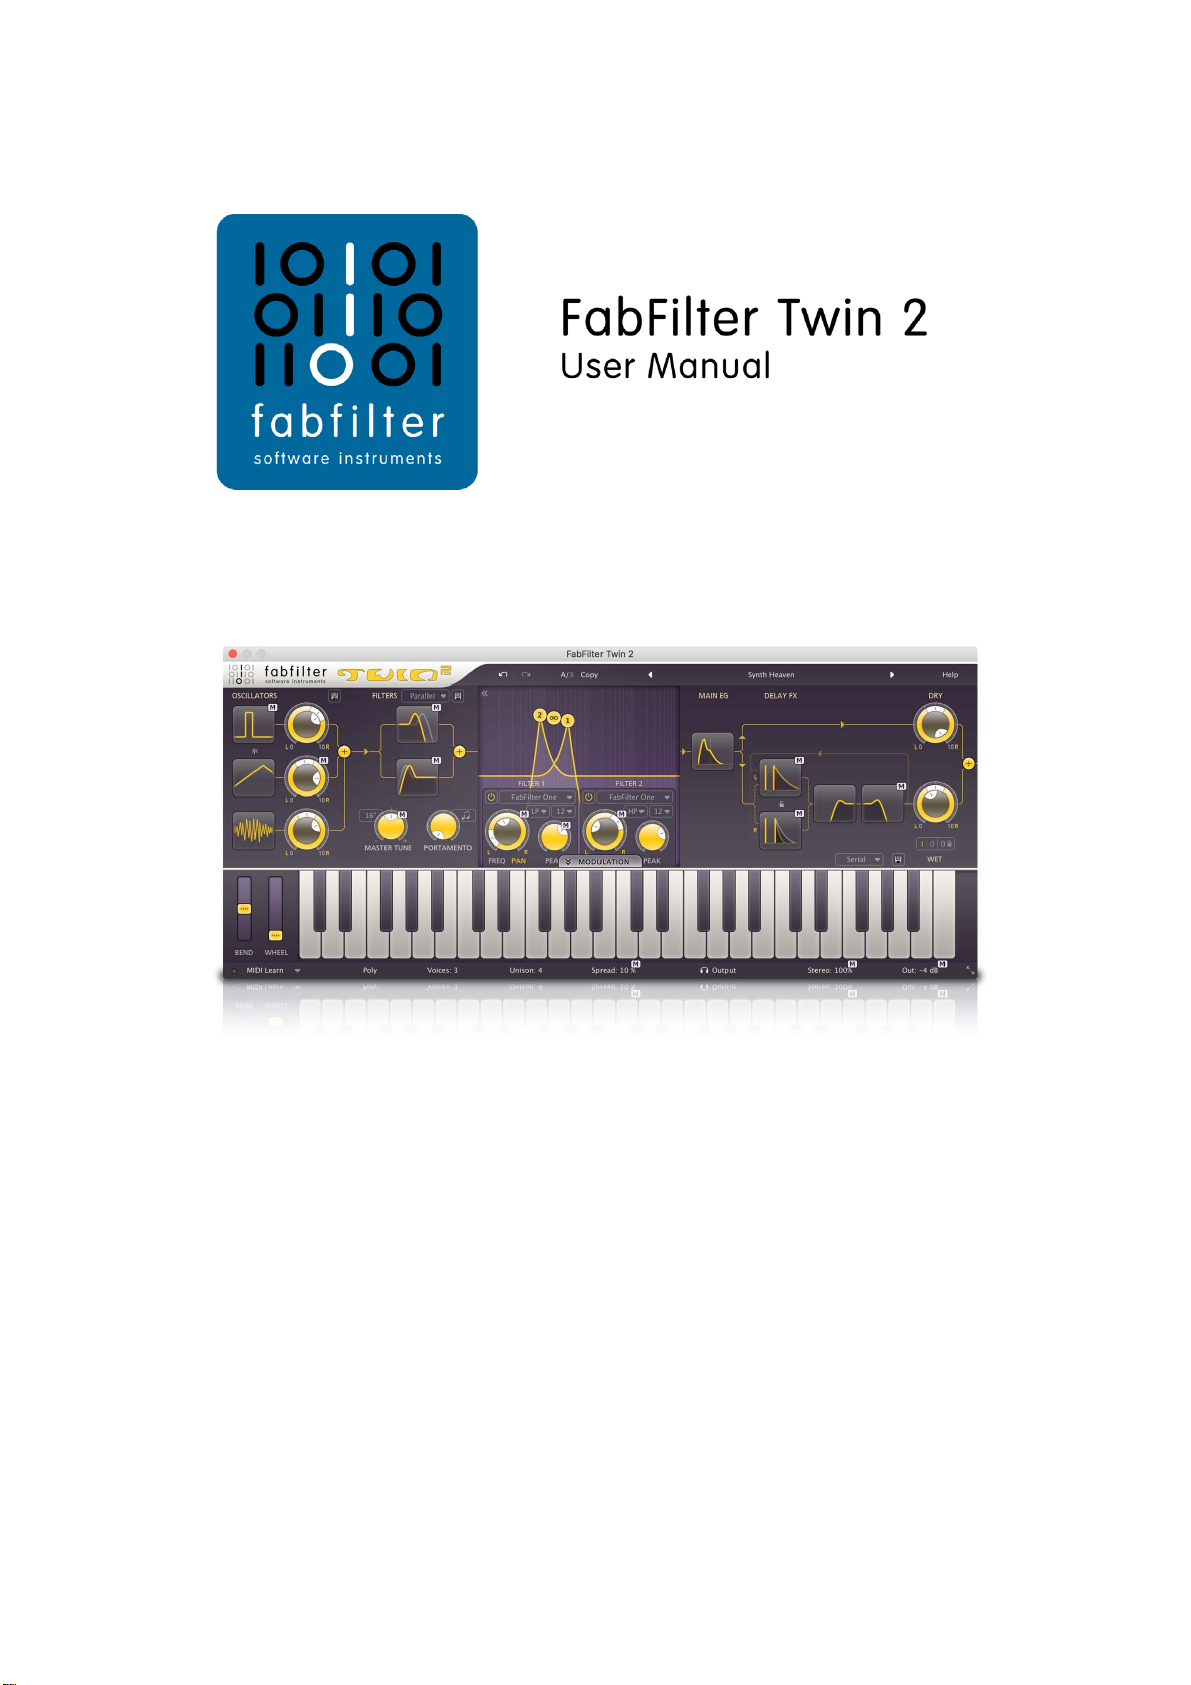
Table of contents
1

. . . . . . . . . . . . . . . . . . . . . . . . . . . . . . . . . . . . . . . . . . . . . . . . . . . . . . . . . . . . . . . . . . . . . . . . . . . . . . . 3
. . . . . . . . . . . . . . . . . . . . . . . . . . . . . . . . . . . . . . . . . . . . . . . . . . . . . . . . . . . . . . . . . . . . . . . . . . . . . . . 5
. . . . . . . . . . . . . . . . . . . . . . . . . . . . . . . . . . . . . . . . . . . . . . . . . . . . . . . . . . . . . . . . . . . . . . . . . . . . . . . 6
. . . . . . . . . . . . . . . . . . . . . . . . . . . . . . . . . . . . . . . . . . . . . . . . . . . . . . . . . . . . . . . . . . . . . . . . . . . . . . . 8
. . . . . . . . . . . . . . . . . . . . . . . . . . . . . . . . . . . . . . . . . . . . . . . . . . . . . . . . . . . . . . . . . . . . . . . . . . . . . . . 10
. . . . . . . . . . . . . . . . . . . . . . . . . . . . . . . . . . . . . . . . . . . . . . . . . . . . . . . . . . . . . . . . . . . . . . . . . . . . . . . 11
. . . . . . . . . . . . . . . . . . . . . . . . . . . . . . . . . . . . . . . . . . . . . . . . . . . . . . . . . . . . . . . . . . . . . . . . . . . . . . . 12
. . . . . . . . . . . . . . . . . . . . . . . . . . . . . . . . . . . . . . . . . . . . . . . . . . . . . . . . . . . . . . . . . . . . . . . . . . . . . . . 14
. . . . . . . . . . . . . . . . . . . . . . . . . . . . . . . . . . . . . . . . . . . . . . . . . . . . . . . . . . . . . . . . . . . . . . . . . . . . . . . 16
. . . . . . . . . . . . . . . . . . . . . . . . . . . . . . . . . . . . . . . . . . . . . . . . . . . . . . . . . . . . . . . . . . . . . . . . . . . . . . . 17
. . . . . . . . . . . . . . . . . . . . . . . . . . . . . . . . . . . . . . . . . . . . . . . . . . . . . . . . . . . . . . . . . . . . . . . . . . . . . . . 19
. . . . . . . . . . . . . . . . . . . . . . . . . . . . . . . . . . . . . . . . . . . . . . . . . . . . . . . . . . . . . . . . . . . . . . . . . . . . . . . 20
. . . . . . . . . . . . . . . . . . . . . . . . . . . . . . . . . . . . . . . . . . . . . . . . . . . . . . . . . . . . . . . . . . . . . . . . . . . . . . . 21
. . . . . . . . . . . . . . . . . . . . . . . . . . . . . . . . . . . . . . . . . . . . . . . . . . . . . . . . . . . . . . . . . . . . . . . . . . . . . . . 23
. . . . . . . . . . . . . . . . . . . . . . . . . . . . . . . . . . . . . . . . . . . . . . . . . . . . . . . . . . . . . . . . . . . . . . . . . . . . . . . 25
. . . . . . . . . . . . . . . . . . . . . . . . . . . . . . . . . . . . . . . . . . . . . . . . . . . . . . . . . . . . . . . . . . . . . . . . . . . . . . . 26
. . . . . . . . . . . . . . . . . . . . . . . . . . . . . . . . . . . . . . . . . . . . . . . . . . . . . . . . . . . . . . . . . . . . . . . . . . . . . . . 27
. . . . . . . . . . . . . . . . . . . . . . . . . . . . . . . . . . . . . . . . . . . . . . . . . . . . . . . . . . . . . . . . . . . . . . . . . . . . . . . 28
. . . . . . . . . . . . . . . . . . . . . . . . . . . . . . . . . . . . . . . . . . . . . . . . . . . . . . . . . . . . . . . . . . . . . . . . . . . . . . . 29
. . . . . . . . . . . . . . . . . . . . . . . . . . . . . . . . . . . . . . . . . . . . . . . . . . . . . . . . . . . . . . . . . . . . . . . . . . . . . . . 30
. . . . . . . . . . . . . . . . . . . . . . . . . . . . . . . . . . . . . . . . . . . . . . . . . . . . . . . . . . . . . . . . . . . . . . . . . . . . . . . 31
. . . . . . . . . . . . . . . . . . . . . . . . . . . . . . . . . . . . . . . . . . . . . . . . . . . . . . . . . . . . . . . . . . . . . . . . . . . . . . . 32
. . . . . . . . . . . . . . . . . . . . . . . . . . . . . . . . . . . . . . . . . . . . . . . . . . . . . . . . . . . . . . . . . . . . . . . . . . . . . . . 33
. . . . . . . . . . . . . . . . . . . . . . . . . . . . . . . . . . . . . . . . . . . . . . . . . . . . . . . . . . . . . . . . . . . . . . . . . . . . . . . 34
. . . . . . . . . . . . . . . . . . . . . . . . . . . . . . . . . . . . . . . . . . . . . . . . . . . . . . . . . . . . . . . . . . . . . . . . . . . . . . . 35
. . . . . . . . . . . . . . . . . . . . . . . . . . . . . . . . . . . . . . . . . . . . . . . . . . . . . . . . . . . . . . . . . . . . . . . . . . . . . . . 36
. . . . . . . . . . . . . . . . . . . . . . . . . . . . . . . . . . . . . . . . . . . . . . . . . . . . . . . . . . . . . . . . . . . . . . . . . . . . . . . 37
. . . . . . . . . . . . . . . . . . . . . . . . . . . . . . . . . . . . . . . . . . . . . . . . . . . . . . . . . . . . . . . . . . . . . . . . . . . . . . . 38
. . . . . . . . . . . . . . . . . . . . . . . . . . . . . . . . . . . . . . . . . . . . . . . . . . . . . . . . . . . . . . . . . . . . . . . . . . . . . . . 39
. . . . . . . . . . . . . . . . . . . . . . . . . . . . . . . . . . . . . . . . . . . . . . . . . . . . . . . . . . . . . . . . . . . . . . . . . . . . . . . 40
. . . . . . . . . . . . . . . . . . . . . . . . . . . . . . . . . . . . . . . . . . . . . . . . . . . . . . . . . . . . . . . . . . . . . . . . . . . . . . . 41
. . . . . . . . . . . . . . . . . . . . . . . . . . . . . . . . . . . . . . . . . . . . . . . . . . . . . . . . . . . . . . . . . . . . . . . . . . . . . . . 42
. . . . . . . . . . . . . . . . . . . . . . . . . . . . . . . . . . . . . . . . . . . . . . . . . . . . . . . . . . . . . . . . . . . . . . . . . . . . . . . 43
. . . . . . . . . . . . . . . . . . . . . . . . . . . . . . . . . . . . . . . . . . . . . . . . . . . . . . . . . . . . . . . . . . . . . . . . . . . . . . . 44
. . . . . . . . . . . . . . . . . . . . . . . . . . . . . . . . . . . . . . . . . . . . . . . . . . . . . . . . . . . . . . . . . . . . . . . . . . . . . . . 45
. . . . . . . . . . . . . . . . . . . . . . . . . . . . . . . . . . . . . . . . . . . . . . . . . . . . . . . . . . . . . . . . . . . . . . . . . . . . . . . 47
. . . . . . . . . . . . . . . . . . . . . . . . . . . . . . . . . . . . . . . . . . . . . . . . . . . . . . . . . . . . . . . . . . . . . . . . . . . . . . . 48
Table of Contents
About FabFilter Twin 2
Overview
Loading presets
Purchasing FabFilter Twin 2
Support
2
Introduction
Quick start
Using FabFilter Twin 2
What-you-use-is-what-you-see
Knobs
Component buttons
Oscillators
Filters
Interactive filter display
Delay section
Modulation
Drag-and-drop modulation slots
XLFO
Envelope generator
Envelope follower
MIDI source
XY Controller
Polyphony and unison
Output controls
MIDI Learn
Undo, redo, A/B switch
Tips & tricks
Stand-alone (Windows)
Presets
Saving presets
Section presets
How presets are stored
Purchasing FabFilter Twin 2
Entering your license key
Support
Upgrading to Twin 2
Manual installation
Using the side chain
MIDI CC table
License agreement
Acknowledgements
About FabFilter
About FabFilter Twin 2
3
Tons of new features...
Of course, this new version of the Twin software synthesizer brings a lot of new features. To
full-featured oscillators instead of two. Then, we have added a delay effect section with two delay lines and two filters, which
you can use to create all sorts of delay, echo, chorus, flanger and phaser effects. And finally, Twin's award-winning filters
now contain all 11 filter characteristics from Volcano 2!
But the main improvements are definitely in the modulation section. Twin's celebrated drag-and-drop modulation system
now offers 50 modulation slots. And instead of the simple LFOs and EGs from Twin 1, you now get all the XLFOs, Envelope
Generators, Envelope Followers, MIDI Sources and XY Controllers you need! Twin 2 also has a side-chain input, which feeds
the Envelope Followers and can be used to trigger the Envelope Generators. There's also our improved MIDI
which makes it easy to connect your hardware controllers to Twin's parameters.
... and a brand new look!
One of the first things you'll notice, is Twin 2's brand new user interface. We have put a lot of effort into ensuring that Twin
is still extremely easy to use, even with all its new features!
Buttons: multi-purpose buttons that both show the state of a component (oscillator, filter or delay) and let you alter the
values of its most important parameters using XY mouse movements. Together, the component buttons show you the
internal routing of the synthesizer.
The bottom section of FabFilter Twin has the what-you-use-is-what-you-see
Volcano 2. The idea is simple yet powerful: Do you want an extra Envelope Generator? Just add one! Do you want an XY
Controller? Just add one and start modulating things! At all times, the
that you are actually using. This results in
embrace. Finally, the
source!
traditional modulation slots from Twin 1 are replaced by a far more intuitive slot view per modulation
an elegant user interface that experienced producers and novices alike will
We improved the top section by introducing Component
modulation interface, introduced earlier in
interface only contains modulation sources and slots
start with, you now get three
Learn system,
Modulation madness
Twin 2 brings new and improved modulation sources and because of our improved interface, you
how many sources you have: there are enough sources to keep you busy
extremely easy to make via drag-and-drop
Our improved XLFO offers you anything from a simple sine wave to a fully programmable 16-step
Generators and Envelope Followers can make use of the plug-in's
make your presets more fun to play with,
form of MIDI data.
Finally
If you have spent some time with Twin 2, you will find use for it in any kind of project. The
can do with it is to explore the vast library of presets. Find out
starting point for your own
FabFilter Twin 2 is available in VST, VST3, AU (Audio Units) and AAX Native formats (all both 64-bit and 32-bit), as well as
RTAS (32-bit only), for Mac OS X and Windows.
Windows requirements
32-bit: Windows 10, 8, 7, Vista or XP
64-bit: Windows 10, 8, 7 or Vista (x64)
VST 2/3 host or Pro Tools
explorations.
.
side-chain signal, the XY Controllers are a great way to
and the new MIDI modulation sources let you modulate parameters using any
Mac OS X requirements
OS X 10.6 or higher
AU or VST 2/3 host or Pro Tools
Intel processor
what a variety of effects you can create, and use them as a
for a long time! Modulation connections are still
don't have to worry about
sequencer. The Envelope
best way to discover what you

Next: Quick start
4
See Also
Using FabFilter Twin 2
Upgrading to Twin 2

Quick start
5
The installer will copy the FabFilter Twin 2 plug-in into the common VST/VST3, AU (OS X only), RTAS and AAX
plug-in folders on your computer. On OS X, the global plug-in folders in /Library/Audio/Plug-Ins are used.
In most cases, your host will then recognize the plug-in automatically. However, if the instructions below do
not work, see Manual
Cubase
Open the VST Instruments panel, click on an empty slot and select FabFilter Twin from the menu that
appears. Right-click in the list of tracks and choose Add MIDI Track to create a new MIDI track and assign
it to the new FabFilter Twin 2 instrument.
Logic
Create an Audio Instrument track in the arrange window and select FabFilter Twin 2 as the input and
choose a preferred output. You will find FabFilter Twin 2 in the Audio Units -> FabFilter section (named FF
Twin 2).
Ableton Live
In Session view, select the track you would like to place FabFilter Twin 2 on, for example by clicking the
track name. At the left top of Ableton Live's interface, click on the Plug-in Device Browser icon (third icon
from the top). From the plug-ins list, double-click FabFilter/FabFilter Twin 2, or drag it onto the track.
Pro Tools
Create a new stereo instrument track and add FabFilter Twin 2 as the first insert.
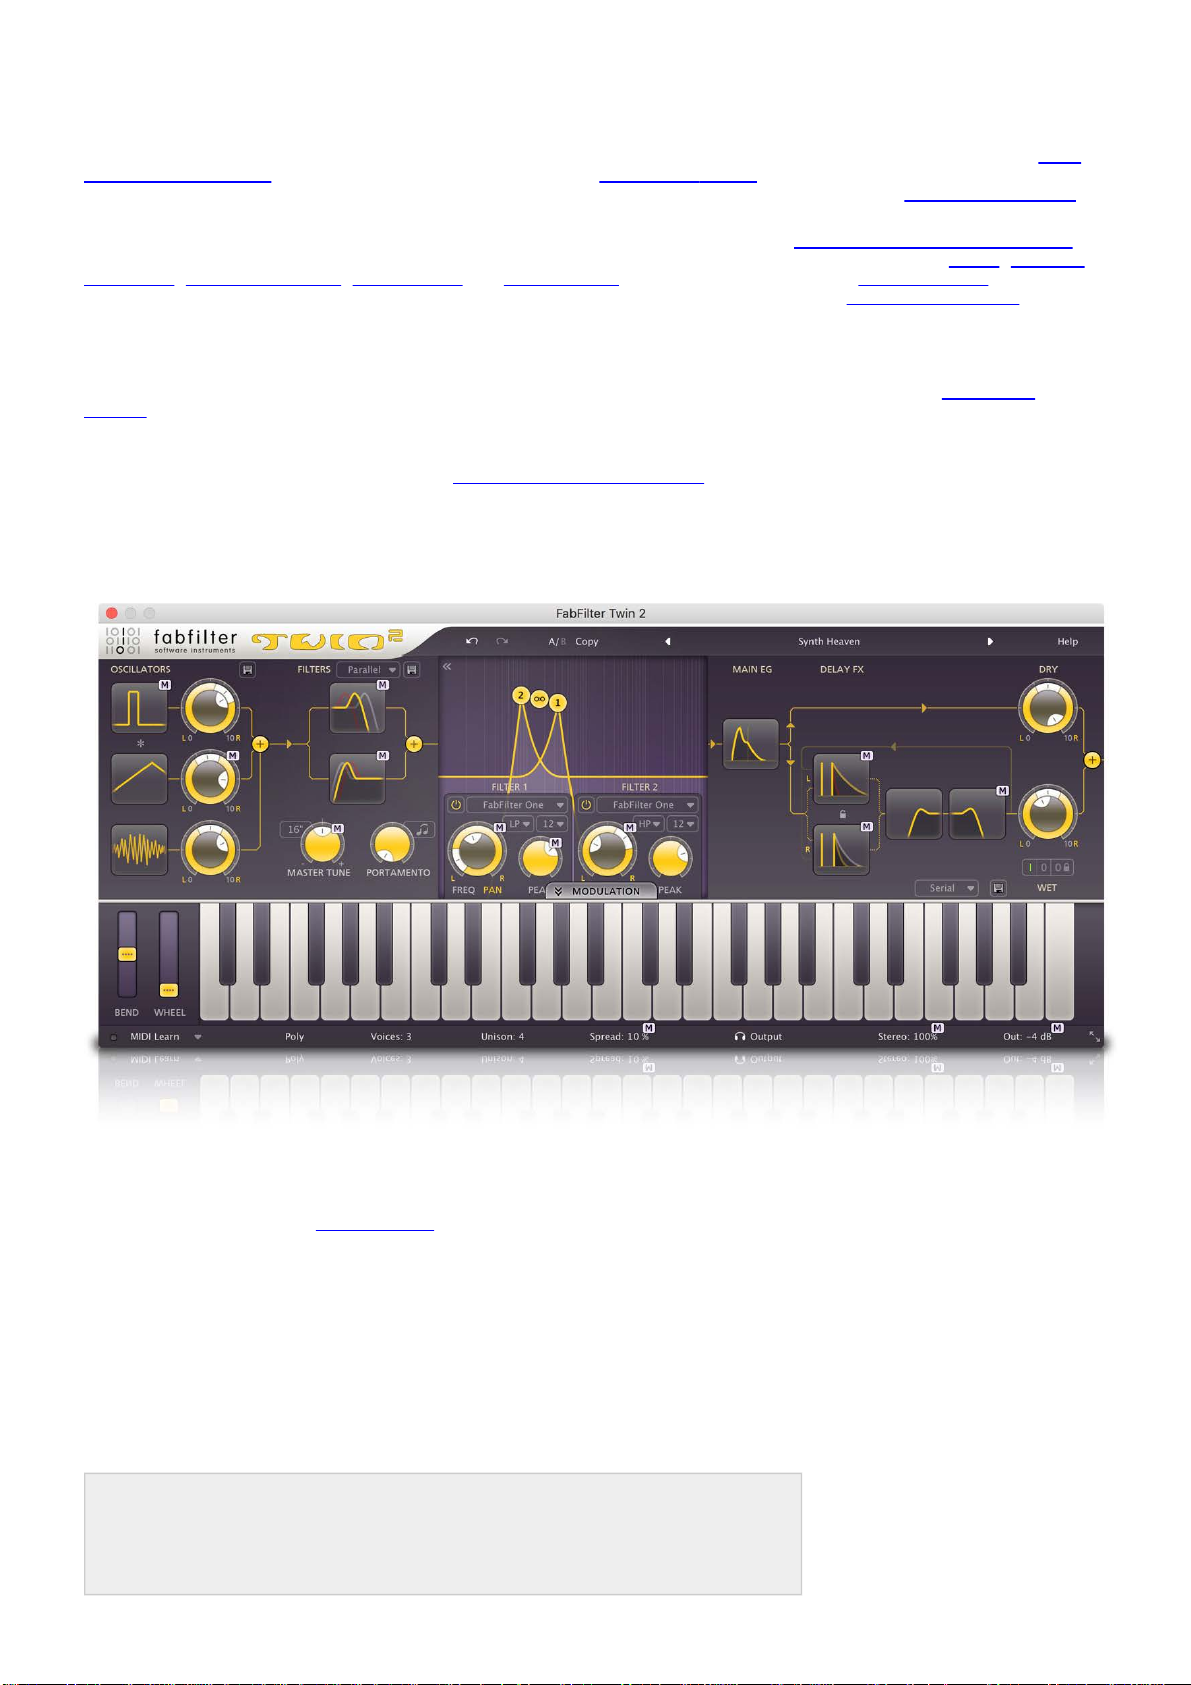
Use the Presets button at the top of the plug-in interface to try different settings from the many factory presets
that are bundled with FabFilter Twin 2. Have fun!
Next: FabFilter Twin 2 overview
See Also
Upgrading to Twin 2
Overview
Loading presets
installation instead.
Overview
6
FabFilter Twin 2's interface is divided into multiple sections:
Presets, undo and A/B
The Undo, Redo, A/B and Copy buttons at the top of the plug-in interface enable you to undo
switch between different states of the plug-in. With the preset buttons, you
library of factory presets or save your own settings so
Synth section
The top section is the actual synth, the sound-producing heart of the instrument. Here you'll
the filters
portamento, master tune and volume controls. Each component of the synthesizer is represented
component button
Modulation button
The modulation button shows or hides the entire modulation section at the bottom of the
Twin 2 offers virtually unlimited modulation possibilities, but all this
why the modulation section is hidden by default, and
preset or design your own.
Source selection bar
The source selection bar shows all modulation sources at a glance and lets you easily scroll
new sources. FabFilter Twin 2 offers XLFO
Controller sources. See also Modulation.
Modulation slots and sources
The bottom section contains the modulation overview. Twin 2 is a fully modular synthesizer
We found a simple way to show you everything that is modulating, and what
modulation source, the modulation slots show exactly what
adjust the amount of modulation. You can
all, we think we made sound design easier
MIDI Learn, monitoring and output mix
The bottom bar contains the MIDI Learn
parameter. Next, we find various polyphony and unison
fat sounds. At the far right are stereo spread and output
Resize
The resize button in the lower-right corner lets you choose between normal and wide interface
wide layout is designed such that the component display at the top half of the
scrolled. Most hosts support dynamic resizing of the interface;
, the main envelope generator and the delays logically displayed, together with general settings like
that shows its state and lets you edit it directly.
, Envelope Generator (EG), Envelope Follower (EF), MIDI and XY
very easily set up modulation connections with drag-and-drop
and more fun!
feature which sets up any MIDI controller to control any plug-in
you can re-use them in other songs.
you can look 'under the hood' when you want to tweak a
targets are modulated by this source and let you
settings which give you the possibility to create super-
level settings.
power might be a bit intimidating. That's
otherwise just close and re-open the interface
can easily browse through the vast
is modulated by what. Above each
interface never needs to be
your changes and
find the oscillators
interface. FabFilter
around and create
without the cables!
layouts. The
,
by a
. All in

window.
Presets
7
With the preset buttons, you can easily browse through the factory presets or save your own
re-use them in other songs. See also Presets
Next: What-you-use-is-what-you-see
See Also
Quick start
.
sounds so you can
What-you-use-is-what-you-see
8
Often an impressive feature list results in an impressively difficult-to-use interface full of controls for parameters you
might never even use. For almost every plug-in developer one of the
featured plug-in is to design an interface that is
revolutionary new interface concept:
The idea is simple yet powerful. At all times, the interface only contains the modulation
actually using. This results in an intuitive user interface that
You can easily create more modulation sources. Do you want another XLFO? Just add one! Do you
generator? Just add one and start modulating things! Of course there is a limit
create, but in practice it feels like you can create as many
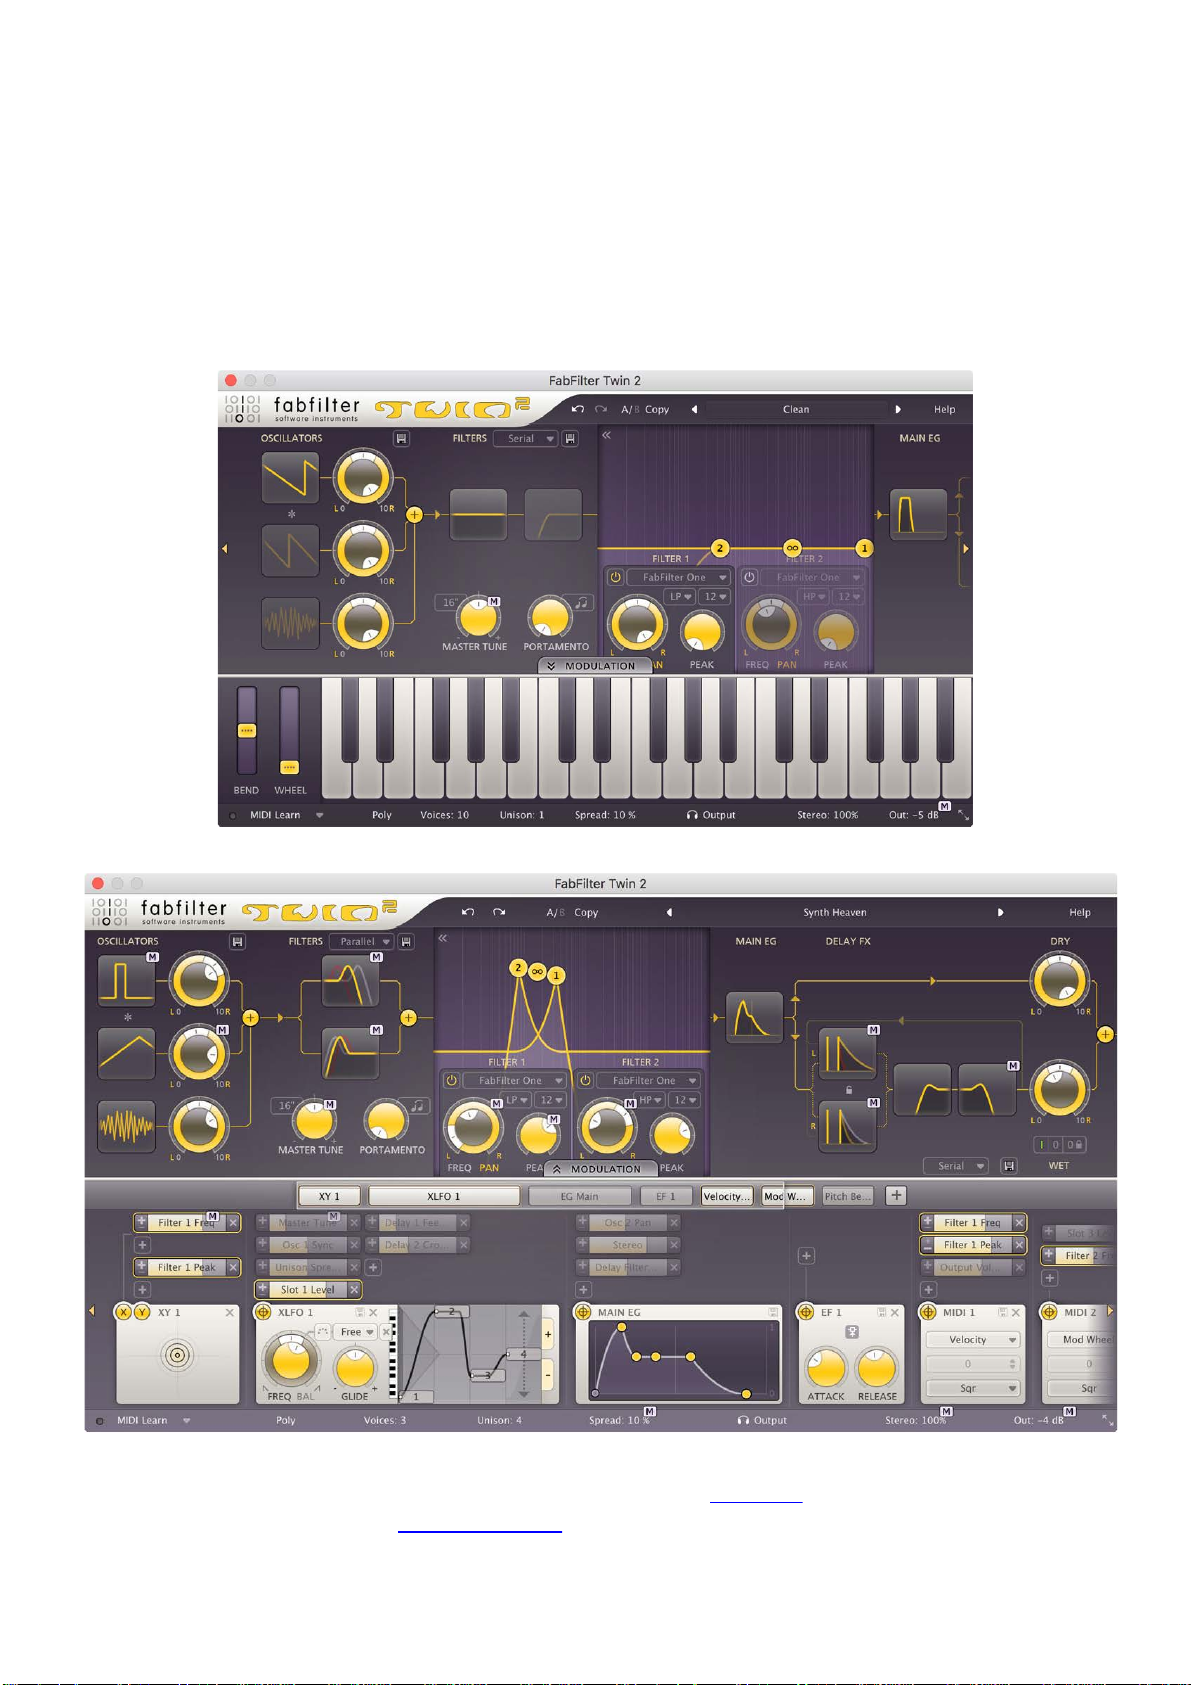
To give you an idea, a simple preset with the modulation section hidden looks like this:
What-you-use-is-what-you-see.
easy to use. And we think we did it! FabFilter introduces a
experienced producers and novices alike will embrace.
sources as you will ever need.
greatest challenges when making a complex full-
sources and slots that you are
to the number of sources you can
want an envelope
... and a more complex preset, with various modulation sources and modulation, looks like this:
To help you understand even the most complex presets, modulation slots are grouped with each source. Each
component, knob or controller that is being modulated is marked with a little M
the modulation source and slots responsible for the
Another interface innovation are the component buttons
parameters you don't need to see all the
oscillators, filters or
delays.
time. Only when you want, the interface can show more parameters of the
modulation. See also Modulation
. These make it possible to do more in depth editing of
button. Simply click the M to highlight
.

Tip: the resize button in the lower-right corner of the interface allows you to make the interface wider, so you can see
more components and modulation sources at the same time.
9
Next: Knobs
See Also
Modulation
Overview

Knobs
10
It is easy to control FabFilter Twin 2's parameters with the large round knobs. They will light up when you
move the mouse cursor around to indicate that you can adjust them. The moment you move the mouse cursor
over a knob, a parameter value display will pop up, which shows the name and the current value of the
parameter.
All knobs support four ways of control:
1. Vertical mode
Click on the center area of a knob and drag up or down to rotate it. The knob reacts to the speed with
which you are dragging, so if you move the mouse slowly, you make precise adjustments.
2. Rotate mode
Grab the arrow of the knob and drag it around. By moving the mouse cursor further away from the
knob while dragging it, you can make precise adjustments.
3. Mouse wheel mode
Perhaps the easiest way to make adjustments is by using the mouse wheel when you hover over a
knob. This mode works for all the knobs and possible panning rings. (On Windows, you might need to
click in the plug-in interface first to make sure it is the active window.)
4. Text entry mode
Double-click a knob to enter an exact value using the keyboard.
Tips
To reset a knob to its default position, hold down the Ctrl key (Windows) or Command key (macOS) and
click the knob once. Note: In Pro Tools, Twin 2 uses the default Pro Tools keyboard shortcut for reset:
Alt+click.
To fine-tune a value when using vertical drag mode or the mouse wheel, hold down the Shift key while
dragging or moving the mouse wheel. Note: In Pro Tools, Twin 2 uses the default Pro Tools keyboard
shortcut for fine tune: Ctrl+drag on Windows or Command+drag on macOS.
There are several handy shortcuts in text entry mode. With frequency values, you can type e.g. '1k'
to set the value to 1000 Hz, and also 'A4' for 440 Hz, or even strings like 'C#3+13'. With dB values, you
can type e.g. '2x' to get +6 dB (the value that corresponds to two times louder). With all values, you can
also type a percentage (e.g. '50%' will put a knob exactly in the middle position).
Sometimes, knobs in our plug-in interfaces are linked: these be adjusted simultaneously by holding
down the Alt key (Shift key in Pro Tools) while dragging on one of them. For example, an output level
and input level setting of a plug-in could be adjusted simultaneously (in the opposite direction) this way.
Next: Component buttons
See Also
Support
Component buttons
11
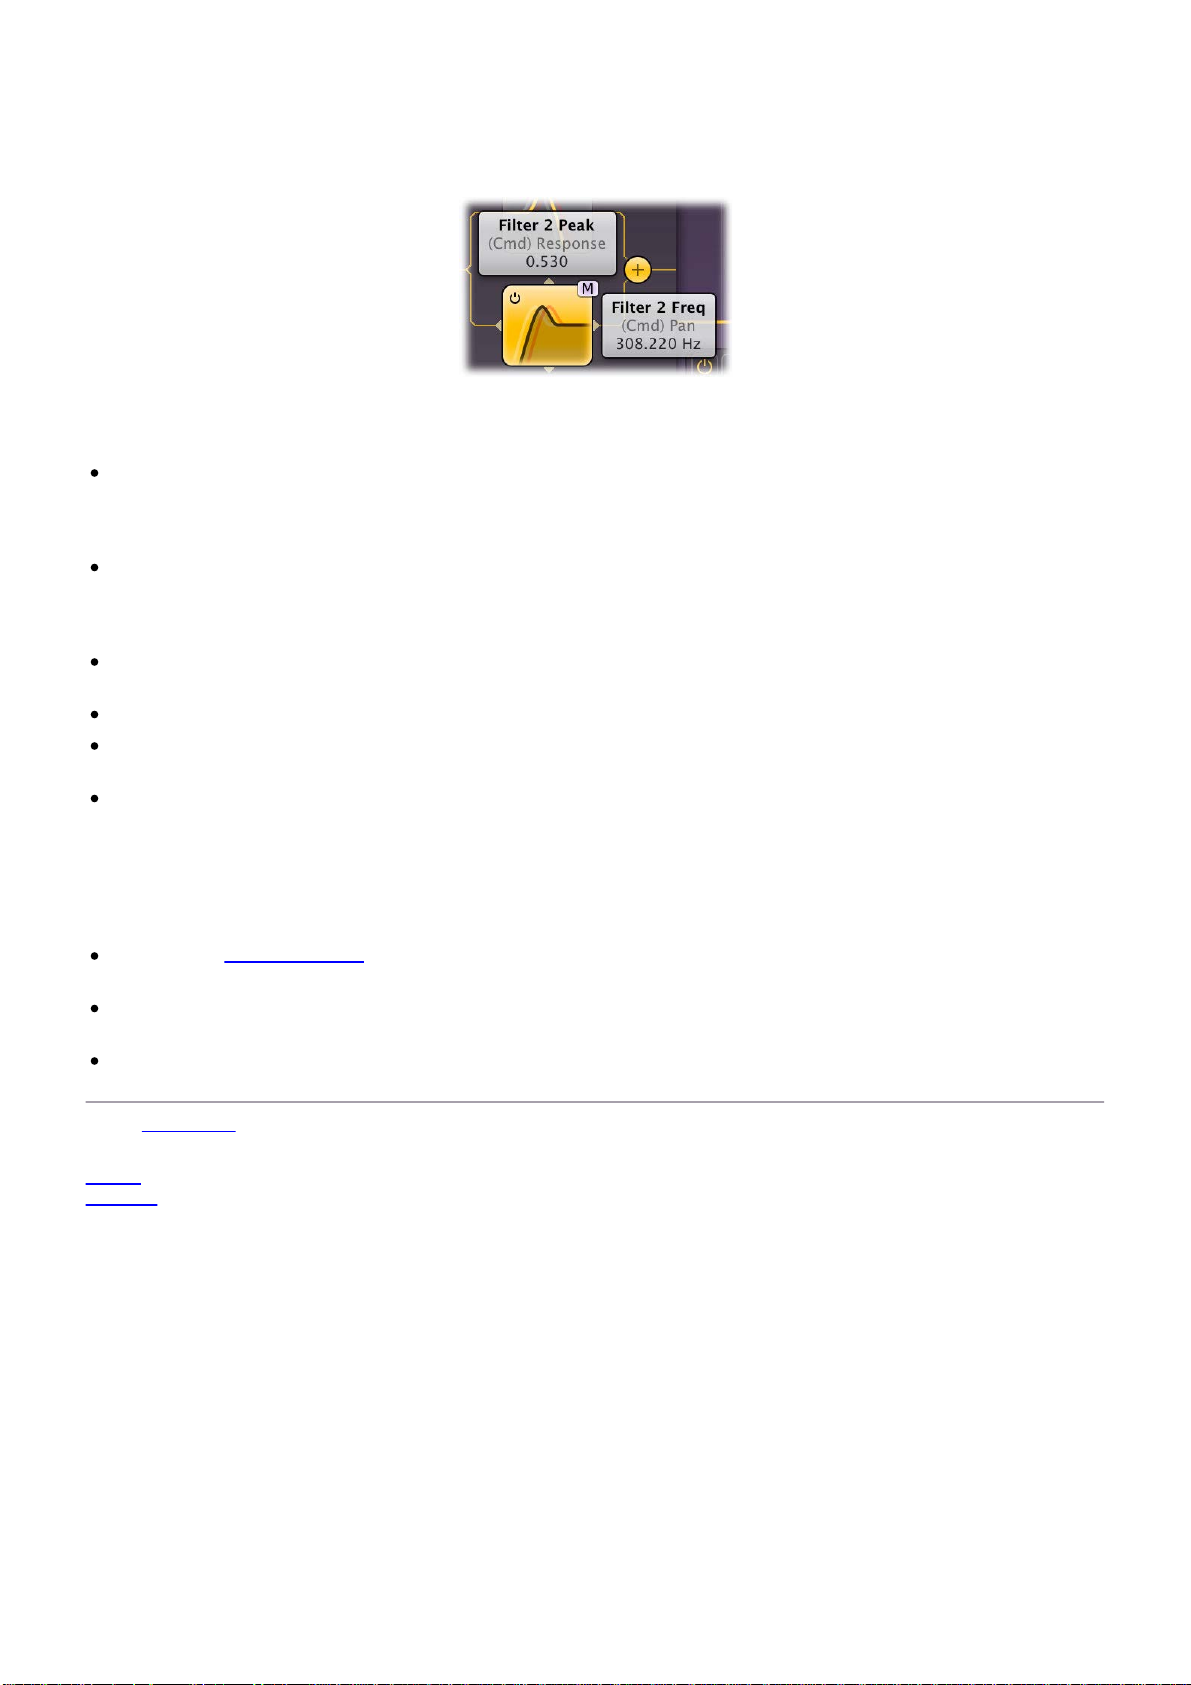
All components that make up the synthesizer in FabFilter Twin are displayed as large component buttons in
the top section of the interface: three oscillators and following the signal path, two filters, two delays, and two
more filters in the delay section.
You can edit the most important parameters of a component directly by clicking and dragging on the
component button. As soon as you move the mouse cursor over a component button, value displays will pop up
to show the current values of those parameters.
Drag horizontally and vertically to change the parameters. There are two sets of parameters: you can
toggle between them by holding down the Ctrl key on Windows, or the Command key on OS X. For
example, in the above screen shot, you would normally change the filter frequency and peak parameters;
by holding down Ctrl/Command, you adjust the filter panning and response curve parameters instead.
To view all parameters of a component, such as a filter or oscillator, click the component button once.
This will expand the complete interface for all related components. Click the component button again to
hide the interface. While a component interface is expanded, you can scroll the top section of Twin's
interface with the left and right scroll buttons at the far ends of the interface.
Hold down Shift while dragging to adjust only one parameter in the direction in which you move the
mouse cursor.
Hold down Alt while dragging to adjust all related components in parallel.
You can also adjust the component buttons with the mouse wheel. On Windows, most mouse wheels only
work vertically, but you can hold down the Ctrl and Shift keys simultaneously for horizontal adjustments.
Each of the buttons has an on/off switch in the left top corner, to quickly enable or disable the
component.
We strongly suggest for you to try all these movements yourself, and you'll find it's a great aid in quickly
setting up Twin the way you like. The most important parameters are always available, and if you need access
to all parameters, they are just a mouse click away.
Tips
Clicking the Main EG button does not open a dedicated EG section, but rather highlights the Main EG
source in the modulation section.
You can turn off the parameter value displays for the component buttons with the Show Component
Displays option in the Help menu.
The resize button in the lower-right corner of the interface allows you to make the interface wider, so you
can see more components at the same time.
Next: Oscillators
See Also
Knobs
Support
Oscillators
12
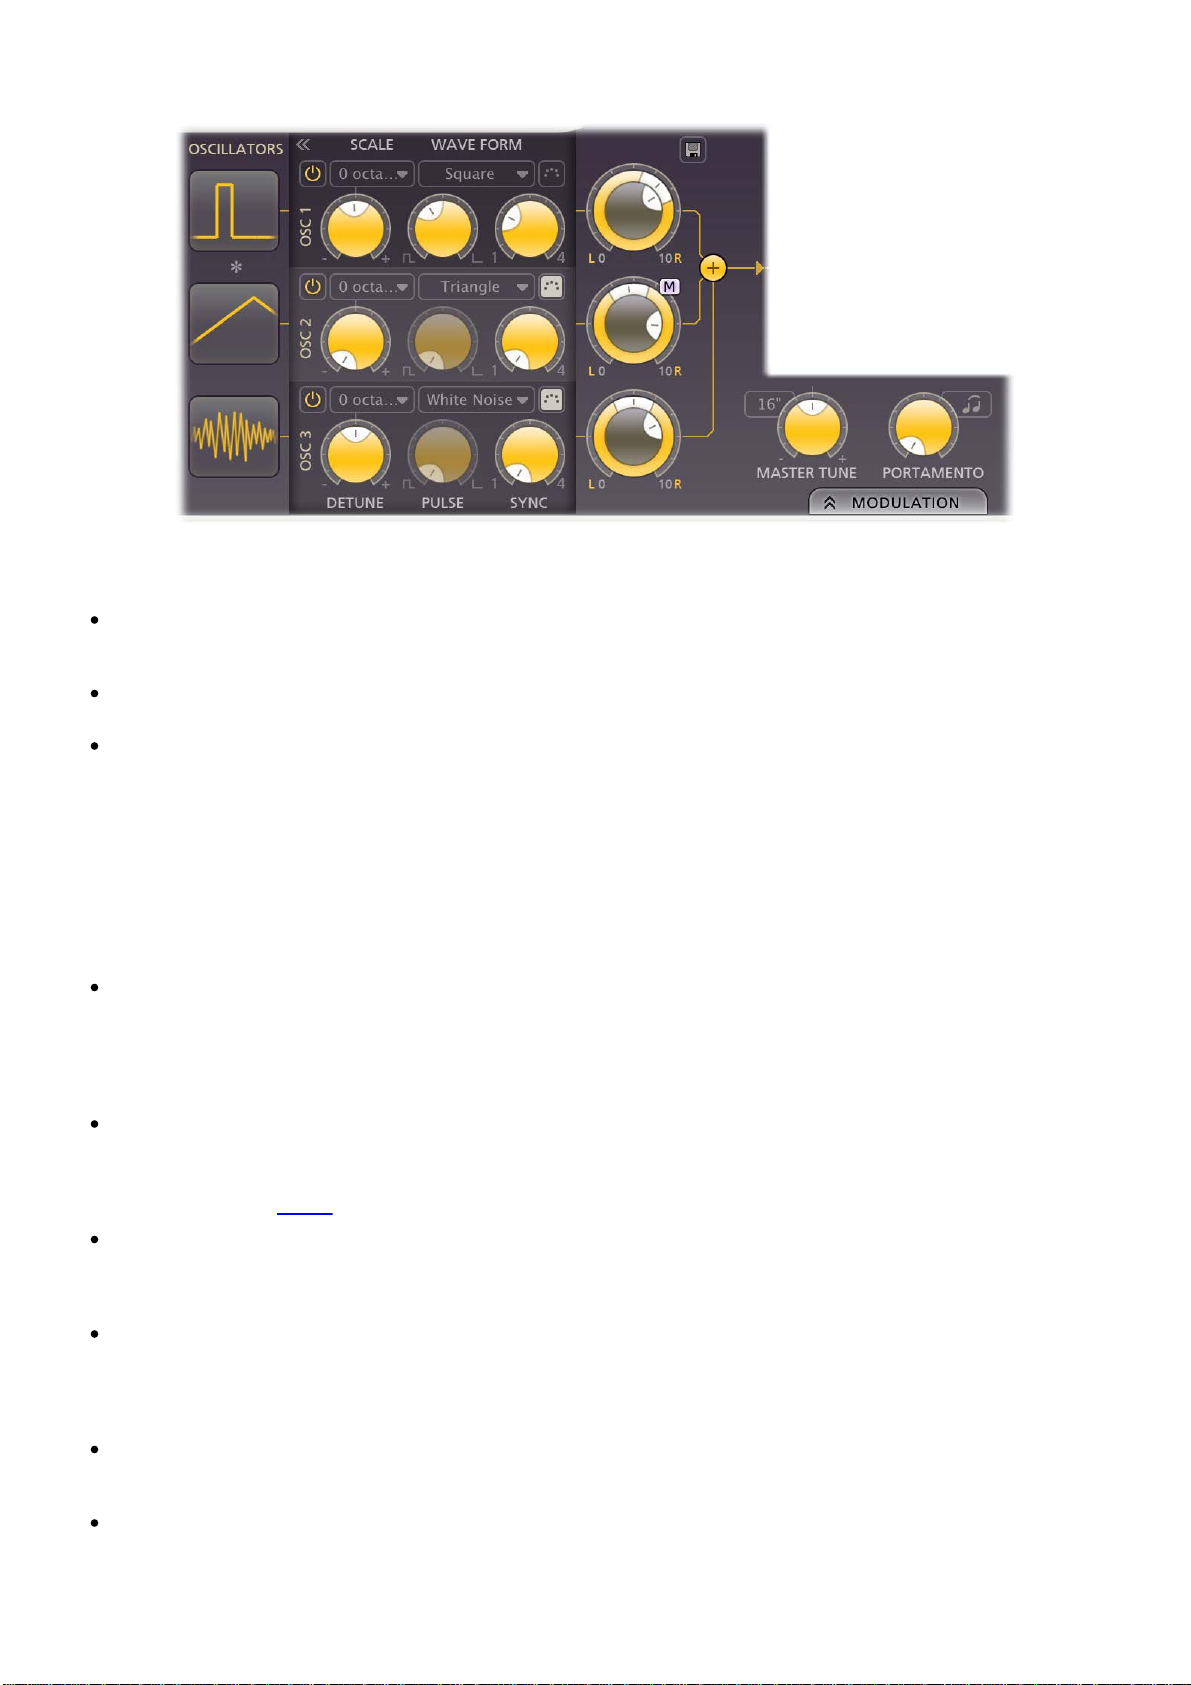
FabFilter Twin 2 comes with three full featured oscillators. Combined with our award winning filters this gives
you an exceptional broad palette of sounds. The oscillators are very analog sounding and completely aliasingfree (for the digifoobs!). For every oscillator the following parameters are available:
Enabled
This will turn an oscillator on or off, so you can easily check the contribution of an oscillator to the overall
sound, or turn it off to reduce CPU usage.
Scale
Each oscillator can be transposed up to 3 octaves above the master tune.
Waveform
The Waveform parameter selects the waveform that the oscillator produces:
1. Triangle (a soft, warm tone)
2. Sawtooth (a sharp bright tone that is ideal for filtering)
3. Square (a more metallic sound, adjustable with the pulse width setting)
4. Sine (a simple sine wave, the most basic waveform without overtones)
5. White noise (has a flat frequency response, meaning all frequencies at equal power)
6. Pink noise (is like white noise but with less power in the higher frequencies)
Phase Sync
Next to the waveform setting, the Phase Sync button (with a MIDI icon) toggles oscillator phase sync on
and off. When oscillator phase sync is on, the oscillator resets its phase to halfway the waveform on each
note-on event. With short, percussive sounds, this works really well to create a sharp and aggressive
attack with every note. However, normally you should turn it off because it sometimes introduces
unwanted clicks.
Detune
The Detune knob sets the detune for each oscillator. The detune knob has a range of +/- one octave, and
is extra sensitive around the 0 position. It is a modulation target as well. Like any other knob, you can
double-click it to enter a value directly using the keyboard. For example, try '0.5 octaves' or '1 semitone'
or '50 cents'. See Knobs
Pulse Width
The Pulse Width knob adjusts the pulse width of the square waveform, from an even square to an
infinitely thin pulse (which is actually inaudible). The pulse width is a modulation target and is only
available when a square wave is selected.
Sync
The Sync knob adjusts the level of hard sync for its oscillator. When set to 1, the oscillator works
normally without hard sync. When set to a higher value, the oscillator will 'squeeze' more phases into one
actual audible phase, which drastically changes the harmonics in the sound with a metallic-sounding
effect. Sync is a modulation target.
Level/Pan
The volume and pan of each oscillator can be adjusted using the combined Level/Pan knobs. The inner
knob set the overall level and outer ring sets the panning. Both are modulation targets.
Ring modulation
You can ring modulate the first oscillator with the second oscillator using the small * button between the
component buttons for oscillator 1 and 2. Ring modulation combines two waveforms, and outputs the
sum and difference of the frequencies present in each waveform. This produces a signal rich in overtones,
for more information.
suitable for producing bell-like or otherwise metallic sounds.
Master Tune/Scale
13
The Master Tune knob determines the global frequency offset of all oscillators. The menu above the knob
transposes the frequency by full octaves. The Master Tune knob is a modulation target so you can
modulate the frequency of all oscillators at once.
Portamento
The Portamento knob adjusts the amount of portamento or glide, which makes the oscillators slide from
one note to another. A little portamento is great for smooth keyboard solos, or when playing large bass
intervals. Good portamento is one of those things that give your play just that little bit extra: it's magic.
So we have fine-tuned it until it was just perfect! The best thing is: we have created a unique portamento
because it also works in polyphonic mode, so you can play sliding chords. You can choose between two
different portamento modes.
1. When using Normal portamento (high/low key portamento), gliding will happen always when
holding down keys.
2. When using Legato portamento (also called fingered portamento), gliding will not be applied for
the first key pressed, only for the keys after that.
Portamento is also a modulation target.
Tips
Disabling an oscillator reduces CPU usage. Also, the oscillators operate more efficiently when the Sync
knob is set to 1 and is not modulated (disabling hard sync).
When you want to change any oscillator parameter for all oscillators at the same time, just hold down the
Alt key while turning a knob.
The section presets button next to the level/pan knobs for the oscillators lets you store and retrieve
all oscillator parameters as a section preset, which is very useful for accessing often-used combinations of
parameters.
Oscillator component buttons
Each oscillator is visually represented as a component button. By clicking on the component button and
dragging, you can directly alter the most important oscillator parameters:
Detune: drag horizontally
Scale: drag vertically
Sync: drag horizontally while holding down the Ctrl (Windows) or Command (OS X) key
Wave Form: drag vertically while holding down the Ctrl (Windows) or Command (OS X) key
Click on a button to open the full oscillator interface (shown in the screen shot above) that provides access to
all parameters. For other component shortcuts, see Component buttons
Next: Filters
See Also
Overview
.
Filters
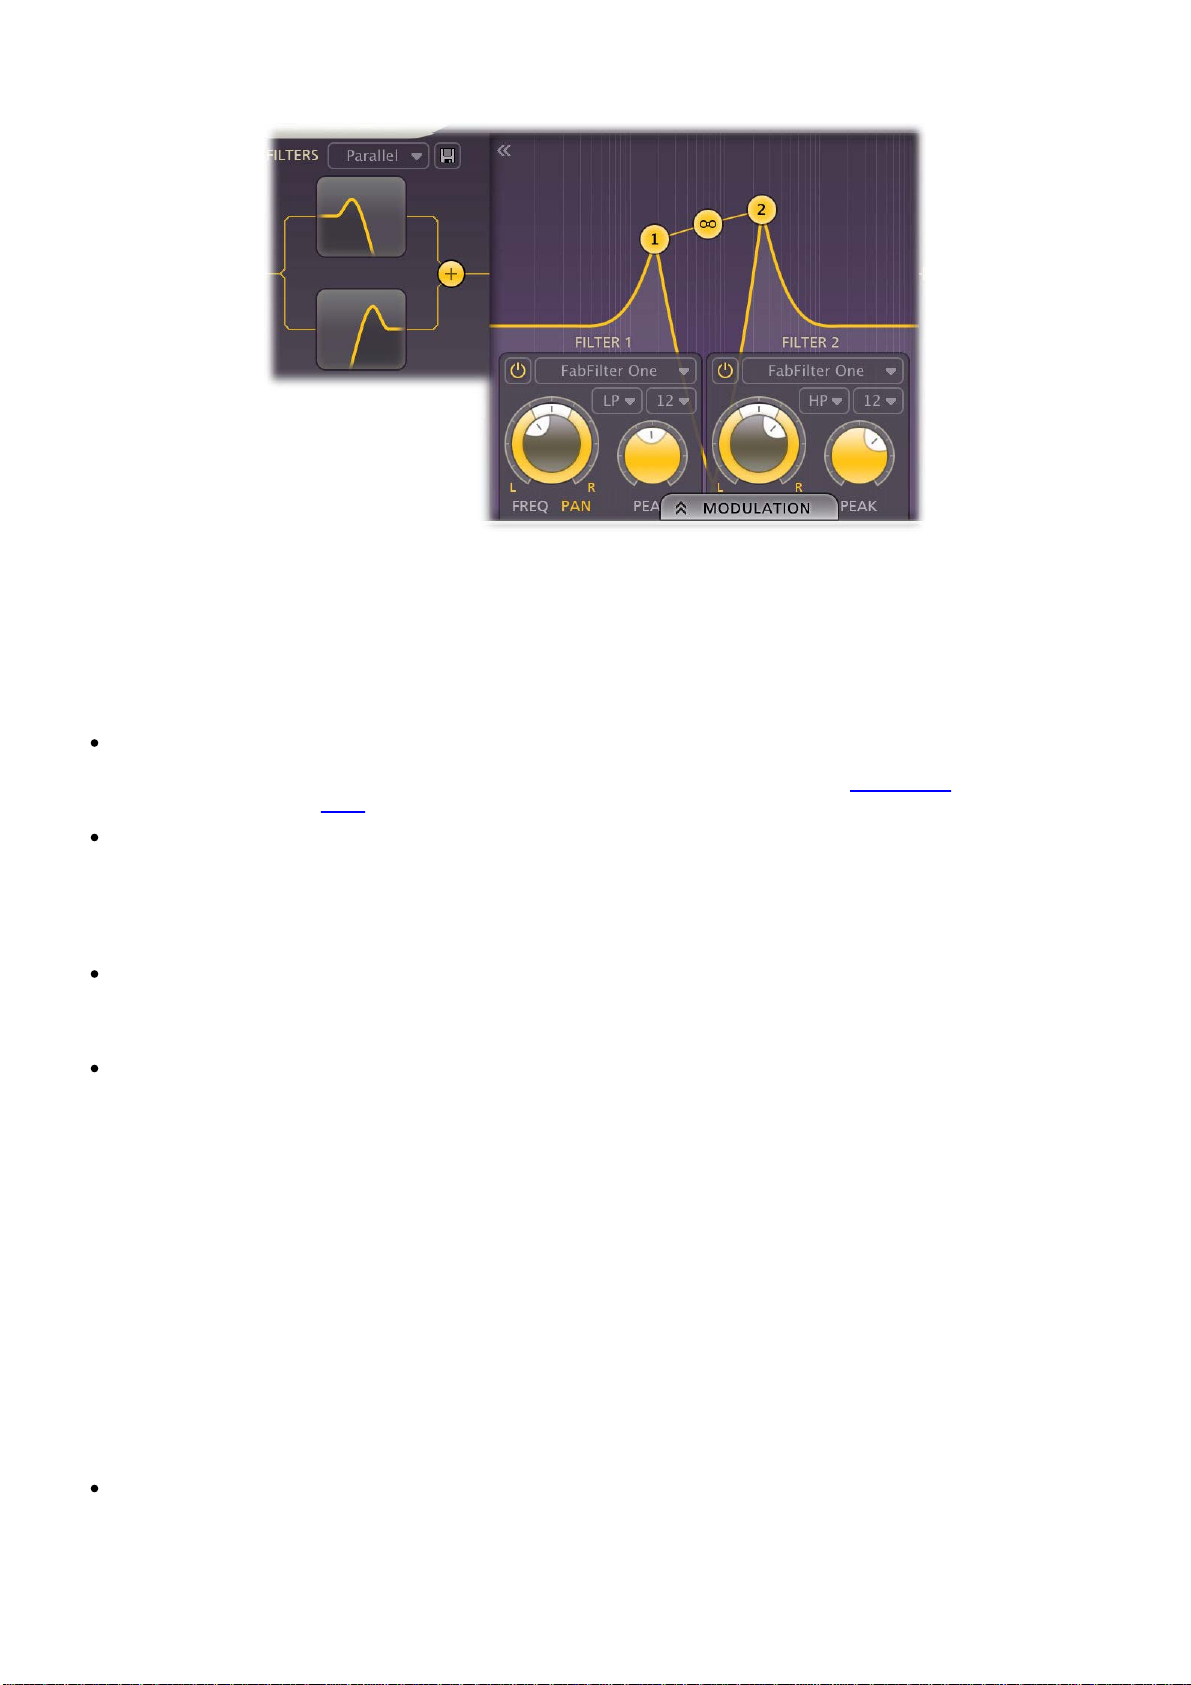
14
FabFilter Twin 2 has four multi-mode stereo filters. The two main filters are put right after the oscillators and
the other two are used within the delay section. The filters can be routed in three modes: serial, parallel and
per oscillator/delay. Every filter can be switched between low-pass, high-pass, and band-pass responses with
12, 24 and 48 dB/octave slopes and a staggering amount of eleven different high-quality filter characteristics
that define the unique sound and overdrive of the filter. They range from smooth with moderate overdrive to
raw, self-oscillating and over-the-top! All characteristics have been tuned very carefully, using our state-of-theart FabFilter filter technology.
For every filter the following parameters are available:
Frequency
The filter frequency is adjustable over the entire audio range. The Frequency controls the center or cutoff frequency of the filter and can be controlled in real time, either manually, via modulation
external devices using MIDI
Pan
The Pan ring around the Frequency knob lets you filter the left and right channels differently. It works as
a stereo balance setting for the center frequency of the filter. For example, when you turn the Pan knob
to the left, the left channel will be filtered with a lower center frequency, and the right channel will be
filtered with a higher center frequency. You can use this to create various stereo filtering effects and thus
it makes for a great modulation target.
Peak
The Peak knob adjusts the resonance of the filter. A little resonance will cause the filter to create warmer
and more characteristic tones. At maximum resonance, the filter will self-oscillate with most filter
characteristics.
Characteristic
FabFilter Twin 2 lets you choose between 11 different filter characteristics:
1. FabFilter One, the original filter characteristic taken from our award-winning FabFilter One
synthesizer
2. Smooth, like the cream in your coffee
3. Raw, a filter with lots of overdrive and exhibits a character of its own
4. Hard, moderately distorting filter, with a nice clean whistle
5. Hollow, juicy moderate distortion with fairly much low-end self-oscillation
6. Extreme, for more wild sonic ideas
7. Gentle, a more smooth and clean general purpose characteristic
8. Tube, with a warmer sound and nice overdrive, great for synth sounds
9. Metal, with a rough, sharper sound and distortion
10. Easy Going, a softer version of the Tube filter
11. Clean, linear behavior with no clipping or distortion at all
Response
The response of each filter can be set to either Low Pass, High Pass, or Band Pass. In Low Pass mode, the
filter will pass through frequencies lower than the center frequency. In High Pass mode, frequencies
higher than the center frequency will be passed through. In Band Pass mode, only the frequencies around
the cut-off frequency will be passed through.
.
, or via
Slope
The slope sets the steepness of the filter, which controls how aggressively the frequencies around the
15
center frequency are filtered. You can choose between 12 dB/octave, 24 dB/octave or 48 dB/octave
settings. For example, if the response is set to Low Pass, more high frequencies will be passed above the
cutoff frequency using at 12 dB/octave than at 48 dB/octave. But let your ears decide! Just listen to the
sound as you move the filter around and see if you like it...
Routing
The routing of the filters can be changed. The different settings are clearly graphically represented in the
interface. There are three different setups:
1. Serial: the sound passes through both filters serially. So the sound of all oscillators are led
through filter 1 and then through filter 2.
2. Parallel: the sound is led through both filters in parallel and the result is then mixed together
after the filters.
3. Per Osc / Delay: the output of oscillator 1 or delay 1 goes through filter 1, the output of
oscillator 2 or delay 2 goes through filter 2. For the main filters, the output of oscillator 3 is
routed through both filters.
Tip: The section presets button
as a section preset, which is very useful for accessing often-used combinations of parameters.
next to the routing button lets you store and retrieve all filter parameters
Filter component buttons
Each filter is visually represented as a component button. By clicking on the component button and dragging,
you can directly alter the most important filter parameters:
Frequency: drag horizontally
Peak: drag vertically
Pan: drag horizontally while holding down the Ctrl (Windows) or Command (OS X) key
Response: drag vertically while holding down the Ctrl (Windows) or Command (OS X) key
Click on a button to open the full filter interface (shown in the screen shot above) that provides access to all
parameters. For other component shortcuts, see Component buttons
.
Next: Interactive filter display
See Also
Oscillators
Modulation
Overview
Loading...