


 Loading...
1

Table of Contents
Introduction
. .About. . . . .FabFilter. . . . . .Timeless. . . . . . .2. . . . . . . . . . . . . . . . . . . . . . . . . . . . . . . . . . . . . . . . . . . . . . . . . . . . . . . . . . .3
. .Quick. . . . start. . . . . . . . . . . . . . . . . . . . . . . . . . . . . . . . . . . . . . . . . . . . . . . . . . . . . . . . . . . . . . . . . . . . . . . . .4
Using FabFilter Timeless 2
. .Overview. . . . . . . . . . . . . . . . . . . . . . . . . . . . . . . . . . . . . . . . . . . . . . . . . . . . . . . . . . . . . . . . . . . . . . . . . . . . .5
. .What. . . .-you. . .-use. . .-is. .-what. . . .-you. . .-see. . . . . . . . . . . . . . . . . . . . . . . . . . . . . . . . . . . . . . . . . . . . . . . . . . . . . . . . . .7
. .Knobs. . . . . . . . . . . . . . . . . . . . . . . . . . . . . . . . . . . . . . . . . . . . . . . . . . . . . . . . . . . . . . . . . . . . . . . . . . . . .9
. .Delay. . . . lines. . . . . . . . . . . . . . . . . . . . . . . . . . . . . . . . . . . . . . . . . . . . . . . . . . . . . . . . . . . . . . . . . . . . . . . .10.
. .Filters. . . . . . . . . . . . . . . . . . . . . . . . . . . . . . . . . . . . . . . . . . . . . . . . . . . . . . . . . . . . . . . . . . . . . . . . . . . .12.
. .Filter. . . .parameters. . . . . . . . . . . . . . . . . . . . . . . . . . . . . . . . . . . . . . . . . . . . . . . . . . . . . . . . . . . . . . . . . . . . . . . .14.
. .Interactive. . . . . . . .filter. . . .display. . . . . . . . . . . . . . . . . . . . . . . . . . . . . . . . . . . . . . . . . . . . . . . . . . . . . . . . . . . . . . . .16.
. .Modulation. . . . . . . . . . . . . . . . . . . . . . . . . . . . . . . . . . . . . . . . . . . . . . . . . . . . . . . . . . . . . . . . . . . . . . . . . . . .17.
. .Drag. . . -.and. . .-drop. . . .modulation. . . . . . . .slots. . . . . . . . . . . . . . . . . . . . . . . . . . . . . . . . . . . . . . . . . . . . . . . . . . . . . . . . .18.
. .XLFO. . . . . . . . . . . . . . . . . . . . . . . . . . . . . . . . . . . . . . . . . . . . . . . . . . . . . . . . . . . . . . . . . . . . . . . . . . . .20.
. .Envelope. . . . . . .generator. . . . . . . . . . . . . . . . . . . . . . . . . . . . . . . . . . . . . . . . . . . . . . . . . . . . . . . . . . . . . . . . . . . . .22.
. .Envelope. . . . . . .follower. . . . . . . . . . . . . . . . . . . . . . . . . . . . . . . . . . . . . . . . . . . . . . . . . . . . . . . . . . . . . . . . . . . . .23.
. .MIDI. . . .source. . . . . . . . . . . . . . . . . . . . . . . . . . . . . . . . . . . . . . . . . . . . . . . . . . . . . . . . . . . . . . . . . . . . . . . .24.
. .XY. .controller. . . . . . . . . . . . . . . . . . . . . . . . . . . . . . . . . . . . . . . . . . . . . . . . . . . . . . . . . . . . . . . . . . . . . . . . . .25.
. .Input/output. . . . . . . . . controls. . . . . . . . . . . . . . . . . . . . . . . . . . . . . . . . . . . . . . . . . . . . . . . . . . . . . . . . . . . . . . . . . . .26.
. .MIDI. . . .learn. . . . . . . . . . . . . . . . . . . . . . . . . . . . . . . . . . . . . . . . . . . . . . . . . . . . . . . . . . . . . . . . . . . . . . . .27.
. .Undo,. . . . .redo,. . . .A/B. . .switch. . . . . . . . . . . . . . . . . . . . . . . . . . . . . . . . . . . . . . . . . . . . . . . . . . . . . . . . . . . . . . . .29.
Presets
. .Loading. . . . . .presets. . . . . . . . . . . . . . . . . . . . . . . . . . . . . . . . . . . . . . . . . . . . . . . . . . . . . . . . . . . . . . . . . . . . . .30.
. .Saving. . . . .presets. . . . . . . . . . . . . . . . . . . . . . . . . . . . . . . . . . . . . . . . . . . . . . . . . . . . . . . . . . . . . . . . . . . . . . .31.
. .Section. . . . . .presets. . . . . . . . . . . . . . . . . . . . . . . . . . . . . . . . . . . . . . . . . . . . . . . . . . . . . . . . . . . . . . . . . . . . . .32.
. .How. . . presets. . . . . .are. . .stored. . . . . . . . . . . . . . . . . . . . . . . . . . . . . . . . . . . . . . . . . . . . . . . . . . . . . . . . . . . . . . . .33.
Purchasing FabFilter Timeless
. .Purchasing. . . . . . . .FabFilter. . . . . . .Timeless. . . . . . . . . . . . . . . . . . . . . . . . . . . . . . . . . . . . . . . . . . . . . . . . . . . . . . . . . . . . .34.
. .Entering. . . . . . your. . . .license. . . . .key. . . . . . . . . . . . . . . . . . . . . . . . . . . . . . . . . . . . . . . . . . . . . . . . . . . . . . . . . . . . .35.
Support
. .Support. . . . . . . . . . . . . . . . . . . . . . . . . . . . . . . . . . . . . . . . . . . . . . . . . . . . . . . . . . . . . . . . . . . . . . . . . . . .36.
. .Upgrading. . . . . . . .to. Timeless. . . . . . .2. . . . . . . . . . . . . . . . . . . . . . . . . . . . . . . . . . . . . . . . . . . . . . . . . . . . . . . . . . . .37.
. .Manual. . . . . installation. . . . . . . . . . . . . . . . . . . . . . . . . . . . . . . . . . . . . . . . . . . . . . . . . . . . . . . . . . . . . . . . . . . . . . .38.
. .VST. . .plug. . .-.in. .versions. . . . . . . . . . . . . . . . . . . . . . . . . . . . . . . . . . . . . . . . . . . . . . . . . . . . . . . . . . . . . . . . . . .39.
. .External. . . . . .side. . . chaining. . . . . . . . . . . . . . . . . . . . . . . . . . . . . . . . . . . . . . . . . . . . . . . . . . . . . . . . . . . . . . . . . . .40.
. .Component. . . . . . . . routing. . . . . . . . . . . . . . . . . . . . . . . . . . . . . . . . . . . . . . . . . . . . . . . . . . . . . . . . . . . . . . . . . . . .42.
. .License. . . . . .agreement. . . . . . . . . . . . . . . . . . . . . . . . . . . . . . . . . . . . . . . . . . . . . . . . . . . . . . . . . . . . . . . . . . . . . .43.
. .Acknowledgements. . . . . . . . . . . . . . . . . . . . . . . . . . . . . . . . . . . . . . . . . . . . . . . . . . . . . . . . . . . . . . . . . . . . . . . . . . . .45.
. .About. . . . .FabFilter. . . . . . . . . . . . . . . . . . . . . . . . . . . . . . . . . . . . . . . . . . . . . . . . . . . . . . . . . . . . . . . . . . . . . . .46.
2

About FabFilter Timeless 2
Welcome to the wobbly world of one of the most versatile delay plug-ins: Fabfilter Timeless\2. At its heart there are two independent, programmable delay lines. The addition of a high quality filter section and incredible new modulation features will get you time-warped where no man has gone\before.
All these controls provide an almost unbelievable array of sound manipulation possibilities,\ranging from simple repeat echo to genuinely original sounds that you wouldn't expect from a\delay plug-in.
What's new in Timeless 2?
First of all, FabFilter Timeless 2 contains a vastly improved modulation section, with all the\XLFOs (programmable LFOs), envelope generators, envelope followers, XY controllers, and MIDI\sources you will ever need! Modulation is more powerful and easier to work with thanks to the new\what-you-use-is-what-you-see interface. Finally, the new Mid/Side mode, even lower\minimum delay time, and the new Freeze feature ensure that Timeless 2 will let you go even\further in regarldless which creative sound-mangling experiment you are engaged in.
Of course, FabFilter Timeless 2 opens all presets from Timeless 1 without problems. See\Upgrading to Timeless 2 for more information.
FabFilter Timeless 2 is available in VST, VST3, AU (Audio Units), AAX Native and AudioSuite formats (all both 64-bit and 32-bit), as well as RTAS (32-bit only), for Mac OS X and Windows.
Windows requirements |
Mac OS X requirements |
32-bit: Windows 10, 8, 7, Vista or XP |
OS X 10.6 or higher |
64-bit: Windows 10, 8, 7 or Vista (x64) |
AU or VST 2/3 host or Pro Tools |
VST 2/3 host or Pro Tools |
Intel processor |
|
|
Next: Quick start |
|
See Also |
|
Using FabFilter Timeless 2 |
|
3

Quick start
The installer will copy the FabFilter Timeless 2 plug-in into the common VST, VST 3, AU (macOS only)\and Pro Tools plug-in folders on your computer. On macOS, the global plug-in folders in\/Library/Audio/Plug-Ins are used.
In most cases, your host will then recognize the plugin automatically. However, if the\instructions below do not work, see Manual\installation instead.
 Cubase
Choose an empty insert slot, for example in the Mixer, and select FabFilter Timeless 2 from the menu that appears. To use the MIDI features in Timeless 2, create a new MIDI track and set its output to the Timeless 2 instance you have just created. (The VST 3 version of Timeless 2 can be found in the Delay section.)
 Logic Pro
Choose an empty insert slot on one of your audio tracks, instrument tracks or buses and select\FabFilter Timeless 2 from the pop-up menu. You will find FabFilter Timeless 2 in the Audio Units > FabFilter section (named FF Timeless 2).
 Ableton Live
In Session view, select the track you would like to place FabFilter Timeless 2 on, for example by\clicking the track name. At the left top of Ableton Live's interface, click on the Plug-in\Device Browser icon (third icon from the top). From the plug-ins list, double-click\FabFilter/FabFilter Timeless 2, or drag it onto the track.
 Pro Tools
Choose an empty insert slot on one of your audio tracks, instrument tracks or buses and select\FabFilter Timeless 2 from the pop-up menu in the Delay section.
Use the Presets button at the top of the plug-in interface to try different settings from the\many factory presets that are bundled with FabFilter Timeless 2. Have fun!
Next: FabFilter Timeless 2 overview
See Also
VST plug-in versions
Upgrading to Timeless 2
Loading presets
4

Overview
FabFilter Timeless 2's interface is divided into multiple sections:
 Presets, undo, A/B, help
The Undo, Redo, A/B and Copy buttons at the top of the plug-in interface enable you to undo\your changes and switch between different states of the plug-in. With the preset buttons, you\can easily browse through the vast library of factory presets or save your own settings so you\can re-use them in other songs. The Help button provides access to the help file and other\information and options.
 Feedback and delays
This is where the magic begins. The delay time is controlled by a big knob and can be\synchronized to the host tempo. Both delay lines have there own feedback and cross feedback\knobs which determine the amount of repeats. See Delay\lines.
 Filter section
And in the filter section, the magic goes on! Our state-of-the-art multimode filters let you\morph the delayed sounds, adding filtering effects ranging from gentle sweeps up to\self-oscillating madness. See Filters.
 Dry/wet level
Here you control the audio output gain. The dry (unprocessed) signal and the output of the\delay lines have their own output volume knobs. (The input gain control is located at the far\left of the plug-in.) See Input/Output stage.
 Modulation button
The modulation button shows or hides the entire modulation section at the bottom of the\interface. FabFilter Timeless 2 offers virtually unlimited modulation possibilities, but all\this power might be a bit intimidating. That's why the modulation section is hidden by default,\and you can look 'under the hood' when you want to tweak a preset or design your own.
 Source selection bar
The source selection bar shows all modulation sources at a glance and lets you easily scroll\around and create new sources. FabFilter Timeless 2 offers XLFO,\Envelope Generator (EG), Envelope Follower (EF), MIDI and XY Controller sources.\See also Modulation.
 Modulation slots and sources
The bottom section contains the modulation sources. The modulation section in Timeless 2 is\fully modular Ñ but without the cables! We found a simple way to show you everything that is\modulating, and what is modulated by what. Above each modulation source, the modulation slots\show exactly what targets are modulated by this source and let you adjust the amount of\modulation. You can very easily
5

set up modulation connections with drag-and-drop. All in all, we think we made sound design easier\and more fun!
 MIDI Learn, channel mode, output options
The bottom bar contains the MIDI Learn feature which sets up any\MIDI controller to control any plug-in parameter. Next, we find the channel mode option for\Mid/Side channel mode, the auto-mute selfoscillation option, and a monitoring option that\lets you listen to the dry input and side-chain signals.
 Resize
The resize button in the lower-right corner lets you choose between normal and wide interface\layouts. The wide layout eliminates scrolling in the top part of the interface and provides\more space for the modulation sources at the bottom of the interface. Most hosts support\dynamic resizing of the interface; otherwise just close and re-open the interface window.
Next: What-you-use-is-what-you-see
See Also
Component routing
Quick start
6

What-you-use-is-what-you-see
Often an impressive feature list results in an impressively difficult-to-use interface full of\controls for parameters you might never even use. For almost every plug-in developer one of the\greatest challenges when making a complex full-featured plug-in is to design an interface that is\easy to use. And we think we did it! FabFilter introduces a revolutionary new interface concept:\What-you-use-is-what-you-see.
The idea is simple yet powerful. At all times, the interface only contains the modulation\sources and slots that you are actually using. This results in an intuitive user interface that\experienced producers and novices alike will embrace.
You can easily create more modulation sources. Do you want another XLFO? Just add one! Do you\want an envelope generator? Just add one and start modulating things! Of course there is a limit\to the number of sources you can create, but in practice it feels like you can create as many\sources as you will ever need.
To give you an idea, a simple preset without modulation looks like this:
... while a more complex preset, with various modulation sources and an expanded filter\section, looks like this:
7

To help you understand even the most complex presets, modulation slots are grouped with each\source. Each component, knob or controller that is being modulated is marked with a little\M button. Simply click the M to highlight the modulation source\and slots responsible for the modulation. See also Modulation.
Another interface innovation are the filter buttons in the filter\section. You can control the main filter parameters simply by dragging on the filter buttons,\which makes for an uncluttered interface that is easy to overview.
Next: Knobs
See Also
Modulation
Overview
8

Knobs
It is easy to control FabFilter Timeless 2's parameters with the large round knobs. They will light up when you move the mouse cursor around to indicate that you can adjust them. The moment you move the mouse cursor over a knob, a parameter value display will pop up, which shows the name and the current value of the parameter.
All knobs support four ways of control:
1.Vertical mode
Click on the center area of a knob and drag up or down to rotate it. The knob reacts to the\speed with which you are dragging, so if you move the mouse slowly, you make precise\adjustments.
2.Rotate mode
Grab the arrow of the knob and drag it around. By moving the mouse cursor further away from the knob while dragging it, you can make precise adjustments.
3.Mouse wheel mode
Perhaps the easiest way to make adjustments is by using the mouse wheel when you hover over a knob. This mode works for all the knobs and possible panning rings. (On Windows, you might need\to click in the plug-in interface first to make sure it is the active window.)
4.Text entry mode
Double-click a knob to enter an exact value using the keyboard.
Tips
 To reset a knob to its default position, hold down the Ctrl key (Windows) or\Command key (macOS) and click the knob once. Note: In Pro Tools, Timeless 2 uses the\default Pro Tools keyboard shortcut for reset: Alt+click.
 To fine-tune a value when using vertical drag mode or the mouse wheel, hold down the\Shift key while dragging or moving the mouse wheel. Note: In Pro Tools, Timeless 2 uses the default Pro Tools keyboard shortcut for fine tune: Ctrl+drag on Windows or\Command+drag on macOS.
 There are several handy shortcuts in text entry mode. With frequency values, you can\type e.g. '1k' to set the value to 1000 Hz, and also 'A4' for 440 Hz, or even strings like\'C#3+13'. With dB values, you can type e.g. '2x' to get +6 dB (the value that corresponds to\two times louder). With all values, you can also type a percentage (e.g. '50%' will put a knob\exactly in the middle position).
 Sometimes, knobs in our plug-in interfaces are linked: these be adjusted\simultaneously by holding down the Alt key (Shift key in Pro Tools) while\dragging on one of them. For example, an output level and input level setting of a plug-in\could be adjusted simultaneously (in the opposite direction) this way.
Next: Delay lines
See Also
Overview
9

Delay lines
The delay lines are the center of FabFilter Timeless 2. Of course, they cause a delay in the\transmission of a signal passing through. There is a wide range of effects possible with a\digital delay: repeat echo, slap-back delay, chorus, vibrato, and resonant 'tunnel' echo.
There are two delay lines: one receiving input from the left channel, and the other from the\right channel (except in Mid/Side mode).
You control each delay line with the following parameters:
 Delay time
Well, guess what... this sets the delay time! To be more precise: the time of the delay given\to a signal passing through.
The delay time can be locked/synchronized to the tempo of your sequencer host. When this\is activated using the curved switch the knob controls the sub-multiples of this tempo (we\call this the Delay Offset instead of the Delay Time). The small dots that appear around the\knob make it easier to get precise and quick access to certain fractions that are related to\your sequencer tempo.
When the delay time is not locked to your sequencer tempo it is possible to 'tap'\the tempo of the delay by clicking on the number-display above or below the knob.\The display will turn into an illuminated TAP button. The next time you\click here the time between the clicks is calculated and used as delay time.
Just tap it a\few times to get some values you want to work with.
In case you want to use the exact same delay time for both delay lines, enable the Delay\Link switch between the delay lines. This makes it easier to set up both delay lines with the\same settings.
 Delay pan
Pans the output of each delay line to the left or right channel.
 Feedback
You can vary the feedback to produce more than one repeat from a single sound. All the\feedback control does is to send some of the delayed output (after passing through the\filters) back to the input so it gets delayed again; the more feedback, the more repeats.\There are separate knobs for the left and right filter output for both delay lines.
When a signal coming out of a delay line is routed back into the other delay line this is\called "crossfeedback" hence the names on the interface. Cross-feedback is used to mix\different delay times and creates beautiful stereo effects.
The amount of total feedback determines the number of audible repeats. Higher levels will\have more repeats and above a certain level feedback will cause higher volumes at every cycle\and thus create sonic mayhem! Be careful with your ears and speakers, and don't use too high\feedback levels.
There is a convenient lock icon that makes it possible to set up feedback settings for\both delay lines.
 Feedback invert switch
Very interesting effects can be achieved when inverting the phase of one of the feedback\signals. The effect of this is most noticeable on effects that use a very short delay time.\By inverting the phase of the signal fed back to the input, it allows different harmonics to\be accentuated by the filtering process, and so gives a choice of two types of tonal\coloration, one usually sounding thinner than the other. On longer delay times it might alter\the stereo perception of the sound.
 Delay style
There are two different ways the digital delay can behave:
1.Tape which behaves like a classic tape delay. When the delay time is changed in\positive direction i.e. the delay time gets shorter, you will hear a increase in pitch of\the delayed signal.
10
Conversely when the delay time is made longer you will hear a\decrease in pitch of the delayed signal. This is the way analog delays sound and makes\'playing' the delay so much fun.
2.Stretch makes this plug-in simply unique. It means that no matter whether the\delay time gets shorter or longer, the pitch will remain constant using granular\techniques. This is NOT possible with an analog delay and we thought this to be a highly\creative addition. Listen to some of the presets using this algorithm and you will hear\what sonic possibilities this option has to offer.
 Freeze
The Freeze button lets you freeze the sound that's currently in the delay lines. As soon as you\activate freeze, the input to the delay line is cut off, so no new sounds will be stored. The\delay lines will keep playing the current sound, which you can now filter continously. Also,\you can of course change the delay time which will also transform the sound in the buffers.\This can really warp the sound and change it into something completely different! The Freeze\option is not stored in presets because it really needs to be turned on and off\dynamically.
The settings of all delay parameters can be stored as a section preset.
Tips
 By setting a delay time of between 30 and 100 ms and adding a little gentle modulation with\no feedback, you get the classic chorus effect.
 At very short delay times (5 to 50 ms), increasing feedback will give a resonant cardboard\tube or tunnel echo sound, the pitch of the resonance being set by the delay time. This effect\is useful in creating new sounds or modifying existing ones beyond recognition; used with a\synth, it can create the illusion of ring modulation or phase sync.
 Short delays of between 30 and 100 ms are used to create slap-back echo effects, which are\quite effective on vocals and guitar.
 Delay times in excess of 100 ms will give you the familiar tape echo type of sound, and\this is a valuable effect for warming up vocals and guitar.
 If you are interested you can read more about delay technology on Wikipedia
  .
.
Next: Filters
See Also
Component routing
Overview
11
Filters
FabFilter Timeless 2 comes with two high-quality filters, each with no less than eleven\different sound characteristics. These multimode filters are based on our award winning filters\first developed for FabFilter One. You can use them individually or combine filter\characteristics to create your own sounds in any way imaginable. Both filters are stereo\filters.
The filter buttons let you easily adjust the main filter parameters, simply by clicking and\dragging on the button. As soon as you move the mouse cursor over a filter button, value displays\will pop up to show the current values of the associated parameters.
 Click and then drag horizontally or vertically to change the filter\frequency and peak parameters. You can change the filter\panning and response curve parameters instead by holding down\the Ctrl key on Windows, or the Command key on OS X.
 To view all filter parameters, click the one of the filter buttons once. This will expand\the filter section to show the complete filter interface. Click the filter button again to hide\the interface. While the filter section is expanded, you can scroll the top section of\Timeless' interface with the left and right scroll buttons at the far ends of the\interface.
 Hold down Shift while dragging to adjust only one parameter in the direction in\which you move the mouse cursor.
 Hold down Alt while dragging to adjust parameters in both filters in parallel.
 You can also adjust the component buttons with the mouse wheel. On Windows, most mouse\wheels only work vertically, but you can hold down the Ctrl and Shift keys\simultaneously for horizontal adjustments.
 The filter buttons have an on/off switch in the left top corner, to quickly enable or\disable the filter.
We strongly suggest for you to try all these movements yourself, and you'll find it's a great\aid in quickly setting up the filters in Timeless the way you like. The most important parameters\are always available, and if you need access to all parameters, they are just a mouse click\away.
Tip: You can turn off the parameter value displays for the filter buttons\with the Show Component Displays option in the Help menu.
Filter routing
Above the filter buttons, the filter routing can be set. There are three\different ways of configuring the filters in the audio signal path:
1. Serial will put both left and right channel of the delay lines first thru filter 1\and than thru filter 2.
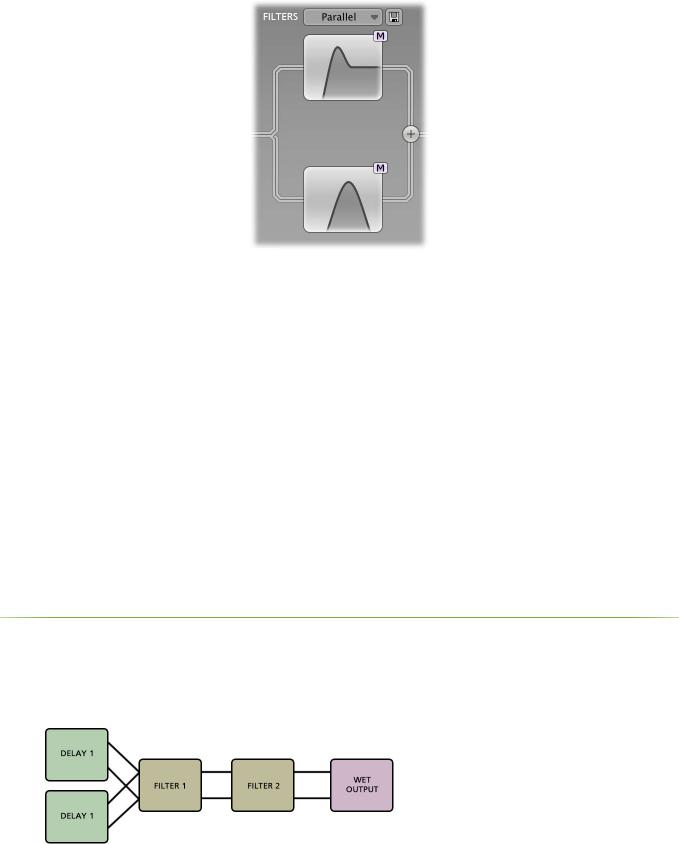
2.Parallel: The output of delay line 1 into both filter 1 and 2, and the output of\delay line 2 into both filter 1 and 2.
12

3.Per channel: delay lines and filters are working in 2 groups. Delay line 1 uses\filter 1 and delay line 2 uses filter 2.
Next: Filter parameters
See Also
Overview
Interactive filter display
Section presets
13

Filter parameters
By clicking on one of the filter buttons in the filter section, the\filter section expands to show all filter parameters and the interactive filter display.
You control each filter in Timeless 2 with the following parameters:
 Frequency
The filter frequency is adjustable over the entire audio range. The Frequency controls the\center or cutoff frequency of the active filter and can be controlled in real time, either\manually or via external devices.
 Pan
Pan
The Pan ring around the Frequency knob lets you filter the left and right channels\differently. It works as a stereo balance setting for the center frequency of the filter. For\example, when you turn the Pan knob to the left, the left channel will be filtered with a\lower center frequency, and the right channel will be filtered with a higher center\frequency. You can use this to create various stereo filtering effects, especially in\combination with modulation.
 Peak
Peak
The Peak knob adjusts the resonance of the active filter. A little resonance will cause the\filter to create warmer and more characteristic tones. At maximum resonance, the filter will\self-oscillator with most filter characteristics. (The Auto Mute Self-Osc option in the\bottom bar will help to keep this manageable. See Input/output\options.)
 Characteristic
FabFilter Timeless offers the possibility to choose between three different filter\characteristics:
1.FabFilter One, the original filter characteristic taken from our award-winning\FabFilter One synthesizer
2.Smooth, like the cream in your coffee
3.Raw, a filter with lots of overdrive and exhibits a character of its own
4.Hard, moderately distorting filter, with a nice clean whistle
5.Hollow, juicy moderate distortion with fairly much low-end self-oscillation
6.Extreme, for more wild sonic ideas
7.Gentle, a more smooth and clean general purpose characteristic
8.Tube, with a warmer sound and nice overdrive, great for synth sounds
9.Metal, with a rough, sharper sound and distortion
10.Easy Going, a softer version of the Tube filter
11.Clean, linear behavior with no clipping or distortion at all
 Response
The response of each filter can be set to either Low Pass, High Pass, or Band\Pass. In Low Pass mode, the filter will pass through frequencies lower than the center\frequency. In High Pass mode, frequencies higher than the center frequency will be passed\through. In Band Pass mode, only the frequencies around the cut-off frequency will be passed\through.
 Slope
Slope
14
Loading...