


 Loading...
1

Table of Contents
Introduction
. .About. . . . .FabFilter. . . . . .Pro. . -.C. 2. . . . . . . . . . . . . . . . . . . . . . . . . . . . . . . . . . . . . . . . . . . . . . . . . . . . . . . . . . . . . .3
. .Quick. . . . start. . . . . . . . . . . . . . . . . . . . . . . . . . . . . . . . . . . . . . . . . . . . . . . . . . . . . . . . . . . . . . . . . . . . . . . . .5
Using FabFilter Pro-C 2
. .Overview. . . . . . . . . . . . . . . . . . . . . . . . . . . . . . . . . . . . . . . . . . . . . . . . . . . . . . . . . . . . . . . . . . . . . . . . . . . . .6
. .Knobs. . . . . . . . . . . . . . . . . . . . . . . . . . . . . . . . . . . . . . . . . . . . . . . . . . . . . . . . . . . . . . . . . . . . . . . . . . . . .8
. .Dynamics. . . . . . .controls. . . . . . . . . . . . . . . . . . . . . . . . . . . . . . . . . . . . . . . . . . . . . . . . . . . . . . . . . . . . . . . . . . . . . .9
. .Time. . . .controls. . . . . . . . . . . . . . . . . . . . . . . . . . . . . . . . . . . . . . . . . . . . . . . . . . . . . . . . . . . . . . . . . . . . . . . .11.
. .Side. . . chain. . . . .section. . . . . . . . . . . . . . . . . . . . . . . . . . . . . . . . . . . . . . . . . . . . . . . . . . . . . . . . . . . . . . . . . . . .13.
. .Displays. . . . . . and. . . metering. . . . . . . . . . . . . . . . . . . . . . . . . . . . . . . . . . . . . . . . . . . . . . . . . . . . . . . . . . . . . . . . . . .15.
. .Oversampling. . . . . . . . . . . . . . . . . . . . . . . . . . . . . . . . . . . . . . . . . . . . . . . . . . . . . . . . . . . . . . . . . . . . . . . . . . . .17.
. .Full. . .screen. . . . .mode. . . . and. . . resizing. . . . . . . . . . . . . . . . . . . . . . . . . . . . . . . . . . . . . . . . . . . . . . . . . . . . . . . . . . . . .18.
. .Input. . . .and. . . output. . . . . options. . . . . . . . . . . . . . . . . . . . . . . . . . . . . . . . . . . . . . . . . . . . . . . . . . . . . . . . . . . . . . . .20.
. .MIDI. . . .learn. . . . . . . . . . . . . . . . . . . . . . . . . . . . . . . . . . . . . . . . . . . . . . . . . . . . . . . . . . . . . . . . . . . . . . . .21.
. .Undo,. . . . .redo,. . . .A/B. . .switch. . . . . . . . . . . . . . . . . . . . . . . . . . . . . . . . . . . . . . . . . . . . . . . . . . . . . . . . . . . . . . . .23.
Presets
. .Loading. . . . . .presets. . . . . . . . . . . . . . . . . . . . . . . . . . . . . . . . . . . . . . . . . . . . . . . . . . . . . . . . . . . . . . . . . . . . . .24.
. .Saving. . . . .presets. . . . . . . . . . . . . . . . . . . . . . . . . . . . . . . . . . . . . . . . . . . . . . . . . . . . . . . . . . . . . . . . . . . . . . .25.
. .How. . . presets. . . . . .are. . .stored. . . . . . . . . . . . . . . . . . . . . . . . . . . . . . . . . . . . . . . . . . . . . . . . . . . . . . . . . . . . . . . .26.
Purchasing FabFilter Pro-C 2
. .Purchasing. . . . . . . .FabFilter. . . . . . .Pro. .-.C.2. . . . . . . . . . . . . . . . . . . . . . . . . . . . . . . . . . . . . . . . . . . . . . . . . . . . . . . . .27.
. .Entering. . . . . . your. . . .license. . . . .key. . . . . . . . . . . . . . . . . . . . . . . . . . . . . . . . . . . . . . . . . . . . . . . . . . . . . . . . . . . . .28.
Support
. .Support. . . . . . . . . . . . . . . . . . . . . . . . . . . . . . . . . . . . . . . . . . . . . . . . . . . . . . . . . . . . . . . . . . . . . . . . . . . .29.
. .Upgrading. . . . . . . .to. Pro. . .-C. .2. . . . . . . . . . . . . . . . . . . . . . . . . . . . . . . . . . . . . . . . . . . . . . . . . . . . . . . . . . . . . .30.
. .Manual. . . . . installation. . . . . . . . . . . . . . . . . . . . . . . . . . . . . . . . . . . . . . . . . . . . . . . . . . . . . . . . . . . . . . . . . . . . . . .31.
. .VST. . .plug. . .-.in. .versions. . . . . . . . . . . . . . . . . . . . . . . . . . . . . . . . . . . . . . . . . . . . . . . . . . . . . . . . . . . . . . . . . . .32.
. .External. . . . . .side. . . chaining. . . . . . . . . . . . . . . . . . . . . . . . . . . . . . . . . . . . . . . . . . . . . . . . . . . . . . . . . . . . . . . . . . .33.
. .License. . . . . .agreement. . . . . . . . . . . . . . . . . . . . . . . . . . . . . . . . . . . . . . . . . . . . . . . . . . . . . . . . . . . . . . . . . . . . . .35.
. .Acknowledgements. . . . . . . . . . . . . . . . . . . . . . . . . . . . . . . . . . . . . . . . . . . . . . . . . . . . . . . . . . . . . . . . . . . . . . . . . . . .37.
. .About. . . . .FabFilter. . . . . . . . . . . . . . . . . . . . . . . . . . . . . . . . . . . . . . . . . . . . . . . . . . . . . . . . . . . . . . . . . . . . . . .38.
2

About FabFilter Pro-C 2
There is one signal-processing tool that is almost impossible to do without in any form of\audio recording or postproduction: compression. Compression is available in a wide variety of\different formats, flavors, designs and degrees of quirkiness.
FabFilter Pro-C 2 is not just a good sounding compressor. FabFilter Pro-C 2 is a superb stereo\compressor with all the tricks up its sleeve that you will ever need. With its different\compression styles and options like mid/side compression and side-chaining with optional EQ\filtering, it can work in any desired way. Whether mastering or mixing, Pro-C 2 will do the job\with lots of style.
New in version 2
When you open Pro-C 2 for the first time, you'll notice right away that it has a brand new\look. With its gorgeous, resizable interface, optional level display, knee display and side-chain\EQ controller, it can either take the form of a classic, straightforward analog compressor, or\present itself as a modern allround compressor with extensive metering and controls. It's up to\you!
Of course, apart from the new look and feel, we've also added many often-requested new\features. Most importantly, FabFilter Pro-C 2 introduces five brand new compression styles, in addition to the three\original v1 styles. With their unique characteristics, it's like getting five brand new\compressors!
 Vocal - Very effective algorithm to bring\vocals to the front of your mix. It works with automatic knee and ratio settings, so\compressing your lead vocal is as easy as choosing the right threshold.
 Mastering - Designed to be as transparent as\possible, introducing as little harmonic distortion as possible, while still being able to\catch those fast transients.
 Bus - Especially great for bus processing, or\for adding a pleasant glue to your drums, mixes or tracks.
  Punch - Traditional, analog-like compression\behavior, sounds good on anything!
3

 Pumping - Deep and over-the-top pumping, great\for drum processing or EDM. But of course, it doesn't stop there. We've implemented a ton of other improvements:
 Introducing Lookahead (up to 20 ms), which can be\enabled/disabled as well to ensure zero latency processing.
 Introducing Hold (up to 500 ms).
 Introducing custom Knee, variable from hard knee\to a 72 dB soft knee, which enables you to achieve saturationlike compression effects.
 Introducing Range setting, which limits the\maximum applied gain change.
 Introducing Mix, which scales the gain change\from 0% to 200%.
 Introducing up to 4x Oversampling.
 Simplified and improved side-chain stereo handling, introducing variable stereo linking with mid-only, side-only, M>S and\S>M processing.
 Introducing side-chain EQ section, with\customizable HP and LP filters, plus an additional freely adjustable sidechain filter (Bell, Low Shelf, High\Shelf, Band Pass, Notch or Tilt).
 Fully redesigned user interface, including optional\knee and level displays with a variable range from 9 dB to 90 dB.
 Introducing Full Screen mode, offering a\large level display and side-chain EQ controller.
 Extended Threshold range to -60 dB.
 Introducing Audition Triggering option, to be\able to hear on which parts of the audio Pro-C 2 is triggering and how much compression is\taking place.
 Introducing multiple interface sizes:\Small, Medium and Large.
 Introducing MIDI triggering. If MIDI is\enabled, the compressor is triggered when you hit any key on a connected MIDI keyboard\controller.
 Highly improved level meters, with peak and loudness\level visualization. The loudness level complies with the Momentary mode of the EBU\R128 / ITU-R 1770 standards.
 Introducing Retina support on OS X and High DPI support\on Windows.
Upgrading to Pro-C 2
Upgrading from Pro-C version 1 to the new Pro-C 2 is safe and easy: installing Pro-C 2 will\not replace or delete the previous Pro-C 1 plug-in. Both versions will co-exist\and can both be used at the same time. This ensures that you can open old songs that use Pro-C 1\without problems! FabFilter Pro-C 2 opens presets from Pro-C 1 without problems, but note that\the resulting sound can be different, because of fundamental changes and improvements in Pro-C 2.\See Upgrading to Pro-C 2 for more information.
FabFilter Pro-C 2 is available in VST, VST3, AU (Audio Units), AAX Native and AudioSuite formats (all both 64-bit and 32-bit), as well as RTAS (32-bit only), for Mac OS X and Windows.
Windows requirements |
Mac OS X requirements |
|
32-bit: Windows 10, 8, 7, Vista or XP |
OS X 10.6 or higher |
|
64-bit: Windows 10, 8, 7 or Vista (x64) |
AU or VST 2/3 host or Pro Tools |
|
VST 2/3 host or Pro Tools |
Intel processor |
|
|
|
|
|
|
|
Next: Quick start |
|
|
See Also |
|
|
Using FabFilter Pro-C 2 |
|
|
4

Quick start
The installer will copy the FabFilter Pro-C 2 plug-in into the common VST, VST 3, AU (macOS only)\and Pro Tools plug-in folders on your computer. On macOS, the global plug-in folders in\/Library/Audio/Plug-Ins are used.
In most cases, your host will then recognize the plugin automatically. However, if the\instructions below do not work, see Manual\installation instead.
 Cubase
Choose an empty insert slot, for example in the Mixer, and select FabFilter Pro-C 2 from the menu that appears. To use the MIDI features in Pro-C 2, create a new MIDI track and set its output to the Pro-C 2 instance you have just created. (The VST 3 version of Pro-C 2 can be found in the Dynamics section.)
 Logic Pro
Choose an empty insert slot on one of your audio tracks, instrument tracks or buses and select\FabFilter Pro-C 2 from the pop-up menu. You will find FabFilter Pro-C 2 in the Audio Units > FabFilter section (named FF Pro-C 2).
 Ableton Live
In Session view, select the track you would like to place FabFilter Pro-C 2 on, for example by\clicking the track name. At the left top of Ableton Live's interface, click on the Plug-in\Device Browser icon (third icon from the top). From the plug-ins list, double-click\FabFilter/FabFilter Pro-C 2, or drag it onto the track.
 Pro Tools
Choose an empty insert slot on one of your audio tracks, instrument tracks or buses and select\FabFilter Pro-C 2 from the pop-up menu in the Dynamics section.
To begin, choose fast attack and release times, put the ratio to a gentle setting (like 4:1)\and bring down the threshold to make compression audible. Adjust the parameters until you have\the desired effect. Have fun!
Next: Using FabFilter Pro-C 2
See Also
Manual installation
VST plug-in versions
5
Overview
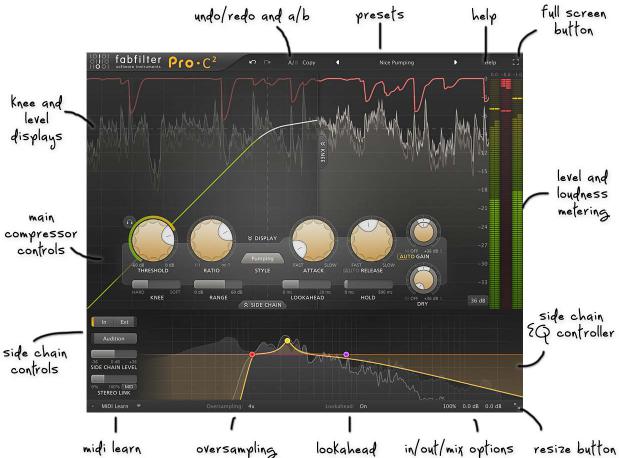
The interface of FabFilter Pro-C 2 is designed to be easy to use while providing all necessary\information and controls. It consists of the following elements:
 Level display
The animated level display shows you the incoming and processed audio signals together with the\gain reduction. It helps you detemine the correct compressor settings. You can hide the level\display with the Display button. This will also hide the knee display and change the vertical\level meters to horizontal ones, making Pro-C 2 look and feel more like a traditional\compressor. See Displays and metering.
 Knee display
The Knee display visualizes the input/output transform of the detection circuit, including the\effect of the Threshold, Ratio, Knee and Range parameters. It conveniently uses the same scale\as the level display underneath. Use the Knee button to show or hide the knee display. See\Displays and metering.
 Dynamics and time controls
Floating at the heart of the interface, there's a panel with the main compressor controls.\Threshold, Ratio, Knee and Range control the triggering and how much compression is applied.\The Attack, Release, Lookahead and Hold affect the smoothing and curves of the gain reduction.\See Dynamics controls and Time\controls.
 Level metering
At the right-hand side of the interface, the input-, gain reductionand output level meters\and their readouts provide an immediate overview of the current levels. The input and output\level meters show both peak and loudness levels. The loudness level complies with the\Momentary mode of the EBU R128 / ITU- R 1770 standards. See Displays and metering.
 MIDI Learn
MIDI Learn lets you easily associate any MIDI controller with any plug-in parameter. See\MIDI Learn.
 Oversampling
The Oversampling setting sets the amount of internal oversampling, which reduces possible\aliasing for fast/aggressive dynamics processing, at the cost of additional CPU usage. See\Oversampling.
 Input and output options
At the right of the bottom bar, you can bypass the entire plug-in and adjust the initial input\and final output levels. See Input and output options.
 Resize and Full Screen mode
The Resize button at the far right of the bottom bar selects between various interface sizes.\In addition, click the Full Screen button at the right top corner of the interface to let Pro-C\2 fill the entire screen. See Full Screen mode and\resizing.
6

 Presets, undo, A/B, help
With the preset buttons, you can easily browse through the factory presets or save your own\settings so you can re-use them in other songs. The Undo, Redo, A/B and Copy buttons at the top\of the plug-in interface enable you to undo your changes and switch between different states of\the plug-in. Finally, the Help menu provides access to help and version information. See\Loading presets and Undo,\redo, A/B switch.
Next: Knobs
See Also
Quick start
Dynamics controls
Time controls
7
Knobs
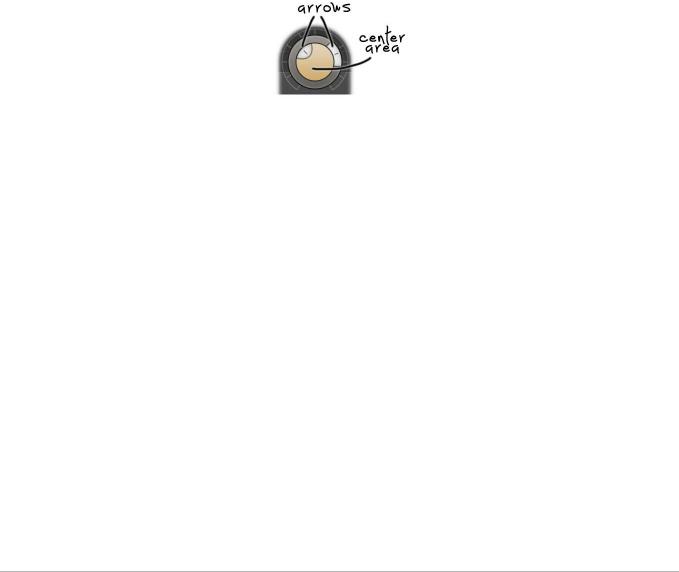
It is easy to control FabFilter Pro-C 2's parameters with the large round knobs. They will light up when you move the mouse cursor around to indicate that you can adjust them. The moment you move the mouse cursor over a knob, a parameter value display will pop up, which shows the name and the current value of the parameter.
All knobs support four ways of control:
1.Vertical mode
Click on the center area of a knob and drag up or down to rotate it. The knob reacts to the\speed with which you are dragging, so if you move the mouse slowly, you make precise\adjustments.
2.Rotate mode
Grab the arrow of the knob and drag it around. By moving the mouse cursor further away from the knob while dragging it, you can make precise adjustments.
3.Mouse wheel mode
Perhaps the easiest way to make adjustments is by using the mouse wheel when you hover over a knob. This mode works for all the knobs and possible panning rings. (On Windows, you might need\to click in the plug-in interface first to make sure it is the active window.)
4.Text entry mode
Double-click a knob to enter an exact value using the keyboard.
Tips
 To reset a knob to its default position, hold down the Ctrl key (Windows) or\Command key (macOS) and click the knob once. Note: In Pro Tools, Pro-C 2 uses the\default Pro Tools keyboard shortcut for reset: Alt+click.
 To fine-tune a value when using vertical drag mode or the mouse wheel, hold down the\Shift key while dragging or moving the mouse wheel. Note: In Pro Tools, Pro-C 2 uses the default Pro Tools keyboard shortcut for fine tune: Ctrl+drag on Windows or\Command+drag on macOS.
 There are several handy shortcuts in text entry mode. With frequency values, you can\type e.g. '1k' to set the value to 1000 Hz, and also 'A4' for 440 Hz, or even strings like\'C#3+13'. With dB values, you can type e.g. '2x' to get +6 dB (the value that corresponds to\two times louder). With all values, you can also type a percentage (e.g. '50%' will put a knob\exactly in the middle position).
 Sometimes, knobs in our plug-in interfaces are linked: these be adjusted\simultaneously by holding down the Alt key (Shift key in Pro Tools) while\dragging on one of them. For example, an output level and input level setting of a plug-in\could be adjusted simultaneously (in the opposite direction) this way.
Next: Dynamics controls
See Also
Using FabFilter Pro-C 2
8
Dynamics controls
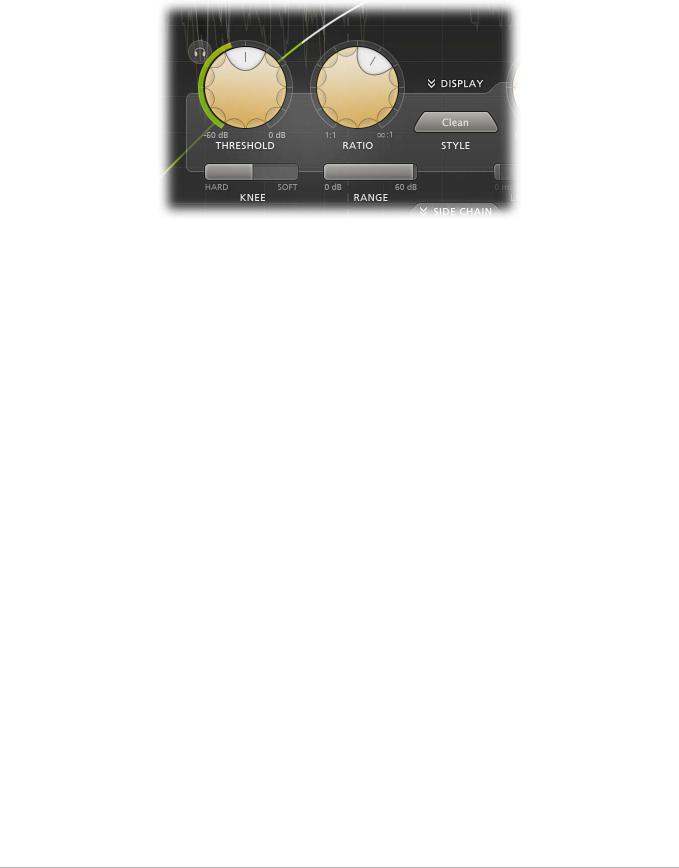
The left part of the main compressor settings panel contains the large style button and the\controls that affect the detection path of the compressor.
 The Style button selects the style or compression. Pro-C 2 offers 8 different styles, all\with their own characteristics:
 Clean - An allround, low distortion, feedforward, program dependent style\(originally from Pro-C v1).
 Classic - A vintage, feedback, very program dependent style (originally from\Pro-C v1).
 Opto - A relatively slow, very soft knee, more linear opto style (originally\from Pro-C v1),
 Vocal - A very effective algorithm to bring vocals to the front of your mix. It\works with automatic knee and ratio settings, so compressing your lead vocal is as easy as\choosing the right threshold.
 Mastering - Designed to be as transparent as possible, introducing as little\harmonic distortion as possible, while still being able to catch those fast\transients.
 Bus - Especially great for bus processing, or for adding a pleasant glue to your\drums, mixes or tracks.
 Punch - Traditional, analog-like compression behavior, sounds good on\anything!
 Pumping - Deep and over-the-top pumping, great for drum processing or EDM.
 The Threshold knob determines above which side chain level the gain should be\reduced. The circular side-chain level meter around the Threshold knob shows the level of the\filtered and possibly stereolinked signal that is used for detection. This feedback makes it a\lot easier to choose a proper Threshold setting.
 Using the Audition Triggering button, at the left top of the Threshold button, you\can hear on which parts of the audio Pro-C 2 is triggering and how much compression is taking\place. This helps you choose an appropriate Threshold level as well, making sure Pro-C 2\catches the necessary peaks.
 The Ratio knob sets the amount of compression. At a ratio of 10:1, just one dB of\output signal above the threshold remains for every 10 dB of input signal above the threshold.\You can click on the small dots around the Ratio knob to jump to certain fixed ratio amounts.\If you move the knob completely to the left (1:1), no compression will take place. If you move\it completely to the right (infinity), everything above the threshold will be completely\compressed away, making Pro-C act as a limiter.
 The Knee slider set the 'roundness' of the compression around the threshold, which\can vary from 0 dB (hard knee) to 72 dB (soft knee). Using a soft knee can help to make the\compression more gradual and transparent. With very soft knee settings (> 60 dB), in\combination with a fast Attack setting, you can achieve almost saturation-like effects.
 The Range slider limits the maximum amount of applied gain change. Compare this to\the Ratio slider which scales the dynamics behavior instead.
Tips
 Instead of using the incoming audio to trigger the compressor, you can also trigger\it via MIDI. If MIDI is enabled (see MIDI Learn),\compression will be applied when you hit any key on a connected MIDI keyboard controller, using\the Note On event.
Next: Time controls
See Also
Side chain section
9
Using FabFilter Pro-C 2
10
Time controls
The right part of the main compressor settings panel contains the controls that affect the\smoothing and curve shape of the gain change signal, and the wet/dry mixing controls.
 The Attack knob determines how fast compression will kick in, ranging from 0.005 ms\(very fast) to 250 ms (very slow). For transient-rich program material like drums, fast attack\times are needed to minimize overshoot. For other program material, too short attack times may\dull the sound or introduce audible distortion. FabFilter Pro-C 2 is capable of very fast\attack times and they are program dependent.
 The Release knob sets the time that the compressor takes to recover from gain\reduction. The various compression characteristics of Pro-C 2 use different release models, and\in most cases, the release time is very program dependent. This means that Pro-C 2 recovers\very quickly from compression after a transient, and quite slowly after longer periods of gain\reduction. Note: When Auto Release is used, the Release knob will adjust the overall effect of\the auto release feature on the release time.
 The Auto Release button (the AUTO label next to RELEASE) enables a smart auto\release feature. When enabled, the compressor adjusts the release time depending on the current\amount of gain reduction, so this actually introduces an additional form of program dependency.\When Auto Release is used, the Release knob will adjust the overall effect of the auto release\feature on the release time.
 The Lookahead slider sets how much advance time Pro-C 2 will use to anticipate peaks\in the audio signal. Using a bit of lookahead can help to preserve transients and results in\much more transparent gain reduction. Because lookahead causes additional latency, it can be\globally enabled or disabled in the bottom bar.
 The Hold slider sets the time with which peaks in gain reduction will be prolonged.\Applying a bit of hold time can help increase the transparency of gain reduction. With longer\hold times, you can achieve nice pumping effects.
 The Wet Gain knob adjusts the gain of the signal after it has been compressed. This\is also known as make-up gain because it compensates for the gain reduction introduced by the\compressor. The pan ring around the Wet Gain knob controls the balance between mid and side.\This can be especially useful when applying make-up gain after mid-only or side-only\compression.
 When Auto Gain is enabled (using the AUTO button next to GAIN), automatic make-up\gain is applied to the processed signal, depending on current settings for Threshold, Ratio,\Knee and Attack. Auto Gain helps you to keep the audible audio level the same while adjusting\the controls. The Auto Gain algorithm is aware of mid-only or side-only processing. So for\example, if you're compressing 100% mid-only, Auto Gain will only apply make-up gain to the mid\signal and leave the side-signal untouched.
Note that the auto-gain algorithm doesn't actually measure loudness to determine which gain to\apply. It just makes an educated guess, so you might want still to tweak the output gain in\some situations.
 The Dry Gain knob controls the amount of dry (uncompressed) input signal\that is added to the output. This is called parallel compression: the dynamics in the dry\signal are preserved while the compressed signal adds body and character to the overall sound.\The advantage of this is that the sound is reinforced where it needs it, but without the risk\of crushing any peak transients.
Program dependency
The different compressor styles in FabFilter Pro-C 2 all have their own kind of program\dependency. This means that the compressor reacts differently to different kinds of input\(program material). For example, Pro-C 2 will recover very fast from transients (fast\changes/peaks), but will react quite a bit slower after longer periods of gain reduction. Both\the attack and release times are less or more program dependent, depending on the chosen\compression style.
Next: Side chain section
11
See Also
Dynamics controls Using FabFilter Pro-C 2
12
Loading...