

Page 1
Table of contents
1
Page 2

. . . . . . . . . . . . . . . . . . . . . . . . . . . . . . . . . . . . . . . . . . . . . . . . . . . . . . . . . . . . . . . . . . . . . . . . . . . . . . . 3
. . . . . . . . . . . . . . . . . . . . . . . . . . . . . . . . . . . . . . . . . . . . . . . . . . . . . . . . . . . . . . . . . . . . . . . . . . . . . . . 5
. . . . . . . . . . . . . . . . . . . . . . . . . . . . . . . . . . . . . . . . . . . . . . . . . . . . . . . . . . . . . . . . . . . . . . . . . . . . . . . 6
. . . . . . . . . . . . . . . . . . . . . . . . . . . . . . . . . . . . . . . . . . . . . . . . . . . . . . . . . . . . . . . . . . . . . . . . . . . . . . . 8
. . . . . . . . . . . . . . . . . . . . . . . . . . . . . . . . . . . . . . . . . . . . . . . . . . . . . . . . . . . . . . . . . . . . . . . . . . . . . . . 10
. . . . . . . . . . . . . . . . . . . . . . . . . . . . . . . . . . . . . . . . . . . . . . . . . . . . . . . . . . . . . . . . . . . . . . . . . . . . . . . 11
. . . . . . . . . . . . . . . . . . . . . . . . . . . . . . . . . . . . . . . . . . . . . . . . . . . . . . . . . . . . . . . . . . . . . . . . . . . . . . . 12
. . . . . . . . . . . . . . . . . . . . . . . . . . . . . . . . . . . . . . . . . . . . . . . . . . . . . . . . . . . . . . . . . . . . . . . . . . . . . . . 14
. . . . . . . . . . . . . . . . . . . . . . . . . . . . . . . . . . . . . . . . . . . . . . . . . . . . . . . . . . . . . . . . . . . . . . . . . . . . . . . 15
. . . . . . . . . . . . . . . . . . . . . . . . . . . . . . . . . . . . . . . . . . . . . . . . . . . . . . . . . . . . . . . . . . . . . . . . . . . . . . . 16
. . . . . . . . . . . . . . . . . . . . . . . . . . . . . . . . . . . . . . . . . . . . . . . . . . . . . . . . . . . . . . . . . . . . . . . . . . . . . . . 17
. . . . . . . . . . . . . . . . . . . . . . . . . . . . . . . . . . . . . . . . . . . . . . . . . . . . . . . . . . . . . . . . . . . . . . . . . . . . . . . 19
. . . . . . . . . . . . . . . . . . . . . . . . . . . . . . . . . . . . . . . . . . . . . . . . . . . . . . . . . . . . . . . . . . . . . . . . . . . . . . . 21
. . . . . . . . . . . . . . . . . . . . . . . . . . . . . . . . . . . . . . . . . . . . . . . . . . . . . . . . . . . . . . . . . . . . . . . . . . . . . . . 22
. . . . . . . . . . . . . . . . . . . . . . . . . . . . . . . . . . . . . . . . . . . . . . . . . . . . . . . . . . . . . . . . . . . . . . . . . . . . . . . 23
. . . . . . . . . . . . . . . . . . . . . . . . . . . . . . . . . . . . . . . . . . . . . . . . . . . . . . . . . . . . . . . . . . . . . . . . . . . . . . . 24
. . . . . . . . . . . . . . . . . . . . . . . . . . . . . . . . . . . . . . . . . . . . . . . . . . . . . . . . . . . . . . . . . . . . . . . . . . . . . . . 25
. . . . . . . . . . . . . . . . . . . . . . . . . . . . . . . . . . . . . . . . . . . . . . . . . . . . . . . . . . . . . . . . . . . . . . . . . . . . . . . 26
. . . . . . . . . . . . . . . . . . . . . . . . . . . . . . . . . . . . . . . . . . . . . . . . . . . . . . . . . . . . . . . . . . . . . . . . . . . . . . . 28
. . . . . . . . . . . . . . . . . . . . . . . . . . . . . . . . . . . . . . . . . . . . . . . . . . . . . . . . . . . . . . . . . . . . . . . . . . . . . . . 29
. . . . . . . . . . . . . . . . . . . . . . . . . . . . . . . . . . . . . . . . . . . . . . . . . . . . . . . . . . . . . . . . . . . . . . . . . . . . . . . 30
. . . . . . . . . . . . . . . . . . . . . . . . . . . . . . . . . . . . . . . . . . . . . . . . . . . . . . . . . . . . . . . . . . . . . . . . . . . . . . . 31
. . . . . . . . . . . . . . . . . . . . . . . . . . . . . . . . . . . . . . . . . . . . . . . . . . . . . . . . . . . . . . . . . . . . . . . . . . . . . . . 32
. . . . . . . . . . . . . . . . . . . . . . . . . . . . . . . . . . . . . . . . . . . . . . . . . . . . . . . . . . . . . . . . . . . . . . . . . . . . . . . 33
. . . . . . . . . . . . . . . . . . . . . . . . . . . . . . . . . . . . . . . . . . . . . . . . . . . . . . . . . . . . . . . . . . . . . . . . . . . . . . . 34
. . . . . . . . . . . . . . . . . . . . . . . . . . . . . . . . . . . . . . . . . . . . . . . . . . . . . . . . . . . . . . . . . . . . . . . . . . . . . . . 35
. . . . . . . . . . . . . . . . . . . . . . . . . . . . . . . . . . . . . . . . . . . . . . . . . . . . . . . . . . . . . . . . . . . . . . . . . . . . . . . 36
. . . . . . . . . . . . . . . . . . . . . . . . . . . . . . . . . . . . . . . . . . . . . . . . . . . . . . . . . . . . . . . . . . . . . . . . . . . . . . . 37
. . . . . . . . . . . . . . . . . . . . . . . . . . . . . . . . . . . . . . . . . . . . . . . . . . . . . . . . . . . . . . . . . . . . . . . . . . . . . . . 38
. . . . . . . . . . . . . . . . . . . . . . . . . . . . . . . . . . . . . . . . . . . . . . . . . . . . . . . . . . . . . . . . . . . . . . . . . . . . . . . 39
. . . . . . . . . . . . . . . . . . . . . . . . . . . . . . . . . . . . . . . . . . . . . . . . . . . . . . . . . . . . . . . . . . . . . . . . . . . . . . . 41
. . . . . . . . . . . . . . . . . . . . . . . . . . . . . . . . . . . . . . . . . . . . . . . . . . . . . . . . . . . . . . . . . . . . . . . . . . . . . . . 43
. . . . . . . . . . . . . . . . . . . . . . . . . . . . . . . . . . . . . . . . . . . . . . . . . . . . . . . . . . . . . . . . . . . . . . . . . . . . . . . 44
Table of Contents
About FabFilter Volcano 2
Overview
Loading presets
Purchasing FabFilter Volcano 2
Support
2
Introduction
Quick start
Using FabFilter Volcano 2
What-you-use-is-what-you-see
Knobs
Filters
Filter parameters
Interactive filter display
Routing
Modulation
Drag-and-drop modulation slots
XLFO
Envelope generator
Envelope follower
MIDI source
XY controller
Output controls
MIDI Learn
Undo, redo, A/B switch
Presets
Saving presets
Section presets
How presets are stored
Purchasing FabFilter Volcano 2
Entering your license key
Support
Upgrading to Volcano 2
Manual installation
VST plug-in versions
External side chaining
License agreement
Acknowledgements
About FabFilter
Page 3

About FabFilter Volcano 2
3
Volcano 2 is more than just an update of Volcano 1. The original idea of high quality filters being modulated
with several sources is still present but Volcano 2 has been redesigned from the ground up. Now it is not only
capable of high quality filtering effects, but it can even be used for phasing, flanging, chorus and many other
cool effects!
Bigger than ever... and easier-to-use than ever!
Of course, the new version of Volcano brings a lot of new features. To start with, you now get four full-featured
filters which can be routed in almost any possible way (including Per-Channel and Mid-Side). Then, the real fun
starts with our totally re-designed drag-and-drop modulation system
instead of the two simple LFOs and the single Envelope Generator in Volcano 1, you now get all the XY
Controller, XLFOs, Envelope Generators, Envelope Followers and MIDI Sources you need! Of course, the new
version also has a side-chain input
Followers. Volcano 2 also features our improved MIDI Learn
controllers to Volcano's parameters.
What-you-use-is-what-you-see
Volcano 2 introduces a revolutionary new interface concept: what-you-use-is-what-you-see
yet powerful: do you want another filter? Just add one! Do you want an Envelope Follower? Just add one and
start modulating things! At all times, the interface only contains the filters, modulation sources and slots that
you are actually using. This results in an intuitive user interface that experienced producers and novices alike
will embrace.
, which can be used to trigger the Envelope Generators or feed the Envelope
system, which makes it easy to associate your
with a 24 slot modulation matrix. And
. The idea is simple
Modulation madness
Volcano 2 brings new and improved modulation sources and because of our improved interface, you don't have
to worry about how many sources you have: there are enough sources to keep you busy for a long time!
Our new XLFO offers you anything from a simple sine wave to a fully programmable 16-step sequencer. The
Envelope Generators and Envelope Followers can make use of the plug-in's side-chain signal, and the new MIDI
modulation sources let you modulate parameters using any form of MIDI data.
Finally
If you have spent some time with Volcano 2, you will find use for it in any kind of project. The best way to
discover what you can do with it is to explore the presets. Find out what a variety of effects you can create,
and use them as a starting point for your own explorations.
FabFilter Volcano 2 is available in VST, VST3, AU (Audio Units), AAX Native and AudioSuite formats (all both
64-bit and 32-bit), as well as RTAS (32-bit only), for Mac OS X and Windows.
Page 4

Windows requirements
32-bit: Windows 10, 8, 7, Vista or XP
Mac OS X requirements
4
64-bit: Windows 10, 8, 7 or Vista (x64)
VST 2/3 host or Pro Tools
Next: Quick start
See Also
Using FabFilter Volcano 2
Upgrading to Volcano 2
VST plug-in versions
OS X 10.6 or higher
AU or VST 2/3 host or Pro Tools
Intel processor
Page 5
Quick start
5
The installer will copy the FabFilter Volcano 2 plug-in into the common VST, VST 3, AU (macOS only) and Pro
Tools plug-in folders on your computer. On macOS, the global plug-in folders in /Library/Audio/Plug-Ins are
used.
In most cases, your host will then recognize the plugin automatically. However, if the instructions below do not
work, see Manual
Cubase
Choose an empty insert slot, for example in the Mixer, and select FabFilter Volcano 2 from the menu that
appears. To use the MIDI features in Volcano 2, create a new MIDI track and set its output to the Volcano
2 instance you have just created. (The VST 3 version of Volcano 2 can be found in the Filter section.)
Logic Pro
Choose an empty insert slot on one of your audio tracks, instrument tracks or buses and select FabFilter
Volcano 2 from the pop-up menu. You will find FabFilter Volcano 2 in the Audio Units > FabFilter section
(named FF Volcano 2).
Ableton Live
In Session view, select the track you would like to place FabFilter Volcano 2 on, for example by clicking
the track name. At the left top of Ableton Live's interface, click on the Plug-in Device Browser icon (third
icon from the top). From the plug-ins list, double-click FabFilter/FabFilter Volcano 2, or drag it onto the
track.
Pro Tools
Choose an empty insert slot on one of your audio tracks, instrument tracks or buses and select FabFilter
Volcano 2 from the pop-up menu in the Effect section.
Use the Presets button to try different settings from the many factory presets that are bundled with FabFilter
Volcano 2. Have fun!
installation instead.
Next: FabFilter Volcano 2 overview
See Also
VST plug-in versions
Upgrading to Volcano 2
Overview
Loading presets
Page 6
Overview
6
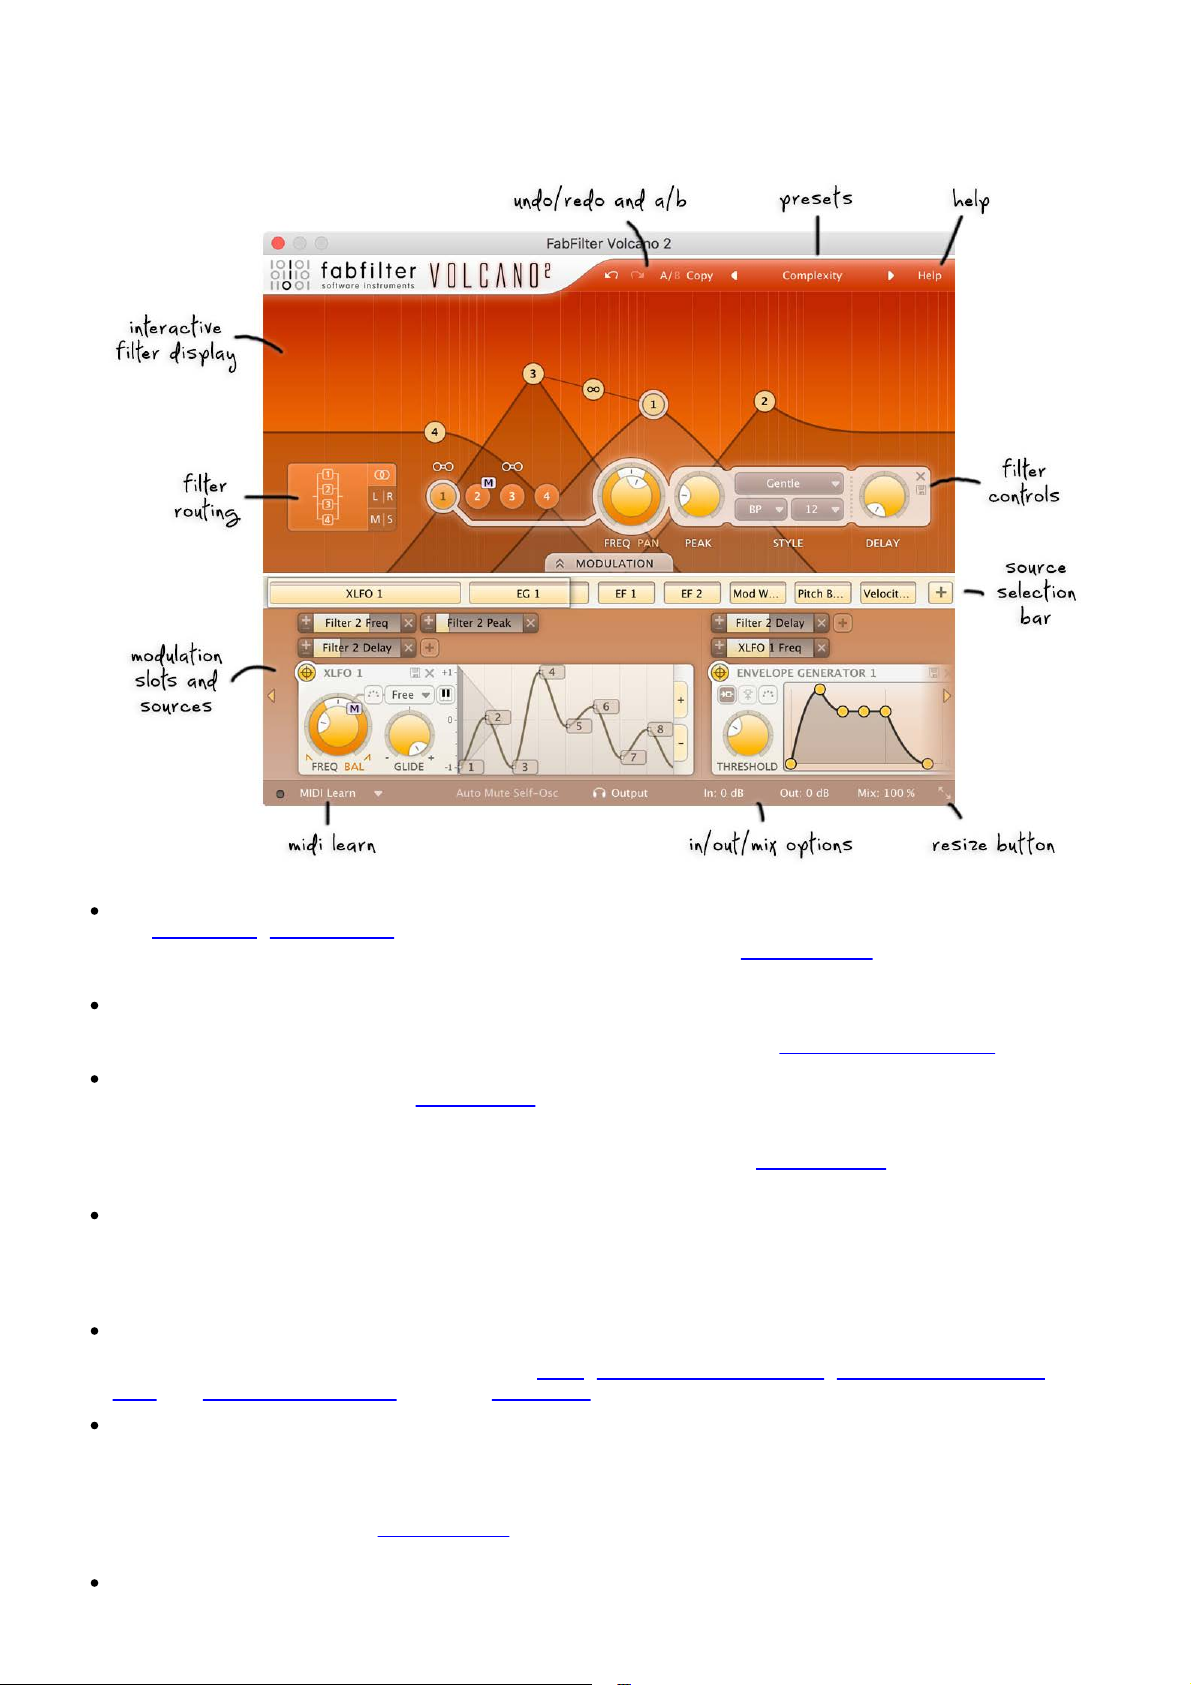
Volcano's interface is divided into horizontal sections:
Presets, undo and A/B
The Undo, Redo
changes and switch between different states of the plug-in. With the preset buttons
browse through the factory presets or save your own settings so you can re-use them in other songs.
Interactive filter display
This is the graphic representation of the filter settings which allows you to drag all filters individually or
simultaneously and control the filter settings with key combinations. See Interactive filter display
Filter controls
At the bottom of the display, the filter controls
offer a choice of low-pass, high-pass and band-pass modes and come with 11 algorithms that offer
different filter characteristics. Each filter has a special delay option with short delay times up to 30 ms,
creating all kinds of stereo effects. At the left of the filter controls, the routing
of the four filters.
Modulation button
The modulation button shows or hides the entire modulation section at the bottom of the interface.
FabFilter Volcano 2 offers virtually unlimited modulation possibilities, but all this power might be a bit
intimidating. That's why the modulation section is hidden by default, and you can look 'under the hood'
when you want to tweak a preset or design your own.
Source selection bar
The source selection bar shows all modulation sources at a glance and lets you easily scroll around and
create new sources. FabFilter Volcano 2 offers XLFO
and XY Controller sources. See also Modulation.
MIDI
Modulation slots and sources
The bottom section contains the modulation sources. The modulation section in Volcano 2 is fully modular
— but without the cables! We found a simple way to show you everything that is modulating, and what is
modulated by what. Above each modulation source, the modulation slots show exactly what targets are
modulated by this source and let you adjust the amount of modulation. You can very easily set up
modulation connections with drag-and-drop
fun!
MIDI Learn, monitoring and input/output/mix
, A/B and Copy buttons at the top of the plug-in interface enable you to undo your
, you can easily
.
provide full control over all filter parameters. The filters
button selects the routing
, Envelope Generator (EG), Envelope Follower (EF),
. All in all, we think we made sound design easier and more
Page 7

The bottom bar contains the MIDI Learn feature which sets up any MIDI controller to control any plug-in
parameter. Next, we find various output options and mix buttons. See Output controls.
7
Resize
The resize button in the lower-right corner lets you choose between normal and wide interface layouts.
The wide layout provides more space for the modulation sources at the bottom of the interface. Most
hosts support dynamic resizing of the interface; otherwise just close and re-open the interface window.
Next: What-you-use-is-what-you-see
See Also
About FabFilter Volcano 2
Support
Page 8
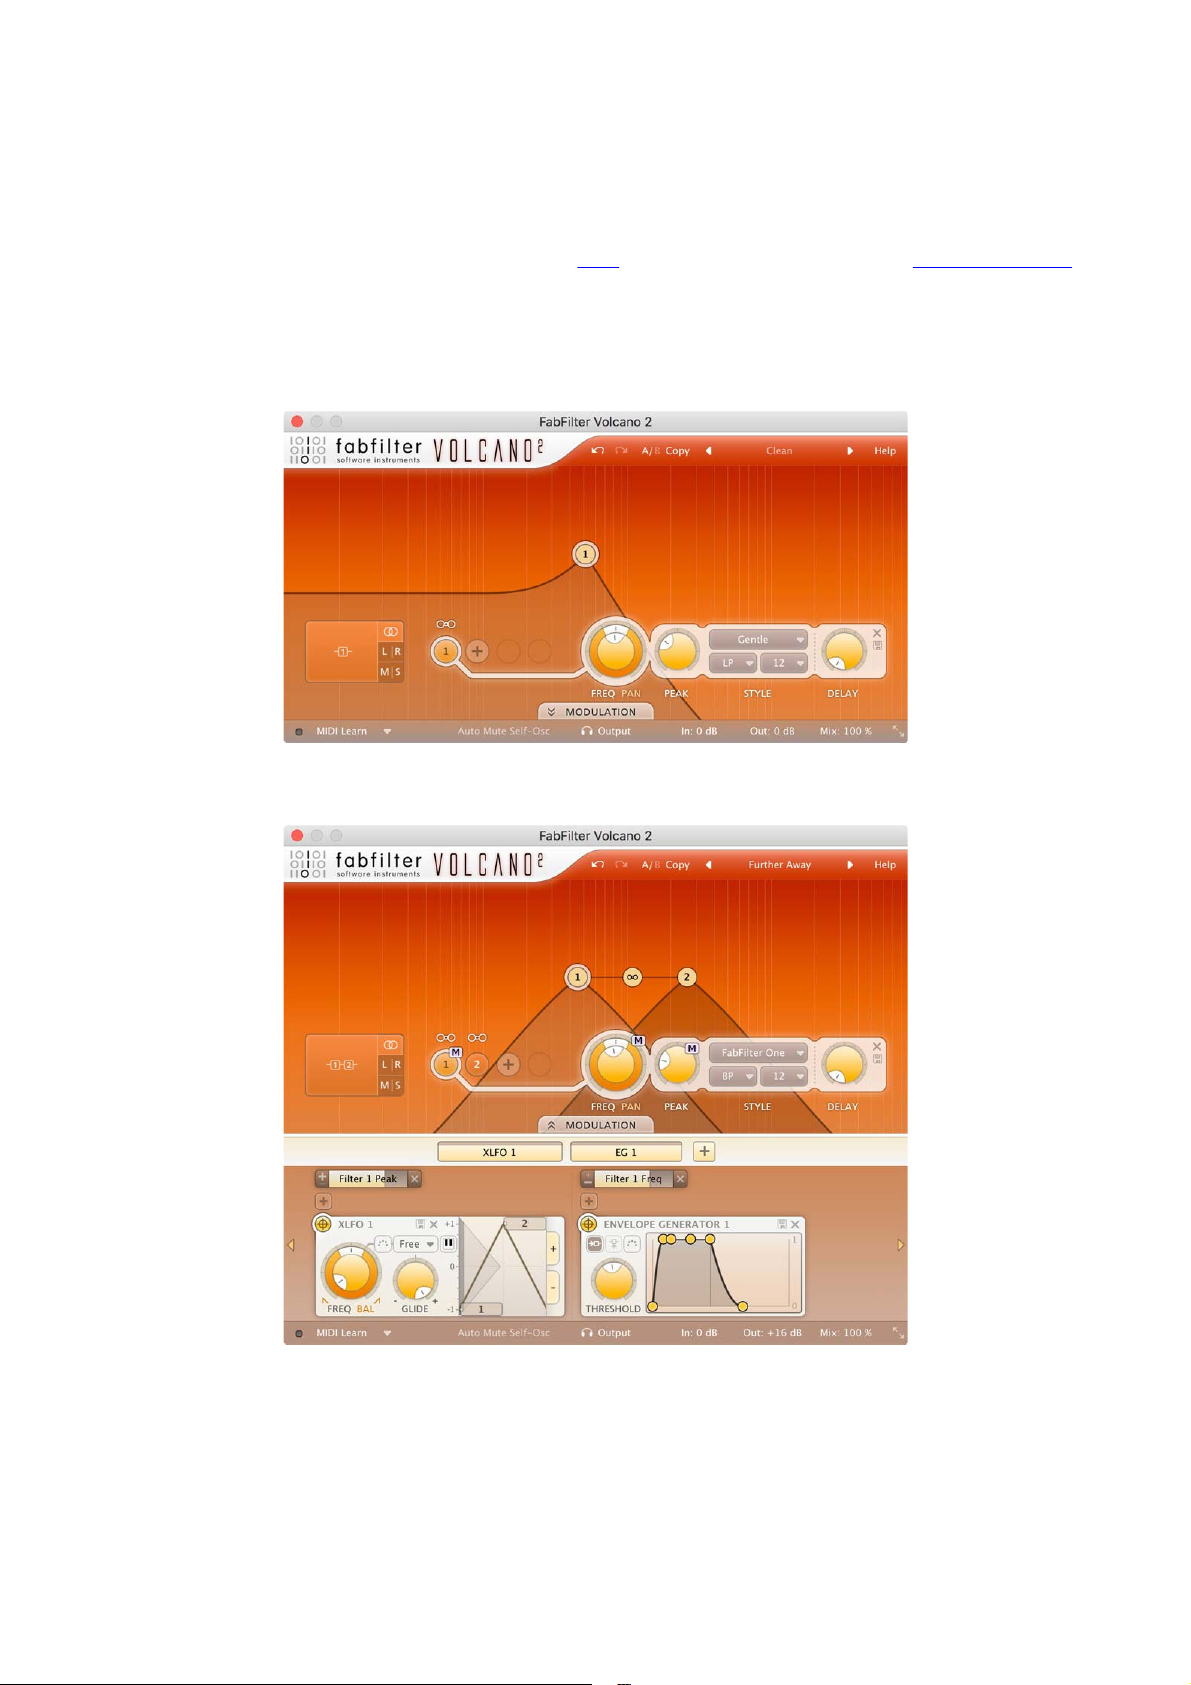
What-you-use-is-what-you-see
8
Most of the times an impressive feature list results in an impressively difficult-to-use interface, full of controls
for parameters you might never even use.
For almost every plug-in developer one of the greatest challenges when making such a complex full-featured
plug-in is to design an interface that is easy-to-use. And we think we did it! FabFilter introduces a revolutionary
new interface concept: What-you-use-is-what-you-see.
The idea is simple yet powerful. Do you want another filter
Just add one and start modulating things! At all times, the interface only contains the filters, modulation
sources and slots that you are actually using. Of course there is a limit to the number of sources you can
create, but in practice it feels like you can create as many sources as you will ever need.
This results in an intuitive user interface that experienced producers and novices alike will embrace. To give
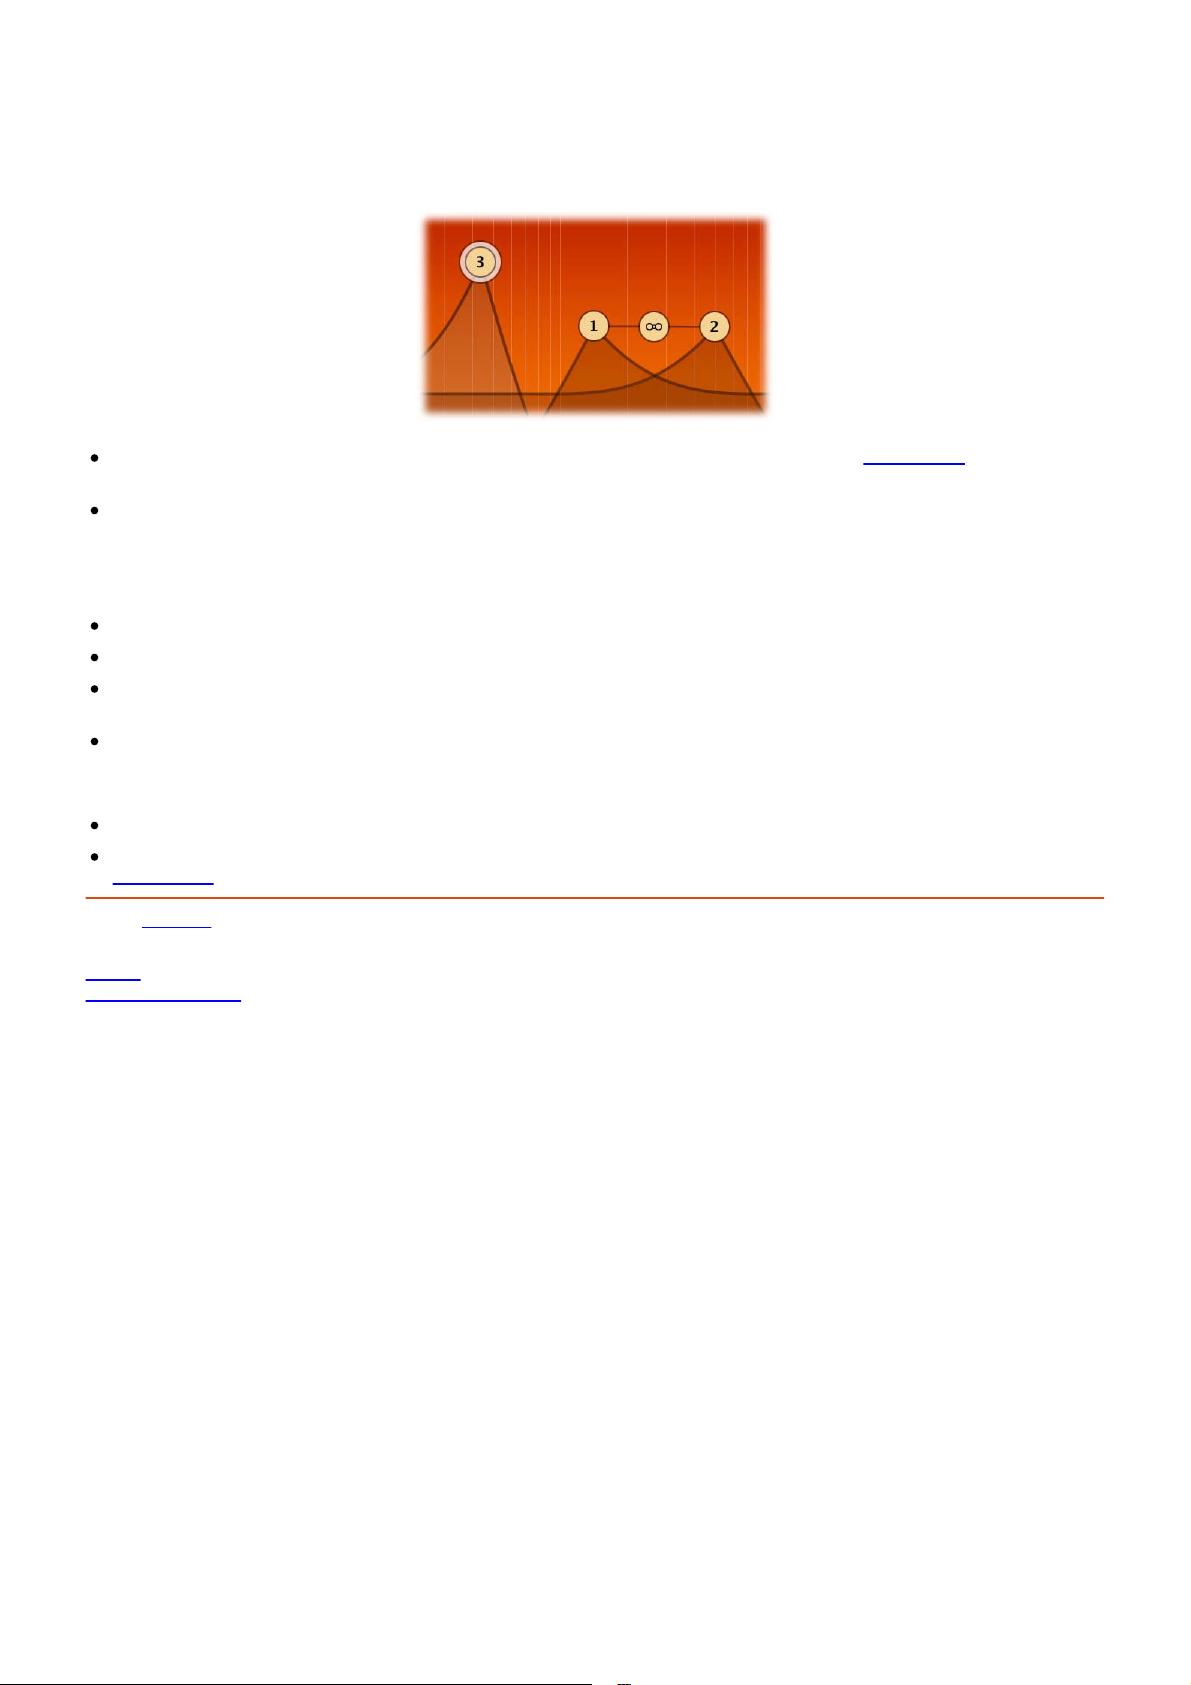
you an idea, a simple preset with just one low pass filter and the modulation section hidden looks like this:
? Just add one! Do you want an envelope follower?
... a more complex preset with two filters and modulation using our new XLFO and an Envelope Generator looks
like this:
... and a very complex preset, with four filters and a lot of modulation sources and modulation, looks like this:
Page 9
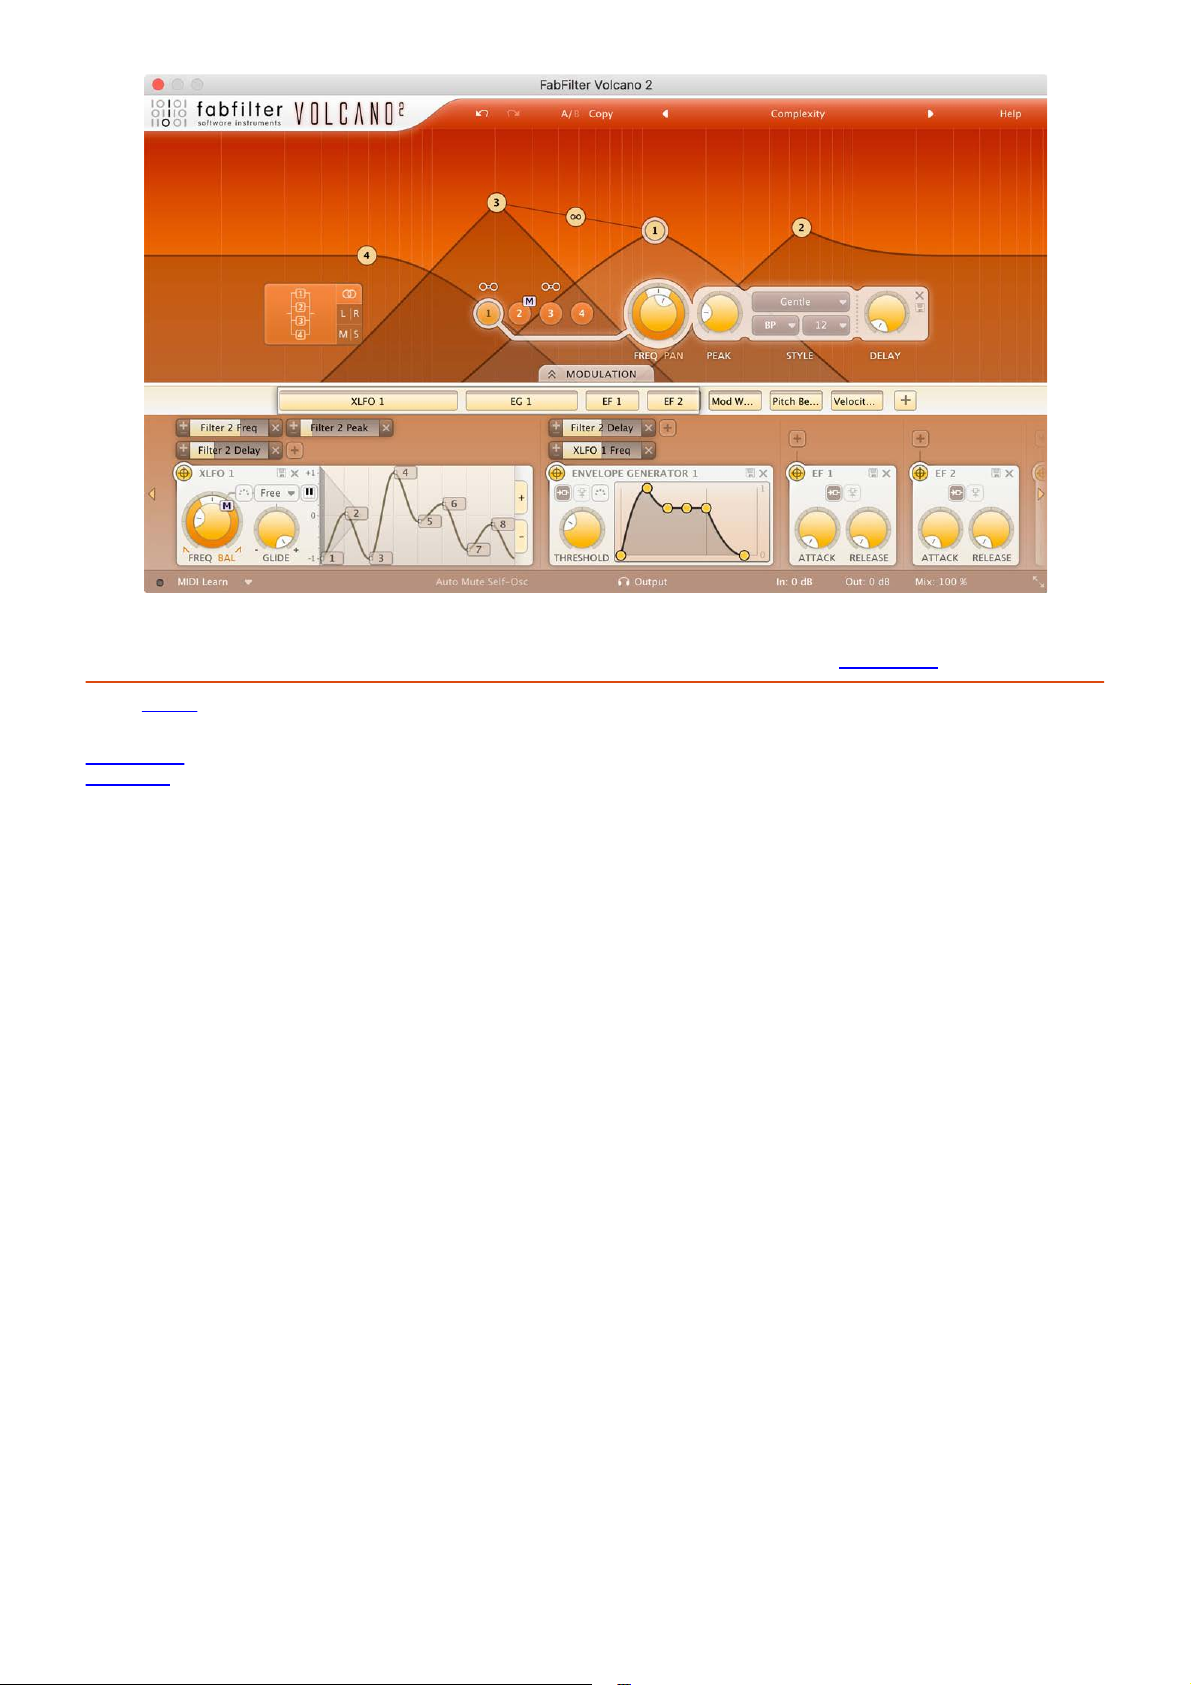
To help you understand even the most complex presets, modulation slots are grouped with each source. Each
9
component, knob or controller that is being modulated is marked with a little M button. Simply click the M to
highlight the modulation source and slots responsible for the modulation. See also Modulation
.
Next: Knobs
See Also
Modulation
Overview
Page 10
Knobs
10
It is easy to control FabFilter Volcano 2's parameters with the large round knobs. They will light up when you
move the mouse cursor around to indicate that you can adjust them. The moment you move the mouse cursor
over a knob, a parameter value display will pop up, which shows the name and the current value of the
parameter.
All knobs support four ways of control:
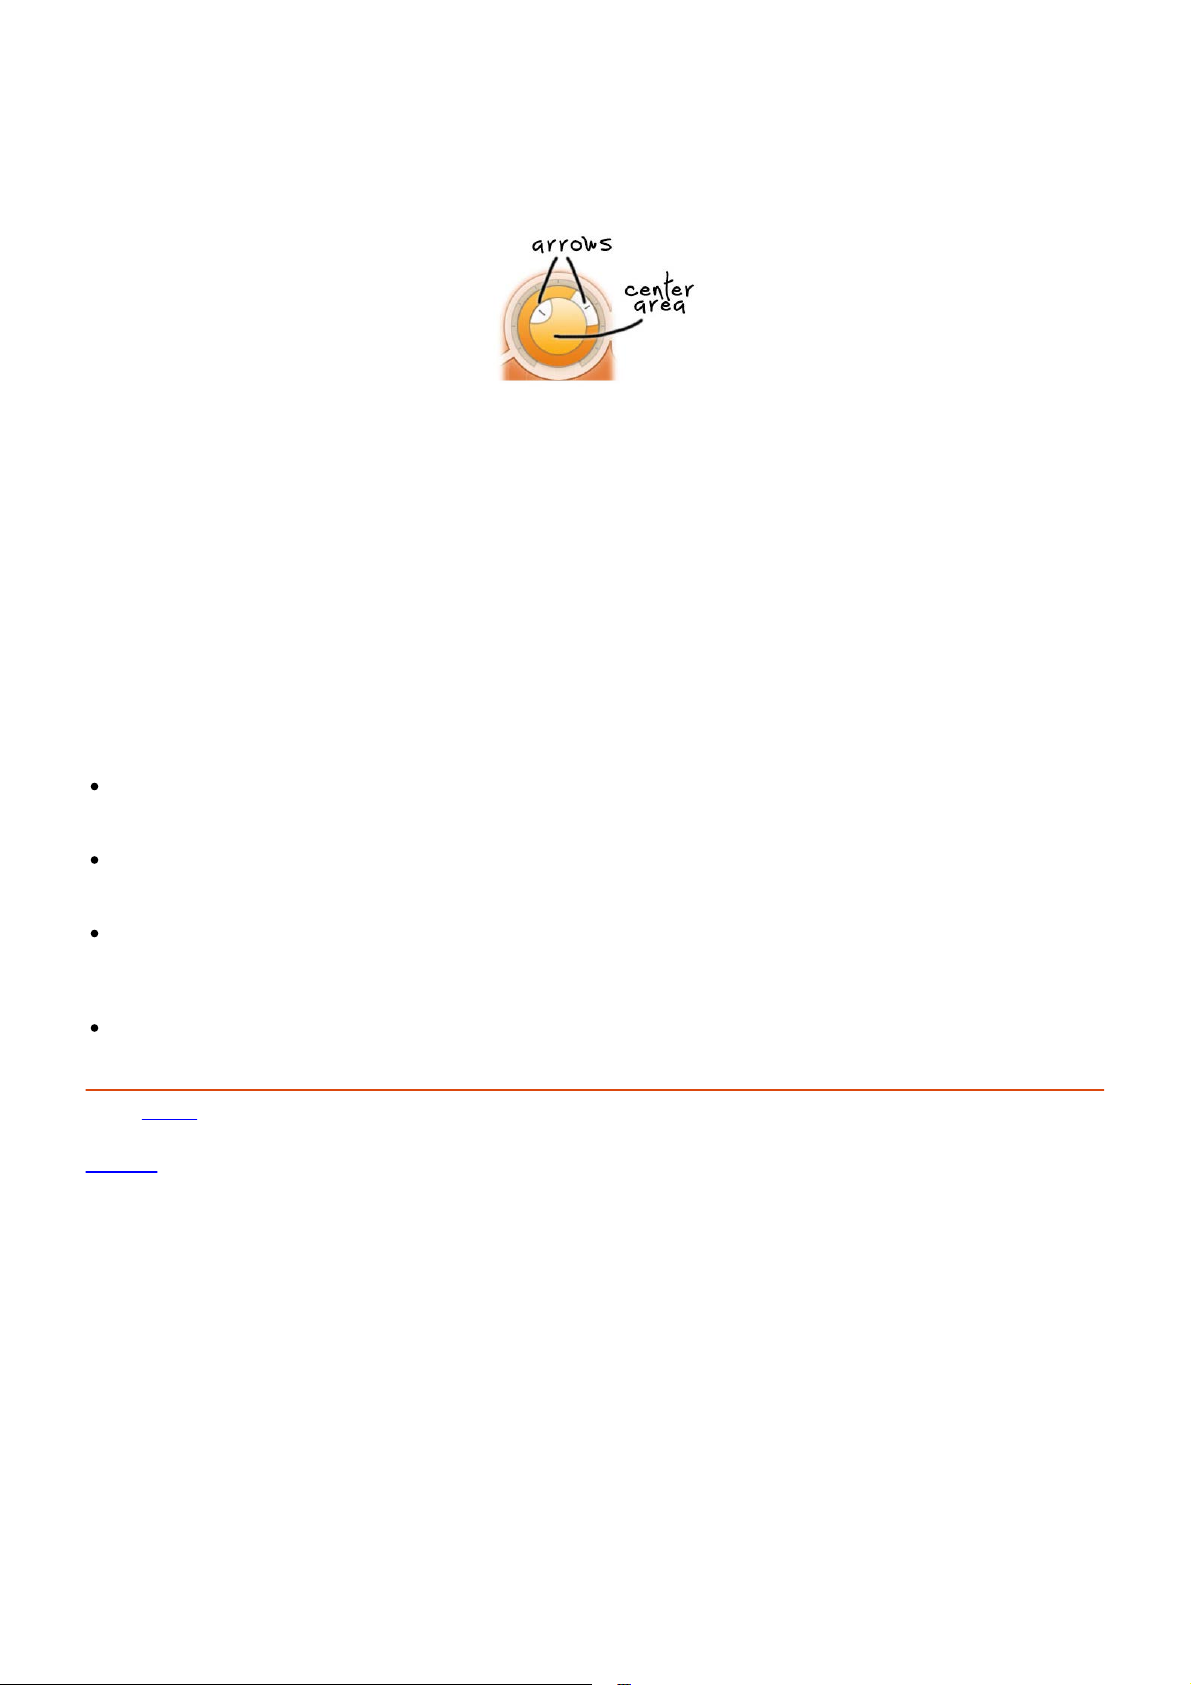
1. Vertical mode
Click on the center area of a knob and drag up or down to rotate it. The knob reacts to the speed with
which you are dragging, so if you move the mouse slowly, you make precise adjustments.
2. Rotate mode
Grab the arrow of the knob and drag it around. By moving the mouse cursor further away from the
knob while dragging it, you can make precise adjustments.
3. Mouse wheel mode
Perhaps the easiest way to make adjustments is by using the mouse wheel when you hover over a
knob. This mode works for all the knobs and possible panning rings. (On Windows, you might need to
click in the plug-in interface first to make sure it is the active window.)
4. Text entry mode
Double-click a knob to enter an exact value using the keyboard.
Tips
To reset a knob to its default position, hold down the Ctrl key (Windows) or Command key (macOS) and
click the knob once. Note: In Pro Tools, Volcano 2 uses the default Pro Tools keyboard shortcut for reset:
Alt+click.
To fine-tune a value when using vertical drag mode or the mouse wheel, hold down the Shift key while
dragging or moving the mouse wheel. Note: In Pro Tools, Volcano 2 uses the default Pro Tools keyboard
shortcut for fine tune: Ctrl+drag on Windows or Command+drag on macOS.
There are several handy shortcuts in text entry mode. With frequency values, you can type e.g. '1k'
to set the value to 1000 Hz, and also 'A4' for 440 Hz, or even strings like 'C#3+13'. With dB values, you
can type e.g. '2x' to get +6 dB (the value that corresponds to two times louder). With all values, you can
also type a percentage (e.g. '50%' will put a knob exactly in the middle position).
Sometimes, knobs in our plug-in interfaces are linked: these be adjusted simultaneously by holding
down the Alt key (Shift key in Pro Tools) while dragging on one of them. For example, an output level
and input level setting of a plug-in could be adjusted simultaneously (in the opposite direction) this way.
Next: Filters
See Also
Support
Page 11
Filters
11
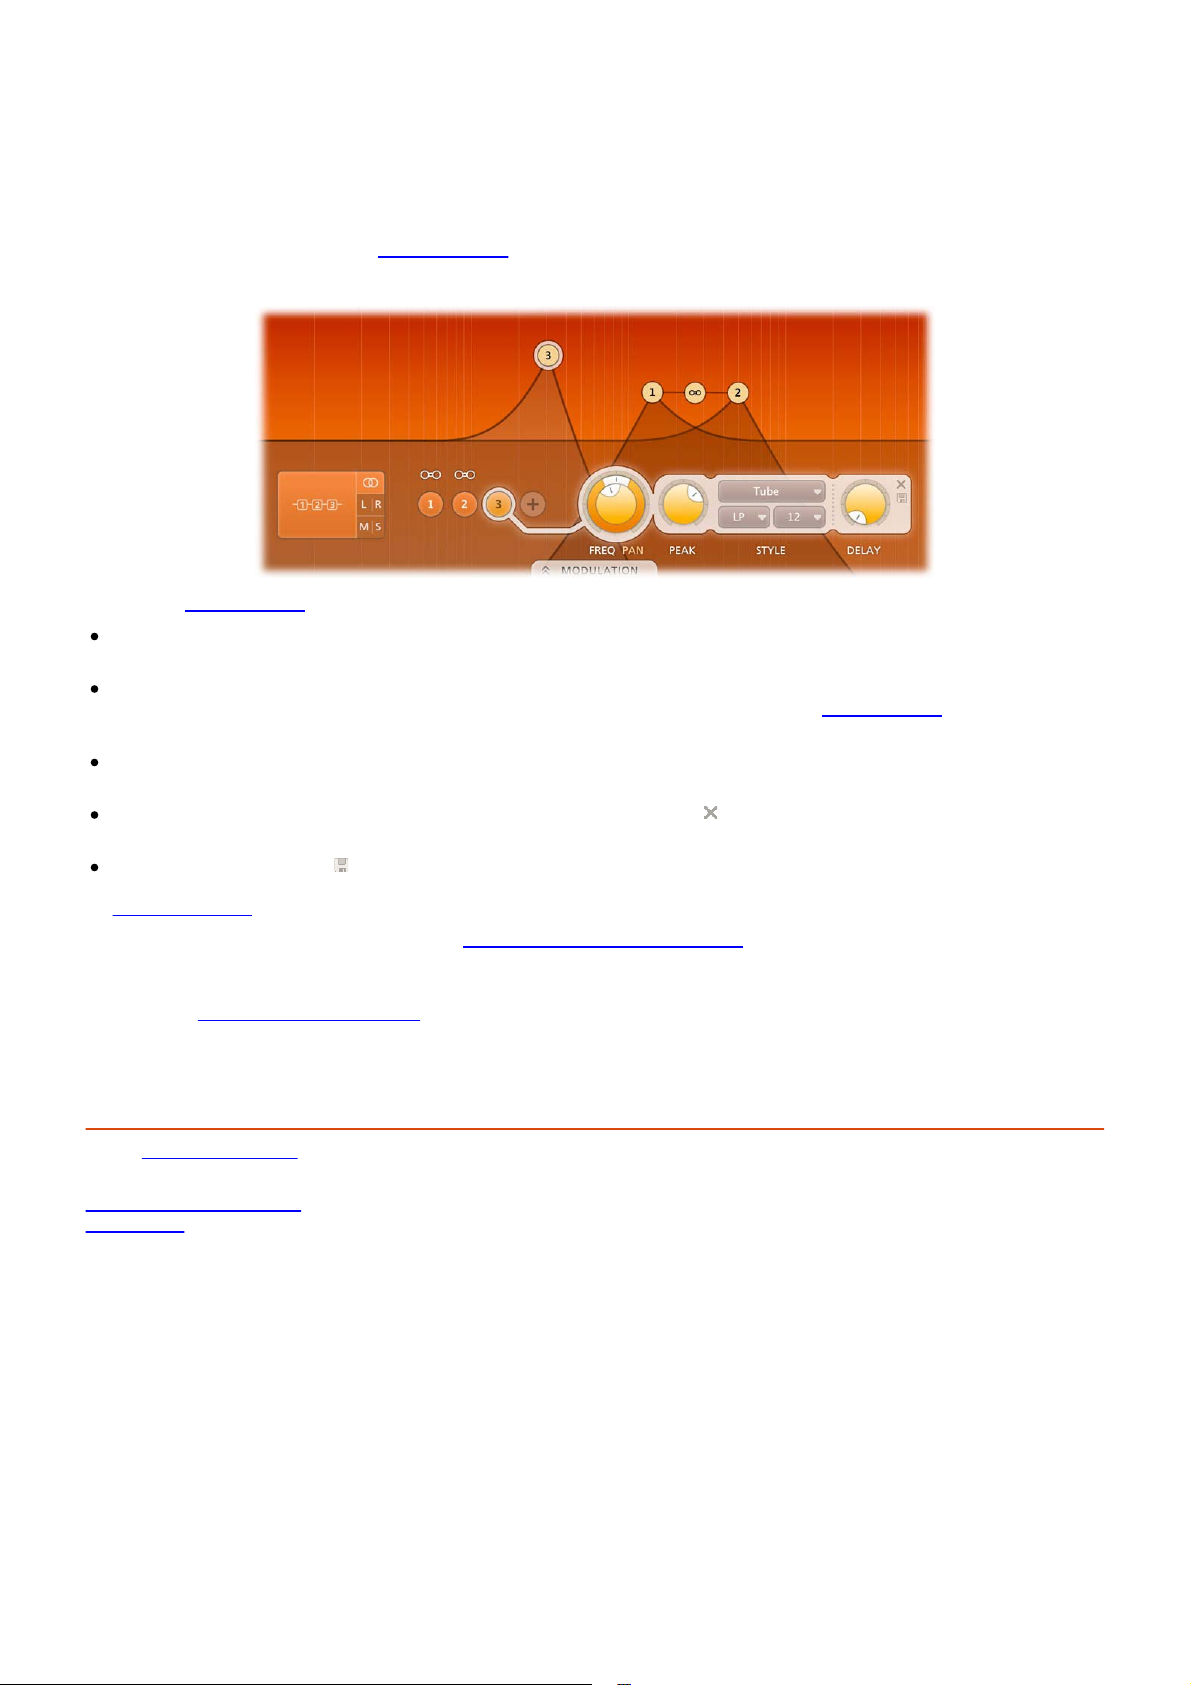
Volcano 2 comes with four multi-mode stereo filters, which can be routed in almost every possible way, even
per-channel and mid-side.
Every filter can be switched between low-pass, high-pass, and band-pass responses with 12, 24 and 48
dB/octave slopes and a staggering amount of eleven different high-quality filter characteristics that define the
unique sound and overdrive of the filter. They range from smooth with moderate overdrive to raw, selfoscillating and over-the-top! All characteristics
FabFilter filter technology.
One set of filter controls is shared among all filters, which shows the parameters of the active filter.
To activate a filter, click one of the numbered filter buttons. The button for the currently active filter
lights up and is connected visually with the filter controls section.
To bypass the active filter, click its filter button again. The first click activates the filter; once it is active,
the filter button enables and disables the filter. When a filter is bypassed, the filter controls
disabled, but can still be used to adjust the filter.
To add a filter, click the + button next to the last filter button. The newly added filter will copy most of
its settings from the currently active filter.
To remove a filter, activate it and then click the Remove button at the top right of the filter controls
section. If there is only one filter left, you cannot remove it.
Click the Presets button to save the current filter and routing settings, or to access previously saved
section presets. Note that this affects all filters and the routing, not just the active filter. See also
Section presets
In the filters section, we applied our new what-you-use-is-what-you-see concept: you only get filter buttons for
filters that you are actually using at the moment. Even the Routing button only contains the routing options
available for the current number of filters!
When using L/R or M/S configuration
filters just one click will add or delete 2 filters automatically.
You can use the filters individually or combine filter characteristics to create your own sounds in any way
imaginable. To experience the full potential of Volcano 2's filters, try it on some signals with rich harmonics
(synth sounds, distorted guitar or complete mixes are good sources for filtering).
.
, the amount of filters will always be 2 or 4. So when adding or deleting
have been tuned very carefully, using our state-of-the-art
will look
Next: Filter parameters
See Also
Interactive filter display
Modulation
Page 12
Filter parameters
12
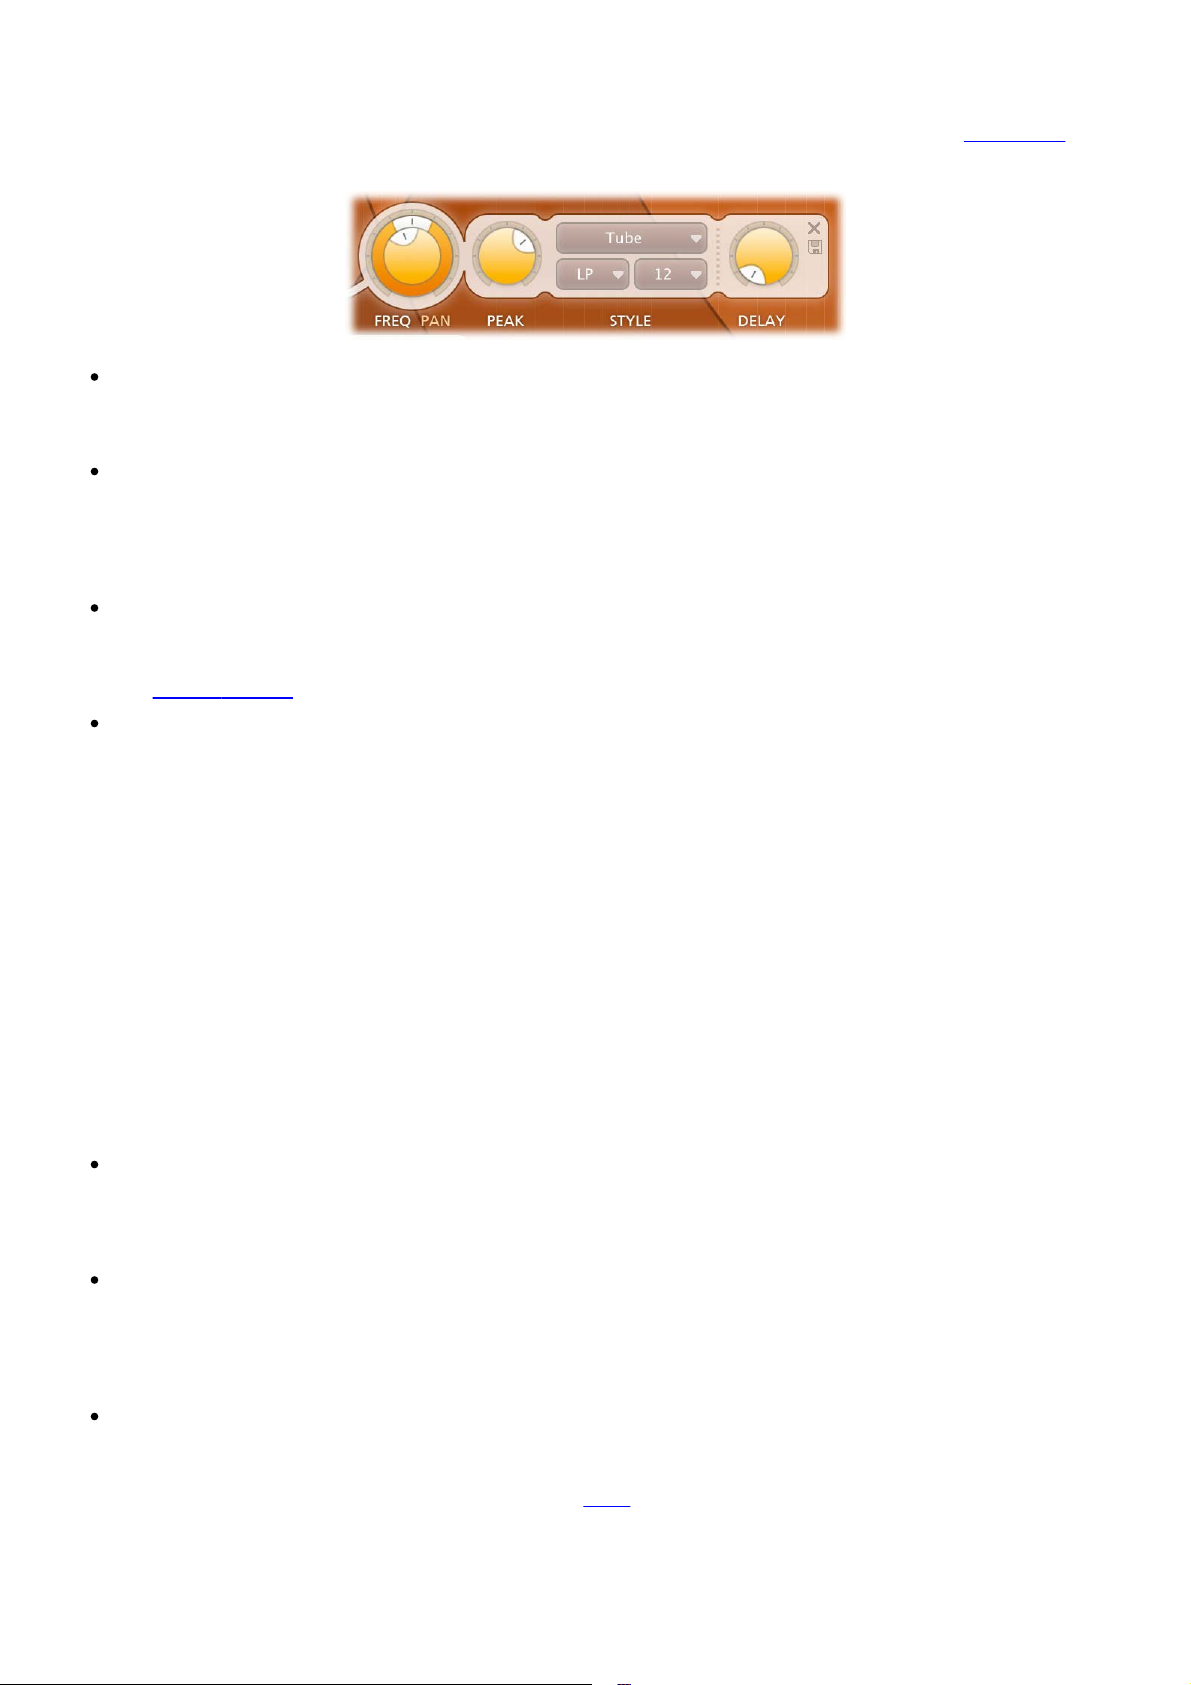
Volcano 2 contains up to four independent multi-mode filters. You control the parameters of the active filter
with the following settings:
Frequency
The filter frequency is adjustable over the entire audio range. The Frequency controls the center or cutoff frequency of the active filter and can be controlled in real time, either manually or via external
devices.
Pan
The Pan ring around the Frequency knob lets you filter the left and right channels differently. It works as
a stereo balance setting for the center frequency of the filter. For example, when you turn the Pan knob
to the left, the left channel will be filtered with a lower center frequency, and the right channel will be
filtered with a higher center frequency. You can use this to create various stereo filtering effects,
especially in combination with modulation.
Peak
The Peak knob adjusts the resonance of the active filter. A little resonance will cause the filter to create
warmer and more characteristic tones. At maximum resonance, the filter will self-oscillator with most
filter characteristics. (The Auto Mute Self-Osc option in the bottom bar will help to keep this manageable.
See Output
Characteristic
FabFilter Volcano 2 lets you choose between 11 different filter characteristics:
1. FabFilter One, the original filter characteristic taken from our award-winning FabFilter One
synthesizer
2. Smooth, like the cream in your coffee
3. Raw, a filter with lots of overdrive and exhibits a character of its own. Great for distortion guitar
sounds
4. Hard, moderately distorting filter, with a nice clean whistle
5. Hollow, juicy moderate distortion with fairly much low-end self-oscillation
6. Extreme, for more wild sonic ideas
7. Gentle, a more smooth and clean general purpose characteristic
8. Tube, with a warmer sound and nice overdrive, great for synth sounds
9. Metal, with a rough, sharper sound and distortion
10. Easy Going, a softer version of the Tube filter
11. Clean, linear behavior with no clipping distortion at all
Response
The response of each filter can be set to either Low Pass, High Pass, or Band Pass. In Low Pass mode, the
filter will pass through frequencies lower than the center frequency. In High Pass mode, frequencies
higher than the center frequency will be passed through. In Band Pass mode, only the frequencies around
the cut-off frequency will be passed through.
Slope
The slope switch sets the steepness of the filter, which controls how aggressively the frequencies around
the center frequency are filtered. You can choose between 12 dB/octave, 24 dB/octave or 48 dB/octave
settings. For example, if the response is set to Low Pass, more high frequencies will be passed above the
cutoff frequency using at 12 dB/octave than at 48 dB/octave. But let your ears decide! Just listen to the
sound as you move the filter around and see if you like it...
Delay
Each filter has an delay function that will, well yes, delay the sound passing through. This feature will add
some more wobblyness to your sounds! For example the creation of comb-filter effects (chorus/flanging).
These effects occur when 2 or more signals are added together while the delay time is changing of at
least 1 of the signals. You can set it up by using an XLFO
delay time of a filter. Use slow XLFO rates to create the classic flanging effect. In this case the Stereo
configuration works best.
Or how about some crazy stereo effects using the "Haas" effect. Mr. Haas found out that time differences
controls.)
sending a simple sine wave to modulate the
Page 13

are very important for your stereo perception. So when the left channel is delayed we will hear it coming
from the right speaker. More about this in this Wikipedia article .
13
To set this up start with 2 filters and select the L/R configuration with the routing button. The schematic
diagram will show us the filter 1 is used for the left channel and filter 2 is used for the right channel. If
you raise the delay of filter 1 it will sound like the sound is panned to the right purely based on delay
times, not volume. Now reset the delay time (both filters) to 0 and take a new XLFO to modulate the
delay time of both filters and inverse 1 of the Modulation
Slot. Now you will hear the stereo image move
from left to right. Sweet innit! From here you can add more filters with different settings and pan them
differently and it will create some truly blissful stereo effects.
The delay offers so many extra sound design opportunities that we strongly suggest that you take some
time to experiment with it.
Tip: When you make changes to filter parameters that are modulation targets
and delay), the modulation slots
that use that target are automatically shown. You can return to view all
(cut-off frequency, peak, pan
connections by using the Show All Slots button that appears on the left in the modulation slots bar.
Next: Interactive filter display
See Also
Filters
Modulation
Page 14
Interactive filter display
14
The interactive filter display gives an overview of the filter parameters and makes it very easy to adjust
multiple filter parameters simultaneously. The vertical lines in the background represent a logarithmic scale
that correspond to the actual filter frequencies.
Drag a filter dot to adjust the Frequency and Peak parameters for that filter. The active filter will have a
light colored ring around its filter dot in the display (filter 2 in the screen shot above).
Drag the link dot (between filter 1 and 3 in the screen shot above) to adjust all linked filters
simultaneously. To link filters, click on the link buttons that appear when the mouse is just above the
filter buttons. For example, you can set them up as 4 resonant band-pass filters and sweep the cutoffs
simultaneously. This configuration will give you access to all manner of 'vocal' sounds, as well as even
more dramatic formant-based timbres.
Shift+click a filter dot to toggle between the different filter slopes.
Ctrl+click (Command+click on Mac) a filter dot to toggle between the different filter responses.
When holding down the Alt key while dragging a filter dot, the other linked filters will change accordingly,
as if you where dragging the link dot.
Holding down both the Alt+Ctrl keys (Alt+Command keys on Mac) while dragging a filter dot will adjust
all linked filters while fixing the link dot in the center, so the other linked filters will 'mirror' the changes.
Tips
Of course, all changes made in the filter display can be automated!
You can connect a MIDI controller to either the frequency or the peak adjustment of the link dot with the
MIDI Learn
feature.
Next: Routing
See Also
Filters
Filter parameters
Page 15

Routing
15
Volcano 2 lets you route the four available filters in almost any way you can think of. There are 3 basic routing
configurations: Stereo, L/R or M/S. By clicking the main routing button, the routing possibilities are presented
for each configuration depending on the amount of filters used.
The three buttons at the right of the routing button switch between the main routing configurations:
Stereo
In this default mode, both the left and the right channel pass through all filters. You can use the Pan
rings to introduce differences in cutoff frequencies for each output channel and thus create beautiful
stereo effects.
Left/Right
In this case the left and right channel will go through different filters. This allows for more extreme
settings and stereo effects. If there are two filters, the left channel will go only through filter 1, and the
right channel will only go through filter 2. If there are four filters, filter 1 and 2 are used by the left
channel, and filter 3 and 4 are used by the right channel.
Mid/Side
This is the icing on the cake, never seen before in a filter plug-in. Now the signal is split into a Mid and a
Side channel using the sum and difference of the left and right channels. Each signal is sent through
different filters (as in L/R mode) after which it is reconstructed into the normal left and right channels.
The Mid/Side concept has its origin in stereo microphone techniques using two microphones (more about
that here on Wikipedia
) but also gives us many options to process a stereo audio signal.
Next: Modulation
See Also
Filters
Page 16

Modulation
16
The real fun with Volcano 2 starts with the incredible modulation options. Almost any parameter can be
modulated. These are called modulation targets. They can be modulated by any of the available modulation
sources: XY controllers
signal always flows via a modulation slot that allows you to vary the extent of modulation.
Use the Modulation button at the top to show or hide the entire modulation section, which consists of the
following elements:
Source selection bar
The source selection bar shows a schematic overview of all modulation sources at all times. Simply click
on a source button here to scroll the source into view. The highlighted section of the bar shows the
currently visible part, and it can be dragged to scroll the sources as well. The top segment of each source
button lights up according to the modulation signal it is currently sending.
Modulation slots
As said before: every modulation source uses a modulation slot to send its signal to the target. Volcano 2
always groups all modulation slots above the source that they're connected to. Each slot displays the
destination, graphically shows the amount, and you can quickly turn it on or off, or reverse its output.
Modulation sources
The modulation sources are organized in a horizontally scrolling strip below the source selection bar.
There are 5 different kinds of sources available: The XLFO
imagine and can be synchronized to the host tempo. The Envelope generator
and triggered by audio or MIDI. The Envelope follower
side-chain signal. The MIDI
the XY controller
To add a modulation source, click the + button in the source selection bar.
To delete a modulation source, click the remove button in the top right corner in the source interface.
When a source is deleted, modulation slots that use that source will also be deleted automatically.
Tip: You can scroll the modulation source section with the mouse wheel. On Windows, most mouse wheels only
work vertically, but you can hold down the Ctrl and Shift keys for horizontal scrolling in that case.
, XLFOs, envelope generators, envelope followers and MIDI sources. The modulation
can generate almost any waveform you can
is of the usual ADSR kind
will follow the loudness of the incoming audio or
source transforms any incoming MIDI data into a modulation signal. Finally,
lets you modulate two targets using horizontal and vertical mouse movements.
Next: Drag-and-drop modulation slots
See Also
Filters
Overview
Page 17

Drag-and-drop modulation slots
17
One of the best features of FabFilter Volcano 2 is undoubtedly the ability to set up modulation connections with
drag-and-drop. There is no need to search through long drop-down menus containing dozens of sources and
targets or to find your way in cluttered and obscure matrix views. This simple method of making modulation
connections makes sound designing become fun, easy and, above all: fast. So how does it work?
Grab a source... ... drag it to a target... ... and drop it.
First, grab the source drag
button that you would like to
use as a modulation signal, for
example XLFO 3. The moment
you click on the source drag
button, the interface dims and
all modulation targets are
highlighted.
If you wish, you can also add a slot manually using the small plus button above each modulation source. You
can also modulate slot level knobs, which makes incredibly complex modulation setups possible. To sort the
slots click the + button in the source selection bar and select Sort Slots from the menu that pops up.
Once a slot has been added, you can edit it:
Use the Level slider to adjust the amount of modulation. Like with knobs, hold down Shift for fine-tuning;
hold down Alt to adjust all slot levels for the same source; Ctrl-click (Windows) or Command-click (OS X)
to reset the level to the default value.
To the left of the Level slider, you can invert the modulation signal with the +/- button.
When you hover over the slider on the left an on/off button appears. Use this to temporarily disable the
slot. On the right a menu is accessible that gives direct access to all available modulation targets.
To delete the slot, click the Remove button to the right of the Level slider.
Our what-you-use-is-what-you-see interface makes complex programming very easy. Volcano 2 uses dynamic
slot highlighting to visualize all the sources that modulate a specific target. When a parameter is modulated a
small modulation indicator "M" appears:
The moment you start dragging,
you will see a line from the
source drag button to the icon
that you are dragging. If you
hover the mouse over filter
buttons or source selection
buttons they will automatically
be activated. The mouse cursor
will snap to any available
modulation target.
Now drop the icon on the
highlighted knob of the
parameter that you would like
to modulate, for example the
Filter 1 Cut-off knob. That's all
there is to it!
Click the M modulator indicator to highlight all slots that modulate this target. In the source selection bar the
sources that modulate the target are also highlighted.
Page 18

This feature makes programming so much more fun because it's easy to see what is happening inside a patch.
18
To return to the normal interface click anywhere on the interface background or click the Modulation Indicator
again.
When a modulation indicator appears next to a filter button
or envelope generator, this means one or more
parameters are modulated. When you click that indicator it will highlight all slots that modulate a target of the
component or envelope generator.
Next: XLFO
See Also
Modulation
What-you-use-is-what-you-see
Page 19

XLFO
19
The XLFO is like a classic LFO but it can do so much more! It can also be used as a 16 step sequencer with an
individual glide parameter for every step. The display shows the waveform that is used by the XLFO. Steps can
be freely added or deleted to shape the funkiest of waveforms. But there is more... This XLFO can also be used
as arpeggiator! The values can be equally be distributed over 2 octaves, so when connecting it to any pitch
parameter, it will function like an arpeggiator. We couldn't make it more funky!
To add an XLFO as a modulation source, click the + button in the source selection bar
At the left of the XLFO interface, you find the global parameters that affect the entire waveform:
Frequency
The frequency knob sets the time it takes for 1 cycle of the waveform to complete. This knob is a
modulation target, so you could let one XLFO modulate the frequency of another XLFO. The XLFO can be
synchronized to the tempo of the plug-in host or set to run free. With the options at the top-right corner
of the frequency button you can choose the different settings:
Free running mode will allow values from 0.0 to 500 Hz, so the minimum cycle length is 0.002
seconds.
When using any of the synchronized cycle lengths (16 to 1/64, measured in bars) the frequency
knob changes into the Offset knob. It now acts like a cycle length multiplier and therefore is
capable of changing the cycle length relative to the host tempo, from half to two times the host
tempo. Click the dots around the knob to jump to certain predefined offsets for dotted and triplet
synchronization.
Balance
The outer ring of the frequency knob adjusts the time balance of the first and last halves of the step
sequence. For example, when turned to the left, the first half of the wave form is generated more quickly
than the last half.
MIDI sync
The XLFO can be restarted at any point using MIDI if the MIDI sync option is enabled at the top-right
corner of the frequency knob. When activated a note-on MIDI message (e.g. pressing a key) will restart
the cycle of the waveform (to the point set by the Phase offset slider).
Snap
This function makes it possible to use the XLFO as an arpeggiator. When you enable Snap, a small piano
keyboard appears, the range of the XLFO turns into 2 octaves, and steps "snap" to notes on the piano
keyboard. Now when you modulate the filter frequency, turn the slot level to maximum, and the total
amount of modulation will exactly correspond to 2 octaves. With filter
hear individual notes if used with high filter peak settings.
Glide
The global Glide knob acts like an overall glide offset. The amount of glide determines the point within a
step at which the XLFO starts to interpolate to the value of the next step. The global Glide value is added
to the glide value for individual steps to arrive at the final glide value for each step. The final glide value
is limited between 0 (no interpolation) and 1 (full interpolation). Because the global Glide value can range
from -1 to 1 it can completely overrule the individual step glide values at the extreme settings. It is also
a modulation target which allows for very cool effects.
Phase offset
In the step editor you can see a triangular shape. The vertical line of the shape indicates the beginning of
each cycle. You can move this triangular shape, and thus change the beginning of a XLFO cycle. This
phase offset is a modulation target, so when the XLFO frequency is set to 0, you can use another
modulator to cycle through the different steps.
Tip: Like with knobs
At the top right of the global settings, the Presets button provides access to the XLFO section presets. The
Remove button
You can customize this by overwriting the predefined Default section preset.
, you can Ctrl/Command-click on the phase offset slider to reset it.
deletes the XLFO source. By default, the XLFO starts with two steps that make a sine wave.
frequency parameters, you will
and click New XLFO.
Editing Steps
You can shape the waveform of the XLFO in almost any way you want by editing the individual steps.
Drag a step up or down to change the value for the step.
Page 20

Click a step to select it.
Hold down Ctrl (Command on Mac) and click a step to select multiple steps. Hold down Shift and click
20
a step to select a consecutive range of steps.
Click next to a step to deselect all steps.
Click the + button at the end of all steps to add a new step. The new step is added to the right of the
selected step, or at the end of all steps.
Click the - button at the end of all steps to remove the selected steps. If no steps are selected, the last
step is removed.
If one or more steps are selected, the XLFO expands to show the step interface where the parameters for the
selected steps can be edited:
Random
The Random button enables random values for this step. If enabled, the XLFO will use a new random
value for the step each time it encounters it. The display also changes to show that the value is chosen at
random (see step 3 in the screen shot above).
Value
The Value knob adjusts the value of step. This is the same as dragging the step up and down, except that
with multiple selected steps, the value of all steps is set to the same value. In contrast, when you drag
multiple selected steps, the relative distance is kept the same.
Curve
The Curve button selects the curve that is used to interpolate to the next step when the final glide value
is higher than 0: Linear, Sqr, Sqrt and Sine.
Glide
The Glide knob sets the per-step glide value. This is combined with the global glide value to determine at
which point the XLFO starts to interpolate towards the next step.
To start exploring the many sound shaping possibilities start with a XLFO that modulates
a Delay Time or Filter
Frequency knob to make the sound change over time. You'll be amazed by the many possibilities. Have a look
at the presets to see the XLFO in many different setups to get an idea of what it can do for you and start
creating your own sequences to funkify your life!
Next: Envelope generator
See Also
Modulation
Drag-and-drop modulation slots
What-you-use-is-what-you-see
Page 21

Envelope generator
21
The envelope generator (EG) generates an ADSR envelope. The envelope being the way in which the level
changes with time and is controlled by the Attack, Decay, Sustain and Release parameters. Its function is to
modulate a parameter over time, based on MIDI input or the amplitude of the input signal or side chain signal.
To add an envelope generator as a modulation source, click the + button in the source selection bar and click
New Envelope Generator.
The following EG parameters are available (hold the mouse over a control point in the EG display to see which
parameter it affects):
Trigger
The EG can be triggered by three different kinds of input: MIDI note events, the main input signal, or the
signal from the side-chain input. When MIDI is selected, the Threshold knob is hidden. Depending on the
type and amplitude of the incoming signal you need to adjust the threshold for optimal functioning. Look
at the top segment of the source button for the EG to see when it is in the triggered (Attack-DecaySustain) state. See also VST plug-in versions
Delay
The time it takes for the attack to start after the key is pressed (or triggered when the side-chain signal
exceeds the threshold).
Attack
The Attack portion of the envelope is the time taken for the amplitude to reach maximum value. Slow
attack is commonly part of sounds called pads. But for percussive sounds the attack time should be as
short as possible.
Decay
After the sound has reached its maximum level, it starts to decay until it reaches a level known as the
Sustain level at a rate set by the Decay time setting.
Sustain
This is the level reached after the decay time. The EG will hold this level as long as a key is pressed. Note
that this parameter specifies a volume level rather than a time period.
Hold
Once the key is released, the value will remain at the sustain level for a time set by the hold parameter.
Release
After the hold time the sound resumes its decay, this time at a new rate determined by the Release
setting.
Tips
When adjusting the EG control points, you can hold down the Shift key to fine-tune a setting, just like
with regular knobs
To let a sustain pedal control the EG, you can hook it up to the Hold setting. The recommended way to do
this is via a MIDI source
At the top right of the EG interface, the Presets button provides access to the EG section presets. The
Remove button
creating a new EG) by overwriting the predefined Default section preset.
.
.
deletes the envelope generator. You can customize the default EG settings (used when
.
Next: Envelope follower
See Also
Modulation
Drag-and-drop modulation slots
What-you-use-is-what-you-see
Page 22

Envelope follower
22
The envelope follower modulation source will output an envelope similar to the side-chain signal. The amplitude
of the positive peaks of the input signal is measured and the outer shape (= envelope) is the output signal of
the modulation source. You can set the Attack and Release parameters to 'smooth out the bumps'.
To add an envelope follower as a modulation source, click the + button in the source selection bar
New Envelope Follower.
The two buttons at the top of the EF source interface select which signal is used to trigger on: the main input
signal or the signal from the side-chain input. See also VST plug-in versions
At the top right of the source interface, the Presets button provides access to the EF section presets. The
Remove button
a new EF) by overwriting the predefined Default section preset.
Next: MIDI source
See Also
Modulation
Drag-and-drop modulation slots
What-you-use-is-what-you-see
deletes the envelope follower. You can customize the default EF settings (used when creating
.
and click
Page 23

MIDI source
23
The MIDI source is a powerful modulation source if you want more control over Volcano 2 using a MIDI
keyboard or MIDI control knobs. Note that you first need to route data from a MIDI track to Volcano in your
host.
To add a MIDI source as a modulation source, click the + button in the source selection bar
MIDI Source.
MIDI Input
Normally the MIDI source lets you use MIDI input such as velocity, pitch bend and modulation wheel to
influence any parameter that can be modulated.
Controller number
... but when you set the input selection to Controller, it lets you use any MIDI controller as a modulation
source.
Response curve
The response curve can be adjusted to get the desired control over the MIDI source output. For example,
when used with velocity as MIDI source the linear, exponential, logarithmic, square, square root or sine
curves make great dynamic differences.
Using a MIDI source is different from MIDI Learn
uses a modulation slot instead. This way you can add modulation to an already modulated destination. Or you
can use the full rotation of a knob while actually modulating a smaller range. This can be a good way to control
say, the filter cut-off frequency or EG attack for which you sometimes want to make small changes with great
precision.
At the top right of the source interface, the Presets button
presets. The Remove button deletes the MIDI source. You can customize the default MIDI source settings
(used when creating a new MIDI source) by overwriting the predefined Default section preset.
Tips
When modulating filter frequency with pitch bend, the default slot level value corresponds to +/- one
note of modulation (you can reset to the default value by Ctrl/Command-clicking the slot level). The
maximum slot level corresponds to +/- one octave.
To let a sustain pedal control an envelope generator, use a MIDI source. Set the input to Controller, and
the controller number to 64. Now, drag
point of the envelope generator, and set the slot level to maximum. Of course, you can also set up more
sophisticated behavior of the sustain pedal, for example by modulation the release setting instead of
hold: the possibilities are endless.
The VST 3 version of FabFilter Volcano 2 doesn't support per-note aftertouch modulation.
because there is no direct control of a knob via MIDI but it
provides access to the MIDI source section
the source drag button for the MIDI source to the hold control
and click New
Next: XY Controller
See Also
Modulation
Drag-and-drop modulation slots
What-you-use-is-what-you-see
MIDI learn
Page 24

XY Controller
24
The XY Controller makes for more tweaking fun. It's a classic, and we didn't dare to leave it out! It can control
two parameters with one mouse movement. When browsing presets don't forget to listen to the sound
mangling possibilities provided by these controllers.
To add an XY controller as a modulation source, click the + button in the source selection bar and click New XY
Controller.
Because the XY controller has two "outputs", it also has two source drag buttons labeled X and Y. The slots for
the XY controller are grouped in two rows, with the X-slots at the top. For example, in the screen shot above,
the X axis controls the output panning, while the Y axis controls the level.
The Remove button
Tips
To reset the XY Controller to its default position, hold down the Ctrl key (Windows) or Command key (OS
X) and click once.
When you want to adjust only one parameter on one axis, holding Shift will make it easier to do so while
keeping the other parameter constant.
With MIDI learn, you can set up a hardware MIDI controller to control the XY controller. So if your MIDI
controller has XY-functionality you can directly control Volcano 2.
deletes the XY Controller.
Next: Output controls
See Also
Support
Page 25

Output controls
25
Besides the MIDI learn button, the bottom bar controls various options and settings for the output signal of
Volcano 2.
Auto Mute Self-Osc
The Auto Mute Self-Osc option reduces the resonance of the filters if there is no incoming audio signal.
Depending on the filter characteristic you can push the filter into self-oscillation with increasing peak
values. The auto-mute feature will make higher peak settings possible while the filters will not be howling
continuously when you stop playback in your host.
Audition
The audition switch (recognizable by its headphones icon) lets you listen to either the normal output
signal (default setting), the input signal (bypassing the entire plug-in) or the side chain signal. When
setting up side chaining in your host this is very useful to confirm that the correct side chain signal is
routed to the plug-in.
Input
The input button shows the current input gain and lets you adjust it from -36 dB to +36 dB. To change
the gain, simply drag the button up and down. For precise adjustments or to change the panning, click
the input button once to open a pop-up window with the actual input/pan knobs. Click the button again to
let the pop-up window disappear. The input and pan knobs are also modulation targets
Output
The output button shows the current output gain, also adjustable from -36 dB to +36 dB. It works the
same as the input button and is also a modulation target. Note that you can overdrive the filters by
increasing the input gain and reducing the output gain at the same time.
Mix
You can use the mix button to mix some of the original (dry, unprocessed) input signal back into the
output signal, reducing the amount of filtered (wet) signal. Like the input and output buttons, this is also
a modulation target.
.
Next: MIDI learn
See Also
Overview
Modulation
Page 26

MIDI Learn
26
Controlling FabFilter Volcano 2's parameters directly with MIDI is very easy using the MIDI Learn feature. With
MIDI Learn, you can associate any MIDI controller with any parameter.
Click the MIDI Learn button in the bottom bar to enter MIDI Learn mode. The interface dims and the
parameters that can be controlled are highlighted. Each parameter has a small text balloon that displays the
associated controller number. Now do the following to associate a controller number with a parameter:
1. Touch the control of the desired parameter in the interface that you wish to control. A red square will
mark the chosen parameter.
2. Adjust the slider or knob on your MIDI keyboard or MIDI controller that you want to associate with
that parameter.
That's it! The parameter will now be controlled with the MIDI controller. You can now go back to step 1 to
associate a different parameter. Note that there is no warning when you associate a different knob with a
controller number that is already used. It will just be replaced.
To exit MIDI Learn mode, click the MIDI Learn button again, or click Close at the top of the interface.
Click the small menu drop-down button next to the MIDI Learn button to access the MIDI Learn menu:
Enable MIDI
This globally turns MIDI control of parameters on or off: useful in hosts that automatically send all MIDI
events on a track to all effect plug-ins associated with that track as well.
Clear
This submenu shows all parameter associations and lets you delete individual associations or clear all
associations in one step.
Revert
Reverts to the last saved MIDI mapping (or the state when the plug-in was started).
Save
Saves the current MIDI mapping so Revert will go back to this state. The current mapping is
automatically saved when closing the plug-in.
Routing MIDI to effect plug-ins
For MIDI Learn to work properly, the plug-in need to actually receive MIDI of course. Depending on your host,
it can be quite difficult to route MIDI data to effect plug-ins. Here's how to do it in the most important hosts:
Logic Pro
Instead of adding FabFilter Volcano 2 to one of the insert slots, create a new Instrument Track, and
click on the Instrument slot. Then choose AU MIDI-controlled Effects > FabFilter > FF Volcano 2. Now,
the plug-in receives MIDI. To get audio into the plug-in, click the 'Side Chain' drop down menu in Logic's
plug-in header and choose the actual input track. Next, you can mute that original track, so you only
hear the audio through the plug-in. The only downside is that plug-ins with an external side-chain cannot
use it anymore.
Page 27

Cubase
Simply create a new MIDI track and set its output to the Volcano 2 instance you would like to control
27
via MIDI.
Pro Tools
Create a new MIDI track. From the MIDI input drop down menu, choose your MIDI device (if not
already selected) and from the MIDI output drop down menu, choose FabFilter Volcano 2 -> channel 1 for
the instance you would like to control.
Ableton Live
First of all, create a new MIDI track. From the 'MIDI from' drop down menu, choose your MIDI device (if
not already selected). Then, in the 'MIDI to' drop down menu, choose the Audio track that has FabFilter
Volcano 2 on it. NOTE: only the first plug-in on any track can receive MIDI!
Next: Undo, redo, A/B switch
See Also
Overview
Page 28

Undo, redo, A/B switch
28
The Undo and Redo buttons at the top of the FabFilter Volcano 2 interface enable you to easily undo changes
you made to the plug-in. With the A/B feature, you can quickly switch between two different states of the plugin.
The Undo button at the left will undo the last change. Every change to the plug-in (such as dragging a
knob or selecting a new preset) creates a new state in the undo history. The Undo button steps back
through the history to restore the previous states of the plug-in.
The Redo button cancels the last undo command. It steps forward through the history until you are back
at the most recent plug-in state.
The A/B button switches from A to B and back. Before switching, the current state of the plug-in is
saved, so if you click this button twice, you are back at the first state. The button highlights the currently
selected state (A or B). In the example above, the A state is active.
The Copy button copies the active state to the inactive state. This marks the current state of the plug-in
and allows you to go back to it easily with the A/B button. After clicking Copy, the button disables itself to
show that both states are equal, so there is nothing to copy anymore.
Notes
If the plug-in parameters are changed without using the plug-in interface, for example with MIDI or
automation, no new undo states are recorded.
The Undo and Redo buttons will disable themselves if there is nothing to undo or redo.
Next: Loading presets
See Also
Overview
Page 29

Loading presets
29
The included presets give a great overview of what you can do with FabFilter Volcano 2. You can either use the
presets as they are, or tweak them further to create your own unique effects.
To load a preset, click the preset button. The presets menu will appear with all available presets. Click a
menu item to load that preset. The currently selected preset is highlighted with check marks.
To explore the presets one by one, click on the little arrow buttons to the left and right of the main preset
button. This will load the previous or next preset in the menu.
The preset button shows the name of the current preset. If you have changed the preset by adjusting one or
more parameters, the name is dimmed to indicate that this is not the original preset anymore.
Tips
The Default Setting preset is loaded automatically when FabFilter Volcano 2 is started. To change the
default settings, simply overwrite this preset by clicking Options > Save As Default in the presets
menu.
Some factory presets use envelope generators. You may need to adjust their threshold parameters
(depending on the level of the input signal) to get the desired effect.
To open a preset outside the presets folder, click Options > Open Other Preset. This might be useful if
someone sends you a preset by e-mail, for example.
If somehow the factory presets are lost or not installed properly, click Options > Restore Factory
Presets in the preset menu to restore them.
MIDI Program Change and Bank Select
Loading a presets can also be done via MIDI, using Bank Select and Program Change messages. Click Options
> Enable MIDI Program Changes in the preset menu to enable or disable this feature. When enabled, the
corresponding bank/program numbers are shown in front of the preset name (for example: (2/65) My Preset).
This means that you can load that preset by first sending a Bank Select message to select bank 2 and then
sending a Program Change message to select program 65.
Important: All the presets in your preset folder are numbered automatically, starting with bank 0 and program
0. This way, you are able to access any of the presets via MIDI. However, this also means that when you add
new presets to the menu, bank/program numbers of other presets might change. Be aware of this when
recording program changes in a session!
Compatibility with Volcano 1.x
All presets created with Volcano 1.x can be loaded in Volcano 2. If Volcano 1.x is also installed on your
computer, your Volcano 1 presets will be accessible via the V1 Preset Folder submenu in the preset menu.
You can read more about compatibility between Volcano 1.x and Volcano 2 in Upgrading to Volcano 2
take some time to read it if you are planning to replace Volcano 1 instances with Volcano 2 instances in your
songs.
Next: Saving presets
See Also
Overview
Quick Start
. Please
Page 30

Saving presets
30
You can easily extend the included presets with new settings to build your own library of presets for FabFilter
Volcano 2 that you can reuse in various projects. This is also a good way to copy settings across multiple
instances of FabFilter Volcano 2 in a session.
To save the current setting as a preset, click the preset button, and then click Save As. A standard Save dialog
will appear. Type a name for the new preset and click Save to finish.
In the Save dialog, you can also rename and delete existing presets and create a new folder to store presets in.
New folders will show up as new categories in the preset menu. (On macOS, this should be done with the
Finder.)
See How presets are stored
Next: Section presets
See Also
Loading presets
Using FabFilter Volcano 2
to determine the preset folder location and learn more about factory presets.
Page 31

Section presets
31
You can save your own unique settings for different components of the plug-in using section presets. This way
you can reuse certain common settings to customize Volcano to your own needs. To load and save section
presets, click the Presets button
Volcano 2 comes with a basic selection of section presets, but we encourage you to save your own presets to
build a custom library of sound building blocks.
Supported sections are:
The combined filter section, including routing and routing mode
XLFO
Envelope generator
Envelope follower
MIDI source
When you add a new modulation source, it loads its Default section preset. You can customize the initial
settings by just overwriting that preset using the save dialog.
Section presets are stored in the Application Data folder (Windows) or Application Support folder (macOS) for
the current user. For example, the full path to the section presets on Windows 10 is C:\Users\
<User>\AppData\Roaming\FabFilter\Volcano 2\Component Presets (note that this folder is hidden by default).
You cannot change the section preset paths.
Next: How presets are stored
See Also
Loading presets
Overview
in a section. This will display a presets menu for that section. FabFilter
Page 32

How presets are stored
32
Presets for FabFilter Volcano 2 are stored in separate files with the .ffp extension (for FabFilter Preset). All
presets reside in subfolders in the main preset folder. The subfolders will show up as separate categories in the
preset menu. You can also further divide the subfolders into categories.
You can manage the preset files just like other files on your computer. The easiest way to do this is in the Save
dialog that appears if you are saving a preset. The preset menu will automatically reload itself with the changes
when the dialog is closed.
Furthermore it is very easy to share your newly created presets with other users since FabFilter presets use the
same file format on both Windows and macOS.
The default location of the main preset folder is My Documents\FabFilter\Volcano 2 for Windows, and
~/Library/Audio/Presets/FabFilter/FabFilter Volcano 2 for macOS. To change this location, first copy all presets
to the desired new location, and then click Options > Change Preset Folder in the preset menu and select
the new folder.
Restoring factory presets
If you have accidentally lost the factory presets, you can easily restore them by clicking Options > Restore
Factory Presets in the preset menu. This will install all factory presets again.
Next: Purchasing FabFilter Volcano 2
See Also
Saving presets
Overview
Page 33

Purchasing FabFilter Volcano 2
33
Once you have downloaded and installed the evaluation copy of FabFilter Volcano 2, you may evaluate it during
30 days. Every time you start the plug-in, you will see the following dialog:
While there are still days left, you can click Evaluate to start working with the plugin. If you want to keep
using FabFilter Volcano 2 after the evaluation period, you must buy a copy in the online FabFilter Shop by
clicking the Buy Now button in the evaluation dialog.
Go to the FabFilter Shop and purchase FabFilter Volcano 2 now
We accept credit cards from all major companies, check payments, wire payments, and PayPal. The FabFilter
Shop uses secure connections and encryption: therefore your personal information is completely safe.
Within a few minutes after you have purchased your copy, you will receive an email containing your personal
license key. You use this license key to turn the evaluation copy into a fully registered version without the
evaluation dialog and the 30-day trial restriction.
Note: If the evaluation period has expired but you didn't have the chance to properly evaluate the plug-in, you
can request a new evaluation period by contacting us at info@fabfilter.com
.
Next: Entering your license key
See Also
Support
License agreement
Page 34

Entering your license key
34
After you have purchased FabFilter Volcano 2 in the online FabFilter Shop , you will immediately receive an email containing your personal license key. This license key will turn the evaluation version into a fully registered
plug-in.
Start FabFilter Volcano 2 and click Enter License in the evaluation dialog, or click Enter License on the
Help menu if the plug-in is already running.
Copy the license information from the email you have received and paste it into the text field. Make sure
that you are copying the entire license key including the Product and Licensee lines! If you are not sure
what text to copy, just copy and paste the whole e-mail.
After you have entered your license information, you will need to restart the plug-in host, so make sure you
save your settings if needed. From now on, you will be able to use FabFilter Volcano 2 for an unlimited period
of time with full support via email.
Tips
After your purchase, you can always retrieve your license key again by logging into your personal
FabFilter account . Here you can also keep track of all your orders and take advantage of great
discounts when buying other FabFilter plug-ins.
To deauthorize your license key and remove it from the computer, click Deauthorize on the Help menu.
If you temporarily needed to install your license on another computer, or if you have transferred your
license to someone else, this is the way to deinstall your personal license key safely.
Next: Support
See Also
Purchasing FabFilter Volcano 2
Support
License agreement
Page 35

Support
35
If you need help with problems or questions, and the help file does not provide an answer, please visit the
support pages on our web site.
Go to FabFilter Support
From here, you have direct access to the customer support forum, very useful tutorial videos for all FabFilter
plug-ins, online and PDF versions of all our help files, and a section with extra downloads (such as presets,
controller templates, older plug-in versions).
For sales-related questions and technical support, you can also contact FabFilter directly at info@fabfilter.com
Reporting a bug
If you have encountered a bug in FabFilter Volcano 2, first of all make sure that you are using the latest version
of the plug-in, which you can find at www.fabfilter.com/download
FabFilter Volcano 2 that you are using by clicking Help > About in the plug-in interface. If the bug is still
present in the latest version, please send us an e-mail at info@fabfilter.com
information as possible: operation system and version, host software and version, steps to reproduce the bug,
etc. Thanks in advance!
Next: Upgrading to Volcano 2
See Also
Overview
About FabFilter
. You can easily check the version of
and include as much technical
.
Page 36

Upgrading to Volcano 2
36
Upgrading from Volcano 1.x to Volcano 2 is safe and easy: installing Volcano 2 will not replace or delete the
previous Volcano 1.x plug-in. Both versions will co-exist and can both be used at the same time. This ensures
that you can open old songs that use Volcano 1.x without problems!
Volcano 1.x presets
All presets created with Volcano 1.x can be loaded in Volcano 2. If you upgraded from Volcano 1 to the new
version, your original Volcano 1 presets will be accessible via the V1 Preset Folder item in the preset menu.
See also Loading presets
.
Replacing a Volcano 1.x instance by Volcano 2
If you are working on a song and want to replace a Volcano 1 instance with the new Volcano 2, we advise you
to do the following:
First, save the current setting of the Volcano 1.x instance as a FabFilter preset in the Volcano 1 preset
folder.
Then, remove the Volcano 1 instance and add Volcano 2 in its place.
Finally, load the V1 preset that you just created into Volcano 2 via the preset menu.
Automation
Because the feature set of Volcano 2 has changed drastically, any automation data that has been written by a
Volcano 1 instance cannot be read correctly by Volcano 2.
Next: Manual installation
See Also
Overview
Support
Page 37

Manual installation
37
When installing FabFilter Volcano 2, the installation program will try to copy the plug-in into the appropriate
plug-ins folders, and in most cases your host will recognize FabFilter Volcano 2 automatically. Otherwise, please
follow these instructions:
Windows
On Windows, most hosts have their own VST plug-ins folder. So if you are using Windows and your host does
not recognize FabFilter Volcano 2, you need to locate the proper plug-ins folder for your host first (it is usually
shown in the Preferences or similar dialog). Then, copy the file FabFilter Volcano 2.dll from C:\Program
Files\FabFilter\Volcano 2 (or C:\Program Files (x86)\FabFilter\Volcano 2 if you are using a 32-bit host on 64-bit
Windows) to the plug-ins folder that you have found and restart the host so it can reload all its plug-ins. For
the AAX version of Volcano 2, copy the FabFilter Volcano 2.aaxplugin folder to the common Pro Tools AAX plugin folder on your computer; for the RTAS version of Volcano 2, copy the FabFilter Volcano 2.dpm and FabFilter
Volcano 2.dpm.rsr files to the Pro Tools RTAS plug-in folder on your computer.
You can simply uninstall plug-ins or bundles via the Control Panel.
macOS
On macOS, plug-ins are installed in the standard plug-in folders in the system Library folder. These are the only
possible correct locations:
Audio Units: /Library/Audio/Plug-Ins/Components
VST/VST3: /Library/Audio/Plug-Ins/VST and /Library/Audio/Plug-Ins/VST3
RTAS: /Library/Application Support/Digidesign/Plug-Ins
AAX: /Library/Application Support/Avid/Audio/Plug-Ins
Note: AU and VST/VST3 plug-ins may also be placed in the user's Library folders under
/Users/<username>/Library/Audio/Plug-Ins.
To uninstall the plug-ins from your Mac, you can just delete the specific FabFilter plug-in files at the above
locations. Finally, if you really want to delete all data written by our plug-ins, you can remove the following
folders/files from the user Library folder as well:
/Users/<username>/Library/Audio/Presets/FabFilter/FabFilter Volcano 2
/Users/<username>/Library/Application Support/FabFilter/Volcano 2
/Users/<username>/Library/Preferences/com.fabfilter.Volcano.2.plist
Note: Since OS X 10.7 (Lion), the system and user Library folders are marked as hidden by default. To make
them visible again in Finder, open Terminal (found in /Applications/Utilities) and enter the following commands:
chflags nohidden /Library
chflags nohidden ~/Library
If you still have problems, contact FabFilter Support .
Next: VST plug-in versions
See Also
Quick start
Support
Page 38

VST plug-in versions
38
FabFilter Volcano 2 is available in both VST 2 and VST 3 formats. They can be installed and used both at the
same time. The VST 3 format offers easy side-chaining and is more CPU-friendly in some cases, but it can only
be used by hosts that support it, for example recent versions of Cubase, Studio One or FL Studio. The VST 2
format is compatible with a larger variety of hosts.
Both the VST 2 and VST 3 versions of the plug-in automatically adapt themselves to the channel layout of the
track they are inserted on (mono/stereo).
For the VST 2 format, there is a separate FabFilter Volcano 2 (Mono) version of the plug-in which always runs
in mono mode. This is included for backwards compatibility with existing sessions. For new sessions we
recommend to use the regular plug-in which automatically adapts itself to the track it is inserted on.
In addition, there are two (SC) versions of the FabFilter Volcano 2 plug-in. In total these form all combinations
of mono/stereo and with or without external side chain
FabFilter Volcano 2 (stereo/mono without side chain)
FabFilter Volcano 2 (SC) (stereo/mono with side chain)
FabFilter Volcano 2 (Mono) (mono without side chain for backwards compatibility)
FabFilter Volcano 2 (Mono SC) (mono with side chain for backwards compatibility)
The default VST plug-in does not have external side chain support because some hosts (e.g. Steinberg
WaveLab) will not work correctly otherwise.
The external side chain feature in FabFilter Volcano 2 (SC) works well in some hosts, like Ableton Live and
Reaper.
With Steinberg Cubase, it is recommended to use the VST 3 plug-in. With the VST 2 plug-in, you need to do
the following to use an external side chain input:
1. Create a Group Channel track with Quadro configuration (in the More... menu).
2. Open the VST Connections window. In the Group/FX tab, locate the group bus you just created and
right-click it to create child buses for the Stereo and Stereo (Ls Rs) parts.
3. In the Mixer, insert FabFilter Volcano 2 (SC) in the group channel track.
4. You can now route the input audio signal track to the Stereo child bus. The side chain track must be
routed to the Stereo (Ls Rs) child bus. (The routing settings are found at the top of each channel.)
5. Use Volcano 2's monitoring feature
it.
Note: In earlier versions of Cubase, the Group/FX tab is missing from the VST Connections window. In this
case, you must pan the input track to the front of the quadro bus, and the side chain track to the rear of the
quadro bus. If you are using Cubase 4, make sure you have upgraded to at least version 4.02 to get everything
to work.
in the bottom bar to confirm that everything is routed as you want
input:
Next: External side chaining
See Also
Quick start
Manual installation
Page 39

External side chaining
39
FabFilter Volcano 2 offers the possibility of feeding an external signal to its side chain, so that you can make it
trigger on a different signal than the audio it is actually processing. Feeding a signal to a plug-in's side-chain
inputs works slightly different in various hosts. This topic describes the procedure for some of the most popular
hosts around: Cubase
To explain how it works, we use a scenario with two tracks. The first one contains the audio that we want to
process with Volcano 2, which we'll call the main track from now. The second track contains the audio that we
want to route to Volcano 2's external side-chain input and use as trigger signal. We'll call this track the side
chain track.
After setting up everything according to the instructions below for your host, you can check whether everything
is routed correctly: play the audio and enable FabFilter Volcano 2's Audition button to listen to the side-chain
signal. Afterwards, disable the Audition mode again. Any envelope generators
to trigger on the external side chain, will now respond to the side chain signal.
Cubase
Open Cubase and create a new empty project.
Add two audio tracks that we'll use as main track and side chain track.
Add audio files on both the main track and the side chain track. You can simply drag audio files from a
Finder/Explorer window onto a track.
Open the Mixer. In the main track, click on an empty insert slot and select the VST 3 version of FabFilter
Volcano 2 in the Filter menu (note the VST 3 icon which looks like ///).
Open FabFilter Volcano 2's interface and set up an envelope generator or envelope follower, triggered by
the external side chain signal.
In the plug-in header, click on the Activate Side-Chain button (right of the R/W buttons) to enable the
external side chain in Cubase.
At the top of the Mixer, set the output for the side chain track to the side-chain input of FabFilter Volcano
2.
, Logic Pro, Ableton Live and Pro Tools.
or envelope followers that are set
Logic Pro
Open Logic Pro and create a new empty project via File > New...
Add two audio tracks (via Track > New...) that we'll use as main track and side chain track.
Add audio files on both the main track and the side chain track. You can simply drag audio files from a
Finder/Explorer window onto a track.
Select the main track and add Volcano 2 in the first Insert effect slot.
Open FabFilter Volcano 2's interface and set up an envelope generator or envelope follower, triggered by
the external side chain signal.
In the right top corner of the plug-in interface header, in the 'Side Chain' menu, choose the side chain
track. Now, the signal from the side chain track is sent to FabFilter Volcano 2's external side-chain input.
Ableton Live
Open Ableton Live and start with an empty arrangement. We'll use Track 1 as the side chain track and
Track 2 as the main track.
From the folder menu's on at the left top of Ableton Live's interface, drag different audio clips to the first
empty slots of Track 1 and Track 2.
From the VST (or Audio Units) plug-in menu, also at the left top of Ableton Live's interface, drag FabFilter
Volcano 2 onto Track 2, the main track.
Open FabFilter Volcano 2's interface and set up an envelope generator or envelope follower, triggered by
the external side chain signal.
In Track 1 (the side chain track) in the 'Audio To' menu select 'Track 2' instead of the default 'Master'.
Now, an extra menu appears right below: choose 'FF Volcano 2 3/4' instead of the default 'Track In' to
route the track's signal to FabFilter Volcano 2's external side chain inputs.
Note: In the scenario above, you won't hear Track 1 (the side-chain signal) anymore, since its audio is
only routed to Volcano 2's side-chain inputs. To avoid this, use one additional track (e.g. Track 3), choose
'Track 1' from its 'Audio From' dropdown menu, and in the 'Audio To' menu select 'Track 2' instead of the
default 'Master'. Now, from the extra menu below choose 'FF Volcano 2 3/4'. Of course, you can now
leave Track 1's 'Audio To' setting to the original 'Master' so you will still hear the signal.
Pro Tools
Page 40

Open Pro Tools and start a new empty session.
Create two audio tracks that we'll use as main track and side chain track. Add audio files to both track.
40
Open the Mix window to display the tracks with their Insert slots and Sends slots.
In the first 'Sends' slot of the side chain track, choose 'Bus 1'. The track view for Bus 1 will open: set its
level slider to 0.0 dB so the bus actually produces audio!
In the first 'Inserts' slot of the main track, choose Effect > FabFilter Volcano 2.
Open FabFilter Volcano 2's interface and set up an envelope generator or envelope follower, triggered by
the external side chain signal.
Now, in the 'Key Input' menu of the plug-in interface (just above the FabFilter logo), choose bus > Bus 1
instead of the default 'no key input'. Now, the audio from the side chain track is routed to Volcano 2's
external side chain input via Bus 1.
Next: License agreement
See Also
Input/output controls
Page 41

FabFilter Software License Agreement
41
This license agreement concerns and describes your rights and the conditions upon which you may use the
FabFilter software you selected. We advise you to read this entire agreement. By accepting this agreement or
by using FabFilter software, you agree to all of these terms. If you do not accept and comply with these terms,
you may not use the FabFilter software or its features.
Applicability
This license agreement applies to all the FabFilter software, plug-ins and programs you may use during the
Evaluation period, and/or thereafter subject to an acquired license key to certain FabFilter software of any
version, including any and all upgrades, supplements or services, unless other terms come with such versions,
upgrades or supplements.
Licenses
The software will be licensed to the Customer, not sold. With the FabFilter license key, you will be granted after
full payment the right in perpetuity (meaning that the license agreement shall not automatically expire) to
install, run and use the software concerned under certain conditions. These conditions vary subject to the
license you acquired. FabFilter distinguishes the following licenses:
A Personal License is a named license to the software concerned, granting access to the software on an
unlimited number of Devices, as long the license is used by the designated person who acquired the
FabFilter license key. Usage of the Personal license by someone else but the designated licensee is an
infringement of the rights of FabFilter. The Customer should at all times protect its license key from theft
and/or abuse.
A Site License is a non-personal license to the FabFilter software concerned, acquired on the name of an
institution or entity, who is the licensee. A Site License will grant access to the FabFilter software on a
certain maximum number of designated Devices, as specified in the license key itself (e.g. "20 seats"). If
the Site License is used on computers/servers for any form of automated processing, the licensee may
not make any plug-in controls/parameters of the FabFilter software available to the end users of the
FabFilter software, i.e. only "black box" processing is allowed.
These FabFilter licenses, whether a Personal or Site License, will give you access to certain FabFilter software of
the specified major version. The license will include all future minor updates to the software (e.g. version 2.19
to version 2.20), which typically include bug fixes or small new features. The license will exclude any future
new major versions of the products (e.g. version 1.x to version 2.x). To allow yourself access to such new
major version of the software, a new FabFilter license to such major version must be acquired.
All FabFilter licenses, both Personal or Site License, give the Customer or end user the right to install and use
the FabFilter software to the extent it has been developed and under the conditions herein. Any rights not
explicitly granted to you, the Customer, remain with FabFilter, including but not limited to the right to alter,
reverse engineer, reverse compile, take apart, or disassemble the FabFilter software or any of the files in the
distribution.
A Bundle License is Personal or Site License for multiple FabFilter software products, which gives the Customer
or end user the right to install and use the specific software products that the bundle (e.g. Total Bundle)
contains at the moment of purchasing the Bundle License. Any software products or new major software
versions added to the bundle after that date cannot be claimed as part of the prior acquired Bundle License. A
Bundle License (if not Educational or NFR) can only be transferred as a whole, using a License Transfer.
An Upgrade License is a Personal or Site License for a new major version of FabFilter software. You may only
use an Upgrade License if you have a license for the previous major version of the same FabFilter software.
Educational (EDU) and NFR licenses
A Personal or Site License can be marked as EDU (Educational) or NFR (Not For Resale), meaning the following:
A Personal or Site License marked as Educational License is equal to the respective Personal or Site
License, with the only exception that the Educational License may not be transferred to a third party.
A Personal or Site License marked as NFR ("Not For Resale"), is typically intended for journalists that wish
to review the FabFilter software. A License marked as NFR is equal to the respective Personal or Site
License, with the only exception that the NFR License may not be transferred to a third party.
Duration and Evaluation
As specified in the specific terms per license, all licenses will be granted for perpetuity (meaning that the
license agreement shall not automatically expire), as long as all conditions herein are respected.
The Evaluation period is a period of thirty (30) days commencing on the first day of using the software
concerned and automatically expiring 30 days thereafter. After the Evaluation period has expired and no
FabFilter license key has been acquired, the software will stop working and should be removed from your
computer.
In addition to any and all such possibilities that FabFilter may have in accordance with the law, FabFilter may
terminate without prior notice or warning in case of abuse of the FabFilter software as well as in case of
(personal) bankruptcy.
Page 42

Support
42
FabFilter shall give its reasonable commercial efforts to service any major version of any FabFilter software
including email support. FabFilter is entitled to terminate support for any major version of any FabFilter
software at any time at its sole discretion.
License Transfer
A Personal or Site License (not Educational or NFR) may be transferred to a third party. You will have to buy a
License Transfer to activate the "transfer"-option in your FabFilter account
. After this option has been
activated you will be able to transfer your license to any third party.
Third Party Software
VST is a trademark of Steinberg Media Technologies GmbH. RTAS and AAX are trademarks of Avid Technology,
inc. Audio Units is a trademark of Apple Computer, inc.
Applicable Law
This license agreement is governed by Dutch law. The courts of Amsterdam are authorized courts to rule on
any dispute that may arise from this license agreement.
Disclaimer
TO THE MAXIMUM EXTENT PERMITTED BY LAW, FABFILTER, FREDERIK SLIJKERMAN AND FLORIS KLINKERT,
AUTHORS OF THIS FABFILTER PRODUCT, SPECIFICALLY DISCLAIM ALL WARRANTIES, EXPRESSED OR
IMPLIED, INCLUDING BUT NOT LIMITED TO IMPLIED WARRANTIES OF NON-INFRINGEMENT,
MERCHANTABILITY AND FITNESS FOR A PARTICULAR PURPOSE. FABFILTER, FREDERIK SLIJKERMAN AND
FLORIS KLINKERT, DO NOT WARRANT THAT THE SOFTWARE WILL MEET YOUR REQUIREMENTS OR THAT THE
SOFTWARE WILL OPERATE ERROR-FREE OR UNINTERRUPTED. TO THE MAXIMUM EXTENT PERMITTED BY LAW,
FABFILTER, FREDERIK SLIJKERMAN AND FLORIS KLINKERT, SHALL NOT BE LIABLE FOR ANY DAMAGE A
FABFILTER PRODUCT MAY CAUSE OR DAMAGES THAT MAY ARISE OUT OF THE USE OF A FABFILTER PRODUCT
OR INABILITY TO USE A FABFILTER PRODUCT, INCLUDING BUT NOT LIMITED TO SPECIAL, INCIDENTAL,
CONSEQUENTIAL OR OTHER DAMAGES. IN NO EVENT FABFILTER, FREDERIK SLIJKERMAN OR FLORIS
KLINKERT WILL BE LIABLE FOR AN AMOUNT IN EXCESS OF TWO HUNDRED FIFTY EUROS (€ 250,00).
Next: Acknowledgements
See Also
Purchase FabFilter Volcano 2
Support
Page 43

Acknowledgements
43
Credits go to Gijs van Klooster for writing this help file. You can visit Gijs' web site at www.redhouse.nl .
FabFilter Volcano 2 comes with a large library of presets. Some of these were created by external sound
designers:
bManic (BM)
Ouroboros (O)
Visit the FabFilter sound designers page to read more about each sound designer.
Next: About FabFilter
See Also
Purchase FabFilter Volcano 2
Support
Page 44

About FabFilter
44
Beautiful sound. Fantastic workflow. These are the foundations of FabFilter. We create powerful audio plug-ins
with superb sound quality and innovative interfaces.
A unique perspective
At FabFilter, we make the best possible tools for music production and audio processing. To achieve this, we
continually rethink and challenge industry standards: we've never been afraid of reinventing the wheel.
Considering every little detail, we tune our algorithms and interfaces until they sound perfect, look amazing and
feel great to work with.
It's the sound that counts
Above everything else, you need superb sound quality. That's why we put a lot of effort into developing unique
audio processing algorithms, ranging from our famous resonating filters to transparent high-end EQ and
dynamics processing.
Innovative interfaces, great design
Every FabFilter plug-in has an easy-to-use, well-designed interface aimed at providing unsurpassed workflow.
Our plug-ins focus on the task you're performing at that specific moment: they expose the features you need,
when you need them. And because of our special attention to design, you'll be delighted every time you open a
FabFilter plug-in.
Don't take our word for it
We always set the highest standard for sound quality, usability and design to make truly great products that
raise the bar on what audio software can do. That's why we're very happy with the praise we've received from
users and press alike:
"In the decade since the release of its first plug-in, One, FabFilter has made an indelible mark on the
music production landscape." — Computer Music magazine
"While many other software developers are busy trying to model hardware, FabFilter is leaving them
in the dust by being visionaries and reaching into the future. FabFilter stuff is just on another level."
— Jeff Sanders
"FabFilter has an enviable reputation for making easy-to-use, powerful tools." — Music Tech
magazine
FabFilter was founded in 2002 by Frederik Slijkerman and Floris Klinkert, and is based in Amsterdam, The
Netherlands.
See Also
Support
FabFilter web site
 Loading...