

Page 1
Table of contents
Page 2

. . . . . . . . . . . . . . . . . . . . . . . . . . . . . . . . . . . . . . . . . . . . . . . . . . . . . . . . . . . . . . . . . . . . . . . . . . . . . . . 3
. . . . . . . . . . . . . . . . . . . . . . . . . . . . . . . . . . . . . . . . . . . . . . . . . . . . . . . . . . . . . . . . . . . . . . . . . . . . . . . 5
. . . . . . . . . . . . . . . . . . . . . . . . . . . . . . . . . . . . . . . . . . . . . . . . . . . . . . . . . . . . . . . . . . . . . . . . . . . . . . . 6
. . . . . . . . . . . . . . . . . . . . . . . . . . . . . . . . . . . . . . . . . . . . . . . . . . . . . . . . . . . . . . . . . . . . . . . . . . . . . . . 8
. . . . . . . . . . . . . . . . . . . . . . . . . . . . . . . . . . . . . . . . . . . . . . . . . . . . . . . . . . . . . . . . . . . . . . . . . . . . . . . 9
. . . . . . . . . . . . . . . . . . . . . . . . . . . . . . . . . . . . . . . . . . . . . . . . . . . . . . . . . . . . . . . . . . . . . . . . . . . . . . . 11
. . . . . . . . . . . . . . . . . . . . . . . . . . . . . . . . . . . . . . . . . . . . . . . . . . . . . . . . . . . . . . . . . . . . . . . . . . . . . . . 13
. . . . . . . . . . . . . . . . . . . . . . . . . . . . . . . . . . . . . . . . . . . . . . . . . . . . . . . . . . . . . . . . . . . . . . . . . . . . . . . 15
. . . . . . . . . . . . . . . . . . . . . . . . . . . . . . . . . . . . . . . . . . . . . . . . . . . . . . . . . . . . . . . . . . . . . . . . . . . . . . . 16
. . . . . . . . . . . . . . . . . . . . . . . . . . . . . . . . . . . . . . . . . . . . . . . . . . . . . . . . . . . . . . . . . . . . . . . . . . . . . . . 18
. . . . . . . . . . . . . . . . . . . . . . . . . . . . . . . . . . . . . . . . . . . . . . . . . . . . . . . . . . . . . . . . . . . . . . . . . . . . . . . 19
. . . . . . . . . . . . . . . . . . . . . . . . . . . . . . . . . . . . . . . . . . . . . . . . . . . . . . . . . . . . . . . . . . . . . . . . . . . . . . . 21
. . . . . . . . . . . . . . . . . . . . . . . . . . . . . . . . . . . . . . . . . . . . . . . . . . . . . . . . . . . . . . . . . . . . . . . . . . . . . . . 22
. . . . . . . . . . . . . . . . . . . . . . . . . . . . . . . . . . . . . . . . . . . . . . . . . . . . . . . . . . . . . . . . . . . . . . . . . . . . . . . 25
. . . . . . . . . . . . . . . . . . . . . . . . . . . . . . . . . . . . . . . . . . . . . . . . . . . . . . . . . . . . . . . . . . . . . . . . . . . . . . . 27
. . . . . . . . . . . . . . . . . . . . . . . . . . . . . . . . . . . . . . . . . . . . . . . . . . . . . . . . . . . . . . . . . . . . . . . . . . . . . . . 30
. . . . . . . . . . . . . . . . . . . . . . . . . . . . . . . . . . . . . . . . . . . . . . . . . . . . . . . . . . . . . . . . . . . . . . . . . . . . . . . 31
. . . . . . . . . . . . . . . . . . . . . . . . . . . . . . . . . . . . . . . . . . . . . . . . . . . . . . . . . . . . . . . . . . . . . . . . . . . . . . . 32
. . . . . . . . . . . . . . . . . . . . . . . . . . . . . . . . . . . . . . . . . . . . . . . . . . . . . . . . . . . . . . . . . . . . . . . . . . . . . . . 34
. . . . . . . . . . . . . . . . . . . . . . . . . . . . . . . . . . . . . . . . . . . . . . . . . . . . . . . . . . . . . . . . . . . . . . . . . . . . . . . 35
. . . . . . . . . . . . . . . . . . . . . . . . . . . . . . . . . . . . . . . . . . . . . . . . . . . . . . . . . . . . . . . . . . . . . . . . . . . . . . . 36
. . . . . . . . . . . . . . . . . . . . . . . . . . . . . . . . . . . . . . . . . . . . . . . . . . . . . . . . . . . . . . . . . . . . . . . . . . . . . . . 37
. . . . . . . . . . . . . . . . . . . . . . . . . . . . . . . . . . . . . . . . . . . . . . . . . . . . . . . . . . . . . . . . . . . . . . . . . . . . . . . 38
. . . . . . . . . . . . . . . . . . . . . . . . . . . . . . . . . . . . . . . . . . . . . . . . . . . . . . . . . . . . . . . . . . . . . . . . . . . . . . . 39
. . . . . . . . . . . . . . . . . . . . . . . . . . . . . . . . . . . . . . . . . . . . . . . . . . . . . . . . . . . . . . . . . . . . . . . . . . . . . . . 40
. . . . . . . . . . . . . . . . . . . . . . . . . . . . . . . . . . . . . . . . . . . . . . . . . . . . . . . . . . . . . . . . . . . . . . . . . . . . . . . 41
. . . . . . . . . . . . . . . . . . . . . . . . . . . . . . . . . . . . . . . . . . . . . . . . . . . . . . . . . . . . . . . . . . . . . . . . . . . . . . . 42
. . . . . . . . . . . . . . . . . . . . . . . . . . . . . . . . . . . . . . . . . . . . . . . . . . . . . . . . . . . . . . . . . . . . . . . . . . . . . . . 43
. . . . . . . . . . . . . . . . . . . . . . . . . . . . . . . . . . . . . . . . . . . . . . . . . . . . . . . . . . . . . . . . . . . . . . . . . . . . . . . 44
. . . . . . . . . . . . . . . . . . . . . . . . . . . . . . . . . . . . . . . . . . . . . . . . . . . . . . . . . . . . . . . . . . . . . . . . . . . . . . . 46
. . . . . . . . . . . . . . . . . . . . . . . . . . . . . . . . . . . . . . . . . . . . . . . . . . . . . . . . . . . . . . . . . . . . . . . . . . . . . . . 48
. . . . . . . . . . . . . . . . . . . . . . . . . . . . . . . . . . . . . . . . . . . . . . . . . . . . . . . . . . . . . . . . . . . . . . . . . . . . . . . 49
Table of Contents
About FabFilter Pro-Q 3
Overview
Loading presets
Purchasing FabFilter Pro-Q 3
Support
2
Introduction
Quick start
Using FabFilter Pro-Q 3
Knobs
Display and workflow
Band controls
Dynamic EQ
Solo
Full Screen mode and resizing
Piano display
Stereo options
Surround
Processing mode
Spectrum analyzer
EQ Match
Spectrum Grab
Output options
MIDI learn
Undo, redo, A/B switch
Presets
Saving presets
How presets are stored
Purchasing FabFilter Pro-Q 3
Entering your license key
Support
Upgrading to Pro-Q 3
Manual installation
VST plug-in versions
External side chaining
License agreement
Acknowledgements
About FabFilter
Page 3
About FabFilter Pro-Q 3
3
Since its original release in 2009, FabFilter Pro-Q has become the trusted workhorse EQ plug-in for many
engineers and producers around the world, widely praised for its superb workflow, excellent sound quality and
extensive feature set. With version 3, we're bringing Pro-Q to a new level, introducing features like dynamic
EQ, surround support up to Dolby Atmos 7.1.2, per-band mid/side processing, and much more.
FabFilter Pro-Q 3 gives you the highest possible sound quality, a complete feature set, and a gorgeous,
intelligent interface that is designed to help you get 'that' sound quickly and easily.
New in version 3
At first glance, FabFilter Pro-Q 3 looks quite similar to its predecessor. But looks are deceiving! Of course, the
clean design and intelligence of Pro-Q 2 is still present, but a lot of exciting new functionality has been added to
improve your sound and workflow:
Dynamic EQ for any of the 24 bands (Shelf or Bell at any slope), with Dynamic Range and Threshold
controls and an intelligent Auto Threshold mode.
Dynamic EQ bands still feature perfect analog EQ shape matching and also support Linear Phase mode.
Easily create dynamic bands in the EQ display by holding the Alt key while dragging the result curve or
double-clicking in the display.
Surround support (up to 7.1.2 Dolby Atmos), with intelligent per-band speaker selection.
Per-band mid/side or left/right processing options.
New Brickwall LP/HP filter slope.
New Flat Tilt filter shape: a flat tilting correction curve over the whole audible frequency spectrum.
Improved spectrum analyzer with frequency collision indication and the option to show the spectrum of
any other Pro-Q 3 instance: simply hover over the analyzer button in the bottom bar and choose another
Pro-Q 3 plug-in instance here. Instances are named automatically and can be renamed if needed.
Improved EQ parameter value display with bypass, shape and delete buttons and easy access to the band
menu.
Improved Spectrum Grab with labels indicating the most important peaks.
Improved EQ band menu (also accessible via the value display), with Make Dynamic, Invert Gain options
and more.
Improved EQ Match, adding the possibility to match with a post spectrum from another Pro-Q 3 instance
in your session.
Improved Auto Gain with channel weighting and an estimated correction of dynamic gain for a better
overall gain adjustment.
Improved MIDI Learn with the ability of controlling the active band using a single set of controls on your
Page 4
MIDI controller.
Overall new and fresh design.
4
Other key features
And of course, all the goodness of the Pro-Q 2 is still here: highest possible sound quality, Natural and Linear
Phase processing, univeral slope support for all EQ shapes, EQ match, a gorgeous, resizeable interface with full
screen more for easy and precise editing, up to 24 EQ bands, intelligent band solo mode, stereo or mid/side
processing, intelligent multi-band selection and editing for maximum ease and efficiency, spectrum grab, GPUpowered graphics acceleration, double-click text entry of parameter values, different display ranges: 3 dB and
6 dB ranges for mastering, 12 dB and 30 dB for mixing, Pro Tools hardware control surfaces support, MIDI
Learn, undo/redo and A/B comparison, and an extensive help file with interactive help hints.
Upgrading to Pro-Q 3
Upgrading from Pro-Q version 2 to the new Pro-Q 3 is safe and easy: installing Pro-Q 3 will not replace or
delete the previous Pro-Q 2 and Pro-Q version 1 plug-ins. All versions will co-exist and can be used at the same
time. This ensures that you can open old songs that use Pro-Q 2 or Pro-Q 1 without problems! Of course,
FabFilter Pro-Q 3 opens all presets from Pro-Q 2 and Pro-Q 1 without problems. See Upgrading to Pro-Q 3
more information.
FabFilter Pro-Q 3 is available in VST, VST3, AU (Audio Units), AAX Native and AudioSuite formats (all both 64bit and 32-bit).
for
Windows requirements
32-bit: Windows 10, 8, 7, Vista or XP
64-bit: Windows 10, 8, 7 or Vista (x64)
VST 2/3 host or Pro Tools
Next: Quick start
See Also
Using FabFilter Pro-Q 3
Acknowledgements
macOS requirements
OS X 10.8 or higher
AU or VST 2/3 host or Pro Tools
Intel processor
Page 5

Quick start
5
The installer will copy the FabFilter Pro-Q 3 plug-in into the common VST, VST 3, AU (macOS only) and Pro
Tools plug-in folders on your computer. On macOS, the global plug-in folders in /Library/Audio/Plug-Ins are
used.
In most cases, your host will then recognize the plugin automatically. However, if the instructions below do not
work, see Manual
Cubase
Choose an empty insert slot, for example in the Mixer, and select FabFilter Pro-Q 3 from the menu that
appears. To use the MIDI features in Pro-Q 3, create a new MIDI track and set its output to the Pro-Q 3
instance you have just created. (The VST 3 version of Pro-Q 3 can be found in the EQ section.)
Logic Pro
Choose an empty insert slot on one of your audio tracks, instrument tracks or buses and select FabFilter
Pro-Q 3 from the pop-up menu. You will find FabFilter Pro-Q 3 in the Audio Units > FabFilter section
(named FF Pro-Q 3).
Ableton Live
In Session view, select the track you would like to place FabFilter Pro-Q 3 on, for example by clicking the
track name. At the left top of Ableton Live's interface, click on the Plug-in Device Browser icon (third icon
from the top). From the plug-ins list, double-click FabFilter/FabFilter Pro-Q 3, or drag it onto the track.
Pro Tools
Choose an empty insert slot on one of your audio tracks, instrument tracks or buses and select FabFilter
Pro-Q 3 from the pop-up menu in the EQ section.
To begin, just open the plug-in and drag the yellow line in the display or double-click anywhere to create new
EQ bands. Enjoy!
installation instead.
Next: FabFilter Pro-Q 3 overview
See Also
Overview
Page 6
Overview
See Also
6
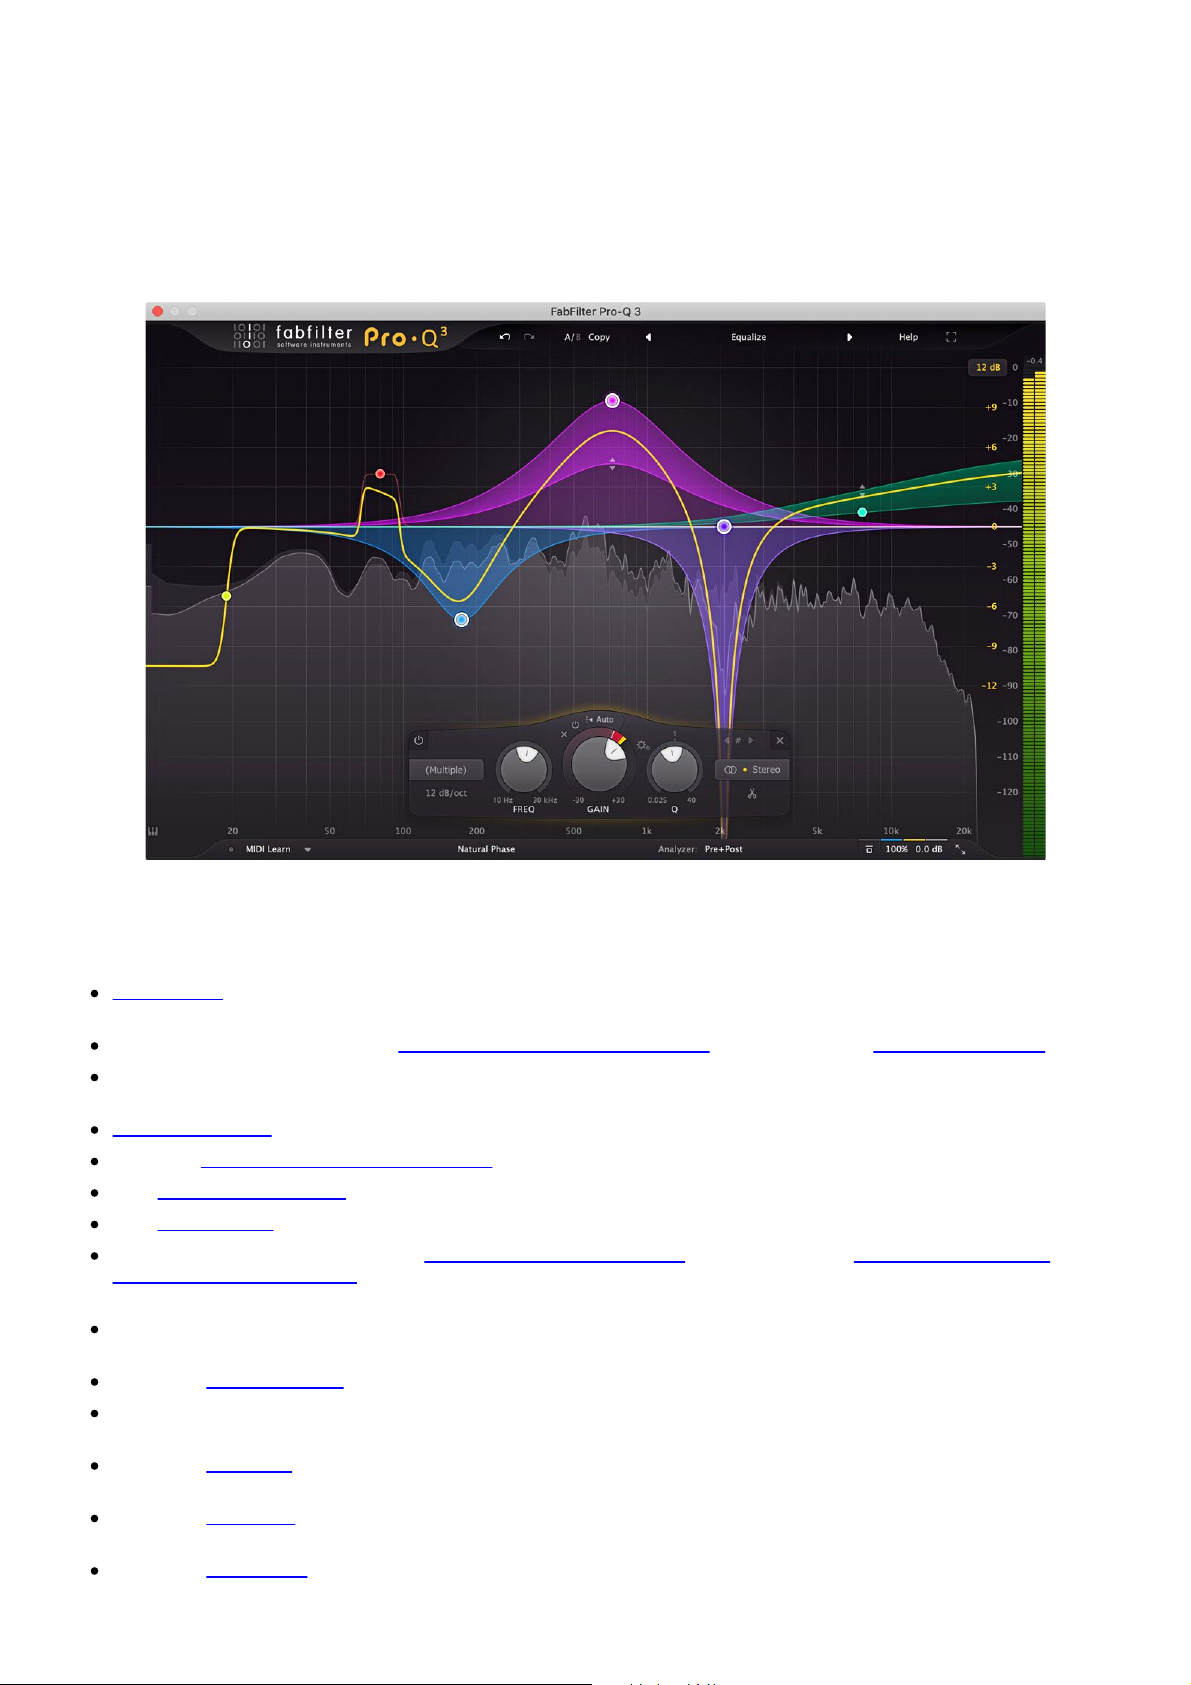
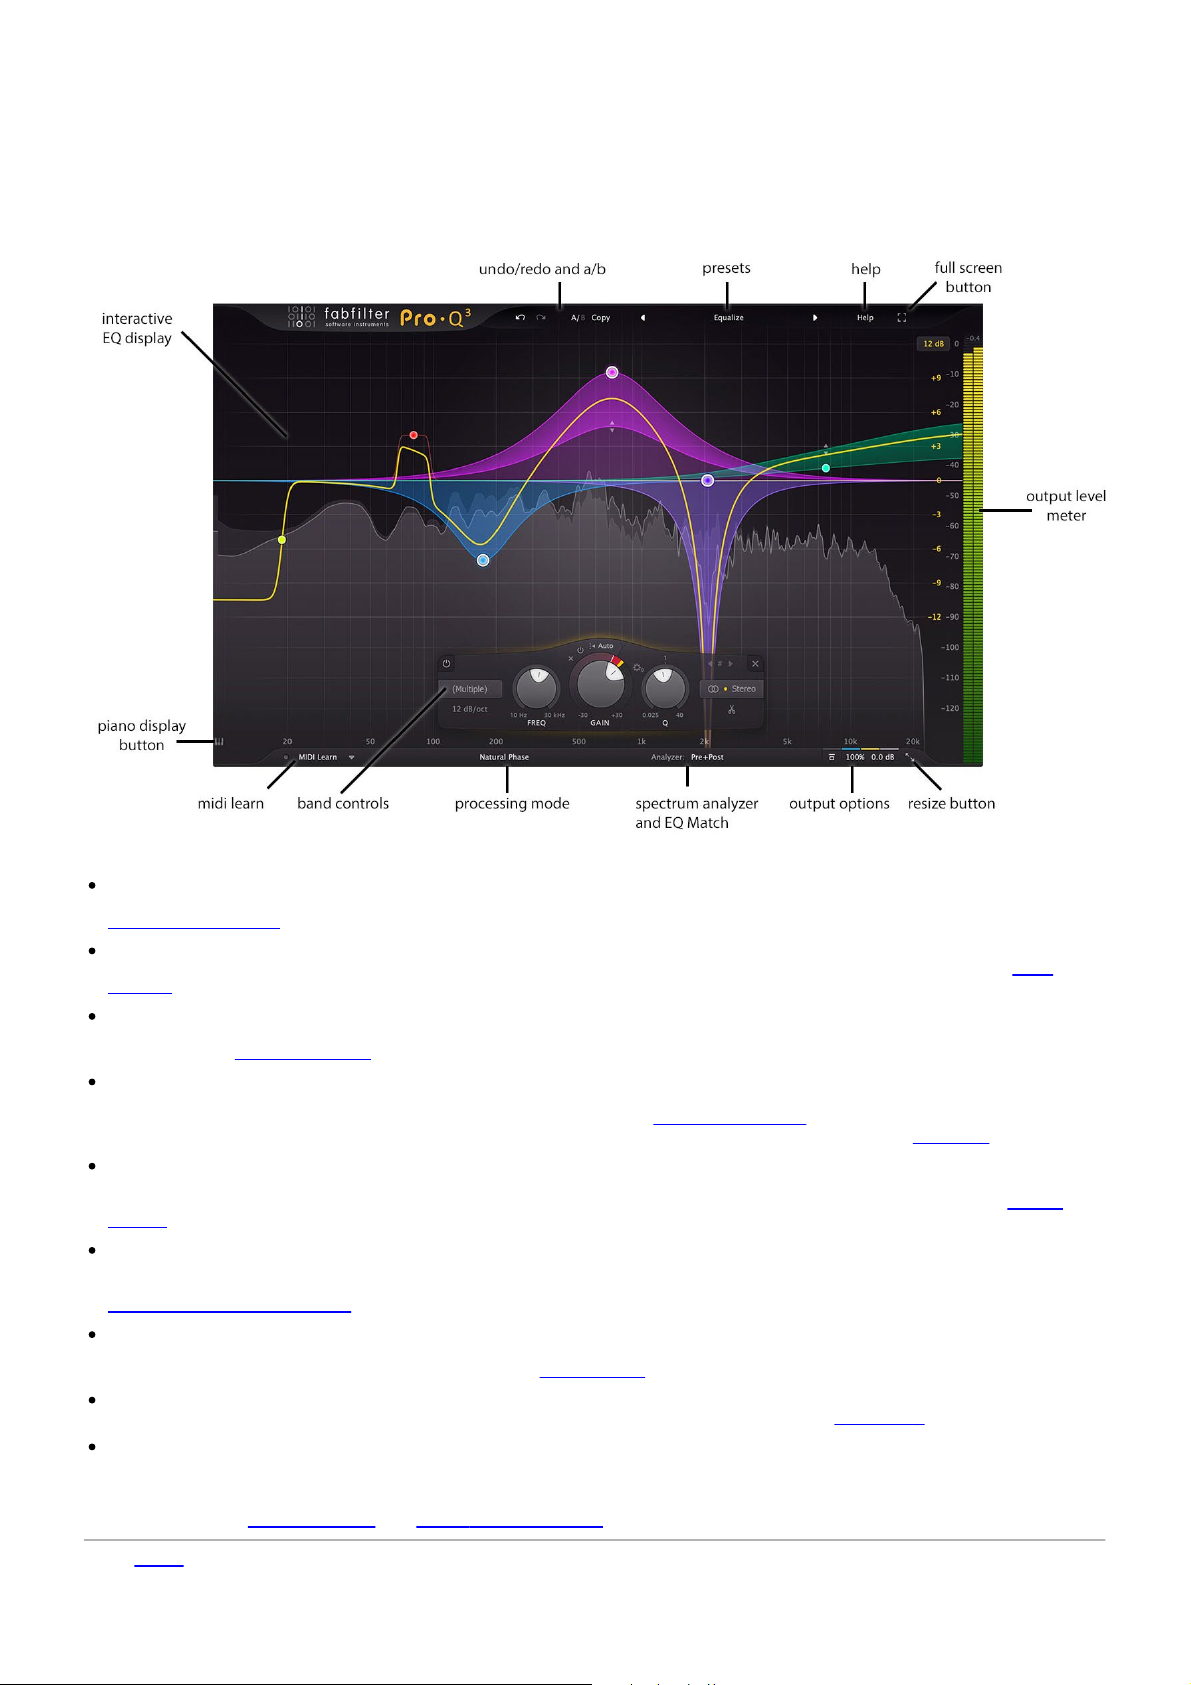
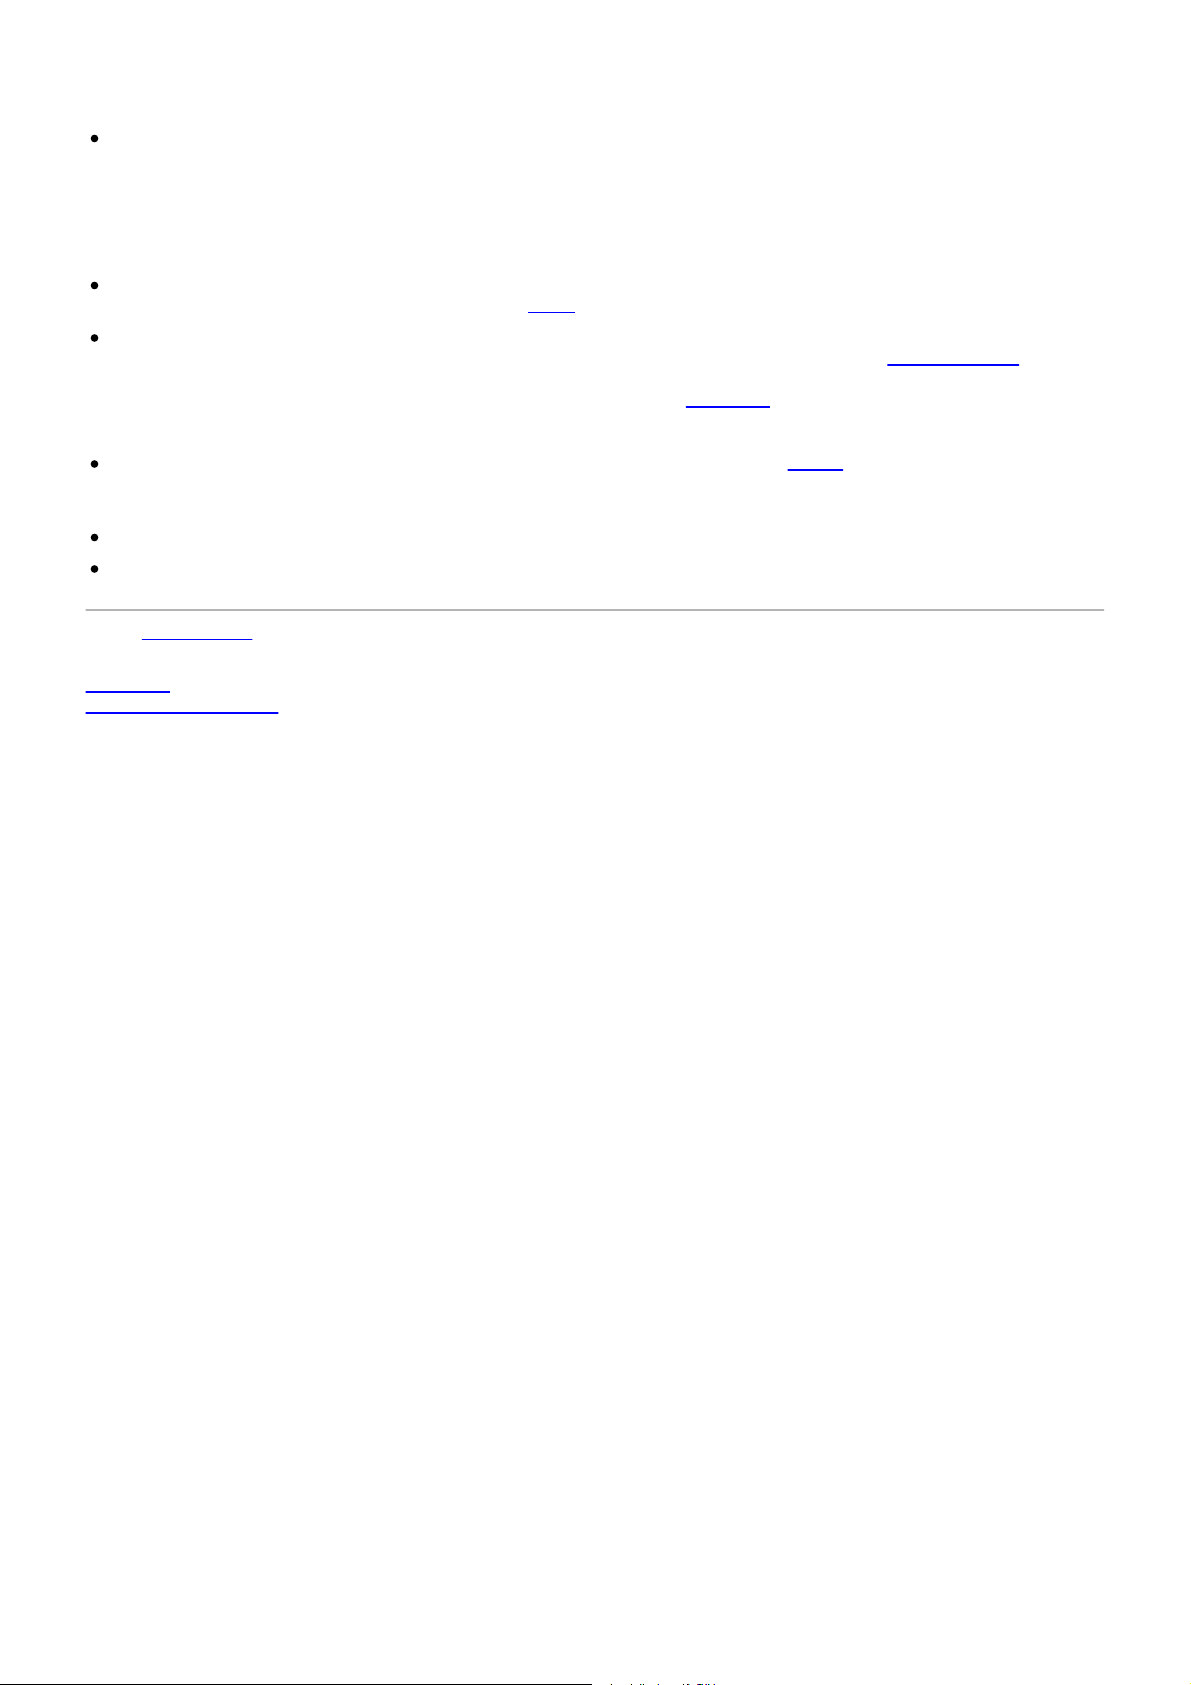
The interface of FabFilter Pro-Q 3 is simple and straightforward. The interactive EQ display fills the whole plug-in window, and
lets you create and adjust EQ bands using the mouse. When you
floating above the display, positioned
currently
phase), spectrum analyzer settings, global
selected EQ bands. The bottom bar offers features like processing mode (zero latency, Natural Phase or linear
under the selected bands. Using the band controls, you can change the settings of the
bypass, phase-invert, auto-gain, gain scale and output level/panning.
create or select bands, the band controls will appear,
Interactive EQ display
The interactive EQ display shows you in a glance what's going on and lets you easily create and
Display and workflow
Band selection controls
The controls below the EQ display adjust the parameters of the currently selected EQ bands in
controls.
Processing mode
FabFilter Pro-Q 3 can work in zero-latency mode, Natural Phase mode or in linear-phase mode
resolution. See Processing
Spectrum analyzer and EQ Match
Via the Analyzer button, you can enable or disable the real-time spectrum analyzers for the
external signals, and you can customize the analyzer settings. See
you can also access
Output options
On the far right of the bottom bar, you can bypass the entire plug-in, invert the output phase,
gain, show/hide the output metering, apply an overall gain scale and
options.
Resize and Full Screen mode
Using the Resize button at the right of
Full Screen
Full Screen mode and resizing
Piano display
Using the Piano Display button, you can toggle between the normal frequency scale and a piano
which you can easily quantize band frequencies. See Piano display
MIDI learn
MIDI Learn lets you easily associate any MIDI controller with any plug-in parameter. See
Presets, undo, A/B, help
With the preset buttons, you can easily browse through the factory presets or save your own
them in other songs. The Undo, Redo, A/B and Copy buttons at the top
changes and switch between different states of
information. See
button at the right top corner, you can enter Full Screen mode, in which Pro-Q 3 fills the whole screen. See
.
mode.
pre-EQ, post-EQ and
EQ Match mode, which lets you match the spectrum of a reference signal. See EQ Match
the bottom bar, you can choose a desired interface size. In addition, using the
.
Loading presets
and Undo, redo, A/B switch.
the plug-in. Finally, the Help menu provides access to help and version
Spectrum Analyzer
adjust the output level and panning. See Output
.
of the plug-in interface enable you to undo your
. Via the same settings panel,
MIDI Learn
settings so you can re-use
edit EQ bands. See
the display. See Band
with variable processing
.
enabled or disable auto-
keyboard display, via
.
Next: Knobs
Page 7

Quick start
7
Page 8
Knobs
8
It is easy to control FabFilter Pro-Q 3's parameters with the large round knobs. They will light up when you
move the mouse cursor around to indicate that you can adjust them. The moment you move the mouse cursor
over a knob, a parameter value display will pop up, which shows the name and the current value of the
parameter.
All knobs support four ways of control:
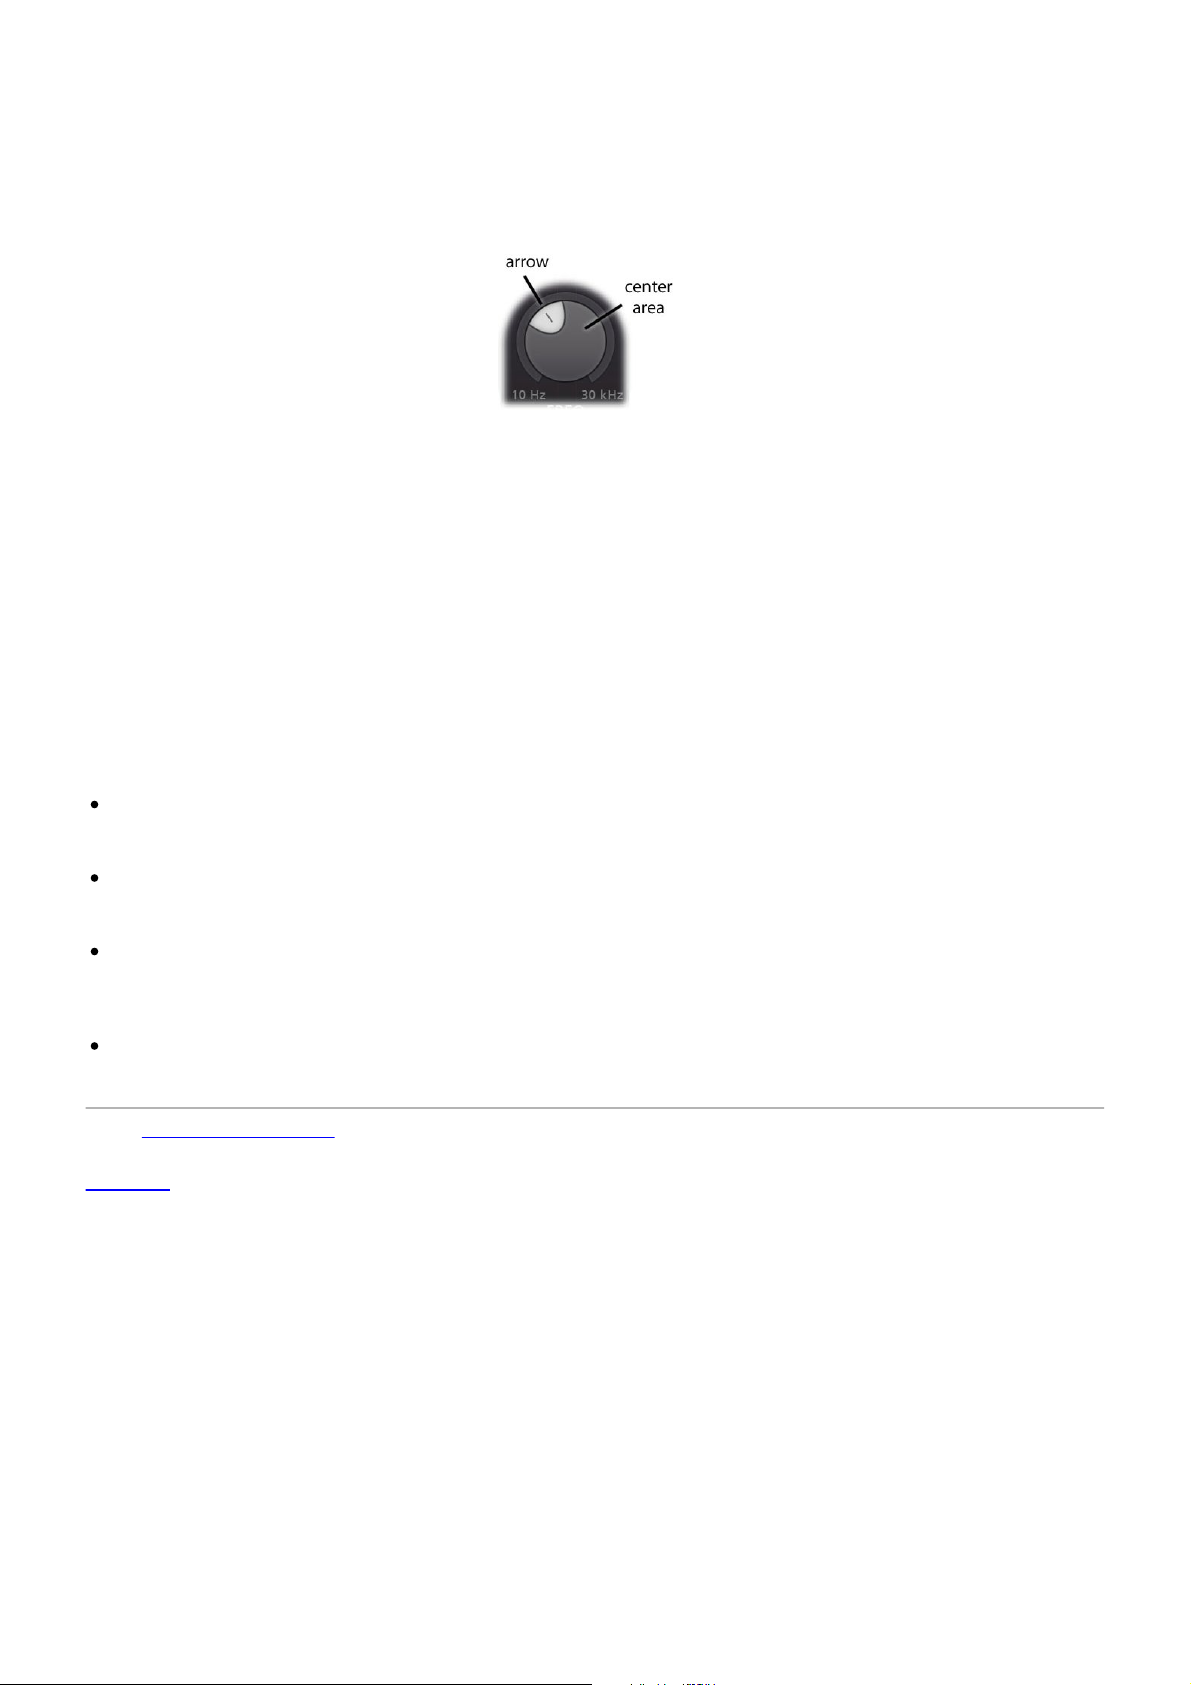
1. Vertical mode
Click on the center area of a knob and drag up or down to rotate it. The knob reacts to the speed with
which you are dragging, so if you move the mouse slowly, you make precise adjustments.
2. Rotate mode
Grab the arrow of the knob and drag it around. By moving the mouse cursor further away from the
knob while dragging it, you can make precise adjustments.
3. Mouse wheel mode
Perhaps the easiest way to make adjustments is by using the mouse wheel when you hover over a
knob. This mode works for all the knobs and possible panning rings. (On Windows, you might need to
click in the plug-in interface first to make sure it is the active window.)
4. Text entry mode
Double-click a knob to enter an exact value using the keyboard.
Tips
To reset a knob to its default position, hold down the Ctrl key (Windows) or Command key (macOS) and
click the knob once. Note: In Pro Tools, Pro-Q 3 uses the default Pro Tools keyboard shortcut for reset:
Alt+click.
To fine-tune a value when using vertical drag mode or the mouse wheel, hold down the Shift key while
dragging or moving the mouse wheel. Note: In Pro Tools, Pro-Q 3 uses the default Pro Tools keyboard
shortcut for fine tune: Ctrl+drag on Windows or Command+drag on macOS.
There are several handy shortcuts in text entry mode. With frequency values, you can type e.g. '1k'
to set the value to 1000 Hz, and also 'A4' for 440 Hz, or even strings like 'C#3+13'. With dB values, you
can type e.g. '2x' to get +6 dB (the value that corresponds to two times louder). With all values, you can
also type a percentage (e.g. '50%' will put a knob exactly in the middle position).
Sometimes, knobs in our plug-in interfaces are linked: these be adjusted simultaneously by holding
down the Alt key (Shift key in Pro Tools) while dragging on one of them. For example, an output level
and input level setting of a plug-in could be adjusted simultaneously (in the opposite direction) this way.
Next: Display and workflow
See Also
Overview
Page 9
Display and workflow
9
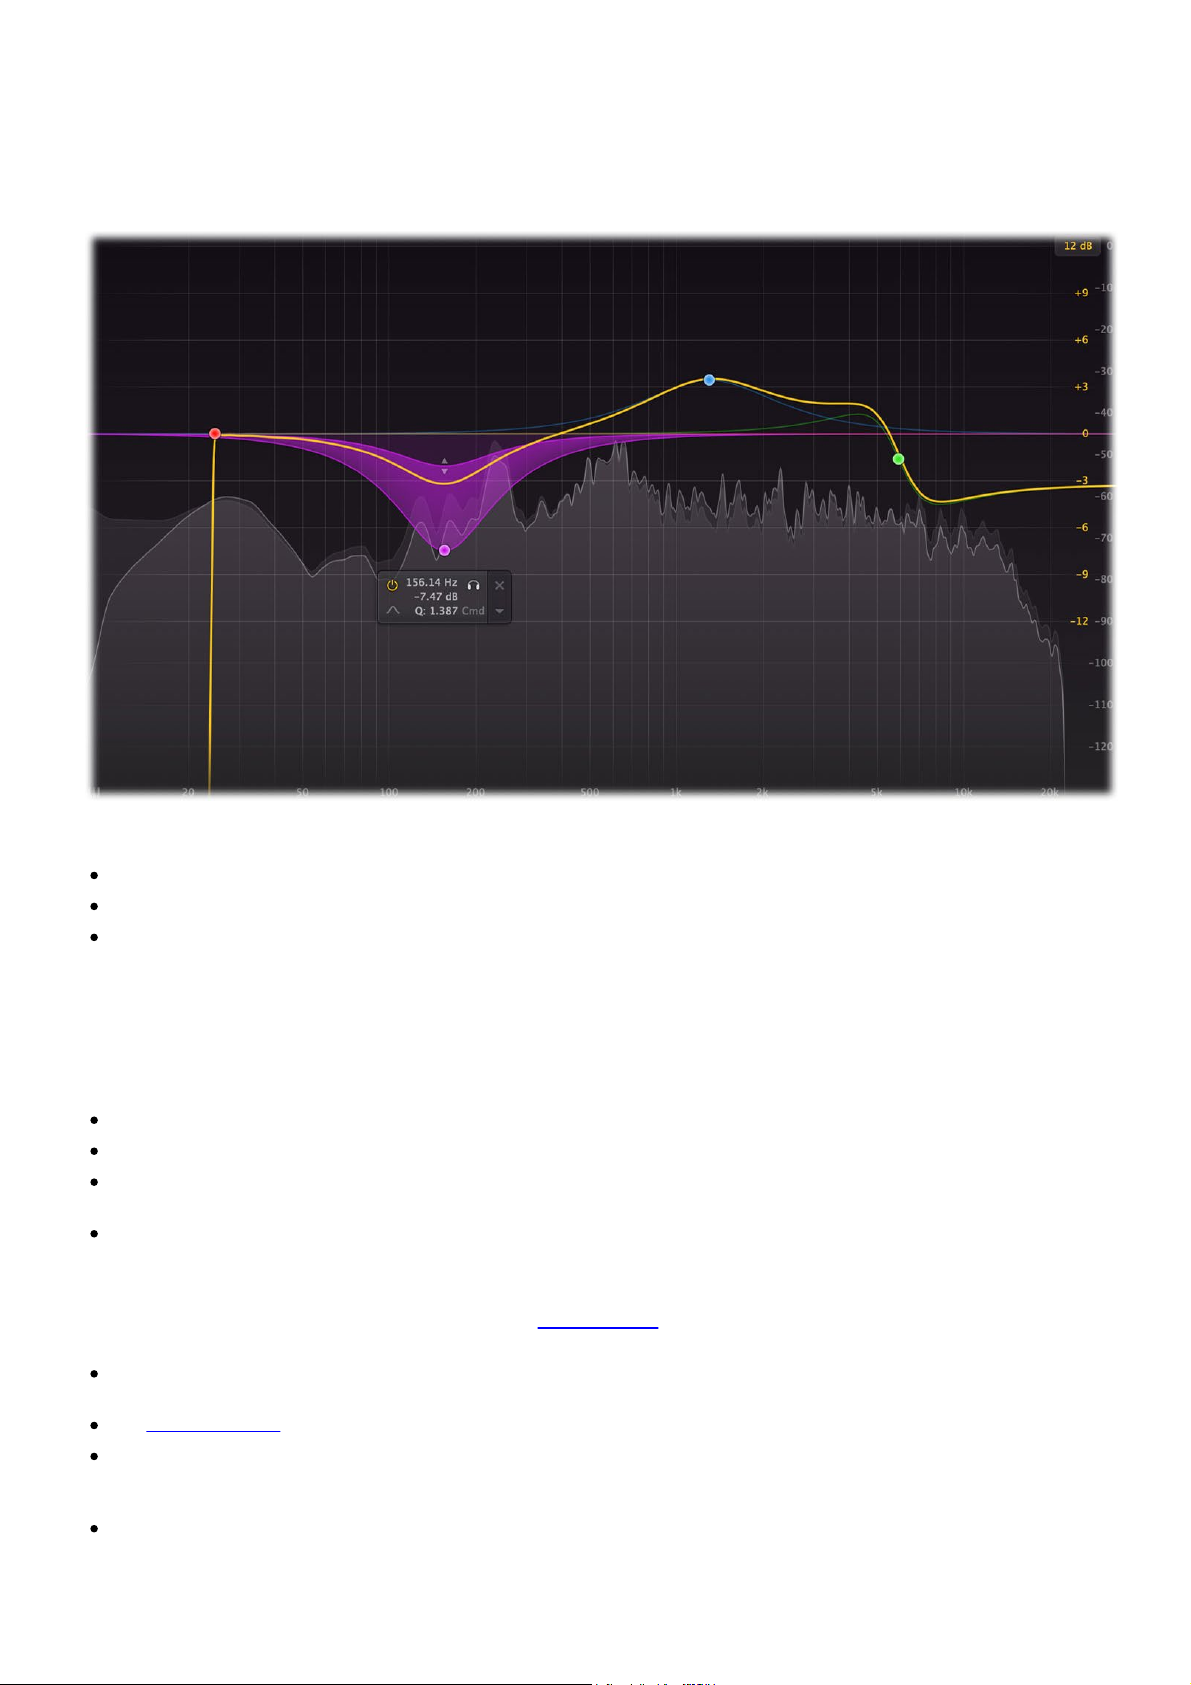
The large display shows all EQ bands and lets you easily create new bands and edit them. The thick yellow curve
shows the overall frequency response and dynamic behavior of the equalizer. The EQ display looks
straightforward, but holds a lot of intelligence and smart features. We strongly
read this topic and learn about all its options and shortcuts...
it will highly improve your workflow!
recommend to take some time to
simple and
Creating bands
To add a new EQ band, simply click on the yellow overall curve and drag it up or down.
Alternatively, double-click or Ctrl-click (Command-click on macOS) on the display background.
Hold down the Alt key while creating a band using the method above, to create a dynamic band instead
of a normal band.
The shape of newly created curves is determined automatically depending on where you click,
used to this, it's a real time-saver! Do you need a Notch curve? Just
display. Want a Low Cut or High Cut filter? Double-click
yellow curve at the left or right
Selecting bands
Click the EQ band's dot or the colored area around it to select it.
Click and drag on the display background to select adjacent bands by dragging a rectangle around them.
Hold down Ctrl (Command on macOS) and click another dot to select multiple bands. Hold down Shift
and click a dot to
Deselect all bands by clicking anywhere on the display background.
Adjusting and editing bands
Once you have selected one or more EQ bands, the display highlights the shapes of the selected
now of course edit the EQ settings via the floating band controls
dragging
them around:
Click and drag a selected dot to adjust the frequency and gain of all selected bands. If you have multiple
bands selected, the gain of
For dynamic bands, drag the dynamic range indicator up or down to adjust the dynamic range.
Move the mouse wheel to adjust the Q setting, making the selected bands narrower or wider. This works
while dragging or when the mouse pointer is above a curve.
by holding down Ctrl (Command on macOS) while dragging vertically.
Move the mouse wheel while holding down Alt to adjust the dynamic range setting or Ctrl (Command on
macOS) to adjust the gain. Hold both Alt and Ctrl (Alt+Command on macOS) to perform a linked change,
trading gain for dynamic range.
select a consecutive range of bands.
end of the display.
all selected bands will be scaled relative to each other.
in the far left or far right areas. Shelving filter? Drag the
double-click in the far low area of the
, but the easiest way to adjust them is simply by
Alternatively, adjust the Q of all selected bands
and once you get
bands. You can
Page 10
Hold down Shift while dragging (or while using the mouse wheel) to fine-tune the settings of the selected
bands.
10
Hold down Alt while dragging to constrain to horizontal adjustments (frequency) or vertical adjustments
(gain or Q, depending on the
Ctrl/Command key).
Hold down Alt and click the dot on an EQ band once to toggle its bypass state (enabling or disabling the
band).
Hold down Ctrl+Alt (Command+Alt on macOS) and click the dot on an EQ band once to change its shape.
Hold down Alt+Shift and click the dot on an EQ band once to change its slope.
Double-click a dot to enter values in the EQ parameter display (using the Tab key to step through
Frequency, Gain and Q) or double-click the values in the
can enter frequencies in various ways, like
"100", "2k", "A4" or "C#2+13".
parameter value display directly. Note that you
If you right-click on the dot for an EQ band, a pop-up menu appears with various band settings. This is a
quick way to modify the EQ band while you're working in the
display.
EQ parameter display
Next to each EQ band's dot in the display, the EQ parameter display shows the exact parameter values for the EQ
band, along with quick controls to bypass or delete a band, enter solo mode
, and change its shape. You can
double-click a value in the display directly to edit it. Click the triangular menu button to access the band menu
with more options. In case you find the EQ parameter display to be distracting, you can turn it off via the Show
EQ Parameter Display option on the Help menu.
Display range
Note that two display scales are drawn: the yellow scale corresponds to the EQ band curves and
curve. The gray scale at the far right is used by the spectrum analyzer
corner of the display at the top of the yellow scale, there is a drop-down button to
+/- 3 dB, 6 dB, 12 dB or 30 dB. When you are dragging
range will expand automatically as
needed.
a curve outside the current range of the display, the
and output level meter. In the top-right
choose the display range:
yellow overall
Horizontal zooming
Sometimes it might be useful to zoom in to a specific frequency for extra precise editing. You
by clicking and dragging the frequency scale at the bottom of the EQ display,
just above the bottom bar. You can
can easily do this
do the following:
Click and drag up and down to zoom in and out at the frequency you have clicked on.
While zoomed in, you can also drag left and right to move the frequency scale.
Just double-click the scale to return to its default full range.
Tips
In Full Screen mode, available via the button at the right top of the interface, the EQ display will fill the
whole screen so you can make very precise adjustements.
See Full Screen mode and resizing
.
To quantize a frequency without using the piano display, just double-click a curve dot in the display or
the Frequency knob in the EQ controls, and enter a value like
"A4" or "C#2".
It is possible to turn off the automatic adjustment of the display range via the Auto-Adjust Display
Range option on the Help menu.
Even though frequencies above 20 kHz are generally inaudible, the display extends to 30 kHz so you can
put filters above this limit. The left part of the filter, extending into the
affects the sound. This gives you even more possibilities to
shape the frequency response of the equalizer
audible frequency spectrum, still
just the way you need it.
Next: Band controls
See Also
Overview
Dynamic EQ
Spectrum Grab
Page 11
Band controls
11
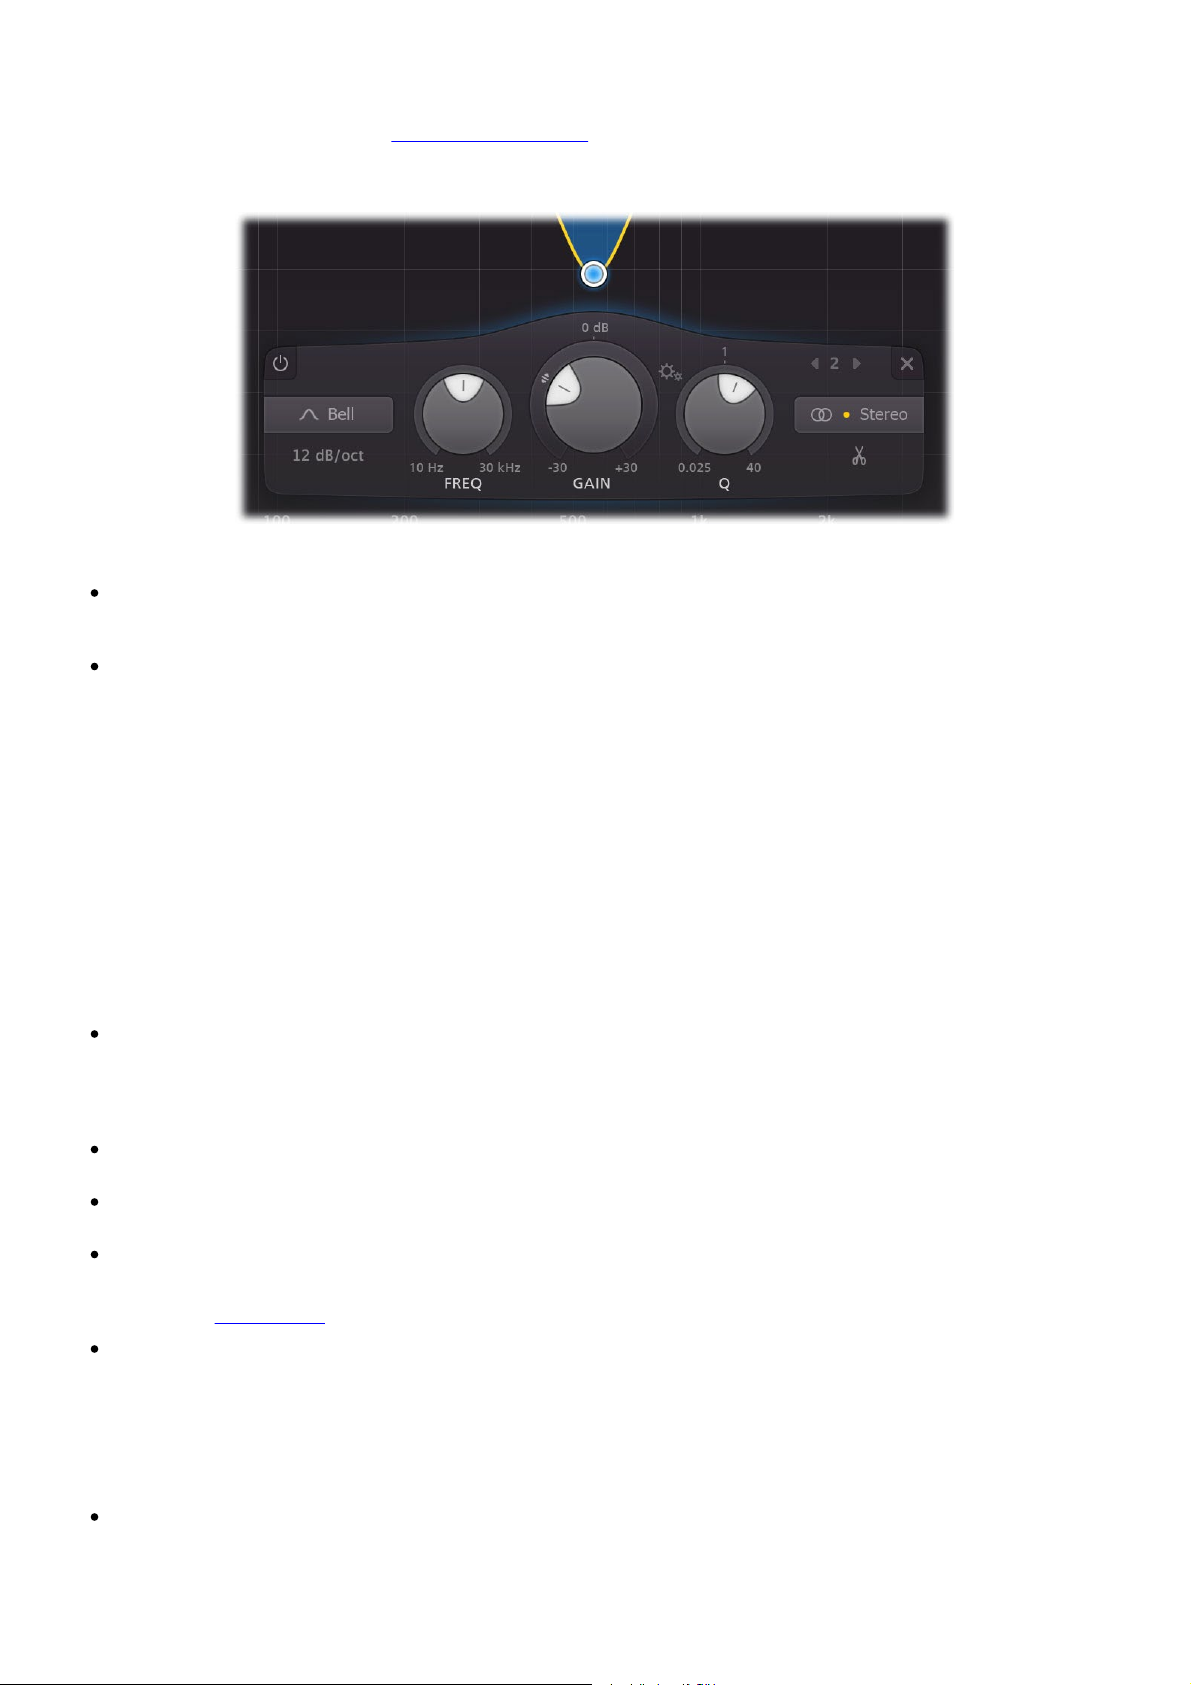
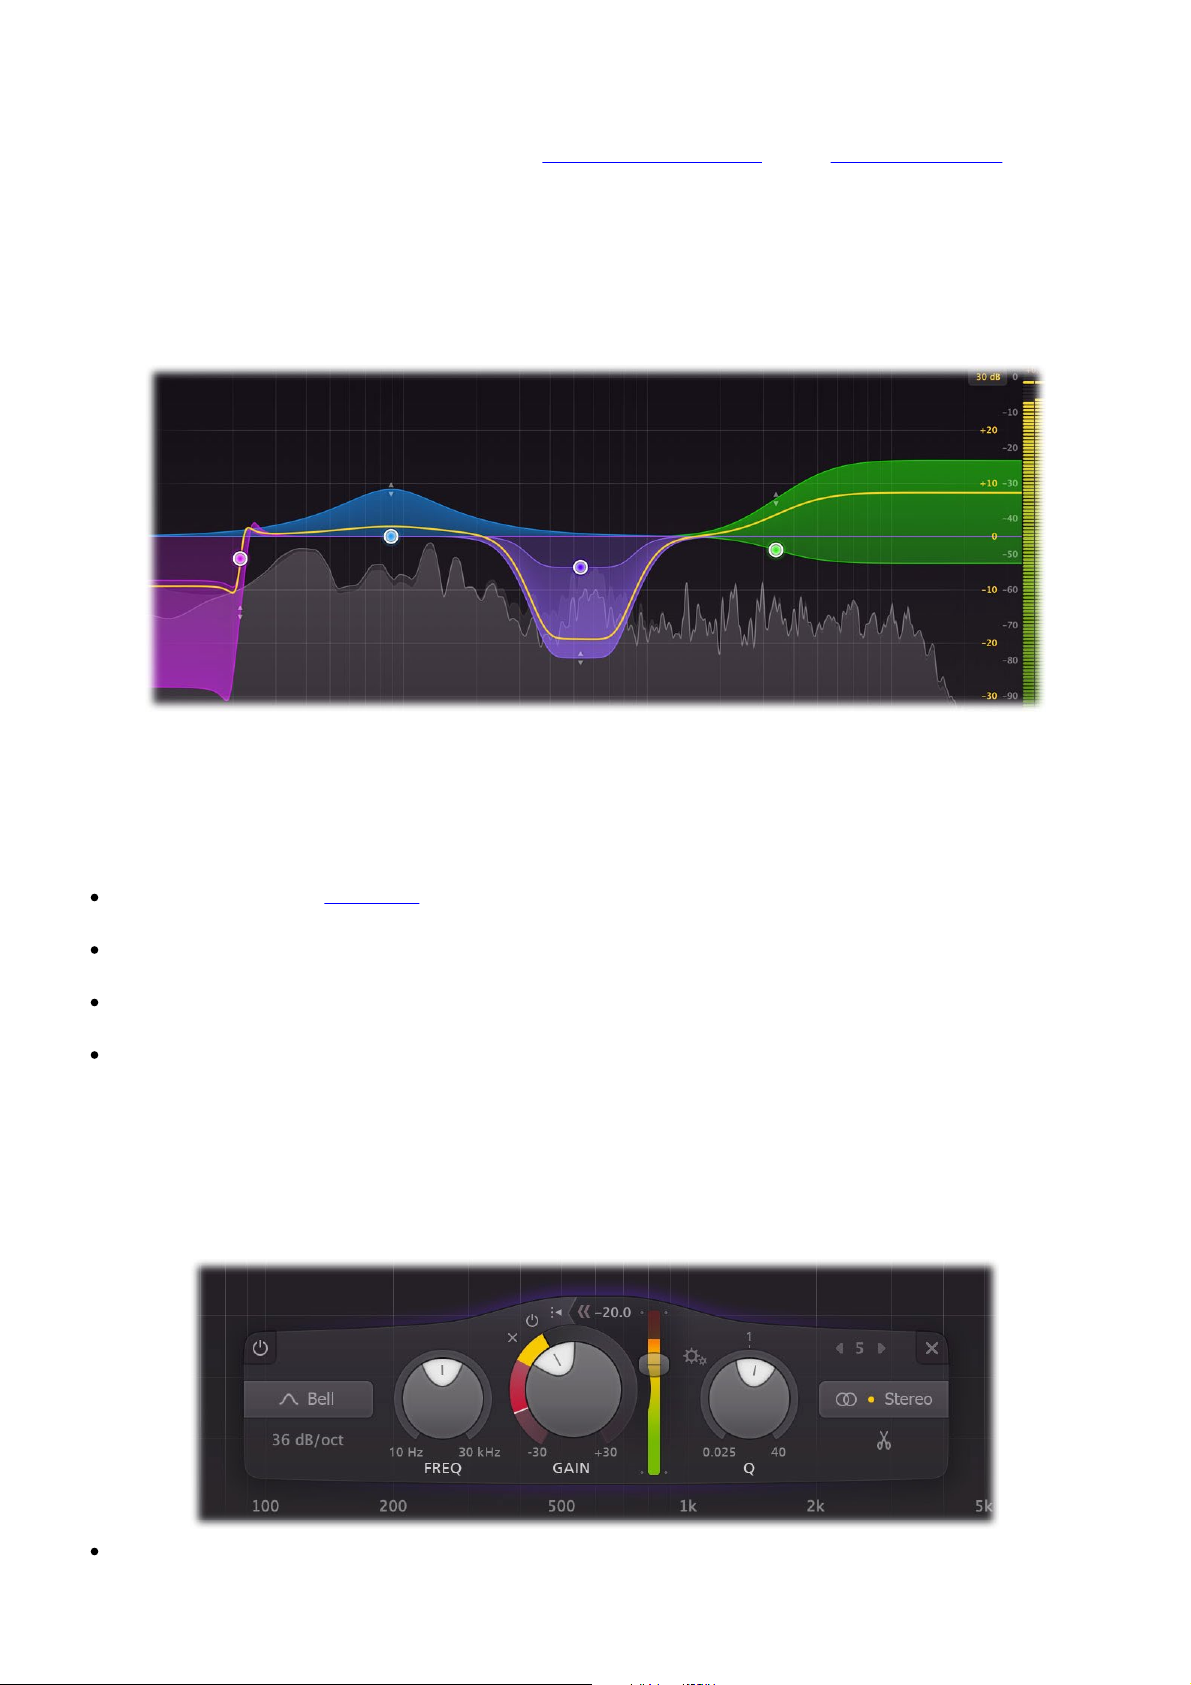
When you select EQ bands in the interactive EQ display, the floating band controls will automatically appear,
right under the selected bands at the bottom of the display. The band controls show the current settings of the
selected EQ bands and enable you to adjust them precisely.
From left to right, the following settings are available:
The bypass button at the left top lets you easily bypass the selected EQ bands. Note that you can also
bypass an EQ band by Alt-clicking its dot in the display. While an EQ band is bypassed, it is dimmed in
the display and a red light glows in the bypass button.
The shape button selects the filter shape of the selected bands:
1. Bell, the traditional parametric EQ shape and probably the most versatile of them all
2. Low Shelf, to boost or attenuate low frequencies
3. Low Cut, to cut all sound below the filter frequency
4. High Shelf, to boost or attenuate high frequencies
5. High Cut, to cut all sound above the filter frequency
6. Notch, to cut a small section of the spectrum
7. Band Pass, to isolate a section of the spectrum
8. Tilt Shelf, to tilt the spectrum around a certain frequency
9. Flat Tilt, to tilt the spectrum using a flat curve, around a certain frequency
Note: you also change the shape of an EQ band by Ctrl+Alt-clicking its dot (Command+Alt on macOS) in
the display.
The slope button below the shape parameter sets the steepness of the filter from 6 dB/octave to 96
dB/octave (and even up to Brickwall for Low Cut and High Cut filters). In Pro-Q, the slope not only
applies to the usual Low Cut and High Cut filters, but to all filter shapes! This allows you to make highly
surgical adjustments if needed. So for example, you can make ultra-narrow Bell or Notch filters or very
steep Shelving filters.
The frequency knob sets the frequency of the selected band between 5 Hz and 30 kHz. If multiple bands
are selected, they are adjusted in parallel.
The gain knob sets the gain in dB of the selected bands between -30 and +30 dB. This setting is only
used for Bell and Shelving filter types.
The dynamic range ring sets the range of dynamic EQing in dB, ranging from -30 to 30 dB (possibly
limited by the gain setting limits). Choosing a positive or negative dynamic range will make the band
dynamic and expose additional dynamic controls. This setting is only available for Bell and Shelving filter
types. See Dynamic EQ
The Q knob sets the bandwidth of the selected bands, widening or narrowing them. The Q cannot be
adjusted when a 6 dB/octave slope is used.
Note: Because there are different interpretations of Q values in various EQ plug-ins and scientific papers,
we have chosen the value 1 to correspond to the default bandwidth. For the shelf filters, the internal Q
values are chosen such that they result in a good range of shelf shapes. Keep this in mind when trying to
reproduce the filter shapes of another EQ plug-in in Pro-Q: the interpretation of the Q values might not
be the same.
Using the Gain-Q interaction button, between the gain and Q knobs, you can enable a subtle, analogEQ-like gain-Q interaction. When enabled, Q and gain influence each other in a pleasant way often found
in analog mixing consoles. Essentially, this means that the Q automatically gets a bit narrower when gain
is increased, and the other way around, a little gain is added when the Q gets very narrow.
.
Page 12
Note: Gain-Q interaction only affects the Bell filter shape. Pro-Q remembers the last Gain-Q interaction
setting that you've chosen and will use this for new instances of the plug-in.
12
The previous- and next band buttons let you step through the current available bands in the display, in
the order in which they currently appear in the display. In between, the band number of the current band
is shown to help you to identify this band in the host when automating EQ parameters.
Note: When creating new bands, they will be numbered 1, 2, 3 and so on. But when you delete a band,
the others won't renumber, in order to ensure that currently written automation in your host still controls
the correct band.
The delete button at the right top removes the selected EQ bands. If you have accidentally deleted some
bands, you can easily restore them using the Undo
button at the top of the plug-in interface.
The stereo placement button controls which channels are affected by the selected bands. The split
button (scissors icon) splits the selected bands into L and R (or M and S) bands. See Stereo options
When using Pro-Q on a surround channel, the stereo placement button will open a panel with more
extensive stereo placement and speaker selection setting. See Surround
.
Tips
Double-click any knob to enter the value directly using the keyboard. See Knobs for more information.
For the Frequency knob, you can enter values in various ways, like "100" or "2k", but also "A4" or
"C#2+13".
To hide the band controls, simply deselect all bands by clicking on the display background.
Hold down the Alt key while changing the gain or dynamic range knobs in a reverse-linked way (i.e. to
trade gain for dynamic range).
Next: Dynamic EQ
See Also
Overview
Display and workflow
.
Page 13
Dynamic EQ
13
One of the most important new features in Pro-Q 3 is dynamic EQ: any of Pro-Q's bands (with Bell or Shelf
shapes) can be made dynamic, at any slope, with perfect analog matching
Simply put, dynamic EQ changes the gain of an EQ band dynamically, depending on the level of the input
signal. This makes it possible to perform subtle and surgical edits similar to a multi-band compressor, but in a
way that's often more intuitive and easier to work with.
Since Pro-Q is used by many engineers and producers worldwide as their standard workhorse EQ, we have
ensured that Pro-Q 3 remains very lightweight and ultra-fast to work with, keeping the existing natural
workflow and shortcuts. Dynamic EQ in Pro-Q 3 is an intuitive and elegant extension of the regular workflow:
the dynamic options and controls are only exposed when you actually start using them, and won't get in the
way of your normal EQ work.
and in Linear Phase mode.
The dynamic behavior of Pro-Q 3 has been carefully tuned and is highly program dependent: attack, release
and knee all depend on the processed audio, the frequency range of the EQ band and the current dynamic
range. This results in very natural and smooth sounding compression and expansion, useful for a wide range of
dynamic EQing applications.
Creating dynamic bands
Any of Pro-Q's bands can be made dynamic. This can be achieved in different ways:
Select EQ bands in the EQ display, and then adjust the dynamic range ring around the Gain knob in the
band controls, choosing a positive of negative value.
Hover above an EQ band in the display, and use the mouse wheel while holding down the Alt key to
adjust the dynamic range for this band or the selected EQ bands.
Select EQ bands in the display, and then choose Make Dynamic on the band menu (which you can
access by right-clicking the band dot, or via the menu button in the EQ parameter display).
You can also create dynamic bands right away (initialized with a dynamic range instead of normal
gain), by holding down the Alt key while creating bands in any of the normal ways: Alt+drag the result
curve, Alt+double-click in the EQ display or Alt+Ctrl+click (Alt+Command+click on macOS) in the EQ
display.
Internally, the dynamic EQ process will trigger on a band-limited version of the plugin's input, according to the
frequency range the band works on.
Dynamic band controls
The following dynamic controls are displayed for dynamic EQ bands:
The dynamic range ring sets the amount of dynamic EQing for a band, ranging from -30 to 30 dB
(possibly limited by the maximum gain setting limits). Choose a positive (expansion) or negative
Page 14
(compression) value here enables dynamic EQing and exposes the additional dynamic controls. Note that
this setting is only available for Bell and Shelving filter types. The current dynamic gain change is shown
14
as a yellow bar inside the ring, on top of the dynamic range that is indicated in red.
Note that you can also drag the dynamic range indicator for a band in the EQ display
adjust the dynamic range.
up or down to
The auto-threshold button toggles the dynamic behavior between the default auto- or custom threshold
mode. When in auto mode, the threshold is constantly adjusting to the level of the current, band-limited
trigger signal. Click it to enable the custom threshold mode, revealing the threshold slider.
The threshold slider, visible when not using auto-threshold mode, sets the threshold for triggering the
dynamic EQ. The level of the trigger signal is shown in the slider, making it easy to find the correct
threshold. Note that a soft knee is used internally by the dynamic EQ algorithm, so it can start triggering
a little bit below the selected threshold value.
The bypass dynamics button at the left top of the dynamic range ring makes it easy to bypass the
dynamic behavior of the currently selected bands. While the dynamic behavior is bypassed, this is
reflected in the EQ display, the dynamic range ring is shown as inactive, and a red light glows in the
button.
The clear dynamics button will reset the dynamic range to 0 dB for all selected bands, essentially
turning them back into normal, non-dynamic bands.
How and when to use dynamic EQ
Generally when mixing or mastering, making static EQ adjustments works very well. But sometimes, using EQ
dynamically can be the key to solving specific frequency issues or bringing out certain elements in a mix. For
example, you can use dynamic EQ to brighten a kick drum or tame a hi-hat in your drum track, highlighting or
suppressing only the transients. Or you could use a narrow dynamic bell filter to suppress sibilance in a vocal
recording. Especially in combination with the per-band mid/side/stereo options
, the possibilities are endless.
Pro-Q 3's workflow is perfectly designed for this: you can use it as your go-to EQ on every channel, doing the
usual static EQing, but when you need to you can make any band dynamic right away.
Linear Phase processing
Dynamic EQing also works in Linear Phase mode
, but only for Processing Resolution settings up to High. The
attack and release response will be slightly different from the normal behavior in Zero Latency and Natural
Phase modes.
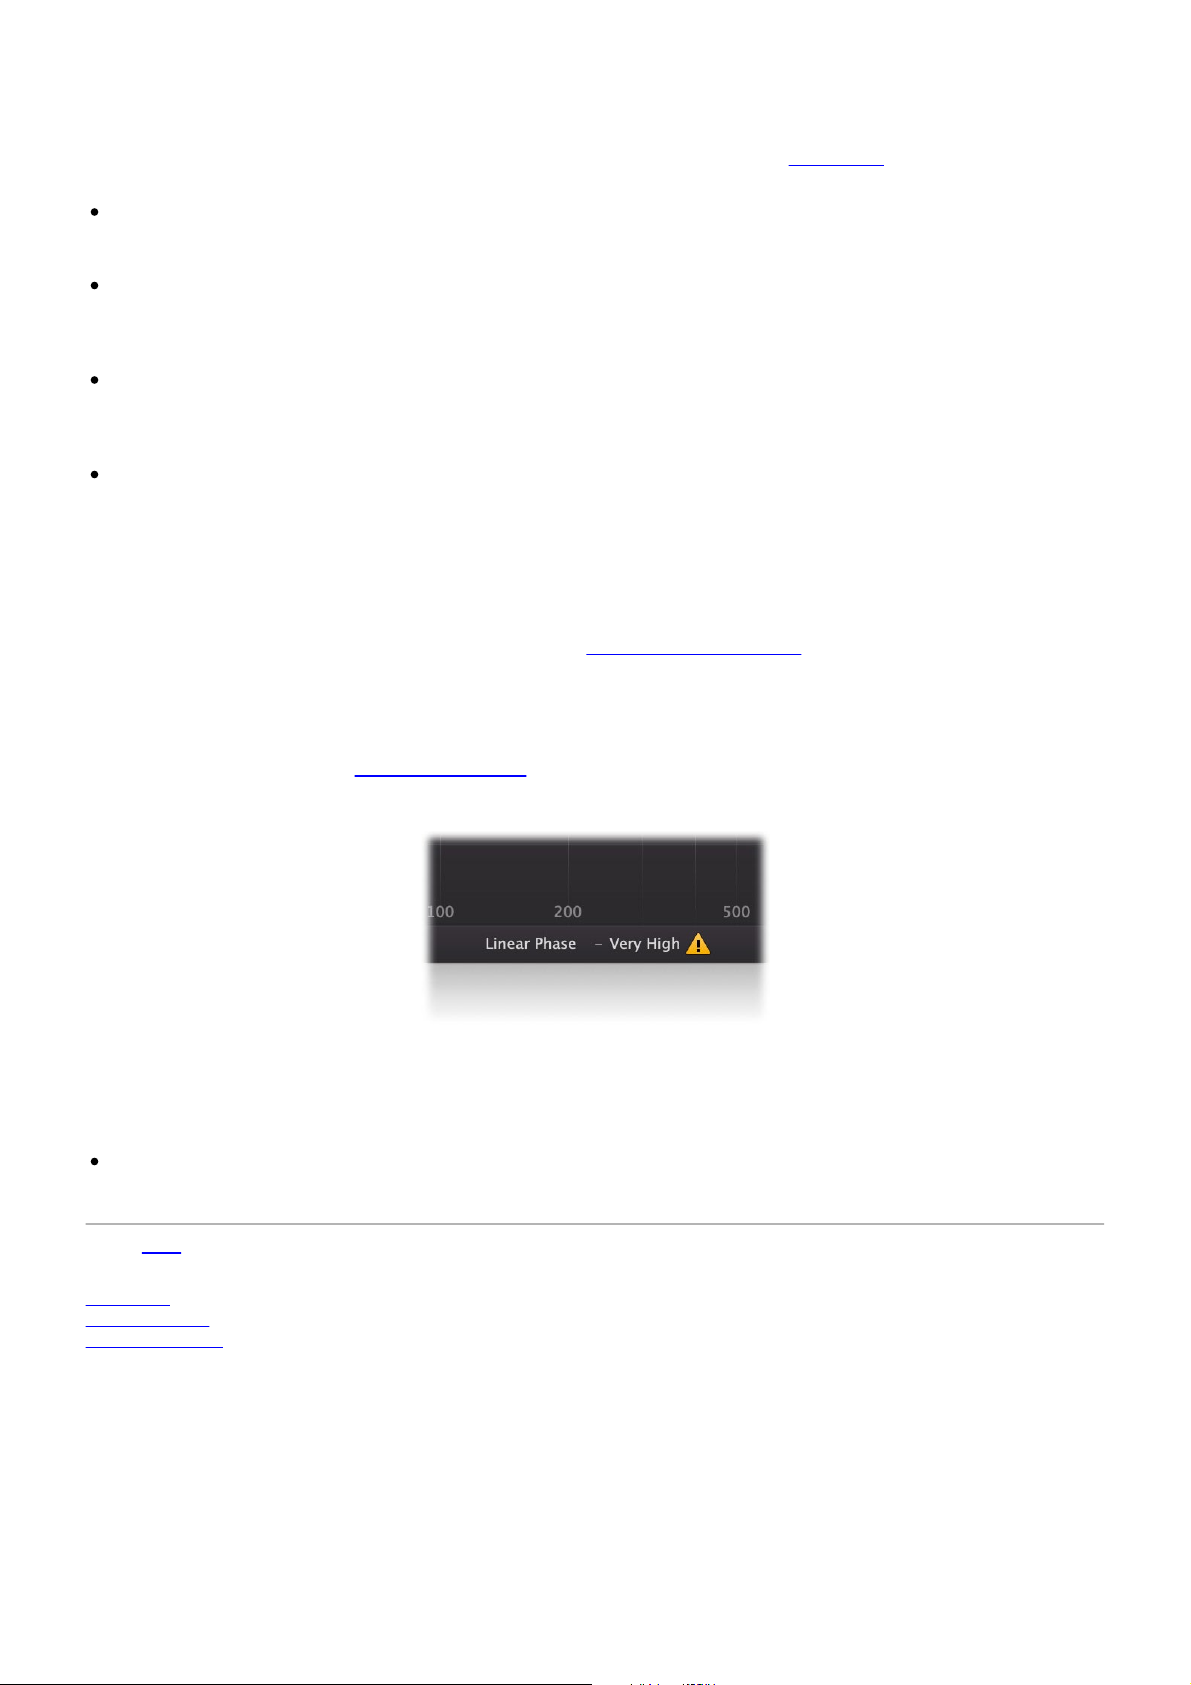
When using dynamic EQ in Linear Phase mode in combination with the Very High or Maximum resolution
settings, you will see a warning sign next to the Processing Mode button to indicate that this is not possible. In
this case, simply lower the resolution to High or lower to be able to use dynamic EQing.
Tips
When using the mouse wheel above an EQ band while holding down both Alt and Ctrl (Command on
macOS), you change both the dynamic range and gain or the band in a reverse linked way, i.e. you can
trade gain for dynamic range.
Next: Solo
See Also
Overview
Band controls
Spectrum Grab
Page 15

Solo
15
When you move the mouse cursor near an EQ band in the display, the EQ parameter display pops up showing
the current parameter values for the band.
Click and hold the solo button (with the headphones icon) to enter solo mode for the current EQ band. The
other EQ bands will dim, just like the yellow overall curve. Simply drag the solo button horizontally to change
the frequency of the band, or vertically to adjust the solo listening level.
In solo mode, you don't hear the effect of the EQ band itself, but instead you will hear the part of the frequency
spectrum that is being affected by that band. Of course, the frequency range depends on the frequency and Q
settings, and is visualized in the display as well.
When using solo mode with Low Cut or High Cut bands, you will hear the frequencies that are being cut away
instead of the frequencies that pass, which helps you to determine whether you are cutting the right
frequencies.
Generally, solo mode aims to expose the parts of the incoming audio that matter to the current EQ band, but
that you can't hear just by listening to the regular EQ sound.
Tips
When using solo with Bell or Shelving bands, hold down Ctrl (Cmd on macOS) while dragging to change
the Q, which will of course affect the frequency range that you hear. For filter types that do not have a
Gain setting (Low- and High Cut, Notch, Band Pass), dragging in solo mode has the same effect as
dragging the normal, changing both Frequency and Q.
You can adjust the solo listening level by moving the mouse up or down while holding the solo button.
If the piano display is enabled, the parameter value display will also show the note number that
corresponds to the band frequency.
You can turn the parameter value display on and off by clicking Show EQ Parameter Display in the
Help menu.
Next: Full Screen mode and resizing
See Also
Overview
Display and workflow
Page 16

Full Screen mode and resizing
16
With just the click of a button, the Pro-Q 3 interface will fill up the whole computer screen so you can make
ultra-precise adjustments and get the best view on the spectrum analyzers. To exit Full Screen mode, just
press Escape or click the Full Screen button again.
Resizing
In addition to Full Screen mode, you can also customize the normal interface size using the Resize button at
the right of the bottom bar. You can choose between Mini (smallest size, equal to the AUv3 default plug-in size
on iOS), Small, Medium (the default size), Large or Extra Large. Once you have selected a size, it will
automatically become the default size for new plug-in instances.
Tips
When using the VST3 plug-in, you can resize the plug-in interface by just dragging the window edges to
any size you like. Of course you can always go back to one of the predefined sizes with the resize button.
The Large and Extra Large interface options will be greyed out in the Resize button menu if the current
display is too small to support them.
Page 17

When using the Mini mode, the band controls will be hidden and bands can only be adjusted via the
interactive display, the EQ parameter display and the curve menu.
17
Next: Piano display
See Also
Overview
Display and workflow
Page 18

Piano display
18
Using the Piano Display button at the bottom left of Pro-Q's interface, just above the bottom bar, you can
toggle between the normal frequency scale and a piano keyboard display, via which band frequencies can be
adjusted as well. The highlighted keys correspond to an 88-keys grand piano layout, ranging from A0 (27.5 Hz)
to C8 (4186.01 Hz).
For every band in the display, there is a corresponding dot on the keyboard. You can interact with the dots in
two ways:
Click the dot once to quantize the associated band's frequency to the exact musical note.
Click and drag the dot to change the frequency while keeping it quantized to musical notes.
While the piano display is active, parameter value displays that show a band's frequency will also show that
frequency as a musical note (including cents offset). Note that at any time, also if the piano display is not
showing, you can enter frequencies as musical notes. For example, you can double-click on the Frequency knob
in the band selection controls and type "D#5 +13", or "A4".
Tips
To quantize a frequency without using the piano display, just double-click a curve dot in the display or
the Frequency knob in the EQ controls, and enter a value like "A4" or "C#2".
Pro-Q 2 displays the C4 key as middle C, following the most used Roland standard. Note that some DAWs
(e.g. Cubase) might use a different format, showing C3 as middle C (the Yamaha standard).
By default, the piano display key that matches the frequency at the current mouse position is highlighted,
and a small label shows its note number. You can turn this feature on or off by clicking Show Frequency
On Hover in the Help menu.
Next: Stereo options
See Also
Overview
Display and workflow
Page 19

Stereo options
19
One of FabFilter Pro-Q 3's best features is that it's very easy to equalize left, right, mid or side signals in a
different way. This is a great way to surgically remove unwanted sound artefacts, or even to add stereo effects.
To make this even more powerful than in version 2, Pro-Q 3 offers a stereo placement setting per band. In the
default Stereo mode, an EQ band works on both channels of a stereo pair. Using the stereo placement button
on the right-hand side of the band controls
information instead:
, you can choose to process only the left, right, mid or side
Click the split button underneath the buttons to duplicate the selected band, making two identical copies, one
operating only on the left channel and one operating on the right channel. This makes it very easy to slightly
adjust one of the channels. The EQ display will group curves that work on the same channels, to visualize the
resulting adjustments.
Using the Mid or Side stereo placement setting, you can then easily filter the mid (mono) information
independently from the side (stereo) information. This is often the best way to fix artefacts or modify stereo
information, because mid/side represents the stereo signal in a more natural way.
The result curve for adjustments exclusive for the left channel will be shown in white, while red is used for the
right channel. The mid and side adjustment curves are shown in green and blue. Of course, curves that affect
all channels are shown in yellow as always.
Techniques
Independent channel equalization is very useful when dealing with stereo audio containing unbalanced
frequency content over the stereo field. Let's say you want to combine a stereo drum recording with a stereo
accoustic guitar recording. The drum recording contains more low-mid frequencies in the left channel (for
example a low tom), and more high frequencies in the right channel (like cymbals or a hi-hat). The guitar
sound, recorded with a mic capturing the sound-board/hole panned left and one capturing the fretboard/neck
panned right, might have similar frequencies as the drum recording, making it hard to combine them in a
balanced way. By using independent left/right channel EQing, it is possible to balance these elements so that
they do not fight each other. Instead of EQing the whole stereo track of the drums and guitars one can simply
EQ where it is necessary to get the two elements to complement each other.
Mid/side EQ is perhaps most commonly used to bring some stereo elements further up within a recording,
either by cutting certain frequencies in the mid channel or by boosting the wanted frequency range in the side
channel. It is great for adding a bit of depth to typical hard panned rock/heavy guitar recordings where you
boost the "bite" frequency range of the guitars (around 2-4kHz) with a quite narrow EQ. Combine this with
Page 20

cutting some of the "mud" away from the side channels will give the effect of huge guitars that still sit well
within a mix.
20
Independent mid/side equalization is also often used during mastering. For example, raising high frequencies in
the side channel can freshen up the sound, while a low cut filter in the mid channel can work very well to clear
up the low end.
Consider using linear-phase processing
when filtering stereo channels (left, right, mid or side) differently to
avoid introducing unwanted phase changes.
Surround and mono operation
FabFilter Pro-Q 3 can also work as a mono or surround equalizer plug-in and will adapt itself automatically to
the channel layout of the track it is inserted on. In a mono instance, the dedicated stereo options like output
panning and stereo placement are not available, of course. When used on surround tracks, Pro-Q 3 will offer
extra channel placement options, via which you can customize the selection of speakers EQ bands will apply to.
See Surround
.
If you load a preset with stereo- or surround specific bands (e.g. with Left stereo placement or Lss/Rss
speakers setting), they will be shown as disabled in the EQ display, and won't affect audio processing. You can
simply remove these bands, or enable them again using the Reset Placement/Speakers command in the
band's curve menu, which will reset the stereo placement and speakers settings of the selected bands to make
them compatible with the current track.
Best practice is to save custom surround or channel-specific presets
in a dedicated subfolder to use only when
needed.
Next: Surround
See Also
Overview
Band controls
Display and workflow
Page 21

Surround
21
FabFilter Pro-Q 3 supports all important surround formats, up to 7.1.2 Dolby Atmos. When you add Pro-Q 3 to
a surround channel, the interface automatically adapts itself to the used multi-channel format. The output level
meter will show all channels, with appropriate labels to identify them. In addition, the Stereo Placement button
will now give access to a surround panel with more sophisticated options to choose which speakers/channels
are affected by the selected EQ bands.
Speakers and stereo placement
The surround panel shows you an overview of the available speakers in the current surround channel layout. By
default, all speakers are selected except the LFE channels. Using the All button at the left top, you can toggle to
include or exclude the LFE channels. Click a row of speakers to only select this row, e.g. Lss/Rss or Center. In
addition, you can select a specific stereo placement
information of the selected speakers. Of course you can also click any of the individual speaker icons directly to
let the selected bands work on that speaker only.
setting at the top to affect only the left, right, mid or side
The caption of the stereo placement button in the band controls will describe the selected speakers and an
additional label under the button will show specific stereo placement information (e.g. "Left only") if needed.
Notes
Output panning is not available when using Pro-Q 3 in a surround layout. We recommend to change
surround channel levels using a dedicated surround panning plug-in.
If you load a preset that uses specific surround settings that are not available in the current channel
layout, some bands may be disabled, and won't affect the audio. You can either remove these bands, or
enable them again via the curve menu's Reset Placement/Speakers item, resetting the
speakers/stereo placement information.
Dolby Atmos support (7.0.2 and 7.1.2) is currently only available in the AAX plug-in in Pro Tools. Other
supported surround formats are 3.0 (LCR), 4.0 (both Quad and LCRS), 5.0, 5.1, 6.0, 6.1, 7.0 and 7.1
(both DTS and SDSS). These are available in all plug-in formats.
Next: Processing mode
See Also
Overview
Stereo options
Band controls
Page 22
Processing mode
22
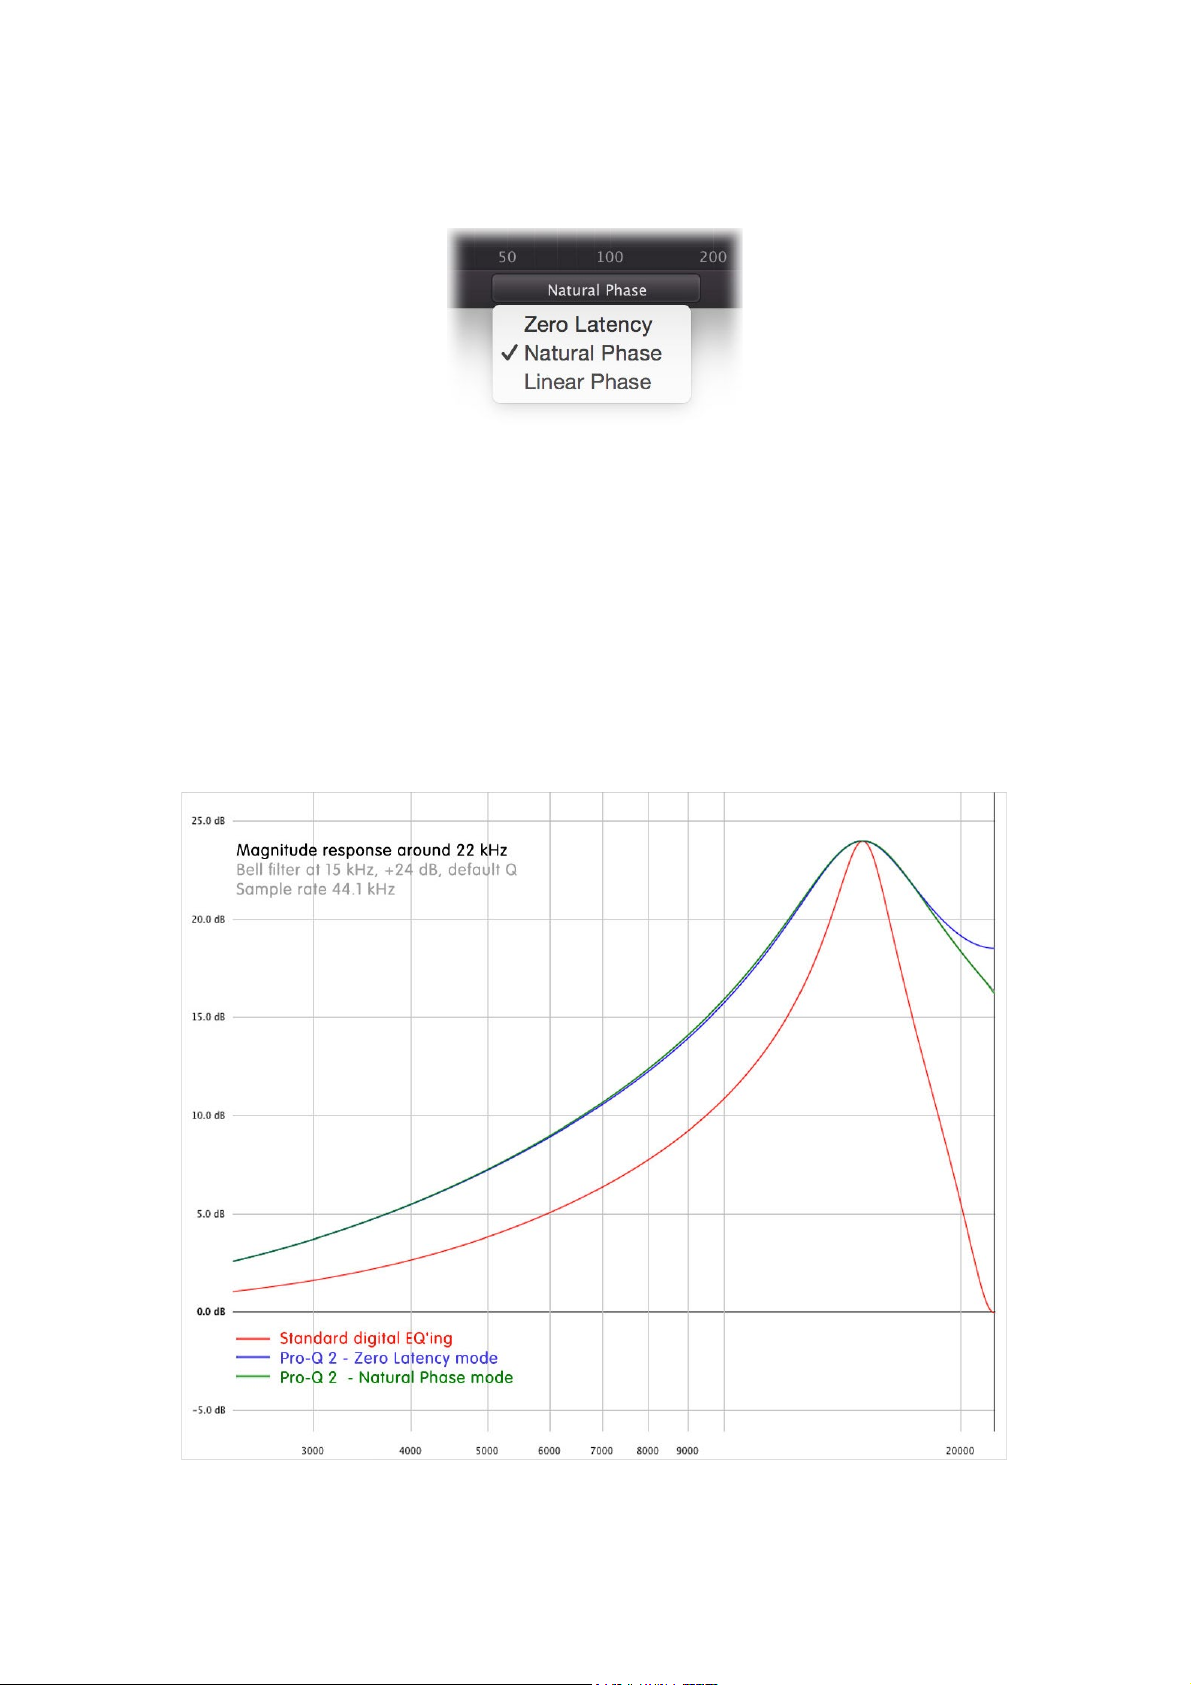
The Processing Mode button in the bottom bar selects the type of EQ processing. In almost all cases, either
Zero Latency or Natural Phase modes will deliver perfect results, and when linear-phase processing is needed,
you can of course use Linear Phase mode with a customizable resolution.
Zero Latency
In Zero Latency mode, Pro-Q matches the magnitude response of analog EQ'ing as closely as possible,
obviously without introducing any latency. It is Pro-Q's most efficient processing mode, and absolutely
sufficient for most applications.
Natural Phase
Pro-Q's unique Natural Phase mode performs even better. It not only perfectly matches magnitude response of
analog EQing, but also closely matches the analog phase response. So it delivers the most accurate frequency
response and best sound quality, even at the lowest frequencies and highest Q settings, without introducing
noticable pre-ring or long latency.
To illustrate the difference between the two modes, we've plotted both magnitude and phase response of a Bell
filter at 15 kHz, and we've also compared this with standard digital EQ'ing, like most DAWs implement in their
factory EQ plug-ins.
The red curve shows the magnitude response of standard digital EQ'ing, which really is
far from perfect. The blue curve is the response in Pro-Q's Zero Latency mode, which
is nearly perfect, except for a small deviation above 18 kHz. The green line shows ProQ's Natural Phase mode: it matches the theoretical analog magnitude response
precisely!
Page 23

And now the phase response. Again, the red curve represents standard digital EQ'ing,
of the spectrum, use this mode. The total latency is 9216 samples at a sample rate of 44.1 kHz (about
23
and blue curve Pro-Q's Zero Latency mode: both have a non-ideal phase response. The
green line illustrates Pro-Q's Natural Phase mode response. Apart from a very small,
inaudible deviation above 20 kHz, it perfectly matches the theoretical analog phase
response.
Linear Phase
When filtering audio, traditional analog and digital filters not only change the magnitude, but introduce phase
changes as well. What happens is that the phase of different frequencies in the signal is changed in different
ways. This can have an audible effect on the sound, but not necessarily in a bad way. Most of the time, for
example for a simple bell or shelving filter, the phase effects are very subtle and hardly noticable. However, for
higher-order filters like steep low cut or high cut filters, the effect can become quite apparent as the phase
distortion starts to affect transients and can make the sound less transparent.
Moreover, problems arise when you mix a filtered and phase-altered signal with another similar signal that has
not been filtered, or that has been filtered in a different way. In this case, it is very likely that the different
phase components of both signals won't match up properly and will cancel each other to some extent. This
situation can for example occur when mastering. It is quite common to apply an equalizer only to a part of the
song, using crossfades at the beginning and end of the affected region. Because the phase information in the
original and filtered parts is different, the fades won't work as intended.
Linear-phase processing provides an answer to these problems. Linear-phase filters only change the magnitude
of the audio, while leaving the phase untouched. However, linear-phase filters also have some disadvantages.
First of all they introduce latency: the entire signal is delayed when passing through the plug-in. Higher
processing resolution (for better response in the low frequencies), results in longer latency, but unfortunately
this can also introduce 'pre-ring' that can make transients (e.g. a kick drum) lose their edge.
When Linear Phase processing is selected, a Processing Resolution button becomes available. Choosing the
correct resolution is a compromise depending on the program material and your personal preference. The
following resolutions are available:
Low provides linear-phase processing with a minimal latency. Use only with low Q settings, or when only
changing the mid-high part of the spectrum. With a sample rate of 44.1 kHz, it results in a total latency
of 3072 samples (about 70 ms).
Medium is a good compromise between low-frequency resolution and latency and we recommend to use
this in general for linear-phase processing. The total latency is 5120 samples at a sample rate of 44.1
kHz (about 116 ms).
High gives great low-frequency resolution. If you need to use high Q settings when changing the low end
Page 24

209 ms).
Very High gives even better low-frequency resolution. The total latency is 17408 samples at a sample
24
rate of 44.1 kHz (about 395 ms).
Maximum results in very high low-frequency resolution at the expense of a very large latency and
possible pre-echo problems. The total latency here is 66560 samples at a sample rate of 44.1 kHz (about
1509 ms).
Note: when using both L/R-specific bands and M/S-specific bands
at the same time, the linear phase processing
will be done in two separate stages: first the L/R stage, then the M/S stage. Be aware that this will double the
latency.
Changing EQ band frequencies in Linear Phase mode sounds just as smooth as when using the other modes, no
zipper effects whatsoever. This might sound trivial, but it's actually quite unique in linear-phase processing!
Choosing a suitable processing mode
As already explained, in almost all normal mixing and mastering situations, Zero Latency mode or Natural
Phase mode (with its even better accuracy and phase response) will be the best choice. It is important to
understand that linear-phase processing is not better or more transparent than normal processing, it is
different! Linear-phase EQ'ing is a problem-solving tool, in general only used to avoid phase cancellation
problems.To learn mode about linear-phase vs. normal EQ'ing, watch Dan Worrall's excellent video tutorial on
the subject: www.fabfilter.com/video/eq-linear-phase-vs-minimum-phase
.
Notes
Dynamic EQing also works in Linear Phase mode, but only for Processing Resolution settings up to 'High'.
See Dynamic EQ
.
When working with different sample rates, the latency in samples of the various linear-phase modes can
change to give you approximately the same low-frequency resolution (and the same latency in ms).
Due to Pro-Q 3's advanced design, the CPU usage is very low, even when using up to 24 EQ bands, and it
doesn't change much with the different linear-phase processing modes.
Next: Spectrum analyzer
See Also
Overview
Display and workflow
Page 25

Spectrum analyzer
side chain of the plug-in, or the post-EQ spectrum from any other Pro-Q 3 instance, as shown in the list of
25
To help you judge the effect of the combined EQ bands on the incoming audio signal, FabFilter Pro-Q 3 includes a
powerful real-time frequency analyzer.
The spectrum analyzer can be customized via the analyzer panel, which pops up automatically when you hover
above the analyzer button in the bottom bar. It offers the following
options:
The Pre and Post buttons at the left top of the analyzer panel enable or disable the pre- and post-EQ
spectrum visualization. Note that when global bypass
audio, so the spectrum analyzer is disabled
The instance name label shows the name of this Pro-Q 3 instance. In most DAWs, this name will be based on
the name of the track at which Pro-Q 3 is inserted. You can choose a custom name if you want by doubleclicking the instance name label.
In addition, you can visualize an external spectrum in the main EQ display: this can be either the external
as well.
is enabled, the plug-in won't receive or handle any
Page 26

external spectrums. Simply click an external spectrum in the list to activate it. It will be shown in the EQ
display with a light red outline to distinguish it from the regular pre- or post-EQ spectrum.
26
The Freeze button at the left bottom of the panel causes the spectrum to stop falling and build up a maximum
over time. While Freeze is enabled, a blue line at the top of
this state as well.
the Analyzer button in the bottom bar indicates
The Spectrum Grab button next to the Freeze button enables or disables the Spectrum Grab feature. If
enabled, you can leave the mouse above the spectrum for a few seconds, and
Spectrum Grab mode. Existing EQ bands will be dimmed while the
one of the peaks in the white output spectrum line,
and drag to adjust! See Spectrum Grab
spectrum freezes. You can now simply grab
Pro-Q will automatically enter
.
The Show Collisions button enables or disables frequency collision indication. When enabled, the main
analyzer will highlight areas of the spectrum (using a red glow) where frequencies may collide with frequencies
of the currently selected external spectrum, possibly causing auditory masking issues. In addition, similar
highlighting is shown in the list of external spectrums (the side chain and other Pro-Q 3 instances) so you can
easily browse for possibly clashing signals. Note that this is merely an indication, and not exact science.
Always use your ears to decide whether you are actually dealing with problematic collisions or frequency
masking. To properly detect peaks and collision areas in the low frequencies, it's best to use the High or
Maximum analyzer resolution setting.
Hover above (or click on) the Settings button to open a panel with settings to customize the behavior of the
real-time spectrum measurements:
The Range setting specifies the vertical range of the spectrum analyzer, which can be 60 dB, 90 dB (the
default setting) or 120 dB.
The Resolution setting determines how precise the spectrum analyzer works. Higher resolution settings
allow more precision in the low-frequency area, but because more
calculate a single spectrum, the update rate will be lower which
The Low value corresponds to a
resolution of 1024 points, Medium to 2048, High to 4096, and
incoming samples are needed to
generally results a slower attack time.
Maximum to 8192 points.
The Speed setting selects the release speed of the spectrum. A fast release shows dynamic changes
more clearly, while a slow release gives you more time to examine
the spectrum before it disappears.
The Tilt setting tilts the measured spectrum around 1 kHz with a specified slope, expressed in dB per
octave. The default setting of 4.5 dB/oct results in a natural
looking spectrum, resembling best how
loudness is perceived by the human ear.
Clicking the EQ Match button will invoke EQ Match mode. This is a two-step process that uses the side-chain
and post-EQ spectrum analysis and adds EQ bands to match the
side-chain characteristics. See EQ Match
.
Horizontal zooming
Sometimes it might be useful to zoom in to a specific frequency. You can easily do this by clicking and dragging the
frequency scale at the bottom of the EQ display, just above the bottom
bar. You can do the following:
Click and drag up and down to zoom in and out at the frequency you have clicked on.
While zoomed in, you can also drag left and right to move the frequency scale.
Just double-click the scale to return to its default full range.
Tips
When you hover over the display, or move the mouse slowly, the frequency under the mouse cursor is shown
in the frequency scale at the bottom of the display. If the piano display
cursor is highlighted. You can turn this feature on or off by clicking Show Frequency On
is enabled, the key under the mouse
Hover in the Help
menu.
To properly detect peaks and collision areas in the low frequencies, it's best to use the High or Maximum
analyzer resolution setting.
When skipping through presets, the current analyzer settings are not changed, but they are saved in songs.
Hold down the Freeze button to freeze temporarily until you release the mouse button again.
If desired, you can make the analyzer panel 'sticky' by clicking the Analyzer button once. Click it again to hide
the panel.
Next: EQ Match
See Also
Overview
External side-chaining
Display and workflow
Page 27

EQ Match
27
Sometimes, it can be very useful to be able to match the tonal characteristics of a certain reference audio signal.
For example, you're in the process of recording vocals, and for some reason
the recordings you made a few days earlier. Or you really
song, and want your own track to sound
You can of course add EQ bands and try to find appropriate settings yourself, but Pro-Q offers an automated
process to do this for you: EQ Match! It's a simple process that lets you
compares it to the spectrum of the current input, and adds new EQ bands to make your audio sound like the
reference signal. It gets you 'that' sound in less than a minute.
Step 1: Choose your reference
Start by clicking the EQ Match button in the Analyzer panel, accessible via the
which opens the EQ Match panel at the bottom of Pro-Q's
plug-in input and starts analysis right away, building an input spectrum.
alike.
like the overall color and sound of a certain mastered
interface. By default, EQ Match is already listening to
you just don't get them to sound like
choose or record a reference spectrum,
Analyzer button in the bottom bar,
Click the Reference button to choose a reference source. You have the following options:
Select a previously stored Reference Spectrum
Just choose one of your earlier saved reference spectrums and you're ready to match!
To save a spectrum, just add a FabFilter Pro-Q 3 instance to a track that contains the reference audio,
the EQ Match panel, analyze the input for a while and then choose Save Input As Reference Spectrum via
the Reference button. Once saved, you can select it as a reference immediately in any other Pro-Q 3
instance.
Record a reference spectrum via the main plug-in input
Let's say you punched in some new vocals on a track you've recorded a few days ago, and they
slightly different. In this case, after building the current input spectrum, you can select Input as reference,
move the playhead to an earlier point in your song that plays the previously recorded vocal, and build a
reference spectrum from it. If needed, you can easily switch back and forth to building the original and
reference spectrums, toggling the Record/Pause buttons.
Use the External Spectrum as the reference
If you have selected an external spectrum in the analyzer panel
input, or the post-EQ spectum of another Pro-Q 3 instance), you can select to use this as the reference
spectrum as well. The plug-in will then analyze both original and reference spectrums at
Once it has gathered enough information, the Match button will become enabled
(which can be the external side-chain
the same time.
and you're ready to
sound
open
Page 28

proceed. If you haven't selected an external spectrum in advance, the side chain input will shown as an
option here.
Spectrum analyzer
28
When you're analyzing input or reference audio, the spectrum averages over time, so after a while
doesn't take more than 30 seconds), you'll notice that the detected average spectrum
more. Once a valid input and reference spectum have been analyzed or selected,
isn't changing much any
you'll see a thick white line that
shows the difference and the Match button will automatically become available.
Note: If there's no audio detected at the inputs you've chosen to analyze, either because
or the side chain isn't connected properly, you will be notified about
this.
your DAW isn't running
Step 2: Match
After analyzing and clicking the Match button, Pro-Q automatically calculates how
bands are needed to match the sound of the side-chain audio. EQ Match
and gives you the opportunity to customize the matching
detail, using the slider.
now proposes a number of new bands,
many and what kind of EQ
(normally this
By choosing more bands, even the smallest differences in the analyzed spectrums will be matched, while
choosing less bands will only cover the main shape of the difference spectrum.
this, as EQ Match intelligently chooses the number of bands
that is sufficient to match the most important
Usually, there's no need to alter
characteristics of the difference spectrum.
If you're happy with the results, simply click the Finish button (or click anywhere
after which the new EQ bands are permanently added. Of course, you
can also choose to return to the previous
outside the EQ Match panel),
step, by clicking the Analyze button.
Notes
You might see a warning that no audio is being detected for the input and/or reference, so there's nothing
to analyze. This usually happens because either your DAW isn't running or
because the main plug-in input
or the side chain input isn't properly connected and receiving audio.
The Match button will automatically become available when both a valid input and reference spectrum have
been analyzed or selected. Until that time, there's not enough information to match and it will remain
disabled.
EQ Match uses the same resolution as the regular spectrum analyzer. If you need more low-frequency
resolution, try setting the Resolution parameter in the analyzer settings
to High or Maximum.
Next: Spectrum Grab
See Also
Overview
External side-chaining
Page 29

Display and workflow
29
Page 30

Spectrum Grab
30
Did you ever wonder how it would be if you could just grab that obvious peak in the frequency spectrum
analyzer? That's possible in Pro-Q! If the Post-EQ or Pre-EQ
the spectrum for a few seconds, Pro-Q will automatically enter Spectrum Grab mode. Existing EQ bands will be
dimmed while the spectrum freezes. You can now simply grab one of the peaks in the white output spectrum
line, and drag to adjust. The most important peaks in the signal will show a label with their frequency (or note
value when the piano display
is enabled).
analyzer is active, and you leave the mouse above
After dragging a peak and releasing the mouse button, the interface will revert back to normal again and you'll
see the new EQ band that has just been added, so you can customize it if needed.
By default, Spectrum Grab is enabled, but if you find it distracting, you can disable it in the Analyzer Settings
panel, accessible via the bottom bar.
Notes
You can also activate Permanent Spectrum Grab mode by clicking and holding in the spectrum area
until the highlight becomes blue. This freezes the spectrum permanently so you can grab and drag
multiple spectrum peaks. To exit this mode, simply click on the display background instead of on the
white spectrum curve.
Spectrum Grab works best when the Post-EQ setting is enabled in the Analyzer settings, because this
relates best to what you are actually hearing. Spectrum Grab will also work with only the Pre-EQ
spectrum enabled, but when you grab and adjust a peak by dragging it down, you won't see this reflected
in the spectrum of course.
In Spectrum Grab mode, only Bell filters are created, and an appropriate Q is determined automatically.
Of course, after creating a new band, you can further customize it using the normal band controls
Next: Output options
See Also
Overview
Spectrum analyzer
Display and workflow
.
Page 31

Output options
31
At the righthand side of the bottom bar in the interface, FabFilter Pro-Q offers a set of global output options.
The Global Bypass button lets you bypass the entire plug-in. While most hosts already provide the ability to
bypass plug-ins, our internal global bypass feature is guaranteed to work correctly in Linear Phase or
Phase mode (compensating for the latency of the plug-in) and also applies soft bypassing to avoid clicks. While
the plug-in is bypassed, the EQ display dims and a red line at the top of the bypass button appears.
As soon as you hover the mouse above the output option button, right next to the bypass button, a panel with
various options and a large output/pan knob will pop up, giving you access to the following settings:
Using the Phase Invert toggle button, you can flip the phase of the output signal. While Phase Invert is
active, the button becomes blue, and a blue line at the top of the output level button indicates this state
as well.
If Auto Gain is enabled, using the button with the 'A' symbol, Pro-Q automatically compensates for
increase or loss of gain after EQ'ing. Note that the applied make-up gain is an educated guess based on
the current EQ settings, and is not a dynamic process based on actually measured levels. While Auto Gain
is enabled, the button becomes yellow, and a yellow line at the top of the output level button indicates
this state as well.
Using the Output Level Metering button, you can choose to show or hide the level meter at the far
right of the interface, which shows the current output level of the plug-in. Note that FabFilter Pro-Q 3 has
unlimited internal headroom and will never clip itself: the metering indicates clipping only to warn against
possible clipping during further processing of the output signal.
Using the Gain Scale slider, just below the gain level/pan knobs, you can scale the effect of the gain
settings of all curves by dragging horizontally. This can be very useful when you want to automate the
overall effect of the EQ.
Note: This only affects the EQ shapes that actually offer a gain setting: Bell and Shelving filters. It will
not affect the other filter types.
The Output Gain knob lets you adjust the output level between minus infinity and +36 dB. You can use
this to correct any overall level change that the EQ bands might introduce. Note that FabFilter Pro-Q 3
features unlimited internal headroom so it won't clip internally at any level. You only need to be
concerned about any clipping that might occur after the signal has left Pro-Q 3.
The Output Pan ring (only visible on stereo tracks) adjusts the relative levels of the left and right, or
mid and side audio channels.
The Output Pan Mode (only visible on stereo tracks) selects between normal left/right or mid/side
output panning.
Natural
Tips
If you would like to enable/disable Auto Gain by default for new instances, simply update the default
preset by clicking Options > Save As Default in the presets menu.
If desired, you can make the output options panel 'sticky' by clicking the output button once. Click it
again to hide the panel.
You can directly adjust the output gain or the gain scale by clicking and dragging the output button
vertically.
When the output knobs are visible, you can double-click them to be able to enter a value directly using
the keyboard.
Next: MIDI learn
See Also
Overview
Page 32

MIDI Learn
32
Controlling FabFilter Pro-Q 3's parameters directly with MIDI is very easy using the MIDI Learn feature. With MIDI
Learn, you can associate any MIDI controller with any parameter.
Click the MIDI Learn button in the bottom bar to enter MIDI Learn mode. The interface dims and the parameters
that can be controlled are highlighted. Each parameter has a
controller number. Now do the following to
1. Touch the control of the desired parameter in the interface that you wish to control. A
the chosen parameter.
2. Adjust the slider or knob on your MIDI keyboard or MIDI controller that you want to associate with that
parameter.
That's it! The parameter will now be controlled with the MIDI controller. You can now go back to step 1 to associate
a different parameter. Note that there is no warning when you associate a
that is already used. It will just be replaced.
To exit MIDI Learn mode, click the MIDI Learn button again, or click Close at the top of the interface.
Click the small menu drop-down button next to the MIDI Learn button to access the MIDI
Enable MIDI
This globally turns MIDI control of parameters on or off: useful in hosts that automatically
on a track to all effect plug-ins associated with that track as well.
Clear
This submenu shows all parameter associations and lets you delete individual associations or
associations in one step.
Revert
Reverts to the last saved MIDI mapping (or the state when the plug-in was started).
Save
Saves the current MIDI mapping so Revert will go back to this state. The current mapping is
saved when closing the plug-in.
Routing MIDI to effect plug-ins
For MIDI Learn to work properly, the plug-in need to actually receive MIDI of course. Depending on your host, it can
be quite difficult to route MIDI data to effect plug-ins. Here's
Logic Pro
Instead of adding FabFilter Pro-Q 3 to one of the insert slots, create a new Instrument
the Instrument slot. Then choose AU MIDI-controlled
receives MIDI. To get audio
and choose the actual input track. Next, you can mute that original track, so you only
the plug-in. The only downside is that plug-ins with an external
into the plug-in, click the 'Side Chain' drop down menu in Logic's plug-in header
associate a controller number with a parameter:
small text balloon that displays the associated
red square will mark
different knob with a controller number
Learn menu:
send all MIDI events
clear all
automatically
how to do it in the most important hosts:
Track, and click on
Effects > FabFilter > FF Pro-Q 3. Now, the plug-in
hear the audio through
side-chain cannot use it anymore.
Page 33

Cubase
Simply create a new MIDI track and set its output to the Pro-Q 3 instance you would like to control via MIDI.
33
Pro Tools
Create a new MIDI track. From the MIDI input drop down menu, choose your MIDI
selected) and from the MIDI output drop down menu, choose FabFilter
Pro-Q 3 -> channel 1 for the instance
device (if not already
you would like to control.
Ableton Live
First of all, create a new MIDI track. From the 'MIDI from' drop down menu,
already selected). Then, in the 'MIDI to' drop down menu,
it. Note: only the first plug-in on any
track can receive MIDI.
choose the Audio track that has FabFilter Pro-Q 3 on
choose your MIDI device (if not
Controlling the active EQ band
You can use MIDI Learn in Pro-Q 3 in two ways: either by connecting each knob or slider on your MIDI controller to
a specific band (for example connecting it to Band 1 Frequency or Band 3 Gain), or by setting up one set of controls
on your MIDI controller to adjust the active band. The advantage of controlling the active band is that you only need
a small amount of controls on your MIDI controller. However, this works only while the plug-in interface is open in
your DAW.
To associate a knob or slider on your MIDI controller with a specific band, click the band dot for the band you
want to control after entering MIDI Learn mode. The band name drop-down input now shows the band
number, for example Band 1 (like in the screen shot above). Click on a control in the interface. The bar at the
top will show the name of the parameter, for example Band 1 Frequency. Now turn a slider or knob on your
MIDI controller to associate it with this parameter.
To associate a knob or slider on your MIDI controller with the active band, simply don't select a band after
entering MIDI Learn mode. The band name drop-down input will show Active Band. Click on a control in the
interface right away. The bar at the top shows e.g. Active Band Frequency as the name. Turn a slider or knob
on your MIDI controller to make the association.
In active band mode, you can also connect buttons on your MIDI controller to the previous/next band and the
delete band buttons in the band controls. The button in the interface will be activated upon receiving a controller
message of 127 after a previous lower value from the MIDI controller. This allows you to activate a band directly
from your MIDI controller.
Note that you can use the band name drop-down input to switch between any specific band or active band mode.
Next: Undo, redo, A/B switch
See Also
Overview
Page 34

Undo, redo, A/B switch
34
The Undo and Redo buttons at the top of the FabFilter Pro-Q 3 interface enable you to easily undo changes you
made to the plug-in. With the A/B feature, you can quickly switch between two different states of the plug-in.
The Undo button at the left will undo the last change. Every change to the plug-in (such as dragging a
knob or selecting a new preset) creates a new state in the undo history. The Undo button steps back
through the history to restore the previous states of the plug-in.
The Redo button cancels the last undo command. It steps forward through the history until you are back
at the most recent plug-in state.
The A/B button switches from A to B and back. Before switching, the current state of the plug-in is
saved, so if you click this button twice, you are back at the first state. The button highlights the currently
selected state (A or B). In the example above, the A state is active.
The Copy button copies the active state to the inactive state. This marks the current state of the plug-in
and allows you to go back to it easily with the A/B button. After clicking Copy, the button disables itself to
show that both states are equal, so there is nothing to copy anymore.
Notes
If the plug-in parameters are changed without using the plug-in interface, for example with MIDI or
automation, no new undo states are recorded.
The Undo and Redo buttons will disable themselves if there is nothing to undo or redo.
Next: Loading presets
See Also
Overview
Page 35

Loading presets
35
FabFilter Pro-Q 3 comes with a small set of basic presets, giving a good idea of what you can do.
To load a preset, click the preset button. The presets menu will appear with all available presets. Click a
menu item to load that preset. The currently selected preset is highlighted with check marks.
To explore the presets one by one, click on the little arrow buttons to the left and right of the main preset
button. This will load the previous or next preset in the menu.
The preset button shows the name of the current preset. If you have changed the preset by adjusting one or
more parameters, the name is dimmed to indicate that this is not the original preset anymore.
Tips
The Default Setting preset is loaded automatically when FabFilter Pro-Q 3 is started. To change the
default settings, simply overwrite this preset by clicking Options > Save As Default in the presets
menu.
To open a preset outside the presets folder, click Options > Open Other Preset. This might be useful if
someone sends you a preset by email, for example.
If somehow the factory presets are lost or not installed properly, click Options > Restore Factory
Presets in the preset menu to restore them.
MIDI Program Change and Bank Select
Loading a presets can also be done via MIDI, using Bank Select and Program Change messages. Click Options
> Enable MIDI Program Changes in the preset menu to enable or disable this feature. When enabled, the
corresponding bank/program numbers are shown in front of the preset name (for example: (2/65) My Preset).
This means that you can load that preset by first sending a Bank Select message to select bank 2 and then
sending a Program Change message to select program 65.
Important: All the presets in your preset folder are numbered automatically, starting with bank 0 and program
0. This way, you are able to access any of the presets via MIDI. However, this also means that when you add
new presets to the menu, bank/program numbers of other presets might change. Be aware of this when
recording program changes in a session!
Working with Pro Tools control surfaces
FabFilter Pro-Q 3 supports the most important Pro Tools hardware control surfaces, such as Avid ICON DControl and D-Command. Because you need a fixed number of bands in Pro-Q to use this effectively, we have
added a Flat 7 Bands factory preset that can be used as your personal default preset. To set this preset as
FabFilter Pro-Q's startup setting, load it once and then choose Options > Save As Default in the presets
menu.
Next: Saving presets
See Also
Overview
Page 36

Saving presets
36
You can easily extend the included presets with new settings to build your own library of presets for FabFilter
Pro-Q 3 that you can reuse in various projects. This is also a good way to copy settings across multiple
instances of FabFilter Pro-Q 3 in a session.
To save the current setting as a preset, click the preset button, and then click Save As. A standard Save dialog
will appear. Type a name for the new preset and click Save to finish.
In the Save dialog, you can also rename and delete existing presets and create a new folder to store presets in.
New folders will show up as new categories in the preset menu. (On macOS, this should be done with the
Finder.)
See How presets are stored
Next: How presets are stored
See Also
Loading presets
Overview
to determine the preset folder location and learn more about factory presets.
Page 37

How presets are stored
37
Presets for FabFilter Pro-Q 3 are stored in separate files with the .ffp extension (for FabFilter Preset). All
presets reside in subfolders in the main preset folder. The subfolders will show up as separate categories in the
preset menu. You can also further divide the subfolders into categories.
You can manage the preset files just like other files on your computer. The easiest way to do this is in the Save
dialog that appears if you are saving a preset. The preset menu will automatically reload itself with the changes
when the dialog is closed.
Furthermore it is very easy to share your newly created presets with other users since FabFilter presets use the
same file format on both Windows and macOS.
The default location of the main preset folder is My Documents\FabFilter\Pro-Q 3 for Windows, and
~/Library/Audio/Presets/FabFilter/FabFilter Pro-Q 3 for macOS. To change this location, first copy all presets to
the desired new location, and then click Options > Change Preset Folder in the preset menu and select the
new folder.
Restoring factory presets
If you have accidentally lost the factory presets, you can easily restore them by clicking Options > Restore
Factory Presets in the preset menu. This will install all factory presets again.
Next: Purchasing FabFilter Pro-Q 3
See Also
Saving presets
Overview
Page 38

Purchasing FabFilter Pro-Q 3
38
Once you have downloaded and installed the evaluation copy of FabFilter Pro-Q 3, you may evaluate it during
30 days. Every time you start the plug-in, you will see the following dialog:
While there are still days left, you can click Evaluate to start working with the plugin. If you want to keep
using FabFilter Pro-Q 3 after the evaluation period, you must buy a copy in the online FabFilter Shop by clicking
the Buy Now button in the evaluation dialog.
Go to the FabFilter Shop and purchase FabFilter Pro-Q 3 now
We accept credit cards from all major companies, check payments, wire payments, and PayPal. The FabFilter
Shop uses secure connections and encryption: therefore your personal information is completely safe.
Within a few minutes after you have purchased your copy, you will receive an email containing your personal
license key. You use this license key to turn the evaluation copy into a fully registered version without the
evaluation dialog and the 30-day trial restriction.
Note: If the evaluation period has expired but you didn't have the chance to properly evaluate the plug-in, you
can request a new evaluation period by contacting us at info@fabfilter.com
.
Next: Entering your license key
See Also
Support
License agreement
Page 39

Entering your license key
39
After you have purchased FabFilter Pro-Q 3 in the online FabFilter Shop , you will immediately receive an email containing your personal license key. This license key will turn the evaluation version into a fully registered
plug-in.
Start FabFilter Pro-Q 3 and click Enter License in the evaluation dialog, or click Enter License on the
Help menu if the plug-in is already running.
Copy the license information from the email you have received and paste it into the text field. Make sure
that you are copying the entire license key including the Product and Licensee lines! If you are not sure
what text to copy, just copy and paste the whole e-mail.
After you have entered your license information, you will need to restart the plug-in host, so make sure you
save your settings if needed. From now on, you will be able to use FabFilter Pro-Q 3 for an unlimited period of
time with full support via email.
Tips
After your purchase, you can always retrieve your license key again by logging into your personal
FabFilter account . Here you can also keep track of all your orders and take advantage of great
discounts when buying other FabFilter plug-ins.
To deauthorize your license key and remove it from the computer, click Deauthorize on the Help menu.
If you temporarily needed to install your license on another computer, or if you have transferred your
license to someone else, this is the way to deinstall your personal license key safely.
Next: Support
See Also
Purchasing FabFilter Pro-Q 3
Support
License agreement
Page 40

Support
40
If you need help with problems or questions, and the help file does not provide an answer, please visit the
support pages on our web site.
Go to FabFilter Support
From here, you have direct access to the customer support forum, very useful tutorial videos for all FabFilter
plug-ins, online and PDF versions of all our help files, and a section with extra downloads (such as presets,
controller templates, older plug-in versions).
For sales-related questions and technical support, you can also contact FabFilter directly at info@fabfilter.com
Reporting a bug
If you have encountered a bug in FabFilter Pro-Q 3, first of all make sure that you are using the latest version
of the plug-in, which you can find at www.fabfilter.com/download
FabFilter Pro-Q 3 that you are using by clicking Help > About in the plug-in interface. If the bug is still present
in the latest version, please send us an e-mail at info@fabfilter.com
as possible: operation system and version, host software and version, steps to reproduce the bug, etc. Thanks
in advance!
Next: Upgrading to Pro-Q 3
See Also
Overview
About FabFilter
. You can easily check the version of
and include as much technical information
.
Page 41

Upgrading to Pro-Q 3
41
Upgrading from Pro-Q version 2 or 1 to the new Pro-Q 3 is safe and easy: installing Pro-Q 3 will not replace or
delete the previous Pro-Q 1 or Pro-Q 2 plug-ins. Different major versions will co-exist and can be used at the
same time. This ensures that you can open old songs that use Pro-Q 2 or Pro-Q 1 without problems!
Presets from version 1 or 2
All presets created with Pro-Q 1 or 2 can be loaded in Pro-Q 3. If you upgraded to the new version, your
original presets v1 and v2 presets will be accessible via the V1 Preset Folder and V2 Preset Folder items in
the preset menu. See also Loading presets
Note: Because the processing engine in Pro-Q has been renewed and improved, it's possible that a Pro-Q 1
preset loaded into Pro-Q 3 sounds slightly different.
Replacing a Pro-Q 1/2 instance by Pro-Q 3
If you are working on a song and want to replace a Pro-Q version 1/2 instance with the new Pro-Q 3, we advise
you to do the following:
First, save the current setting of the instance as a FabFilter preset in the Pro-Q 1/2 preset folder.
Then, remove the old Pro-Q instance and add Pro-Q 3 in its place.
Finally, load the preset that you just created into Pro-Q 3 via the V1/V2 Preset Folder submenu in the
preset menu.
Automation
Because the feature set of Pro-Q 3 has changed fundamentally, any automation data that has been written by a
Pro-Q 1 or Pro-Q 2 instance cannot be read correctly by Pro-Q 3.
Next: Manual installation
See Also
Overview
Support
.
Page 42

Manual installation
42
When installing FabFilter Pro-Q 3, the installation program will try to copy the plug-in into the appropriate plugins folders, and in most cases your host will recognize FabFilter Pro-Q 3 automatically. Otherwise, please follow
these instructions:
Windows
On Windows, most hosts have their own VST plug-ins folder. So if you are using Windows and your host does
not recognize FabFilter Pro-Q 3, you need to locate the proper plug-ins folder for your host first (it is usually
shown in the Preferences or similar dialog). Then, copy the file FabFilter Pro-Q 3.dll from C:\Program
Files\FabFilter\Pro-Q 3 (or C:\Program Files (x86)\FabFilter\Pro-Q 3 if you are using a 32-bit host on 64-bit
Windows) to the plug-ins folder that you have found and restart the host so it can reload all its plug-ins. For
the AAX version of Pro-Q 3, copy the FabFilter Pro-Q 3.aaxplugin folder to the common Pro Tools AAX plug-in
folder on your computer.
You can simply uninstall plug-ins or bundles via the Control Panel.
macOS
On macOS, plug-ins are installed in the standard plug-in folders in the system Library folder. These are the only
possible correct locations:
Audio Units: /Library/Audio/Plug-Ins/Components
VST/VST3: /Library/Audio/Plug-Ins/VST and /Library/Audio/Plug-Ins/VST3
AAX: /Library/Application Support/Avid/Audio/Plug-Ins
Note: AU and VST/VST3 plug-ins may also be placed in the user's Library folders under
/Users/<username>/Library/Audio/Plug-Ins.
To uninstall the plug-ins from your Mac, you can just delete the specific FabFilter plug-in files at the above
locations. Finally, if you really want to delete all data written by our plug-ins, you can remove the following
folders/files from the user Library folder as well:
/Users/<username>/Library/Audio/Presets/FabFilter/FabFilter Pro-Q 3
/Users/<username>/Library/Application Support/FabFilter/Pro-Q 3
/Users/<username>/Library/Preferences/com.fabfilter.Pro-Q.3.plist
Note: Since OS X 10.7 (Lion), the system and user Library folders are marked as hidden by default. To make
them visible again in Finder, open Terminal (found in /Applications/Utilities) and enter the following commands:
chflags nohidden /Library
chflags nohidden ~/Library
If you still have problems, contact FabFilter Support .
Next: VST plug-in versions
See Also
Quick start
Support
Page 43

VST plug-in versions
43
FabFilter Pro-Q 3 is available in both VST 2 and VST 3 formats. They can be installed and used both at the
same time. The VST 3 format offers easy side-chaining, free interface resizing, and is more CPU-friendly in
some cases, but it can only be used by hosts that support it, for example recent versions of Cubase, Studio
One or FL Studio. The VST 2 format is compatible with a larger variety of hosts.
Both the VST 2 and VST 3 versions of the plug-in automatically adapt themselves to the channel layout of the
track they are inserted on (mono/stereo and surround).
Next: External side chaining
See Also
Quick start
Manual installation
Page 44

External side chaining
44
FabFilter Pro-Q 3 offers the possibility of feeding an external signal to its side chain, so that you can visualize
the signal in the Analyzer, comparing it with the pre-EQ and post-EQ spectrums. Also, you can use the SC input
to let Pro-Q 3 match its spectrum, using EQ Match
Feeding a signal to a plug-in's side-chain inputs works slightly different in various hosts. This topic describes
the procedure for some of the most popular hosts around: Cubase
explain how it works, we use a scenario with two tracks. The first one contains the audio that we want to
process with Pro-Q 3, which we'll call the main track from now. The second track contains the audio that we
want to route to Pro-Q 3's external side-chain input. We'll call this track the side chain track.
After setting up everything according to the instructions below for your host, you can check whether everything
is routed correctly. Play the audio and make sure you've chosen the 'Side Chain' item from the external
spectrum list in the Analyzer panel
Cubase
Open Cubase and create a new empty project.
Add two audio tracks that we'll use as main track and side chain track.
Add audio files on both the main track and the side chain track. You can simply drag audio files from a
Finder/Explorer window onto a track.
Open the Mixer. In the main track, click on an empty insert slot and select the VST 3 version of FabFilter
Pro-Q 3 in the EQ menu (note the VST 3 icon which looks like ///).
In the plug-in header, click on the Activate Side-Chain button (right of the R/W buttons) to enable the
external side chain in Cubase.
At the top of the Mixer, set the output for the side chain track to the side-chain input of FabFilter Pro-Q 3.
. Confirm that FabFilter Pro-Q 3 shows the side-chain spectrum now.
.
, Logic Pro, Ableton Live and Pro Tools. To
Logic Pro
Open Logic Pro and create a new empty project via File > New...
Add two audio tracks (via Track > New...) that we'll use as main track and side chain track.
Add audio files on both the main track and the side chain track. You can simply drag audio files from a
Finder/Explorer window onto a track.
Select the main track and add Pro-Q 3 in the first Insert effect slot.
In the right top corner of the plug-in interface header, in the 'Side Chain' menu, choose the side chain
track. Now, the signal from the side chain track is sent to FabFilter Pro-Q 3's external side-chain input.
Ableton Live
Open Ableton Live and start with an empty arrangement. We'll use Track 1 as the side chain track and
Track 2 as the main track.
From the folder menu's on at the left top of Ableton Live's interface, drag different audio clips to the first
empty slots of Track 1 and Track 2.
From the VST (or Audio Units) plug-in menu, also at the left top of Ableton Live's interface, drag FabFilter
Pro-Q 3 onto Track 2, the main track.
In Track 1 (the side chain track) in the 'Audio To' menu select 'Track 2' instead of the default 'Master'.
Now, an extra menu appears right below: choose 'FF Pro-Q 3 3/4' instead of the default 'Track In' to
route the track's signal to FabFilter Pro-Q 3's external side chain inputs.
Page 45

Pro Tools
45
Open Pro Tools and start a new empty session.
Create two audio tracks that we'll use as main track and side chain track. Add audio files to both track.
Open the Mix window to display the tracks with their Insert slots and Sends slots.
In the first 'Sends' slot of the side chain track, choose 'Bus 1'. The track view for Bus 1 will open: set its
level slider to 0.0 dB so the bus actually produces audio!
In the first 'Inserts' slot of the main track, choose EQ > FabFilter Pro-Q 3.
Now, in the 'Key Input' menu of the plug-in interface (just above the FabFilter logo), choose bus > Bus 1
instead of the default 'no key input'. Now, the audio from the side chain track is routed to Pro-Q 3's
external side chain input via Bus 1.
Next: License agreement
See Also
Quick start
Manual installation
Page 46

FabFilter Software License Agreement
46
This license agreement concerns and describes your rights and the conditions upon which you may use the
FabFilter software you selected. We advise you to read this entire agreement. By accepting this agreement or
by using FabFilter software, you agree to all of these terms. If you do not accept and comply with these terms,
you may not use the FabFilter software or its features.
Applicability
This license agreement applies to all the FabFilter software, plug-ins and programs you may use during the
Evaluation period, and/or thereafter subject to an acquired license key to certain FabFilter software of any
version, including any and all upgrades, supplements or services, unless other terms come with such versions,
upgrades or supplements.
Licenses
The software will be licensed to the Customer, not sold. With the FabFilter license key, you will be granted after
full payment the right in perpetuity (meaning that the license agreement shall not automatically expire) to
install, run and use the software concerned under certain conditions. These conditions vary subject to the
license you acquired. FabFilter distinguishes the following licenses:
A Personal License is a named license to the software concerned, granting access to the software on an
unlimited number of Devices, as long the license is used by the designated person who acquired the
FabFilter license key. Usage of the Personal license by someone else but the designated licensee is an
infringement of the rights of FabFilter. The Customer should at all times protect its license key from theft
and/or abuse.
A Site License is a non-personal license to the FabFilter software concerned, acquired on the name of an
institution or entity, who is the licensee. A Site License will grant access to the FabFilter software on a
certain maximum number of designated Devices, as specified in the license key itself (e.g. "20 seats"). If
the Site License is used on computers/servers for any form of automated processing, the licensee may
not make any plug-in controls/parameters of the FabFilter software available to the end users of the
FabFilter software, i.e. only "black box" processing is allowed.
These FabFilter licenses, whether a Personal or Site License, will give you access to certain FabFilter software of
the specified major version. The license will include all future minor updates to the software (e.g. version 2.19
to version 2.20), which typically include bug fixes or small new features. The license will exclude any future
new major versions of the products (e.g. version 1.x to version 2.x). To allow yourself access to such new
major version of the software, a new FabFilter license to such major version must be acquired.
All FabFilter licenses, both Personal or Site License, give the Customer or end user the right to install and use
the FabFilter software to the extent it has been developed and under the conditions herein. Any rights not
explicitly granted to you, the Customer, remain with FabFilter, including but not limited to the right to alter,
reverse engineer, reverse compile, take apart, or disassemble the FabFilter software or any of the files in the
distribution.
A Bundle License is Personal or Site License for multiple FabFilter software products, which gives the Customer
or end user the right to install and use the specific software products that the bundle (e.g. Total Bundle)
contains at the moment of purchasing the Bundle License. Any software products or new major software
versions added to the bundle after that date cannot be claimed as part of the prior acquired Bundle License. A
Bundle License (if not Educational or NFR) can only be transferred as a whole, using a License Transfer.
An Upgrade License is a Personal or Site License for a new major version of FabFilter software. You may only
use an Upgrade License if you have a license for the previous major version of the same FabFilter software.
Educational (EDU) and NFR licenses
A Personal or Site License can be marked as EDU (Educational) or NFR (Not For Resale), meaning the following:
A Personal or Site License marked as Educational License is equal to the respective Personal or Site
License, with the only exception that the Educational License may not be transferred to a third party.
A Personal or Site License marked as NFR ("Not For Resale"), is typically intended for journalists that wish
to review the FabFilter software. A License marked as NFR is equal to the respective Personal or Site
License, with the only exception that the NFR License may not be transferred to a third party.
Duration and Evaluation
As specified in the specific terms per license, all licenses will be granted for perpetuity (meaning that the
license agreement shall not automatically expire), as long as all conditions herein are respected.
The Evaluation period is a period of thirty (30) days commencing on the first day of using the software
concerned and automatically expiring 30 days thereafter. After the Evaluation period has expired and no
FabFilter license key has been acquired, the software will stop working and should be removed from your
computer.
In addition to any and all such possibilities that FabFilter may have in accordance with the law, FabFilter may
terminate without prior notice or warning in case of abuse of the FabFilter software as well as in case of
(personal) bankruptcy.
Page 47

Support
47
FabFilter shall give its reasonable commercial efforts to service any major version of any FabFilter software
including email support. FabFilter is entitled to terminate support for any major version of any FabFilter
software at any time at its sole discretion.
License Transfer
A Personal or Site License (not Educational or NFR) may be transferred to a third party. You will have to buy a
License Transfer to activate the "transfer"-option in your FabFilter account
. After this option has been
activated you will be able to transfer your license to any third party.
Third Party Software
VST is a trademark of Steinberg Media Technologies GmbH. RTAS and AAX are trademarks of Avid Technology,
inc. Audio Units is a trademark of Apple Computer, inc.
Applicable Law
This license agreement is governed by Dutch law. The courts of Amsterdam are authorized courts to rule on
any dispute that may arise from this license agreement.
Disclaimer
TO THE MAXIMUM EXTENT PERMITTED BY LAW, FABFILTER, FREDERIK SLIJKERMAN AND FLORIS KLINKERT,
AUTHORS OF THIS FABFILTER PRODUCT, SPECIFICALLY DISCLAIM ALL WARRANTIES, EXPRESSED OR
IMPLIED, INCLUDING BUT NOT LIMITED TO IMPLIED WARRANTIES OF NON-INFRINGEMENT,
MERCHANTABILITY AND FITNESS FOR A PARTICULAR PURPOSE. FABFILTER, FREDERIK SLIJKERMAN AND
FLORIS KLINKERT, DO NOT WARRANT THAT THE SOFTWARE WILL MEET YOUR REQUIREMENTS OR THAT THE
SOFTWARE WILL OPERATE ERROR-FREE OR UNINTERRUPTED. TO THE MAXIMUM EXTENT PERMITTED BY LAW,
FABFILTER, FREDERIK SLIJKERMAN AND FLORIS KLINKERT, SHALL NOT BE LIABLE FOR ANY DAMAGE A
FABFILTER PRODUCT MAY CAUSE OR DAMAGES THAT MAY ARISE OUT OF THE USE OF A FABFILTER PRODUCT
OR INABILITY TO USE A FABFILTER PRODUCT, INCLUDING BUT NOT LIMITED TO SPECIAL, INCIDENTAL,
CONSEQUENTIAL OR OTHER DAMAGES. IN NO EVENT FABFILTER, FREDERIK SLIJKERMAN OR FLORIS
KLINKERT WILL BE LIABLE FOR AN AMOUNT IN EXCESS OF TWO HUNDRED FIFTY EUROS (€ 250,00).
Next: Acknowledgements
See Also
Purchasing FabFilter Pro-Q 3
Support
Page 48

Acknowledgements
48
A huge thanks to all our beta testers for their relentless testing of the different beta versions! Special thanks go
to bManic and Dan Worrall for their work on the factory presets.
Furthermore we would like to thank all our users for their support and loyalty over the years. You have made
this new version of Pro-Q possible.
Next: About FabFilter
See Also
Purchasing FabFilter Pro-Q 3
Support
Page 49

About FabFilter
49
Beautiful sound. Fantastic workflow. These are the foundations of FabFilter. We create powerful audio plug-ins
with superb sound quality and innovative interfaces.
A unique perspective
At FabFilter, we make the best possible tools for music production and audio processing. To achieve this, we
continually rethink and challenge industry standards: we've never been afraid of reinventing the wheel.
Considering every little detail, we tune our algorithms and interfaces until they sound perfect, look amazing and
feel great to work with.
It's the sound that counts
Above everything else, you need superb sound quality. That's why we put a lot of effort into developing unique
audio processing algorithms, ranging from our famous resonating filters to transparent high-end EQ and
dynamics processing.
Innovative interfaces, great design
Every FabFilter plug-in has an easy-to-use, well-designed interface aimed at providing unsurpassed workflow.
Our plug-ins focus on the task you're performing at that specific moment: they expose the features you need,
when you need them. And because of our special attention to design, you'll be delighted every time you open a
FabFilter plug-in.
Don't take our word for it
We always set the highest standard for sound quality, usability and design to make truly great products that
raise the bar on what audio software can do. That's why we're very happy with the praise we've received from
users and press alike:
"In the decade since the release of its first plug-in, One, FabFilter has made an indelible mark on the
music production landscape." — Computer Music magazine
"While many other software developers are busy trying to model hardware, FabFilter is leaving them
in the dust by being visionaries and reaching into the future. FabFilter stuff is just on another level."
— Jeff Sanders
"FabFilter has an enviable reputation for making easy-to-use, powerful tools." — Music Tech
magazine
FabFilter was founded in 2002 by Frederik Slijkerman and Floris Klinkert, and is based in Amsterdam, The
Netherlands.
See Also
Support
FabFilter web site
 Loading...