

Page 1

EN
Basic Guide
LV
Pamatdarbību rokasgrāmata
LT
Pagrindinių vadovas
ET
Põhijuhend
Page 2

Ink Cartridge Codes/Tintes kasetņu kodi/
Rašalo kasečių kodai/Tindikassettide koodid
BK C M Y
Black
Melns
Juoda
Must
Cyan
Gaišzils
Žydra
Tsüaan
Magenta
Purpurs
Purpurinė
Magenta
Yellow
Dzeltens
Geltona
Kollane
Stag
Briedis
Elnias
Hirved
Apple
Ābols
Obuolys
Õun
http://www.epson.eu/pageyield
For information on Epson’s ink cartridge yields, please visit the website above. Available ink cartridge sizes
vary by area.
Lai ieg ūtu informāciju par Epson tintes kasetnes izdrukājamo lapu skaitu, apmeklējiet iepriekš norādīto
tīmekļa vietni. Pieejamie tintes kaset u izmeri var atš irties atkariba no iegades vietas.
Informacija apie „Epson“ rašalo kasečių išeigas pateikta aukščiau nurodytame tinklalapyje. Rašalo kaseciu
dydis gali skirtis atsižvelgiant i regiona.
Teavet Epsoni tindikasseti koguste kohta leiate ülalolevalt veebilehelt. Tindikassettide suurused erinevad
piirkonniti.
T1301 T1302 T1303 T1304
T1291 T1292 T1293 T1294
Page 3

Basic Guide
Contents
Contents
Introduction......................... 2
Where to Find Information................... 2
Caution, Important and Note................. 2
Using Epson Connect Service................. 2
Safety Instructions................... 3
Control Panel Overview............. 3
Button and LCD........................... 4
Lights................................... 5
Paper and Media Handling.......... 5
Selecting Paper............................ 5
Loading Paper into the Paper Cassette........... 6
Placing Originals.......................... 7
Automatic Document Feeder (ADF).......... 7
Scanner glass........................... 9
Inserting a Memory Card.................... 9
Copying............................ 10
Scanning........................... 10
Faxing.............................. 11
Introducing FAX Utility.................... 11
Connecting to a Phone Line.................. 11
About a phone cable..................... 11
Using the phone line for fax only............ 11
Sharing line with phone device............. 12
Checking the fax connection............... 12
Setting Up Fax Features..................... 13
Setting up speed dial entries................ 13
Setting up group dial entries............... 13
Sending Faxes............................ 13
Receiving Faxes........................... 14
Printing Reports.......................... 14
Precautions.............................. 16
Replacing an ink cartridge................... 17
Basic Troubleshooting............. 19
Error Messages........................... 19
Paper Jams.............................. 20
Removing jammed paper from the rear cover
.................................... 20
Removing jammed paper from inside the
product.............................. 21
Removing jammed paper from the paper
cassette............................... 22
Removing jammed paper from the Automatic
Document Feeder (ADF). . . . . . . . .......... 23
Print Quality Help......................... 24
Faxing Help............................. 24
Where To Get Help.................. 24
Technical Support Web Site.................. 24
English
More Functions..................... 15
Replacing Ink Cartridges........... 16
Safety instructions......................... 16
1
Page 4

Basic Guide
Introduction
Where to Find
Information
Introduction
!
Caution
must be followed carefully to avoid bodily injury.
Important
c
must be observed to avoid damage to your
equipment.
The latest version of the following manuals are available
on the Epson support website.
http://www.epson.eu/Support (Europe)
http://support.epson.net/ (outside Europe)
❏ Start Here (paper):
Provides you with information on setting up the
product and installing the software.
❏ Basic Guide (paper):
Provides you with basic information when you are
using the product without a computer. This manual
may not be included depending on model and
region.
❏ User’s Guide (PDF):
Provides you with detailed operating, safety, and
troubleshooting instructions. See this guide when
using this product with a computer, or when using
advanced features such as 2 sided copying.
To view the PDF manual, you need Adobe Acrobat
Reader 5.0 or later, or Adobe Reader.
❏ Network Guide (HTML):
Provides network administrators with information
on both the printer driver and network settings.
❏ Help (on the product display):
Note
contain useful tips and restrictions on product operation.
Using Epson Connect
Service
Using Epson Connect and other companies’ services,
you can easily print directly from your smartphone,
tablet PC or laptop, anytime and practically anywhere
even across the globe! For more information about the
printing and other services, visit the following URL;
https://www.epsonconnect.com/ (Epson Connect
portal site)
http://www.epsonconnect.eu (Europe only)
You can view the Epson Connect guide by
double-clicking the
shortcut icon on the desktop.
Provides basic operating and troubleshooting
instructions on the product’s LCD screen. Select the
Help menu on the control panel.
Caution, Important and
Note
Caution, Important, and Note in this manual are
indicated as below and have the following meaning.
2
Page 5

Basic Guide
Safety Instructions
Safety Instructions
Read and follow these instructions to ensure safe use of
this product. Make sure you keep this guide for future
reference. Also, be sure to follow all warnings and
instructions marked on the product.
❏ Use only the power cord supplied with the product
and do not use the cord with any other equipment.
Use of other cords with this product or the use of the
supplied power cord with other equipment may
result in fire or electric shock.
❏ Be sure your AC power cord meets the relevant local
safety standard.
❏ Never disassemble, modify, or attempt to repair the
power cord, plug, printer unit, scanner unit, or
options by yourself, except as specifically explained
in the product’s guides.
❏ Unplug the product and refer servicing to qualified
service personnel under the following conditions:
The power cord or plug is damaged; liquid has
entered the product; the product has been dropped
or the casing damaged; the product does not
operate normally or exhibits a distinct change in
performance. Do not adjust controls that are not
covered by the operating instructions.
❏ Place the product near a wall outlet where the plug
can be easily unplugged.
❏ Do not place or store the product outdoors, near
excessive dirt or dust, water, heat sources, or in
locations subject to shocks, vibrations, high
temperature or humidity.
❏ Take care not to spill liquid on the product and not
to handle the product with wet hands.
❏ Keep this product at least 22 cm away from cardiac
pacemakers. Radio waves from this product may
adversely affect the operation of cardiac
pacemakers.
❏ If the LCD screen is damaged, contact your dealer.
If the liquid crystal solution gets on your hands,
wash them thoroughly with soap and water. If the
liquid crystal solution gets into your eyes, flush
them immediately with water. If discomfort or
vision problems remain after a thorough flushing,
see a doctor immediately.
❏ Avoid using a telephone during an electrical storm.
There may be a remote risk of electric shock from
lightning.
❏ Do not use a telephone to report a gas leak in the
vicinity of the leak.
Note:
The following provides safety instructions for ink
cartridges.
& “Replacing Ink Cartridges” on page 16
English
Control Panel Overview
Note:
❏ Control panel design varies depending on location.
❏ Although the control panel design an d what displayed on the LCD screen such as menu names and option names may
differ from your actual product, the method of operation is the same.
3
Page 6

Basic Guide
Button and LCD
Control Panel Overview
Buttons Function
a
b
c
d
e - LCD screen displays menus. If your product has a touch panel, you can scroll the screen by
f
g
h +, - Sets the number of copies.
i 0 - 9, *, # Specifies the date/time or the number of co pies , as well as fa x nu mber s. E nter s alp han umer ic
j
l, u, r, d, OK Press l, u, r, d to select menus. Press OK to confirm the setting you have selected and go to
Turns the product on or off.
Returns to the top menu. When on the top menu, switches between the modes.
Displays the last number dialed. When entering numbers in fax mode, this inserts a pause
symbol (-) that acts as a brief pause during dialing.
Displays the Contacts list in fax mode.
swiping the LCD screen. Try swiping a little harder if the touch panel is slow to respond.
Cancels/returns to the previous menu.
next screen. When typing a fax number, l acts as a backspace key, and r inserts a space.
characters and switches between uppercase, lowercase, and numbers each time it is pressed.
It may be easier to use the software keypad to enter text instead of using these buttons.
Starts printing/copying/scanning/faxing in black and white.
4
Page 7

Basic Guide
Buttons Function
k
Paper and Media Handling
Starts printing/copying/scanning/faxing in color.
l
m
u, d
Stops the current operation or initializes the current settings.
Scrolls the screen.
Lights
Lights Function
On when the product is on.
Flashes when the product is receiving data, printing/copying/scanning/faxing, replacing an
ink cartridge, charging ink, or cleaning the print head.
Stays on while the printer is connected to a network. Flashes while network settings are being
adjusted (green: Wi-Fi/orange: Ethernet).
Note:
For more information on the icons displayed on the LCD screen, see the Help on the control panel.
Paper and Media
Handling
Selecting Paper
The product automatically adjusts itself for the type of
paper you select in your print settings. That is why the
paper type setting is so important. It tells your product
what kind of paper you are using and adjusts the ink
coverage accordingly. The table below lists the settings
you should choose for your paper.
For this paper LCD paper type
Epson Premium Glossy
Photo Paper
Epson Premium Semigloss
Photo Paper
Epson Glossy Photo Paper Glossy
Epson Photo Paper Photo Paper
Epson Matte Paper –
Heavyweight
Epson Photo Quality Ink Jet
Paper
*1 You can perform 2-sided printing with this paper.
English
Prem. Glossy
Prem. Glossy
Matte
Matte
For this paper LCD paper type
Plain paper*
Epson Bright White Ink Jet
Paper*
Epson Ultra Glossy Photo
Paper
1
1
Plain Paper
Plain Paper
Ultra Glossy
5
Page 8

Basic Guide
Paper and Media Handling
Loading Paper into the
Paper Cassette
Follow these steps to load paper:
a. Paper cassette 1
b. Paper cassette 2
* The availability of this part varies by product.
Pull out the paper cassette.
A
*
Pinch and slide the edge guides to the sides of the
B
paper cassette.
Slide the edge guide to adjust to the paper size you
C
will use.
Load paper toward the edge guide with printable
D
side face down, and check that the paper is not
sticking out from the end of the cassette.
Note:
If the output tray has been ejected, close it before pulling
out the paper cassette.
6
Page 9

Basic Guide
Paper and Media Handling
Note:
❏ Paper cassette 2 supports plain paper size B5 or
larger only.
❏ Fan and align the edges of the paper before loading.
Slide the edge guides to the edges of the paper.
E
Slide out the output tray and raise the stopper.
G
Note:
❏ Leave enough space in front of the product for the
paper to be fully ejected.
❏ Do not remove or insert the paper cassette while the
product is operating.
❏ For instructions on loading media other than plain
paper such as envelopes and pre-punched paper, see
the PDF User’s Guide.
Placing Originals
Automatic Document Feeder
(ADF)
English
Note:
For plain paper, do not load paper above the H arrow
mark inside the edge guide.
For Epson special media, make sure the number of sheets
is less than the limit specified for the media.
Keep the cassette flat and slowly and carefully
F
reinsert it all the way into the product.
You can load your original documents in the Automatic
Document Feeder (ADF) to copy, scan, or fax multiple
pages quickly. The ADF can scan both sides of your
documents. To do so, select the option in the copy
setting menu. You can use the following originals in the
ADF.
Size A4/Letter/Legal
Type Plain paper
Weight
Capacity 30 sheets or 3 mm or less
When you scan a 2-sided document using the ADF, legal
size paper is not available.
7
2
64 g/m
to 95 g/m
(A4, Letter)/10 sheets
(Legal)
2
Page 10
Basic Guide
Paper and Media Handling
Important:
c
To prevent paper jams, avoid the following
documents. For these types, use the scanner glass.
❏ Documents held together with paper clips,
staples, etc.
❏ Documents that have tape or paper stuck to
them.
❏ Photos, OHPs, or thermal transfer paper.
❏ Paper that is torn, wrinkled, or has holes.
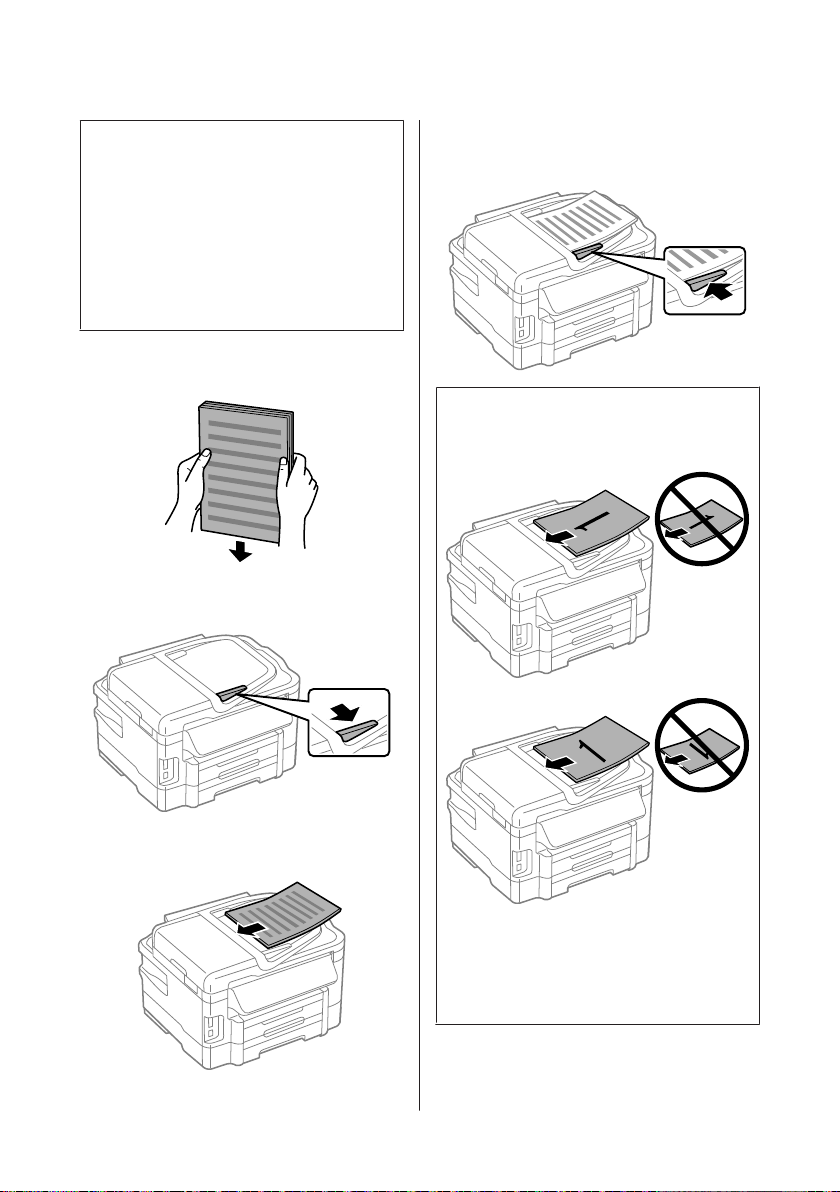
Tap the originals on a flat surface to even the
A
edges.
Slide the edge guide on the Automatic Document
B
Feeder.
Slide the edge guide until it is flush with the
D
originals.
Note:
❏ For 2-up Copy layout, place the original as shown.
Make sure the orientation of the original matches
the Document Orientation settings.
Insert the originals face-up and short edge first
C
into the Automatic Document Feeder.
❏ When you use the copy function with the Automatic
Document Feeder (ADF), the print settings are fixed
at Reduce/Enlarge - Actual Size, Paper Type - Plain
Paper, and Paper Size - A4/Legal. The print is
cropped if you copy an original larger than A4.
8
Page 11

Basic Guide
Paper and Media Handling
Scanner glass
Open the document cover and place your
A
original face-down on the scanner glass.
Slide the original to the corner.
B
Close the cover gently.
C
SD, miniSD, microSD, SDHC, miniSDHC,
microSDHC, SDXC, microSDXC, MultiMediaCard,
MMCplus, MMCmobile, MMCmicro, Memory Stick
Duo, Memory Stick PRO Duo, Memory Stick PRO-HG
Duo, Memory Stick Micro, MagicGate Memory Stick
Duo
Important:
c
The following memory cards require an adapter.
Attach it before inserting the card into the slot,
otherwise the card may get stuck.
❏ miniSD, microSD, miniSDHC, microSDHC,
microSDXC, MMCmicro
❏ MMCmobile
❏ Memory Stick Micro
Insert one card at a time.
A
English
Note:
When there is a document in the Automatic Document
Feeder (ADF) and on the scanner glass, priority is given
to the document in the Automatic Document Feeder
(ADF).
Inserting a Memory Card
You can print photos that are stored on a memory card,
or save scanned data on a memory card. The following
memory cards are supported.
9
Page 12

Basic Guide
Copying
Check the light stays on.
B
= on, = flashing
Important:
c
❏ Do not try to force the card all the way into the
slot. It should not be fully inserted.
❏ Do not remove the memory card while the light
is flashing. The data in the memory card may
be lost.
Copying
Follow the steps below to copy documents. For products
with two paper cassettes, if you want to copy a large
quantity of documents in a single batch, load A4/Legal
plain paper in both cassettes and set the Paper Source to
Cassette 1>Cassette 2 in step 7.
Select the appropriate copy settings such as paper
G
size, paper type, and paper quality.
Note:
❏ Depending on the model, you can make copy settings
in Paper and Copy Settings.
❏ You can preview the copy results before you start
copying.
❏ You can make various layout copies such as 2-sided
copy, 2-up copy, and so on. Change the 2-sided or
layout settings as necessary.
Press one of the x buttons to set the color mode,
H
and then start copying.
Note:
Refer to the PDF User’s Guide for other copying functions
and the Copy mode menu list.
Scanning
You can scan documents and send the scanned image
from the product to a connected computer.
Note:
For information on Scan to Cloud, see the Epson
Connect guide, which can be accessed using the shortcut
on the desktop.
icon
Load paper in the paper cassette.
A
& “Loading Paper into the Paper Cassette” on
page 6
Place original.
B
& “Placing Originals” on page 7
Enter Copy mode from the Home menu.
C
Press + and - to set the number of copies.
D
Set the density.
E
Press d to enter the Copy menu.
F
10
Place your original(s).
A
& “Placing Originals” on page 7
Select Scan from the Home menu.
B
Select a scan menu items.
C
If you select Scan to PC, select a computer.
D
If you select Scan to Memory Card, make settings
such as the scan format and 2-sided settings.
Page 13
Basic Guide
Faxing
Press the x buttons to start scanning.
E
Note:
For more information on other scan functions and the
scan mode menu list, see the PDF User’s Guide.
Your scanned image is saved.
Faxing
Introducing FAX Utility
FAX Utility is a software capable of transmitting data
such as documents, drawings, and tables created using a
word processing or spreadsheet application directly by
fax, without printing. In addition, this utility has a
function to save a received fax as a PDF file on a
computer. This enables you to check the data without
printing it and print only the data that you want to print.
Use the following procedure to run the utility.
Windows
Click the start button (Windows 7 and Vista) or click
Start (Windows XP), point to All Programs, select
Epson Software, and then click FAX Utility.
Mac OS X
Click System Preference, click Print & Fax or Print &
Scan, and then select FAX (your printer) from Printer.
Then click as follows;
Mac OS X 10.6.x, 10.7.x: Option & Supplies - Utility -
Open Printer Utility
Mac OS X 10.5.x: Open Print Queue - Utility
❏ RJ-11 Phone Line
❏ RJ-11 Telephone set connection
Depending on the area, a phone cable may be included
with the product. If so, use that cable.
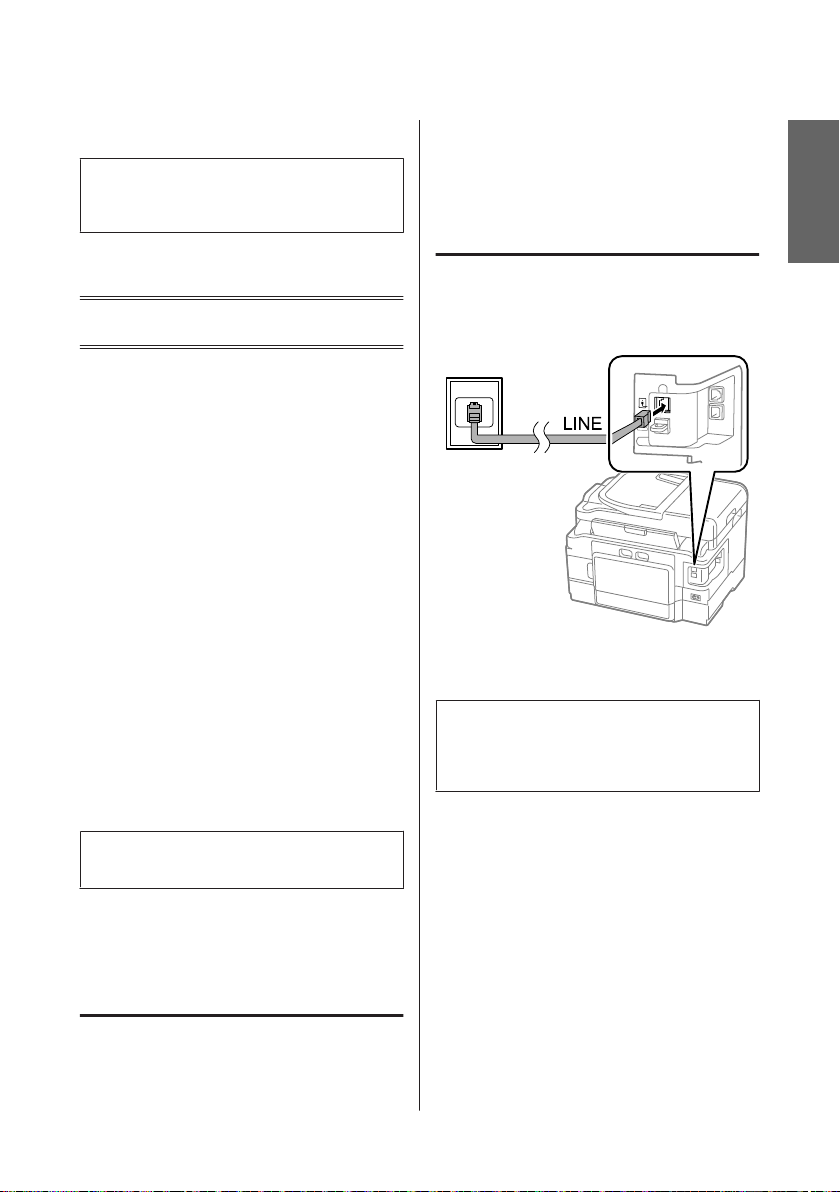
Using the phone line for fax only
Connect a phone cable leading from a telephone
A
wall jack to the LINE port.
Make sure Auto Answer is set to On.
B
& “Receiving Faxes” on page 14
Important:
c
If you do not connect an external telephone to the
product, make sure you turn on auto answer.
Otherwise, you cannot receive faxes.
English
Note:
For more details, see the online help for FAX Utility.
Connecting to a Phone
Line
About a phone cable
Use a phone cable with the following interface
specification.
11
Page 14

Basic Guide
Faxing
Sharing line with phone device
Connect a phone cable leading from a telephone
A
wall jack to the LINE port.
Remove the cap.
B
Connect a phone or answering machine to the
C
EXT. port.
Note:
See the PDF User’s Guide for other connection methods.
Checking the fax connection
You can check whether the product is ready to send or
receive faxes.
Load plain paper in the cassette.
A
& “Loading Paper into the Paper Cassette” on
page 6
Note:
If your product is equipped with two cassettes, load paper
in cassette 1. If you have changed the Paper Source setting
(Setup > Fax Settings > Receive Settings > Paper
Source), load paper in the cassette you specified.
Enter Setup mode from the Home menu.
B
Select Fax Settings.
C
Select Check Fax Connection.
D
Press one of the x buttons to print the report.
E
Note:
If an errors are reported, try the solutions in the report.
12
Page 15

Basic Guide
Faxing
Setting Up Fax Features
Setting up speed dial entries
You can create a speed dial list allowing you to select fax
recipient numbers quickly when faxing. Up to 100
combined speed dial and group dial entries can be
registered.
Enter Fax mode from the Home menu.
A
Press or select Contacts.
B
Select Edit Contacts.
C
Select Speed Dial Setup. You see the available
D
speed dial entry numbers.
Select the speed dial entry number that you want
E
to register. You can register up to 100 entries.
Use the numeric keypad to enter a phone
F
number. You can enter up to 64 digits.
Note:
A hyphen ("-") causes a slight pause when dialing. Only
include it in phone numbers when a pause is necessary.
Spaces entered between numbers are ignored when
dialing.
Enter a name to identify the speed dial entry. You
G
can enter up to 30 characters.
Select Done to register the name.
H
Setting up group dial entries
You can add speed dial entries to a group, allowing you
to send a fax to multiple recipients at the same time. Up
to 99 combined speed dial and group dial entries can be
entered.
Enter Fax mode from the Home menu.
A
Select Edit Contacts.
C
Select Group Dial Setup. You see the available
D
group dial entry numbers.
Select the group dial entry number that you want
E
to register.
Enter a name to identify the group dial entry. You
F
can enter up to 30 characters.
Select Done to register the name.
G
Select a speed dial entry that you want to register
H
in the group dial list.
Repeat step 8 to add other speed dial entries to the
I
group dial list. You can register up to 99 speed
dial entries in a group dial.
Press OK to finish creating a group dial list.
J
Sending Faxes
Place your original in the Automatic Document
A
Feeder or on the scanner glass.
& “Placing Originals” on page 7
Enter Fax mode from the Home menu.
B
Use the keys on the numeric keypad to enter the
C
fax number. You can enter up to 64 digits.
Note:
❏ To display the last fax number you used, press
❏ Press d and make the send settings. To scan and fax
❏ Make sure you have entered the header information.
or Redial.
both sides of your original, select 2-Sided Faxing,
On, and then load the original in the Automatic
Document Feeder. Depending on the model, you can
also make the settings by selecting Send Settings.
Some fax machines automatically reject incoming
faxes that do not include header information.
English
Press or select Contacts.
B
13
Page 16

Basic Guide
Faxing
Press x (color) or x (B&W) to start sending a
D
color or monochrome fax.
Note:
If the fax number is busy or there is some problem, this
product redials after one minute. Press Redial to redial
immediately.
Receiving Faxes
Follow the instructions to make settings to receive faxes
automatically.
Note:
❏ Depending on the Fax Output settings, the received
fax is saved as a data or printed.
❏ If Fax Output is set to Save, the received fax data is
automatically saved as data, and you can skip step
1.
Load plain paper in the cassette.
A
& “Loading Paper into the Paper Cassette” on
page 6
Note:
If your product is equipped with two cassettes, make
Paper Source settings.
Setup > Fax Settings > Receive Settings > Paper Source
If you want to print a large quantity of faxes in a single
batch, load plain paper in both cassettes and set Paper
Source to Cassette 1>Cassette 2.
Make sure Auto Answer is set to On.
B
Setup > Fax Settings > Receive Settings > Auto
Answer > On
Note:
❏ When an answering machine is connected directly
to this product, make sure you set Rings to Answer
correctly using the following procedure.
❏ Depending on the region, Rings to Answer may be
unavailable.
❏ For more information on receiving faxes manually,
see the PDF User’s Guide.
Enter Setup mode from the Home menu.
C
Select Fax Settings.
D
Select Communication.
E
Select Rings to Answer.
F
Select the number of rings.
G
Important:
c
Select more rings than needed for the answering
machine to pick up. If it is set to pick up on the fourth
ring, set the product to pick up on the fifth ring or
later. Otherwise the answering machine cannot
receive voice calls.
Note:
When you receive a call and the other party is a fax, the
product receives the fax automatically even if the
answering machine picks up the call. If you pick up the
phone, wait until the LCD screen displays a message
saying that a connection has been made before you hang
up. If the other party is a caller, the phone can be used as
normal or a message can be left on the answering
machine.
Printing Reports
Follow the instructions below to print a fax report.
Load plain paper in the cassette.
A
& “Loading Paper into the Paper Cassette” on
page 6
Note:
If your product is equipped with two cassettes, make
Paper Source settings.
Setup > Fax Settings > Receive Settings > Paper Source
Enter Fax mode from the Home menu.
B
If Advanced Options is displayed on the LCD
C
screen, select Advanced Options.
If it is not displayed, press d.
14
Page 17

Basic Guide
More Functions
Select Fax Report.
D
Select the item you want to print.
E
Note:
Only Fax Log can be viewed on the screen.
Press one of the x buttons to print the report you
F
selected.
Note:
For more information on other fax functions and the fax
mode menu list, see the PDF User’s Guide.
More Functions
More Functions provides you with many special menus that make printing easy and fun! For more details, select More
Functions, select each menu, and then follow the instructions on the LCD screen.
Menu Functions
ID Card Copy
Print Photos
Yo u ca n co p y b o th s id e s o f an I D c a rd a t th e
same time.
You can print photos stored on a memory
card or an external USB device without
using a computer. You can also reduce and
enlarge your photos, and adjust the photo
quality.
English
Copy/Restore Photos
Photo Layout Sheet
15
You can make faithful copies of your
originals. If your original photo is faded,
you can restore color to bring it back to life.
You can print your photos on a memory
card in various layouts.
Page 18

Basic Guide
Replacing Ink Cartridges
Menu Functions
Print Ruled Papers
Replacing Ink
Cartridges
Safety instructions
❏ Keep ink cartridges out of the reach of children.
❏ Be careful when you handle used ink cartridges, as
there may be some ink around the ink supply port.
If ink gets on your skin, wash the area thoroughly
with soap and water.
If ink gets into your eyes, flush them immediately
with water. If discomfort or vision problems
continue after a thorough flushing, see a doctor
immediately.
If ink gets into your mouth, spit it out immediately
and see a doctor right away.
❏ To maintain optimum print head performance,
some ink is consumed from some cartridges not
only during printing but also during maintenance
operations such as ink cartridge replacement and
print head cleaning.
❏ If you nee d to rem ove an i nk c art ridg e te mpo rar ily ,
be sure to protect the ink supply area from dirt and
dust. Store the ink cartridge in the same
environment as the product. When storing the
cartridge, be sure that its label identifying the color
of the ink cartridge is facing upward. Do not store
ink cartridges upside down.
❏ For maximum ink efficiency, only remove an ink
cartridge when you are ready to replace it. Ink
cartridges with low ink status may not be used when
reinserted.
❏ Do not open the ink cartridge package until you are
ready to install it in the product. The cartridge is
vacuum packed to maintain its reliability. If you
leave a cartridge unpacked for a long time before
using it, normal printing may not be possible.
You can print ruled paper or graph paper
with or without a photo set as the
background.
Precautions
❏ Epson recommends the use of genuine Epson ink
cartridges. Epson cannot guarantee the quality or
reliability of non-genuine ink. The use of
non-genuine ink may cause damage that is not
covered by Epson’s warranties, and under certain
circumstances, may cause erratic product behavior.
Information about non-genuine ink levels may not
be displayed.
❏ Do not shake ink cartridges too vigorously;
otherwise ink may leak from the cartridge.
❏ Install all ink cartridges; otherwise, you cannot
print.
16
Page 19

Basic Guide
Replacing Ink Cartridges
Replacing an ink cartridge
Open the scanner unit. The ink cartridge holder
A
moves to the ink cartridge replacement position.
Important:
c
❏ Do not move the ink cartridge holder by hand;
otherwise, you may damage the product.
❏ Do not lift up the scanner unit when the
document cover is open.
Open the ink cartridge cover.
B
Pinch and remove the ink cartridge.
C
Note:
❏ The illustration shows replacement of the black ink
cartridge. Replace the cartridge appropriate to your
situation.
❏ Removed ink cartridges may have ink around the
ink supply port, so be careful not to get any ink on the
surrounding area when removing the cartridges.
English
Note:
If the ink cartridge holder does not move to the ink
cartridge replacement position, follow the instruction
below.
Home > Setup > Maintenance > Ink Cartridge
Replacement
17
Gently shake new replacement cartridges four or
D
five times and remove the replacement ink
cartridge from its package.
Page 20

Basic Guide
Replacing Ink Cartridges
Remove only the yellow tape.
E
Important:
c
❏ You must remove the yellow tape from the
cartridge before installing it; otherwise, print
quality may decline or you may not be able to
print.
❏ If you have installed an ink cartridge without
removing the yellow tape, take the cartridge
out of the product, remove the yellow tape, and
then reinstall it.
❏ Do not remove the transparent seal from the
bottom of the cartridge; otherwise, the
cartridge may become unusable.
❏ Do not remove or tear the label on the
cartridge; otherwise, ink will leak.
Insert the cartridge and press it until it clicks.
F
Close the ink cartridge cover.
G
Close the scanner unit slowly. Ink charging
H
starts.
Note:
❏ The power light continues to flash whil e the product
is charging ink. Do not turn off the product during
ink charging. If the ink charging is incomplete, you
may not be able to print.
❏ If you had to replace an ink cartridge during
copying, to ensure copy quality after ink charging is
finished, cancel the job that is copying and start
again from placing the originals.
Ink cartridge replacement is complete. The product will
return to its previous status.
18
Page 21

Basic Guide
Basic Troubleshooting
Basic Troubleshooting
Error Messages
This section describes the meaning of messages displayed on the LCD screen.
Error Messages Solutions
Paper out or Paper jam
Printer error. Turn the power off and on again. For details,
see your documentation.
Communication error. Check if a computer is connected. Make sure the computer is connected correctly. If the error
The maintenance box is nearing the end of its service life. Replace maintenance box before the end its service life.
The maintenance box is at the end of its service life. You
need to replace it.
A printer’s ink pad is nearing the end of its service life.
Please contact Epson Support.
A printer’s ink pad is at the end of its service life. Please
contact Epson Support.
No dial tone detected. Run Check Fax Connection under
Fax Settings in Setup menu.
Combination of the IP address and the subnet mask is
invalid. See your documentation.
Recovery Mode The firmware update has failed. You will need to re-attempt the
& See “Paper Jams” on page 20
Turn the product off and then back on. Make sure that no paper is
still in the product. If the error message still appears, contact Epson
support.
messages still appears, make sure that scanning software is
installed on your computer and that the software settings are
correct.
For more details, see the PDF User’s Guide.
When the maintenance box is full, the product stops and you need
to replace the maintenance box to continue printing.
Replace the maintenance box.
Press x button to resume printing. The message will be displayed
until the ink pad is replaced. Contact Epson support to replace ink
pads before the end of their service life. When the ink pads are
saturated, the product stops and Epson support is required to
continue printing.
Contact Epson support to replace ink pads.
Make sure the phone cable is connected correctly and the phone
line works.
& See “Connecting to a Phone Line” on page 11
If you connected the product to a PBX (Private Branch Exchange)
phone line or Terminal Adapter, turn off the Dial Tone Detection.
Select Fax Settings > Communication > Dial Tone Detection
>Off.
Refer the online Network Guide.
firmware update. Ready a USB cable and visit your local Epson
website for further instructions.
English
19
Page 22

Basic Guide
Basic Troubleshooting
Paper Jams
Caution:
!
Never touch the buttons on the control panel while
your hand is inside the product.
Note:
❏ Cancel the print job if prompted by a message from
the LCD screen or the printer driver.
❏ After you have removed the jammed paper, press the
button indicated in the LCD screen.
Removing jammed paper from
the rear cover
Pull out the rear cover.
A
Carefully remove the jammed paper.
C
Open the rear cover.
D
Carefully remove the jammed paper.
B
20
Page 23

Basic Guide
Basic Troubleshooting
Carefully remove the jammed paper.
E
Reattach the rear cover.
F
Removing jammed paper from
inside the product
Carefully remove the jammed paper.
A
Open the scanner unit.
B
Important:
c
Do not lift up the scanner unit when the document
cover is open.
Remove all of the paper inside, including any
C
torn pieces.
English
21
Page 24

Basic Guide
Basic Troubleshooting
Important:
c
Do not touch the flat white cable connected to the
cartridge holder.
Close the scanner unit slowly.
D
Removing jammed paper from
the paper cassette
Pull out the paper cassette.
A
Note:
If you cannot pull out the cassette, unplug the power cord
from the product and the electrical outlet. Unplug all
other cables from the product.
Carefully stand the product on its side as shown below
and carefully pull out the cassette.
Remove the jammed paper from the cassette.
B
Carefully remove any paper jammed inside the
C
product.
22
Align the edges of the paper.
D
Keep the cassette flat and slowly and carefully
E
reinsert it all the way into the product.
Page 25

Basic Guide
Basic Troubleshooting
Removing jammed paper from
the Automatic Document Feeder
(ADF)
Remove the stack of paper from the ADF input
A
tray.
Open the ADF cover.
B
Important:
c
Make sure you open the ADF cover before removing
jammed paper. If you do not open the cover, the
product may be damaged.
Carefully remove the jammed paper.
C
Open the document cover.
E
Carefully remove the jammed paper.
F
Close the document cover.
G
English
Close the ADF cover.
D
23
Raise the ADF input tray.
H
Page 26

Basic Guide
Where To Get Help
Carefully remove the jammed paper.
I
Return the ADF input tray to its original
J
position.
Print Quality Help
If you see banding (light lines), missing colors, or any
other quality problems in your printouts, try the
following solutions.
❏ Make sure you have loaded the paper and place your
original correctly.
& “Loading Paper into the Paper Cassette” on
page 6
& “Placing Originals” on page 7
Faxing Help
❏ Make sure the phone cable is connected correctly
and check that the phone line works. You can check
the line status by using the Check Fax Connection
function.
& “Connecting to a Phone Line” on page 11
❏ If the fax did not send, make sure that the recipient’s
fax machine is turned on and working.
❏ If this product is not connected to a phone and you
want to receive faxes automatically, make sure you
turn on auto answer.
& “Receiving Faxes” on page 14
Note:
For more solutions to faxing problems, see the online
User’s Guide.
Where To Get Help
Technical Support Web
Site
❏ Check the paper size settings and the paper type
settings.
& “Selecting Paper” on page 5
❏ The print head may be clogged. Perform a nozzle
check first and then clean the print head.
Setup > Maintenance > Nozzle Check
(a) OK
(b) Needs a head cleaning
Epson’s Technical Support Web Site provides help with
problems that cannot be solved using the
troubleshooting information in your product
documentation. If you have a Web browser and can
connect to the Internet, access the site at:
http://support.epson.net/
http://www.epson.eu/Support (Europe)
If you need the latest drivers, FAQs, manuals, or other
downloadables, access the site at:
http://www.epson.com
http://www.epson.eu/Support (Europe)
Then, select the support section of your local Epson
Web site.
24
Page 27

Pamatdarbību rokasgrāmata
Satura rādītājs
Satura rādītājs
Ievads................................ 2
Kur atrast informāciju....................... 2
Brīdinājumi, svarīga informācija un piezīmes...... 2
Izmantojot Epson Connect Pakalpojums......... 2
Drošības instrukcijas................ 3
Vadības paneļa pārskats............ 4
Poga un LCD ekrāns........................ 4
Lampiņas................................ 5
Darbības ar papīru un drukas
materiāliem......................... 5
Papīra izvēle.............................. 5
Ievieto papīru papīra kasetē................... 6
Oriģinālu novietošana....................... 8
Automātiskais dokumentu padevējs (ADP). . . . . 8
Skenera stikls.......................... 10
Atmiņas kartes ievietošana.................. 10
Kopēšana........................... 11
Skenēšana.......................... 11
Fakss............................... 12
Informācija par FAX Utility.................. 12
Savienošana ar tālruņa līniju................. 12
Par tālruņa kabeli....................... 12
Tālruņa līnija izmantota tikai faksam......... 12
Līnijas lietošana kopā ar tālruņa ierīci........ 13
Faksa savienojuma pārbaude............... 13
Faksa funkciju iestatīšana................... 14
Ātrās zvanīšanas ierakstu iestatīšana......... 14
Grupu zvanu ierakstu iestatīšana............ 14
Faksa sūtīšana............................ 14
Faksu saņemšana......................... 15
Atskaišu drukāšana........................ 16
Vairāk funkciju..................... 16
Tintes kasetņu nomaiņa............ 17
Drošības instrukcijas....................... 17
Piesardzības pasākumi...................... 17
Tintes kasetnes nomaiņa.................... 18
Pamata traucējummeklēšana. . . .. . 20
Kļūdu paziņojumi......................... 20
Iesprūdis papīrs.......................... 21
Iestrēgušā papīra izņemšana no aizmugurējā
vāka................................. 21
Iesprūduša papīra izņemšana no produkta
iekšpuses............................. 22
Iestrēgušā papīra izņemšana no papīra kasetes
.................................... 23
Automātiskajā dokumentu padevējā (ADP)
iestrēdzis papīrs........................ 24
Drukas kvalitātes palīdzība.................. 25
Palīdzība faksa sūtīšanā..................... 25
Kur saņemt palīdzību............... 25
Tehniskā atbalsta interneta vietne............. 25
Latviešu
1
Page 28

Pamatdarbību rokasgrāmata
Ievads
Ievads
Kur atrast informāciju
Jaunākā tālāk minēto rokasgrāmatu versija ir pieejama
Epson atbalsta vietnē.
http://www.epson.eu/Support (Eiropa)
http://support.epson.net/ (ārpus Eiropas)
❏ Sāciet šeit (drukāts materiāls):
Ietver informāciju par produkta uzstādīšanu un
programmatūras instalēšanu.
❏ Pamatdarbību rokasgrāmata (drukāts
materiāls):
Nodrošina pamata informāciju, kad lietojat šo
produktu bez datora. Atkarībā no modeļa un
reģiona šī rokasgrāmata var nebūt iekļauta.
❏ Lietotāja rokasgrāmata (PDF):
Ietver detalizētas darbības, drošības un problēmu
novēršanas instrukcijas. Skatiet šo rokasgrāmatu,
kad lietojat produktu ar datoru vai izmantojot tādas
papildu funkcijas kā divpusējā kopēšana.
Lai skatītu PDF rokasgrāmatu, nepieciešama
Adobe Acrobat Reader 5.0 vai jaunāka versija vai
programma Adobe Reader.
❏ Tīkla vednis (HTML):
Ietver tīkla administratoriem paredzētu
informāciju par printera draiveri un tīkla
iestatījumiem.
Brīdinājumi, svarīga
informācija un piezīmes
Brīdinājumi, svarīga informācija un piezīmes šajā
rokasgrāmatā ir norādīti tādā veidā, kā redzams zemāk,
un to nozīme ir šāda.
Brīdinājums
!
tās ir rūpīgi jāievēro, lai izvairītos no traumām.
Svarīga informācija
c
ir jāievēro, lai izvairītos no aprīkojuma
bojājumiem.
Piezīme
ietver noderīgus padomus par produkta darbību un tās
ierobežojumus.
Izmantojot Epson
Connect Pakalpojums
Izmantojot Epson Connect un citus šī uzņēmuma
pakalpojumus, varat jebkurā laikā viegli drukāt tieši no
viedtālruņa, planšetdatora vai klēpjdatora gandrīz
jebkurā vietā visā pasaulē! Lai iegūtu plašāku
informāciju par drukāšanu un citiem pakalpojumiem,
izmantojiet šādu URL;
https://www.epsonconnect.com/ (Epson Connect
portāla vietne)
http://www.epsonconnect.eu (tikai Eiropai)
❏ Help (produkta displejā):
Sniedz darbības un traucējummeklēšanas
pamatinstrukcijas produkta LCD ekrānā. Atlasiet
Help izvēlni vadības panelī.
2
Page 29

Pamatdarbību rokasgrāmata
Drošības instrukcijas
Apskatīt Epson Connect rokasgrāmatu var, veicot
dubultklikšķi uz
īsinājumikonas darbvirsmā.
Drošības instrukcijas
Izlasiet un ievērojiet šīs instrukcijas, lai garantētu drošu
šī produkta lietošanu. Saglabājiet šo rokasgrāmatu
uzziņai nākotnē. Ņemiet arī vērā visas uz produkta
norādītās instrukcijas un brīdinājumus.
❏ Izmantojiet tikai kopā ar produktu piegādāto
elektrības vadu, un nelietojiet to ar jebkādu citu
iekārtu. Jebkādu citu vadu lietošana ar šo produktu
vai piegādātā elektrības vada izmantošana ar citu
iekārtu var izraisīt ugunsgrēku vai elektriskās
strāvas triecienu.
❏ pārliecinieties, ka jūsu maiņstrāvas elektrības vads
atbilst vietējam drošības standartam;
❏ novietojiet produktu sienas rozetes tuvumā, kur
iespējams viegli izraut kontaktspraudni.
❏ neuzglabājiet un nenovietojiet produktu zem
atklātas debess, netīrumos vai putekļos, ūdens vai
siltuma avotu tuvumā vai vietās, kurās iespējami
triecieni, vibrācijas, augsta temperatūra vai
mitrums.
❏ Uzmanieties, lai neuzlietu uz produkta šķidrumu,
un nerīkojieties ar produktu ar mitrām rokām.
❏ Šim produktam ir jāatrodas vismaz 22 cm attālumā
no elektrokardiostimulatoriem. Šī produkta radītie
radio viļņi var negatīvi ietekmēt
elektrokardiostimulatoru darbību.
❏ Ja šķidro kristālu ekrāns ir bojāts, sazinieties ar tā
izplatītāju. Ja šķidro kristālu šķīdums nokļūst uz
rokām, rūpīgi tās nomazgājiet ar ziepēm un ūdeni.
Ja šķidro kristālu šķīdums iekļūst acīs, nekavējoties
tās izskalojiet ar ūdeni. Ja pēc skalošanas joprojām
ir nepatīkamas sajūtas vai redzes problēmas,
nekavējoties apmeklējiet ārstu;
❏ Izvairieties no tālruņa lietošanas negaisa laikā.
Pastāv maz ticams risks saņemt zibens triecienu.
❏ Nelietojiet tālruni, lai ziņotu par gāzes noplūdi,
šādas noplūdes vietas tuvumā.
Piezīme:
Tālāk ir sniegta drošības informācija par tintes
kasetnēm.
& "Tintes kasetņu nomaiņa" 17. lpp.
Latviešu
❏ Nekad pats neveiciet elektrības vada,
kontaktspraudņa, printera, skenera vai
papildaprīkojuma demontēšanu, modificēšanu vai
remontēšanu, izņemot atsevišķus gadījumus, kas
izskaidroti produkta rokasgrāmatās.
❏ izraujiet produkta elektrības vadu un ļaujiet apkopi
veikt kvalificētam servisa personālam šādos
gadījumos:
elektrības vads vai kontaktspraudnis ir bojāts;
produktā ir iekļuvis šķidrums; produkts ir nokritis
vai tā apvalks ir bojāts; produkts nedarbojas pareizi
vai parāda izteiktu veiktspējas maiņu. Neregulējiet
vadības elementus, kuri nav aprakstīti lietošanas
instrukcijās;
3
Page 30

Pamatdarbību rokasgrāmata
Vadības paneļa pārskats
Vadības paneļa pārskats
Piezīme:
❏ Vadības paneļa dizains atšķiras atkarībā no iegādes vietas.
❏ Lai gan vadības paneļa dizains, izvēlnes un opciju nosaukumi, kā arī citi elementi LCD ekrānā var mazliet atšķirties no
faktiskā produkta, taču darbības metode ir tāda pati
Poga un LCD ekrāns
Pogas Funkcija
a
b
c
d
e - LCD ekrāns attēlo izvēlnes. Ja jūsu produktam ir skārienpanelis, ekrānu var ritināt, skarot LCD
f
Ieslēdz vai izslēdz produktu.
Atgriežas galvenajā izvēlnē. Atrodoties galvenajā izvēlnē, pārslēdzas starp režīmiem.
Parāda pēdējo zvanīto numuru. Ievadot numurus faksa režīmā, šādi tiek ievadīts pauzes
simbols (-), kas darbojas kā īsa pauze zvanīšanas laikā.
Attēlo Contacts sarakstu faksa režīmā.
ekrānu. Mēģiniet uzspiest nedaudz stiprāk, ja skārienpanelis reaģē lēni.
Atceļ/atgriež iepriekšējo izvēlni.
4
Page 31

Pamatdarbību rokasgrāmata
Darbības ar papīru un drukas materiāliem
Pogas Funkcija
g
h +, - Iestata kopiju skaitu.
i 0 - 9, *, # Parāda datumu/laiku vai kopiju skaitu, kā arī faksa numurus. Ļauj ievadīt burtciparu rakstzīmes
j
l, u, r, d, OK Nospiediet l, u, r, d, lai izvēlētos vajadzīgo izvēlni. Nospiediet OK, lai apstiprinātu izvēlēto
iestatījumu un pārietu uz nākamo ekrānu. Ievadot faksa numuru, l darbojas kā
atpakaļatkāpes taustiņš un r ievada atstarpi.
un, ikreiz nospiežot, izvēlēties lielos un mazos burtus un ciparus. Var būt vienkāršāk teksta
ievadei šo pogu vietā izmantot programmatūras klaviatūru.
Sāk melnbaltu drukāšanu/kopēšanu/skenēšanu/faksa darbību.
k
l
m
u, d
Sāk krāsainu drukāšanu/kopēšanu/skenēšanu/faksa darbību.
Aptur pašreizējo darbību vai inicializē pašreizējos iestatījumus.
Ritina ekrānu.
Lampiņas
Lampiņas Funkcija
Deg, kad produkts ir ieslēgts.
Mirgo, kad produkts saņem datus, drukā/kopē/skenē/veic faksa darbības, tiek mainīta tintes
kasetne, tiek uzpildīta tinte vai tīrīta drukas galviņa.
Paliek ieslēgta, kamēr produkts ir pievienots tīklam. Mirgo tīkla iestatījumi pielāgošanas laikā
(zaļa: Wi-Fi/oranža: Ethernet).
Piezīme:
Lai iegūtu plašāku informāciju par LCD ekrānā attēlotajām ikonām, skatiet Help vadības panelī.
Darbības ar papīru un
drukas materiāliem
Papīra izvēle
Produkts automātiski pielāgojas drukas iestatījumos
izvēlētajam papīra veidam. Tādēļ papīra veida
iestatījums ir ļoti svarīgs. Tas informē produktu, kādu
papīra veidu izmantojat, un attiecīgi pielāgo tintes
klājumu. Zemāk redzamajā tabulā redzami papīra
iestatījumi, starp kuriem jums jāizvēlas.
Šim papīra veidam Papīra veids LCD ekrānā
Parasts papīrs*
Epson Bright White Ink Jet
Paper (Koši balts tintes
printeru papīrs)*
Epson Ultra Glossy Photo
Paper (Īpaši spodrs foto pa‐
pīrs)
Epson Premium Glossy
Photo Paper (Augstākā la‐
buma foto spodrpapīrs)
1
1
Latviešu
Plain Paper
Plain Paper
Ultra Glossy
Prem. Glossy
5
Page 32

Pamatdarbību rokasgrāmata
Darbības ar papīru un drukas materiāliem
Šim papīra veidam Papīra veids LCD ekrānā
Epson Premium Semigloss
Photo Paper (Augstākā la‐
buma foto pusspodrpapīrs)
Epson Glossy Photo Paper
(Spodrs foto papīrs)
Epson Photo Paper (Foto
papīrs)
Epson Matte Paper - Hea‐
vyweight (Matēts papīrs –
smagsvara)
Epson Photo Quality Ink Jet
Paper (Foto kvalitātes tin‐
tes printeru papīrs)
*1 Uz šī papīra var veikt divpusējo drukāšanu.
Prem. Glossy
Glossy
Photo Paper
Matte
Matte
Ievieto papīru papīra
kasetē
Sekojiet šiem soļiem, lai ievietotu papīru:
Izvelciet papīra kaseti.
A
Piezīme:
Ja izvades paplāte tikusi izstumta, aizveriet to pirms
papīra kasetes izvilkšanas.
Saspiediet un virziet malu vadotnes uz papīra
B
kasetes sāniem.
a. Papīra kasete 1
b. Papīra kasete 2
* Šīs daļas pieejamība atšķiras atkarībā no produkta.
*
6
Page 33

Pamatdarbību rokasgrāmata
Darbības ar papīru un drukas materiāliem
Pavirziet malu vadotni, lai noregulētu papīra
C
izmēru, kāds tiks izmantots.
Ievietojiet papīru pret malas vadotni ar
D
apdrukājamo pusi uz leju un pārbaudiet, vai
papīrs nesniedzas ārā no kasetes gala.
Virziet malu vadotnes pie papīra malām.
E
Piezīme:
Ja izmantojat parastu papīru, neievietojiet to virs H
atzīmes malu vadotnes iekšpusē.
Izmantojot īpašos Epson drukas materiālus,
pārliecinieties, vai patiesais lapu skaits ir mazāks par
norādīto maksimumu.
Latviešu
Piezīme:
❏ Papīra kasete 2 atbalsta tikai parastu B5 izmēra
papīru vai lielāku.
❏ Pirms ievietojat papīru, pārlapojiet to un
nolīdziniet tā malas.
Turiet kaseti lēzeni un lēni un rūpīgi pilnībā
F
ievietojiet to produktā.
7
Page 34

Pamatdarbību rokasgrāmata
Darbības ar papīru un drukas materiāliem
Izbīdiet izvades paplāti un paceliet aizturi.
G
Piezīme:
❏ Produkta priekšpusē atstājiet pietiekami daudz
vietas, lai papīrs varētu tikt pilnībā izvadīts.
❏ Neizņemiet vai neievietojiet papīra kaseti, kamēr
produkts darbojas.
❏ Instrukcijas par tādu drukas materiālu, kas nav
parastais papīrs, piemēram, aploksnes un iepriekš
perforēts papīrs, ievietošanu skatīt PDF Lietotāja
rokasgrāmata.
Oriģinālu novietošana
Automātiskais dokumentu
padevējs (ADP)
Svarīga informācija:
c
Lai novērstu papīra iestrēgšanu, izvairieties lietot
tālāk norādītos dokumentu veidus. Šiem veidiem
izmantojiet skenera stiklu.
❏ Dokumenti, kas sastiprināti ar saspraudēm,
skavām utt.
❏ Dokumenti, kuriem pielīmēta lente vai papīrs.
❏ Fotoattēli, kodoskopa slaidi vai papīrs ar
termopārneses druku.
❏ Ieplēsts, sakrokots papīrs vai papīrs ar
caurumiem.
Pasitiet oriģinālu kaudzīti pret līdzenu virsmu,
A
lai izlīdzinātu malas.
Pavirziet automātiskā dokumentu padevēja
B
malas vadotni.
Oriģinālos dokumentus var ievietot automātiskajā
dokumentu padevējā (ADP), lai ātri kopētu, skanētu vai
nosūtītu pa faksu vairākas lapas. ADP var skenēt abas
dokumenta puses. Lai to paveiktu, atlasiet opciju kopiju
iestatījuma izvēlnē. ADP var izmantot šāda veida
oriģinālus.
Izmērs A4/Letter/Legal
Tips Parasts papīrs
Svars
Ražīgums 30 loksnes vai ne vairāk kā 3
Izmantojot ADP divpusēja dokumenta skenēšanai,
legal izmēra papīrs nav pieejams.
2
no 64 g/m
līdz 95 g/m
mm (A4, Letter)/10 loksnes
(Legal)
2
8
Page 35

Pamatdarbību rokasgrāmata
Darbības ar papīru un drukas materiāliem
Ievietojiet oriģinālus automātiskajā dokumentu
C
padevējā ar priekšpusi uz augšu un īsāko malu pa
priekšu.
Virziet malas vadotni, līdz tā sakrīt ar
D
oriģināliem.
Piezīme:
❏ 2 lapu loksnē kopijas izkārtojumam novietojiet
oriģinālu kā parādīts. Pārliecinieties, vai oriģināla
orientācija atbilst Document Orientation
iestatījumiem.
Latviešu
❏ Izmantojot kopēšanas funkciju ar automātisko
dokumentu padevēju (ADP), tiek automātiski
izmantoti šādi fiksēti drukāšanas iestatījumi:
Reduce/Enlarge — Actual Size, Paper Type — Plain
Paper un Paper Size — A4/Legal. Kopējot
oriģinālu, kas ir lielāks par A4, izdruka tiek
apgriezta.
9
Page 36

Pamatdarbību rokasgrāmata
Darbības ar papīru un drukas materiāliem
Skenera stikls
Atveriet dokumentu vāku un novietojiet
A
oriģinālu uz skenera stikla ar priekšpusi uz leju.
Virziet oriģinālu līdz stūrim.
B
Uzmanīgi aizveriet vāku.
C
SD, miniSD, microSD, SDHC, miniSDHC,
microSDHC, SDXC, microSDXC, MultiMediaCard,
MMCplus, MMCmobile, MMCmicro, Memory Stick
Duo, Memory Stick PRO Duo, Memory Stick PRO-HG
Duo, Memory Stick Micro, MagicGate Memory Stick
Duo
Svarīga informācija:
c
Šādām atmiņas kartēm vajadzīgs adapters.
Piestipriniet pirms kartes ievietošanas atverē,
citādi karte var iesprūst.
❏ miniSD, microSD, miniSDHC, microSDHC,
microSDXC, MMCmicro
❏ MMCmobile
❏ Memory Stick Micro
Vienā reizē ievietojiet vienu karti.
A
Piezīme:
Kad automātiskajā dokumentu padevējā (ADP) un uz
skenera stikla atrodas dokumenti, prioritāte ir
dokumentam, kurš atrodas automātiskajā dokumentu
padevējā (ADP).
Atmiņas kartes
ievietošana
Var izdrukāt atmiņas kartē saglabātus fotoattēlus vai
saglabāt skenētos datus atmiņas kartē. Ir atbalstītas
šādas atmiņas kartes.
10
Page 37

Pamatdarbību rokasgrāmata
Kopēšana
Pārbaudiet, vai gaismiņa turpina degt.
B
= ieslēgta, = mirgo
Svarīga informācija:
c
❏ Nemēģiniet karti pilnībā iespiest atverē. Tai
nav jābūt pilnībā ievietotai.
❏ Neņemiet ārā atmiņas karti, kamēr lampiņa
mirgo. Dati atmiņas kartē var tikt zaudēti.
Kopēšana
Lai kopētu dokumentus, izpildiet tālāk minētās
darbības. Produktiem ar divām papīra kasetēm, ja
vēlaties kopēt lielu dokumentu daudzumu vienā reizē,
ievietojiet A4/Legal parastu papīru abās kasetēs un
7. darbībā iestatiet Paper Source Cassette 1>Cassette
2.
Ievietojiet papīru papīra kasetē.
A
& "Ievieto papīru papīra kasetē" 6. lpp.
Izvēlieties vajadzīgos kopēšanas iestatījumus,
G
piemēram, papīra izmēru, papīra veidu un papīra
kvalitāti.
Piezīme:
❏ Atkarībā no modeļa, jūs varat veikt kopēšanas
iestatījumus Paper and Copy Settings.
❏ Kopēšanas rezultātus var priekšskatīt pirms
kopēšanas sākšanas.
❏ Var iegūt dažāda izkārtojuma kopijas, piemēram,
divpusējās, 2 lapas loksnē kopijas un tā tālāk.
Mainiet divpusējos vai izkārtojuma iestatījumus
pēc nepieciešamības.
Nospiediet vienu no x pogām, lai iestatītu krāsu
H
režīmu, un tad sāciet kopēšanu.
Piezīme:
Skatiet PDF Lietotāja rokasgrāmata, lai iegūtu
informāciju par citām kopēšanas funkcijām un režīma
Copy izvēlņu sarakstu.
Skenēšana
Var noskenēt dokumentus un nosūtīt skenētos attēlus
no produkta uz ar to savienoto datoru.
Piezīme:
Informāciju par Scan to Cloud skatiet Epson Connect
rokasgrāmatā, kurai var piekļūt, izmantojot
īsinājumikonu
darbvirsmā.
Latviešu
Ievietojiet oriģinālu.
B
& "Oriģinālu novietošana" 8. lpp.
Ievadiet Copy režīmu izvēlnē Home.
C
Nospiediet + un -, lai iestatītu kopiju skaitu.
D
Iestatiet blīvumu.
E
Nospiediet d, lai ieietu iezvēlnē Copy.
F
11
Novietojiet oriģinālu(-s).
A
& "Oriģinālu novietošana" 8. lpp.
Atlasiet Scan izvēlnē Home.
B
Izvēlieties skenēšanas izvēlnes vienumus.
C
Atlasot Scan to PC, norādiet datoru.
D
Atlasot Scan to Memory Card, veiciet tādus
iestatījumus kā skenēšanas formāts un divpusējā
skenēšana.
Page 38

Pamatdarbību rokasgrāmata
Fakss
Nospiediet x pogas, lai sāktu skenēšanu.
E
Piezīme:
Plašāku informāciju par citām skenēšanas funkcijām un
skenēšanas režīma izvēlņu sarakstu skatiet PDF formāta
Lietotāja rokasgrāmata.
Skenētais attēls tiek saglabāts.
Fakss
Informācija par FAX Utility
FAX Utility ir programmatūra, kas spēj pārsūtīt datus,
piemēram, dokumentus, attēlus un tabulas, kas
izveidotas ar tekstapstrādes vai izklājlapas
programmatūru, tieši pa faksu, iepriekš neizdrukājot.
Paplidus šai utilītprogrammai ir saņemtā faksa kā PDF
faila saglabāšanas datorā funkcija. Tas ļauj pārbaudīt
datus nedrukājot un drukāt tikai vajadzīgos datus. Lai
palaistu šo utilītprogrammu, veiciet tālāk norādīto
procedūru.
Windows
Noklikšķiniet uz sākšanas pogas (Windows 7 un Vista)
vai noklikšķiniet Start (Sākt) (Windows XP),
novietojiet kursoru uz All Programs (Visas
programmas), atlasiet Epson Software un tad
noklikšķiniet FAX Utility.
Savienošana ar tālruņa
līniju
Par tālruņa kabeli
Izmantojiet tālruņa kabeli ar šādām saslēguma
specifikācijām.
❏ RJ-11 tālruņa līnija
❏ RJ-11 tālruņu tīkla savienojums
Atkarībā no reģiona produkta komplektācijā var būt
iekļauts tālruņa kabelis. Ja tas ir tā, izmantojiet šo kabeli.
Tālruņa līnija izmantota tikai
faksam
Tālruņa kabeli, kas savienots ar tālruņa sienas
A
kontaktu, savienojiet ar LINE portu.
Mac OS X
Noklikšķiniet System Preference (Sistēmas
preference), noklikšķiniet Print & Fax (Drukāt un
Sūtīt faksu) vai Print & Scan (Drukāt un Skenēt), un
tad atlasiet FAX Print er (Printeris) (jūsu printeris). Pēc
tam noklikšķiniet uz šādām opcijām;
Mac OS X 10.6.x, 10.7.x: Option & Supplies — Utility
— Open Printer Utility
Mac OS X 10.5.x: Open Print Queue — Utility
Piezīme:
Lai iegūtu papildu informāciju, skatiet FAX Utility
tiešsaistes palīdzību.
12
Pārliecinieties, vai opcija Auto Answer ir
B
iestatīta kā On.
& "Faksu saņemšana" 15. lpp.
Svarīga informācija:
c
Ja produktam nav pievienots ārējs tālrunis, noteikti
ieslēdziet automātisko atbildētāju. Pretējā
gadījumā nevarēsit saņemt faksa sūtījumus.
Page 39

Pamatdarbību rokasgrāmata
Fakss
Līnijas lietošana kopā ar tālruņa
ierīci
Tālruņa kabeli, kas savienots ar tālruņa sienas
A
kontaktu, savienojiet ar LINE portu.
Noņemiet vāciņu.
B
Savienojiet tālruni vai automātiskā atbildētāja
C
ierīci ar EXT. portu.
Piezīme:
Informāciju par citām savienojuma metodēm skatiet
PDF formāta Lietotāja rokasgrāmata.
Faksa savienojuma pārbaude
Produktu var pārbaudīt, vai tas ir gatavs faksu
nosūtīšanai vai saņemšanai.
Ievietojiet parastu papīru kasetē.
A
& "Ievieto papīru papīra kasetē" 6. lpp.
Latviešu
Piezīme:
Ja produkts ir aprīkots ar divām kasetēm, ievietojiet
papīru kasetē 1. Ja izmainījāt iestatījumu Paper Source
(Setup > Fax Settings > Receive Settings > Paper
Source), ievietojiet papīru jūsu norādītajā kasetē.
Ieejiet Setup režīmā no izvēlnes Home.
B
Atlasiet Fax Settings.
C
Atlasiet Check Fax Connection.
D
Nospiediet vienu no pogām x, lai izdrukātu
E
atskaiti.
13
Page 40

Pamatdarbību rokasgrāmata
Fakss
Piezīme:
Ja atskaitē ir uzrādītas kļūdas, izmēģiniet atskaitē
norādītos risinājumus.
Faksa funkciju iestatīšana
Ātrās zvanīšanas ierakstu
iestatīšana
Var izveidot ātro zvanu sarakstu, kurā ātri var i zvēlēties
faksa saņēmēju numurus. Ir iespējams reģistrēt līdz 100
apvienotiem ātro zvanu un grupu zvanu ierakstiem.
Ieejiet Fax režīmā no izvēlnes Home.
A
Nospiediet vai atlasiet Contacts.
B
Atlasiet Edit Contacts.
C
Atlasiet Speed Dial Setup. Tiek parādīti
D
pieejamie ātro zvanu numuri.
Izvēlieties ātrā zvana numuru, ko vēlaties
E
reģistrēt. Ir iespējams reģistrēt līdz 100
ierakstiem.
Izmantojiet ciparu tastatūru, lai ievadītu tālruņa
F
numuru. Ir iespējams ievadīt līdz 64 cipariem.
Grupu zvanu ierakstu iestatīšana
Var pievienot ātro zvanu ierakstus grupai, lai varētu
nosūtīt faksu vairākiem adresātiem vienlaikus. Ir
iespējams ievadīt līdz 99 apvienotiem ātro zvanu un
grupu zvanu ierakstiem.
Ieejiet Fax režīmā no izvēlnes Home.
A
Nospiediet vai atlasiet Contacts.
B
Atlasiet Edit Contacts.
C
Atlasiet Group Dial Setup. Tiek parādīti
D
pieejamie grupu zvanu numuri.
Izvēlieties grupu zvana numuru, ko vēlaties
E
reģistrēt.
Ievadiet vārdu, lai identificētu grupas zvana
F
ierakstu. Ir iespējams ievadīt līdz 30 rakstzīmēm.
Atlasiet Done, lai reģistrētu vārdu.
G
Izvēlieties ātrā zvana ierakstu, ko vēlaties
H
reģistrēt grupu zvanu sarakstā.
Atkārtojiet 8. darbību, lai grupu zvanu sarakstam
I
pievienotu citus ātro zvanu ierakstus. Grupas
zvanam ir iespējams pievienot līdz 99 ātro zvanu
ierakstiem.
Piezīme:
Defise (“-”) nodrošina nelielu pauzi numuru
izsaukšanas laikā. Ievietojiet to tikai tādos tālruņu
numuros, kuru izsaukšanas laikā ir nepieciešama pauze.
Starp cipariem ievadītās pauzes numuru izsaukšanas
laikā tiek ignorētas.
Ievadiet vārdu, lai identificētu ātrā zvana
G
ierakstu. Ir iespējams ievadīt līdz 30 ra kstzīmēm.
Atlasiet Done, lai reģistrētu vārdu.
H
Nospiediet OK, lai pabeigtu grupas zvanu
J
saraksta izveidi.
Faksa sūtīšana
Novietojiet oriģinālu automātiskajā dokumentu
A
padevējā vai uz skenera stikla.
& "Oriģinālu novietošana" 8. lpp.
Ieejiet Fax režīmā no izvēlnes Home.
B
14
Page 41

Pamatdarbību rokasgrāmata
Fakss
Ar ciparu tastatūras taustiņiem ievadiet faksa
C
numuru. Ir iespējams ievadīt līdz 64 cipariem.
Piezīme:
❏ Lai parādītu pēdējo izmantoto faksa numuru,
nospiediet
❏ Nospiediet d un veiciet sūtīšanas iestatījumus. Lai
skenētu un sūtītu abas oriģināla puses, atlasiet
2-Sided Faxing, On, un tad ievietojiet oriģinālu
automātiskajā dokumentu padevējā. Atkarībā no
modeļa var veikt iestatījumus arī, atlasot Send
Settings.
❏ Pārliecinieties, vai esat ievadījis galvenes
informāciju. Dažas faksa aparāti automātiski
noraida ienākošos faksus, kuros nav iekļauta
galvenes informācija.
Nospiediet x (krāsa) vai x (M&B), lai sāktu
D
krāsaina vai monohroma faksa sūtīšanu.
Piezīme:
Ja faksa numurs ir aizņemts vai ir radusies kāda
problēma, šis produkts pārzvana pēc vienas minūtes.
Nospiediet Redial, lai pārzvanītu nekavējoties.
vai Redial.
Faksu saņemšana
Lai automātiski saņemtu faksus, izpildiet tālāk minētās
instrukcijas.
Piezīme:
❏ Atkarībā no iestatījumiem Fax Output, saņemtais
fakss tiek saglabāts kā dati va izdrukāts.
❏ Ja Fax Output iestatīta kā Save, saņemtie faksa dati
tiek automātiski saglabāti kā da ti un 1. da rbīb u va r
izlaist.
Ievietojiet parastu papīru kasetē.
A
& "Ievieto papīru papīra kasetē" 6. lpp.
Piezīme:
Ja produkts ir aprīkots ar divām kasetēm, iestatiet Paper
Source.
Setup > Fax Settings > Receive Settings > Paper Source
Ja vēlaties drukāt lielu faksu daudzumu vienā reizē,
ievietojiet parastu papīru abās kasetēs un iestatiet Paper
Source Cassette 1>Cassette 2.
Pārliecinieties, vai opcija Auto Answer ir
B
iestatīta kā On.
Setup > Fax Settings > Receive Settings > Auto
Answer > On
Piezīme:
❏ Ja automātiskā atbildētāja ierīce ir savienota tieši ar
produktu, noteikti pareizi iestatiet parametru Rings
to Answer, veicot tālāk norādīto procedūru.
❏ Atkarībā no atrašanās vietas funkcija Rings to
Answer var nebūt pieejama.
❏ Instrukcijas par manuālu faksu saņemšanu, skatiet
PDF formāta Lietotāja rokasgrāmata.
Ieejiet Setup režīmā no izvēlnes Home.
C
Atlasiet Fax Settings.
D
Atlasiet Communication.
E
Atlasiet Rings to Answer.
F
Iestatiet zvanu skaitu.
G
Svarīga informācija:
c
Izvēlieties vairāk signālu, nekā automātiskajam
atbildētājam nepieciešams, lai paceltu klausuli. Ja
automātiskais atbildētājs ir iestatīts tā, lai paceltu
klausuli pēc ceturtā signāla, iestatiet produktu tā,
lai paceltu klausuli pēc piektā signāla vai vēlāk.
Pretējā gadījumā automātiskais atbildētājs
nevarēs saņemt balss zvanus.
Piezīme:
Ja saņemat zvanu, un otra puse veic faksa sūtījumu,
produkts automātiski saņem faksu pat tad, ja
automātiskais atbildētājs ir pacēlis klausuli. Ja esat
pacēlis tālruņa klausuli, pagaidiet, līdz LCD ekrānā
parādās ziņojums, kurā norādīts, ka ir izveidots
savienojums, un tikai pēc tam nolieciet klausuli. Ja otra
puse veic tālruņa zvanu, tālruni var izmantot kā ierasts
vai automātiskajā atbildētājā var atstāt ziņu.
Latviešu
15
Page 42

Pamatdarbību rokasgrāmata
Vairāk funkciju
Atskaišu drukāšana
Izpildiet tālāk sniegtos norādījumus, lai izdrukātu faksa
atskaiti.
Ievietojiet parastu papīru kasetē.
A
& "Ievieto papīru papīra kasetē" 6. lpp.
Piezīme:
Ja produkts ir aprīkots ar divām kasetēm, iestatiet Paper
Source.
Setup > Fax Settings > Receive Settings > Paper Source
Ieejiet Fax režīmā no izvēlnes Home.
B
Ja LCD ekrānā tiek attēlotas Advanced Options,
C
atlasiet Advanced Options.
Ja nav attēlotas, nospiediet d.
Atlasiet Fax Report.
D
Izvēlieties drukājamo vienumu.
E
Piezīme:
Ekrānā var skatīt tikai Fax Log.
Nospiediet vienu no pogām x, lai izdrukātu
F
izvēlēto atskaiti.
Piezīme:
Plašāku informāciju par citām faksa funkcijām un faksa
režīma izvēlņu sarakstu skatiet PDF formāta Lietotāja
rokasgrāmata.
Vairāk funkciju
More Functions sniedz daudzas īpašas izvēlnes, kas atvieglo drukāšanu! Lai iegūtu plašāku informāciju, atlasiet More
Functions, atlasiet katru izvēlni un tad rīkojieties atblistoši instrukcijām LCD ekrānā.
Izvēlne Funkcijas
ID Card Copy
Abas ID kartes puses var kopēt vienlaicīgi.
Print Photos
16
Atmiņas kartē vai ārējā USB ierīcē nogla‐
bātos fotoattēlus var drukāt, neizmantojot
datoru. Fotoattēlus var arī samazināt un
palielināt, un koriģēt fotoattēlu kvalitāti.
Page 43

Pamatdarbību rokasgrāmata
Tintes kasetņu nomaiņa
Izvēlne Funkcijas
Copy/Restore Photos
Var izveidot precīzas oriģinālu kopijas. Ja
oriģinālais fotoattēls ir izbalējis, krāsas var
atjaunot.
Photo Layout Sheet
Print Ruled Papers
Tintes kasetņu
nomaiņa
Drošības instrukcijas
❏ uzglabājiet tintes kasetnes bērniem nepieejamā
vietā.
❏ Esiet uzmanīgs darbā ar lietotām tintes kasetnēm —
ap tintes padeves portu var atrasties tintes atliekas.
Ja tinte nokļūst uz ādas, rūpīgi to nomazgājiet ar
ziepēm un ūdeni.
Ja tinte iekļūst acīs, nekavējoties tās izskalojiet ar
ūdeni. Ja pēc skalošanas joprojām jūtaties
nepatīkami vai redzes problēmas nepāriet,
nekavējoties apmeklējiet ārstu.
Ja tinte iekļūst mutē, nekavējoties izspļaujiet to un
pēc iespējas ātrāk apmeklējiet ārstu.
Atmiņas kartē esošos fotoattēlus var dru‐
kāt dažādos izkārtojumos.
Var drukāt grafētu papīru ar vai bez foto‐
attēla fonā.
Piesardzības pasākumi
❏ Epson iesaka izmantot autentiskas Epson tintes
kasetnes. Epson nevar garantēt ne-autentiskas
tintes kvalitāti un uzticamību. Neautentiskas tintes
izmantošana var izraisīt bojājumus, uz kuriem
neattiecas Epson garantija, un noteiktos apstākļos
tie var izraisīt neprognozējamu produkta darbību.
Informācija par neautentiskas tintes līmeņiem var
netikt parādīta.
❏ Nekratiet tintes kasetnes pārāk spēcīgi; pretējā
gadījumā tinte izplūst no kasetnes.
❏ Lai saglabātu optimālu drukas galviņas darbību, no
visām kasetnēm tiek patērēts mazliet tintes ne tikai
drukāšanas laikā, bet arī apkopes darbību laikā,
piemēram, tintes kasetnes nomaiņas vai drukas
galviņas tīrīšanas laikā.
Latviešu
17
Page 44

Pamatdarbību rokasgrāmata
Tintes kasetņu nomaiņa
❏ Ja Jums uz kādu laiku ir jāizņem tintes kasetne,
pārliecinieties, ka tintes padeves zona ir aizsargāta
pret netīrumiem un putekļiem. Uzglabājiet tintes
kasetnes tādā pašā vidē, kādā uzglabājat produktu.
Kad uzglabājat kasetni, pārliecinieties, ka tās
uzlīme, kas norāda tintes kasetnes krāsu, ir
pagriezta uz augšu. Neuzglabājiet tintes kasetnes ar
augšpusi uz leju.
❏ Lai iegūtu maksimālu efektivitāti, izņemiet tintes
kasetni tikai tad, kad esat gatavs to nomainīt.
Atkārtoti ievietojot, nevar tikt izmantotas tintes
kasetnes ar zemu tintes statusu.
❏ Neatveriet tintes kasetnes iepakojumu, pirms esat
gatavs uzstādīt kasetni produktā. Lai uzturētu tās
uzticamību, kasetne atrodas vakuuma iepakojumā.
Ja kasetne ilgāku laiku tiek atstāta neiepakota —
pirms tās montēšanas normāla drukāšana var būt
neiespējama.
❏ Uzstādiet visas tintes kasetnes; pretējā gadījumā
nevarēsit drukāt.
Tintes kasetnes nomaiņa
Atveriet skeneri. Tintes kasetnes turētājs
A
pārvietojas uz tintes kasetnes nomaiņas pozīciju.
Svarīga informācija:
c
❏ Nepārvietojiet tintes kasetnes turētāju ar
rokām. Tādā veidā varat sabojāt produktu.
❏ Neceliet skeneri, kad ir atvērts dokumentu
vāks.
Piezīme:
Ja tintes kasetnes turētājs nepārvietojas tintes kasetnes
nomaiņas pozīcijā, rīkojieties saskaņā ar turpmāk
sniegtajām instrukcijām.
Home > Setup > Maintenance > Ink Cartridge
Replacement
Atveriet tintes kasetnes vāku.
B
18
Saspiediet uz izņemiet tintes kasetni.
C
Page 45

Pamatdarbību rokasgrāmata
Tintes kasetņu nomaiņa
Piezīme:
❏ Attēlā parādīta melnās tintes kasetnes nomaiņa.
Nomainiet kasetni atbilstoši situācijai.
❏ Izņemtām tintes kasetnēm padeves porta apvidū
var būt tinte, tādēļ, izņemot kasetnes, uzmanieties,
lai nesasmērētos ar tinti.
Viegli sakratiet jauno nomaiņas kasetni četras vai
D
piecas reizes un izņemiet nomaiņas tintes kasetni
no iepakojuma.
Noņemiet tikai dzelteno lentu.
E
Svarīga informācija:
c
❏ Pirms uzstādīšanas no kasetnes ir jānoņem
dzeltenā lente; pretējā gadījumā drukāšanas
kvalitāte var pasliktināties vai arī vispār nebūs
iespējams drukāt.
❏ Ja esat uzstādījis tintes kasetni, nenoņemot
dzelteno lentu, izņemiet kasetni no produkta,
noņemiet dzelteno lentu un uzstādiet kasetni
atpakaļ.
❏ Nenoņemiet caurspīdīgo izolāciju no kasetnes
apakšas; pretējā gadījumā kasetne var kļūt
nelietojama.
❏ Nenoņemiet un nenoplēsiet kasetnes etiķeti;
pretējā gadījumā var rasties noplūde.
Ievietojiet kasetni un piespiediet to, līdz atskan
F
klikšķis.
Aizveriet tintes kasetnes vāku.
G
Latviešu
19
Page 46

Pamatdarbību rokasgrāmata
Pamata traucējummeklēšana
Lēnam aizveriet skeneri. Sākas tintes
H
uzpildīšana.
Piezīme:
❏ Lampiņa turpina mirgot, kamēr produkts tiek
uzpildīts ar tinti. Neizslēdziet produktu tintes
uzpildes laikā. Ja tintes uzpilde netiks pabeigta,
iespējams, nevarēsit drukāt.
❏ Ja tintes kasetne ir jānomaina kopēšanas laikā, lai
nodrošinātu labu kopēšanas kvalitāti pēc tintes
uzpildes pabeigšanas, atceliet pašreizējo kopēšanas
darbu un sāciet visu no jauna no oriģinālu
novietošanas.
Tintes kasetnes maiņa ir pabeigta. Produkts atgriežas
iepriekšējā statusā.
Pamata traucējummeklēšana
Kļūdu paziņojumi
Šajā nodaļā ir aprakstīta LCD ekrānā parādīto paziņojumu nozīme.
Kļūdu paziņojumi Risinājumi
Papīrs beidziet vai Papīrs iesprūdis
Printer error. Turn the power off and on again. For details,
see your documentation.
Communication error. Check if a computer is connected. Pārliecinieties, vai dators ir pareizi pievienots. Ja kļūdas paziņo‐
The maintenance box is nearing the end of its service life. Nomainiet apkopes kārbu pirms tās kalpošanas laika beigām.
The maintenance box is at the end of its service life. You
need to replace it.
A printer's ink pad is nearing the end of its service life.
Please contact Epson Support.
A printer's ink pad is at the end of its service life. Please
contact Epson Support.
& Skatīt "Iesprūdis papīrs" 21. lpp.
Izslēdziet un ieslēdziet produktu. Pārliecinieties, vai produktā nav
papīra. Ja kļūdas paziņojums turpina parādīties, sazinieties ar Ep‐
son atbalsta dienestu.
jums joprojām tiek parādīts, pārliecinieties, vai datorā ir instalēta
un pareizi iestatīta skenēšanas programmatūra.
Lai iegūtu detalizētāku informāciju, skatīt PDF formāta Lietotāja
rokasgrāmata.
Kad apkopes kārba ir pilna, produkts apstājas un apkopes kārba ir
jānomaina, lai varētu turpināt drukāšanu.
Nomainiet apkopes kārbu.
Nospiediet pogu x, lai atsāktu drukāšanu. Paziņojums tiek rādīts,
kamēr nav nomainīts tintes paliktnis. Lai nomainītu tintes palikt‐
ņus pirms to kalpošana termiņa beigām, sazinieties ar Epson pa‐
līdzības dienestu. Ja tintes paliktņi ir piesūcināti, produkts pār‐
trauc darbu un, lai turpinātu drukāšanu, ir nepieciešams Epson
atbalsts.
Lai nomainītu tintes paliktņus, sazinieties ar Epson palīdzības die‐
nestu.
20
Page 47

Pamatdarbību rokasgrāmata
Pamata traucējummeklēšana
Kļūdu paziņojumi Risinājumi
No dial tone detected. Run Check Fax Connection under
Fax Settings in Setup menu.
Combination of the IP address and the subnet mask is
invalid. See your documentation.
Recovery Mode Programmaparatūras atjaunināšana neizdevās. Programmapara‐
Pārliecinieties, vai tālruņa kabelis ir pareizi pievienots un tālruņa
līnija darbojas.
& Skatīt "Savienošana ar tālruņa līniju" 12. lpp.
Ja produkts ir savienots ar PBX (privātā atzara centrāles) tālruņa
līniju vai termināla adapteri, izslēdziet funkciju Dial Tone Detec‐
tion. Izvēlieties Fax Settings > Communication > Dial Tone De‐
tection >Off.
Skatiet tiešsaistes Tīkla vednis.
tūras atjaunināšana ir jāmēģina vēlreiz. Sagatavojiet USB kabeli un
apmeklējiet vietējo Epson vietni, lai saņemtu tālākus norādījumus.
Latviešu
Iesprūdis papīrs
Brīdinājums:
!
nekad nepieskarieties vadības paneļa pogām,
kamēr jūsu roka atrodas produktā.
Piezīme:
❏ atceliet drukas darbu, ja to pieprasa paziņojums
LCD ekrānā vai printera draiverī.
❏ Kad iesprūdušais papīrs ir izņemts, nospiediet LCD
ekrānā norādīto pogu.
Iestrēgušā papīra izņemšana no
aizmugurējā vāka
Izvelciet aizmugurējo vāku.
A
Uzmanīgi izņemiet iestrēgušo papīru.
B
Uzmanīgi izņemiet iestrēgušo papīru.
C
21
Page 48

Pamatdarbību rokasgrāmata
Atveriet aizmugures vāku.
D
Uzmanīgi izņemiet iestrēgušo papīru.
E
Pamata traucējummeklēšana
Iesprūduša papīra izņemšana no
produkta iekšpuses
Uzmanīgi izņemiet iestrēgušo papīru.
A
Atveriet skeneri.
B
Atkal piestipriniet aizmugures vāku.
F
22
Svarīga informācija:
c
neceliet skeneri, kad ir atvērts dokumentu vāks.
Page 49

Pamatdarbību rokasgrāmata
Pamata traucējummeklēšana
Izņemiet visu papīru no iekšpuses, tajā skaitā arī
C
noplēstos gabaliņus.
Svarīga informācija:
c
Neaiztieciet plakano balto vadu, kas pievienots
kasetnes turētājam.
Piezīme:
Ja nevarat izvilkt kaseti, atvienojiet strāvas vadu no
produkta un elektrības izvades. Atvienojiet visus citus
produkta vadus.
Uzmanīgi novietojiet produktu uz sāna, kā parādīts
zemāk, un izvelciet kaseti.
Izņemiet iestrēgušo papīru no kasetes.
B
Uzmanīgi izņemiet produkta iekšpusē iestrēgušo
C
papīru.
Latviešu
Lēnam aizveriet skeneri.
D
Iestrēgušā papīra izņemšana no
papīra kasetes
Izvelciet papīra kaseti.
A
23
Nolīdziniet papīra malas.
D
Turiet kaseti lēzeni un lēni un rūpīgi pilnībā
E
ievietojiet to produktā.
Page 50

Pamatdarbību rokasgrāmata
Pamata traucējummeklēšana
Automātiskajā dokumentu
padevējā (ADP) iestrēdzis papīrs
Izņemiet papīra kaudzīti no ADP ievades
A
paliktņa.
Atveriet ADP vāku.
B
Svarīga informācija:
c
Raugieties, lai pirms iesprūdušā papīra izņemšanas
ADP vāks būtu atvērts. Ja neatverat vāku, produkts
var tikt sabojāts.
Uzmanīgi izņemiet iestrēgušo papīru.
C
Atveriet dokumenta vāku.
E
Uzmanīgi izņemiet iestrēgušo papīru.
F
Aizveriet dokumenta vāku.
G
Aizveriet ADP vāku.
D
24
Paceliet ADP ievades paliktni.
H
Page 51

Pamatdarbību rokasgrāmata
Kur saņemt palīdzību
Uzmanīgi izņemiet iestrēgušo papīru.
I
Novietojiet ADP ievades paplāti tās sākotnējā
J
pozīcijā.
Drukas kvalitātes
palīdzība
Ja redzat līniju saplūšanu (gaišas līnijas), iztrūkstošas
krāsas vai jebkādas citas kvalitātes problēmas izdrukās,
izmēģiniet tālāk minētos risinājumus.
❏ Pārliecinieties, vai esat ievietojis papīru un pareizi
novietojis oriģinālu.
& "Ievieto papīru papīra kasetē" 6. lpp.
& "Oriģinālu novietošana" 8. lpp.
❏ Pārbaudiet papīra izmēru un veida iestatījumus.
& "Papīra izvēle" 5. lpp.
❏ Drukas galviņa var būt aizsērējusi. Vispirms veiciet
sprauslu pārbaudi un pēc tam iztīriet drukas
galviņu.
Setup > Maintenance > Nozzle Check
Palīdzība faksa sūtīšanā
❏ Pārliecinieties, vai tālruņa kabelis ir pareizi
pievienots un tālruņa līnija darbojas. Jūs varat
pārbaudīt līnijas statusu, izmantojot funkciju
Check Fax Connection.
& "Savienošana ar tālruņa līniju" 12. lpp.
❏ Ja fakss netika nosūtīts, pārliecinieties, vai adresāta
faksa aparāts ir ieslēgts un darbojas.
❏ Ja produkts nav savienots ar tālruni un jūs vēlaties
saņemt faksus automātiski, noteikti ieslēdziet
automātisko atbildētāju.
& "Faksu saņemšana" 15. lpp.
Piezīme:
Lai uzzinātu citus faksa darbības problēmu risinājumus,
skatiet tiešsaistes Lietotāja rokasgrāmata.
Kur saņemt palīdzību
Tehniskā atbalsta
interneta vietne
Epson Tehniskā atbalsta interneta vietne sniedz
palīdzību tādu problēmu gadījumā, ko nevar atrisināt,
izmantojot problēmu novēršanas informāciju jūsu
produkta dokumentācijā. Ja jums ir tīmekļa
pārlūkprogramma un interneta savienojums,
apmeklējiet vietni:
http://support.epson.net/
http://www.epson.eu/Support (Eiropa)
Latviešu
(a) Labi
(b) Nepieciešama drukas galviņas tīrīšana
Ja jums ir nepieciešami jaunākie draiveri, atbildes uz
bieži uzdotiem jautājumiem, rokasgrāmatas, vai citi
lejupielādējami materiāli, apmeklējiet vietni:
http://www.epson.com
http://www.epson.eu/Support (Eiropa)
Tad izvēlieties jūsu vietējās Epson interneta vietnes
atbalsta nodaļu.
25
Page 52

Page 53

Pagrindinių vadovas
Turinys
Turinys
Įvadas............................... 2
Kur rasti informaciją........................ 2
Simboliai „perspėjimas“, „svarbu“ ir „pastaba“..... 2
Paslaugos Epson Connect naudojimas........... 2
Saugos instrukcijos.................. 3
Valdymo skydelio apžvalga......... 3
Mygtukai ir skystųjų kristalų ekranas............ 4
Lemputės................................ 5
Popieriaus ir laikmenų naudojimas
....................................... 6
Popieriaus pasirinkimas..................... 6
Popieriaus įkrovimas į popieriaus kasetę......... 6
Originalų padėjimas........................ 8
Automatinis dokumentų tiektuvas (ADF)...... 8
Skaitytuvo stiklas....................... 10
Atminties kortelės įdėjimas.................. 10
Kopijavimas........................ 11
Nuskaitymas....................... 11
Faksogramos siuntimas............ 12
Apie „FAX Utility“........................ 12
Jungimasis prie telefono linijos............... 12
Apie telefono kabelį..................... 12
Telefono liniją naudojant tik faksui.......... 12
Bendra linija su telefono aparatu............ 13
Fakso ryšio patikrinimas.................. 13
Fakso funkcijų paruošimas.................. 14
Greitojo rinkimo įvesčių paruošimas......... 14
Grupinio rinkimo įvesčių paruošimas........ 14
Faksogramų siuntimas..................... 14
Faksogramų priėmimas..................... 15
Ataskaitų spausdinimas..................... 16
Daugiau funkcijų................... 16
Rašalo kasečių pakeitimas......... 17
Saugos instrukcijos........................ 17
Atsargumo priemonės...................... 17
Rašalo kasetės pakeitimas................... 18
Trikčių šalinimo pagrindai......... 20
Klaidų pranešimai......................... 20
Popieriaus strigtys......................... 21
Įstrigusio popieriaus išėmimas iš galinio
gaubto............................... 21
Gaminio viduje įstrigusio popieriaus išėmimas
.................................... 22
Įstrigusio popieriaus išėmimas iš popieriaus
kasetės............................... 23
Įstrigusio popieriaus išėmimas iš automatinio
dokumentų tiektuvo (ADF)................ 24
Spausdinimo kokybės žinynas................ 25
Faksogramų siuntimo pagalba................ 25
Kur gauti pagalbos................. 25
Techninės pagalbos svetainė................. 25
Lietuviškai
1
Page 54

Pagrindinių vadovas
Įvadas
Įvadas
Perspėjimas
!
turi būti kruopščiai laikomasi, kad būtų išvengta
fizinio sužalojimo.
Kur rasti informaciją
Naujausias toliau nurodytų instrukcijų versijas rasite
„Epson“ pagalbos interneto svetainėje.
http://www.epson.eu/Support (Europai)
http://support.epson.net/ (ne Europai)
❏ Pradėkite čia (popierinė):
Pateikia informaciją apie gaminio sąranką ir
programinės įrangos diegimą.
❏ Pagrindinių vadovas (popierinis):
Pateikia pagrindinę informaciją, kai naudojatės
gaminiu be kompiuterio. Priklausomai nuo
modelio ir regiono, šis vadovas gali būti nepridėtas.
❏ Vartotojo vadovas (PDF):
Pateikia išsamias eksploatavimo, saugos ir trikčių
šalinimo instrukcijas. Ieškokite informacijos šiame
vadove, kai naudojate šį gaminį su kompiuteriu
arba kai naudojate papildomas funkcijas, pvz.,
dvipusį kopijavimą.
Norint skaityti PDF instrukciją, reikalinga „Adobe
Acrobat Reader 5.0“ ar naujesnė versija arba
„Adobe Reader“.
❏ Tinklo vadovas (HTML):
Tinklo administratoriams pateikia informaciją apie
spausdintuvo tvarkyklės ir tinklo nustatymus.
Svarbu
c
turi būti laikomasi, kad būtų išvengta įrangos
sugadinimo.
Pastaba
pateikiami naudingi patarimai ir apribojimai dėl
gaminio naudojimo.
Paslaugos Epson Connect
naudojimas
Naudodami Epson Connect ir kitas bendrovės
paslaugas, galite lengvai spausdinti tiesiog iš išmaniojo
telefono, planšetinio arba nešiojamojo kompiuterio ir
praktiškai iš bet kurios vietos visame pasaulyje! Daugiau
informacijos apie spausdinimą ir kitas paslaugas rasite
nurodytu URL adresu;
https://www.epsonconnect.com/ („Epson Connect“
portalo svetainė)
http://www.epsonconnect.eu (tik Europai)
„Epson Connect“ vadovą galite peržiūrėti darbalaukyje
dukart spustelėję nuorodos piktogramą
.
❏ Help (gaminio ekrane):
gaminio LCD ekrane pateikiamos pagrindinės
naudojimo ir trikčių šalinimo instrukcijos.
Valdymo skydelyje pasirinkite meniu Help.
Simboliai „perspėjimas“,
„svarbu“ ir „pastaba“
Perspėjimai, svarbi informacija ir pastabos šiame
dokumente nurodomi kaip pavaizduota ir paaiškinta
žemiau.
2
Page 55

Pagrindinių vadovas
Saugos instrukcijos
Saugos instrukcijos
Perskaitykite ir laikykitės šių nurodymų, kad
užtikrintumėte saugų šio gaminio naudojimą. Būtinai
pasilikite šį vadovą, kad prireikus, vėliau galėtumėte
paskaityti. Be to, būtinai laikykitės visų įspėjimų ir
instrukcijų, pateiktų ant gaminio.
❏ Naudokite tik su gaminiu patiektą maitinimo laidą.
Šio laido nenaudokite su jokiu kitu gaminiu. Su šiuo
gaminiu naudojant kitus laidus arba naudojant šį
laidą su kitais įrenginiais, gali kilti gaisras arba
trenkti elektros smūgis.
❏ Įsitikinkite, kad jūsų kintamosios srovės elektros
laidas atitinka taikomus vietinius saugos
standartus.
❏ Niekada neišrinkite, nekeiskite ir nemėginkite
remontuoti elektros laido, spausdintuvo,
skaitytuvo ar jų priedų patys, išskyrus atvejus,
atskirai išaiškintus gaminio instrukcijose.
❏ Atjunkite gaminį ir patikėkite jo remonto darbus
atitinkamos kvalifikacijos remonto darbuotojams
šiais atvejais:
Elektros laidas arba kištukas yra pažeisti; į gaminį
pateko skysčio; gaminys buvo numestas arba jo
korpusas yra pažeistas; gaminys neveikia įprastai
arba jo darbo savybės aiškiai pasikeitė.
Nereguliuokite valdiklių, jei tai nenurodyta
naudojimo instrukcijose.
❏ Pastatykite gaminį šalia sieninio lizdo, iš kurio
kištukas gali būti lengvai ištrauktas.
❏ Nestatykite ir nelaikykite gaminio lauke, vietose,
kur yra didelis užterštumas ar dulkės, netoli
vandens ir kaitinimo šaltinių, taip pat vietose,
kuriose jį veiks smūgiai, vibracijos, aukšta
temperatūra ar drėgmė.
❏ Saugokitės, kad ant gaminio neužpiltumėte skysčių
ir nesilieskite prie jo šlapiomis rankomis.
❏ Šis gaminys turi būti laikomas ne mažesniu kaip 22
cm atstumu nuo širdies stimuliatorių. Šio gaminio
skleidžiamos radijo bangos gali pakenkti širdies
stimuliatorių veikimui.
❏ Jei skystųjų kristalų ekranas yra pažeistas,
kreipkitės į platintoją. Jei skystųjų kristalų tirpalo
patenka jums ant rankų, kruopščiai jas nuplaukite
muilu ir vandeniu. Jei skystųjų kristalų tirpalo
patenka į akis, nedelsdami išplaukite jas vandeniu.
Jei kruopščiai praplovus akis jaučiamas
diskomfortas ar regėjimo sutrikimai, nedelsdami
kreipkitės į gydytoją.
❏ Nesinaudokite telefonu elektrinės audros metu.
Gali kilti nedidelis elektros smūgio dėl žaibo
pavojus.
❏ Būdami šalia dujų nuotėkio, nesinaudokite
telefonu, kad praneštumėte apie dujų nuotėkį.
Pastaba:
Rašalo kasetėms taikomos saugos instrukcijos pateiktos
nurodytame skyriuje.
& „Rašalo kasečių pakeitimas” puslapyje 17
Lietuviškai
Valdymo skydelio apžvalga
Pastaba:
❏ valdymo skydelio dizainas priklauso nuo jūsų vietovės.
❏ Nors valdymo skydelis ir LCD ekrano rodiniai, pvz., meniu arba parinkčių pavadinimai gali skirtis nuo esančių jūsų
gaminyje, bet veikimo metodas yra toks pat.
3
Page 56

Pagrindinių vadovas
Valdymo skydelio apžvalga
Mygtukai ir skystųjų kristalų ekranas
Mygtukai Funkcija
a
b
c
d
e - LCD ekrane rodomi meniu. Jei jūsų gaminys turi liečiamąjį skydelį, galite slinkti ekranu
f
g
h +, - Nustatomas kopijų skaičius.
i 0 - 9, *, # Nurodoma data/laikas arba kopijų skaičius, taip pat fakso numeriai. Įvedami raidiniai bei
l, u, r, d, OK Paspauskite l, u, r, d, jei norite pasirinkti meniu. Paspauskite OK, jei norite patvirtinti
Įjungiamas arba išjungiamas gaminys.
Grįžtama į viršutinį meniu. Esant viršutiniame meniu, perjungia režimus.
Rodomas paskutinis rinktas numeris. Įvedant numerius fakso režimu, šiuo mygtuku
įterpiamas pauzės simbolis (-), rinkimo metu atitinkantis trumpą pauzę.
Fakso režimu rodo sąrašą Contacts.
braukdami per LCD ekraną. Jei liečiamasis skydelis lėtai reaguoja, pabandykite braukti truputį
stipriau.
Atšaukiamas/grąžinamas ankstesnis meniu.
pasirinktą nustatymą ir pereiti prie kito ekrano. Renkant fakso numerį, l veikia kaip naikinimo
klavišas, o r mygtuku įterpiamas tarpas.
skaitiniai simboliai ir kiekvieną kartą paspaudžiant kaitaliojamos didžiosios, mažosios raidės ir
skaitmenys. Programinės įrangos klaviatūra tekstą įvesti gali būti lengviau, nei naudojant
šiuos mygtukus.
4
Page 57

Pagrindinių vadovas
Mygtukai Funkcija
j
k
l
Valdymo skydelio apžvalga
Pradedamas spausdinimas / kopijavimas / nuskaitymas / faksogramos siuntimas nespalvotu
režimu.
Pradedamas spausdinimas / kopijavimas / nuskaitymas / faksogramos siuntimas spalvotu
režimu.
Sustabdoma dabartinė operacija arba inicijuojami esami nustatymai.
m
u, d
Paslenka ekraną.
Lemputės
Lemputės Funkcija
Įsižiebia, kai gaminys įjungiamas.
Mirksi, kai gaminys gauna duomenis, spausdina/kopijuoja/nuskaito/siunčia faksogramą, kai
keičiama rašo kasetė, spausdinimo galvutė pripildoma rašalo arba valoma.
Šviečia nemirksėdama, kai spausdintuvas prijungtas prie tinklo. Mirksi, kai reguliuojami tinklo
nustatymai (žalia: Wi-Fi / oranžinė: eternetas).
Pastaba:
Daugiau informacijos apie LCD ekrane rodomas piktogramas rasite valdymo skydelyje pasirinkę Help.
Lietuviškai
5
Page 58

Pagrindinių vadovas
Popieriaus ir laikmenų naudojimas
Popieriaus ir
laikmenų naudojimas
Popieriaus pasirinkimas
Gaminys automatiškai prisitaiko prie jūsų spausdinimo
nustatymuose pasirinkto popieriaus tipo. Todėl
popieriaus tipo nustatymas toks svarbus. Juo nurodote
gaminiui, kokį naudojate popierių, ir atitinkamai
nustatomas rašalo kiekis. Tolesnėje lentelėje pateikti
nustatymai, kuriuos turėtumėte pasirinkti savo
popieriui.
Šiam popieriui Popieriaus tipas LCD
Paprastas popierius
„Epson“ Bright White Ink
Jet Paper (Poliruotas baltas
popierius rašaliniams
spausdintuvams)*
„Epson“ Ultra Glossy Photo
Paper (Itin blizgus fotogra‐
finis popierius)
„Epson“ Premium Glossy
Photo Paper (Aukščiausios
kokybės blizgus fotografi‐
nis popierius)
„Epson“ Premium Semi‐
gloss Photo Paper (Aukš‐
čiausios kokybės pusiau
blizgus fotografinis popie‐
rius)
„Epson“ Glossy Photo Pa‐
per (Blizgus fotografinis
popierius)
„Epson“ Photo Paper (Foto‐
grafinis popierius)
„Epson“ Matte Paper - Hea‐
vyweight (Matinis popie‐
rius – sunkus)
„Epson“ Photo Quality Ink
Jet Paper (Kokybiškas foto‐
grafinis popierius rašali‐
niams spausdintuvams)
*1 Naudodami šį popierių galite spausdinti iš dviejų pusių.
1
ekrane
*1
Plain Paper
Plain Paper
Ultra Glossy
Prem. Glossy
Prem. Glossy
Glossy
Photo Paper
Matte
Matte
Popieriaus įkrovimas į
popieriaus kasetę
Norėdami įdėti popieriaus atlikite šiuos veiksmus:
a. 1 popieriaus kasetė
b. 2 popieriaus kasetė
* Ar ši dalis yra, priklauso nuo gaminio.
Ištraukite popieriaus kasetę.
A
Pastaba:
Jei išvesties dėklas išstumtas, uždarykite jį prieš
ištraukdami popieriaus kasetę.
*
6
Page 59

Pagrindinių vadovas
Popieriaus ir laikmenų naudojimas
Suspauskite ir nustumkite kraštų kreiptuvus prie
B
popieriaus kasetės šonų.
Stumdami kraštų kreiptuvą pritaikykite jį
C
naudojamo popieriaus dydžiui.
Įdėkite popierių prie krašto kreiptuvo,
D
spausdinama puse į apačią, ir patikrinkite, ar
popierius nekyšo iš kasetės galo.
Pastaba:
❏ 2 popieriaus kasetė skirta tik B5 ir didesniam
paprastam popieriui.
❏ prieš įdėdami pakratykite ir išlygiuokite popieriaus
kraštus.
Pastumkite kraštų kreiptuvus iki popieriaus
E
kraštų.
Lietuviškai
Pastaba:
Jei naudojate paprastą popierių, nedėkite popieriaus virš
kraštų kreiptuvo viduje esančios rodyklės žymos H.
Jei naudojate „Epson“ specialią laikmeną, įsitikinkite,
kad lakštų skaičius yra mažesnis už atitinkamai
laikmenai nurodytą limitą.
7
Page 60

Pagrindinių vadovas
Popieriaus ir laikmenų naudojimas
Laikydami kasetę lygiai, lėtai ir atsargiai įkiškite
F
ją iki galo į gaminį.
Ištraukite išvesties dėklą ir pakelkite stabdiklį.
G
Pastaba:
❏ Palikite užtektinai vietos gaminio priekyje, kad
popierius galėtų visiškai išlįsti.
❏ Neištraukite ir nedėkite popieriaus kasetės, kol
gaminys veikia.
❏ Instrukcijų apie kitų laikmenų (pvz., vokų ar
popieriaus su skylutėmis) pakrovimą ieškokite PDF
Vartotojo vadovas.
Dydis „A4“/„Letter“/„Legal“
Tipas Paprastas popierius
Svoris
Talpa 30 lakštų arba 3 mm ar ma‐
Nuskaitant dvipusį dokumentą su ADF, negalima
naudoti „Legal“ formato popieriaus.
Svarbu:
c
Kad nebūtų popieriaus strigčių, venkite žemiau
išvardytų dokumentų. Šio tipo dokumentams
naudokite skaitytuvo stiklą.
❏ Dokumentai, sujungti popieriaus spaustukais,
sąvaržėlėmis ir kt.
❏ Dokumentai, prie kurių prilipdyta juosta ar
popierius.
❏ Nuotraukos, OHP arba terminis popierius.
❏ Perplėštas, suglamžytas ar skylėtas popierius.
Pastuksenkite originalus ant plokščio paviršiaus,
A
kad susilygintų lapų kraštai.
Pastumkite automatinio dokumentų tiektuvo
B
kraštų kreiptuvą.
Nuo 64 g/m
žiau (A4, „Letter“)/10 lakštų
(„Legal“)
2
iki 95 g/m
2
Originalų padėjimas
Automatinis dokumentų
tiektuvas (ADF)
Originalius dokumentus galima įdėti į automatinį
dokumentų tiektuvą (ADF) ir greitai nukopijuoti,
nuskaityti arba išsiųsti faksu kelis lapus. ADF gali
nuskaityti abi jūsų dokumento puses. Norėdami tai
padaryti, pasirinkite šią parinktį kopijavimo nustatymų
meniu. ADF galite naudoti nurodytus originalus.
8
Page 61

Pagrindinių vadovas
Popieriaus ir laikmenų naudojimas
Įdėkite originalus spausdinama puse į viršų ir
C
trumpuoju kraštu pirmiau į automatinį
dokumentų tiektuvą.
Slinkite kraštų kreiptuvą, kol jis priglus prie
D
originalų.
Pastaba:
❏ dviejų kopijų išdėstymui padėkite originalą taip,
kaip parodyta. Įsitikinkite, kad originalas pasuktas
taip, kaip nurodyta nustatymuose Document
Orientation.
Lietuviškai
❏ Kai su automatiniu dokumentų tiektuvu (ADF)
naudojate kopijavimo funkciją, fiksuojami šie
spausdinimo nustatymai: Reduce/Enlarge - Actual
Size, Paper Type - Plain Paper ir Paper Size - A4/
Legal. Spaudinys apkarpomas, jei kopijuojamas
originalas yra didesnis už A4.
9
Page 62

Pagrindinių vadovas
Popieriaus ir laikmenų naudojimas
Skaitytuvo stiklas
Atidarykite dokumentų dangtį ir padėkite
A
originalą gerąja puse žemyn ant skaitytuvo stiklo.
Paslinkite originalą į kampą.
B
Atsargiai uždarykite dangtį.
C
„SD“, „miniSD“, „microSD“, „SDHC“, „miniSDHC“,
„microSDHC“, „SDXC“, „microSDXC“,
„MultiMediaCard“, „MMCplus“, „MMCmobile“,
„MMCmicro“, „Memory Stick Duo“, „Memory Stick
PRO Duo“, „Memory Stick PRO-HG Duo“, „Memory
Stick Micro“, „MagicGate Memory Stick Duo“
Svarbu:
c
Toliau nurodytoms kortelėms reikalingas
adapteris. Pritvirtinkite jį prieš į angą kišdami
kortelę, antraip kortelė gali užstrigti.
❏ „miniSD“, „microSD“, „miniSDHC“,
„microSDHC“, „microSDXC“, „MMCmicro“
❏ „MMCmobile“
❏ „Memory Stick Micro“
Vienu metu kiškite vieną kortelę.
A
Pastaba:
Jei dokumentas yra automatiniame dokumentų tiektuve
(ADF) ir ant skaitytuvo stiklo, pirmenybė teikiama
dokumentui automatiniame dokumentų tiektuve.
Atminties kortelės
įdėjimas
Galite spausdinti atminties kortelėje įrašytas
nuotraukas arba įrašyti nuskaitytus duomenis į
atminties kortelę. Palaikomos toliau nurodytos
atminties kortelės.
10
Page 63

Pagrindinių vadovas
Kopijavimas
Patikrinkite, ar neužgeso lemputė.
B
= įjungta, = mirksi
Svarbu:
c
❏ Nebandykite jėga įkišti kortelę iki galo. Ji
neturi būti iki galo įkišta.
❏ Neištraukite kortelės, kol mirksi lemputė.
Galite prarasti kortelėje esančius duomenis.
Kopijavimas
Norėdami kopijuoti dokumentus, atlikite toliau
pateiktus veiksmus. Naudojant gaminius su dviem
popieriaus kasetėmis, jei norite vienoje partijoje
nukopijuoti daug dokumentų, į abi kasetes įdėkite A4 /
„Legal“ popieriaus ir 7-ame veiksme nustatykite Paper
Source kaip Cassette 1>Cassette 2.
Įdėkite popierių į popieriaus kasetę.
A
& „Popieriaus įkrovimas į popieriaus kasetę”
puslapyje 6
Padėkite originalą.
B
& „Originalų padėjimas” puslapyje 8
Per meniu Home įjunkite režimą Copy.
C
Spausdami + ir - nustatykite kopijų skaičių.
D
Nustatykite tankį.
E
Paspauskite d, kad atvertumėte meniu Copy.
F
Pasirinkite atitinkamus kopijavimo nustatymus,
G
pavyzdžiui, popieriaus dydį, popieriaus tipą ir
popieriaus kokybę.
Pastaba:
❏ Priklausomai nuo modelio, kopijavimo nustatymus
galima keisti per Paper and Copy Settings.
❏ Prieš pradėdami kopijuoti, galite peržiūrėti
kopijavimo rezultatus.
❏ Galite daryti įvairaus įdėstymo kopijas, pvz.,
dvipusę kopiją, 2 puslapių kopiją ir t. t. Pagal
poreikį, pakeiskite dvipusį ar išdėstymo
nustatymus.
Paspauskite vieną iš x mygtukų, kad
H
nustatytumėte spalvos režimą, ir pradėkite
kopijuoti.
Pastaba:
PDF Vartotojo vadovas rasite informacijos apie kitas
kopijavimo funkcijas ir Copy režimo meniu sąrašą.
Nuskaitymas
Galite nuskaityti dokumentus ir nuskenuotą vaizdą
nusiųsti iš gaminio į kompiuterį.
Pastaba:
Jei reikia daugiau informacijos apie Scan to Cloud, žr.
„Epson Connect“ vadovą, kuris pasiekiamas per
darbalaukyje esančią nuorodos piktogramą
Padėkite originalą (-us).
A
& „Originalų padėjimas” puslapyje 8
Iš Home meniu pasirinkite Scan.
B
Pasirinkite nuskaitymo meniu elementus.
C
Jei pasirinkote Scan to PC, pasirinkite
D
kompiuterį.
Jei pasirinkote Scan to Memory Card, pasirinkite
nustatymus, pvz., nuskaitymo formatą ir
dvipusius nustatymus.
.
Lietuviškai
11
Page 64

Pagrindinių vadovas
Faksogramos siuntimas
Paspauskite x mygtukus, kad prasidėtų
E
nuskaitymas.
Pastaba:
Daugiau informacijos apie kitas nuskaitymo funkcijas ir
nuskaitymo režimo meniu sąrašą žr. PDF instrukcijoje
Vartotojo vadovas.
Nuskaitytas vaizdas išsaugotas.
Faksogramos
siuntimas
Apie „FAX Utility“
„FAX Utility“ – tai programa, su kuria duomenis,
pavyzdžiui, dokumentus, brėžinius ir lenteles, sukurtas
naudojant teksto apdorojimo arba skaičiuoklės
programą, galima perduoti tiesiogiai faksu, jų
nespausdinant. Be to, naudojant šią priemonę, gautą
faksą galima įrašyti PDF formatu į kompiuterį. Taip
galite nespausdindami peržiūrėti duomenis ir
išspausdinti tik tuos duomenis, kurie reikalingi.
Paslaugų programą paleiskite atlikdami nurodytus
veiksmus.
Jungimasis prie telefono
linijos
Apie telefono kabelį
Naudokite nurodytų techninių duomenų telefono
kabelį.
❏ RJ-11 telefono linija
❏ RJ-11 telefono aparato jungtis
Priklausomai nuo regiono, prie gaminio gali būti
pridėtas telefono kabelis. Jei taip ir yra, naudokite tą
kabelį.
Telefono liniją naudojant tik
faksui
Iš telefono sieninio lizdo einantį telefono kabelį
A
įjunkite į LINE prievadą.
Windows
Spustelėkite pradžios mygtuką („Windows 7“ ir
„Vista“) arba spustelėkite Start (Pradėti) („Windows
XP“), nurodykite All Programs (Visos programos),
pasirinkite Epson Software, o paskui spustelėkite FAX
Utility.
Mac OS X
Spustelėkite System Preference, spustelėkite Print &
Fax arba Print & Scan, po to pasirinkite FAX (jūsų
spausdintuvas) sąraše Printer. Spustelėkite kaip
nurodyta toliau.
„Mac OS X 10.6.x, 10.7.x“: Option & Supplies - Utility -
Open Printer Utility
„Mac OS X 10.5.x“: Open Print Queue - Utility
Pastaba:
Išsamiau žr. „FAX Utility“ žiniatinklio pagalbą.
12
Būtinai nurodykite nustatymo Auto Answer
B
reikšmę On.
& „Faksogramų priėmimas” puslapyje 15
Svarbu:
c
Jei išorinio telefono aparato nejungiate su gaminiu,
įsitikinkite, kad įjungėte automatinį atsakiklį.
Kitaip negalėsite priimti faksogramų.
Page 65

Pagrindinių vadovas
Faksogramos siuntimas
Bendra linija su telefono aparatu
Iš telefono sieninio lizdo einantį telefono kabelį
A
įjunkite į LINE prievadą.
Nuimkite dangtelį.
B
Prijunkite telefoną arba telefoninį atsakiklį prie
C
EXT. prievado.
Pastaba:
Apie kitus jungimo metodus žr. PDF instrukcijoje
Vartotojo vadovas.
Fakso ryšio patikrinimas
Galite pasirinkti, ar gaminys pasirengęs priimti ar
išsiųsti faksogramas.
Įdėkite paprasto popieriaus į kasetę.
A
& „Popieriaus įkrovimas į popieriaus kasetę”
puslapyje 6
Lietuviškai
Pastaba:
Jei gaminys turi dvi kasetes, įdėkite popieriaus į 1 kasetę.
Jei pakeitėte Paper Source nustatymą (Setup > Fax
Settings > Receive Settings > Paper Source), įkraukite
popierių į jūsų nurodytą kasetę.
Per meniu Home įjunkite režimą Setup.
B
Pasirinkite Fax Settings.
C
Pasirinkite Check Fax Connection
D
Paspauskite vieną iš x mygtukų, kad būtų
E
išspausdinta ataskaita.
13
Page 66

Pagrindinių vadovas
Faksogramos siuntimas
Pastaba:
Jei ataskaitoje bus nurodyta klaidų, pamėginkite jas
išspręsti, kaip aprašyta ataskaitoje.
Fakso funkcijų
paruošimas
Greitojo rinkimo įvesčių
paruošimas
Galite sukurti greitojo rinkimo sąrašą, suteikiantį
galimybę greitai pasirinkti faksogramų gavėjų numerius
siunčiant faksu. Galima registruoti iki 100 greitojo
rinkimo ir grupinio rinkimo įvesčių kartu.
Per meniu Home įjunkite režimą Fax.
A
Paspauskite arba pasirinkite Contacts.
B
Pasirinkite Edit Contacts.
C
Pasirinkite Speed Dial Setup. Matote
D
prieinamus greitojo rinkimo įvesčių numerius.
Pasirinktumėte norimą įregistruoti greitojo
E
rinkimo įvesties numerį. Galite registruoti iki
100 įvesčių.
Skaičių klaviatūra įveskite telefono numerį.
F
Galite įvesti iki 64 skaitmenų.
Pastaba:
Jei įvestas brūkšnelis („-“), prieš renkant numerį
įterpiama trumpa pauzė. Telefono numeriuose
brūkšnelius įterpkite tik tada, kai pauzė būtina. Renkant
numerius, nepaisoma tarp skaičių įvestų tarpų.
Grupinio rinkimo įvesčių
paruošimas
Greitojo rinkimo įvestis galite įtraukti į grupę, ir galėsite
siųsti faksogramą daugeliui gavėjų vienu metu. Galima
įvesti iki 99 greitojo rinkimo ir grupinio rinkimo įvesčių
kartu.
Per meniu Home įjunkite režimą Fax.
A
Paspauskite arba pasirinkite Contacts.
B
Pasirinkite Edit Contacts.
C
Pasirinkite Group Dial Setup. Matote
D
prieinamus grupinio rinkimo įvesčių numerius.
Pasirinktumėte norimą įregistruoti grupinio
E
rinkimo įvesties numerį.
Įveskite pavadinimą, įvardijantį grupinio
F
rinkimo įvestį. Galite įvesti iki 30 simbolių.
Pasirinkite Done, kad įregistruotumėte
G
pavadinimą.
Grupinio rinkimo sąraše pasirinkite norimą
H
įregistruoti greitojo rinkimo įvestį.
Pakartokite 8 veiksmą, kad į grupinio rinkimo
I
sąrašą įtrauktumėte kitas greitojo rinkimo
įvestis. Grupiniam rinkimui galite registruoti iki
99 greitojo rinkimo įvesčių.
Paspauskite OK, kad baigtumėte kurti grupinio
J
rinkimo sąrašą.
Faksogramų siuntimas
Įveskite pavadinimą, įvardijantį greitojo rinkimo
G
įvestį. Galite įvesti iki 30 simbolių.
Pasirinkite Done, kad įregistruotumėte
H
pavadinimą.
14
Originalą įdėkite į automatinį dokumentų
A
tiektuvą arba padėkite ant skaitytuvo stiklo.
& „Originalų padėjimas” puslapyje 8
Per meniu Home įjunkite režimą Fax.
B
Page 67

Pagrindinių vadovas
Faksogramos siuntimas
Skaičių klaviatūros mygtukais įveskite fakso
C
numerį. Galite įvesti iki 64 skaitmenų.
Pastaba:
❏ Jei norite, kad būtų parodytas paskutinis naudotas
fakso numeris, paspauskite
❏ Paspauskite d ir pasirinkite siuntimo nustatymus.
Norėdami nuskaityti ir išsiųsti faksu abi originalo
puses, pasirinkite 2-Sided Faxing, On ir įdėkite
originalą į automatinį dokumentų tiektuvą. Tam
tikruose modeliuose galite nustatymus keisti ir
pasirinkę Send Settings.
❏ Įsitikinkite, kad įvedėte antraštės informaciją. Kai
kurie fakso aparatai automatiškai atmeta
įeinančias faksogramas, kuriose nėra antraštės
informacijos.
Paspauskite x (spalvotas) arba x (nespalvotas),
D
kad pradėtumėte siųsti spalvotą arba nespalvotą
faksogramą.
Pastaba:
Jei fakso numeris užimtas arba iškilo kokia nors
problema, šis gaminys iš naujo perrenka numerį po
vienos minutės. Paspauskite Redial, kad numeris būtų
perrenkamas iš karto.
arba Redial.
Faksogramų priėmimas
Įdėkite paprasto popieriaus į kasetę.
A
& „Popieriaus įkrovimas į popieriaus kasetę”
puslapyje 6
Pastaba:
Jei gaminys turi dvi kasetes, pasirinkite Paper Source
nustatymus.
Setup > Fax Settings > Receive Settings > Paper Source
Jei norite spausdinti daug faksogramų vienoje partijoje,
įdėkite paprasto popieriaus į abi kasetes ir nustatykite
Paper Source kaip Cassette 1>Cassette 2.
Būtinai nurodykite nustatymo Auto Answer
B
reikšmę On.
Setup > Fax Settings > Receive Settings > Auto
Answer > On
Pastaba:
❏ Kai telefoninis atsakiklis yra tiesiogiai sujungtas su
šiuo gaminiu, atlikę žemiau nurodytus veiksmus,
įsitikinkite, kad tinkamai nustatėte Rings to
Answer.
❏ Skirtinguose regionuose Rings to Answer funkcija
gali būti neprieinama.
❏ Daugiau informacijos apie faksogramų priėmimą
rankiniu būdu, žr. PDF instrukciją Vartotojo
vadovas.
Per meniu Home įjunkite režimą Setup.
C
Lietuviškai
Atlikite nurodytus veiksmus, kad nustatytumėte
aparatą priimti faksogramas automatiškai.
Pastaba:
❏ Priklausomai nuo Fax Output nustatymų, gautas
faktas įrašomas kaip duomenys arba
išspausdinamas.
❏ Jei Fax Output nustatytas Save, gauti fakso
duomenys automatiškai įrašomi kaip duomenys, ir
jūs galite praleisti 1 veiksmą.
15
Pasirinkite Fax Settings.
D
Pasirinkite Communication.
E
Pasirinkite Rings to Answer.
F
Pasirinkite skambėjimų skaičių.
G
Svarbu:
c
Pasirinkite daugiau skambučių nei reikia, kad
įsijungtų telefoninis atsakiklis. Jei šis atsakiklis
nustatytas taip, kad įsijungtų po ketvirto
skambučio, nustatykite, kad gaminys atsakytų po
penkto skambučio ar vėliau. Kitaip telefoninis
atsakiklis negalės priimti balso skambučių.
Page 68

Pagrindinių vadovas
Daugiau funkcijų
Pastaba:
Kai priimate skambutį, o skambinanti šalis yra faksas,
gaminys gauna faksogramą automatiškai, net jei į
skambutį atsako telefoninis atsakiklis. Jei pakeliate
telefono ragelį, prieš jį padėdami palaukite, kol skystųjų
kristalų ekrane bus parodytas pranešimas apie tai, kad
ryšys užmegztas. Jei skambinanti šalis yra asmuo,
telefoną galima naudoti įprastai arba palikti pranešimą
telefoniniame atsakiklyje.
Ataskaitų spausdinimas
Laikykitės žemiau pateiktų instrukcijų, kaip spausdinti
fakso ataskaitą.
Įdėkite paprasto popieriaus į kasetę.
A
& „Popieriaus įkrovimas į popieriaus kasetę”
puslapyje 6
Pastaba:
Jei gaminys turi dvi kasetes, pasirinkite Paper Source
nustatymus.
Setup > Fax Settings > Receive Settings > Paper Source
Daugiau funkcijų
Per meniu Home įjunkite režimą Fax.
B
Jei LCD ekrane rodoma Advanced Options,
C
pasirinkite Advanced Options.
Jei nerodoma, paspauskite d.
Pasirinkite Fax Report.
D
Pasirinkite elementą, kurį norite spausdinti.
E
Pastaba:
Ekrane galima matyti tik Fax Log.
Paspauskite vieną iš x mygtukų, kad būtų
F
išspausdinta pasirinkta ataskaita.
Pastaba:
Daugiau informacijos apie kitas fakso funkcijas ir fakso
režimo meniu sąrašą žr. PDF instrukcijoje Vartotojo
vadovas.
More Functio ns pateikia daug special ių meniu , su kuriais spausdinti paprasta ir smagu! Daugiau informacijos rasite
pasirinkę More Functions, pasirinkę kiekvieną meniu ir vadovaudamiesi LCD ekrano instrukcijomis.
Meniu Funkcijos
ID kortelės kopija
Spausdinti nuotraukas
16
Galite vienu metu nukopijuoti abi ID ko r‐
telės puses.
Galite spausdinti atminties kortelėje arba
išoriniame USB įrenginyje saugomas nuo‐
traukas nenaudodami tam kompiuterio.
Taip pat galite sumažinti arba padidinti
nuotraukas, pakoreguoti jų kokybę.
Page 69

Pagrindinių vadovas
Rašalo kasečių pakeitimas
Meniu Funkcijos
Kopijuoti / atkurti nuotraukas
Galite daryti tikslias originalų kopijas. Jei
originali nuotrauka išbluko, galite atkurti
spalvą ir vėl grąžinti nuotrauką gyvenimui.
Nuotraukos išdėstymo lapas
Spausdinti suliniuotus popie‐
rius
Rašalo kasečių
pakeitimas
Saugos instrukcijos
❏ Laikykite kasetes vaikams nepasiekiamoje vietoje.
❏ Būkite atsargūs, kai naudojate panaudotas kasetes,
nes aplink rašalo tiekimo angą gali būti likę šiek tiek
rašalo.
Jei rašalo patenka jums ant odos, kruopščiai
nuplaukite suteptą sritį muilu ir vandeniu.
Jei rašalo patenka į akis, nedelsdami praplaukite
vandeniu. Jei kruopščiai praplovus akis vis tiek
jaučiamas diskomfortas ar regėjimo sutrikimai,
nedelsdami kreipkitės į gydytoją.
Jei rašalo patenka į burną, nedelsdami išspjaukite ir
iškart kreipkitės į gydytoją.
Galite spausdinti įvairiai išdėstytas nuo‐
traukas iš atminties kortelės.
Galite spausdinti suliniuotą popierių arba
milimetrinį popierių su nuotrauka arba be
nuotraukos fone.
Atsargumo priemonės
❏ „Epson“ rekomenduoja naudoti originalias
„Epson“ rašalo kasetes. „Epson“ negali garantuoti
neoriginalaus rašalo kokybės arba patikimumo. Ne
gamintojo pagaminto rašalo naudojimas gali
sukelti pažeidimus, kuriems netaikoma „Epson“
garantija, ir, tam tikromis sąlygomis, įrenginys gali
veikti netinkamai. Gali nerodyti informacijos apie
ne gamintojo pagaminto rašalo lygius.
❏ Nepurtykite rašalo kasečių pernelyg stipriai; jei
nesilaikysite šio nurodymo, iš kasetės gali ištekėti
rašalas.
❏ Siekiant užtikrinti optimalų spausdinimo galvutės
našumą, šiek tiek rašalo iš tam tikrų kasečių
sunaudojama ne tik spausdinant, bet ir atliekant
priežiūros veiksmus, pavyzdžiui, keičiant rašalo
kasetę ir valant spausdinimo galvutę.
Lietuviškai
17
Page 70

Pagrindinių vadovas
Rašalo kasečių pakeitimas
❏ Jei jums reikia laikinai ištraukti rašalo kasetę,
būtinai apsaugokite rašalo padavimo sritį nuo
purvo ir dulkių. Rašalo kasetę laikykite toje pačioje
aplinkoje, kurioje laikote gaminį. Sandėliuodami
rašalo kasetę pasirūpinkite, kad jos spalvą
nurodanti etiketė būtų nukreipta į viršų.
Nelaikykite rašalo kasečių nukreiptų žemyn.
❏ Didžiausiam rašalo naudojimo efektyvumui
užtikrinti rašalo kasetę ištraukite tik tada, kai norite
ją pakeisti. Rašalo kasetės su besibaigiančio rašalo
būsena nebegali būti naudojamos pakartotinai.
❏ Neatidarykite rašalo kasetės įpakavimo, kol nesate
pasirengę įdėti jos į gaminį. Siekiant užtikrinti
patikimumą kasetė supakuota vakuume. Jei
išpakuotą kasetę paliksite ilgą laiką nenaudojamą,
nebebus galima užtikrinti normalaus spausdinimo.
❏ Įdėkite visas kasetes; priešingu atveju negalėsite
spausdinti.
Rašalo kasetės pakeitimas
Atidarykite skaitytuvą. Rašalo kasetės laikiklis
A
pasislenka į kasetės pakeitimo padėtį.
Svarbu:
c
❏ Nejudinkite rašalo kasetės laikiklio ranka;
galite sugadinti gaminį.
❏ Kai atidarytas dokumentų dangtis, skaitytuvo
įrenginio nekelkite.
Pastaba:
Jei rašalo kasetės laikiklis nejuda į rašalo kasetės keitimo
padėtį, vadovaukitės toliau pateikiama instrukcija.
Home > Setup > Maintenance > Ink Cartridge
Replacement
Atidarykite rašalo kasetės dangtį.
B
18
Suimkite ir išimkite rašalo kasetę.
C
Page 71

Pagrindinių vadovas
Rašalo kasečių pakeitimas
Pastaba:
❏ Iliustracijoje rodomas juodos rašalo kasetės
keitimas. Keiskite jums reikalingą rašalo kasetę.
❏ Išimtose rašalo kasetėse ties rašalo tiekimo anga gali
būti rašalo, todėl išimdami kasetes būkite atsargūs,
kad rašalo nepatektų ant gretimų paviršių.
Švelniai pakratykite naujas kasetes keturis ar
D
penkis kartus ir išimkite pakaitinę kasetę iš
pakuotės.
Nuimkite tik geltoną juostą.
E
Svarbu:
c
❏ Prieš įdedant kasetę, nuo jos reikia nuimti
geltoną juostą; priešingu atveju suprastės
spausdinimo kokybė arba negalėsite
spausdinti.
❏ Jei rašalo kasetę įdėjote nenuėmę geltonos
juostos, išimkite kasetę iš gaminio, nuimkite
geltoną juostą ir vėl įdėkite kasetę.
❏ Nenuplėškite permatomos plombos nuo
kasetės apačios; priešingu atveju negalėsite
naudoti kasetės.
❏ Nenuimkite ir nenuplėškite ant kasetės
esančios etiketės; priešingu atveju pratekės
rašalas.
Įdėkite kasetę ir spauskite ją iki spragtelės.
F
Uždarykite rašalo kasetės dangtį.
G
Lietuviškai
19
Page 72

Pagrindinių vadovas
Trikčių šalinimo pagrindai
Lėtai uždarykite skaitytuvo įrenginį. Pradedama
H
pripildyti rašalu.
Pastaba:
❏ Maitinimo lemputė mirksi, kol gaminys
pripildomas rašalo. Neišjunkite gaminio, kai vyksta
pripildymas rašalu. Jei pildymas rašalu
neužbaigiamas, negalėsite spausdinti.
❏ Jei rašalo kasetę turėjote pakeisti kopijavimo metu,
siekdami užtikrinti kopijos kokybę pripildžius
sistemą rašalo, atšaukite kopijavimo užduotį ir
pradėkite nuo originalo padėjimo.
Rašalo kasetės pakeitimas baigtas. Gaminys grįžta į
ankstesnę būseną.
Trikčių šalinimo pagrindai
Klaidų pranešimai
Šiame skyriuje aprašyta, ką reiškia skystųjų kristalų ekrane rodomi pranešimai.
Klaidų pranešimai Sprendimai
Nėra popieriaus arba Popieriaus strigtis
Printer error. Turn the power off and on again. For details,
see your documentation.
Communication error. Check if a computer is connected. Įsitikinkite, kad kompiuteris prijungtas taisyklingai. Jei klaidos
The maintenance box is nearing the end of its service life. Pakeiskite priežiūros dėžutę prieš pasibaigiant jos galiojimo laikui.
The maintenance box is at the end of its service life. You
need to replace it.
A printer's ink pad is nearing the end of its service life.
Please contact Epson Support.
A printer's ink pad is at the end of its service life. Please
contact Epson Support.
& Žr. „Popieriaus strigtys” puslapyje 21
Išjunkite ir vėl įjunkite gaminį. Įsitikinkite, kad gaminyje nebeliko
popieriaus. Jei klaidos pranešimas vis tiek rodomas, kreipkitės į
„Epson“ pagalbos skyrių.
pranešimas vis tiek rodomas, įsitikinkite, kad kompiuteryje yra
įdiegta nuskaitymo programinė įranga ir kad programos įrangos
nustatymai tinkami.
Daugiau informacijos žr. PDF Vartotojo vadovas.
Kai priežiūros dėžutė pilna, gaminys sustoja. Norėdami spausdinti
toliau, turite pakeisti priežiūros dėžutę.
Pakeiskite priežiūros dėžutę.
Paspauskite x mygtuką, kad tęstumėte spausdinimą. Pranešimas
rodomas iki pakeičiama rašalo pagalvėlė. Kreipkitės į „Epson“ ap‐
tarnavimo skyrių, kad pakeistų rašalo pagalvėles iki baigsis jų tar‐
navimo laikas. Kai rašalo pagalvėlės permirksta, gaminys nustoja
spausdinti ir, kad galėtumėte toliau spausdinti, reikia kreiptis į
„Epson“ aptarnavimo skyrių.
Kreipkitės į „Epson“ aptarnavimo skyrių, kad pakeistų rašalo pa‐
galvėles.
20
Page 73

Pagrindinių vadovas
Trikčių šalinimo pagrindai
Klaidų pranešimai Sprendimai
No dial tone detected. Run Check Fax Connection under
Fax Settings in Setup menu.
Combination of the IP address and the subnet mask is
invalid. See your documentation.
Recovery Mode Nepavyko atnaujinti programinės aparatinės įrangos. Jums reikės
Įsitikinkite, kad telefono kabelis prijungtas taisyklingai, o telefono
linija veikia.
& Žr. „Jungimasis prie telefono linijos” puslapy je 12
Jei sujungėte gaminį su PBX (privačiosios automatinės telefono
stoties) linija arba galiniu adapteriu, išjunkite Dial Tone Detec‐
tion. Pasirinkite Fax Settings > Communication > Dial Tone
Detection >Off.
Žr. žiniatinklio Tinklo vadovas.
iš naujo pamėginti atnaujinti programinę aparatinę įrangą. Pa‐
ruoškite USB kabelį ir tolesnių instrukcijų ieškokite apsilankę vie‐
tos „Epson“ interneto svetainėje.
Popieriaus strigtys
Perspėjimas:
!
Niekada nelieskite valdymo skydelio mygtukų, kai
ranka yra gaminio viduje.
Pastaba:
❏ Jei skystųjų kristalų ekrane pateiktame pranešime
arba spausdintuvo tvarkyklėje nurodoma, atšaukite
spausdinimo užduotį.
❏ Pašalinę įstrigusį popierių, paspauskite skystųjų
kristalų ekrane nurodytą mygtuką.
Įstrigusio popieriaus išėmimas iš
galinio gaubto
Ištraukite galinį gaubtą.
A
Atsargiai išimkite įstrigusį popierių.
B
Atsargiai išimkite įstrigusį popierių.
C
Lietuviškai
21
Page 74

Pagrindinių vadovas
Atidarykite galinį gaubtą.
D
Atsargiai išimkite įstrigusį popierių.
E
Trikčių šalinimo pagrindai
Gaminio viduje įstrigusio
popieriaus išėmimas
Atsargiai išimkite įstrigusį popierių.
A
Atidarykite skaitytuvą.
B
Iš naujo pritvirtinkite galinį gaubtą.
F
22
Svarbu:
c
Kai atidarytas dokumentų dangtis, skaitytuvo
įrenginio nekelkite.
Page 75

Pagrindinių vadovas
Trikčių šalinimo pagrindai
Pašalinkite visą viduje esantį popierių, įskaitant
C
suplėšytas dalis.
Svarbu:
c
Nelieskite plokščio balto kabelio, prijungto prie
kasetės laikiklio.
Pastaba:
Jei negalite ištraukti kasetės, atjunkite maitinimo laidą
nuo gaminio ir elektros lizdo. Atjunkite nuo gaminio
visus kitus kabelius.
Atsargiai pastatykite gaminį ant šono, kaip parodyta
toliau, ir atsargiai ištraukite kasetę.
Išimkite iš kasetės įstrigusį popierių.
B
Atsargiai išimkite gaminyje įstrigusį popierių
C
Lietuviškai
Lėtai uždarykite skaitytuvo įrenginį.
D
Įstrigusio popieriaus išėmimas iš
popieriaus kasetės
Ištraukite popieriaus kasetę.
A
23
Sulygiuokite popieriaus kraštus.
D
Laikydami kasetę lygiai, lėtai ir atsargiai įkiškite
E
ją iki galo į gaminį.
Page 76

Pagrindinių vadovas
Trikčių šalinimo pagrindai
Įstrigusio popieriaus išėmimas iš
automatinio dokumentų
tiektuvo (ADF)
Išimkite popieriaus šūsnį iš ADF įvesties dėklo.
A
Atidarykite ADF dangtį.
B
Svarbu:
c
įsitikinkite, kad prieš išimdami užstrigusį popierių
atidarėte ADF dangtį. Jei dangčio neatidarysite,
galite sugadinti gaminį.
Atsargiai išimkite įstrigusį popierių.
C
Atidarykite dokumentų dangtį.
E
Atsargiai išimkite įstrigusį popierių.
F
Uždarykite dokumentų dangtį.
G
Uždarykite ADF dangtį.
D
24
Pakelkite ADF įvesties dėklą.
H
Page 77

Pagrindinių vadovas
Kur gauti pagalbos
Atsargiai išimkite įstrigusį popierių.
I
Grąžinkite ADF įvesties dėklą į pradinę padėtį.
J
Spausdinimo kokybės
žinynas
Jei spaudiniuose matomos juostas (šviesios linijos),
trūksta spalvų arba yra kitų kokybės problemų,
išmėginkite nurodytus sprendimus.
❏ Įsitikinkite, kad įdėjote popieriaus ir tinkamai
padėjote originalą.
& „Popieriaus įkrovimas į popieriaus kasetę”
puslapyje 6
& „Originalų padėjimas” puslapyje 8
❏ Patikrinkite popieriaus formato ir popieriaus tipo
nustatymus.
& „Popieriaus pasirinkimas” puslapyje 6
❏ Gali būti, kad užsikimšusi spausdinimo galvutė.
Pirmiausia patikrinkite purkštukus, po to išvalykite
spausdinimo galvutę.
Setup > Maintenance > Nozzle Check
Faksogramų siuntimo
pagalba
❏ Įsitikinkite, kad telefono kabelis prijungtas
tinkamai, ir patikrinkite, ar telefono linija veikia.
Linijos būseną galite patikrinti naudodami Check
Fax Connection funkciją.
& „Jungimasis prie telefono linijos” puslapyje 12
❏ Jei faksogramos išsiųsti nepavyko, įsitikinkite, kad
gavėjo fakso aparatas įjungtas ir veikia.
❏ Jei šis gaminys nesujungtas su telefonu, o jūs norite
priimti faksogramas automatiškai, įsitikinkite, kad
įjungėte automatinį atsakiklį.
& „Faksogramų priėmimas” puslapyje 15
Pastaba:
Daugiau faksogramos siuntimo problemų sprendimo
būdų rasite internetinėje instrukcijoje Vartotojo
vadovas.
Kur gauti pagalbos
Techninės pagalbos
svetainė
„Epson“ techninės pagalbos svetainėje pateikiama
pagalba, kai kyla problemų, kurių negalima išspręsti
naudojantis trikčių šalinimo informacija, pateikiama
jūsų gaminio dokumentuose. Jei turite žiniatinklio
naršyklę ir galite prisijungti prie žiniatinklio,
atsidarykite svetainę, esančią adresu:
http://support.epson.net/
http://www.epson.eu/Support (Europai)
Lietuviškai
(a) Gerai
(b) Reikia valyti galvutę
Jei jums reikia naujausių tvarkyklių, DUK, instrukcijų ir
kitos parsisiunčiamos medžiagos, prisijunkite prie
svetainės adresu:
http://www.epson.com
http://www.epson.eu/Support (Europai)
Tada pasirinkite vietinio „Epson“ svetainės pagalbos
skyrių.
25
Page 78

Page 79

Põhijuhend
Sisukord
Sisukord
Sissejuhatus......................... 2
Kust leida teavet........................... 2
Ettevaatust, oluline teave ja märkus............. 2
Teenuse Epson Connect kasutamine............ 2
Ohutusalased juhised................ 3
Juhtpaneeli tutvustus............... 3
Nupp ja LCD............................. 4
Tuled................................... 5
Paberi ja meediumite käsitsemine
....................................... 6
Paberi valimine............................ 6
Paberi laadimine paberikassetti................ 6
Originaalide paigutamine.................... 8
Automaatne dokumendisöötur (ADF)......... 8
Skanneriklaas.......................... 10
Mälukaardi sisestamine..................... 10
Kopeerimine........................ 11
Skannimine......................... 11
Faksimine.......................... 12
FAX Utility tutvustamine................... 12
Telefoniliiniga ühendamine.................. 12
Telefonikaabli kohta..................... 12
Telefoniliini kasutamine ainult faksimiseks.... 12
Liini jagamine telefoniseadmega............ 13
Faksiühenduse kontrollimine............... 13
Faksifunktsioonide seadistamine.............. 14
Kiirvalimisnumbrite seadistamine........... 14
Rühmavalimisnumbrite seadistamine......... 14
Fakside saatmine.......................... 14
Fakside vastuvõtmine...................... 15
Aruannete printimine...................... 15
Veel funktsioone................... 16
Tindikasseti vahetamine........... 17
Ohutusalased juhised...................... 17
Ettevaatusabinõud......................... 17
Tindikasseti vahetamine.................... 18
Üldine tõrkeotsing................. 20
Tõrketeated............................. 20
Paberiummistused........................ 21
Kinnijäänud paberi eemaldamine tagumisest
kattest............................... 21
Kinnijäänud paberi eemaldamine toote seest
.................................... 22
Kinnijäänud paberi eemaldamine
paberikassetist......................... 23
Ummistunud paberi eemaldamine
automaatsest dokumendisööturist (ADF). . . . . . 24
Printimiskvaliteedi spikker.................. 25
Faksimise spikker......................... 25
Kust saada abi?..................... 25
Tehnilise toe veebisait...................... 25
Eesti
1
Page 80

Põhijuhend
Sissejuhatus
Kust leida teavet
Sissejuhatus
!
Ettevaatust!
tuleb hoolikalt järgida kehavigastuste vältimiseks.
Oluline teave
c
tuleb järgida seadme kahjustamise vältimiseks.
Järgnevate juhendite uusimad versioonid on saadaval
Epsoni kasutajatoe veebisaidilt.
http://www.epson.eu/Support (Euroopa)
http://support.epson.net/ (väljaspool Euroopat)
❏ Alusta siit (paber):
Pakub teavet toote seadistamise ja tarkvara
installimise kohta.
❏ Põhijuhend (paber):
Sisaldab põhilist informatsiooni toote kasutamise
kohta ilma arvutita. Seda juhendit ei pruugi
sõltuvalt mudelist ja piirkonnast olla lisatud.
❏ Kasutusjuhend (PDF):
Pakub üksikasjalikke juhiseid kasutamise, ohutuse
ja tõrkeotsingu kohta. Tutvuge käesoleva
juhendiga, kui kasutate käesolevat toodet arvutiga
või kui kasutate täpsemaid funktsioone, näiteks
2-poolset kopeerimist.
PDF-juhendi lugemiseks läheb teil vaja rakendust
Adobe Acrobat Reader 5.0 või uuemat või
rakendust Adobe Reader.
❏ Võrgujuhend (HTML):
Pakub võrguadministraatoritele teavet nii
printeridraiveri kui ka võrgusätete kohta.
❏ Help (toote ekraanil):
Märkus
sisaldab kasulikke nõuandeid ja kitsendusi toote töö
kohta.
Teenuse Epson Connect
kasutamine
Kasutades teenust Epson Connect ja teiste ettevõtete
teenuseid saate te mugavalt printida otse oma
nutitelefonist, tahvelarvutist või sülearvutist, seda igal
ajal ja praktiliselt ükskõik millisest kohast maailmas!
Printimise ning teiste teenuste kohta lisateabe
saamiseks külastage järgmist veebiaadressi:
https://www.epsonconnect.com/ (portaali Epson
Connect sait)
http://www.epsonconnect.eu (ainult Euroopa)
Te saate teenuse Epson Connect juhendit vaadata, kui te
topeltklõpsate töölaual otseteeikoonil
.
Annab toote LCD-paneelil lihtsamaid kasutamisja tõrketuvastusjuhiseid. Valige juhtpaneelilt
menüüst Help.
Ettevaatust, oluline teave
ja märkus
Hoiatus, oluline teave ja märkus on selles juhendis
viidatud allnäidatud moel ning need omavad järgnevat
tähendust.
2
Page 81

Põhijuhend
Ohutusalased juhised
Ohutusalased juhised
Toote ohutu kasutuse tagamiseks lugege ja järgige neid
juhiseid. Hoidke see juhend tuleviku tarbeks kindlasti
alles. Lisaks järgige ka tootele märgitud hoiatusi ja
juhiseid.
❏ Kasutage ainult tootega kaasa pandud toitejuhet ja
ärge kasutage seda juhet muudeks otstarveteks.
Muude juhete kasutamine tootega või kaasa
pandud toitejuhtme kasutamine teiste seadmetega
võib põhjustada tulekahju või elektrilöögi.
❏ Veenduge, et teie vahelduvvoolu toitejuhe vastaks
kehtivatele kohalikele ohutusnormidele.
❏ Ärge proovige toitejuhet, pistikut, printerit,
skannerit ega lisaseadmeid ise lahti võtta, muuta või
parandada, välja arvatud juhul, kui selleks on
toodud täpsed juhised toote juhendites.
❏ Eemaldage toode vooluvõrgust ja toimetage
teenindustöödeks kvalifitseeritud tehniku kätte,
kui:
toitejuhe või pistik on saanud viga; tootesse on
sattunud vedelikku; toode on maha kukkunud või
selle korpus vigastatud; toode ei tööta normaalselt
või selle tööomadused on märgatavalt muutunud.
Ärge kasutage nuppe, mida käesolev kasutusjuhend
ei käsitle.
❏ Paigutage toode pistikupesa lähedale, et pistikut
oleks võimalik kerge vaevaga vooluvõrgust
eemaldada.
❏ Ärge kasutage ega hoidke toodet välistingimustes ja
kohtades, kus see võib kokku puutuda mustuse või
tolmu, vee või ülemäärase kuumusega. Ärge
paigutage toodet kohtadesse, kus see võib saada
lööke, puutuda kokku vibratsiooni, kõrge
temperatuuri või niiskusega.
❏ Hoiduge tootele vedelike ajamisest ja ärge kasutage
toodet märgade kätega.
❏ Hoidke käesolev seade südamestimulaatoritest
vähemalt 22 cm kaugusel. Käesolevast seadmest
lähtuvad raadiolained võivad
südamestimulaatorite tööle ebasoodsalt mõjuda.
❏ Kui vedelkristallekraan on vigastatud, pöörduge
printeri müüja poole. Kui vedelkristallekraanist
lekib vedelkristallilahust ja see satub kätele, peske
käsi hoolikalt vee ja seebiga. Kui vedelkristallilahus
satub silma, loputage silmi kohe veega. Kui
ebamugavustunne ja nägemisprobleemid püsivad
ka pärast põhjalikku loputamist, pöörduge kohe
arsti poole.
❏ Vältige telefoni kasutamist elektritormi ajal. Võib
esineda väike risk saada välgust elektrilöök.
❏ Ärge kasutage telefoni gaasilekkest teatamiseks
lekke läheduses.
Märkus.
Järgnevalt on ära toodud ohutusjuhised tindikassettide
kohta.
& „Tindikasseti vahetamine” lk 17
Eesti
Juhtpaneeli tutvustus
Märkus.
❏ Juhtpaneeli kujundus on asukohati erinev.
❏ Ehkki juhtpaneeli kujundus ning LCD-paneelile kuvatud menüü, suvandite ja muude kirjete nimed võivad tegeli kust
tootest olla erinevad, on nende tööpõhimõte sama.
3
Page 82

Põhijuhend
Nupp ja LCD
Juhtpaneeli tutvustus
Nupud Fun ktsioon
a
b
c
d
e - LCD-paneel kuvab menüüd. Kui teie tootel on puutepaneel, saate näpuga üle LCD-paneeli
f
g
h +, - Määrab koopiate arvu.
i 0 - 9, *, # Kuupäeva/kellaaja või koopiate arvu määramine , samuti faksinumbrite valimine. Sisestab
l, u, r, d, OK Menüüde valimiseks vajutage l, u, r, d. Vajutage OK, et kinnitada valitud säte ja minna
Lülitab printeri sisse või välja.
Naaseb ülamenüüsse. Ülamenüüs olles lülitab erinevate režiimide vahel.
Viimati valitud numbri kuvamine. Faksirežiimis numbrite sisestamisel lisab see pausisümboli
(-), mis toimib valimise ajal lühikese pausina.
Kuvab faksirežiimis loendi Contacts.
tõmmates kuvapilti kerida. Kui puutepaneel reageerib aeglaselt, proovige tugevamalt
tõmmata.
Valiku tühistamine / eelmisse menüüsse naasemine.
järgmisele ekraanile. Faksinumbri tippimisel toimib l tagasilükkeklahvina ja r sisestab
tühiku.
tähtnumbrilised märgid ja vahetab igal vajutusel suur- ja väiketähtede ning numbrite vahel.
Teksti on hõlpsam sisestada tarkvaraklahvistikuga mitte neid nuppe kasutades.
4
Page 83

Põhijuhend
Nupud Fun ktsioon
j
Juhtpaneeli tutvustus
Alustab kopeerimist/skannimist/faksimist mustvalgelt.
k
l
m
u, d
Alustab printimist/kopeerimist/skannimist värviliselt.
Peatab asetleidva toimingu või lähtestab hetkesätted.
Kerib ekraanikuva.
Tuled
Tuled Funktsioon
Põleb, kui toode on sisse lülitatud.
Vilgub, kui toode võtab andmeid vastu või prindib/kopeerib/skannib/faksib, tindikasseti
vahetamisel, tindi laadimisel või prindipea puhastamisel.
Jääb põlema, kui printer on ühendatud võrku. Vilgub, kui võrgusätteid reguleeritakse
(roheline: Wi-Fi, oranž: Ethernet).
Märkus.
LCD-paneelile kuvatud ikoonide kohta lisateabe saamiseks vt juhtpaneelil valikut Help.
Eesti
5
Page 84

Põhijuhend
Paberi ja meediumite käsitsemine
Paberi ja meediumite
käsitsemine
Paberi valimine
Toode reguleerib ennast ise automaatselt vastavalt teie
poolt valitud paberitüübile. See on põhjus, miks paberi
tüüp nii oluline on. See ütleb teie tootele, millist paberit
te kasutate, ning reguleerib vastavalt tindi kattekihti.
Allolev tabel toob välja nimekirja määrangutest, mida te
peate oma paberi jaoks valima.
Selle paberi korral LCD paberitüüp
Tavapaber*
Epson Bright White Ink Jet
Paper (Helevalge tindiprin‐
teri paber)*
Epson Ultra Glossy Photo
Paper (Ekstraläikiv fotopa‐
ber)
Epson Premium Glossy
Photo Paper (Kõrgkvali‐
teetne läikiv fotopaber)
Epson Premium Semigloss
Photo Paper (Kõrgkvali‐
teetne poolläikiv fotopa‐
ber)
Epson Glossy Photo Paper
(Läikiv fotopaber)
Epson Photo Paper (Foto‐
paber)
Epson Matte Paper - Hea‐
vyweight (Matt paber –
paks)
Epson Photo Quality Ink Jet
Paper (Fotokvaliteediga
tindiprinteri paber)
*1 Selle paberi puhul on võimalik 2-poolne printimine.
1
1
Plain Paper
Plain Paper
Ultra Glossy
Prem. Glossy
Prem. Glossy
Glossy
Photo Paper
Matte
Matte
Paberi laadimine
paberikassetti
Paberi laadimisel järgige neid samme.
a. Paberikassett 1
b. Paberikassett 2
* Selle osa saadavus on tooteti erinev.
Tõmmake paberikassett välja.
A
Märkus.
Kui väljastussalv on väljastatud, sulgege see enne
paberikasseti väljatõmbamist.
*
6
Page 85

Põhijuhend
Paberi ja meediumite käsitsemine
Pigistage ja lükake külgjuhikud vastu
B
paberikasseti külgi.
Lükake külgjuhikut vastavalt kasutatavale
C
paberiformaadile.
Laadige paber külgjuhiku suunas prinditav pool
D
allpool ning veenduge, et paber ei ulatu kasseti
tagaosast välja.
Märkus.
❏ Paberikassett 2 toetab ainult B5 või sellest
suuremaid tavapaberi formaate.
❏ Lehvitage enne laadimist paberit ja tasandage selle
servad.
Lükake külgjuhikud vastu paberi servi.
E
Eesti
Märkus.
Ärge laadige tavapaberit külgjuhiku siseküljel olevast
H noolemärgist kõrgemale.
Veenduge Epsoni eripaberi korral, et lehtede arv on
väiksem kui kandjate jaoks kindlaksmääratud piir.
7
Page 86

Põhijuhend
Paberi ja meediumite käsitsemine
Hoidke kassetti horisontaalselt ning sisestage
F
aeglaselt ja ettevaatlikult lõpuni tootesse.
Libistage väljastussalv välja ning tõstke
G
paberitõke üles.
Märkus.
❏ Jätke toote ette piisavalt vaba ruumi, et paber saaks
täielikult välja tulla.
❏ Ärge eemaldage ega sisestage paberikassetti toote
töötamise ajal.
❏ Muude meediumite peale tavapaberi, näiteks
ümbrike ja eelaugustatud paberite laadimise kohta
vaadake juhiseid PDF-failist Kasutusjuhend.
Originaalide paigutamine
Automaatne dokumendisöötur
(ADF)
Te saate oma originaaldokumendid laadida
automaatsesse dokumendisööturisse, et kopeerida,
skannida või faksida korraga kiiresti mitmeid lehti.
ADF suudab skannida teie dokumentide mõlemat
külge. Selleks valige kopeerimise seadistamise menüüs
vajalik suvand. Automaatses dokumendisööturis saate
kasutada järgmisi originaale.
Formaat A4/Letter/Legal
Tüüp Tavapaber
Kaal
Mahutavus 30 lehte või 3 mm või vä‐
ADF-i abil 2-poolset dokumenti skannides pole
legal-formaadis paberit võimalik kasutada.
Oluline teave:
c
Paberiummistuste vältimiseks ärge kasutage
järgmisi dokumente. Nende tüüpide puhul
kasutage skanneriklaasi.
❏ Kirjaklambrite, klambrite vms kooshoitavad
paberid.
❏ Kleeplindi või külgekleepunud paberiga
dokumendid.
❏ Fotod, kiled, termoülekandega paber.
❏ Rebenenud, kortsus või aukudega paber.
2
64 g/m
kuni 95 g/m
hem (A4, Letter) / 10 lehte
(Legal)
2
Koputage originaalide servad tasasel pinnal
A
ühtlaseks.
8
Page 87

Põhijuhend
Paberi ja meediumite käsitsemine
Libistage külgjuhik automaatsesse
B
dokumendisööturisse.
Sisestage originaalid esiküljega üleval ja lühike
C
serv eespool automaatsesse
dokumendisööturisse.
Libistage külgjuhikut, kuni see on originaalidega
D
ühetasane.
Märkus.
❏ 2 lehte lehel kopeerimise küljenduse puhul asetage
originaalid näidatud kujul. Veenduge, et
originaalide suund vastab sättele Document
Orientation.
Eesti
❏ Kui te kasutate automaatse dokumendisööturiga
kopeerimisfunktsiooni, siis on printimissätted
fikseeritud väärtusele Reduce/Enlarge — Actual
Size, Paper Type — Plain Paper ja Paper Size —
A4/Legal. Suurema kui A4-formaadis originaali
kopeerimisel kärbitakse väljaprinti.
9
Page 88

Põhijuhend
Paberi ja meediumite käsitsemine
Skanneriklaas
Avage dokumendikaas ja asetage originaal
A
esiküljega allpool skanneriklaasile.
Lükake originaal nurka.
B
Sulgege kaas õrnalt.
C
SD, miniSD, microSD, SDHC, miniSDHC,
microSDHC, SDXC, microSDXC, MultiMediaCard,
MMCplus, MMCmobile, MMCmicro, Memory Stick
Duo, Memory Stick PRO Duo, Memory Stick PRO-HG
Duo, Memory Stick Micro, MagicGate Memory Stick
Duo
Oluline teave:
c
Järgmiste mälukaartide jaoks on vaja adapterit.
Kinnitage see enne kaardi pesasse sisestamist,
vastasel juhul võib kaart kinni jääda.
❏ miniSD, microSD, miniSDHC, microSDHC,
microSDXC, MMCmicro
❏ MMCmobile
❏ Memory Stick Micro
Sisestage üks kaart korraga.
A
Märkus.
Kui dokument on nii automaatses dokumendisööturis
(ADF) kui ka skanneriklaasil, antakse eesõigus
automaatses dokumendisööturis (ADF) asuvale
dokumendile.
Mälukaardi sisestamine
Võite printida mälukaardile salvestatud fotosid või
salvestada skannitud andmed mälukaardile. Toetatakse
järgmisi mälukaarte.
10
Page 89

Põhijuhend
Kopeerimine
Kontrollige, et lamp jääks põlema.
B
= põleb, = vilgub
Oluline teave:
c
❏ Ärge püüdke kaarti jõuga lõpuni pilusse
suruda. Seda ei pea olema lõpuni sisestatud.
❏ Ärge eemaldage mälukaarti ajal, kui lamp
vilgub. Mälukaardil olevad andmed võivad
minna kaotsi.
Kopeerimine
Dokumentide kopeerimiseks järgige alltoodud samme.
Kui te soovite kahe paberikassetiga toodete puhul
kopeerida suurt hulka dokumente ühe partiina, laadige
mõlemasse kassetti A4-/Legal-formaadis tavapaberit
ning seadke 7. sammus Paper Source väärtuseks
Cassette 1>Cassette 2.
Laadige paber paberikassetti.
A
& „Paberi laadimine paberikassetti” lk 6
Valige asjakohased kopeerimissätted nagu
G
küljendus, paberi formaat, paberitüüp ja paberi
kvaliteet.
Märkus.
❏ Mudelist sõltuvalt võib teil olla võimalik teha
kopeerimisseadistusi menüüs Paper and Copy
Settings.
❏ Võite eelvadata kopeerimistulemusi enne
kopeerimise alustamist.
❏ Võite teha erineva küljendusega koopiaid, näiteks
2-poolne kopeerimine, 2 lehte lehel kopeerimine jne.
Vajaduse korral muutke 2-poolse või küljenduse
sätteid.
Värvirežiimi valimiseks vajutage ühele
H
nuppudest x ning alustage seejärel kopeerimist.
Märkus.
Vaadake PDF-ist Kasutusjuhend lähemalt teiste
kopeerimisfunktsioonide ja režiimi Copy menüüloendi
kohta.
Skannimine
Te saate skannida dokumente ja saata skannitud
kujutise tootest ühendatud arvutisse.
Märkus.
Teavet funktsiooni Scan to Cloud kohta lugege teenuse
Epson Connect juhendist, mida saab avada töölaualt
otseteeikooniga
.
Eesti
Asetage originaal.
B
& „Originaalide paigutamine” lk 8
Avage režiim menüüst Home režiim Copy.
C
Vajutage koopiate arvu määramiseks nuppu + ja
D
-.
Määrake tihedus.
E
Vajutage nuppu d, et minna menüüsse Copy.
F
11
Paigutage dokument (dokumendid).
A
& „Originaalide paigutamine” lk 8
Valige suvand Scan menüüst Home.
B
Valige skannimismenüü kirjed.
C
Kui valite Scan to PC, valige arvuti.
D
Kui valite Scan to Memory Card, tehke
seadistused, näiteks skannimisformaat ja
2-poolsed sätted.
Page 90

Põhijuhend
Faksimine
Vajutage skannimise alustamiseks nuppe x.
E
Märkus.
Rohkem teavet muude skannimisfunktsioonide ja
skannimisrežiimi menüüloendi kohta võite lugeda
PDF-failist Kasutusjuhend.
Skaneeritud pilt salvestatakse.
Faksimine
FAX Utility tutvustamine
FAX Utility on tarkvara, mis on võimeline andmeid, nt
teksti- või tabeltöötlusrakenduste abil loodud
dokumente, jooniseid ja tabeleid, edastama otse faksi
kaudu, ilma printimata. Lisaks on sellel utiliidil
funktsioon vastu võetud faksi arvutisse PDF-failina
salvestamiseks. See võimaldab teil kontrollida andmeid
ilma neid välja printimata ning printida ainult neid
andmeid, mida te tahate printida. Utiliidi käivitamiseks
toimige järgmiselt.
Windows
Klõpsake Start-nupul (Windows 7 ja Vista) või nupul
Start (Windows XP), osutage suvandile All Programs
(Kõik programmid), valige Epson Software ja seejärel
klõpsake suvandil FAX Utility.
Telefoniliiniga
ühendamine
Telefonikaabli kohta
Kasutage järgneva liidesespetsifikatsiooniga
telefonikaablit.
❏ RJ-11 telefoniliin
❏ RJ-11 telefonikomplekti ühendus
Sõltuvalt piirkonnast võib telefonikaabel tootega kaasas
olla. Kui nii, siis kasutage seda kaablit.
Telefoniliini kasutamine ainult
faksimiseks
Ühendage telefoni seinapistikust tulev
A
telefonikaabel LINE-porti.
Mac OS X
Klõpsake System Preference, klõpsake Print & Fax või
Print & Scan ja valige seejärel FAX (teie printer)
suvandist Printer. Edasi klõpsake järgnevalt;
Mac OS X 10.6.x, 10.7.x: Option & Supplies — Utility
— Open Printer Utility
Mac OS X 10.5.x: Open Print Queue — Utility
Märkus.
Täpsemad üksikasjad leiate FAX Utility võrguspikrist.
12
Veenduge, et suvandi Auto Answer sätteks on
B
valitud On.
& „Fakside vastuvõtmine” lk 15
Oluline teave:
c
Kui te ei ühenda välist telefoni tootega, lülitage
automaatvastaja kindlasti sisse. Vastasel korral ei
saa te fakse vastu võtta.
Page 91

Põhijuhend
Faksimine
Liini jagamine
telefoniseadmega
Ühendage telefoni seinapistikust tulev
A
telefonikaabel LINE-porti.
Eemaldage kork.
B
Ühendage telefon või automaatvastaja
C
EXT.-porti.
Märkus.
Muid ühendusmeetodeid vaadake PDF-failist
Kasutusjuhend.
Faksiühenduse kontrollimine
Te saate kontrollida, kas toode on fakside saatmiseks ja
vastuvõtmiseks valmis.
Laadige tavapaber kassetti.
A
& „Paberi laadimine paberikassetti” lk 6
Eesti
Märkus.
Kui teie toode on varustatud kahe paberikassetiga,
laadige paber kassetti 1. Kui olete muutnud suvandi
Paper Source seadistust (Setup > Fax Settings > Receive
Settings > Paper Source), laadige paber teie nimetatud
kassetti.
Avage menüüst Home režiim Setup.
B
Valige suvand Fax Settings.
C
Valige suvand Check Fax Connection.
D
Vajutage aruande printimiseks ühte nuppudest
E
x.
13
Page 92

Põhijuhend
Faksimine
Märkus.
Tõrgete teatamisel proovige aruandes esitatud
lahendusi.
Faksifunktsioonide
seadistamine
Kiirvalimisnumbrite
seadistamine
Saate luua kiirvalimisloendi, mis võimaldab faksimisel
faksisaajate numbrid kiiresti valida. Registreerida saab
kuni 100 kombineeritud kiir- ja rühmavalimisnumbrit.
Avage menüüst Home režiim Fax.
A
Vajutage või valige Contacts.
B
Valige suvand Edit Contacts.
C
Valige suvand Speed Dial Setup. Näete
D
saadaolevaid kiirvalimisnumbreid.
Valige kiirvalimisnumbri sisestus, mida te
E
registreerida soovite. Saate registreerida kuni 100
kirjet.
Kasutage numbriklahvistikku, et sisestada
F
telefoninumber. Saate sisestada kuni 64 numbrit.
Rühmavalimisnumbrite
seadistamine
Saate lisada kiirvalimisnumbreid ka rühmale,
võimaldades sellega saata faksi korraga mitmele
numbrile. Sisestada saab kuni 99 kombineeritud kiir- ja
rühmavalimisnumbrit.
Avage menüüst Home režiim Fax.
A
Vajutage või valige Contacts.
B
Valige suvand Edit Contacts.
C
Valige suvand Group Dial Setup. Näete
D
saadaolevaid rühmavalimisnumbreid.
Valige rühmavalimisnumbri sisestus, mida te
E
registreerida soovite.
Sisestage rühmavalimisnumbri tuvastamiseks
F
nimi. Saate sisestada kuni 30 tähemärki.
Nime registreerimiseks valige Done.
G
Valige kiirvalimisnubri sisestus, mida te soovite
H
registreerida rühmavalimisloendis.
Teiste kiirvalimisnumbrite
I
rühmavalimisloendisse lisamiseks korrake
sammu 8. Rühmavalimisloendisse saate
registreerida kuni 99 kiirvalimisnumbrit.
Märkus.
Sidekriips ("-") tekitab valimises lühikese pausi. Lisage
see telefoninumbrile ainult siis, kui pausimine on vajalik.
Numbrite vahele sisestatud tühikuid eiratakse valimise
ajal.
Sisestage kiirvalimisnumbri tuvastamiseks nimi.
G
Saate sisestada kuni 30 tähemärki.
Nime registreerimiseks valige Done.
H
Rühmavalimisloendi loomise lõpetamiseks
J
vajutage OK.
Fakside saatmine
Asetage originaal(id) automaatsesse
A
dokumendisööturisse või skanneriklaasile.
& „Originaalide paigutamine” lk 8
Avage menüüst Home režiim Fax.
B
14
Page 93

Põhijuhend
Faksimine
Sisestage faksinumber numbriklahvistiku
C
klahvide abil. Saate sisestada kuni 64 numbrit.
Märkus.
❏ Viimati kasutatud faksinumbri kuvamiseks
vajutage
❏ Vajutage d ning tehke saatmisseadistused. Oma
originaali mõlema poole skannimiseks ja
faksimiseks valige 2-Sided Faxing, On ning laadige
seejärel originaal automaatsesse
dokumendisööturisse. Mudelist sõltuvalt võite
samuti teha seadistusi valides Send Settings.
❏ Kontrollige, kas te olete sisestanud päiseinfo. Mõned
faksid keelduvad automaatselt sissetulevatest
faksidest, millel puudub päiseinfo.
Vajutage x (värviline) või x (mustvalge), et
D
alustada värvilise või monokromaatilise faksi
saatmist.
Märkus.
Kui faksinumber on kinni või ilmneb mõni probleem,
valib toode selle numbri ühe minuti pärast uuesti. Kohe
uuesti valimiseks vajutage Redial.
või Redial.
Fakside vastuvõtmine
Järgige juhiseid, et teha sätted fakside automaatseks
vastuvõtmiseks.
Märkus.
❏ Suvandi Fax Output sätetest sõltuvalt salvestatakse
vastu võetud faks failina või prinditakse.
❏ Kui suvandi Fax Output seadeks on valitud Save,
salvestatakse vastu võetud faksiandmed failina ning
te võite 1. sammu vahele jätta.
Laadige tavapaber kassetti.
A
& „Paberi laadimine paberikassetti” lk 6
Märkus.
Kui teie toode on varustatud kahe paberikassetiga, tehke
suvandi Paper Source seadistused.
Setup > Fax Settings > Receive Settings > Paper Source
Kui soovite printida suure hulga fakse ühe partiina,
laadige mõlemasse paberikassetti tavapaber ning valige
suvandi Paper Source seadeks Cassette 1>Cassette 2.
Veenduge, et suvandi Auto Answer sätteks on
B
valitud On.
Setup > Fax Settings > Receive Settings > Auto
Answer > On
Märkus.
❏ Kui automaatvastaja on ühendatud otse tootega,
veenduge, et olete suvandi Rings to Answer järgmist
toimingut kasutades õigesti määranud.
❏ Olenevalt piirkonnast ei pruugi suvand Rings to
Answer olla saadaval.
❏ Fakside käsitsi vastuvõtmise kohta lisateabe
saamiseks vaadake PDF-faili Kasutusjuhend.
Avage menüüst Home režiim Setup.
C
Valige suvand Fax Settings.
D
Valige suvand Communication.
E
Valige suvand Rings to Answer.
F
Valige helinate arv.
G
Oluline teave:
c
Valige rohkem helinaid, kui on vaja
automaatvastaja rakendumiseks. Kui
rakendumine on seadistatud neljandale helinale,
seadistage toode rakenduma viiendal või enamal
helinal. Vastasel juhul ei saa automaatvastaja
häälkõnesid vastu võtta.
Märkus.
Kui teile helistatakse ja teine osapool on faks, võtab toode
faksi automaatselt vastu isegi siis, kui automaatvastaja
vastab kõnele. Kui võtate telefonitoru, oodake enne selle
hargilepanekut, kuni LCD-ekraanil kuvatakse sõnum, et
ühendus on loodud. Kui teine osapool on helistaja, saab
telefoni kasutada tavapäraselt või jätta
automaatvastajasse sõnumi.
Aruannete printimine
Faksiaruande printimiseks järgige alltoodud juhiseid.
Eesti
15
Page 94

Põhijuhend
Veel funktsioone
Laadige tavapaber kassetti.
A
& „Paberi laadimine paberikassetti” lk 6
Märkus.
Kui teie toode on varustatud kahe paberikassetiga, tehke
suvandi Paper Source seadistused.
Setup > Fax Settings > Receive Settings > Paper Source
Avage menüüst Home režiim Fax.
B
Kui LCD-paneelile on kuvatud Advanced
C
Options, valige suvand Advanced Options.
Kui pole kuvatud, vajutage d.
Valige suvand Fax Report.
D
Valige kirje, mida soovite printida.
E
Märkus.
Ekraanil saab kuvada ainult suvandi Fax Log.
Vajutage valitud aruande printimiseks ühte
F
nuppudest x.
Märkus.
Rohkem teavet muude faksimisfunktsioonide ja
faksimisrežiimi menüüloendi kohta võite lugeda
PDF-failist Kasutusjuhend.
Veel funktsioone
Suvand More Functions annab teie käsutusse palju erimenüüsid, mis muudavad printimise lihtsaks ja lõbusaks!
Lisateabe jaoks valige More Functions, valige vajalik menüü ning järgige seejärel LCD-paneelile kuvatud juhiseid.
Menüü Funktsioonid
ID-kaardi koopia
Võite kopeerida samaaegselt ID-kaardi
mõlemat külge.
Fotode printimine
Fotode kopeerimine/taastami‐
ne
16
Võite printida mälukaardile või välisele
USB-mäluseadmele salvestatud fotosid il‐
ma arvutit kasutamata. Samuti võite vä‐
hendada või suurendada oma fotosid ning
kohandada foto kvaliteeti.
Võite teha oma originaalidest loomutruid
koopiaid. Kui originaalfoto on tuhmunud,
võite taastada selle värvid ning pildi uuesti
ellu äratada.
Page 95

Põhijuhend
Tindikasseti vahetamine
Menüü Funktsioonid
Foto küljendusleht
Võite printida oma fotosid mälukaardile
erinevate küljendustega.
Lineeritud paberite printimine
Tindikasseti
vahetamine
Ohutusalased juhised
❏ Hoidke tindikassette lastele kättesaamatus kohas.
❏ Olge kasutatud tindikassettide käsitsemisel
ettevaatlik, sest tindiväljastusava ümber võib olla
tindijääke.
Kui tinti satub nahale, peske seda kohta põhjalikult
vee ja seebiga.
Kui tinti satub silma, loputage silmi kohe veega. Kui
ebamugavustunne ja nägemisprobleemid püsivad
ka pärast põhjalikku loputamist, pöörduge kohe
arsti poole.
Kui tint satub teile suhu, sülitage see kohe välja ja
pöörduge arsti poole.
Võite printida lineeritud paberit või graa‐
fikupaberit kas taustaks seatud fotoga või
ilma.
Ettevaatusabinõud
❏ Epson soovitab kasutada Epsoni
originaaltindikassette. Epson ei garanteeri
mitteoriginaalse tindi kvaliteeti ega töökindlust.
Mitteoriginaalsete tindikassettide kasutamine võib
tekitada kahju, mida ei kata Epsoni garantiid ning
mis mõningatel juhtudel võivad põhjustada toote
töös tõrkeid. Mitteoriginaalse tindikasseti
tinditaset võidakse mitte kuvada.
❏ Ärge raputage tindikassette liiga tugevalt; vastasel
juhul võib tindikassett lekkima hakata.
❏ Prindipea töökvaliteedi säilitamiseks kulutatakse
mõnedest kassettidest natuke tinti mitte ainult
printimise ajal, vaid ka hooldustoiminguteks nagu
tindikassettide vahetamine ja prindipea
puhastamine.
❏ Kui te peate tindikasseti ajutiselt eemaldama, siis
kaitske tindi toiteala mustuse ja tolmu eest.
Hoiundage tindikassett tootega samas keskkonnas.
Kui te hoiustate tindikasseti, siis jätke tindikasseti
värvi näitav silt ülespoole. Ärge hoidke
tindikassette tagurpidiasendis.
Eesti
17
Page 96

Põhijuhend
Tindikasseti vahetamine
❏ Maksimaalse kasuteguri saavutamiseks eemaldage
tindikassett ainult siis, kui te soovite seda vahetada.
Madala tindiolekuga tindikassette ei pruugi olla
võimalik pärast taaspaigaldamist kasutada.
❏ Ärge avage tindikassetti pakendit, enne kui te olete
valmis seda tootesse paigaldama. Kassett on selle
töökindluse tagamiseks paigaldatud
vaakumpakendisse. Kui te ei paigalda pakendist
välja võetud kassetti kohe, võib normaalne
printimine olla hiljem võimatu.
❏ Paigaldage kõik tindikassetid; vastasel juhul ei saa te
printida.
Tindikasseti vahetamine
Avage skanner. Tindikasseti hoidja liigub
A
vahetusasendisse.
Märkus.
Kui tindikasseti hoidja ei liigu tindikasseti
vahetusasendise, tegutsege vastavalt järgmistele
juhistele.
Home > Setup > Maintenance > Ink Cartridge
Replacement
Avage tindikasseti kate.
B
Pigistage ja eemaldage tindikassett.
C
Oluline teave:
c
❏ Ärge liigutage tindikasseti hoidjat käega;
sellega võite toodet kahjustada.
❏ Ärge tõstke skannerit üles, kui dokumendikaas
on avatud.
Märkus.
❏ Joonisel on kujutatud musta tindi kasseti
vahetamine. Vahetage teie olukorral sobiv kassett.
❏ Eemaldatud tindikassettide tindiväljastusava
ümber võib olla tinti, seega olge kassettide
eemaldamisel ettevaatlik, et ümbrusse ei satuks
tinti.
18
Page 97

Põhijuhend
Tindikasseti vahetamine
Raputage uusi asenduskassette neli või viis korda
D
õrnalt ning eemaldage asendustindikassett oma
pakendist.
Eemaldage ainult kollane teip.
E
Oluline teave:
c
❏ Te peate kassetilt enne paigaldamist
eemaldama kollase teibi; vastasel juhul võib
printimiskvaliteet langeda või printimine
osutuda võimatuks.
❏ Kui te olete tindikasseti paigaldanud ilma
kollast teipi eemaldamata, võtke kassett
tootest välja, eemaldage kollane teip ja
paigaldage see siis uuesti.
❏ Ärge eemaldage läbipaistvat pitserit kasseti
põhjalt; vastasel juhul võib kassett muutuda
kasutuskõlbmatuks.
❏ Ärge eemaldage ega rebige kassetil olevat silti;
vastasel juhul hakkab tint lekkima.
Sisestage kassett ja suruge sellele, kuni kostub
F
klõpsatus.
Sulgege tindikasseti kate.
G
Eesti
19
Page 98

Põhijuhend
Üldine tõrkeotsing
Sulgege skanner aeglaselt. Algab tindi laadimine.
H
Märkus.
❏ Toitetuli jätkab tindi laadimise ajal vilkumist. Ärge
lülitage toodet tindi laadimise ajal välja. Kui tindi
laadimine pole lõppenud, ei pruugi printimine olla
võimalik.
❏ Kui te pidite tindikasseti vahetama kopeerimise
ajal, tühistage koopiate kvaliteedi tagamiseks
pooleliolev kopeerimine ja alustage originaalide
paigutamisest otsast peale.
Tindikasseti vahetus on lõppenud. Toode naaseb
eelnevasse olekusse.
Üldine tõrkeotsing
Tõrketeated
Selles jaotises kirjeldatakse LCD-paneelile kuvatavate teadete tähendusi.
Tõrketeated Lahendused
Paber otsas või paberiummistus
Printer error. Turn the power off and on again. For details,
see your documentation.
Communication error. Check if a computer is connected. Veenduge, et arvuti on õigesti ühendatud. Tõrketeate uuesti ku‐
The maintenance box is nearing the end of its service life. Vahetage hoolduskarp enne selle eluea lõppu.
The maintenance box is at the end of its service life. You
need to replace it.
A printer’s ink pad is nearing the end of its service life.
Please contact Epson Support.
A printer’s ink pad is at the end of its service life. Please
contact Epson Support.
& Vt „Paberiummistused” lk 21
Lülitage toode välja ja seejärel uuesti sisse. Veenduge, et tootesse
pole paberit jäänud. Tõrketeate uuesti kuvamisel võtke ühendust
Epsoni toega.
vamisel veenduge, et arvutisse on installitud skannimistarkvara ja
et tarkvarasätted on õiged.
Täpsema teabe saamiseks vt PDF-faili Kasutusjuhend.
Kui hoolduskarp on täis, toode seiskub ning teil tuleb enne prin‐
timise jätkamist hoolduskarp välja vahetada.
Vahetage hoolduskarp.
Printimise jätkamiseks vajutage nuppu x. Teadet kuvatakse kuni
tindipadja asendamiseni. Tindipatjade vahetamiseks enne nende
kestuse lõppemist võtke ühendust Epsoni toega. Kui tindipadjad
on küllastunud, siis toode seiskub ning printimise jätkamiseks on
vaja Epsoni tuge.
Tindipatjade vahetamiseks võtke ühendust Epsoni toega.
20
Page 99

Põhijuhend
Üldine tõrkeotsing
Tõrketeated Lahendused
No dial tone detected. Run Check Fax Connection under
Fax Settings in Setup menu.
Combination of the IP address and the subnet mask is
invalid. See your documentation.
Recovery Mode Püsivara värskendamine nurjus. Peate proovima püsivara uuesti
Veenduge, et telefonikaabel on korralikult ühendatud ja telefoni‐
liin töötab.
& Vt „Telefoniliiniga ühendamine” lk 12
Kui ühendasite toote PBX (kodukeskjaama) telefoniliini või termi‐
naladapteriga, lülitage Dial Tone Detection välja. Valige Fax Set‐
tings > Communication > Dial Tone Detection >Off.
Vt võrgus olevat Võrgujuhend.
värskendada. Pange USB-kaabel valmis ja külastage edasiste ju‐
histe saamiseks Epsoni kohalikku veebisaiti.
Paberiummistused
Ettevaatust!
!
Ärge kunagi puudutage juhtpaneelil olevaid nuppe,
kui teie käsi on toote sees.
Märkus.
❏ Tühistage printimistöö, kui seda nõutakse teates
LCD-paneelil või printeridraiveris.
❏ Kui te olete kinnijäänud paberi eemaldanud,
vajutage LCD-paneelil viidatud nuppu.
Kinnijäänud paberi
eemaldamine tagumisest
kattest
Tõmmake tagumine kate välja.
A
Eemaldage ummistunud paber ettevaatlikult.
B
Eemaldage ummistunud paber ettevaatlikult.
C
Eesti
21
Page 100

Põhijuhend
Avage tagumine kate.
D
Eemaldage ummistunud paber ettevaatlikult.
E
Üldine tõrkeotsing
Kinnijäänud paberi
eemaldamine toote seest
A
B
Eemaldage ummistunud paber ettevaatlikult.
Avage skanner.
Pange tagumine kate tagasi.
F
22
Oluline teave:
c
Ärge tõstke skannerit üles, kui dokumendikaas on
avatud.
 Loading...